Insulet 002 iXL Remote Controller User Manual
Insulet Corporation iXL Remote Controller Users Manual
Insulet >
Contents
- 1. Users Manual
- 2. New FCC Notice
Users Manual

Doctor
Name:
Address:
Telephone Number(s):
Nurse/Educator
Name:
Address:
Telephone Number(s):
Insurance
Name:
Address:
Telephone Number(s):
Policy Number:
Pharmacy
Pharmacist:
Address:
Telephone Number(s):
Prescriptions
Script # Name Dosage Times Per Day
Emergency Services
Dial 911 (USA only; not available in all communities)
Insulet Corporation
100 Cummings Center • Suite 239G • Beverly, MA 01915 USA
Customer Support: (800) 591-3455 (24 hours/7days)
Sales/Supplies: (800) 591-9948
Web Site: www.insulet.com
i iXL™ Diabetes Management System User Guide: Contacts and Important Information
Use the spaces below to record important health and product information.
10776 Rev A
Contacts and Important Information

Contents
Introduction . . . . . . . . . . . . . . . . . . . . . . . . . . . . . . . . . . . . . . . . . . vi
About This User Guide . . . . . . . . . . . . . . . . . . . . . . . . . . . . . . . vi
Conventions and terms . . . . . . . . . . . . . . . . . . . . . . . . . . . . vi
Symbols . . . . . . . . . . . . . . . . . . . . . . . . . . . . . . . . . . . . . . . . . vi
Before You Get Started . . . . . . . . . . . . . . . . . . . . . . . . . . . . . . .vii
Indication . . . . . . . . . . . . . . . . . . . . . . . . . . . . . . . . . . . . . . . vii
Contraindications . . . . . . . . . . . . . . . . . . . . . . . . . . . . . . . . . vii
Your Important Role in Successful Pump Therapy . . . . . . . viii
Your Personal Diabetes Management Information . . . . . . . . ix
My Notes . . . . . . . . . . . . . . . . . . . . . . . . . . . . . . . . . . . . . . . . . . x
1: Your New iXL™ Diabetes Management System . . . . . . . . . . 1
Insulin-Delivery with the iXL™System . . . . . . . . . . . . . . . . . . 1
How Does the iXL™ System Work? . . . . . . . . . . . . . . . . . . . . . 2
RediSet™ System . . . . . . . . . . . . . . . . . . . . . . . . . . . . . . . . . 2
Wireless Technology . . . . . . . . . . . . . . . . . . . . . . . . . . . . . . . 2
Data Storage . . . . . . . . . . . . . . . . . . . . . . . . . . . . . . . . . . . . . 2
The iXL™ Pump . . . . . . . . . . . . . . . . . . . . . . . . . . . . . . . . . . . . . 3
The iXL™ Remote Controller . . . . . . . . . . . . . . . . . . . . . . . . . . . 3
Buttons that program and control the iXL™ System . . . . . 4
Entering and changing text . . . . . . . . . . . . . . . . . . . . . . . . . . 5
Primary screens . . . . . . . . . . . . . . . . . . . . . . . . . . . . . . . . . . . 6
My Notes . . . . . . . . . . . . . . . . . . . . . . . . . . . . . . . . . . . . . . . . . . 7
2: Getting Started . . . . . . . . . . . . . . . . . . . . . . . . . . . . . . . . . . . . . . 9
The iXL™ Startup Kit . . . . . . . . . . . . . . . . . . . . . . . . . . . . . . . . . 9
Set Up the iXL™ Remote Controller . . . . . . . . . . . . . . . . . . . . 10
Turn on the remote . . . . . . . . . . . . . . . . . . . . . . . . . . . . . . . 10
The iXL™ Setup Wizard . . . . . . . . . . . . . . . . . . . . . . . . . . . . . . 10
My Notes . . . . . . . . . . . . . . . . . . . . . . . . . . . . . . . . . . . . . . . . . 13
3: Basal Rates . . . . . . . . . . . . . . . . . . . . . . . . . . . . . . . . . . . . . . . 15
What is a Basal Rate? . . . . . . . . . . . . . . . . . . . . . . . . . . . . . . . 15
Personalized Basal Programs . . . . . . . . . . . . . . . . . . . . . . . . 15
Create a basal program . . . . . . . . . . . . . . . . . . . . . . . . . . . 16
Enable an existing basal program . . . . . . . . . . . . . . . . . . . 19
Change or delete a basal program . . . . . . . . . . . . . . . . . . 20
Preset Temporary Basal Rates . . . . . . . . . . . . . . . . . . . . . . . . 22
What is a temporary basal rate? . . . . . . . . . . . . . . . . . . . . 22
Create a temporary basal preset . . . . . . . . . . . . . . . . . . . . 22
Enable an existing temporary basal preset . . . . . . . . . . . . 23
Cancel an active temporary basal preset . . . . . . . . . . . . . 23
Change or delete a temporary basal preset . . . . . . . . . . . 23
One-Time Temporary Basal Rates . . . . . . . . . . . . . . . . . . . . . 24
Enable a one-time temporary basal rate . . . . . . . . . . . . . . 24
Cancel a one-time temporary basal rate . . . . . . . . . . . . . . 25
Maximum Basal Rate . . . . . . . . . . . . . . . . . . . . . . . . . . . . . . . 25
What is the maximum basal rate? . . . . . . . . . . . . . . . . . . . 25
Set a maximum basal rate . . . . . . . . . . . . . . . . . . . . . . . . . 25
My Notes . . . . . . . . . . . . . . . . . . . . . . . . . . . . . . . . . . . . . . . . . 26
iXL™ Diabetes Management System User Guide: Contents ii

4: Bolus Doses . . . . . . . . . . . . . . . . . . . . . . . . . . . . . . . . . . . . . . . 27
What is a Bolus? . . . . . . . . . . . . . . . . . . . . . . . . . . . . . . . . . . . 27
Bolus Dose Options . . . . . . . . . . . . . . . . . . . . . . . . . . . . . . . . . 27
Deliver Bolus Doses . . . . . . . . . . . . . . . . . . . . . . . . . . . . . . . . 28
Deliver a normal bolus . . . . . . . . . . . . . . . . . . . . . . . . . . . . 28
Deliver an extended bolus . . . . . . . . . . . . . . . . . . . . . . . . . 29
Deliver an iBolus™ (audio bolus) . . . . . . . . . . . . . . . . . . . . 31
Cancel Active Boluses . . . . . . . . . . . . . . . . . . . . . . . . . . . . . . 32
My Notes . . . . . . . . . . . . . . . . . . . . . . . . . . . . . . . . . . . . . . . . . 33
5: The iXL™ Pump . . . . . . . . . . . . . . . . . . . . . . . . . . . . . . . . . . . . 35
The Pump Change Process . . . . . . . . . . . . . . . . . . . . . . . . . . . 35
Deactivate current pump . . . . . . . . . . . . . . . . . . . . . . . . . . 36
Activate a new pump . . . . . . . . . . . . . . . . . . . . . . . . . . . . . 38
Fill the new pump . . . . . . . . . . . . . . . . . . . . . . . . . . . . . . . . . 39
Select the infusion site . . . . . . . . . . . . . . . . . . . . . . . . . . . . 41
Prepare the infusion site . . . . . . . . . . . . . . . . . . . . . . . . . . . 41
Attach the new pump . . . . . . . . . . . . . . . . . . . . . . . . . . . . . 41
Insert cannula and begin insulin delivery . . . . . . . . . . . . . 42
Check Pump Status . . . . . . . . . . . . . . . . . . . . . . . . . . . . . . . . . 43
Suspend Insulin Delivery . . . . . . . . . . . . . . . . . . . . . . . . . . . . . 43
Resume Insulin Delivery . . . . . . . . . . . . . . . . . . . . . . . . . . . . . 45
Avoid Infusion Site Infections . . . . . . . . . . . . . . . . . . . . . . . . . 46
Get the Most From Your Pump . . . . . . . . . . . . . . . . . . . . . . . . 46
Avoid extreme temperatures . . . . . . . . . . . . . . . . . . . . . . . 46
Water and your pump . . . . . . . . . . . . . . . . . . . . . . . . . . . . . 47
Safe storage . . . . . . . . . . . . . . . . . . . . . . . . . . . . . . . . . . . . . 47
My Notes . . . . . . . . . . . . . . . . . . . . . . . . . . . . . . . . . . . . . . . . . 48
6: iXL™ Remote Controller Features . . . . . . . . . . . . . . . . . . . . . 49
The Status Screen . . . . . . . . . . . . . . . . . . . . . . . . . . . . . . . . . . 49
Insulin Gauge and Display . . . . . . . . . . . . . . . . . . . . . . . . . . . 49
System Setup Menu . . . . . . . . . . . . . . . . . . . . . . . . . . . . . . . . 50
Reset the Date or Time . . . . . . . . . . . . . . . . . . . . . . . . . . . . . . 50
Reset the time . . . . . . . . . . . . . . . . . . . . . . . . . . . . . . . . . . . 51
Reset the date . . . . . . . . . . . . . . . . . . . . . . . . . . . . . . . . . . . 51
Change Bolus and Basal Settings . . . . . . . . . . . . . . . . . . . . . 52
Set Alerts and Reminders . . . . . . . . . . . . . . . . . . . . . . . . . . . . 53
Choose alerts and reminders . . . . . . . . . . . . . . . . . . . . . . . 54
Customize the Remote . . . . . . . . . . . . . . . . . . . . . . . . . . . . . . . 54
Set remote options . . . . . . . . . . . . . . . . . . . . . . . . . . . . . . . 55
Set Diagnostic Functions . . . . . . . . . . . . . . . . . . . . . . . . . . . . 56
Set diagnostic options . . . . . . . . . . . . . . . . . . . . . . . . . . . . . 56
Get the Most from Your Remote . . . . . . . . . . . . . . . . . . . . . . . 58
Keep it handy . . . . . . . . . . . . . . . . . . . . . . . . . . . . . . . . . . . . 58
Communicating with the pump . . . . . . . . . . . . . . . . . . . . . . 58
Water and your remote . . . . . . . . . . . . . . . . . . . . . . . . . . . . 58
Avoid extreme temperatures . . . . . . . . . . . . . . . . . . . . . . . 58
Electrical interference . . . . . . . . . . . . . . . . . . . . . . . . . . . . . 58
My Notes . . . . . . . . . . . . . . . . . . . . . . . . . . . . . . . . . . . . . . . . . 59
iii iXL™ Diabetes Management System User Guide: Contents
Contents

Contents
7: My Records . . . . . . . . . . . . . . . . . . . . . . . . . . . . . . . . . . . . . . . 61
Record Keeping . . . . . . . . . . . . . . . . . . . . . . . . . . . . . . . . . . . . 61
Insulin Delivery History . . . . . . . . . . . . . . . . . . . . . . . . . . . . . . 61
View insulin delivery history . . . . . . . . . . . . . . . . . . . . . . . . 61
Alarm History . . . . . . . . . . . . . . . . . . . . . . . . . . . . . . . . . . . . . . 63
User and Product Information . . . . . . . . . . . . . . . . . . . . . . . . 64
Add or change user information . . . . . . . . . . . . . . . . . . . . 64
My Notes . . . . . . . . . . . . . . . . . . . . . . . . . . . . . . . . . . . . . . . . . 65
8: Achieve Healthy, Safe Pumping . . . . . . . . . . . . . . . . . . . . . . 67
Your Role in Safe Pumping . . . . . . . . . . . . . . . . . . . . . . . . . . . 67
Safety Features . . . . . . . . . . . . . . . . . . . . . . . . . . . . . . . . . . . . 67
Automatic priming, safety checks, and insertion
with RediSet™ . . . . . . . . . . . . . . . . . . . . . . . . . . . . . . . . . . 67
Continuous monitoring . . . . . . . . . . . . . . . . . . . . . . . . . . . . 67
Rapid occlusion detection . . . . . . . . . . . . . . . . . . . . . . . . . 68
Alerts and advisory and hazard alarms . . . . . . . . . . . . . . . 68
Daily Diabetes Management Activities . . . . . . . . . . . . . . . . . 68
Check blood glucose . . . . . . . . . . . . . . . . . . . . . . . . . . . . . . 68
Inspect the infusion site . . . . . . . . . . . . . . . . . . . . . . . . . . . 69
Water and Your Pump . . . . . . . . . . . . . . . . . . . . . . . . . . . . . . . 69
Traveling and Vacationing . . . . . . . . . . . . . . . . . . . . . . . . . . . . 69
Plan for changing time zones . . . . . . . . . . . . . . . . . . . . . . . 69
Take enough supplies . . . . . . . . . . . . . . . . . . . . . . . . . . . . . 70
Minimize airport security delays . . . . . . . . . . . . . . . . . . . . 70
Keep supplies accessible . . . . . . . . . . . . . . . . . . . . . . . . . . 71
Avoid Adverse Reactions . . . . . . . . . . . . . . . . . . . . . . . . . . . . 71
General precautions . . . . . . . . . . . . . . . . . . . . . . . . . . . . . . 71
Hypoglycemia (low blood glucose) . . . . . . . . . . . . . . . . . . 72
Hyperglycemia (high blood glucose) . . . . . . . . . . . . . . . . . 75
Diabetic ketoacidosis (DKA) . . . . . . . . . . . . . . . . . . . . . . . . 78
Handling Special Situations . . . . . . . . . . . . . . . . . . . . . . . . . . 79
Prepare for emergencies . . . . . . . . . . . . . . . . . . . . . . . . . . 79
Sick days . . . . . . . . . . . . . . . . . . . . . . . . . . . . . . . . . . . . . . . 79
Exercising, playing sports, or working hard . . . . . . . . . . . 80
Short-term removal . . . . . . . . . . . . . . . . . . . . . . . . . . . . . . . 80
X-rays, MRIs, and CT scans . . . . . . . . . . . . . . . . . . . . . . . . 81
Surgery or hospitalization . . . . . . . . . . . . . . . . . . . . . . . . . . 81
My Notes . . . . . . . . . . . . . . . . . . . . . . . . . . . . . . . . . . . . . . . . . 82
9: Be Aware: Hazard and Advisory Alarms . . . . . . . . . . . . . . . 83
Safety Checks . . . . . . . . . . . . . . . . . . . . . . . . . . . . . . . . . . . . . 83
Hazard Alarms . . . . . . . . . . . . . . . . . . . . . . . . . . . . . . . . . . . . . 83
Respond to hazard alarms . . . . . . . . . . . . . . . . . . . . . . . . . 87
Advisory Alarms . . . . . . . . . . . . . . . . . . . . . . . . . . . . . . . . . . . . 88
Respond to advisory alarms . . . . . . . . . . . . . . . . . . . . . . . . 91
My Notes . . . . . . . . . . . . . . . . . . . . . . . . . . . . . . . . . . . . . . . . . 92
10:Troubleshoot Communication Failures . . . . . . . . . . . . . . . . . 93
The Communication Failure Sequences . . . . . . . . . . . . . . . . 93
Failure at start up . . . . . . . . . . . . . . . . . . . . . . . . . . . . . . . . . 93
Failure during operation . . . . . . . . . . . . . . . . . . . . . . . . . . . 94
My Notes . . . . . . . . . . . . . . . . . . . . . . . . . . . . . . . . . . . . . . . . . 96
iXL™ Diabetes Management System User Guide: Contents iv

Appendices . . . . . . . . . . . . . . . . . . . . . . . . . . . . . . . . . . . . . . . . . . 97
The iXL™ Pump Care and Maintenance . . . . . . . . . . . . . . . . 97
Storage . . . . . . . . . . . . . . . . . . . . . . . . . . . . . . . . . . . . . . . . . 97
Cleaning . . . . . . . . . . . . . . . . . . . . . . . . . . . . . . . . . . . . . . . . 97
The iXL™ Remote Controller Care and Maintenance . . . . . 97
Storage . . . . . . . . . . . . . . . . . . . . . . . . . . . . . . . . . . . . . . . . . 97
Cleaning . . . . . . . . . . . . . . . . . . . . . . . . . . . . . . . . . . . . . . . . 97
Replacing batteries . . . . . . . . . . . . . . . . . . . . . . . . . . . . . . . 98
If the remote becomes submerged in water . . . . . . . . . . . 99
If you drop the remote . . . . . . . . . . . . . . . . . . . . . . . . . . . . . 99
Insulin and Supplies . . . . . . . . . . . . . . . . . . . . . . . . . . . . . . . 100
Storage . . . . . . . . . . . . . . . . . . . . . . . . . . . . . . . . . . . . . . . . 100
Ordering supplies . . . . . . . . . . . . . . . . . . . . . . . . . . . . . . . . 100
Limited Warranty for the iXL™ Remote Controller . . . . . . . 101
Limited warranty coverage . . . . . . . . . . . . . . . . . . . . . . . . 101
Warranty claim procedure . . . . . . . . . . . . . . . . . . . . . . . . 101
Conditions . . . . . . . . . . . . . . . . . . . . . . . . . . . . . . . . . . . . . . 101
Exclusions . . . . . . . . . . . . . . . . . . . . . . . . . . . . . . . . . . . . . . 101
Miscellaneous . . . . . . . . . . . . . . . . . . . . . . . . . . . . . . . . . . 101
iXL™ System Options and Settings . . . . . . . . . . . . . . . . . . . 102
iXL™ Pump Specifications . . . . . . . . . . . . . . . . . . . . . . . . . . 103
iXL™ Remote Controller Specifications . . . . . . . . . . . . . . . . 103
iXL™ System Label Symbols . . . . . . . . . . . . . . . . . . . . . . . . . 104
iXL™ Remote Controller Icons . . . . . . . . . . . . . . . . . . . . . . . 104
iXL™ System Federal Communications Commission (FCC)
Notice Concerning Interference . . . . . . . . . . . . . . . . . . . . 105
Helpful Resources . . . . . . . . . . . . . . . . . . . . . . . . . . . . . . . . . 105
My Notes . . . . . . . . . . . . . . . . . . . . . . . . . . . . . . . . . . . . . . . . 106
Glossary . . . . . . . . . . . . . . . . . . . . . . . . . . . . . . . . . . . . . . . . . . . . 107
Index . . . . . . . . . . . . . . . . . . . . . . . . . . . . . . . . . . . . . . . . . . . . . . . 111
© 2003 Insulet Corporation. All rights reserved.
iXL, RediSet, and iBolus are trademarks of Insulet Corporation.
Patents pending.
viXL™ Diabetes Management System User Guide: Contents
Contents
Introduction
About This User Guide
Conventions and Terms
Convention/Term Meaning
Bold Names of buttons, soft keys, menus, and
screens are bold.
Italics Words in italics are defined in the Glossary
at the end of this User Guide.
Press Press and release a button or soft key.
Hold Keep pressing a button until its function
is complete.
Menu A list of options on the remote.
Options allow you to perform tasks.
Screen Displays programming, operating, and
alarm/alert information.
Button A physical button on the remote, such as
the Power button.
Soft key A button on the remote whose label or
function appears on the screen directly
above the button. The label changes
depending on the task you are performing.
Icon An image on the remote screen that indicates
a menu option or item of information. A table
of screen icons appears in the Appendices.
Symbols
Symbol Meaning
Warning Describes potential serious adverse
reactions, or indicates conditions that
could cause death or serious injury.
Caution Indicates conditions that could cause
minor or moderate injury to you or
damage to the device.
Note Provides helpful information.
Tip Offers a suggestion for successful
pumping.
iXL™ Diabetes Management System User Guide: Introduction vi
Before You Get Started
US Federal law restricts this device to sale by or on the
order of a physician.
Indication
The Insulet iXL Diabetes Management System is intended for
the continuous subcutaneous delivery of insulin at set and
variable rates for the management of diabetes mellitus in
persons requiring insulin.
Contraindications
Insulin pump therapy is NOT recommended for people who
are either:
•Unable to perform at least four (4) blood glucose checks
per day.
•Unable to maintain contact with their healthcare provider.
•Unable to use the system according to instructions.
If you are unable to use the system according to
instructions, you may be putting your health and safety
at risk. Talk with your healthcare provider if you have
questions or concerns about using the system properly.
Work with your healthcare provider to establish diabetes
management guidelines that best fit your needs. These may
include:
Insulin-to-Carbohydrate Ratio: Number of grams of carbohydrate
covered by one unit of insulin. For example, if your insulin-to-
carbohydrate ratio is 1:10, then you need to deliver one unit of
insulin to cover every ten grams of carbohydrate you eat.
Correction Factor or Sensitivity Factor: How much one unit of
insulin will lower blood glucose. For example, if your sensitivity
factor is 40, one unit of insulin will lower your blood glucose by
40mg/dl.
Target Blood Glucose Range: A range of blood glucose levels
that you are trying to achieve during a certain period of the day.
For example, you may want one range before meals, a different
range two hours after meals, and yet another range for bedtime.
Your individual needs influence the initial settings you and your
healthcare provider will enter into the iXL’s Remote Controller
during setup (see Chapter 2, Getting Started).
Although your healthcare provider must assist you in entering
these initial settings, soon you will be entering and changing
your own settings with confidence and ease. Don’t be
intimidated by the new technology. The iXL System is more
user-friendly than most electronic devices you use every day.
In fact, technology is what makes the iXL System so easy to use.
vii iXL™ Diabetes Management System User Guide: Introduction
Introduction
Introduction
Your healthcare provider is a valuable resource. You are going
to rely on him/her for a lot of critical information about your
iXL System, especially during the first few weeks and months.
If you have questions about diabetes management after starting
on the iXL System, do not hesitate to talk with your healthcare
provider. You can call us 24 hours a day, 7 days a week for
emergencies or for technical questions about iXL System setup
or operation.
Customer Support: (24 hours/7 days) (800) 591-3455
Sales and Supplies: (800) 591-9948
Web Site: www.insulet.com
Do NOT attempt to use the iXL Diabetes Management
System without first meeting with your healthcare
provider to receive training.
Your Important Role in Successful Pump
Therapy
Your healthcare provider will give you all the tools and training
you need to be successful with insulin pump therapy. However,
in the end, your success depends on YOU. You must become
actively involved in your own diabetes management if you want
to enjoy the outstanding control, freedom, and flexibility that is
possible with the iXL System. Being actively involved means:
•Frequently monitoring and recording blood glucose levels.
•Learning how to operate your iXL System and practicing
proper pumping techniques.
•Regular visits with your healthcare provider.
iXL™ Diabetes Management System User Guide: Introduction viii
Your Personal Diabetes Management
Information
Basal Programs
Name Time Segment Rate
______________ 12:00 am to _______ _______ U/hr
_______ to _______ _______ U/hr
_______ to _______ _______ U/hr
_______ to _______ _______ U/hr
_______ to _______ _______ U/hr
______________ 12:00 am to _______ _______ U/hr
_______ to _______ _______ U/hr
_______ to _______ _______ U/hr
_______ to _______ _______ U/hr
_______ to _______ _______ U/hr
______________ 12:00 am to _______ _______ U/hr
_______ to _______ _______ U/hr
_______ to _______ _______ U/hr
_______ to _______ _______ U/hr
_______ to _______ _______ U/hr
Temp Basal Presets
Name Adjustment
______________ _______ U/hr
______________ _______ U/hr
______________ _______ U/hr
Insulin-to-Carbohydrate Ratio
1.0 unit of insulin covers _______ grams of carbohydrate
Correction (Sensitivity) Factor
1.0 unit of insulin lowers blood glucose by about _______ mg/dl
Target Blood Glucose Range
Before meals: Between _______ and _______ mg/dl
2 hours after meals: Less than _______ mg/dl
Bedtime: Between _______ and _______ mg/dl
2–3am: More than _______ mg/dl
Hemoglobin A1c
Target: _________
Date: __________ Result: _________
Date: __________ Result: _________
Date: __________ Result: _________
Date: __________ Result: _________
ix iXL™ Diabetes Management System User Guide: Introduction
Introduction
Introduction
My Notes:
iXL™ Diabetes Management System User Guide: Introduction x
My Notes:
xi iXL™ Diabetes Management System User Guide: Introduction
Introduction
Your New iXL™ Diabetes Management System 1
Insulin Delivery with the iXL™ System
The iXL System is more than just a pump. It is a complete
diabetes management system.
The long-term health benefits of better blood glucose control
are well known. Maintaining near-normal blood glucose can
help you live a longer, healthier life with fewer diabetes-related
complications. However, good health is not the only advantage
enjoyed by people who use the iXL Diabetes Management
System. There are many practical, everyday benefits having
to do with convenience, freedom, and flexibility.
Continuous insulin delivery, possible only with an insulin
pump, most closely mimics the insulin release of a healthy
pancreas. Since the landmark 10-year Diabetes Control and
Complications Trial (DCCT), the long-term health benefits of
maintaining near-normal blood glucose levels have been
widely recognized.
Continuous insulin delivery at preset rates eliminates the need
for scheduled daily injections and the interruptions that come
with them. Continuous delivery of rapid-acting, U-100 insulin
also gives you the freedom to eat what you want and when you
want. You don’t have to plan snacks or meals around when your
insulin is peaking. In addition, with the iXL System, insulin
delivery can be changed with the press of a button to adapt to
snacks or unexpected changes in daily routine. The iXL System
is ideal for all kinds of people, because it fits every lifestyle.
The iXL Diabetes Management System works much like the
pancreas of a person without diabetes by delivering insulin
in two ways:
•A small, constant background supply of insulin (called a
basal rate) is delivered automatically at a programmed rate
throughout the day and night.
•An extra dose of insulin (called a bolus) can be delivered
when needed to match the carbohydrates (sugar content)
in a meal or snack, or to correct a high blood glucose.
iXL™ Diabetes Management System User Guide: Your New iXL™ Diabetes Management System 1
2 iXL™ Diabetes Management System User Guide: Your New iXL™ Diabetes Management System
Your New iXL™ Diabetes Management System1
How does the iXL™ System Work?
The iXL Diabetes Management System is a two part system:
a pump and a remote. The iXL Pump is small and has a low, thin
profile. The pump is worn on the body and is comfortable to
wear. An adhesive holds the pump against the skin. The pump
can hold up to 200 units of deliverable insulin. Each time you
activate a new pump, you fill it with the amount of insulin you
need. The iXL System stores insulin right inside the pump. Insulin
enters your body from the pump through a short thin tube (called
a cannula). With the iXL Pump, there is no long tubing to get
tangled or caught on things. Deactivate the used pump and
apply a new one every 48-72 hours or as instructed by your
healthcare provider.
RediSet™System
The iXL Pump uses the RediSet system, a built-in infusion set
with an automatic inserter. With other systems, you have to
either insert the infusion set manually or carry around a separate
inserter. With the RediSet feature, once the iXL Pump is attached
to your skin, you simply press a button on the remote and the
automatic inserter does the rest.
Wireless Technology
The iXL System is wireless. The remote is small, lightweight,
and not attached to the pump, so you can carry it inside an
article of clothing or put it in a backpack, briefcase, or purse.
All pump operations are programmed and controlled through
the iXL Remote Controller. You use the remote to make insulin
delivery adjustments, respond to alarms and alerts and obtain
the pump status. The remote uses on-screen messages to guide
you through menu options. The menu options are clear and easy
to understand and there are only a few buttons on the remote
to learn and use.
Data Storage
Another part of the iXL System’s convenience is data storage.
Paper charts are useful, but sometimes they can be
inconvenient to carry or use. The remote’s electronic data
storage and retrieval system displays up to 90 days’ worth
of information on the remote screen.
Your New iXL™ Diabetes Management System 1
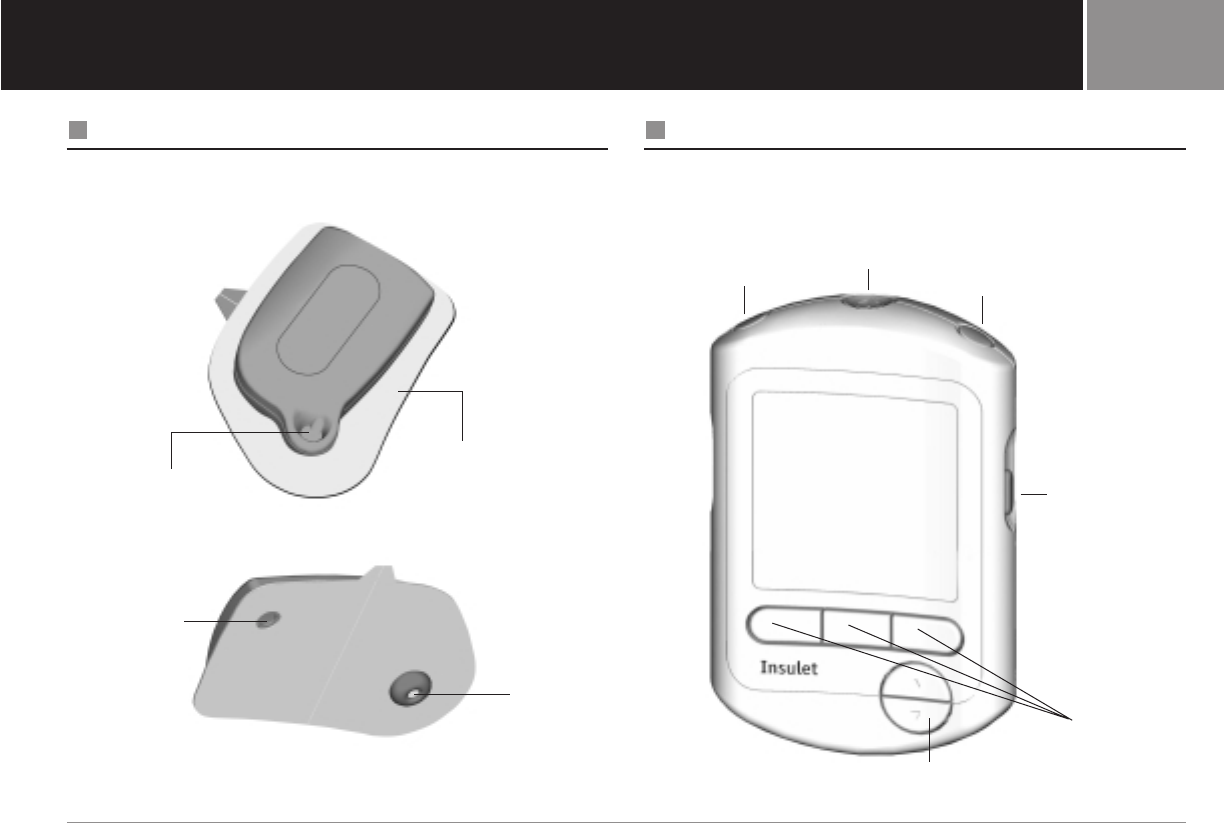
The iXL™ Pump
The iXL Pump attaches to your skin with an adhesive backing,
similar to a bandaid.
The iXL™ Remote Controller
All pump operations are programmed and controlled through
the palm-sized iXL Remote Controller. The remote “talks” to the
pump using wireless technology, similar to a mobile phone.
iXL™ Diabetes Management System User Guide: Your New iXL™ Diabetes Management System 3
Up/Down Controller
Soft keys
iBolus
Fill port
Needle cap
User info/support
Status Power
Adhesive backing
Viewing window
Your New iXL™ Diabetes Management System1
Buttons that program and control the iXL™ System
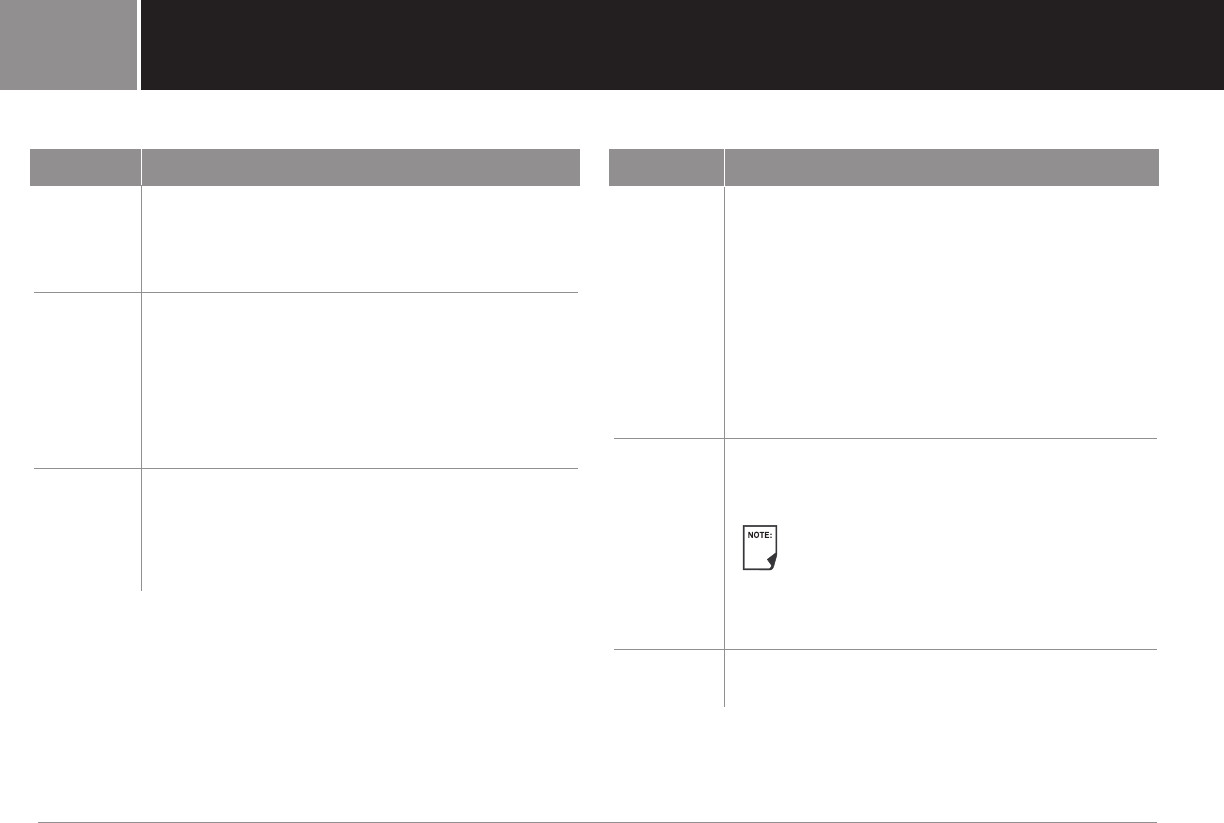
Button Action
Power Pressing turns the screen on and off. Holding
activates the backlight, which lets you read the
screen in the dark. To preserve battery life, use
the backlight only when necessary.
Status Brings you to the Status screen (shown later in
this chapter). Among other things, the Status
screen tells you what basal rate or bolus dose is
currently running, the time and amount of the last
bolus delivered, how much insulin is in the pump
reservoir, and how much power remains in the
remote’s batteries.
User Info/ Brings you to the User Info/Support screen,
Support which shows Insulet Corporation information,
product information, and–if you or your
healthcare provider enter it–any personalized
user information you want.
Button Action
Soft Keys Called “soft” because they do not have a “hard”
label or definite purpose. Soft key labels and
functions depend on the menu or screen you are
viewing. The label appears on the screen directly
above the physical button you press. For example,
when you are in the Main menu, the left soft key
is labeled Status and pressing it brings you to the
Status screen. However, when you are in the
Status screen, the same soft key is labeled Menu
and pressing it brings you to the Main menu.
Up/Down Pressing scrolls through a list of available menu
Controller options or numbers so you can pick the one you
want. Holding the button scrolls faster.
In some lists, the Up/Down Controller button
cannot be used for scrolling, because it is
being used for another purpose. In this case,
press the soft key labeled More to go to the
next screen.
iBolus™ Lets you easily and discreetly deliver a bolus dose
(Audio Bolus) “on the go,” without having to look at the screen.
4 iXL™ Diabetes Management System User Guide: Your New iXL™ Diabetes Management System

Your New iXL™ Diabetes Management System 1
Entering and changing text
To enter text, numbers, or characters (for example, when
entering your personal contact information), use the Up/Down
Controller button to scroll to the character you want, and then
press Select. Repeat for each character needed to spell the
word or name you want to add.
To change a number, time, or date, select the number and use
the Up/Down Controller button to increase or decrease it.
iXL™ Diabetes Management System User Guide: Your New iXL™ Diabetes Management System 5
Your New iXL™ Diabetes Management System1
6 iXL™ Diabetes Management System User Guide: Your New iXL™ Diabetes Management System
Primary Screens
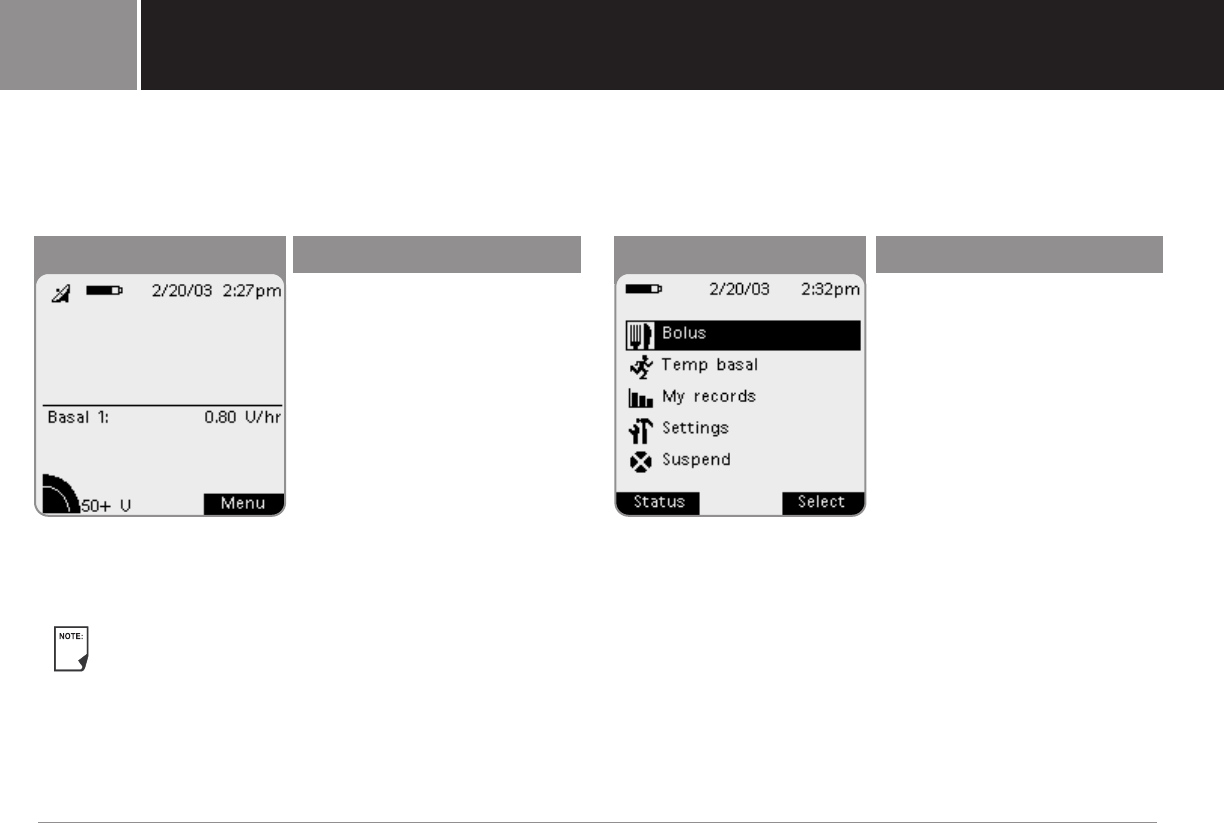
Messages on the screen tell you how the system is operating,
list menu choices, or explain how to perform certain tasks.
The system’s two primary screens are:
Status Screen Action
View the system’s current
operating status
•Date and time.
•Remote battery level.
•Insulin reservoir volume (how
much insulin is in the pump).
•When an extended bolus is
being delivered, how much
insulin has been delivered.
•Name and rate of current basal program, unless a bolus dose
is currently being delivered (see above).
•Whether a temporary basal program is in use.
If a pump is in Suspend mode, the Status screen
displays “INSULIN SUSPENDED.” If a pump has not yet
been activated (as during pump changes), the screen
displays “No active pump. Would you like to activate a
pump now?” (see Chapter 5, The iXL Pump, for details).
You can go to the Status screen at any time by pressing
the Status button.
Main Menu Screen Action
Go to all the major submenus:
•Bolus menu to deliver bolus
doses.
•Temp basal menu to deliver
temporary basal rates.
•My records menu to review
insulin delivery records, alarm
records, and personal user
information.
•Settings menu to customize system settings and to set and
name basal and temporary basal programs that meet your
personal needs.
•Suspend menu to suspend, cancel, or resume insulin delivery
programs.
Your New iXL™ Diabetes Management System 1
iXL™ Diabetes Management System User Guide: Your New iXL™ Diabetes Management System 7
My Notes:
Your New iXL™ Diabetes Management System1
My Notes:
8 iXL™ Diabetes Management System User Guide: Your New iXL™ Diabetes Management System
Getting Started
The iXL™ Startup Kit
Your kit contains:
•This User Guide
•One (1) iXL Remote Controller
•Ten (10) iXL Pumps (filling syringe and needle is provided
with each pump)
•Two (2) AAA alkaline batteries
•Registration card (postage paid)
If you are a first-time iXL System user, you need to meet with your
healthcare provider for training and system setup before using
it. To get a head start on learning about your new iXL System,
review this User Guide before your first training session. Having
a basic understanding of the System in advance will help you
get more out of your training sessions.
After unpacking your startup kit, use the list above to make sure
you have everything. Then, complete the registration card and
promptly mail it to us. Returning the card allows us to contact
you with important product updates or warranty information.
Do NOT use the iXL Diabetes Management System until
you have been trained by your healthcare provider. He/she
will initialize the system based on your individual needs.
iXL™ Diabetes Management System User Guide: Getting Started 9
2
Set Up The iXL™ Remote Controller
Chapter 6 describes the remote’s options in detail. The
instructions in this chapter are simplified to help you get started.
Turn on the remote
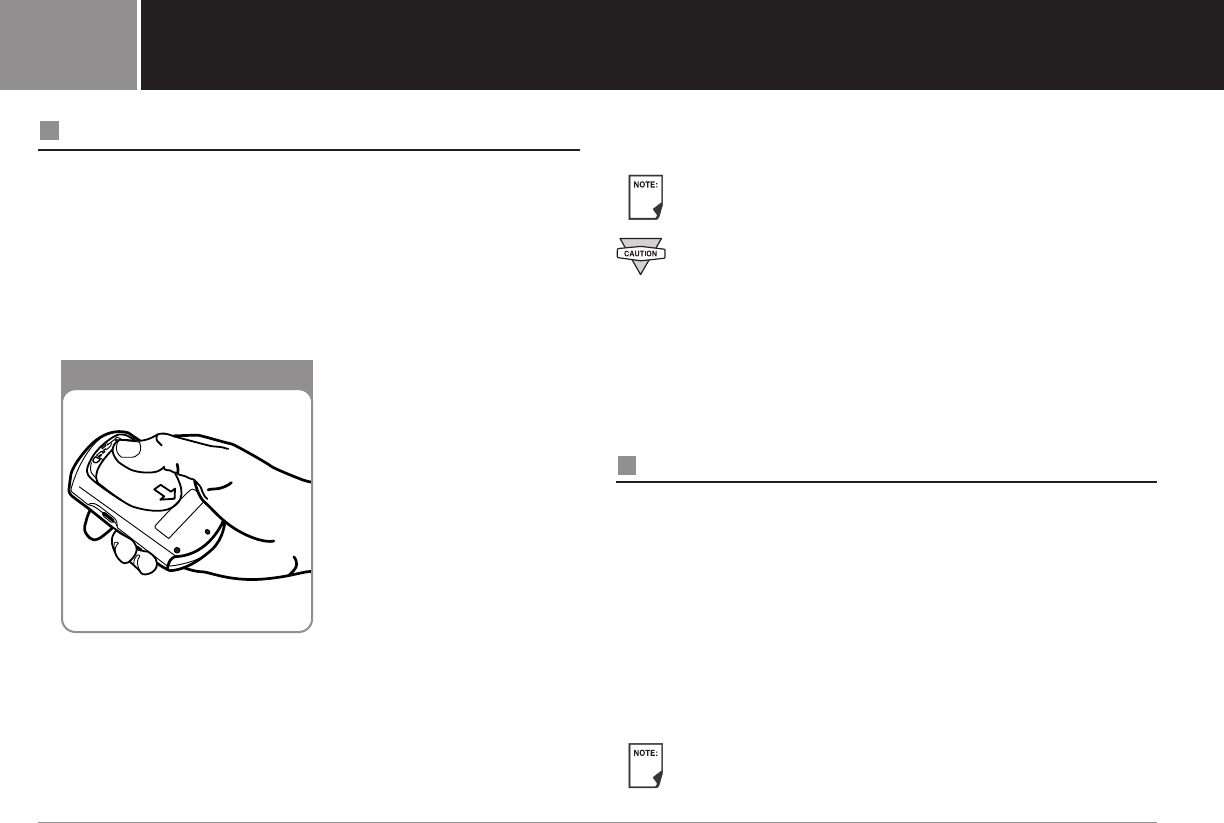
1. Open the battery compartment on the back of the remote by
gently pressing down on the ribbed side of the compartment
door until it opens (Figure 2-1). No special tools are necessary.
2. Insert two (2) new AAA alkaline batteries into the
compartment.
The diagram inside the compartment shows you which
direction to insert the batteries.
Use only new AAA alkaline batteries to power the
remote. Never use old or used batteries; the remote
may not work properly.
3. Replace battery door.
4. Turn the remote face-up.
5. Press the Power button.
The iXL™ Setup Wizard
The first time you turn on the iXL Remote Controller, the Setup
Wizard comes on automatically. Although setup is easy with the
Wizard, if you are a first-time user, your healthcare provider
must guide you through the process. Setup takes only a few
minutes and is easy to do:
•Use the Up/Down Controller button to increase or decrease
a number or to move up or down a list.
•Press the soft key labeled Next to continue to the next screen.
•Press the Back soft key to return to previous screens.
You can adjust these settings later as your needs change
or you fine-tune your iXL System.
10 iXL™ Diabetes Management System User Guide: Getting Started
Getting Started2
Figure 2-1
Getting Started
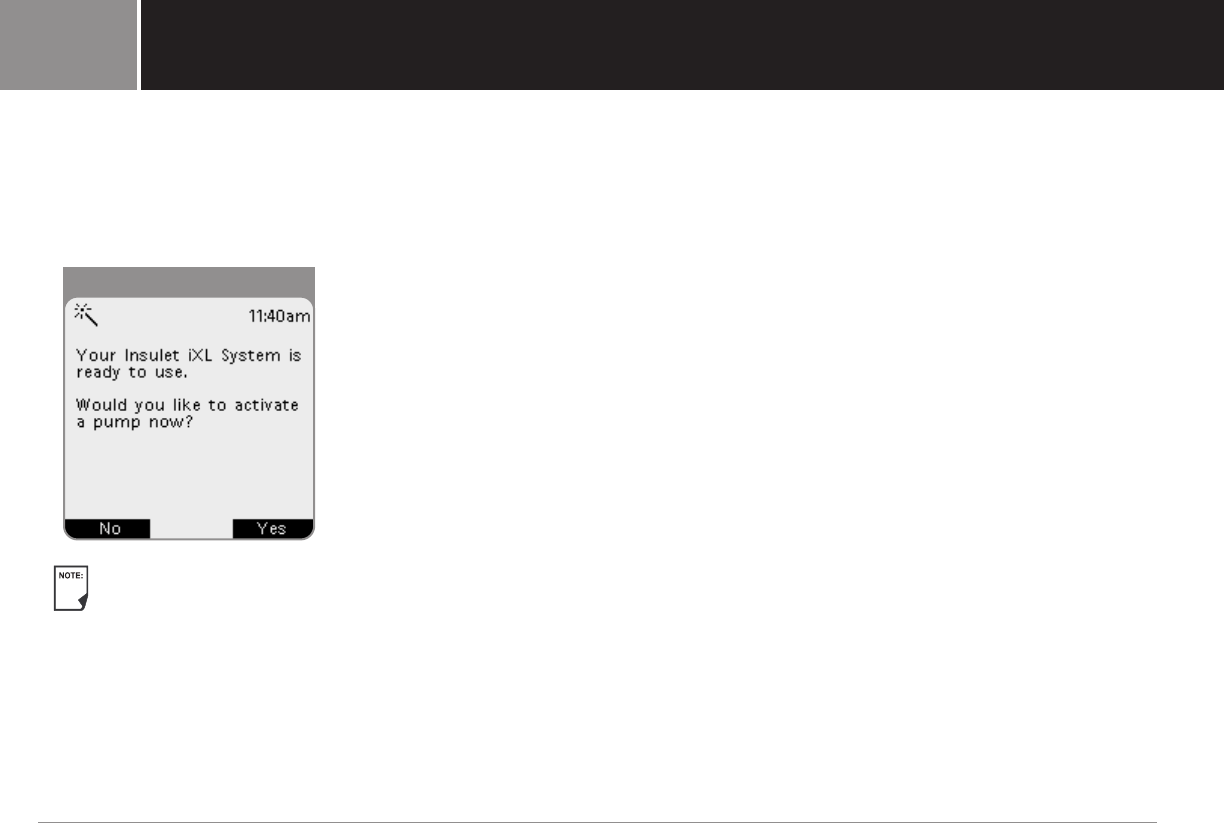
The Wizard’s Welcome screen (Figure 2-2) gets you started.
Press the Continue soft key to begin setting time and day, bolus
and basal options, and indicators.
1. Use the Up/Down Controller button to increase or decrease
the time. (If you prefer a 24-hour clock, press the 12hr/24hr
soft key.) Then press Next.
2. Enter the current year, then press Next.
3. Choose the current month, then press Next.
4. Enter the current day, then press Next.
5. Choose the date format you prefer, then press Next.
6. Choose a bolus increment (how much each press of the
Up/Down Controller button will increase or decrease a bolus
delivery), either 0.10, 0.50, or 1.00 units of insulin, then press
Next.
7. Choose the maximum bolus you can give at one time, up to
30 units in 0.10-unit increments, then press Next.
8. Choose the maximum basal rate you can set, up to 30 units
per hour, then press Next.
9. Choose the initial basal rate to use, then press Next.
The initial basal program established with the Setup
Wizard is named Basal 1. You can change the name in
the Settings > Basal programs menu (see Chapter 3,
Basal Rates).
10.Press Done to confirm the basal program shown on the
screen. To add more basal segments to the program, or to
change the rate shown, press Edit (see Chapter 3, Basal
Rates, for details).
11.Press Confirm to confirm the basal program you have set.
To see the basal program as a list, press List. To return to the
graphic view, press Graph.
To avoid confusion, since “midnight” both begins and
ends a 24-hour period, the end of the day is represented
as 11:59 pm.
12.Choose the maximum daily dose of insulin you should take,
from 0 to 200 units in 5-unit increments, then press Next.
13.Choose the level of insulin in the reservoir at which the
remote should give you an alarm. Choose from 10 to 50 units
in 5-unit increments, then press Next.
iXL™ Diabetes Management System User Guide: Getting Started 11
2
Figure 2-2
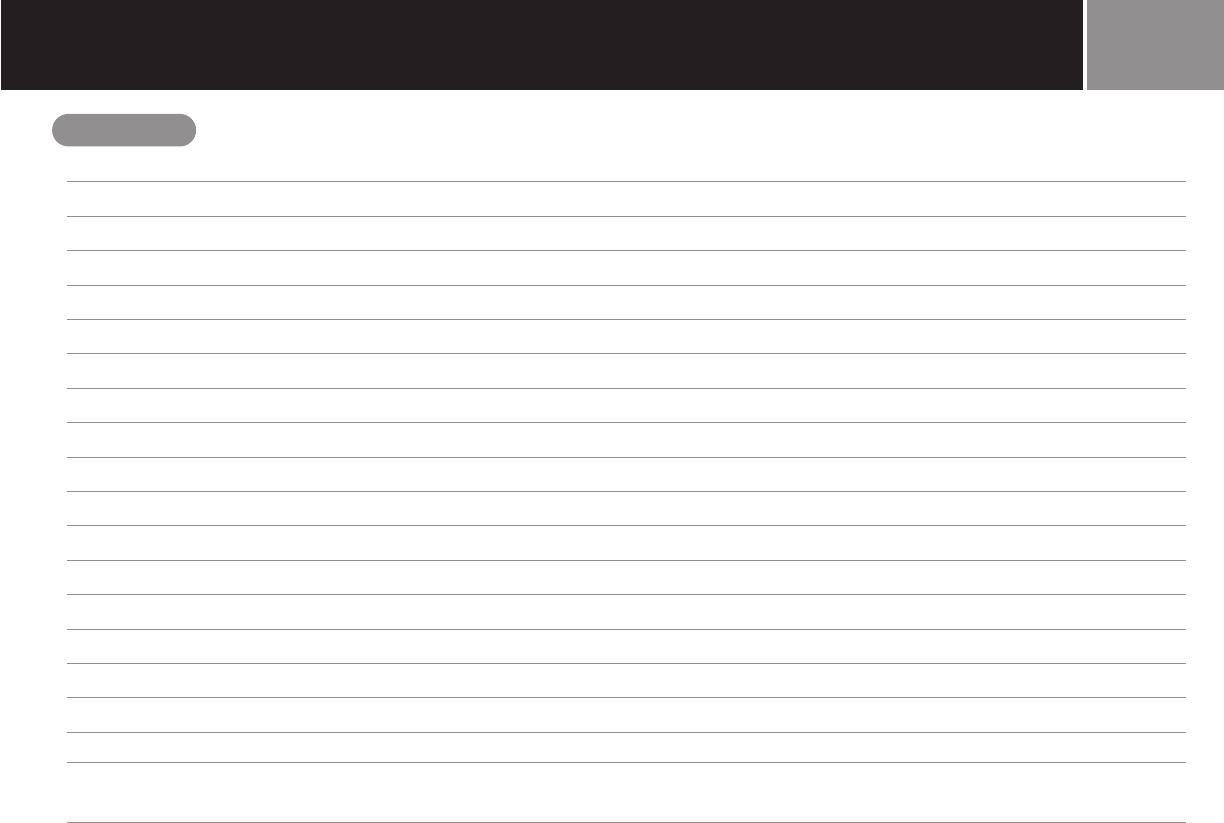
14.The remote now asks whether you want to activate a pump
(Figure 2-3). You can:
•Press Yes if you are ready to activate a new iXL Pump.
•Press No if you do not want to activate a pump at this time.
The remote displays the Main menu.
You can press the Power button to turn off the remote
at any time during setup. Otherwise, it turns off
automatically after a screen time-out period you set
(see Chapter 6, iXL Remote Controller Features). If you
turn the remote on again within 5 minutes, you will return
to the same Setup Wizard screen you last saw. If you
turn it on after 5 minutes, you will return to the beginning
of the Setup Wizard.
Your healthcare provider will help you fill and attach your first
iXL Pump. The process is easy because on-screen messages
walk you through every step. Please refer to Chapter 5, The iXL
Pump, for detailed instructions.
12 iXL™ Diabetes Management System User Guide: Getting Started
Getting Started2
Figure 2-3
Getting Started
My Notes:
iXL™ Diabetes Management System User Guide: Getting Started 13
2
My Notes:
14 iXL™ Diabetes Management System User Guide: Getting Started
Getting Started2
Basal Rates
What is a Basal Rate?
A basal rate is a small base or background amount of insulin
that is delivered, at a preset rate, continuously for a specified
period of time.
Even without eating, our bodies need a small, constant supply
of insulin for normal cell activity. In people without diabetes, the
pancreas continuously delivers this background supply of
insulin. For people using the iXL Diabetes Management System,
the iXL Pump mimics a healthy pancreas by delivering insulin at
a programmed basal rate.
Approximately 50% of a pumper’s total daily dose comes
from basal insulin delivery; the remaining 50% comes
from bolus doses (see Chapter 4, Bolus Doses).
Personalized Basal Programs
Insulin needs vary throughout the day. Therefore, most people
set their basal rates to deliver slightly more (or less) insulin at
certain times. For example, one person may need to deliver a
higher rate of insulin during the early morning and a lower rate
during the late evening. A basal program describes the amount
of insulin to be delivered during an entire 24-hour period.
A basal program contains at least one basal rate for the 24-hour
period, but for most people it will be broken into several time
segments, or basal segments, each delivering a different rate of
insulin. A sample basal program with three basal segments
might be:
Basal Segment Basal Rate Meaning
12:00am – 8:00am 0.60U/hr Between midnight and
8:00am, the pump delivers
0.60 units of insulin per hour.
8:00am – 3:00pm 0.80U/hr Between 8:00am and 3:00pm,
the pump delivers 0.80 units
of insulin per hour.
3:00pm – 11:59pm* 0.70U/hr Between 3:00pm and 11:59pm
(midnight), the pump delivers
0.70 units of insulin per hour.
*To avoid confusion, the end of a day is represented as 11:59pm.
iXL™ Diabetes Management System User Guide: Basal Rates 15
3
In addition to normal daily changes, insulin needs can vary
with different routines or days of the week. For example, regular
school or workday routines may differ from weekend routines,
and insulin needs may differ, too. With your healthcare provider,
you will decide on the basal rates that best match your lifestyle
and insulin needs. You will enter at least one basal program
(your Basal 1 program) into your remote during the setup process
(see Chapter 2, Getting Started). You can add other programs
later as you fine-tune your system settings or when your needs
change. You can preset basal rates to use for regular occasions
when you need a different rate than the Basal 1 program
provides, such as exercise times or school nights.
Create a basal program
The iXL Remote Controller can store up to seven different basal
programs. Each program can contain 48 rates, programmed in
half-hour increments. Once you enter a basal program into the
remote, pressing a few buttons is all it takes to pick the program
you want. The iXL Pump continues to deliver insulin at those
rates until you change that program or switch to another one.
For up to 72 hours, you get insulin delivery that’s customized to
your personal needs.
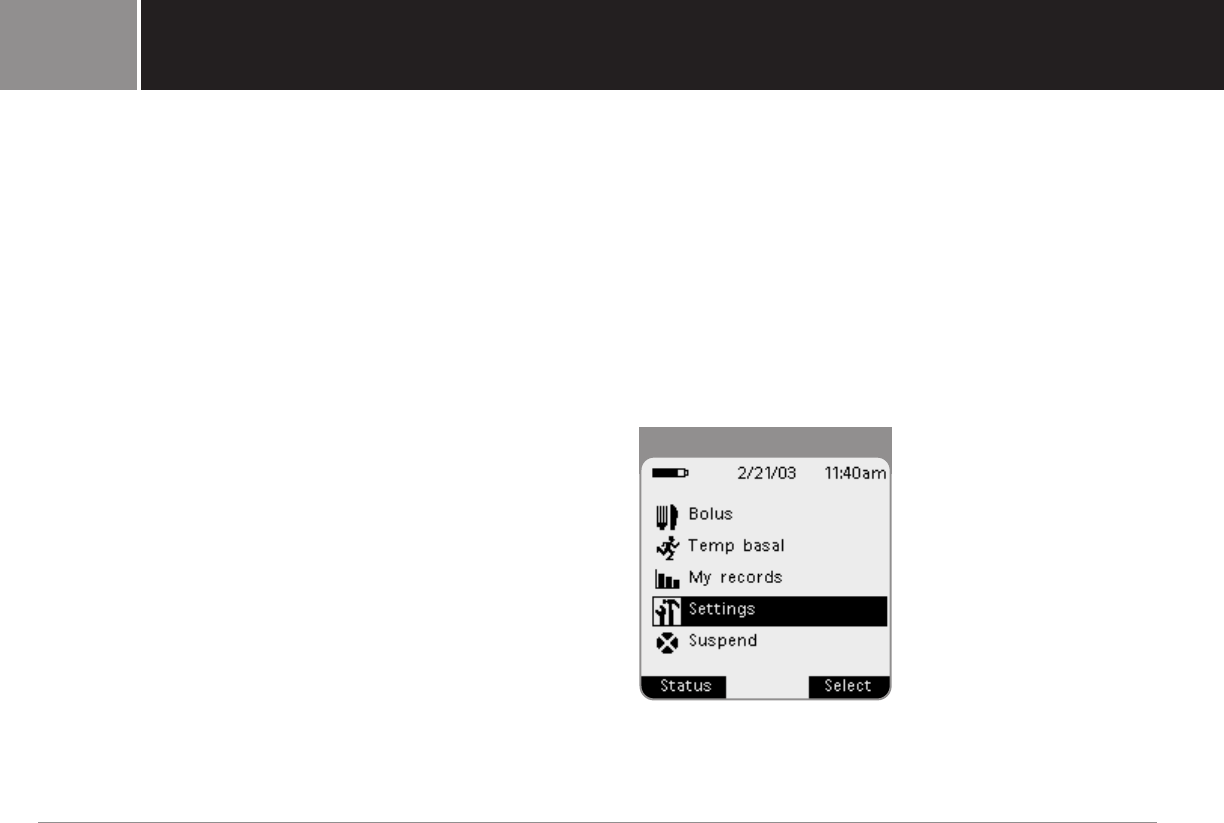
1. In the Main menu, use the Up/Down Controller button to
choose Settings (Figure 3-1); then press the soft key
labeled Select.
16 iXL™ Diabetes Management System User Guide: Basal Rates
Basal Rates3
Figure 3-1
Basal Rates
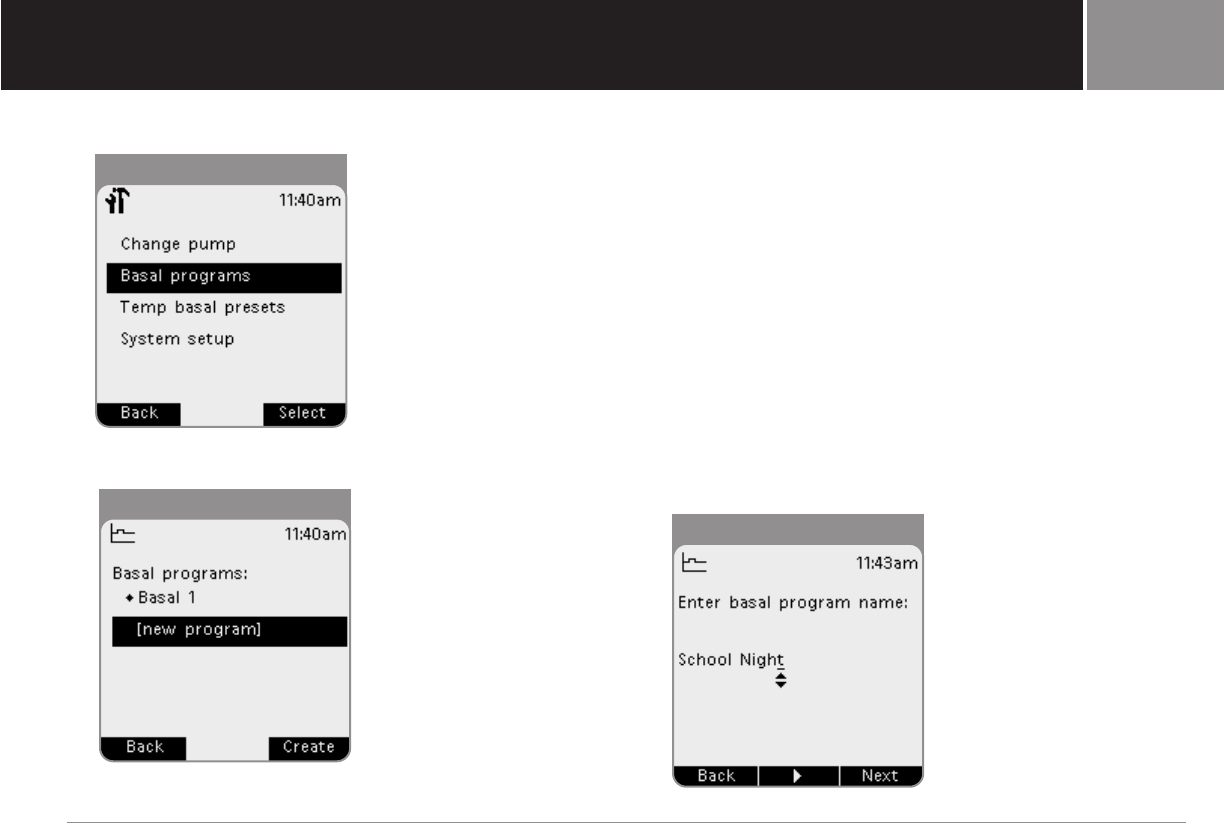
2. Choose Basal programs (Figure 3-2), then press Select.
3. Choose [new program] (Figure 3-3), then press Create.
4. To use the iXL System’s default naming system, simply press
Next.The default naming system automatically assigns
program names in numerical order, such as Basal 1, Basal 2,
Basal 3.
Or, to give a different name to the program:
(a)Press the Up/Down Controller button to enter the
characters that spell the name you want. An underscore (_)
on the screen indicates which character you are changing.
Press the soft key labeled with the arrow to move the
underscore to the next character. For example, if you have
school three nights a week and eat early those nights, you
might enter S, c, h, o, o, l, space, N, i, g, h, t (Figure 3-4).
(A blank character/space is the first and last option in the
scrolling menu.)
(b)Press Next.
iXL™ Diabetes Management System User Guide: Basal Rates 17
3
Figure 3-2
Figure 3-3
Figure 3-4
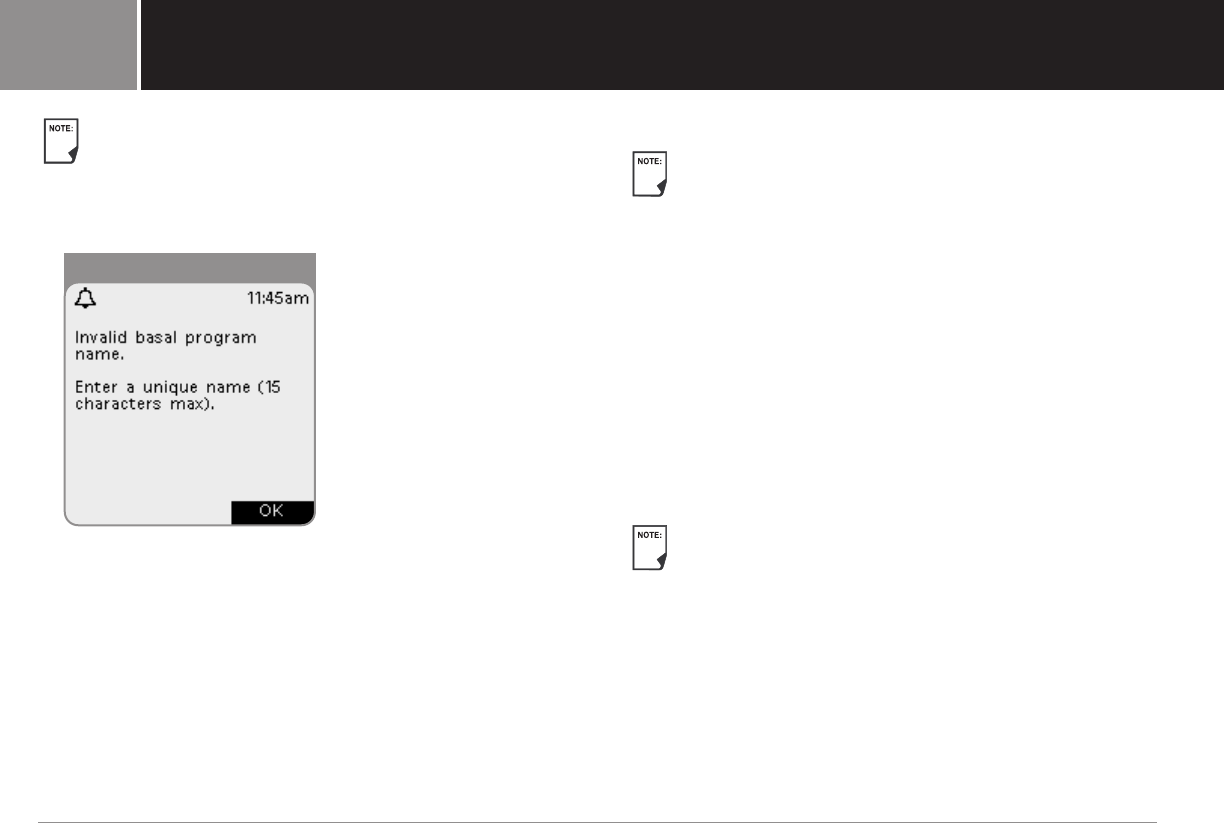
As a safety feature, the words “Invalid basal program
name” (Figure 3-5) appear if the name you entered does
not have at least one character or if the name is being
used by another basal program. Press OK to return to the
previous screen and enter a different name.
5. Enter the rate, in U/hr, for the first basal segment (from Off
to the maximum you entered during setup), then press Next.
6. Review the list showing your new basal program.
New programs show the first basal rate during the time
period 12:00am-11:59pm. The end of the day is
represented by 11:59pm.
To use the same basal rate for the entire 24-hour program,
press Done and continue with step 7.
Or, to add basal segments and rates (for example, a higher
basal rate between 8:00am and 3:00pm):
(a)Press Edit.
(b) Enter the start time (for example, 8:00am), then press Next.
Basal segments are in 30-minute increments.
(c)Enter the end time (for example, 3:00pm), then press Next.
(d)Enter the rate for the new basal segment (for example,
0.80U/hr), then press Next.
Basal rates outside the changed segment do not change.
(e) Repeat steps a-d for each new segment and rate you want.
(f) Press Done.
18 iXL™ Diabetes Management System User Guide: Basal Rates
Basal Rates3
Figure 3-5
Basal Rates
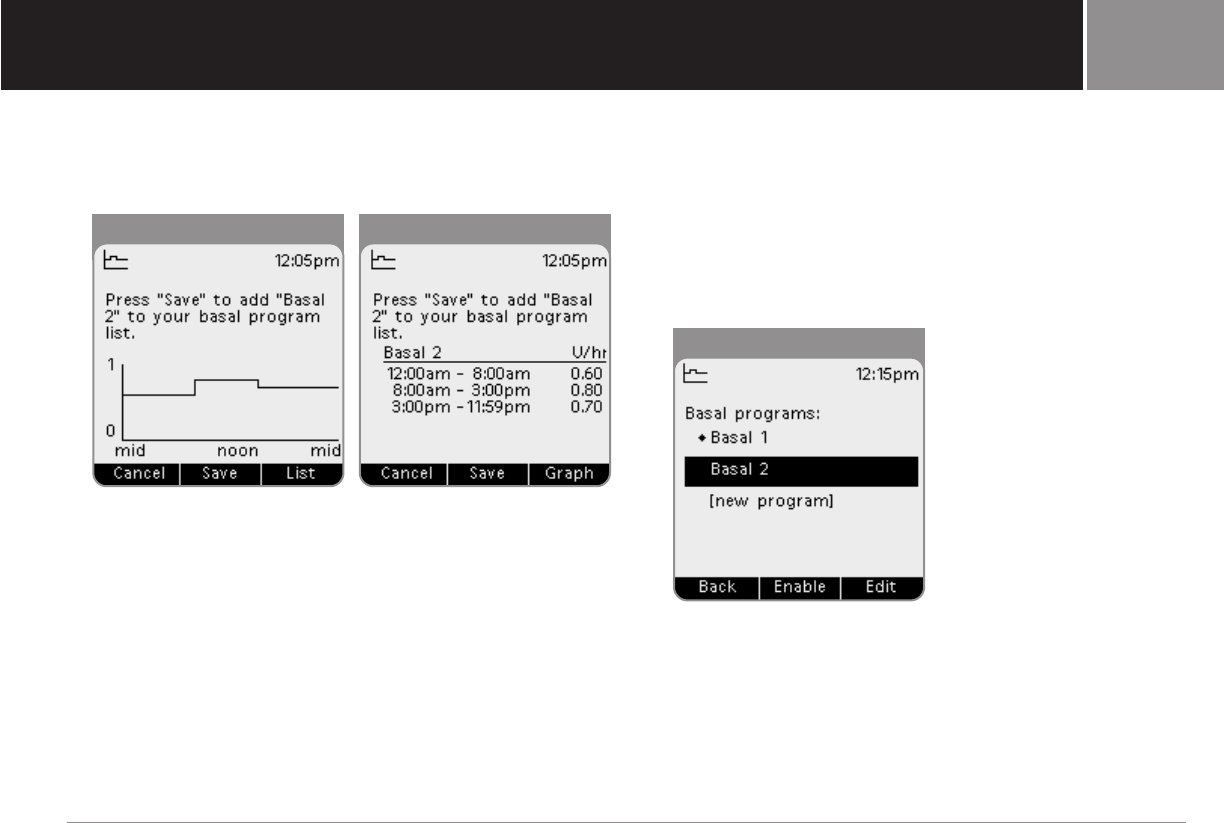
7. Review the graph of the new basal program (Figure 3-6).
To see the program as a list, press List (Figure 3-7). To see
the graph again, press Graph.
To add the program to the remote’s memory, press Save.
Or press Cancel to cancel the newly entered program.
Repeat the steps above for each basal program (up to 7) you
want to create.
Enable an existing basal program
1. In the Main menu, use the Up/Down Controller button to
choose Settings; then press the soft key labeled Select.
2. Choose Basal programs, then press Select.
3. Choose the program you want from the list (Figure 3-8), then
press Enable.
To see a graph of the basal program, press Graph.
iXL™ Diabetes Management System User Guide: Basal Rates 19
3
Figure 3-6 Figure 3-7
Figure 3-8
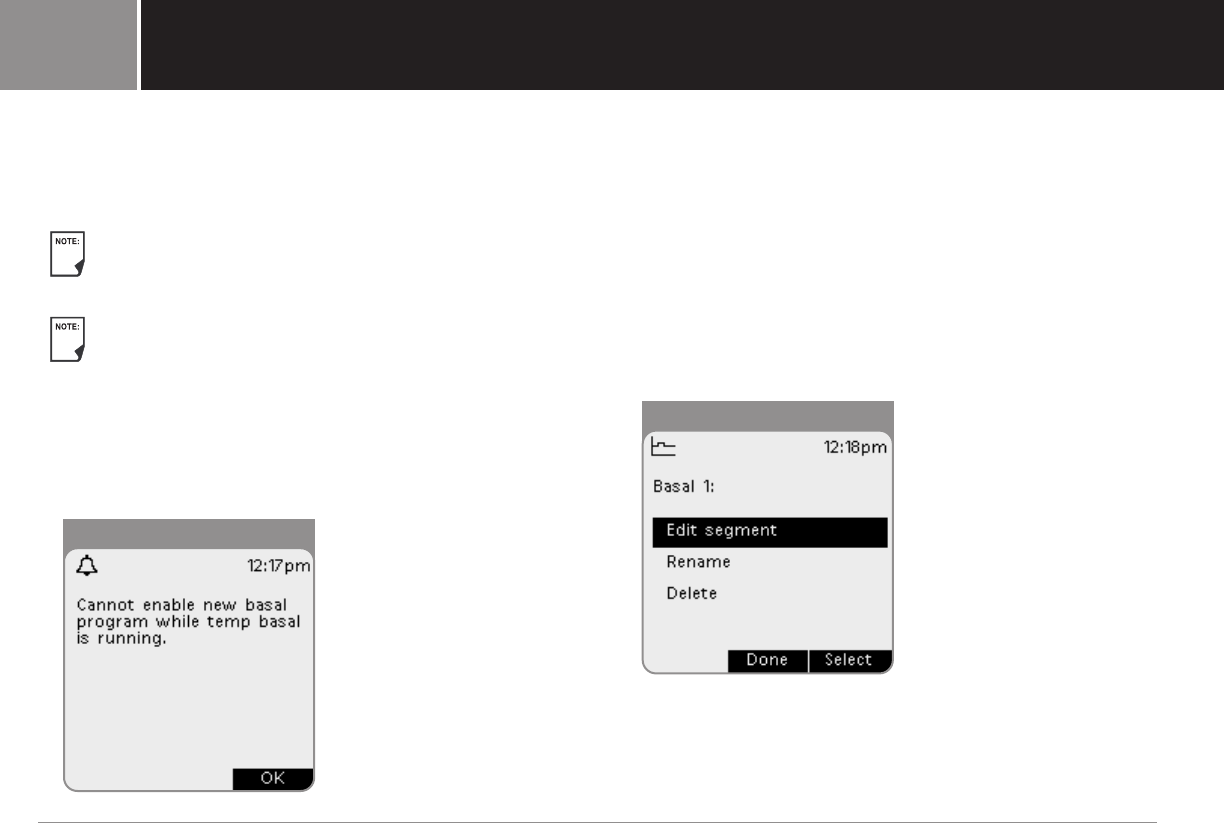
4. Press Enable to start the selected basal program. The pump
beeps to indicate that the chosen basal program is running.
Or press Cancel to return to the list and select a different
program.
A diamond icon (♦) appears next to the program that is
currently running. You cannot select the current program
to enable, because it is already running.
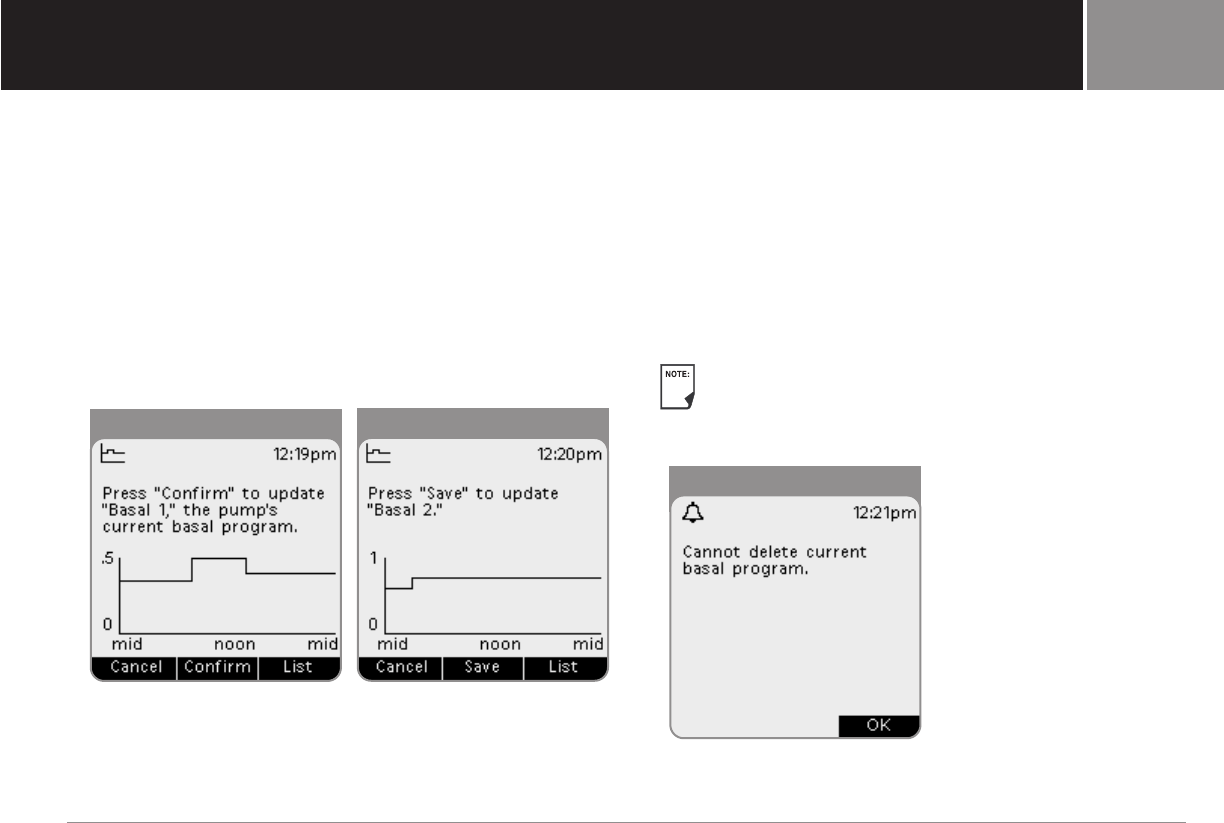
As a safety feature, you cannot enable a new basal
program while a temporary basal preset is in process
(see “Preset Temporary Basal Rates” later in this
chapter); you must first cancel the current temporary
basal preset. If you try to activate a new program before
you cancel the temporary preset, the screen displays an
error message (Figure 3-9). Press OK to return to the list
of available basal programs.
Change or delete a basal program
1. In the Main menu, use the Up/Down Controller button to
choose Settings; then press the soft key labeled Select.
2. Choose Basal programs, then press Select.
3. Choose a program from the list, then press Edit.
4. Follow the steps below, then press Done.
To change a segment or rate in the basal program:
1. Choose Edit segment, then press Select (Figure 3-10).
Or press Done to back out of this process.
2. To edit the program, press Edit.
3. Enter the start time for the segment you want to change then
press Enter.
4. Enter an end time for this segment, then press Enter.
20 iXL™ Diabetes Management System User Guide: Basal Rates
Basal Rates3
Figure 3-9
Figure 3-10
Basal Rates
5. Enter a basal rate for the new segment, then press Enter.
6. To save the newly entered segment into the basal program,
press Save. If you want to make additional edits, press Edit
and repeat steps 3-5.
7. If this is the currently active basal program, press Confirm
(Figure 3-11) to update. (The pump beeps to indicate that the
active basal program has been updated.)
Press Save (Figure 3-12) for any other basal program.
Or, press Cancel to ignore the edits you made to the basal
program and return to the edit screen.
To rename a basal program:
1. After choosing a program from the list, choose Rename and
then press Select.
2. Press the Up/Down Controller button to enter the characters
that spell out the name you want; then press Save.
Or press Back to back out of this process.
To delete a basal program:
1. After choosing a program from the list, choose Delete and
then press Select.
2. Press Delete to permanently delete the program.
Or press Cancel to back out of the deletion process.
As a safety feature, you cannot delete the current basal
program. If you try to delete the current program, the
screen displays an error message (Figure 3-13). Press OK
to return to the list of editing options.
iXL™ Diabetes Management System User Guide: Basal Rates 21
3
Figure 3-11 Figure 3-12
Figure 3-13
Preset Temporary Basal Rates
What is a temporary basal rate?
A temporary basal rate lets you adjust your basal rate for a
short period of time. If a temporary change later becomes
permanent, you can create a new basal program for it. Some
temporary changes are easy to predict and respond to; they
happen routinely and you may know from experience how they
affect your insulin needs. For example, you might take the same
exercise class twice a week for eight weeks, or join a summer
soccer league. For women, a monthly hormonal change that
affects blood sugars is an example of predictable change. To
easily handle predictable but short-term changes, you can preset
a temporary basal rate, so it is ready whenever you need it. The
remote can remember up to seven (7) temporary basal presets.
Create a temporary basal preset
1. In the Main menu, use the Up/Down Controller button to
choose Settings; then press the soft key labeled Select.
2. Choose Temp basal presets, then press Select.
3. Choose [new preset], then press Create.
4. To use the iXL System’s default naming system, simply press
Next. The default naming system automatically assigns
program names in numerical order, such as Temp basal 1,
Temp basal 2, Temp basal 3.
Or, to give a different name to the program:
(a)Press the Up/Down Controller button to enter the
characters that spell the name you want. An underscore
(_) on the screen indicates which character you are
changing. Press the arrow key to move the underscore to
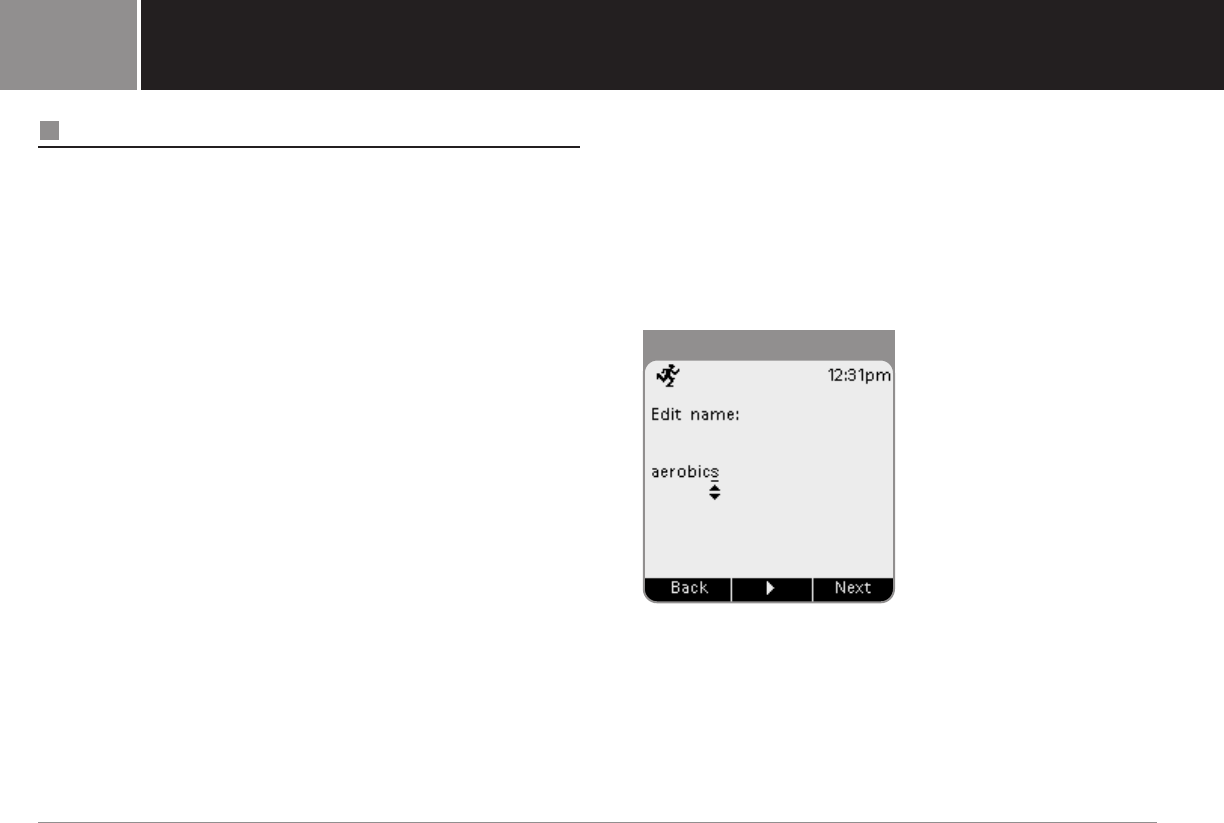
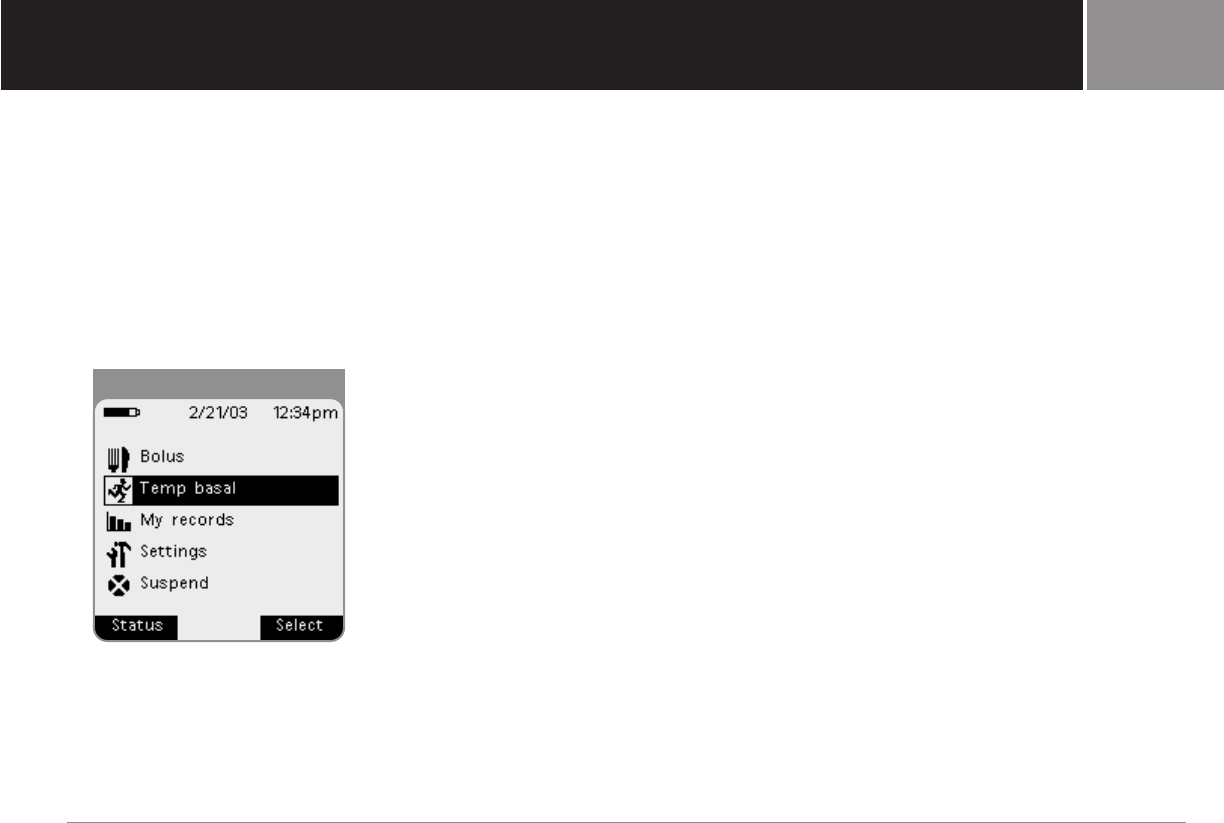
the next character. For example, if you take an aerobics
class two nights a week, you might enter a, e, r, o, b, i, c, s
(Figure 3-14).
(b)Press Next.
5. Enter the new temporary basal rate, from Off to the maximum
basal rate you entered during setup; then press Next.
22 iXL™ Diabetes Management System User Guide: Basal Rates
Basal Rates3
Figure 3-14
Basal Rates
6. Review the temporary basal name and rate; press Save to
accept it.
Or press Back to return to the previous screen and enter a
different rate.
Enable an existing temporary basal preset
1. In the Main menu, use the Up/Down Controller button to
choose Temp basal (Figure 3-15); then press the soft key
labeled Select.
2. Choose the temp basal preset you want to use from the list,
then press Select.
3. Enter the duration for the temporary rate, in increments of 30
minutes, then press Enter.
4. Press Start to begin the temporary basal rate shown on the
screen.
Or press Back to return to the previous screen if you want to
enter a different duration.
Cancel an active temporary basal preset
1. In the Main menu, use the Up/Down Controller button to
choose Suspend/cancel; then press the soft key labeled
Select.
2. Choose Cancel temp basal, then press Select.
3. Press Confirm to cancel the currently running temporary
basal preset.
Or press Back to back out of this process.
Change or delete a temporary basal preset
1. In the Main menu, use the Up/Down Controller button to
choose Settings; then press the soft key labeled Select.
2. Choose Temp basal presets, then press Select.
3. Choose a temporary program from the list, then press Edit.
4. Follow the steps in the next section, then press Done.
iXL™ Diabetes Management System User Guide: Basal Rates 23
3
Figure 3-15
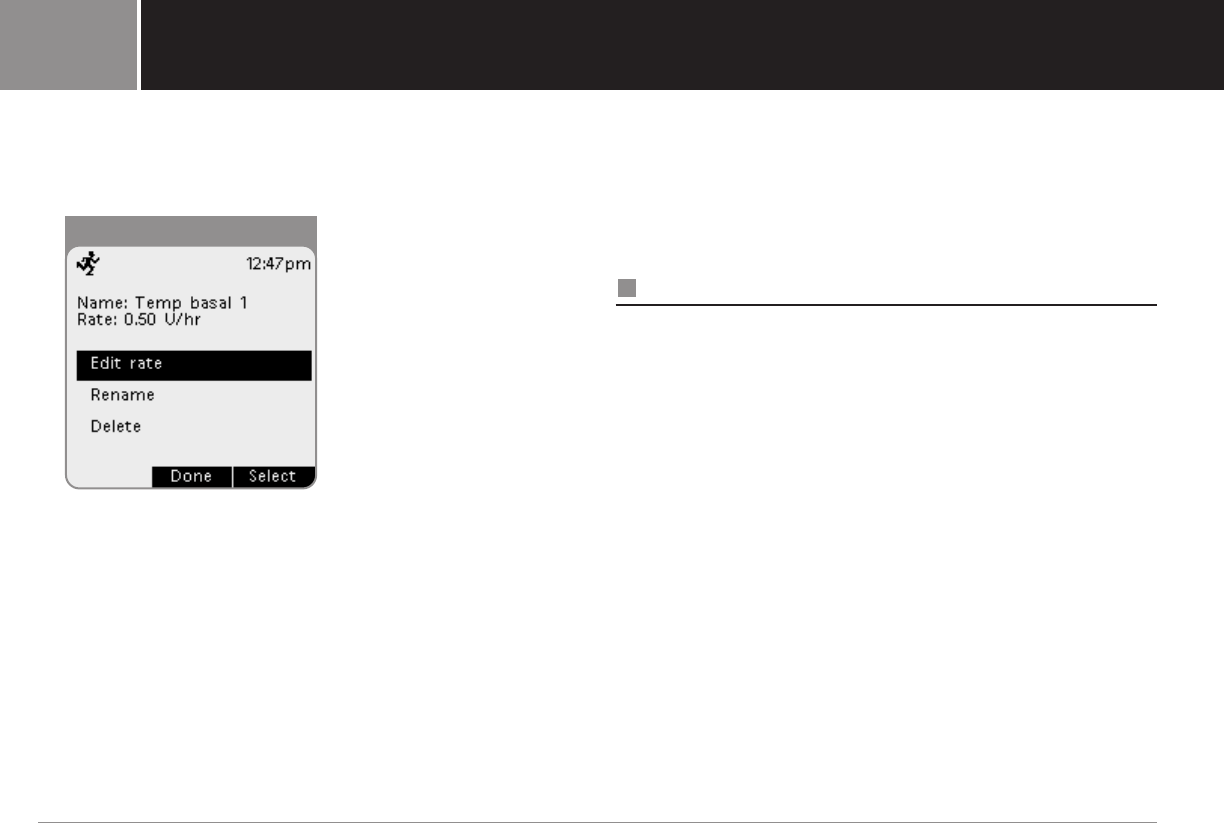
To change a temporary basal preset:
1. Choose Edit rate, then press Select (Figure 3-16).
Or press Done to back out of this process.
2. Enter a new rate for the program, then press Save.
To rename a temporary basal preset:
1. Choose Rename and then press Select.
2. Press the Up/Down Controller button to enter the characters
that spell out the name you want; then press Save.
Or press Back to back out of this process.
To delete a temporary basal preset:
1. Choose Delete and then press Select.
2. Press Delete to permanently delete the preset.
Or press Cancel to back out of this process.
One-Time Temporary Basal Rates
On occasion, you may need to change the current basal rate for
a short time. For example, if you are going cross-country skiing
for several hours, you may want to lower the basal rate during
and after you exercise.
Enable a one-time temporary basal rate
1. In the Main menu, use the Up/Down Controller button to
choose Temp basal; then press the soft key labeled Select.
2. Choose [enter manually] from the list of temp basal presets.
(If you have not created any temp basal presets, the remote
skips this step.)
3. Enter the temporary basal rate in units per hour, then press
Enter.
4. Enter the length of time for the temporary rate, in increments
of 30 minutes, then press Enter.
5. Press Start to start the temporary basal rate shown on the
screen.
Or press Back to back out of this process.
24 iXL™ Diabetes Management System User Guide: Basal Rates
Basal Rates3
Figure 3-16
Basal Rates
Cancel a one-time temporary basal rate
1. In the Main menu, use the Up/Down Controller button to
choose Suspend/cancel; then press the soft key labeled
Select.
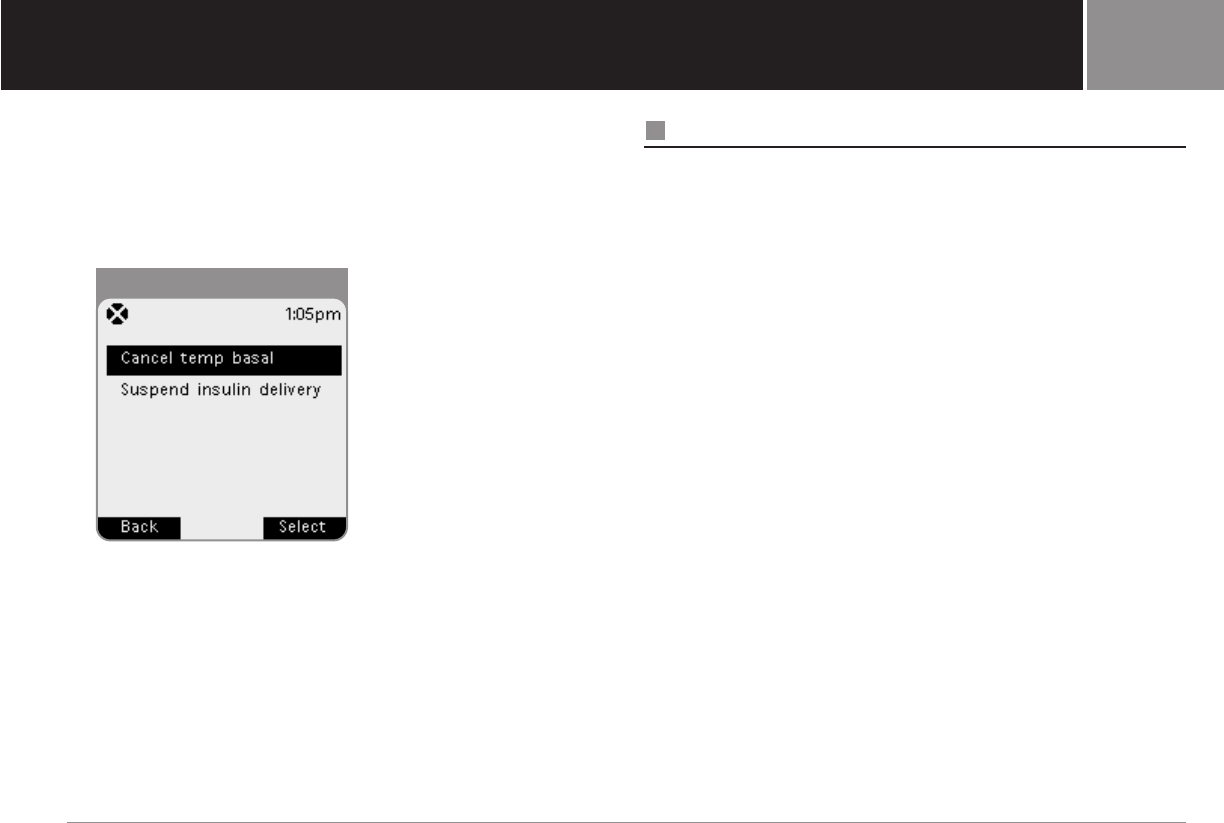
2. Choose Cancel temp basal (Figure 3-17); then press Select.
3. Press Confirm to cancel the temporary basal shown on the
screen.
Or press Back to back out of this process.
Maximum Basal Rate
What is the maximum basal rate?
The maximum basal rate is a safety feature. It limits the basal
rate (U/hr) that the iXL Pump can deliver. Once it is entered into
the remote’s memory, the maximum applies to both regular basal
programs and temporary basal rates.
You and your healthcare provider will enter an initial maximum
basal rate into your remote during the setup process (see
Chapter 2, Getting Started). You can change it later as you
fine-tune your system settings or when your needs change.
Set a maximum basal rate
1. In the Main menu, use the Up/Down Controller button to
choose Settings; then press the soft key labeled Select.
2. Choose System setup, then press Select.
3. Choose Bolus/basal setup, then press Select.
4. Choose Max basal rate, then press Select.
5. Enter a new maximum basal rate, then press Enter.
6. You can press Back at any screen to back out of this process.
iXL™ Diabetes Management System User Guide: Basal Rates 25
3
Figure 3-17
My Notes:
26 iXL™ Diabetes Management System User Guide: Basal Rates
Basal Rates3
Bolus Doses
What is a Bolus?
A bolus is an extra dose of insulin, delivered when needed to
match the carbohydrates (sugar content) in a meal or snack, or
to lower blood glucose when it gets too high. This extra dose is
in addition to the basal rate delivered throughout the day and
night (see Chapter 3, Basal Rates).
The size of a bolus dose depends on many variables.
These variables include your blood glucose level, insulin-to-
carbohydrate ratio, activity level, and the type and amount of
food you eat. With the iXL System, it is easy to adapt to any
situation, because – with the press of a few buttons – you can
adjust to unexpected or changing insulin needs.
During setup, you enter bolus dose settings in the remote
(see Chapter 2, Getting Started). However, you can adjust these
settings as you fine-tune your system settings or when your
needs change (see Chapter 6, iXL Remote Controller Features).
Bolus Dose Options
So you can fully enjoy the freedom of eating what and when
you want, the iXL System offers the following bolus dose options:
Normal Bolus: When you need a dose of insulin right way (to
cover a meal or snack you are about to eat or to reduce a high
blood glucose level).
Extended Bolus: When you are eating high-fat or high-protein
foods (which take longer to digest and are slower to affect
blood glucose) or when you are eating for an extended period
(for example, at a party or during a holiday meal).
iBolus™ (Audio Bolus): When you want to give yourself a
bolus “on the go,” without looking at the remote screen. This
feature is especially handy if you want to give yourself a bolus
discreetly or without having to stop what you are doing (for
example, when attending classes or meetings, eating out, or
entertaining).
The bolus features in the iXL System are designed for
flexibility and convenience. You can easily transition
from a normal to an extended bolus simply by pressing
a few buttons.
Although you cannot deliver an extended bolus while another
extended bolus is active, you can deliver a normal or an iBolus
while an extended bolus is being delivered.
iXL™ Diabetes Management System User Guide: Bolus Doses 27
4
Deliver Bolus Doses
Deliver a normal bolus
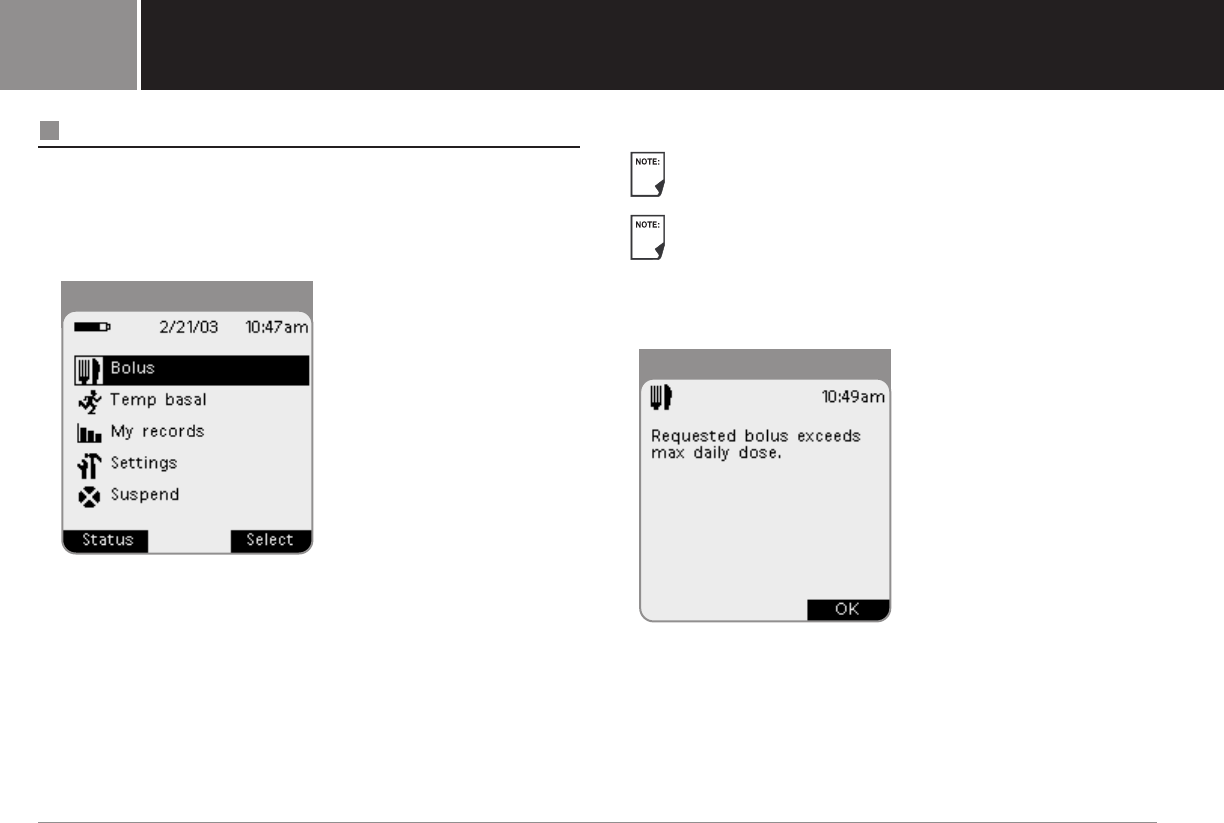
1. In the Main menu, use the Up/Down Controller button to
choose Bolus (Figure 4-1); then press the soft key labeled
Select.
2. Enter the number of units you want to deliver.
3. Press Enter.
As a safety feature, the remote only allows you to give a
bolus at or below your maximum bolus dose.
If the dose you enter would put you over your maximum
total daily dose, an on-screen message appears (Figure
4-2). Press OK and request a smaller amount; or increase
the system setting for maximum daily dose (see Chapter
6, iXL Remote Controller Features).
28 iXL™ Diabetes Management System User Guide: Bolus Doses
Bolus Doses4
Figure 4-1
Figure 4-2
Bolus Doses
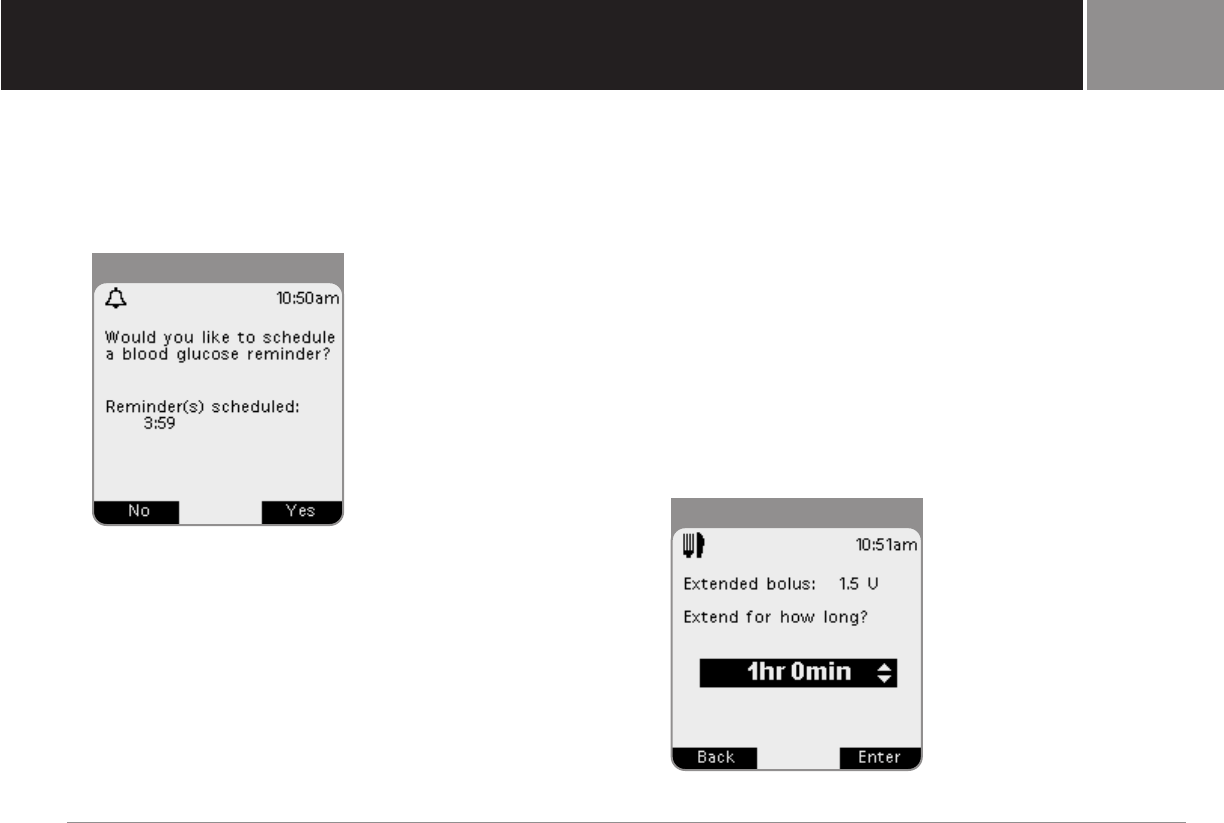
4. If you have set the blood glucose reminder option to Audible
or Vibrate (see Chapter 6, iXL Remote Controller Features),
the remote asks whether you want to schedule a reminder
(Figure 4-3). Reminders that have been set previously appear
at the bottom of this screen.
If you want to set a reminder:
(a)Press Yes.
(b)Enter the time for the reminder.
(c)Press OK.
If you do not want to set a reminder, press No.
If you have set the blood glucose reminder to Off, the remote
will not ask you to set a reminder.
5. Press Start to begin the bolus delivery.
Or press Back if you decide not to deliver the bolus.
Deliver an extended bolus
1. In the Main menu, use the Up/Down Controller button to
choose Bolus; then press the soft key labeled Select.
2. Enter the number of units you want to deliver.
3. Press Extended.
4. Enter the units of insulin (if any) that you want to take
immediately, then press Enter.
5. Enter the time (up to 8 hours, in 30-minute increments) over
which to deliver the remainder of the bolus (the amount
shown on the screen, Figure 4-4); then press Enter.
iXL™ Diabetes Management System User Guide: Bolus Doses 29
4
Figure 4-3
Figure 4-4
6. If you have set the blood glucose reminder option to Audible
or Vibrate (not Off) and you want to add a reminder:
(a)Press Yes.
(b)Enter the time for the reminder.
(c)Press OK.
If you do not want to set a reminder, press No.
If you have set the blood glucose reminder to Off, the remote
will not ask you to set a reminder.
7. Press Start to begin the bolus delivery.
Or press Back if you decide not to deliver the bolus.
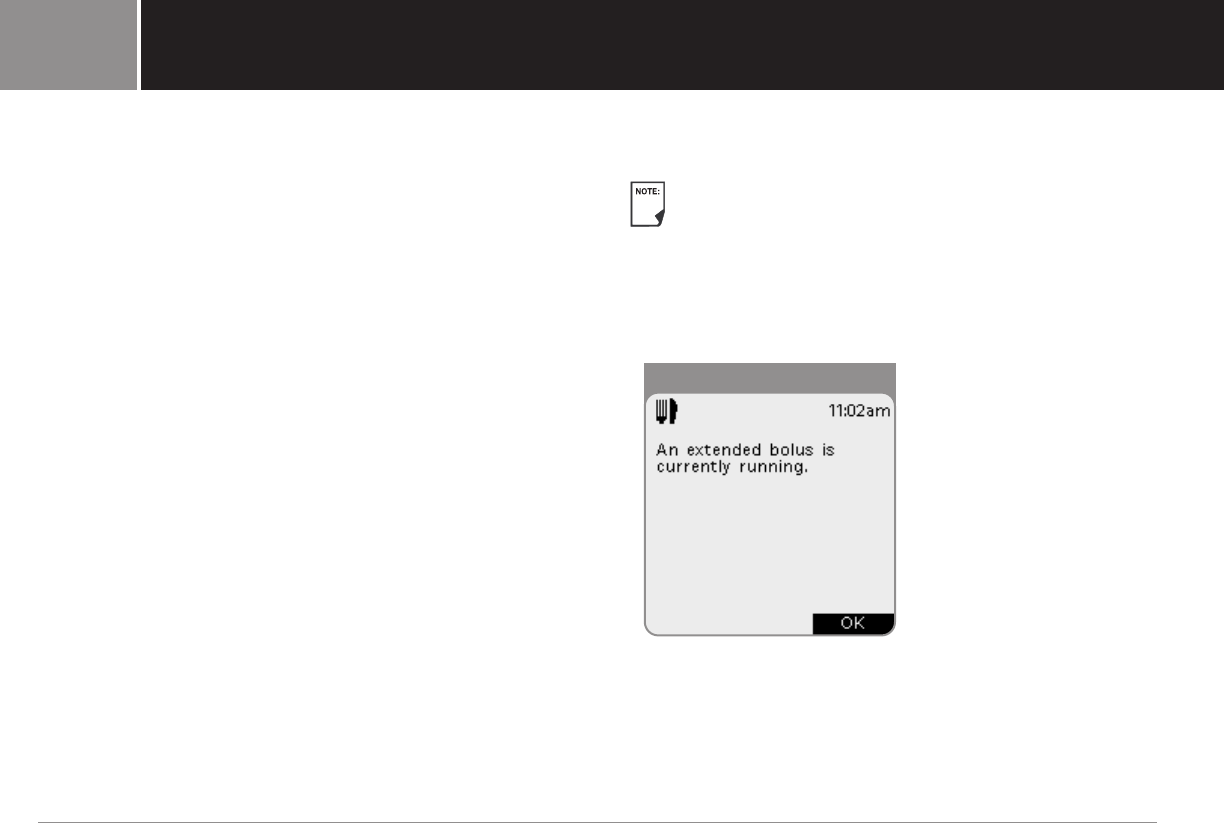
As a safety feature, if you try to set an extended bolus
while another extended bolus is being delivered, an
on-screen message appears (Figure 4-5). Press OK and
wait until the extended bolus is complete, or cancel the
extended bolus (see “Cancel Active Boluses” later in this
chapter). You can deliver a normal bolus while an
extended bolus is being delivered.
30 iXL™ Diabetes Management System User Guide: Bolus Doses
Bolus Doses4
Figure 4-5
Bolus Doses
Deliver an iBolus™ (audio bolus)
The iXL System’s exclusive iBolus feature lets you deliver a
bolus conveniently and discreetly, without having to look at the
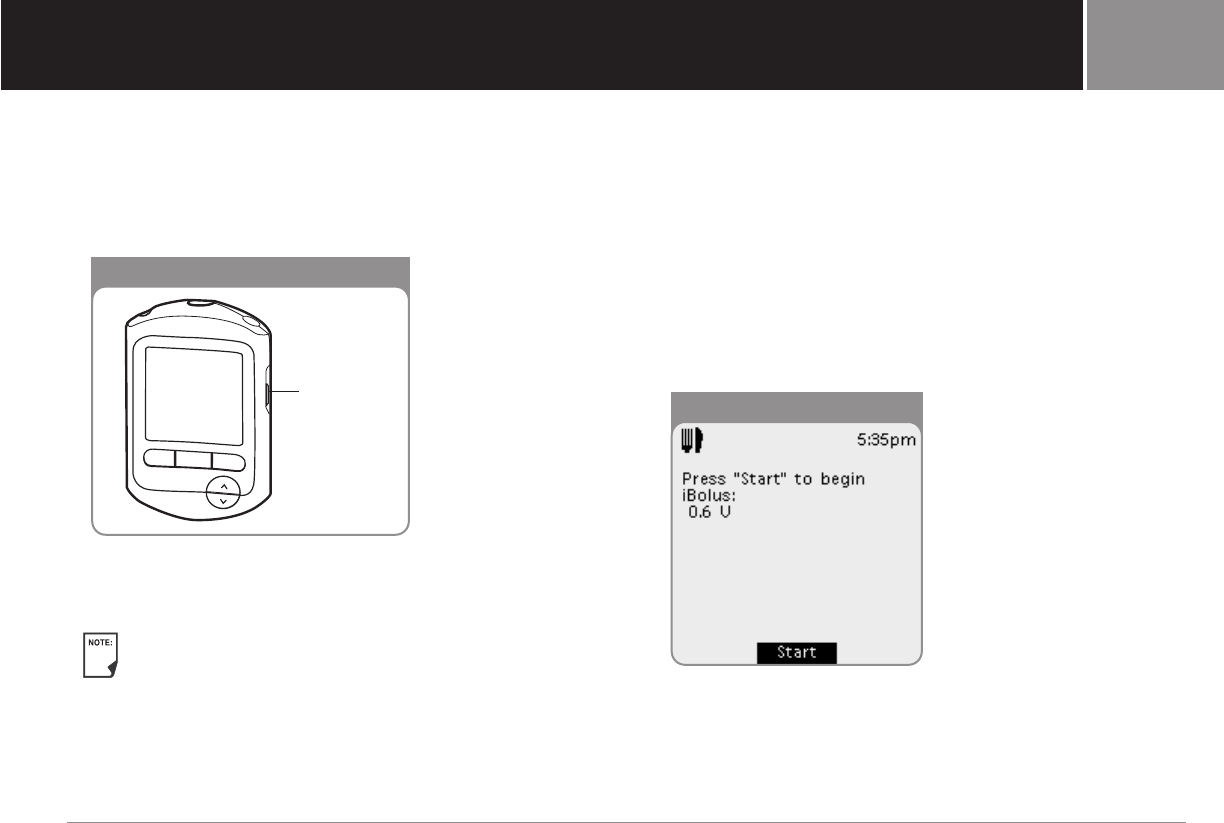
remote screen. The iBolus button is located on the right side of
the remote (Figure 4-6).
The iBolus increment depends on the bolus increment
that you select during setup. For example, if your normal bolus
increment is 1.0 unit, the iBolus increment will be the same.
When delivering an iBolus dose, the blood glucose check
reminder feature defaults to Off.
1. Press the iBolus button.
The remote beeps once to confirm that the iBolus feature is
active.
2. Press the iBolus button once for each increment of insulin to
deliver. For example, if you want to deliver 3 units and your
increment is set to 1 unit, press the iBolus button 3 times .
3. After a brief pause, the remote beeps once for each
increment entered, so you can confirm the dose by counting
the number of beeps.
If you press the iBolus button during the counting period, the
remote cancels the operation and returns to the Status screen.
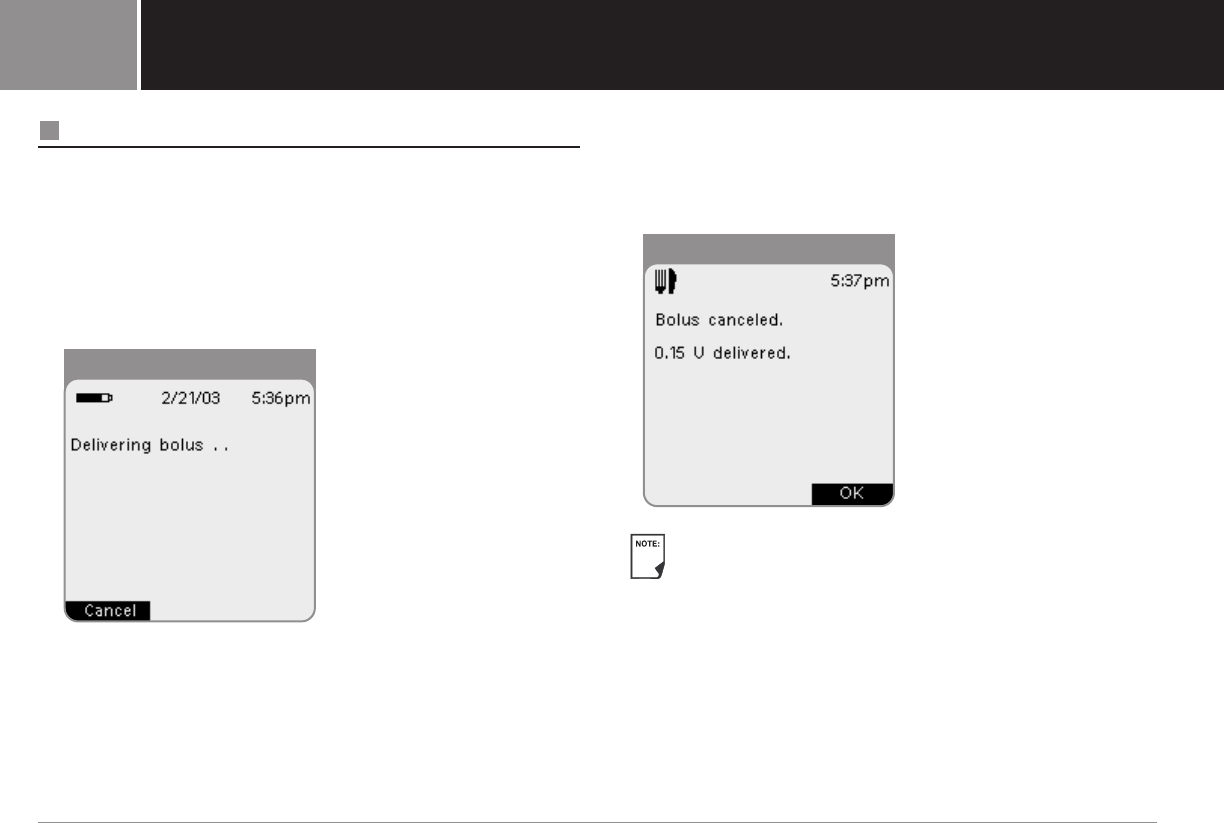
4. Within 3 seconds of hearing the final beep, press Start to
confirm the dose (Figure 4-7).
If you do not press Start within 3 seconds, the remote
automatically cancels the iBolus and returns to the Main
menu.
5. After you confirm the dose, the pump beeps once to signal
that bolus delivery has begun.
iXL™ Diabetes Management System User Guide: Bolus Doses 31
4
Figure 4-6
Figure 4-7
iBolus button
Cancel Active Boluses
The iXL System is extremely flexible and can respond almost
immediately to your changing insulin needs. It is easy to cancel
an active bolus (one that is currently being delivered), even
after insulin delivery has started.
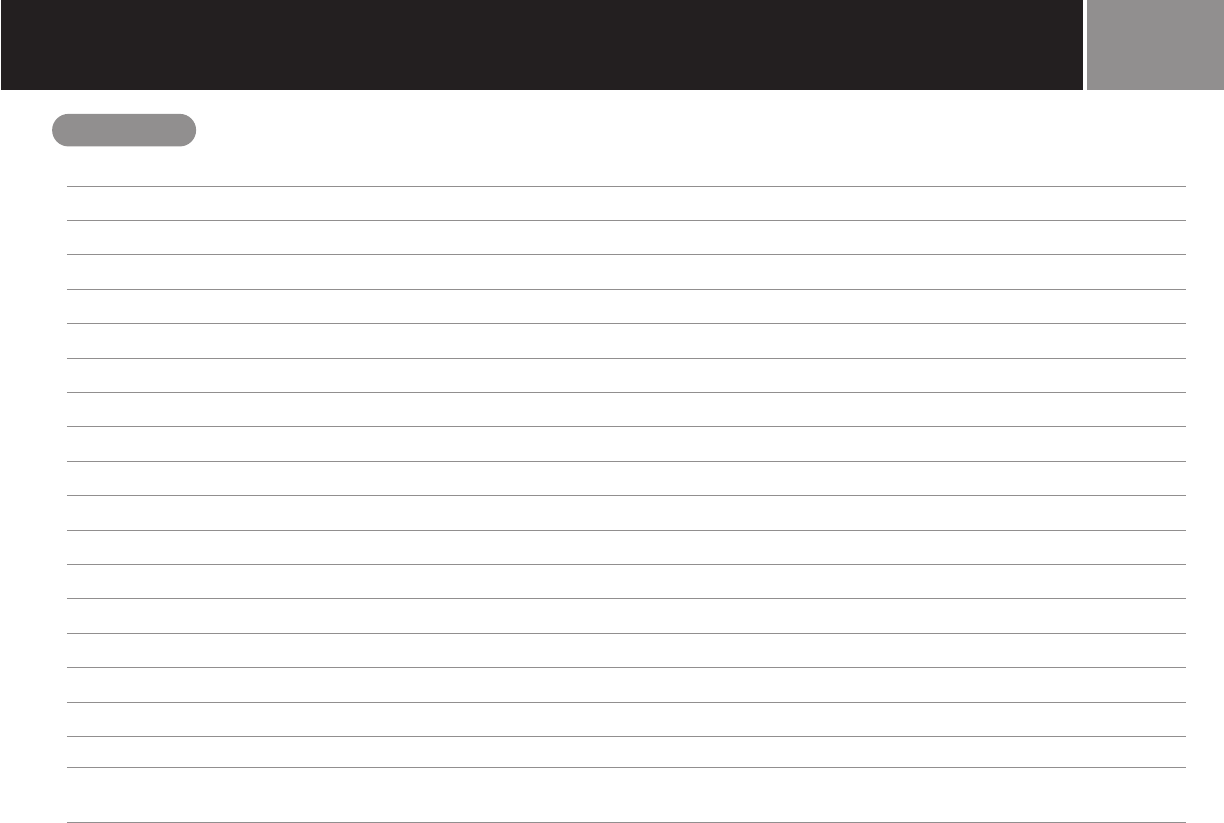
1. Press the Power button to turn on the remote, if it is not
already on. An on-screen message appears as long as a
bolus is being delivered (Figure 4-8).
2. Press the soft key labeled Cancel.
The pump beeps to confirm the bolus is canceled. An
on-screen message tells you how much insulin was
delivered before you canceled the bolus (Figure 4-9).
If the bolus has already been completed, the “Delivering
bolus” message and the Cancel soft key label do not
appear.
3. Press OK to return to the Status screen.
32 iXL™ Diabetes Management System User Guide: Bolus Doses
Bolus Doses4
Figure 4-8
Figure 4-9
Bolus Doses
My Notes:
My Notes:
iXL™ Diabetes Management System User Guide: Bolus Doses 33
4
My Notes:
34 iXL™ Diabetes Management System User Guide: Bolus Doses
Bolus Doses4
The iXL™ Pump
The Pump Change Process
You should replace the pump at least once every 48-72 hours, or
as instructed by your healthcare provider. (You can also choose
to have the remote alert you when you need to replace the
pump (see Chapter 6, iXL Remote Controller Features and
Chapter 9, Hazard and Advisory Alarms).
WARNINGS!
•Do NOT attach or use a pump if its sterile packaging is
open or damaged, as this may increase the risk of infection.
Pumps are sterile unless packaging has been opened or
damaged.
•Do NOT attach or use a pump if it is damaged in any way.
A damaged pump may not work properly.
•Do NOT attach a pump without first using aseptic technique
to clean the infusion site.
•Do NOT use the iXL Pump if you are sensitive to or have
allergies to acrylic adhesives or have fragile or easily
damaged skin.
•Check often to make sure the pump and soft cannula are
securely attached and in place. A loose or dislodged cannula
may interrupt insulin delivery.
IMPORTANT!
Because insulin pumps use rapid-acting insulin, pump users
are at increased risk for developing hyperglycemia (high blood
glucose) if insulin delivery is interrupted. If it is untreated, severe
hyperglycemia can quickly lead to diabetic ketoacidosis (DKA),
which can cause coma, shock, breathing difficulties, or death.
If insulin delivery is interrupted for any reason, you may need to
replace the missing insulin–usually with an injection of
rapid-acting insulin. Ask your healthcare provider for instructions
on handling interrupted insulin delivery.
Gather the following equipment and supplies:
•Vial of rapid-acting U-100 insulin
Use ONLY rapid-acting U-100 insulin with iXL Pumps.
NEVER use insulin that is cloudy; it may be old or
inactive. Failure to use rapid-acting U-100 insulin, or using
insulin that is old or inactive may lead to hyperglycemia
or diabetic ketoacidosis (DKA).
•An unopened iXL Pump (including filling syringe and needle
provided with each pump)
•Alcohol prep swab
If you are a first-time iXL System user, your healthcare
provider will guide you through the steps for system
setup, including steps for initializing and attaching your
first pump. Do NOT attempt to attach or use an iXL Pump
until you have been trained by your healthcare provider.
iXL™ Diabetes Management System User Guide: The iXL™ Pump 35
5
Deactivate current pump
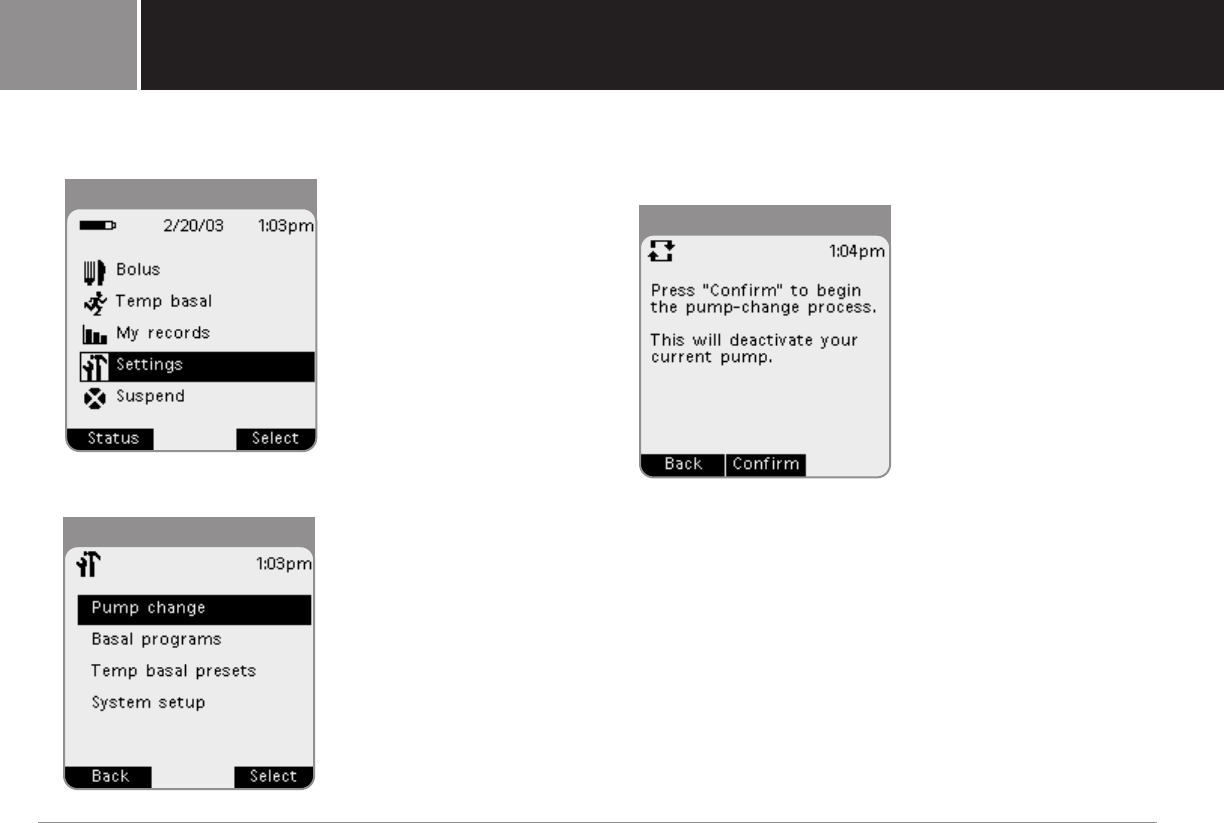
1. In the Main menu of the remote, select Settings (Figure 5-1).
2. In the Settings menu, select Pump change (Figure 5-2).
3. In the Confirm Pump change screen, press Confirm
(Figure 5-3).
36 iXL™ Diabetes Management System User Guide: The iXL™ Pump
The iXL™ Pump5
Figure 5-1
Figure 5-2
Figure 5-3
The iXL™ Pump
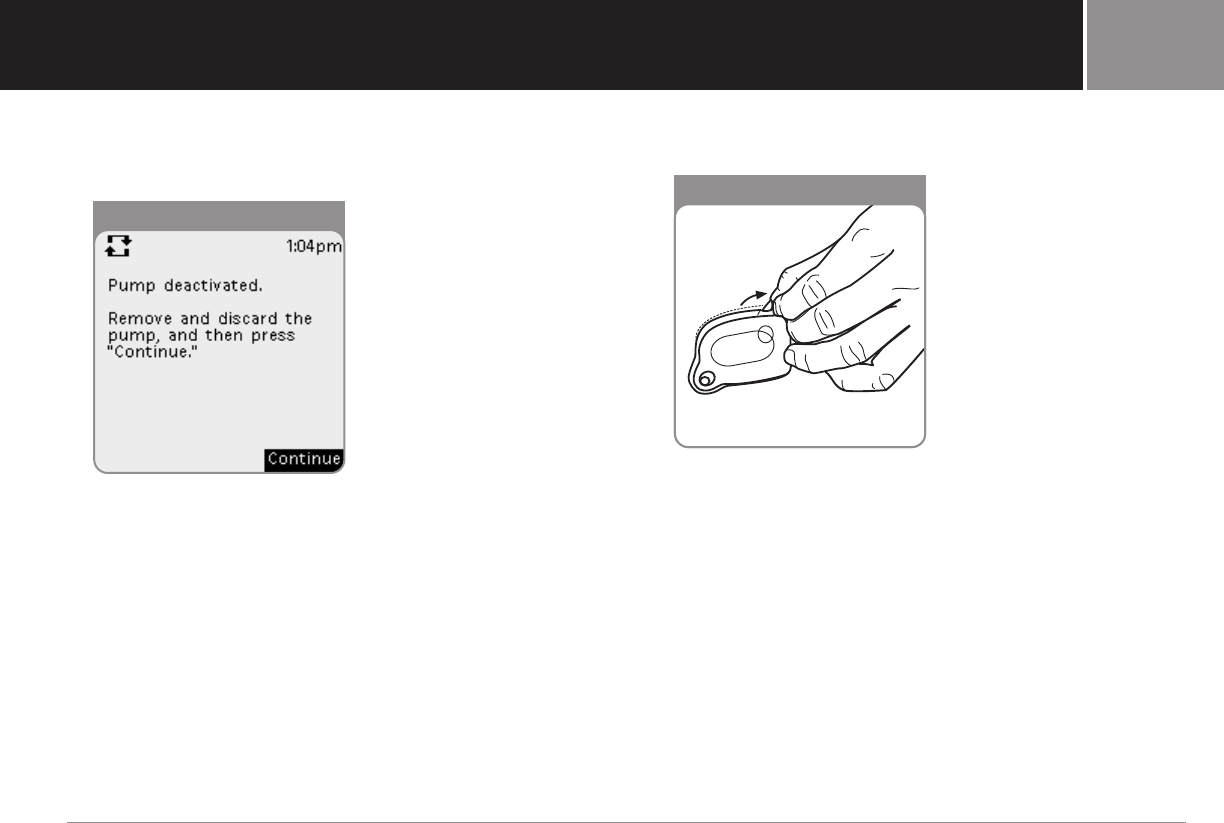
4. At the message, “Pump deactivated. Remove and discard
the pump, and then press Continue” (Figure 5-4), remove the
old pump.
(a)Lift the edges of the adhesive tape from your skin and
remove the entire pump (Figure 5-5).
(b)Use soap and water to remove any adhesive that remains
on the skin or, if necessary, use an adhesive remover.
(c)Discard used pump according to local waste disposal
regulations.
5. After removing the old pump, press Continue.
iXL™ Diabetes Management System User Guide: The iXL™ Pump 37
5
Figure 5-4
Figure 5-5
Activate a new pump
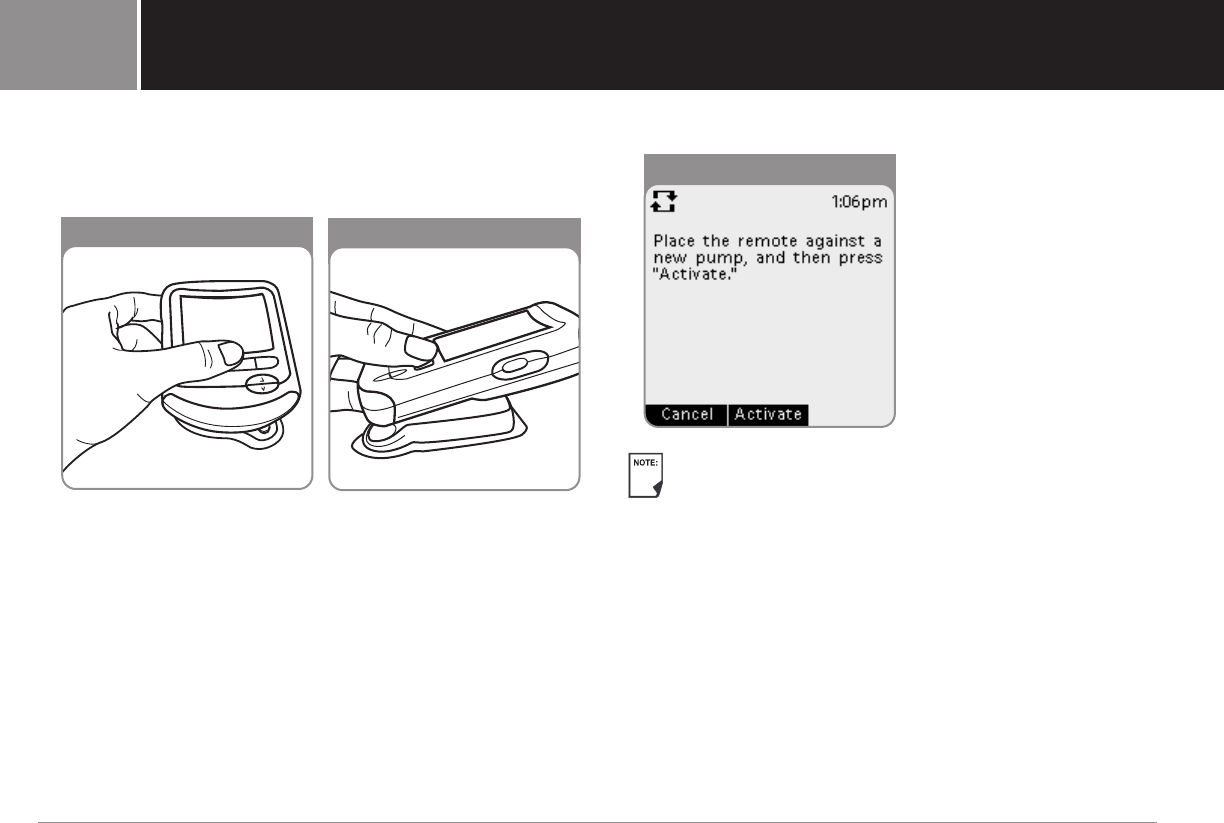
1. Remove the new pump from its sterile package.
2. Place the remote against the new pump (Figures 5-6A/5-6B).
3. Press Activate (Figure 5-7).
After you press Activate, the pump beeps, indicating that the
remote has successfully activated the pump. The iXL System
safety features ensure that the remote works only with the
newly activated pump.
38 iXL™ Diabetes Management System User Guide: The iXL™ Pump
The iXL™ Pump5
Figure 5-6A
Figure 5-7
Figure 5-6B
The iXL™ Pump
Fill the new pump
1. Use an alcohol prep swab to clean the top of the insulin vial;
discard the prep swab.
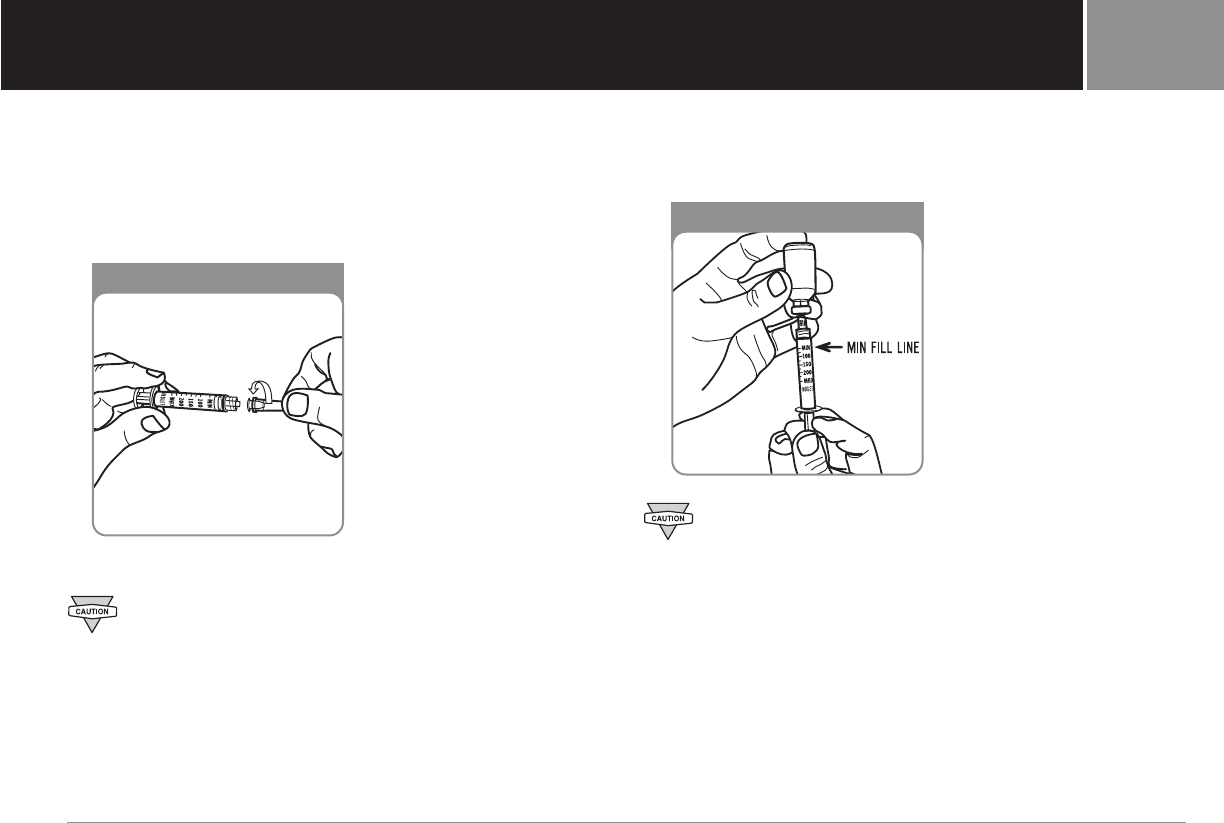
2. Lock the filling needle onto the syringe by turning it
clockwise (Figure 5-8).
3. Remove protective cap from needle.
Use care after removing the needle cap and exposing
the fill needle.
4. Draw air into syringe equal to the amount of insulin being
withdrawn.
5. Insert needle into vial and inject the air. This makes it easier
to draw the insulin out of the vial.
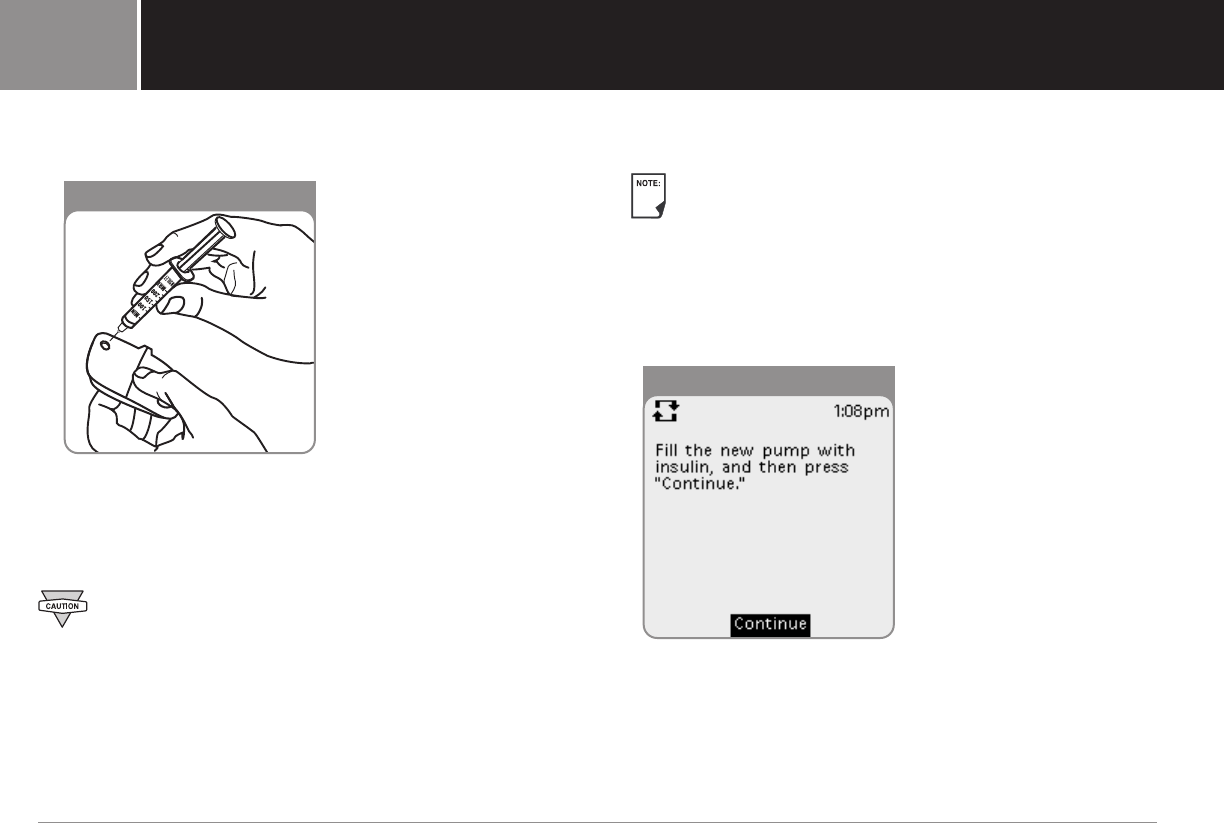
6. Withdraw insulin from vial, expelling any air bubbles. Fill
syringe with enough insulin for 72 hours, or at least to the
MIN (minimum) fill line (Figure 5-9).
Avoid using insulin from more than one vial, which may
introduce air into the syringe.
iXL™ Diabetes Management System User Guide: The iXL™ Pump 39
5
Figure 5-8
Figure 5-9
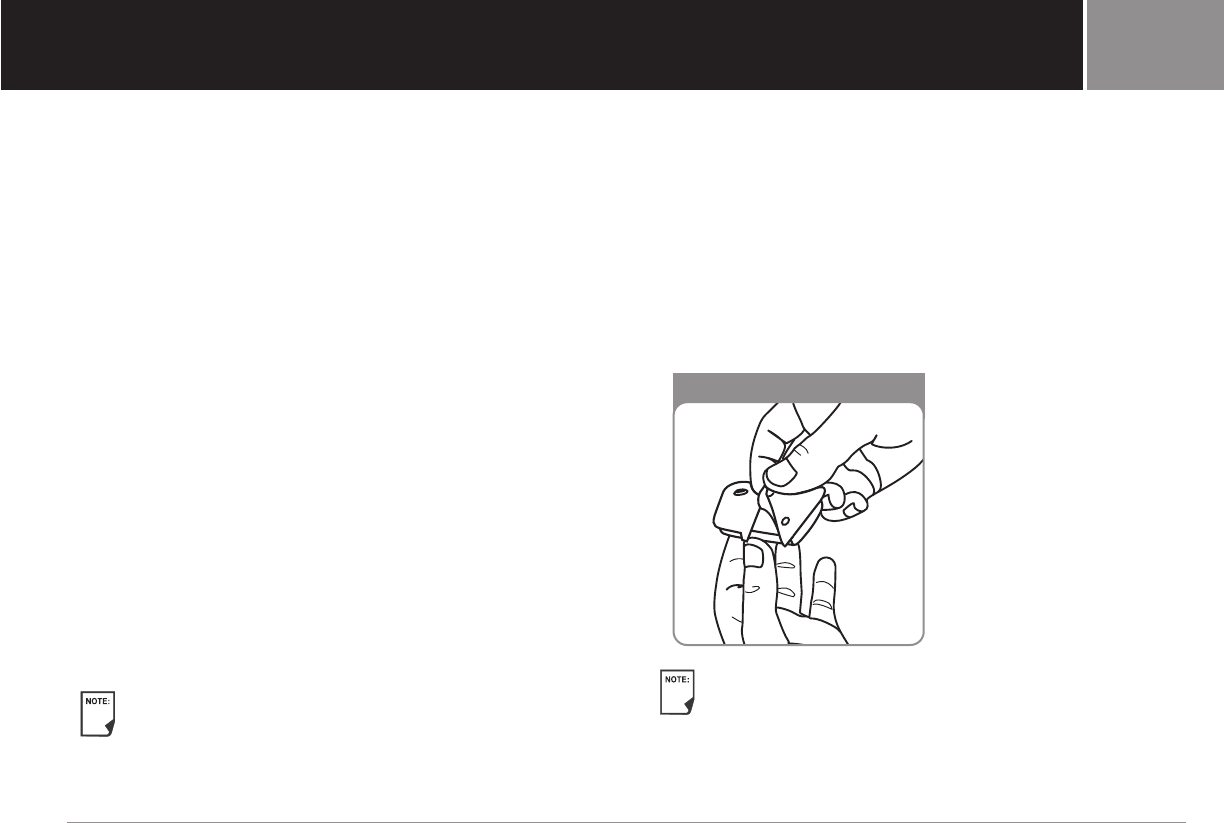
7. Remove needle from vial and insert into the insulin fill port on
the underside of the pump body (Figure 5-10).
8. Depress syringe plunger to completely empty syringe into the
pump.
9. Remove needle from insulin fill port. Port is self-sealing;
insulin will not leak after needle is removed.
Do NOT insert the fill syringe into the fill port more than
once.
10.Place protective cap on needle and remove needle from
syringe.
11.Place capped needle in sharps container. Dispose of used
needles according to local waste disposal regulations.
The fill syringe is intended for single use only and should
be used only with iXL Pumps.
12.After you fill the pump, press Continue (Figure 5-11). The
pump’s RediSet system performs a series of safety checks
and automatically primes the pump. Once complete, the
remote beeps, letting you know that the priming and safety
checks were successful.
40 iXL™ Diabetes Management System User Guide: The iXL™ Pump
The iXL™ Pump5
Figure 5-10
Figure 5-11
The iXL™ Pump
Select the infusion site
Before attaching a new pump, you must first select an
appropriate infusion site. Due to ease of access, viewing, and
reliable insulin absorption, the abdomen is often preferred. Your
healthcare provider may suggest other potential sites, including
the hip or upper thigh.
•Avoid sites where belts, waistbands, or tight clothing may
rub against, disturb, or dislodge the pump.
•Rotate infusion sites with each pump change. A new infusion
site should be at least 1“ away from the last site. (Using the
same location can lead to scarring, which reduces insulin
absorption.)
•Do NOT attach the pump within 2“ of your navel or over a
mole or scar, where insulin absorption may be reduced.
Prepare the infusion site
You can reduce the risk of infusion site infection by following
aseptic technique and disinfecting the infusion site. Before
attaching a new pump, always:
1. Wash hands with soap and water.
2. Use soap to wash the infusion site.
Antibacterial soap may irritate skin, especially at the
infusion site. Consult with your healthcare provider on
guidelines for treating any skin irritation.
3. Dry the site with a clean towel.
4. Use an alcohol prep swab to disinfect the infusion site. Start
at the center of the site and move outward in a circular motion.
5. Let the site air-dry thoroughly. Do NOT blow on the site to dry it.
Attach the new pump
1. Prepare the pump for attaching to your infusion site. Using
the pull tabs, remove and discard the white paper backing
from the adhesive tape (Figure 5-12). The protective needle
cap will come off in this process.
When the needle cap comes off, a few drops of insulin
may escape from the needle.
iXL™ Diabetes Management System User Guide: The iXL™ Pump 41
5
Figure 5-12
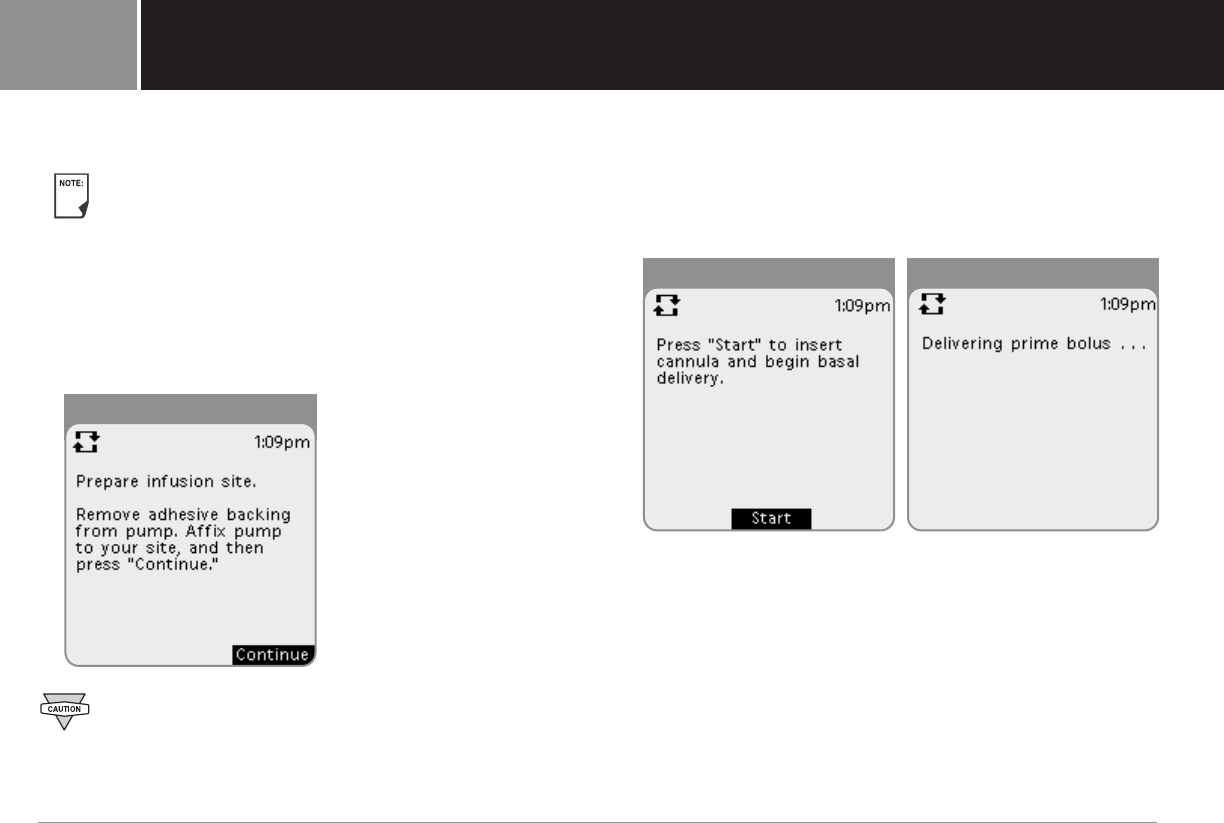
Figure 5-14 Figure 5-15
2. Attach pump to the prepared infusion site; press firmly to
secure it to your skin.
Under normal conditions, the iXL Pump’s adhesive keeps
it securely in place for up to 3 days. A variety of products
are available to help secure the pump to the skin. Ask
your healthcare provider about these products. Avoid
getting body lotion, creams, or oils near the infusion site;
these products may loosen the adhesive.
3. After you securely attach the pump, press Continue
(Figure 5-13).
The adhesive is designed for one-time use.
Once removed, a pump cannot be reattached.
Insert cannula and begin insulin delivery
1. To insert the soft cannula, press Start (Figure 5-14).
The pump’s RediSet system automatically inserts the soft
cannula and delivers a prime bolus to fill the cannula with
insulin (Figure 5-15).
42 iXL™ Diabetes Management System User Guide: The iXL™ Pump
The iXL™ Pump5
Figure 5-13
The iXL™ Pump
The remote will alert every 5 minutes until the pump
change process is complete. You must complete the
pump change process within one hour.
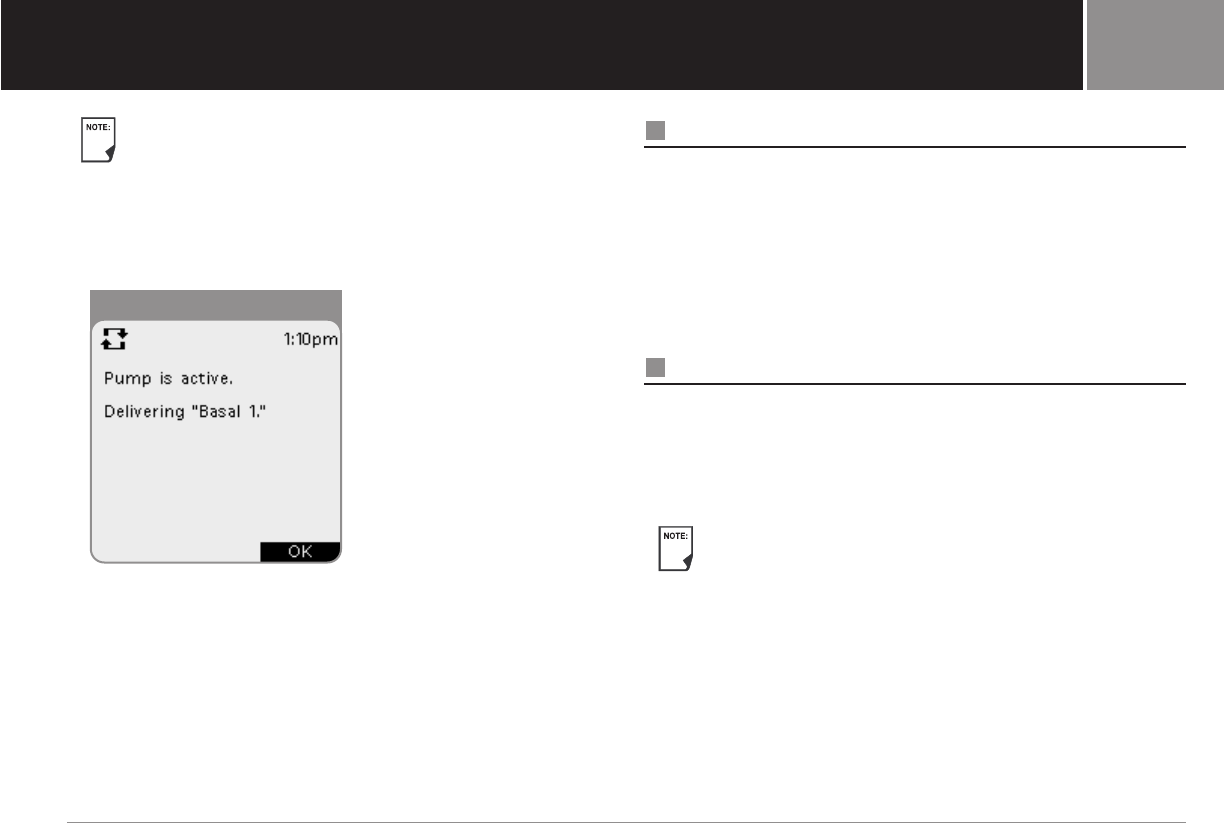
Once the soft cannula is inserted and the prime bolus has filled
the cannula, the pump will beep, indicating that it is active and
delivering insulin at the programmed basal rate (Figure 5-16).
2. Press OK to return to the Status screen.
Check Pump Status
To check pump status:
•From the Main menu, press Status. The remote automatically
checks the status of the pump. The remote then displays the
current reservoir volume, basal and bolus rates, and any
alarm conditions. (See Chapter 6, iXL Remote Controller
Features, for details of what you see on the Status screen.)
Suspend Insulin Delivery
Sometimes you may need to briefly stop insulin delivery (for
example, during exercise). The iXL System lets you suspend
insulin delivery for up to 2 hours. While in suspension, the pump
beeps once every 15 minutes, reminding you of the pump’s
suspend status.
At any time during a suspension period, press Resume
to resume the basal program that was running when you
suspended insulin delivery.
iXL™ Diabetes Management System User Guide: The iXL™ Pump 43
5
Figure 5-16
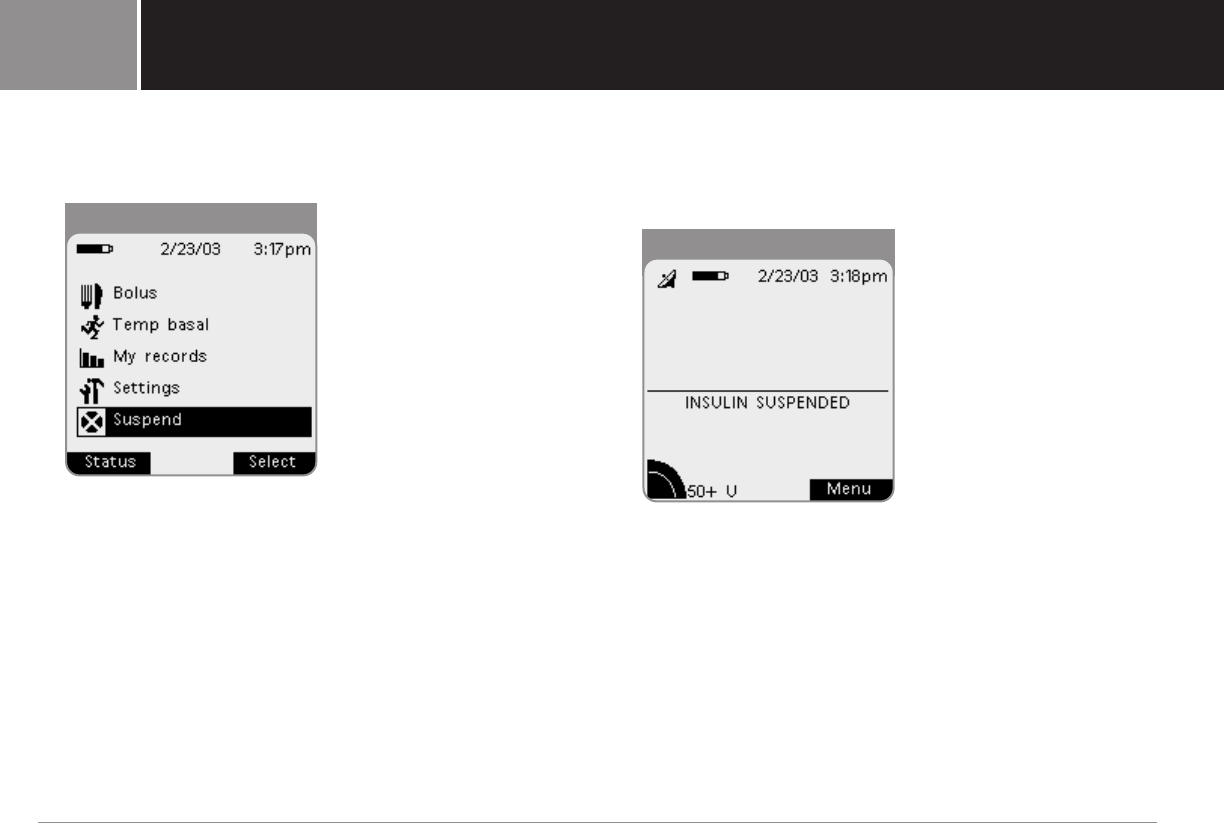
Figure 5-18
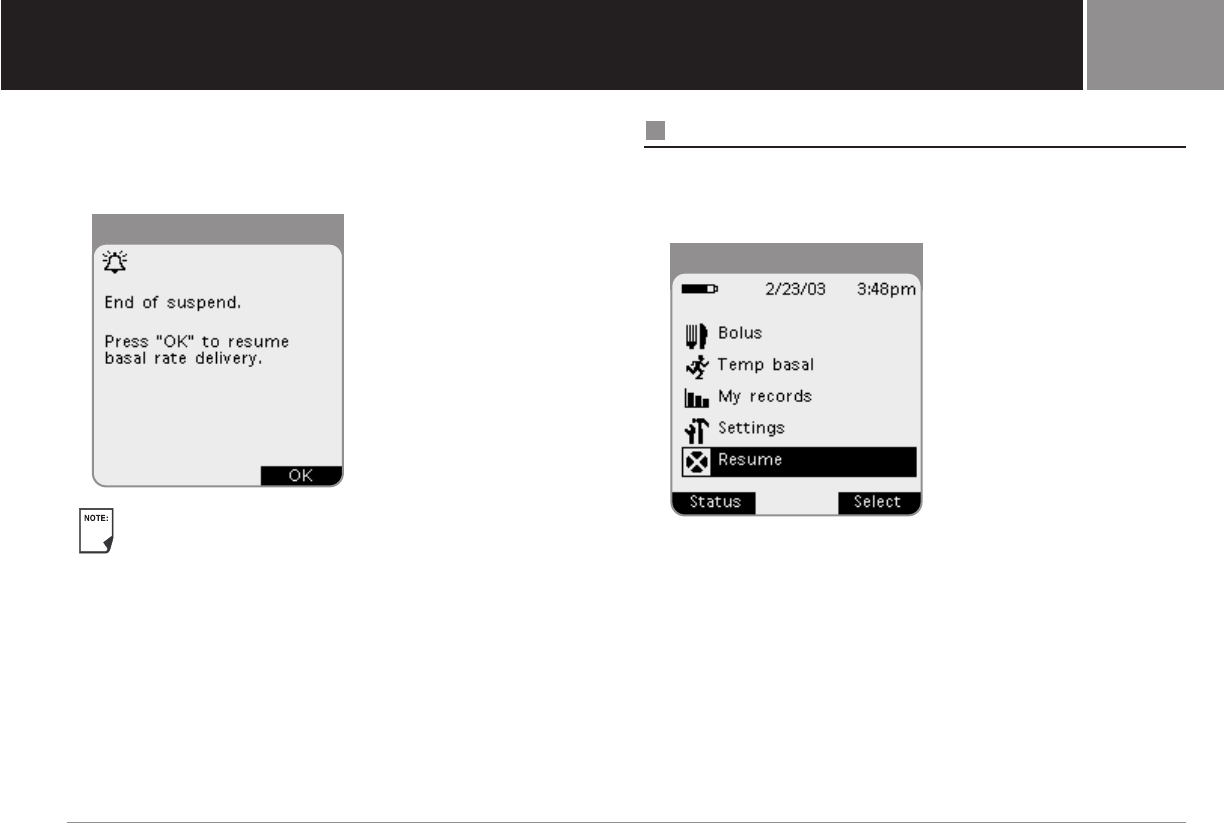
1. In the Main menu, use the Up/Down Controller button to
choose Suspend (Figure 5-17); then press the soft key
labeled Select.
If a temporary or extended bolus is in process, the menu item
will be Suspend/cancel instead, and cancel options for these
programs will also appear in the menu.
2. Choose Suspend insulin delivery.
3. Enter how long you want to stop all insulin delivery, from
30 minutes to 2 hours in 30-minute increments.
4. Press Enter.
5. Press Suspend to confirm that you want to halt all insulin
delivery (basal and bolus). The pump beeps and an on-screen
message lets you know that insulin delivery is indeed
suspended (Figure 5-18).
Or press Back to enter a different time period or to cancel
the suspension.
The pump beeps every 15 minutes until the end of the suspension
period. The Status screen shows “INSULIN SUSPENDED” until
you resume insulin delivery (see Resume Insulin Delivery on the
next page).
44 iXL™ Diabetes Management System User Guide: The iXL™ Pump
The iXL™ Pump5
Figure 5-17
The iXL™ Pump
At the end of the suspend period, a pump Advisory alarm will
occur.
To resume your programmed basal rate, press OK (Figure 5-19).
The Advisory alarm will repeat every 15 minutes until you
press OK.
Resume Insulin Delivery
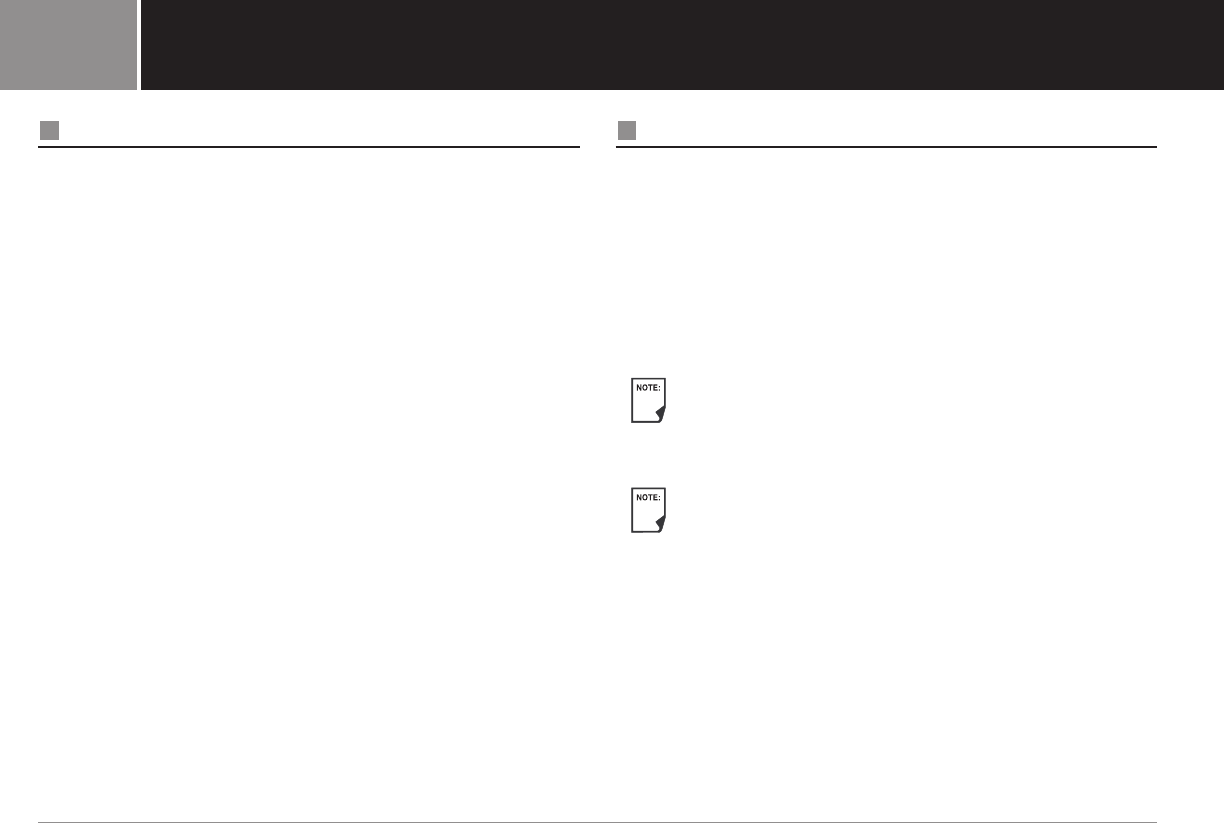
1. In the Main menu, use the Up/Down Controller button to
choose Resume (Figure 5-20); then press the soft key
labeled Select.
2. Press Resume to restart the basal program that was
previously running. Or press Back if you want to continue
the suspension.
iXL™ Diabetes Management System User Guide: The iXL™ Pump 45
5
Figure 5-19
Figure 5-20
Avoid Infusion Site Infections
•Always wash your hands and use aseptic technique to
prepare the infusion site before attaching a pump.
•Do not apply a pump to any area of skin with an active
infection. If you are unsure whether to use a specific site,
consult your healthcare provider.
•At least once a day, use the pump’s infusion site viewing
window to check the site for signs of infection and to confirm
that the soft cannula is securely in place.
•Be aware of the signs of infection, including pain, swelling,
redness, discharge, or heat at the site. If you suspect an
infection, immediately remove the pump and attach a new
one in a different location. Then contact your healthcare
provider.
•Change the pump at least once every 48-72 hours, or as
instructed by your healthcare provider.
Get the Most From Your Pump
Avoid extreme temperatures
Do NOT expose the iXL Pump to extreme operating temperatures.
Exposing pumps to temperatures below 41°F (5°C) or above
104°F (40°C) can cause pump malfunction. Do NOT expose your
pump to direct sunlight for extended durations. It is recommended
that you remove your pump prior to using hot tubs, whirlpools,
or saunas. These conditions would expose the pump to extreme
temperatures and may also affect the insulin inside the pump.
Remember to check your blood glucose levels frequently
before and after removing the pump. Check with your
healthcare provider for guidelines on removing the pump
for extended periods.
Insulin degrades at high temperatures and will freeze
near 32°F (0°C). Check the insulin manufacturer’s
instructions for use.
46 iXL™ Diabetes Management System User Guide: The iXL™ Pump
The iXL™ Pump5
The iXL™ Pump
Water and your pump
The iXL Pump is watertight to a depth of 8 feet for up to 30
minutes (IPX8). After exposure to water, rinse off the pump with
clean water and dry it with a towel.
Do NOT expose your iXL Pump to water at depths greater
than 8 feet or for durations exceeding 30 minutes.
Check often to make sure the pump and soft cannula are
securely attached and in place.
The iXL Remote Controller is not waterproof. Do NOT
place it in or near water.
Safe Storage
Store unopened iXL Pumps in a cool, dry place. Extreme heat
or cold can damage pumps and cause them to malfunction.
If pumps are exposed to extreme temperatures, inspect them
carefully before use. Do NOT attach or use pump if its sterile
packaging is opened or damaged. Pumps are sterile unless
packaging is opened or damaged.
iXL™ Diabetes Management System User Guide: The iXL™ Pump 47
5
My Notes:
48 iXL™ Diabetes Management System User Guide: The iXL™ Pump
The iXL™ Pump5
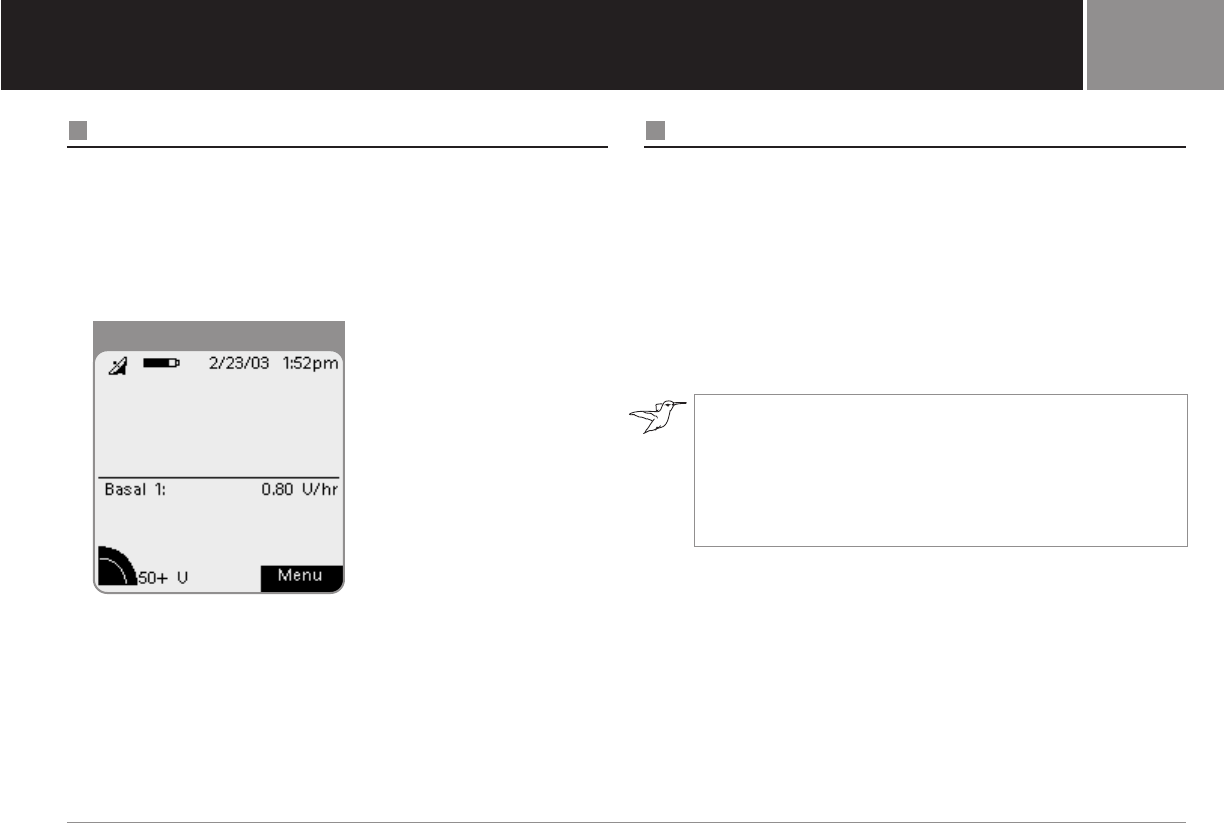
iXL™ Remote Controller Features
The Status Screen
The top of the iXL Remote Controller Status screen (Figure 6-1)
displays the “communicating” icon, an icon showing how full
the battery is, and the current date and time. The center of the
screen provides information on current insulin delivery (or
suspension). The bottom of the screen shows an insulin gauge
and the soft key for the Main menu.
Insulin Gauge and Display
One of the important icons on the Status screen is the insulin
gauge in the lower lefthand corner. It indicates how much insulin
is left in the pump’s reservoir. As the reservoir empties, the icon
changes to indicate the amount of insulin remaining.
Next to the insulin gauge, the remote displays the number of units
remaining in the pump. As long as more than 50 units remain,
the gauge displays “50+ U.” Once the reservoir volume drops to
50 units, the gauge counts down unit by unit. When the volume
falls below 5 units, the display changes to “Low Reservoir.”
Regularly checking the insulin gauge enables you to plan
pump changes easily. For example, if you know you will
need approximately 20 units during your work day and
the insulin gauge shows only 17 units remaining, you can
either take a new pump with you or change it before you
leave for the day.
iXL™ Diabetes Management System User Guide: iXL™ Remote Controller Features 49
6
Figure 6-1
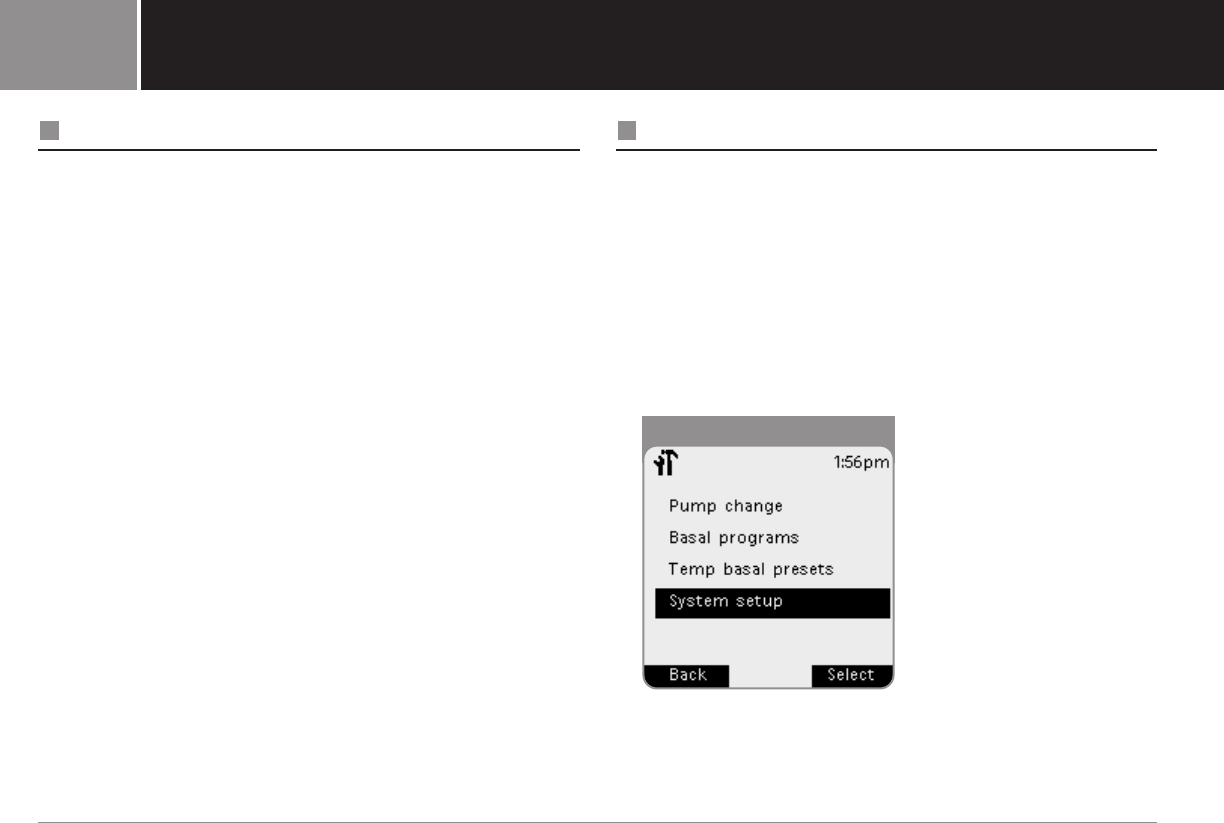
System Setup Menu
The System setup menu lets you personalize the settings that
control the iXL System. These include:
•Date and time
•Bolus doses and basal rates
•Alerts and reminders
•Remote options: remote lock, screen time-out, and backlight
time-out
•Diagnostics: check alarms and reset remote
You and your healthcare provider entered initial system settings
using the Setup Wizard (see Chapter 2, Getting Started). After
setup, however, you can use the System setup menu to customize
or change those settings, as described in this chapter.
Reset the Date or Time
Occasionally, you need to change date and time settings
(for example, to adjust for daylight savings time or after resetting
the remote). As a safety feature, you can change date and time
settings only when the pump is deactivated or when insulin
delivery is suspended (see Chapter 5, The iXL Pump).
1. Either suspend insulin delivery or deactivate the pump.
2. In the Main menu, use the Up/Down Controller button to
choose Settings; then press the soft key labeled Select.
3. Choose System setup, then press Select (Figure 6-2).
4. Choose Date/time, then press Select.
5. Choose either Time or Date, then press Edit.
6. Follow the steps below, then press Done.
50 iXL™ Diabetes Management System User Guide: IXL™ Remote Controller Features
iXL™ Remote Controller Features6
Figure 6-2
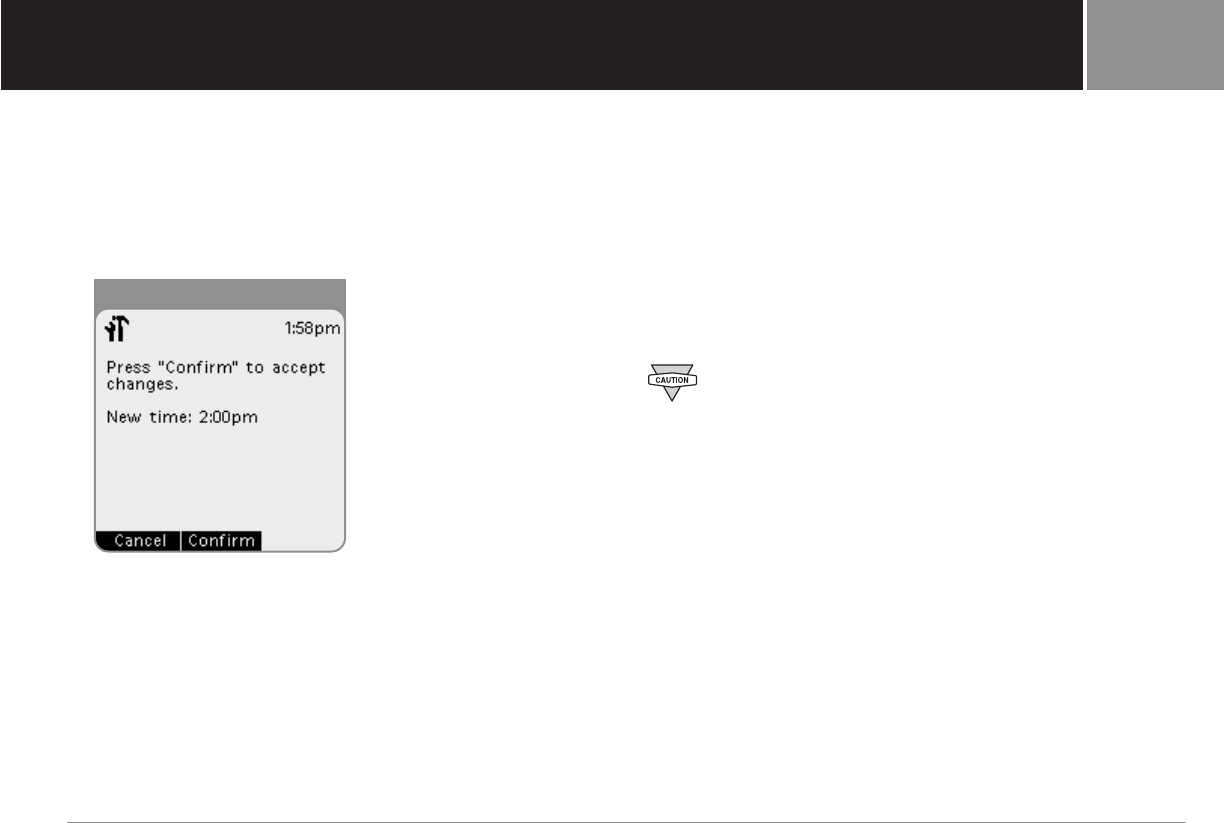
iXL™ Remote Controller Features
Reset the time
1. Enter the current time.
2. Choose either a 12-hour or 24-hour clock, then press Enter.
3. Press Confirm to accept the new time (Figure 6-3).
Or press Cancel to back out of this process.
Reset the date
1. Enter the current year, then press Enter.
2. Choose the current month, then press Enter.
3. Enter the current day, then press Enter.
4. Choose the date format to be displayed by the remote, then
press Select.
5. Press Confirm to accept the new date and format.
Or press Cancel to back out of this process.
Remember to resume insulin delivery or activate a new
pump after changing the date or time.
iXL™ Diabetes Management System User Guide: IXL™ Remote Controller Features 51
6
Figure 6-3
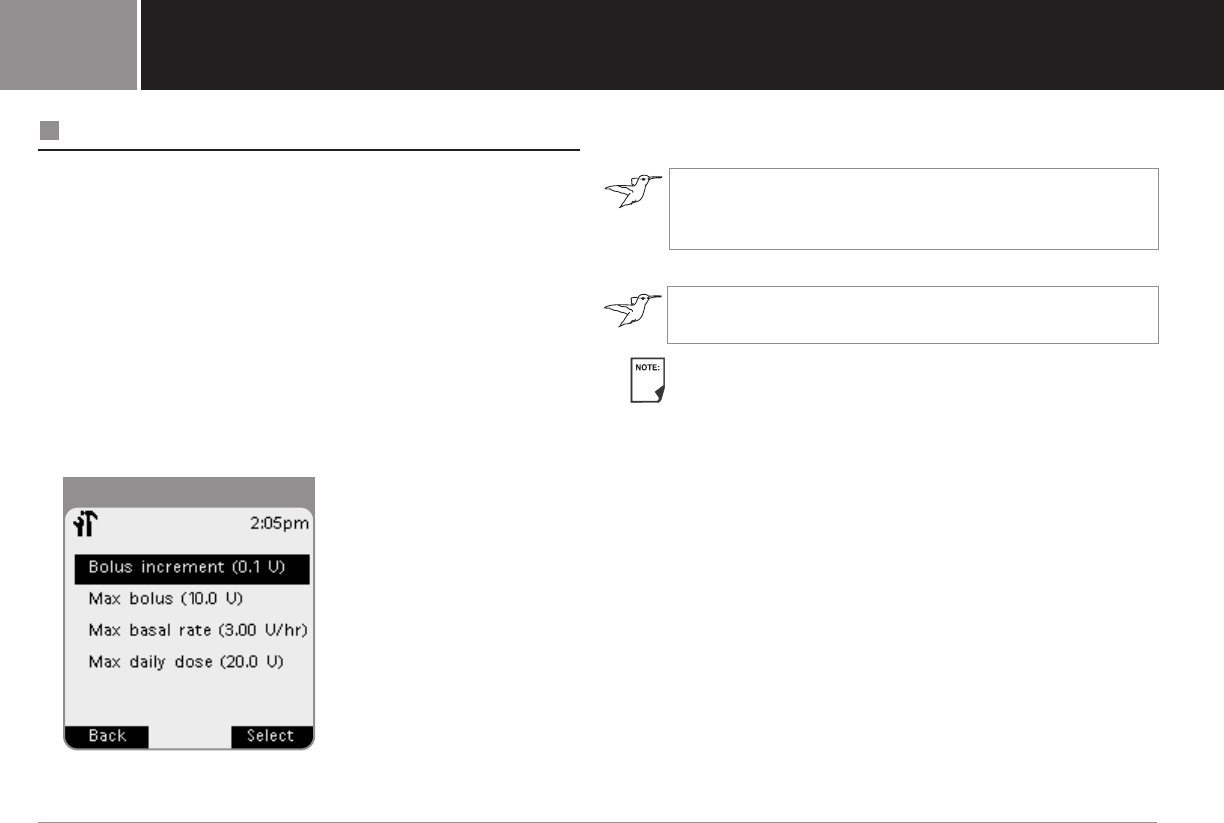
Change Bolus and Basal Settings
You can reset the bolus increment, the maximum bolus dose, the
maximum basal rate, and the maximum daily dose.
1. In the Main menu, use the Up/Down Controller button to
choose Settings; then press the soft key labeled Select.
2. Choose System setup, then press Select.
3. Choose Bolus/basal setup, then press Select.
4. Choose one of the following (Figure 6-4) and then press Select:
• Bolus increment
• Max bolus
• Max basal rate
• Max daily dose
5. Use the Up/Down Controller button to enter a value, then
press Select.
Some settings have preset defaults, but all settings
are changeable. See the Appendices for a list of system
specifications, including preset default settings.
6. Repeat steps 4 and 5 for each setting you want to change.
For details on basal rate and bolus dose settings, see
Chapter 3, Basal Rates, and Chapter 4, Bolus Doses.
If the remote’s clock becomes corrupted and the clock
is reset, then the max daily dose checks will only apply
moving forward. If a clock reset is required due to a
Remote error, the max daily dose will be reset and the
max daily dose checks will only apply to insulin deliveries
moving forward from this point in time (see Chapter 9,
Hazard and Advisory Alarms).
52 iXL™ Diabetes Management System User Guide: IXL™ Remote Controller Features
iXL™ Remote Controller Features6
Figure 6-4
iXL™ Remote Controller Features
Set Alerts and Reminders
In addition to automatic safety alarms (see Chapter 9, Hazard
and Advisory Alarms), the iXL System offers a number of alerts
and reminders that you can set to help you manage your
diabetes. These features are optional. You can turn alerts and
reminders on or off at any time. They include:
BG (blood glucose) reminder: Reminds you to check your blood
glucose. Choose from Off, Audible, or Vibrate. The default setting
is Off. When the reminder is on, the remote reminds you each
time you enter a bolus dose, and you can then choose a time
interval.
Expiration: Alerts you when a pump is nearing expiration
(72 hours). Choose an alert period from 3 to 18 hours before
expiration in 1-hour increments, or choose Off. The default
setting is Off. (This optional alert is in addition to two advisory
alarms, at 2 and 1 hours before expiration, and a hazard alarm
at actual expiration time, as described in Chapter 9, Hazard
and Advisory Alarms.)
Low reservoir: Alerts you when insulin in the pump reaches a
certain level, so you can plan ahead to change the pump.
Choose a level from 10 to 50 units, in 5-unit increments. The
default setting is 10 units.
Auto off: Alerts you if no buttons have been pressed within a
certain time period. This alert can be especially reassuring for
users who are prone to hypoglycemia unawareness. Choose a
time period from 1 to 24 hours, in 1-hour increments, or choose
Off. Choose from an audio-only or an audio-plus-vibration alert.
The default setting is Off.
Reminders: Pump beeps when a program is in process (see
Chapter 3, Basal Rates, and Chapter 4, Bolus Doses, for details).
These include:
• Temporary basal in process
• Extended bolus in process
Choose On or Off. The default setting is On.
Confidence alerts: Pump beeps in response to your instructions,
so you become familiar with the operation of the iXL System and
feel confident that you are getting the insulin you need. These
alerts include:
• Bolus delivery started
• Bolus delivery completed
• Extended bolus started
• Extended bolus completed
• Temporary basal rate started
• Temporary basal completed
Choose On or Off. The default setting is On.
iXL™ Diabetes Management System User Guide: IXL™ Remote Controller Features 53
6
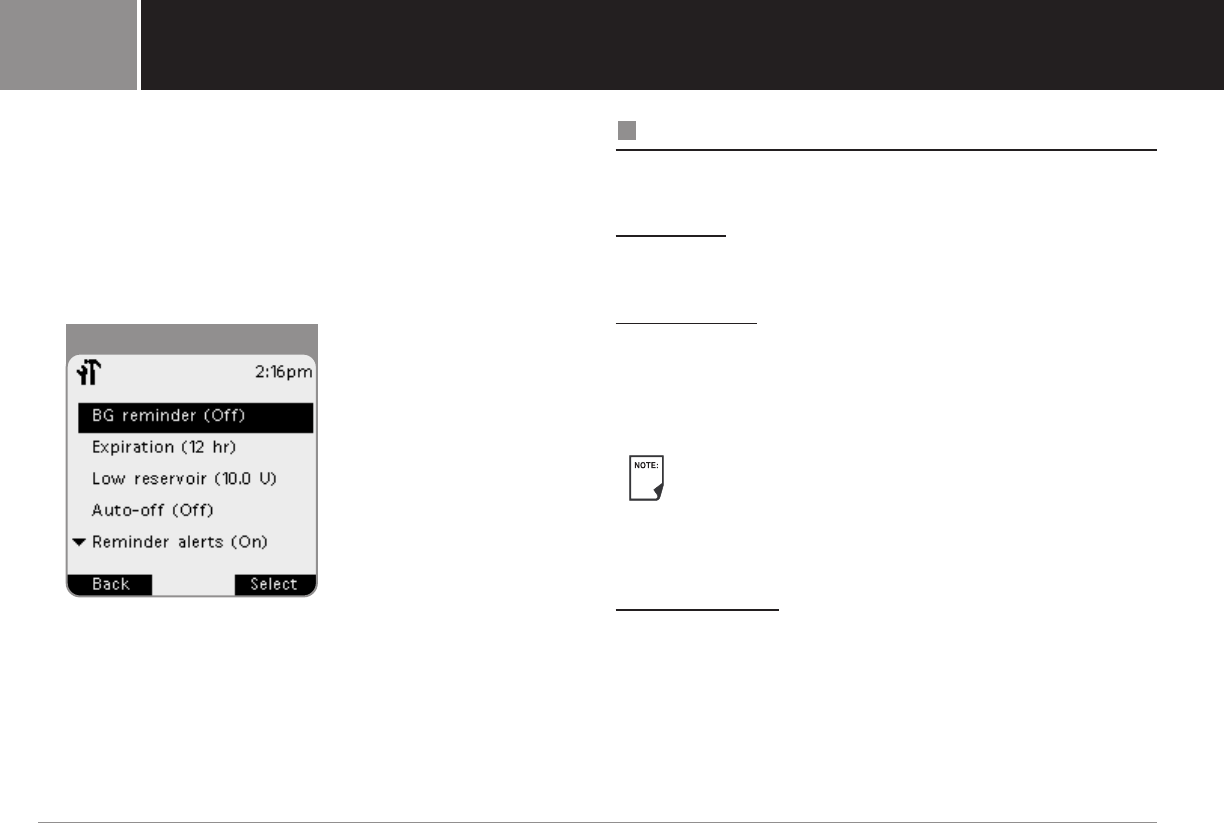
Choose alerts and reminders
1. In the Main menu, use the Up/Down Controller button to
choose Settings; then press the soft key labeled Select.
2. Choose System setup, then press Select.
3. Choose Alerts/reminders, then press Select.
4. Choose the reminder or alert you want to set (Figure 6-5),
then press Select.
5. Choose the desired option or set the desired value and press
Select or Enter.
Repeat steps 1-5 to set more alerts or reminders.
Customize the Remote
Additional options let you customize how the iXL Remote
Controller operates:
Remote lock: “Locks” the buttons on the remote. The default
setting is Off. This safety feature can help avoid accidentally
changing basal rates or giving boluses.
Screen time-out: The screen goes blank after a time interval
that you set, during which you have not pressed any buttons on
the remote. This setting preserves battery power by turning off
the screen when you are not using it. Choose an interval of 15,
30, or 60 seconds. Set it at the lowest setting (15 seconds) to
maximize battery life. The default is 30 seconds.
Press the Power button to turn the screen back on.
If it has been less then 5 minutes since the screen timed
out, pressing the Power button returns you to the same
screen you were using. If it has been longer than 5
minutes, the remote brings you to the Status screen.
Backlight time-out: The backlight allows you to see the screen
in the dark and remains on while you are using the remote. To
turn it on, hold the Power button for three seconds. This setting
turns off the backlight when you have not used it for a time
interval that you set. Choose an interval of 15, 30, or 60 seconds.
Set at the lowest setting (15 seconds) to maximize battery life.
The default is 30 seconds.
54 iXL™ Diabetes Management System User Guide: IXL™ Remote Controller Features
iXL™ Remote Controller Features6
Figure 6-5
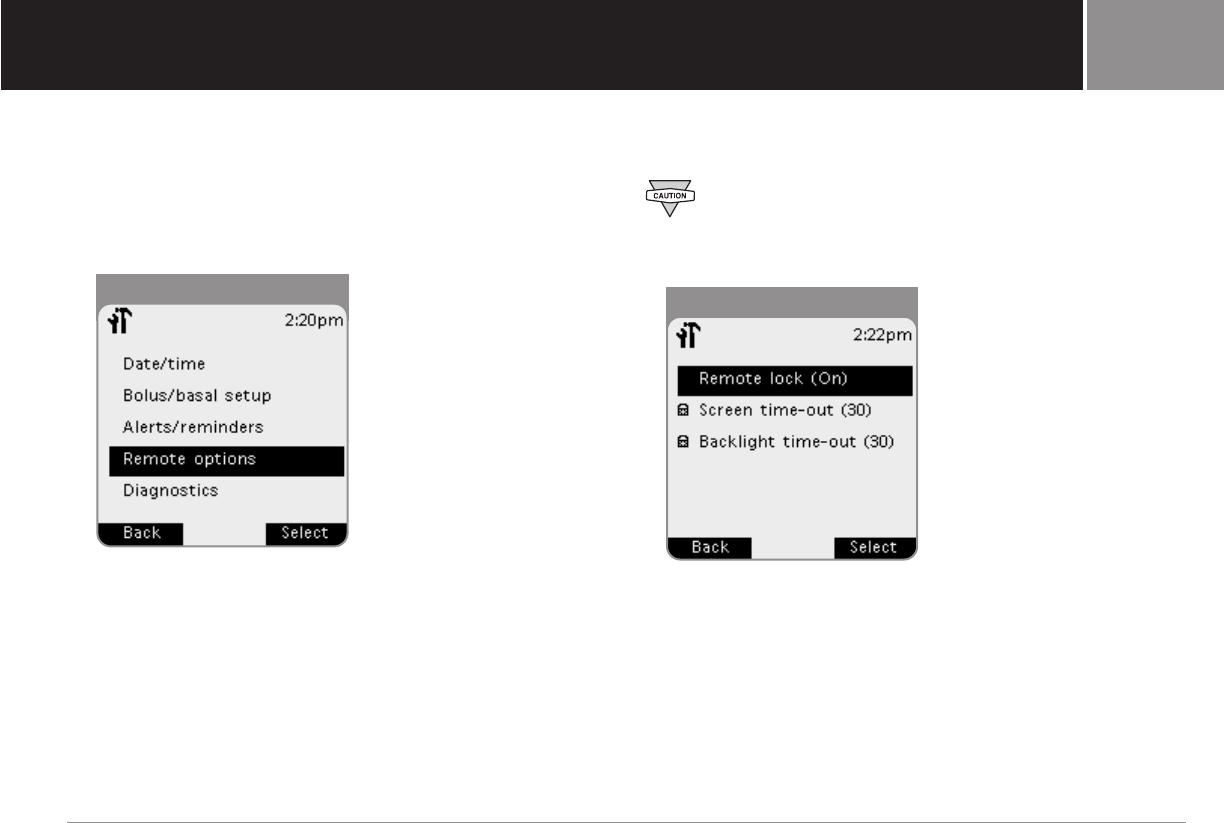
iXL™ Remote Controller Features
Set remote options
1. In the Main menu, use the Up/Down Controller button to
choose Settings; then press the soft key labeled Select.
2. Choose System setup, then press Select.
3. Choose Remote options (Figure 6-6), then press Select.
4. Choose one of the following, then press Select:
• Remote lock
• Screen time-out
• Backlight time-out
To set Remote lock:
1. Choose Off or On, then press Select.
If you choose On, other remote options and most other
soft keys are locked (Figure 6-7) and will not respond to
button presses. To use them, you must first set Remote
lock to Off.
To set time-outs:
1. Choose a time interval of 15, 30, or 60 seconds, then press
Select.
iXL™ Diabetes Management System User Guide: IXL™ Remote Controller Features 55
6
Figure 6-6 Figure 6-7
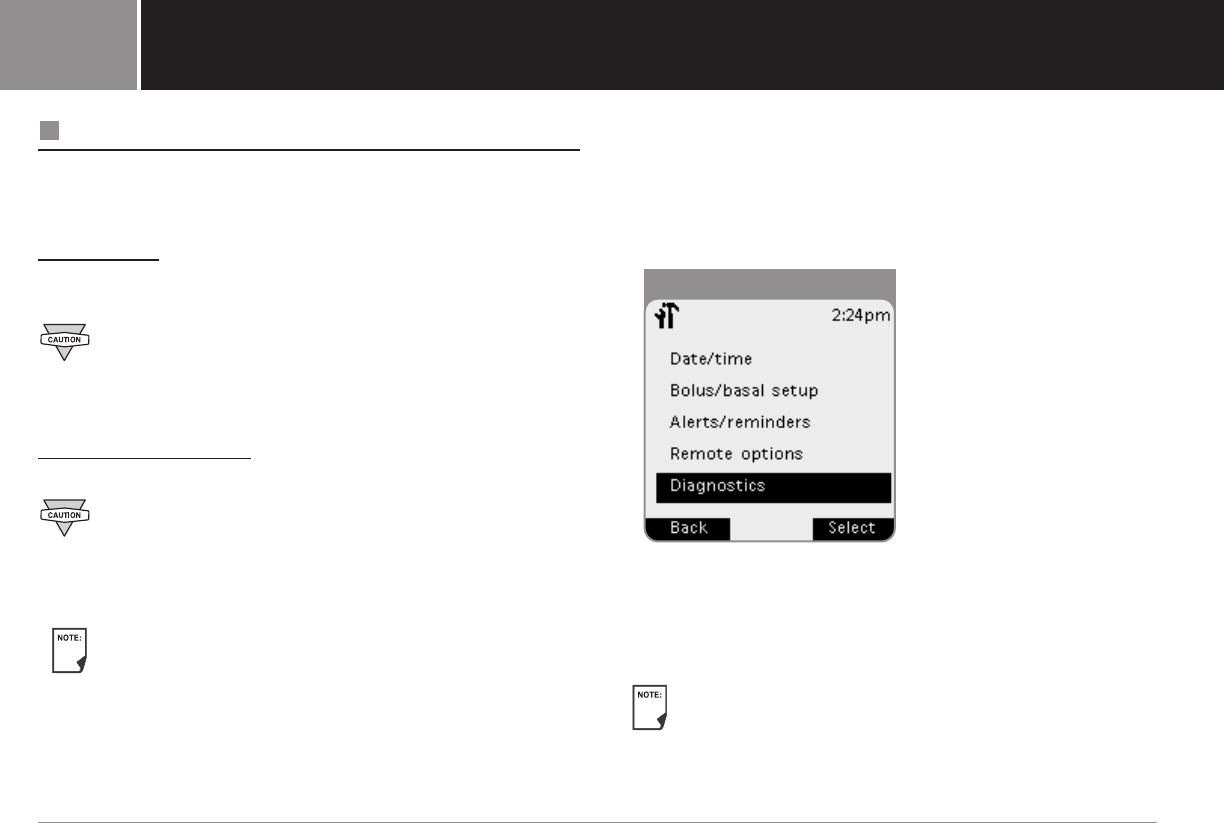
Set Diagnostic Functions
The Diagnostics screen allows you to instantly confirm how the
system is working or to completely update settings entered
during setup (see Chapter 2, Getting Started). They include:
Check alarms: Confirms that all alarms work properly when
needed. When you select this function, the remote beeps, then
vibrates, and then the pump beeps.
If the remote fails to beep and/or vibrate, call Insulet
immediately at (800) 591-3455. If a pump is active and fails
to beep, change pump immediately (see Chapter 5, The
iXL Pump).
Reset remote (soft reset): Restores all settings in the remote to
the factory defaults.
Resetting the remote deletes all history records, basal
programs, temporary basal presets, and user information
from memory. Before using this feature, be sure you have
a written record of the information you need before it is
deleted.
As a safety feature, you cannot reset the remote from the
Diagnostics screen when a pump is active. You must first
deactivate the pump.
Set diagnostic options
1. In the Main menu, use the Up/Down Controller button to
choose Settings; then press the soft key labeled Select.
2. Choose System setup, then press Select.
3. Choose Diagnostics, then press Select (Figure 6-8).
To check alarms:
1. Choose Check alarms, then press Select.
2. Press Confirm. The remote beeps three times, then vibrates.
If a pump is active, it then beeps three times.
Check the alarm function at every pump change.
56 iXL™ Diabetes Management System User Guide: IXL™ Remote Controller Features
iXL™ Remote Controller Features6
Figure 6-8
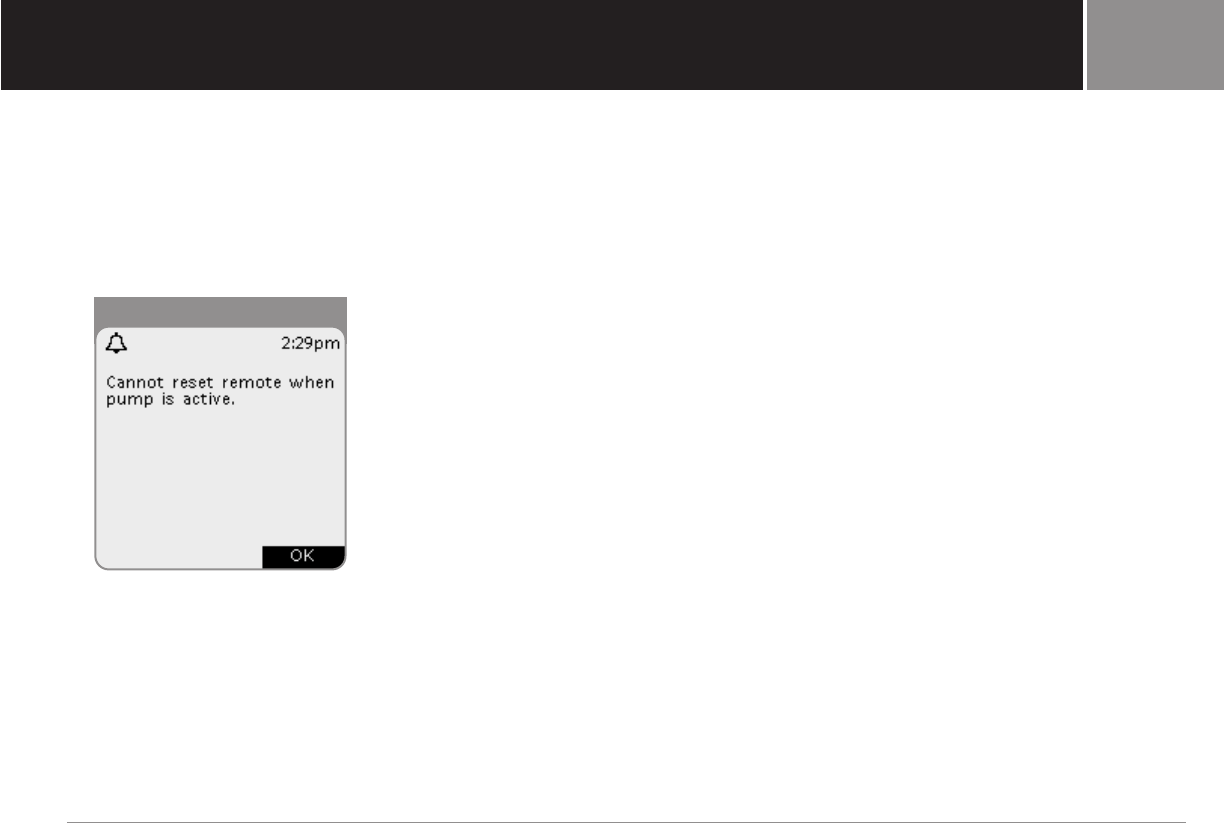
iXL™ Remote Controller Features
To reset the remote:
1. Choose Reset remote.
2. If the pump is deactivated, the screen shows what information
will be deleted. Press Confirm to reset the remote.
If the pump is still active, you will be unable to reset the remote
(Figure 6-9). Press OK to return to the diagnostics menu.
iXL™ Diabetes Management System User Guide: IXL™ Remote Controller Features 57
6
Figure 6-9
Get the Most from Your Remote
Keep it handy
Wireless communication technology means you don’t have to
keep the remote right next to the pump for the pump to work.
Once you set your basal rate, the pump continues to deliver
insulin at that rate until you decide to change it or until you
give yourself a bolus dose. Meanwhile, since the remote is
small, lightweight, and is not attached to the pump, you can
store it conveniently inside an article of clothing (like a shirt
pocket) or put it discreetly into a drawer, briefcase, or purse.
Communicating with the pump
When you enter or change programs, hold the remote within
12” (30.5cm) of the pump. If you wear the pump on your
abdomen, holding the remote in your hands when pressing the
buttons should be close enough.
Water and your remote
The remote is not waterproof. Do NOT place it in or near water.
Avoid extreme temperatures
Extreme operating temperatures can affect remote batteries
and interfere with system operation. Avoid using the remote in
temperatures below 41°F (5°C) or above 104°F (40°C).
Do NOT store or leave the remote where it may be exposed to
extreme temperatures, such as inside a car. Extreme heat
or cold can cause the device to malfunction.
Electrical interference
The remote is designed to withstand normal radio interference
and electromagnetic fields. However, as with all wireless
communication technology, certain operating conditions can
interrupt communication. For example, electric appliances
such as microwave ovens and electric machinery located in
manufacturing environments may cause interference. In most
cases, interruptions are easy to resolve (see Chapter 10,
Troubleshooting Communication Failures).
58 iXL™ Diabetes Management System User Guide: IXL™ Remote Controller Features
iXL™ Remote Controller Features6
iXL™ Remote Controller Features
My Notes:
iXL™ Diabetes Management System User Guide: IXL™ Remote Controller Features 59
6
My Notes:
60 iXL™ Diabetes Management System User Guide: IXL™ Remote Controller Features
iXL™ Remote Controller Features6
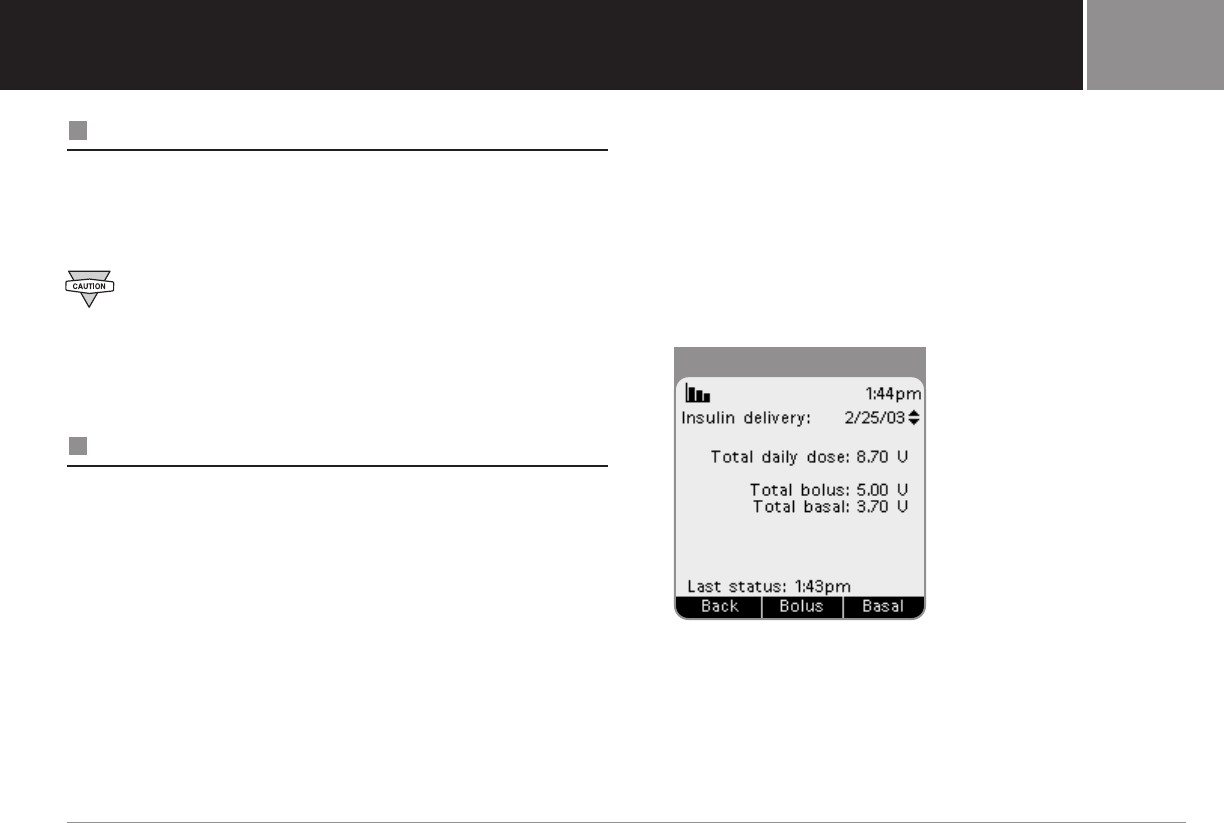
My Records
Record Keeping
Record keeping is an important part of successful diabetes
management. The iXL Remote Controller helps simplify this task.
It automatically stores insulin-delivery records, alarm records,
and personal information.
If the remote batteries run out, data in the remote’s
memory is at risk. Information will be lost if the batteries
are not changed within 2 hours. Do NOT remove the
batteries until you have new ones at hand; the longer the
batteries are removed, the more the memory is at risk.
Insulin Delivery History
The remote stores:
•Basal rates (including any rate changes and temporary basals)
•Bolus doses (normal, extended, and iBolus)
•Dates, times, and how long insulin delivery was suspended
and dates and times when it was resumed
•Total daily doses (total daily bolus + total daily basal) by date
The remote can store up to 2400 insulin-delivery events (basal
and bolus), or approximately 90 days of information. Information
older than 90 days is automatically deleted as new information
is added.
View insulin delivery history
1. In the Main menu, use the Up/Down Controller button to
choose My records; then press the soft key labeled Select.
2. Choose Insulin delivery, then press Select.
The remote displays today’s information first (from 12:00am
to the current time), including the total daily dose delivered,
total of boluses delivered, and total basal amount delivered
(Figure 7-1). The date appears in the second line of the screen.
To see information for a different date, press the Up/Down
Controller button.
iXL™ Diabetes Management System User Guide: My Records 61
7
Figure 7-1
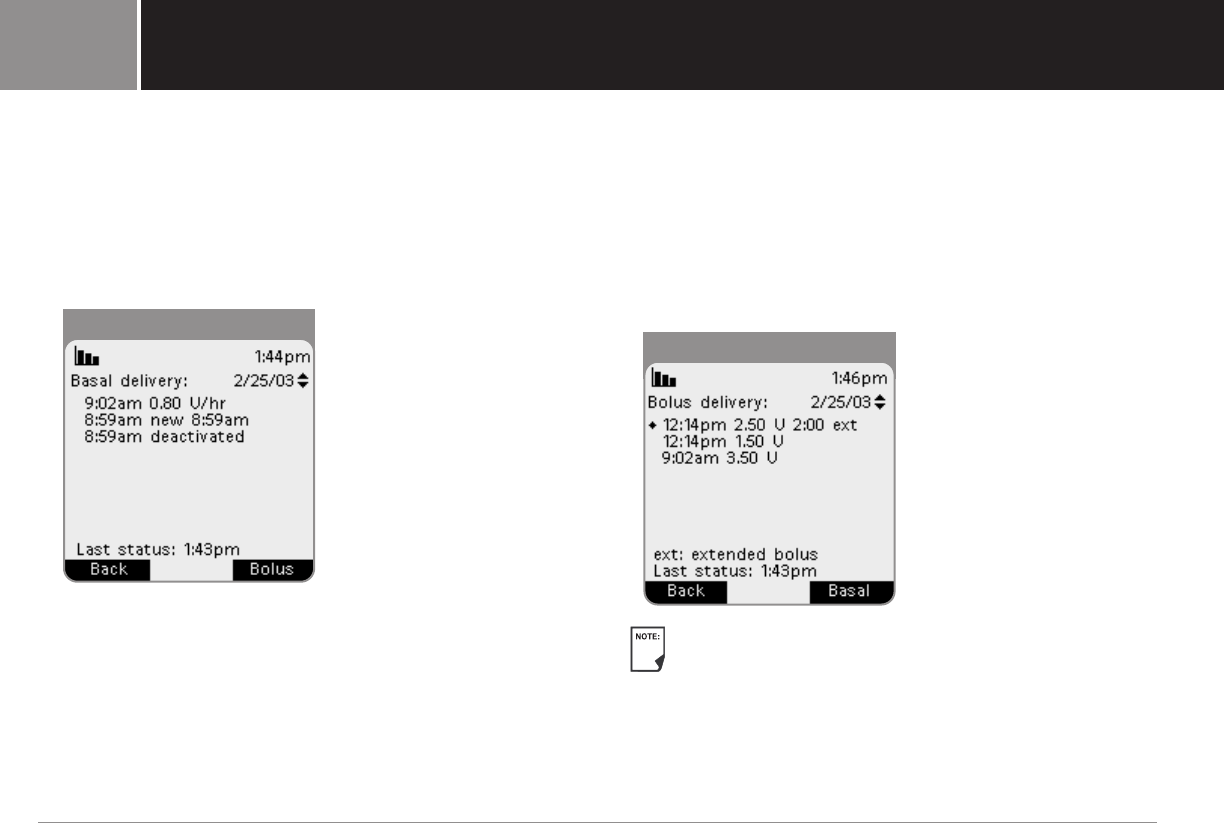
3. Press Basal (Figure 7-2).
The display indicates the time of day and whether a basal
was suspended, the pump was deactivated, or a temp basal
rate was delivered. If a temp basal rate is currently running,
a diamond icon (♦) appears next to it. If a temp basal rate
was cancelled, the screen shows how long it ran before
being cancelled.
Press the Up/Down Controller button for different dates.
If not all the information fits onto one screen, a page icon
appears at the bottom center of the screen. Press More to
go to the next screen of information. Continue to press More
until you return to the first screen.
4. Press Bolus (Figure 7-3).
The display indicates whether the bolus was normal, extended
(ext), or an iBolus (i). (Normal and extended boluses are
displayed separately even if they were programmed at the
same time.) Extended boluses are shown with time and
duration. If an extended bolus is currently running, a diamond
icon (♦) appears next to it. If a bolus was cancelled, only the
amount delivered before cancellation is shown.
The amount shown after cancellation may be in 0.05 unit
increments, even though the smallest dose you can
program is 0.10 units.
Press the Up/Down Controller button for different dates. Press
More for additional screens.
62 iXL™ Diabetes Management System User Guide: My Records
My Records7
Figure 7-2
Figure 7-3
My Records
Alarm History
The remote lists the entire alarm history for the device, from
the current date to when the remote was first activated. The
remote can store up to 128 alarm records.
1. In the Main menu, use the Up/Down Controller button to
choose My records; then press the soft key labeled Select.
2. Choose Alarm history, then press Select.
The remote displays the type, date, and time of each alarm.
3. Press the shift key labeled More for additional screens.
iXL™ Diabetes Management System User Guide: My Records 63
7
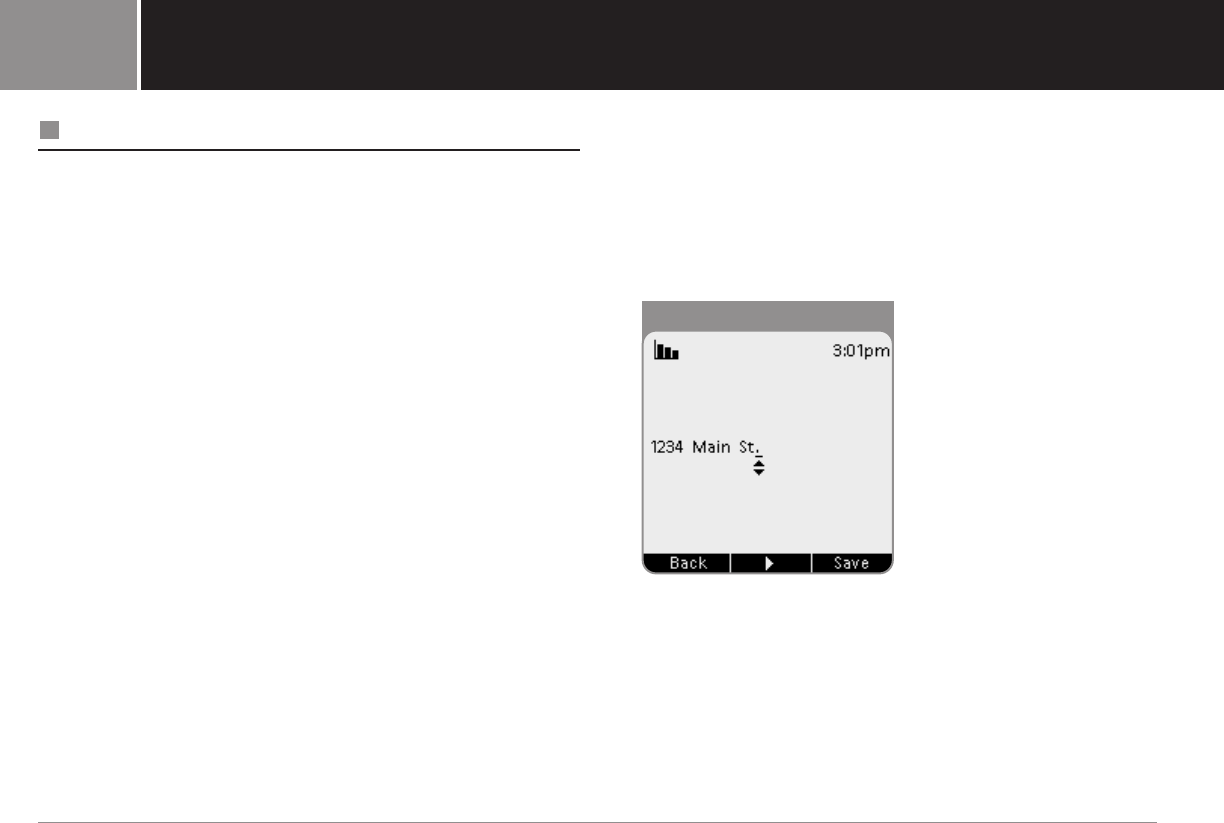
User and Product Information
You or your healthcare provider may have entered your personal
contact information (name, address, telephone numbers, and
email address) during your pump-start visit. To view that
information, press the User Info/Support button (?) in the upper
right corner of the remote. You can add or change user
information at any time (see below).
The user information screen also displays contact information
for Insulet Corporation and product information for your iXL
System (make, model, serial number). The factory enters the
corporate and product information and you cannot change it.
Add or change user information
1. In the Main menu, use the Up/Down Controller button to
choose My records; then press the soft key labeled Select.
2. Choose My info, then press Select.
3. Choose name, address1, address2,phone1, phone2, or email,
then press Select.
4. Press the Up/Down Controller button to enter the characters
that spell the name, address, phone number, or email
address. An underscore (_) on the screen indicates which
character you are changing. Press the arrow key to move the
underscore to the next character. For example, if you live at
1234 Main Street, you might enter 1, 2, 3, 4, space, M, a, i, n,
space, S, t., (Figure 7-4).
5. Press Done.
6. Repeat steps 3 through 5 for each line of personal information
you want to enter.
64 iXL™ Diabetes Management System User Guide: My Records
My Records7
Figure 7-4
My Records
My Notes:
iXL™ Diabetes Management System User Guide: My Records 65
7
My Notes:
66 iXL™ Diabetes Management System User Guide: My Records
My Records7
Achieve Healthy, Safe Pumping
Your Role in Safe Pumping
Before deciding on the iXL Diabetes Management System, you
and your healthcare provider discussed the advantages and
benefits of the iXL System, as well as the responsibilities that
come with insulin pump therapy. Remember: Safe pumping
begins and ends with you. If you have questions or doubts about
being able to safely use the iXL System at any time, consult your
healthcare provider immediately.
Most pump problems are easily avoided by:
•Learning all you can about successful diabetes management.
•Being actively involved in your treatment.
•Checking your blood glucose frequently.
•Washing your hands and disinfecting infusion sites to reduce
the possibility of infection.
•Being aware of the signs of hypoglycemia (low blood
glucose), hyperglycemia (high blood glucose), and DKA
(see “Avoid Adverse Reactions” later in this chapter).
•Keeping a diabetes emergency kit with you at all times (see
“Prepare for Emergencies” later in this chapter).
•Knowing how to contact your healthcare provider in case of
an emergency.
If you are unable to use the system according to
instructions, you may be putting your health and safety
at risk. Talk with your healthcare provider if you have
questions or concerns about using the iXL System.
Safety Features
The iXL System’s state-of-the-art design includes the latest
safety technology. Its built-in safety features include:
Automatic priming, safety checks, and insertion
with RediSet™
Every time a new iXL Pump is activated, the exclusive RediSet
system automatically primes and performs a safety check on the
pump, then inserts and primes the cannula (see Chapter 5, The
iXL Pump). Micro-processor technology makes it possible to
complete thousands of safety checks in only a few seconds.
Continuous monitoring
The iXL System checks the operation of the remote and pump
and informs you if any problems are detected. For example,
during setup, you entered a maximum daily dose. If you try to
give a bolus that would put you over the maximum for the day,
the remote alerts you. This automatic safeguard protects you
from unintended overdelivery of insulin. The system checks
communication between the remote and the pump as well as
functions within each device.
iXL™ Diabetes Management System User Guide: Achieve Healthy, Safe Pumping 67
8
Rapid occlusion detection
An occlusion is a blockage or interruption in insulin delivery.
The iXL System can detect an occlusion as small as 2 units,
which may lower your risk for hyperglycemia or DKA.
An occlusion may result from a blockage, pump
malfunction, or from using old or inactive insulin. If insulin
delivery is interrupted by an occlusion, check your blood
glucose level and follow the treatment guidelines
established by your healthcare provider (see “Avoid
Adverse Reactions” later in this chapter).
Alerts and advisory and hazard alarms
For your safety, the iXL System provides a range of alerts and
alarms to notify you of continuing functions, tell you that your
attention is needed, or warn you of hazardous situations. For
example, the Auto off advisory alarm alerts you when you have
not used the remote to communicate with the pump within a
time period that you set. You can set a time period between 1
and 24 hours, in 1-hour increments. If you do not respond to an
Auto off advisory alarm within 15 minutes, the pump and remote
go into a hazard alarm state.
See Chapter 6, iXL Remote Controller Features, for a description
of alerts and reminders and how to set them, and Chapter 9,
Hazard and Advisory Alarms, for a list of safety alarms built into
the iXL System and how to respond to them.
Daily Diabetes Management Activities
To ensure proper iXL System operation and your continued good
health, you should perform these activities every day:
Check blood glucose
Routine blood glucose checks allow you to identify and treat high
or low blood glucose before it becomes a problem (see “Avoid
Adverse Reactions” later in this chapter).
•Check your blood glucose at least 4 to 6 times a day: when
you wake up, before every meal, and before going to bed.
In addition, check:
•Whenever you feel nauseated or sick.
•Before driving a car.
•Whenever your blood glucose has been running unusually
high or low.
•If you suspect that your blood glucose is high or low.
•Before, during, and after exercise.
•As directed by your healthcare provider.
68 iXL™ Diabetes Management System User Guide: Achieve Healthy, Safe Pumping
Achieve Healthy, Safe Pumping8
Achieve Healthy, Safe Pumping
Inspect the infusion site
At least once a day, use the iXL Pump’s viewing window to
inspect the infusion site. Check the site for signs of infection,
such as pain, swelling, redness, discharge, or heat.
If an infusion site shows signs of infection:
1. Immediately remove the pump and attach a new one at a
different site (see Chapter 5, The iXL Pump).
2. Contact your healthcare provider.
3. Treat the infection according to instructions from your
healthcare provider. (Refer to Chapter 5, The iXL Pump, for
detailed information on site care and preparation.)
Consider making infusion site checks a part of your
regular daily routine (like showering or brushing your
teeth). That way, it’s easy to remember.
Water and Your Pump
The iXL Pump is watertight to a depth of 8 feet for up to 30
minutes (IPX8). After exposure to water, rinse off the pump with
clean water and dry it with a towel.
Do NOT expose your iXL Pump to water at depths greater
than 8 feet or for durations exceeding 30 minutes. Check
the infusion site often to make sure the pump and soft
cannula are securely attached and in place.
The iXL Remote Controller is not waterproof. Do NOT
place it in or near water.
Traveling and Vacationing
Plan for changing time zones
If you’re planning a business trip or vacation to a different
time zone, you may need to adjust your basal rate programs.
For changes of just a few hours, basal rate adjustments are
minor and easy to calculate. For long-distance travel, however,
figuring out the correct program can be more challenging.
Your healthcare provider can help with these adjustments.
iXL™ Diabetes Management System User Guide: Achieve Healthy, Safe Pumping 69
8
Take enough supplies
Keeping your emergency kit with you during trips or vacations
is especially important (see “Prepare for emergencies” later
in this chapter). It may be difficult or impossible to get insulin
or supplies in an unfamiliar place. If traveling by air, be sure to
pack your supplies in your carry-on luggage. When packing for
travel, be sure to include the following and take more than you
think you’ll need:
•Diabetes emergency kit packed in your carry-on luggage
•Enough pumps for your trip, plus a backup supply
•Extra remote batteries
•Insulin syringes or pens in case you need injections
•Several vials of insulin or insulin cartridges if you use a pen
•Glucagon kit (make sure any person you are traveling with
knows how to give the injection)
•Alcohol prep swabs
•Written prescriptions for all medications and supplies
(generic medications may be easier to find than brand names
outside the US)
When traveling outside the country or for long periods of
time, consider taking a backup remote. Call (800) 591-9948
to order additional pump supplies for your trip.
Minimize airport security delays
Contact the airlines in advance for information on their current
security requirements. To make airport security checks go
smoothly, be sure you have the following easily accessible:
•A signed letter from your healthcare provider explaining that
you need to carry insulin supplies and pump equipment
•An emergency kit (see “Prepare for emergencies” later in
this chapter)
•A list of the supplies you must carry, including the contents
of your emergency kit
•Prescriptions for insulin and all supplies, clearly marked with
their original pharmacy labels
If the detector goes off, tell the security screener that you have
diabetes and wear an insulin pump.
iXL Pumps and Remote Controllers can safely pass
through airport X-ray machines (see the FCC notice in
the Appendices).
70 iXL™ Diabetes Management System User Guide: Achieve Healthy, Safe Pumping
Achieve Healthy, Safe Pumping8
Achieve Healthy, Safe Pumping
Keep supplies accessible
On airplanes and trains, keep these items in your carry-on
luggage, rather than checking them:
•iXL Remote Controller
•An emergency kit
•Extra vials of insulin (cargo area temperatures may affect
insulin)
•A copy of your healthcare provider’s letter (see “Minimize
airline security delays”)
•Prescriptions for insulin and supplies
•Snacks (in case food is not available)
•Bottled water (especially on planes) to prevent dehydration
•The name and phone number of a physician at your final
destination, in case of emergency
Avoid Adverse Reactions
Most risks related to insulin pump therapy can be avoided by
practicing good pumping techniques and by acting promptly at
the first sign of trouble. You can avoid potential problems by
being aware of the signs of hypoglycemia (low blood glucose),
hyperglycemia (high blood glucose), and DKA. The easiest and
most reliable way to avoid these conditions is to check your
blood glucose often.
General precautions
•Keep careful records and discuss changes and adjustments
with your healthcare provider.
•Tell your healthcare provider if you have extreme highs or
lows, or if highs or lows are occurring more often than usual.
•If you have technical difficulties with your iXL System and
are unable to resolve them, do not hesitate to contact us.
Our 24-hour technical support hotline is (800) 591-3455.
iXL™ Diabetes Management System User Guide: Achieve Healthy, Safe Pumping 71
8
Hypoglycemia (low blood glucose)
Hypoglycemia can occur even when a pump is working properly.
Never ignore the signs of low blood glucose (no matter how mild).
If left untreated, severe hypoglycemia can cause seizures or
lead to unconsciousness. If you suspect or feel that your blood
glucose level is low, check your blood glucose level to confirm.
For users who are prone to hypoglycemia unawareness, a
condition in which people do not realize when their blood
glucose levels are low, the iXL System’s blood glucose
reminder can be especially useful.
Symptoms of hypoglycemia
Never ignore these symptoms:
•Shakiness
•Fatigue
•Sweating
•Cold, clammy skin
•Weakness
•Blurred vision or a headache
•Sudden hunger
•Rapid heart rate
•Confusion
•Tingling in the lips or tongue
•Anxiety
To avoid hypoglycemia (low blood glucose)
•Make sure your blood glucose is at least 100 mg/dl before
driving or working with dangerous machinery or equipment.
Besides the risk of hypoglycemia while driving or operating
dangerous equipment, focusing on a task may cause you to
miss symptoms you might notice otherwise.
•Work with your healthcare provider to establish individualized
blood glucose targets and guidelines.
•Keep a fast-acting carbohydrate (such as glucose tablets,
hard candies, or juice) with you at all times to respond
quickly to low blood glucose.
•Teach your friends, family members, and colleagues to
recognize the signs of hypoglycemia, so they can help if
you develop hypoglycemia unawareness or a severe
adverse reaction.
•Keep a glucagon injection kit with your emergency supplies.
Teach friends and family members how to give a glucagon
injection in case you have severe hypoglycemia and become
unconscious.
Periodically check the expiration date of your glucagon
kit to make sure it has not expired.
Always carry medical identification and wear an
emergency medical necklace or bracelet such as the
Medic Alert tag.
72 iXL™ Diabetes Management System User Guide: Achieve Healthy, Safe Pumping
Achieve Healthy, Safe Pumping8
Achieve Healthy, Safe Pumping
Again, frequent blood glucose checks are the key to avoiding
potential problems. Detecting low blood glucose early lets you
treat it before it becomes a problem.
Check with your healthcare provider for guidance in any and all
areas listed above.
To treat hypoglycemia (low blood glucose)
Any time your blood glucose is low, treat it immediately.
Check it every 15 minutes while you are treating, to make sure
you don’t over-treat the condition and cause blood glucose
levels to rise too high.
Even if you cannot check your blood glucose, do NOT
wait to treat symptoms of hypoglycemia, especially if you
are alone.
1. If blood glucose is 80 mg/dl or below, eat or drink 15 grams of
fast-acting carbohydrate, such as glucose tablets, juice, or
hard candy (see “How much is 15 grams of carbohydrate?”).
Do NOT use chocolate or candy bars to treat low blood
glucose. Their fat content slows down glucose absorption.
2. Check blood glucose again after 15 minutes.
3. If blood glucose remains low, take another 15 grams of
carbohydrate.
4. Repeat steps 2 and 3 until blood glucose is within target range.
5. Investigate possible cause for hypoglycemia to avoid
similar problems in the future (see “Possible causes of low
blood glucose”).
How much is 15 grams of carbohydrate?
Examples of fast-acting foods:
•Three 5-gram glucose tablets, or four 4-gram tablets
•4 ounces of orange juice
•6 lifesavers or similar hard candy
•1/2 can of regular (non-diet) soda
•2 tablespoons of table sugar, honey, or corn syrup
Teach people you trust (like family members and close
friends) how to give a glucagon injection. You will need
to rely on them to give it to you if you have severe
hypoglycemia and become unconscious. Include a copy
of the glucagon instructions in your emergency kit and
periodically review the procedure with family and friends.
iXL™ Diabetes Management System User Guide: Achieve Healthy, Safe Pumping 73
8
Possible causes of hypoglycemia (low blood glucose)
Possible cause of low Suggested action
Incorrect basal rate Check basal rate program.
program
Pump time not set Reset time.
correctly
Bolus too large Check bolus size and timing.
Do NOT over-correct for post-meal
glucose levels.
Check carb intake (consult healthcare
provider about carb counting).
Consult healthcare provider to refine
insulin-to-carb ratio.
Wrong bolus timing Time bolus with food intake.
Check blood glucose before giving
meal bolus; if necessary, adjust bolus.
Alcohol consumption Consult with your healthcare provider
for alcohol consumption guidelines.
Check blood glucose before going to
bed (check with healthcare provider for
guidance).
Unplanned activity If blood glucose is below 100 mg/dl, eat
a snack before activity.
Possible cause of low Suggested action
Prolonged or intense Adjust insulin delivery as instructed
exercise by your healthcare provider.
Check blood glucose before, during,
and after activity and treat as necessary.
Effects of exercise can last several
hours–even a full day–after activity
ends.
Low carbohydrate Consume carbohydrate before
intake prior to activity activity, especially if you have not
decreased insulin beforehand.
Failure to use the Consult healthcare provider on setting
temporary (temp) basal temp basal rates (see Chapter 3, Basal
rate feature Rates).
Prone to severe Consult healthcare provider about
hypoglycemia raising target blood glucose levels.
Hypoglycemia Consult healthcare provider about
unawareness hypoglycemia unawareness and about
raising target blood glucose levels.
Incorrect target blood Consult healthcare provider about
glucose levels raising target blood glucose levels.
Incorrect correction Consult healthcare provider about
factor (sensitivity correction (sensitivity) factor; adjust it
factor) if appropriate.
74 iXL™ Diabetes Management System User Guide: Achieve Healthy, Safe Pumping
Achieve Healthy, Safe Pumping8

Achieve Healthy, Safe Pumping
Hyperglycemia (high blood glucose)
Insulin pumps use rapid-acting insulin; therefore, if there is
an interruption in insulin delivery, pump users are at risk for
developing hyperglycemia.
Symptoms of hyperglycemia (high blood glucose)
•Fatigue
•Frequent urination, especially during the night
•Unusual thirst or hunger
•Unexplained weight loss
•Blurred vision
•Slow healing of cuts or sores
Hyperglycemia symptoms can be confusing.
Always check your blood glucose before you treat
for hyperglycemia.
To avoid hyperglycemia (high blood glucose)
Check your blood glucose at least four 4-6 times a day
(when you wake up, before each meal, and before going to bed).
In addition, always check it:
•Whenever you feel nauseated or sick.
•Before driving a car.
•Whenever your blood glucose has been running unusually
high or low.
•If you suspect that your blood glucose is high or low.
•Before, during, and after exercise.
•As directed by your healthcare provider.
To treat hyperglycemia (high blood glucose)
Always check your blood glucose levels frequently when
treating hyperglycemia to make sure you don’t over-treat the
condition and cause blood glucose levels to drop too far.
1. Check your blood glucose level. The result will help you to
find out how much insulin is needed to return your blood
glucose to the target range.
2. If your blood glucose is over 250 mg/dl, check for ketones.
If ketones are present, follow your healthcare provider’s
guidelines.
3. If ketones are not present, take a correction bolus as
prescribed by your healthcare provider.
4. Check blood glucose again after 2 hours.
iXL™ Diabetes Management System User Guide: Achieve Healthy, Safe Pumping 75
8
5. If blood glucose levels have not decreased, take a second
bolus by injection, using a sterile syringe. Ask your healthcare
provider whether to inject the same amount of insulin as in
step 3.
6. If you feel nauseated at any point, check for ketones and
call your healthcare provider immediately (see “Diabetic
ketoacidosis” later in this chapter).
7. If blood glucose remains high after another 2 hours, replace
the pump (fill the new pump using a new vial of insulin), then:
•Contact your healthcare provider for guidance.
•Drink eight ounces of water every 30 minutes until blood
glucose is within target range.
If you need emergency attention, ask a friend or family
member to take you to the emergency room or call an
ambulance. Do NOT drive yourself.
8. Investigate possible cause for hyperglycemia to avoid
similar problems in the future (see “Possible causes of
hyperglycemia”).
Possible causes of hyperglycemia (high blood glucose)
Possible cause of high Suggested action
Expired insulin Deactivate and remove used pump.
Attach new pump filled with insulin
from a new vial.
Insulin exposed to Deactivate and remove used pump.
extreme temperatures Attach new pump filled with insulin
from a new vial.
Infusion site in or near Deactivate and remove used pump.
a scar or mole Attach a new pump in a different
location.
Infected infusion site Deactivate and remove used pump.
Attach a new pump in a different location
and consult your healthcare provider.
Dislodged cannula Deactivate and remove used pump.
Attach a new pump in a different
location.
Avoid sites near a waistband, belt,
or other area where friction may
dislodge the cannula.
Empty pump Deactivate and remove used pump.
Attach a new pump in a different
location.
Incorrect bolus dose Check carb intake (consult healthcare
provider about carb counting).
76 iXL™ Diabetes Management System User Guide: Achieve Healthy, Safe Pumping
Achieve Healthy, Safe Pumping8
Achieve Healthy, Safe Pumping
Possible cause of high Suggested action
Incorrect bolus timing Time bolus with food intake.
Check blood glucose before giving
meal bolus; if necessary, adjust bolus.
Incorrect basal rate Confirm that programmed basal rate is
correct.
Consult healthcare provider before
making changes to your basal rate.
High-protein or Calculate protein/fat intake and
high-fat meal account for it in your bolus timing and
bolus type. (Consult your healthcare
provider for guidance.)
Less activity than Use temporary (temp) basal rate
normal feature (see Chapter 3, Basal Rates).
Blood glucose greater Do NOT exercise when ketones are
than 250 mg/dl present (blood glucose increases with
(with ketones present) exercise when ketones are present).
before exercise Consult healthcare provider about
exercise guidelines.
Infection or illness See “Sick days“ later in this chapter.
Consult healthcare provider about
sick-day guidelines.
Possible cause of high Suggested action
Medication change Speak with your healthcare provider
about any medication changes or
additions.
Weight loss or gain Consult your healthcare provider.
Premenstrual cycle Program a temp basal preset for
premenstrual cycle (see Chapter 3,
Basal Rates).
Pregnancy Consult your healthcare provider.
Check with your healthcare provider for guidance on any
of the causes or suggested actions above.
iXL™ Diabetes Management System User Guide: Achieve Healthy, Safe Pumping 77
8

Diabetic ketoacidosis (DKA)
Insulin pumps use only rapid-acting insulin. Because there is
no reserve of long-acting insulin in the body, any occlusion or
interruption in insulin delivery can rapidly lead to diabetic
ketoacidosis (DKA). DKA is a serious–but totally
preventable– emergency that can occur if you ignore high blood
glucose levels.
If left untreated, DKA can cause breathing difficulties, shock,
coma, and eventually death.
Symptoms of DKA
•Nausea and vomiting
•Abdominal pain
•Dehydration
•Fruity-smelling breath
•Dry skin or tongue
•Drowsiness
•Rapid pulse
•Labored breathing
The symptoms of DKA are much like those of the flu. Before
assuming you have the flu, check your blood glucose and check
for ketones to rule out DKA.
To avoid DKA
The easiest and most reliable way to avoid DKA is by checking
your blood glucose at least 4 to 6 times a day. Routine checks
allow you to identify and treat high blood glucose before DKA
develops.
To treat DKA
1. Once you have begun treatment for high blood glucose,
check for ketones.
2. If ketones are negative or trace, continue treating for high
blood glucose.
3. If ketones are positive, but you are not feeling nauseated or
ill, replace the pump, using a new vial of insulin.
4. If ketones are present and you are feeling nauseated or ill,
immediately call your healthcare provider for guidance.
5. Check blood glucose again after 2 hours. If blood glucose
level has not declined, immediately call your healthcare
provider for guidance. If you need to go to the emergency
room for further treatment, do NOT drive yourself: either call
an ambulance or have a friend or family member drive you.
78 iXL™ Diabetes Management System User Guide: Achieve Healthy, Safe Pumping
Achieve Healthy, Safe Pumping8
Achieve Healthy, Safe Pumping
Handling Special Situations
Prepare for emergencies
Prepare and keep an emergency kit with you at all times to
quickly respond to any diabetes emergency. The kit should
include:
•Blood glucose meter and strips
•Lancet device and lancets
•Ketone strips
•Glucose tablets or another fast-acting source of carbohydrate
•Alcohol prep swabs
•A vial of rapid-acting U-100 insulin
•Syringes for injecting insulin
•Instructions from your healthcare provider about appropriate
injection doses if insulin delivery is interrupted
•Several iXL Pumps with their syringes and filling needles
•Extra remote batteries (at least two AAA alkaline)
•Extra blood glucose meter batteries
•A copy of the letter from your healthcare provider for airline
security
•Contact information for reaching your healthcare provider
and/or doctor in case of an emergency
•Glucagon kit and written instructions for giving an injection if
you are unconscious (see ”Avoid Adverse Reactions” earlier
in this chapter).
Ask your healthcare provider to help you develop plans
for handling emergency situations, including what to do
if you cannot reach your healthcare provider.
Sick days
Any physical stress can cause your blood glucose to rise, and
illness is a physical stress. Your healthcare provider can help
you make a specific plan for sick days. The following are only
general guidelines.
When you are ill, check your blood glucose more often (at least
once every 2 hours) to avoid DKA. The symptoms of DKA are
much like those of the flu. Before assuming you have the flu,
check your blood glucose to rule out DKA (see ”Avoid Adverse
Reactions” earlier in this chapter).
iXL™ Diabetes Management System User Guide: Achieve Healthy, Safe Pumping 79
8
To handle sick days:
•Treat the underlying illness to promote faster recovery.
•Eat as normally as you can.
•Adjust bolus doses, if necessary, to match changes in
carbohydrate/calorie intake.
•Always continue your basal insulin, even if you are unable
to eat. Contact your healthcare provider for suggested basal
rate adjustments during sick days.
•Check your blood glucose every two hours and keep careful
records of results.
•Test for ketones when blood glucose is 250 mg/dl or higher.
• Follow your healthcare provider’sguidelines for giving
additional insulin on sick days.
•Drink plenty of noncaffeinated fluids to prevent dehydration.
If you are well enough to eat, drink sugar-free
beverages. However, if you are too sick to eat solid
foods, alternate between sugar-free beverages and
those containing sugar.
•Call your healthcare provider immediately if you have any of
the following: persistent nausea, vomiting for more than two
hours, high blood glucose or ketones that stay elevated
despite increased insulin, or low blood glucose with nausea
or vomiting.
Exercising, playing sports, or working hard
Check your blood glucose levels before, during, and after
exercising, playing sports, or doing unusually hard physical labor.
Under normal conditions the iXL Pump’s adhesive keeps it
securely in place for up to three days. There are a variety of
products available to help secure the pump to the skin. Ask
your healthcare provider about these products.
For some contact sports, you may want to remove the iXL Pump
(see “Short-term removal” below).
Short-term removal
The iXL Pump is designed to be discreet as well as comfortable.
It should be worn at all times so that you can enjoy all the
benefits of continuous insulin delivery. Occasionally, though, it
may be necessary to temporarily remove the pump.
Be sure to check your blood glucose levels before removing the
pump and after attaching a new one. Pumps are designed for
one-time use. Do not attempt to reattach a used iXL Pump.
If possible, avoid wasting pumps by planning removal
times that coincide with a scheduled pump replacement.
If you will need to remove the pump for more than 1 hour, ask
your healthcare provider to recommend appropriate guidelines.
80 iXL™ Diabetes Management System User Guide: Achieve Healthy, Safe Pumping
Achieve Healthy, Safe Pumping8
Achieve Healthy, Safe Pumping
X-rays, MRIs, and CT scans
The iXL Pump and Remote Controller may be affected by strong
radiation or magnetic fields. Before having an X-ray, MRI, or CT
scan (or any similar test or procedure), remove your pump and
remote and put them outside the treatment area. Check with
your healthcare provider on pump removal guidelines.
The pump and remote can tolerate common
electromagnetic and electrostatic fields, including airport
security and cellular phones.
Surgery or hospitalization
For scheduled surgeries or hospitalization, you should tell the
doctor/surgeon or hospital staff about your insulin pump. It may
be necessary to remove it for certain procedures or treatments
and replace the basal insulin that was missed while the pump
was removed. Your healthcare provider can help you prepare
for these situations.
Always carry medical identification and wear an
emergency medical necklace or bracelet such as the
Medic Alert tag. (See the end of the Appendices for
address, telephone, and web site information.)
iXL™ Diabetes Management System User Guide: Achieve Healthy, Safe Pumping 81
8
Notes:
82 iXL™ Diabetes Management System User Guide: Achieve Healthy, Safe Pumping
Achieve Healthy, Safe Pumping8
Be Aware: Hazard and Advisory Alarms
Safety Checks
A very important safety feature of the iXL System is its ability
to check its own functions and to let you know when something
needs attention. When you turn on the remote, the system
automatically performs a series of safety checks. To make you
aware of a serious or potentially serious condition, the system
will sound an audible alarm and display an on-screen message
with instructions for resolving the alarm. All alarms include a
date and time indicating when the condition occurred. Alarm
conditions are easy to handle, and will not be a problem if you
attend to them promptly.
Check your blood glucose level frequently.
Hazard Alarms
Hazard alarms occur either when the pump is in a hazard
condition or something is wrong with the remote. Hazard alarms
are all continuous tones and each has an on-screen message
(see the “Hazard Alarms” table on the following pages). Follow
the instructions in the message to resolve the alarm situation.
If a bolus is being delivered when a hazard alarm occurs
in the pump, the bolus is cancelled. (A hazard alarm in
the remote, however, does not cancel a bolus delivery.)
Before the system displays the alarm’s on-screen
message, it tells you how much insulin was delivered
before the bolus was cancelled. That information is
stored in the system’s history records (see Chapter 7, My
Records). After you resolve the alarm, you can check the
amount of the last bolus displayed on the Status screen
to see how much of the bolus was delivered.
iXL™ Diabetes Management System User Guide: Be Aware: Hazard and Advisory Alarms 83
9
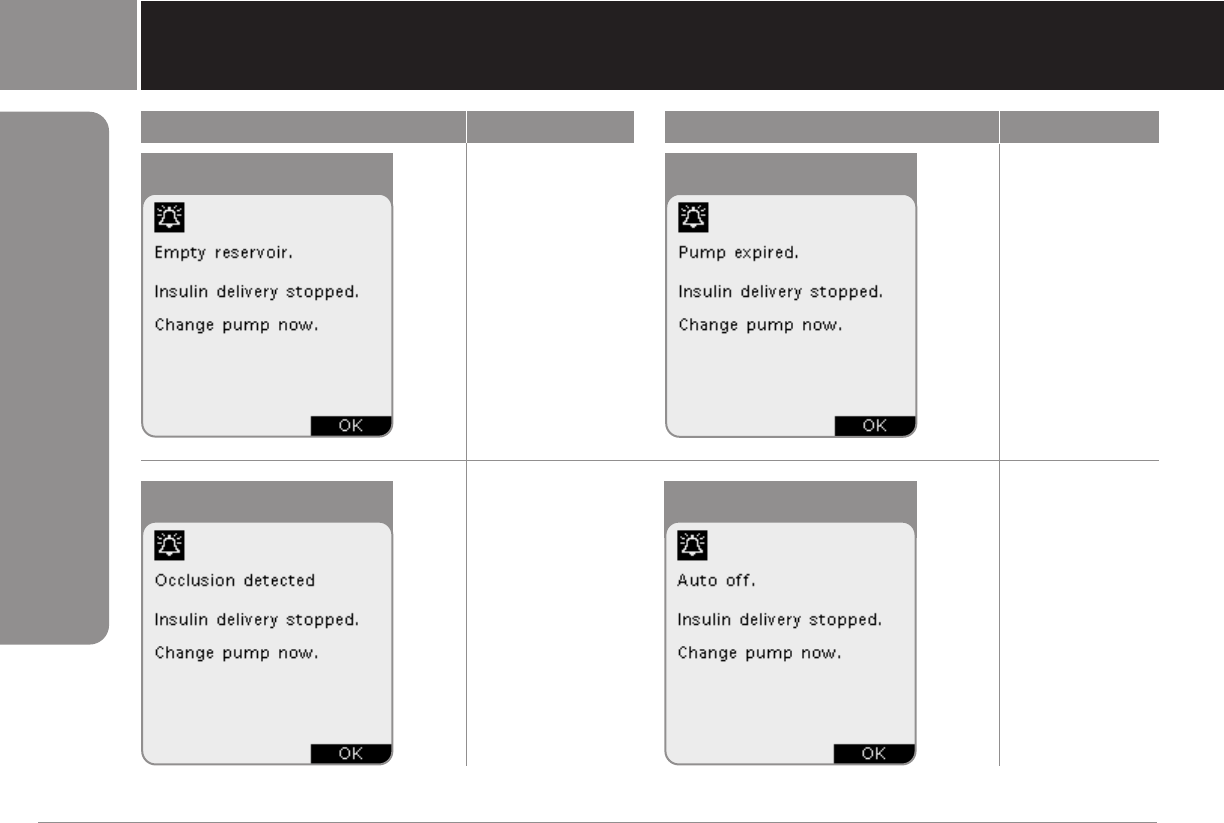
84 iXL™ Diabetes Management System User Guide: Be Aware: Hazard and Advisory Alarms
Be Aware: Hazard and Advisory Alarms9
Hazard Alarms
Alarm Type Source Action to resolve Alarm Type Source Action to resolve
Empty reservoir Pump Press OK to Pump expired Pump Press OK to
acknowledge. acknowledge.
Change pump. Change pump.
Occlusion detected Pump Press OK to Auto Off Pump Press OK to
acknowledge. and acknowledge.
Change pump. Remote Change pump.
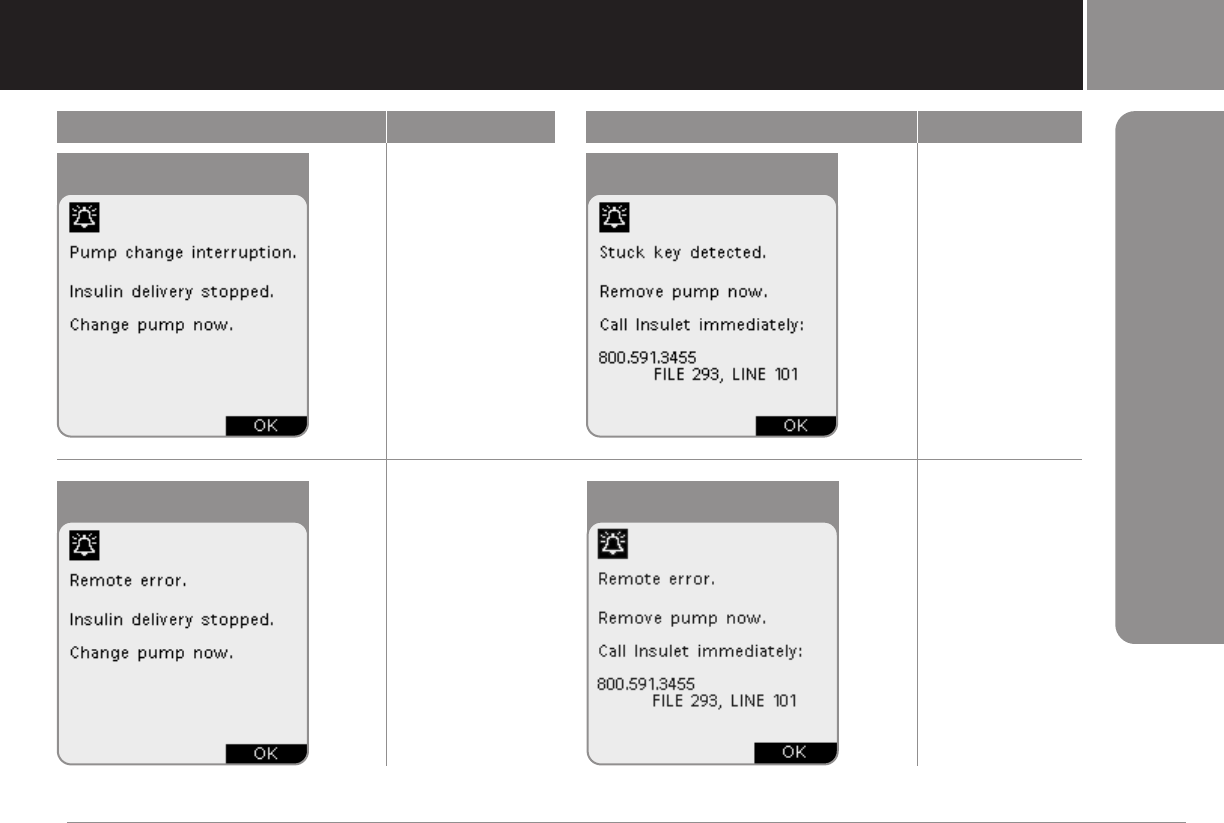
Be Aware: Hazard and Advisory Alarms
iXL™ Diabetes Management System User Guide: Be Aware: Hazard and Advisory Alarms 85
9
Hazard Alarms
Alarm Type Source Action to resolve Alarm Type Source Action to resolve
Pump change interruption Pump Press OK to Stuck key detected Remote Press OK to
acknowledge. acknowledge.
Change pump. Remove pump.
Call Insulet.
(800) 591-3455
Remote error Remote Press OK to Remote error Remote Press OK to
acknowledge. acknowledge.
Change pump. Remove pump.
Call Insulet.
(800) 591-3455
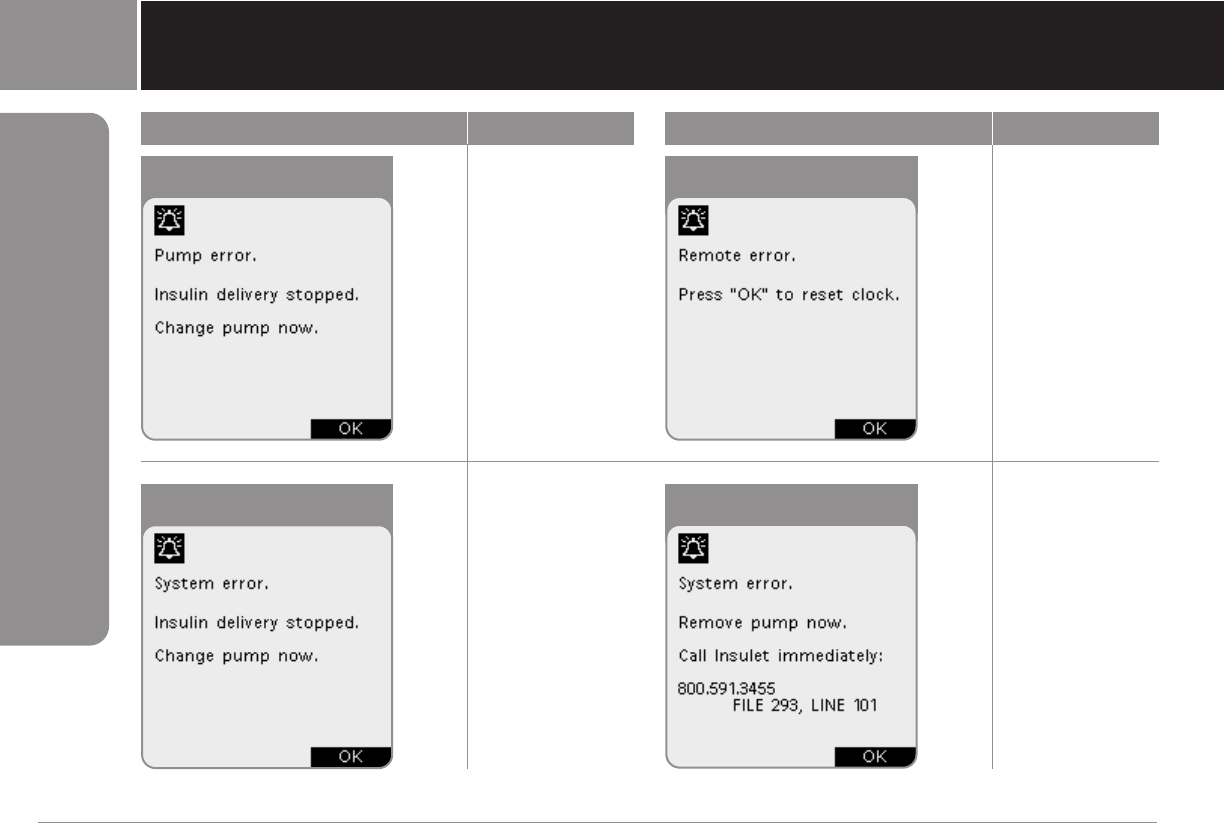
86 iXL™ Diabetes Management System User Guide: Be Aware: Hazard and Advisory Alarms
Be Aware: Hazard and Advisory Alarms9
Alarm Type Source Action to resolve
Pump error Pump Press OK to
or acknowledge.
Remote Change pump.
Hazard Alarms
Alarm Type Source Action to resolve
Remote error Remote Press OK to
acknowledge.
System error Pump Press OK to
or acknowledge.
Remote Change pump.
System error Press OK to
acknowledge.
Remove pump.
Call Insulet.
(800) 591-3455

Respond to hazard alarms
Due to the serious nature of hazard alarms, you must act
promptly to resolve them.
1. Acknowledge the alarm condition by pressing OK, which
silences the alarm.
2. Deactivate and remove the current pump (see Chapter 5,
The iXL Pump).
3. Activate and attach a new pump (see Chapter 5, The iXL
Pump).
For a hazard alarm caused by a stuck key, remote error,
or system error that displays, “Call Insulet immediately,”
remove the pump and call Insulet immediately for
instructions. The 24-hour support line is (800) 591-3455.
Be Aware: Hazard and Advisory Alarms 9
Hazard Alarms
iXL™ Diabetes Management System User Guide: Be Aware: Hazard and Advisory Alarms 87
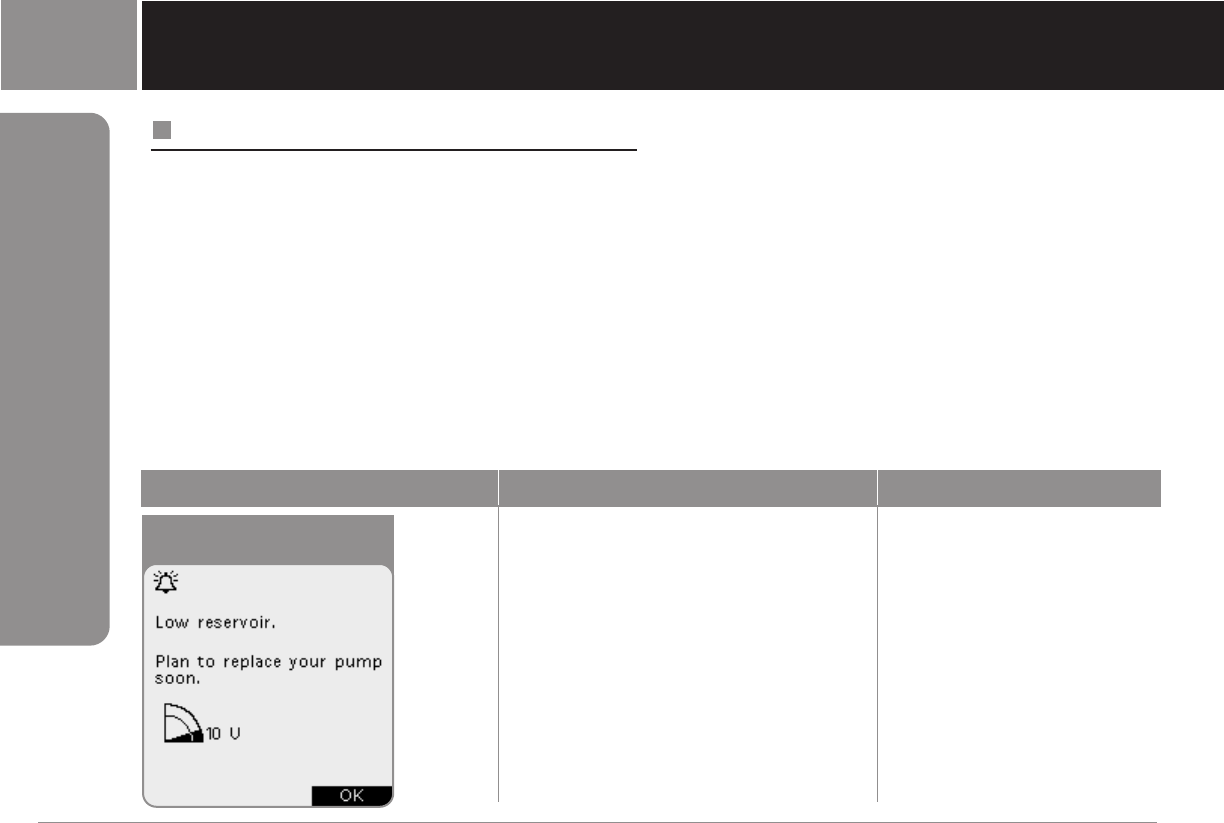
Alarm Type Source Beep pattern and escalation process Action to resolve
Low reservoir volume Pump 3 sets of beeps every minute for 3 minutes. Press OK to acknowledge.
Repeats every 60 minutes until
acknowledged.
Escalates to hazard alarm when is empty.
(based on volume selected by user)
9
88 iXL™ Diabetes Management System User Guide: Be Aware: Hazard and Advisory Alarms
Advisory Alarms
Advisory alarms tell you about a condition that requires
your attention. When you hear an advisory alarm, turn on
the remote to display the Status screen. The screen
displays a message describing the alarm and how to
resolve it.
Some advisory alarms are controlled by levels you set in
the Settings screen (for example, the insulin level at which
the low-reservoir-volume alarm sounds). All advisory
alarms are time-sensitive and require a response. Some
advisory alarms escalate to hazard alarms if you do not
respond within a certain time period (as noted in the
table below).
Each advisory alarm beeps intermittently and displays an
on-screen message once the remote Status screen is
updated.
Be Aware: Hazard and Advisory Alarms9
Advisory Alarms
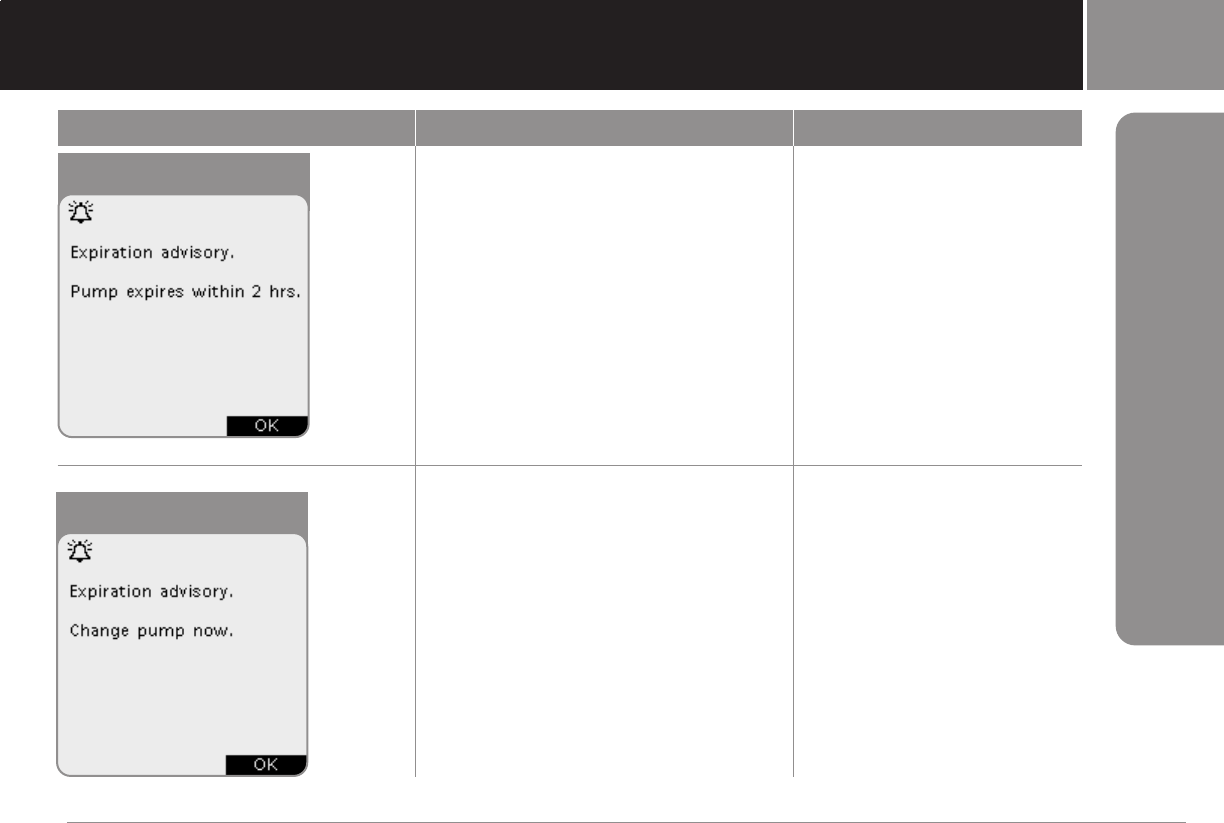
Be Aware: Hazard and Advisory Alarms
iXL™ Diabetes Management System User Guide: Be Aware: Hazard and Advisory Alarms 89
9
Advisory Alarms
Alarm Type Source Beep pattern and escalation process Action to resolve
Pump expiration advisory IPump 3 sets of beeps every minute for 3 minutes. Press OK to acknowledge.
Repeats every 60 minutes. Change pump.
Escalates to “Pump expiration advisory II”
after 2 hours.
Pump expiration advisory II Pump 3 sets of beeps every minute for 3 minutes. Press OK to acknowledge.
Escalates to “Pump expired” hazard Change pump.
alarm after 60 minutes.
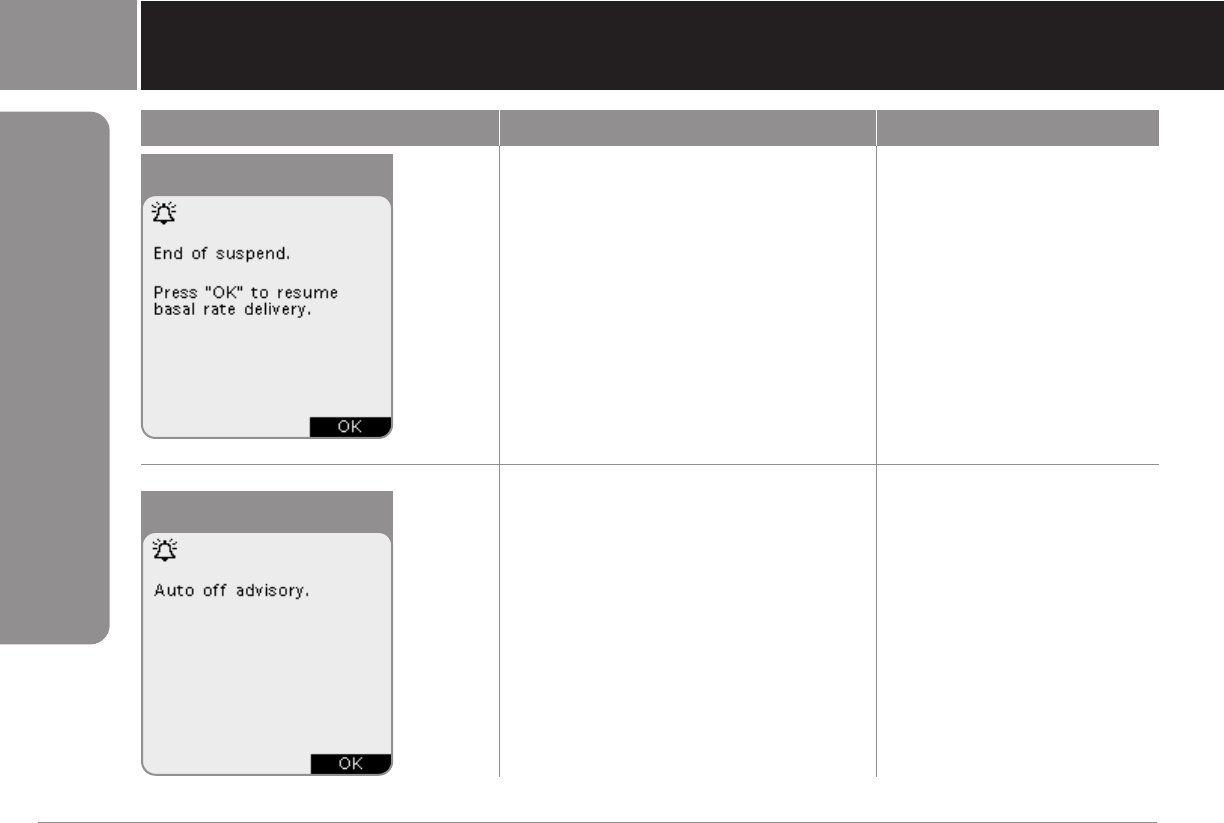
Advisory Alarms
90 iXL™ Diabetes Management System User Guide: Be Aware: Hazard and Advisory Alarms
Be Aware: Hazard and Advisory Alarms9
Alarm Type Source Beep pattern and escalation process Action to resolve
End of suspend Pump 3 sets of beeps every minute for 3 minutes. Press OK to resume insulin
Repeats until insulin delivery is resumed. delivery at programmed
basal rate.
Auto off advisory Pump and 3 sets of beeps every minute for 15 minutes. Press OK to acknowledge.
Remote Escalates to “Auto off” hazard alarm if not
acknowledged within 15 minutes.
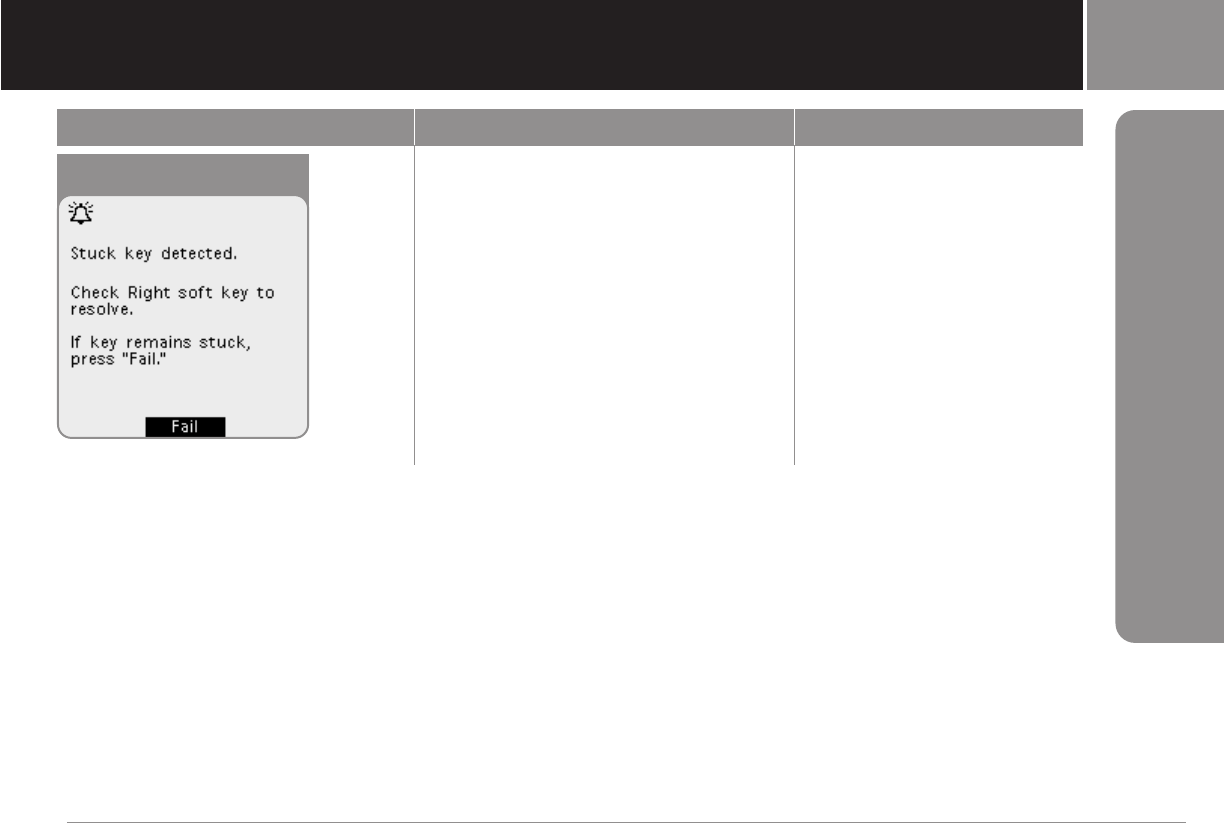
Be Aware: Hazard and Advisory Alarms
iXL™ Diabetes Management System User Guide: Be Aware: Hazard and Advisory Alarms 91
9
Advisory Alarms
Alarm Type Source Beep pattern and escalation process Action to resolve
Stuck key detected Remote 3 sets of beeps every 3 minutes for 60 Check key to resolve.
minutes. If key remains stuck, press Fail.
Escalates to “Stuck key” hazard alarm if
not resolved within 60 minutes of if you
press Fail.
Respond to advisory alarms
For an advisory alarm caused by a low reservoir or pump
expiration:
1. Acknowledge the alarm condition by pressing OK,
which silences the alarm.
2. Deactivate and remove the current pump (see Chapter
5, The iXL Pump).
3. Attach and activate a new pump (see Chapter 5, The iXL
Pump).
For an advisory alarm caused by Auto off or End of
suspend, simply press OK.
For an advisory alarm caused by a stuck key, press the
soft key or button named in the on-screen message. If
this does not resolve the problem, press Fail. This action
results in a hazard alarm with instructions to call Insulet
support for assistance.
92 iXL™ Diabetes Management System User Guide: Be Aware: Hazard and Advisory Alarms
Be Aware: Hazard and Advisory Alarms9
My Notes:
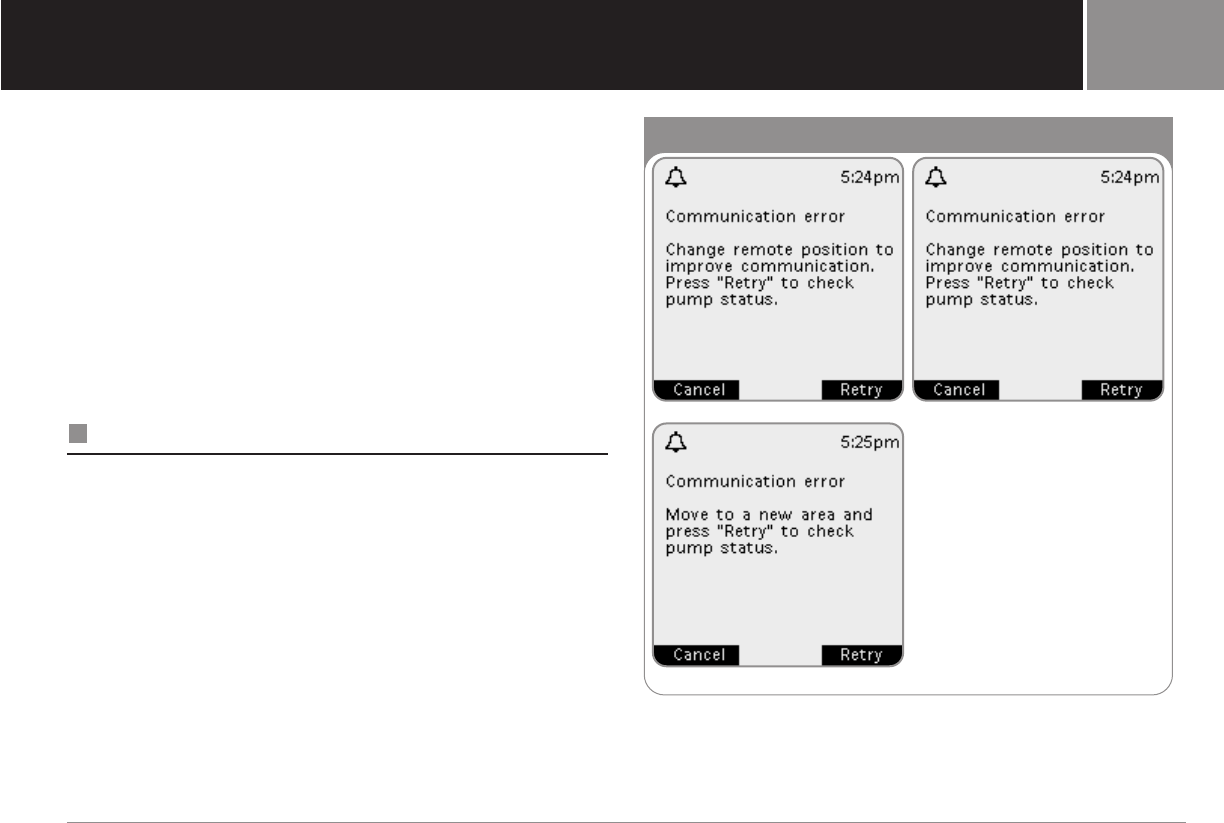
Troubleshoot Communication Failures
Every time you turn on or use the iXL Remote Controller, it
establishes communication with the active pump. Usually,
communication occurs quickly. However, communication can
fail if the remote is:
•Too far from the pump (it must be within 12 inches when
entering or changing settings).
•Interrupted by outside interference (see FCC Notice in the
Appendices).
In either case, the error is easy to resolve. The remote walks you
through the steps you need to take.
The Communication Failure Sequences
Failure at start up
If you turn on the remote or press Status and the remote cannot
communicate with the pump within 10 seconds, you will see the
messages in Figure 10-1, in sequence.
1. At the first message, change remote position and press Retry.
2. If communication still fails, you will see the second message.
Change remote position and press Retry again.
3. If the second retry attempt does not succeed, you see the
third message. Move to a new area (across a room, to a
different room, or away from electrical appliances) and press
Retry again.
Press Cancel to return to the Status screen, which displays
information as of the last status check.
iXL™ Diabetes Management System User Guide: Troubleshoot Communication Failures 93
10
Figure 10-1
1 2
3
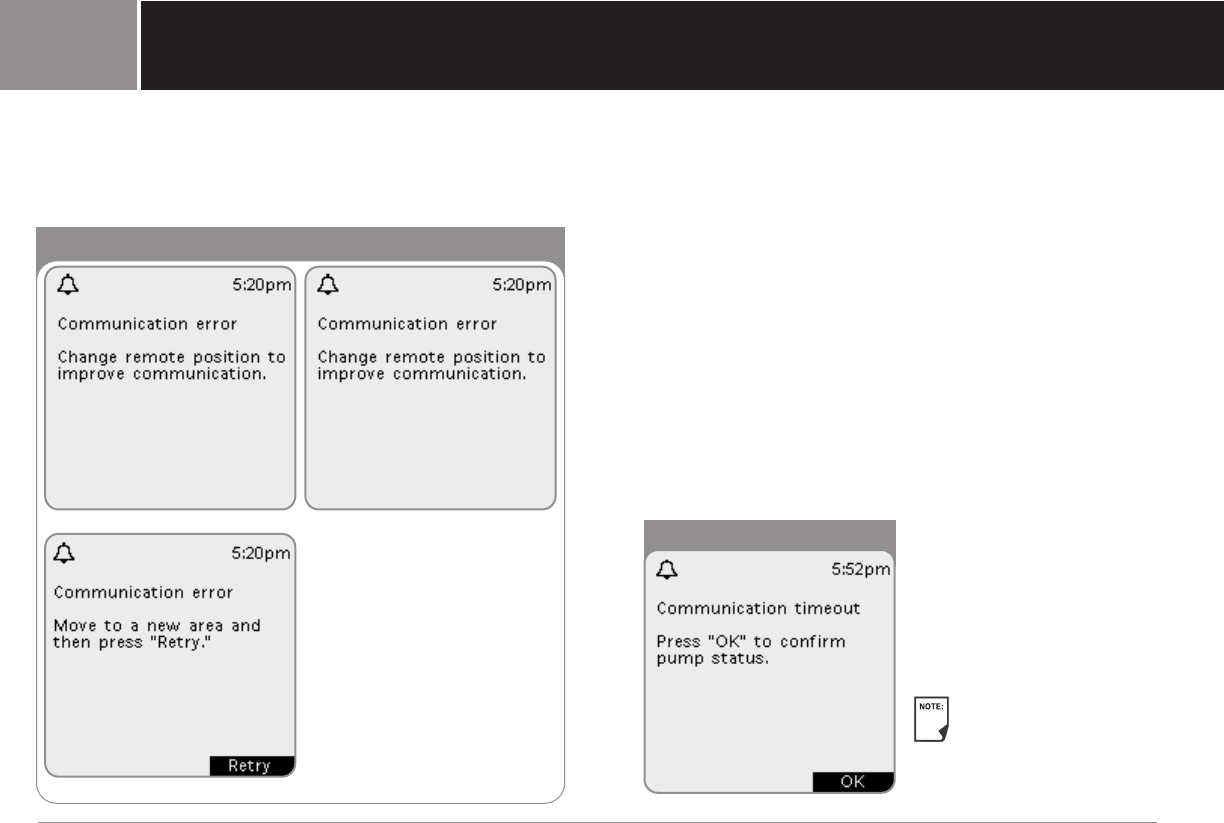
Failure during operation
If the remote is unable to deliver your instructions (such as a
bolus delivery or a change in basal program) to the pump within
6 seconds, you will see the messages in Figure 10-2, in sequence.
1. At the first message, change remote position to improve
communication. You do not need to press any soft keys. The
remote will try to communicate with the pump for another 10
seconds.
2. If communication still fails, you will see the second message.
Change remote position to improve communication. The
remote will try for another 10 seconds (total, 26 seconds).
3. If that attempt fails, and you were originally trying to Cancel
a bolus dose, a hazard alarm will sound.
If you were not trying to cancel a bolus, you will see the
third message. Move to a new area (across a room, to a
different room, or away from electrical appliances). This
time, press Retry.
4. If you press Retry within 2 minutes, the remote will try for
another 26 seconds. If that fails, the hazard alarm will sound.
If you do not press Retry
within 2 minutes, you will see
the screen in Figure 10-3.
Press OK to confirm pump
status. If the status check
fails, the remote will then
sound a hazard alarm.
See Chapter 9, Hazard
and Advisory Alarms,
for more information
about hazard alarms.
94 iXL™ Diabetes Management System User Guide: Troubleshoot Communication Failures
Troubleshoot Communication Failures10
Figure 10-2
1 2
3
Figure 10-3
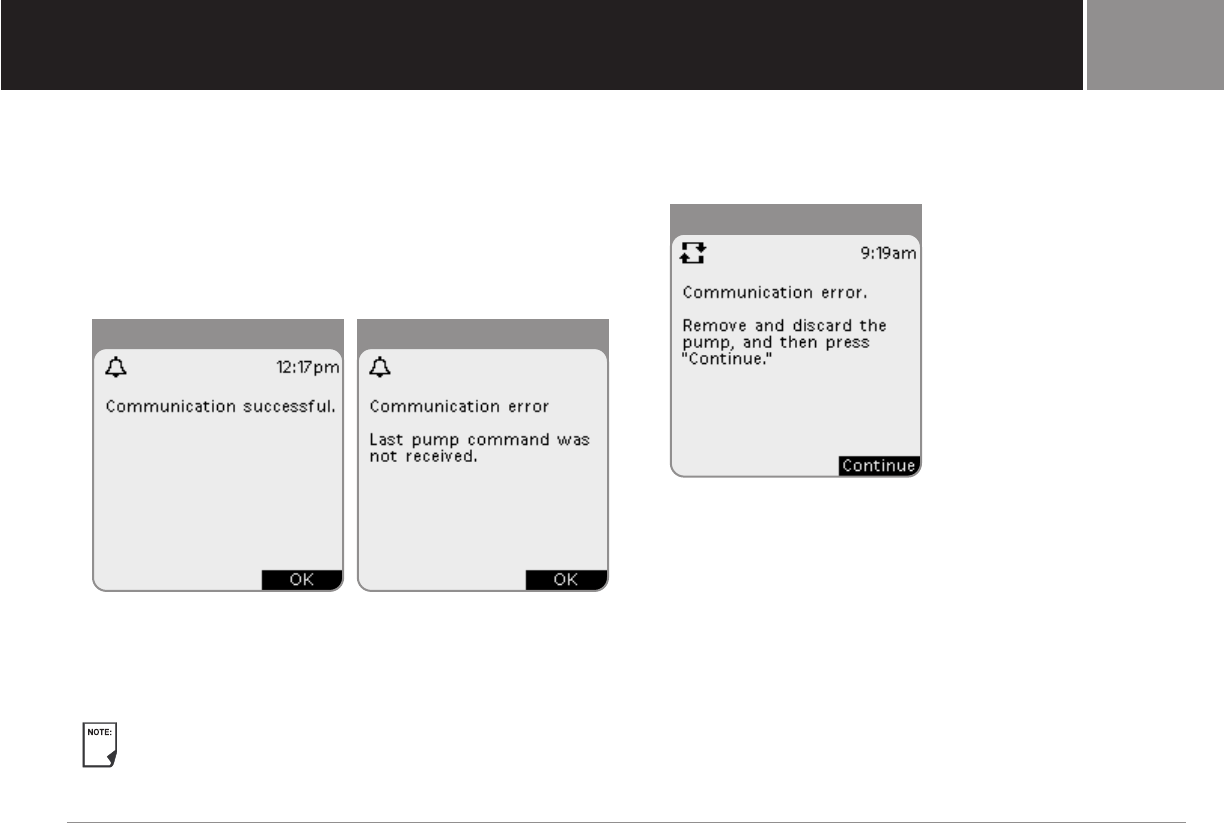
Troubleshoot Communication Failures
5. If you were entering a command when communication failed,
when communication is reestablished, the system either:
(a) Indicates the command was successful (Figure 10-4) and
displays the next screen in the command sequence within
5 seconds.
(b) Indicates the command was not received by the pump
(Figure 10-5). Press OK.
If you were activating a pump, the system returns to the
previous screen where you can continue activation.
If you were issuing any other command, the system returns
to the Status screen, where you can reissue the command.
For technical support, call Insulet’s 24-hour customer
support at (800) 591-3455.
6. If you were deactivating a pump when communication failed,
you will see the message in Figure 10-6. Remove and discard
the old pump and then press Continue to activate a new pump.
iXL™ Diabetes Management System User Guide: Troubleshoot Communication Failures 95
10
Figure 10-4 Figure 10-5
Figure 10-6
My Notes:
96 iXL™ Diabetes Management System User Guide: Troubleshoot Communication Failures
Troubleshoot Communication Failures10
iXL™ Diabetes Management System User Guide: Appendices 97
Appendices
iXL™ Pump Care and Maintenance
Storage
Store unopened iXL Pumps in a cool, dry place. Extreme heat
or cold can damage pumps and cause them to malfunction.
If pumps are exposed to extreme temperatures, inspect them
carefully before use. Do not attach or use pump if its sterile
packaging is opened or damaged. Pumps are sterile unless
packaging is opened or damaged.
Cleaning
iXL Pumps are water tight. If you need to clean the pump, you
can gently wash it with a clean damp cloth. You can use a
clean, damp cloth, or use mild soap and water. However, do not
use strong detergents or solvents. They can damage the pump’s
casing or irritate the infusion site.
Hold your pump securely and take care while cleaning
the pump so the catheter doesn’t get kinked and the
pump doesn’t become detached.
iXL™ Remote Controller Care and Maintenance
Storage
When you are not actively using the remote to enter or change
programs, you can store it in a convenient, nearby location. The
storage location should be a cool, dry place.
Do NOT store or leave the remote where it may be
exposed to extreme temperatures, such as inside a car.
Extreme heat or cold can cause the device to malfunction.
If the remote is not safe from children or others who may press
the buttons unintentionally, consider activating the optional
Remote lock safety feature that prevents accidental program
changes (see Chapter 6, iXL Remote Controller Features).
Cleaning
You can clean the outside of the remote with a clean, damp cloth.
Do NOT use soap, detergent, or solvents. Never put any liquid
into the battery compartment.
If the battery compartment becomes soiled, gently shake out the
debris or use a dry, lint-free cloth to remove it.
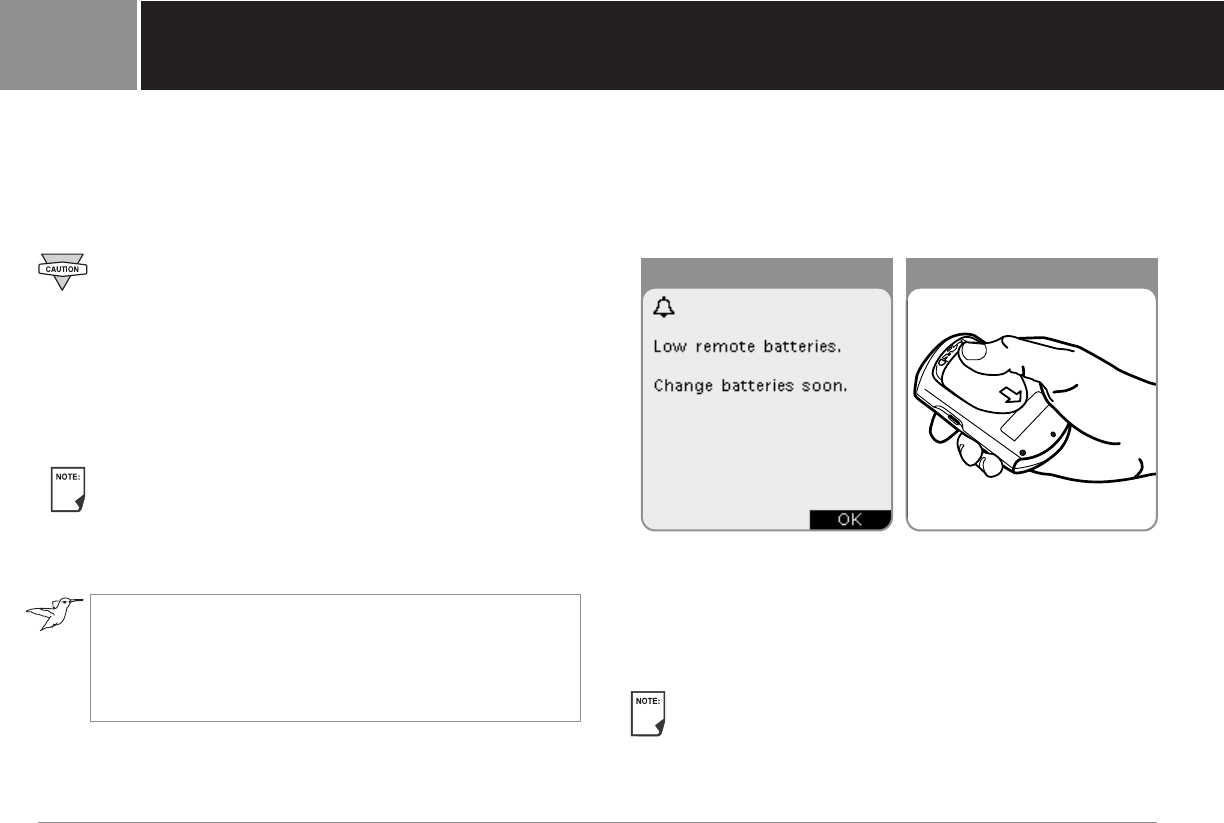
98 iXL™ Diabetes Management System User Guide: Appendices
Appendices
Replacing batteries
The iXL Remote Controller uses 2 AAA alkaline batteries. You
can purchase them at any grocery, hardware, or convenience
store, or order them from Insulet (see “Ordering supplies” later
in this chapter).
Use only new AAA alkaline batteries to power the remote.
Never use old or used batteries; the remote may not
work properly.
On average, a pair of batteries powers the remote controller for
4 weeks. The remote automatically alerts you when its battery
power gets low (see Figure A-1). After “Low remote battery”
alert, press OK to turn off the alert and replace the batteries as
soon as you can.
If batteries run out, data and settings stored in the remote’s
memory may be lost. Replace old batteries promptly.
Information may be lost if batteries are removed and not
replaced within 2 hours. Therefore, do not remove the old
batteries until you have new ones to replace them.
The remote’s backlight and vibrate features use more
battery power than other system operations. To preserve
battery life, consider turning off these features if you do
not use them (see Chapter 6, iXL Remote Controller
Features).
To replace batteries:
1. On the back of the remote, open the battery compartment by
gently pressing down on the ribbed side of the compartment
door until it opens (Figure A-2). You don’t need any special
tools.
2. Inspect the battery compartment to make sure there is no dust
or debris that might interfere with battery terminals. Shake
out any debris or use a clean, lint-free cloth to remove it.
3. Insert two (2) new AAA alkaline batteries into the
compartment and close it.
The diagram inside the compartment shows you the
direction to insert the batteries.
4. Turn the remote face up.
Figure A-1 Figure A-2
iXL™ Diabetes Management System User Guide: Appendices 99
Appendices
5. Press the Power button.
The remote is now ready to use.
If the remote becomes submerged in water
The iXL Remote Controller is not waterproof. Do NOT place it in
water or leave it near water where it can accidentally fall in. If
it becomes submerged in water:
1. Dry the outside of the device with a clean, lint-free cloth.
2. Open the battery compartment; remove the batteries and
discard them.
3. Use a clean, lint-free cloth to gently absorb any water in the
battery compartment.
4. Leave the battery compartment door open until the device is
thoroughly dry.
Never use a blow dryer or hot air to dry the pump or
remote. Extreme heat can damage the electronics.
5. Do NOT attempt to use the remote until it has thoroughly
air-dried.
For technical support, call Insulet’s 24-hour customer
support at (800) 591-3455.
If you drop the remote
The iXL Remote Controller is built to withstand a lot of abuse,
but shock or severe impact can damage it. If you drop the
remote or if it is otherwise subjected to severe impact:
1. Inspect the outside of the device for visible signs of damage.
2. Press the Power button to see whether the remote comes on
and whether the LCD screen is damaged.
3. Inspect the inside of the battery compartment for visible
signs of damage.
4. Do NOT use the remote if it appears damaged or is not
working as it should.
For technical support, call Insulet’s 24-hour customer
support at (800) 591-3455.
100 iXL™ Diabetes Management System User Guide: Appendices
Appendices
Insulin and Supplies
Storage
Store all iXL System products and supplies (including unopened
pumps) in a cool, dry place. Products or supplies that have been
exposed to extreme temperatures may not function properly.
It is especially important to store your insulin in a well-controlled
environment. Inspect insulin before using it; never use insulin
that looks cloudy or discolored. Insulin that is cloudy or
discolored may be old, contaminated, or inactive. Check the
insulin manufacturer’s instructions for use.
Ordering supplies
All iXL System products and supplies are available directly from
Insulet Corporation. You can order them at any time by calling
(800) 591-9948. We use established, reliable carriers to insure
fast, safe delivery. Special or overnight delivery is possible to
most parts of the continental United States.
iXL™ Diabetes Management System User Guide: Appendices 101
Appendices
Limited Warranty for the iXL™ Remote
Controller
Limited warranty coverage
Insulet Corporation (“Insulet”) warrants to the original purchaser (“you”) that the
iXL Remote Controller (the “Remote”) will be free from defects in materials and
workmanship, under normal use and conditions, for a period of two (2) years from
the date of purchase. If Insulet determines that the Remote is defective during the
warranty period, Insulet will either repair or replace, at its option, the Remote at no
charge to you, subject to the conditions and exclusions stated herein. This Warranty
applies only to new devices and, in the event the Remote is repaired or replaced,
the warranty period shall not be extended.
Warranty claim procedure
You must notify Insulet of the claimed defect within the warranty period by writing
or calling: Insulet Corporation, 100 Cummings Center, Suite 239G, Beverly, MA
01915; Telephone: (800) 591-3455; Facsimile: (978) 299-0301. The claim must include
the date of purchase, model number, serial number, and a description of the
claimed defect. Insulet's authorization must be obtained prior to returning the
Remote. If authorized, the Remote must be properly packaged and returned to
Insulet. Insulet will pay all freight and transportation charges, where applicable,
incurred in shipping a Remote to be repaired or replaced under this Warranty.
Conditions
Proof of Purchase in the form of a bill of sale or receipted invoice showing that the
Remote is within the warranty period must be presented to obtain warranty service.
Exclusions
This Warranty covers only the original purchaser and cannot be transferred
with sale, rental, or other transfer of the Remote to any other person or entity.
THIS WARRANTY DOES NOT APPLY IF THE REMOTE HAS BEEN:
•Changed or modified by any person or entity other than Insulet;
•Serviced or repaired by any person or entity other than Insulet;
•Damaged by an act of God, misuse, abuse, negligence, accident, wear and
tear, unreasonable use, or by other causes unrelated to defective materials
or workmanship.
Miscellaneous
REPAIR OR REPLACEMENT AS PROVIDED UNDER THIS WARRANTY IS
YOUR EXCLUSIVE REMEDY. ANY APPLICABLE IMPLIED WARRANTIES,
INCLUDING WARRANTIES OF MERCHANTABILITY AND FITNESS FOR A
PARTICULAR PURPOSE, ARE LIMITED IN DURATION TO THE DURATION
OF THIS WARRANTY. IN NO EVENT SHALL INSULET, ITS SUPPLIERS, OR
ITS DISTRIBUTORS BE LIABLE FOR CONSEQUENTIAL OR INCIDENTAL
DAMAGES OR FOR BREACH OF ANY EXPRESS OR IMPLIED WARRANTY
ON THE REMOTE.
Some states do not allow limitation on how long an implied warranty lasts, and
some states do not allow the exclusion or limitation of consequential or incidental
damages, so the above limitations or exclusions may not apply to you.
This Warranty gives you specific legal rights, and you may also have other rights
which vary from state to state. This Warranty is valid only in the United States.
No Other Warranty. Unless modified in a written document signed by both parties,
this Warranty is understood to be the complete and exclusive agreement between
the parties, superceding all prior agreements, oral or written, and all other
communications between the parties relating to the subject matter of this agreement.
No employee of Insulet or any other party is
authorized to make any warranty in
addition to those made in this Warranty.
102 iXL™ Diabetes Management System User Guide: Appendices
Appendices
iXL™ System Options and Settings
Time 12-hour or 24-hour clock
Default is 12-hour
Date MM/DD/YY
DD/MM/YY
MM.DD.YY
DD.MM.YY
Default is MM/DD/YY
Bolus and iBolus 0.1, 0.5, or 1.0 units
increment Default is 0.1 units
Extended bolus duration 30 minutes to 8 hours
Maximum bolus size Up to 30 units in 0.1 unit increments
Default is 10 units
Basal rate increment 0.05 units
Basal programs 7
Basal rate segments 48 per program
Maximum basal rate 30 U/hr
Default is 3.00 U/hr
Temp basal presets 7
Temp basal duration 30 minutes to 24 hours
Suspend 30 minutes to 2 hours
Backlight time-out 15, 30, or 60 seconds
Default is 30 seconds
Screen time-out 15, 30, or 60 seconds
Default is 30 seconds
Language English
History storage 2400 records/90 days
Remote lock On or Off
Default is Off
Auto off alert Off; 1 hour to 24 hours
Default is Off
Blood glucose reminder Off, Audible, or Vibrate
Reminder time of 1, 2, 3, or 4
hours after every bolus dose
Default is Off
Low reservoir volume 10 to 50 units in 5-unit increments
indicator Default is 10.0 units
Pump expiration alert Off; 3 to18 hours in 1-hour
increments
Default is 12 hours
iXL™ Diabetes Management System User Guide: Appendices 103
Appendices
iXL™ Pump Specifications
Size: 1.6” wide x 2.75” long x 0.6” high
(4.1cm x 6.99cm x 1.5cm)
Weight: 31 grams
Operating temperature range: 41°F to 104°F (5°C to 40°C)
Storage temperature range: 14°F to 122°F (-10°C to 50°C)
Reservoir volume (deliverable): 200 units
Cannula insertion depth: 6.5mm
Water tight rating: IPX8
Insulin concentration: U-100
Alarm type: Audible
Delivery accuracy (tested per IEC 60601-2-24):
Basal: +/- 5% at rates > 0.1 U/hr
Bolus: +/- 5% for all set values
iXL™ Remote Controller Specifications
Size: 2.75” wide x 4.5” long x 1.125” high
(6.99cm x 11.4cm x 2.858cm)
Weight: 165 grams
Screen: 2” square (5cm square) backlit LCD
Battery: Powered by two (2) AAA alkaline batteries
Battery life: approximately 4 weeks
Operating temperature range: 41°F to 104°F (5°C to 40°C)
Storage temperature range: 14°F to 122°F (-10°C to 50°C)
Communication distance: up to 12” (30.5cm)
Alarm type: Audible, vibratory
Warranty: 2 years
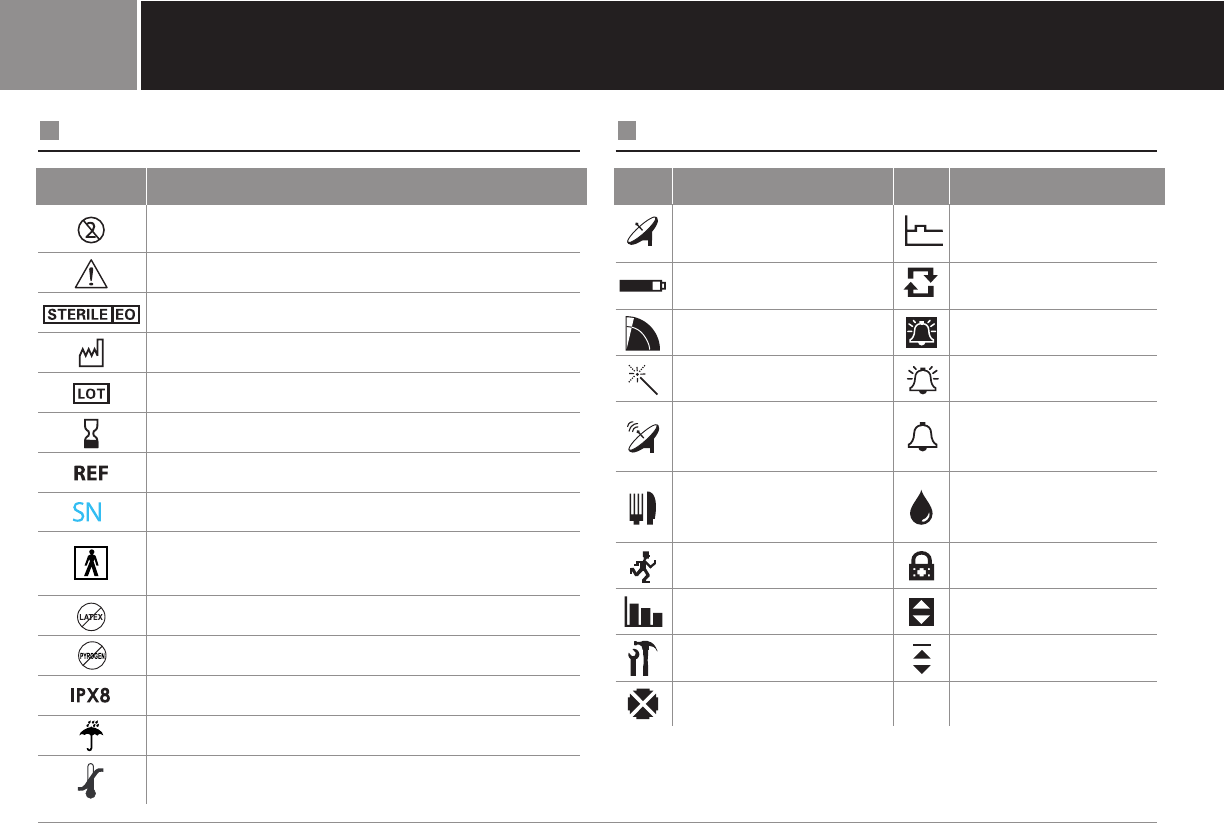
104 iXL™ Diabetes Management System User Guide: Appendices
Appendices
iXL™ System Label Symbols
Symbol Meaning
Do NOT reuse this device. Single-use only.
Please read instructions for use (See User’s Guide).
Sterilized by ethylene oxide
Manufacture date: (year–month)
Lot number
Expiration date (use-by date): (year–month)
Reference/record number: (reorder number)
Device serial number
Type BF medical device
(protection from electrical shock)
Latex free
Non-pyrogenic
Watertight to 8 feet for 30 minutes
Keep dry
Storage temperature
iXL™ Remote Controller Icons
Icon Menu Option Icon Menu Option
Status Basal Program
Battery Pump change
Insulin Gauge Hazard Alarm
Setup Wizard Advisory Alarm
Communicating Confidence, Reminder,
and Information Alert
Bolus & iBolus Blood glucose check
reminder
Temp Basal Remote Lock Icon
My Records Up/Down Icon
Settings Text entry cursor
Suspend/Resume/Cancel
iXL™ Diabetes Management System User Guide: Appendices 105
Appendices
iXL™ System Federal Communications
Commission (FCC) Notice Concerning
Interference
The iXL Remote Controller complies with Part 15 (Radio
Frequency Devices) of the FCC Rules. As such, it is subject to
the following two conditions:
1. It may not cause harmful interference.
2. It must be able to accept interference, including interference
that may cause undesirable operation of the device.
The iXL Remote Controller has been tested and found to
comply with the limits for a Class B digital device (according to
Part 15 of the FCC Rules). These limits are designed to provide
reasonable protection against harmful interference in a
residential setting.
The iXL Remote Controller generates, uses, and can radiate
radio frequency energy; and (if installed and used according
to instructions) may cause harmful interference to radio
communications. There are no guarantees that interference
will not occur in a particular installation. If the remote does
cause harmful interference to radio or television reception,
the interference may be corrected by one or more of the
following measures:
•Moving or relocating the remote
•Increasing the distance between the remote and the other
device that is emitting or receiving interference
Helpful Resources
American Diabetes Association
1660 Duke Street • Alexandria, VA 22314
(800) 342-2383
www.diabetes.org
International Association for Medical Assistance to Travelers
List of doctors in foreign countries who speak English and who
received post-graduate education in the US or Great Britain
417 Center Street • Lewiston, NY 14092
(716) 754-4883
Juvenile Diabetes Research Foundation International
120 Wall Street • New York, NY 10005-4001
(800) 533-2873
www.jdf.org
Medic Alert Foundation
To order medical ID necklaces and bracelets
PO Box 1009 • Turlock, CA 95381-1009
(800) 432-5378
www.medicalert.org
National Institute of Diabetes & Digestive & Kidney Diseases
(NIDDK)
National Institutes of Health
Building 31, Center Drive, MSC 2560 • Bethesda, MD 20892-2560
www.niddk.nih.gov/health/diabetes/diabetes.htm
My Notes:
106 iXL™ Diabetes Management System User Guide: Appendices
Appendices

Glossary
A1c (see Hemoglobin A1c)
Advisory alarm
Notification by the remote that a serious condition exists.
Aseptic technique
A method for maintaining sterilization and preventing
contamination.
Basal program
One or more basal rates that together cover a 24-hour period
from midnight to midnight.
Basal rate
A small base or background amount of insulin that is delivered,
at a preset rate, continuously for a specified period of time.
Basal rates are measured in units per hour (U/hr).
Basal segment (time segment)
The time period during which a specific basal rate is delivered.
Blood glucose (see glucose)
Blood glucose level
The amount of glucose, or sugar, in the blood. In the United
States, blood glucose levels are measured in milligrams per
deciliter (mg/dl).
Bolus dose
A dose of insulin taken to correct an elevated blood glucose level
or to cover carbohydrates in a meal or snack.
Cannula
A small, thin tube inserted below the skin, which serves to
introduce a liquid medication into the body.
Carbohydrate (carb)
One of the three main nutrients found in food. (The other two
are protein and fat.) Foods that contain carbohydrates include
starches, sugars, vegetables, fruits, and dairy products.
Carbohydrate counting
A method of meal planning based on counting the number of
grams of carbohydrate in a given food.
CSII (continuous subcutaneous insulin infusion)
The medical term for using an insulin pump.
Complications (of diabetes)
Harmful effects of diabetes such as damage to the eyes,
kidney, heart, blood vessels, nervous system, teeth and gums,
feet, and skin.
iXL™ Diabetes Management System User Guide: Glossary 107

Glossary
Correction factor (also known as sensitivity factor)
A formula for how much one unit of insulin will lower your blood
glucose. For example, if your sensitivity factor is 40, one unit of
insulin will lower your blood glucose by 40mg/dl.
Dawn phenomenon
An early morning rise in blood glucose level caused by the
normal release of hormones that block insulin’s effect.
Diabetes Control and Complications Trial (DCCT)
A study by the National Institute of Diabetes and Digestive and
Kidney Diseases, conducted from 1983 to 1993 in people with
type 1 diabetes showed that good blood glucose control
significantly helped prevent or delay diabetes complications.
Diabetes
A condition characterized by hyperglycemia (high blood glucose)
resulting from the body’s inability to use blood glucose for energy.
In type 1 diabetes, the pancreas no longer makes insulin and
therefore blood glucose cannot enter the cells to be used for
energy. In type 2 diabetes, either the pancreas does not make
enough insulin or the body is unable to use insulin correctly.
Extended Bolus
A feature of the iXL System that allows a bolus dose to be given
over an extended period of time.
Healthcare provider
A professional who teaches people how to manage their health.
Many healthcare providers are certified diabetes educators or
CDEs. All healthcare providers are a resource for valuable
diabetes management information.
Glucose
A simple sugar (also known as dextrose) used by the body for
energy. Without insulin, the body cannot use glucose for energy.
Hazard alarm
Notification by the remote that a dangerous condition exists.
Hemoglobin A1c (HbA1c)
A test that measures a person’s average blood glucose level
over the past 2 to 3 months. Also called glycosylated
hemoglobin, the test shows the amount of glucose that sticks
to the red blood cell, which is proportional to the amount of
glucose in the blood.
Hyperglycemia (high blood glucose)
A higher-than-normal level of glucose in the blood; generally
180mg/dl or higher.
Hypoglycemia (low blood glucose)
A lower-than-normal level of glucose in the blood; generally
70mg/dl or lower.
108 iXL™ Diabetes Management System User Guide: Glossary
Glossary
Hypoglycemia unawareness
A condition in which a person does not feel or recognize the
symptoms of hypoglycemia.
iBolus (Audio)
A feature of the iXl System that allows a bolus dose to be given
“on the go” without looking at the remote screen.
Increment
The act or process of increasing or decreasing a number, value,
or amount.
Infusion
Introducing a liquid substance under the skin into the body.
Infusion site
Place on the body where an infusion set is inserted.
Insulin
A hormone that helps the body use glucose for energy. The beta
cells of a healthy pancreas make insulin.
Insulin reaction (see hypoglycemia)
Insulin-to-carbohydrate ratio
Number of grams of carbohydrate covered by one unit of insulin.
For example, if your insulin-to-carbohydrate ratio is 1:10, then
you need to deliver one unit of insulin to cover every ten grams
of carbohydrate you eat.
Ketoacidosis (diabetic ketoacidosis or DKA)
A very serious condition in which extremely high blood glucose
levelsand a severe lack of insulin cause the body to break down
fat for energy. The breakdown of fat releases ketones into the
blood and urine. DKA can take hours or days to develop, with
symptoms that include stomach pain, nausea, vomiting, fruity
breath odor, and rapid breathing.
It is important to rule out ketoacidosis when experiencing
symptoms that might otherwise indicate the flu.
Ketones
Acidic byproducts that result from the breakdown of fat for
energy. The presence of ketones indicates that the body is using
stored fat and muscle (instead of glucose) for energy.
Multiple daily injections (MDIs)
Introducing insulin into the body with a syringe several times
a day.
Occlusion
A blockage or interruption in insulin delivery.
Prime bolus
An amount of insulin used to fill the cannula, preparing it to begin
delivering insulin under your skin.
Sensitivity factor (see correction factor)
iXL™ Diabetes Management System User Guide: Glossary 109

110 iXL™ Diabetes Management System User Guide: Glossary
Glossary
Sharps
Any medical item that may cause punctures or cuts to those
handling them. Sharps include needles, syringes, scalpel
blades, disposable razors, and broken medical glassware.
Sharps container
A puncture-proof container used for storage and disposal of
used sharps.
Soft key
A button on the iXL Remote whose label or function appears on
the screen directly above the button. The label changes
depending on the task you are performing.
Target blood glucose range
A range of blood glucose levels that you are trying to achieve
during a certain period of the day. For example, you may want
one range before meals, a different range two hours after
meals, and yet another range for bedtime.
Time segment (see basal segment)

A
A1c (see hemoglobin A1c)
activate pump . . . . . . . . . . . . . . . . . . . . 38
adverse reactions, avoiding . . . . . . . . . 71
airport security . . . . . . . . . . . . . . . . . . . 70
advisory alarms . . . . . . . . . . . . . . . . 87,107
auto off advisory . . . . . . . . . . . . . . . . 90
end of suspend . . . . . . . . . . . . . . . . . 90
low reservoir volume . . . . . . . . . . 11,88
pump expiration advisory I . . . . . . . . 89
pump expiration advisory II . . . . . . . 89
stuck key detected . . . . . . . . . . . . . . 91
troubleshooting . . . . . . . . . . . . . . . . . 91
alarm history . . . . . . . . . . . . . . . . . . . . . 63
alerts . . . . . . . . . . . . . . . . . . . . . . . . . . . . 53
aseptic technique . . . . . . . . . . . 41,46,107
attach pump . . . . . . . . . . . . . . . . . . . . . . 41
audio bolus (see iBolus™)
automatic inserter (see RediSet™)
automatic priming . . . . . . . . . . . . . . . . . 67
avoiding infection . . . . . . . . . . . . . . . 41,46
B
backlight . . . . . . . . . . . . . . . . . . . . . . . 4,54
time-out . . . . . . . . . . . . . . . . . . . . . 54,55
basal program . . . . . . . . . . . . . . . . . 15,107
change . . . . . . . . . . . . . . . . . . . . . . . . 20
create . . . . . . . . . . . . . . . . . . . . . . . . . 16
delete . . . . . . . . . . . . . . . . . . . . . . . . . 21
edit . . . . . . . . . . . . . . . . . . . . . . . . . . . 20
enable . . . . . . . . . . . . . . . . . . . . . . . . . 19
personal programs . . . . . . . . . . . . . . . ix
rename . . . . . . . . . . . . . . . . . . . . . . . . 21
suspend . . . . . . . . . . . . . . . . . . . . . . . 43
basal rate . . . . . . . . . . . . . . . . . . . . . 15,107
initial . . . . . . . . . . . . . . . . . . . . . . . . . . 11
maximum . . . . . . . . . . . . . . . . . . 11,25,52
basal segment . . . . . . . . . . . . . . . . . 15,107
change . . . . . . . . . . . . . . . . . . . . . . . . 20
basal, temporary presets . . . . . . . . . . . 22
cancel active . . . . . . . . . . . . . . . . . . . 23
change . . . . . . . . . . . . . . . . . . . . . . . . 24
create . . . . . . . . . . . . . . . . . . . . . . . . . 22
delete . . . . . . . . . . . . . . . . . . . . . . . . . 22
edit . . . . . . . . . . . . . . . . . . . . . . . . . . . 24
enable . . . . . . . . . . . . . . . . . . . . . . . . . 23
personal presets . . . . . . . . . . . . . . . . . ix
rename . . . . . . . . . . . . . . . . . . . . . . . . 24
basal, temporary rate . . . . . . . . . . . . . . 24
cancel active . . . . . . . . . . . . . . . . . . . .25
enable . . . . . . . . . . . . . . . . . . . . . . . . . 24
batteries, replacing . . . . . . . . . . . . . . . . 98
battery compartment . . . . . . . . . . . . . . 10
blood glucose . . . . . . . . . . . . . . . . . . . 108
blood glucose reminder . . . . . . . 29,30,53
blood glucose targets . . . . . . . . . vii,ix,110
bolus . . . . . . . . . . . . . . . . . . . . . . . . . . . . 27
cancel . . . . . . . . . . . . . . . . . . . . . . . . 32
extended . . . . . . . . . . . . . . . . . 27,29,107
iBolus™ (audio) . . . . . . . . . . . . . . 27,109
normal . . . . . . . . . . . . . . . . . . . . . . . . . 27
bolus increment . . . . . . . . . . . . . . . . 11,52
bolus, maximum . . . . . . . . . . . . . . . . 11,52
button . . . . . . . . . . . . . . . . . . . . . . . . . . vi,4
iBolus™ . . . . . . . . . . . . . . . . . . . . . . . . 4
power . . . . . . . . . . . . . . . . . . . . . . . . . . 4
soft keys . . . . . . . . . . . . . . . . . . . . . . . . 4
status . . . . . . . . . . . . . . . . . . . . . . . . . . 4
up/down controller . . . . . . . . . . . . . . . 4
user info/support . . . . . . . . . . . . . . . . . 4
C
cannula . . . . . . . . . . . . . . . . . . . . . . . . . 107
insert . . . . . . . . . . . . . . . . . . . . . . . . . . 42
carb counting . . . . . . . . . . . . . . . . . . . . 107
carbohydrate . . . . . . . . . . . . . . . . . . 73,107
change pump . . . . . . . . . . . . . . . . . . . . . 35
check alarms . . . . . . . . . . . . . . . . . . . . . 56
cleaning
pump . . . . . . . . . . . . . . . . . . . . . . . . . . 97
remote . . . . . . . . . . . . . . . . . . . . . . . . . 97
communication failure . . . . . . . . . . . . . 93
complications, diabetes-related . . . . 107
confidence alerts . . . . . . . . . . . . . . . . . 53
continuous subcutaneous insulin
iXL™ Diabetes Management System User Guide: Index 111
Index

infusion (CSII) . . . . . . . . . . . . . . . . . . 107
contraindications . . . . . . . . . . . . . . . . . . vii
conventions and terms . . . . . . . . . . . . . vi
correction factor . . . . . . . . . . . . . vii,ix,107
CT scans . . . . . . . . . . . . . . . . . . . . . . . . . 81
D
data storage . . . . . . . . . . . . . . . . . . . . . . . 2
date . . . . . . . . . . . . . . . . . . . . . . . . . . 11,50
dawn phenomenon . . . . . . . . . . . . . . . 107
DCCT (Diabetes Control and
Complications Trial) . . . . . . . . . . . . 1,107
diabetes . . . . . . . . . . . . . . . . . . . . . . . . 107
diabetic ketoacidosis (DKA) . . . . . 78,109
avoiding . . . . . . . . . . . . . . . . . . . . . . . 78
symptoms . . . . . . . . . . . . . . . . . . . . . . 78
treatment . . . . . . . . . . . . . . . . . . . . . . 78
diagnostic functions . . . . . . . . . . . . . . . 56
disinfect infusion site . . . . . . . . . . . . . . 41
E
electrical interference . . . . . . . . . . . . . 58
emergency kit . . . . . . . . . . . . . . . . . . . . 79
enter text . . . . . . . . . . . . . . . . . . . . . . . . . 5
exercise . . . . . . . . . . . . . . . . . . . . . . . . . 80
extended bolus . . . . . . . . . . . . . . 27,29,107
cancel . . . . . . . . . . . . . . . . . . . . . . . . . 32
deliver . . . . . . . . . . . . . . . . . . . . . . . . . 29
extreme temperatures . . . . . . . . . . . 46,58
F
FCC notice . . . . . . . . . . . . . . . . . . . . . . 105
fill port . . . . . . . . . . . . . . . . . . . . . . . . . 3,40
fill pump . . . . . . . . . . . . . . . . . . . . . . . . . 39
fill syringe/needle . . . . . . . . . . . . . . . . . . 5
G
gauge, insulin . . . . . . . . . . . . . . . . . . . . . 49
glucose (see blood glucose)
H
hazard alarm . . . . . . . . . . . . . . . . . . 83,108
auto off . . . . . . . . . . . . . . . . . . . . . . . . 84
empty reservoir . . . . . . . . . . . . . . . . . 84
occlusion . . . . . . . . . . . . . . . . . . . . . . 84
pump error . . . . . . . . . . . . . . . . . . . . . 86
pump expiration . . . . . . . . . . . . . . . . . 84
pump change interrupted . . . . . . . . . 85
remote error . . . . . . . . . . . . . . . . . . . . 85
stuck key . . . . . . . . . . . . . . . . . . . . . . . 85
system error . . . . . . . . . . . . . . . . . . . . 86
troubleshooting . . . . . . . . . . . . . . . . . 87
hemoglobin A1c (HbA1c) . . . . . . . . ix,108
high blood glucose (see hyperglycemia)
history
alarm . . . . . . . . . . . . . . . . . . . . . . . . . . 63
insulin delivery . . . . . . . . . . . . . . . . . . 61
hospitalization . . . . . . . . . . . . . . . . . . . . 81
hyperglycemia . . . . . . . . . . . . . . . . . 75,108
avoiding . . . . . . . . . . . . . . . . . . . . . . . 75
causes . . . . . . . . . . . . . . . . . . . . . . 76,77
symptoms . . . . . . . . . . . . . . . . . . . . . . 75
treatment . . . . . . . . . . . . . . . . . . . . . . 75
hypoglycemia . . . . . . . . . . . . . . . . . 72,109
avoiding . . . . . . . . . . . . . . . . . . . . . . . 72
causes . . . . . . . . . . . . . . . . . . . . . . . . 74
symptoms . . . . . . . . . . . . . . . . . . . . . . 72
treatment . . . . . . . . . . . . . . . . . . . . . . 73
hypoglycemia unawareness . . . . . . . .108
I
iBolus™
cancel . . . . . . . . . . . . . . . . . . . . . . . . .32
button . . . . . . . . . . . . . . . . . . . . . . . . . 3,4
deliver . . . . . . . . . . . . . . . . . . . . . . . . . 31
increment . . . . . . . . . . . . . . . . . . . . . . 31
Increment . . . . . . . . . . . . . . . . . . . . . . . 109
bolus . . . . . . . . . . . . . . . . . . . . . . . . 11,52
iBolus™ . . . . . . . . . . . . . . . . . . . . . . . . 31
indication for use . . . . . . . . . . . . . . . . . . vii
infection
avoiding . . . . . . . . . . . . . . . . . . . . . 41,46
signs of . . . . . . . . . . . . . . . . . . . . . . . . 46
infusion . . . . . . . . . . . . . . . . . . . . . . . . . 109
infusion site . . . . . . . . . . . . . . . . . . . . . 109
disinfect . . . . . . . . . . . . . . . . . . . . . . . 41
inspect . . . . . . . . . . . . . . . . . . . . . . . . 69
prepare . . . . . . . . . . . . . . . . . . . . . . . . 41
112 iXL™ Diabetes Management System User Guide: Index
Index

Index
select . . . . . . . . . . . . . . . . . . . . . . . . . 41
initial basal rate . . . . . . . . . . . . . . . . . . . 11
insulin . . . . . . . . . . . . . . . . . . . . . . . . . . 109
insulin gauge . . . . . . . . . . . . . . . . . . . . . 49
insulin delivery
history . . . . . . . . . . . . . . . . . . . . . . . . . 42
history . . . . . . . . . . . . . . . . . . . . . . . . . 61
resume . . . . . . . . . . . . . . . . . . . . . . . . 45
suspend . . . . . . . . . . . . . . . . . . . . . . . 43
insulin storage . . . . . . . . . . . . . . . . . . . 100
insulin-to-carbohydrate ratio . . . vii,ix,109
IPX8 . . . . . . . . . . . . . . . . . . . . . . . 47,69,103
K
ketoacidosis, diabetic (DKA) . . . . . 78,109
symptoms . . . . . . . . . . . . . . . . . . . . . . 78
treatment . . . . . . . . . . . . . . . . . . . . . . 78
ketones . . . . . . . . . . . . . . . . . . . . . . . . . 109
L
low blood glucose (see hypoglycemia)
M
main menu . . . . . . . . . . . . . . . . . . . . . . . . 6
maximum basal rate . . . . . . . . . . 11,25,52
maximum bolus . . . . . . . . . . . . . . . . . 11,52
maximum daily dose . . . . . . . . . . . . . 11,52
MIN (minimum) fill line . . . . . . . . . . . . . 39
MRIs . . . . . . . . . . . . . . . . . . . . . . . . . . . . 81
multiple daily injections (MDIs) . . . . . 109
my records . . . . . . . . . . . . . . . . . . . . . . . 61
N
needle cap . . . . . . . . . . . . . . . . . . . . . . . . 3
normal bolus . . . . . . . . . . . . . . . . . . . . . 27
deliver . . . . . . . . . . . . . . . . . . . . . . . . . 28
O
occlusion . . . . . . . . . . . . . . . . . . . . . . . 109
detection . . . . . . . . . . . . . . . . . . . . . . . 68
operating temperatures . . . . . . . . . . . 103
order supplies . . . . . . . . . . . . . . . . . . . 100
P
power button . . . . . . . . . . . . . . . . . . . . . 3,4
power, remote . . . . . . . . . . . . . . . . . . . . 10
prepare infusion site . . . . . . . . . . . . . . . 41
prime bolus . . . . . . . . . . . . . . . . . . . 42,109
prime, automatic . . . . . . . . . . . . . . . . . . 67
pump
activate . . . . . . . . . . . . . . . . . . . . . . . . 38
attach . . . . . . . . . . . . . . . . . . . . . . . . . 41
change process . . . . . . . . . . . . . . . . . 35
clean . . . . . . . . . . . . . . . . . . . . . . . . . . 97
deactivate . . . . . . . . . . . . . . . . . . . . . . 36
expiration . . . . . . . . . . . . . . . . . . . . . . 53
fill . . . . . . . . . . . . . . . . . . . . . . . . . . . . . 39
illustration . . . . . . . . . . . . . . . . . . . . . . . 3
operating temperatures . . . . . . . . . 103
placement . . . . . . . . . . . . . . . . . . . . . . 41
prime . . . . . . . . . . . . . . . . . . . . . . . . . . 40
remove . . . . . . . . . . . . . . . . . . . . . . . . 37
short-term removal . . . . . . . . . . . . . . 80
specifications . . . . . . . . . . . . . . . . . . 103
status . . . . . . . . . . . . . . . . . . . . . . . . . 43
storage . . . . . . . . . . . . . . . . . . 47,97,103
water . . . . . . . . . . . . . . . . . . . . . . . 47,69
R
reactions, adverse (see adverse
reactions)
record keeping . . . . . . . . . . . . . . . . . . . 61
RediSet™ . . . . . . . . . . . . . . . . . . . . 2,40,42
reminders . . . . . . . . . . . . . . . . . . . . . . . . 53
remote
clean . . . . . . . . . . . . . . . . . . . . . . . . . . 97
dropped . . . . . . . . . . . . . . . . . . . . . . . . 99
icons . . . . . . . . . . . . . . . . . . . . . . . . . 104
illustration . . . . . . . . . . . . . . . . . . . . . . . 3
lock . . . . . . . . . . . . . . . . . . . . . . . . . 54,55
operating temperature . . . . . . . . . . .103
replacing batteries . . . . . . . . . . . . . . 98
reset . . . . . . . . . . . . . . . . . . . . . . . . 56,57
set up . . . . . . . . . . . . . . . . . . . . . . . . . 10
specifications . . . . . . . . . . . . . . . . . . 103
storage . . . . . . . . . . . . . . . . . . . . . 97,103
water . . . . . . . . . . . . . . . . . . . . . 58,69,99
iXL™ Diabetes Management System User Guide: Index 113

reservoir . . . . . . . . . . . . . . . . . . . . . . . . 102
resources . . . . . . . . . . . . . . . . . . . . . . . 105
resume insulin delivery . . . . . . . . . . . . . 45
S
safety features . . . . . . . . . . . . . . . . . . . . 67
screen time-out . . . . . . . . . . . . . . . . . 54,55
sensitivity factor . . . . . . . . . . . . . vii,ix,107
setup wizard . . . . . . . . . . . . . . . . . . . . . . 10
sharps . . . . . . . . . . . . . . . . . . . . . . . . . . 110
sharps container . . . . . . . . . . . . . . . . . 110
sick days . . . . . . . . . . . . . . . . . . . . . . 79,80
soft key . . . . . . . . . . . . . . . . . . . . vi,3,4,110
specifications
pump . . . . . . . . . . . . . . . . . . . . . . . . . 103
remote . . . . . . . . . . . . . . . . . . . . . . . . 103
status
button . . . . . . . . . . . . . . . . . . . . . . . . . 3,4
screen . . . . . . . . . . . . . . . . . . . . . . . . . . 6
stop insulin delivery . . . . . . . . . . . . . . . 43
storage
insulin . . . . . . . . . . . . . . . . . . . . . . . . 100
pump . . . . . . . . . . . . . . . . . . . . 47,97,103
remote . . . . . . . . . . . . . . . . . . . 58,97,103
supplies . . . . . . . . . . . . . . . . . . . . . . . 100
supplies
order . . . . . . . . . . . . . . . . . . . . . . . . . 100
storage . . . . . . . . . . . . . . . . . . . . . . . 100
travel . . . . . . . . . . . . . . . . . . . . . . . . . . 70
surgery . . . . . . . . . . . . . . . . . . . . . . . . . . 81
suspend insulin delivery . . . . . . . . . . . . 43
symbols . . . . . . . . . . . . . . . . . . . . . . . vi,104
system options and settings . . . . . . . . 102
system setup menu . . . . . . . . . . . . . . . . 50
T
target blood glucose range . . . . vii,ix,110
temporary basal presets . . . . . . . . . . . . 22
cancel active . . . . . . . . . . . . . . . . . . . 23
change . . . . . . . . . . . . . . . . . . . . . . . . 24
create . . . . . . . . . . . . . . . . . . . . . . . . . 22
delete . . . . . . . . . . . . . . . . . . . . . . . . . 24
edit . . . . . . . . . . . . . . . . . . . . . . . . . . . 24
enable . . . . . . . . . . . . . . . . . . . . . . . . . 23
personal presets . . . . . . . . . . . . . . . . . ix
rename . . . . . . . . . . . . . . . . . . . . . . . . 24
temporary basal rate . . . . . . . . . . . . . . . 24
cancel active . . . . . . . . . . . . . . . . . . . 25
enable . . . . . . . . . . . . . . . . . . . . . . . . 24
time . . . . . . . . . . . . . . . . . . . . . . . . . . 11,50
time-out
backlight . . . . . . . . . . . . . . . . . . . . 54,55
screen . . . . . . . . . . . . . . . . . . . . . . 54,55
travel
airport security . . . . . . . . . . . . . . . . . . 70
emergency supplies . . . . . . . . . . . 70,71
time zones . . . . . . . . . . . . . . . . . . . . . 69
U
up/down controller button . . . . . . . . . . 3,4
user info/support button . . . . . . . . . . . 3,4
user information . . . . . . . . . . . . . . . . . . 64
V
viewing window . . . . . . . . . . . . . . . . . 3,46
W
warranty . . . . . . . . . . . . . . . . . . . . . . . . 101
watertight rating (IPX8) . . . . . . . 47,69,103
wireless technology . . . . . . . . . . . . . . 2,58
X
x-rays . . . . . . . . . . . . . . . . . . . . . . . . . . . 81
114 iXL™ Diabetes Management System User Guide: Index
Index

iXL™ Diabetes Management System User Guide: 115
