JVCKENWOOD K2T001 Card Printer w/Built-in RFID Tag User Manual CX 120 pm65e2
JVC KENWOOD Corporation Card Printer w/Built-in RFID Tag CX 120 pm65e2
UserManual.wiki
>
JVCKENWOOD
>
K2T001 User Manual
>
Users Manual 1 of 2
Contents
1.
Users Manual 1 of 2
2.
Users Manual 2 of 2
3.
Startup Guide 1 of 3
4.
Startup Guide 2 of 3
5.
Startup Guide 3 of 3
Users Manual 1 of 2
Navigation menu
Upload a User Manual
Namespaces
Wiki Guide
HTML
PDF
Info
Views
User Manual
Discussion / Help
Navigation
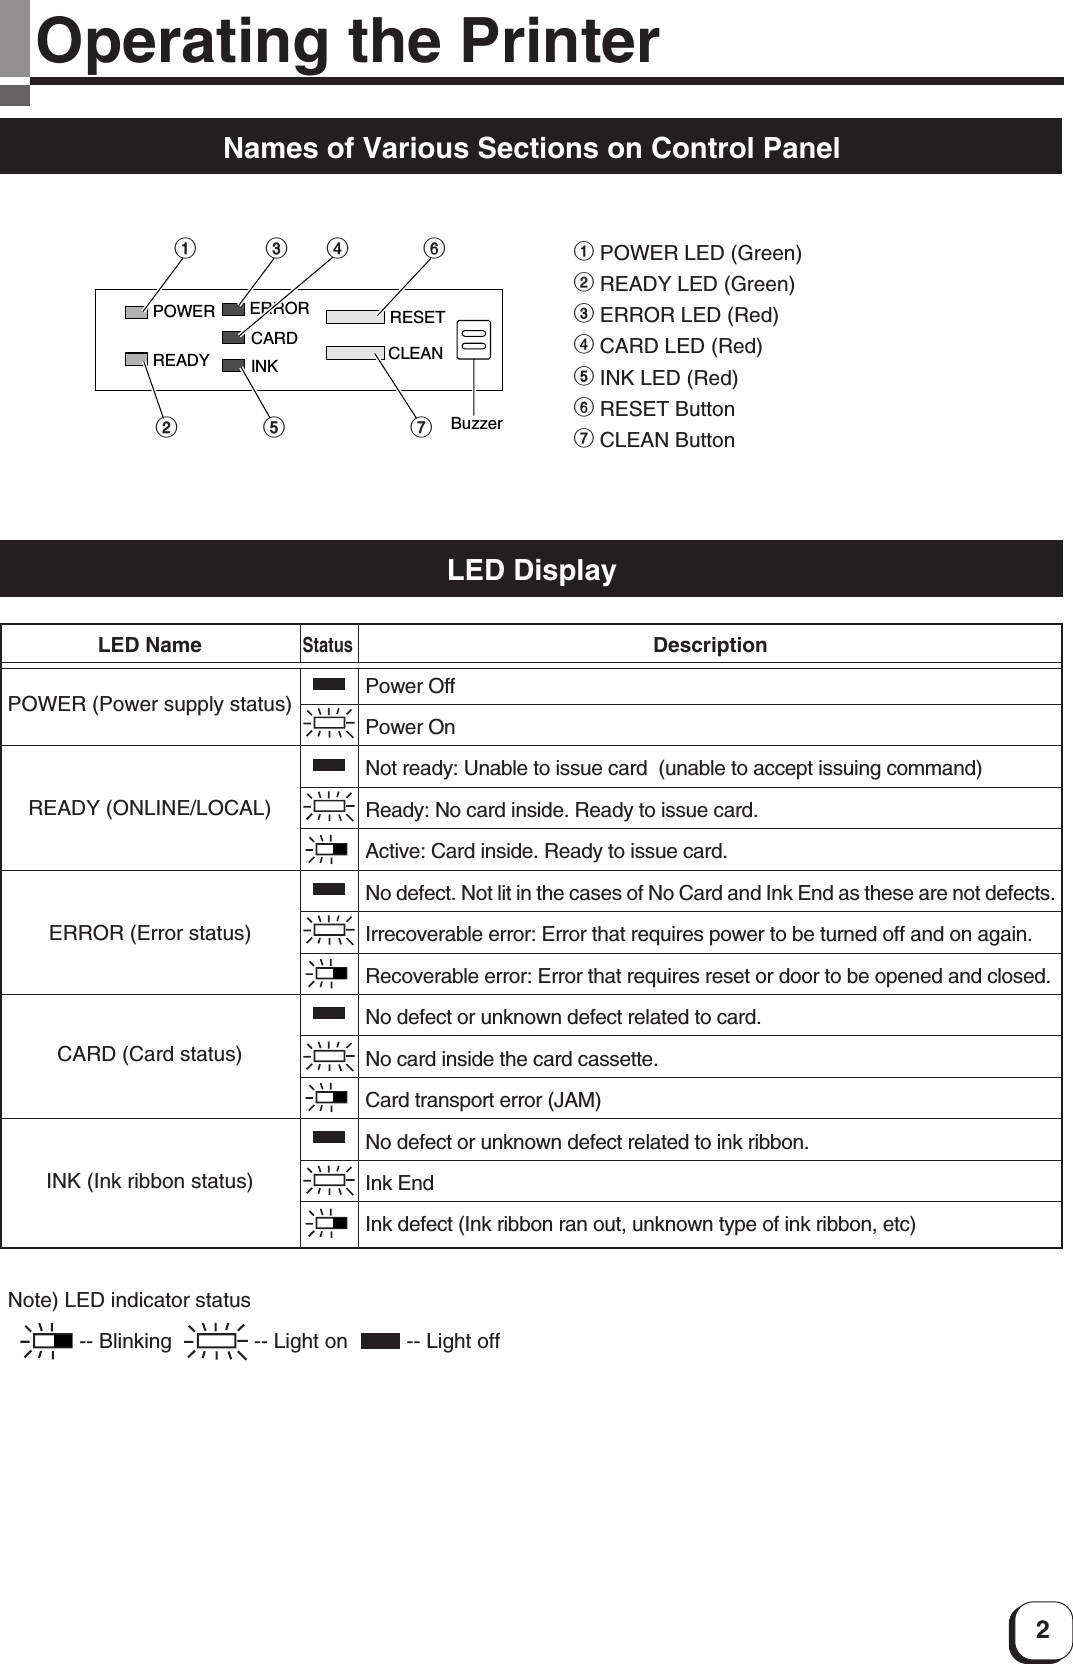
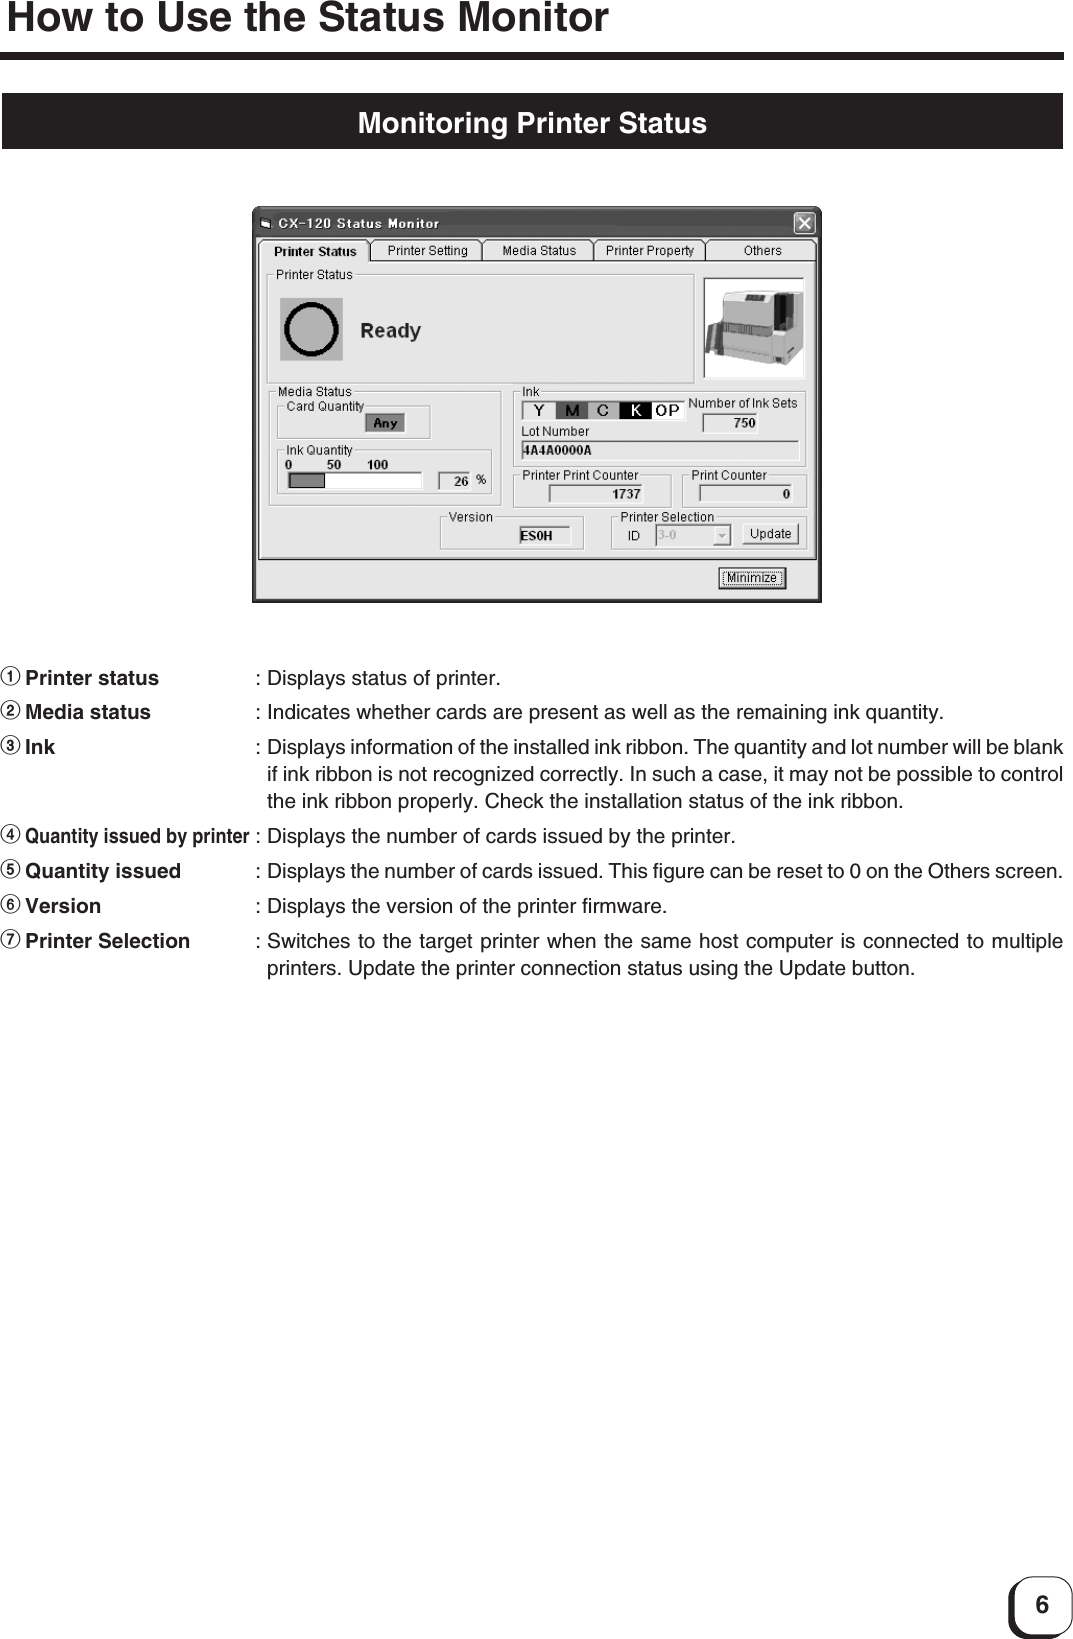
![Direct Dye Sublimation PrinterCX-120• Thank you for purchasing our product.• Before using, be sure to read the "Notes for Safe Operation" and use the unit safely.• Keep this instruction manual in a place near the printer and read it when necessary.• The manufacturing number is important for quality control. Please check whether the manufacturing number on the back of this unit is correct during purchase. Notes regarding this manual. (1) The contents of this manual shall not be reprinted or redistributed in any form without prior consent.(2) The contents of this manual or the specifications and external appearance of this unit may be altered without prior notice.(3) Illustrations used in this manual may differ slightly from the actual shape of this unit.KAT- InstructionsModelOperating the Printer ......................................... 2Names of Various Sections on Control Panel .......... 2LED Display ............................................................. 2Button Control .......................................................... 3Initialization .............................................................. 4Test Printing ............................................................. 4Differences Between Printing Modes ............... 4How to Use the Status Monitor ......................... 5Screen Configuration ............................................... 5Monitoring Printer Status ......................................... 6Ready Status Display ........................................... 7Error Status Display ............................................. 7Status Display ...................................................... 7Changing Printer Settings ........................................ 8Checking the Media and Printing Status .................. 9Display When Ink is Unknown ................................ 10Checking Printer Configuration .............................. 11Upgrading Firmware .............................................. 12Resetting the [No. of Cards Issued] Item ............... 13Test Printing ........................................................... 13Software Upgrade ............................................ 14Update of Status Monitor ....................................... 14Update of USB Driver - Windows XP ..................... 15Update of USB Driver - Windows2000 ................... 16Uninstalling Software ...................................... 19Deletion of Status Monitor...................................... 19Deletion of USB Driver - WindowsXP .................... 19Deleting USB Driver - Windows2000 ..................... 20Troubleshooting (Detailed Version) ........................... 22Internal Configuration............................................. 22List of Error Codes and Corresponding Actions ..... 23When ink ribbon is torn .......................................... 25Problems Related to Printing ................................. 25Problems related to Color Printing ......................... 26Problems Related to Text Printing .......................... 27Actions to Take When Printer Fails to Start Up ...... 28Version Upgrade ............................................... 29Specifications ................................................... 30Main Specifications ................................................ 30External Dimension ................................................ 30Table of Contents](https://usermanual.wiki/JVCKENWOOD/K2T001.Users-Manual-1-of-2/User-Guide-521185-Page-1.png)
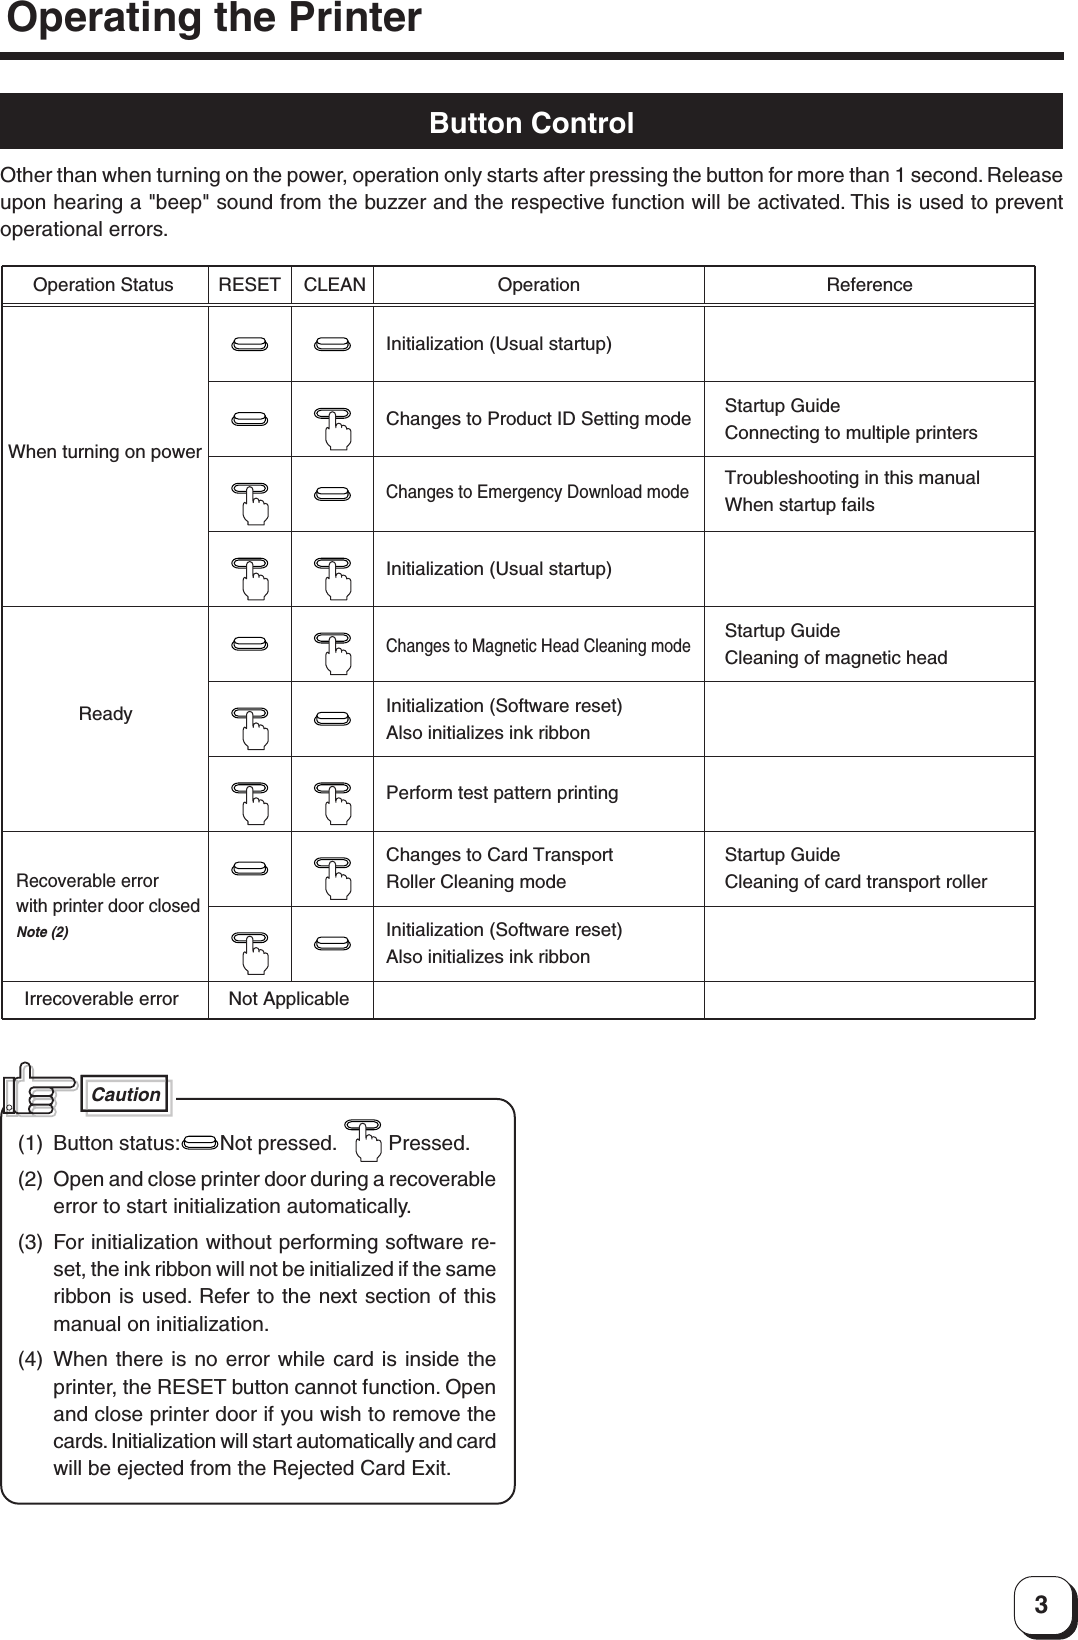
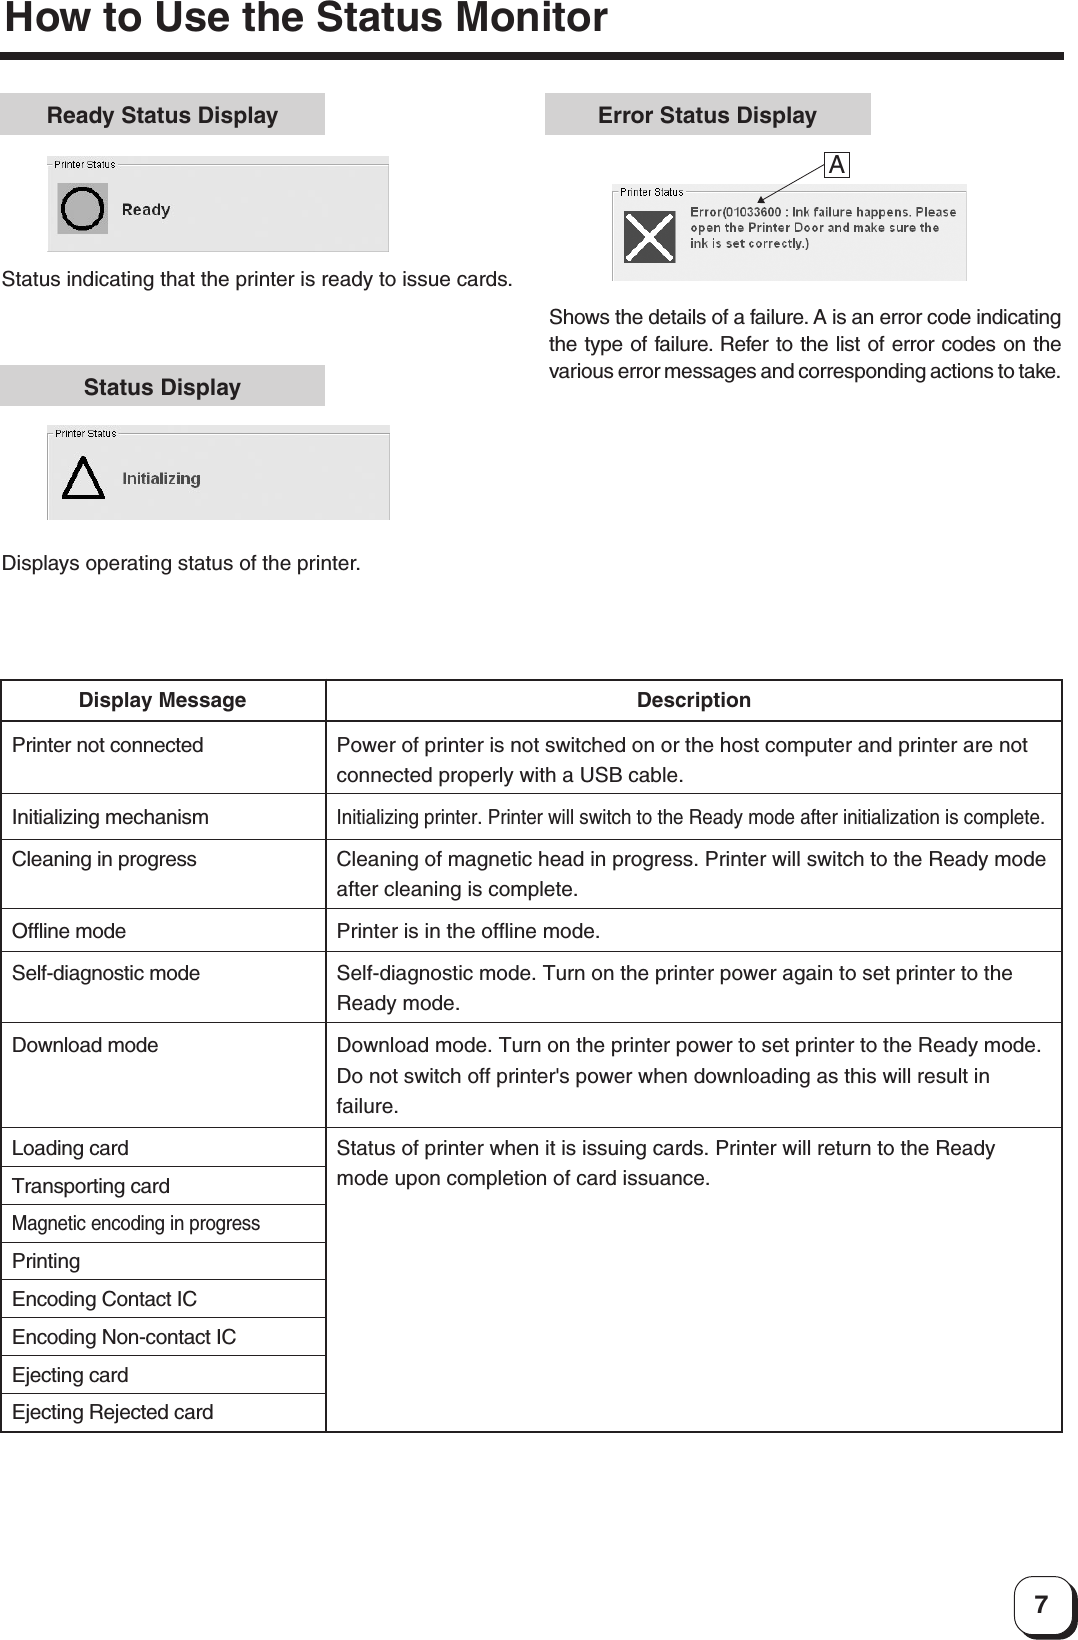
![13Resetting the [No. of Cards Issued] ItemYou can reset the number of cards issued on the Others screen.1 AClick on A to set the recorded number of cards issued to 0.ATest PrintingTest printing is performed on the Others screen. Test printing does not make use a printer driver. Checking can bedone to ensure that the printer is working properly.1Select double-side or single-side printing using A.2Click on B to start test printing. Printer will print a card.ABHow to Use the Status Monitor](https://usermanual.wiki/JVCKENWOOD/K2T001.Users-Manual-1-of-2/User-Guide-521185-Page-13.png)
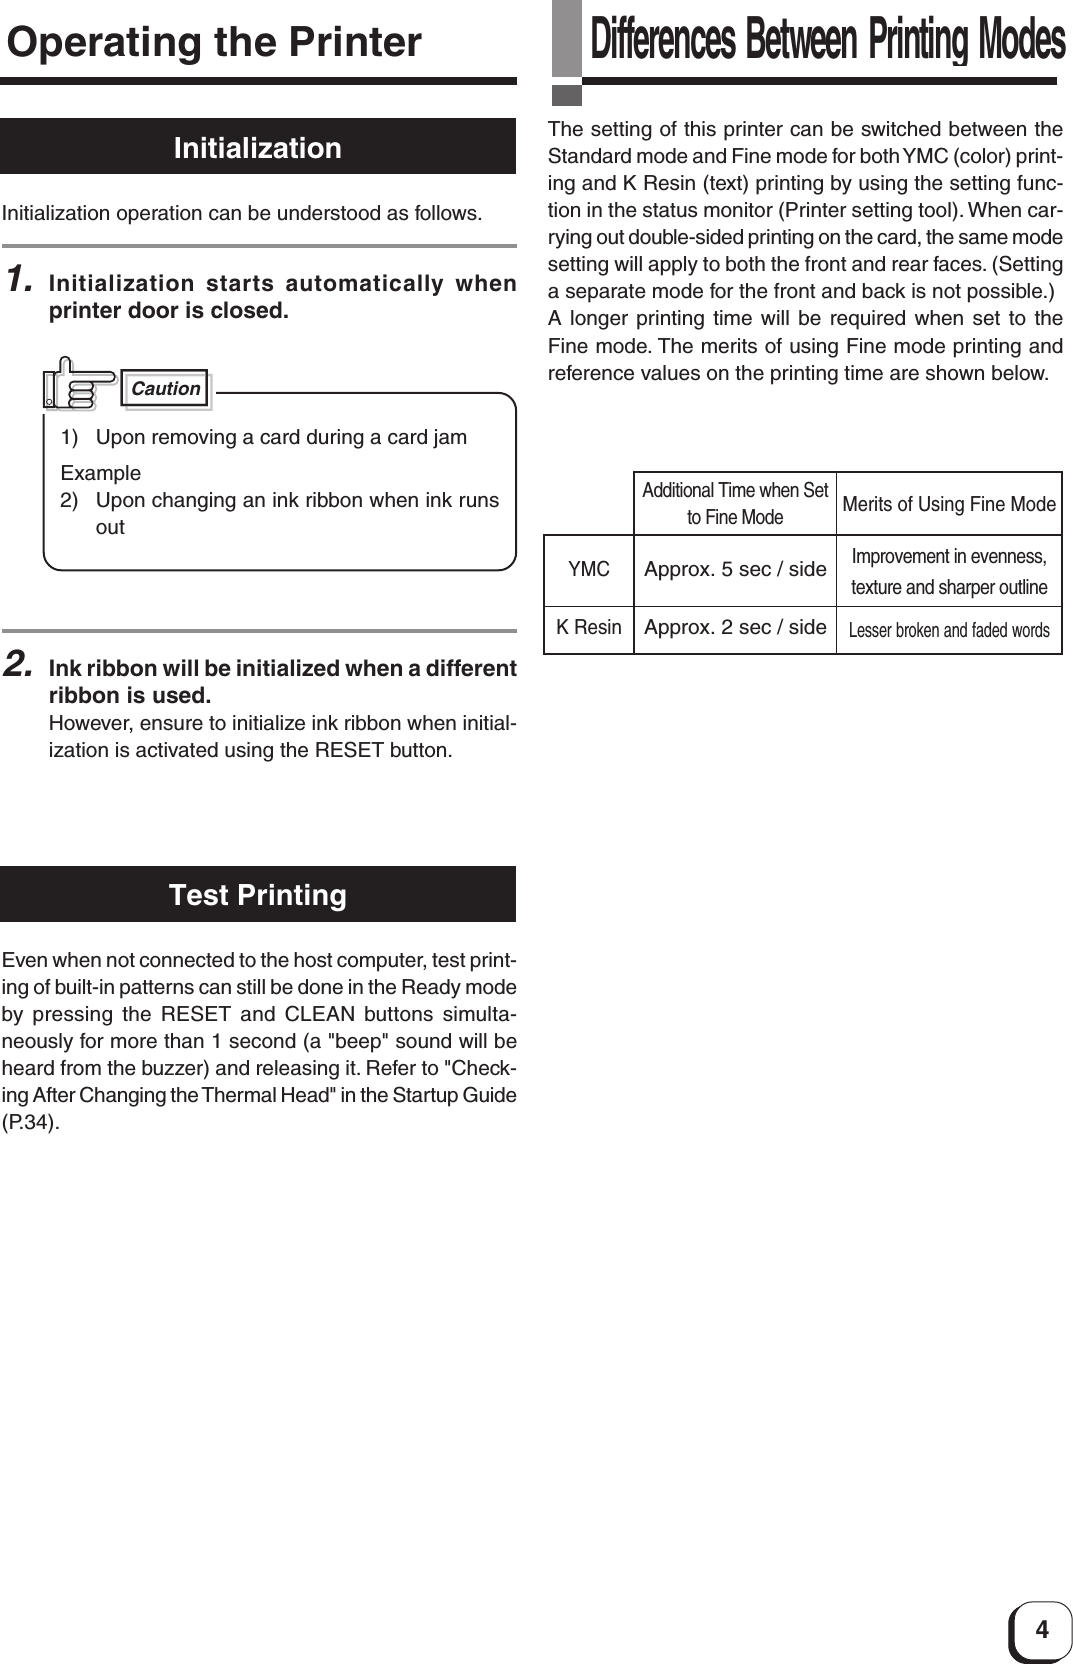
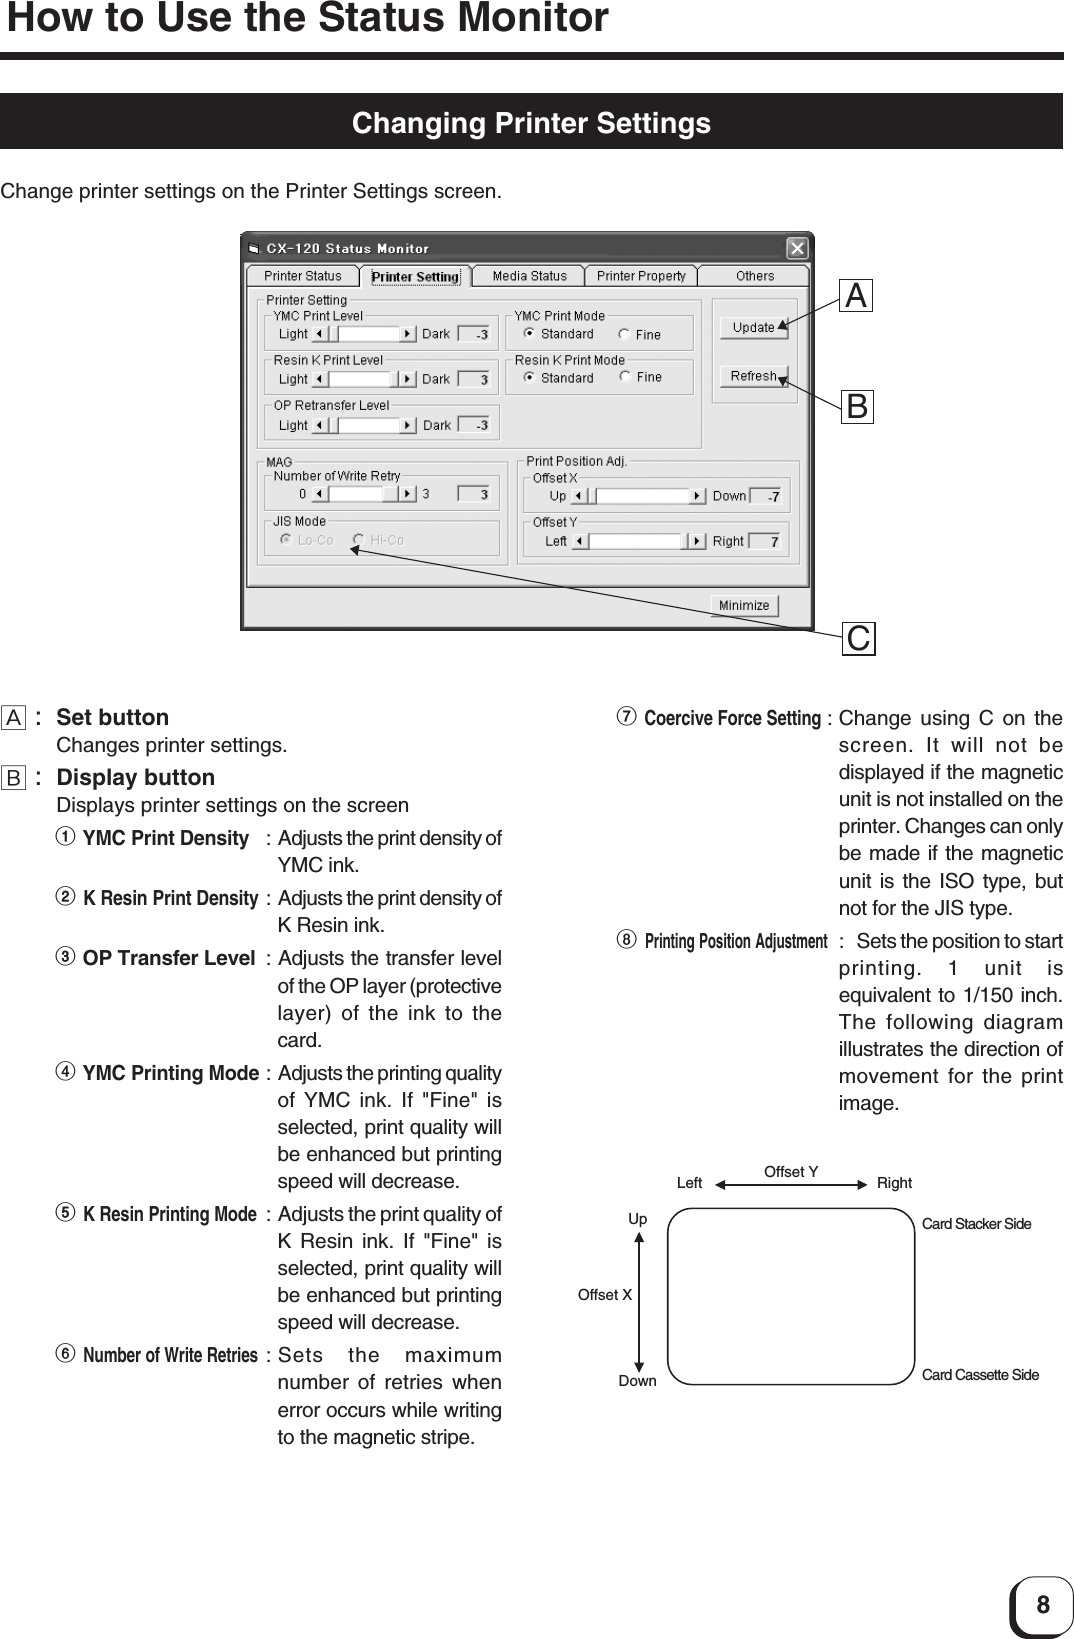
6.When the following screen appears,1Select "Driver" tab and2click on the "Update Driver" button7.When the following screen appears,1Select "No, I do not wish to connect this time" and2click on the "next" buttonSoftwqre Upgrade](https://usermanual.wiki/JVCKENWOOD/K2T001.Users-Manual-1-of-2/User-Guide-521185-Page-15.png)
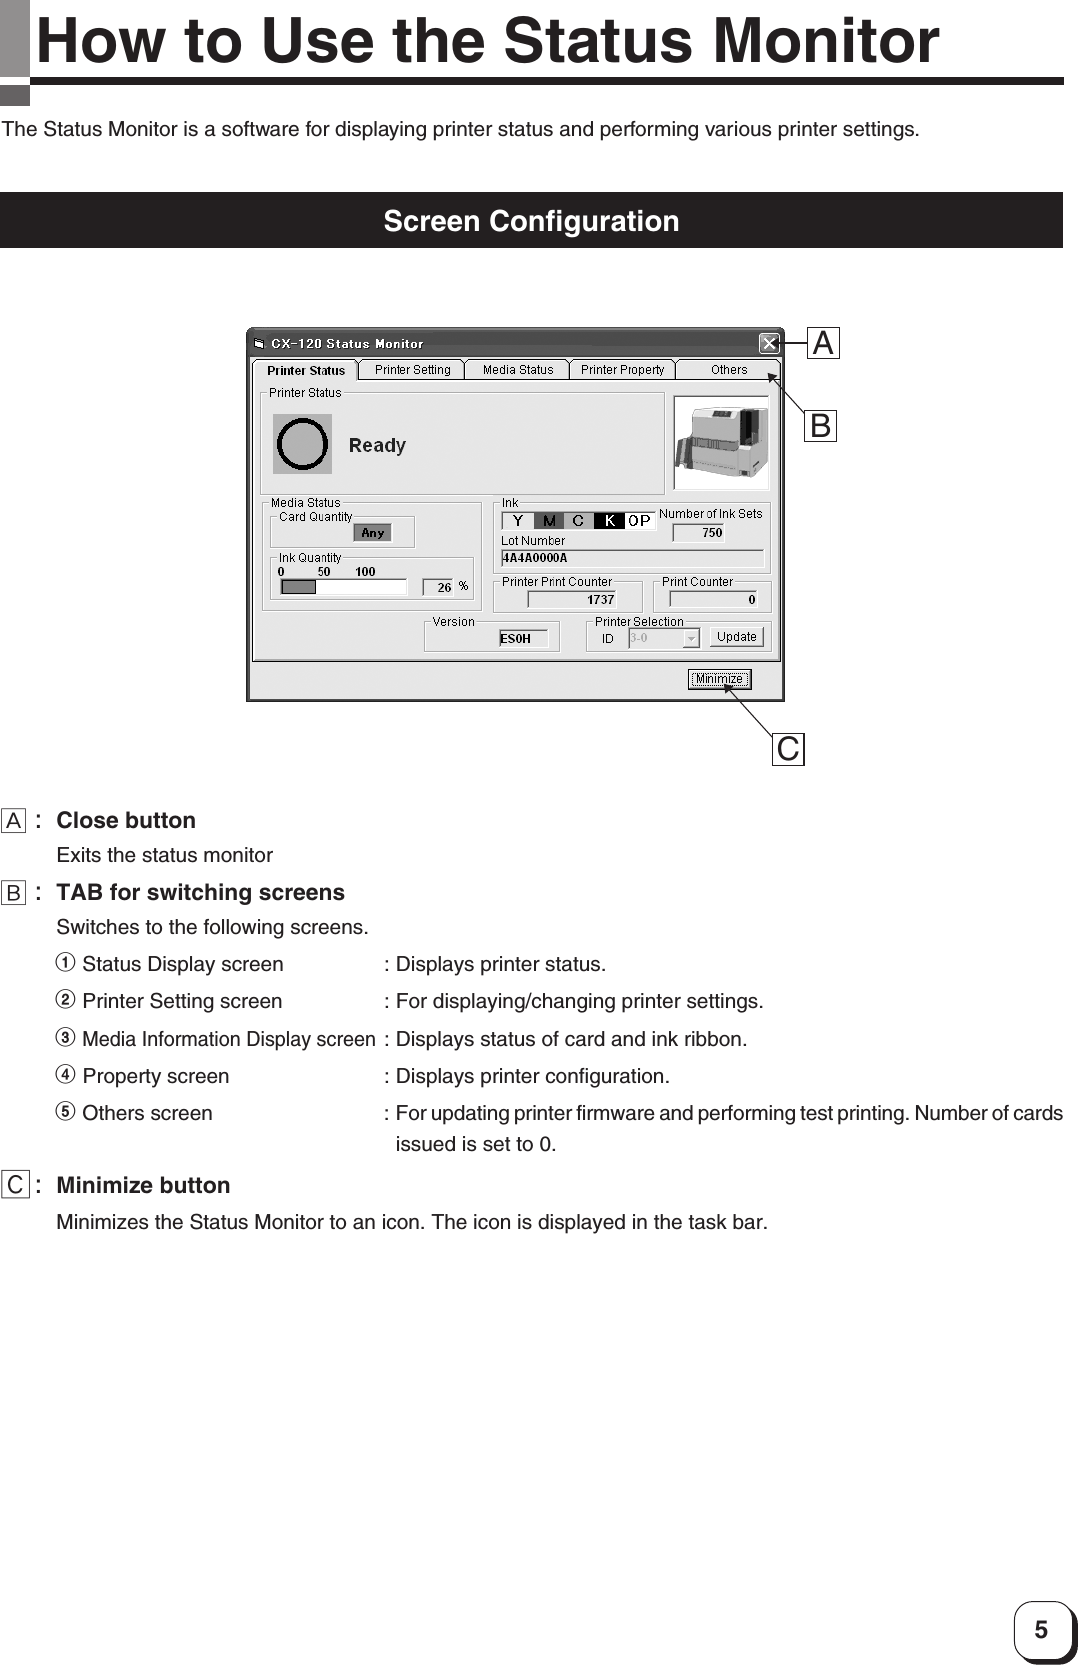
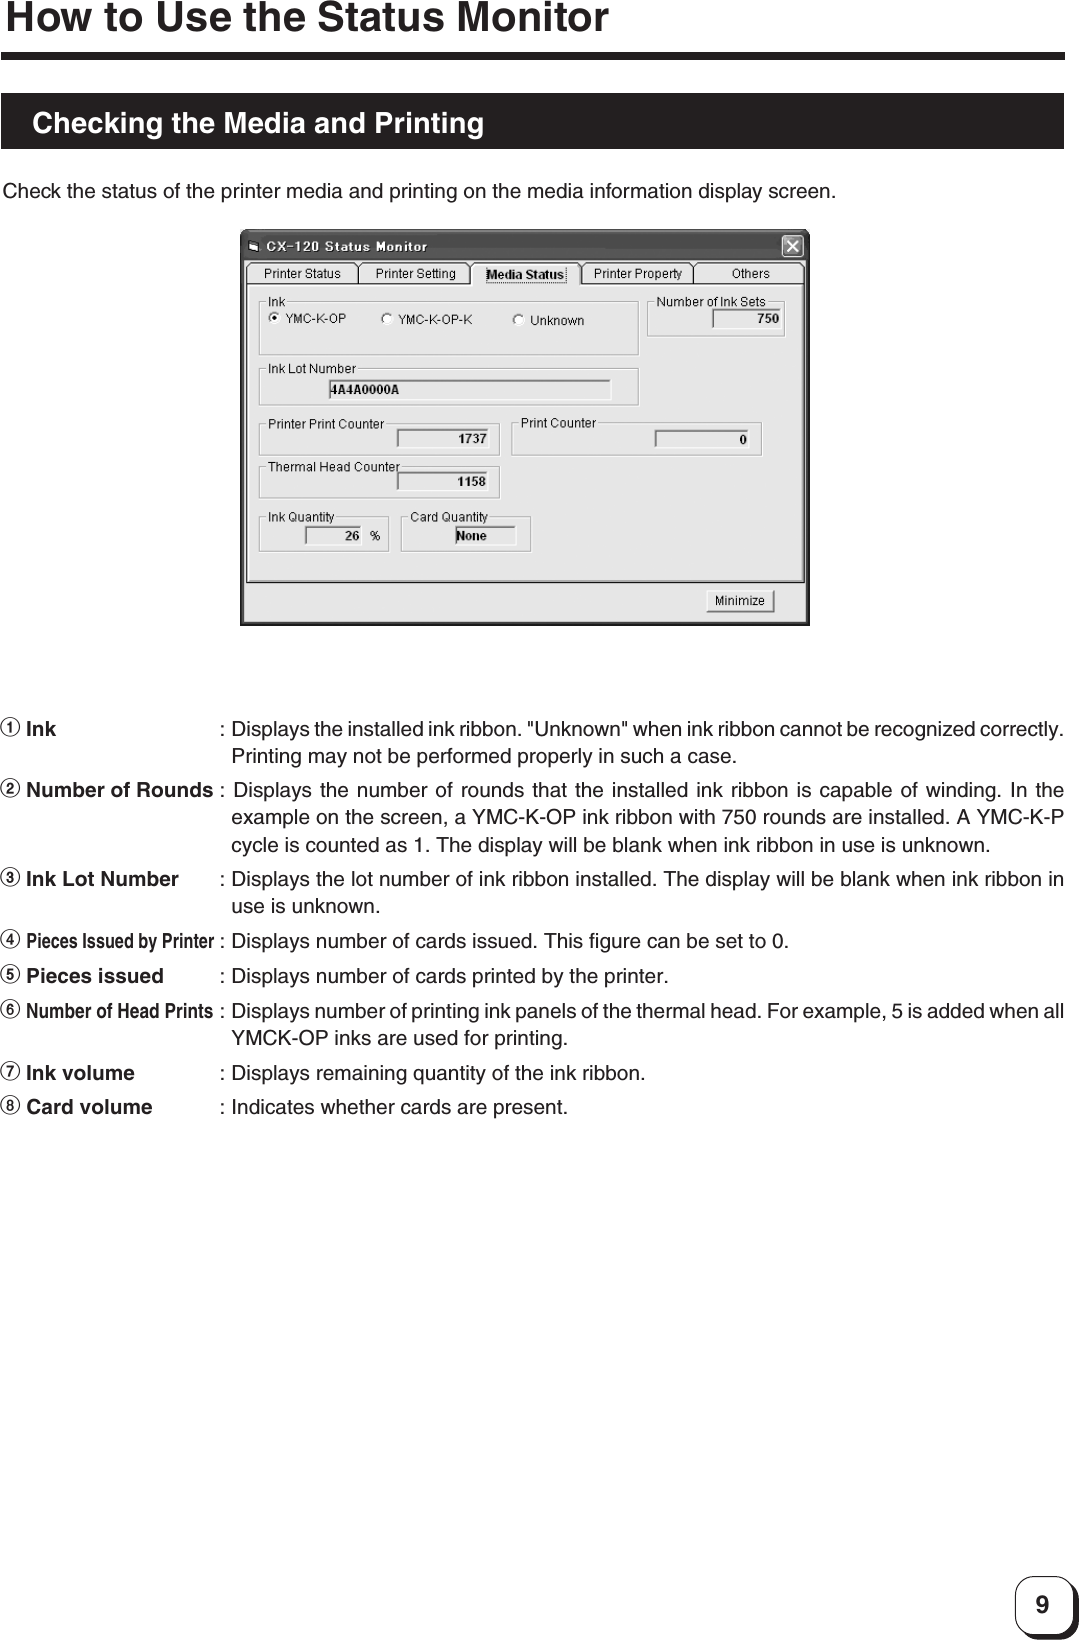
8.When the following screen appears,1Select "Automatic installation of Software(recommended)" and2click on the "next" button9.When the following screen appears, click onthe "continue" button.10.When the following screen appears, clickon the "Finish" button.Update of USB driver begins.Update of USB driver is now complete.Softwqre Upgrade](https://usermanual.wiki/JVCKENWOOD/K2T001.Users-Manual-1-of-2/User-Guide-521185-Page-16.png)