JVCKENWOOD K9X004 Card Printer w/Built-in RFID Unit User Manual
JVC KENWOOD Corporation Card Printer w/Built-in RFID Unit
UserManual.wiki
>
JVCKENWOOD
>
K9X004 User Manual
>
User manual 1 of 3
Contents
1.
User manual 1 of 3
2.
User manual 2 of 3
3.
User manual 3 of 3
User manual 1 of 3
Navigation menu
Upload a User Manual
Namespaces
Wiki Guide
HTML
PDF
Info
Views
User Manual
Discussion / Help
Navigation
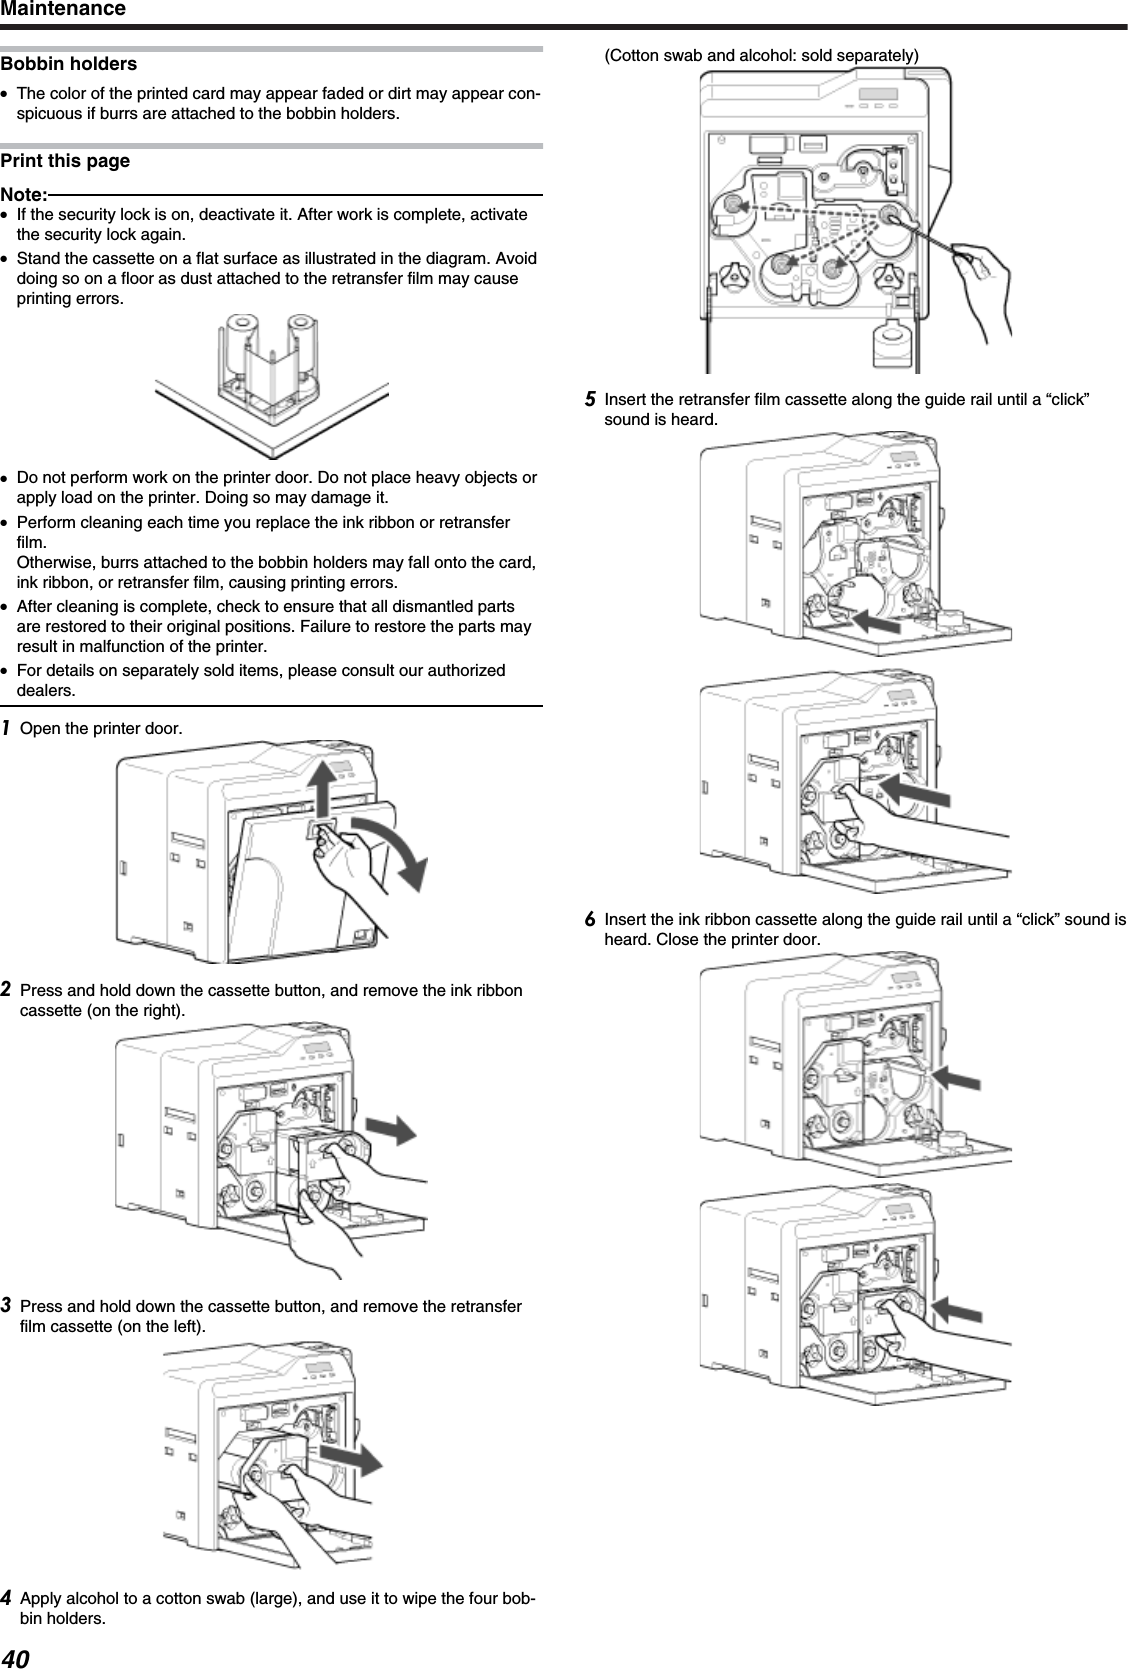
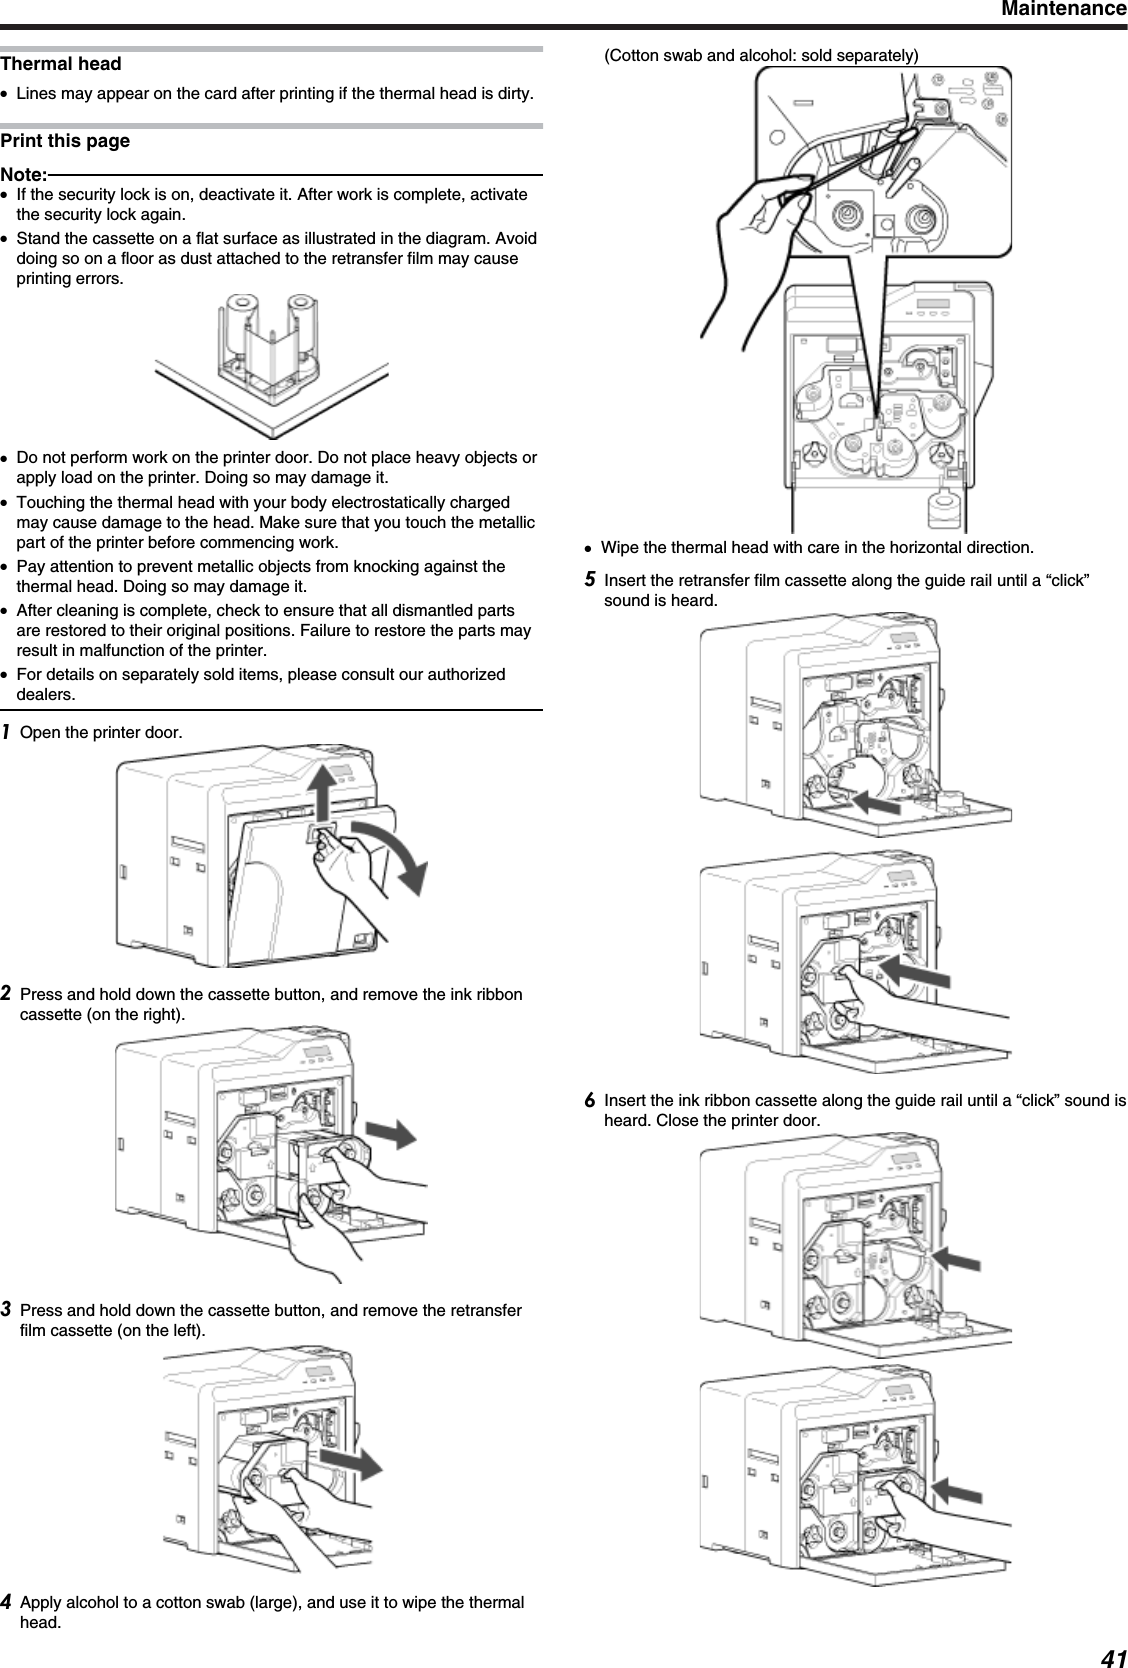
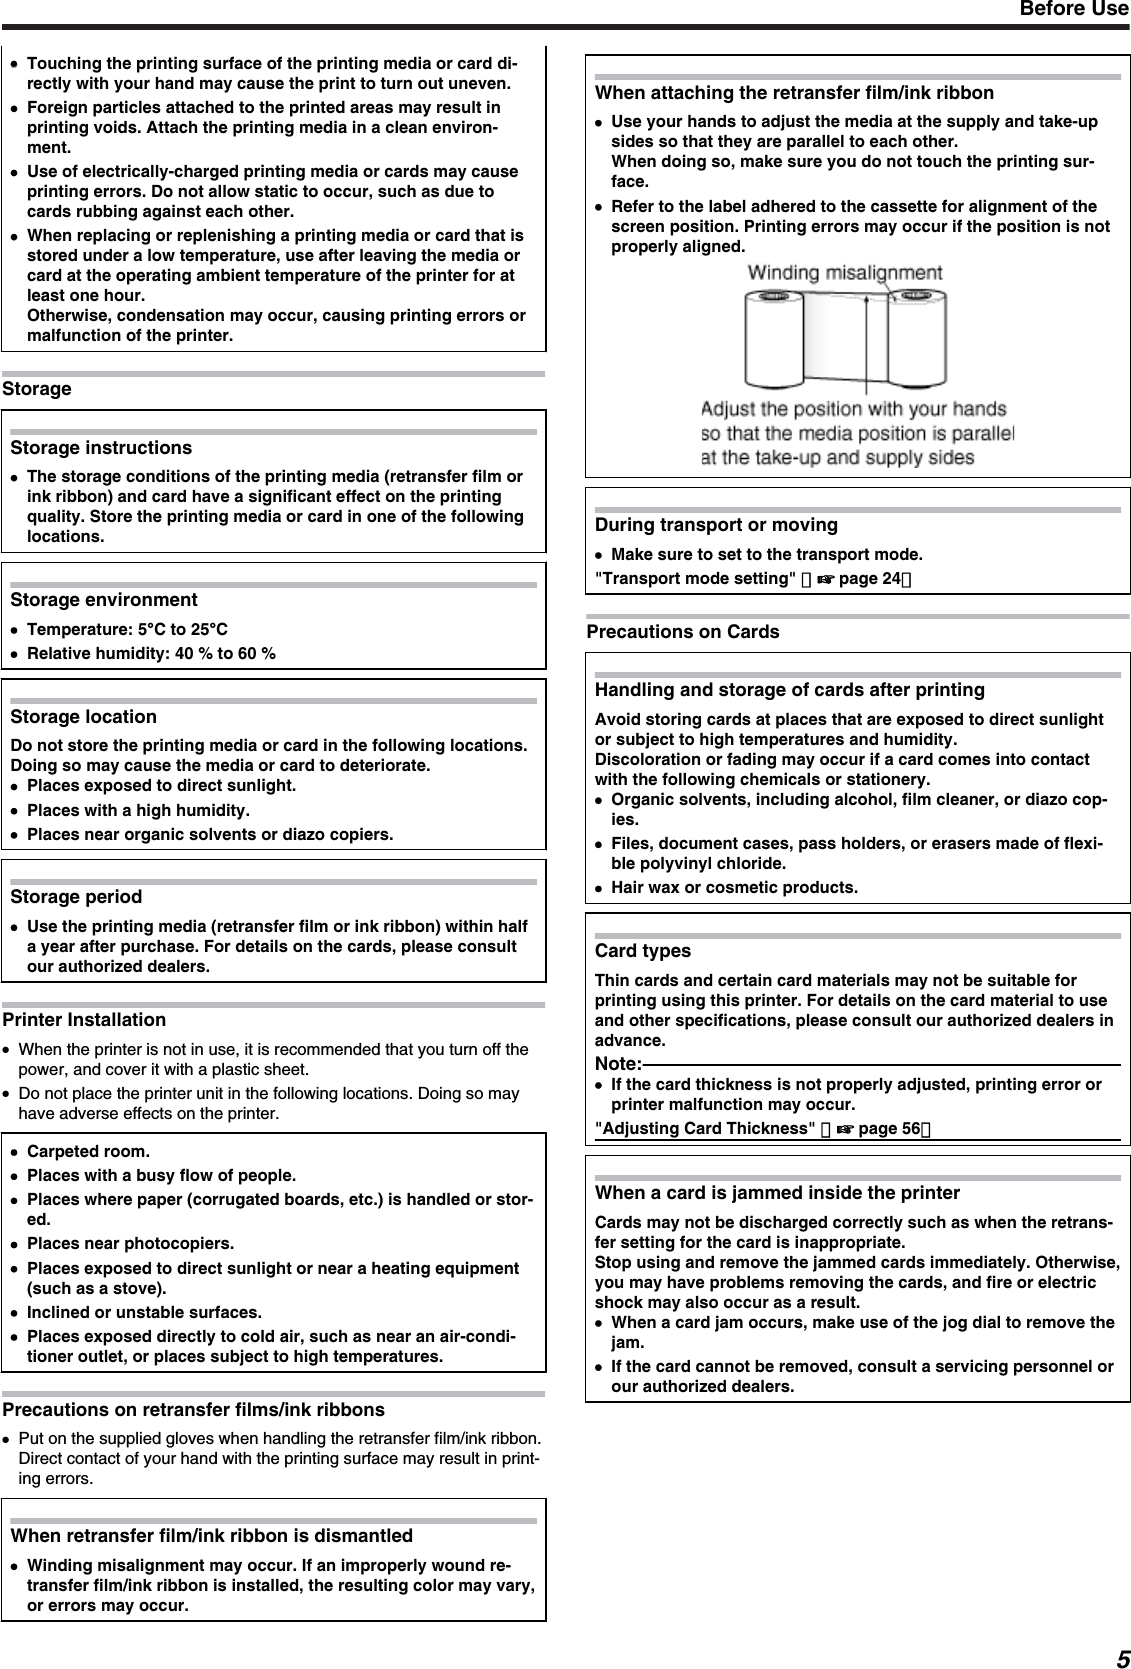
![ContentsContentsBefore UseAbout this Manual ................................................................... 3Precautions ............................................................................. 3Disclaimer ............................................................................... 6Name and functions of parts ................................................... 6Specifications .......................................................................... 9Accessories/separately sold items ........................................ 10Options .................................................................................. 11OperationOperation Panel .................................................................... 11Setting Mode ......................................................................... 13Setting Mode Flow ............................................................. 14Setting using the operation panel .......................................... 17Security ................................................................................. 25Setting Using the Status Monitor ........................................... 27Printing a Card ...................................................................... 27ReplacementPrecautions on cards ............................................................ 28Ink Ribbon ............................................................................. 29Retransfer Film ...................................................................... 31MaintenanceServicing of Parts .................................................................. 34Servicing Based on Print Output ........................................... 42TroubleshootingWhen an Error Message is Displayed ................................... 42Precautions on cards ............................................................ 44Ink Ribbon ............................................................................. 49Retransfer Film ...................................................................... 50Unable to produce desired printing results ............................ 50Printer not operating as desired ............................................ 51Before sending printer for repair ........................................... 51SetupInstallation and Connection ................................................... 52Printing Media ....................................................................... 53Printer and Computer Connection ......................................... 57Computer Settings ................................................................ 58Software ............................................................................ 58Install ................................................................................. 58Uninstall ............................................................................. 69IP Sec ................................................................................ 72Printer Driver Settings ....................................................... 74Port Monitor Settings ......................................................... 80Status Monitor Settings ..................................................... 80Inline Encoding .................................................................. 86List of Error Codes ............................................................. 87Frequently Asked Questions ............................................. 89Printer Setting ....................................................................... 90Operation Panel ................................................................. 90Setting using the operation panel ...................................... 90About this Manual●"Contents of this manual" ' page 3●"How to read this manual" ' page 3Precautions●"Safety precautions" ' page 3●"Precautions during use" ' page 4Disclaimer●"Disclaimer" ' page 6Name and Functions of Parts●"Internal mechanism diagram" ' page 6●"Front" ' page 7●' page 7Rear]●"Right" ' page 7●"Left" ' page 7●"When printer door is open" ' page 7●"Ink ribbon cassette" ' page 8●"Retransfer film cassette" ' page 8Specifications●"Main specifications" ' page 9●"Outline dimensional drawing" ' page 9Accessories/Separately Sold Items●"Accessories" ' page 10●"Sold separately" ' page 10Options●"Functions" ' page 11●"Options" ' page 11Contents2](https://usermanual.wiki/JVCKENWOOD/K9X004.User-manual-1-of-3/User-Guide-1189339-Page-2.png)
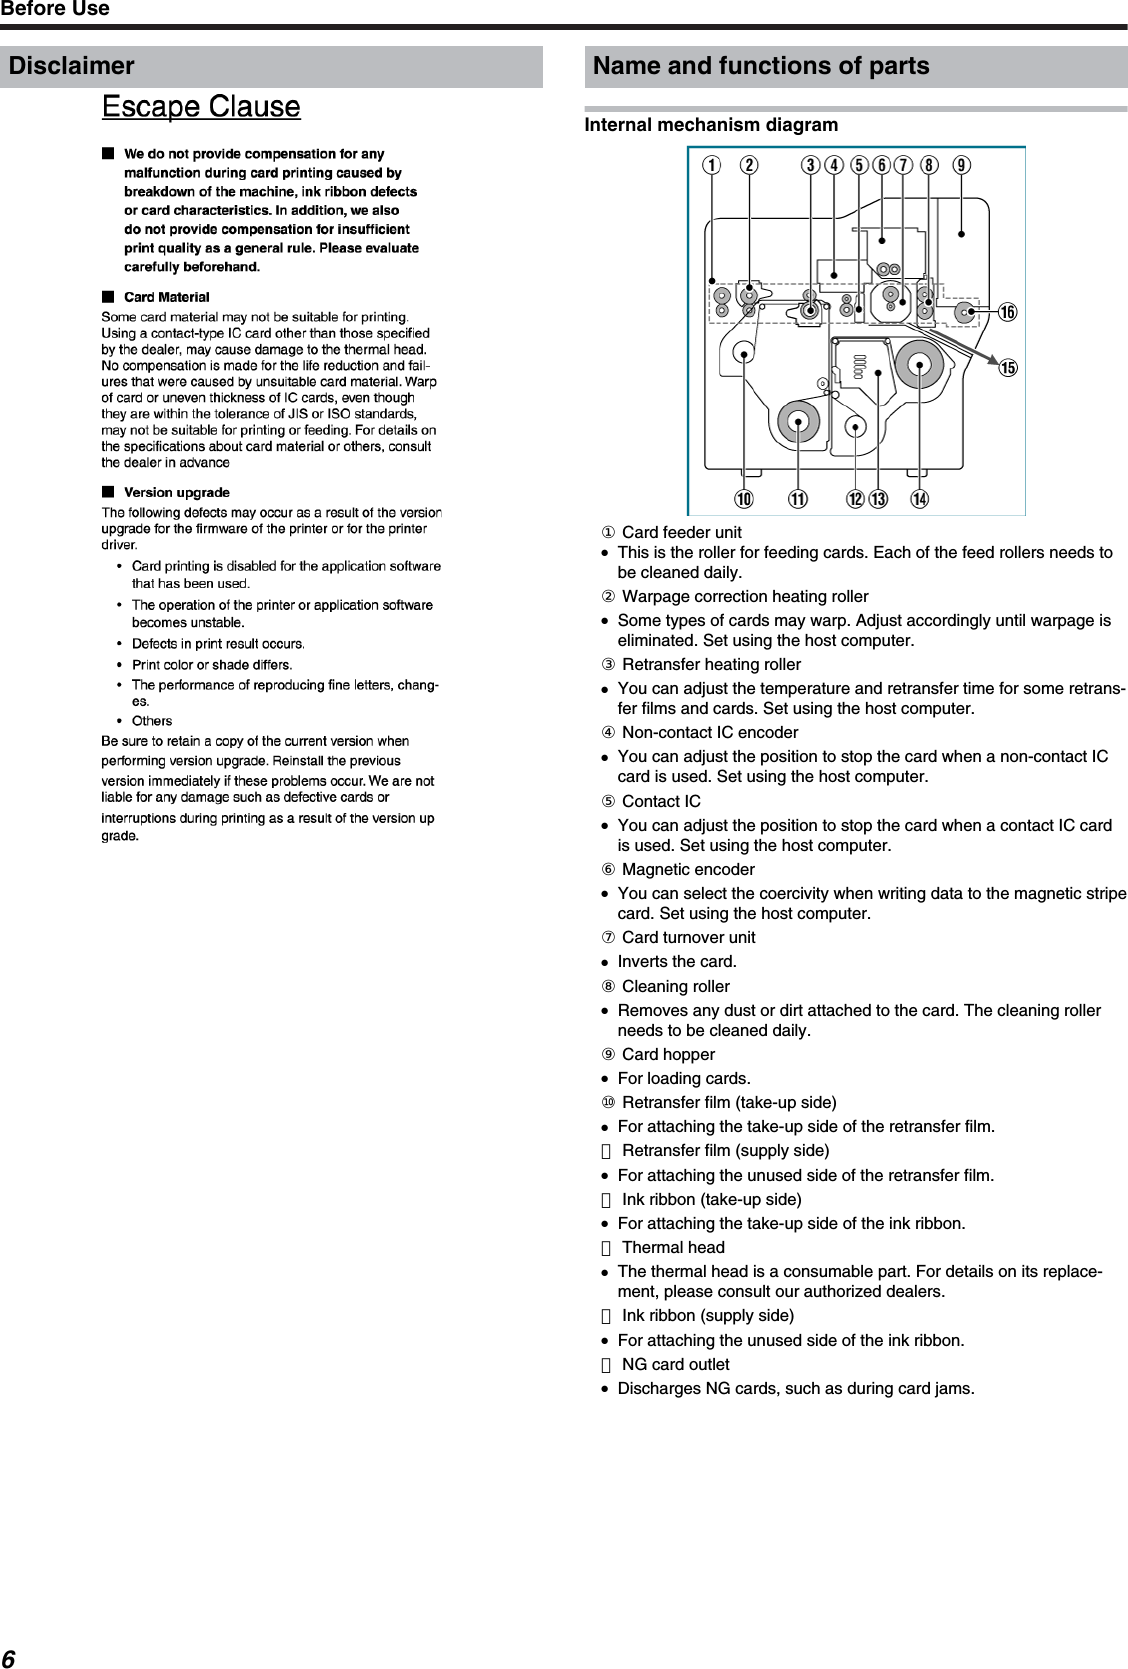
![Front① Sliding knob●Opens/Closes the printer door.●Slide it upward, and pull toward you to open the printer door.② Operation buttons●For selecting and confirming information on the operation panel.③ Operation panel●Displays menus and error messages.④ Card hopper●For loading cards.⑤ Printer door⑥ Power switch●Turns the power On/Off.Rear① USB cable connection terminal●For connecting a USB 2.0 interface cable.② LAN cable connection terminal●For connecting an Ethernet interface cable.③ Cable clamp●For securing the supplied USB cable."Connection" (' page 57)④ [AC INLET] power supply terminal●For connecting the power cord.Right① NG card outlet●If a card is left inside the printer when the power is turned on or re-set, the card will be automatically discharged.●Cards in the printer are discharged when an error occurs on themagnetic card or IC card.② Air suction fan opening●Air inlet of the internal cooling fan.③ Filter cover●This is the cover of the fan filter.④ Security slot●For attaching the Kensington lock.Left① Card outlet●Outlet for discharging the cards.② Card stacker (supplied) attachment slot●For attaching the supplied card stacker.When printer door is open① Cassette buttons●Press these buttons in order to pull out the ink ribbon cassette or re-transfer film cassette.② Cleaning unit●Removes any dust or dirt attached to the card.③ Ink ribbon cassetteBefore Use7](https://usermanual.wiki/JVCKENWOOD/K9X004.User-manual-1-of-3/User-Guide-1189339-Page-7.png)

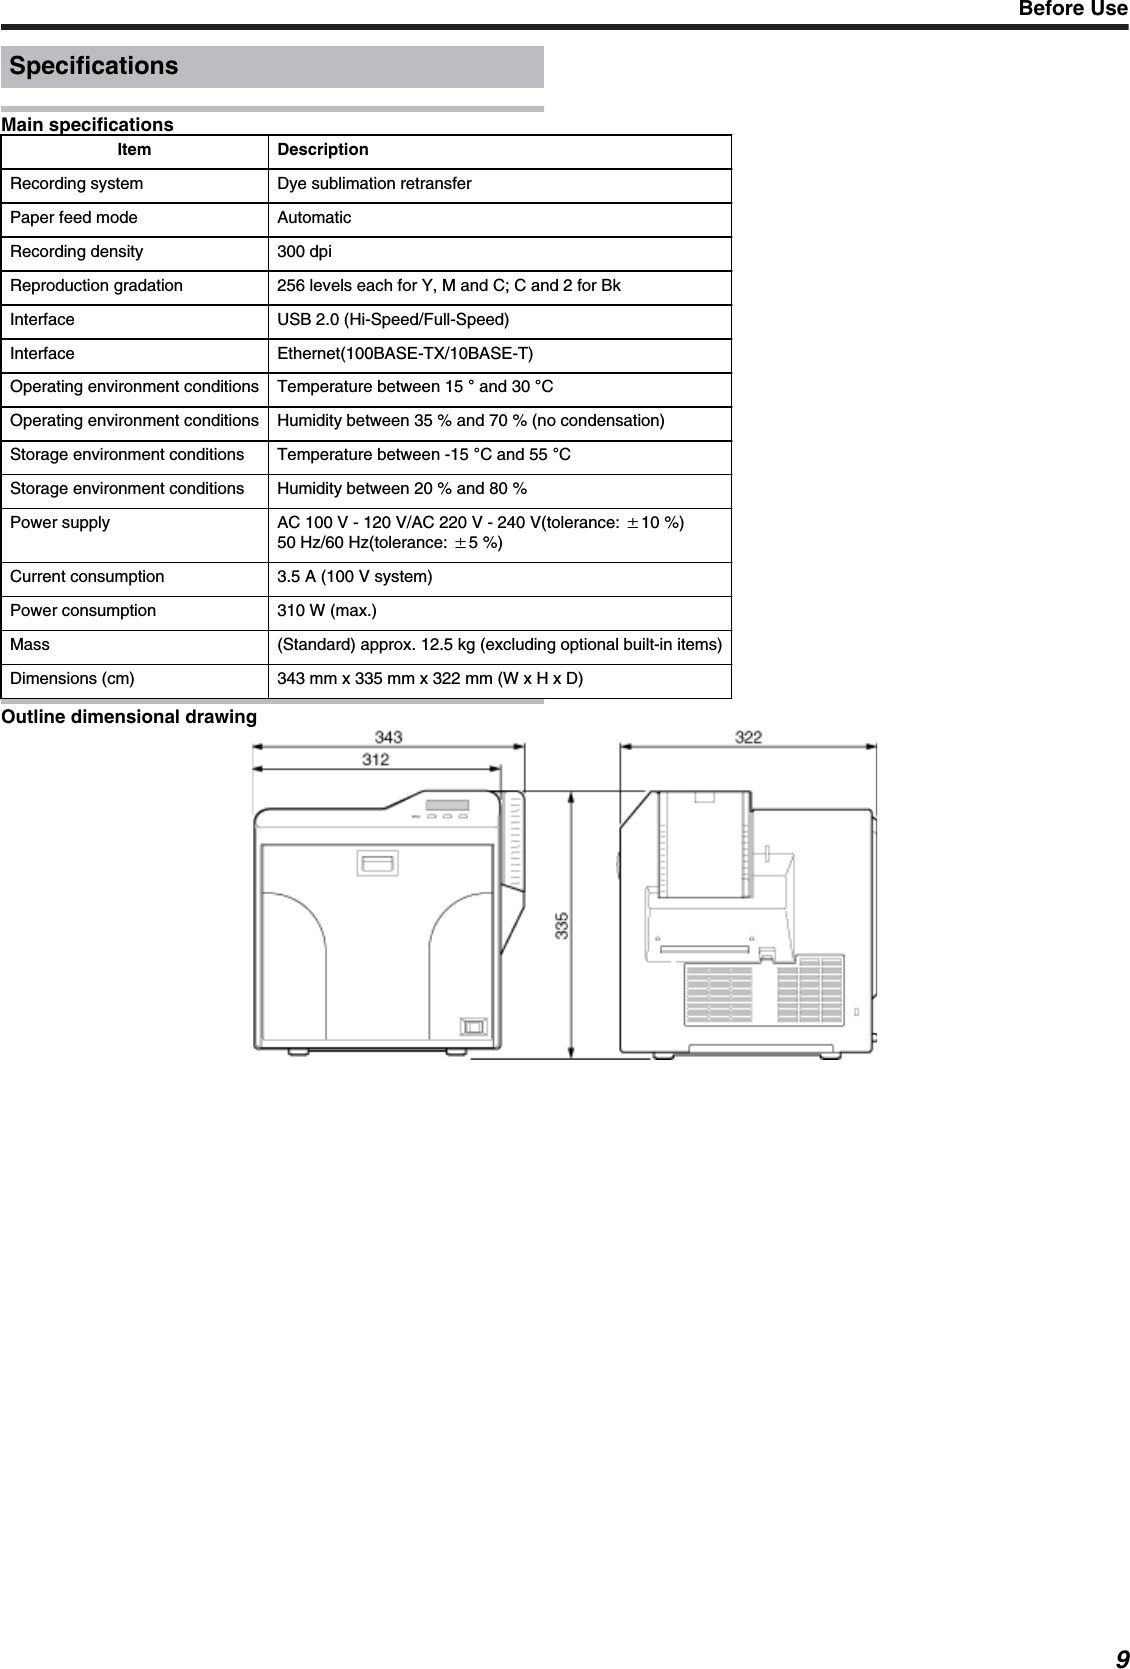
![OptionsFunctions●●Double-sided printerPrinter that supports double-sided printing.●Single-sided printerPrinter that supports single-sided printing.Options●Warpage correctionDevice for correcting card warpage after printing.●Magnetic encoderDevice for writing data to a magnetic stripe card.●Supports only installation of a double-sided printer.●Contact IC encoderDevice for writing data to a contact IC card.●Non-contact IC encoderDevice for writing data to a non-contact IC card.Operation Panel●"Operation Panel" ' page 11●"Setting Using the Operation Panel" ' page 13●"Setting using the operation panel" ' page 17●"Security" ' page 25●"Setting using the status monitor" ' page 80●"Printing a Card" ' page 27Operation PanelName and functions of parts① Operation panel●Displays the mode settings, operating status, and error messages.② Status icon/operation button display●Displays the status icon or the function of the operation button duringmode setting.③ Operation buttons●For selecting a button displayed on the operation panel.Operation buttonsResets the printer.●After clearing an error, press in the order of [Reset]DB.Displays the user mode.Exits setting.Pressing it each time brings you to the next higher settingmode level.Displays the setting mode in the next lower level.Confirms or executes a setting.It is also used to save a new setting.●The display does not change if an item cannot be altered using the op-eration panel.●Pressing it each time displays the next setting item.Pressing it each time displays the next setting value.Displays the settings change mode.●If [Change] is not displayed for an item, you can adjust the settingson the status monitor of a PC."Status monitor setting" (' page 80)Before Use11](https://usermanual.wiki/JVCKENWOOD/K9X004.User-manual-1-of-3/User-Guide-1189339-Page-11.png)
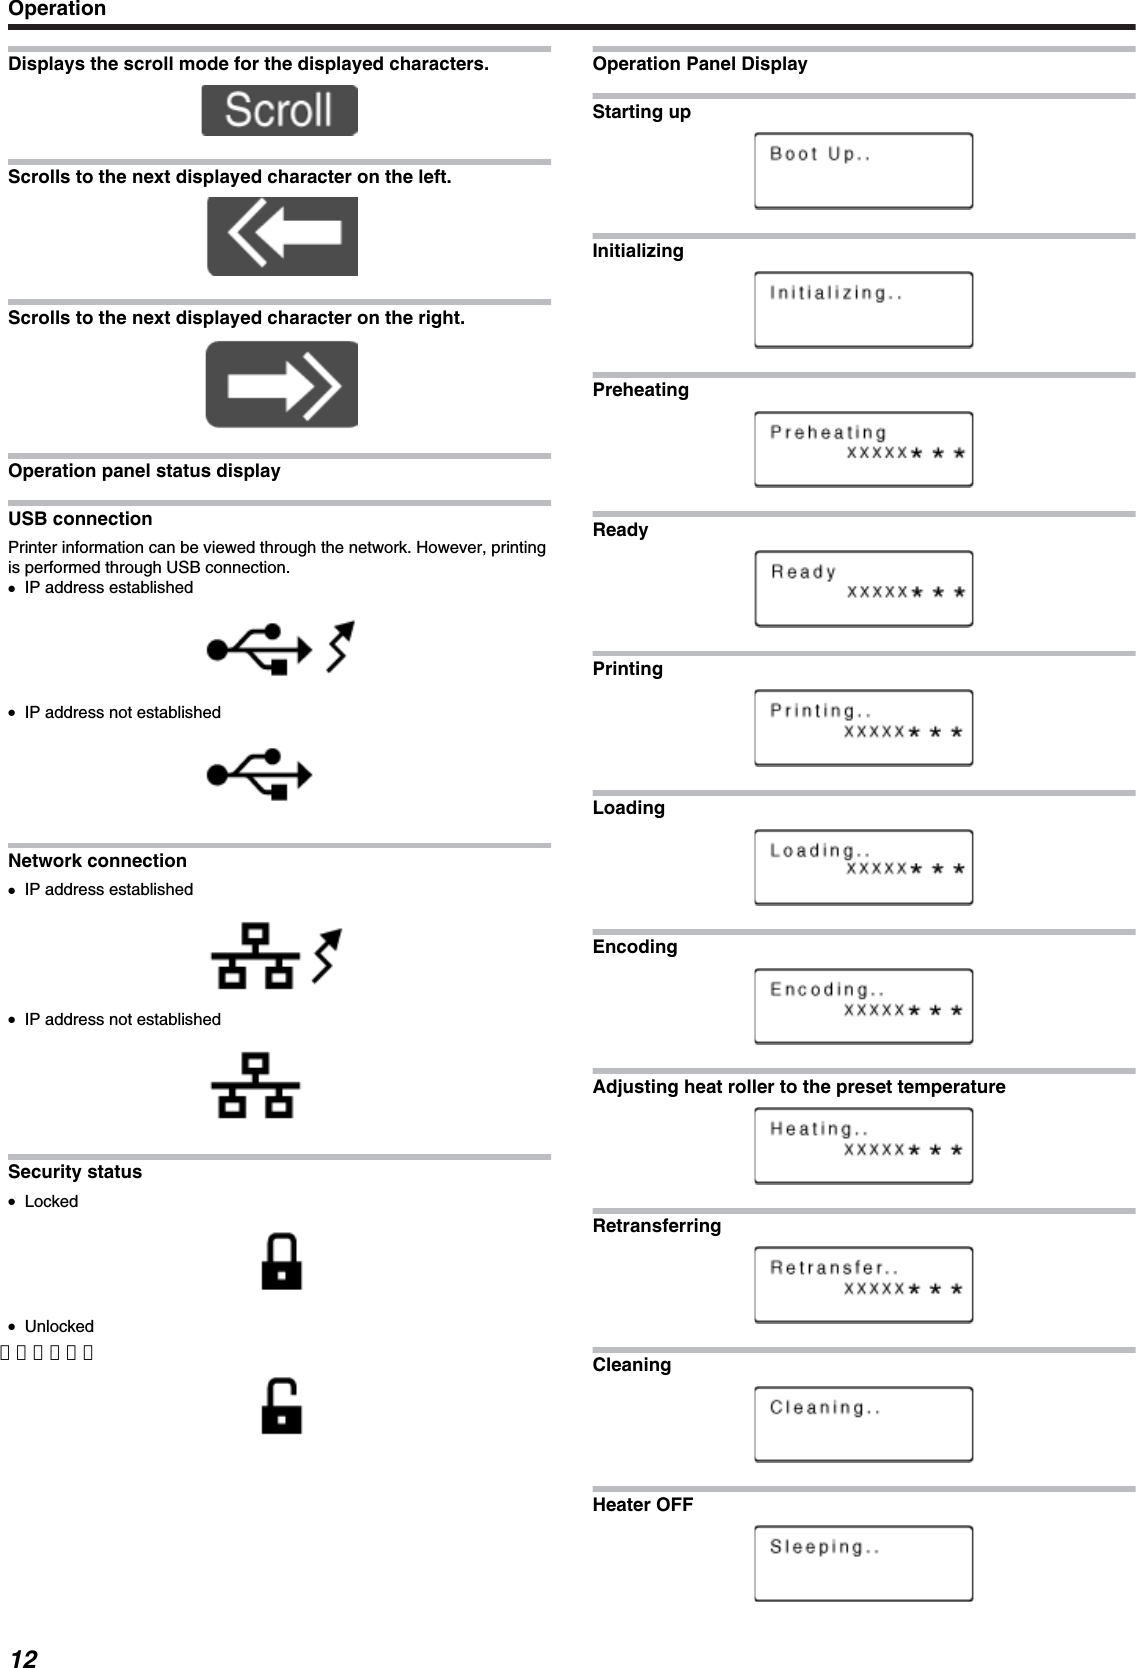
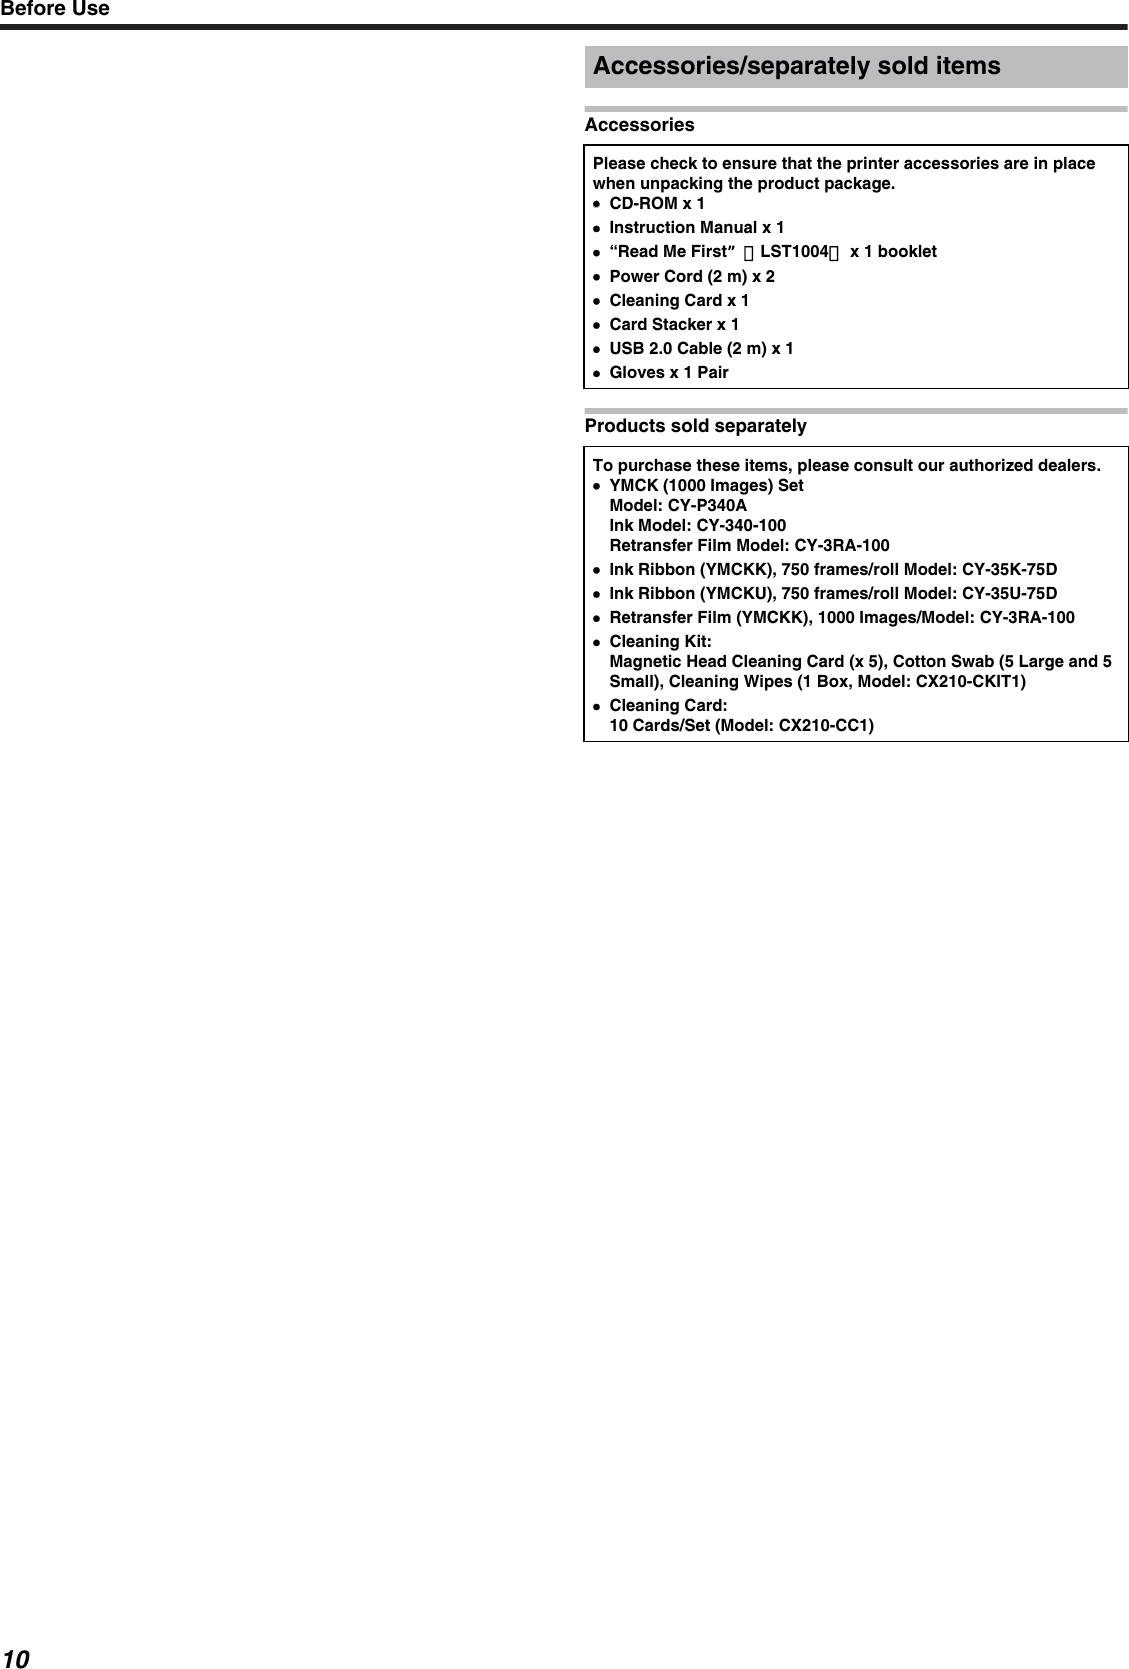
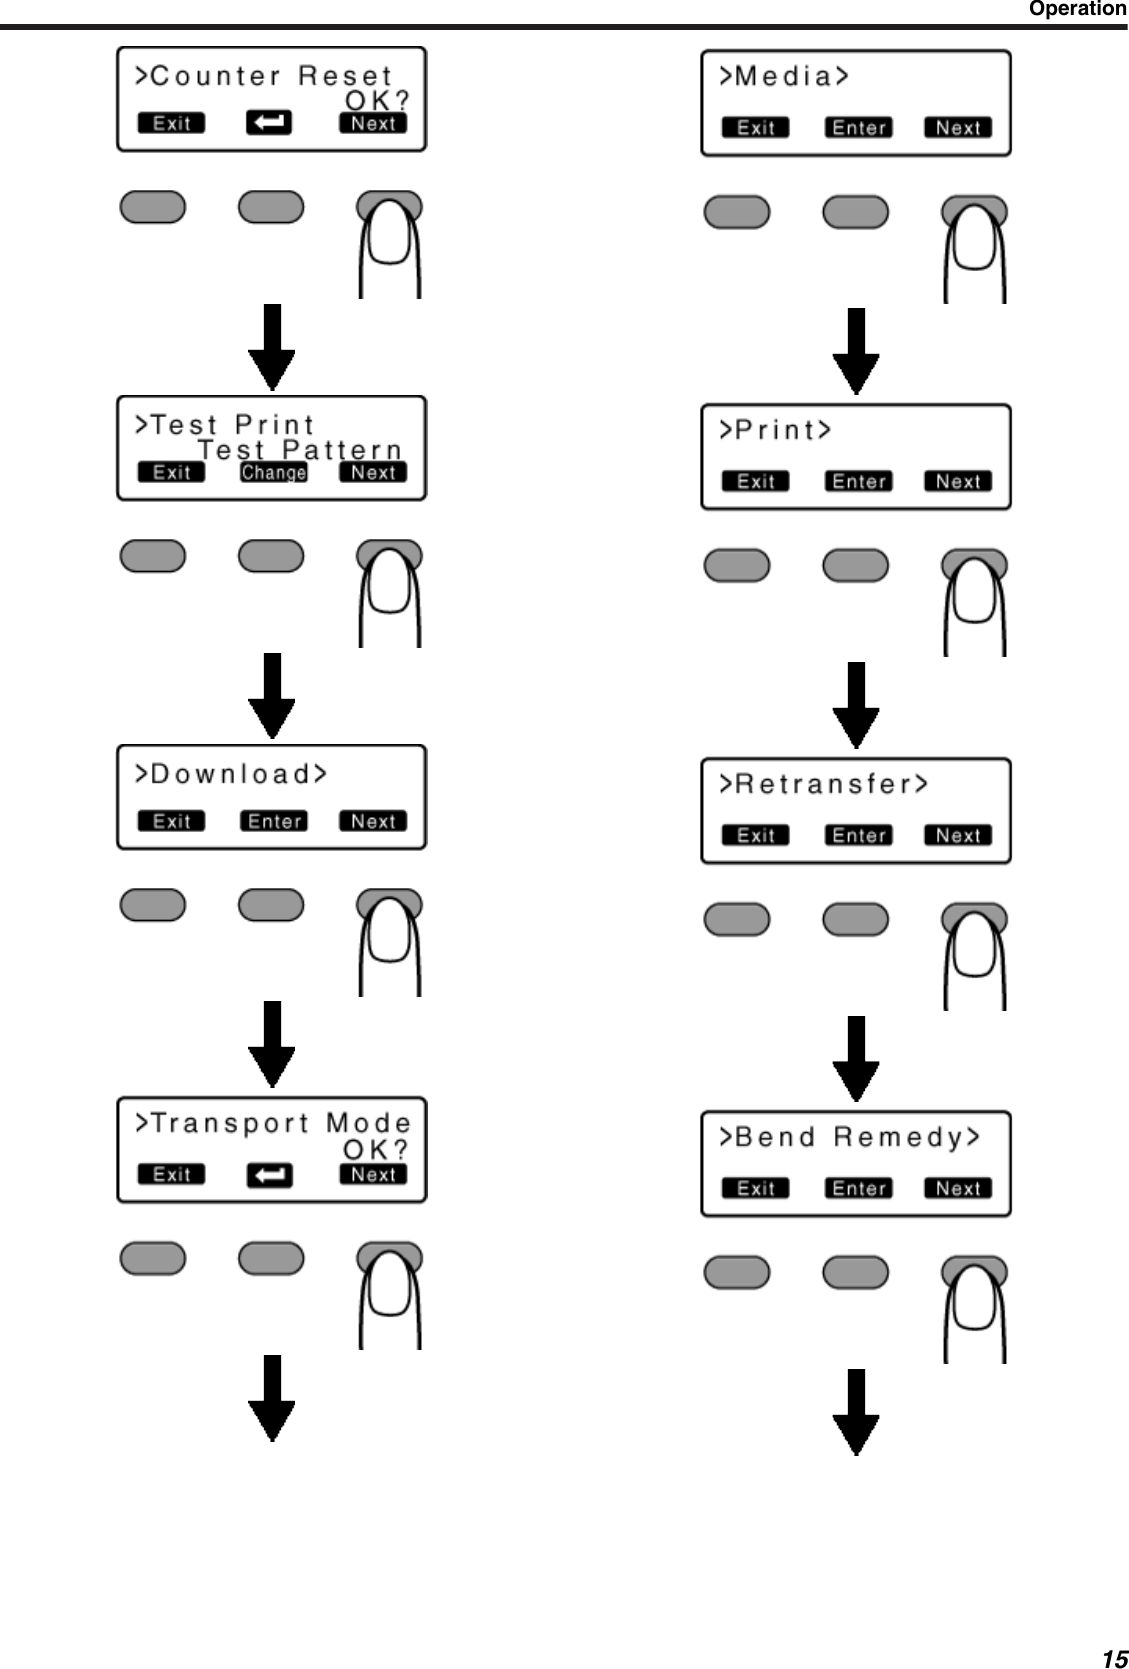
![Setting Mode●●Settings can be viewed on the printer’s operation panel.●Settings can be changed on the status monitor of the computer."Setting Using the Operation Panel" (' page 17)"Setting Mode Flow" (' page 14)Cleaning●For setting during cleaning of the card feed roller or magnetic head.Setting values●RollersSelect this value when cleaning the card feed roller.●MGSelect this value when cleaning the magnetic head.Counter Reset●Resets the free counter and error counter.Test Print●Prints the printer’s built-in test pattern, or the different setting values.●When system troubles occur, printing can be performed using settingson the printer or computer by operating only the printer.Setting values●Test Print: Test Pattern, Printer Setting, Network, Lami SettingDown load●Updates the firmware.Transport Mode●For setting the transport mode.Media●Displays the settings of the printing media.Setting values●Ink Type: YMCK, YMCKPO, K, YMCKK, YMCKUVSet according to the type of ink ribbon.●Film Type: 1000, 750Set according to the type of retransfer film.●Card Thickness: Standard, ThinSet according to the thickness of the card.Standard: Supports card thickness of 0.76 mmThin: Supports card thickness of 0.25 mmPrint●Displays the printing settings.Setting values●YMC Level: -3, -2, -1, 0, 1, 2, 3For setting the YMC (color) density level.Selecting a larger value increases the density level.●Black Level: -3, -2, -1, 0, 1, 2, 3For setting the K (black) density level.Selecting a larger value increases the density level.●Black Mode: Standard, FineFor setting the printing mode for the K (black) component.If the characters still appear faded after raising the [Black Lev-el], set to [Fine].However, printing time required will be longer than the [Stand-ard] setting.●UV Level: -3, -2, -1, 0, 1, 2, 3For setting the UV ink density level.Selecting a larger value increases the density level.During UV printing, card warpage may increase if the card has alow heat resistance or under an environment with high tempera-ture.●PO Level: -3, -2, -1, 0, 1, 2, 3For setting the density level of the peel-off ink.Selecting a larger value increases the density level.Retransfer●Displays the retransfer mode settings.Setting values●Temp Level: -2, -1, 0, 1, 2For setting the retransfer roller temperature.Selecting a larger value increases the temperature.Retransfer may fail depending on the card used. If retransfer fails,raise the setting to the next higher value.A higher retransfer roller temperature helps to enhance card re-transfer, but the stronger heat may also cause the card to deform.If the printer is not initialized after changing the temperature set-ting, temperature is adjusted after the printing operation starts.●Speed (Front): -3, -2, -1, 0, 1, 2For setting the surface retransfer speed.Selecting a larger value increases the speed.Retransfer may not be successful for some parts of the card de-pending on the card used. Lowering the setting value helps to en-hance retransfer, but the stronger heat may also cause the card todeform.●Speed (Back): -3, -2, -1, 0, 1, 2For setting the rear surface retransfer speed.Selecting a larger value increases the speed.Some types of cards may warp during double-sided printing. Ifcard warpage occurs, raise the setting to the next higher value.●MG Peel Mode: Standard, MG StripeFor setting the method for peeling the retransfer film.●Standby Mode: Front wait, Back waitFor setting the laminator standby position.Select whether to standby at the front or rear surface during dou-ble-sided printing.Bend Remedy●Displays the warpage correction mode settings.Setting values●Temp Level: -5, -4, -3, -2, -1, 0, 1, 2, 3, 4, 5, offFor setting the warpage correction roller temperature.Selecting a larger value increases the temperature.If the printer is not initialized after changing the temperature set-ting, temperature is adjusted after the printing operation starts.●Speed: -2, -1, 0, 1, 2For setting the warpage correction mode speed.Selecting a larger value increases the speed.Heat Roller●Displays the settings of the power save mode or low temperaturestandby mode.Setting values●Power Saving: 5 mins, 10 mins, 15 mins, 20 mins, 25 mins, 30mins, 45 mins, 60 mins, offFor setting the time of the power save mode.While in the [Ready] mode, if the printer is not operated during aspecific time interval, the retransfer roller, warpage correctionroller, and backlight of the operation panel are turned off to savepower.Operation13](https://usermanual.wiki/JVCKENWOOD/K9X004.User-manual-1-of-3/User-Guide-1189339-Page-13.png)
![●●HR Control: Off, OnFor setting whether to standby the printer by lowering the retrans-fer heat roller temperature if cards are not issued for 30 minutesor longer.The printer will automatically be restored to the original mode dur-ing the next card issuance, but it may take a longer time beforethe first card is printed.Set this to On during normal use.Setting●Displays the printer settings.Setting values●Display:Mode:CounterCounter: Total Cnt, Head Cnt, Free Cnt, Cleaning Cnt, Error CntContrast: -3, -2, -1, 0, 1, 2, 3For setting the display status the operation panel.●Buzzer: On, OffFor setting whether to sound the buzzer when an error occurs orwhen settings are changed.●Unit No:No.1 ~ No.10For setting the printer’s unit number according to the USB envi-ronment.Option●Displays the optional settings.Setting values●MG: None, ISO, JISDisplays the availability of a magnetic encoder or the type of en-coder used.●IC Antenna: None, InstalledDisplays the availability of a non-contact IC encoder.●IC Contact: None, ISO Type, JIS TypeDisplays the availability of a contact IC encoder or the type of en-coder used.●Contact IC R/W: None, InstalledDisplays the availability of an IC contact.●Bend Remedy HR: None, InstalledDisplays the availability of a warpage correction heat roller.●Turn Over: None, InstalledDisplays the availability of retransfer unit.MG●Displays the coercivity settings.Setting values●JIS Type: Loco, HicoFor setting the coercivity when writing data to a JIS magneticstripe card.●Retry Count: 0, 1, 2, 3For setting the number of retries during data writing.Network●Displays the network settings.Setting values●Printer Name: ASCII character strings (10 characters)For setting the printer name.●Host IF: LAN, USBFor setting the interface.If the printer is connected via USB interface, the setting switchesautomatically to the USB setting even if it is set to LAN during ini-tialization.●IPv4:DHCP: On, OffSetting: IP Address, Subnet Mask, GatewayEfective IP:IP AddressFor setting IPv4.●IPv6:Adrs Config: Auto, ManualSetting:IP Address, Prefix Len, GatewayEfective IP: IP Address1, IP Address2, IP Address3For setting IPv6.●Session Time Out: Off, 10 mins, 20 mins, 30 mins, 60 minsFor setting the session timeout interval.●MAC Address: Hexadecimal character stringsDisplays the MAC address.●IP Sec Mode: Off, OnFor setting the availability of IP Sec.●IP Sec Type: not Setting, Preshard, CertificateDisplays the method for IP Sec verification.Setting Mode Flow●Settings can be viewed on the printer’s operation panel.●Settings can be changed on the status monitor of the computer."Setting Mode" (' page 13)Press [Menu]●A setting item appears.Press [Next]●Pressing it each time displays the next setting item.●Pressing [Enter] or [Change] displays the setting value.●Pressing [Next] or A displays the next setting value.●Pressing [Exit] displays the setting mode of the next higher level.Operation14](https://usermanual.wiki/JVCKENWOOD/K9X004.User-manual-1-of-3/User-Guide-1189339-Page-14.png)

![Setting using the operation panelInitialization●●Whenever the power is turned on, cue (initialization) is per-formed automatically on the ink ribbon and retransfer film.●You can also perform initialization using the operation buttonon the operation panel.Press [Reset]●A [Initialize] message appears.Press B●An [Initializing] message appears, and initialization of the printer starts.Initializing printer when attaching the cassetteMemo:●When detaching the ink ribbon cassette or retransfer film cassette fromthe printer body, dust may adhere to the ink ribbon or retransfer film.Printing errors such as discoloring and retransfer error may occur de-pending on the size of the dust particles.To prevent printing errors from occurring, initialize the printer when youattach the cassette.●When attaching a new retransfer film, it is recommended that you for-ward the film by one or two images before printing.Turn on the power.Check to ensure that [Ready] or [Preheating] is displayed on theoperation panel of the printer.Press [Reset]●A [Initialize] message appears.Initializing printer without feeding the image① Press B●An [Initializing] message appears, and initialization of theprinter starts.Initializing printer after feeding by one image① Press [Next]●A [Next Panel, OK?] message appears.Operation17](https://usermanual.wiki/JVCKENWOOD/K9X004.User-manual-1-of-3/User-Guide-1189339-Page-17.png)
![②② Press B●An [Initializing] message appears, and the printer is initializedafter feeding the ink ribbon and retransfer film by one image.Initializing printer after feeding by two images① Press [Next]●A [2'nd Panel, OK?] message appears.② Press B●An [Initializing] message appears, and the printer is initializedafter feeding the ink ribbon and retransfer film by two images.Firmware updatePress [Menu]●A [Cleaning] message appears.Press [Next] to set to [Down load]●Pressing the [Next] button each time displays the next screen.Press [Enter]●Data download from the host computer starts.●A [Downloading] message during data download from the host com-puter.Note:●Do not turn off the power during data download from the host comput-er.Doing so may damage the printer firmware and cause malfunction.●A [Please Power Off] message when data download from the hostcomputer is complete.Operation18](https://usermanual.wiki/JVCKENWOOD/K9X004.User-manual-1-of-3/User-Guide-1189339-Page-18.png)
![Turn off the power.●The firmware is updated.Counter setting●This is used for setting the type of counter displayed on the operationpanel.Counter types●●Total: total counterDisplays the total number of cards that are correctly printed.●Head: Head counterDisplays the total number of printed sides for the same head.●Free: free counterDisplays the number of cards that are correctly printed. This num-ber can be reset.●Cleaning Cun: Cleaning counterDisplays the number of cards that are correctly printed after thelast cleaning.●Error Cnt: Error counterDisplays the number of cards that are not correctly printed. Thisnumber can be reset.Press [Menu]●A [Cleaning] message appears.Press [Next] to display [Setting]●Pressing the [Next] button each time displays the next screen.Press [Enter]●A [Display] message appears.Press [Enter]●A [Mode] message appears.Operation19](https://usermanual.wiki/JVCKENWOOD/K9X004.User-manual-1-of-3/User-Guide-1189339-Page-19.png)
![Press [Next]●A [Counter] message appears.Press [Change]●A setting change screen appears.Press A and select a setting value.Press B to confirm the setting value.●Pressing B confirms the setting and returns you to the previousscreen.Press [Exit]●Pressing [Exit] each time returns you to the previous screen.Resetting the counter●Resets the free counter and error counter.Press [Menu]●A [Cleaning] message appears.Press [Next] to set to [Counter Reset]Press B●Resets the free counter and error counter.Checking reset●●Select [Free Cnt] or [Error Cnt] under [Counter setting].Test print●Prints the printer’s built-in test pattern, or the different setting values.●When system troubles occur, printing can be performed using settingson the printer or computer by operating only the printer.Test types●●Printer Setting:Prints according to the values preset in the printer’s user mode.●Network:Prints according to the values preset through the network.●Press [Menu]●A [Cleaning] message appears.Press [Next] to display [Test Print]Operation20](https://usermanual.wiki/JVCKENWOOD/K9X004.User-manual-1-of-3/User-Guide-1189339-Page-20.png)
![Press [Change].●A [Test Pattern] message appears.Press A and select a test type.Press B●Test print starts.Contrast setting●This is used for setting the contrast of the operation panel display.Setting values●●-3, -2, -1, 0, 1, 2, 3Selecting a larger value increases the contrast.Press [Menu]●A [Cleaning] message appears.Press [Next] to set to [Setting]●Pressing the [Next] button each time displays the next screen.Press [Enter]●A [Display] message appears.Press [Enter]●A [Mode] message appears.Press [Next]●A [Contrast] message appears.Press [Change]●A setting selection screen appears.Press A and select a setting value.Press B to confirm the setting value.●Pressing B confirms the setting and returns you to the previousscreen.Press [Exit]●Pressing [Exit] each time returns you to the previous screen.Operation21](https://usermanual.wiki/JVCKENWOOD/K9X004.User-manual-1-of-3/User-Guide-1189339-Page-21.png)
![Buzzer sound setting●This is used for setting the buzzer sound when an error occurs.Setting values●●On: turns on buzzer sound, Off: turns off buzzer soundPress [Menu]●A [Cleaning] message appears.Press [Next] to set to [Setting]Press [Enter]●A [Display] message appears.Press [Next] to set to [Buzzer]Press [Change]●A setting selection screen appears.Press A and select a setting value.Press B to confirm the setting value.●Pressing B confirms the setting and returns you to the previousscreen.●To display the next setting value, press A.Press [Exit]●Pressing [Exit] each time returns you to the previous screen.Operation22](https://usermanual.wiki/JVCKENWOOD/K9X004.User-manual-1-of-3/User-Guide-1189339-Page-22.png)
![Unit number setting●For setting the printer’s unit number according to the USB environment.Setting values●●No.1 ~ No.10Press [Menu]●A [Cleaning] message appears.Press [Next] to set to [Setting]Press [Enter]●A [Display] message appears.Press [Next] to set to [Unit No]Press [Change]●A setting selection screen appears.Press A and select a setting value.Press B to confirm the setting value.●Pressing B confirms the setting and returns you to the previousscreen.Press [Exit]●Pressing [Exit] each time returns you to the previous screen.Operation23](https://usermanual.wiki/JVCKENWOOD/K9X004.User-manual-1-of-3/User-Guide-1189339-Page-23.png)
![Transport mode settingNote:●Make sure that you set to the transport mode when transporting ormoving the printer.Failure to do so may result in malfunction of the printer.●When transporting or moving the printer, ensure that the heat roller issecured to a safe position.Open the printer door.Press and hold down the cassette button, and remove the ink ribboncassette (on the right) to remove the ink ribbon.Press and hold down the cassette button, and remove the retransferfilm cassette (on the left) to remove the retransfer film.Close the printer door.Turn on the power.Check to ensure that [Film Search] is displayed on the operationpanel of the printer.Press [Menu]●A [Cleaning] message appears.Press [Next] to set to [Transport Mode]Press B●After setting to the transport mode, a [Please Power Off] messageappears. Turn off the power, and attach the cassette.Note:●When in the transport mode, the retransfer film cassette cannot be in-stalled to the printer with the retransfer film attached.Canceling the transport mode●●With the printer door closed. turn on the power, and cancel thetransport mode.Operation24](https://usermanual.wiki/JVCKENWOOD/K9X004.User-manual-1-of-3/User-Guide-1189339-Page-24.png)
![SecuritySecurity setting●●When a security number is set, opening/closing of the printerdoor and detachment of the card hopper are disabled.●To change the security number, you have to delete it and regis-ter a new number again.Press the operation button (center) for at least 3 seconds.●A [Set Sec-Key OK?] message appears.Press B●A [New Key] message appears.Enter a number.●You can enter up to 8 digits.●Pressing A each time advances to the next number.●Pressing E each time advances to the next digit.Press B●A [Re-enter] message appears.Input the number you have entered in [New Key] again.Press B●If this number is consistent with the number entered in [NewKey], the display returns to [Ready], and the new password isregistered.●If this number is not consistent with the number entered in [NewKey], the display returns to [Set Sec-Key]. Enter a numberagain.Turning off the security function●You can deactivate the locked security as follows.Press the operation button (center) for at least 3 seconds.●A [Unlock Sec-Key OK?] message appears.Press E●A [Unlock Sec-Key] message appears.Enter the security number registered for [New Key].Operation25](https://usermanual.wiki/JVCKENWOOD/K9X004.User-manual-1-of-3/User-Guide-1189339-Page-25.png)
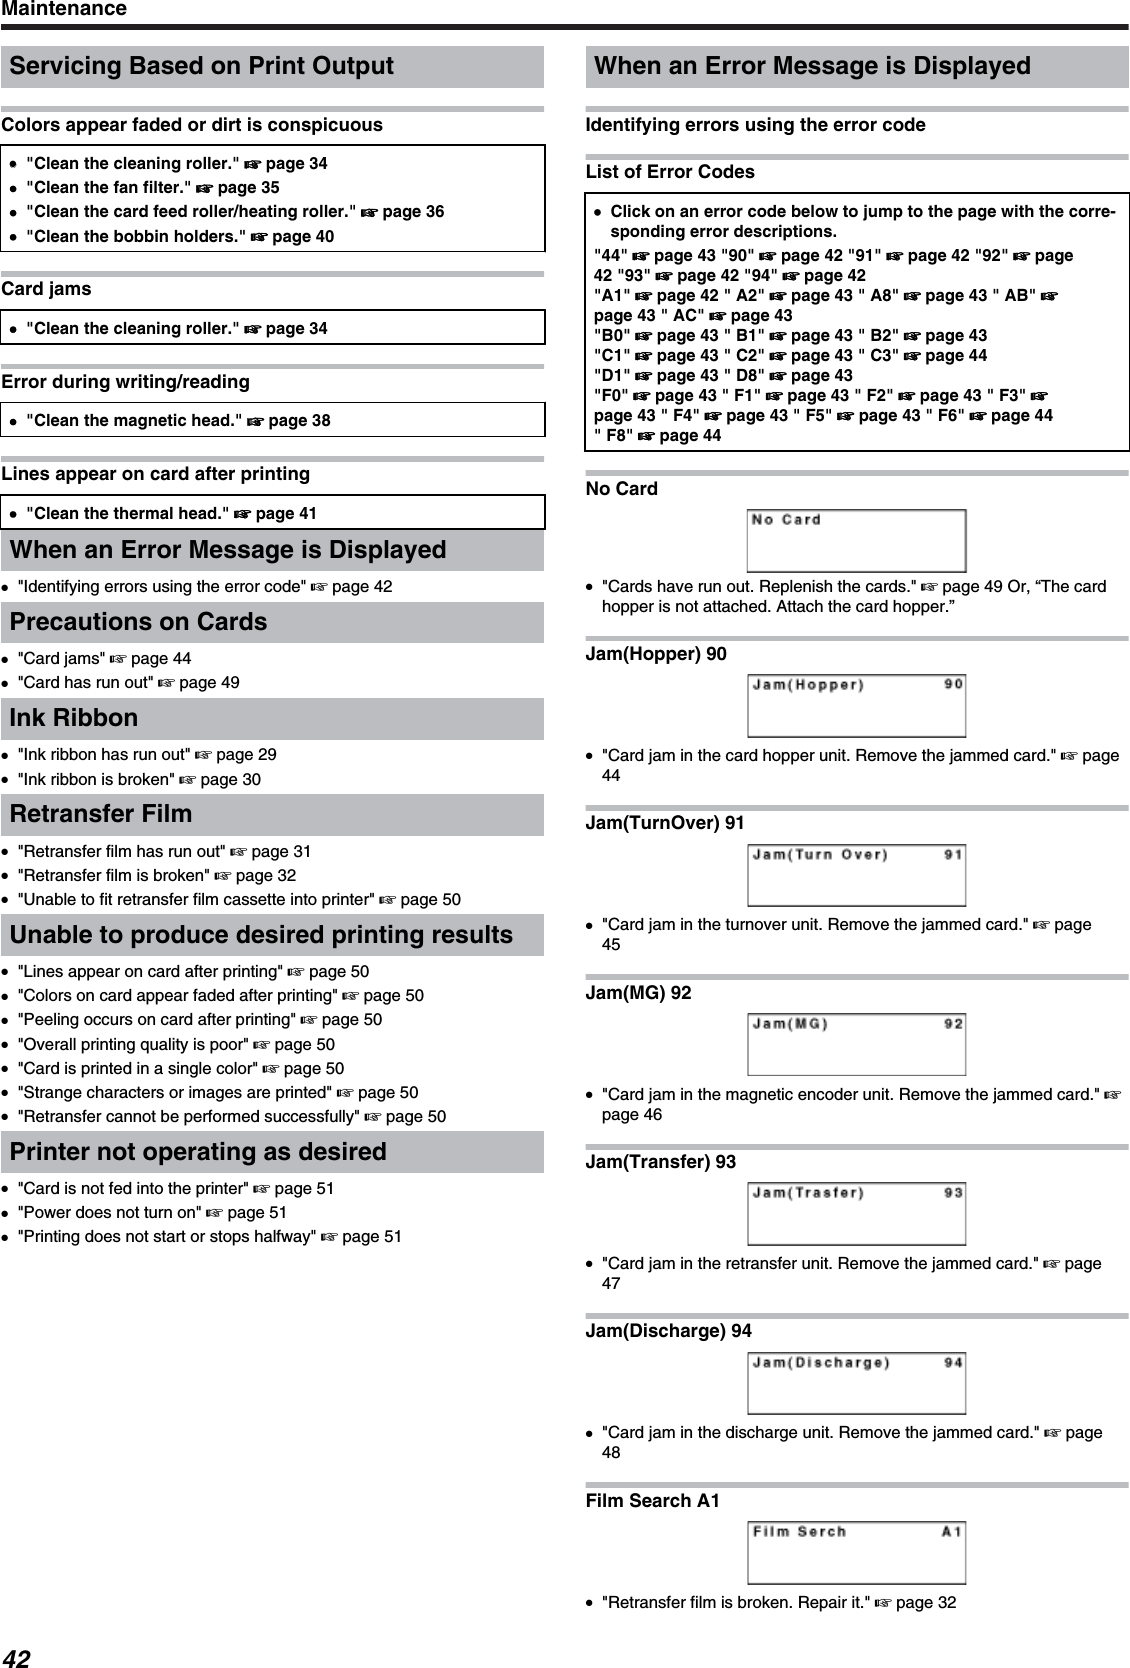
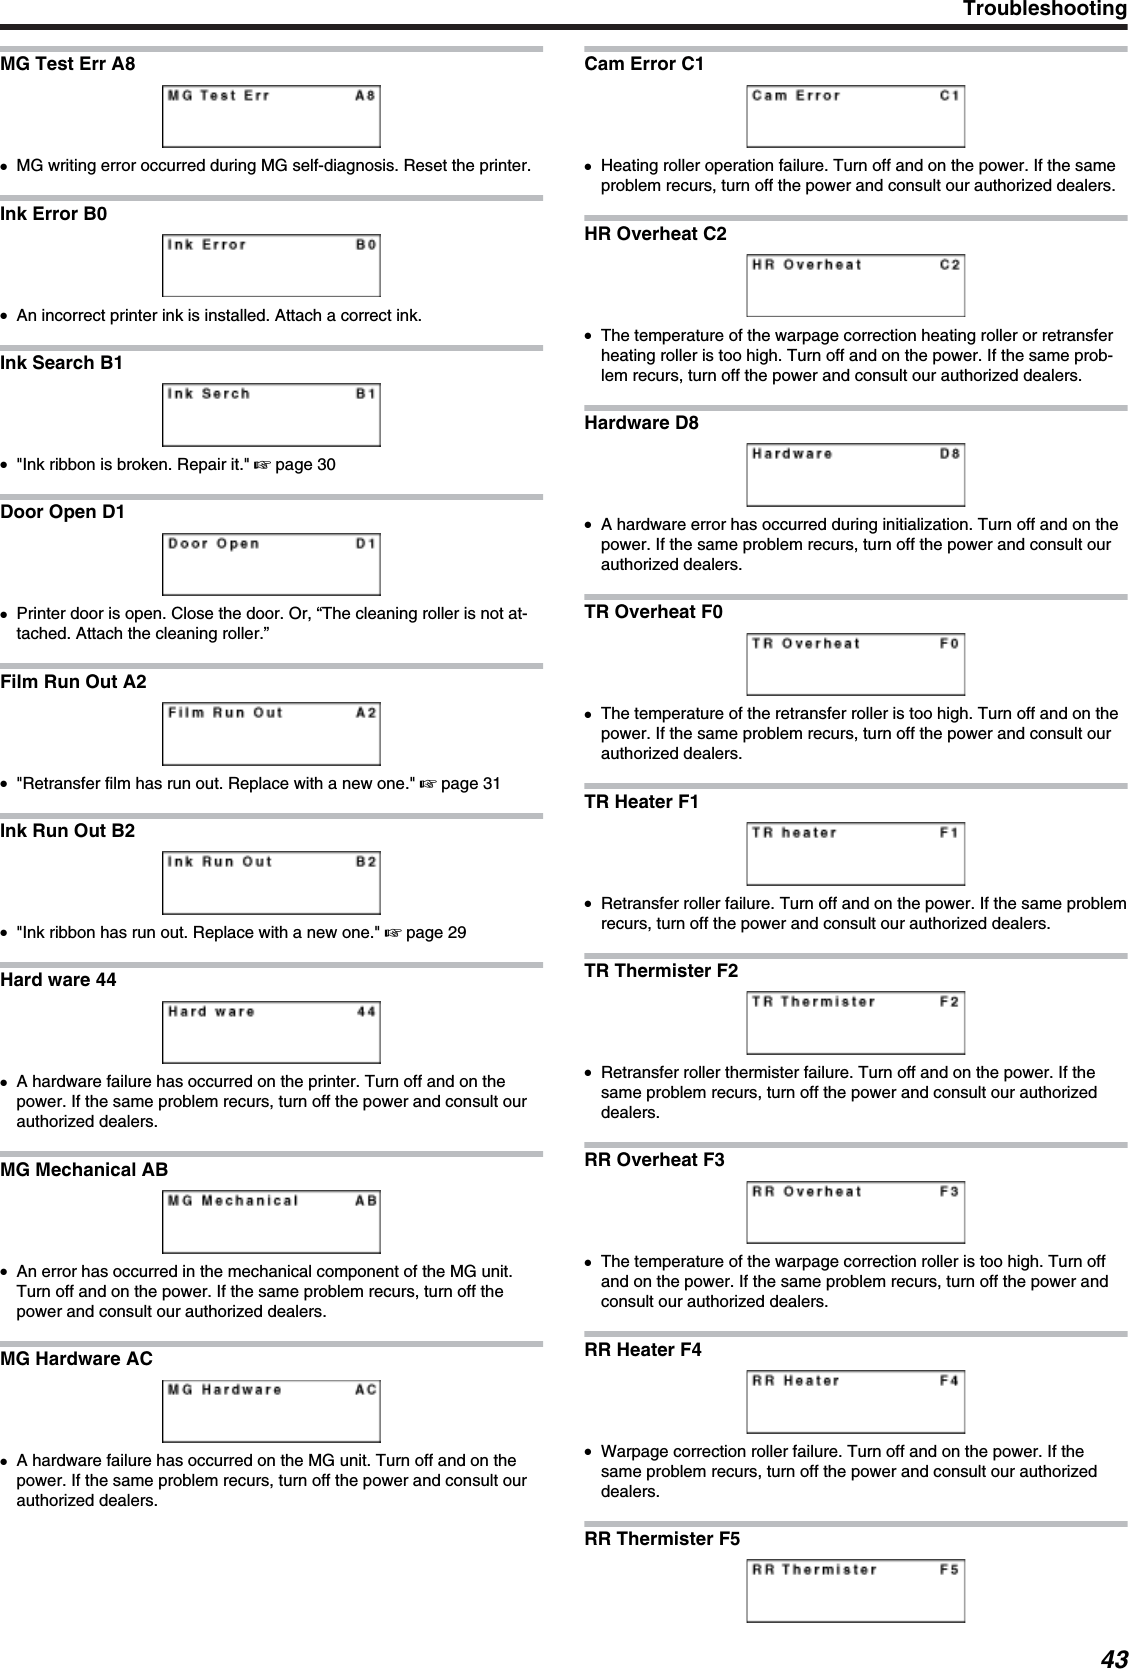
![●Pressing A each time advances to the next number.●Pressing E each time advances to the next digit.Press B●●If this number is consistent with the number entered in [NewKey], the display returns to [Ready], and the lock is deactivated.●If this number is not consistent with the number entered in [NewKey], the display returns to [Unlock Sec-Key OK?]. Enter a num-ber again.Deleting security number●You can delete a registered security number as follows.●To change the security number, you have to delete it and regis-ter a new number again.Press the operation button (center) for at least 3 seconds.●A [Unlock Sec-Key OK?] message appears.Press [Next]●A [Delete Sec-Key OK?] message appears.Press B●A [Key for DEL] message appears.Enter the security number entered in [New Key].●Pressing E each time advances to the next digit.●Pressing A each time advances to the next number.Press B●If this number is consistent with the number entered in [NewKey], the display returns to [Ready], and the lock is deactivated.●If this number is not consistent with the number entered in [NewKey], the display returns to [Unlock Sec-Key OK?]. Enter a num-ber again.Operation26](https://usermanual.wiki/JVCKENWOOD/K9X004.User-manual-1-of-3/User-Guide-1189339-Page-26.png)
![Setting Using the Status Monitor"Status Monitor Settings" (' page 80)Printing a CardNote:●If you see an [Initializing...] or [Preheating..] message on the LCD panelof the printer, this means the printer is not ready yet. Printing cannot beperformed in this case.●Printing the card on the side with the magnetic stripe may cause print-ing errors or damage to the card’s functions. If you want to do so, con-sult our authorized dealers in advance.Printing a CardTurn on the power.Check to ensure that cards are inserted into the card hopper.Open the print settings screen of the application.Select this printer from [Name].●If there are multiple printers, select the name of the printer that youwant to perform printing on.After ensuring that a [Ready] message appears on the LCD panel ofthe printer, start printing."Precautions on cards" '' page 28●"Card has run out" ' page 28"Ink Ribbon" ' page 29●"Ink ribbon has run out" ' page 29●"Ink ribbon is broken" ' page 30"Retransfer Film" ' page 31●"Retransfer film has run out" ' page 31●"Retransfer film is broken" ' page 32Operation27](https://usermanual.wiki/JVCKENWOOD/K9X004.User-manual-1-of-3/User-Guide-1189339-Page-27.png)
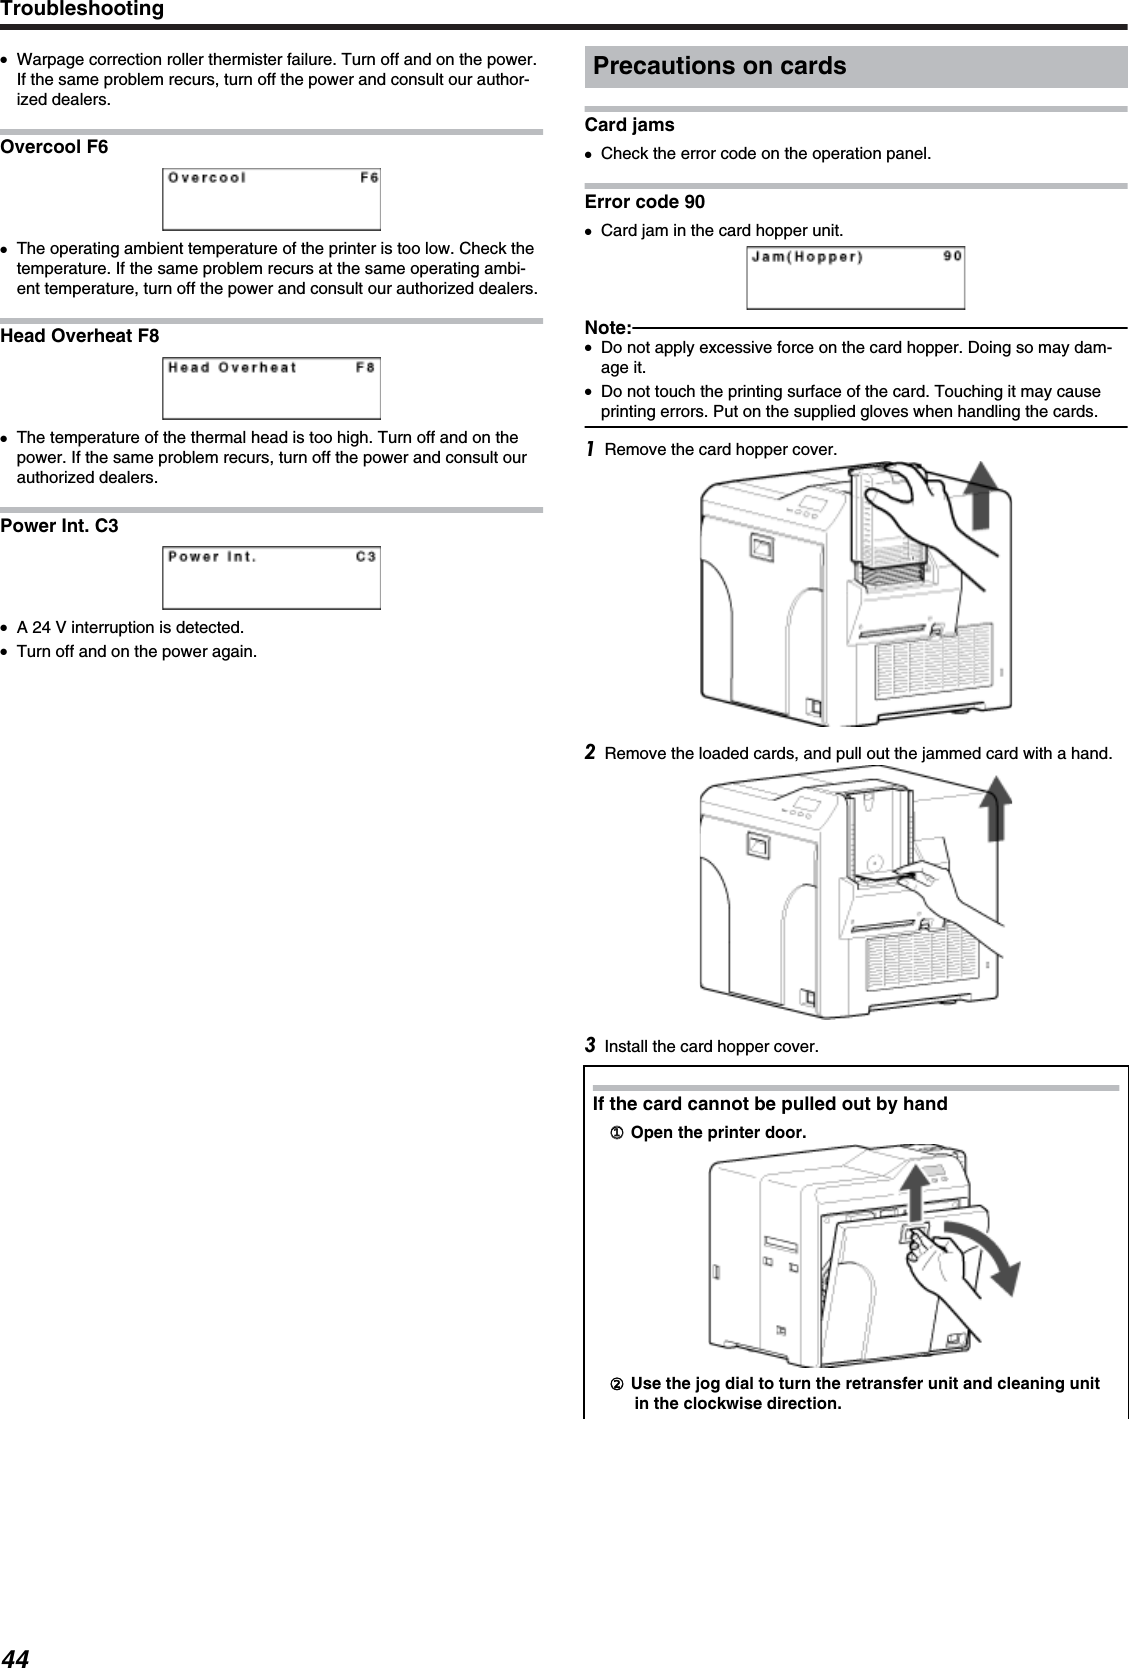
![Precautions on cardsCard has run out●Replenish the cards.Print this pageNote:●If the security lock is on, deactivate it. After work is complete, activatethe security lock again.●Do not touch the printing surface of the card. Touching it may causeprinting errors. Put on the supplied gloves when handling the cards.●When using new cards, separate them one by one before setting themin the printer. Cards may be adhered to each other due to static, thuscausing card jams.●Align the cards before setting them in the printer. Otherwise, the cardhopper cover may not close properly, and this may damage the printer.●Printing the card on the side with the magnetic stripe may cause print-ing errors or damage to the card’s functions. If you want to do so, con-sult our authorized dealers in advance.●To set cards with both functions (magnetic stripe and contact IC), fol-low the procedure for setting the contact IC card.Set the card hopper knob to [OPEN].Lift to remove the card hopper cover.Align the orientation of the cards, and set them in the printer.Magnetic cards●●Set the card with the magnetic stripe facing upward and towardthe printer, or facing downward and toward you..ISO contact IC cards●Set the card with the Contact IC terminal facing upward and to-ward the rear of the printer, or downward and toward the frontof the printer.Install the card hopper cover.Replacement28](https://usermanual.wiki/JVCKENWOOD/K9X004.User-manual-1-of-3/User-Guide-1189339-Page-28.png)
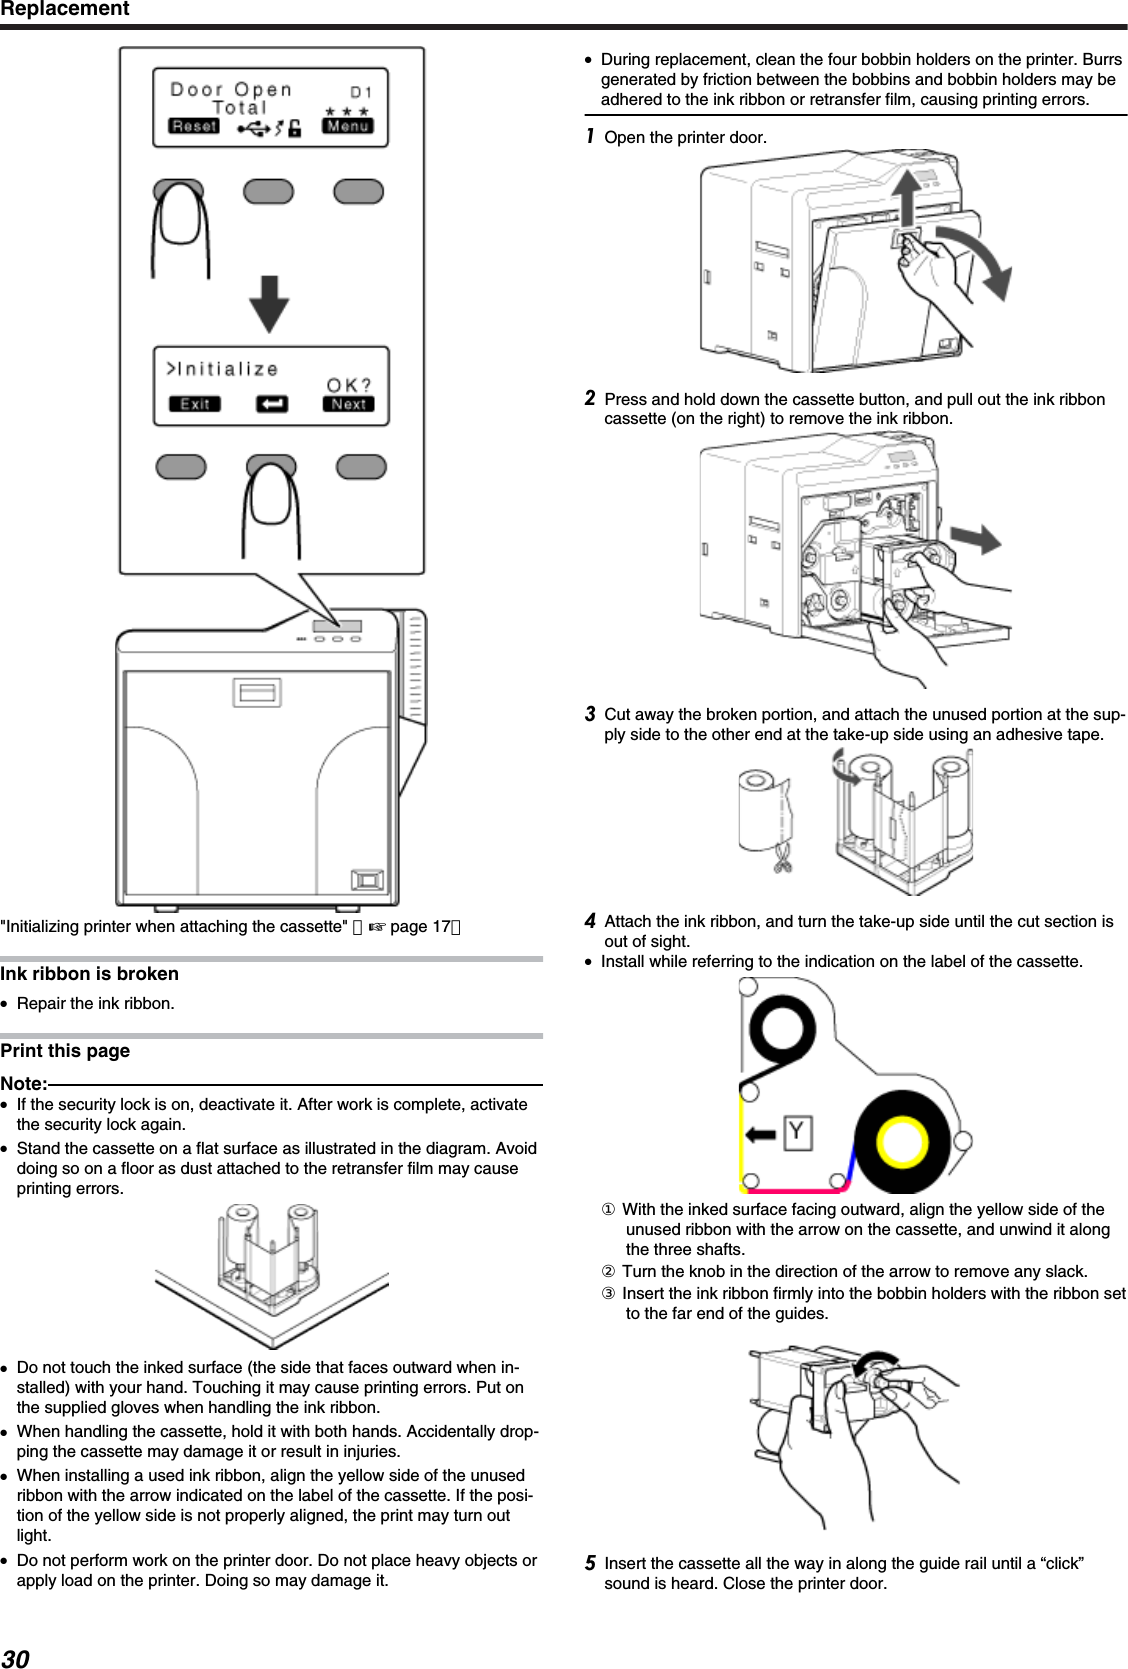
![Ink RibbonInk ribbon has run out●Replace with a new ink ribbon.Print this pageNote:●If the security lock is on, deactivate it. After work is complete, activatethe security lock again.●Stand the cassette on a flat surface as illustrated in the diagram. Avoiddoing so on a floor as dust attached to the retransfer film may causeprinting errors.●Do not touch the inked surface (the side that faces outward when in-stalled) with your hand. Touching it may cause printing errors. Put onthe supplied gloves when handling the ink ribbon.●When installing a used ink ribbon, align the yellow side of the unusedribbon with the arrow indicated on the label of the cassette. If the posi-tion of the yellow side is not properly aligned, the print may turn outlight.●When handling the cassette, hold it with both hands. Accidentally drop-ping the cassette may damage it or result in injuries.●Do not perform work on the printer door. Do not place heavy objects orapply load on the printer. Doing so may damage it.●During replacement, clean the four bobbin holders on the printer. Burrsgenerated by friction between the bobbins and bobbin holders may beadhered to the ink ribbon or retransfer film, causing printing errors.Open the printer door.Press and hold down the cassette button, and pull out the ink ribboncassette (on the right) to remove the ink ribbon.Install a new ink ribbon.●Install while referring to the indication on the label of the cassette.① With the inked surface facing outward, align the yellow side of theunused ribbon with the arrow on the cassette, and unwind it alongthe three shafts.② Insert the ink ribbon firmly into the bobbin holders with the ribbon setto the far end of the guides.●A: take-up side (black)●B: unused side (yellow)Remove any slack in the ink ribbon.① Hold the cassette.② Turn the knob in the direction indicated by the arrow.Insert the cassette all the way in along the guide rail until a “click”sound is heard. Close the printer door.Press [Reset]DB to reset the printer.Replacement29](https://usermanual.wiki/JVCKENWOOD/K9X004.User-manual-1-of-3/User-Guide-1189339-Page-29.png)
![Press [Reset]DB to reset the printer."Initializing printer when attaching the cassette" (' page 17)Retransfer FilmRetransfer film has run out●Replace with a new retransfer film.Print this pageNote:●If the security lock is on, deactivate it. After work is complete, activatethe security lock again.●Stand the cassette on a flat surface as illustrated in the diagram. Avoiddoing so on a floor as dust attached to the retransfer film may causeprinting errors.●Do not touch the retransfer face (the side that faces outward when in-stalled) with your hand. Touching it may cause printing errors. Put onthe supplied gloves when handling the retransfer film.●When handling the cassette, hold it with both hands. Accidentally drop-ping the cassette may damage it or result in injuries.●When installing a used retransfer film, align the unused side of the filmwith the arrow indicated on the label of the cassette. Failure to do somay result in errors, or the print may turn out light.●When installing a new film, make sure that at least three black lines arewound onto the take-up side. Insufficient winding may cause the printerto malfunction.●Do not perform work on the printer door. Do not place heavy objects orapply load on the printer. Doing so may damage it.●During replacement, clean the four bobbin holders on the printer. Burrsgenerated by friction between the bobbins and bobbin holders may beadhered to the ink ribbon or retransfer film, causing printing errors.Open the printer door.Press and hold down the cassette button, and pull out the retransferfilm cassette (on the left) to remove the retransfer film.Install a new retransfer film.●Install while referring to the indication on the label of the cassette.Replacement31](https://usermanual.wiki/JVCKENWOOD/K9X004.User-manual-1-of-3/User-Guide-1189339-Page-31.png)
![① When installing the retransfer film, make sure that at least threeblack lines are wound onto the take-up side.② With the retransfer face facing outward, align the unused side of thefilm with the arrow on the cassette, and unwind it along the threeshafts.③ Insert the retransfer film firmly into the bobbin holders with the filmset to the far end of the guides.●A: take-up side (black)●B: unused side (green)Remove any slack in the film.① Hold the retransfer film cassette.② Turn the knob in the direction indicated by the arrow.Insert the cassette all the way in along the guide rail until a “click”sound is heard. Close the printer door.Press [Reset]DB to reset the printer.Memo:●When attaching a new retransfer film, it is recommended that you for-ward the film by one or two images before printing."Initializing printer when attaching the cassette" (' page 17)Retransfer film is broken●Repair the retransfer film.Print this pageNote:●If the security lock is on, deactivate it. After work is complete, activatethe security lock again.●Stand the cassette on a flat surface as illustrated in the diagram. Avoiddoing so on a floor as dust attached to the retransfer film may causeprinting errors.●Do not touch the retransfer face (the side that faces outward when in-stalled) with your hand. Touching it may cause printing errors. Put onthe supplied gloves when handling the retransfer film.●When handling the cassette, hold it with both hands. Accidentally drop-ping the cassette may damage it or result in injuries.●When installing a used retransfer film, align the unused side of the filmwith the arrow indicated on the label of the cassette. Failure to do somay result in errors, or the print may turn out light.Replacement32](https://usermanual.wiki/JVCKENWOOD/K9X004.User-manual-1-of-3/User-Guide-1189339-Page-32.png)
![●Do not perform work on the printer door. Do not place heavy objects orapply load on the printer. Doing so may damage it.●During replacement, clean the four bobbin holders on the printer. Burrsgenerated by friction between the bobbins and bobbin holders may beadhered to the ink ribbon or retransfer film, causing printing errors.Open the printer door.Press and hold down the cassette button, and pull out the retransferfilm cassette (on the left) to remove the retransfer film.Cut away the broken portion, and attach the unused portion at the sup-ply side to the other end at the take-up side using an adhesive tape.Attach the retransfer film, and turn the take-up side until the cut sectionis out of sight.① With the retransfer face facing outward, align the unused side of thefilm with the arrow on the cassette, and unwind it along the threeshafts.② Insert the retransfer film firmly into the bobbin holders with the filmset to the far end of the guides.③ Turn the knob in the direction of the arrow to remove any slack.Insert the cassette all the way in along the guide rail until a “click”sound is heard. Close the printer door.Press [Reset]DB to reset the printer."Initializing printer when attaching the cassette" (' page 17)Replacement33](https://usermanual.wiki/JVCKENWOOD/K9X004.User-manual-1-of-3/User-Guide-1189339-Page-33.png)

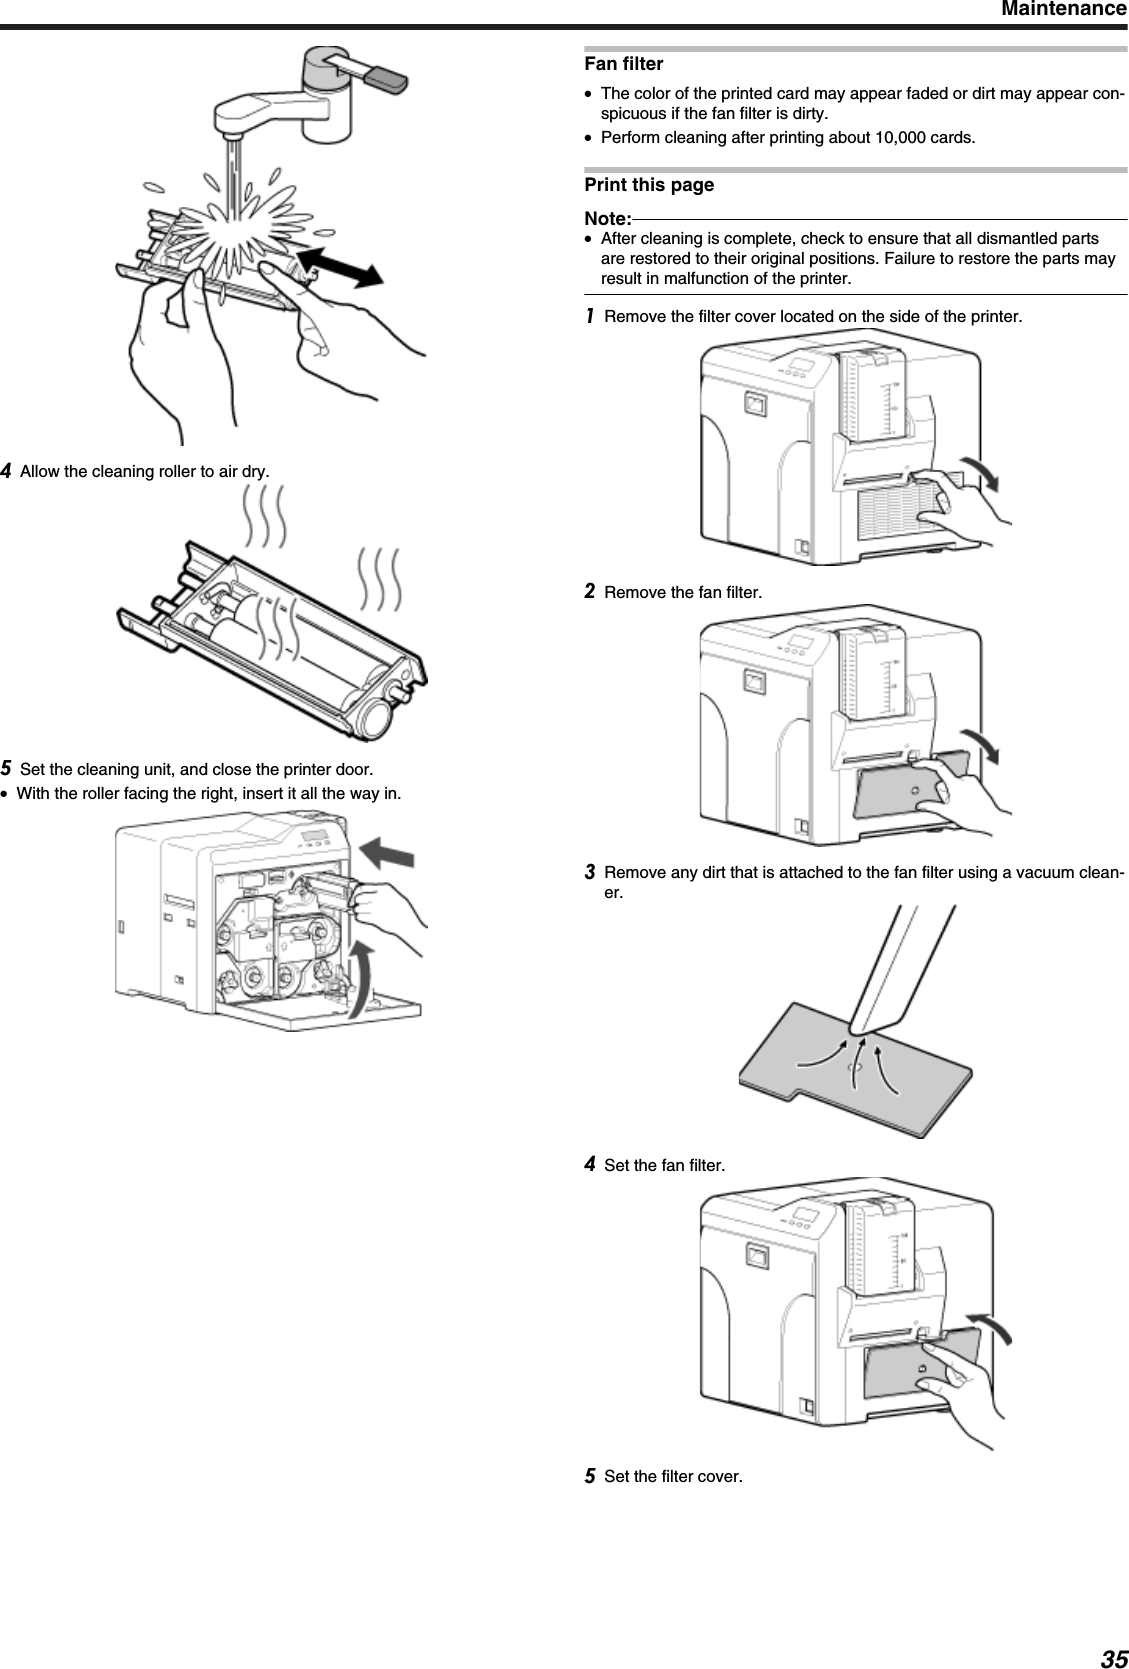
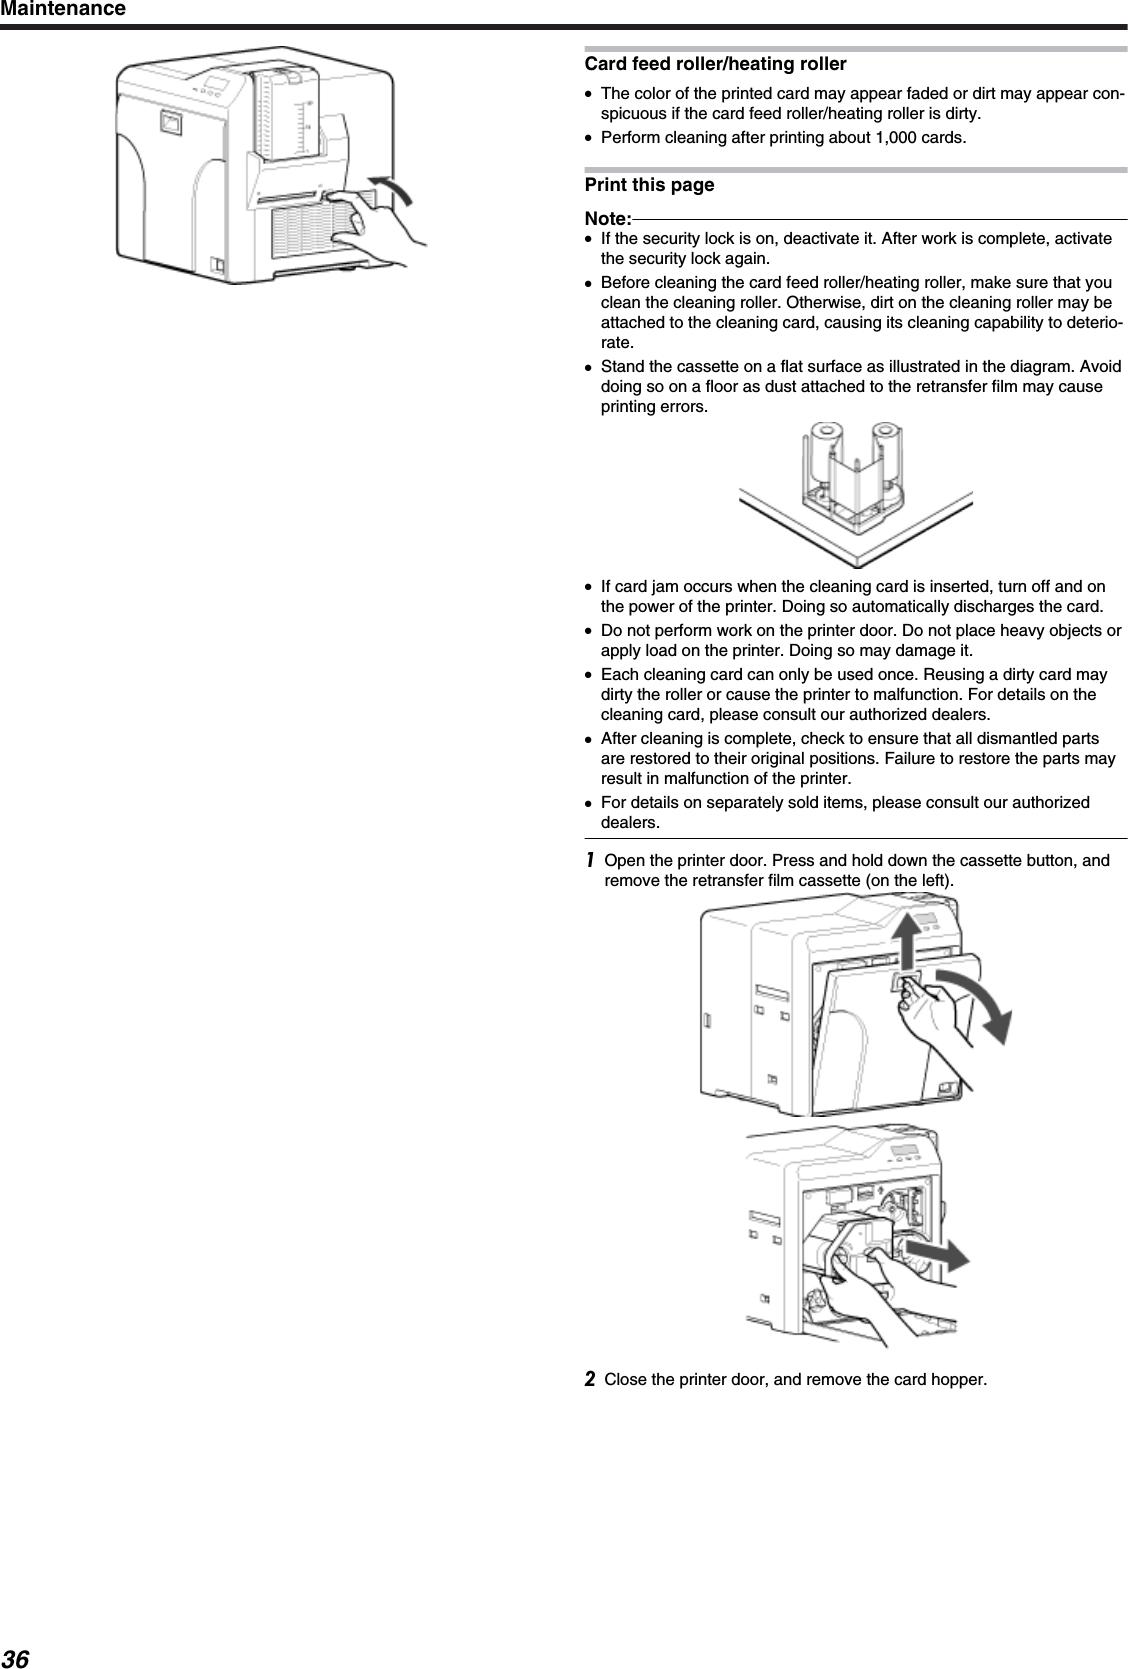
![Turn on the power.Press [Menu] to set to [Cleaning]Press [Enter] to set to [Rollers]Peel off the backing paper from the cleaning card (sold separately).Press B●A [Cleaning Start OK?] message appears.Press B●A [Cleaning...] message appears.Note:●If the retransfer heating roller is hot, a [HR is too hot] message will bedisplayed. Turn off the power, and perform cleaning after the retransferheating roller has cooled down completely.Insert the cleaning card (sold separately) within 20 seconds.●The roller draws in the card, and cleaning starts automatically. Reversethe adhesive face, and insert the card again.Note:●Insert the card within 20 seconds after pressing B.●After pressing B, the buzzer sounds upon a lapse of 20 seconds, anda [Jam (Hopper)] error message appears 10 seconds later.Press [Reset]DB to cancel the error.●When a standard-sized card is inserted, the card is automatically dis-charged from the NG card outlet, and the printer returns to the [Clean-ing Start OK?] screen. After the cleaning card is discharged, turn off the power, and installthe retransfer film cassette and card hopper.Maintenance37](https://usermanual.wiki/JVCKENWOOD/K9X004.User-manual-1-of-3/User-Guide-1189339-Page-37.png)
![●To turn on the power again, do so after an interval of at least 10 sec-onds.Magnetic head●Writing/Reading errors may occur if the magnetic head is dirty.●Perform cleaning after printing about 1,000 cards.Print this pageNote:●If the security lock is on, deactivate it. After work is complete, activatethe security lock again.●Before cleaning the magnetic head, make sure that you clean thecleaning roller. Otherwise, dirt on the cleaning roller may be attached tothe cleaning card, causing its cleaning capability to deteriorate.●After cleaning is complete, check to ensure that all dismantled partsare restored to their original positions. Failure to restore the parts mayresult in malfunction of the printer.●Do not perform work on the printer door. Do not place heavy objects orapply load on the printer. Doing so may damage it.●For details on separately sold items, please consult our authorizeddealers.Turn on the power.Check to ensure that [Ready] or [Preheating] is displayed on theoperation panel of the printer.Remove the card hopper.Press [Menu] to set to [Cleaning]Maintenance38](https://usermanual.wiki/JVCKENWOOD/K9X004.User-manual-1-of-3/User-Guide-1189339-Page-38.png)
![[Enter]D Press [Next] to set to [MG]Apply alcohol on the magnetic head cleaning card (sold separately).●Apply about three to four drops of alcohol on the magnetic stripe.Press BInsert the magnetic head cleaning card within 20 seconds.Note:●Insert the card within 20 seconds after pressing B.●After pressing B, the buzzer sounds upon a lapse of 20 seconds, anda [Jam (Hopper)] error message appears 10 seconds later.Press [Reset]DB to cancel the error.After the cleaning card is discharged, turn off the power, and install thecard hopper.●To turn on the power again, do so after an interval of at least 10 sec-onds.Maintenance39](https://usermanual.wiki/JVCKENWOOD/K9X004.User-manual-1-of-3/User-Guide-1189339-Page-39.png)