JVCKENWOOD V2T001 USB wireless transmitter User Manual cover RX D301S J f p65
JVC KENWOOD Corporation USB wireless transmitter cover RX D301S J f p65
UserManual.wiki
>
JVCKENWOOD
>
V2T001 User Manual
Users Manual
Navigation menu
Upload a User Manual
Namespaces
Wiki Guide
HTML
PDF
Info
Views
User Manual
Discussion / Help
Navigation
![Warnings, Cautions, and OthersMises en garde, précautions et indications diversesCaution–– STANDBY/ON button!Disconnect the mains plug to shut the power off completely. The STANDBY/ON button in any position does not disconnect themains line. The power can be remote controlled.Attention—Touche STANDBY/ON!Déconnectez la fiche d’alimentation secteur pour couperl’alimentation complètement. La touche STANDBY/ON,dans n’importe quelle position, ne déconnecte pas le systèmedu secteur. L’alimentation ne peut pas être télécommandé.CAUTIONTo reduce the risk of electrical shocks, fire, etc.:1. Do not remove screws, covers or cabinet.2. Do not expose this appliance to rain or moisture.ATTENTIONAfin d’éviter tout risque d’électrocution, d’incendie, etc.:1. Ne pas enlever les vis ni les panneaux et ne pas ouvrir lecoffret de l’appareil.2. Ne pas exposer l’appareil à la pluie ni à l’humidité.WARNING: TO REDUCE THE RISK OF FIRE OR ELECTRIC SHOCK, DO NOT EXPOSE THIS APPLIANCE TO RAIN OR MOISTURE. CAUTION: TO REDUCE THE RISK OF ELECTRIC SHOCK, DO NOT REMOVE COVER (OR BACK). NO USER SERVICEABLE PARTS INSIDE. REFER SERVICING TO QUALIFIED SERVICE PERSONNEL.RISK OF ELECTRIC SHOCKDO NOT OPENThe lightning flash with arrowhead symbol, within an equilateral triangle is intended to alert the user to the presence of uninsulated "dangerous voltage" within the product's enclosure that may be of sufficient magnitude to constitute a risk of electric shock to persons.The exclamation point within an equilateral triangle is intended to alert the user to the presence of important operating and maintenance (servicing) instructions in the literature accompanying the appliance.CAUTIONNote to CATV system installer:This reminder is provided to call the CATV system installer’sattention to Section 820-40 of the NEC which providesguidelines for proper grounding and, in particular, specifiesthat the cable ground shall be connected to the groundingsystem of the building, as close to the point of cable entry aspractical.CAUTIONChanges or modifications not approved by JVC could void theuser’s authority to operate the equipment.For Canada/pour le CanadaCAUTION: TO PREVENT ELECTRIC SHOCK, MATCH WIDE BLADE OF PLUG TO WIDE SLOT, FULLY INSERTATTENTION: POUR EVITER LES CHOCS ELECTRIQUES, INTRODUIRE LA LAME LA PLUS LARGE DE LA FICHE DANS LA BORNE CORRESPONDANTE DE LA PRISE ET POUSSER JUSQUAU FONDFor U.S.ADeclaration of Conformity:Trade Name: JVCModel Number: RX-D301S/RX-D302BThis device complies with Part 15 of the FCC Rules. Operationis subject to the following two conditions:(1) This device may not cause harmful interference.(2) This device must accept any interference received,including interference that may cause undesired operation.Responsible Party: JVC Americas Corp.Address: 1700 Valley Road, WayneNew Jersey 07470Telephone Number: 973-317-5000For USB wireless transmitterThis device complies with Part 15 of the FCC Rules. Operationis subject to the following two conditions:(1) This device may not cause harmful interference.(2) This device must accept any interference received,including interference that may Cause undesired operation.FCC Radiation Exposure Statement: For Canada/pour le CanadaThis Class B digital apparatus complies with CanadianICES-003.Cet appareil numérique de la classe B est conforme à la normeNMB-003 du Canada.For Canada/pour le CanadaOperation is subject to the following two conditions: (1) thisdevice may not cause interference, and (2) this device mustaccept any interference, including interference that may causeundesired operation of the device.L’utilisation de ce dispositif est autorisée seulement auxconditions suivantes : (1) il ne doit pas produire de brouillageet (2) l’utilisateur du dispositif doit être prêt à accepter toutbrouillage radioélectrique reçu, même si ce brouillage estsusceptible de compromettre le fonctionnement du dispositif.For U.S.AThis equipment has been tested and found to comply with the limits for a Class B digital device, pursuant to part 15 of the FCC Rules. These limits are designed to provide reasonable protection against harmful interference in a residential installation.This equipment generates, uses and can radiate radio frequency energy and, if not installed and used in accordance with the instructions, may cause harmful interference to radio communications. However, there is no guarantee that interference will not occur in a particular installation. If this equipment does cause harmful interference to radio or television reception, which can be determined by turning the equipment off and on, the user is encouraged to try to correct the interference by one or more of the following measures:- Reorient or relocate the receiving antenna.- Increase the separation between the equipment and receiver.- Connect the equipment into an outlet on a circuit different from that to which the receiver is connected.- Consult the dealer or an experienced radio/TV technician for help.safety_RX-D301S[J]_f.p65 05.2.22, 16:441This equipment complies with FCC RF radiation exposure limits set forth for an uncontrolled environment. To maintain compliance with FCC RF exposure compliance requirements, please avoid direct contact to the transmitting antenna during transmitting.This transmitter must not be co-located or operating in conjunction with any other antenna or transmitter.](https://usermanual.wiki/JVCKENWOOD/V2T001/User-Guide-530886-Page-1.png)
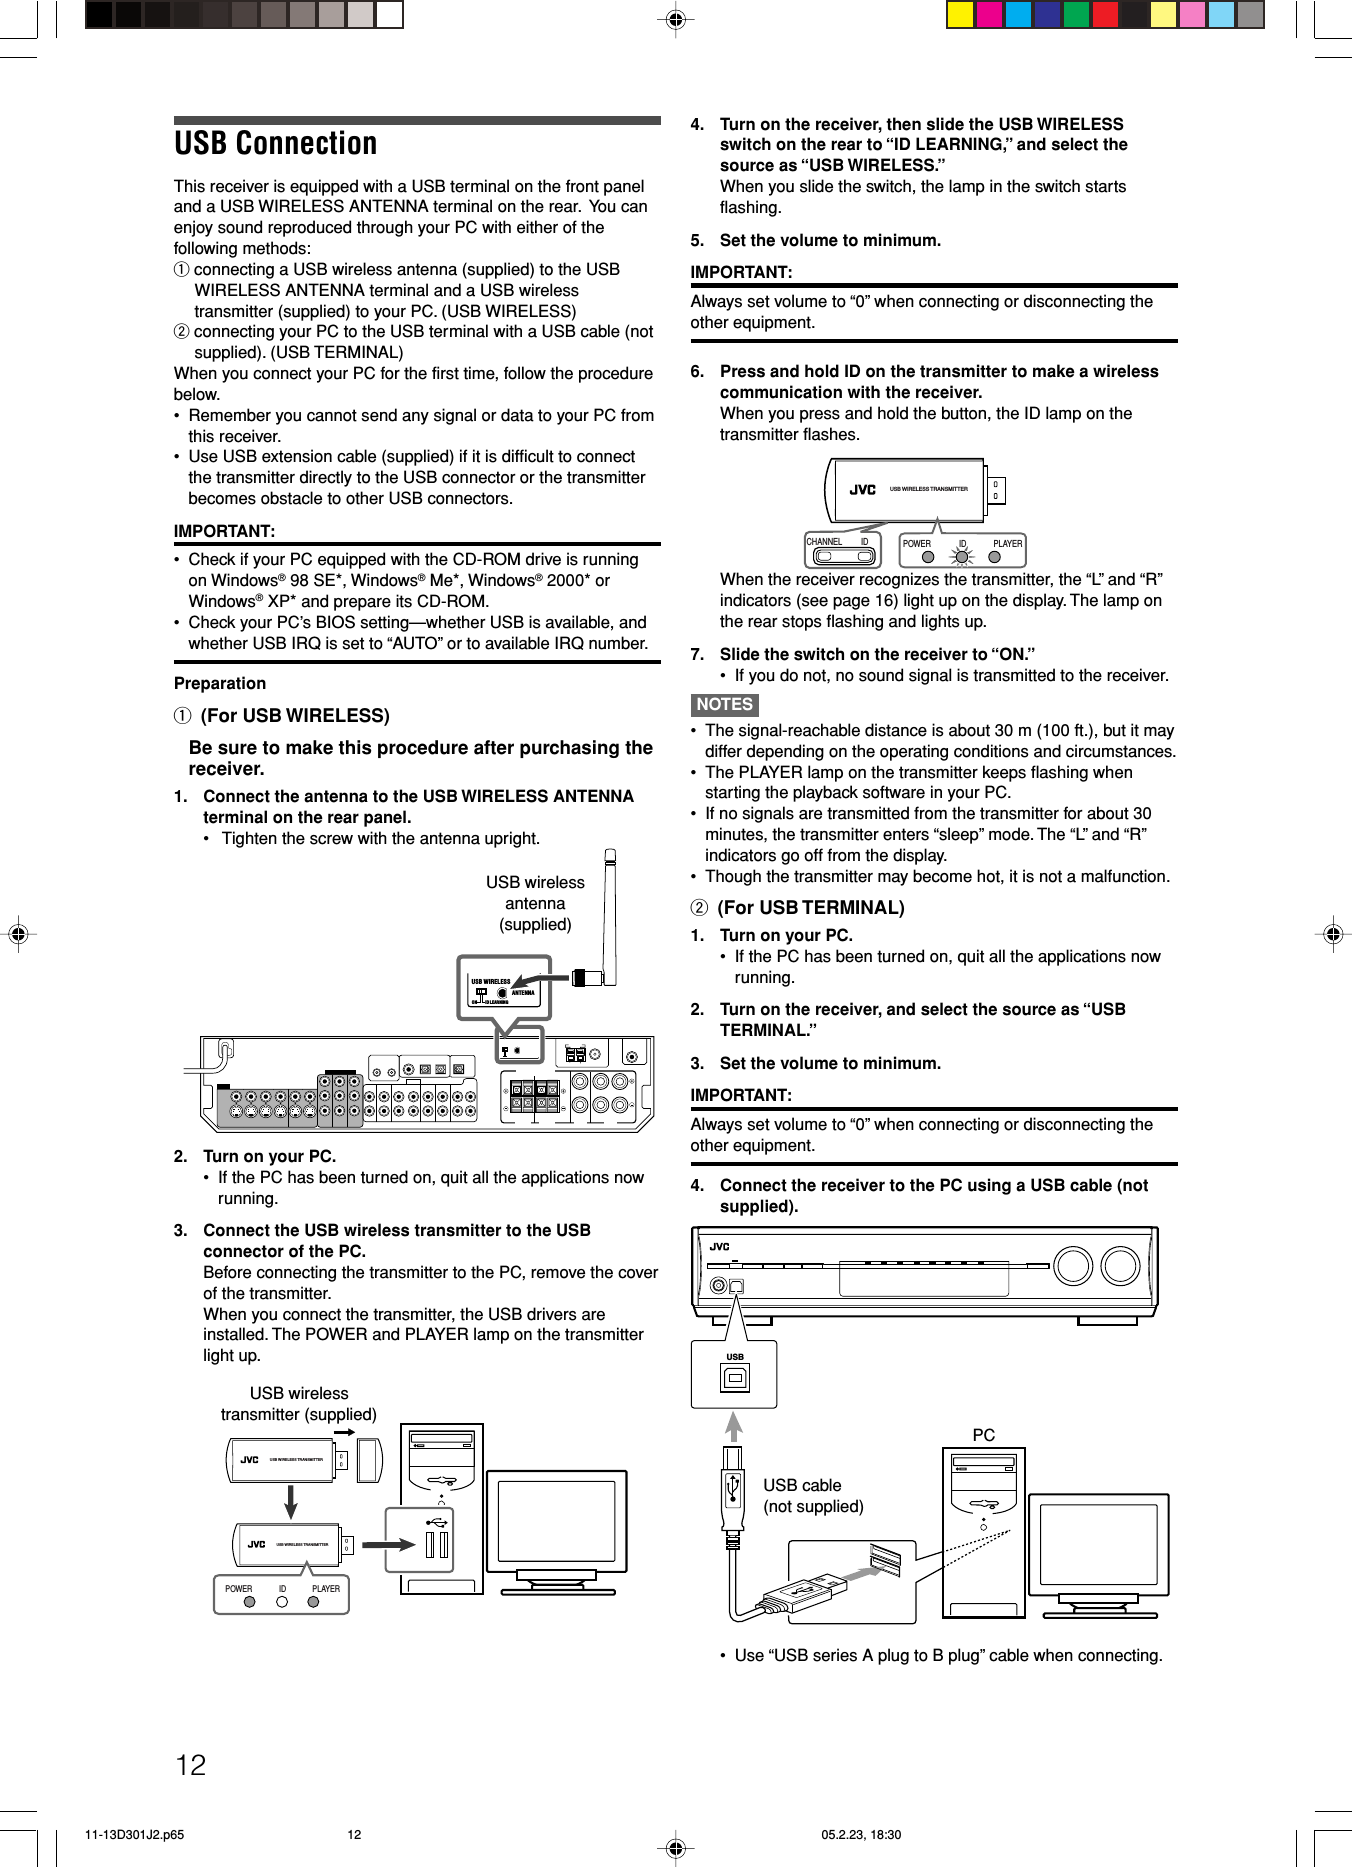
![13Now PC is ready for playback through the USB connection.After installation is completed, you can use your PC as theplayback source. The PC automatically recognizes the receiverwhenever the transmitter is connected to the PC or the USB cableis connected between the PC and the receiver while the receiveris turned on.• When not using the PC as the playback source, disconnect thetransmitter or the USB cable.To play back sounds on the PC, refer to the manuals suppliedwith the sound reproduction application installed in the PC. Startthe application after the USB device is recognized.When playing back with USB WIRELESS,connect the transmitter and aim the transmitter at the antenna. Ifany obstacles are in between, playback will be interrupted or thewireless communication will be canceled.If noise comes during playback with USB WIRELESS,press CHANNEL to change the frequency band.• By pressing CHANNEL for more than 3 seconds, you cansearch for the frequency band which is not used aroundautomatically.How to install the USB driversThe following procedure is described using the English version ofWindowsR XP. If your PC is running on a different version ofoperation system or language, the screens shown on your PC'smonitor will differ from the ones used in the following procedure.The following procedure is applied both to USB WIRELESS andUSB TERMINAL.1. The USB drivers are installed automatically.• If the USB drivers are not installed automatically, install theUSB drivers by following the instructions on the PC’smonitor.2. Check if the drivers are correctly installed.1. Open the Control Panel on your PC:Select [Start] = [Control Panel].2. Select [System] = [Hardware] = [Device Manager] =[Sound, video and game controllers] = [Universal SerialBus controllers].• The following window appears, and you can check whetherthe drivers are installed.If no sound comes from the speakers, check the followingitems:(For both USB WIRELESS and USB TERMINAL)- check the USB device is recognized properly.- check the playback software in your PC is compatible with theUSB device.- open the Control Panel on your PC, select [Sounds and AudioDevices] = [Audio] tab = [Sound playback] = [Default device],and check [Default device] is set to [USB Audio device].(For USB WIRELESS)- select “USB WIRELESS” as the source.- connect the USB wireless transmitter correctly with the USBWIRELESS switch on the receiver “ON.”- keep proper distance between the receiver and your PC.- check the ID lamp on the transmitter and the signal indicators“L” and “R” on the display light up.(For USB TERMINAL)- select “USB TERMINAL” as the source.- connect the USB cable correctly.NOTES• DO NOT turn off the receiver or disconnect the transmitter orthe USB cable while installing the drivers and for severalseconds while your PC is recognizing the receiver.• If your PC does not recognize the receiver, disconnect thetransmitter or the USB cable and connect it again. If it does notwork yet, restart Windows.• The installed drivers can be recognized only when thetransmitter is connected to your PC or the USB cable isconnected between the receiver and your PC.• The sound may not be played back correctly—interrupted ordegraded—due to your PC settings and PC specifications.• Use a USB cable (version 1.1 or later). Recommended cordlength is 1.5 m.* Microsoft®, Windows® 98 SE, Windows® Me, Windows® 2000,and Windows® XP are registered trademarks of Microsoftcorporation.11-13D301J2.p65 05.2.23, 11:3813](https://usermanual.wiki/JVCKENWOOD/V2T001/User-Guide-530886-Page-3.png)