KTC Telecom KFR-100 Family Radio Transceiver User Manual Manual
KTC Telecom Co., Ltd. Family Radio Transceiver Manual
Users Manual
13. USER’S MANUAL
Safety Information For FRS UNIT
Your wireless handheld portable transceiver contains a low power transmitter.
When the Push-to Talk (PTT) button is pushed it sends out radio frequency (RF)
signals. This device is authorized to operate at a duty factor not to exceed 50%.
In August 1996, the Federal Communications Commission (FCC) adopted RF
exposure guidelines with safety levels for hand-held wireless devices.
Important Note: To maintain compliance with the FCC’s RF exposure
guidelines, hold the transmitter and antenna at least 1 inch (2.5 centimeters) from
your face and speak in a normal voice, with the antenna pointed up and away from
the face.
If you wear the handset on your body while using the headset accessory, use only
the manufacturers supplied belt clip for this product and ensure that the antenna
is at least 1 inch (2.5 centimeters) from your body when transmitting.
Use only the supplied antenna. Unauthorized antennas, modifications, or attach-
ments could damage the transmitter and may violate FCC regulations.
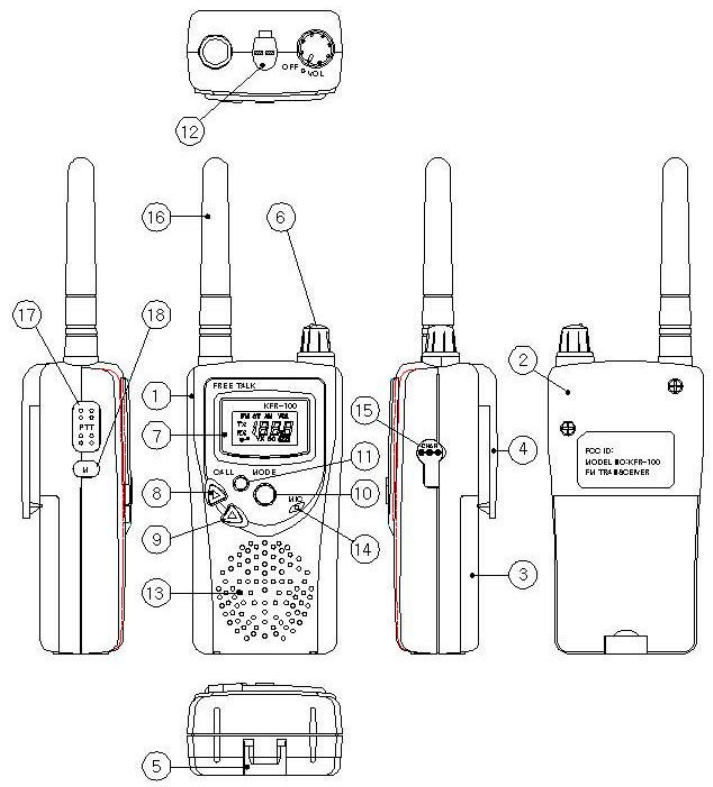
13.1 Key Name
FUNCTIONS AND CONTROLS
1) Top Cover
2) Bottom Cover
3) Battery Cover
4) Belt Clip
5) Lock Knob
6) Volume Knob
7) LCD Window
8) Up Botton
9) Down Botton
10) Menu Botton
11) Call Botton
12) Ear Mic/Spk Cap
13) Speaker
14) Mic
15) Charger Cap
16) Antenna
17) PTT Botton
18) Monitor Botton
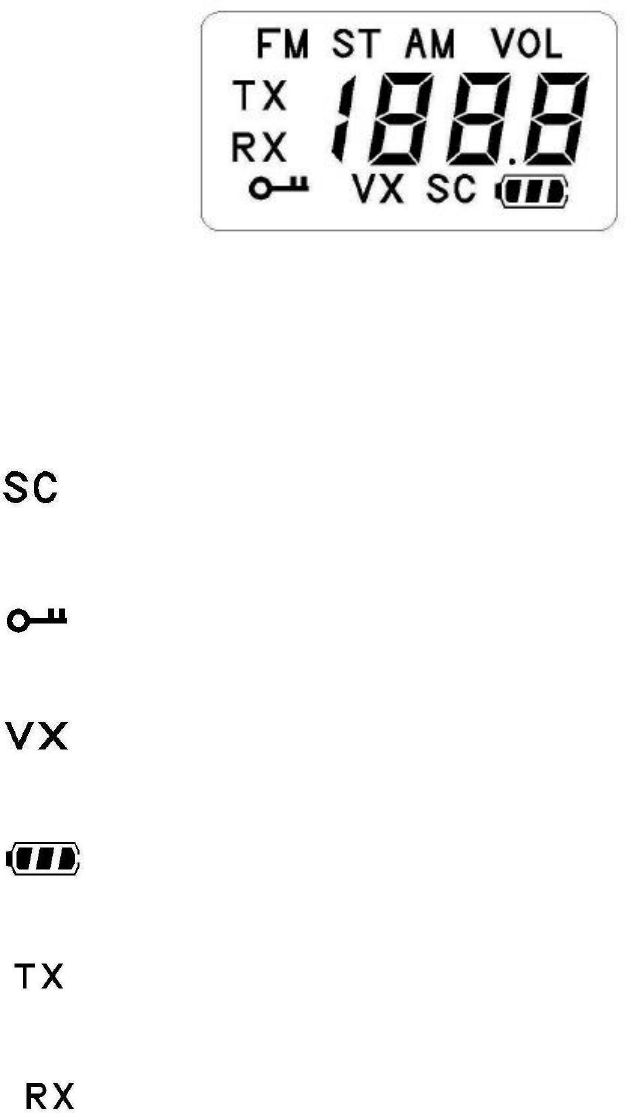
13.2 ICONS on LCD
1) CTCSS Indicator
Blinks digits right side when CTCSS code selected up/dn key,
and confirm by PTT key.
2) Auto Channel Scan Indicator
icon appears in the auto scan mode or when the auto scan mode is activated.
3) Lock Indicator
icon lock selection mode or when the call key long pressed.
4) VOX Indicator
icon blinks in VOX selection mode or appears when VOX is activated.
5) Battery Level Indicator
Battery Level Meter indicates the remaining battery strength.
6) Tx Indicator
icon appears when a signal is being transmitted.
8) Rx Indicator
icon appears when a signal is being received.
9) Left side Segment Display
Indicates the channel number in use at the normal mode.
when the Function Button is pressed, it displays the function menu in sequence:
FM radio CH / CTC / VOX / TOT
13) Right side Segment Display
Displays the CTCSS tone option at the normal mode.
Displays the SUBMENU of each MENU in the function mode.
(e.g. CH 1~38 / UO: On,OF / TOT: On,OF / FM radio Vol LVL0~7 / CAL number:1~5)
13.3 Key Function
13.3-1 Power Volume on/off
1) Clockwise - Power On
- To turn the unit on.
A short confirming melody will play.
2) Counterclockwise - Power Off
- To turn the unit off.
13.3-2 Mode button
Short Touch
:Press this button briefly to enter function edit mode in standby mode.
Long Touch
:Auto Channel SCAN
This feature allows you to scan for an active channel and communicate with the
party transmitting.
To access the Auto Channel Scan,
- Press the Mode Button until the auto channel icon blinks and SC appears in the
LCD Panel.
- Press the Up Button or the Down Button to choose scanning up or down from
the current channel number.
- Press the PTT button to confirm your selection.
- The unit will begin scanning for an active main channel. If a transmission is
detected, the Rx will appear on the LCD Panel.
- To turn off the auto channel scan feature in the standby mode, simply press the
Function button once.
13.3-3 UP button
- In the standby mode, press this button briefly to move to the next higher main or
sub channel.
In the function edit mode, press briefly to shift from the current option in each
submenu to the next option in the same submenu.
- Pressing this button for radio mode will allow you to volume level in the standby of
radio mode or through different menus in the function edit mode.
13.3-4 DOWN button
- In the standby mode, press this button briefly to move to the previous lower main or
sub channel.
In the function edit mode, press briefly to shift from the current option in each
submenu to the previous option in the same submenu.
- Pressing this button for radio mode will allow you to volume level in the standby of
radio mode or through different menus in the function edit mode.

13.3-5 Push-to-Talk (PTT) button
- Press it firmly and speak into the Built-in Microphone to transmit.
The red Tx icon on the LCD Panel will appears.
- Release it to revert to standby mode. When an incoming call is received, the Rx icon
on the LCD Panel will appears.
13.3-6 Monitor button
- Press it to check activity on the current channel before you try to transmit.
- Adjust the Volume Control if necessary.
- When you press the monitor button shortly, the LCD Panel will be illuminated with a
green color back-light.
- and if you want to hear low signal, press 1 second more and then you can heard the
signal during press monitor button and RX icon will appears.
13.3-7 Call button
- Call Ringer
:Press the CALL Button to call another party on the same channel.
TX icon will appear on the display.
The user selected 5 call ringers melody will play.
- Key Lock
:This feature prevents accidental channel change and disturbance to the preferred
preferred settings of the communicator. Key Lock temporarily disables the call key
pressed 2 seconds.
To access the Key Lock Selection menu,
- Press the call key until the auto lock icon
appears on the LCD panel.
- To disable lock function press 2 seconds again.
13.3-8 External Mic/Speaker
- This jack accepts an optional headset/microphone for totally handsfree operation.
Please refer to the enclosed accessory order form to order accessories.
See also section regarding VOX SELECTION MODE.
13.4 Setting and Operation
13.4-1 Basic Channel Selection
In order to communicate with other FRS units, both you and the receiving party must be
on the same channel.
KFR-100 has 14 channels as indicated by the left side digits in the LCD Display Panel.
Before, trying to ransmit on the selected channel, you should press the monitor button
to check the activity on that channel.
If someone is already on the selected channel, you should try another channel that is
clear.
To change the basic channel,
- In the standby mode, press the Up button briefly to move to the next higher main
channel number.
- Press the Down button briefly to move to the next lower main channel number.
13.4-2 FM Radio Mode
In order to listen FM radio, you can set the Menu button.
First, FM icon blink and then press up/dn button the radio mode setted.
If you wanted channel select, you can press Menu button the radio frequency blinking
And the radio frequencies moving by up/dn button pressing, after then confirm CH by
PTT key pressed.
- In radio mode, Memu button 2 seconds press you can more easily radio frequency
seeking 100 KHz spacing.
Also, radio volume is controlled by up/dn button.
- Radio lock set and disable is confirm by Call button 2 seconds more.
13.4-3 CTCSS (Coded Tone Controlled Squelch System) Sub-Channel selection mode
This feature allows you to utilize a less used channel range (00-38) within a main
channel. This enables you to communicate with another party on the same main channel
using the same subcode. This helps to avoid congestion on the main channel and filters
out unwanted noise and static.
There are 38 CTCSS sub-channels for each main channel.
To change the CTCSS sub-channel,
- Press the Function Button until right side digits blinking on the LCD Panel.
- Press the Up button or the Down button to choose the desired sub-channel to use.
The corresponding sub-code frequency will be displayed right-side corner.
- Press the PTT Key to confirm your selection.
NOTE: To communicate with other FRS units, they must be switched to the same
channel and CTCSS subcode. To communicate with other FRS units that do
not have subcodes, switch your unit to the same channel with the subcode
set to OFF.
13.4-5 VOX Selection Mode
The Voice Activated Transmission (VOX) function allows your voice to activate
transmission automatically when the communicator is used with the optional handsfree
mic/headset (refer to enclosed accessory order form). It also allows handsfree use
when a mic/headset is not being used without having to use the PTT button.
To access the VOX selection menu,
- Press the Mode button until the VOX icon blinks and VX appears on the LCD Panel.
- Press the Up button or the Down Button to select ON/OFF.
- Press the PTT button to confirm your selection.
- To turn off the VOX feature, enter the VOX selection mode and then select Off to
confirm by PTT key pressed.
13.4-6 Call Ringer Melody Selection Mode
This feature provides 5 user selectable call ringer melodies to alert you of a calling
party.
To select your favorite Call Ringer melody,
- Press the Mode button until the call icon blinks and A1~A5 appears on the LCD panel.
- Press the Up button or Down button to preview the 5 available melodies.
- Press the PTT key to confirm your selection.