KYE SYSTEMS GMZKI PenSketch T609A User Manual Pen
KYE Systems Corp PenSketch T609A Pen
UserManual.wiki
>
KYE SYSTEMS
>
GMZKI User Manual
>
User Manual - Windows
Contents
1.
User Manual - MAC
2.
User Manual - Windows
User Manual - Windows
Navigation menu
Upload a User Manual
Namespaces
Wiki Guide
HTML
PDF
Info
Views
User Manual
Discussion / Help
Navigation

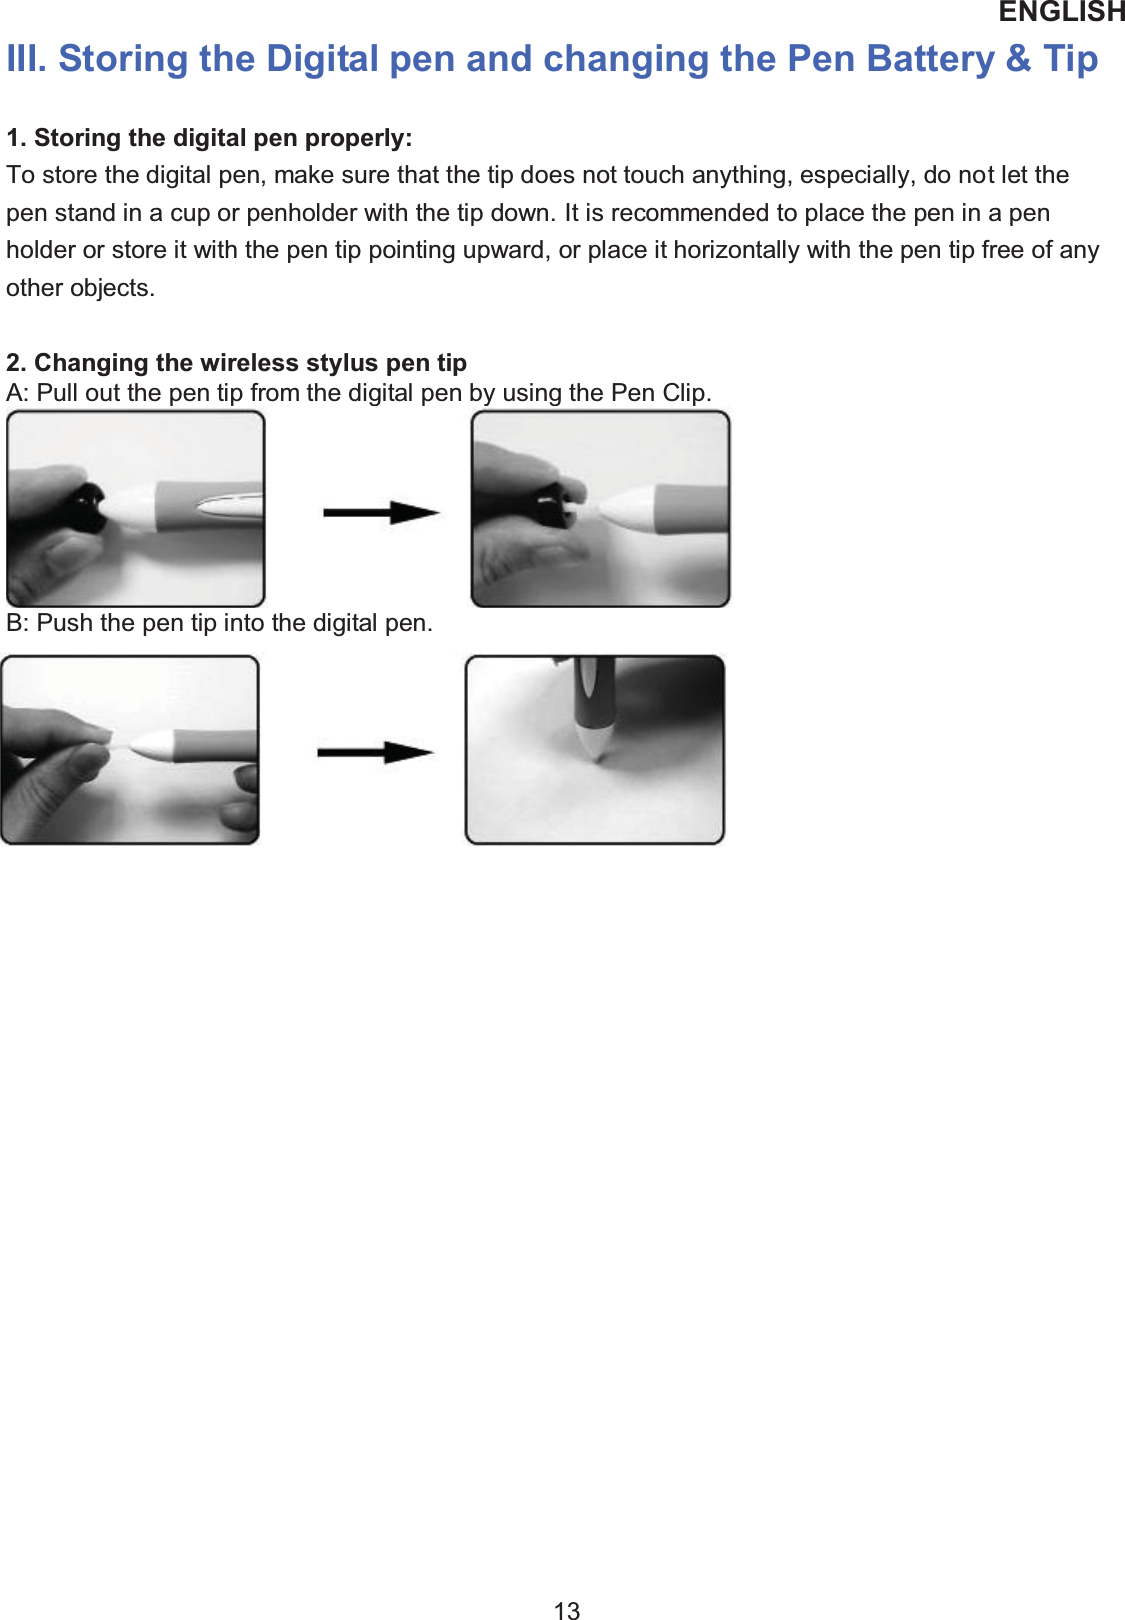
![ENGLISH 3 4. When the tablet detects the presence of the digital pen or mouse, the LED will stay on. This happens either when pen tip is placed within the working area or hovering above the tablet. 5. When you press a button on the pen barrel, or click on a mouse button, the LED will be light up. 6. Hovering and moving the pen or the mouse in the working area will cause the cursor on the screen to move accordingly. Note: After the tablet’s device driver has been properly installed, a small tablet icon ( ) will appear in the system tray, which is normally at the lower right corner of the screen. 7. Usage Tips 7.1 Wake up the digital mouse from the standby mode If the digital mouse does not react after you do not use it for a while, press the left button to “wake” it up from the standby mode. 7.2 Tapping before you use the digital pen Before you use the digital pen, or after not using it for several minutes, tap the pen on any surface of the tablet to “wake” it up from the standby mode. 7.3 Double tapping When you double tap the digital pen (equivalent to a double click with a mouse), try to keep the pen tip away from the tablet’s surface, or at least try to lift the pen tip as fast as possible before the second tap. 7.4 Storing the digital pen To store the pen, make sure the pen tip does not touch anything, and especially do not let the pen stand in a cup or penholder with the tip down. Place the pen in a penholder, or turn the pen tip pointing upward or horizontally with the pen tip free of any pressure by other objects. 7.5 Scrolling function of digital pen The digital pen has the same function as a normal mouse when scrolling pages. Press the first button of the digital pen (same function as the mouse middle button) over the tablet’s working area. 7.6 Using a pen without a mouse You may install the digital pen, digital mouse, and a regular mouse in your computer at the same time and you can also remove them to a different computer as well. However, only one device is able to work at a time. Do not use more than two devices at the same time in case the screen cursor is jittering or not moving. II. Pen tablet configuration You can configure the pen tablet by modifying the functions of the pen tip and the two barrel buttons. Tap [Start] > [All programs] > [io Tablet], and double-tap the [io Tablet ] icon, or tap on the tablet icon ( ) in the system tray, usually located at the lower right corner of the screen. You may also adjust the pressure sensitivity of the pen by determining the scope of the tablet’s working area or (re-)](https://usermanual.wiki/KYE-SYSTEMS/GMZKI.User-Manual-Windows/User-Guide-1861217-Page-4.png)
![ENGLISH 14 IV. Question & Answer Question 1: How can I get the latest update or uninstall the software᧻᧻ Answer: You can download the new driver from our website www.geniusnet.com. 1. Uninstall your old driver: Click [Start] ► [All Programs] ► [io Tablet] ► [Uninstall]. 2. Download the latest version of the driver from the download section and save it to your hard disk. 3. Unzip the file in a folder on your hard disk (with Windows built-in unzip utility or a program like Winzip). 4. Double-click the Setup.exe in the folder where you unzipped the file. Question 2: The tablet does not work. What can I do? Check if the following is okay. 1. Remove the tablet's USB plug from the computer. 2. Uninstall the tablet driver from the system. 3. Re-connect the tablet's USB to the computer. 3.1 Check whether the tablet's LED is on or not? If the LED is unlit, that means your tablet is at fault. 3.2 Test your pen in the tablet working area, if it can work as a mouse, it means the hardware is OK. 4. You can download the latest version of driver directly from our website www.geniusnet.com. 5. Setup the new version of the driver; and remember to restart your computer. 6. After you restart your computer, on the bottom right of the screen, you will find the tablet icon ( ). 6.1 If you can't find the tablet icon ( ) on the bottom right of the screen, it means the driver failed to install, and there could be a compatibility issue. 6.2 Check [My Computer] ► [Properties] ► [Hardware] ► [Device Manager], if you see an exclamation mark, it means the installed driver of the tablet is incompatible with the Windows system. 7. By clicking the tablet icon ( ) on the bottom right of the screen, you can test the pressure sensitivity to see whether the pen pressure function works or not. (Check the Pen tablet configuration section for more details). ˝ġ ,I\RXGRQRWKDYHSHQSUHVVXUHLWPHDQVWKHSHQPLJKWEHIDXOW\ ](https://usermanual.wiki/KYE-SYSTEMS/GMZKI.User-Manual-Windows/User-Guide-1861217-Page-15.png)