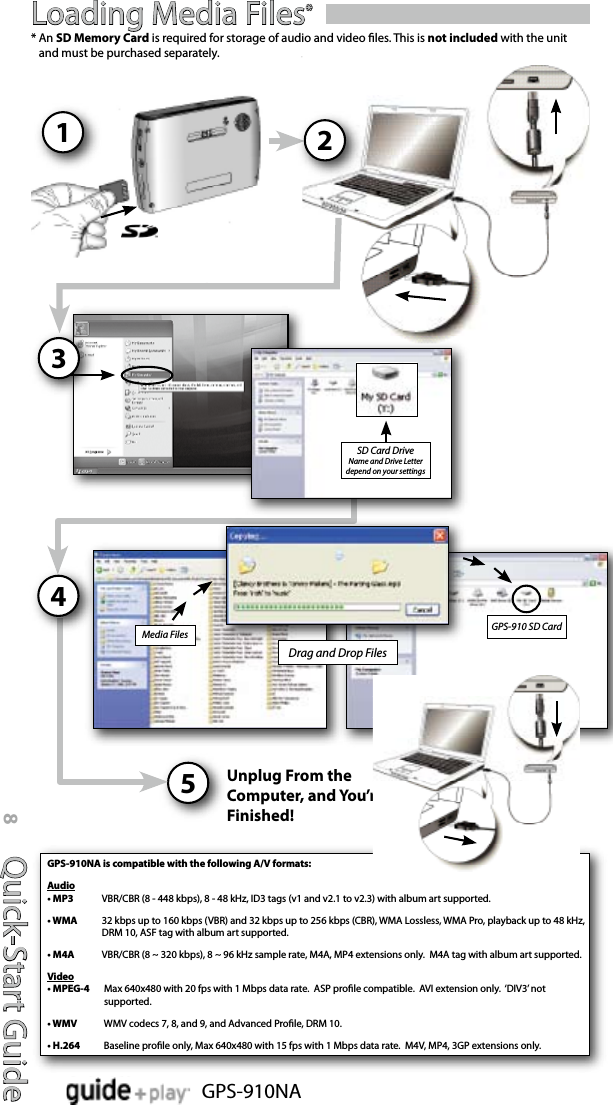
Kinpo Electronics GPS-NEWPORT PORTABLE TOUCHSCREEN NAVIGATION SYSTEM AND A/V MEDIA PLAYER User Manual

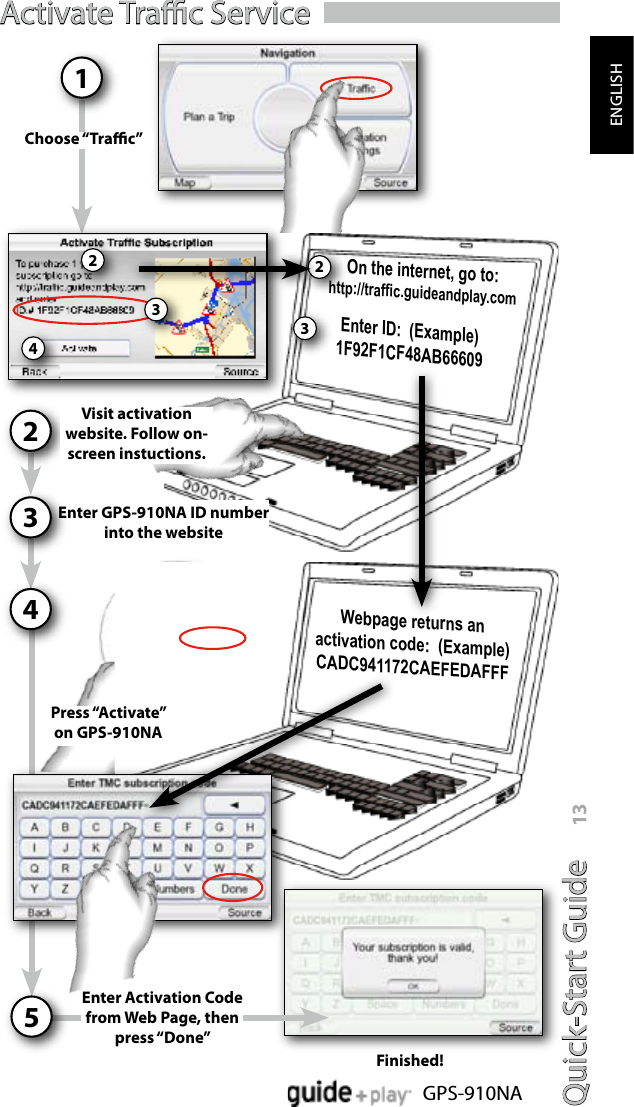
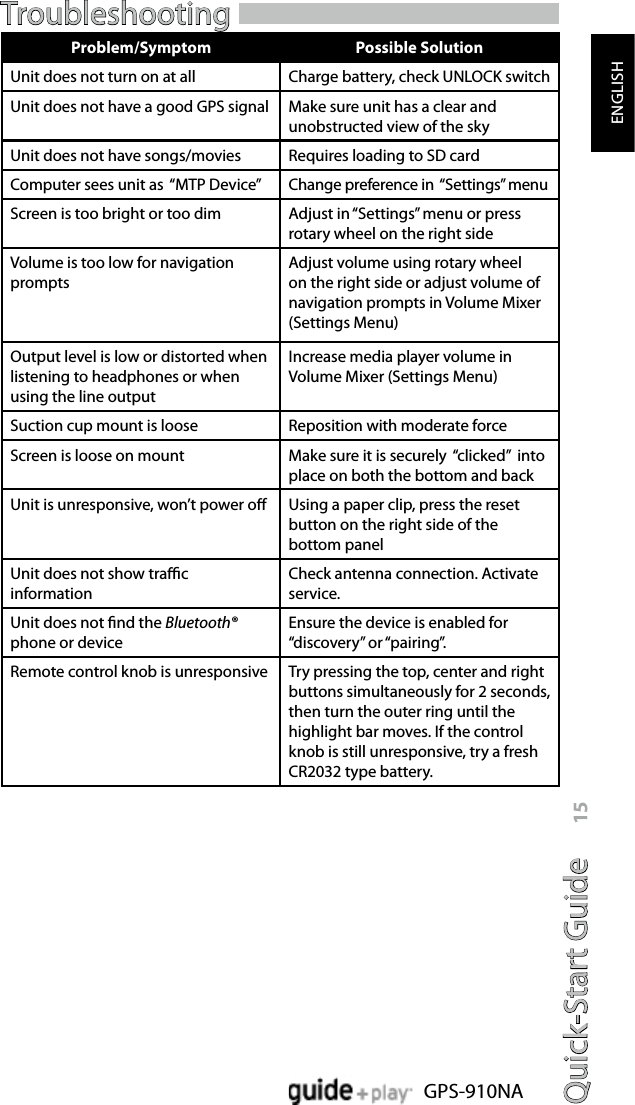
Kinpo Electronics Inc PORTABLE TOUCHSCREEN NAVIGATION SYSTEM AND A/V MEDIA PLAYER

User manual

GPS-910NAPortable Touchscreen Navigation System and A/V Media PlayerQuick-Start Guide
Contentswww.guideandplay.comThe Harman Kardon® GPS-910 uses a lithium-polymer battery. Under normal operating conditions, the battery will provide superior service with a lifespan that is superior to those of other battery types. Please observe the following guidelines to protect the performance of your GPS-910 and its battery:Do not operate the unit in ambient temperatures outside the following range: –10° C (14° F) to 55° C (131° F).Do not store the unit even for short periods in ambient temperatures outside the following range: –20° C (–4° F) to 60° C (140° F).Do not store the unit for long periods in ambient temperatures outside the following range: 0° C (32° F) to 25° C (77° F).The GPS-910 will not charge the battery at temperatures above 50° C (122° F).Le Harman Kardon® GPS-910 utilise une pile au lithium-polymère. Dans des conditions d’utilisation normales, la pile ore une durée de vie et un rendement supérieurs à celui des autres types de piles. Veuillez observer les lignes directrices ci-dessous pour optimiser le rendement de votre GPS-910 et de sa pile:Ne pas faire fonctionner l’unité à une température inférieure à –10° C (14° F) ou supérieure à 55° C (131° F).Ne pas ranger l’unité, même pour une courte période de temps, dans un endroit où la température ambiante est inférieure à -20° C (–4° F) ou supérieure à 60° C (140° F).Ne pas ranger l’unité pendant une longue période de temps dans un endroit où la température ambiante est inférieure à 0° C (32° F) ou supérieure à 25° C (77° F).La pile du GPS-910 ne se charge pas lorsque la température ambiante est supérieure à 50° C (122° F).El GPS-910 de Harman Kardon® usa una batería de litio-polímero. Bajo condiciones normales de operación, la batería le brindará un servicio superior y una vida útil mucho más prolongada que cualquiera de los otros tipos de baterías. Siga las directrices siguientes para proteger el desempeño de su GPS-910 y de su batería:No utilice la unidad en entornos cuya temperatura está fuera de la gama siguiente: –10° C (14° F) a 55° C (131° F).No guarde la unidad en entornos cuya temperatura está fuera de la gama siguiente aún por periodos muy cortos: –20° C (–4° F) a 60° C (140° F).No almacene la unidad por periodos prolongados en entornos cuya temperatura está fuera de la gama siguiente: 0° C (32° F) a 25° C (77° F).El GPS-910 no cargará la batería en temperaturas arriba de 50° C (122° F).English Instructions ................................................ 3
Quick-Start Guide 3GPS-910NAENGLISHBefore You Begin42Unlock SwitchPower On31Charge Battery at Least 6 HoursGo Outdoors to Obtain GPS Signal ReceptionWhat’s in the BoxWARNING:  Operation of any feature of this device while driving is dangerous.  Do not operate this device while driving.  Do not view or operate audio or video modes while driving.For safety reasons, this device will cease navigation functions when the video mode is enabled.  Do not attempt to disable any safety function incorporated in this device.  Any alteration of this device may cause serious injury and shall void the warranty.GPS-910NACar ChargerWall ChargerUSB CableQuick-Start GuideCarrying CaseFold-Flat Mounting Bracket Plastic Adhesive Disc for Dash-MountWireless Remote Control w/BatteryMounting Disc for Wireless RemoteAlcohol Cleaning Pads for Mounting SurfacesTo put the unit in stand by mode,  PRESS the power button momentarily.To turn unit completely o, PRESS and HOLD the power button for 2 seconds.
Quick-Start Guide4GPS-910NASetup WizardFinished!Select LanguageSelect UnitsSelect Time ZoneSet Time of Day1234522221111The geographic information provided by this device serves as a navigational aid only and does not include information pertaining to construction, road closures, speed restrictions, road or trac conditions, or other circumstances relevant to public safety.  The driver must always be aware of the actual road conditions and surroundings, and decide whether or not to follow the information provided by this device.  Obey all trac laws and observe safe driving practices. The manufacturer does not accept responsibility for any inaccurate or incomplete information provided by this device.
Quick-Start Guide 5GPS-910NAENGLISHPlan a TripInput the destination213Choose “Plan a Trip” Choose “Address”Follow the on-screen prompts54Choose “Go”
Quick-Start Guide6GPS-910NAConnecting a Bluetooth Phone*From GPS-910NA Menu Select “Phone”2Place your Bluetooth® enabled phone in the “pairing” or “discovery” mode.1*  A Bluetooth® enabled phone is required operation with GPS-910NA calling features. Please read the instructions with your particular phone to determine how to place it into “pairing” or “discovery” mode to set up the connection with GPS-910NA.Press “Search”3Select Phone4GPS-910NA will connect to the selected device and then import the Phone Book and Call HistoryFinished!Now you are ready to place and receive calls!5The rst time you select “Phone” with no previous devices in the memory, the “Cell Phone Setup” screen automatically appears GPS-910NA will search and retreive names on all Bluetooth® devices in range
DOCUMENT NUMBER  REV  1.7.2  PN-SS-FUNC-1249  DATE 8/1/2007 TITLE User Interface Specification for Venice Personal Navigation Device  - 148 - PhatNoise / Harman Consumer Group  Confidential - Data subject to controls on cover page      FM Transmitter    The FM transmitter is turned ON and OFF with the center footer button.  The frequency is changed by pressing the arrow left (smaller number) and arrow right (for larger number) buttons.  Frequency cannot be changed when the FM antenna is turned off.  When the transmitter is turned off all of the buttons and the current frequency are grayed out and the message “Transmitter OFF” is centered on the screen.  The default setting is the FM Transmitter Off.   FM Presets   The six preset buttons on the bottom of the screen are used to save the current FM frequency and jump to a saved frequency.  By default, all of the buttons display three periods.  Pressing and holding a preset button for three seconds saves the current FM frequency, makes a button press sound (a second time), and displays the frequency as the button label.
Quick-Start Guide 7GPS-910NAENGLISHPlacing and Receiving CallsYou can place and receive calls directly from the screen of GPS-910NA once a phone is paired and an external hands-free microphone has been connected (microphone not included).  Dial by Phone BookDial by VoiceDial by Call HistoryRedial Last NumberDirect Dial from KeypadExample: Placing a call from the Phone BookSelect “Phone Book”1Select Name to Call2Call is Placed3Hang up when call is nishedExample: Receiving an incoming callWhen a call is incoming, choose “Accept”Call is answered. Begin speaking.2Scroll Up/Down1Hang up when call is nishedThere are several ways in which to place calls
Quick-Start Guide8GPS-910NAGPS-910NA is compatible with the following A/V formats:Audio• MP3    VBR/CBR (8 - 448 kbps), 8 - 48 kHz, ID3 tags (v1 and v2.1 to v2.3) with album art supported.• WMA    32 kbps up to 160 kbps (VBR) and 32 kbps up to 256 kbps (CBR), WMA Lossless, WMA Pro, playback up to 48 kHz, DRM 10, ASF tag with album art supported.• M4A    VBR/CBR (8 ~ 320 kbps), 8 ~ 96 kHz sample rate, M4A, MP4 extensions only.  M4A tag with album art supported.Video• MPEG-4    Max 640x480 with 20 fps with 1 Mbps data rate.  ASP prole compatible.  AVI extension only.  ‘DIV3’ not supported.• WMV    WMV codecs 7, 8, and 9, and Advanced Prole, DRM 10.• H.264    Baseline prole only, Max 640x480 with 15 fps with 1 Mbps data rate.  M4V, MP4, 3GP extensions only.Loading Media Files*21SD Card DriveName and Drive Letterdepend on your settings*  An SD Memory Card is required for storage of audio and video les. This is not included with the unit and must be purchased separately.Media Files GPS-910 SD CardDrag and Drop Files534Unplug From the Computer, and You’re Finished!
Quick-Start Guide 9GPS-910NAENGLISHVideo Menu(Green Icon)Using the Multimedia PlayerSource Menu SwitcherChoosing  “Music” from the source menu brings up the  Main Music Menu screen.  You can select music by Artist, Album, Genre, Playlist or Song, using the appropriate button. Then, navigate through the list to choose your song.Choosing  “Video” from the source menu brings up the  “Video” screen.  You can view all the video les stored on the SD card and select one to view  by pressing that le name.Main Music Menu Example Video Menu ExampleScroll Up/DownFile NameFor safety reasons, this device will cease navigation functions when the video mode is enabled.  Do not attempt to disable any safety function incorporated in this device.  Any alteration of this device may cause serious injury and shall void the warranty.Audio Menu(Red Icon)
Quick-Start Guide10GPS-910NAIn-Vehicle InstallationSelect Mounting Location1Install GPS-910NA  in Mounting BaseDash-MountInstall Mounting Base221Display AngleAdjustmentWindshield-MountLockUnlockClean dash with supplied alcohol pad.Do not install this device in any manner that impairs the safe operation of the vehicle.  Do not install this device on any airbag panels or in the deployment eld of any airbags.  Do not place the device on the vehicle’s dashboard unsecured.  Failure to observe the installation or usage instructions may result in trac accidents or personal injury.The installation of this device on the windshield, between the driver and the windshield, or otherwise in any manner that obstructs the driver’s clear view of the road or trac conditions is dangerous and may be prohibited by law.  State laws in California and Minnesota (and possibly other states) prohibit the mounting of this device on the windshield, in which case other mounting methods should be used.  Check your state and local laws before mounting.Mounting the Unit3
Quick-Start Guide 11GPS-910NAENGLISHCR2032/DL2032Use a coin to remove the bottom cover.Push the knob down onto the base, and turn clockwise to lock it into place. The knob can be removed by turning the bottom counterclockwise.Orient the base so that the arrow is facing the front of the car.You can either screw the base to the mounting location or use the supplied adhesive pad.If you use the adhesive pad, you must FIRST CLEAN the surface with the supplied alcohol cleaning pad.Toward front of carControl Knob Button OperationMounting the Control KnobSelect Mounting Location1Install Battery2Mount Control Knob Base3Attach ControlKnob to Base4Press once for Center menu bar itemPress and hold for 2 seconds to suspend power or turn onScreen Dependent Button FunctionPress to select the highlighted menu itemRotate outer ring to move the highlight bar on the active screenIf Left or Right button is held for 2 seconds, outer ring becomes Volume or Brightness adjustmentPress once for Back (Same as Left button on Screen)Press and hold for 2 seconds to adjust Volume Up/Down from outer ringPress once for Source (Same as Right button on Screen)Press and hold for 2 seconds to adjust Brightness from  outer ring
Quick-Start Guide12GPS-910NAVolumeHeadphone JackDo not use headphones while driving!Car ConnectionsPortable Audio12Connect Headphones or Ear BudsOr Use the Built-In SpeakerThe installation and use suggestions provided by the manufacturer may be subject to restrictions or limitations by federal, state or local laws.  The user should determine whether the installation and use of this device is governed by any law prior to installation or use.  For more information, please consult the user’s manual online at http://www.guideandplay.com.Note: The headphone output may also be connected to the line/aux input of an audio device when the GPS-910NA is away from the car, but when docked in the mount it’s recommended to use the connection in the mount for easy removal and redocking of the unit.Hands-Free MicrophoneAudio Output12 VDCAUX INConnect to Audio System or Use Built-In SpeakerPlug In for Chargingand for Trac Service31Mount and Connect Hands-Free Microphone2DC Power
Quick-Start Guide 13GPS-910NAENGLISHActivate Trac ServiceFinished!Choose “Trac”Enter GPS-910NA ID number into the website122Enter ID:  (Example) 1F92F1CF48AB66609On the internet, go to:http://trafc.guideandplay.com233Visit activation website. Follow on-screen instuctions.Webpage returns an activation code:  (Example) CADC941172CAEFEDAFFF344Press “Activate” on GPS-910NAEnter Activation Code from Web Page, then press “Done”5
Quick-Start Guide14GPS-910NAText to Speech FeatureChoose “Navigation Settings”1GPS-910NA has a feature called “Text to Speech” in which navigation prompts that appear on the screen as text can be congured to be spoken in one of several voices (male or female). You can choose to have only directions announced or both directions and street names. For example, the voice would say: “In 500 feet, turn left on Lincoln Blvd.”Choose “Voice Settings”2Choose a voice prole3Finished!
Quick-Start Guide 15GPS-910NAENGLISHProblem/Symptom Possible SolutionUnit does not turn on at all Charge battery, check UNLOCK switchUnit does not have a good GPS signal Make sure unit has a clear and unobstructed view of the skyUnit does not have songs/movies Requires loading to SD cardComputer sees unit as  “MTP Device” Change preference in  “Settings” menuScreen is too bright or too dim Adjust in “Settings” menu or press rotary wheel on the right sideVolume is too low for navigation promptsAdjust volume using rotary wheel on the right side or adjust volume of navigation prompts in Volume Mixer (Settings Menu)Output level is low or distorted when listening to headphones or when using the line outputIncrease media player volume in Volume Mixer (Settings Menu)Suction cup mount is loose Reposition with moderate forceScreen is loose on mount Make sure it is securely  “clicked”  into place on both the bottom and backUnit is unresponsive, won’t power o Using a paper clip, press the reset button on the right side of the bottom panelUnit does not show trac informationCheck antenna connection. Activate service.Unit does not nd the Bluetooth® phone or deviceEnsure the device is enabled for “discovery” or “pairing”.Remote control knob is unresponsive Try pressing the top, center and right buttons simultaneously for 2 seconds, then turn the outer ring until the highlight bar moves. If the control knob is still unresponsive, try a fresh CR2032 type battery.Troubleshooting
For customer and technical support, call516.255.4545 (USA only).250 Crossways Park Drive, Woodbury, New York 11797www.harmankardon.com©2007 Harman International Industries, Incorporated. All rights reserved.Harman Kardon is a trademark of Harman International Industries, Incorporated, registered in the United States and/or other countries. Guide + Play is a trademark of Harman International Industries, Incorporated.Part No. 950-0223-001      HDM00G20109 MWCDownload the complete GPS-910NA User’s Manual at www.guideandplay.com.Please RecycleThis Class B digital apparatus complies with Canadian ICES-003.Cet appareil numérique de la classe B est conforme à la norme NMB-003 du Canada.IC Warning statementThis digital apparatus does not exceed the Class B limits for radio noise emissions from digital apparatus as set out in the interference-causing equipment standard entitled "Digital Apparatus," ICES-003 of Industry Canada. Cet appareil numérique respecte les limites de bruits radioélectriques applicables aux appareils numériques de Classe B prescrites dans la norme sur le material brouilleur: "Appareils Numériques," NMB-003 édictée par l’Industrie.(1) this device may not cause interference,and (2) this device must accept any interference, including interference that may cause undesired operation of the device."This equipment has been tested and found to comply with the limits for a Class B digital device, pursuant to part 15 of the FCC rules. These limits are designed to provide reasonable protection against harmful interference in a residential installation. This equipment generates, uses and can radiate radio frequency energy and, if not installed and used in accordance with the instructions, may cause harmful interference to radio communications. However, there is no guarantee that interference will not occur in a particular installation. If this equipment does cause harmful interference to radio or television reception, which can be determined by turning the equipment o and on, the user is encouraged to try to correct the interference by one or more of the following measures: -Reorient or relocate the receiving antenna.-Increase the separation between the equipment and receiver.-Connect the equipment into an outlet on a circuit dierent from that to which the receiver is connected.-Consult the dealer or an experienced radio/TV technician for help.You are cautioned that changes or modications not expressly approved by the party responsible for compliance could void your authority to operate theequipment.FCC RF Radiation Exposure Statement: 1.This Transmitter must not be co-located or operating in conjunction with any other antenna or transmitter.2.This equipment complies with FCC RF radiation exposure limits set forth for an uncontrolled environment. This equipment should be installed and operated with a minimum distance of 20 centimeters between the radiator and your body.

Navigation menu