Kyocera IUW19AA IBurst User Terminal 2Mbps Desktop User Manual Manual 1
Kyocera Corporation IBurst User Terminal 2Mbps Desktop Manual 1
Kyocera >
Contents
- 1. Manual 1
- 2. Manual 2
Manual 1
iBurst Terminal, Desktop Model (UTW), Manual
Kyocera Corporation S03T-EE001 Rev.1.01 Aug.7.2008
- 1 -
Igarashi Yamamoto
Koyama
Designed
Checked
Approved
August 7, 2008
Date:
1.0
1
Revision:
S03
T
-
EE
-
001
Reference:
For Windows Vista/XP/2000

iBurst Terminal, Desktop Model (UTW), Manual
Kyocera Corporation S03T-EE001 Rev.1.01 Aug.7.2008
- 2 -
Revision History
Revision
Author Date Detail
1.00 Igarashi February 27,
2008
First Edition
1.01 Yamamoto
August 7, 2008
Add FCC information
Copyright © Kyocera Corporation 2006 - 2008

iBurst Terminal, Desktop Model (UTW), Manual
Kyocera Corporation S03T-EE001 Rev.1.01 Aug.7.2008
- 3 -
CONTENTS
CONTENTS CONTENTS
CONTENTS
Safety Precautions on iBurst Terminal
Safety Precautions on iBurst TerminalSafety Precautions on iBurst Terminal
Safety Precautions on iBurst Terminal................................
................................................................
................................................................
................................................................
..........................................
....................
.......... 4
44
4
Chapter 1
Chapter 1Chapter 1
Chapter 1
Introduction
IntroductionIntroduction
Introduction ................................
................................................................
................................................................
................................................................
..............................................................
............................................................
.............................. 8
88
8
Components List
Components ListComponents List
Components List ................................
................................................................
................................................................
................................................................
................................................................
................................................................
................................................................
................................................................
................................................
................................
................ 9
99
9
Pictures of Accessories
Pictures of AccessoriesPictures of Accessories
Pictures of Accessories ................................
................................................................
................................................................
................................................................
................................................................
................................................................
................................................................
................................................................
.......................................
..............
....... 9
99
9
Requirements on your PC
Requirements on your PCRequirements on your PC
Requirements on your PC ................................
................................................................
................................................................
................................................................
................................................................
................................................................
................................................................
................................................................
..................................
....
.. 9
99
9
Outlook of iBurst Terminal
Outlook of iBurst TerminalOutlook of iBurst Terminal
Outlook of iBurst Terminal ................................
................................................................
................................................................
................................................................
................................................................
................................................................
..............................................................
............................................................
.............................. 10
1010
10
Indicator
IndicatorIndicator
Indicators
ss
s ................................
................................................................
................................................................
................................................................
................................................................
................................................................
................................................................
................................................................
.........................................................
..................................................
......................... 10
1010
10
Outlook to use the iBurst Terminal
Outlook to use the iBurst TerminalOutlook to use the iBurst Terminal
Outlook to use the iBurst Terminal................................
................................................................
................................................................
................................................................
................................................................
................................................................
...................................................
......................................
...................11
1111
11
Chap
ChapChap
Chapter 2
ter 2ter 2
ter 2
Setup Procedure
Setup ProcedureSetup Procedure
Setup Procedure................................
................................................................
................................................................
................................................................
......................................................
............................................
...................... 12
1212
12
Installation
Installation Installation
Installation for
forfor
for WindowsXP/2000
WindowsXP/2000 WindowsXP/2000
WindowsXP/2000 ...................................................................................................... 13
Installation for Windows XP
Installation for Windows XPInstallation for Windows XP
Installation for Windows XP ................................
................................................................
................................................................
................................................................
................................................................
................................................................
............................................................
........................................................
............................ 13
1313
13
Installation for Windows 2000
Installation for Windows 2000Installation for Windows 2000
Installation for Windows 2000 ................................
................................................................
................................................................
................................................................
................................................................
................................................................
.........................................................
..................................................
......................... 14
1414
14
Connection
Connection Connection
Connection Settings
SettingsSettings
Settings for Windows Vista
for Windows Vista for Windows Vista
for Windows Vista ............................................................................................ 18
Creating a connection and starting the connection
Creating a connection and starting the connectionCreating a connection and starting the connection
Creating a connection and starting the connection ................................
................................................................
................................................................
................................................................
..........................................................
....................................................
.......................... 18
1818
18
To disconnect
To disconnectTo disconnect
To disconnect................................
................................................................
................................................................
................................................................
................................................................
................................................................
................................................................
................................................................
....................................................
........................................
.................... 21
2121
21
To connect again
To connect againTo connect again
To connect again................................
................................................................
................................................................
................................................................
................................................................
................................................................
................................................................
................................................................
...............................................
..............................
............... 22
2222
22
Tips for useful connection settings
Tips for useful connection settingsTips for useful connection settings
Tips for useful connection settings ................................
................................................................
................................................................
................................................................
................................................................
................................................................
...................................................
......................................
................... 24
2424
24
Connection
Connection Connection
Connection Settings
SettingsSettings
Settings for Windows XP
for Windows XP for Windows XP
for Windows XP ................................................................................................ 26
Creating a connection
Creating a connectionCreating a connection
Creating a connection................................
................................................................
................................................................
................................................................
................................................................
................................................................
................................................................
................................................................
.......................................
..............
....... 26
2626
26
To connect
To connectTo connect
To connect................................
................................................................
................................................................
................................................................
................................................................
................................................................
................................................................
................................................................
.........................................................
..................................................
......................... 30
3030
30
To disconnect
To disconnectTo disconnect
To disconnect................................
................................................................
................................................................
................................................................
................................................................
................................................................
................................................................
................................................................
....................................................
........................................
.................... 31
3131
31
Tips for useful conn
Tips for useful connTips for useful conn
Tips for useful connection settings
ection settingsection settings
ection settings ................................
................................................................
................................................................
................................................................
................................................................
................................................................
...................................................
......................................
................... 32
3232
32
Connection
Connection Connection
Connection Settings
SettingsSettings
Settings for Windows 2000
for Windows 2000 for Windows 2000
for Windows 2000............................................................................................. 34
To connect
To connectTo connect
To connect................................
................................................................
................................................................
................................................................
................................................................
................................................................
................................................................
................................................................
.........................................................
..................................................
......................... 34
3434
34
To
To To
To dis
disdis
disconnect
connectconnect
connect ................................
................................................................
................................................................
................................................................
................................................................
................................................................
................................................................
................................................................
....................................................
........................................
.................... 35
3535
35
Chapter 3
Chapter 3Chapter 3
Chapter 3
Utility Software
Utility SoftwareUtility Software
Utility Software ................................
................................................................
................................................................
................................................................
......................................................
............................................
...................... 36
3636
36
Status Indication over Ethernet
Status Indication over EthernetStatus Indication over Ethernet
Status Indication over Ethernet ........................................................................................................ 37
Chapter 4
Chapter 4Chapter 4
Chapter 4
Uninstallation
UninstallationUninstallation
Uninstallation................................
................................................................
................................................................
................................................................
.........................................................
..................................................
......................... 44
4444
44
Uninstallation for Windows 2000
Uninstallation for Windows 2000Uninstallation for Windows 2000
Uninstallation for Windows 2000 ...................................................................................................... 45
Ap
ApAp
Appendix
pendixpendix
pendix ................................
................................................................
................................................................
................................................................
................................................................
................................................................
......................................................
............................................
...................... 48
4848
48
MTU optimizer on Windows 2000
MTU optimizer on Windows 2000MTU optimizer on Windows 2000
MTU optimizer on Windows 2000...................................................................................................... 49
Trouble when disabling a bui
Trouble when disabling a buiTrouble when disabling a bui
Trouble when disabling a buil
ll
lt
tt
t-
--
-in wireless LAN device on Windows PC
in wireless LAN device on Windows PCin wireless LAN device on Windows PC
in wireless LAN device on Windows PC ....................................... 52
FCC Compliance Statement
FCC Compliance StatementFCC Compliance Statement
FCC Compliance Statement............................................................................................................... 53
FCC RF Radiation Expo
FCC RF Radiation ExpoFCC RF Radiation Expo
FCC RF Radiation Exposure Statement
sure Statementsure Statement
sure Statement ........................................................................................... 54

iBurst Terminal, Desktop Model (UTW), Manual
Kyocera Corporation S03T-EE001 Rev.1.01 Aug.7.2008
- 4 -
Safety Precautions on iBurst Terminal
Safety Precautions on iBurst TerminalSafety Precautions on iBurst Terminal
Safety Precautions on iBurst Terminal
• Things you must know
• When using the product, use it correctly according to the safety precautions.
• The product uses particular radio frequency band tuned for the network operator.
• The safety precautions, hardware, software, and the design of the product may be changed
in the future without any announcement to the customers.
• About use restriction
• The product is designed as an OA apparatus for home use. Please use it neither in the
medical apparatus directly to affect a human life, nor the system of which very high
reliability is required.
• Do not use the product in the zone where the wireless machines are forbidden, such as an
airplane and a hospital. An electric device and medical apparatus are affected and it
becomes the cause of the accident.
• About Qualification
• Our company does not take any responsibility about the damage produced by use under
the conditions such as natural disasters, earthquake, flood, fires, misuse by intent or
carelessness or other than the responsibility of our company.
• Our company does not take any responsibility about the damage produced by external
factor, failure, malfunction, and fault of product, such as loss of enterprise profits,
enterprise discontinuation, change and disappearance of the contents of memory etc.
• Our company takes no responsibility about the damage produced by not keeping the
written contents of an owner's manual.
• Our company takes no responsibility about the damage produced from incorrect operation
in combination with the connection apparatus and software in which our company is not
participating etc.
• iBurst ™ is a registered trademark of ArrayComm, Inc.
• Windows and Windows Vista are registered trademarks of Microsoft Corporation.
• Mac OS X is a registered trademark of Apple Inc.
• In addition, the name of the software carried in this document and peripheral equipment is
each company’s trademark, or a registered trademark.

iBurst Terminal, Desktop Model (UTW), Manual
Kyocera Corporation S03T-EE001 Rev.1.01 Aug.7.2008
- 5 -
• For your safety
-------- Danger
Danger Danger
Danger --------
----------------
--------
( If used improperly, may cause death or serious injury. )
• Do not use with an abnormal condition, such as with emission of smoke or odor. It may
cause fire or electric shock.
• Do not disassemble or remodel the product. It may cause fire or electrical shock.
• Do not use or place the product at places with high humidity such as in the bath room or
near the humidifier. It may cause fire or electric shock. And do not touch the product with
wet hands.
• Do not use the product with power supply other than AC100 to 240V. It may cause fire or
electric shock.
• Do not plug too many leads into a single socket with extensions such as table taps, divided
outlets, and divided sockets. It may cause fire or electric shock. Moreover, make sure that
the total current does not exceed the capacity of the power supply. Otherwise, may cause
fire or electrical shock.
• Do not damage, break, modify, bend, pull, twist, or bundle the AC cord. In addition, if a
heavy material is placed onto the cord or it is heated, the cord may break and cause fire or
electric shock.
• Securely insert the plug into the outlet. If a metal object edges the teeth of the plug, it may
cause fire or electric shock. When pulling out the plug from the outlet, be sure to hold onto
its head. Pulling the cord can damage itself.
• When you change the installation place of the product, pull out the plug from the outlet
and confirm that PC is completely separated from it. Otherwise, the cord may be damaged
and cause electric shock or fire.
• Before inserting the plug into the outlet, check that there is no dust on its edge and head.
As dusts can easily enter between the plug and the outlet, they may cause fire or electric
shock. Pull out the plug from the outlet, at least once in a half year or a year, and
clean/maintenance.
• Use the AC/DC adapter enclosed with the product.
Input:100-240V~/50-60Hz/0.6A
Output: 9V 1.7A
Type: 3A-161DA09 (ENG)
Usage of other AC/DC adapters may cause fire or electric shock.
• Do not place things or put cloth on the top of the plug. It may heat and break the plastic
and/or the rubber, causing fire or electric shock.

iBurst Terminal, Desktop Model (UTW), Manual
Kyocera Corporation S03T-EE001 Rev.1.01 Aug.7.2008
- 6 -
------- Warning
Warning Warning
Warning --------
----------------
--------
( If used improperly, may cause disability or physical damage. )
• Do not give a shock strong against the product, such as dropping and throwing. It becomes
the cause of failure. Moreover, do not ride on the product. It may become the cause of an
injury.
• Do not put the product under direct sunshine or near equipment with high temperature
such as a stove and a heater. It may raise the temperature of the interior and cause fire.
• Do not put the product at places with an extreme fluctuation of temperature, such as near
the air conditioner or a heater. The dew condensation may occur in the interior and cause
fire, electrical shock, and malfunction.
• Do not put the product at places with oil and steams such as in the kitchen. In addition, do
not put it at dusty places and places where metal powder and toxic gas occur. It may cause
fire or electric shock.
• Do not place the product on unstable places such as on an unsteady desk or slanted
surfaces. In addition, do not put any object on the product. It may loose balance and
tumble, or fall and cause injury.
• When the thunder occurs in near, do not use the product and its peripheral equipment. It
may become the cause of an electric shock.
• If suspending the use for a long time, pull out the plug from the outlet.
• Do not use the AC cord with an extension cord. It may cause fire.
• For maintenance, pull out the AC plug from the outlet for safety. Do not wipe the product
with benzene, thinner, or alcohol. It may cause the product to decolorize or deform. If the
product be stained, put some neutral detergent on a dry cloth and wipe gently.
• Do not connect electricity supplied LAN cable to the product. It may cause smoke or fire.
• Do not touch the connector pins directly with your hands. Static electricity may affect the
components. As static electricity is created from both the cloth and the human body, before
putting or removing the product, release static electricity by touching a metal object such
as a small cabinet.
• Do not use it in the intense place of vibration. It becomes the cause of failure.

iBurst Terminal, Desktop Model (UTW), Manual
Kyocera Corporation S03T-EE001 Rev.1.01 Aug.7.2008
- 7 -
-------- Caution
CautionCaution
Caution --------
( If treated improperly, the equipment may not perform or work properly. )
• Do not put the product at low temperature. The product may not function properly.
• Do not put the product on the top of magnetic objects and places where electromagnetic
waves occur. This includes electrical appliances, AV, and OA (microwave oven, speaker, TV,
radio, fluorescent light, inverter air conditioner, and electric kitchen appliances). The
product will not be able to make communication properly if effected by magnetism or
electronic noise. Putting the product near TV or radio may cause RF receive error.
• The product lifetime may shorten if used at places with hydrogen sulfide such as at a hot
spring.
• Data communication will be disabled or a data file may corrupt if the PC is turned off or
the product is separated from the PC during the communication. Important data must be
verified against the original data.
• For fixing the product, use the enclosed fixture.
• When connecting the product onto PC, use the enclosed LAN cable.

iBurst Terminal, Desktop Model (UTW), Manual
Kyocera Corporation S03T-EE001 Rev.1.01 Aug.7.2008
- 8 -
Chapter 1
Chapter 1Chapter 1
Chapter 1
Introduction
IntroductionIntroduction
Introduction
7
This chapter
This chapter This chapter
This chapter describes what should be confirmed
describes what should be confirmed describes what should be confirmed
describes what should be confirmed before
before before
before
using iBurst
using iBurst using iBurst
using iBurst Terminal
TerminalTerminal
Terminal.
..
.
iBurst Terminal, Desktop Model (UTW), Manual
Kyocera Corporation S03T-EE001 Rev.1.01 Aug.7.2008
- 9 -
Components List
Components List Components List
Components List
The table below shows the list of components. Please confirm items in the package.
Component
ComponentComponent
Component
Notes
NotesNotes
Notes
Q’
Q’Q’
Q’ty
tyty
ty
iBurst Terminal Unit of Desktop model
Refer to the pictures shown in next page.
1
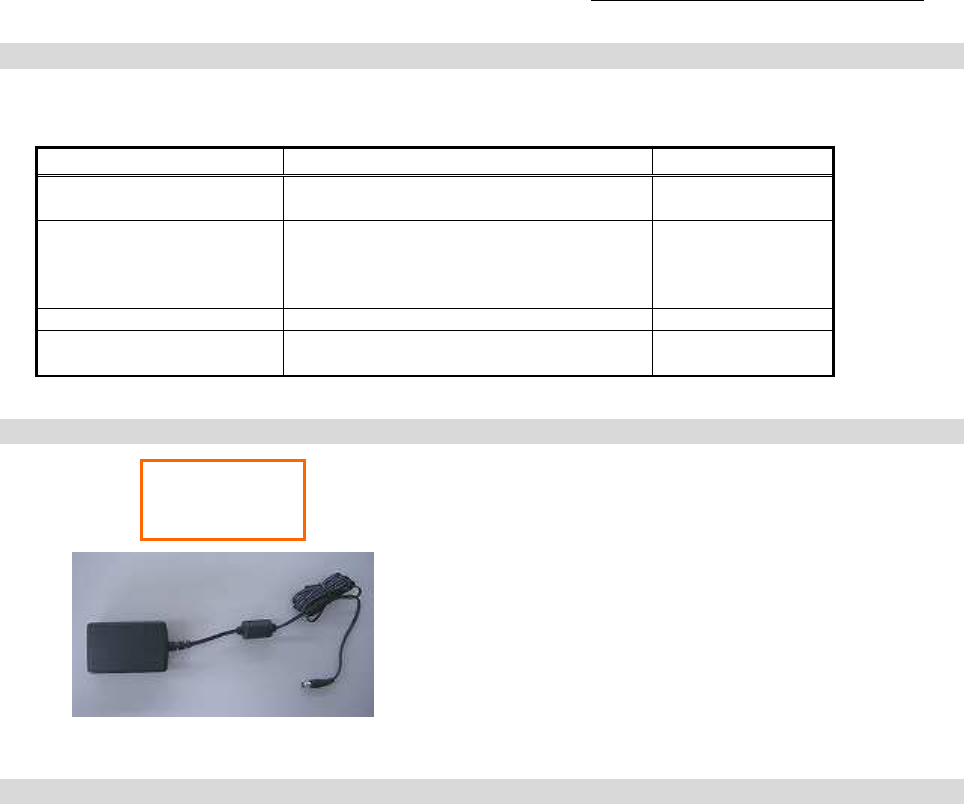
AC/DC Adapter Input: 100 - 240V AC/ 50 - 60Hz/ 600mA
Output: 9V DC/ 1.7A
Cable Length of output side: 2m
* See picture 1 below.
1
Power Cable Length: 2m 1
Ethernet Cable Type: Straight through/ Category 5
Length: 2m
1
Pictures of Accessories
Pictures of Accessories Pictures of Accessories
Pictures of Accessories
Requirements on your PC
Requirements on your PC Requirements on your PC
Requirements on your PC
• PC/AT Compatible PC with Windows Vista/XP/2000 (x86 based); or
version 10.1.5 to 10.5 of Mac OS X. (Refer to the manual for Mac OS X.)
• 10 Base-T or 100 Base-Tx Ethernet port or compatible.
Picture 1
AC/DC Adapter
iBurst Terminal, Desktop Model (UTW), Manual
Kyocera Corporation S03T-EE001 Rev.1.01 Aug.7.2008
- 10 -
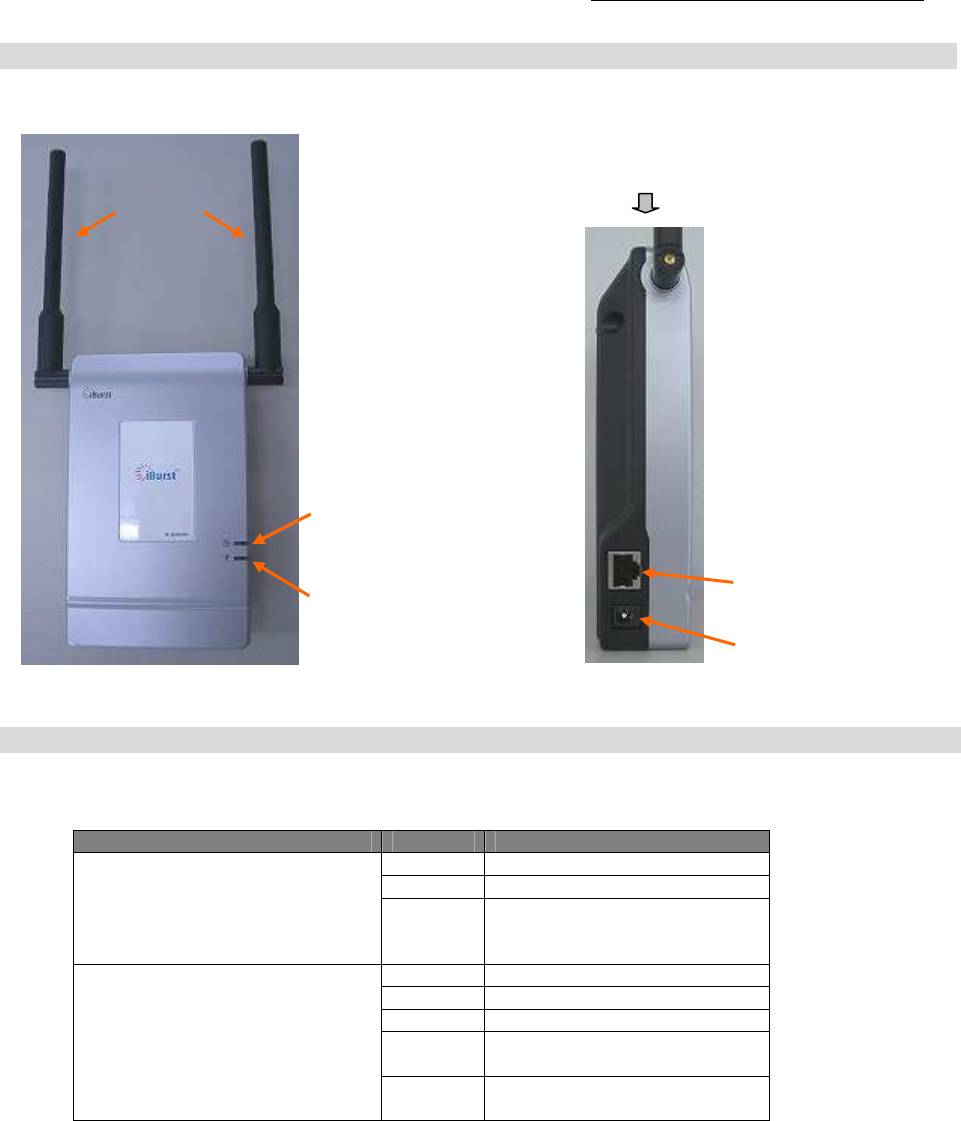
Outlook of iBurst Terminal
Outlook of iBurst Terminal Outlook of iBurst Terminal
Outlook of iBurst Terminal
Indicator
IndicatorIndicator
Indicators
s s
s
The table below describes meaning of each indicator.
Indicator State Meaning
Power Indicator OFF Turned OFF
Purple During Boot
Blue After Boot
Blinking when ethernet link
down
Link/Communication Indicator OFF Turned OFF
Yellow During Boot
Amber No signal receiving
Yellow Weak signal receiving
Blinking when communicating.
Green Strong signal receiving
Blinking when communicating.
100 Base-Tx port
left si
de view
Antenna
Power Indicator
Link/Communication Indicator
DC Power Input
iBurst Terminal, Desktop Model (UTW), Manual
Kyocera Corporation S03T-EE001 Rev.1.01 Aug.7.2008
- 11 -
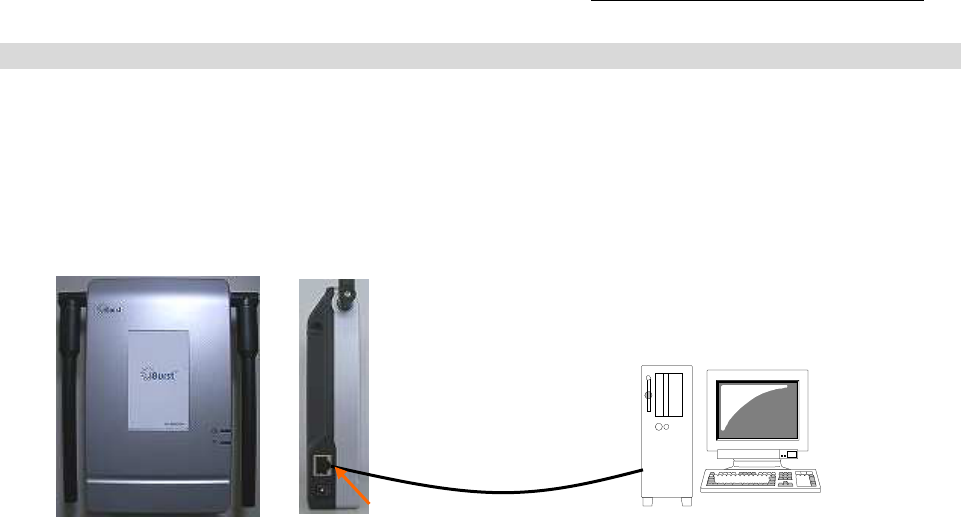
Outlook to use the iBurst Terminal
Outlook to use the iBurst Terminal Outlook to use the iBurst Terminal
Outlook to use the iBurst Terminal
The UTW has one 100 Base-Tx Ethernet port. The 100 Base-Tx Ethernet port, shall be connected
with your PC. If you want to utilize 100 Base-Tx connection, you don’t have to install the software
in case Windows Vista or Mac OS X. Please read through every sections related with the
operating system for details.
1
0
0
Base
-
T
x
Category 5 Cable
(Straight cable)
iBurst Terminal, Desktop Model (UTW), Manual
Kyocera Corporation S03T-EE001 Rev.1.01 Aug.7.2008
- 12 -
Chap
ChapChap
Chapter 2
ter 2ter 2
ter 2
Setup Procedure
Setup ProcedureSetup Procedure
Setup Procedure
This chapter describes how to install
This chapter describes how to install This chapter describes how to install
This chapter describes how to install iBurst software,
iBurst software,iBurst software,
iBurst software, then
then then
then
guides you how to make a network connection so as to use
guides you how to make a network connection so as to use guides you how to make a network connection so as to use
guides you how to make a network connection so as to use
data communication service.
data communication service.data communication service.
data communication service.
iBurst Terminal, Desktop Model (UTW), Manual
Kyocera Corporation S03T-EE001 Rev.1.01 Aug.7.2008
- 13 -
Installation
Installation Installation
Installation for
forfor
for WindowsXP/2000
WindowsXP/2000 WindowsXP/2000
WindowsXP/2000
This section shows the procedure to install iBurst software on your PC for utilizing iBurst
Terminal. The procedure shall be done once before using it.
ATTENTION: After you install this iBurst software, if you install any existing iBurst software for
1Mbps UT on the same PC, UTW does not work with maximum throughput and
performance on this PC. In this case, please be sure to install this iBurst software
again. After this, you can use UTW with maximum throughput and performance.
Installation for Windows XP
Installation for Windows XP Installation for Windows XP
Installation for Windows XP
1. Turn your PC on.
2. Insert the Software Utility CD provided by the network operator into your CD-ROM drive; or
execute the appropriate installation software.
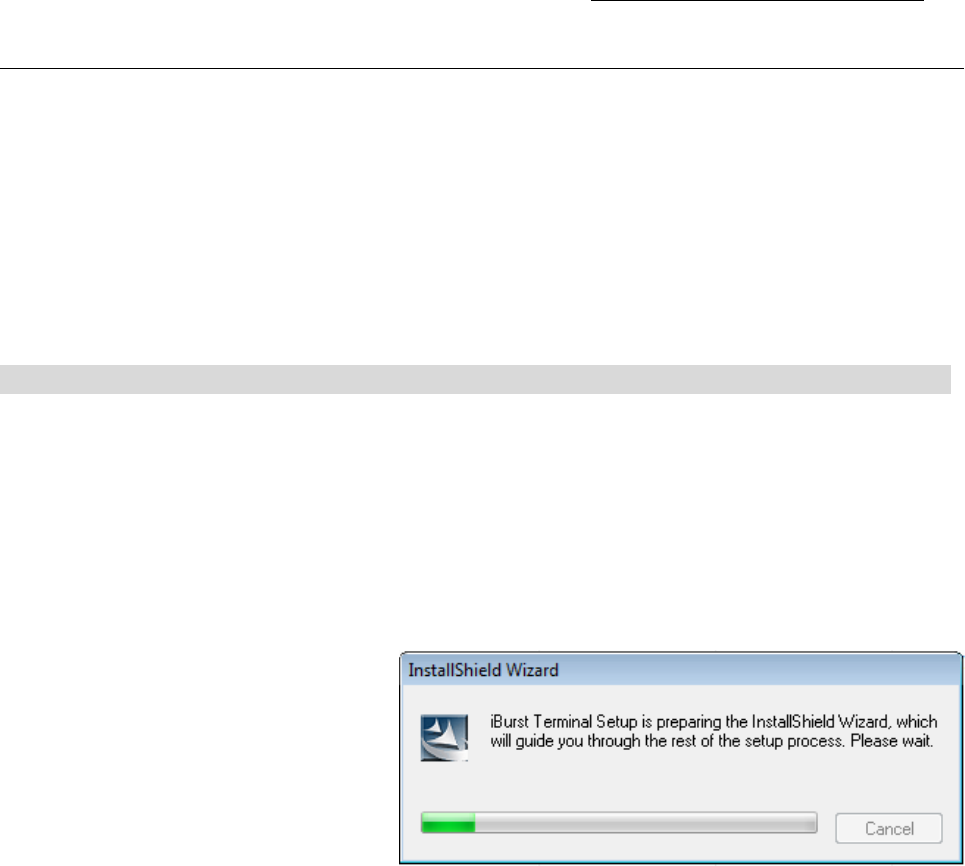
3. The software will show progress of preparation.
iBurst Terminal, Desktop Model (UTW), Manual
Kyocera Corporation S03T-EE001 Rev.1.01 Aug.7.2008
- 14 -
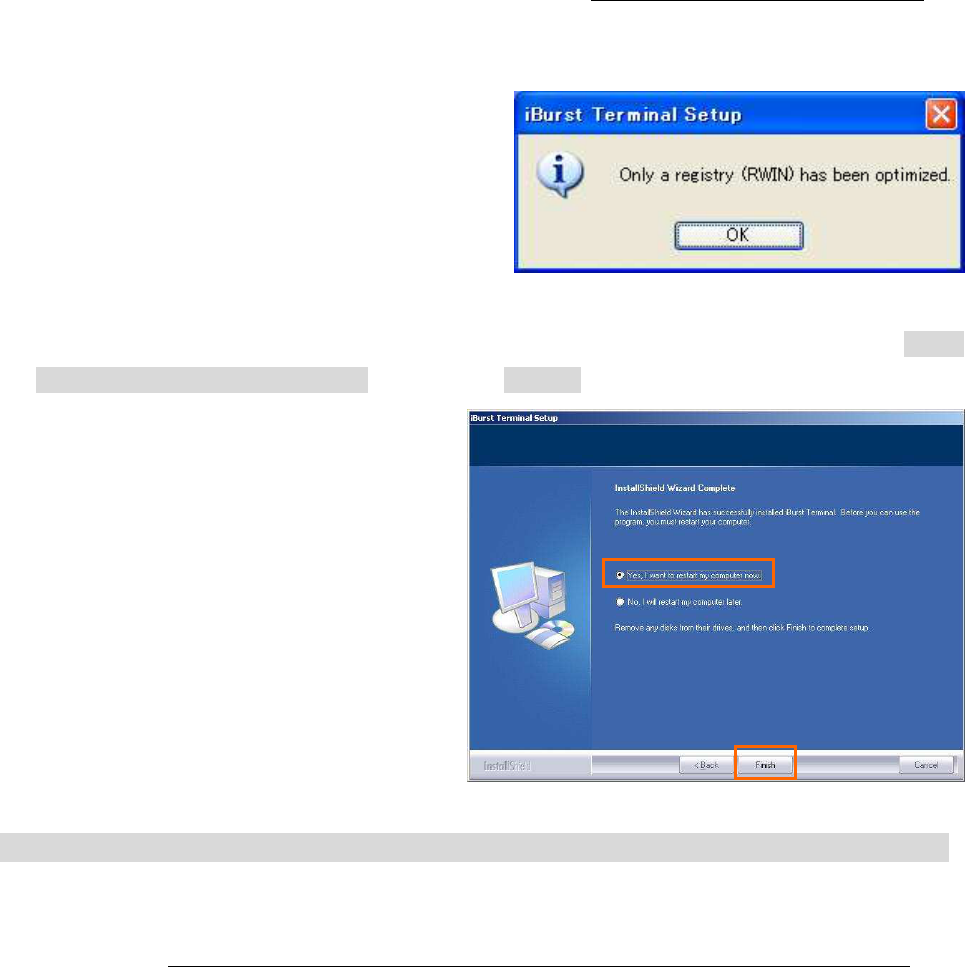
4. The registry (RWIN) is optimized with this software.
5. When the installing process finishes, the dialog window shown below will appear. Select [Yes, I
want to restart my computer now] and click the [Finish] button in the dialog window.
Installation for Windows 2000
Installation for Windows 2000 Installation for Windows 2000
Installation for Windows 2000
1. Make sure to remove the iBurst Terminal from your PC.
ATTENTION: Don
DonDon
Don’
’’
’t
t t
t plug
plugplug
plug the iBurst Terminal
the iBurst Terminal the iBurst Terminal
the iBurst Terminal into
intointo
into your PC until completion of installation.
your PC until completion of installation. your PC until completion of installation.
your PC until completion of installation.
2. Turn your PC on.
3. Insert the Software Utility CD provided by the network operator into your CD-ROM drive; or
execute the appropriate installation software.
iBurst Terminal, Desktop Model (UTW), Manual
Kyocera Corporation S03T-EE001 Rev.1.01 Aug.7.2008
- 15 -
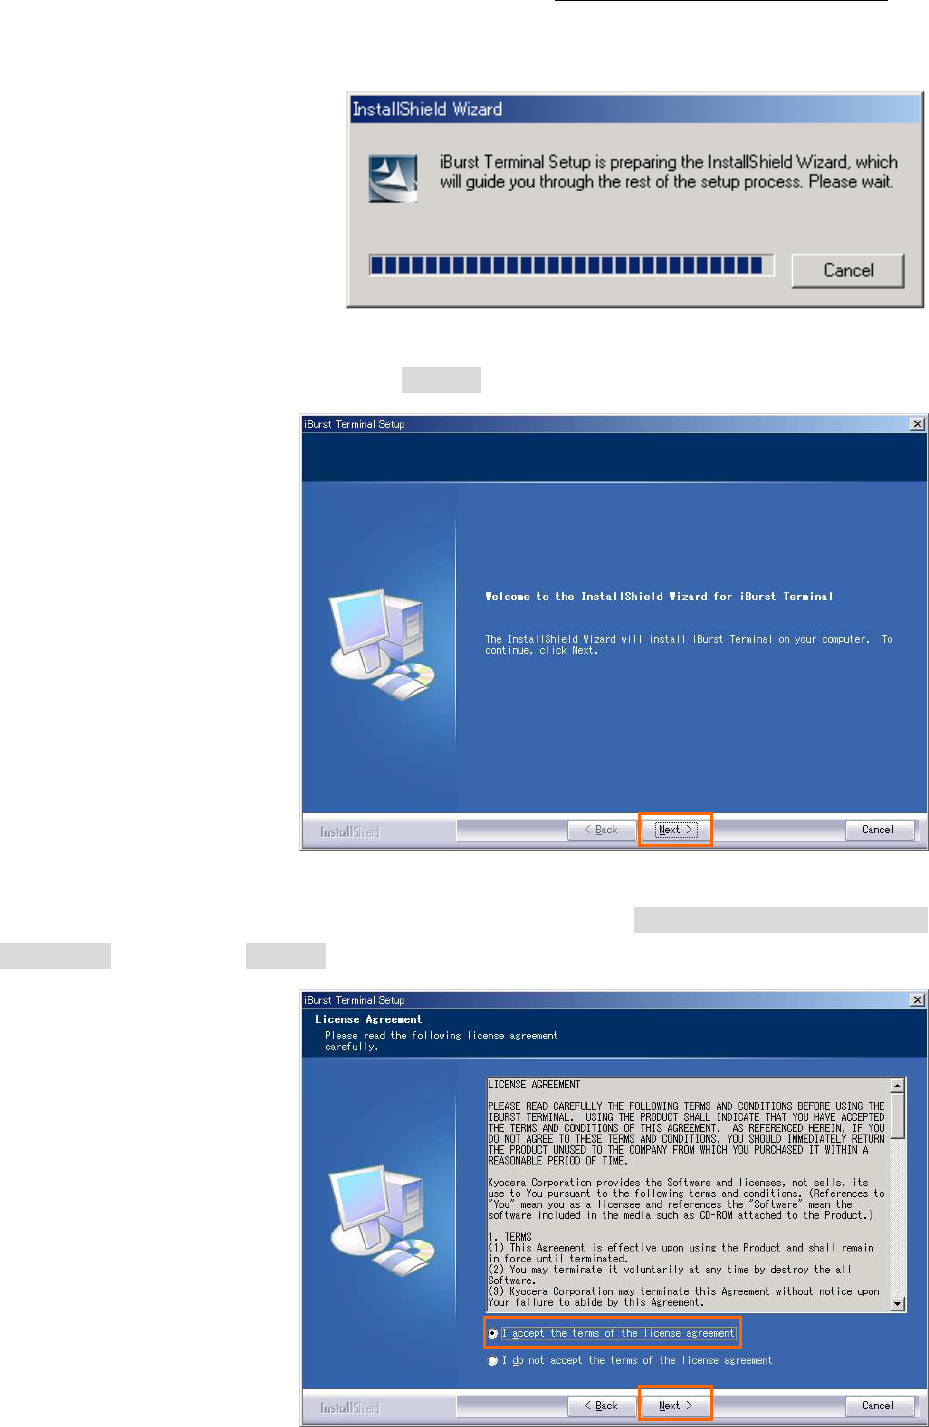
4. The software will show progress of preparation.
5. iBurst Terminal Setup starts. Click the [Next >] button.
6. Read through the license agreement. If you can agree it, select [I accept the terms the license
agreement] and click the [Next >] button.
iBurst Terminal, Desktop Model (UTW), Manual
Kyocera Corporation S03T-EE001 Rev.1.01 Aug.7.2008
- 16 -
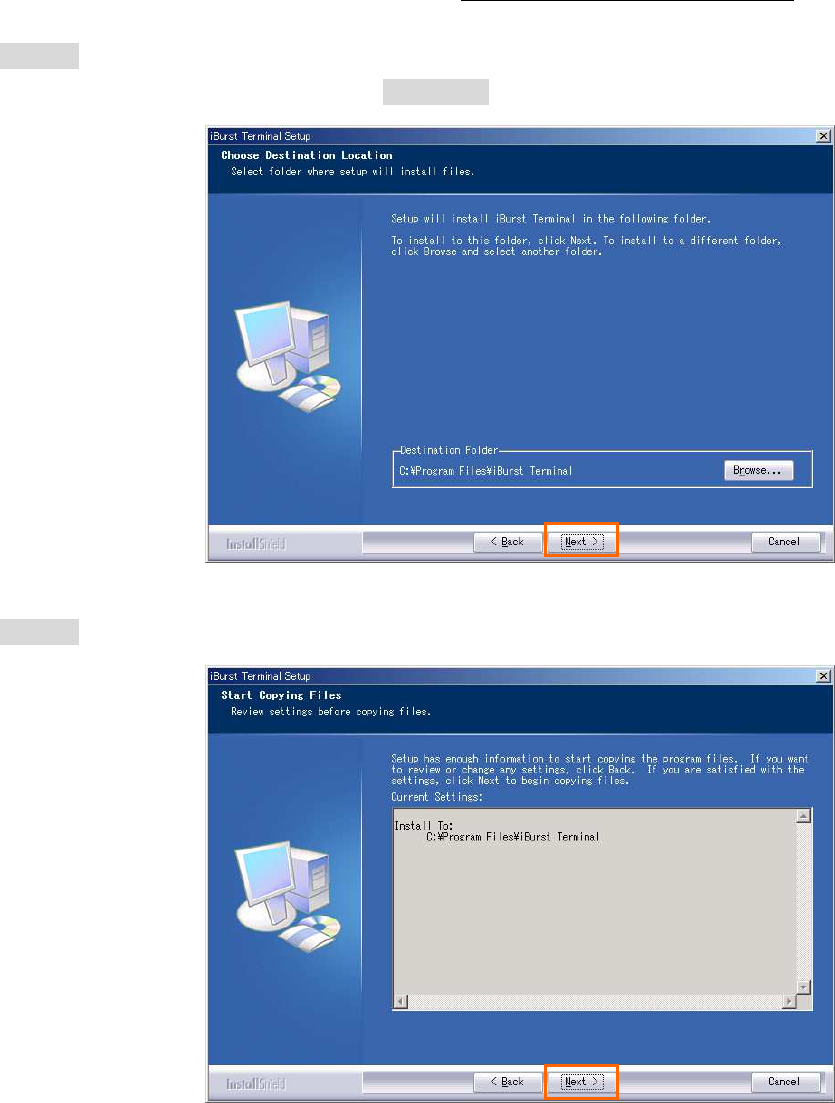
7. Click the [Next >] button after appearing dialog window as shown below.
NOTE: To install to a different folder, click [Browse…] and specify another folder.
8. Click the [Next >] button.
iBurst Terminal, Desktop Model (UTW), Manual
Kyocera Corporation S03T-EE001 Rev.1.01 Aug.7.2008
- 17 -
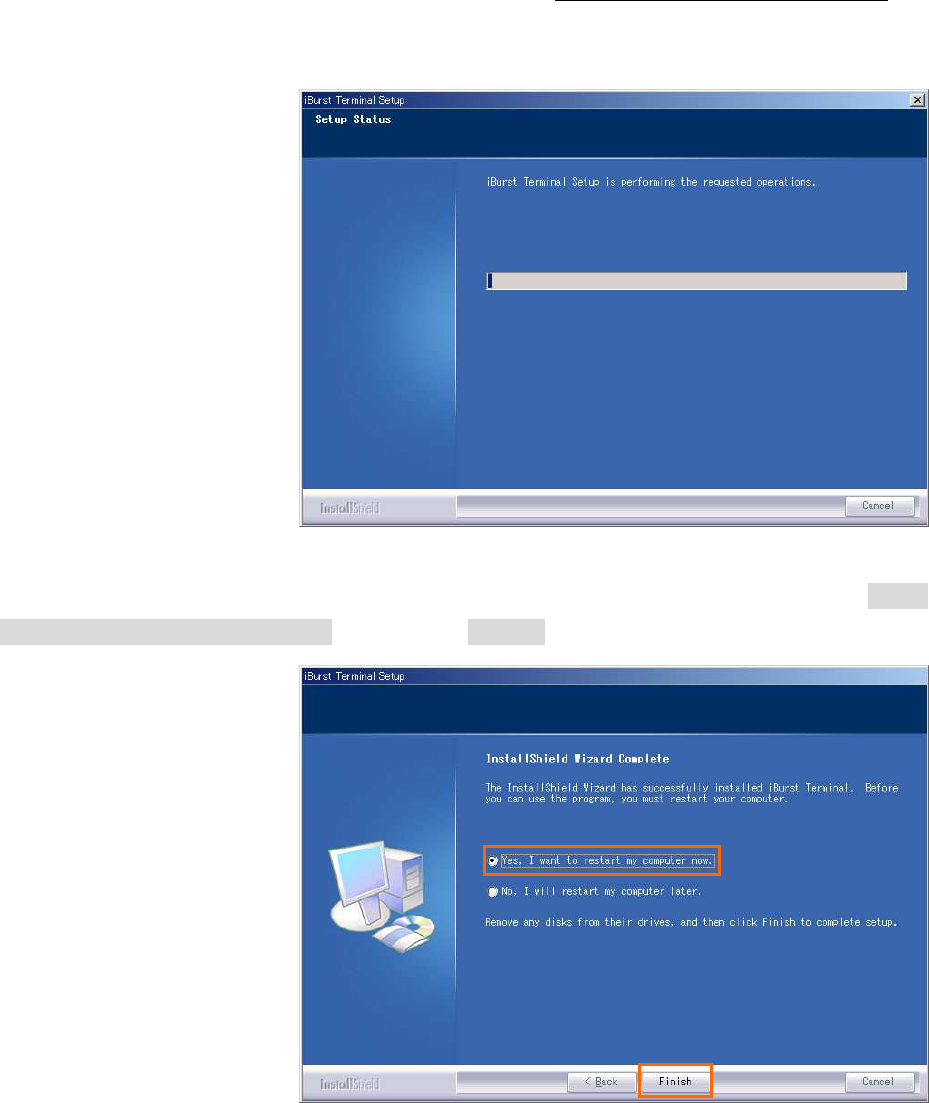
9. The following dialog window will appear, and installation of software begins.
10. When the installing process finishes, the dialog window shown below will appear. Select [Yes, I
want to restart my computer now] and click the [Finish] button in the dialog window.
NOTE: Before restarting the PC, you can find an iBurst icon on the task tray. In case
Windows 2000, you can find a shortcut icon of connection tool on the desktop too.
iBurst Terminal, Desktop Model (UTW), Manual
Kyocera Corporation S03T-EE001 Rev.1.01 Aug.7.2008
- 18 -
Connection
Connection Connection
Connection Settings
SettingsSettings
Settings for Windows Vista
for Windows Vista for Windows Vista
for Windows Vista
Creating a connection and starting the connection
Creating a connection and starting the connectionCreating a connection and starting the connection
Creating a connection and starting the connection
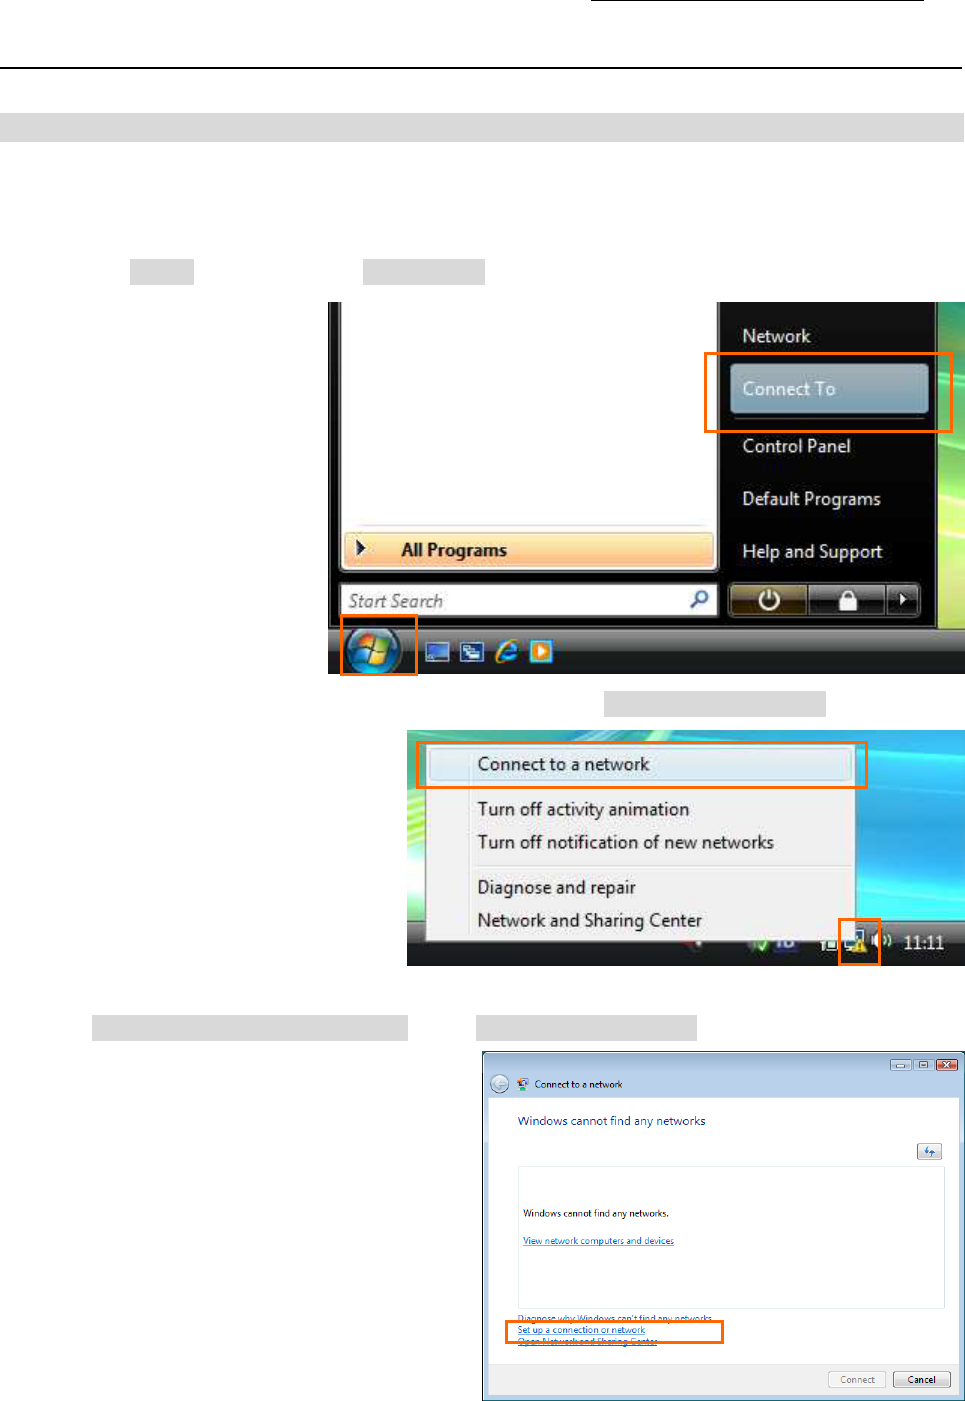
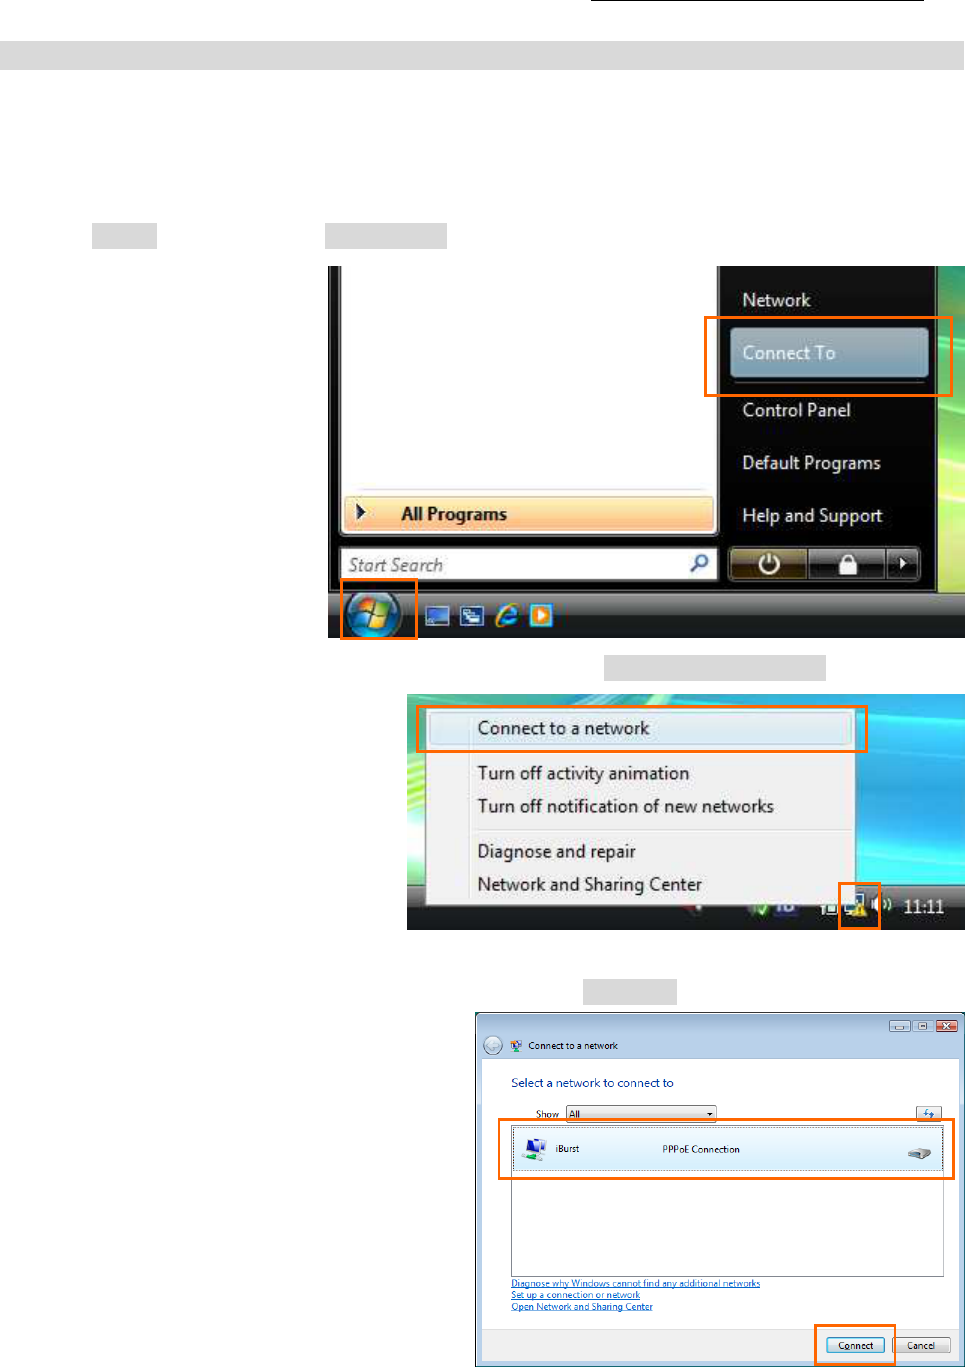
1. Make sure to plug the iBurst Terminal into your PC.
2. Click the [Start] button and click [Connect To] as shown below; or
Right click on the network icon at the task tray and select [Connect to a network].
3. Click [Set up a connection or network] in the [Connect to a network] display.

iBurst Terminal, Desktop Model (UTW), Manual
Kyocera Corporation S03T-EE001 Rev.1.01 Aug.7.2008
- 19 -
4. Select [Connect to the Internet] and click the [Next] button.
5. Select [Broadband (PPPoE)].
6. Enter user name and password assigned by the internet service provider (ISP) you subscribed.
It is recommended to enable [Remember this password]. Any connection name is acceptable
but this manual uses [iBurst] as an example of a connection name. It is not recommended to
enable [Allow other people to use this connection]. And then, click the [Connect] button.
Enabling it is recommended.

iBurst Terminal, Desktop Model (UTW), Manual
Kyocera Corporation S03T-EE001 Rev.1.01 Aug.7.2008
- 20 -
7. The dialog shows [Connecting to <the connection name>…] in several seconds.
8. After connected, the dialog shows [Testing your Internet connection…] in several seconds.
9. When the dialog shows [You are connected to the Internet], click [Close] button. Of course you
may choose [Browsing Internet] to open the Internet Explorer.
iBurst Terminal, Desktop Model (UTW), Manual
Kyocera Corporation S03T-EE001 Rev.1.01 Aug.7.2008
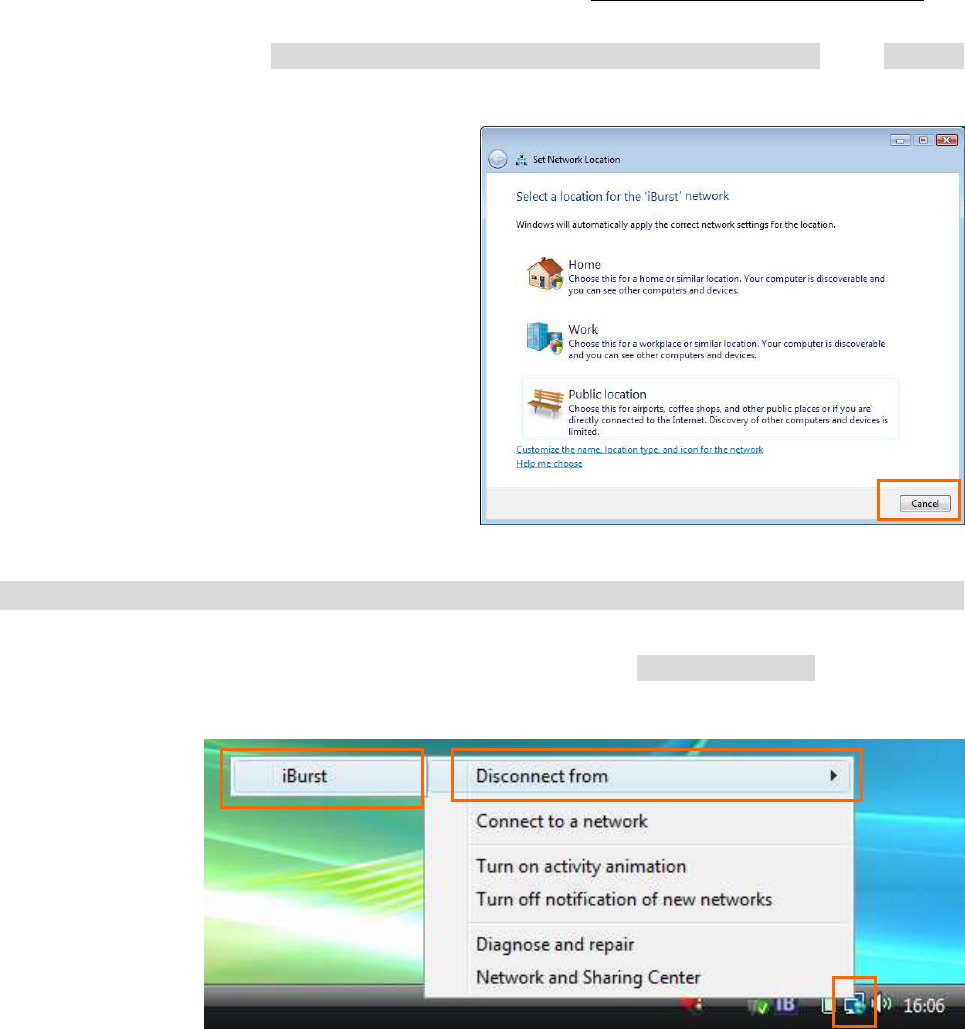
- 21 -
10. When the dialog shows [Set a location for the ‘<the connection name>’ network], click [Cancel]
button. Of course you may choose a location among them.
To disconnect
To disconnect To disconnect
To disconnect
1. Right click on the network icon at the task tray, select [Disconnect from] and click the
appropriate connection name.
iBurst Terminal, Desktop Model (UTW), Manual
Kyocera Corporation S03T-EE001 Rev.1.01 Aug.7.2008
- 22 -
To connect again
To connect again To connect again
To connect again
This section shows the procedure to connect to the Internet again through iBurst. You have to do
this every time before starting Internet accessing.
1. Click [Start] button and click [Connect To]; or
Right click on the network icon at the task tray and select [Connect to a network].
2. Choose the connection name for iBurst service and click [Connect].
iBurst Terminal, Desktop Model (UTW), Manual
Kyocera Corporation S03T-EE001 Rev.1.01 Aug.7.2008
- 23 -
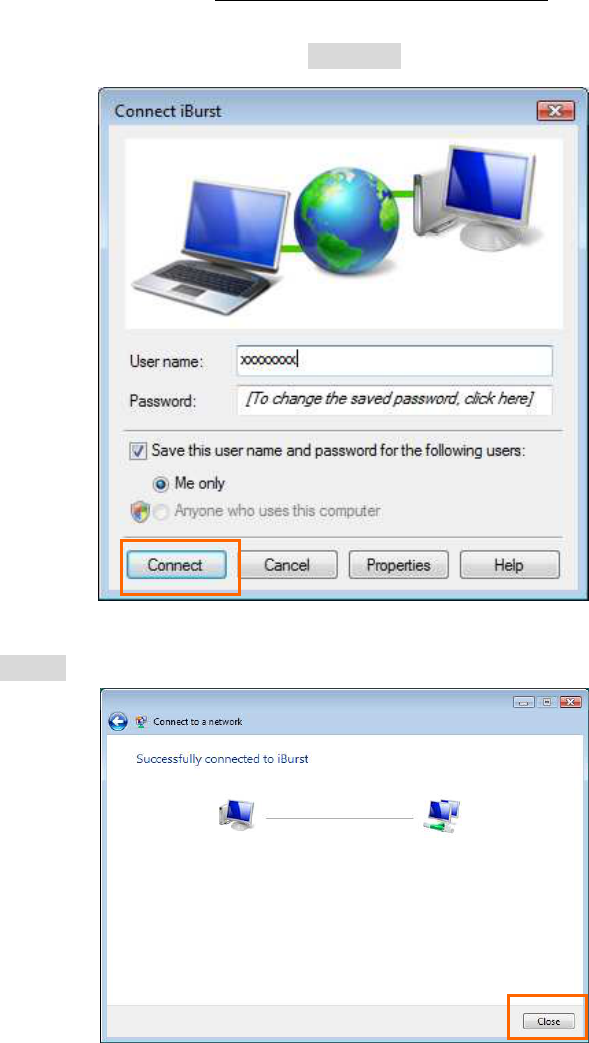
3. When a dial-up connection dialog is popped up, fill items and click [Connect].
4. When connected successfully, click [Close].
iBurst Terminal, Desktop Model (UTW), Manual
Kyocera Corporation S03T-EE001 Rev.1.01 Aug.7.2008
- 24 -
Tips for useful connection settings
Tips for useful connection settings Tips for useful connection settings
Tips for useful connection settings
When you open Internet Explorer, Windows Vista will attempt to make the Internet connectivity
according to a particular setting in the Internet Explorer if not connected. The tips below will
give you useful information.
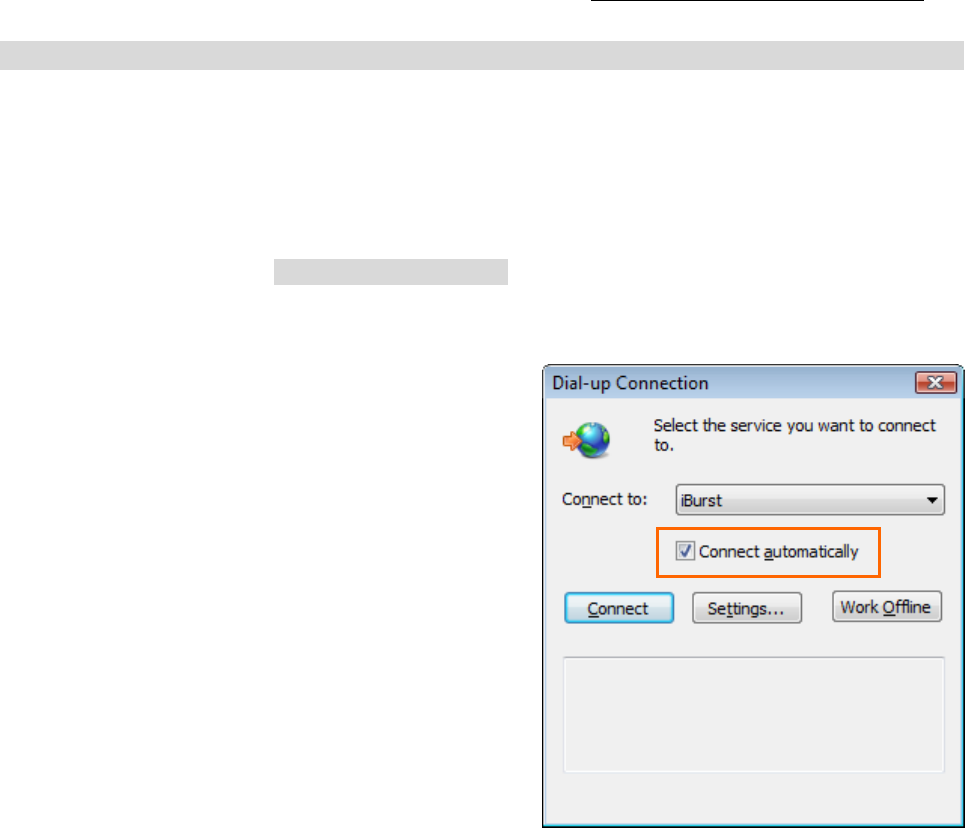
1. When the dial-up connection dialog for iBurst service as shown below appears, it is
recommended to enable [Connect automatically]. This will make Windows Vista to connect to
the Internet without any your key action when Windows Vista needs the Internet connectivity.
iBurst Terminal, Desktop Model (UTW), Manual
Kyocera Corporation S03T-EE001 Rev.1.01 Aug.7.2008
- 25 -
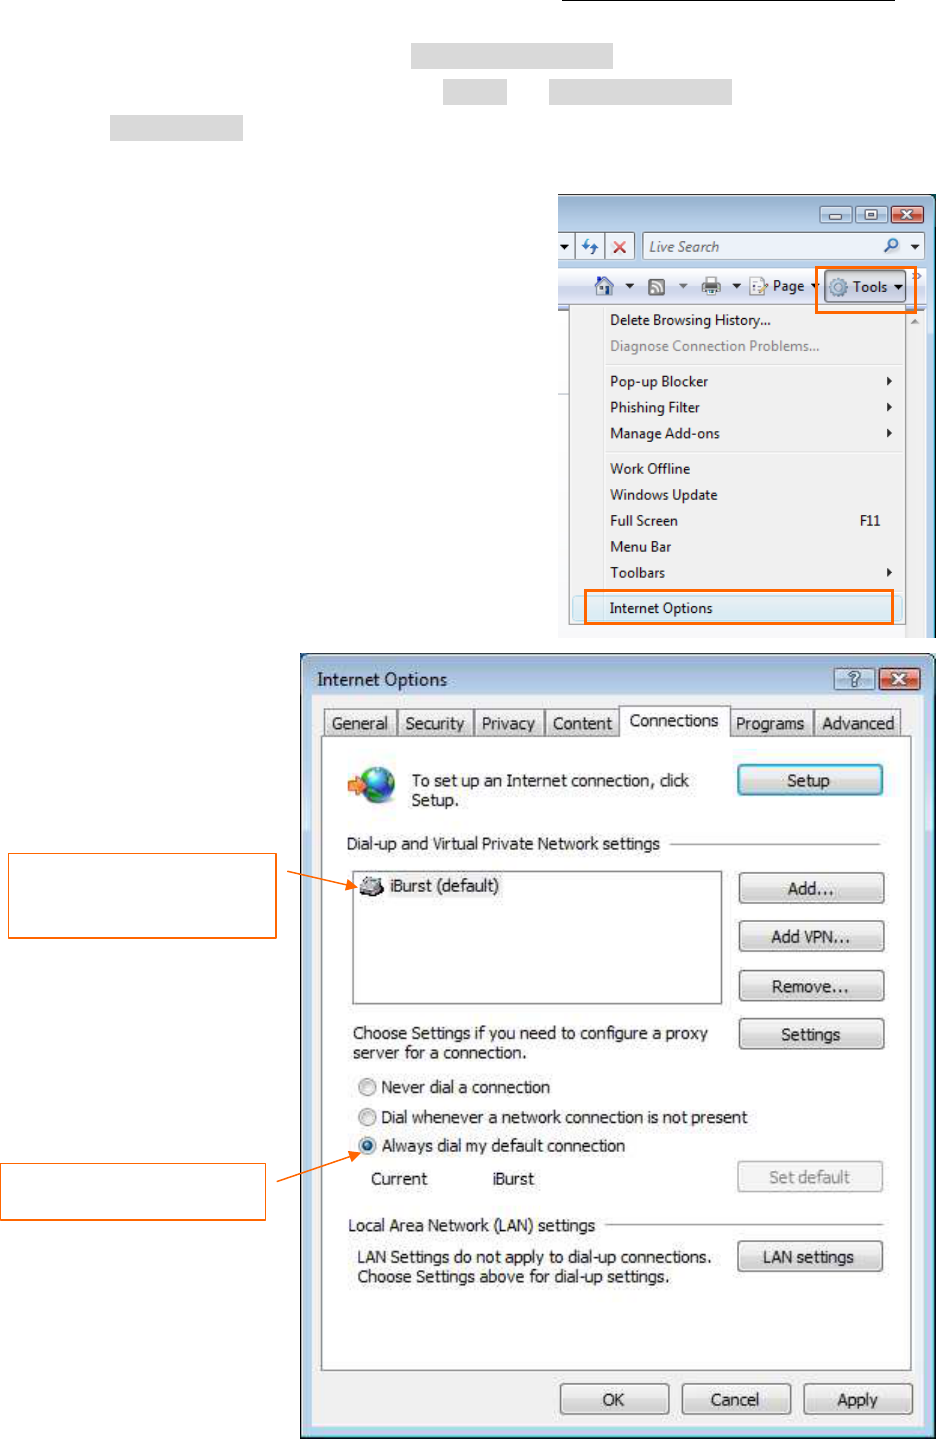
2. You can enable always connection on the [Internet Properties] as follows. In order to open the
dialog, open the Internet Explorer, select [Tools] -> [Internet Options]. You can find the
setting on [Connections] tab of the dialog.
Selecting
“
Always dial ...
”
is recommended
The connection name of
iBurst service must be the
default connection.
iBurst Terminal, Desktop Model (UTW), Manual
Kyocera Corporation S03T-EE001 Rev.1.01 Aug.7.2008
- 26 -
Connection
Connection Connection
Connection Settings
SettingsSettings
Settings for Windows XP
for Windows XP for Windows XP
for Windows XP
Creating a connection
Creating a connection Creating a connection
Creating a connection
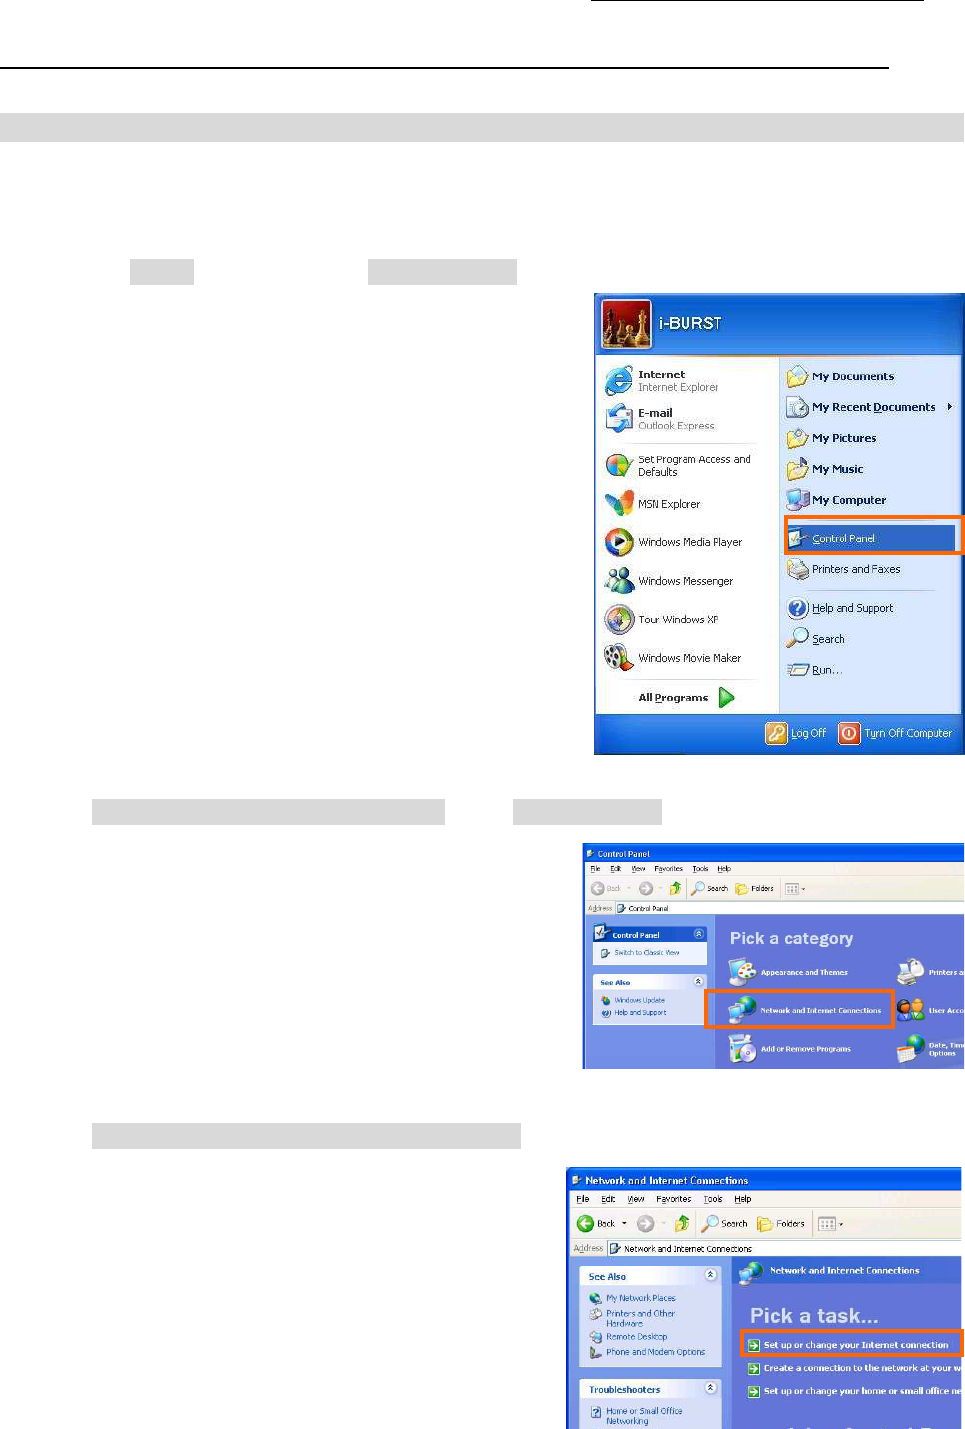
1. Make sure to plug the iBurst Terminal into your PC.
2. Click the [Start] button, and click [Control Panel] as shown below.
3. Click [Network and Internet Connections] in the [Control Panel] display.
4. Click [Set up or Change your Internet connection].
iBurst Terminal, Desktop Model (UTW), Manual
Kyocera Corporation S03T-EE001 Rev.1.01 Aug.7.2008
- 27 -
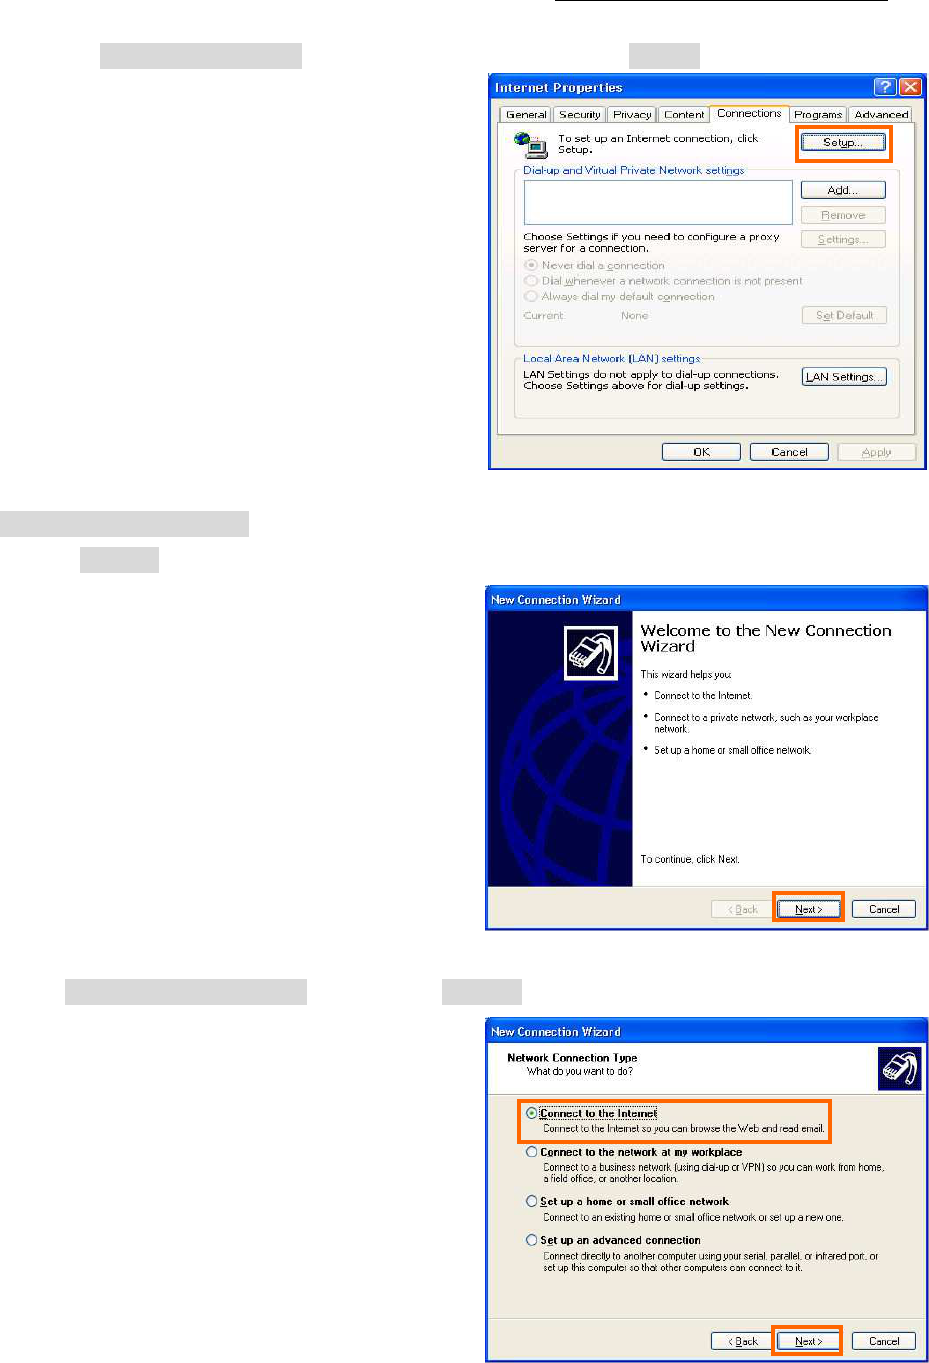
5. When the [Internet Properties] dialog window appears, click the [Setup] button.
6. [New Connection Wizard] will begin and the dialog window as shown below will appear.
Click the [Next >] button in the dialog window.
7. Select [Connect to the Internet] and click the [Next >] button.
iBurst Terminal, Desktop Model (UTW), Manual
Kyocera Corporation S03T-EE001 Rev.1.01 Aug.7.2008
- 28 -
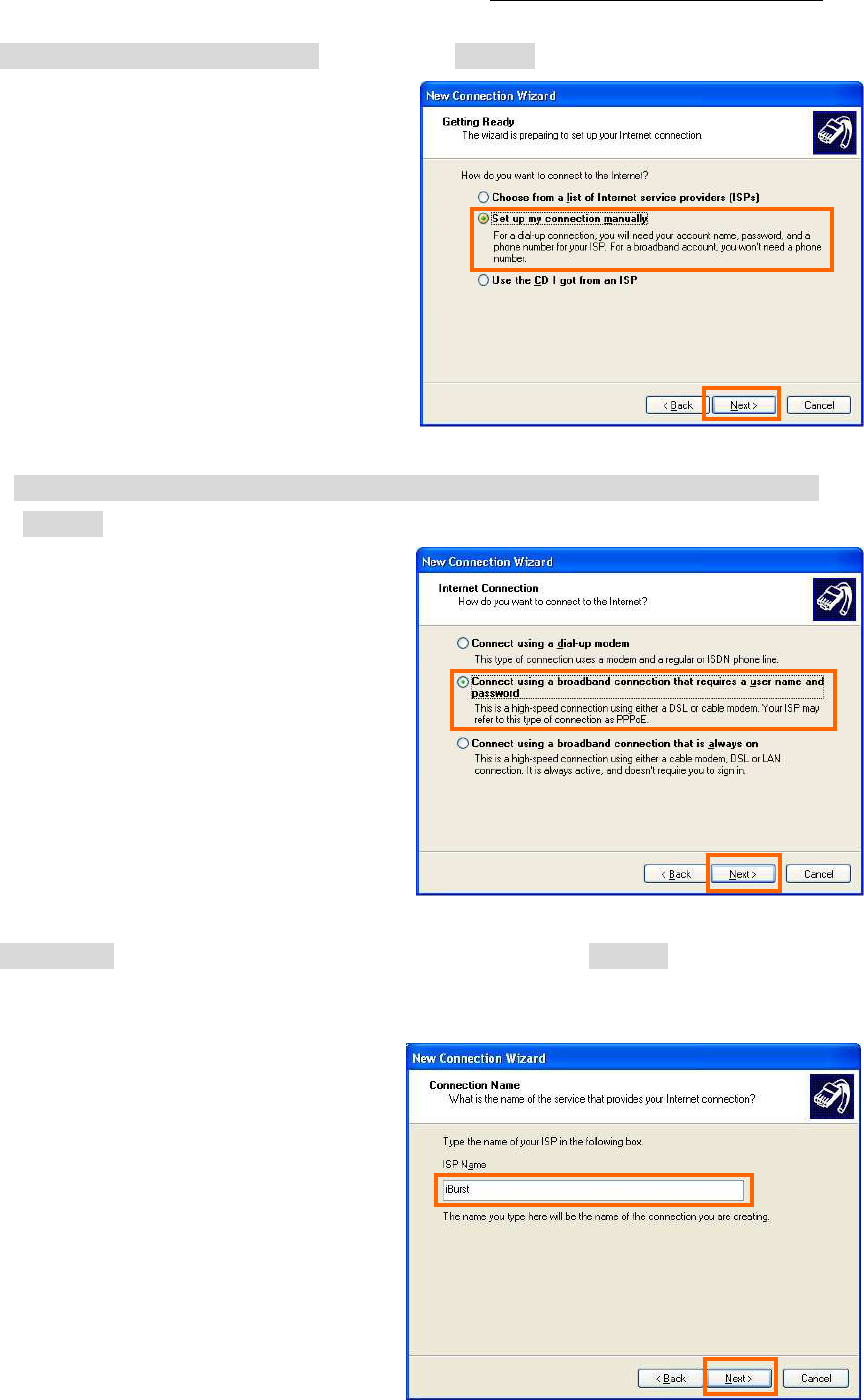
8. Select [Set up my connection manually] and click the [Next >] button.
9. Select [Connect using a broadband connection that requires a user name and password] and
click the [Next >] button.
10. Fill in [ISP Name]. Any ISP name is acceptable. And then, click [Next >] button.
NOTE: “iBurst” in the picture below is an example.
iBurst Terminal, Desktop Model (UTW), Manual
Kyocera Corporation S03T-EE001 Rev.1.01 Aug.7.2008
- 29 -
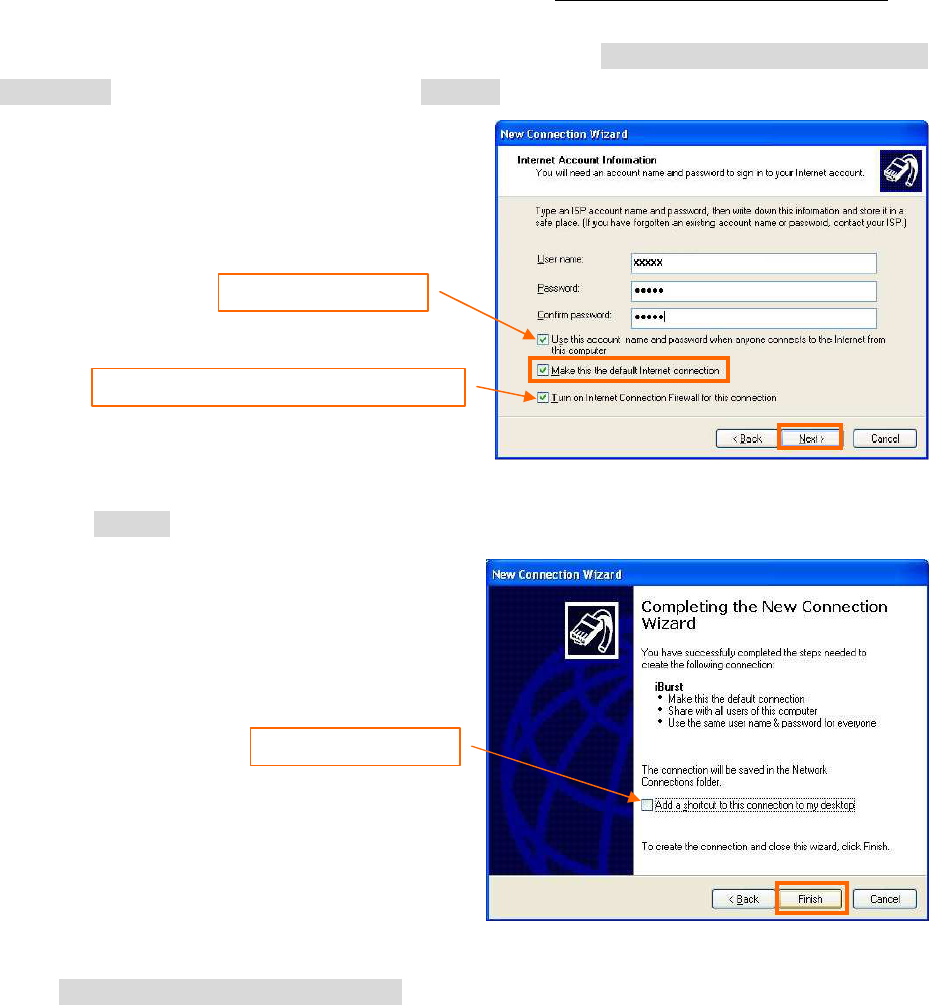
11. Enter user name and password and make sure that the [Make this the default Internet
connection] check box is checked. Click the [Next >] button.
12. Click the [Finish] button.
13. Close [Network and Internet Connection] window.
Check it if you want.
Nothing in case SP2 of Windows XP.
Check it if you want.
iBurst Terminal, Desktop Model (UTW), Manual
Kyocera Corporation S03T-EE001 Rev.1.01 Aug.7.2008
- 30 -
To connect
To connect To connect
To connect
This section shows the procedure to connect to the Internet through iBurst. You have to do this
every time before starting Internet accessing.
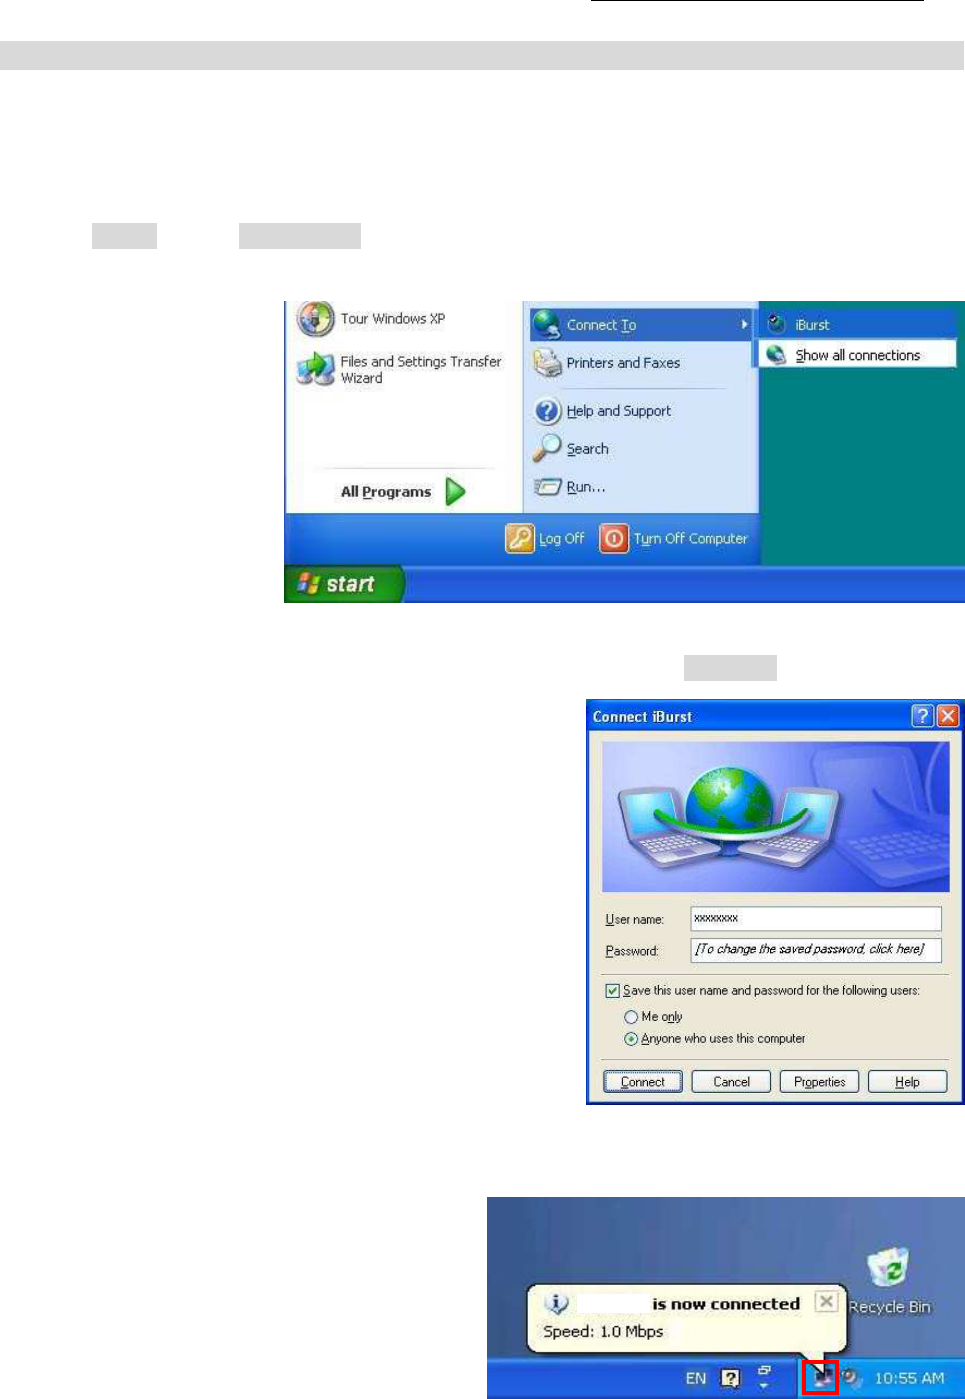
1. Click [Start] button, [Connect To] and <Connection name you created>.
NOTE: The connection name “iBurst” in the picture below is an example.
2. When a dial-up connection dialog is popped up, fill items and click [Connect].
3. When the connection establishment process is complete, a message indicating completion of the
connection will appear at the task tray as shown below.
iBurst
iBurst Terminal, Desktop Model (UTW), Manual
Kyocera Corporation S03T-EE001 Rev.1.01 Aug.7.2008
- 31 -
To disconnect
To disconnect To disconnect
To disconnect
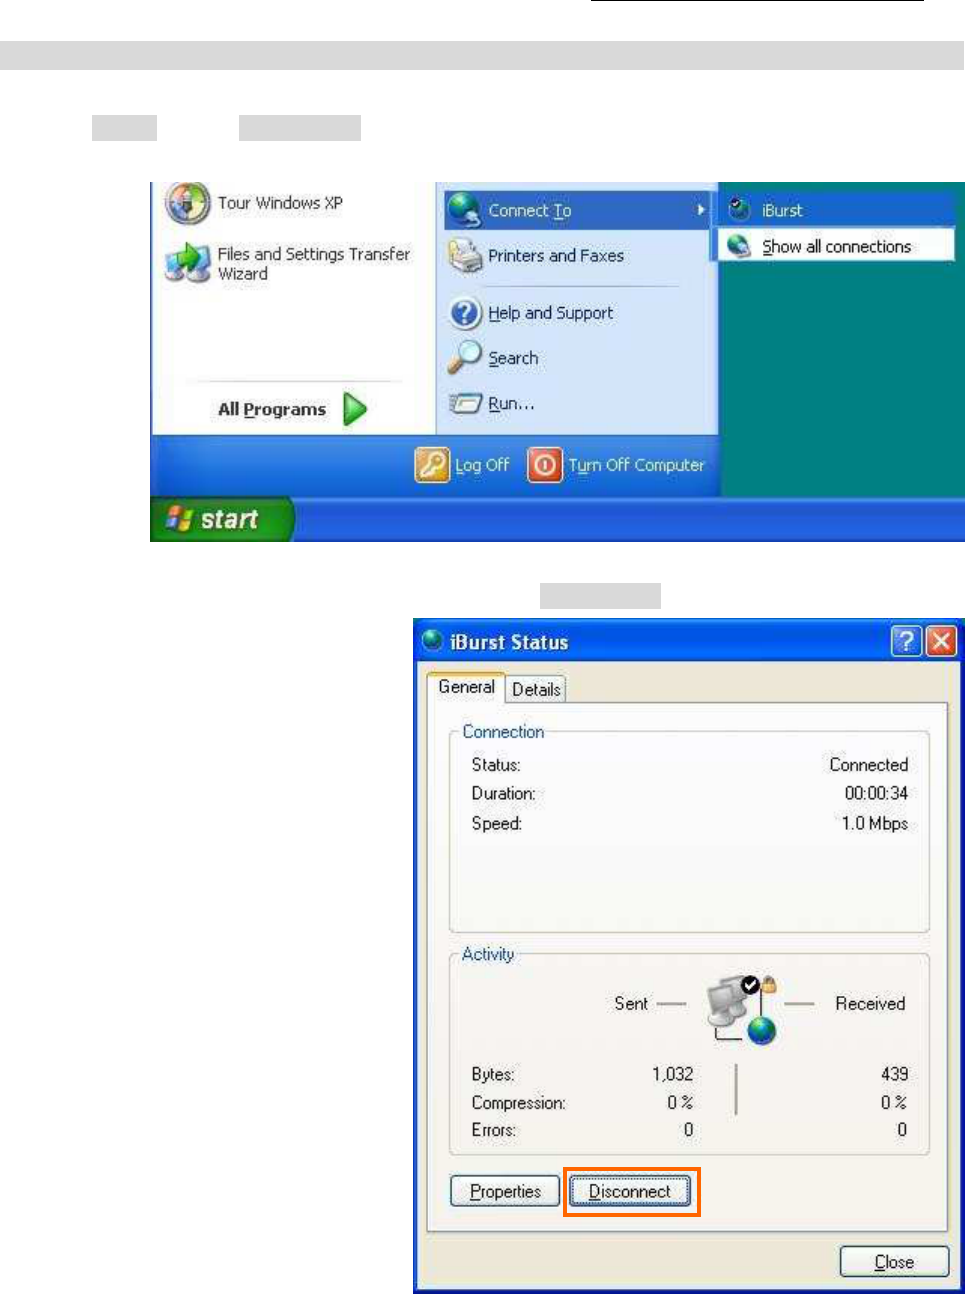
1. Click [Start] button, [Connect To] and <Connection name you created>.
NOTE: The connection name “iBurst” in the picture below is an example.
2. When a connection status dialog is popped up, click [Disconnect].
3. It will be disconnected.
iBurst Terminal, Desktop Model (UTW), Manual
Kyocera Corporation S03T-EE001 Rev.1.01 Aug.7.2008
- 32 -
Tips for useful conn
Tips for useful connTips for useful conn
Tips for useful connection settings
ection settings ection settings
ection settings
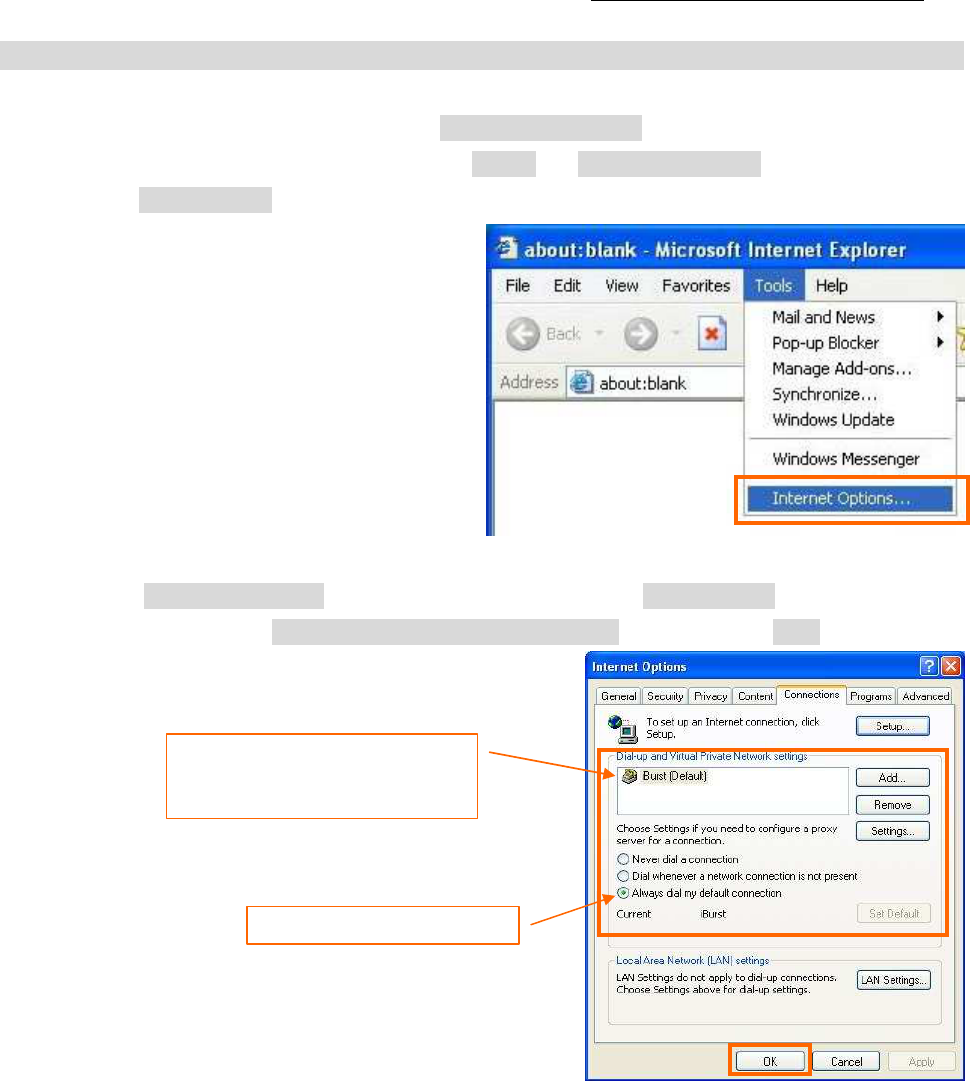
1. You can enable always connection on the [Internet Properties] as follows. In order to open the
dialog, open the Internet Explorer, select [Tools] -> [Internet Options]. You can find the
setting on [Connections] tab of the dialog.
2. When the [Internet Options] dialog window appears, select [Connections] tab. Confirm the
connection name, select [Always dial my default connection], and then click [OK].
The ISP name specified when
creating a connection must be
the default connection.
Select “Always dial ...”.
iBurst Terminal, Desktop Model (UTW), Manual
Kyocera Corporation S03T-EE001 Rev.1.01 Aug.7.2008
- 33 -
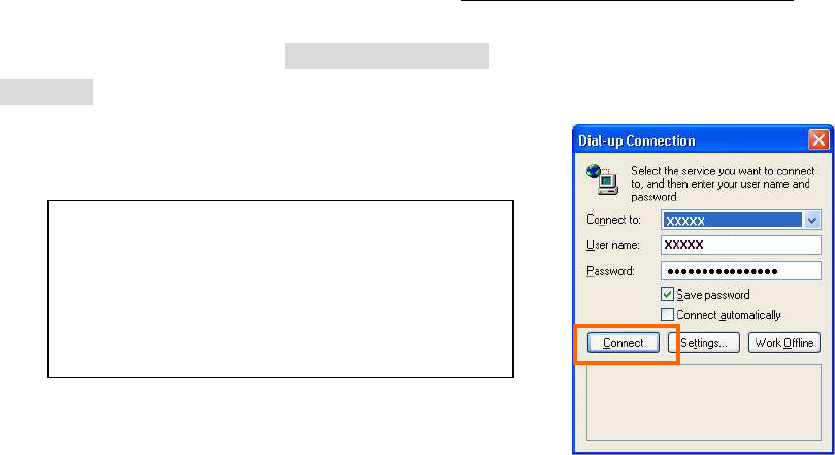
3. When you open Internet Explorer, the [Dial-up Connection] dialog as shown below will appear.
Click the [Connect] button to connect to the network.
NOTE:
If you don’t choose “Always dial my default
connection” at step 2 above, you have to
open this dial-up connection dialog
manually every when you want to connect to
the Internet.
iBurst Terminal, Desktop Model (UTW), Manual
Kyocera Corporation S03T-EE001 Rev.1.01 Aug.7.2008
- 34 -
Connection
Connection Connection
Connection Settings
SettingsSettings
Settings for Windows 2000
for Windows 2000 for Windows 2000
for Windows 2000
To connect
To connectTo connect
To connect
This section shows the procedure to connect to the Internet through iBurst. You have to do this
every time before starting Internet accessing.
1. Make sure to plug the iBurst Terminal into your PC.
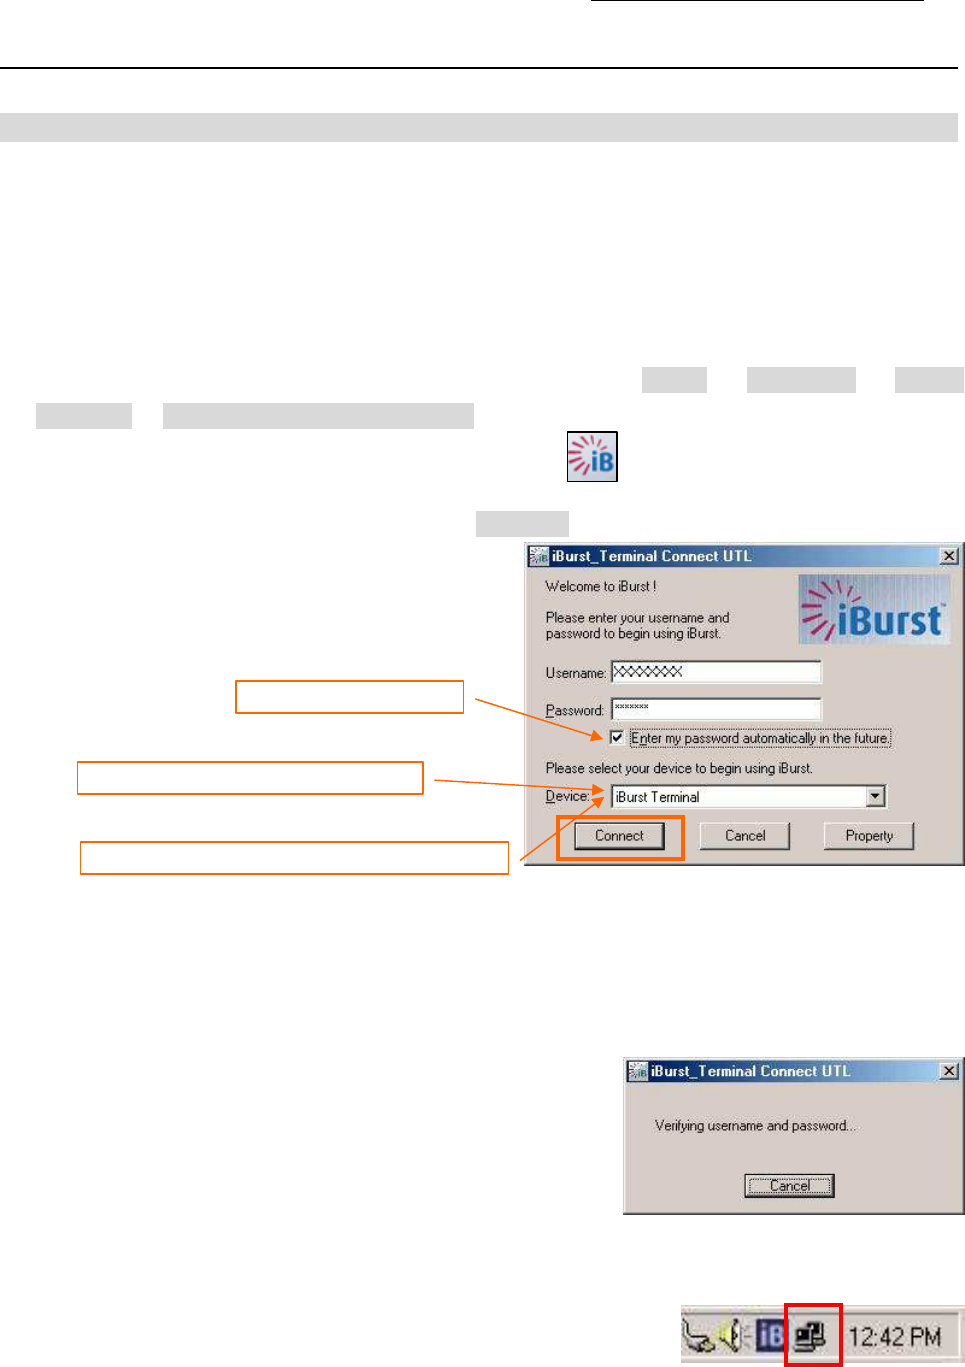
2. Double click the shortcut icon on the PC desktop; or click [Start] -> [Programs] -> [iBurst
Terminal] -> [iBurst_Terminal Connect UTL]
3. Enter user name and password and click the [Connect] button.
NOTE: ‘Cancel’ to close the dialog.
‘Property’ to open properties of the dial-up connection for iBurst Terminal.
4. While connecting to network, the following connection status window is displayed.
5. When logging on successfully, a network connection icon will be displayed at the task tray.
“
iBurst Terminal
”
shall be selected.
Check it if you want.
“
Ethernet A
daptor
Name
”
will be select
ed.
If no iBurst Terminal plugged in:

iBurst Terminal, Desktop Model (UTW), Manual
Kyocera Corporation S03T-EE001 Rev.1.01 Aug.7.2008
- 35 -
To
To To
To dis
disdis
disconnect
connectconnect
connect
1. Double click the shortcut icon on the PC desktop; or click [Start] -> [Programs] -> [iBurst
Terminal] -> [iBurst_Terminal Connect UTL]
2. When the dialog will appear, click the [Disconnect] button.
3. Connection will be cleared shortly.

iBurst Terminal, Desktop Model (UTW), Manual
Kyocera Corporation S03T-EE001 Rev.1.01 Aug.7.2008
- 36 -
Chapter 3
Chapter 3Chapter 3
Chapter 3
Utility Software
Utility SoftwareUtility Software
Utility Software
This chapter describes the features an
This chapter describes the features anThis chapter describes the features an
This chapter describes the features and usage of the
d usage of the d usage of the
d usage of the
Utility Software
Utility Software Utility Software
Utility Software for iBurst Terminal.
for iBurst Terminal.for iBurst Terminal.
for iBurst Terminal.

iBurst Terminal, Desktop Model (UTW), Manual
Kyocera Corporation S03T-EE001 Rev.1.01 Aug.7.2008
- 37 -
Status Indication over Ethernet
Status Indication over Ethernet Status Indication over Ethernet
Status Indication over Ethernet
Introduction
In case that you want to make an IP connectivity through Ethernet, you can see statuses of iBurst
Terminal on a web browser instead of iBurst Utility software. In this case, you need to follow the
steps described in this section.
Attention
Since the Ethernet port of an iBurst Terminal has a fixed IP address, 192.168.250.55 as default, it
is strongly recommended to isolate both the iBurst Terminal and your PC from a live Ethernet
network in order to avoid any network trouble.
Information
You can use a straight, not cross, cable to connect between the iBurst Terminal and your PC, it
means that the Ethernet port of an iBurst Terminal has a interface like as a HUB.
Procedure
1. To enable communication with the iBurst Terminal, you have to change IP address of your PC.
<In case Windows Vista>
1) Click “Start” -> “Connect To” to open that.
2) Click “Open Network and Sharing Center” to open that.
3) Click “Manage Network Connections” to open that.
4) Double click the name of the Ethernet port you want to use which should be listed at “Local
Area Connections”.
5) “Local Area Connection Status” dialog will appear. On “General” tab in the dialog, click
“Properties”.
6) When “User Account Control” is prompted, click “Continue”.
7) “Local Area Connection Properties” dialog will appear. On “Networking” tab in the dialog,
select “Internet Protocol Version 4 (TCP/IPv4)” and click “Properties” button. “Internet
Protocol Version 4 (TCP/IPv4) Properties” dialog will appear.
8) On “General” tab in the dialog, select “Use the following IP address:” and specify IP address
and Subnet Mask according to network plan. In case of connecting directly between the
iBurst Terminal and your PC, the settings shown below are recommended as an example.
IP address: 192.168.250.1
Subnet mask: 255.255.255.0
Default gateway: (blank)
9) Click “OK” to close the TCP/IPv4 properties.
10) Click “Close” to close the connection properties.
11) Close all window.

iBurst Terminal, Desktop Model (UTW), Manual
Kyocera Corporation S03T-EE001 Rev.1.01 Aug.7.2008
- 38 -
<In case Windows XP>
1) Click “Start” -> “Control Panel” to open that.
2) Click “Network and Internet Connections” to open that.
3) Click “Network Connections” to open that.
4) Double click the name of the Ethernet port you want to use which should be listed at “LAN
or High-Speed Internet”.
5) “Local Area Connection Status” dialog will appear. On “General” tab in the dialog, click
“Properties”.
6) “Local Area Connection Properties” dialog will appear. On “General” tab in the dialog, select
“Internet Protocol (TCP/IP)” and click “Properties” button. “Internet Protocol (TCP/IP)
Properties” dialog will appear.
7) On “General” tab in the dialog, select “Use the following IP address:” and specify IP address
and Subnet Mask according to network plan. In case of connecting directly between the
iBurst Terminal and your PC, the settings shown below are recommended as an example.
IP address: 192.168.250.1
Subnet mask: 255.255.255.0
Default gateway: (blank)
8) Click “OK” to close the TCP/IP properties.
9) Click “OK” to close the connection properties.
10) Close “Network Connections” window.
<In case Windows 2000>
1) Click “Start” -> “Settings” -> “Control Panel” to open that.
2) Double click “Network and Dial-up Connections” to open that.
3) Double click the connection of the Ethernet port you want to use. In general case, the
name should be “Local Area Connection”. A properties dialog will appear.
4) On “General” tab in the dialog, select “Internet Protocol (TCP/IP)” and click “Properties”
button. “Internet Protocol (TCP/IP) Properties” dialog will appear.
5) On “General” tab in the dialog, select “Use the following IP address:” and specify IP address
and Subnet Mask according to your network plan. In case of connecting directly between
the iBurst Terminal and your PC, the settings shown below are recommended as an
example.
IP address: 192.168.250.1
Subnet mask: 255.255.255.0
Default gateway: (blank)
6) Click “OK” to close the TCP/IP properties.
7) Click “OK” to close the Ethernet Connection properties.
8) Close “Network and Dial-up Connections” window.
iBurst Terminal, Desktop Model (UTW), Manual
Kyocera Corporation S03T-EE001 Rev.1.01 Aug.7.2008
- 39 -
2. Open a web browser, e.g. Internet Explorer.
3. Specify a URL as follows.
http://192.168.250.55/
NOTE: Even though you change IP address of the iBurst Terminal, the iBurst Terminal
hold the default IP address. So, the default IP address cannot be used for the
other equipment in the network connected. The URL will jump automatically to
the IP address you changed.
4. Now, you are seeing information in the iBurst Terminal. The structure of the information
pages is as follows.
IP Address Setting
Jump Link Information
Link Information
Configuration
Help
Help
iBurst Terminal, Desktop Model (UTW), Manual
Kyocera Corporation S03T-EE001 Rev.1.01 Aug.7.2008
- 40 -
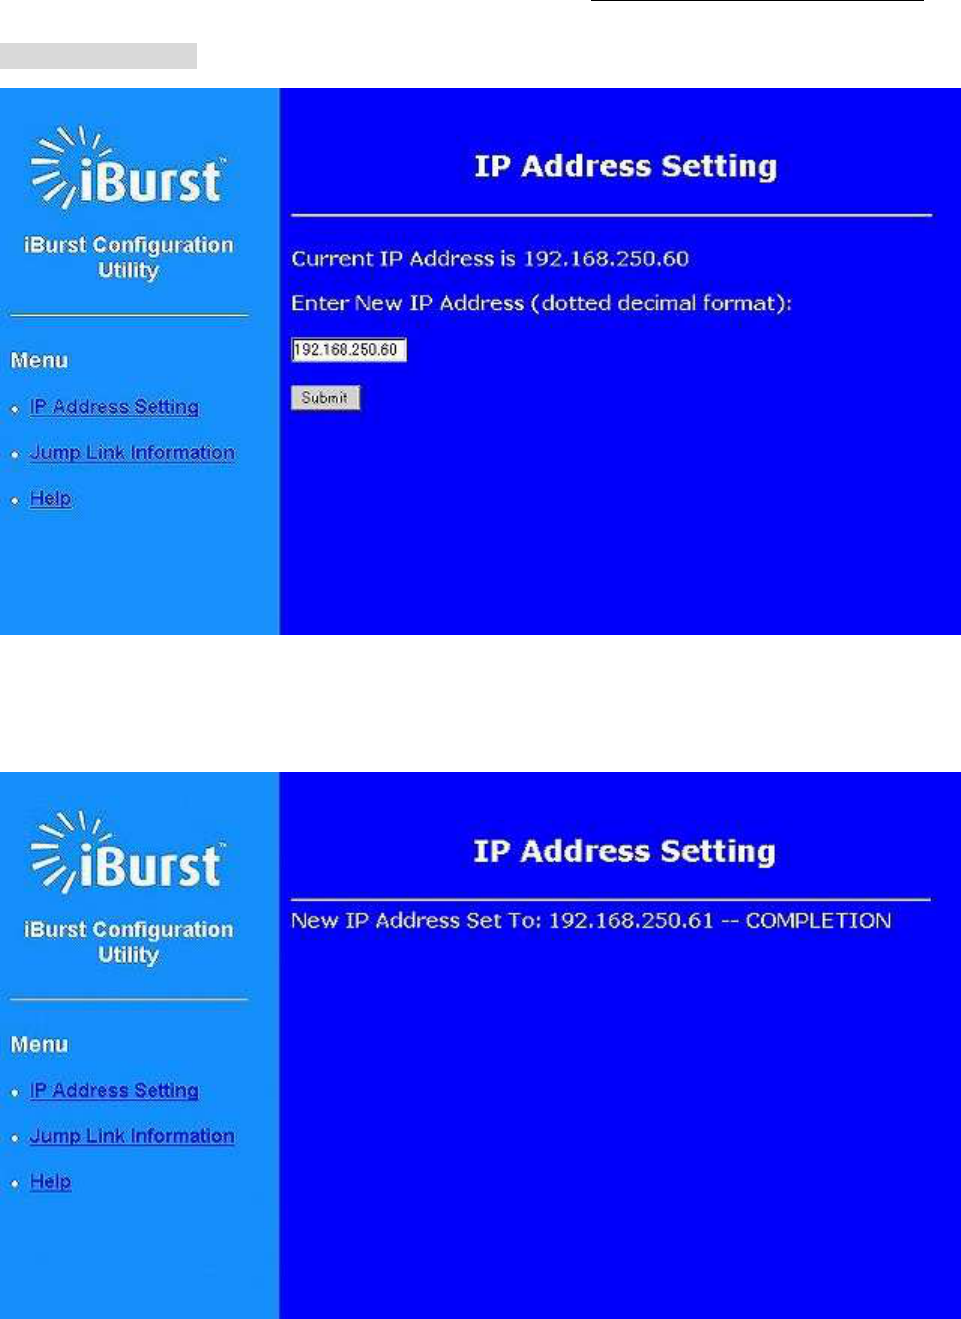
[IP Address Setting]
This page shows current IP address of the iBurst Terminal. You can change the IP address on
this page. To change it, type new IP address and click “Submit” button. The page shown below
will be shown.
iBurst Terminal, Desktop Model (UTW), Manual
Kyocera Corporation S03T-EE001 Rev.1.01 Aug.7.2008
- 41 -
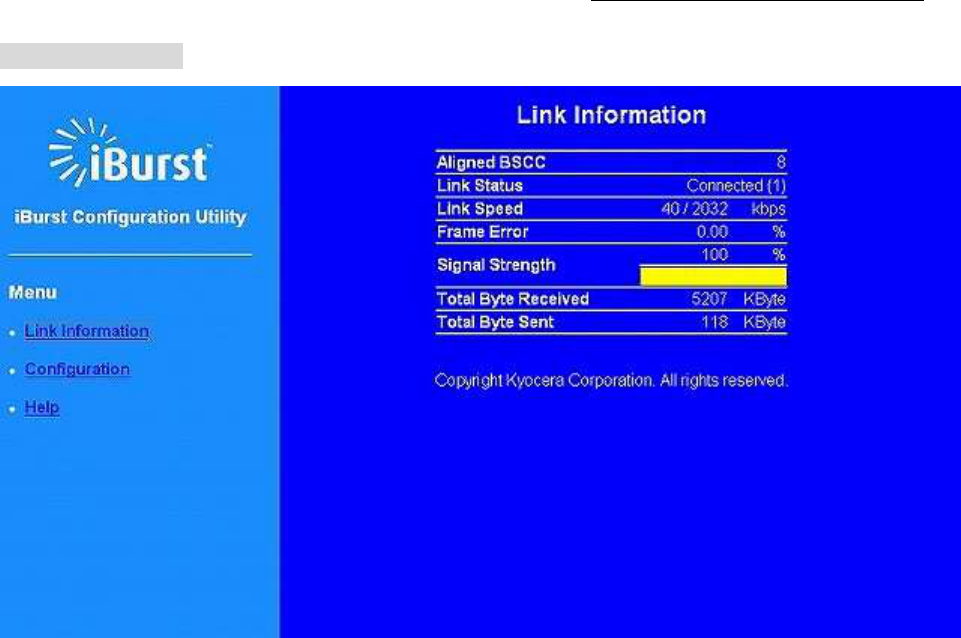
[Link Information]
Aligned BSCC
Aligned BSCCAligned BSCC
Aligned BSCC
This indicates current aligned Base Station Color Code.
Link Status
Link StatusLink Status
Link Status
This indicates current link status between the iBurst Terminal and the access point.
Connect
ConnectConnect
Connect (number of sessions)
(number of sessions) (number of sessions)
(number of sessions) :
::
:
The link is connected.
No Connect
No Connect No Connect
No Connect : The iBurst Terminal is connected with your PC but the link is not connected.
Link Speed
Link SpeedLink Speed
Link Speed
This indicates current bandwidth allocated automatically between the iBurst Terminal and a
radio base station.
Frame Error Rate
Frame Error RateFrame Error Rate
Frame Error Rate
This indicates current Frame Error Rate on the downlink air.

iBurst Terminal, Desktop Model (UTW), Manual
Kyocera Corporation S03T-EE001 Rev.1.01 Aug.7.2008
- 42 -
Signal Strength
Signal StrengthSignal Strength
Signal Strength
This indicates current signal strength of the received radio signal. The signal bar indicates the
level visually in percentage and the status words are categorized according to the percent level as
follows.
No Signal :
No Signal :No Signal :
No Signal :
0%
Poor :
Poor :Poor :
Poor :
In the range of 1 to 24%
Fair :
Fair :Fair :
Fair :
In the range of 25 to 49%
Good
GoodGood
Good : In the range of 50 to 74%
Excellent :
Excellent :Excellent :
Excellent :
In the range of 75 to 100%
Total Byte Received
Total Byte ReceivedTotal Byte Received
Total Byte Received
Total Byte Received indicates the total number of bytes received from the access point since the
communication link is established.
Total Byte Sent
Total Byte SentTotal Byte Sent
Total Byte Sent
Total Byte Sent indicates the total number of bytes transmitted to the access point since the
communication link is established.
** All information will be updated every 5 seconds.
iBurst Terminal, Desktop Model (UTW), Manual
Kyocera Corporation S03T-EE001 Rev.1.01 Aug.7.2008
- 43 -
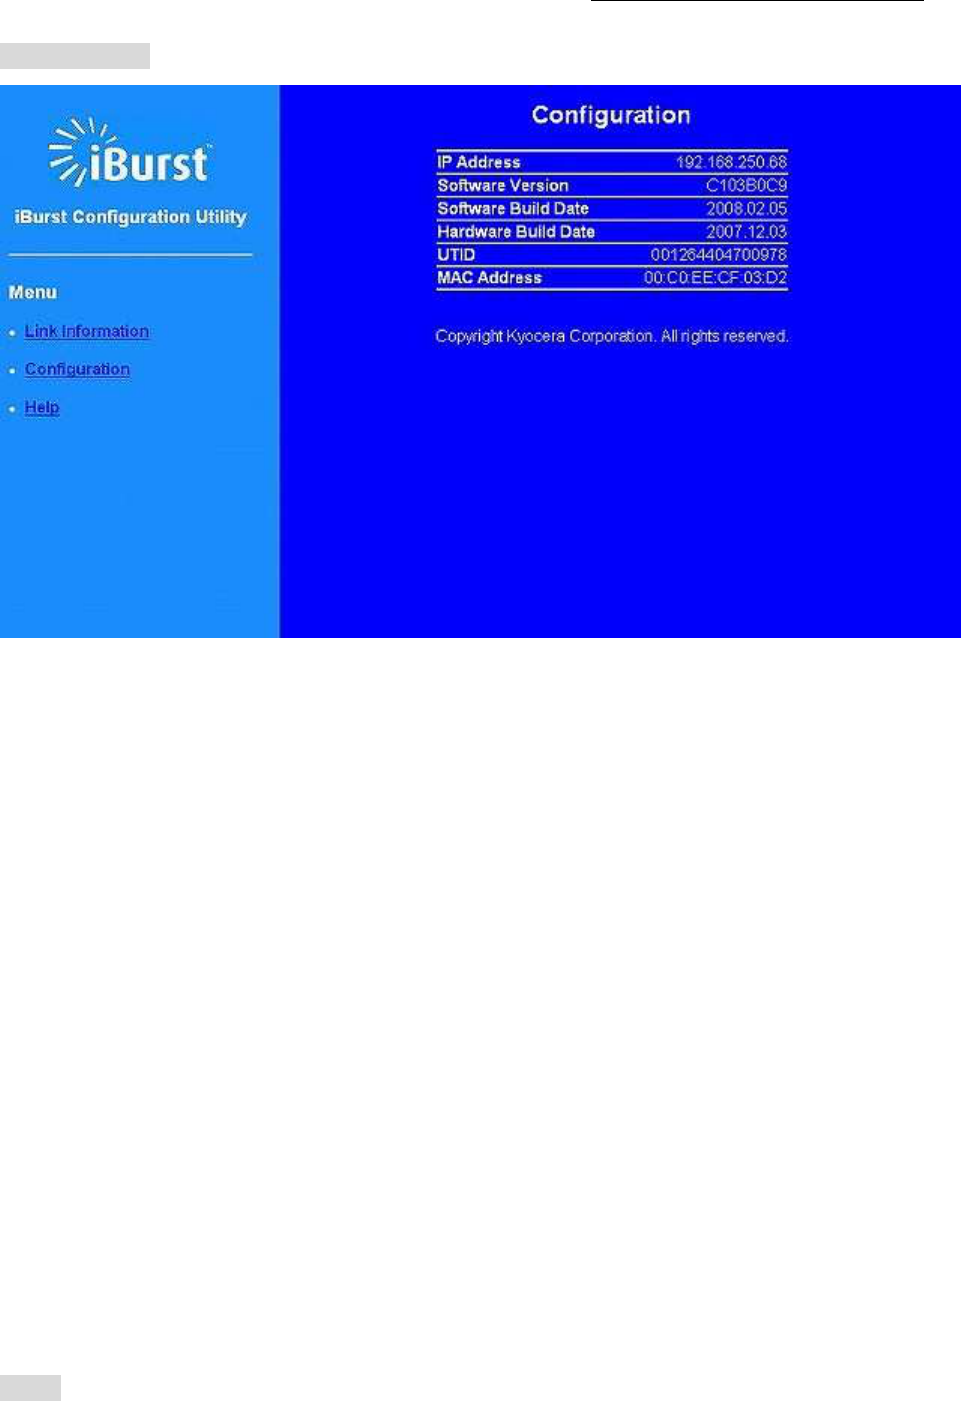
[Configuration]
IP Address
IP AddressIP Address
IP Address
This shows the IP address of the iBurst Terminal.
Software version
Software versionSoftware version
Software version
This shows the firmware version.
Software build date
Software build dateSoftware build date
Software build date
This shows the build date of the firmware.
Hardware build date
Hardware build dateHardware build date
Hardware build date
This shows the manufactured date of the iBurst Terminal.
UTID
UTIDUTID
UTID
UTID is an identifier assigned to the iBurst Terminal. This will be used for maintenance
support.
Mac Address
Mac AddressMac Address
Mac Address
This shows the Mac address of the iBurst Terminal.
[Help]
This navigates you to see the web pages.

iBurst Terminal, Desktop Model (UTW), Manual
Kyocera Corporation S03T-EE001 Rev.1.01 Aug.7.2008
- 44 -
Chapter 4
Chapter 4Chapter 4
Chapter 4
Uninstallation
UninstallationUninstallation
Uninstallation
This chapter describes how to uninstall
This chapter describes how to uninstall This chapter describes how to uninstall
This chapter describes how to uninstall iBurst software
iBurst softwareiBurst software
iBurst software.
..
.
iBurst Terminal, Desktop Model (UTW), Manual
Kyocera Corporation S03T-EE001 Rev.1.01 Aug.7.2008
- 45 -
Uninstallation for Windows 2000
Uninstallation for Windows 2000 Uninstallation for Windows 2000
Uninstallation for Windows 2000
1. Close all programs that are currently running.
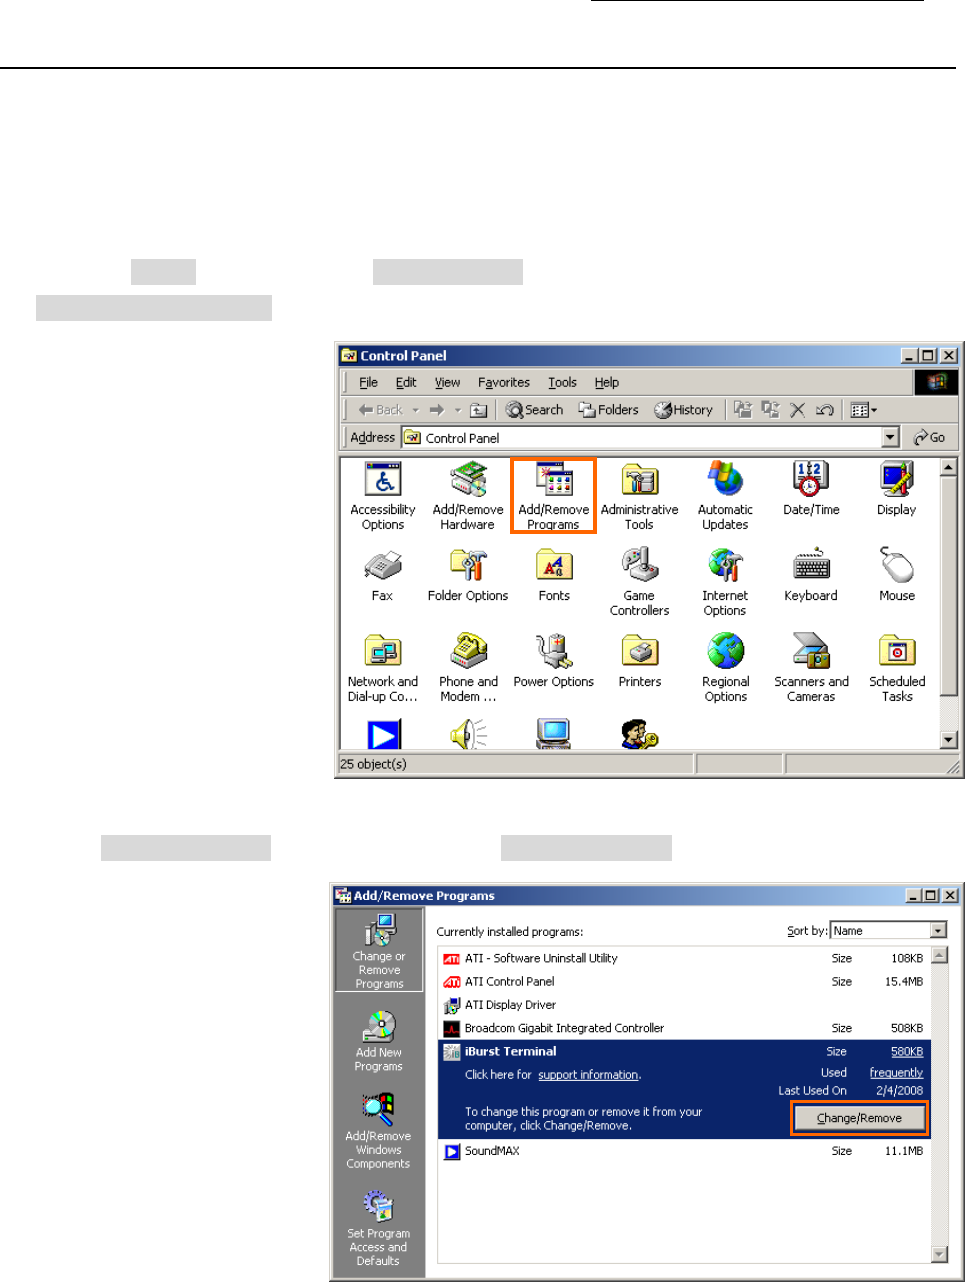
2. Disconnect the iBurst Terminal from your PC.
3. Click the [Start] button, and click [Control Panel] to open Control Panel, and then double click
[Add/Remove Programs].
4. Select [iBurst Terminal] software, and click the [Change/Remove] button.
iBurst Terminal, Desktop Model (UTW), Manual
Kyocera Corporation S03T-EE001 Rev.1.01 Aug.7.2008
- 46 -
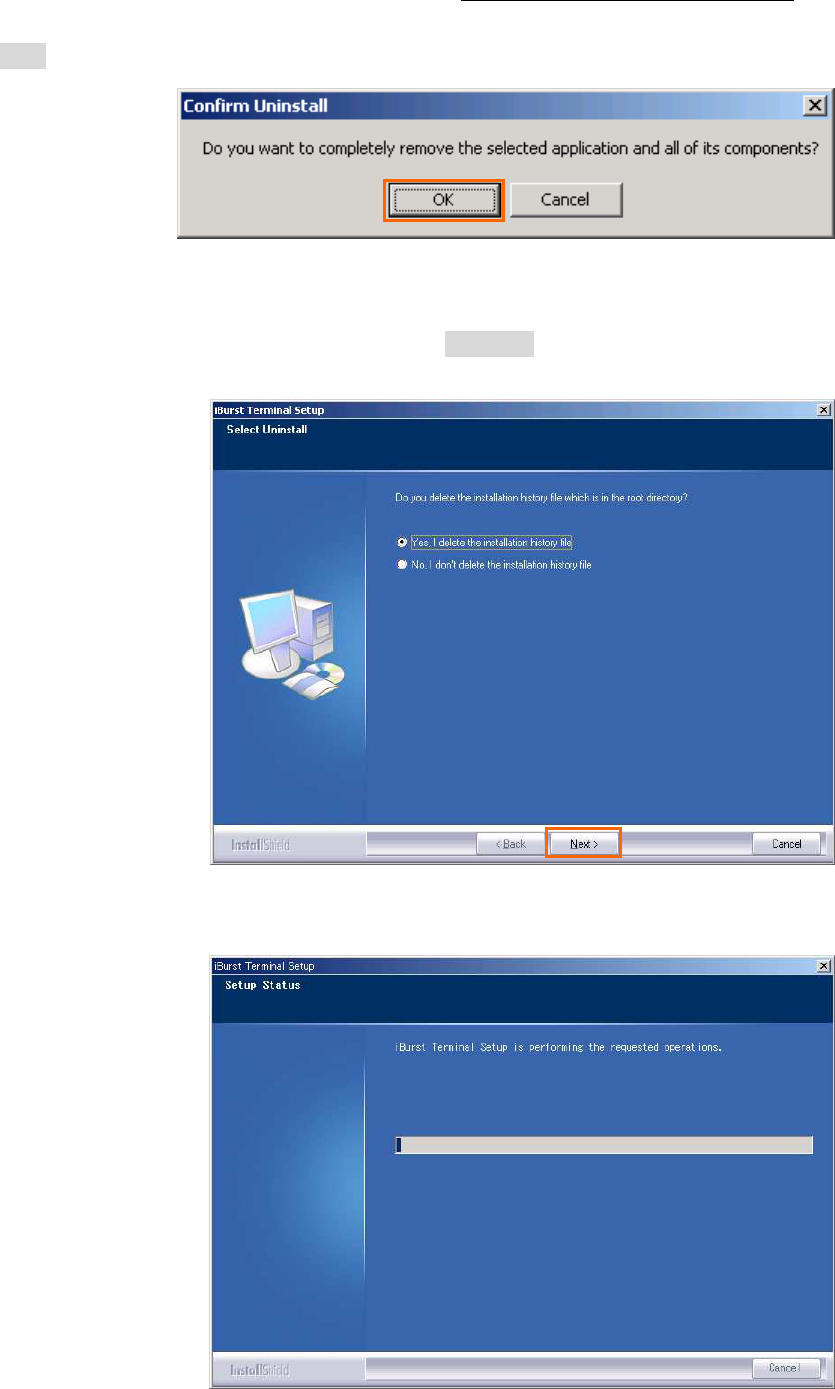
5. Click the [OK] button after appearing dialog window as shown below.
6. The following dialog window will appear, and select to delete or not to delete installation
history files before uninstallation, then click the [Next >] button. Selecting “Yes” is
recommended.
7. The following dialog window will appear, and uninstallation of software begins.
iBurst Terminal, Desktop Model (UTW), Manual
Kyocera Corporation S03T-EE001 Rev.1.01 Aug.7.2008
- 47 -
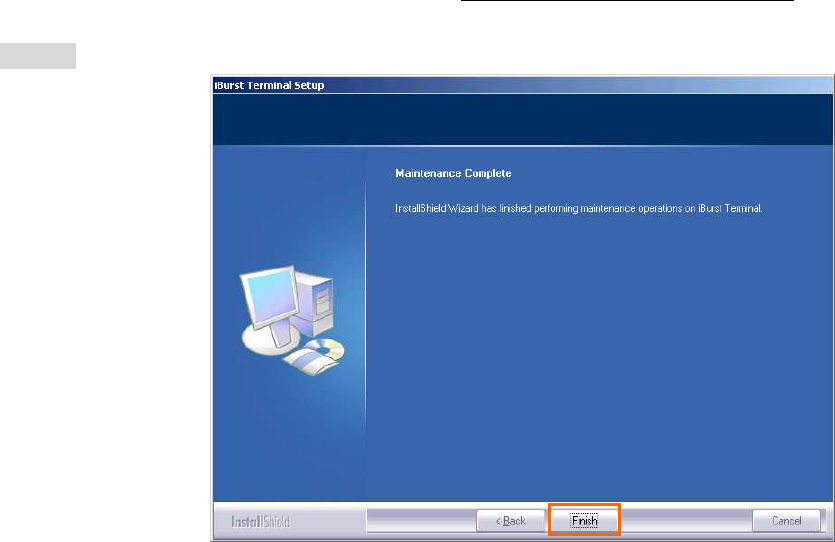
8. Click the [Finish] button after appearing dialog window as shown below.

iBurst Terminal, Desktop Model (UTW), Manual
Kyocera Corporation S03T-EE001 Rev.1.01 Aug.7.2008
- 48 -
Ap
ApAp
Appendix
pendixpendix
pendix
iBurst Terminal, Desktop Model (UTW), Manual
Kyocera Corporation S03T-EE001 Rev.1.01 Aug.7.2008
- 49 -
MTU optimizer on Windows 2000
MTU optimizer on Windows 2000 MTU optimizer on Windows 2000
MTU optimizer on Windows 2000
MTU optimizer software measures the optimized packet size between your PC and a HOST. It is
recommended to tune MTU size in order to avoid any throughput problem. This function is a part
of Kyocera PPPoE dialer and it is available on Windows 2000.
NOTE: You need to make a Internet connection through the iBurst Terminal prior to
start this procedure.
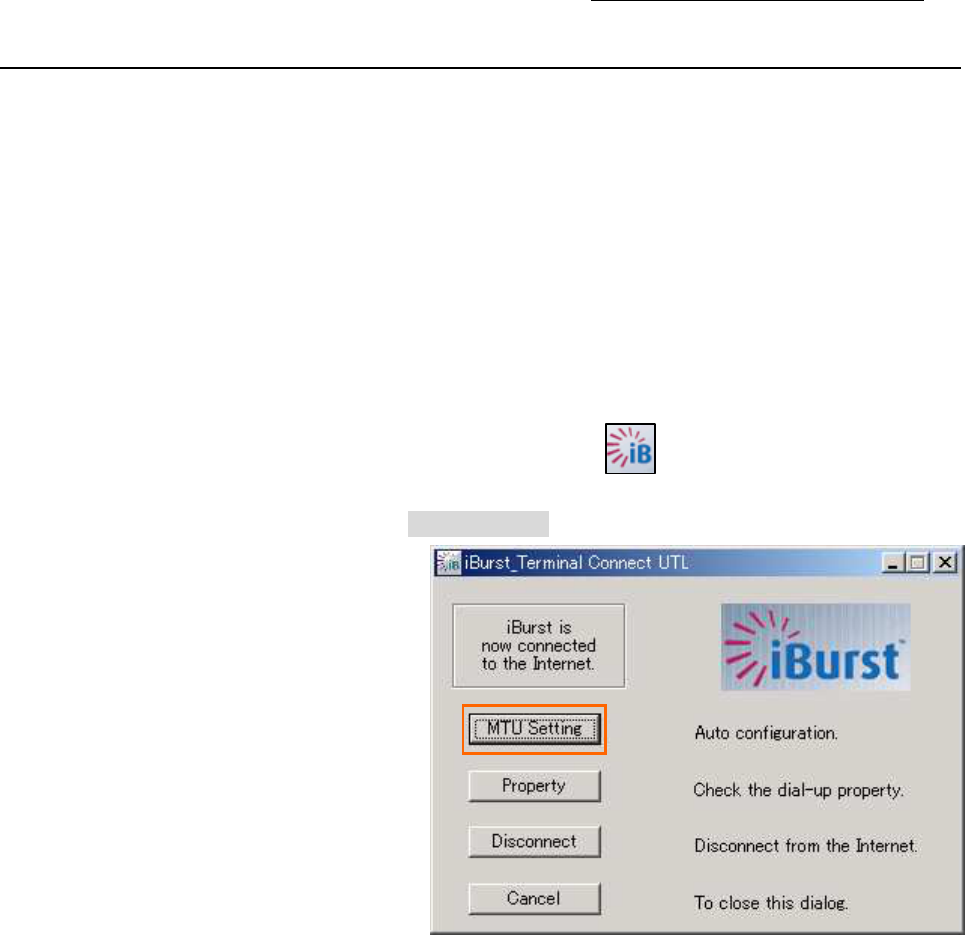
1. While your PC is being connected to the Internet through the iBurst Terminal, double click the
iBurst connection utility icon.
2. When the dialog will appear, click the [MTU Setting] button.
NOTE: ‘Property’ to open properties of the dial-up connection for iBurst Terminal.
‘Disconnect’ to disconnect from the Internet.
‘Cancel’ to close the dialog.
iBurst Terminal, Desktop Model (UTW), Manual
Kyocera Corporation S03T-EE001 Rev.1.01 Aug.7.2008
- 50 -
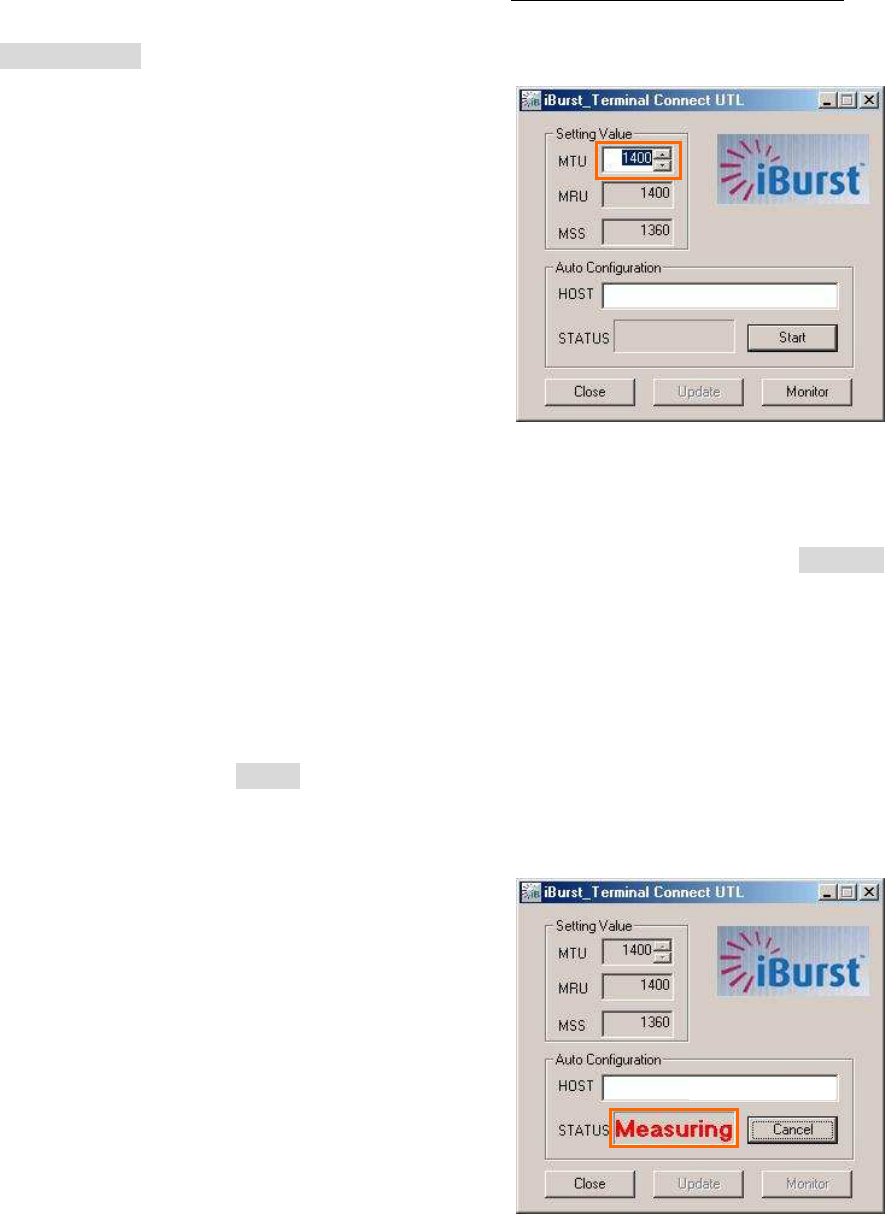
3. The [MTU Setting] dialog is as follows.
4. There are 2 methods to decide MTU size, i.e. manually or automatically.
5. If you want to change MTU size manually, type a value in the MTU field and click the [Update]
button. Your PC may request to restart it.
6. If you want to optimize MTU size automatically,
• type a target URL or an IP address of the HOST, which will be notified by the network
operator, and click the [Start] button.
• The optimizer starts measuring and every value will be varied automatically.
NOTE: ‘Cancel’ to stop measuring.
XXX.XXX.XXX.XXX
iBurst Terminal, Desktop Model (UTW), Manual
Kyocera Corporation S03T-EE001 Rev.1.01 Aug.7.2008
- 51 -
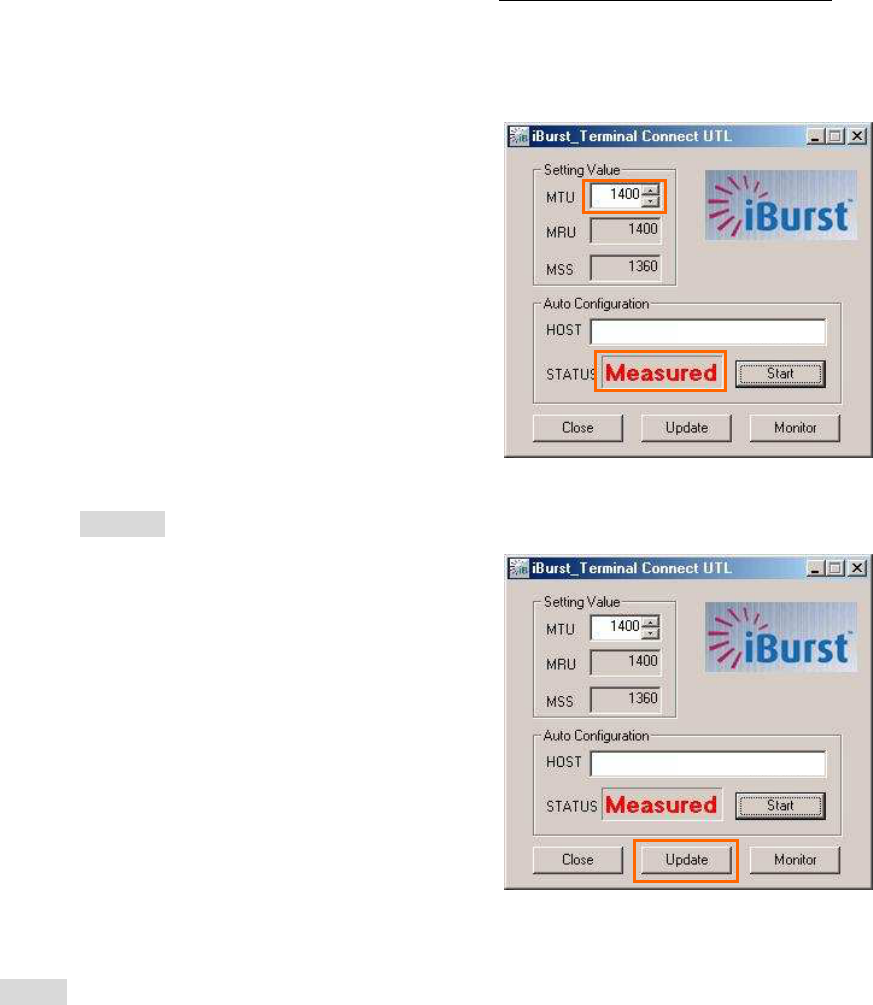
• The optimizer will finish automatically with a result of the optimized MTU size in the
MTU field.
• Click the [Update] button to memorize into your PC. Your PC may request to restart it.
NOTE: ‘Monitor’ to revoke the result and show the current memorized MTU size.
7. Click [Close] to close the dialog.
8. If you updated, you need to restart your PC to take effect.
XXX.XXX.XXX.XXX
XXX.XXX.XXX.XXX

iBurst Terminal, Desktop Model (UTW), Manual
Kyocera Corporation S03T-EE001 Rev.1.01 Aug.7.2008
- 52 -
Trouble when disabling a bui
Trouble when disabling a buiTrouble when disabling a bui
Trouble when disabling a buil
ll
lt
tt
t-
--
-in wireless LAN device on Windows PC
in wireless LAN device on Windows PC in wireless LAN device on Windows PC
in wireless LAN device on Windows PC
On some particular models of Windows PC, disabling a built-in wireless LAN device on “Device
Manager” will make a trouble that the PC doesn’t recognize iBurst User Terminals, not only iBurst
devices, when attaching or removing it. Since such PC shall have a wireless LAN utility to
control and monitor wireless LAN devices, please turn the wireless LAN device off by utilizing the
utility to avoid such trouble if you want to disable it.

iBurst Terminal, Desktop Model (UTW), Manual
Kyocera Corporation S03T-EE001 Rev.1.01 Aug.7.2008
- 53 -
FCC Compliance Statement
FCC Compliance Statement FCC Compliance Statement
FCC Compliance Statement
FCC WARNING
Changes or modifications not expressly approved by the party responsible for compliance could
void the user’s authority to operate the equipment.
NOTICE
This equipment has been tested and found to comply with the limits for a Class B digital device,
pursuant to part 15 of the FCC rules. These limits are designed to provide reasonable protection
against harmful interference in a residential installation. This equipment generates, uses and can
radiate radio frequency energy and, if not installed and used in accordance with the instructions,
may cause harmful interference to radio communications. However, there is no guarantee that
interference will not occur in a particular installation. If this equipment does cause harmful
interference to radio or television reception, which can be determined by turning the equipment
off and on, the user is encouraged to try to correct the interference by one or more of the following
measures:
▬
Reorient or relocate the receiving antenna.
▬
Increase the separation between the equipment and receiver.
▬
Connect the equipment into an outlet on a circuit different from that to which the receiver is
connected.
▬
Consult the dealer or an experienced radio/TV technician for help.

iBurst Terminal, Desktop Model (UTW), Manual
Kyocera Corporation S03T-EE001 Rev.1.01 Aug.7.2008
- 54 -
FCC RF Radiation Expo
FCC RF Radiation ExpoFCC RF Radiation Expo
FCC RF Radiation Exposure Statement
sure Statementsure Statement
sure Statement
This transmitter must not be co-located or operated in conjunction with any other antenna or
transmitter.
This equipment complies with FCC radiation exposure limits set forth for uncontrolled equipment
and meets the FCC radio frequency (RF) Exposure Guidelines in Supplement C to OET65. This
equipment should be installed and operated with at least 20cm and more between the radiator and
person’s body (excluding extremities: hands, wrists, feet and ankles).
[The end of this manual]