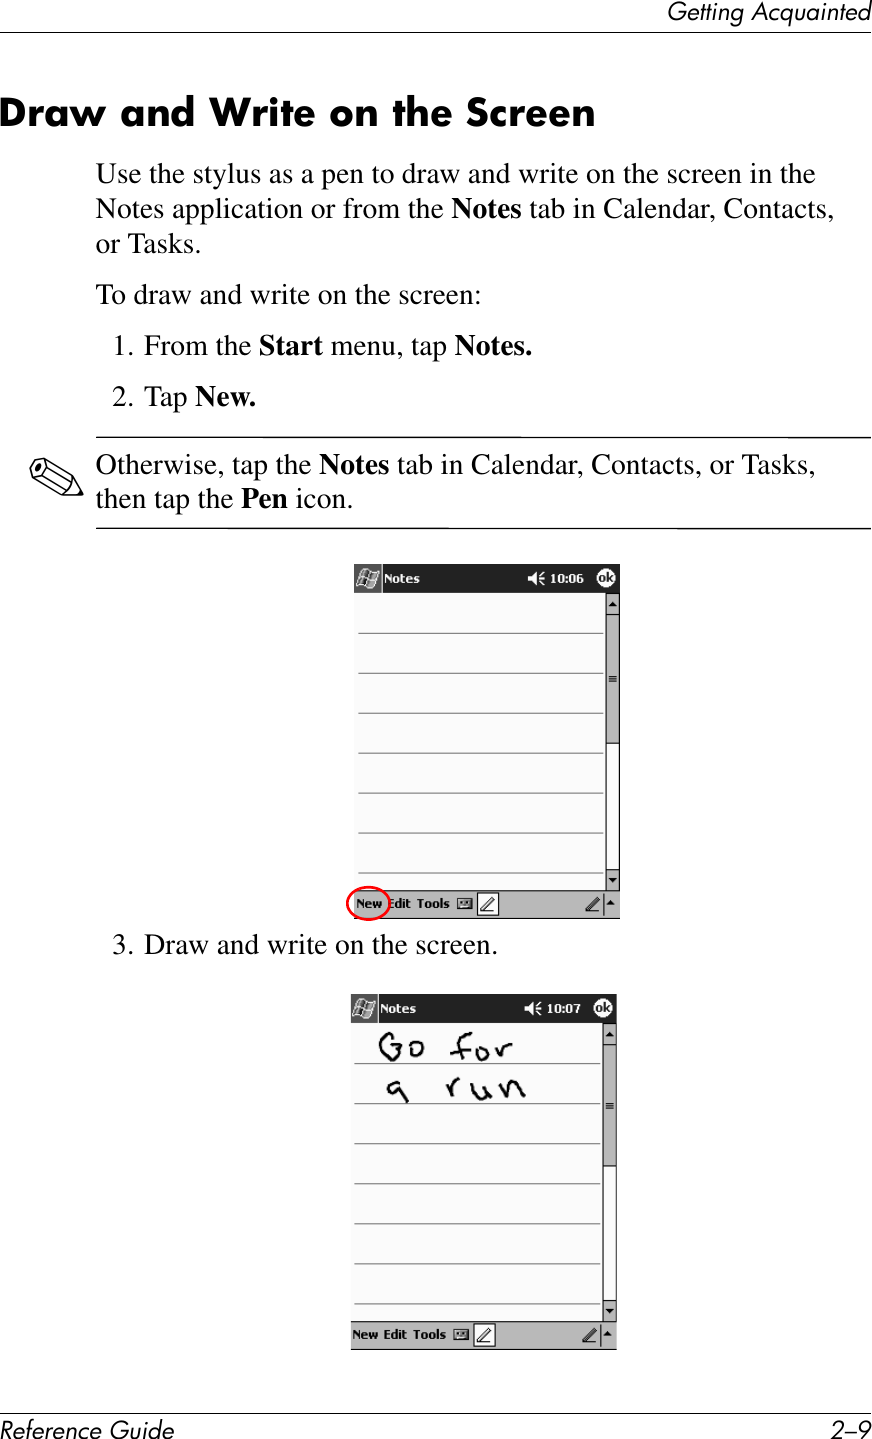
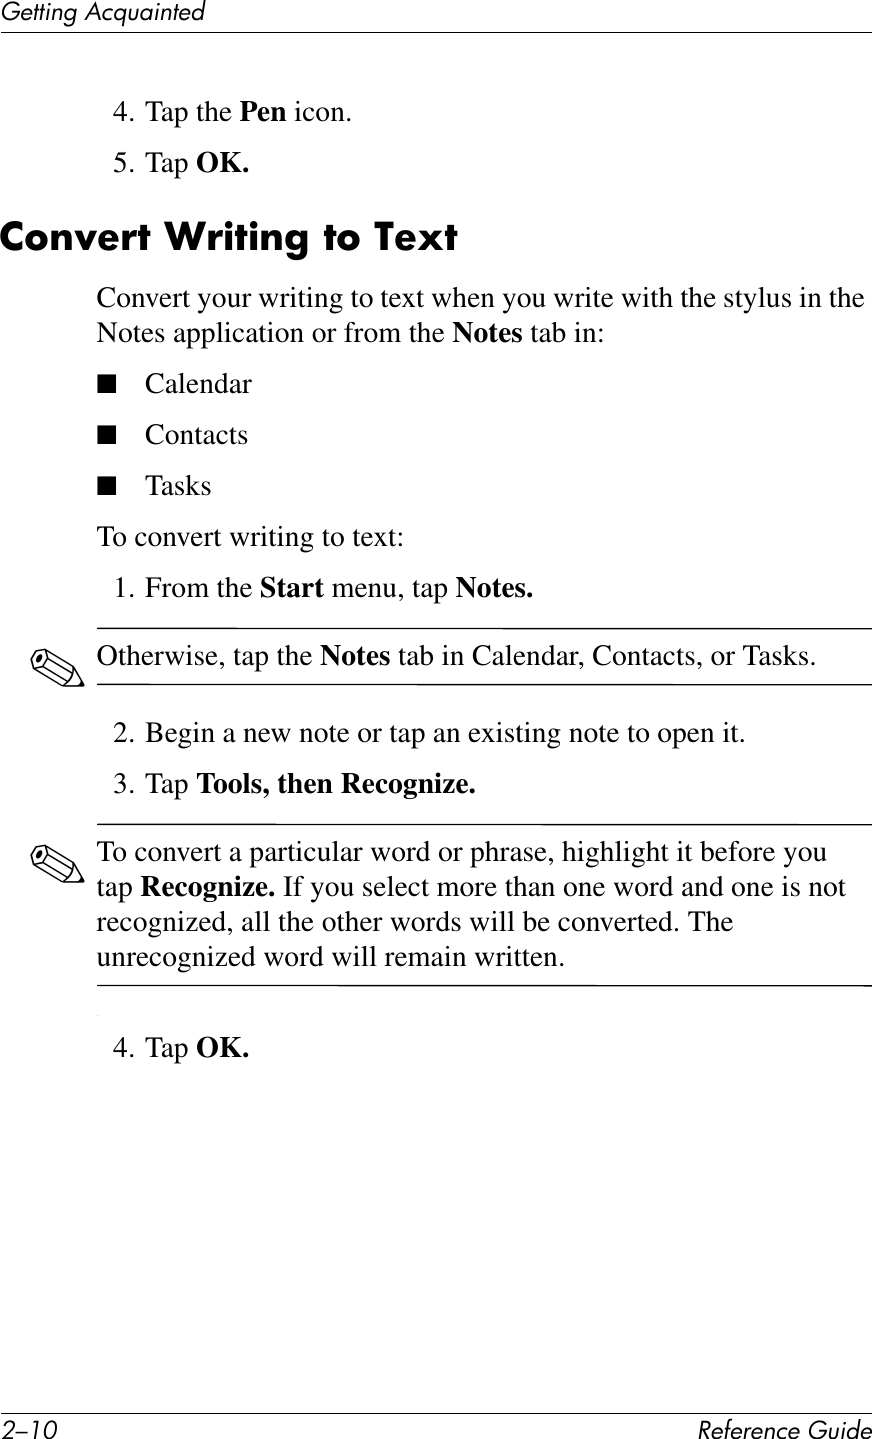
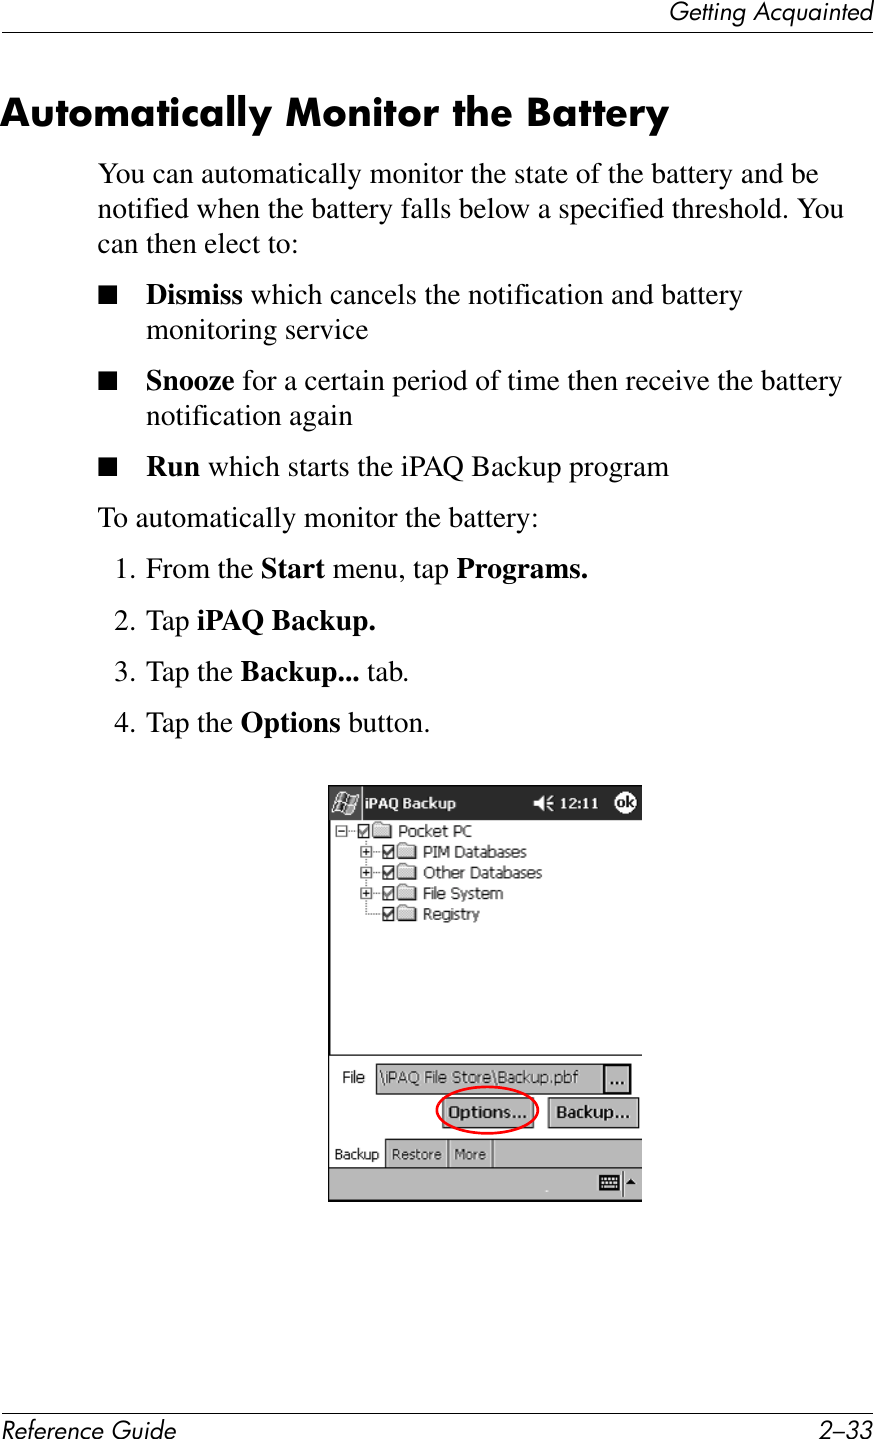
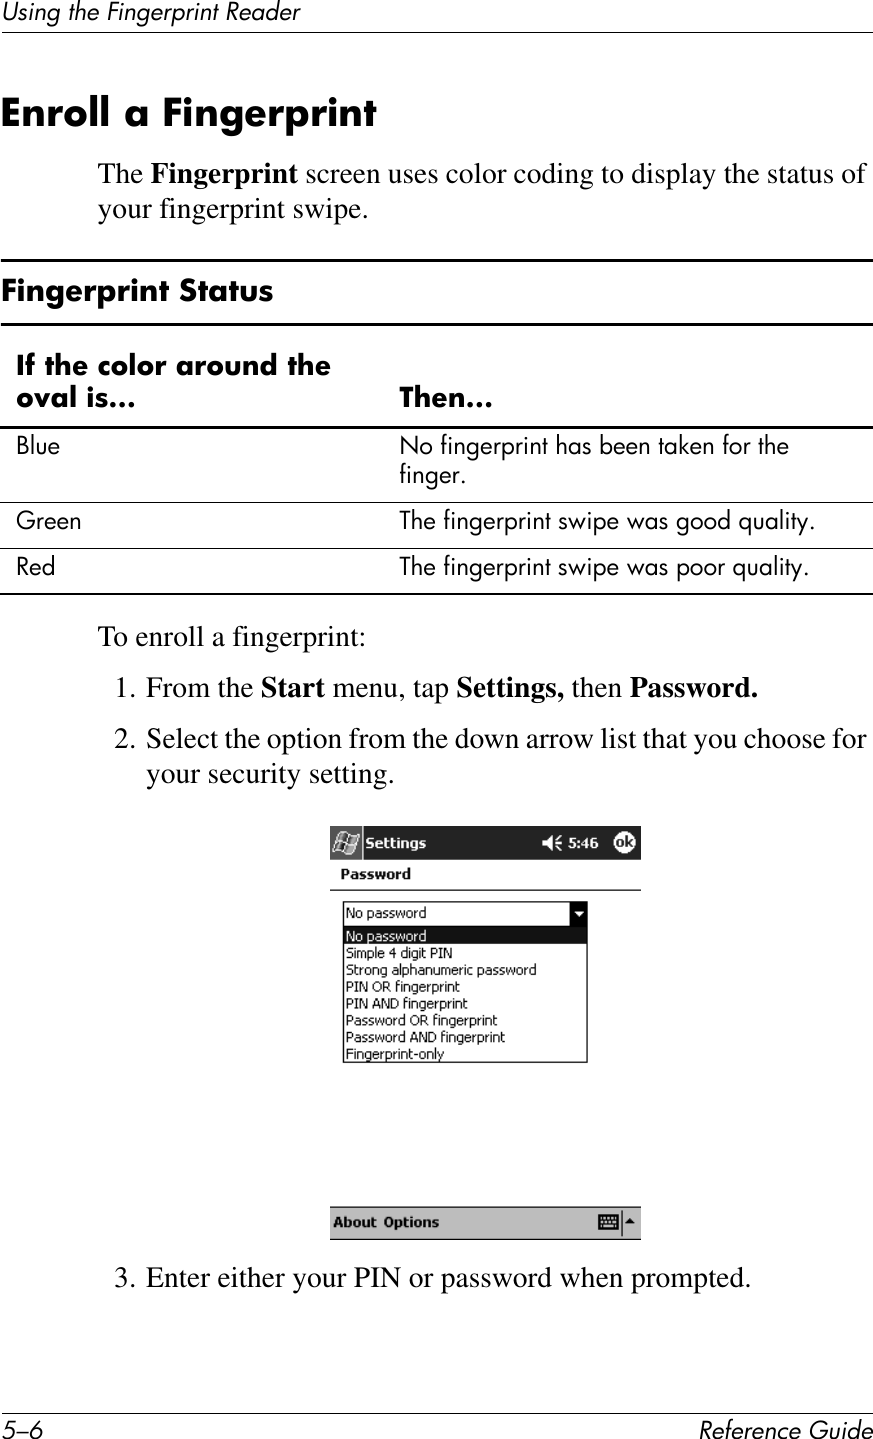
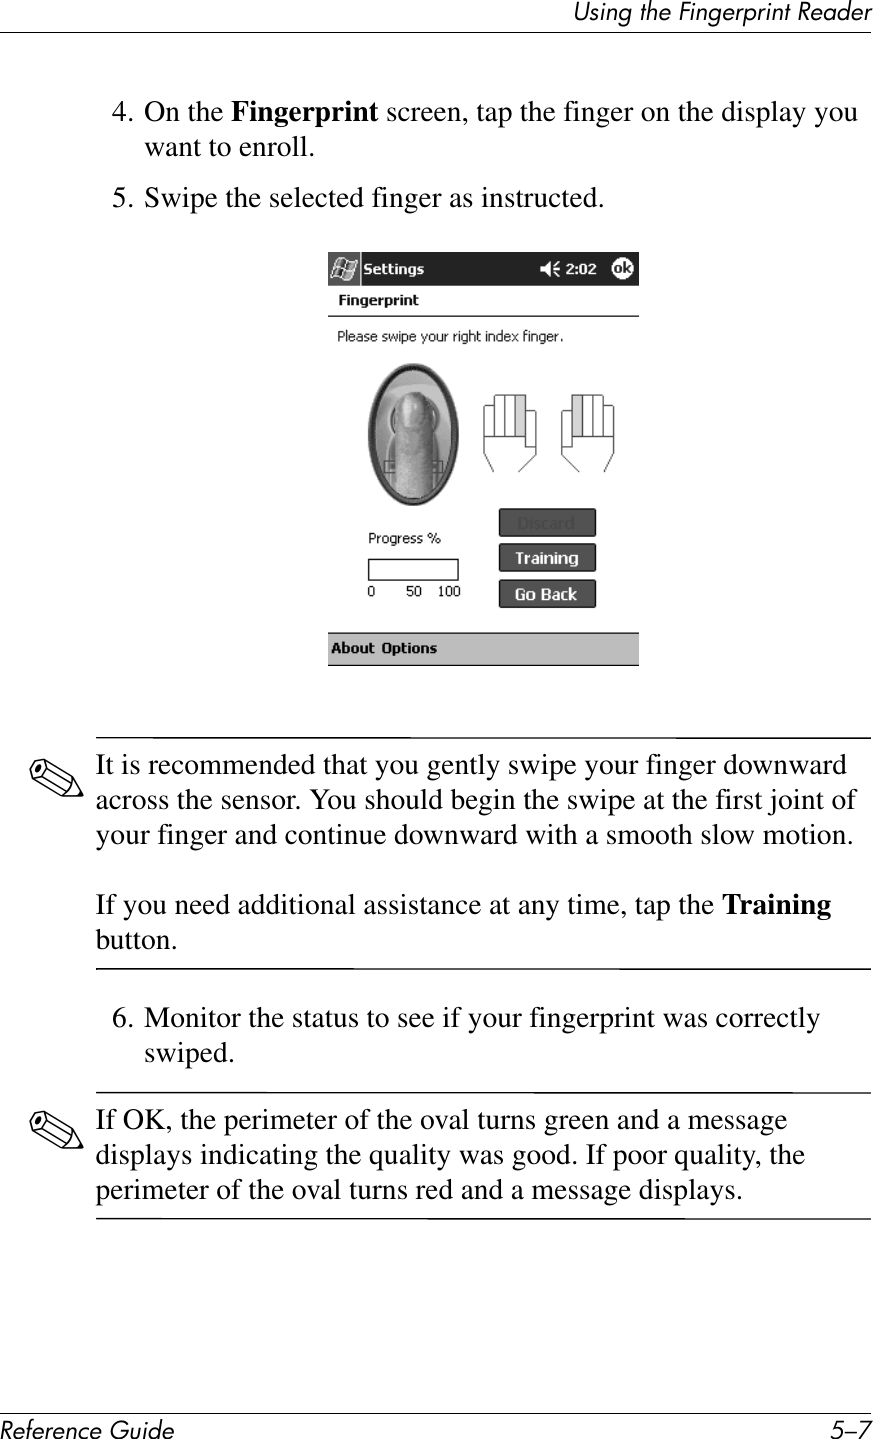
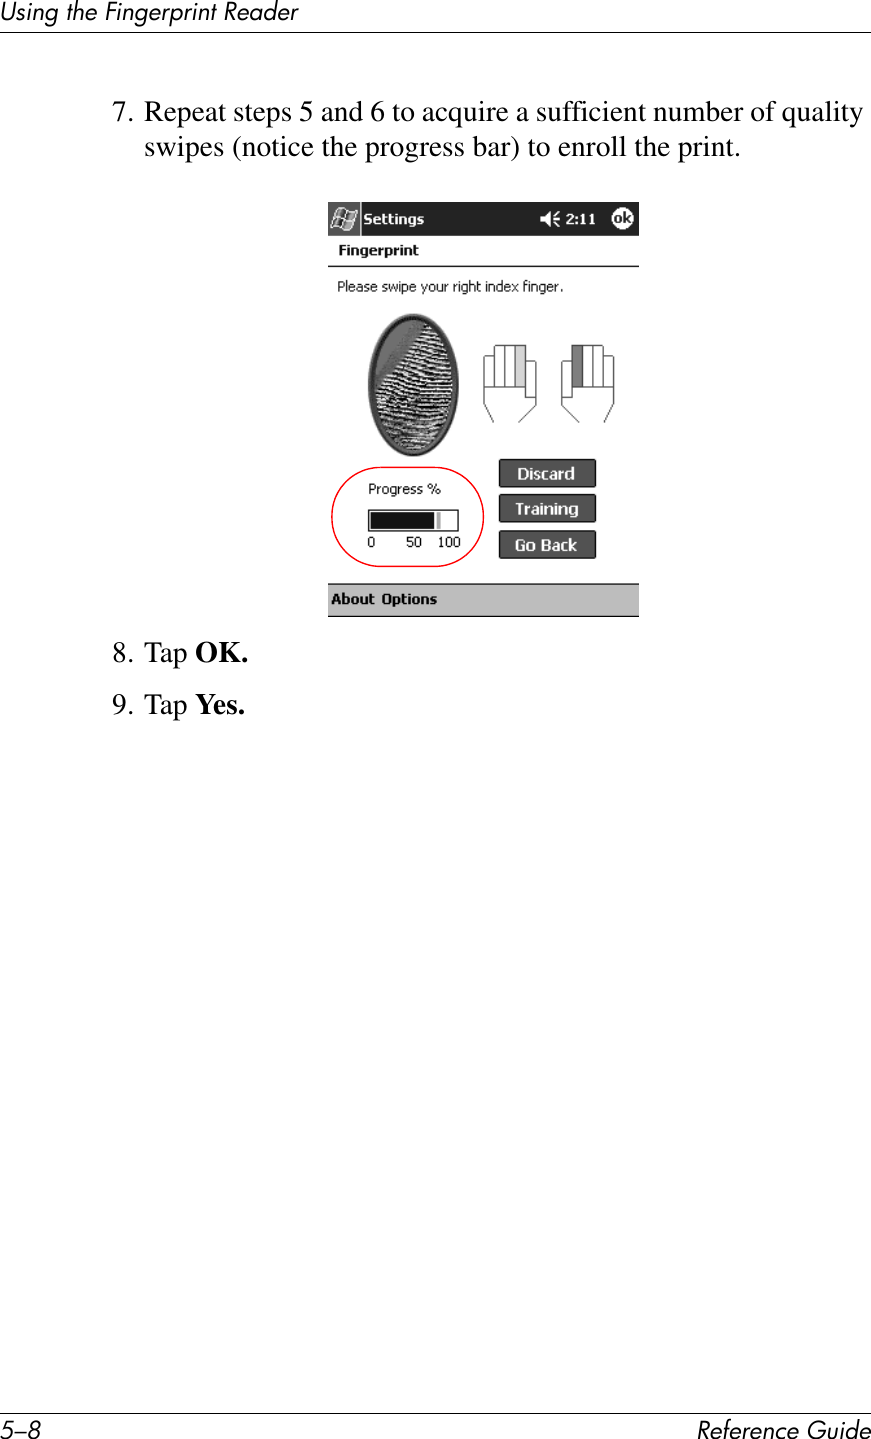
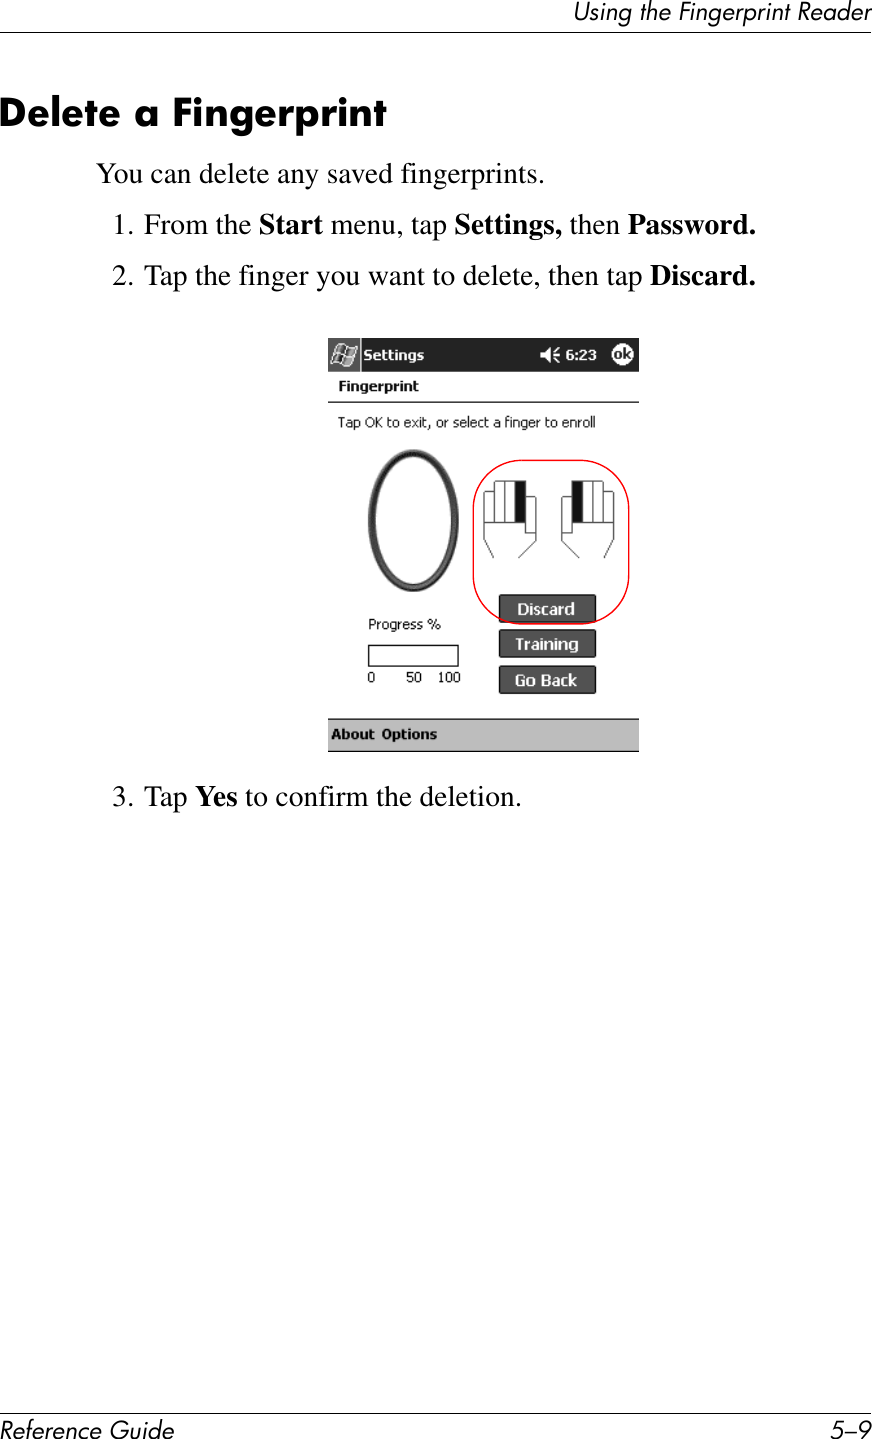
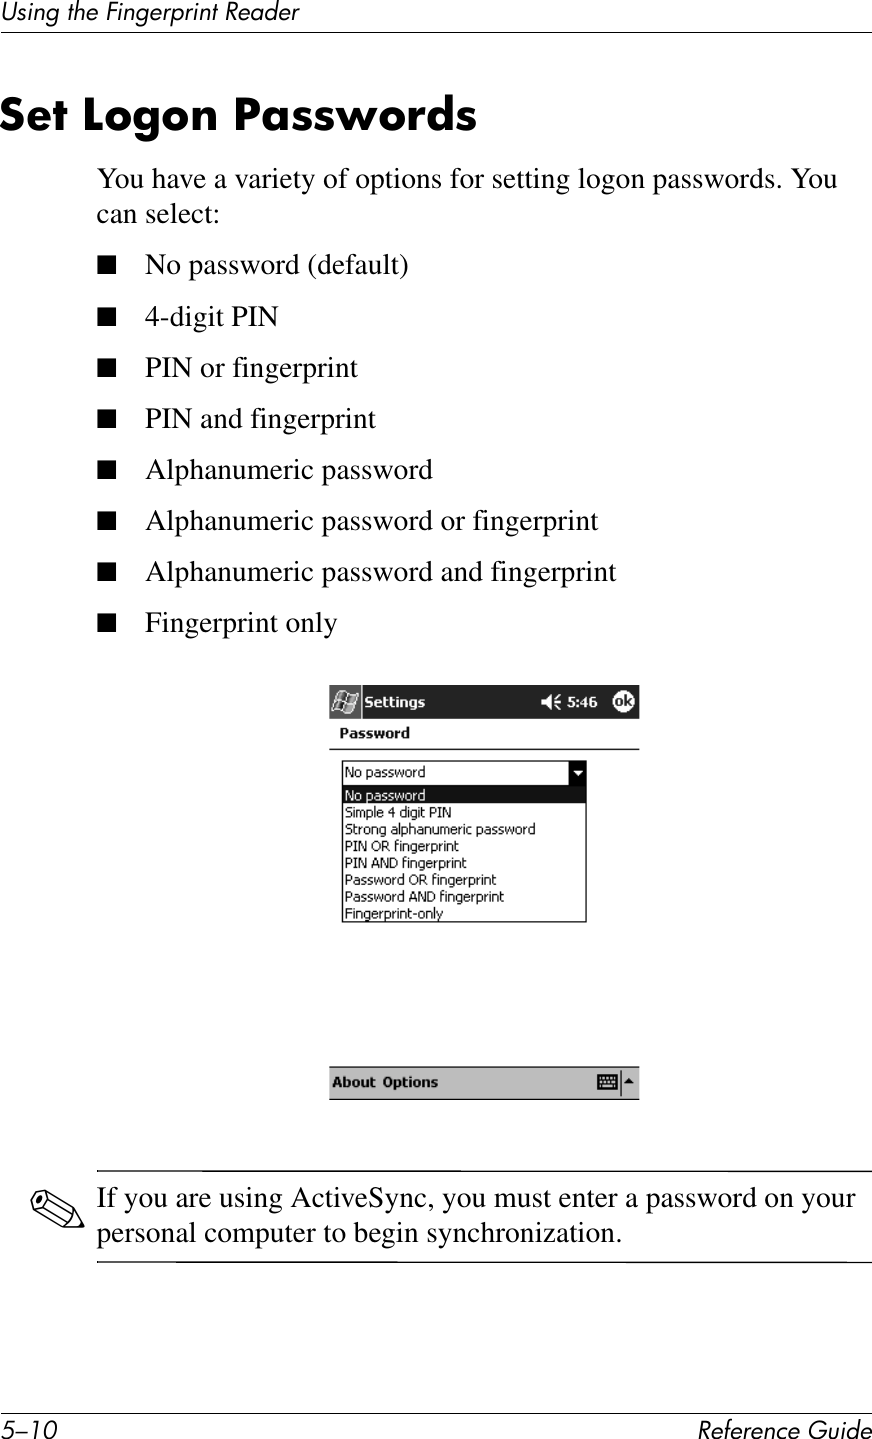
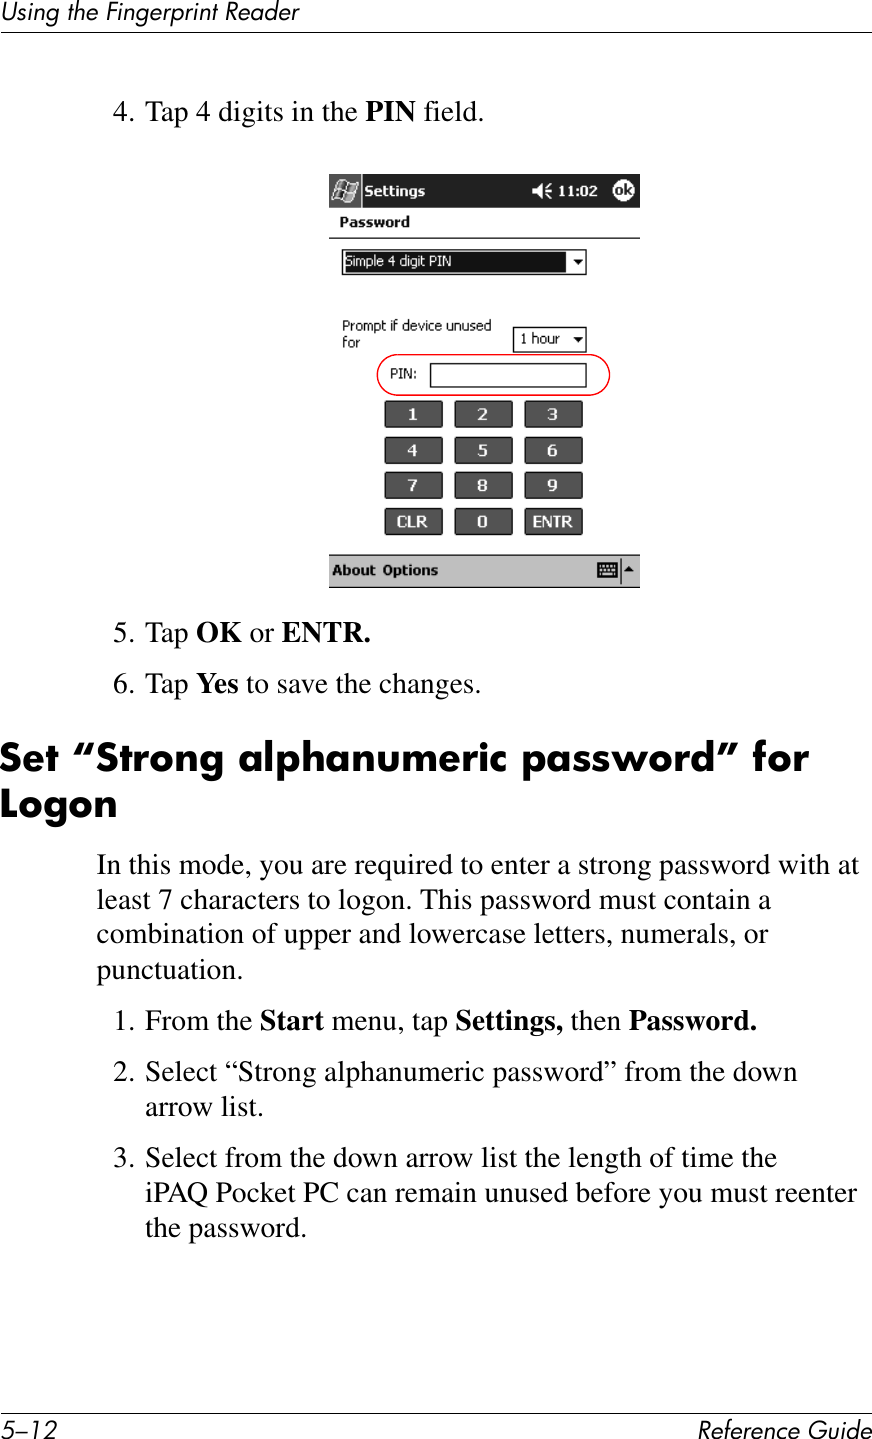
LG Electronics USA PDA-PE2030A Wireless PDA User Manual Exhibit 08 Manual
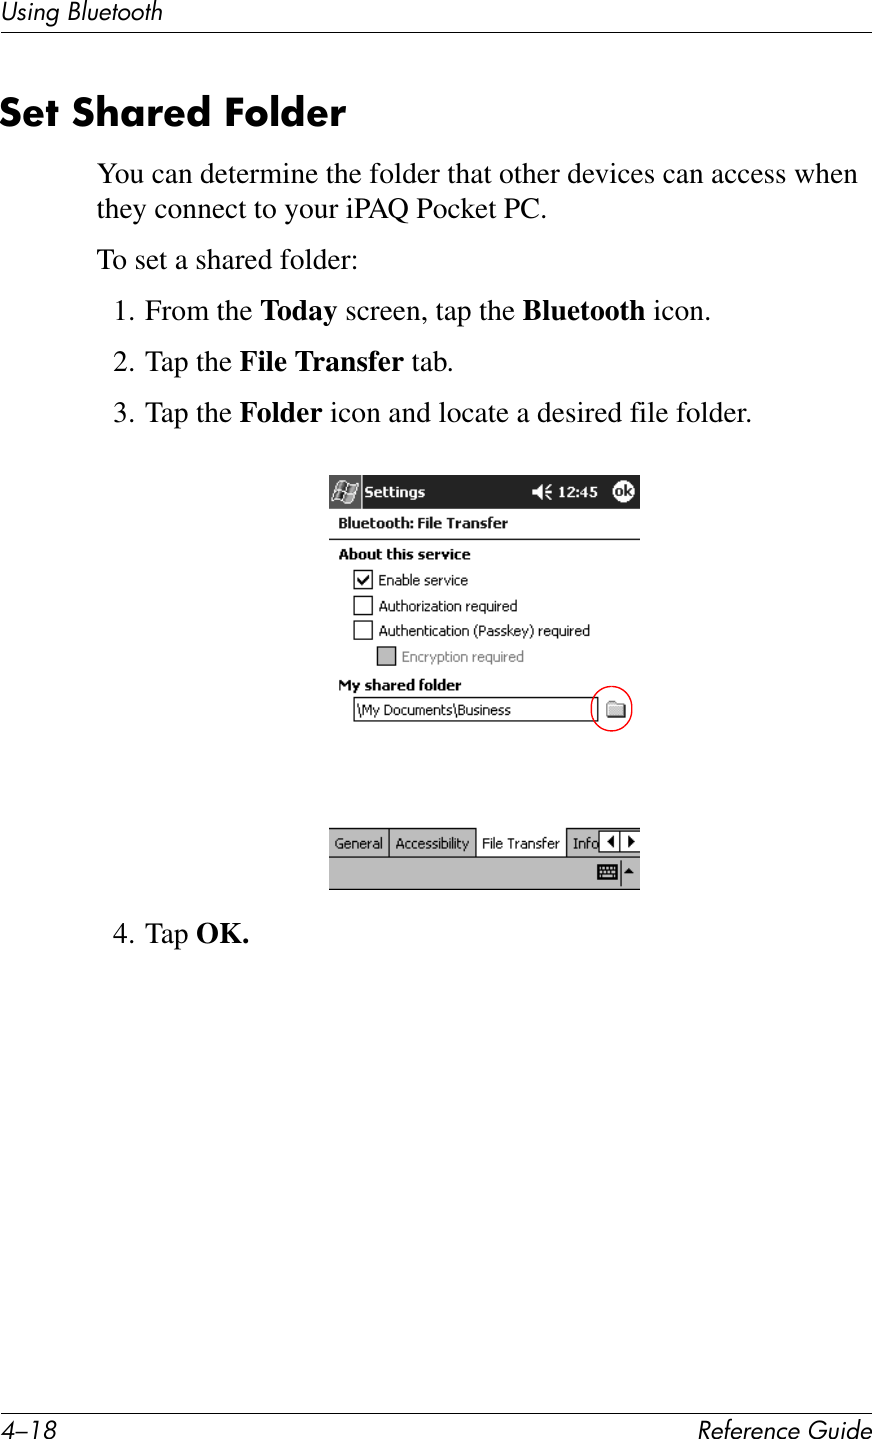
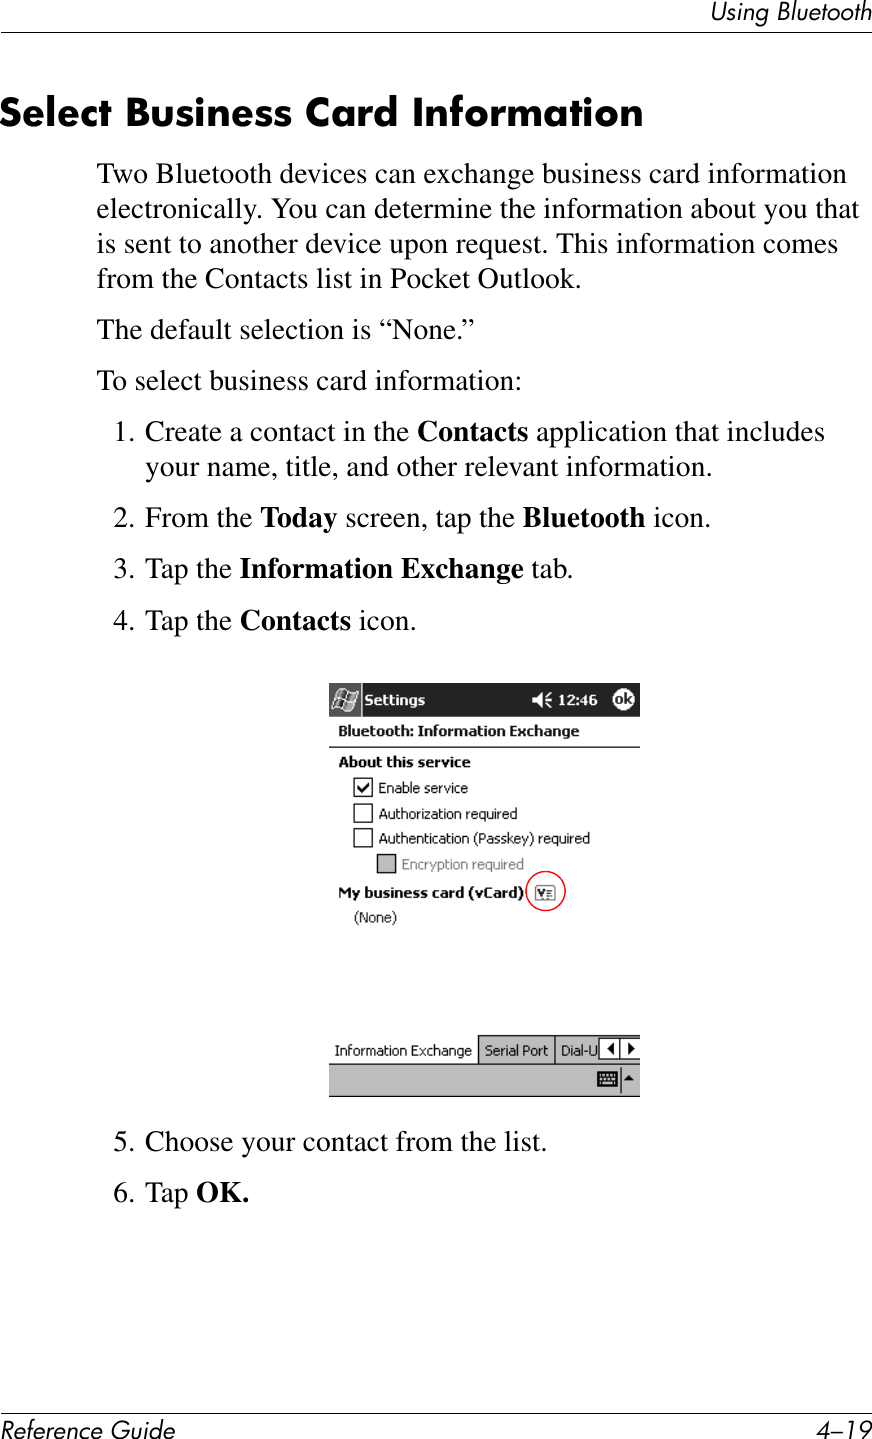
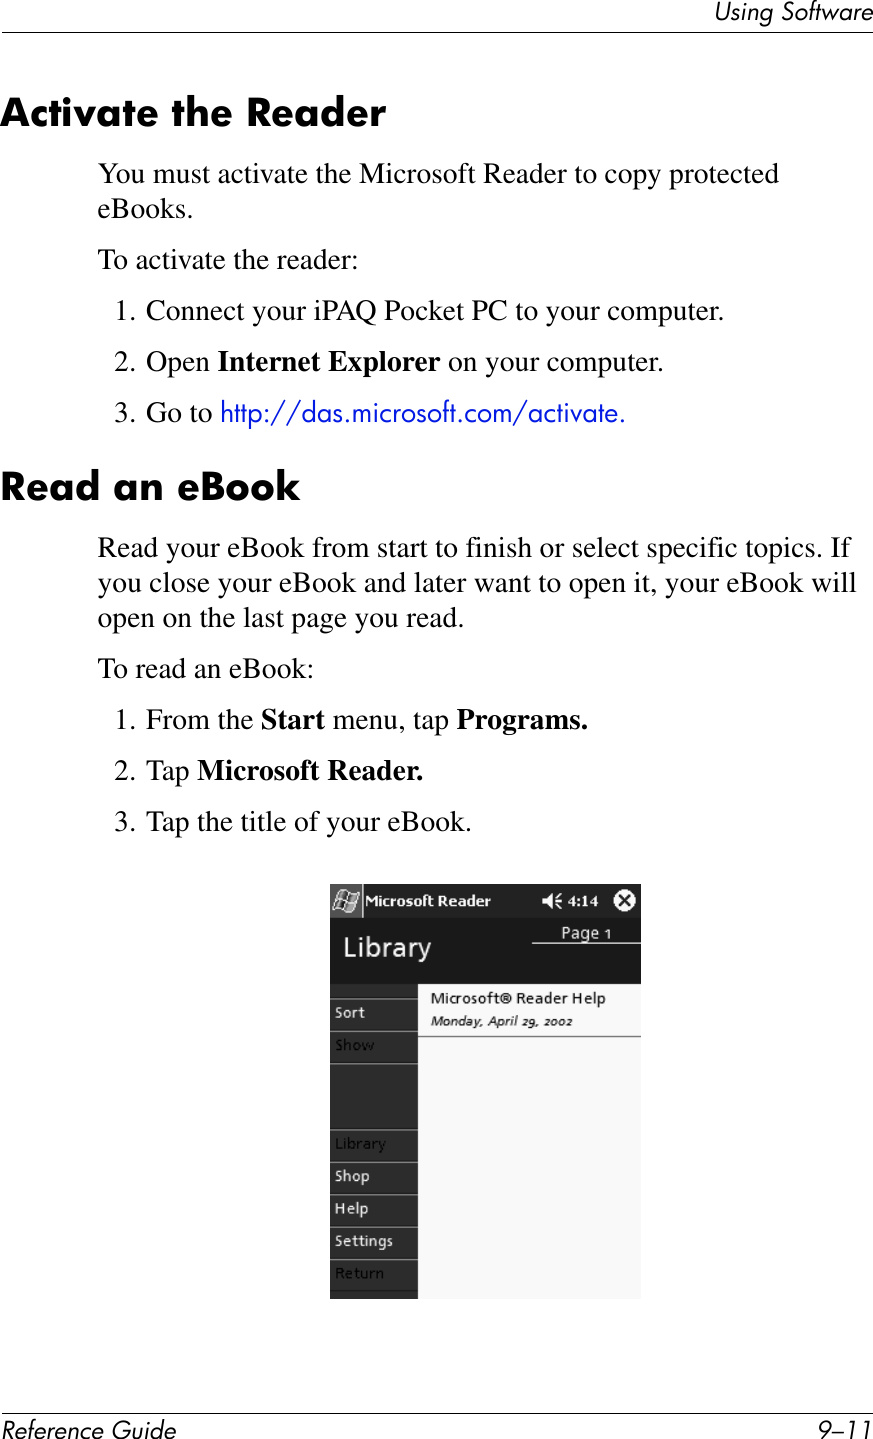
LG Electronics USA Wireless PDA Exhibit 08 Manual
UserManual.wiki
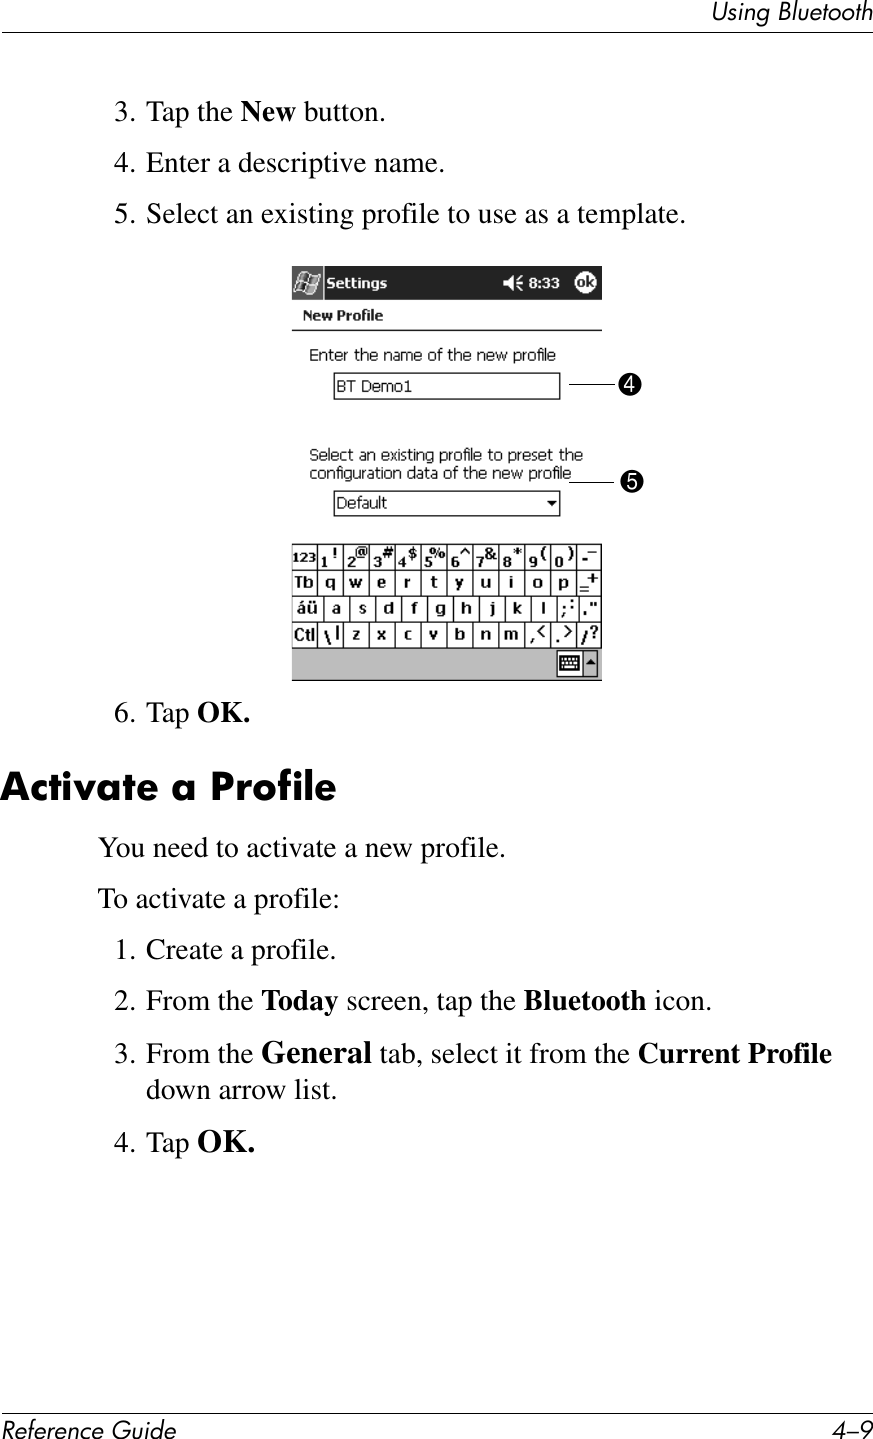
>
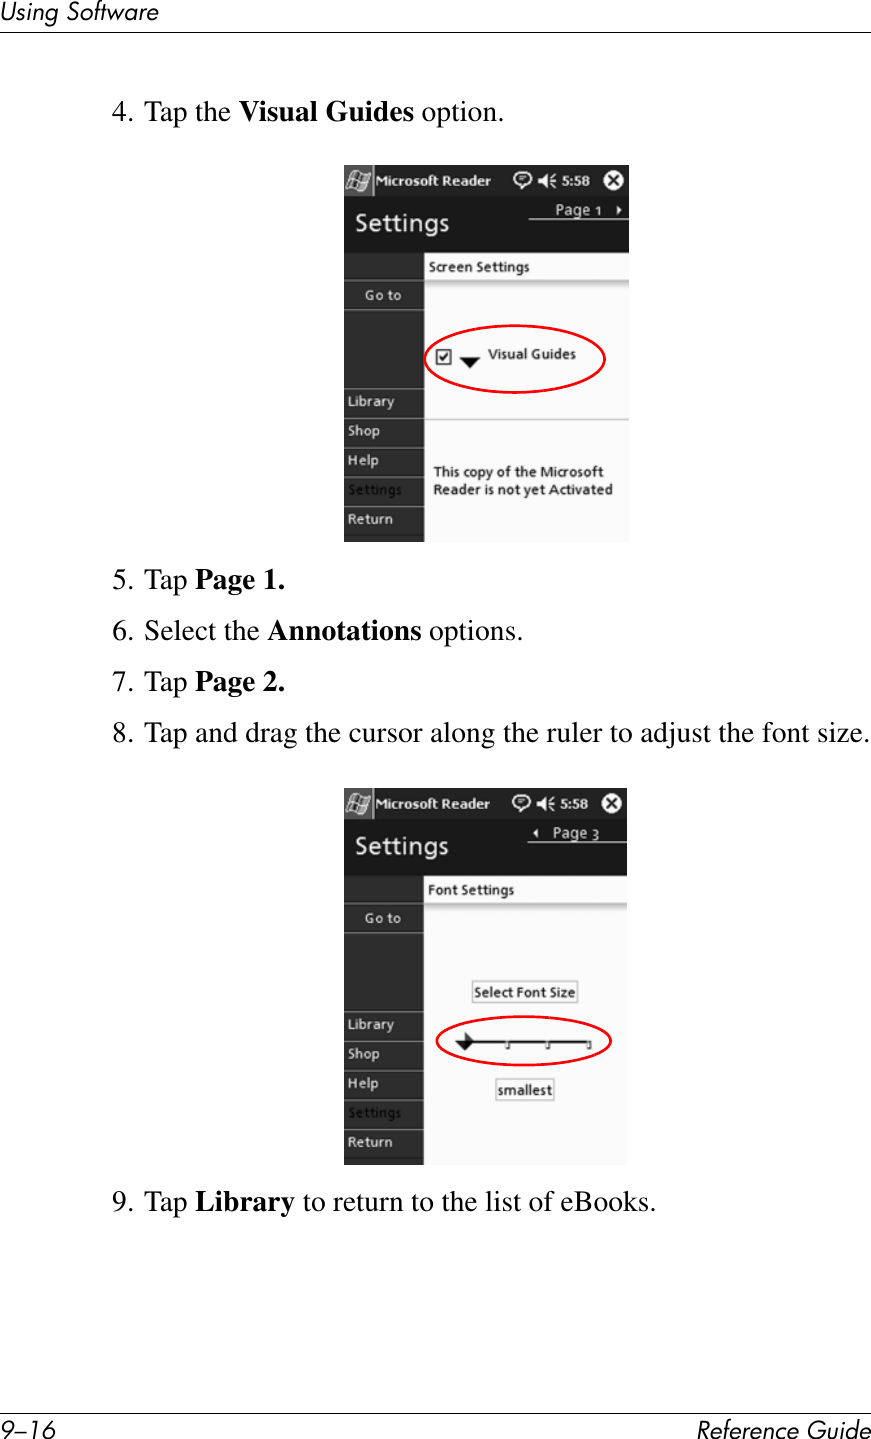
LG Electronics USA
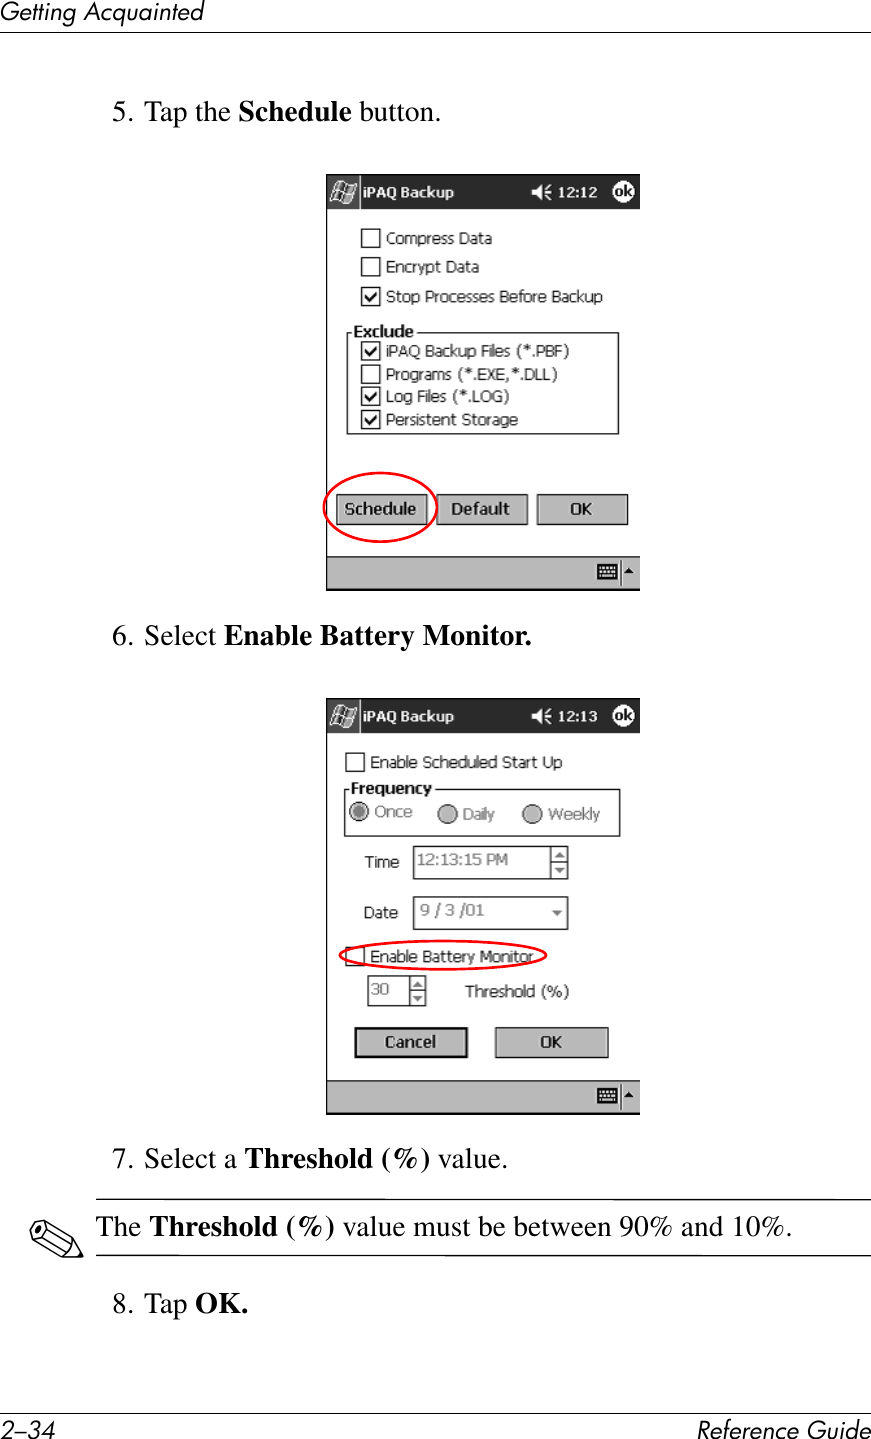
>
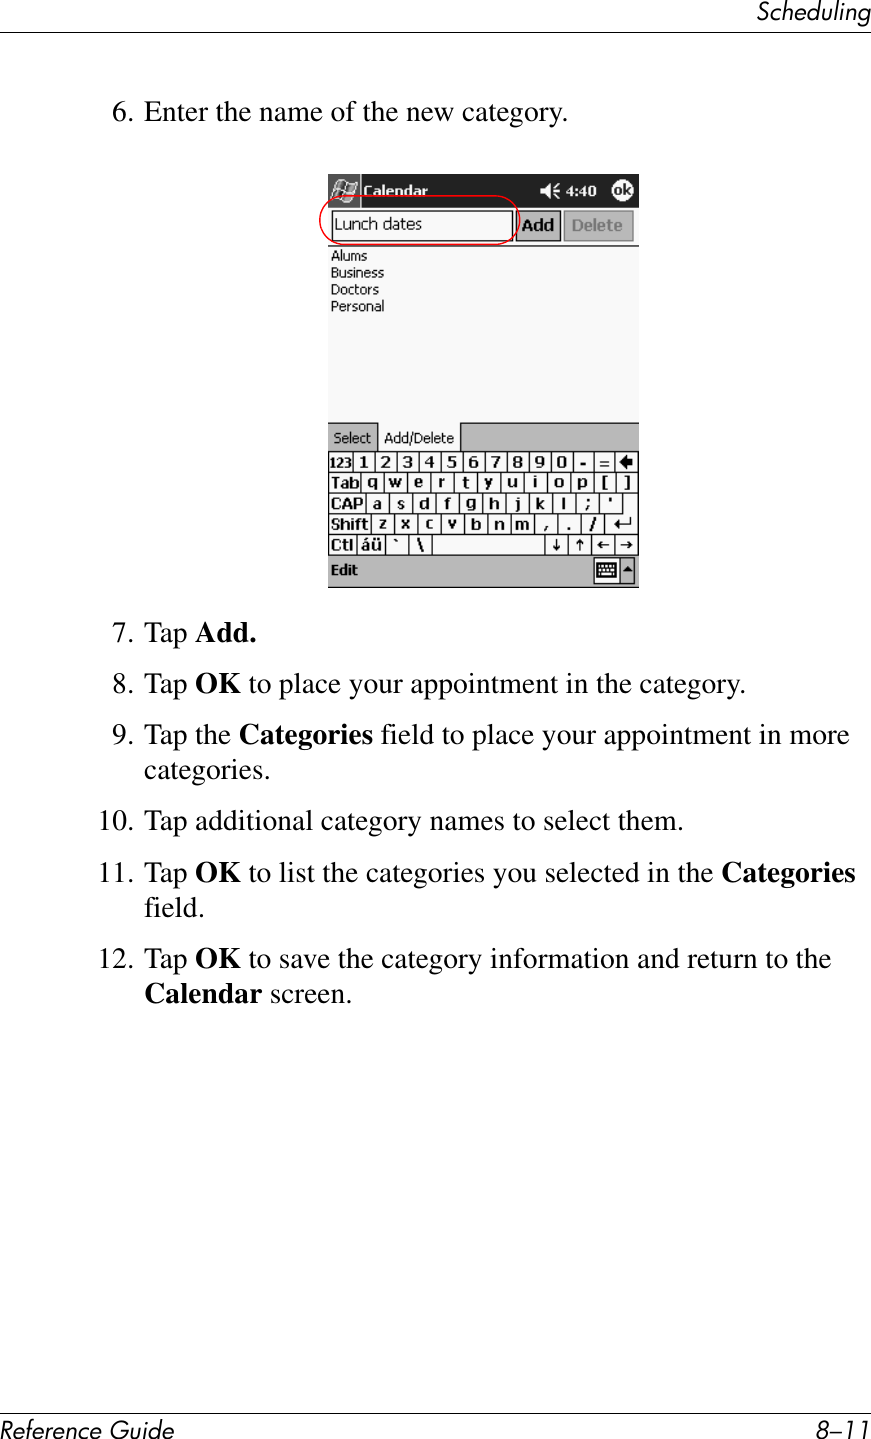
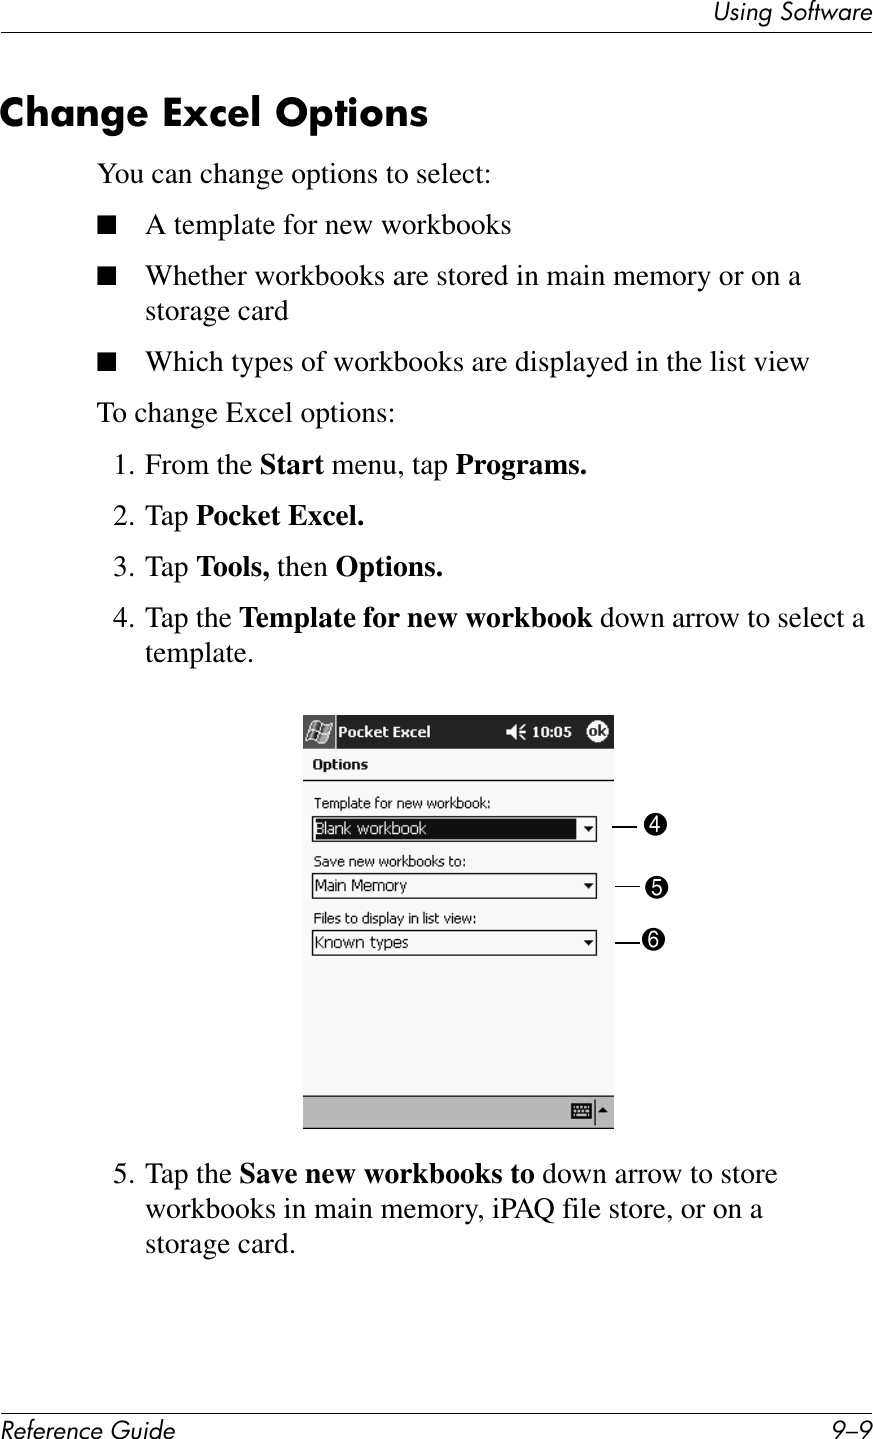
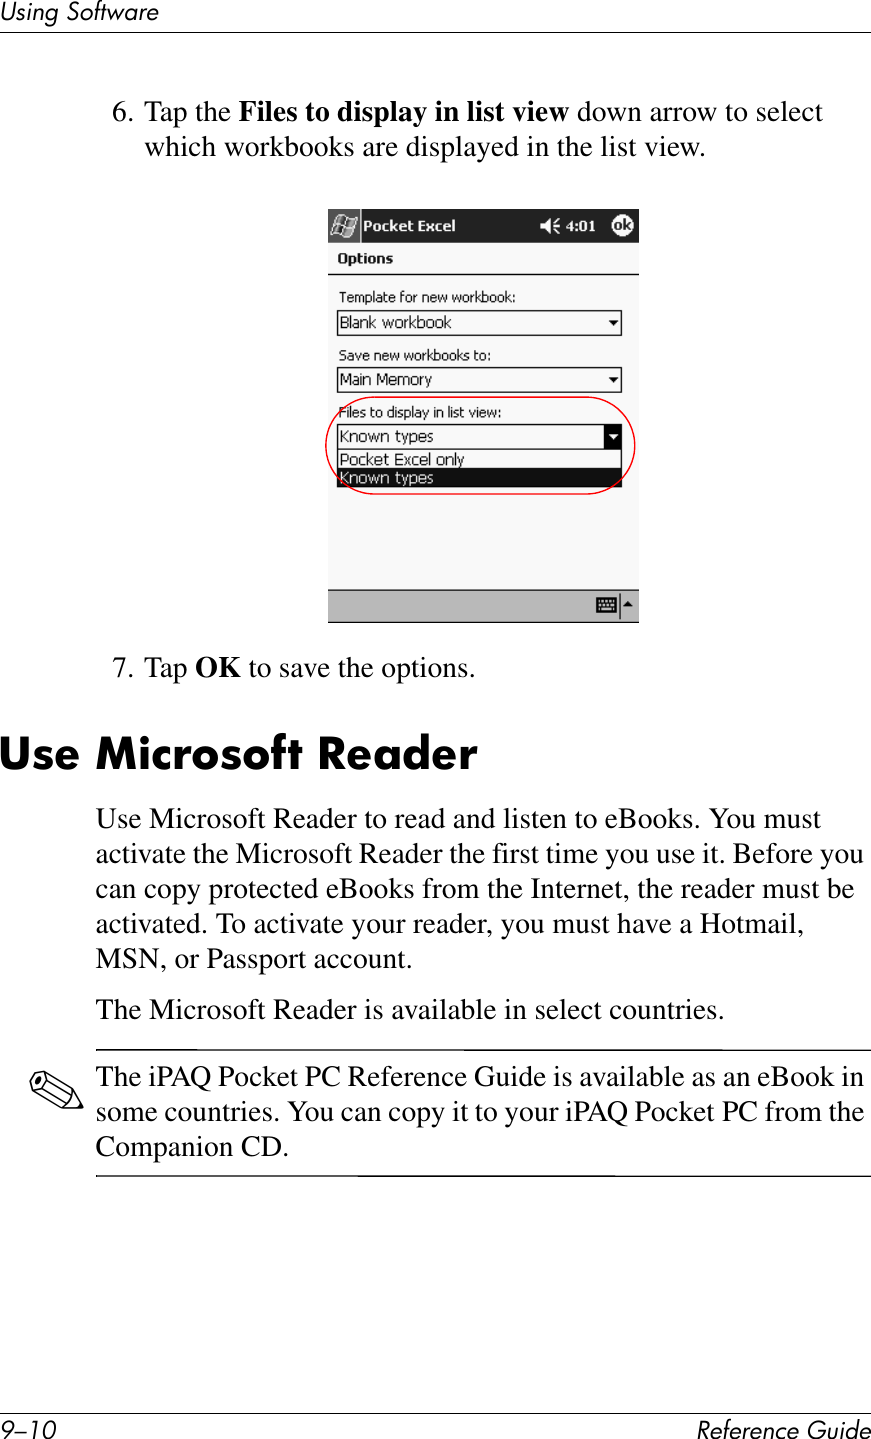
PDA-PE2030A User Manual
>
Exhibit 08 Manual
Contents
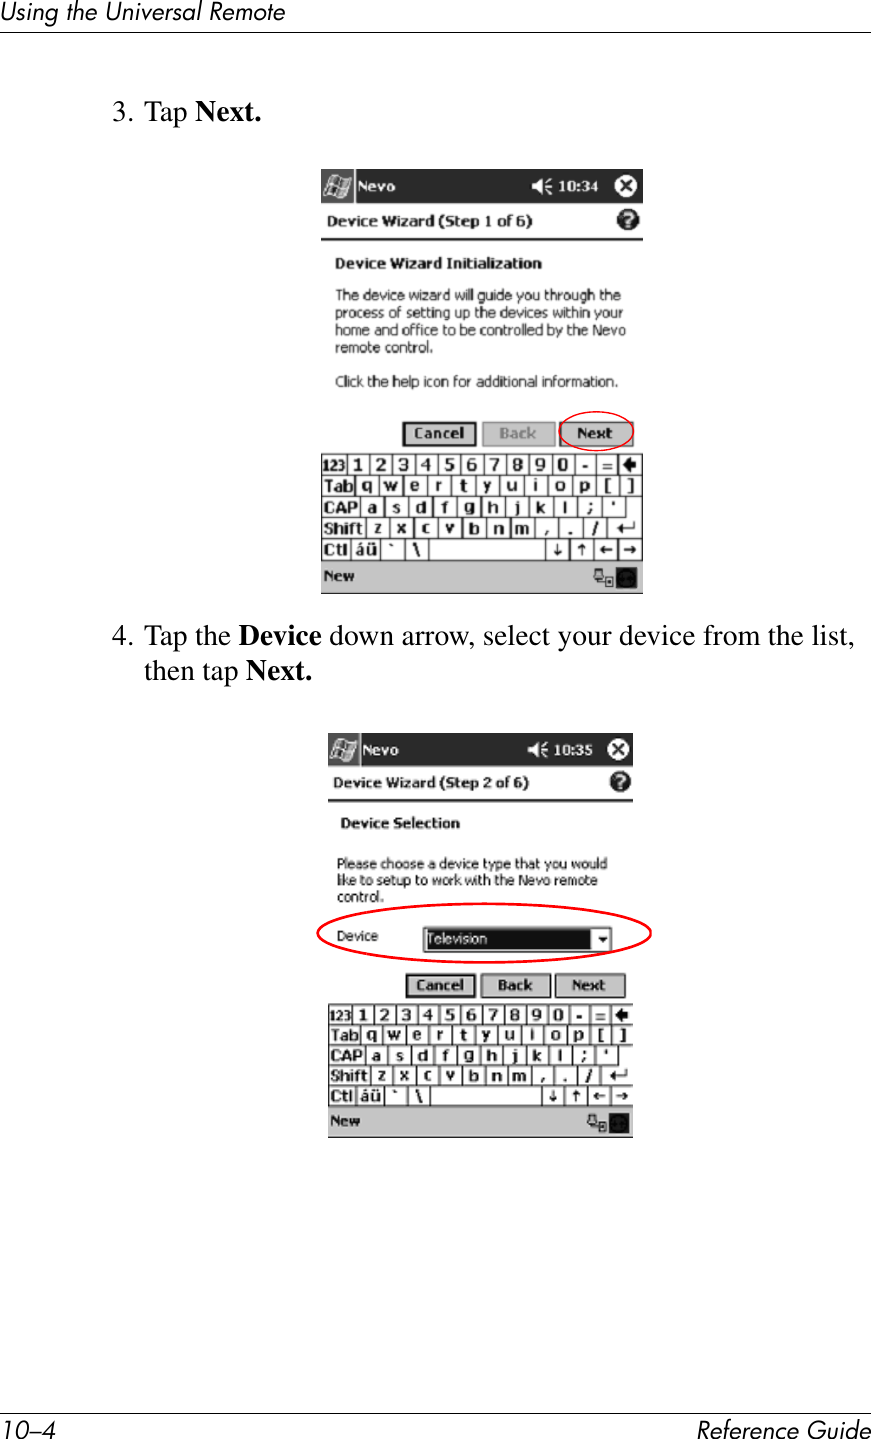
1.
Exhibit 08 Manual
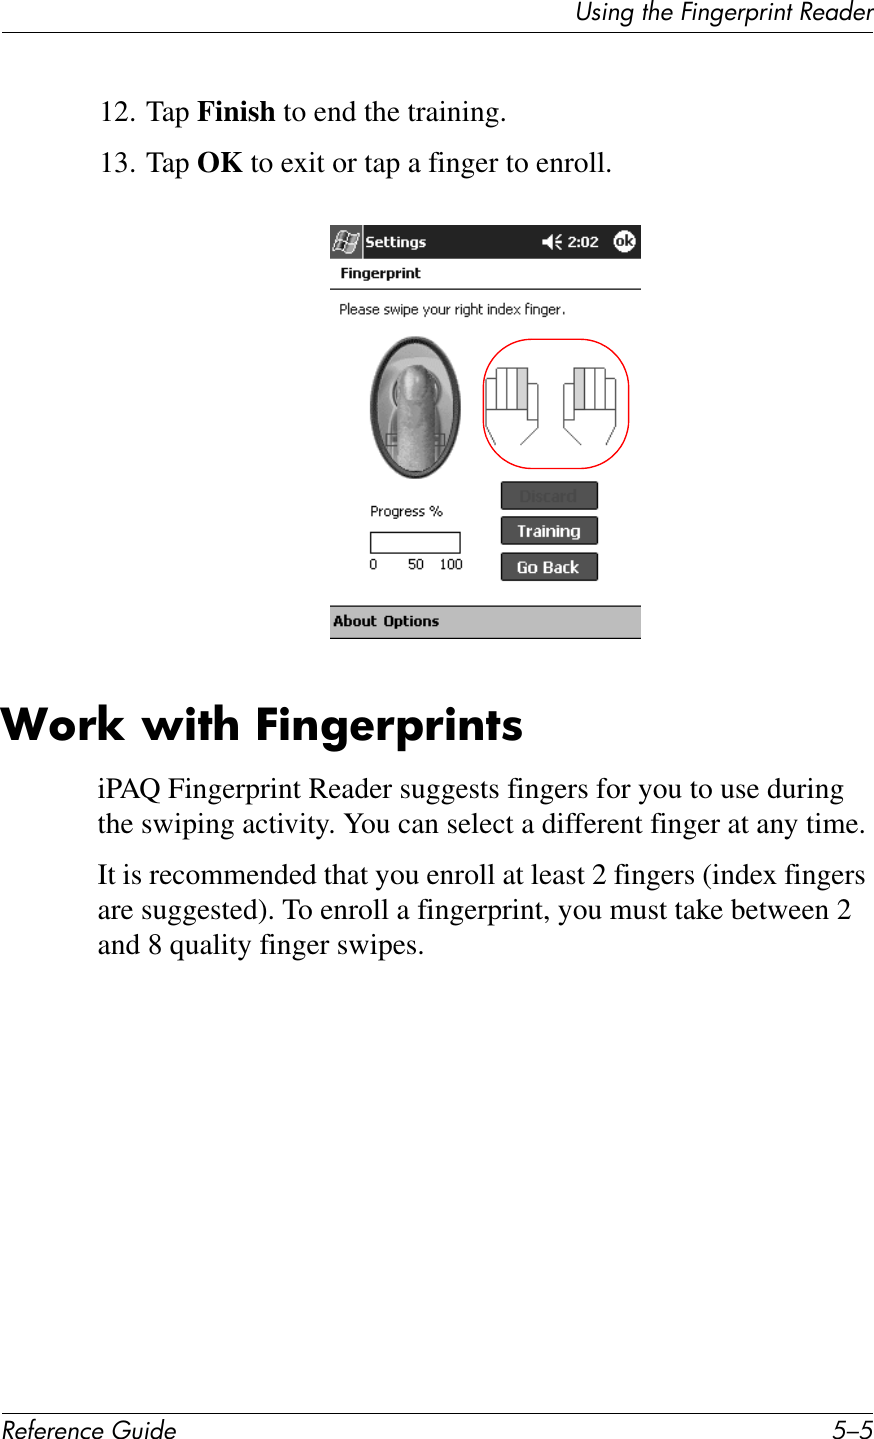
2.
Exhibit 8
3.
Exhibit 8 User manual
Exhibit 08 Manual
Navigation menu
Upload a User Manual
Namespaces
Wiki Guide
HTML
PDF
Info
Views
User Manual
Discussion / Help
Navigation


![./C !"#"$"%&"'()*+"("11*%2'314$1"+E!6$7&S;$"@E!6$7&S;$"@&26IF6$"$781:F";T"!1#&D7251Y#P($)+Y#541$)2S6L"!&/$*)%;76!1759+2#BD71!#Z#)!72H$6H759+2#1(D$C#Z#)!72H+CH2++6#BD71!#Z#7D725Y#)7D+6C72Y#+P+6,3:7O@(81#%41!#,(#+[+),Y#"41!#,(#D()*4S6L"!&C(776$1#@426#46$,#(6#76C#(BB526@6!&U)8F@;O1#M$H!#)(6,271,#)(D(2#1)2++66V/$W6Q&C(776$1&&))+11#F(42#\69(A#B(2#1+6C$6H#76C#2+)+$P$6H#+?57$D7V)4;8T&C(776$1&]"+6Y#)D(1+Y#76C#1E$,)!#9+,E++6#7""D$)7,$(61Y#246#4,$D$,$+1Y#76C#)!76H+#1+,,$6H18DX+;O&.;N)';7)6$&C(776$1&N)2(DD#,!2(4H!#7#D$1,#76C#"41!#,(#1+D+),#T1$5$D72#,(#41$6H#7#[(F1,$)*U9E)$'"!F!)$7&-";*"!1&Q$(5+,2$)#+6!76)+C#1+)42$,F](https://usermanual.wiki/LG-Electronics-USA/PDA-PE2030A.Exhibit-08-Manual/User-Guide-275330-Page-16.png)

![./E !"#"$"%&"'()*+"("11*%2'314$1"+46F&S;$"@46F&S;$"@&26IF6$"$781,$7"$$;1#@27615$,1#76C#2+)+$P+1#1$H67D12:7O@(81#%41!#,(#+[+),Y#"41!#,(#D()*3/$#!;!"*[3$)N"!8;@&-"I67"1#Q+751#$6B(257,$(6#,(^B2(5#(,!+2#$6B272+C?+679D+C#C+P$)+14:"%(!"&U)')7;@&/[5&\:U/5]&^QF;$8)6$&:@671#N4""(2,1#N+)42+#3$H$,7D#TN3U#1,(27H+#76C#+A"761$(6#)72C1](https://usermanual.wiki/LG-Electronics-USA/PDA-PE2030A.Exhibit-08-Manual/User-Guide-275330-Page-18.png)
![./.E !"#"$"%&"'()*+"("11*%2'314$1"+R"?,(?C7,+#$6B(257,$(6#(6#F(42#W$)2(1(B,#%()*+,#%-#;00;#1(B,E72+!,,":^^EEEG5$)2(1(B,G)(5^5(9$D+^"()*+,")%2(H2751#,!7,#72+#7D2+7CF#(6#F(42#M%#$%&'#%()*+,#%-@!+#:;'*;<=';7&>"1';6'67?@4%*7%'6A#76C#P"@F#(6#F(42#M%#$%&'#%()*+,#%-G#@7"#:7;!7d&,!+6#P"@F_-(66+),$6H#F(42#M%#$%&'#%()*+,#%-#,(#7#)(5"4,+2@!$1#("11*%2'314$1"+#H4$C+Y#,!+#:;'*;<=';7&>"1';6'!"#"$"%&"'()*+"B#(2#&),$P+NF6)#M+D"#(6#,!+#:;'*;<=';7&>"1';6'67?@4%*7%'6ASO+H$1,+2#F(42#M%#$%&'#%()*+,#%-#,(#2+)+$P+#+?57$D#B2(5#M%#"+2,7$6$6H#,(#1"+)$7D#(BB+21#76C#"2(5(,$(61]E6+2#O+H$1,27,$(6#-72C#$6#8(2,!#&5+2$)7#(2#!,,":^^EEEG!"G)(5^14""(2,^2+H$1,27,$(6c72276,F#76C#1+2P$)+#$6B(257,$(6c(2DCE$C+#d$5$,+C#c72276,F#N,7,+5+6,#$6#,!+#9(AGE6!&)$#6!I;7)6$&6$___ :""&7?)8&86(!%"___](https://usermanual.wiki/LG-Electronics-USA/PDA-PE2030A.Exhibit-08-Manual/User-Guide-275330-Page-28.png)
![("11*%2'314$1"+!"#"$"%&"'()*+" ./.F4!6(W@"8?667)$'&;$*&:(FF6!7&/$#6!I;7)6$E6!&)$#6!I;7)6$&6$___ :""&7?)8&86(!%"___-(66+),$6H#,(#76C#1F6)!2(6$b$6H#E$,!#7#)(5"4,+2&),$P+NF6)#M+D"#(6#F(42#"+21(67D#)(5"4,+2G#@(#P$+E#P"@Fd#1,72,#&),$P+NF6)Y#)D$)*#P"@Fd#,!+6#)D$)*#Y)%!686#7&,%7)N":O$%&P"@F_@2(49D+1!((,$6H#$6B(257,$(6#(6#&),$P+NF6)#)(66+),$(61@!+#&),$P+NF6)#,2(49D+1!((,+2#(6#F(42#)(5"4,+2G#&B,+2#$61,7DD$6H#,!+#C+1*,("#1(B,E72+G#-D$)*#P"@Fd#,!+6#4!6(W@"8?667"!_KA)!76H$6H#B$D+1#7B,+2#1F6)!2(6$b$6H#F(42#M%#$%&'#%()*+, %-]6D$6+#&),$P+NF6)#(6#F(42#)(5"4,+2G#_$+E#,!+#(6D$6+#!+D"#9F#("+6$6H#W$)2(1(B,#&),$P+NF6)#(6#F(42#)(5"4,+2Y#,!+6#1+D+),#P"@Fd&Y)%!686#7&,%7)N":O$%&P"@F_d71,?5$64,+#4"C7,+1#76C#C+,7$D+C#,+)!6$)7D#$6B(257,$(6@!+#O+7C#W+#B$D+1Y#D()7,+C#$6#,!+#W$)2(1(B,#&),$P+NF6)#B(DC+2#(6#,!+#:;'*;<=';7&>"1';6'67?@4%*7%'6ASN4""(2,#B(2#F(42#M%#$%&'#%()*+, %-!,,":^^EEEG!"G)(5^14""(2,^"()*+,")N7B+,F#\6B(257,$(6 \5"(2,76,#N7B+,F#\6B(257,$(6#$6#,!+':;'*;<=';7&>"1';6'!"#"$"%&"'()*+"SR"?,(?C7,+#$6B(257,$(6#(6#c$6C(E1?"(E+2+C#C+P$)+1!,,":^^EEEG5$)2(1(B,G)(5^"()*+,")](https://usermanual.wiki/LG-Electronics-USA/PDA-PE2030A.Exhibit-08-Manual/User-Guide-275330-Page-29.png)


![("11*%2'<&T)4*%1"+!"#"$"%&"'()*+" 0/0D6. Tap the check box Enable Scheduled Start Up.7. Select 1 of the Frequency radio buttons. 8. Tap OK.:"@"%7)$'&;&E!"=("$%O&#6!&C;%T(F/#&O6(&8"@"%7___ 4?"$&7?"&W;%T(F&L)@@___]6)+#TC+B74D,U Q+H$6#7,#7#C+1$H67,+C#B4,42+#,$5+#76C C7,+G37$DF ]))42#7,#,!+#175+#,$5+#+7)!#C7FGc++*DF ]))42#(6#7#1)!+C4D+C#C7F#7,#7#)+2,7$6#,$5+#+7)!#E++*G](https://usermanual.wiki/LG-Electronics-USA/PDA-PE2030A.Exhibit-08-Manual/User-Guide-275330-Page-54.png)
![("11*%2'<&T)4*%1"+!"#"$"%&"'()*+" 0/0HS"!#6!I&;&E(@@&-"8"7A full reset is sometimes referred to as a “hard reset.” You should perform a full reset when you want to clear all settings, programs, and data from RAM.A full reset will de-activate the battery. The power button will not function until the battery is reactivated.✎Programs and data stored in iPAQ File Store are not automatically deleted. You must manually delete the files.To perform a full reset:Ä2,34/5.1&\B#F(4#"+2B(25#7#B4DD#2+1+,Y#F(4#E$DD#2+,426#,(#F(42#C+B74D,#1+,,$6H1#76C#D(1+#7DD#$6B(257,$(6#6(,#$6#O]WG1. Press and hold the 1 and 4 application buttons.](https://usermanual.wiki/LG-Electronics-USA/PDA-PE2030A.Exhibit-08-Manual/User-Guide-275330-Page-58.png)

![UL*%2'1Q"'J*$"K"LL'M<N!"#"$"%&"'()*+" 9/9To use WLAN on your iPAQ Pocket PC, you need to turn ON the WLAN and set up your device.✎The first time you tap the iPAQ WLAN icon, the Setup screen displays. Once you create profiles, tapping the iPAQ WLAN icon enables the WLAN and places the icon in the lower right corner of the Today screen.4(!$&5.&7?"&+A,.1. From the Start menu, tap iPAQ WLAN.✎If you are setting your iPAQ Pocket PC for the first time, the Setup screen displays when you tap the iPAQ WLAN icon. Once you create profiles (see “Work with Profiles”), tapping the iPAQ WLAN icon enables the WLAN and places the icon in the lower right corner of the Today screen.2. Tap the WLAN icon to turn on the WLAN.The iPAQ Pocket PC has an LED indicator that illuminates to reflect WLAN and the connection status./#&7?"&A^U&)$*)%;76!&)8___ 4?"$d&7?"&+A,.&)8___g2++6 ]6#76C#)(66+),+CGh+DD(E ]6#76C#6(,#)(66+),+CG](https://usermanual.wiki/LG-Electronics-USA/PDA-PE2030A.Exhibit-08-Manual/User-Guide-275330-Page-83.png)
![9/E !"#"$"%&"'()*+"UL*%2'1Q"'J*$"K"LL'M<N4. Enter the profile information.5. Tap Next.6. Tap “Use server-assigned IP address” and use the DHCP server address or select “Use specific IP address.”E)"@*&.;I" &/$#6!I;7)6$%2(B$D+#875+ K6,+2#7#675+#B(2#F(42#"2(B$D+GNN\3 @!$1#$1#,!+#1+2P$)+#1+,#$C+6,$B$+2#TNN\3U#76C#,!+#C+B74D,#$1#`9D76*a#E!+6#)(66+),$6H#,(#76#$6B271,24),42+#6+,E(2*G#@!$1#7DD(E1#F(4#,(#)(66+),#,(#76F#7P7$D79D+#7))+11#"($6,Gh(4#76C#,!+#E$2+D+11#1$,+#F(4#E76,#,(#)(66+),#,(#541,#41+#,!+#175+#NN\3G#@!$1#$C+6,$B$)7,$(6#6459+2#41+1#7#57A$545#(B#e; )!727),+21#76C#$1#)71+#1+61$,$P+G%(E+2#W767H+5+6, @!+#C+B74D,#1+D+),$(6#$1#`8(Ga#N+D+),$6H#`h+1a#E$DD#"2(P$C+#D(E+2#"+2B(2576)+#76C#41+#D+11#"(E+2G8+,E(2* h(4#!7P+#,E(#)!($)+1:#$6B271,24),42+#(2#7C#!()G@!+#C+B74D,#1+D+),$(6#$1#`\6B271,24),42+GaR1+#$6B271,24),42+#,(#)(66+),#,(#7#E$2+C#6+,E(2*#P$7#7#E$2+D+11#7))+11#"($6,GR1+#7C#!()#B(2#"++2?,(?"++2#)(5546$)7,$(61G-!766+D @!+#C+B74D,#$1#`&4,(Ga#h(4#C(#6(,#6++C#,(#1"+)$BF#7#)!766+D#$B#F(4#72+#41$6H#76#$6B271,24),42+#6+,E(2*G#\,#E$DD#41+#,!+#175+#)!766+D#71#,!+#7))+11#"($6,G],!+2E$1+Y#1+,#,!+#B2+I4+6)F#,!7,#)(22+1"(6C1#,(#F(42#)(46,2Fi1#2+H4D7,(2F#)(55$11$(6i1#276H+#76C#,!+#<0;G==9#1,76C72CG@27615$11$(6#O7,+ @!+#C+B74D,#$1#`&4,(Ga@!$1#$1#,!+#E$2+D+11#C7,7#,27615$11$(6#1"++CG h(4#)76#1+D+),#1"++C1#(B#=Y#;Y#.G.Y#(2 ==#W9"1G](https://usermanual.wiki/LG-Electronics-USA/PDA-PE2030A.Exhibit-08-Manual/User-Guide-275330-Page-86.png)

![UL*%2'PK)"1771Q!"#"$"%&"'()*+" C/93$*"!87;$*&4"!I8There are several terms used throughout this booklet.4?"&4"!I___ Y";$8___&4,!+6,$)7,$(6 @!+#41+2#541,#P+2$BF#7#645+2$)#"711*+F#9+B(2+#7#)(66+),$(6#(2#7),$P$,F#)76#9+#)(5"D+,+CG&4,!(2$b7,$(6 @!+#41+2#541,#7""2(P+#7#)(66+),$(6#(2#7),$P$,F#9+B(2+#$,#)76#9+#)(5"D+,+CGQD4+,((,!#6+$H!9(2!((C#(2#C+P$)+#H2(4"&#)(DD+),$(6#(B#QD4+,((,!#C+P$)+1GQ(6C$6H#T%7$2+C#C+P$)+1U @(#)2+7,+#7#,241,+C#)(66+),$(6#9+,E++6#F(42#C+P$)+#76C#76(,!+2G#]6)+#7#9(6C#$1#)2+7,+CY#,!+#,E(#C+P$)+1#9+)(5+#"7$2+CG&#,241,+C#C+P$)+#C(+1#6(,#2+I4$2+#74,!+6,$)7,$(6#(2#74,!(2$b7,$(6G3+P$)+#7CC2+11 @!+#46$I4+#+D+),2(6$)#7CC2+11#(B#7#QD4+,((,!#C+P$)+G3+P$)+#C$1)(P+2F @!+#D()7,$(6#76C#2+)(H6$,$(6#(B#76(,!+2#QD4+,((,!#C+P$)+G3+P$)+#675+ @!+#675+#7#QD4+,((,!#C+P$)+#"2(P$C+1#E!+6#C$1)(P+2+C#9F#76(,!+2#C+P$)+GK6)2F",$(6 &#5+,!(C#(B#"2(,+),$6H#C7,7Gd$6*#*+F &#*+F#41+C#,(#1+)42+DF#"7$2#C+P$)+1G%711*+F &#)(C+#F(4#+6,+2#,(#74,!+6,$)7,+#)(66+),$(61#(2#7),$P$,$+1#2+I4+1,+C#9F#(,!+2#C+P$)+1G%+21(67D#\6B(257,$(6#W767H+2#T%\WU&#)(DD+),$(6#(B#7""D$)7,$(61#41+C#,(#5767H+#C7$DF#941$6+11#,71*1#T+GHGY -(6,7),1Y#-7D+6C72Y#76C#@71*1UG%2(B$D+1 &#)(DD+),$(6#(B#QD4+,((,!#1+,,$6H1GN+2P$)+#C$1)(P+2F 3+,+25$6$6H#E!$)!#7""D$)7,$(61#F(4#!7P+#$6#)(55(6#E$,!#(,!+2#C+P$)+1G](https://usermanual.wiki/LG-Electronics-USA/PDA-PE2030A.Exhibit-08-Manual/User-Guide-275330-Page-97.png)

![C/.C !"#"$"%&"'()*+"UL*%2'PK)"1771Q3$F;)!&U"N)%"8You can remove the paired relationship between devices.1. From the Today screen, tap Start.2. Tap Programs, then Bluetooth Manager.3. Tap Tools, then Paired devices.4. Tap a device name.5. Tap Remove.6. Tap Yes to remove the pairing.,@@6L&26$$"%7)$'You can determine if all devices or only paired devices can connect to your iPAQ Pocket PC.,@@6L&,@@&U"N)%"8&76&26$$"%71. From the Today screen, tap the Bluetooth icon.2. Tap the Accessibility tab.3. Select Allow other devices to connect, then All devices.4. Tap OK.Ä2,34/5.1&@!$1#7DD(E1#76F#C+P$)+Y#+P+6#,!(1+#46*6(E6#,(#F(4Y#,(#)(66+),#,(#F(42#$%&'#%()*+,#%-G#]6)+#,!+F#72+#)(66+),+CY#1+)42$,F#1+,,$6H1#B(2#1"+)$B$)#1+2P$)+1#E$DD#7""DF#71#1"+)$B$+C#$6#,!+#QD4+,((,!#N+,,$6H1G](https://usermanual.wiki/LG-Electronics-USA/PDA-PE2030A.Exhibit-08-Manual/User-Guide-275330-Page-108.png)
![UL*%2'PK)"1771Q!"#"$"%&"'()*+" C/0.38"&U);@X3F&."7L6!T)$'When using dial-up networking, the remote device providing the dial-up networking service, and the remote computer to which you are connecting must both have telephone access.Devices that can provide dial-up networking include Bluetooth:■Mobile phones■Desktop computers■Modems26$#)'(!"&U);@X3F&26$$"%7)6$8You can configure the dial-up networking settings.1. From the Today screen, tap the Bluetooth icon.2. Tap the Dial-Up Networking tab.3. Select a communications port from the COM Port down arrow list.4. Select a baud rate from the Baud Rate down arrow list (typical rate is 57600).5. Select the type of flow control to use from the Flow Control down arrow list (typical setting is hardware [RTS/CTS]).6. Tap OK.](https://usermanual.wiki/LG-Electronics-USA/PDA-PE2030A.Exhibit-08-Manual/User-Guide-275330-Page-115.png)

![67%%"&1*%2!"#"$"%&"'()*+" E/9To Sync with a Personal Computer:1. Insert the HP iPAQ Pocket PC companion CD into your computer.2. Follow the instructions in the installation wizard. For more help, click the ActiveSync Help button during installation.The information you select will automatically synchronize when your installation is complete.38"&7?"&:"!);@&/$#!;!"*&\/-]&26$$"%7)6$After setting up a connection with a USB or serial cable and a cradle, synchronize your iPAQ Pocket PC and your computer using an infrared connection if you have an infrared port or an infrared USB adapter installed on your computer. The infrared connection option works only on computers that have Windows 98, Me, XP, or 2000 operating system installed.1. Follow the steps in “To Sync with a Personal Computer.”2. Follow your computer manufacturer’s instructions to install and set up an infrared port.3. From your computer, open Microsoft ActiveSync.4. From the File menu, select Connection Settings.5. Click “Allow serial cable or infrared connection to this COM port.”6. Click the OK button.7. Click the down arrow and choose Infrared Port (IR).✎Place your iPAQ Pocket PC and the infrared port so they are unobstructed and within 12 inches of each other.](https://usermanual.wiki/LG-Electronics-USA/PDA-PE2030A.Exhibit-08-Manual/User-Guide-275330-Page-150.png)
![67%%"&1*%2!"#"$"%&"'()*+" E/..^$7"!&;$&/$7"!$"7&,**!"88&\3-A]With Pocket Internet Explorer and a connection to the Internet, you can view Web sites on your iPAQ Pocket PC by typing a URL in the Address bar.✎Web sites that use HTML 4.0, DHTML, animated GIF images, and Java applets may not work correctly in Pocket Internet Explorer. For more information, see the Bonus software on the CD.To enter an Internet address:1. From the Start menu, tap Internet Explorer.2. Tap View, then Address Bar.3. Enter the address (URL) in the Address bar.4. Tap the Go icon.](https://usermanual.wiki/LG-Electronics-USA/PDA-PE2030A.Exhibit-08-Manual/User-Guide-275330-Page-158.png)
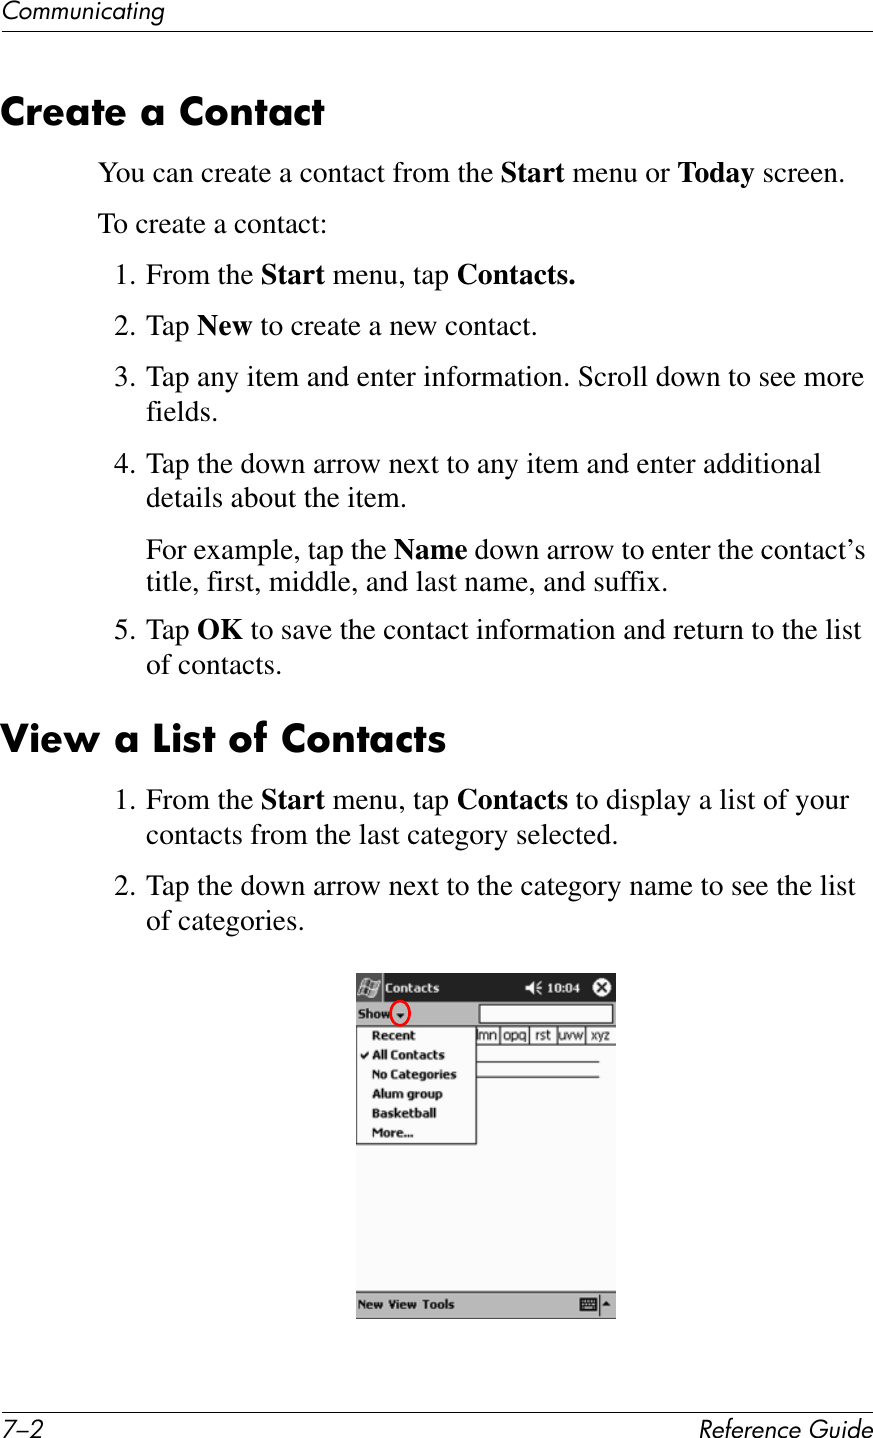
![F/E !"#"$"%&"'()*+"67??)%*&41*%28. Tap the Categories field again to place your contact in additional categories.9. Tap additional category names to select them, then tap OK to list the categories you selected in the Categories field.10. Tap OK to save the category information and return to the list of contacts.U"@"7"&26$7;%78Ä2,34/5.1&\B#F(4#C+D+,+#7#)(6,7),#(6#F(42#$%&'#%()*+, %-#76C#1F6)!2(6$b+#-(6,7),1#E$,!#F(42#)(5"4,+2Y#F(4#57F#C+D+,+#,!+#)(6,7),#$6#]4,D((*#(6#F(42#)(5"4,+2GTo delete contacts:1. From the Start menu, tap Contacts to see a list of your contacts from the last category selected.2. Tap the down arrow next to the category name to see a list of categories.3. Tap a category name to see a list of contacts placed in that category.](https://usermanual.wiki/LG-Electronics-USA/PDA-PE2030A.Exhibit-08-Manual/User-Guide-275330-Page-165.png)


![!"#"$"%&"'()*+" P/.CP;!*L;!"&:F"%)#)%;7)6$8:O87"I&:F"%)#)%;7)6$8:F"%)#)%;7)6$8:O87"I&E";7(!" ?F&)S,b&?DBMM&:"!)"8%2()+11(2 \6,+D#%n&;.0#T/00#WMbUW+5(2F f/#WQ#N3O&W#(2#H2+7,+2O]W e;#WQ#(2#H2+7,+2N3#N,(27H+ W+5(2F#)72C#76C#N3\]#2+7CF3$1"D7F @2761BD+),$P+#)(D(2#@J@Y#;/0#A#e;0#"$A+D1Y#f/k)(D(2#14""(2,Y#G;/?C(,#"$,)!dK3#Q7)*D$H!, W4D,$?D+P+D#92$H!,6+11#7C[41,5+6,Y#D$H!,#1+61(2#B(2#74,(57,$)#7C[41,5+6,#(B#92$H!,6+11#D+P+D&4C$( N"+7*+2Y#eG.#55#1,+2+(#!+7C"!(6+#76C#5$)2("!(6+ [7)*\6B272+C \23&Y#C7,7#,2761B+2#4"#,(#==.G;#k9#"+2#1+)(6C#76C#R6$P+217D#O+5(,+#-(6,2(D#B(2#)(6,2(D#(B#!(5+#+6,+2,7$65+6,#46$,1QD4+,((,! N(5+#5(C+D1J$6H+2"2$6,#O+7C+2 @!+257D#1E$"+#,+)!6(D(HF](https://usermanual.wiki/LG-Electronics-USA/PDA-PE2030A.Exhibit-08-Manual/User-Guide-275330-Page-247.png)
![:4$+V4$"'3@"&*#*&41*7%L!"#"$"%&"'()*+" P/95F"!;7)$'&^$N)!6$I"$7^$N)!6$I"$73: Y"7!)%@+5"+27,42+ ]"+27,$6H e;p#,(#=0/p#J 0p#,(#/0p#-8(6("+27,$6H ?;;p#,(#=/0p#J ?e0?p#,(#f0p#-O+D7,$P+#M45$C$,F ]"+27,$6H =0#,(#>0q =0#,(#>0q8(6("+27,$6H =0#,(#>0q =0#,(#>0qW7A$545#&D,$,4C+ ]"+27,$6H 0o=.Y000#B, =/Gm#,(#=0G=#"1$78(6("+27,$6H 0o=.Y000#B, =/Gm#,(#=0G=#"1$7](https://usermanual.wiki/LG-Electronics-USA/PDA-PE2030A.Exhibit-08-Manual/User-Guide-275330-Page-249.png)