LG ELECTRONICS DM110 Dual-Mode Cellular Phone (AMPS/CDMA) User Manual LG DM110 User Guide
LG Electronics, Inc. Dual-Mode Cellular Phone (AMPS/CDMA) LG DM110 User Guide
Users Manual
User Guide

FCC WARNING STATEMENT
For body-worn operation, the antenna should be kept at least 1 inch from the body
when transmitting, to comply with FCC RF exposure requirements. An optional
holster/belt-clip is available as an accessory. Users are cautioned that the use of
non-tested accessories may exceed FCC RF exposure limits. Please contact your
local dealer for optional accessory information.
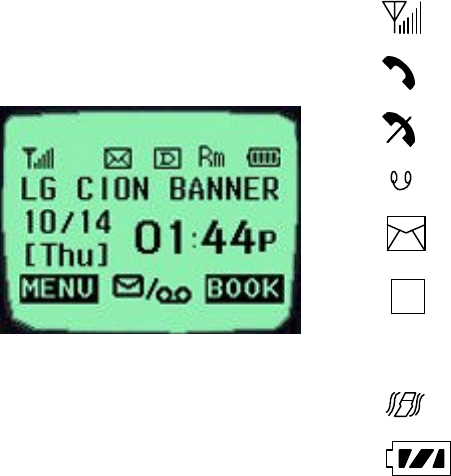
CHAPTER 1. THE NAME AND FUNCTIONS
Hold Icon
Rm
Signal Strength (RSSI)
In Use
No Service
Digital Service is available
Roaming
Short Message (Voice)
Battery Level
Short Message (Text)
Vibrator Enabled
D

CHAPTER 2. BASIC FUNCTIONS
Turning the Phone On and Off
<Turning the Terminal On>
1. Connect the terminal to the charged battery or the external power supply.
2. Press the [END/PWR] key for about 1.5 seconds until a red right appears on the upper side
of the terminal.
< Turning the Terminal Off >
1. Press the [END/PWR] key until the end message appears on the LCD, and then stop pressing
the key.
2. If an antenna is stretched, push it in for safety.
Making a Call
<Method1> Entering the Entire Phone Number
1. If the terminal is turned off, turn it on.
2. Enter the phone number.
(Enter the area code, if necessary.)
3. Press the [SND] key.
- If the terminal is locked on, enter the password to unlock the terminal. Then, attempt the
call again.
- If the call is not connected, “Call Failed” signal will be indicated on the LCD.
4. Press the [END] key.
<Method2> Using Phone Book Entry
1. Enter the phone entry number, and press the [SND] key or press the related phone entry
number for some time. Then, the call will be attempted.
e.g.) Press the [2] key for some time, then call will be
connected to the phone number stored in the Entry #2.
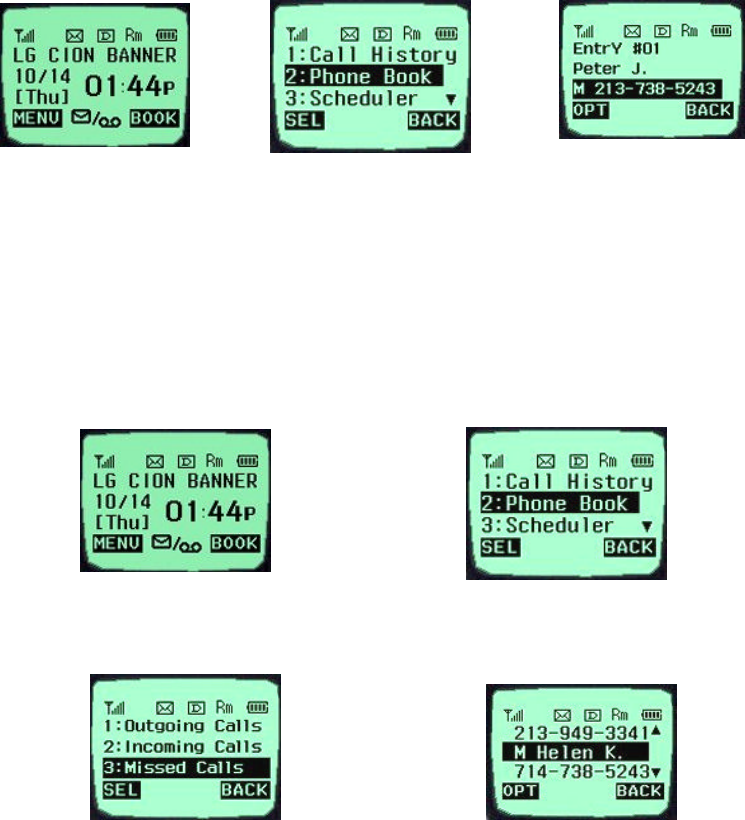
2. If you are not sure of the phone entry number, select the Soft Key (BOOK) on the right side.
3. Place the cursor on the Phone Book, and press the Soft Key (SEL) on the left side.
4. Search the Phone Book Entry number or name requested in the Phone Book to attempt a call
to the phone number stored in it.
<Method3> Using the Recent Call History
1. Select the Soft Key (BOOK) on the right side.
2. If the screen changes, place the cursor on the Call History. Then, press the Soft Key (SEL) on
the left side.
3. If the “Outgoing Calls”, “Incoming Calls”, and “Missed Calls” are indicated on the screen,
select the menu requested. Ten phone numbers of the recent calls are stored in each menu.
Place the cursor on the menu requested, and press the Soft Key (SEL) on the left side.
4. The phone number list appears on the screen. Then, search and place the cursor on the phone
number or name requested, and press the [SND] key.
Correcting Dialing Mistakes
1. Press the Soft Key [CLR] on the right side of the screen to erase the number or character of
the last entry.
2. Press the Soft Key (CLR) on the right side for one second, then all the number or character
requested will be erased.
Receiving Calls
1. Press any key except for the [END/PWR] key to receive a call.
HPress the END Key once to stop the bell or vibration.
HH Press the END Key twice to end the incoming call
2. When the call completes, press the [END/PWR] key.
3. Or close the flip.
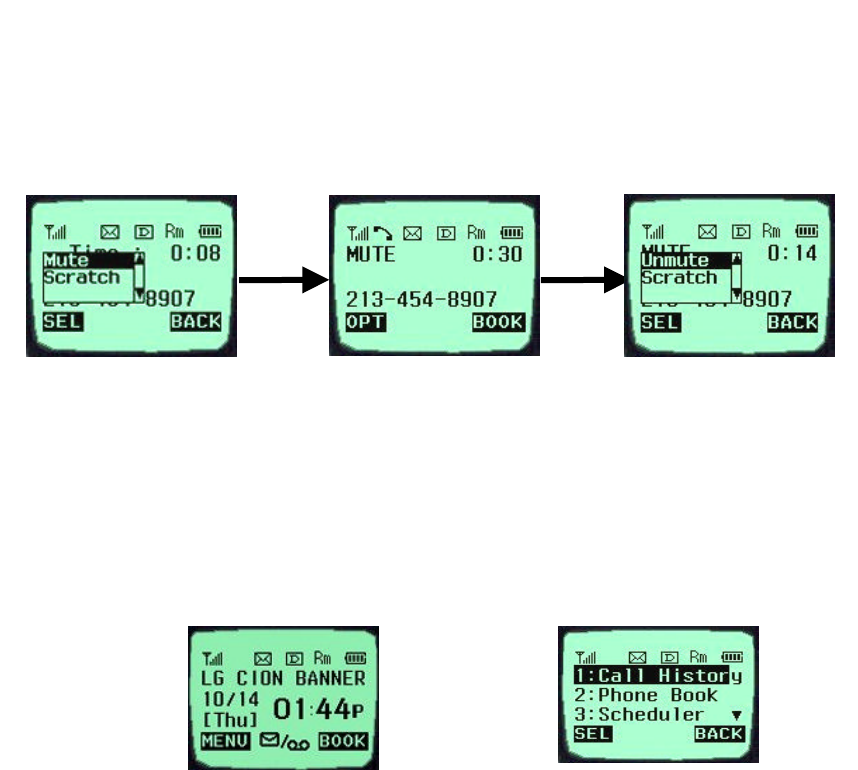
Mute
1. Press the Soft Key (MENU) on the left side during the call.
Redialing Last Outgoing Number
<Method 1>
1. Just press [SND] key to redial the last outgoing number. Then, the call will be attempted.
<Method 2> using the Call History
1. Press the Soft Key (BOOK) on the right side.
2. Place the cursor on the Call history menu on the screen, and press the Soft Key (SEL) on
the left side.
3. Then, three menus will appear.
-
“Outgoing Calls”: Ten last outgoing calls are stored in this menu.
-
“Incoming Calls”: Ten last incoming calls are stored in this menu
.
-
“Missed Calls”: Ten last missed calls are stored in this menu
.
2. If a popup menu appears on the screen,
place the cursor on the Mute menu and
press the Soft Key (SEL) on the left side to
select the Mute state. (The message”Mute”
will be indicated on the screen.)
3. Press the Soft Key (OPT) on the left side
to clear the function. The popup menu will
appear. Select the Unmute menu. (The
message “Mute” will be disappear on the screen
4. Place the cursor on the menu requested, and press the Soft Key (SEL) on the left side.
e.g.) Place the cursor on the “Outgoing Calls” menu and press the Soft
Key (SEL) on the left side.
5. The phone number list will appear. Place the cursor on the phone number or name requested,
and press the [SND] key. Then, the call will be attempted.
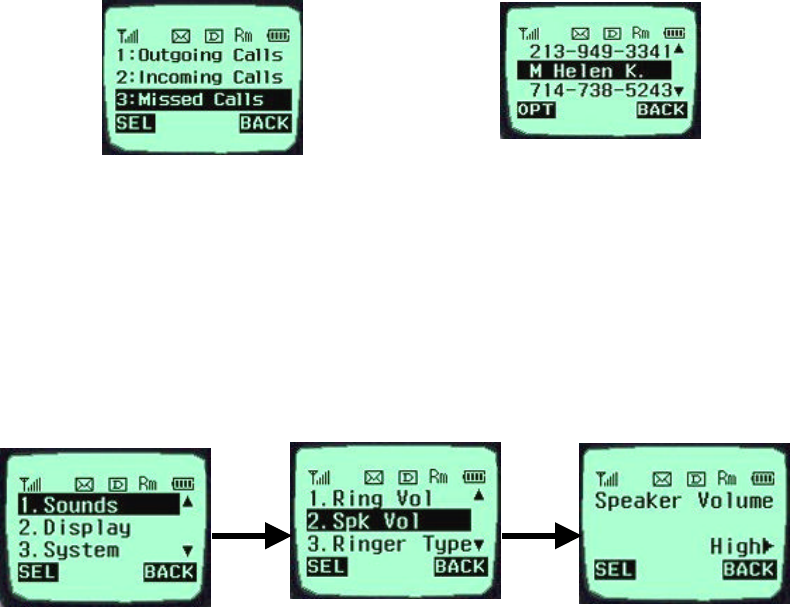
Adjusting the Volume
It is possible to adjust the speaker volume, ring volume, and the ringer type with the volume
buttons on the upper left side of the terminal.
- It is possible to adjust the speaker volume during the call.
- It is possible to adjust the key tone volume in a idle state.
- It is possible to adjust the ring volume during the ringing time.
- It is possible to adjust the ring volume from the Sounds item on the Menu screen also.
( F [MENU] [Sounds][SpkVol] or [MENU]-1-2)
If you turn the ring volume down to the minimum, the message “-Ringer Off-“ will be indicated
on the LCD and no ringing sound will be sent out.
- Adjust the ringer type on the Sounds item on the Menu screen.
(F [MENU] [Sounds][Tone Length] or [MENU]-1-5)
CHAPTER 3. PHONE BOOK FEATURES
Two types of Phone Books
This service enables easier use of the outgoing or incoming phone numbers because it is
possible to store up to 200 phone numbers in the memory. It is possible to store the phone
numbers either in the Personal Phone Book memory or in the Recent Call History List
Personal Phone Book Memory
It is possible to store up to 4 phone numbers of 32 digits including name up to 12 characters in
each entry of the Phone Book.
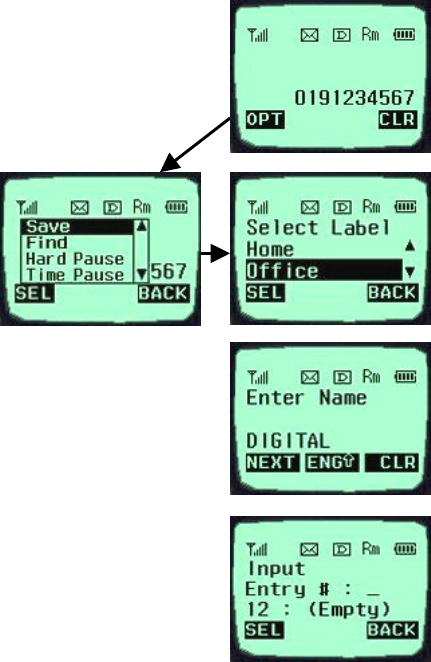
<Storing the Phone Number in the Personal Phone Book >
1. Enter the number to be stored. (Up to 32 characters)
2. Press the Soft Key (OPT) on the left side and then, a popup
menu will appear. Place the cursor on the [save] key on the
Menu and press the Soft Key (SEL) on the left side.
3. Select a Label.
4. Enter the name up to 12 characters.
(Verify the number of characters and
press the [save] key.) If you do not
want to enter the name, press the
[save] key without entering characters.
5. Designate the Entry number. Then, an empty Entry number will be
designated automatically. If you do not want this Entry number,
designate another Entry number. If an existing phone number
occupies the memory of the designated Entry number, a message
will appear to verify if you want to overlap the existing one with
a new one. If you select the [ok] key, the existing phone number
will be erased in the entry, and a new one will be stored. If you
want to maintain the existing phone number, designate another
entry number.
6. Messages will appear to set the Voice Dial, ID Ringer, screen color, and the Secret function
in turn. If you set the Secret function to the memory address, you will be unable to see the
phone number or to correct it.
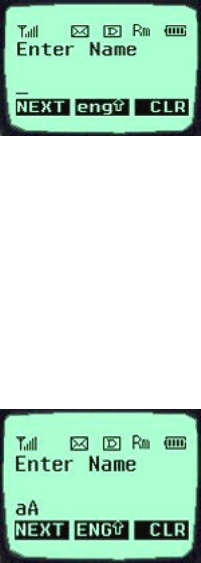
Entering Characters
You will be provided with 5types of modes (English Lower, English Upper, Digil, Special Char,
Icon) to enter the characters. Use the upside (é) key to change among the modes while entering
the characters. The present mode is indicated on the lower center of the screen. Whenever you
press the upside (é) key, the modes will change in the order of “ENG” - “eng” - “DIG” -
“SPEC” - “ICON” - “ENG” `````` . Select the mode before you enter the characters, and enter
the characters.
1. When the mode is ready for entry, the cursor (“_“) will be
indicated on the space for entry.
(If you enter one character, the cursor will move to the following
space automatically and wait for entry.)
2. Use the right side (è) key or the “0” key in the “ENG” - “eng” state to place a space among
the characters.
3. Verify if the cursor is placed where the character is to be entered, and change the mode by
using the upside/downside (t / s) key.
4. Verify if the mode requested is indicated on the lower center of the screen, and enter the
character.
5. Use 8 keys of [2]~[9] to enter the character in the “eng” and
“ENG” mode. One key is designated with three or more than
three characters. Therefore, press each key repeatedly for a short
period of time until the character requested appears. For example,
if you want to enter a character “K”, set the “ENG” mode with
the upside/downside (s / t) keys and then press [5] key twice for short time continuously.
6. Enter the numbers of 0~9 with ten keys from [0] to [9] in a “DIG” mode.
(Reference: The “ENG”, “eng” and “DIG” modes remain in the same state even after you
enter a character, while the “SPEC” and “ICON” modes automatically change into an
“ENG” mode after you enter one character.)
7. Enter a special code or icon in the “SPEC” or “ICON” mode.
An icon set is indicated in the order of 12 keypads on the right
side of the screen in a “SPEC (ICON)” mode. Press the key
corresponding to the symbol (icon) to be entered in reference of
them, and then the symbol (icon) will be entered on the space
where the cursor is placed. Press the Soft Key (MORE) on the
right side when the symbol (icon) set is indicated on the screen,
and then another set of symbols (icons) will be indicated on the
screen. The symbol (icon) set is composed of three types of sets.
Press the Soft Key (MORE) on the right side repeatedly in a
preset SPEC (ICON) mode to change one type of symbol set
into another one. If the symbol (icon) set requested is indicated, use the keypad to enter the
symbol (icon).
8. Use the Soft Key (CLR) on the right side to erase the input character. Press it for a short
period of time to erase the last input character, and press it for some time to erase all the
input characters.
9. If you complete entry of the characters, use the Soft Key on the left side to move to other
items.
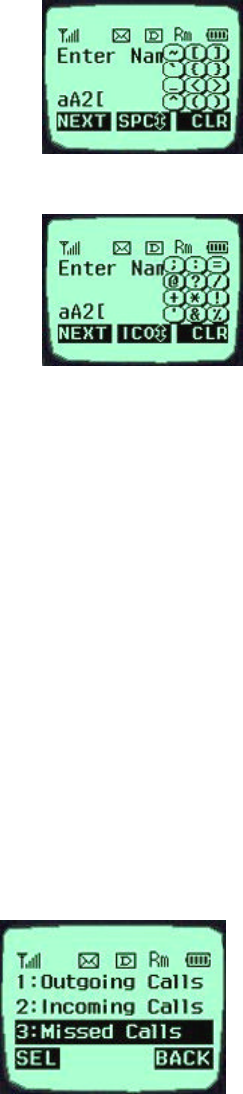
Recent Call History List
This service enables easy and fast redialing with its function to store ten last outgoing calls,
incoming calls, missed calls and added phone numbers (numbers stored by the scratch pad
function).
<Retrieving Recent Call History>
1. Press the Soft Key (BOOK) on the right side of the screen.
2. Place the cursor on the Call history of the screen, and press the Soft Key (SEL) key on the
left side.
3. Then, three menus will appear on the screen.
- “Outgoing Calls”: Ten last outgoing calls are stored in
this service.
- “Incoming Calls”: Ten last incoming calls are stored in
it.
- “Missed Calls”: Ten last missed calls are stored in it.
Select one of the three menus.
4. Then the corresponding phone number list will appear. Place the cursor on the number
requested and press the [SND] key to attempt a call.
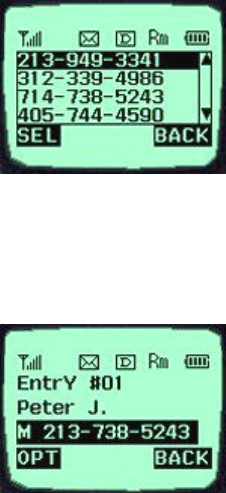
Retrieving Numbers

<Retrieving One Phone Numbers by Memory Location Number>
1. Enter the Phone Entry number (up to three digits) to be
retrieved in an initial state.
2. Press the Soft Key (OPT) on the left side, and then a popup
menu will appear.
3. Place the cursor on the “Entry” item on the popup menu and
press the Soft Key (SEL) on the left side. And then, the information stored in the input entry
number will appear. Press the [SND] key to attempt a call to
that number.
4. In another method, press the Soft Key (BOOK) on the right
side in an initial state and select the items in the order of
[Phone Book] and [Find Entry] on the menu. And then, a
message will appear to request the entry number. Enter the number to be retrieved.
Enter a specific number in an initial state to retrieve a phone number with a specific number,
and press the Soft Key (OPT) on the left side. If you select the “Find” item on the popup menu,
a Phone Numbers List with the number requested will be indicated. Select the phone number to
be retrieved, and then the information related to the entry will appear.
<Retrieving by Name Search>
1. Press the Soft Key (BOOK) on the right side in an initial state.
2. Select the [Phone Book] item.
3. If you select the [Find Name] item, a message will appear to request the name.
4. Then, a name list with the input characters will appear.
5. Place the cursor on the name to be searched and select the Soft Key (SEL) on the left side.
And then, the related information will appear.
Dialing Numbers from Your Phone Book
This function enables fast dialing with the entry number stored with the phone number
requested.
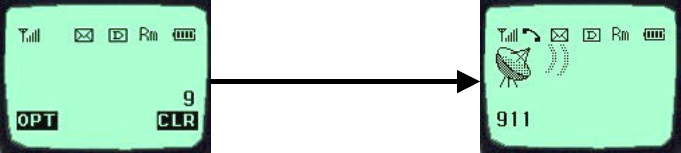
<One-Touch Dialing>
One-Touch Dialing enables the call with the touch of just one key by its function to store the
phone numbers requested in the Phone Book. This service is available only for the phone
number stored in the entry numbers 01~09.
1. Press the Phone Book Entry number for
some time to connect a call.
2. The Entry 9 is designated for the
number ‘911’.
<Two-Touch Dialing (Speed Dialing)>
Two-Touch Dialing function is available only for the phone numbers stored in the Entry
numbers 10~99.
1. Press the first number of the two digit Entry numbers for a short period of time.
2. Press the second number for some time to attempt dialing.
<Three-Touch Dialing (Speed Dialing)>
The Three-Touch Dialing function is available only for phone numbers stored in the Entry
numbers 100~199.
1. Press the first two digit numbers among the three digit entry numbers for a short period of
time.
2. Press the last digit number for some time to attempt dialing.
<Dialing from a Memory list>
1. Press the Soft Key (BOOK) on the right side.
2. Select the “Phone Book” menu.
3. Select the “Find Entry” item.
4. Use the upside and downside key instead of the Entry number, and
then the contents of the Phone Book Memory will appear in the
order of the Entry numbers.
5. Place the cursor on the number requested, and press the
[SND] key.
<Dialing from a Memory Location>
1. Press the Soft Key (BOOK) on the right side of the screen.
2. Select the “Phone Book” menu.
3. Enter the entry number requested and press the Soft Key
(SEL) on the left side.
4. Place the cursor on the number requested in the Entry, and
press the [SND] key.
Advanced Phone Book Feature
Pause Feature
When you call the automated system such as sending the voice message, you have to press a
few numbers. This service enables storing the numbers by a specific symbol of the Pauses to
save instead of pressing the numbers by hand.
Pauses are two types as follows.
1. Hard Pause (H) – Press the [SND] key to send the following numbers.
2. Time Pause (T) – Pause for about 2 seconds to send the following numbers. Use the Time
Pause in case longer Pause time is necessary.
3. Hyphen –Use the hyphen just to indicate the number, as the pause is not available between
two numbers.
Storing a Number with Pauses
1. Enter the number.
2. Press the Soft Key (OPT) on the left to use the Pause function.
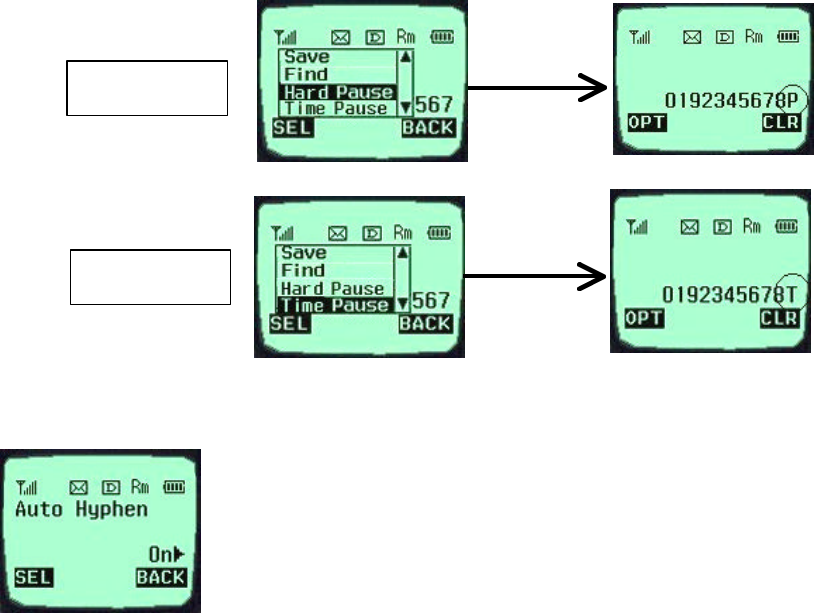
3. Select the [Hard Pause] item on the popup menu, and then a character “P” will be indicated
on the screen.
4. Select the [Time Pause] item, and then the 2 Sec Pause will be indicated as the character “T”.
**Note – Press the items in the orders of the Soft Key (MENU) on the
left, the [Auto Hyphen] and [ON] items on the screen in a call waiting
state to select the Auto Hyphen function.
“Prepending” a stored number
If you travel out of your usual life zone, and have to add the numbers such as the area code to
the existing phone numbers in the Phone Book, use the “Prepending” function. If the Phone
Book Entry, the call information, and the call back (message response) number are indicated on
the screen, it is possible to add numbers to the original numbers
1. If the phone number stored in the memory appears on the screen, press the Soft Key (OPT)
on the left.
[Hard Pause]
[Time Pause]
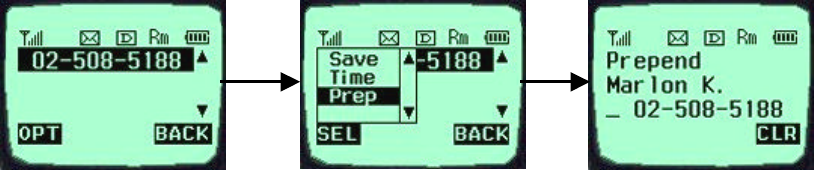
2. Select the [Prepend] item on the popup menu. Then, the cursor will be placed at the
beginning of the phone number.
3. Enter the numbers to be added, and press the Soft Key (Call) on the left or [SND] key to
attempt a call.
CHAPTER 4. MENU FEATURE
Main Menu
It is possible to verify or change various functions or setup the
terminal status on the main menu.
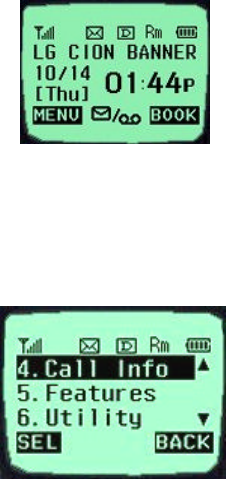
General Guidelines to MENU Access and Settings
1. Press the Soft Key (MENU) on the left and the menu items
will appear.
2. Use the upside and downside keys (é ê) to move to the
menu items not indicated on the screen.
3. Place the cursor on the menu item requested with the
direction keys to select a menu item, and press the Soft Key
(SEL) on the left. And then, press the number corresponding to the menu item to be selected.
4. Use the upside and downside keys (é ê) to change the setup values in the menu items.
5. Press the Soft Key (SEL) on the left to store the setup values changed in the menu item, or
press the Soft Key (BACK) on the right to leave the setup values not stored.
6. Press the Soft Key (BACK) on the right to move up to the upper level during the value setup
in the menu items.
Menu Item Descriptions
Menu 1. <Sounds>
1. Ring Sounds ( F [MENU]-1-1 )
Select one of three bell sounds and fourteen melodies with the direction keys.

2. Ringer Type ( F [MENU]-1-2 )
Set one of three ringer types (Ring, Vibrator, and LED) with
the direction keys.
3. Ring Volume & Vibrator ( F [MENU]-1-3 )
- Ring type: Adjust the ring volume in seven levels (High - Medium –
Low - Off - Vib1 - Vib2 - Viv3) with the direction keys. The ring
volume is also adjustable with the side keys while the bell is ringing
or in a call waiting state.
- Vibrator type: Adjust the vibrator volume in four levels. (Low
– Middle – High – Escalating).
- Lamp
4. Beep Volume (F [MENU]-1-6)
Adjust the beep in three levels (High > Medium > Low) with
the direction keys.
5. Tone Length (F [MENU]-1-5)
Set the tone length in two levels (Short, Long) with the direction
keys.
6.Earpiece Volume (F [MENU]-1-6)

Adjust the earpiece volume in three levels (High > Medium >
Low) with the direction keys. It is also adjustable with the side
keys in a busy line state.
7. Alert ( F [MENU]-1-7 )
An alert signal is activated according to each situation by
five submenus under the Alert menus.
- Service Change: This signal notifies whether a call is available or not between the service
and the no service areas.
Minute Beep: This signal is activated when period of time (1minute, 3minutes and
10minutes) elapses from the call connection.
- Fade: It is activated if the call is disconnected in a busy line state.
- Connection : It is activated to notify that the call is connected.
Menu 2. <Display>
1. Backlight ( F [MENU]-2-1 )
It is possible to adjust the keypad and the backlight time in 5
levels with the direction keys.
(Always Off, 10 Sec, 30 Sec, Always On, On Flip up)
2. Banner ( F [MENU]-2-2 )
It is possible to store the characters to appear on the standby
state of the terminal. Select either “Keep” or “Change” with
the direction keys.
3. THEME ( F [MENU]-2-3 )
- Default
- Srar Theme
- Theme3
- Theme4
Select one of the above items.
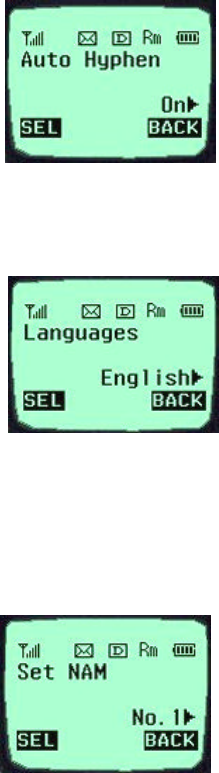
4. Auto Hyphen (F [MENU]-2-4 )
It is possible to set the function to enter the Hyphen to the input
number automatically to an “On” or “Off” state. .
5. Languages ( F [MENU]-2-5 )
It is possible to set the language to be used in the terminal
among four languages with the direction keys
(Select one of four languages of English, French, Spanish, and
Portuguese)
Menu 3. <System>
1. Set NAM( F [MENU]-3-1 )
Select one NAM in the two NAM (Number Assignment
Module) services. Select either “No. 1” or “No. 2” with the
direction key. Both “No.1” and “No. 2” have different NAM
parameters, respectively. Therefore, if you select the NAM
nidentified with the subscribed number, the service is not
available.

2. Auto NAM ( F [MENU]-3-2 )
This service enables setting of the NAM to the identified
subscribed number for one or more than one NAMs. Use the
direction keys to set the service to either “On” or “Off” state.
3. Force Mode ( F [MENU]-3-3 )
In the Force Mode, the Selections move to the Prefer Mode on
the Hidden Menu.
4. Sys select ( F [MENU]-3-4 )
Select either “On” or “Off” with the direction keys. It is
possible to select the cellular company with this function.
5. Version ( F [MENU]-3-5 )
This service informs on the present terminal S/W version. It has
two items of “S/W” and “PRL” as the submenu.
Menu 4. <Call Info>
1. Last Call ( F [MENU]-4-1 )
This service shows the last call time.
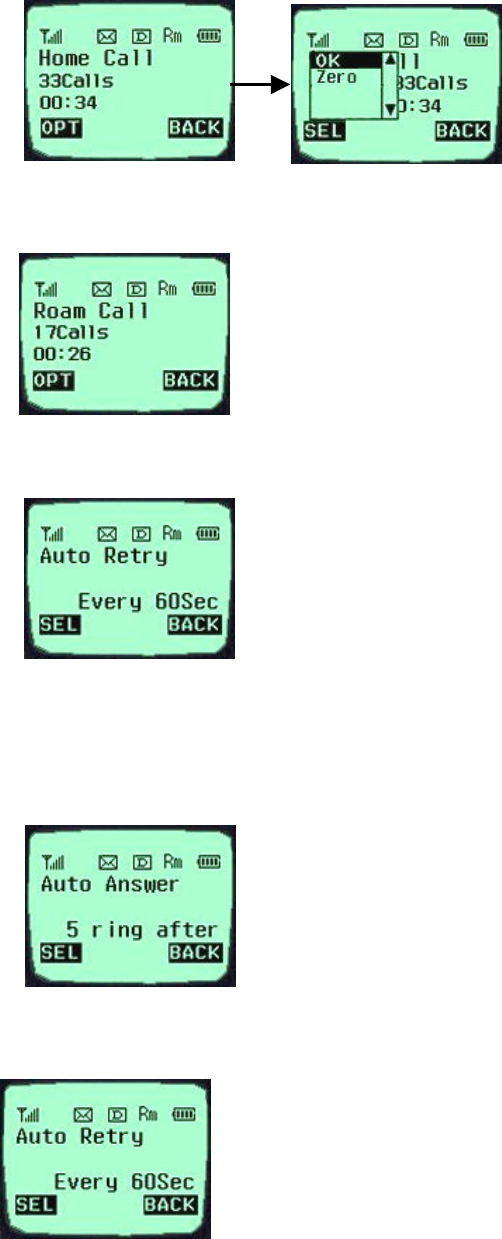
2. Home Call (F [MENU]-4-2 )
- Total call time at the Home
system (not roaming) from initial
setup to the present.
3. Roam Call ( F [MENU]-4-3 )
Shows the call time at the roaming system from initial setup to
the present
4. All Calls ( F [MENU]-4-4 )
It shows the total call time to the present either at the Home
system or the roaming system or both.
Menu 5. <Setup>
1. Auto ans ( F [MENU]-513 )
Auto answer service is one of the most useful functions while
driving a vehicle, and it enables automatic answering to the
incoming call after the bell rings for designated times.
(Off, 1 ring after, 3 ring after, 5 ring after)
2. Auto Retry ( F [MENU]-5-2 )
If the called user is in a busy line state, this service automatically
attempts a call to that number in a certain interval. It is possible to
set the interval in four selections. (Off, every 10sec, every 30sec,
every 60sec)
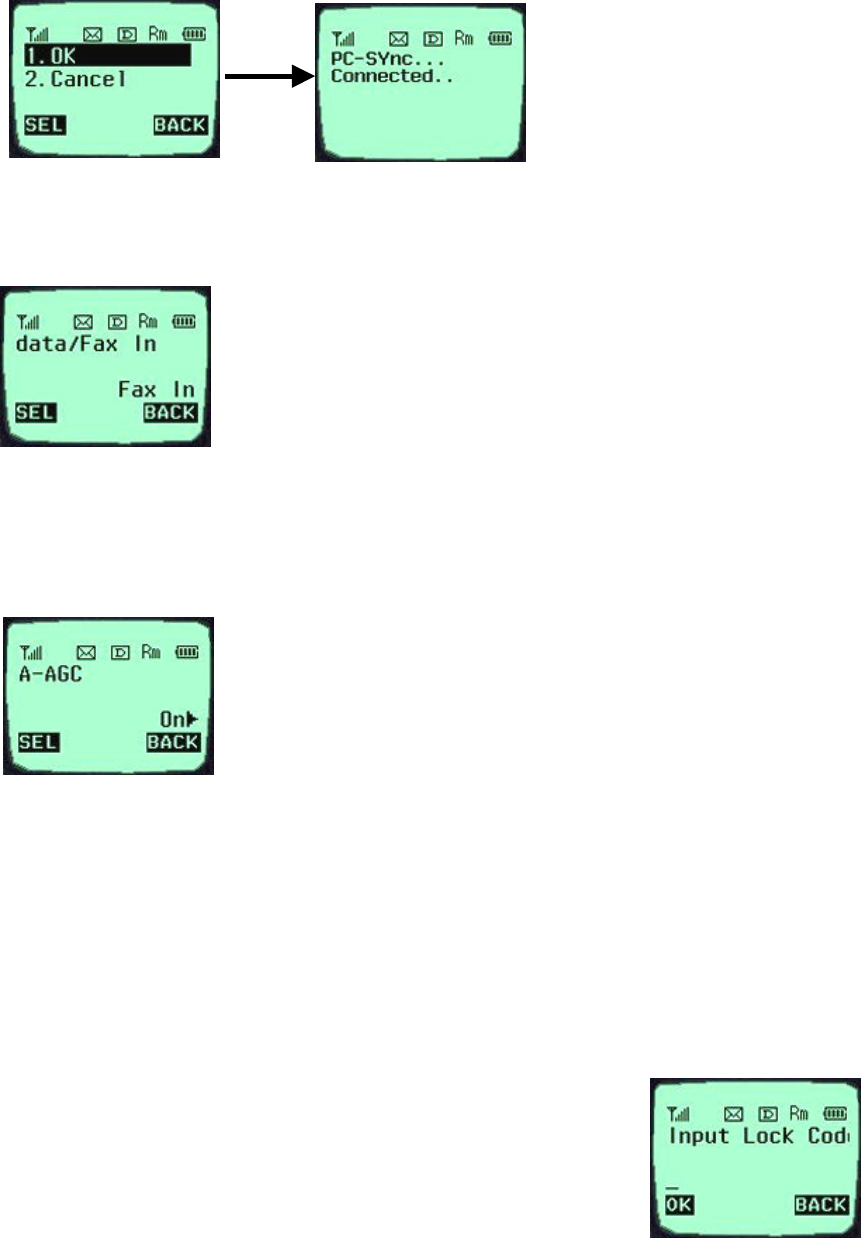
3. PC-Syn ( F [MENU]-5-4 )
6. Data/Fax In (F [MENU]-5-1)
This service enables selection of the data communication type in
either the modem termination type or the FAX termination type.
Select one of the “Off”, “Data In”, and “FAX In” services, and
select the Soft Key (SEL) on the left.
- Data In: If you want to receive data from the originating user in peer-to-peer
communication, select this service.
- FAX In: If you want to receive fax messages from the originating user, select this service.
7. A-AGC (F [MENU]-5-5)
This service enables adjustment and setup of the user’s terminal
speaker volume according to the corresponding user’s speaker
volume and the environmental noise level around the user
during the call traffic. Select either “On” or “Off” with the
direction key.
Menu 6. Utility
Menu 7. <Security>
Select the Soft Key (MENU) on the left in an initial call waiting state,
and select [6. Security]. Then a message will appear on the LCD to
request the Lock Code. If you fail to enter the correct Lock Code of
four characters, the process will not proceed to the following low level
menu. And if the Lock Code is not correct, the process will return to the Main Menu.
1. Lock Phone ( F [MENU]-7-1 )
Set the terminal lock function to either “Off” or “Lock Now” with the direction key.
2. Restriction ( F [MENU]-7-3 )
This service enables restriction on the call service. Select either “Off” or “Outgoing” with the
direction key. Select “Outgoing”, then the call service will be restricted only to the phone
numbers stored in the Entries from 1to 9 and to the emergency phone numbers. However, call
termination is available.
3. Clear Callinfo (F [MENU]-7-5 )
This service enables clearing of all the call information in the Memory. Select either “Ok” or
“Cancel” with the direction key. Select “Ok”, then a message will appear on the LCD to
confirm the command before the service clears the information. Select “Yes” to clear the
information requested.
4. Erase PB (Erase Phone Book) ( F [MENU]-7-4 )
This service enables erasing of all the information in the Phone Book. Select either “Ok” or
“Cancel” with the direction key. Select “Ok”, then a message will appear on the LCD to
confirm the command before the service erases the information. Select “Yes” to erase the
information requested.
5. Emergency # ( F [MENU]-7-5 )
This service enables entering of the emergency phone numbers up to three.
It has three items of “View”, “Add” and “Erase All” as the Submenu. Select “View” to view
the emergency phone numbers. If the memory address is empty, the message “Empty” will be
indicated. Select “Add”, enter the phone number requested and then select the Soft Key
(SAVE) on the left, to add the emergency phone numbers. Enter the memory address when a
message appears to request the memory address on the following image, and then press the
Soft Key (Save) on the left to store it. Select “Erase All” to erase all the emergency phone
numbers. Then, a message will appear to confirm the command. Select the Soft Key (YES)
on the left to erase all the emergency phone numbers.
6. New Code ( F [MENU]-7-6 )
This service enables replacing of the present terminal Lock Code in four digits with a new
Lock Code. A message will appear to confirm the command to change the lock code.
7. Send PIN ( F [MENU]-7-7 )
This service enables automatic transmission of the password at the request of the service
provider. Select either “Yes” or “No” with the direction key.
CHAPTER 6. Massage
Massage Service
This service supports reception of the text message, alerting, and the voice mailbox. It is
possible to access the above functions with the text message key ( . ). Call back
service is also available with the call key ([SND] key) , if the calling number is indicated on the
message received.
It is possible to store up to 23 messages and to receive up to 120 characters per message. It is
recommended to check the number of character receivable because the capacity depends on the
system service provider.
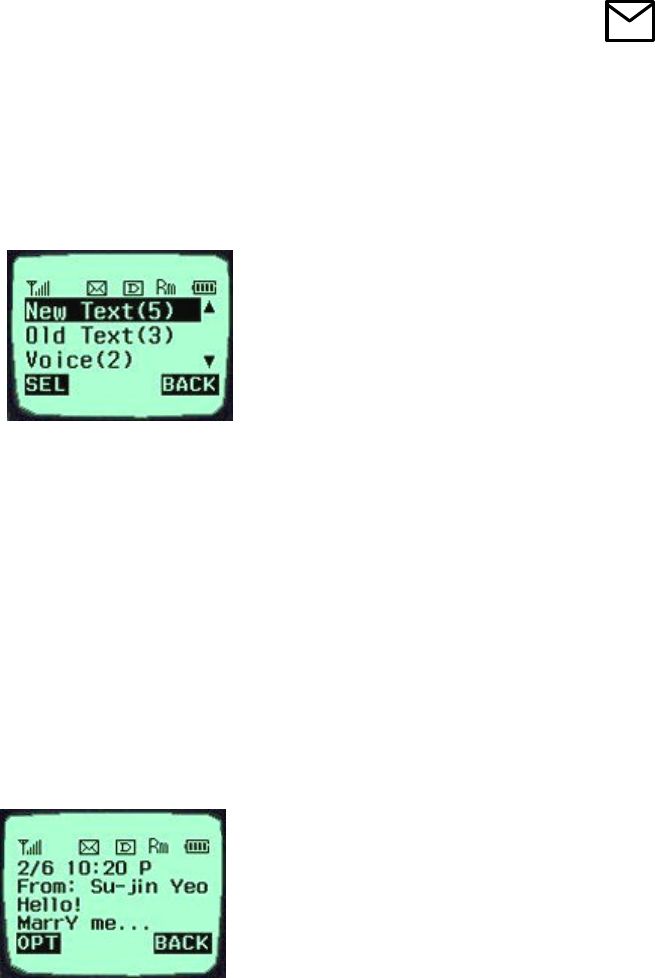
<Initial Message Service Image >
- Move the cursor with the upside and downside
keys, and press Softkey(SEL) for the menu
requested. Press Softkey(BACK) to return to the
initial image on the terminal.
- ( ): The number in the parenthesis indicates
the number of messages.
<Type of Menu>
- New Text : Menu to check a new incoming text message
- Old Text : Menu to check the verified but not erased text messages
- Voice : Menu to check the number of voice messages in the voice mailbox
- Erase All : Menu to erase all the stored messages
- Setting : Menu to select the alerting tone to report arrival of a message
1. New Text (*)
- Menu to check the message received but not checked by the user
- * In the parenthesis indicates the number of messages not checked by
the use.
<When a message has been received. >
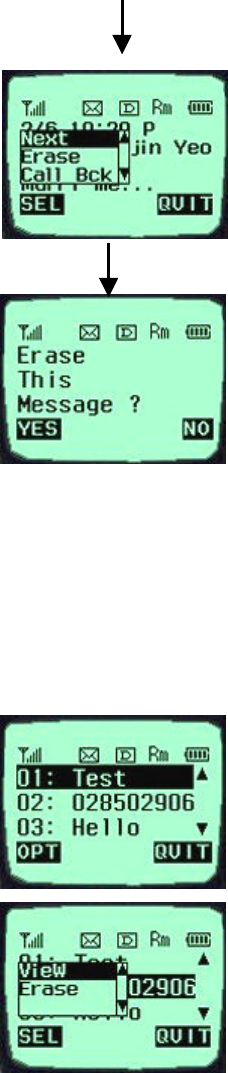
Select the OPT, and the sub menu related to the message will appear.
<When the Erase item is selected on the sub menu >
-
-
-
-
- [Next]: It indicates that there is another message received. (If no more new message has
been received, the old text list will be indicated.)
- [Erase]: It erases the message.
- [Call back]: It calls back to the calling number.
-
2. Old Text (*)
-
- It indicates the checked but not erased messages in the
form of the list.
- It indicates the checked and stored message in the form of
the list. Move the location of > with the upside or downside
key to select the message.
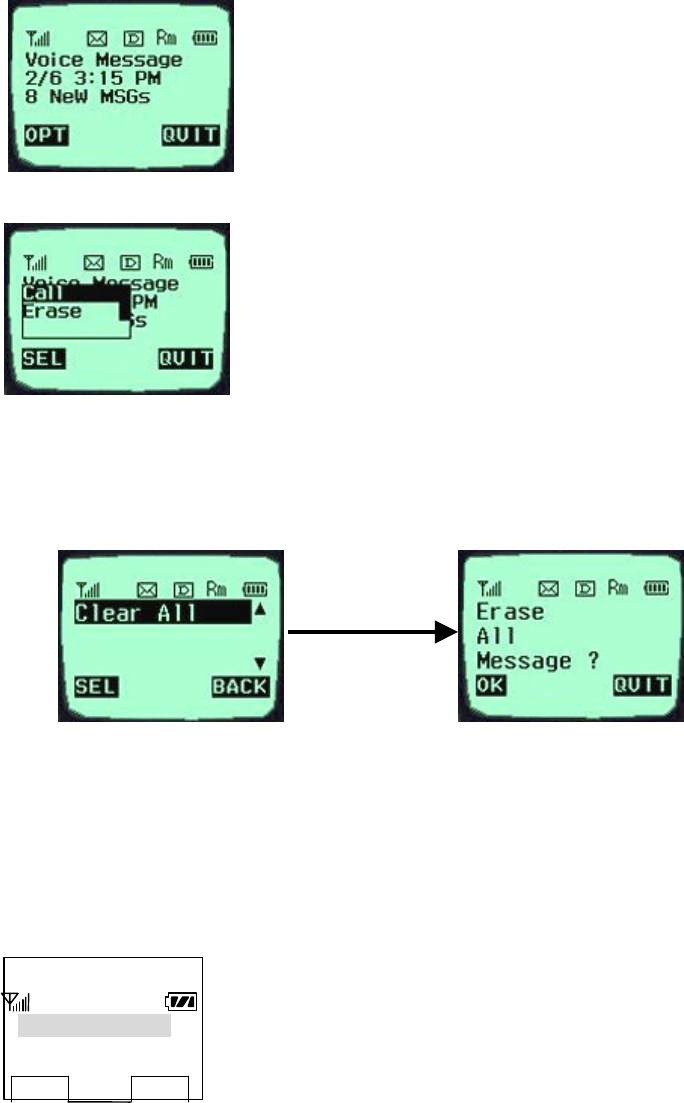
3. Voice (*)
- It indicates the number of the voice messages
in the voice mailbox.
- Press the voice mailbox identification number or the [Call]
menu key. Then, the voice mailbox will connect.
- Select the [Erase] menu item. Then, the messages will be
erased, as many as indicated on the LCD, without need to
verify the number of messages
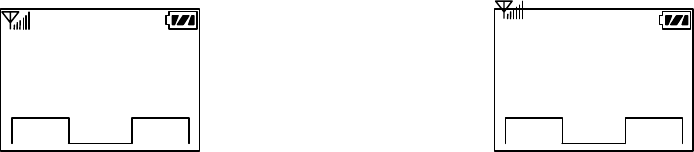
4. Erase All
- This service enables erasing of all the messages stored by the message
service.
5. Setting
- It is possible for the user to set the alarm to report arrival of a message.
- Alert: Select one of 2 alerts, 4 alerts and mute services.
- 2 Min Alert: It is possible for the user to select the re-alerting service to
report arrival of a new message, when 2minutes elapse after the user
does not check a new message.
1: Alert
2: 2Min Alert
SEL BACK
- Selecting the setting menu
- Selecting the Alert menu Selecting the2 Min Alert menu
ALERT SELECT
2 alerts
OK NEXT
2 MIN ALERT
ALERT
Off
OK NEXT