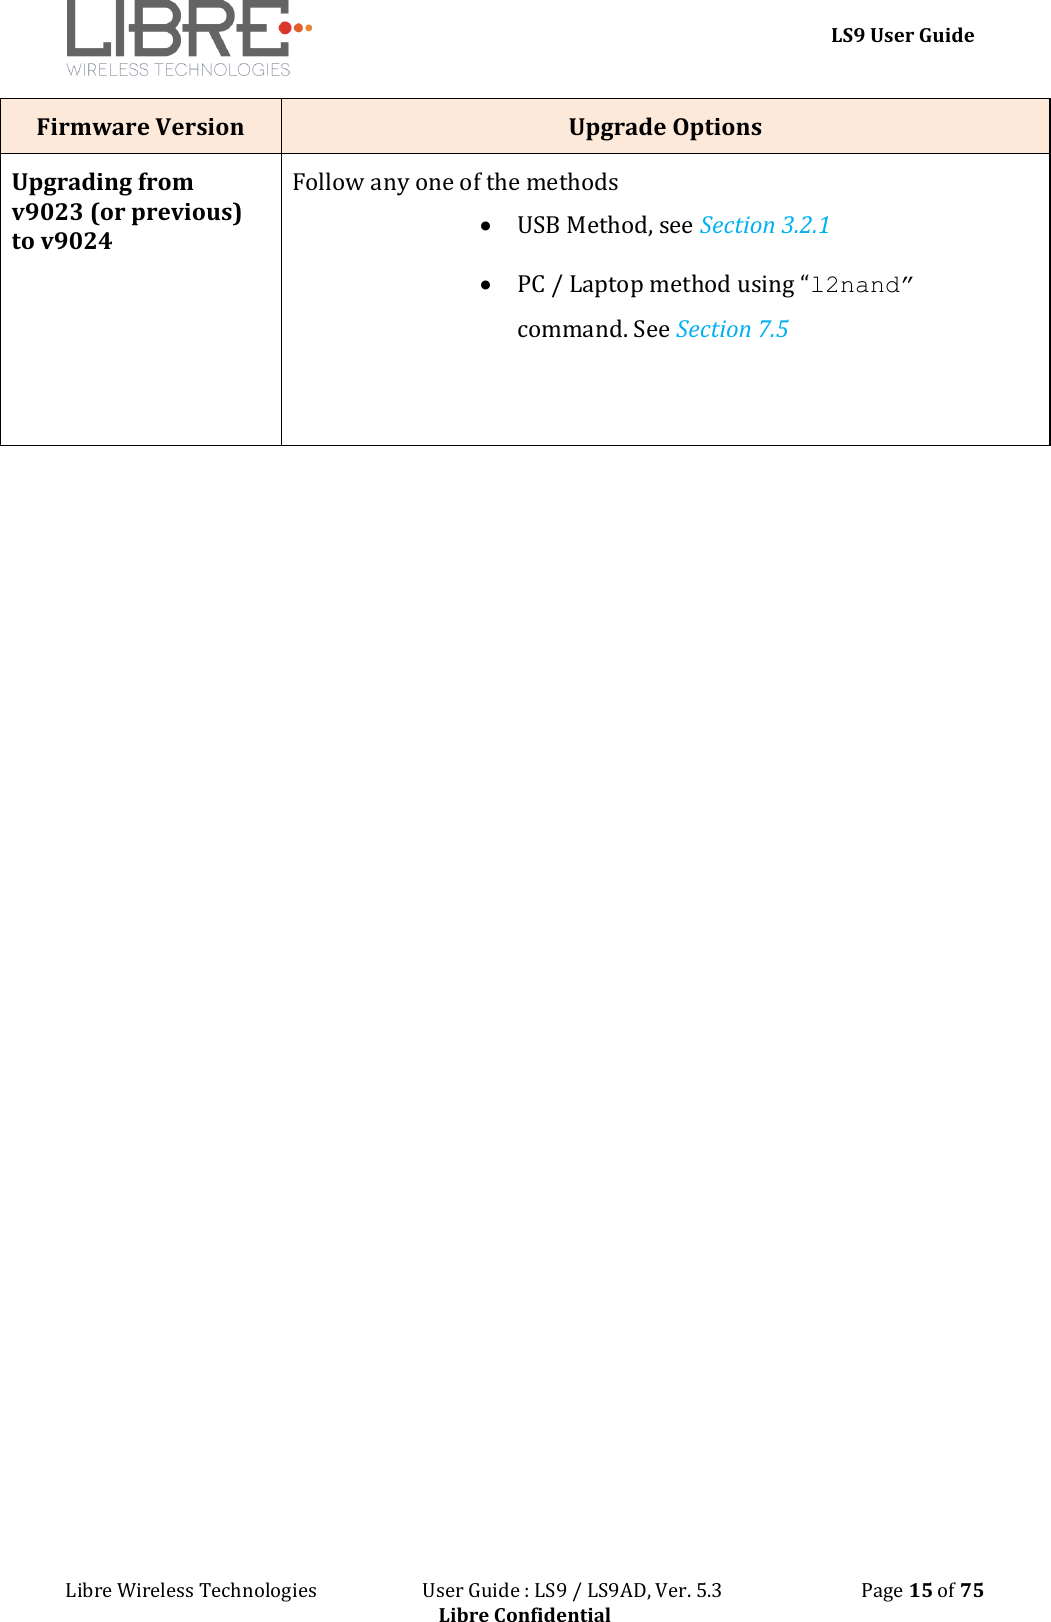
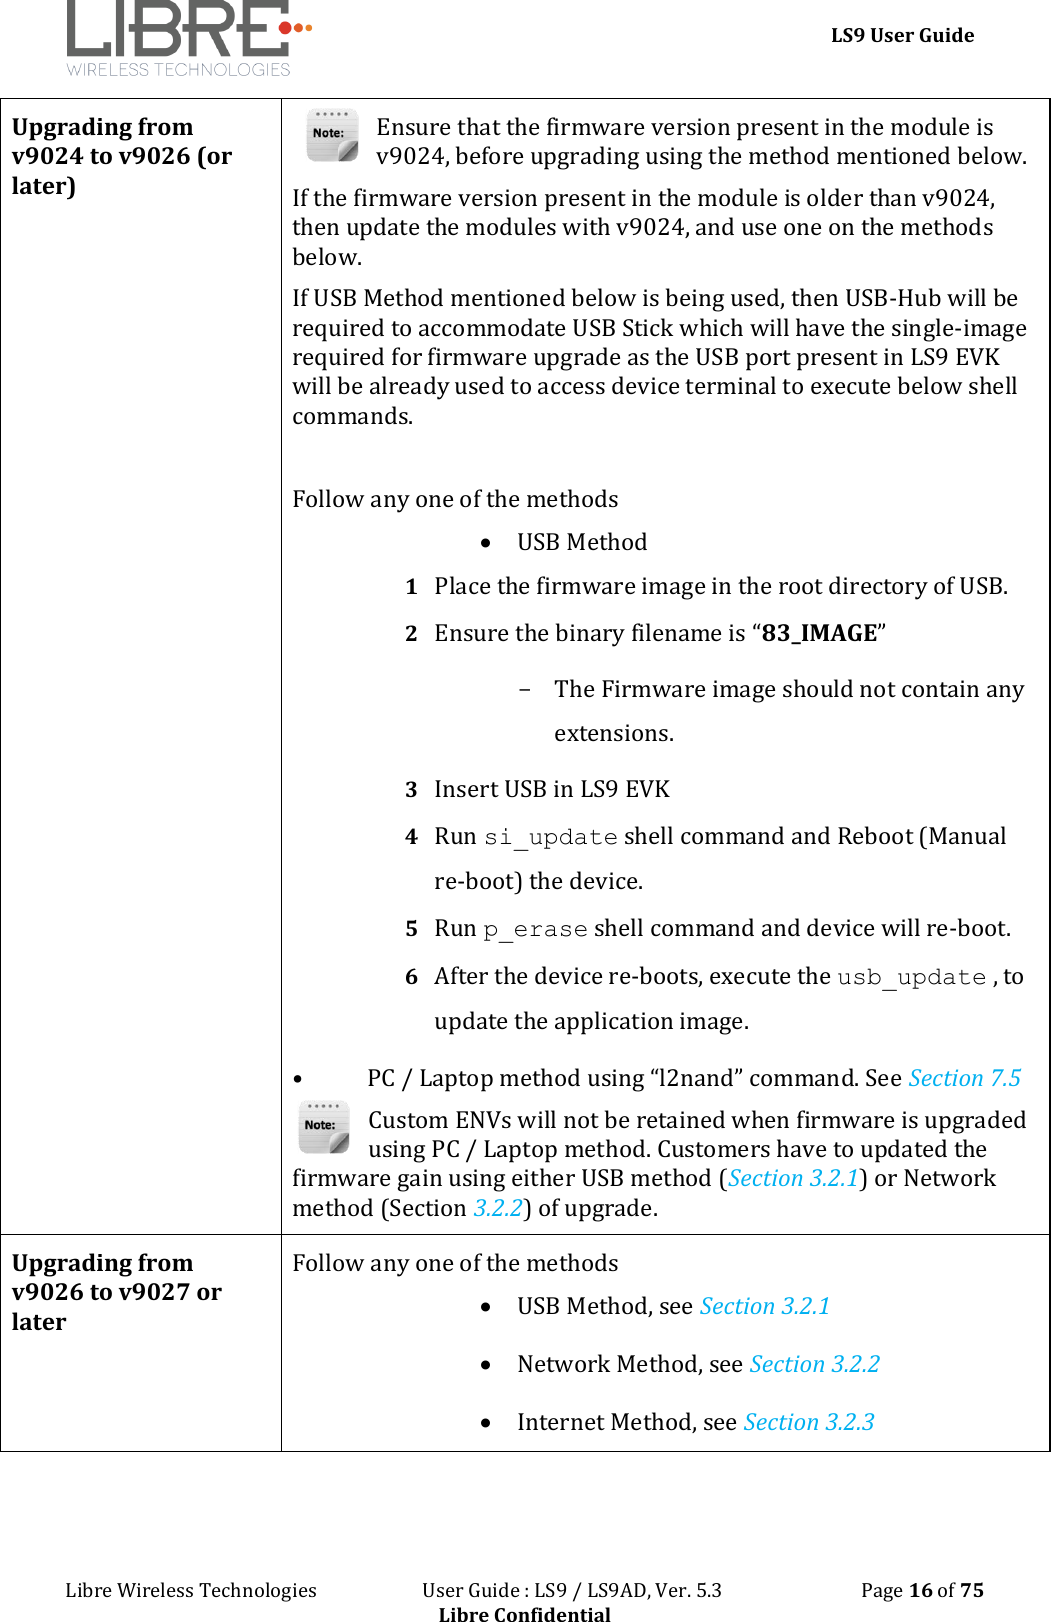
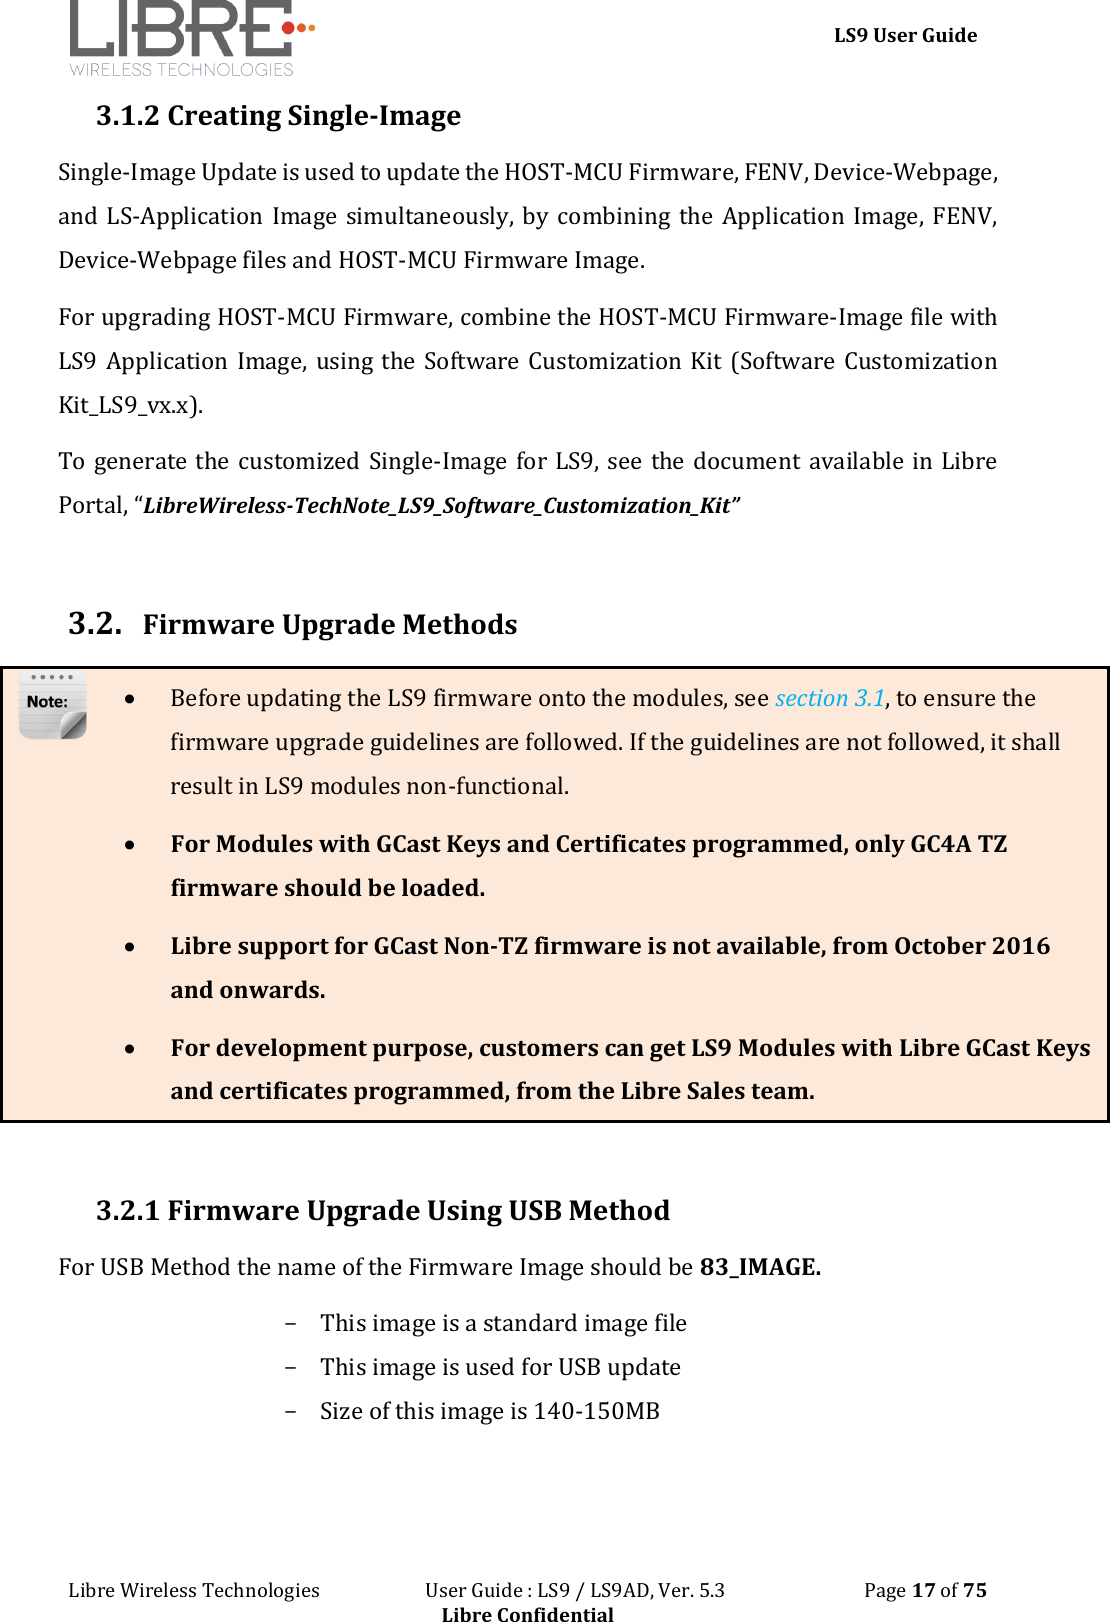
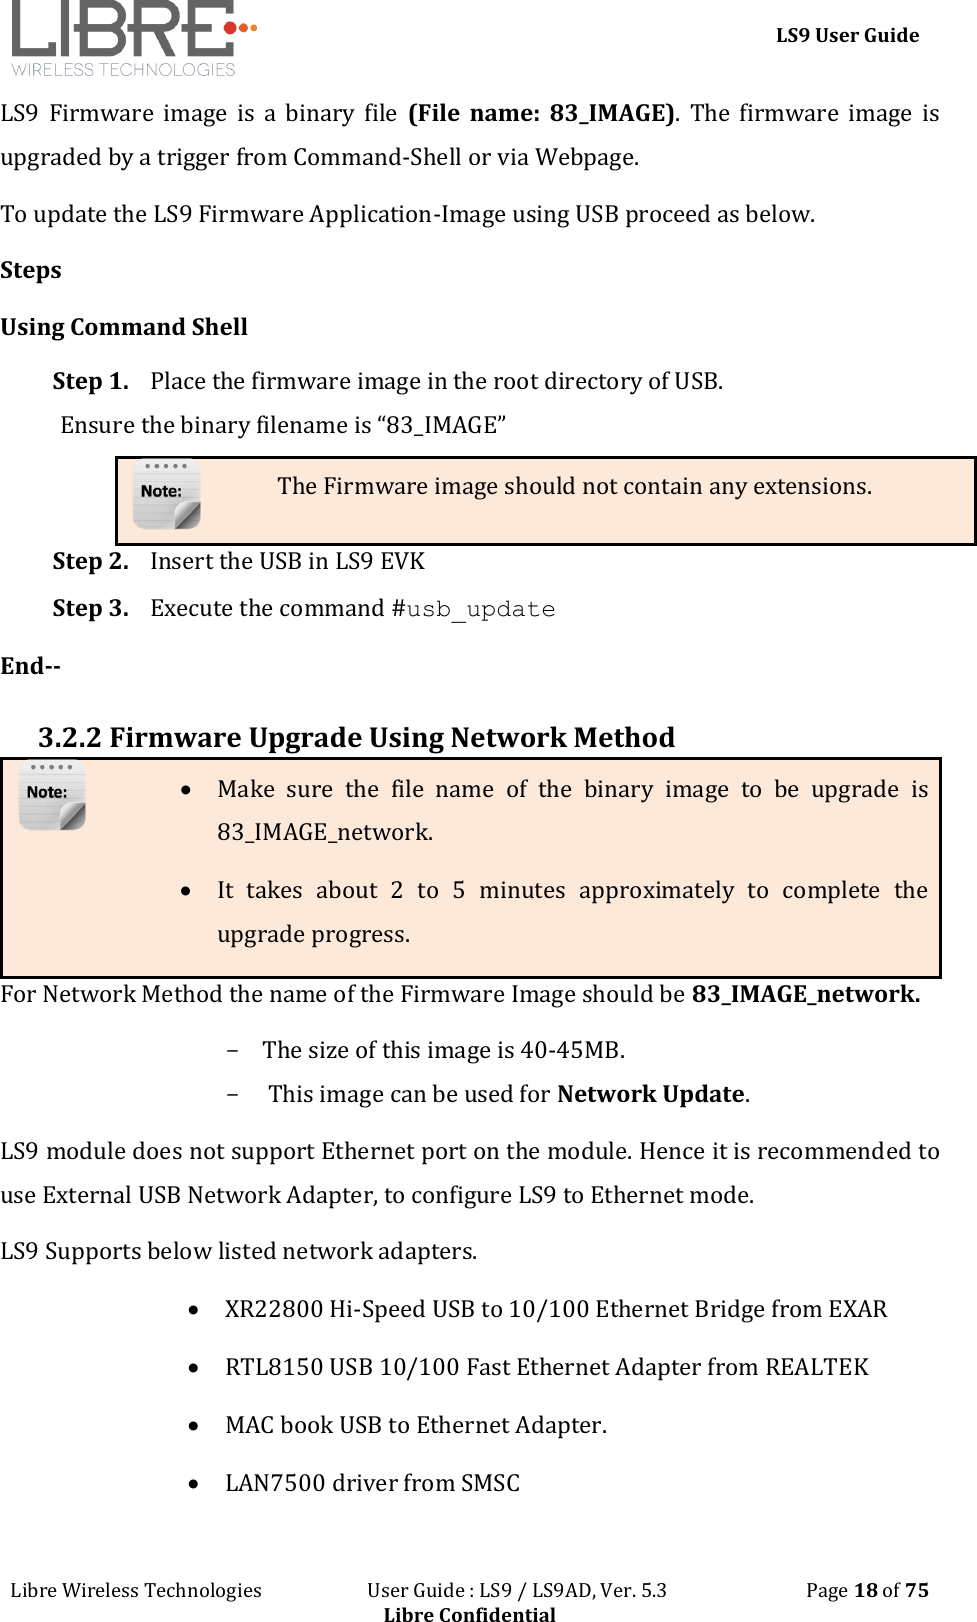
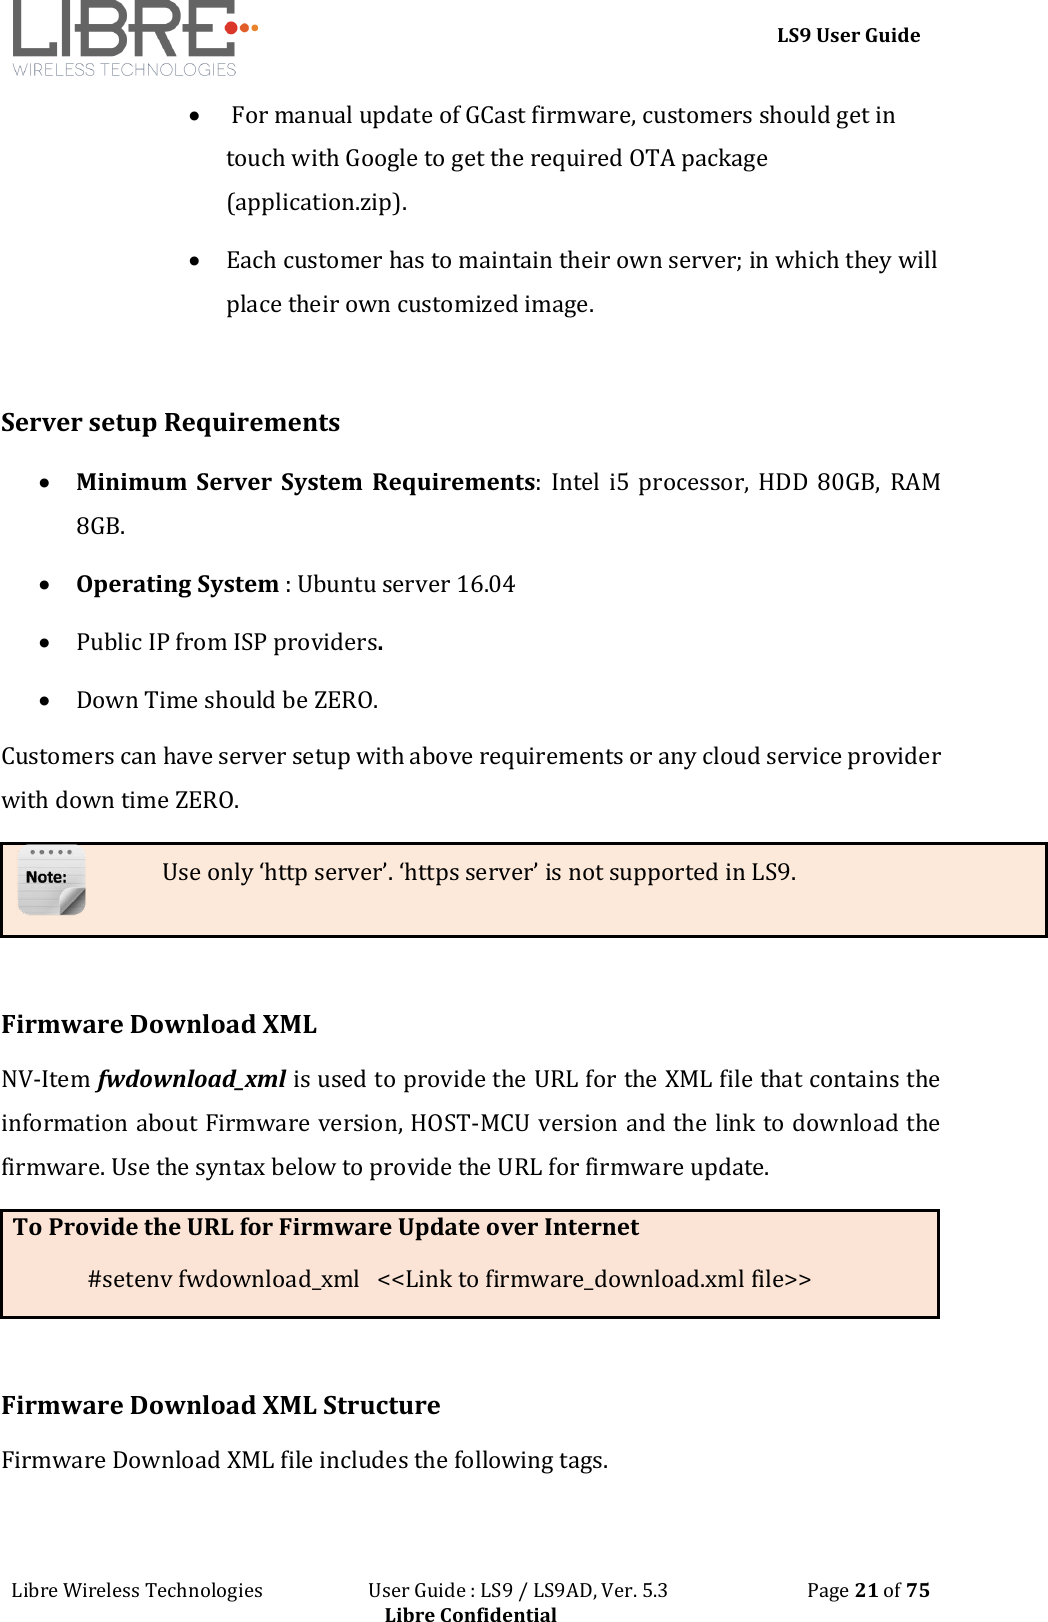
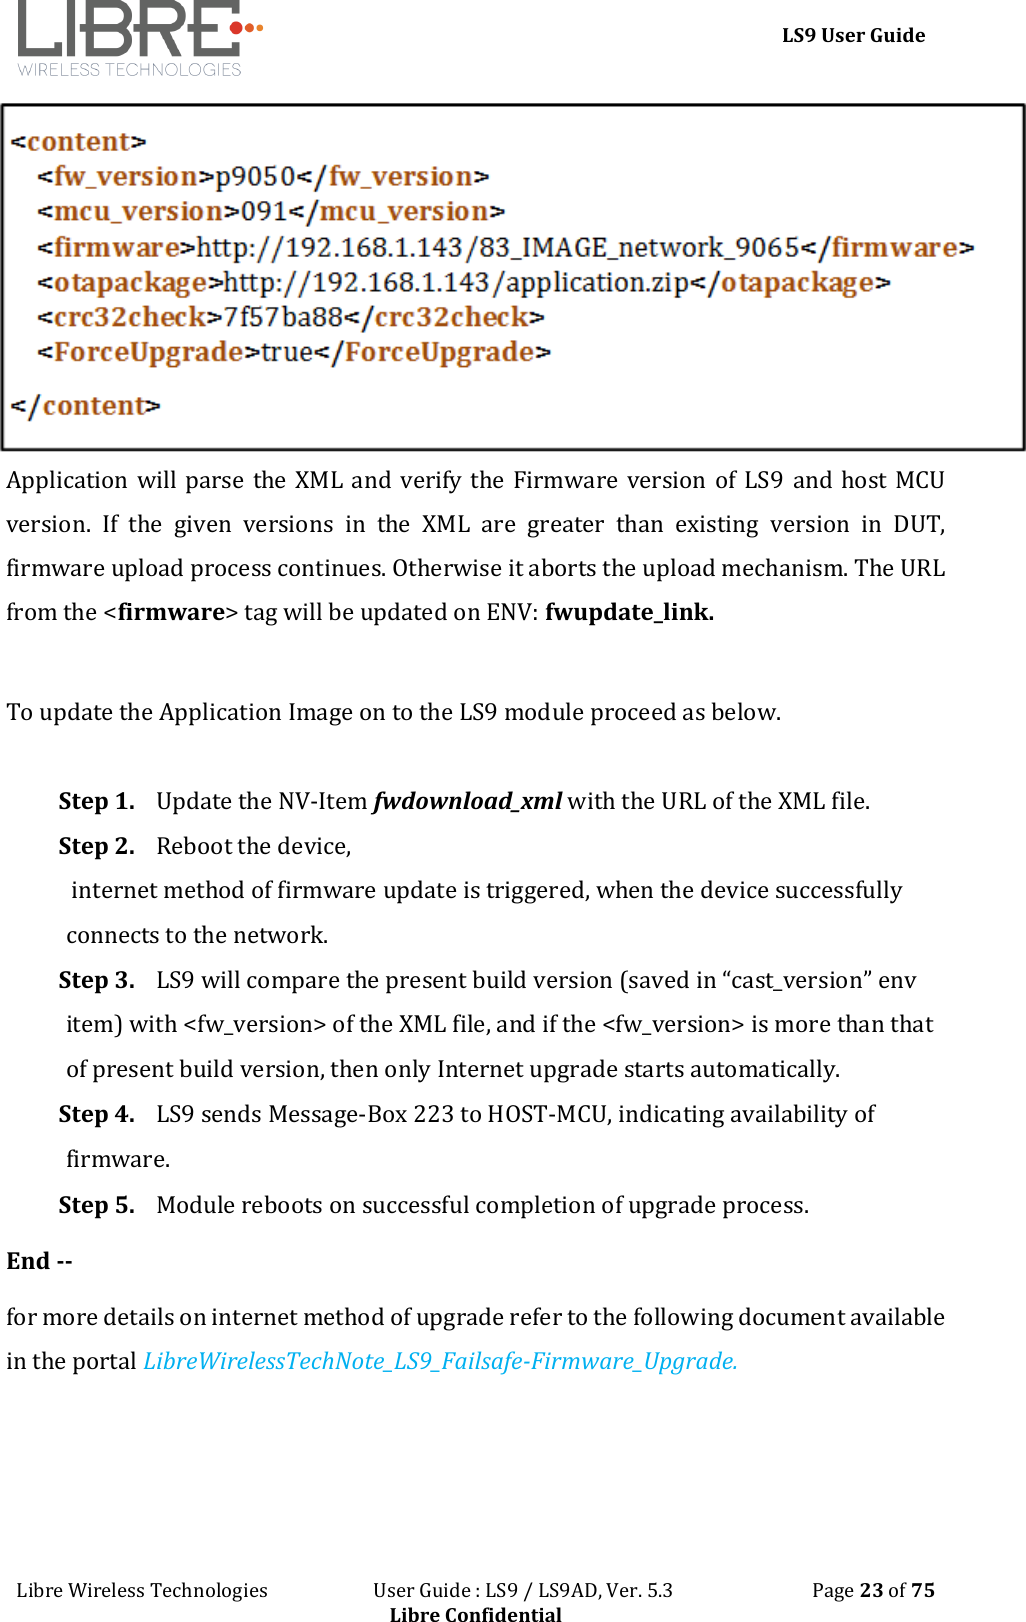
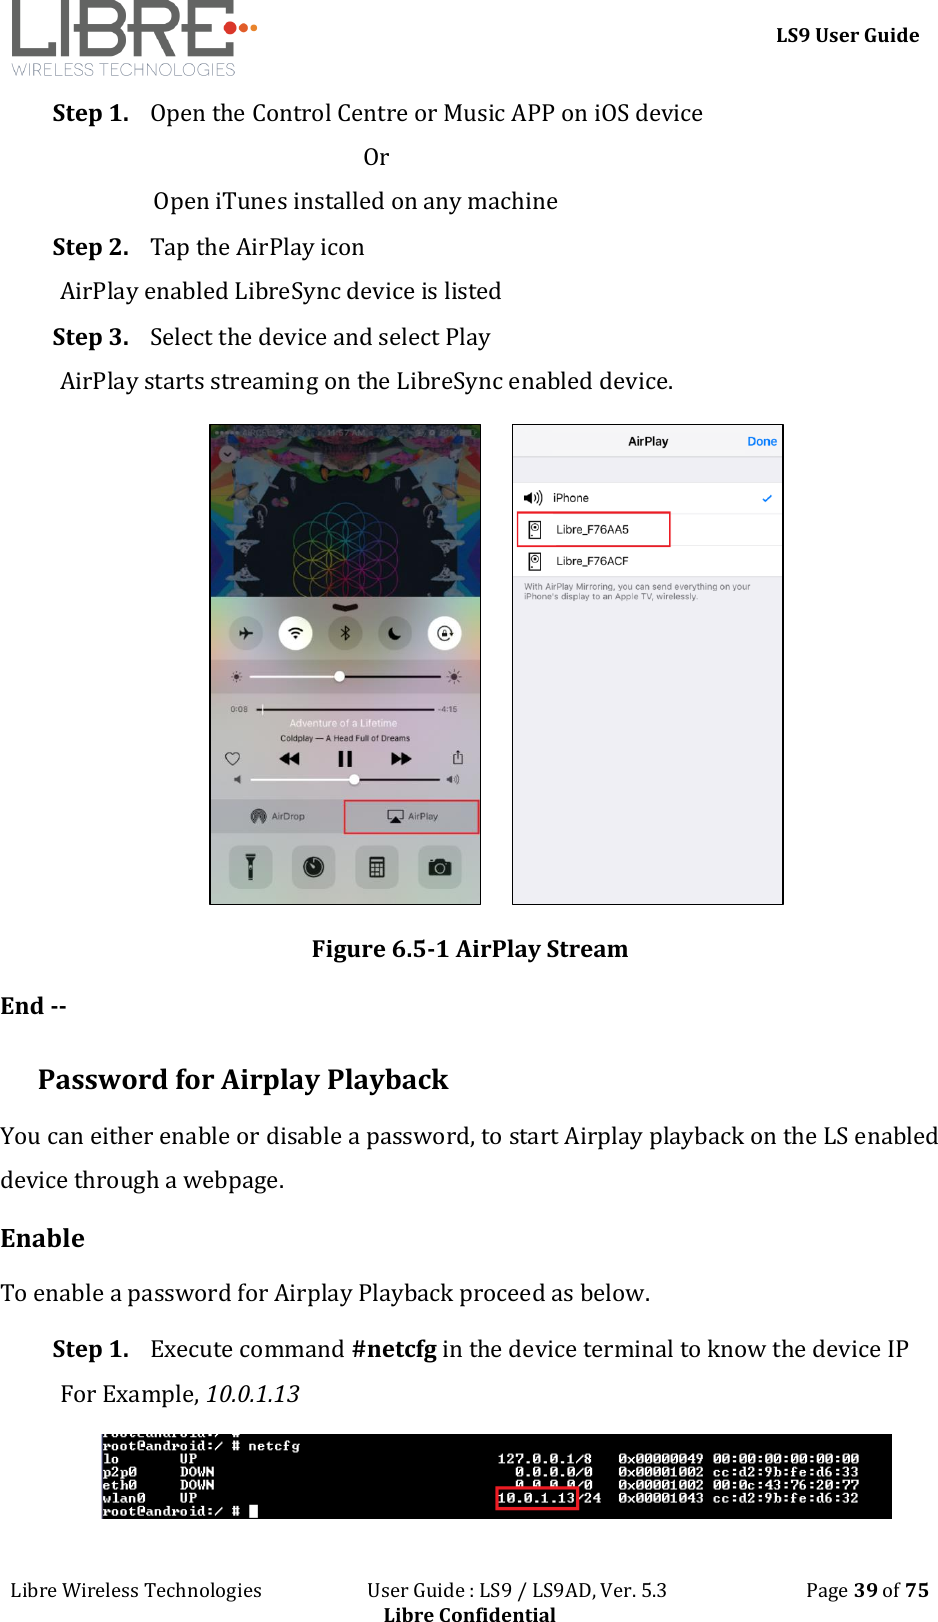
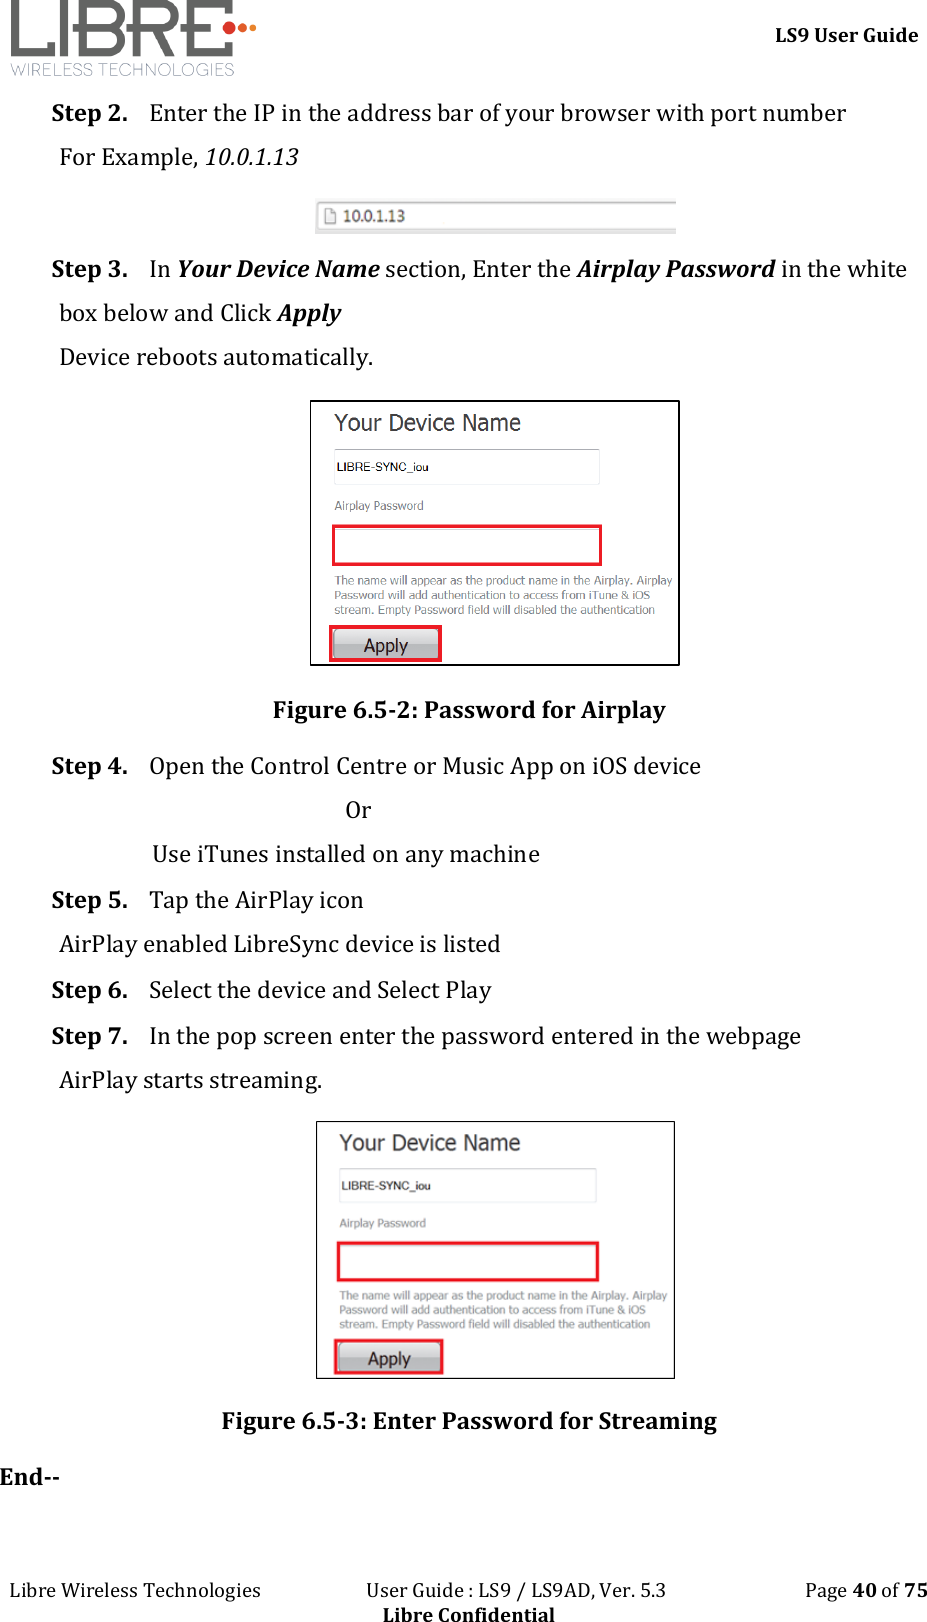
Libre Wireless Technologies LS9AD-AC11DBT media/audio streaming module User Manual Copyright 2014 by Libre Wireless Technologies

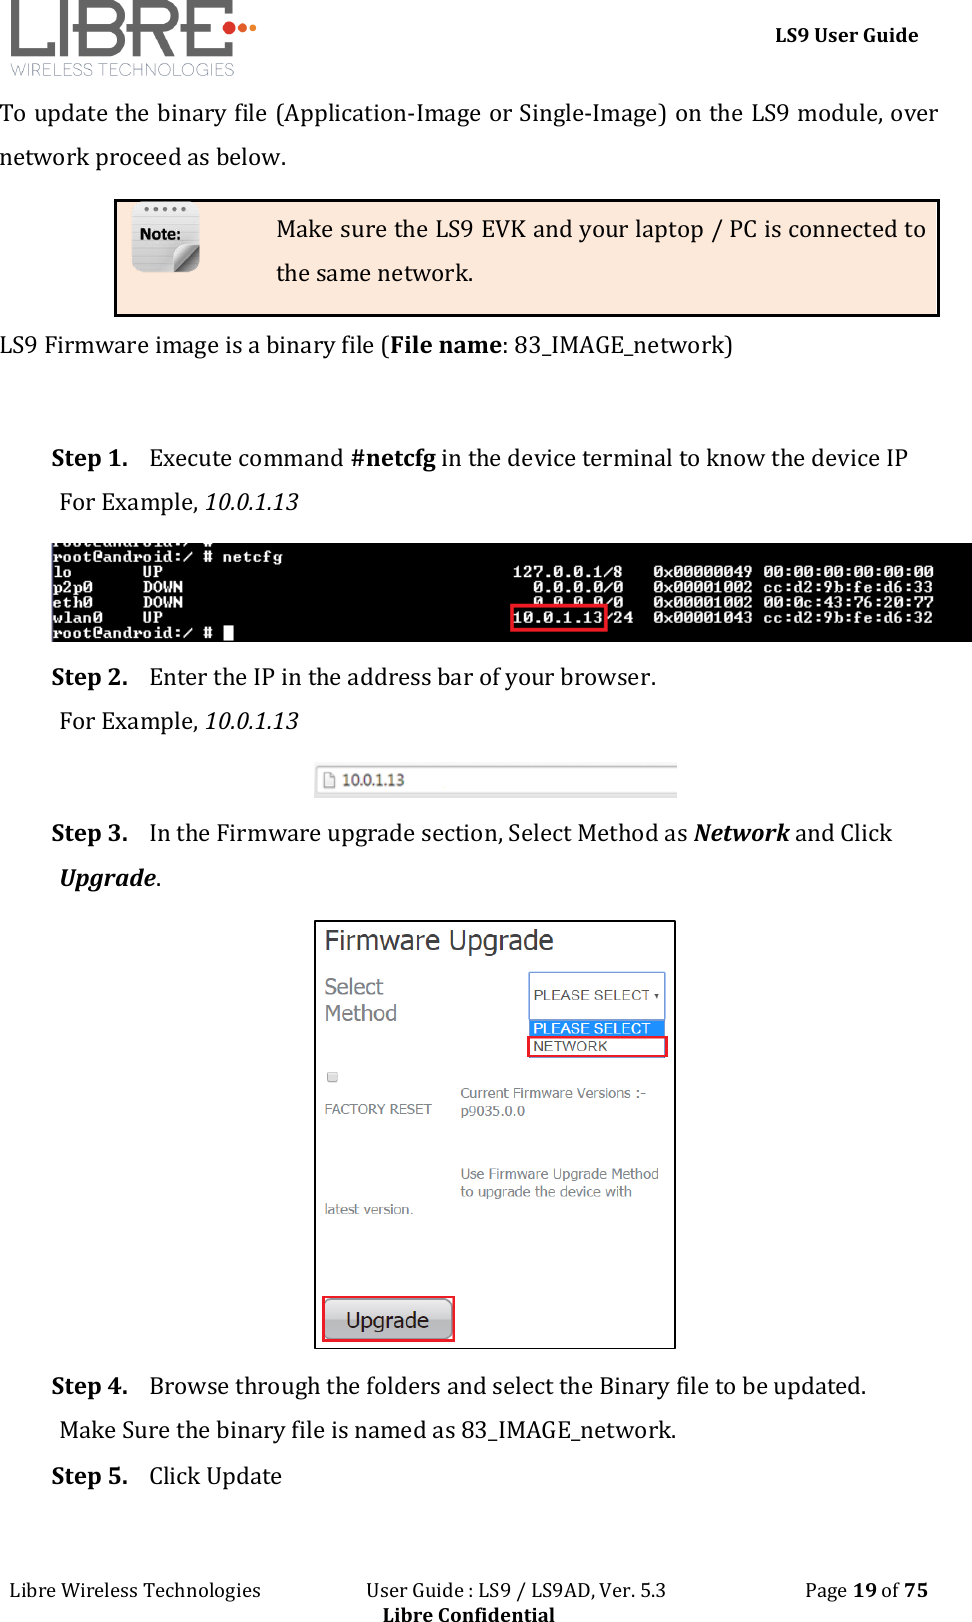
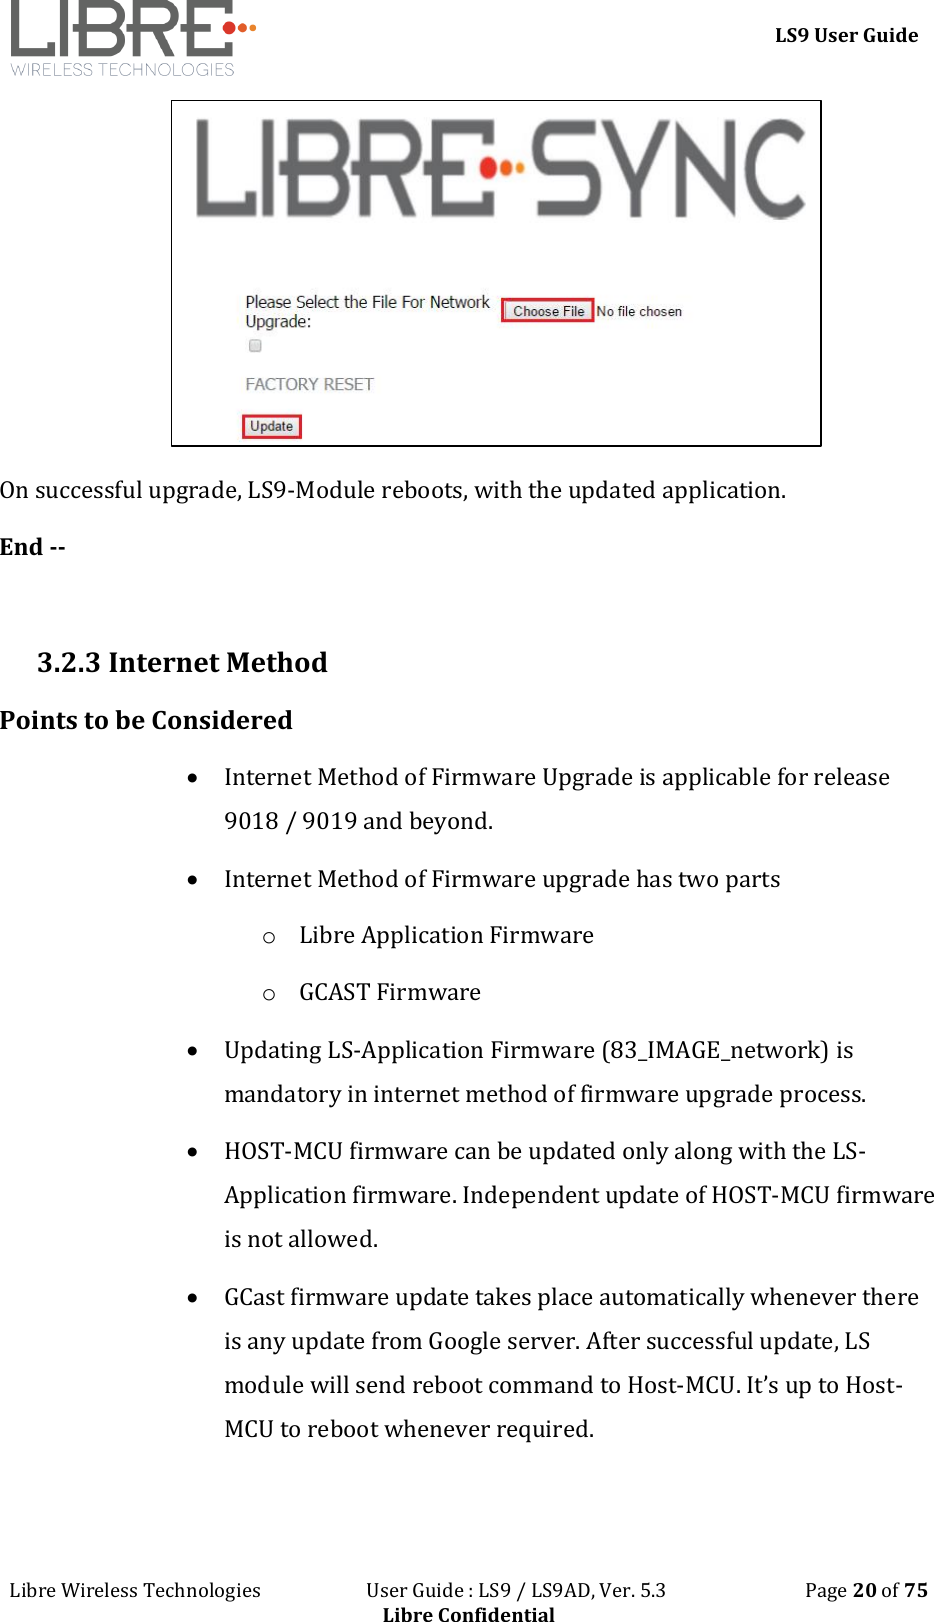
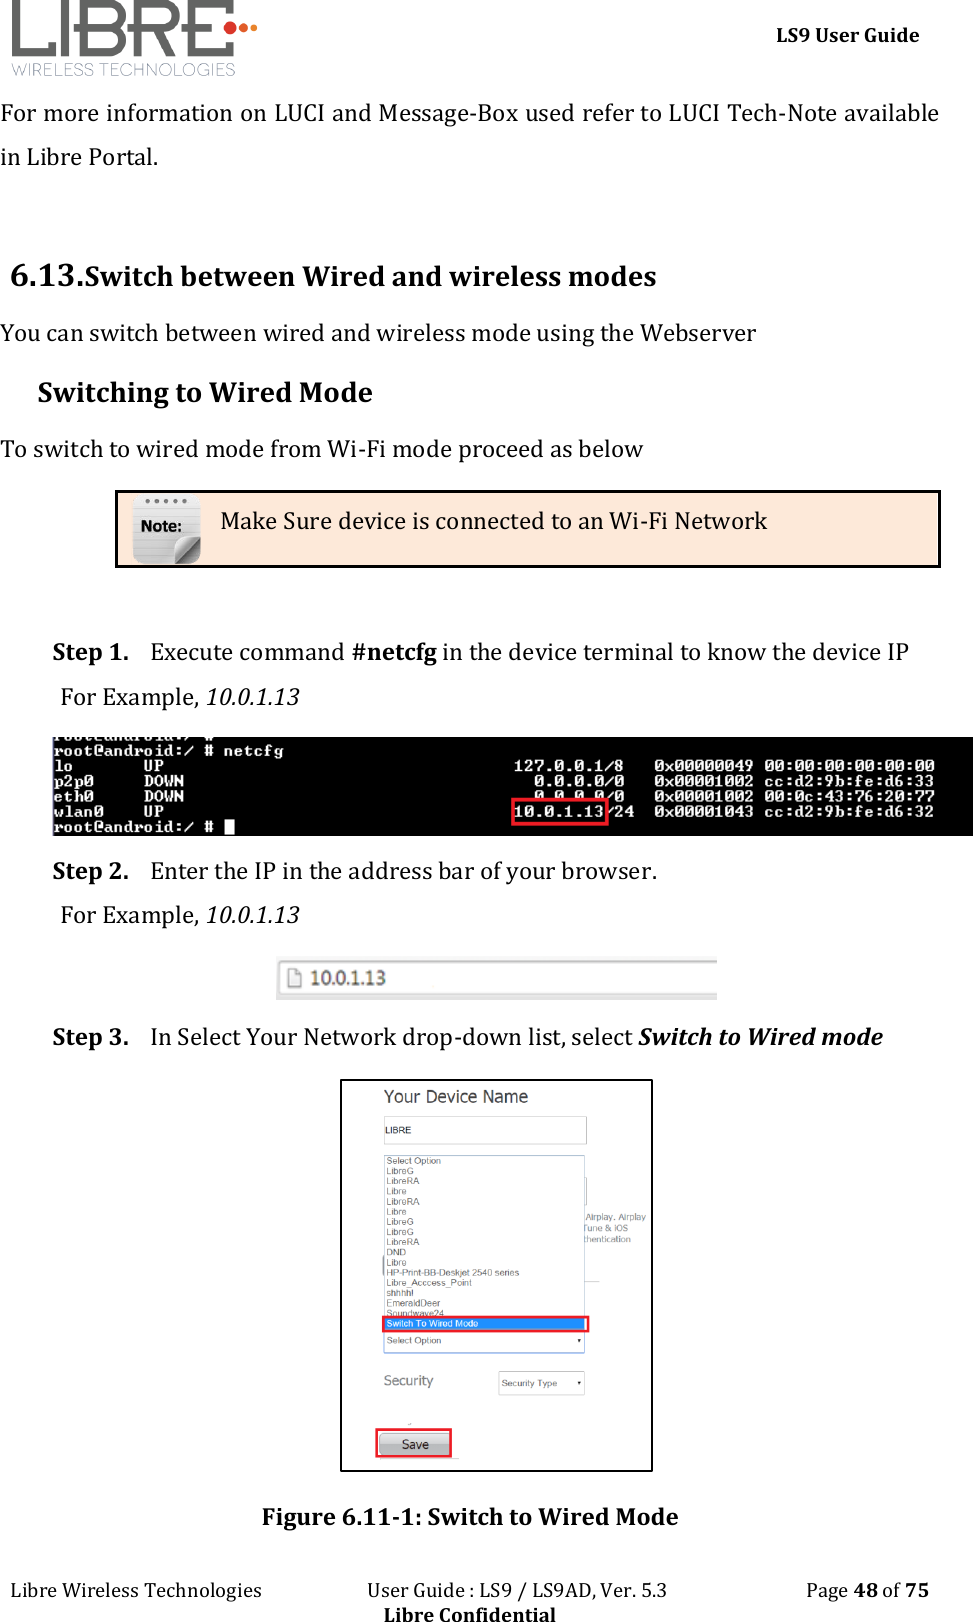
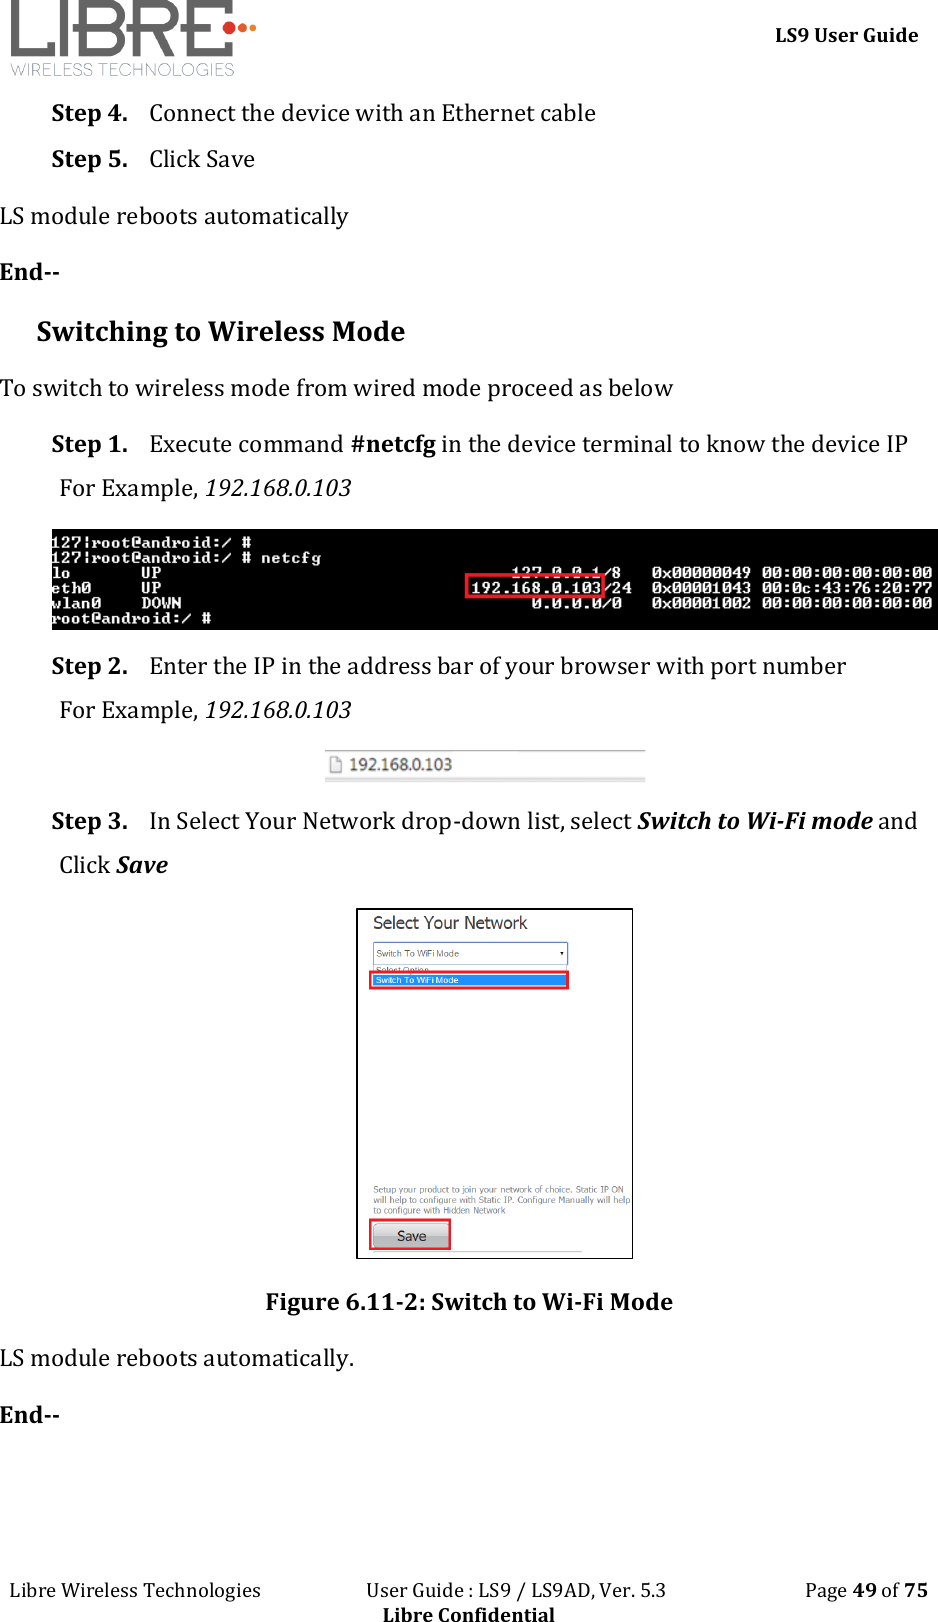
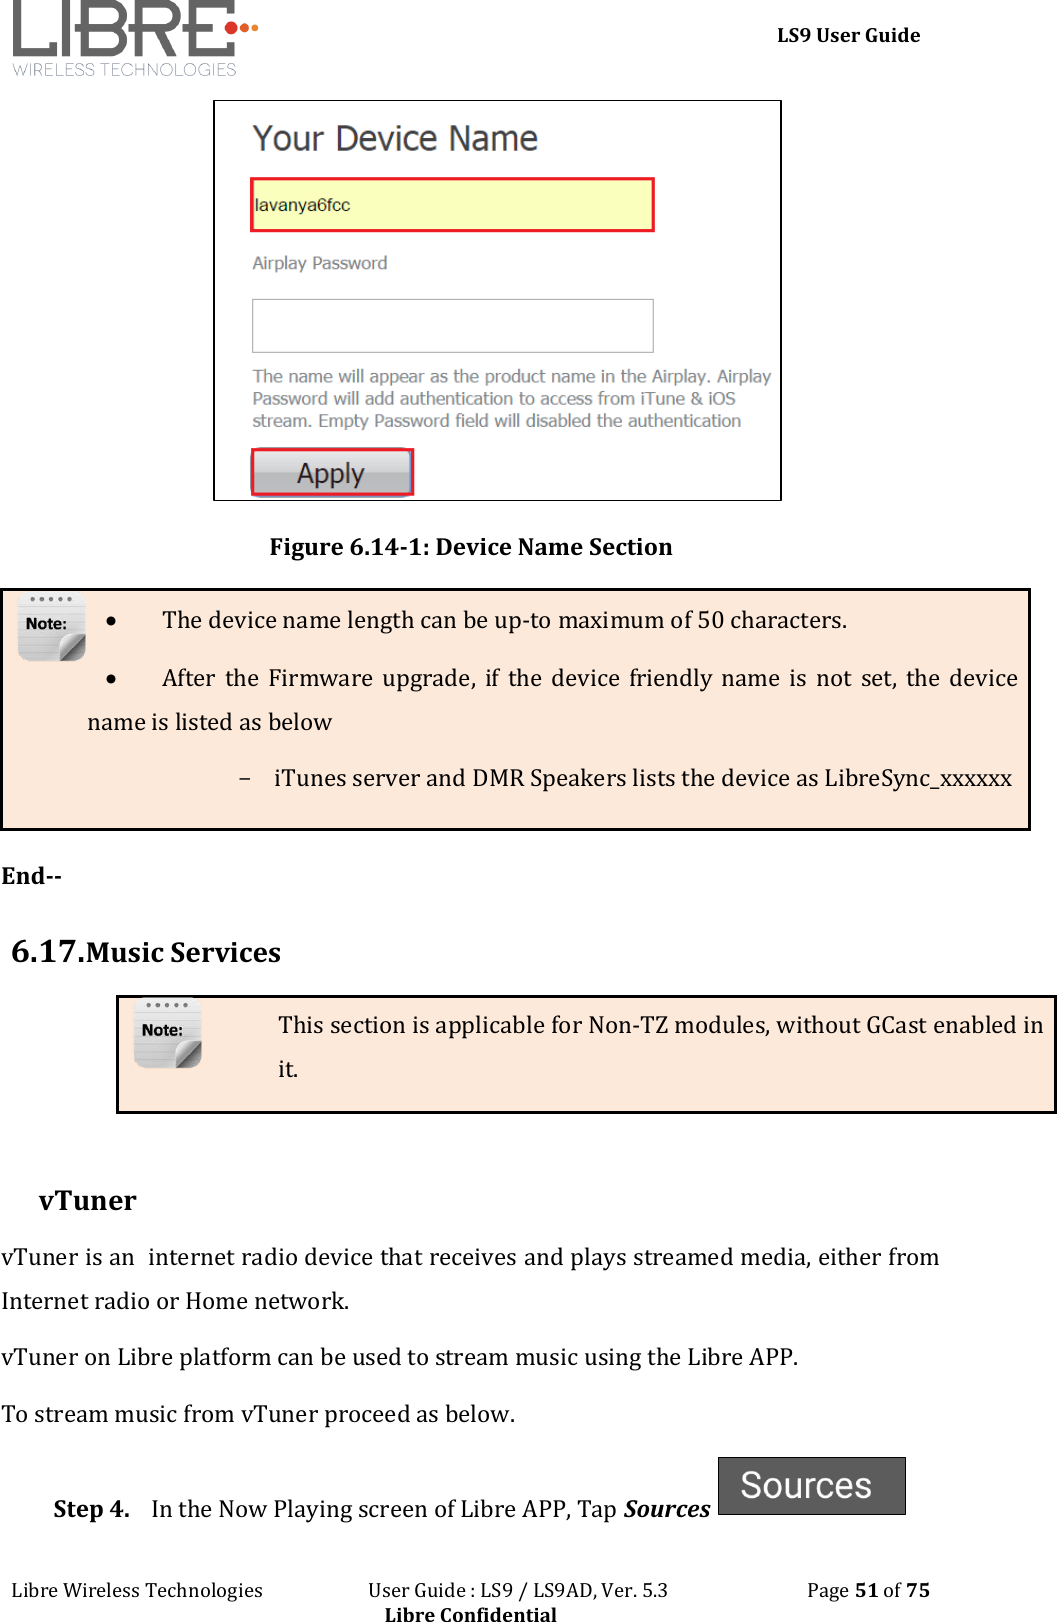
Libre Wireless Technologies Inc. media/audio streaming module Copyright 2014 by Libre Wireless Technologies

Contents

15_LS9AD-AC11DBT UserMan

Libre Wireless Technologies © 2016  Libre Confidential              User Guide Module : LS9 / LS9AD  Rev: 5.3
    LS9 User Guide Libre Wireless Technologies                       User Guide : LS9 / LS9AD, Ver. 5.3                              Page 2 of 75 Libre Confidential    Libre Wireless Technologies Private Limited librewireless.com Copyright © 2016 Libre Wireless Technologies. All rights reserved.  Circuit diagrams and other information relating to Libre Wireless Technologies products are included as a means  of  illustrating  typical  applications.  Consequently,  complete  information  sufficient  for  construction purposes is not necessarily given. Although the information has been checked and is believed to be accurate, no responsibility is assumed for inaccuracies. Libre Wireless Technologies reserves the right to make changes to  specifications  and  product  descriptions  at  any  time  without  notice.  Contact  your  local  Libre  Wireless Technologies sales office to obtain the latest specifications before placing your product order. The provision of this information does not convey to the purchaser of the described semiconductor devices any licenses under any patent rights or other intellectual property rights of Libre Wireless Technologies or others. All sales are expressly conditional on your agreement to the terms and conditions of the most recently dated version of Libre Wireless Technologies standard Terms of Sale Agreement dated before the date of your order (the "Terms of Sale Agreement"). The product may contain design defects or errors known as anomalies which may cause  the product's functions  to deviate from published specifications. Anomaly  sheets are available upon request. Libre Wireless Technologies products are not designed, intended, authorized or warranted for use in any life support or other application where product failure could cause or contribute to personal injury or  severe  property  damage.  Any  and  all  such  uses  without  prior  written  approval  of  an  Officer  of  Libre Wireless Technologies and further testing and/or modification will be fully at the risk of the customer. Copies of this document or other Libre Wireless Technologies literature, as well as the Terms of Sale Agreement, may be obtained by visiting Libre Wireless Technologies website.  LIBRE WIRELESS TECHNOLOGIES DISCLAIMS AND EXCLUDES ANY AND ALL WARRANTIES, INCLUDING WITHOUT LIMITATION ANY AND ALL IMPLIED WARRANTIES OF MERCHANTABILITY, FITNESS FOR A PARTICULAR  PURPOSE,  TITLE,  AND  AGAINST  INFRINGEMENT  AND  THE  LIKE,  AND  ANY  AND  ALL WARRANTIES ARISING FROM ANY COURSE OF DEALING OR USAGE OF TRADE. IN NO EVENT SHALL LIBRE  WIRELESS  TECHNOLOGIES  BE  LIABLE  FOR  ANY  DIRECT,  INCIDENTAL,  INDIRECT,  SPECIAL, PUNITIVE, OR CONSEQUENTIAL DAMAGES; OR FOR LOST DATA, PROFITS, SAVINGS OR REVENUES OF ANY  KIND;  REGARDLESS  OF  THE  FORM  OF  ACTION,  WHETHER  BASED  ON  CONTRACT;  TORT; NEGLIGENCE  OF  LIBRE  WIRELESS  TECHNOLOGIES    OR  OTHERS;  STRICT  LIABILITY;  BREACH  OF WARRANTY; OR OTHERWISE; WHETHER OR NOT ANY REMEDY OF BUYER IS HELD TO HAVE FAILED OF ITS  ESSENTIAL PURPOSE, AND  WHETHER OR  NOT LIBRE WIRELESS TECHNOLOGIES   HAS BEEN ADVISED OF THE POSSIBILITY OF SUCH DAMAGES
    LS9 User Guide Libre Wireless Technologies                       User Guide : LS9 / LS9AD, Ver. 5.3                              Page 3 of 75 Libre Confidential Table of Contents 1. Introduction ............................................................................................................................ 8 1.1. User Guide Insight ............................................................................................................................. 8 2. Libre Wireless Technologies’ EVK ................................................................................ 10 2.1. LS9 EVK Setup .................................................................................................................................. 12 3. Firmware Upgrade ............................................................................................................. 14 3.1. Preparing for Firmware Upgrade. .......................................................................................... 14 3.1.1 Upgrade Guidelines ........................................................................................................................ 14 3.1.2 Creating Single-Image ................................................................................................................... 17 3.2. Firmware Upgrade Methods ..................................................................................................... 17 3.2.1 Firmware Upgrade Using PC / Laptop Method ................................................................ 71 3.2.2 Firmware Upgrade Using USB Method ................................................................................. 17 3.2.3 Firmware Upgrade Using Network Method ....................................................................... 18 3.2.4 Internet Method ............................................................................................................................... 20 4. Network Configuration ..................................................................................................... 24 4.1. Wireless Network Setup Using WAC and SAC .................................................................. 24 4.1.1 Wireless Network Setup Using WAC ..................................................................................... 24 4.1.2 Wireless Network Setup Using SAC (Speaker Android Configuration) method ............................................................................................................................................................. 25 4.2. Wireless Network Setup Using Webserver ........................................................................ 32 4.2.1 LS-Configure Method .................................................................................................................... 32 4.2.2 Webpage Method ............................................................................................................................ 32 4.3. WPS Trigger from Command Line .......................................................................................... 35 4.4. WPS Trigger from LUCI ................................................................................................................ 35 5. Configuring Non-Volatile-Item ...................................................................................... 36 6. Features ................................................................................................................................. 37 6.1. Libre APP for Android .................................................................................................................. 37 6.2. DDMS .................................................................................................................................................... 37 6.3. Source Switching ............................................................................................................................. 38 6.4. Failsafe Mechanism ........................................................................................................................ 38
    LS9 User Guide Libre Wireless Technologies                       User Guide : LS9 / LS9AD, Ver. 5.3                              Page 4 of 75 Libre Confidential 6.5. Software Security ............................................................................................................................ 38 6.6. Airplay® ............................................................................................................................................... 38 Password for Airplay Playback ............................................................................................................ 39 6.7. Cast For Audio .................................................................................................................................. 41 6.8. Spotify Connect ................................................................................................................................ 43 6.9. AUX-In Support ................................................................................................................................ 46 6.10. USB Playback .................................................................................................................................... 46 6.11. DLNA ® / DMR .................................................................................................................................. 46 6.12. LUCI Over UART .............................................................................................................................. 47 6.13. Switch between Wired and wireless modes ...................................................................... 48 Switching to Wired Mode ....................................................................................................................... 48 Switching to Wireless Mode .................................................................................................................. 49 6.14. TCP / IP Tunneling ......................................................................................................................... 50 6.15. Wi-Fi Scan Result ............................................................................................................................ 50 6.16. Device Name Configuration ....................................................................................................... 50 6.17. Music Services .................................................................................................................................. 51 vTuner ............................................................................................................................................................. 51 QQ Music ......................................................................................................................................................... 53 Spotify ............................................................................................................................................................. 56 Tidal  ............................................................................................................................................................. 58 6.18. Telnet .................................................................................................................................................... 60 6.19. Roon Music ......................................................................................................................................... 61 7. Appendix ............................................................................................................................... 62 7.1. ACP Setup............................................................................................................................................ 62 7.2. Rework on LS6 EVK to evaluate LS9 Module. ................................................................... 63 7.3. Install USB Composite Drive ...................................................................................................... 63 7.4. Install Android Composite ADB Driver ................................................................................ 66
    LS9 User Guide Libre Wireless Technologies                       User Guide : LS9 / LS9AD, Ver. 5.3                              Page 5 of 75 Libre Confidential Table of Figures Figure 2-2: LS9 EVK ...................................................................................................................... 10 Figure 2-3: LS9AD EVK ................................................................................................................ 11 Figure 2.4: LS9 / LS9AD Module and LS9 Bridge-Board .................................................. 12 Figure 3.1-1: LS9 Firmware Folder Structure ..................................................................... 72 Figure 4.1.-1: WAC Speaker Listed .......................................................................................... 25 Figure 6.2-1: DDMS Setup in webpage ................................................................................... 37 Figure 6.5-1 AirPlay Stream ...................................................................................................... 39 Figure 6.5-2: Password for Airplay ......................................................................................... 40 Figure 6.5-3: Enter Password for Streaming ....................................................................... 40 Figure 6.6-1: Disable Airplay Password ................................................................................ 41 Figure 6.6-1: Cast for Audio Application Menu ................................................................... 42 Figure 6.6-2: Device list ............................................................................................................... 42 Figure 6.6-3: Cast for Audio Enabled Device Selected ...................................................... 43 Figure 6.7-1: Spotify APP ............................................................................................................ 44 Figure 6.7-2: Spotify Login Screen ........................................................................................... 44 Figure 6.7-3: Device Selection................................................................................................... 45 Figure 6.7-4: Device List ............................................................................................................. 45 Figure 6.9-1: Media Player Stream Menu.............................................................................. 46 Figure 6.9-2: Media Streaming Options ................................................................................. 47 Figure 6.11-1: Switch to Wired Mode ..................................................................................... 48 Figure 6.11-2: Switch to Wi-Fi Mode....................................................................................... 49 Figure 6.14-1: Device Name Section ....................................................................................... 51 Figure 6.16.1-1: vTuner Browse Screen ................................................................................ 52 Figure 6.16.1-2: Now Playing Screen for vTuner ............................................................... 53 Figure 6.16.3-1: QQ Music APP ................................................................................................. 54 Figure 6.16.3-2: Login Screen ................................................................................................... 54 Figure 6.16.3-3: Device Selection Option .............................................................................. 55 Figure 6.16.3-4: Device List ....................................................................................................... 55 Figure 6.16.4-1: Spotify APP ...................................................................................................... 56 Figure 6.16.4-2: Spotify Login Screen .................................................................................... 57
    LS9 User Guide Libre Wireless Technologies                       User Guide : LS9 / LS9AD, Ver. 5.3                              Page 6 of 75 Libre Confidential Figure 6.16.4-3: Device Selection ............................................................................................ 57 Figure 6.16.4-4: Device List ....................................................................................................... 58 Figure 6.16.6-1: Tidal Browse Screen .................................................................................... 59 Figure 6.16.6-2: Now Playing Screen for Tidal .................................................................... 60
    LS9 User Guide Libre Wireless Technologies                       User Guide : LS9 / LS9AD, Ver. 5.3                              Page 7 of 75 Libre Confidential Document Revision History Revision Date Description of change 5.3 November 11, 2016 Incorporated updates 5.2 October 18, 2016  Updated section 6.19 5.1 October 17, 2016 Added Applicable for LS9AD modules and Roon Music Playback 5.0 August 24, 2016 Updated Section 3.2.1 4.9 August 10, 2016 Updated section 3.1 and 3.2 4.8 August 4, 2016 Updated section 3.2.4 4.7 August 3, 2016 Updated Section 4.12 4.6 July 28, 2016 Updated section 3 4.5 July 13, 2016 Updated section 4.2.2 “Webpage Method” 4.4 July 11, 2016 Added Section 6.17 “Telnet” 4.3 June 30, 2016 Added section 6.17 and Updated section 3.2 4.2 June 29, 2016 Updated section 3.2 4.1 June 21, 2016 Updated section 3.2 4.0 June 17, 2016 Updated Section 5
    LS9 User Guide Libre Wireless Technologies                       User Guide : LS9 / LS9AD, Ver. 5.3                              Page 8 of 75 Libre Confidential 1. Introduction Libre  Wireless  provides  evaluation  kit  (EVK)  for  users  to  gain  familiarity  with  our products  and  expedite  their  own  design  and  development.  User  can  connect  to  LS9 module through USB, or wireless interface to configure the module, manage the on board device on the module, and perform functional test.   Libre had delivered few  LS9 sample modules  with OLD Market ID  (MID #01). These modules should be returned back to Libre Sales team. Contact Libre Sale Team to know more and swap the existing LS9 Modules. Libre  has  stopped  making firmware  release  matching to  OLD  MID.  Upgrading  any LS9 firmware to modules with OLD MID shall result in LS9 modules non-functional. The NEW Market ID (MID #03) should only be used going forward. To Know the MID # in the LS9-Module, check for the below log in the device terminal. On the device boot-up, in the device terminal the below MID is printed. Below screen-shot is of the NEW MID# 03.   1.1. User Guide Insight This  document  provides  information  on  the  procedures  to  be  followed  while  using LibreSync for various purpose such as,  Firmware update  Network Configuration  - WAC / SAC Method - Webserver Method o Web page method o LS-Connect Method o Manual Configuration Method  Configuring Non-Volatile Items
    LS9 User Guide Libre Wireless Technologies                       User Guide : LS9 / LS9AD, Ver. 5.3                              Page 9 of 75 Libre Confidential  Streaming Airplay / Cast For Audio / Spotify Connect   Source Switching  Software Security  DDMS  DLNA / DMR  Wi-Fi Scan Results  Music Services  LUCI  AUX Support  Bluetooth Support  TCP / IP Tunneling  Device Name Configuration  Roon Music
    LS9 User Guide Libre Wireless Technologies                       User Guide : LS9 / LS9AD, Ver. 5.3                              Page 10 of 75 Libre Confidential 2. Libre Wireless Technologies’ EVK Figure 2-1 Marks different components of the LS9 Module    Figure 2-2: LS9 EVK
    LS9 User Guide Libre Wireless Technologies                       User Guide : LS9 / LS9AD, Ver. 5.3                              Page 11 of 75 Libre Confidential  Figure 2-3: LS9AD EVK
    LS9 User Guide Libre Wireless Technologies                       User Guide : LS9 / LS9AD, Ver. 5.3                              Page 12 of 75 Libre Confidential 2.1. LS9 EVK Setup To setup the LS9 EVK and Get Started proceed as below.  ACP is not provided along with Libre EVK. It is recommended to buy “ACP-V2.0C”. from Apple Inc.  LS9 supports 4 or 8 port USB-Hub and using USB-Hub one can see debug log and also connect USB pen drive to update firmware.  LS9 EVK supports 4 port USB-Hub by default. If you choose to use 8 port USB-hub then, the USB-Hub should be self powered.  In LS9, USB Hub can be detected dynamically.    Plug  in  and  plug-out  of  each  port  in  USB  hub  can  also  be  detected dynamically. Step 1. Connect the LS9 module to LS9 Bridge-Board.  Figure 2.4: LS9 / LS9AD Module and LS9 Bridge-Board Step 2. Insert LS9 Bridge-Board and LS9 module on LS9-EVK. Step 3. Insert ACP on LS9 EVK.  See section 7.1 for more details on ACP Setup. Step 4. Connect the USB Null Modem cable or UART cable to the Laptop / PC from EVK. 1 If the NV-Item hostpresent is “0”, connect either of the cables to see debug logs.
    LS9 User Guide Libre Wireless Technologies                       User Guide : LS9 / LS9AD, Ver. 5.3                              Page 13 of 75 Libre Confidential 2 If the NV-Item hostpresent is “1”, connect only USB Null Modem cable. Step 5. Connect the EVK Power adaptor to DC Jack on EVK Step 6. Power On the EVK, using ON/ OFF Switch Step 7. Open the device terminal such as, Teraterm (for windows) / Zoc6 / CoolTerm (for Mac) and set the Baud rate to 115200  End --
    LS9 User Guide Libre Wireless Technologies                       User Guide : LS9 / LS9AD, Ver. 5.3                              Page 14 of 75 Libre Confidential 3. Firmware Upgrade  If LS9 Modules are loaded with BIST image, then to load the LS Application image on the LS9 Modules, see document “LibreWirelessTechNote - LibreSync_LS9_SoftwareProcess_Tool” available in Libre Portal.  If LS9 Modules are loaded with LS Application image, then follow the steps as explained in this chapter. Firmware Application Upgrade on LS9 module can be done in one of the following ways.  USB Method  Network Method  Internet Method  PC / Laptop Method  To  know  the  firmware  version  present  in  the  LS9  module,  execute  the  following command “#getprop” in the device terminal.    3.1. Preparing for Firmware Upgrade. 3.1.1 Upgrade Guidelines Before updating the LS9 firmware onto the modules, see the table below to  know  the appropriate method of update to be used.
    LS9 User Guide Libre Wireless Technologies                       User Guide : LS9 / LS9AD, Ver. 5.3                              Page 15 of 75 Libre Confidential Firmware Version Upgrade Options Upgrading from v9023 (or previous) to v9024 Follow any one of the methods  USB Method, see Section 3.2.1  PC / Laptop method using “l2nand” command. See Section 7.5
    LS9 User Guide Libre Wireless Technologies                       User Guide : LS9 / LS9AD, Ver. 5.3                              Page 16 of 75 Libre Confidential Upgrading from v9024 to v9026 (or later) Ensure that the firmware version present in the module is v9024, before upgrading using the method mentioned below.  If the firmware version present in the module is older than v9024, then update the modules with v9024, and use one on the methods below. If USB Method mentioned below is being used, then USB-Hub will be required to accommodate USB Stick which will have the single-image required for firmware upgrade as the USB port present in LS9 EVK will be already used to access device terminal to execute below shell commands.   Follow any one of the methods  USB Method  1 Place the firmware image in the root directory of USB. 2 Ensure the binary filename is “83_IMAGE” - The Firmware image should not contain any extensions. 3 Insert USB in LS9 EVK 4 Run si_update shell command and Reboot (Manual re-boot) the device. 5 Run p_erase shell command and device will re-boot. 6 After the device re-boots, execute the usb_update , to update the application image. • PC / Laptop method using “l2nand” command. See Section 7.5 Custom ENVs will not be retained when firmware is upgraded using PC / Laptop method. Customers have to updated the firmware gain using either USB method (Section 3.2.1) or Network method (Section 3.2.2) of upgrade. Upgrading from v9026 to v9027 or later Follow any one of the methods  USB Method, see Section 3.2.1  Network Method, see Section 3.2.2  Internet Method, see Section 3.2.3
    LS9 User Guide Libre Wireless Technologies                       User Guide : LS9 / LS9AD, Ver. 5.3                              Page 17 of 75 Libre Confidential 3.1.2 Creating Single-Image  Single-Image Update is used to update the HOST-MCU Firmware, FENV, Device-Webpage, and LS-Application Image  simultaneously, by  combining  the Application  Image, FENV, Device-Webpage files and HOST-MCU Firmware Image.  For upgrading HOST-MCU Firmware, combine the HOST-MCU Firmware-Image file with LS9 Application Image, using the Software Customization Kit (Software Customization Kit_LS9_vx.x). To generate the customized Single-Image for LS9, see the document available in Libre Portal, “LibreWireless-TechNote_LS9_Software_Customization_Kit”  3.2. Firmware Upgrade Methods  Before updating the LS9 firmware onto the modules, see section 3.1, to ensure the firmware upgrade guidelines are followed. If the guidelines are not followed, it shall result in LS9 modules non-functional.  For Modules with GCast Keys and Certificates programmed, only GC4A TZ firmware should be loaded.   Libre support for GCast Non-TZ firmware is not available, from October 2016 and onwards.  For development purpose, customers can get LS9 Modules with Libre GCast Keys and certificates programmed, from the Libre Sales team.  3.2.1 Firmware Upgrade Using USB Method For USB Method the name of the Firmware Image should be 83_IMAGE. - This image is a standard image file - This image is used for USB update  - Size of this image is 140-150MB
    LS9 User Guide Libre Wireless Technologies                       User Guide : LS9 / LS9AD, Ver. 5.3                              Page 18 of 75 Libre Confidential LS9  Firmware  image  is  a  binary  file  (File  name:  83_IMAGE).  The  firmware  image  is upgraded by a trigger from Command-Shell or via Webpage. To update the LS9 Firmware Application-Image using USB proceed as below. Steps Using Command Shell Step 1. Place the firmware image in the root directory of USB. Ensure the binary filename is “83_IMAGE” The Firmware image should not contain any extensions. Step 2. Insert the USB in LS9 EVK Step 3. Execute the command #usb_update End-- 3.2.2 Firmware Upgrade Using Network Method For Network Method the name of the Firmware Image should be 83_IMAGE_network. - The size of this image is 40-45MB. -  This image can be used for Network Update. LS9 module does not support Ethernet port on the module. Hence it is recommended to use External USB Network Adapter, to configure LS9 to Ethernet mode.  LS9 Supports below listed network adapters.   XR22800 Hi-Speed USB to 10/100 Ethernet Bridge from EXAR  RTL8150 USB 10/100 Fast Ethernet Adapter from REALTEK  MAC book USB to Ethernet Adapter.  LAN7500 driver from SMSC  Make  sure  the  file  name  of  the  binary  image  to  be  upgrade  is 83_IMAGE_network.   It  takes  about  2  to  5  minutes  approximately  to  complete  the upgrade progress.
    LS9 User Guide Libre Wireless Technologies                       User Guide : LS9 / LS9AD, Ver. 5.3                              Page 19 of 75 Libre Confidential To update the binary file (Application-Image or Single-Image) on the LS9 module, over network proceed as below. Make sure the LS9 EVK and your laptop / PC is connected to the same network. LS9 Firmware image is a binary file (File name: 83_IMAGE_network)  Step 1. Execute command #netcfg in the device terminal to know the device IP For Example, 10.0.1.13  Step 2. Enter the IP in the address bar of your browser. For Example, 10.0.1.13  Step 3. In the Firmware upgrade section, Select Method as Network and Click Upgrade.  Step 4. Browse through the folders and select the Binary file to be updated.  Make Sure the binary file is named as 83_IMAGE_network. Step 5. Click Update
    LS9 User Guide Libre Wireless Technologies                       User Guide : LS9 / LS9AD, Ver. 5.3                              Page 20 of 75 Libre Confidential  On successful upgrade, LS9-Module reboots, with the updated application. End --  3.2.3 Internet Method Points to be Considered  Internet Method of Firmware Upgrade is applicable for release 9018 / 9019 and beyond.  Internet Method of Firmware upgrade has two parts o Libre Application Firmware  o GCAST Firmware  Updating LS-Application Firmware (83_IMAGE_network) is mandatory in internet method of firmware upgrade process.  HOST-MCU firmware can be updated only along with the LS-Application firmware. Independent update of HOST-MCU firmware is not allowed.    GCast firmware update takes place automatically whenever there is any update from Google server. After successful update, LS module will send reboot command to Host-MCU. It’s up to Host-MCU to reboot whenever required.
    LS9 User Guide Libre Wireless Technologies                       User Guide : LS9 / LS9AD, Ver. 5.3                              Page 21 of 75 Libre Confidential   For manual update of GCast firmware, customers should get in touch with Google to get the required OTA package (application.zip).  Each customer has to maintain their own server; in which they will place their own customized image.    Server setup Requirements   Minimum  Server  System Requirements:  Intel  i5 processor,  HDD  80GB,  RAM 8GB.  Operating System : Ubuntu server 16.04   Public IP from ISP providers.  Down Time should be ZERO. Customers can have server setup with above requirements or any cloud service provider with down time ZERO.  Use only ‘http server’. ‘https server’ is not supported in LS9.   Firmware Download XML NV-Item fwdownload_xml is used to provide the URL for the XML file that contains the information about Firmware version, HOST-MCU version and the link to download the firmware. Use the syntax below to provide the URL for firmware update. To Provide the URL for Firmware Update over Internet #setenv fwdownload_xml   <<Link to firmware_download.xml file>>    Firmware Download XML Structure Firmware Download XML file includes the following tags.
    LS9 User Guide Libre Wireless Technologies                       User Guide : LS9 / LS9AD, Ver. 5.3                              Page 22 of 75 Libre Confidential  fw_version: fw_version is tag used to set the firmware version. firmware version should start with ‘p’ followed by the actual version number.  For example, p0902  mcu_version:  mcu_version tag is used to set the HOST-MCU version.  firmware: Firmware tag is used to give the URL of the system firmware image. For example, http://192.168.1.143/83_IMAGE_network_9040   otapackage: Ota package is used to give the link of the CAST OTA package.  The CAST OTA package is downloaded, when LS-Firmware Upgrade is initiated. OTA file can be upgraded only when a higher Firmware version is available in the server. For example, http://192.168.1.143/application.zip  If  the  module  is  a  Non-TZ  module,  then  the  otapackage  tag  should  not  be included in the xml file. Customers can obtain the CAST OTA from Google on signing of the appropriate agreement with Google.  crc32check: CRC32 Check for firmware image which is mentioned in <firmware> field.   CRC check is applicable for the Single-Image (LS-Application Image + HOST-MCU Image).   CRC check is not applicable for GCast OTA Application Image.  ForceUpgrade: Setting the tag ForceUpgrade as true, is to ensure the start of firmware upgrade on the device immediately. Ensure to provide the direct URL link for the URLs of Firmware Download XML, Firmware, and Cast OTA package. Redirection methods are not supported.
    LS9 User Guide Libre Wireless Technologies                       User Guide : LS9 / LS9AD, Ver. 5.3                              Page 23 of 75 Libre Confidential Application will parse the XML and verify the Firmware version of LS9 and host MCU version.  If  the  given  versions  in  the  XML  are  greater  than  existing  version  in  DUT, firmware upload process continues. Otherwise it aborts the upload mechanism. The URL from the <firmware> tag will be updated on ENV: fwupdate_link.  To update the Application Image on to the LS9 module proceed as below.  Step 1. Update the NV-Item fwdownload_xml with the URL of the XML file.  Step 2. Reboot the device,  internet method of firmware update is triggered, when the device successfully connects to the network. Step 3. LS9 will compare the present build version (saved in “cast_version” env item) with <fw_version> of the XML file, and if the <fw_version> is more than that of present build version, then only Internet upgrade starts automatically. Step 4. LS9 sends Message-Box 223 to HOST-MCU, indicating availability of firmware. Step 5. Module reboots on successful completion of upgrade process. End -- for more details on internet method of upgrade refer to the following document available in the portal LibreWirelessTechNote_LS9_Failsafe-Firmware_Upgrade.
    LS9 User Guide Libre Wireless Technologies                       User Guide : LS9 / LS9AD, Ver. 5.3                              Page 24 of 75 Libre Confidential 4. Network Configuration You can configure the network to LS9 module in the following ways.   Wireless Network Setup Using WAC and SAC Method  Wireless Network Setup Using Webserver Method Speakers  present  in  different  Wi-Fi  frequency  bands  cannot  form  a DDMS Group.  For  example,  If  Speaker  A  is  in  Wi-Fi  frequency  band  of  2.4GHz  and Speaker B is in Wi-Fi frequency band of 5GHz, then you cannot form a DDMS Group of Speaker A and Speaker B.  Whereas,  If  Speaker  A  and  Speaker  B  are  in  same  frequency  band (Speaker A and Speaker B are in 2.4GHZ or Speaker A and Speaker B are in 5GHZ), then they form a DDMS Group.  4.1. Wireless Network Setup Using WAC and SAC 4.1.1 Wireless Network Setup Using WAC To setup a wireless network using Wireless Accessory Configuration (WAC) proceed as below: Step 1. Short-Press the Setup-Button on LS9 EVK to trigger WAC mode. Step 2. On an iOS device running iOS, go to Settings > Wi-Fi > SET UP NEW DEVICE The WAC speaker is listed. For example, Libre <MacID>.
    LS9 User Guide Libre Wireless Technologies                       User Guide : LS9 / LS9AD, Ver. 5.3                              Page 25 of 75 Libre Confidential  Figure 4.1.-1: WAC Speaker Listed Step 3. Select the speaker / EVK and Tap NEXT iOS device shares its Wi-Fi settings; that is SSID and Password with the WAC speaker and configures the device. On successful configuration the device is configured to the Wi-Fi network to which the iOS device is connected. End--  4.1.2 Wireless Network Setup Using SAC (Speaker Android Configuration) method To setup a wireless network using Libre Android APP proceed as below Step 1. Short-Press the Setup button on LS9 EVK to trigger SAC. Speaker enters SAC mode Step 2. Open the Libre App
    LS9 User Guide Libre Wireless Technologies                       User Guide : LS9 / LS9AD, Ver. 5.3                              Page 26 of 75 Libre Confidential  Step 3. Tap Configure in the menu   Step 4. In Speakers To be Setup section Tap Add more Speaker.
    LS9 User Guide Libre Wireless Technologies                       User Guide : LS9 / LS9AD, Ver. 5.3                              Page 27 of 75 Libre Confidential Step 5. In Speaker Setup page, Tap configure using SAC.  Step 6. On Speaker To Be Setup page select the speaker to be configured.
    LS9 User Guide Libre Wireless Technologies                       User Guide : LS9 / LS9AD, Ver. 5.3                              Page 28 of 75 Libre Confidential  Step 7. On Speaker Setup page, Tap  Next
    LS9 User Guide Libre Wireless Technologies                       User Guide : LS9 / LS9AD, Ver. 5.3                              Page 29 of 75 Libre Confidential  Step 8. In Device Setup Page, Tap Open Settings.
    LS9 User Guide Libre Wireless Technologies                       User Guide : LS9 / LS9AD, Ver. 5.3                              Page 30 of 75 Libre Confidential Step 9. Select the Module from the Wi-Fi list  Step 10. Go back to Libre APP and Tap Next
    LS9 User Guide Libre Wireless Technologies                       User Guide : LS9 / LS9AD, Ver. 5.3                              Page 31 of 75 Libre Confidential Step 11. On Speaker Setup page, select the Home-Network and enter the password.  Step 12. Tap SAVE.  Step 13. Continue the configuration steps for all the speakers.  End--
    LS9 User Guide Libre Wireless Technologies                       User Guide : LS9 / LS9AD, Ver. 5.3                              Page 32 of 75 Libre Confidential 4.2. Wireless Network Setup Using Webserver 4.2.1 LS-Configure Method To setup wireless network using LS-Connect proceed as below Step 1. Short-Press the Setup-Button on LS9 EVK to trigger LS-Connect Device enters “AP” mode and is available in the Wi-Fi network list as LSConfigure_xxxxxx Step 2. From the network list Select LSConfigure_xxxxxx and connect the laptop to the network. Step 3. Enter the following URL in the address bar of your browser 192.168.43.1  Step 4. Select the Access Point (AP) to be connected to, from Select Your Network drop-down list. Step 5. Select Security Type from Security drop-down list, Enter the valid login credentials and Click OK Device disconnects from laptop and connects to the network selected Step 6. To know the newly acquired IP execute command #netcfg in the device terminal End--  4.2.2 Webpage Method  This method is used if the device is already connected to a network. To setup wireless network via Webpage proceed as below Step 1. Execute command #netcfg in the device terminal to know the device IP Step 2. Enter the IP in the address bar of your browser. For Example, 10.0.1.13, The webpage shows the Network status of the currently connected Access Point.
    LS9 User Guide Libre Wireless Technologies                       User Guide : LS9 / LS9AD, Ver. 5.3                              Page 33 of 75 Libre Confidential  Step 3. In Select Your Network section, Select the Access Point (AP) to be connected, from Select your Network drop-down list and Click Save   End --  You can also connect the device to the network of your choice by setting the Static IP for the device from the device web page. Static IP address is a known  IP address pre-allocated  to the device. Static IP does not change and the device will have the same IP always.  Step 1. Select the Access Point from Select Your Network drop-down list.  Step 2. Enable Static IP ON / OFF settings.
    LS9 User Guide Libre Wireless Technologies                       User Guide : LS9 / LS9AD, Ver. 5.3                              Page 34 of 75 Libre Confidential  Step 3. Enter IP Address, Net Mask, Gateway, Primary DNS, Secondary DNS details as shown in the below screenshot, and click Save   Use any IP address from the Access Point IP’s address range which is not assigned to any client device already. Device reboots and connects to the network and acquires the static IP as defined. Step 4. To know the IP address of the device, execute command #netcfg in the device terminal End--
    LS9 User Guide Libre Wireless Technologies                       User Guide : LS9 / LS9AD, Ver. 5.3                              Page 35 of 75 Libre Confidential 4.3. WPS Trigger from Command Line  To setup a wireless network using WPS proceed as below Step 1. On system boot, enter the command #wpa_cli wps_pbc in device terminal Step 2. Trigger (Press Once) Setup button in the Access Point. Device connects to the Network of the Access Point. Step 3. To know the newly acquired IP execute command #netcfg in the device terminal End--  4.4. WPS Trigger from LUCI You can setup a wireless network for the LS-Enabled speaker, using the LUCI Message-Box #141.  Message-Box #141 is used by Host to trigger WPS mode. For more information see section 6 in LUCI Technical Note,  LibreWirelessTechNote - LS_Light_Weight_Universal_Control_Interface.
    LS9 User Guide Libre Wireless Technologies                       User Guide : LS9 / LS9AD, Ver. 5.3                              Page 36 of 75 Libre Confidential 5. Configuring Non-Volatile-Item Non-Volatile  (NV)  item in  LibreSync  can  be  configured  through  command  line  or  by editing the env-item.xml file, shared by Libre.  To configure the NV-Item, type the below command in the command line and Reboot the LS-Module to apply the changes. Command Syntax #setenv <NV_item_name> <<value>> #reboot   There  should  be  space  between  setenv  and  <NV_item_name>  and  between  the <NV_item_name> and  <<value>> . To know the value of the NV-Item set, type the below command in the command line. Command Syntax #getenv <NV_item_name>  To reset all the NV-Items to factory default values, type the below command in the command line. Command Syntax #SetFacDefault To know all the NV-items values, type the below command in the command line. Command Syntax #GetAllENV  Example To configure NV-item hostpresent #setenv hostpresent 1 #reboot To Know the value of the NV-Item hostpresent. #getenv hostpresent  For detailed information on Configuring the NV-Items refer to  “LibreWirelessTechNote – Non-Volatile_Items_in_LibreSync” available in Libre Portal.
    LS9 User Guide Libre Wireless Technologies                       User Guide : LS9 / LS9AD, Ver. 5.3                              Page 37 of 75 Libre Confidential 6. Features 6.1. Libre APP for Android LUCI enables user to remotely, control the LibreSync LS9 enabled product using the Libre Application  for  android.  The  application  can  be  used  to  browse  DLNA-DMS  in  the network, USB connected to device and other online radio stations such as vTuner and TuneIn , and stream music using the DMP feature supported by LS9. For more information on using Libre APP refer   LibreWireless-Usability_Guide_Dynamic_Direct_Multi-Node_Streaming  6.2. DDMS A  Wireless  Dynamic  Direct  Multi-Node  Streaming  (DDMS)  Zone  is  a  group  of  nodes, (DDMS  enabled  speakers)  chosen  dynamically  by  an  end  user  to  synchronously  play audio from a given content source.  This group of speakers can play music from any Audio Source synchronously without any delay between the nodes. Each group can consists of two or more nodes.   For information on setting up devices for DDMS, and Using Libre App refer to  LibreWireless-Usability_Guide_Dynamic_Direct_Multi-Node_Streaming The device webpage provides interface to update DDMS SSID and password.  Figure 6.2-1: DDMS Setup in webpage
    LS9 User Guide Libre Wireless Technologies                       User Guide : LS9 / LS9AD, Ver. 5.3                              Page 38 of 75 Libre Confidential 6.3. Source Switching LibreSync  enables  user  to switch  the  playback  sources  without  any  hitches. User  can choose to stream music either from Cast-For-Audio (C4A) Spotify connect and the music streams on the selected device from the source. For example, A LS Device streaming Cast-For-Audio (C4A) starts streaming music from Spotify connect when, the user selects music from Spotify APP to be played on the device.  6.4. Failsafe Mechanism Failsafe Mechanism safeguards the modules from being corrupted or unusable, in case of power failure or reset during the firmware upgrade. If there is a power failure during the firmware update process of the critical portions like kernel, firmware update process is re-tried automatically in the next boot up.  There is no need to connect to the network, open device webpage or download the single image again from the server to complete the Firmware update process.   For  more  information  on  Failsafe  Mechanism  see  LibreWirelessTechNote_Failsafe-Firmware_Upgrade , available in Libre Portal. 6.5. Software Security LibreSync software is secured using Crypto IC. Crypto IC is embedded either in the LS9 module or the ACP. Crypto IC authenticates and allows only the valid LS9 software to boot on the LS9 modules.  6.6. Airplay® After the speaker or device is configured to the network, it is discovered by the iOS device and iTunes, and is available for AirPlay streaming.  To stream AirPlay proceed as below Failsafe Mechanism is applicable for network and internet update only.
    LS9 User Guide Libre Wireless Technologies                       User Guide : LS9 / LS9AD, Ver. 5.3                              Page 39 of 75 Libre Confidential Step 1. Open the Control Centre or Music APP on iOS device                                                        Or                  Open iTunes installed on any machine Step 2. Tap the AirPlay icon AirPlay enabled LibreSync device is listed Step 3. Select the device and select Play AirPlay starts streaming on the LibreSync enabled device.          Figure 6.5-1 AirPlay Stream End --  Password for Airplay Playback You can either enable or disable a password, to start Airplay playback on the LS enabled device through a webpage. Enable To enable a password for Airplay Playback proceed as below. Step 1. Execute command #netcfg in the device terminal to know the device IP For Example, 10.0.1.13
    LS9 User Guide Libre Wireless Technologies                       User Guide : LS9 / LS9AD, Ver. 5.3                              Page 40 of 75 Libre Confidential Step 2. Enter the IP in the address bar of your browser with port number For Example, 10.0.1.13  Step 3. In Your Device Name section, Enter the Airplay Password in the white box below and Click Apply Device reboots automatically.  Figure 6.5-2: Password for Airplay Step 4. Open the Control Centre or Music App on iOS device                                                     Or                  Use iTunes installed on any machine Step 5. Tap the AirPlay icon AirPlay enabled LibreSync device is listed Step 6. Select the device and Select Play Step 7. In the pop screen enter the password entered in the webpage AirPlay starts streaming.  Figure 6.5-3: Enter Password for Streaming End--
    LS9 User Guide Libre Wireless Technologies                       User Guide : LS9 / LS9AD, Ver. 5.3                              Page 41 of 75 Libre Confidential Disable To disable a password for Airplay Playback proceed as below. Step 1. Execute command #netcfg in the device terminal to know the device IP For Example, 10.0.1.13  Step 2. Enter the IP in the address bar of your browser with port number For Example, 10.0.1.13  Step 3. In Your Device Name section, Clear the previous Password and leave the white space blank and Click Apply Step 4. A pop-up message appears Click OK  Click Apply  Figure 6.6-1: Disable Airplay Password Device reboots automatically. End --  6.7. Cast For Audio Once the speaker or device is configured to the network, it is discovered by Cast For Audio supported iOS / Android Application (i.e. Cast for Audio Application), and is available for Cast For Audio streaming. To stream Cast For Audio proceed as below
    LS9 User Guide Libre Wireless Technologies                       User Guide : LS9 / LS9AD, Ver. 5.3                              Page 42 of 75 Libre Confidential Step 1. Connect the iOS / Android device in same network as your LS-Device. Step 2. Open the Cast for Audio Application on iOS / Android device Step 3. Tap the Cast icon on Cast for Audio Application       Figure 6.6-1: Cast for Audio Application Menu Step 4. Cast For Audio enabled LS-Device is listed  Figure 6.6-2: Device list Step 5. Select the device and start Cast For Audio streaming
    LS9 User Guide Libre Wireless Technologies                       User Guide : LS9 / LS9AD, Ver. 5.3                              Page 43 of 75 Libre Confidential  Figure 6.6-3: Cast for Audio Enabled Device Selected End --  6.8. Spotify Connect LibreSync enables you to stream music via Spotify connect.  To use the Spotify connect APP proceed as below. Step 1. Register for Spotify premium account and get the Username and Password for the account  Step 2. Download the Spotify app from the APP store/Play Store. To stream music from Spotify connect proceed as below. Step 3. Reboot the LS enabled device and connect to the network. Step 4. Connect iOS device/Android phone to the same network. Step 5. Open the Spotify APP
    LS9 User Guide Libre Wireless Technologies                       User Guide : LS9 / LS9AD, Ver. 5.3                              Page 44 of 75 Libre Confidential  Figure 6.7-1: Spotify APP Step 6. Login to Spotify, using the Username and Password received, during registration.  Figure 6.7-2: Spotify Login Screen Step 7. Browse for songs in the Spotify Server Step 8. In Now playing screen, select Speaker in right bottom
    LS9 User Guide Libre Wireless Technologies                       User Guide : LS9 / LS9AD, Ver. 5.3                              Page 45 of 75 Libre Confidential  Figure 6.7-3: Device Selection Step 9. Select the LS enabled device  Figure 6.7-4: Device List LS enabled device starts streaming music from Spotify Connect  End --
    LS9 User Guide Libre Wireless Technologies                       User Guide : LS9 / LS9AD, Ver. 5.3                              Page 46 of 75 Libre Confidential 6.9. AUX-In Support Users can connect Audio Source to AUX-In jack of EVK and select the source from Libre-APP. 6.10. USB Playback LS supports audio playback from USB. User can select the content source from an USB drive to stream music on LS-Enabled speaker.  6.11. DLNA ® / DMR After the device is configured to the network, device is discoverable over UPnP®.  Any Universal  Plug  and  Play  (UPnP)  /  Digital  Living  Network  Alliance  (DLNA)  certified controller can be used to stream music to the device. To test Play To functionality proceed as below Step 1. Open Media Player on Windows 7 Step 2. In the play list, Click Play To and select the LS enabled speaker or device                   Or  Right click on the song and Click Play To Music starts streaming. If the speaker / device is not visible on the Windows 7 Media Player, go to Stream > More streaming options, ensure speaker is in Allowed state.   Figure 6.9-1: Media Player Stream Menu
    LS9 User Guide Libre Wireless Technologies                       User Guide : LS9 / LS9AD, Ver. 5.3                              Page 47 of 75 Libre Confidential  Figure 6.9-2: Media Streaming Options  Digital Media Renderer (DMR) functionality can be verified using  any  app  on  the  Android  /  iOS  devices  as  well.  For example, the native audio player on Samsung Galaxy devices can be used.  End--  6.12. LUCI Over UART LibreSync  enabled  devices  provides  a  set  of  Message-Boxes  for  Control  and  Status Indications to, remote control itself. LUCI Architecture is designed to enable developers to remote control LibreSync products using a common light weight protocol. LUCI provides control for status indications such as    Play Control  Browse Control  Device Attachment / Detachment Status (USB)  User Interface, Time Stamp, Volume Control  Firmware Upgrade Process  Multi-Room Audio Status, Multi-Room Audio Modes  Network Configuration Status  Bluetooth Control
    LS9 User Guide Libre Wireless Technologies                       User Guide : LS9 / LS9AD, Ver. 5.3                              Page 48 of 75 Libre Confidential For more information on LUCI and Message-Box used refer to LUCI Tech-Note available in Libre Portal.   6.13. Switch between Wired and wireless modes  You can switch between wired and wireless mode using the Webserver Switching to Wired Mode To switch to wired mode from Wi-Fi mode proceed as below Make Sure device is connected to an Wi-Fi Network  Step 1. Execute command #netcfg in the device terminal to know the device IP For Example, 10.0.1.13  Step 2. Enter the IP in the address bar of your browser. For Example, 10.0.1.13  Step 3. In Select Your Network drop-down list, select Switch to Wired mode   Figure 6.11-1: Switch to Wired Mode
    LS9 User Guide Libre Wireless Technologies                       User Guide : LS9 / LS9AD, Ver. 5.3                              Page 49 of 75 Libre Confidential Step 4. Connect the device with an Ethernet cable Step 5. Click Save LS module reboots automatically End-- Switching to Wireless Mode To switch to wireless mode from wired mode proceed as below Step 1. Execute command #netcfg in the device terminal to know the device IP For Example, 192.168.0.103  Step 2. Enter the IP in the address bar of your browser with port number For Example, 192.168.0.103  Step 3. In Select Your Network drop-down list, select Switch to Wi-Fi mode and Click Save  Figure 6.11-2: Switch to Wi-Fi Mode LS module reboots automatically. End--
    LS9 User Guide Libre Wireless Technologies                       User Guide : LS9 / LS9AD, Ver. 5.3                              Page 50 of 75 Libre Confidential 6.14. TCP / IP Tunneling  TCP/IP Tunnelling is a unique feature supported by LS modules. Tunneling enables a Host MCU to communicate with other network devices over UART. The Host MCU can build their own proprietary protocol using LUCI tunneling. For more information on TCP / IP tunneling refer LUCI document  LibreWirelessTechNote - LS_Light_Weight_Universal_Control_Interface  6.15. Wi-Fi Scan Result Wi-Fi Scan result enables you to list the available access point. This feature is intended to be used by the APP developers to list the available networks in the APP for configuration.  To use the feature, in the address bar of your browser enter the IP address followed by /scanresult.asp.   6.16. Device Name Configuration You can define a friendly name to LS-Enabled device. To define the friendly name proceed as below. Step 1. Execute command #netcfg in the device terminal to know the device IP For Example, 10.0.1.13  Step 2. Enter the IP in the address bar of your browser with port number For Example, 10.0.1.13  Step 3. In Your Device Name section, Enter the Device Name in the white box and Click Apply  Device reboots automatically.
    LS9 User Guide Libre Wireless Technologies                       User Guide : LS9 / LS9AD, Ver. 5.3                              Page 51 of 75 Libre Confidential  Figure 6.14-1: Device Name Section  The device name length can be up-to maximum of 50 characters.  After the  Firmware  upgrade,  if  the  device  friendly  name  is  not  set,  the  device name is listed as below - iTunes server and DMR Speakers lists the device as LibreSync_xxxxxx  End--  6.17. Music Services This section is applicable for Non-TZ modules, without GCast enabled in it.   vTuner vTuner is an  internet radio device that receives and plays streamed media, either from Internet radio or Home network. vTuner on Libre platform can be used to stream music using the Libre APP. To stream music from vTuner proceed as below. Step 4. In the Now Playing screen of Libre APP, Tap Sources
    LS9 User Guide Libre Wireless Technologies                       User Guide : LS9 / LS9AD, Ver. 5.3                              Page 52 of 75 Libre Confidential Step 5. Tap vTuner from the source List   Step 6. Browse through the list and select the song of your choice.   Figure 6.16.1-1: vTuner Browse Screen Step 7. LS enabled speaker starts streaming the song from vTuner.
    LS9 User Guide Libre Wireless Technologies                       User Guide : LS9 / LS9AD, Ver. 5.3                              Page 53 of 75 Libre Confidential  Figure 6.16.1-2: Now Playing Screen for vTuner End --  QQ Music LibreSync enable you to stream music via QQ music service.  To use the QQ music service Step 1. Register for QQ Music account and get the Username and Password for the account Step 2. Download the QQ Music app from the Play Store. To stream music from QQ Music proceed as below. Step 3. Reboot the LS enabled device and connect to the network. Step 4. Connect Smartphone to the same network. Step 5. Open the QQ Music APP
    LS9 User Guide Libre Wireless Technologies                       User Guide : LS9 / LS9AD, Ver. 5.3                              Page 54 of 75 Libre Confidential  Figure 6.16.3-1: QQ Music APP Step 6. Login to QQ Music, using the Username and Password received, during registration.  Figure 6.16.3-2: Login Screen Step 7. Browse for songs in the QQ Music Server
    LS9 User Guide Libre Wireless Technologies                       User Guide : LS9 / LS9AD, Ver. 5.3                              Page 55 of 75 Libre Confidential Step 8. In Now playing screen, select ‘Q’ symbol  Figure 6.16.3-3: Device Selection Option Step 9. Select the LS enabled device  Figure 6.16.3-4: Device List Playback from QQ music on the LS enabled device starts. End - -
    LS9 User Guide Libre Wireless Technologies                       User Guide : LS9 / LS9AD, Ver. 5.3                              Page 56 of 75 Libre Confidential  Spotify  LibreSync enables you to stream music via Spotify connect.  Spotify  on  LS-Enabled  speakers  supports  to  Save  /  Play/  Delete  presets,  for  more information on Spotify Preset Actions refer to Message-Box # 75 in LUCI Document  (LibreWirelessTechNote-LS_Light_Weight_Universal_Control_Interface)  available  in LibreSync Document Portal.  To use the Spotify connect APP proceed as below. Step 1. Register for Spotify premium account and get the Username and Password for the account  Step 2. Download the Spotify app from the App store/Play Store.   The device name is listed as, LibreSync_xxxxxx  In Spotify free account, LS Device will not be listed in the Spotify speaker list. To stream music from Spotify connect proceed as below. Step 3. Reboot the LS enabled device and connect to the network. Step 4. Connect iOS device/Android phone to the same network. Step 5. Open the Spotify APP  Figure 6.16.4-1: Spotify APP
    LS9 User Guide Libre Wireless Technologies                       User Guide : LS9 / LS9AD, Ver. 5.3                              Page 57 of 75 Libre Confidential Step 6. Login to Spotify, using the Username and Password received, during registration.  Figure 6.16.4-2: Spotify Login Screen Step 7. Browse for songs in the Spotify Server Step 8. In Now playing screen, select Speaker symbol in right bottom  Figure 6.16.4-3: Device Selection
    LS9 User Guide Libre Wireless Technologies                       User Guide : LS9 / LS9AD, Ver. 5.3                              Page 58 of 75 Libre Confidential Step 9. Select the LS enabled device  Figure 6.16.4-4: Device List LS enabled device starts streaming music from Spotify Connect  End --  Tidal Tidal,  also  known  as  TIDALHiFi  is  a  subscription-based  music  streaming  service  that offers lossless audio and high definition music. The service has over 30 million tracks and 75,000 music videos. Tidal on Libre platform is used to stream music using the Libre APP. To stream music from Tidal proceed as below. Step 1. In the Now Playing screen of Libre APP, Tap Sources   Step 2. Tap Tidal  from the source List   Step 3. Enter the User Name and Password to login to the music service.
    LS9 User Guide Libre Wireless Technologies                       User Guide : LS9 / LS9AD, Ver. 5.3                              Page 59 of 75 Libre Confidential  Step 4. Browse through the list and select the song of your choice.   Figure 6.16.6-1: Tidal Browse Screen Step 5. LS enabled speaker starts streaming the song from Tidal.
    LS9 User Guide Libre Wireless Technologies                       User Guide : LS9 / LS9AD, Ver. 5.3                              Page 60 of 75 Libre Confidential  Figure 6.16.6-2: Now Playing Screen for Tidal End -- 6.18.  Telnet Telnet  provides  access  to  the  command  line  interface  of  the  LS-Enabled  device  over Ethernet / Wi-Fi.  To enable or disable Telnet in the device LibreSync provides a configurable Non-Volatile Item “telnet”. Setting this NV-Item as 1 enables Telnet in the device.  For  more  information  on  configuring  NV-item  refer  to  LibreWirelessTechNote    Non-Volatile_Items_in_LibreSync available in Libre Portal.
    LS9 User Guide Libre Wireless Technologies                       User Guide : LS9 / LS9AD, Ver. 5.3                              Page 61 of 75 Libre Confidential 6.19.  Roon Music Roon is a music player service which looks at your music and finds photos, bios, reviews, lyrics, and concert dates, and makes connections between artists, composers, performers, conductors, and producers. LS9-module supports playback from Roon player in its platform. To enable Roon Music proceed as below.  Step 1. Get Membership account or Free trail account from Roon https://roonlabs.com/pricing.html  Step 2. Download applications, which support Roon music playback  https://roonlabs.com/downloads.html  Step 3. Launch the Roon server, and add your music content.                  Music can be added from local content of PC, network folder, USB. Step 4. Added Music content will be indexed and it can be played from Roon control.  Step 5. Select LS9 as audio output device ("Select Audio Zone")                  LS9 will be one of Roon audio out endpoint. End--
    LS9 User Guide Libre Wireless Technologies                       User Guide : LS9 / LS9AD, Ver. 5.3                              Page 62 of 75 Libre Confidential 7. Appendix  7.1. ACP Setup It is recommended to Use “ACP 2.0C”.  To insert ACP on LS9 EVK proceed as below. Step 1. To use the ACP board in LS6 EVK, remove the ACP board from the ACP slot as shown below.  Step 2. Insert the ACP board onto the ACP slot in the LS9 EVK as shown below.
    LS9 User Guide Libre Wireless Technologies                       User Guide : LS9 / LS9AD, Ver. 5.3                              Page 63 of 75 Libre Confidential End--  7.2. Rework on LS6 EVK to evaluate LS9 Module. If you are using LS6 EVK for LS9 module evolution then Step 1. Remove electrolytic capacitor C15, C22, USB connector and Re-mount and soldier electrolytic capacitor on the back side of the LS6 EVK. Step 2. Connect 5v from LS6 EVK to LS9 module USB_VBUS J1-pin 17  7.3. Install USB Composite Drive To Install USB Composite Drive proceed as below Step 1. Download Marvell Windows USB Driver available in Libre Portal https://librewireless.sharefile.com/share#/view/s465a9d86cfb4fc4b/fi43add6-6929-324d-14ea-debffef787bf  Step 2. Connect the power adaptor, press and hold the USB-Boot button, and simultaneously connect the USB cable and power on the EVK. Step 3. Open Device Manager.
    LS9 User Guide Libre Wireless Technologies                       User Guide : LS9 / LS9AD, Ver. 5.3                              Page 64 of 75 Libre Confidential After boot up, if there is only one “Android ADB Interface” device as shown in the above  screenshot,  then  follow,  section  2.1.1  to  install  USB  Composite  Drive. Otherwise skip section 2.1.1 and go to section 2.1.2 directly.  Step 4. Right click “Android ADB Interface”, and select “Update Driver Software”.   Step 5. Select “Browse my computer for driver software”.   Step 6. Select “let me pick from a list device driver on my computer”
    LS9 User Guide Libre Wireless Technologies                       User Guide : LS9 / LS9AD, Ver. 5.3                              Page 65 of 75 Libre Confidential   Step 7. Select “USB Composite Device”, then click “Next”.  After installation, two unknown devices will be seen as shown in the below screenshot.
    LS9 User Guide Libre Wireless Technologies                       User Guide : LS9 / LS9AD, Ver. 5.3                              Page 66 of 75 Libre Confidential  End-- 7.4. Install Android Composite ADB Driver To install Android Composite ADB Driver (ADBD) proceed as below. Step 1. Download ADB Composite Driver from http://developer.android.com/sdk/win-usb.html Step 2. Power on LS EVK ADBD starts on LS-EVK Boot-Up. Two unknown devices will show up in Device Manager as seen in the below screenshot.  Step 3. Right click the 2nd device, and select “Update Driver Software.”
    LS9 User Guide Libre Wireless Technologies                       User Guide : LS9 / LS9AD, Ver. 5.3                              Page 67 of 75 Libre Confidential    Step 4. Select “Browse my computer for driver software”
    LS9 User Guide Libre Wireless Technologies                       User Guide : LS9 / LS9AD, Ver. 5.3                              Page 68 of 75 Libre Confidential   Step 5. Select “let me pick from a list device drivers on my computer”   Step 6. Select “Show all Device”, then click “Next”
    LS9 User Guide Libre Wireless Technologies                       User Guide : LS9 / LS9AD, Ver. 5.3                              Page 69 of 75 Libre Confidential   Step 7. Select “Have Disk…”   Step 8. Go to Google USB driver file location and then select “OK”
    LS9 User Guide Libre Wireless Technologies                       User Guide : LS9 / LS9AD, Ver. 5.3                              Page 70 of 75 Libre Confidential   Step 9. Select “Android Composite ADB Interface”, then click “Next”.   Step 10. Click “Yes” on Update Driver Warning message then   Step 11. Click “Install” on Windows Security message
    LS9 User Guide Libre Wireless Technologies                       User Guide : LS9 / LS9AD, Ver. 5.3                              Page 71 of 75 Libre Confidential   Step 12. After installation is complete, “Android Composite ADB Interface” device is displayed as shown in the screenshot.   End -- 7.5. Firmware Upgrade Using PC / Laptop Method For PC / Laptop Method the name of the Firmware Image should be 83_IMAGE. - This image is a standard image file - This image is used for l2nand update (PC / Laptop) - Size of this image is 140-150MB To update the firmware Application Image on to the LS9 module using your PC / Laptop, proceed as below. Step 1. Setup the LS9 EVK system, as explained in section 2.1 1 Instead of USB Null Modem cable, Connect USB-Type-A to USB-Type-A cable to the Laptop USB port. 2 Download and install the US_BOOT tool from  Libre Portal LibreSync LS_tools LS9USB_BOOT for NEW MID This step is applicable for LS9 modules with new MID only.
    LS9 User Guide Libre Wireless Technologies                       User Guide : LS9 / LS9AD, Ver. 5.3                              Page 72 of 75 Libre Confidential 3 Install Marvell Windows USB Driver in your PC / Laptop.  See section 7.3 for procedure on installing Marvell Windows USB Driver 4 Install Android Composite ADB Driver.  See section 7.4 for procedure on installing Android Composite ADB Driver Step 2. Download LS9 Basic Release Package from Libre Portal Path: LibreSync LS_Firmwares  LS9  LS9_Release_9004 Firmwares  If you have already downloaded the 9004 release package ignore this step. Step 3. Download the latest firmware image (83_IMAGE) from Libre Portal.  Path: LibreSync  LS_Firmwares  LS9 Step 4. Copy the latest firmware image (83_IMAGE) into the Basic Release Package folder  Figure 3.1-1: LS9 Firmware Folder Structure  Step 5. Connect the Laptop to LS9 EVK with the USB type A to Type A connector Step 6. Download and install PuTTY Application http://www.putty.org/  Step 7. Connect the power adapter to power source but do not switch ON the power yet Step 8. Press and hold the USB-Boot button, and simultaneously connect the USB cable and Power ON the EVK.
    LS9 User Guide Libre Wireless Technologies                       User Guide : LS9 / LS9AD, Ver. 5.3                              Page 73 of 75 Libre Confidential Step 9. Execute the script run.bat  LS9 boots to bootloader.  Step 10. Execute the command #l2nand –m <image_number> on debug shell. Syntax #l2nand –m <image_number> Example # l2nand -m 83 LS flashes the image onto LS9.  Step 11. On Successful Completion Reboot the Module. End - -    7.6. FCC Information Federal Communication Commission Interference Statement  This equipment has been tested and found to comply with the limits for a Class B digital device,  pursuant  to  Part  15  of  the  FCC  Rules.  These  limits  are  designed  to  provide reasonable  protection  against  harmful  interference  in  a  residential  installation.  This equipment generates, uses and can radiate radio frequency energy and, if not installed and used in accordance with the instructions, may cause harmful interference to radio communications.  However, there is no guarantee that interference will not occur in a particular  installation.    If this  equipment  does  cause  harmful  interference  to  radio or television reception, which can be determined by turning the equipment off and on, the user is encouraged to try to correct the interference by one of the following measures:   Reorient or relocate the receiving antenna.   Increase the separation between the equipment and receiver.   Connect the equipment into an outlet on a circuit different from that to which the receiver is connected.   Consult the dealer or an experienced radio/TV technician for help.
    LS9 User Guide Libre Wireless Technologies                       User Guide : LS9 / LS9AD, Ver. 5.3                              Page 74 of 75 Libre Confidential FCC Caution:  Any  changes  or  modifications  not  expressly  approved  by  the  party  responsible  for compliance could void the user's authority to operate this equipment.  This device complies with Part 15 of the FCC Rules. Operation is subject to the following two conditions:  (1) This device may not cause harmful interference, and (2) This device must accept any interference received, including interference that may cause undesired operation.  FCC Radiation Exposure Statement:   This equipment complies with FCC radiation exposure limits set forth for an uncontrolled environment. This transmitter module must not be co-located or operating in conjunction with any other antenna or transmitter.   This End equipment should be installed and operated with a minimum distance of 20 centimetres between the radiator and your body.  IMPORTANT NOTE:  In  the  event  that  these  conditions  cannot  be  met  (for  example  certain  laptop configurations or co-location with another transmitter), then the FCC authorization is no longer considered  valid  and  the  FCC  ID  cannot  be  used  on  the final product. In  these circumstances, the OEM integrator will be responsible for re-evaluating the end product (including the transmitter) and obtaining a separate FCC authorization.    End Product Labelling   The final end product must be labelled in a visible area with the following:       LS9 - “Contains FCC ID: 2ADBM-LS9-AC11DBT”.  LS9AD - “Contains FCC ID: 2ADBM-LS9AD-AC11DBT”.
    LS9 User Guide Libre Wireless Technologies                       User Guide : LS9 / LS9AD, Ver. 5.3                              Page 75 of 75 Libre Confidential  Manual Information to the End User   The OEM integrator has to be aware not to provide information to the end user regarding how to install or remove this RF module in the user’s manual of the end product which integrates this module.

Navigation menu