Lifeline Systems 1000 Philips Lifeline Cordless Phone Communicator User Manual
Lifeline Systems Inc Philips Lifeline Cordless Phone Communicator Users Manual
Contents
- 1. Users Manual
- 2. User Manual
Users Manual

Collateral Standards for the
Philips Lifeline Cordless Phone Communicator
IMPORTANT SAFETY INSTRUCTIONS
When using your telephone equipment, basic
safety precautions should always be followed to
reduce the risk of fire, electric shock and injury
to persons, including the following:
1. Do not use this product near water, for
example, near a bath tub, wash bowl, kitchen
sink or laundry tub, in a wet basement or near
a swimming pool.
2. Avoid using a telephone (other than a cordless
type) during an electrical storm. There may be
a remote risk of electric shock from lightning.
3. Do not use the telephone to report a gas leak
in the vicinity of the leak.
SAVE THESE INSTRUCTIONS
Federal Communications Commission (FCC):
Specific Absorption Rate (SAR):
Caution - To maintain the compliance with the FCC’s
RF exposure guideline, place the base unit and voice
extension unit at least 20 cm from nearby persons.
For body worn operation, this handset has been tested
and meets the FCC RF exposure guidelines. Use of
accessories may not ensure compliance with FCC RF
exposure guidelines.
47 CFR 15:
Privacy of communications may not be ensured when
using this phone.
Note: This equipment has been tested and found to
comply with the limits for a Class B digital device,
pursuant to part 15 of the FCC Rules. These limits
are designed to provide reasonable protection against
harmful interference in a residential installation. This
equipment generates, uses and can radiate radio
frequency energy and, if not installed and used in
accordance with the instructions, may cause harmful
interference to radio communications. However, there
is no guarantee that interference will not occur in a
particular installation. If this equipment does cause
harmful interference to radio or television reception,
which can be determined by turning the equipment off
and on, the user is encouraged to try to correct the
interference by one or more of the following measures:
—Reorient or relocate the receiving antenna.
—Increase the separation between the equipment and
receiver.
—Connect the equipment into an outlet on a
circuit different from that to which the receiver is
connected.
—Consult the dealer or an experienced radio/TV
technician for help.
47 CFR 68:
This equipment is hearing aid compatible.
Alarm Dialers:
WHEN PROGRAMMING EMERGENCY NUMBERS
AND(OR) MAKING TEST CALLS TO
EMERGENCY NUMBERS:
1. Remain on the line and briefly explain to the
dispatcher the reason for the call.
2. Perform such activities in the off-peak hours, such as
early morning or late evenings.
Caution - To ensure proper operation, this equipment
must be installed according to the enclosed installation
instructions. To verify that the equipment is operating
properly and can successfully report an alarm,
this equipment must be tested immediately after
installation, and periodically thereafter, according to the
enclosed test instructions.
0940838 CORDLESS Supplement NOTICE.indd 1 8/30/12 4:28 PM
Philips Lifeline
111 Lawrence Street
Framingham, MA 01702-8156
Tel: 1-800-451-0525
www.lifelinesystems.com
Philips Lifeline Canada
95 Barber Greene Road, Suite 105
Toronto, Ontario, Canada M3C 3E9
Tel: 1-800-387-8120
www.lifeline.ca
P/N 0940838, Rev. 01
© 2012. All rights reserved. Signal range may vary due to environmental factors.
IMPORTANTES MESURES DE SÉCURITÉ
Certaines mesures de sécurité doivent être prises
pendant l’utilisation de material téléphonique
afin de réduire les risques d’incendie, de choc
électrique et de blessures. En voice quelquesunes:
1. Ne pas utiliser l’appareil près de l’eau, p.ex.,
près d’une baignoire, d’un lavabo, d’un évier
de cuisine, d’un bac à laver, dans un sous-sol
humide ou près d’une piscine.
2. Éviter d’utiliser le telephone (sauf s’il s’agit d’un
appareil sans fil) pendant un orage électrique.
Ceci peut présenter un risque de choc
électrique causé par la foudre.
3. Ne pas utiliser l’appareil téléphonique pour
signaler une fuite de gaz s’il est situé près de la
fuite.
CONSERVER CES INSTRUCTIONS
Industry Canada (IC):
ICES-003:
This Class B digital apparatus complies with Canadian
ICES-003. Cet appareil numérique de la classe B est
conforme à la norme NMB-003 du Canada.
CS-03:
This product meets the applicable Industry Canada
technical specifications. / Le présent matériel est
conforme aux specifications techniques applicables
d’Industrie Canada.
The Ringer Equivalence Number (REN = 0.1) is
an indication of the maximum number of devices
allowed to be connected to a telephone interface.
The termination of an interface may consist of any
combination of devices subject only to the requirement
that the sum of the RENs of all the devices not exceed
five. / L’indice d’équivalence de la sonnerie (IES = 0.1)
sert à indiquer le nombre maximal de terminaux qui
peuvent être raccordés à une interface téléphonique.
La terminaison d’une interface peut consister en une
combinaison quelconque de dispositifs, à la seule
condition que la somme d’indices d’équivalence de la
sonnerie de tous les dispositifs n’excède pas cinq.
0940838 CORDLESS Supplement NOTICE.indd 2 8/30/12 4:28 PM
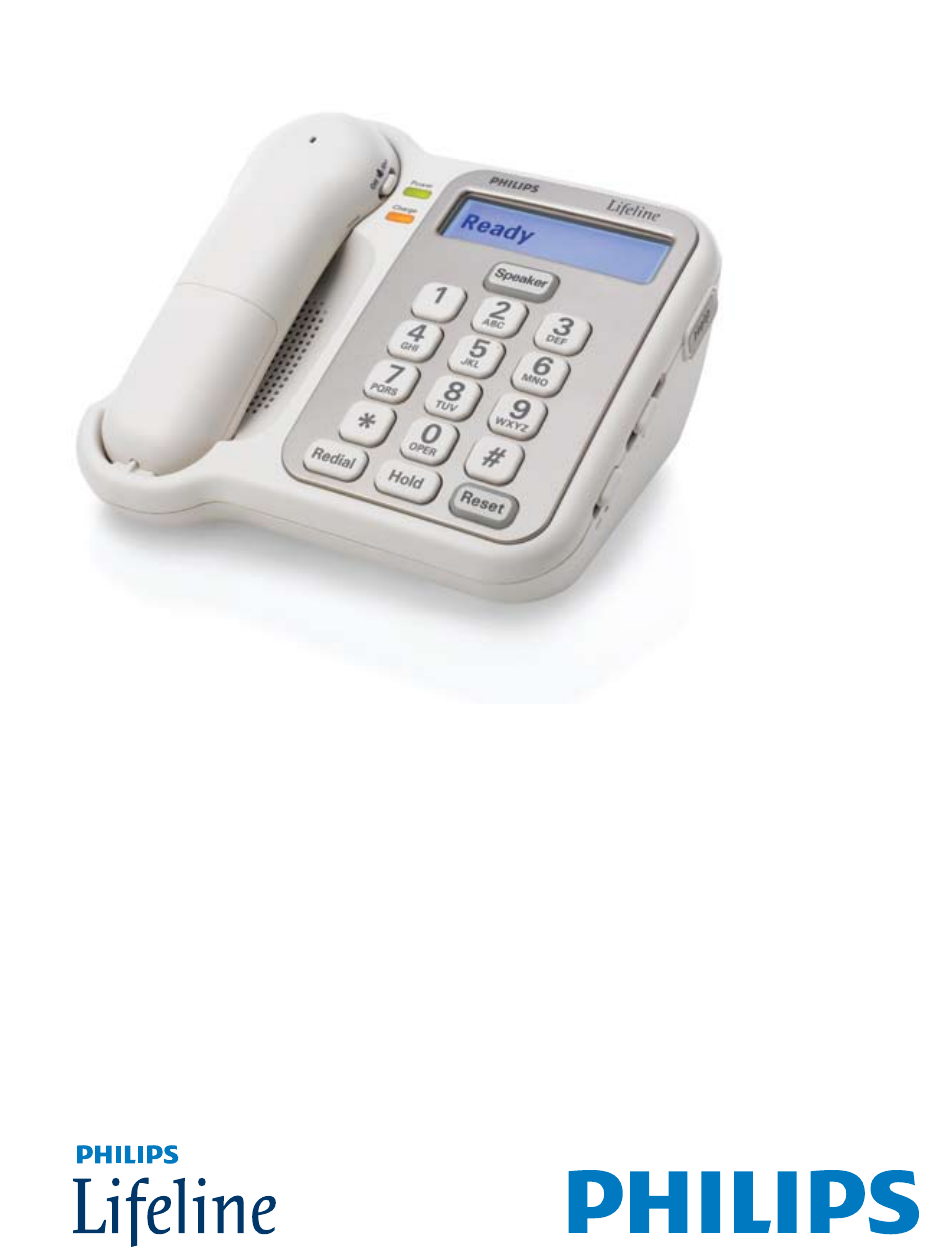
Philips Lifeline Cordless
Phone Communicator
User’s Manual
2
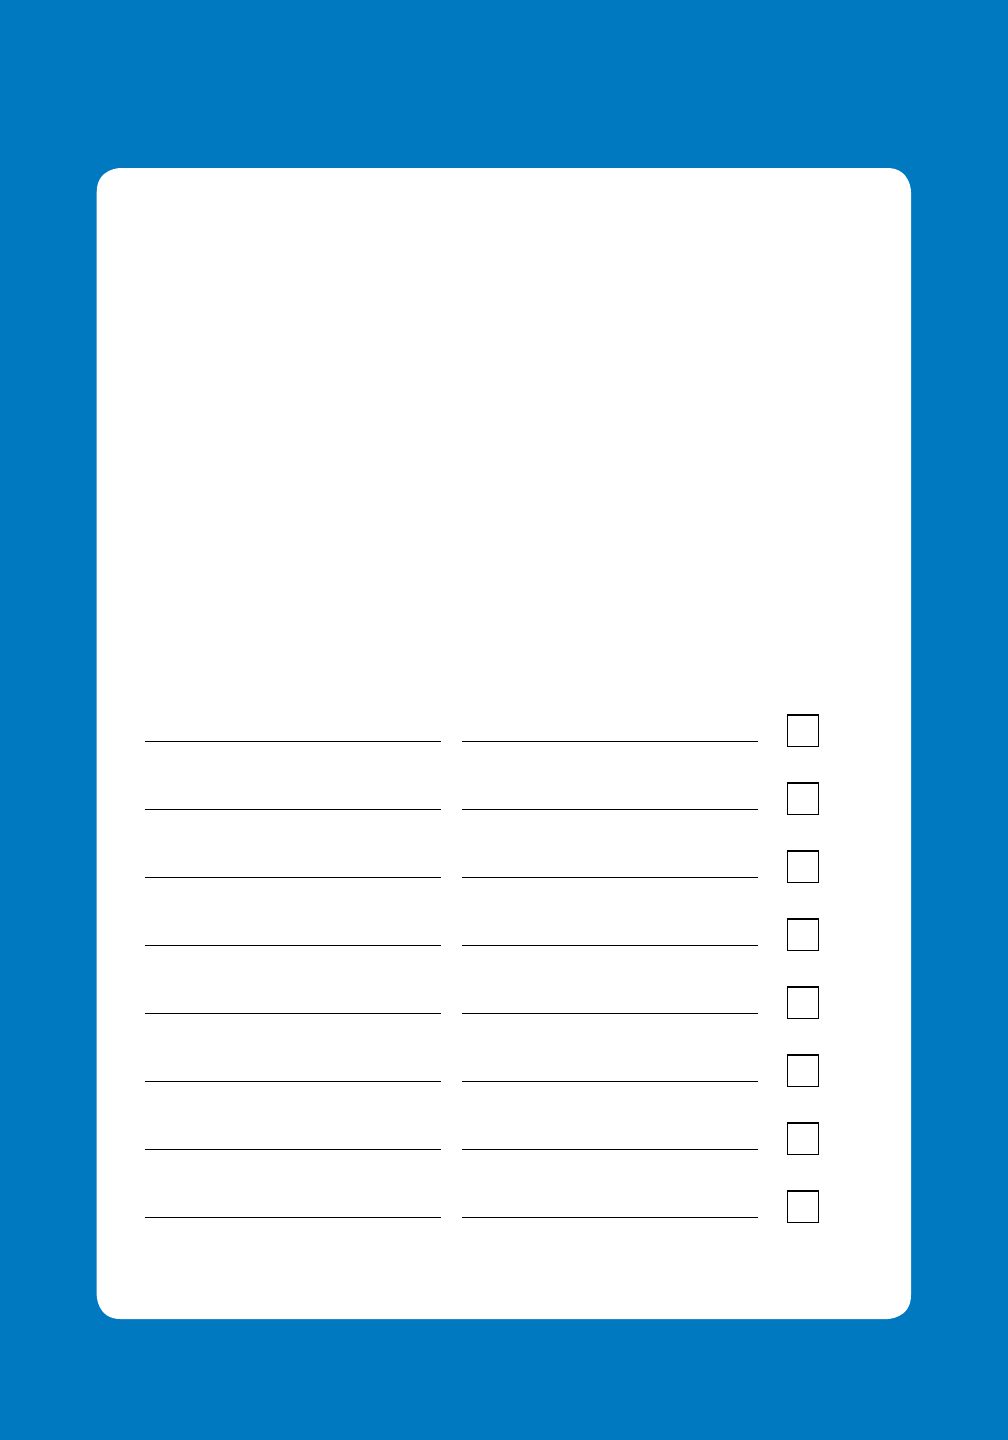
Important Phone Numbers
List of My Responders and People to Notify:
Responders are people whom Lifeline will call in case of an emergency.
People to Notify are people who will be notified that you required
help but who are not involved in coming to your assistance.
Please see page 6 for more information.
Do They
Name Phone Number(s) Have a Key?

Contents
Welcome ........................................................................................ 1
Chapter 1: Lifeline Service
Getting Started ...............................................................................................................................4
Lifeline Help Button .....................................................................................................................4
Responders and People to Notify.......................................................................................6
Chapter 2: Your Lifeline Cordless Phone
Phone Base .......................................................................................................................................8
Cordless Handset .......................................................................................................................12
Voice Extension ...........................................................................................................................14
Additional Handset with Charger ....................................................................................16
Chapter 3: Calling for Help
Calling for Help ............................................................................................................................18
Chapter 4: Monthly Check-in Call
Check-in Call .................................................................................................................................22
Check-in Reminder....................................................................................................................22
Chapter 5: Making Telephone Calls
Making Calls with the Handset ..........................................................................................24
Making Calls with the Phone Base ...................................................................................24
Switching Between the Handset and Phone Base ..................................................25
Redialing Calls ...............................................................................................................................25
Chapter 6: Answering Telephone Calls
Answering Calls with the Handset ..................................................................................28
Answering Calls with Your Lifeline Help Button .....................................................28
Answering Calls with the Phone Base ...........................................................................29
Caller ID ..........................................................................................................................................29
Call Waiting ...................................................................................................................................30
Switching Between the Handset and the Phone Base .........................................30
Chapter 7: Charging the Handset
Low Battery Message ...............................................................................................................32
Recharging the Handset .........................................................................................................33
Chapter 8: Adjusting the Volume
Ringer Volume ..............................................................................................................................36
Speaker Volume ..........................................................................................................................37
Chapter 9: Tips and Techniques
Finding the Handset ..................................................................................................................40
Attaching the Belt Clip to the Handset ........................................................................40
Adjusting Your Lifeline Help Button Neck Cord ....................................................41
Cleaning ...........................................................................................................................................42
Turning On Enunciated Dialing ..........................................................................................44
Chapter 10: Reference
Troubleshooting ...........................................................................................................................46
Equipment Service .....................................................................................................................48
Batteries ...........................................................................................................................................49
Safety Information ......................................................................................................................50
Chapter 11: Frequently Asked Questions
Lifeline Service .............................................................................................................................52
Your Lifeline Cordless Phone ..............................................................................................54
Calling for Help ............................................................................................................................56
Monthly Check-in Call .............................................................................................................56
Answering Telephone Calls ..................................................................................................57
Charging the Handset ..............................................................................................................58
Chapter 12: Regulatory Compliance
FCC and Canadian ACTA Regulations ..........................................................................60
Requirements for the United States ...............................................................................60
Requirements for Canada .....................................................................................................64

1
Welcome
Thank you for choosing Philips Lifeline. We are leaders in the medical
alert industry, having served more than 6 million people since 1974.
We are committed to developing innovative products that help people
maintain their independence. We strive to develop products that are
attractive, practical, and easy to use. You’ll find that your new Philips
Lifeline Cordless Phone Communicator provides access to our reliable
medical alert service and also delivers great features for your everyday
phone use.
This new Lifeline Cordless Phone lets you place and receive calls
throughout your home. It also functions as your Lifeline Communicator,
which works seamlessly with your Lifeline Help Button. Should you need
assistance, simply press your Help Button at any time of day or night, and
the Lifeline Communicator will dial the Lifeline Response Center. Personal
Response Associates are available 24 hours a day, 7 days a week.
We have included a Quick Start Guide, which will make it easy to begin
using your new Lifeline Cordless Phone. You’ll find clear, step-by-step
instructions guided by voice prompts. You control the pace of the setup
and move to the next step only when you are ready.
Once again, thank you for choosing Philips Lifeline!
2Lifeline Service

3
Chapter 1
Lifeline Service
Topics described in this chapter include:
Getting Started ..........................................................................................4
Lifeline Help Button .................................................................................4
Responders and People to Notify .........................................................6
4Lifeline Service
Getting Started
The Quick Start Guide, included in the box, provides simple, step-by-step
instructions on how to set up your equipment and test the coverage range
of your Lifeline Help Button. If you have any questions, please contact
Lifeline.
Lifeline Help Button
Your Lifeline Help Button provides a direct connection to Lifeline and
allows you to summon assistance 24 hours a day, 7 days a week. When
you press your Lifeline Help Button, it transmits a signal to your Lifeline
Cordless Phone. The phone automatically calls the Lifeline Response
Center, and a Personal Response Associate will come on the line to see if
you need assistance.
Always wear your Lifeline Help Button. ?
Your Lifeline Help Button is waterproof and should be worn at all times –
even when bathing and sleeping. It is your direct connection to Lifeline.
Important Reminders
• WearyourLifelineHelpButtoninyourhomeatalltimes,especially
while sleeping and bathing. The bathroom is often the place where
people fall and need help.
• YourLifelineHelpButtoniswaterproofandshouldbeworninthe
shower or bath.
• YourLifelineHelpButtonisnotamicrophone,soyoudon’ttalkinto
it. Instead, press the Help Button and speak into the handset or in the
direction of the base speakerphone or optional Voice Extension.
• YoumayorderadditionalLifelineHelpButtonsforothermembersof
your household. For more information, please contact Lifeline.
• BesuretotesttherangeofyourLifelineHelpButtonwhenyousetup
the system. See the Quick Start Guide for instructions.
5
• TestyourLifelineHelpButtoneverymonthbypressingitandplacing
a check-in call to the Lifeline Response Center. See page 22 for
instructions.
• DonotremovethelabelonthebackofyourLifelineHelpButton.
The label ensures that your Lifeline Help Button remains waterproof.
If the label is removed, peeling off, or damaged in any way, please
contact Lifeline.
• DonotputyourLifelineHelpButtonthroughtheclotheswasher,dryer
or dishwasher.
• YourLifelineHelpButtoncanonlybeservicedinthefactory.Thereare
no user-replaceable parts inside of it.
• Likeallcordlessphones,yourLifelineCordlessPhonerequiresAC
power to operate. However, in the event of a power outage, your
Lifeline Cordless Phone will provide up to 1 hour of backup power for
regular phone calls and 30 hours of backup power for Help Calls. Your
Lifeline Service will not work if there is a power outage of more than 30
hours.
• ItistypicallyrecommendedthatLifelinesubscribersalsohaveacorded
phone in their home, which can function throughout a power outage.
• TheLifelineCordlessPhonereliesonelectricalandtelephoneservice
that is wholly beyond the control of Lifeline. If your telephone service is
out of order or disconnected, your equipment will not operate.
• Ifyouhaveanotherphoneinadifferentareaofyourhomeanditisleft
off-hook, your Lifeline Cordless Phone will not be able to place a Help
Call. To make sure that your Lifeline Cordless Phone can place a Help
Call when needed, plug the other phone(s) into the phone accessory
jack on the back of your Lifeline Cordless Phone’s base. If you need
assistance, please call Lifeline.
6Lifeline Service
Responders and People to Notify
As a Lifeline subscriber, you should identify one or more people who
will agree to respond in the event of an incident. These are called
Responders. Typically, Responders are family members, friends or
neighbors who are nearby and can come to assist you.
Often, there are other people who are not available to assist you but who
would like to know that you needed assistance. These could be family
members in another area or healthcare professionals who are involved in
your care. These people are referred to as People to Notify.
Choosing a Responder
It is best to choose a Responder who:
• Hasakeytoyourhomeorknowswhereoneislocated
(perhaps in a key lockbox).
• Couldcometohelpyouatdifferenttimesofthedayornight.
• Livesorworkswithin10minutesofwhereyoulive.
• Isphysicallycapableofassistingyouifyouneedhelp.
Information Lifeline Needs About Responders
Please ensure that Lifeline has the following information about each
person acting as a Responder. Also, record the information inside the
front cover of this User’s Manual:
• Name
• Phonenumbers–home,workandcellphone
• WhetherornottheResponderhasakeytoyourhome

7
Chapter 2
Your Lifeline Cordless Phone
Topics described in this chapter include:
Phone Base .................................................................................................8
Cordless Handset ...................................................................................12
Voice Extension .......................................................................................14
Additional Handset with Charger .......................................................16

8Your Lifeline Cordless Phone
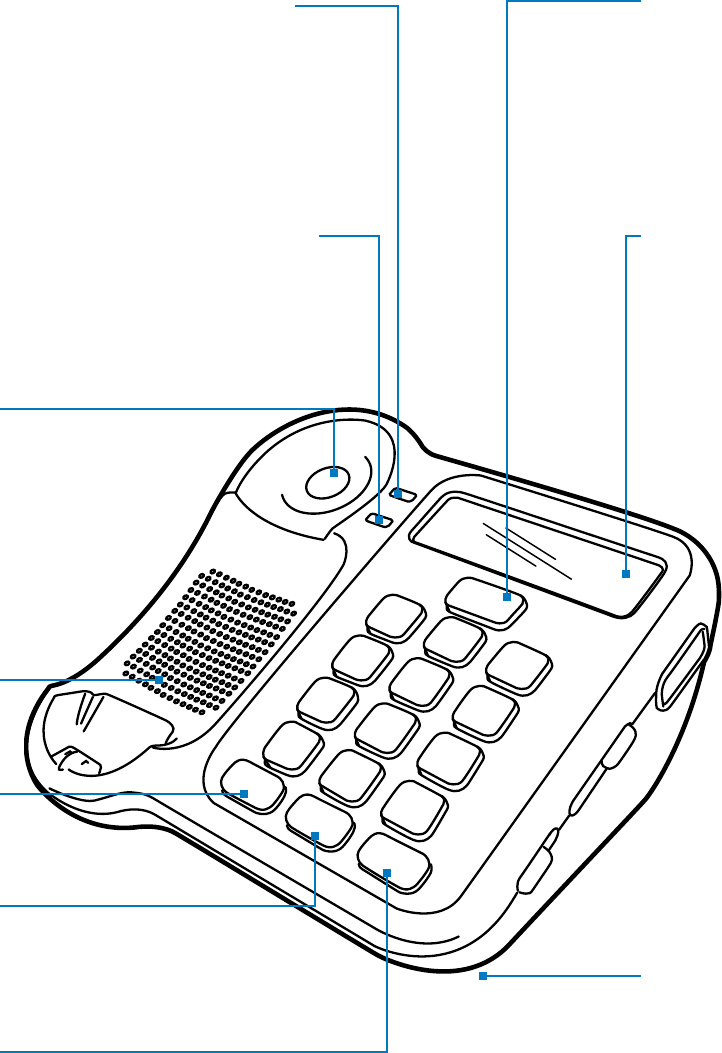
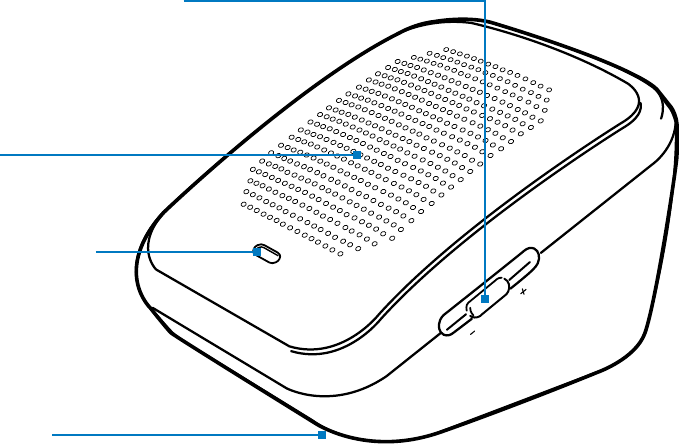
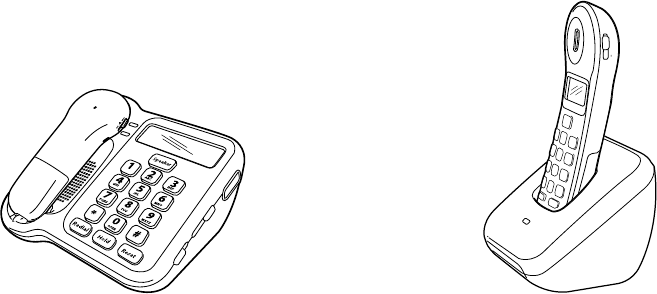
Phone Base
As the heart of your system, the phone base has several functions.
First and foremost, it is your Lifeline Communicator, which means that
it receives the signal when you press your Lifeline Help Button and
automatically calls Lifeline. Additionally, it is the speaker and microphone
you use to communicate with the Personal Response Associate. It is also
the base and charging station for your handset.
Find button
Press Find to locate your handset by making it beep.
Any handset that is sitting in the optional charger
will not beep. Do not hold down the Find button
for longer than two seconds or the phone will enter
registration mode. If you need assistance, please call
Lifeline.
Speaker
This function is used for hands-free phone calls.
Redial button
Press Redial to call the most recently dialed number.
Hold button
Used for call waiting, Hold is pressed to put one call on
hold and answer a second incoming call.
Reset button
The Reset button will blink if there is any condition that
requires your attention.
9
12
ABC
Find
Power
Charge
3
DEF
45
JKL
6
MNO
GHI
78
TUV
OPER
9
WXYZ
PQRS
*0
Hold
Speaker
Redial
Reset
#
Microphone
The microphone
that is used to hear
your voice is located
on the bottom of the
phone base.
LCD display
This easy-to-read
display shows
information about your
phone calls and the
status of the Lifeline
Cordless Phone.
Power indicator
A green light indicates
that the phone is on.
Charge indicator
An orange light
indicates that the
handset is being
charged.
Speaker button
Press Speaker to
make or receive a
hands-free call or
to terminate a call.
10 Your Lifeline Cordless Phone
- Volume +
Off Max
Off Max
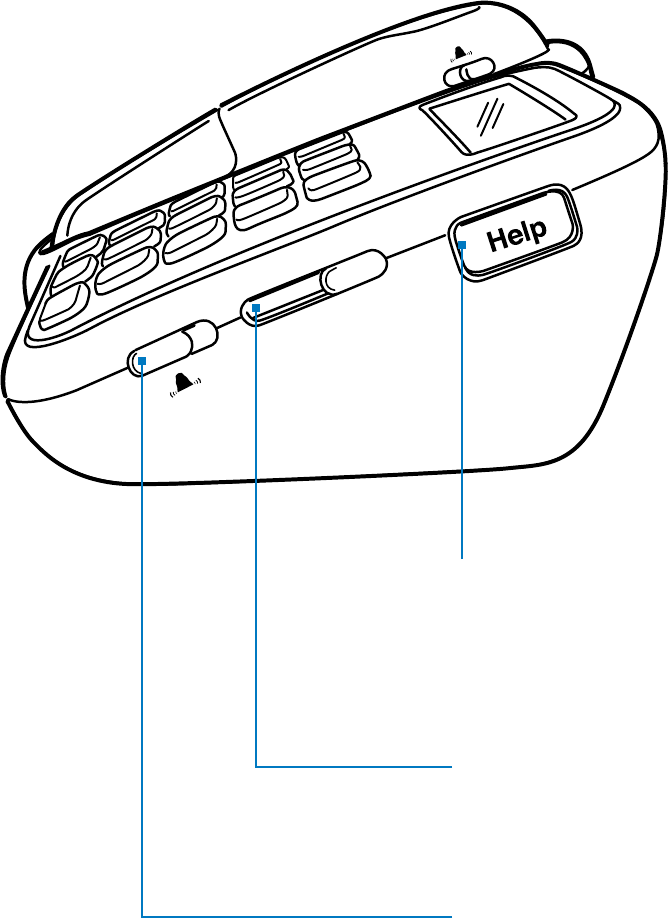
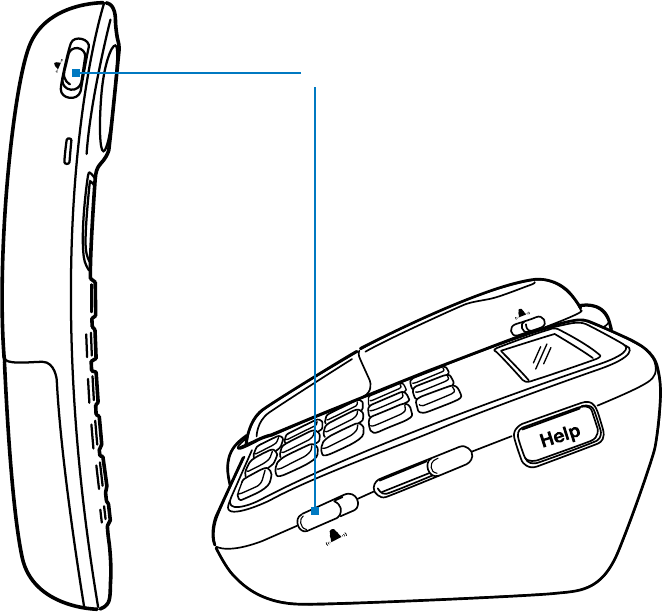
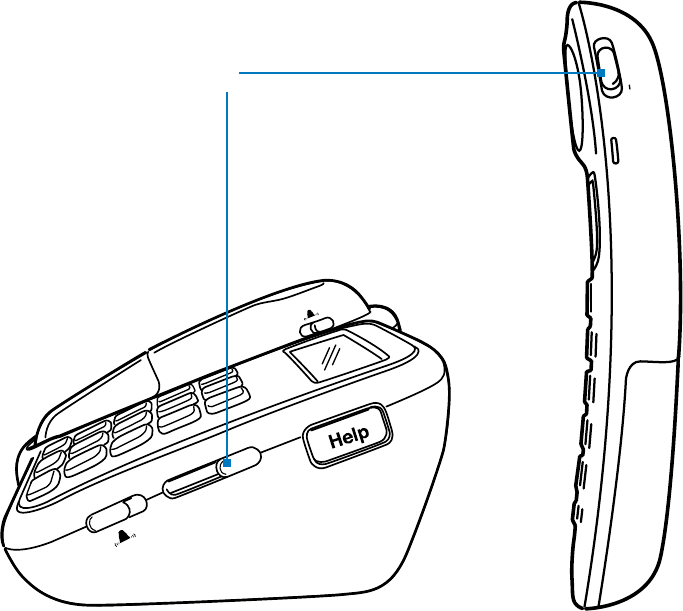
Help button
Press Help to send a Help
Call to the Lifeline Response
Center.
Speaker volume switch
This controls the volume of the
speaker on the phone base.
Ringer volume switch
This controls the volume of
the ring on the phone base.
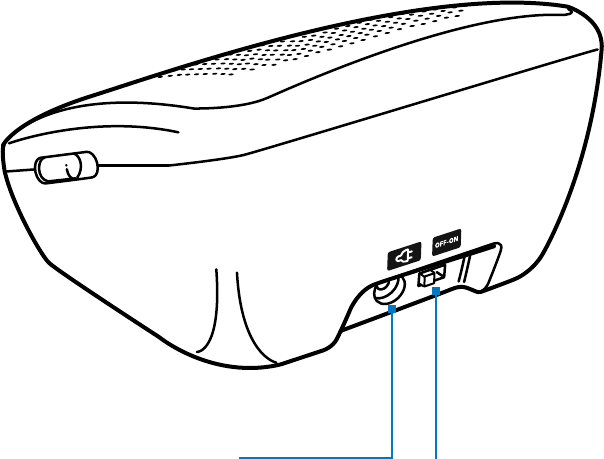
Phone Base, Side View
11
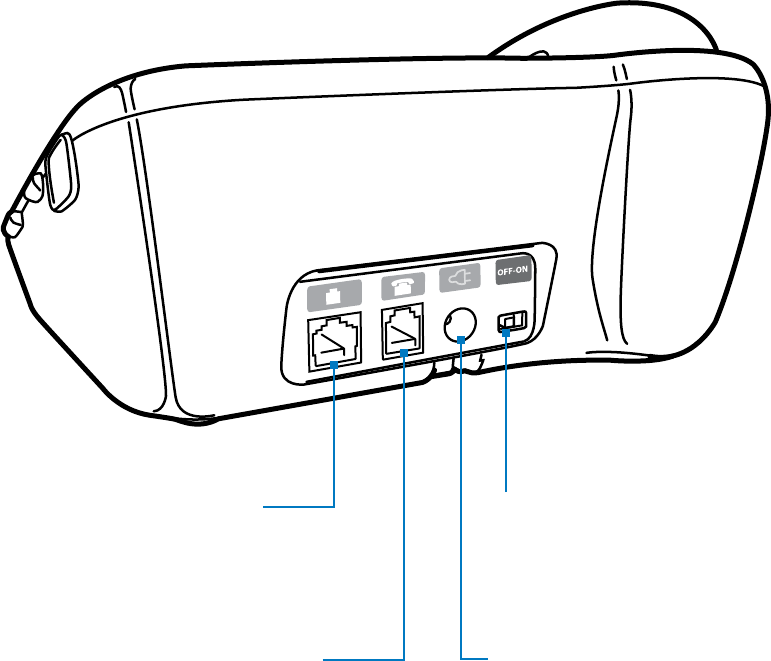
Phone cord jack
This is used to connect the
phone to a jack on the wall.
Phone accessory jack
Answering machines or other
phone accessories are plugged
in here.
Power switch
This allows the Lifeline Cordless
Phone to be turned on or off.
Power cord jack/plug
This is used to connect the
phone to an electrical outlet
on the wall.
Phone Base, Back View
12 Your Lifeline Cordless Phone
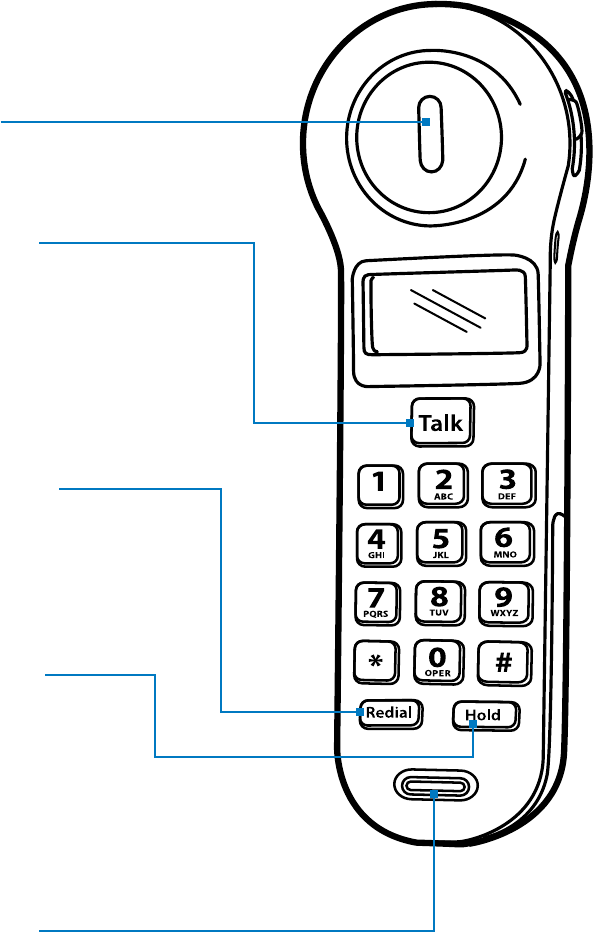
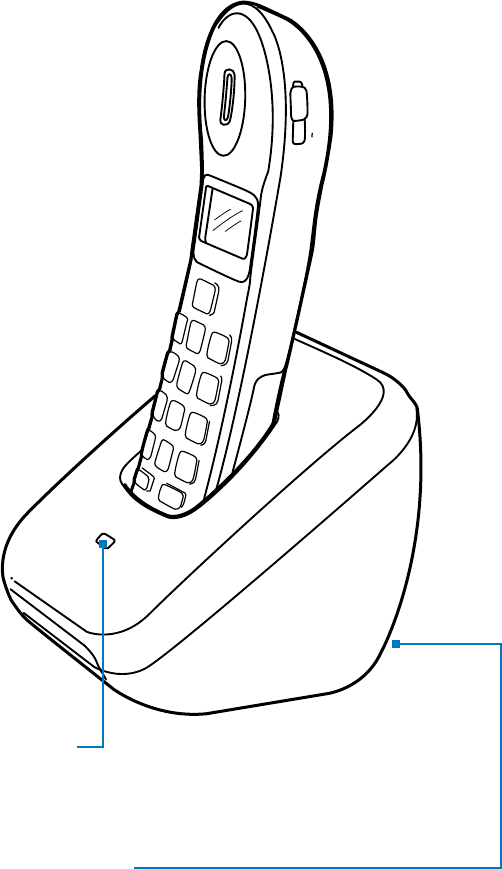
Cordless Handset, Front View
The handset allows you to place or receive calls within and around your
home. But remember, it is not a cellular phone, so it will not work away
from your home.
Earpiece
Talk button
Press Talk to make,
answer or terminate
a call.
Redial button
Press Redial to call the
most recently dialed
number.
Hold button
Used for Call Waiting,
Hold is pressed to
put one call on hold
and answer a second
incoming call.
Microphone
13
Off Max
Ringer volume switch
This controls the volume of the ring
on the handset.
Earpiece volume switch
This controls the volume of the
earpiece.
Belt clip connectors
Belt clip
The belt clip attaches to the back of
the handset.
Cordless Handset, Back View
14 Your Lifeline Cordless Phone
Speaker volume switch
This controls the volume of the
speaker on the Voice Extension.
Speaker
Power indicator
A green light
indicates when the
Voice Extension is
powered on.
Microphone
The microphone that is used to
hear your voice is located on the
bottom of the Voice Extension.
Volume
Power
Voice Extension, Front View
The Voice Extension provides another speakerphone from which you can
speak with Lifeline or anyone else. Ideal for large and multi-floor homes,
it has a microphone to pick up your voice and a speaker so you can clearly
hear the other party.
This is an optional item. If you would like to order the Voice Extension, ?
please contact Lifeline.
15
- Volume +
Power cord jack/plug
This is used to connect the voice
extension to an electrical outlet on
the wall.
Voice Extension, Back View
Power switch
This allows the Voice
Extension to be turned
on or off.
16 Your Lifeline Cordless Phone
Charge
9
#
6
3
5
2
1
4
7
*
Talk
Hold
Redial
8
0
Volume
+
Charge indicator
An orange light indicates that the handset is being charged.
Power cord jack/plug
This is used to connect the charger to an electrical
outlet on the wall.
Additional Handset with Charger
Many of our subscribers enjoy the convenience of having an additional
handset elsewhere in the home. This allows you to keep the handsets
charging and available in two locations.
This is an optional item. If you would like to order an additional handset ?
with charger, please contact Lifeline.

17
Chapter 3
Calling for Help
Topics described in this chapter include:
Calling for Help .......................................................................................18
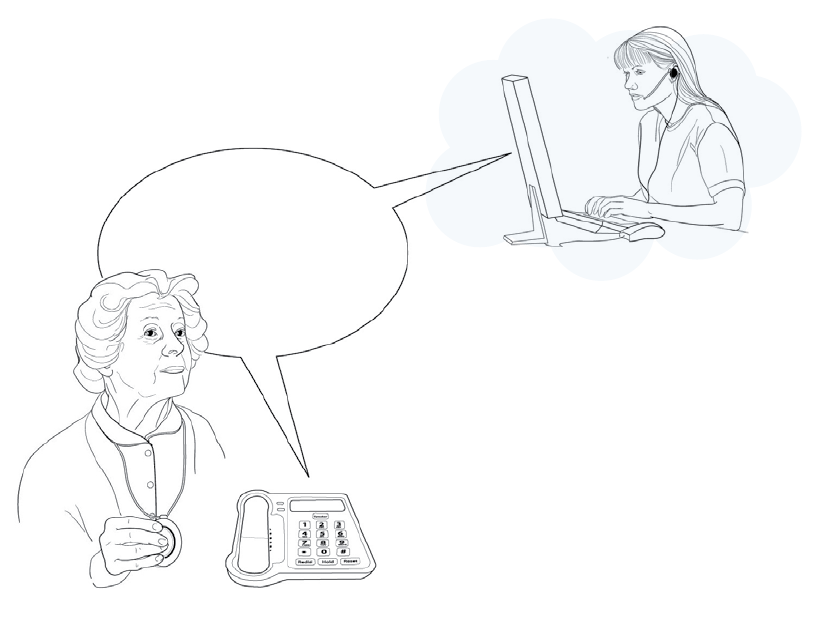
18 Calling for Help
Hello, Mrs. Smith.
Do you need help?
If you need help, press your Lifeline Help Button or press the Help button
on the side of the phone base. You will hear beeping and the Speaker
button will start blinking red.
If you are on a telephone call and need help, press your Lifeline Help ?
Button to end the call and automatically send a Help Call.
1. The phone calls the Lifeline Response Center.
While it dials the Lifeline Response Center your phone will play a
message saying: “Your Help Call is in progress; please wait.” This
message will be repeated three times. The display will show:
“Help Call in Progress.”
Once connected with the Lifeline Response Center, your phone
will ring one time and play a message saying: “Your call has been
connected; someone will be right with you.” The display will show:
“Call Connected.”
Calling for Help
19
2. The Lifeline Response Center will answer the call.
A Personal Response Associate will speak to you through the phone’s
built-in speaker and microphone. If you are using the optional Voice
Extension, you will hear the Personal Response Associate’s voice from
both the phone base and the Voice Extension, and your voice will be
picked up by either one of the units.
You can also use your handset to communicate with the Personal
Response Associate. Press the Talk key on the handset and speak into it
as you normally would.
If you cannot speak or if you cannot be heard, the Personal Response ?
Associate will try calling you back. If you cannot answer the phone or if the
Personal Response Associate cannot hear you, help will be sent to your home.
3. The Lifeline Response Center will listen to you and send help if needed.
The Personal Response Associate will speak with you and send the
help you want. If you are unable to speak or if the Personal Response
Associate cannot clearly hear you, Responders will be called in the order
that you listed them when you signed up with Lifeline. If you accidently
press your Lifeline Help Button, just tell the Personal Response Associate
that you are okay.
4. Lifeline will send help.
If needed, Lifeline will contact your Responders until they reach
someone who is available to help you. If Lifeline cannot reach any of
your Responders, they will dispatch emergency services to your home.
5. At your request, Lifeline will remain on the line with you until
help arrives.
6. Once your Responder or emergency services arrive, they will press
the blinking Reset button to indicate that help has arrived.
The Personal Response Associate will contact the household to see if
additional assistance is needed.
7. Once help is provided, Lifeline will contact your People to Notify to
let them know that you needed help.
20 Monthly Check-in Call

21
Chapter 4
Monthly Check-in Call
Topics described in this chapter include:
Check-in Call............................................................................................22
Check-in Reminder .................................................................................22
22 Monthly Check-in Call
Check-in Call
Lifeline wants you to check in every month to confirm that your phone
and your Lifeline Help Button are working normally. Many people find it
helpful to select the date of their birthday to make their monthly check-
in call. For example, if your birthday is January 8th, you might make your
check-in call on the 8th day of every month.
The monthly check-in call is the ideal time to tell Lifeline about any changes ?
to your health or contact information.
1. Press your Lifeline Help Button just as you would for a Help Call.
2. Wait for the Personal Response Associate to speak to you. Explain
that you are just checking in and do not need assistance.
3. Be sure to tell the Personal Response Associate about any changes
regarding your household, phone numbers, health conditions,
medications or the list of people you want to respond or to be
notied in case of an incident.
Check-in Reminder
If you have not pressed your Lifeline Help Button for 32 consecutive days,
your Lifeline Cordless Phone will remind you to check in with the Lifeline
Response Center. The yellow Reset button on the phone will start
blinking, and both the phone base and the handset will display: “Time to
Test Your Lifeline.”
If you are on the telephone, please complete your call and hang up before ?
performing the monthly check-in.
When you press the Reset button or hang up the phone, your phone will
play a message saying: “Time to test your Lifeline. Please press the Lifeline
button you are wearing. Thank you. This is a recording.”
When you hear this message, please press your Lifeline Help Button and
let the Personal Response Associate know that you are checking in and do
not need any help.

23
Chapter 5
Making Telephone Calls
Topics described in this chapter include:
Making Calls with the Handset ............................................................24
Making Calls with the Phone Base ......................................................24
Switching Between the Handset and the Phone Base ....................25
Redialing Calls ..........................................................................................25
24 Making Telephone Calls
Making Calls with the Handset
With the handset, you can make calls from any location in your home.
To make a phone call using the handset:
1. Press the Talk button on the handset. The Talk button will light up
and you will hear a dial tone through the earpiece.
2. Dial the number you want to call. You can press the keys either on
the handset or on the phone base. Once all the numbers have been
dialed, your call will be placed.
3. When you have nished your call, press the Talk button again to
hang up.
Making Calls with the Phone Base
You can make hands-free telephone calls directly from the phone base.
To make a call from the phone base:
1. Press the Speaker button. The Speaker button will light up and you
will hear a dial tone.
2. Dial the number you want to call. Once all the numbers have been
dialed, your call will be placed.
3. When you have nished your call, press the Speaker button again to
hang up.
If you are having difficulty hearing the person you are speaking with, you ?
may need to adjust the volume. Move the volume switch on the side of
the phone base or the handset towards “+” to make the sound louder or
towards “-” to make the sound softer.
Your phone has the ability to announce each number as it is pressed. ?
This is called Enunciated Dialing. To turn on this feature, please refer to
page 44.
25
Switching Between the Handset and the Phone Base
During a call you can easily switch between the handset and the phone
base. If you have made a call with the phone base and want to switch to
the handset:
• PresstheTalkbuttononthehandset.Therewillbeaveryshortdelay
while the call is switched. Continue your call using the handset.
If you have made a call with the handset and want to switch to the
phone base:
• PresstheSpeakerbuttononthephonebase.Therewillbeavery
short delay while the call is switched. Continue your call using the
phone base.
Redialing Calls
The Redial feature will automatically call the most recently dialed
phone number. There is a Redial button on both the phone base and
the handset.
1. Press the Redial button. You will hear a series of tones as the
number is redialed. Once all the numbers have been dialed, your call
will be connected.
2. When you have nished your call, press the Talk button on the
handset or the Speaker button on the phone base to hang up.
26 Answering Telephone Calls

27
Chapter 6
Answering Telephone Calls
Topics described in this chapter include:
Answering Calls with the Handset .....................................................28
Answering Calls with Your Lifeline Help Button ............................28
Answering Calls with the Phone Base ...............................................29
Caller ID ...................................................................................................29
Call Waiting ..............................................................................................30
Switching Between the Handset and the Phone Base ....................30
28 Answering Telephone Calls
Answering Calls with the Handset
If the handset is off the phone base, it will ring and the Talk button will
start blinking when there is an incoming call. If you subscribe to Caller ID
through your telephone service provider, the caller’s name and number
will be displayed on the handset. If you do not have Caller ID, then
“Caller Unknown” will be displayed.
To answer a call with the handset:
1. Press the Talk button and begin conversation. The Talk button will
stop blinking but still be lit up.
2. When you have nished your call, press the Talk button again to
hang up.
Answering Calls with Your Lifeline Help Button
You can also use your Lifeline Help Button to answer a phone call. This
feature is useful when you are close enough to the phone base to have a
conversation, but you can’t get there quickly enough to answer the call.
To answer a call using your Lifeline Help Button:
1. When you hear the telephone ring, press your Lifeline Help Button
to answer the call.
2. Speak in the direction of the phone base or the optional Voice
Extension.
3. When you have nished your conversation, press your Lifeline Help
Button again to end the call.
If you need help while you’re on a telephone call that was answered using ?
your Lifeline Help Button, press the Lifeline Help Button to end the call and
press it again to send a Help Call.

29
Answering Calls with the Phone Base
You can answer a call and have a hands-free conversation using the phone
base. When there is an incoming call, the phone will ring and the Speaker
button will start blinking. If you subscribe to Caller ID through your
telephone service provider, the caller’s name and number will be displayed.
If you do not have Caller ID, then “Caller Unknown” will be displayed.
To answer a call from the phone base:
1. Press the Speaker button and begin your conversation. The Speaker
button will stop blinking but still be lit up.
2. When you have nished your call, press the Speaker button again to
hang up.
Visible Ringer ?
If your hearing is impaired or you choose to turn off the telephone ringer,
you can still tell when you have an incoming telephone call. The Talk
button on the handset and the Speaker button on the phone base will both
start blinking when you have an incoming call.
Caller ID
When there is an incoming call, the phone will ring and the caller’s
name and number will be displayed on both the phone base and the
handset. If the name is not available or the number is restricted,
“Caller Unknown” will be displayed.
Caller ID is a service offered by many telephone companies. If you ?
subscribe to Caller ID, the caller’s name and number will be displayed.
John Smith
1-598-988-9321
30 Answering Telephone Calls
Call Waiting
You can put one call on hold and answer a second incoming call by
pressing the Hold button. There is a Hold button on both the phone
base and the handset.
Call Waiting is a service offered by many telephone companies. If you are ?
on a call and have Call Waiting, you will hear a tone when a second call
comes in.
1. When you hear the Call Waiting tone, ask the person you are talking
with to please hold on.
2. Press the Hold button. The rst call is automatically put on hold, and
you will be connected to the second call. Begin your conversation.
3. To return to the rst call, press the Hold button again.
If you subscribe to both Caller ID and Call Waiting, the caller’s name and
phone number will be displayed when a second call comes in. After you
hear the Call Waiting tone, look at the display to see who is calling. You
can then decide whether you want to answer the second call.
Switching Between the Handset and the Phone Base
During a call, you can easily switch between the handset and the phone
base. If you have answered a call with the phone base and want to switch
to the handset:
• PresstheTalkbuttononthehandset.Therewillbeaveryshortdelay
while the call is switched. Continue your call using the handset.
If you have answered a call with the handset and want to switch to the
phone base:
• PresstheSpeakerbuttononthephonebase.Therewillbeavery
short delay while the call is switched. Continue your call using the
phone base.

31
Chapter 7
Charging the Handset
Topics described in this chapter include:
Low Battery Message .............................................................................32
Recharging the Handset ........................................................................33
32 Charging the Handset
Low Battery Message
The handset has a rechargeable battery that arrives charged. When fully
charged, it provides up to 6 hours of talk time or 96 hours of standby time
before it requires recharging.
Your Lifeline Cordless Phone will automatically test the battery power
in the handset and inform you when the handset battery needs to be
recharged.
If the battery needs to be recharged:
• TheyellowResetbuttonwillstartblinking.
• “Handset Battery Low” will be displayed on the phone base.
• “Low Battery” will be displayed on the handset.
33
OR
Phone base Additional handset
with charger
Charge
9
#
6
3
5
2
1
4
7
*
Talk
Hold
8
0
Volume
+
Recharging the Handset
To recharge the handset, place it in the phone base cradle or in the
optional charger. When this is done:
• Youwillhearabeep.
• Theorangechargeindicatoronthephonebaseortheoptionalcharger
will light up.
• “Handset Charging” will be displayed on the phone base and
the handset.
It can take up to 15 hours to fully charge a completely discharged
handset battery.
It is a good idea to place the handset on the phone base or the optional ?
charger each night. This will ensure that the handset is fully charged and
ready to use in the morning.
34 Adjusting the Volume

35
Chapter 8
Adjusting the Volume
Topics described in this chapter include:
Ringer Volume .........................................................................................36
Speaker Volume .......................................................................................37
36 Adjusting the Volume
Ringer Volume
You can adjust the volume of the ringer on both the phone base and the
handset. The ringer volume switch is indicated by a bell symbol and has
three positions: Off, Standard and Maximum.
• Tosettheringasloudaspossible,movetheswitchtoMax.
• Tosettheringtoastandardvolume,movetheswitchtothe
middle position.
• Toturnofftheringer,movetheswitchtoOff.
If you turn off the ringer volume, your phone will not ring for an ?
incoming phone call. However, the Talk button on the handset and the
Speaker button on the phone base will both start blinking when you
have an incoming call.
Max
Off
- Volume +
Off Max
Off Max
Ringer volume
37
Speaker Volume
You can adjust the volume of the speaker on the phone base, handset and
optional Voice Extension. The speaker volume control is a sliding switch,
indicated by the word “Volume.”
• Tomakethevolumelouder,slidethecontroltowards“+.”
• Tomakethevolumesofter,slidethecontroltowards“–.”
Volume
+
- Volume +
Off Max
Off Max
Speaker volume
38 Tips and Techniques

39
Chapter 9
Tips and Techniques
Topics described in this chapter include:
Finding the Handset ................................................................................40
Attaching the Belt Clip to the Handset .............................................40
Adjusting Your Lifeline Help Button Neck Cord ............................41
Cleaning .....................................................................................................42
Turning On Enunciated Dialing ............................................................44

40 Tips and Techniques
Finding the Handset
To locate your handset, press the Find button on the phone base.
The handset will start to beep and will continue beeping for up to
5 minutes. Once you have located the handset, press any key on it to
stop the beeping.
The handset will not beep if it is in the optional charger or if the handset ?
battery has completely discharged.
Attaching the Belt Clip to the Handset
The belt clip attaches to the back of the handset and allows you to hang
the handset from your belt or pocket.
To attach the belt clip:
1. Align the sides of the belt clip with
the connectors on the handset.
2. Gently push the belt clip towards
the back of the handset.
3. The belt clip will snap into place.
To remove the belt clip:
1. Press down gently on the center
of the belt clip.
2. Pull the left edge away from the
handset.
3. Remove the belt clip from the
back of the handset.
41
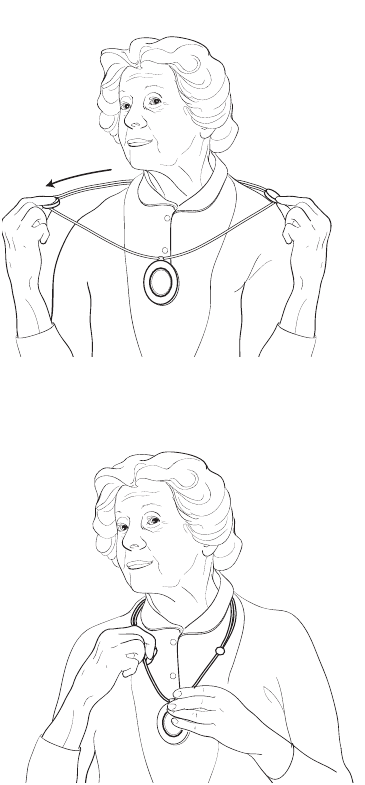
Adjusting Your Lifeline Help Button Neck Cord
To shorten:
With a tab between your first
finger and thumb of each hand,
slide both tabs apart in line with
your shoulders.
To lengthen:
Pull one strand of the neck cord
while sliding the tab to the back.
Repeat on the other side.
HelpButtonnotactualsize–enlargedtoshowdetail.
42 Tips and Techniques
Cleaning
Lifeline Help Button
Your Lifeline Help Button is completely waterproof, so you can submerge
it in warm water for easy cleaning. But first, please turn off your Lifeline
Cordless Phone to avoid sending a false Help Call.
1. Move the power switch on the back of the phone base to the
OFF position.
2. Wash your wrist strap or adjustable neck cord with a mild liquid
dishwashing detergent.
3. Gently wipe your Lifeline Help Button with an isopropyl (rubbing)
alcohol wipe or a cotton pad moistened with alcohol. Do not soak it
in the alcohol, however.
4. Blot excess moisture with a towel and allow the Help Button
to air-dry.
5. Be sure to move the power switch on the back of the phone base to
the ON position.
6. Test your system by pressing your Lifeline Help Button. Tell the
Personal Response Associate that you are just testing your equipment
after cleaning.
43
Phone Base and Handset
You should keep your equipment free of dust by occasionally wiping it
with a soft cotton cloth. If additional cleaning is required, you should first
turn off the power and then disconnect the cords from the wall. This will
prevent false button presses and possible damage to the equipment.
1. Slide the power switch to the OFF position and unplug the power
cord from the electrical outlet. Unplug the telephone cord from the
wall jack.
2. Slightly dampen a soft cloth with a mild all-purpose cleaner and gently
wipe the surfaces clean. Never use detergents, excess water, treated
cloths or sprays. Do not spray or pour any cleaner directly onto the
equipment, as excessive moisture will damage it. Do not use aerosols
on or near the phone base.
3. Reconnect the power cord to the electrical outlet, reconnect the
telephone cord to the wall jack, and then turn the power switch
back to ON.
4. Test your system by pressing your Lifeline Help Button. Tell the
Personal Response Associate that you are just testing your equipment
after cleaning.
Remember to turn the power OFF and disconnect all cords before cleaning. ?
Do not spray cleaners directly onto equipment because moisture could get ?
inside and cause damage.
44 Tips and Techniques
Turning On Enunciated Dialing
Your Lifeline Cordless Phone has the ability to announce each number
as it is pressed. With this feature, you can be sure that you are dialing
correctly. To turn the enunciated dialing feature on or off, please follow
these instructions:
To turn ON enunciated dialing:
1. Press these keys on the phone base: “# # 051# .”
2. The display will show: “##051# Voice Keys On.”
3. After 10 seconds, the phone will return to its normal state and
“Ready” will be displayed.
4. When you dial your next call, each key that you press will be audibly
announced. That is, you will hear the word “one,” instead of a tone
for the number one.
To turn OFF enunciated dialing:
1. Press these keys on the phone base: “# #050#.”
2. The display will show: “##050# Voice Keys Off.”
3. After 10 seconds, the phone will return to its normal state and
“Ready” will be displayed.
4. When you dial your next call, you will hear a tone for each key
that you dial.
If you have any questions, please contact Lifeline.

45
Chapter 10
Reference
Topics described in this chapter include:
Troubleshooting ......................................................................................46
Equipment Service ..................................................................................48
Batteries ....................................................................................................49
Safety Information...................................................................................50
46 Reference
Troubleshooting
If you have any questions about your Lifeline Cordless Phone, Lifeline
Help Button or other aspects of the Lifeline Service, please press your
Lifeline Help Button, press the Help Button on the side of your phone
base or call Lifeline.
Blinking Reset Button
Your Lifeline Cordless Phone automatically tests the system on a regular
basis. If a problem is identified, the Reset button on the phone base will
start to blink. To find out what is wrong, press the Reset button. The
phone will announce the problem and tell you what to do. Please refer to
the following chart for further information.
If you have made a Help Call, the Reset button will start to blink. Once ?
your Responder or emergency services arrive, they will press the Reset
button to indicate that help has arrived.

47
Phone Base
Display
Handset
Display
Press Reset and
You Will Hear...
What to Do
Time to Test
Your Lifeline
Time to Test
Your Lifeline
Time to test your Lifeline.
Please press the Lifeline
button that you are
wearing. Thank you. This
is a recording.
Press your Lifeline Help
Button to perform your
monthly check-in.
Handset
Battery Low
Handset
Battery Low
Your handset battery
is low. Please place in
charger.
Return the handset
to the phone base or
optional charger to
charge battery.
Check Phone
Cord
No Phone Line Your phone line is not
connected. Please check
the phone cord.
Make sure that the phone
cord is plugged into an
active phone jack.
Check Power
Cord
*green power
light will also be
blinking
Check Base
Power
No power is detected.
Please check the power
cord.
Make sure that the
power cord is plugged
in and that the outlet is
not controlled by a wall
switch.
Check Voice
Extension
Power
Please check Extension
power adapter and
connections.
Make sure that the
power cord is plugged
in and that the outlet is
not controlled by a wall
switch.
A Phone Is
Off-Hook
A Phone Is
Off-Hook
A phone is off-hook.
Please check other
phones in your home.
Make sure that all phones
in your home are hung
up.
Base Battery
Low
Phone base battery low. The battery in your
phone base is low and
needs to be replaced.
Lifeline will contact
you to arrange for a
replacement.
Button Battery
Low
Button battery low. The battery in your
Lifeline Help Button is
low and needs to be
replaced. Lifeline will
contact you to arrange
for a replacement.
Extension
Battery Low
Extension speakerphone
battery low. Please
contact Lifeline.
The battery in your Voice
Extension is low and
needs to be replaced.
Please contact Lifeline to
request a replacement.

48 Reference
Indicator Lights
The lights on the phone base, handset, optional charger, and optional
Voice Extension indicate the current status of the system. Please refer
to the table below.
Indicator Light Location Status What It Means
Green Power
Indicator
Phone Base,
Voice Extension
ON The power cord is connected
properly and power is being
provided.
Blinking There is no power but the
backup battery is okay.
OFF The power switch is in the
OFF position or there is no
power, and the battery in the
base is low.
Orange Charge
Indicator
Phone Base,
Optional Charger
ON The handset is being charged.
OFF The handset is not placed
on the base or is seated
incorrectly.
Speaker Button Phone Base Red - Blinking A Help Call is in progress.
White - Blinking There is an incoming call.
White - ON A telephone call is in progress.
White Talk Button Handset ON A telephone call is in progress.
Blinking There is an incoming call.
Reset Button Phone Base Blinking A problem has been identified.
Refer to the chart above.
Equipment Service
The Lifeline Cordless Phone and the Lifeline Help Button are manufactured
to high quality standards. Philips Lifeline equipment can only be factory-
serviced by Philips Lifeline. For information on obtaining service or repairs,
please call Lifeline.
49
Batteries
The phone base, handset and Voice Extension all contain batteries that
are factory installed.
The battery status of the phone base and Voice Extension is automatically
tested on a regular basis. The Voice Extension battery should last up to
eighteen months, while the phone base battery should last up to thirty
six months, depending on usage. If either battery needs to be replaced,
the yellow Reset button on the phone base will start to blink. When you
press the Reset button, the phone will announce the problem and tell you
what to do.
Please be sure to dispose of batteries properly. ?
Power Outages
The phone base battery will provide up to:
• 30hoursofbackuppowerforHelpCalls
• 1hourofbackuppowerforregularphonecalls
The Voice Extension battery will provide up to:
• 5hoursofbackuppowerforHelpCalls
Important: Your Lifeline Service will not work if there is a power ?
outage of more than 30 hours!
Handset Battery
The handset has a rechargeable battery. When fully charged, the handset
provides up to 6 hours of talk time or 96 hours of standby time before it
requires recharging. The rechargeable battery should last up to eighteen
months, depending on usage. If the handset does not recharge or hold a
charge, the battery may need to be replaced. Please contact Lifeline to
arrange for a replacement.
50 Frequently Asked Questions
Safety Information
• Thephonebase,additionalhandsetandoptionalVoiceExtensionmust
be placed in an indoor living area.
• Takecarenottoblockthemicrophoneholelocatedonthebottomof
the phone base and the optional Voice Extension. For example, do not
place them on a tablecloth or padded surface.
• Makesurethatyoudonotplugyourequipmentintoanelectricaloutlet
that is controlled by a wall switch, because someone could accidentally
turn off the power.
• Makesurethatthephonebaseisawayfromanyclutteroranyobject
that might block its ability to receive a signal from your Lifeline Help
Button. The phone should not be placed on or near your refrigerator
or any type of metal cabinet or bookcase, since this may limit the
effective range of the Lifeline Help Button.
• Toreducetheriskofelectricalshockorfire,donotplacethe
equipment in or near water or other liquids.
• Nevercarrytheequipmentbythecordoryankthecordtodisconnect
it from an electrical outlet. Instead, grasp the plug and gently pull to
disconnect.
• Donotspraycleanersdirectlyontoyourequipmentbecausemoisture
could get inside and cause damage.

51
Chapter 11
Frequently Asked Questions
Topics described in this chapter include:
Lifeline Service .........................................................................................52
Your Lifeline Cordless Phone ...............................................................54
Calling for Help .......................................................................................56
Monthly Check-in Call ...........................................................................56
Answering Telephone Calls ..................................................................57
Charging the Handset ............................................................................58
52 Frequently Asked Questions
Lifeline Service
What if I move to a different home or apartment?
We can transfer your service to your new or second home. Just give
Lifeline a few weeks’ notice to make the change. Please contact Lifeline to
arrange this.
What if I spend part of the year in another home?
We can transfer your service for the time you are at your other home.
Just give Lifeline a few weeks’ notice to make the change. Please contact
Lifeline to arrange this.
Can the Lifeline Service be used if I have DSL Internet service from the
phone company on the same telephone line?
Yes, but a simple filter must be installed on the phone line. Contact
your phone company to obtain a DSL filter, or purchase one from a local
electronics store (e.g., Radio Shack). Be sure to read the pamphlet we
have included with your communicator: Important Information Regarding
Your Telephone Service and Your Philips Lifeline Service. This information is
also available online at www.lifelinesys.com/phoneservice.
Can the Lifeline Service be used if I have broadband or Voice-over-IP
(VoIP) phone service?
The Lifeline Service is compatible with a wide variety of phone services,
including broadband and VoIP. However, your Lifeline Service will work
better with some telephones services than others. It is important that
you understand how your Lifeline Service will work with your current
phone service and any other phone service you may later switch to.
Be sure to read the pamphlet we have included with your communicator:
Important Information Regarding Your Telephone Service and Your Philips
Lifeline Service. This information is also available online at
www.lifelinesys.com/phoneservice.
Can I plug my communicator into an RJ31X jack?
Yes, if your house has been wired with a special phone jack (RJ31X), you
can connect the Philips Lifeline Cordless Phone Communicator to it.
However, this requires a special phone cord which was not included with
the phone. Please contact Lifeline for assistance.
53
Can two people in the same household both have the Lifeline Service?
Yes, please contact Lifeline for more information.
Can I have more than one Lifeline Help Button for myself?
No, we have learned that subscribers are best served by having one
Lifeline Help Button.
Can I wear my Lifeline Help Button in the shower or bath?
Yes, the Lifeline Help Button is completely waterproof and should be
worn at all times. But please note that the Lifeline Help Button cannot
send a signal when it is fully submerged under water.
Can I wear my Lifeline Help Button in bed?
Yes, we ask that you wear your Lifeline Help Button at all times whenever
you are in your home. The button was designed to provide adequate
protection against sending an accidental signal, even if you roll over on it.
What if I accidentally hit my Lifeline Help Button?
If you accidentally press your Lifeline Help Button, a Personal Response
Associate will respond to your call to make sure that everything is okay.
Just tell the Associate that it was pressed accidentally and that you do not
need assistance. Don’t be concerned that you are bothering Lifeline; we
just want to be sure that you are all right.
Does the Lifeline Help Button have a battery?
Yes, each Lifeline Help Button has a battery that can only be replaced
at the factory. The Lifeline Help Button will automatically send a signal
to Lifeline when the battery needs to be replaced, and someone from
Lifeline will contact you about the replacement.
What’s the difference between the “Slimline” and “Classic” Help Buttons?
The difference between the Slimline™ and the Classic™ Lifeline Help
Buttons is their appearance. Additionally, the “Slimline” Help Button can
be worn on the wrist with a strap. The functionality of both is the same.
How can I get a Lifeline Help Button on a wrist strap?
When you received your Philips Lifeline Cordless Phone Communicator,
you may have been given a neck cord, since that is the most popular way
to wear the Lifeline Help Button. If you would like to order a wrist strap,
please contact Lifeline.
54 Frequently Asked Questions
Your Lifeline Cordless Phone
Will the phone work during a power outage?
Your Lifeline Cordless Phone has battery backup power, which means that
it can function during a power outage, provided that your phone service
is working. It will provide up to 30 hours of backup power for Help Calls
and up to one hour for regular phone calls. For further information,
please refer to page 49.
How can I be sure my Lifeline Cordless Phone is working?
Your phone is working properly as long as the green power Indicator on
the base is lit and the Reset button is not blinking. If the yellow Reset
button is blinking, please press the Reset button to hear what is wrong.
How far away from the phone will the Lifeline Help Button work?
Your Help Button provides coverage inside your home and may provide
coverage in the area immediately outside (yard, porch, etc.). When you
set up your Lifeline Cordless Phone, you should test your Lifeline Help
Button’s signal range to determine which areas of your home are covered.
See the Quick Start Guide for instructions.
Why do I need to place the phone and the Voice Extension on a
hard surface?
It is important to place the phone and optional Voice Extension on a hard
surface because the microphones that are used to hear your voice are
located on the bottom. A hard surface is required in order to provide the
best possible sound quality.
Why is the handset beeping?
The Find button on the phone base may have been pressed. When Find
is pressed, the handset will beep for up to 5 minutes to help you locate it.
Press any key on the handset to stop the beeping.
Why don’t I hear the handset beeping after pressing the Find button?
There are a few possible explanations. The handset may be under a
pillow, blanket or cushion that is muffling the sound. Or, the handset
may be sitting in the optional charger. Or, the handset battery may be
completely discharged.
55
Do I need to change batteries?
Lifeline will contact you when the battery in the phone base needs to be
replaced. If the handset or Voice Extension cannot take a charge, please
contact Lifeline.
Is there a difference between the Help Button on the phone base and
my Lifeline Help Button?
No, they will both place calls to the Lifeline Response Center when
pressed. The Lifeline Button that you wear around your neck (or on your
wrist) is always with you, so it is more convenient to use since you are not
always near your phone base.
Do I need to test my Lifeline Cordless Phone?
Lifeline wants you to check in once a month by pressing your Lifeline Help
Button to confirm that your phone and your Help Button are working
normally. If you forget to check in, the phone will remind you. Please
refer to page 22.
Are my two handsets from Philips Lifeline interchangeable?
Yes, you can store and charge either handset on the phone base or in the
optional charger.
Why isn’t my new handset working?
You may have to “introduce” the new handset to your phone. Please
contact Lifeline for assistance.
Why isn’t the Voice Extension working?
You may have to “introduce” the Voice Extension to your phone. Please
contact Lifeline for assistance.
56 Frequently Asked Questions
Calling for Help
What happens if I make a Help Call and the Lifeline Response Center
can’t hear me?
The Personal Response Associate will probably be able to hear you
through the highly sensitive microphone. However, if you cannot be heard
or if you cannot speak, Lifeline will place another call to your home. If no
one answers, help will be sent quickly.
Do I use the Lifeline Help Button to speak with Lifeline?
No, the Lifeline Help Button is not a microphone. You do not speak into
it. Rather, the button sends a signal to the phone, which then calls Lifeline.
You should speak into the handset or in the direction of the phone base
or the optional Voice Extension.
What happens if I press my Lifeline Help Button and can’t hear the
Personal Response Associate?
Stay where you are. The Personal Response Associate will probably be
able to hear you, but if not, he or she will place another call to your home.
If no one answers, help will be sent quickly.
Monthly Check-in Call
Do I have to check in on a particular day or time?
No, you can check in at any time that is convenient for you. Many people
find it helpful to select the date of their birthday to make their check-in
call. For example, if your birthday is January 8th, you might make your
check-in call on the 8th of every month.
How will I remember when it is time for the monthly check-in?
Your Lifeline Cordless Phone will remind you. If you have gone 32
consecutive days without pressing your Lifeline Help Button, the yellow
Reset button on the phone will start blinking, and both the phone base
and the handset will display: “Time to Test Your Lifeline.”
57
Answering Telephone Calls
Why is the Talk button on the handset blinking?
Why is the Speaker button on the phone base blinking?
You have an incoming phone call. If you do not hear a telephone ring,
please check the volume level on the phone base and the handset.
Why does the display say “Caller Unknown”?
You have an incoming call, but you do not have Caller ID service.
Why does the display say “Private Caller”?
You have Caller ID, but the caller has requested that his/her information
not be displayed.
If I use my Lifeline Help Button to answer a call, will it call the Lifeline
Response Center?
If you press your Lifeline Help Button while the phone is ringing, it will
simply answer the incoming call. You will not be connected to the Lifeline
Response Center.
Why can the person on the other end of the line still hear me after I’ve
pressed the Hold button?
The Hold button is only used for Call Waiting. If you subscribe to Call
Waiting, press the Hold button to put your primary phone call on hold
and answer a second incoming call.
Why do I hear beeping when I’m on the phone?
If you subscribe to Call Waiting, you will hear a Call Waiting tone when
another call comes in during a conversation.
Why was nobody on the line after I heard a Call Waiting tone and
pressed the Hold button?
You may have waited too long before pressing the Hold button, and the
other party simply hung up.
Where is the Flash button for Call Waiting?
The Hold button is the same as a Flash button on other phones.
58 Frequently Asked Questions
Charging the Handset
How can I be sure that the handset is charged?
If “Ready” is displayed on the handset, then it is charged and ready for
use. If the handset battery needs to be recharged, “Low Battery” will
be displayed on the handset, and the yellow Reset button on the phone
base will start blinking.
Why isn’t the handset recharging?
Make sure that the handset is correctly positioned in the phone base
cradle or the optional charger. When the handset is correctly positioned,
you will hear a short beep and the orange charge indicator will light up.
If this doesn’t work, please contact Lifeline for assistance.
How long will the handset last before I have to recharge it?
When fully charged, the handset provides up to 6 hours of talk time or 96
hours of standby time before it requires recharging. However, it is a good
idea to get in the habit of recharging your handset each night.
Why isn’t my handset working?
If you have just set up your new Lifeline Cordless Phone, you may have
to activate the handset. Press the Talk button and “Ready” should
be displayed on the handset. If this doesn’t work, please contact Lifeline
for assistance.

59
Chapter 12
Regulatory Compliance
Topics described in this chapter include:
FCC and Canadian ACTA Regulations ...............................................60
Requirements for the United States...................................................60
Requirements for Canada .....................................................................64
60 Regulatory Compliance
FCC and Canadian ACTA Regulations
Your Philips Lifeline Cordless Phone Communicator has been registered with
the U. S. Federal Communications Commission (FCC) and the Canadian
Administration Council for Terminal Attachments (ACTA), in accordance with
Part 15 and Part 68.
Requirements for the United States
Notice
The FCC requires that you connect your Lifeline Cordless Phone to the
nationwide telephone network through a modular telephone jack (USOC
RJ11C, R J11W or RJ14). This equipment may not be used with coin telephone
lines or party lines. Contact the state public utility commission, public service
commission or corporation commission for more information.
Notification for the Telephone Company
Upon request of your local telephone company, you are required to provide
them with the following information:
1. The “Line” to which you will connect your Lifeline Cordless Phone (that is,
your phone number); and
2. The Lifeline Cordless Phone’s FCC Registration Number and Ringer
Equivalence Number (REN). Those numbers are on the bottom of your
Lifeline Cordless Phone. The REN is used to determine how many devices
may be connected to a telephone line.
Excessive RENs on a telephone line may result in the devices not ringing in
response to an incoming call. In most, but not all, areas, the sum of RENs
should not exceed five (5.0). To be certain of the number of devices that may
be connected to a line, as determined by the total RENs, contact your local
telephone company. For products approved after July 23, 2001, the REN for
this product is part of the product identifier that has the format US: AAAEQ##
TXXXX. The digits represented by ## are the REN without a decimal point
(e.g., 03 is a REN of 0.3).
Repair Information
If trouble is experienced with this equipment, please contact Philips Lifeline
for repair or warranty information. If the equipment is causing harm to the
telephone network, the telephone company may request that you disconnect
the equipment until the problem is resolved.
61
Caution: Changes or modifications not expressly approved by the party
responsible for compliance could void the user’s authority to operate the
equipment.
Rights of the Telephone Company
If this equipment causes harm to the telephone network, the telephone
company will notify you in advance that temporary discontinuance of service
may be required. But if advance notice isn’t practical, the telephone company
will notify the customer as soon as possible. Also, you will be advised of your
right to file a complaint with the FCC if you believe it is necessary.
The telephone company may make changes in its facilities, equipment,
operations or procedures that could affect the operation of the equipment. If
this happens, the telephone company will provide advance notice in order for
you to make necessary modifications to maintain uninterrupted service.
Interference Information: FCC Rules Part 15
Your Lifeline Cordless Phone complies with Part 15 of the FCC Rules.
Operation is subject to the following two conditions: (1) this device may not
cause harmful interference; and (2) this device must accept any interference
received, including interference that may cause undesired operation.
NOTE: Your Lifeline Cordless Phone has been tested and found to comply
with the limits for a Class B digital device, pursuant to Part 15 of the FCC Rules.
These limits are designed to provide reasonable protection against harmful
interference in a residential installation. This equipment generates, uses and can
radiate radio frequency energy and, if not installed and used in accordance with
the instructions, may cause harmful interference to radio communications.
However, there is no guarantee that interference will not occur in a particular
installation. If this equipment does cause harmful interference to radio or
television reception, which can be determined by turning the equipment off and
on, the user is encouraged to try to correct the interference by one or more of
the following measures:
•MovetheLifelineCordlessPhoneawayfromyourradioortelevision.
•PlugtheLifelineCordlessPhoneintoadifferentpoweroutletthanyourradio
or television.
62 Regulatory Compliance
ACTA (Administration Council for Terminal Attachments)
Information
This equipment complies with Part 68 of the FCC rules and the requirements
adopted by the ACTA. On the bottom of this equipment is a label that
contains, among other information, a product identifier in the format
US: AAAEQ##TXXXX. If requested, this number must be provided to
the telephone company.
A plug and jack used to connect this equipment to the premises’ wiring and
telephone network must comply with the applicable FCC Part 68 rules and
requirements adopted by the ACTA. A compliant telephone cord and modular
plug is provided with this product. It is designed to be connected to a
compatible modular jack that is also compliant. See installation instructions
for details.
If your home has specially wired alarm equipment connected to the telephone
line, ensure that the installation of the Lifeline Cordless Phone does not disable
your alarm equipment. If you have questions about what will disable alarm
equipment, consult your telephone company or a qualified installer.
Caution: In order for “alarm dialing equipment” to be able to seize the
phone line to report an alarm or other event when other customer equipment
(telephone, answering system, computer modem, etc.) connected to the same
line is in use, “alarm dialing equipment” must be connected to a properly
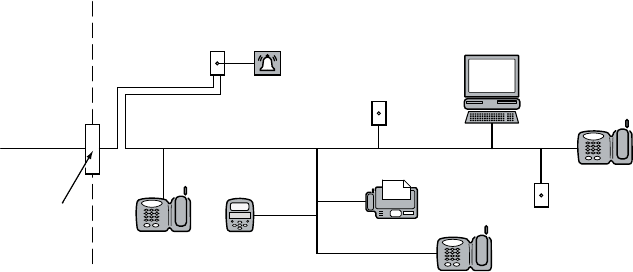
installed RJ31X jack. The RJ31X jack must be connected in series with,
and ahead of, all other equipment attached to the same phone line. Series
installation of an RJ31X jack is depicted in the figure on the following page. If
you have any questions concerning these instructions, you should consult your
telephone company or a qualified installer about installing the necessary jack and
“alarm dialing equipment” for you.
63
Caution: If the above diagram is not used, this equipment cannot report an
alarm when other equipment (telephone, answering system, computer modem,
etc.) connected to the same phone line is in use.
NOTICE TO THE USER: Any changes or modifications not expressly
approved by Philips Lifeline for compliance could void your authority to operate
the equipment.
UL1637
The maximum separation (range) of the equipment, under test conditions
and for comparative purposes only, is seven hundred feet. This range may be
significantly reduced when the equipment is installed in a typical home.
Patent Information
One or more of the following U.S. Patents may apply to this product: D277,465;
4,524,243; 4,760,593; 4,622,544; 4,908,602; 4,884,059; D313,363; D313,362;
4,064,368; 3,989,900; 5,091,930; 5,128,979.
RJ31X
Jack
Customer Premises Equipment and Wiring
Alarm Dialing
Equipment
Network
Service
Provider’s
Facilities
Network
Demarcation
Point
Telephone
Line
Unused
RJ-11 Jack
Unused
RJ-11 Jack
Computer
Telephone Answering
System
Telephone
Fax Machine
Telephone
64 Regulatory Compliance
Requirements for Canada
Department of Communications — Government of Canada Notice
The Canadian Department of Communications label identifies certified
equipment. This certification means that the equipment meets certain
telecommunications network protective, operational and safety requirements.
The Department does not guarantee that the equipment will operate to
the user’s satisfaction. Users should ensure, for their own protection, that
the electrical ground connections of the power utility, telephone lines and
internal metallic water pipe system, if present, are connected together. These
precautions may be particularly important in rural areas. The manufacturer
requires that you connect your Lifeline Cordless Phone to the nationwide
telephone network through a modular telephone jack (USOC RJ11C, RJ11W
or RJ14). This equipment may not be used with coin telephone lines or party
lines. Contact the local public utility commission, public service commission or
corporation commission for information.
Notification for the Telephone Company
Upon request of your local telephone company, you are required to provide
them with the following information:
1. The “Line” to which you will connect your Lifeline Cordless Phone (that is,
your phone number); and
2. The Lifeline Cordless Phone’s FCC Registration Number and Ringer
Equivalence Number (REN). Those numbers are on the bottom of your
Lifeline Cordless Phone. The REN is used to determine how many devices
that may be connected to a telephone line.
Excessive RENs on a telephone line may result in the devices not ringing in
response to an incoming call. In most, but not all, areas, the sum of RENs
should not exceed five (5.0). To be certain of the number of devices that may
be connected to a line, as determined by the total RENs, contact your local
telephone company. For products approved after July 23, 2001, the REN for
this product is part of the product identifier that has the format US: AAAEQ##
TXXXX. The digits represented by ## are the REN without a decimal point
(e.g., 03 is a REN of 0.3).
Repair Information
If trouble is experienced with this equipment please contact Philips Lifeline
for repair or warranty information. If the equipment is causing harm to the
telephone network, the telephone company may request that you disconnect
the equipment until the problem is resolved.
65
Caution: Changes or modifications not expressly approved by the party
responsible for compliance could void the user’s authority to operate the
equipment.
Rights of the Telephone Company
If this equipment causes harm to the telephone network, the telephone
company will notify you in advance that temporary discontinuance of service
may be required. But if advance notice isn’t practical, the telephone company
will notify the customer as soon as possible. Also, you will be advised of your
right to file a complaint with the Government of Canada if you believe it is
necessary.
The telephone company may make changes in its facilities, equipment,
operations or procedures that could affect the operation of the equipment. If
this happens the telephone company will provide advance notice in order for
you to make necessary modifications to maintain uninterrupted service.
Interference Information: RSS-210 of Industry Canada
Your Lifeline Cordless Phone complies with RSS-210 of Industry Canada.
Operation is subject to the following two conditions: (1) this device may not
cause harmful interference; and (2) this device must accept any interference
received, including interference that may cause undesired operation.
NOTE: Your Lifeline Cordless Phone has been tested and found to comply
with the limits for a Class B digital device, pursuant to RSS-210 of Industry
Canada. These limits are designed to provide reasonable protection against
harmful interference in a residential installation. This equipment generates,
uses and can radiate radio frequency energy and, if not installed and used in
accordance with the instructions, may cause harmful interference to radio
communications. However, there is no guarantee that interference will
not occur in a particular installation. If this equipment does cause harmful
interference to radio or television reception, which can be determined by
turning the equipment off and on, the user is encouraged to try to correct the
interference by one or more of the following measures:
•MovetheLifelineCordlessPhoneawayfromyourradioortelevision.
•PlugtheLifelineCordlessPhoneintoadifferentpoweroutletthanyourradio
or television.
66 Regulatory Compliance
ACTA (Administration Council for Terminal Attachments)
Information
This equipment complies with Part 68 of the FCC rules and the requirements
adopted by the ACTA. On the bottom of this equipment is a label that
contains, among other information, a product identifier in the format US:
AAAEQ##TXXXX. If requested, this number must be provided to the
telephone company.
A plug and jack used to connect this equipment to the premises’ wiring and
telephone network must comply with the applicable FCC Part 68 rules and
requirements adopted by the ACTA. A compliant telephone cord and modular
plug is provided with this product. It is designed to be connected to a
compatible modular jack that is also compliant. See installation instructions
for details.
If your home has specially wired alarm equipment connected to the telephone
line, ensure that the installation of the Lifeline Cordless Phone does not disable
your alarm equipment. If you have questions about what will disable alarm
equipment, consult your telephone company or a qualified installer.
Caution: In order for “alarm dialing equipment” to be able to seize the
phone line to report an alarm or other event when other customer equipment
(telephone, answering system, computer modem, etc.) connected to the same
line is in use, “alarm dialing equipment” must be connected to a properly
installed RJ31X jack. The RJ31X jack must be connected in series with,
and ahead of, all other equipment attached to the same phone line. Series
installation of an RJ31X jack is depicted in the figure on the following page. If
you have any questions concerning these instructions, you should consult your
telephone company or a qualified installer about installing the necessary jack and
“alarm dialing equipment” for you.

67
Caution: If the above diagram is not used, this equipment cannot report an
alarm when other equipment (telephone, answering system, computer modem,
etc.) connected to the same phone line is in use.
UL1637
The maximum separation (range) of the equipment, under test conditions
and for comparative purposes only, is seven hundred feet. This range may be
significantly reduced when the equipment is installed in a typical home.
Patent Information
One or more of the following Canadian Patents may apply to this product:
1,274,930; 1,256,613.
RJ31X
Jack
Customer Premises Equipment and Wiring
Alarm Dialing
Equipment
Network
Service
Provider’s
Facilities
Network
Demarcation
Point
Telephone
Line
Unused
RJ-11 Jack
Unused
RJ-11 Jack
Computer
Telephone Answering
System
Telephone
Fax Machine
Telephone

68
Philips Lifeline
111 Lawrence Street
Framingham, MA 01702-8156
Tel: 1-800-451-0525
www.lifelinesystems.com
Philips Lifeline Canada
95 Barber Greene Road, Suite 105
Toronto, Ontario, Canada M3C 3E9
Tel: 1-800-387-8120
www.lifeline.ca
P/N 0940597, Rev. 03
© 2009. All rights reserved. Signal range may vary due to environmental factors.