Luda Farm RECEIVER Digital Receiver User Manual WiFi NVR
Luda. Farm AB Digital Receiver WiFi NVR
user manual

www.reo-link.com
Reolink Digital Technology Co.,Ltd
E-mail: service@reo-link.com
Quick Start Guide
WiFi NVR
1
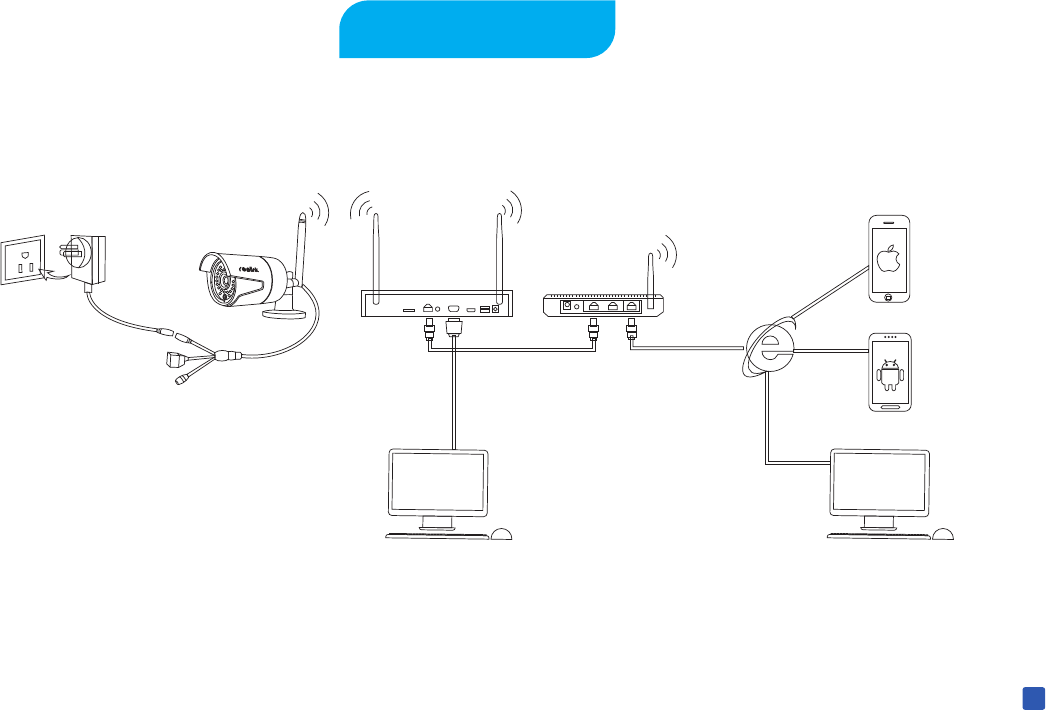
Connection Diagram
PC
Monitor
Android phone
iPhone/iPad
Internet
Router
Wi-Fi NVR
Power
RJ45
Reset
Power adapter
3
HDMI
VGA
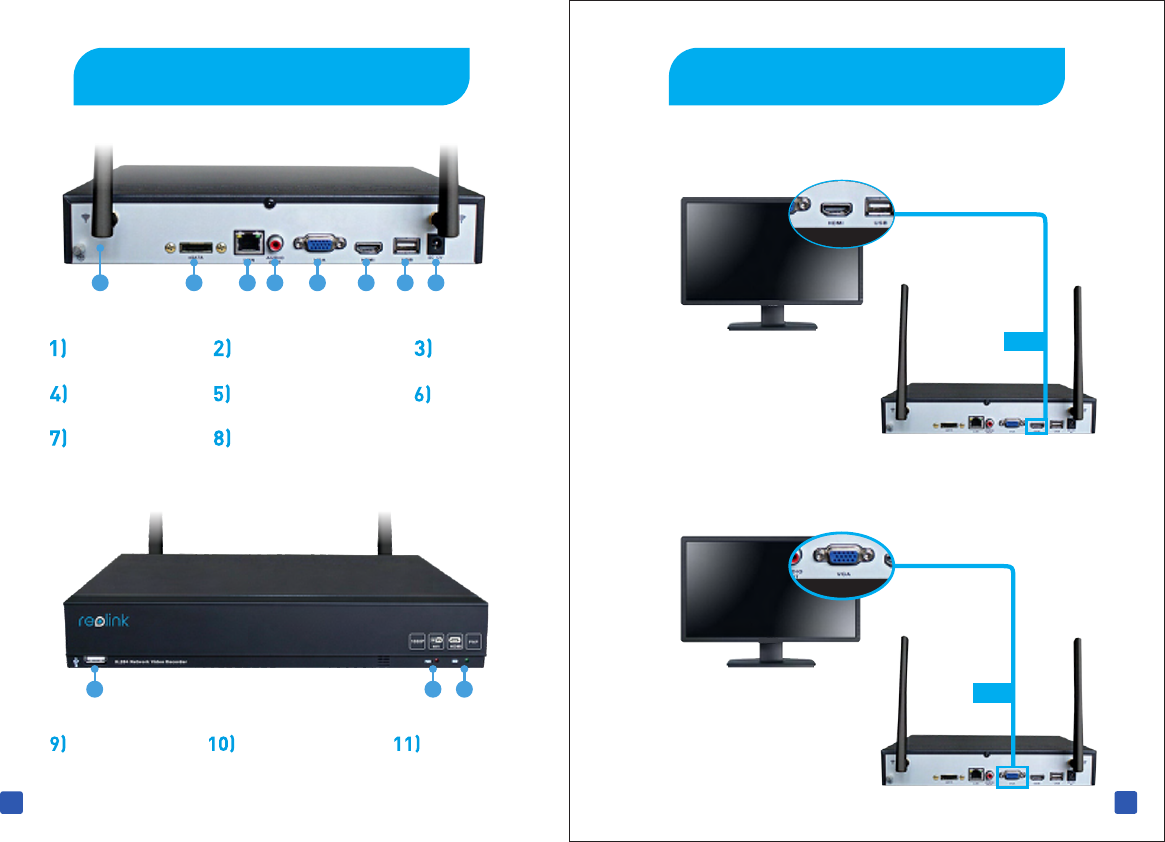
Step 1: Connect your NVR to TV Monitor
HDMI: Use the HDMI Cable provided to connect your NVR
to the TV HDMI port.
Or VGA: Use the VGA port to connect your NVR to the TV
Monitor.
HDMI
VGA
VGA
2
Getting to know your NVR
Power
12 3 4 5 6 7 8
WiFi eSATA LAN
Audio Out VGA HDMI
USB
910 11
USB Power LED HDD LED
5
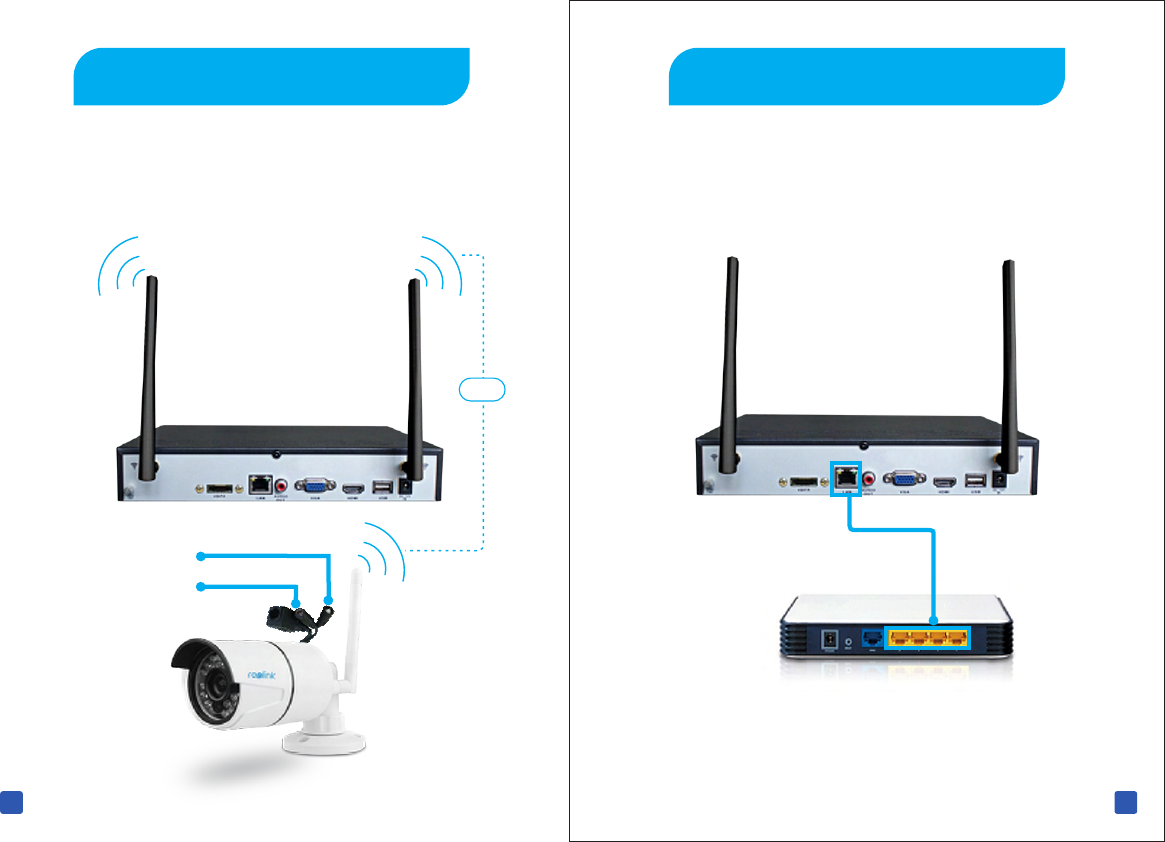
Step 3: Connect Network
If you want to view the NVR remotely (using mobile or Wi-Fi), you
need to connect the NVR to the internet.
4
Step 2: Connect the Cameras
Use the cable provided, connect the end to the NVR and the
other end to the network socket of camera as below.
DC Power (optinal)
Reset Button
WiFi
7
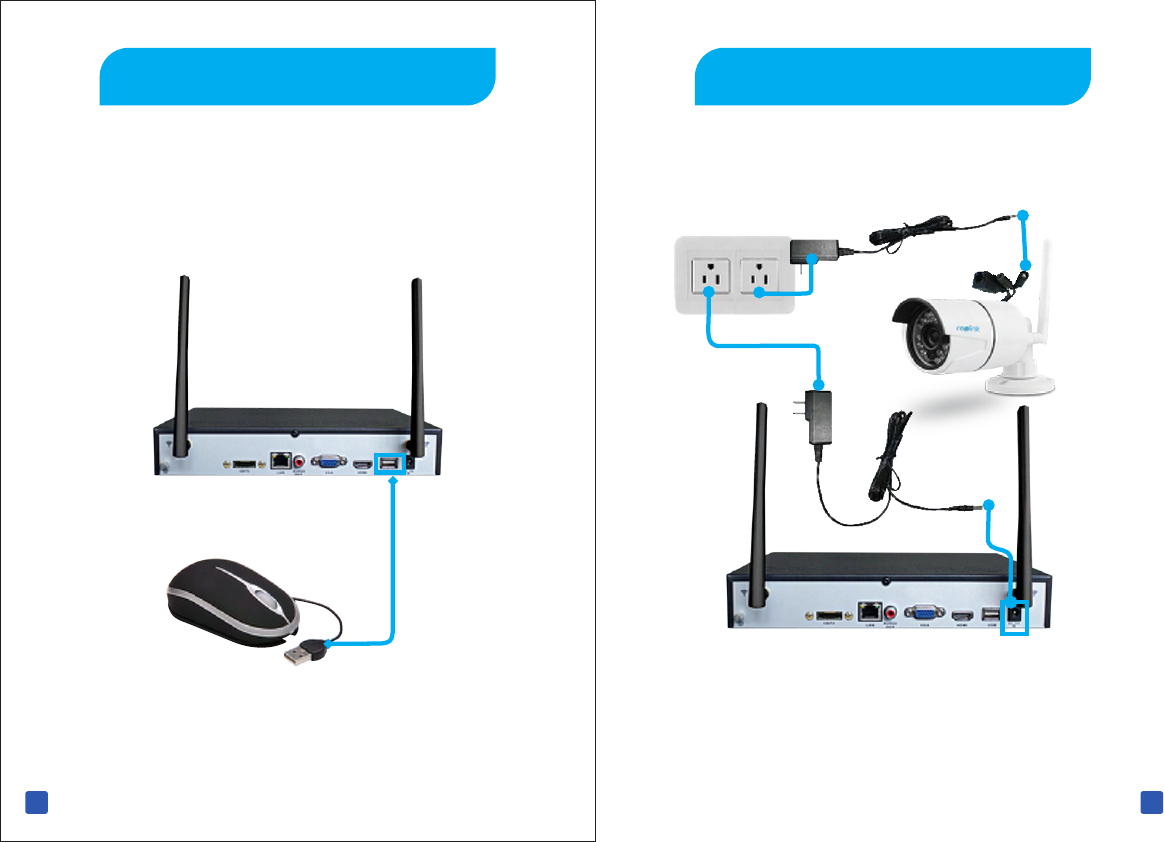
Step 5: Connect the Power Adapters
Connect the power cord to turn on the NVR.
You may have the General View of the Connection Diagram
at next page.
Step 4: Connect the mouse
You may connect the mouse to either of the two (2) rear USB
Ports to control your NVR.
6
Quick Start Guide
Windows Setup Guide
8 9
The Setup Wizard will run automatically the first time you
turn on your NVR.
It will enable you to:
Name the cameras
Configure your email account
Sync the NVR time with the internet server
Choose setting for daylight saving
Set a new password for the NVR
Set up language, video format, resolution, time zone and
date format
2. Set the admin and guest password
11
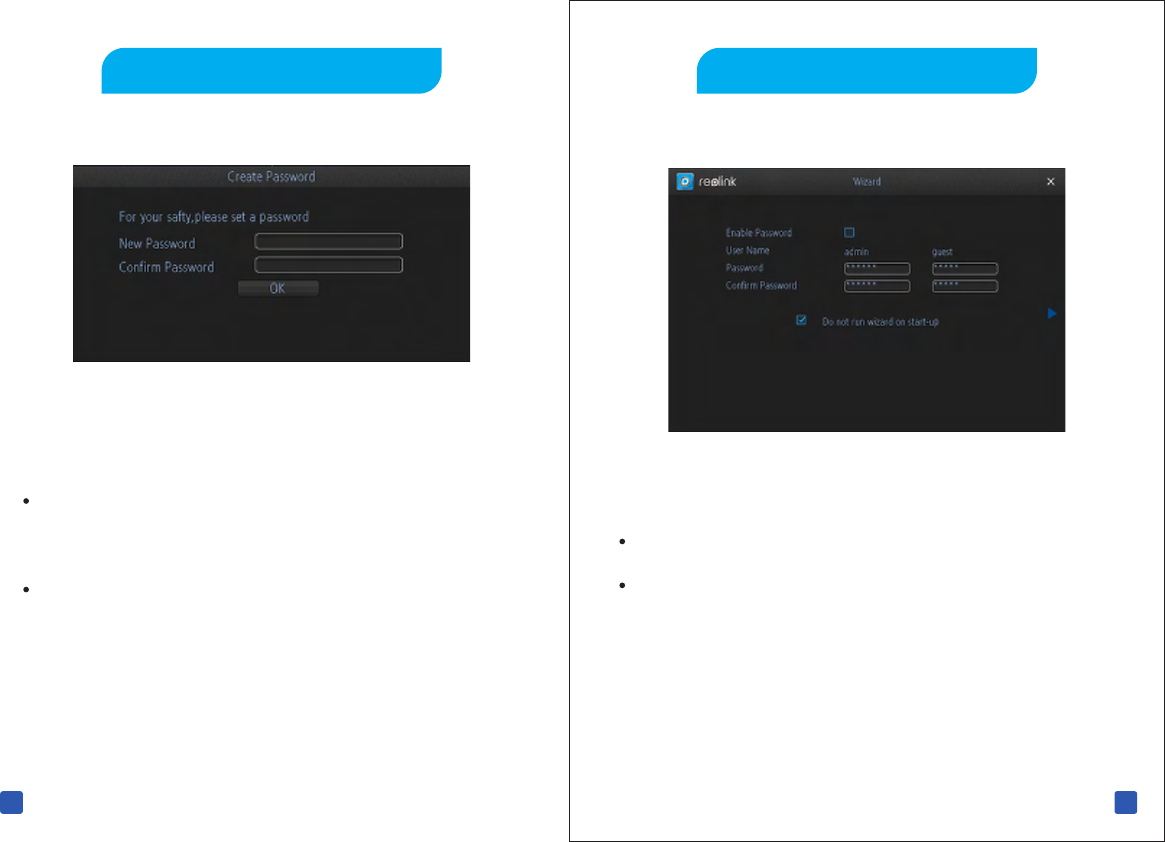
1. Create password
For first time to use WIFI NVR , default password is Blank , you
need to create a new password for your NVR , then click OK to
continue .
10
If you already reset the password on App , you can directly use
the password which you created on App to continue
Enable password protect ,so you need to input password for every
Set the password for the admin and guest account
Here you can:

4. Basic Setting
Here you can Set up language , video Standard ,Time Zone
and Resolution for display
1312
3. Set WiFi Mode and SSID
You can set the SSID and Key
Here you can:
Default WIFI Mode is AP , this is used for connect Camera with
NVR
Set the WIFI signal Channel for the NVR
15
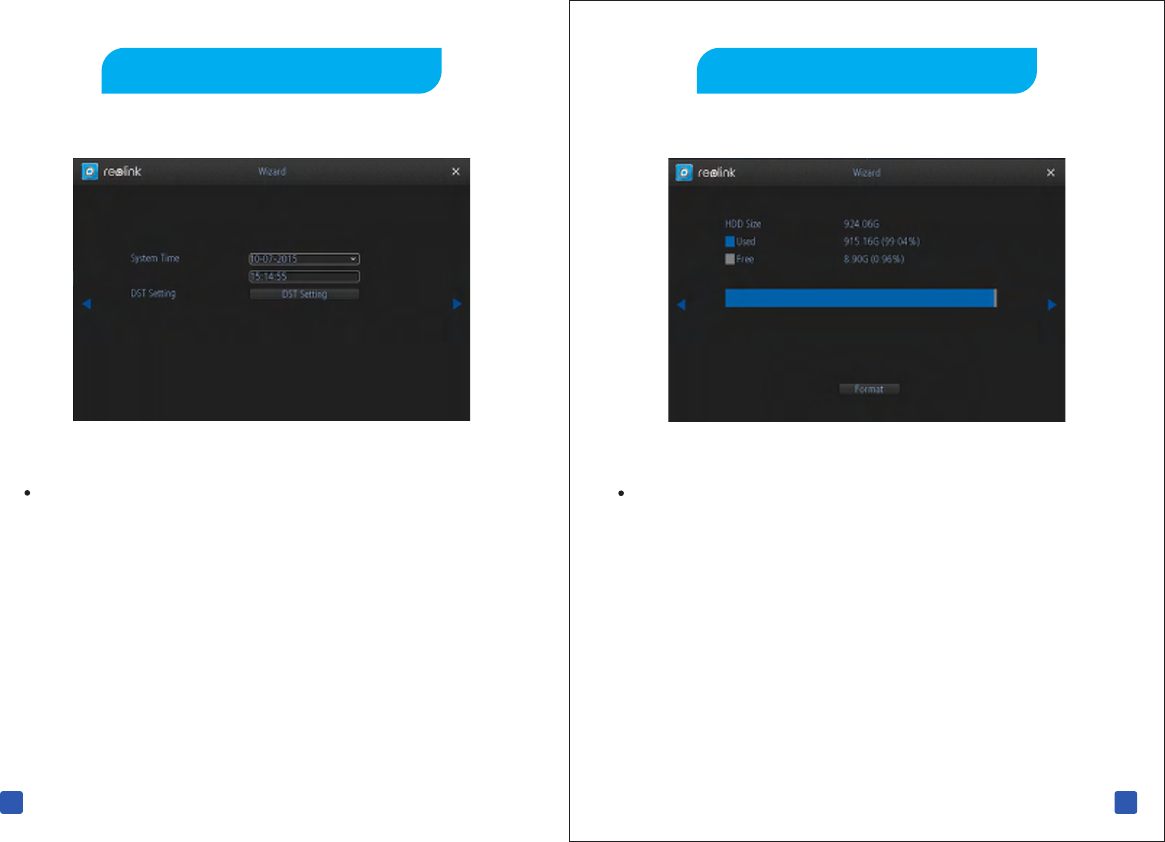
Here you can format the HDD
6. HDD Format
5. Time Setting
Here you can setting the system time and DST Time
14
16
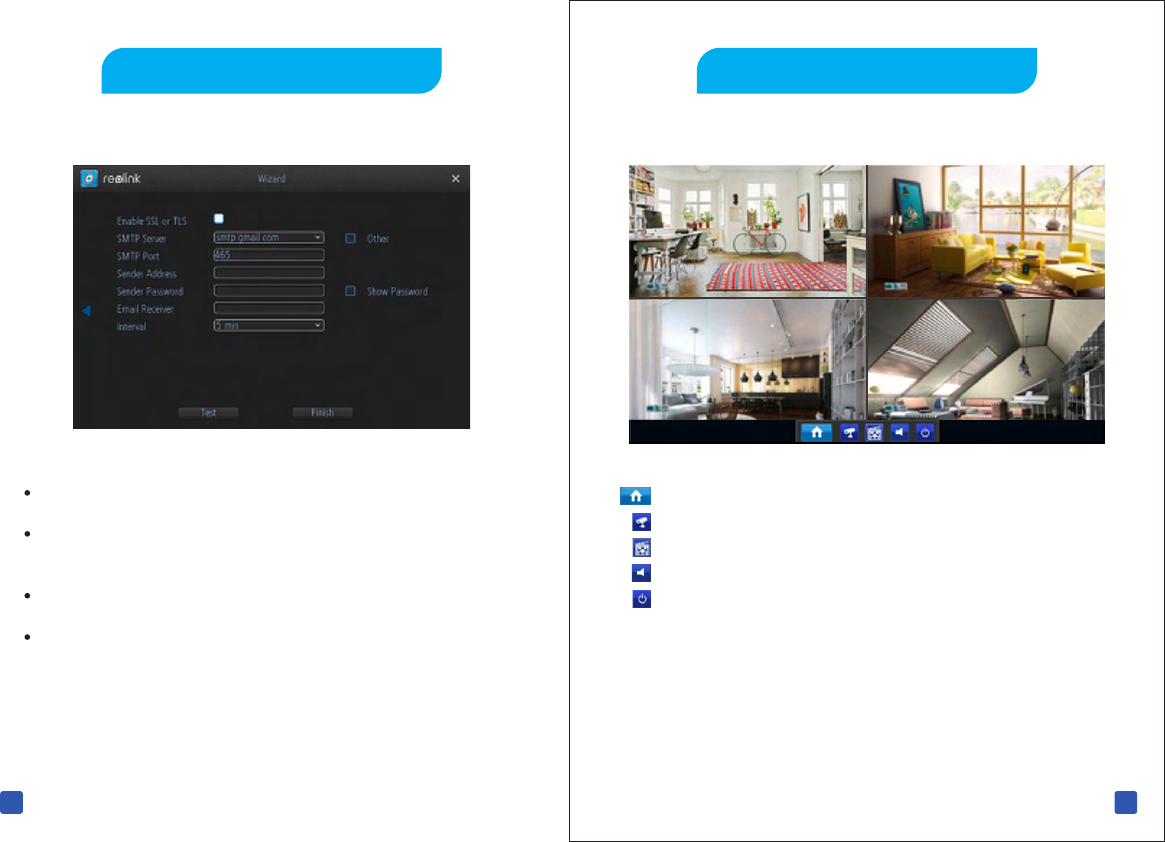
7. E-mail Setting 8. Live View Screen
You can send email alert when detect alarms events
We suggest to use Gmail ,you can go to www.gmail.com to
create your account .
Click “Test” to verify the setting is correct
Click “ Finish” to finish wizard setting
17
Open the main Menu
Open the camera device list
Open the Video Search page
enable and disable the Audio
Shutdown , reboot or Lock the system
18
Quick Start Guide
Mobile App
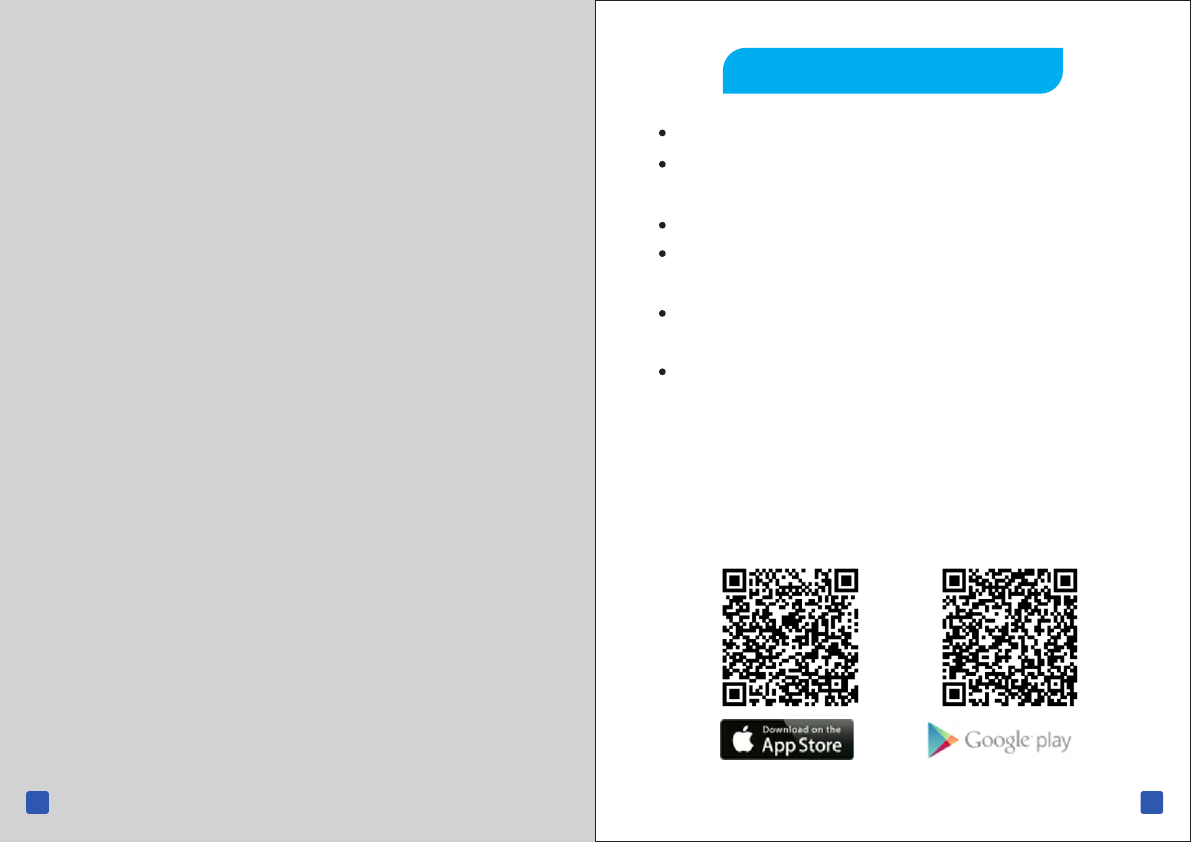
Using Reolink App, you can
Add a new device by quickly scanning the QR Code.
Perform simultaneous Multi-channel viewing with up to
16 channels on a screen.
Remotely playback the recording from your NVR HDD
Capture video from the live view channels directly saved
to your iOS or Android mobile device.
Capture single and multiple images and saved to your iOS
or Android mobile device.
Remotely Control PTZ (Pan, Tilt, Zoom) cameras.
You may now download the Reolink App from AppStore or
Google Play.
Please scan QR code below for more information.
19
20
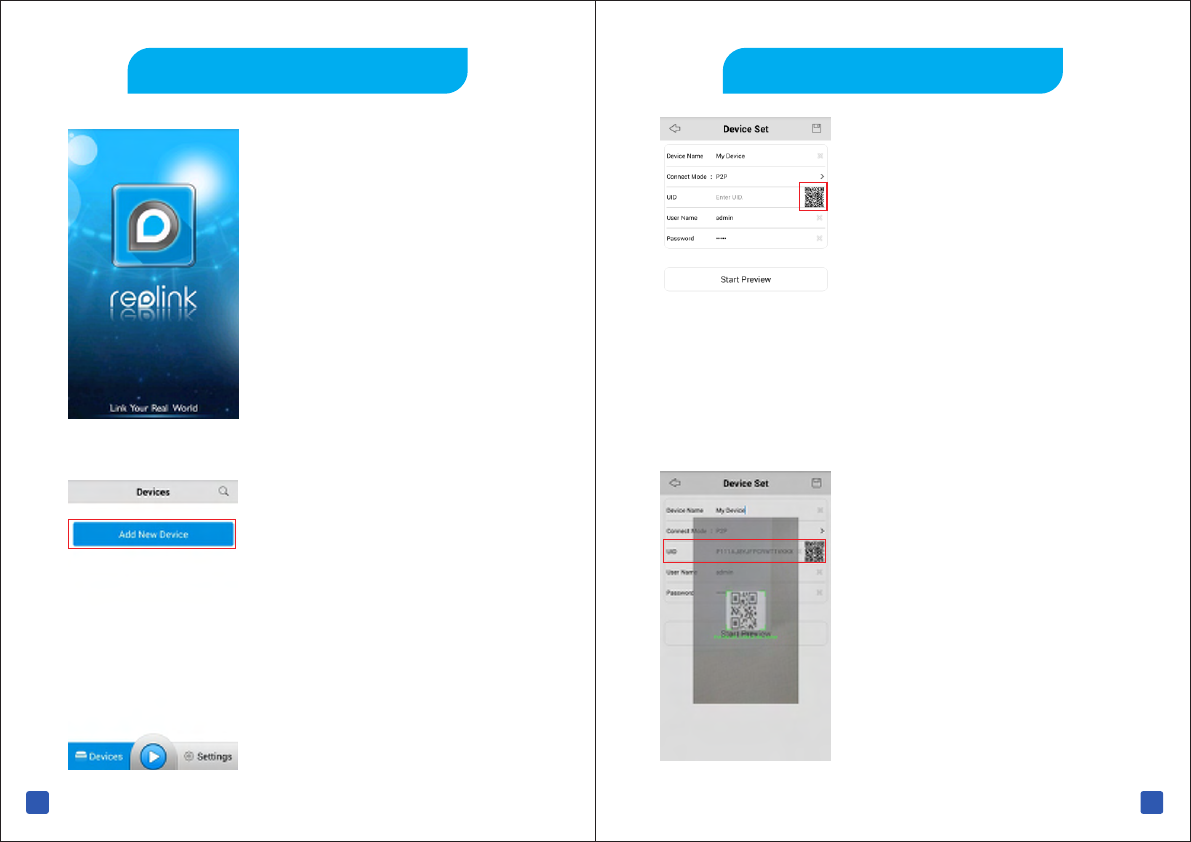
1. After downloading the
Reolink App, install and
launch the application.
2. During start-up, you will
see this splash screen. Tap
“Add New Device” Button.
A. Add a Device
21
B. Add a Device
3. Tap the QR code icon. In order
to scan, hold your mobile device
over the QR Code sticker found
at the top of your NVR.
4.You will hear a beep sound when
the QR Code has been successfully
scanned. Then the UID information
of your NVR will be automatically
generated.
22
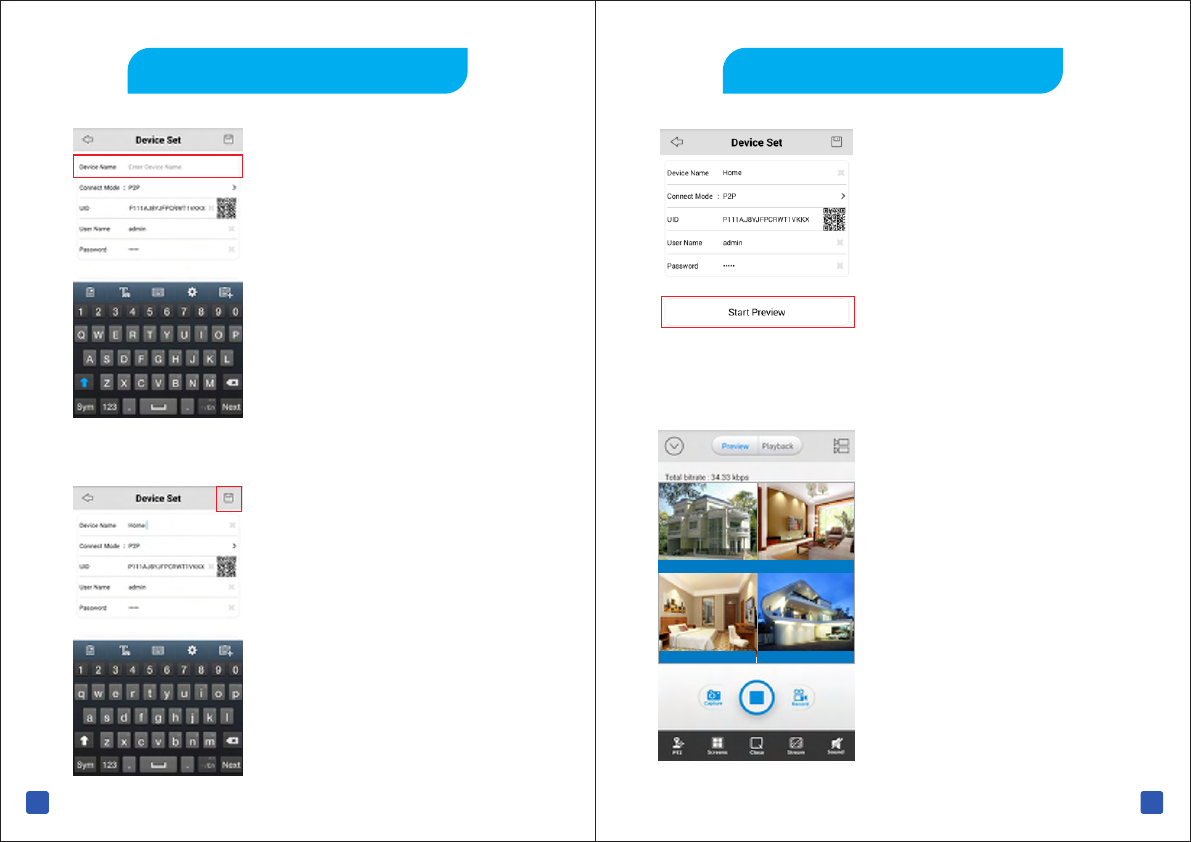
C. Add a Device
5. Tap the “Device Name” to edit
the name of your NVR. Enter the
password (default password is
blank) or the one that you created
in the setup wizard.
6. Tap the “Save” Button at the
upper right corner to apply the
changes.The app will verify and
test your connection.
23
D. Add a Device
8. You will now see a Live View of
all your connected IP Cameras.
Below is a quick run-through on
how to familiarize yourself with
the different buttons and functions
of the App.
Channel:2(My Device)
Channel:1(My Device)
Channel:3(My Device) Channel:4(My Device)
7. When the App has successfully
connected with the NVR, tap the
“Start Preview” button.
If the App fails to connect, ensure
that the entered UID and login
details are valid.
24
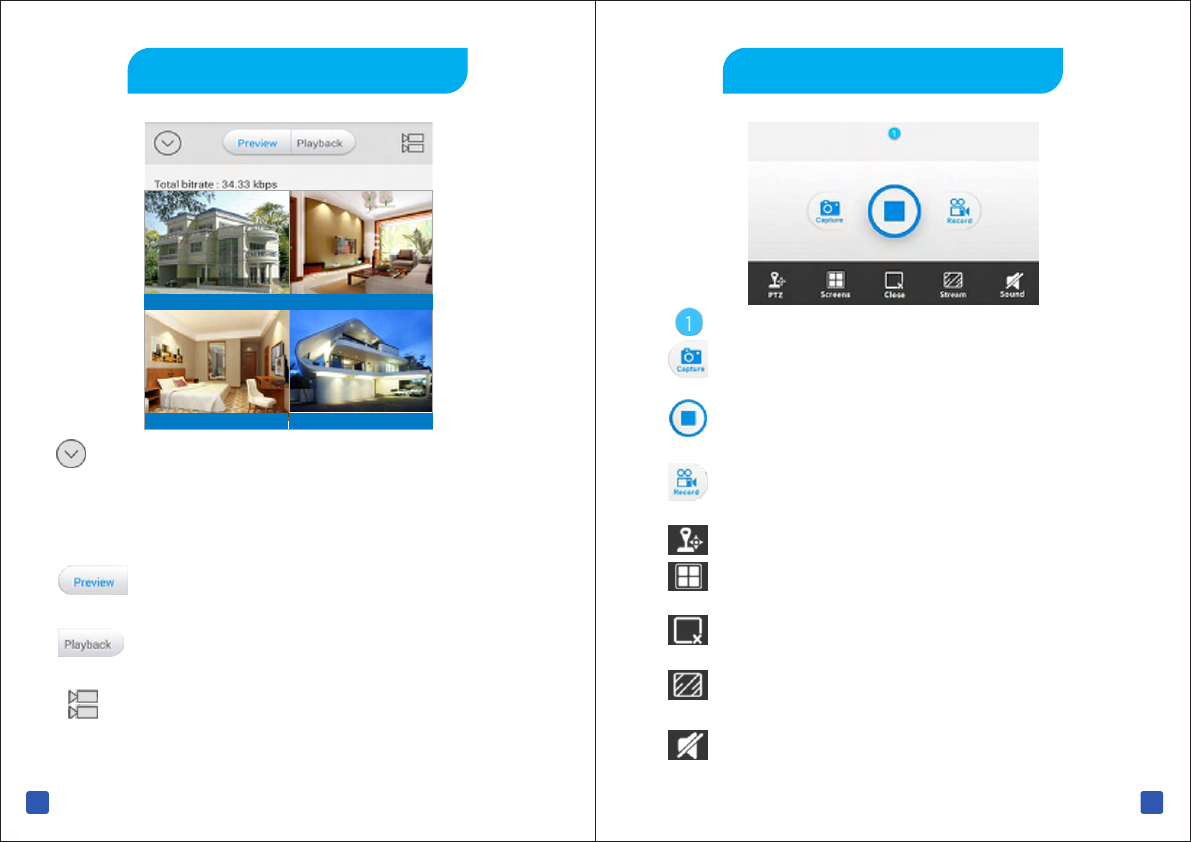
E. Preview
1. Menu Button – you may access this button to functions such
as Add, Edit and Delete a device. You may also access the Manual,
Version Information and check the Playback Video recorded to your
mobile device. Tap the Play button to exit the menu.
Preview – Tap this button to access the Live View Mode.
A red border will surround the existing selected camera.
2.
3. Playback – Tap this to remotely playback video recorded
to your NVR.
4. Camera List – this will allow you to enable or disable the
cameras available.
Channel:2(My Device)
Channel:1(My Device)
Channel:3(My Device) Channel:4(My Device)
25
F. Preview
1. Shows which camera or group you are viewing.
2. Takes a snapshot of the selected camera and save the
image to your mobile device.
3. Stop/ Start all cameras, stops live view of all the cameras.
Tap again to restart all cameras.
4. Records video of selected cameras to your mobile device.
Tap the button again to stop the recording.
5. Controls any PTZ camera that is connected.
6. Multiple camera views, you may select 1/4/9/16 camera
to view at the same time.
7. Stop/Start selected camera, stops live view of selected
camera. Tap again to restart the selected camera.
8. Video Quality Stream, you may change the Live View
image video quality.
9. Sound – enable / disable audio
26
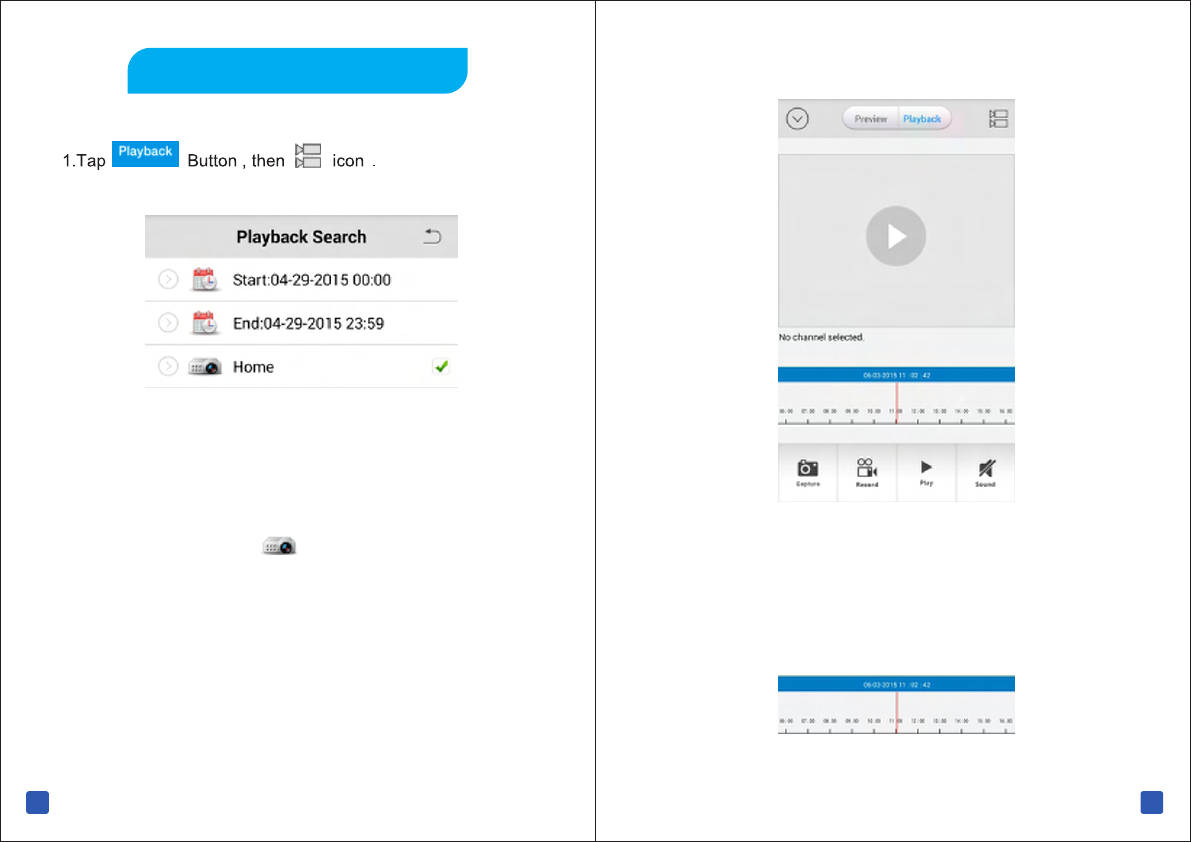
G. Playback
2. Select the Start and End time/date.
3.Tap the > button next to and select the camera.
Only one (1) camera may be selected when searching.
4. Tap the Start Search to display the files that fit with your search.
You will see below screen.
5. Slide the timeline bar to choose the file you want to play.
You may also drag to magnify the timeline bar.
27
See below for example.
28
Quick Start Guide
Windows Client Software
Windows Client Software
You may find the Reolink Client Software from the CD provided
or may download from the website at to access www.reo-link.com
and control your NVR from your computer.
After completing download, navigate to the Download Folder or
to the location you saved the file.
Double click the file, a new window will open, double click the program
to start installation. Follow the instructions in this quick start guide.
29
30
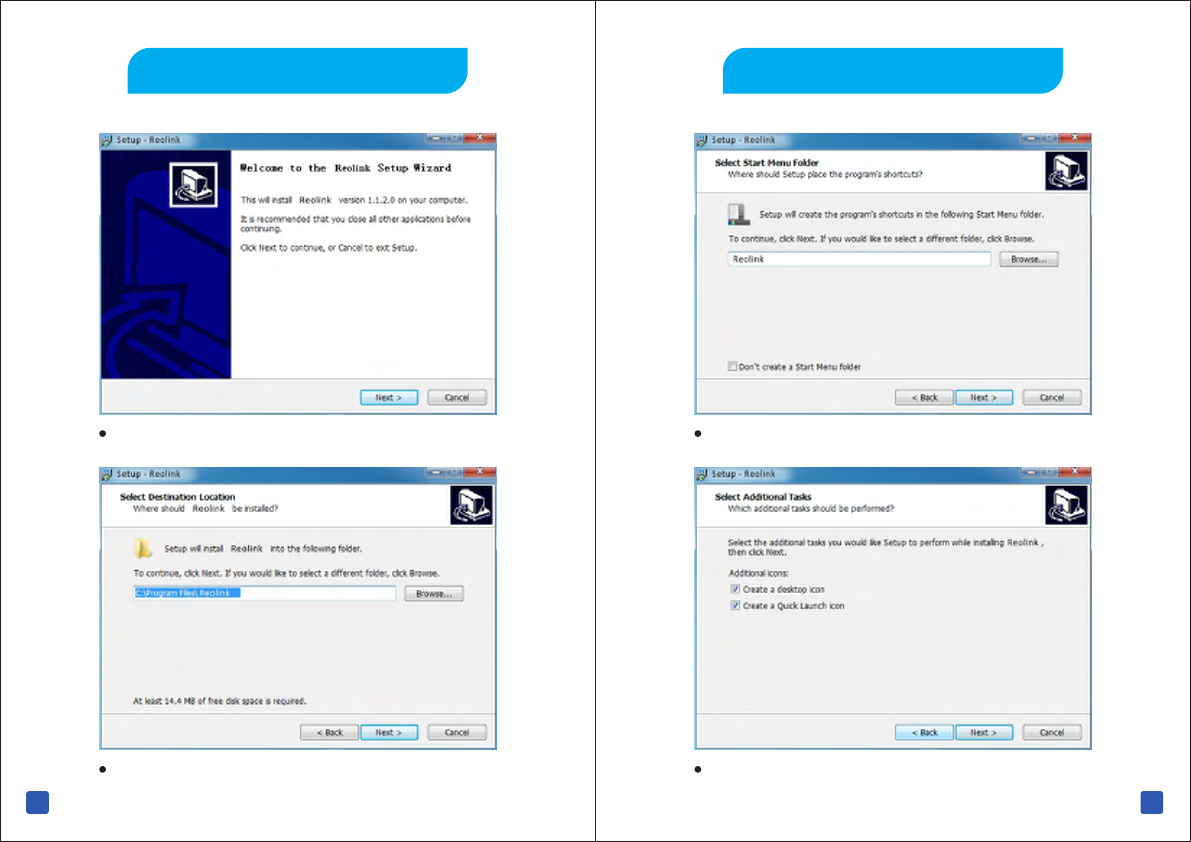
Install Reolink
Click “Next” to begin
Click “Next”
Input the Start Menu Name and click “Next”
31
Install Reolink
Select additional task then click “Next”
33
Use Reolink
The Reolink software allows you to control your NVR within
the same network or remotely over the internet. The following
instructions will provide a step-by-step procedure on how to
properly use the control buttons and its functions.
Note :
Default Username: admin
Default Password: (blank)
32
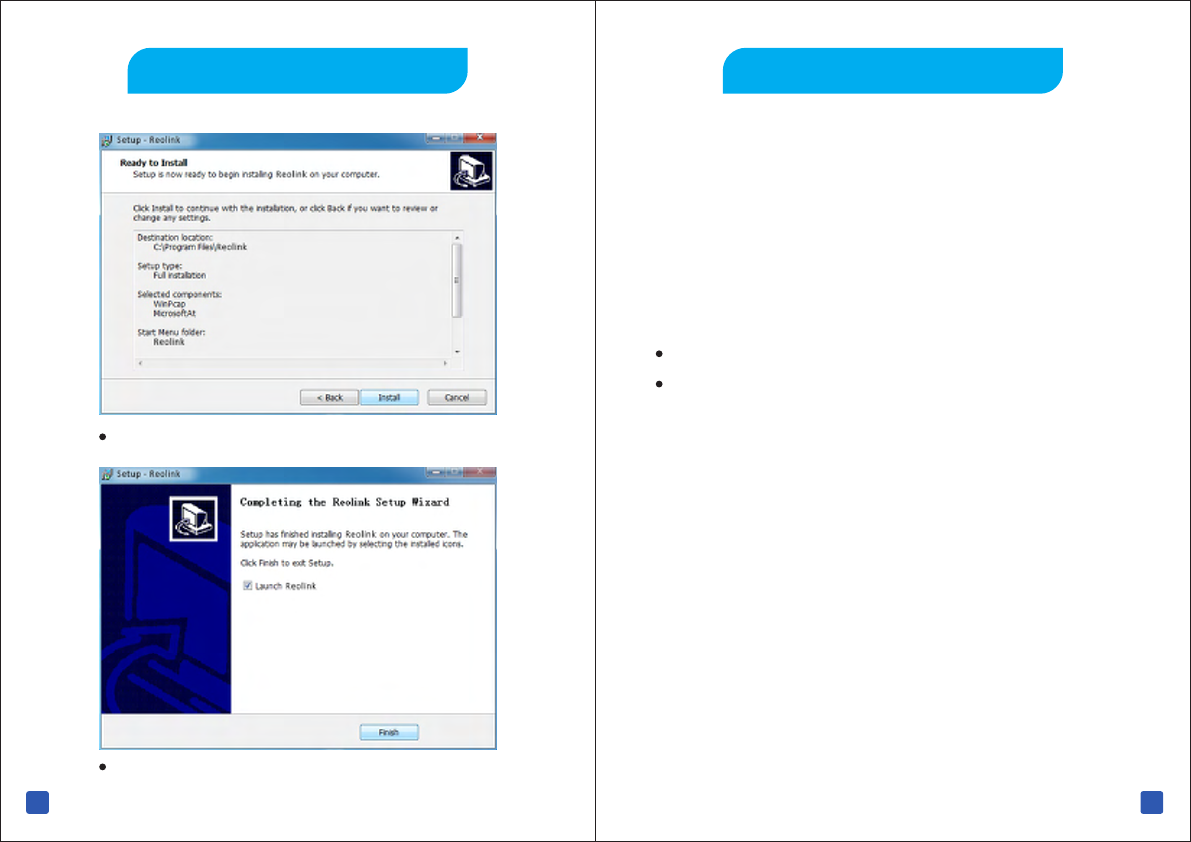
Click Finish to complete installation
Click install to start installation of software
Install Reolink
Install Reolink
UID Mode and IP Address Mode
UID Mode
UID is a 16-digital phanumeric key that is printed in the label sticker
found on the NVR. Use this mode if the NVR and computer is located
separately (e.g. NVR is at home, computer is at the office). For the
stream type, select “sub stream”
IP Address Mode
Standard method in connecting your NVR to the computer. Ensure
that they are both attached on the same network.
35
34
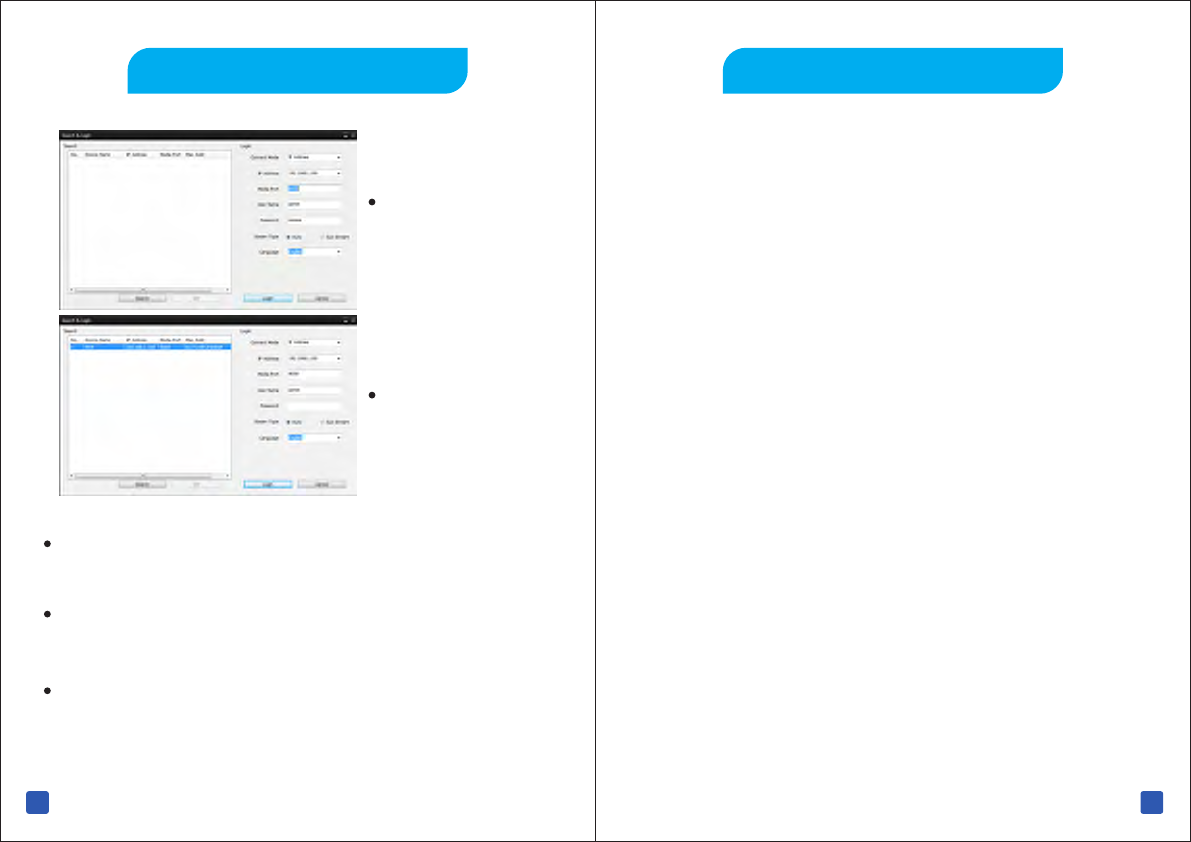
Use Reolink
Click Search to
see the NVR on
your network.
Your NVR will be
displayed in the list,
click to select.
You need login details to connect. You may use the default
username (admin) and password (blank) or the one that you
have created.
If you connect the NVR on the same network, select “Main
Stream” under the stream type. If you are connecting over
the internet, please select “Sub Stream” to run smoothly.
Click Login to connect.
37
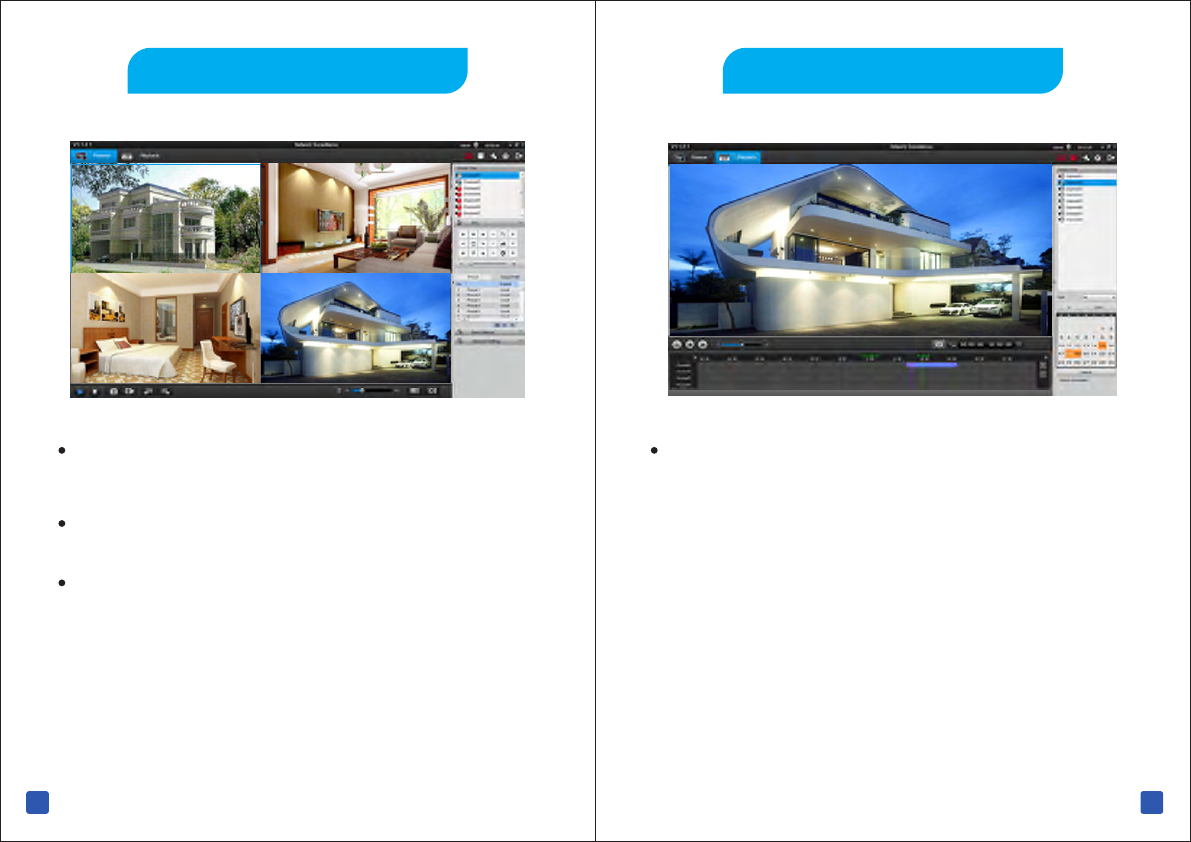
Playback
You may select the camera you want to play. For more details,
please refer to the User Manual.
36
Preview
This mode allows you to watch the Live View of the cameras
on your computer.
Expand basic settings to adjust the brightness, contrast, etc.
Advanced Setting allows you to change how each camera
adapts to different lighting conditions over day and night.
38
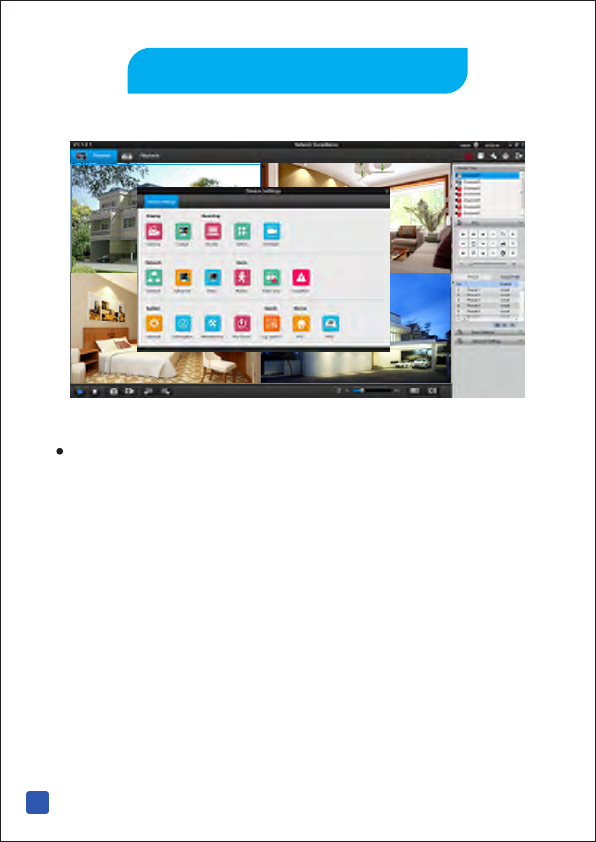
Device Setting
You may configure most settings of the NVR on your computer.
For more details, please refer to the User Manual.
FCC Statement
This equipment has been tested and found to comply with the limits for a Class B digital device,
pursuant to Part 15 of the FCC Rules. These limits are designed to provide reasonable
protection against harmful interference in a residential installation. This equipment generates
uses and can radiate radio frequency energy and, if not installed and used in accordance with
the instructions, may cause harmful interference to radio communications. However, there is
no guarantee that interference will not occur in a particular installation. If this equipment does
cause harmful interference to radio or television reception, which can be determined by turning
the equipment off and on, the user is encouraged to try to correct the interference by one or
more of the following measures:
-- Reorient or relocate the receiving antenna.
-- Increase the separation between the equipment and receiver.
-- Connect the equipment into an outlet on a circuit different from that to which the receiver is
connected.
-- Consult the dealer or an experienced radio/TV technician for help.
This device complies with part 15 of the FCC Rules. Operation is subject to the following two
conditions:(1) This device may not cause harmful interference, and (2) this device must accept
any interference received, including interference that may cause undesired operation.
Changes or modifications not expressly approved by the party responsible for compliance
could void the user's authority to operate the equipment.
This equipment complies with FCC radiation exposure limits set forth for an uncontrolled environment.
This equipment should be installed and operated with minimum distance 20cm between the radiator
& your body.