Mad Catz D232266A3713C GameSmart C.T.R.L.R User Manual 32266 MUG 13SEP13
Mad Catz, Inc. GameSmart C.T.R.L.R 32266 MUG 13SEP13
Mad Catz >
Contents
- 1. Users Manual - warranty & compliance sheet
- 2. Users Manual - part 1 of 2
- 3. Users Manual - part 2 of 2
Users Manual - part 1 of 2
:: MOBILE GAMEPAD :: MOBILE GAMEPAD :: MOBILE GAMEPAD ::
FOR POUR FÜR
multiplatform :: multi-plateforme
Windows
®
Mac OS X [10.7+]
Smart DevicesAndroid 3.0+
.2
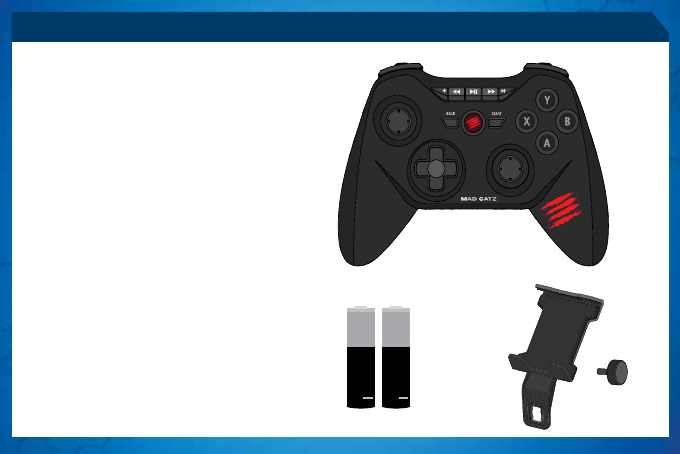
PACKAGE INCLUDES
A
B
C
Game Controller
2 x AAA Batteries
Travel Clip
Controller di gioco
2 batterie ministilo
Clip da viaggio
A
B
C
Mando de juego
2 baterías AAA
Clip para viajes
A
B
C
Spelkontroll
2 st. AAA-batterier
Resefäste
A
B
C
Spil-controller
2 x AAA-batterier
Rejseklip
A
B
C
Comando de Jogo
2 pilhas AAA
Clip de viagem
A
B
C
ENGLISH
ITALIANO
ESPAÑOL
SVENSK
DANSK
PORTUGUÊS
.B
3 21
3 21
.A
.C
Manette de jeu
2 piles AAA
Support de voyage
A
B
C
FRANÇAIS
Spiele-Controller
2 Mikrobatterien
Clip für die Reise
A
B
C
DEUTSCH
.3
1 2 3
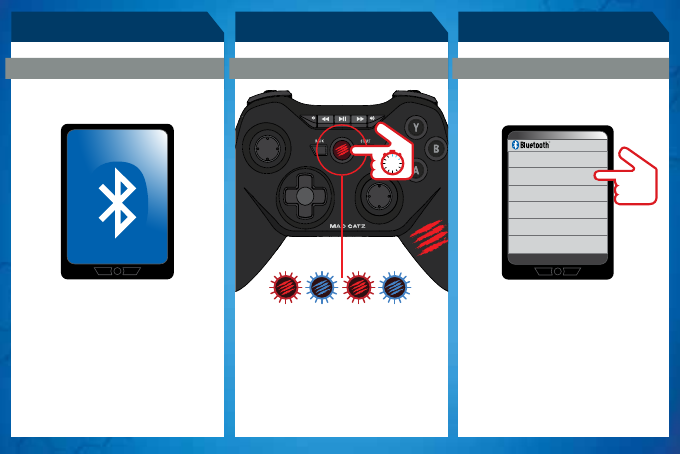
Press and hold for 3 seconds
Halten Sie die Taste für3 Sekunden gedrückt
Appuyez pendant 3 secondes
Premere e tenere premuto per 3 secondi
Mantén presionado durante 3 segundos
Tryk og hold nede i 3 sekunder
Tryck och håll in i 3 sekunder
Prima e mantenha premido durante
3 segundos
EN
DE
FR
IT
ES
DA
SV
PT
Select the gamepad from the list
Wählen Sie das Gamepad aus der Liste aus
Sélectionnez la manette dans la liste
Selezionare il gamepad dall’elenco
Seleccione el dispositivo de control en la lista
Vælg gamepad fra listen
Välj gamepad från listan
Seleccione o comando de consola na lista
EN
DE
FR
IT
ES
DA
SV
PT
Turn Bluetooth on and search for devices
Aktivieren Sie Bluetooth und suchen Sie
nach Geräten
Activez la fonction Bluetooth et recherchez
les appareils
Attivare Bluetooth e cercare dispositivi
Enciende el Bluetooth y busca dispositivos
Aktivér Bluetooth, og søg efter enheder
Aktivera Bluetooth och sök efter enheter
Ligue o Bluetooth para procurar dispositivos
EN
DE
FR
IT
ES
DA
SV
PT
My Laptop
Mad Catz C.T.R.L.
My Laptop
Mad Catz C.T.R.L.R
3
My Laptop
Mad Catz C.T.R.L.R

.4
Piles à insérer
Application Mad Catz
Information produit
Instructions de configuration
Témoins lumineux (LED)
Mises à jour du firmware
Einsetzen der Batterien
Mad Catz-App
Produktinformationen
Installationsanleitung
LED-Anzeigen
Firmware-Aktualisierung
CONTENTS
ENGLISH
Insert Batteries
Mad Catz App
Product Information
Setup Instructions
LED Indicators
Firmware Updates
5
5
6
7-10
8
11
5
5
12
13-16
14
17
DEUTSCH
Inserire le batterie
App Mad Catz
Informazioni sul prodotto
Istruzioni di configurazione
Spie LED di indicazione
Aggiornamenti firmware
5
5
24
25-28
26
29
ITALIANO
Colocar las baterías
App Mad Catz
Información del producto
Instrucciones de configuración
Indicadores LED
Actualizaciones de firmware
5
5
30
31-34
32
35
ESPAÑOL
Sæt batterierne i
Mad Catz-app
Produktinformation
Opsætningsvejledning
Lysdioder
Uppdateringar av inbyggd programvara
5
5
36
37-40
38
41
SVENSK
Sätt i batterierna
Mad Catz-app
Produktinformation
Installationsanvisningar
LED-indikatorer
Firmwareopdateringer
5
5
42
43-46
44
47
DANSK
Inserir Pilhas
Aplicação Mad Catz
Informações do produto
Instruções de configuração
Indicadores LED
Actualizações de firmware
5
5
48
49-52
50
53
PORTUGUÊS
5
5
18
19-22
20
23
FRANÇAIS
.5
INSERT BATTERIES MAD CATZ A.P.P.
+
+
Download the Mad Catz App
Laden Sie die MadCatz-App
Téléchargez l’application Mad Catz
Scarica l’app Mad Catz
Descargue la aplicación Mad Catz
Download Mad Catz-app
Hämta Mad Catz-appen
Transferir a aplicação Mad Catz
EN
DE
FR
IT
ES
DA
SV
PT
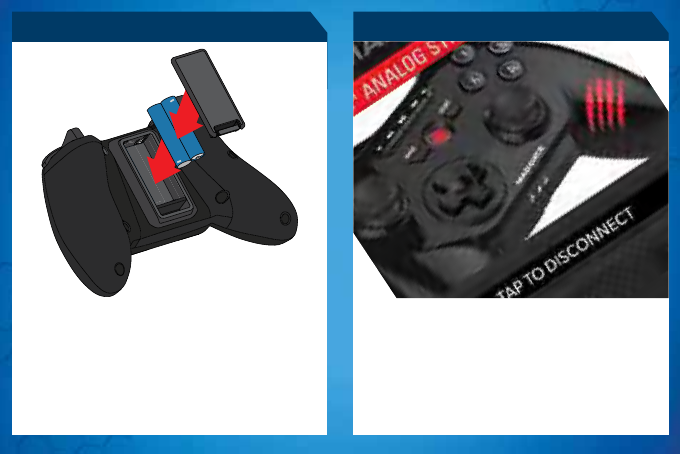
Insert 2x AAA batteries
Setzen Sie die beiden Mikrobatterien ein
Insérez les deux piles AAA
Inserire 2 batterie ministilo
Coloque las 2 baterías AAA
Sæt 2 x AAA-batterier i
Sätt i 2 st. AAA-batterier
Inserir 2 pilhas AAA
EN
DE
FR
IT
ES
DA
SV
PT
.6
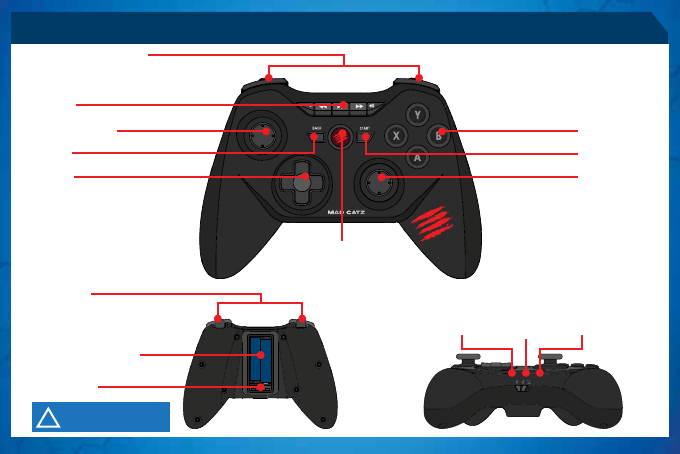
PRODUCT INFORMATION
+
-
+
-
ACTION
ANALOG STICK
ANALOG STICK
2 X AAA BATTERIES
D-PAD
TRIGGERS
HOME
MICRO USB
GAMESMART
MODE
MOUSE
MODE
PC
MODE
START
SHOULDER BUTTONS
MEDIA
BACK
USB NOT for charging!
For firmware updates only
!
.7
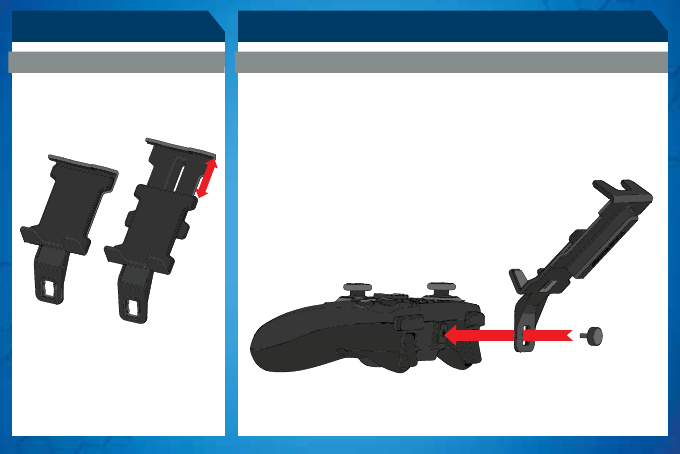
SETUP INSTRUCTIONS
ATTACHING THE TRAVEL CLIPCLIP SETUP
1. Unscrew bolt and remove from the pad
2. Place clamp into position
3. Screw bolt into pad to secure clamp
Minimum Device Width = 58.6 mm
Maximum Device Width = 80.5 mm