Magicard 3680-0001 Ultima Printer with RFID User Manual
Magicard Ltd Ultima Printer with RFID
Magicard >
User Manual
1
User Manual
ID Card Printer
Document: 4392 Version v1.01 – 17/07/2018
ReTransfer ID Card Printer – User Manual
2
CONTENTS
The information contained in this document is subject to change without notice ................................................. 4
Safety Instructions: ................................................................................................................................................ 4
CE Declaration: ...................................................................................................................................................... 4
FCC Declaration: .................................................................................................................................................... 4
CCC Declaration: .................................................................................................................................................... 4
CAUTION: .............................................................................................................................................................. 4
Printer installation ................................................................................................................................................. 5
Welcome ..................................................................................................................................................... 5
IMPORTANT – Do not connect the USB yet!.................................................................................................... 6
Printer Environmental requirements: ............................................................................................................. 6
Fitting the Printer accessories ................................................................................................................................ 7
Installing the Dye Film .................................................................................................................................. 8
Connect the Power Supply ............................................................................................................................ 9
Choosing the Correct Connector for your Region .......................................................................................... 10
installing the driver .............................................................................................................................................. 11
The printer Driver settings ................................................................................................................................... 13
Using your ID Card Printer ........................................................................................................................... 14
Printer Main Components ........................................................................................................................... 14
Front Display Panel ..................................................................................................................................... 15
Printer Menus ............................................................................................................................................ 16
Main Homepage ............................................................................................................................... 16
Main Homepage (cont…) ................................................................................................................... 17
Tools Menu ...................................................................................................................................... 17
Additional Settings Options ............................................................................................................... 18
Help Menu ....................................................................................................................................... 19
Cleaning Menu ................................................................................................................................. 20
The Internal Test Card ................................................................................................................................ 21
Available Encoder Modules ......................................................................................................................... 22
Choosing the Right dye film ................................................................................................................................. 23
Choosing the Right Cards ..................................................................................................................................... 24
Card size .................................................................................................................................................... 24
Card thickness ............................................................................................................................................ 24
To obtain good quality prints the Cards must be… ........................................................................................ 24
Printable area of the Card ........................................................................................................................... 24
Using Magnetic Stripe Cards ........................................................................................................................ 25
In the event of a Card jamming in the printer ............................................................................................... 25
ReTransfer ID Card Printer – User Manual
3
Caring for your printer ......................................................................................................................................... 26
MAINTAINING YOUR PRINTER IS IMPORTANT!!! ........................................................................................... 26
Cleaning Supplies ....................................................................................................................................... 26
Cleaning the Printer Rollers using the Cleaning Kit ........................................................................................ 27
Replacing the Cleaning Roller ...................................................................................................................... 28
Cleaning the Print Head using the Cleaning Swab .......................................................................................... 29
Cleaning the Printer using the Cleaning Card ................................................................................................ 30
Upgrading to DUO Operation .............................................................................................................................. 31
Available consumables ........................................................................................................................................ 32
Printer Error codes ............................................................................................................................................... 33

ReTransfer ID Card Printer – User Manual
4
THE INFORMATION CONTAINED IN THIS DOCUMENT IS SUBJECT TO CHANGE
WITHOUT NOTICE
Magicard Ltd. shall not be liable for errors contained herein or for incidental consequential damages in connection with the furnishing,
performance or use of this material.
This document contains proprietary information belonging to Magicard Ltd. and may not be wholly or partially copied, stored in a data
retrieval system, or used for any purpose other than that for which it was supplied, without the express written authority of Magicard
Ltd. All rights are reserved.
The HoloKote feature is protected by US PATENT No: 5,990,918 and by EUROPEAN PATENT SPECIFICATION EP 0 817 726 B1.
Microsoft and Windows 2000, XP, Vista and Windows 7 and 8 are trademarks of Microsoft Corporation.
Copyright © 2011 Magicard Electronics Limited.
SAFETY INSTRUCTIONS:
To prevent electric shock do not remove covers.
Do not attempt to service the printer yourself.
There are no user serviceable parts inside. In the event of malfunction, refer servicing to your printer’s supplier.
This product is only to be used with the Power Source supplied at point of purchase.
Take care not to spill any liquid on the printer.
Ensure that the power supply cord is no longer than 2 metres in length and includes a properly grounded connection.
When handling the printer avoid touching the thermal printing edge of the thermal print head. Any grease and contamination will
shorten its life.
Before transporting the printer, remove the dye film & card hoppers and pack the printer in its original packaging.
CE DECLARATION:
FCC DECLARATION:
Information to the user.
NOTE:
This equipment has been tested and found to comply with the limits for a Class A digital device, pursuant to part 15 of the FCC Rules.
These limits are designed to provide reasonable protection against harmful interference when the equipment is operated in a
commercial environment. This equipment generates, uses, and can radiate radio frequency energy and, if not installed and used in
accordance with the instruction manual, may cause harmful interference to radio communications. Operation of this equipment in a
residential area is likely to cause harmful interference in which case the user will be required to correct the interference at his own
expense.
CCC DECLARATION:
CAUTION:
Unapproved changes or modifications could void the Users authority to operate the equipment and affect any related
warranty claim.
If using this printer in Germany:
To provide adequate short-circuit protection and over-current protection for this printer, the building installation must be protected by a
16 Amp circuit breaker.
Bei Anschluß des Druckers an die Stromversorgung muß sichergestellt werden, daß die Gebäudeinstallation mit einem 16 A-
Überstromschalter abgesichert ist.
ReTransfer ID Card Printer – User Manual
5
PRINTER INSTALLATION
Welcome
Thank you for choosing a Retransfer Card Printer
Before setting up your printer using the Driver CD–ROM, please follow the simple steps in this guide on
installing your Printer. This guide helps you make your printing experience more enjoyable and secure.
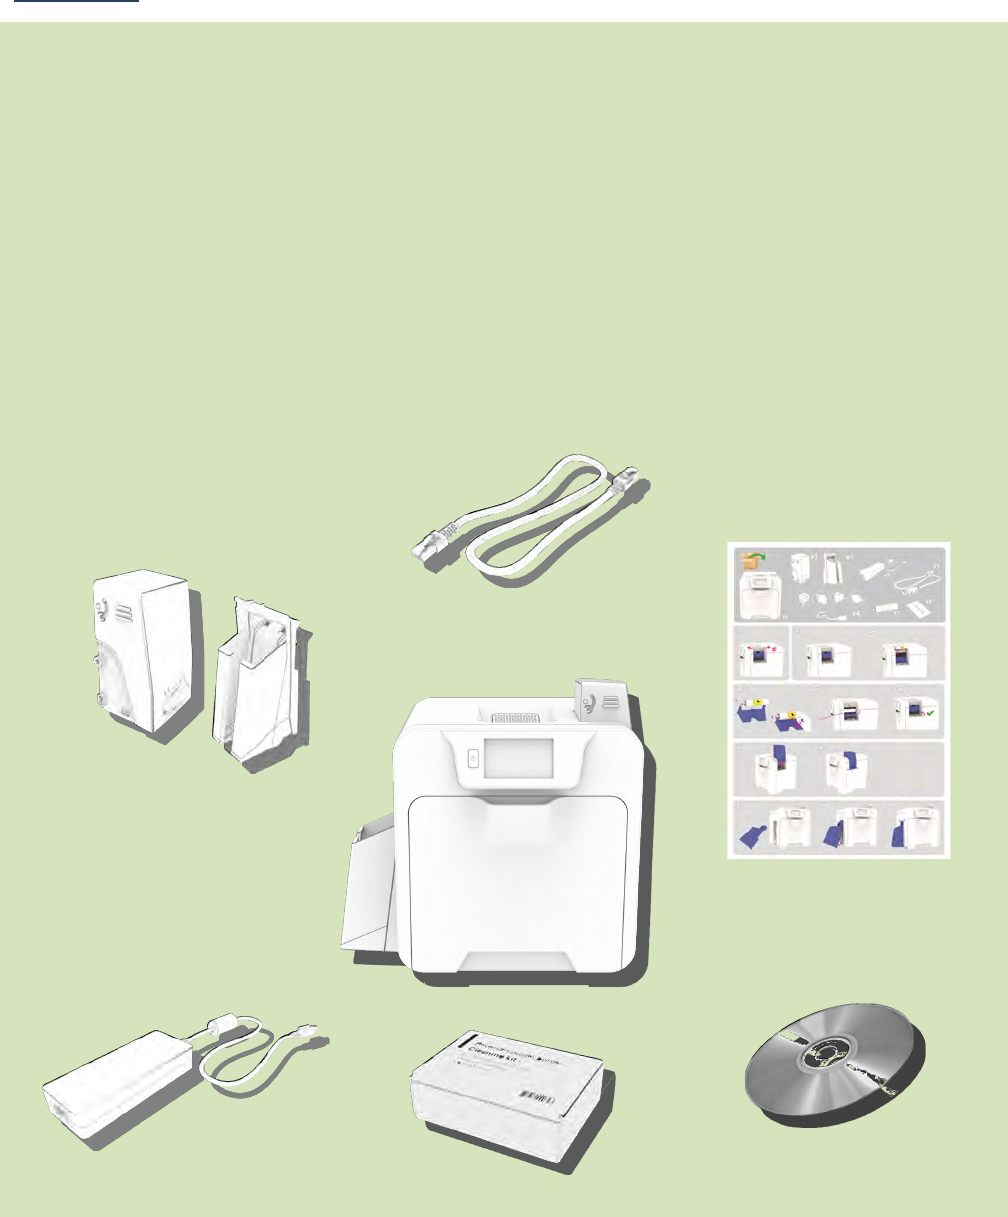
Please ensure you have the following items before you begin the installation:
1. ReTransfer ID Card Printer
2. Card Hopper and Stacker
3. USB Cable
4. QuickStart Guide
5. Driver CD ROM
6. Cleaning Cards x2
7. Power Adaptor and Leads
2.
3
.
7
.
6
.
4
.
5
.
1.
ReTransfer ID Card Printer – User Manual
6
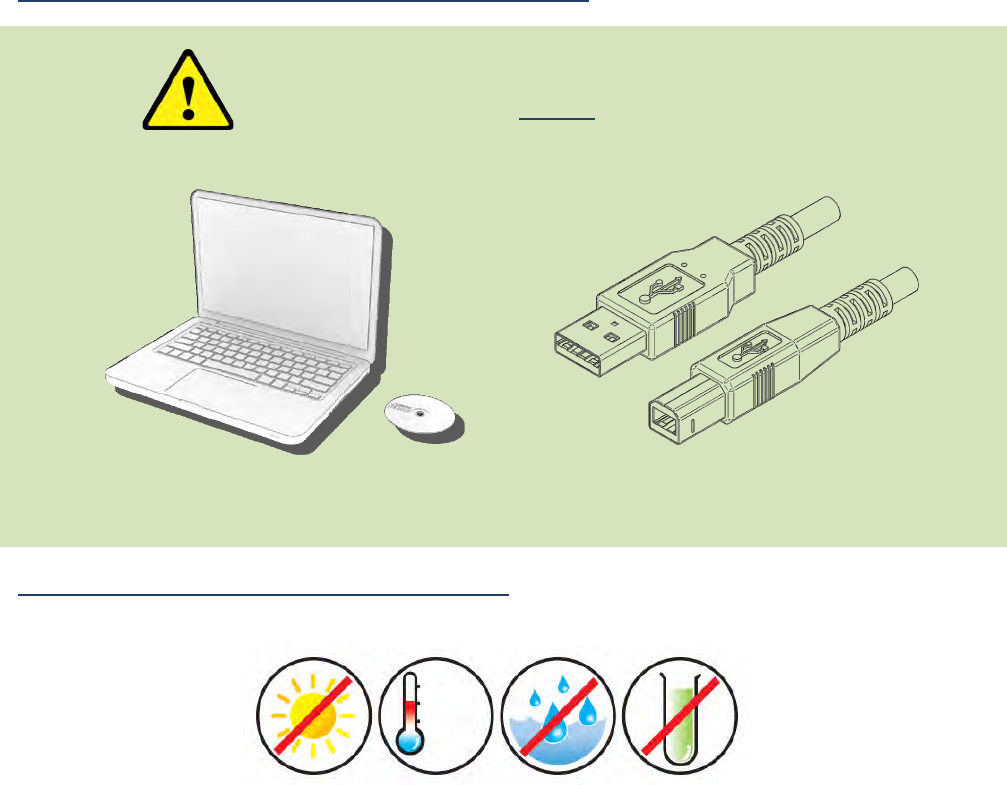
IMPORTANT – Do not connect the USB yet!
Printer Environmental requirements:
Normal Office environment with:
A correctly Earthed Power Supply
Ambient temperature +10 to 30oC (50 to 86oF)
Protection from direct sunlight and chemicals
Protection from sudden temperature changes
Relative Humidity 20 - 70%
Sufficient space for:
- Opening the Front Cover
- Cable access at the rear
See
Below
IMPORTANT
Install the Driver software BEFORE connecting the USB Cable!
2.
1.
ReTransfer ID Card Printer – User Manual
7
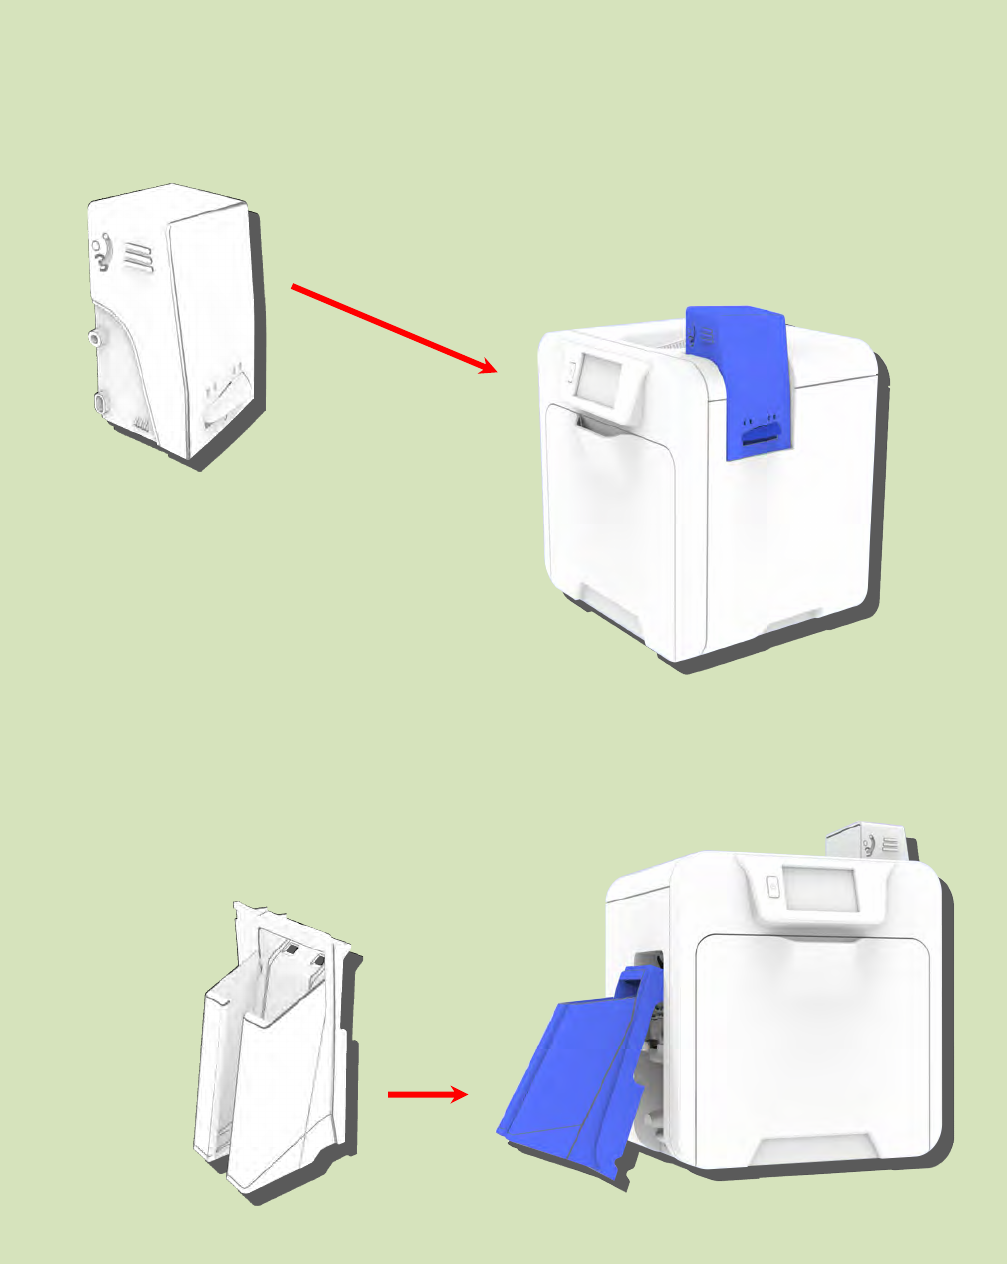
FITTING THE PRINTER ACCESSORIES
Card Feed Hopper:
Insert the Hopper into the aperture on the right-side of the
Printer and click into place.
Always fan the Cards to ensure these do not stick together
due to a build-up of static electricity.
Try to handle the Cards as little as possible before printing.
Card Stacker:
Insert the Stacker into the aperture on the
left-side of the Printer and click into place.
The Stacker can hold up to 200x 30 thou
(0.76 – 1.02 mm) thick Cards.
Card Stacker
Card Feed Hopper
ReTransfer ID Card Printer – User Manual
8
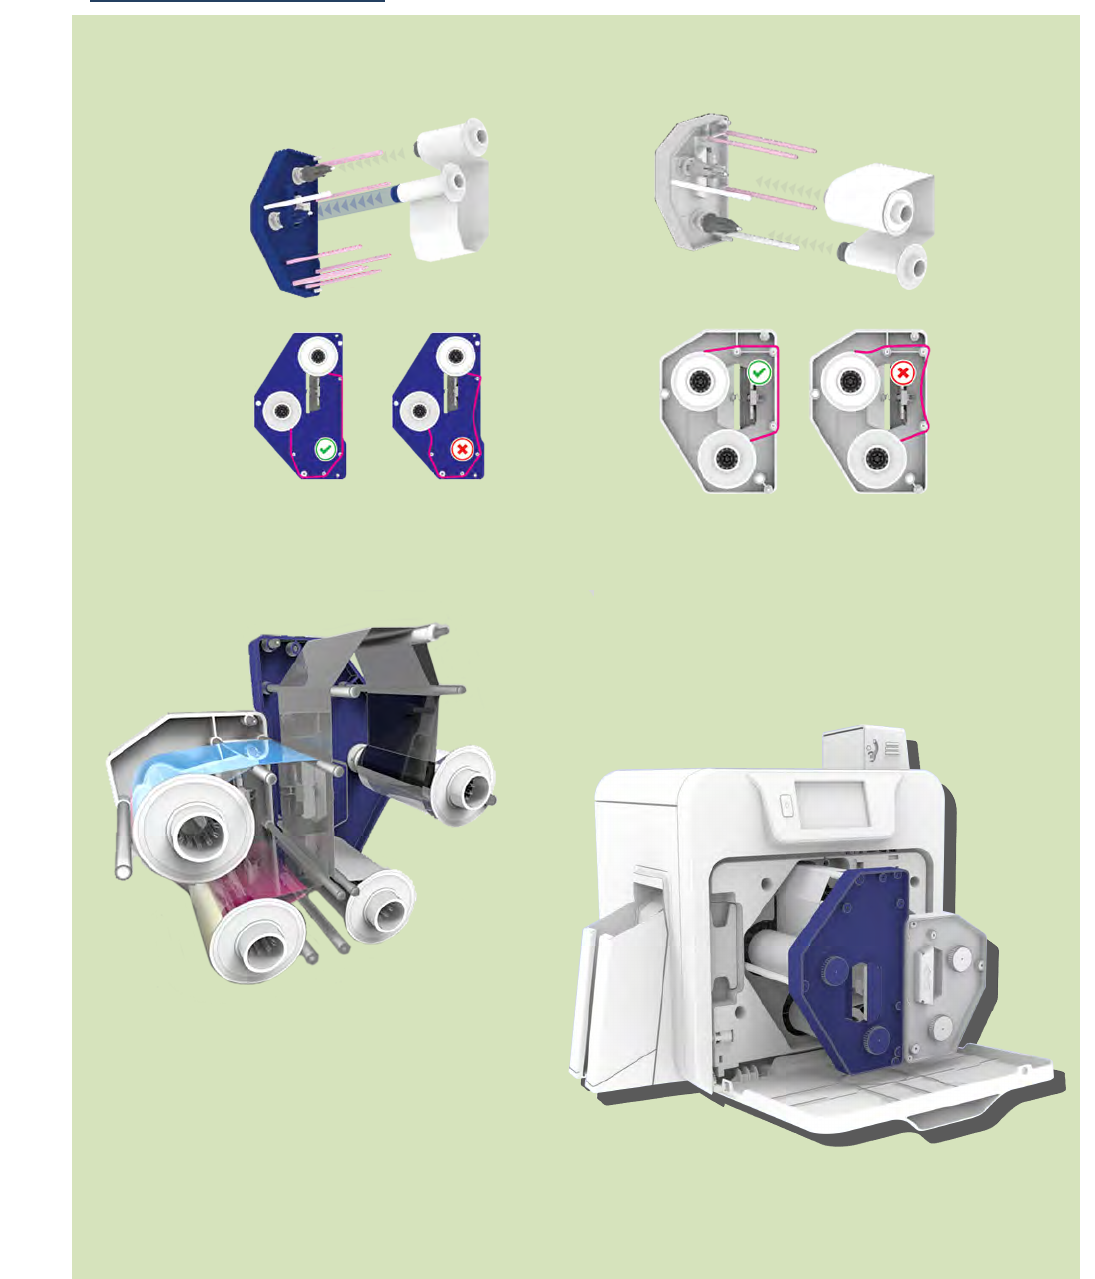
Installing the Dye Film
3.
Open the Printer’s Front Cover and remove the Films from their Packaging.
4. Films correctly inserted.
1.
Inserting the Retransfer Film
2.
Inserting the
Dye
Film.
5. Close the Film Cartridge
then insert the Cartridge
into the Printer.
ReTransfer ID Card Printer – User Manual
9
Connect the Power Supply
Connect Mains
Power Supply Unit (PSU) to the rear
of the Printer but do not
connect the USB cable at this stage.
Printers will despatch with the correct regional mains connector (which will
include one of the following illustrated below).
IMPORTANT:
Do not connect the USB until
the CD ROM Driver has been
installed.
ReTransfer ID Card Printer – User Manual
10
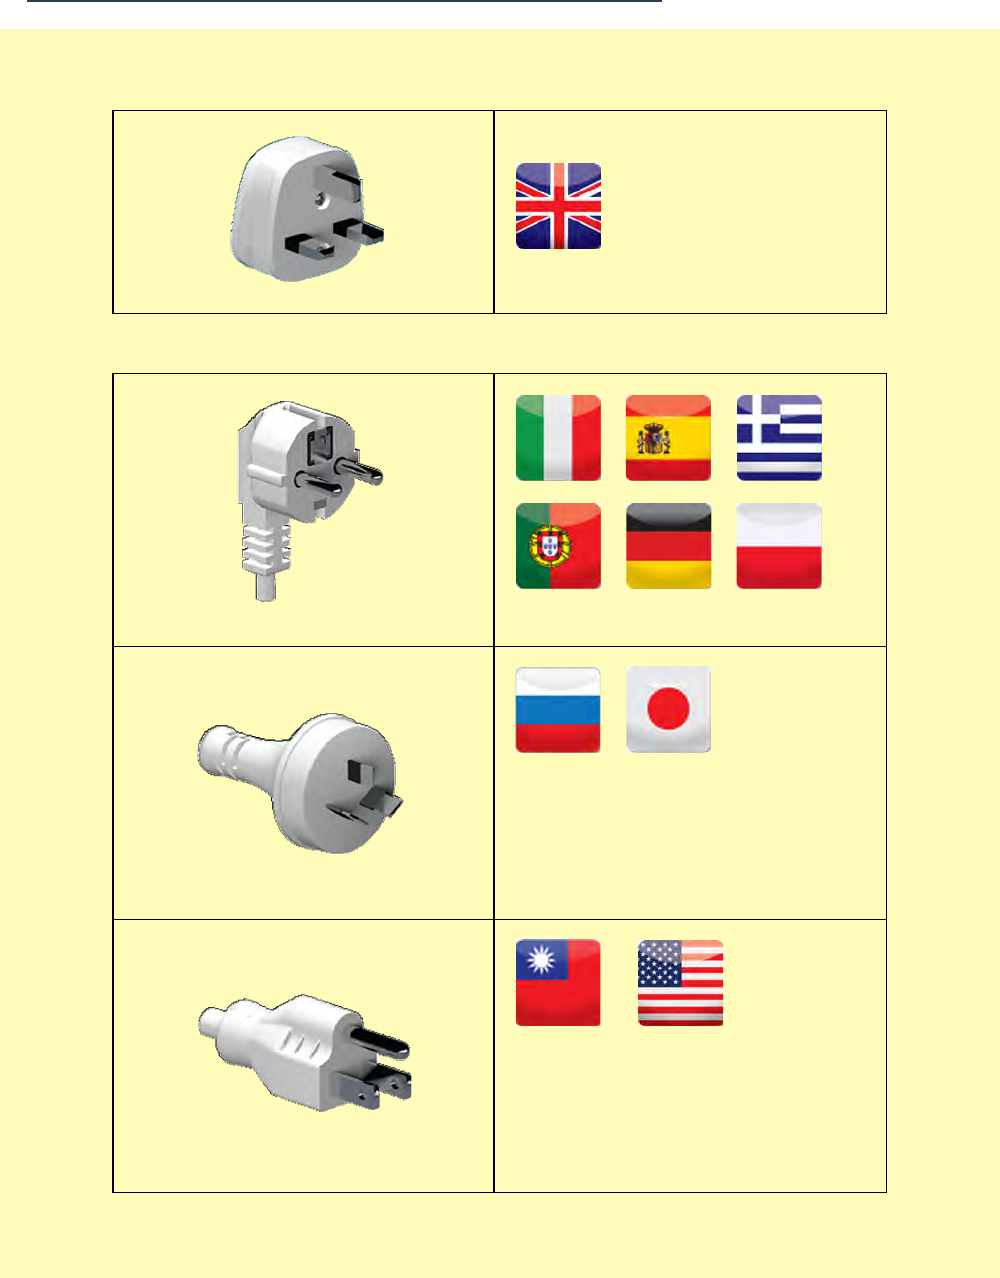
Choosing the Correct Connector for your Region
ReTransfer ID Card Printer – User Manual
11
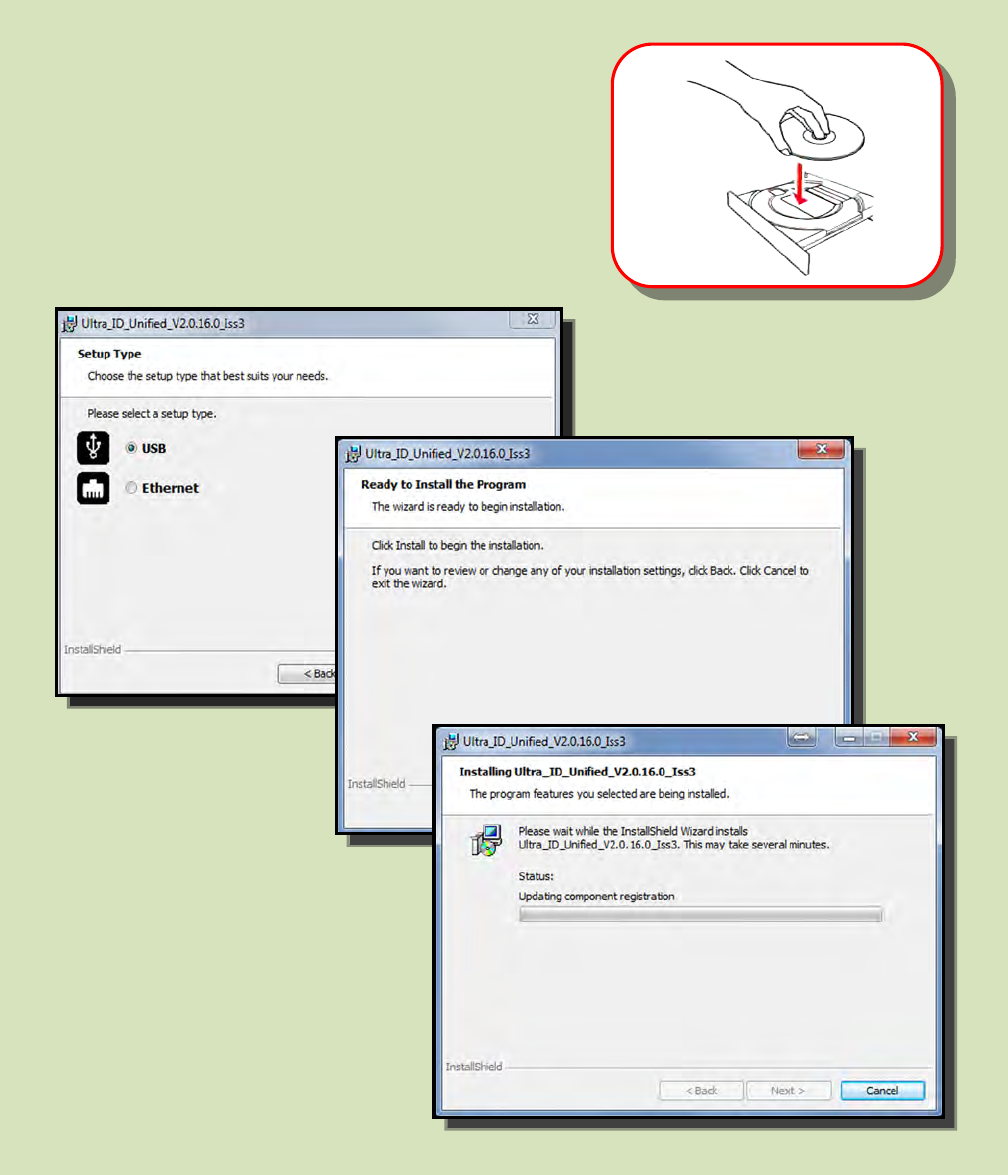
INSTALLING THE DRIVER
N
OTE: The pri
nter
is designed to
retrieve a “Dynamic” IP Address.
A “Static” mode and IP Address
configuration can be updated using
the LCD User Interface.
The installation procedure is
the same for Ethernet
except you will be prompted
to enter an IP Address.
1.
Load
the driver CD ROM into the PC.
Note: If the CD does not run automatically,
click the “Start” Button, then click on “Run”. Type
“D:\autorun”, where D is the drive letter for
your CD Drive, then press the Return Key.
2. Now follow the on screen instructions to
install the Printer Driver (please see below):

ReTransfer ID Card Printer – User Manual
12
INSTALLING THE DRIVER (Cont…)
1.
W
hen the Driver has completed it’
s installation, connect the USB cable
(shown
below). Now restart the Computer.
2. When complete you should now see the installed Driver icon on the Devices and
Printers window on the Computer (this may take several seconds as the Computer
needs to configure the USB Port in order to communicate with the Printer).
3. Installation complete!

ReTransfer ID Card Printer – User Manual
13
THE PRINTER DRIVER SETTINGS
Accessing the Driver Preferences Settings:
Windows 7
Windows 8/8.1/10
Help with Driver Settings:
The Printer Driver contains a built-in
help file (in HTML format) – this file
gives an excellent, clear explanation
of each Driver setting.
To view the Driver’s help file, go to
the Printing Preferences (as
described above), and click on the
“Help” Button.
Open the Devices and
Printers Window.
Right-click on the
Printer icon.
Select Printing
Preferences.
ReTransfer ID Card Printer – User Manual
14
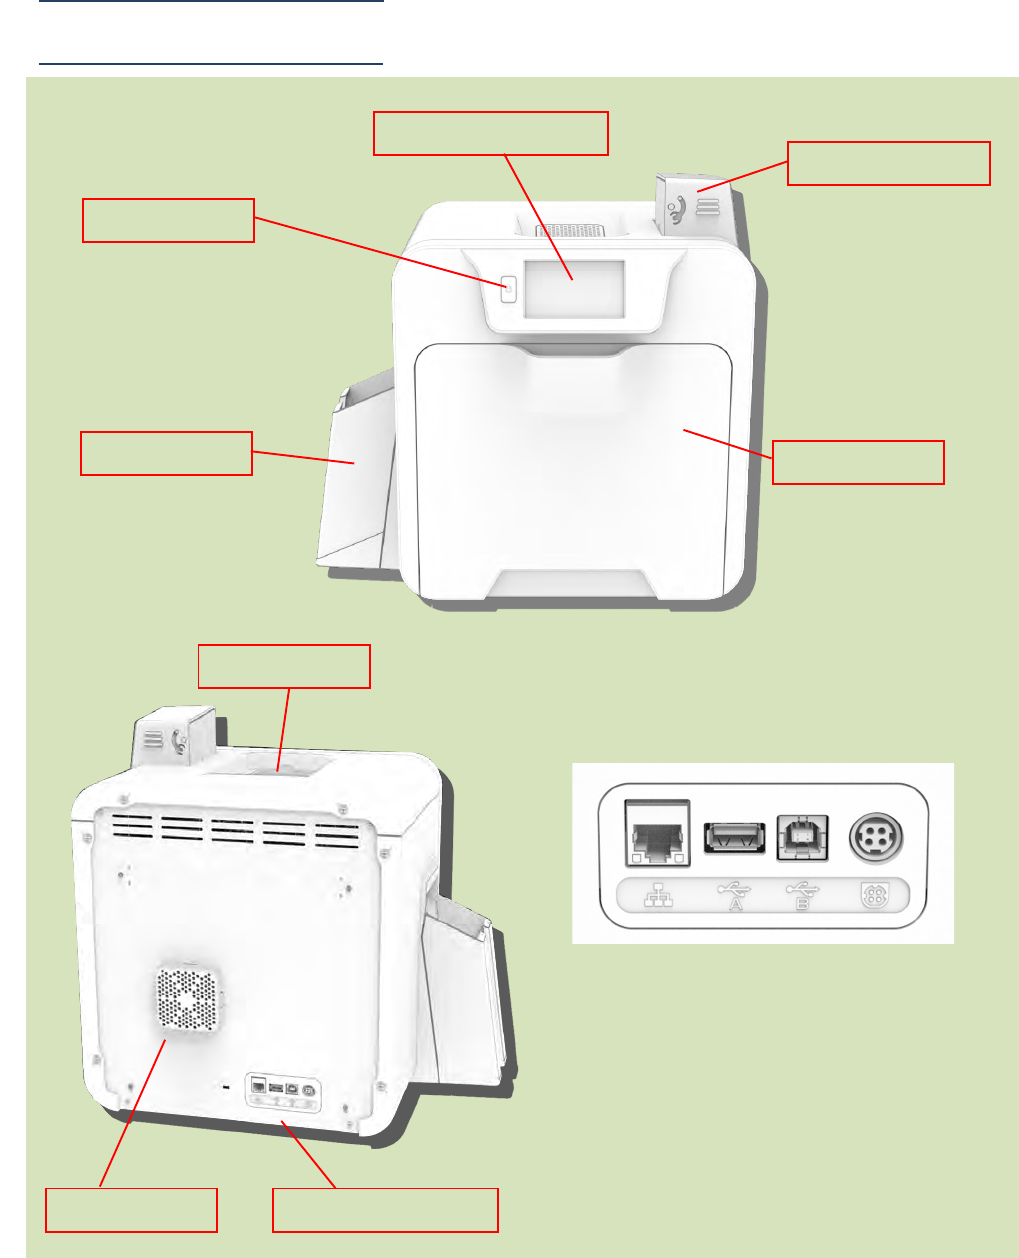
Using your ID Card Printer
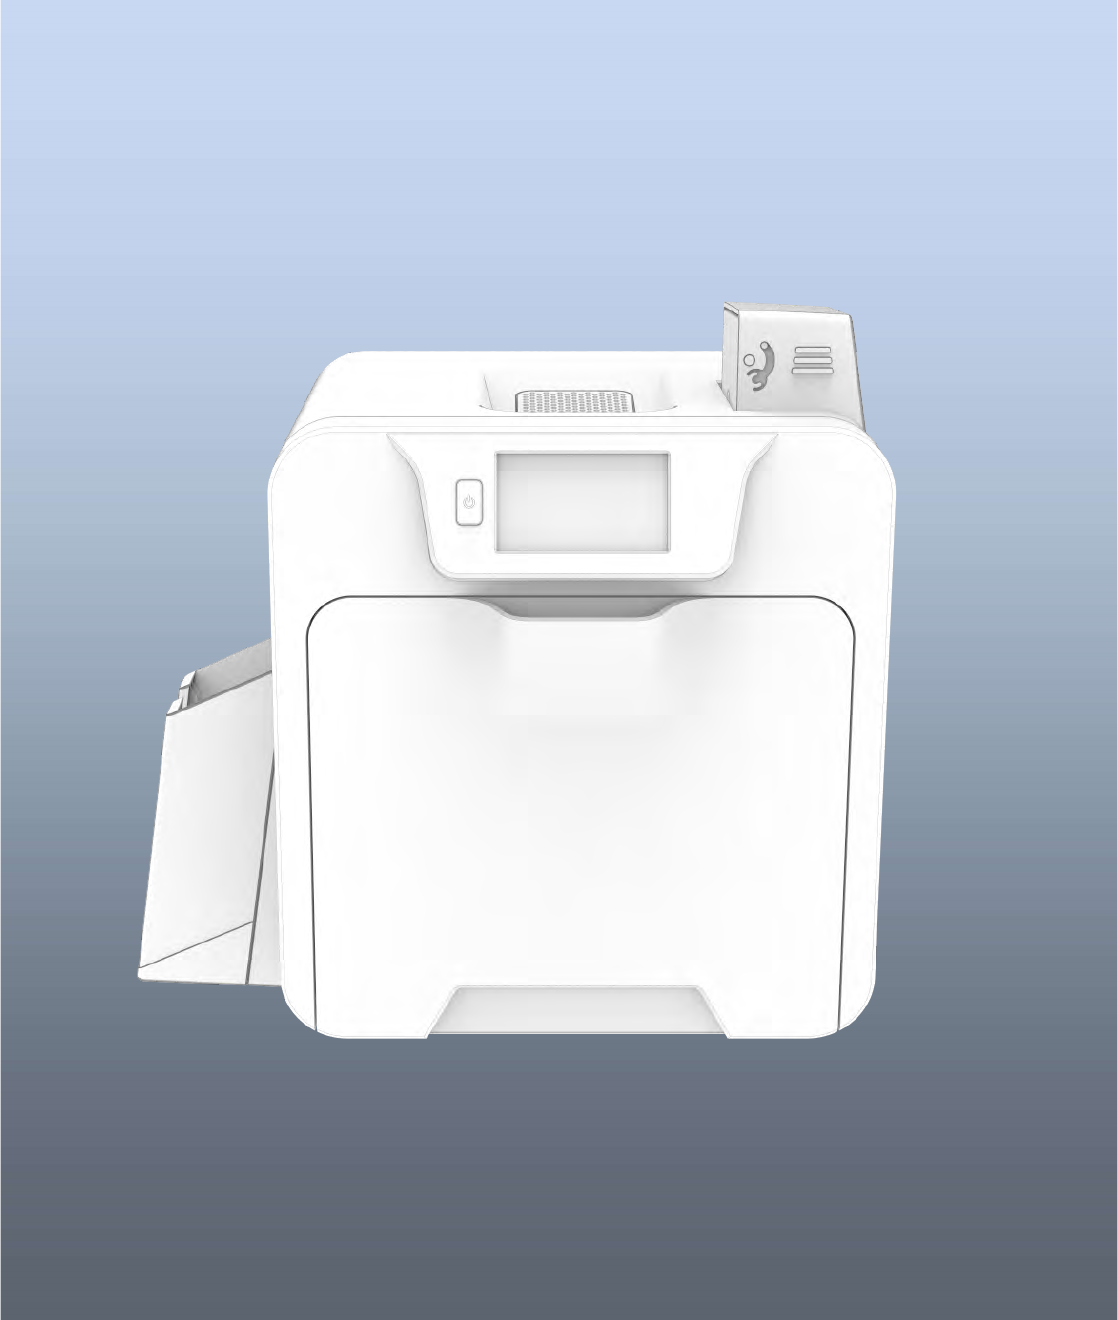
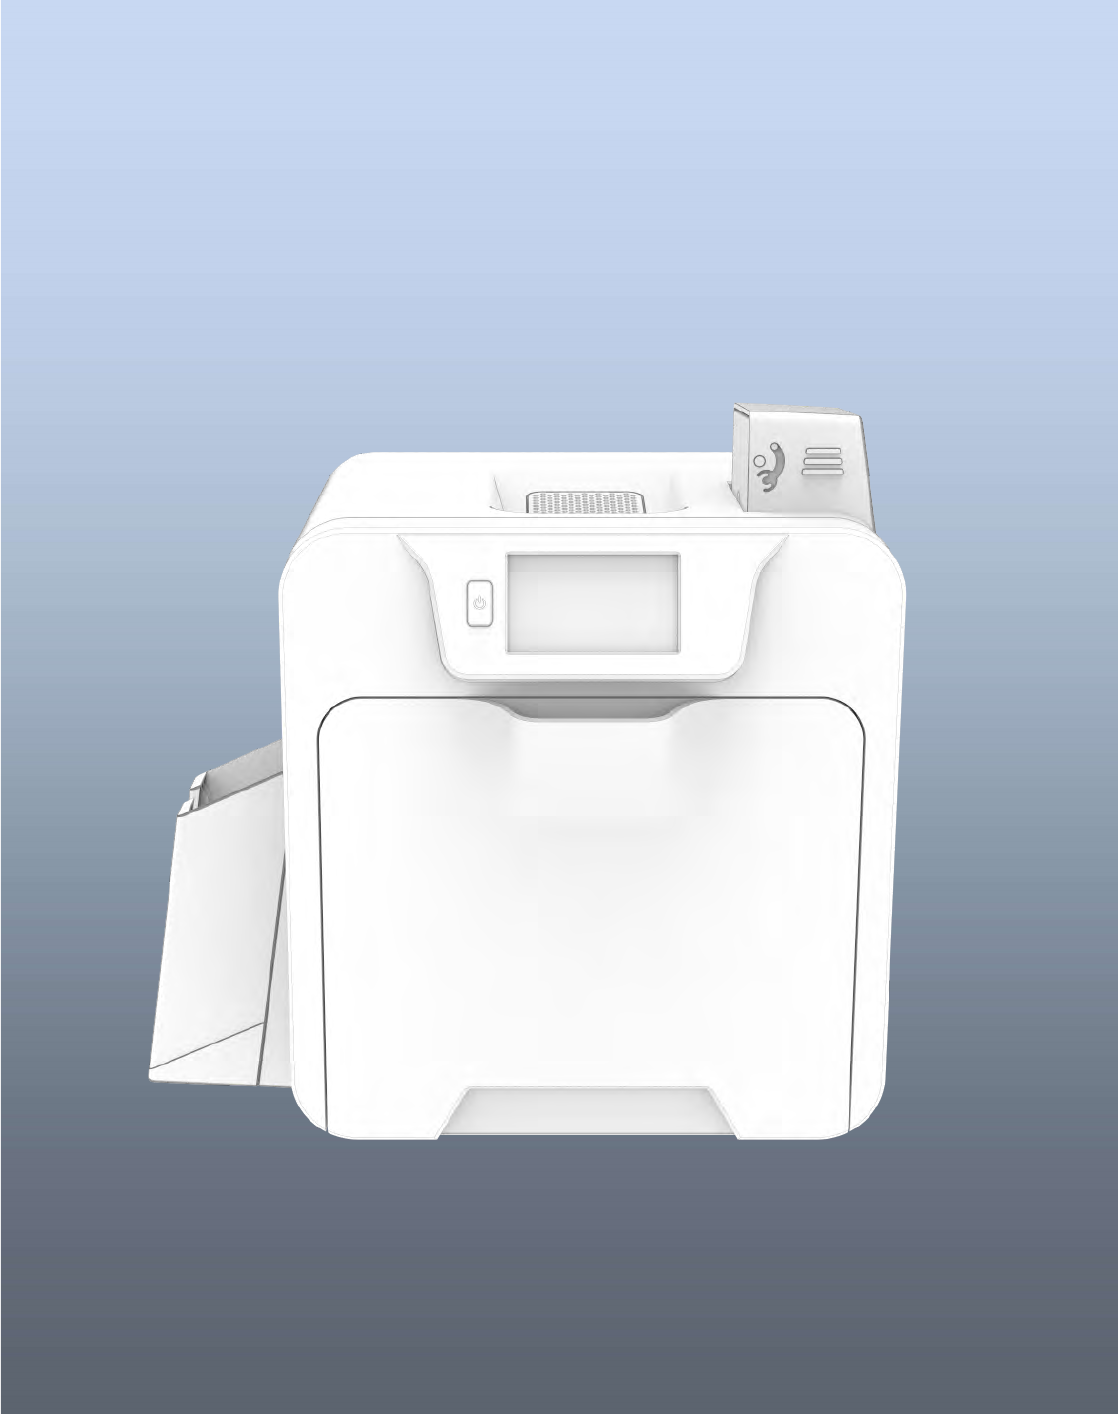
Printer Main Components
Printer Front
View
Front Cover
Card Feed Hopper
Power On/Off
Card Stacker
Colour Touch Screen
Rear Interface Panel
(Zoomed)
Ethernet USB A USB B PSU
Printer Rear
View
Rear Ventilator
Top Ventilator
Rear
Interface Panel

ReTransfer ID Card Printer – User Manual
15
Front Display Panel
Printer Menu Layout
The front Display panel comprises a full col
our touch
-
sensitive Liquid Crystal Display (LCD) capable of
displaying 16.7 million colours at a resolution of 480 x 272 pixels (w x h).
Cleaning
Remove Cards…
Remove Film…
Insert Cleaning
Card…
Help
How to replace the
Film
How to Clear a Print
Jam
How to Clean the
Printer
How to Open the
Door
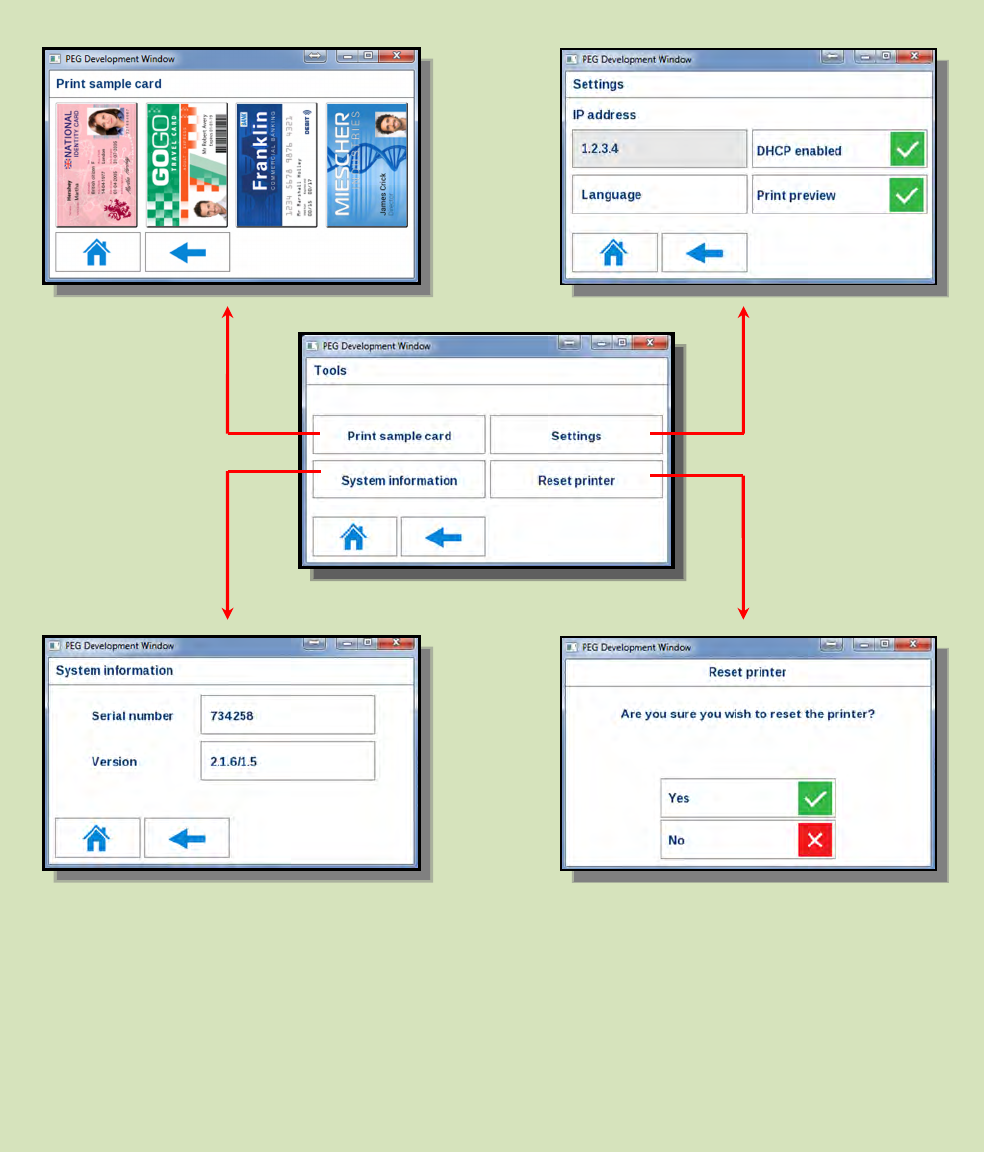
Main Homepage
Reset Printer
Settings
System Information
Print Sample Card
Tools
ReTransfer ID Card Printer – User Manual
16
Main Homepage
Printer Menus
USB
Ethernet
WiFi
Printer Connection
Indicates the currently selected connection method to the Printer.
Temperature Ready
Indicates whether the Heated Roller temperature has
reached the required temperature.
The operating temperature can be displayed by touching
this icon.
Unused Film
Indicates the unused Film left on the Spool.
Temperature Ready
Unused
F
ilm
Printer connection
Tools Menu
Help Menu Cleaning Menu
ReTransfer ID Card Printer – User Manual
17
Main Homepage (cont…)
Tools Menu
Tools Menu Homepage
Additional Settings
options are shown
on Page 15.
ReTransfer ID Card Printer – User Manual
18
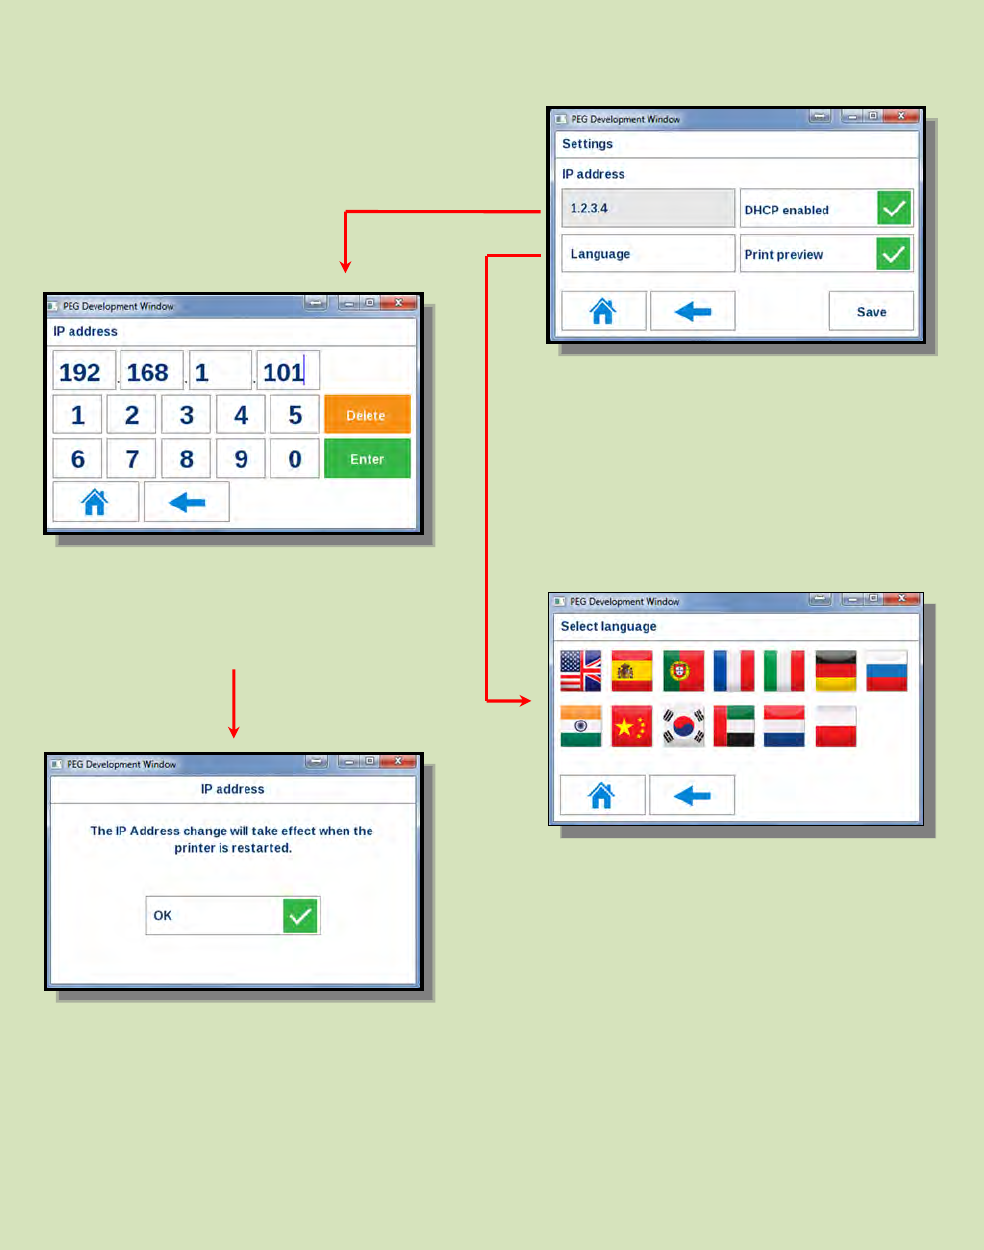
Additional Settings Options
Settings Menu Homepage
Additional settings are possible from the
Settings Menu Homepage.
The Print
er’s IP Address can
be set manually if required.
Manually enter the IP Address you
wish to set and click “Enter”.
If you make a mistake or wish to
change the address, click “Delete”.
A
ny changes made will take
effect after the printer is
restarted.
Additional Language options
are also possible.
All settings in this window
can be saved.

ReTransfer ID Card Printer – User Manual
19
Help Menu
Clicking any of the Help Menu Buttons will display a short animation showing the
process selected.
Help
Menu Homepage
ReTransfer ID Card Printer – User Manual
20
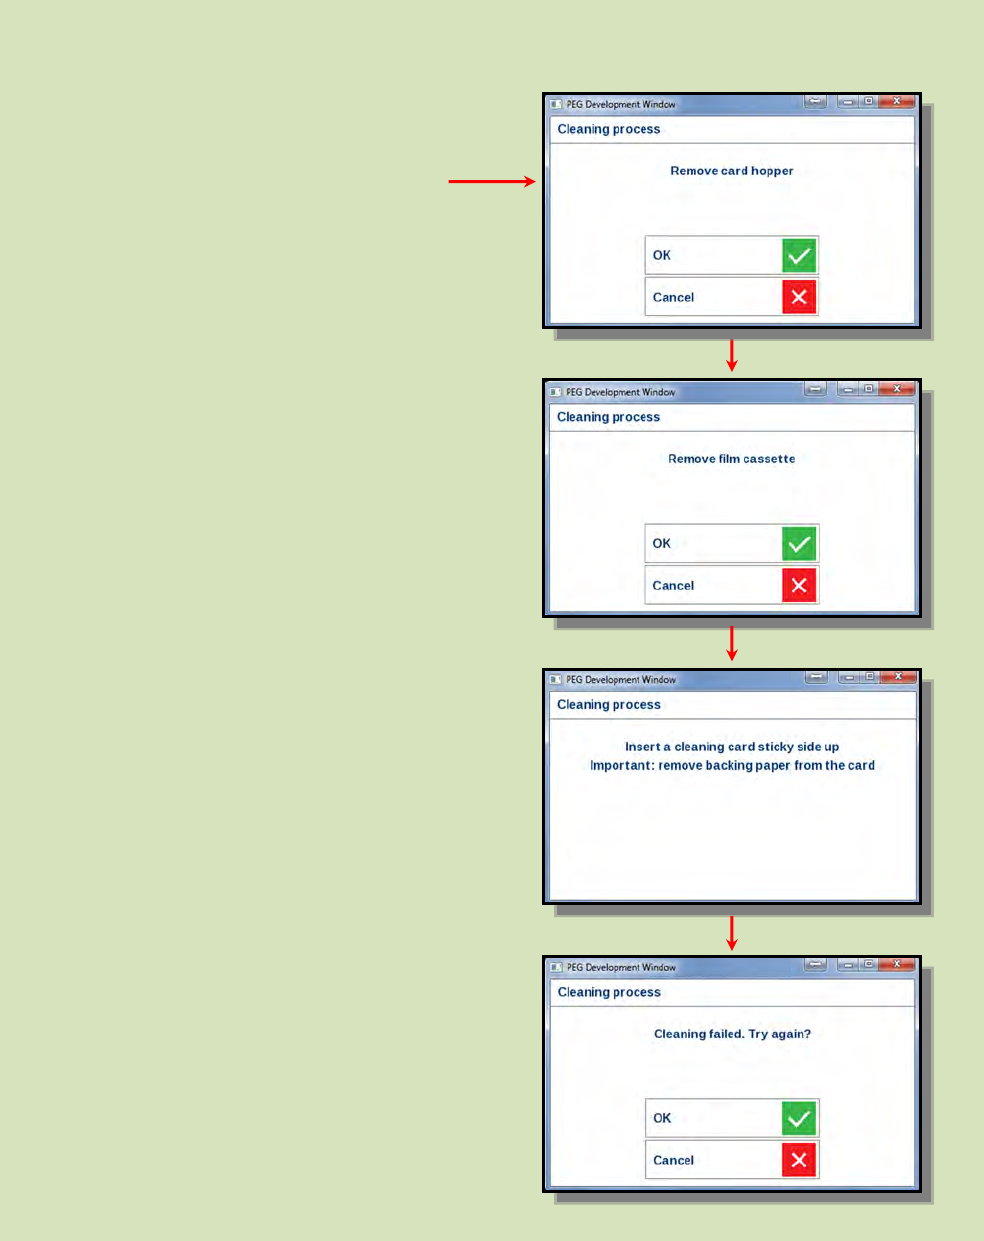
Cleaning Menu
Cleaning
Menu Homepage
Cleaning the Printer is easy…
Simply select the Cleaning option from
the Main Homepage and follow the
On-Screen instructions.

ReTransfer ID Card Printer – User Manual
21
The Internal Test Card
The internal Test Cards are essentially the same images that are accessible via the
Tools Menu (clicking the “Print Sample Card” Button).
Each of the above images is stored and generated entirely within the Printer (making
these independent of the Host PC).
ReTransfer ID Card Printer – User Manual
22
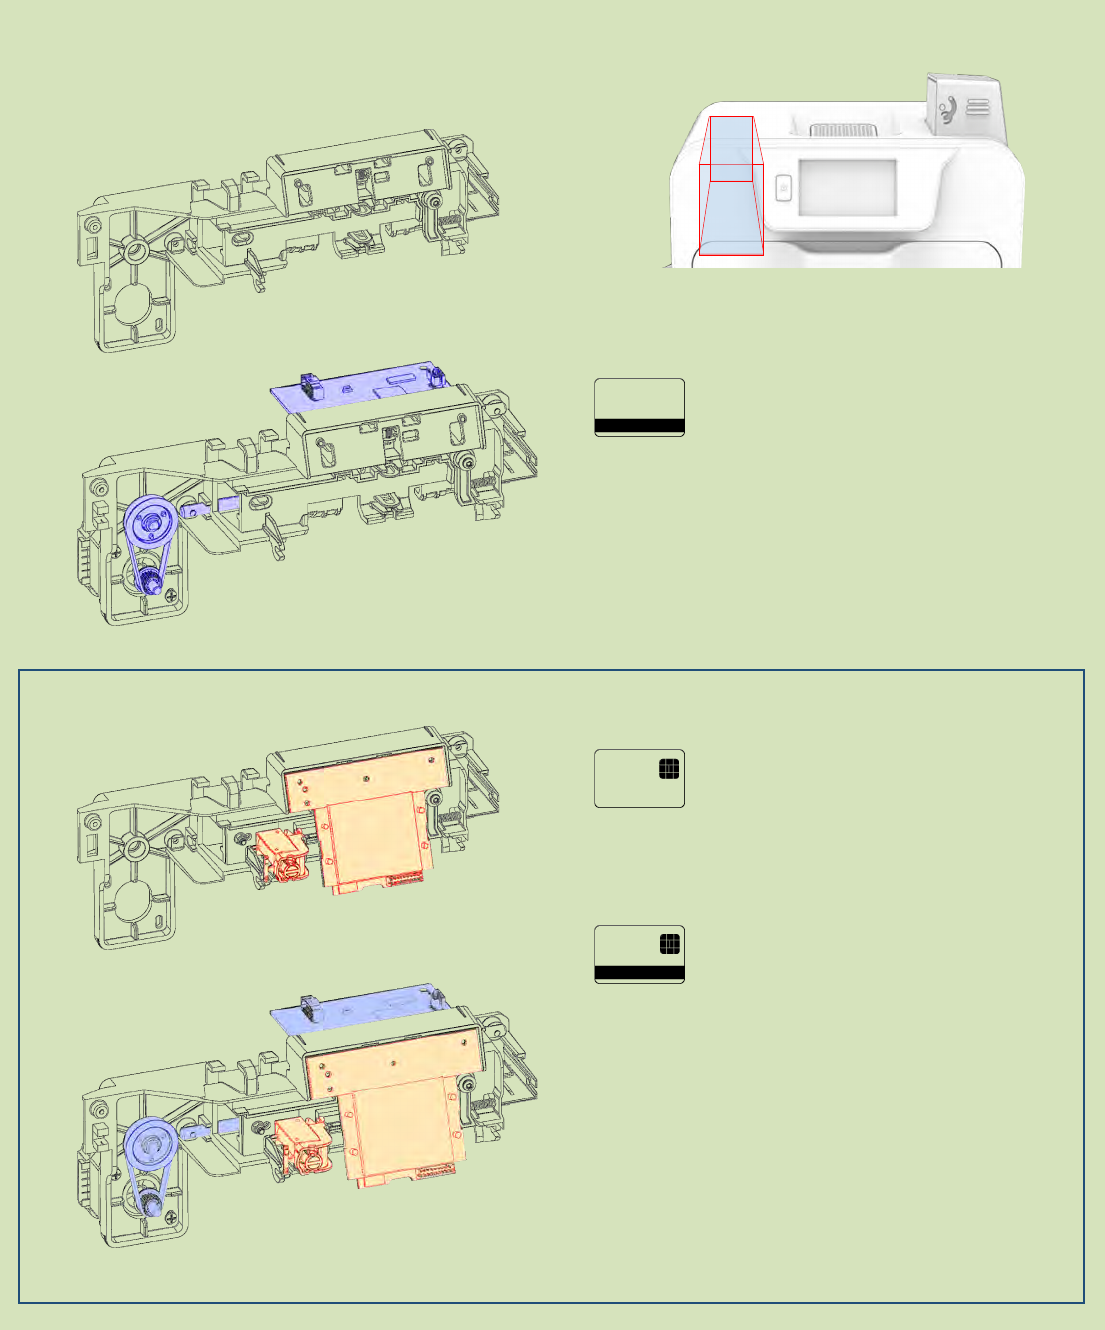
Available Encoder Modules
Upgrade Frame Only
Approximate Encoder Location
Upgrade Magnetic/Smart
Smart E
ncoder (Omnikey 5122)
Supported Cards: MIFARE, DESFire, iClass.
The OMNIKEY® 5122 Reader Board is a dual interface PC-linked reader
that reads/writes to both a 13.56 MHz contactless smart card and
virtually any contact smart card. The dual interface feature,
implemented on a small PCB, economically supports end-user
environments where both contactless and contact smart card
technology may be in use. The reader supports contactless Smart cards
with up to 424 kbps in ISO 14443 transmission mode.
Upgrade Smart Only
Magnetic encoding is enabled by default if a Ma
gnetic
Encoder Module is fitted within the Printer.
The Printer’s Firmware is able to detect the Encoder
and will make the necessary configuration changes
accordingly.
Upgrade Magnetic Only

ReTransfer ID Card Printer – User Manual
23
CHOOSING THE RIGHT DYE FILM
NOTE:
The HE1000YMCK is generally the appropriate choice for colour printing with both single-sided (UNO)
and double-sided (DUO) Printers.
A HE750YMCKK Film is also more economical when printing a colour of the front of the Card and Black
only (such as Barcodes etc.) on the rear of the Card.
Below is a general guide to selecting the most suitable Film for any typical application.
Dye Film Typical Use
HE1000 YMCK Dye Film & RT Film Set – 1000 Prints
HE3000S Holokote Film Set – 3000 Prints (4 YMCKK & 3 RT Films)
HE3000K Holokote Film Set – 3000 Prints (4 YMCKS & 3 RT Films)
HE750YMCKK YMCKK Dye Film - 750 Prints
HE750YMCKS YMCKS Dye Film - 750 Prints
HE1000YMCK YMCK Dye Film - 1000 Prints
HE1000RT Re-transfer Film - 1000 Prints
HE3000K-BLACK K Dye-Film BLACK – 3000 Prints
ReTransfer ID Card Printer – User Manual
24
CHOOSING THE RIGHT CARDS
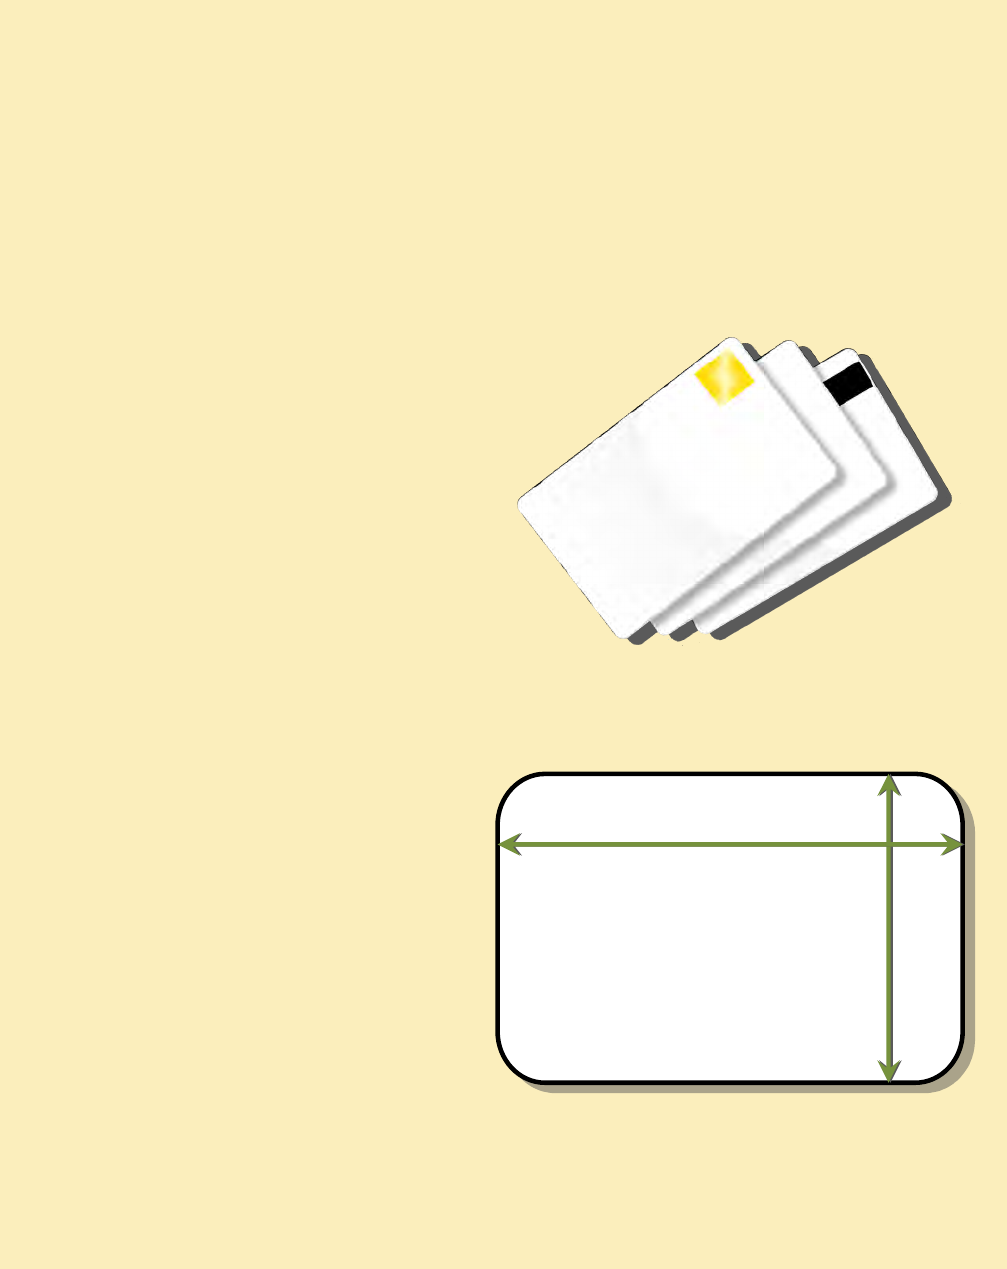
Card size
Card thickness
To obtain good quality prints the Cards must be…
Printable area of the Card
Glossy white.
Free from contamination.
Free from surface irregularities.
Free from burrs at Card edges.
The printable area of a standard CR80 Card
is
size of 1036 x 664 pixels to obtain
“over the edge” print quality.
Not all white PVC Cards are the same. For best image quality always use high grade PVC Cards.
Pure PVC Card stock or laminated PVC/Polyester Cards are available. The latter are more durable and
better suited to heavy use and heat lamination when required. For access control and Smart Card
applications, your Dealer should provide the appropriate type for Retransfer printing.
For consistent results, stick to a single variety of good quality Cards, such as those available from your
ID Card Printer Supplier.
CR80
(Standard) = 3.375” x 2.125
” (
86.5 mm x 53.98 mm). (w x h)
Standard
–
0.030
” (
0.76 mm).
Maximum – 0.063” (1.25 mm).
5
6.27
mm
2.21 inches
664 pixels
8
7.79
mm
3.45 inches
103
6 pixels
ReTransfer ID Card Printer – User Manual
25
Remove the card feed Hopper.
Open the door and remove the film cassette. It may be necessary to turn the upper transfer film
spool clockwise in order to free the film from the card if adhesion has occurred.
Close the door. The printer will perform an initialisation routine and then attempt to eject the card.
If this fails and another card jam error is reported, select the retry option on the LCD and the
printer will perform an alternative card eject routine.
If the card fails to eject and a card jam error is still displayed open the door and inspect the
printer to locate the card position.
If accessible from the card feed area, attempt to retrieve the card by hand.
If this is not possible then use the ‘Move card’ feature which will turn the drive rollers in the
required direction in order to free the card. Important: Using this method the card should be
ejected from the right hand side of the printer (feed Hopper location).
If the card still cannot be retrieved then please contact Technical Support for further assistance.
Using Magnetic Stripe Cards
In the event of a Card jamming in the printer
I
f you have a P
rinter fitted with the
optional Magnetic Encoding module,
you can print and encode the magnetic
stripe on the rear of a magnetic stripe
Card in one operation.
Magnetic stripe formats:
ISO 7811 (HiCo/LoCo)
JIS2
Custom formats
When loading Magnetic Stripe Cards,
make sure the stripe is uppermost with
the stripe closest to the body of the
Printer.

ReTransfer ID Card Printer – User Manual
26
MAINTAINING YOUR PRINTER IS IMPORTANT!!!
Maintenance is an important factor of your Printer’s good operation and longevity.
Maintaining a regular cleaning routine will give you optimum print quality and prevent down
time. We recommend that you clean the Printer’s rollers and Print Head each time you change
Dye Films.
A clean Printer will produce superior quality printed Cards and is less likely to require Factory
maintenance and/or repair.
In normal environments, regular maintenance should improve the longevity of the Print Head
itself. (Remember… foreign particles can lodge under the Head and cause permanent damage!)
Increased reliability when magnetic encoding.
CARING FOR YOUR PRINTER
Cleaning Supplies

ReTransfer ID Card Printer – User Manual
27
To prevent Cards slipping during printing, we recommend that you clean your Printer using a Cleaning
Card each time you replace either Film.
Cleaning the Printer Rollers using the Cleaning Kit
What’s in the Cleaning Kit?
Adhesive Cleaning Cards
Self-adhesive Cards with a paper
peel-off backing – used for
removing contamination
From Feed Rollers.
Swabs
Alcohol soaked Swabs – used for
cleaning the face of the Print Head
and hard-to-reach transport areas.
Roller Wipes
Alcohol soaked wipes – used for
cleaning Feed Rollers.
ReTransfer ID Card Printer – User Manual
28
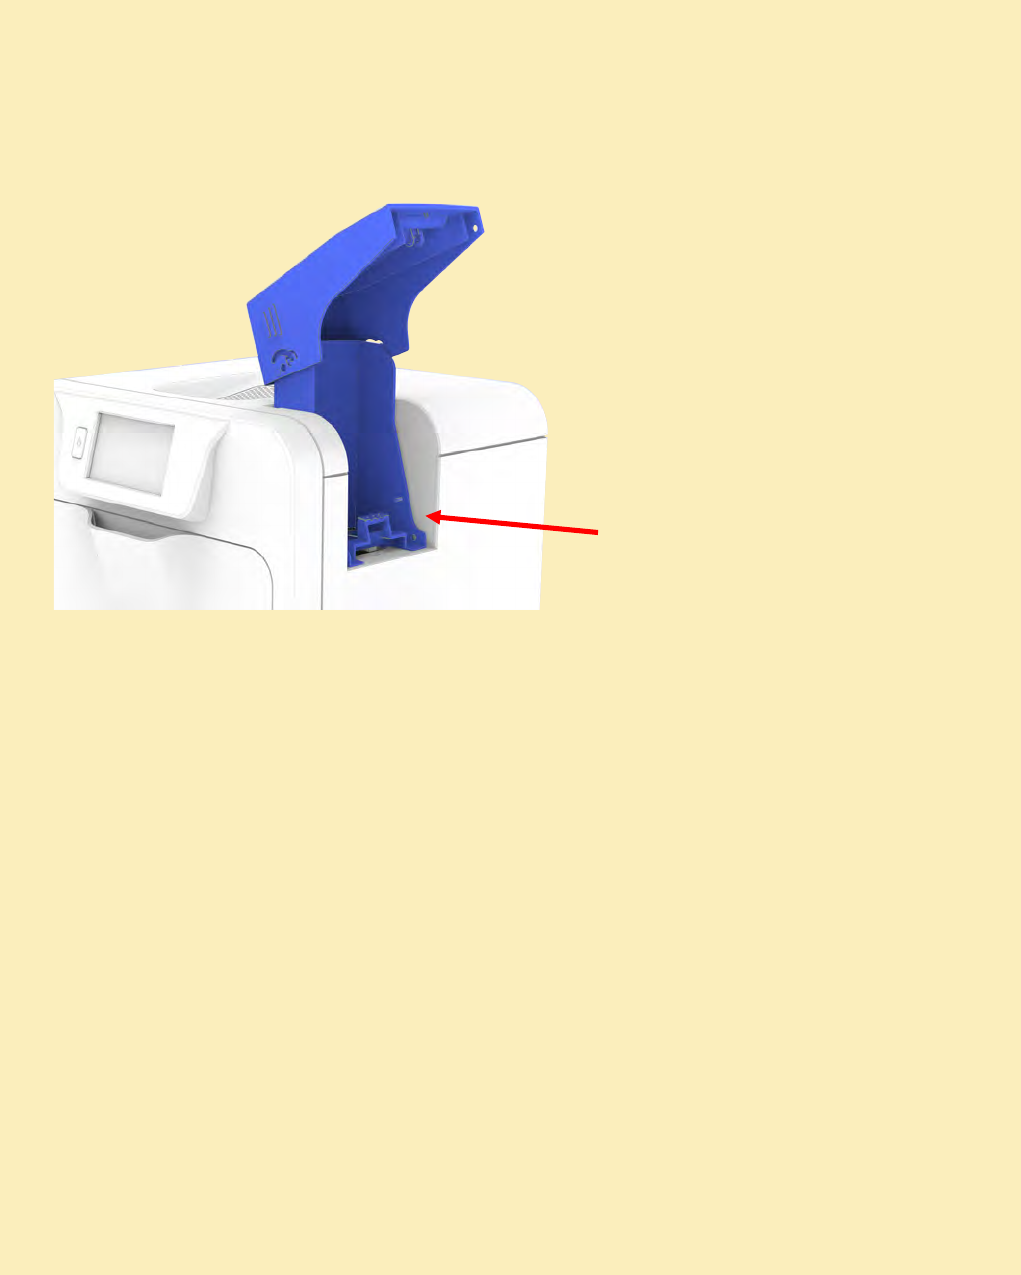
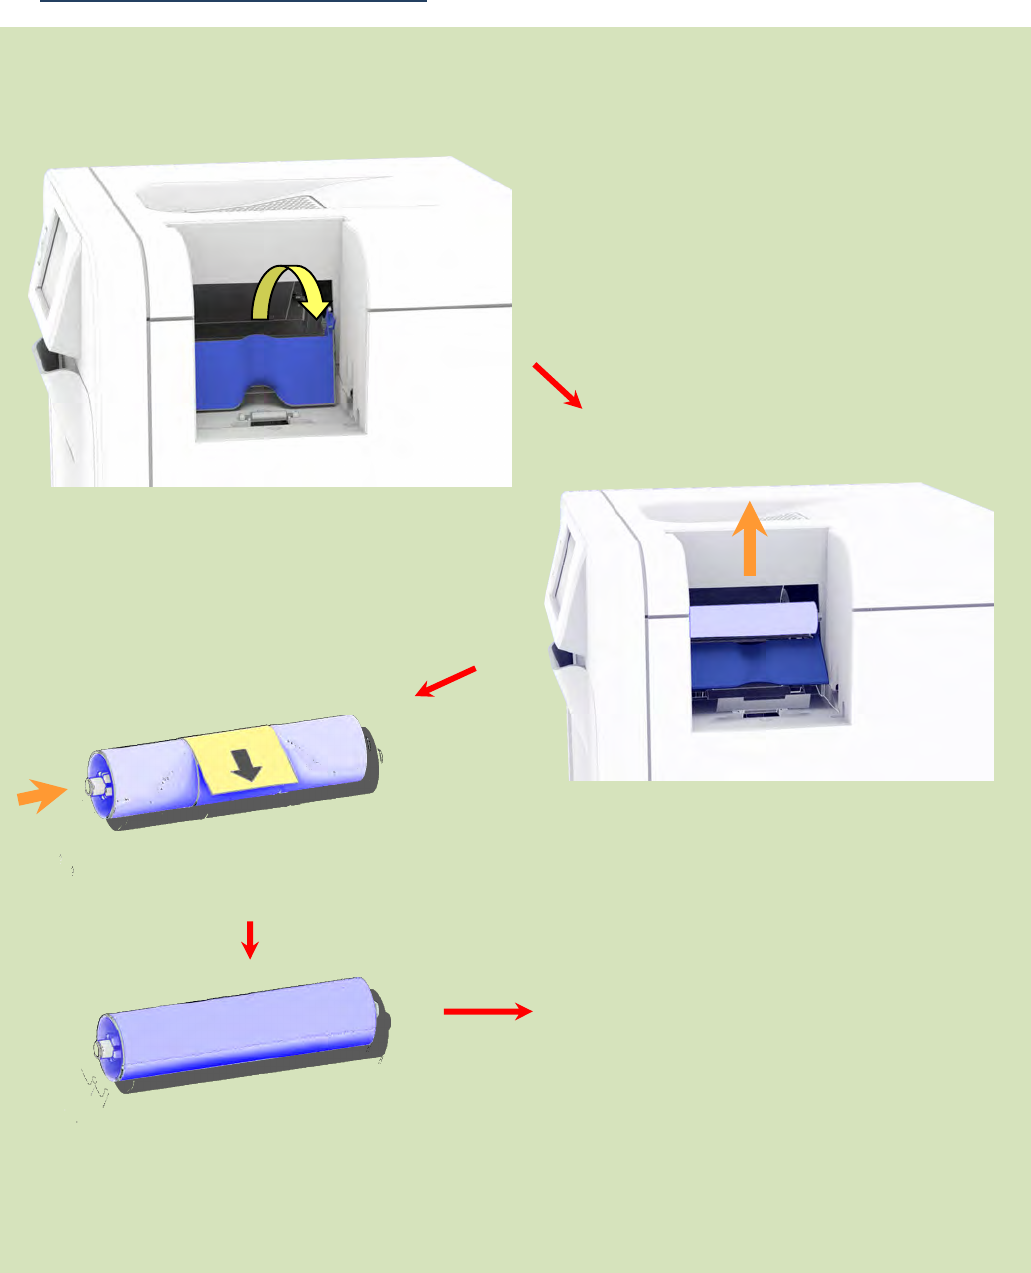
Replacing the Cleaning Roller
Replacing the Cleaning Roller:
Clip the new Cleaning Roller
(complete with Steel Bar) into the
Printer.
Close the Cleaning Roller Cover.
This completes the replacement
process for the Cleaning Roller.
Hinge the Roller Cover forward.
Unclip the used Cleaning Roller and
slide out the Steel Bar.
Do Not Discard this Bar.
Discard the used Cleaning Roller.
Hinge Roller Cover forward
Remove the paper wrapper
protecting the sticky layer on this
Roller.
Slide the Steel Bar into the
new Cleaning Roller.
U
nclip and Remove
Cleaning Roller
ReTransfer ID Card Printer – User Manual
29
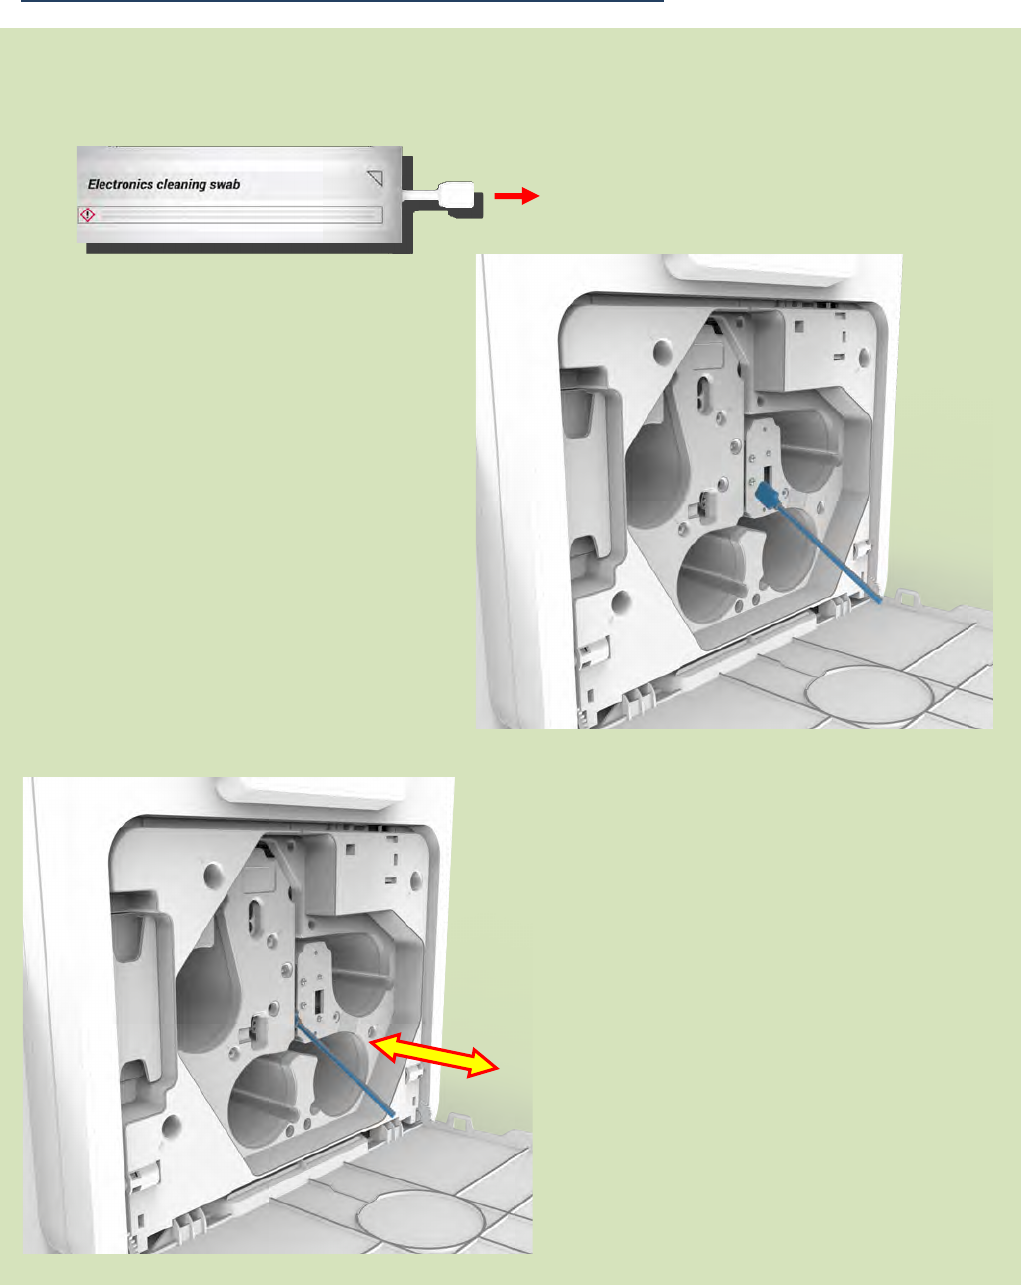
Cleaning the Print Head using the Cleaning Swab
Using the Cleaning Swab:
Remove the Cleaning Swab
from it’s packaging.
1.
2.
Remove the Film Cartridge
from the Printer.
3. Run the Swab repeatedly
along the front Face of the
Print Head.
ReTransfer ID Card Printer – User Manual
30
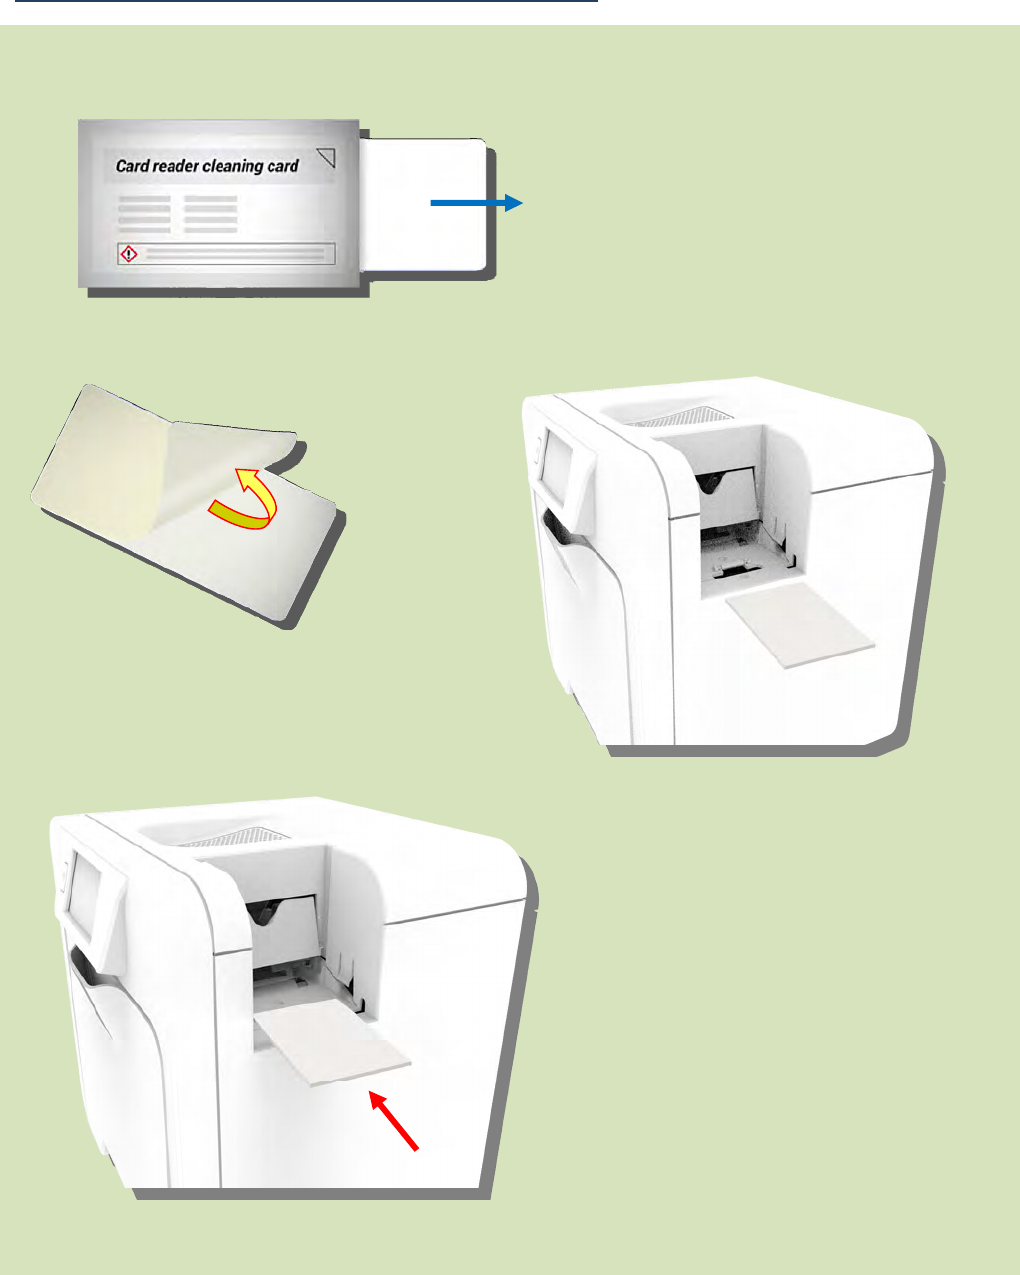
Cleaning the Printer using the Cleaning Card
Using the Cleaning Card:
1. Remove the Cleaning Card
from the packaging.
2. Peel off the backing paper
from the Cleaning Card.
3. Select the cleaning option
on the Printer.
4. Follow the instruction on the Printer
display.
5. Feed the Cleaning Card into the Printer.

ReTransfer ID Card Printer – User Manual
31
UPGRADING TO DUO OPERATION
T
he
Retransfer printer
can be supplied in two var
iants: UNO (single
-
sided) or DUO (double
-
sided).
All Retransfer printers are fitted as standard with a Card Rotation Unit (however in the UNO, the
Rotation Unit is only used to rotate a Card in order to facilitate magnetic encoding. It is not possible to
print two sides of a Card in one operation. However, the Retransfer printer UNO can be upgraded to a
DUO variant as a retro-fit if required).
The upgrade will be available electronically via the Customer Support Portal and is downloaded to the
Printer via the Driver.

ReTransfer ID Card Printer – User Manual
32
Product Code
Description
Dye Film
HE1000 YMCK Dye Film & Re-transfer Film Set – 1000 Prints
HE3000S Holokote Film Set – 3000 Prints (4 YMCKK & 3 Re-transfer Films)
HE3000K Holokote Film Set – 3000 Prints (4 YMCKS & 3 Re-transfer Films)
HE750YMCKK YMCKK Dye Film - 750 Prints
HE750YMCKS YMCKS Dye Film - 750 Prints
HE1000YMCK YMCK Dye Film - 1000 Prints
HE1000RT Re-transfer Film - 1000 Prints
HE1000RTD Durable Re-transfer Film – 1000 Prints
HE3000K-BLACK K Dye-Film BLACK – 3000 Prints
Cleaning Kit
E9887 Reverse Transfer Printer Cleaning Kit
Cards
M9006-793 PVC CR80 Cards – Plain
M9006-794 PVC CR80 Cards – Magnetic Stripe Hi-Co
M9006-796 PVC CR80 Cards - Holopatch
PET or composite cards should be the recommended type used.
AVAILABLE CONSUMABLES

PRINTER ERROR CODES
Firmware Version FP-5 Dev-20
Error Displayed message Error Description
104 FPGA programming error While preparing to update the FPGA, the device ID read from the fitted
FPGA was not a recognised one. This is probably either due to a SPI
comms failure between the processor and FPGA, or a faulty FPGA.
111 Firmware update failure
While attempting to verify a new firmware upgrade file was successfully
saved to flash memory, the printer failed to allocate enough memory
for the verification process. This may be because there are a large
number of pending jobs in the printer's memory.
112 Holokote update failure While processing an incoming capability upgrade file, the printer was
unable to write the new file to the SD card. This may be because the SD
card is not plugged in correctly, or the SD card has developed a fault.
113 Capability update failure
While updating the printer's capabilities during boot-up, the printer
failed to save the printer's identity information to the SD card. This may
be because the SD card is not plugged in correctly, or the SD card has
developed a fault.
114 HoloKote verification failure
While processing a HoloKote file, the printer detected that the file data
was not of the correct format. This may be because the wrong file was
sent, the file has become corrupted, or there was an error in the
software which produced the file.
115 HoloKote slot empty
While attempting to retrieve a HoloKote file from the SD card, the
printer was unable to read the SD card data. This is probably because
the slot specified has no HoloKote bitmap installed, but could also be
due to a fault with the SD card hardware.
116 Duplex Upgrade The printer has been upgraded to Duplex. No Error – Information Only
117 Duplex Downgrade The printer has had the duplex printing capability removed. No Error –
Information Only
1024 Feature unavailable
The printer received a mag read job, but the printer has no detectable
mag encoder module fitted. Either the job was sent to the wrong
printer, or the printer has a mag module fitted which cannot be
detected due to a hardware fault, or the printer has been set up as the
wrong model.
1025 Out of cards While trying to feed a new card from the input hopper to the point
where it blocks the feed sensor, it took too many attempts to extract a
card. This could be because the hopper was empty, or the card feed

ReTransfer ID Card Printer – User Manual
34
motor was not functioning correctly, or the feed opto sensor was faulty.
1026 Card jam. Open door for more options
While feeding a new card from the hopper, and having already
extracted the card far enough for it to block the feed sensor, the printer
tried to feed the card further forwards to block the print position
sensor. However, it took too long for the print position sensor to
become blocked. This could be because the card was physically
obstructed, or the card drive stepper motor was not functioning
correctly, or the print position sensor was faulty.
1027 Flipper card jam
While initialising the flipper, the printer attempted to rotate the flipper
clockwise until the flipper opto sensor unblocked, and it took too long
for that sensor to unblock. This is probably due to either a faulty flipper
opto sensor, the flip rotation motor not functioning correctly, or an
obstruction preventing free rotation of the flipper.
1028 Invalid job option
The printer was sent a request to move a card, but the selected card
destination was invalid. This may be because the job data was
corrupted in transit, or because the job data was sent by a faulty
application, or because the printer firmware needs to be updated to a
version recognising the given destination.
1029 Heated roller timeout During a print job, while waiting for the heated roller to reach its target
temperature, it took too long to reach that target.
1030 Heated roller cam error
While carrying out a printer soak test, the printer was unable to lower
the heated roller. This is possibly either because the heated roller cam
opto sensor is faulty, or the cam motor is not functioning correctly, or
the cam was physically obstructed.
1031 Print roller cam error
During a print job, while just about to print one of the colour planes
onto the transfer film, the printer was unable to move the print roller to
the closed position. This may be because the print roller cam
mechanism has been obstructed, or the cam opto sensor is faulty, or
the cam motor is not functioning correctly.
1032 Dye film panel timeout
While attempting to move the dye film to a particular panel, the printer
was unable to find the requested panel. This could be because the film
movement is being obstructed, or there is a problem with one or both
of the film motors, or the dye panel sensor/LED is faulty.
1033 Dye film panel unavailable
While validating the print options at the start of a print job, the printer
determined that the print job required a colour or security feature that
was not available with the currently fitted dye film. This is probably
because either the wrong type of film is fitted, or the wrong driver
options were selected.

ReTransfer ID Card Printer – User Manual
35
1034 Transfer film panel timeout
During a print job, while printing onto the transfer film, the printer was
unable to detect the index mark on the transfer film. This may be
because the transfer film is beyond the end-of-film marker tape (i.e. has
run out), or the index sensor needs to be recalibrated, or the index
sensor is faulty, or the film cannot move due to an obstruction or motor
fault.
1035 Mag head home timeout
While attempting to return the mag head to the home position, the
printer first had to clear the head home opto sensor by moving the mag
head a short distance towards the front of the printer. However, the
head took too long to clear the head home opto sensor. This may be
because there was a physical obstruction preventing the head from
moving, or the head stepper motor is not working properly, or the head
opto sensor is faulty.
1036 Mag head move timeout
While attempting to encode a mag card in the forwards direction, the
printer had to wait for the mag head to unblock the head home opto
sensor. However, the head took too long to do so. This may be because
there was a physical obstruction preventing the head from moving, or
the head stepper motor is not working properly, or the head opto
sensor is faulty.
1037 Mag verify
The printer attempted to read data from a mag card in order to verify
an encode operation, but no data was found, not even leading zeroes.
This could mean that the card was loaded in the wrong orientation, the
wrong type of card was used, the mag PCB was faulty, the head stepper
motor was not functioning properly, or the head was physically
obstructed.
1038 Cover open The printer was about to start a print job, and detected that the cover
was open. If the cover is not in fact open, it may be that the cover opto
sensor is faulty.
1041 Transfer film expired At the start of a print job, the printer determined that the transfer film
currently fitted had run out of prints. A new roll of transfer film should
be fitted before retrying the print job.
1042 Dye film expired At the start of a print job, the printer determined that the dye film
currently fitted had run out of prints. A new roll of dye film should be
fitted before retrying the print job.
1043 Both films expired At the start of a print job, the printer determined that the dye film and
transfer film currently fitted had both run out of prints. New rolls of film
should be fitted before retrying the print job.
1044 Index LED calibration failed While attempting to calibrate the transfer index LED, the printer found
that the required LED brightness setting was either too low or too high

ReTransfer ID Card Printer – User Manual
36
to be considered trustworthy. This could either be due to a faulty or
incorrectly fitted transfer index sensor or LED PCB. It could also be due
to something physically obscuring the transfer index sensor/LED during
calibration.
1045 Dye LED calibration failed
While attempting to calibrate the dye film LED, the printer found that
one of the required LED brightness settings was either too low or too
high to be considered trustworthy. This could either be due to a faulty
or incorrectly fitted dye sensor or LED PCB. It could also be due to
something physically obscuring the dye sensor/LED during calibration.
1046 Dye film not found
While validating the print options at the start of a print job, the printer
determined that film was required, yet no dye film was fitted. If dye
film is in fact fitted, it may be that the tag reader hardware is faulty, or
that the tag on the dye film is faulty.
1047 Transfer film not found
While validating the print options at the start of a print job, the printer
determined that film was required, yet no transfer film was fitted. If
transfer film is in fact fitted, it may be that the tag reader hardware is
faulty, or that the tags on the transfer film is faulty.
1048 Film is fitted. Please remove The printer was requested to carry out a printer soak test, but detected
that film was fitted. All film should be removed before retrying the soak
test.
1049 No film is fitted While initialising the print engine, the printer was unable to detect
either of the film RFID tags. This is possibly because neither roll of film
is fitted, or there is a problem with the RFID reader hardware.
1050 Printhead timeout During a print job, while waiting for the Printhead to reach its target
temperature, it took too long to reach that target.
1051 Failed to read the SD card
While processing a newly-inserted soak test dongle, the printer failed to
open the dongle. This may be because the dongle was programmed
incorrectly, was the wrong dongle, was corrupted, or was faulty. It may
also be because the firmware needs to be updated to support the data
format.
1052 Failed to write to the SD card
While attempting to update the printer's partner code, the printer was
unable to save the updated identity information onto the SD card. This
is probably because the SD card is either not fitted correctly, not
programmed correctly, or faulty.
1053 Internal storage media absent During boot-up initialisation, the printer's internal SD card failed the
authentication check. This may be because the SD card was not
programmed correctly, or was faulty.
1055 Partner code mismatch While processing a request to reset the printer's partner code to 0 using
a partner code dongle, the printer found that the dongle's partner code

ReTransfer ID Card Printer – User Manual
37
did not match that of the printer. Therefore, the request was denied.
1056 Partner code programming dongle is corrupt While processing a partner code dongle, the printer found that the
dongle's partner code was 0, which is not allowed. This may be because
the dongle is corrupt.
1057 File Read error
While preparing to print a demo card, the printer was unable to load
the image data from the selected card's PRN file on the SD card. This is
possibly because the SD card is either not programmed properly, or
faulty.
2048 Cleaning is overdue
During printer boot-up initialisation, while attempting to check whether
the printer needed to be cleaned, the printer determined that cleaning
was overdue. This error message is a prompt to the user to carry out
the cleaning routine.
2049 The printer has not been calibrated
During printer boot-up initialisation, while attempting to check whether
printer calibration was required, the printer determined that calibration
had not yet been performed. This error message is a prompt to the user
to carry out the automatic calibration and soak test.
2051 The printer is too hot to soak test
The printer was requested to carry out a printer soak test, but detected
that the heated roller was too hot (above 60 degrees Celsius). The
printer should be switched off and allowed to cool, and then switched
on without film fitted before retrying the soak test.
2052 No cleaning card
At the start of a roller cleaning routine, the printer was waiting for the
cleaning card to be inserted into the print engine. However, it took too
long for the cleaning card's leading edge to be detected at the print
position opto sensor. This is probably because the cleaning card was
not inserted, but if not then it could be that either the feed motor or
card drive motor was not functioning correctly, or the print position
opto sensor was faulty.
2053 Incorrect cleaning card type detected
At the start of a roller cleaning routine, and having already detected
what should have been a cleaning card being inserted, the printer
determined that the inserted card was shorter than expected and
therefore probably not actually a proper roller cleaning card. This is
probably because the wrong sort of card was inserted, or the card input
hopper was not removed before initiating the cleaning cycle.
2054 Cleaning card jam
At the start of a roller cleaning routine, and having already detected
that a cleaning card had been inserted, the printer was waiting for the
cleaning card's leading edge to reach the eject opto sensor. However, it
took too long for the eject sensor to become blocked. This is possibly

ReTransfer ID Card Printer – User Manual
38
due to either the cleaning card was obstructed, or a faulty eject sensor.
2055 Cleaning card not ejected. Please remove card from rear of
printer
While performing a roller cleaning cycle, and having already fed in a
roller cleaning card as far as the flipper rollers and fed it back again to
the point where the print position opto sensor was unblocked, it took
too long for the feed opto sensor to become unblocked. This probably
means that the cleaning card has become jammed, perhaps due to a
physical obstruction or because the card is slipping on the rollers.
8191 General (miscellaneous) error While attempting to retrieve a HoloKote file from the SD card, the
printer found that an invalid parameter was supplied for selecting how
the bitmap should be rotated. This indicates a bug in the firmware.
9000 The heater is over temperature
In the firmware module which controls the heated roller temperature,
the printer detected that the heated roller temperature was above the
maximum permitted level. This is either due to a fault in the control
software, or a problem with the temperature measurement hardware.
9001 The Printhead is over temperature
In the firmware module which controls the Printhead temperature, the
printer detected that the Printhead temperature was above the
maximum permitted level. This is either due to a fault in the control
software, or a problem with the temperature measurement hardware.
9002 The heater sensor is disconnected
In the firmware module which controls the heated roller temperature,
the temperature sensor alarm was triggered and the temperatures
sensor was reporting an unusually low temperature. This is almost
always because the temperature sensor is not connected properly.
9003 The Printhead is disconnected In the firmware module which controls the Printhead temperature, the
temperature sensor was reporting an unusually low temperature. This
is almost always because the Printhead is not connected properly.