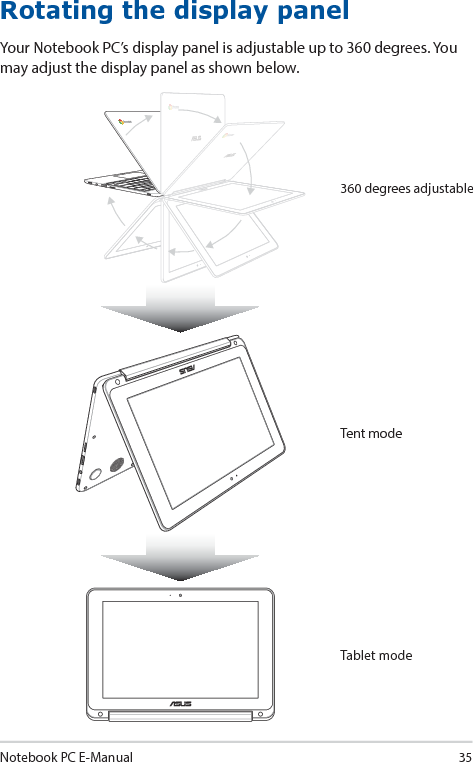
Marvell Semiconductor W8997-M1216 IEEE 802.11 2X2 MU-MIMO ac/a/b/g/n Wireless LAN + Bluetooth NGFF Module User Manual W8997 M1216 UserMan

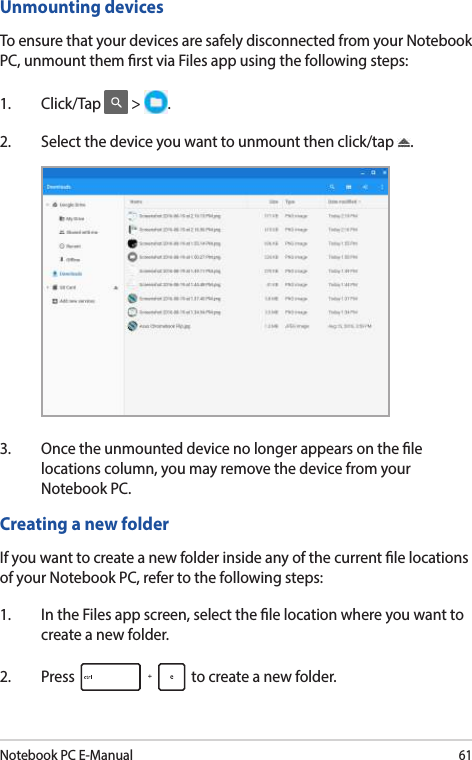
Marvell Semiconductor, Inc. IEEE 802.11 2X2 MU-MIMO ac/a/b/g/n Wireless LAN + Bluetooth NGFF Module W8997 M1216 UserMan
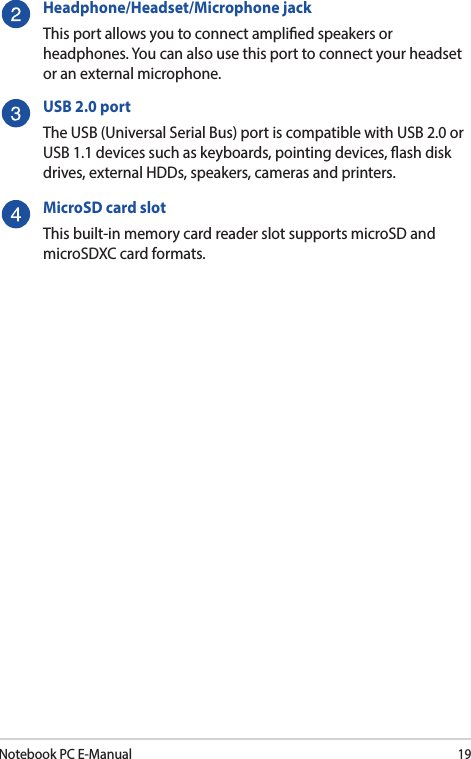
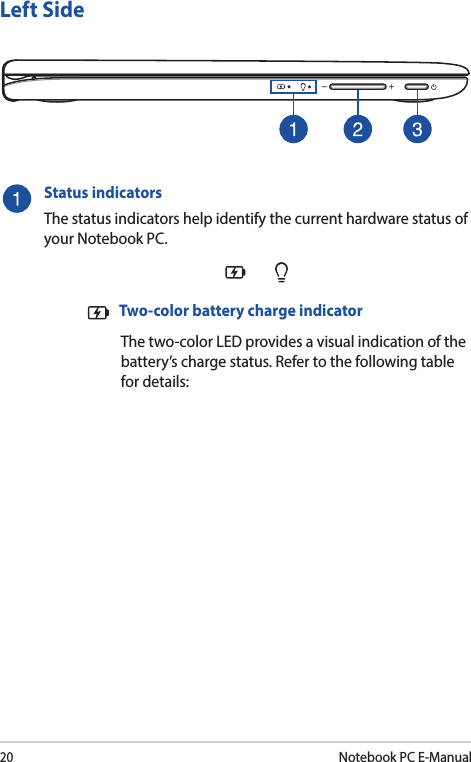
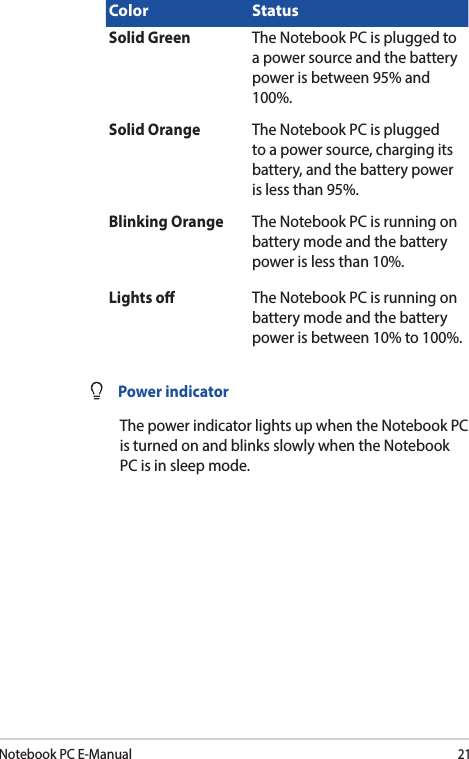
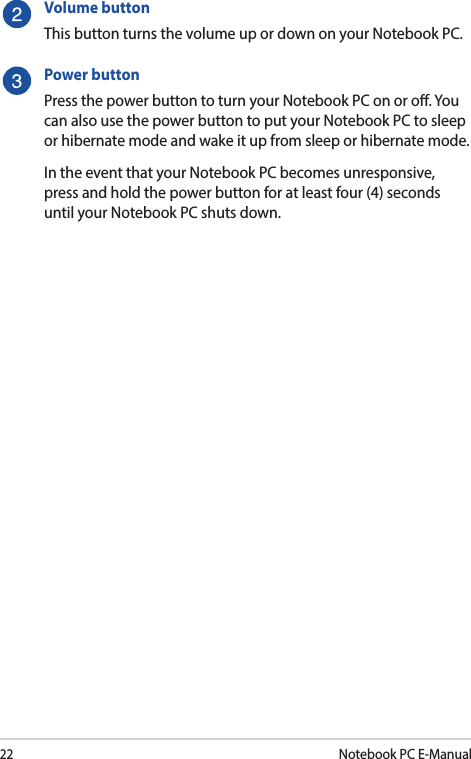
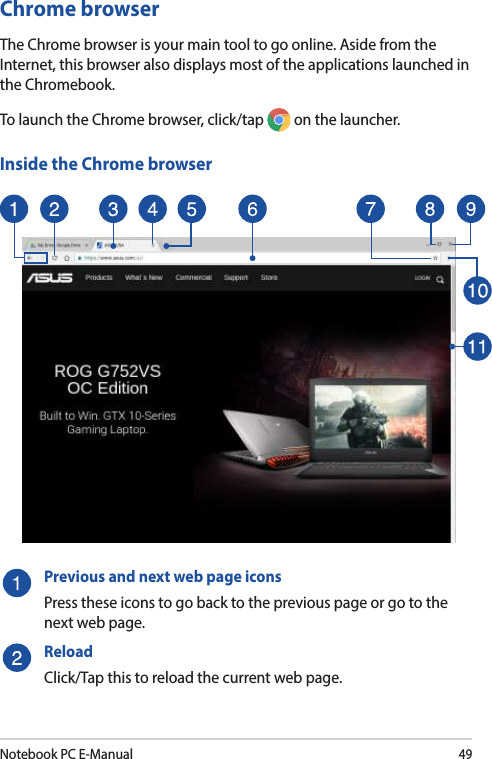
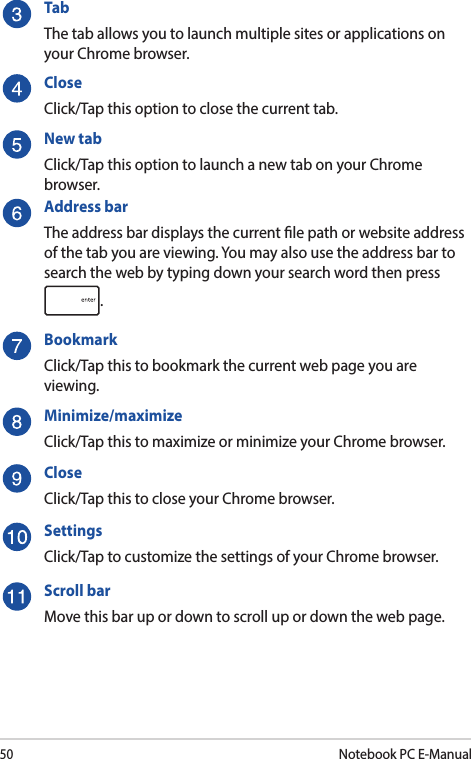
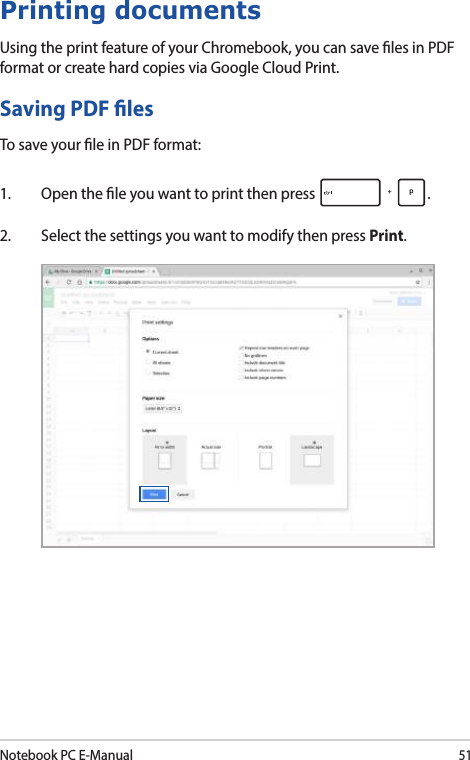
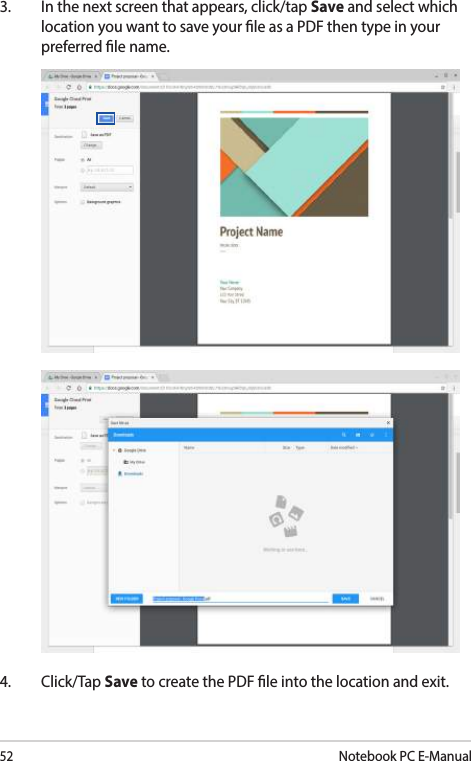
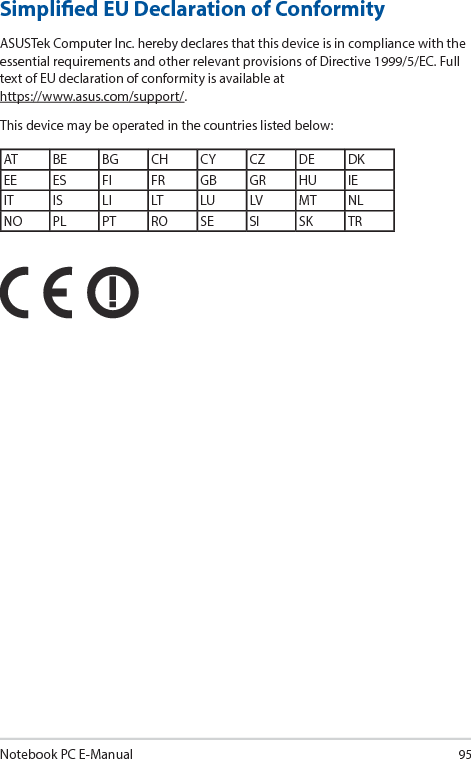
(W8997-M1216) UserMan

E12400First Edition / February 2017E-Manual
2Notebook PC E-ManualCOPYRIGHT INFORMATIONNo part of this manual, including the products and software described in it, may be reproduced, transmitted, transcribed, stored in a retrieval system, or translated into any language in any form or by any means, except documentation kept by the purchaser for backup purposes, without the express written permission of ASUSTeK COMPUTER INC. (“ASUS”).ASUS PROVIDES THIS MANUAL “AS IS” WITHOUT WARRANTY OF ANY KIND, EITHER EXPRESS OR IMPLIED, INCLUDING BUT NOT LIMITED TO THE IMPLIED WARRANTIES OR CONDITIONS OF MERCHANTABILITY OR FITNESS FOR A PARTICULAR PURPOSE. IN NO EVENT SHALL ASUS, ITS DIRECTORS, OFFICERS, EMPLOYEES OR AGENTS BE LIABLE FOR ANY INDIRECT, SPECIAL, INCIDENTAL, OR CONSEQUENTIAL DAMAGES (INCLUDING DAMAGES FOR LOSS OF PROFITS, LOSS OF BUSINESS, LOSS OF USE OR DATA, INTERRUPTION OF BUSINESS AND THE LIKE), EVEN IF ASUS HAS BEEN ADVISED OF THE POSSIBILITY OF SUCH DAMAGES ARISING FROM ANY DEFECT OR ERROR IN THIS MANUAL OR PRODUCT.Products and corporate names appearing in this manual may or may not be registered trademarks or copyrights of their respective companies, and are used only for identication or explanation and to the owners’ benet, without intent to infringe.SPECIFICATIONS AND INFORMATION CONTAINED IN THIS MANUAL ARE FURNISHED FOR INFORMATIONAL USE ONLY, AND ARE SUBJECT TO CHANGE AT ANY TIME WITHOUT NOTICE, AND SHOULD NOT BE CONSTRUED AS A COMMITMENT BY ASUS. ASUS ASSUMES NO RESPONSIBILITY OR LIABILITY FOR ANY ERRORS OR INACCURACIES THAT MAY APPEAR IN THIS MANUAL, INCLUDING THE PRODUCTS AND SOFTWARE DESCRIBED IN IT.Copyright © 2017 ASUSTeK COMPUTER INC. All Rights Reserved.LIMITATION OF LIABILITYCircumstances may arise where because of a default on ASUS’ part or other liability, you are entitled to recover damages from ASUS. In each such instance, regardless of the basis on which you are entitled to claim damages from ASUS, ASUS is liable for no more than damages for bodily injury (including death) and damage to real property and tangible personal property; or any other actual and direct damages resulted from omission or failure of performing legal duties under this Warranty Statement, up to the listed contract price of each product.ASUS will only be responsible for or indemnify you for loss, damages or claims based in contract, tort or infringement under this Warranty Statement.This limit also applies to ASUS’ suppliers and its reseller. It is the maximum for which ASUS, its suppliers, and your reseller are collectively responsible.UNDER NO CIRCUMSTANCES IS ASUS LIABLE FOR ANY OF THE FOLLOWING: (1) THIRD-PARTY CLAIMS AGAINST YOU FOR DAMAGES; (2) LOSS OF, OR DAMAGE TO, YOUR RECORDS OR DATA; OR (3) SPECIAL, INCIDENTAL, OR INDIRECT DAMAGES OR FOR ANY ECONOMIC CONSEQUENTIAL DAMAGES (INCLUDING LOST PROFITS OR SAVINGS), EVEN IF ASUS, ITS SUPPLIERS OR YOUR RESELLER IS INFORMED OF THEIR POSSIBILITY.SERVICE AND SUPPORTVisit our multi-language website at https://www.asus.com/support/
Notebook PC E-Manual3Table of ContentsAbout this manual ..................................................................................................... 7Conventions used in this manual ............................................................................. 8Typography ....................................................................................................................... 8Safety precautions .....................................................................................................9Using your Notebook PC ..............................................................................................9Caring for your Notebook PC .....................................................................................10Proper disposal ................................................................................................................11Chapter 1: Hardware SetupGetting to know your Notebook PC ...................................................................14Top View .............................................................................................................................14Bottom ................................................................................................................................ 17Right Side .......................................................................................................................... 18Left Side ............................................................................................................................. 20Chapter 2: Using your Notebook PCGetting started ...........................................................................................................24Charge your Notebook PC ...........................................................................................24Gestures for the touch screen panel and touchpad .....................................27Using touch screen panel gestures ..........................................................................27Using the touchpad ....................................................................................................... 29Using the keyboard ................................................................................................... 34Rotating the display panel .....................................................................................35
4Notebook PC E-ManualChapter 3: Working with ChromebookStarting for the rst time .........................................................................................38Sign-in area ..................................................................................................................39Browse as Guest .............................................................................................................. 39User account .....................................................................................................................40Using your desktop ...................................................................................................41Apps list .............................................................................................................................. 41Status area .........................................................................................................................43Connecting to the Internet ....................................................................................46Enabling your Wi-Fi connection ................................................................................ 46Switching to a new Wi-Fi network connection .................................................... 46Adding a network connection ................................................................................... 47Chrome browser .............................................................................................................49Printing documents ..................................................................................................51Saving PDF les ............................................................................................................... 51Google Cloud Print ......................................................................................................... 53Managing your les ..................................................................................................58Files app ............................................................................................................................. 58Google Drive .................................................................................................................... 62Resetting your Notebook PC .................................................................................66Using Powerwash ........................................................................................................... 66Turning your Notebook PC o ..............................................................................68Using Chromebook ........................................................................................................68Using the power button on your Notebook PC ................................................... 68Putting your Notebook PC to sleep ....................................................................68
Notebook PC E-Manual5Tips and FAQsUseful tips for your Notebook PC ........................................................................70Hardware FAQs ...........................................................................................................71Software FAQs ............................................................................................................. 73AppendicesInternal Modem Compliancy ..................................................................................... 76Overview ............................................................................................................................ 76Network Compatibility Declaration ......................................................................... 77Non-Voice Equipment ................................................................................................... 77Federal Communications Commission Interference Statement ................... 80FCC Radio Frequency (RF) Exposure Caution Statement ................................. 81CE Mark Warning .............................................................................................................81IC Radiation Exposure Statement for Canada ...................................................... 82Déclaration d’Industrie Canada relative à l’exposition aux ondes radio .... 83Wireless Operation Channel for Dierent Domains ........................................... 84France Restricted Wireless Frequency Bands ....................................................... 84UL Safety Notices ............................................................................................................ 86Power Safety Requirement .......................................................................................... 87TV Notices .........................................................................................................................87REACH ................................................................................................................................. 87
6Notebook PC E-ManualMacrovision Corporation Product Notice .............................................................. 87Prevention of Hearing Loss ......................................................................................... 87Nordic Lithium Cautions (for lithium-ion batteries) ........................................... 88Optical Drive Safety Information .............................................................................. 89CTR 21 Approval (for Notebook PC with built-in Modem) .............................. 90ENERGY STAR complied product .............................................................................. 92Global Environmental Regulation Compliance and Declaration .................. 92ASUS Recycling/Takeback Services .......................................................................... 93Rechargeable Battery Recycling Service in North America............................. 93Regional notice for California ..................................................................................... 93Regional notice for Singapore ...................................................................................93Regional notice for India .............................................................................................. 94Notices for removable batteries ................................................................................ 94Avis concernant les batteries remplaçables.......................................................... 94Simplied EU Declaration of Conformity ...............................................................95
Notebook PC E-Manual7About this manualThis manual provides information about the hardware and software features of your Notebook PC, organized through the following chapters:Chapter 1: Hardware SetupThis chapter details the hardware components of your Notebook PC.Chapter 2: Using your Notebook PCThis chapter shows you how to use the dierent parts of your Notebook PC.Chapter 3: Working with ChromebookThis chapter provides an overview of using the Chromebook.Tips and FAQsThis section presents some recommended tips, hardware FAQs, and software FAQs you can refer to for maintaining and xing common issues with your Notebook PC.AppendicesThis section includes notices and safety statements for your Notebook PC.
8Notebook PC E-ManualConventions used in this manualTo highlight key information in this manual, some text are presented as follows:IMPORTANT! This message contains vital information that must be followed to complete a task.NOTE: This message contains additional information and tips that can help complete tasks.WARNING! This message contains important information that must be followed to keep you safe while performing tasks and prevent damage to your Notebook PC's data and components.TypographyBold = This indicates a menu or an item that must be selected.Italic = This indicates sections that you can refer to in this manual.
Notebook PC E-Manual9Safety precautionsUsing your Notebook PCThis Notebook PC should only be used in environments with ambient temperatures between 5°C (41°F) and 35°C (95°F).Refer to the rating label on the bottom of your Notebook PC and ensure that your power adapter complies with this rating.Do not leave your Notebook PC on your lap or near any part of your body to prevent discomfort or injury from heat exposure.Do not use damaged power cords, accessories, and other peripherals with your Notebook PC.While powered on, ensure that you do not carry or cover your Notebook PC with any materials that can reduce air circulation.Do not place your Notebook PC on uneven or unstable work surfaces.You can send your Notebook PC through x-ray machines (used on items placed on conveyor belts), but do not expose them to magnetic detectors and wands.Contact your airline provider to learn about related in-ight services that can be used and restrictions that must be followed when using your Notebook PC in-ight.
10Notebook PC E-ManualCaring for your Notebook PCDisconnect the AC power and remove the battery pack (if applicable) before cleaning your Notebook PC. Use a clean cellulose sponge or chamois cloth dampened with a solution of nonabrasive detergent and a few drops of warm water. Remove any extra moisture from your Notebook PC using a dry cloth.Do not use strong solvents such as thinners, benzene, or other chemicals on or near your Notebook PC.Do not place objects on top of your Notebook PC.Do not expose your Notebook PC to strong magnetic or electrical elds.Do not use or expose your Notebook PC near liquids, rain, or moisture.Do not expose your Notebook PC to dusty environments.Do not use your Notebook PC near gas leaks.
Notebook PC E-Manual11Proper disposalDo not throw your Notebook PC in municipal waste. This product has been designed to enable proper reuse of parts and recycling. The symbol of the crossed out wheeled bin indicates that the product (electrical, electronic equipment and mercury-containing button cell battery) should not be placed in municipal waste. Check local regulations for disposal of electronic products.Do not throw the battery in municipal waste. The symbol of the crossed out wheeled bin indicates that the battery should not be placed in municipal waste.
12Notebook PC E-Manual
Notebook PC E-Manual13Chapter 1:Hardware Setup
14Notebook PC E-ManualGetting to know your Notebook PCTop ViewNOTE: The keyboard's layout may vary per region or country. The Notebook view may also vary in appearance depending on the Notebook PC model.
Notebook PC E-Manual15Camera indicatorThe camera indicator lights up when the built-in camera is in use.CameraThe built-in camera allows you to take pictures or record videos using your Notebook PC.360º-adjustable touch screen panelYour Notebook PC’s touch screen panel can be adjusted all the way into a 360º angle. This feature allows you to quickly turn your device from a Notebook PC into a touch-enabled tablet PC.This high-denition touch screen panel provides excellent viewing features for photos, videos, and other multimedia les on your Notebook PC. It also allows you to operate it using touch screen gestures.NOTE: For more details on how to turn your Notebook PC into a tablet device, refer to the Rotating the display panel section in this manual.
16Notebook PC E-ManualKeyboardThe keyboard provides full-sized QWERTY keys with a comfortable travel depth for typing. It also enables you to use the function keys and controls other multimedia functions.NOTE: The keyboard layout diers by model or territory.TouchpadThe touchpad allows the use of multi-gestures to navigate onscreen, providing an intuitive user experience. It also simulates the functions of a regular mouse.NOTE: For more details, refer to the Using the touchpad section in this manual.
Notebook PC E-Manual17BottomNOTE: The bottom side may vary in appearance depending on model.WARNING! The bottom of the Notebook PC can get warm to hot while in use or while charging the battery pack. When working on your Notebook PC, do not place it on surfaces that can block the vents.IMPORTANT! Battery time varies by usage and by the specications for this Notebook PC. The battery pack cannot be disassembled.Audio speakersThe built-in audio speakers allow you to hear audio straight from your Notebook PC. Audio features are software-controlled.
18Notebook PC E-ManualRight SideUSB Type-C/DisplayPort/Power (DC) input combo portThe USB (Universal Serial Bus) Type-C port provides a transfer rate of up to 5 Gbit/s and is backward compatible to USB 2.0. Use a USB Type-C adapter to connect your Notebook PC to an external display. Insert the bundled power adapter into this port to charge the battery pack and supply power to your Notebook PC.NOTE: Transfer rate of this port may vary per model.WARNING! The adapter may become warm to hot while in use. Do not cover the adapter and keep it away from your body while it is connected to a power source.IMPORTANT! It may take longer to fully charge your Notebook PC through a low-voltage power source. Use only the bundled power adapter to charge the battery pack and supply power to your Notebook PC.
Notebook PC E-Manual19Headphone/Headset/Microphone jackThis port allows you to connect amplied speakers or headphones. You can also use this port to connect your headset or an external microphone.USB 2.0 portThe USB (Universal Serial Bus) port is compatible with USB 2.0 or USB 1.1 devices such as keyboards, pointing devices, ash disk drives, external HDDs, speakers, cameras and printers.MicroSD card slotThis built-in memory card reader slot supports microSD and microSDXC card formats.
20Notebook PC E-ManualLeft SideStatus indicatorsThe status indicators help identify the current hardware status of your Notebook PC.  Two-color battery charge indicator  The two-color LED provides a visual indication of the battery’s charge status. Refer to the following table for details:
Notebook PC E-Manual21Color StatusSolid Green The Notebook PC is plugged to a power source and the battery power is between 95% and 100%.Solid Orange The Notebook PC is plugged to a power source, charging its battery, and the battery power is less than 95%.Blinking Orange The Notebook PC is running on battery mode and the battery power is less than 10%.Lights o The Notebook PC is running on battery mode and the battery power is between 10% to 100%.  Power indicator  The power indicator lights up when the Notebook PC is turned on and blinks slowly when the Notebook PC is in sleep mode.
22Notebook PC E-ManualVolume buttonThis button turns the volume up or down on your Notebook PC.Power buttonPress the power button to turn your Notebook PC on or o. You can also use the power button to put your Notebook PC to sleep or hibernate mode and wake it up from sleep or hibernate mode.In the event that your Notebook PC becomes unresponsive, press and hold the power button for at least four (4) seconds until your Notebook PC shuts down.
Notebook PC E-Manual23Chapter 2:Using your Notebook PC
24Notebook PC E-ManualIMPORTANT!Power adapter information:• Inputvoltage:100-240Vac• Inputfrequency:50/60Hz• Ratingoutputcurrent:2.2A(33W)• Ratingoutputvoltage:15VCharge the Notebook PC for 3 hours before using it in battery mode for the rst time.NOTE: The power adapter may vary in appearance, depending on models and your region.Getting startedCharge your Notebook PCA.  Connect the DC power connector into your Notebook PC’s power (DC) input port.B.  Plug the AC power adapter into a 100V~240V power source.
Notebook PC E-Manual25IMPORTANT!• Locatetheinput/outputratinglabelonyourNotebookPCandensure that it matches the input/output rating information on your power adapter. Some Notebook PC models may have multiple rating output currents based on the available SKU.• EnsurethatyourNotebookPCisconnectedtothepoweradapterbefore turning it on for the rst time. We strongly recommend that you use a grounded wall socket while using your Notebook PC on power adapter mode.• ThesocketoutletmustbeeasilyaccessibleandnearyourNotebookPC.• TodisconnectyourNotebookPCfromitsmainpowersupply,unplugyour Notebook PC from the power socket.WARNING!Read the following precautions for your Notebook PC’s battery:• OnlyASUS-authorizedtechniciansshouldremovethebatteryinsidethe device (for non-removable battery only).• Thebatteryusedinthisdevicemaypresentariskofreorchemicalburn if removed or disassembled.• Followthewarninglabelsforyourpersonalsafety.• Riskofexplosionifbatteryisreplacedbyanincorrecttype.• Donotdisposeofinre.• Neverattempttoshort-circuityourNotebookPC’sbattery.• Neverattempttodisassembleandreassemblethebattery (for non-removable battery only).• Discontinueusageifleakageisfound.• Thebatteryanditscomponentsmustberecycledordisposedofproperly.• Keepthebatteryandothersmallcomponentsawayfromchildren.
26Notebook PC E-ManualLift to open the display panel and your Notebook PC will turn on automaticallyNOTE: You can also press the power button to turn your Notebook PC on or o.
Notebook PC E-Manual27Using touch screen panel gesturesThe gestures allow you to launch programs and access the settings of your Notebook PC. The functions can be activated by using the hand gestures on your Notebook PC’s touch screen panel.Gestures for the touch screen panel and touchpadGestures allow you to launch programs and access the settings of your Notebook PC. Refer to the following illustrations when using hand gestures on your touch screen panel and touchpad.NOTE: The following screenshots are for reference only. The touch screen panel’s appearance may vary depending on model.Tap Double tapTap to select an item and launch it.Double tap to select a block of text.
28Notebook PC E-ManualTap and hold Slide to the right or leftTap and hold an item until a menu appears (if available), and you may tap to select an action from the menu.Slide to the right or left to go backward or forward through your web browsing history.Bottom edge swipe Pinch or stretchSlide your ngertip upward from the bottom edge of the screen to toggle on and o the auto-hide shelf.Use two of your ngertips to pinch or stretch on the screen to zoom out or zoom in.
Notebook PC E-Manual29Using the touchpadMoving the pointerYou can tap anywhere on the touchpad to activate its pointer, then slide your nger on the touchpad to move the pointer onscreen.Slide horizontallySlide verticallySlide diagonally
30Notebook PC E-ManualOne-nger gesturesTap/Double-tap• Tapanapptoselectit.• Double-tapanapptolaunchit.• Double-taponanactivescreentominimizeormaximizeitonyour display panel.Drag and dropTap on an active screen then slide the same nger without lifting it o the touchpad. To drop the screen to its new location, lift your nger from the touchpad.
Notebook PC E-Manual31Two-nger gesturesTapTap two ngers on the touchpad to simulate the right-click function.Two-nger scroll (up/down) Two-nger scroll (left/right)Slide two ngers to scroll up or down.Slide two ngers to scroll left or right.
32Notebook PC E-ManualDrag and dropSelect an item then press and hold the touchpad. Using your other nger, slide on the touchpad to drag the item, lift your nger o the button to drop the item.
Notebook PC E-Manual33Swipe left/Swipe rightIf you opened multiple tabs on your web browser, swipe three ngers left or right to switch between these tabs.Three-nger gesturesSwipe downSwipe down to see an overview of all the screens currently opened on Chromebook.
34Notebook PC E-ManualUsing the keyboardThe following shortcut keys on your Notebook PC’s keyboard can be used to launch programs and functions while using your Chromebook.Goes back to the previous pageMoves to the next pageReloads your current web pageActivates full-screen mode for the currently opened screenSwitches to the next windowDecreases display brightnessIncreases display brightnessTurns o the speaker volumeTurns down the speaker volumeTurns up the speaker volumeActivates keyboard lockActivates the search box
Notebook PC E-Manual35Rotating the display panelYour Notebook PC’s display panel is adjustable up to 360 degrees. You may adjust the display panel as shown below.360 degrees adjustableTent modeTablet mode
36Notebook PC E-Manual
Notebook PC E-Manual37Chapter 3:Working with Chromebook
38Notebook PC E-ManualStarting for the rst timeWhen you start your Notebook PC for the rst time, please follow the series of following steps to congure your Chromebook:1.  Press the power button on your Notebook PC. Wait for a few minutes until the setup screen appears.2.  From the setup screen, select your preferred option from the drop-down button beside the following items:• Selectyourlanguage• Selectyourkeyboard• SelectanetworkOnce nished, click/tap Continue.3.  Carefully read the Chrome OS Terms then select Accept and Continue.4.  In the following sign-in screen, input the Email and Password of your Google account. If you don’t have a Google account yet, you may create one by clicking on the create a Google Account link.  If you want to skip this sign-in process, you may also click/tap browse as Guest to proceed.5.  Once the setup process is complete, the web browser is launched and you may start working on Chromebook.
Notebook PC E-Manual39Sign-in areaAfter turning on your Notebook PC, the sign-in screen appears so you can choose to work on Chromebook using either of the following options:IMPORTANT! Ensure you have Internet connection before choosing any of the following sign-in options.Browse as GuestThis option is recommended if you simply want to browse online or let others use your Notebook PC. Downloaded les, browser history, and cookies are not stored once you sign out as guest.
40Notebook PC E-ManualUser accountUse this option to access apps and other programs oered in Chromebook and save downloaded les, apps, and browser histories right into your user account.Signing in to your user accountSelect the user account you want to use then type your password on the enter password eld.Adding a user accountRefer to the following steps if you want to add a new user account:1. Click/Tap Add user on the bottom part of the sign-in area.2.  In the following screen, input the new Email and Password you would like to add as a user account. Your email account must be Gmail. To create a new Google account, click/tap the create a Google Account link.3. Click/Tap Sign in.
Notebook PC E-Manual41Using your desktopApps listStart working on your Notebook PC by launching apps that can be accessed after signing in to your user account. These apps enable a variety of functions that can help you maximize the features of your Notebook PC.To launch the apps list, click/tap   on the launcher.NOTE: When browsing as a guest, only the   icon appears on your launcher.Apps launcher icon Launcher
42Notebook PC E-ManualAdding apps on the launcherTo add more apps on the launcher:1. Click/Tap .2.  Right-click on the apps you want to add on the launcher then select Pin to shelf.Deleting apps from the launcherTo delete any of the apps you currently have on the launcher:1.  Right-click on the apps you want to delete.2. Select Unpin.Conguring the apps settingsTo congure your apps’ appearance once launched:1.  Right-click on the apps you want to congure.2.  Select any of the following options:• Open as regular tab• Open as pinned tab• Open as window• Open maximized
Notebook PC E-Manual43Status areaAt a glance, the status area displays an overview of your Google user account information. It also allows you to change the settings of your Notebook PC and your current user account.Launching the status areaTo launch the status area, click/tap anywhere on the status area box on the lower right corner of your desktop screen.Click/Tap to launch the status areastatus area
44Notebook PC E-ManualInside the status areaUser accountThis shows the currently used Google user account.SettingsClick/Tap this option to access your Chromebook settings.Sign outClick/Tap this option to sign out from the current user account.NetworkClick/Tap this option to view your current network connection, available network connections, and the network settings.BluetoothClick/Tap this option to enable or disable your Bluetooth feature and manage other Bluetooth devices.
Notebook PC E-Manual45VolumeDrag the volume slider to the left or to the right to turn the volume up or down on your Notebook PC.Battery statusThis shows the current battery life percentage of your Notebook PC. It also calculates the remaining time before your battery becomes discharged or fully-charged again.Date and timeClick/Tap this option if you want to adjust the date and time settings of your Notebook PC.Chromebook helpClick/Tap this option to access the Chromebook help center.ShutdownClick/Tap this option to sign out of your current log in session and turn o your Notebook PC.LockClick/Tap this option to lock your current session and return to the sign in area.
46Notebook PC E-ManualConnecting to the InternetInternet connection is a must for you to work on Chromebook. Connect to the Internet wirelessly using a Wi-Fi connection.Enabling your Wi-Fi connectionTo enable your Wi-Fi connection:1.  Launch the status area.2. Select No network > Turn Wi-Fi on.Switching to a new Wi-Fi network connectionBy default, your Notebook PC uses the Wi-Fi network you chose during the setup process when you used your device for the rst time. In case you need to choose a new network connection, refer to the following steps:1.  Launch the status area.2.  Select your current Wi-Fi network connection.3.  Select your new Wi-Fi network connection from the current list of networks then type in the corresponding password, if necessary.
Notebook PC E-Manual47Adding a network connectionTo add a new network connection to your list of networks:1.  Launch the status area.2. Click/Tap Settings.3. Under Internet connection, select Add connection.
48Notebook PC E-Manual4. Choose Add Wi-Fi... then input the necessary details to setup your new network connection.5. Click/Tap Connect to start connecting to the Internet using this new network connection.
Notebook PC E-Manual49Chrome browserThe Chrome browser is your main tool to go online. Aside from the Internet, this browser also displays most of the applications launched in the Chromebook.To launch the Chrome browser, click/tap   on the launcher.Inside the Chrome browserPrevious and next web page iconsPress these icons to go back to the previous page or go to the next web page.ReloadClick/Tap this to reload the current web page.
50Notebook PC E-ManualTabThe tab allows you to launch multiple sites or applications on your Chrome browser.CloseClick/Tap this option to close the current tab.New tabClick/Tap this option to launch a new tab on your Chrome browser.Address barThe address bar displays the current le path or website address of the tab you are viewing. You may also use the address bar to search the web by typing down your search word then press .BookmarkClick/Tap this to bookmark the current web page you are viewing.Minimize/maximizeClick/Tap this to maximize or minimize your Chrome browser.CloseClick/Tap this to close your Chrome browser.SettingsClick/Tap to customize the settings of your Chrome browser.Scroll barMove this bar up or down to scroll up or down the web page.
Notebook PC E-Manual51Printing documentsUsing the print feature of your Chromebook, you can save les in PDF format or create hard copies via Google Cloud Print.Saving PDF lesTo save your le in PDF format:1.  Open the le you want to print then press  .2.  Select the settings you want to modify then press Print.
52Notebook PC E-Manual4. Click/Tap Save to create the PDF le into the location and exit.3.  In the next screen that appears, click/tap Save and select which location you want to save your le as a PDF then type in your preferred le name.
Notebook PC E-Manual53Google Cloud PrintIf you need to create le printouts from your Notebook PC, you may do so using the Google Cloud Print feature. Google Cloud Print allows you to create hard copies using these key ingredients: cloud-based technology, an active Internet connection, and a cloud print enabled printer.Refer to the following information for details on how to use this feature.Using Cloud Ready printersIf your printer already supports Google Cloud Print, refer to its user guide to start using it with your Notebook PC.You may check your printer’s compatibility with this feature via this link: http://www.google.com/cloudprint/learnNOTE: If your printer does not appear on the list, you may refer to the Connecting a classic printer to Google Cloud Print section in this manual.
54Notebook PC E-ManualConnecting a classic printer to Google Cloud PrintClassic printers are printers that do not automatically support Google Cloud Print and needs to be manually setup for use with Google.To use a classic printer with your Notebook PC, you need to connect the said printer to Google Cloud Print via a compatible Windows® computer.IMPORTANT!• EnsurethatyouarerunningaWindows®XPorhigheronyourcomputer. When using Windows® XP, ensure that the Windows XP Service Pack 3 (SP3) is already installed.• YoumustinstalltheprintertoyourcompatibleWindows®computerrst before connecting it with Google Cloud Print.• EnsurethatyourcomputerhasaninstalledGoogleChromebrowser.
Notebook PC E-Manual55To connect classic printers to Google Cloud print:1.  Connect your preferred printer to your computer then turn on both devices.IMPORTANT! Ensure that your printer is already installed to your computer before proceeding with the next steps.2.  Connect your computer to the Internet then open your Google Chrome browser.3. Click   > Settings.4. Click Show advanced settings...5.  Scroll down to see Google Cloud Print then click Manage.
56Notebook PC E-Manual6. Under Classic printers, click Add printers.7.  Sign in using your Google account.8.  In the next screen, click the printer that you want to connect to Google Cloud Print then click Add printer(s).9.  The following screen appears when you have successfully set up your printer with Google Cloud Print.
Notebook PC E-Manual57Using Google Cloud Print to create printoutsAfter successfully connecting your printer with Google Cloud Print, you can start printing les from your Notebook PC using the following procedures:1.  Open the le you want to print then press  .2.  Under the Destination option, click/tap Change...3.  From the list of registered printers under Google Cloud Print, select the printer you want to use.4.  Congure any additional print options you may want to use then click/tap Print.
58Notebook PC E-ManualManaging your lesManage and store les on your Notebook PC using the Files app and Google Drive app.Using these apps, you can store and edit various les such as documents, images, audios, and videos while working on your Notebook PC. You may also save and access these les via Google Drive’s cloud storage system.Files appThe Files app allows you to see all the les that have been downloaded to your Notebook PC and those that are stored on your Google Drive. It also shows all connected external devices to your Notebook PC.To launch the Files app, click/tap   >  .Inside the Files app
Notebook PC E-Manual59File locationsThis column shows you the currently available le locations. This also shows all the external storage devices that are currently connected to your Notebook PC.SearchClick/Tap on the search button to enable the search box. To use the search box, type the le name you want to locate then press .Switch to list or gridClick/Tap this option to rearrange your les to a list or a grid view.Minimize/maximizeClick/Tap this to maximize or minimize your Chrome browser.CloseClick/Tap this to close your Chrome browser.SettingsClick/Tap this button to customize the settings of your currently active le location.
60Notebook PC E-ManualAccessing les stored on your Notebook PCThe Downloads folder inside the Files app is where your Notebook PC stores all types of les downloaded online or saved on your Notebook PC.To access these les, simply launch the Files app then select the Downloads folder and click/tap the le you want to open.Moving les to another folderIf you want to move les from one location to another inside the Files app, refer to the following procedures:1.  Open the le location where the le is currently placed.2.  Select the le(s) you want to move then drag and drop the le(s) into the new le location.
Notebook PC E-Manual61Unmounting devicesTo ensure that your devices are safely disconnected from your Notebook PC, unmount them rst via Files app using the following steps:1. Click/Tap  >  .2.  Select the device you want to unmount then click/tap  .Creating a new folderIf you want to create a new folder inside any of the current le locations of your Notebook PC, refer to the following steps:1.  In the Files app screen, select the le location where you want to create a new folder.2. Press   to create a new folder.3.  Once the unmounted device no longer appears on the le locations column, you may remove the device from your Notebook PC.
62Notebook PC E-ManualGoogle DriveGoogle Drive is a 15GB cloud storage system you can access on your Notebook PC via your Google account. It allows you to sync and access your les across other devices such as mobile phones, tablet PCs, and other Notebook PCs.There are two ways in which you can access Google Drive on your Notebook PC: via the Files app or by launching the Google Drive app.Launching Google Drive via the Files appGoogle Drive under the Files app allows you to see all the les that are currently stored in your Google Drive. It also allows you to quickly move les from the Downloads folder into your Google Drive.To launch Google Drive via the Files app:1. Click/Tap  >  .2. Select Google Drive to view all the les currently stored in it under the following categories:• My Drive - Lists all stored les.• Shared with me - Lists all les that are shared from other Google accounts.• Recent - Lists all recently opened les.• Oine - Lists all les that can be accessed oine.
Notebook PC E-Manual63IMPORTANT! Ensure that you are connected to the Internet when launching the Google Drive app.Moving your downloads to Google DriveBy default, all the les downloaded on your Notebook PC are stored inside the Files app. You can move these les to your Google Drive using the following procedures:1. Click/Tap  >  .2. Click/Tap Downloads then select the Google docs, les, or folders that you want to move then drag and drop these selected items into Google Drive.Launching the Google Drive appBy accessing the Google Drive app, you can customize its settings and maximize the use of Google Drive.To launch the Google Drive app, click/tap   >  .
64Notebook PC E-ManualInside the Google Drive appCreate/UploadClick/Tap this option to create a new le that is automatically saved in your Google Drive or upload les or folders from another location into your Google Drive.File locationsThis column shows you the currently available le locations inside your Google Drive.SearchClick/Tap this button to start searching for the indicated le name.
Notebook PC E-Manual65Search boxType the name of the le, folder, or Google document that you want to nd inside Google Drive then press   or click/tap .Switch to list or gridClick/Tap this option to rearrange your les to a list or a grid view.Details and activityClick/Tap this option to show the activity log of your Google Drive account and the details of your My Drive le location.SettingsClick/Tap this button to customize the settings of your Google Drive.
66Notebook PC E-ManualResetting your Notebook PCIn case you need to reset your Chromebook to its default settings, you may do so using Powerwash.Using PowerwashWARNING!• Backupallyourdatabeforeperformingthisoption.• AlldatastoredlocallyinyourNotebookPCaredeletedwhenusingPowerwash. However, your Google Drive accounts and other data synchronized with these accounts are not going to be aected.1.  Launch the status area then select Settings.2.  Scroll down then click/tap Show advanced settings...
Notebook PC E-Manual673. Click/Tap Powerwash.4.  When prompted, click/tap Restart.5.  In the next window, click/tap Powerwash to proceed.
68Notebook PC E-ManualTurning your Notebook PC offYou can turn o your Notebook PC by doing either of the following procedures:Using Chromebook1.  Launch the status area.2. Click/Tap  .Using the power button on your Notebook PCYou can also use this option to turn o your Notebook PC in case it becomes unresponsive.Putting your Notebook PC to sleepTo put your Notebook PC on Sleep mode, press the power button once.IMPORTANT! Save your les before performing this option to prevent loss of important data.To do this, press the power button on your Notebook PC for at least four (4) seconds until your Notebook PC turns o.
Notebook PC E-Manual69Tips and FAQs
70Notebook PC E-ManualUseful tips for your Notebook PCTo help you maximize the use of your Notebook PC, maintain its system performance, and ensure all your data are kept secured, here are some useful tips that you can follow:• Useananti-virussoftwaretoprotectyourdataandkeepthisupdated too.• Unlessabsolutelynecessary,refrainfromusingforceshutdowntoturn o your Notebook PC.• Alwaysbackupyourdataandmakeitapointtocreateabackupdata in an external storage drive.• RefrainfromusingtheNotebookPCatextremelyhightemperatures. If you are not going to use your Notebook PC for a long period of time (at least a month), we recommend that you take out the battery if the battery is removable.• Disconnectallexternaldevicesandensureyouhavethefollowingitems prior to resetting your Notebook PC:-  Backup data-  Log in ID and password-  Internet connection information
Notebook PC E-Manual71Hardware FAQs1.  A black dot, or sometimes a colored dot, appears onscreen when I turn on the Notebook PC. What should I do?Although these dots normally appear onscreen, they will not aect your system. If the incident continues and subsequently aects system performance, consult an authorized ASUS service center.2.  My display panel has an uneven color and brightness. How can I x this?The color and brightness of your display panel may be aected by the angle and current position of your Notebook PC. The brightness and color tone of your Notebook PC may also vary per model. You may use the function keys or the display settings in your operating system to adjust the appearance of your display panel.3.  How can I maximize my Notebook PC‘s battery life?You can try doing any of the following suggestions:• Usethefunctionkeystoadjustthedisplaybrightness.• DisconnectunusedUSBdevices.• Closeunusedapplications,especiallythosethattakeuptoomuch system memory.
72Notebook PC E-Manual4.  My battery charge indicator does not light up. What’s wrong?• Checkwhetherthepoweradapterorbatterypackisattached correctly. You may also disconnect the power adapter or battery pack, wait for a minute, then reconnect them again to the power outlet and Notebook PC.• Iftheproblemstillexists,contactyourlocalASUSservicecenter for assistance.5.  When I play audio and video les, why can’t I hear any sound from my Notebook PC’s audio speakers?You can try doing any of the following suggestions:• Press  to turn up the speaker volume.• Checkifyourspeakersweresettomute.• CheckifaheadphonejackisconnectedtoyourNotebookPC and remove it.6.  What should I do if my Notebook PC’s power adapter gets lost or my battery stops working?Contact your local ASUS service center for assistance.7.  My Notebook PC cannot do keystrokes correctly because my cursor keeps on moving. What should I do?Make sure that nothing accidentally touches or presses on your touchpad while you type on the keyboard.
Notebook PC E-Manual73Software FAQs1.  When I turn on my Notebook PC, the power indicator lights up but nothing appears on my screen. What can I do to x this?You can try doing any of the following suggestions:• ForceshutdownyourNotebookPCbypressingthepowerbutton for at least four (4) seconds. Check if the power adapter and battery pack are inserted correctly then turn on your Notebook PC.• Iftheproblemstillexists,contactyourlocalASUSservicecenter for assistance.2.  What should I do when my screen displays this message: “Remove disks or other media. Press any key to restart.”?You can try doing any of the following suggestions:• RemoveallconnectedUSBdevicesthenrestartyourNotebook PC.• Removeanyopticaldiscsthatareleftinsidetheopticaldrivethen restart.• Iftheproblemstillexists,yourNotebookPCmighthaveamemory storage problem. Contact your local ASUS service center for assistance.3.  My Notebook PC boots slower than usual and my operating system lags. How can I x this?Delete the applications you recently installed or were not included with your operating system package then restart your system.
74Notebook PC E-Manual4.  My Notebook PC does not boot up. How can I x this?You can try doing any of the following suggestions:• RemoveallconnecteddevicestoyourNotebookPCthenrestart your system.• Iftheproblemstillexists,contactyourlocalASUSservicecenter for assistance.5.  Why can’t my Notebook PC wake up from sleep mode?• Youneedtopressthepowerbuttontoresumeyourlastworking state.• Yoursystemmighthavecompletelyusedupitsbatterypower. Connect the power adapter to your Notebook PC and connect to a power outlet then press the power button.
Notebook PC E-Manual75Appendices
76Notebook PC E-ManualInternal Modem CompliancyThe Notebook PC with internal modem model complies with JATE (Japan), FCC (US, Canada, Korea, Taiwan), and CTR21. The internal modem has been approved in accordance with Council Decision 98/482/EC for pan-European single terminal connection to the public switched telephone network (PSTN). However due to dierences between the individual PSTNs provided in dierent countries, the approval does not, of itself, give an unconditional assurance of successful operation on every PSTN network termination point. In the event of problems you should contact your equipment supplier in the rst instance.OverviewOn 4th August 1998 the European Council Decision regarding the CTR 21 has been published in the Ocial Journal of the EC. The CTR 21 applies to all non voice terminal equipment with DTMF-dialling which is intended to be connected to the analogue PSTN (Public Switched Telephone Network).CTR 21 (Common Technical Regulation) for the attachment requirements for connection to the analogue public switched telephone networks of terminal equipment (excluding terminal equipment supporting the voice telephony justied case service) in which network addressing, if provided, is by means of dual tone multi-frequency signalling.
Notebook PC E-Manual77Network Compatibility DeclarationStatement to be made by the manufacturer to the Notied Body and the vendor: “This declaration will indicate the networks with which the equipment is designed to work and any notied networks with which the equipment may have inter-working diculties.”Statement to be made by the manufacturer to the user: “This declaration will indicate the networks with which the equipment is designed to work and any notied networks with which the equipment may have inter-working diculties. The manufacturer shall also associate a statement to make it clear where network compatibility is dependent on physical and software switch settings. It will also advise the user to contact the vendor if it is desired to use the equipment on another network.”Up to now the Notied Body of CETECOM issued several pan-European approvals using CTR 21. The results are Europe’s rst modems which do not require regulatory approvals in each individual European country.Non-Voice EquipmentAnswering machines and loud-speaking telephones can be eligible as well as modems, fax machines, auto-dialers and alarm systems. Equipment in which the end-to-end quality of speech is controlled by regulations (e.g. handset telephones and in some countries also cordless telephones) is excluded.
78Notebook PC E-ManualThis table shows the countries currently under the CTR21 standard.Country Applied More TestingAustria1Yes NoBelgium Yes NoCzech Republic No Not ApplicableDenmark1Yes YesFinland Yes NoFrance Yes NoGermany Yes NoGreece Yes NoHungary No Not ApplicableIceland Yes NoIreland Yes NoItaly Still Pending Still PendingIsrael No NoLichtenstein Yes NoLuxemburg Yes NoThe Netherlands1Yes YesNorway Yes NoPoland No Not ApplicablePortugal No Not ApplicableSpain No Not ApplicableSweden Yes NoSwitzerland Yes NoUnited Kingdom Yes No
Notebook PC E-Manual79This information was copied from CETECOM and is supplied without liability. For updates to this table, you may visit  http://www.cetecom.de/technologies/ctr_21.html.1 National requirements will apply only if the equipment may use pulse dialling (manufacturers may state in the user guide that the equipment is only intended to support DTMF signalling, which would make any additional testing superuous).In The Netherlands additional testing is required for series connection and caller ID facilities.
80Notebook PC E-ManualFederal Communications Commission Interference StatementThis device complies with FCC Rules Part 15. Operation is subject to the following two conditions:• Thisdevicemaynotcauseharmfulinterference.• Thisdevicemustacceptanyinterferencereceived,includinginterferencethat may cause undesired operation.This equipment has been tested and found to comply with the limits for a class B digital device, pursuant to Part 15 of the Federal Communications Commission (FCC) rules. These limits are designed to provide reasonable protection against harmful interference in a residential installation. This equipment generates, uses, and can radiate radio frequency energy and, if not installed and used in accordance with the instructions, may cause harmful interference to radio communications. However, there is no guarantee that interference will not occur in a particular installation. If this equipment does cause harmful interference to radio or television reception, which can be determined by turning the equipment o and on, the user is encouraged to try to correct the interference by one or more of the following measures:• Reorientorrelocatethereceivingantenna.• Increasetheseparationbetweentheequipmentandreceiver.• Connecttheequipmentintoanoutletonacircuitdierentfromthattowhich the receiver is connected.• Consultthedealeroranexperiencedradio/TVtechnicianforhelp.WARNING! The use of a shielded-type power cord is required in order to meet FCC emission limits and to prevent interference to the nearby radio and television reception. It is essential that only the supplied power cord be used. Use only shielded cables to connect I/O devices to this equipment. You are cautioned that changes or modications not expressly approved by the party responsible for compliance could void your authority to operate the equipment.(Reprinted from the Code of Federal Regulations #47, part 15.193, 1993. Washington DC: Oce of the Federal Register, National Archives and Records Administration, U.S. Government Printing Oce.)
Notebook PC E-Manual81FCC Radio Frequency (RF) Exposure Caution StatementWARNING! Any changes or modications not expressly approved by the party responsible for compliance could void the user’s authority to operate this equipment. “The manufacture declares that this device is limited to Channels 1 through 11 in the 2.4GHz frequency by specied rmware controlled in the USA.”This equipment complies with FCC radiation exposure limits set forth for an uncontrolled environment. To maintain compliance with FCC RF exposure compliance requirements, please avoid direct contact to the transmitting antenna during transmitting. End users must follow the specic operating instructions for satisfying RF exposure compliance.CE Mark WarningThis device complies with the R&TTE Directive 1999/5/EC (replaced in 2017 by RED 2014/53/EU), the EMC Directive 2004/108/EC (replaced in April 2016 by 2014/30/EU), and the Low Voltage Directive 2006/95/EC (replaced in April 2016 by 2014/35/EU) issued by the Commission of the European Community.Countries where the device will be sold to:AT BE BG CH CY CZ DE DKEE ES FI FR GB GR HU IEIT IS LI LT LU LV MT NLNO PL PT RO SE SI SK TR
82Notebook PC E-ManualIC Radiation Exposure Statement for CanadaThis equipment complies with IC radiation exposure limits set forth for an uncontrolled environment. To maintain compliance with IC RF exposure compliance requirements, please avoid direct contact to the transmitting antenna during transmitting. End users must follow the specic operating instructions for satisfying RF exposure compliance.Operation is subject to the following two conditions:• Thisdevicemaynotcauseinterferenceand• Thisdevicemustacceptanyinterference,includinginterferencethatmaycause undesired operation of the device.To prevent radio interference to the licensed service (i.e. co-channel Mobile Satellite systems) this device is intended to be operated indoors and away from windows to provide maximum shielding. Equipment (or its transmit antenna) that is installed outdoors is subject to licensing.This device complies with Industry Canada licence-exempt RSS standard(s).CAN ICES-3(B)/NMB-3(B)
Notebook PC E-Manual83Déclaration d’Industrie Canada relative à l’exposition aux ondes radioCet appareil est conforme aux limites d’exposition aux radiations d’Industrie Canada dénies pour un environnement non-contrôlé. Pour maintenir la conformité avec les exigences d’exposition RF d’IC, veuillez éviter tout contact direct avec l’antenne pendant l’émission. Les utilisateurs naux doivent suivre les instructions de fonctionnement spéciques pour satisfaire la conformité aux expositions RF.Son utilisation est sujette aux deux conditions suivantes:• Cetappareilnepeutpascauserd’interférence,et• Cetappareildoitacceptertouteinterférence,ycomprislesinterférencesqui pourraient causer un fonctionnement non souhaité de l’appareil.Pour éviter les interférences radio avec le service sous licence (c’est à-dire le partage de canal avec les systèmes de téléphonie satellite), cet appareil est destiné à être utilisé en intérieur et loin des fenêtres pour fournir un blindage maximal. Tout appareil (ou son antenne d’émission) qui est installé en extérieur est sujet à cette licence.Le present appareil est conforme aux CNR d’Industrie Canada applicables aux appareils radio exempts de licence.CAN ICES-3(B)/NMB-3(B)
84Notebook PC E-ManualFrance Restricted Wireless Frequency BandsSome areas of France have a restricted frequency band. The worst case maximum authorized power indoors are:• 10mWfortheentire2.4GHzband(2400MHz–2483.5MHz)• 100mWforfrequenciesbetween2446.5MHzand2483.5MHzNOTE: Channels 10 through 13 inclusive operate in the band 2446.6 MHz to 2483.5 MHz.There are few possibilities for outdoor use: on private property or on the private property of public persons, use is subject to a preliminary authorization procedure by the Ministry of Defense, with maximum authorized power of 100mW in the 2446.5–2483.5MHzband.Useoutdoorsonpublicpropertyisnotpermitted.In the departments listed below, for the entire 2.4 GHz band:• Maximumauthorizedpowerindoorsis100mW• Maximumauthorizedpoweroutdoorsis10mWWireless Operation Channel for Dierent DomainsN. America 2.412-2.462 GHz Ch01 through CH11Japan 2.412-2.484 GHz Ch01 through Ch14Europe ETSI 2.412-2.472 GHz Ch01 through Ch13
Notebook PC E-Manual85Departmentsinwhichtheuseofthe2400–2483.5MHzbandispermittedwithanEIRP of less than 100mW indoors and less than 10mW outdoors:01  Ain 02  Aisne 03  Allier05  Hautes Alpes 08  Ardennes 09  Ariège11  Aude 12  Aveyron 16  Charente24  Dordogne 25  Doubs 26  Drôme32  Gers 36  Indre 37  Indre et Loire41  Loir et Cher 45  Loiret 50  Manche55  Meuse 58  Nièvre 59  Nord60  Oise 61  Orne 63  Puy du Dôme64  Pyrénées Atlantique 66  Pyrénées Orientales 67  Bas Rhin68  Haut Rhin 70  Haute Saône 71  Saône et Loire75  Paris 82  Tarn et Garonne 84  Vaucluse88  Vosges 89  Yonne 90  Territoire de Belfort94  Val de MarneThis requirement is likely to change over time, allowing you to use your wireless LAN card in more areas within France. Please check with ART for the latest information (www.arcep.fr).NOTE: Your WLAN Card transmits less than 100mW, but more than 10mW.
86Notebook PC E-ManualUL Safety NoticesRequired for UL 1459 covering telecommunications (telephone) equipment intended to be electrically connected to a telecommunication network that has an operating voltage to ground that does not exceed 200V peak, 300V peak-to-peak, and 105V rms, and installed or used in accordance with the National Electrical Code (NFPA 70).When using the Notebook PC modem, basic safety precautions should always be followed to reduce the risk of re, electric shock, and injury to persons, including the following:• DONOTusetheNotebookPCnearwater,forexample,nearabathtub,wash bowl, kitchen sink or laundry tub, in a wet basement or near a swimming pool.• DONOTusetheNotebookPCduringanelectricalstorm.Theremaybearemote risk of electric shock from lightning.• DONOTusetheNotebookPCinthevicinityofagasleak.Required for UL 1642 covering primary (non-rechargeable) and secondary (rechargeable) lithium batteries for use as power sources in products. These batteries contain metallic lithium, or a lithium alloy, or a lithium ion, and may consist of a single electrochemical cell or two or more cells connected in series, parallel, or both, that convert chemical energy into electrical energy by an irreversible or reversible chemical reaction.• DONOTdisposetheNotebookPCbatterypackinare,astheymayexplode. Check with local codes for possible special disposal instructions to reduce the risk of injury to persons due to re or explosion.• DONOTusepoweradaptersorbatteriesfromotherdevicestoreducethe risk of injury to persons due to re or explosion. Use only UL certied power adapters or batteries supplied by the manufacturer or authorized retailers.
Notebook PC E-Manual87Power Safety RequirementProducts with electrical current ratings up to 6A and weighing more than 3Kg must use approved power cords greater than or equal to: H05VV-F, 3G, 0.75mm2 or H05VV-F, 2G, 0.75mm2.TV NoticesNote to CATV System Installer—Cable distribution system should be grounded (earthed) in accordance with ANSI/NFPA 70, the National Electrical Code (NEC), in particular Section 820.93, Grounding of Outer Conductive Shield of a Coaxial Cable–installationshouldincludebondingthescreenofthecoaxialcabletotheearth at the building entrance.REACHComplying with the REACH (Registration, Evaluation, Authorization, and Restriction of Chemicals) regulatory framework, we publish the chemical substances in our products at ASUS REACH website at  http://csr.asus.com/english/REACH.htm.Macrovision Corporation Product NoticeThis product incorporates copyright protection technology that is protected by method claims of certain U.S.A. patents and other intellectual property rights owned by Macrovision Corporation and other rights owners. Use of this copyright protection technology must be authorized by Macrovision Corporation, and is intended for home and other limited viewing uses only unless otherwise authorized by Macrovision Corporation. Reverse engineering or disassembly is prohibited.Prevention of Hearing LossTo prevent possible hearing damage, do not listen at high volume levels for long periods.
88Notebook PC E-ManualNordic Lithium Cautions (for lithium-ion batteries)CAUTION! Danger of explosion if battery is incorrectly replaced. Replace only with the same or equivalent type recommended by the manufacturer. Dispose of used batteries according to the manufacturer’s instructions. (English)ATTENZIONE! Rischio di esplosione della batteria se sostituita in modo errato. Sostituire la batteria con un una di tipo uguale o equivalente consigliata dalla fabbrica. Non disperdere le batterie nell’ambiente. (Italian)VORSICHT! Explosionsgefahr bei unsachgemäßen Austausch der Batterie. Ersatz nur durch denselben oder einem vom Hersteller empfohlenem ähnlichen Typ. Entsorgung gebrauchter Batterien nach Angaben des Herstellers. (German)ADVARSELI! Lithiumbatteri - Eksplosionsfare ved fejlagtig håndtering. Udskiftning må kun ske med batteri af samme fabrikat og type. Levér det brugte batteri tilbage til leverandøren. (Danish)VARNING! Explosionsfara vid felaktigt batteribyte. Använd samma batterityp eller en ekvivalent typ som rekommenderas av apparattillverkaren. Kassera använt batteri enligt fabrikantens instruktion. (Swedish)VAROITUS! Paristo voi räjähtää, jos se on virheellisesti asennettu. Vaihda paristo ainoastaan laitevalmistajan sousittelemaan tyyppiin. Hävitä käytetty paristo valmistagan ohjeiden mukaisesti. (Finnish)ATTENTION! Il y a danger d’explosion s’il y a remplacement incorrect de la batterie. Remplacer uniquement avec une batterie du mêre type ou d’un type équivalent recommandé par le constructeur. Mettre au rebut les batteries usagées conformément aux instructions du fabricant. (French)ADVARSEL! Eksplosjonsfare ved feilaktig skifte av batteri. Benytt samme batteritype eller en tilsvarende type anbefalt av apparatfabrikanten. Brukte batterier kasseres i henhold til fabrikantens instruksjoner. (Norwegian)(Japanese)ВНИМАНИЕ! При замене аккумулятора на аккумулятор иного типа возможно его возгорание. Утилизируйте аккумулятор в соответствии с инструкциями производителя. (Russian)
Notebook PC E-Manual89Optical Drive Safety InformationLaser Safety InformationWARNING! To prevent exposure to the optical drive’s laser, do not attempt to disassemble or repair the optical drive by yourself. For your safety, contact a professional technician for assistance.CD-ROM Drive Safety WarningCLASS 1 LASER PRODUCTService warning labelWARNING! INVISIBLE LASER RADIATION WHEN OPEN. DO NOT STARE INTO BEAM OR VIEW DIRECTLY WITH OPTICAL INSTRUMENTS.CDRH RegulationsThe Center for Devices and Radiological Health (CDRH) of the U.S. Food and Drug Administration implemented regulations for laser products on August 2, 1976. These regulations apply to laser products manufactured from August 1, 1976. Compliance is mandatory for products marketed in the United States.WARNING! Use of controls or adjustments or performance of procedures other than those specied herein or in the laser product installation guide may result in hazardous radiation exposure.Coating NoticeIMPORTANT! To provide electrical insulation and maintain electrical safety, a coating is applied to insulate the device except on the areas where the I/O ports are located.
90Notebook PC E-ManualCTR 21 Approval (for Notebook PC with built-in Modem)DanishDutchEnglishFinnishFrench
Notebook PC E-Manual91GermanGreekItalianPortugueseSpanishSwedish
92Notebook PC E-ManualENERGY STAR complied productENERGY STAR is a joint program of the U.S. Environmental Protection Agency and the U.S. Department of Energy helping us all save money and protect the environment through energy ecient products and practices.All ASUS products with the ENERGY STAR logo comply with the ENERGY STAR standard, and the power management feature is enabled by default. The monitor and computer are automatically set to sleep within 10 and 30 minutes of user inactivity. Users could wake your computer through click the mouse, press any key on the keyboard, or press the power button. Please visit http://www.energystar.gov/powermanagement for detail information on power management and its benets to the environment. In addition, please visit http://www.energystar.gov for detail information on the ENERGY STAR joint program.NOTE: Energy Star is NOT supported on FreeDOS and Linux-based products without power management.Global Environmental Regulation Compliance and DeclarationASUS follows the green design concept to design and manufacture our products, and makes sure that each stage of the product life cycle of ASUS product is in line with global environmental regulations. In addition, ASUS disclose the relevant information based on regulation requirements.Please refer to http://csr.asus.com/english/Compliance.htm for information disclosure based on regulation requirements ASUS is complied with:Japan JIS-C-0950 Material DeclarationsEU REACH SVHCKorea RoHS
Notebook PC E-Manual93For US and Canada customers, you can call 1-800-822-8837 (toll-free) for recycling information of your ASUS products’ rechargeable batteries.Rechargeable Battery Recycling Service in North AmericaASUS Recycling/Takeback ServicesASUS recycling and takeback programs come from our commitment to the highest standards for protecting our environment. We believe in providing solutions for you to be able to responsibly recycle our products, batteries, other components as well as the packaging materials. Please go to  http://csr.asus.com/english/Takeback.htm for detailed recycling information in dierent regions.Regional notice for CaliforniaWARNING! This product may contain chemicals known to the State of California to cause cancer, birth defects or other reproductive harm. Wash hands after handling.Regional notice for SingaporeThis ASUS product complies with IMDA Standards.Complies with IMDA StandardsDB103778
94Notebook PC E-ManualNotices for removable batteries• Riskofexplosionifbatteryisreplacedbyanincorrecttype.• Thebatteryanditscomponentmustberecycledordisposedofproperly.Avis concernant les batteries remplaçables• Labatteriedel’ordinateurportablepeutprésenterunrisqued’incendieoude brûlure si celle-ci est retirée ou désassemblée.• Labatterieetsescomposantsdoiventêtrerecyclésdefaçonappropriée.Regional notice for IndiaThis product complies with the “India E-waste (Management and Handling) Rule 2011” and prohibits use of lead, mercury, hexavalent chromium, polybrominated biphenyls (PBBs) and polybrominated diphenyl ethers (PBDEs) in concentrations exceeding 0.1% by weight in homogenous materials and 0.01% by weight in homogenous materials for cadmium, except for the exemptions listed in Schedule-II of the Rule.
Notebook PC E-Manual95AT BE BG CH CY CZ DE DKEE ES FI FR GB GR HU IEIT IS LI LT LU LV MT NLNO PL PT RO SE SI SK TRSimplied EU Declaration of ConformityASUSTek Computer Inc. hereby declares that this device is in compliance with the essential requirements and other relevant provisions of Directive 1999/5/EC. Full text of EU declaration of conformity is available at https://www.asus.com/support/.This device may be operated in the countries listed below:
96Notebook PC E-Manual

Navigation menu