Matsushima Measure Tech MWLM-PR26 Microwave Level Meter User Manual Rev 2
Matsushima Measure Tech Co., Ltd. Microwave Level Meter Users Manual Rev 2
Users Manual Rev 2
TMWLM-003E
Rev0:Jan.31,2012
Rev8:May.14.2013
M
ATSUSHIMA
Contents
Safety precautions ・・・・・・・・・・・・・・・・・・・・1
1.Overview・・・・・・・・・・・・・・・・・・・・・・・2
2.Measurement principle・・・・・・・・・・・・・・・・・2
3.Specifications ・・・・・・・・・・・・・・・・・・・・2
4.System configuration・・・・・・・・・・・・・・・・・・4
5.Dimensions・・・・・・・・・・・・・・・・・・・・・・5
6.Installation ・・・・・・・・・・・・・・・・・・・・・・8
7.Wiring・・・・・・・・・・・・・・・・・・・・・・・・11
8.LCD adjustment unit ・・・・・・・・・・・・・・・・・12
9.Start-up・・・・・・・・・・・・・・・・・・・・・・・12
10.Parameter setting ・・・・・・・・・・・・・・・・・・13
11.Troubleshooting ・・・・・・・・・・・・・・・・・・・20
12.Menu structure ・・・・・・・・・・・・・・・・・・・21
INSTRUCTION MANUAL FOR
MICROWAVE LEVEL METER
TYPE
MWLM-PR26
※An operator should read carefully this instruction manual and conduct
correct handing.
MACHINERY LABORATORY CO.,LTD.
1-8-18 Norimatsu-Higashi,Yahatanishi-ku,Kitakyushu 807-0837 Japan
Phone No.(8193)691-3731 Fax No.(8193)691-3735
E-mail: info@matusima.co.jp
MATSUSHIMA

1
Safety precautions
z Be sure to thoroughly read the instruction manual before using the products.
z Keep the instruction manual in a safe, convenient location for future reference.
z All or part of the contents described in this manual may be changed without any notice.
z Due to our constant striving for further improvement of products, parts or products that differ from those
described in this manual may be substituted.
WARNING (Failure to observe this WARNING may cause a fatal or serious injury.)
・Be sure to confirm that any peripheral equipment does not move before installation work.
In addition, observe safety requirements for installation work where high-place work is expected.
・Be sure to turn off the power source before wiring, mounting and transportation work.
(Failure to observe this WARNING may result in an electric shock/ injury or equipment damage due to
short-circuit.)
・Carry out wiring work correctly with reference to a proper drawing.
・Never disassemble the equipment.
(Failure to observe this WARNING may result in an electric shock.)
・Do not open the cover under an explosive environmental condition when power is entered.
(Failure to observe this WARNING may result in an injury or equipment damage.)
・Do not place or store the equipment in any hostile environmental place where it will be subjected to
direct sunlight, rain, water droplet, hazardous gas / water, etc..
!
CAUTION (Failure to observe this CAUTION may cause a moderate injury or equipment damage.)
・Do not use the equipment for any purpose other than the original purpose of use.
・Be sure to confirm the specification of equipment and use the equipment within the range of specification.
(Mounting conditions such as temperature, power source, frequency, etc.)
・Make sure a correct wiring before applying power source.
・Do not have a shock or strong impact to the equipment.
(Failure to observe this CAUTION may result in equipment damage.)
・Be sure to connect necessary terminals (grounding, etc.).
・Remove all wiring to the equipment before doing electrical welding work near the equipment.
・Do not forcedly bend or pull the lead wire also do not use unnecessarily long wire.
・Tighten the cover, lead outlet, etc. properly so that dust, rainwater, etc. do not enter inside the equipment.
・Do not use the equipment under a corrosive condition (NH3, SO2, CI2, etc.).
・Be sure to tighten the cable grand so that outer air does not enter inside the equipment.
・When applying piping connection such as conduit, etc. instead of cable gland, apply putty or equivalents
On the cable entry so that outer air does not enter inside the equipment.
IMPORTANT (indicates notes or information to help customers.)
Limitations of Warranty:
・Warranty period shall be one year from the date of delivery (ex-factory).
・Any damage of any other products that have occurred for use of the equipment is not covered by
this warranty. Also any loss induced by failure or malfunction of the equipment is not covered by
this warranty.
・Failure or malfunction caused by following are not covered by this warranty:
a. Modification or repair by a party other than MATSUSHIMA’s authorized personnel, or replacement of
parts not recommended by MATSUSHIMA.
b. Inadequate storage, installation, use, inspection or maintenance that does not comply with specifications.
c. Cause for any peripheral equipment or device.
d. Accident beyond control and force majeure (fire, earthquake, flood, riots, etc.).
Lack of instructions to MATSUSHIMA for information or safety requirements that can be predicted only by
customers’ side.
This warranty conditions do not limit customers’ legal right.
Price for the equipment does not include any charge for services such as commissioning, supervising, etc..
!
!
2
1. Overview
Microwave level meter measures level of bulk solids and liquids in the storage vessels without physical
contact to measuring material. This model of level meter doesn't need separate output unit, which 4..20mA
current output signal is carried by same two wires for power supply.
2. Measurement principle
The level meter transmits microwaves at constant intervals, and receives echoes (reflection of transmitted
waves) from the surface of material under measurement. The time difference between transmission and
reception of microwave is processed by microcomputer to accurately determine level of stored materials.
3. Specifications
3-1.General Specifications
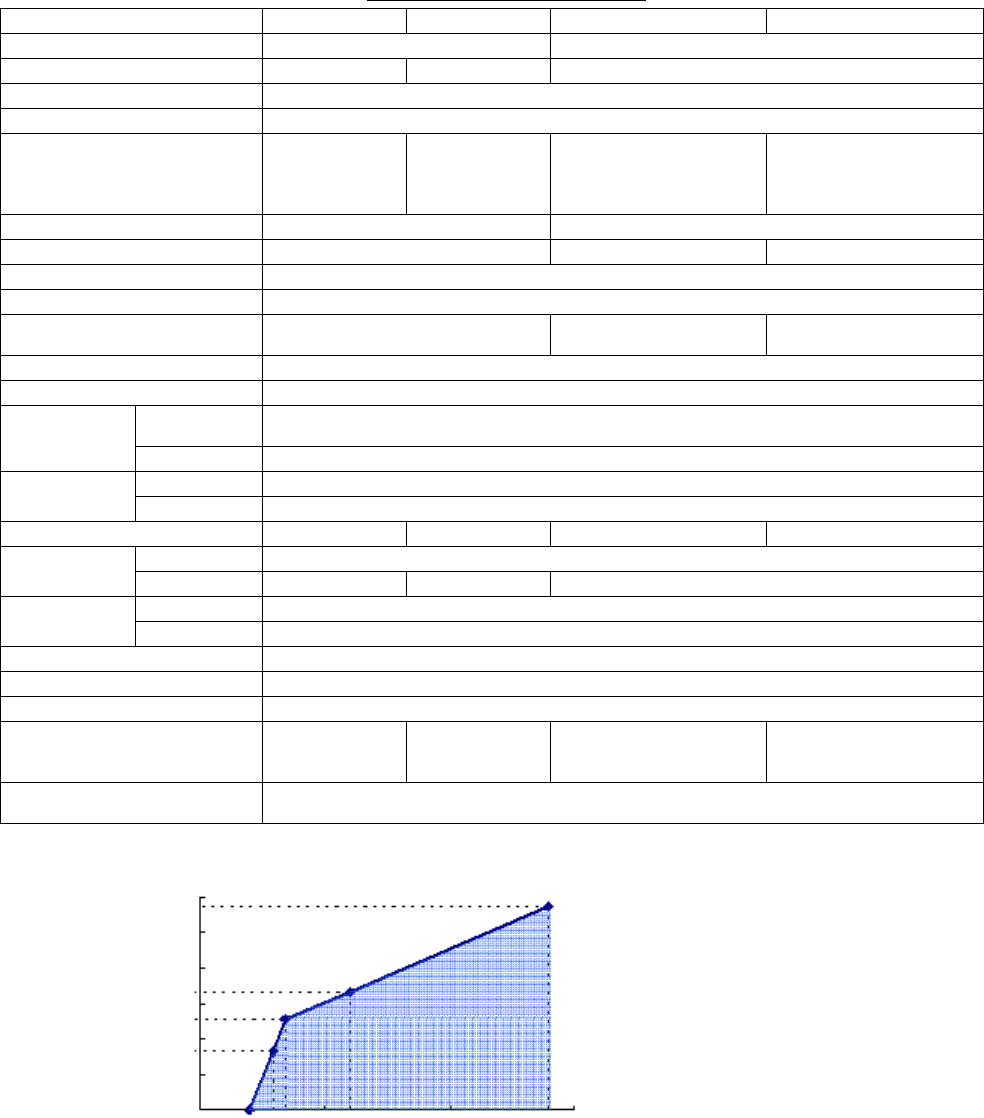
Table1. Standard specification
Model MWLM-PR26C1G MWLM-PR26H1G MWLM-PR26H3G / F / S MWLM-PR26H7G / F / S
Applications For liquid For powder
Antenna Corn Small horn Horn
Power Supply(※1) DC 20 to 32V
Power consumption Max. 704mW
Mounting(※2) G2 screws G1 screws
G:G1 1/2 screws
F:JIS5K65A flange
S : JIS10K100A swiveling
flange
G:G1 1/2 screws
F:JIS10K100A flange
S : JIS10K100A swiveling
flange
Dead Zone 0.5m below the antenna 0.3m below the antenna
Max Measurable Distance(※3) 10m 35m 70m
Transmitting frequency Approx. 26GHz
Transmitting cycle Every 83ms
Bean angle(-3dB) Approx. 24deg.
(Approx.48deg. side beam) Approx. 14deg.
(Approx.28deg. side beam) Approx. 8deg.
(Approx.16deg. side beam)
Resolution 1mm
Allowable Fluctuation Rate 10cm/s
Repeatability Within 2m or less:±30mm
Within 2m or more:±20mm or ±0.04% of measurement range (Whichever is greater)
Accuracy
(※3) Temp. error 0.06%/10K
Housing -40∼+60℃(With LCD:-20∼+60℃)(Note:1h warm-up operation required at -40℃)
Ambient Temp.
(※4) Antenna -40 to +150℃
Allowable pressure 500kPa 1MPa G:1Mpa,F:490kPa,S:10kPa G:1Mpa,F:250kPa,S:10kPa
Housing ADC
Material Antenna PTFE SUS304 SUS316L
Housing IP66 (Housing cover and lead outlet must be closed.)
Protection
(※5) Antenna IP67
Lead outlet 1-G1/2 (Applicable size:φ8∼12mm)
Output signal DC4 to 20mA×1 (Resistive load Max.499Ω)
Integral Time 0∼999s
Mass Approx. 1.9kg Approx. 1.6kg G:Approx. 2.3kg
F:Approx. 4.4kg
S:Approx. 5.6kg
G:Approx. 2.7kg
F:Approx. 5.3kg
S:Approx. 6.0kg
Accessories(option) LCD Adjustment unit (GRAPHIC COM2)、Data communication cable (HM-USB-ISO)
PC Adjustment software (MDTM)
※1) Power supply ripple voltage must be less than 0.2Vp-p.
Noise and surges should not be interfered. (Recommended)
Fig.1. Loop voltage versus loop resistance
900
18 20 20.9 24 32 33
Loop voltage (V)
Loop resistance(Ω)
863
499
381
250
0 21.4
3
※2) When mount on a short stand pipe, install the level meter so that the end of the antenna protrude
from the short stand pipe.
※3) The measurement range and accuracy are guaranteed only when, antenna is pointed at an angle
perpendicular to the material surface, temperature is normal (15℃),
permittivity is more than two at high pressure, and no any presence of airborne dust, vapor,
and agitated foam.
If these conditions are not satisfied, the measurement range and accuracy may differ according to
the measurement conditions.
※4) Ensure that freezing and/or condensing will not occur inside the electronic unit.
※5) Take care that water may enter and damage the equipment, if lead outlet not tighten firmly or loosen.
When the equipment operated in the presence of process gases and/or fluids, those materials may
penetrate through resin of cone antenna and damage the equipment,
specially corrosive gases such as H2S, HCl and HF.
3-2. Authentication
FCC and IC conformity (only for USA/Canada)
・This device complies with part 15 of the FCC Rules. Operation is subject to the following two
conditions: (1) This device may not cause harmful interference, and (2) this device must accept
any interference received, including interference that may cause undesired operation.
・Changes or modifications not expressly approved by the manufacturer could void the user’s
authority to operate the equipment
・This device complies with Industry Canada licence-exempt RSS standard(s).
Operation is subject to the following two conditions: (1) this device may not cause interference,
and (2) this device must accept any interference, including interference that may cause undesired
operation of the device.
FCC ID:PVK-MWLM-PR26
IC :10700A-MWLMPR26
・RF Exposure: A distance of 20 cm shall be maintained between the antenna, and the transmitter
may not be co-located with any other transmitter or antenna.
・This device shall be installed and operated in a completely enclosed container to prevent RF
emissions, which otherwise can interference with aeronautical navigation. Installation shall be done
by trained installers, in strict compliance with the manufacture’s instructions.
・This device shall be installed only by professionally training individuals inside closed containers
at permanent fixed positions, pointing in a downward direction.
・The use of this device is on a “no-interference, no protection” basis. That is, the user shall accept
operations of high-powered radar in the same frequency band which may interfere with or damage
this device. However, level probing devices found to interference with primary licensing operations
will be required to be removed at the user’s expense.
4
4. System configuration
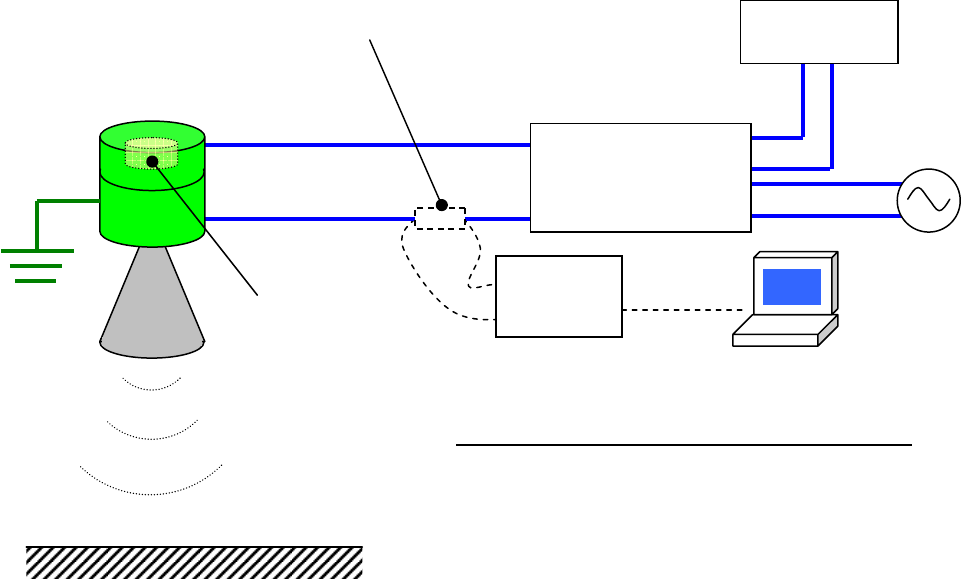
This device is two wired which 4..20mA current output signal and power supply are carried on the same two
wire cable.
・Power supply:Nominal DC 24V
・Output current signal:DC 4 to 20mA
・Load resistance:Max. 499 Ohm for 24V (total of load resistor 250 Ohm plus cable resistance).
For other configurations, please refer to graph shown in Fig.1.
・Cable size:0.3mm2 to 1.25 mm2 (AWG 22 to 16)
Ammeter
DC4 to 20mA
DC24V
Loop power
supply
AC power
+−
+
−
(D-class
grounding)
Fig. 2. System configuration example
HART
modem
Adjustment PC
※When communicating to HART network, loop resistor of
250 Ohm must be connected at power supply side
−
+
※LCD adjustment unit
(Optional)
Balanced type
shielded wire
※Optional products for adjustment of level meter
・LCD adjustment unit
・HART modem
・Software for the PC adjustment
Level meter
5
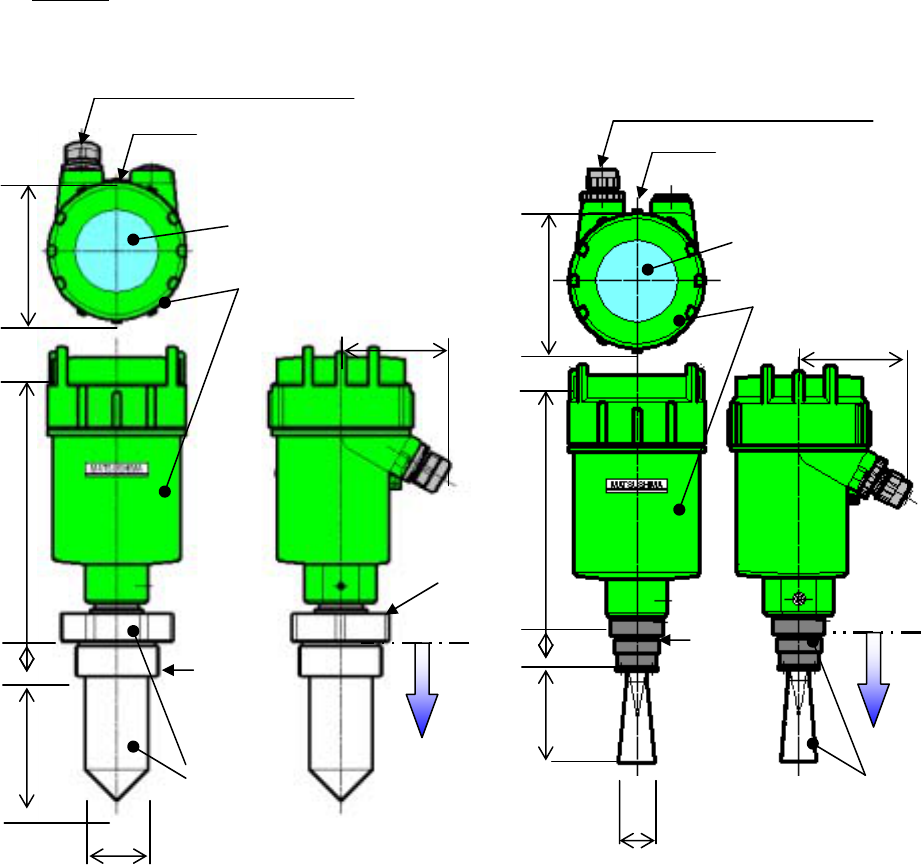
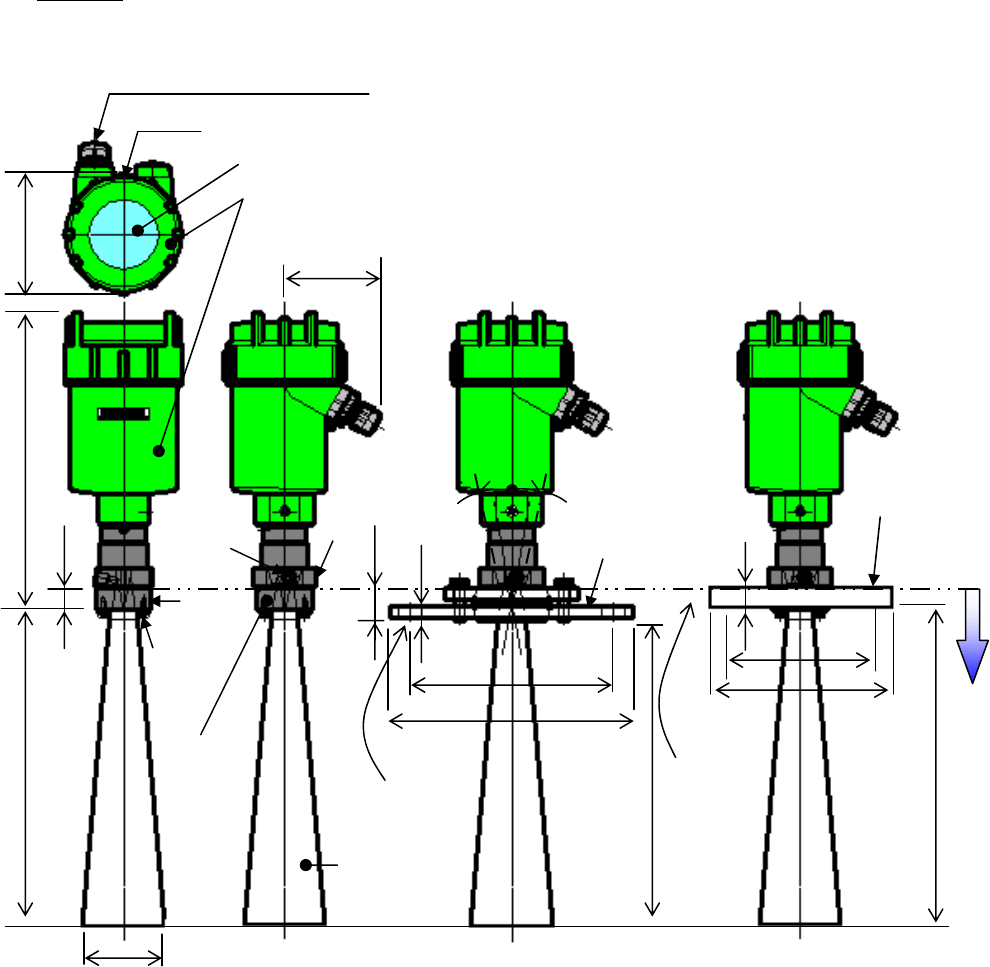
5. Dimensions (Units : mm)
※Refer to external dimensions for measurement reference point.
Basically upper part of mounting compartment is measurement reference point.
Fig. 3. External dimensions for liquid type
Housing/Cover: ADC
(φ104)
(82)
(213) 25 (90)
φ45
Transparent window: PC
Earth terminal(M4)
Lead outlet G1/2
Cable φ8∼12mm
G2
Boss/Antenna:
PTFE
●Li
q
uid
(φ104)
(82)
G1
Boss/Antenna:
SUS304
(199)
25
(70)
Measurement
reference point
φ24
Lead outlet G1/2
Cable φ8∼12mm
Earth terminal(M4)
Transparent window: PC
Housing/Cover: ADC Housing/Cover: ADC
Measurement
reference point
Hex-head
opposite side
70
6
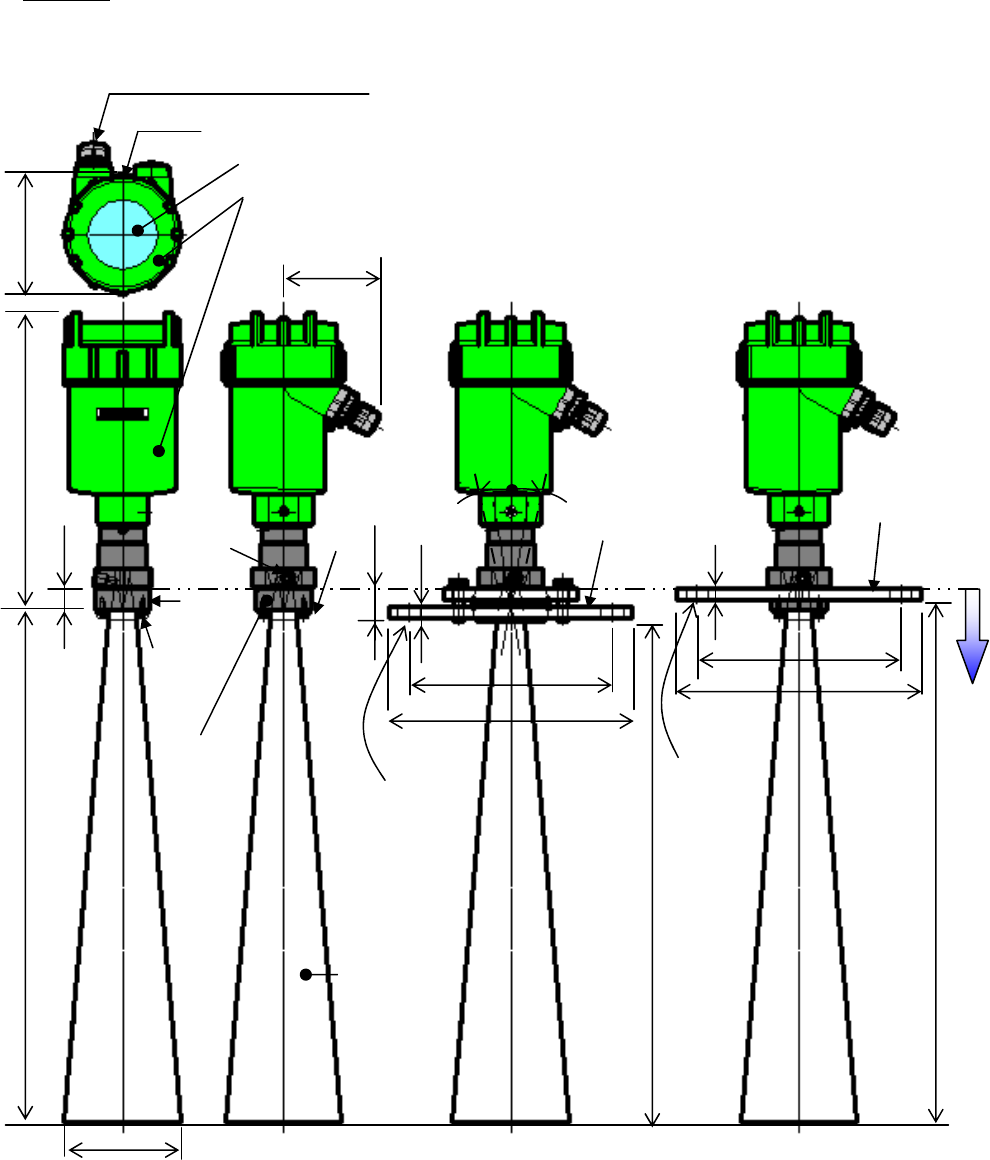
※Refer to external dimensions for measurement reference point.
Basically upper part of mounting compartment is measurement reference point.
20
(φ104)
(82)
(255)
220
(φ56)
G1 1
/
2
Purge hole
G1/8
Boss:
SUS304
Antenna:
SUS316L
●Solid-1
4-M4
Bolt
(28)
14
10
(192)
(204)
JIS10K100A
flange with
Swivelling
mechanism
SUS304
Max.10° JIS5K65A
SUS304
PCD175
φ210
PCD130
φ155
8-φ19
Mounting hole
4-φ15
Mounting
hole
Lead outlet G1/2
Cable φ8∼12mm
Earth terminal(M4)
Transparent window: PC
Housing/Cover: ADC
Measurement
reference point
Fig. 4-1. External dimensions for solid type
Hex-head
opposite side
50
7
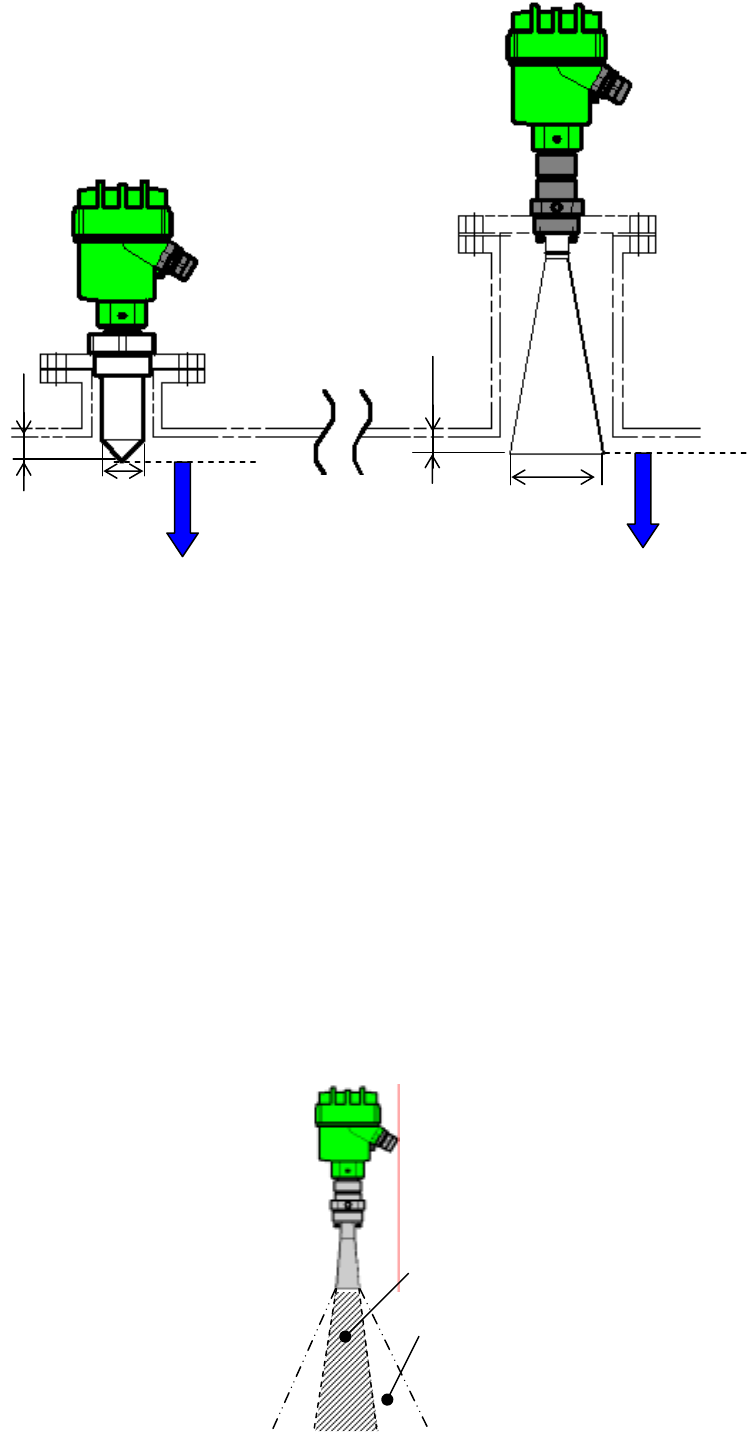
※Refer to external dimensions for measurement reference point.
Basically upper part of mounting compartment is measurement reference point.
20
(φ104)
(82)
(255)
441
(φ98)
G1 1
/
2
Purge hole
G1/8
Boss:
SUS304
Antenna:
SUS316L
●Solid-2
4-M4
Bolt
(28)
10
10
(433)
(449)
JIS10K100A flange
with Swivelling
mechanism
SUS304
Max.10° JIS10K100A
SUS304
PCD175
φ210
PCD175
φ210
8-φ19
Mounting hole
8-φ19
Mounting
hole
Lead outlet G1/2
Cable φ8∼12mm
Earth terminal(M4)
Transparent window: PC
Housing/Cover: ADC
Measurement
reference point
Fig. 4-2. External dimensions for solid type
Hex-head
opposite side
50
8
6. Installation
6-1. Installation
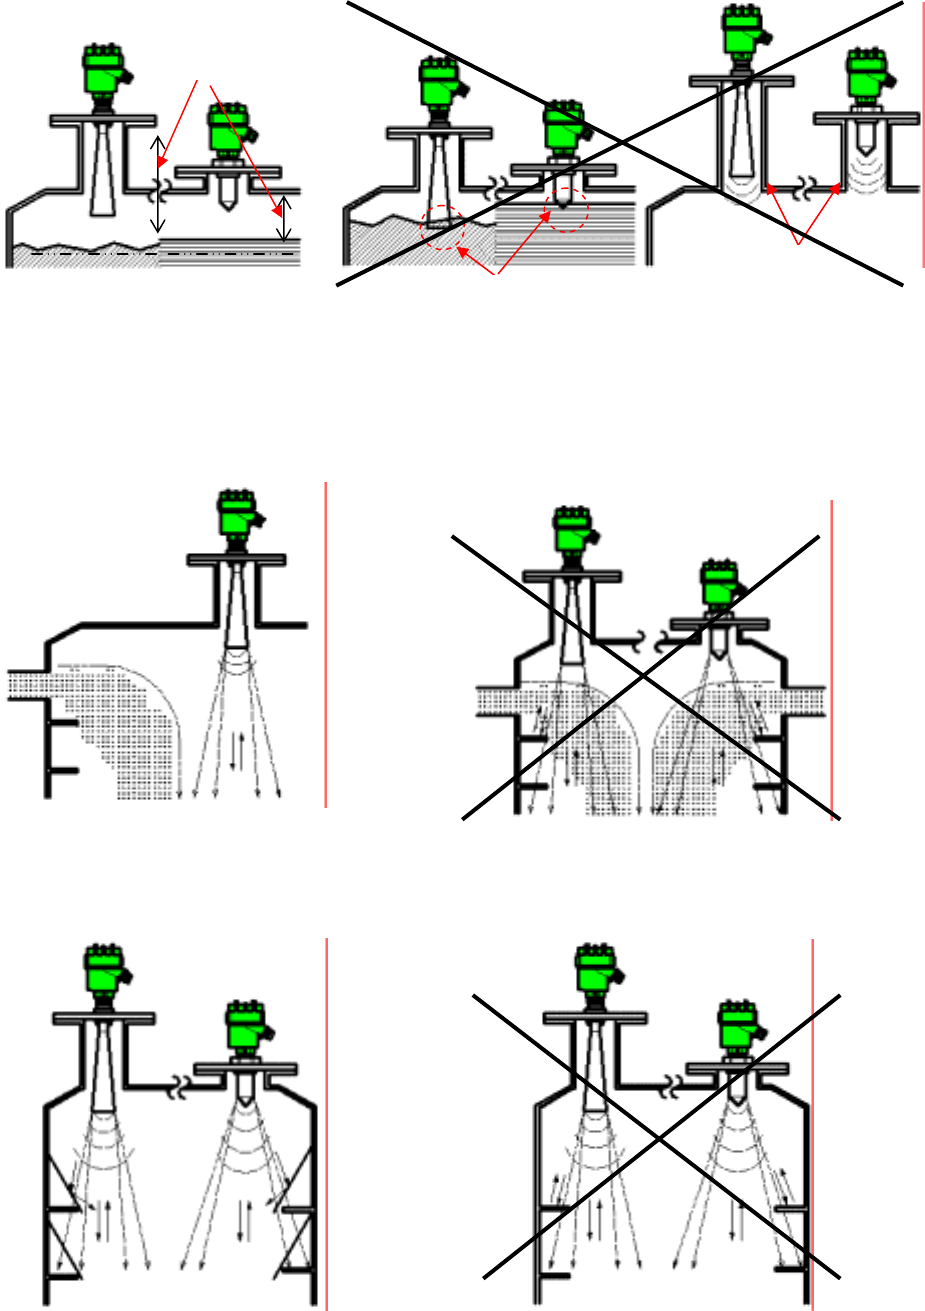
・ If material surface enter to the blind sector, a stand pipe shall be used to ensure that material surface
can not reach the blind sector of the level meter. But if the material surface will not enter the blind sector,
then stand pipe should not be used.
・ If length of stand pipe is longer than required, such that antenna end is not protruded from stand pipe,
then it causes malfunction of instrument.
・ When required stand pipe length is longer than antenna, please use cone shape stand and ensure
radiation angle including the side beam.
Keep radiation free of interference from the stand pipe.
【Recommended height of stand pipe】
Solid: The end of the horn antenna must be protruded a minimum of 10mm from the stand pipe.
Liquid: The end of the antenna must be protruded a minimum of 25mm from the stand pipe.
【Calculation of radiation angle expansion】
Solid :Distance from meas. reference point × tan16°+φ98 (Antenna diameter)
Solid :Distance from meas. reference point × tan28°+φ56 (Antenna diameter)
Liquid:Distance from meas. reference point × tan48°+φ45 (Antenna diameter)
Fig. 5. Installation for liquid and for solid
100%(Radiation angle)
50%(Side beam)
≧25
≧10
0.3m
φ
45
φ
98
Blind sector Blind sector
0.5m
9
6-2. Installation precautions
・ Set the value of 100%(20mA) level so that the blind sector is secured. Setting the 100%(20mA) level
within the blind sector will cause a malfunction of the instrument.
・ Avoid too long stand pipe to prevent malfunction of the instrument.
・ Do not install instrument close to inlet of material under measurement.
・ Do not install any interfering instruments within the side beam, because reflections from beams, pipes,
and other supports within the tank will cause false echoes.
・ Provide shielding to minimize noise or unwanted reflections, when crossbeams, and other supports
are installed within the tank.
Fig. 6. Radiation angle and side beam reference
Long stand pipe
Antenna burying
Blind secto
r
Fig. 7. Installation precaution (1)
Fig. 8. Installation precaution (2)
10
【False reflections】
In environments where interfering signals are generated, level meter may indicate incorrect
measurements results. False reflections up to a certain level of strength can be suppressed by
executing the echo learning function. However, the level meter's installed position must be changed if
true echoes cannot be received or if the reflection level (measured in dB) is extremely low. When there
are obstructions such as crossbeams, pipes, or level switches in the tank, install the level meter in a
position where there is no obstruction within its radiation angle.
Important:It is not possible to specify the range of false reflections in dB that can be
suppressed by the learning function because the level of true echo from the
surface of material differs depending on the level meter installation conditions and
measuring material type. The general guideline for the level of false reflections
that can be suppressed by the learning function is one third (1/3) of true echo
level.
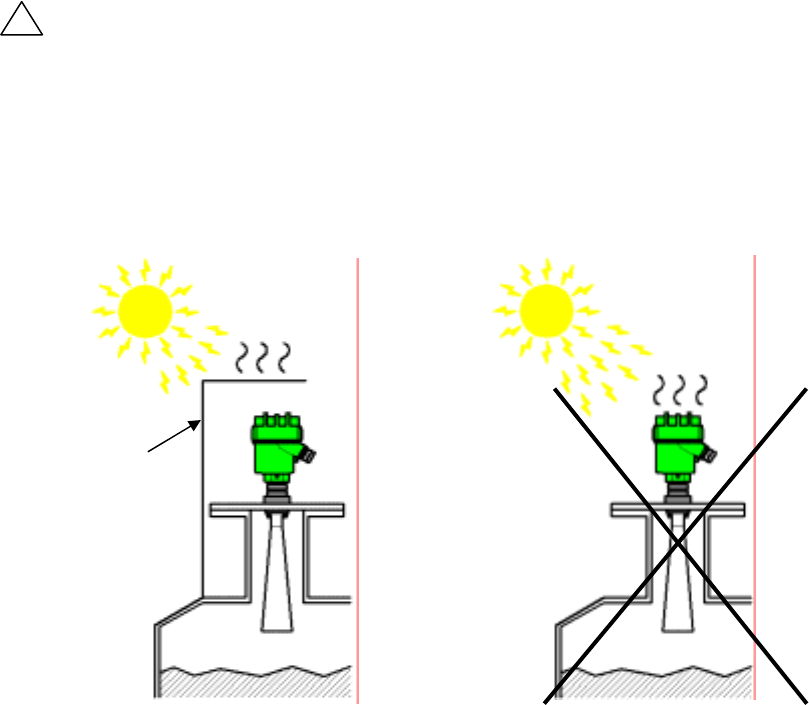
・Install protection such as a simple roof above the Level Meter to avoid exposure to direct sunlight.
Fig. 9. Installation precaution (3)
!
Simple cover
Fig. 10. Installation precaution (4)
11
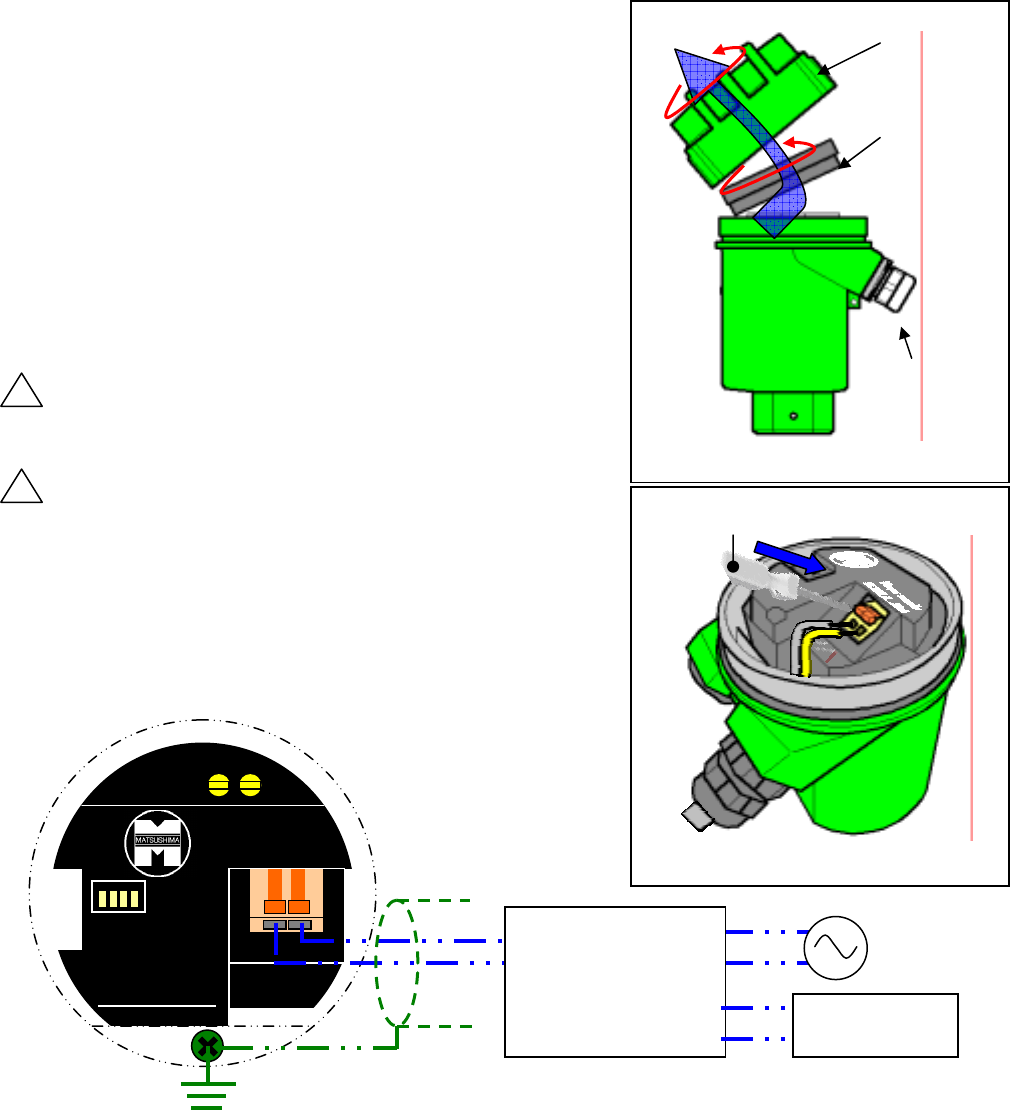
7. Wiring
7-1. Unscrew the cover. (Rotate counterclockwise)
7-2. If an optional LCD adj. unit is attached, remove it.
(Rotate counterclockwise or to direction “OPEN").
7-3. Open the wire entry of terminal block by pushing
on the actuating lever with flat screwdriver.
(Recommended flat screwdriver:
Axis diameterφ3mm and blade tip size 2.6mm)
7-4. Insert wires as shown on the panel, positive (+) to terminal
entry No.1 and negative (-) to terminal No.2.
Please wire so that there is no mistake.
Release actuating lever of the terminal.
7-5. Connect the ground wire to internal earth ground terminal.
7-6. Attach the LCD adj. unit if it had been installed.
7-7. Screw the cover on tightly.
Important:
The size of the acceptable cable is
max. 1.25mm2 (0.3mm2 to 1.25 mm2).
(AWG22 to 16)
Warning:
Do wiring when the instrument is powered OFF.
Avoid short circuit and reverse polarity.
The instrument must be supplied with
DC power supply, do not apply different voltage.
Tighten the cover and lead outlet firmly after
wiring completed.
!
!
Cover
LCD ad
j
. uni
t
Lead outlet
Fig. 11. Cover detaching
Fig. 12. Wiring technique
Flat screwdriver
LCD
HART I
/
F
Power supply
DC24V , 4..20mA
MWLM-PR26
1 2
+ - +
Fig. 13. Connection example
※Left figure shows that LCD Adj. unit removed.
※Do not touch to the LCD Adj. unit connection
terminal, while instrument is powered on.
−
DC24V
Current Loop
supply
AC Power
(D-class grounding)M4
Ammeter
DC4∼20mA
12
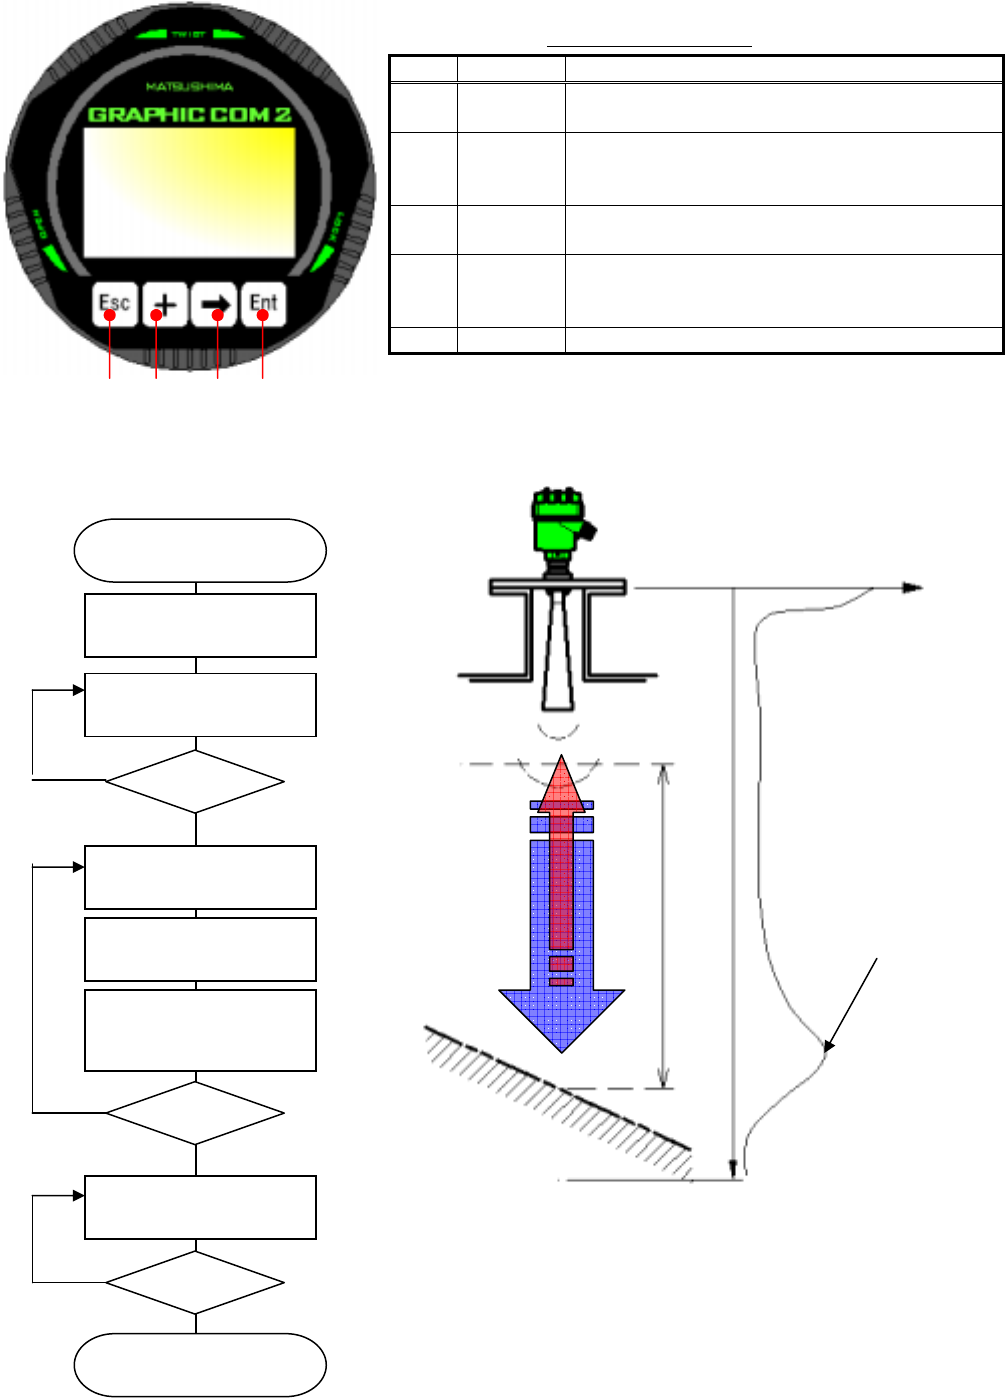
8. LCD adjustment unit (GRAPHIC COM II) Optional
Table 2. Key functions
9. Start - up
No. Key Function
1. Esc - Interrupt entry (cancel)
- Returns to previous screen
2. +
- Moves cursor
- Change value
- Change Y axis (reflection) of waveform
3. → - Moves cursor to the left
- Change X axis (distance) of waveform
4. Ent
- Enters to menu
- Accepts value
- Shifts to next screen
5. Display Displays parameters and waveforms
①
②
③
④
Fig. 14. LCD adjustment unit
Level meter
installation
Wiring
Wiring
confirmation
Power supply
turning on
Error code output
Distance display
confirmation
Adjsutment with LCD
Adj. unit or PC
Ready to start
level measurement
OK?
OK?
OK?
Y
N
Y
N
Y
70m
0m Reflection (dB)
100%(20mA)
0%(4mA)
Reflection echo
Fig. 16. Measurement range
※ "LCD adj. unit" ,"Software for PC adjustment" and
"HART modem" are optional products.
※ For the error code details, please refer to “Instruction manual for
LCD adjustment unit” and “Operating manual for adjustment
software Matsushima DTM”.
Power supply
confirmation
N
⑤
13
Fig.15. Start - up
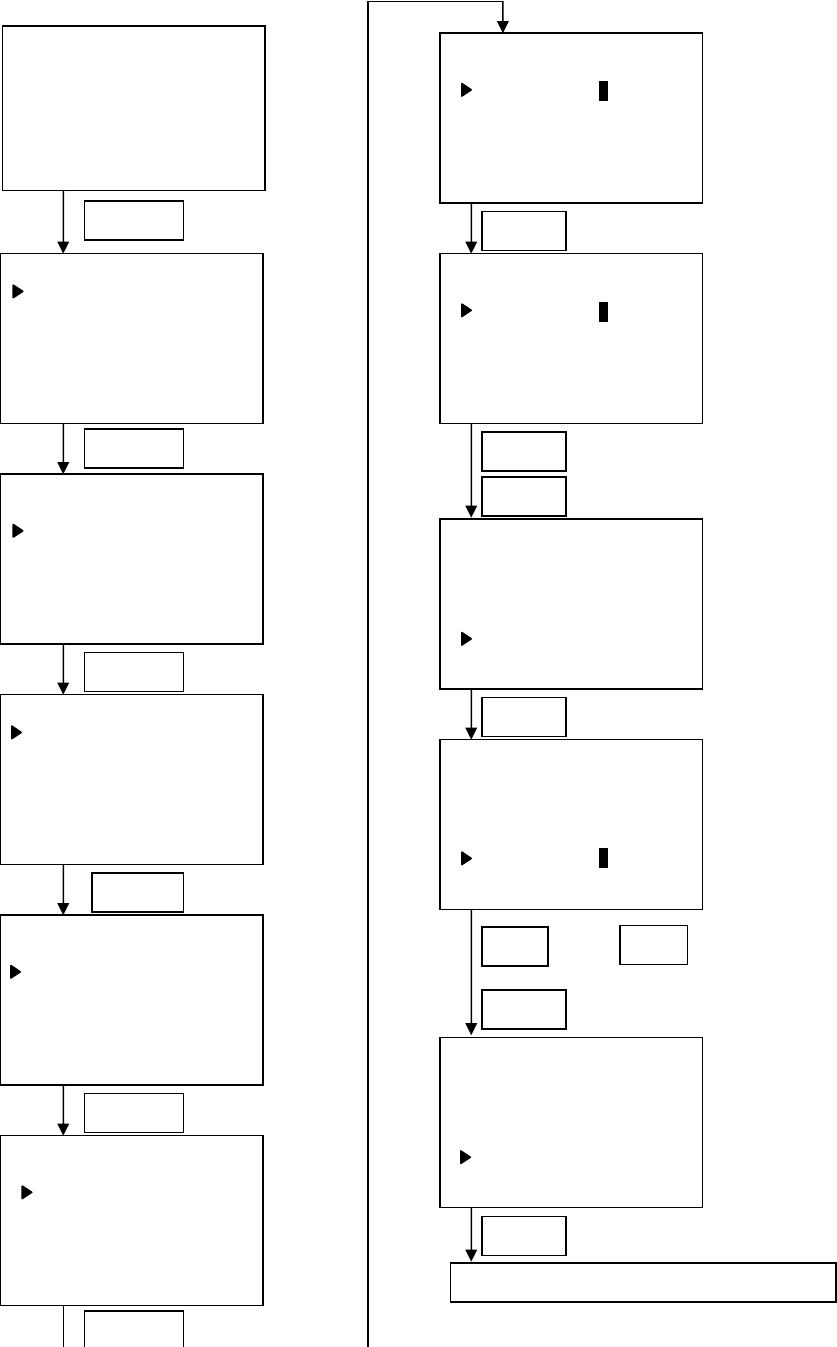
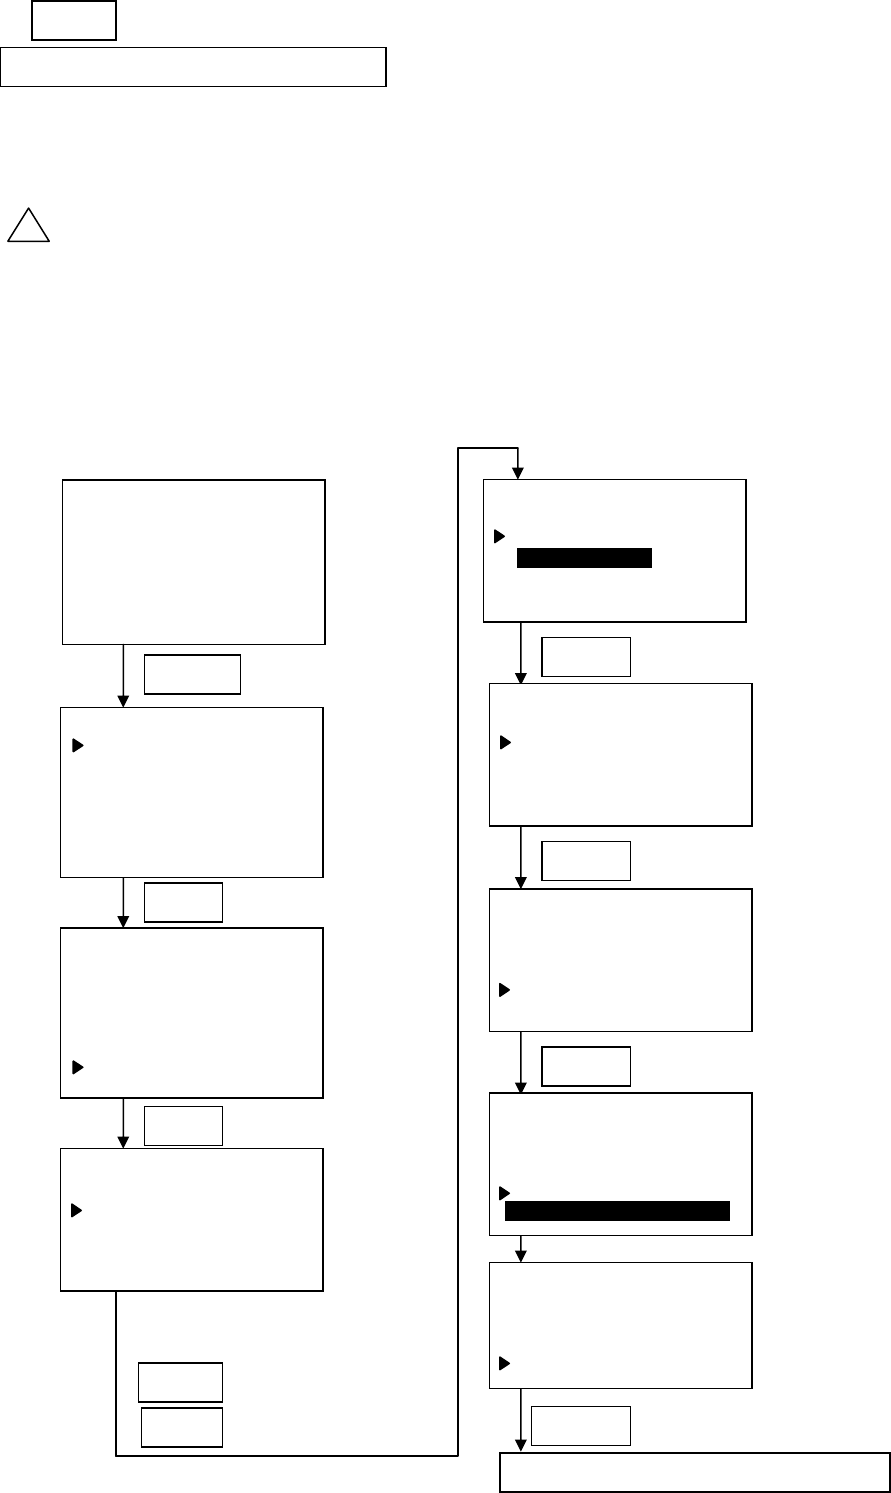
10. Parameter setting
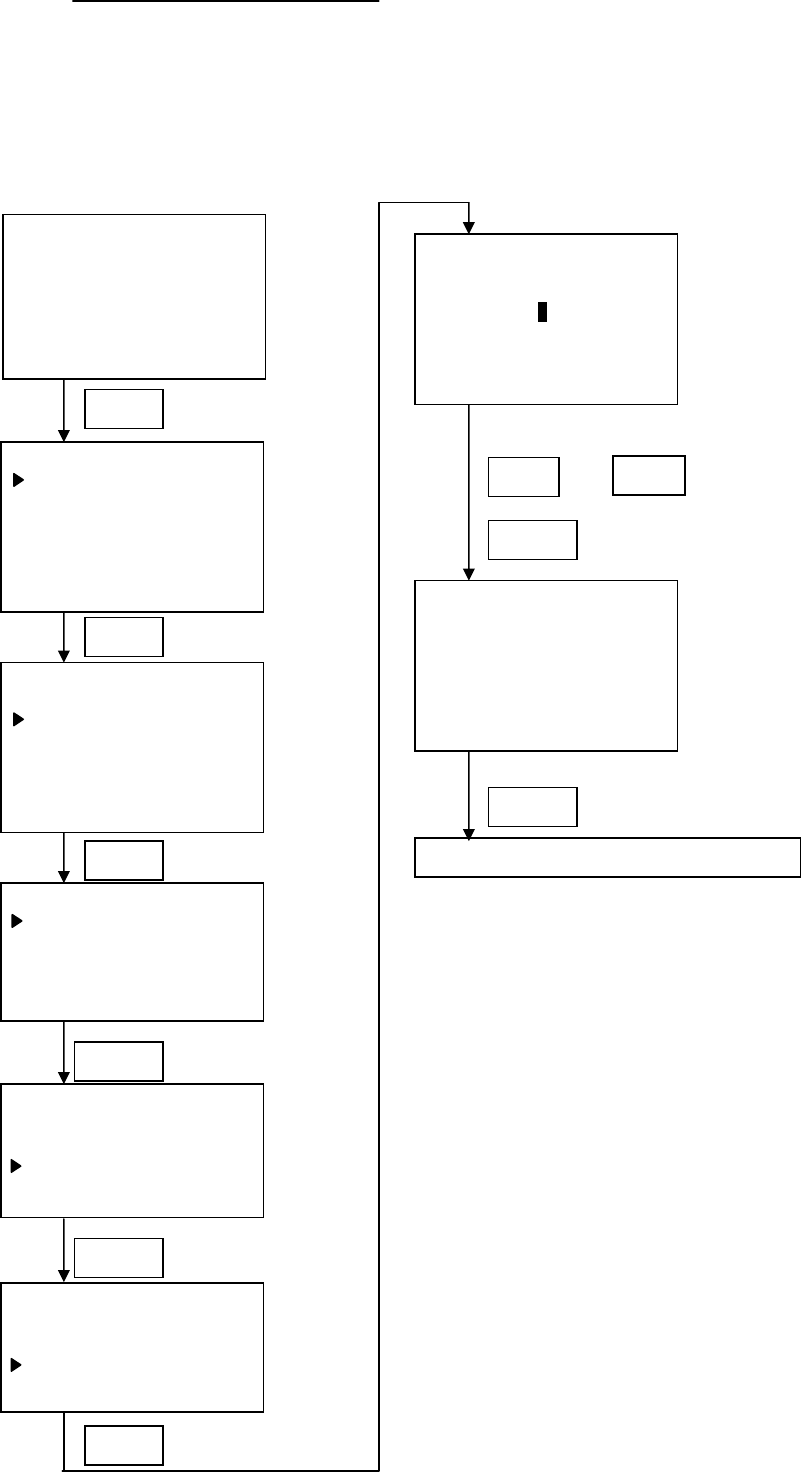
10.1 Measurement span
Sets measurement span corresponding to the process level of 100% and 0%.
Distance: Distance from level meter measuring reference point to material surface
12.345m
Distance APS
Menu 0
1.Identification setting
2.Basic setting
3.Sensor adjustment
4.Graph display
5.Self test
6.Reset
▼
【Measurement screen】
Ent ×1
Menu 0
1.Identification setting
2.Basic setting
3.Sensor adjustment
4.Graph display
5.Self test
6.Reset
▼
+×1
Ent ×1
Basic setting 2
1.Application
2.Meas.range span
3.Damping
▼
Measurement range span 2.2
1.Full setting
Distance =1.000m
Percent =100.00%
2.Empty setting
Distance =70.000m
Percent =0.00%
▼
Measurement range span 2.2
1.Full setting
Distance =2.000m
Percent =100.00%
2.Empty setting
Distance =70.000m
Percent =0.00%
▼
Measurement range span 2.2
1.Full setting
Distance =2.000m
Percent =100.00%
2.Empty setting
Distance =70.000m
Percent =0.00%
▼
Measurement range span 2.2
1.Full setting
Distance =1.000m
Percent =100.00%
2.Empty setting
Distance =70.000m
Percent =0.00%
▼
1.000m is changed to
2.000m as an example.
Measurement range span 2.2
1.Full setting
Distance =2.000m
Percent =100.00%
2.Empty setting
Distance =70.000m
Percent =0.00%
▼
+ ×1
Basic setting 2
1.Application
2.Meas.range span
3.Damping
▼
Ent ×1
Ent
+×1
+×2
Ent ×1
Measurement range span 2.2
1.Full setting
Distance =2.000m
Percent =100.00%
2.Empty setting
Distance =6.000m
Percent =0.00%
▼
Ent ×1
Ent ×1
+× Several time
→
and
Setting of the measuring
span has been
completed.
Please return to the
measurement screen.
Measurement screen (Omitted)
Esc ×>3
70.000m is changed to
6.000m as an example.
14
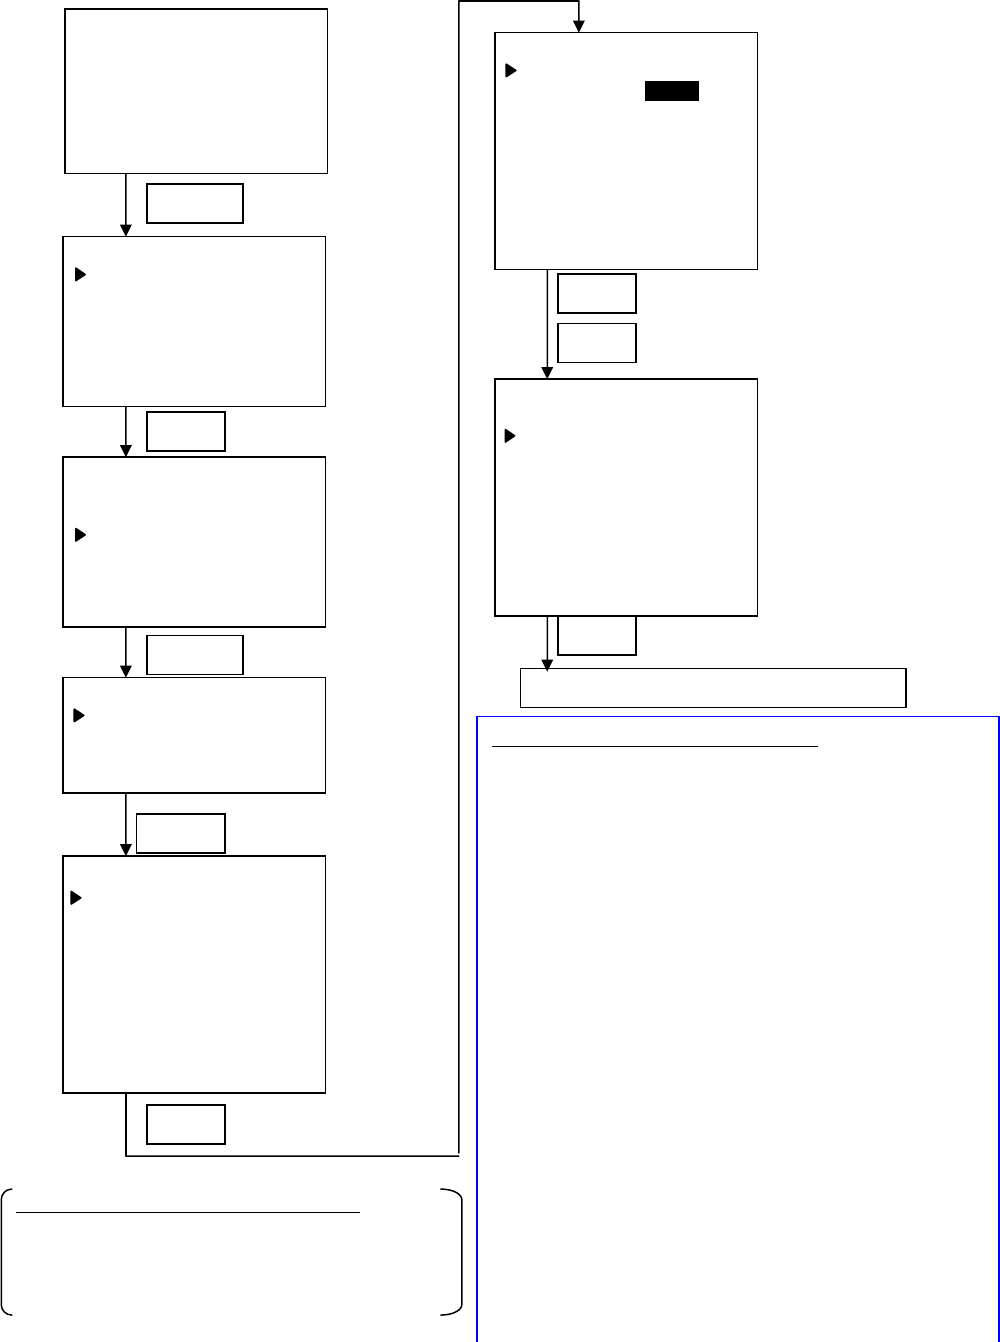
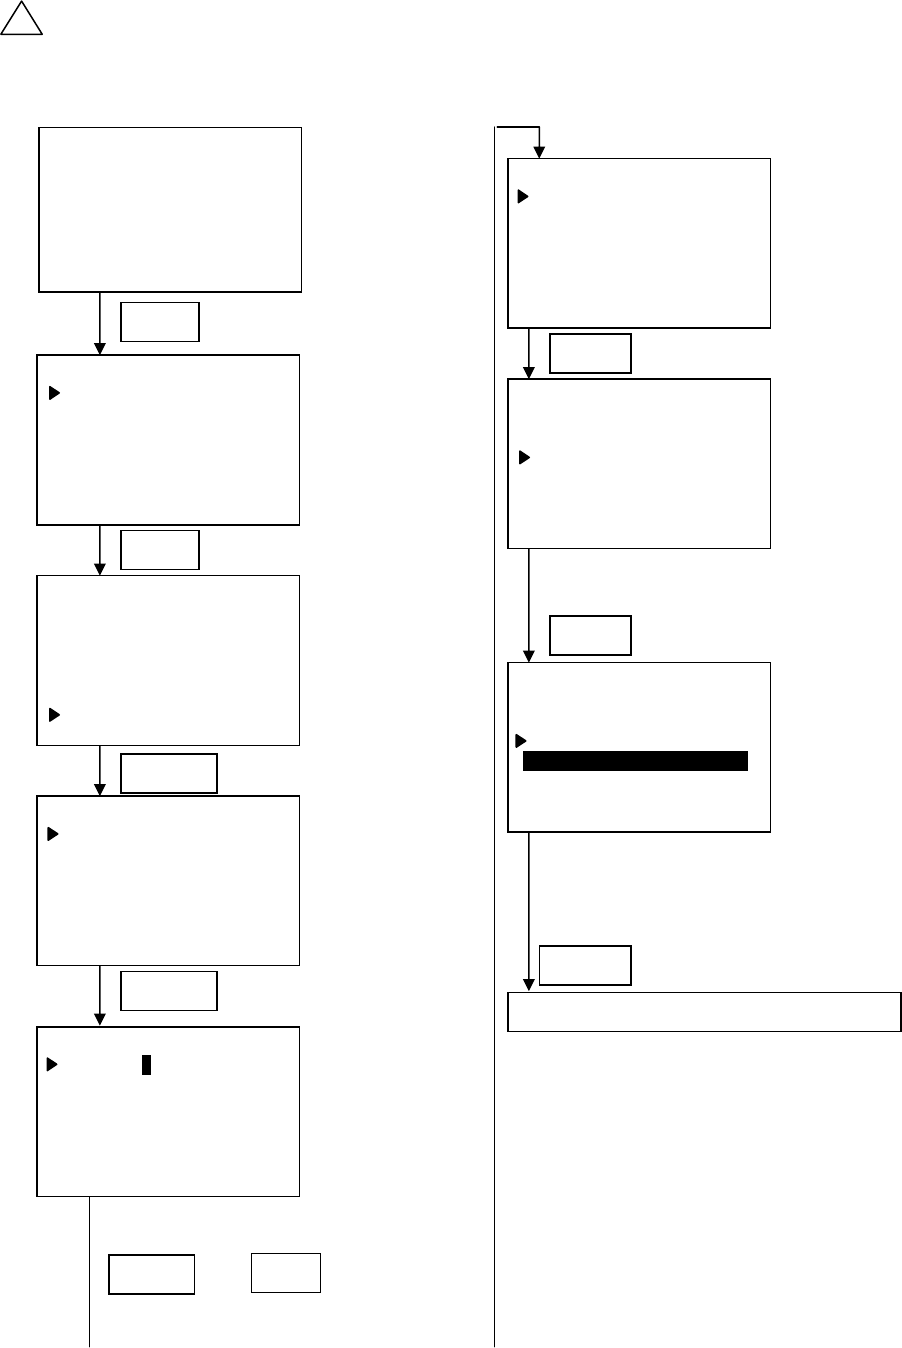
10-2. Damping
Sets time constant for the damping filter. The damping filter smooth the response to a sudden change in
process level. This time can be set between 0 and 999 seconds.
Keep in mind that the reaction time of the entire measurement will be longer and the sensor will react to
measured value changes with a delay)
×1
12.345m
Distance APS
Menu 0
1.Identification setting
2.Basic setting
3.Sensor adjustment
4.Graph display
5.Self test
6.Reset
▼
【Measurement screen】
Ent ×1
Menu 0
1.Identification setting
2.Basic setting
3.Sensor adjustment
4.Graph display
5.Self test
6.Reset
▼
+ ×1
Ent ×1
Basic setting 2
1.Application
2.Meas.range span
3.Damping
+ ×2
Basic setting 2
1.Application
2.Meas.range span
3.Damping
Damping 2.3
= 0sec
Ent ×1
Ent ×1
Damping 2.3
=000sec
Damping 2.3
= 30sec
Ent ×1
+× Several time
→
and
Esc ×>3
Measurement screen (Omitted)
30sec is changed to
0sec as an example.
Setting of the damping has
been completed.
Please return to the
measurement screen.
15
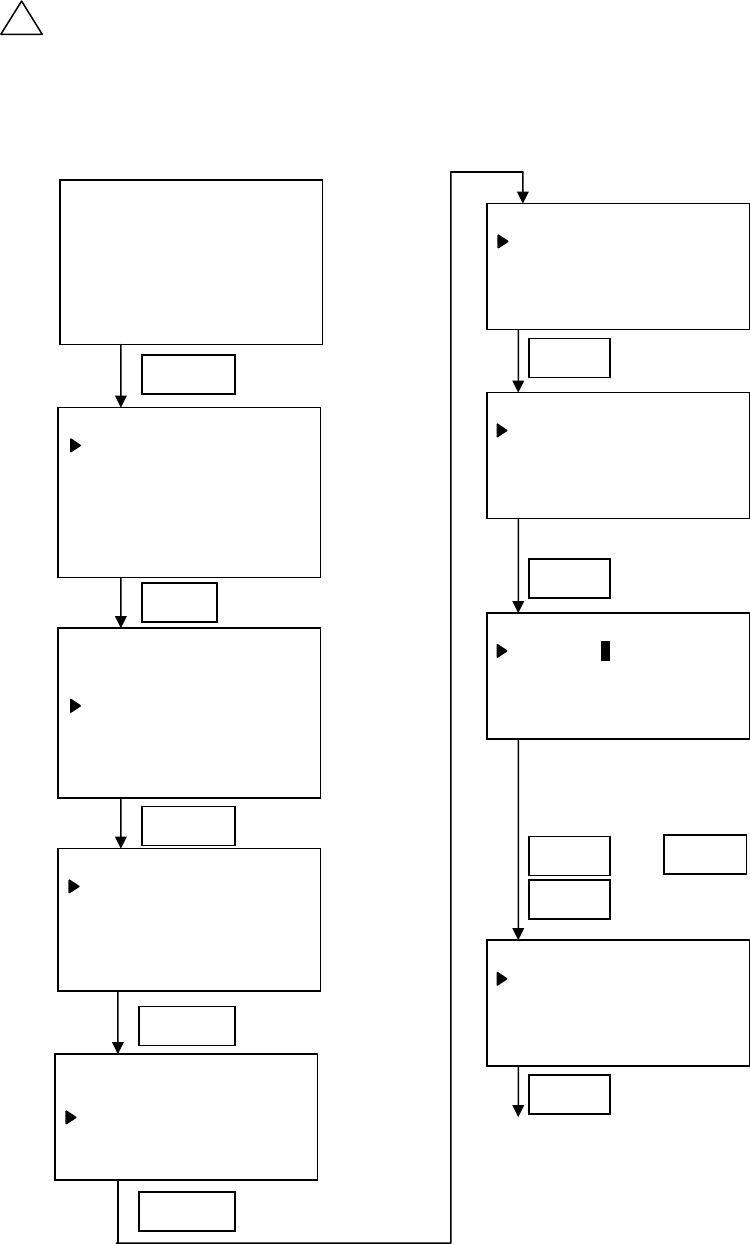
10-3. Current output
Selects the 4..20mA current output mode corresponding to the process level 0-100% and alarm current
value.
12.345m
Distance APS
Menu 0
1.Identification setting
2.Basic setting
3.Sensor adjustment
4.Graph display
5.Self test
6.Reset
▼
【Measurement screen】
Ent ×1
Menu 0
1.Identification setting
2.Basic setting
3.Sensor adjustment
4.Graph display
5.Self test
6.Reset
▼
+ ×2
Ent ×1
Sensor adjustment 3
1.Current output set
2.Meas. adjustment
Ent ×1
Current output set 3.1
1.Current output sel
=4-20mA
2.Alarm output sel
=Hold
3.Max current sel
=20mA
4.Min current sel
=4mA
5.Sel.alarm current val.
=22mA
Ent ×1
Current output set 3.1
1.Current output sel
=4-20mA
2.Alarm output sel
=Hold
3.Max current sel
=20mA
4.Min current sel
=4mA
5.Sel.alarm current val.
=22mA
’20-4mA’ is changed to
‘4-20mA’as an example.
Current output set 3.1
1.Current output sel
=20-4mA
2.Alarm output sel
=Hold
3.Max current sel
=20mA
4.Min current sel
=4mA
5.Sel.alarm current val.
=22mA
+×1
Ent ×1
Esc ×>3
【Current output set other settings】
・"2.Alarm output sel". Selects alarm current value to
output whenever measured value is not correct due to
loss echo or other erroneous condition.
Possible selection: Hold / Sel.val / Max. / Min.
Hold → Output remains at previous measured result.
Sel.val → Value set by "5.Sel.alarm current val"
is output.
Max. → Value set by "3.Max.current sel" is output.
Min. → Value set by "4.Min.current sel" is output.
・"3.Max.current sel". Selects current value to output
when "Max." is selected by "2.Alarm output sel".
Possible selection: 20mA / 20.5mA / 22mA
・"4.Min.current sel ". Selects current value to output
when "Min." is selected by "2.Alarm output sel".
Possible selection: 4mA / 3.6mA / 3.8mA
・"5.Sel.alarm current val". Sets current value to output
when "Sel.val" is selected by "2.Alarm output sel".
Setting range: 3.6mA to 22.0mA
Meaning of “Current output sel” item
『4-20mA』=100%Level(Upper level) : 20mA
0%Level(Lower level) : 4mA
『20-4mA』=100%Level(Upper level) : 4mA
0%Level(Lower level) : 20mA
Measurement screen (Omitted)
Setting of the current
output set has been
completed.
Please return to the
measurement screen.
16
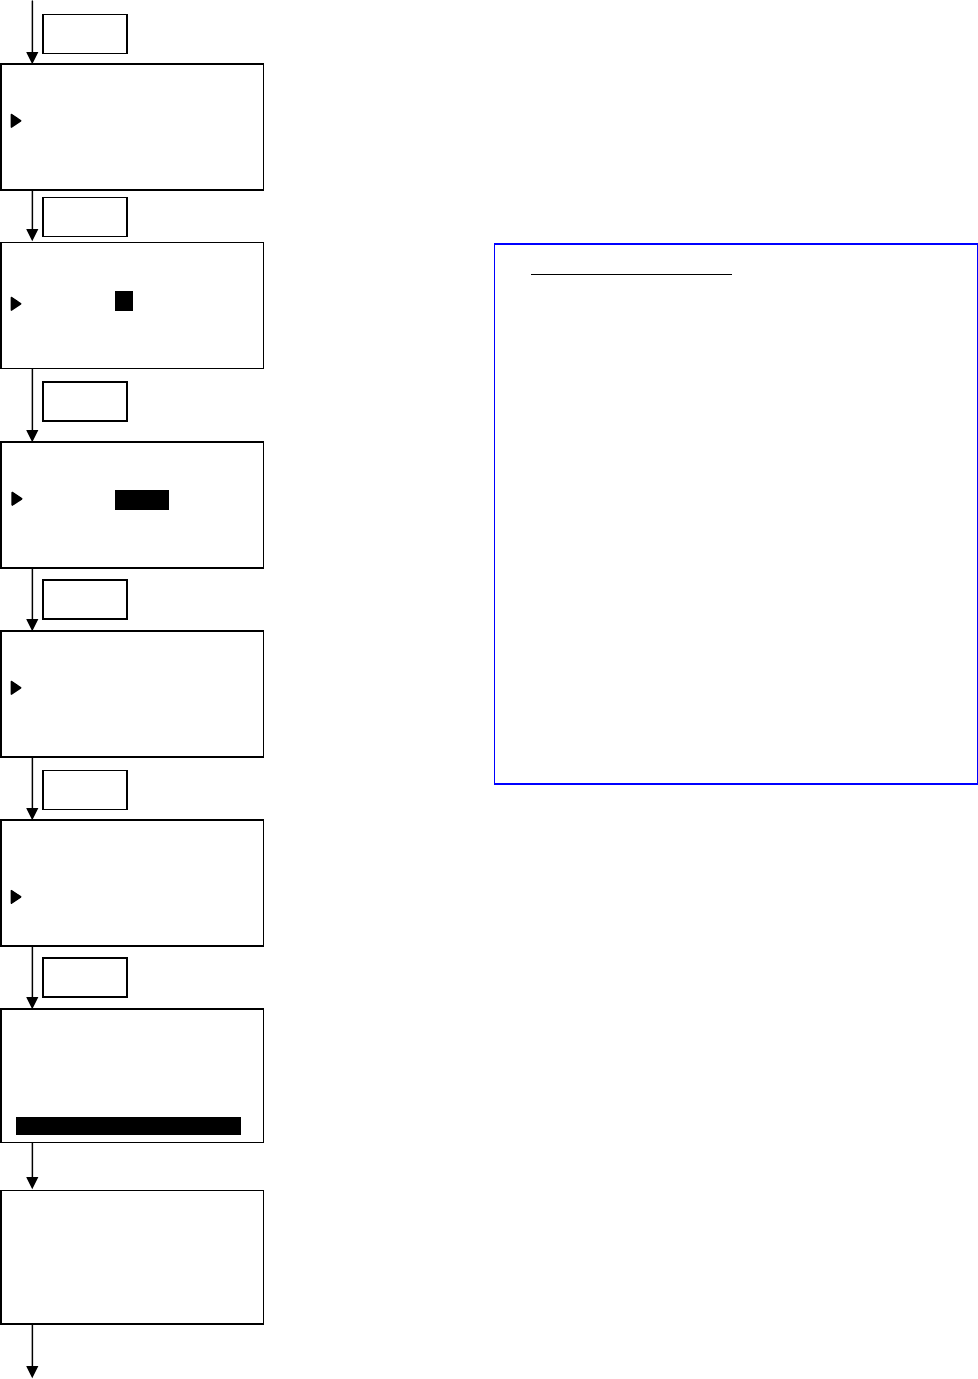
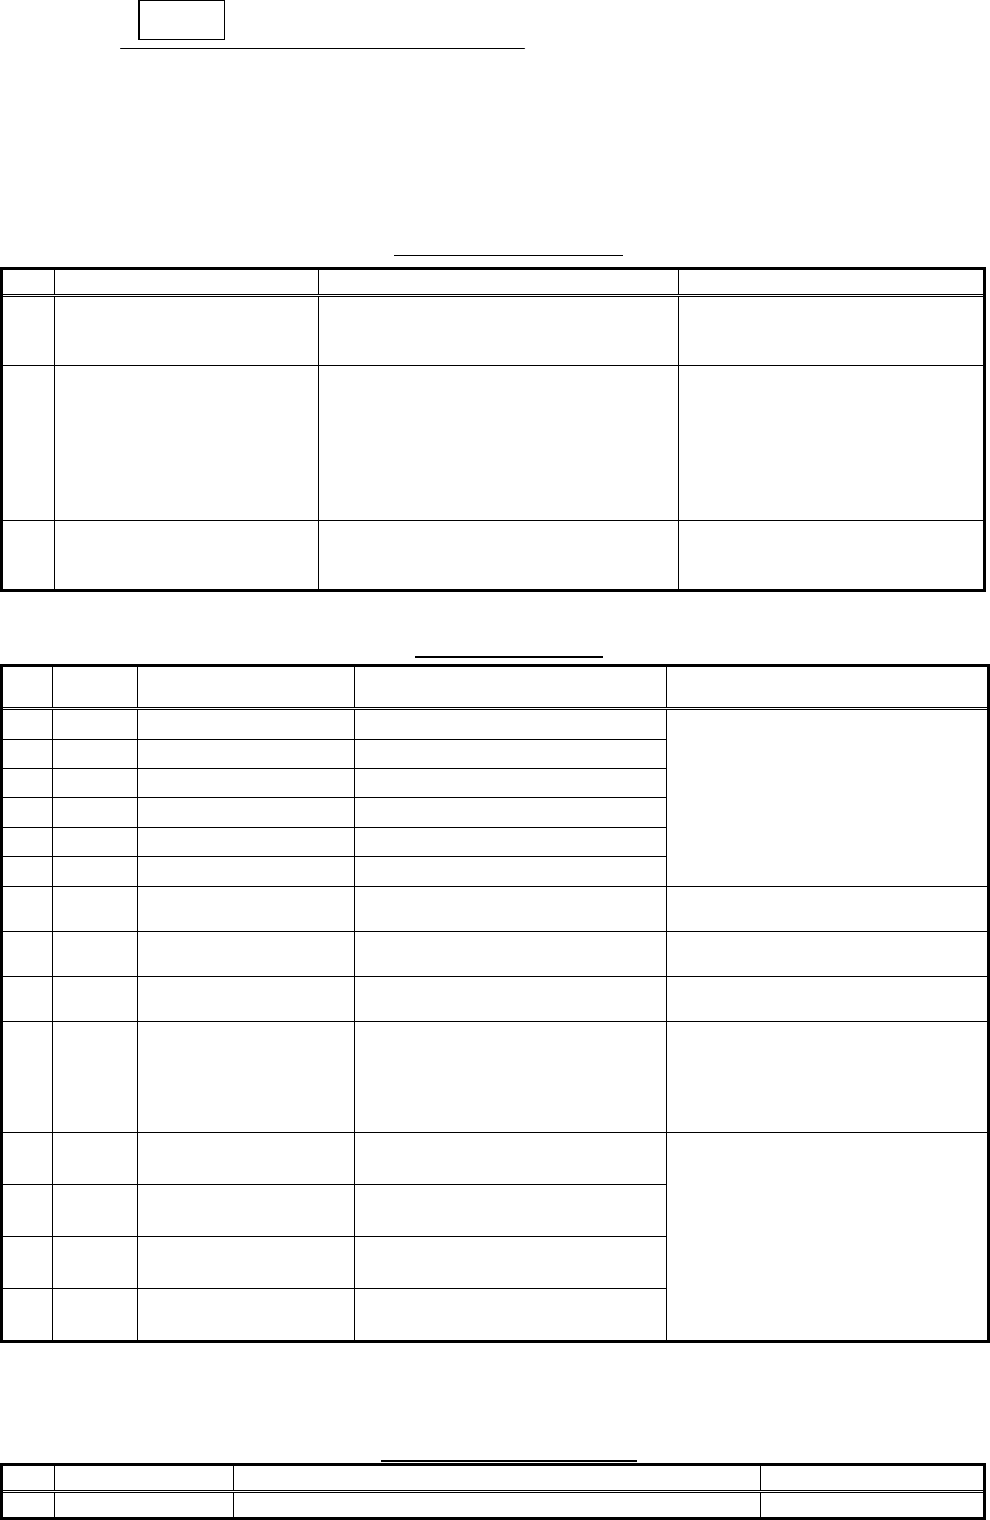
10-4. Echo learning of false echo
Sets mask to unwanted reflections (false echoes or noise echoes) being received from obstructions
within a tank.
Important:In most cases sets distance from level meter to unwanted reflections as echo
learning distance. If there is true echo between the level meter and the masking distance,
then echo learning distance shall be set as distance to true echo. Actual distance to mask
will be around 1m less than the entered value.
!
12.345m
Distance APS
Menu 0
1.Identification setting
2.Basic setting
3.Sensor adjustment
4.Graph display
5.Self test
6.Reset
▼
【Measurement screen】
Ent ×1
Menu 0
1.Identification setting
2.Basic setting
3.Sensor adjustment
4.Graph display
5.Self test
6.Reset
▼
+ ×2
Ent ×1
Sensor adjustment 3
1.Current output set
2.Meas. adjustment
Sensor adjustment 3
1.Current output set
2.Meas. adjustment
+×1
Ent ×1
Meas. adjustment 3.2
1.Echo learning
2.TW Adjustment
Echo learning 3.2.1
Distance = 0.00m
Execution=−
OK
Ent ×1
Echo learning 3.2.1
Distance =_0.00m
Execution=−
OK
Ent ×1
’2.00m’ is changed to
‘0.00m’ as an example.
Ent ×1
+× Several time
→
and
Echo learning 3.2.1
Distance = 2.00m
Execution=−
OK
Continue on next page.
+×1
17
Echo learning 3.2.1
Distance = 2.00m
Execution=−
OK
+ ×1
Echo learning 3.2.1
Distance = 2.00m
Execution=−
OK
It changes from the
display of "−" to the
display of "Update".
Ent ×1
+ ×2
Echo learning 3.2.1
Distance = 2.00m
Execution=Update
OK
'Ent' The button is
pushed, and "Update"
is selected.
Echo learning 3.2.1
Distance = 2.00m
Execution=Update
OK
Ent ×1
Continued from previous page.
+ ×1
Echo learning 3.2.1
Distance = 2.00m
Execution=Update
OK
Ent ×1
Echo learning 3.2.1
Distance = 2.00m
Execution=Update
OK
Echo learnin
g
When echo learning
ends, the message
"Echo learning" at lower
screen will be cleared.
Echo learning 3.2.1
Distance = 2.00m
Execution=Update
OK
Setting of the echo learning
was completed.
Please return to the
measurement screen.
・"Selectable execution
【Clear/Update/Addition】
Clear :Deletes all echo learning data.
Update :Deletes current echo learning data
and writes new data.
Addition :Addition of echo learning data
The data that had been input in the
past is not deleted and new data is
added.
18
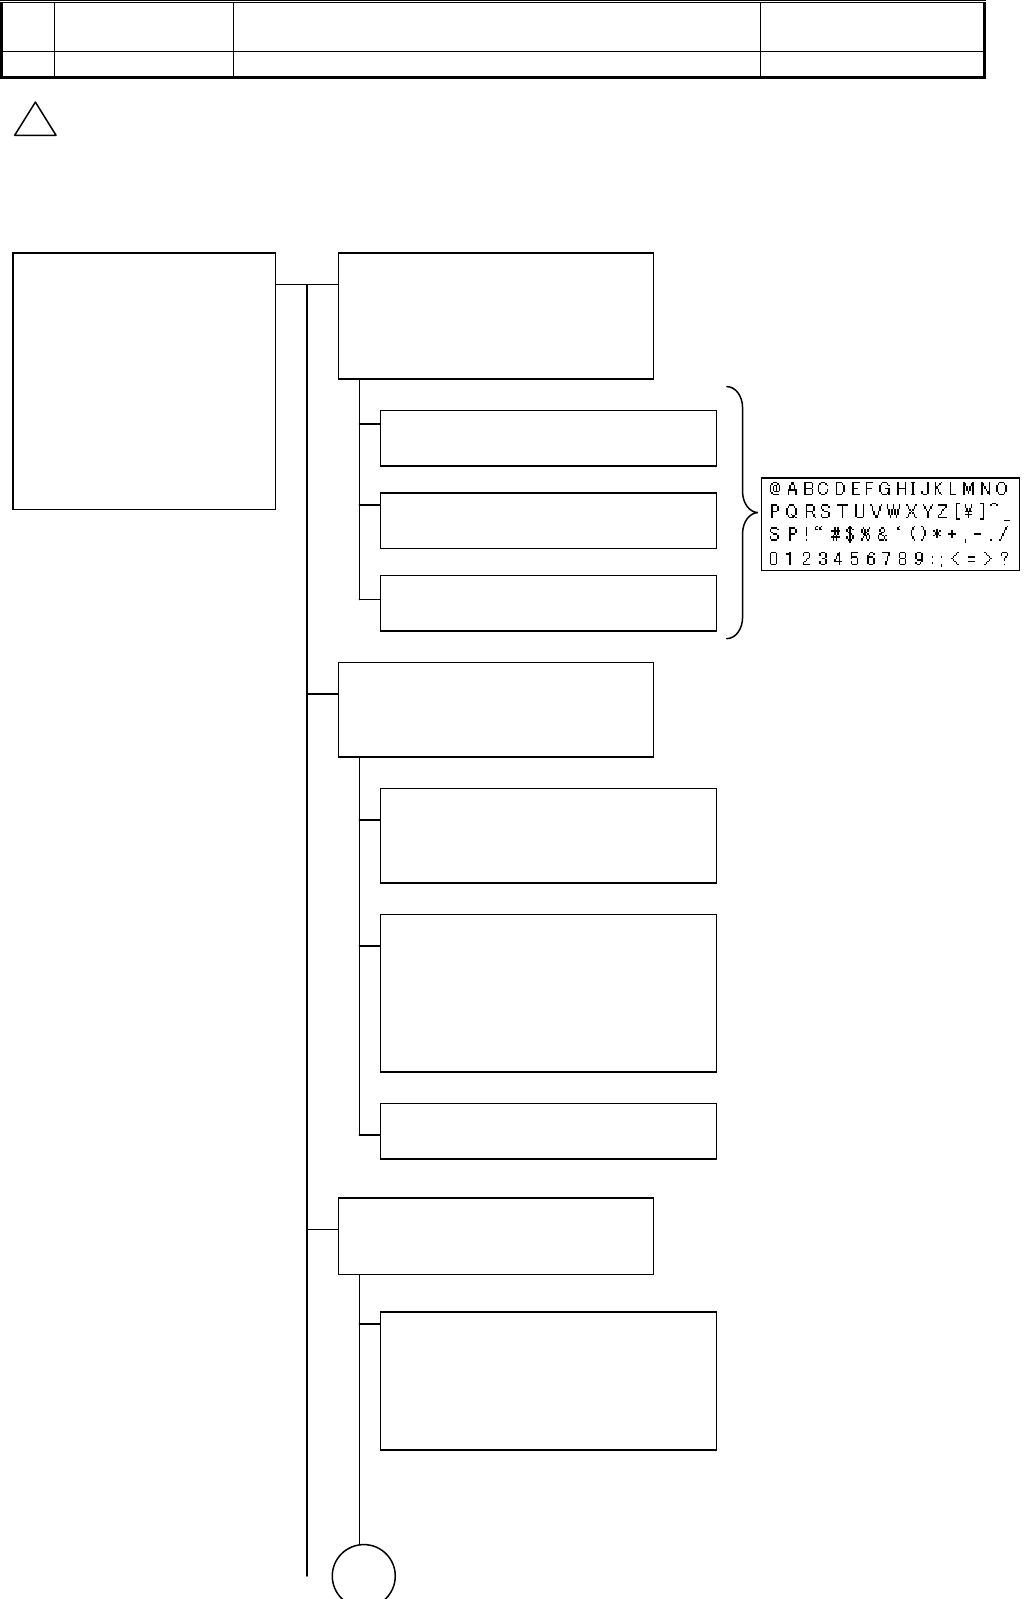
10-5. Reset
There are two reset options. Use "Measuring reset" to restart measurement without affecting
parameters. Use "Parameter reset" to reset parameters to the default settings.
Important:"Parameter reset"
・ Parameter reset returns various parameters to instrument default. Please take note of
current settings before execute parameter reset.
・ It is possible to clear echo learning range and strength by using the optional PC software,
but echo learning setting described in article 10-4 does not clear even when reset is
executed.
・ There are two reset types described above, but there is menu item "Factory reset" might
be displayed. This reset type used at factory setting and user can not apply this reset.
Measurement screen (Omitted)
Esc × >3
!
12.345m
Distance
APS
Menu 0
1.Identification setting
2.Basic setting
3.Sensor adjustment
4.Graph display
5.Self test
6.Reset
▼
【Measurement screen】
Ent ×1
Menu 0
1.Identification setting
2.Basic setting
3.Sensor adjustment
4.Graph display
5.Self test
6.Reset
▼
+ ×5
Ent ×1
Reset 6
Reset selection
Execution
=−
OK
+ ×2
Reset 6
Reset selection
Execution
=Parameter reset
OK
Ent ×1
Ent ×1
’Parameter reset’ is
changed to ‘−’as an
example.
Reset 6
Reset selection
Execution
=Parameter reset
OK
+×1
Reset 6
Reset selection
Execution
=Parameter reset
OK
Ent ×1
Reset 6
Reset selection
Execution
=Parameter reset
OK
__During communication___
When reset completed,
“Communication" display
will be cleared.
Reset 6
Reset selection
Execution
=Parameter reset
OK
Click Esc three times to
return to measurement
screen.
Measurement screen (Omitted)
Esc ×>3
19
10-6. Current output test
Allows you to input simulation value in order to test the functioning of the current output.
Important:When you are ready to end the simulation, click on 'Esc' to return the instrument
to the actual level measurement.
!
12.345m
Distance APS
Menu 0
1.Identification setting
2.Basic setting
3.Sensor adjustment
4.Graph display
5.Self test
6.Reset
▼
【Measurement screen】
Ent ×1
Menu 0
2.Basic setting
3.Sensor adjustment
4.Graph display
5.Self test
6.Reset
7.Current output test
▼
+ ×6
Ent ×1
Current output test 7
Percent =100.00%
Current = 20.000mA
OK
Output = %
Current = mA
×1
Ent ×1
Current output test 7
Percent =100.00%
Current = 20.000mA
OK
Output = %
Current = mA 50% is output
as an example.
Current output test 7
Percent = 50.00%
Current = 12.000mA
OK
Output = %
Current = mA
+ × Several-time
→
and
+×2
Current output test 7
Percent = 50.00%
Current = 12.000mA
OK
Output = %
Current = mA
Ent ×1
Current output test 7
Percent = 50.00%
Current = 12.000mA
OK
_________Testing_________
Output = 50.00%
Current = 12.000mA
The message “Testing”
blinks during simulation.
Click ”Esc” to interrupt
simulation.
Measurement screen (Omitted)
Esc ×>3
20
※In this manual, only setup steps of the typical parameters have been described.
Please refer to "Instruction manual for LCD adjustment unit" and "Operating manual for
adjustment software Matsushima DTM" for other settings.
11.Troubleshooting
If you encounter any problems, first check if they are described in this section, then execute suggested
corrective actions.
Table 3. Troubleshooting
Table 4. Error codes
No. Error
code Error type Description Corrective actions
1 E8000 SRAM Error SRAM failure
2 E4000 EEPROM Error EEPROM failure
3 E2000 MIC Error MIC unit failure
4 E1000 Trig Error Trigger signal lost
5 E0800 LCD Error LCD adj. unit failure
6 E0400 Charge Error Charge circuit failure
Turn off device power and turn on
again
7 E0200 I2C Checksum error Communication between level meter
and LCD adj. unit failed
Ensure LCD adj. unit attached
properly
8 S.CPU Level meter not
responding No response from level meter Turn off device power and turn on
again
9 S.I2C I2C Checksum error Communication between level meter
and LCD adj. unit failed
Ensure LCD adj. unit attached
properly
10 E0080 Lost echo
・Reflection echo is currently being
detected
・There is no reflection echo
・There is no reflection echo in the
measurement span
・Check whether there are adhesives
in the horn antenna. If there is
adhesives, clean the horn antenna
・Optimize measurement span
11 E0008 Min. meas. limit over Measured distance is lower than
"Min. meas. limit"
12 E0004 Max. meas. limit over Measured distance is higher than
"Max. meas. limit".
13 E0002 Upper range limit over
(100% over)
Measured distance exceeds "Upper
range limit over (100% over)".
14 E0001 Lower range limit over
(0% over)
Measured distance undergoes
"Lower range limit over (0% over)".
Check setting for Min. and Max.meas.
limit over, and Upper and Lower
range limit over. If you set invalid then
error message must be clear.
Please note that those settings can
be altered by optional PC software
only. You can not change by LCD adj.
unit
※Error message No.11 to 14 will be displayed, only when appropriate settings are set to "Valid" by PC
adjustment software Matsushima DTM. The default settings are "Invalid".
If problem persists, please contact your local Matsushima sales office.
Table 5. Periodic inspection
No. Item Descriptions Interval (standard)
1 Check of ・Confirm whether there is damage on housing etc. Every 12 months
No. Problem Check the following Corrective actions
1 Powered ON the device, but
screen is blank
・Are wiring connections correct ?
・Check whether the power is supplied to
the device?
・Correct the wiring
・Supply power to the device
2 Measured level reading higher
than material level
・Are there any obstructions between
antenna and material surface to be
measured ?
・Are there any inlet streams of material
under measurement within the
radiation angle
・Execute echo learning to mask
false echo from the obstacle
・Change the level meter position
3 Measured level reading lower
than material level
・Check whether the material surface
entered to the blind sector ?
・Change level meter installation
Ent
21
appearance ・Tighten the cover and lead outlet
・Tighten the bolt for installation fixture
2 Check of antenna ・Clean the antenna (Solid: Inside,Liquid: Outside) Every 6 to 12 months
Important: Standard periodic inspection interval differs depending on measurement
condition and measuring material.
12.Menu structure
All values shown here are parameter defaults.
!
Menu 0
1.Identification setting
2.Basic setting
3.Sensor adjustment
4.Graph display
5.Self test
6.Reset
7.Current output test
8.HART communication
9.Sensor information
10.Display
11.Service
Identification setting 1
1.Tag=SENSOR
2.Description=PULSE-RADAR
3.Message=LEVEL METER
4.Installation Day=2011/01/01
1.1 Tag change
SENSOR
1.2 Description change
PULSE-RADAR
1.3 Message change
LEVEL METER
Basic setting 2
1.Application
2.Meas.range span
3.Damping
2.1 Application
1.Meas.unit=m
2.Measuring object=Liquid
3.Level change rate=Normal<1m/min
2.2 Meas. range span
1.Full setting
Distance =0m
Percent =100%
2.Empty setting
Distance =70m
Percent =0%
【Input range】
2.3 Damping
0s
Main menu
【Setting range】
Meas. Unit=m/ft
Measuring object=Liquid/Solid
Level change rate
=Normal<1m/min
Fast>1m/min
【Setting range】
Full setting
Distance=0∼70.000m
Percent =0∼100.00%
Empty setting
Distance=0∼70.000m
Percent =0∼100.00%
【Setting range】
0∼999s
Sensor adjustment 3
1.Current output set
2.Meas.adjustment
3.1 Current output set
1.Current output sel =4-20mA
2.Alarm current sel =Hold
3.Max.Current sel =20mA
4.Min.Current sel =4mA
5.Sel.alarm current val=22mA
【Setting range】
Current output sel.
=4-20mA/20-4mA
Alarm current sel.
=Hold/Sel..val/Max/Min
Max. current sel.
=20mA,20.5mA,22mA
Min. current sel.
=4mA,3.6mA,3.8mA
Sel. Alarm current val.
=3.6mA∼22.0mA
22
A
A B
3.2 Meas. adj.
1.Echo learning
2.TW adjustment
【Setting range】
Distance=0∼70.000m
3.2.1 Echo learning
Distance = 0.000m
3.2.2 TW adjustment
Distance = 0.000m 【Setting range】
Distance=0∼70.000m
Graph display 4
1.Echo curve(EC)
2.Echo detection curve +EC+TW
Screen of echo curve
Screen of EDC+EC+TW
Self test 5
OK
Diagnosis result
Reset 6
Reset selection
=Measuring reset
【Reset】
Measuring reset
Parameter reset
Factory reset
Current output test 7
1.Percent = 100%
2.Current = 20.000mA
【Output range】
Percent =0.00∼100.00%
Current =3.600∼22.000mA
HART communication 8
1.Polling address = 0
2.Preamble number = 5
【Setting range】
Polling address =0∼63(Basis:0)
Preamble number =5∼20(Basis:5)
Sensor information 9
Manufacturer = Matsushima
Device type = MWLM-PR26
Serial number = 0
Firmware version = 1.00
Order number = 0
Factory adj.date = 2010/5/26
【It is not possible to set it.】
Display 10
1.Display setting = Distance
2.Language = English
【Setting range】
Display setting=Distance(m)
Level distance(m)
Level%(%)
Current(mA)
Language=English/Japanese
B