Microprogram Information RIDESENSE RIDESENSE User Manual
Microprogram Information Co., Ltd. RIDESENSE
User Manual
RIDESENSE User Manual
RIDESENSE overview:
The GIANT RIDESENSE employs ANT+ and Bluetooth® Smart (BLE 4.0) license
certification technology.
ANT+: ANT+ certification compliant meter.
Bluetooth® Smart (BLE 4.0): Bluetooth® Smart (BLE 4.0) compliant system App.
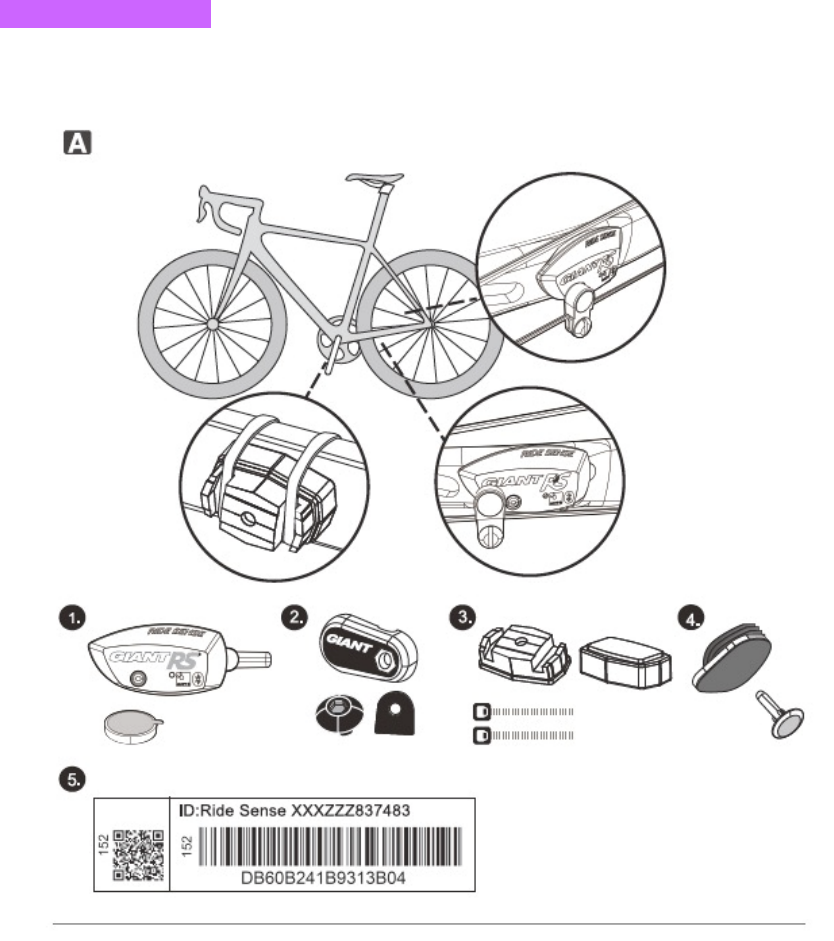
Accessories included
1. RIDESENSE x1: Hexagon socket head cap screw (SHCS) x1, (for 2.5mm hex
wrench with the maximum locking torque of 0.4Nm); washer x1; CR2032
battery x1
2. Speed sensor magnet x1: round head SHCS x1 (for 3mm hex wrench with the
maximum locking torque of 0.5Nm); washer x1
3. Revolution sensor magnet x1: ties x2; washer x1
4. Seat stay plug—included with your bike (not included with standalone
RIDESENSE product)
5. Pairing code label x1 (the QRcode for mobile phone scanning and the 16-digit
bar code for alarm function initiation)

Note: Please check accessories included with your RIDESENSE product before
installation. In case of any damage or shortage, call the dealer from whom you
purchased your RIDESENSE product or GIANT immediately. For a RIDESENSE
product that came with your new bike, remember to get the magnet set and seat stay
plug from the dealer who sold you the bike.
Product specification
Specification Information Description
Wireless technology
ANT+
Bluetooth® Smart (BLE
4.0)
RIDESENSE is a signal
transmission device. See
Meter and App manual for
details on pairing
operation.
Battery CR2032 battery x1
Please remove the battery
from your product if it will
not be used for a long time.
This will prevent sensor
damage by leaking of
battery electrolyte.
Time to last (estimate) May last around 500
hours for continuous use
The battery may last one
and half a years when
using the product one hour
per day.
Sensing range
1. ANT+: 10 meters in
open space
2. Bluetooth®: 40 meters
in open space
Effective sensing range
varies with actual
environment conditions.
Water and dirt proof
grade IP X7
Weight 18 gram Including one CR2032
battery
LED light indicators Yellow and red light each

Operating temperature
range -20°C~60°C
Speed/pedaling
frequency App supported
OS versions
Android 4.3 or later;
iOS 7 or later
See individual App
installation manual for list
of compatible models.
Alarm App supported OS
versions
Android 4.3 or later;
iOS 7 or later
Support GIANT App only.
Please refer to individual
alarm App setup
guidelines.
Function mode
Function Description Remark
ANT+ pairing Connecting to meter
ANT+
To enable the meter’s
pairing mode and search
for RIDESENSE device,
please refer to the meter
user manual.
Bluetooth pairing Connecting to App To enable the App’s
pairing mode and search
for RIDESENSE device,
please refer to the App
user manual.
Power saving and sleep
The RIDESENSE goes
into sleep mode without
sensing any magnet
motion in 20 minutes.
The system auto wakes up
and is connected once a
peddling frequency or
speed magnet motion is
detected in sleep mode.
The device remains active
(instead of entering the
power saving and sleep
mode) in alarm mode.
Power saving, sleep and
wakeup
The RIDESENSE wakes
up once peddling magnet
The RIDESENSE device
is started and the

or speed magnet motion
has been detected (valid
for peddling frequency
magnet only)
connection resumed once
peddling frequency
magnet or speed magnet
motion is detected by
RIDESENSE.
Reset Reset the device
Press and hold the RESET
button for 12 seconds and
wait for the red and yellow
indicator to light up once
respectively.
Low battery reminder
The alarm function starts
and the red LED light
flashes three times when
power of the battery gets
low. Replace the battery
immediately.
Replace the battery
immediately.
Enable handset alert
device function
Enable the function by
scanning the QRcode
printed in the
RIDESENSE label with
the GIANT App or enter
the barcode contained in
the accessory label in
App.
Please download your
GIANT App at Google
play (Android) or App
store (iOS).
Note: Please refer to the
GIANT App manual for
the shooting and scanning
steps.
Magnet light indicators
once started successfully
After the device has
awoken and there is
magnet motion detected in
the first 20 peddling, an
LED light indicator lights
up to validate the magnet
installation.
Yellow light: Peddling
frequency magnet
detection
Red light: Speed magnet
detection
Installation steps
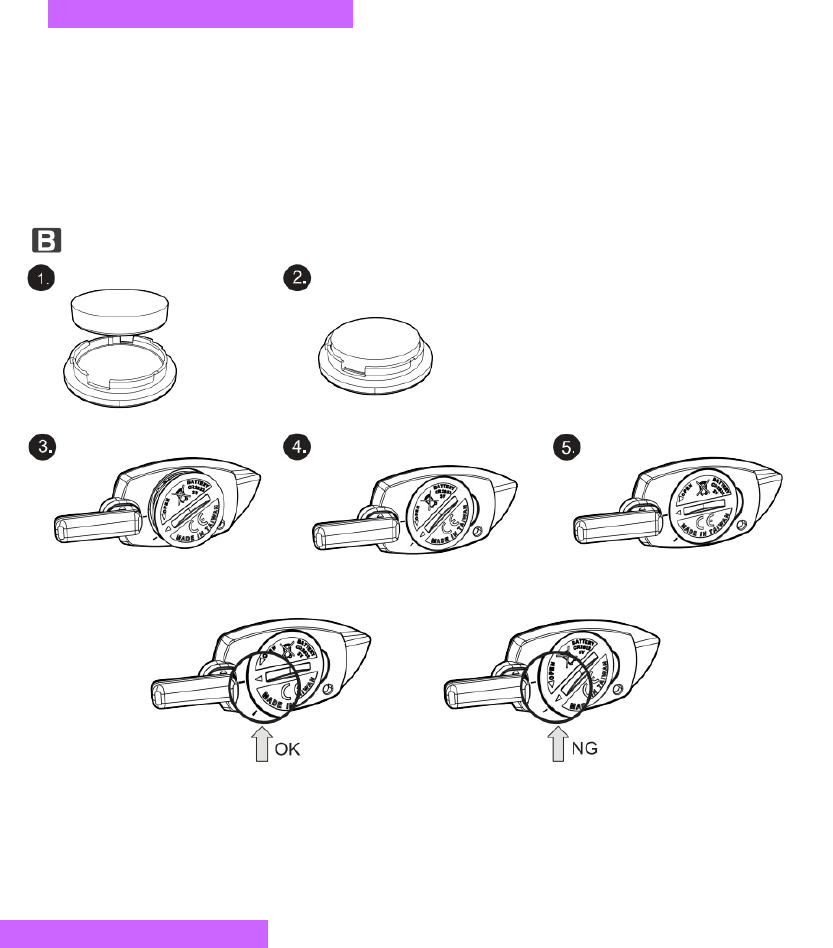
To install the battery cover: B
Warning: Make sure edge of the battery cover is well placed before installing
your RIDESENSE. Otherwise, the battery cover may fail to seal closely, the battery
compartment spring may fail, or the waterproof function may get lost. (Please refer to
installation steps given earlier.)
To install RIDESENSE: C
Remove the bike included seat stay plug (not included with standalone
RIDESENSE product), insert the RIDESENSE antenna in the seat stay tube,
attach and fasten the RIDESENSE device to the seat stay with one SHCS using a
2.5mm hex wrench at maximum locking torque of 0.4Nm.
Note: Please make sure the battery cover is well sealed for 100% waterproof.
Warning: Make sure the RIDESENSE is well locked before each and every bike ride
or you may suffer function failure or even severe personal injury.
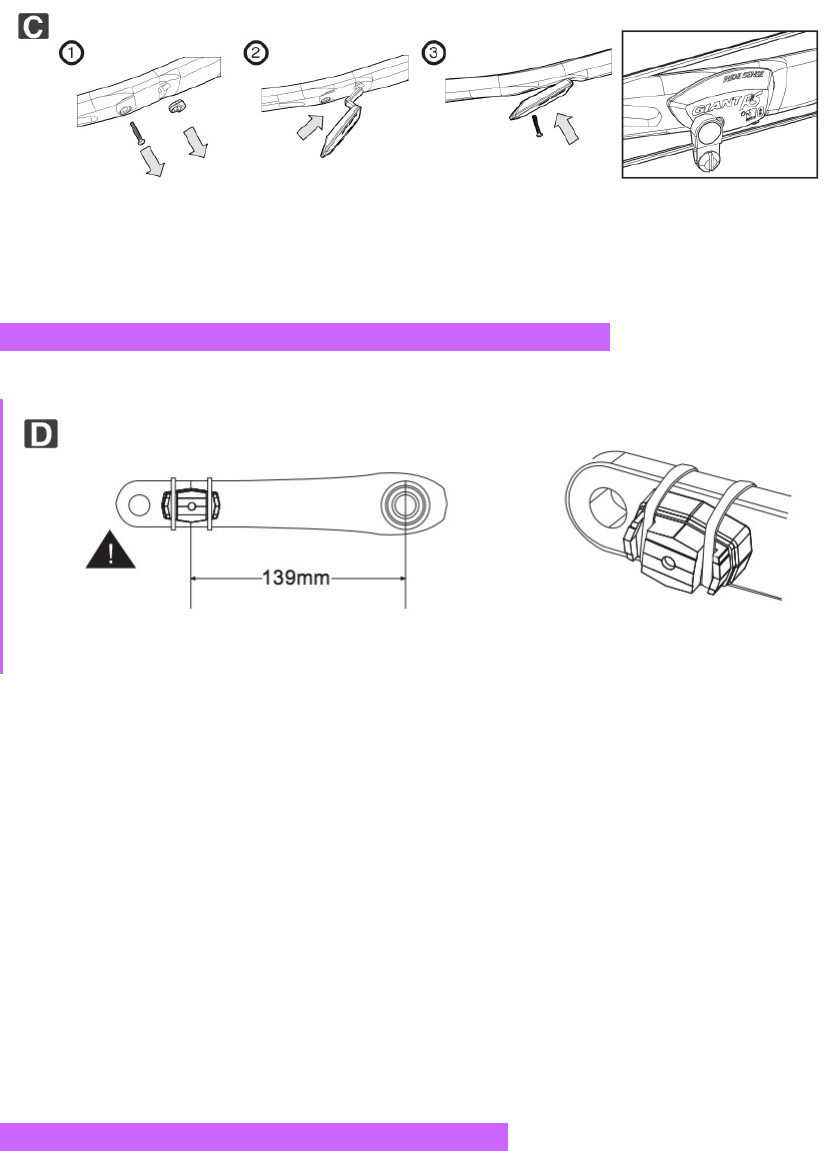
Installing the peddling frequency sensor magnet (PFSM): D
Note: Please fasten the PFSM to the crank with the included tie. Tear off the tape
at back of the PFSM, attach and fix it at inside of the left crank 139mm away
from center of the press fit with the included ties, rotate the crank to test starting
the PFSM.
Note: Raise the PFSM with included pad to keep it within 7mm from the frame
or motion of the PFSM may fail to be detected.
Installation the speed sensor magnet (SSM): E&F
Note: Keep the SSM and RIDESENSE 2~10mm away from each other. You may
flip the SSM and install it to the back wheel spoke to ensure the proper gap
between the two.
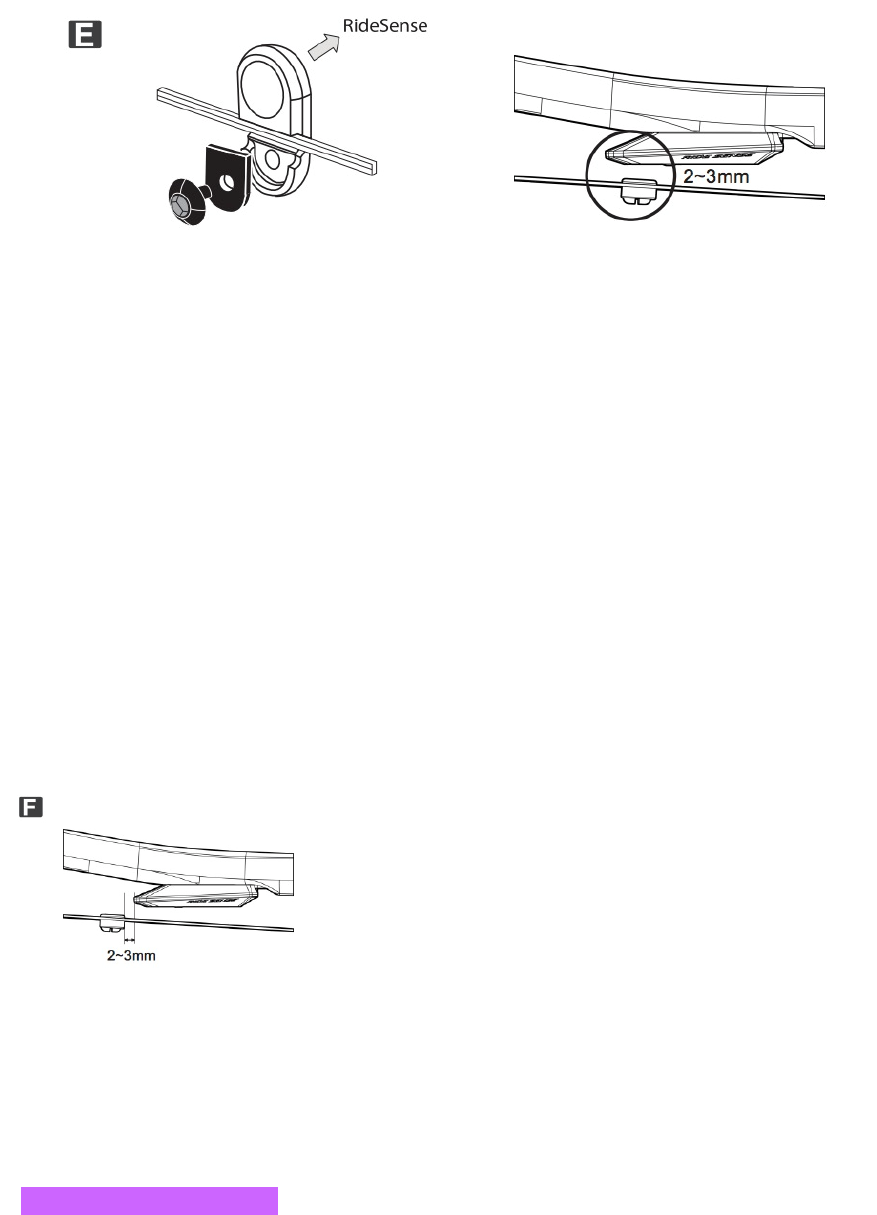
In case the SSM is too close to or interfering with the RIDESENSE, install them
at location away from each other (ensure end of the device 2~3mm away from
the edge of SSM). Otherwise, the SSM may hit the RIDESENSE and result in
damage. See figure below for correct installation position.
(Ensure end of the device 2~3mm away from the
edge of SSM.)
Remove RIDESENSE: G
Remove the screw, push the device forward, compress and deform the silica gel
before pulling it upward, remove it carefully without damaging the antenna
compartment. Insert the seat stay plug in the fix opening for RIDESENSE after it
was removed.
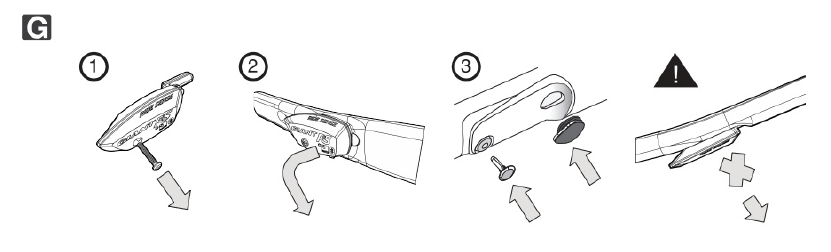
Warning: Pull RIDESENSE vertically upward from its installation location may
damage the RIDESENSE or the frame and breach your warranty terms.
RIDESENSE maintenance
1. Replace battery
Note: Check remaining power of your battery before riding your bike ride. Low
battery may lead to RIDESENSE sensor error or pairing failure.
Note: Wait 30 seconds for the RIDESENSE to reset after its battery was removed
to ensure its successful operation after battery replacement.
Note: Remove the battery from your product in case it will not be used for long
time. This will prevent the sensor from damage by leak of battery electrolyte.
Warning: Insert a battery in the battery compartment before locking the battery
cover with screw. Make sure edge of the battery cover is well placed or the
battery cover may fail to seal closely, the battery compartment spring may fail, or
the waterproof function may get lost. (Please refer to installation steps given
earlier.)

Reset RIDESENSE
Method 1: Remove the battery, wait 30 seconds before inserting it back,
the RIDESENSE is now reset.
Method 2: Press and hold the RESET button for 12 seconds and wait for
the red and yellow indicator to light up once respectively, the RIDESENSE
is now reset.
Notes:
1. The sensor may be used in rainy day but not under water. DO NOT clean it with
high-pressure water jet.
2. Please check distance between the sensor and its magnets regularly.
3. DO NOT clean the sensor with inferior chemical cleaners.
4. Be careful about your biking safety.
Warranty statement
1. GIANT shall warrant your RIDESENSE for 2 years after its purchase date.
During this warranty period the GIANT authorized dealer shall offer
comprehensive after service for damages under normal operation according to
the user manual and determined to be caused by poor product quality.
2. If problem of your product persists after taking troubleshooting measures
given in the user manual, please present your purchase receipt, complete set of
RIDESENSE, and the meter to any GIANT dealer for inspection and warranty
service.
Conditions that may void your product warranty:
Modifying your product or its accessories.
Using your product for purposes not intended for its design.
Damages caused by failure to use this product according to instructions given in
this manual.
Additional costs derived from product failure.
Your warranty period or terms may vary with local regulations. The warranty
provided does not affect your statutory rights under applicable legislation in force.
DGT statement
DO NOT change frequency, increase power, or modify designed features and
functions of low power radio transmitter and receiver with type qualification without
approval in advance. Use of low power radio transmitter and receiver should not
interfere with aviation safety and legitimate communications. In case of any
interference, stop using the device immediately and resume its use only after the
interference has been eliminated. The said legitimate communications is any radio
communication operation approved by the telecommunication regulations. This
device must accept any interference by legitimate communications or industrial,
scientific, and medical radio equipment.

FCCRegulations:
Thisdevicecomplieswithpart15oftheFCCRules.Operationissubjecttothefollowingtwo
conditions:(1)Thisdevicemaynotcauseharmfulinterference,and(2)thisdevicemustacceptany
interferencereceived,includinginterferencethatmaycauseundesiredoperation.
Changesormodificationsnotexpresslyapprovedbythepartyresponsibleforcompliancecouldvoid
theuser‘sauthoritytooperatetheequipment.
***********************************************************************************
ThisequipmenthasbeentestedandfoundtocomplywiththelimitsforaClassBdigitaldevice,
pursuanttopart15oftheFCCRules.Theselimitsaredesignedtoprovidereasonableprotection
againstharmfulinterferenceinaresidentialinstallation.Thisequipmentgenerates,usesandcan
radiateradiofrequencyenergyand,ifnotinstalledandusedinaccordancewiththeinstructions,may
causeharmfulinterferencetoradiocommunications.However,thereisnoguaranteethat
interferencewillnotoccurinaparticularinstallation.Ifthisequipmentdoescauseharmful
interferencetoradioortelevisionreception,whichcanbedeterminedbyturningtheequipmentoff
andon,theuserisencouragedtotrytocorrecttheinterferencebyoneormoreofthefollowing
measures:
—Reorientorrelocatethereceivingantenna.
—Increasetheseparationbetweentheequipmentandreceiver.
—Connecttheequipmentintoanoutletonacircuitdifferentfromthattowhichthereceiveris
connected.
—Consultthedealeroranexperiencedradio/TVtechnicianforhelp.
***********************************************************************************
ICRegulations:
ThisdevicecomplieswithIndustryCanada’slicence‐exemptRSSs.Operationissubjecttothefollowing
twoconditions:
(1)Thisdevicemaynotcauseinterference;and
(2)Thisdevicemustacceptanyinterference,includinginterferencethatmaycauseundesired
operationofthedevice.
LeprésentappareilestconformeauxCNRd'IndustrieCanadaapplicablesauxappareilsradioexempts
delicence.L'exploitationestautoriséeauxdeuxconditionssuivantes:
(1)l'appareilnedoitpasproduiredebrouillage,et
(2)l'utilisateurdel'appareildoitacceptertoutbrouillageradioélectriquesubi,mêmesilebrouillage
estsusceptibled'encompromettrelefonctionnement."
***********************************************************************************
CANICES‐3(B)/NMB‐3(B)

Troubleshooting
Please troubleshoot your product according to instructions given below. Please reset
your RIDESENSE afterwards. If the problem persists, call the dealer from whom you
have purchased your product or contact GIANT.
Symptom Causes Troubleshooting
ANT+ pairing failure 1. ANT+ device
interference
2. Enter power
saving and sleep
mode
1. Make sure there is no
active ANT transmitter in
existence, e.g.
speed/peddling frequency
device. Press and hold the
RESET button for 12
seconds and wait for the
red and yellow indicator to
light up once respectively
to reset your RIDESENSE.
2. Move the peddling
frequency magnet or speed
magnet across the
RIDESENSE to wake it
up.
Bluetooth pairing failure 1. RIDESENSE is
Bluetooth connected
2. Enter power saving
and sleep mode
1. Check whether the
RIDESENSE is busy when
connected to other
App/devices.
If it remains busy, you may
disconnect it by resetting your
RIDESENSE. Press and hold
the RESET button for 12
seconds and wait for the red
and yellow indicator to light
up once respectively to reset
your RIDESENSE.
2. Move the peddling
frequency magnet or speed

magnet across the
RIDESENSE to wake it up.
RIDESENSE alarm
function initiation failure
1. Invalid alarm code
entry
2. Enter power saving
and sleep mode
1. Check whether the alarm
QRcode and bar code
contained in the accessory
label is scanned and entered
correctly.
2. Move the peddling
frequency magnet or speed
magnet across the
RIDESENSE to wake it up.
Connection to
RIDESENSE failure
1. Low battery power Make sure there is adequate
battery power left.
2. Enter power saving
and sleep mode
Move the peddling frequency
magnet or speed magnet across
the RIDESENSE to wake it up.
3. Device pairing
failed
Pair the devices.
Lack of speed or
peddling frequency
information
1. Poor magnet
sensing
Make sure the magnet is
installed within the sensing
area.
2. Enter power saving
and sleep mode
Move the peddling frequency
magnet or speed magnet across
the RIDESENSE to wake it up.
Please recycle disposed battery.
Mercury contents of this product comply with regulations 01890-AR4 of the EPA.
Note: Please remove the battery from your product if it will not be used for a long
time. This will prevent the sensor from being damage by the leaking of battery
electrolyte.