Mitsubishi Electric Sanda Works BD1G Blu-ray Disc Player User Manual Users manual
Mitsubishi Electric Corporation Sanda Works Blu-ray Disc Player Users manual
Contents
- 1. Users manual
- 2. User Manual
Users manual

Blu-ray Disc Player
BD-1G
User’s
Manual
1
This equipment complies with FCC/IC radiation exposure limits set forth for an uncontrolled environment and
meets the FCC radio frequency (RF) Exposure Guidelines and RSS-102 of the IC radio frequency (RF) Exposure rules.
This equipment should be installed and operated keeping the radiator at least 20cm or more away from person’s body.
Cet équipement est conforme aux limites d’exposition aux rayonnements énoncées pour un environnement
non contrôlé et respecte les règles les radioélectriques (RF) de la FCC lignes directrices d'exposition et d’exposition
aux fréquences radioélectriques (RF) CNR-102 de l’IC. Cet équipement doit être installé et utilisé en gardant une
distance de 20 cm ou plus entre le dispositif rayonnant et le corps.
This device complies with Part 15 of FCC Rules and Industry Canada licence-exempt RSS standard(s).
Operation is subject to the following two conditions: (1) this device may not cause interference, and (2)
this
device must accept any interference, including interference that may cause undesired operation of this
device.
Le présent appareil est conforme aux la partie 15 des règles de la FCC et CNR d'Industrie Canada
applicables aux appareils radio exempts de licence. L'exploitation est autorisée aux deux conditions
suivantes : (1) l'appareil ne doit pas produire de brouillage, et (2) l'utilisateur de l'appareil doit accepter
tout
brouillage radioélectrique subi, même si le brouillage est susceptible d'en compromettre le
fonctionnement.
2
3
'DWDWUDQVPLVVLRQLVDOZD\VLQLWLDWHGE\VRIWZDUHZKLFKLVWKHSDVVHGGRZQWKURXJKWKH0$&
WKURXJKWKHGLJLWDODQGDQDORJEDVHEDQGDQGILQDOO\WRWKH5)FKLS
6HYHUDOVSHFLDOSDFNHWVDUHLQLWLDWHGE\WKH0$&7KHVHDUHWKHRQO\ZD\VWKHGLJLWDOEDVHEDQGSRUWLRQ
ZLOOWXUQRQWKH5)WUDQVPLWWHUZKLFKLWWKHQWXUQVRIIDWWKHHQGRIWKHSDFNHW
7KHUHIRUHWKHWUDQVPLWWHUZLOOEHRQRQO\ZKLOHRQHRIWKHDIRUHPHQWLRQHGSDFNHWVLVEHLQJWUDQVPLWWHG
,QRWKHUZRUGVWKLVGHYLFHDXWRPDWLFDOO\GLVFRQWLQXHWUDQVPLVVLRQLQFDVHRIHLWKHUDEVHQFHRI
LQIRUPDWLRQWRWUDQVPLWRURSHUDWLRQDOIDLOXUH
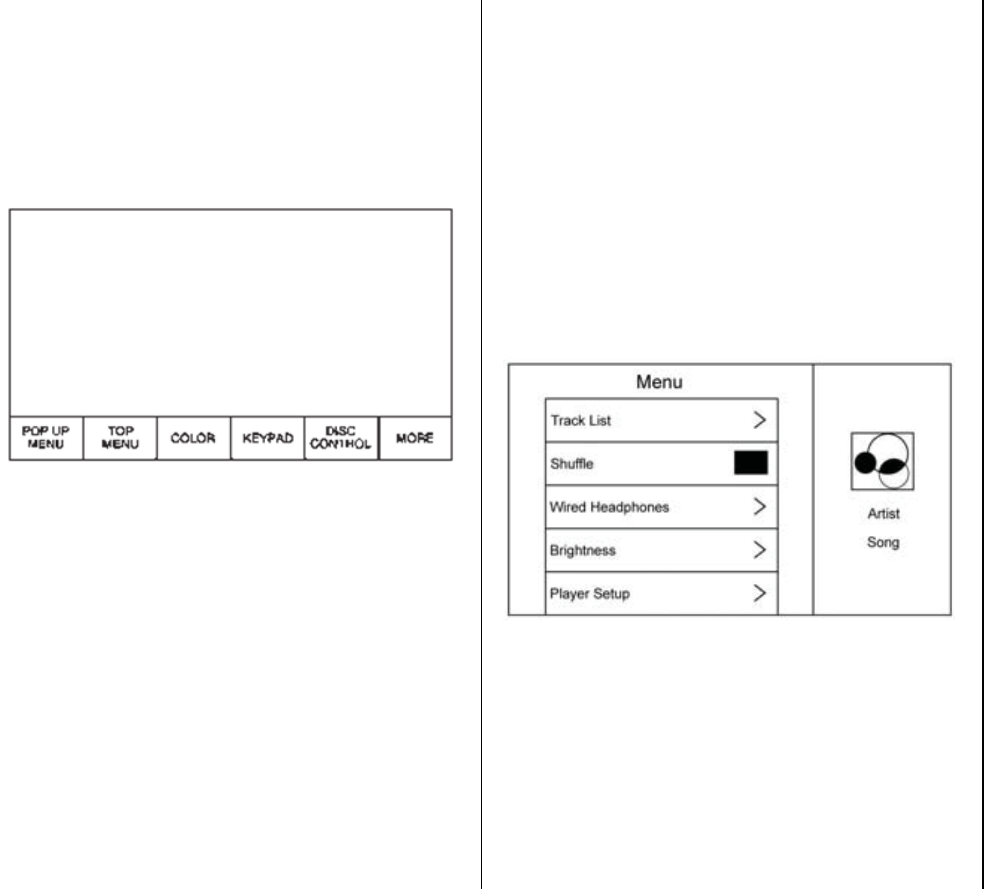
Disc Menu BD
Press MEDIA on the remote control
and then select CD/DVD/BD, USB,
HDMI, AUX, or Photo Viewer.
Press MENU on the remote control
once to display menus based on the
media.
Choose from POP UP MENU (BD
Only), TOP MENU, COLOR,
KEYPAD, DISC CONTROL, and
MORE (SETTINGS, PREVIOUS,
NEXT, STILLS OFF).
To close, press the MENU button or
Back button, or wait for the
time out.
Disc Menu DVD
Press MENU on the remote control
once to select from TOP MENU,
KEYPAD, STOP DISC, PHOTO,
and SETTINGS.
To close, press MENU or Back, or
wait for the time out.
CD Menu
Select from:
.
Track List
.
Shuffle
.
Disc Information (if available)
.
Wired Headphones
.
Brightness
.
Player Setup: Audio
Compression, Auto Enter (if
available)
.
DivX VOD
.
Title Search (if available)
.
Software Information
Pop Up Menu (BD Only)
Select POP UP MENU from the
menu options to display the disc
menu on top of the movie. Make a
selection to exit the Pop-up menu.
When the Pop-up menu is opened,
the
overlay/Interaction
Selector
menu will be closed. The Pop-up
menu is disc dependent and may or
may not time out on its own.
Top Menu BD/DVD
Select this item to display the menu
for the DVD or BD. Make a selection
to exit the TOP MENU. TOP MENU
is not available for BDAV, DVD-VR,
and AVC-REC.
4
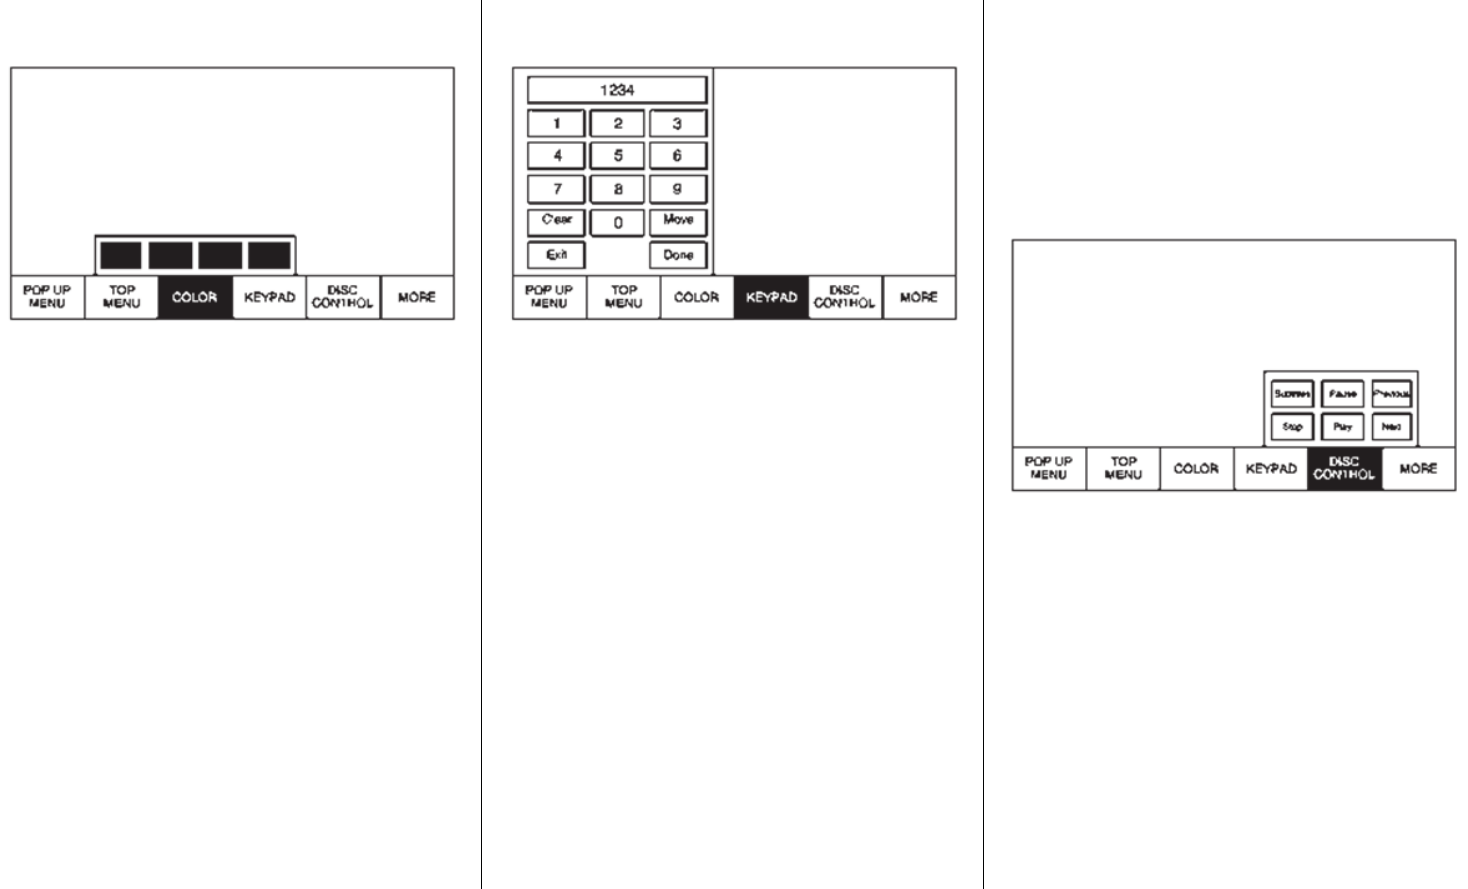
Color (BD Only)
Select COLOR to display the four
color button options: blue, yellow,
red, and green. Highlight a color
option and press ENTER and the
appropriate action will be carried
out. Press the Back button or MENU
button, or wait for the 15-second
time out to close the menu. Press
the down arrow on the yellow color
to keep the overlay menu up, but
close the color menu. The color
menu is disc dependent; selecting
colors for discs that do not support
this feature will have no function.
Keypad BD/DVD
Press KEYPAD to display the single
digit entry keypad. To close the
keypad, press the Back button or
MENU button, wait for the menu to
time out, or press the down arrow
from the Exit or Done buttons to
keep the menu up but close the
keypad. The keypad is disc
dependent; selecting numbers for
discs that do not support this feature
will have no function.
The keypad input is limited to four
digits. Any digits entered beyond
four will be discarded.
Press the Clear button to clear one
digit at a time. Press and hold the
Clear button to clear all entered
digits.
Disc Control (BDAV and
BDMV Only)
Press DISC CONTROL to display
options for subtitles, play, pause,
track forward, track previous, and
stop the disc. Press the Back button
or MENU button, or wait for the time
out to close the menu. Press the
down arrow from Stop, Play, or Next
to keep the overlay menu up, but
close the disc control menu. The
disc control menu is disc
5
dependent; selecting controls for
discs that do not support this feature
will have no function.
Stop Disc (DVD Only)
Press Stop to close the overlay
menu and open the Disc Stopped
screen. Press Menu on the screen
to open the Disc Stopped menu.
Select from Resume Playback, Top
Menu, Title Search, Restart Disc,
Browse Media, and Player Setup.
Some of these options are not
available while the disc is playing.
Resume Playback: Returns to the
current position on the disc and
resumes play.
Top Menu: Returns to the disc
provided menu.
Title Search (BDMV, AVCHD, and
DVD-V only): Provides a keypad.
Browse Media (BDAV, DVD-A,
DVD-VR, AVCREC only): Allows the
media on the disc to be searched in
a list format.
Restart Disc: Allows the disc to
restart from the beginning.
More BD/DVD
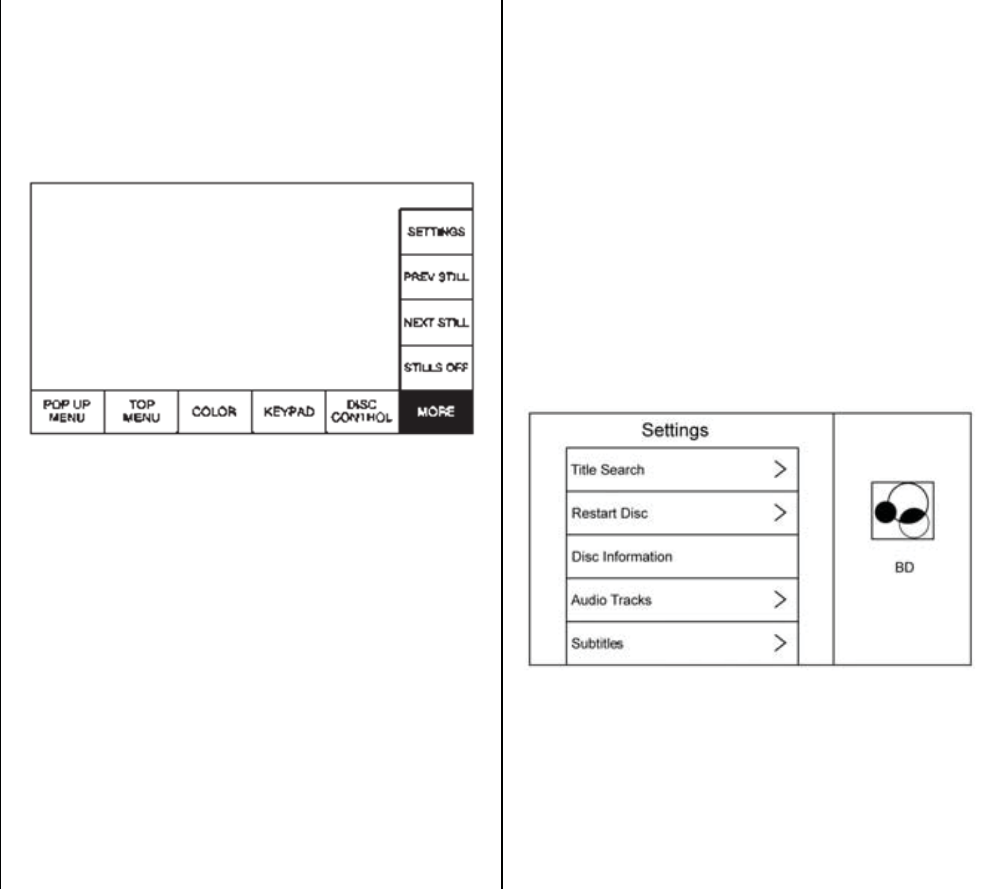
The MORE submenu includes both
the SETTINGS item and items
related to still pictures.
Prev Still/Next
Still/Stills
Off
This feature allows for turning stills
off, going to the previous still,
or advancing to the next still picture.
PREV STILL will go back to the
previous picture. NEXT STILL will
advance to the next picture in
sequential order. STILLS OFF will
return to the designated home still,
if it is available. Press the Back
button or MENU button, or wait for
the 15-second time out to close the
menu. Press the down arrow on the
bottom option to close the next still
pop-up. The menu will remain up.
This feature is disc dependent.
This feature can also be accessed
from the Photo button on the DVD
Disc Menu depending on the disc.
Settings BD/DVD
Select to access:
.
Browse Media (BDAV, AVCREC,
DVD-A, DVD-VR Only): Allows
browsing by Video List or
Playlist.
6
.
Title Search (AVCHD, DVD-V,
BDMV Only): This allows the
titles provided by the disc to be
searched. Select this option to
bring up a keypad to search for
specific titles.
.
Restart Disc: Restarts the disc
from the beginning.
.
Disc Information (if available)
.
Audio Tracks
.
Subtitles
.
Angle (BDMV, DVD-V, DVD-A
Only): Select an angle by using
the up and down arrows to
highlight the option, and then
press ENTER or the right arrow.
.
Screen Mode: Use Screen Mode
to adjust the framing on the RSE
display. Select Normal, Wide,
or Zoom. Screen Mode only
applies to video sources and
should be maintained if the disc
is ejected.
.
Wired Headphones: Use Wired
Headphones to listen to audio
on the wired headphones. The
headphone audio plays
depending on which screen is
selected. The default is screen 1
audio.
.
Brightness: Increase the
brightness by using the up or
right arrow and decrease the
brightness by using the down or
left arrow. Each screen
brightness can be adjusted
separately.
.
Player Setup: See
“
Player
Setup
”
later in this section.
.
DivX VOD
.
Software Information
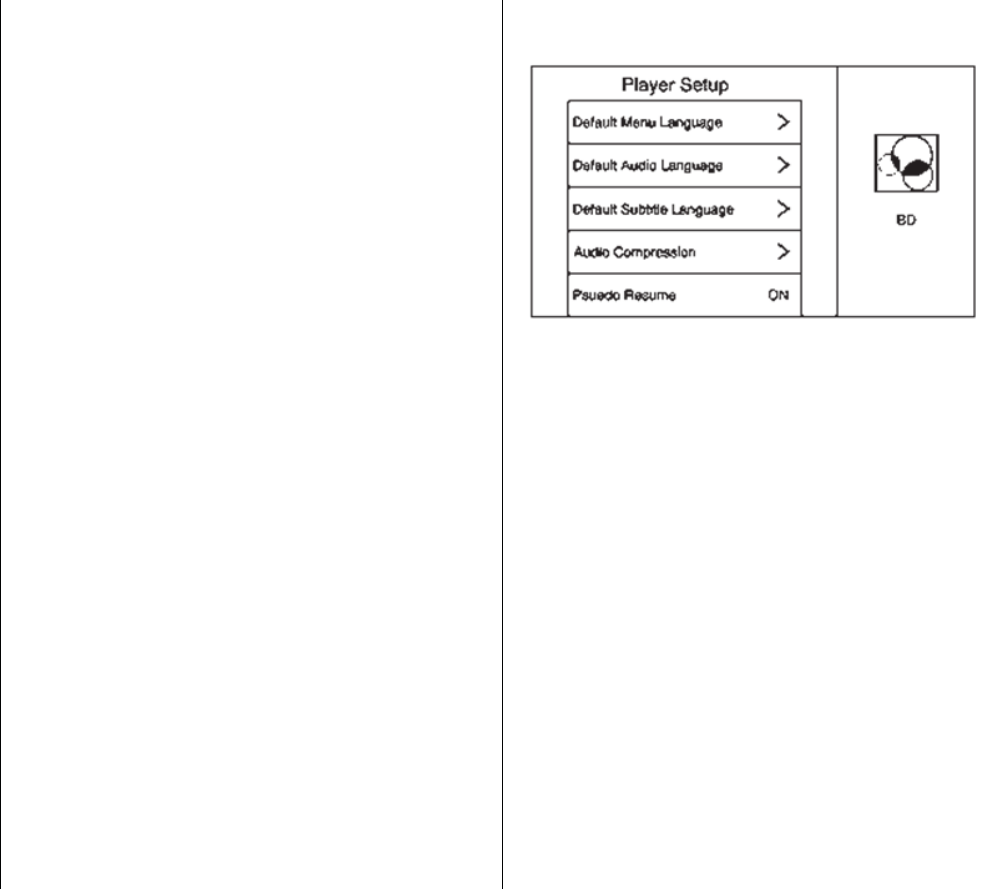
Player Setup BD/DVD
Player Setup may include:
.
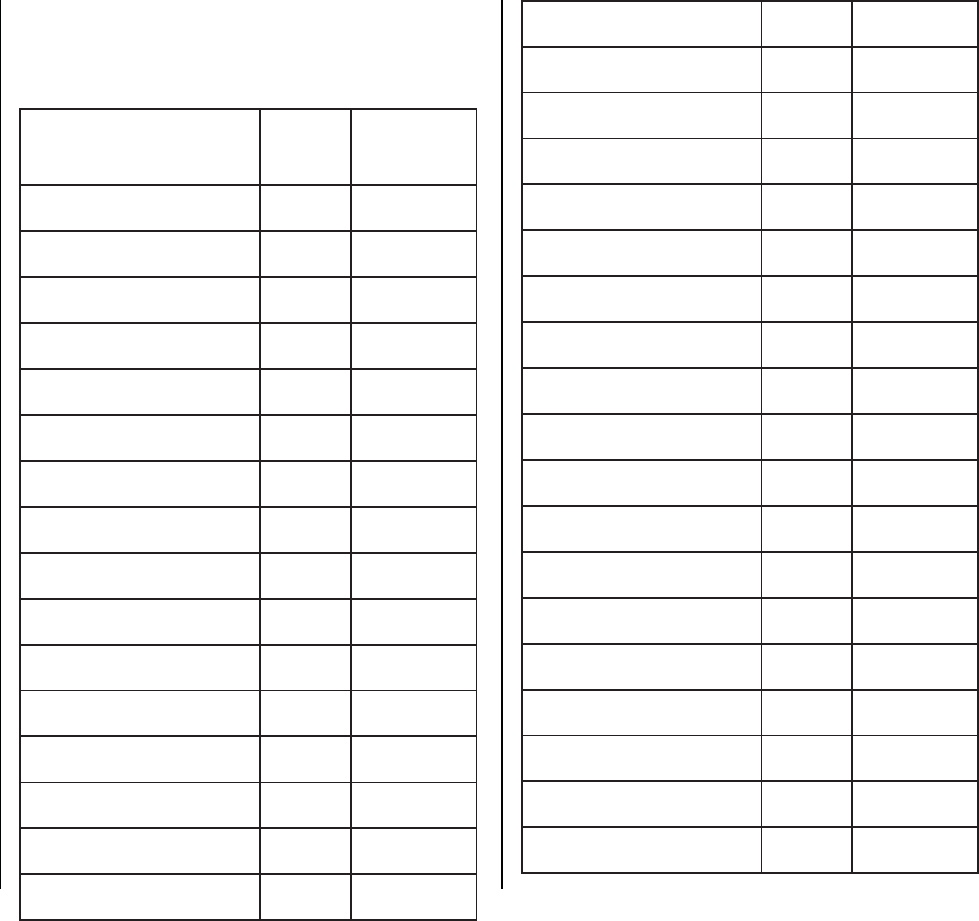
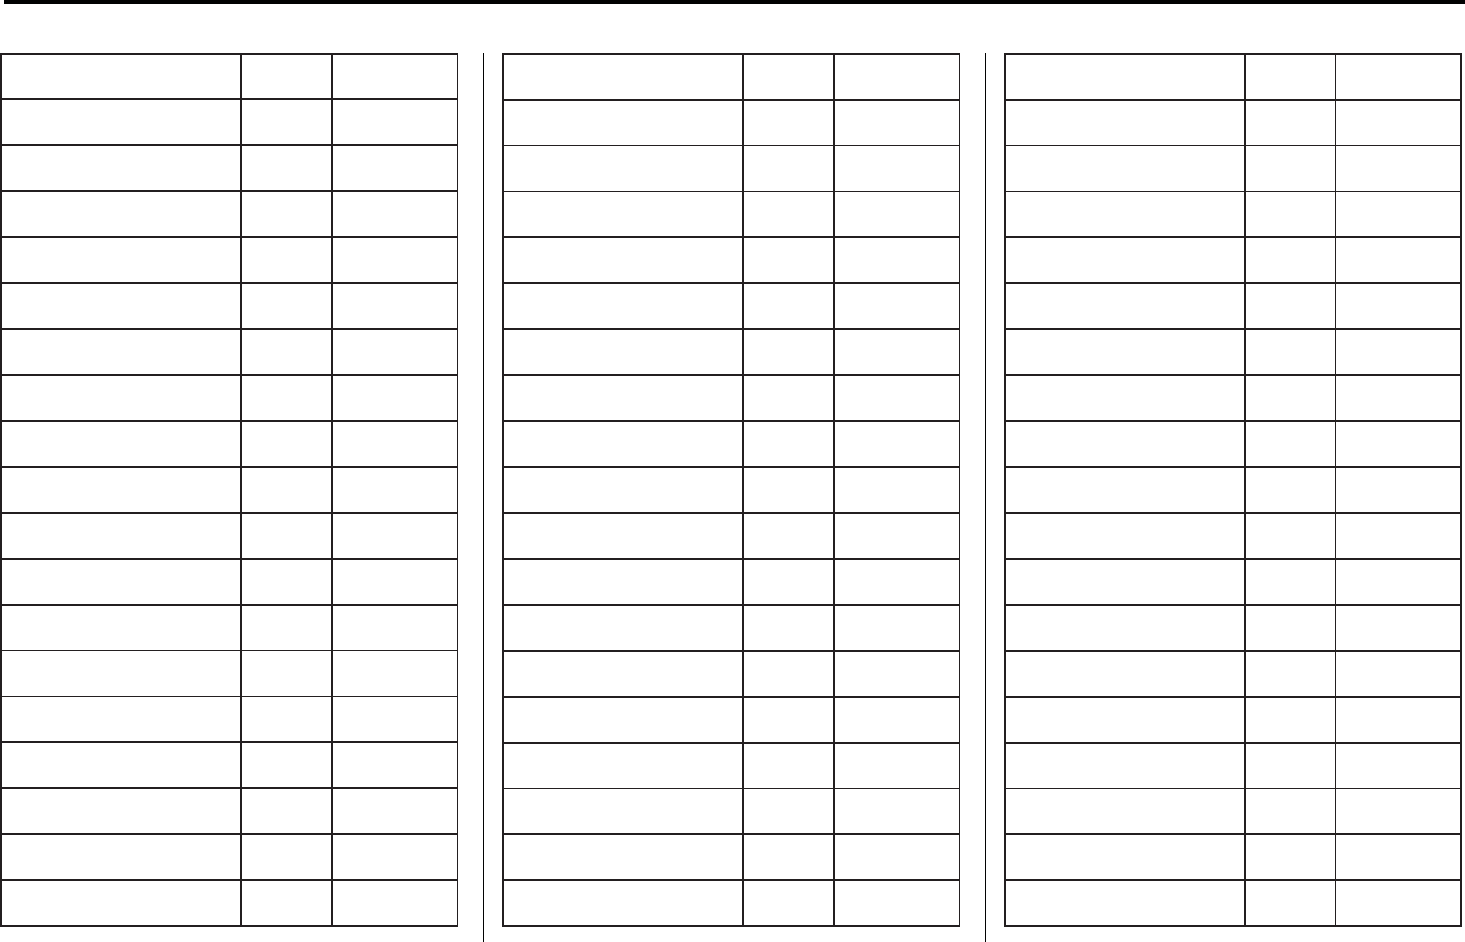
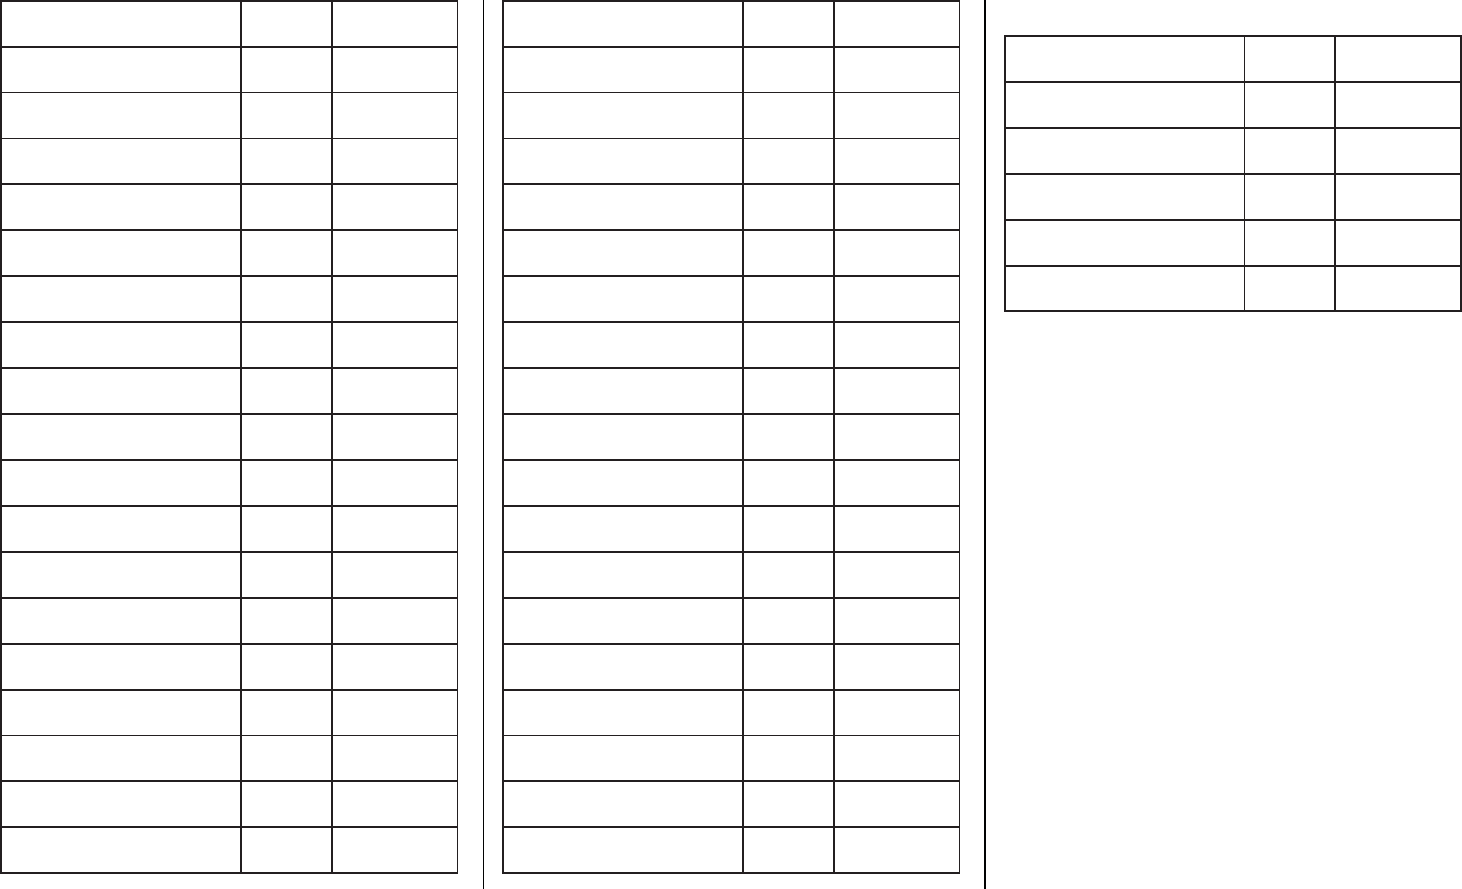
Default Menu Language: With no
disc inserted, select from a list of
languages or enter a
language code.
.
Default Audio Language: With
no disc inserted, select from a
list of languages or enter a
language code.
.
Default Subtitle Language: With
no disc inserted, select from a
list of languages or enter a
language code.
7
Assamase ASM 6583
Aymara AYM 6589
Azerbaijani AZE 6590
Bashkir BAK 6665
Byelorussian BEL 6669
Bulgarian BUL 6671
Bihari
BIH 6672
Bislama BIS 6673
Bengali BEN 6678
Tibetan BOD 6679
Breton BRE 6682
Catalan CAT 6765
Corsican COS 6779
Czech CES 6783
Welsh
CYM 6789
Danish DAN 6865
Bhutani DZO 6890
Esperanto EPO 6979
Estonian EST 6984
Language/Code User
Code
Japanese JPN 7465
English ENG 6978
French FRA 7082
German DEU 6869
Italian
ITA 7384
Spanish SPA 6983
Dutch
NLD 7876
Russian RUS 8285
Chinese ZHO 9072
Korean KOR 7579
Greek
ELL 6976
Afar
AAR 6565
Abkhazian ABK 6566
Afrikaans AFR 6570
Amharic AMH 6577
Arabic ARA 6582
.
Audio Compression: When on,
the RSE will attempt to reduce
the difference between the audio
highs and lows.
.
Pseudo Resume: When on, the
RSE will attempt to resume play
of the video where it left off. This
can be turned on or off.
.
Auto Enter: When on, the RSE
will attempt to start play of the
video when the disc is inserted.
This feature can be turned on or
off. Not all discs support this
feature.
.
Audio Channel (AVCREC,
DBAV, DVD-VR Only) contains:
Stereo, Left Mono, and Right
Mono. Audio Channel is
available from the Settings
menu. Default will be determined
by the disc.
.
Format Internal User Memory:
Only shown when no disc is
inserted.
Enter Language Code
Enter the desired language code.
8
Indonesian IND 7368
Icelandic ISL 7383
Hebrew HEB 7269
Yiddish YID 8973
Javanese JAV 7487
Georgian KAT 7565
Kazakh KAZ 7575
Greenlandic KAL 7576
Cambodian KHM 7577
Kannada KAN 7578
Kashmiri KAS 7583
Kurdish KUR 7585
Kirghiz KIR 7589
Latin
LAT 7665
Lingala LIN 7678
Laothian LAO 7679
Lithuanian LIT 7684
Latvian LAV 7686
Malagasy MLG 7771
Maori
MRI 7773
Macedonian MKD 7775
Malayalam MAL 7776
Mongolian MON 7778
Moldavian MOL 7779
Marathi MAR 7782
Malay
MSA 7783
Maltese MLT 7784
Burmese MYA 7789
Nauru
NAU 7865
Nepali NEP 7869
Norwegian NOR 7879
Occtian OCI 7967
Oromo ORM 7977
Oriya
ORI 7982
Panjabi PAN 8065
Polish
POL 8076
Pashto, Pushto PUS 8083
Portuguese POR 8084
Basque EUS 6985
Persian FAS 7065
Finnish FIN 7073
Fiji
FIJ 7074
Faroese FAO 7079
Friesian FRY 7089
Irish
GLE 7165
Scots-Gaelic GLA 7168
Galician GLG 7176
Guarani GRN 7178
Gujarati GUJ 7185
Hausa HAU 7265
Hindi
HIN 7273
Croatian HRV 7282
Hungarian HUN 7285
Armenian HYE 7289
Interlingua INA 7365
Interlingue ILE 7369
Inupiak IPK 7375
9
Quechua QUE 8185
Rhaeto-Romance ROH 8277
Kirundi RUN 8278
Romanian RON 8279
Kinyarwanda KIN 8287
SanSkrit SAN 8365
Sindhi
SND 8368
Sangho SAG 8371
Serbo-Croatian SCR 8372
Singhalese SIN 8373
Slovak SLK 8375
Uzbek UZB 8590
Vietnamese VIE 8673
Volapuk VOL 8679
Wolof
WOL 8779
Xhosa XHO 8872
Yoruba YOR 8979
Zulu
ZUL 9085
Slovenian SLV 8376
Samoan SMO 8377
Shona SNA 8378
Somali SOM 8379
Albanian SQI 8381
Serbian SRP 8382
Siswaiti SSW 8383
Sesotho SOT 8384
Sundanese SUN 8385
Swedish SWE 8386
Swahili SWA 8387
Tamil
TAM 8465
Telugu TEL 8469
Tajik
TGK 8471
Thai
THA 8472
Tigrinya TIR 8473
Turkmen TUK 8475
Tagalog TGL 8476
Setswana TSN 8478
Tonga
TON 8479
Turkish TUR 8482
Tsonga TSO 8483
Tatar
TAT 8484
Twi
TWI 8487
Ukrainian UKR 8575
Urdu
URD 8582
Errors
Errors can occur if the local storage
area has been broken or if the
ignition is turned off
during
formatting. If the screen is closed
during formatting, this will not
interrupt the formatting. If the
screen
is opened again, the current state of
format will be displayed. If an error
occurs, the Error screen will display
when the ignition is turned on.
Wired
Headphones
To select the headphone audio
for
the wired headphone jack based
on
screen 1 or screen 2, press
ENTER
10

or the right arrow on the remote.
Press the Back button to exit
the menu.
The headphones are linked to
screen 1 by default.
Player Setup (CD-DA Only)
This allows access to Audio
Compression and Auto Enter.
Title Search (CD-DA Only)
This displays a keypad. Press Stop
to close the overlay menu and open
the Disc Stopped screen. Press
Menu on the screen to open the
Disc Stopped menu. Select Title
Search.
Disc Information (CD-DA Only)
If the inserted disc is a BDMV,
BDAV, AVCHD, AVCREC,
DVD-Video, or DVD-VR, the disc
title should display. If the inserted
disc is DVD-Audio, DTS-CD, CDDA,
or Mixed-CD, the track number will
display.
DivX
®
This indicates the vehicle is
registered to play DivX media and
states how to obtain more
information.
Software Information
This allows access to Version
Information, Save Vehicle Info to
USB, and View Open Source.
Save Vehicle Info to USB allows the
current version to be saved to a
jump drive, which must be done
before an update can be performed.
View Open Source indicates where
software information can be found.
Changing Between SCREEN 1 and
SCREEN 2
For single overhead screen
systems only:
Although two audio sources can be
listened to at one time, only one
video source can be viewed on the
overhead screen at a time.
Press the SCREEN 1 or SCREEN 2
button on the remote control to
change between which source will
display on the overhead screen.
When SCREEN 1 is being displayed
and the SCREEN 2 button on the
remote is pressed, the source for
SCREEN 2 will be displayed. The
audio for SCREEN 1 is available on
channel 1 of the headphones and
the audio for SCREEN 2 is available
on channel 2 of the headphones.
Change the channel on the
headphones to the desired screen
source.
One user can listen to the audio
from SCREEN 1 and view the
source on the overhead display
while another user can listen to a
separate audio source by changing
the channel on the wireless
headphones or setting their wired
headphones to SCREEN 2 in
the MENU.
11
Rear Media
Use REAR MEDIA to select AUX,
Disc, USB, or HDMI sources for
the Rear Seat Entertainment
(RSE). When using the REAR
MEDIA
button to select a source, both rear
screens will be sourced and begin
playback of the first available file.
The video will only display on the
front screen if the vehicle is in
P (Park). When the vehicle is in any
other gear, the front screen displays
the active media source.
Previous Track/Next Track
Press
t
or
u
to select the
previous or next track on the current
media.
Play/Pause
Press
r
to play or
j
to pause,
depending on the current selection.
A time bar displays when the pause
button is pressed.
Menu
(DVD/BD/HDMI/USB/AUX/VCD)
MENU is only available in D (Drive).
Press the MENU button to display
these menu options:
.
Tone Settings
.
Auto Volume Control
.
Traffic Announcements
Tone Settings (DVD/BD)
Tone settings for bass, mid, and
treble are available in any source
mode. Once set, tone settings are
set for all sources.
Auto Volume Control (DVD/BD)
Automatic Volume Control (AVC)
adjusts the volume of the audio
based on the speed or ambient
noise of the vehicle. Some vehicles
may be equipped with the Bose
AudioPilot system. In these cases,
the Auto Volume main menu item is
replaced with the Bose AudioPilot
menu item. AVC or Bose AudioPilot
is available to use with any
source mode.
12
Traffic
Announcements
(DVD/BD)
Traffic program alerts will display in
the RSE system. The video will
continue to play and the audio will
mute, depending on the alert.
Closing the Menu (DVD/BD)
Press the Back or Exit button to
close a menu. This will return to the
RSE application on the previously
viewed screen.
Power
Press the power button on the
screen to turn the rear RSE screens
on or off. The front screen will
continue to operate when the rear
screens are turned off. The rear
screens can be turned back on by
pressing the power button again or
from the rear seat by using the
remote. Select SCREEN 1 or 2 and
press the power button.
13
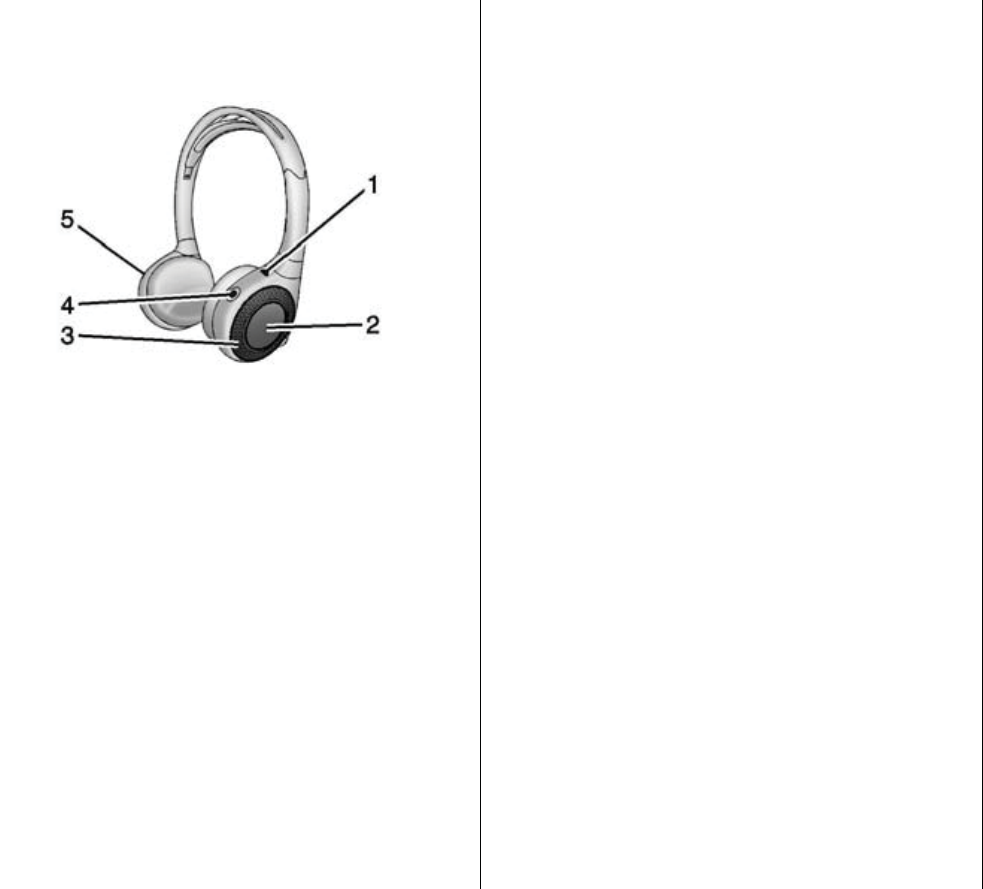
Headphones
1. Power Indicator
Light
2. Channel 1 or 2
Switch
3. Volume
Control
4. Power
Button
5. Battery
Cover
RSE includes two or four 2-channel
wireless headphones depending on
the vehicle model. The headphones
are used to listen to various
multimedia. The wireless
headphones have a power button,
Channel 1 or 2 switch, and a
volume control.
Press the power button to turn on
the headphones. A light on the
headphones comes on. If the light does not come on, check the
batteries.
Intermittent
sound or static
can also indicate weak batteries.
See
“
Battery Replacement
”
later in
this section.
Turn the headphones off when not in
use.
Press the center of the right side of
the headphone to change the
channel.
Channel
1 will provide
audio associated with
screen
1 and
channel
2 will provide audio
associated with
screen
2.
Infrared transmitters are on the top of
the left seatback video screen or in
front of the second overhead
screen. The headphones shut off
automatically to save the battery
power if the RSE system is off or if
the headphones are out of range of
the transmitters for more than
three
minutes. Moving too far
forward or stepping out of the
vehicle can cause the headphones
to lose the signal or have static.
Use the volume control on the
14
headphones to adjust the volume. For best audio performance,
wear the headphones as
indicated with L (Left) and R
(Right) on the ear
pads. Do not let anything cover
the ear pads.
{
Caution
Do not store the headphones
in
heat or direct sunlight. This
could damage the headphones
and
repairs will not be covered by
the
warranty. Storage in extreme
cold can weaken the batteries.
Keep
the headphones stored in a
cool, dry place.
If the foam ear pads become
worn or damaged, the pads can
be
replaced separately. To
purchase replacement ear pads,
call
1-888-293-3332
or contact your
dealer.
15
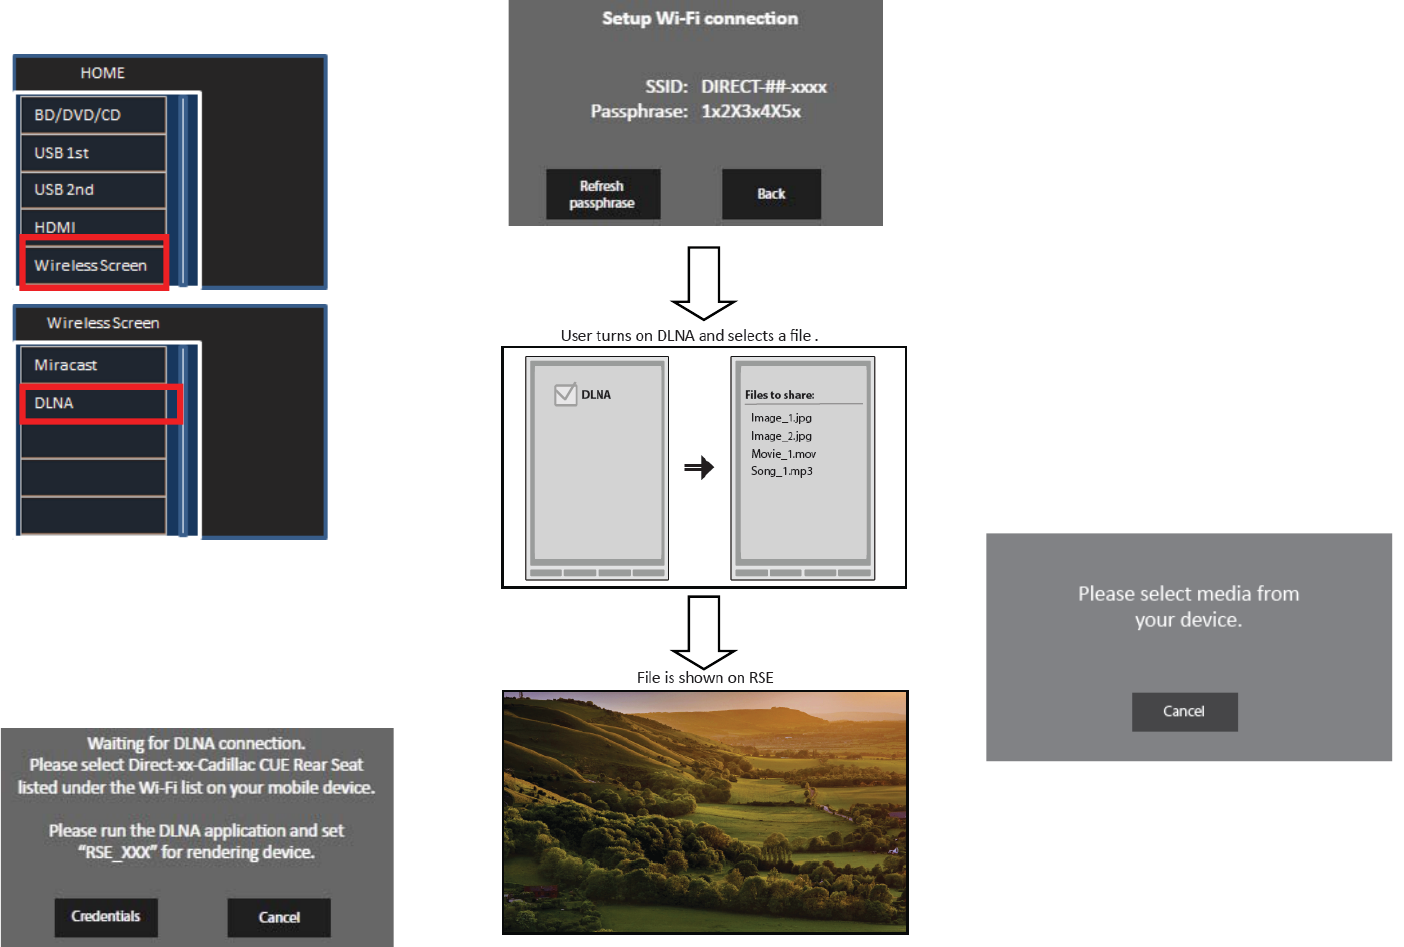
WiFi Menu(DNLA)
After power on, wait until the above
display appears.
Select DLNA.
When‘DLNA’isselected,theuser
shallbeshownbelowfigure.
Just the 1st connection, select
‘Credentials’.When‘Credentials’is
selected,theusershallbeshownleft
figure.
Input passphrase on user’s device.
If Wi-Fi connection is established, the
user may initiate DLNA through their
mobile device. Left figure will be
shown.
Once successfully connected via WiFi
or WiFi-Direct below figure will be
shown after selecting ‘DLNA’.
16
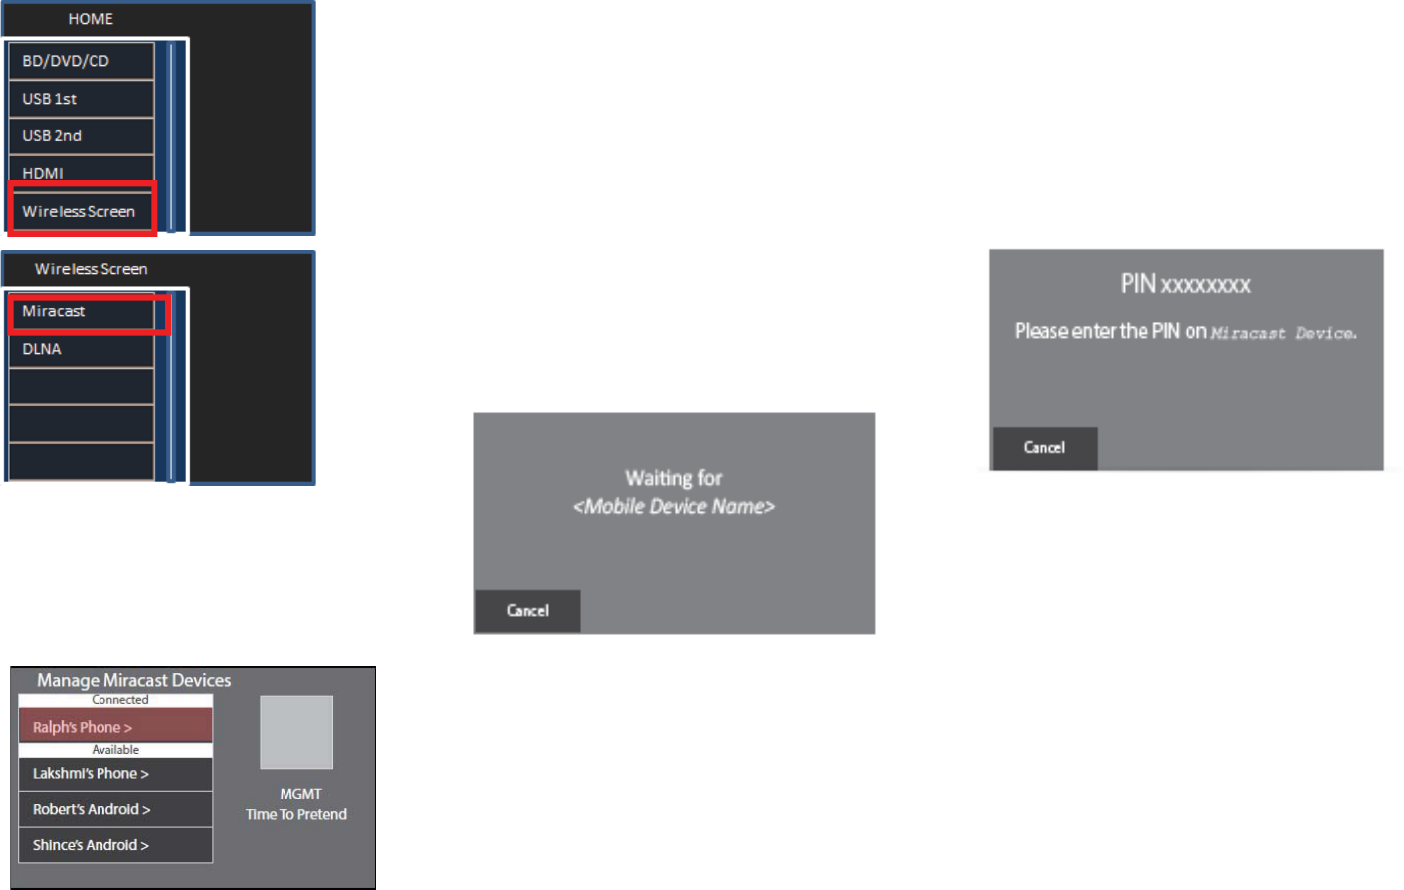
WiFi Menu(Miracast)
In the case of a Display Method
Connection, the BD-1G Module will
display a popup showing a PIN # and
requesting the user to enter the
PIN # as shown below figure. If entered
correctly, the device will
begin screening.
Initiating the connection on the users
device to Miracast will take them
through one of the connection methods
outlined below. Pressing cancel from
this screen will take the user back
to the Mobile Device Settings.
Depending on the device, one of the
following connection methods
will be used.
1) Push Button Configuration
2) Display Method
3) Keypad
After power on, wait until the above
display appears.
Select Miracast.
When‘Miracast’isselected,theuser
shallbeshownbelowfigure.
In the case of a simple connection,
on the BD-1G and confirmed on the
device, the user will see the screen
shown above figure.
17
Battery Replacement
To change the batteries:
1. Loosen the screw to the battery
door on the left side of the
headphones.
2. Slide the battery door open.
3. Replace the two AAA batteries.
4. Replace the battery door and
tighten the screw.
Remove the batteries if the
headphones will not be used for a
long time.
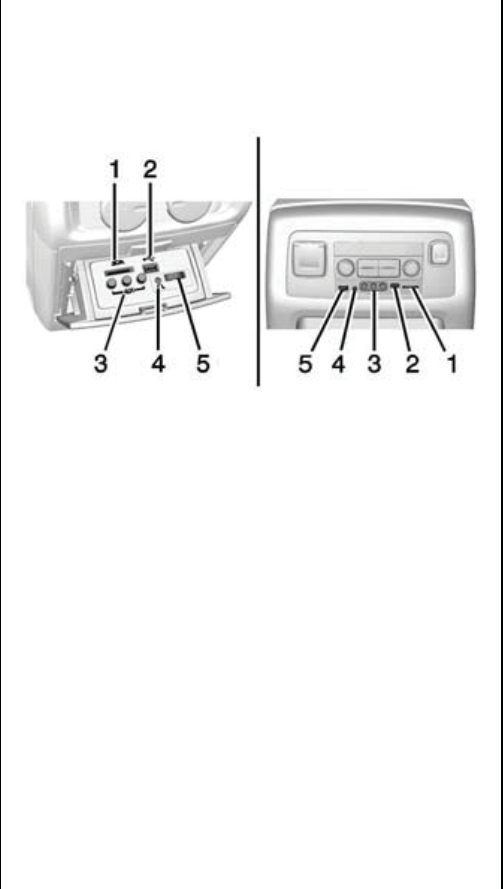
Auxiliary Inputs
Audio/Video (A/V) Jacks
Rear Media Connections (As
Equipped)
1. HDMI
2. USB
Port
3. A/V
Jacks
4. Wired Headphone
Jack
5. Volume
Control
If equipped with RSE, an HDMI
(1), a USB port (2), A/V input
jacks (3), wired headphone jack
(4), and a volume control (5) will
be
inside the rear storage area of the
center console.
The A/V jacks allow audio or video
cables to be connected from an
auxiliary device such as a
camcorder or video game system.
The A/V jacks are color coded:
.
Yellow for video input
.
White for left audio input
.
Red for right audio input
Power for the auxiliary devices is
not supplied by the infotainment
system.
To use the auxiliary inputs of the
RSE system:
1. Connect the auxiliary device
cables to the A/V jacks.
2. Power on both the auxiliary
device and the RSE video
screen.
18
USB
This allows for video and audio
playback of supported media.
To use the USB:
1. Insert the device in the
appropriate slot.
2. Select the source via the rear
screen menu with the remote
control MEDIA button.
3. Select the source via the front by
pressing on the Video
application on the home screen.
Audio Output
Audio from a Blu-ray/DVD/CD
player or auxiliary inputs can be
heard through:
.
Wireless headphones
.
Vehicle speakers
.
Vehicle wired headphone jack
The RSE system transmits the
audio signal to the wireless
headphones if an audio signal is
available. See
“
Headphones
”
earlier
in this section.
Wired Headphone Jack
Audio from the wired headphone
jack can be heard from the desired
source through the MENU button on
the remote and by selecting
Settings, then Headphones. The
headphone audio is selected based
on the audio associated with
screen
1 or
screen
2.
The front seat passengers are able
to listen to playback from the A/V
jacks through the vehicle speakers
by selecting Rear A/V as the source
on the radio.
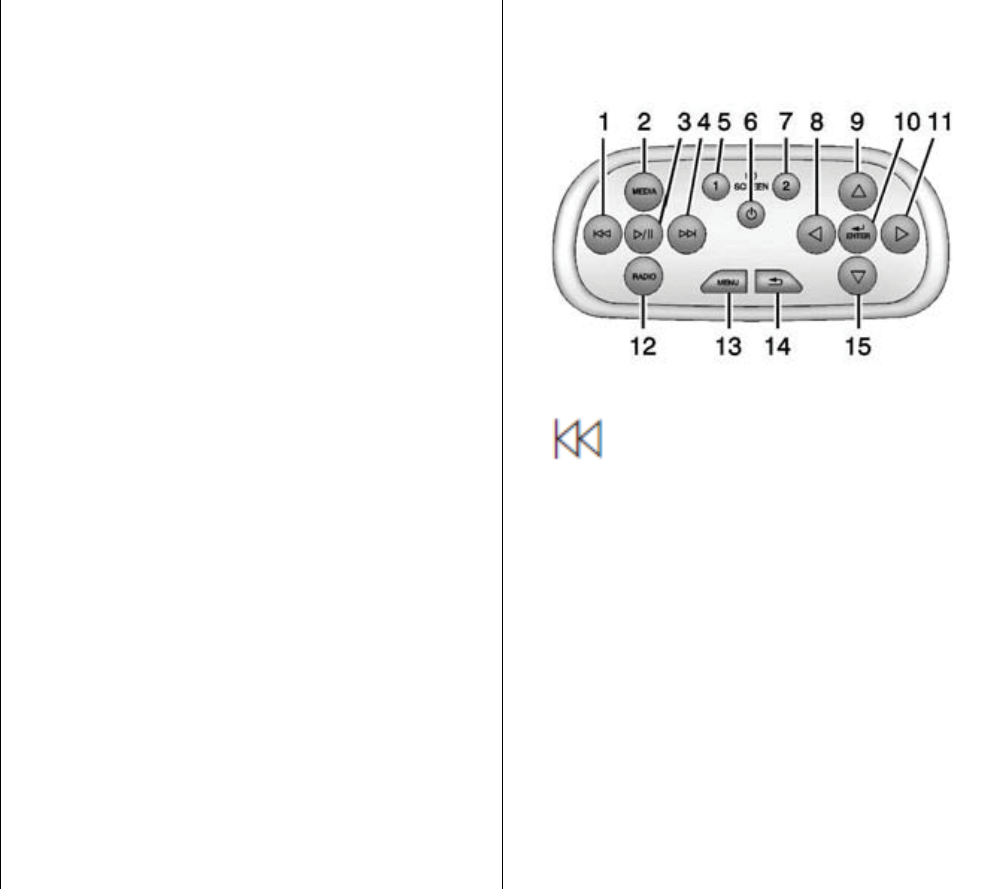
Remote Control
Remote Control Buttons
1.
7
(Previous/Reverse)
.
Radio: Press to seek the
previous radio station.
.
CD: Press to seek the
previous track.
.
Blu-ray/DVD: Press to seek
the previous chapter.
.
Press and hold for fast
reverse.
2. MEDIA
.
Press to scroll through the
menus including: CD, AUX,
Blu-ray/DVD, HDMI, USB.
19
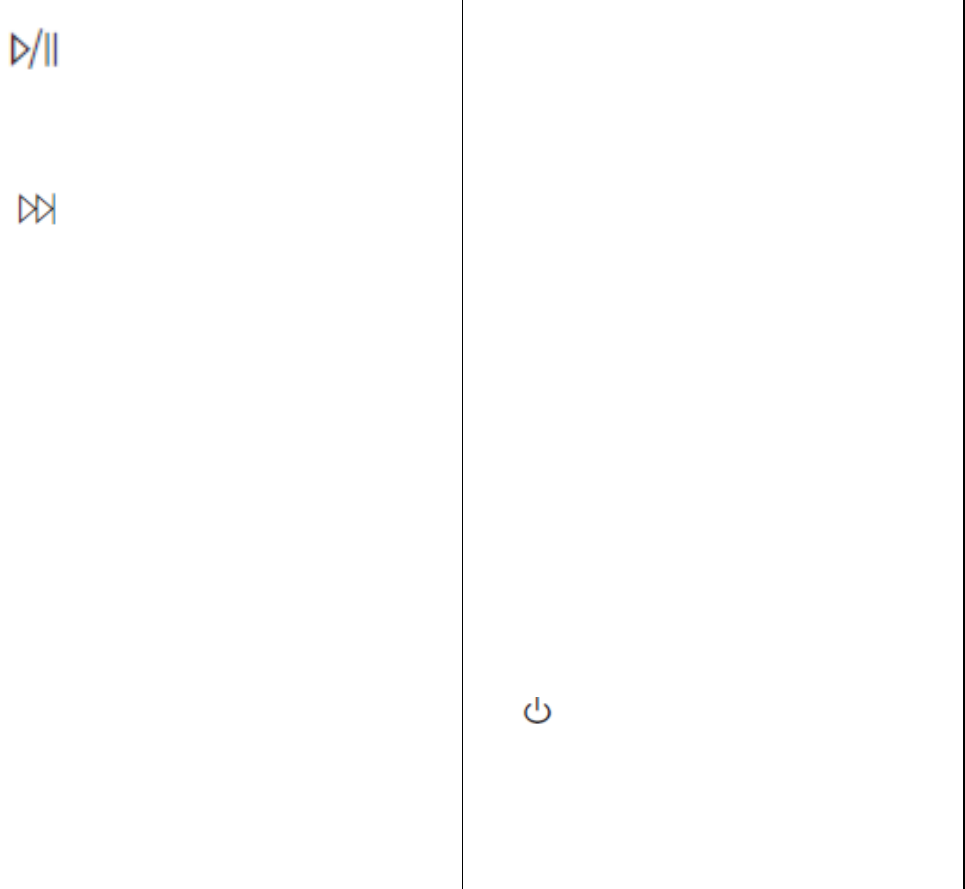
3.
J
(Play/Pause)
.
Press to start playing.
Press to pause. Press
again to continue playing.
4.
6
(Next/Fast Forward)
.
Radio: Press to seek the
next radio station.
.
CD: Press to seek the next
track.
.
Blu-ray/DVD: Press to seek
the next chapter.
.
Press and hold to fast
forward.
5. SCREEN 1
.
For dual seatback screens:
Press to select the left
screen. Once pressed, all
remote control commands
will only pertain to
screen
1.
.
For single overhead
screens:
Press to change the source
displayed on the overhead
screen to SCREEN 1
selected source. Select
audio sources. Only one
video can be played on the
screen at a time. Audio for
both sources will continue
on the headphones. Once
pressed, all remote control
commands will correspond
to SCREEN 1.
.
For dual overhead screens:
Press to select the second
row overhead screen. Once
pressed, all remote control
commands will correspond
to
SCREEN
1.
6. O(Power)
.
Press to turn the video
screens on and off.
7. SCREEN 2
.
For dual seatback screens:
Press to select the right
screen. Once pressed, all
remote control commands
will only pertain to
SCREEN
2.
.
For single overhead
screens:
Press to change the source
displayed on the overhead
screen to SCREEN 2
selected source. Only one
video can be played on the
screen at a time. Audio for
both sources will continue
on the headphones. Once
pressed, all remote control
commands will correspond
to SCREEN 2.
.
For dual overhead screens:
Press to select the optional
third row overhead screen.
Once pressed, all remote
control commands will
correspond to
SCREEN
2.
20
8.
o
(Previous/Reverse/Decrease)
.
Radio and CD: Press to go
to the previous station or
track.
.
Press to go to the
previous menu.
.
Press to decrease the
brightness of the RSE
screen.
9. w(Up Arrow)
.
Press to scroll up a
list.
10.
r
/ENTER
.
Press to select
the
highlighted choice in
any menu.
.
Press and hold for
quick play.
11.
p
(Next/Forward/Increase)
.
Radio and CD: Press to
go to the next station or
track.
.
Press to go to the
next menu.
.
Press to increase the
brightness of the RSE
screen.
12. RADIO
.
Press to scroll through the
radio sources including
AM, FM, or XM (if
equipped).
13. MENU
.
Press to go to the menu of
the now playing screen.
14.
4
(Back)
.
Press to go back to the
previous menu.
.
Press and hold to go back
to the now playing screen.
15.
x
(Down Arrow)
.
Press to go down a list.
To use the remote control, aim it at
the transmitter window at either
seatback console or at the second
row overhead screen and press the
buttons firmly. Direct sunlight or very
bright light could affect the ability of
the RSE transmitter to receive
signals from the remote control.
Check the batteries if the remote
control does not seem to be
working. See
“
Battery Replacement
”
later in this section. Objects
blocking the line of sight could also
affect the function of the remote
control.
{
Caution
Storing the remote control in a hot
area or in direct sunlight can
damage it, and the repairs will not
be covered by the warranty.
Storage in extreme cold can
weaken the batteries. Keep the
remote control stored in a cool,
dry place.
21

Battery Replacement
To change the remote control
batteries:
1. Insert a coin or key to pull up the
rear cover on the remote control.
2. Replace the two AAA batteries
in the compartment.
3. Replace the battery cover.
Remove the batteries from the
remote control if it will not be used
for an extended period of time.
RSE Troubleshooting
No power: The ignition might not
be in ON/RUN or ACC/
ACCESSORY.
The picture does not fill the
screen. There are black borders
on the top and bottom or on both
sides or it looks stretched out:
Press the MENU button on the
remote control to change the display
mode setting.
In auxiliary mode, the picture
moves or scrolls: Check the
auxiliary input connections at both
devices.
The remote control does not
work: Check to make sure the
remote control is programmed to the
correct screen. Make sure there is
no obstruction between the remote
control and the transmitter window
and check the batteries to make
sure they are not dead or installed
incorrectly.
There is no sound from the
headphones with the indicator
light on: If the batteries are good,
make sure the headphones are
programmed to the correct screen
and on the correct channel for the
screen being viewed.
The auxiliary source is running
but there is no picture or sound:
Check that the RSE video screen is
in the auxiliary source mode by
pressing the MEDIA button on the
remote control. Check the auxiliary
input connections at both devices.
Sometimes the wireless
headphone audio cuts out or
buzzes: Check for obstructions,
low batteries, reception range, and
interference from cell phone towers
or from cellular telephone use in the
vehicle. Check that the headphones
are on correctly using the L (Left)
and R (Right) on the headphones.
Check that the headphones are
positioned properly with the
headband across the top of
the head.
I lost the remote and/or the
headphones: See your dealer for
assistance.
The Blu-ray/DVD is playing, but
there is no picture or sound:
Check that the RSE video screen is
sourced to the Blu-ray/DVD player
by pressing the MEDIA button on
the remote control.
22