Motorola MC35 EDA User Guide [English] Manual To The 23a6e949 49de 4724 8b13 358cec4f2b72
User Manual: Motorola MC35 EDA to the manual
Open the PDF directly: View PDF ![]() .
.
Page Count: 236 [warning: Documents this large are best viewed by clicking the View PDF Link!]
- Welcome
- 1 First Things First
- 2 System Tour
- 3 Entering Information
- 4 Managing Information
- 5 Wireless Communications
- 6 Using the Windows Mobile Programs
- 7 Using Phone
- 8 Using MC35 Companion Programs
- 9 Customizing your MC35
- 10 User Support
- Index
MC35 EDA
User Guide
User Guide
MC35 Enterprise Digital Assistant
COPYRIGHT
© 2007 by Motorola, Inc. All rights reserved.
No part of this publication may be reproduced or used in any form, or by any electrical or
mechanical means, without permission in writing from Motorola. This includes electronic or
mechanical means, such as photocopying, recording, or information storage and retrieval
systems. The material in this manual is subject to change without notice.
The software is provided strictly on an "as is" basis. All software, including firmware, furnished
to the user is on a licensed basis. Motorola grants to the user a non-transferable and non-
exclusive license to use each software or firmware program delivered hereunder (licensed
program). Except as noted below, such license may not be assigned, sublicensed, or otherwise
transferred by the user without prior written consent of Motorola. No right to copy a licensed
program in whole or in part is granted, except as permitted under copyright law. The user shall
not modify, merge, or incorporate any form or portion of a licensed program with other program
material, create a derivative work from a licensed program, or use a licensed program in a
network without written permission from Motorola. The user agrees to maintain Motorola’s
copyright notice on the licensed programs delivered hereunder, and to include the same on any
authorized copies it makes, in whole or in part. The user agrees not to decompile, disassemble,
decode, or reverse engineer any licensed program delivered to the user or any portion thereof.
Motorola reserves the right to make changes to any software or product to improve reliability,
function, or design.
Motorola does not assume any product liability arising out of, or in connection with, the
application or use of any product, circuit, or application described herein.
No license is granted, either expressly or by implication, estoppel, or otherwise under any
Motorola, Inc., intellectual property rights. An implied license only exists for equipment, circuits,
and subsystems contained in Motorola products.
MOTOROLA and the Stylized M Logo are registered in the US Patent & Trademark Office.
Symbol is a registered trademark of Symbol Technologies, Inc. All other product or service
names are the property of their respective owners. Bluetooth is a registered trademark of
Bluetooth SIG. Microsoft, Windows and ActiveSync are either registered trademarks or
trademarks of Microsoft Corporation. Other product names mentioned in this manual may be
trademarks or registered trademarks of their respective companies and are hereby
acknowledged.
Motorola, Inc.
One Symbol Plaza
Holtsville, New York 11742-1300
http://www.symbol.com

Welcome
v
Welcome
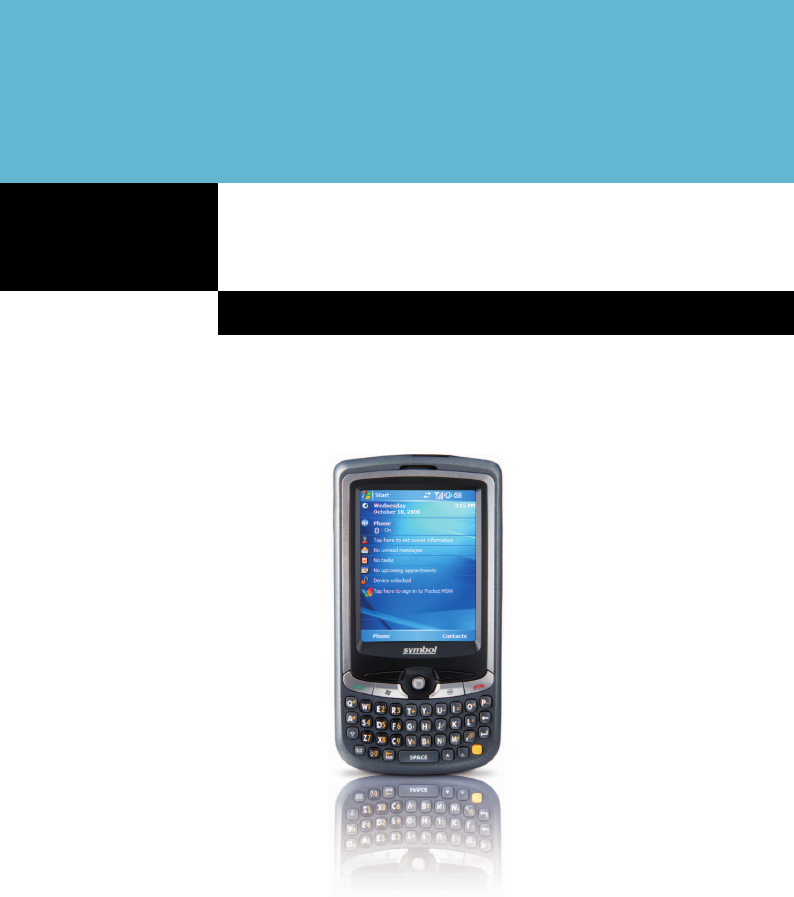
Thank you for making MC35 your choice for your mobile computing and communication
needs. Your new sleek MC35 is a fully integrated EDA-mobile phone device. It combines
the power of high-performance EDA applications for organizing personal and
work-related information with the connectivity function of a mobile phone. The device
also supports high-speed General Packet Radio Services (GPRS) for on-the-go Internet
access, as well as a high quality Global Positioning System (GPS) solution to meet your
travel needs. Selected MC35 models have a built-in camera for taking pictures and bar
code data capture. All these features make your MC35 the ideal digital companion for
both work and play.

Welcome
vi

vii
Welcome v
1 First Things First 1
Package contents. . . . . . . . . . . . . . . . . . . . . . . . . . . . . . . . . . . . . . . . . . . . . . . . . . . . . . . 1
Preparing to use your MC35 . . . . . . . . . . . . . . . . . . . . . . . . . . . . . . . . . . . . . . . . . . . . . . 1
Installing the battery pack . . . . . . . . . . . . . . . . . . . . . . . . . . . . . . . . . . . . . . . . . . . . 1
Charging the MC35 . . . . . . . . . . . . . . . . . . . . . . . . . . . . . . . . . . . . . . . . . . . . . . . . . 2
Installing Microsoft ActiveSync . . . . . . . . . . . . . . . . . . . . . . . . . . . . . . . . . . . . . . . . 3
Starting the MC35 . . . . . . . . . . . . . . . . . . . . . . . . . . . . . . . . . . . . . . . . . . . . . . . . . . 4
Creating an ActiveSync partnership . . . . . . . . . . . . . . . . . . . . . . . . . . . . . . . . . . . . 4
2 System Tour 7
Features summary . . . . . . . . . . . . . . . . . . . . . . . . . . . . . . . . . . . . . . . . . . . . . . . . . . . . . . 7
Performance . . . . . . . . . . . . . . . . . . . . . . . . . . . . . . . . . . . . . . . . . . . . . . . . . . . . . . 7
Display. . . . . . . . . . . . . . . . . . . . . . . . . . . . . . . . . . . . . . . . . . . . . . . . . . . . . . . . . . . 7
Audio . . . . . . . . . . . . . . . . . . . . . . . . . . . . . . . . . . . . . . . . . . . . . . . . . . . . . . . . . . . . 7
Mobile connectivity . . . . . . . . . . . . . . . . . . . . . . . . . . . . . . . . . . . . . . . . . . . . . . . . . 7
Hardware connectivity. . . . . . . . . . . . . . . . . . . . . . . . . . . . . . . . . . . . . . . . . . . . . . . 8
Battery pack . . . . . . . . . . . . . . . . . . . . . . . . . . . . . . . . . . . . . . . . . . . . . . . . . . . . . . 8
Design and ergonomics . . . . . . . . . . . . . . . . . . . . . . . . . . . . . . . . . . . . . . . . . . . . . 8
Accessories. . . . . . . . . . . . . . . . . . . . . . . . . . . . . . . . . . . . . . . . . . . . . . . . . . . . . . . 9
Hardware tour . . . . . . . . . . . . . . . . . . . . . . . . . . . . . . . . . . . . . . . . . . . . . . . . . . . . . . . . 10
Hardware interface. . . . . . . . . . . . . . . . . . . . . . . . . . . . . . . . . . . . . . . . . . . . . . . . . . . . . 12
Using the touch screen backlight key . . . . . . . . . . . . . . . . . . . . . . . . . . . . . . . . . . 12
Using the stylus. . . . . . . . . . . . . . . . . . . . . . . . . . . . . . . . . . . . . . . . . . . . . . . . . . . 12
Using the SD/MMC expansion slot . . . . . . . . . . . . . . . . . . . . . . . . . . . . . . . . . . . . 12
Soft buttons and keypad . . . . . . . . . . . . . . . . . . . . . . . . . . . . . . . . . . . . . . . . . . . . 14
Command interface . . . . . . . . . . . . . . . . . . . . . . . . . . . . . . . . . . . . . . . . . . . . . . . . . . . . 17
Today screen. . . . . . . . . . . . . . . . . . . . . . . . . . . . . . . . . . . . . . . . . . . . . . . . . . . . . 17
Start menu. . . . . . . . . . . . . . . . . . . . . . . . . . . . . . . . . . . . . . . . . . . . . . . . . . . . . . . 18
Navigation bar . . . . . . . . . . . . . . . . . . . . . . . . . . . . . . . . . . . . . . . . . . . . . . . . . . . . 18
Command bar . . . . . . . . . . . . . . . . . . . . . . . . . . . . . . . . . . . . . . . . . . . . . . . . . . . . 20
Pop-up menus . . . . . . . . . . . . . . . . . . . . . . . . . . . . . . . . . . . . . . . . . . . . . . . . . . . . 20
Notifications. . . . . . . . . . . . . . . . . . . . . . . . . . . . . . . . . . . . . . . . . . . . . . . . . . . . . . 20
3 Entering Information 21
Using the MC35 keypad. . . . . . . . . . . . . . . . . . . . . . . . . . . . . . . . . . . . . . . . . . . . . . . . . 21
Using the Input Selector. . . . . . . . . . . . . . . . . . . . . . . . . . . . . . . . . . . . . . . . . . . . . . . . . 21
Keyboard . . . . . . . . . . . . . . . . . . . . . . . . . . . . . . . . . . . . . . . . . . . . . . . . . . . . . . . . 22
Block Recognizer . . . . . . . . . . . . . . . . . . . . . . . . . . . . . . . . . . . . . . . . . . . . . . . . . 23
Letter Recognizer . . . . . . . . . . . . . . . . . . . . . . . . . . . . . . . . . . . . . . . . . . . . . . . . . 23
Transcriber. . . . . . . . . . . . . . . . . . . . . . . . . . . . . . . . . . . . . . . . . . . . . . . . . . . . . . . 24
Star Key. . . . . . . . . . . . . . . . . . . . . . . . . . . . . . . . . . . . . . . . . . . . . . . . . . . . . . . . . 25
Writing on the screen. . . . . . . . . . . . . . . . . . . . . . . . . . . . . . . . . . . . . . . . . . . . . . . . . . . 25
Drawing on the screen . . . . . . . . . . . . . . . . . . . . . . . . . . . . . . . . . . . . . . . . . . . . . . . . . . 27
Recording a message . . . . . . . . . . . . . . . . . . . . . . . . . . . . . . . . . . . . . . . . . . . . . . . . . . 28
Using My Text . . . . . . . . . . . . . . . . . . . . . . . . . . . . . . . . . . . . . . . . . . . . . . . . . . . . . . . . 29
Using ActiveSync . . . . . . . . . . . . . . . . . . . . . . . . . . . . . . . . . . . . . . . . . . . . . . . . . . . . . . 30
Synchronizing information with your computer . . . . . . . . . . . . . . . . . . . . . . . . . . . 30
Synchronizing with a server . . . . . . . . . . . . . . . . . . . . . . . . . . . . . . . . . . . . . . . . . 34
Using ActiveSync to copy files. . . . . . . . . . . . . . . . . . . . . . . . . . . . . . . . . . . . . . . . 36
Synchronization options . . . . . . . . . . . . . . . . . . . . . . . . . . . . . . . . . . . . . . . . . . . . 36
ActiveSync errors . . . . . . . . . . . . . . . . . . . . . . . . . . . . . . . . . . . . . . . . . . . . . . . . . 37
Using wireless communication. . . . . . . . . . . . . . . . . . . . . . . . . . . . . . . . . . . . . . . . . . . . 38
4 Managing Information 39
Opening programs . . . . . . . . . . . . . . . . . . . . . . . . . . . . . . . . . . . . . . . . . . . . . . . . . . . . . 39
Program list . . . . . . . . . . . . . . . . . . . . . . . . . . . . . . . . . . . . . . . . . . . . . . . . . . . . . . 40
Using Search . . . . . . . . . . . . . . . . . . . . . . . . . . . . . . . . . . . . . . . . . . . . . . . . . . . . . . . . . 42
Using File Explorer. . . . . . . . . . . . . . . . . . . . . . . . . . . . . . . . . . . . . . . . . . . . . . . . . . . . . 42
5 Wireless Communications 43
Wireless communication features . . . . . . . . . . . . . . . . . . . . . . . . . . . . . . . . . . . . . . . . . 43
Beam function . . . . . . . . . . . . . . . . . . . . . . . . . . . . . . . . . . . . . . . . . . . . . . . . . . . . 43
Contents

viii
GPRS connection . . . . . . . . . . . . . . . . . . . . . . . . . . . . . . . . . . . . . . . . . . . . . . . . .49
WiFi connection . . . . . . . . . . . . . . . . . . . . . . . . . . . . . . . . . . . . . . . . . . . . . . . . . . .50
Managing wireless connections . . . . . . . . . . . . . . . . . . . . . . . . . . . . . . . . . . . . . . . . . . .56
Using Wireless Manager . . . . . . . . . . . . . . . . . . . . . . . . . . . . . . . . . . . . . . . . . . . .56
Getting connected . . . . . . . . . . . . . . . . . . . . . . . . . . . . . . . . . . . . . . . . . . . . . . . . . . . . .59
Connecting to the Internet . . . . . . . . . . . . . . . . . . . . . . . . . . . . . . . . . . . . . . . . . . .59
Connecting to your office network . . . . . . . . . . . . . . . . . . . . . . . . . . . . . . . . . . . . .60
Viewing intranet URLs . . . . . . . . . . . . . . . . . . . . . . . . . . . . . . . . . . . . . . . . . . . . . .61
Setting an e-mail server connection. . . . . . . . . . . . . . . . . . . . . . . . . . . . . . . . . . . .61
6 Using the Windows Mobile Programs 63
Microsoft Outlook Mobile programs . . . . . . . . . . . . . . . . . . . . . . . . . . . . . . . . . . . . . . . .63
Calendar . . . . . . . . . . . . . . . . . . . . . . . . . . . . . . . . . . . . . . . . . . . . . . . . . . . . . . . .63
Contacts . . . . . . . . . . . . . . . . . . . . . . . . . . . . . . . . . . . . . . . . . . . . . . . . . . . . . . . .66
Tasks. . . . . . . . . . . . . . . . . . . . . . . . . . . . . . . . . . . . . . . . . . . . . . . . . . . . . . . . . . .70
Notes. . . . . . . . . . . . . . . . . . . . . . . . . . . . . . . . . . . . . . . . . . . . . . . . . . . . . . . . . . .72
Messaging. . . . . . . . . . . . . . . . . . . . . . . . . . . . . . . . . . . . . . . . . . . . . . . . . . . . . . .74
Microsoft Office Mobile programs. . . . . . . . . . . . . . . . . . . . . . . . . . . . . . . . . . . . . . . . . .78
Word Mobile . . . . . . . . . . . . . . . . . . . . . . . . . . . . . . . . . . . . . . . . . . . . . . . . . . . . .78
Excel Mobile . . . . . . . . . . . . . . . . . . . . . . . . . . . . . . . . . . . . . . . . . . . . . . . . . . . . .81
PowerPoint Mobile . . . . . . . . . . . . . . . . . . . . . . . . . . . . . . . . . . . . . . . . . . . . . . . .83
Windows Media Player . . . . . . . . . . . . . . . . . . . . . . . . . . . . . . . . . . . . . . . . . . . . . . . . .86
Copying files to your device . . . . . . . . . . . . . . . . . . . . . . . . . . . . . . . . . . . . . . . . . .86
The library . . . . . . . . . . . . . . . . . . . . . . . . . . . . . . . . . . . . . . . . . . . . . . . . . . . . . . .87
The playlist. . . . . . . . . . . . . . . . . . . . . . . . . . . . . . . . . . . . . . . . . . . . . . . . . . . . . . .87
File Playback . . . . . . . . . . . . . . . . . . . . . . . . . . . . . . . . . . . . . . . . . . . . . . . . . . . . .91
Customizing the Player . . . . . . . . . . . . . . . . . . . . . . . . . . . . . . . . . . . . . . . . . . . . .92
Internet Explorer Mobile . . . . . . . . . . . . . . . . . . . . . . . . . . . . . . . . . . . . . . . . . . . . . . . .96
Pocket MSN. . . . . . . . . . . . . . . . . . . . . . . . . . . . . . . . . . . . . . . . . . . . . . . . . . . . . . . . . .99
MSN Hotmail. . . . . . . . . . . . . . . . . . . . . . . . . . . . . . . . . . . . . . . . . . . . . . . . . . . .101
MSN Messenger . . . . . . . . . . . . . . . . . . . . . . . . . . . . . . . . . . . . . . . . . . . . . . . . .103
7 Using Phone 109
Phone setup . . . . . . . . . . . . . . . . . . . . . . . . . . . . . . . . . . . . . . . . . . . . . . . . . . . . . . . . .109
Installing the SIM card . . . . . . . . . . . . . . . . . . . . . . . . . . . . . . . . . . . . . . . . . . . . .109
Entering your PIN. . . . . . . . . . . . . . . . . . . . . . . . . . . . . . . . . . . . . . . . . . . . . . . . .111
Dialer screen . . . . . . . . . . . . . . . . . . . . . . . . . . . . . . . . . . . . . . . . . . . . . . . . . . . . . . . .112
Dialer buttons. . . . . . . . . . . . . . . . . . . . . . . . . . . . . . . . . . . . . . . . . . . . . . . . . . . .112
Phone status icons. . . . . . . . . . . . . . . . . . . . . . . . . . . . . . . . . . . . . . . . . . . . . . . .113
Phone operation . . . . . . . . . . . . . . . . . . . . . . . . . . . . . . . . . . . . . . . . . . . . . . . . . . . . . .113
Turning the phone function on and off . . . . . . . . . . . . . . . . . . . . . . . . . . . . . . . . .113
Erasing number input. . . . . . . . . . . . . . . . . . . . . . . . . . . . . . . . . . . . . . . . . . . . . .115
Answering a call. . . . . . . . . . . . . . . . . . . . . . . . . . . . . . . . . . . . . . . . . . . . . . . . . .116
Rejecting a call. . . . . . . . . . . . . . . . . . . . . . . . . . . . . . . . . . . . . . . . . . . . . . . . . . .116
Ending a call . . . . . . . . . . . . . . . . . . . . . . . . . . . . . . . . . . . . . . . . . . . . . . . . . . . .116
Adjusting the phone volume. . . . . . . . . . . . . . . . . . . . . . . . . . . . . . . . . . . . . . . . .116
Using the speakerphone . . . . . . . . . . . . . . . . . . . . . . . . . . . . . . . . . . . . . . . . . . .116
Muting a call. . . . . . . . . . . . . . . . . . . . . . . . . . . . . . . . . . . . . . . . . . . . . . . . . . . . .117
Making phone calls . . . . . . . . . . . . . . . . . . . . . . . . . . . . . . . . . . . . . . . . . . . . . . .117
Phone features . . . . . . . . . . . . . . . . . . . . . . . . . . . . . . . . . . . . . . . . . . . . . . . . . . . . . . .121
Call notification and identification. . . . . . . . . . . . . . . . . . . . . . . . . . . . . . . . . . . . .122
Call hold . . . . . . . . . . . . . . . . . . . . . . . . . . . . . . . . . . . . . . . . . . . . . . . . . . . . . . . .122
Conference call . . . . . . . . . . . . . . . . . . . . . . . . . . . . . . . . . . . . . . . . . . . . . . . . . .123
Call notes . . . . . . . . . . . . . . . . . . . . . . . . . . . . . . . . . . . . . . . . . . . . . . . . . . . . . . .123
Text messaging service . . . . . . . . . . . . . . . . . . . . . . . . . . . . . . . . . . . . . . . . . . . .125
Voice mail. . . . . . . . . . . . . . . . . . . . . . . . . . . . . . . . . . . . . . . . . . . . . . . . . . . . . . .128
Contacts integration . . . . . . . . . . . . . . . . . . . . . . . . . . . . . . . . . . . . . . . . . . . . . . .129
Call History . . . . . . . . . . . . . . . . . . . . . . . . . . . . . . . . . . . . . . . . . . . . . . . . . . . . .131
Phone profiles. . . . . . . . . . . . . . . . . . . . . . . . . . . . . . . . . . . . . . . . . . . . . . . . . . . . . . . .134
Phone preferences . . . . . . . . . . . . . . . . . . . . . . . . . . . . . . . . . . . . . . . . . . . . . . . . . . . .136
Phone tab. . . . . . . . . . . . . . . . . . . . . . . . . . . . . . . . . . . . . . . . . . . . . . . . . . . . . . .136
Services tab . . . . . . . . . . . . . . . . . . . . . . . . . . . . . . . . . . . . . . . . . . . . . . . . . . . . .138
Network tab . . . . . . . . . . . . . . . . . . . . . . . . . . . . . . . . . . . . . . . . . . . . . . . . . . . . .142
Band tab. . . . . . . . . . . . . . . . . . . . . . . . . . . . . . . . . . . . . . . . . . . . . . . . . . . . . . . .143

ix
8 Using MC35 Companion Programs 145
Phone management programs . . . . . . . . . . . . . . . . . . . . . . . . . . . . . . . . . . . . . . . . . . 145
SIM Manager. . . . . . . . . . . . . . . . . . . . . . . . . . . . . . . . . . . . . . . . . . . . . . . . . . . . 145
SIM Toolkit. . . . . . . . . . . . . . . . . . . . . . . . . . . . . . . . . . . . . . . . . . . . . . . . . . . . . . 147
Wireless communication programs . . . . . . . . . . . . . . . . . . . . . . . . . . . . . . . . . . . . . . . 148
Internet Sharing. . . . . . . . . . . . . . . . . . . . . . . . . . . . . . . . . . . . . . . . . . . . . . . . . . 148
Push to Talk. . . . . . . . . . . . . . . . . . . . . . . . . . . . . . . . . . . . . . . . . . . . . . . . . . . . . 149
GPRS Setting . . . . . . . . . . . . . . . . . . . . . . . . . . . . . . . . . . . . . . . . . . . . . . . . . . . 157
Terminal Services Client . . . . . . . . . . . . . . . . . . . . . . . . . . . . . . . . . . . . . . . . . . . 158
Express GPS Connect . . . . . . . . . . . . . . . . . . . . . . . . . . . . . . . . . . . . . . . . . . . . 160
Media-related programs. . . . . . . . . . . . . . . . . . . . . . . . . . . . . . . . . . . . . . . . . . . . . . . . 164
Pictures & Videos . . . . . . . . . . . . . . . . . . . . . . . . . . . . . . . . . . . . . . . . . . . . . . . . 164
Camera . . . . . . . . . . . . . . . . . . . . . . . . . . . . . . . . . . . . . . . . . . . . . . . . . . . . . . . . 173
CamWedge . . . . . . . . . . . . . . . . . . . . . . . . . . . . . . . . . . . . . . . . . . . . . . . . . . . . . 178
Product download-related programs . . . . . . . . . . . . . . . . . . . . . . . . . . . . . . . . . . . . . . 181
AirBEAM Smart . . . . . . . . . . . . . . . . . . . . . . . . . . . . . . . . . . . . . . . . . . . . . . . . . . 181
Rapid Deployment Client. . . . . . . . . . . . . . . . . . . . . . . . . . . . . . . . . . . . . . . . . . . 190
Download Agent . . . . . . . . . . . . . . . . . . . . . . . . . . . . . . . . . . . . . . . . . . . . . . . . . 192
9 Customizing your MC35 193
Adjusting system preferences . . . . . . . . . . . . . . . . . . . . . . . . . . . . . . . . . . . . . . . . . . . 193
Personal tab . . . . . . . . . . . . . . . . . . . . . . . . . . . . . . . . . . . . . . . . . . . . . . . . . . . . 193
System tab . . . . . . . . . . . . . . . . . . . . . . . . . . . . . . . . . . . . . . . . . . . . . . . . . . . . . 198
Connections tab . . . . . . . . . . . . . . . . . . . . . . . . . . . . . . . . . . . . . . . . . . . . . . . . . 203
Program management . . . . . . . . . . . . . . . . . . . . . . . . . . . . . . . . . . . . . . . . . . . . . . . . . 206
Adding programs to your device . . . . . . . . . . . . . . . . . . . . . . . . . . . . . . . . . . . . . 206
Removing programs . . . . . . . . . . . . . . . . . . . . . . . . . . . . . . . . . . . . . . . . . . . . . . 208
10 User Support 209
Customer support . . . . . . . . . . . . . . . . . . . . . . . . . . . . . . . . . . . . . . . . . . . . . . . . . . . . 209
Protecting your MC35 . . . . . . . . . . . . . . . . . . . . . . . . . . . . . . . . . . . . . . . . . . . . . . . . . 210
Using system locks . . . . . . . . . . . . . . . . . . . . . . . . . . . . . . . . . . . . . . . . . . . . . . . 210
Creating backup files. . . . . . . . . . . . . . . . . . . . . . . . . . . . . . . . . . . . . . . . . . . . . . 211
Troubleshooting . . . . . . . . . . . . . . . . . . . . . . . . . . . . . . . . . . . . . . . . . . . . . . . . . . . . . . 213
Troubleshooting reminders . . . . . . . . . . . . . . . . . . . . . . . . . . . . . . . . . . . . . . . . . 213
Troubleshooting procedures . . . . . . . . . . . . . . . . . . . . . . . . . . . . . . . . . . . . . . . . 213
Recalibrating the screen . . . . . . . . . . . . . . . . . . . . . . . . . . . . . . . . . . . . . . . . . . . 217
Resetting your MC35. . . . . . . . . . . . . . . . . . . . . . . . . . . . . . . . . . . . . . . . . . . . . . 218
Battery pack information . . . . . . . . . . . . . . . . . . . . . . . . . . . . . . . . . . . . . . . . . . . 219
Index 221

x

1 First Things First
Package contents
1
1 First Things First
•Package contents
•Preparing to use your MC35
Package contents
Your MC35 comes packed in a cardboard box. Carefully unpack the box and remove the
contents. If any of the following items are missing or damaged, contact your dealer
immediately.
•MC35 Enterprise Digital Assistant
•Stylus
•Standard life battery
•AC adapter (with four region-specific clip plugs)
•USB sync cable
•MC35 Quick Start Guide
•MC35 Regulatory Guide
Preparing to use your MC35
Perform the following easy setup tasks to begin using your device:
1 Install the battery pack.
2 Charge your device.
3 Install ActiveSync 4.2 or higher on your computer.
4 Start the MC35.
5 Create an ActiveSync partnership between your device and your computer.
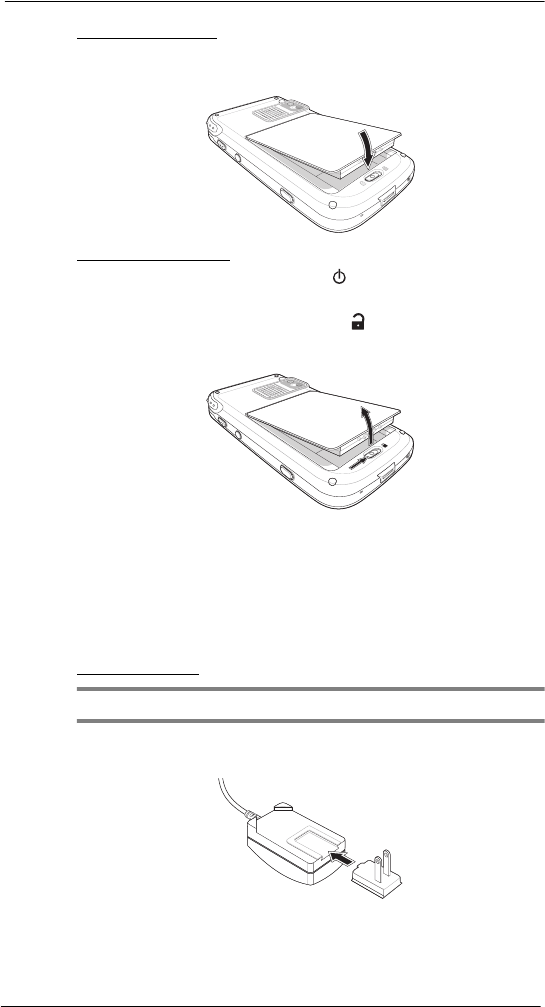
Installing the battery pack
Your MC35 uses a high-density removable and rechargeable 1370 mAh lithium polymer/
standard life battery. See “Battery problem” on page 213 for more information on how to
conserve power consumption to make your battery last longer.
NOTE: An optional 2740 mAh extended life battery is available.
WARNING! There is a risk of fire and burns if the battery is handled improperly. DO
NOT disassemble, crush, puncture, short external contacts, or dispose the battery in fire
or water. DO NOT attempt to open or service the battery. Dispose of used batteries
according to local recycling guidelines in your area.
1 First Things First
Preparing to use your MC35
2
To install the battery pack:
Align the tabs on the battery pack with the grooves on the rear side of the device, and
then insert the battery pack in place. The battery pack locks to the chassis with an
audible click.
To uninstall the battery pack:
1 If the device is on, press the Power button to turn off the device.
Wait for five seconds to allow the device to completely power off.
2 Slide the battery latch toward the unlock icon to release the battery pack from
the chassis (1).
3 Completely detach the battery pack from the device (2).
Charging the MC35
Initial charging of a standard life battery takes about four hours. The extended life battery
type requires at least eight hours. After the initial charging, charge your device everyday
to restore the battery to full capacity. Charge your device using the AC adapter cable, see
instructions below.
While waiting for the initial charging to complete, install Microsoft® ActiveSync® 4.2 or
higher on your computer to prepare for the initial synchronization procedure. Refer to the
next section for instructions.
To charge your device:
NOTE: Use the clip plug applicable in your country.
1 Slide the replaceable clip plug into the AC adapter until it locks into place with an
audible click.
1
2

1 First Things First
Preparing to use your MC35
3
2 Plug the AC adapter cable into the mini USB connector on bottom of the device.
3 Connect the AC adapter cable into an electrical outlet.
The LED indicator on the right side of the touch screen lights up orange to signify
that AC connection is made.
If the battery level becomes low in the course of normal use, a status icon appears
on the device screen indicating low or depleted battery status (see "Status icons" on
page 18 for more information). In both cases, perform an ActiveSync operation to
back up your data, and then recharge your device as soon as possible.
If the battery level reaches low status, the device enters sleep mode; if the battery
level reaches very low status, the device enters deep sleep mode. In this case, you
have about 72 hours to recharge your device after which you risk losing all data on
your device’s internal memory.
Installing Microsoft ActiveSync
ActiveSync is already installed on your MC35; you only need to install it on your
computer.
System installation requirements
•Supported operating systems:
•Windows 2000 Service Pack 4
•Windows Server® 2003 Service Pack 1
•Windows Server 2003 Service Pack 1 for Itanium-based Systems
•Windows Server 2003, Standard x64 Edition
•Windows XP® Media Center Edition
•Windows XP Professional x64 Edition
•Windows XP Service Pack 1
•Windows XP Service Pack 2
•Windows XP Tablet PC Edition
•Microsoft Outlook® 2000, Microsoft Outlook XP, or Microsoft Outlook® 2003
(recommended) messaging and collaboration clients required for Microsoft Outlook
Office Mobile synchronization
•Microsoft Office 2000, Microsoft Office XP or Microsoft Office 2003 for Microsoft
Office Mobile® synchronization
•Microsoft Internet Explorer 6.0 or later for Internet Explorer Mobile favorites
synchronization
•Microsoft Systems Management Server 2.0
•Hard disk drive with 7 MB of available hard disk space (actual requirements may
vary based on selected features and user’s current system configuration)
•USB port, Bluetooth, or infrared connection
1 First Things First
Preparing to use your MC35
4
To install Microsoft ActiveSync on your computer:
1 Close all open programs, including those that run at startup, and disable any
virus-scanning software.
2 Download the ActiveSync setup software from the Microsoft ActiveSync Download
page at http://www.microsoft.com.
3 On the download prompt, click Open.
4 Follow all on-screen instructions to complete installation.
To confirm you've successfully installed ActiveSync, open ActiveSync, then click
Help > About Microsoft ActiveSync.
For detailed information about using ActiveSync on your computer, start ActiveSync
on your computer, click Help > Microsoft ActiveSync Help.
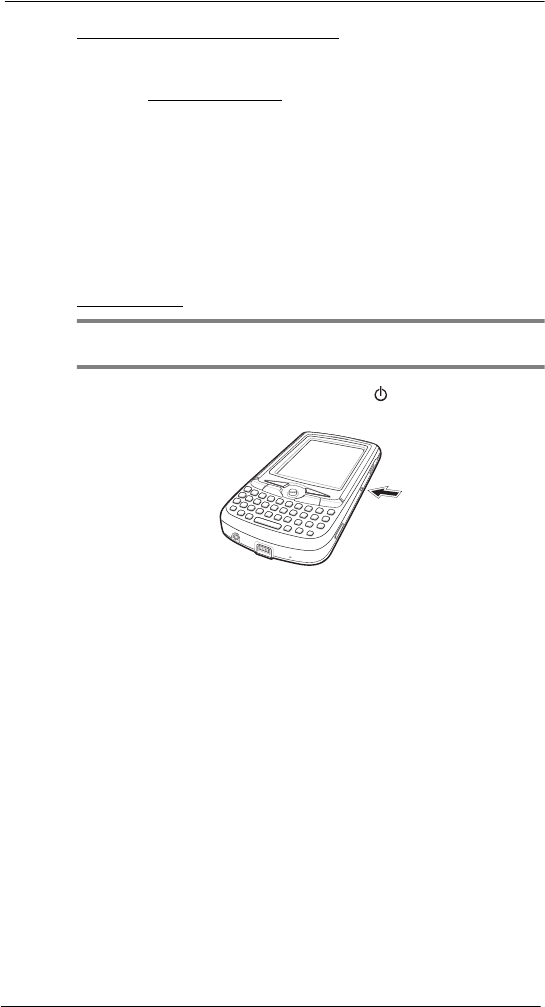
Starting the MC35
After you have initially charged your device, the device is ready for use. You can now
start your device where you will calibrate the display, learn basic stylus usage, and set up
the system date and time.
To start your MC35:
NOTE: After pressing the power button, wait four seconds for the device to power on
before pressing the power button again.
1 Turn on your device by pressing the Power button located on the right side of
the touch screen.
2 Follow the on-screen Welcome Screen Wizard instructions.
3 After the device setup, create an ActiveSync partnership to synchronize information
between your computer and/or server and your MC35.
Creating an ActiveSync partnership
After installing ActiveSync on your computer and completing the device setup, you can
now set up a partnership between your MC35 (first time connection only) and your
computer and/or a server with the help of the New Partnership setup wizard. This wizard
will help you:
•Set up a partnership so you can synchronize information between your
device and your computer
•Customize your synchronization settings
1 First Things First
Preparing to use your MC35
5
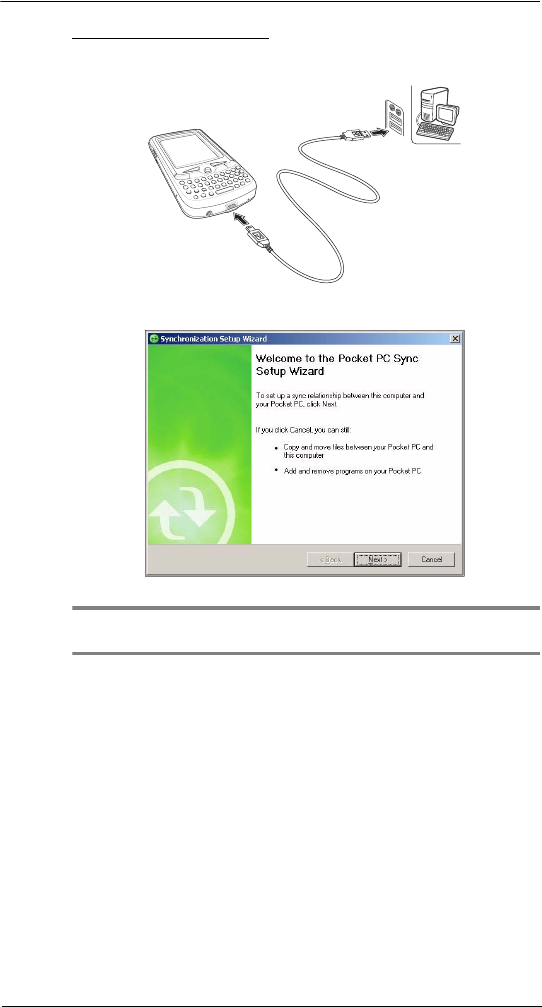
To create an ActiveSync partnership:
1 Connect the USB sync cable into the connector on the bottom of your device, then
plug the USB sync cable into a USB port on your computer.
The Synchronization Setup Wizard automatically starts on your computer screen.
NOTE: If the wizard does not automatically appear, launch ActiveSync on your
computer by clicking on its icon from Start > Programs.
2 Follow the on-screen instructions.
To prevent synchronization problems, select the “Synchronize directly with a server
running Microsoft Exchange Server...” option only if you are certain that your
company is running Microsoft Exchange Server with Exchange ActiveSync and you
know the server address and logon credentials. For more information, contact your
corporate network administrator or service provider.
By default, ActiveSync only synchronize information for Contacts, Calendar,
Messaging (Outlook E-Mail), Tasks, and Favorites (for Internet Explorer Mobile). If
you decide to synchronize other files, for example, Word documents, ActiveSync
need to convert these files. Converted files may not contain all information found in
original file.
1 First Things First
Preparing to use your MC35
6
3 Click Finish to close the wizard and start the initial synchronization.
During the synchronization process, the ActiveSync window appears on your
computer, while the Data connectivity icon appears on your device’s navigation
bar.
After the initial synchronization, the information types you’ve selected for
synchronization are copied to your device. Disconnect your device from your
computer and you're ready to go!
The next time you connect your device, your computer recognizes it automatically.
You don’t need to set up the partnership again. You can initiate synchronization from
your device anytime via several connection options—via USB sync cable, infrared,
or Bluetooth connections. For more information on these connection options and
other ActiveSync configuration settings, see “Using ActiveSync” on page 30.

2 System Tour
Features summary
7
2 System Tour
•Features summary
•System tour
•Hardware interface
•Command interface
Features summary
Listed below are the MC35 key features and specifications.
Performance
•Intel® PXA270 processor with speed of up to 416 MHz
•Integrated Intel XScaleTM Technology
•System memory:
•64 MB SDRAM for application storage
•128 MB Flash ROM
•Microsoft Windows MobileTM 5.0 software
•Microsoft ActiveSync technology for data synchronization
•Express GPS Connect for Assisted Global Positioning System (AGPS) function
•Available configuration models
Display
•2.8" transreflective Thin Film Transistor Liquid Crystal Display (TFT LCD)
•Quarter Video Graphics Array (QVGA) resolution
•65 K color depth support
•Hardware and software backlight controls
•Microsoft ClearType technology for clearer, crisper font display
Audio
•Embedded AC '97 CODEC with CD-quality stereo output
•Built-in industry-standard 2.5-mm earphone jack
•Built-in speaker and microphone
•Separate volume control for system sounds and phone function
•Playback support for both Windows Media and MIDI sound files for personalizing
ring tones and sound notifications
Mobile connectivity
•Phone function
•Quad-band GSM broadband function (850/900/1800/1900 MHz)
•Customizable ring tones and ringer options
•Hardware and software launch options
Model Part number
•WAN/PAN/GPS
•WAN/PAN/GPS/Camera
•WAN/PAN/LAN/GPS
•WAN/PAN/LAN/GPS/Camera
•MC35-B-0
•MC35-C-0
•MC35-L-0
•MC35-CL-0

2 System Tour
Features summary
8
•Wireless connectivity
•IrDA standard Infrared (IR) sensor for short-range file exchange
•Bluetooth for personal area network (PAN) connection
•High-speed GPRS for mobile Internet access via GSM network
•Optional WiFi (IEEE 802.11b/g) hardware for wireless local area network
(WLAN) connection
Hardware connectivity
•Mini USB B connector
•SD/MMC expansion slot
•2.5-mm earphone jack (four-wire)
•Optional 2.0 megapixel micro/macro dual focus digital camera
Battery pack
•Removable and rechargeable 1370 mAh standard life or 2740 mAh
extended life battery pack
•Charging time from empty to full capacity:
•Standard life battery: four hours
•Extended life battery: eight hours
•Operation time (in hours)
NOTE: Length of battery operation depends on power consumption which in turn is
based on system resources use. For example, constantly using the backlight or using
power-demanding applications shortens the length of battery operation.
Design and ergonomics
•Stylish and sleek design
•Dimensions
•Length: 127 mm (5 inches)
•Width: 66 mm (2.6 inches)
•Depth: 19 mm (0.51 inches)
•Weight (approximately, with battery pack): 179 g (6.3 oz.)
Standard life battery
(default)
Extended life battery
(optional)
•Talktime
•Standby
•MP3 playback
•WMV playback time
•Internet browsing time (WLAN)
•GPS usage
4
150
12
8
4
8
8
300
24
16
8
16
Conditions:
•MP3 playback time measured with the backlight off.
•WMV playback time measured with the backlight on and phone off.

2 System Tour
Features summary
9
•User-friendly navigation features
•Joystick for one-hand operation
•Volume button for system volume control
•Push To Talk button for voice recordings and PTT calls. This button is
only available for PTT when PTT service is provided by your carrier.
Contact your mobile phone service provider about feature availability.
The PTT button can also be set to launch another program. Tap Start >
Settings > Personal > Buttons to customize this button
•Camera/Bar Code switch for enabling camera or data capture mode
•Camera button for launching the Pictures & Videos program
Accessories
•Vehicle kit (includes the auto mounting kit, auto charger and hands-free handset)
•Leather case
•USB charge/sync cable
•Travel charger
•Hands-free headset (earbuds)
•Protective boot
•Stylus 3-pack
•Standard life battery
•Extended life battery
2 System Tour
Hardware tour
10
Hardware tour
This section is a descriptive tour of the MC35 hardware interface.
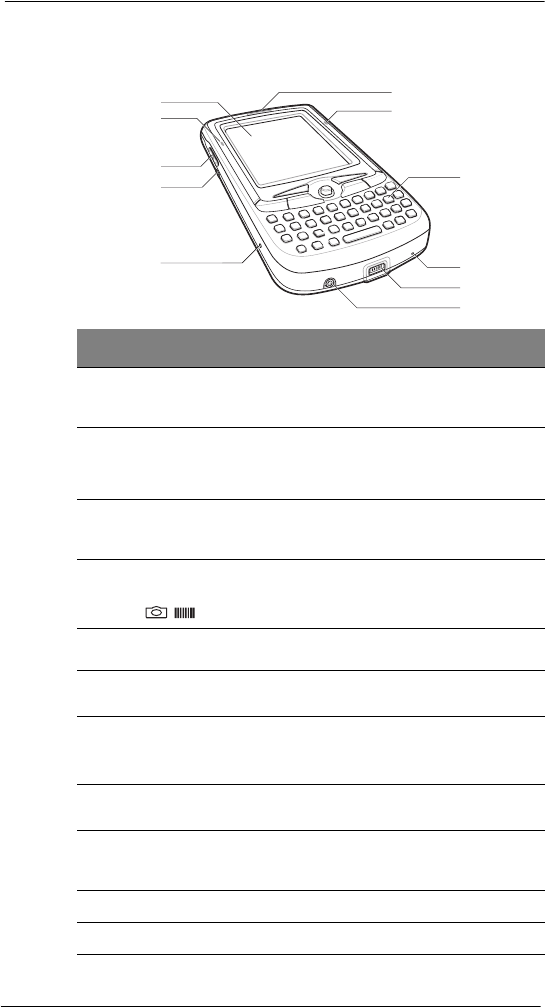
No. Component Description
1 LCD touch
screen
Displays the applications and data stored on your
device. It is touch-sensitive and responds to the
stylus or your finger.
2 GSM status/
notification LED
• Fast flashing green - indicates GSM activity.
• Solid green - indicates voice call in progress.
• Flashing red - indicates system alarms or
reminders.
3 Volume up/down
button (system
volume only)
Press the top key to increase volume, press the
bottom key to decrease volume.
4 Camera/Bar
Code switch
Toggles the camera lens mode from bar code
data capture to camera mode (for device
configurations with camera function only).
5 Reset button Press the tip of the stylus into the button to reset
your device.
6 Earphone jack Connects to an audio line-out device such as
earphones or headphones.
7 Connector • For ActiveSync operation - accepts the USB
sync cable, which in turn connects to a
computer’s USB port.
• For recharging - accepts the AC adapter cable.
8 Microphone Inputs audio into your device during phone calls or
when recording voice notes.
9 Keypad Key in alphanumeric characters. It also supports
special keys for launching phone/messaging
functions, as well as for backlight control.
10 Charging LED Lights up orange during battery charging.
11 Phone speaker Listen to a phone call from here.
1
2
11
10
9
8
7
6
3
4
5
2 System Tour
Hardware tour
11
No. Component Description
12 Main battery Removable and rechargeable battery pack.
13 System speaker Listen to multimedia files here. When the
speakerphone is active, sounds are emitted here.
14 Camera lens
(optional)
Take pictures or captures bar code data.
15 Camera flash
(optional)
Provides illumination when taking pictures in low
light conditions.
16 IR port Uses infrared technology to transmit and receive
data from other IR-enabled devices.
17 SD/MMC
expansion slot
Supports SD/MMC/SDIO storage cards allowing you
to expand the device memory capacity.
Install add-on applications or use files stored in it for
use with internal applications. You can also use it to
back up data from your device.
18 Stylus To use the stylus, remove it from its holder and hold
it the same way you hold a pen or pencil.
19 Push To Talk
button
Press this button to:
• Create voice recordings – See “Recording a
message” on page 28 for more information.
• Initiate Push to Talk calls – See “Push to Talk”
on page 149 for more information.
Note: This button can be set to launch another
program. Tap Start > Settings > Personal >
Buttons to customize this button.
20 Power button Press to toggle the device on/off.
Note: Wait four seconds after pressing the power
button to allow the device to power on/off before
pressing the power button again.
12
13
14
15
16
18
19
20
21
22
17
2 System Tour
Hardware interface
12
Hardware interface
This section explains basic hardware procedures and describes the MC35 keypad and
function buttons.
Using the touch screen backlight key
Under some lighting conditions, viewing information on the LCD touch screen may be
difficult. If this is the case, activate the backlight by tapping the screen or by pressing the
Backlight key (not applicable when viewing the Today screen, the Dialer pad will instead
be displayed).
Using the stylus
On your device, the stylus replaces the mouse.
•Tap - Touch the screen once with the stylus to open items and select options.
•Drag - Hold the stylus on the screen and drag across the screen to select text and
images. Drag in a list to select multiple items.
•Tap and hold - Tap and hold the stylus on an item to see a list of actions available
for that item. In the pop-up menu that appears, tap the action you want to perform.
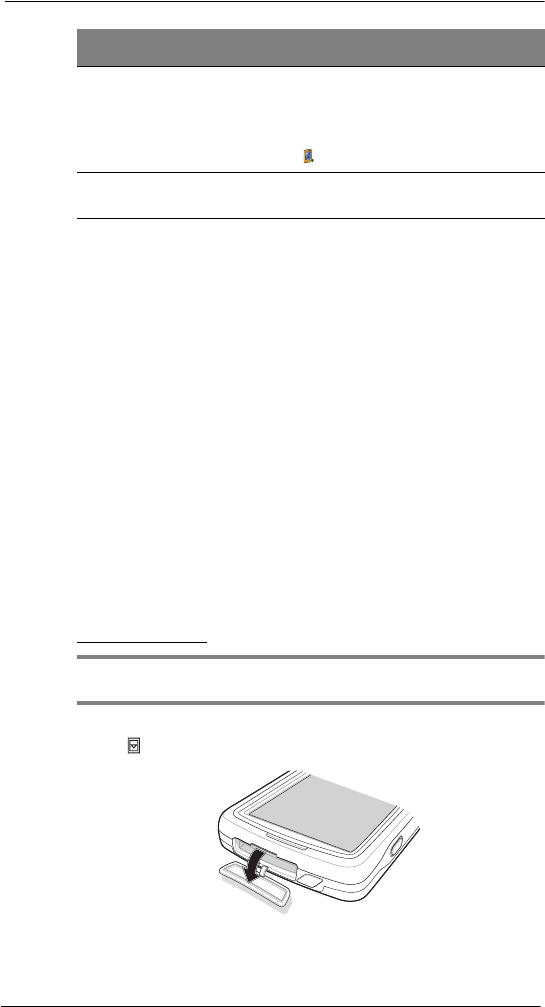
Using the SD/MMC expansion slot
Your device has an expansion slot compatible with a range of SD and MMC storage
cards, which are primarily used to back up or transfer files and data. The slot also
supports SDIO cards for added connectivity options.
To insert a storage card:
NOTE: This device comes with a protective plastic card in the card slot. Remove the
plastic card from the slot before trying to insert a storage card.
1 Hold your device securely, then lift the rubber cover from the SD/MMC expansion
slot .
21 Camera button Press to launch the Pictures & Videos program and
take pictures or capture bar code data.
Note: In MC35 configuration models with no camera
function, this button can be set to launch another
program. Tap Start > Settings > Personal >
Buttons to customize this button.
22 Battery release
latch
Unlocks the battery pack from the chassis.
No. Component Description
1

2 System Tour
Hardware interface
13
2 Slide the SD/MMC card into the slot and push in until it locks into place.
The card is secure when it is not protruding from the base.
3 Insert the rubber cover back into place.
To remove a storage card:
1 Hold your device securely, then lift the rubber cover from the SD/MMC expansion
slot .
2 Push against the top of the card, as if you were pushing it further into the slot, letting
the card spring out. An audible system sound indicates that the card has been
released.
3 Gently remove the card from the slot.
4 Close the rubber cover.
2
2 System Tour
Hardware interface
14
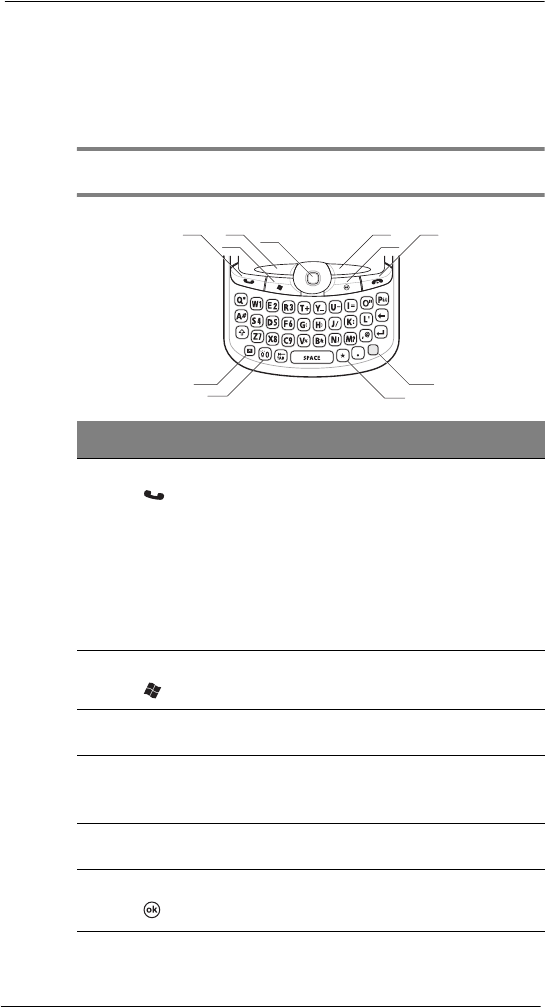
Soft buttons and keypad
The MC35 keypad has alphanumeric keys that produce the 26-character alphabet (A-Z,
both lowercase and uppercase), numbers (0-9), and assorted special characters. The
keypad is color-coded to indicate when the modifier key is pressed to produce a
particular character or action. In addition to alphanumeric keys, the keypad also has soft
buttons and special keys to launch particular applications, control the screen backlight,
and display the on-screen keyboard.
NOTE: The keypad illuminates when a key is pressed and stays lit for approximately
five seconds.
No. Component Description
1 Send button • When there’s an incoming call, press to accept
the call.
• During an ongoing call, press and hold to toggle
on/off the speakerphone mode.
• From Speed Dial, press to call the currently
selected number.
• From Call History, press to call the currently
selected log item.
• In Messaging, press to send a composed e-mail/
text message or display options for a received
e-mail/text message.
• Change between an active call and call that is on
hold.
2 Start button Press to display the Start menu.
3 Left soft button Press to perform the function indicated on the lower
left corner of the display.
4 Joystick • Press the center of the joystick to access menu
options and confirm your selection.
• Move the joystick in a left, right, up or down
direction to navigate through the menu options.
5 Right soft button Press to perform the function indicated on the lower
right corner of the display.
6 OK button Press to close the active program and display the
Today screen.
13
245
6
7
8
9
10
11

2 System Tour
Hardware interface
15
7 End button • When there’s an incoming call, press to reject
the call.
• During an ongoing call, press to end the call.
• When manually dialing a number, press to
delete the number input.
• Press and hold for at least five seconds to toggle
the Wireless connections on/off. See “Managing
wireless connections” on page 56 for more
information.
8 Orange key Use this key to enable the secondary keypad
characters/functions.
• To type a special character, press the Orange
key and secondary character key. To illustrate,
pressing the Orange key, then J will allow you to
type a slash (/).
• Press the Orange key twice to lock the keypad in
secondary character/action mode. Press the
Orange key again to revert to the default keypad
mode (alphabetic, lower-case).
• Press and hold the Orange key while entering
characters or actions.
9 Star key Press this key to display the on-screen keyboard.
10 Backlight/0 key • Press this key to adjust the touch screen
backlight.
• Press the Orange key, then this key to type the
zero ‘0’ character.
• In the Today screen, press this key to display the
Dialer pad.
11 Messaging
key
Press this key to launch the Messaging program.
See “Messaging” on page 74 for more information.
No. Component Description

2 System Tour
Hardware interface
16
Secondary keypad input mode
Key Default
input
Keystroke combination
Shift or CAPS + Key Orange + Key
Qq Q *
Ww W 1
Ee E 2
Rr R 3
Tt T +
Yy Y _
Uu U -
Ii I =
Oo O “
Pp P áü
Aa A #
Ss S 4
Dd D 5
Ff F 6
Gg G (
Hh H )
Jj J /
Kk K :
Ll L ‘
Zz Z 7
Xx X 8
Cc C 9
Vv V %
Bb B &
Nn N !
Mm M ?
,, , @
Brightness Brightness Brightness 0
Note: The following keys only have one action: Backspace, Shift, Enter, Messaging,
Tab, Space, and Star.

2 System Tour
Command interface
17
Command interface
This section explains the MC35 command interface.
Today screen
When you turn on your device for the first time each day (or after a preset period of
inactivity), you'll see the Today screen. This screen provides an at-a glance view of the
day’s important reminders and status.
To display the Today screen:
•When viewing another screen, press the OK button or tap > Today .
•You can also define a preset period of inactivity after which the Today screen is
displayed. Follow the steps below.
1 Tap > Settings .
2 On the Personal tab, tap Today .
3 On the Items tab, select the “Today timeout“ option.
4 Tap the pick list beside the check box to set the period of inactivity.
5 Tap ok.
To customize the Today screen:
1 Tap > Settings .
2 On the Personal tab, tap Today .

2 System Tour
Command interface
18
3 On the Appearance tab, tap the “Use this picture as background” check box.
4 Tap Browse to select a picture from the pictures stored in your device.
5 Tap ok.
Start menu
The Start menu displays a list of active programs, as well as options to view the
Programs, Settings, and Help screens.
Navigation bar
The navigation bar is located on the top of the screen. It shows the status icons for the
battery, volume, and data connectivity. Notifications icons for system alarms and
reminders are also displayed here.
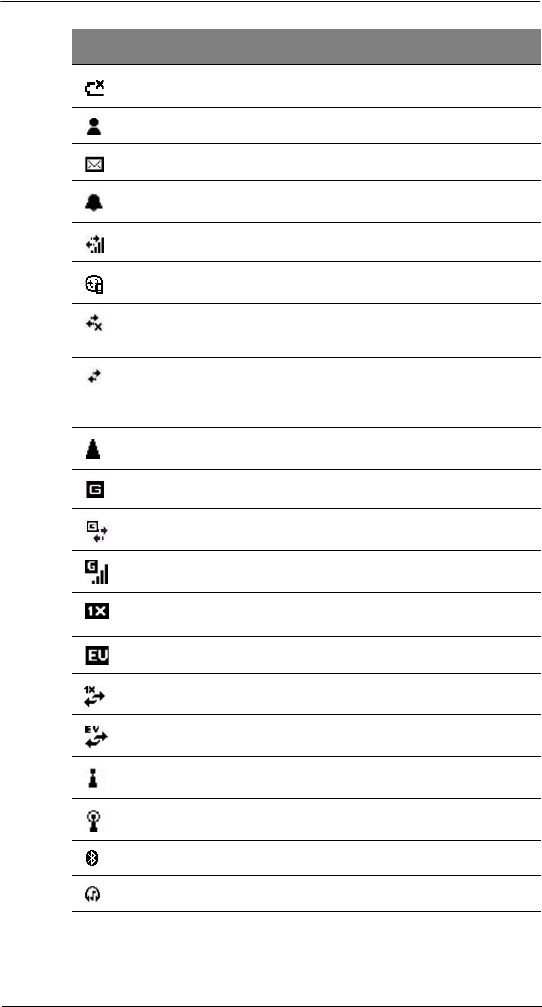
Status icons
The table below describes some of the status icons you may see on the navigation bar.
NOTE: See “Phone status icons” on page 113 for more information on the status icons
related to the phone function.
Tap a program icon to open it.
Tap to see more programs.
Tap to customize your device.
Tap to launch the online Help.
Icon Description
Speaker on
Speaker off
Vibrate mode
Battery level
Battery charging
Battery is low
2 System Tour
Command interface
19
1 If more notification icons need to be displayed than there is room to display them, the
Notification icon appears on the command bar. Tap Notification to view all notification
icons.
Battery power completely depleted
Notification1 that one or more instant messages were received
Notification that one or more e-mail/text messages were received
Pending alarm
Data call in progress
Synchronization error
• No data connection. Tap to activate the device’s Phone, WiFi,
Bluetooth, or cellular data wireless connection (GPRS).
• Device is not synchronized with a computer
• Data connection is active
• Phone and wireless features, such as WiFi, Bluetooth, or GPRS; on
your device are turned on.
• Device is synchronized with a computer
Roaming
GPRS network is available
GPRS data connection is active
GPRS signal status
1xRTT (single carrier radio transmission technology) data service is
available
EVDO (Evolution Data Optimized) high speed data service is available
Transmit or receive data on 1xRTT connection
Transmit or receive data on EVDO connection
WiFi on
WiFi data call
Bluetooth
Bluetooth audio
Icon Description
2 System Tour
Command interface
20
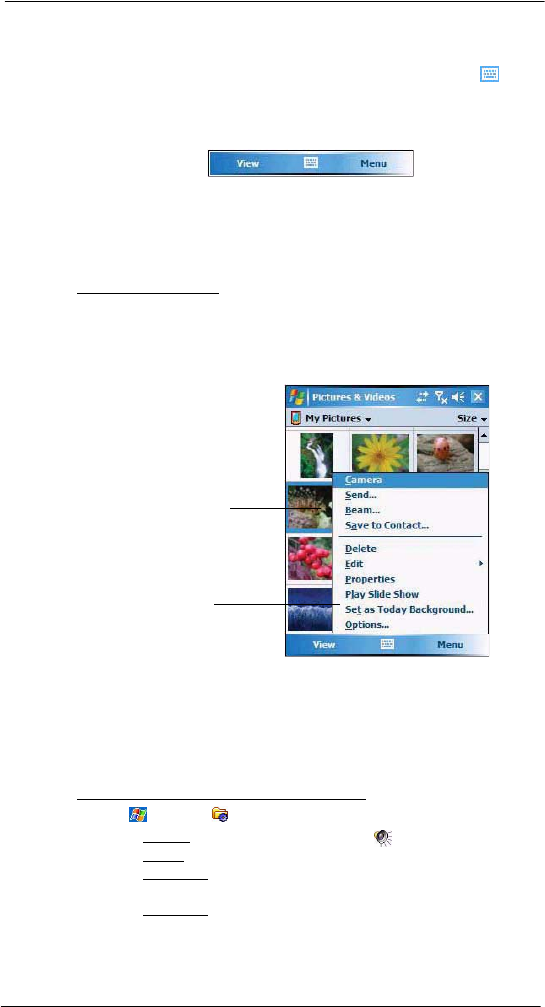
Command bar
Use the command bar at the bottom of the screen to perform tasks in programs. The
command bar includes menu names, buttons, and the Input Selector button .
•To create a new item in the current program, tap New.
•To view a notification or an image file received on your device, tap View.
•To see the name of a button, tap and hold the stylus on the button. Drag the
stylus off the button so that the command is not carried out.
Pop-up menus
With pop-up menus, you can quickly choose an action for an item. For example, you can
use the pop-up menu in the contact list to quickly delete a contact, make a copy of a
contact, or send an e-mail message to a contact. The actions in the pop-up menus vary
from program to program.
To display a pop-up menu:
1 Tap and hold the stylus on the item that you want to perform the action on.
2 When the menu appears, lift the stylus then:
•Tap the action you want to perform.
•Tap anywhere outside the menu to close the menu without performing
an action.
Notifications
Your device reminds you in a variety of ways when you have something to do or receive a
message. For example, if you've set up an appointment in Calendar, a task with a due
date in Tasks, or an alarm in Clock, you'll be notified in any of the following ways:
•A message box appears on the screen.
•A sound, which you can specify, is played.
To choose reminder types and sounds for your device:
1 Tap > Settings .
2 On the Personal tab, tap Sounds & Notifications .
3 On the Sounds tab, select the kind of events you want to be notified of.
4 On the Notifications tab, select the manner of notification you prefer for each event.
5Tap ok.
6 On the Notifications tab, select the manner of notification you prefer for each event.
Lift the stylus and tap
the option you want.
Tap and hold the selected item
to display a pop-up menu.

3 Entering Information
Using the MC35 keypad
21
3 Entering Information
•Using the MC35 keypad
•Using the Input Selector
•Writing on the screen
•Drawing on the screen
•Creating a recording
•Using My Text
•Using ActiveSync
•Using wireless communication
Using the MC35 keypad
The MC35 keypad has alphanumeric keys that produce the 26-character alphabet (A-Z,
both lowercase and uppercase), numbers (0-9), and assorted special characters. In
addition to alphanumeric keys, the keypad also has function buttons and special keys
that perform specific action. See “Soft buttons and keypad” on page 14 for more
information.
Using the Input Selector
Use Input Selector to enter typed text in any program where text entry is possible. You
can either tap the keys on an on-screen keyboard or by use any of the handwriting
recognition options.
To show or hide the Input Selector:
•Tap the Input Selector arrow, then select an input option.
Word Completion
When you use the Input Selector, your device anticipates the word you are typing or
writing and displays it above the Input Selector arrow. When you tap the displayed
word, it is inserted into your text at the insertion point. The more you use your device, the
more words it learns to anticipate.

3 Entering Information
Using the Input Selector
22
To define the Word Completion settings:
1 Tap > Settings .
2 On the Personal tab, tap Input .
3 On the Word Completion tab, define the word suggestion settings.
4Tap ok.
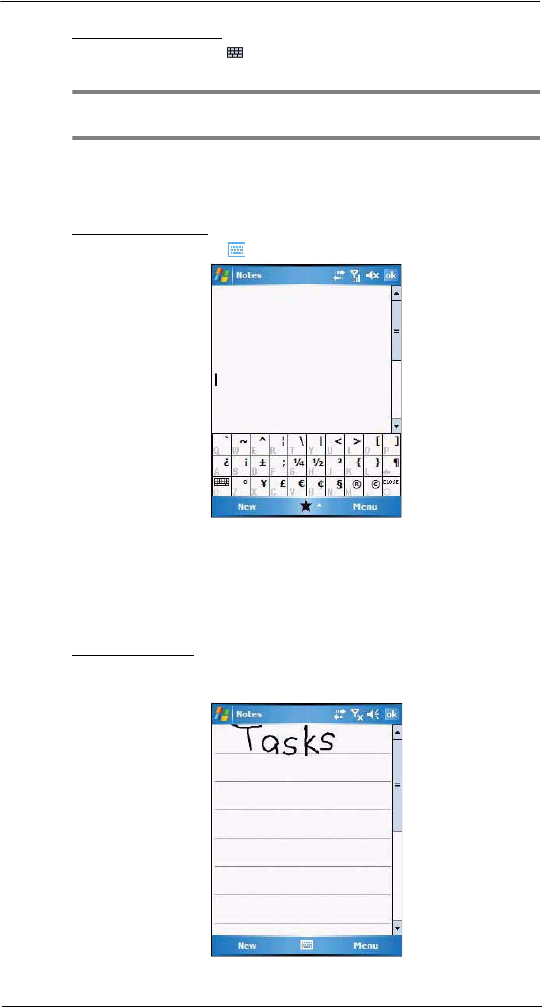
Keyboard
The soft keyboard allows you to “type” information just like in a regular keyboard by
tapping the on-screen keys.
To use the soft keyboard:
1 Tap the Input Selector arrow, then select Keyboard; or you can press the Star
key on the MC35 keypad.
2 On the soft keyboard that is displayed, tap the keys with your stylus.
TIP: To make the keys larger, tap the Input Selector arrow, and then Options. In
the Input method list, select Keyboard, and then tap Large Keys.
3 Entering Information
Using the Input Selector
23
Block Recognizer
With Block Recognizer, you use a single stroke to write letters, numbers, symbols, and
punctuation, which are then converted into typed text.
To use Block Recognizer:
1 Tap the Input Selector arrow, then select Block Recognizer.
2 Write characters, numbers, and symbols in the designated writing area.
•Enter letters by writing in the abc (left) area of the box
•Enter numbers by writing in the 123 (right) area of the box.
•Enter symbols and punctuation by tapping in either area of the box and
then writing the desired character.
TIP: For help with writing characters with Block Recognizer, tap the question mark
near the writing area.
Letter Recognizer
With Letter Recognizer, you can write individual letters, numbers, and punctuation and
have them converted into typed text.
To use Letter Recognizer:
1 Tap the Input Selector arrow, then select Letter Recognizer.
3 Entering Information
Using the Input Selector
24
2 Write characters, numbers, and symbols in the designated writing area.
•Enter capital letters by writing in the ABC (left) area of the box.
•Enter lower case letters by writing in the abc (middle) area of the box.
•Enter numbers by writing in the 123 (right) area of the box.
•Enter punctuation and symbols by tapping in either area of the box and
then writing the desired character.
TIP: For help with writing characters with Letter Recognizer, tap the question mark
near the writing area.
Transcriber
Transcriber allows you to write anywhere on the screen using the stylus just as you would
on paper. It recognizes cursive or printed handwriting, or a combination of both.
To use Transcriber:
1 Tap the Input Selector arrow, then select Transcriber.
2 Write anywhere on the screen.
3 Pause and let transcriber change the written characters to typed text.
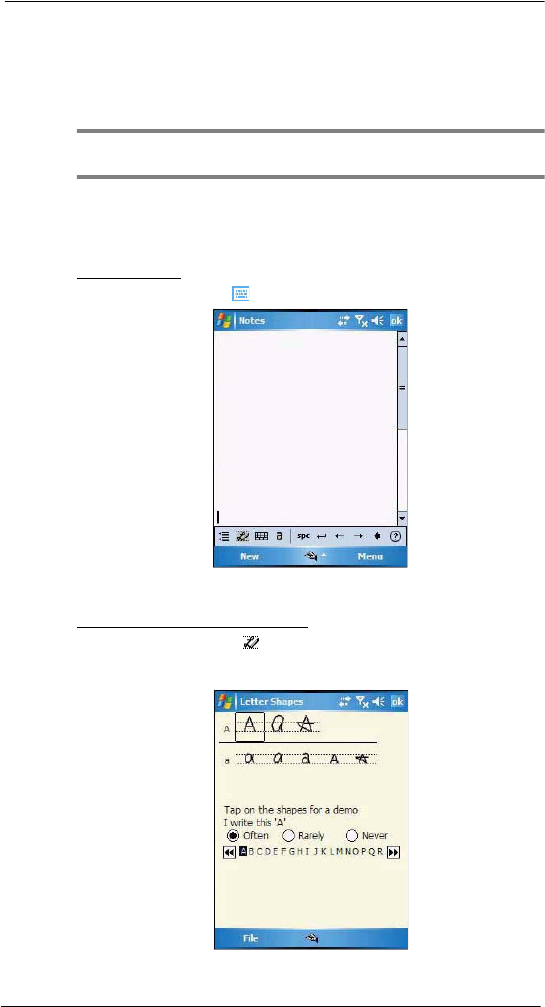
To learn how to write a letter in Transcriber:
1 Tap the letter shape icon on the toolbar.
2 In the screen that appears, select the letter you want to learn about, then tap one of
the examples.
3 Entering Information
Writing on the screen
25
To punctuate in Transcriber:
1 Tap the keyboard icon on the toolbar.
2 Tap the punctuation mark you need.
TIP: For specific instructions on using the Transcriber, tap the question mark on the
toolbar.
Star Key
Use the Star Key option to enter special symbols not available on the regular soft
keyboard, such as ¿ and £.
To enter special symbols:
1 Tap the Input Selector arrow, then select Star Key.
2 On the soft keyboard that is displayed, tap the special symbol keys with your stylus.
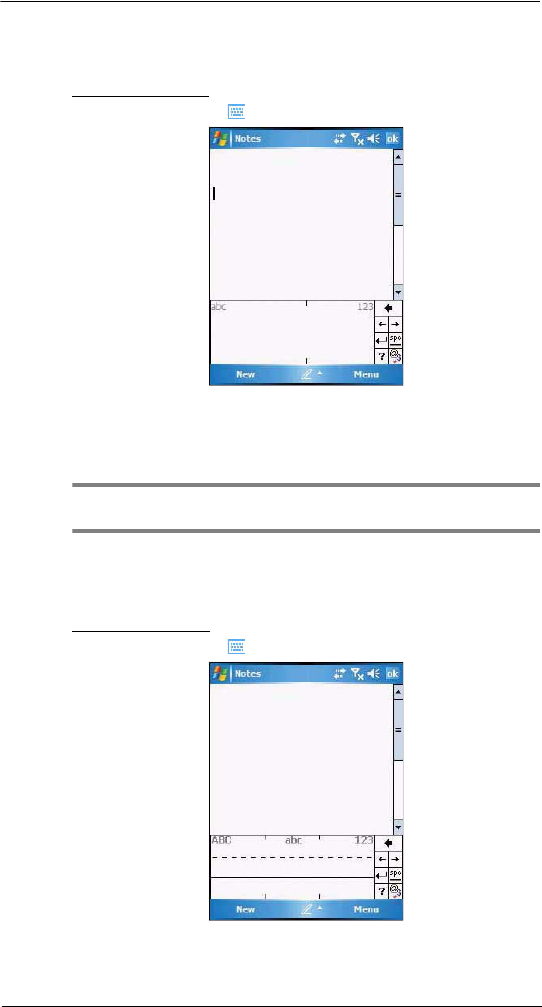
Writing on the screen
In Notes, you can use your stylus to write directly on the screen. Write the way you do on
paper. You can edit and format what you've written and convert the information to text at
a later time.
To write on the screen:
•Tap Menu > Draw.
This action displays lines on the screen to help you write.
3 Entering Information
Writing on the screen
26
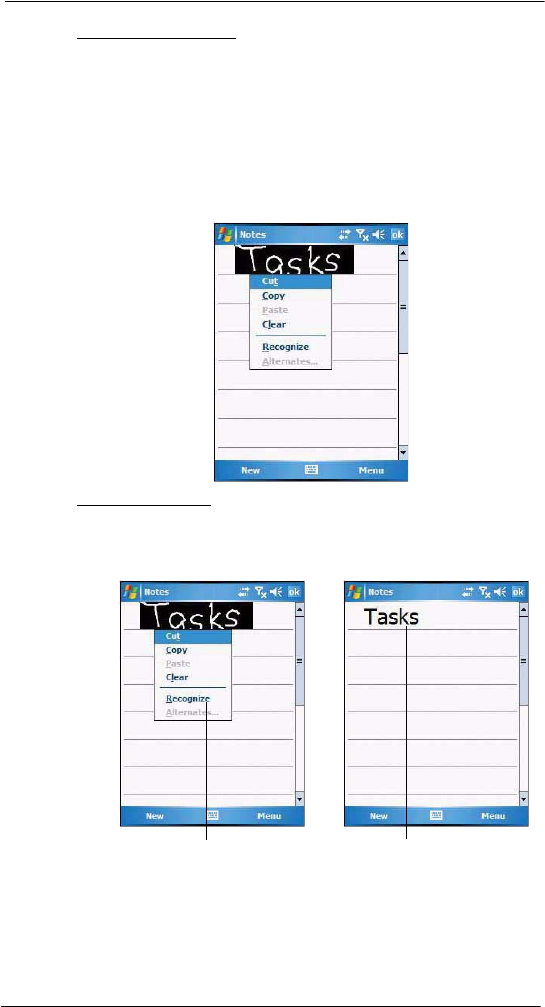
To select and edit written text:
If you want to edit or format written text, you must select it first.
1 Tap and hold the stylus next to the text you want to select until the insertion point
appears.
2 Without lifting, drag the stylus across the text you want to select.
If you accidentally write on the screen, tap Menu > Undo Ink, and try again.
-or-
Tap the text to deselect it.
3 You can cut, copy, and paste written text in the same way you work with typed text:
(a) Tap and hold the selected words.
(b) Tap an editing command on the pop-up menu.
To convert writing to text:
•Tap Menu > Tools > Recognize.
If you want to convert only certain words, select them before tapping Recognize on
the Tools menu (or tap and hold the selected word, then tap Recognize on the
pop-up menu). If a word is not recognized, it is left as writing.
If the conversion is incorrect, you can select different words from a list of
alternates or return to the original writing. To do so:
(a) Tap and hold the incorrect word (tap one word at a time).
(b) In the pop-up menu, tap Alternates.
A menu with a list of alternate words appear.
Select the text you want to convert, then
tap Recognize on the pop-up menu.
The writing is turned into text.
3 Entering Information
Drawing on the screen
27
(c) Perform one of the following:
•Tap the word you want to use.
•Tap the writing at the top of the menu to return to the original writing.
Conversion reminders
•Hyphenated and foreign words that use special characters such as accents and
some punctuation cannot be converted.
•If you add writing to a word to change it (such as changing a "3" to an "8") after you
attempt to recognize the word, the writing you add is not included if you attempt to
recognize the writing again.
Tips for getting good recognition
•Write neatly.
•Write on the lines. Write the cross of the "t" and apostrophes below the top line so
that they are not confused with the word above. Write periods and commas above
the line.
•For better recognition, try increasing the zoom level to 300% using the Tools menu.
•Write the letters of a word closely and leave big gaps between words so that your
device can easily tell where words begin and end.
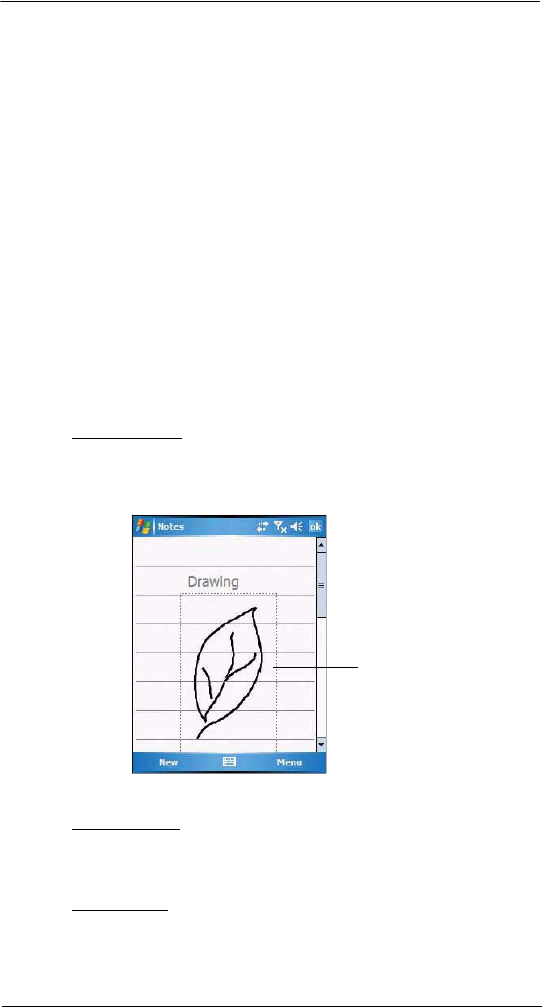
Drawing on the screen
In Notes, you can draw on the screen in the same way that you write on the screen. The
difference between writing and drawing on the screen is how you select items and how
they can be edited. For example, selected drawings can be resized, while writing cannot.
To create a drawing:
1 Draw a triangle on the screen.
A drawing box appears.
2 Subsequent strokes in or touching the drawing box become part of the drawing.
Drawings that do not cross three ruled lines are treated as writing.
You may want to change the zoom level so that it is easier to work on or view your
drawing. Tap Menu > Zoom and select a zoom level.
To select a drawing:
If you want to edit or format a drawing, you must select it first.
•Tap and hold the stylus on the drawing until the selection handle appears.
•To select multiple drawings, tap and hold the stylus on the drawing, then drag to
select the drawings you want.
To edit a drawing:
1 Tap and hold the selected drawing.
2 Tap an editing command on the pop-up menu, or tap Menu > Edit.
The drawing box indicates the
boundaries of the drawing.
3 Entering Information
Recording a message
28
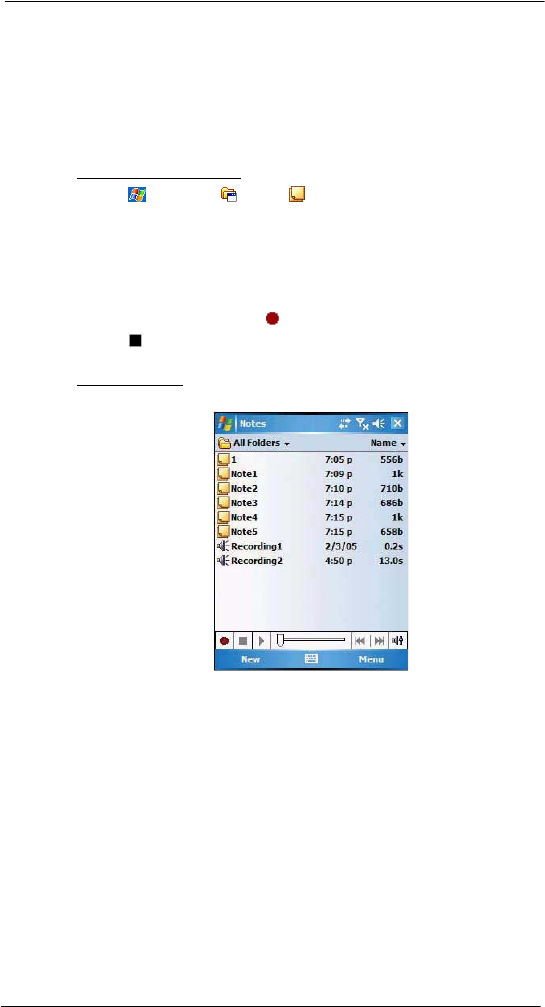
Recording a message
In any program where you can write or draw on the screen, you can also quickly capture
thoughts, reminders, and phone numbers by recording a message.
•In Calendar, Tasks, and Contacts, you can include a recording in an item.
•In Notes, you can either create a stand-alone recording, include a recording in a
written note, or set a voice recording as your ring tone.
•In Phone, you can create a recording during a call.
•In Messaging, you can attach a recording to an e-mail message.
To create a recording in Notes:
1 Tap > Programs > Notes .
If you want to include the recording in a note, open the note first.
2Tap Menu > View Recording Toolbar.
3 Position your device's built-in microphone near your mouth or other source of
sound.
You can also use the microphone in the stereo headset/single earbud headset
bundled with your device to create a recording.
4 On the Recording toolbar, tap .
5 Tap to stop recording.
The new recording appears in the note list or as an embedded icon.
To play a recording:
•Tap it in the list or tap its icon in the Notes.
3 Entering Information
Using My Text
29
To set a voice recording as ringtone:
•Tap and hold a voice recording in Notes, then select Set As Ringtone on
the pop-up menu.
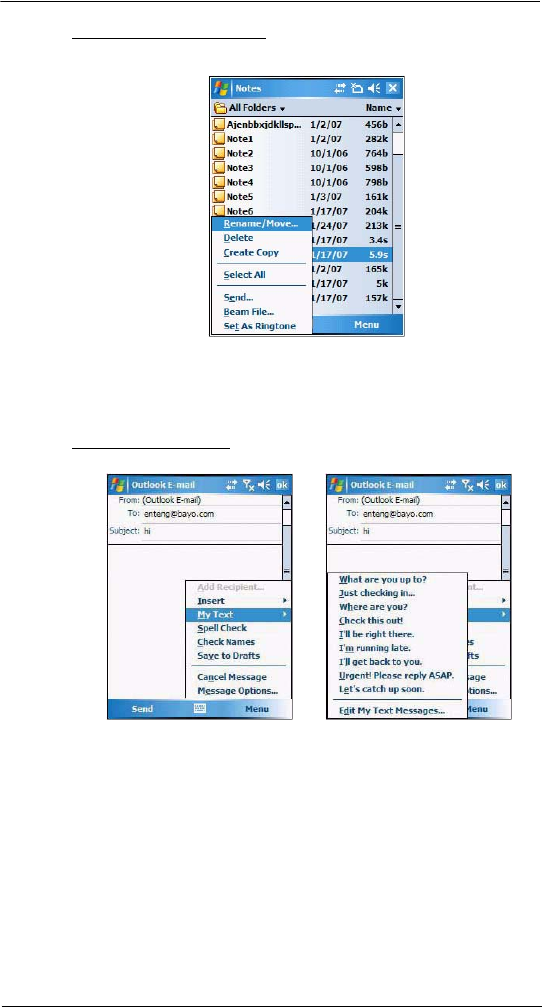
Using My Text
When using Messaging or MSN Messenger, use My Text to quickly insert preset
messages into the text entry area.
To insert a My Text message:
1 Tap Menu > My Text, then tap a message.
2Tap ok.
3 Entering Information
Using ActiveSync
30
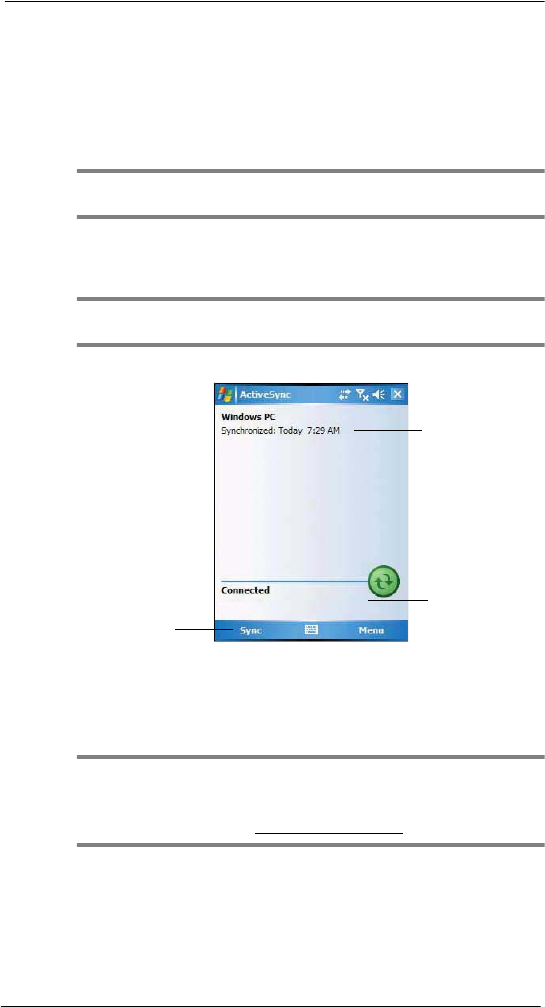
Using ActiveSync
Use Microsoft ActiveSync to synchronize information between your MC35 and your
computer and/or a server so you always have the most up-to-date information wherever
you are.
Use ActiveSync to:
•Keep Microsoft Outlook Mobile data up-to-date by synchronizing your device with
the Microsoft Outlook data on, including Outlook contacts’ pictures, on your
computer.
NOTE: Microsoft Outlook XP or Microsoft Outlook 2003 is required for synchronization
of Outlook contacts' pictures.
•Open and edit your Microsoft Office Mobile files in your device and synchronize it
back to your computer. Files are automatically converted to the correct format.
•Access and configure Microsoft Windows Media Player music, including album art,
and video files on your computer.
IMPORTANT: Windows Media Player files can only be synchronized via ActiveSync
USB connection.
•Synchronize Internet Explorer Mobile favorites on your computer.
Synchronizing information with your computer
ActiveSync supports the following connection options between your device and your
computer:
•USB connection – using the USB sync cable. This connection is established
when you created your device’s ActiveSync partnership with your computer.
IMPORTANT: Using an external USB hub when establishing an ActiveSync
connection may result to have some connection instabilities such as drops in the
connection, or an unresponsive computer. For more information about this issue, see
article 817900, "USB port may stop working after removing or inserting USB device" in
the Microsoft Knowledge Base at http://support.microsoft.com.
•Infrared connection – This connection is only applicable if your computer has an
infrared port. This method is ideal for quickly switching between multiple devices
since there are no cables or adapters to change.
•Bluetooth connection – This connection is only applicable if your computer is
equipped with a Bluetooth adapter or access point.
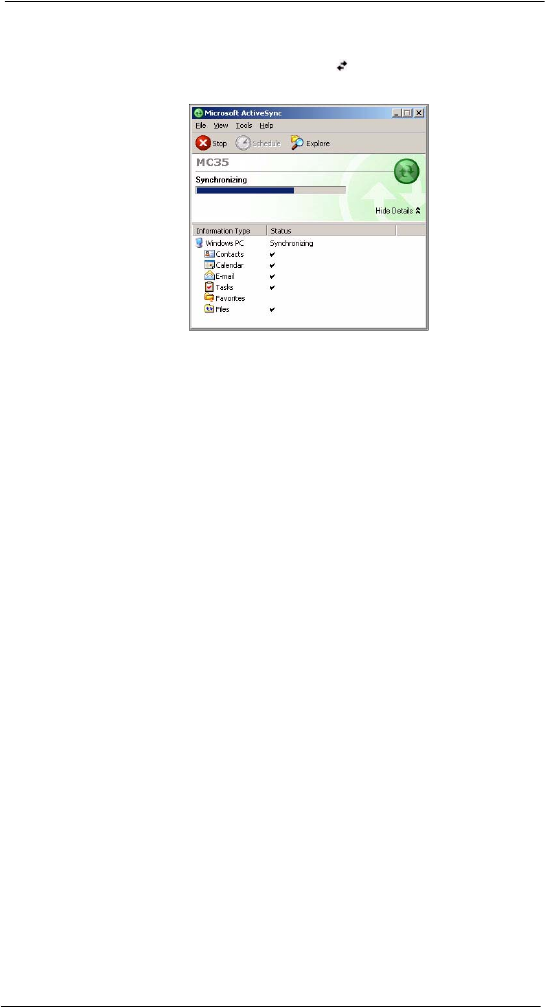
Tap to connect
and synchronize.
Displays connection
status
Displays detailed
connection status

3 Entering Information
Using ActiveSync
31
NOTE: To synchronize remotely with your computer, it must be turned on.
To set up a USB ActiveSync connection:
1 Perform the steps below on your computer.
(a) Open ActiveSync .
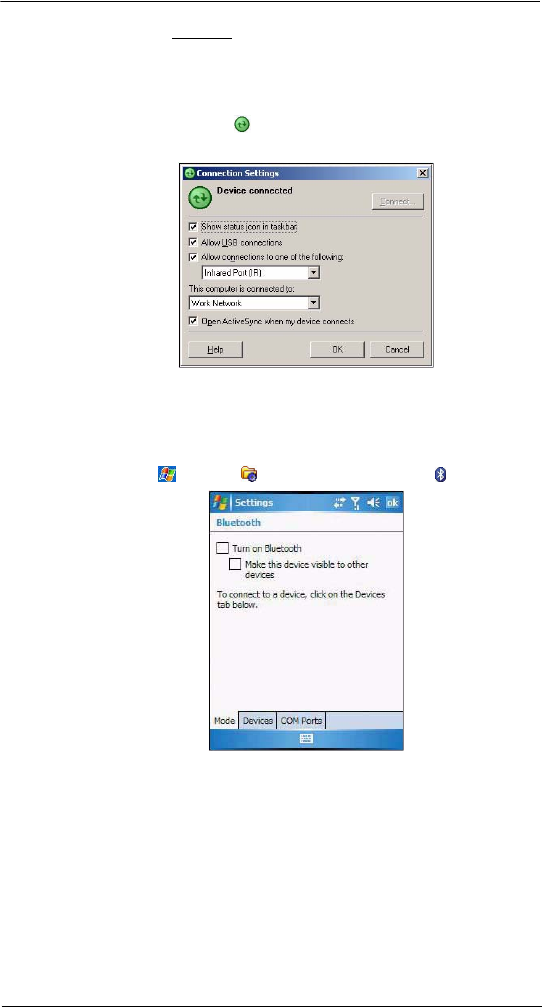
(b) Click File > Connection Settings.
(c) Select the “Allow USB connections“ option.
(d) Click OK.
2 Perform the steps below on your device.
(a) Tap > Programs > ActiveSync .
(b) Tap Menu > Connections.
(c) Select the “Synchronize all PCs using this connection” option.
(d) Select USB.
(e) Tap ok.
3 Connect your device to your computer using the USB sync cable.
Synchronization is automatically initiated.
To set up an infrared ActiveSync connection:
1 Perform the steps below on your computer.
(a) Configure the infrared port on your computer.
Refer to your computer’s user documentation for instructions.
(b) Once your computer’s IR port is ready, open ActiveSync .
(c) Click File > Connection Settings.
(d) On the “Allow connections to one of the following” drop-down list, select
Infrared Port (IR).
(e) Click OK.
2 Perform the steps below on your device.
3 Entering Information
Using ActiveSync
32
(a) Align the IR port of your device with that on your computer so that they
are unobstructed and within close range.
(b) Tap > Programs > ActiveSync .
(c) Tap Menu > Connect via IR.
Synchronization is automatically initiated. Wait for synchronization to
complete before you move your device.
To set up a Bluetooth ActiveSync connection:
Before setting up a Bluetooth ActiveSync connection, configure the Bluetooth function of
your device. See “Bluetooth connection” on page 45 for more information.
IMPORTANT: For additional security, disable network bridging on the computer
(specifically, bridging to a Remote NDIS adapter) before connecting to the computer to
pass though to the Internet or a network. For more information on network bridging, see
Windows Help on your computer.
NOTE: The instructions below are for computers that support the Windows XP SP2 or
later version operating system.
1 Perform the steps below on your computer.
(a) Click Start > Settings > Control Panel.
(b) Double-click Bluetooth Devices.
(c) On the Options tab, select the check box for the “Turn discovery on” and
“Allow Bluetooth devices to connect to this computer” options.
3 Entering Information
Using ActiveSync
33
(d) On the COM Ports tab, click Add.
(e) Select the “Incoming (device initiates the connection)” option, then click OK.
(f) Note the number of the COM port that was added. The COM port number
must be no higher than 20.
(g) Click OK.
(h) Open ActiveSync .
(i) Click File > Connection Settings.
(j) On the “Allow connections to one of the following” drop-down list, select the
COM port with the number you noted in step f.
2 Ensure that the Bluetooth is turned on your computer and discoverable and within
close range.
3 Make MC35 discoverable to your PC.
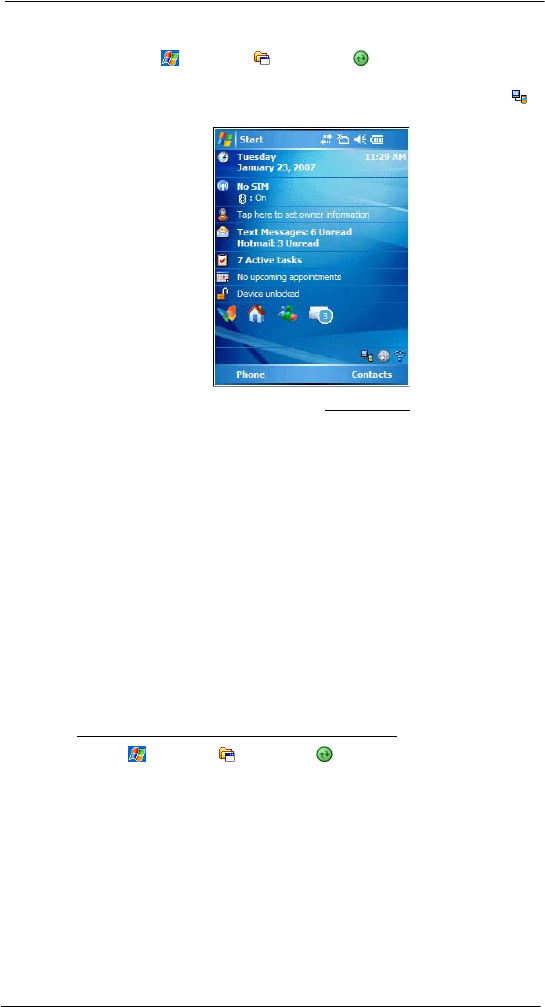
(a) Tap > Settings > Connections tab> Bluetooth .
(b) On the Mode tab, select the check box for the “Turn on Bluetooth” and “Make
this device visible to other devices” check box.
(c) Tap ok.
3 Entering Information
Using ActiveSync
34
4 Perform the steps below on your device.
(a) Tap > Programs > ActiveSync .
(b) Tap Menu > Connect via Bluetooth.
Synchronization is automatically initiated. The PC to USB status icon
appears on the lower right corner of the Today screen.
If an Authentication is required, the Enter Passcode screen appears, type an
alphanumeric passkey (PIN code), then tap Next; enter the same passkey on
the other device.
The passkey is recommended for enhanced security. Your passkey must be
between 1 to 16 alphanumeric characters.
If you do not want to use a passkey, tap Next.
Synchronizing with a server
The option to synchronize your device with a server is available when you first create a
partnership. Note that this option only synchronizes information for Contacts, Calendar,
Messaging (Outlook E-mail), and Tasks.
After your first full synchronization with Microsoft Exchange server, you can schedule
automatic synchronization between your device and the server every time an item arrives
or is changed in the Microsoft Exchange server.
Enable server synchronization only if you are certain that your company is running
Microsoft Exchange Server with Exchange ActiveSync. Before you can begin to
synchronize information with a server, you need to request the following information,
either from your service provider or from your corporate network administrator:
•Your user name and password in your corporate network
•The name of the Microsoft Exchange server
To set up synchronization with a Microsoft Exchange server:
1 Tap > Programs > ActiveSync .
3 Entering Information
Using ActiveSync
35
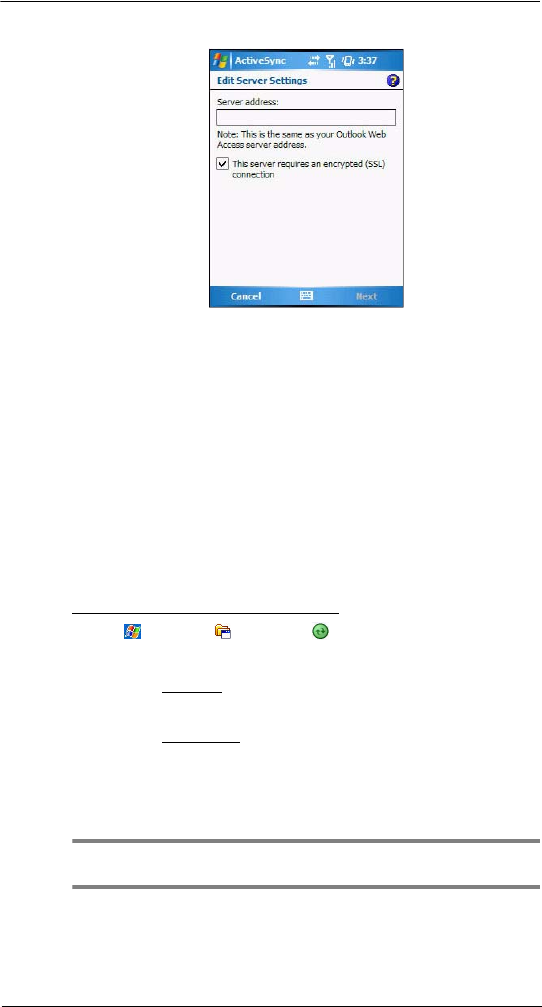
2Tap Menu > Add Server Source.
3 In the “Server address” box, enter the name of the Microsoft Exchange server to
which you want to connect.
Select the “This server requires an encrypted (SSL) connection” option if it is
applicable to your corporate network.
4Tap Next.
5 Enter your user name, password, and domain name.
If you intend to enable automatic synchronization, select the “Save password”
option.
6Tap Advanced.
Define the rules for resolving conflicts if items change on both your device and on
the server.
7Tap Next.
8 Select the check box opposite the types of information that you want to synchronize
with the server.
9 Define the synchronization settings for each information type by tapping the type of
information, then tap Settings.
10 Tap Finish.
To set up automatic synchronization with a server:
1 Tap > Programs > ActiveSync .
2Tap Menu > Schedule.
3 Perform one or both of the following:
•Under Peak times, select the “When new items arrive” option.
It is more cost-efficient to synchronize on a regular schedule when mail
volume is high, instead of when new items arrive.
•Under Off-peak times, select the “When new items arrive” option.
This can be more cost-efficient than synchronizing on a regular schedule when
mail volume is low.
4 To set the days and hours that makes up your peak and off-peak times, click
Change Times.
5Tap ok.
NOTE: Some devices or versions of Microsoft Exchange Server may also require
you to specify a device address to use this feature.
3 Entering Information
Using ActiveSync
36
To stop synchronizing with a server:
You can stop synchronizing an information type with a server, and instead synchronize it
with your computer.
1 Tap > Programs > ActiveSync .
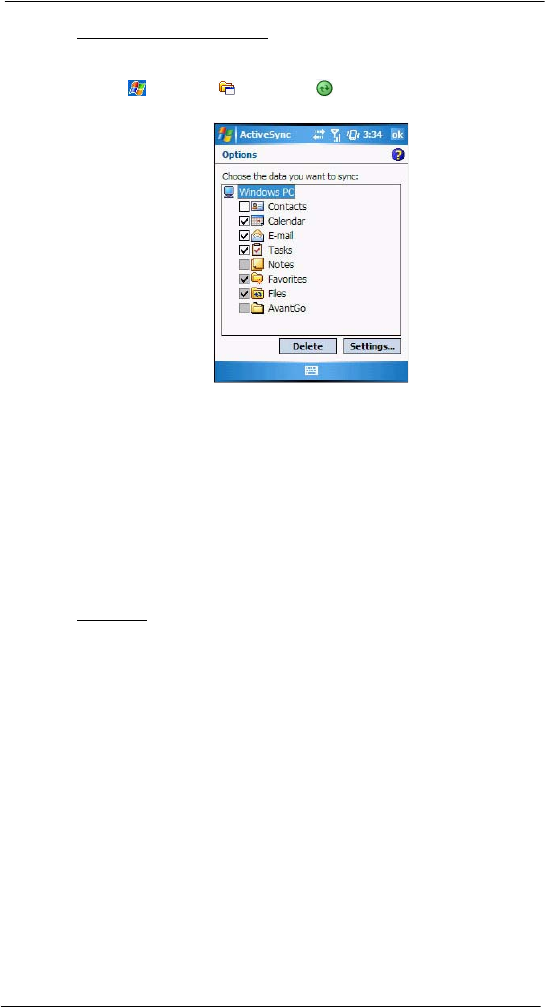
2Tap Menu > Options.
3 Deselect the check box opposite the types of Information that you no longer want to
synchronize with the server.
4Tap ok.
Using ActiveSync to copy files
You can use ActiveSync to exchange information from your device to your computer and
vice versa. Changes you make to the information on one location do not affect the
information on the other one. If you want to automatically update information on both
your device and computer, synchronize the information instead.
You can copy two types of information to your device: files and Pocket Access Windows
CE Store information.
The procedure below only applies to copying files. Refer to the ActiveSync Help on your
computer for instructions on how to copy Pocket Access Windows CE Store information.
To copy files:
1 Connect your device to your computer.
2 In ActiveSync on your computer, click Explore.
Windows Explorer opens the Mobile Device window for your device.
3 Locate the file that you want to copy on your device or computer.
4 Perform one of the following:
•To copy the file to your device, right-click the file and click Copy. Place
the cursor in the desired folder for your device, right-click, then click
Paste.
•To copy the file to your computer, right-click the file and click Copy.
Place the cursor in the desired folder for your computer, right-click, then
click Paste.
Synchronization options
Users have the option to customize both the type and volume of information to be
synchronized, as well the schedule synchronization should occur.
Remote synchronization schedule
You can control when remote synchronization occurs by selecting a synchronization
schedule.
3 Entering Information
Using ActiveSync
37
NOTE: When you are in roaming mode, you can synchronize manually to reduce
roaming charges, or you can use the mobile schedule you’ve set.
NOTE: When your device is connected to your computer via the USB sync cable,
synchronization occurs automatically—changes made on the computer or device is
duplicated immediately.
To set up a wireless synchronization schedule:
1 Tap > Programs > ActiveSync .
2Tap Menu > Schedule.
3 Perform one or both of the following:
•Under Peak times, select a shorter interval when you are working or
when e-mail volume is high.
•Under Off-peak times, select a longer interval or the “As items arrive”
option.
•Enabling the “Use above settings when roaming” option is more
consumptive in terms of battery power and roaming cost compare to
manual synchronization.
4Tap ok.
Synchronization type and volume
By default, ActiveSync only synchronize information for Contacts, Calendar, Messaging
(Outlook E-Mail), Tasks, and Favorites (for Internet Explorer Mobile). You can select
which information types are synchronized. You can also control how much information is
synchronized. To illustrate, when synchronizing Calendar, you can set ActiveSync to
synchronize appointments within a certain date range and for specific categories only.
For example business appointments from the past two weeks only.
To control the volume of information synchronized, see the ‘Synchronizing ...” section
“Using the Windows Mobile Programs” on page 63.
NOTE: ActiveSync does not support synchronizing subfolders in Calendar and
Contacts.
To select the type of information to synchronize:
IMPORTANT: If you decide to synchronize files, for example Word documents,
ActiveSync needs to convert these files. Converted files may not contain all information
found in original file.
1 Connect your device to your computer.
2 Click Tools > Options.
3 Select the information type that you want to synchronize.
4 If available, click Settings, and then select the options you want.
5 Repeat steps 2 and 3 for each information type.
ActiveSync errors
Whenever ActiveSync cannot successfully synchronize information, it displays an Error
link on the ActiveSync window on your device. Tap the link to display more information
about the error that occurred.
Some types of errors can interfere with automatic synchronization. If you suspect that a
scheduled automatic synchronization has not occurred, you should try to manually
synchronize your information. Successfully completing manual synchronization resets
automatic synchronization.

3 Entering Information
Using wireless communication
38
Using wireless communication
You can use any of the wireless communication options listed below to download
information to your MC35. For more information on using these options, See “5 Wireless
Communications” on page 43 for more information.
•IR port for short-range file exchange
•Bluetooth for PAN connection
•High-speed GPRS for mobile Internet access
•Optional WiFi (IEEE 802.11b/g) for WLAN connection
4 Managing Information
Opening programs
39
4 Managing Information
•Opening programs
•Using Search
•Using File Explorer
Opening programs
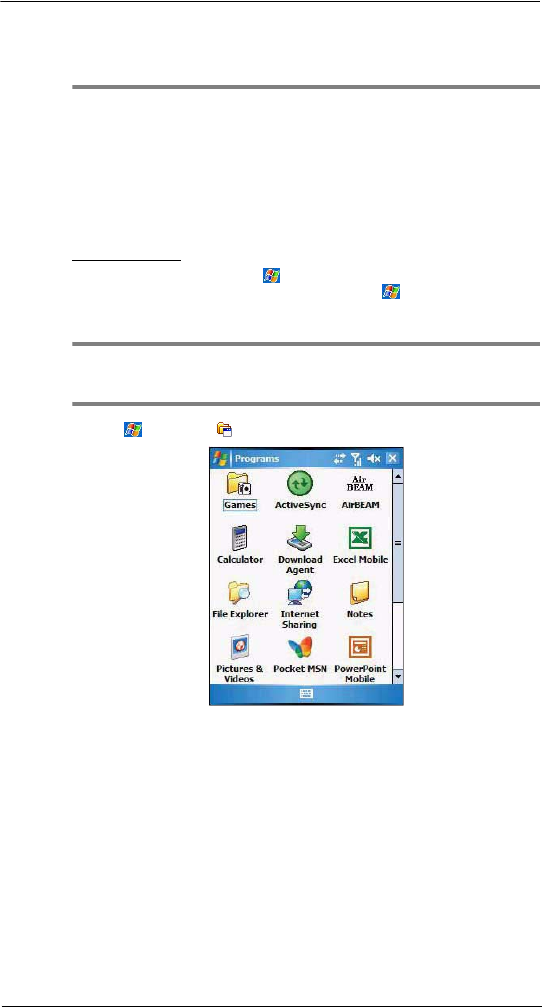
Your MC35 supports a variety of EDA and wireless communication programs to help you
manage both personal and work-related information.
To open a program:
•Tap a program name from the menu.
You can select which programs are displayed on the menu. See “To add a
program to the Start menu program using Settings” on page 207 for more
information.
NOTE: Some programs have abbreviated labels for check boxes and drop-down lists.
To see the full spelling of an abbreviated label, tap and hold the stylus on the label.
Drag the stylus off the label so that the command is not carried out.
•Tap > Programs , then tap program icon.
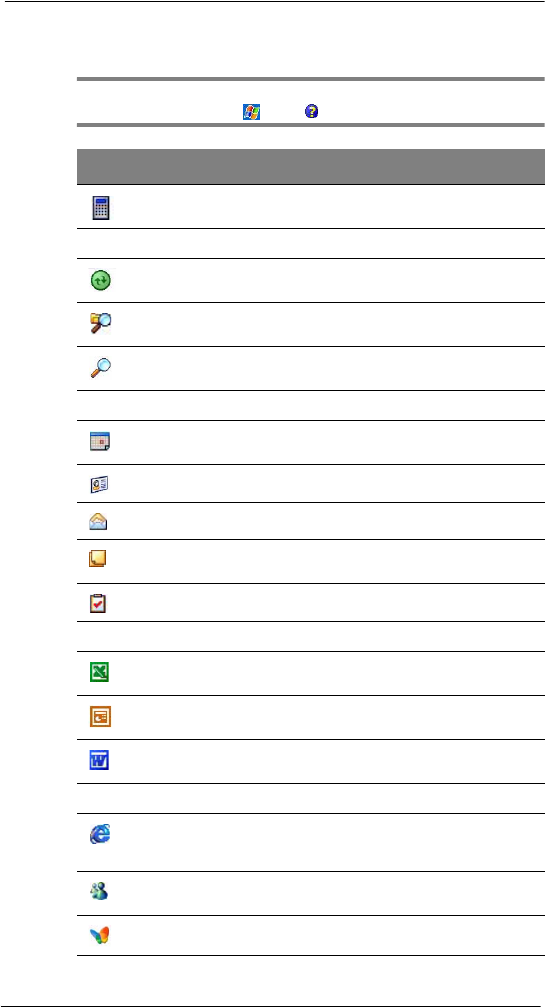
4 Managing Information
Opening programs
40
Program list
The following table contains a list of programs installed on your device.
NOTE: To get detailed information on using any of the applications listed in this
section, open the program, tap > Help .
Icon Program Usage
Calculator Perform basic arithmetic computations.
Device management programs
ActiveSync Synchronize information between your device and
your computer and/or server.
File Explorer Manage the files stored on your device, as well as
those in a storage card.
Search Locate specific files stored on your device, as well
as those in a storage card.
Microsoft Outlook Mobile programs
Calendar Keep track of your appointments and create
meeting requests.
Contacts Keep track of your friends and colleagues.
Messaging Send and receive text and e-mail messages.
Notes Create handwritten or typed notes, drawings, and
voice recordings.
Tasks Keep track of your tasks.
Microsoft Office Mobile programs
Excel Mobile Create new workbooks or view and edit Excel
workbooks created on your computer.
PowerPoint
Mobile
View slide show presentations.
Word Mobile Create new documents or view and edit Word
documents created on your computer.
Other Microsoft Windows Mobile programs
Internet
Explorer
Mobile
Browse Internet and intranet sites, and download
programs and files to your device.
MSN®
Messenger
Send and receive instant messages with your MSN
Messenger contacts.
Pocket MSN Subscribe to popular MSN services.

4 Managing Information
Opening programs
41
Windows Media
Player Mobile
Play stored or streaming digital audio and video
files.
Phone-related programs
Phone Send and receive local and international calls and
text messages.
SIM Manager View the contents of your SIM card and transfer it to
your contacts list.
SIM Toolkit Access the mobile content and data services, such
as news, weather, banking, and traveling
information; offered by the mobile phone service
provider.
Wireless communication programs
Express GPS
Connect
Use Assisted Global Positioning System (AGPS)
technology for you travel/navigation activities.
GPRS
Settings
Configure the device’s GPRS settings.
Internet
Sharing
Configure your device as a modem for connecting to
the Internet via a USB or Bluetooth personal area
network (PAN) connection.
Push to Talk Conduct walkie-talkie style conversations using a
mobile phone connection.
Terminal
Services Client
Log onto a Windows NT server type PC that is
running the Terminal Services software and use all
of the programs that are available on that PC from
your device.
Media-related programs
CamWedge Enable bar code data capture.
Pictures &
Videos
Take pictures and video.
Download-related programs
AirBEAM Smart Allows specially designed software packages to be
transferred between a host server and your MC35.
Download
Agent
Manage the download and installation of add-on
programs.
Rapid
Deployment
Client
Facilitates software downloads from a Mobility
Services Platform Console FTP server to your
device.
Icon Program Usage
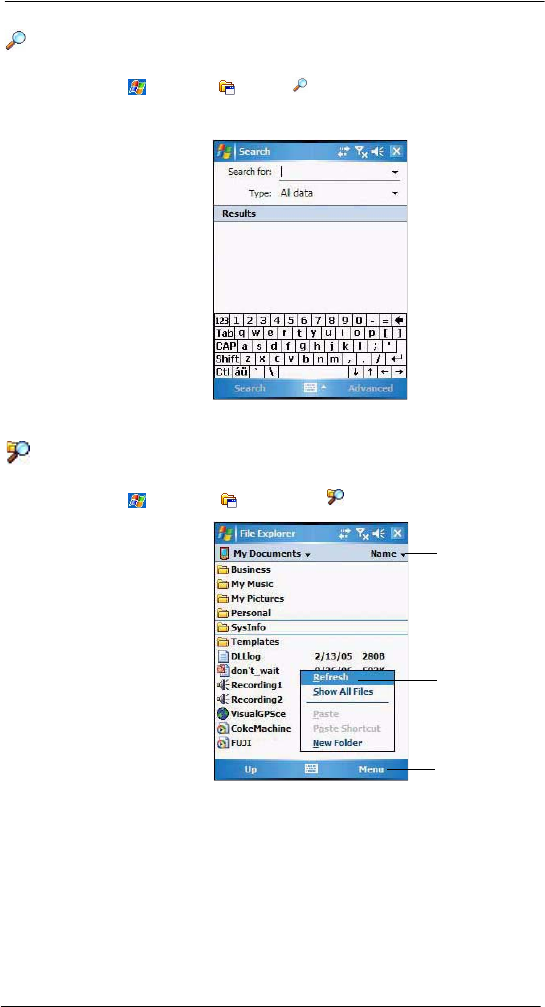
4 Managing Information
Using Search
42
Using Search
The Search function helps you locate a particular file quickly.
1 Tap > Programs > Search .
2 Enter the file name of the file you’re searching, then select a data type.
3Tap Search.
Using File Explorer
Use File Explorer to locate files on your device and to organize these files into folders.
•Tap > Programs > File Explorer .
Tap here to select a
sort criterion for the
list.
Tap here to display a
pop-up menu.
Tap and hold a blank
area to display the New
Folder command.
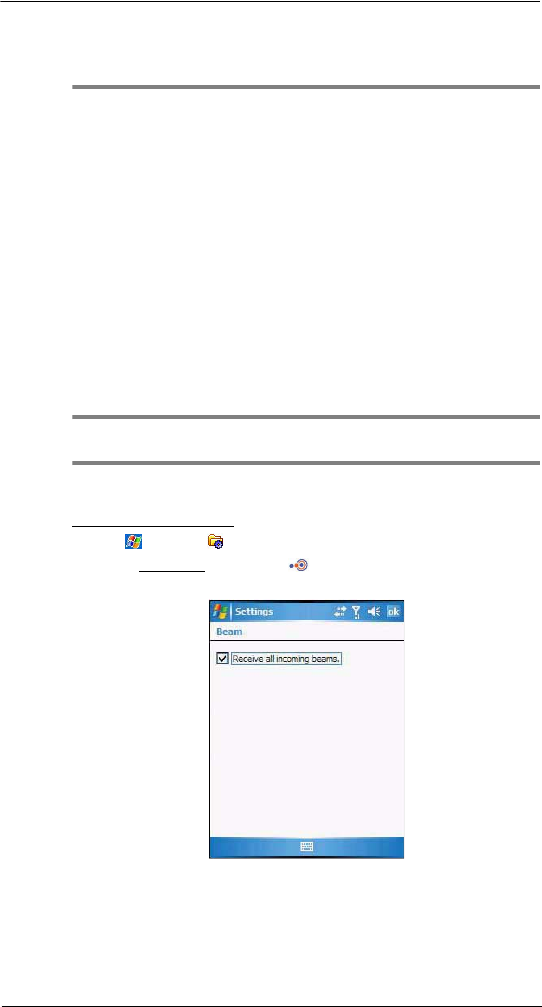
5 Wireless Communications
Wireless communication features
43
5 Wireless Communications
•Wireless communication features
•Managing wireless connections
•Getting connected
Wireless communication features
You can use your MC35 to exchange information with other mobile devices and connect
to your computer, a network, or the Internet. You have the following connection options:
•Use the infrared sensor or the Bluetooth function to exchange files from another
IR- or Bluetooth-enabled device.
•Use a GPRS or WiFi connection to send and receive e-mail messages by using
Messaging; and view Web or WAP pages by using Internet Explorer Mobile.
Contact your mobile phone service provider to have your WAP or GPRS connection
activated.
Beam function
In a Microsoft Windows Mobile program (except Messaging), and Picture & Videos, you
can exchange files using either infrared or Bluetooth.
TIP: You can also beam files (not folders) from the File Explorer screen. To do, tap
and hold the item you want to send, then tap Beam File from the pop-up menu.
First activate the beam function before exchanging files with another IR- or Bluetooth-
enabled device.
To activate the Beam function:
1 Tap > Settings .
2 On the Connections tab, tap Beam .
3 Tap “Receive all incoming beams” check box.
4Tap ok.
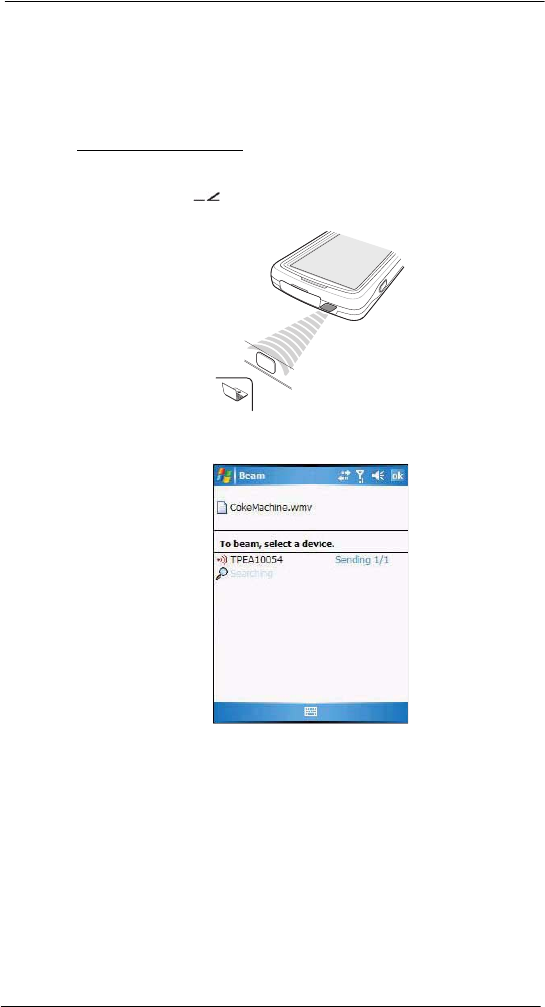
5 Wireless Communications
Wireless communication features
44
Infrared connection
Using infrared, you can enable short-range file exchange between your MC35 and
another IR-enabled device.
Exchanging files using IR connection
Ensure that the IR function on both your MC35 and on other device you want to
exchange files with are enabled.
To send files via IR connection:
1 Switch to the program where you created the item you want to send and locate the
item in the list.
2 Align the IR port of your device with that of the IR-enabled device so that they
are unobstructed and within a close range.
3 Tap and hold the item, then tap Beam [type of item] on the pop-up menu.
4 Tap the device that you want to send the file to.

5 Wireless Communications
Wireless communication features
45
To receive files via IR connection:
1 Align the IR port of your device with that of the IR-enabled device so that they
are unobstructed and within a close range.
2 Have the owner of the other IR-enabled device send the file to you.
3 On the Receiving Data callout, tap Yes.
Bluetooth connection
Your device allows you to connect to any Bluetooth-enabled device in your personal area
network (PAN). Once connected you can perform the following:
•Send and receive files to another Bluetooth-enabled device.
•Transfer an outgoing call to a Bluetooth-enabled headset. See “To make a
call from a Bluetooth-enabled headset” on page 120 for more information.
•Print files to a Bluetooth-enabled printer.
Additional software is required on your device to enable you to print files to a
Bluetooth-enabled printer. Contact your local dealer for more information.
•Once connected to another Bluetooth-enabled device or computer, you can locate
and use any of the services available on the device.
Activating the Bluetooth function
You have two options to activate your MC35’s Bluetooth connection—using the Wireless
Manager or the Bluetooth option under the Settings > Connections preferences. Once
activated, connection is indicated as On in the Wireless Manager section of the
Today screen.
To activate Bluetooth via the Wireless Manager:
See “To activate Bluetooth via the Wireless Manager” on page 57 for more information.
To activate Bluetooth using the Settings option:
1 Tap > Settings .
2 On the Connections tab, tap Bluetooth .
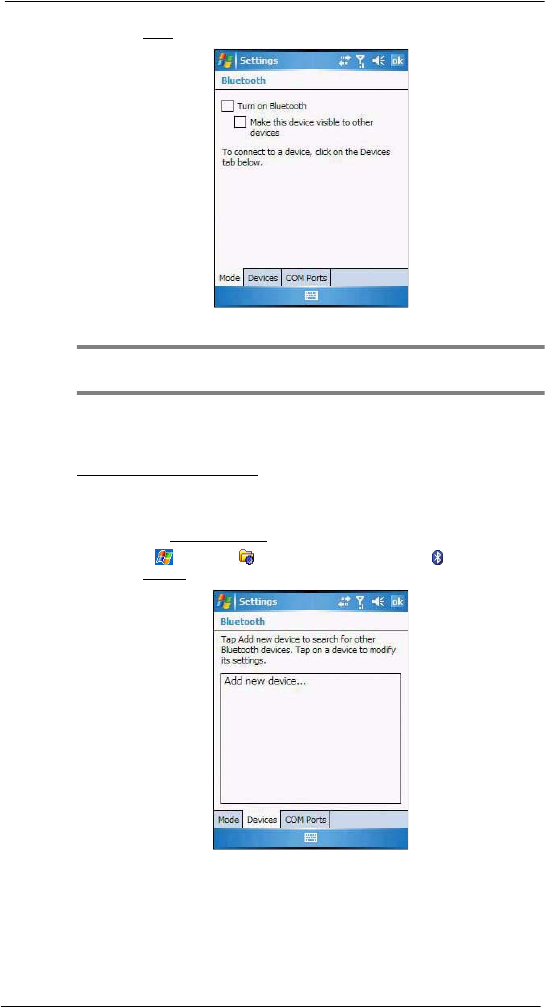
5 Wireless Communications
Wireless communication features
46
3 On the Mode tab, select all the check boxes.
4 Tap ok.
NOTE: Deactivate the Bluetooth feature when you do not plan to use it for an
extended time.
Creating a Bluetooth partnership
You need to create a partnership with another Bluetooth-enabled device to be able to
exchange information with it.
To create a Bluetooth partnership:
1 Ensure that your MC35 and the other Bluetooth-enabled device(s) are turned on,
visible, and within close range of each other.
2 Perform either of the following.
•On the Wireless Manager screen, tap Menu > Bluetooth Settings.
•Tap > Settings > Connections tab> Bluetooth .
3 On the Devices tab, tap Add new device.
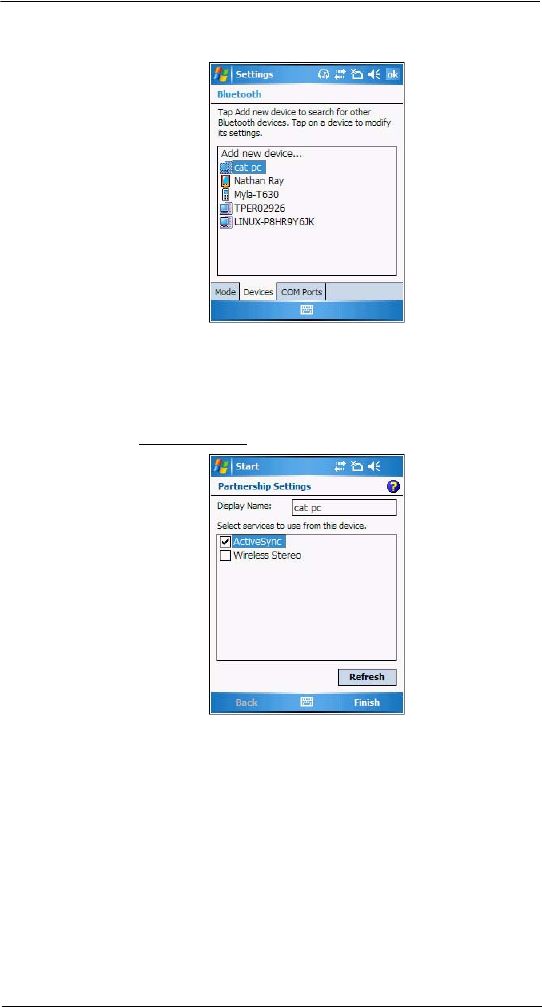
5 Wireless Communications
Wireless communication features
47
Your device searches for Bluetooth-enabled devices on your personal area network
(PAN) and displays them in the device list.
4 Tap the name of the device in the list, then tap Next.
If you want to use a passcode, type an alphanumeric passkey, then tap Next; enter
the same passkey on the other device.
The passkey is recommended for enhanced security. Your passkey must be
between 1 to 16 alphanumeric characters.
If you do not want to use a passkey, tap Next.
5 On the Partnership Settings screen, perform the following:
(a) Type in a meaningful device name on the Display Name box to identify the
device later.
(b) Select the type of services you want to enable for this Bluetooth partnership.
6Tap Finish.
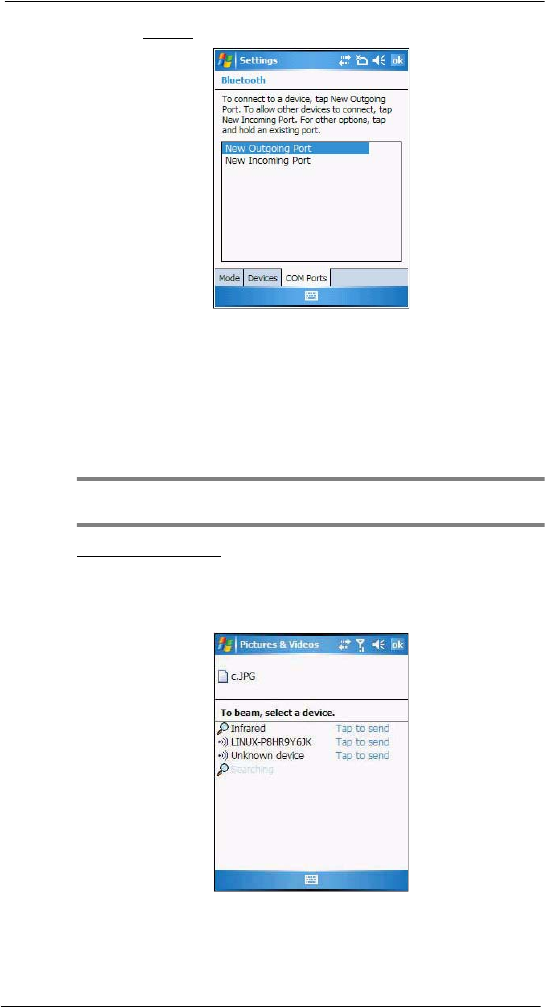
5 Wireless Communications
Wireless communication features
48
7 On the Bluetooth screen, tap the COM Ports tab, then perform one of the following:
•To connect to a device, tap New Outgoing Port.
•To allow other devices to connect to the MC35, tap New Incoming
Port.
8 Select the device you want to add, then tap Next.
9 Select a numbered COM port from the list.
10 Select “Secure Connection” option to designate the COM port for Bluetooth
partnership.
11 Tap Finish, then tap ok.
Exchanging files using Bluetooth
IMPORTANT: Ensure that the two devices have Bluetooth turned on, discoverable,
and within close range.
To send files via Bluetooth:
1 Switch to the program where you created the item you want to send and locate the
item in the list.
2 Tap and hold the item, then tap Beam [type of item] on the pop-up menu.
3 Tap the device that you want to send the file to.
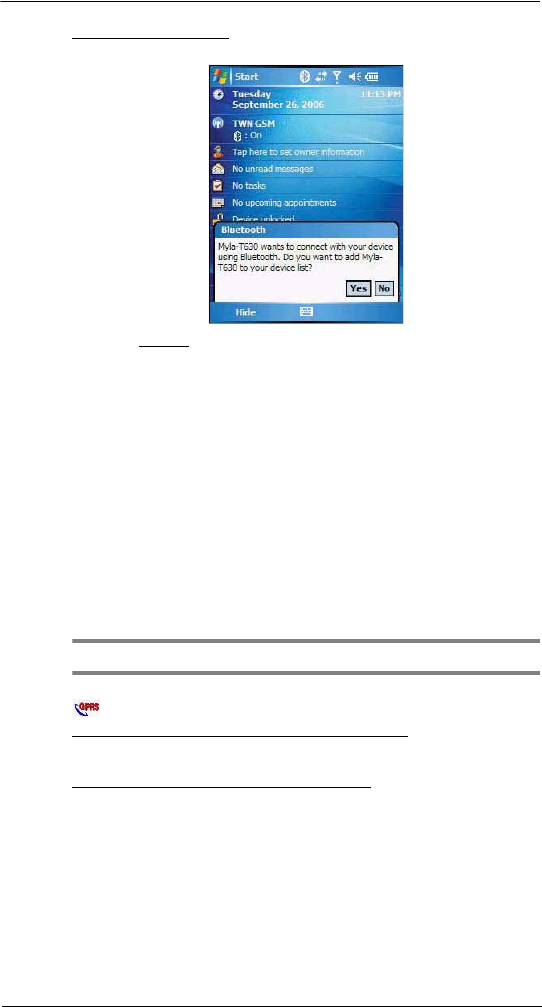
5 Wireless Communications
Wireless communication features
49
To receive files via Bluetooth:
1 Have the owner of the other Bluetooth-enable device send the file to you.
2 On the Bluetooth callout, tap Yes.
GPRS connection
General Packet Radio Service (GPRS) is a packet-switched technology that allows
transmission of data between mobile phones and the Internet over a GSM network. It
supports an “always on” capability which uses the GSM network only during data
transmission. This means users only pay for the amount of downloaded information
rather than the duration of the network connection.
The communication software for creating a GPRS connection is already installed on your
device. Your service provider will provide software needed to install other services, such
as paging and fax services.
Once you’ve established a GPRS connection, you can:
•Use Messaging to send and receive e-mail messages.
•Use Internet Explorer Mobile to access Web or WAP pages
•Use Windows Media Player 10 Mobile for Pocket PC to listen to streaming media
•Use MSN Messenger to conduct IM sessions with your friends and colleagues.
Configuring your GPRS connection
NOTE: GPRS Settings application is not available on all configurations.
You have two options to configure your GPRS connection—using the GPRS Settings
or the Connections option under the Settings > Connections preferences.
To manually configure GPRS connection using GPRS Settings:
See “To configure GPRS connection using GPRS settings” on page 157 for more
information.
To manually configure GPRS connection using Settings:
See “To connect to the Internet” on page 59 for more information.
For more information on configuring your device’s GPRS setting, contact your mobile
phone service provider.

5 Wireless Communications
Wireless communication features
50
Connecting to the GPRS network
NOTE: When downloading large files through GPRS data connection, incoming phone
calls are not received. Phone calls are directed to voicemail.
A GPRS connection is required to connect to a GPRS network. To create a GPRS
connection, the GPRS features on your GSM account must be enabled and activated on
your SIM card. You may be required to configure your GPRS connection and
authenticate GPRS to connect to the GPRS network. Obtain the user name and
password from your mobile phone service provider.
To connect to GPRS network:
1 On the navigation bar, tap the Data connectivity icon .
2 Tap Connect GPRS.
The Connecting call drop-down box displays. The GPRS data connection active
icon appears on the navigation bar and changes to and to once a GPRS
connection is established.
To end a GPRS connection:
Perform one of the following:
•On the navigation bar, tap the Data connectivity icon , then tap Cancel
on the Connectivity drop-down box.
•On the Today screen, tap Wireless Manager > Menu > Disconnect
Cellular Data.
WiFi connection
Your MC35 supports an optional WiFi hardware (IEEE 802.11b/g) you can use to scan
for existing wireless local area network (WLAN) access points or hot spots. WLAN
access points or hot spots can be found in homes and office or public areas such as
inside airports, restaurants, coffee shops, hotels, or other public areas. Just like in a
GPRS connection, a WiFi access allows you to connect to a computer, access the
Internet, and send/ receive e-mail and files.
NOTE: WiFi access in some areas may require a separate purchase of a service
contract with a wireless service provider. Check with a WiFi service provider in your
area for more information.
Activating a WiFi connection
You have several options to activate your MC35’s WiFi connection—from the Today
screen, using the Wireless Manager or the WiFi Card Setting icon; or the WiFi option
under the Settings > Connections preferences. Once activated, WiFi connection is
indicated as On in the Wireless Manager section of the Today screen.
To activate WiFi connection via the Wireless Manager:
See “To activate WiFi connection via the Wireless Manager” on page 57 for more
information.
To activate WiFi connection using the WiFi Card Setting icon:
1 On the Today screen, tap the WiFi Card Setting icon , located on the lower
right corner of the screen.

5 Wireless Communications
Wireless communication features
51
2 Select Enable Wi-Fi Card.
To activate WiFi using the Settings option:
1 Tap > Settings .
2 On the Connections tab, tap WiFi Card Setting .
3 Select Enable WiFi Card, then select a running mode.
4Tap ok.
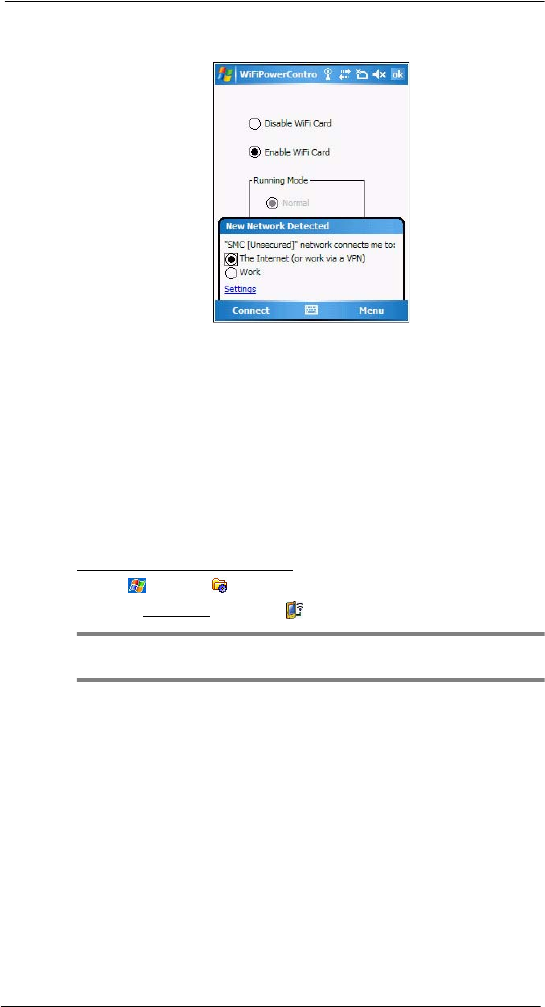
5 Wireless Communications
Wireless communication features
52
Your device will automatically detect the WLAN access points available in your area
and display them on the notification prompt.
5 Select the network you want to connect to.
6 Tap ok.
Setting up a wireless network connection
After activating WiFi connection, you can proceed to the wireless network setup. A
wireless network can be automatically detected or be manually added by entering the
related network settings. Before performing the procedure in this section, determine if
authentication information is needed.
Check the following before setting up a wireless network connection for your device.
•Make sure that the Internet Protocol (TCP/IP) is installed on your computer.
•Make sure the network system and remote access server in your workplace
supports TCP/IP protocol
•Make sure you have remote access account. Ask your network administrator for
assistance on setting up a wireless connection.
To set up a wireless network connection:
1 Tap > Settings .
2 On the Connections tab, tap WiFi .
TIP: Alternatively, from the Today screen, you can tap Wireless Manager > Menu >
WiFi Settings.
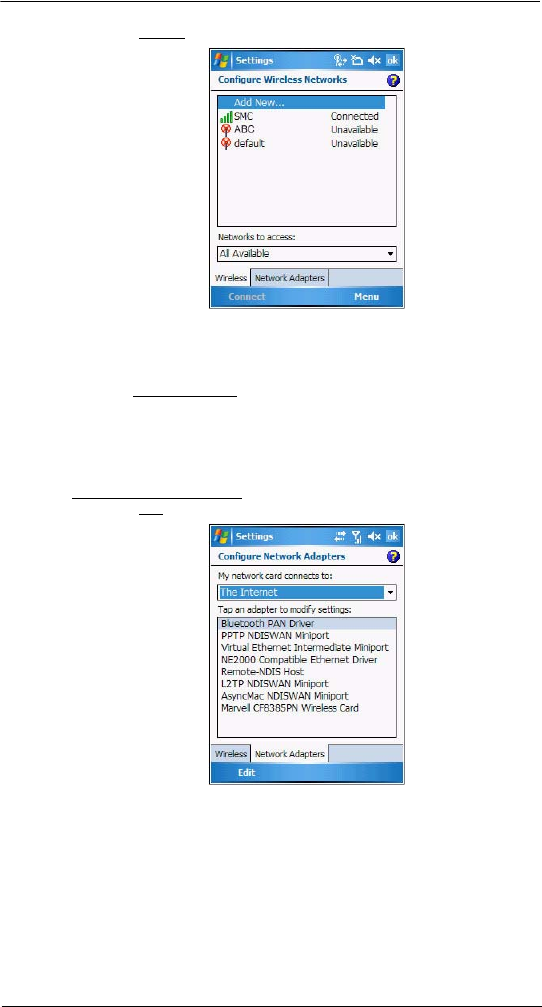
5 Wireless Communications
Wireless communication features
53
3On the Wireless tab, perform one of the following:
•If your preferred network is not listed, tap Add New. See “To add a wireless
network “ on page 54 for more information.
•Tap an available wireless network. Previously configured networks are
already listed. To change network settings, tap a network and follow the
on-screen instructions.
4 In the Networks to access drop-down list, select the type of network you wish to
connect to. Options include:
•All available
•Only access points
•Only computer-to-computer
5Tap ok.
To configure a network adapter:
1 On the WiFi screen, tap the Network Adapters tab.
2 Make your desired changes to the available adapters on the list.
3Tap ok.
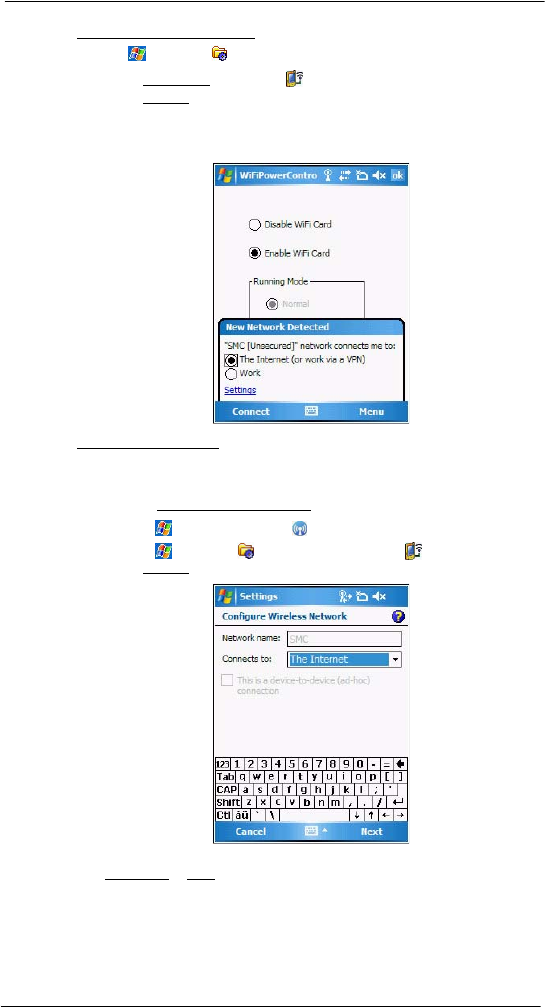
5 Wireless Communications
Wireless communication features
54
To connect to a wireless network:
1 Tap > Settings .
2 On the Connections tab, tap WiFi .
3On the Wireless tab, tap an available wireless network.
4 On the command bar, tap Connect.
If a wireless network is detected, a similar screen appears, tap Connect on the
command bar.
To add a wireless network:
If your preferred wireless network is not automatically detected, you can add the network
provided you know the wireless network settings. Contact your network administrator for
wireless network settings applicable to your network.
1 Open the Configure Wireless Networks screen by performing one of the following:
•Tap > Wireless Manager > Menu > WiFi Settings.
•Tap > Settings > Connections tab > WiFi .
2On the Wireless tab, tap Add New.
3 Enter the Network name, then choose whether the wireless network connects to
The Internet or Work network.
4 If you want to connect to another wireless device (Ad-hoc mode), select the “This is
a device-to-device (ad-hoc) connection” option.
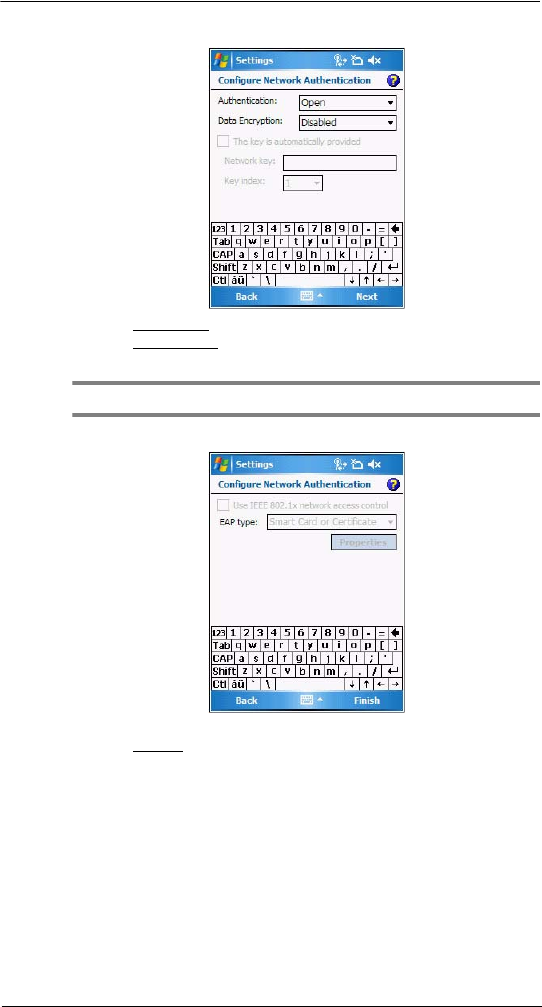
5 Wireless Communications
Wireless communication features
55
5Tap Next.
6 In the Authentication drop-down list, select the authentication method.
7 In the Data Encryption drop-down list, select an encryption method.
8 Tap “The key is automatically provided” check box or enter the network key.
NOTE: Obtain network security settings from the network administrator.
9Tap Next.
10 Tap the “Use IEEE 802.1x network access control” check box.
11 In the EAP type drop-down list, select an appropriate EAP method.
12 Tap Finish.
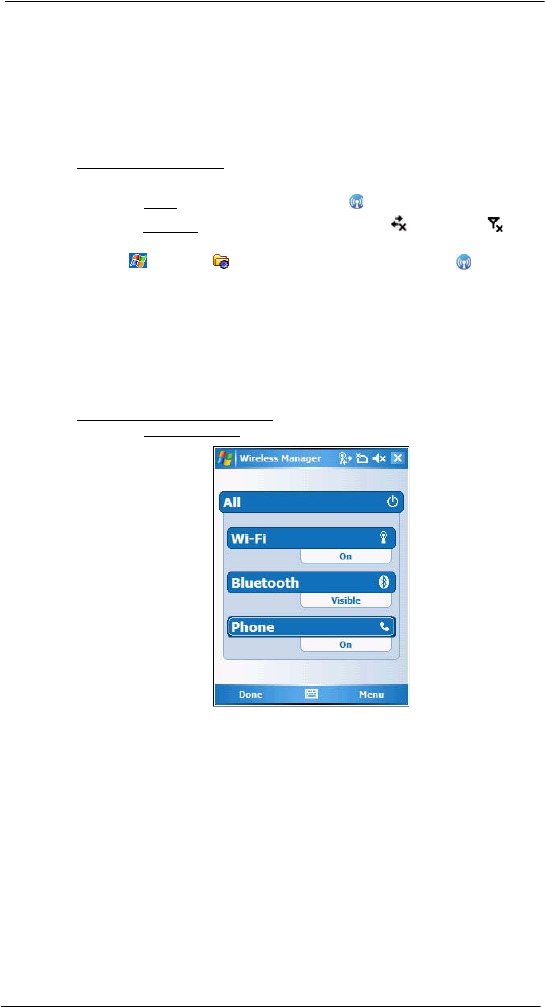
5 Wireless Communications
Managing wireless connections
56
Managing wireless connections
Using Wireless Manager
The Wireless Manager provides easy management to the wireless features on your
device. This program complements your device’s integrated wireless card enabling you
to turn the wireless features on and off and allows for centralized management of the
WiFi, Bluetooth, and Phone settings.
To open Wireless Manager:
Perform one of the following:
•On the Today screen, tap Wireless Manager .
•On the navigation bar, tap the Data connectivity icon or signal icon ,
then from the Connectivity drop-down box, tap Wireless Manager.
•Tap > Settings > Connections tab > Wireless Manager .
Activating wireless features
You can use Wireless Manager to turn the following wireless features on and off— one at
a time or all at the same time.
•WiFi
•Bluetooth
•Phone
•Cellular Data GPRS connection
To turn multiple wireless features on:
•On the Wireless Manager screen, tap All > Done.
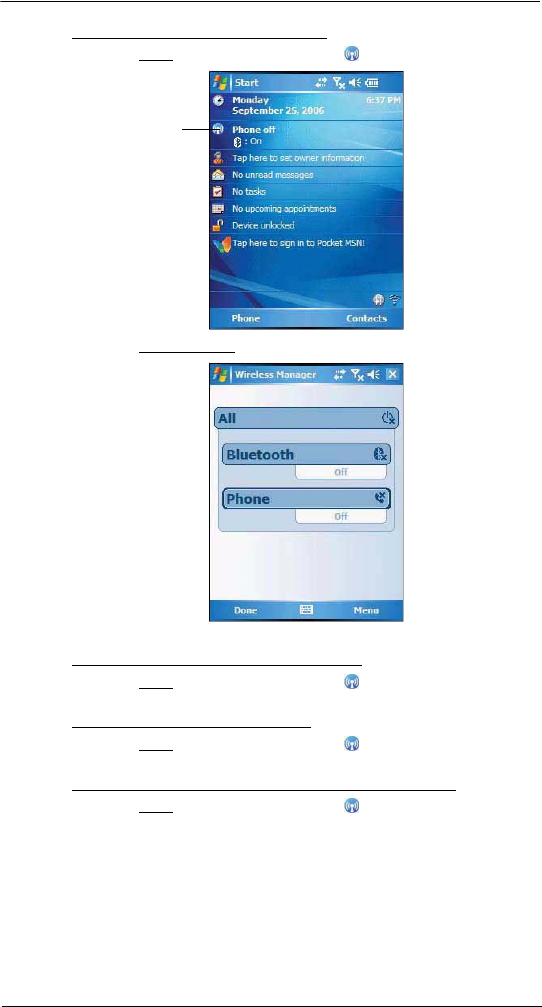
5 Wireless Communications
Managing wireless connections
57
To activate Bluetooth via the Wireless Manager:
1 On the Today screen, tap Wireless Manager .
2 On the Wireless Manager screen, tap Bluetooth.
3Tap Done.
To activate WiFi connection via the Wireless Manager:
1 On the Today screen, tap Wireless Manager .
2Tap WiFi > Done.
To activate Phone via the Wireless Manager:
1 On the Today screen, tap Wireless Manager .
2Tap Phone > Done.
To disconnect cellular data GPRS connection via the Wireless Manager:
1 On the Today screen, tap Wireless Manager .
Tap to launch the
Wireless Manager.
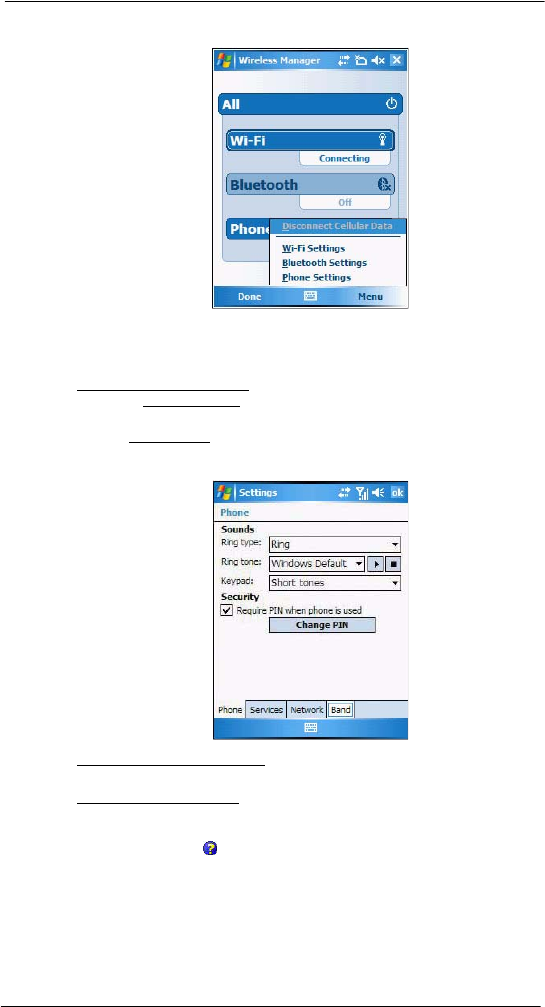
5 Wireless Communications
Managing wireless connections
58
2 Tap Menu > Disconnect Cellular Data.
Configuring the multiple wireless settings
Using Wireless Manager, you can set Phone, Bluetooth, and WiFi settings.
To configure the Phone settings:
1 On the Wireless Manager screen, tap Menu.
2Select Phone Settings.
The Phone Settings screen has four tabs—Phone, Services, Network, and
Band. See “Phone preferences” on page 136 for the configuration options
available for each tab.
To configure the Bluetooth settings:
See “Bluetooth connection” on page 45 for more information.
To configure the WiFi settings:
See “WiFi connection” on page 50 for more information.
For information on configuring the Bluetooth settings, Phone settings, or
WiFi settings, tap Help .
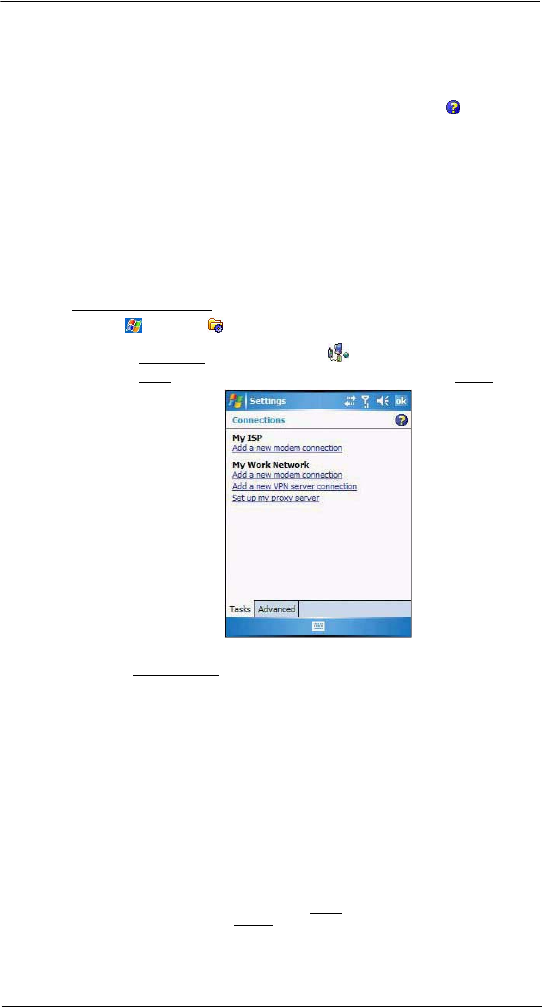
5 Wireless Communications
Getting connected
59
Getting connected
After configuring your device’s wireless settings you can now define the network settings
you’ll be using to access the Internet, connect to your office network, and view intranet
URLs.
For help information on performing the following procedures, tap Help from the
screen you’re having difficulty with.
Once you’ve establish these network settings; use Internet Explorer Mobile to view
Internet and intranet sites. See “Internet Explorer Mobile” on page 96 for more
information.
Connecting to the Internet
You can connect to the Internet by using a modem or wireless connection. Before you
perform the procedure below, obtain the following information from your Internet service
provider (ISP) or wireless service provider.
•ISP server phone number or access point
•User name and password
To connect to the Internet:
1 Tap > Settings .
2 On the Connections tab, tap Connections .
3 On the Tasks tab, tap Add a new modem connection from either My ISP.
4 Enter a name for the connection (e.g. Internet).
5 In the Select a modem list, select your modem type.
If you will be using a mobile phone network, select Cellular Line.
If you will be using GPRS, select Cellular Line (GPRS).
6Tap Next.
7 Enter the access point name provided by your mobile service provider.
8Tap Next.
9 If required, enter the user name, password, and domain name.
If the mobile phone service provider specified the IP addresses of your DNS
servers, tap Advanced > Servers tab. Select Use specific server address, enter
the DNS addresses, then tap ok.
10 Tap Finish.
The connection is automatically started when you begin using a program that uses
an Internet connection.
To manually start the connection, perform one of the following:
•Repeat steps 1 and 2, then on the Tasks tab, tap Manage existing
connections under My ISP. Tap and hold a connection name, then
select Connect from the pop-up menu.
•Perform the “To connect to a wireless network” procedure on page 54.
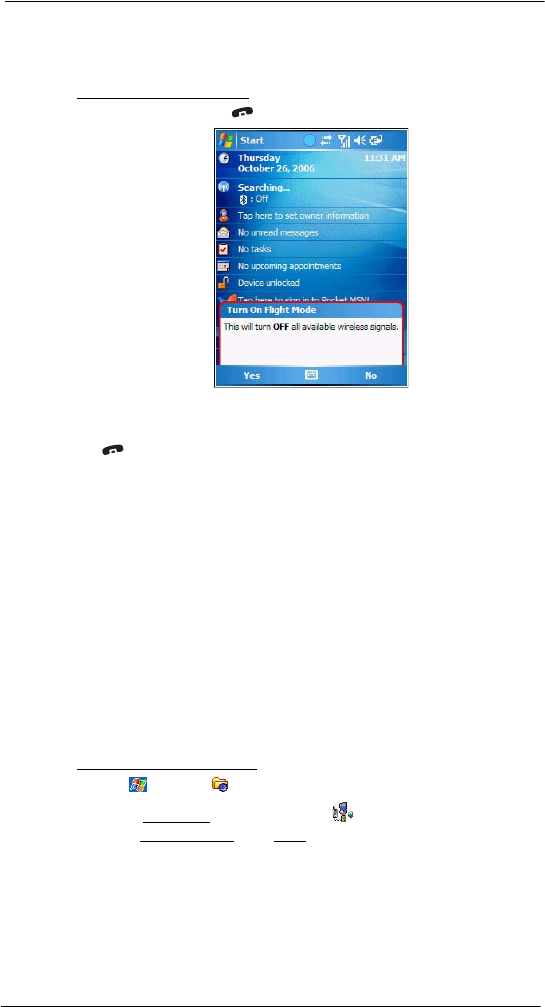
5 Wireless Communications
Getting connected
60
Flight Mode
Flight Mode allows you to turn off all the active wireless connections for safe use on an
airplane.
To turn off wireless connections:
1 Press and hold the End button for five seconds.
2Select Yes when the Turn On Flight Mode notification appears. All active wireless
connections are turned off.
When you want to turn the wireless connections back on, press and hold the End
button for five seconds. Select Yes when the Turn Off Flight Mode notification
appears. The device remembers which wireless connections were active prior to
entering Flight Mode and only turns on those wireless connections.
Connecting to your office network
You can connect to your office network by using a modem, virtual private network (VPN),
or wireless connection. Before you perform the procedure below, obtain the following
information from your network administrator or your wireless service provider.
•For a modem connection:
•ISP server phone number or access point
•User name and password
•For a VPN connection:
•User name, password, and domain name
•TCP/IP settings
•VPN server host name or IP address
•ISP server phone number or access point
If you will be using a modem or a VPN connection, perform the procedure in this section.
If you will be using a wireless connection, perform the “To connect to a wireless network”
procedure on page 54.
To connect to your office network:
1 Tap > Settings .
2 On the Connections tab, tap Connections .
3 Under My Work Network on the Tasks tab; select the kind of work connection you
will be using.
4 Enter the required information for the selected work connection.
5 Tap Finish.
The connection is automatically started when you use Internet Explorer Mobile to
connect to your work network. Begin using a program that uses an Internet
connection. To manually start the connection, perform one of the following:

5 Wireless Communications
Getting connected
61
(a) Repeat steps 1 and 2, then on the Tasks tab, tap Set up my proxy server
under My Work Network.
(b) On the Modem or VPN tab, tap and hold a connection name, then select
Connect from the pop-up menu.
Viewing intranet URLs
If you’ll be connecting to intranet sites that have periods in their URLs (e.g.
intranet.corporatename.com), you must add them the to Work URL Exceptions list.
Otherwise, Internet Explorer Mobile will search for them in the Internet rather than the
company’s intranet.
To add an intranet URL:
1 Tap > Settings .
2 On the Connections tab, tap Connections .
3 On the Advanced tab, tap Exceptions.
4Tap Add New URL.
5 Enter the intranet URL.
TIP: If you use URLs that share the same root company name, you can add them as
group by entering *.corporatename.com.
6Tap Finish.
Setting an e-mail server connection
You can set up a connection to an e-mail server so that you can send and receive e-mail
messages on your device. You can use multiple e-mail accounts to receive your
messages. For each e-mail account you intend to use, first set up and name the e-mail
service. If you use the same service to connect to different mailboxes, set up and name
each mailbox connection.
There are two types of e-mail account that can be managed using your device.
•Microsoft Outlook
Using Microsoft Outlook, your Inbox is updated each time you sync with your
computer or corporate e-mail server.
•POP3/IMAP4
This includes e-mail service from providers. These e-mail accounts can be
managed remotely using a wireless connection.

5 Wireless Communications
Getting connected
62
To set up an e-mail account:
For an explanation on any of the setup screens, tap > Help .
1 Tap > Messaging .
2 Tap Menu > Tools > New Account.
3 Select the e-mail type from the drop-down list, then tap Next.
If you have selected an Outlook E-mail account, messages on the Microsoft Outlook
Inbox folder on your computer will synchronize to your device’s Outlook E-mail
Inbox during the next time you perform an ActiveSync synchronization.
NOTE: The first time that you synchronize Outlook e-mail with your device, any
existing Outlook e-mail items on your device are deleted and replaced by items
synchronized from your computer.
4 If you have selected POP3 or an IMAP e-mail account, follow the succeeding steps.
5 Enter your e-mail address, then tap Next.
This will initiate auto-configuration which attempts to connect your device to your
e-mail server and automatically download the necessary e-mail connection settings.
If auto-configuration is successful you can begin sending/receiving e-mails. If
unsuccessful you will need to manually enter the settings.
6 Once auto-configuration is finished, tap Next, then Finish, or you can select
Options to configure additional e-mail settings.
If auto-configuration is not successful, contact your ISP or network administrator for
the following information and enter them manually:
•User name and password
•Domain name
•Account type and name
•Incoming and outgoing e-mail server
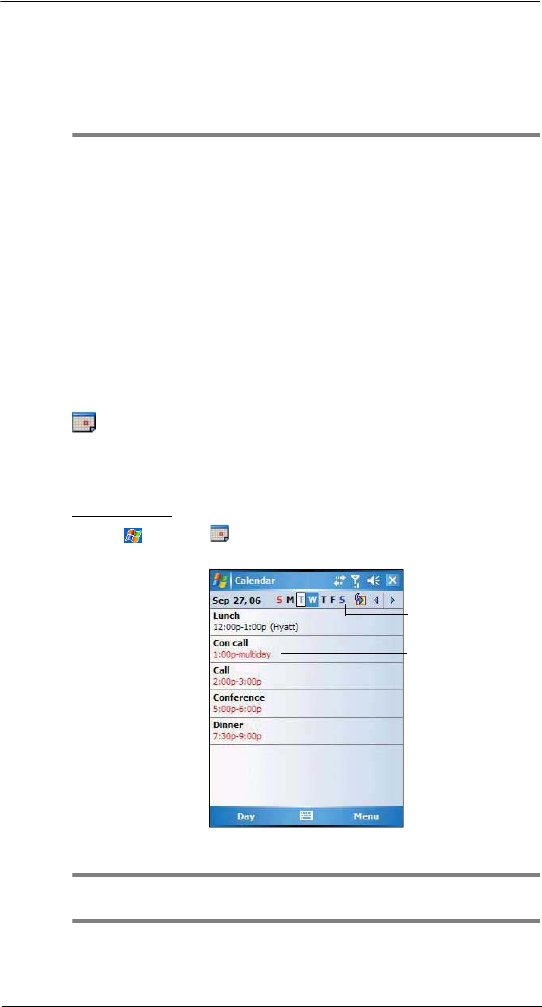
6 Using the Windows Mobile Programs
Microsoft Outlook Mobile programs
63
6 Using the Windows
Mobile Programs
•Microsoft Outlook Mobile programs
•Microsoft Office Mobile programs
•Windows Media Player 10 Mobile for Pocket PC
•Internet Explorer Mobile
•Pocket MSN
Microsoft Outlook Mobile programs
Microsoft Outlook Mobile includes Calendar, Contacts, Inbox, Notes, Tasks, and
Messaging. You can use these programs individually or in tandem with each other. For
example, e-mail addresses stored in Contacts can be used in Messaging.
You can use ActiveSync to synchronize your Outlook Mobile data with the Microsoft
Outlook information on your computer or to a Microsoft Exchange server.
See ”Using ActiveSync” on page 30 for more information.
Calendar
Calendar enables you to conveniently manage your schedules and appointments or any
other activities associated with a time and date. You can schedule appointments,
including meetings and other events. Checking your appointments is easy using one of
several views—Agenda, Day, Week, Month, and Year.
To open Calendar:
•Tap > Calendar .
Calendar opens to today’s schedule.
Switch display views by tapping the view option on the lower left corner of
the command bar.
NOTE: You can customize the Calendar display, such as changing the first day of the
week, by tapping Menu > Options.
Tap to go to
current date.
Tap to display or edit the
appointment details.
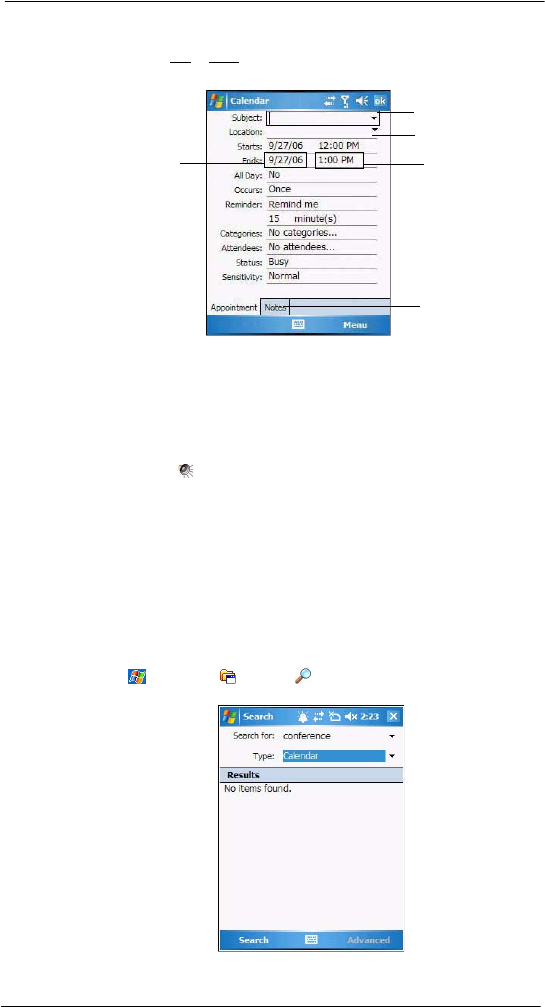
6 Using the Windows Mobile Programs
Microsoft Outlook Mobile programs
64
Scheduling an appointment
1 If you are in Day or Week view, tap the desired date and time for the appointment.
2Tap Menu > New Appointment.
3 Using the soft keyboard, enter the appointment details.
To select a field, tap it.
Hide the soft keyboard to see all available fields.
4 To add notes, tap the Notes tab.
5 After completing the appointment details, tap ok.
If you select “Remind me” in an appointment, your device notifies you
according to the options set in the Settings > Personal > Sounds &
Notifications option.
Viewing an appointment
You can view an appointment schedule in all views except for Year and Agenda view.
•To see the details of an appointment, tap the appointment.
•To see a pop-up menu of available actions for an appointment, tap and hold the
appointment.
•In Year view, the time of appointments are indicated by symbols. An upward
triangle means a morning appointment; a downward triangle means an afternoon
appointment. A solid square indicates an appointment that overlaps the noon day
border.
Finding an appointment
•Tap > Programs > Search , enter the appointment name, select
Calendar for the type, then tap Search.
Notes is a good place
for maps, directions,
or meeting reminders.
Tap to choose previously
entered location.
Tap to select a time.
Tap to choose from a
predefined text.
Tap to select a date.
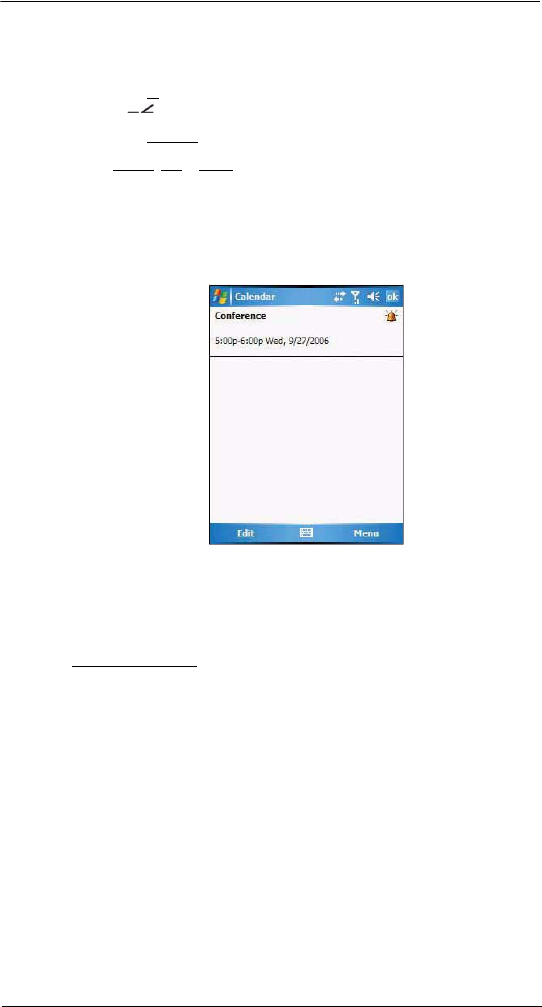
6 Using the Windows Mobile Programs
Microsoft Outlook Mobile programs
65
Beaming an appointment
You can send an appointment to another IR- or Bluetooth-enabled device by beaming it.
1 If you intend to send the appointment:
•Via IR: Ensure that the two devices have IR turned on, then align the IR port
of your device with that of the other device so that they are unobstructed
and within close range.
•Via Bluetooth: Ensure that the two devices have Bluetooth turned on,
discoverable, and within close range.
2 In Agenda, Day or Month view, tap and hold the appointment.
3Select Beam Appointment on the pop-up menu.
4 Tap the device that you want to send the appointment to.
Using the Calendar summary screen
When you tap an appointment in Agenda or Day view, a summary screen is displayed. To
change the appointment, tap Edit.
Creating a meeting request
You can use Calendar to set up meetings with users of Outlook or Pocket Outlook. The
meeting request is created automatically and is sent when you synchronize Messaging
or when you connect to your e-mail server. Indicate how you want meeting requests sent
by tapping Menu > Options.
To schedule a meeting:
1 Create an appointment.
2 In the appointment details, hide the input panel, then tap Attendees.
3 Select the check box before the e-mail address of the contacts you want to send a
meeting request to.
4Tap ok twice—once to return to the appointment details page and another to save
the appointment.
The meeting request is created automatically and placed in the Outbox folder.
5Tap ok.
Synchronizing calendar items
•Calendar items created on your device are copied to your computer and/or
on a Microsoft Exchange server during synchronization, and vice versa. By
default, Calendar items from the last two weeks are synchronized.
•Similarly, Calendar items that are deleted from your device are deleted from
your computer and/or server during synchronization, and vice versa.
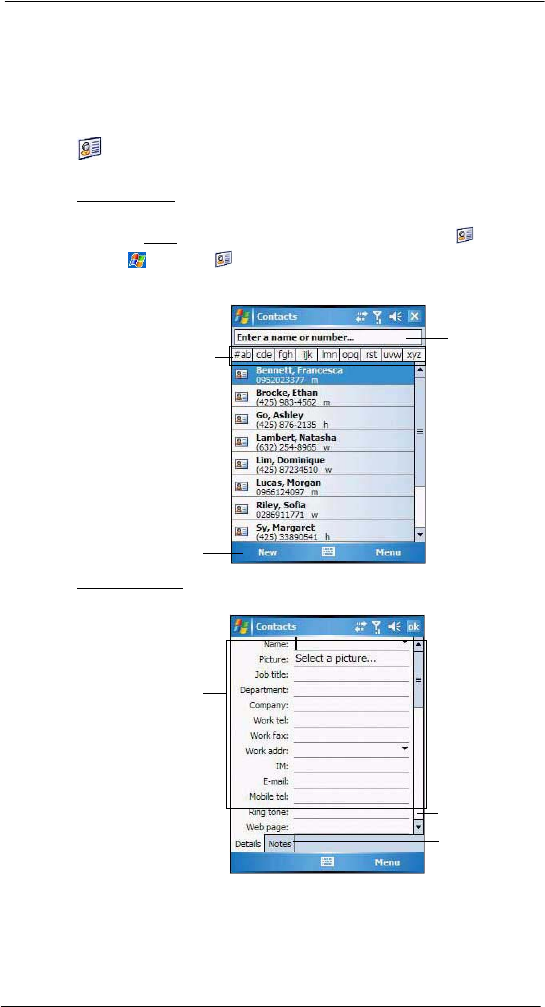
6 Using the Windows Mobile Programs
Microsoft Outlook Mobile programs
66
•To save storage space on your device, synchronize appointments within a
convenient date range. Perform the following:
(a) Connect your device to your computer.
(b) In ActiveSync on your computer, if the details pane is not open, click Show
Details.
(c) Double-click Calendar, then select an interval in “Synchronize only the past”.
Contacts
Contacts maintains a list of your friends’ and colleagues’ contact information.
To open Contacts:
Perform one of the following:
•On the Today screen, press the right soft button or tap Contacts .
•Tap > Contacts .
Contacts opens to the contact list. To change the way contact information is
displayed in the list, tap Menu > Options.
To create a contact:
1 Tap New.
2 Using the soft keyboard, enter a name and other contact information.
To select a field, tap it.
Hide the soft keyboard to see all available fields.
3 To add notes, tap the Notes tab.
Enter the name of
the contact you’re
searching for.
Tap to create a
new contact.
Tap one of the letter blocks to
display only contact names
starting with such letters.
Tap a field to enter
contact information.
Notes is a good
place for additional
contact information.
Scroll to see more
fields.
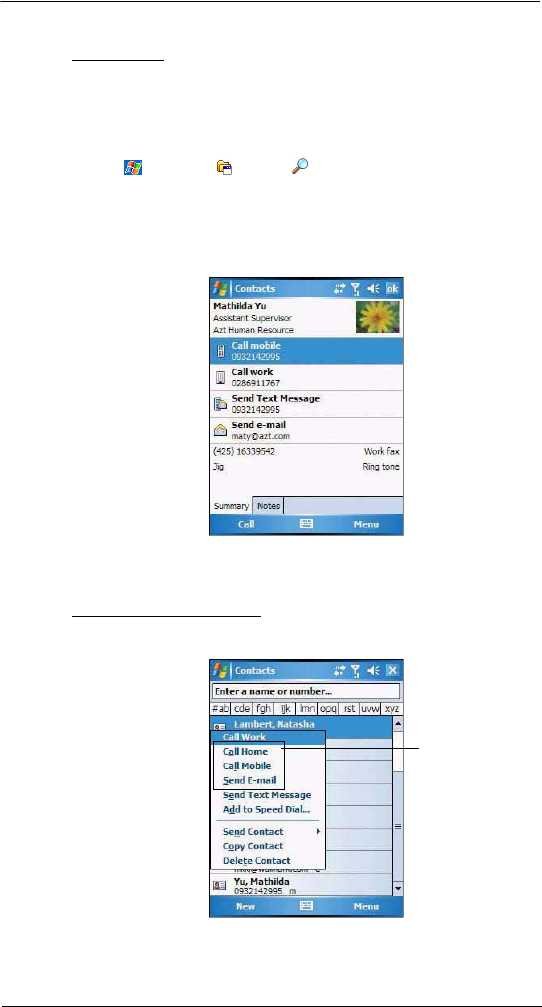
6 Using the Windows Mobile Programs
Microsoft Outlook Mobile programs
67
4 After completing the contact details, tap ok.
To find a contact:
There are several ways to find a contact.
•Using the MC35 keypad, press the starting letter of the contact name
•Tap one of the letter blocks displayed across the top of the contact list.
•Use the Smart Lookup function by entering the first few letters of the contact you’re
looking for in the search box under the navigation bar. To show all contacts again,
clear text from the box or tap the button to the right of the box.
•Tap > Programs > Search , enter the contact name, select Contacts
for the type, then tap Search.
Using the Contacts summary screen
When you tap a contact in the contact list (or select it using the joystick), a summary
screen displays. This is referred to as a contact card. To change the contact information,
tap Menu > Edit.
Calling a contact
You can make a call to a contact using either the contact list or the contact card.
To make a call from the contact list:
•Using commands in the pop-up menu.
(a) Tap and hold a contact to display a pop-up menu of actions.
(b) Tap any of the Call options to make a call.
Tap any call options
to make a call.
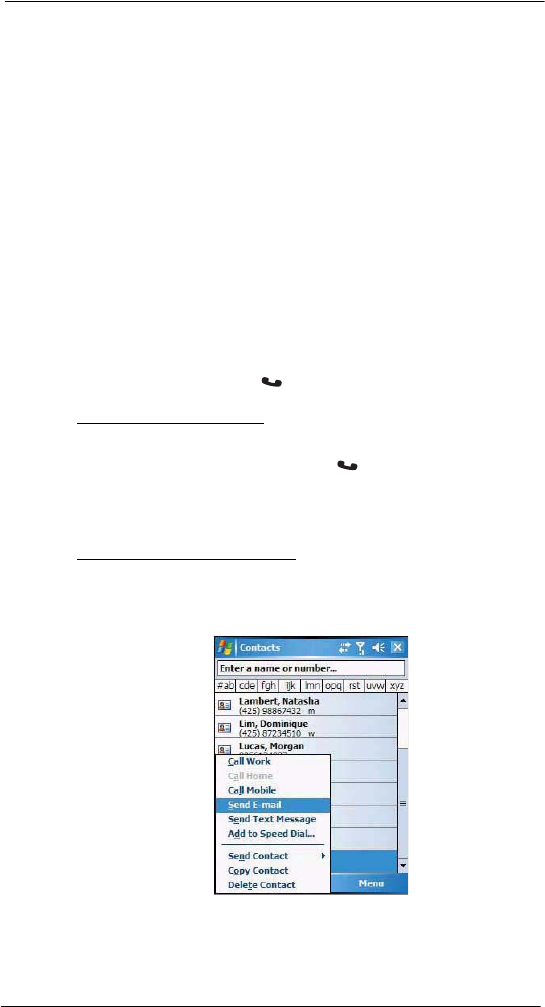
6 Using the Windows Mobile Programs
Microsoft Outlook Mobile programs
68
•Using the contact list abbreviation
(a) Tap the letter in the right column next to the contact you want to call. The
contact’s summary screen appears.
(b) Tap which number to call or send e-mail/text messages.
The letter that appears opposite a contact entry corresponds to a particular
contact information. These are as follows:
•e – E-mail address
•e2 – Second e-mail address
•e3 – Third e-mail address
•h – Home phone number
•h2 – Second home phone number
•m – Mobile phone number
•pgr – Pager phone number
•sms – SMS address
•w – Work phone number
•w2 – Second work phone number
•web – Web page
•Using the hardware buttons
(a) Move the joystick up or down to scroll through the contact list and select the
contact you want to call.
(b) Press the Send button twice—once to launch Phone and another to
make the call. The call will be made to that contact’s priority number.
To make a call from a contact card:
•Tap any of the listed phone numbers.
•Move the joystick up or down to scroll through the listed numbers and select
one, then press the joystick or Send button to make the call.
Sending a message to a contact
You can send an e-mail or text message to a contact either from the contact list or from a
contact card.
To send a message from the contact list:
1 Tap and hold a contact to display a pop-up menu of actions.
- or -
Move the joystick up or down to scroll through the list and select a contact, then
press the joystick to display a pop-up menu of actions.

6 Using the Windows Mobile Programs
Microsoft Outlook Mobile programs
69
2Tap Send E-mail or Send Text Message.
- or -
Move the joystick up or down to select either Send option, then press the joystick to
enable it.
Messaging opens to a new message screen with the “To” box automatically filled
out with the selected contact’s e-mail address/SMS number.
3 Proceed to composing the message.
To send a message from a contact card:
1 Tap any of the listed e-mail/text addresses.
- or -
Move the joystick up or down to scroll through the listed e-mail/text addresses and
select one, then press the joystick.
Messaging opens to a new message screen with the “To” box automatically filled
out with the selected contact’s e-mail/text address.
2 Proceed to composing the message.
Beaming a contact card
You can send a contact card to another IR- or Bluetooth-enabled device either from the
contact list or from a contact card screen.
To beam a contact card from the contact list:
1 If you intend to send the contact card:
•Via IR: Ensure that the two devices have IR turned on, then align the IR port
of your device with that of the other device so that they are unobstructed
and within close range.
•Via Bluetooth: Ensure that the two devices have Bluetooth turned on,
discoverable, and within close range.
2 Tap and hold a contact to display a pop-up menu of actions.
- or -
Move the joystick up or down to scroll through the list and select a contact, then
press the joystick to display a pop-up menu of actions.
3Tap Send Contact > Beam.
4 Tap the device that you want to send the contact card to.
To beam an open contact card:
1 Perform step 1 of the previous section.
2Tap Menu > Send Contact > Beam.
3 Tap the device that you want to send the contact card to.
Synchronizing contacts
•Contacts created on your device are copied to your computer or on a Microsoft
Exchange server during synchronization, and vice versa. By default, all of your
contacts are synchronized.
•Similarly, contacts that are deleted from your device are deleted from your
computer and/or server during synchronization, and vice versa.
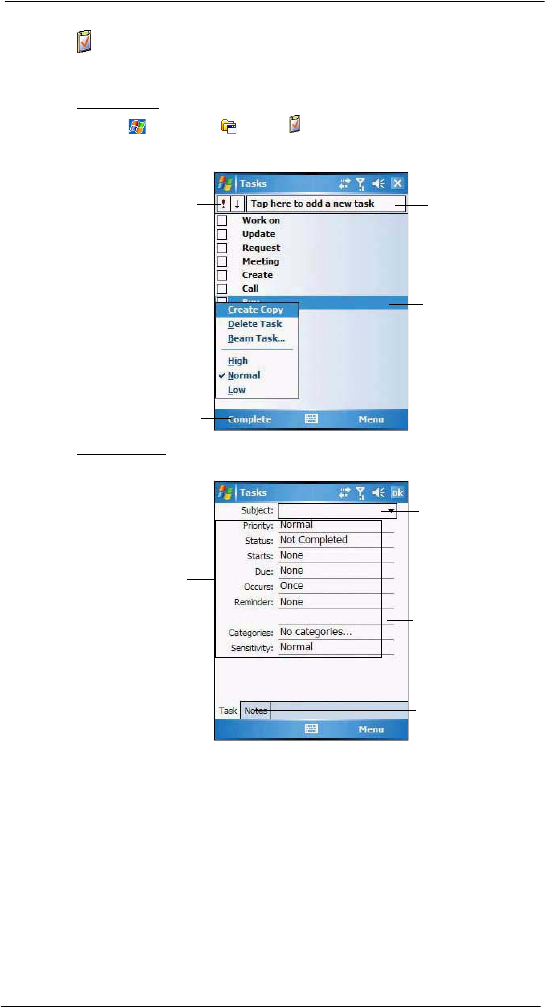
6 Using the Windows Mobile Programs
Microsoft Outlook Mobile programs
70
Tasks
Use Tasks to keep track of what you have to do and prioritize them based on their
importance and urgency.
To open Tasks:
•Tap > Programs > Tasks .
Tasks opens to the task list. To change the way task information is displayed
in the list, tap Menu > Options.
To create a task:
1 Tap Menu > New Task.
2 Using the soft keyboard, enter the task details.
To select a field, tap it.
Hide the soft keyboard to see all available fields.
3 To add notes, tap the Notes tab.
4 After completing the task details, tap ok.
Managing tasks
By default all created task items appear as one long list and are named based on their
subject line. To keep your tasks organized and allow quick searching you can choose to:
•Filter tasks based on their category or completion status. Tap Menu > Filter, then
select a filter option.
Tap and hold to display a
pop-up menu of actions.
Indicates high priority.
Tap to set the selected
task as Active or
Complete.
Tap to create a short
to-do task.
Scroll to see more
fields.
Tap to choose
predefined subjects.
Tap a field to enter
task information.
Notes is a good place
for additional task
information.

6 Using the Windows Mobile Programs
Microsoft Outlook Mobile programs
71
•Sort tasks based on their completion status, priority level, subject, start date, or due
date. Tap Menu > Sort By, then select a sort criteria.
Beaming a task item
You can send a task item to another IR- or Bluetooth-enabled device either from the task
list or from a task summary screen.
To beam a task item from the task list:
1 If you intend to send the task item:
•Via IR: Ensure that the two devices have IR turned on, then align the IR port
of your device with that of the other device so that they are unobstructed
and within close range.
•Via Bluetooth: Ensure that the two devices have Bluetooth turned on,
discoverable, and within close range.
2 Tap and hold a task item to display a pop-up menu of actions.
- or -
Move the joystick up or down to scroll through the list and select a task item, then
press the joystick to display a pop-up menu of actions.
3Tap Beam Task.
4 Tap the device that you want to send the task item to.
To beam a task item from its summary screen:
1 Perform step 1 of the previous section.
2Tap Menu > Beam.
3 Tap the device that you want to send the task item to.
Using the Tasks summary screen
When you tap a task in the task list, a summary screen displays. To change the task, tap
Edit.
Synchronizing tasks
•Task synchronization is, by default, automatically selected in ActiveSync.
•Tasks can only be synchronized with your computer; they cannot be synchronized
with a server.
•Tasks created on your device are copied to your computer during synchronization,
and vice versa. By default, only incomplete tasks are synchronized.
•Similarly, tasks that are deleted from your device are deleted from your computer
during synchronization, and vice versa.
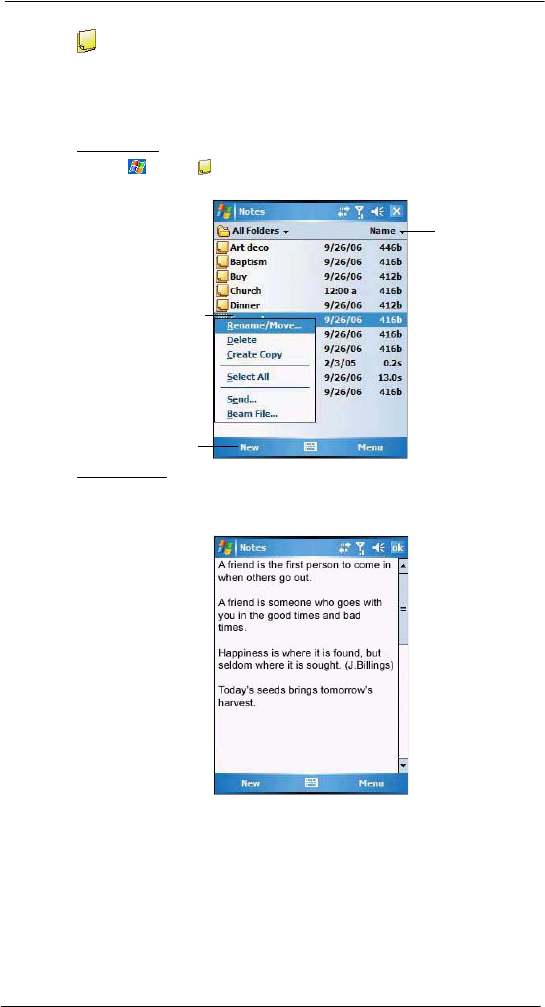
6 Using the Windows Mobile Programs
Microsoft Outlook Mobile programs
72
Notes
Quickly capture thoughts, reminders, ideas, drawings, and phone numbers with Notes.
You can create a written note or a recording. You can also include a recording in a note.
If a note is open when you create the recording, it is included in the note as an icon. If the
note list displays, it is created as a stand-alone recording. The option to create notes is
integrated in other Outlook Mobile programs.
To open Notes:
•Tap > Notes .
Notes opens to the note list.
To create a note:
1 Tap New.
2 Compose the note by using any of the Input Selector options, by writing/drawing on
the screen, or by creating a recording.
3 Once you’ve completed the note, tap ok.
Managing notes
By default all created notes appear as one long list and are named chronologically
(i.e., Note1, Note2, etc.). To keep your notes organized you can choose to:
•Move or copy notes to system default folders, or you can create new folders to fit
your preferences. This helps you filter your notes and locate them quickly. Select
the appropriate command from the pop-up menu or tap Menu.
Tap to change the
sort order of the list.
Tap to create a
new item.
Tap and hold to display a
pop-up menu of actions.

6 Using the Windows Mobile Programs
Microsoft Outlook Mobile programs
73
•Rename notes to identify them in a more meaningful manner. Select the
appropriate command from the pop-up menu or tap Menu.
•Sort notes based on name, date, size, or type to make searching easier. Tap the
Sort By pick list on the upper right corner of the note list, then select a sort criteria.
Sending a note
You can send a note by beaming it to another person’s IR- or Bluetooth-enabled device,
or you can send it via e-mail.
NOTE: You must first set up an e-mail account on your device before you can send a
note by e-mail. See ”Setting an e-mail server connection” on page 61 for more
information.
To beam a note from the note list:
1 If you intend to send the note:
•Via IR: Ensure that the two devices have IR turned on, then align the IR port
of your device with that of the other device so that they are unobstructed
and within close range.
•Via Bluetooth: Ensure that the two devices have Bluetooth turned on,
discoverable, and within close range.
2 Tap and hold a note to display a pop-up menu of actions.
- or -
Move the joystick up or down to scroll through the list and select a note, then press
the joystick to display a pop-up menu of actions.
3Tap Beam File.
4 Tap the device that you want to send the note to.
To beam an open note:
1 Perform step 1 of the previous section.
2Tap Menu > Tools > Beam.
3 Tap the device that you want to send the note to.
To send a note via e-mail from the task list:
1 Tap and hold a note to display a pop-up menu of actions.
- or -
Move the joystick up or down to scroll through the list and select a note, then press
the joystick to display a pop-up menu of actions.
2Tap Send.
A new message screen displays with the selected note shown as an attachment
(*.pwi).
3 Proceed to completing the e-mail message.
To send an open note via e-mail:
1 Tap Menu > Tools > Send.
A new message screen displays with the selected note shown as an attachment
(*.pwi).
2 Proceed to completing the e-mail message.
Synchronizing notes
•Notes synchronization is, by default, automatically selected in ActiveSync.
•Notes can only be synchronized with your computer; they cannot be synchronized
with a server.
•Notes created on your device are copied to your computer during synchronization,
and vice versa.
•Similarly, notes that are deleted from your device are deleted from your computer
during synchronization, and vice versa.
•Handwritten text or drawings will appear as pictures in your computer.

6 Using the Windows Mobile Programs
Microsoft Outlook Mobile programs
74
Messaging
Use Messaging to manage and organize both your e-mail and text (SMS) messages.
See ”Setting an e-mail server connection” on page 61 for more information on how to set
up an e-mail server connection. For instructions on how to use a text messaging service,
see “Text messaging service” on page 125.
With Messaging, you can:
•Synchronize Outlook E-mail messages Microsoft Outlook on your computer or with
a Microsoft Exchange server.
•Send and receive e-mail messages by connecting directly to an e-mail server
through an Internet service provider (ISP) or a network.
•Send and receive text messages through your mobile service subscription.
Messaging supports 8 bits data with class 0, 1, 2, 3, as well as USDD (Unstructured
Supplementary Service Data).
To open Messaging:
•Tap > Messaging .
To send and receive e-mail messages:
•Tap Menu > Send /Receive.
Using the message list
The messages you receive display in the message list. By default, the most recently
received messages display first in the list.
Tap to select a sort order
for the messages.
Tap to create a new
e-mail or text message.
Tap to toggle display from
folder list to message list.
Tap to select the sort
order for messages.
Tap and hold a message
to display a pop-up menu
of actions.

6 Using the Windows Mobile Programs
Microsoft Outlook Mobile programs
75
When you receive a message, tap it to open. Unread messages are displayed in bold
text.
Creating an e-mail/text message
Whether you want to send an e-mail or text message, you do so by changing the Account
option. To do so, tap Menu > Go To > Text Messages or Outlook E-mail.
The following procedures explain how to compose an e-mail message. For procedures
on how to compose a text message, see page 127.
To compose an e-mail message:
1 In the message list, tap New.
2 Enter the e-mail address of your intended recipients in the “To” box. You can do this
in different ways.
•Manually enter the address using any of the Input Selector options.
•Type the first few letters of an e-mail address that is stored in Contacts, then
tap any of the available e-mail addresses. The auto-suggest feature suggests
e-mail addresses as you type so that you find them more quickly.
•Tap Menu > Add Recipient to display the contact list, then tap a contact from
the list.
Make sure multiple e-mail addresses within the same field is separated with a
semicolon.
3 Compose your e-mail message.
Outlook E-Mail supports the following e-mail options.
•To enter a preset or frequently used messages, tap Menu > My Text, then
select a message.
•Use the Menu > Insert command to attach a picture, voice note, or any file as
e-mail attachments.
When attaching a voice note, the Recording toolbar appears for you to create
the voice note (file format: .wav); or you can select a previously created voice
note (file format: .pwi).
Outlook Mobile now supports attachment of Office Mobile files (Word, Excel,
and PowerPoint).
•Use the Menu > Spell Check command to search your message for common
spelling errors.
•Use the Menu > Message Options command to set the priority level,
security, and language options.
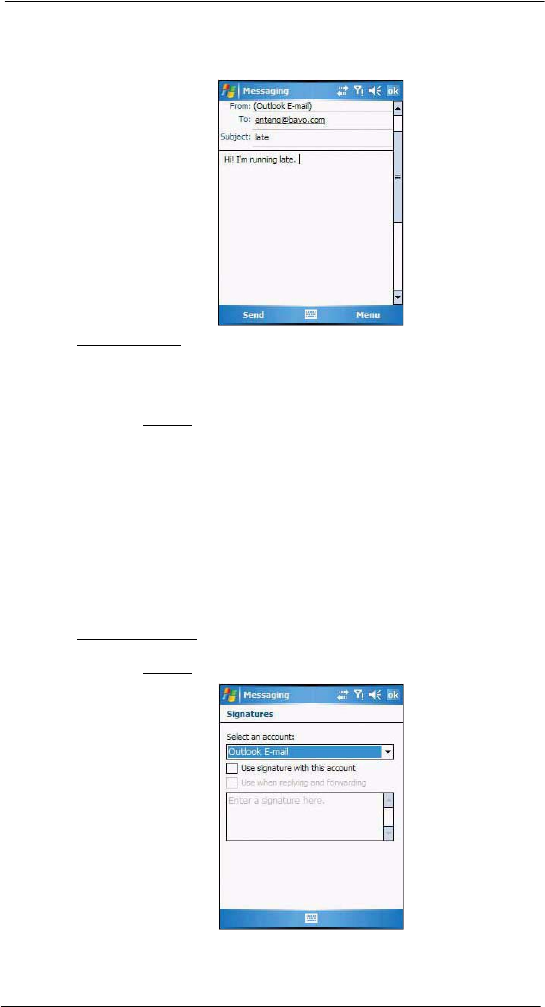
6 Using the Windows Mobile Programs
Microsoft Outlook Mobile programs
76
4Tap Send when you've finished the message.
If you are working offline, the message is moved to the Outbox folder and sent the
next time you’re online.
To keep sent items:
By default, sent e-mail messages are not saved on your device to help conserve
memory. If you prefer to keep copies of sent e-mail messages, follow the procedure
below:
1 In the message list, tap Menu > Tools > Options.
2 On the Message tab, then select the “Keep copies of sent items in the Sent folder”
option.
3Tap ok.
4 If you are using an Outlook E-mail or a IMAP4 account, select the Sent Items folder
for synchronization.
For more information on e-mail synchronization options, see “To configure
ActiveSync e-mail synchronization settings” on page 77.
Creating a message signature
You can personalize your e-mail and text messages by appending a signature to it. The
signature support of your device allows you to create different signatures for your e-mail
and SMS account. This feature also eliminates the need to re-type a closing for every
message.
To create a signature:
1 In the message list, tap Menu > Tools > Options.
2 On the Accounts tab, tap Signatures.
3 Tap the pick list to select which account to create a signature for.

6 Using the Windows Mobile Programs
Microsoft Outlook Mobile programs
77
4 Select the “Use signature with this account” option.
5 You can use the signature for new messages only, or you can select the “Use
signature when replying and forwarding” option to append it to all outgoing
messages.
6 Enter a signature in the box.
7Tap ok.
Managing messages and folders
By default, messages are displayed in one of five folders for each service you have
created—Deleted Items, Drafts, Inbox, Outbox, and Sent Items.
•The behavior of the Deleted and Sent Items folders depends on the options
you have chosen. To set these options, in the message list:
(a) Tap Menu > Tools > Options.
(b) On the Message tab, select your options.
•If you want to organize messages into subfolders, tap Menu > Tools >
Manage Folders to create new folders.
•To move a message to another folder, in the message list, tap and hold the
message, then tap Move on the pop-up menu.
Downloading messages
The manner in which messages are downloaded in your device depends on the type
account you have.
•E-mail messages in an Outlook E-mail account can be downloaded during
ActiveSync synchronization.
•E-mail messages in an e-mail account provided by your ISP, or that you access
using a virtual private network (VPN) server can be downloaded from a remote
email server.
•Text messages are automatically received by your device when the phone function
is turned on. When the phone function is disabled, messages are held by your
mobile phone service provider until the next time you turn the phone function on.
Synchronizing Outlook e-mail messages
Outlook e-mail messages can be synchronized as part of the general ActiveSync
synchronization process.
During ActiveSync synchronization:
•Only the first 500 bytes (or characters, including spaces) of each new message
sent to you within the last three days.
•Messages are copied from the Outlook Inbox folder on your computer, or from a
Microsoft Exchange server, to the Outlook E-mail Inbox folder on your device.
•The messages on your device and on your computer are linked. When you delete a
message on your device, it is also deleted from your computer the next time you
synchronize, and vice versa.
To set up ActiveSync e-mail synchronization:
1 Open ActiveSync on your computer.
2 Click Tools > Options.
3 In the Mobile Device list under the Desktop area, select the “E-mail” option.
4 Click OK.
To configure ActiveSync e-mail synchronization settings:
1 Connect your device to your computer.
2 On ActiveSync on your computer, make sure the details pane is open. If it’s not,
click Show Details.
3 Double-click E-Mail.
4 Select the e-mail synchronization options you prefer.
•If you receive long messages often and want to synchronize them in full, select
a larger size in the “Limit e-mail size to” list.
•If you want to synchronize more past messages, increase the interval in the
“Include the previous” box.

6 Using the Windows Mobile Programs
Microsoft Office Mobile programs
78
•If you want to include email attachments, select the “Include file attachments”
option. To limit the size of synchronized attachments, select the “Only if
smaller than” option and enter a size limit. Attachments larger than this limit
will not be synchronized with your device.
•If you want to synchronize folders other than Inbox, click Select Folders, then
select the subfolders that you want to synchronize.
The Deleted Items folder synchronizes only one direction, from the device to
the computer. Items in the Deleted Items folder on your computer will not
appear on your device.
5 Click OK twice.
Synchronizing POP3/IMAP4 e-mail messages
POP3/IMAP4 e-mail messages are downloaded using an e-mail server connection.
During e-mail server synchronization:
•New e-mail messages are downloaded to that account’s Inbox folder.
•E-mail messages in that account’s Outbox folder are sent.
•E-mail messages that have been deleted in the e-mail server are removed from
your device’s Inbox folder.
•If you are using a POP3 account and you move e-mail messages to a folder you
created, the link is broken between the messages on your device and their copies
on the e-mail server. The next time you connect, the e-mail server sees that the
messages are missing from the device’s Inbox and delete them from the server.
This prevents you from having duplicate copies of a message, but it also means
that you will no longer have access to messages that you move to folders created
from anywhere except your device.
•If you are using an IMAP4 account, the folders you create and the e-mail messages
you move are mirrored on the server. Therefore, messages are available to you
anytime you connect to your e-mail server, whether it is from your device or from
your computer. This synchronization of folders occurs whenever you connect to
your mail server, create new folders or rename/delete folders when connected.
To synchronize POP3/IMAP4 e-mail messages:
1 On the message list on your device, tap Menu > Go To, then select the e-mail
account you want to use.
2Tap Menu > Send/Receive.
Microsoft Office Mobile programs
Microsoft Office Mobile includes the mobile versions of the popular Word, Excel, and
PowerPoint programs. With these mobile programs, you maintain a productive work
schedule even while on-the-go.
Word Mobile
Use Word Mobile to:
•Create and edit documents and templates and save them as .doc, .rtf, .txt,
and .dot files.
•Edit Word documents and templates created on your computer. You can
also open and edit Pocket Word (*.psw) documents.
•Synchronize documents and templates between your device and your
computer.
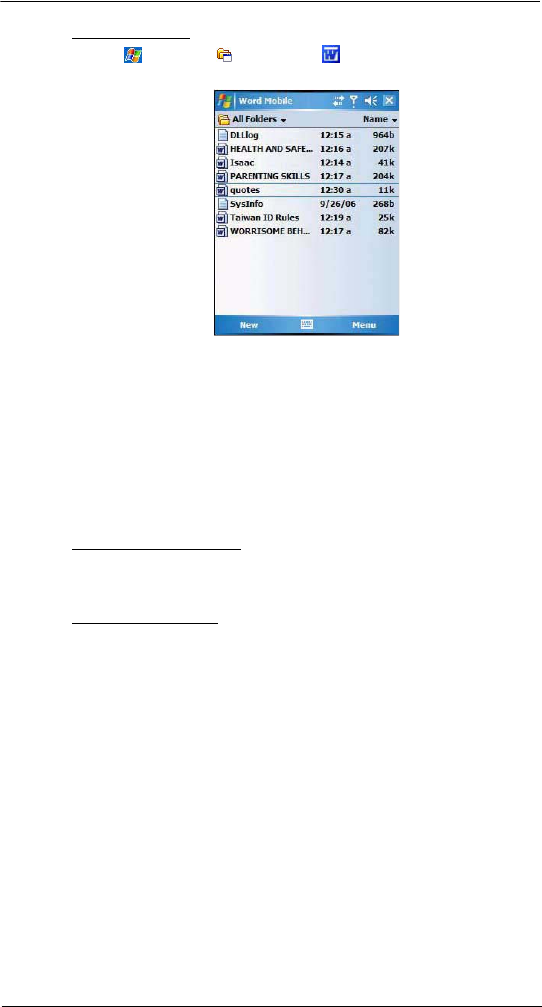
6 Using the Windows Mobile Programs
Microsoft Office Mobile programs
79
To open Word Mobile:
•Tap > Programs > Word Mobile .
The Word Mobile document list displays.
Using the Word Mobile document list
The Word Mobile document list is the default screen when you open Word Mobile. Every
time you tap ok in an open document, this list displays.
•Tap a file in the document list to open it. You can open only one document at
a time.
•To delete, make copies of, and send files, tap and hold a file in the list, then select
the appropriate action on the pop-up menu.
Creating a Word Mobile document
Word Mobile has built-in templates for creating a new document, meeting notes, memo,
phone memo, and to do list.
To change the default template:
1 On the document list, tap Menu > Options.
2 Select another template from the “Default template” pick list.
3Tap ok.
To create a new document:
1 On the document list, tap New.
A new document appears based on the default template.
2 Enter the information using any of the Input Selector options.
3 Format texts by using the Word Mobile toolbar.
This toolbar provides basic formatting options, such as font style, paragraph
alignment, and bullet options. You can show and hide this toolbar by tapping View >
Toolbar.
4Tap ok.
This will close the newly created document and automatically name the file after the
first several words in the document. The new document is placed in the Word
Mobile document list.
- or -
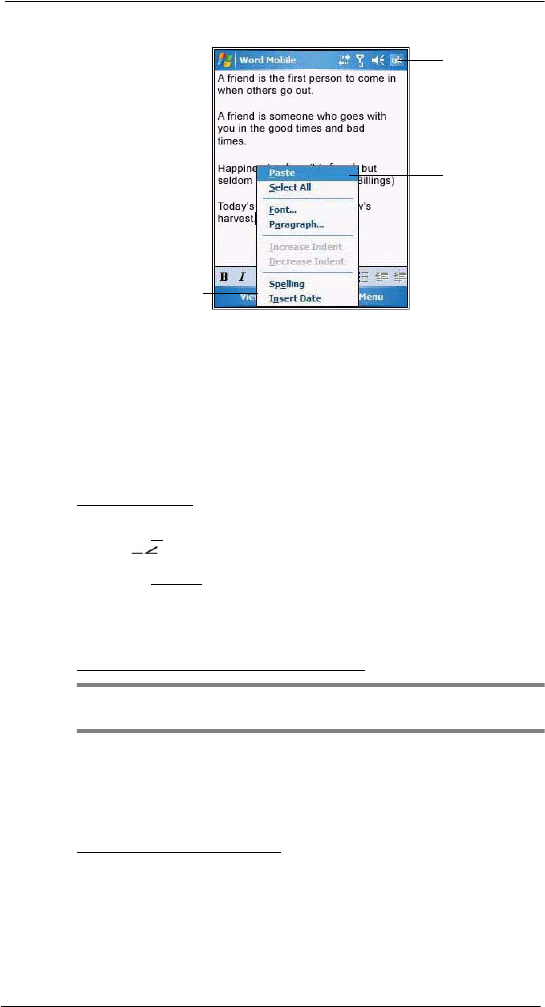
6 Using the Windows Mobile Programs
Microsoft Office Mobile programs
80
Tap Menu > File > Save As to customize the save settings.
Tips for working in Word Mobile
•If you're opening a Word document created on a computer, select Wrap to
Window on the View menu so that you can see the entire document.
•You can change the zoom magnification by tapping View > Zoom, then
select the percentage you want. Select a higher percentage to enter text and
a lower one to see more of your document.
Sending a Word Mobile document
You can send a Word Mobile document by beaming it to another person’s IR- or
Bluetooth-enabled device or send it as an attachment via e-mail.
To beam a document:
1 If you intend to send the document:
•Via IR: Ensure that the two devices have IR turned on, then align the IR port
of your device with that of the other device so that they are unobstructed
and within close range.
•Via Bluetooth: Ensure that the two devices have Bluetooth turned on,
discoverable, and within close range.
2 From the Word document list, select the item you want to beam.
3Tap Menu > Beam File.
4 Tap the device that you want to send the file to.
To send a document via e-mail from the document list:
NOTE: Make sure that your device is properly setup to send and receive mail. See
”Getting connected” on page 59 for more information.
1 From the Word document list, select the item you want to send.
2Tap Menu > Send.
A new message screen displays with the selected file shown as an attachment.
3 Proceed to completing the e-mail message.
4Tap Send.
To send an open document via e-mail:
1 Tap Menu > File > Send.
A new message screen displays with the file shown as an attachment.
2 Proceed to completing the e-mail message.
Tap to return to the
document list
(changes are saved
automatically).
Tap to view the toolbar,
change Zoom options,
and enable text wrapping.
Tap and hold
anywhere in the
document to display
a pop-up menu of
actions.
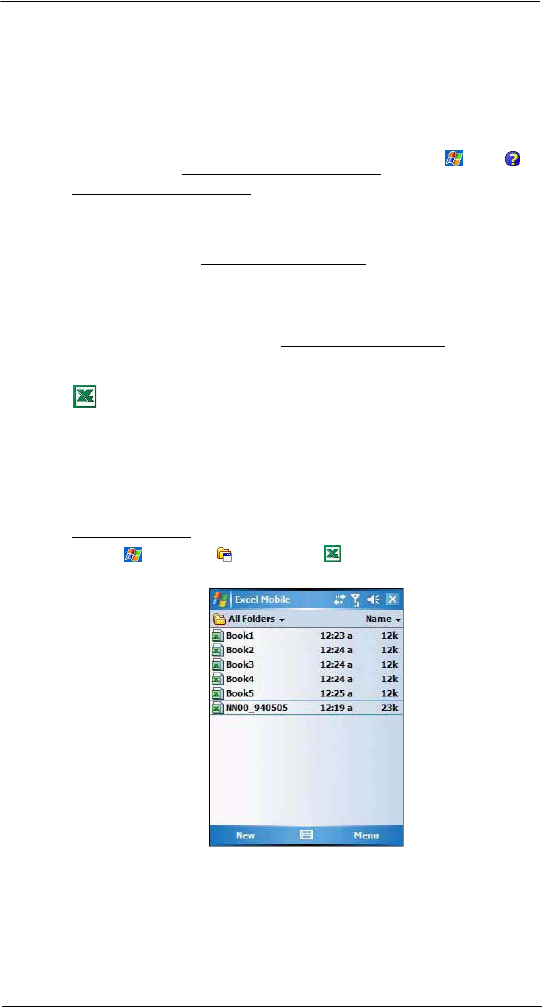
6 Using the Windows Mobile Programs
Microsoft Office Mobile programs
81
Synchronizing Word documents
You can synchronize Word documents created on your computer with your device. Note
the following reminders when selecting this option.
•Word Mobile does not support synchronization of password-protected files. You
must first remove the password protection in Word on your computer if you want to
view the document on the device.
•ActiveSync need to convert your computer document files before synchronizing it
with your device. Converted files may not contain all information found in original
file. For more information, on the Word Mobile document list, tap > Help ,
then locate the Unsupported features in Word Mobile link.
To synchronize Word documents:
1 Connect your device to your computer.
2 Click Tools > Options.
3 Select the “Files” option.
This will create the <device name> My Documents folder on your computer’s
desktop.
4 Place all the Word documents you want to synchronize with your device in this
folder.
5 Initiate synchronization.
The documents you placed on the <device name> My Documents folder are copied
to your device.
Excel Mobile
Use Excel Mobile to:
•Create, view, and edit workbooks and save them as .xls and .xlt files.
•Edit Excel workbooks and templates created on your computer.
•Create, view, and edit charts/graphs and save them in a separate worksheet
or embed them as objects in the source worksheet.
•Synchronize Excel workbooks and templates between your device and your
computer.
To open Excel Mobile:
•Tap > Programs > Excel Mobile .
The Excel Mobile workbook list displays.
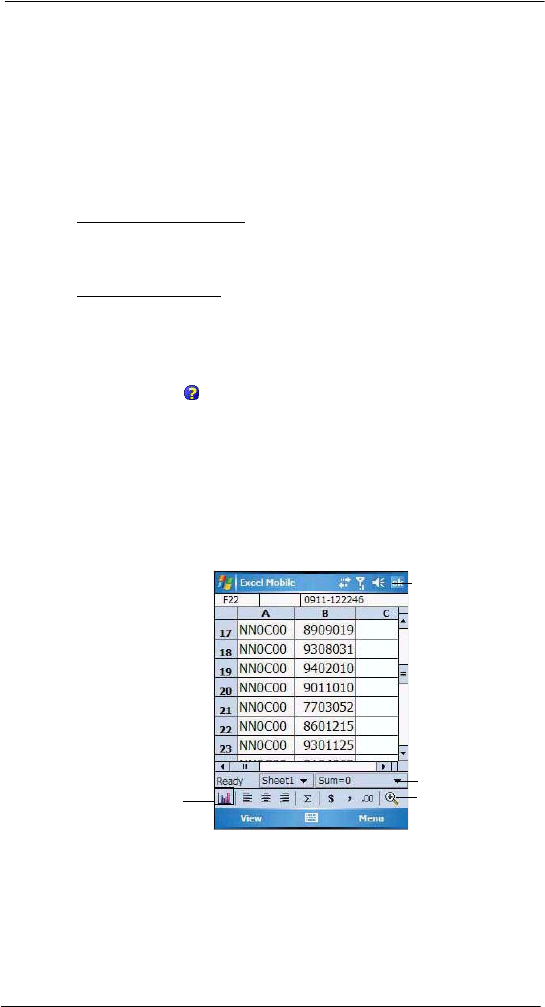
6 Using the Windows Mobile Programs
Microsoft Office Mobile programs
82
Using the Excel Mobile workbook list
The Excel Mobile workbook list is the default screen when you open Excel Mobile. Every
time you tap ok in an open workbook, this list displays.
•Tap a file in the workbook list to open it. You can open only one workbook at
a time.
•To delete, make copies of, and send files, tap and hold a file in the list, then select
the appropriate action on the pop-up menu.
Creating an Excel Mobile workbook
Word Mobile has built-in templates for creating a blank workbook and a vehicle mileage
log.
To change the default template:
1 On the workbook list, tap Menu > Options.
2 Select another template from the “Template for new workbook” drop-down list.
3Tap ok.
To create a new workbook:
1 On the workbook list, tap New.
A new workbook appears based on the on default template.
2 Perform any of the following.
•Tap a cell, enter the information (values, text, formula), then tap Enter.
If you’re entering a formula, enter the equal sign (=) first.
Tap Help for more information on how to perform more advanced
workbook tasks.
•Use the Excel toolbar. It has tools for working with formulas, functions,
and charts; as well as options for sorting and filtering data. You can
show and hide this toolbar by tapping View > Toolbar.
•A new workbook by default has only three worksheets. To add more
worksheets, tap Menu > Format > Modify Sheets > Insert.
3Tap ok.
This will close the newly created workbook and automatically name the file as
Book#. The new document is placed in the Excel Mobile workbook list.
- or -
Tap Menu > File > Save As to customize the save settings.
Tips for working in Excel Mobile
Note the following when working in large worksheets.
•View in full-screen mode to see as much of your worksheet as possible.
•Tap View > Full Screen.
•To exit full screen mode, tap View, then deselect Full Screen.
Tap to return to the work-
book list (changes are
saved automatically).
Status bar
Tap to create a
charts or graph.
Toobar
6 Using the Windows Mobile Programs
Microsoft Office Mobile programs
83
•Show and hide screen elements.
•Tap View, then tap the elements you want to show or hide.
•You might want to freeze the top and left-most panes in a worksheet to keep row
and column labels visible as you scroll through a sheet.
(a) Select the cell where you want to freeze panes.
(b) Tap View > Freeze Panes.
•Split panes to view different areas of a large worksheet.
(a) Tap View > Split.
(b) Drag the split bar to where you want it.
To remove the split, tap View > Remove Split.
•Show and hide rows and columns.
•To hide a row or column:
(a) Select a cell in the row or column you want to hide.
(b) Tap Menu > Format > Row or Column > Hide.
•To display a hidden row or column:
(a) Select the cells which span the hidden row or column.
(b) Tap Menu > Format > Row or Column > Unhide.
Sending an Excel Mobile workbook
You can send an Excel Mobile workbook by beaming it to another person’s IR- or
Bluetooth-enabled device, or you can send it as an e-mail attachment. You can do any of
these in the same manner as you do with a Word Mobile document. See “Synchronizing
Word documents” on page 81 for more information.
Synchronizing Excel workbooks
You can synchronize Excel workbook created on your computer with your device. You
can do this in the same manner as you do with Word documents. See “Synchronizing
Word documents” on page 81 for more information.
PowerPoint Mobile
Use PowerPoint Mobile to view slide show presentations. You can download slide show
presentations from a storage card, company network, internet, e-mail attachment or
obtained by synchronizing with your personal computer.
To open PowerPoint Mobile:
•Tap > Programs > PowerPoint Mobile .
Getting slide shows onto your device
You can download PowerPoint files from a memory card or the Web to your computer,
then synchronize them with your device. To do so, you need to activate your device (you
only need to activate it once), then set up synchronization for files in ActiveSync.
To get slide show presentation onto your device:
1 Open ActiveSync on your computer.
2 Use Windows Explorer on your computer to locate the PowerPoint Mobile folder
and the Pocket_PC My Documents folder.
3 Use ActiveSync to download the files from your computer to your device as
described in the Read Me file in the PowerPoint Mobile folder.
Using PowerPoint Mobile
PowerPoint Mobile contains a list of files stored on your device. The file list is the default
screen when you open PowerPoint Mobile.
To open a PowerPoint presentation:
1 Tap > Programs > PowerPoint Mobile .

6 Using the Windows Mobile Programs
Microsoft Office Mobile programs
84
2 Tap the slide show you want to view.
3 Tap the current slide to advance to the next slide.
To stop a slide show presentation:
In a PowerPoint Mobile presentation, tap and hold , then tap End Show.

6 Using the Windows Mobile Programs
Microsoft Office Mobile programs
85
To change the slide show presentation:
1 In a PowerPoint Mobile presentation, tap and hold , then tap Show Options.
2 Tap the Orientation tab, then select the orientation.
To navigate between slides:
1 In a PowerPoint Mobile presentation, tap and hold the , then tap
Go to Slide.
2 Tap the slide you want to view.
Setting the slide show playback options
You can change the PowerPoint presentation settings to turn off animation, prevent slide
show transitions from playing, or set time interval between each slide.
To set the slide show playback options:
1 In a PowerPoint Mobile presentation, tap and hold the , then tap
Show Options.
2 Tap the Playback tab; select the Override playback options for all files check box.
3 Perform any of the following:
•Select the “Show without animation” option to turn off builds and other
animations.
•Select the “Show without slide transition” option to prevent slide
transitions from playing.
•Select the “Use slide timings, if present” option to use the timings
recorded with each slide in a presentation.
•Select the -“Loop continuously” option to automatically advance to the
first slide after the last slide in a presentation.
4Tap ok.
Sending a PowerPoint file
You can send a PowerPoint file to another person either by e-mail or by beaming it to that
person’s IR- or Bluetooth-enabled device.
NOTE: You must first set up an e-mail account on your device before you can send a
PowerPoint file by e-mail. See “To set up an e-mail account” on page 62 for more
information.
To send a PowerPoint file by beaming:
1 In the PowerPoint document list, tap and hold the document.
2Tap Beam File on the pop-up menu.
3 Perform one of the following:
•Select a Bluetooth-enabled device, then tap the Tap to send link.
•Align the IR port of your device with that of the other IR-enabled
device so that they are unobstructed and within close range, then select
the IR-enabled device and tap the Tap to send link.
To send a PowerPoint file by e-mail:
1 In the PowerPoint document list, tap and hold the document.
2Tap Send via E-mail on the pop-up menu.
A new message screen in Inbox displays with the selected note shown as an
attachment (*.pwi).
3 Proceed to completing the e-mail message.
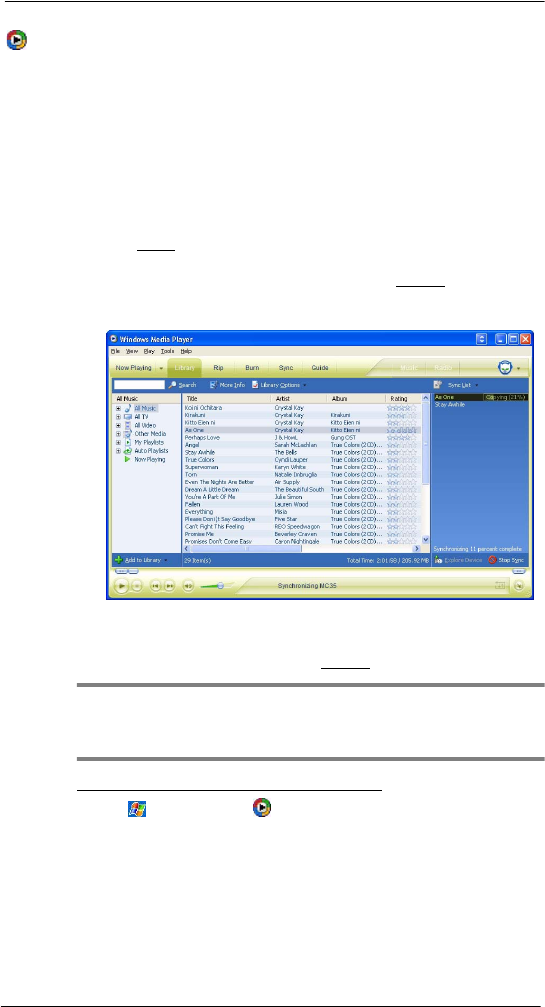
6 Using the Windows Mobile Programs
Windows Media Player
86
Windows Media Player
Enjoy your favorite music and movies on the road, online or offline, with the new
Windows Media Player 10 Mobile for Pocket PC. The Player provides you with the
highest quality audio and video experience for your mobile entertainment and it works
seamlessly with Windows Media Player 10 on your Windows XP-based computer.
Copying files to your device
Use the Sync feature in Windows Media Player 10 on your computer to copy your digital
media files to your device. Using the Player, instead of simply copying files using the
Explore button in ActiveSync, ensures that licenses are copied with protected files.
1 In Windows Media Player on your computer, click the Library tab (you must first
connect your device to your computer).
2 In the Playlist pane, click the playlist, category, or other item that you want to copy.
3 On the top right side of the screen, click Now Playing List, then select Sync List.
4 Drag the items from middle portion of the screen to the Sync List pane to add them
to the list of items to be synchronized.
5 Click Start Sync at the bottom right corner of the screen.
Windows Media Player verifies that there is sufficient storage space on your device
to copy the selected files. If there is sufficient space, the files are converted (if
necessary) and copied. If the device has insufficient storage space, May not fit
appears next to the selected items in the Sync List pane.
NOTE: To facilitate faster copying of audio files to your device, it is recommended that
you configure Windows Media Player 10 on your computer to automatically determine
the quality level settings applicable to your MC35 EDA. See the Windows Media Player
Help on your computer for more information.
To open Windows Media Player 10 Mobile for Pocket PC:
•Tap > Windows Media .
The Player displays the last open screen from your previous session.
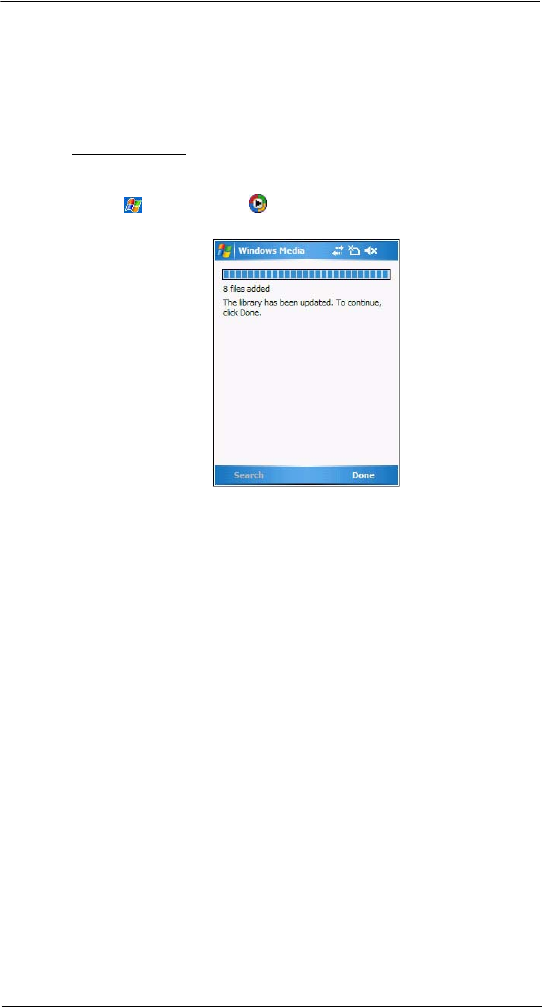
6 Using the Windows Mobile Programs
Windows Media Player
87
The library
The library contains links to your playlists and audio or video files. You can sort content
by criteria such as artist name, album title or genre. By default, Windows Media Player 10
Mobile automatically searches your device for compatible digital media files and adds
them to the My Device library. Similarly, when you insert a storage card into your device,
Windows Media Player 10 Mobile automatically detects the files and adds them to the
Storage Card library.
To update the library:
If the Player does not detect new files that you copy to your device, you can manually
update the library.
1 Tap > Windows Media .
2Tap Menu > Update Library.
3 Wait for files to be added, then tap Done.
The playlist
A playlist is a customized list of digital media files that you want to watch or listen to.
Using a playlist lets you group various digital media files together and specify the order
you want the files to play in. You can also use playlists to copy files to your computer.
You can create a playlist based on:
•Source - For example, tracks from various CDs of your favorite artist or
streaming media from an online music site.
•Personal preferences - For example, a playlist of tracks belonging to your
favored music genre or video clips from your funny movie collection.
•Mood or activities - For example, a playlist of tracks you want to listen while
travelling or during your R&R periods.
The Player has two default playlists:
•Local Content - Consists of all compatible audio and video files stored on
your device and/or storage card.
•Web Favorites - Consists of your favorite streaming media files. This playlist
is empty until you add items to it.
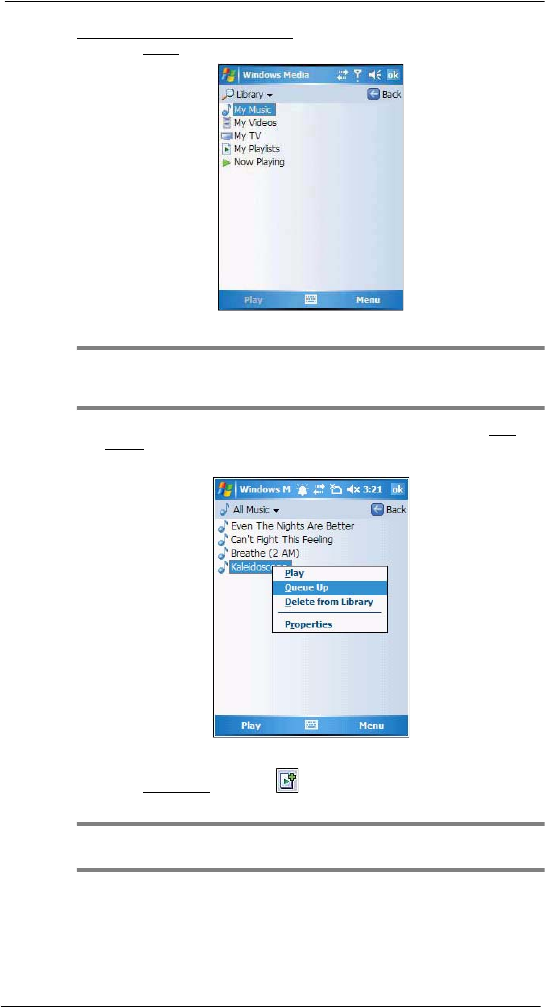
6 Using the Windows Mobile Programs
Windows Media Player
88
To add items to the Now Playing playlist:
1 On the Library screen, tap Menu > Library.
2 Select a library in the Library pick list (for example a storage card).
TIP: If the Player does not detect new files that you copied to your device, you can
manually update the library by tapping Menu > Update Library. After the files have
been added, tap Done.
3 Select a category, then tap and hold the item that you want to add in the Now
Playing folder.
4Tap Menu > Queue Up.
5Tap Menu > Now Playing.
6 On the Now Playing screen, tap to switch to the Library screen and find items
to add to the Now Playing playlist.
NOTE: To quickly add a group of files to the Now Playing playlist, tap and hold an item
in the library (such as an album name, artist name or genre), then tap Queue Up.
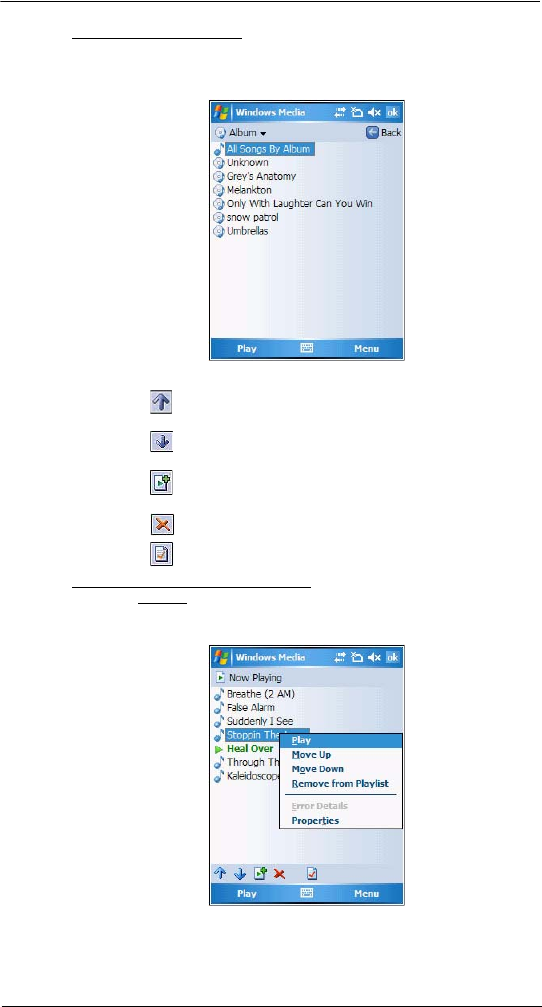
6 Using the Windows Mobile Programs
Windows Media Player
89
To edit the Now Playing playlist:
1 On the Player screen, tap Now Playing.
- or -
Tap Menu > Library > Now Playing, then the playlist you want to edit.
2 Perform any of the following:
•Tap to move the selected item up in the playlist. You can also tap
and drag an item to move it up in the playlist.
•Tap to move the selected item down in the playlist. You can also
tap and drag an item to move it down in the playlist.
•Tap to display the Library screen and add items to the Now Playing
playlist.
•Tap to delete the selected item from the playlist.
•Tap to view track properties of the selected item.
To delete an item in the Now Playing playlist:
1 On the Playback screen, tap Now Playing.
2 Tap and hold the item you want to delete, then tap Remove from Playlist from the
pop-up menu.
- or -
Tap an item you want to delete, then tap Menu > Remove from Playlist.
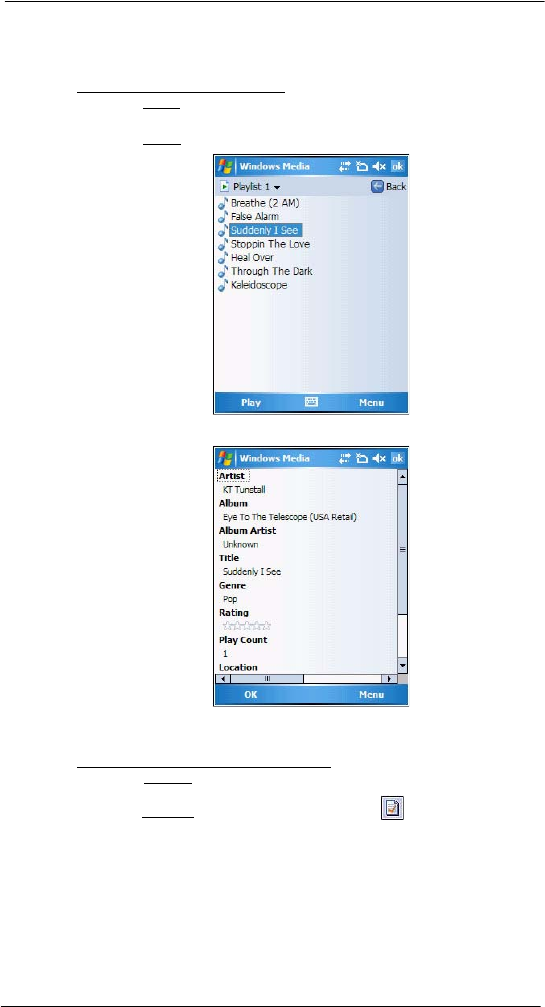
6 Using the Windows Mobile Programs
Windows Media Player
90
Viewing track properties
You can check the file properties of a track for your reference. You can do this either in a
playlist screen or in the Player screen.
To view track properties from a playlist:
1 On the Library screen, tap My Playlists.
2 Tap a playlist category.
3 On the Playlist screen, tap or play a file.
4Tap Menu > Properties.
5 Tap the scroll bar to view more fields.
6Tap ok.
To view track properties from the Player screen:
•On the Playback screen, tap Menu > Properties.
- or -
On the Playback screen, tap Now Playing, then tap .
Tap the scroll bar to view more fields.
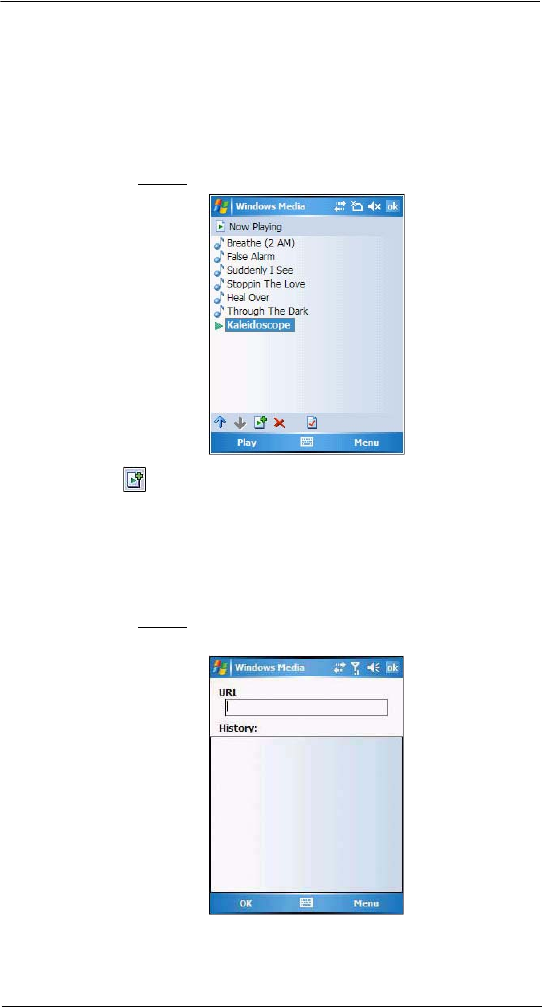
6 Using the Windows Mobile Programs
Windows Media Player
91
File Playback
The Player supports playback of the following file formats:
•Windows Media - Including .asf, .asx, .wax, .wm, .wma, .wmv, .wmx, and .wvx files.
•MPEG - .mp3 files
You can play files stored in your device, a storage card, or a network.
Playing a file stored in your device or in a storage card
If you want to use files stored in a storage card, install the card to your device. See “To
insert a storage card” on page 12 for more information.
1 On the Playback screen, tap Now Playing.
2 Tap , then the playlist/location where the file you want to play is assigned/
located.
3Tap Play.
Screen shifts to the Player screen. Unless you selected the last listed track in a
playlist or location, the rest of the tracks will automatically be played.
Playing a streaming media file
You can play files located on a network. Your device must first be connected to the
network before you can do this.
1 On the Playback screen, tap Menu > Library.
2Tap Menu > Open URL.
3 Enter a URL.
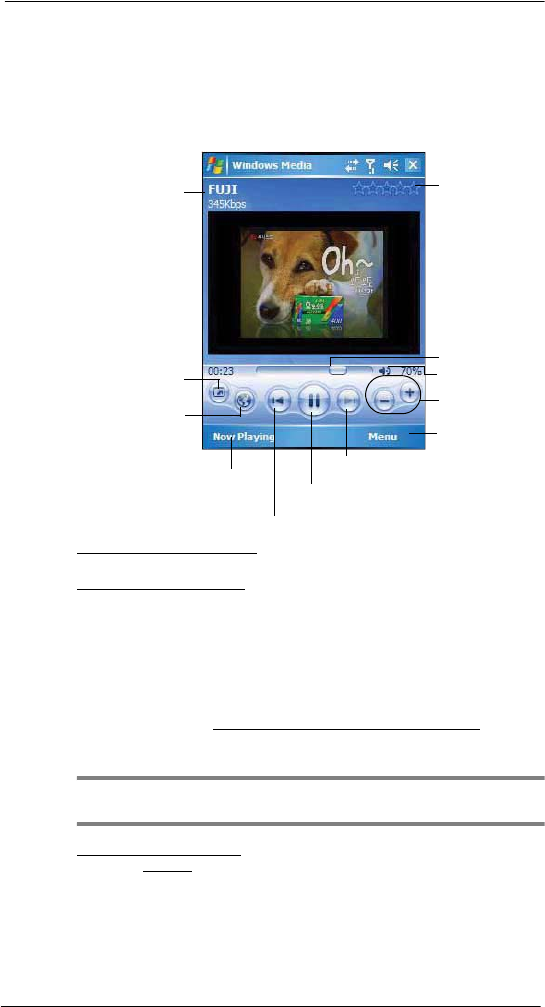
6 Using the Windows Mobile Programs
Windows Media Player
92
4Tap ok.
Screen shifts to the Player screen.
Playback controls
The user interface of the Windows Media Player Mobile Playback screen lets you easily
manage all aspects of the track playback. The screenshot below shows the functions of
the Playback control buttons, as well as all available menus.
To play a playlist in random order:
•Tap Menu > Shuffle.
To repeat playback of a playlist:
•Tap Menu > Repeat.
Customizing the Player
You can change the appearance and functionality of the Player to suit your personal style
and preferences.
Using skins to change the Player look
Change the appearance of the Player by using skins. To download skins and learn
related information, go to http://www.microsoft.com/windows/windowsmedia/.
To download skins from your computer to your device, follow the procedures described in
the “Using ActiveSync to copy files” section on page 36.
NOTE: To make sure that downloaded skins appear in the Skin Chooser panel, do not
store the skin files in the Windows folder of your device.
To change Player appearance:
1 On the Playback screen, tap Menu > Options > Skins tab.
Displays the rating of
the current file
Displays the track
title, artist name,
and/or genre.
Adjust the progress
of the current track.
Tap to adjust
volume.
Tap to toggle the
sound on or off.
Tap to skip to next track.
Tap to play or pause.
Tap to skip to previous track.
Tap to shift to full
screen mode.
Tap to go to http://www.
windowsmedia.com.
Tap to display the
Now Playing playlist.
Tap to select
playback mode and
program settings.
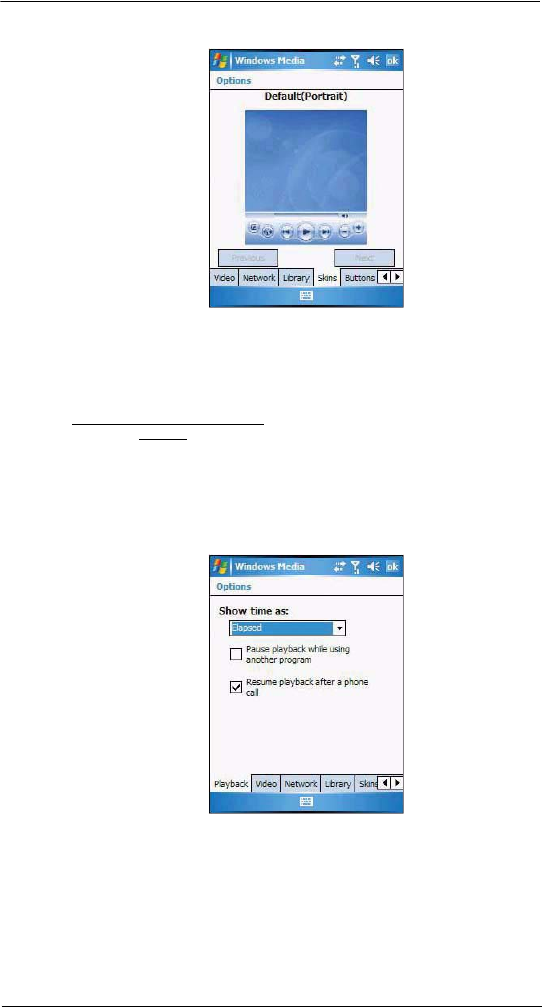
6 Using the Windows Mobile Programs
Windows Media Player
93
2 Tap the Previous or Next button to locate a skin.
3Tap ok.
The Player switches to skin mode.
Changing your audio and video settings
You can change the audio and video settings of the Player to suit your listening
preferences.
To set audio and video preferences:
1 On the Playback screen, tap Menu > Options > Playback tab.
2 Perform the following:
•In the “Show time as” list, select whether to show how much time has
elapsed or remaining on the Playback screen.
•Tap the “Pause playback while using another program” check box, to
pause or continue playback when another program screen is displayed.
•Select the “Resume playback after a phone call” option, to continue
playback after a phone call.
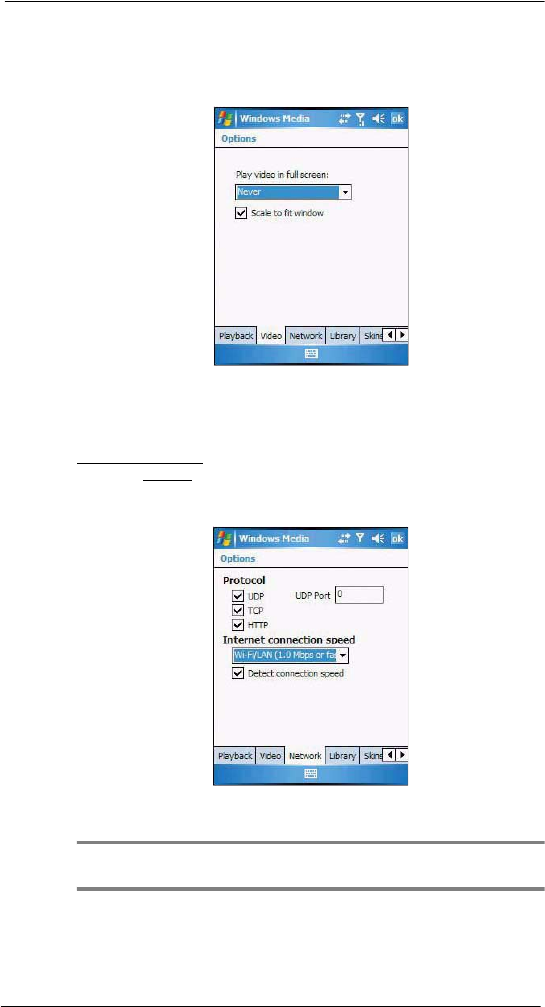
6 Using the Windows Mobile Programs
Windows Media Player
94
3 Tap the Video tab, then perform the following:
•In the “Play video in full screen” list, select a screen size for video
playback.
•Select the “Scale to fit in window” option to scale down oversized video
files (typically over 240 x 176 pixels).
4Tap ok.
Changing your network settings
You can define Player settings for connecting to a network to optimized playback of
streaming media.
To set network settings:
1 On the Playback screen, tap Menu > Options > Network tab.
2 Select the check box opposite each network protocol you want to enable.
You must select at least one protocol.
3 Select the speed of your network connection.
4Tap ok.
NOTE: Some networks use a firewall that prevents users from receiving streams.
Contact your network administrator for more information.
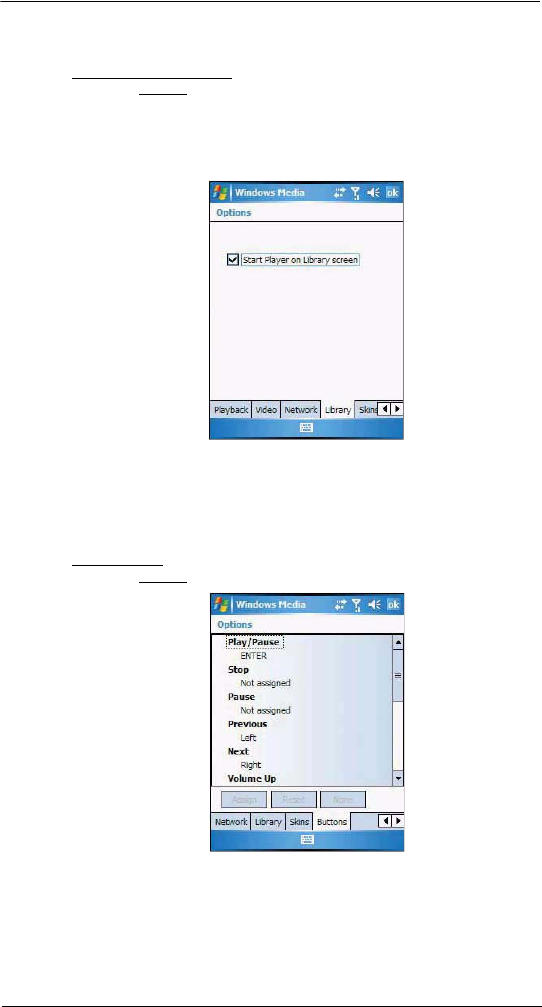
6 Using the Windows Mobile Programs
Windows Media Player
95
Changing the startup screen
You can define the startup screen when you start the Windows Media Player Mobile.
To change the startup screen:
1 On the Playback screen, tap Menu > Options > Library tab.
2 Perform one of the following:
•Select the “Start Player on Library screen” option, to show the Library
screen when you start the Windows Media Player Mobile.
•Clear the “Start Player on Library screen” check box, to show the
Playback screen when you start the Windows Media Player Mobile.
3Tap ok.
Setting hardware playback controls
The button mapping function allows you to assign hardware buttons on your device to
perform standard playback functions. You can also assign a button to toggle off the
screen to help minimize power consumption while continuing to listen to music.
To map a button:
1 On the Playback screen, tap Menu > Options > Buttons tab.
2 In the list of controls, tap a control name.
3 Tap the Assign button, then press the hardware button on your device.
4Tap ok.
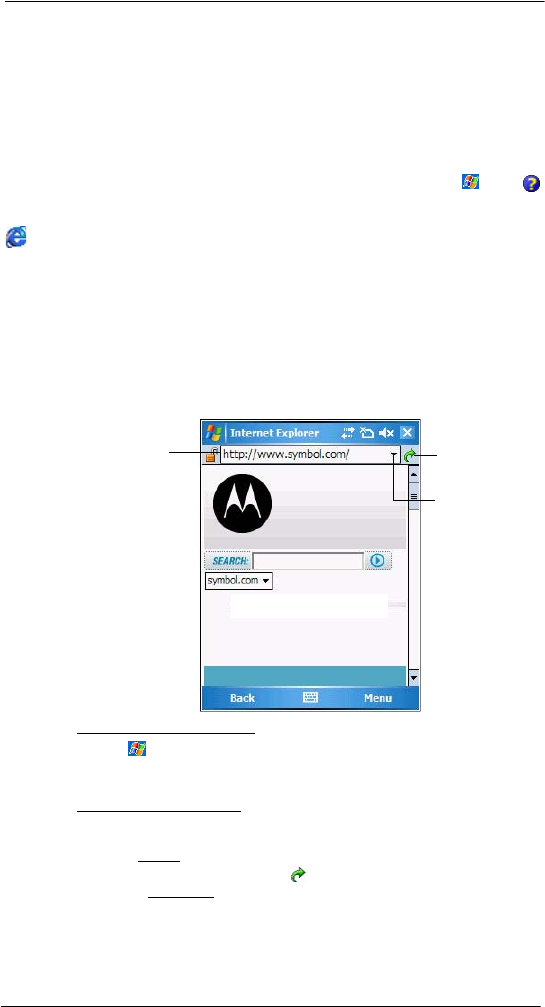
6 Using the Windows Mobile Programs
Internet Explorer Mobile
96
Licenses and Protected files
Some digital media content from the Internet, CD tracks, and videos have associated
licenses that protect them from being unlawfully distributed or shared.
Licenses are managed and created using digital rights management (DRM), which is the
technology for securing content and managing the rights for its access.
Some licenses may prevent you from playing files that are copied to your device. Files
that have licenses associated with them are called protected files.
Use the Windows Media Player on your computer to copy your digital media files to your
device. Using the Player, ensures that licenses are copied with protected files.
For more information on using Windows Media Player for Pocket PC, tap > Help .
Internet Explorer Mobile
Use Internet Explorer Mobile to view Internet or Intranet sites from your device. You can
download files and programs when browsing these sites. During synchronization with
your computer, you can choose to download your favorite links and mobile favorites that
are stored in the Mobile Favorites subfolder of Internet Explorer on your computer.
Internet Explorer Mobile includes support for:
•XHTML Basic
•Cascading Style Sheets
•WML 2.0
•JScript 5.5
•IPv6
To open Internet Explorer Mobile:
•Tap > Internet Explorer.
Browsing the Internet
To connect and start browsing:
Perform any of the following:
•Tap Menu > Favorites, then tap the favorite you want to view.
•In the address bar that appears at the top of the screen, enter the Web
address you want to visit, then tap .
•Tap the Address Bar pick list to choose from previously entered addresses.
Go button
Tap to select a
previously selected
site.
Enter the web
address you want
to visit.
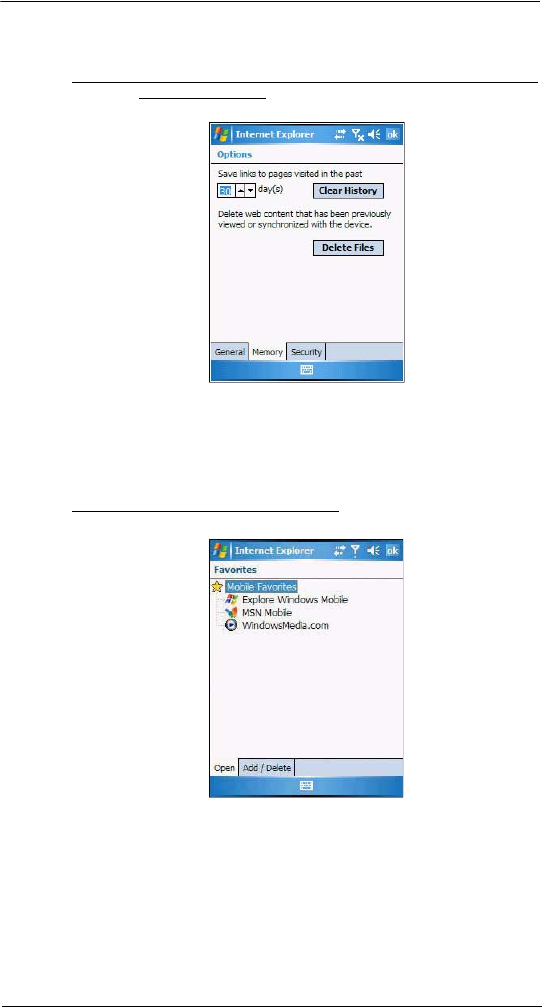
6 Using the Windows Mobile Programs
Internet Explorer Mobile
97
Viewing the History list
•Tap Menu > History.
To change the number of days of links stored in the History list and clear the History list:
1 On the Internet Explorer Mobile main screen, tap Menu > Tools > Options >
Memory tab.
2 Tap the pick list under “Save links to pages visited in the past” to set the number of
days of links.
3Tap Clear History to delete the stored links.
4Tap ok.
Mobile favorites
To display the Mobile Favorites navigation screen:
1 Tap Menu > Favorites.
2 Tap the page you want to view.
The page that was downloaded the last time you synchronized with your computer
displays. If the page is not on your device, the favorite is dimmed. Synchronize with
your computer again to download the page to your device, or connect to the Internet
to view the page.
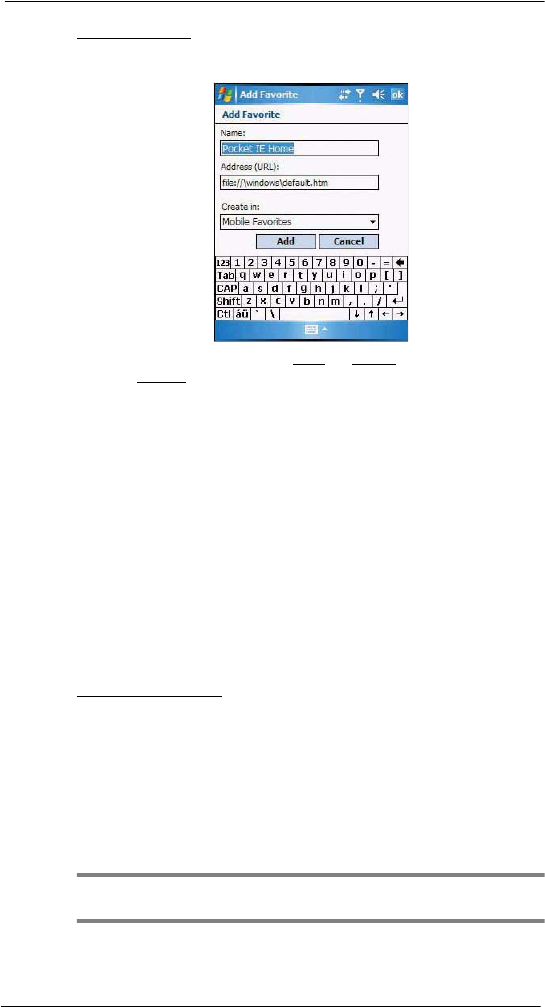
6 Using the Windows Mobile Programs
Internet Explorer Mobile
98
To add a favorite link:
1 While on the page you want to add, tap and hold on the page.
2Tap Add to Favorites from the pop-up menu.
3 Make the changes you want on the Name and Address boxes.
4 In the Create in list, select the folder where you want the link to be stored.
5Tap Add, then tap ok.
Mobile Favorites folder
Only items stored in the Mobile Favorites subfolder of the Favorites folder of Internet
Explorer on your computer are synchronized with your device. This folder was created
when you selected the Favorites information type for ActiveSync synchronization with
your computer.
Favorite Links
During synchronization, the list of favorite links in the Mobile Favorites folder on your
computer is synchronized with Internet Explorer Mobile on your device. Both locations
are updated with changes made to either list each time you synchronize. Unless you
mark the favorite link as a mobile favorite, only the link will be downloaded to your device,
and you will need to connect to your ISP or network to view the content.
Mobile Favorites
If you are using Microsoft Internet Explorer 5.0 or later on your computer, you can
download mobile favorites to your device. Synchronizing mobile favorites downloads
Web content to your device and enables you to view pages while you are disconnected
from your ISP and computer. To quickly create mobile favorites, use the Internet Explorer
plug-in installed with ActiveSync.
To create a mobile favorite:
1 In Internet Explorer on your computer, click Tools > Create Mobile Favorite.
2 To change the link name, enter a new name in the Name box.
3 Optionally, in Update, select a desired update schedule.
If you did not specify an update schedule, you need to manually download content
to keep the information updated on both your computer and device. Before
synchronizing with your device, in Internet Explorer on your computer, click Tools,
then Synchronize. You will see the last time content was downloaded to the
computer, and you can manually download content if needed.
4 Click OK.
Internet Explorer downloads the latest version of the page to your computer.
TIP: You can add a button to the Internet Explorer toolbar for creating mobile favorites.
In Internet Explorer on your computer, click View > Toolbars > Customize.
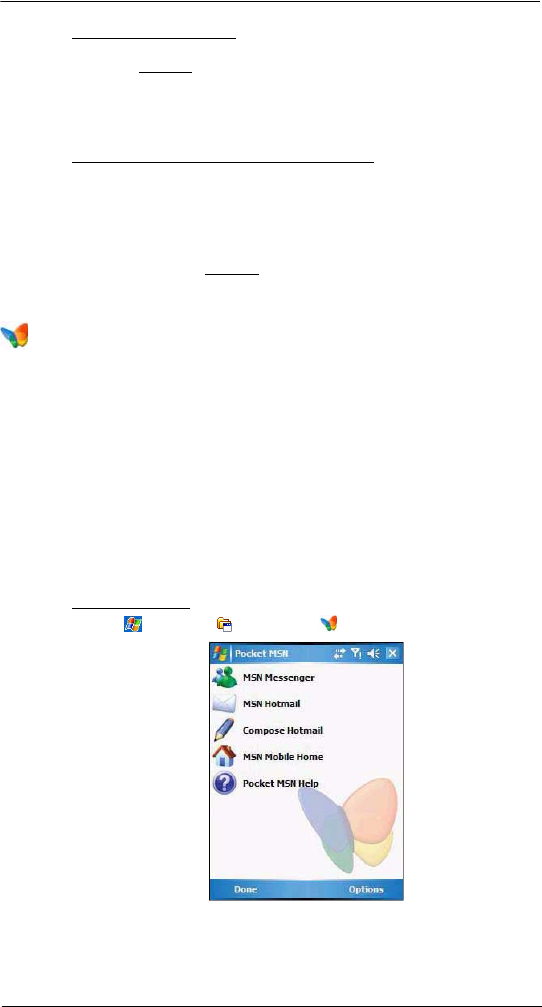
6 Using the Windows Mobile Programs
Pocket MSN
99
To download a mobile favorite:
1 Right-click the mobile favorite, then click Properties.
2 On the Download tab, specify the number of links deep you want to download.
To conserve device memory, go only one level deep.
3 Synchronize your device and computer.
Mobile favorites that are stored in the Mobile Favorites folder in Internet Explorer
are downloaded to your device.
To save device memory in downloading mobile favorites:
Mobile favorites take up storage memory on your device. To minimize the amount of
memory used, observe the following:
•In the settings for the Favorites information type in ActiveSync options, turn
off pictures and sounds, or top some mobile favorites from being
downloaded to your device.
•Limit the number of downloaded linked pages. In Internet Explorer on the
computer, right-click the mobile favorite you want to change, then click
Properties. On the Download tab, specify 0 or 1 for the number of linked
pages you want to download.
Pocket MSN
Pocket MSN includes support for the following:
•MSN Hotmail
You can read, write and send e-mail, delete e-mail and manage your
Hotmail folder.
•MSN Messenger
See who’s online. Send and receive instant messages. Subscribe to status
update for selected contacts so you are notified when they are online.
•MSN Mobile Home
Launch a personalized browser that offers e-mail access and a portal that
allows access to customized stock lists, weather, sports, entertainment and
news headlines.
•Options and settings
Configure the Pocket MSN settings to create a custom Pocket MSN
experience.
•Pocket MSN Help
Get detailed information on how to use pocket MSN.
To open Pocket MSN:
1 Tap > Programs > Pocket MSN .
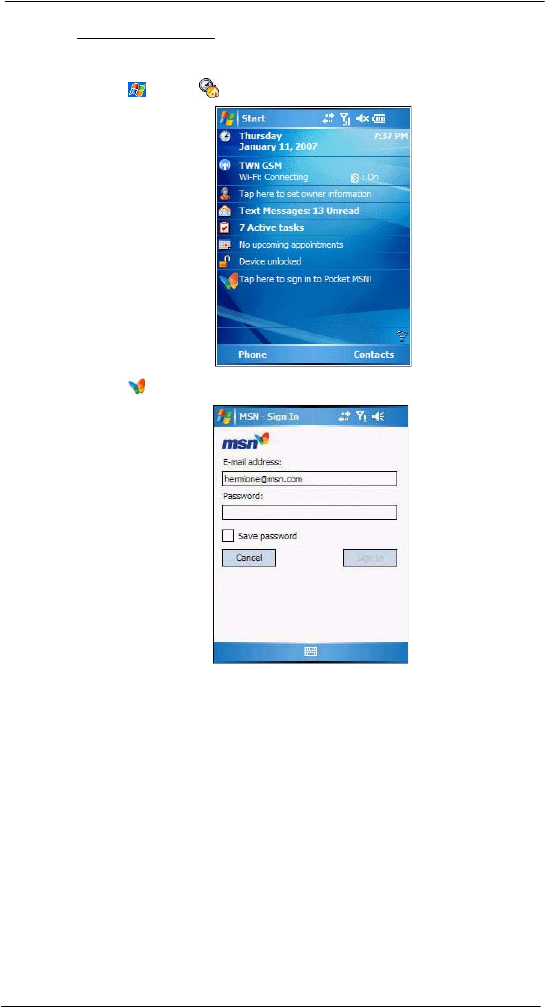
6 Using the Windows Mobile Programs
Pocket MSN
100
To sign in to Pocket MSN:
Signing in to Pocket MSN helps to maintain a secure access to your MSN Hotmail and
MSN Messenger accounts.
1 Tap > Today .
2Tap Tap here to sign in to Pocket MSN.
3 Enter your sign-in name and password.
Select the “Save password” option so you need not enter these information again
the next time you sign in.
4Tap Sign In.
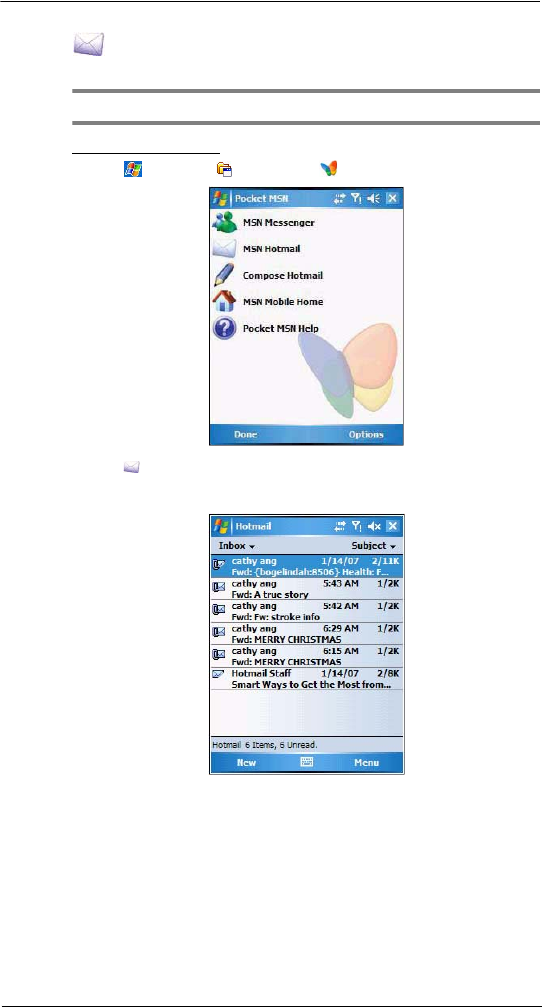
6 Using the Windows Mobile Programs
Pocket MSN
101
MSN Hotmail
MSN Hotmail on your device lets you access your Hotmail Inbox.
NOTE: Make sure you create a connection to the internet before using MSN Hotmail.
To view your Hotmail Inbox:
1 Tap > Programs > Pocket MSN .
2Tap MSN Hotmail.
To synchronize your Hotmail Inbox so you see your latest e-mail messages, tap
Menu > Send/Receive.
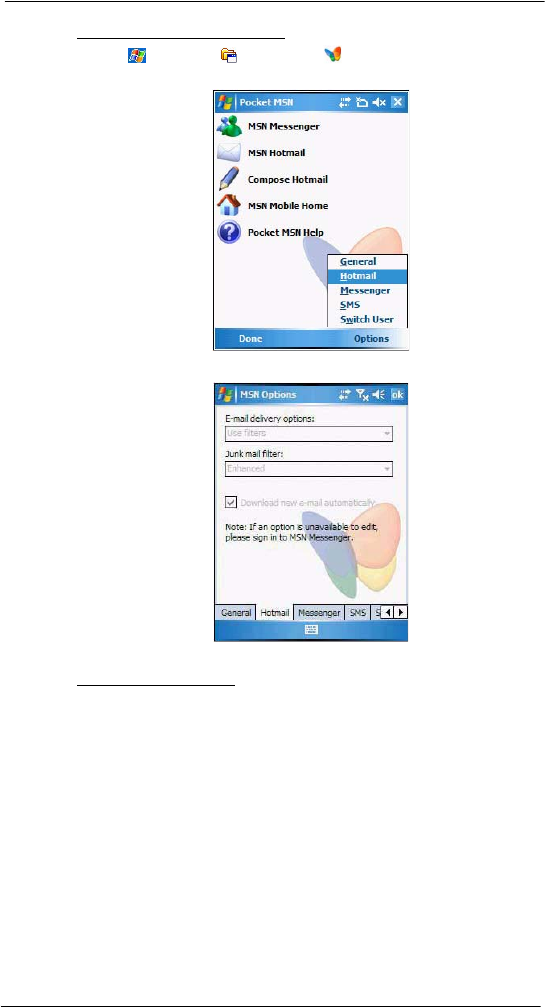
6 Using the Windows Mobile Programs
Pocket MSN
102
To keep your Hotmail Inbox up-to-date:
1 Tap > Programs > Pocket MSN .
2Tap Options > Hotmail.
3 Tap the “Download new e-mail automatically” check box.
4Tap ok.
To create an e-mail message:
1 On the Hotmail Inbox screen, tap New.
2 Enter the e-mail add of your intended recipients in the “To” box.
3 Enter the subject in the Subject line.
4 Compose your message.
5Tap Send when you have finished the message.
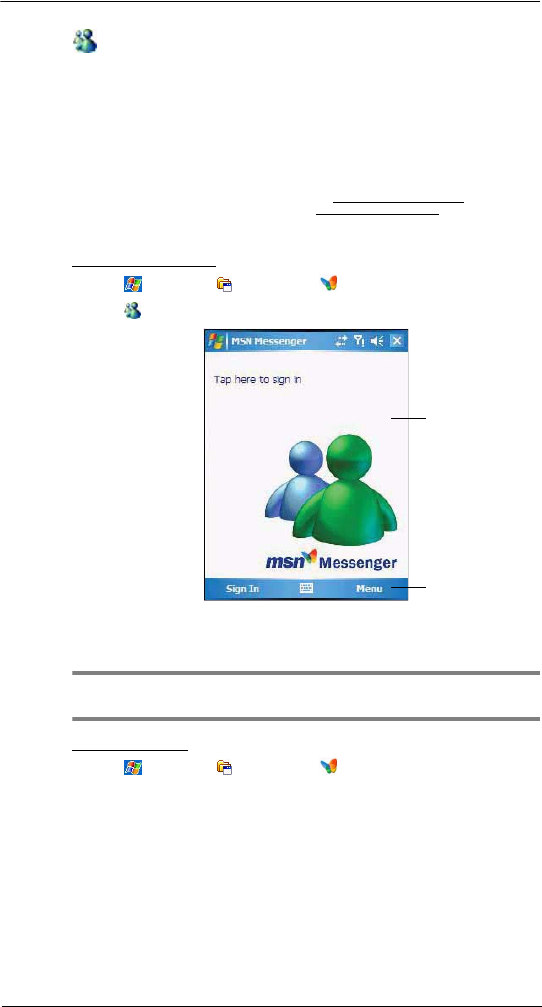
6 Using the Windows Mobile Programs
Pocket MSN
103
MSN Messenger
MSN Messenger on your device is an instant messaging program that lets you:
•See who is online
•Send and receive instant messages
•Conduct instant message conversations with groups of contacts
Requirements to use MSN Messenger
•For MSN Messenger Service, a Passport. If you have a Hotmail® or MSN
account, you already have a Passport.
•Sign up for a Microsoft Passport account at http://www.passport.com. Get a
free Microsoft Hotmail e-mail address at http://www.hotmail.com.
•For Exchange Instant Messaging Service, an Exchange account.
•To set up an Exchange account, see your network administrator.
To open MSN Messenger:
1 Tap > Programs > Pocket MSN .
2Tap MSN Messenger.
Setting up an account
Before you can connect, you must enter Passport or Exchange account information.
NOTE: Make sure you create a connection to the internet before using MSN
Messenger.
To set up an account:
1 Tap > Programs > Pocket MSN .
Tap anywhere on the
screen to sign in.
Tap to access
program options.
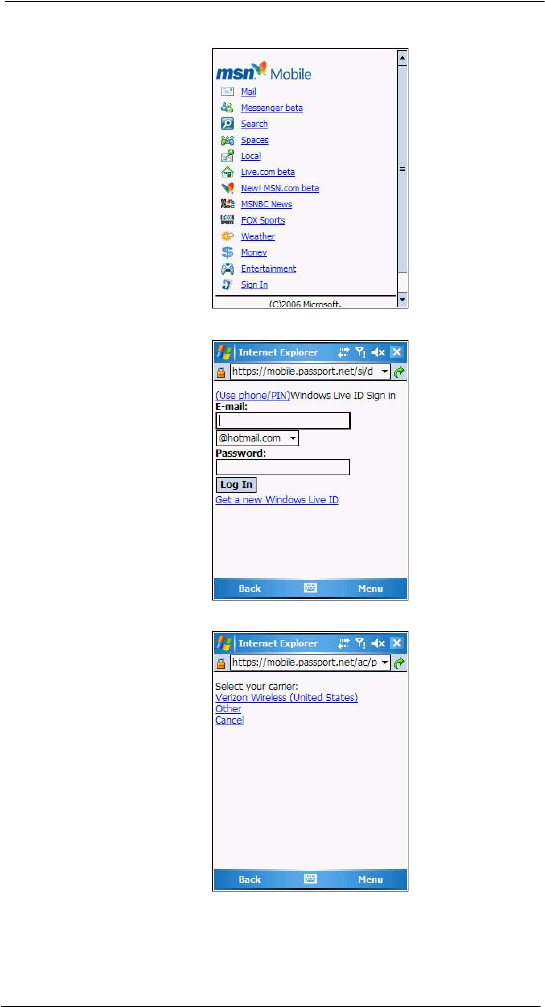
6 Using the Windows Mobile Programs
Pocket MSN
104
2Tap MSN Mobile Home.
3Tap Sign In.
4Tap Get a new Windows live ID.
6 Using the Windows Mobile Programs
Pocket MSN
105
5 Select your carrier.
6 Enter your mobile phone number for confirmation.
7 Your sign-in name and password are established the first time you sign into Pocket
MSN.
8Tap OK.
To sign in to your account:
1 Tap anywhere on the MSN Messenger screen.
2 Enter your sign-in name and password.
Select the Save password check box so you need not enter these information again
the next time you sign in.
6 Using the Windows Mobile Programs
Pocket MSN
106
3Tap Sign In.
If you already use MSN Messenger on your computer, your contacts will show up on
your device without being added again.
NOTE: To sign in after connecting to a wireless network, tap Menu > Options >
Messenger, then follow the directions on the screen.
To work with contacts:
The MSN Messenger screen shows all of your messenger contacts at a glance, divided
into Online and Not Online categories. From this view, while connected, you can chat,
send an e-mail, block the contact from chatting with you, or delete contacts from your list
using the pop-up menu.
•To see others online without being seen, tap Menu > My Status > Appear
Offline.
•If you block a contact, you appear offline but remain on the blocked contact
list.
•To unblock a contact, tap and hold the contact, then tap Unblock on the
pop-up menu.
To chat with contacts:
1 To open a chat window, tap a contact name.
2 Enter your message in the text entry area at the bottom of the screen, or tap My
Text to enter a preset message.
3Tap Send.

6 Using the Windows Mobile Programs
Pocket MSN
107
Tips when chatting with contacts
•To invite another contact to a multi-user chat, tap Menu > Chat, then tap the
contact you want to invite.
•To return back to your chat window, tap Menu > Chat, then select the
person with whom you were chatting.
•To see if the contact you are chatting with is responding, look for the
message under the text entry area.
To sign out of your account:
•Tap Menu > Sign Out.

6 Using the Windows Mobile Programs
Pocket MSN
108

7 Using Phone
Phone setup
109
7 Using Phone
The phone function of your MC35 EDA boasts of standard cell phone features—such as
mailbox and text messages—as well as several handy call features including Speed Dial,
Caller ID, Conference Call, Call Forwarding, Call Waiting, Voice Mail and Text messages,
Fixed Dialing, Call Barring, Call History, speakerphone, note taking, voice mail, and
emergency number setting.
The Phone program is integrated with both Microsoft Contacts and Messaging. This
means you can make a call and send e-mail/text messages from any of these three
programs. This fully integrated functionality of Phone also makes sharing contact
information between programs an easier task.
This chapter shows you how to install a SIM (Subscriber Identity Module) card on your
device. It also describes basic phone operations and features, as well as ways of
customizing the phone function based on your preferences.
•Phone setup
•Dialer screen
•Phone operation
•Making phone calls
•Phone features
•Phone profiles
•Phone preferences
Phone setup
Installing the SIM card
If you wish to use the phone function, you need to first install a valid SIM card.
A SIM card is a small printed circuit board that must be installed when signing on as a
subscriber in a GSM-based mobile phone like your MC35. It contains subscriber details,
security information and memory for a personal directory of numbers.
To install the SIM card:
1 If the device is switched on:
(a) Press the Power button to turn off the device.
(b) Wait for five seconds to allow the device to completely enter sleep mode.
2 Remove the battery pack. See “To unistall the battery pack” on page 2 for
instructions.
3 With the rear panel facing you, slide the SIM card holder to the right.
4 Lift the holder halfway from the recess area.
7 Using Phone
Phone setup
110
5 Insert the SIM card into the SIM card holder.
Note the proper position of the SIM card—the card connector (i.e., gold area) should
be facing downward with the beveled corner fitting the lower-left corner of the
recess area.
6 Press the SIM card holder down.
7 Slide the SIM card holder to the left to lock it into place.
8 Reinstall the battery pack. See “To install the battery pack” on page 2 for
instructions.
The default settings for your device are programmed on the assumption that you’ll
be using the phone function once you’ve properly installed a SIM card (and in some
cases, entered a PIN), you can then proceed to establishing a connection to your
mobile service provider’s network.
NOTE: If you’re not going to install a SIM card on your device, keep the Phone
program closed or turn the program off using Wireless Manager to minimize power
consumption.
3
4
5
7
6
7 Using Phone
Phone setup
111
Entering your PIN
After installing the SIM card you’ll be able to activate your mobile service connection. In
most cases, SIM cards are preset with a PIN (Personal Identity Number), provided by
your mobile service provider.
To enter your PIN:
1 Tap > Phone .
2 On the Dialer screen, enter the preset PIN from your mobile phone service provider.
3Tap Enter.
If you consecutively enter a wrong PIN for three times, the SIM card is blocked. If
that happens, you can unblock it with the PIN Unblocking Key (PUK code) also
provided by your mobile phone service provider.
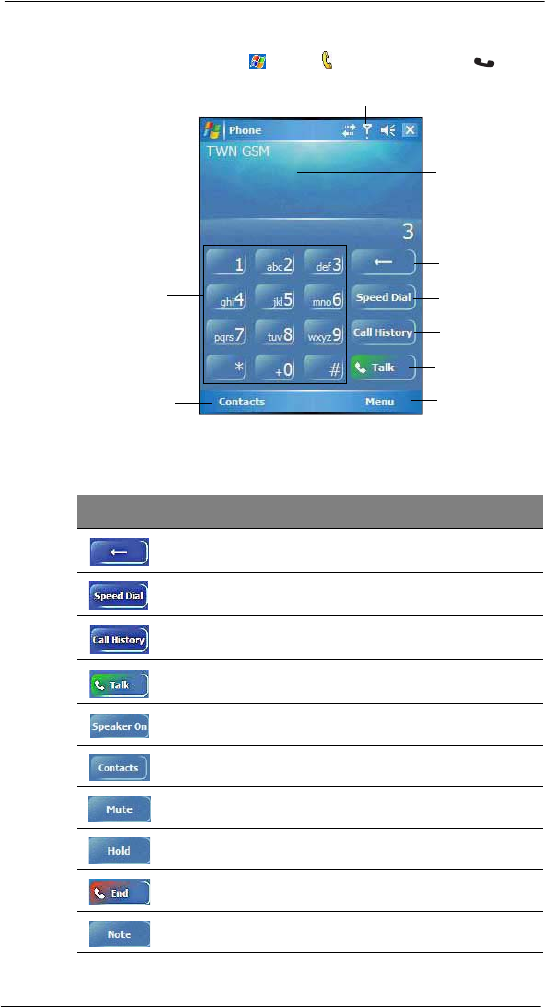
7 Using Phone
Dialer screen
112
Dialer screen
To launch the Dialer screen, tap > Phone or press the Send button .
Dialer buttons
The list below shows the actions of the Dialer screen buttons.
Tap to back space
over individual
numbers.
Tap call the currently
displayed number.
Tap to view the
Speed Dial list.
This icon indicates the status of
the mobile service connection.
Tap to view the Call
History entries.
Tap to view the
Contacts list.
Soft keypad for
inputting.
Last number called
is displayed here.
Tap Menu, then
Options to view
Phone Settings.
Icon Description
Tap to erase the number you entered.
Tap to view the Speed Dial list.
Tap to see all received, made, and missed calls.
Tap to call the displayed number.
Tap to enable speakerphone mode.
Tap to view Contacts.
Tap to mute a call.
Tap to hold a call.
Tap to end a call.
Tap during a call to create a note or recording for a particular call.
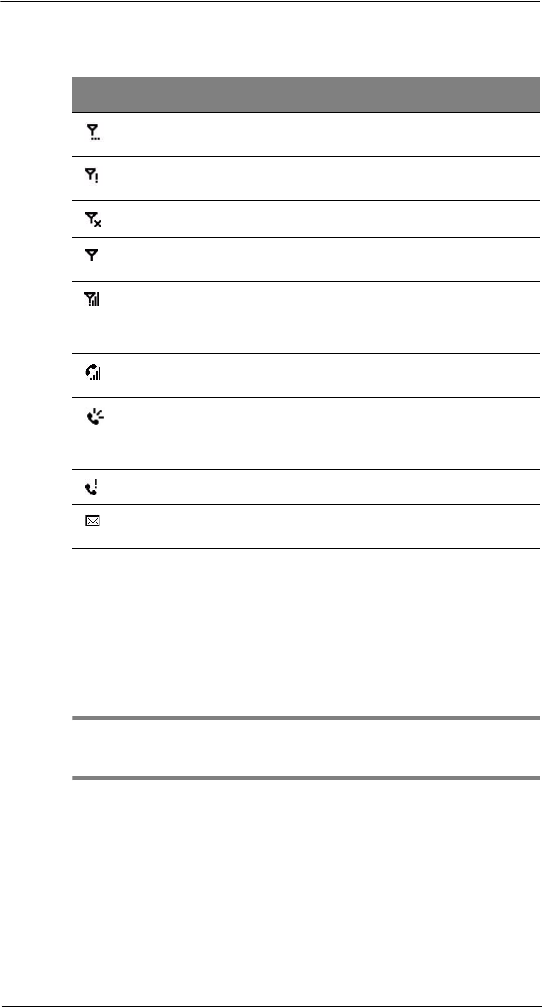
7 Using Phone
Phone operation
113
Phone status icons
The list below shows the Phone-related status icons.
Phone operation
Turning the phone function on and off
If you have turned the phone function off, removed and then reinstalled the SIM card, the
connection to your mobile service provider’s network is not automatically enabled. You
have the option to just use the device’s EDA features or you can re-establish the mobile
service connection.
IMPORTANT: In many countries it is required by law to turn off cell phones when
boarding commercial flights. Turning off your MC35 does not turn off the device’s phone
function; you must use the Wireless Manager to turn off the phone.
Icon Name Description
Network search Indicates that the device is attempting to
establish mobile service connection.
No network Indicates that the device is not able to
establish mobile service connection.
Phone off Indicates that the phone is off.
In network service Indicates that the phone is connected to a
network.
Signal status The number of bars indicates the strength of your
connection signal. As the strength of the signal
diminishes the number of bars in the icon
diminishes, with no bars indicating no signal.
Active call Indicates that a call is being made or there is an
incoming call.
Speakerphone Indicates that the speakerphone mode is
enabled. See “Using the speakerphone” on
page 116 for more information on how to activate
the speakerphone.
Missed call Indicates that you have a missed call.
Unread message Indicates that you have unread text or e-mail
message(s), as well as voice mail notification(s).
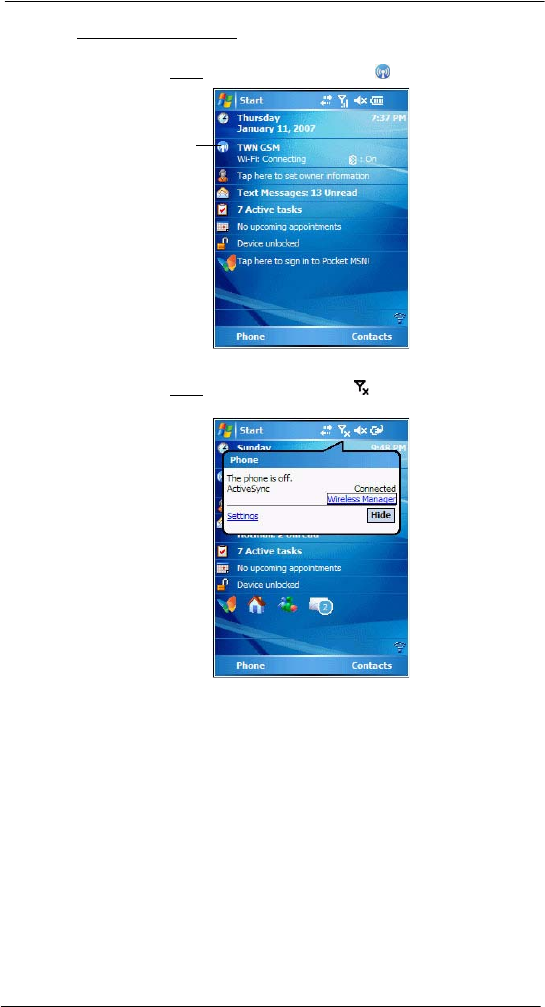
7 Using Phone
Phone operation
114
To turn on the phone function:
1 Launch the Wireless Manager application:
•On the Today screen, tap Wireless Manager .
-or-
•On the Today screen, tap the signal icon on the upper right corner
of the screen, then from the Phone callout, tap Wireless Manager.
Tap to launch the
Wireless Manager.
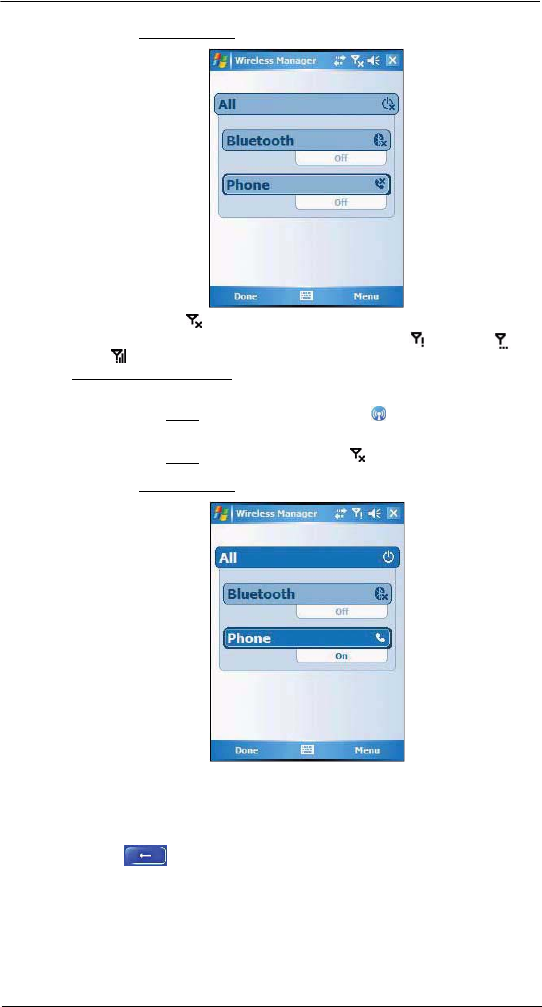
7 Using Phone
Phone operation
115
2 On the Wireless Manager screen, tap Phone to turn on phone function.
The signal icon changes indicating the MC35 is searching for a mobile
connection. This may take a few seconds. The signal icon changes to , and
to once a mobile connection is established.
To turn off the phone function:
1 Launch the Wireless Manager application.
•On the Today screen, tap Wireless Manager .
-or-
•On the Today screen, tap the signal icon and select Wireless
Manager.
2 On the Wireless Manager screen, tap Phone to turn off phone function.
Erasing number input
If you entered a wrong phone number when dialing, you can either backspace to erase
individual digits or you can delete the entire phone number
•Tap to backspace over digits.
•Press the Backspace key on the keypad.
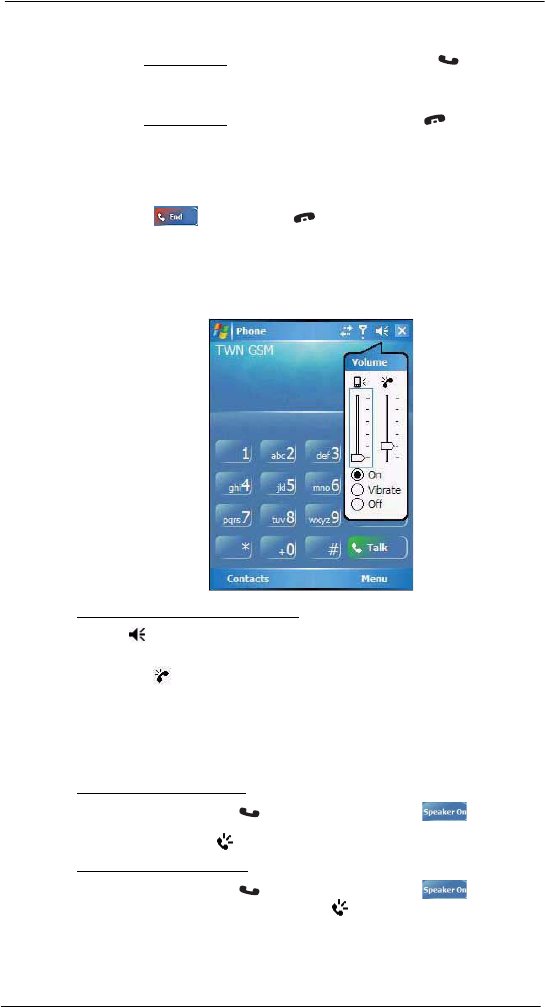
7 Using Phone
Phone operation
116
Answering a call
•On the Call Notification callout, tap Answer or press the Send button.
Rejecting a call
•On the Call Notification callout, tap Ignore or press the End button.
Depending on your mobile service subscription, either a busy tone is sent
out, or the call is forwarded to your voice mailbox.
Ending a call
•Tap End or press the End button.
Adjusting the phone volume
To adjust the phone volume, you must do so during a call. If you adjust the volume at
another time it only affects the level of the system sounds (i.e., ring and notification
alerts, .wmv/MP3 playback).
To adjust the phone conversation volume:
1 Tap on the navigation bar or press the volume key down to bring up the Volume
drop-down box.
2 Drag the slider to adjust the phone volume.
Using the speakerphone
To attend to phone calls, attach the single earbud headset or activate the speakerphone
mode. The speakerphone function allows you to talk hands-free and/or let other people
listen to the caller.
To enable speakerphone mode:
•Press and hold the Send button or tap the Speaker On screen
button until the speakerphone turns on as indicated by the appearance of the
Speakerphone icon on the navigation bar.
To disable speakerphone mode:
•Press and hold the Send button or tap the Speaker On screen
button again until the Speakerphone icon disappears from the
navigation bar.
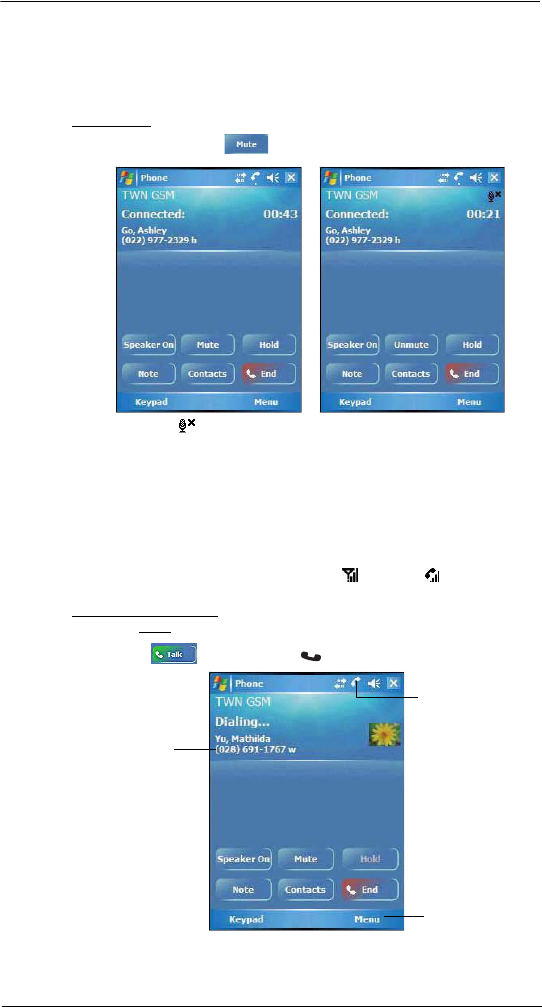
7 Using Phone
Phone operation
117
Muting a call
During a call you can mute the microphone so that the person with whom you are
speaking cannot hear you, but you can still hear him or her. This is useful if, for example,
you do not want the other person to hear a conversation or background noise on your
side of the call.
To mute a call:
•During a call, tap Mute to toggle the mute function on and off.
The mute icon is displayed on the Dialer screen’s entry area to indicate that the
mute function is enabled.
Making phone calls
The integrated nature of your device’s phone function lets you make calls in a variety of
ways across different applications. You can make a call by:
•Manually entering a phone number using the Dialer keypad.
•Accessing numbers using Speed Dial, Call History, Microsoft Contacts or
SIM Manager.
Once a call has been initiated the signal icon changes to indicating
an active call.
To make a call using dialer:
1 On the Dialer keypad, tap the phone number you want to call.
2Tap Talk or press the Send button.
Tap to terminate
the call.
This icon indicates a call is
being made and the
strength of the signal.
The number being
called is displayed
here.
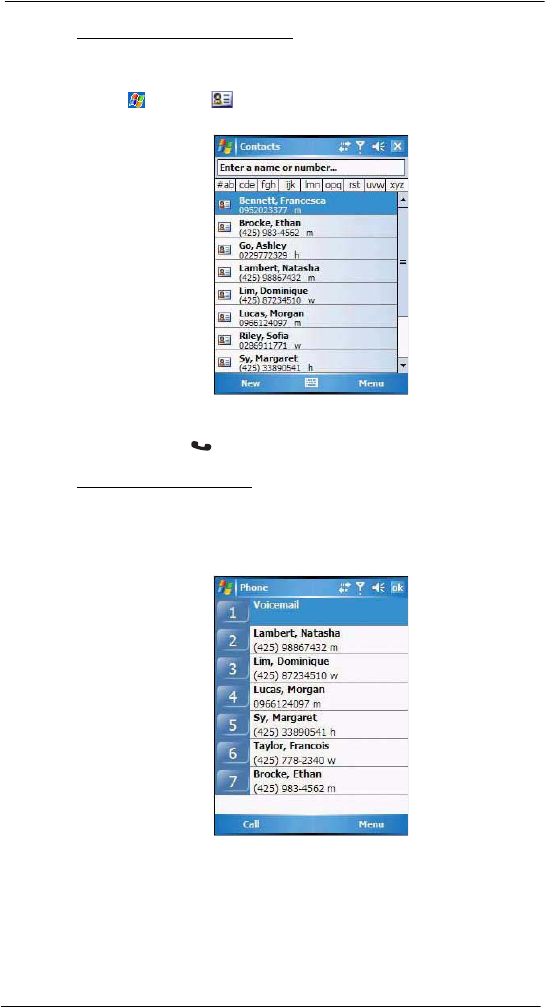
7 Using Phone
Phone operation
118
To make a call using Microsoft Contacts:
There are several ways to make a call in Contacts. In this section, only the method using
the hardware buttons is described. See "Calling a contact" on page 67 for instructions on
other methods.
1 Tap > Contacts .
Contacts opens to the contact list.
2 Type a name or number, or move the joystick up or down to scroll through the
contact list and select the contact you want to call.
3 Press the Send button twice—once to launch Phone and another to make the
call. The call will be made to that contact’s priority number.
To make a call using Speed Dial:
Speed Dial is a list you create for numbers you call regularly. Only numbers stored in
Microsoft Contacts can be added to this list.
You can make a call in two ways:
•By memorizing a phone number’s position in the Speed Dial list, you can dial
the number by entering its location number.
In the picture above, Natasha Lambert is at position 2. To dial her number,
tap and hold 2 on the Dialer keypad until you hear a beep.
If a number holds a position of 10 or higher tap the first number, and then tap
and hold the second to dial. For instance, to call the number in position 12,
tap 1 then tap and hold 2.
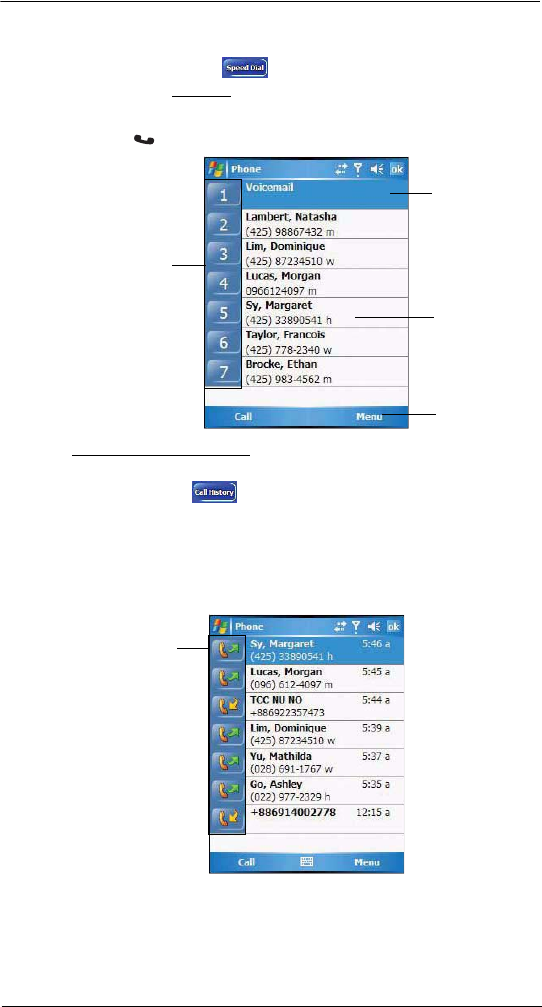
7 Using Phone
Phone operation
119
•Alternatively, if you don’t remember the position of a number in the Speed
Dial list follow the steps below:
(a) Tap Speed Dial .
(b) On the Speed Dial screen, press the joystick to go through the list to find the
number you want to call.
(c) Once the number is selected, you can either press the joystick or the Send
button to initiate the call.
To make a call using Call History:
Call History is a record of all incoming, outgoing, and missed calls.
1 Tap Call History .
2 Find the number you want to call. You can select a call category—All Calls, Missed,
Outgoing, Incoming, and By Caller—by tapping the pick list in the top-left corner of
the screen.
3 Once the number has been selected press the joystick or the Send button to make
the call.
Tap the category icon on the left of the selected number.
Tap to adjust voice
mail settings.
Tap to edit contact
details.
Tap to add a
contact to the
Speed Dial list.
Tap a Speed Dial
number to call that
contact.
Tap a category icon
to call the number
opposite it.
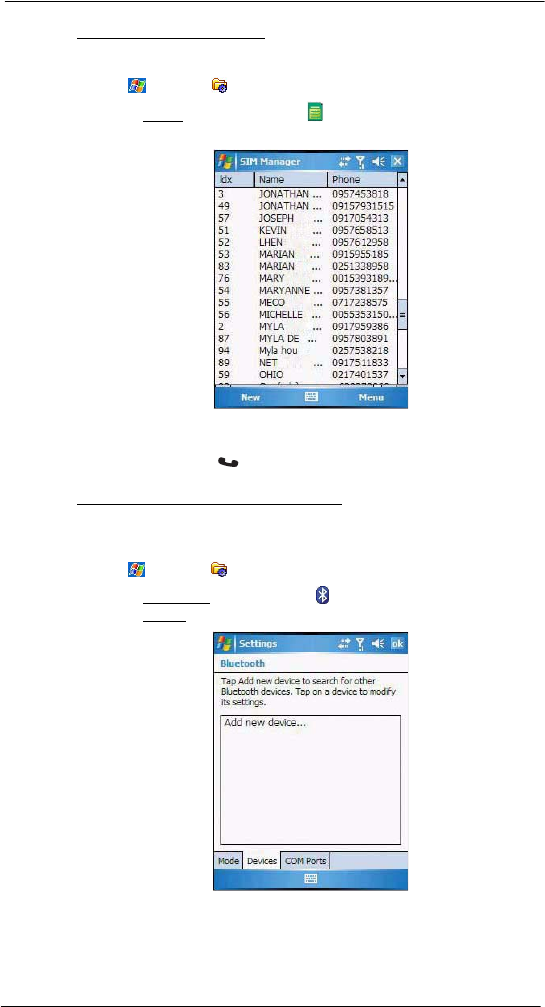
7 Using Phone
Phone operation
120
To make a call using SIM Manager:
SIM Manager is a program you can use to view and manage the contents of your SIM
card.
1 Tap > Settings .
2 On the System tab, tap SIM Manager .
Wait for the SIM card contents to load.
3 Scroll to the SIM contact you want to call and perform any of the following:
•Press the joystick.
•Press the Send button.
•Tap and hold the SIM contact, then select Call from the pop-up menu.
To make a call from a Bluetooth-enabled headset:
You can use a Bluetooth-enabled headset with your device when you create a
partnership between your device and the headset.
1 Make sure that the two devices are turned on, discoverable, and within close range.
2Tap > Settings .
3 On the Connections tab, tap Bluetooth .
4 On the Devices tab, tap Add new device.
Your device will search for other Bluetooth devices and displays them in the device
list.
5 Tap the name of the Bluetooth-enabled hands-free device in the list, then tap Next.

7 Using Phone
Phone features
121
6 If you want to use a passcode, enter the alphanumeric passcode for the Bluetooth-
enabled hands-free device, then tap Next.
You can find the passcode in the manufacturer’s documentation for your hands-free
device.
7Tap Finish.
8 Select the check box for the Hands Free service, and tap Finish.
To make an International call:
For making a call to an overseas number that is not stored either in your SIM card or on
your device, follow the steps below.
1 Tap and hold the Backlight/0 key until the plus (+) sign appears.
This sign replaces the international number prefix “00”.
2 Enter the full phone number you want to dial.
It includes the country code, area code (without the leading zero), and phone
number.
3Tap Talk or press the Send button.
Making an emergency call
MC35 supports the international emergency number 112, and for US/Canada residents,
the emergency number 911 as well. You can call these numbers for emergency police,
fire, and medical assistance.
NOTE: In some cases, additional local emergency numbers may be provided by your
mobile phone service provider.
Generally, you can make a call to these emergency numbers, with or without a SIM card
installed on your device, as long as a mobile phone service network is available in your
area. However, some mobile phone service providers may require that a SIM card is
inserted, and in some cases that the PIN has been entered as well, before an emergency
call can be made. Contact your mobile service provider for the requirements applicable
to your mobile subscription.
To make an emergency call:
1 Dial the emergency number by using Dialer.
•For international emergency calls, dial 112.
•For US/Canada emergency calls, dial 911.
2Tap Talk or press the Send button.
Phone features
Flexibility is a hallmark of your device’s phone function. This is best exemplified in such
features as Call Notification, Call Hold and Conference Call, which allows you to attend
to more than one call simultaneously—all with a simple tap of your stylus.
Variety is another hallmark of your device’s phone function. This is implemented in such
range of features as Call Notes, text/e-mail messaging, Voice Mail, and Contacts
Integration.
NOTE: The availability of some of the phone features described in this section may
depend on your mobile service subscription. Contact your mobile service provider for
information.
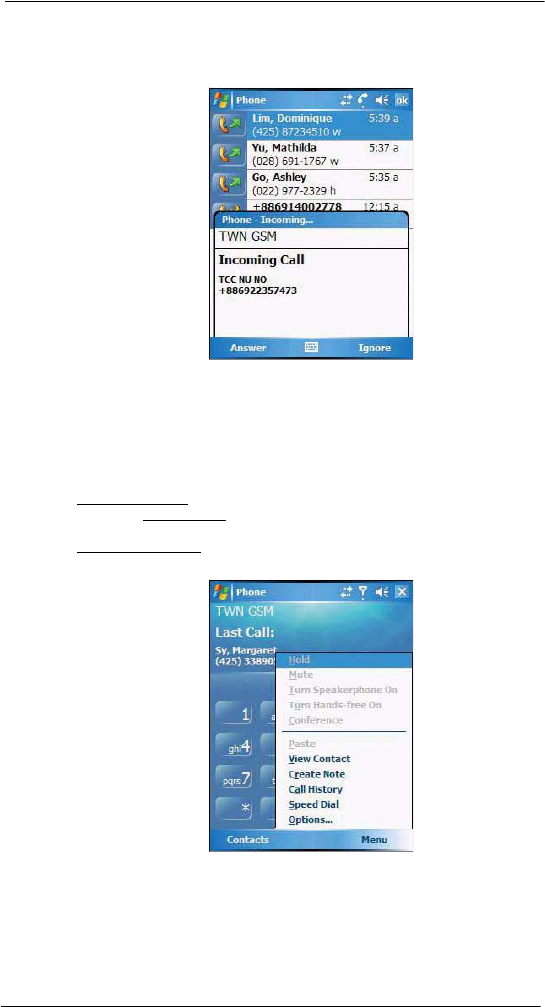
7 Using Phone
Phone features
122
Call notification and identification
The Call Notification feature lets you know if another person is trying to call you when you
are talking on the phone. When this happens the following callout appears.
The Caller Identification feature matches the incoming call number with those stored in
Contacts so you know who is calling you.
Call hold
After being notified of an incoming call while already on the phone, you can choose to
reject a call by tapping the Ignore button on the Call Notification callout, or you can use
the Call hold feature to attend to both calls.
To put a call on hold:
•On the Call Notification callout, tap Answer to take the incoming call and put
the original one on hold.
To swap between calls:
•To shift between two callers tap Menu > Hold.
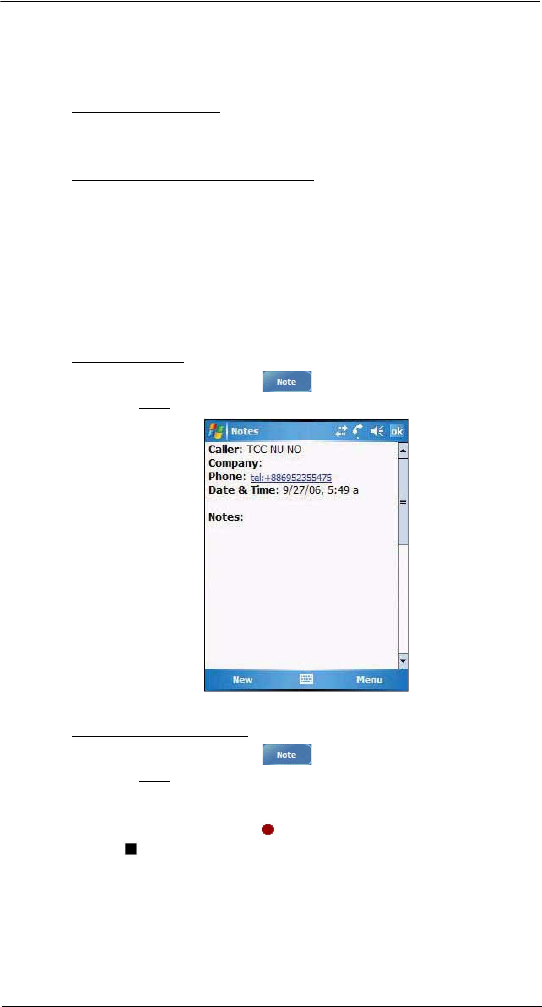
7 Using Phone
Phone features
123
Conference call
With the Conference Call feature you can create a conversation line between several
callers. You can either, put a call on hold, then dial another number and wait for it to be
picked up; or accept an incoming call when you already have one in progress.
To set up a conference call:
•During a call with two active numbers, tap Menu > Conference.
If the conference connection is successful the word “Conference” will appear
in the input area of the Dialer screen.
To add additional people to a conference call:
You can connect up to six (6) callers at a time in a conference call.
1 During an active conference call, tap Menu > Hold.
2 Key in the new number.
3Tap Resume to return and continue with the conference call.
4 Repeat steps 1-3 to add more people in the conference call.
Call notes
The Call Notes feature allows you to create a written or recorded note during a call. The
call note will be saved as an attachment to your call as viewed in Call History.
To create a call note:
1 During an active call, tap Note .
2 On the Notes screen, use any of the input methods to compose your call note.
3 After you finished your call note, tap ok.
To add a recording to a call note:
1 During an active call, tap Note .
2 On the Notes screen, tap Menu > View Recording Toolbar.
3 Position your device's built-in microphone near your mouth or other source of
sound.
4 On the Recording toolbar, tap .
5 Tap to stop recording.
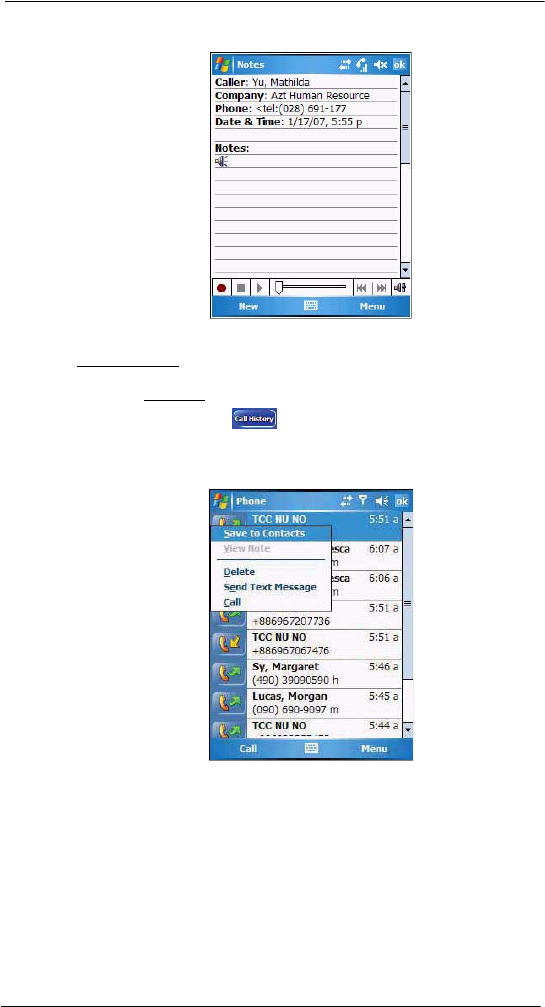
7 Using Phone
Phone features
124
The new recording appears as an embedded icon.
6Tap ok.
To view a call note:
You can view call notes either from the Call History screen or from the Notes program.
•On the Call History screen:
(a) Tap Call History .
(b) Select a log item marked with this icon.
(c) Tap and hold the selected log item, then tap View Note from the pop-up
menu.
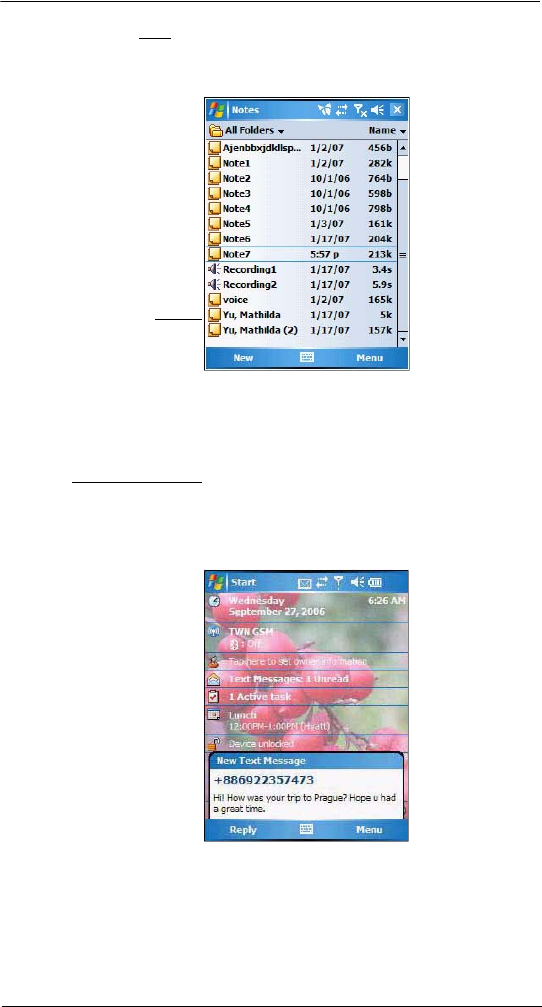
7 Using Phone
Phone features
125
•On the Notes screen:
Tap the call note from the list.
A call note’s label corresponds to the name or phone number of the related
contact.
Text messaging service
Just like a regular mobile phone, you can send and receive text messages using your
device. Your account is automatically setup in Inbox when you activated your mobile
service subscription.
To view a text message:
You can view a text message whether the phone function is on or off.
•When the phone function is on, you can view a text message from its
notification callout:
Tap the text message notification icon on the navigation bar to display the
message.
Call note
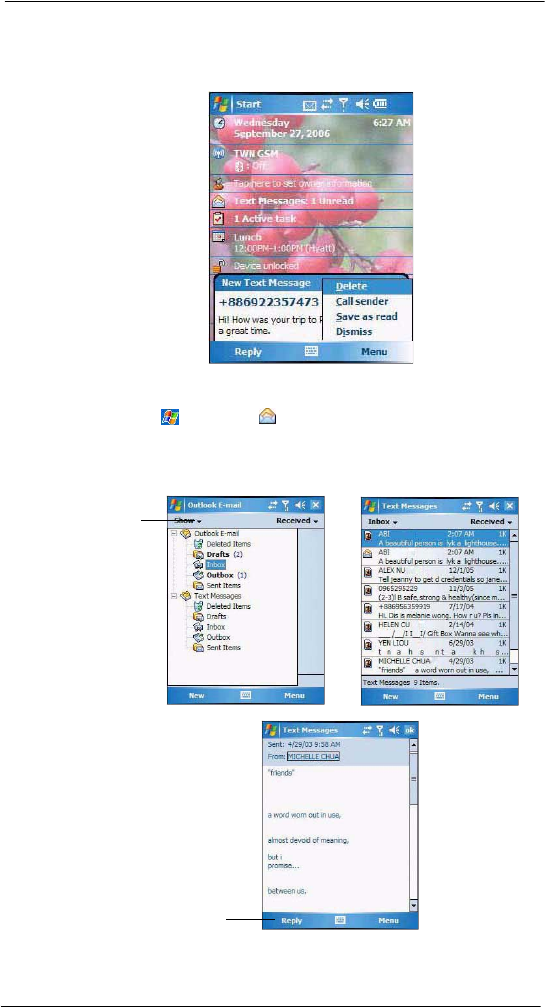
7 Using Phone
Phone features
126
The Caller Identification feature matches incoming text message numbers with
those stored in Contacts so you know who is sending you a message. Furthermore,
the “New Text Message” callout gives you the option to call the sender or save,
dismiss, or delete the message.
•When the phone function is off, you can still view received text message in
Messaging:
(a) Tap > Messaging .
(b) Tap the pick list on the top-left corner to display the navigator panel.
(c) Tap Inbox.
(d) In the message list, tap a text message.
Tap to reply the
message.
Tap to
display the
navigator
panel.
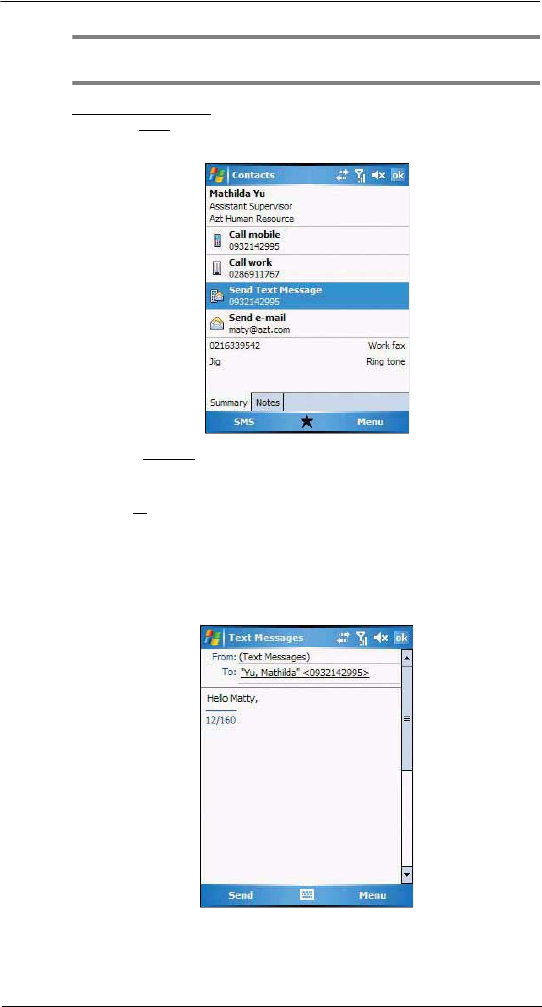
7 Using Phone
Phone features
127
NOTE: If the phone function is turned off and you tried to call the sender, send a reply,
or forward the message, you will be prompted to turn the phone function on.
To create a text message:
1 On the Dialer screen, tap Menu > View Contact.
The contact’s information displays.
2 Tap the Summary tab, then tap Send Text Message.
-or-
Tap Menu > Send Text Message.
3In the To field, enter the SMS number of one or more recipients, separating them
with a semicolon. You can do this in two ways:
•Manually enter the SMS number using any of the input panel options.
•Tap the To field or Address Book to display the contact list, then tap a
contact from the list.
Tap the To field or Address Book again to hide the contact list.
4 Compose your message.
7 Using Phone
Phone features
128
The auto-correct feature automatically fixes common spelling errors as you type so
your messages are more accurate.
The character counter lets you see and control the size of the message as you
compose.
If you want to know if your text message was received, tap Menu, Message
Options, then select the Request SMS text message delivery notification check
box.
5Tap Send when you've finished the message.
If the phone function is turned on, your text message will be sent out. If it’s off, you
will be prompted to turn on the phone function. If you do so, the message will be
sent out; otherwise when you tap ok, the message will be saved in the Drafts folder
and you can send it out later.
Voice mail
With the voice mail service you need not miss a message when you miss a call.
Unattended calls (i.e., no answer, phone function is turned off or is out of network
service) or a busy line will automatically forward callers to your voice mailbox where they
can leave their messages.
When you insert your SIM card into your device, it will automatically detect and set as
default the voice mailbox number provided by your mobile service provider. By default,
the first Speed Dial location is assigned to your voice mailbox.
To retrieve your voice mails:
•Tap and hold the button on the Dialer keypad.
Your voice mail retrieval number is automatically dialed.

7 Using Phone
Phone features
129
•Tap the New Text Message Notification icon informing you of the new
voice mail, then tap Menu > Call sender from the “New Text message”
callout.
Contacts integration
Your device’s phone function is integrated with other applications making it easy for you
to share contacts—phone numbers—between programs. Listed below are the places
where contacts can be stored on your device:
•Microsoft Contacts
Your contact list contains phone numbers that you can use in Phone.
•Your SIM card
You interchange your SIM card between your MC35 and another device;
while using the other device you can create new contacts on the SIM card.
•Call History
New contact numbers can be found in incoming or missed calls.
Sharing contacts in Microsoft Contacts
Below are several advantages for exporting contact information to Microsoft Contacts:
•As a backup in case you lose your SIM card while using it with another
device.
•If you are using your SIM with another device, you may need the numbers
stored in Microsoft Contacts.
•Exporting phone numbers to Microsoft Contacts allows you to create a more
detailed record.
To add contacts to Microsoft Contacts:
You can choose to create new contacts or add contacts from SIM Contacts or from Call
History.
•See “To create a contact” on page 66 for more information on creating new
contacts.
•See “Sharing contacts in call history” on page 130 for more information on
adding Call History items.
•See “Sharing contacts in SIM Contacts” on page 130 for more information on
adding SIM contacts.
To export contacts from Microsoft Contacts:
1 Perform one of the following:
•Tap and hold a contact to display the pop-up menu.
•Tap a contact to select it, then tap Menu.
If you do not select a contact, the first entry on the list will be exported.
2 Select the location where to export the contact.
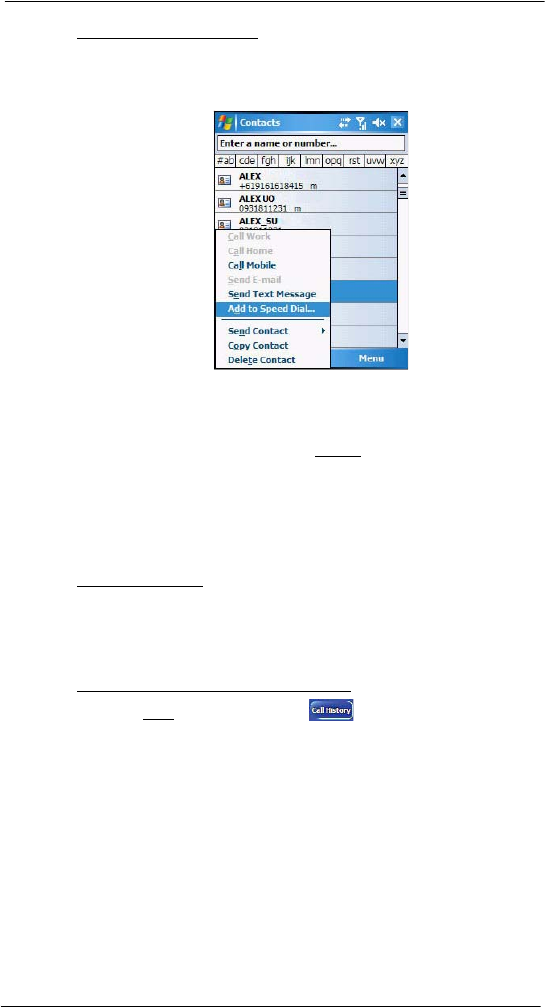
7 Using Phone
Phone features
130
To export a contact to Speed Dial:
1 Perform one of the following:
•Tap and hold a contact to display the pop-up menu, then tap Add to
Speed Dial.
•Tap a contact to select it, then tap Menu > Add to Speed Dial.
2 In the next screen add the contact details.
3 Select a location. You can either:
•Accept the default location which is the first available position in the
Speed Dial list.
•Use the up and down arrows in the Location field to scroll and select the
desired location. If you want to put a number in a position that is already
occupied, the new number will overwrite the number already there.
4Tap ok.
Sharing contacts in SIM Contacts
SIM Contacts enable you to manage all contacts stored in your SIM card with the option
to export this information to Microsoft Contacts.
To export SIM contacts:
You can choose to export individual or all SIM Manager contacts to Microsoft Contacts.
Sharing contacts in call history
Call History is a record of all incoming, outgoing, and missed calls. You have the option to
export new numbers under the Incoming and Missed categories to Microsoft Contacts.
To export Call History entries to Microsoft Contacts:
1 On the Dialer screen, tap Call History .
The Incoming or Missed categories appear.
2 Tap and hold the number you want to export.
3 In the pop-up menu that appears select Save to Contacts.
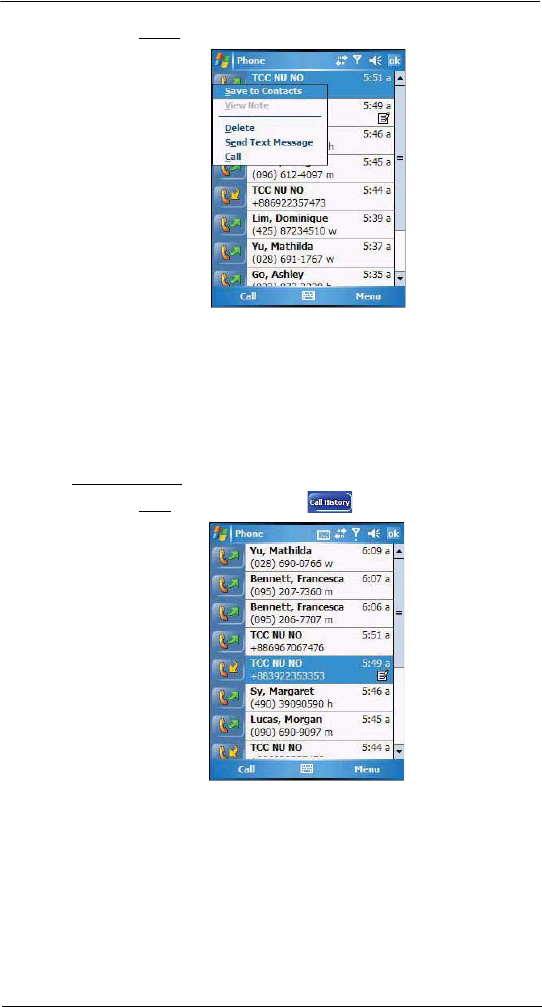
7 Using Phone
Phone features
131
4 On the Contact screen add additional contact details.
5Tap ok or press the joystick.
The call details in the Call History for the transferred number will change to display
the contact name specified.
Call History
All calls made on your device are recorded in Call History. It provides the time and
duration of all incoming, outgoing, and missed calls, and a summary of total calls. You
can refer to it to access any notes taken during a call. You can also set a limit on the
number of entries or delete them as necessary to save memory space.
To view Call History:
•On the Dialer screen, tap Call History .
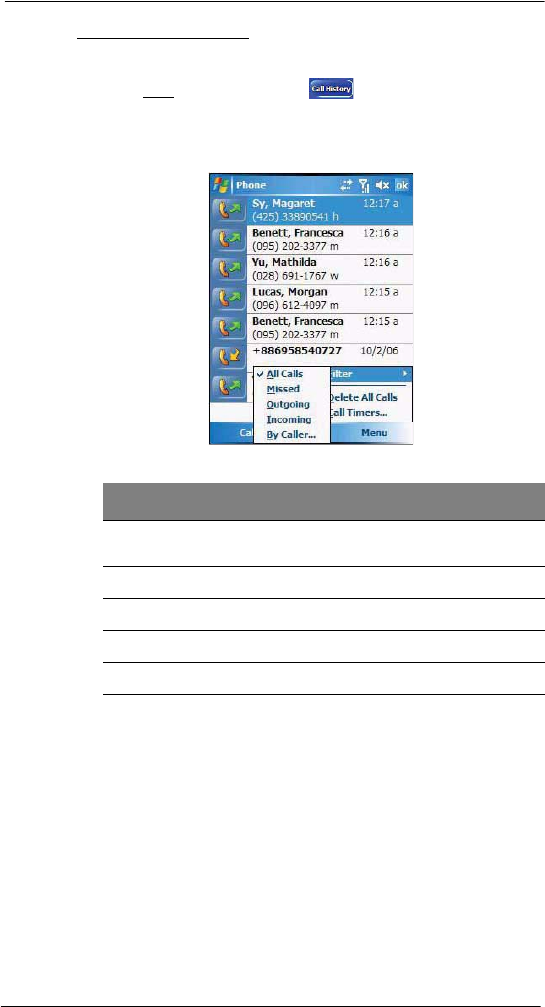
7 Using Phone
Phone features
132
To change the Call History view:
You can limit the number of entries that appear on the Call History list according to
specific criteria, such as All Calls, Missed, Outgoing, Incoming, or By Caller.
1 On the Dialer screen, tap Call History .
2Tap Menu > Filter, then select a different view. For example, you can view only
missed or incoming calls.
If you want to see list of all calls related a specific contact, select By Caller, then
select a contact name.
The Call History list can be filtered according to the following criteria.
Category Description
All Calls Shows all calls made to and from your device in a
chronological order.
Missed Shows calls made to your device that were not answered.
Outgoing Shows all calls made from your device.
Incoming Shows all calls made to your device.
By Caller Shows all calls related to a specific contact.
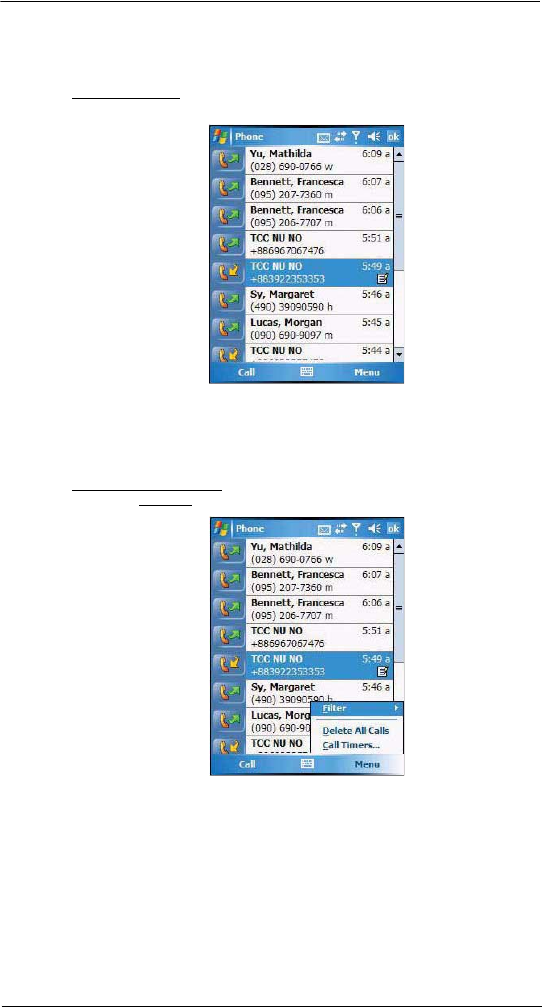
7 Using Phone
Phone features
133
Call details
Call History allows you to check the date and time a call was made, as well as the
duration.
To view call details:
•Find the call you are interested in, then tap it once.
Call history limit
To minimize the memory space occupied by the Call History items, you can set a limit for
the number of entries retained after a specific period of time. You can also delete items
that you no longer need.
To set the Call History limit:
1 On the command bar, tap Menu > Call Timers.
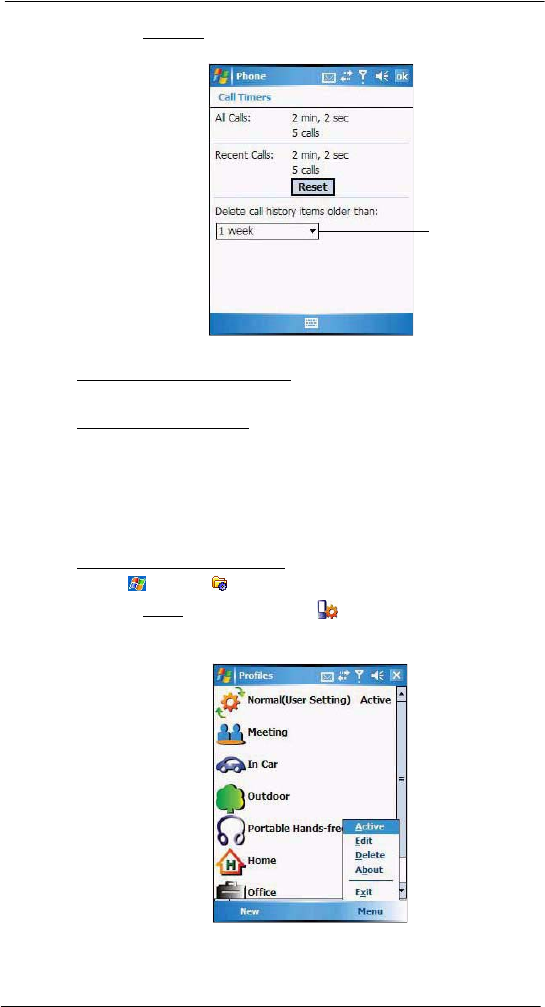
7 Using Phone
Phone profiles
134
2 On the Call Timers screen, tap the ”Delete call history items older than” pick list,
then, tap a time period option.
3Tap ok.
To delete individual Call History entries:
•Tap and hold the entry you want to delete, then from the pop-up menu,
select Delete.
To delete all Call History entries:
•From the command bar, tap Menu> Delete All Calls.
Phone profiles
Your device supports five types of preset profiles. These preset profiles allow you to
personalize the ring tone, image, and profile expiration time settings of your device, and
to activate a profile for different events and environments.
To activate a pre-defined phone profile:
1 Tap > Settings .
2 On the System tab, tap Phone Profiles .
3 Select a profile setting.
4Tap Menu > Active.
Tap to select a basis
for the call history limit.

7 Using Phone
Phone profiles
135
To create a new phone profile:
1 Tap > Settings .
2 On the System tab, tap Phone Profiles .
3Tap New > Yes.
4 Define the phone profile settings.
5Tap ok.
To change a phone profile setting:
1 Tap a profile setting that you want to change.
2Tap Menu > Edit.
3 Enter a profile name.
4 Set the ring volume for incoming voice calls and messages by pressing the Volume
key up or down.
5 Select a ringing option for incoming voice calls in the Ring Type list.
6 Select a ringing option for incoming messages; tap the Short Message Sound list.
7 Select a picture to add to your profile by tapping Browse.
8 Set the duration of the alerting signal prior to an incoming voice call or SMS
message.
9Tap Advance.
10 On the Incoming, Reminders, and Message tab, define settings for an incoming
voice call or SMS message.
11 Tap Save > OK.
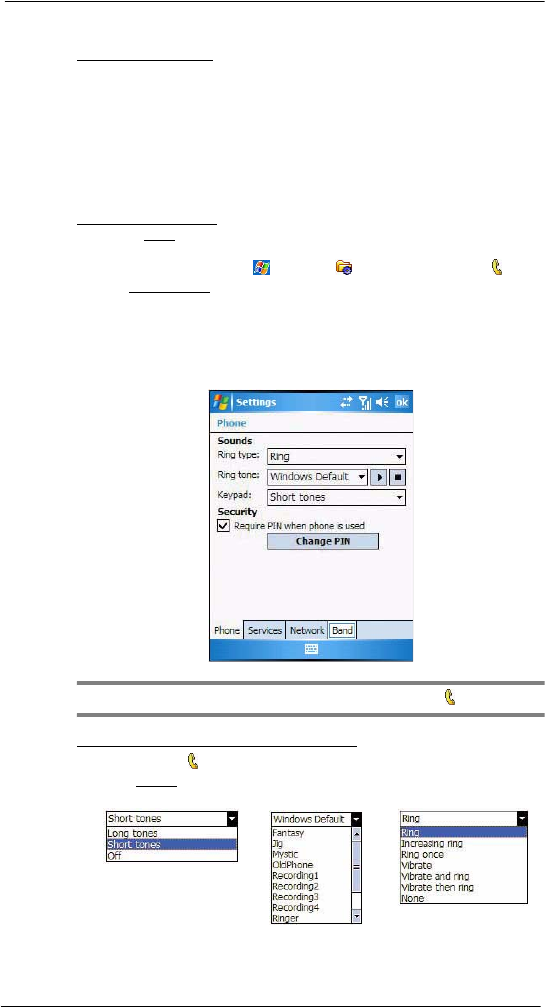
7 Using Phone
Phone preferences
136
12 Tap OK > Yes.
To delete a phone profile:
1 Tap a profile setting.
2Tap Menu > Delete.
3Tap Yes > OK.
Phone preferences
You can configure most features of the phone function to suit your preferences. You do
this by accessing the Phone option under Settings.
To access Phone settings:
•On the Dialer screen, tap Menu > Options.
- or -
From any other screen, tap > Settings > Personal tab > Phone .
The Phone Settings screen has four tabs—Phone, Services, Network, and
Band. Refer to the following sections for the configuration options available
for each tab.
Phone tab
Configure sound and security settings in this tab.
NOTE: Before proceeding with the configuration, make sure Phone is turned on.
To configure ring type, ring tone, and keypad sounds
1 Turn on Phone .
2 In the Sounds option, tap the pick list for each field, then select your choice from the
drop-down list.
Ring Type Ring Tone Keypad Sounds
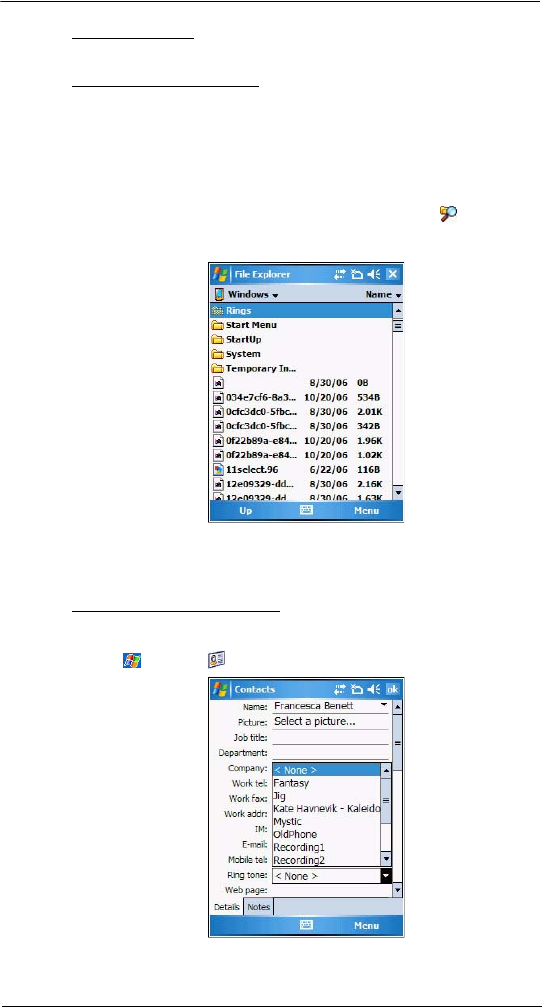
7 Using Phone
Phone preferences
137
To listen to a ring tone:
•Select the ring tone file you want to play, then tap the Play button. To stop
ring tone playback, tap the Stop button.
To customize the ring tone options:
To have a more personalized batch of ring tones to choose from, you can download
additional sound files to your device. File formats supported include .wav, .wma, .mp3,
and .mid.
1 To add more ring tone options to your device, you can:
•Synchronize sound files from your computer using ActiveSync.
•Download sound files from a network using a GPRS or WiFi connection
•Received sound files from other IR- or Bluetooth enabled devices.
2 After receiving the sound files in your device, use File Explorer to make sure
that they are located in the My Device | Windows | Rings folder. Only then will they
be listed as ring tone options.
3 Create customized ring tone options by creating stand-alone recordings in Notes.
These recordings are automatically copied to the My Device | Windows | Rings
folder. See “To set a voice recording as ringtone” on page 29 for related
instructions.
To associate a ring tone with a contact:
Rings tones can be set to be triggered by a contact to let you know at once when an
incoming call is from that contact without looking at the display.
1 Tap > Contacts .
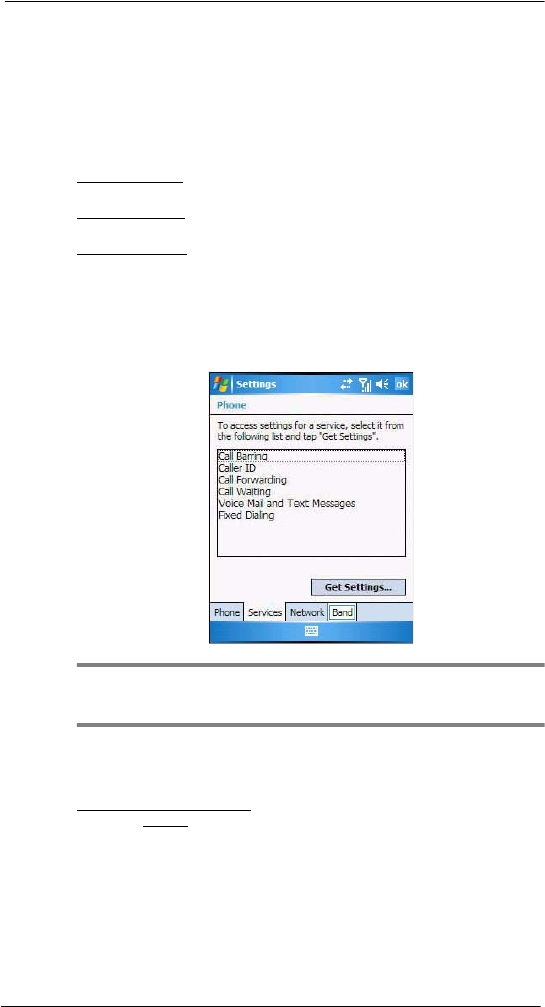
7 Using Phone
Phone preferences
138
2 Tap a contact in the contact list (or select it using the joystick), a summary screen
displays. This is referred to as a contact card.
3Tap Menu > Edit.
4On the Ring tone list, select a voice recording.
5Tap ok.
Configuring your PIN
Under the Security options, you can change your PIN and have it enabled or disabled.
To enable your PIN:
•Select the “Require PIN when phone is used” check box.
To disable your PIN:
•Deselect the “Require PIN when phone is used” check box.
To change your PIN:
1 Tap the Change Pin button. The Dialer screen displays.
2 Enter the old PIN, input a new one, then retype it for confirmation.
Services tab
Configure the different phone services in this tab—Call Barring, Caller ID, Call
Forwarding, Call Waiting, Voice Mail and Text Messages, and Fixed Dialing.
NOTE: The availability of some of the phone services described in this section may
depend on your mobile service subscription. Contact your mobile service provider for
information.
Call barring
You have the option to block calls in specific situations.
To enable or disable call barring:
1 On the services list, tap Call Barring.
2 Tap the Get Settings button (retrieving settings may take a few minutes).
3 On the next screen, define the call barring settings.
•Block incoming calls
•All calls - to prevent any calls from coming through
•When roaming - to block incoming calls when in phone service is in
roaming status
•Off - to accept all incoming calls
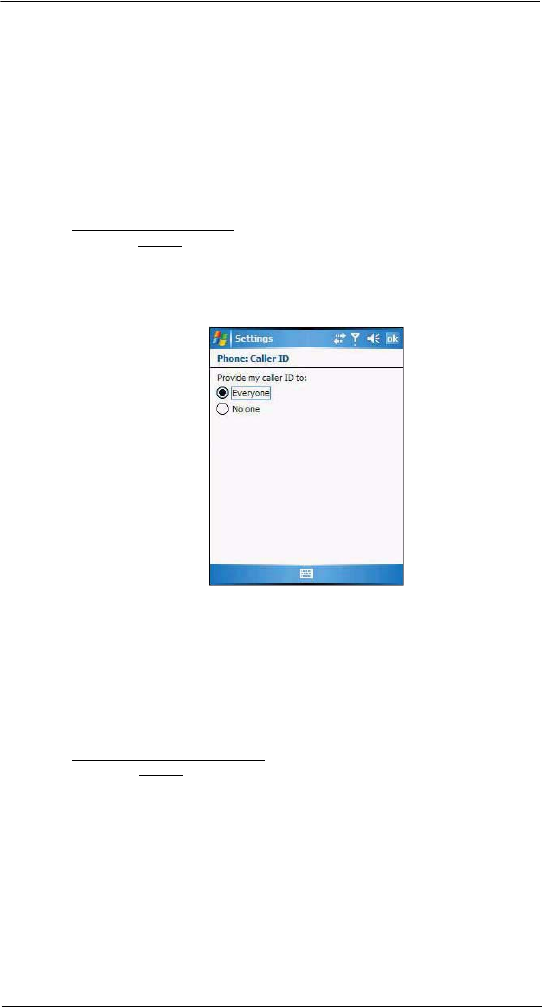
7 Using Phone
Phone preferences
139
•Block outgoing calls
•All calls - to prevent any calls from being made from your device
•International - to block outgoing international calls
•International except to home country - to block all outgoing international
calls other than those being made to the set home country
•Off - to disable call barring for all outgoing calls
4Tap ok.
Caller ID
When this service is enabled and you make a call, your phone number will be displayed
on the phone screen of the person you’re calling.
To enable or disable Caller ID:
1 On the services list, tap Caller ID.
2 Tap the Get Settings button (retrieving settings may take a few minutes).
3 On the next screen, define the caller ID settings.
•Everyone - to enable Caller ID
•No one - to disable Caller ID
4Tap ok.
Call forwarding
This service allows you to forward incoming calls to another phone number. You can
choose to forward all calls to the same number or specify a number based on the
following conditions:
•Unavailable - the phone function is turned off or is out of network service
•Busy - when you are attending to a phone call
•No answer - when you are not answering your phone calls
To enable or disable call forwarding:
1 On the services list, tap Call Forwarding.
2 Tap the Get Settings button (retrieving settings may take a few minutes).
3 On the next screen, follow these steps to enable or disable call forwarding:
•To enable call forwarding:
•Tap the “Forward all incoming phone calls” check box, then specify the
call forward phone number on the “To” field.
- or -
•To forward incoming calls to a different number based on the following
conditions, then specify the call forward phone number on the box
opposite it:

7 Using Phone
Phone preferences
140
•No answer - forward calls to a specific phone number when you
can’t answer your phone
•Unavailable - forward calls to a specific phone number when the
phone is turned off or you are unreachable
•Busy - forward calls to specific phone number when the line is busy
•To disable call forwarding, deselect all the check boxes.
4. Tap ok.
Call waiting
This service allows you to receive another call during an active call.
To enable or disable call waiting:
1 On the services list, tap Call Waiting.
2 Tap the Get Settings button (retrieving settings may take a few minutes).
3 In the next screen, define the call waiting settings.
•Notify me - to enable call waiting, or
•Do not notify me - to disable call waiting
4Tap ok.
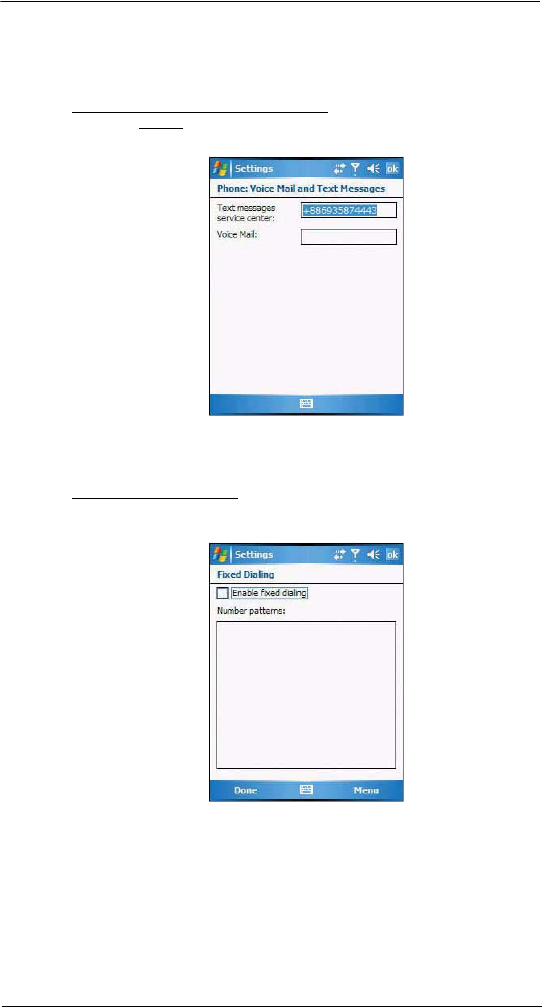
7 Using Phone
Phone preferences
141
Voice mail and text messages
By default your device will automatically detect and set the voice mail and text messages
access numbers provided by your mobile service provider. You can view these numbers
for your reference.
To view voice mail and text messages numbers:
1 On the services list, tap Voice Mail and Text Messages.
2 Tap the Get Settings button (retrieving settings may take a few minutes).
Fixed dialing
This service allows you to set predefined numbers or prefixes that you would like to call.
To create fixed number entries:
1 On the services list, tap Fixed Dialing.
2 Tap the Get Settings button (retrieving settings may take a few minutes).
3 Tap the “Enable fixed dialing” check box, then tap Done.
4 To add a number to the list, tap Menu > Add.
5 Enter the phone number or area code you want to be restricted, then tap Done.
6 Repeat steps 4 and 5 to add more numbers, then tap Done.
7 Enter the unblock (PUK2) code.
8 Enter the PIN2, then tap Done.
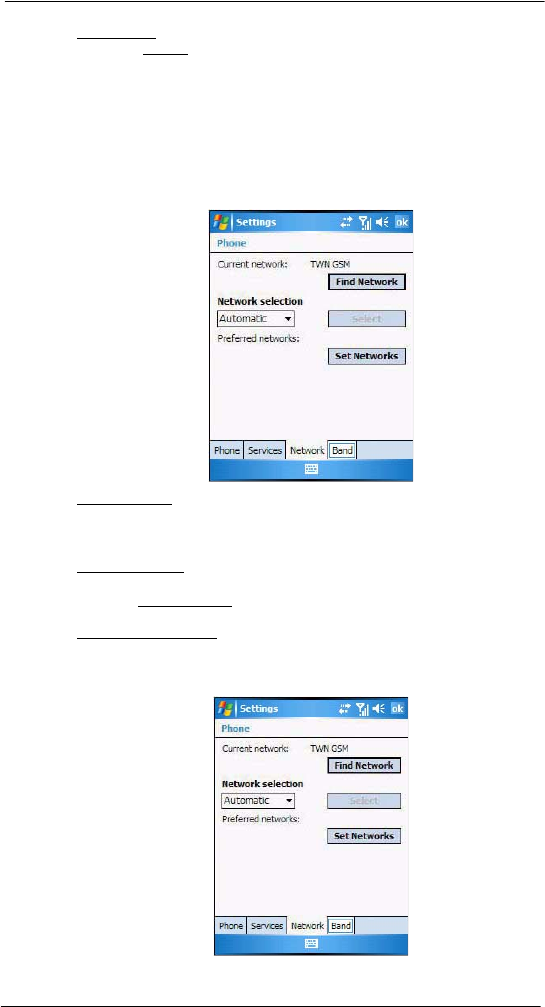
7 Using Phone
Phone preferences
142
To edit entries:
1 On the services list, tap Fixed Dialing.
2 Tap the Get Settings button (retrieving settings may take a few minutes).
3 Select the number pattern, then tap Menu.
4Tap Edit, then enter PIN2 and tap Done.
5 Enter the new number, name, and position, then tap Done.
Network tab
This tab allows you to configure settings related to mobile service networks. The
currently activated network is indicated on the first line of this tab.
To find a network:
Do this when the network status is currently out of network service and you want to
conduct a search.
•Tap the Find Network button (search process may take a few minutes).
To select a network:
Set the mode for conducting a network search.
•In the Network selection drop-down list, tap either Automatic or Manual.
Retrieving network settings may take a few minutes if you select Manual.
To set preferred networks:
If there are many mobile phone service providers available in your area, you can
configure this function to select your preferred ones and set its priority level.
1 Tap the Set Networks button (search process may take a few minutes).
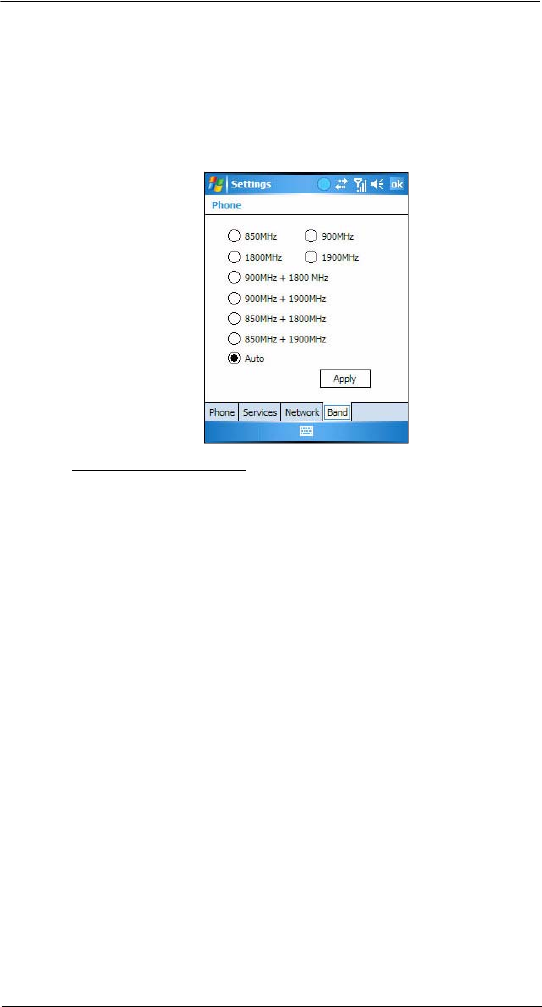
7 Using Phone
Phone preferences
143
2 To include a listed network as a preferred network, tap the check box opposite it.
3 To set the priority level, tap a preferred network, then tap the Move Up or
Move Down buttons.
4Tap ok.
Band tab
MC35 operates on the GSM 850/900/1800/1900 bands. Use the Band tab to select a
GSM band for your device to operate on.
To set your device’s roam mode:
1 On the Band tab, select a GSM band.
2Tap Apply.

7 Using Phone
Phone preferences
144
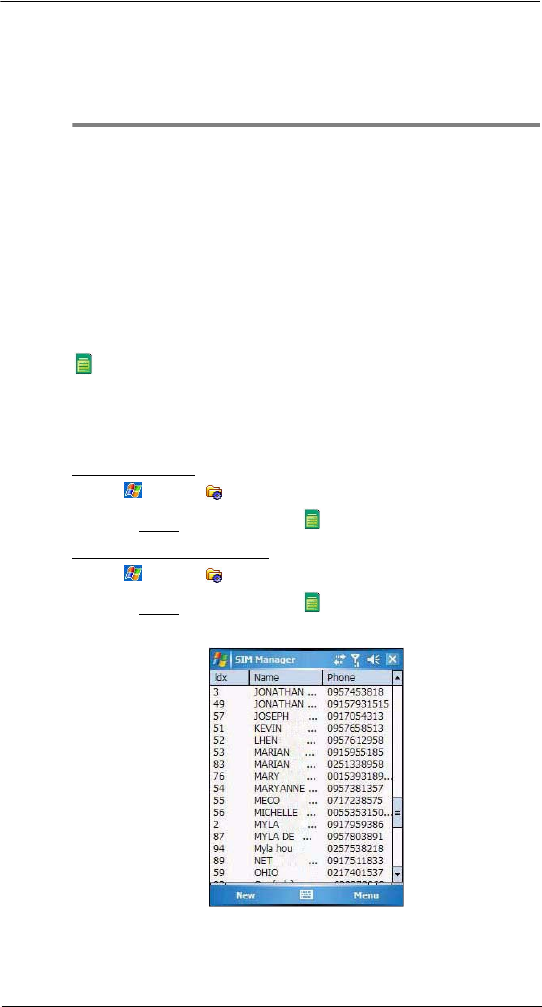
8 Using MC35 Companion Programs
Phone management programs
145
8 Using MC35
Companion Programs
•Phone management programs
•Wireless communication programs
•Media-related programs
•Product download-related programs
Phone management programs
These programs help you manage the contents of your SIM card.
•Use SIM Manager to manage contacts stored in your SIM card
•Use SIM Toolkit to access the mobile content and data services, such as
news, weather, banking, and traveling information; offered by the mobile
operators
SIM Manager
SIM Manager enables you to manage all contacts stored on your SIM card. This program
complements your device’s phone function by enabling not just the addition of new phone
numbers on your SIM card, but more importantly, exporting such contact information to
Microsoft Contacts. This eliminates the need to manually enter these new contact
information in your device.
To open SIM Manager:
1 Tap > Settings .
2 On the System tab, tap SIM Manager .
To copy SIM contacts to your device:
1 Tap > Settings .
2 On the System tab, tap SIM Manager .
Wait for SIM card contents to load. This may take a few seconds.
3Tap Menu > Tools > Save All to Contacts.
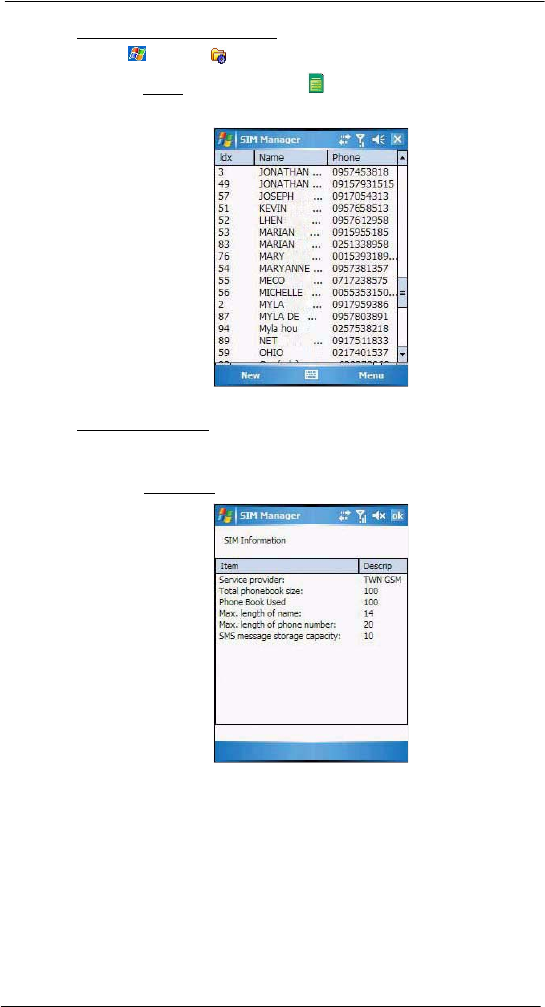
8 Using MC35 Companion Programs
Phone management programs
146
To copy a SIM contact to your device:
1 Tap > Settings .
2 On the System tab, tap SIM Manager .
Wait for the SIM card contents to load. This may take a few seconds.
3 Tap and hold a SIM contact, then select Save To Contacts.
To view SIM information:
The SIM Manager also provides view of the settings, such as the service provider, phone
book size, phone book used, maximum length of contact name, maximum length of
phone numbers, and SMS message storage capacity.
•On the SIM Manager screen, tap Menu > Tools > About.
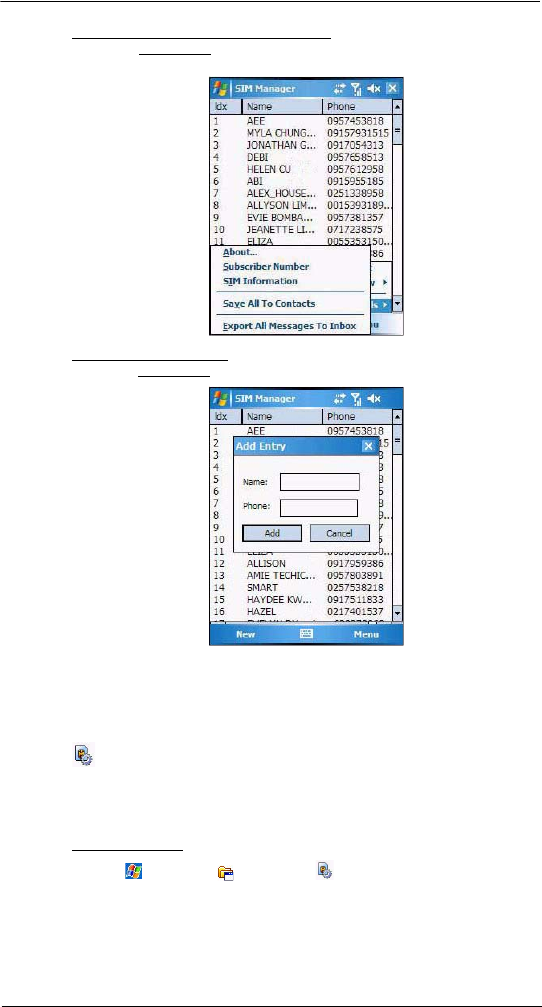
8 Using MC35 Companion Programs
Phone management programs
147
To export SIM text messages to the Inbox folder:
•On the SIM Manager screen, tap Menu > Tools > Export All Messages to
Inbox.
To create a new SIM contact:
1 On the SIM Manager screen, tap New.
2 Enter the contact name and phone number.
3Tap Add.
Procedures on how to perform the various SIM Manager operations is integrated on
“Chapter 7 Using Phone” on page 109.
SIM Toolkit
SIM Toolkit enables you to access the online services offered by your mobile operator.
This feature is dependent on your mobile operator. Online services, such as news,
weather, banking, and traveling information can be accessed from your MC35. Check the
availability of services with your mobile phone service provider.
To open SIM Toolkit:
•Tap > Programs > SIM Toolkit .
Wait for data contents to load. This may take a few seconds.
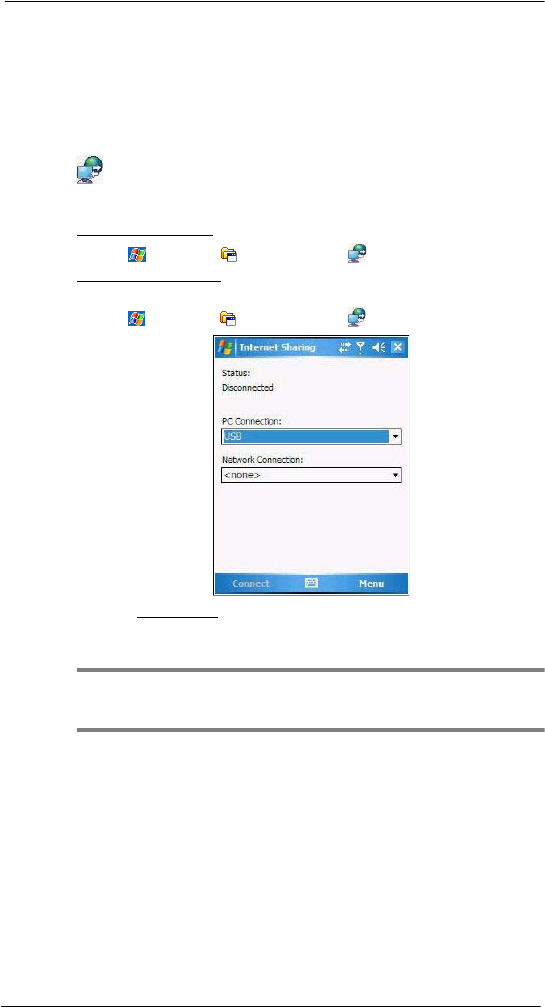
8 Using MC35 Companion Programs
Wireless communication programs
148
Wireless communication programs
•Internet Sharing
•Push to Talk
•GPRS Setting
•Terminal Services Client
•Express GPS Connect
Internet Sharing
Internet Sharing enables your computer to use the device as a modem for connecting to
the Internet.
To open Internet Sharing:
•Tap > Programs > Internet Sharing .
To use MC35 as a modem:
1 Connect your device to your computer using USB cable or a Bluetooth.
2Tap > Programs > Internet Sharing .
3 In the PC Connection list, select the connection type.
4 Select the network connection that the device should use to connect to the Internet.
5Tap Connect.
NOTE: If your computer is Bluetooth-enabled and you select Bluetooth as the PC
connection, you must initiate and complete the Bluetooth PAN partnership before
Internet Sharing will work. For more information, refer to Windows Help and Support.
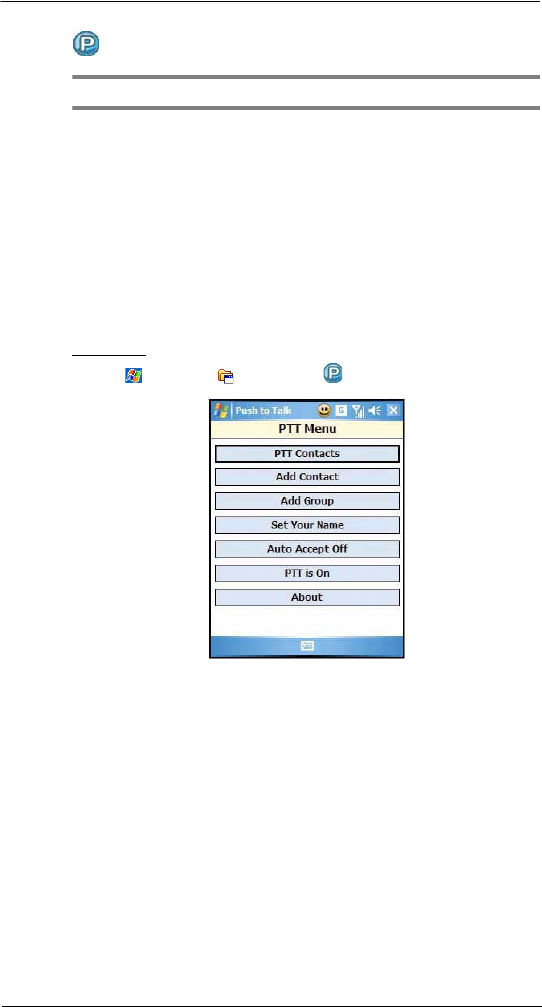
8 Using MC35 Companion Programs
Wireless communication programs
149
Push to Talk
NOTE: Push to Talk application is not available on all configurations.
Push to Talk (PTT) is a walkie-talkie style service that provides simple communication
with one person or with a group of people having compatible devices. With PTT,
conversations are sent over cellular networks and only one person can talk at a time and
then only by pressing the Push to Talk button. Calling a group of people can be
conducted within set groups already established or created just before the session, by
sending invitation messages among individual PTT participants or for users already
involved in one PTT session. While using PTT, you can use the other functions of the
MC35.
Before you can use PTT, you must define the required PTT service settings. See
“Configuring the PTT Settings” on page 156 for more information.
PTT menu
The PTT menu lets you easily view PTT contacts, create an individual contact or a group,
create a PTT name, configure auto accept invitations feature, or switch PTT on or off.
To open PTT:
•Tap > Programs > Push to Talk .
The PTT screen includes the following menu commands or parameters:
•PTT Contacts - Displays the PTT Contacts screen.
•Add Contact - Lets you create an individual PTT contact.
•Add Group - Lets you create a PTT group.
•Set Your Name - Lets you create a PTT user name.
•Auto Accept Off - Toggles the auto accept invitation feature.
•PTT is On - Toggles PTT on or off.
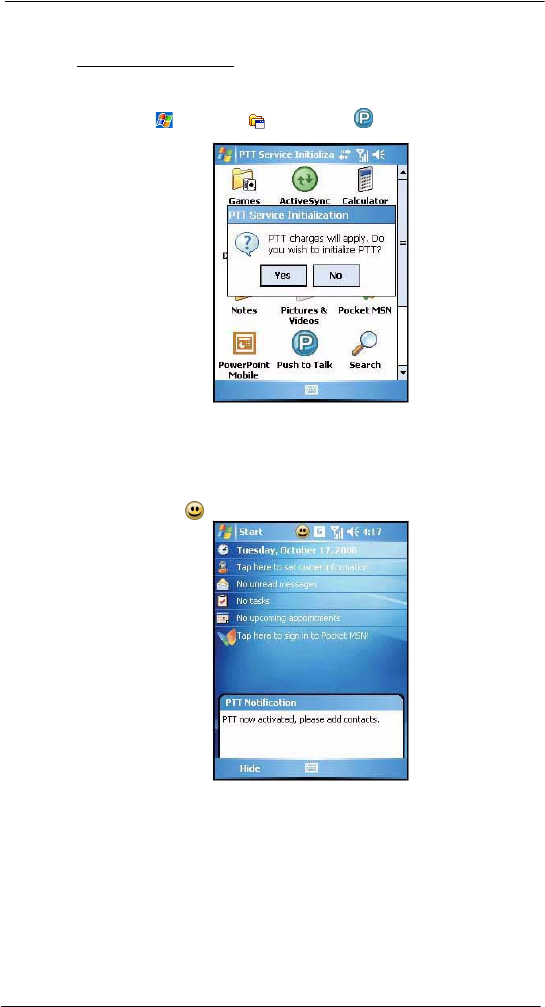
8 Using MC35 Companion Programs
Wireless communication programs
150
Using PTT
To initialize your PTT service:
1 Begin initializing your PTT service by performing one of the following:
•Press the Push to Talk button on your device.
•Tap > Programs > Push to Talk .
2Tap Yes.
3 Set your PTT user name, then tap ok.
A confirmation message box is displayed.
4Tap ok.
When activation is complete, notification prompt is displayed and the User
Presence icon appears on the navigation bar.
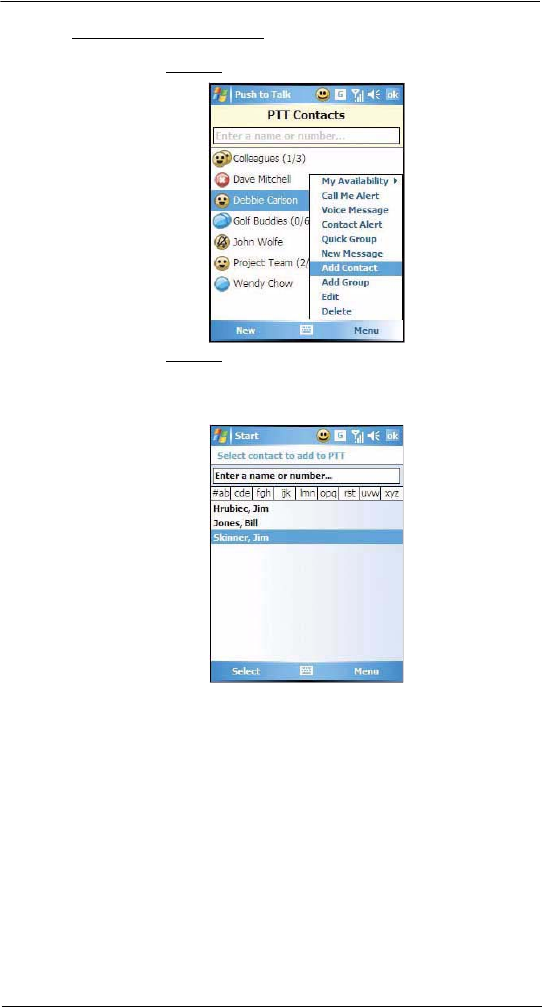
8 Using MC35 Companion Programs
Wireless communication programs
151
To create an individual PTT contact:
1 Perform one of the following:
•On the PTT Menu screen, tap PTT Contacts > Menu > Add Contact.
•On the PTT Menu screen, tap Add Contact.
2 Enter the name and mobile number of your contact.
-or-
Open Contacts, then select a contact to add to PTT.
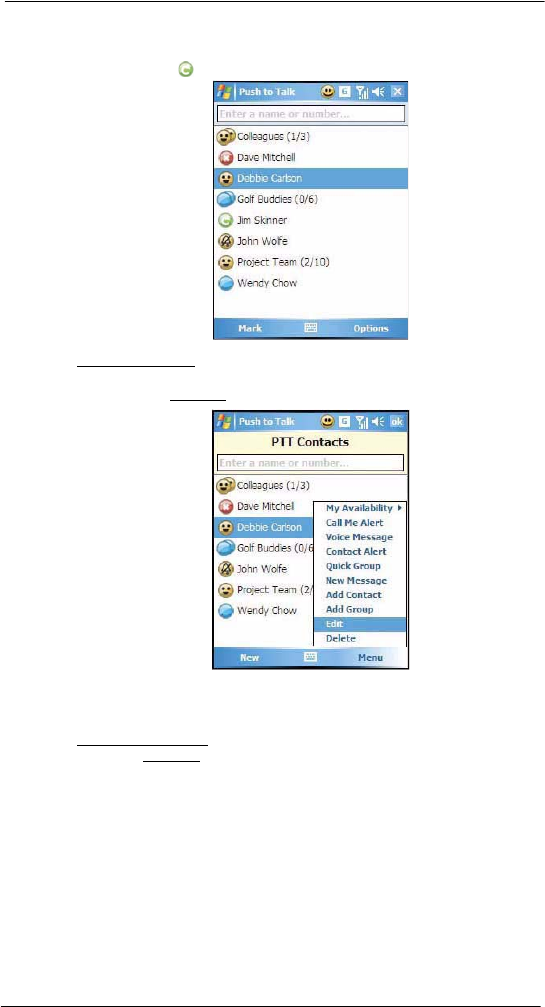
8 Using MC35 Companion Programs
Wireless communication programs
152
3Tap ok.
The newly added contact, Jim Skinner, appears in the list next to the Invitation in
progress icon .
To edit a PTT contact:
1 Perform one of the following:
•On the PTT Menu screen, tap PTT Contacts > a contact > Menu > Edit.
•Tap and hold a contact in the PTT Contact list, then tap Edit.
2 Enter a new name for the contact, then tap ok.
The number in the screen is read only and cannot be modified.
To delete a PTT contact:
1 On the PTT Menu screen, tap PTT Contacts > a contact > Menu > Delete.
2Tap Yes.
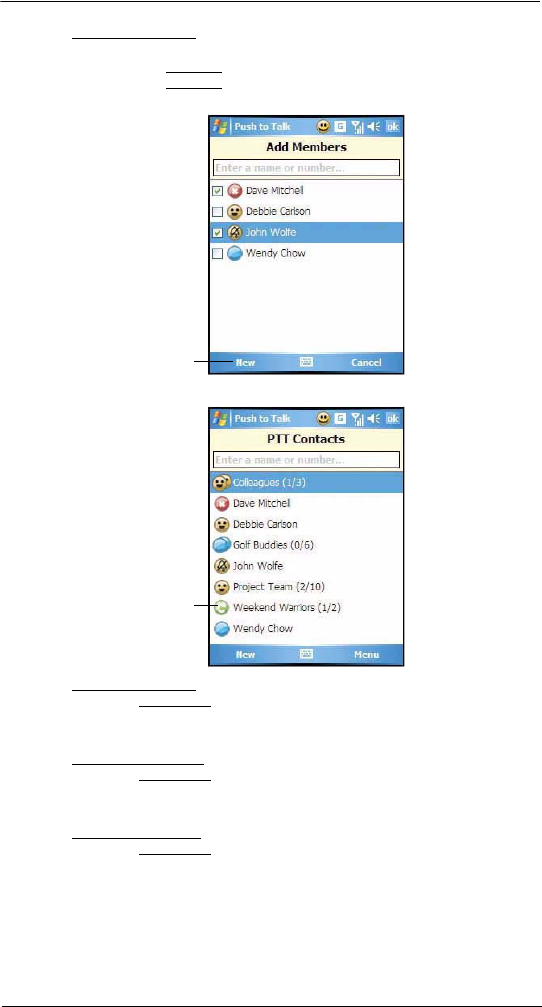
8 Using MC35 Companion Programs
Wireless communication programs
153
To create a PTT group:
1 Perform one of the following:
•On the PTT Menu screen, tap PTT Contacts > Menu > Add Group.
•On the PTT Menu screen, tap Add Group.
2 Enter a name for the new group and tap ok.
3 Select a contact to add in the group, then tap ok.
To delete a PTT group:
1 On the PTT Contacts screen, select a group name.
2Tap Menu > Delete Group.
3Tap Yes.
To rename a PTT group:
1 On the PTT Contacts screen, select a group name.
2Tap Menu > Rename Group.
3 Enter the new group name, then tap ok.
To leave the talk group:
1 On the PTT Contacts screen, select a group name.
2Tap Menu > Leave Group.
3Tap Yes.
Tap to create new
PTT contacts.
New group appears
with the Invitation in
progress icon.
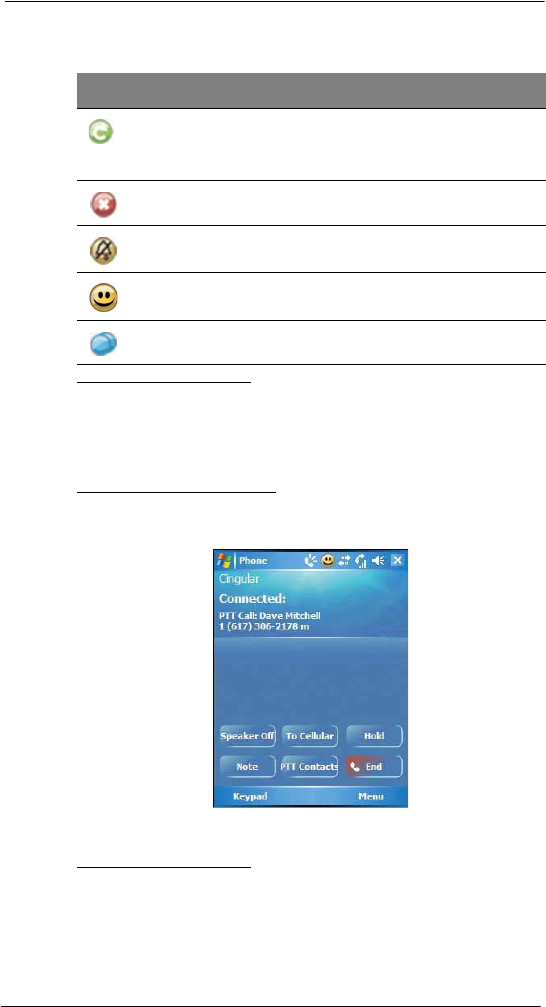
8 Using MC35 Companion Programs
Wireless communication programs
154
PTT Contacts status icons
The list below shows the status icons that appear next to the individuals in PTT Contacts.
To change the availability status:
1 Press the Push to Talk button.
2Tap Menu > My Availability, then select a status.
PTT calls
PTT calls can only be made to individuals or groups established in your PTT Contacts.
To make an individual or a group call:
1 Press the Push to Talk button.
2 Navigate to the individual or group you want to call, then press the Push to Talk
button.
3Tap Speaker Off to turn on speaker.
4Tap To Cellular to convert to Cellular call.
To receive an incoming PTT call:
•If your status is Available, PTT calls are automatically accepted, a PTT call
tone is played and then caller’s voice can be heard.
•If your status is Silent/Vibrate, the phone vibrates prompting you to accept
or reject the call.
•If you receive a call while a call is in progress, a message box appears on
the screen.
Icon Name Description
Invitation in
Progress
Displays when you have sent an invitation to join a
group or you are waiting for an individual to accept your
invitation. Once a member accepts, this status will
change to Available.
Do Not
Disturb
Displays when a contact has changed their
availability to Do Not Disturb. PTT calls cannot be place.
Silent/Vibrate Indicates a contact has set their ringer to either Silent or
Vibrate.
Available Indicates the contact can receive a PTT call.
Unavailable Contact has turned PTT off, powered down their device,
or moved out of coverage.
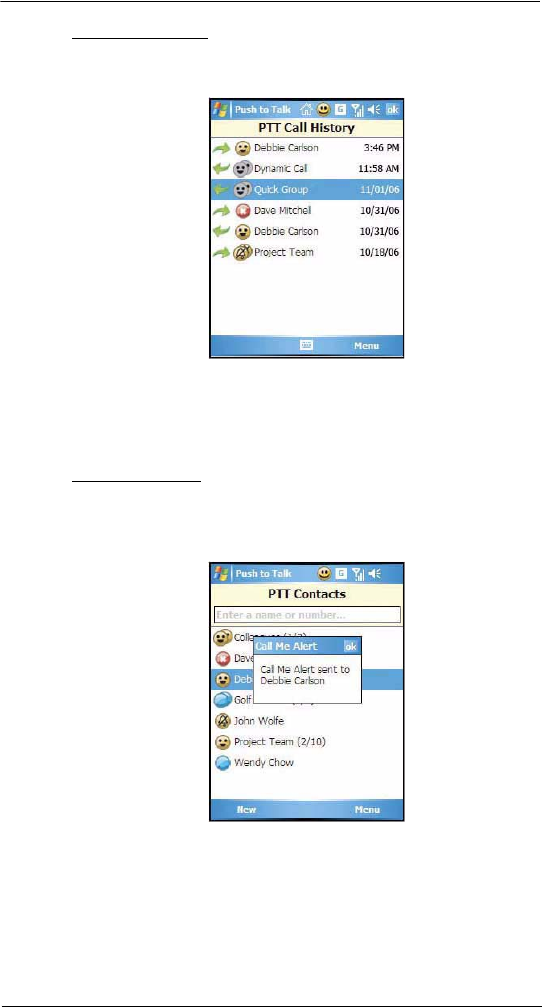
8 Using MC35 Companion Programs
Wireless communication programs
155
To view PTT Call History:
Perform one of the following:
•Press and hold the Push to Talk button.
•During an incoming call, tap Menu > PTT Call History.
•On the PTT Call History screen, perform the following:
•Make a PTT call by selecting a contact and pressing the Push to Talk
button. Initiating PTT calls to dynamic or quick groups is not allowed.
•Delete all or select items in the list by tapping Menu > Delete > All or
Selected.
•View all incoming and outgoing items by tapping Menu > Filter > All,
Incoming, or Outgoing.
To send a Call Me Alert:
Call Me Alert is a message displayed across the receiver’s screen
1 Press the Push to Talk button.
2 Select the individual you wish to alert.
3Tap Menu > Call Me Alert.
4Tap ok.
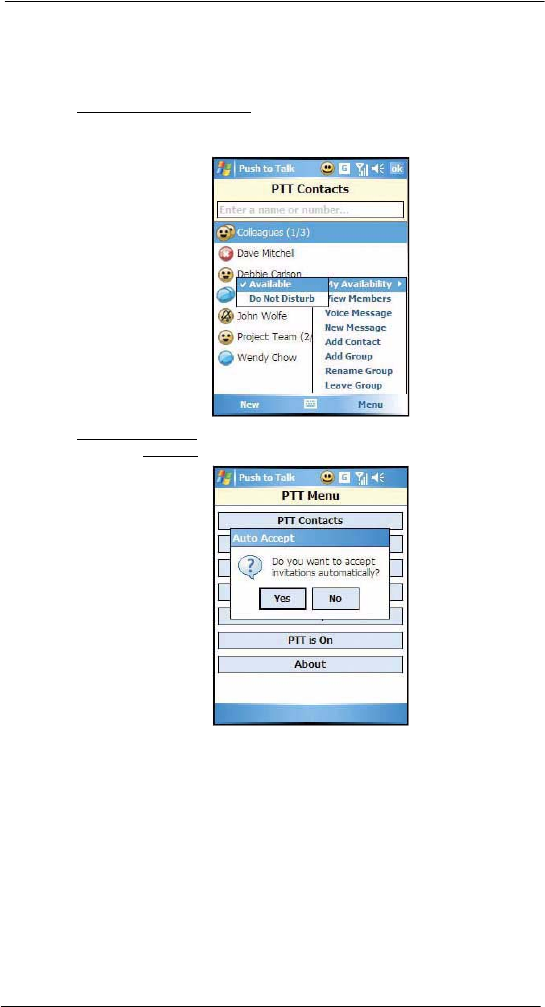
8 Using MC35 Companion Programs
Wireless communication programs
156
Configuring the PTT Settings
You can configure most features of the PTT to suit your preferences. You do this by
accessing the Set Your Name, Auto Accept Off, or PTT is On commands in the PTT
menu.
To change your presence status:
1 Press the Push to Talk button.
2Tap Menu > My Availability > turn it On or Off.
To auto accept invites:
1 On the PTT Menu screen, tap Auto Accept Off.
2Tap Yes.
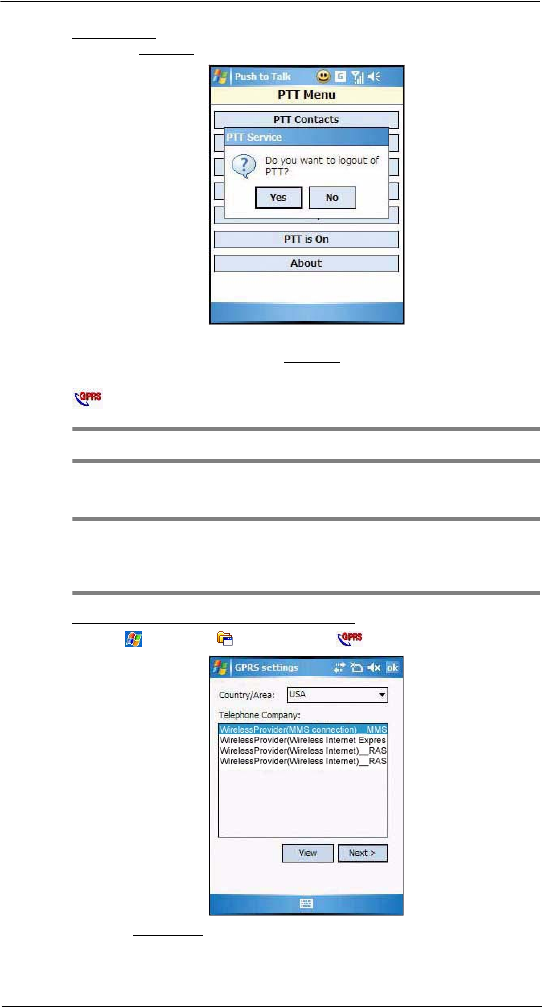
8 Using MC35 Companion Programs
Wireless communication programs
157
To turn PTT off:
1 On the PTT Menu screen, tap Auto Accept Off.
2Tap Yes.
3 To turn it on, tap PTT is On on the PTT Menu screen.
GPRS Setting
NOTE: GPRS Settings application is not available on all configurations.
General Packet Radio Service or GPRS Setting is a communication software for creating
a GPRS connection. It is pre-installed on your device.
NOTE: The first time you use your SIM card, the GPRS Settings automatically detects
the phone network and operator and sets up the GPRS connection information for you.
If not, contact your mobile phone service provider for more information. You can also
modify these settings to your own preference or create your own network settings.
To configure GPRS connection using GPRS settings:
1 Tap > Programs > GPRS Settings .
2 In the Country/Area drop-down list, select the appropriate country name.
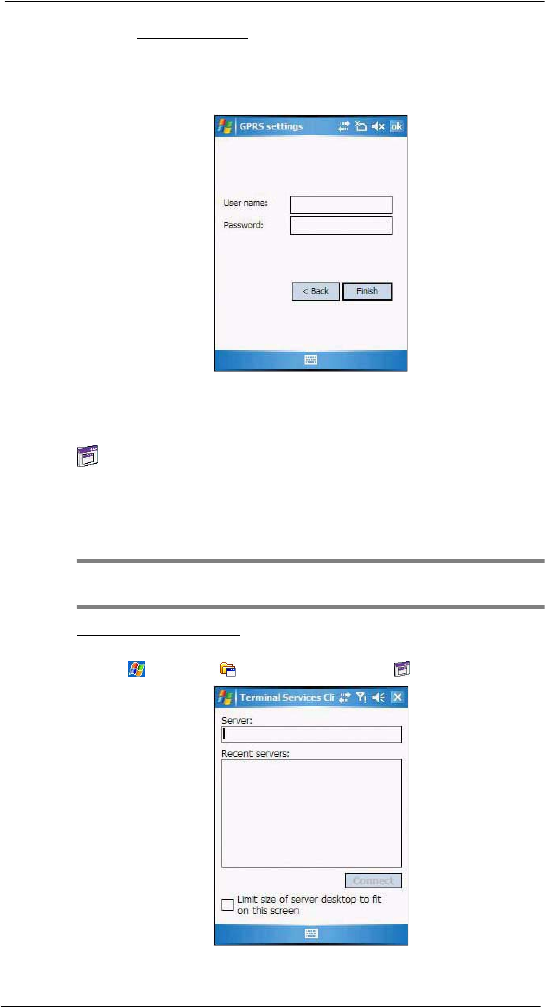
8 Using MC35 Companion Programs
Wireless communication programs
158
3 In the Telephone Company list, select the APN of your mobile phone service
provider.
If required by your provider to change the connection name, modem type, APN
name, tap View.
4Tap Next.
5 If a user name and password are provided by your mobile ISP, enter the user name
and password.
6Tap Finish, then tap ok on the confirmation prompt.
Terminal Services Client
Use Terminal Services Client to log onto a Windows NT server type computer that is
running Terminal Services software and use all of the programs that are available on that
computer from your device. For example, instead of running Word Mobile, you can run
the PC version of Microsoft Word and access all of the .doc files on that computer from
your device.
NOTE: Procedures described in this section applies to computers using the Windows
2000 or later version operating system.
To connect to a remote server:
1 Start a remote connection to the server using a GPRS or WiFi connection.
2Tap > Programs > Terminal Services Client .
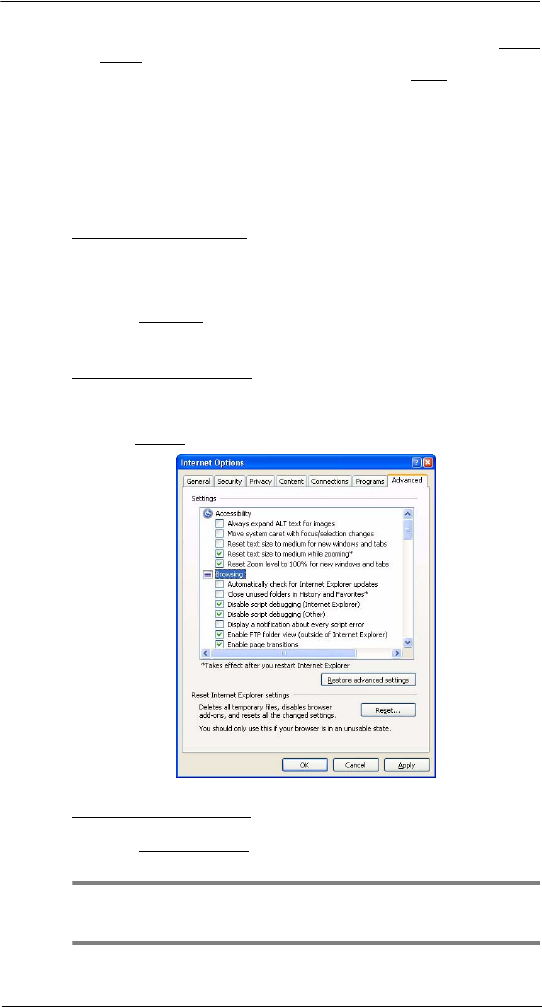
8 Using MC35 Companion Programs
Wireless communication programs
159
3 To connect to a server you have previously connected to, tap a server in the Recent
Servers list.
To connect to a new server, enter the server’s name in the Server field.
Select the “Limit size of desktop to fit on the screen” check box only if you intend to
use applications that have been specifically sized for use with a mobile device.
4Tap Connect.
Once connected to the server, the computer’s screen may more than fill your
device’s screen. If scroll bars are displayed on the server’s screen, you will see more
than one set of scroll bars on your device—one to scroll information on the
computer, and the other one to scroll the Terminal Services screen. To ensure you
are scrolling the PC window contents, use the five directional buttons at the bottom
of the Terminal Services Client screen.
To improve display performance:
Display performance is improved by decreasing the time it takes for the screen to be
refreshed on the PC.
1 On your PC, select Start > Settings > Control Panel.
2 Double-click Display.
3 On the Appearance tab, click Effect.
4 Clear the “Use the following transition effects for menus and tool tips” check box.
5 Click Apply, then OK.
To improve browser performance:
The performance of Internet Explorer on your PC is improved by decreasing the time it
takes for Web pages to be refreshed.
1 In Internet Explorer on your PC, select Tools > Internet Options > Advanced tab.
2 Under Browsing, clear the “Use smooth scrolling” check box.
3 Click Apply, then OK.
To disconnect and end a session:
1 In the Terminal Services Client PC window, click Start > Shut Down.
2 On the Shut Down Windows dialog box, click Log Off [user name].
3 Click OK.
NOTE: If the network administrator has configured Terminal Services Client to
reconnect to disconnected sessions, you will be reconnected to this session the next
time you connect to this server.

8 Using MC35 Companion Programs
Wireless communication programs
160
Express GPS Connect
MC35 is integrated with the latest GPS (Global Positioning System) technology to quickly
compute positions in locations where GPS signals are barely detectable. Optimum GPS
performance can be achieved with Express GPS Connect. This program operates by
transferring GPS satellite data (ephemeris information) from the Internet to your device,
where it is stored in memory. Express GPS Connect can get satellite data when your
MC35 is connected to your PC or the Internet. This process occurs in the background,
ensuring the GPS functions are ready to use at all times.
To open Express GPS Connect:
1 Start a remote connection to the server using a GPRS or WiFi connection.
2Tap > Settings .
3 On the Connections tab, tap Express GPS Connect .
Using Express GPS Connect
Use Express GPS Connect for the first time
The first time you use your MC35 EDA, make sure your Express GPS Connect satellite
data is current. For your first location fix, it is best to be outdoors under an open sky, with
no tall buildings or other obstructions close by. It should take one to two minutes to
compute the first position fix. After obtaining the first fix, Express GPS Connect operates
at the optimum GPS performance level. If the data has expired, you should check your
Express GPS Connect settings.
Express GPS Connect position fix times
•The time it takes for Express GPS Connect to get a position fix varies with
signal reception conditions. In open and nearly open sky conditions, the
MC35 typically can get a position fix in just a few seconds. In blocked signal
conditions Express GPS Connect will start in one minute or less if the GPS
signals are sufficiently strong.
Using your MC35 near a window gives it a better view to the sky and
improves the chance of a successful position fix.
•Express GPS Connect starts searching for signals based on the most recent
position fix. When traveling to a new location your MC35 will need extra time
and more open signal conditions to obtain a location fix. After your first fix in
the new location full performance is restored.
•When traveling to a different time zone, you can change the time zone
settings to tell Express GPS Connect you have traveled.
Satellite reception
•GPS receivers work best when they have a direct line of sight to the
satellites. For example, somebody turning on a GPS receiver in the middle of
the Gobi Desert will obtain a position fix much sooner than a GPS user trying
to get a position fix in the middle of Wall Street. The reason for this is simple:
the Gobi Desert is a huge, flat expanse. It has no tall buildings and very few
natural obstructions that could block GPS signals. GPS is ideal for an "open
sky" environment like the Gobi Desert.
•In contrast, Wall Street represents an "urban canyon" environment, where
tall buildings on both sides of the street block, reflect, and scatter incoming
GPS signals. These conditions also apply when trying to use a GPS receiver
indoors. A traditional GPS receiver simply may not be able to compute a
position in an urban canyon or indoor environment.
•When you are getting your first GPS position fix with the MC35, try to do it in
an environment that is as close to "open sky" as possible. The first position
fix is crucial because it includes a calibration process that helps subsequent
position fixes to be computed more rapidly. After getting the first position fix,
you will be able to enjoy the benefits of the Express GPS Connect's high-
sensitivity technology, which, when coupled with Express GPS Connect
satellite data, allows you to get position fixes in places where traditional GPS
receivers can't.

8 Using MC35 Companion Programs
Wireless communication programs
161
How to improve GPS performance
Your MC35 computes your position faster and more accurately, provided the following are
adhered to:
•Always operate with current Express GPS Connect data.
•Configure your MC35 to automatically update Express GPS Connect data.
•Keep the MC35 away from other electronic devices that may emit radio
waves (such as laptop computers and USB devices).
•Protect your MC35 from extreme temperature variations and violent shocks.
•If you are indoors and do not get a position after one minute, move to a
window to give the MC35 a better view of the sky.
•If you have traveled more than 500 miles since you last used your MC35, or
if the unit has been reset, the next position computation should be performed
under open sky conditions, and extra time should be allowed.
•When traveling to a different time zone, be sure to change the MC35's time
zone settings.
•If you have traveled more than 500 miles from the location where you
last used the MC35’s GPS capability, the device will need extra time to
compute a position fix. Here are a few ways to reduce the time to obtain
a position in your new location.
•If traveling by plane, it is best to wait until you leave the terminal
building before trying to obtain your first position fix.
•After the device obtained the first position fix in a new region, optimum
Express GPS Connect performance is restored.
•If you have traveled to another time zone, you can speed up the GPS
position computation by changing the time zone settings on your
device. This causes Express GPS Connect to proceed immediately to a
global satellite search.
•If you do not change the time zone, Express GPS Connect will initially
search for satellites based on your previous position, increasing the
time required to obtain a position fix.
Express GPS Connect status icons
The Express GPS Connect icon located on the lower right corner of the Today screen
indicates the expected level of GPS performance and the amount of time until the
Express GPS Connect data expires.
Downloading the Express GPS Connect Data File
You have two options to download satellite data—from the Today screen, using the
Express GPS Connect icon ; or the Express GPS Connect option under the Settings
> Connections preferences. Once activated, Express GPS Connect icon on the Today
screen turns from gray to blue .
NOTE: Be sure the current date is displayed on the MC35. If the date and time are not
current, tap the Clock icon on the Today screen.
Icon Description
Indicates satellite data is valid and current
Indicates satellite data is valid and is due to expire within 24 or fewer
hours
Indicates satellite data has expired
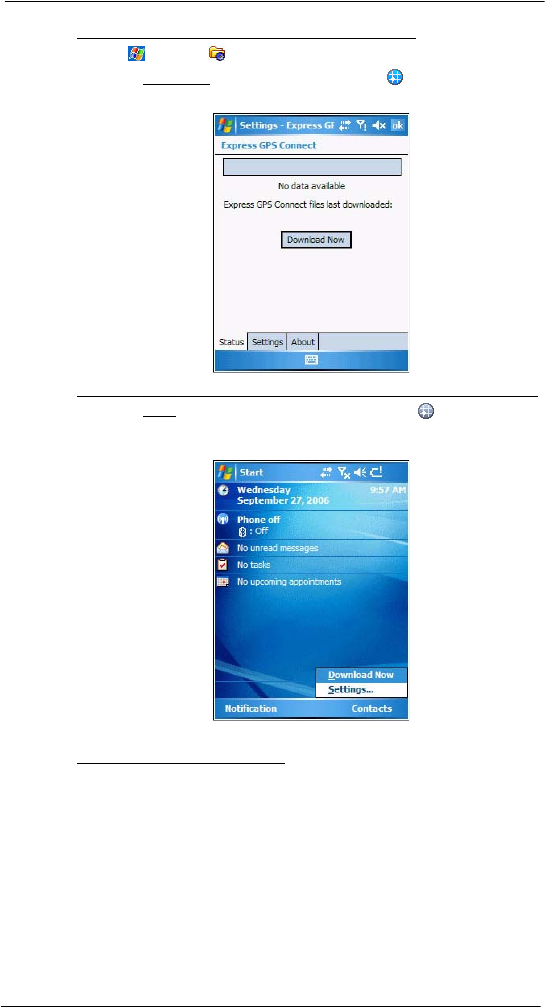
8 Using MC35 Companion Programs
Wireless communication programs
162
To download the Express GPS Connect data file using Settings:
1 Tap > Settings .
2 On the Connections tab, tap Express GPS Connect .
3Tap Download Now.
To download the Express GPS Connect data file using the Express GPS Connect icon:
1 On the Today screen, tap the Express GPS Connect icon , located on the
lower right corner of the screen.
2Tap Download Now.
3Tap ok.
To refresh Express GPS Connect data:
You device can refresh Express GPS Connect data through the following:
•PC with Internet connectivity using ActiveSync or Bluetooth.
•GPRS/EDGE wireless data service connection.
•ActiveSync to obtain Express GPS Connect data files already stored on your
PC. This method requires you to install the supplied PC utility that retrieves
Express GPS Connect data through the Internet.
•With any of these methods, your MC35 can be configured to refresh Express
GPS Connect satellite data automatically, or you can manually refresh the
data by tapping Download Now.
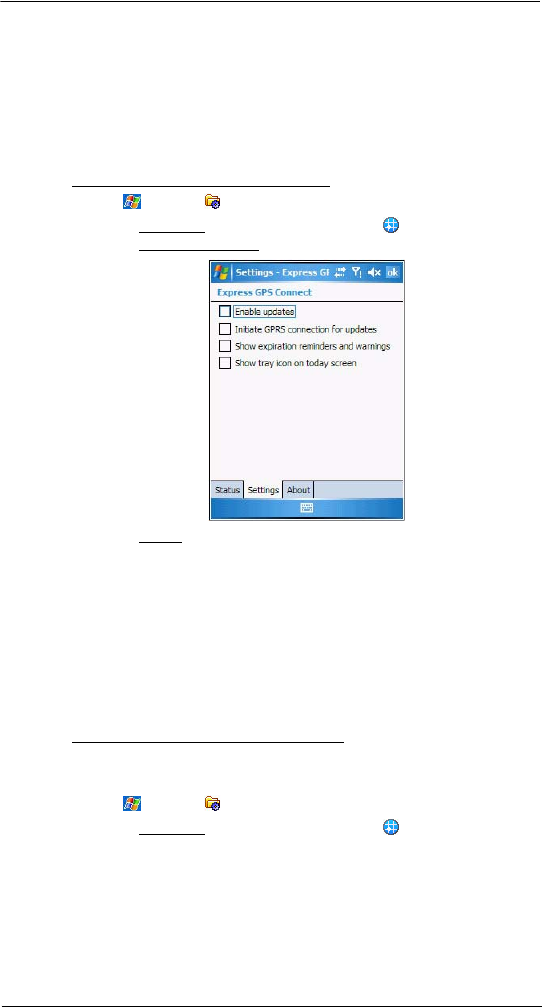
8 Using MC35 Companion Programs
Wireless communication programs
163
Configuring the Express GPS Connect
You can set preference settings on how to use Express GPS Connect. You can perform
the following configuration options in Express GPS Connect:
•Specify Express GPS Connect to obtain satellite data updates.
•Specify Express GPS Connect to automatically update using a GPRS
connection.
•Specify Express GPS Connect to show expiration reminders and warnings.
•Specify Express GPS Connect to display an icon on the lower right corner of
the Today screen.
To configure the Express GPS Connect settings:
1 Tap > Settings .
2 On the Connections tab, tap Express GPS Connect .
3 On the Express GPS Connect screen, tap the Settings tab.
4 On the Settings tab, set the following options:
•Tap “Enable updates” check box to enable Express GPS Connect to
obtain satellite data. If disabled, ActiveSync must be used to obtain
data.
•Tap “Initiate GPRS connection for updates” check box to allow Express
GPS Connect to automatically update data on the device using a GPRS
connection.
•Tap “Show expiration reminders” check box to receive notifications
when a satellite data has expired before you start a location application.
If disabled, the device operates without the benefit of Express GPS
Connect and GPS performance is unfavorable.
•Tap “Show tray icon on Today screen” check box to display an icon on
the lower right corner of the Today screen.
5Tap ok.
To perform an Express GPS Connect factory reset:
MC35 Express GPS Connect saves information related to GPS operation that reduces
the time required to compute positions. If there is a problem with the MC35's memory,
this information might be corrupted.
1 Tap > Settings .
2 On the Connections tab, tap Express GPS Connect .
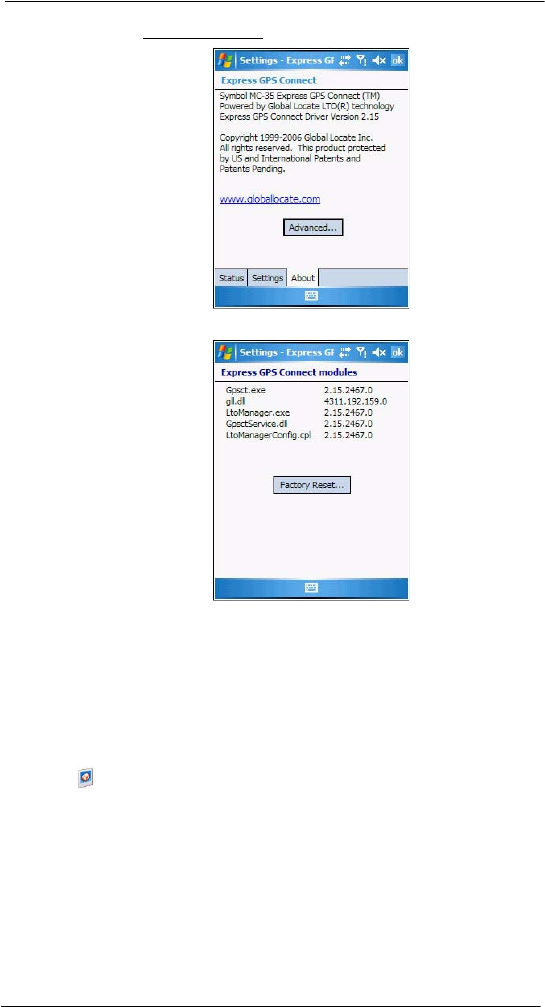
8 Using MC35 Companion Programs
Media-related programs
164
3 On the Express GPS Connect screen, tap the About tab.
4Tap Advanced > Factory Reset.
This removes all of the Express GPS Connect internal operating information and
restores the factory default settings.
Media-related programs
•Pictures & Videos
•Camera
•Camera Wedge
Pictures & Videos
Pictures & Videos extends your device’s function to the visual scene with its image
management, viewer and editing functions. It supports BMP, GIF and JPEG image
formats, as well as record and launch video clips stored on your device or on a storage
card. Now you can keep those images of your favorite moments as mobile as you are.
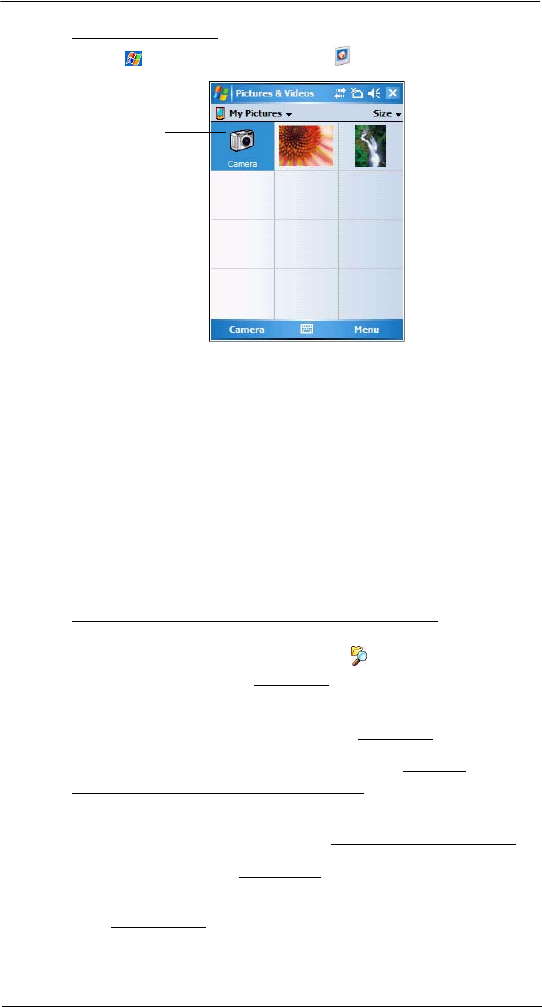
8 Using MC35 Companion Programs
Media-related programs
165
To open Pictures & Videos:
•Tap > Programs > Pictures & Videos .
Pictures & Videos opens to a thumbnail view of all image files stored on the
My Pictures folder on your device and/or on a storage card attached to your
device.
You can use Pictures & Videos to perform any of the following:
•View images in thumbnail, full screen or slide show mode
•Edit BMP, GIF and JPEG images
•Set a BMP, GIF and JEG image as the background of the Today screen,
similar to using a wallpaper on your computer’s desktop screen.
•Send an image file or video clip via infrared or using Inbox
•Record a video clip
•Launch video clips stored on your device.
•Launch the Camera application.
Copying image files or video clips to your device
To view your image files and video clips in Pictures & Videos, copy the files to the My
Pictures folder of your device or on a storage card folder.
To copy image files or video clips from your computer to your device:
1 Connect your device to your computer.
2 In ActiveSync on your computer, click Explore .
Windows Explorer opens the Mobile Device window for your device.
3 Locate then select the file(s) that you want to copy on your device.
4 Right-click the selected file(s), then click Copy.
5 Place the cursor on the My Pictures folder of the Mobile Device window, right-click,
then click Paste.
In Pictures & Videos, tap to view image files stored in the My Pictures folder.
To copy image files from a storage card to your device:
1 Install the storage card to your device’s SD/MMC expansion slot.
2 Perform steps 1-4 of the procedure above.
3 Locate the Built-in Storage folder under the My Windows Mobile-Based Device
directory.
4 Open the folder under the Built-in Storage folder where you want to save your
image file(s).
5 Place the cursor on the selected folder, right-click, then click Paste.
In Pictures & Videos, tap to view image files stored in an attached storage card.
Tap to launch
the Camera
application.
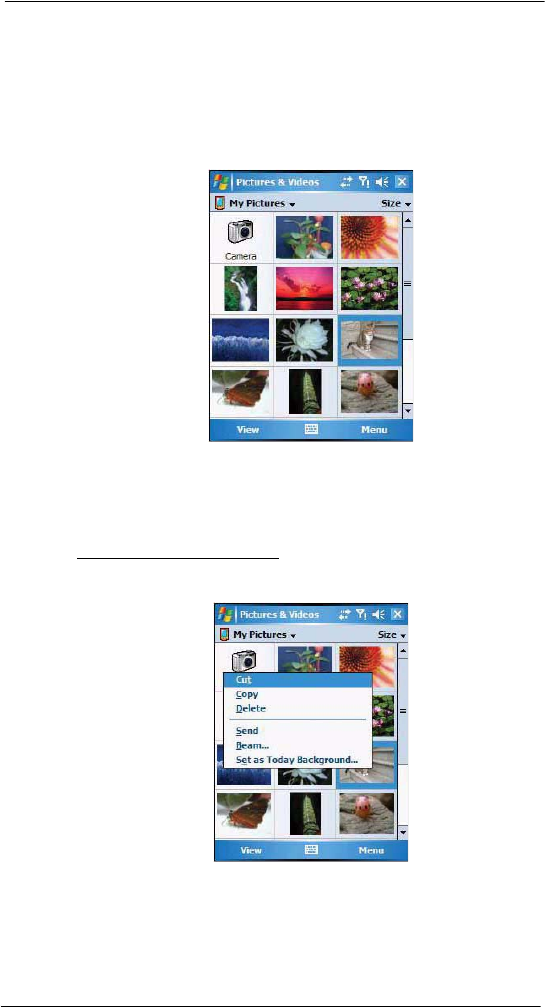
8 Using MC35 Companion Programs
Media-related programs
166
Organizing photos and videos
You can use Pictures & Videos to organize and search for images stored on your MC35
or on a SD/MMC card. You can also edit images and send them as an MMS or e-mail
attachment, view a slide show of your pictures or set a picture as a background on the
Today screen. Pictures & Videos display images in any of the three view modes—
thumbnail (default), full screen, and slide show.
Thumbnail mode
Thumbnail mode is the default view mode every time you open Pictures.
You can perform the following while in thumbnail mode:
•Tap and hold a thumbnail to display a pop-up menu of available actions.
•Place your stylus within the edge at the far left or far right of the screen and
then drag the stylus over the images to perform multiple selections useful in
deleting images by batch rather than by thumbnail.
•Move the joystick up or down to select the previous/next thumbnail.
To perform image management tasks:
It is only in thumbnail mode can you perform most of the image management tasks.
1 Tap and hold a thumbnail to display a pop-up menu of available actions.

8 Using MC35 Companion Programs
Media-related programs
167
2 Perform any of the following:
•Tap Cut to move image file to the Storage Card folder.
•Tap Copy to create a duplicate image file. This is useful when you want
to edit an image but still want to retain an original copy of the image.
•Tap Delete to remove the selected thumbnail from its location. You are
prompted to confirm the deletion.
•Tap Send to attach image as an attachment to an e-mail.
•Tap Beam to send the thumbnail to another Bluetooth or IR-enabled
device.
•Tap Set as Today Background to set image as background of the
Today screen.
Full screen mode
It is only in full screen mode can you perform any editing action on an image.
To view image in full screen mode:
•Tap a thumbnail or press the joystick while a thumbnail is selected.
In this view, the selected image is maximized so that it fits the entire screen
(with the navigator and command bars still visible) used to display it.
Tap ok or press the joystick to return to thumbnail mode.
To change the image orientation:
You can change the display orientation of an image.
•On the command bar, tap Menu > Edit > Rotate to rotate the image 90°
counter-clockwise.
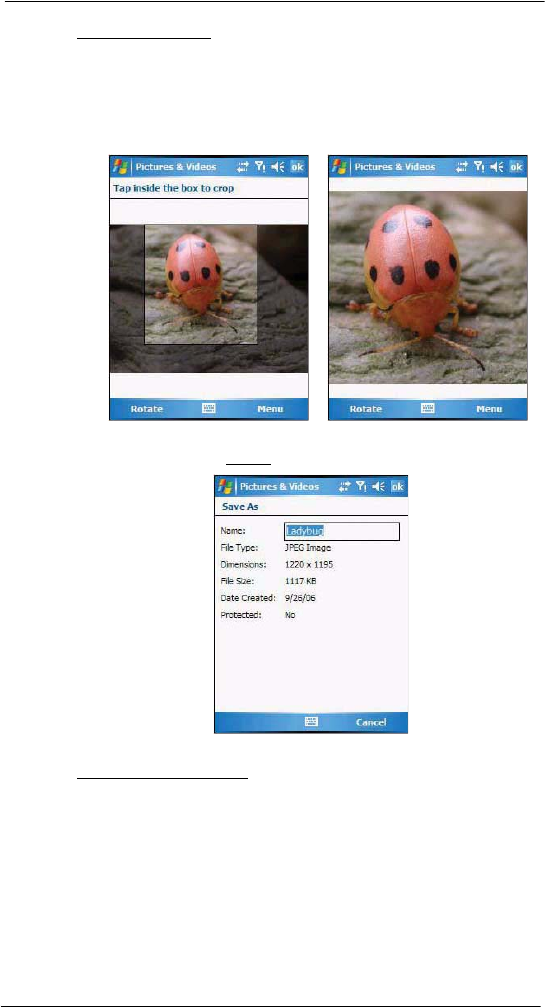
8 Using MC35 Companion Programs
Media-related programs
168
To crop part of an image:
You have the option to specify a portion of an image and then save that portion as a new
JPEG file.
1 Tap Menu > Edit.
2Tap Menu > Crop to enable the Crop tool.
3 Drag your stylus across part of the image you want to crop.
4 Tap inside the selection.
5Tap Menu > Save As.
6 Fill out the fields in the Save As screen.
7Tap ok.
To zoom in/zoom out the image:
To view images in a larger or smaller scale use the Zoom tool.
1 Tap the image.
2Tap Menu > Zoom.
A zoom selection panel appears on the lower right corner of the screen.
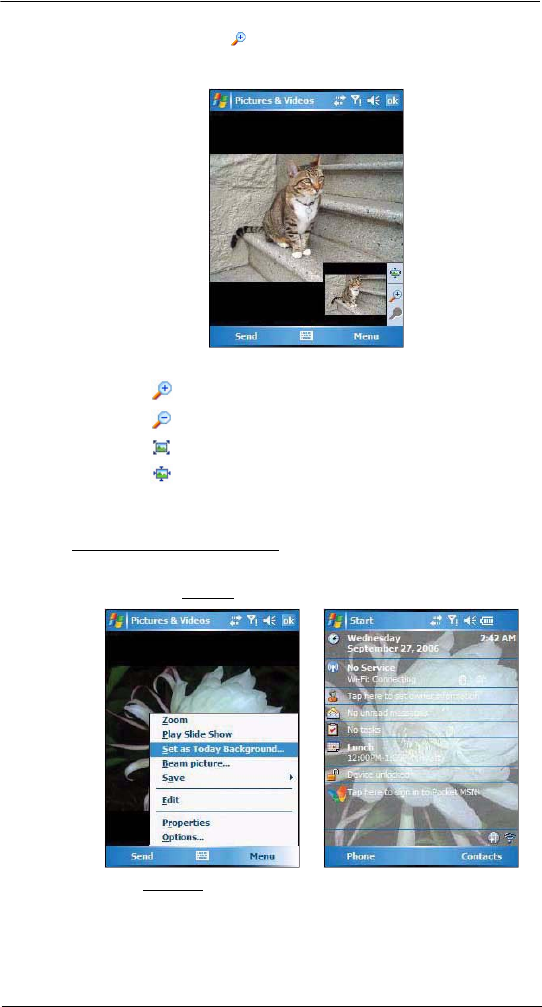
8 Using MC35 Companion Programs
Media-related programs
169
3 Tap the Magnify button to enable the zoom selection tools.
The full screen image zooms in and a red selection border automatically appears on
the image inside the zoom selection panel.
4 Perform any of the following:
•Tap to magnify the size of the image.
•Tap to reduce the size of the image.
•Tap to zoom into an image.
•Tap to return the image to its original view size.
•Drag the red box within the small frame to pan the image in any
direction you want.
5Tap Menu > Zoom to hide the zoom selection panel.
To set an image as a Today wallpaper:
To add a custom look to the Today screen of your device; apply a wallpaper of your
choice using any image.
1 Tap and hold a thumbnail, then tap Set as Today Background.
2 Tap the up or down arrows to set the transparency level.
3Tap ok.
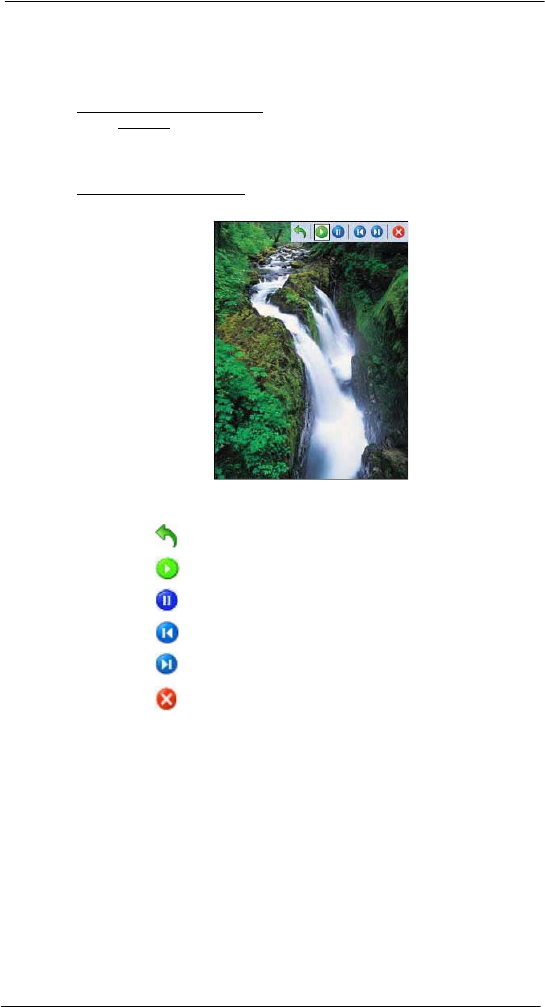
8 Using MC35 Companion Programs
Media-related programs
170
Slide show mode
You can view images in a slide show much like viewing a PowerPoint presentation in your
computer. Images are adjusted to fit the entire display area and are shown in a five
seconds interval (default).
To view image in slide show mode:
•In thumbnail mode, tap Menu > Play Slide Show.
During the slide show, you can use hardware buttons to control the image
display. Move the joystick up or down to display the previous image; rotate
down to display the next image.
To view the Slide Show toolbar:
•During the slide show, tap anywhere on the screen or press the joystick.
The icons in the Slide Show toolbar lets you control the pace of the slide
show, as well as change the orientation of the images.
•Tap to rotate the images counterclockwise.
•Tap to continue the slide show after pausing it.
•Tap to pause the slide show.
•Tap to display the previous image.
•Tap to display the next image.
•Tap to stop the slide show. Screen returns to thumbnail mode.
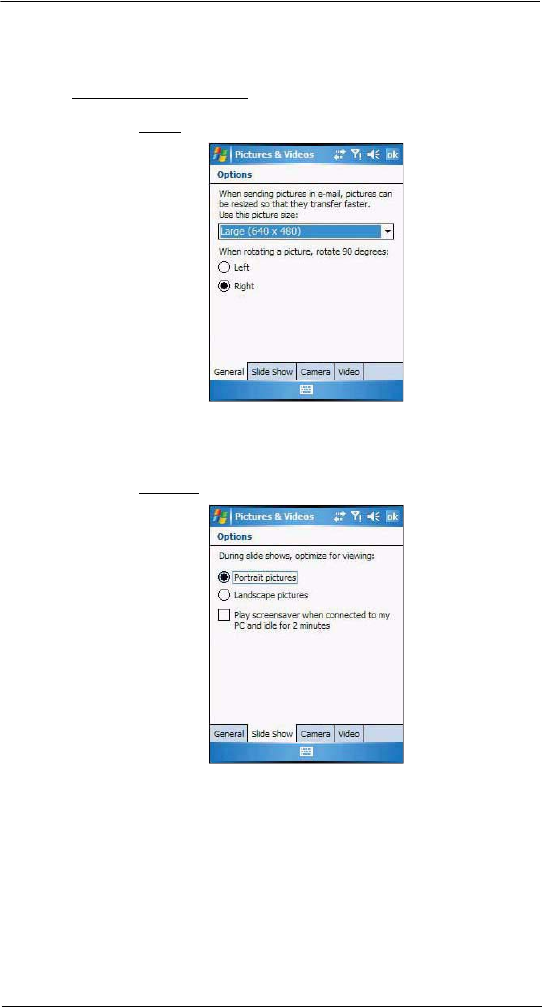
8 Using MC35 Companion Programs
Media-related programs
171
Customizing Pictures & Videos
Using the Options command you can set preference settings on how to use Pictures &
Videos.
To customize Pictures & Videos:
1 On either thumbnail or full screen mode, tap Menu > Options.
2 On the General tab, set the following options:
•Select the size of the pictures you want to send through e-mail. Only pictures
sent through an e-mail message is resized, the original picture remains
unchanged.
•Resize pictures for faster e-mail transfer
•Rotate pictures towards left or right.
3 On the Slide Show tab, set the following options:
•Select the “Portrait pictures” or “Landscape pictures” radio button to set
slide show orientation.
•Select the “Play a screensaver when connected to my PC and idle for 2
minutes” check box to set the image files in the My Pictures folder as a
screensaver whenever your device is connected to the USB sync cable
and is idle for 2 minutes.
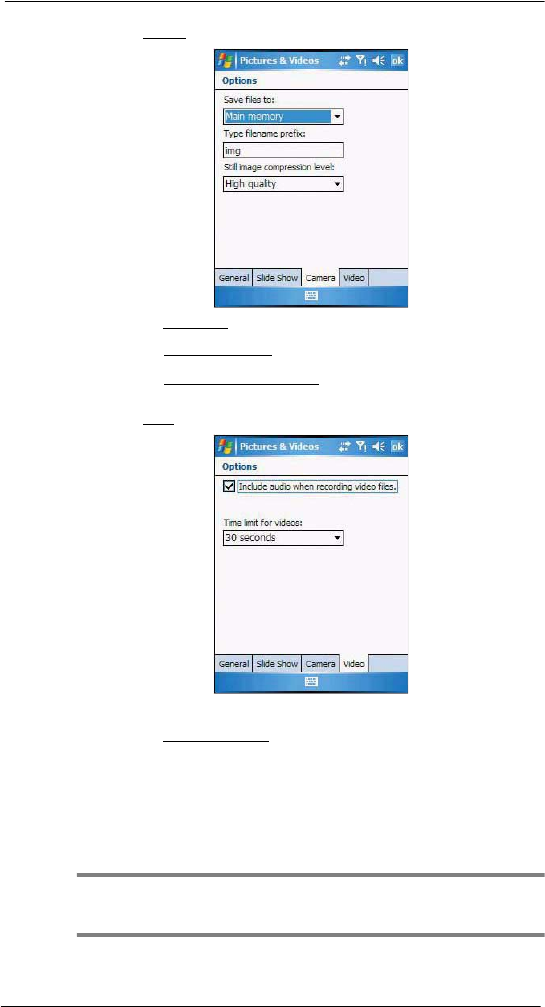
8 Using MC35 Companion Programs
Media-related programs
172
4 On the Camera tab, set the following options:
•In the Save files to list, select to save image files to onboard memory or
built-in storage.
•In the Type filename prefix box, enter the prefix to be used as a default
title for the image file.
•In the Still image compression level list, set a compression level when
saving the image. The high quality setting provides the best image
quality but more memory is required.
5 On the Video tab, set the following options:
•Select the “Include audio when recording video file” check box, to
include audio when recording video files.
•In the Time limit for videos list, select the length for video clips recorded
with the camera.
6Tap ok.
You can take photos and videos and capture bar code data with the device’s built-in
camera. The camera lens is located on the rear of the device. Images can be stored on
the device’s onboard memory or a memory card. Once you take photos or video clips,
you can associate the image with a name in the phone book, e-mail it to friends, or send
it to other Pocket PCs or phones. You can also send images to your computer via
Bluetooth or IR.
NOTE: The image capture application must be installed and enabled in order to
operate the data capture. For more information on the type of image capture application
compatible with your device, refer to the Symbol website.
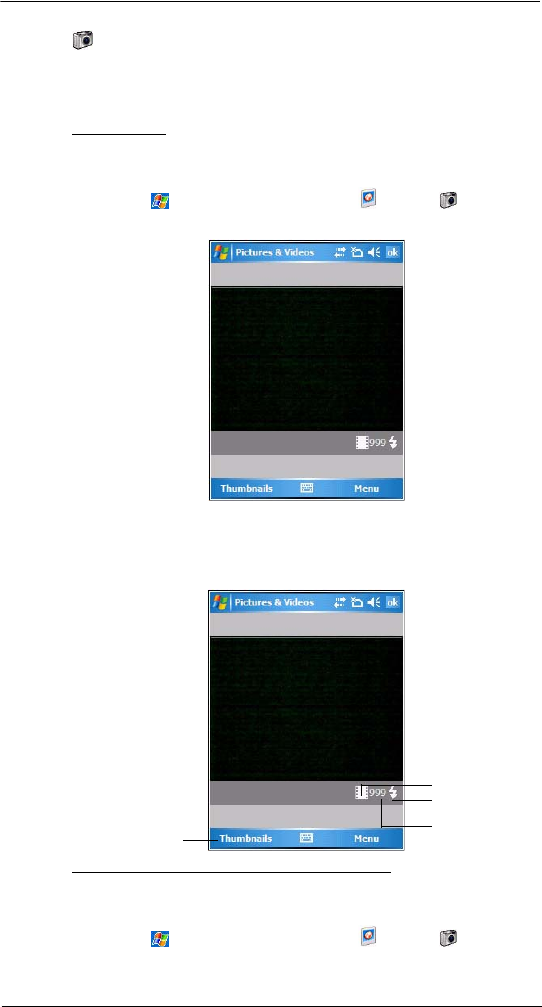
8 Using MC35 Companion Programs
Media-related programs
173
Camera
With the Camera application you can take pictures and shoot videos, and modify settings
with Camera while you are on mobile. The images and video clips are automatically
saved in the Pictures & Videos application, where you can view and edit them. By default
captured images or videos are saved as JPEG or WMV file.
To open Camera:
1 Perform one of the following:
•Press the Camera button located on the lower-right side of the phone,
to activate the camera.
•Tap > Programs > Pictures & Videos > Camera .
•Open Pictures & Videos, then tap Camera on the command bar.
Camera screen
The Camera screen displays the view finder. Information about the current settings or
the remaining number of images that can be saved to your device are displayed on the
lower right corner of the screen. This screen also provides an option to toggle shooting
mode between camera and video mode.
To switch shooting mode from camera mode to video mode:
1 Launch Camera, by performing one of the following:
•Press the Camera button located on the lower-right side of the phone,
to activate the camera.
•Tap > Programs > Pictures & Videos > Camera .
Normal mode
Flash
Normal mode
Tap to display
Pictures & Videos
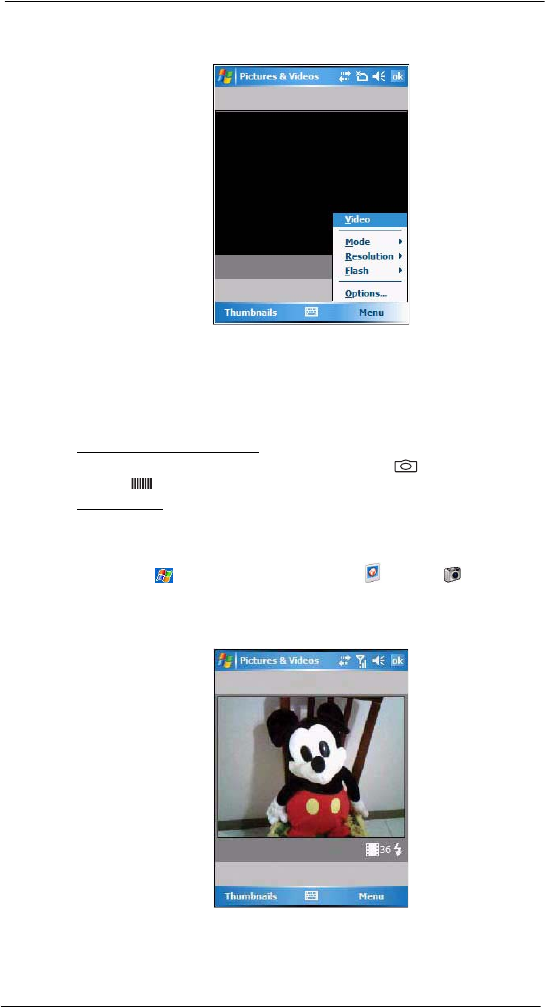
8 Using MC35 Companion Programs
Media-related programs
174
•Open Pictures & Videos, then tap Camera on the command bar.
2Tap Menu > Video.
To switch back to camera mode, tap Menu > Still.
Camera capture mode
The MC35 offers two types of camera capture mode:
•Camera - for taking pictures and recording videos
•Bar code - for capturing a bar code data
To select a camera capture mode:
•Slide the Camera/Bar Code switch to the Camera icon or the Bar code
icon to switch from one capture mode to another.
To take a photo:
1 Launch the Camera application by performing one of the following:
•Press the Camera button located on the lower-right side of the phone,
to activate the camera.
•Tap > Programs > Pictures & Videos > Camera .
•Open Pictures & Videos and tap Camera on the command bar.
2 Check the image on the view finder, adjust if necessary.
3 Press the Camera button to take the picture.
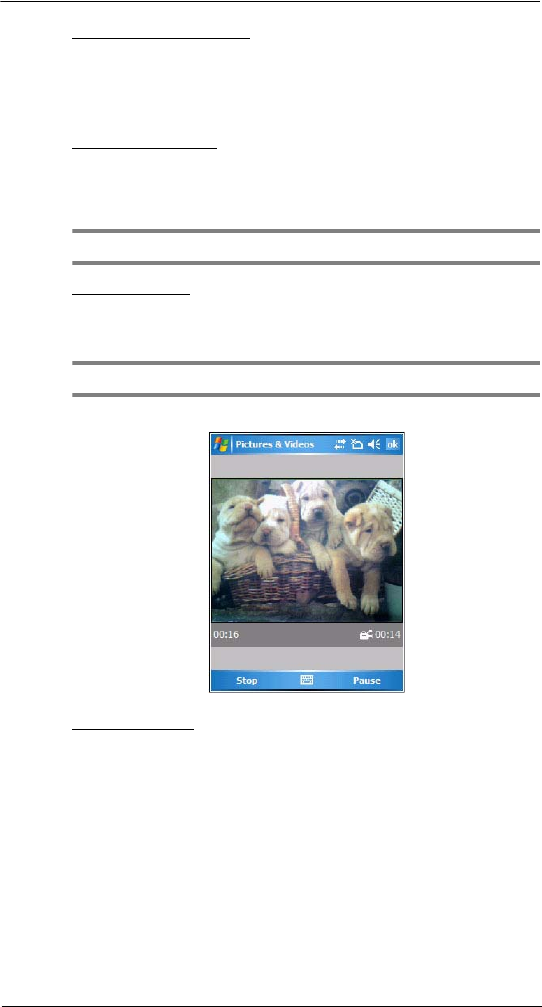
8 Using MC35 Companion Programs
Media-related programs
175
To take photos using burst mode:
Burst mode is a way to take a series of quick pictures.
1 Launch the Camera application.
2Tap Menu > Mode > Burst.
3 Press the Camera button to take the picture.
To stop a burst of pictures before all pictures have been taken, close Camera.
To take photos using timer:
Using the timer, you can take a self-portrait. Just place the device on a stable support
and press the camera button, then get into position.
1 Launch the Camera application.
2Tap Menu > Mode > Timer.
NOTE: By default, the self timer delay is set at five seconds.
To record a video clip:
1 Launch the Camera application.
2Tap Menu > Video to set shooting mode to video.
The available recording time displays on the screen.
NOTE: By default, the time limit for recording videos is set at 15 and 30 seconds.
3 Press the Camera button to begin recording.
Recording stops when you press the Camera button again.
To select video quality:
You can specify the quality (video resolution and sound fidelity) and size of the video
clips you record. Video clips of higher quality require more memory.
1 On the Camera screen, tap Menu > Video.
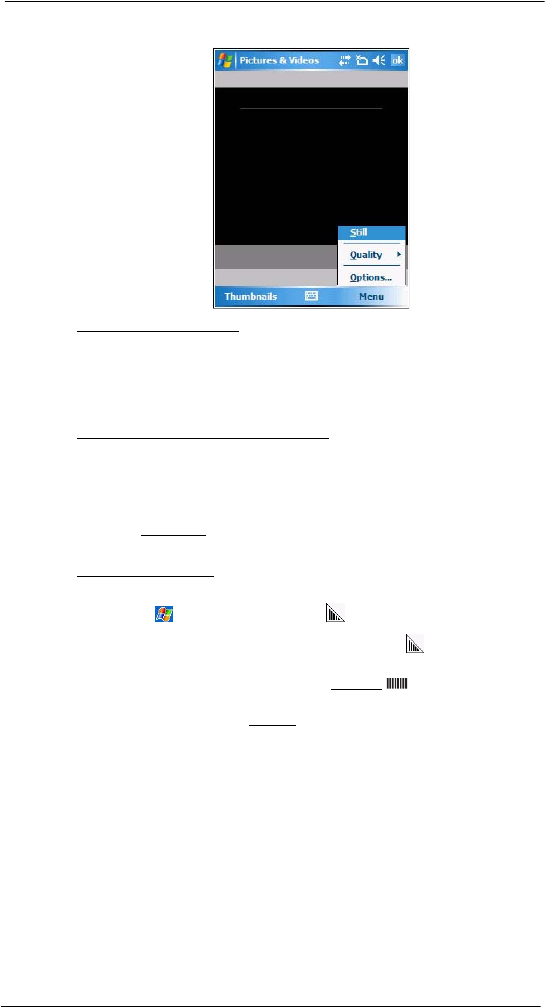
8 Using MC35 Companion Programs
Media-related programs
176
2Tap Menu > Quality.
To select picture compression:
You can set the compression level for the pictures you take. Note that selecting a high
quality picture increases the size of the file significantly.
1 On the Camera screen, tap Menu > Video.
2Tap Menu > Options > Camera tab.
3 In the Still Image compression level box, tap the desired compression level.
To set default location where photos are saved:
You can set the default location where pictures are saved. If you select main memory,
pictures are saved to permanent storage on your device, which may require that you
consider the storage needs of other programs.
1 On the Camera screen, tap Menu > Video.
2Tap Menu > Options > Camera tab.
3 In the “Save files to” list, select main memory or storage card.
4Tap ok.
To capture bar code data:
1 Start the CamWedge application.
•Tap > Programs > CamWedge .
2 On the Today screen, tap and hold the CamWedge icon located on the lower
right corner of the screen, select Test from the CamWedge menu.
3 Place the Camera/Bar Code switch to the Bar Code position.
4 Press and hold the Camera button.
5 Point the MC35 toward the bar code and align if necessary. A small window
appears on the screen. Align the bar code in the window.
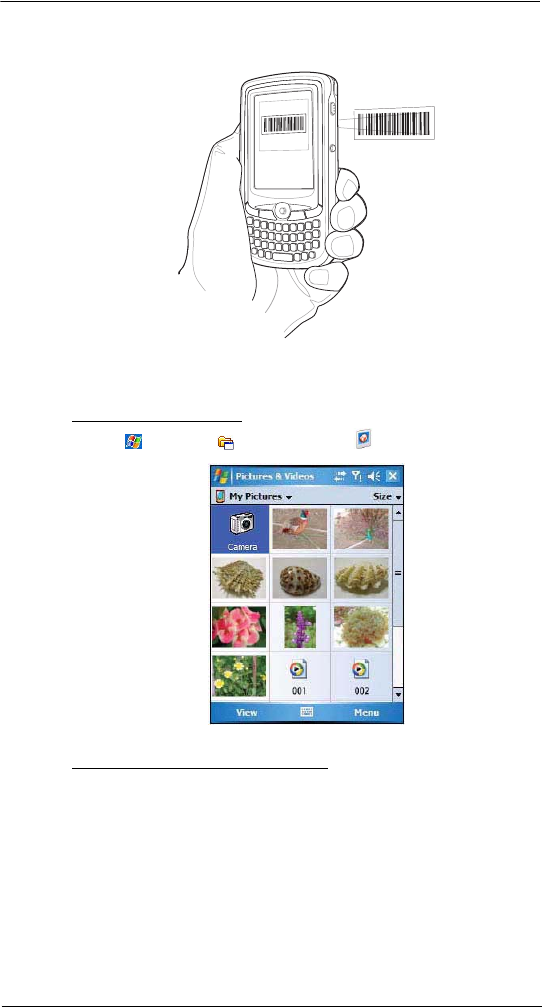
8 Using MC35 Companion Programs
Media-related programs
177
6 Press the Camera button to capture the bar code data. The device beeps when the
bar code data is captured.
7 Tap the x button to exit the CamWedge Test screen.
8 Exit the CamWedge application.
•On the Test screen menu bar, tap Exit > Exit.
To view photos and video clips:
1 Tap > Programs > Pictures & Videos .
2 Tap the picture or video clip that you want to see.
To configure the camera settings of your device:
1 Launch the Camera application.
2Tap Menu, then configure the device settings.
•Video - Tap to switch to video or still (camera) mode.
•Mode - Select from the following modes to take your picture:
•Normal - Takes picture using the default settings.
•Burst - Takes picture consecutively in continuous mode.
•Timer - Takes picture five seconds after pressing the Camera button.
•Resolution - The default resolution setting is 650 x 152 pixels.
•Flash - Turns flash on and off.
•Options - Displays the camera options screen.
3Tap ok to exit.
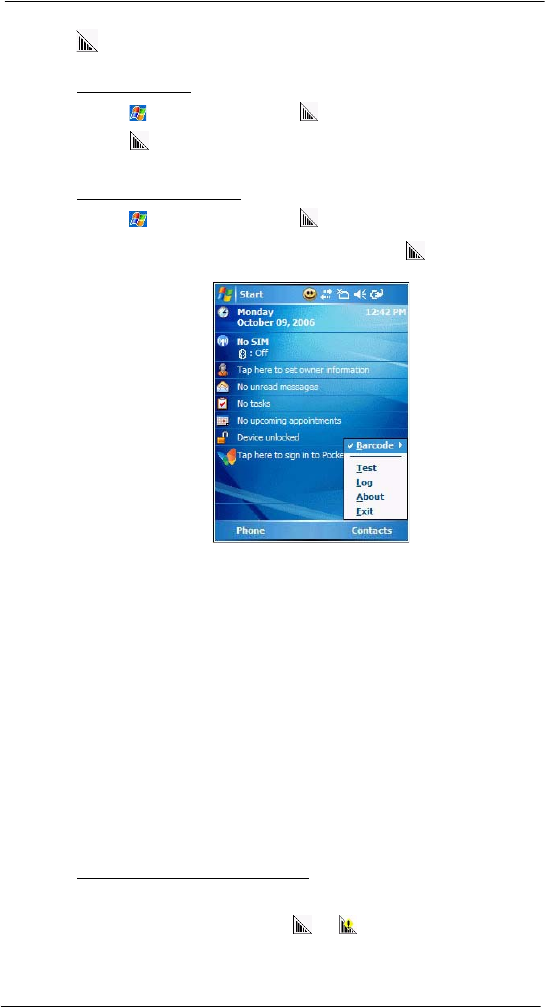
8 Using MC35 Companion Programs
Media-related programs
178
CamWedge
CamWedge enables bar code data capture with the MC35.
To open CamWedge:
•Tap > Programs > CamWedge . Once activated, the CamWedge
icon appears on the lower right corner of the Today screen. Bar code
data capture is enabled by default when CamWedge is launched. A check
mark appears alongside Barcode in the menu when it is enabled.
To view the CamWedge menu:
•Tap > Programs > CamWedge .
•On the Today screen, tap and hold the CamWedge icon located on the
lower right corner of the screen.
The CamWedge menu includes the following:
•Barcode - Displays the status of CamWedge and allows you to view or
modify a bar code configuration type.
•Enable - Allows data capture when pressing the Camera button.
•Disable - Prevents data capture from occurring when pressing the
Camera button.
•Prefix/Suffix - Allows modification of the bar code data.
•Options - Allows you to set options for capturing bar codes.
•Test - Allows data capture operations to be tested locally.
•Log - Displays information logged by CamWedge.
•About - Displays the CamWedge info screen.
•Exit - Closes the application.
Configuring the CamWedge Settings
Use the CamWedge menu to set preference settings on how to use CamWedge. You can
perform the following configuration options in CamWedge:
•Enable or disable the bar code data capture
•Specify the bar code prefix or suffix options
•Set the options for capturing bar codes
To enable or disable bar code data capture:
•On the CamWedge menu, select Barcode > Enable.
•On the CamWedge menu, select Barcode > Disable. The CamWedge icon
on the Today screen changes from and .
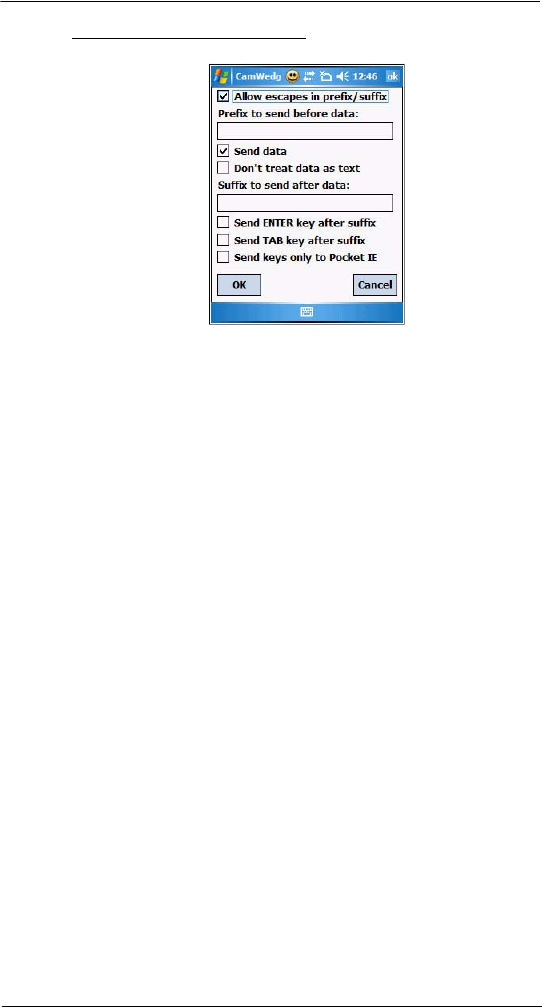
8 Using MC35 Companion Programs
Media-related programs
179
To specify the bar code prefix/suffix options:
1 On the CamWedge menu, select Barcode > Prefix/Suffix.
2 Set the following options:
•Tap the “Allow escapes in prefix/suffix” check box to enable escape
sequences to be embedded in prefix and suffix strings. Escape
sequences allow non-textual data to be transmitted as part of the prefix
or suffix string. All escape sequences begin with the backlash “\”
character. The supported escape sequences include:
•\b Backspace
•\f Form feed
•\n New line (line feed)
•\r Carriage return
•\t Tab
•\xHH ASCII character represented in Hexadecimal notation. Consult a
standard ASCII chart for suitable values.
•\vHH Virtual key code represented in Hexadecimal notation.
•In the “Prefix to send before data” box, enter the string to be sent before
the captured data.
•Tap the “Send data” check box to disable this option. By default, this
option is enabled to allow transfer of the captured bar code data to the
device. Disabling this option prevents the actual data from being
transmitted. The prefix and suffix strings, if present, are still transmitted
even if this option is disabled.
•Tap the “Don’t treat data as text” check box to read bar code data as
binary data and transmit the data in hexadecimal format. By default, this
checkbox is disabled. This option does not affect the Test function in
CamWedge, which has its own mechanism to display Hex and text
formats.
•In the “Suffix to send after data” box, enter the desired string to be sent
after the captured data.
•Tap the “Send ENTER key after suffix” check box to transmit an ENTER
key (VK_RETURN virtual key code) following all other data.
•Tap the “Send TAB key after suffix” check box to transmit a TAB key
(VK_TAB virtual key code) following all other data.
•Tap the “Send keys only to Pocket IE” check box to enable the AutoPIE
mode. The AutoPIE mode allows CamWedge to work correctly with
Pocket Internet Explorer. AutoPIE mode enables bar code data capture
when the cursor is on a field that can accept keyboard input. This allows
for better power management and eliminates any confusion caused by
capturing when there is no field to accept the data.
3Tap ok.

8 Using MC35 Companion Programs
Media-related programs
180
To configure the options for capturing bar codes:
1 On the CamWedge menu, select Barcode > Options.
2 Tap the “Flashlight” check box to enable the flashlight when capturing bar code
data.
3 Tap the “Press and Hold Trigger” check box causes the device to stop the bar code
decoding session when the Camera button is released. If disabled, the bar code
decoding session continues until a bar code is decoded or the Scan Timeout is
reached.
4 In the “Scan Timeout” box, enter the scan timeout in milliseconds. If no bar code is
decoded the scanner stops decoding after the given Scan Timeout elapses.
5 In the “Profile” drop-down box, select a bar code symbology. The profile selected
determines which bar code type to decode.
6Tap ok.
Test Window
The Test window displays information processed from the data captured by the MC35.
This window is typically used to ensure that the captured data is being transmitted as
expected. When the CamWedge screen is closed, normal operation resumes sending
any captured data to the foreground application.
To open the Test window:
1 On the CamWedge menu, select Test.
The Test window includes a button to toggle the data capture format between
hexadecimal and text and a menu bar with all of the CamWedge functions.
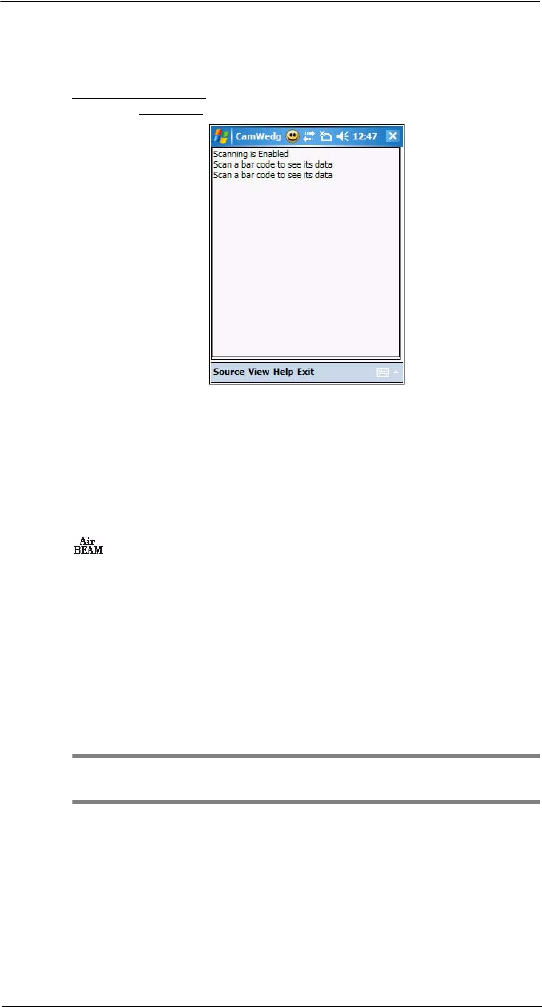
8 Using MC35 Companion Programs
Product download-related programs
181
Log Window
The Log window displays a scrolling list of the actions performed. This does not include
the captured data. The Log window is typically used to confirm the actions of the user.
To open the Log window:
•On the CamWedge menu, select Log.
A menu bar with all of the CamWedge functions is available within the window.
Product download-related programs
•AirBeam Smart
•Rapid Deployment Client
•Download Agent
AirBEAM Smart
The AirBEAM Smart product allows specially designed software packages to be
transferred between a host server and MC35. Before transfer, AirBEAM Smart checks
and compares package version, so that only updated packages are loaded.
AirBEAM Smart resides on radio-equipped client devices and allows them to request,
download and install software, as well as to upload files and status data. Both download
and upload of files can be accomplished in a single communications session. The ability
to transfer software over a radio network can greatly reduce the logistical efforts of client
software management.
In an AirBEAM Smart system, a network-accessible host server acts as the storage point
for the software transfer. The AirBEAM Smart Client uses the industry standard FTP or
TFTP file transfer protocols to check the host system for updates and, if necessary, to
transfer updated software.
NOTE: For more detailed information about AirBEAM, refer to the AirBEAM® Smart
Windows® CE Client Product Reference Guide.

8 Using MC35 Companion Programs
Product download-related programs
182
AirBEAM Package Builder
In a typical distributed AirBEAM system, software to be transferred is organized into
packages. In general, an AirBEAM package is simply a set of files that are assigned
attributes both as an entire package and as individual component files. The package is
assigned a version number and the transfer occurs when an updated version is available.
An AirBEAM package can optionally contain developer-specified logic to be used to
install the package. Installation logic is typically used to update client device flash images
or radio firmware. Examples of common AirBEAM packages would include packages for
custom client application software, radio firmware and AirBEAM Smart Client software.
Once these packages are built, they are installed on the host server for retrieval by the
handheld device. The AirBEAM Package Builder is a utility used to define, generate and
install AirBEAM packages to a server. The packages are then loaded from the server
onto a client device equipped with an AirBEAM Smart Client executable.
For detailed instructions on how to define, generate and install AirBEAM packages to the
server, refer to the AirBEAM Package Builder Product Reference Guide.
AirBEAM Smart Client
The AirBEAM Smart Client is installed on the handheld vehicle computer. It is configured
with the server access information, the names of the packages to be downloaded and
other controlling parameters. When the AirBEAM Smart Client is launched, the device
connects to the specified FTP server and checks the packages it is configured to look for.
If the package version was updated, the client requests the transfer.
AirBEAM License
The AirBEAM Smart Client is a licensed software product. The AirBEAM Smart Client's
version synchronization functionality is enabled through a license key file that is stored
on the client device. The license key file can be built into AirBEAM Smart Client's image,
or downloaded in a special AirBEAM package.
The AirBEAM license key file contains a unique key and a customer specific banner that
is displayed when the AirBEAM Smart Client version synchronization logic is invoked.
To open AirBEAM:
•Tap > Programs > AirBEAM .
Configuring the AirBEAM Smart Client
Using the Configure command you can set preference settings on how to use AirBEAM.
You can perform the following configuration options in AirBEAM:
•Specify the package name of the first four of eight packages that are to be
loaded during the AirBEAM synchronization process. The specified package
name must correspond to a package that is available on the specified
package server.
•Specify the package name of the last four of eight packages that are to be
loaded during the AirBEAM synchronization process. The specified package
name must correspond to a package that is available on the specified
package server.
•Specify the configurations of the server to which the client connects during
the package synchronization process.
•Set various miscellaneous AirBEAM features.
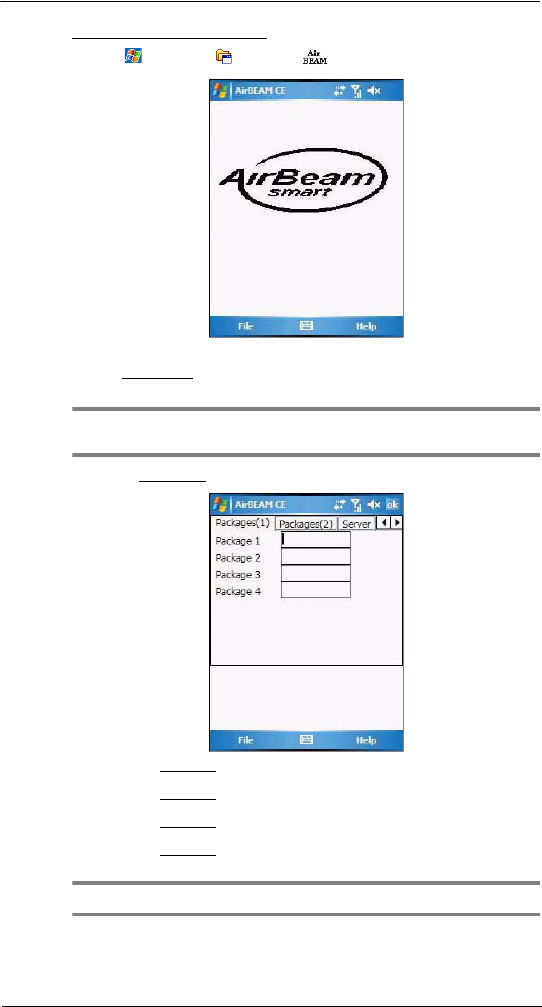
8 Using MC35 Companion Programs
Product download-related programs
183
To configure AirBEAM Smart Client:
1 Tap > Programs > AirBEAM .
2Tap File > Configure.
The Configuration screen has seven tabs that you can modify - Packages(1),
Packages(2), Server, Misc(1), Misc(2), Misc(3), and Misc(4).
NOTE: No inadvertent trailing spaces should be entered on the seven tabs.
Information entered in these fields are case and space sensitive.
3 On the Packages(1) tab, set the following options:
•In the Package 1 field, enter the package name of the first of eight
packages.
•In the Package 2 field, enter the package name of the second of eight
packages.
•In the Package 3 field, enter the package name of the third of eight
packages.
•In the Package 4 field, enter the package name of the fourth of eight
packages.
NOTE: Package 1 to Package 4 fields are optional fields.
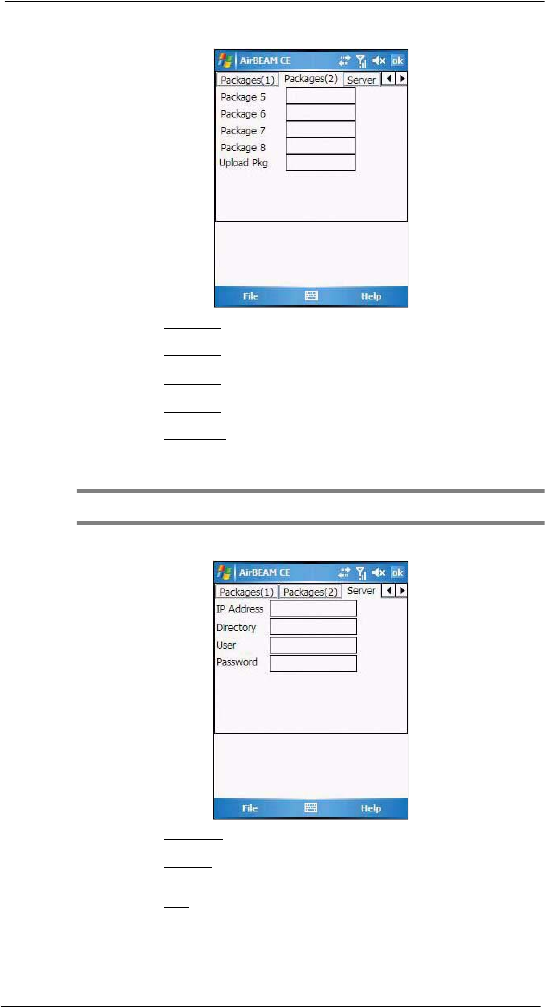
8 Using MC35 Companion Programs
Product download-related programs
184
4Tap Packages(2) tab, then set the following options:
•In the Package 5 field, enter the package name of the fifth of eight
packages.
•In the Package 6 field, enter the package name of the sixth of eight
packages.
•In the Package 7 field, enter the package name of the seventh of eight
packages.
•In the Package 8 field, enter the package name of the eighth of eight
packages.
•In the Upload Pkg field, enter the name of a package that is to be
processed
for upload files during the AirBEAM synchronization process.
The specified package name must correspond to a package that is
available on the specified package server.
NOTE: Package 5 to Package 8 and Upload Pkg fields are optional fields.
5Tap Server tab, then set the following options:
•In the IP Address field, enter the IP address of the server. It may be a host
name or a dot notation format.
•In the Directory field, enter the
directory on the server that contains the
AirBEAM package definition files. All AirBEAM package definition files are
retrieved from this directory during the package synchronization process.
•In the User field, enter the FTP user name that is used during the login phase
of the package synchronization process.
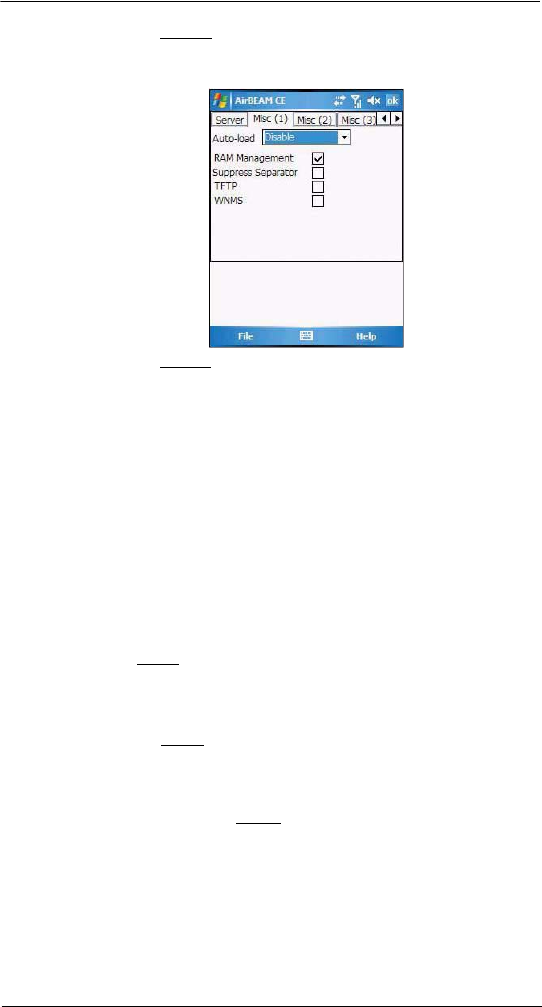
8 Using MC35 Companion Programs
Product download-related programs
185
•In the Password field, enter the FTP password that corresponds to the FTP
user specified in the User field. The specified password is used during the
login phase of the package synchronization process.
6Tap Misc(1) tab, then set the following options:
•In the Auto-load drop-down list, specify how the AirBEAM Smart Client
is to be invoked automatically when the client device is rebooted. The
selections include:
•Disable - The AirBEAM Smart Client is not invoked automatically during
the boot sequence.
•Interactive - The AirBEAM Smart Client is invoked automatically during
the boot sequence. The package synchronization process is started
automatically. The Synchronization Dialog box appears and the user is
required to press the OK button when the process is complete.
•Non-interactive - The AirBEAM Smart Client is invoked automatically
during the boot sequence. The package synchronization process is
started automatically. The Synchronization Dialog box is displayed, but
the user is not required to select OK when the process is complete. The
Synchronization Dialog box terminates automatically.
•Background - The AirBEAM Smart Client is invoked automatically during
the boot sequence. The package synchronization process is started
automatically. Nothing is displayed while the synchronization process is
occurring.
•Tap the “RAM Management” check box to specify whether the automatic RAM
management is enabled during the package synchronization process.
If enabled, RAM management logic is invoked when there is not enough free
disk space to download a package. The RAM management logic attempts to
remove any disposable AirBEAM packages resident on the client.
•Tap the “Suppress Separator' check box to specify whether the automatic
insertion of a file path separator character should be suppressed when the
client generated server package definition file names.
When enabled, the parameter also disables the appending of .apd to the
package. This feature is useful for AS/400 systems, in which the file path
separator character is a period. When this feature is enabled, the server
directory (Directory) and package name (Package 1, Package 2, Package 3
and Package 4) are appended “as is” when building the name for the server
package definition file.
When this feature is disabled, a standard file path separator is used to
separate the server directory (Directory) and package name (Package 1,
Package 2, Package 3 and Package 4) when building the name for the server
package definition file. In addition, an .apd extension is appended
automatically.
•Tap the “TFTP” check box to specify whether the TFTP protocol is to be used
to download files. By default, the AirBEAM Smart Client uses the FTP protocol.
•Tap the “WNMS” check box to specify whether the AirBEAM Smart Client
uploads a WNMS information file at the end of each version synchronization.
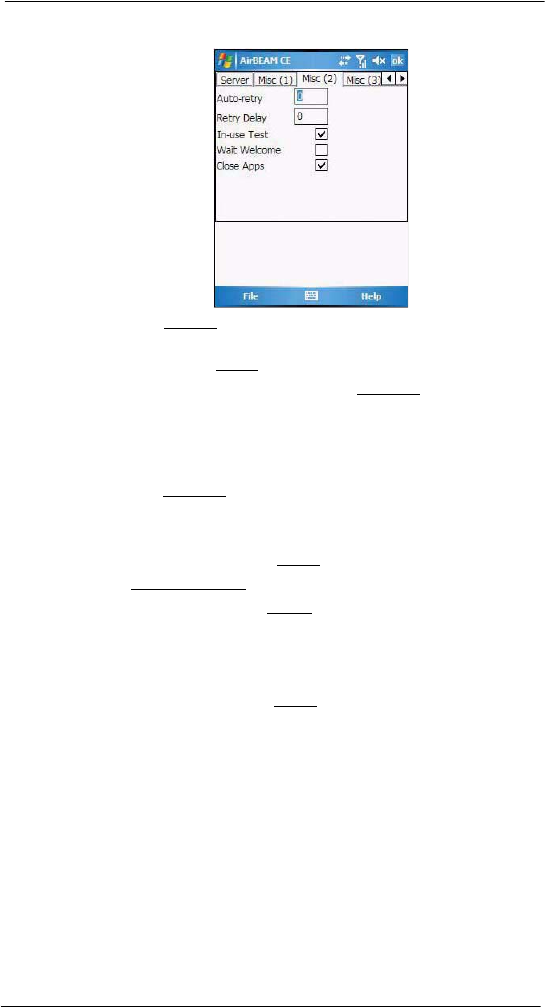
8 Using MC35 Companion Programs
Product download-related programs
186
7Tap Misc(2) tab, then set the following options:
•In the Auto-retry field, specify whether the AirBEAM Smart Client
automatically retries if there is a failure during the synchronization
process.
If this feature is enabled, the AirBEAM Smart Client displays a popup
dialog indicating the attempt of a retry. The popup dialog is displayed
for the number of seconds specified in the Retry Delay field.
The valid values for this field are:
•-1: The AirBEAM Smart Client automatically retries indefinitely.
• 0: The AirBEAM Smart Client does not automatically retry.
•-0: The AirBEAM Smart Client automatically retries up to the number of
times specified.
•In the Retry Delay field, specify the amount of time, in seconds, that the
AirBEAM Smart Client delays before automatically retrying after a
synchronization failure.
•Tap the “In-use Test” check box to specify whether the AirBEAM Smart
Client tests to determine if a file is in-use before downloading.
If the In-use Test feature is enabled, the AirBEAM Smart Client
downloads a temporary copy of any files that are in-use. If any
temporary in-use files are downloaded the AirBEAM Smart Client
automatically resets the client to complete the copy of the in-use files. If
the In-use Test feature is disabled, the synchronization process fails
(-813) if any download files are in-use.
•Tap the “Wait Welcome” check box to specify whether the AirBEAM
Smart Client waits for the WELCOME windows to be completed before
automatically launching the synchronization process after a reset.
•Tap the “Close Apps” check box to specify whether the AirBEAM Smart
Client automatically attempts to close non-system applications prior to
resetting the mobile unit. If enabled the AirBEAM Smart Client sends a
WM_CLOSE message to all non-system applications before resetting
the mobile unit. This feature offers applications the opportunity to
prepare (i.e. close open files) for the pending reset.
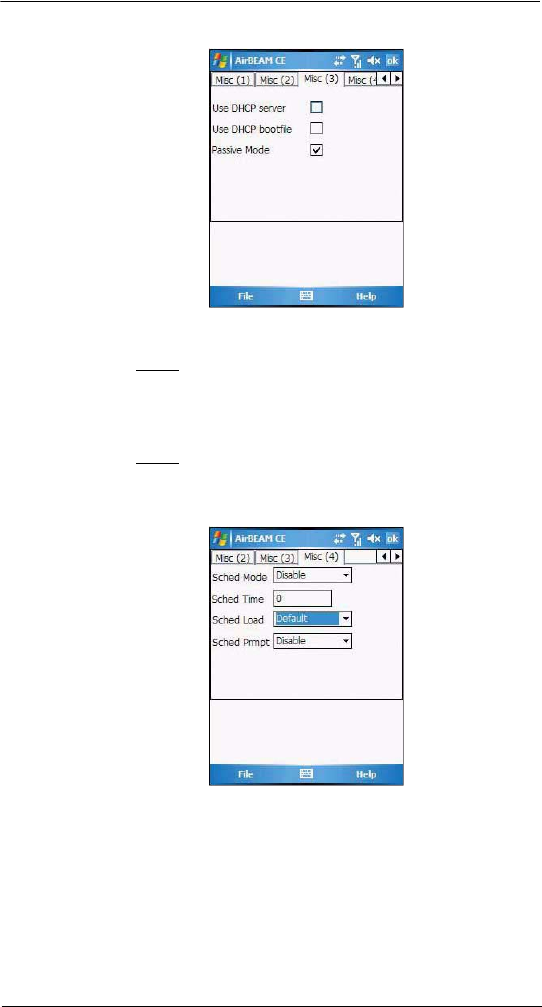
8 Using MC35 Companion Programs
Product download-related programs
187
8Tap Misc(3) tab, then set the following options:
•Tap the “Use DHCP server” check box to specify whether the AirBEAM
Smart Client uses the DHCP response option 66 to specify the IP
address of the FTP/TFTP server.
If enabled, special RF network registry settings are required to force the
DHCP server to return the “TFTP server name” field (option 66). The
special RF network registry settings are included, but commented out,
in the radio network registry initialization files (essid_xxxx_yy.reg).
•Tap the “Use DHCP bootfile” check box to specify whether the
AirBEAM Smart Client uses the DHCP response option 67 to specify
the Package and Package 1 parameters.
If enabled, special RF network registry settings are required to force the
DHCP server to return the “Bootfile name” field (option 67). The special
RF network registry settings are included, but commented out, in the
radio network registry initialization files (essid_xxxx_yy.reg).
9Tap Misc(4) tab, then set the following options:

8 Using MC35 Companion Programs
Product download-related programs
188
•In the Sched Mode drop-down list, specify whether (and how) the
scheduled mode is enabled. If enabled, schedule mode causes the
AirBEAM synchronization process to occur periodically. The selections
include:
•Disable - The schedule mode is disabled.
•Fixed time - The schedule mode is enabled. The AirBEAM
synchronization will be launched once per day at the time specified in the
Sched Time setting. The synchronization will be launched every day
Sched Time minutes past midnight.
•Fixed period - The schedule mode is enabled. The AirBEAM
synchronization will be launched at a period by the Sched Time setting.
The synchronization will be launched every Sched Time minutes.
•In the Sched Time field, specify, in minutes, the period for the schedule
mode. The Sched Mode setting specifies how the Sched Time value is
used.
•In the Sched Load drop-down list, specify the load mode to be used for
scheduled synchronization, if enabled. The selections include:
•Default - Specifies that the load mode specified in the Auto-load setting is
to be used for scheduled synchronization sessions.
•Interactive - The Synchronization Dialog displays when a scheduled
synchronization session occurs. The user is required to press the OK
button to dismiss the dialog.
•Non-interactive - The Synchronization Dialog displays when a scheduled
synchronization session occurs. The dialog is automatically dismissed
when the synchronization is complete, unless an error occurs. If an error
occurs the user is required to press the OK button to dismiss the dialog.
•Background - Nothing is displayed when the scheduled synchronization
sessions occur.
•In the Sched Prompt drop-down list, specify whether the AirBEAM client
prompts the user when updates are available in schedule mode. The
settings include:
•Disable - Updated packages are automatically downloaded. The user is
not prompted.
•Alert - Updated packages are not automatically downloaded. The user is
prompted to warm boot the device to initiate the package downloads.
•Launch - Updated packages are not automatically downloaded. The user
is prompted to start the package download. The user can defer the
package download by responding no to the prompt. The MAXNOPRESS
registry setting can be used to limit the number of times the user can
defer the update.
•Confirm - Updated packages are not automatically downloaded. This
value behaves the same as the Launch value, except that the user is
required to confirm an additional prompt before the download starts.
Synchronizing with the Server
When the synchronization process is initiated, the AirBEAM Smart Client attempts to
open an FTP session using the AirBEAM Smart Client configuration. Once connected,
the client processes the specified packages. Packages are loaded only if the server
version of a given package is different from the version loaded on the client. Once the
upload process is complete, the AirBEAM Smart Client closes the FTP session with the
server.
The AirBEAM Smart Client can launch an FTP session with the server either manually,
when initiated by the user, or automatically.
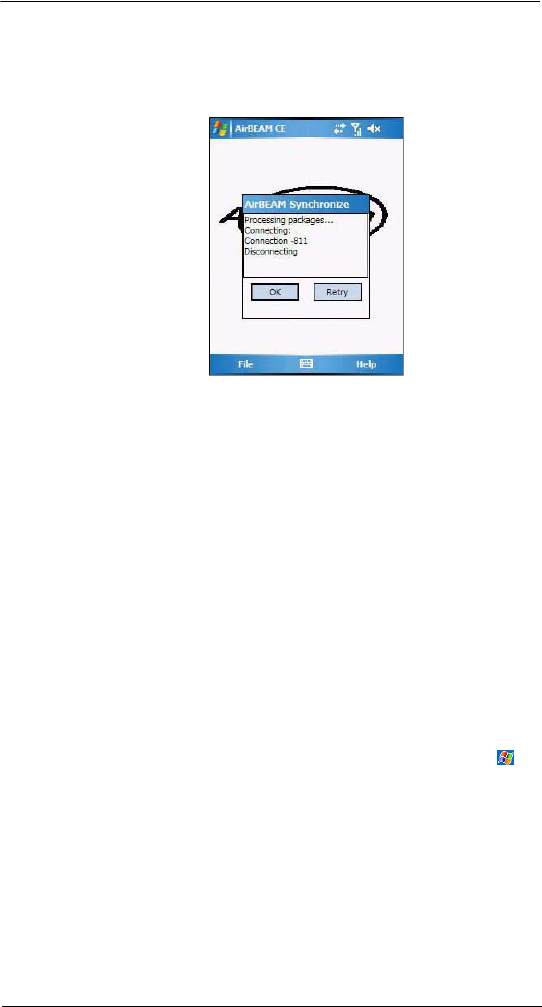
8 Using MC35 Companion Programs
Product download-related programs
189
Manual Synchronization
1 Configure the AirBEAM Smart Client. See “Configuring the AirBEAM Smart Client”
on page 182 for more information.
2 From the main AirBEAM CE screen, tap File, then Synchronize.
Once connected, the AirBEAM Synchronize screen appears.
•The Status List displays status messages that indicate the progress of
the synchronization process.
•Press Enter to return to the Main Menu. This button remains inactive
until the synchronization process is complete.
•Select Retry and press ENTER to restart the synchronization process.
This button is activated only if there is an error during the
synchronization process.
Automatic Synchronization
The AirBEAM Smart Client can be configured to launch automatically using the Misc(1)
tab (see Misc(1) on page 185). When setting automatic synchronization, use the Auto-
load drop-down list to specify how the AirBEAM Smart Client should be invoked
automatically when the client device is rebooted. See Misc(1) on page 185 for
instructions on enabling Auto Sync.
AirBEAM Staging
The AirBEAM Smart staging support is intended to speed up and simplify the process of
staging custom or updated operating software onto mobile devices directly from
manufacturing. The staging support is part of the AirBEAM Smart CE Client that is
integrated into the vehicle computer.
The AirBEAM Smart support works by defaulting the AirBEAM Client configuration to a
known set of values and launching the AirBEAM Smart package download logic. A
staging environment, including an RF network, FTP server and AirBEAM packages must
be setup. Ideally a staging network and server should be setup to match the default
AirBEAM Staging client configuration.
The AirBEAM Smart staging utility is invoked from the Application directory (tap ,
Programs > File Explorer > My Device icon > Windows).
The AirBEAM Staging support provides several benefits:
•Many devices can be simultaneously loaded over the RF network.
•The AirBEAM staging utility provides a simple single dialog user interface
that is used to quickly start the software installation process.
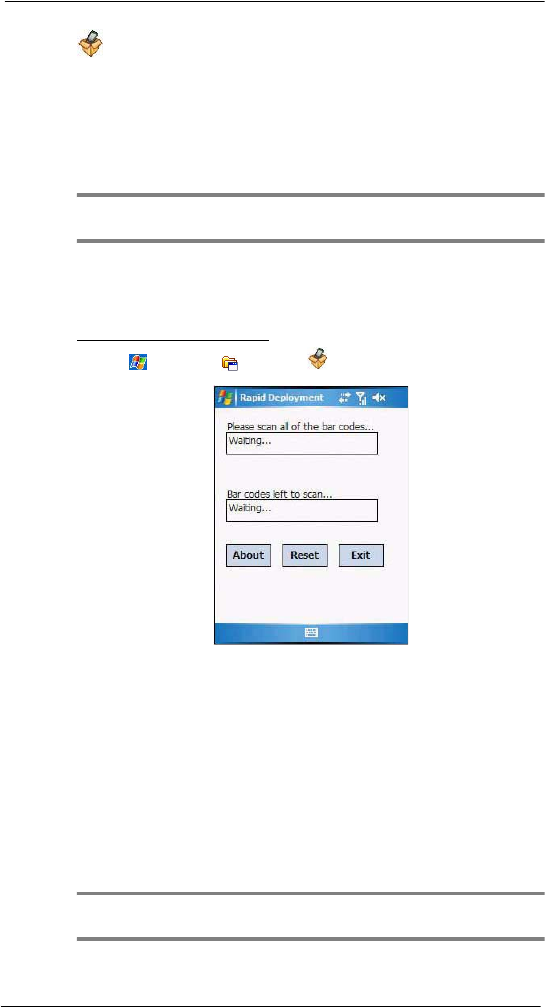
8 Using MC35 Companion Programs
Product download-related programs
190
Rapid Deployment Client
The Rapid Deployment (RD) Client facilitates software downloads to an MC35
from a Mobility Services Platform (MSP) Console’s FTP server. The MSP
Console is a web-based interface to the wireless infrastructure monitoring and
management tools provided by the MSP Lite or MSP Enterprise server.
When software packages are transferred to the FTP server, the MC35 on the wireless
network can download them. The location of software packages are encoded in RD bar
codes. When the MC35 captures a bar code(s), the software package(s) is downloaded
from the FTP server to the MC35. A single RD bar code can be captured by multiple
MC35s.
NOTE: For detailed information about the MSP Console, MSP Lite/MSP Enterprise
servers and creating RD bar codes, refer to the MSP User Guide.
Rapid Deployment Window
The Rapid Deployment window displays bar code capture status and provides features
for resetting and exiting the application.
To open Rapid Deployment window:
•Tap > Programs > RDClient .
The Rapid Deployment screen include the following parameters:
•Please capture all of the bar codes - Displays the status of a captured
bar code.
•Waiting - indicates the MC35 is ready to capture a bar code.
•OK - indicates the MC35 successfully captured a bar code. (The Indicator
LED bar on the wearable terminal turns green and a beep sounds).
If there are no bar codes left to capture, the Rapid Deployment
Configuring window displays.
•Bar codes left to scan... - Displays a list of any remaining bar codes to
capture (1-D bar codes only). When all required bar codes are captured
successfully, the Rapid Deployment Configuring window displays.
•About - Displays the Rapid Deployment Client Info window.
•Reset - Removes any previously captured data.
•Exit - Closes the application. A confirmation window displays. Select
Yes to exit or No to return to the Rapid Deployment window.
NOTE: If the application is exited prior to capturing all required bar codes, any
captured data collected up to that point is lost.

8 Using MC35 Companion Programs
Product download-related programs
191
Capturing RD Bar Codes
When the MC35 captures and successfully decodes a single or multiple RD bar codes,
the data encoded in the bar code can:
•Reset the MC35’s connection profile. A connection profile is a set of
Wireless Application parameters that the MC35 uses to access the wireless
network.
•Initiate downloads of one or more software packages from an FTP server to
the MC35.
NOTE: Currently, RD only recognizes AirBEAM software packages. See “AirBEAM
Smart” on page 181 for more information.
To capture an RD bar code:
1 Obtain the appropriate RD bar code(s) from the MSP Administrator.
2 Launch the RD application on the MC35. The Rapid Deployment window displays.
3 Capture the appropriate bar code(s) to complete the configuration and/or download.
(a) A PDF417 bar code (2-D bar code) can contain all download data in a single
bar code. In this case, only one bar code may be required to capture.
(b) Multi-part linear bar codes (1-D bar codes) can require capturing several bar
codes. Bar codes can be captured in any order. The text box under Bar
codes left to scan... shows the remaining bar codes to capture.
4 After all appropriate bar codes are captured successfully, the MC35 connects to the
server and the Rapid Deployment Configuring window displays while network
settings are configured.
NOTE: If the MC35 cannot connect to the server, it continues to retry until the user
cancels (exits) the application. If failure to connect to the server persists, see the MSP
Administrator.
5 When configuration is complete:
(a) The Today screen displays.
(b) A new Wireless profile is created on the MC35 from the data encoded in the
bar code(s) captured.
(c) The designated package(s) are downloaded from the FTP server.
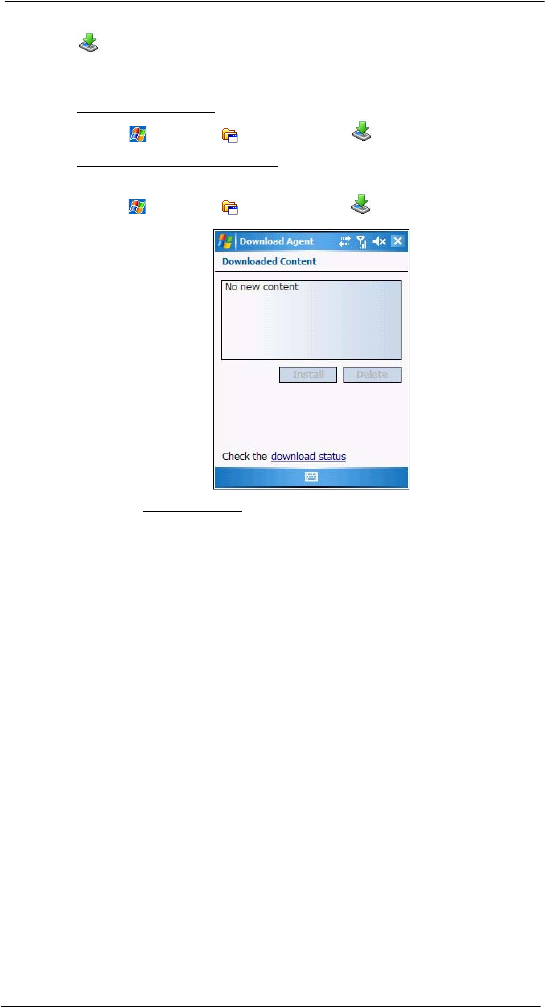
8 Using MC35 Companion Programs
Product download-related programs
192
Download Agent
The Download Agent facilitates software downloads and updates from the Internet
to the MC35 EDA. This program also provides information about the software
download status from the Internet.
To open Download Agent:
•Tap > Programs > Download Agent .
To install a software from the Internet:
1 Connect to the Internet.
2Tap > Programs > Download Agent .
3 On the Download Content list, select a software, then tap Install.
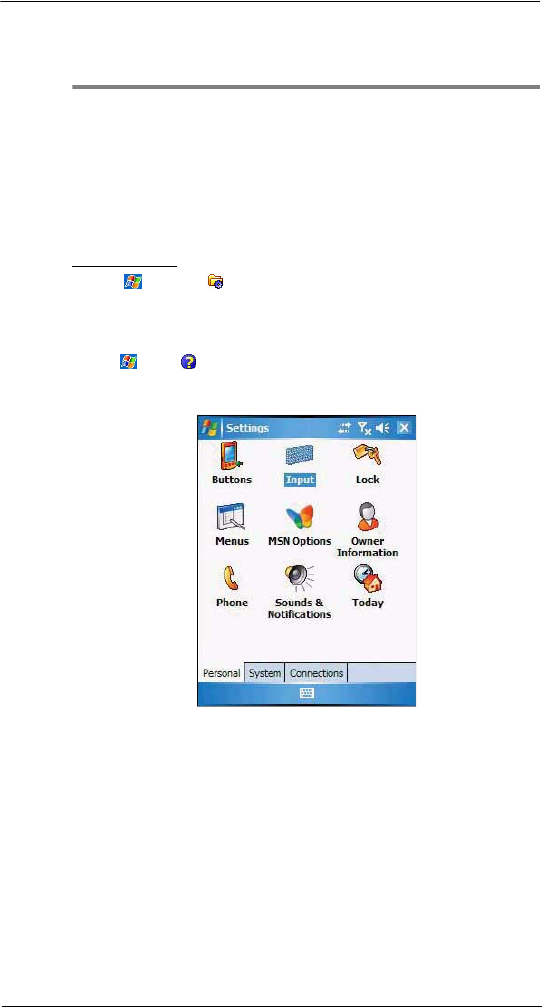
9 Customizing your MC35
Adjusting system preferences
193
9 Customizing your MC35
•Adjusting system preferences
•Program management
Adjusting system preferences
You can adjust the settings of your device to suit the way you work. Adjusting certain
settings, such as backlight, auto power off timer, system volume, and processor speed,
from the factory default settings may decrease your standby time.
To access Settings:
•Tap > Settings .
The Settings window has three tabs—Personal, System, and Connections,
each of which has its own set of options.
The following sections show the configuration page for each Settings option.
For detailed instructions on these pages, access the page from your device,
tap > Help .
Personal tab
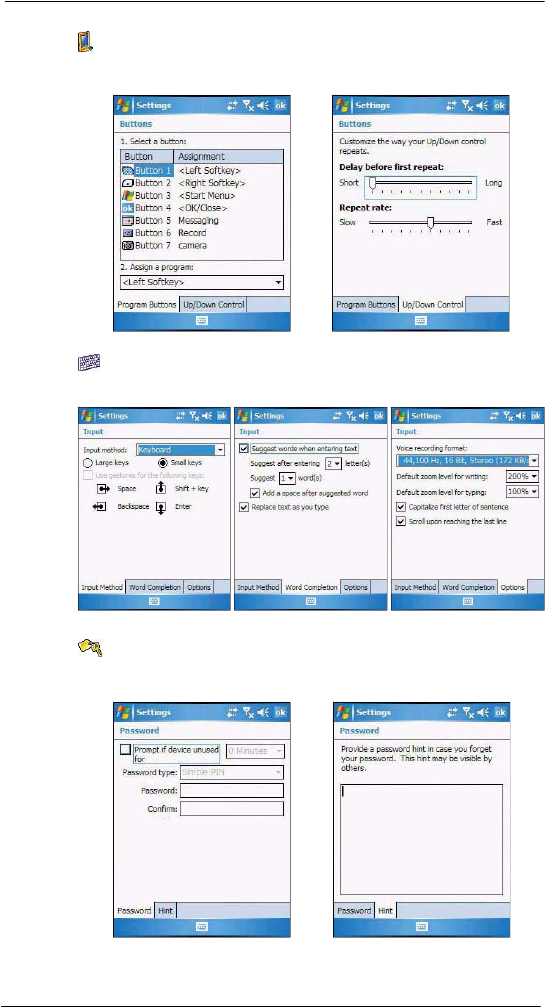
9 Customizing your MC35
Adjusting system preferences
194
Buttons
Assign the Send/End button on the stereo headset/single earbud headset to commonly-
used programs. You can also adjust the on-screen scrolling speed here.
Input
Select an input method, options for word completion and other related settings.
Lock
Set a password to prevent unauthorized access to your device. You also have the option
to set a password hint to serve as a reminder in case you forget your password.
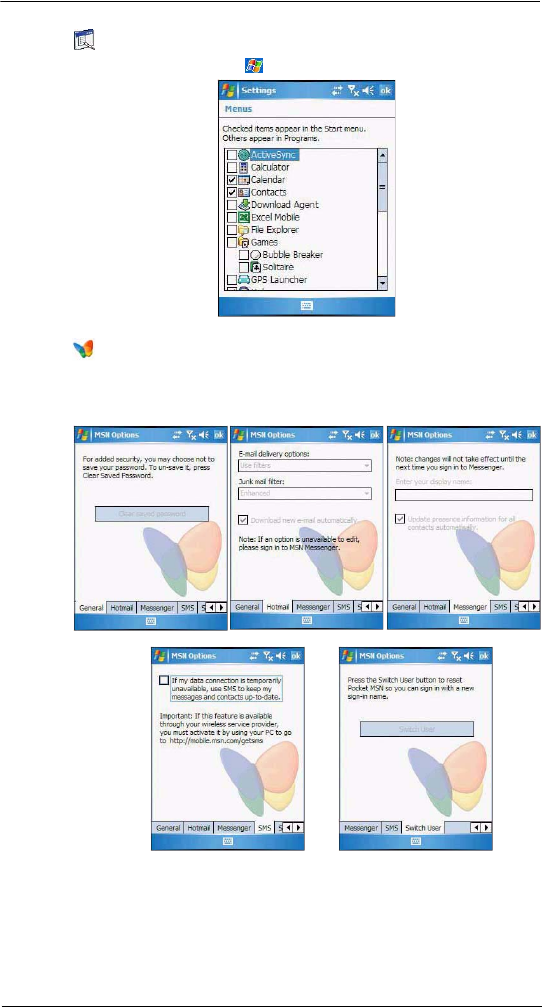
9 Customizing your MC35
Adjusting system preferences
195
Menus
Customize what appears on the menu.
MSN Options
Set up the password and login settings in the MSN services. It also provides instant
access to the MSN Hotmail’s Inbox, MSN Messenger’s Contact list, and options for
customizing your Pocket MSN experience.
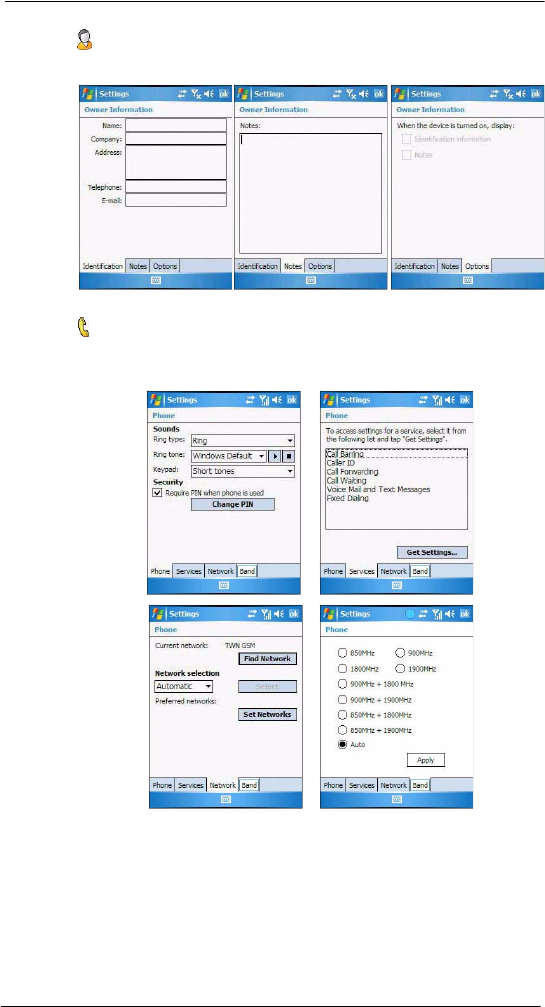
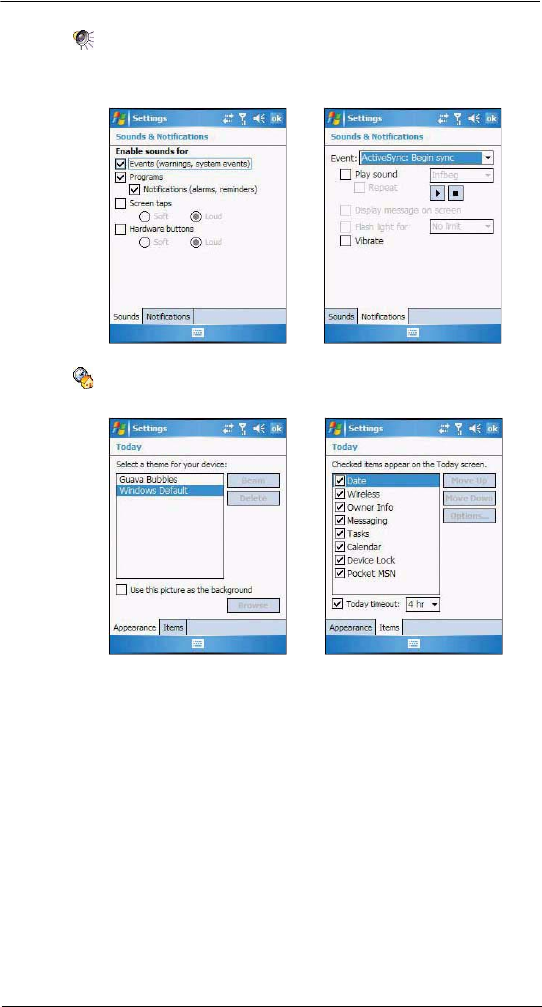
9 Customizing your MC35
Adjusting system preferences
197
Sounds & Notification
Set the volume level for system sounds and select the types of action you want to hear
sounds for. You can also define how you want to be notified about different events.
Options for personalizing sound notifications are also available.
Today
Customize the look and the information that is displayed on the Today screen.
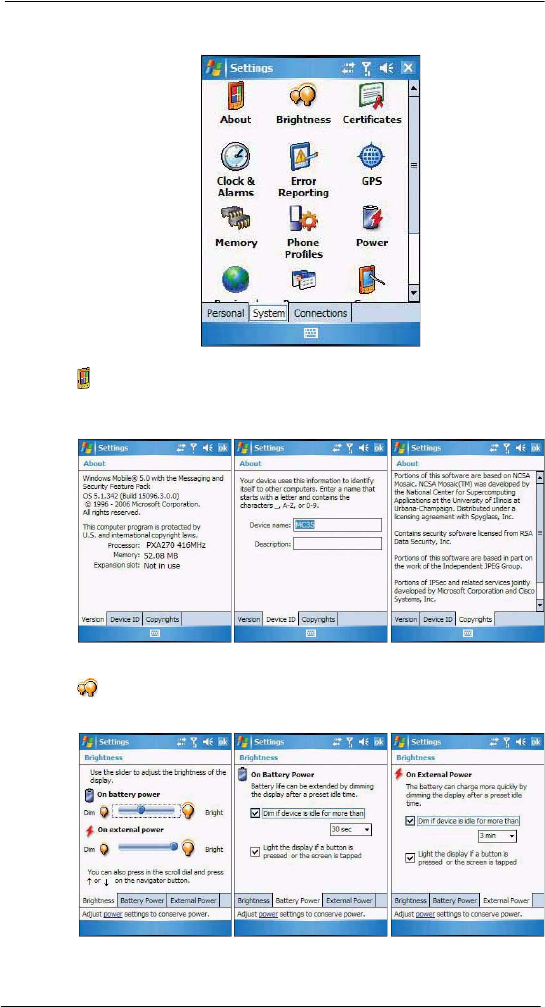
9 Customizing your MC35
Adjusting system preferences
198
System tab
About
Displays your device’s version and copyright information; includes an option to define a
device ID.
Brightness
Define settings for the display brightness and backlight control.

9 Customizing your MC35
Adjusting system preferences
199
Certificates
View and manage the public key certificates available on your device.
Clock & Alarms
Change the time or set alarms.
Error reporting
Enable or disable error reporting.
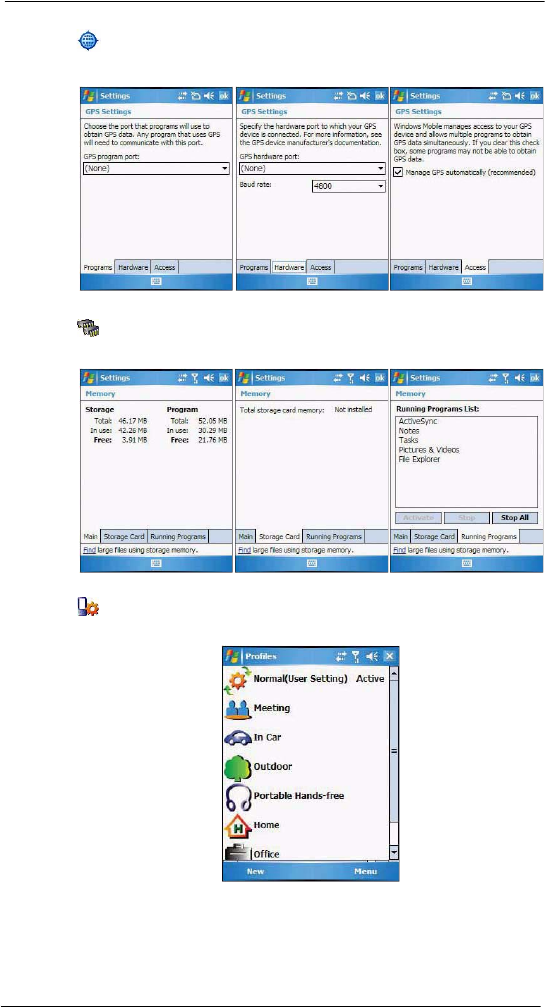
9 Customizing your MC35
Adjusting system preferences
200
GPS
Adjust the GPS settings.
Memory
Adjust allocation of storage and main memory.
Phone Profiles
View and edit the Phone function’s preset profiles for different operations mode.

9 Customizing your MC35
Adjusting system preferences
201
Power
View power level for both the main and backup battery. To minimize power consumption,
you can define settings for the auto-off function and the processor’s operation speed.
Regional Settings
Set default number and time display formats and other related options.
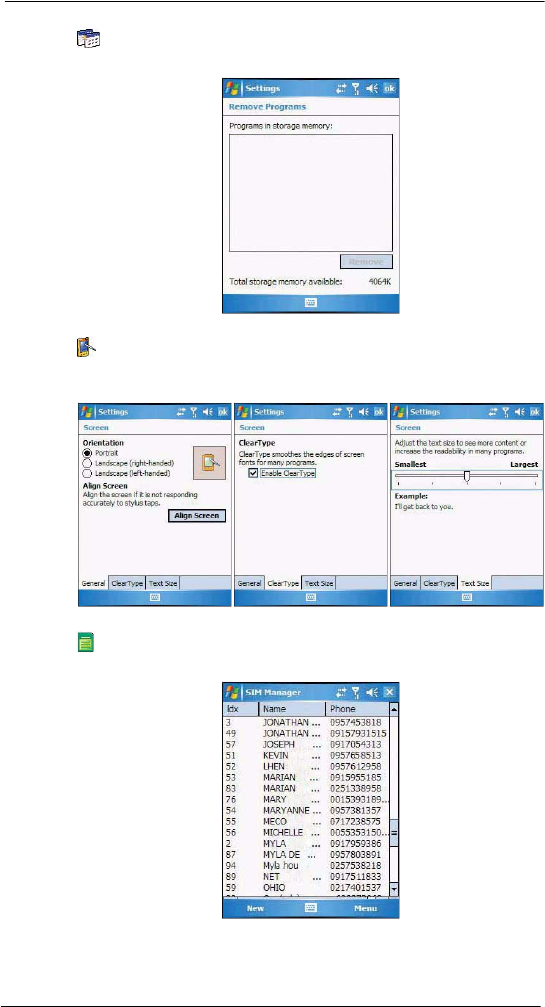
9 Customizing your MC35
Adjusting system preferences
202
Remove Programs
Remove programs from storage memory.
Screen
Set the viewing orientation and text size setting. You can also recalibrate screen and
enable the ClearType feature.
SIM Manager
Manage all contacts stored on your SIM card.
9 Customizing your MC35
Adjusting system preferences
203
System Information
Displays your device’s hardware and software information.
Connections tab
Beam
Define settings for the beam function.
9 Customizing your MC35
Adjusting system preferences
204
Bluetooth
Use this option to configure the device’s Bluetooth settings.
Connections
Adjust settings for connecting to your ISP or to a local network.
Express GPS Connect
Enable and customize settings for the GPS connection utility.
9 Customizing your MC35
Adjusting system preferences
205
USB to PC
Enable or disable the enhanced network connectivity.
WiFi/Network Cards
Setup wireless network connection or customize settings for your device’s network
adapter.
WiFi Card Setting
Allows you to enable the WiFi (Wireless Fidelity) networking.
To configure the wireless network connection settings, tap WiFi .
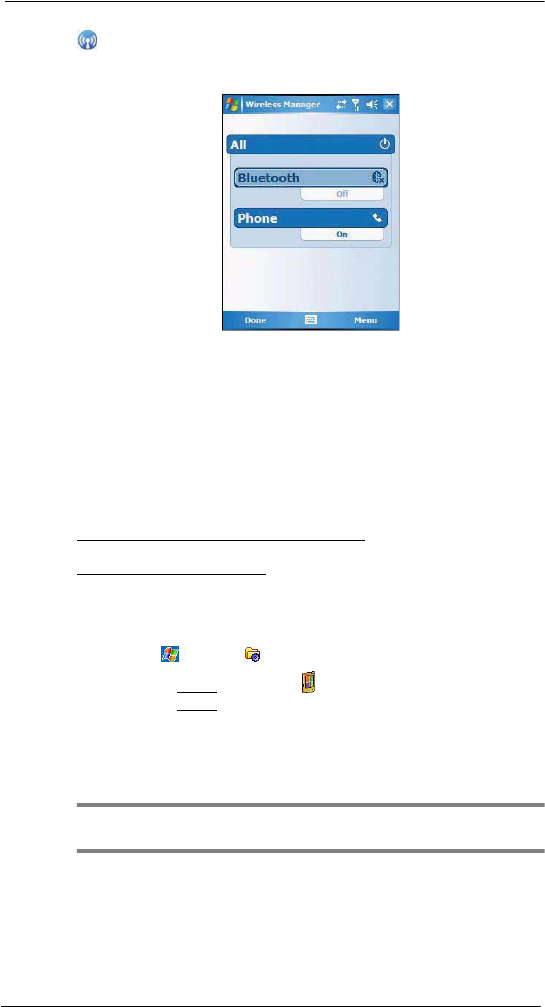
9 Customizing your MC35
Program management
206
Wireless Manager
Enable or disable the device's wireless radios and customize WiFi, Bluetooth, and Phone
settings.
Program management
Adding programs to your device
Programs bundled with your device at the factory are stored in ROM (read-only memory).
You cannot remove these programs, and you'll never accidentally lose ROM contents.
ROM programs can be updated using special installation programs with a *.xip
extension. All other programs and data files installed to your device after factory
installation are stored in the Random Access Memory (RAM). You can install any
program created for your device, as long as it has enough memory. The most popular
place to find software for your device is on the Windows Mobile Web site
http://www.microsoft.com/windowsmobile/default.mspx You can add programs to your
device either by using ActiveSync or by downloading the program from the Internet.
To add programs using ActiveSync:
Before installing a program on your device, you must first install the appropriate software
for your device on your computer.
1 Determine your device and processor type so that you know which version of the
software to install.
(a) Tap > Settings .
(b) On the System tab, tap About .
(c) On the Version tab, make a note of the processor information.
2 Download the program to your computer (or insert the CD or disk that contains the
program into your computer).
You may see a single *.xip, *.exe, or *.zip file, a Setup.exe file, or several versions
of files for different device types and processors. Be sure to select the program
designed for a Pocket PC and your device’s processor type.
NOTE: Read any installation instructions, Readme files, or documentation that come
with the program. Many programs provide special installation instructions.
3 Connect your device to your computer.

9 Customizing your MC35
Program management
207
4 Double-click the *.exe file.
•If the file is an installer, the installation wizard will begin. Follow the directions
on the screen. Once the software has been installed on your computer, the
installer will automatically transfer the software to your device.
•If the file is not an installer, you will see an error message stating that the
program is valid but it is designed for a different type of computer. You will
need to move this file to your device. If you cannot find any installation
instructions for the program in the Readme file or documentation, use the
ActiveSync Explore button to copy the program file to the Program Files folder
on your device. For more information on copying files using ActiveSync, see
page 36.
5 Once installation is complete, tap > Programs , then the program icon to
launch it.
To add a program directly from the Internet:
1 Determine your device and processor type so that you know which version of the
software to install.
(a) Tap > Settings .
(b) On the System tab, tap About .
(c) On the Version tab, make a note of the processor information.
2 Download the program to your device straight from the Internet using Internet
Explorer Mobile.
You may see a single *.xip, *.exe or *.zip file, a Setup.exe file, or several versions of
files for different device types and processors. Be sure to select the program
designed for a Pocket PC and your device’s processor type.
NOTE: Read any installation instructions, Readme files, or documentation that comes
with the program. Many programs provide special installation instructions.
3 Tap the file, such as a *.xip or *.exe file. The installation wizard will begin.
4 Follow the on-screen instructions.
Adding a program to the Start menu
You can choose what program icons should appear on the menu based on which ones
you use most often.
To add a program to the Start menu program using Settings:
1 Tap > Settings .
2 On the Personal tab, tap Menus .
3 Select the check box for the programs you wish to add.
If you do not see the program you want, you can either use File Explorer on your
device to move the program to the Start Menu folder, or use ActiveSync on your
computer to create a shortcut to the program and place the shortcut in the Start
Menu folder.
To add a program to the Start menu program using File Explorer on your device:
1 Tap > Programs > File Explorer .
2 Tap the My Device icon (tap the folder list, labeled My Documents by default, and
then My Device to see a list of all folders on your device).
3 Open the path: Windows > Start > Programs.
4 Tap and hold the program you want to add to the menu, then tap Cut on the pop-up
menu.
5 Open the path: Windows > Start Menu.
6 Tap and hold a blank area of the window, then tap Paste on the pop-up menu.
7 The program will now appear on the menu.
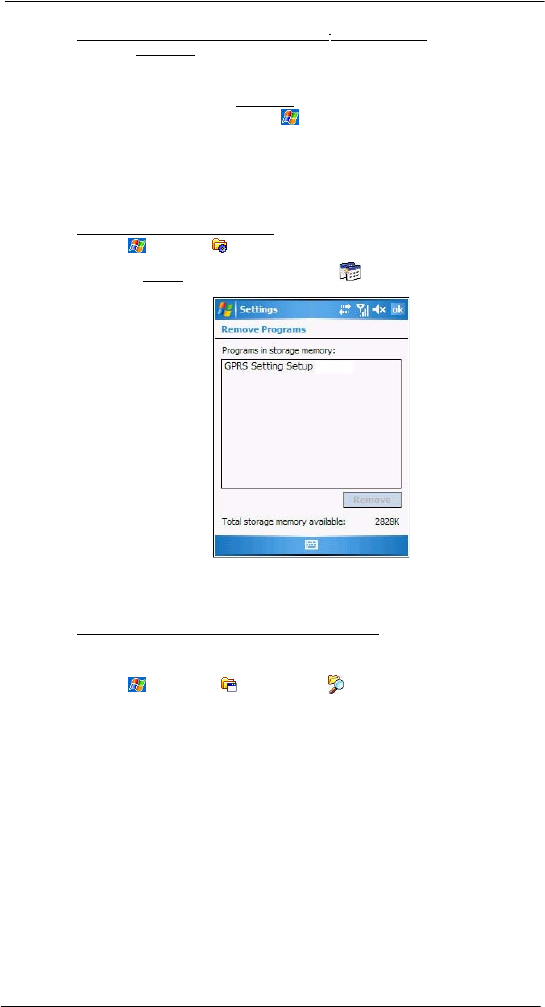
9 Customizing your MC35
Program management
208
To add a Start menu program using ActiveSync on your computer:
1 In the ActiveSync on your computer, click Explore to explore your device’s files and
locate the program.
2 Right-click the program, and then click Create Shortcut.
3 Move the shortcut to the Start Menu folder in the Windows folder.
The shortcut now appears on the menu.
For more information on using ActiveSync, see ActiveSync Help on your computer.
Removing programs
You can only remove programs that you installed. Programs that come with your device
cannot be removed.
To remove a program using Settings:
1 Tap > Settings .
2 On the System tab, tap Remove Programs .
3 Tap the program you wish to remove.
4Tap Remove.
5Tap Yes. If another confirmation message appears, tap Yes again.
To remove a program using File Explorer on your device:
If the program does not appear in the list of installed programs in Remove Programs, use
File Explorer on your device to locate the program:
1 Tap > Programs > File Explorer .
2 Tap the My Device icon (tap the folder list, labeled My Documents by default, and
then My Device to see a list of all folders on your device).
3 Open the path: Windows > Start > Programs.
4 Tap and hold the program you want to remove, then tap Delete on the pop-up
menu.

10 User Support
Customer support
209
10 User Support
•Customer support
•Protecting your MC35
•Troubleshooting
Customer support
Refer to following help resources on how to use your MC35.
For information on: Refer to:
Operating instructions This User Guide. It provides online reference for
using your device. The guide is available for
download. Visit http://support.symbol.com
The MC35 Help. To view Help, tap > Help .
Programs on your device
Additional programs that can
be installed on your device
See “Program list” on page 40 for more
information.
Up-to-date information
regarding your device
For the latest information on the MC35 visit
http://www.symbol.com/mc35
Technical assistance Go to http://www.symbol.com/contactsupport to
contact the Symbol Global Interactive Center for
your region.
If you purchased your Symbol product from a
Symbol Business Partner, contact that Business
Partner for service.
Before contacting, have the model number and
serial number at hand. If your problem cannot be
solved by the Symbol Global Interactive Center,
you may need to return your equipment for
servicing and you will be given specific directions.
Motorola is not responsible for any damages
incurred during shipment if the approved shipping
container is not used. Shipping the units
improperly can possibly void the warranty.
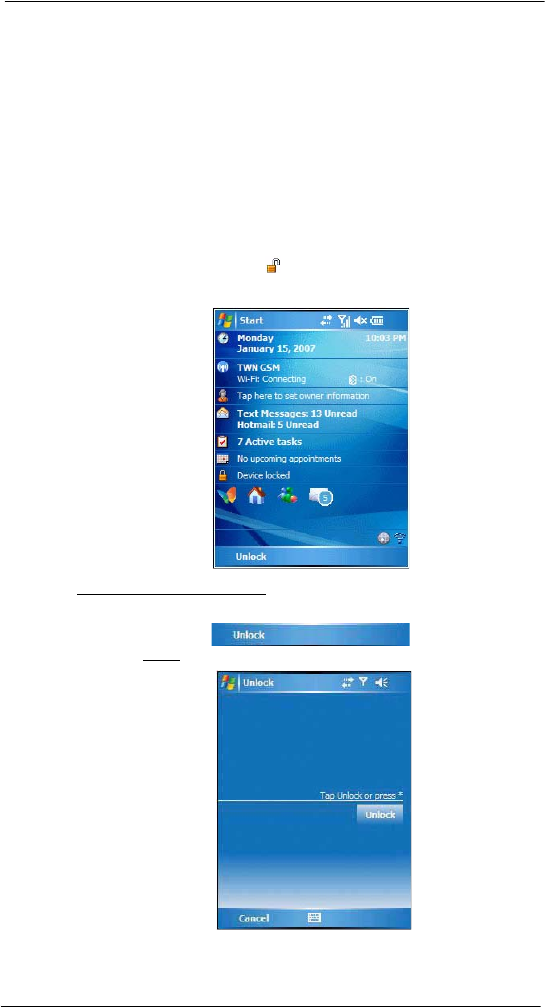
10 User Support
Protecting your MC35
210
Protecting your MC35
Your device is not just a financial investment but a wealthy source of personal
information. It is then imperative that you protect your device from unauthorized access,
as well as data loss.
Using system locks
There several ways that you can secure your MC35, both from accidental key presses
and from unauthorized access.
•Locking the keypad
•Locking the touch screen
•Setting an access password lock
Locking the keypad/touch screen
Tapping the Device unlocked icon on the Today screen prevents accidental data
entry from both the keypad and the touch screen. When the device is locked, the
command bar displays Unlock.
To unlock the keypad/touch screen:
1 On the command bar, tap Unlock.
2On the Unlock screen, tap Unlock or press the orange and Q keys on the keypad.
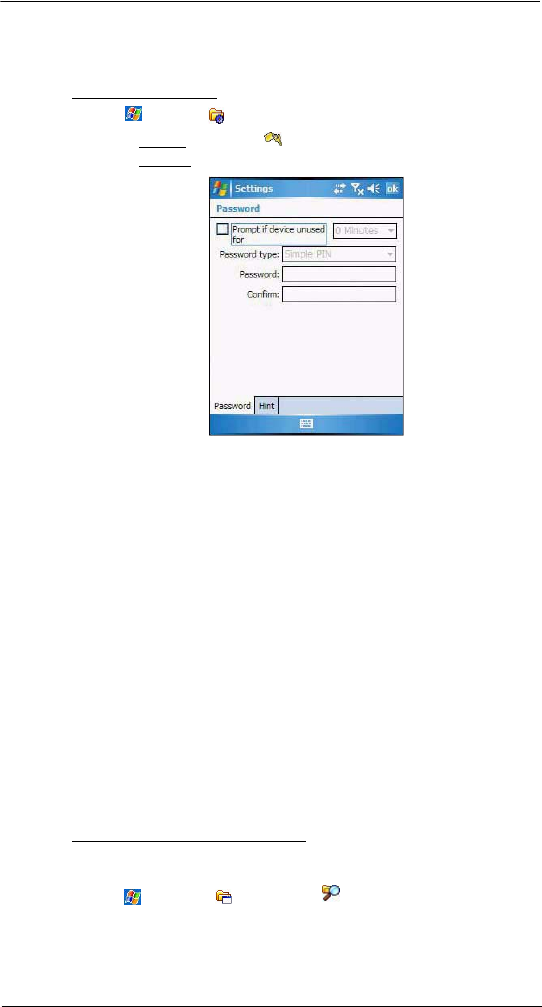
10 User Support
Protecting your MC35
211
Locking the device
You have the option to create a lock password that will be required to access your device
after a set period of inactivity.
To assign a lock password:
1 Tap > Settings .
2 On the Personal tab, tap Lock .
3 On the Password tab, perform the following:
(a) Select the “Prompt if device unused for” check box, then tap the pick list
opposite it to set the period of inactivity before the lock password is required
for access.
(b) Select a password type pick list. You have two options.
•Simple PIN – This password mode requires a 4-digit password.
•Strong alphanumeric – This password mode requires an alphanumeric
password (i.e., a combination of upper- and lower case letters, numbers,
and symbols) consisting of at least seven characters.
4 Type then confirm your lock password.
5 If you want to set a keyword to serve as a password reminder in case you forget it,
tap the Hint tab.
6Tap ok.
Creating backup files
Any additional programs or new data in your device are stored in the Random Access
Memory (RAM). These items are lost if you have to perform a hard reset or your device
loses all power for any other reason. Because of this, it is important that you regularly
back up files to your computer via ActiveSync or to a storage card using the device’s
built-in SD/MMC expansion slot.
If you have access to your computer, use ActiveSync to synchronize files between your
device and your computer. See “Synchronizing information with your computer” on
page 30 for more information.
In instances where you are unable to access your computer, you can back up files to a
storage card.
To back up individual files in a storage card:
1 Insert a storage card into the SD/MMC expansion slot on the top of your device.
See “Using the SD/MMC expansion slot” on page 12 for more information.
2Tap > Programs > File Explorer .
3 Select the file you want to back up.
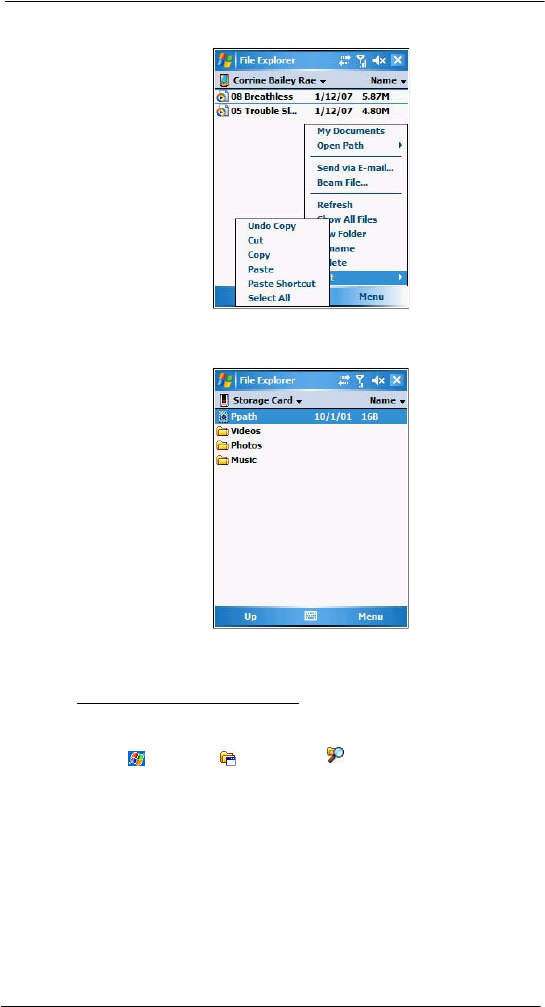
10 User Support
Protecting your MC35
212
4Tap Menu > Edit > Copy.
5 Tap the My Device icon (tap the folder list, labeled My Documents by default, and
then My Device to see a list of all folders on your device), then select Storage
Card.
6Tap Menu > Edit > Paste.
7 After the backup process, remove the storage card from the SD/MMC expansion
slot.
To back up several files in a storage card:
1 Insert a storage card into the SD/MMC expansion slot on the top of your device.
See “Using the SD/MMC expansion slot” on page 12 for more information.
2Tap > Programs > File Explorer .
3 Perform one of the following:
•Locate the file folder containing the files you want to back up.
•Create a new folder and move/copy the files you want to back up there.
4 Tap and hold the file folder you want to backup, then select Copy from the pop-up
menu.
5 Tap the My Device icon (tap the folder list, labeled My Documents by default, and
then My Device to see a list of all folders on your device), then select Storage
Card.
6 Tap and hold a blank area, then select Paste from the pop-up menu.
7 After the backup process, remove the storage card from the SD/MMC expansion
slot.
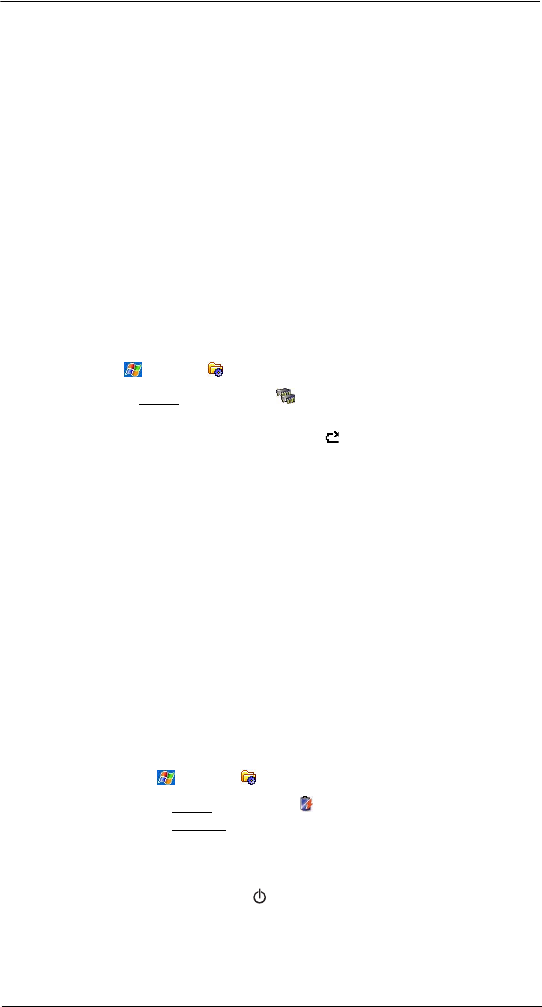
10 User Support
Troubleshooting
213
Troubleshooting
Troubleshooting reminders
When a troubleshooting procedure requires uninstalling the battery pack or resetting the
device, note the following:
•If the procedure requires uninstalling the battery pack, first turn the device
off. Once it is off, wait for five seconds to allow the device to completely enter
sleep mode before removing the battery pack.
Troubleshooting procedures
The following sections describe a list of possible situations that may arise during the use
of your device. Easy answers and solutions are provided for each one.
Battery problem
Memory on your MC35 EDA is shared between storage memory and program memory.
Storage memory is used to store the information you create and programs you install.
Program memory is used to run programs on your device. Your device automatically
manages the allocation between storage and program memory.
To view memory allocation and availability:
1 Tap > Settings .
2 On the System tab, tap Memory .
Battery loses power
When the battery is low, you see a battery icon (See “Status icons” on page 18 for
more information) in the navigation bar and a pop up screen that tells you to recharge the
battery as soon as possible.
Your device uses both a detachable and rechargeable main battery pack and an
embedded backup battery cell. When the main battery pack is removed or is completely
drained out, your device shuts down. The backup battery cell retains data for 30 minutes
after which you risk losing all data on the internal memory of your device.
Tips on how to make battery charge last longer
To make your battery charge to last as long as possible, observe the guidelines listed
below:
•Use external power whenever possible
Use the AC adapter to plug your device into external power whenever possible,
especially when:
•Establishing a remote connection
•Using the backlight
•Watching/listening to audio or video files
•Connecting to a computer and/or server
•Shorten auto suspend time
While on battery power, your device automatically suspends operation if you
haven’t touched the hardware buttons or used the stylus for a specified period of
time. Maximize battery life by shortening this time.
(a) Tap > Settings .
(b) On the System tab, tap Power .
(c) On the Advanced tab, adjust the setting on the “On battery power” pick list.
If the device lapses into sleep mode, allow ample time before turning it back
on to allow for a smoother power mode transition. The device wakes up from
sleep mode when any of the following events occur:
•The Power button .
•The device is connected to the USB sync cable.
•A storage card is inserted into the SD/MMC expansion slot.
10 User Support
Troubleshooting
214
•A call is received by your device.
•A preset alarm event is activated.
•Turns off sounds you don’t need.
Your device emits sounds in response to a number of events, such as warnings,
reminders, and screen taps or hardware button actions. Optimize battery life, by
turning off any sounds you don’t need.
(a) Tap > Settings .
(b) On the Personal tab, tap Sounds & Notifications .
(c) Clear the check boxes on both Sound and Notifications tabs.
•Disable the phone function when no SIM card is installed on your device.
Password problem
Forgotten password
If you forget your password, you’ll need to clear your device’s memory by hard resetting
it. See “To perform a hard reset” on page 218 for more information.
Memory problem
Device memory run out
If you receive a message stating that storage or program memory is unavailable, try the
following solutions.
Finding space in storage memory
•Move data to an SD or MMC storage card.
(a) Insert a storage card to your device’s SD/MMC expansion slot.
(b) Tap > Programs > File Explorer .
(c) Tap and hold the file you want to move, then tap Cut from the pop-up menu.
(d) Open the My Documents folder; tap Menu, Edit, then Paste.
NOTE: Files stored in folders other than My Documents or stored in folders within
subfolders in My Documents may not show up in the list view of some programs.
•Move e-mail attachments.
(a) Insert a storage card to your device’s SD/MMC expansion slot.
(b) Tap > Messaging .
(c) On the Messaging tab, select the tap Menu > Tools > Options.
(d) On the Storage tab, select “Store attachments on storage card” check box.
All attachments are moved to the storage card, and new attachments are
automatically stored on the storage card.
(e) Tap ok.
•Set programs such as Notes, Word Mobile, and Excel Mobile to
automatically save new items on the storage card. In the program, tap Menu
> Options.
•Delete unnecessary files.
(a) Tap > Programs > File Explorer .
(b) Locate the file for deletion.
(c) Tap and hold the file, then tap Delete on the pop up menu.

10 User Support
Troubleshooting
215
Finding space in program memory
•Stop programs you are not currently using.
In most cases, programs automatically stop to free needed memory. However, in
some situations, such as when confirmation dialog boxes are waiting for a user
response, the program may not be able to automatically stop. To check the state of
your active programs:
(a) Tap > Settings .
(b) On the System tab, tap Memory.
(c) On the Running Programs tab, tap the program you want to view, then tap
Activate.
(d) Close any open windows or messages and return the program to list view.
If this doesn’t work, you can stop the program manually.
(a) Close all open confirmation dialog boxes and return the program to list view.
(b) Stop the program by tapping Stop or Stop All on the Running Programs tab.
•Clear storage memory as described in the preceding section.
This frees some storage memory so that it can be allocated to program
memory.
•Perform a soft reset on your device. See “To perform a soft reset” on page
218 for more information.
Screen problems
Screen freezes or responds slowly
Perform a soft reset on your device. See “To perform a soft reset” on page 218 for more
information.
Screen is blank
Press and hold the Power button for a full second. If that doesn’t work:
•Remove the battery pack and check if the SIM card holder is closed properly.
•If you are using the device on battery power, shift the device to AC power.
•Perform a soft reset on your device. See “To perform a soft reset” on page
218 for more information.
Screen is dark
Prolonged exposure to direct sunlight may cause your device screen to temporarily
darken. This is normal for LCD screens and is not permanent.
Screen is hard to read
If you’re having a hard time viewing a document in:
•Notes - try changing the size of the view. To do this, tap a zoom percentage
on the Menu.
•Word Mobile and Excel Mobile - try changing the size of the view. Tap View
> Zoom, then select a zoom percentage.
•Internet Explorer - try changing the font size. Tap View > Text Size, then
select a size.
Screen flashes on then off when power button is pressed
This occurs when the screen backlight has automatically turned off but the device is still
powered on.
•Tap the screen or press a key to light the display.
•Set the backlight off time to greater than or equal to the power off time.
Tapping and writing problems
Inaccurate response to stylus taps
Recalibrate the screen. See “Recalibrating the screen” on page 217 for more
information.
Slow or no response
Perform a soft reset on your device. See “To perform a soft reset” on page 218 for more
information.

10 User Support
Troubleshooting
216
IR connection problem
Failure to beam information
If you’re having difficulty transferring information via IR, try the following:
•Transfer only one file or no more than 25 contact cards at a time.
•Align your device’s IR port with that of the receiving device so that they
are unobstructed and within a close range.
•Adjust the room lighting. Some types of light interfere with IR connections.
Try moving to a different location or turning off some lights.
Bluetooth connection problem
Failure to beam information
If you’re having difficulty transferring information via Bluetooth, try the following:
•Transfer only one file or no more than 25 contact cards at a time.
•Turn on Bluetooth for MC35 and the receiving device.
•Make sure the devices are within close range.
Phone connection problem
If you have a problem using the phone function, try the following:
•Check if your device’s wireless connection to your mobile service provider is
switched on and the signal unobstructed.
•Contact your mobile phone service provider for assistance.
Internet connection problem
If you’re having difficulty establishing Internet connection, try the following:
•Make sure you have properly set up a connection to your device ISP
(Internet Service Provider).
•Check if your device’s wireless connection to your mobile service provider is
switched on and the signal unobstructed.
NOTE: When your device is connected to the USB sync cable while the GPRS
function is on, you will not be able to browse web pages.
•Verify your user name and password with your device ISP.
•Verify with your device’s ISP that the network you are trying to connect is
available, or try to connect to it using another device or from a computer.
Network connection problem
If you’re having network connection problems, try the following:
•Check if your device’s wireless connection to your mobile service provider is
switched on and the signal unobstructed.
•Verify that you have added necessary server information.
(a) Tap , Settings.
(b) On the Connections tab, tap Connections .
Most networks use DHCP, so you need not change these settings unless
your network administrator instructs you to do so.
•If the option Network Connection is not listed as a connection method in
the ActiveSync dialog box when starting synchronization, wait for a few
minutes and try again. Also, if synchronization does not start right away,
the network is probably busy, and it may take a minute for your device to
connect to the network.
•Verify your user name and password with your network administrator.
•Verify with your network administrator that the network you are trying to
connect is available, or try to connect to it using another device or from a
computer.
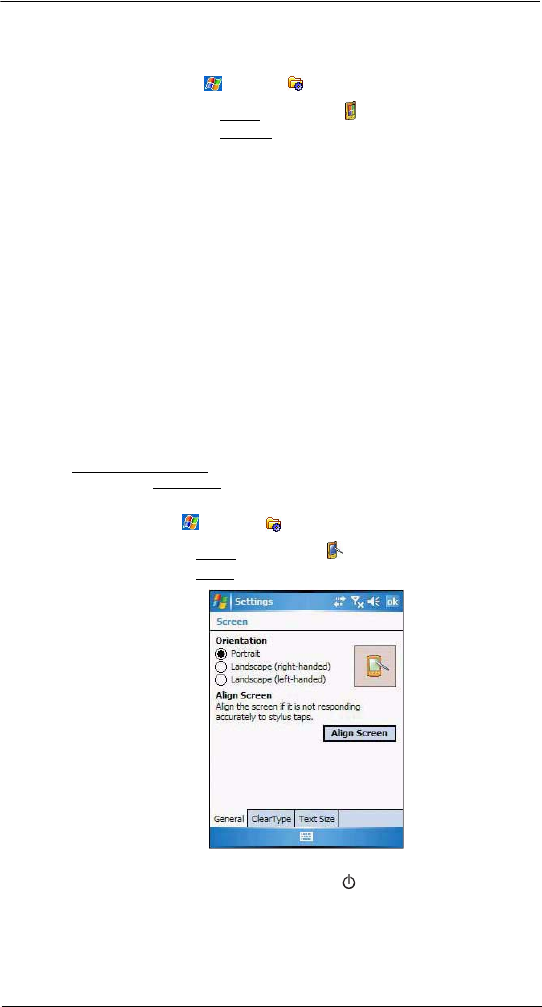
10 User Support
Troubleshooting
217
•You may need to change your device name if you are trying to connect to
a network and cannot because another Pocket PC Phone with the same
name is already connected. To change your device’s name:
(a) Tap > Settings .
(b) On the System tab, tap About .
(c) On the Device ID tab, enter a new name on the Device name field.
(d) Tap ok.
Additional troubleshooting information is available in Connections Help
of your device and on the ActiveSync Help on your computer.
USB cable problem
The following solutions may help if you encounter problems when connecting to your
computer.
•Make sure that your device is turned on.
•Plug the other end of the cable securely into the universal connector on the
base of your device.
Additional troubleshooting information is available in Connections Help of your device
and on the ActiveSync Help on your computer.
Recalibrating the screen
When you first startup your MC35, you are asked to calibrate the screen by tapping the
center of a cross with your stylus as it moves around the screen. This process ensures
that when you tap the screen with your stylus the item tapped is activated.
If, however, while using your device, you discover tapping an item does not bring up the
appropriate response, it means the touch screen has lost its calibration.
To recalibrate the screen:
1 Open the Align Screen via software or hardware function.
•Software launching
(a) Tap > Settings .
(b) On the System tab, tap Screen .
(c) On the Screen tab, tap Align Screen.
•Hardware launching
Simultaneously press the Power button and the joystick.
2 Tap the center of the cross with your stylus as it moves around the screen.
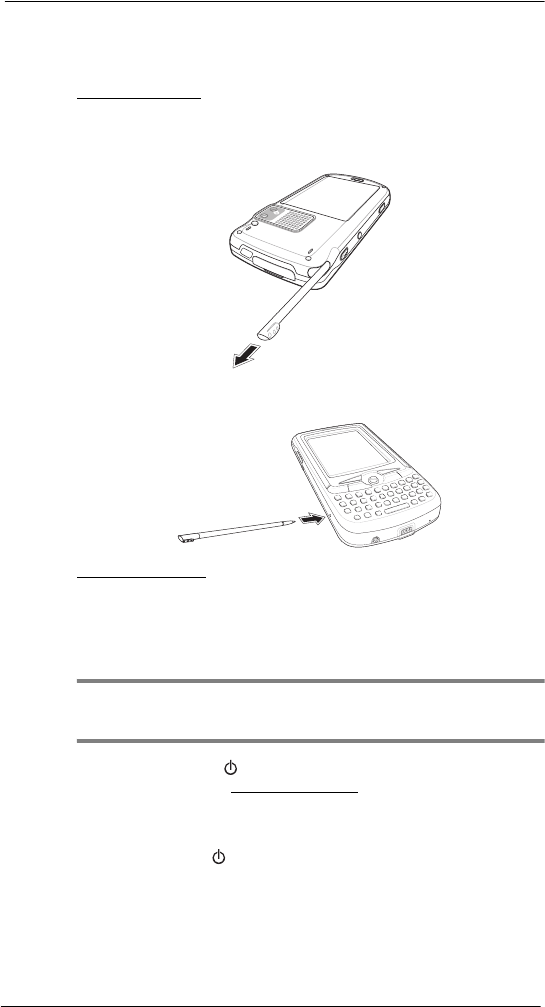
10 User Support
Troubleshooting
218
Resetting your MC35
You may have to perform a reset if the device freezes (i.e., device no longer responds to
the buttons on the screen).
To perform a soft reset:
A soft reset allows your device to get a fresh start, similar to rebooting a computer. This
restarts your device and adjusts memory allocation. All records and entries are retained
after a soft reset. Unsaved data in open programs may in some cases be lost.
1 Remove the stylus from its holder.
2 Lightly press the tip of the stylus to the reset button located on the lower-left side of
the device.
To perform a hard reset:
A hard reset removes power to your device. This erases all records and entries, deletes
all additional programs you have installed, and restores the device’s default factory
settings. Never perform a hard reset unless a soft reset does not correct your problem.
When you perform your next ActiveSync operation, you can restore any data that you
previously synchronized to your computer or you can restore data that you backed up to
a storage card.
NOTE: When you perform a hard reset, the date and time settings are not retained.
Formats, preferences, and other settings are restored to their default factory
settings.
1 Hold down the Power and Push to Talk buttons.
2 While holding down the Power and Push to Talk buttons, gently press the tip of the
stylus to the Reset button.
The message “To clear all data in the memory, press Volume Up button. To cancel
the operation, press Volume Down Button.” appears.
3 Release the Power and Push to Talk buttons.
4 Press the top key of the Volume button.
You will be prompted to confirm the hard reset.

10 User Support
Troubleshooting
219
Battery pack information
CAUTION: DANGER OF EXPLOSION IF BATTERY IS INCORRECTLY REPLACED. REPLACE
ONLY WITH THE SAME OR EQUIVALENT TYPE RECOMMENDED BY THE MANUFACTURER.
DISPOSE OF USED BATTERIES ACCORDING TO THE MANUFACTURER’S INSTRUCTIONS.
This device is equipped with a removable and rechargeable Lithium polymer battery .
When a replacement is needed, please request the dealer from whom your device was
purchased to assist you. Use only manufacturer approved batteries.
Battery pack reminders
•Do not disassemble or open crush, bend or deform, puncture or shred.
•Do not modify or remanufacture, attempt to insert foreign objects into the
battery, immerse or expose to water or other liquids, expose to fire,
explosion or other hazard.
•Only use the battery for the system for which it is specified.
•Only use the battery with a charging system that has been qualified with the
system per this standard. Use of an unqualified battery or charger may
present a risk of fire, explosion, leakage, or other hazard.
•Do not short circuit a battery or allow metallic conductive objects to contact
battery terminals.
•Replace the battery only with another battery that has been qualified with the
system per this standard, IEEE-Std-1725-200x. Use of an unqualified battery
may present a risk of fire, explosion, leakage or other hazard.
•Promptly dispose of used batteries in accordance with local regulations
•Battery usage by children should be supervised.
•Avoid dropping the phone or battery. If the phone or battery is dropped,
especially on a hard surface, and the user suspects damage, take it to a
service center for inspection.
•Improper battery use may result in a fire, explosion or other hazard.

10 User Support
Troubleshooting
220

221
Index
A
activate profile 134
ActiveSync 30
install 3
requirements 3
synchronize Calendar 65
synchronize Contacts 69
synchronize Tasks 71, 73
synchronize with server 34
add program 206
AirBEAM 181
Client 182
configuration
Misc(1) tab 185
Misc(2) tab 186
Misc(3) tab 187
Misc(4) tab 187
Packages(1) tab 183
Packages(2) tab 184
Server tab 184
configure 182
package builder 182
rapid deployment 191
staging 189
synchronization with server 188
B
back up 211
Bluetooth
create partnership 46
send items 48
C
Calendar 63
call history 131
call hold 122
Call Me Alert
send 155
call notes 123
call notification 122
caller identification 122
Camera 173
camera screen 173
capture bar code data 176
capture mode
bar code 176
camera 173
record video clip 175
settings 177
take photo 174
view photos 177
view video clip 177
CamWedge 178
configure 178
Log window 181
menu 178
Test window 180
command interface 17
command bar 20
navigation bar 18
notifications 20
pop-up menus 20
Today screen 17
command bar 20
navigation bar 18
Start menu 18
status icons 18
companion programs 145
media-related 164
phone management 145
product download-related 181
wireless communication 148
conference call 123
connections settings 203
Beam 203
Bluetooth 204
Connections 204
Express GPS Connect 204
Network Cards 205
USB to PC 205
WiFi 205
WiFi Card Setting 205
Wireless Manager 206
connectivity features 43
Bluetooth 45
connect to e-mail server 61
e-mail service 62
infrared 44
WiFi 50
Contacts 66
beam 69
call 67
create 66
find 67
send a message 68
summary screen 67
view 66
contacts integration 129
copyright iv
customer support 209
customize features
install/remove program
add 206
using ActiveSync 206
via Internet 207
remove 208
customize MC35 193
D
data capture
RD bar codes 191
device 218
activate from sleep mode 214
guides 209
lock 211
reset 218
device features 7
accessories 9
audio 7
battery pack 8
connectivity 8
display 7
ergonomics 8
performance 7
dialer screen 112
buttons 112

222
Download Agent 192
draw on the screen 27
E
e-mail service 62
enter data 21
using block recognizer 23
using input panel 21
using keypad 21
enter PIN 111
Excel Mobile 81
create 82
Express GPS Connect 160
configure 163
F
flight mode
turn off 60
turn on 60
G
GPRS connection 49
configure 49
GPRS Setting 157
configure 157
H
hardware interface 12
keypad 14
SD/MMC expansion slot 12
soft buttons 14
stylus 12
touch screen backlight key 12
hardware tour 10
I
Inbox 74
Index 221
infrared
receive items 45
input panel 21
Internet Explorer Mobile 96
browse 96
Mobile favorites 97
Internet Sharing 148
L
lock
keypad 210
screen 210
M
manage applications 39
find information 42
open programs 39
organize information 42
media-related program 164
Camera 173
CamWedge 178
Pictures & Videos 164
Microsoft Pocket Outlook 63
Calendar 63
open 63
schedule appointment 64
Contacts 66
Inbox 74
Notes 72
create note 72
open 72
Tasks 70
Mobility Services Platform Console 190
MSP 190
My Text 29
N
Notes 72
P
package contents 1
personal settings 193
Buttons 194
Input 194
Lock 194
Menus 195
MSN Options 195
Owner Information 196
Phone 196
Sounds & Notification 197
Today 197
phone 109
adjust volume 116
answer a call 116
end a call 116
erase number input 115
mute a call 117
reject a call 116
setup 109
speakerphone 116
status icons 113
turn off 115
turn on 114
phone calls 117
International call 121
using Bluetooth-enabled
headset 120
using Call History 119
using dialer 117
using Microsoft Contacts 118
using SIM Manager 120
using Speed Dial 118
phone features 121
phone function 109
phone management
SIM Manager 145
SIM Toolkit 147
phone preferences 136
network 142
phone tab 136
services 138
call barring 138
call forwarding 139
call waiting 140
caller ID 139
fixed dialing 141
voice mail and text
messages 141
Pictures & Videos 164
customize 171
full screen mode 167
slide show mode 170
thumbnail mode 166
Pocket MSN 99
Help 99
MSN Hotmail 99
view Hotmail Inbox 101
MSN Messenger 99

223
set up 103
sign in 105
MSN Mobile Home 99
Sign in 100
PowerPoint Mobile 83
open a slide show 83
slide show playback options 85
product download-related program 181
AirBEAM Smart 181
Download Agent 192
Rapid Deployment Client 190
PTT
turn off 157
turn on 157
PTT Call History
view 155
PTT calls 154
make call 154
receive call 154
PTT Contacts 154
add group 153
add individual 151
delete group 153
delete individual 152
edit individual 152
leave group 153
rename group 153
status icons 154
PTT service
initialize 150
PTT Settings
auto accept invites 156
change presence status 156
Push to Talk 149
R
Rapid Deployment Client 190
record message 28
remove program 208
S
screen 217
calibrate 217
setup 2
charge 2
LED status 3
setup procedures 1
charge your device 2
install battery pack 2
turn on 4
uninstall battery pack 2
sharing contacts 129
call history 130
Microsoft Contacts 129
SIM Contacts 130
SIM card
install 109
SIM Manager 145
load 145
SIM Toolkit 147
speakerphone 116
storage card
insert 12
remove 13
synchronize with PC
using Bluetooth 32
using USB 31
system settings 198
About 198
Brightness 198
Certificates 199
Clock & Alarms 199
Error reporting 199
GPS 200
Memory 200
Phone Profiles 200
Power 201
Regional Settings 201
Remove Programs 202
Screen 202
SIM Manager 202
System Information 203
T
Tasks 70
beam 71
create 70
summary screen 71
Terminal Services Client 158
connecting 158
text messaging 125
troubleshooting 213
battery loses power 213
battery problem 213
cable problem 217
connection problem
Bluetooth 216
Internet 216
IR 216
network 216
phone connection 216
memory problem 214
password problem 214
reminders 213
screen problems 215
writing problems 215
U
unlock
keypad 210
screen 210
V
voice mail 128
W
Windows Media Player 86
customize 92
file playback 91
library 87
playback controls 92
playlist 87
wireless communication program 148
Express GPS Connect 160
GPRS Setting 157
Internet Sharing 148
Push to Talk 149
Terminal Services Client 158
Word Mobile 78
create 79
file list 79, 82

224