Netgear orporated 16200344 AC1900 Smart WiFi Router / AC1750 Smart WiFi Router User Manual rev
Netgear Incorporated AC1900 Smart WiFi Router / AC1750 Smart WiFi Router rev
Contents
- 1. User Manual rev
- 2. User Manual (Statements)
- 3. User Manual statement
- 4. User Manual
User Manual rev
Quick Start
AC1900 Smart WiFi Router
Model R6800
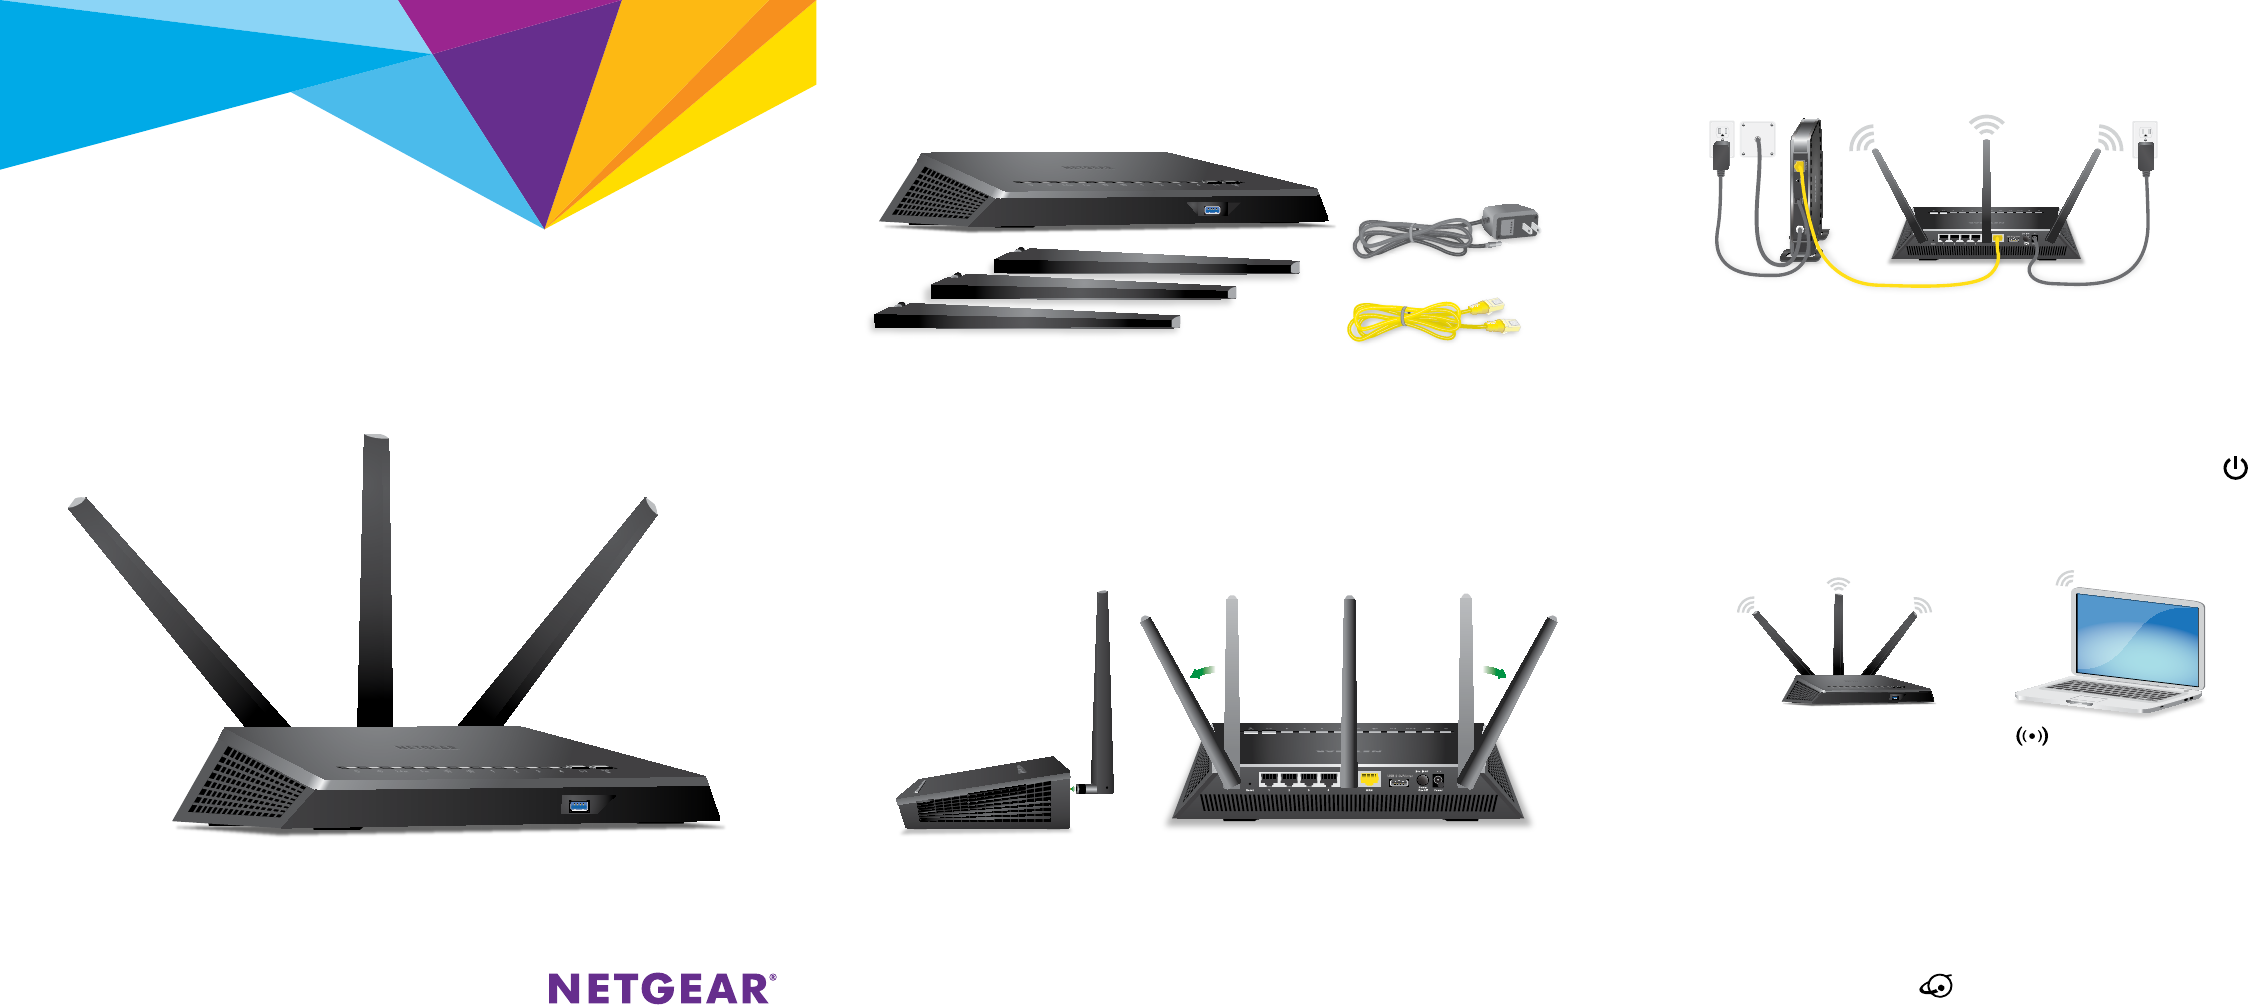
For the best WiFi performance, position the antennas as shown.
Package Contents
Router
Power adapter
(varies by region)
Ethernet cable
1. Position the Antennas
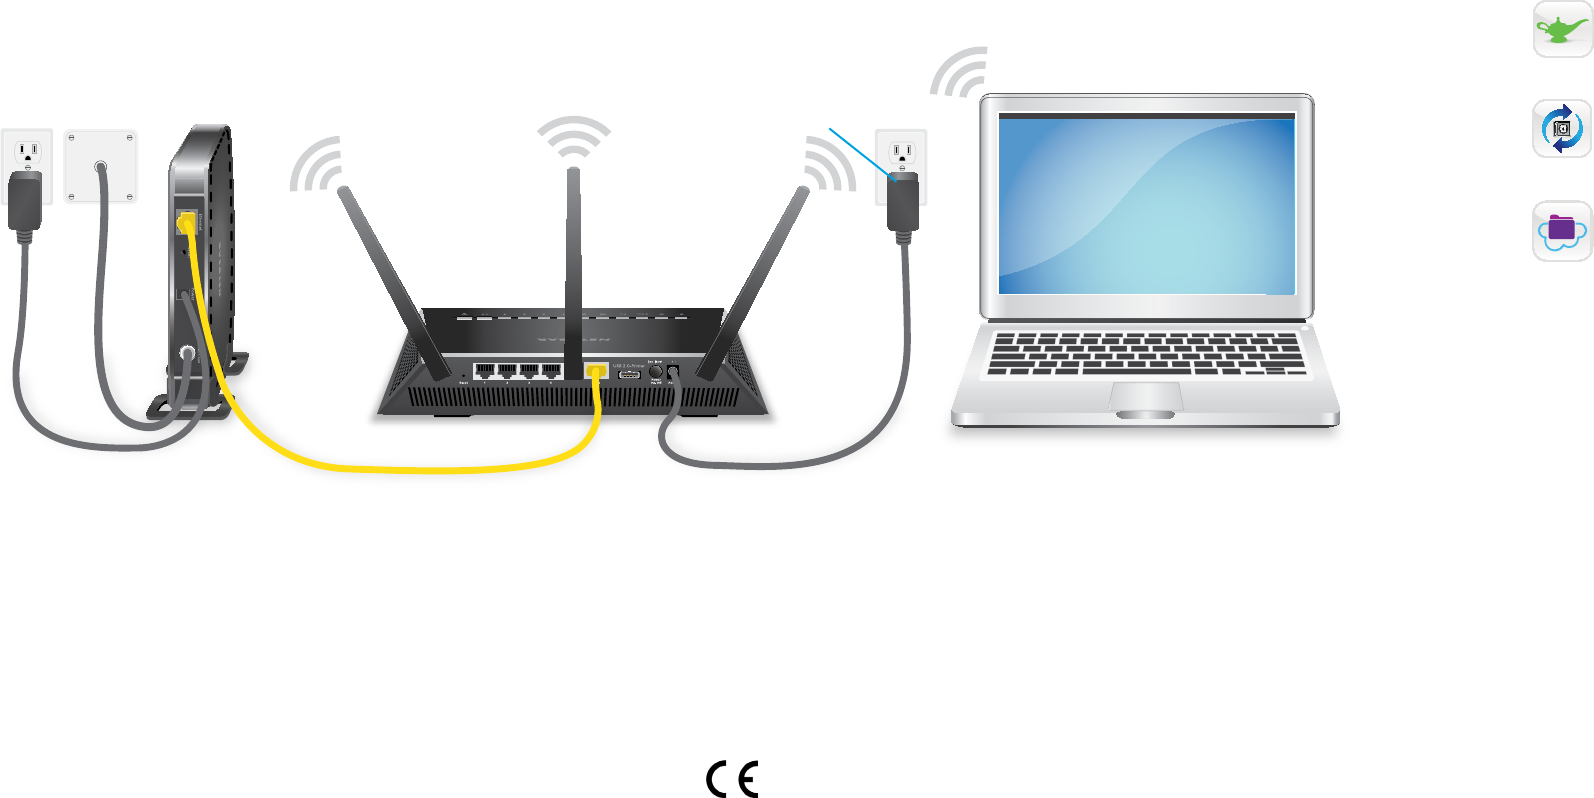
Unplug your modem, remove and replace the backup battery if it uses one, and then
plug the modem back in. Use the Ethernet cable to connect the modem to the yellow
Internet port on the router.
Note: If your Internet connection does not require a modem, connect your main
Ethernet cable to the yellow Internet port on the router.
Connect the router to a power source. The router’s Power LED lights amber and
then turns white when the router is ready.
Make sure that the router’s WiFi LED is lit. Look on the router’s label for the
preassigned WiFi network name (SSID) and network key (password).
Open the WiFi connection manager on your WiFi‑enabled computer or mobile device,
find the router’s SSID, and use the router’s password to connect to the router’s WiFi
network.
Launch a web browser. If the installation assistant does not display, visit www.
routerlogin.net. If a login window displays, enter admin for the admin user name and
password for the admin password.
Follow the on‑screen instructions to connect to the Internet.
The router’s Internet LED lights white when the router is connected to the
Internet.
2. Restart Your Modem and
Plug In Your Router
3. Connect to the Internet
Antennas (3)
45° 45°
All Set Up!
Router
Modem
Ethernet cable
Internet
For more information about your router, see the Do More booklet.
September 2016
NETGEAR, Inc.
350 East Plumeria Drive
San Jose, CA 95134, USA
Computer
Power
adapter
NETGEAR INTL LTD
Building 3, University Technology Centre
Curraheen Road, Cork, Ireland
Get Free Apps
Start enjoying your new router right away with free apps that make management simple.
Visit netgear.com/support to download the apps.
NETGEAR genie. Personal dashboard to monitor, control, and repair your home
network. Includes remote access to manage your network away from home.
ReadySHARE Vault. Free software for automatic backup of a Windows
computer to a USB hard drive connected to the router.
ReadyCLOUD. Enjoy personal and secure cloud access to USB storage anytime,
anywhere.
Support
Thank you for purchasing this NETGEAR product. You can visit
www.netgear.com/support to register your product, get help, access the latest
downloads and user manuals, and join our community. We recommend that you use only
official NETGEAR support resources.
For the current EU Declaration of Conformity, visit
http://support.netgear.com/app/answers/detail/a_id/11621/.
For regulatory compliance information, visit
http://www.netgear.com/about/regulatory/.
See the regulatory compliance document before connecting the power supply.
© NETGEAR, Inc., NETGEAR and the NETGEAR Logo are trademarks of NETGEAR, Inc.
Any non‑NETGEAR trademarks are used for reference purposes only.
BETA DOCUMENT
Quick Start
AC1750 Smart WiFi Router
Model R6700v2
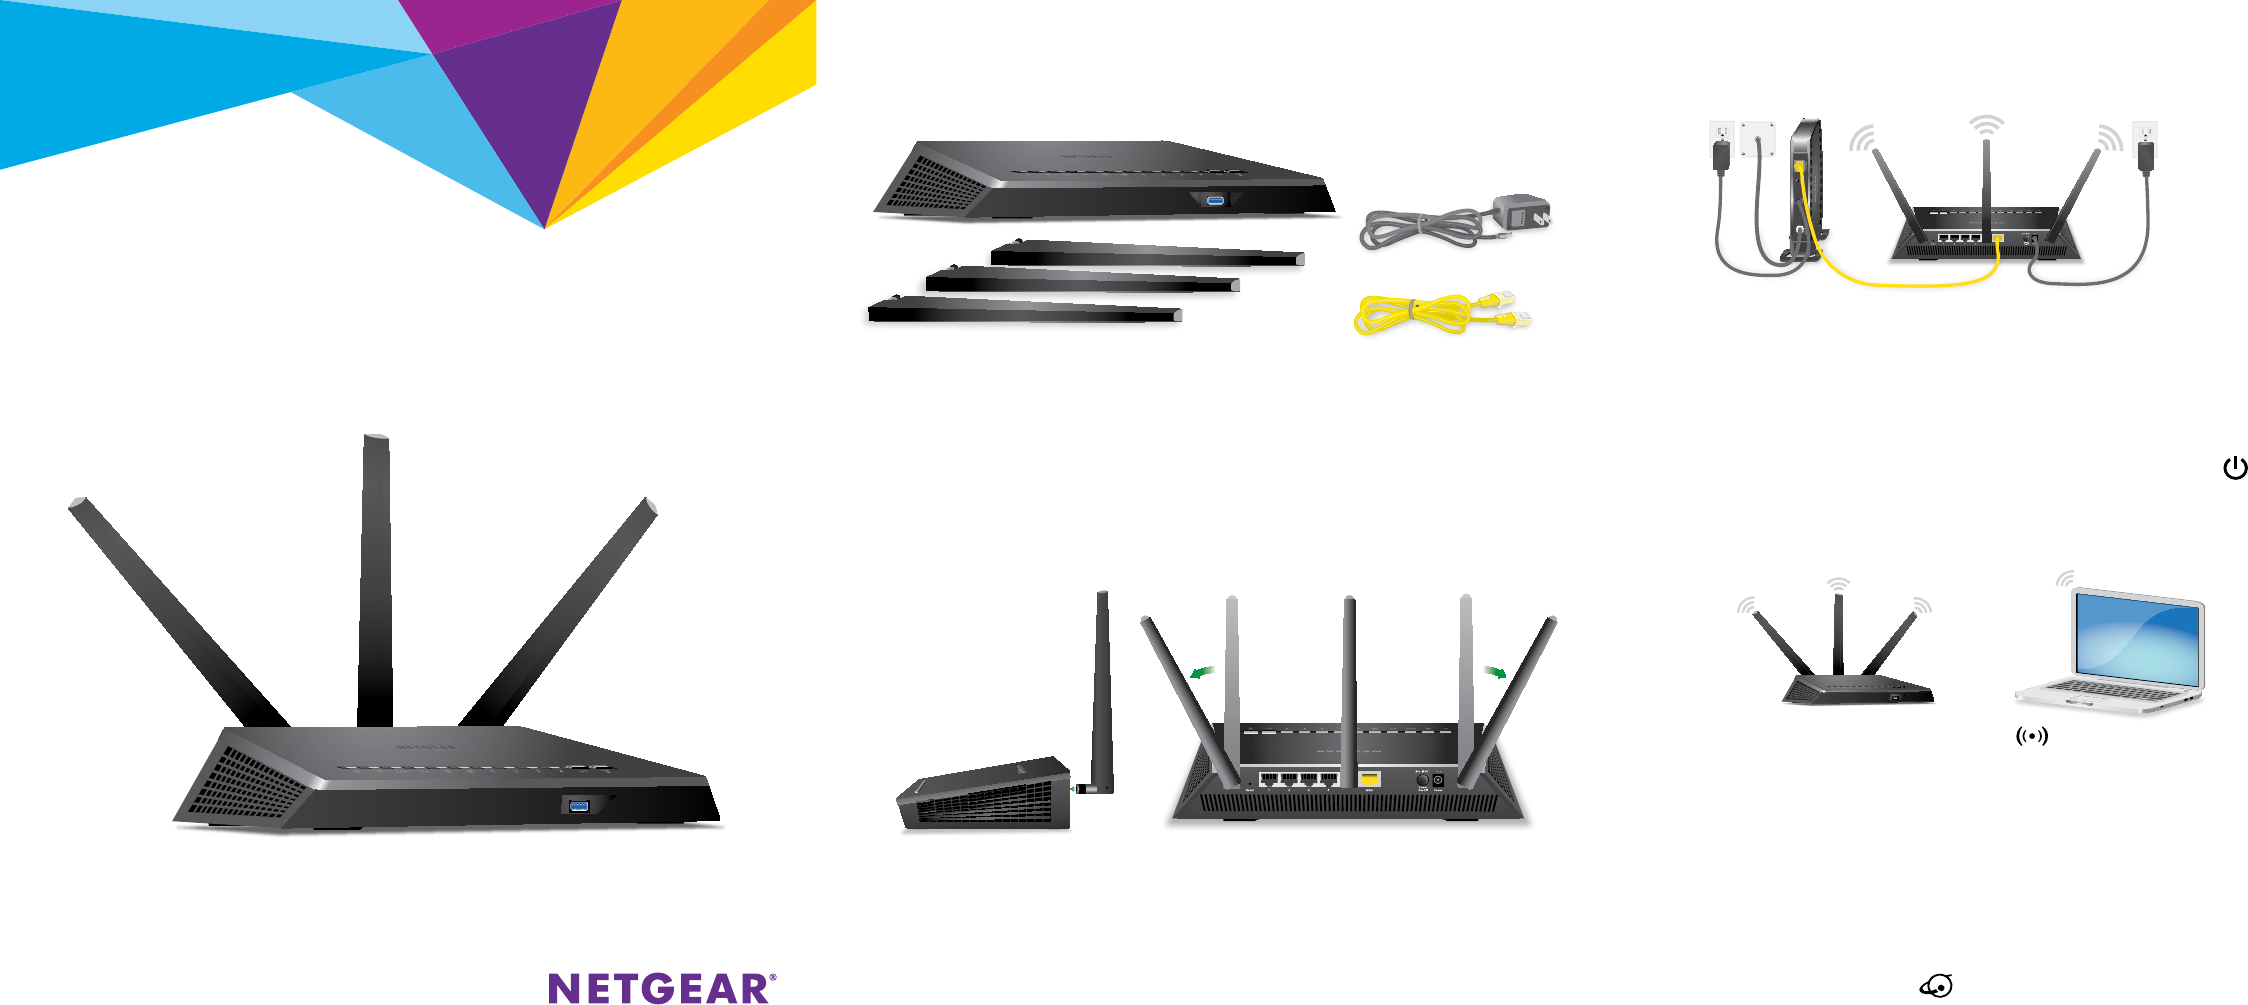
For the best WiFi performance, position the antennas as shown.
Package Contents
Router Power adapter
(varies by region)
Ethernet cable
1. Position the Antennas
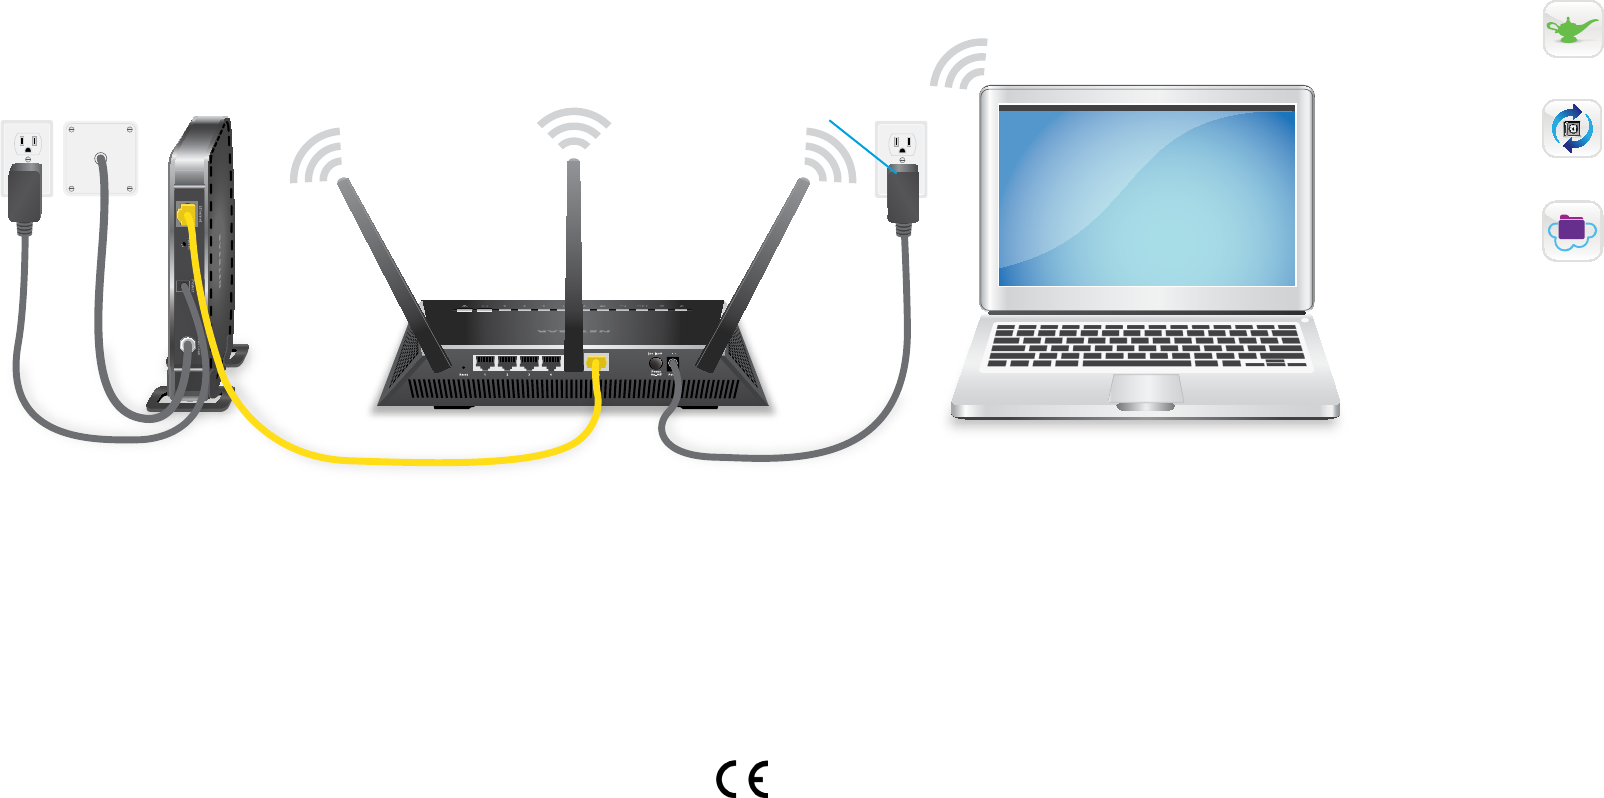
Unplug your modem, remove and replace the backup battery if it uses one, and then
plug the modem back in. Use the Ethernet cable to connect the modem to the yellow
Internet port on the router.
Note: If your Internet connection does not require a modem, connect your main
Ethernet cable to the yellow Internet port on the router.
Connect the router to a power source. The router’s Power LED lights amber and
then turns white when the router is ready.
Make sure that the router’s WiFi LED is lit. Look on the router’s label for the
preassigned WiFi network name (SSID) and network key (password).
Open the WiFi connection manager on your WiFi‑enabled computer or mobile device,
find the router’s SSID, and use the router’s password to connect to the router’s WiFi
network.
Launch a web browser. If the installation assistant does not display, visit www.
routerlogin.net. If a login window displays, enter admin for the admin user name and
password for the admin password.
Follow the on‑screen instructions to connect to the Internet.
The router’s Internet LED lights white when the router is connected to the
Internet.
2. Restart Your Modem and
Plug In Your Router
3. Connect to the Internet
Antennas (3)
45° 45°
All Set Up!
Router
Modem
Ethernet cable
Internet
For more information about your router, see the Do More booklet.
September 2016
NETGEAR, Inc.
350 East Plumeria Drive
San Jose, CA 95134, USA
Computer
Power
adapter
NETGEAR INTL LTD
Building 3, University Technology Centre
Curraheen Road, Cork, Ireland
Get Free Apps
Start enjoying your new router right away with free apps that make management simple.
Visit netgear.com/support to download the apps.
NETGEAR genie. Personal dashboard to monitor, control, and repair your home
network. Includes remote access to manage your network away from home.
ReadySHARE Vault. Free software for automatic backup of a Windows
computer to a USB hard drive connected to the router.
ReadyCLOUD. Enjoy personal and secure cloud access to USB storage anytime,
anywhere.
Support
Thank you for purchasing this NETGEAR product. You can visit
www.netgear.com/support to register your product, get help, access the latest
downloads and user manuals, and join our community. We recommend that you use only
official NETGEAR support resources.
For the current EU Declaration of Conformity, visit
http://support.netgear.com/app/answers/detail/a_id/11621/.
For regulatory compliance information, visit
http://www.netgear.com/about/regulatory/.
See the regulatory compliance document before connecting the power supply.
© NETGEAR, Inc., NETGEAR and the NETGEAR Logo are trademarks of NETGEAR, Inc.
Any non‑NETGEAR trademarks are used for reference purposes only.
BETA DOCUMENT
Quick Start
AC1750 Smart WiFi Router
Model R6700v2
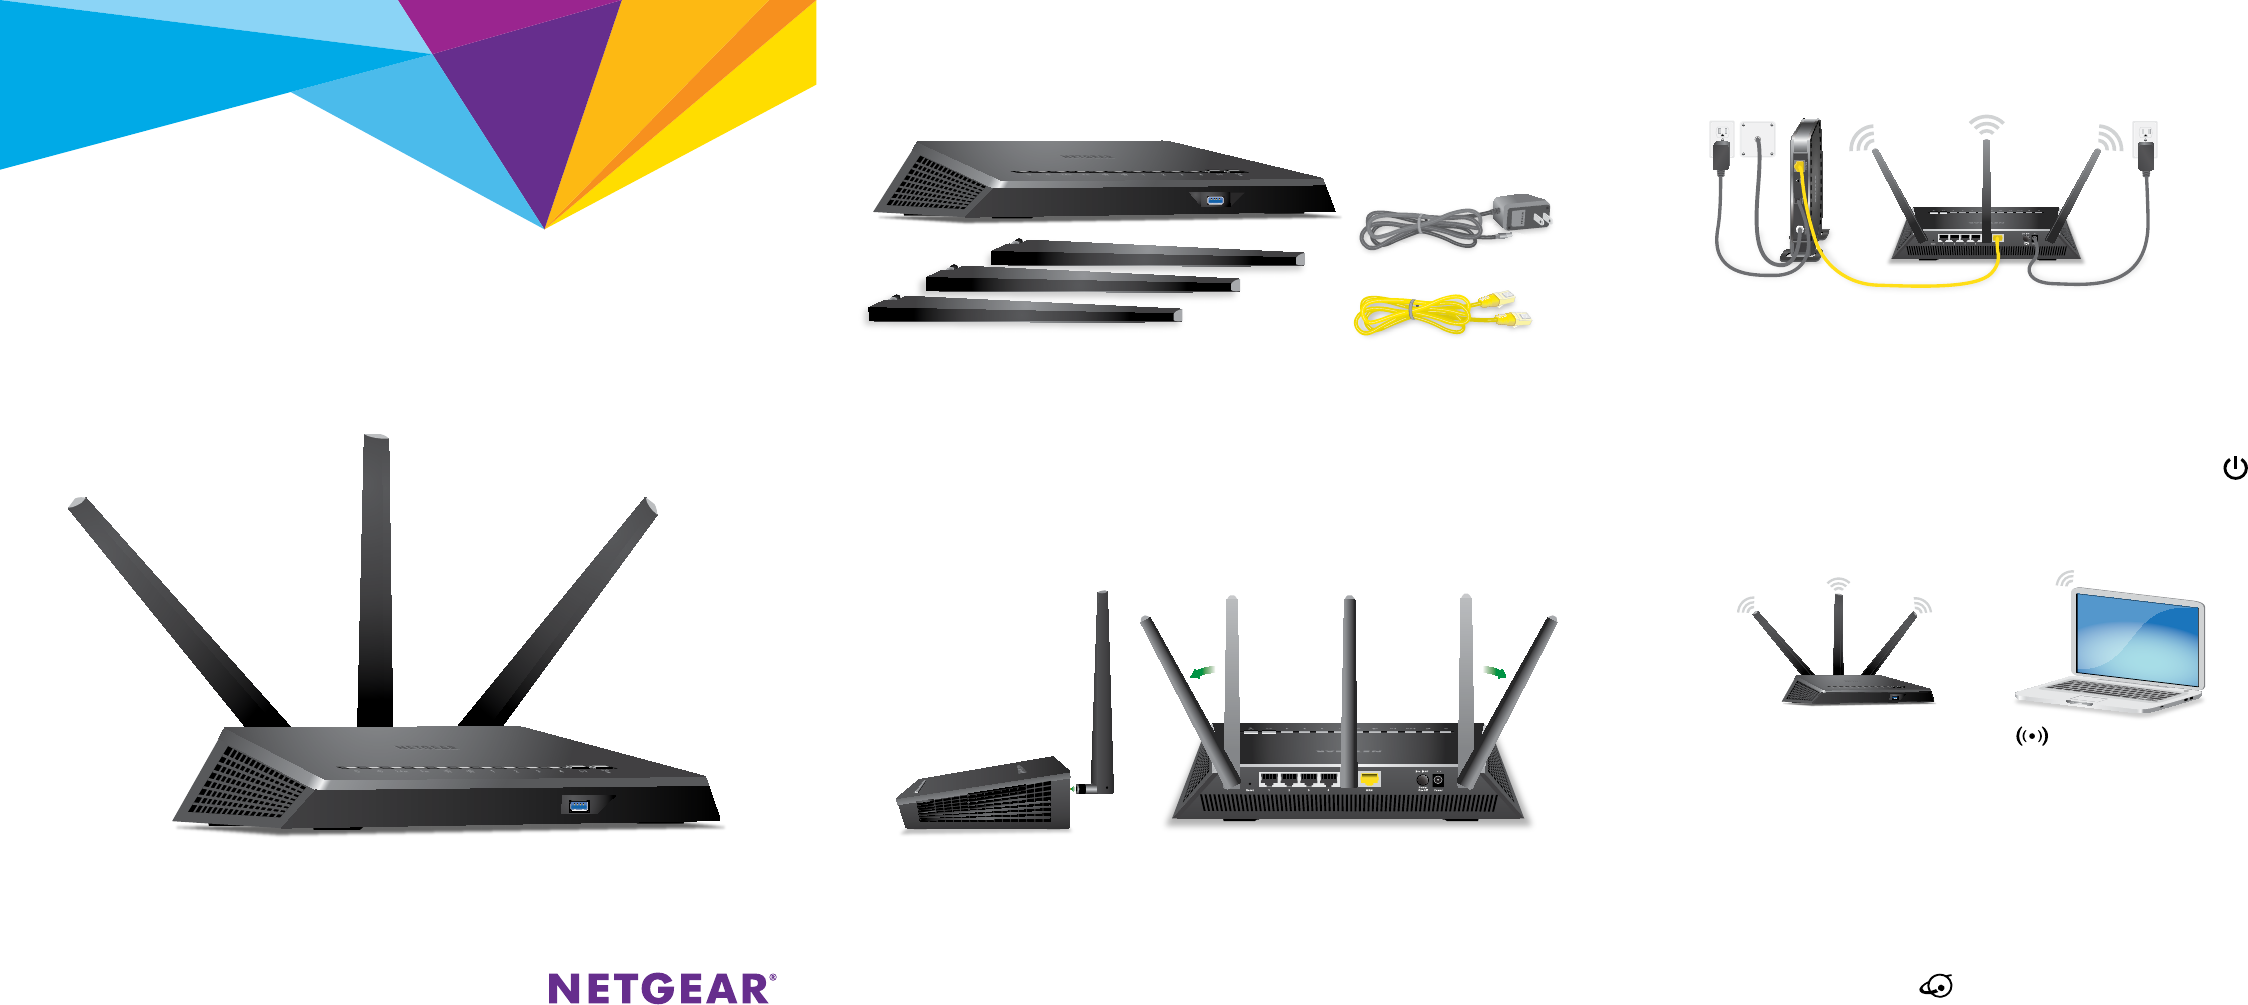
For the best WiFi performance, position the antennas as shown.
Package Contents
Router Power adapter
(varies by region)
Ethernet cable
1. Position the Antennas
Unplug your modem, remove and replace the backup battery if it uses one, and then
plug the modem back in. Use the Ethernet cable to connect the modem to the yellow
Internet port on the router.
Note: If your Internet connection does not require a modem, connect your main
Ethernet cable to the yellow Internet port on the router.
Connect the router to a power source. The router’s Power LED lights amber and
then turns white when the router is ready.
Make sure that the router’s WiFi LED is lit. Look on the router’s label for the
preassigned WiFi network name (SSID) and network key (password).
Open the WiFi connection manager on your WiFi‑enabled computer or mobile device,
find the router’s SSID, and use the router’s password to connect to the router’s WiFi
network.
Launch a web browser. If the installation assistant does not display, visit www.
routerlogin.net. If a login window displays, enter admin for the admin user name and
password for the admin password.
Follow the on‑screen instructions to connect to the Internet.
The router’s Internet LED lights white when the router is connected to the
Internet.
2. Restart Your Modem and
Plug In Your Router
3. Connect to the Internet
Antennas (3)
45° 45°
AC1900 Smart WiFi Router
Model R6900v2
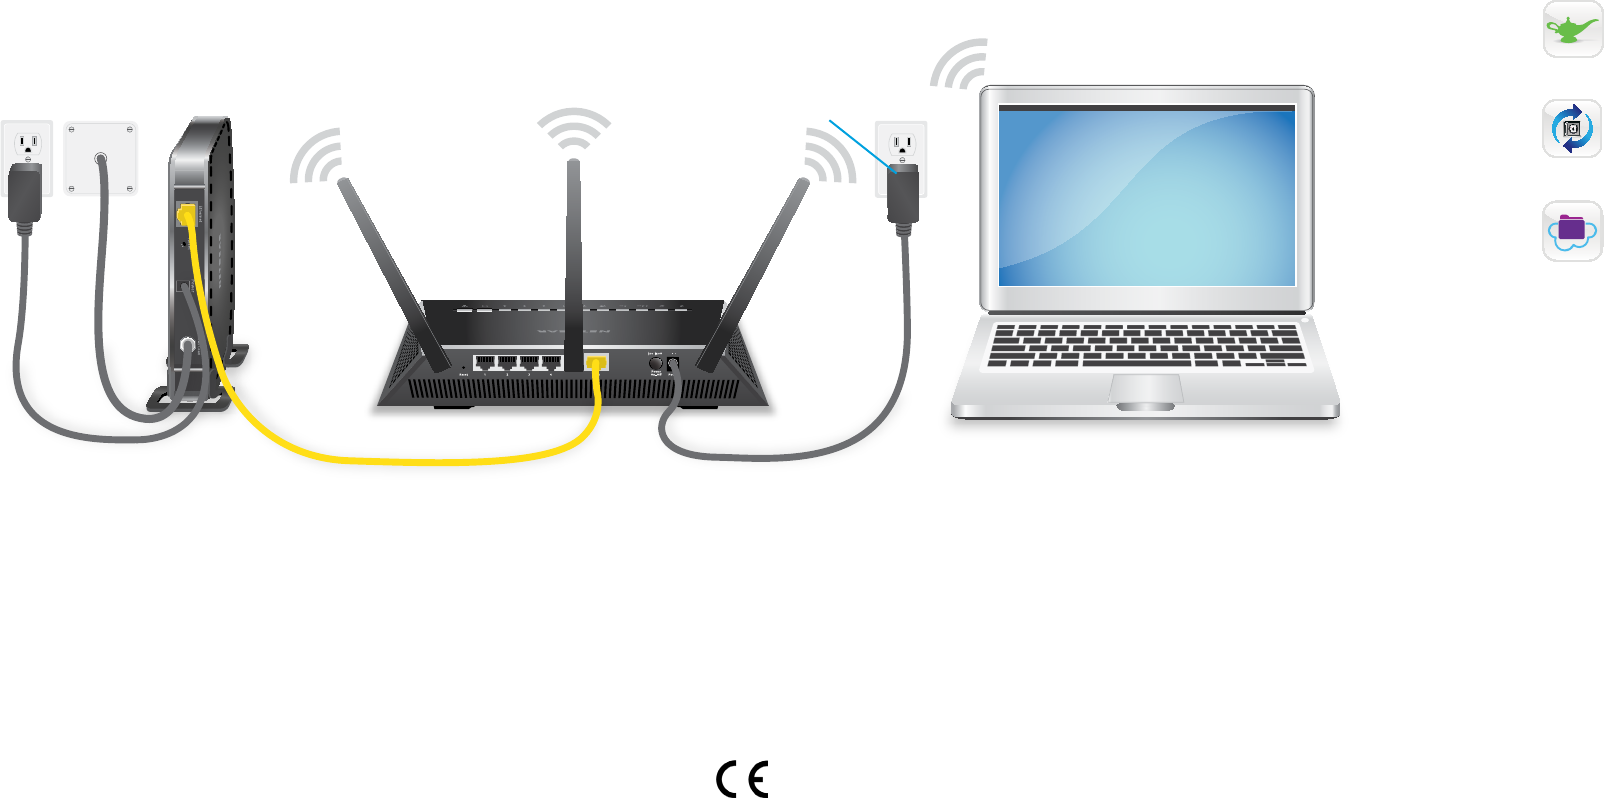
All Set Up!
Router
Modem
Ethernet cable
Internet
For more information about your router, see the Do More booklet.
September 2016
NETGEAR, Inc.
350 East Plumeria Drive
San Jose, CA 95134, USA
Computer
Power
adapter
NETGEAR INTL LTD
Building 3, University Technology Centre
Curraheen Road, Cork, Ireland
Get Free Apps
Start enjoying your new router right away with free apps that make management simple.
Visit netgear.com/support to download the apps.
NETGEAR genie. Personal dashboard to monitor, control, and repair your home
network. Includes remote access to manage your network away from home.
ReadySHARE Vault. Free software for automatic backup of a Windows
computer to a USB hard drive connected to the router.
ReadyCLOUD. Enjoy personal and secure cloud access to USB storage anytime,
anywhere.
Support
Thank you for purchasing this NETGEAR product. You can visit
www.netgear.com/support to register your product, get help, access the latest
downloads and user manuals, and join our community. We recommend that you use only
official NETGEAR support resources.
For the current EU Declaration of Conformity, visit
http://support.netgear.com/app/answers/detail/a_id/11621/.
For regulatory compliance information, visit
http://www.netgear.com/about/regulatory/.
See the regulatory compliance document before connecting the power supply.
© NETGEAR, Inc., NETGEAR and the NETGEAR Logo are trademarks of NETGEAR, Inc.
Any non‑NETGEAR trademarks are used for reference purposes only.
BETA DOCUMENT