OPENERS DMP-2010 MP3 PLAYER User Manual
OPENERS Co., Ltd. MP3 PLAYER
UserManual.wiki
>
OPENERS
>
DMP 2010 User Manual
USER MANUAL
Navigation menu
Upload a User Manual
Namespaces
Wiki Guide
HTML
PDF
Info
Views
User Manual
Discussion / Help
Navigation

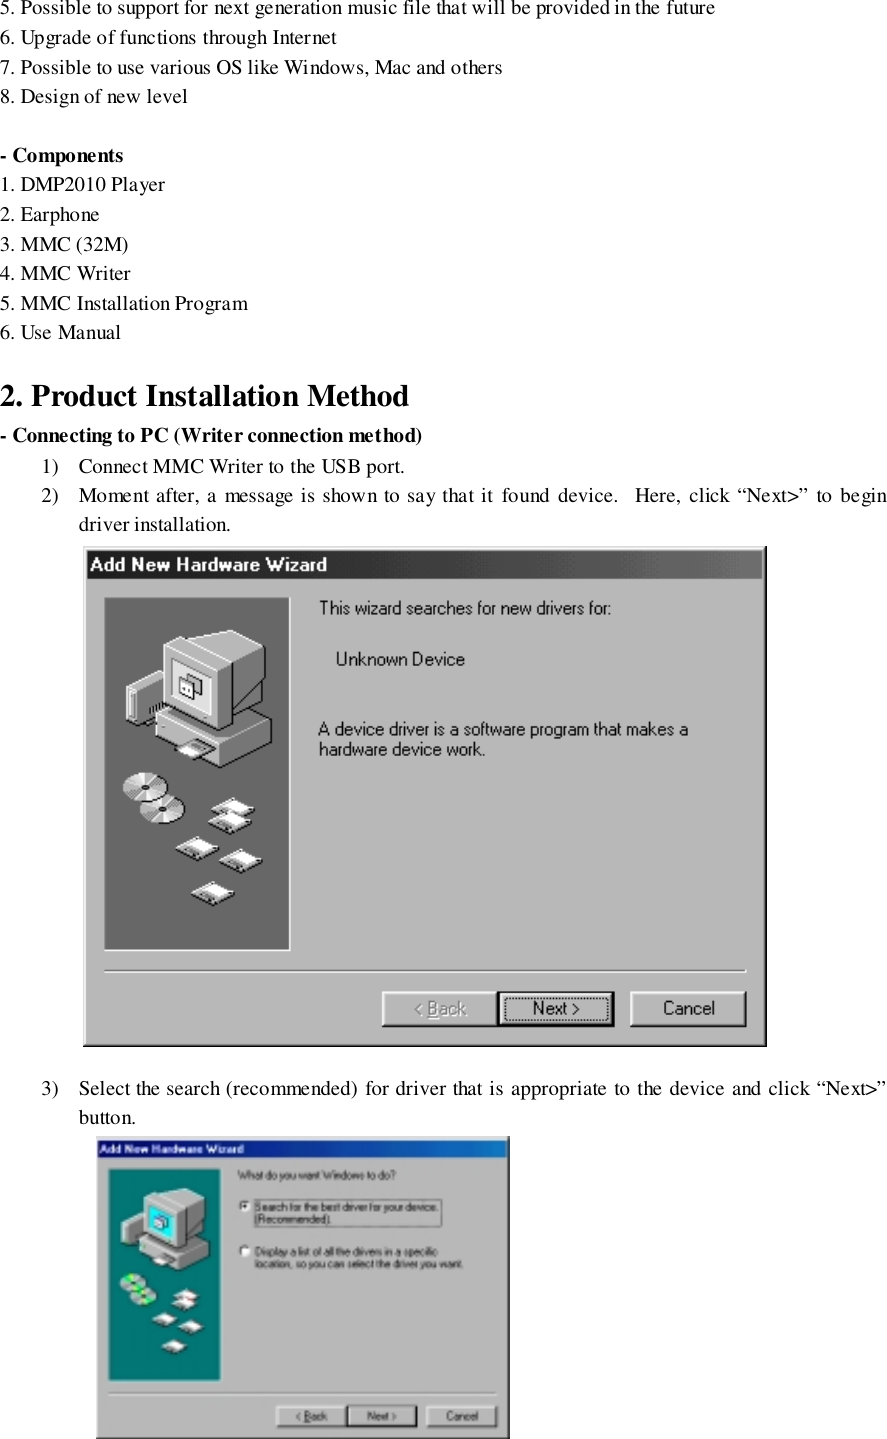
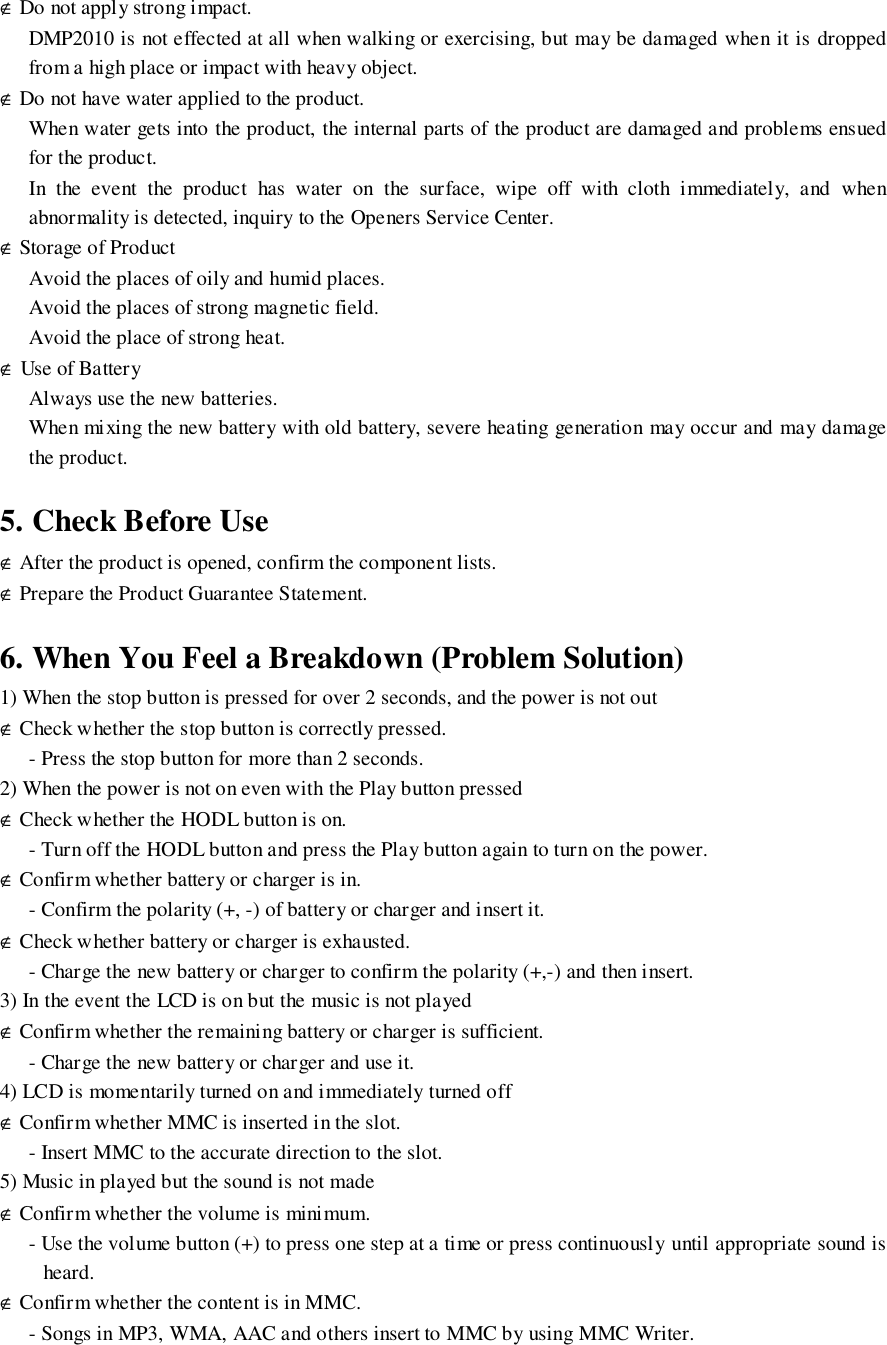
![* When program is executed, the following picture appears.After inserting the MMC card into Writer, press 2 button.- Program Use Method* Download (File copy with MMC card at PC)1) Set-Shell is executed at [Begin]-[Program (P)]-[cowon]-[Jet-Shell].*Click twice when executing the program.2) Insert MMC card into Writer.3) After selecting the desired file, press " " button.* Upload (File copy at MMC card to PC) <Upload function is not supported only when the expanding is MP3>1) Set-Shell is executed at [Begin]-[Program (P)]-[cowon]-[Jet-Shell]. *Click twice when executing the program.2) Insert MMC card into Writer.](https://usermanual.wiki/OPENERS/DMP-2010/User-Guide-126721-Page-8.png)
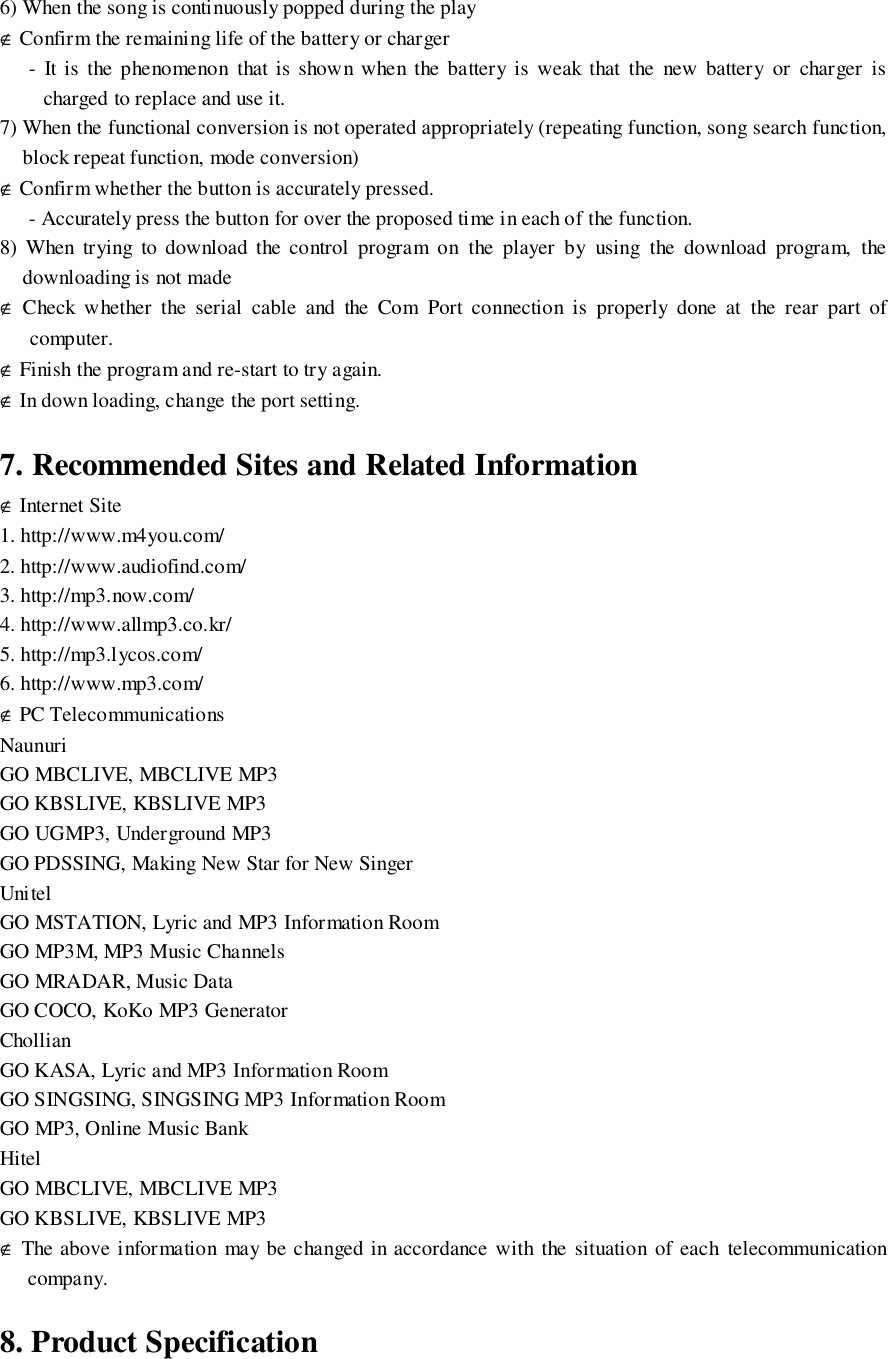
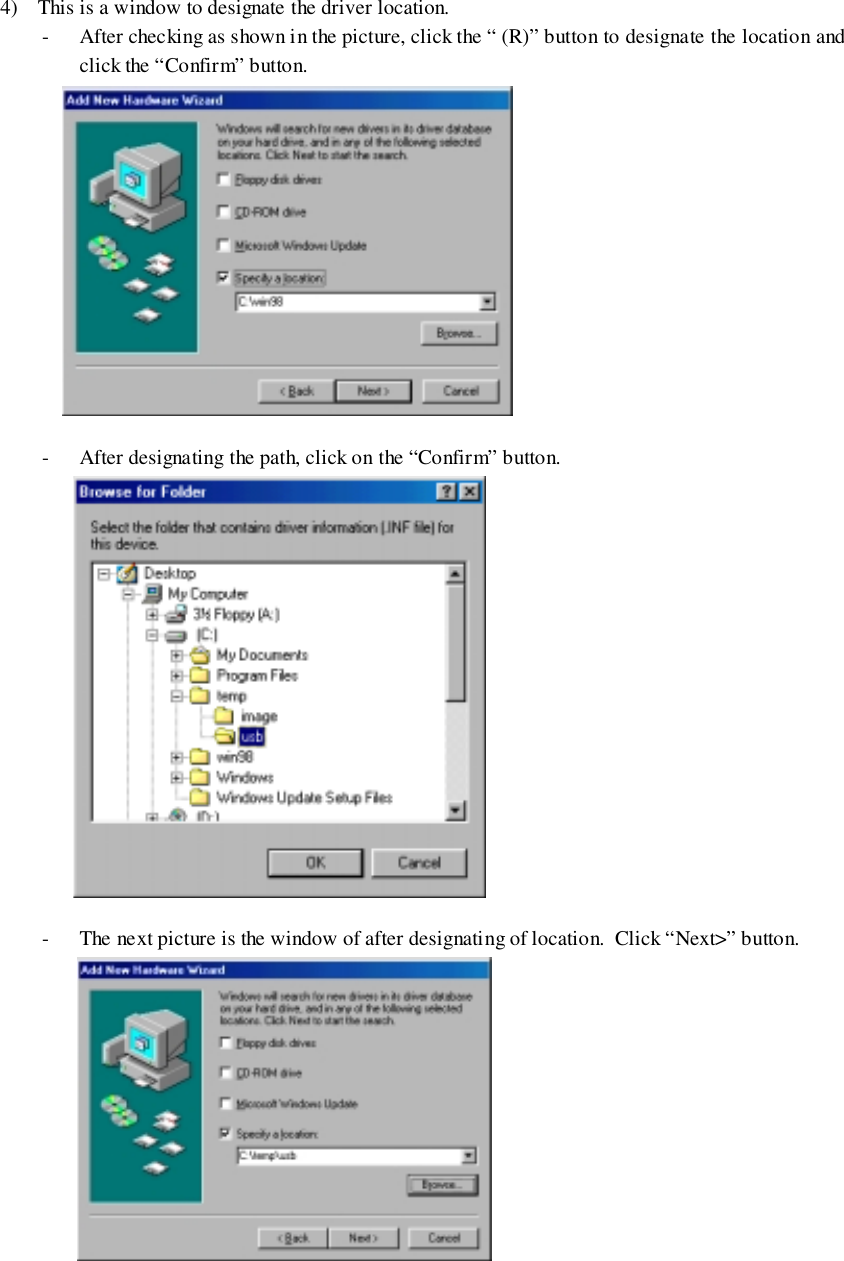
![3) After selecting the desired file, press " " button.* Delete the file from MMC card1) Set-Shell is executed at [Begin]-[Program (P)]-[cowon]-[Jet-Shell]. *Click twice when executing the program.2) Insert MMC card into Writer.3) After selecting the desired file, press " X " button.](https://usermanual.wiki/OPENERS/DMP-2010/User-Guide-126721-Page-9.png)
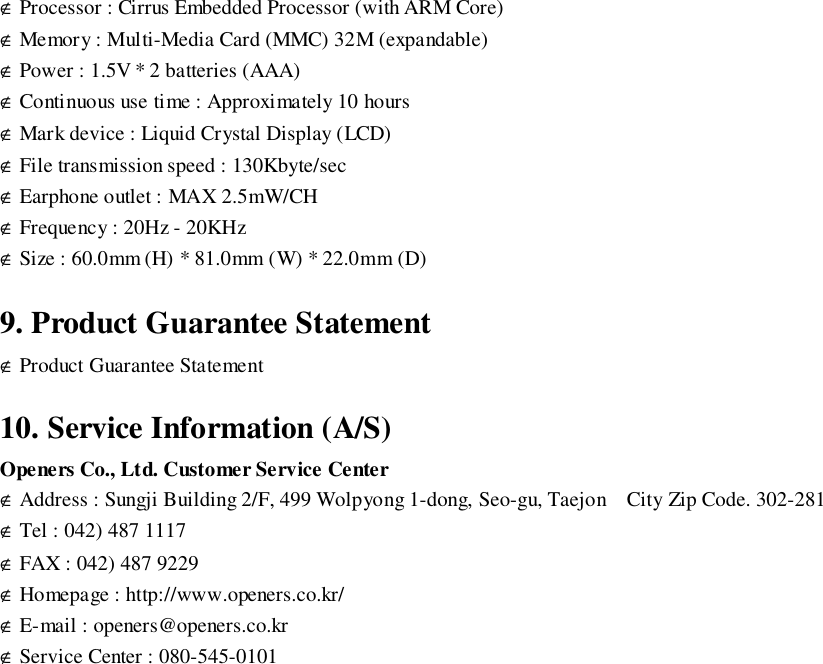
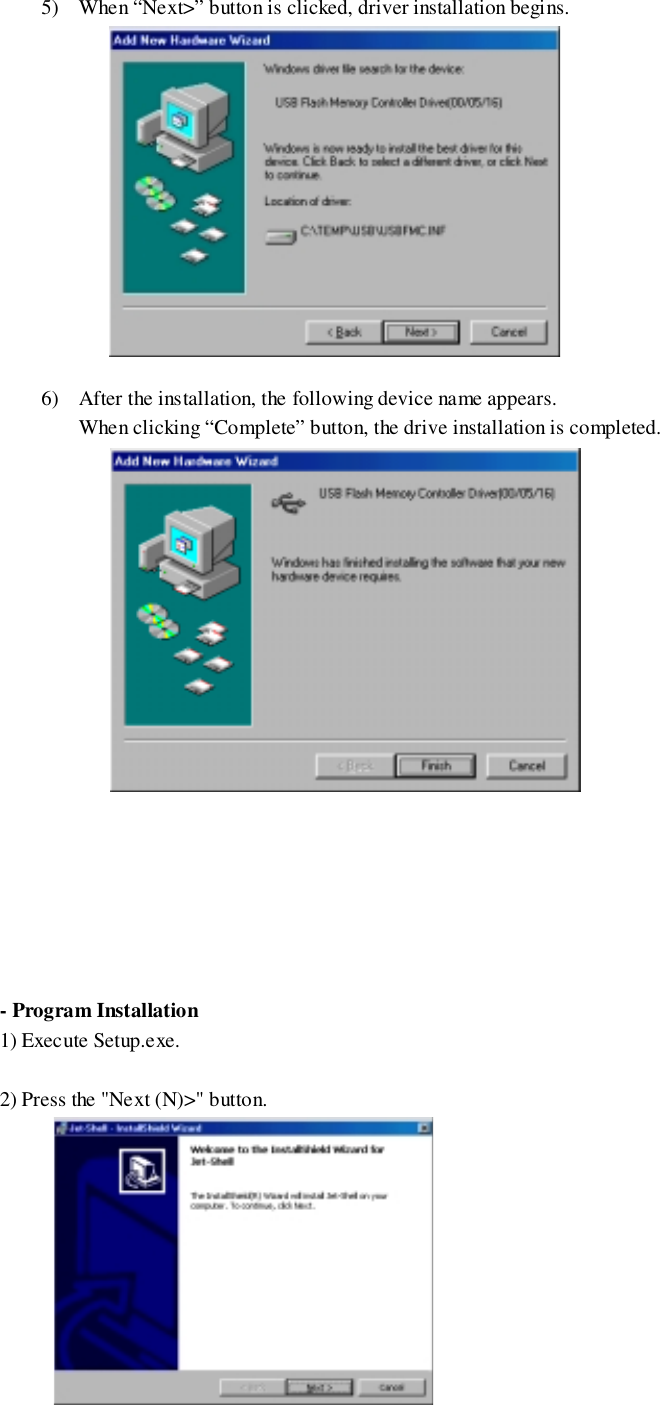
![* MMC Card Format1) Set-Shell is executed at [Begin]-[Program (P)]-[cowon]-[Jet-Shell]. *Click twice when executing the program.2) Insert MMC card into Writer.3) Select "File"-"Format Flash Memory Card " from Menu.4) When talk box is shown, press the "Start" button.5) When work is complete, press the "Close" button.- Program Deletion1) [Begin]-[Control Board]-[Program Add/Delete] is executed.2) After selecting Jet-Shell, press the "Add/Delete." button.3) Click the “Next>” button.4) After selecting “Remove”, click the “Next>” button.5) Click the “Remove” button to begin the program removal.6) When remove is completed, press the “Finish” button.3. How to Use Product Power on for DMP2010 and Music play1) Insert MMC card into the slot.2) The power is on by pressing [ ∂ ] button and the LCD back light is on.3) After approximately 4 seconds, “Start DMP2010" is shown on the LCD screen, the music that washeard the last time is play. A moment later, the title of the playing song is appeared on the LCD screen.4) On the LCD screen, the remaining battery, MMC status, sound effect, volume and the like are marked.5) When pressing all buttons of DMP2010, the LCD back light is on and the LCD back light is](https://usermanual.wiki/OPENERS/DMP-2010/User-Guide-126721-Page-10.png)
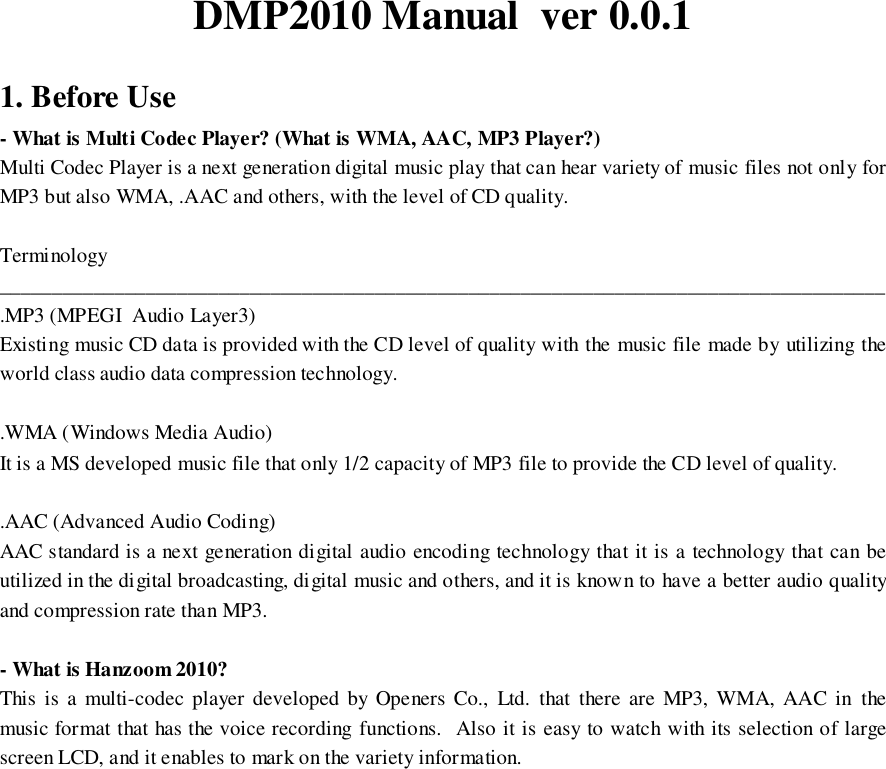
![automatically turned off in 2 seconds. At This Time,a) The file that has the MP3, WMA, AAC, ASF extension is searched and played. Voice recording file isplay only at the voice file search condition.b) The English support is made but not the Korean support. When the song title is in Korean, the order ofthe song in B MMC is the third and if it is MP3, it is marked with “B:\Music003.MP3”.c) The song is play with the same volume and sound effect of the last music when the power of off.d) When there is changes in MMC, play is made from the first song in A card.(Reference) When two MMC is simultaneously inserted in the two slots, the order is determinedfollowing the unique ID of MMC. For this reason, Slot A and Slot B are not separatelydesignated. However, MMC with fast unique ID is recognized as A and the other MMC isrecognized as B.(Caution) When MMC are all taken out from DMP2010 while in play, power is disconnected in amoment of time. Stopping of Music play and Turn Off of DMP2010 Power1) When the [ € ] button is pressed while the music is play, the play of the song is stopped, and the “Stop”is shown on the LCD screen.2) When the [ ∂ ] button is pressed while the play is stopped, the song is resumed.3) While DMP2010 is on and pressed [ € ], "Power off" is shown on the LCD screen and it automaticallypressed to off. Method to Use the Mode for Functions1) When mode button is pressed, it becomes the condition that searches the installed function.2) When the [ ℵℵ ] button or [ ∂∂ ] button is pressed, the entire functions may be searched.3) When the [ ∂ ] button is pressed, the mode search condition is automatically stopped and the applicablefunction is executed.4) When the [ € ] button is pressed, all mode search is finished.5) When the mode button is pressed again, all mode searches are expired.6) When selecting a function, the location of mode is continuously maintained. Therefore, when themode button is pressed, the mode of the last execution appeared on the LCD screen. The exception ismade when voice recording is made, the location of mode is “5. Voice Mode". The are 14 current functions.1. Repeat Mode (Function that repeat one song)2. Intro Mode (Function to search entire songs)3. Random Mode (Function of play with irregular order)4. Sound Effect (Function of sound effect)5. Voice Mode (Function of play with voice recording)6. File Copy (Song duplication function)7. File Delete (Song deletion function)8. BookMark Set (Book Mark setting function)](https://usermanual.wiki/OPENERS/DMP-2010/User-Guide-126721-Page-11.png)
![9. BookMark Seek (Book Mark search function)10. Auto power off (Automatic expiration function)11. Fast Search (High speed search function)12. Tel Book (Telephone book function)13. Stop Watch (Stop Watch function)14. E2 Dictionary (English to English Dictionary Function) Play Condition1) In the play condition, there are entire repeat, 1 son repeat, irregular play functions.2) The basic play condition is the entire repeat play condition.ε Determination of 1 song repeat play condition1) Press the menu button and search with the [ ℵℵ ] button or [ ∂∂ ] button to show “1.Repear Mode” onthe LCD screen, then press the [ ∂ ] button to execute the 1 song repeat play function.2) When the [ ∂ ] button is pressed, "Repeat Mode On" on the LCD screen is shown and the applicablesong is repeatedly played. Picture 1 is on and all pictures are off.ε Cancel the 1 song repeat play condition1) When the menu button is pressed and the [ ℵℵ ] button or [ ∂∂ ] button to search with “1. RepeatMode” on the LCD screen is on, the press the [ ∂ ] button to cancel the play function for 1 song repeat.2) When the [ ∂ ] button is pressed and the "Repeat Mode Off" appears on the LCD screen, play conditionfor 1 song repeat is cancelled. The 1 picture is off and all pictures are on. At this time,a) While setting for play condition for 1 song repeat, the [ ℵℵ ] button or [ ∂∂ ] button is pressed and playthe applicable songs.ε Setting of irregular play condition1) Pressed the Menu button and search the [ ℵℵ ] button or [ ∂∂ ] button to show “3. Random Mode” onthe LCD screen, press the [ ∂ ] button to execute the irregular play function.2) Press the [ ∂ ] button to show the "Random Mode On" on the LCD screen, then the order of play isirregularly played. Picture 1 or all pictures is off.ε Canceling of Irregular play condition1) Pressed the Menu button and search the [ ℵℵ ] button or [ ∂∂ ] button to show “3. Random Mode” onthe LCD screen, press the [ ∂ ] button to cancel the irregular play function.2) Press the [ ∂ ] button to show the "Random Mode Off" on the LCD screen, then the irregular play iscancelled. All pictures are on. At this time,a) While in irregular play is on, press the [ ℵℵ ] button or [ ∂∂ ] button, the order of songs played isirregularly played. Go to the Next Song1) When the [ ∂∂ ] button is pressed, the current song is stopped and next song is played. On the LCDscreen, the title of the song played is played.2) On the entire play condition, the entire songs are circulated.](https://usermanual.wiki/OPENERS/DMP-2010/User-Guide-126721-Page-12.png)
![3) On the 1 song play condition, the same song is repeatedly played.4) On the irregular play condition, songs are played at random. Go to the Previous Song1) When the [ ℵℵ ] button is pressed, the current song is stopped and the previous song is played. On theLCD screen, the title of the played song is played.2) After the music is played, the [ ℵℵ ] button is pressed before 3 seconds, it moves to the previous song.When pressing the [ ℵℵ ] button after 3 seconds, the current song is re-played from the beginningpart.3) In the entire play condition, the entire songs are circulated.4) In the 1 song play condition, the same song is repeatedly played.5) In the irregular play condition, the irregular song is played. Volume Control1) When the volume is raisedPress the [ Κ ] button shortly to have the volume increased by each level.Press the [ Κ ] button long to have the volume increased in serially.2) When the volume is reducedPress the [ ] button shortly to reduce the volume by each level.Press the [ ] button long to reduce the volume consecutively. At this time,a) The volume is marked on the LCD screen in 20 levels. Pause Function1) While music is in play, press the [ ∂ ] button to temporarily stop the music and “Pause” is marked onthe LCD screen.2) Press the [ ∂ ] button again, the music is continuously played and the title of the song is played on theLCD screen. At this time,a) When none of the button is pressed for 30 seconds in the temporarily stopped condition, the power isautomatically stopped for protecting the battery. Conversion of Sound Effect1) In the sound effect of DMP2010, there are two functions in Emphasis Sound and 3 DimensionSurround function.2) Combine the two functions to make four types of sound effects.ε Setting Up of Sound Effects1) Press the Menu button to search the [ ℵℵ ] button or [ ∂∂ ] button to show “4. Sound Effect” on theLCD screen, the function of Sound Effect set is executed by pressing the [ ∂ ] button.2) After pressing the [ ∂ ] button, one of the “3S On EMP On", “3S On EMP Off", “3S Off EMP Off",“3S Off EMP On" conditions are selected on the LCD screen, and the sound effect is reflected on theapplicable song.](https://usermanual.wiki/OPENERS/DMP-2010/User-Guide-126721-Page-13.png)
![3) To select the desired sound effect, repeat 1) and 2).4) When "3S On" is set, S picture is on the LCD screen, and when "3S Off" is set, S picture is off on theLCD screen. Search Function1) After playing for about 8 seconds with the quick search function for the desired song, then go to thenext song.ε Setting for search for songs1) Press the Menu button, search the [ ℵℵ ] button or [ ∂∂ ] button to show “2. Intro Mode” on the LCDscreen, then press the [ ∂ ] button to execute the music search function.2) Press the [ ∂ ] button to show “Intro Mode On” on the LCD screen and set the song search function.3) After playing one song for approximately 8 seconds, it goes over to the next song.ε Canceling of Song Search Function1) Press the Menu button and search the [ ℵℵ ] button or [ ∂∂ ] button to show “2. Intro Mode” on theLCD screen, then press the [ ∂ ] button to cancel the setting of song search function.2) After pressing the [ ∂ ] button, the “Intro Mode Off” is shown on the LCD screen, and the song searchfunction is canceled. Block Repeat Function1) While a song is played, the user may repeatedly play the song in the desired block.ε Setting Up of Block Repeat Function1) When pressing the [ R ] button, "Local Repeat S" shows on the LCD screen and the block repeatstarting point is set up.2) When pressing the [ R ] button again, "Local Repeat" shows on the LCD screen and the block repeatending point is set up.3) When pressing the [ ∂ ], [ € ] , [ ℵℵ ], [ ∂∂ ] buttons, the title of the song is shown on the LCD screenand the block repeat function is canceled.4) In the block repeat, 1) and 2) are set up again to use the block repeat function. HOLD Function1) When the HOLD button is on, “ “ picture is on the LCD screen. And the function is not performedeven other buttons are pressed.2) By preventing the case of wrongly pressing the button in waling or running with DMP2010, theactivation is increased.3) In the event the HOLD button is on in the condition of not having the power on, the power is on withpressing the [ ∂ ] button and "Hold key Enable" is shown on the LCD screen. If the HOLD button isnot turned off, the power is automatically off in 6 seconds. Once HOLD button is off, DMP2010 is innormal operation. Voice Recording Function1) The voice of the surrounding may be recorded.2) The music file and voice recording file are separated and played.3) The basic condition of DMP2010 is music play condition, and for playing the voice recording file. Thefunction has to be selected with the voice mode.](https://usermanual.wiki/OPENERS/DMP-2010/User-Guide-126721-Page-14.png)
![4) After the recording, it becomes the voice file search condition that the [ ∂ ] button is pressed to listen tothe recorded contents.ε Use of Recording Function1) When pressing the recording button, "Voice Record On" is shown on the LCD screen to beginrecording.2) When the recording button is pressed again, the recording is finished.3) While in recording, the time to record and time of recording is shown together.4) When the cording is finished, it becomes the voice file search condition and when the [ ∂ ] button ispressed, the recorded contents can be heard.5) With the [ ℵℵ ] button or [ ∂∂ ] button, the voice file can be searched.6) By consecutive performance of 1) and 2), record the voice may be recorded on other files.ε Setting Up of Voice File Search Condition1) Pressing the Menu button, and search the [ ℵℵ ] button or [ ∂∂ ] button to show the “5. Voice Mode”on the LCD screen, press the [ ∂ ] button to set up the voice file search condition.2) After pressing the [ ∂ ] button, "Voice Mode Off" appears on the LCD screen, and the voice recordingfile is played.ε Canceling of Voice File Search Condition1) Pressing the Menu button and search the [ ℵℵ ] button or [ ∂∂ ] button to show “6. Voice Mode” onthe LCD screen, then press the [ ∂ ] button to cancel the voice file search condition.2) After pressing the [ ∂ ] button, "Voice Mode Off" appears on the LCD screen and the music is played.3) After pressing the [ ∂ ] button, the voice file search condition is automatically canceled. At this time,a) If already existing recorded file, “A:\VOICE005.721", is exist, the name of newly recorded file is“A:\VOICE006.721" that a number is increased one at a time.b) The recording time is determined by the capacity of MMC card, and the recording is stoppedautomatically with the remaining 3 seconds for recording. BookMark Function1) Bookmark is set up in the location of the song that is being played.2) It may easily be moved to the Bookmark position.ε Setting Up of Bookmark Location1) Press the Menu button and search the [ ℵℵ ] button or [ ∂∂ ] button to show “8. Bookmark Set” on theLCD screen, then press the [ ∂ ] button to set the Bookmark position.2) When pressing the [ ∂ ] button, "Bookmark Set" is shown on the LCD screen and the Bookmarkposition on the MMC is stored.ε Setting Up of Bookmark Location Search Function1) When the Menu button is pressed and the [ ℵℵ ] button or [ ∂∂ ] button is searched to show “9.BookMark Seek” on the LCD screen, the [ ∂ ] button is pressed to search the Bookmark position.2) After pressing the [ ∂ ] button, the title of the song that was bookmarked on the LCD screen is showedand the song is played. (Caution) The current BookMark function is played where the song that is bookmarked in the event ofMP3 format. However, in the event of AAC, WMA format, it plays in the initial position of the songBookMarked.](https://usermanual.wiki/OPENERS/DMP-2010/User-Guide-126721-Page-15.png)
![ Automatic Termination Function1) Set up the operation time of DMP2010.2) DMP2010 automatically turns off when the time set for automatic expiration function has come.3) In the evening, the music can be enjoyed at the desired time.ε Setting Up of Automatic Expiration Function1) Press the Menu button and search the [ ℵℵ ] button or [ ∂∂ ] button to show “10.Stop Timer” on theLCD screen, then the [ ∂ ] button is pressed to set the Stop Timer function.2) When the [ ∂ ] button is pressed, "Auto power Set" is shown on the LCD screen and it becomes theautomatic expiration setting condition.3) When the [ ∂∂ ] button is pressed, the automatic expiration setting time is increased for 10 minutes ofeach.4) When the [ ℵℵ ] button is pressed, the automatic expiration setting time is decreased for 10 minutesof each.5) After pressing the [ € ] button, the automatic expiration setting is completed.ε Canceling of Automatic Expiration Function1) After pressing the Menu button and search the [ ℵℵ ] button or [ ∂∂ ] button to show “10. Stop Timer”on the LCD screen, the [ ∂ ] button is pressed to set the Stop Timer function.2) After pressing the [ ∂ ] button, "Auto power Set" appears on the LCD screen and it becomes automaticexpiration setting condition.3) By pressing the [ ℵℵ ] button to set the automatic expiration setting time for [ 00:00 ].4) After pressing the [ € ] button, the automatic expiration setting is canceled. Stop Watch Function1) Press the Menu button and search the [ ℵℵ ] button or [ ∂∂ ] button to shown “13. Stop Watch” on theLCD screen, the [ ∂ ] button is pressed to set the Stop Watch function.2) After pressing the [ ∂ ] button, "Ready [00:00:00]" appears on the LCD screen and it becomes the stopwatch preparation condition.3) When pressing the [ ∂ ] button at preparation condition, "Run [00:00:00]" shows on the LCD screen,and the stop watch time increases.4) When the [ ∂ ] button is pressed again, "Stop [00:04:26]" shows on the LCD screen, and the measuringof stop watch time is stopped.5) When the [ ∂ ] button is pressed again, "Ready [00:00:00]" shows on the LCD screen, and thepreparation for stop watch is made.6) When the [ € ] button is pressed, the Stop Watch function is canceled and the music is played. (Caution) Time is measured with one second interval. Quick Search Function1) User searches quickly for the play position of the song being played.2) It moves in three seconds before and after.3) It only supports MP3 file alone.ε Setting Up Fast Search Function1) Press the Menu button and search the [ ℵℵ ] button or [ ∂∂ ] button to show “11. Fast Search” on theLCD screen, then the [ ∂ ] button is pressed to set up the fast search function.2) After pressing the [ ∂ ] button, " Fast Search On" appears on the LCD screen and it sets the fast search](https://usermanual.wiki/OPENERS/DMP-2010/User-Guide-126721-Page-16.png)
![function.2) When the [ ∂∂ ] button is pressed, it moves 3 seconds forward.3) When the [ ℵℵ ] button is pressed, it moves 3 seconds backward.ε Canceling of Fast Search Function1) Press the Menu button and search the [ ℵℵ ] button or [ ∂∂ ] button to show “11. Fast Search” on theLCD screen, then press the [ ∂ ] button to cancel the fast search function.2) After pressing the [ ∂ ] button, " Fast Search Off" appears on the LCD screen, and the fast searchfunction is canceled. File Duplication Function1) This is a function that the user copies the currently played song to other MMC.ε Setting Up of File Copy Function1) Press the Menu button and search the [ ℵℵ ] button or [ ∂∂ ] button to show “6. File Copy” on theLCD screen, then press the [ ∂ ] button to perform the file copy function.2) When pressing the [ ∂ ] button, "File Copy Process" appears on the LCD screen and it is copied toother MMC.3) When the [ ∂ ] button is pressed, the file copy function is automatically canceled. At this time,a) When there is only one MMC card, copy is not made. File Deletion Function1) This is a function that the user deletes the currently playing song from MMC.ε Setting Up of File Deletion Function1) Press the Menu button and search the [ ℵℵ ] button or [ ∂∂ ] button to show “7. File Delete” on theLCD screen, then press the [ ∂ ] button to perform the file delete function.2) When the [ ∂ ] button is pressed, "File Delete" appears on the LCD screen, then the currently playingsong is deleted from MMC.3) After pressing the [ ∂ ] button, the file deleting function is automatically canceled. Telephone Book Function1) It searches the telephone lists stored in MMC.ε Setting Up of Tel book Function1) Press the Menu button and search the [ ℵℵ ] button or [ ∂∂ ] button to show “12. Tel Book” on theLCD screen, then press the [ ∂ ] button to set the Tel book function.2) After the power is on and first performed, “ Processing " appears on the LCD screen momentarily.When this function is again performed, the telephone list comes immediately.3) "telbook.txt" file is on MMC, and press the [ ∂ ] button, name of the person is shown on the LCDscreen.4) When the [ ∂∂ ] button is pressed, the name of the next person appears.5) When the [ ℵℵ ] button is pressed, the name of the previous person appears.6) When the [ ∂ ] button is pressed, the telephone number of selected person appears.7) When the [ € ] button is pressed, the telephone book function is canceled and the music is played.8) In order to use the telephone book function, MMC has to have “telbook.txt" file.9) In order to make “telbook.txt" file, the edition to fit in to the following format document editor has to](https://usermanual.wiki/OPENERS/DMP-2010/User-Guide-126721-Page-17.png)
![be made.--------------------------------Name1#Telephone number1Name2#Telephone number2Name3#Telephone number3Name4#Telephone number4--------------------------------# is used as a special mark that it is not used as name or telephone number.Name is supported with up to 16 characters.Telephone number is supported with up to 16 characters.10) Support is made up to the maximum of 256 persons. English to English Dictionary Function1) It searches the English to English dictionary stored in MMC.ε Setting Up of English to English Dictionary Function1) Press the Menu button and search the [ ℵℵ ] button or [ ∂∂ ] button to shown “13. E2Dictionary” onthe LCD screen, press the [ ∂ ] button to set the English to English Dictionary function.2) After the power is on and first performed, “ Processing " appears on the LCD screen momentarily.Then when this function is played again, English to English Dictionary comes immediately.3) “e2edic.txt" file is in MMC, and the [ ∂ ] button is pressed to show the English to English Dictionarycontents appear on the LCD screen.4) When the [ ∂∂ ] button is pressed, following vocabulary appears.5) When the [ ℵℵ ] button is pressed, previous vocabulary appears.6) When the [ ∂ ] button is pressed, the meaning of the selected vocabulary appears.7) When the [ € ] button is pressed, the English to English Vocabulary function is canceled and the musicis played.8) In order to use the English to English Vocabulary function, “e2edic.txt" file has to be made in MMC.9) In order to make “e2edic.txt" file, the edition is made with the document editor as the followingformat.--------------------------------Word1#Meaning of Word1&Word2#Meaning of Word2&Word3#Meaning of Word3&Word4#Meaning of Word4&--------------------------------# and & are used as special mark that these are not used as the words or meanings.Words are supported with 16 characters.Meanings are supported with 128 characters.10) It supports up to the maximum of 64 words.4. Cautions∉ When an electrical shock or physical impact is applied while listening to music, the software of ourproduct may determine to have abnormality to the currently playing song that it automatically playsthe next song.This is to prevent the stoppage that is caused by mistake or defect of the product.](https://usermanual.wiki/OPENERS/DMP-2010/User-Guide-126721-Page-18.png)