PA Times Technology EP5 Wearable Digital Video Camera User Manual
Shenzhen Pa. Times Technology Co., Ltd Wearable Digital Video Camera
User Manual


2
Product specifications
Resolution 1080P/30FPS
Video format MOV H.264
Sensor SONY High-sensitivityCMOS
DOF 1 Meter to infinity
Pixels 8.0 MP
Degree 90◦
WIFI Built-in
Bluetooth Built-in
Microphone Built-in MIC
USB Micro USB
Battery Built-in
820mAh
lithium-ion
battery
Working voltage 3.7V
Working current 300mA

3
External Memory Card Support maximum 64GB TF Card
Compatibility Windows XP or above/Mac OSX10.5 or above
Size 90*20*25mm
Weigh 70g
Packing List
High-Definition digital camera
Adjustable head hoop
USB cable
Flexible glue
Wrench
Hook
4
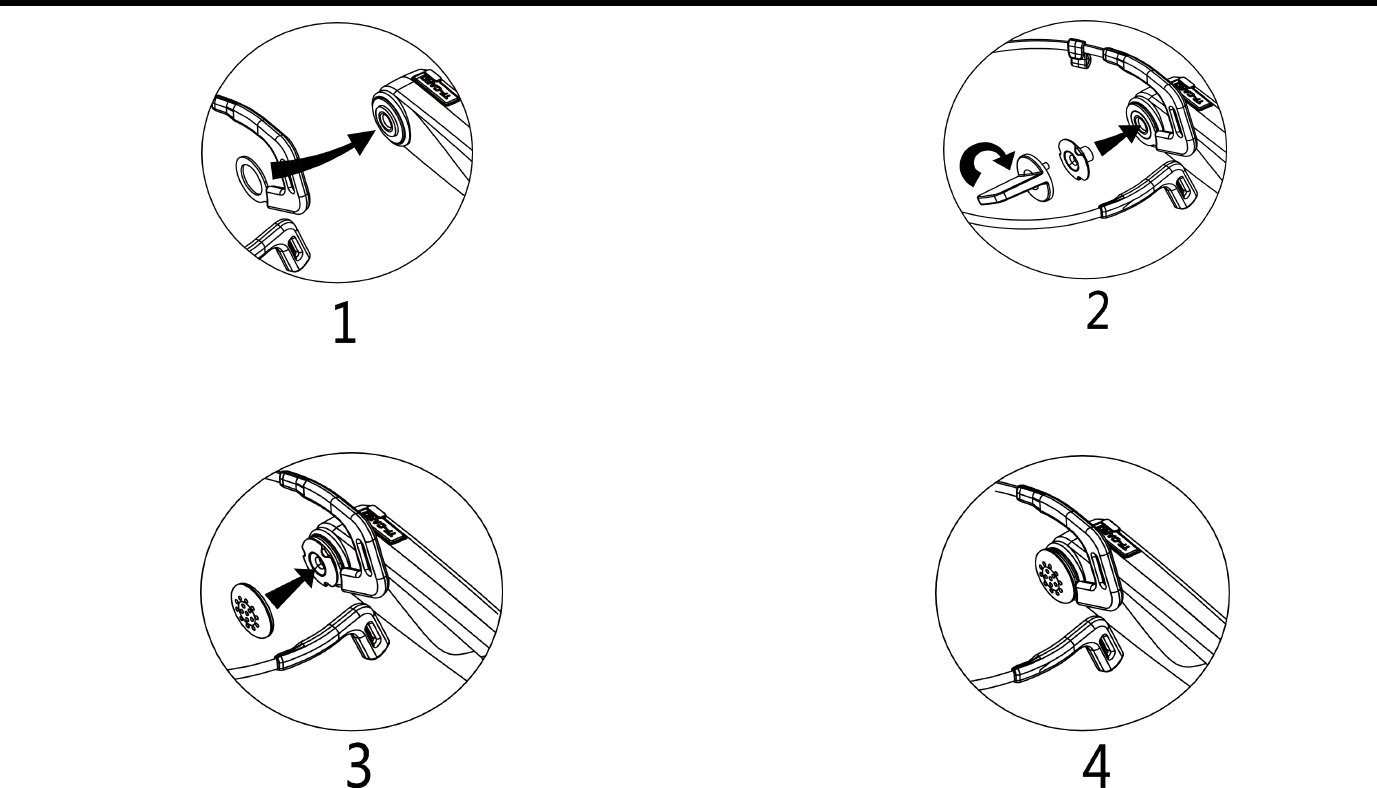
Installation
Fix the headband at the Lock the headband and the host by using
screw hole of the camera a small wrench and screw
Install the soft case on the screw Installation completed
5
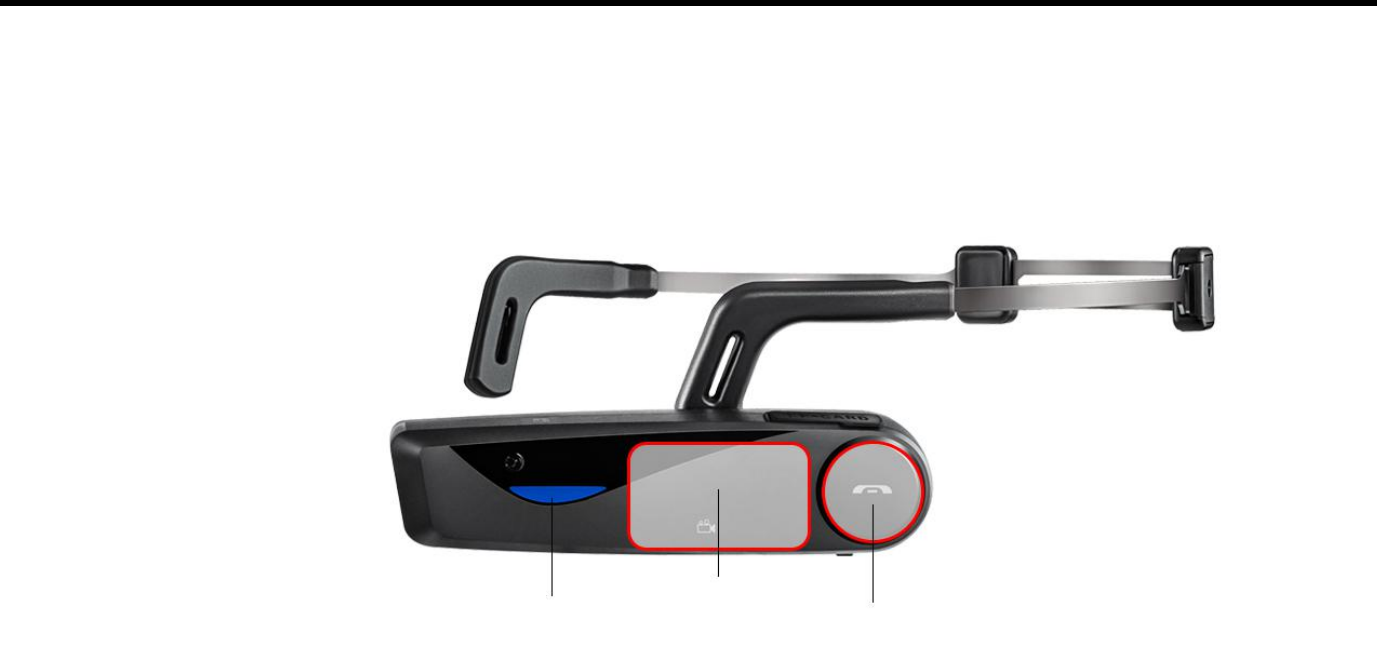
Appearance
Status Indicator
Video touch area
Bluetooth touch area
6
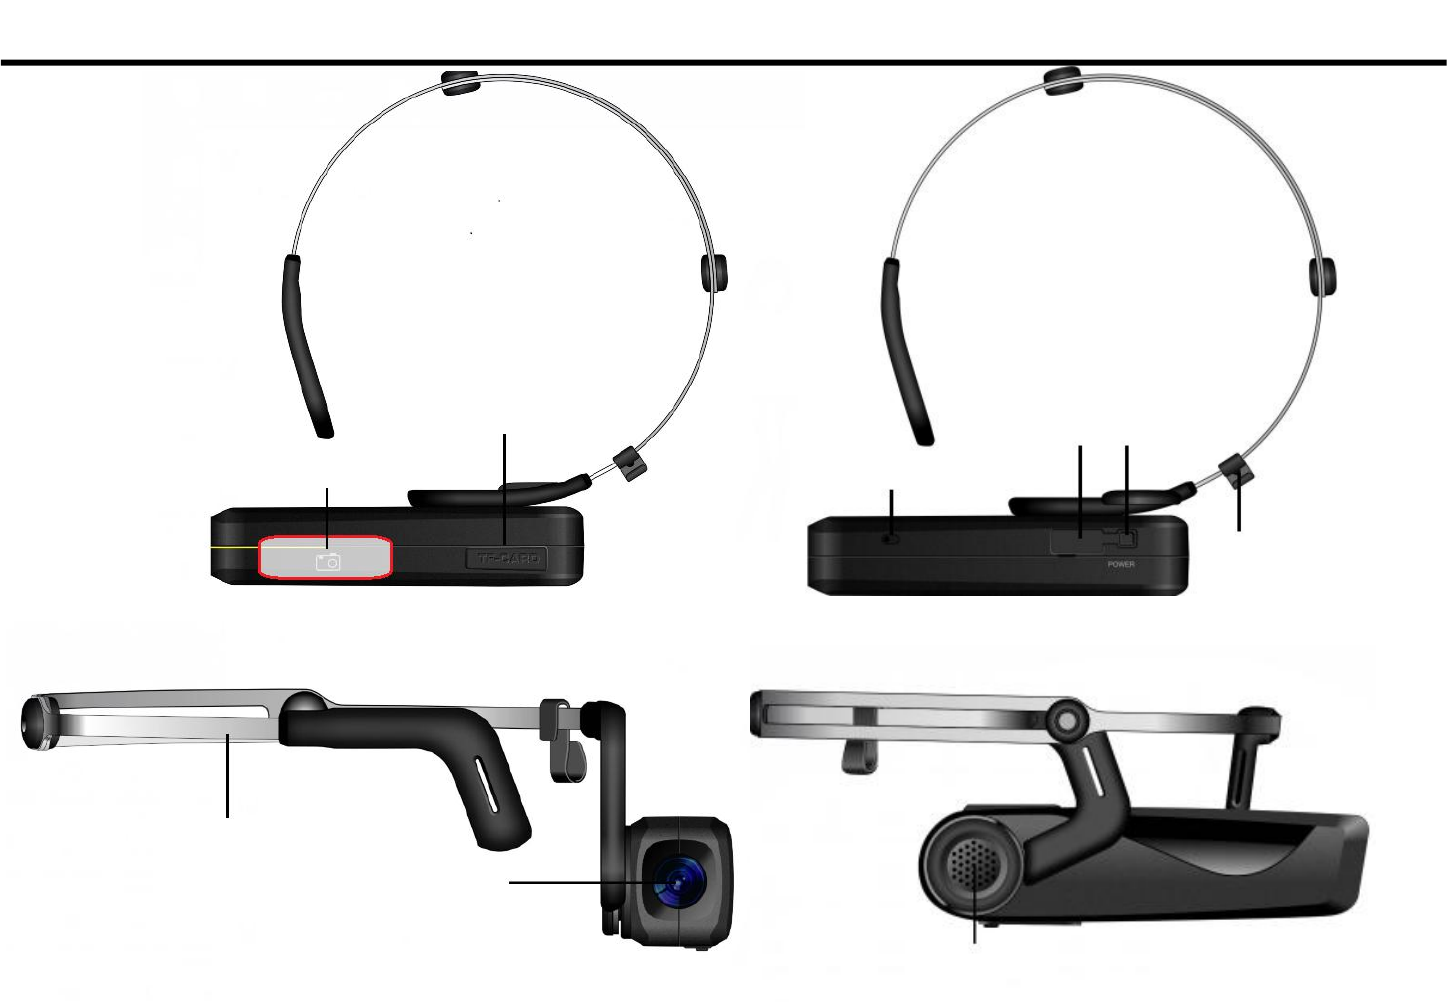
Power
TF Card /Reset
Wrench
Mic
USB
Head-mounted steel ring
Photo touch area
Lens
Speaker
Appearance

7
Start using
Camcorder
Charge the camcorder before first use.
How to charge the camcorder.
1. Take out the camcorder and the micro USB cable.
2. Connect the charger or computer and the camcorder with USB cable to start charging.
3. While charging, if the batter is not fully charged, the charging indicator red light will turn on and it will turn
off when the charging is completed.
Note: When the electricity is too low, the speaker makes "Battery low, please charge timely",use a 5V/1A
charger to charge the battery.
Install the TF card
1. Open the TF card slot cover.
2. Insert a TF card which is belong to class 10 or higher in the shutdown state, memory card supports
maximum 64GB. Insert the TF card following the card symbol direction of the camcorder.
8
3. Format the TF card on the machine: press the camera area for 3 seconds after startup, the green light
flashes quickly, the TF card is completely formatted till the green light keeps on, then can be used normally.
The formatted memory card in the machine is unnecessary to format again (in order to avoid accidentally
deleted the contents of the customer, the formatted memory card can no longer be formatted again on the
machine).
4. Cover the card slot cover.
Note:
1. Do Not plug in/out the TF card when the camcorder is turned on,otherwise it may damage the TF card or
the machine.
2. You need to complete the match with the machine when inserting the new TF card, the speaker makes
“Please hold the photo button to format the memory card”,and must format the TF card on the machine first.
3. The speaker sounds “Please insert the memory card” when you didn’t insert the TF card,please insert the
memory card according to the remind .
Use the camcorder
1. Make sure the batter is fully charged and the TF card is inserted completed before using.
2. Press and hold the power button for 5 seconds to turn on the camcorder, the green will turn on.
3. The camera will enter standby mode after turning on.
9
4. Press the video button to start recording,the green light will flashes during the recording and the speaker
sounds “Start recording” ;Press the video button again to stop recording and the green light will stops
blinking but keep light on, and the speaker will sounds “Stop recording”.
5. Press the camera button to enter the camera mode and take pictures, the camera will take one picture
when each press the button. The green light will flashes once and the speaker will sounds “Taking picture”
when taking photo.
WiFi
1.When the camcorder is turned on and shooting is not started, press the power button once to turn on/off
the WIFI, the orange indicator light will turn on and sounds “WIFI ON /WIFI OFF” .
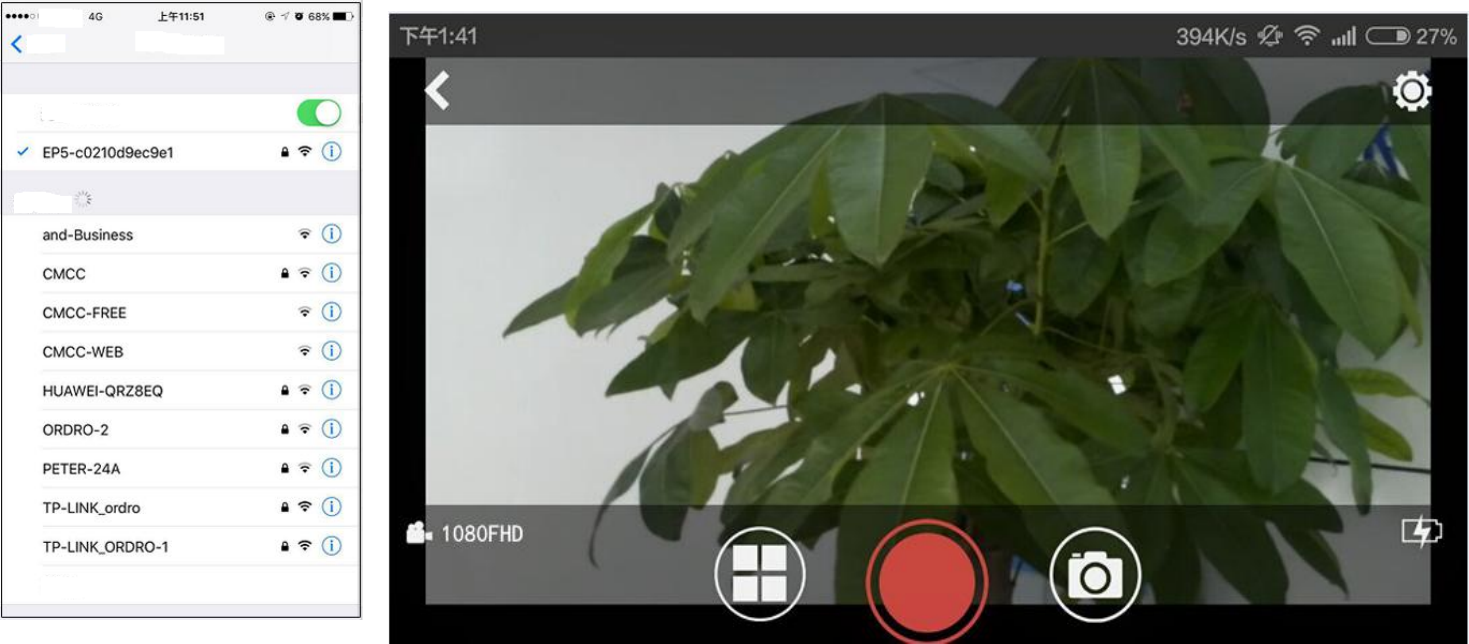
2.Open the WIFI of your phone, find the WIFI name of your camcorder, enter the password to connect the
camcorder. After connection, you can enter the APP to preview the real-time screen.

10
How to use the APP
1.Android users from Baidu applications, 91 applications and Google search LzxViewer market to download
the application and install it to your mobile phone. Apple users can search from the App Srore LzxViewer to
download the application and install it on your smart mobile phone.
IOS/Android Google play
11
2.Open the WIFI of your phone and search nearby WIFI, select the corresponding WIFI of the machine and
enter the password.
3.Enter the APP LzxViewer to preview the real-time screen.
Note:WiFI name defaults to prefix EP5+SSID, the initial password is 12345678 .
4.The three buttons in the bottom of the camera can be used to switch the three modes of : Playback, video,
WLAN
WLAN
other...
Set Up
Mobiel
Select...

12
photo; When you press the video button which is in red, the word “REC” will appears in the upper right
corner of the preview screen and the orange light will flashes to indicate that the recording starts;Press the
camera button to switch to the photo mode, when you press the yellow button, the preview screen will
flash and the orange light flashes, which means the camera has been completed.
5.Press the setting icon on the upper right corner, you can set the parameters of the camcorder: Video
resolution, camera resolution, exposure value, memory card capacity view, memory card format, WIFI
name/password modification, automatic shutdown settings, factory settings, Software version view.
6.Turn off the WIFI, press the power button, the orange light switch to green light, which indicates that the
WIFI function has been turned off, and switched to standby mode.
NOTE:The machine can be connected to the APP and preview then the camcorder is lack of TF card, but can
not enter the settings, if you want to enter the settings, please turn off the power and insert a TF card, then
turn on the power and enter the APP to do operation.
Bluetooth
1. Touch the Bluetooth button for 5s,the machine will sounds “Bluetooth on,ready prepare’ and the blue
light flashes.
2. Turn on the Bluetooth of your phone and search nearby Bluetooth devices. Name EP5 will be displayed in
13
the list of available devices, pair the Bluetooth of your phone and the camcorder, the camcorder will
sounds “Device connected” while the blue light slowly blinks when the connection is successful.
3. When playing music, press the Bluetooth button once to pause playback, press the button again to
continue the play, press and hold for 3 s to dial the latest call log number.
4. Touch the Bluetooth button for 5s to turn off, the machine will sounds “Bluetooth off” and shutdown ,the
blue light will turn off and the same time.
How to connect the device
When the camera connect with PC ,when it turn on ,will sounds “Please select the USB function and press the
video button to enter the removable disk mode and press the photo button to enter the Pc-cam mode”
1. USB Mode:Connect the camera to the computer via USB cable. Press the power button to boot and then
touch the video button, the speaker will sounds a “Enter the removable disk mode” sound which indicates
that has entered the removable disk mode, then you can view/download the files of your camcorder.
2. PCCAM Mode:Connect the camera to the computer via USB cable. Press the camera button, the speaker
will issued a “Enter the Pc-cam mode” sound which indicates that has enter the PCCAM mode, it can be
used for remote video.
Restore to factory settings
Long press the camera area for more than 10 seconds to restore the factory settings, during the process, the
14
status light will flash rapidly, accompanied by rapid warning tone;Status light stops flashing and switch to
steady, after resetting the factory settings, it will sounds “Factory setting has been restored,”the camera
name is reset to model EP5 + SN, the WIFI password is reset to 12345678.
15
Warning
Any Changes or modifications not expressly approved by the party responsible for compliance could
void the user's authority to operate the equipment.
This device complies with part 15 of the FCC Rules. Operation is subject to the following two
conditions:
(1) This device may not cause harmful interference,
and (2) this device must accept any interference received, including interference that may cause
undesired operation.
Note: This equipment has been tested and found to comply with the limits for a Class B digital device,
pursuant to part 15 of the FCC Rules. These limits are designed to provide reasonable protection
against harmful interference in a residential installation. This equipment generates, uses and can
radiate radio frequency energy and, if not installed and used in accordance with the instructions, may
cause harmful interference to radio communications. However, there is no guarantee that interference
will not occur in a particular installation. If this equipment does cause harmful interference to radio or
television reception, which can be determined by turning the equipment off and on, the user is
encouraged to try to correct the interference by one or more of the following measures:
device are performed in positions and locations as
16
—Reorient or relocate the receiving antenna.
—Increase the separation between the equipment and receiver.
—Connect the equipment into an outlet on a circuit different from that to which the receiver is
connected.
—Consult the dealer or an experienced radio/TV technician for help.
SAR tests are conducted using standard operating positions accepted by the FCC with the
phone transmitting at its highest certified power level in all tested frequency bands, although
the SAR is determined at the highest certified power level, the actual SAR level of the device
while operating can be well below the maximum value.
Before a new model device is a available for sale to the public, it must be tested and certified
to the FCC that it does not exceed the exposure limit established by the FCC, Tests for each
required by the FCC.
Non-compliance with the above restrictions may result in violation of RF exposure guidelines.