Polyconcept 841-827 900MHz 40 Channel Cordless Phone w/ CID User Manual Retro Phone 3M
POLYCONCEPT HONG KONG LIMITED 900MHz 40 Channel Cordless Phone w/ CID Retro Phone 3M
UserManual.wiki
>
Polyconcept
>
841-827 User Manual
>
User Manual
Contents
1.
User Manual
2.
FCC Information
User Manual
Navigation menu
Upload a User Manual
Namespaces
Wiki Guide
HTML
PDF
Info
Views
User Manual
Discussion / Help
Navigation
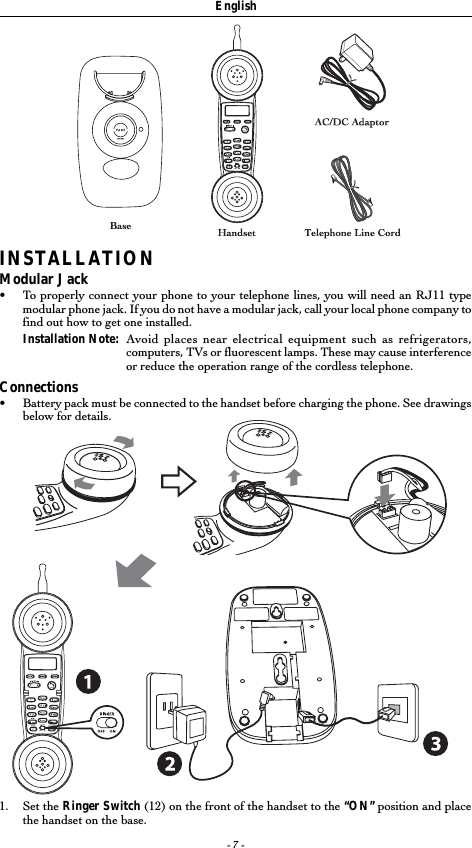
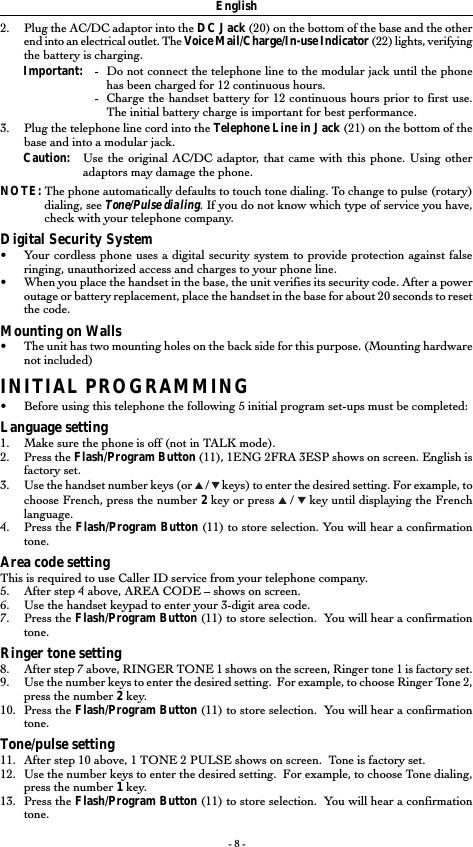
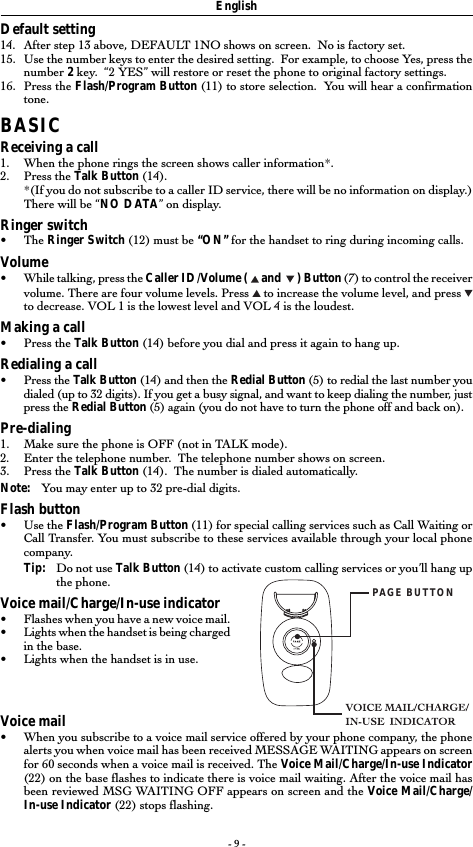
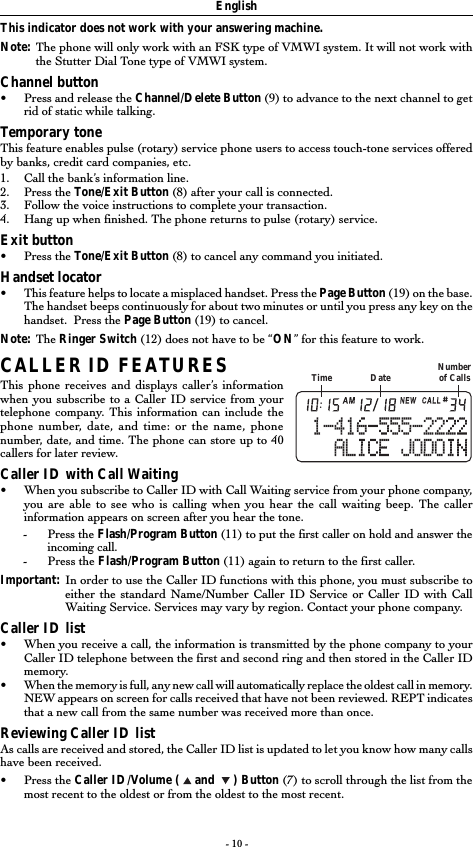
![- 2 -EnglishCONSUMER INFORMATIONThis equipment complies with Part 68 of the FCC rules and the requirements adopted by theACTA. On the bottom of this equipment is a label that contains, among other information, aproduct identifier in the format US:AAAEQ##TXXXX. If requested, this number must beprovided to the telephone company.An applicable certification jacks Universal Service Order Codes (USOC) for the equipmentis provided (i.e., RJ11C) in the packaging with each piece of approved terminal equipment.A plug and jack used to connect this equipment to the premises wiring and telephone networkmust comply with the applicable FCC Part 68 rules and requirements adopted by the ACTA.A compliant telephone cord and modular plug is provided with this product. See installationinstructions for details.The REN is used to determine the number of devices that may be connected to a telephoneline. Excessive RENs on a telephone line may result in the devices not ringing in response toan incoming call. In most but not all areas, the sum of RENs should not exceed five (5.0). Tobe certain of the number of devices that may be connected to a line, as determined by the totalRENs, contact the local telephone company.If this equipment causes harm to the telephone network, the telephone company will notifyyou in advance that temporary discontinuance of service may be required. But if advancenotice isn’t practical, the telephone company will notify the customer as soon as possible.Also, you will be advised of your right to file a complaint with the FCC if you believe it isnecessary.The telephone company may make changes in its facilities, equipment, operations or proceduresthat could affect the operation of the equipment. If this happens the telephone company willprovide advance notice in order for you to make necessary modifications to maintainuninterrupted service.Please follow instructions for repairing if any (e.g. battery replacement section); otherwisedo not replace or repair any parts of the device unless specified.Connection to a party line service is subject to state tariffs. Contact the state public utilitycommission, public service commission or corporation commission for information.This equipment is hearing aid compatible.NOTICE:If your home has specially wired alarm equipment connected to the telephone line, ensure theinstallation of this [equipment ID] does not disable your alarm equipment. If you have questionsabout what will disable alarm equipment, consult your telephone company or a qualifiedinstaller.NOTICE:According to telephone company reports, AC electrial surges, typically resulting from lightingstrikes, are very destructive to telephone equipment connected to AC power sources. Tominimize damage from these types of surges, a surge arrestor is recommended.Should you experience trouble with this equipment, please Contact Polyconcept USA, Inc.,by calling Toll Free: 1 (800) 358-8122 for repair or warranty information. If the equipmentis causing harm to the telephone network, the telephone company may request that youdisconnect the equipment until the problem is resolved.WARNING:Changes or modifications to this unit not expressly approved by the party responsible forcompliance could void the user’s authority to operate the equipment.NOTE:This equipment has been tested and found to comply with the limits for a Class B digitaldevice, pursuant to Part 15 of the FCC Rules. These limits are designed to provide reasonableprotection against harmful interference in a residential installation. This equipment generates,uses and can radiate radio frequency energy and, if not installed and used in accordance withthe instructions, may cause harmful interference to radio communications.](https://usermanual.wiki/Polyconcept/841-827.User-Manual/User-Guide-543839-Page-2.png)