Panasonic Mobile Communications 211049A Dual Mode UMTS / GSM Cellular Mobile Radio with Bluetooth User Manual Part 1 of 2
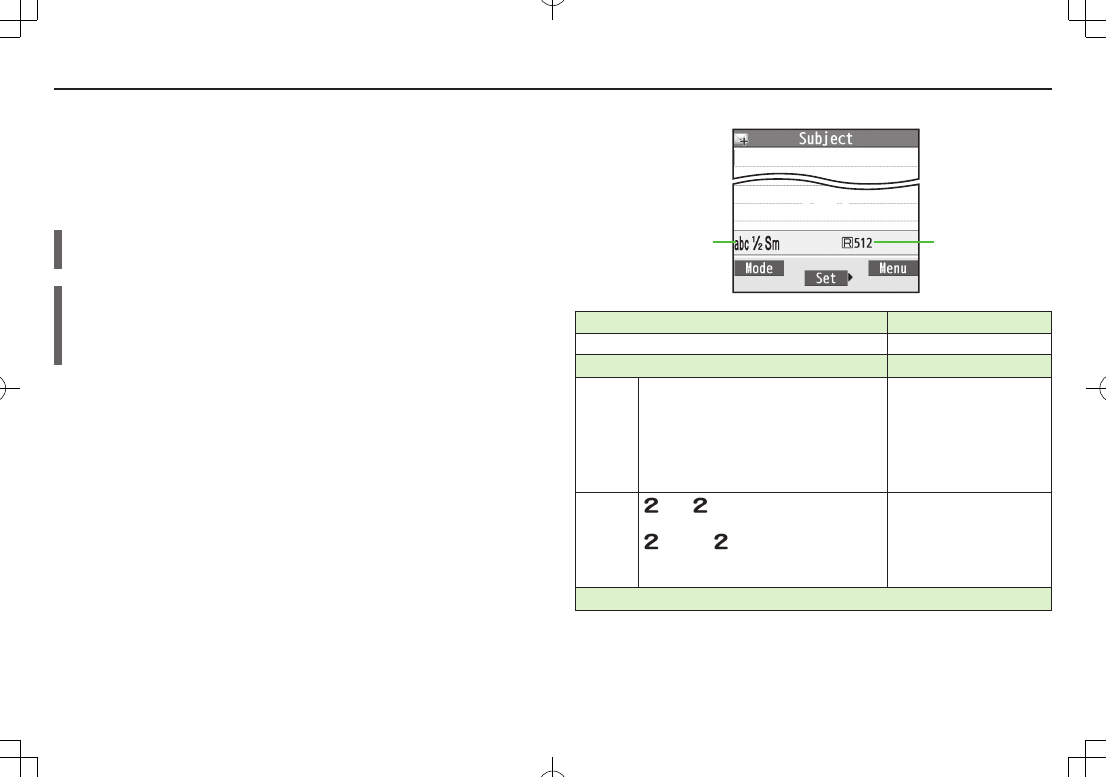
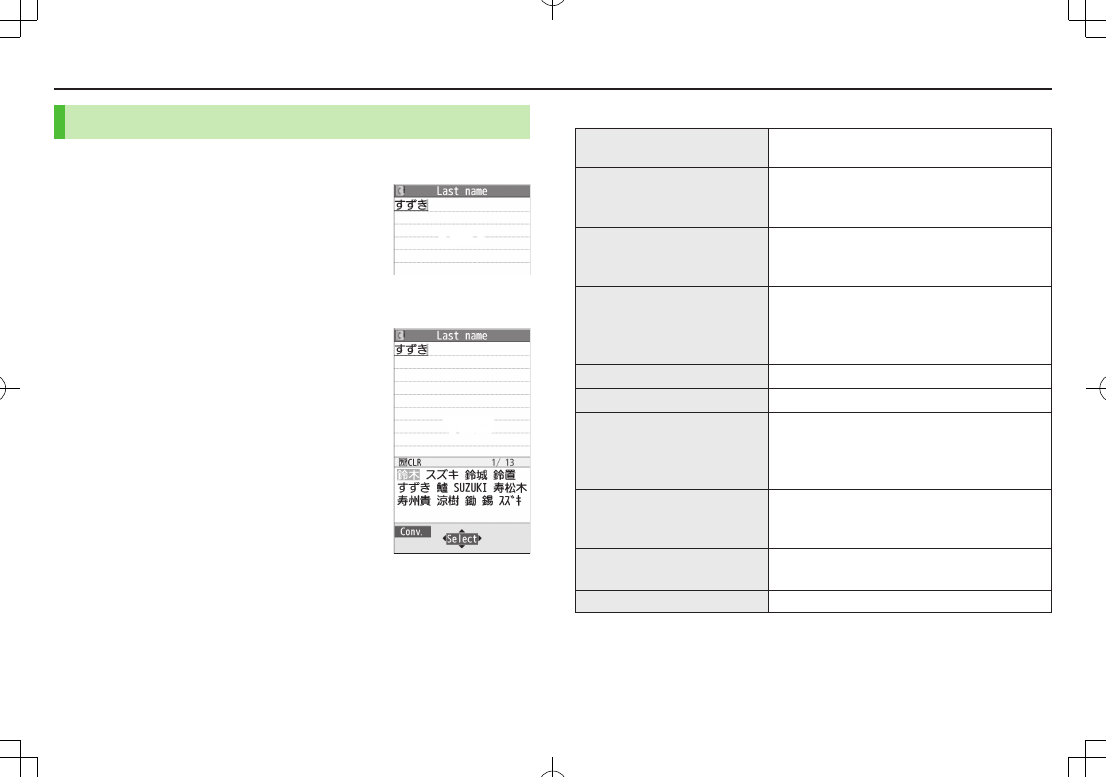
Panasonic Mobile Communications Development of Europe Ltd Dual Mode UMTS / GSM Cellular Mobile Radio with Bluetooth Part 1 of 2
Contents
- 1. User Manual Part 1 of 2
- 2. User Manual Part 2 of 2
User Manual Part 1 of 2
User Guide
103P

Introduction
Thank you for purchasing SoftBank 103P.
Read this guide thoroughly beforehand for proper usage.
Accessible services may vary by service area, subscription, etc.
SoftBank 103P is compatible with both 3G and GSM network technologies.
Note
Unauthorized copying of any part of this guide is prohibited.
Guide content is subject to change without prior notice.
Efforts have been made to ensure the accuracy and clarity of this guide. Please contact SoftBank Customer
Support, General Information (ZP.9-22) about unclear or missing information.
1-1
Contents
Getting Started
Getting Started
Contents ..........................................................1-1
Package Contents ............................................1-2
Using This Guide ..............................................1-2
USIM Card Installation ....................................1-4
Charging Battery .............................................1-5
microSD Card Installation................................1-6
Parts & Functions .............................................1-7
Basic Operations ..............................................1-9
Display ...........................................................1-11
Handset Menus ..............................................1-12
Handset Security ...........................................1-14
Mobile Manners.............................................1-15
Text Entry
Entering Text ....................................................2-1
Editing Text ......................................................2-4
Calling
Emergency Calls ..............................................3-1
Voice Calls .......................................................3-1
Video Calls .......................................................3-2
International Calls ...........................................3-3
Answer Phone..................................................3-5
Optional Services ............................................3-6
Phone Book .....................................................3-9
Messaging
Basics ...............................................................4-1
Customizing Handset Address .........................4-2
Sending S! Mail & SMS ....................................4-3
Receiving Messages ........................................4-4
PC Mail ............................................................4-6
Internet
Getting Started ...............................................5-1
Accessing Internet ...........................................5-2
Bookmarks & Saved Pages ..............................5-3
Internet Settings .............................................5-4
Connectivity
Infrared ............................................................6-1
Bluetooth® .......................................................6-3
External Devices ..............................................6-5
Camera & Imaging
Before Using Camera .......................................7-1
Capturing phots ...............................................7-4
Recording Videos .............................................7-5
Other Camera Functions ..................................7-6
Others
Digital TV .........................................................8-1
Picture Album ..................................................8-4
Appendix
Handset Data Backup ......................................9-1
Software Update .............................................9-2
Troubleshooting ...............................................9-3
Safety Precautions ...........................................9-5
Handling Precautions ....................................9-12
Copyrights .....................................................9-16
Specific Absorption Rate (SAR) .....................9-18
Specifications ................................................9-19
Support ..........................................................9-19
1-2
Getting Started
Package Contents
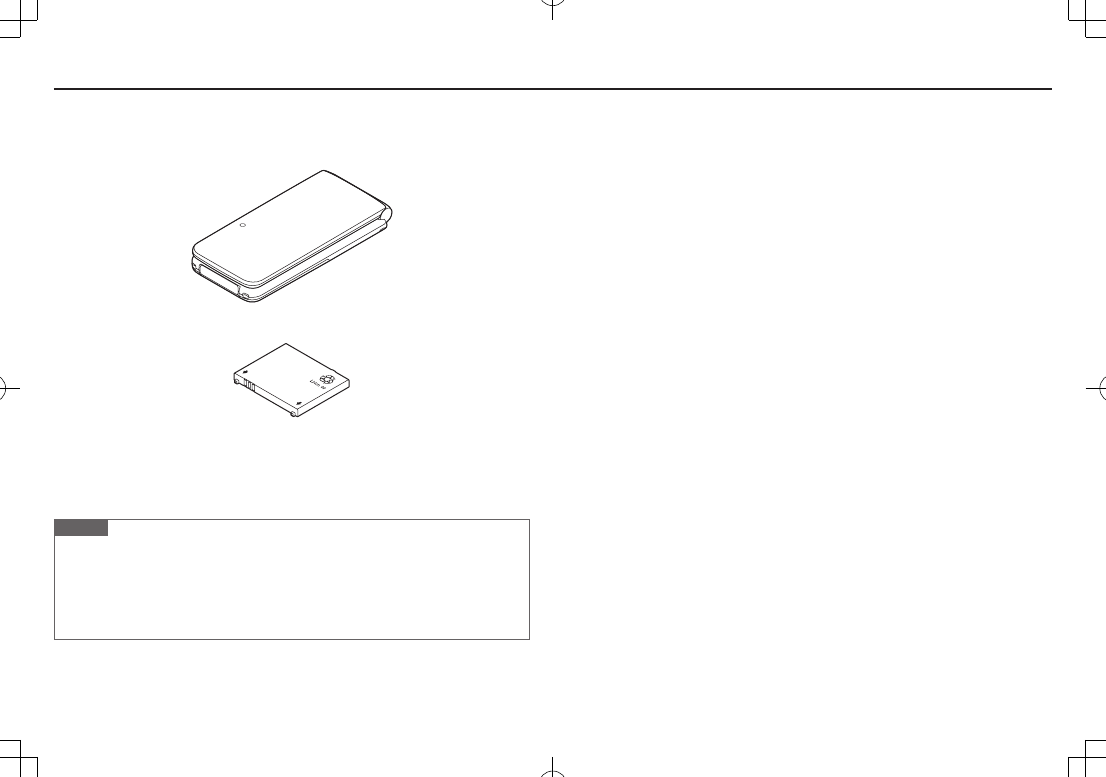
Handset (103P)
Battery (PMBAS1)
(Japanese)
(Japanese)
(Japanese)
Note
Use SoftBank Mobile specified AC Charger (sold separately) to charge Battery.
For more information about AC Charger and accessories, please contact
SoftBank Customer Support, General Information (ZP.9-22).
103P accepts microSD or microSDHC Card (not included). Purchase one to use
related functions (ZP.1-6, P.9-1).
Using This Guide
Before reading on, please make note of the following:
SoftBank 103P is referred to as "handset" or "103P."
"microSD Card" and "microSDHC Card" are referred to as "microSD Card."
Screenshots, etc. are for reference. Actual handset windows, menus, etc. may
differ
.
Key icons are simplified.
Most operation descriptions begin in Standby.
Pressing a key for more than one second is described as "Press and hold."
1-3
Getting Started
Guide Symbols
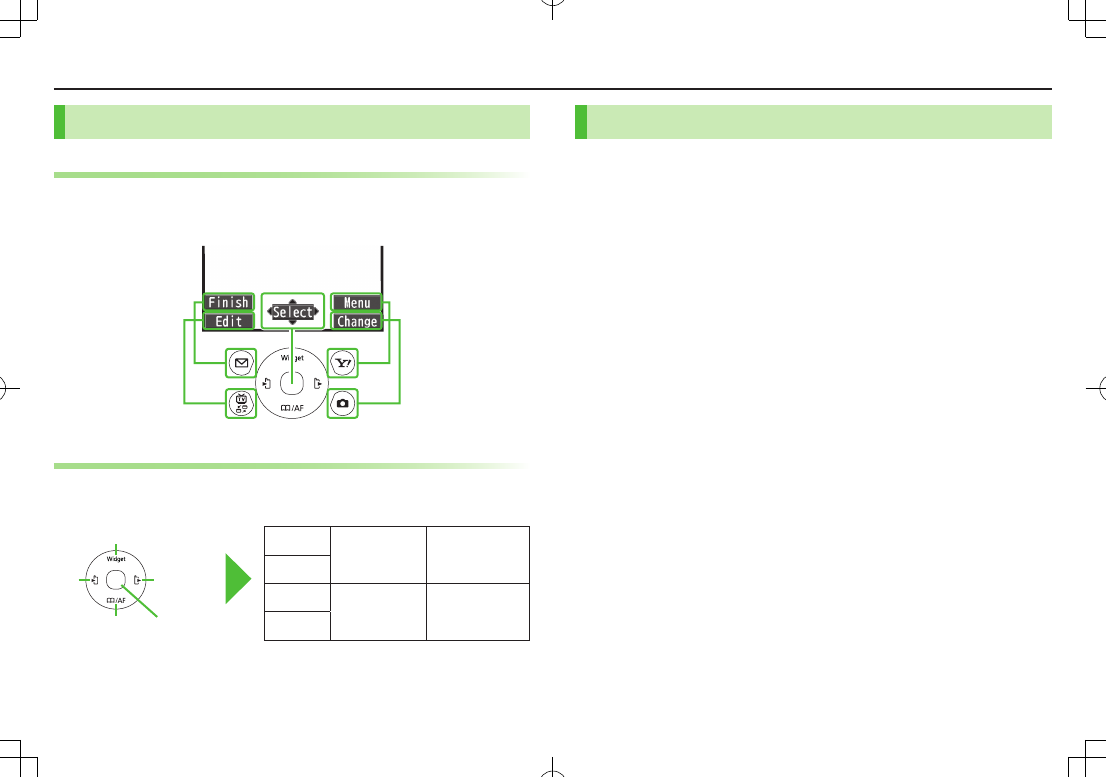
Softkeys
Press the corresponding key to execute the function or operation
indicated at the bottom of Display.
Example:
Multi Selector
Use Multi Selector to select items, navigate menus, etc. In this
guide, Multi Selector operations are indicated as shown below.
>zUp ?zUp/Down Xz
Up/Down/
Left/Right
Cz
Down
VzLeft <zLeft/Right *zCenter
NzRight
Left Right
Up
Down Center
Japanese Functions & Services
When "(Japanese)" appears in a title, Japanese ability is required
to use full range of the function or service.
1-4
Getting Started
USIM Card Installation
Always turn off handset power before removing Battery (ZP.1-5).
USIM PINs: ZP.1-17
Inserting
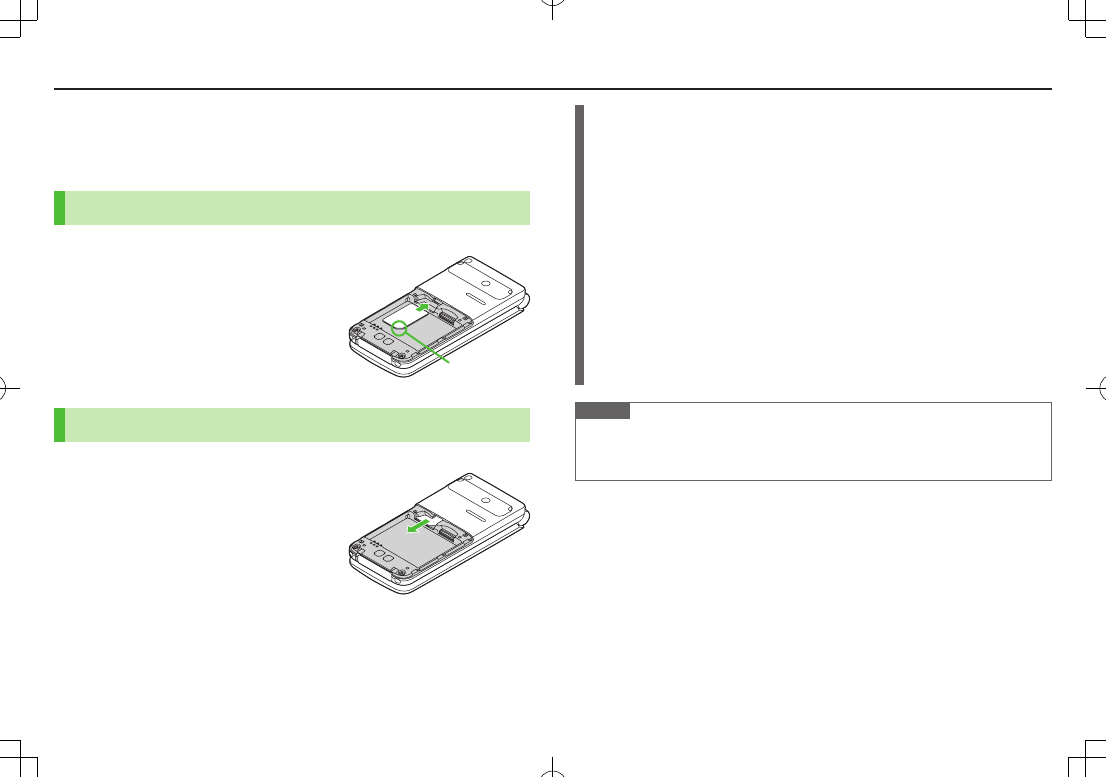
1 With IC chip down, insert USIM Card
Removing
1 Slide out USIM Card gently
Notch
Important
USIM Card is the property of SoftBank Mobile.
Return USIM Card to SoftBank Mobile upon service cancellation.
USIM Card will be reissued for a fee if lost or damaged.
If USIM Card/handset with USIM Card installed is lost or stolen, contact
SoftBank Customer Support or SoftBank Mobile Global Call Center
(ZP.9-22).
Back up USIM Card files. SoftBank Mobile is not liable for lost files.
USIM Card specifications/performance may change without prior notice.
Pre-installed S! Appli may be unusable while a different or replacement
USIM Card is installed.
Some downloaded files may be inaccessible after upgrades/repairs, USIM
Card/handset replacement.
Returned USIM Cards are recycled.
Note
Do not forcefully insert/remove USIM Card; may damage handset/USIM Card.
Avoid touching USIM Card terminals or IC chip; doing so may hinder
performance/USIM Card recognition.
1-5
Getting Started
Charging Battery
Battery Installation
Always turn off handset power before removing Battery.
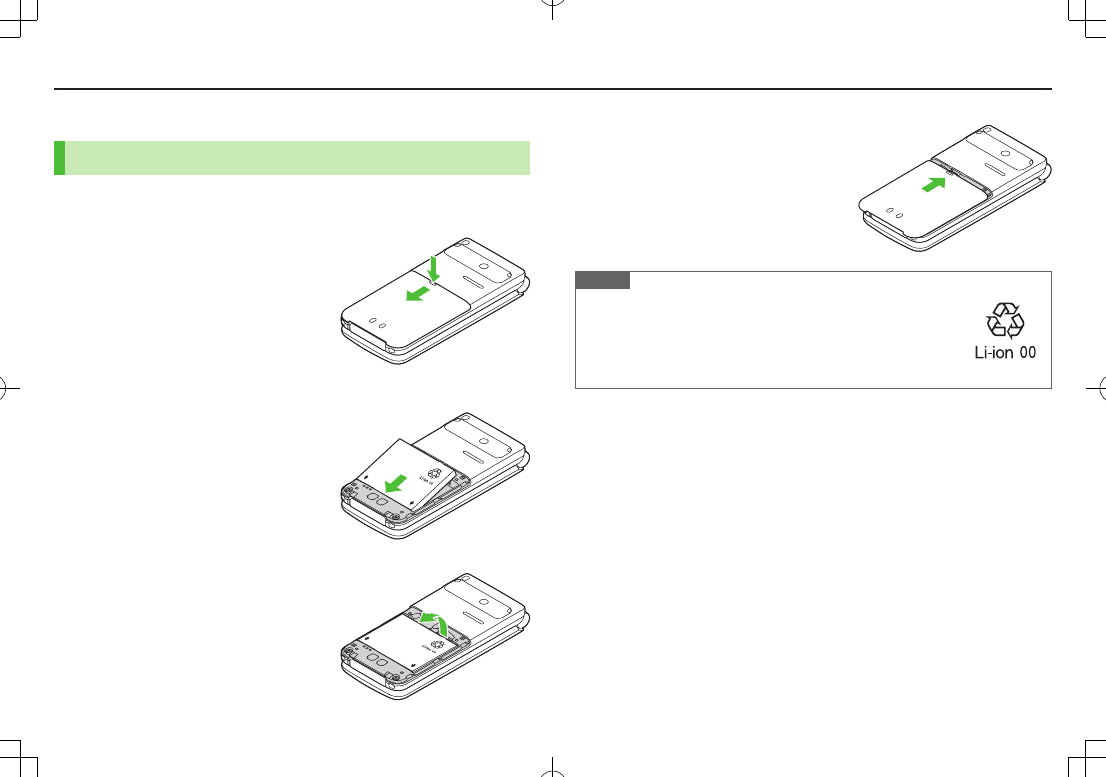
1 Press and slide to remove Battery Cover
2 Insert Battery
Align Battery contacts with handset pins
Remove Battery
Lift Battery out as shown
3 Replace Battery Cover
Battery Cover should click into place.
Note
Lithium-ion batteries are valuable and recyclable resources.
・ Recycle used lithium-ion battery at shops displaying this symbol:
・ To avoid fire or electric shock, do not:
- Short-circuit Battery
- Disassemble Battery
1-6
Getting Started
Charging Battery
Use only specified AC Charger (sold separately).
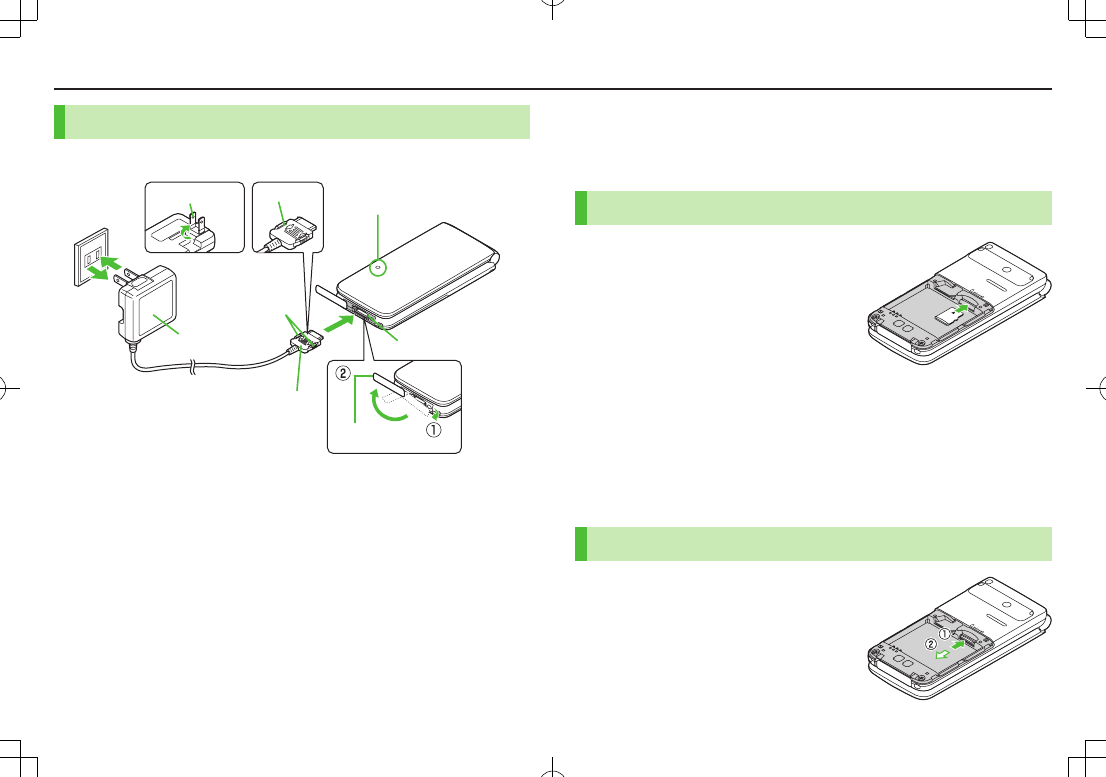
1 Connect AC Charger to handset
2 Extend Charger Blades, and plug AC Charger into AC Outlet
Charging Indicator illuminates and charging starts.
When charging is complete, Charging Indicator goes out.
3 When charging is complete, unplug AC Charger, then
disconnect handset
Squeeze Release Tabs to remove Charger Connector, and replace Port Cover.
Port Cover
Charging Indicator
External Device Port
Arrows up
Release Tabs
Charger Connector
AC Charger
Charger Blades
AC Outlet
3
2
1
microSD Card Installation
Power off handset before inserting/removing microSD Card.
Handset Data Backup: ZP.9-1
Inserting
1 Insert microSD Card until it clicks
■Format microSD Card
>Main Menu 4 Tools 4 microSD Backup 4 Refer Data 4 S[Menu]
4 microSD format 4 Enter Phone Password 4 YES
Formatting microSD Card deletes all saved files/data.
Do not power off handset or remove microSD Card while formatting; may
damage handset or microSD Card.
Removing
1 Push microSD Card in
microSD Card pops out with a light push.
Getting Started
1-7
Parts & Functions
5.1M

Getting Started
1-8
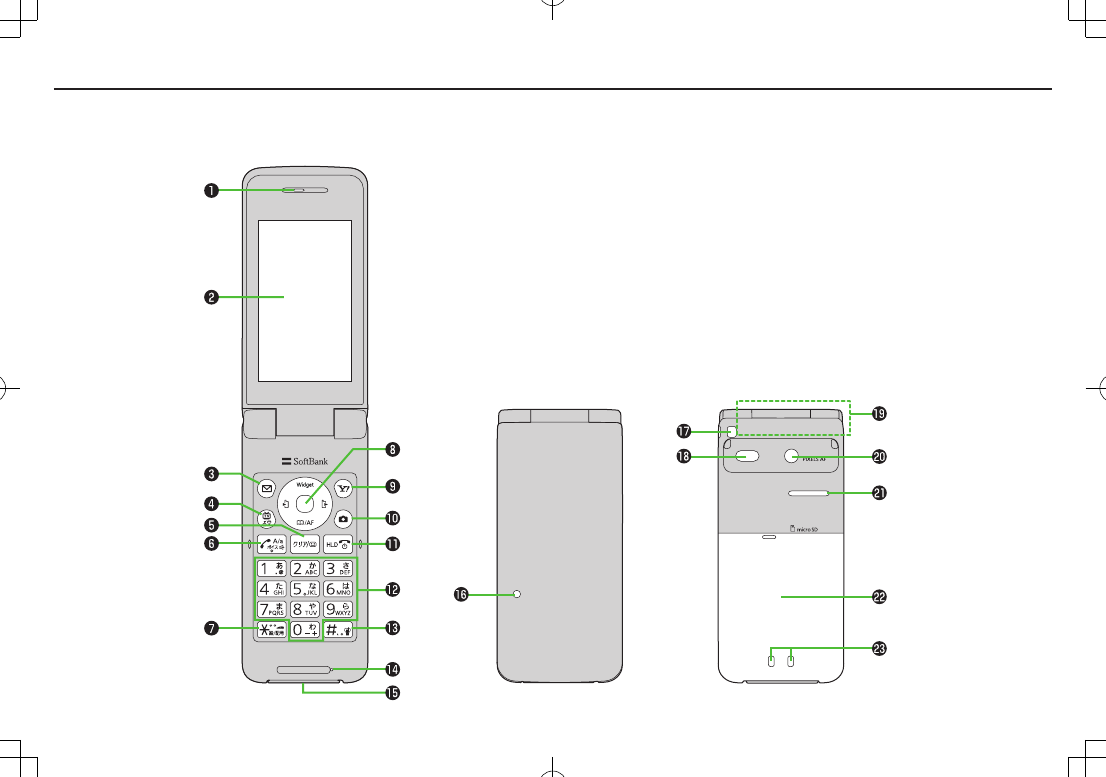
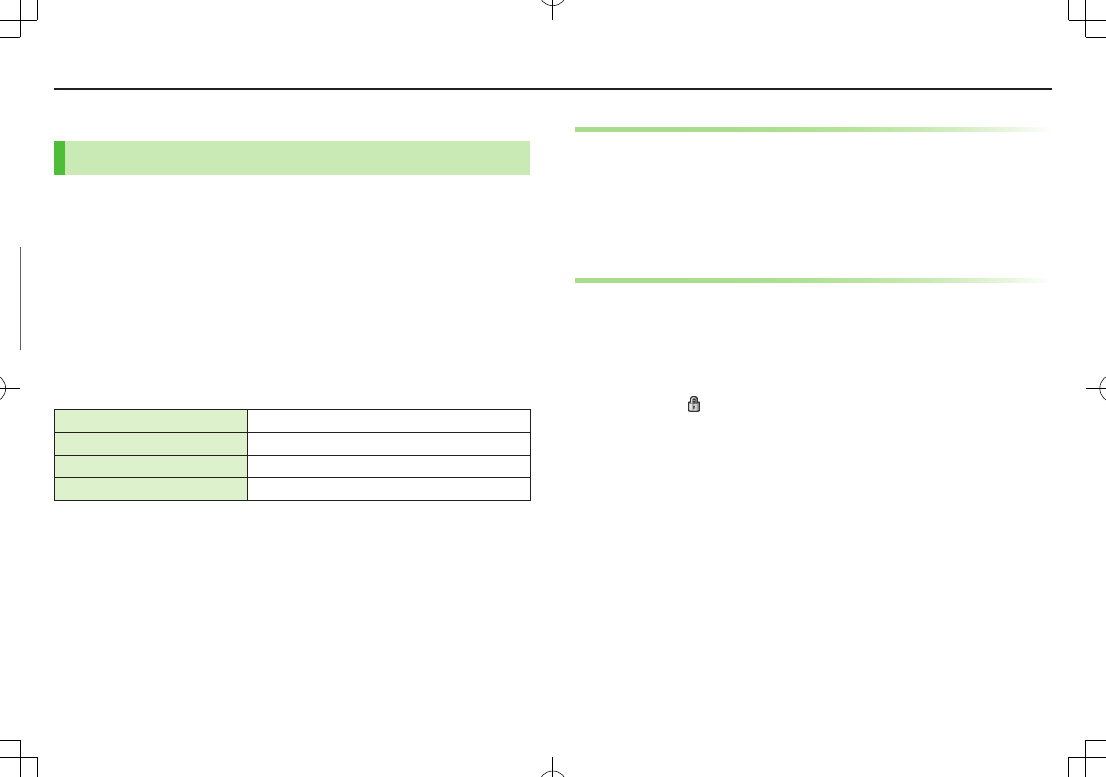
Earpiece
Display
A Mail Key
・ Open Messaging menu
・ Execute Upper Left Softkey function
1 TV Key
・ Activate TV
・ Open TASK MENU
・ Execute Lower Left Softkey function
K Clear/Memo Key
・ Delete characters
・ Cancel menus
・ Use Answer Phone
J Send Key
・ Initiate or answer calls
・ Toggle upper/lower case in text entry windows
・ Use Voice Dial
G /Pictograph/Symbol/Driving Mode Key
・ Enter " "
・ Access pictographs in text entry windows
・ Toggle Driving Mode on/off
z Multi Selector
・ Move cursor or select menus (ZP.1-3)
・ >z
Select icons/S! Quick News
・ Cz
Open Phone Book
・ Vz
Open Incoming Call Logs
・ Nz
Open Redial logs
S Yahoo! Keitai Key
・ Open Yahoo! Keitai top menu
・
Execute Upper Right Softkey function
F Camera Key
・ Activate Camera
・ Execute Lower Right Softkey function
L End/Escape & Power Key
・ Power on/off (ZP.1-9)
・ End calls
・ Return to Standby
P-O Keypad
・ Enter phone number/text
H #/Manner Mode Key
・ Enter "r"
・ Toggle Manner Mode on/off
Mic
External Device Port
・ Connect AC Charger, earphone or other
accessories here
Notification Light/Charging Indicator
・ Flashes for incoming transmissions
・ Lights for charging
Strap Eyelet
Infrared Port
・ Transfer data via Infrared
Internal Antenna Area
Camera
Speaker
Battery Cover
Charging Terminals
Note
Do not press microphone button when connecting
Earphone with Mic. Doing so may cause
malfunction. If pressed accidentally, unplug then
reconnect it.
1-9
Getting Started
Camera
Speaker
Battery Cover
Charging Terminals
Note
Do not press microphone button when connecting
Earphone with Mic. Doing so may cause
malfunction. If pressed accidentally, unplug then
reconnect it.
Basic Operations
Power On/Off
1 Power On
Press and hold L
Start-up window appears and handset enters Standby.
Power Off
Press L for 2+ seconds
Handset shuts down.
■Initial Setup
The first time handset powers on and Initial setting window appears, select
YES
and set the following: (Each item can be set separately.)
Date & Time*(ZP.1-10) Set date and time
Phone Password (ZP.1-17) Enter 9999, and enter new Phone Password
Key Tone Select
ON
or
OFF
Font Size
Set Display font size all at once
* May set/adjust automatically upon network connection
Retrieving Network Information
Pressing *z, A, S or >z for the first time in Standby may
initiate Network Information retrieval; press *z to retrieve it.
Update Network Information to use messaging, Internet, etc.
Update Network Information manually: Main Menu 4 Settings
4 Connectivity 4 Retrieve NW Info 4 YES
Keyguard
Lock handset keys to prevent accidental operation. Opening
handset temporarily cancels Keyguard.
1 Press and hold *z
To cancel Keyguard, press and hold *z with handset open.
While set, appears in Standby. (Indicator is grayed out while Keyguard
is temporarily canceled.)
If handset is closed while Keyguard is active, or Keyguard activated in
closed position, Display enters Power Saver Mode and Display Lock
activates. (ZP.1-15)

1-10
Getting Started
English Interface
Main Menu 4 4 4 Language 4 English
Date & Time
Main Menu 4Settings 4 Date & Time 4 Date & Time
1 Enter year 7 Enter date 7 Enter time
■World Clock
>After Step 1, Highlight time zone 7 A[Edit] 7 Xz to select a time zone
7 *z[Select]
Alternatively, in Step 1,
World Clock
7
ON
or
OFF
(7 For
ON
, Xz to select
an area).
My Number
1 *z 7 P
■Edit Account Details
Save phone number, mail address, street address, etc. in Account Details.
Handset phone number cannot be edited or deleted.
>After Step 1, A[Edit] 7 Enter Phone Password 7 Edit 7 A[Finish]
■Send Account Details via Infrared
>After Step 1, F[Ir]
Getting Started
1-11
Display
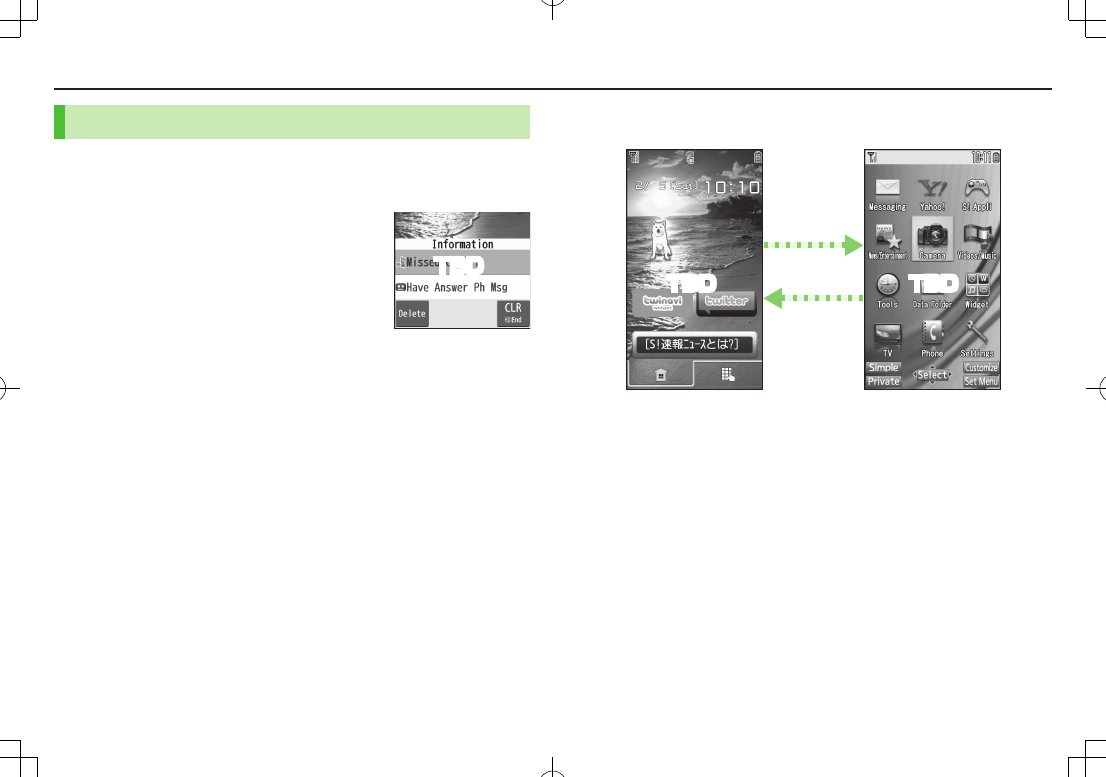
Icons & Indicators
Data Transmission
3G/GSM Packet Transmitting
Network Service
/
3G/GSM Packet Transmission Available*
/
3G/GSM Packet Transmission
Unavailable*
* Appears only while abroad
Secure Content
PC Site Browser Active
Infrared Active
USB Cable Connected
Keyguard Active
Voicemail
(Blue) Bluetooth® Device Connected
microSD Card installed
Unread Message
Unread Urgent News
Manner Mode Active
Software Update
(Notification/Updating/Result)
Digital TV Active
During Timer Recording
/ Recording TV Program/Paused
Vibration Active (Incoming Call/Message)
Incoming Call/Message Ringtone Disabled
Driving Mode Active
~
Answer Phone Active (Number of Recorded
Messages (Voice Call))
~
Answer Phone Active (Number of Recorded
Messages (Video Call))
Information Window (ZP.1-12)
Display Indicators
Signal Strength
Strong Moderate Weak Low
Offline Mode Active
Out-of-Range
Battery Level
7 7 7
(Red)
TBD
1-12
Getting Started
Information Window
In Standby, Information Window opens for missed events.
Select a notification to view/access information.
1 Highlight an item 7 *z
Follow onscreen instructions.
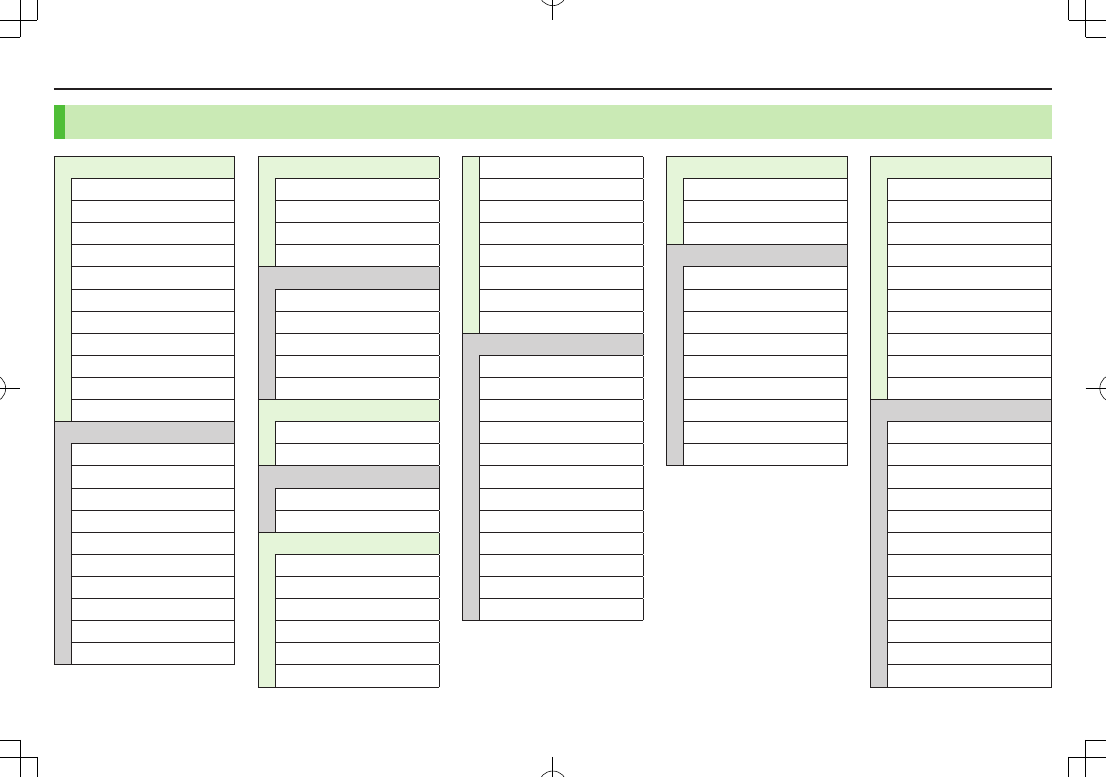
Handset Menus
1 In Standby, *z
Main Menu appears.
2 Xz to highlight an icon 7 *z[Select]
Selected function menu appears.
To return to Standby: L
Main MenuStandby
L
*z
TBD
TBD TBD
Getting Started
1-13
Function List
S! Appli
S! Appli List
S! Appli Settings
S! Appli History
Information
Entertainment
S! Info Ch./Weather
S! Quick News
Free Contents
S! Contents Store
Post Blog
Camera
Camera
Video Camera
Media
Music
Videos
Tools
Alarms
Calendar
Calculator
Notepad
Tasks
Dictionary
Sound Recorders
Barcode Reader
Location Settings
Bluetooth
Receive via Infrared
Music Player
microSD Backup
Templates/User Dic.
Data Folder
Pictures
Ring Songs&Tones
S! Appli
Widget
Music
Videos
TV
Books
Customized Screen
Templates
Font
Other Documents
Widget
Widget Store
Widget Contents
Settings
TV
Watch TV
Program List
Timer Watching
Timer Recording
Recording Result
TV Link
Channel List
Channel Setting
User Settings
Messaging
Incoming Mail
Create New
Retrieve New
Drafts
Templates
Sent/Unsent
Server Mail
Create New PC Mail
Create New SMS
Settings
Memory Status
Yahoo!
Yahoo! Keitai
Menu List
Bookmarks
Saved Pages
Web Search
Enter URL
History
PC Site Browser
Set Yahoo! Keitai
Reset
Phone
Phone Book
Create New Entry
Call Log
Account Details
S! Addressbook BkUp
Group
Memory Manager
Restrictions
Settings
Memory Status
Settings
Sound Settings
Display Settings
Customized Screen
Incoming Settings
Phone Settings
Date & Time
Security
Call Settings
Video Call
International Call
Connectivity
Notification Light
1-14
Getting Started
Handset Security
USIM PINs
PIN
4 to 8-digit code used to prevent unauthorized handset use.
When PIN Authentication is
ON
, PIN entry is required each time
handset is turned on (with USIM Card installed).
PIN2 Required for call cost setting.
PIN and PIN2 are set to 9999 by default.
PIN Authentication
Main Menu 4 Settings 4 Security 4 PIN Authentication
1 Enter Phone Password 7
PIN Authentication
7
ON
or
OFF
7 Enter PIN
PIN/PIN2 Lock & Cancellation (PUK/PUK2)
PIN Lock or PIN2 Lock is activated if PIN or PIN2 is incorrectly
entered three times. Cancel PIN Lock or PIN2 Lock by entering PIN
Unblocking Key (PUK/PUK2).
For information about PUK/PUK2, contact SoftBank Customer Support, General
Information (ZP.9-22).
Note
If PUK/PUK2 is incorrectly entered ten times, USIM Card is locked and
handset is disabled. Write down PUK/PUK2.
For procedures required to unlock USIM Card, contact SoftBank Customer
Support, General Information (ZP.9-22).
Passwords
Phone Password
<Default> 9999
4 to 8-digit number required to use/change some handset
functions.
■Change Phone Password
>Main Menu 4 Settings 4 Security 4 Change Phone Password
4 Enter current Phone Password 4 Enter new Phone Password
4
YES
Center Access Code (Security Code)
4-digit number specified at initial subscription; required to access
Voicemail via landlines, subscribe to paid content or restrict
handset services.
For procedures required to change Center Access Code, contact SoftBank
Customer Support, General Information (ZP.9-22).
If entered incorrectly three times, Call Barring settings lock; Center Access Code
must be changed.
If Security Code has been changed on handset, enter the number to activate/
deactivate Call Barring.
Note
Write down Phone Password and Center Access Code. Do not reveal Phone
Password and Center Access Code. SoftBank Mobile is not liable for misuse
or damages.
1-15
Getting Started
Mobile Manners
Minding Mobile Manners
Please use your handset responsibly. Use these basic tips as a
guide. Inappropriate handset use can be both dangerous and
bothersome. Please take care not to disturb others when using
your handset. Adjust handset use according to your surroundings.
Turn it off in theaters, museums and other places where silence is the norm.
Refrain from use in restaurants, lobbies, elevators, etc.
Observe signs and instructions regarding handset use aboard trains, etc.
Refrain from use that interrupts the flow of pedestrian or vehicle traffic.
■Manner-related Features
Manner Mode Mute handset tones and activate vibration for incoming
transmissions.
Vibration Activate in public places, meetings, etc. for silent call/
message alerts.
Ringer Volume Adjust call/message tones, etc.
Offline Mode
Suspend all handset transmissions.
Answer Phone Use to handle incoming calls when inappropriate/unsafe
to answer.
Driving Mode While driving, send a voice message informing the caller
that you cannot answer the call. (Handset does not ring.)
Manner Mode
1 In Standby, press and hold H
appears.
To cancel: Press and hold H again
Offline Mode
Main Menu 4Settings 4 Call Settings 4 Offline Mode
1
YES
appears.
To cancel: Follow the same steps
Driving Mode
1 In Standby, press and hold G
appears.
To cancel: Press and hold G again
2-1
Entering Text
Enter alphanumerics, hiragana, kanji, katakana, symbols and
pictographs.
There are two character input methods: 5-touch and 2-touch
In this guide, examples are described for 5-touch.
2-touch
Press two numeric keys to enter a character.
Touch Keypad
Touch Keypad is available when text entry window is opened via Touch Menu or
handset is closed during Keypad operation.
Using Touch Keypad: ZP.2-5
■Text Entry Window
Character Input Methods Operations
5-touch/2-touch Press and hold A[Mode]
Input Modes (Double-byte/Single-byte) Operations
5-touch
1
/
1: Kanji (hiragana) (double-byte)
1
/
11
/
2: Katakana
abc1
/
1abc1
/
2:
Uppercase alphanumerics
abc1
/
1Smabc1
/
2Sm:
Lowercase
alphanumerics
1
/
11
/
2: Numbers
A[Mode] 7 Select a
character type
2-touch
1
/
1 1
/
2:
Uppercase alphanumerics/
Regular kana
1
/
1Sm 1
/
2Sm: Lowercase
alphanumerics/
Small kana
To toggle double-/
single-byte: A[Mode]
To toggle Small kana/
Regular kana: IP
Remaining Bytes
Text Entry
TBD
2-2
Text Entry
Entering Characters
Example: Enter
1 In alphanumerics mode, A[Mode] 7
す: E three times
ず: Nz* 7 E three times 7 G
き: W twice
* When the next character is on the same key, press Nz first to move cursor.
2 Cz to enter Suggestion List
To exit list: K
3 Xz to select 鈴木
■Other Input Functions
Enter katakana/
alphanumerics
A[Mode] 7 Select input mode (character
type) 7 Enter characters
Enter small kana
(っ, ッ, etc.)
Enter a character 7 J
Alternatively, press a key repeatedly for
assigned small kana.
Enter uppercase letters
Enter a character 7 J
Alternatively, press a key repeatedly for
assigned uppercase letter.
Add ゛
or ゜
Enter a character to add ゛
or ゜
7 G for ゛
or
G twice for ゜
In single-byte katakana mode, enter ゛
or ゜
as
a single-byte character.
Insert line feed F[Line FD] to insert line feeds in text
Add space at end of text Nz
Insert space within text
H repeatedly until single-byte space
appears*, or S[Menu] 7
Input Space
(Double-byte (single-byte) space is entered in 2
bytes (1 byte) input mode.)
Reverse toggle
F[Rev.]
Example: From c, press to toggle as follows:
c 7 b 7 a 7 2…
Move cursor to beginning/
end of sentence
S[Menu] 7
Jump
7
To beginning
or
To end
Undo 1[Undo]
* Space cannot be entered in number mode. Use symbol list.
TBD
TBD
2-3
Text Entry
Pictographs/Symbols/Smileys/URLs
Pictographs do not appear in messages sent to incompatible SoftBank handsets
or most e-mail addresses.
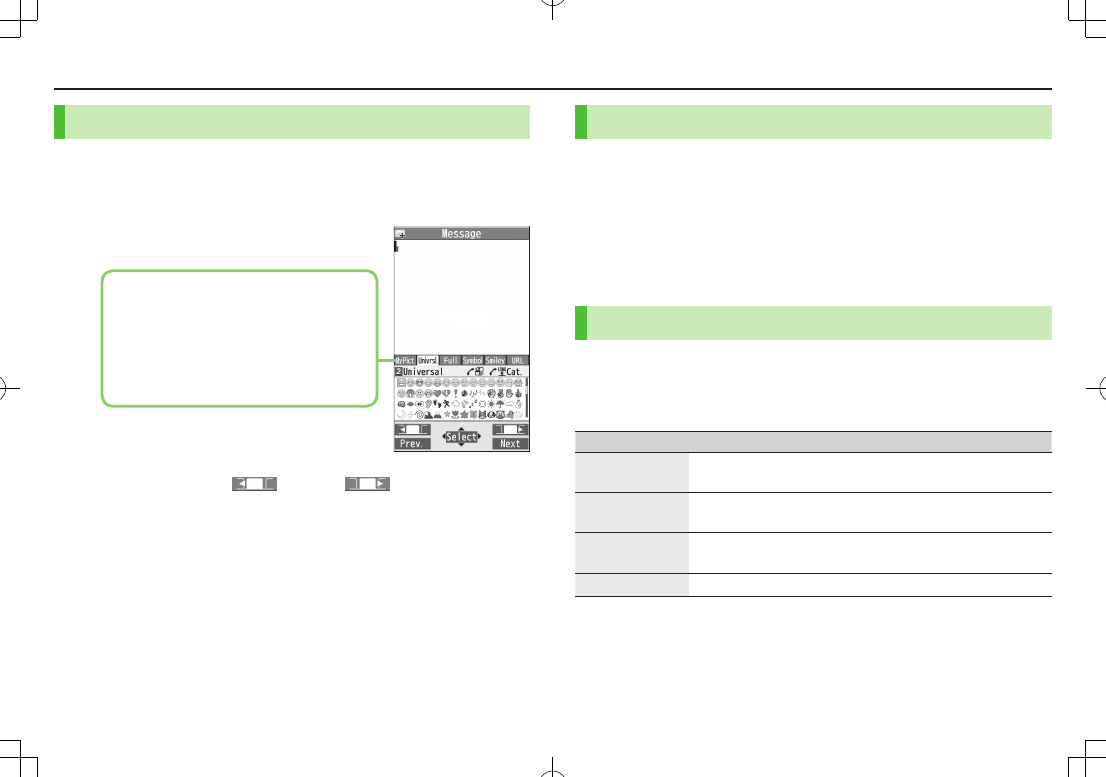
1 In text entry window, G
List Log may appear first.
1 Only in S! Mail text entry window
2 Only for S! Mail
2 To toggle tabs, A[] or S[]
3 Xz to select a pictograph/symbol/smiley/URL
To close list: K
Templates
Insert templates (greetings, URLs, emoticons, etc.).
1 In text entry window, press and hold G
Not available in number mode.
2 Select a category 7 Select a template
Additional Features
1 In text entry window, S[Menu] 7
Templates/Quote
2 Select an item
Item Operation/Description
Kuten code Enter a character code
>Enter a character code (4 digits)
Quote phone
book
Quote Phone Book entry details
>Select an entry 7 Check items 7 A[Finish]
Quote accnt
detls
Quote Account Details
>Enter Phone Password 7 Check items 7 A[Finish]
Bar code reader Activate Bar Code Reader to insert scanned result
My Pict.1: My Pictograms
Univrsl.2: Universal (cross-carrier) pictographs
Full: All pictographs
Symbol: Symbols
Smiley: Smileys
URL: URLs
TBD

2-4
Text Entry
Editing Text
Deleting & Replacing
1 Delete Characters within Lines
Place cursor before a character 7 K
A character after cursor is deleted.
Press and hold K to delete all characters after cursor.
Delete Characters from the End of Text
Place cursor at the end of text 7 K
A character before cursor is deleted.
Press and hold K to delete all characters before cursor.
2 Enter another character
Copy/Cut & Paste
1 In text entry window, S[Menu] 7
Copy
or
Cut
2 Select Text to Copy/Cut
Place cursor before (or after) text to select 7 *z[Start] 7
Place cursor after (or before) text 7 *z[End]
Select All (In S! Mail Message Text Entry Window Only)
S[All] 7 *z[End]
3 Place cursor at target location 7 S[Menu] 7
Paste

3-1
Emergency Calls
Call 110 (Police), 119 (Fire & Ambulance) or 118 (Coast Guard)
even when some handset restrictions are active.
Calls cannot be made in PIN/PIN2, PUK/PUK2 entry window.
Emergency Positioning Request
When an emergency call is made from a mobile phone, location is reported to
first response agencies such as the police.
Location information may be inaccurate due to location or signal conditions.
Describe location or nearby landmarks.
Base Station Positioning System is accurate within 100 meters to
10 kilometers. Location information from distant base stations may be
inaccurate.
Function available wherever system is installed by first response agencies.
Dialing 184 before 110, 119 or 118, cancels location report.
However, first responders may obtain location information for immediate and
serious threats to life.
Not available for international roaming.
Requires no separate subscription or transmission fees.
Voice Calls
Making Voice Calls
1 Enter number with area code 7 J
To adjust volume: ?z or 56
2 L to end call
■Call from Call Logs
><z 7 Select a record 7 J
■Make Calls from Phone Book
>Cz 7 <z to select a page of the required reading 7Select an entry 7 Nz 7
Select a phone number
■Show/Hide Caller ID
>Enter number 7 S[Menu] 7
Notify caller ID
7
OFF
or
ON
To always show/hide Caller ID: Main Menu 4 Settings 4 Call Settings
4 Caller ID 4 Activate 4 ON, OFF or Network Set*
*
Network Set
Caller ID setting varies by subscription.
Answering Voice Calls
1 When a call is received, J to talk
To adjust volume: ?z or 56
2 L to end call
Calling
3-2
Calling
Video Calls
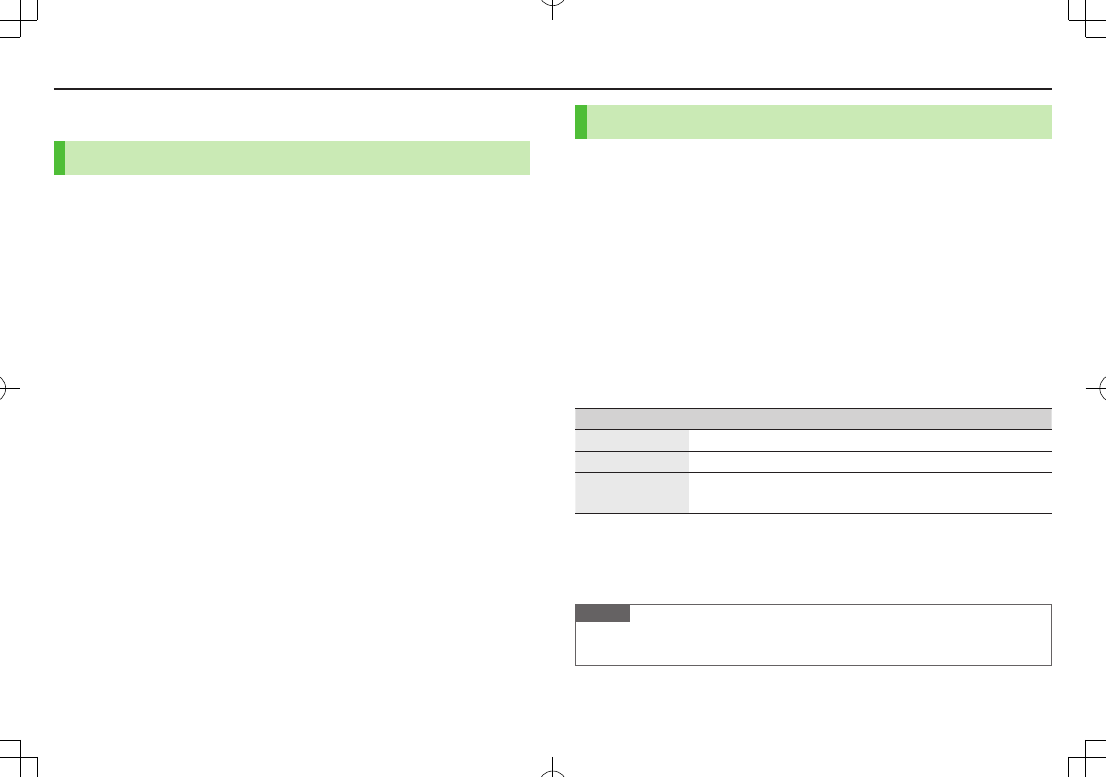
■Video Call Window
Example:
Display appearance may vary by settings/conditions.
Making Video Calls
1 Enter number with area code 7 A[V.Call]
Alternative Image is sent.
To send Video Image: 1[image]
To adjust volume: ?z
2 L to end call
■Call from Call Logs
><z 7 Select a record 7 A[V.Call]
■Make Calls from Phone Book
>Cz 7 <z to select a page of the required reading 7Select an entry 7
Nz 7 Highlight a phone number 7 A[V.Call]
Answering Video Calls
1 When a video call is received, J to talk
To send Video Image: 1[image]
To adjust volume: ?z
2 L to end call
Video Call Indicator
Call Time
Incoming Image
Outgoing Image
(Alternative Image/
Video Image)
Indicators
: Incoming/Outgoing Sound OK
(Gray): Incoming/
Outgoing Sound NA
: Incoming/Outgoing Image OK
(Gray): Incoming/
Outgoing Image NA
: Video ON
: Alternative Image ON
: Speaker ON
: During Bluetooth® handsfree call
: Close-up
: Landscape
: Night mode
TBD
3-3
Calling
International Calls
Calling Abroad from Japan
No application required. See SoftBank Mobile Website:
http://mb.softbank.jp/en/global_services/call/
1 Enter a phone number
2 S[Menu] 7
Int'l dial assist
Country/region code list appears.
3 Select a country/region
4 Voice Call
J
Video Call
A[V. Call]
■Enter Country/Region Code Directly
>P 7 Press and hold P for + (IDD Prefix) 7 Enter a country/region code
7 Enter number (omit first 0) 7 Voice Call: J/Video Call: A[V. Call]
Do not omit leading 0 when calling Italy (country code: 39).
Global Roaming
May require Global Roaming Service application. See SoftBank Mobile Website:
http://mb.softbank.jp/en/global_services/global_roaming/
Example: When Roaming Dial Assistant is ON
Roaming Dial Assistant (ZP.3-4) is
ON
and
Japan
by default.
1 Voice Call
Enter a phone number 7 J
Video Call
Enter a phone number 7 A[V. Call]
2 Select an item
Item Operation/Description
Call to Japan* Call Japan
Call to set code* Call a country/region set for
Roaming Dial Assistant
As is Call Manually enter number to call
Select when calling within the country/region
* First 0 is replaced by IDD Prefix and country/region code (e.g. +81). (When calling
Italy, +39 is added before first 0.)
Confirmation window appears the first time. Select
NO
to set Roaming Dial
Assistant to
OFF
.
Note
IDD Prefix and country/region code can be manually entered in Step 1.
Alternatively, save IDD Prefix and country/region code in Phone Book entries.
3-4
Calling
International Call Settings
From Main Menu 4 Settings 4 International Call
■International Dial Assist Settings
>
Int’l Dial Assist
7 Select an item
Item Operation/Description
Roaming Dial
Assistant
Automatically inserts prefixes (IDD Prefix and country code)
>
ON
or
OFF
(7 For
ON
, select a country/region)
Country/Area
Code
Save country/region codes
>Highlight
<Not Recorded>
7 A[Edit] 7 Enter
country/region name 7 Enter country/region code
To view an entry: Select a saved country/region
To delete: Highlight a country/region 7 S[Menu] 7
Delete this
or
Delete all
(7 For
Delete all
, enter Phone
Password) 7
YES
IDD Prefix Edit IDD Prefix. IDD Prefix is set to 0046010 by default
>S[Menu] 7
Edit
7 Edit IDD Prefix
■Network Mode
<Default> Automatic
>
Select Network
7 Select an item
Item Operation/Description
Automatic Handset automatically selects 3G network in Japan, and
available network (3G or GSM) abroad.
Manual
>Select an item
・
3G/GSM
: 3G service area in Japan or 3G/GSM abroad.
Handset selects an available network automatically.
・
3G
: 3G service areas in Japan or abroad.
・
GSM
: GSM service areas abroad. Unavailable in Japan.
Automatic
is recommended.
■Select Operator
<Default> Auto
>
Select Operator
7 Select an item
Item Operation/Description
Auto Select an operator automatically
Manual
Select an operator manually
>Select an operator
Operators with X are not available.
To view operator list: A[Update]
Network
Re-search
Search available networks
When
Auto
, handset selects an available operator
automatically. When
Manual
, operator list appears.
3-5
Calling
Answer Phone
When Answer Phone is active, – (Voice Call) or –
(Video Call)
appears in Standby (Voice Calls are prioritized).
Unavailable when: handset is off or in Offline Mode; appears. Use Voicemail
(ZP.3-7).
Activating/Canceling Answer Phone
<Default> OFF
1 Press and hold K
To toggle settings, repeat operation.
■Redirect a Call to Answer Phone
>A[Ans. Ph]
Note
When full, new messages cannot be recorded even if Answer Phone is
activated. Delete old messages (ZRight).
Playing Messages
When a new message is recorded,
Information Window opens in Standby.
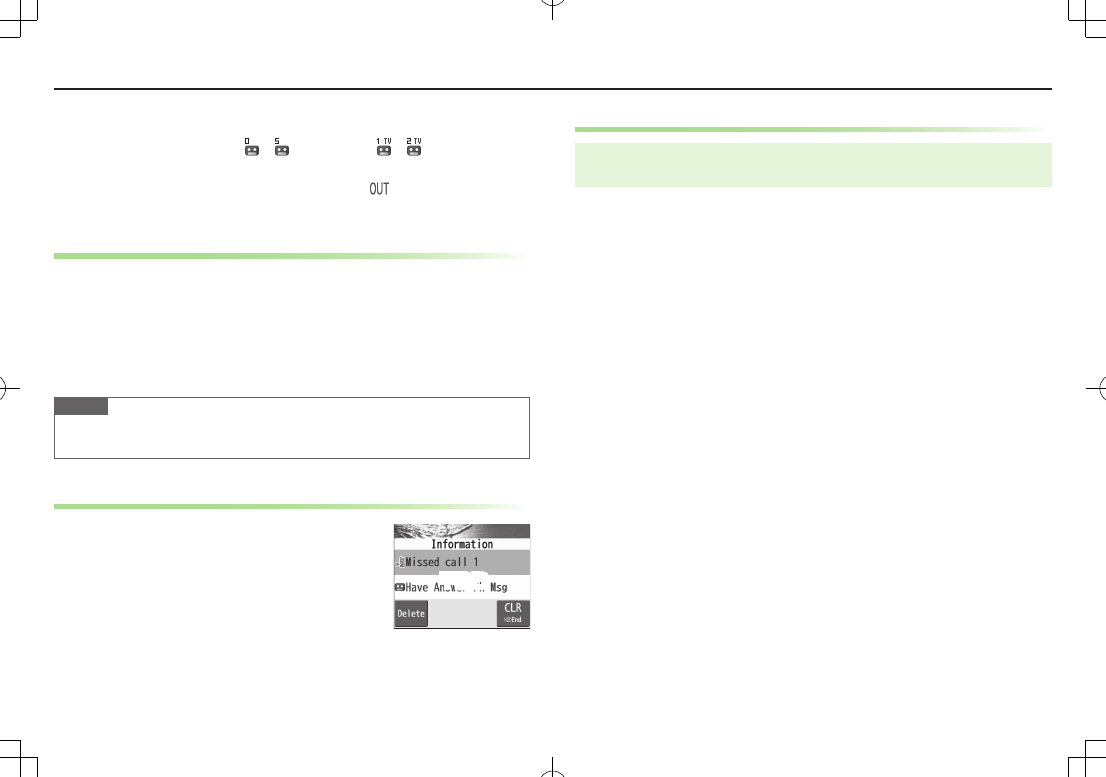
1 In Information Window,
Have Answer Ph Msg
2 Select a message
Deleting Messages
Main Menu 4 Tools 4 Sound Recorders 4 Voice Call Data or
Video Call Data
1 (Highlight a message 7) S[Menu] 7 Select an item
2
YES
■Delete a message during playback
>During playback, S[Erase] 7
YES
TBD
3-6
Calling
Optional Services
For details, see SoftBank Mobile Website: http://mb.softbank.jp/en/
Call Forwarding
Forward unanswerable calls to a preset number when handset is
off, out-of-range, etc.
Call Forwarding and Voicemail cannot be active simultaneously.
Activating Call Forwarding
Main Menu 4 Settings 4 Call Settings 4 Voicemail/Call Fwding
1
Call Forwarding ON
7 Select a type 7 Enter a destination
phone number
?z to select number from Phone Book.
2 Select an item
Item Operation/Description
Ringer ON Forward missed calls
>Select a ring time 7
YES
Ringer OFF Forward all calls without ringing/vibrating
>
YES
■Check Call Forwarding Status
> In Step 1,
Get Status
■Cancel Call Forwarding
> In Step 1,
Deactivate All
7
YES
Note
Toll free/international numbers cannot be saved as fowarding number.
3-7
Calling
Voicemail
Unanswered calls are forwarded to Voicemail Center as set or
when handset is off, out-of-range, engaged, etc.
Calls are forwarded to Voicemail Center via Call Forwarding function; Call
Forwarding and Voicemail cannot be active simultaneously.
Voicemail is not available for Video Calls.
Activating Voicemail
Main Menu 4 Settings 4 Call Settings 4 Voicemail/Call Fwding
1
Voicemail ON
2 Select an item
Item Operation/Description
Ringer ON Forward missed calls
>Select a ring time 7
YES
Ringer OFF Forward all calls without ringing/vibrating
>
YES
■Check Voicemail Status
>In Step 1,
Get Status
■Cancel Voicemail
>In Step 1,
Deactivate All
7
YES
Playing Voicemail Messages
Information Window and appear in Standby when new
messages are recorded.
1 In Information Window,
Voicemail
7
YES
Follow voice guidance.
When Information Window does not appear,
Main Menu 4 Settings 4 Call Settings
4 Voicemail/Call Fwding
4 Play Voicemail 4 YES.
■View Details
View callers' phone numbers and date/time Voicemail messages were left before
playing messages.
Activate Missed Call Notification beforehand (ZBelow).
>Vz 7
Voice Mail Notif.
7 F[]
Missed Call Notification
When Missed Call Notification function is active, Information
Window appears for calls missed while handset was off, out-of
range, engaged etc.
Available only when Voicemail is active.
Main Menu
4
Settings
4
Call Settings
4
Missed Call Notifi.
1
YES
Handset connects to the Network. Follow voice guidance.
TBD
3-8
Calling
Call Waiting
Place the current call on hold and answer a second, or alternate
between calls.
Separate subscription is required for this service.
Activating/Canceling Call Waiting
Main Menu 4 Settings 4 Call Settings 4 Call Waiting
1
Activate
or
Deactivate
7
YES
■Check Call Waiting Status
>In Step 1,
Get Status
Answering Second Call
1 When tone sounds, J
Press J to alternate between calls.
When a second call comes in while first call is on hold, hold status is
canceled and first call resumes.
■Reject Second Call
>When tone sounds, S[Menu] 7
Call Rejection
Note
When Voicemail or Call Forwarding is set to
Ringer ON
while Call Waiting is
active, unanswered calls are transferred to Voicemail Center or the forwarding
number.
When Voicemail or Call Forwarding is set to
Ringer OFF
, Call Waiting is
disabled.
Call Barring
Restrict incoming/outgoing Voice Calls, Video Calls or SMS
messages.
Bar All Outgoing
and
Bar All Incoming
are not available when Call
Forwarding or Voicemail is active. (Call Forwarding or Voicemail takes priority.)
Emergency numbers (110, 119, 118) are dialable even while Call Barring for
outgoing calls is active.
Activating/Deactivating Call Barring
Main Menu 4 Settings 4 Call Settings 4 Call Barring
1 Select an item
Item Operation/Description
Bar All Outgoing Restrict all non-emergency calls
Bar All Int'l Allow only domestic calls
Bar Int'l Restrict all international calls except to Japan
Bar All Incoming Reject all calls
Bar All Roaming Reject calls when outside Japan
2
Activate
or
Deactivate
7
YES
7 Enter Center Access
Code
■Check Call Barring Status
>After Step 1,
Get Status
■Cancel All Call Barring
>In Step 1,
Cancel All Barring
7 Enter Center Access Code
3-9
Calling
Phone Book
Saving to Phone Book
Creating New Entries
1 Press and hold Cz 7 Enter Last name 7 Enter First name
7 Select an item 7 Enter information 7 A[Finish]
Saving Numbers from Call Logs
1 <z 7 Highlight a record 7 S[Menu] 7
Add to Phone Book
2 New Entry
New
7 Enter other details
Add to Existing Entry
Add
7 Select entry 7 Enter other details
When saving to USIM Card,
Overwrite
appears instead of
Add
.
3 A[Finish] (7
YES
)
Note
Press S[Menu] from a function. If
Add to Phone Book
appears, the
information is savable to Phone Book. From a message window, select
Add Address
to save entries; from photo list/photos, select
Set display
7
Phone Book
to save entries.
Changing Save Settings
Main Menu 4 Phone 4 Settings 4 Save Settings
1
Phone
,
USIM
or
Ask Every Time
Managing Phone Book
Editing Phone Book Entries
1 Cz 7 Select an entry 7 1[Edit] 7 Edit entry 7
A[Finish] 7
YES
■Delete Phone Book Entries
>Cz 7 Highlight an entry 7 S[Menu] 7
Delete phone book
7
Select an item 7 Follow steps for selected item
Phone Book Memory Status
Main Menu 4 Phone 4 Memory Status
4-1
Basics
Send messages via S! Mail, SMS or PC Mail.
SoftBank Mobile messaging services are available in Japan and overseas.
For more information, see SoftBank Mobile Website: http://mb.softbank.jp/en/
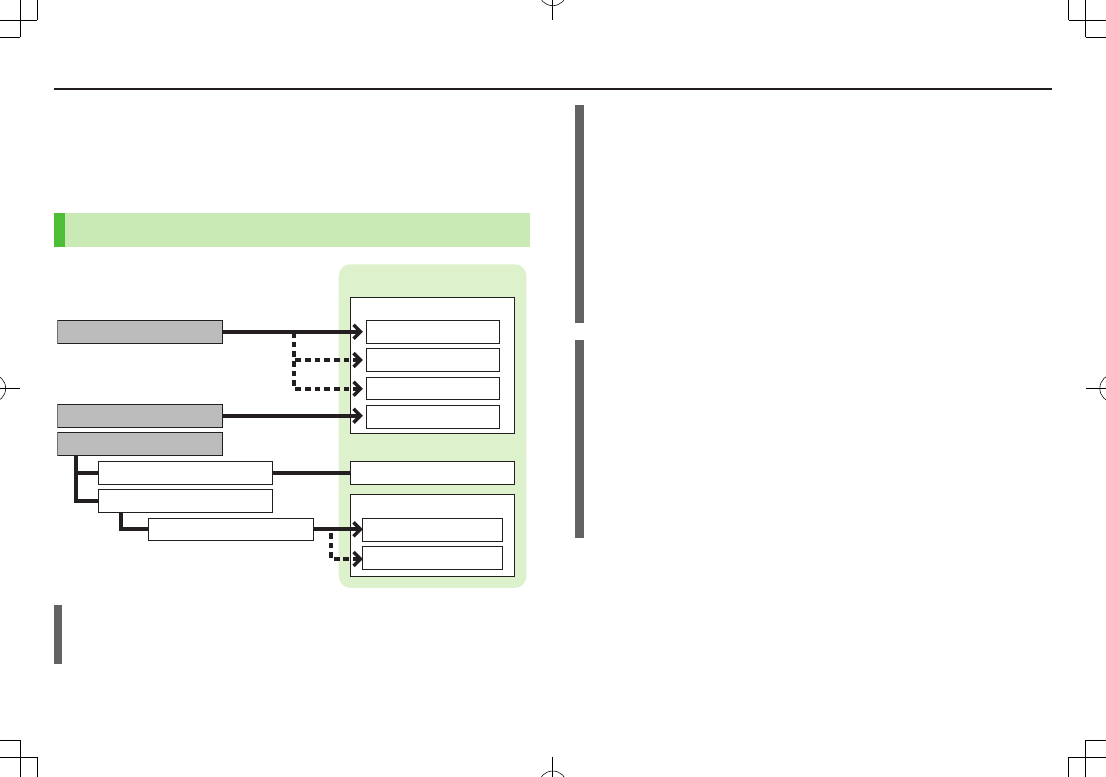
Messaging Folders
Operations while Using PC Mail
Setting PC Mail accounts creates account folders in Messaging Folders.
S! Mail/SMS operations may change as a result.
Sent/Unsent
Sent/Unsent
ユーザーフォルダ
1-3
Drafts
Messaging Folders
Incoming Mail
Received
Spam Folder
Urgent News
ユーザーフォルダ 1-3
Create Messages
Receive Urgent News
Receive Messages
Save as Drafts
Send Messages
Complete/Not Complete
Auto Resend
When handset is out-of-range or in Offline Mode, unsent messages are saved as
Unsent and protected from auto deletion.
When signal returns, messages are automatically sent. Once sent, messages are
unprotected.
To cancel Auto Resend: A 7
Sent/Unsent
7 Select a folder 7 Highlight
a message 7 S[Menu] 7
Release Resending
When Auto Resend function is set to
OFF
, unsent messages are not
automatically sent. However, messages saved as Unsent while Auto Resend
was active are sent automatically. To deactivate Auto Resend function,
A 7
Settings
7
Universal Settings
7
Auto Resend
7
OFF
.
Deleting Messages Automatically
When memory for Messaging Folders is low, old messages are automatically
deleted one by one. Protect important messages from unintentional deletion, or
set message deletion settings to
OFF
. Messages in Drafts and SMS on USIM Card
are not deleted automatically.
To protect messages: In message list, select/highlight a message 7
S[Menu] 7
Protect
7
This one
or
Selected
(7 For
Selected
, check
messages 7
A[Finish])
To deactivate Auto Delete: A 7
Settings
7
Universal Settings
7
Auto Delete
7
Auto Sent Msg Del
or
Auto Received Msg Del
7
OFF
■View Memory Status
>A 7
Memory Status
Messaging
Messaging
4-2
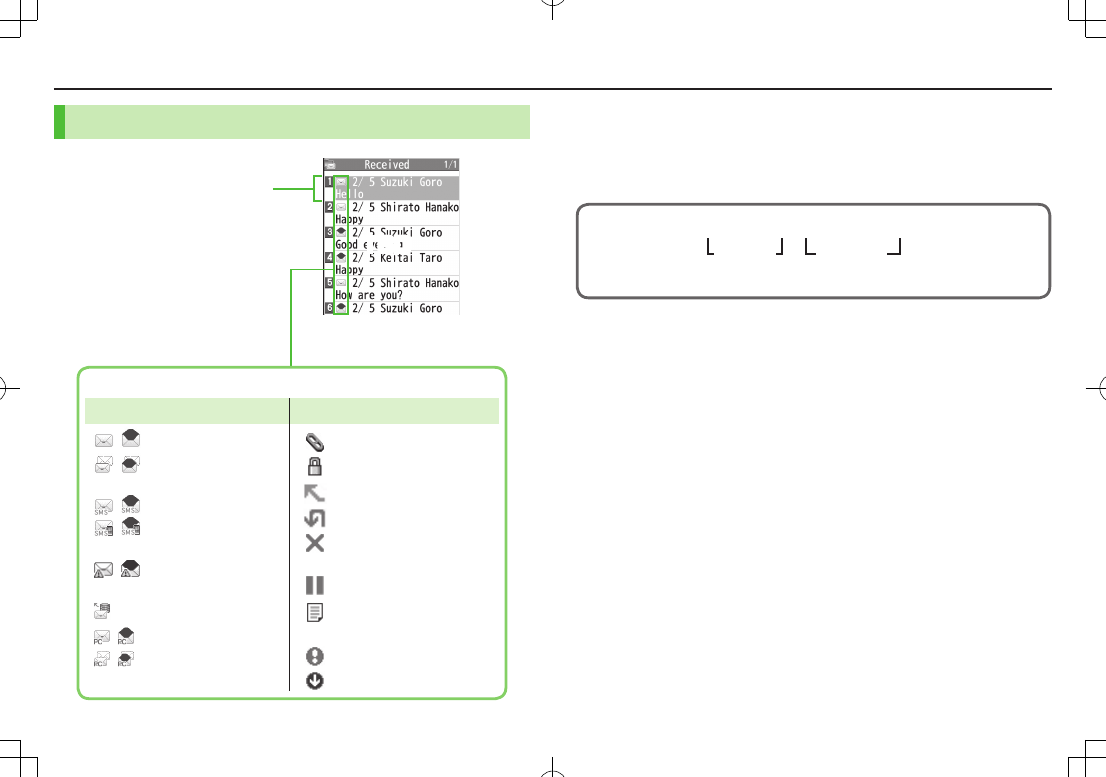
Messaging Folder Contents Customizing Handset Address
Change your handset mail address (alphanumerics before @) to
reduce the risk of receiving spam. Default account name is random
alphanumerics.
For details, see SoftBank Mobile Website: http://mb.softbank.jp/en/
1 A 7
Settings
7
Custom Mail Address
Handset connects to the Network.
Follow onscreen instructions.
abc123-xyz @ softbank.ne.jp
(Customize here)
Domain
Name
Account
Name
Received/Sent Date & Time,
Sender/Recipient,
Subject/SMS Message Text
Example: Received Folder
in Incoming Mail
Message Type/Status
Unread/Read S! Mail
Unread/Read
S! Mail Notice
Unread/Read SMS
Unread/Read
USIM Card SMS
Unread/read
Urgent News
Forwarded Server Mail
Unread/read PC Mail
Unread/read PC Mail
(notice only)
Attachment(s)
(Silver) Protected
Forwarded Message
Replied Message
Failed
(Sent/Unsent Message)
Resend Scheduled
New Delivery Report
(Sent/Unsent Message)
High Priority
Low Priority
Message Type Message Status
/
/
/
/
/
/
/
TBD
Messaging
4-3
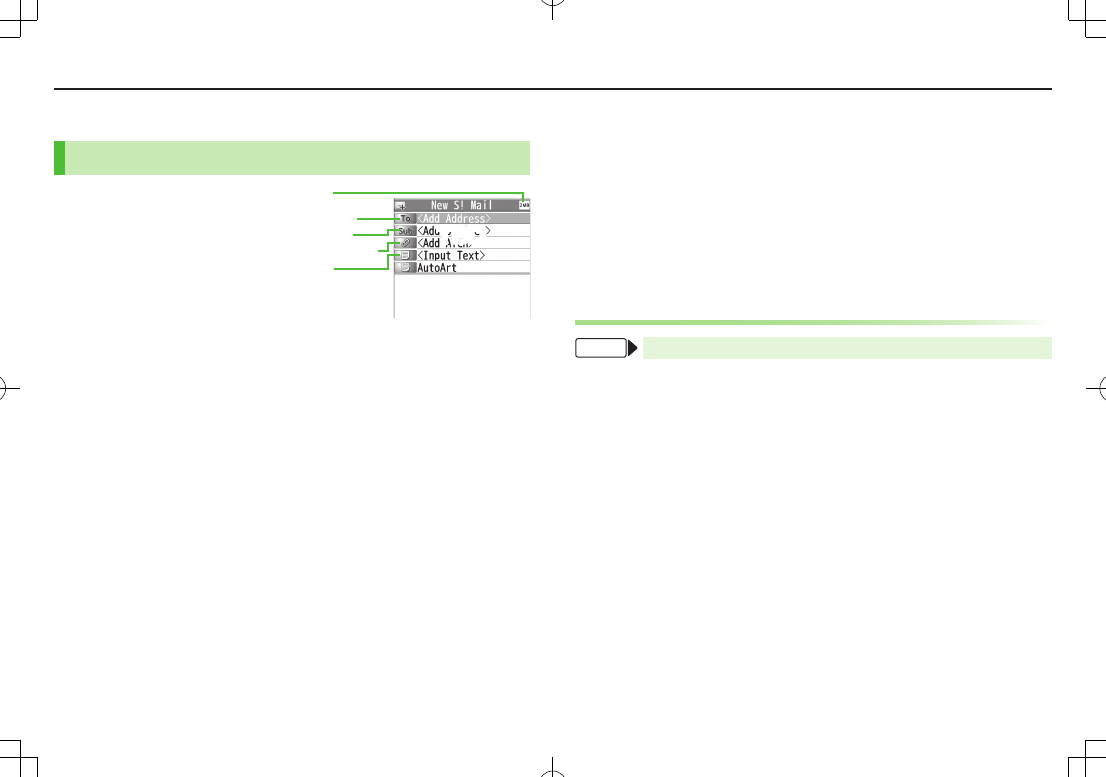
Sending S! Mail & SMS
Sending S! Mail
1 Press and hold A
2 Select Address field
3 Select from Phone Book
Phone Book
7
Select a Phone Book entry 7
Select a mail address or SoftBank handset number
Enter Directly
Enter Mail Address
or
Enter Phone Number
7 Enter a
mail address or SoftBank handset number
Select from Sent/Received Logs
Sent Address
or
Received Address
7 Select a record 7
*z[Select]
4 Select Subject field 7 Enter subject
5 Select Text field 7 Enter text
6 A[Send]
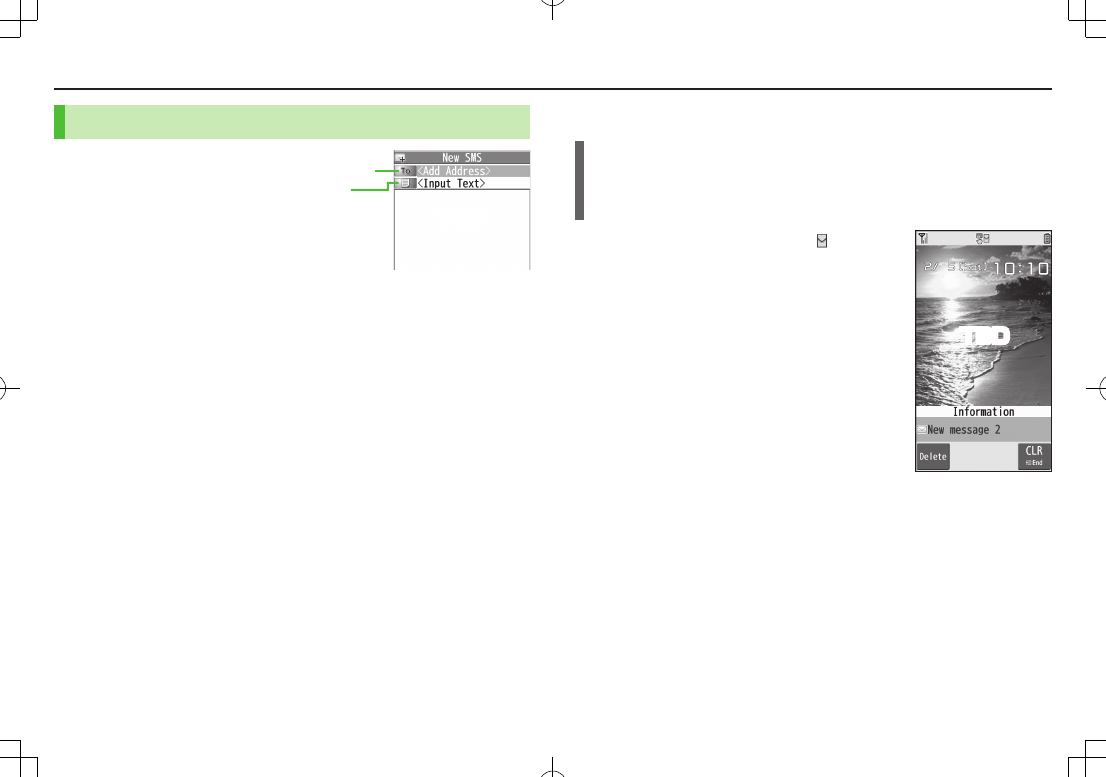
Address field
Mail size
Subject field
Attachment field
Text field
■Add Address
>Select Address field 7
<Not entered>
7 Search/enter address 7 Select an
address/SoftBank handset number or enter directly 7 A[Finish]
■Use Templates
>In Composition window, S[Menu] 7
Load Template
7
Highlight a template (7 A[View]) 7 *z[Select]
■Manual Mail Conversion
>In Composition window, S[Menu] 7
Change mail type
7 Select an item
Adding Attachments
From Composition window, select Attachment field
■Add Attachments
>Select a folder in Data Folder 7 Select a file
■Capture Pictures/Videos to Attach
>
Activate Camera
7
Photo mode
or
Video mode
7 Frame subject 7
*z[Record] or P (7 For video, *z[Stop] or P) 7 *z[Save] or P
Composition Window
TBD
Messaging
4-4
Sending SMS Messages
1 A 7
Create New SMS
2 Select Address field
3 Select from Phone Book
Phone Book
7
Select a Phone Book entry 7
Select a SoftBank handset number
Enter Directly
Direct Entry
7 Enter a SoftBank handset number
Select from Sent/Received Logs
Sent Address
or
Received Address
7 Select a record 7
*z[Select]
4 Select Text field 7 Enter text
When number of entered character exceeds limit, S! Mail conversion
option message appears.
5 A[Send]
■Manual Mail Conversion
>In Composition window, S[Menu] 7
Change mail type
7 Select an item
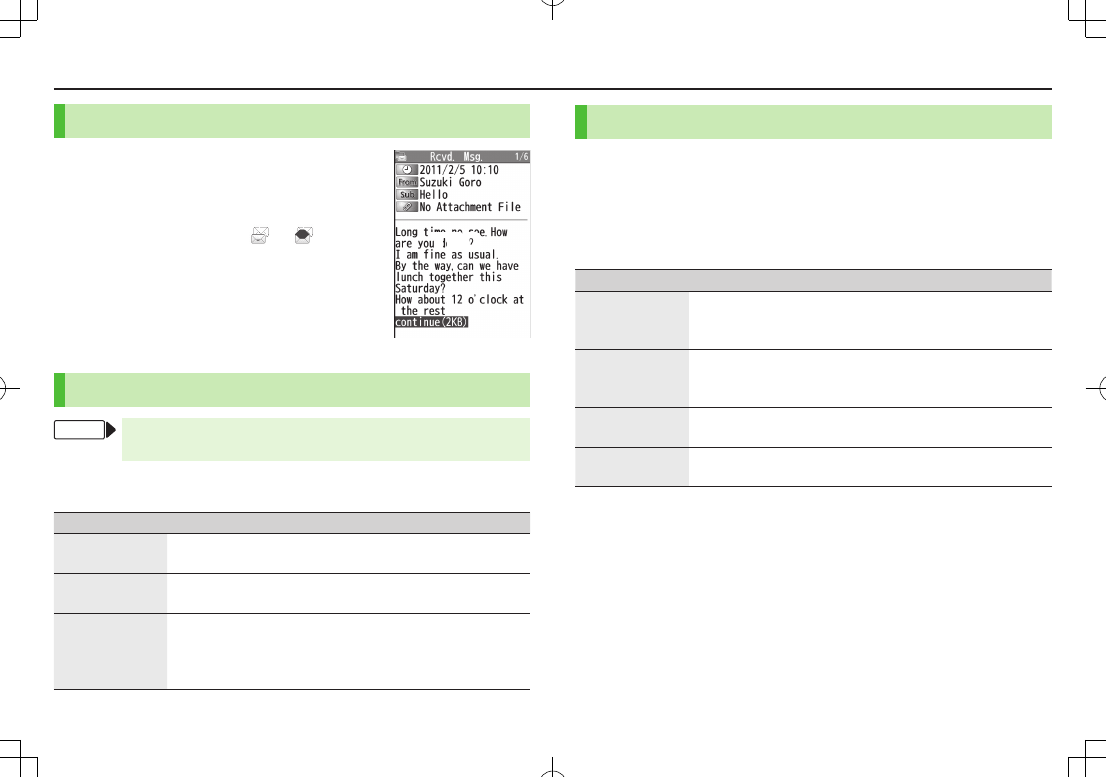
Address field
Text field
Composition Window
Receiving Messages
Retrieving S! Mail Automatically
Auto download retrieves up to 1 MB messages. Transmission fees are incurred;
adjust to use. (To disable auto download/limit message size for auto download:
ZP.4-5)
When a new message is received, appears
and Information Window opens in Standby.
1 In Information Window,
New message
When Information Window does not appear,
A 7
Incoming Mail
7 Select a folder
7 Select a message.
TBD
TBD
Messaging
4-5
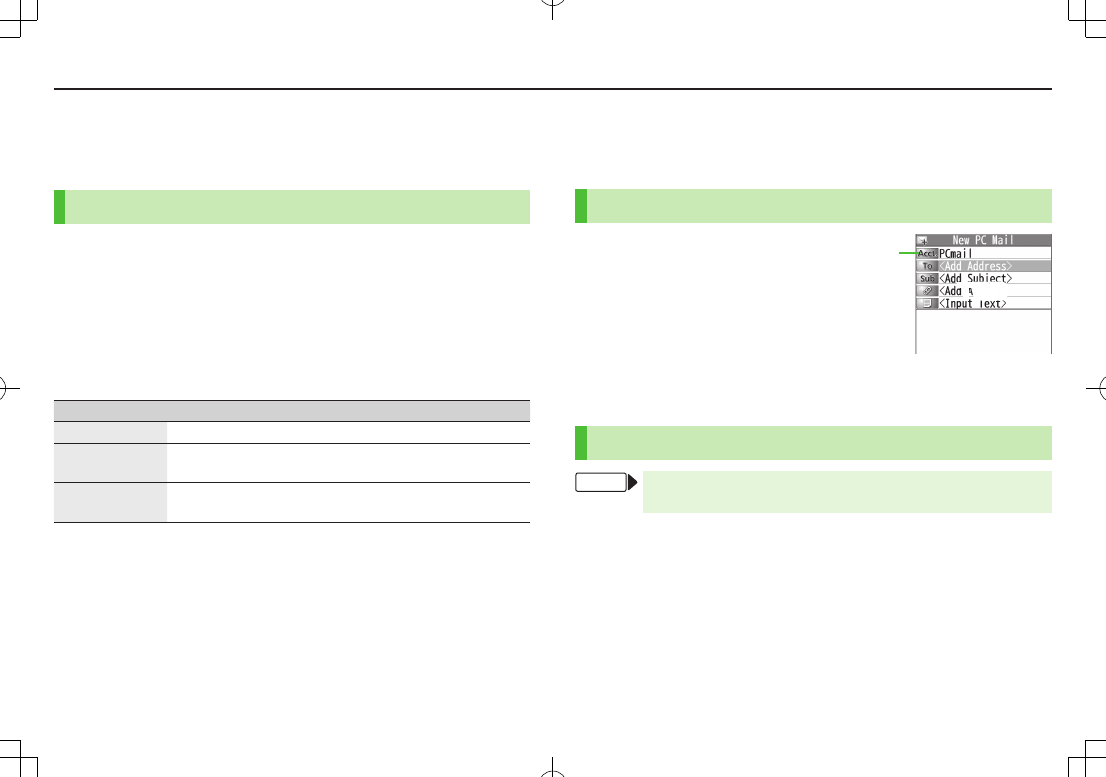
Retrieving Complete S! Mail
When Center sends initial portion of message
(S! Mail Notice), retrieve the complete
message manually.
1 Select a message with or 7
Select
continue (xxxKB)
at the end of
message text
Incoming Options (S! Mail Only)
From Main Menu 4 Messaging 4 Settings
4 S! Mail Settings 4 Incoming Options
1 Select an item
Item Operation/Description
Download Size
Limit
Limit maximum incoming message size
>
300KB
or
2MB
Auto Retrieve
Size
Deactivate/limit Auto retrieval
>Select an item
Auto Retrieve
for
Limit Auto retrieval by Message Type
>
All Messages
or
Selected Messages
(7 For
Selected
Messages
, Check
Address Stored in PB
or
SoftBank Domain Only
7 A[Finish])
Setting Filters (Auto-sort)
1 A 7
Incoming Mail
or
Sent/Unsent
2 Highlight a folder 7 S[Menu] 7
Auto-sort Setting
3 S[Menu] 7 Select an item
Item Operation/Description
Add Subject
Filter messages by subject
>Enter a subject
SMS cannot be sorted by subject.
Add Address
Filter messages by address
>Search/enter address 7 Select/enter an address/SoftBank
handset number
Add Group Filter messages by Group in Phone Book
>Select a group
Add Mail group Filter messages by Mail Group
>Select a Mail Group
■Edit Sort Conditions
>After Step 2, highlight an item 7 *z[Edit] 7 Edit
■Delete Auto-sort Settings
>After Step 2, (highlight an item 7) S[Menu] 7
Delete
or
Delete All
(7 For
Delete All
, enter Phone Password) 7
YES
■Re-sort Set Folders
>To re-sort messages in a specific folder: After Step 1, highlight a folder
7
S[Menu] 7
Re-sort in This
7
YES
>To re-sort messages in all folders: After Step 1,
S[Menu] 7
Sort in All
7
YES
TBD
Messaging
4-6
PC Mail
Using auto-receive settings may incur high packet transmission fees. Be careful
when using handset abroad. (To disable auto download: ZRight)
PC Mail Account Setup
Check ISP information in advance.
PC Mail services may not be available depending on services, settings, contract
details for PC mail account.
1 A 7
Settings
7
PC Mail Settings
7
Account Settings
2
<Not Recorded>
7 Select an item
Item Operation/Description
Account Name
>Enter an account name
Incoming
Options
>Select an item 7 Enter/select an item 7 K
User Name
,
Password
and
Receiving Server
are required
.
Sending Options
>Select an item 7 Enter/select an item 7 K
Mail Address
and
Sender Server
are required.
3 A[Finish] 7
OK
■Quick Yahoo! Mail Address Setup
>After Step 1,
Set Quick Yahoo! Mail
7
YES
or
NO
Follow onscreen instructions.
■Set Default Account
>After Step 1, highlight an account 7 S[Menu] 7
Default account
★ appears for selected account.
■Delete Account
>After Step 1, highlight an account 7 S[Menu] 7
Delete account
7 Enter
Phone Password 7
YES
Sending PC Mail
1 Press and hold A 7
PC Mail
2 Compose a message and send
(ZFrom Step 2 on P.4-3)
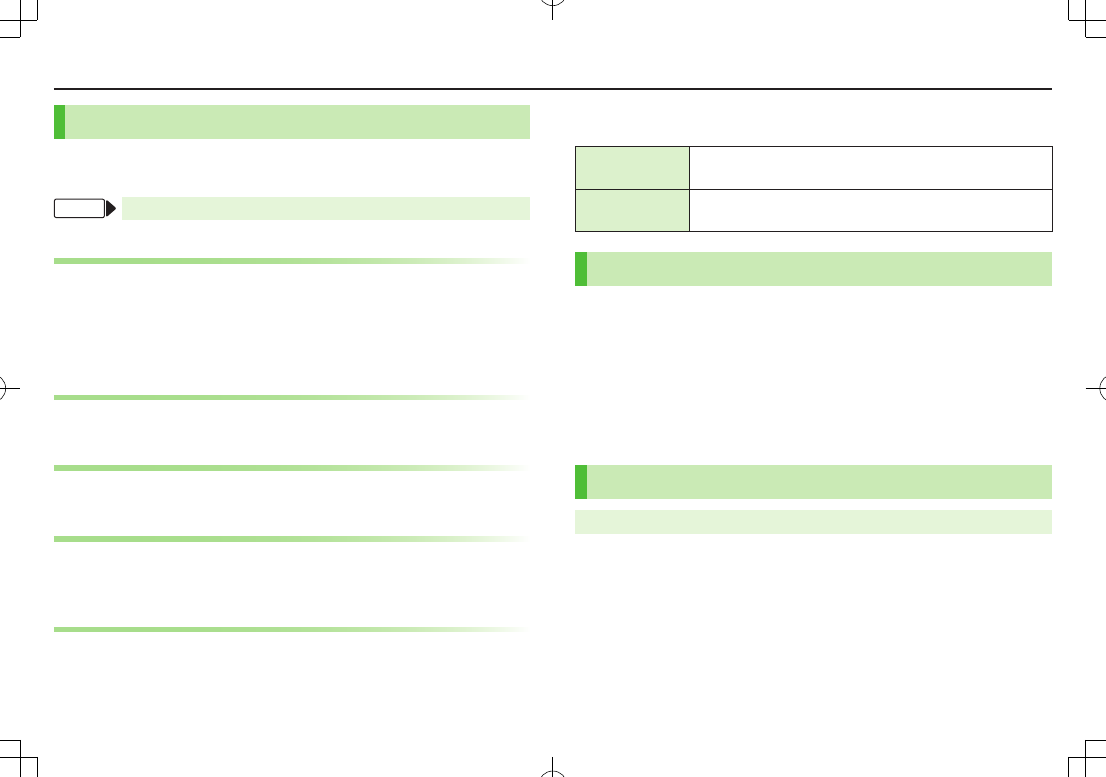
■Change Account
>After Step 1, select Account field 7 Select an account
PC Mail Settings
From Main Menu 4 Messaging 4 Settings
4 PC Mail Settings 4 Auto Check
■Auto Retrieve for New Messages
>
Mail Account
7 Select an account (*z to toggle on/off) 7 A[Finish]
■Set Auto Retrieve Interval/Condition
>
Interval
7 Select an item
■Auto Retrieve (while Abroad)
>
Roaming
7
ON
or
OFF
Account field
PC Mail Composition
Window
TBD

5-1
Getting Started
"Yahoo! Keitai" is both a SoftBank Mobile Internet service and the
SoftBank Mobile Internet portal.
View PC Internet websites via PC Site Browser.
Internet
Yahoo! Keitai
View Mobile Internet Websites
Download image/sound files, etc.
Video/Music Streaming
PC Site Browser
View PC Sites
Download images
Separate subscription is required for Network access.
For more information, see SoftBank Mobile Website: http://mb.softbank.jp/en/
SSL/TLS
SSL (Secure Sockets Layer) and TLS (Transport Layer Security) are
encryption protocols for secure Internet transmissions of
important/sensitive information such as credit card numbers.
Server certificates are saved on handset (ZP.5-4).
Notes
When a security notice appears, subscribers must decide for themselves whether
or not to open the page. SOFTBANK MOBILE Corp., VeriSign Japan K.K.,
Cybertrust Japan Co., Ltd., Entrust Japan Co.,Ltd., GlobalSign K.K., RSA Security
Inc., SECOM Trust Systems Co., Ltd. and Comodo Certificate Authority cannot be
held liable for any damages associated with the use of SSL and TLS.
Internet

5-2
Internet
Accessing Internet
Yahoo! Keitai
From Main Menu 4 Yahoo!
Opening Yahoo! Keitai Menu
1 Open Top Menu
Yahoo! Keitai
Open Menu List
Menu List
2 Select a menu item
Repeat Step 2 as required.
Web Search
1
Web Search
7 Enter text 7 S[OK]
Entering URL
1
Enter URL
2 Enter URL Directly
Direct Entry
7 Enter URL
Use URL History
URL History List
7 Select a URL record
■Delete URL History Records
>After Step1,
URL History List
7 (Highlight a URL 7) S[Menu] 7
Delete
or
Delete All
7
YES
Using Access History
1
History
2 Select a history record
■Delete Access History Records
>After Step 1, (highlight a record 7) S[Menu] 7
Delete
or
Delete All
7
YES
(7 For
Delete All
, enter Phone Password)
■View Access History URLs
>After Step 1, highlight a record 7 S[Menu] 7
Display URL
Exiting Mobile Internet
1 L 7
YES
5-3
Internet
Browsing PC Sites
Some pages may not be viewable.
Viewing PC websites via PC Site Browser may incur high charges.
From Main Menu 4 Yahoo! 4 PC Site Browser
Opening Menu
1
Homepage
2 Select a menu item
Repeat Step 2 as required.
Web Search
Follow Step 1 of "Web Search" for Yahoo! Keitai (ZP.5-2).
Entering URL
Follow Steps 1 & 2 of "Entering URL" for Yahoo! Keitai (ZP.5-2).
Using Access History
Follow Steps 1 & 2 of "Using Access History" for Yahoo! Keitai
(ZP.5-2).
Exiting Internet
1 L 7
YES
Bookmarks & Saved Pages
Bookmarks Save links to websites. Handset connects to the Network to
open the link.
Saved Pages Save page content. Handset opens saved pages without
connecting to the Network.
Saving Webpages
1 Open a webpage 7 S[Menu] 7
Bookmarks
or
Saved Pages
7
Add
2 Select title 7 Edit title
3
OK
7
OK
Viewing Bookmarks & Saved Pages
Main Menu 4 Yahoo! (4 PC Site Browser)
1
Bookmarks
or
Saved Pages
7 Select an item
5-4
Internet
Internet Settings
Web Browsers, Memory Manager & Security
Yahoo! Keitai
From Main Menu 4 Yahoo! 4 Set Yahoo! Keitai
PC Site Browser
From Main Menu 4 Yahoo! 4 PC Site Browser
4 Set PC Site Browser
■Font Size
>
Font Size
7 Select a size
■Clear Cache
>
Memory Manager
7
Clear Cache
7
YES
■Delete Cookies
>
Memory Manager
7
Delete Cookies
7
YES
■Delete User ID or Password Entered when Authentication is
Required
>
Memory Manager
7
Delete Certificates
7
YES
■Data Storage Location (Yahoo! Keitai Browser only)
>
Save Settings
7
Phone
or
microSD
■Auto Send Manufacturer's Number (for Authentication)
(Yahoo! Keitai Browser/PC Site Browser only)
>
Security
7
Manufacture Number
7
ON
or
OFF
■Referer Information
>
Security
7
Send Referer
7
ON
or
OFF
■Cookie Storage
>
Security
7
Cookies
7 Select an item
■Script Execution
>
Security
7
Script
7 Select an item
■View Server Certificates Issued by Certificate Authorities
>
Security
7
Root Certificates
7 Select an item
■Authentication Information
>
Security
7
Certificate Retention
7 Select an item
Reset
From Main Menu 4 Yahoo! (4 PC Site Browser) 4 Reset
■Reset Browser Settings
>
Restore Defaults
7
YES
7 Enter Phone Password
■Initialize Browser
>
Initialize Browser
7
YES
7 Enter Phone Password
6-1
Infrared
Transfer Phone Book/Schedule entries, Messages, Bookmarks and
Data Folder files wirelessly between handset and compatible
devices, including PCs and other mobiles.
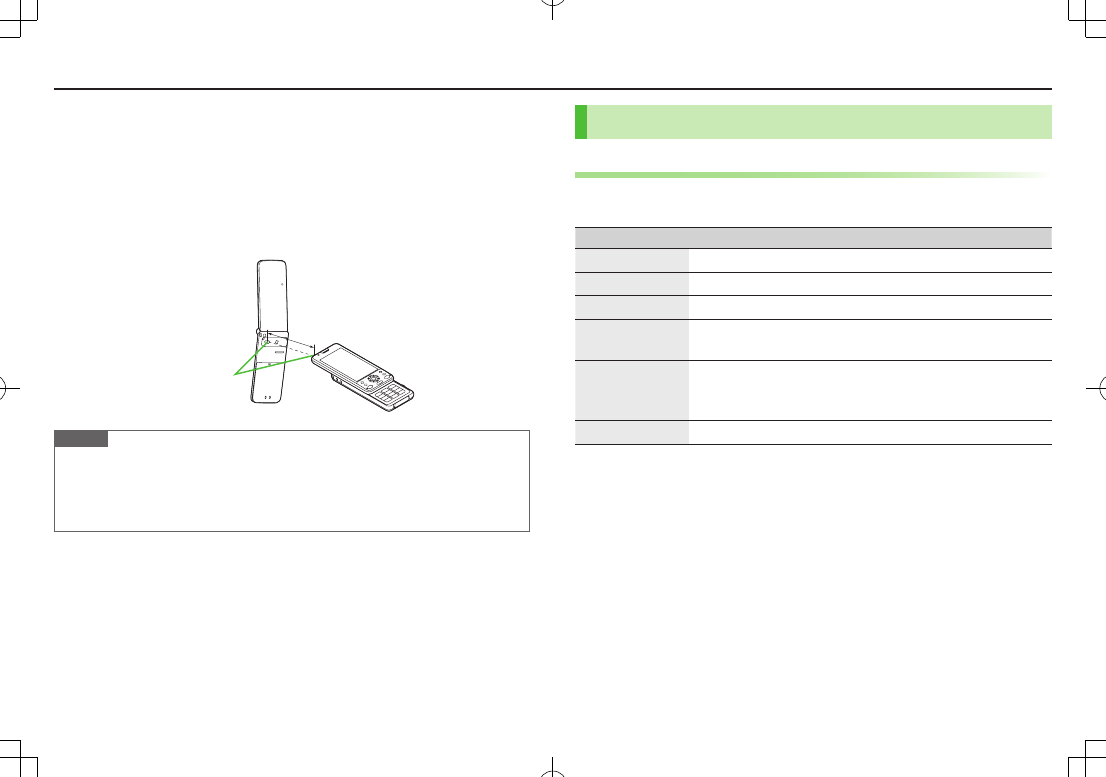
Align infrared ports within 20 cm of one another and make sure no objects are
placed between them. Do not move the devices until transfer is complete.
Note
Following files cannot transfer:
・ Files prohibited for transfers from 103P
・ Phone Book entries and SMS on USIM Card
If memory becomes full, remaining entries are truncated.
赤外線ポート
20cm以内
20cm以内
赤外線ポート
Sending
One/Multiple File Transfer
1 Open/highlight a file, and follow steps below:
Files to Send Operation/Description
Phone Book
>S[Menu] 7
Send Ir data
7
Send phonebook
Account Details
>F[Ir]
Messages
>S[Menu] 7
Send Ir data
7
Send This
Bookmarks
>S[Menu] 7
Send to ExtrnlDvcs
7
Send Ir data
7
Send This
Photos/Videos/
Widgets
>S[Menu] 7
Send Ir data
To send multiple files: S[Menu] 7
Multiple-choice
7
Check files to send 7 S[Menu] 7
Send Ir data
Other Files
>S[Menu] 7
Send Ir data
2
YES
Connectivity
6-2
Connectivity
All File Transfers
Precaution
Receiving all files overwrites all saved files including secret/protected files.
Sending all Phone Book entries transfers Account Details as well. User-saved
Account Details is overwritten on receiving handset (handset number remains).
Session Number
Session number (4 digits) is required for all file transfers via Infrared. Sender and
recipient must enter same Session number to complete transfers.
1 In list, S[Menu] 7 follow steps below:
Files to Send Operation/Description
Phone Book
Send Ir data
7
Send all phonebook
Messages
Send Ir data
7
Send All
Bookmarks
Send to ExtrnlDvcs
7
Send Ir data
7
Send All
Other Files
Send all Ir data
2 Enter Phone Password 7 Enter Session number 7
YES
Receiving
Main Menu 4 Tools 4 Receive via Infrared
1 One/Multiple File Transfer
Receive
7 When a file is received,
YES
All File Transfers
Receive All
7 Enter Phone Password 7 Enter same Session
number as sender's 7
YES
7
YES
6-3
Connectivity
Bluetooth®
For details about headset/handsfree devices, see the device manuals.
Bluetooth® and Wi-Fi devices share the same frequency band. Use of both
devices in close proximity may cause interference, affecting transmission speed,
clarity or connection quality.
Searching & Pairing Devices
Main Menu 4 Tools 4 Bluetooth 4 Search&Paired Device
1
YES
*
Device search starts and names of found devices appear.
To search again: A[Search]
* If there are already paired devices in list, select a device 7 Select a function
2 Select a device 7
YES
7 Enter Phone Password
3 Select text entry field 7 Enter Bluetooth® Passkey
4 Select a Bluetooth® function
Handset connects to Bluetooth® device. When complete, flashes in blue.
After no Bluetooth® connection is made for a certain time, appears in black
and Power saver mode starts.
While connected, (Blue) appears. While in Standby, (Gray) appears.
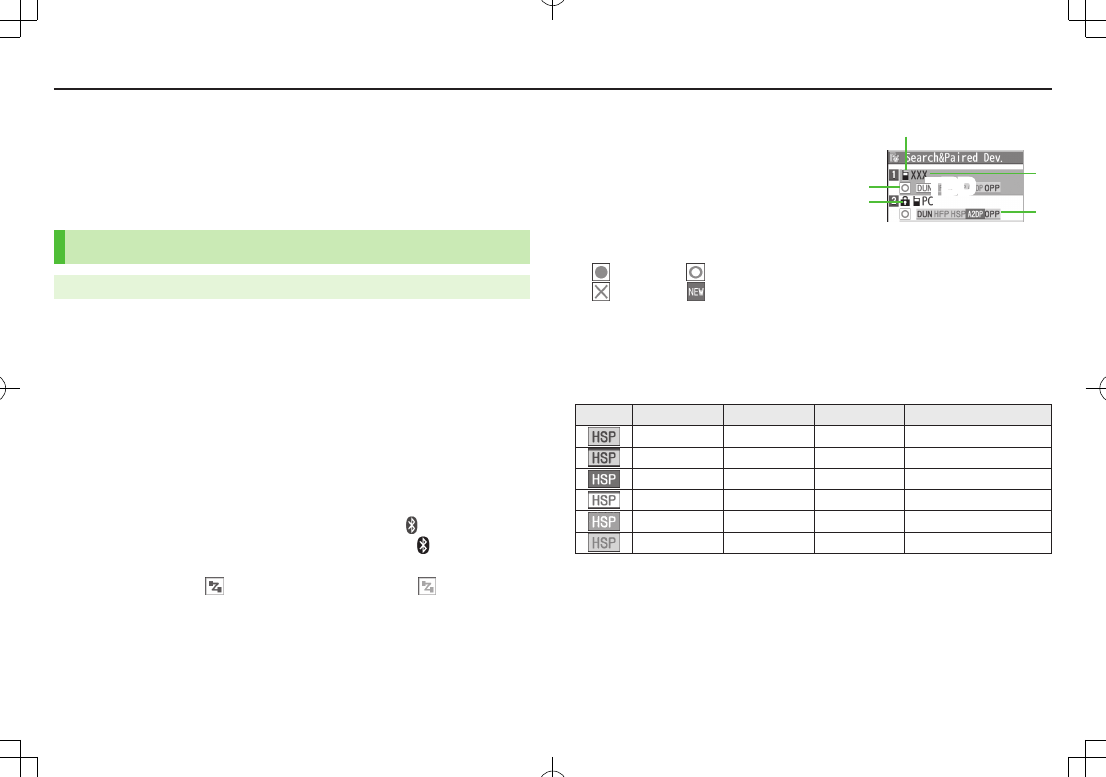
■Search&Paired Device List
❶ Device Type
❷ Device Name
When no names are found,
Bluetooth® addresses appear.
❸ Connection Status
: Connected : Not connected
: Not found : Not paired
❹ Protection
Indicator appears when registered contents are protected.
❺ Profile Status
Icon
Letter Color
Background Color
Frame Color
Status
Blue Gray —
Not connected (Not paired)
Blue Gray Blue Not connected (Paired)
White Green —Connected
Green White Green Standby for connection
White Light green —Preferred device
Gray Gray —Not supported
Search&Paired
Device List
❷
❺
❸
❹
❶
TBD

6-4
Connectivity
Suspending Bluetooth® Functions
Suspend all Bluetooth® functions connected or on standby for
connection, and disable Bluetooth®.
Main Menu 4 Tools 4 Bluetooth
1
Bluetooth OFF
7
YES
To return to standby for previously connected function:
Bluetooth ON
Placing Bluetooth® Devices on Standby for
Connection
Main Menu 4 Tools 4 Bluetooth 4 Accept Registered
1 Check functions to be on standby for connection 7
A[Finish]
To uncheck, select functions to remove check marks.
Sending/Receiving Phone Book
Sending
1 Open Phone Book 7 S[Menu] 7
Send to Bluetooth
2 One File Transfer
Send phonebook
7 Select a recipient device
All File Transfer
Send all phonebook
7 Select a recipient device 7 Enter
Phone Password
3
YES
Receiving
Main Menu 4 Tools 4 Bluetooth 4 Receive via Bluetooth
1 One File Transfer
Receive
7
YES
All File Transfer
Receive All
7 Enter Phone Password 7
YES
7
YES
6-5
Connectivity
External Devices
SoftBank Utility Software (Japanese)
Phone Book, Calendar, Tasks, Messages, Bookmarks, Notepad and
Data Folder files can be transferred to a PC, edited or managed by
using SoftBank Utility Software.
USB cable (sold separately) is necessary for using SoftBank Utility Software.
Set USB Mode to
Communication Mode
.
For SoftBank Utility Software download details, see SoftBank Mobile Website:
http://www.softbank.jp/mb/r/sbu/ (Japanese)
USB (Japanese)
Use USB cable specified by SoftBank Mobile.
Setting USB Mode
<Default> Communication Mode
Main Menu 4 Settings 4 Connectivity 4 USB Mode
1 Select an item
Item Operation/Description
Communication
Mode
Packet transmission, 64K data transmission, data transfer and
calls with USB handsfree compatible devices are available
microSD Mode Read/write data on microSD Card
Data Communication via USB Cable
Use handset as a modem for Internet access by connecting
handset with a PC.
Download utility software from URL below and install on PC.
http://panasonic.jp/mobile/support/download/103p/index.html
1 Install "USBドライバ (USB Driver)" and "Modem Wizard"
from Utility Software (103P) to a PC
2 Set handset to
Communication Mode
(ZLeft), and
connect handset to PC via USB cable
Power up handset before connecting to PC via USB cable.
3 Start up "103P Modem Wizard," and complete
communication setup
"Modem Wizard" enables you to set up APN and dial-up easily.
For setup/starting procedures, see "Modem Wizard" Help.
Note
Connecting handset to a PC or PDA for Internet access may incur high packet
transmission fees.
7-1
Before Using Camera
Notification Light/Charging Indicator illuminates while Camera is active.
Shutter click sounds at fixed volume even in Manner Mode.
File Formats & Save Location
Photos/videos are saved to Data Folder.
Image Type File Format Save Location
Photos JPEG (.jpg) Pictures (Data Folder)
Videos MPEG-4 (.3gp, .mp4),
ASF (.asf) Videos (Data Folder)
Changing Save Location
From Main Menu 4 Camera 4 Photo Mode or Video Camera
1 S[Menu] 7
Storage setting
7
Store in
2
Phone
or
microSD
Camera
7-2
Camera
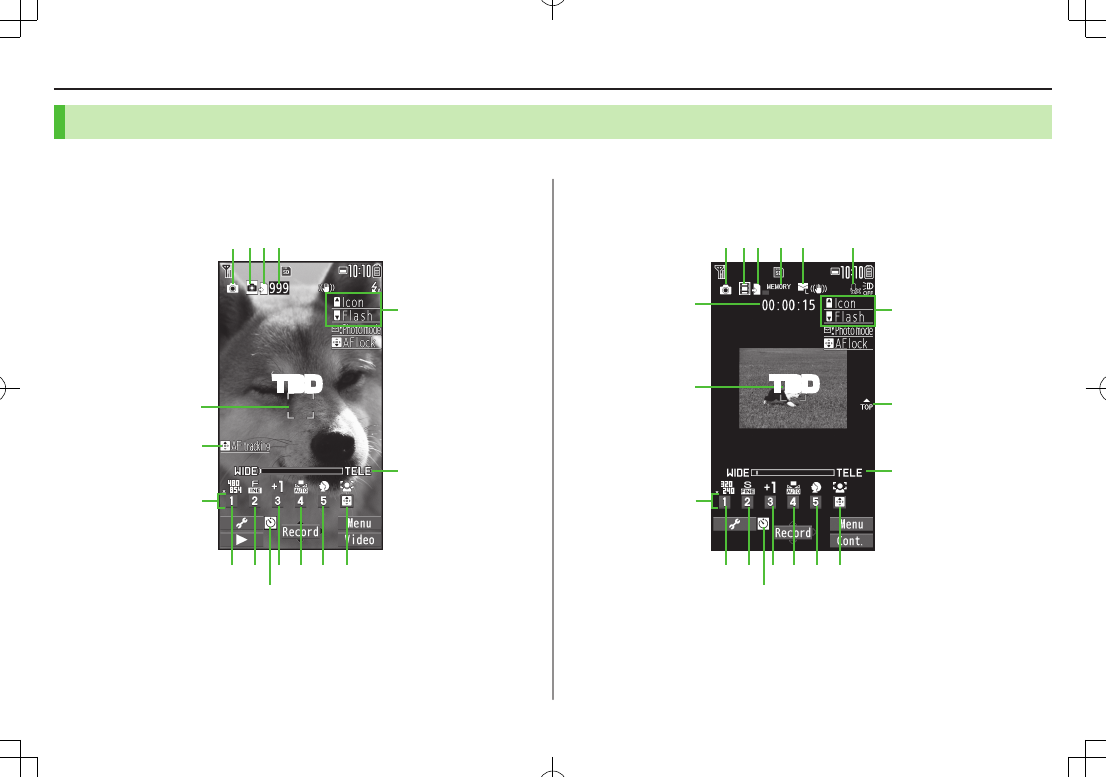
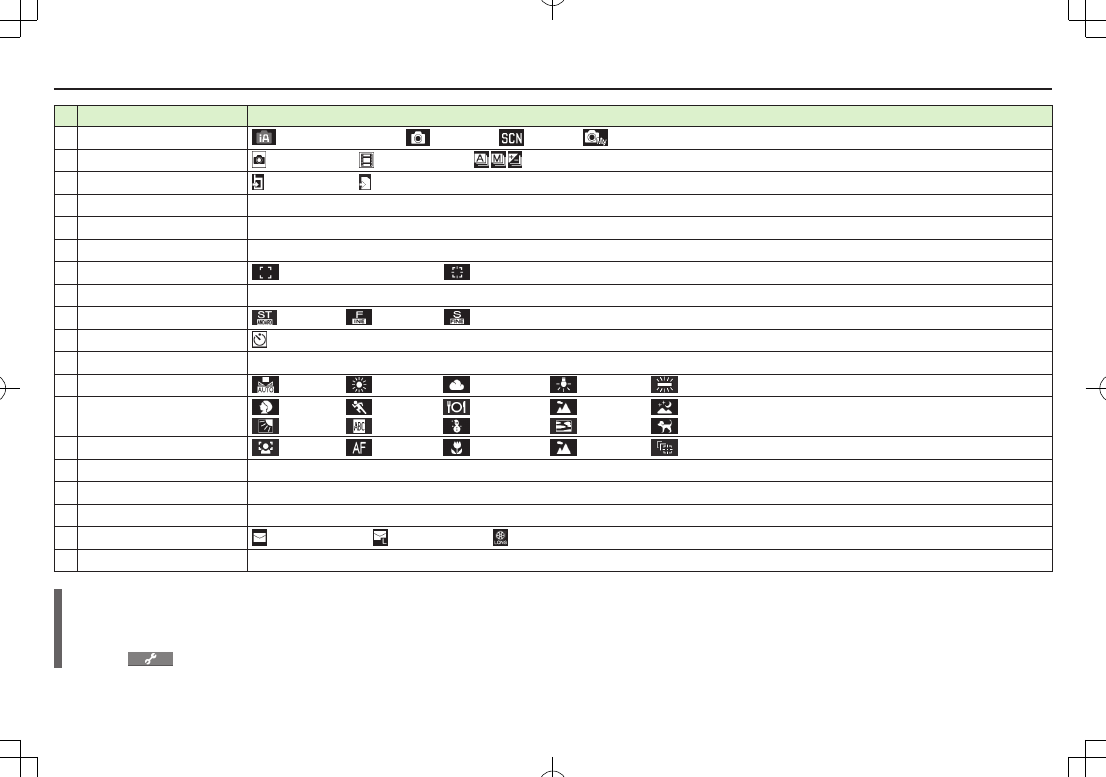
Camera Display Indicators
■Video Camera Mode
Images shown below are for reference only.
■Photo Mode
❽ ❾
❺
❶ ❷❸❹
❼
❺
❺
❻
❽ ❾
❺
❺
❻
❶ ❷❸
❼
TBD TBD
Camera
7-3
Item Description
❶Photo mode iA (Intelligent Auto) Normal Scene MyOriginal (For Scene/MyOriginal, indicators vary by setting.)
❷Camera mode Photo Mode Video Camera / / Action mode (Auto/Manual/Auto bracket)
❸Store in Phone microSD
❹No. of frames Show number of remaining frames
❺Key guidance Show key operation guidance
❻Zoom bar Indicate zoom level
❼Focus Guide Auto focus guide AF tracking guide
❽Image size Indicate image size
❾Quality Standard Fine Super
Auto timer
Exposure Adjust brightness (Level -3 to +3)
White balance Auto Fine Cloudy Bulb Light
Scene Portrait Sports Food Scenery Nightscape
Backlight Character Snow Sunset Pet
Focus mode Face Detect Auto Macro Landscape AF tracking
Recordable time Indicate recordable time
Top indicator Indicate vertical direction
Memory capacity bar Indicate memory status (appears in red when memory is full)
File size Mail restrict'n(S) Mail restrict'n(L) Long time
Movie type set Record video without audio
Key Guidance
Follow the steps below to change settings:
・ Press keys indicated by ❺ (7 ?z to select an item)
・ A[] 7 <z to select a setting 7 ?z to select an item
7-4
Camera
Capturing Photos
1 F
Photo Viewfinder appears.
2 Frame subject 7 *z[Record] or P
Shutter click sounds.
To return to Viewfinder without saving the
image: K
3 *z[Save]
To view the photo immediately after capturing:
1[Folder] 7 K to return to Viewfinder
4 L to exit
Return to Standby.
■Send Photo via S! Mail
>After Step 2, A[] 7 Create message (ZP.4-3)
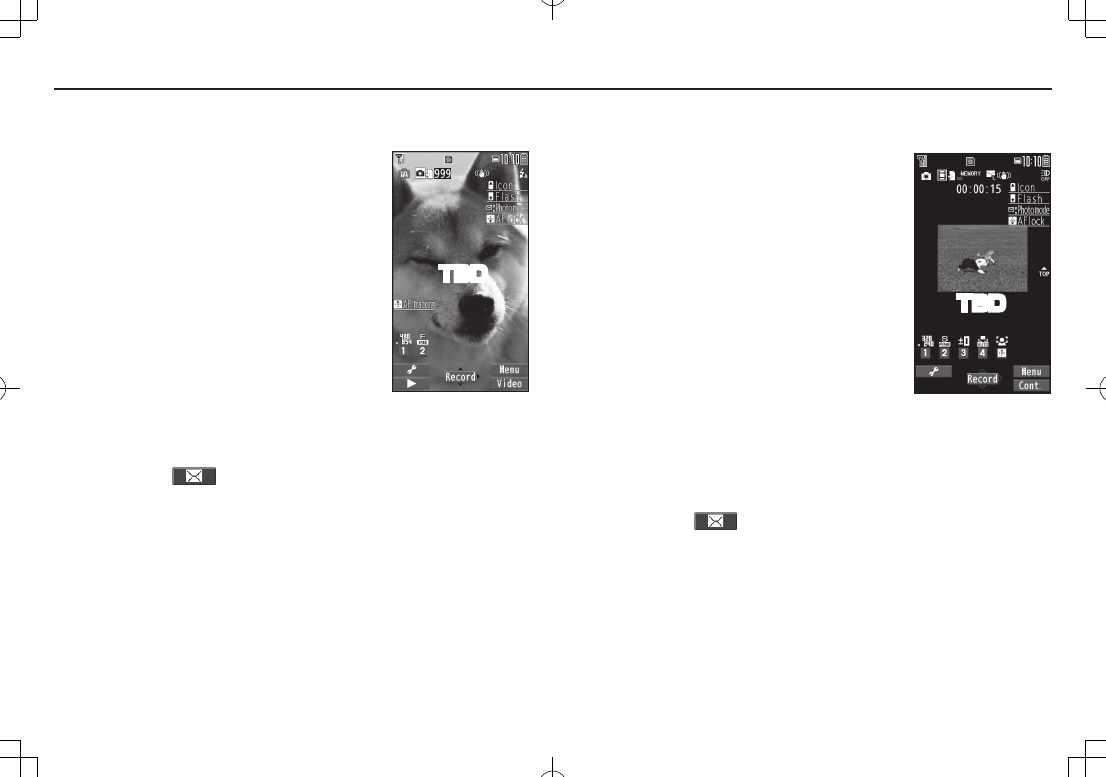
Photo Viewfinder
TBD
Recording Videos
1 F 7 F
Video Viewfinder appears.
2 Frame subject 7 *z[Record] or P
to start recording
Tone sounds and appears.
To return to Viewfinder without saving the
image: K
3 *z[Stop] to end recording
Tone sounds.
To view the video immediately after recording:
1[Folder] 7 K to return to Viewfinder
4 L to exit
Return to Standby.
■Send Video via S! Mail
>After Step 2, A[] 7 Create message (ZP.4-3)
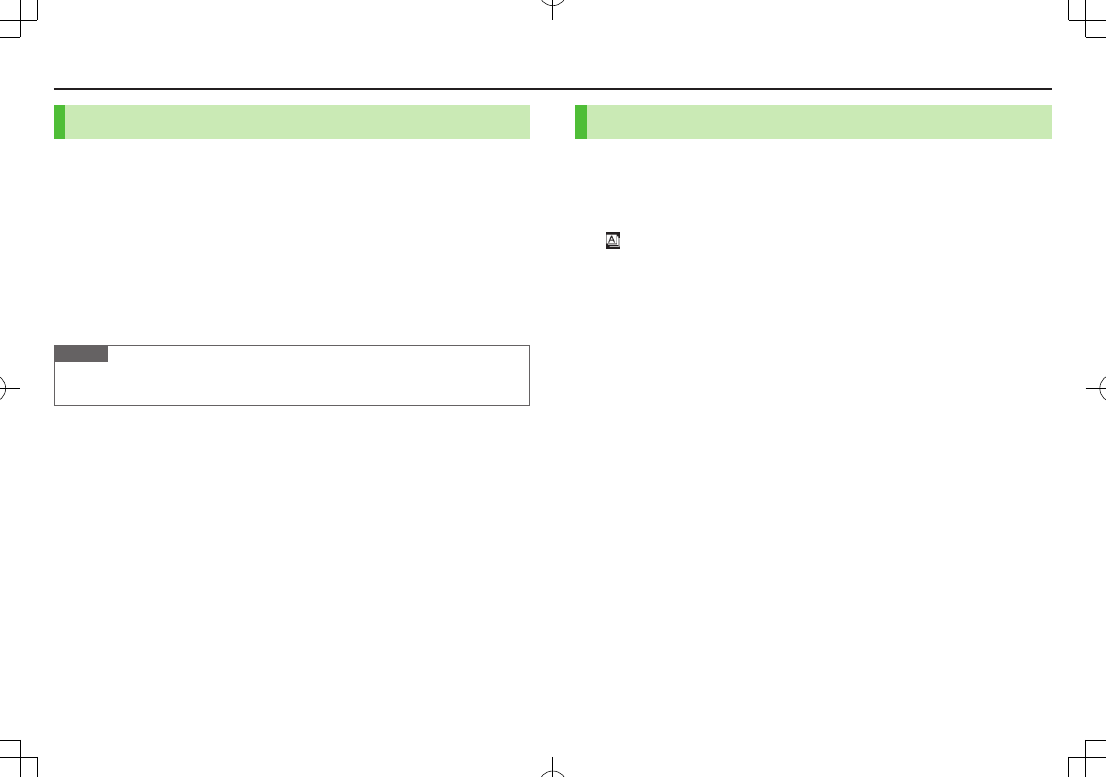
Video Viewfinder
TBD

7-5
Camera
Camera Functions
Auto Focus Lock
Bring focus on subject at center of Display automatically.
Lock focus on subject, and recompose your photo.
1 In Viewfinder, Cz or G
When in focus, handset sounds. Focus Guide turns green.
When out of focus, Focus Guide turns red.
To cancel focus: K
2 Determine composition
3
Capture image in selected camera mode
AF Tracking
Position AF tracking guide on subject. AF tracking guide appears
and Camera tracks moving subject, adjusting focus and exposure.
1 In Viewfiner, >z
AF tracking guide appears.
Upon recognition, AF tracking
guide turns yellow and tracking
begins.
To cancel: Cz or K
2 *z or P to capture photo
Zoom
1 In Viewfinder, <z
TBD
7-6
Camera
Self-Timer
1 In Viewfinder, S 7
Auto timer
2
ON
7 Enter time (seconds)
3 *z[Record]
Auto timer tone sounds. After set period of time, shutter is released and
recording starts.
While Auto timer is active, press A[Quit] or K to return to
Viewfinder without canceling Auto timer.
Note
Auto timer is not available when Action mode is set to
Manual
.
Auto Timer is set to
OFF
after capturing.
Continuous Shooting
Capture a succession of up to 20 still images automatically with a
single press.
1 In Photo Viewfinder, F[Video] 7 F[Cont.]
appears. (Icon may change depending on modes.)
2 Frame subject 7 *z[Record] or P
To stop shooting halfway: K
3 Save All
A[STO all]
Save Selected Images
Select images 7 A[Save]
Check mark appears on selected images. To cancel selection, select the
image again. Check mark disappears.
To view a Full-size Image: Select an image, then press F[Detail] 7
K to return to thumbnail view (<z to view other images while viewing
full-size image.)

7-7
Camera
Viewing Photos & Videos
Main Menu 4 Camera
1 S[Menu] 7
Folder jump
2 Select a file
File appears/plays.
To toggle list/thumbnail view: F[Change]
TBD