Magento 2 Developer's Guide
User Manual: Pdf
Open the PDF directly: View PDF ![]() .
.
Page Count: 412 [warning: Documents this large are best viewed by clicking the View PDF Link!]
- Cover
- Copyright
- Credits
- About the Author
- About the Reviewer
- www.PacktPub.com
- Table of Contents
- Preface
- Chapter 1: Understanding the Platform Architecture
- Chapter 2: Managing the Environment
- Chapter 3: Programming Concepts and Conventions
- Chapter 4: Models and Collections
- Creating a miniature module
- Understanding the flow of schema and data scripts
- Creating an install schema script (InstallSchema.php)
- Creating an upgrade schema script (UpgradeSchema.php)
- Creating an install data script (InstallData.php)
- Creating an upgrade data script (UpgradeData.php)
- Entity CRUD actions
- Creating new entities
- Managing collections
- Summary
- Chapter 5: Using Dependency Injection
- Chapter 6: Plugins
- Chapter 7: Backend Development
- Chapter 8: Frontend Development
- Chapter 9: The Web API
- Chapter 10: The Major Functional Areas
- Chapter 11 : Testing
- Chapter 12
: Building a Module
from Scratch
- Module requirements
- Registering a module
- Creating a configuration file (config.xml)
- Creating e-mail templates (email_templates.xml)
- Creating a system configuration file (system.xml)
- Creating access control lists (acl.xml)
- Creating an installation script (InstallSchema.php)
- Managing entity persistence (Model, Resource, Collection)
- Building a frontend interface
- Building a backend interface
- Creating unit tests
- Summary
- Index


Magento 2 Developer's Guide
Harness the power of Magento 2, the most recent
version of the world's favorite e-commerce platform,
for your online store
Branko Ajzele
BIRMINGHAM - MUMBAI
Magento 2 Developer's Guide
Copyright © 2015 Packt Publishing
All rights reserved. No part of this book may be reproduced, stored in a retrieval
system, or transmitted in any form or by any means, without the prior written
permission of the publisher, except in the case of brief quotations embedded in
critical articles or reviews.
Every effort has been made in the preparation of this book to ensure the accuracy
of the information presented. However, the information contained in this book is
sold without warranty, either express or implied. Neither the author, nor Packt
Publishing, and its dealers and distributors will be held liable for any damages
caused or alleged to be caused directly or indirectly by this book.
Packt Publishing has endeavored to provide trademark information about all of the
companies and products mentioned in this book by the appropriate use of capitals.
However, Packt Publishing cannot guarantee the accuracy of this information.
First published: December 2015
Production reference: 1171215
Published by Packt Publishing Ltd.
Livery Place
35 Livery Street
Birmingham B3 2PB, UK.
ISBN 978-1-78588-658-4
www.packtpub.com

Credits
Author
Branko Ajzele
Reviewer
Mitchell Robles, Jr
Commissioning Editor
Neil Alexander
Acquisition Editor
Vinay Argekar
Content Development Editor
Preeti Singh
Technical Editor
Gaurav Suri
Copy Editors
Vedangi Narvekar
Jonathan Todd
Project Coordinator
Shweta H. Birwatkar
Proofreader
Sas Editing
Indexer
Priya Sane
Production Coordinator
Shantanu N. Zagade
Cover Work
Shantanu N. Zagade
About the Author
Branko Ajzele is a husband, father of two, son, brother, author, and a
software developer.
He has a degree in electrical engineering. A lover of all things digital, he makes a
living from software development. He hopes to nd enough quality time some day
to seriously dive into hobby electronics; he has his eye on Arduino and Raspberry Pi.
He has years of hands-on experience with full-time software development and team
management, and has specializing in e-commerce platforms. He has been working
with Magento since 2008; he has been knee-deep in it since its very rst beta version.
Branko is regularly in touch with everything related to PHP, databases (MySQL/
MongoDB), search/analytics (Solr/Elasticsearch), Node.js, and related technologies.
He has a strong technical knowledge with an ability to communicate those
technicalities frequently and clearly with a strong direction. He feels comfortable
proposing alternatives to demands which he feels can be improved, even when this
means pulling a late shift to meet the deadlines.
He holds several respected IT certications, such as Zend Certied Engineer (ZCE
PHP), Magento Certied Developer (MCD), Magento Certied Developer Plus
(MCD+), Magento Certied Solution Specialist (MCSS), and JavaScript Certied
Developer.
Instant E-Commerce with Magento: Build a Shop, Packt Publishing, was his rst
Magento-related book that was oriented towards Magento newcomers. After writing
this book, he wrote Getting Started with Magento Extension Development for developers.
Currently, he works as a full-time contractor for Lab Lateral Ltd, an award-winning
team of innovative thinkers, artists, and developers who specialize in customer-
centric websites, digital consultancy, and marketing. He is the Lead Magento
Developer and Head of Lab's Croatia ofce.
He was awarded the E-Commerce Developer of the Year by Digital Entrepreneur
Awards in October 2014 for his excellent knowledge and expertise in e-commerce
development. His work is second to none. He is truly dedicated to helping the Lab
Lateral Ltd team and his fellow developers across the world.
About the Reviewer
Mitchell Robles, Jr, is a solutions architect and applications engineer who has
worked in various lead roles for several award-winning digital agencies in San
Diego, CA, USA. Through his own entrepreneurial spirit, he founded Mojo Creative
& Technical Solutions (for more information, visit http://www.mojomage.com/),
which specializes in day-to-day Magento support and development for merchants,
agencies, freelancers, and industry partners. As a certied Magento developer,
Mitchell is the brainchild and lead in developing several must-have Magento
extensions, including Mojo Creative & Technical Solutions' Bundled Mojo, a popular,
full-featured Magento extension that gives administrators total control over how
they display and sell their bundled products. When he is not in the digital matrix,
Mitchell enjoys traveling abroad, exploring, skateboarding, scuba diving, and
tinkering with random projects, from woodworking to 3D printing.
You can follow Mitchell on the Mojo Creative & Technical Solutions' blog, which can
be viewed by visiting http://b.mojomage.com/.

www.PacktPub.com
Support les, eBooks, discount offers, and more
For support les and downloads related to your book, please visit www.PacktPub.com.
Did you know that Packt offers eBook versions of every book published, with PDF
and ePub les available? You can upgrade to the eBook version at www.PacktPub.com
and as a print book customer, you are entitled to a discount on the eBook copy. Get in
touch with us at service@packtpub.com for more details.
At www.PacktPub.com, you can also read a collection of free technical articles, sign
up for a range of free newsletters and receive exclusive discounts and offers on Packt
books and eBooks.
TM
https://www2.packtpub.com/books/subscription/packtlib
Do you need instant solutions to your IT questions? PacktLib is Packt's online digital
book library. Here, you can search, access, and read Packt's entire library of books.
Why subscribe?
• Fully searchable across every book published by Packt
• Copy and paste, print, and bookmark content
• On demand and accessible via a web browser
Free access for Packt account holders
If you have an account with Packt at www.PacktPub.com, you can use this to access
PacktLib today and view 9 entirely free books. Simply use your login credentials for
immediate access.
[ i ]
Table of Contents
Preface vii
Chapter 1: Understanding the Platform Architecture 1
The technology stack 2
The architectural layers 3
The top-level lesystem structure 4
The module lesystem structure 8
Summary 9
Chapter 2: Managing the Environment 11
Setting up a development environment 12
VirtualBox 12
Vagrant 12
Vagrant project 13
Provisioning PHP 16
Provisioning MySQL 17
Provisioning Apache 17
Provisioning Magento installation 18
Setting up a production environment 20
Introduction to Amazon Web Services 20
Setting up access for S3 usage 22
Creating IAM users 23
Creating IAM groups 25
Setting up S3 for database and media les backup 28
Bash script for automated EC2 setup 30
Setting up EC2 35
Setting up Elastic IP and DNS 43
Summary 46
Table of Contents
[ ii ]
Chapter 3: Programming Concepts and Conventions 47
Composer 47
Service contracts 52
Code generation 55
The var directory 57
Coding standards 58
Summary 59
Chapter 4: Models and Collections 61
Creating a miniature module 62
Creating a simple model 64
Creating an EAV model 66
Understanding the ow of schema and data scripts 69
Creating an install schema script (InstallSchema.php) 71
Creating an upgrade schema script (UpgradeSchema.php) 78
Creating an install data script (InstallData.php) 79
Creating an upgrade data script (UpgradeData.php) 83
Entity CRUD actions 85
Creating new entities 88
Reading existing entities 90
Updating existing entities 91
Deleting existing entities 91
Managing collections 91
Collection lters 98
Summary 100
Chapter 5: Using the Dependency Injection 101
The object manager 102
Dependency injection 104
Conguring class preferences 109
Using virtual types 110
Summary 111
Chapter 6: Plugins 113
Creating a plugin 114
Using the before listener 117
Using the after listener 118
Using the around listener 118
The plugin sort order 119
Summary 120
Table of Contents
[ iii ]
Chapter 7: Backend Development 121
Cron jobs 122
Notication messages 124
Session and cookies 127
Logging 132
The proler 136
Events and observers 138
Cache(s) 143
Widgets 146
Custom variables 149
i18n 150
Indexer(s) 155
Summary 157
Chapter 8: Frontend Development 159
Rendering ow 160
View elements 167
Ui components 167
Containers 169
Blocks 172
Block architecture and life cycle 174
Templates 181
Layouts 183
Themes 186
Creating a new theme 187
JavaScript 190
Creating a custom JS component 193
CSS 194
Summary 196
Chapter 9: The Web API 197
User types 198
Authentication methods 201
REST versus SOAP 202
Hands-on with token-based authentication 203
Hands-on with OAuth-based authentication 207
OAuth-based Web API calls 213
Hands-on with session-based authentication 217
Creating custom Web APIs 218
API call examples 235
The getById service method call examples 235
The getList service method call examples 238
The save (as new) service method call examples 243

Table of Contents
[ iv ]
The save (as update) service method call examples 245
The deleteById service method call examples 248
Search Criteria Interface for list ltering 250
Summary 254
Chapter 10: The Major Functional Areas 255
CMS management 255
Managing blocks manually 256
Managing blocks via code 257
Managing blocks via API 259
Managing pages manually 259
Managing pages via code 261
Managing pages via API 261
Catalog management 262
Managing categories manually 262
Managing categories via code 264
Managing categories via API 265
Managing products manually 266
Managing products via code 267
Managing products via API 268
Customer management 269
Managing customers manually 269
Managing customers via code 272
Managing customers via an API 272
Managing customer address via code 273
Managing customers address via an API 274
Products and customers import 275
The custom product types 280
Custom ofine shipping methods 287
Custom ofine payment methods 294
Summary 303
Chapter 11: Testing 305
Types of tests 305
Unit testing 308
Integration testing 309
Static testing 310
Integrity testing 310
Legacy testing 311
Performance testing 312

Table of Contents
[ v ]
Functional testing 314
Writing a simple unit test 318
Summary 325
Chapter 12: Building a Module from Scratch 327
Module requirements 327
Registering a module 329
Creating a conguration le (cong.xml) 331
Creating e-mail templates (email_templates.xml) 332
Creating a system conguration le (system.xml) 335
Creating access control lists (acl.xml) 339
Creating an installation script (InstallSchema.php) 341
Managing entity persistence (Model, Resource, Collection) 344
Building a frontend interface 348
Creating routes, controllers, and layout handles 348
Creating blocks and templates 352
Handling form submissions 356
Building a backend interface 360
Linking the access control list and menu 360
Creating routes, controllers, and layout handles 361
Utilizing the grid widget 363
Creating a grid column renderer 369
Creating grid column options 371
Creating controller actions 372
Creating unit tests 379
Summary 384
Index 385

[ vii ]
Preface
Building Magento-powered stores can be a challenging task. It requires a great
range of technical skills that are related to the PHP/JavaScript programing
language, development and production environments, and numerous
Magento-specic features. This book will provide necessary insights
into the building blocks of Magento.
By the end of this book, you should be familiar with conguration les, the
dependency injection, models, collections, blocks, controllers, events, observers,
plugins, cron jobs, shipping methods, payment methods, and a few other things.
All of these should form a solid foundation for your development journey later on.
What this book covers
Chapter 1, Understanding the Platform Architecture, gives a high-level overview of the
technology stack, architectural layers, top-level system structure, and individual
module structure.
Chapter 2, Managing the Environment, gives an introduction to VirtualBox,
Vagrant, and Amazon AWS as platforms to set up development and production
environments. It further provides hands-on examples to set up/script Vagrant and
Amazon EC2 boxes.
Chapter 3, Programing Concepts and Conventions, introduces readers to a few seemingly
unrelated but important parts of Magento, such as composer, service contracts, code
generation, the var directory, and nally, coding standards.
Chapter 4, Models and Collections, takes a look into models, resources, collections,
schemas, and data scripts. It also shows the practical CRUD actions that are applied
to an entity alongside ltering collections.

Preface
[ viii ]
Chapter 5, Using the Dependency Injection, guides readers through the dependency
injection mechanism. It explains the role of an object manager, how to congure class
preferences, and how to use virtual types.
Chapter 6, Plugins, gives a detailed insight into the powerful new concept called
plugins. It shows how easy it is to extend, or add to, an existing functionality using
the before/after/around listeners.
Chapter 7, Backend Development, takes readers through a hands-on approach to what
is mostly considered backend-related development bits. These involve cron jobs,
notication messages, sessions, cookies, logging, proler, events, cache, widgets,
and so on.
Chapter 8, Frontend Development, uses a higher-level approach to guide the reader
through what is mostly considered frontend-related development. It touches on
rendering the ow, view elements, blocks, templates, layouts, themes, CSS, and
JavaScript in Magento.
Chapter 9, The Web API, takes up a detailed approach to the powerful Web API
provided by Magento. It gives hands-on practical examples to create and use both
REST and SOAP, either through the PHP cURL library, or from the console.
Chapter 10, The Major Functional Areas, adopts a high-level approach towards
introducing readers with some of the most common sections of Magento. These
include CMS, catalog and customer management, and products and customer
import. It even shows how to create a custom product type and a shipping and
payment method.
Chapter 11, Testing, gives an overview of the types of test that are available in
Magento. It further shows how to write and execute a custom test.
Chapter 12, Building a Module from Scratch, shows the entire process of developing
a module, which uses most of the features introduced in the previous chapters.
The nal result is a module that has admin and storefront interface, an admin
conguration area, e-mail templates, installed schema scripts, tests, and so on.
What you need for this book
In order to successfully run all the examples provided in this book, you will need
either your own web server or a third-party web hosting solution. The high-level
technology stack includes PHP, Apache/Nginx, and MySQL. The Magento 2
Community Edition platform itself comes with a detailed list of system requirements
that can be found at http://devdocs.magento.com/guides/v2.0/install-gde/
system-requirements.html. The actual environment setup is explained in
Chapter 2, Managing the Environment.

Preface
[ ix ]
Who this book is for
This book is intended primarily for intermediate to professional PHP developers
who are interested in Magento 2 development. For backend developers, several
topics are covered that will enable you to modify and extend your Magento store.
Frontend developers will also nd some coverage on how to customize the look of a
site in the frontend.
Given the massive code and structure changes, Magento version 2.x can be described
as a platform that is signicantly different from its predecessor. Keeping this in
mind, this book will neither assume nor require previous knowledge of Magento 1.x.
Conventions
In this book, you will nd a number of text styles that distinguish between different
kinds of information. Here are some examples of these styles and an explanation of
their meaning.
Code words in text, database table names, folder names, lenames, le extensions,
pathnames, dummy URLs, user input, and Twitter handles are shown as follows:
"The AbstractProductPlugin1 class does not have to be extended from another
class for the plugin to work."
A block of code is set as follows:
<config xmlns:xsi="http://www.w3.org/2001/XMLSchema-instance"
xsi:noNamespaceSchemaLocation="urn:magento:framework:
ObjectManager/etc/config.xsd">
<type name="Magento\Catalog\Block\Product\AbstractProduct">
<plugin name="foggyPlugin1"
type="Foggyline\Plugged\Block\Catalog\Product\
AbstractProductPlugin1"
disabled="false" sortOrder="100"/>
<plugin name="foggyPlugin2"
type="Foggyline\Plugged\Block\Catalog\Product\
AbstractProductPlugin2"
disabled="false" sortOrder="200"/>
<plugin name="foggyPlugin3"
type="Foggyline\Plugged\Block\Catalog\Product\
AbstractProductPlugin3"
disabled="false" sortOrder="300"/>
</type>
</config>
Preface
[ x ]
Any command-line input or output is written as follows:
php bin/magento setup:upgrade
New terms and important words are shown in bold. Words that you see on the
screen, for example, in menus or dialog boxes, appear in the text like this: "In the
Store View drop-down eld, we select the store view where we want to apply
the theme."
Warnings or important notes appear in a box like this.
Tips and tricks appear like this.
Reader feedback
Feedback from our readers is always welcome. Let us know what you think about
this book—what you liked or disliked. Reader feedback is important for us as it helps
us develop titles that you will really get the most out of.
To send us general feedback, simply e-mail feedback@packtpub.com, and mention
the book's title in the subject of your message.
If there is a topic that you have expertise in and you are interested in either writing
or contributing to a book, see our author guide at www.packtpub.com/authors.
Customer support
Now that you are the proud owner of a Packt book, we have a number of things to
help you to get the most from your purchase.
Downloading the example code
You can download the example code les from your account at http://www.
packtpub.com for all the Packt Publishing books you have purchased. If you
purchased this book elsewhere, you can visit http://www.packtpub.com/support
and register to have the les e-mailed directly to you.

Preface
[ xi ]
Errata
Although we have taken every care to ensure the accuracy of our content, mistakes
do happen. If you nd a mistake in one of our books—maybe a mistake in the text or
the code—we would be grateful if you could report this to us. By doing so, you can
save other readers from frustration and help us improve subsequent versions of this
book. If you nd any errata, please report them by visiting http://www.packtpub.
com/submit-errata, selecting your book, clicking on the Errata Submission Form
link, and entering the details of your errata. Once your errata are veried, your
submission will be accepted and the errata will be uploaded to our website or added
to any list of existing errata under the Errata section of that title.
To view the previously submitted errata, go to https://www.packtpub.com/books/
content/support and enter the name of the book in the search eld. The required
information will appear under the Errata section.
Piracy
Piracy of copyrighted material on the Internet is an ongoing problem across all
media. At Packt, we take the protection of our copyright and licenses very seriously.
If you come across any illegal copies of our works in any form on the Internet, please
provide us with the location address or website name immediately so that we can
pursue a remedy.
Please contact us at copyright@packtpub.com with a link to the suspected
pirated material.
We appreciate your help in protecting our authors and our ability to bring you
valuable content.
Questions
If you have a problem with any aspect of this book, you can contact us at
questions@packtpub.com, and we will do our best to address the problem.
[ 1 ]
Understanding the Platform
Architecture
Magento is a powerful, highly scalable, and highly customizable e-commerce
platform that can be used to build web shops and, if needed, some non-e-commerce
sites. It provides a large number of e-commerce features out of the box.
Features such as product inventory, shopping cart, support for numerous payment
and shipment methods, promotion rules, content management, multiple currencies,
multiple languages, multiple websites, and so on make it a great choice for
merchants. On the other hand, developers enjoy the full set of merchant-relevant
features plus all the things related to actual development. This chapter will touch
upon the topic of robust Web API support, extensible administration interface,
modules, theming, embedded testing frameworks, and much more.
In this chapter, a high-level overview of Magento is provided in the
following sections:
• The technology stack
• The architectural layers
• The top-level filesystem structure
• The module filesystem structure

Understanding the Platform Architecture
[ 2 ]
The technology stack
Magento's highly modular structure is a result of several open source technologies
embedded into a stack. These open source technologies are composed of the
following components:
• PHP: PHP is a server-side scripting language. This book assumes that you
have advanced knowledge of the object-oriented aspects of PHP, which is
often referred to as PHP OOP.
• Coding standards: Magento puts a lot of emphasis on coding standards.
These include PSR-0 (the autoloading standard), PSR-1 (the basic coding
standards), PSR-2 (the coding style guide), PSR-3, and PSR-4.
• Composer: Composer is a dependency management package for PHP.
It is used to pull in all the vendor library requirements.
• HTML: HTML5 is supported out of the box.
• CSS: Magento supports CSS3 via its in-built LESS CSS preprocessor.
• jQuery: jQuery is a mature cross-platform JavaScript library that was
designed to simplify the DOM manipulation. It is one of the most popular
JavaScript frameworks today.
• RequireJS: RequireJS is a JavaScript file and module loader. Using a modular
script loader such as RequireJS helps improve the speed and quality of code.
• Third-party libraries: Magento comes packed with lot of third-party
libraries, with the most notable ones being Zend Framework and Symfony.
It is worth noting that Zend Framework comes in two different major
versions, namely version 1.x and version 2.x. Magento uses both of these
versions internally.
• Apache or Nginx: Both Apache and Nginx are HTTP servers. Each has its
distinct advantages and disadvantages. It would be unfair to say one is better
than another, as their performance widely depends on the entire system's
setup and usage. Magento works with Apache 2.2 and 2.4 and Nginx 1.7.
• MySQL: MySQL is a mature and widely used relational database
management system (RDBMS) that uses structured query language (SQL).
There are both free community versions and commercial versions of MySQL.
Magento requires at least the of MySQL Community Edition version 5.6.
• MTF: Magento Testing Framework (MTF) delivers an automated testing
suite. It covers various types of tests, such as performance, functional, and
unit testing. The entire MTF is available on GitHub, which can be viewed by
visiting https://github.com/magento/mtf as an isolated project.

Chapter 1
[ 3 ]
Different pieces of technology can be glued into various architectures. There are
different ways to look at the Magento architecture—from the perspective of a
module developer, system integrator, or a merchant, or from some other angle.
The architectural layers
From top to bottom, Magento can be divided into four architectural layers, namely
presentation, service, domain, and persistence.
The presentation layer is the one that we directly interact with through the browser. It
contains layouts, blocks, templates, and even controllers, which process commands
to and from the user interface. Client-side technologies such as jQuery, RequireJS,
CSS, and LESS are also a part of this layer. Usually, three types of users interact with
this layer, namely web users, system administrators, and those making the Web API
calls. Since the Web API calls can be made via HTTP in a manner that is the same as
how a user uses a browser, there's a thin line between the two. While web users and
Web API calls consume the presentation layer as it is, the system administrators have
the power to change it. This change manifests in the form of setting the active theme
and changing the content of the CMS (short for content management system) pages,
blocks, and the products themselves.
When the components of a presentation layer are being interacted with, they usually
make calls to the underlying service layer.
The service layer is the bridge between the presentation and domain layer. It contains
the service contracts, which dene the implementation behavior. A service contract
is basically a fancy name for a PHP interface. This layer is where we can nd the
REST/SOAP APIs. Most user interaction on the storefront is routed through the
service layer. Similarly, the external applications that make the REST/SOAP API
calls also interact with this layer.
When the components of a service layer are being interacted with, they usually make
calls to the underlying domain layer.
The domain layer is really the business logic of Magento. This layer is all about
generic data objects and models that compose the business logic. The domain layer
models themselves do not contribute to data persistence, but they do contain a
reference to a resource model that is used to retrieve and persist the data to a MySQL
database. A domain layer code from one module can interact with a domain module
code from another module via the use of event observers, plugins, and the di.xml
denitions. We will look into the details of these later on in other chapters. Given
the power of plugins and di.xml, its important to note that this interaction is best
established using service contracts (the PHP interface).

Understanding the Platform Architecture
[ 4 ]
When the components of the domain layer are being interacted with, they usually
make calls to the underlying persistence layer.
The persistence layer is where the data gets persisted. This layer is in charge of all the
CRUD (short for create, read, update, and delete) requests. Magento uses an active
record pattern strategy for the persistence layer. The model object contains a resource
model that maps an object to one or more database rows. Here, it is important to
differentiate the cases of simple resource model and the Entity-Attribute-Value
(EAV) resource models. A simple resource model maps to a single table, while the
EAV resource models have their attributes spread out over a number of MySQL
tables. As an example, the Customer and Catalog resource models use EAV
resource models, while the newsletter's Subscriber resource model uses a
simple resource model.
The top-level lesystem structure
The following list depicts the root Magento lesystem structure:
• .htaccess
• .htaccess.sample
• .php_cs
• .travis.yml
• CHANGELOG.md
• CONTRIBUTING.md
• CONTRIBUTOR_LICENSE_AGREEMENT.html
• COPYING.txt
• Gruntfile.js
• LICENSE.txt
• LICENSE_AFL.txt
• app
• bin
• composer.json
• composer.lock
• dev
• index.php

Chapter 1
[ 5 ]
• lib
• nginx.conf.sample
• package.json
• php.ini.sample
• phpserver
• pub
• setup
• update
• var
• vendor
The app/etc/di.xml le is one of the most important les that we might often look
into during development. It contains various class mappings or preferences for
individual interfaces.
The var/magento/language-* directories is where the registered languages
reside. Though each module can declare its own translations under app/code/
{VendorName}/{ModuleName}/i18n/, Magento will eventually fall back to its own
individual module named i18n in case translations are not found in the custom
module or within the theme directory.
The bin directory is where we can nd the magento le. The magento le is a script
that is intended to be run from a console. Once triggered via the php bin/magento
command, it runs an instance of the Magento\Framework\Console\Cli application,
presenting us with quite a number of console options. We can use the magento script
to enable/disable cache, enable/disable modules, run an indexer, and do many
other things.
The dev directory is where we can nd the Magento test scripts. We will have a look
at more of those in later chapters.
The lib directory comprises two major subdirectories, namely the server-side PHP
library code and fonts found under lib/internal and the client-side JavaScript
libraries found in lib/web.
The pub directory is where the publicly exposed les are located. This is the directory
that we should set as root when setting up Apache or Nginx. The pub/index.php le
is what gets triggered when the storefront is opened in a browser.

Understanding the Platform Architecture
[ 6 ]
The var directory is where the dynamically generated group type of les such as
cache, log, and a few others get created in. We should be able to delete the content
of this folder at any time and have Magento automatically recreate it.
The vendor directory is where most of the code is located. This is where we can nd
various third-party vendor code, Magento modules, themes, and language packs.
Looking further into the vendor directory, you will see the following structure:
• .htaccess
• autoload.php
• bin
• braintree
• composer
• doctrine
• fabpot
• justinrainbow
• league
• lusitanian
• magento
• monolog
• oyejorge
• pdepend
• pelago
• phpmd
• phpseclib
• phpunit
• psr
• sebastian
• seld
• sjparkinson
• squizlabs
• symfony
• tedivm
• tubalmartin
• zendframework

Chapter 1
[ 7 ]
Within the vendor directory, we can nd code from various vendors, such as
phpunit, phpseclib, monolog, symfony, and so on. Magento itself can be found
here. The Magento code is located under vendor/magento directory, listed (partially)
as follows:
• composer
• framework
• language-en_us
• magento-composer-installer
• magento2-base
• module-authorization
• module-backend
• module-catalog
• module-customer
• module-theme
• module-translation
• module-ui
• module-url-rewrite
• module-user
• module-version
• module-webapi
• module-widget
• theme-adminhtml-backend
• theme-frontend-blank
• theme-frontend-luma
You will see that the further structuring of directories follows a certain naming
schema, whereas the theme-* directory stores themes, the module-* directory
stores modules, and the language-* directory stores registered languages.

Understanding the Platform Architecture
[ 8 ]
The module lesystem structure
Magento identies itself as a highly modular platform. What this means is that
there is literally a directory location where modules are placed. Let's take a peak at
the individual module structure now. The following structure belongs to one of the
simpler core Magento modules—the Contact module that can be found in vendor/
magento/module-contact:
• Block
• composer.json
• Controller
• etc
°acl.xml
°adminhtml
°system.xml
°config.xml
°email_templates.xml
°frontend
°di.xml
°page_types.xml
°routes.xml
°module.xml
• Helper
• i18n
• LICENSE_AFL.txt
• LICENSE.txt
• Model
• README.md
• registration.php
• Test
°Unit
°Block
°Controller
°Helper
°Model
• view
°adminhtml
°frontend
°layout

Chapter 1
[ 9 ]
°contact_index_index.xml
°default.xml
°templates
°form.phtml
Even though the preceding structure is for one of the simpler modules, you can see
that it is still quite extensive.
The Block directory is where the view-related block PHP classes are located.
The Controller directory is where the controller-related PHP classes are stored.
This is the code that responds to the storefront POST and GET HTTP actions.
The etc directory is where the module conguration les are present. Here, we can
see les such as module.xml, di.xml, acl.xml, system.xml, config.xml, email_
templates.xml, page_types.xml, routes.xml, and so on. The module.xml le is an
actual module declaration le. We will look into the contents of some of these les in
the later chapters.
The Helper directory is where various helper classes are located. These classes are
usually used to abstract various store conguration values into the getter methods.
The i18n directory is where the module translation package CSV les are stored.
The Module directory is where the entities, resource entities, collections, and various
other business classes can be found.
The Test directory stores the module unit tests.
The view directory contains all the module administrator and storefront template
les (.phtml and .html) and static les (.js and .css).
Finally, the registration.php is a module registration le.
Summary
In this chapter, we took a quick look at the technology stack used in Magento. We
discussed how Magento, being an open source product, takes extensive use of other
open source projects and libraries such as MySQL, Apache, Nginx, Zend Framework,
Symfony, jQuery, and so on. We then learned how these libraries are arranged into
directories. Finally, we explored one of the existing core modules and briey took a
look at an example of a module's structure.
In the next chapter, we are going to tackle the environment setup so that we can get
Magento installed and ready for development.
[ 11 ]
Managing the Environment
Throughout this chapter, we will look into setting up our development and
production environments. The idea is to have a fully automated development
environment, which can be initiated with a single console command. For a
production environment, we will turn our focus to one of the available cloud
services, and see how easy it is to set up Magento for simpler production projects.
We will not be covering any robust environment setups like auto-scaling, caching
servers, content delivery networks, and similar. These are really jobs for System
Administrator or DevOps roles. Our attention here is the bare minimum needed to
get our Magento store up and running; a milestone we will achieve throughout the
following sections would be:
• Setting up a development environment
°VirtualBox
°Vagrant
°Vagrant project
°Provisioning PHP
°Provisioning MySQL
°Provisioning Apache
°Provisioning Magento installation
• Setting up a production environment
°Introduction to Amazon Web Services (AWS)
°Setting up access for S3 usage
°Creating IAM users
°Creating IAM groups
Managing the Environment
[ 12 ]
°Setting up S3 for database and media files backup
°Bash script for automated EC2 setup
°Setting up EC2
°Setting up Elastic IP and DNS
Setting up a development environment
In this section, we will build a development environment using VirtualBox
and Vagrant.
Magento ofcial requirements call for Apache 2.2 or 2.4, PHP 5.6.x or 5.5.x
(PHP 5.4 is not supported), and MySQL 5.6.x. We need to keep this in
mind during the environment setup.
VirtualBox
VirtualBox is powerful and feature-rich x86 and AMD64/Intel64 virtualization
software. It is free, runs on a large number of platforms, and supports a large
number of guest operating systems. If we are using Windows, Linux, or OS X in
our daily development, we can use VirtualBox to spin up a virtual machine with an
isolated guest operating system in which we can install our server software needed
to run Magento. This means using MySQL, Apache, and a few other things.
Vagrant
Vagrant is a high-level software wrapper used for virtualization software
management. We can use it to create and congure development environments.
Vagrant supports several types of virtualization software such as VirtualBox,
VMware, Kernel-based Virtual Machine (KVM), Linux Containers (LXC),
and others. It even supports server environments like Amazon EC2.
Before we start, we need to make sure we have VirtualBox and Vagrant
installed already. We can download them and install the following
instructions from their ofcial websites: https://www.virtualbox.
org and https://www.vagrantup.com.

Chapter 2
[ 13 ]
Vagrant project
We start by manually creating an empty directory somewhere within our host
operating system, let's say /Users/branko/www/B05032-Magento-Box/. This is the
directory we will pull in Magento code. We want Magento source code to be external
to Vagrant box, so we can easily work with it in our favorite IDE.
We then create a Vagrant project directory, let's say /Users/branko/www/magento-
box/.
Within the magento-box directory, we run the console command vagrant init.
This results in an output as follows:
A 'Vagrantfile' has been placed in this directory. You are now ready
to 'vagrant up' your first virtual environment! Please read the
comments in the Vagrantfile as well as documentation on 'vagrantup.
com' for more information on using Vagrant.
The Vagrantfile is actually a Ruby language source le. If we strip away the
comments, its original content looks like the following:
# -*- mode: ruby -*-
# vi: set ft=ruby :
Vagrant.configure(2) do |config|
config.vm.box = "base"
end
If we were to run vagrant up now within the magento-box directory, this would
start the VirtualBox in headless (no GUI) mode and run the base operating system.
However, let's hold off running that command just now.
The idea is to create a more robust Vagrantfile that covers everything required
for running Magento, from Apache, MySQL, PHP, PHPUnit, composer, and full
Magento installation with performance xture data.
Though Vagrant does not have a separate conguration le on its own, we
will create one, as we want to store conguration data like a MySQL user and
password in it.
Let's go ahead and create the Vagrantfile.config.yml le, alongside a
Vagrantfile in the same directory, with content as follows:
ip: 192.168.10.10
s3:
access_key: "AKIAIPRNHSWEQNWHLCDQ"
secret_key: "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"

Managing the Environment
[ 14 ]
bucket: "foggy-project-dhj6"
synced_folder:
host_path: "/Users/branko/www/B05032-Magento-Box/"
guest_path: "/vagrant-B05032-Magento-Box/"
mysql:
host: "127.0.0.1"
username: root
password: user123
http_basic:
repo_magento_com:
username: a8adc3ac98245f519ua0d2v2c8770ec8
password: a38488dc908c6d6923754c268vc41bc4
github_oauth:
github_com: "d79fb920d4m4c2fb9d8798b6ce3a043f0b7c2af6"
magento:
db_name: "magento"
admin_firstname: "John"
admin_lastname: "Doe"
admin_password: "admin123"
admin_user: "admin"
admin_email: "email@change.me"
backend_frontname: "admin"
language: "en_US"
currency: "USD"
timezone: "Europe/London"
base_url: "http://magento.box"
fixture: "small"
There is no Vagrant-imposed structure here. This can be any valid YAML le. The
values presented are merely examples of what we can put in.
Magento enables us to generate a pair of 32-character authentication tokens that
can use to access the Git repository. This is done by logging in to Magento Connect
with a user name and password, then going to My Account | Developers | Secure
Keys. The Public Key and Private Key then become our username and password for
accessing Magento GitHub repository.
Having a separate conguration le means we can commit Vagrantfile to version
control with our project, while leaving the Vagrantfile.config.yml out of
version control.
We now edit the Vagrantfile by replacing its content with the following:
# -*- mode: ruby -*-
# vi: set ft=ruby :
require 'yaml'
vagrantConfig = YAML.load_file 'Vagrantfile.config.yml'
Chapter 2
[ 15 ]
Vagrant.configure(2) do |config|
config.vm.box = "ubuntu/vivid64"
config.vm.network "private_network", ip: vagrantConfig['ip']
# Mount local "~/www/B05032-Magento-Box/" path into box's "/vagrant-
B05032-Magento-Box/" path
config.vm.synced_folder
vagrantConfig['synced_folder']['host_path'],
vagrantConfig['synced_folder']['guest_path'], owner:"vagrant",
group: "www-data", mount_options:["dmode=775, fmode=664"]
# VirtualBox specific settings
config.vm.provider "virtualbox" do |vb|
vb.gui = false
vb.memory = "2048"
vb.cpus = 2
end
# <provisioner here>
end
The preceding code rst includes the yaml library, and then reads the content of
the Vagrantfile.config.yml le into a vagrantConfig variable. Then we have a
config block, within which we dene the box type, xed IP address, shared folder
between our host and guest operating system, and a few VirtualBox specic details
such as CPU and memory allocated.
We are using the ubuntu/vivid64 box that stands for the server edition of Ubuntu
15.04 (Vivid Vervet). The reason is that this Ubuntu version gives us the MySQL 5.6.x
and PHP 5.6.x, which stand as requirements for Magento installation, among
other things.
We further have a conguration entry assigning a xed IP to our virtual machine.
Let's go ahead and add an entry in the hosts le of our host operating system
as follows:
192.168.10.10 magento.box
The reason why we are assigning the xed IP address to our box is that
we can directly open a URL like http://magento.box within our host
operating system, and then access Apache served page within our guest
operating system.
Managing the Environment
[ 16 ]
Another important part of the preceding code is the one where we dened
synced_folder. Besides source and destination paths, the crucial parts here are
owner, group, and mount_options. We set those to the vagrant user the www-data
user group, and 774 and 664 for directory and le permissions that play nicely
with Magento.
Let's continue editing our Vagrantfile adding several provisioners to it, one below
the other. We do so by replacing the # <provisioner here> from the preceding
example, with content as follows:
config.vm.provision "file", source: "~/.gitconfig", destination:
".gitconfig"
config.vm.provision "shell", inline: "sudo apt-get update"
Here we are instructing Vagrant to pass our .gitconfig le from the host to the
guest operating system. This is so we inherit the host operating system Git setup to
the guest operating system Git. We then call for apt-get update in order to update
the guest operating system.
Provisioning PHP
Further adding to Vagrantfile, we run several provisioners that will install PHP,
required PHP modules, and PHPUnit, as follows:
config.vm.provision "shell", inline: "sudo apt-get -y install php5
php5-dev php5-curl php5-imagick php5-gd php5-mcrypt php5-mhash
php5-mysql php5-xdebug php5-intl php5-xsl"
config.vm.provision "shell", inline: "sudo php5enmod mcrypt"
config.vm.provision "shell", inline: "echo
\"xdebug.max_nesting_level=200\" >> /etc/php5/apache2/php.ini"
config.vm.provision "shell", inline: "sudo apt-get -y install
phpunit"
There is one thing worth pointing out here – the line where we are
writing xdebug.max_nesting_level=200 into the php.ini le. This
is done to exclude the possibility that Magento would not start throwing a
Maximum Functions Nesting Level of '100' reached... error.

Chapter 2
[ 17 ]
Provisioning MySQL
Further adding to Vagrantfile, we run provisioners that will install the MySQL
server, as follows:
config.vm.provision "shell", inline: "sudo debconf-set-selections
<<< 'mysql-server mysql-server/root_password password
#{vagrantConfig['mysql']['password']}'"
config.vm.provision "shell", inline: "sudo debconf-set-selections
<<< 'mysql-server mysql-server/root_password_again password
#{vagrantConfig['mysql']['password']}'"
config.vm.provision "shell", inline: "sudo apt-get -y install
mysql-server"
config.vm.provision "shell", inline: "sudo service mysql start"
config.vm.provision "shell", inline: "sudo update-rc.d mysql
defaults"
What is interesting with the MySQL installation is that it requires a password and a
password conrmation to be provided during installation. This makes it a troubling
part of the provisioning process that expects shell commands to simply execute
without asking for input. To bypass this, we use debconf-set-selections to store
the parameters for input. We read the password from the Vagrantfile.config.yml
le and pass it onto debconf-set-selections.
Once installed, update-rc.d mysql defaults will add MySQL to the operating
system boot process, thus making sure MySQL is running when we reboot the box.
Provisioning Apache
Further adding to Vagrantfile, we run the Apache provisioner as follows:
config.vm.provision "shell", inline: "sudo apt-get -y install
apache2"
config.vm.provision "shell", inline: "sudo update-rc.d apache2
defaults"
config.vm.provision "shell", inline: "sudo service apache2 start"
config.vm.provision "shell", inline: "sudo a2enmod rewrite"
config.vm.provision "shell", inline: "sudo awk '/<Directory
\\/>/,/AllowOverride None/{sub(\"None\", \"All\",$0)}{print}'
/etc/apache2/apache2.conf > /tmp/tmp.apache2.conf"
config.vm.provision "shell", inline: "sudo mv
/tmp/tmp.apache2.conf /etc/apache2/apache2.conf"
config.vm.provision "shell", inline: "sudo awk '/<Directory
\\/var\\/www\\/>/,/AllowOverride None/{sub(\"None\",
\"All\",$0)}{print}' /etc/apache2/apache2.conf >
/tmp/tmp.apache2.conf"

Managing the Environment
[ 18 ]
config.vm.provision "shell", inline: "sudo mv
/tmp/tmp.apache2.conf /etc/apache2/apache2.conf"
config.vm.provision "shell", inline: "sudo service apache2 stop"
The preceding code installs Apache, adds it to the boot sequence, starts it, and turns
on the rewrite module. We then have an update to the Apache conguration le,
as we want to replace AllowOverride None with AllowOverride All, or else
our Magento won't work. Once the changes are done, we stop Apache due to
the later processes.
Provisioning Magento installation
Further adding to Vagrantfile, we now turn our attention to Magento installation,
which we split into several steps. First, we link our host folder, /vagrant-B05032-
Magento-Box/, with the guest, /var/www/html, using Vagrant's synced folder
feature:
config.vm.provision "shell", inline: "sudo rm -Rf /var/www/html"
config.vm.provision "shell", inline: "sudo ln -s
#{vagrantConfig['synced_folder']['guest_path']} /var/www/html"
We then use the composer create-project command to pull the Magento 2 les
from the ofcial repo.magento.com source into the /var/www/html/ director:
config.vm.provision "shell", inline: "curl -sS
https://getcomposer.org/installer | php"
config.vm.provision "shell", inline: "mv composer.phar
/usr/local/bin/composer"
config.vm.provision "shell", inline: "composer clearcache"
config.vm.provision "shell", inline: "echo '{\"http-basic\":
{\"repo.magento.com\": {\"username\": \"#{vagrantConfig
['http_basic']['repo_magento_com']['username']}\",\"password\":
\"#{vagrantConfig['http_basic']['repo_magento_com']['password']}
\"}}, \"github-oauth\": {\"github.com\":
\"#{vagrantConfig['github_oauth']['github_com']}\"}}' >>
/root/.composer/auth.json"
config.vm.provision "shell", inline: "composer create-project --
repository-url=https://repo.magento.com/ magento/project-
community-edition /var/www/html/"
We then create a database in which Magento will be installed later on:
config.vm.provision "shell", inline: "sudo mysql --
user=#{vagrantConfig['mysql']['username']} --
password=#{vagrantConfig['mysql']['password']} -e \"CREATE
DATABASE #{vagrantConfig['magento']['db_name']};\""

Chapter 2
[ 19 ]
We then run the Magento installation from the command line:
config.vm.provision "shell", inline: "sudo php
/var/www/html/bin/magento setup:install --base-
url=\"#{vagrantConfig['magento']['base_url']}\" --db-
host=\"#{vagrantConfig['mysql']['host']}\" --db-
user=\"#{vagrantConfig['mysql']['username']}\" --db-
password=\"#{vagrantConfig['mysql']['password']}\" --db-
name=\"#{vagrantConfig['magento']['db_name']}\" --admin-
firstname=\"#{vagrantConfig['magento']['admin_firstname']}\" --
admin-lastname=\"#{vagrantConfig['magento']['admin_lastname']}\"
--admin-email=\"#{vagrantConfig['magento']['admin_email']}\" --
admin-user=\"#{vagrantConfig['magento']['admin_user']}\" --
admin-password=\"#{vagrantConfig['magento']['admin_password']}\"
--backend-
frontname=\"#{vagrantConfig['magento']['backend_frontname']}\" -
-language=\"#{vagrantConfig['magento']['language']}\" --
currency=\"#{vagrantConfig['magento']['currency']}\" --
timezone=\"#{vagrantConfig['magento']['timezone']}\""
config.vm.provision "shell", inline: "sudo php
/var/www/html/bin/magento deploy:mode:set developer"
config.vm.provision "shell", inline: "sudo php
/var/www/html/bin/magento cache:disable"
config.vm.provision "shell", inline: "sudo php
/var/www/html/bin/magento cache:flush"
config.vm.provision "shell", inline: "sudo php
/var/www/html/bin/magento setup:performance:generate-fixtures
/var/www/html/setup/performance-toolkit/profiles/ce/small.xml"
The preceding code shows we are installing the xtures data as well.
We need to be careful during the Vagrantfile.config.yml le conguration.
Magento installation is quite sensible around provided data. We need to make sure
we provide valid data for elds like mail and password or else the installation will
fail showing errors similar to the following:
SQLSTATE[28000] [1045] Access denied for user 'root'@'localhost'
(using password: NO)
User Name is a required field.
First Name is a required field.
Last Name is a required field.
'magento.box' is not a valid hostname for email address
'john.doe@magento.box'
'magento.box' appears to be a DNS hostname but cannot match TLD
against known list
'magento.box' appears to be a local network name but local network
names are not allowed
Password is required field.
Your password must be at least 7 characters.
Your password must include both numeric and alphabetic characters.

Managing the Environment
[ 20 ]
With this, we conclude our Vagrantfile content.
Running the vagrant up command now within the same directory as Vagrantfile
triggers the box creation process. During this process, all of the previously listed
commands will get executed. The process alone takes up to an hour or so.
Once vagrant up is complete, we can issue another console command, vagrant ssh,
to log in to the box.
At the same time, if we open a URL like http://magento.box in our browser,
we should see the Magento storefront loading.
The preceding Vagrantfile simply pulls from the ofcial Magento Git repository
and installs Magento from the ground up. Vagrantfile and Vagrantfile.config.
yml can be further extended and tailored to suit our individual project needs, like
pulling the code from the private Git repository, restoring the database from the
shared drive, and so on.
This makes for a simple yet powerful scripting process by which we can prepare
fully ready per-project machines for other developers in a team to be able to quickly
spin up.
Setting up a production environment
A production environment is the client-facing environment that focuses on good
performance and availability. Setting up production environments is not really
something we developers tend to do, especially if there are robust requirements
around scaling, load balancing, high availability, and similar. Sometimes, however,
we need to set up a simple production environment. There are various cloud
providers that offer quick and simple solutions to this. For the purpose of this
section, we will turn to Amazon Web Services.
Introduction to Amazon Web Services
Amazon Web Services (AWS) is a collection of remote computing services
frequently referred to as web services. AWS provides on-demand computing
resources and services in the cloud, with pay-as-you-go pricing. Amazon gives a nice
comparison of its AWS resources, saying that using AWS resources instead of your
own is like purchasing electricity from a power company instead of running your
own generator.
Chapter 2
[ 21 ]
If we stop and think about it for a minute, this makes it interesting to not only system
operation roles but also for developers like us. We (developers) are now able to
spin various databases, web application servers, and even complex infrastructures
in a matter of minutes and a few mouse clicks. We can run these services for a few
minutes, hours, or days then shut them down. Meanwhile, we only pay for the
actual usage, not the full monthly or yearly price as we do with most of the hosting
services. Although the overall AWS pricing for certain services might not be the
cheapest out there, it certainly provides a level of commodity and usability unlike
many other services. Commodity comes from things like auto-scaling resources,
a feature that often offers signicant cost savings compared to the equivalent on-
premises infrastructure.
Quality training and a certication program is another important aspect of the
AWS ecosystem. Certications are available for Solutions Architect, Developer,
and SysOps Administrator, across associate and professional levels. Though the
certication is not mandatory, if we deal with AWS on a regular basis, we are
encouraged to take one. Earning the certication puts the seal on our expertise to
design, deploy, and operate highly available, cost-effective, and secure applications
on the AWS platform.
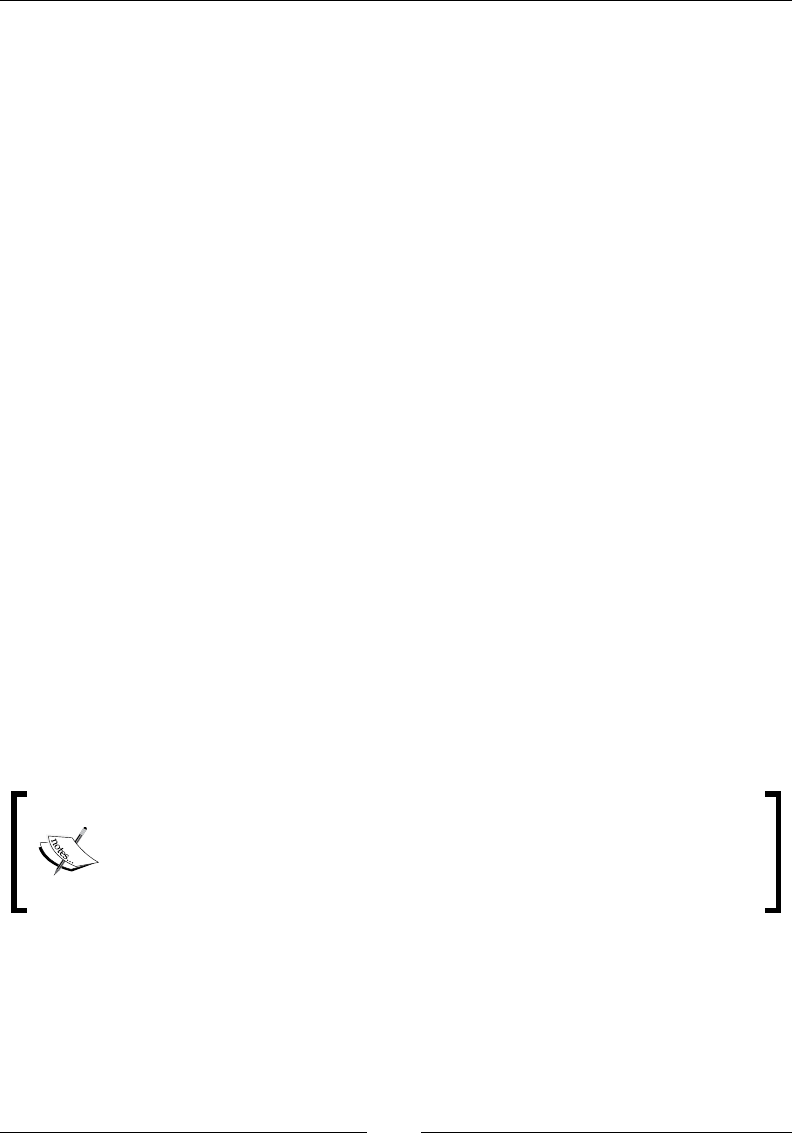
We can manage our AWS through a simple and intuitive web-based user interface
called AWS management console, which is available at https://aws.amazon.
com/console. Signing into AWS, we should be able to see a screen similar to the
following one:

Managing the Environment
[ 22 ]
The preceding image shows how the AWS management console groups the AWS
services visually into several major groups, as follows:
• Compute
• Developer Tools
• Mobile Services
• Storage & Content Delivery
• Management Tools
• Application Services
• Database
• Security & Identity
• Networking
• Analytics
• Enterprise Applications
As part of this chapter, we will be taking a look at the EC2 service found under
the Compute group and the S3 service found under the Storage & Content
Delivery group.
Amazon Elastic Compute Cloud (Amazon EC2) is a web service that provides a
re-sizable compute capacity in the cloud. We can think of it as a virtual computer
machine in the cloud that we can turn on and off at any time, within minutes.
We can further commission one, hundreds, or even thousands of these machine
instances simultaneously. This makes for the re-sizable compute capacity.
S3 provides secure, durable, and highly scalable object storage. It is designed to
provide durability of 99.99% of objects. The service provides a web service interface
to store and retrieve any amount of data from anywhere on the web. S3 is charged
only per storage that is actually used. S3 can be used alone or together with other
AWS services such as EC2.
Setting up access for S3 usage
As part of our production environment, it is good to have reliable storage where we
can archive database and media les. Amazon S3 stands out as a possible solution.
In order to properly set access to the S3 scalable storage service, we need to take a
quick look into AWS Identity and Access Management (IAM for short). IAM is a
web service that helps us securely control access to AWS resources for our users.
We can use IAM to control authentication (who can use our AWS resources) and
authorization (what resources they can use and in what ways). More specically,
as we will soon see, we are interested in Users and Groups.
Chapter 2
[ 23 ]
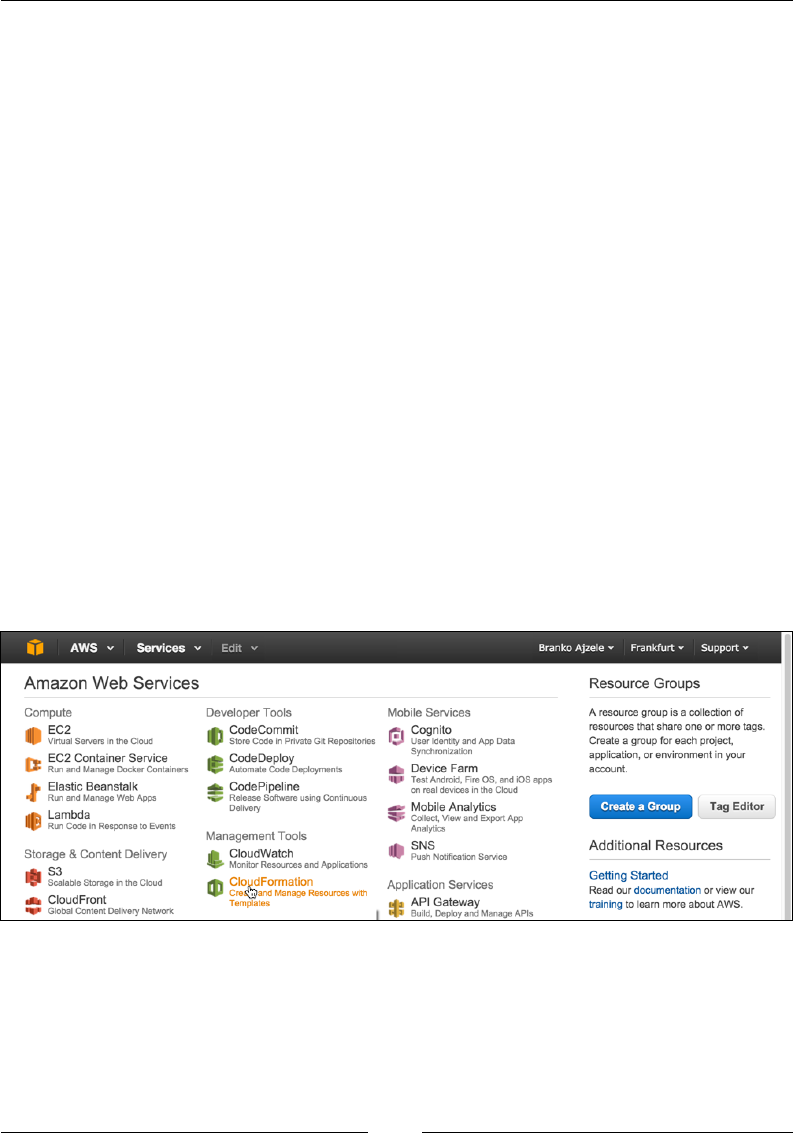
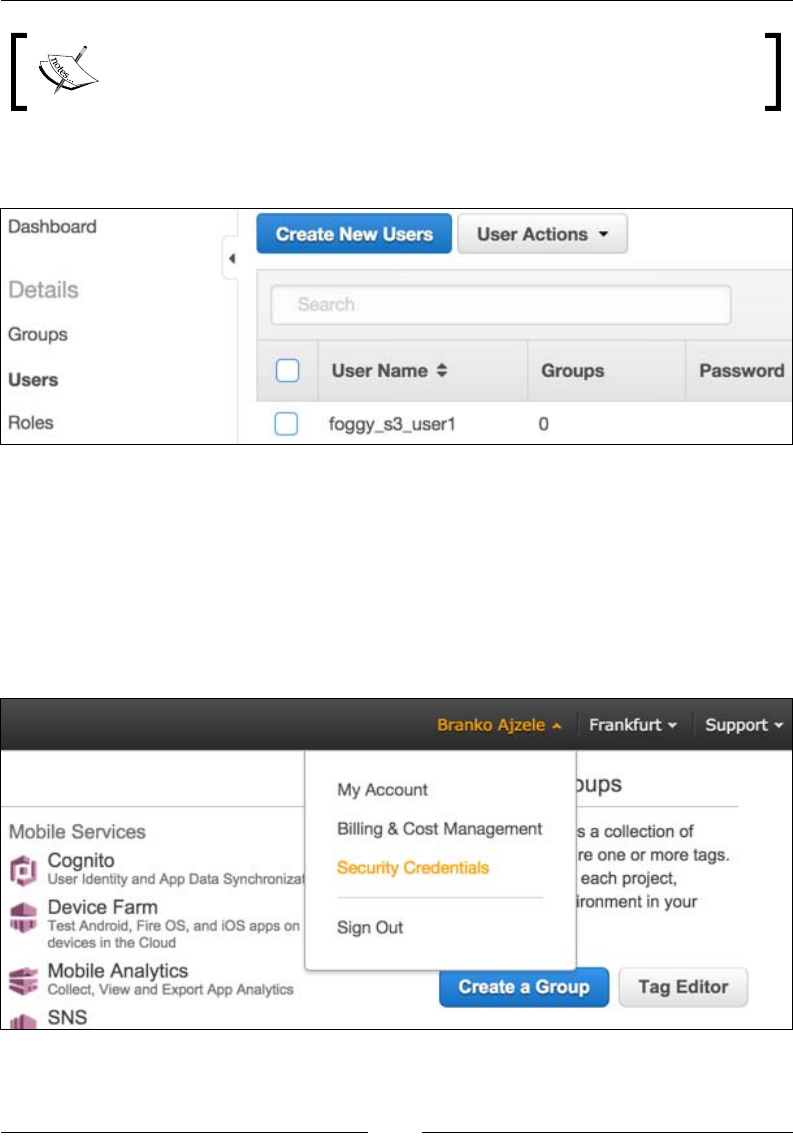
Creating IAM users
This section describes how to create IAM users. An IAM user is an entity that we
create in AWS to represent the person or service using it when interacting with AWS.
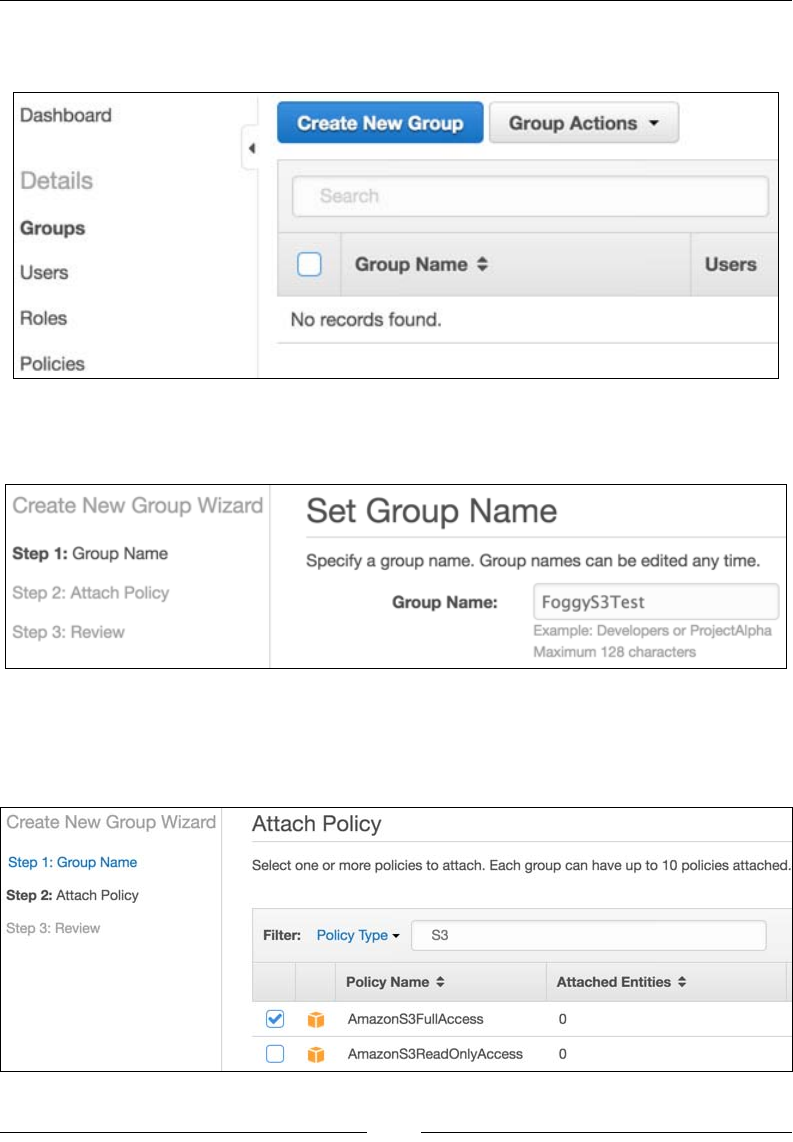
Log in to the AWS console.
Under the user menu, click on Security Credentials as shown in the
following screenshot:
This opens up the security dashboard page.
Clicking on the Users menu should open a screen like the following one:
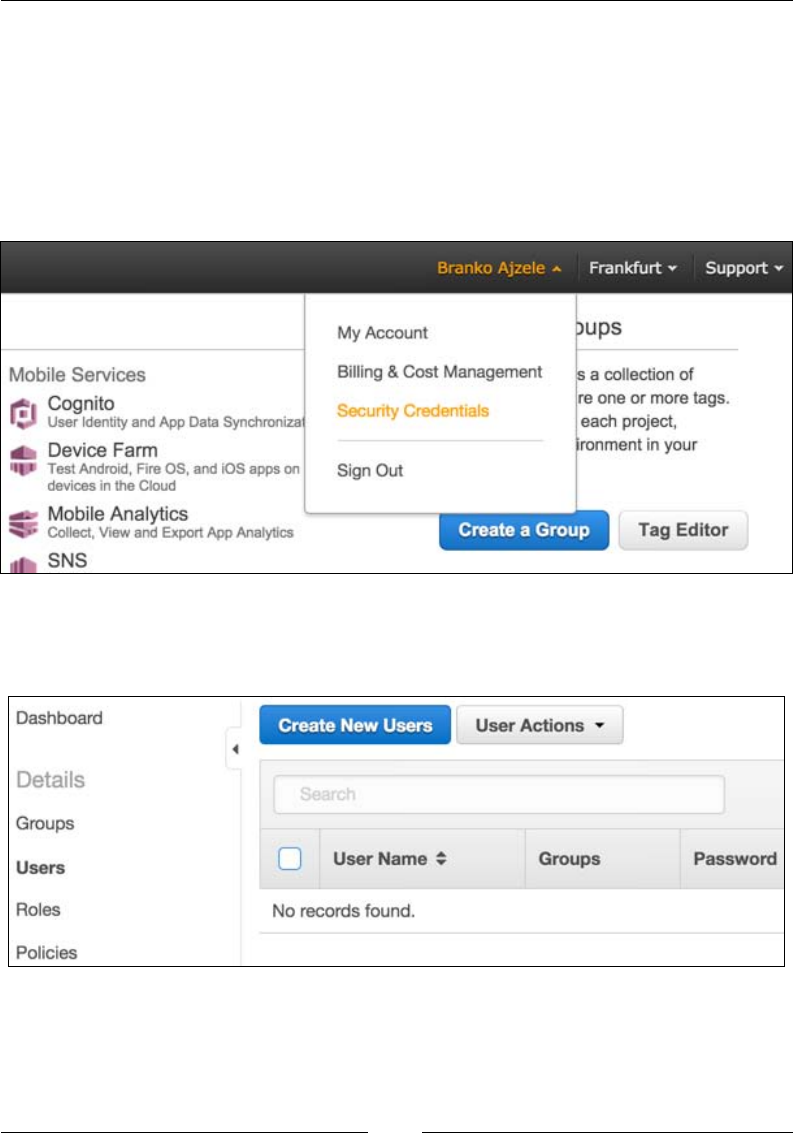
Managing the Environment
[ 24 ]
On the Users menu, we click on Create New User, which opens a page like
the following:
Here, we ll in the desired username for one or more users, something like
foggy_s3_user1, and then click on the Create button.
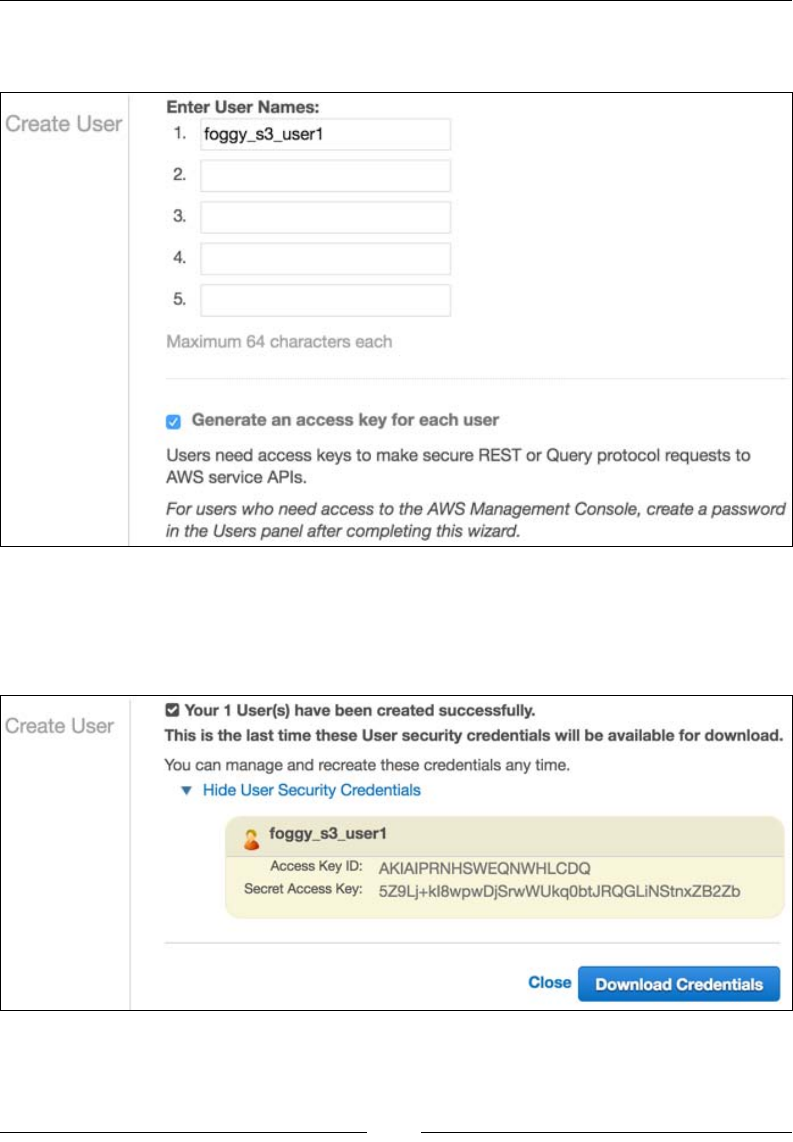
We should now see a screen like the following one:
Here, we can click on Download Credentials to initiate the CSV format le
download or copy and paste our credentials manually.
Chapter 2
[ 25 ]
Access Key ID and Secret Access Key are the two pieces of information
we will be using to access S3 storage.
Clicking the close link takes us back to the Users menu, showing our newly created
user listed as shown in the following screenshot:
Creating IAM groups
This section describes how to create IAM groups. Groups are collections of IAM
users that we can manage as a single unit. So let's begin:
1. Log in to the AWS console.
2. Under the user menu, click on Security Credentials as shown in the
following screenshot:
Managing the Environment
[ 26 ]
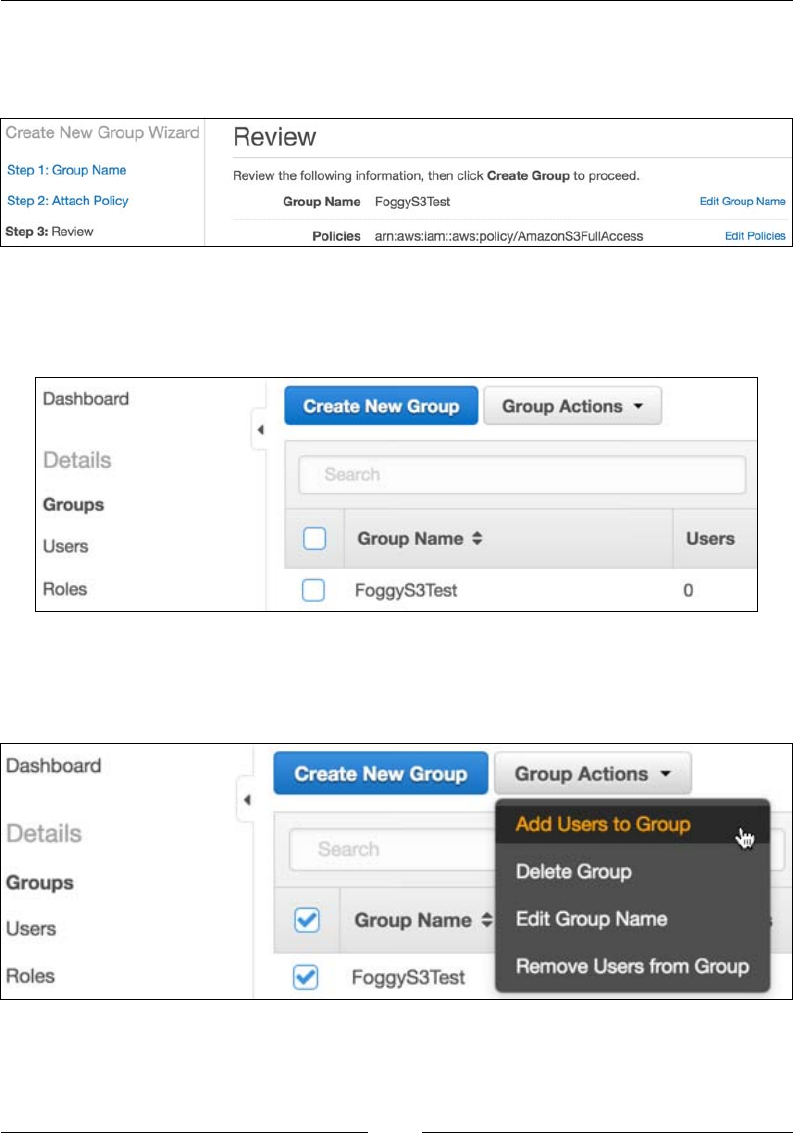
3. This opens up the security dashboard page. Clicking on the Groups menu
should open a screen like the following one:
4. On the Groups menu, we click on Create New Group, which opens a page
like the following:
5. Here, we ll in the desired group name, something like FoggyS3Test.
6. We should now see a screen like the following one, where we need to select
the group Policy Type and click the Next Step button:
Chapter 2
[ 27 ]
7. We select the AmazonS3FullAccess policy type and click the Next
Step button. The Review screen is now shown, asking us to review
the provided information:
8. If the provided information is correct, we conrm it by clicking the Create
Group button. We should now be able to see our group under the Groups
menu as shown in the following screenshot:
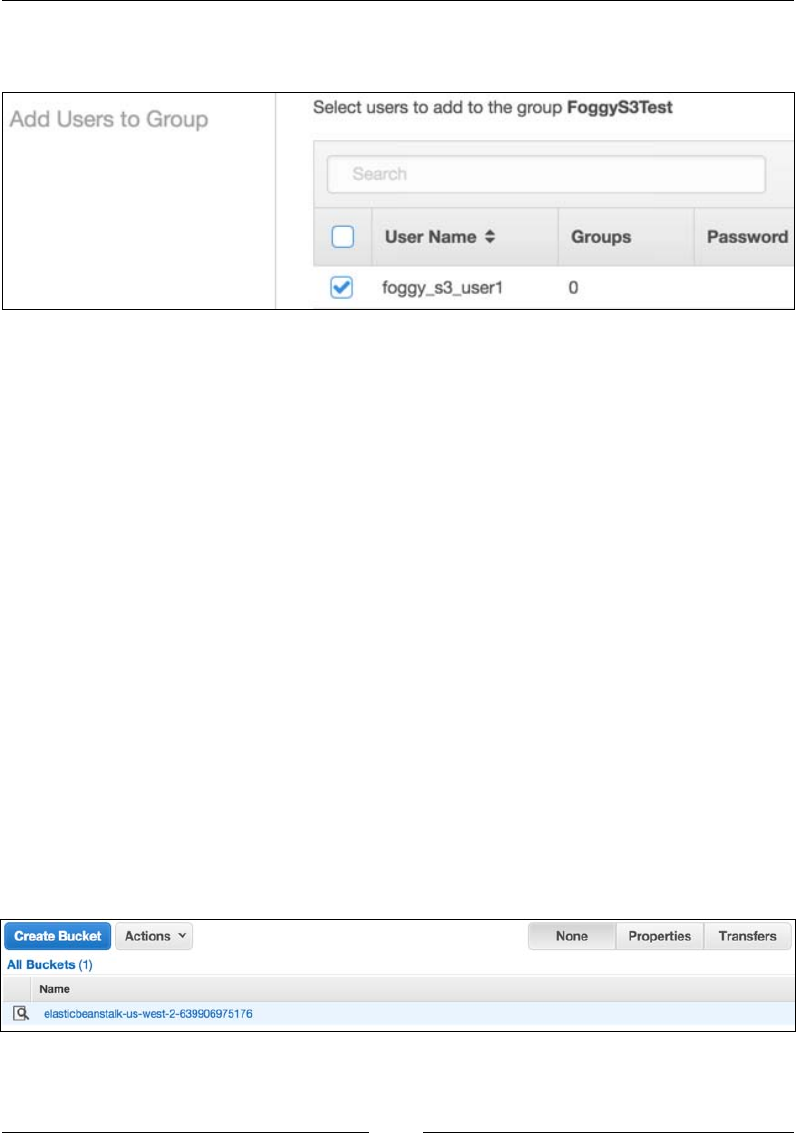
9. Mark the checkbox to the left of Group Name, click the Group Actions
dropdown, and then select Add Users to Group as shown in the
following screenshot:
Managing the Environment
[ 28 ]
10. This opens the Add Users to Group page as shown in the following
screenshot:
11. Mark the checkbox to the left of User Name and click on the Add Users
button. This should add the selected user to the group and throw us back to
the Groups listing.
The result of this user and group creation process is a user with Access Key Id,
Secret Access Key, and assigned user group with the AmazonS3FullAccess policy.
We will use this information later on when we demonstrate backing up the database
to S3.
Setting up S3 for database and media les
backup
S3 consists of buckets. We can think of a bucket as the rst level directory within our
S3 account. We then set the permissions and other options on that directory (bucket).
In this section, we are going to create our own bucket, with two empty folders called
database and media. We will use these folders later on during our environment
setup in order to back up our MySQL database and our media les.
We start by logging in to the AWS management console.
Under the Storage & Content Delivery group, we click on S3. This opens a screen
similar to the following:
Chapter 2
[ 29 ]
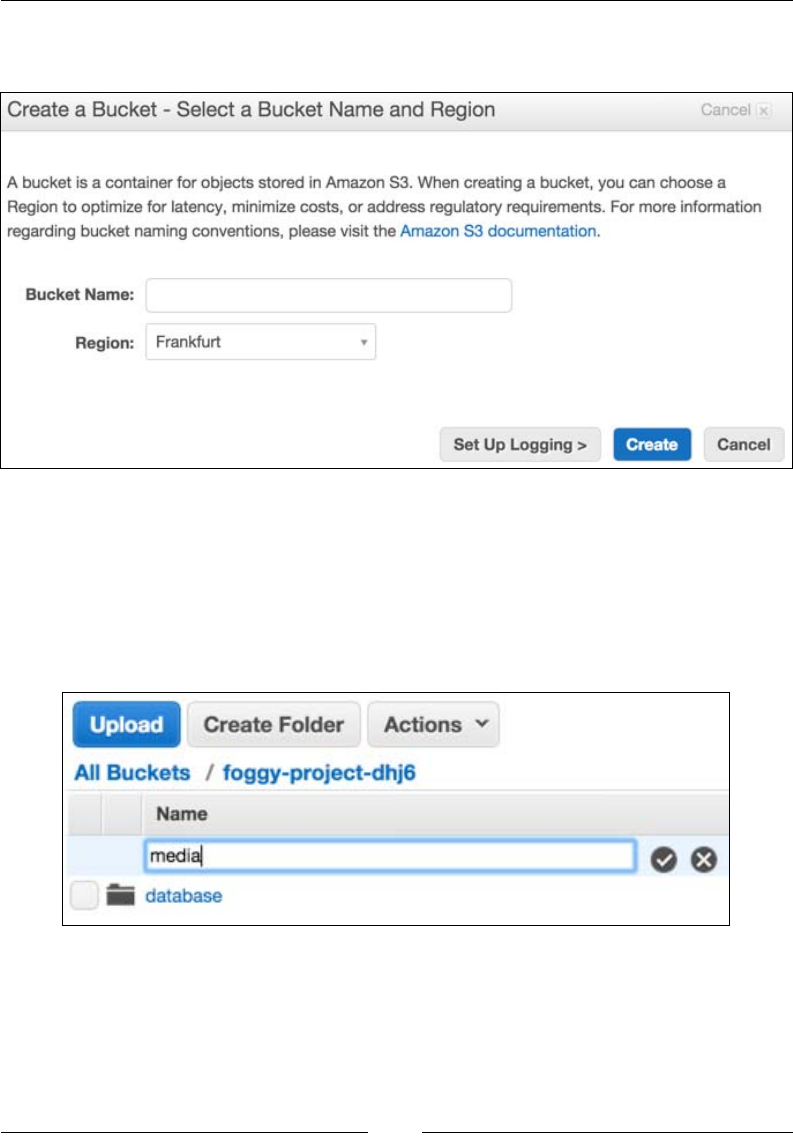
Click on the Create Bucket button. This opens a popup like the one shown in the
following screenshot:
Let's provide a unique Bucket Name, preferably something identifying the project
for which we will be backing up the database and media le, and click the Create
button. For the purpose of this chapter, let's imagine we selected something like
foggy-project-dhj6.
Our bucket should now be visible under the All Buckets list. If we click on it, a new
screen opens like the one shown in the following screenshot:
Here, we click on the Create Folder button and add the necessary database and
media folders.
Managing the Environment
[ 30 ]
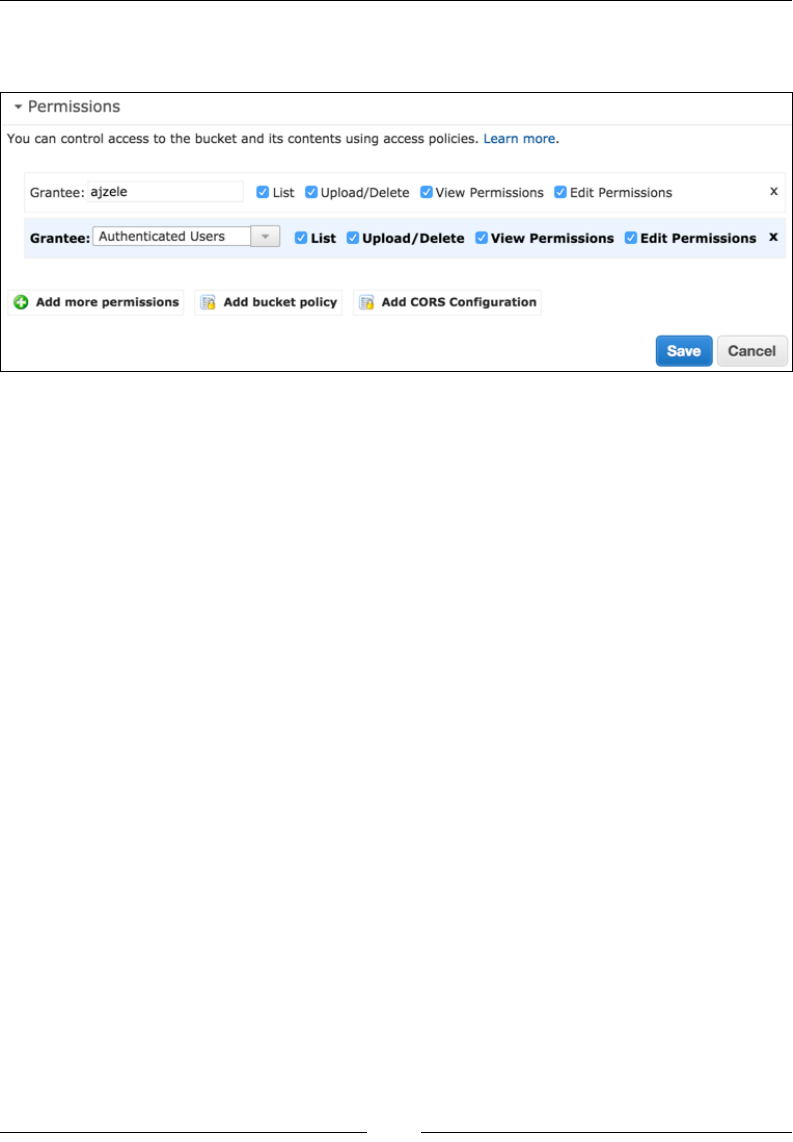
While still within the root bucket directory, click on the Properties button and ll in
the Permissions section as shown in the following screenshot:
Here, we are basically assigning all permissions to Authenticated Users.
We should now have an S3 bucket to which we can potentially store our database
and media backups using the s3cmd console tool that we will soon reference.
Bash script for automated EC2 setup
Similar to the Vagrantfile shell provisioners, let's go ahead and create a sequence
of bash shell commands we can use for a production setup.
The rst block of commands goes as follows:
#!/bin/bash
apt-get update
apt-get -y install s3cmd
Here, start with the #!/bin/bash expression. This species the type of script we are
executing. Then we have a system update and s3cmd tool installation. The s3cmd is
a free command-line tool and client for uploading, retrieving, and managing data in
Amazon S3. We can use it later on for database and media le backups and restores.
We then install the postfix mail server, using the following commands. Since the
postx installation triggers a graphical interface in the console, asking for mailname
and main_mailer_type, we bypass those using sudo debconf-set-selections.
Once installed, we reload postfix.

Chapter 2
[ 31 ]
sudo debconf-set-selections <<< "postfix postfix/mailname string
magentize.me"
sudo debconf-set-selections <<< "postfix postfix/main_mailer_type
string 'Internet Site'"
sudo apt-get install -y postfix
sudo /etc/init.d/postfix reload
Using mail server directly on the EC2 box is ne for smaller production sites, where
we do not expect high trafc or a large number of customers. For more intensive
production sites, we need to pay attention to Amazon, possibly putting a throttle on
port 25, thus resulting in outgoing e-mail timeouts. In which case we can either ask
Amazon to remove the limitation on our account, or move on to more robust services
like Amazon Simple Email Service.
We then install all things related to PHP. Notice how we even install xdebug, though
immediately turning it off. This might come in handy for those very rare moments
when we really need to debug the live site, then we can turn it off and play with
remote debugging. We further download and set composer to the user path:
apt-get -y install php5 php5-dev php5-curl php5-imagick php5-gd php5-
mcrypt php5-mhash php5-mysql php5-xdebug php5-intl php5-xsl
php5enmod mcrypt
php5dismod xdebug
service php5-fpm restart
apt-get -y install phpunit
echo "Starting Composer stuff" >> /var/tmp/box-progress.txt
curl -sS https://getcomposer.org/installer | php
mv composer.phar /usr/local/bin/composer
We then move on to MySQL installation. Here, we are also using debconf-set-
selections to automate the console part of providing input parameters to the
installation. Once installed, MySQL is started and added to the boot process.
debconf-set-selections <<< 'mysql-server mysql-server/root_password
password RrkSBi6VDg6C'
debconf-set-selections <<< 'mysql-server mysql-server/root_password_again
password RrkSBi6VDg6C'
apt-get -y install mysql-server
service mysql start
update-rc.d mysql defaults
Managing the Environment
[ 32 ]
Alongside MySQL, another major component is Apache. We install it using the
following commands. With Apache, we need to pay attention to its apache2.
conf le. We need to change AllowOverride None to AllowOverride All for the
Magento directory:
apt-get -y install apache2
update-rc.d apache2 defaults
service apache2 start
a2enmod rewrite
awk '/<Directory \/>/,/AllowOverride None/{sub("None",
"All",$0)}{print}' /etc/apache2/apache2.conf > /tmp/tmp.apache2.conf
mv /tmp/tmp.apache2.conf /etc/apache2/apache2.conf
awk '/<Directory \/var\/www\/>/,/AllowOverride None/{sub("None",
"All",$0)}{print}' /etc/apache2/apache2.conf > /tmp/tmp.apache2.conf
mv /tmp/tmp.apache2.conf /etc/apache2/apache2.conf
service apache2 restart
Now that we have MySQL and Apache installed, we move on to getting the source
code les in place. Next, we are pulling from the ofcial Magento Git repository. This
is not the same as repo.magento.com we used when setting up the vagrant. Though
in this case the Magento Git repository is public, the idea is to be able to pull the code
from the private GitHub repository. Based on the production environment we tend
to set up, we can easily replace the next part with pulling from any other private Git
repository.
sudo rm -Rf /var/www/html/*
git clone https://github.com/magento/magento2.git /var/www/html/.
sudo composer config --global github-oauth.github.com
7d6da6bld50dub454edc27db70db78b1f8997e6
sudo composer install --working-dir="/var/www/html/"
mysql -uroot -pRrkSBi6VDg6C -e "CREATE DATABASE magento;"
PUBLIC_HOSTNAME="'wget -q -O - http://instance-data/latest/meta-
data/public-hostname'"
To pull the code from a private git repository, we can use a command
of the following form, Git clone: https://<user>:<OAuthToken>@
github.com/<user>/<repo>.git.

Chapter 2
[ 33 ]
The PUBLIC_HOSTNAME variable stores the response of the wget command that calls
the http://instance-data/latest/meta-data/public-hostname URL. This URL
is a feature of AWS that allows us to get the current EC2 instance metadata. We then
use the PUBLIC_HOSTNAME variable during Magento installation, passing it as the
--base-url parameter:
php /var/www/html/bin/magento setup:install --base-
url="http://$PUBLIC_HOSTNAME" --db-host="127.0.0.1" --db-
user="root" --db-password="RrkSBi6VDg6C" --db-name="magento" --
admin-firstname="John" --admin-lastname="Doe" --admin-
email="john.doe@change.me" --admin-user="admin" --admin-
password="pass123" --backend-frontname="admin" --
language="en_US" --currency="USD" --timezone="Europe/London"
The preceding command takes a lot of per project specic conguration values, so we
need to be sure to paste in our own information here appropriately before simply
copying and pasting it.
Now we make sure the Magento mode is set to production, and cache is turned on
and ushed, so it regenerates fresh:
php /var/www/html/bin/magento deploy:mode:set production
php /var/www/html/bin/magento cache:enable
php /var/www/html/bin/magento cache:flush
Finally, we reset the permissions on the /var/www/html directory in order for our
Magento to function properly:
chown -R ubuntu:www-data /var/www/html
find /var/www/html -type f -print0 | xargs -r0 chmod 640
find /var/www/html -type d -print0 | xargs -r0 chmod 750
chmod -R g+w /var/www/html/pub
chmod -R g+w /var/www/html/var
chmod -R g+w /var/www/html/app
chmod -R g+w /var/www/html/vendor
We need to take caution with the preceding Git and Magento installation example.
The idea here was to show how we could automatically set Git pull from the public
or private repository. The Magento installation part is a little bonus for this specic
case, not something we would actually do on our production machine. The whole
purpose of this script would be to serve as a blueprint for powering up new AMI
images. So ideally what we would usually do once the code is pulled, is to restore the
database from some private storage like S3 and then attach it to our installation. Thus
making for a complete restore of les, database, and media once the script is nished.

Managing the Environment
[ 34 ]
Putting that thought aside, let's get back to our script, further adding the daily
database backup using the set of command as follows:
CRON_CMD="mysql --user=root --password=RrkSBi6VDg6C magento | gzip -9
> ~/database.sql.gz"
CRON_JOB="30 2 * * * $CRON_CMD"
( crontab -l | grep -v "$CRON_CMD" ; echo "$CRON_JOB" ) | crontab -
CRON_CMD="s3cmd --access_key="AKIAINLIM7M6WGJKMMCQ" --
secret_key="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" put
~/database.sql.gz s3://foggy-project-ghj7/database/database_'date
+"%Y-%m-%d_%H-%M"'.sql.gz"
CRON_JOB="30 3 * * * $CRON_CMD"
( crontab -l | grep -v "$CRON_CMD" ; echo "$CRON_JOB" ) | crontab -
Here, we are adding the 2:30 AM cron job for backing up the database into the home
directory le named database.sql.gz. Then we are adding another cron job that
executes at 3:30 AM, which pushes the database backup to S3 storage.
Similar to the database backup, we can add media backup instructions to our script
using the set of command as follows:
CRON_CMD="tar -cvvzf ~/media.tar.gz /var/www/html/pub/media/"
CRON_JOB="30 2 * * * $CRON_CMD"
( crontab -l | grep -v "$CRON_CMD" ; echo "$CRON_JOB" ) | crontab -
CRON_CMD="s3cmd --access_key="AKIAINLIM7M6WGJKMMCQ" --
secret_key="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" put
~/media.tar.gz s3://foggy-project-ghj7/media/media_'date +"%Y-%m-
%d_%H-%M"'.tar.gz"
CRON_JOB="30 3 * * * $CRON_CMD"
( crontab -l | grep -v "$CRON_CMD" ; echo "$CRON_JOB" ) | crontab -
The preceding commands have several pieces of information coded in them. We
need to make sure to paste in our access key, secret key, and S3 bucket name
accordingly. For simplicity sake, we are not addressing security implications such as
hardcoding the access tokens into the cron jobs. Amazon provides an extensive AWS
Security Best Practices guide that can be downloaded via the ofcial AWS website.
Now that we have some understanding of what the bash script for automated EC2
setup could look like, let's proceed to setting up the EC2 instance.
Chapter 2
[ 35 ]
Setting up EC2
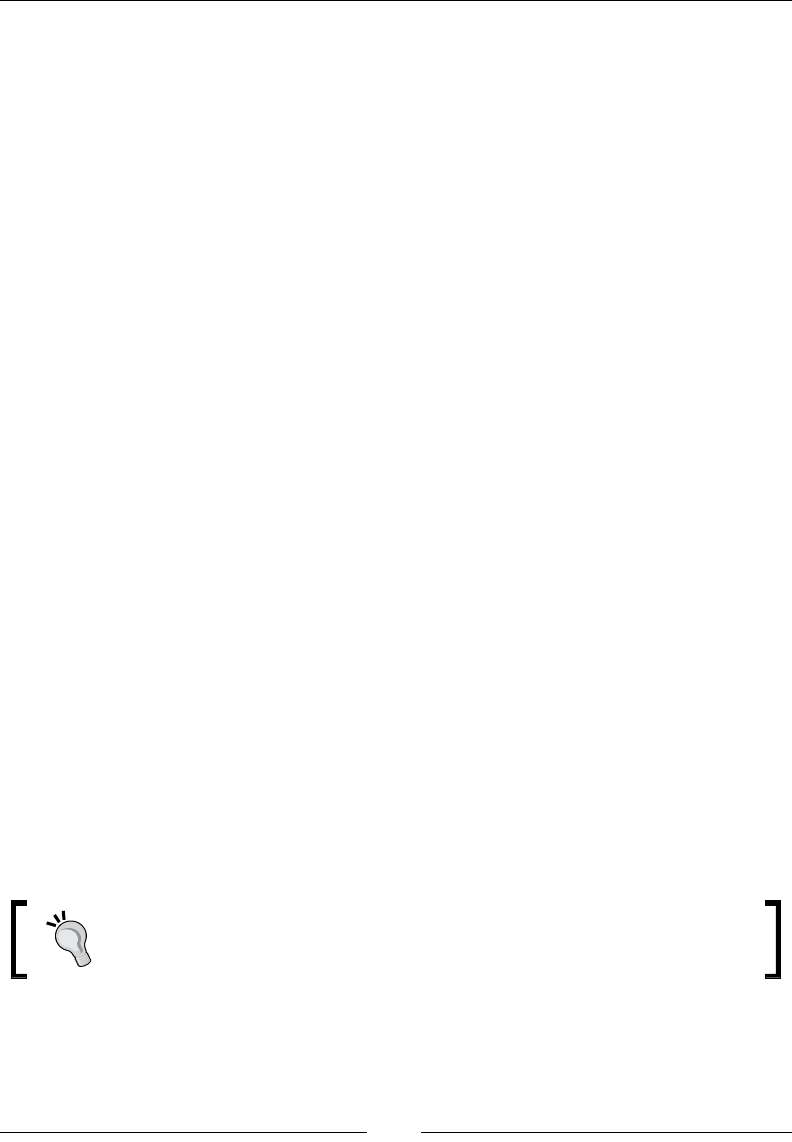
Follow these steps to get the setting done:
1. Log in to the AWS console
2. Under the Compute group, click on EC2, which should open a screen like
the following:
3. Click on the Launch Instance button, which should open a screen like
the following:
Managing the Environment
[ 36 ]
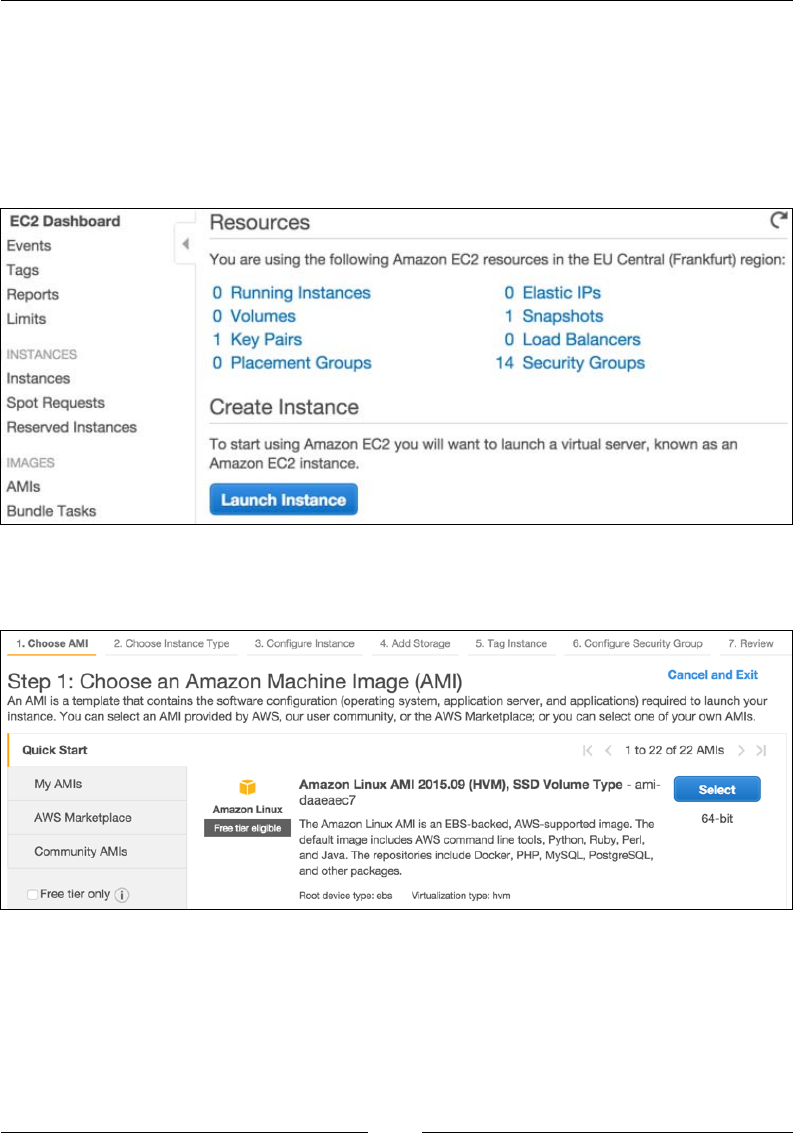
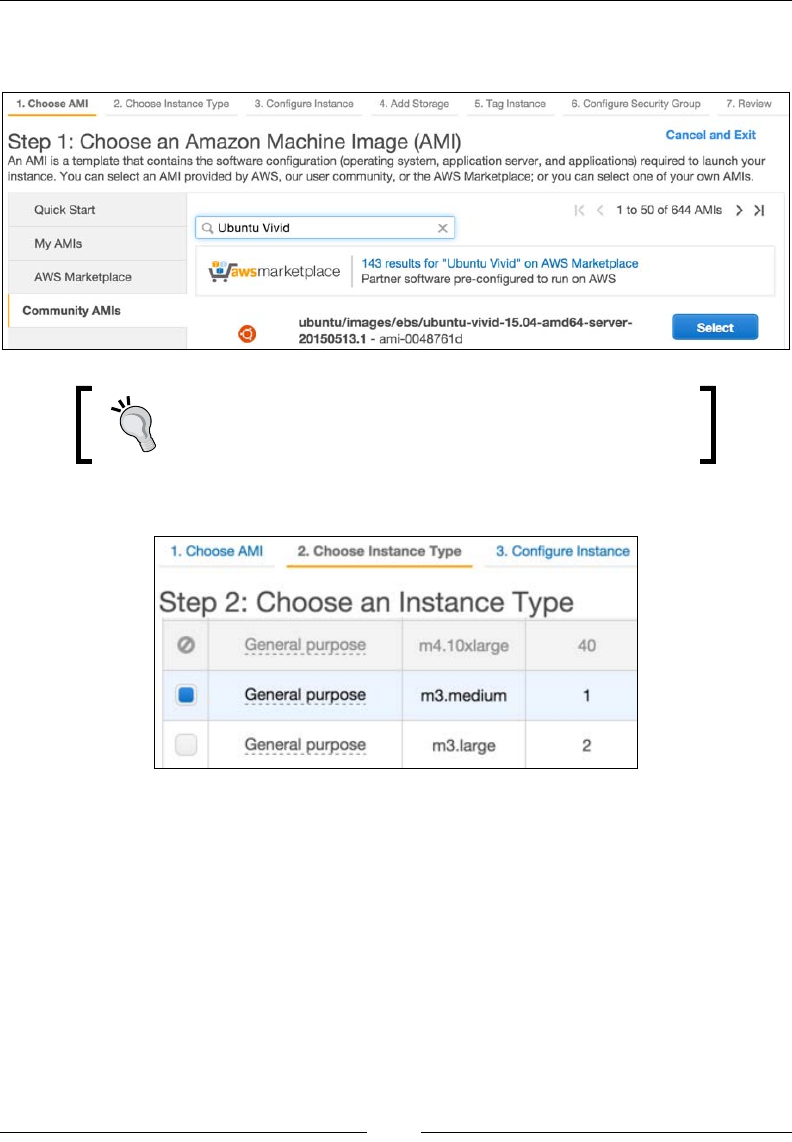
4. Click on the Community AMIs tab to the left, and type in Ubuntu Vivid into
the search eld, as shown in the following screenshot:
The Ubuntu 15.x (Vivid Vervet) server by default supports
MySQL 5.6.x and PHP 5.6.x, which makes it a good
candidate for Magento installation.
We should now see a screen like the following:
5. Choose an instance type and click the Next: Congure Instance Details
button. We should now see a screen like the following:
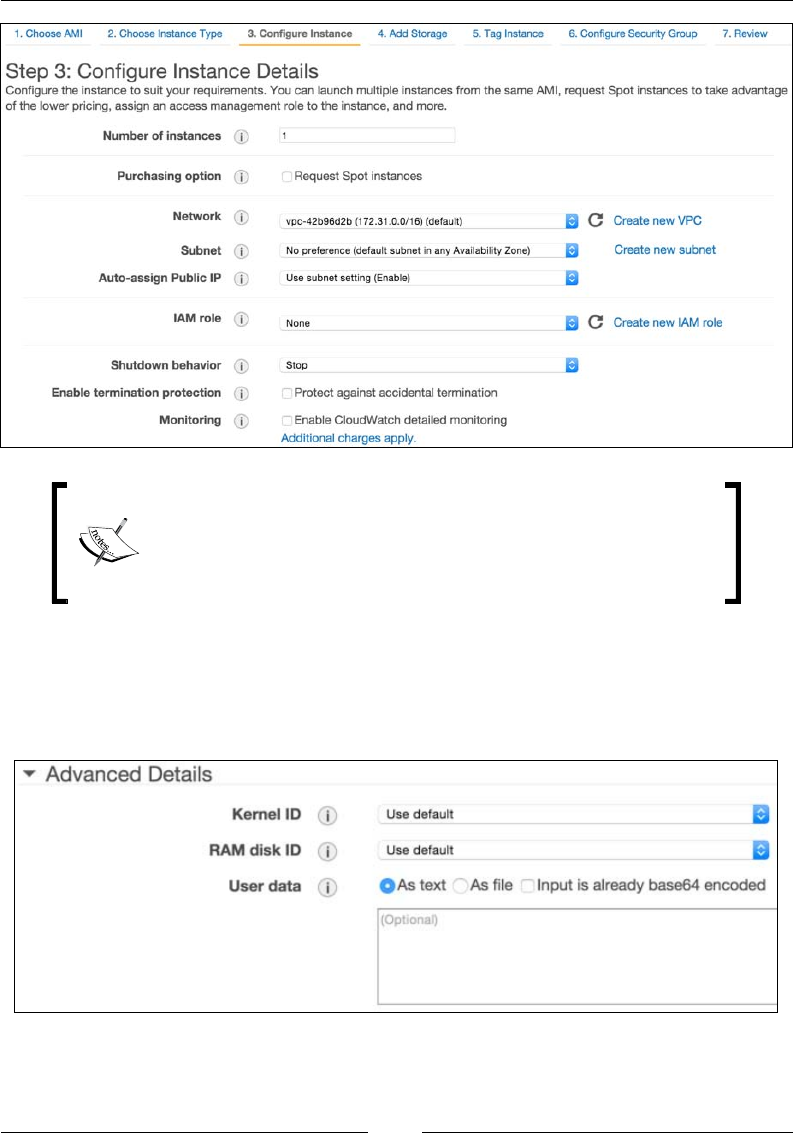
Chapter 2
[ 37 ]
We won't be getting into the details of each of these options.
Suffice to say that if we are working on smaller production
sites, chances are we can leave most of these options with their
default values.
6. Make sure Shutdown behavior is set to Stop.
7. While still on the Step 3: Congure Instance Details screen, scroll down to
the bottom Advanced Details area and expand it. We should see a screen like
the following:
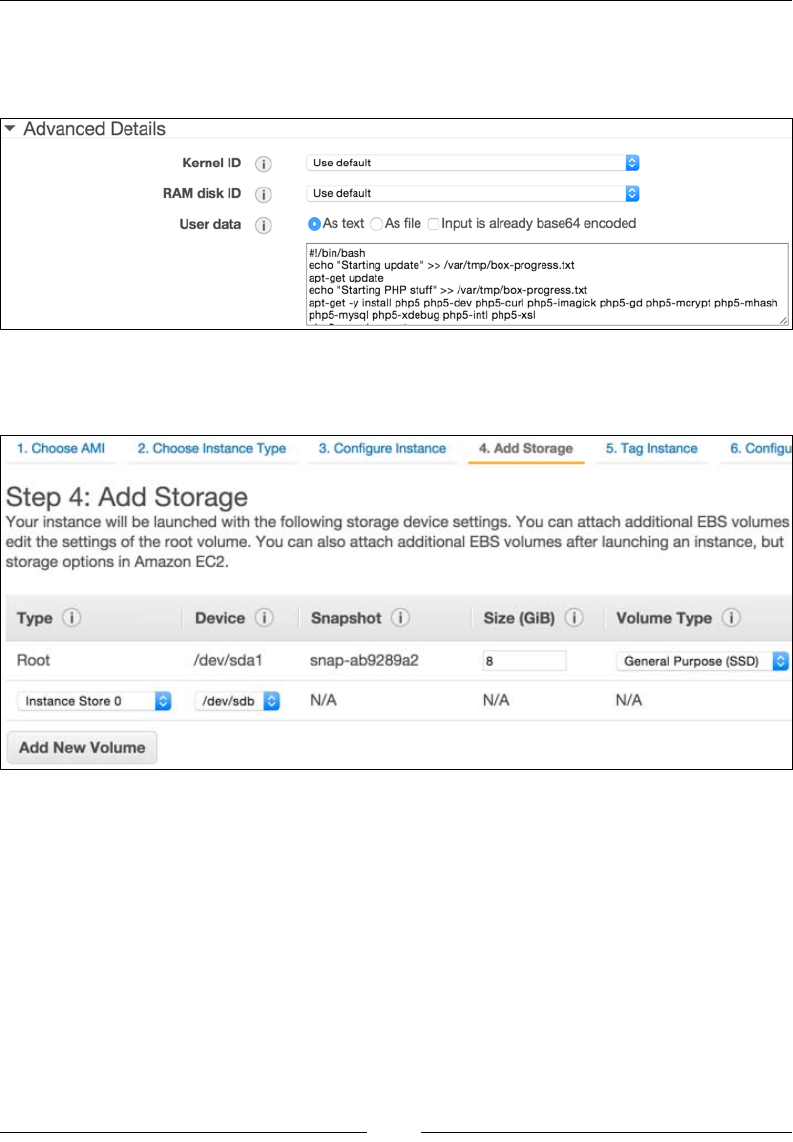
Managing the Environment
[ 38 ]
8. The User Data input is where we will copy and paste the auto-setup
bash script described in the previous section, as shown in the following
screenshot:
9. Once we copy and paste in the User Data, click on the Next: Add Storage
button. This should bring up the screen as shown in the following screenshot:
10. Within Step 4: Add Storage, we can select one or more volumes to attach to
our EC2 instance. Preferably, we should select the SSD type of storage for
faster performance. Once the volume is set, click on Next: Tag Instance.
We should now see a screen like the following:
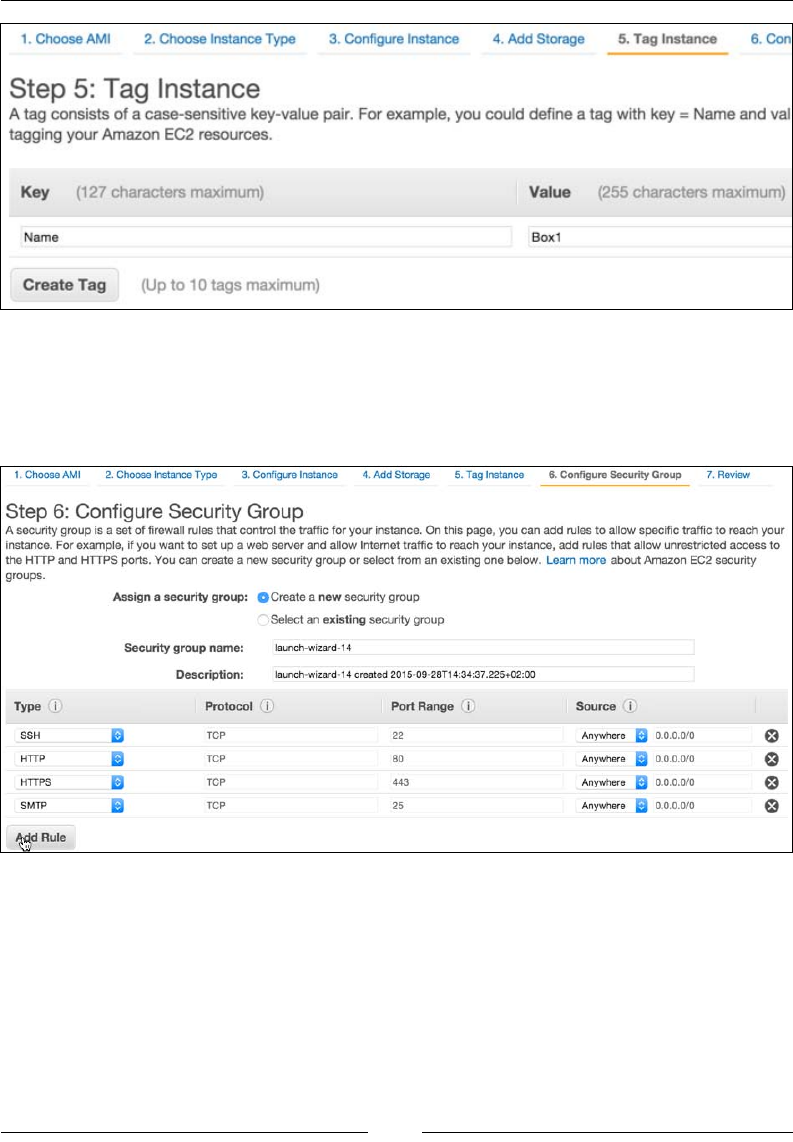
Chapter 2
[ 39 ]
11. The Tag Instance screen allows us to assign tags. Tags enable us to categorize
our AWS resource by purpose, owner, environment, or some other way.
Once we have assigned one or more tags, we click on the Next: Congure
Security Group button. We should now see a screen like the following:
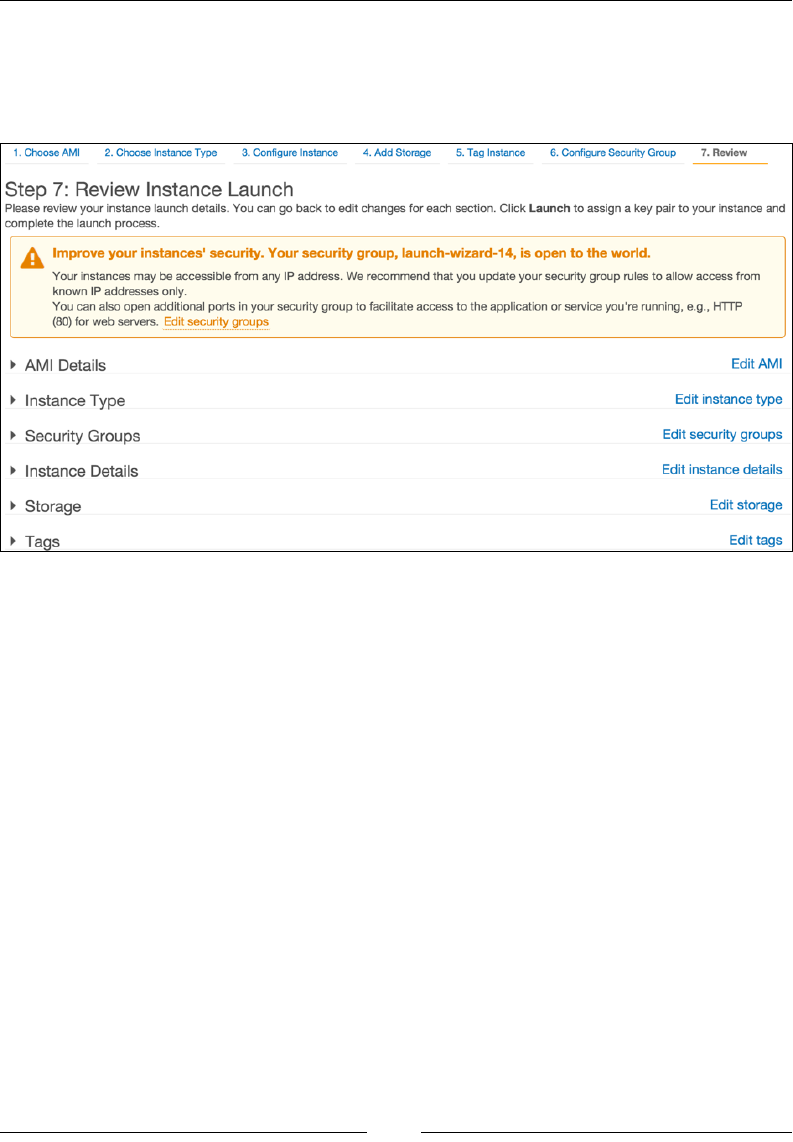
Managing the Environment
[ 40 ]
12. The Congure Security Group screen allows us to set rules for inbound and
outbound trafc. We want to be able to access SSH, HTTP, HTTPs, and SMTP
services on the box. Once we add the rules we want, click on the Review and
Launch button. This opens a screen like the following:
13. The Review Instance Launch screen is where we can view the summary of
the box we congured up to this point. If needed, we can go back and edit
individual settings. Once we are satised with the summary, we click on the
Launch button. This opens a popup like the following:
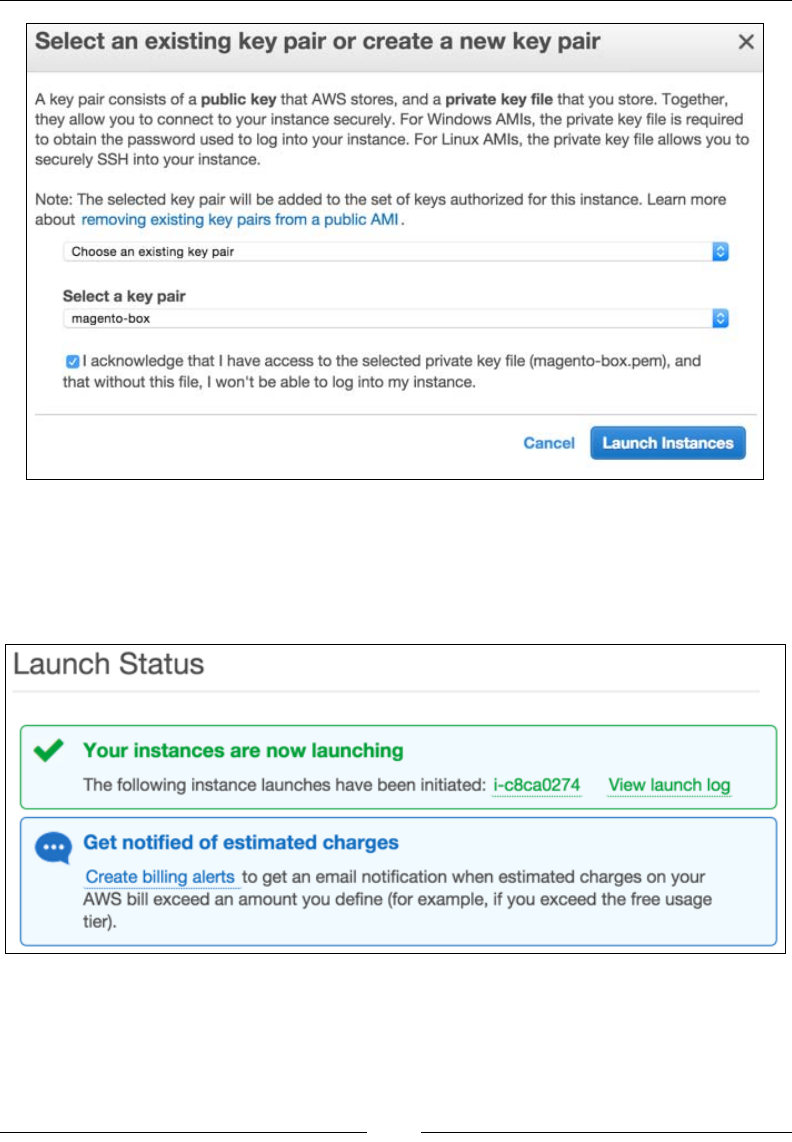
Chapter 2
[ 41 ]
14. Here, we get to choose an existing security key, or create a new one. Keys
are provided in PEM format. Once we select the key, we click on the Launch
Instance button.
We should now see the Launch Status screen like the following:
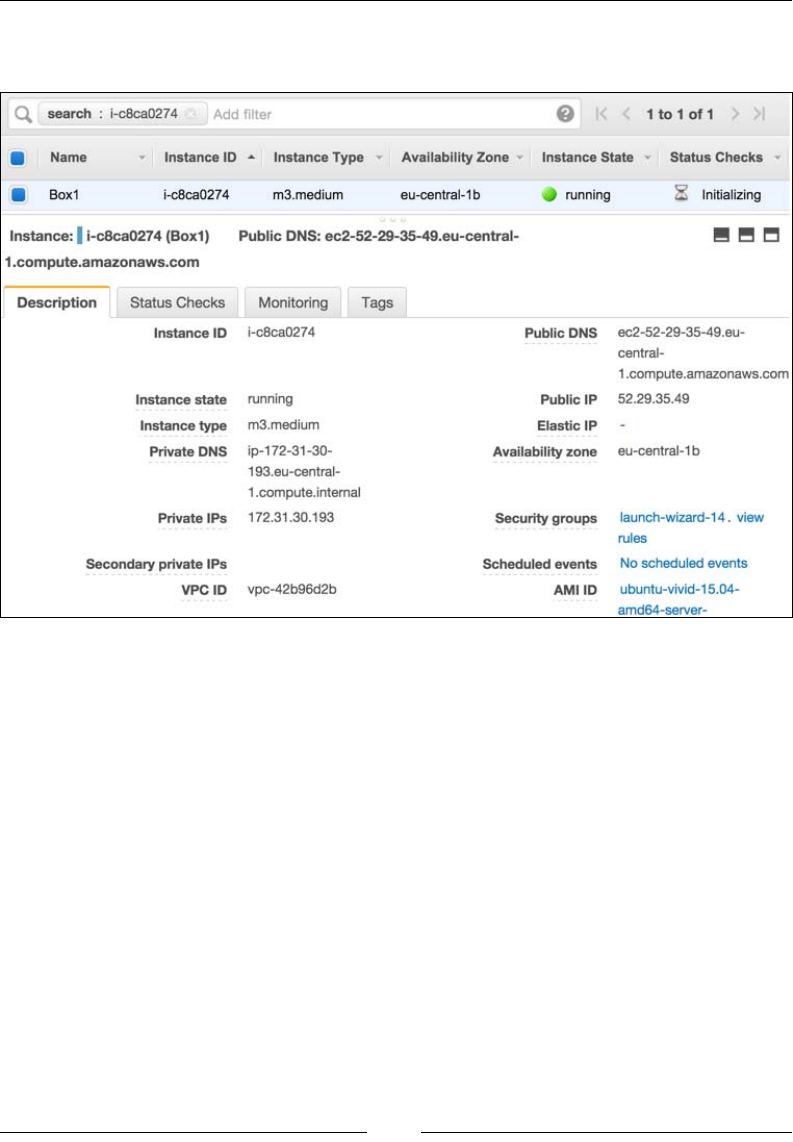
Managing the Environment
[ 42 ]
15. Clicking on the instance name link should throw us back at the EC2
Dashboard like shown in the following screenshot:
With regard to the preceding image, we should now be able to connect to our EC2
box with either one of the following console commands:
ssh -i /path/to/magento-box.pem ubuntu@ec2-52-29-35-49.eu-central-1.
compute.amazonaws.com
ssh -i /path/to/magento-box.pem ubuntu@52.29.35.49
It might take some time for our EC2 box to execute all of the shell commands passed
to it. We can conveniently SSH into the box and then execute the following command
to get an overview of current progress:
sudo tail -f /var/tmp/box-progress.txt
With this, we conclude our instance launch process.
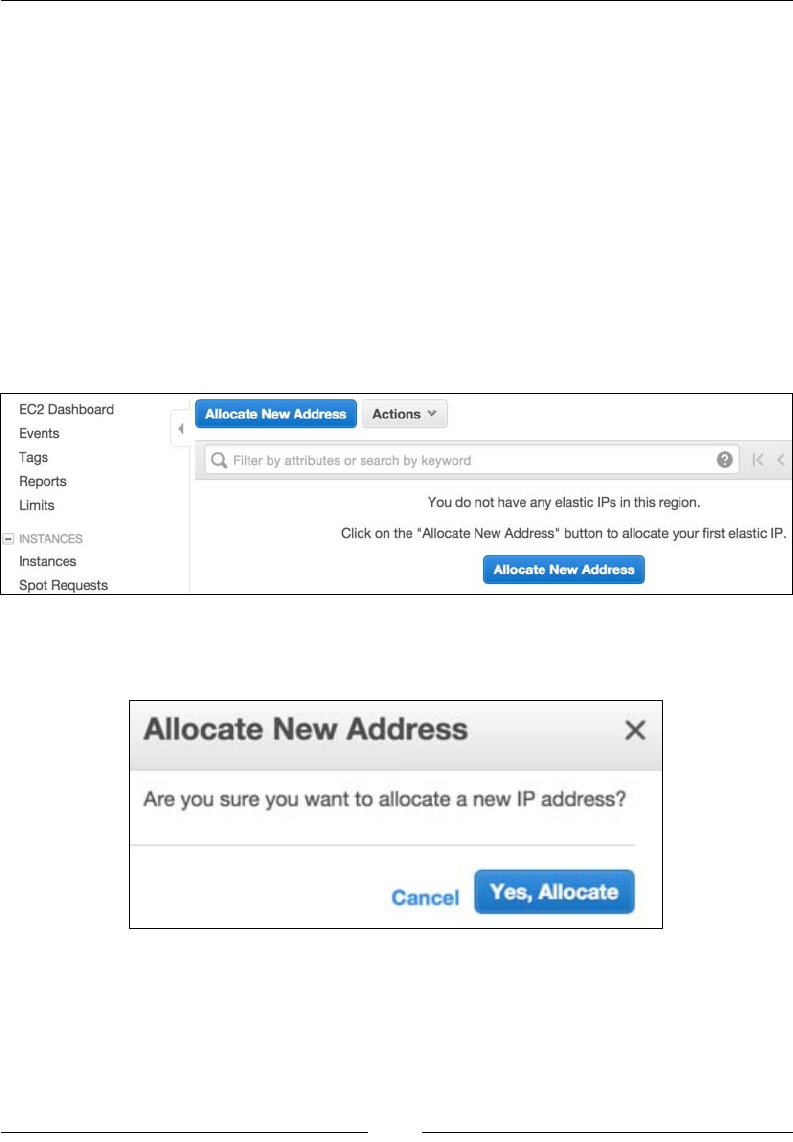
Chapter 2
[ 43 ]
Setting up Elastic IP and DNS
Now that we have an EC2 box in place, let's go ahead and create the so-called Elastic
IP for it. The Elastic IP address is a static IP address designed for dynamic cloud
computing. It is tied to the AWS account, and not some specic instance. This makes
it convenient to easily re-map it from one instance to another.
Let's go ahead and create an Elastic IP as follows:
1. Log in to the AWS console.
2. Under the Compute group, click on EC2, which should get us to the
EC2 Dashboard.
3. Under the EC2 Dashboard, in the left area under Network and Security
grouping, click on Elastic IPs. This should open a screen like the following:
4. Click on the Allocate New Address button, which should open a popup like
the following:
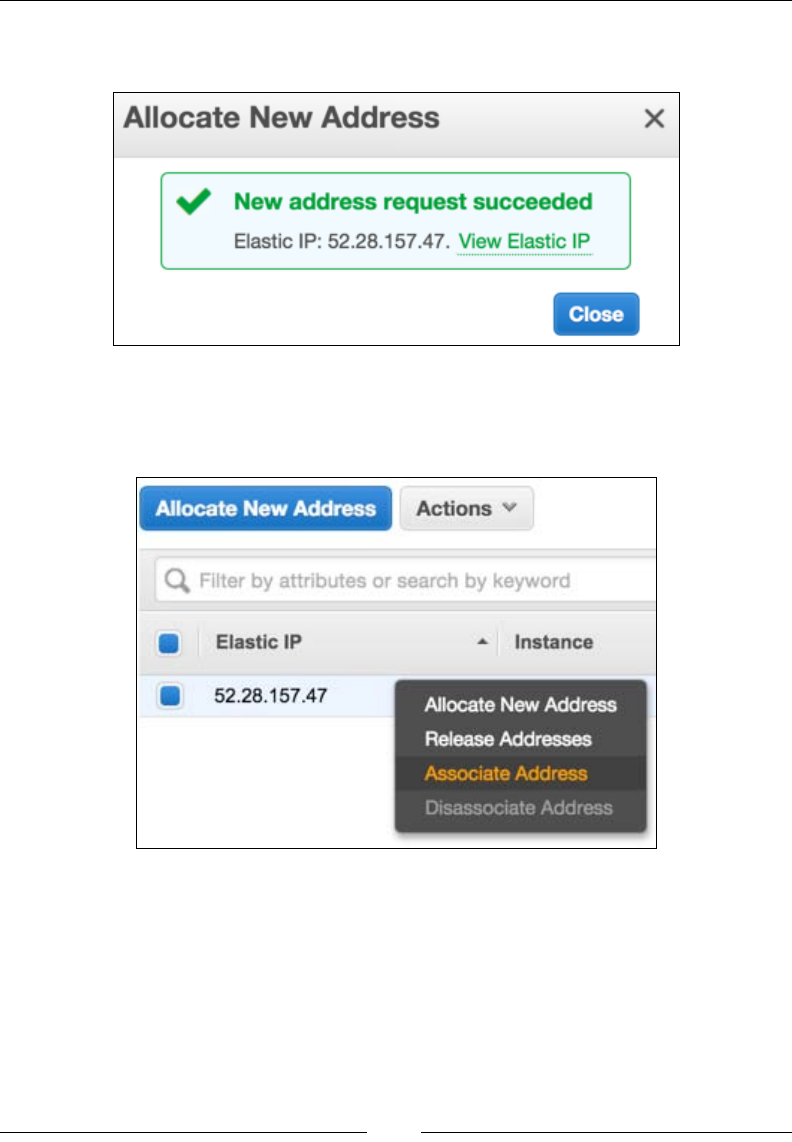
Managing the Environment
[ 44 ]
5. Click on the Yes, Allocate button, which should open another popup like
the following:
6. Now that the Elastic IP address is created, right-clicking on it within
the table listing should bring up the options menu as shown in the
following screenshot:
7. Click on the Associate Address link. This should open a popup like
the following:
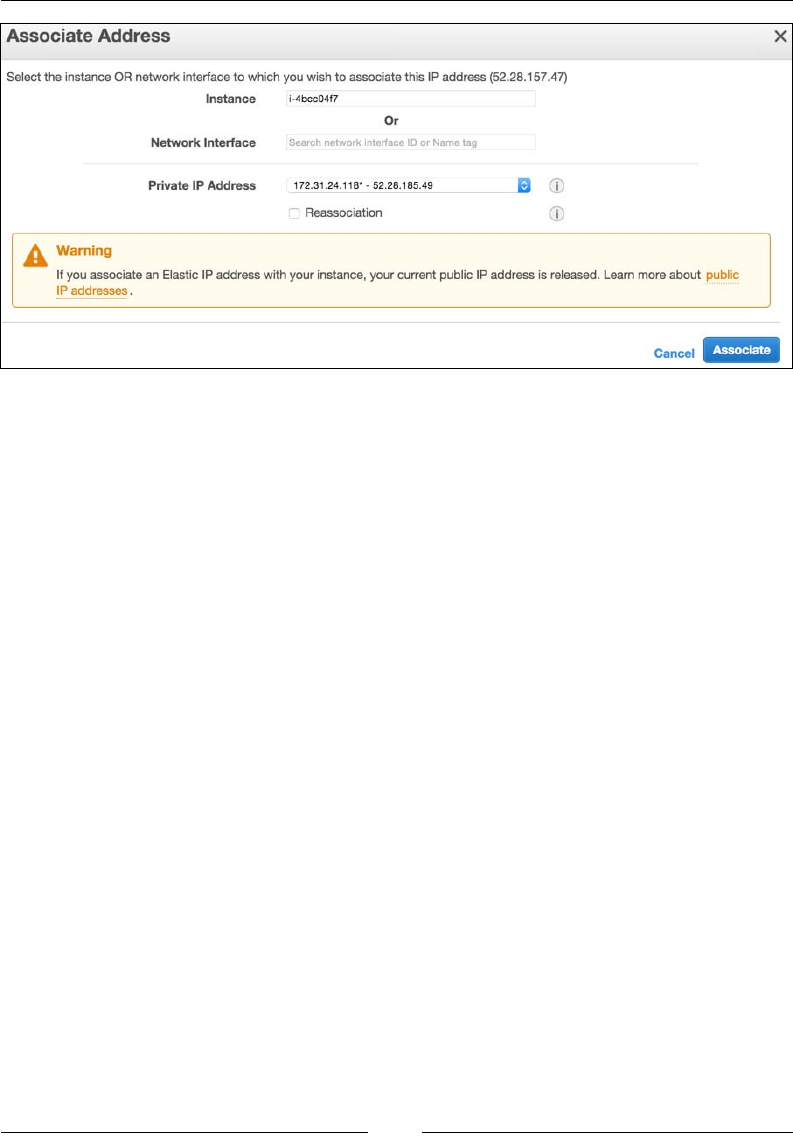
Chapter 2
[ 45 ]
8. On the Associate Address popup, we select the Instance to which we want
to assign the Elastic IP address and click on the Associate button.
At this point, our EC2 box has a static (Elastic IP) address assigned. We can now
log in to our domain registrar and point the A-record of our DNS to the Elastic
IP we just created.
Until we wait for the DNS change to kick in, there is one more thing we need to
address. We need to SSH into our box and execute the following set of commands:
mysql -uroot -pRrkSBi6VDg6C -e "USE magento; UPDATE core_config_data
SET value = 'http://our-domain.something/' WHERE path LIKE
"%web/unsecure/base_url%";"
php /var/www/html/bin/magento cache:flush
This will update the Magento URL, so we can access it via a web browser once the
DNS change kicks in. With a little bit of upfront planning, we could have easily made
this bit a part of the user data for our EC2 instance, simply by providing the right
--base-url parameter value in the rst place.

Managing the Environment
[ 46 ]
Summary
Throughout this chapter, we focused on two main things: setting up development
and production environments.
As part of the development environment, we embraced free software such as
VirtualBox and Vagrant to manage our environment setup. The setup alone came
down to a single Vagrantfile script that contained the necessary set of commands
to install everything from the Ubuntu server, PHP, Apache, MySQL, and even
Magento itself. We should by no means look at this script as nal and only as a
valid script to set up our development environment. Investing time in making the
development environment closer to the project-specic requirements pays off in
terms of team productivity.
We then moved on to the production environment. Here, we looked into Amazon
Web Services, utilizing S3 and EC2 along the way. The production environment also
came with its own scripted installation process that sets most of the things. Similarly,
this script is by no means nal and is only a valid way to set things up; it's more of a
base example of how to do it.
In the next chapter, we will take a closer look at some of programming concepts
and conventions.

[ 47 ]
Programming Concepts and
Conventions
With years of experience, the Magento platform grew up to implement a lot of
industry concepts, standards, and conventions. Throughout this chapter, we
will look into several of these independent sections that stand out in day-to-day
interactions with Magento development.
We will go through the following sections in this chapter:
• Composer
• Service contracts
• Code generation
• The var directory
• Coding standards
Composer
Composer is a tool that handles dependency management in PHP. It is not a package
manager like Yum and Apt on Linux systems are. Though it deals with libraries
(packages), it does so on a per-project level. It does not install anything globally.
Composer is a multiplatform tool. Therefore, it runs equally well on Windows,
Linux, and OS X.
Installing Composer on a machine is as simple as running the installer in the project
directory by using the following command:
curl -sS https://getcomposer.org/installer | php

Programming Concepts and Conventions
[ 48 ]
More information about the installation of Composer can be found on its ofcial
website, which can be viewed by visiting https://getcomposer.org.
Composer is used to fetch Magento and the third-party components that it uses.
As seen in the previous chapter, the following composer command is what pulls
everything into the specied directory:
composer create-project --repository-url=https://repo.magento.com/
magento/project-enterprise-edition <installation directory name>
Once Magento is downloaded and installed, there are numerous composer.json
les that can be found in its directory. Assuming <installation directory name>
is magento2, if we were to do a quick search executing command such as nd
magento2/ -name 'composer.json', that would yield over 100 composer.json
les. Some of these les are (partially) listed here:
/vendor/magento/module-catalog/composer.json
/vendor/magento/module-cms/composer.json
/vendor/magento/module-contact/composer.json
/vendor/magento/module-customer/composer.json
/vendor/magento/module-sales/composer.json
/...
/vendor/magento/theme-adminhtml-backend/composer.json
/vendor/magento/theme-frontend-blank/composer.json
/vendor/magento/theme-frontend-luma/composer.json
/vendor/magento/language-de_de/composer.json
/vendor/magento/language-en_us/composer.json
/...
/composer.json
/dev/tests/...
/vendor/magento/framework/composer.json
The most relevant le is probably the composer.json le in the root of the magento
directory. Its content appears like this:
{
"name": "magento/project-community-edition",
"description": "eCommerce Platform for Growth (Community
Edition)",
"type": "project",
"version": "2.0.0",
"license": [
"OSL-3.0",
"AFL-3.0"
],
"repositories": [

Chapter 3
[ 49 ]
{
"type": "composer",
"url": "https://repo.magento.com/"
}
],
"require": {
"magento/product-community-edition": "2.0.0",
"composer/composer": "@alpha",
"magento/module-bundle-sample-data": "100.0.*",
"magento/module-widget-sample-data": "100.0.*",
"magento/module-theme-sample-data": "100.0.*",
"magento/module-catalog-sample-data": "100.0.*",
"magento/module-customer-sample-data": "100.0.*",
"magento/module-cms-sample-data": "100.0.*",
"magento/module-catalog-rule-sample-data": "100.0.*",
"magento/module-sales-rule-sample-data": "100.0.*",
"magento/module-review-sample-data": "100.0.*",
"magento/module-tax-sample-data": "100.0.*",
"magento/module-sales-sample-data": "100.0.*",
"magento/module-grouped-product-sample-data": "100.0.*",
"magento/module-downloadable-sample-data": "100.0.*",
"magento/module-msrp-sample-data": "100.0.*",
"magento/module-configurable-sample-data": "100.0.*",
"magento/module-product-links-sample-data": "100.0.*",
"magento/module-wishlist-sample-data": "100.0.*",
"magento/module-swatches-sample-data": "100.0.*",
"magento/sample-data-media": "100.0.*",
"magento/module-offline-shipping-sample-data": "100.0.*"
},
"require-dev": {
"phpunit/phpunit": "4.1.0",
"squizlabs/php_codesniffer": "1.5.3",
"phpmd/phpmd": "@stable",
"pdepend/pdepend": "2.0.6",
"sjparkinson/static-review": "~4.1",
"fabpot/php-cs-fixer": "~1.2",
"lusitanian/oauth": "~0.3 <=0.7.0"
},
"config": {
"use-include-path": true
},
"autoload": {
"psr-4": {

Programming Concepts and Conventions
[ 50 ]
"Magento\\Framework\\":
"lib/internal/Magento/Framework/",
"Magento\\Setup\\": "setup/src/Magento/Setup/",
"Magento\\": "app/code/Magento/"
},
"psr-0": {
"": "app/code/"
},
"files": [
"app/etc/NonComposerComponentRegistration.php"
]
},
"autoload-dev": {
"psr-4": {
"Magento\\Sniffs\\":
"dev/tests/static/framework/Magento/Sniffs/",
"Magento\\Tools\\": "dev/tools/Magento/Tools/",
"Magento\\Tools\\Sanity\\":
"dev/build/publication/sanity/
Magento/Tools/Sanity/",
"Magento\\TestFramework\\Inspection\\":
"dev/tests/static/framework/Magento/
TestFramework/Inspection/",
"Magento\\TestFramework\\Utility\\":
"dev/tests/static/framework/Magento/
TestFramework/Utility/"
}
},
"minimum-stability": "alpha",
"prefer-stable": true,
"extra": {
"magento-force": "override"
}
}
Composer's JSON le follows a certain schema. You will nd a detailed
documentation of this schema at https://getcomposer.org/doc/04-schema.md.
Applying to the schema ensures validity of the composer le. We can see that all the
listed keys such as name, description, require, config, and so on, are dened by
the schema.

Chapter 3
[ 51 ]
Let's take a look at the individual module's composer.json le. One of the simpler
modules with the least amount of dependencies is the Contact module with its
vendor/magento/module-contact/composer.json content, which looks like this:
{
"name": "magento/module-contact",
"description": "N/A",
"require": {
"php": "~5.5.0|~5.6.0|~7.0.0",
"magento/module-config": "100.0.*",
"magento/module-store": "100.0.*",
"magento/module-backend": "100.0.*",
"magento/module-customer": "100.0.*",
"magento/module-cms": "100.0.*",
"magento/framework": "100.0.*"
},
"type": "magento2-module",
"version": "100.0.2",
"license": [
"OSL-3.0",
"AFL-3.0"
],
"autoload": {
"files": [
"registration.php"
],
"psr-4": {
"Magento\\Contact\\": ""
}
}
}
You will see that the modules dene dependencies on the PHP version and other
modules. Furthermore, you will see the use of PSR-4 for autoloading and the direct
loading of the registration.php le.
Next, let's take a look at the contents of vendor/magento/language-en_us/
composer.json from the en_us language module:
{
"name": "magento/language-en_us",
"description": "English (United States) language",
"version": "100.0.2",
"license": [
"OSL-3.0",

Programming Concepts and Conventions
[ 52 ]
"AFL-3.0"
],
"require": {
"magento/framework": "100.0.*"
},
"type": "magento2-language",
"autoload": {
"files": [
"registration.php"
]
}
}
Finally, let's take a look at the contents of vendor/magento/theme-frontend-luma/
composer.json from the luma theme:
{
"name": "magento/theme-frontend-luma",
"description": "N/A",
"require": {
"php": "~5.5.0|~5.6.0|~7.0.0",
"magento/theme-frontend-blank": "100.0.*",
"magento/framework": "100.0.*"
},
"type": "magento2-theme",
"version": "100.0.2",
"license": [
"OSL-3.0",
"AFL-3.0"
],
"autoload": {
"files": [
"registration.php"
]
}
}
As mentioned previously, there are a lot more composer les scattered
around Magento.
Service contracts
A service contract is a set of PHP interfaces that is dened by a module. This contract
comprises data interfaces and service interfaces.

Chapter 3
[ 53 ]
The role of the data interface is to preserve data integrity, while the role of the service
interface is to hide the business logic details from service consumers.
Data interfaces dene various functions, such as validation, entity information,
search related functions, and so on. They are dened within the Api/Data directory
of an individual module. To better understand the actual meaning of it, let's take a
look at the data interfaces for the Magento_Cms module. In the vendor/magento/
module-cms/Api/Data/ directory, there are four interfaces dened, as follows:
BlockInterface.php
BlockSearchResultsInterface.php
PageInterface.php
PageSearchResultsInterface.php
The CMS module actually deals with two entities, one being Block and the other one
being Page. Looking at the interfaces dened in the preceding code, we can see that
we have separate data interface for the entity itself and separate data interface for
search results.
Let's take a closer look at the (stripped) contents of the BlockInterface.php le,
which is dened as follows:
namespace Magento\Cms\Api\Data;
interface BlockInterface
{
const BLOCK_ID = 'block_id';
const IDENTIFIER = 'identifier';
const TITLE = 'title';
const CONTENT = 'content';
const CREATION_TIME = 'creation_time';
const UPDATE_TIME = 'update_time';
const IS_ACTIVE = 'is_active';
public function getId();
public function getIdentifier();
public function getTitle();
public function getContent();
public function getCreationTime();
public function getUpdateTime();
public function isActive();
public function setId($id);
public function setIdentifier($identifier);
public function setTitle($title);
public function setContent($content);

Programming Concepts and Conventions
[ 54 ]
public function setCreationTime($creationTime);
public function setUpdateTime($updateTime);
public function setIsActive($isActive);
}
The preceding interface denes all the getter and setter methods for the entity at
hand along with the constant values that denote entity eld names. These data
interfaces do not include management actions, such as delete. The implementation
of this specic interface can be seen in the vendor/magento/module-cms/Model/
Block.php le, where these constants come to use, as follows (partially):
public function getTitle()
{
return $this->getData(self::TITLE);
}
public function setTitle($title)
{
return $this->setData(self::TITLE, $title);
}
Service interfaces are the ones that include management, repository, and metadata
interfaces. These interfaces are dened directly within the module's Api directory.
Looking back at the Magento Cms module, its vendor/magento/module-cms/Api/
directory has two service interfaces, which are dened as follows:
BlockRepositoryInterface.php
PageRepositoryInterface.php
A quick look into the contents of BlockRepositoryInterface.php reveals the
following (partial) content:
namespace Magento\Cms\Api;
use Magento\Framework\Api\SearchCriteriaInterface;
interface BlockRepositoryInterface
{
public function save(Data\BlockInterface $block);
public function getById($blockId);
public function getList(SearchCriteriaInterface
$searchCriteria);
public function delete(Data\BlockInterface $block);
public function deleteById($blockId);
}

Chapter 3
[ 55 ]
Here, we see methods that are used to save, fetch, search, and delete the entity.
These interfaces are then implemented via the Web API denitions, as we will see
later in Chapter 9, The Web API. The result is well-dened and durable API's that
other modules and third-party integrators can consume.
Code generation
One of the neat features of the Magento application is code generation. Code
generation, as implied by its name, generates nonexistent classes. These classes
are generated in Magento's var/generation directory.
The directory structure within var/generation is somewhat similar to that of the
core vendor/magento/module-* and app/code directories. To be more precise, it
follows the module structure. The code is generated for something that is called
Factory, Proxy, and Interceptor classes.
The Factory class creates an instance of a type. For example, a var/generation/
Magento/Catalog/Model/ProductFactory.php le with a Magento\Catalog\
Model\ProductFactory class has been created because somewhere within the
vendor/magento directory and its code, there is a call to the Magento\Catalog\
Model\ProductFactory class, which originally does not exist in Magento. During
runtime, when {someClassName}Factory is called in the code, Magento creates a
Factory class under the var/generation directory if it does not exist. The following
code is an example of the (partial) ProductFactory class:
namespace Magento\Catalog\Model;
/**
* Factory class for @see \Magento\Catalog\Model\Product
*/
class ProductFactory
{
//...
/**
* Create class instance with specified parameters
*
* @param array $data
* @return \Magento\Catalog\Model\Product
*/
public function create(array $data = array())
{

Programming Concepts and Conventions
[ 56 ]
return $this->_objectManager->create($this->_instanceName,
$data);
}
}
Note the create method that creates and returns the Product type instance. Also,
note how the generated code is type safe providing @return annotation for integrated
development environments (IDEs) to support the autocomplete functionality.
Factories are used to isolate an object manager from the business code. Factories can
be dependent on the object manager, unlike business objects.
The Proxy class is a wrapper for some base class. Proxy classes provide better
performance than the base classes because they can be instantiated without
instantiating a base class. A base class is instantiated only when one of its methods
is called. This is highly convenient for cases where the base class is used as a
dependency, but it takes a lot of time to instantiate, and its methods are used
only during some paths of execution.
Like Factory, the Proxy classes are also generated under the var/generation
directory.
If we were to take a look at the var/generation/Magento/Catalog/Model/
Session/Proxy.php le that contains the Magento\Catalog\Model\Session\Proxy
class, we would see that it actually extends \Magento\Catalog\Model\Session. The
wrapping Proxy class implements several magical methods along the way, such as
__sleep, __wakeup, __clone, and __call.
Interceptor is yet another class type that gets autogenerated by Magento. It is related
to the plugins feature, which will be discussed in detail later in Chapter 6, Plugins.
In order to trigger code regeneration, we can use the code compiler that is
available on the console. We can run either the single-tenant compiler or the
multi-tenant compiler.
The single-tenant implies one website and store, and it is executed by using the
following command:
magento setup:di:compile
The multi-tenant implies more than one independent Magento application, and it is
executed by using following command.
magento setup:di:compile-multi-tenant

Chapter 3
[ 57 ]
Code compilation generates factories, proxies, interceptors, and several other classes,
as listed in the setup/src/Magento/Setup/Module/Di/App/Task/Operation/
directory.
The var directory
Magento does a lot of caching and autogeneration of certain class types. These caches
and generated classes are all located in Magento's root var directory. The usual
contents of the var directory is as follows:
cache
composer_home
generation
log
di
view_preprocessed
page_cache
During development, we will most likely need to periodically clear these so that our
changes can kick in.
We can issue the console command as follows to clear individual directories:
rm -rf {Magento root dir}/var/generation/*
Alternatively, we can use the built-in bin/magento console tool to trigger commands
that will delete the proper directories for us, as follows:
• bin/magento setup:upgrade: This updates the Magento database schema
and data. While doing this, it truncates the var/di and var/generation
directories.
• bin/magento setup:di:compile: This clears the var/generation
directory. After doing this, it compiles the code in it again.
• bin/magento deploy:mode:set {mode}: This changes the mode from the
developer mode to the production mode and vice versa. While doing this,
it truncates the var/di, var/generation, and var/view_preprocessed
directories.
• bin/magento cache:clean {type}: This cleans the var/cache and var/
page_cache directories.
It is important to keep the var directory in mind at all times during development.
Otherwise, the code might encounter exceptions and function improperly.

Programming Concepts and Conventions
[ 58 ]
Coding standards
Coding standards are a result of conventions designed to produce high-quality
code. Adopting certain standards yields better code quality, reduces the time taken
to develop, and minimizes maintenance cost. Following coding standards requires
knowing the standards in question and meticulously applying it to every aspect of
the code that we write.
There are several coding standards that Magento abides by, such as the
following ones:
• The code demarcation standard
• The PHP coding standard
• The JavaScript coding standard
• The jQuery widget coding standard
• The DocBlock standard
• JavaScript DocBlock standard
• The LESS coding standard
The code demarcation standard speaks of decoupling HTML, CSS, and JS from PHP
classes. By doing so, the backend-related development stays unaffected by frontend
development and vice versa. This means that we can make business logic changes
without fearing a broken frontend.
The PHP coding standard refers to PSR-1: Basic Coding Standard and PSR-2:
Coding Style Guide that are described at http://www.php-fig.org. PSR-1 touches
on PHP lenames, class names, namespaces, class constant, properties, and methods.
PSR-2 extends the PSR-1 by touching upon the actual inners of a class, such as
spaces, braces, method and properties visibility, control structures, and so on.
The JavaScript coding standard is based on the Google JavaScript Style Guide found
at https://google.github.io/styleguide/javascriptguide.xml. This coding
standard touches on the JavaScript language and coding style rules. It is a lot like
PSR-1 and PSR-2 for PHP.
The jQuery widget coding standard is agged as mandatory for Magento core
developers and recommended for third-party developers. It goes without saying
how important jQuery UI widgets are in Magento. The standard describes several
things, such as widget naming, instantiation, extension, DOM event bubbling,
and so on.
Chapter 3
[ 59 ]
The DocBlock standard touches on the requirements and conventions for the
addition of inline code documentation. The idea is to unify the usage of code
DocBlocks for all les regardless of the programming language in use. However,
a DocBlock standard for that particular language may override it.
The JavaScript DocBlock standard relates to the JavaScript code les and their inline
documentation. It is a subset of Google JavaScript Style Guide and JSDoc, which can
be found at http://usejsdoc.org.
The LESS coding standard denes the formatting and coding style when working
with LESS and CSS les.
You can read more about the actual details of each standard at
http://devdocs.magento.com, as they are too extensive to be
covered in this book.
Summary
In this chapter, we took a look at Composer, which is one of the rst things that we
will interact with when installing Magento. We then moved on to service contracts
as one of the strongest Magento architectural parts, which turned out to be good
old PHP interfaces in use. Further, we covered some bits about the Magento code
generation feature. Thus, we have a basic knowledge of the Factory and Proxy
classes. We then had a look at the var directory and explored its role, especially
during development. Finally, we touched upon the coding standards used
in Magento.
In the next chapter, we will discuss the dependency injection, which is one of the
most important architectural parts of Magento.

[ 61 ]
Models and Collections
Like most modern frameworks and platforms, these days Magento embraces an
Object Relational Mapping (ORM) approach over raw SQL queries. Though
the underlying mechanism still comes down to SQL, we are now dealing strictly
with objects. This makes our application code more readable, manageable, and
isolated from vendor-specic SQL differences. Model, resource, and collection are
three types of classes working together to allow us full entity data management,
from loading, saving, deleting, and listing entities. The majority of our data access
and management will be done via PHP classes called Magento models. Models
themselves don't contain any code for communicating with the database.
The database communication part is decoupled into its own PHP class called
resource class. Each model is then assigned a resource class. Calling load, save, or
delete methods on models get delegated to resource classes, as they are the ones to
actually read, write, and delete data from the database. Theoretically, with enough
knowledge, it is possible to write new resource classes for various database vendors.
Next to the model and resource classes, we have collection classes. We can think of
a collection as an array of individual model instances. On a base level, collections
extend from the \Magento\Framework\Data\Collection class, which implements
\IteratorAggregate and \Countable from Standard PHP Library (SPL) and a few
other Magento-specic classes.
More often than not, we look at model and resource as a single unied thing, thus
simply calling it a model. Magento deals with two types of models, which we might
categorize as simple and EAV models.

Models and Collections
[ 62 ]
In this chapter, we will cover the following topics:
• Creating a miniature module
• Creating a simple model
• The EAV model
• Understanding the flow of schema and data scripts
• Creating an install schema script (InstallSchema.php)
• Creating an upgrade schema script (UpgradeSchema.php)
• Creating an install data script (InstallData.php)
• Creating an upgrade data script (UpgradeData.php)
• Entity CRUD actions
• Managing collections
Creating a miniature module
For the purpose of this chapter, we will create a miniature module called
Foggyline_Office.
The module will have two entities dened as follows:
• Department: a simple model with the following fields:
°entity_id: primary key
°name: name of department, string value
• Employee: an EAV model with the following fields and attributes:
°Fields:
°entity_id: primary key
°department_id: foreign key, pointing to
Department.entity_id
°email: unique e-mail of an employee, string value
°first_name: first name of an employee, string value
°last_name: last name of an employee, string value

Chapter 4
[ 63 ]
°Attributes:
°service_years: employee's years of service, integer value
°dob: employee's date of birth, date-time value
°salary – monthly salary, decimal value
°vat_number: VAT number, (short) string value
°note: possible note on employee, (long) string value
Every module starts with the registration.php and module.xml les. For the
purpose of our chapter module, let's create the app/code/Foggyline/Office/
registration.php le with content as follows:
<?php
\Magento\Framework\Component\ComponentRegistrar::register(
\Magento\Framework\Component\ComponentRegistrar::MODULE,
'Foggyline_Office',
__DIR__
);
The registration.php le is sort of an entry point to our module.
Now let's create the app/code/Foggyline/Office/etc/module.xml le with the
following content:
<config xmlns:xsi="http://www.w3.org/2001/XMLSchema-instance"
xsi:noNamespaceSchemaLocation="urn:magento:framework:Module/
etc/module.xsd">
<module name="Foggyline_Office" setup_version="1.0.0">
<sequence>
<module name="Magento_Eav"/>
</sequence>
</module>
</config>
We will get into more details about the structure of the module.xml le in later
chapters. Right now, we will only focus on the setup_version attribute and module
element within sequence.
The value of setup_version is important because we might use it within our
schema install script (InstallSchema.php) les, effectively turning the install
script into an update script, as we will show soon.
The sequence element is Magento's way of setting dependencies for our module.
Given that our module will make use of EAV entities, we list Magento_Eav as
a dependency.

Models and Collections
[ 64 ]
Creating a simple model
The Department entity, as per requirements, is modeled as a simple model.
We previously mentioned that whenever we talk about models, we implicitly
think of model class, resource class, and collection class forming one unit.
Let's start by rst creating a model class, (partially) dened under the app/code/
Foggyline/Office/Model/Department.php le as follows:
namespace Foggyline\Office\Model;
class Department extends \Magento\Framework\Model\AbstractModel
{
protected function _construct()
{
$this-> _init('Foggyline\Office\Model
\ResourceModel\Department');
}
}
All that is happening here is that we are extending from the \Magento\Framework\
Model\AbstractModel class, and triggering the $this->_init method within _
construct passing it our resource class.
The AbstractModel further extends \Magento\Framework\Object. The fact that
our model class ultimately extends from Object means that we do not have to dene
a property name on our model class. What Object does for us is that it enables us
to get, set, unset, and check for a value existence on properties magically. To give a
more robust example than name, imagine our entity has a property called employee_
average_salary in the following code:
$department->getData('employee_average_salary');
$department->getEmployeeAverageSalary();
$department->setData('employee_average_salary', 'theValue');
$department->setEmployeeAverageSalary('theValue');
$department->unsetData('employee_average_salary');
$department->unsEmployeeAverageSalary();
$department->hasData('employee_average_salary');
$department->hasEmployeeAverageSalary();
Chapter 4
[ 65 ]
The reason why this works is due to Object implementing the setData,
unsetData, getData, and magic __call methods. The beauty of the
magic __call method implementation is that it understands method
calls like getEmployeeAverageSalary, setEmployeeAverageSalary,
unsEmployeeAverageSalary, and hasEmployeeAverageSalary even if they do not
exist on the Model class. However, if we choose to implement some of these methods
within our Model class, we are free to do so and Magento will pick it up when we
call it.
This is an important aspect of Magento, sometimes confusing to newcomers.
Once we have a model class in place, we create a model resource class, (partially)
dened under the app/code/Foggyline/Office/Model/ResourceModel/
Department.php le as follows:
namespace Foggyline\Office\Model\ResourceModel;
class Department extends \Magento\Framework\Model\ResourceModel\Db\
AbstractDb
{
protected function _construct()
{
$this->_init('foggyline_office_department', 'entity_id');
}
}
Our resource class that extends from \Magento\Framework\Model\ResourceModel\
Db\AbstractDb triggers the $this->_init method call within _construct. $this-
>_init accepts two parameters. The rst parameter is the table name foggyline_
office_department, where our model will persist its data. The second parameter is
the primary column name entity_id within that table.
AbstractDb further extends Magento\Framework\Model\ResourceModel\
AbstractResource.
The resource class is the key to communicating to the database. All it
takes is for us to name the table and its primary key and our models can
save, delete, and update entities.

Models and Collections
[ 66 ]
Finally, we create our collection class, (partially) dened under the app/code/
Foggyline/Office/Model/ResourceModel/Department/Collection.php le
as follows:
namespace Foggyline\Office\Model\ResourceModel\Department;
class Collection extends \Magento\Framework\Model\ResourceModel
\Db\Collection\AbstractCollection
{
protected function _construct()
{
$this->_init(
'Foggyline\Office\Model\Department',
'Foggyline\Office\Model\ResourceModel\Department'
);
}
}
The collection class extends from \Magento\Framework\Model\ResourceModel\
Db\Collection\AbstractCollection and, similar to the model and resource
classes, does a $this->_init method call within _construct. This time, _init
accepts two parameters. The rst parameter is the full model class name Foggyline\
Office\Model\Department, and the second parameter is the full resource class
name Foggyline\Office\Model\ResourceModel\Department.
AbstractCollection implements Magento\Framework\App\ResourceConnection\
SourceProviderInterface, and extends \Magento\Framework\Data\Collection\
AbstractDb. AbstractDb further extends \Magento\Framework\Data\Collection.
It is worth taking some time to study the inners of these collection classes, as this
is our go-to place for whenever we need to deal with fetching a list of entities that
match certain search criteria.
Creating an EAV model
The Employee entity, as per requirements, is modeled as an EAV model.
Let's start by rst creating an EAV model class, (partially) dened under the app/
code/Foggyline/Office/Model/Employee.php le as follows:
namespace Foggyline\Office\Model;
class Employee extends \Magento\Framework\Model\AbstractModel
{

Chapter 4
[ 67 ]
const ENTITY = 'foggyline_office_employee';
public function _construct()
{
$this-> _init('Foggyline\Office \Model
\ResourceModel\Employee');
}
}
Here, we are extending from the \Magento\Framework\Model\AbstractModel
class, which is the same as with the simple model previously described. The only
difference here is that we have an ENTITY constant dened, but this is merely
syntactical sugar for later on; it bears no meaning for the actual model class.
Next, we create an EAV model resource class, (partially) dened under the app/
code/Foggyline/Office/Model/ResourceModel/Employee.php le as follows:
namespace Foggyline\Office\Model\ResourceModel;
class Employee extends \Magento\Eav\Model\Entity\AbstractEntity
{
protected function _construct()
{
$this->_read = 'foggyline_office_employee_read';
$this->_write = 'foggyline_office_employee_write';
}
public function getEntityType()
{
if (empty($this->_type)) {
$this->setType(\Foggyline\Office\Model
\Employee::ENTITY);
}
return parent::getEntityType();
}
}
Our resource class extends from \Magento\Eav\Model\Entity\AbstractEntity,
and sets the $this->_read, $this->_write class properties through _construct.
These are freely assigned to whatever value we want, preferably following the
naming pattern of our module. The read and write connections need to be named or
else Magento produces an error when using our entities.

Models and Collections
[ 68 ]
The getEntityType method internally sets the _type value to \Foggyline\Office\
Model\Employee::ENTITY, which is the string foggyline_office_employee.
This same value is what's stored in the entity_type_code column within the eav_
entity_type table. At this point, there is no such entry in the eav_entity_type
table. This is because the install schema script will be creating one, as we will be
demonstrating soon.
Finally, we create our collection class, (partially) dened under the app/code/
Foggyline/Office/Model/ResourceModel/Employee/Collection.php le
as follows:
namespace Foggyline\Office\Model\ResourceModel\Employee;
class Collection extends \Magento\Eav\Model\Entity\Collection\
AbstractCollection
{
protected function _construct()
{
$this->_init('Foggyline\Office\Model\Employee',
'Foggyline\Office\Model\ResourceModel\Employee');
}
}
The collection class extends from \Magento\Eav\Model\Entity\Collection\
AbstractCollection and, similar to the model class, does a $this->_init method
call within _construct. _init accepts two parameters: the full model class name
Foggyline\Office\Model\Employee, and the full resource class name Foggyline\
Office\Model\ResourceModel\Employee.
AbstractCollection has the same parent tree as the simple model collection
class, but on its own it implements a lot of EAV collection-specic methods like
addAttributeToFilter, addAttributeToSelect, addAttributeToSort, and so on.
As we can see, EAV models look a lot like simple models. The
difference lies mostly in the resource class and collection class
implementations and their rst level parent classes. However, we need
to keep in mind that the example given here is the simplest one possible.
If we look at the eav_entity_type table in the database, we can
see that other entity types make use of attribute_model, entity_
attribute_collection, increment_model, and so on. These are
all advanced properties we can dene alongside our EAV model making
it closer to the implementation of the catalog_product entity type,
which is probably the most robust one in Magento. This type of advanced
EAV usage is out of the scope of this book as it is probably worth a book
on its own.

Chapter 4
[ 69 ]
Now that we have simple and EAV models in place, it is time to look into installing
the necessary database schema and possibly pre-ll it with some data. This is done
through schema and data scripts.
Understanding the ow of schema and
data scripts
Simply put, the role of the schema scripts is to create a database structure supporting
your module logic. For example, creating a table where our entities would persist
their data. The role of the data scripts is to manage the data within existing tables,
usually in the form of adding some sample data during module installation.
If we look a few steps back, we can notice how schema_version and data_version
from the database match the setup_version number from our module.xml le.
They all imply the same thing. If we were to now change the setup_version
number in our module.xml le and run the php bin/magento setup:upgrade
console command again, our database schema_version and data_version would
get updated to this new version number.
This is done through module's install and upgrade scripts. If we take a quick
look at the setup/src/Magento/Setup/Model/Installer.php le, we can see a
function, getSchemaDataHandler, with content as follows:
private function getSchemaDataHandler($moduleName, $type)
{
$className = str_replace('_', '\\', $moduleName) . '\Setup';
switch ($type) {
case 'schema-install':
$className .= '\InstallSchema';
$interface = self::SCHEMA_INSTALL;
break;
case 'schema-upgrade':
$className .= '\UpgradeSchema';
$interface = self::SCHEMA_UPGRADE;
break;
case 'schema-recurring':
$className .= '\Recurring';
$interface = self::SCHEMA_INSTALL;
break;
case 'data-install':
$className .= '\InstallData';
$interface = self::DATA_INSTALL;
break;
Models and Collections
[ 70 ]
case 'data-upgrade':
$className .= '\UpgradeData';
$interface = self::DATA_UPGRADE;
break;
default:
throw new \Magento\Setup\Exception("$className does
not exist");
}
return $this->createSchemaDataHandler($className, $interface);
}
This is what tells Magento which classes to pick up and run from the individual
module Setup directory. We will ignore the Recurring case for the moment, as only
the Magento_Indexer module uses it.
For the rst time, we run php bin/magento setup:upgrade against our module;
while it still has no entries under the setup_module table, Magento will execute the
les within the module Setup folder in following order:
• InstallSchema.php
• UpgradeSchema.php
• InstallData.php
• UpgradeData.php
Notice that this is the same order, top to bottom, as in the getSchemaDataHandler
method.
Every subsequent upper module version number change, followed by the console
php bin/magento setup:upgrade command, would result in the following les
being run in the order as listed:
• UpgradeSchema.php
• UpgradeData.php
Additionally, Magento would record the upped version number under the
setup_module database. Magento will only trigger install or upgrade scripts
when the version number in the database is less than the version number in the
module.xml le.
We are not required to always provide these install or upgrade scripts, if
ever. They are only needed when we need to add or edit existing tables or
entries in a database.

Chapter 4
[ 71 ]
If we look carefully at the implementation of the install and update
methods within the appropriate scripts, we can see they both accept
ModuleContextInterface $context as a second parameter. Since upgrade
scripts are the ones triggering on every upped version number, we can use
$context->getVersion() to target changes specic to the module version.
Creating an install schema script
(InstallSchema.php)
Now that we understand the ow of schema and data scripts and their relation to the
module version number, let us go ahead and start assembling our InstallSchema.
We start by dening the app/code/Foggyline/Office/Setup/InstallSchema.php
le with (partial) content as follows:
namespace Foggyline\Office\Setup;
use Magento\Framework\Setup\InstallSchemaInterface;
use Magento\Framework\Setup\ModuleContextInterface;
use Magento\Framework\Setup\SchemaSetupInterface;
class InstallSchema implements InstallSchemaInterface
{
public function install(SchemaSetupInterface $setup,
ModuleContextInterface $context)
{
$setup->startSetup();
/* #snippet1 */
$setup->endSetup();
}
}
InstallSchema conforms to InstallSchemaInterface, which requires the
implementation of the install method that accepts two parameters of type
SchemaSetupInterface and ModuleContextInterface.
The install method is all that is required here. Within this method, we would add any
relevant code we might have to create the tables and columns we need.
Looking through the code base, we can see that Magento\Setup\Module\Setup
is the one extending \Magento\Framework\Module\Setup and implementing
SchemaSetupInterface. The two methods seen in the preceding code, startSetup
and endSetup, are used to run additional environment setup before and after
our code.

Models and Collections
[ 72 ]
Going further, let's replace the /* #snippet1 */ bit with code that will create our
Department model entity table as follows:
$table = $setup->getConnection()
->newTable($setup->getTable('foggyline_office_department'))
->addColumn(
'entity_id',
\Magento\Framework\DB\Ddl\Table::TYPE_INTEGER,
null,
['identity' => true, 'unsigned' => true, 'nullable' =>
false, 'primary' => true],
'Entity ID'
)
->addColumn(
'name',
\Magento\Framework\DB\Ddl\Table::TYPE_TEXT,
64,
[],
'Name'
)
->setComment('Foggyline Office Department Table');
$setup->getConnection()->createTable($table);
/* #snippet2 */
Here, we are instructing Magento to create a table named foggyline_office_
department, add entity_id and name columns to it, and set the comment on the
table. Assuming we are using the MySQL server, when code executes, the following
SQL gets executed in the database:
CREATE TABLE 'foggyline_office_department' (
'entity_id' int(10) unsigned NOT NULL AUTO_INCREMENT COMMENT 'Entity
ID',
'name' varchar(64) DEFAULT NULL COMMENT 'Name',
PRIMARY KEY ('entity_id')
) ENGINE=InnoDB AUTO_INCREMENT=3 DEFAULT CHARSET=utf8
COMMENT='Foggyline Office Department Table';
The addColumn method is the most interesting one here. It takes ve parameters,
from column name, column data type, column length, array of additional options,
and column description. However, only column name and column data type
are mandatory! Accepted column data types can be found under the Magento\
Framework\DB\Ddl\Table class, and go as follows:
boolean smallint integer bigint
float numeric decimal date
timestamp datetime text blob
varbinary

Chapter 4
[ 73 ]
An additional options array might contain some of the following keys: unsigned,
precision, scale, unsigned, default, nullable, primary, identity,
auto_increment.
Having gained insight into the addColumn method, let's go ahead and create the
foggyline_office_employee_entity table for the Employee entity as well.
We do so by replacing the /* #snippet2 */ bit from the preceding code with
the following code:
$employeeEntity = \Foggyline\Office\Model\Employee::ENTITY;
$table = $setup->getConnection()
->newTable($setup->getTable($employeeEntity . '_entity'))
->addColumn(
'entity_id',
\Magento\Framework\DB\Ddl\Table::TYPE_INTEGER,
null,
['identity' => true, 'unsigned' => true, 'nullable' =>
false, 'primary' => true],
'Entity ID'
)
->addColumn(
'department_id',
\Magento\Framework\DB\Ddl\Table::TYPE_INTEGER,
null,
['unsigned' => true, 'nullable' => false],
'Department Id'
)
->addColumn(
'email',
\Magento\Framework\DB\Ddl\Table::TYPE_TEXT,
64,
[],
'Email'
)
->addColumn(
'first_name',
\Magento\Framework\DB\Ddl\Table::TYPE_TEXT,
64,
[],
'First Name'
)
->addColumn(
'last_name',
\Magento\Framework\DB\Ddl\Table::TYPE_TEXT,
64,

Models and Collections
[ 74 ]
[],
'Last Name'
)
->setComment('Foggyline Office Employee Table');
$setup->getConnection()->createTable($table);
/* #snippet3 */
Following good database design practices, we might notice one thing here. If we
agree that every employee can be assigned a single department, we should add
a foreign key to this table's department_id column. For the moment, we will
purposely skip this bit, as we want to demonstrate this through the update schema
script later on.
EAV models scatter their data across several tables, three at a minimum. The table
foggyline_office_employee_entity that we just created is one of them. The other
one is the core Magento eav_attribute table. The third table is not a single table,
rather a list of multiple tables; one for each EAV type. These tables are the result of
our install script.
Information stored within the core Magento eav_attribute table is not the value of
an attribute or anything like it; information stored there is an attribute's metadata.
So how does Magento know about our Employee attributes (service_years, dob,
salary, vat_number, note)? It does not; not yet. We need to add the attributes into
that table ourselves. We will do so later on, as we demonstrate the InstallData.
Depending on the EAV attribute data type, we need to create the following tables:
• foggyline_office_employee_entity_datetime
• foggyline_office_employee_entity_decimal
• foggyline_office_employee_entity_int
• foggyline_office_employee_entity_text
• foggyline_office_employee_entity_varchar
The names of these attribute value tables come from a simple formula, which says
{name of the entity table}+{_}+{eav_attribute.backend_type value}. If we look at the salary
attribute, we need it to be a decimal value, thus it will get stored in foggyline_
office_employee_entity_decimal.

Chapter 4
[ 75 ]
Given the chunkiness of code behind dening attribute value tables, we will focus
only on a single, decimal type table. We dene it by replacing /* #snippet3 */
from the preceding code with the following bit:
$table = $setup->getConnection()
->newTable($setup->getTable($employeeEntity .
'_entity_decimal'))
->addColumn(
'value_id',
\Magento\Framework\DB\Ddl\Table::TYPE_INTEGER,
null,
['identity' => true, 'nullable' => false, 'primary' =>
true],
'Value ID'
)
->addColumn(
'attribute_id',
\Magento\Framework\DB\Ddl\Table::TYPE_SMALLINT,
null,
['unsigned' => true, 'nullable' => false, 'default' =>
'0'],
'Attribute ID'
)
->addColumn(
'store_id',
\Magento\Framework\DB\Ddl\Table::TYPE_SMALLINT,
null,
['unsigned' => true, 'nullable' => false, 'default' =>
'0'],
'Store ID'
)
->addColumn(
'entity_id',
\Magento\Framework\DB\Ddl\Table::TYPE_INTEGER,
null,
['unsigned' => true, 'nullable' => false, 'default' =>
'0'],
'Entity ID'
)

Models and Collections
[ 76 ]
->addColumn(
'value',
\Magento\Framework\DB\Ddl\Table::TYPE_DECIMAL,
'12,4',
[],
'Value'
)
//->addIndex
//->addForeignKey
->setComment('Employee Decimal Attribute Backend Table');
$setup->getConnection()->createTable($table);
Notice the //->addIndex part within code above. Lets replace it with the following
bit.
->addIndex(
$setup->getIdxName(
$employeeEntity . '_entity_decimal',
['entity_id', 'attribute_id', 'store_id'],
\Magento\Framework\DB\Adapter\AdapterInterface::INDEX_TYPE_
UNIQUE
),
['entity_id', 'attribute_id', 'store_id'],
['type' => \Magento\Framework\DB\Adapter\AdapterInterface::INDEX_
TYPE_UNIQUE]
)
->addIndex(
$setup->getIdxName($employeeEntity . '_entity_decimal',
['store_id']),
['store_id']
)
->addIndex(
$setup->getIdxName($employeeEntity . '_entity_decimal',
['attribute_id']),
['attribute_id']
)
The preceding code adds three indexes on the foggyline_office_employee_
entity_decimal table, resulting in a SQL as follows:
• UNIQUE KEY 'FOGGYLINE_OFFICE_EMPLOYEE_ENTT_DEC_ENTT_ID_ATTR_ID_
STORE_ID' ('entity_id','attribute_id','store_id')
• KEY 'FOGGYLINE_OFFICE_EMPLOYEE_ENTITY_DECIMAL_STORE_ID'
('store_id')
• KEY 'FOGGYLINE_OFFICE_EMPLOYEE_ENTITY_DECIMAL_ATTRIBUTE_ID'
('attribute_id')

Chapter 4
[ 77 ]
Similarly, we replace the //->addForeignKey part from the preceding code with the
following bit:
->addForeignKey(
$setup->getFkName(
$employeeEntity . '_entity_decimal',
'attribute_id',
'eav_attribute',
'attribute_id'
),
'attribute_id',
$setup->getTable('eav_attribute'),
'attribute_id',
\Magento\Framework\DB\Ddl\Table::ACTION_CASCADE
)
->addForeignKey(
$setup->getFkName(
$employeeEntity . '_entity_decimal',
'entity_id',
$employeeEntity . '_entity',
'entity_id'
),
'entity_id',
$setup->getTable($employeeEntity . '_entity'),
'entity_id',
\Magento\Framework\DB\Ddl\Table::ACTION_CASCADE
)
->addForeignKey(
$setup->getFkName($employeeEntity . '_entity_decimal',
'store_id', 'store', 'store_id'),
'store_id',
$setup->getTable('store'),
'store_id',
\Magento\Framework\DB\Ddl\Table::ACTION_CASCADE
)
The preceding code adds foreign key relations into the foggyline_office_
employee_entity_decimal table, resulting in a SQL as follows:
• CONSTRAINT 'FK_D17982EDA1846BAA1F40E30694993801' FOREIGN KEY
('entity_id') REFERENCES 'foggyline_office_employee_entity'
('entity_id') ON DELETE CASCADE,
• CONSTRAINT 'FOGGYLINE_OFFICE_EMPLOYEE_ENTITY_DECIMAL_STORE_
ID_STORE_STORE_ID' FOREIGN KEY ('store_id') REFERENCES 'store'
('store_id') ON DELETE CASCADE,
Models and Collections
[ 78 ]
• CONSTRAINT 'FOGGYLINE_OFFICE_EMPLOYEE_ENTT_DEC_ATTR_ID_EAV_
ATTR_ATTR_ID' FOREIGN KEY ('attribute_id') REFERENCES 'eav_
attribute' ('attribute_id') ON DELETE CASCADE
Notice how we added the store_id column to our EAV attribute value tables.
Though our examples won't nd use of it, it is a good practice to use store_id
with your EAV entities to scope the data for a possible multi-store setup. To clarify
further, imagine we had a multi-store setup, and with EAV attribute tables set up
like the preceding one, we would be able to store a different attribute value for each
store, since the unique entry in the table is dened as a combination of entity_id,
attribute_id, and store_id columns.
For the reasons of performance and data integrity, it is important to dene
indexes and foreign key as per good database design practice. We can do
so within InstallSchema when dening new tables.
Creating an upgrade schema script
(UpgradeSchema.php)
During the rst-time module install, an upgrade schema is what gets run
immediately after an install schema. We dene upgrade schema within the
app/code/Foggyline/Office/Setup/UpgradeSchema.php le with (partial)
content as follows:
namespace Foggyline\Office\Setup;
use Magento\Framework\Setup\UpgradeSchemaInterface;
use Magento\Framework\Setup\ModuleContextInterface;
use Magento\Framework\Setup\SchemaSetupInterface;
class UpgradeSchema implements UpgradeSchemaInterface
{
public function upgrade(SchemaSetupInterface $setup,
ModuleContextInterface $context)
{
$setup->startSetup();
/* #snippet1 */
$setup->endSetup();
}
}

Chapter 4
[ 79 ]
UpgradeSchema conforms to UpgradeSchemaInterface, which requires the
implementation of the upgrade method that accepts two parameters of type
SchemaSetupInterface and ModuleContextInterface.
This is quite similar to InstallSchemaInterface, except the method name.
The update method is run when this schema gets triggered. Within this method,
we would add any relevant code we might want to execute.
Going further, let's replace the /* #snippet1 */ part from the preceding code with
the following code:
$employeeEntityTable = \Foggyline\Office\Model\Employee::ENTITY. '_
entity';
$departmentEntityTable = 'foggyline_office_department';
$setup->getConnection()
->addForeignKey(
$setup->getFkName($employeeEntityTable, 'department_id',
$departmentEntityTable, 'entity_id'),
$setup->getTable($employeeEntityTable),
'department_id',
$setup->getTable($departmentEntityTable),
'entity_id',
\Magento\Framework\DB\Ddl\Table::ACTION_CASCADE
);
Here, we are instructing Magento to create a foreign key on the foggyline_office_
employee_entity table, more precisely on its department_id column, pointing to
the foggyline_office_department table and its entity_id column.
Creating an install data script
(InstallData.php)
An install data script is what gets run immediately after upgrade schema. We dene
install data schema within the app/code/Foggyline/Office/Setup/InstallData.
php le with (partial) content as follows:
namespace Foggyline\Office\Setup;
use Magento\Framework\Setup\InstallDataInterface;
use Magento\Framework\Setup\ModuleContextInterface;
use Magento\Framework\Setup\ModuleDataSetupInterface;

Models and Collections
[ 80 ]
class InstallData implements InstallDataInterface
{
private $employeeSetupFactory;
public function __construct(
\Foggyline\Office\Setup\EmployeeSetupFactory
$employeeSetupFactory
)
{
$this->employeeSetupFactory = $employeeSetupFactory;
}
public function install(ModuleDataSetupInterface $setup,
ModuleContextInterface $context)
{
$setup->startSetup();
/* #snippet1 */
$setup->endSetup();
}
}
InstallData conforms to InstallDataInterface, which requires the
implementation of the install method that accepts two parameters of type
ModuleDataSetupInterface and ModuleContextInterface.
The install method is run when this script gets triggered. Within this method, we
would add any relevant code we might want to execute.
Going further, let's replace the /* #snippet1 */ part from the preceding code with
the following code:
$employeeEntity = \Foggyline\Office\Model\Employee::ENTITY;
$employeeSetup = $this->employeeSetupFactory->create(['setup' =>
$setup]);
$employeeSetup->installEntities();
$employeeSetup->addAttribute(
$employeeEntity, 'service_years', ['type' => 'int']
);
$employeeSetup->addAttribute(
$employeeEntity, 'dob', ['type' => 'datetime']
);

Chapter 4
[ 81 ]
$employeeSetup->addAttribute(
$employeeEntity, 'salary', ['type' => 'decimal']
);
$employeeSetup->addAttribute(
$employeeEntity, 'vat_number', ['type' => 'varchar']
);
$employeeSetup->addAttribute(
$employeeEntity, 'note', ['type' => 'text']
);
Using the addAttribute method on the instance of \Foggyline\Office\Setup\
EmployeeSetupFactory, we are instructing Magento to add a number of attributes
(service_years, dob, salary, vat_number, note) to its entity.
We will soon get to the inners of EmployeeSetupFactory, but right now notice the
call to the addAttribute method. Within this method, there is a call to the $this-
>attributeMapper->map($attr, $entityTypeId) method. attributeMapper
conforms to Magento\Eav\Model\Entity\Setup\PropertyMapperInterface,
which looking at vendor/magento/module-eav/etc/di.xml has a preference for
the Magento\Eav\Model\Entity\Setup\PropertyMapper\Composite class, which
further initializes the following mapper classes:
• Magento\Eav\Model\Entity\Setup\PropertyMapper
• Magento\Customer\Model\ResourceModel\Setup\PropertyMapper
• Magento\Catalog\Model\ResourceModel\Setup\PropertyMapper
• Magento\ConfigurableProduct\Model\ResourceModel\Setup\
PropertyMapper
Since we are dening our own entity types, the mapper class we are mostly
interested in is Magento\Eav\Model\Entity\Setup\PropertyMapper. A quick
look inside of it reveals the following mapping array in the map method:
[
'backend_model' => 'backend',
'backend_type' => 'type',
'backend_table' => 'table',
'frontend_model' => 'frontend',
'frontend_input' => 'input',
'frontend_label' => 'label',
'frontend_class' => 'frontend_class',
'source_model' => 'source',
'is_required' => 'required',

Models and Collections
[ 82 ]
'is_user_defined' => 'user_defined',
'default_value' => 'default',
'is_unique' => 'unique',
'note' => 'note'
'is_global' => 'global'
]
Looking at the preceding array keys and value strings gives us a clue as to what is
happening. The key strings match the column names in the eav_attribute table,
while the value strings match the keys of our array passed to the addAttribute
method within InstallData.php.
Let's take a look at the EmployeeSetupFactory class within the app/code/
Foggyline/Office/Setup/EmployeeSetup.php le, (partially) dened as follows:
namespace Foggyline\Office\Setup;
use Magento\Eav\Setup\EavSetup;
class EmployeeSetup extends EavSetup
{
public function getDefaultEntities()
{
/* #snippet1 */
}
}
What's happening here is that we are extending from the Magento\Eav\Setup\
EavSetup class, thus effectively telling Magento we are about to create our own
entity. We do so by overriding getDefaultEntities, replacing /* #snippet1 */
with content as follows:
$employeeEntity = \Foggyline\Office\Model\Employee::ENTITY;
$entities = [
$employeeEntity => [
'entity_model' => 'Foggyline\Office\Model\ResourceModel\
Employee',
'table' => $employeeEntity . '_entity',
'attributes' => [
'department_id' => [
'type' => 'static',
],
'email' => [
'type' => 'static',
],

Chapter 4
[ 83 ]
'first_name' => [
'type' => 'static',
],
'last_name' => [
'type' => 'static',
],
],
],
];
return $entities;
The getDefaultEntities method returns an array of entities we want to register
with Magento. Within our $entities array, the key $employeeEntity becomes an
entry in the eav_entity_type table. Given that our $employeeEntity has a value of
foggyline_office_employee, running the following SQL query should yield
a result:
SELECT * FROM eav_entity_type WHERE entity_type_code =
"foggyline_office_employee";
Only a handful of metadata values are required to make our new entity type
functional. The entity_model value should point to our EAV model resource class,
not the model class. The table value should equal the name of our EAV entity table
in the database. Finally, the attributes array should list any attribute we want created
on this entity. Attributes and their metadata get created in the eav_attribute table.
If we look back at all those foggyline_office_employee_entity_* attribute value
tables we created, they are not the ones that actually create attributes or register a
new entity type in Magento. What creates attributes and a new entity type is the
array we just dened under the getDefaultEntities method. Once Magento
creates the attributes and registers a new entity type, it simply routes the entity
save process to proper attribute value tables depending on the type of attribute.
Creating an upgrade data script
(UpgradeData.php)
The upgrade data script is the last one to execute. We will use it to demonstrate the
example of creating the sample entries for our Department and Employee entities.

Models and Collections
[ 84 ]
We start by creating the app/code/Foggyline/Office/Setup/UpgradeData.php
le with (partial) content as follows:
namespace Foggyline\Office\Setup;
use Magento\Framework\Setup\UpgradeDataInterface;
use Magento\Framework\Setup\ModuleContextInterface;
use Magento\Framework\Setup\ModuleDataSetupInterface;
class UpgradeData implements UpgradeDataInterface
{
protected $departmentFactory;
protected $employeeFactory;
public function __construct(
\Foggyline\Office\Model\DepartmentFactory
$departmentFactory,
\Foggyline\Office\Model\EmployeeFactory $employeeFactory
)
{
$this->departmentFactory = $departmentFactory;
$this->employeeFactory = $employeeFactory;
}
public function upgrade(ModuleDataSetupInterface $setup,
ModuleContextInterface $context)
{
$setup->startSetup();
/* #snippet1 */
$setup->endSetup();
}
}
UpgradeData conforms to UpgradeDataInterface, which requires the
implementation of the upgrade method that accepts two parameters of type
ModuleDataSetupInterface and ModuleContextInterface. We are further adding
our own __construct method to which we are passing DepartmentFactory and
EmployeeFactory, as we will be using them within the upgrade method as shown
next, by replacing /* #snippet1 */ with the following code:
$salesDepartment = $this->departmentFactory->create();
$salesDepartment->setName('Sales');
$salesDepartment->save();
Chapter 4
[ 85 ]
$employee = $this->employeeFactory->create();
$employee->setDepartmentId($salesDepartment->getId());
$employee->setEmail('john@sales.loc');
$employee->setFirstName('John');
$employee->setLastName('Doe');
$employee->setServiceYears(3);
$employee->setDob('1983-03-28');
$employee->setSalary(3800.00);
$employee->setVatNumber('GB123456789');
$employee->setNote('Just some notes about John');
$employee->save();
The preceding code creates an instance of the department entity and then saves it.
An instance of employee is then created and saved, passing it the newly created
department ID and other attributes.
A more convenient and professional-looking approach for saving
an entity could be given as follows:
$employee->setDob('1983-03-28')
->setSalary(3800.00)
->setVatNumber('GB123456789')
->save();
Here, we are utilizing the fact that each of the entity setter
methods returns $this (an instance of the entity object itself), so
we can chain the method calls.
Entity CRUD actions
Up to this point, we have learned how to create a simple model, an EAV model, and
install and upgrade types of schema and data script. Now, let us see how we can
create, read, update and delete our entities, operations that are commonly referred to
as CRUD.
Though this chapter is about models, collections, and related things, for the purpose
of demonstration, let's make a tiny detour into routes and controllers. The idea is to
create a simple Test controller with the Crud action we can trigger in the browser via
a URL. Within this Crud action, we will then dump our CRUD-related code.
Models and Collections
[ 86 ]
To make Magento respond to the URL we punch into the browser, we need to dene
the route. We do so by creating the app/code/Foggyline/Office/etc/frontend/
routes.xml le with the following content:
<config xmlns:xsi="http://www.w3.org/2001/XMLSchema-instance"
xsi:noNamespaceSchemaLocation="urn:magento:framework:App/
etc/routes.xsd">
<router id="standard">
<route id="foggyline_office" frontName="foggyline_office">
<module name="Foggyline_Office"/>
</route>
</router>
</config>
Route denition requires a unique ID and frontName attribute values, which in our
case both equal foggyline_office. The frontName attribute value becomes the part
of our URL structure. Simply put, the URL formula for hitting the Crud action goes
like {magento-base-url}/index.php/{route frontName}/{controller name}/{action name}.
For example, if our base URL were http://shop.loc/, the full URL
would be http://shop.loc/index.php/foggyline_office/
test/crud/. If we have URL rewrites turned on, we could omit the
index.php part.
Once the route has been dened, we can go ahead and create the Test controller,
dened in the app/code/Foggyline/Office/Controller/Test.php le with
(partial) code as follows:
namespace Foggyline\Office\Controller;
abstract class Test extends \Magento\Framework\App\Action\Action
{
}

Chapter 4
[ 87 ]
This really is the simplest controller we could have dened. The only thing worth
noting here is that the controller class needs to be dened as abstract and extend the
\Magento\Framework\App\Action\Action class. Controller actions live outside of
the controller itself and can be found under the subdirectory on the same level and
named as controller. Since our controller is called Test, we place our Crud action
under the app/code/Foggyline/Office/Controller/Test/Crud.php le with
content as follows:
namespace Foggyline\Office\Controller\Test;
class Crud extends \Foggyline\Office\Controller\Test
{
protected $employeeFactory;
protected $departmentFactory;
public function __construct(
\Magento\Framework\App\Action\Context $context,
\Foggyline\Office\Model\EmployeeFactory $employeeFactory,
\Foggyline\Office\Model\DepartmentFactory
$departmentFactory
)
{
$this->employeeFactory = $employeeFactory;
$this->departmentFactory = $departmentFactory;
return parent::__construct($context);
}
public function execute()
{
/* CRUD Code Here */
}
}
The Controller action class is basically just an extension of the controller dening
the execute method. Code within the execute method is what gets run when
we hit the URL in the browser. Additionally, we have a __construct method to
which we are passing the EmployeeFactory and DepartmentFactory classes,
which we will soon use for our CRUD examples. Note that EmployeeFactory and
DepartmentFactory are not classes created by us. Magento will autogenerate them
under the DepartmentFactory.php and EmployeeFactory.php les within the
var/generation/Foggyline/Office/Model folder. These are factory classes for
our Employee and Department model classes, generated when requested.
With this, we nish our little detour and focus back on our entities.

Models and Collections
[ 88 ]
Creating new entities
There are three different avors, if we might call them that, by which we can set
property (eld and attribute) values on our entity. They all lead to the same result.
The following few code snippets can be copied and pasted into our Crud class
execute method for testing, simply by replacing /* CRUD Code Here */ with
one of the following code snippets:
//Simple model, creating new entities, flavour #1
$department1 = $this->departmentFactory->create();
$department1->setName('Finance');
$department1->save();
//Simple model, creating new entities, flavour #2
$department2 = $this->departmentFactory->create();
$department2->setData('name', 'Research');
$department2->save();
//Simple model, creating new entities, flavour #3
$department3 = $this->departmentFactory->create();
$department3->setData(['name' => 'Support']);
$department3->save();
The flavour #1 approach from the preceding code is probably the preferred way
of setting properties, as it is using the magic method approach we mentioned
previously. Both flavour #2 and flavour #3 use the setData method, just in a
slightly different manner. All three examples should yield the same result once the
save method is called on an object instance.
Now that we know how to save the simple model, let's take a quick look at doing the
same with the EAV model. The following are analogous code snippets:
//EAV model, creating new entities, flavour #1
$employee1 = $this->employeeFactory->create();
$employee1->setDepartment_id($department1->getId());
$employee1->setEmail('goran@mail.loc');
$employee1->setFirstName('Goran');
$employee1->setLastName('Gorvat');
$employee1->setServiceYears(3);
$employee1->setDob('1984-04-18');
$employee1->setSalary(3800.00);
$employee1->setVatNumber('GB123451234');
$employee1->setNote('Note #1');
$employee1->save();

Chapter 4
[ 89 ]
//EAV model, creating new entities, flavour #2
$employee2 = $this->employeeFactory->create();
$employee2->setData('department_id', $department2->getId());
$employee2->setData('email', 'marko@mail.loc');
$employee2->setData('first_name', 'Marko');
$employee2->setData('last_name', 'Tunukovic');
$employee2->setData('service_years', 3);
$employee2->setData('dob', '1984-04-18');
$employee2->setData('salary', 3800.00);
$employee2->setData('vat_number', 'GB123451234');
$employee2->setData('note', 'Note #2');
$employee2->save();
//EAV model, creating new entities, flavour #3
$employee3 = $this->employeeFactory->create();
$employee3->setData([
'department_id' => $department3->getId(),
'email' => 'ivan@mail.loc',
'first_name' => 'Ivan',
'last_name' => 'Telebar',
'service_years' => 2,
'dob' => '1986-08-22',
'salary' => 2400.00,
'vat_number' => 'GB123454321',
'note' => 'Note #3'
]);
$employee3->save();
As we can see, the EAV code for persisting the data is identical to the simple model.
There is one thing here worth noting. The Employee entity has a relation dened
toward department. Forgetting to specify department_id on a new employee entity
save would result in an error message similar to the following:
SQLSTATE[23000]: Integrity constraint violation: 1452 Cannot add
or update a child row: a foreign key constraint fails
('magento'.'foggyline_office_employee_entity', CONSTRAINT
'FK_E2AEE8BF21518DFA8F02B4E95DC9F5AD' FOREIGN KEY
('department_id') REFERENCES 'foggyline_office_department'
('entity_id') ON), query was: INSERT INTO
'foggyline_office_employee_entity' ('email', 'first_name',
'last_name', 'entity_id') VALUES (?, ?, ?, ?)
Magento saves these types of errors under its var/report directory.

Models and Collections
[ 90 ]
Reading existing entities
Reading an entity based on a provided entity ID value comes down to instantiating
the entity and using the load method to which we pass the entity ID as shown next:
//Simple model, reading existing entities
$department = $this->departmentFactory->create();
$department->load(28);
/*
\Zend_Debug::dump($department->toArray());
array(2) {
["entity_id"] => string(2) "28"
["name"] => string(8) "Research"
}
*/
There is no real difference between loading the simple model or EAV model, as
shown in the following EAV model example:
//EAV model, reading existing entities
$employee = $this->employeeFactory->create();
$employee->load(25);
/*
\Zend_Debug::dump($employee->toArray());
array(10) {
["entity_id"] => string(2) "25"
["department_id"] => string(2) "28"
["email"] => string(14) "marko@mail.loc"
["first_name"] => string(5) "Marko"
["last_name"] => string(9) "Tunukovic"
["dob"] => string(19) "1984-04-18 00:00:00"
["note"] => string(7) "Note #2"
["salary"] => string(9) "3800.0000"
["service_years"] => string(1) "3"
["vat_number"] => string(11) "GB123451234"
}
*/
Notice how the EAV entity loads all of its eld and attribute values, which is not
always the case when we obtain the entity through EAV collection, as we will show
later on.

Chapter 4
[ 91 ]
Updating existing entities
Updating entities comes down to using the load method to read an existing entity,
reset its value, and calling the save method in the end, like shown in the following
example:
$department = $this->departmentFactory->create();
$department->load(28);
$department->setName('Finance #2');
$department->save();
Regardless of the entity being the simple model or an EAV, the code is the same.
Deleting existing entities
Calling the delete method on a loaded entity will delete the entity from the
database or throw Exception if it fails. Code to delete the entity looks as follows:
$employee = $this->employeeFactory->create();
$employee->load(25);
$employee->delete();
There is no difference in deleting the simple and EAV entities. We should always use
try/catch blocks when deleting or saving our entities.
Managing collections
Let's start with EAV model collections. We can instantiate the collection either
through the entity factory class like follows:
$collection = $this->employeeFactory->create()
->getCollection();
Or we can use object manager to instantiate the collection as shown next:
$collection = $this->_objectManager->create(
'Foggyline\Office\Model\ResourceModel\Employee\Collection's
);
There is also a third way, which might be the preferred one, but it requires us to
dene APIs so we will skip that one for the moment.

Models and Collections
[ 92 ]
Once we instantiate the collection object, we can loop through it and do some
variable dumps to see the content on individual $employee entities, like shown next:
foreach ($collection as $employee) {
\Zend_Debug::dump($employee->toArray(), '$employee');
}
The preceding would yield results like the following:
$employee array(5) {
["entity_id"] => string(2) "24"
["department_id"] => string(2) "27"
["email"] => string(14) "goran@mail.loc"
["first_name"] => string(5) "Goran"
["last_name"] => string(6) "Gorvat"
}
Notice how the individual $employee only has elds on it, not the attributes.
Let's see what happens when we want to extend our collection by using
addAttributeToSelect to specify the individual attributes to add to it,
like shown next:
$collection->addAttributeToSelect('salary')
->addAttributeToSelect('vat_number');
The preceding would yield results like the following:
$employee array(7) {
["entity_id"] => string(2) "24"
["department_id"] => string(2) "27"
["email"] => string(14) "goran@mail.loc"
["first_name"] => string(5) "Goran"
["last_name"] => string(6) "Gorvat"
["salary"] => string(9) "3800.0000"
["vat_number"] => string(11) "GB123451234"
}
Though we are making progress, imagine if we had tens of attributes, and we want
each and every one to be included into collection. Using addAttributeToSelect
numerous times would make for cluttered code. What we can do is pass '*' as a
parameter to addAttributeToSelect and have collection pick up every attribute,
as shown next:
$collection->addAttributeToSelect('*');

Chapter 4
[ 93 ]
This would yield results like the following:
$employee array(10) {
["entity_id"] => string(2) "24"
["department_id"] => string(2) "27"
["email"] => string(14) "goran@mail.loc"
["first_name"] => string(5) "Goran"
["last_name"] => string(6) "Gorvat"
["dob"] => string(19) "1984-04-18 00:00:00"
["note"] => string(7) "Note #1"
["salary"] => string(9) "3800.0000"
["service_years"] => string(1) "3"
["vat_number"] => string(11) "GB123451234"
}
Though the PHP part of the code looks seemingly simple, what's happening in
the background on the SQL layer is relatively complex. Though Magento executes
several SQL queries prior to fetching the nal collection result, let's focus on the last
three queries as shown next:
SELECT COUNT(*) FROM 'foggyline_office_employee_entity' AS 'e'
SELECT 'e'.* FROM 'foggyline_office_employee_entity' AS 'e'
SELECT
'foggyline_office_employee_entity_datetime'.'entity_id',
'foggyline_office_employee_entity_datetime'.'attribute_id',
'foggyline_office_employee_entity_datetime'.'value'
FROM 'foggyline_office_employee_entity_datetime'
WHERE (entity_id IN (24, 25, 26)) AND (attribute_id IN ('349'))
UNION ALL SELECT
'foggyline_office_employee_entity_text'.'entity_id',
'foggyline_office_employee_entity_text'.'
attribute_id',
'foggyline_office_employee_entity_text'.'value'
FROM 'foggyline_office_employee_entity_text'
WHERE (entity_id IN (24, 25, 26)) AND (attribute_id IN
('352'))
UNION ALL SELECT
'foggyline_office_employee_entity_decimal'.'
entity_id',
'foggyline_office_employee_entity_decimal'.'
attribute_id',
'foggyline_office_employee_entity_decimal'.'value'
FROM 'foggyline_office_employee_entity_decimal'
Models and Collections
[ 94 ]
WHERE (entity_id IN (24, 25, 26)) AND (attribute_id IN
('350'))
UNION ALL SELECT
'foggyline_office_employee_entity_int'.'entity_id',
'foggyline_office_employee_entity_int'.'attribute_id',
'foggyline_office_employee_entity_int'.'value'
FROM 'foggyline_office_employee_entity_int'
WHERE (entity_id IN (24, 25, 26)) AND (attribute_id IN
('348'))
UNION ALL SELECT
'foggyline_office_employee_entity_varchar'.'
entity_id',
'foggyline_office_employee_entity_varchar'.'
attribute_id',
'foggyline_office_employee_entity_varchar'.'value'
FROM 'foggyline_office_employee_entity_varchar'
WHERE (entity_id IN (24, 25, 26)) AND (attribute_id IN
('351'))
Before we proceed any further, it is important to know that these queries
are not copy and paste applicable. The reason is that the attribute_id
values will for sure differ from installation to installation. Queries given
here are for us to gain a high-level understanding of what is happening
in the backend on the SQL layer when we use Magento collections on the
PHP application level.
The rst query select simply counts the number of entries in the entity table, and
then passes that info to the application layer. The second select fetches all entries
from foggyline_office_employee_entity, then passes that info to the application
layer to use it to pass entity IDs in the third query as part of entity_id IN (24,
25, 26). Second and third queries here can be pretty resource intense if we
have a large amount of entries in our entity and EAV tables. To prevent possible
performance bottlenecks, we should always use the setPageSize and setCurPage
methods on collection, like shown next:
$collection->addAttributeToSelect('*')
->setPageSize(25)
->setCurPage(5);
This would result in the rst COUNT query still being the same, but the second query
would now look like the following:
SELECT 'e'.* FROM 'foggyline_office_employee_entity' AS 'e' LIMIT
25 OFFSET 4

Chapter 4
[ 95 ]
This makes for a much smaller, thus performance-lighter dataset if we have
thousands or tens of thousands of entries. The point here is to always use
setPageSize and setCurPage. If we need to work with a really large set,
then we need to page through it, or walk through it.
Now we know how to limit the size of the result set and fetch the proper page,
let's see how we can further lter the set to avoid overusing PHP loops for the same
purpose. Thus effectively passing the ltering to the database and not the application
layer. To lter the EAV collection, we use its addAttributeToFilter method.
Let's instantiate a clean new collection like shown next:
$collection = $this->_objectManager->create(
'Foggyline\Office\Model\ResourceModel\Employee\Collection'
);
$collection->addAttributeToSelect('*')
->setPageSize(25)
->setCurPage(1);
$collection->addAttributeToFilter('email',
array('like'=>'%mail.loc%'))
->addAttributeToFilter('vat_number',
array('like'=>'GB%'))
->addAttributeToFilter('salary', array('gt'=>2400))
->addAttributeToFilter('service_years',
array('lt'=>10));
Notice that we are now using the addAttributeToSelect and
addAttributeToFilter methods on collection. We have already seen the database
impact of addAttributeToSelect on a SQL query. What addAttributeToFilter
does is something completely different.
With the addAttributeToFilter method, the count query now gets transformed
into the following SQL query:
SELECT COUNT(*)
FROM 'foggyline_office_employee_entity' AS 'e'
INNER JOIN 'foggyline_office_employee_entity_varchar' AS
'at_vat_number'
ON ('at_vat_number'.'entity_id' = 'e'.'entity_id') AND
('at_vat_number'.'attribute_id' = '351')
INNER JOIN 'foggyline_office_employee_entity_decimal' AS
'at_salary'
ON ('at_salary'.'entity_id' = 'e'.'entity_id') AND
('at_salary'.'attribute_id' = '350')

Models and Collections
[ 96 ]
INNER JOIN 'foggyline_office_employee_entity_int' AS
'at_service_years'
ON ('at_service_years'.'entity_id' = 'e'.'entity_id') AND
('at_service_years'.'attribute_id' = '348')
WHERE ('e'.'email' LIKE '%mail.loc%') AND (at_vat_number.value
LIKE 'GB%') AND (at_salary.value > 2400) AND
(at_service_years.value < 10)
We can see that this is much more complex than the previous count query, now we
have INNER JOIN stepping in. Notice how we have four addAttributeToFilter
method calls but only three INNER JOIN. This is because one of those four calls
is for e-mail, which is not an attribute but a eld within the foggyline_office_
employee_entity table. That is why there is no need for INNER JOIN as the eld is
already there. The three INNER JOIN then simply merge the required info into the
query in order to get the select.
The second query also becomes more robust, as shown next:
SELECT
'e'.*,
'at_vat_number'.'value' AS 'vat_number',
'at_salary'.'value' AS 'salary',
'at_service_years'.'value' AS 'service_years'
FROM 'foggyline_office_employee_entity' AS 'e'
INNER JOIN 'foggyline_office_employee_entity_varchar' AS
'at_vat_number'
ON ('at_vat_number'.'entity_id' = 'e'.'entity_id') AND
('at_vat_number'.'attribute_id' = '351')
INNER JOIN 'foggyline_office_employee_entity_decimal' AS
'at_salary'
ON ('at_salary'.'entity_id' = 'e'.'entity_id') AND
('at_salary'.'attribute_id' = '350')
INNER JOIN 'foggyline_office_employee_entity_int' AS
'at_service_years'
ON ('at_service_years'.'entity_id' = 'e'.'entity_id') AND
('at_service_years'.'attribute_id' = '348')
WHERE ('e'.'email' LIKE '%mail.loc%') AND (at_vat_number.value
LIKE 'GB%') AND (at_salary.value > 2400) AND
(at_service_years.value < 10)
LIMIT 25
Here, we also see the usage of INNER JOIN. We also have three and not four INNER
JOIN, because one of the conditions is done against email, which is a eld. The result
of the query is a attened piece of rows where the attributes vat_number, salary,
and service_years are present. We can imagine the performance impact if we
haven't used setPageSize to limit the result set.

Chapter 4
[ 97 ]
Finally, the third query is also affected and now looks similar to the following:
SELECT
'foggyline_office_employee_entity_datetime'.'entity_id',
'foggyline_office_employee_entity_datetime'.'attribute_id',
'foggyline_office_employee_entity_datetime'.'value'
FROM 'foggyline_office_employee_entity_datetime'
WHERE (entity_id IN (24, 25)) AND (attribute_id IN ('349'))
UNION ALL SELECT
'foggyline_office_employee_entity_text'.'entity_id',
'foggyline_office_employee_entity_text'.'
attribute_id',
'foggyline_office_employee_entity_text'.'value'
FROM 'foggyline_office_employee_entity_text'
WHERE (entity_id IN (24, 25)) AND (attribute_id IN
('352'))
Notice here how UNION ALL has been reduced to a single occurrence now, thus
effectively making for two selects. This is because we have a total of ve attributes
(service_years, dob, salary, vat_number, note), and three of them have been
pulled in through second query. Out of the preceding three queries demonstrated,
Magento basically pulls the collection data from second and third query. This
seems like a pretty optimized and scalable solution, though we should really give
it some thought on the proper use of setPageSize, addAttributeToSelect, and
addAttributeToFilter methods when creating collection.
During development, if working with collections that have lot of attributes, lters,
and possibly a future large dataset, we might want to use SQL logging to record
actual SQL queries hitting the database server. This might help us spot possible
performance bottlenecks and react on time, either by adding more limiting values
to setPageSize or addAttributeToSelect, or both.
In the preceding examples, the use of addAttributeToSelect results in AND
conditions on the SQL layer. What if we want to lter collection using OR conditions?
addAttributeToSelect can also result in SQL OR conditions if the $attribute
parameter is used in the following way:
$collection->addAttributeToFilter([
['attribute'=>'salary', 'gt'=>2400],
['attribute'=>'vat_number', 'like'=>'GB%']
]);
Without going into the details of actual SQL queries this time, it is sufce to say
that they are near identical to the previous example with the AND condition use of
addAttributeToFilter.

Models and Collections
[ 98 ]
Using collection methods like addExpressionAttributeToSelect,
groupByAttribute, and addAttributeToSort, collections offer further gradient
ltering and even shift some calculations from the PHP application layer to the SQL
layer. Getting into the ins and outs of those and other collection methods is beyond
the scope of this chapter, and would probably require a book on its own.
Collection lters
Looking back at the preceding addAttributeToFilter method call examples,
questions pop out as to where can we see the list of all available collection lters.
If we take a quick look inside the vendor/magento/framework/DB/Adapter/Pdo/
Mysql.php le, we can see the method called prepareSqlCondition (partially)
dened as follows:
public function prepareSqlCondition($fieldName, $condition)
{
$conditionKeyMap = [
'eq' => "{{fieldName}} = ?",
'neq' => "{{fieldName}} != ?",
'like' => "{{fieldName}} LIKE ?",
'nlike' => "{{fieldName}} NOT LIKE ?",
'in' => "{{fieldName}} IN(?)",
'nin' => "{{fieldName}} NOT IN(?)",
'is' => "{{fieldName}} IS ?",
'notnull' => "{{fieldName}} IS NOT NULL",
'null' => "{{fieldName}} IS NULL",
'gt' => "{{fieldName}} > ?",
'lt' => "{{fieldName}} /* AJZELE */ < ?",
'gteq' => "{{fieldName}} >= ?",
'lteq' => "{{fieldName}} <= ?",
'finset' => "FIND_IN_SET(?, {{fieldName}})",
'regexp' => "{{fieldName}} REGEXP ?",
'from' => "{{fieldName}} >= ?",
'to' => "{{fieldName}} <= ?",
'seq' => null,
'sneq' => null,
'ntoa' => "INET_NTOA({{fieldName}}) LIKE ?",
];
$query = '';
if (is_array($condition)) {
$key = key(array_intersect_key($condition,
$conditionKeyMap));
...
}

Chapter 4
[ 99 ]
This method is what eventually gets called at some point during SQL query
construction. The $condition parameter is expected to have one of the following
(partially listed) forms:
• array("from" => $fromValue, "to" => $toValue)
• array("eq" => $equalValue)
• array("neq" => $notEqualValue)
• array("like" => $likeValue)
• array("in" => array($inValues))
• array("nin" => array($notInValues))
• array("notnull" => $valueIsNotNull)
• array("null" => $valueIsNull)
• array("gt" => $greaterValue)
• array("lt" => $lessValue)
• array("gteq" => $greaterOrEqualValue)
• array("lteq" => $lessOrEqualValue)
• array("finset" => $valueInSet)
• array("regexp" => $regularExpression)
• array("seq" => $stringValue)
• array("sneq" => $stringValue)
If $condition is passed as an integer or string, then the exact value will be
ltered ('eq' condition). If none of the conditions is matched, then a sequential
array is expected as a parameter and OR conditions will be built using the
preceding structure.
The preceding examples covered EAV model collections, as they are
slightly more complex. Though the approach to ltering more or less
applies to simple model collections as well, the most notable difference is
that there are no addAttributeToFilter, addAttributeToSelect, and
addExpressionAttributeToSelect methods. The simple model collections make
use of addFieldToFilter, addFieldToSelect, and addExpressionFieldToSelect,
among other subtle differences.

Models and Collections
[ 100 ]
Summary
In this chapter, we rst learned how to create simple model, its resource, and
collection class. Then we did the same for an EAV model. Once we had the required
model, resource, and collection classes in place, we took a detailed look at the type
and ow of schema and data scripts. Going hands-on, we covered InstallSchema,
UpgradeSchema, InstallData, and UpgradeData scripts. Once the scripts were
run, the database ended up having the required tables and sample data upon which
we based our entity CRUD examples. Finally, we took a quick but focused look at
collection management, mostly comprising ltering collection to get the desired
result set.
The full module code can be downloaded from https://github.com/ajzele/
B05032-Foggyline_Office.

[ 101 ]
Using the Dependency
Injection
Dependency injection is a software design pattern via which one or more
dependencies are injected or passed by reference into an object. What this exactly
means on a practical level is shown in the following two simple examples:
public function getTotalCustomers()
{
$database = new \PDO( … );
$statement = $database->query('SELECT …');
return $statement->fetchColumn();
}
Here, you will see a simplied PHP example, where the $database object is
created in the getTotalCustomers method. This means that the dependency on
the database object is being locked in an object instance method. This makes for
tight coupling, which has several disadvantages such as reduced reusability and a
possible system-wide effect caused by changes made to some parts of the code.
A solution to this problem is to avoid methods with these sorts of dependencies by
injecting a dependency into a method, as follows:
public function getTotalCustomers($database)
{
$statement = $database->query('SELECT ...');
return $statement->fetchColumn();
}
Here, a $database object is passed (injected) into a method. That's all that
dependency injection is—a simple concept that makes code loosely coupled. While
the concept is simple, it may not be easy to implement it across large platforms such
as Magento.
Using the Dependency Injection
[ 102 ]
Magento has its own object manager and dependency injection mechanism that we
will soon look at in detail in the following sections:
• The object manager
• Dependency injection
• Configuring class preferences
• Using virtual types
To follow and test the code examples given in the following sections, we
can use the code available at https://github.com/ajzele/B05032-
Foggyline_Di. To install it, we simply need to download it and put it in
the app/code/Foggyline/Di directory. Then, run the following set of
commands on the console within Magento's root directory:
php bin/magento module:enable Foggyline_Di
php bin/magento setup:upgrade
php bin/magento foggy:di
The last command can be used repeatedly when testing the snippets
presented in the following section. When php bin/magento
foggy:di is run, it will run the code within the execute method in
the DiTestCommand class. Therefore, we can use the __construct
and execute methods from within the DiTestCommand class and the
di.xml le itself as a playground for DI.
The object manager
The initializing of objects in Magento is done via what is called the object
manager. The object manager itself is an instance of the Magento\Framework\
ObjectManager\ObjectManager class that implements the Magento\Framework\
ObjectManagerInterface class. The ObjectManager class denes the following
three methods:
• create($type, array $arguments = []): This creates a new
object instance
• get($type): This retrieves a cached object instance
• configure(array $configuration): This configures the di instance

Chapter 5
[ 103 ]
The object manager can instantiate a PHP class, which can be a model,
helper, or block object. Unless the class that we are working with has already
received an instance of the object manager, we can receive it by passing
ObjectManagerInterface into the class constructor, as follows:
public function __construct(
\Magento\Framework\ObjectManagerInterface $objectManager
)
{
$this->_objectManager = $objectManager;
}
Usually, we don't have to take care of the constructor parameter's order in Magento.
The following example will also enable us to fetch an instance of the object manager:
public function __construct(
$var1,
\Magento\Framework\ObjectManagerInterface $objectManager,
$var2 = []
)
{
$this->_objectManager = $objectManager;
}
Though we can still use plain old PHP to instantiate an object such as $object =
new \Foggyline\Di\Model\Object(), by using the object manager, we can take
advantage of Magento's advanced object features such as automatic constructor
dependency injection and object proxying.
Here are a few examples of using object manager's create method to create
new objects:
$this->_objectManager->create('Magento\Sales\Model\Order')
$this->_objectManager->create('Magento\Catalog\Model\Product\Image')
$this->_objectManager->create('Magento\Framework\UrlInterface')
$this->_objectManager->create('SoapServer', ['wsdl' => $url, 'options'
=> $options])
The following are a few examples of using object manager's get method to create
new objects:
$this->_objectManager->get('Magento\Checkout\Model\Session')
$this->_objectManager->get('Psr\Log\LoggerInterface')->critical($e)
$this->_objectManager->get('Magento\Framework\Escaper')
$this->_objectManager->get('Magento\Sitemap\Helper\Data')

Using the Dependency Injection
[ 104 ]
The object manager's create method always returns a new object instance, while the
get method returns a singleton.
Note how some of the string parameters passed to create and get are actually
interface names and not strictly class names. We will soon see why this works
with both class names and interface names. For now, it sufces to say that it
works because of Magento's dependency injection implementation.
Dependency injection
Until now, we have seen how the object manager has control over the instantiation
of dependencies. However, by convention, the object manager isn't supposed to
be used directly in Magento. Rather, it should be used for system-level things that
bootstrap Magento. We are encouraged to use the module's etc/di.xml le to
instantiate objects.
Let's dissect one of the existing di.xml entries, such as the one found under the
vendor/magento/module-admin-notification/etc/adminhtml/di.xml le for
the Magento\Framework\Notification\MessageList type:
<type name="Magento\Framework\Notification\MessageList">
<arguments>
<argument name="messages" xsi:type="array">
<item name="baseurl" xsi:type="string">
Magento\AdminNotification\Model\System
\Message\Baseurl</item>
<item name="security" xsi:type="string">
Magento\AdminNotification\Model\System\
Message\Security</item>
<item name="cacheOutdated" xsi:type="string">
Magento\AdminNotification\Model\System\
Message\CacheOutdated</item>
<item name="media_synchronization_error"
xsi:type="string">Magento\AdminNotification\Model\
System\Message\Media\Synchronization\Error</item>
<item name="media_synchronization_success"
xsi:type="string">Magento\AdminNotification\Model\
System\Message\Media\Synchronization\Success</item>
</argument>
</arguments>
</type>

Chapter 5
[ 105 ]
Basically, what this means is that whenever an instance of Magento\Framework\
Notification\MessageList is being created, the messages parameter is passed
on to the constructor. The messages parameter is being dened as an array, which
further consists of other string type items. In this case, values of these string type
attributes are class names, as follows:
• Magento\Framework\ObjectManager\ObjectManager
• Magento\AdminNotification\Model\System\Message\Baseurl
• Magento\AdminNotification\Model\System\Message\Security
• Magento\AdminNotification\Model\System\Message\CacheOutdated
• Magento\AdminNotification\Model\System\Message\Media\
Synchronization\Error
• Magento\AdminNotification\Model\System\Message\Media\
Synchronization\Success
If you now take a look at the constructor of MessageList, you will see that it is
dened in the following way:
public function __construct(
\Magento\Framework\ObjectManagerInterface $objectManager,
$messages = []
)
{
//Method body here...
}
If we modify the MessageList constructor as follows, the code will work:
public function __construct(
\Magento\Framework\ObjectManagerInterface $objectManager,
$someVarX = 'someDefaultValueX',
$messages = []
)
{
//Method body here...
}
After modication:
public function __construct(
\Magento\Framework\ObjectManagerInterface $objectManager,
$someVarX = 'someDefaultValueX',
$messages = [],

Using the Dependency Injection
[ 106 ]
$someVarY = 'someDefaultValueY'
)
{
//Method body here...
}
However, if we change the MessageList constructor to one of the following
variations, the code will fail to work:
public function __construct(
\Magento\Framework\ObjectManagerInterface $objectManager,
$Messages = []
)
{
//Method body here...
}
Another variation is as follows:
public function __construct(
\Magento\Framework\ObjectManagerInterface $objectManager,
$_messages = []
)
{
//Method body here...
}
The name of the $messages parameter in the constructor of the PHP class has to
exactly match the name of the argument within the arguments' list of di.xml.
The order of parameters in the constructor does not really matter as much as
their naming.
Looking further in the MessageList constructor, if we execute func_get_args
somewhere within it, the list of items within the $messages parameter will match
and exceed the one shown in vendor/magento/module-admin-notification/etc/
adminhtml/di.xml. This is so because the list is not nal, as Magento collects the DI
denitions from across entire the platform and merges them. So, if another module is
modifying the MessageList type, the modications will be reected.
If we perform a string search within all the di.xml les across the entire Magento
code base for <type name="Magento\Framework\Notification\MessageList">,
this will yield some additional di.xml les that have their own additions to the
MessageList type, as follows:
//vendor/magento/module-indexer/etc/adminhtml/di.xml
<type name="Magento\Framework\Notification\MessageList">

Chapter 5
[ 107 ]
<arguments>
<argument name="messages" xsi:type="array">
<item name="indexer_invalid_message"
xsi:type="string">Magento\Indexer\Model\Message
\Invalid</item>
</argument>
</arguments>
</type>
//vendor/magento/module-tax/etc/adminhtml/di.xml
<type name="Magento\Framework\Notification\MessageList">
<arguments>
<argument name="messages" xsi:type="array">
<item name="tax" xsi:type="string">Magento
\Tax\Model\System\Message\Notifications</item>
</argument>
</arguments>
</type>
What this means is that the Magento\Indexer\Model\Message\Invalid and
Magento\Tax\Model\System\Message\Notifications string items are being
added to the messages argument and are being made available within the
MessageList constructor.
In the preceding DI example, we only had the $messages parameter dened as one
argument of the array type, and the rest were its array items.
Let's take a look at a DI example for another type denition. This time, it is the one
found under the vendor/magento/module-backend/etc/di.xml le and which is
dened as follows:
<type name="Magento\Backend\Model\Url">
<arguments>
<argument name="scopeResolver" xsi:type="object">
Magento\Backend\Model\Url\ScopeResolver</argument>
<argument name="authSession" xsi:type="object">
Magento\Backend\Model\Auth\Session\Proxy</argument>
<argument name="formKey" xsi:type="object">
Magento\Framework\Data\Form\FormKey\Proxy</argument>
<argument name="scopeType" xsi:type="const">
Magento\Store\Model\ScopeInterface::SCOPE_STORE
</argument>
<argument name="backendHelper" xsi:type="object">
Magento\Backend\Helper\Data\Proxy</argument>
</arguments>
</type>

Using the Dependency Injection
[ 108 ]
Here, you will see a type with several different arguments passed to the constructor
of the Magento\Backend\Model\Url class. If you now take a look at the constructor
of the Url class, you will see that it is dened in the following way:
public function __construct(
\Magento\Framework\App\Route\ConfigInterface $routeConfig,
\Magento\Framework\App\RequestInterface $request,
\Magento\Framework\Url\SecurityInfoInterface $urlSecurityInfo,
\Magento\Framework\Url\ScopeResolverInterface $scopeResolver,
\Magento\Framework\Session\Generic $session,
\Magento\Framework\Session\SidResolverInterface $sidResolver,
\Magento\Framework\Url\RouteParamsResolverFactory
$routeParamsResolverFactory,
\Magento\Framework\Url\QueryParamsResolverInterface
$queryParamsResolver,
\Magento\Framework\App\Config\ScopeConfigInterface
$scopeConfig,
$scopeType,
\Magento\Backend\Helper\Data $backendHelper,
\Magento\Backend\Model\Menu\Config $menuConfig,
\Magento\Framework\App\CacheInterface $cache,
\Magento\Backend\Model\Auth\Session $authSession,
\Magento\Framework\Encryption\EncryptorInterface $encryptor,
\Magento\Store\Model\StoreFactory $storeFactory,
\Magento\Framework\Data\Form\FormKey $formKey,
array $data = []
) {
//Method body here...
}
The __construct method here clearly has more parameters than what's dened
in the di.xml le. What this means is that the type argument entries in di.xml do
not necessarily cover all the class __construct parameters. The arguments that are
dened in di.xml simply impose the types of individual parameters dened in the
PHP class itself. This works as long as the di.xml parameters are of the same type or
descendants of the same type.
Ideally, we would not pass the class type but interface into the PHP constructor and
then set the type in di.xml. This is where the type, preference, and virtualType
play a major role in di.xml. We have seen the role of type. Now, let's go ahead and
see what preference does.

Chapter 5
[ 109 ]
Conguring class preferences
A great number of Magento's core classes pass interfaces around constructors. The
benet of this is that the object manager, with the help of di.xml, can decide which
class to actually instantiate for a given interface.
Let's imagine the Foggyline\Di\Console\Command\DiTestCommand class with a
constructor, as follows:
public function __construct(
\Foggyline\Di\Model\TestInterface $myArg1,
$myArg2,
$name = null
)
{
//Method body here...
}
Note how $myArg1 is type hinted as the \Foggyline\Di\Model\TestInterface
interface. The object manager knows that it needs to look into the entire di.xml for
possible preference denitions.
We can dene preference within the module's di.xml le, as follows:
<preference
for="Foggyline\Di\Model\TestInterface"
type="Foggyline\Di\Model\Cart"/>
Here, we are basically saying that when someone asks for an instance of Foggyline\
Di\Model\TestInterface, give it an instance of the Foggyline\Di\Model\Cart
object. For this to work, the Cart class has to implement TestInterface itself.
Once the preference denition is in place, $myArg1 shown in the preceding example
becomes an object of the Cart class.
Additionally, the preference element is not reserved only to point out the
preferred classes for some interfaces. We can use it to set the preferred class
for some other class.
Now, let's have a look at the Foggyline\Di\Console\Command\DiTestCommand
class with a constructor:
public function __construct(
\Foggyline\Di\Model\User $myArg1,
$myArg2,
$name = null
)
{
//Method body here...
}

Using the Dependency Injection
[ 110 ]
Note how $myArg1 is now type hinted as the \Foggyline\Di\Model\User class.
Like in the previous example, the object manager will look into di.xml for possible
preference denitions.
Let's dene the preference element within the module's di.xml le, as follows:
<preference
for="\Foggyline\Di\Model\User"
type="Foggyline\Di\Model\Cart"/>
What this preference denition is saying is that whenever an instance of the User
class is requested, pass an instance of the Cart object. This will work only if the Cart
class extends from User. This is a convenient way of rewriting a class, where the
class is being passed directly into another class constructor in place of the interface.
Since the class __construct parameters can be type hinted as either classes or
interfaces and further manipulated via the di.xml preference denition, a question
rises as to what is better. Is it better to use interfaces or specic classes? While the
answer might not be fully clear, it is always preferable to use interfaces to specify
the dependencies we are injecting into the system.
Using virtual types
Along with type and preference, there is another powerful feature of di.xml that
we can use. The virtualType element enables us to dene virtual types. Creating a
virtual type is like creating a subclass of an existing class except for the fact that it's
done in di.xml and not in code.
Virtual types are a way of injecting dependencies into some of the existing classes
without affecting other classes. To explain this via a practical example, let's take a
look at the following virtual type dened in the app/etc/di.xml le:
<virtualType name="Magento\Framework\Message\Session\Storage"
type="Magento\Framework\Session\Storage">
<arguments>
<argument name="namespace" xsi:type="string">
message</argument>
</arguments>
</virtualType>
<type name="Magento\Framework\Message\Session">
<arguments>
<argument name="storage" xsi:type="object">
Magento\Framework\Message\Session\Storage</argument>
</arguments>
</type>

Chapter 5
[ 111 ]
The virtualType denition in the preceding example is Magento\Framework\
Message\Session\Storage, which extends from Magento\Framework\Session\
Storage and overwrites the namespace parameter to the message string value. In
virtualType, the name attribute denes the globally unique name of the virtual
type, while the type attribute matches the real PHP class that the virtual type is
based on.
Now, if you look at the type denition, you will see that its storage argument
is set to the object of Magento\Framework\Message\Session\Storage. The
Session\Storage le is actually a virtual type. This allows Message\Session to
be customized without affecting other classes that also declare a dependency on
Session\Storage.
Virtual types allow us to effectively change the behavior of a dependency when it is
used in a specic class.
Summary
In this chapter, we had a look at the object manager and dependency injection, which
are the foundations of Magento object management. We learned the meaning of the
type and preference elements of dependency injection and how to use them to
manipulate class construct parameters. Though there is much more to be said about
dependency injection in Magento, the presented information should sufce and help
us with other aspects of Magento.
In the next chapter, we will extend our journey into di.xml via the concept
of plugins.
[ 113 ]
Plugins
In this chapter, we will take a look at a feature of Magento called plugins. Before we
start with plugins, we rst need to understand the term interception because the two
terms are used somewhat interchangeably when dealing with Magento.
Interception is a software design pattern that is used when we want to insert code
dynamically without necessarily changing the original class behavior. This works by
dynamically inserting code between the calling code and the target object.
The interception pattern in Magento is implemented via plugins. They provide
the before, after, and around listeners, which help us extend the observed
method behavior.
In this chapter, we will cover the following topics:
• Creating a plugin
• Using the before listener
• Using the after listener
• Using the around listener
• The plugin sort order
Before we start creating a plugin, it is worth noting their limitations. Plugins cannot
be created for just any class or method, as they do not work for the following:
• Final classes
• Final methods
• The classes that are created without a dependency injection
Let's go ahead and create a plugin using a simple module called
Foggyline_Plugged.

Plugins
[ 114 ]
Creating a plugin
Start by creating the app/code/Foggyline/Plugged/registration.php le with
partial content, as follows:
\Magento\Framework\Component\ComponentRegistrar::register(
\Magento\Framework\Component\ComponentRegistrar::MODULE,
'Foggyline_Plugged',
__DIR__
);
Then, create the app/code/Foggyline/Plugged/etc/module.xml le with partial
content, as follows:
<config xmlns:xsi="http://www.w3.org/2001/XMLSchema-instance"
xsi:noNamespaceSchemaLocation="urn:magento:framework:Module/
etc/module.xsd">
<module name="Foggyline_Plugged" setup_version="1.0.0">
<sequence>
<module name="Magento_Catalog"/>
</sequence>
</module>
</config>
The preceding le is simply a new module declaration with the dependency set
against the Magento_Catalog module, as we will be observing its class. We will not
go into the details of module declaration right now, as that will be covered later in
the following chapters.
Now, create the app/code/Foggyline/Plugged/etc/di.xml le with partial
content, as follows:
<config xmlns:xsi="http://www.w3.org/2001/XMLSchema-instance"
xsi:noNamespaceSchemaLocation="urn:magento:framework:
ObjectManager/etc/config.xsd">
<type name="Magento\Catalog\Block\Product\AbstractProduct">
<plugin name="foggyPlugin1"
type="Foggyline\Plugged\Block\Catalog\Product\
AbstractProductPlugin1"
disabled="false" sortOrder="100"/>
<plugin name="foggyPlugin2"
type="Foggyline\Plugged\Block\Catalog\Product\
AbstractProductPlugin2"
disabled="false" sortOrder="200"/>

Chapter 6
[ 115 ]
<plugin name="foggyPlugin3"
type="Foggyline\Plugged\Block\Catalog\Product\
AbstractProductPlugin3"
disabled="false" sortOrder="300"/>
</type>
</config>
Plugins are dened within the module di.xml le. To dene a plugin, by using
the type element and its name attribute, we rst map the class that we want to
observe. In this case, we are observing the Magento\Catalog\Block\Product\
AbstractProduct class. Note that even though the le and class name imply an
abstract type of class, the AbstractProduct class is not abstract.
In the type element, we then dene one or more plugins using the plugin element.
The plugin element has the following four attributes assigned to it:
• name: Using this attribute, you can provide a unique and recognizable name
value that is specific to the plugin
• sortOrder: This attribute determines the order of execution when multiple
plugins are observing the same method
• disabled: The default value of this attribute is set to false, but if it is set to
true, it will disable the plugin
• type: This attribute points to the class that we will be using to implement the
before, after, or around listener
After doing this, create the app/code/Foggyline/Plugged/Block/Catalog/
Product/AbstractProductPlugin1.php le with partial content, as follows:
namespace Foggyline\Plugged\Block\Catalog\Product;
class AbstractProductPlugin1
{
public function beforeGetAddToCartUrl(
$subject,
$product, $additional = []
)
{
var_dump('Plugin1 - beforeGetAddToCartUrl');
}
public function afterGetAddToCartUrl($subject)
{

Plugins
[ 116 ]
var_dump('Plugin1 - afterGetAddToCartUrl');
}
public function aroundGetAddToCartUrl(
$subject,
\Closure $proceed,
$product,
$additional = []
)
{
var_dump('Plugin1 - aroundGetAddToCartUrl');
return $proceed($product, $additional);
}
}
As per the type denition in the di.xml le, the plugin observes the Magento\
Catalog\Block\Product\AbstractProduct class, and this class has a method
called getAddToCartUrl, which is dened as follows:
public function getAddToCartUrl($product, $additional = [])
{
//method body here...
}
The AbstractProductPlugin1 class does not have to be extended from another class
for the plugin to work. We dene the before, after and around listeners for the
getAddToCartUrl method by using the naming convention, as follows:
<before> + <getAddToCartUrl> => beforeGetAddToCartUrl
<after> + <getAddToCartUrl> => afterGetAddToCartUrl
<around> + <getAddToCartUrl> => aroundGetAddToCartUrl
We will go into the details of each listener later. Right now we need to
nish the module by creating the AbstractProductPlugin2.php and
AbstractProductPlugin3.php les as a copy of AbstractProductPlugin1.php
and along with that, simply changing all the number values within their code from 1
to 2 or 3.
It's a good practice to organize the listeners into folders matching the structure of
the observed class location. For example, if a module is called Foggyline_Plugged
and we are observing the method in the Magento\Catalog\Block\Product\
AbstractProduct class, we should consider putting the plugin class into the
Foggyline/Plugged/Block/Catalog/Product/AbstractProductPlugin.php le.
This is a not a requirement. Rather, it is a nice convention for other developers to
easily manage the code.

Chapter 6
[ 117 ]
Once the module is in place, we need to execute the following commands on
the console:
php bin/magento module:enable Foggyline_Plugged
php bin/magento setup:upgrade
This will make the module visible to Magento.
If we now open the storefront in a browser for a category page, we will see the
results of all the var_dump function calls.
Let's go ahead and take a look at each and every listener method in detail.
Using the before listener
The before listeners are used when we want to change the arguments of an original
method or add some behavior before an original method is called.
Looking back at the beforeGetAddToCartUrl listener method denition, you will
see that it has three properties assigned in sequence—$subject, $product, and
$additional.
With the before method listener, the rst property is always the $subject property,
which contains the instance of the object type being observed. Properties following
the $subject property match the properties of the observed getAddToCartUrl
method in a sequential order.
This simple rule used for transformation is as follows:
getAddToCartUrl($product, $additional = [])
beforeGetAddToCartUrl($subject, $product, $additional = [])
The before listener methods do not need to have a return value.
If we run get_class($subject) in the beforeGetAddToCartUrl listener method
that we previously saw, we will have the following result:
\Magento\Catalog\Block\Product\ListProduct\Interceptor
extends \Magento\Catalog\Block\Product\ListProduct
extends \Magento\Catalog\Block\Product\AbstractProduct
What this shows is that even though we are observing the AbstractProduct class,
the $subject property is not directly of that type. Rather, it is of the ListProduct\
Interceptor type. This is something that you should keep in mind during
development.

Plugins
[ 118 ]
Using the after listener
The after listeners are used when we want to change the values returned by an
original method or add some behavior after an original method is called.
Looking back at the afterGetAddToCartUrl listener method denition, you will see
that it has only one $subject property assigned.
With the after method listener, the rst and only property is always the $subject
property, which contains the instance of the object type being observed and not the
return value of the observed method.
This simple rule used for transformation is as follows:
getAddToCartUrl($product, $additional = [])
afterGetAddToCartUrl($subject)
The after listener methods do not need to have a return value.
Like the before interceptor method, the $subject property in this case is not
directly of the AbstractProduct type. Rather, it is of the parent ListProduct\
Interceptor type.
Using the around listener
The around listeners are used when we want to change both the arguments and the
returned values of an original method or add some behavior before and after an
original method is called.
Looking back at the aroundGetAddToCartUrl listener method denition, you will
see that it has four properties assigned in sequence—$subject, $proceed, $product,
and $additional.
With the after method listener, the rst property is always the $subject property,
which contains the instance of the object type being observed and not the return
value of the observed method. The second property is always the $proceed property
of \Closure. The properties following the $subject and $proceed match the
properties of the observed getAddToCartUrl method in the sequential order too.
This simple rule used for transformation is as follows:
getAddToCartUrl($product, $additional = [])
aroundGetAddToCartUrl(
$subject,
\Closure $proceed,
$product,
$additional = []
)

Chapter 6
[ 119 ]
The around listener methods must have a return value. The return value is formed
in such way that the parameters following the $closure parameter in the around
listener method denition are passed to the $closure function call in a sequential
order, as follows:
return $proceed($product, $additional);
//or
$result = $proceed($product, $additional);
return $result;
The plugin sort order
Looking back, when we dened a plugin in the di.xml le, one of the attributes that
we set for every plugin denition was sortOrder. It was set to 100, 200 to 300 for
foggyPlugin1, foggyPlugin2 and foggyPlugin3 respectively.
The ow of the code execution for the preceding plugins is as follows:
• Plugin1 - beforeGetAddToCartUrl
• Plugin1 - aroundGetAddToCartUrl
• Plugin2 - beforeGetAddToCartUrl
• Plugin2 - aroundGetAddToCartUrl
• Plugin3 - beforeGetAddToCartUrl
• Plugin3 - aroundGetAddToCartUrl
• Plugin3 - afterGetAddToCartUrl
• Plugin2 - afterGetAddToCartUrl
• Plugin1 - afterGetAddToCartUrl
In other words, if multiple plugins are listening to the same method, the following
execution order is used:
• The before plugin functions with the lowest sortOrder value
• The around plugin functions with the lowest sortOrder value
• The before plugin functions following the sortOrder value from the lowest
to the highest
• The around plugin functions following the sortOrder value from the lowest
to the highest
• The after plugin functions with the highest sortOrder value
• The after plugin functions following the sortOrder value from the highest
to the lowest
Plugins
[ 120 ]
Special care needs to be taken when it comes to the around listener, as
it is the only listener that needs to return a value. If we omit the return
value, we risk breaking the execution ow in such a way that the other
around plugins for the same method won't be executed.
Summary
In this chapter, we had a look at a powerful feature of Magento called plugins. We
created a small module with three plugins; each plugin had a different sort order.
This enabled us to trace the execution ow of multiple plugins that observe the same
method. We explored in detail the before, after, and around listener methods,
while having a strong emphasis on the parameter order. The nalized module used
in this chapter can be found at https://github.com/ajzele/B05032-Foggyline_
Plugged.
In the next chapter, we are going to dive deep into backend development.

[ 121 ]
Backend Development
Backend development is a term that is most commonly used to describe work
closely related to the server side. This usually implies the actual server, application
code, and the database. For example, if we open a storefront of a web shop, add
a few products to the cart, and then check out, the application will store the
information provided. This information is managed on a server with a server-
side language, such as PHP, and then saved in a database. In Chapter 4, Models and
Collections, we took a look at the backbone of backend development. In this chapter,
we will explore other backend-related aspects.
We will use the Foggyline_Office module that was dened in one of the previous
chapters as we go through the following topics:
• Cron jobs
• Notification messages
• Sessions and cookies
• Logging
• The profiler
• Events and observers
• Caches
• Widgets
• Custom variables
• i18n (internationalization)
• Indexers
These individual isolated units of functionality are mostly used in everyday
backend-related development.

Backend Development
[ 122 ]
Cron jobs
Speaking of cron jobs, it is worth noting one important thing. A Magento cron job
is not the same as an operating system cron job. An operating system cron is driven
by a crontab (short for cron table) le. The crontab le, is a conguration le that
species shell commands that need to be run periodically on a given schedule.
A Magento cron job is driven by a periodic execution of PHP code that handles
entries in the cron_schedule table. The cron_schedule table is where Magento
cron jobs are queued once they are picked up from the individual crontab.xml le.
The Magento cron jobs cannot be executed without the operating system cron
job being set to execute the php bin/magento cron:run command. Ideally, an
operating system cron job should be set to trigger Magento's cron:run every
minute. Magento will then internally execute its cron jobs according to the way
an individual cron job is dened in the crontab.xml le.
To dene a new cron job in Magento cron, we rst need to dene a crontab.xml
le in the module. Let's create a app/code/Foggyline/Office/etc/crontab.xml
le with the following content:
<?xml version="1.0"?>
<config xmlns:xsi="http://www.w3.org/2001/XMLSchema-instance"
xsi:noNamespaceSchemaLocation=
"urn:magento:module:Magento_Cron:etc/crontab.xsd">
<group id="default">
<job name="foggyline_office_logHello" instance=
"Foggyline\Office\Model\Cron" method="logHello">
<schedule>*/2 * * * *</schedule>
</job>
</group>
</config>
Note that the XSD schema location points to crontab.xsd from within the Magento_
Cron module.
The id attribute of a group element is set to the default value. In its modules,
Magento denes two different groups, namely default and index. We used the
default value, as this is the one that gets executed when the standard php bin/
magento cron:run command is triggered on the console.
Within the group element, we have individual jobs dened under the job element.
The job element requires us to specify the name, instance, and method attributes.
The name attribute has to be unique within the group element. The value of the
instance and method attributes should point to the class that will be instantiated
and the method within the class that needs to be executed.

Chapter 7
[ 123 ]
The schedule element nested within the cron job species the desired time of job
execution. It uses the same time expression as that of the entries in an operating
system crontab le. The specic example that we will look at denes an expression
(*/2 * * * *) that is executed every two minutes.
Once we have dened the crontab.xml le, we need to dene the
Foggyline\Office\Model\Cron class le, as follows:
namespace Foggyline\Office\Model;
class Cron
{
protected $logger;
public function __construct(
\Psr\Log\LoggerInterface $logger
)
{
$this->logger = $logger;
}
public function logHello()
{
$this->logger->info('Hello from Cron job!');
return $this;
}
}
The preceding code simply denes a logHello method used by the cron job. In
the logHello method, we used the logger method that was instantiated via the
constructor. The logger method will make a log entry in the var/log/system.log
le once it is executed.
Once the command is executed, you will see the Ran jobs by schedule message in
the console. Additionally, the cron_schedule table should get lled with all the
Magento cron jobs that were dened.
At this point, we should trigger the php bin/magento cron:run command in
the console.
Backend Development
[ 124 ]
The cron_schedule table contains the following columns:
• schedule_id: The auto-increment primary field.
• job_code: The value of the job name attribute, as defined in crontab.xml
file, which equals to foggyline_office_logHello table in our example.
• status: Defaults to the pending value for the newly created entries in the
table and allows for a pending, running, success, missed or error value.
Its value changes as the cron job traverses through its life cycle.
• messages: Stores the possible exception error message if the exception has
occurred during a job's execution.
• created_at: The timestamp value that denotes when a job was created.
• scheduled_at: The timestamp value that denotes when a job was scheduled
for execution.
• executed_at: The timestamp value that denotes when a job's
execution started.
• finished_at: The timestamp value that denotes when a job has
finished executing.
Unless we have already set the operating system cron to trigger the php bin/
magento cron:run command, we need to trigger it on our own a few times every
two minutes in order to actually execute the job. The rst time a command is run, if
the job does not exist in the cron_schedule table, Magento will merely queue it, but
it won't execute it. The subsequent cron runs will execute the command. Once we
are sure that the cron job entry in the cron_schedule table has the finished_at
column value lled, we will see an entry that looks like [2015-11-21 09:42:18]
main.INFO: Hello from Cron job! [] [] in the var/log/system.log le.
While developing and testing cron jobs in Magento, we might need to
truncate the cron_schedule table, delete Magento's var/cache
value, and execute the php bin/magento cron:run command
repetitively until we get it tested and working.
Notication messages
Magento implements the notication message mechanism via the Messages
module. The Messages module conforms to \Magento\Framework\Message\
ManagerInterface. Though the interface itself does not impose any session relation,
an implementation adds interface-dened types of messages to a session and allows
access to those messages later. In the app/etc/di.xml le, there is a preference
dened for \Magento\Framework\Message\ManagerInterface towards the
Magento\Framework\Message\Manager class.
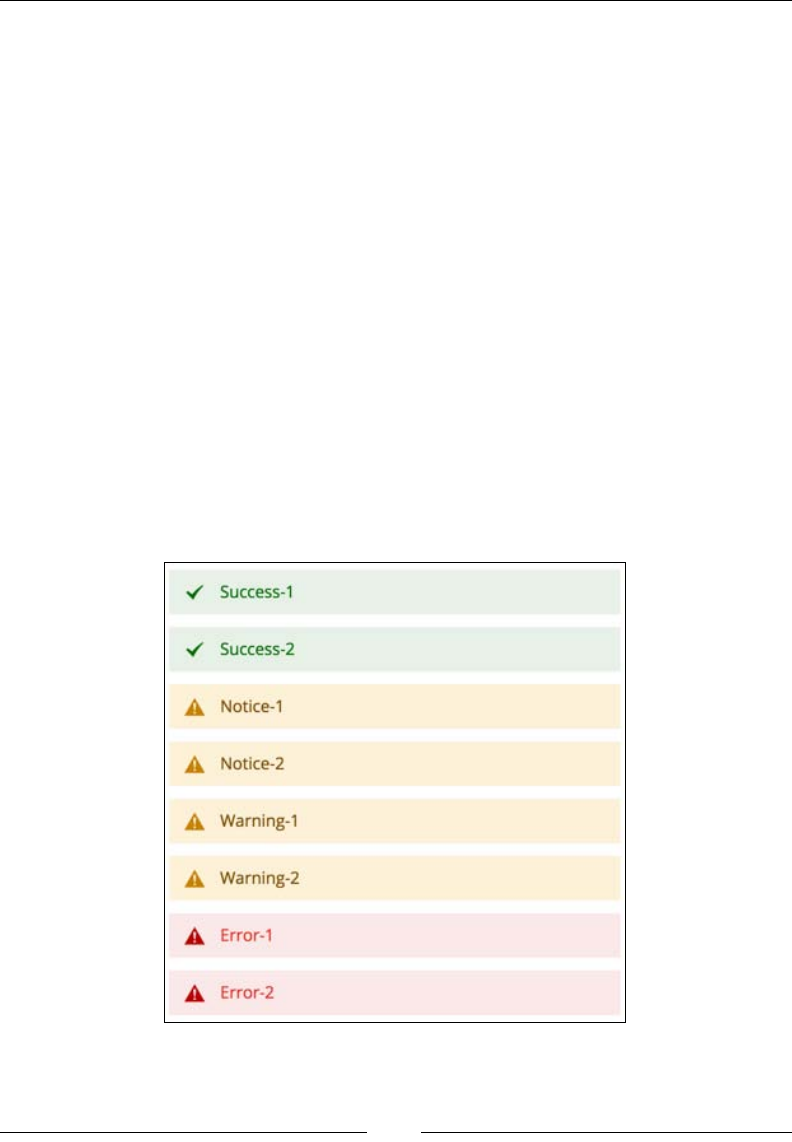
Chapter 7
[ 125 ]
Message\ManagerInterface species four types of messages, namely error,
warning, notice, and success. The types of messages are followed by several
key methods in the Message\Manager class, such as addSuccess, addNotice,
addWarning, addError, and addException. The addException method is basically
a wrapper for addError that accepts an exception object as a parameter.
Let's try to run the following code in the execute method of app/code/Foggyline/
Office/Controller/Test/Crud.php:
$resultPage = $this->resultPageFactory->create();
$this->messageManager->addSuccess('Success-1');
$this->messageManager->addSuccess('Success-2');
$this->messageManager->addNotice('Notice-1');
$this->messageManager->addNotice('Notice-2');
$this->messageManager->addWarning('Warning-1');
$this->messageManager->addWarning('Warning-2');
$this->messageManager->addError('Error-1');
$this->messageManager->addError('Error-2');
return $resultPage;
Once this code executed, the result, as shown in the following screenshot, will appear
on the page in the browser:

Backend Development
[ 126 ]
Notication messages appear both in the frontend and admin area.
The frontend layout vendor/magento/module-theme/view/frontend/layout/
default.xml le denes it as follows:
<page layout="3columns"
xmlns:xsi="http://www.w3.org/2001/XMLSchema-instance"
xsi:noNamespaceSchemaLocation=
"../../../../../../../lib/internal/Magento/Framework
/View/Layout/etc/page_configuration.xsd">
<update handle="default_head_blocks"/>
<body>
<!-- ... -->
<referenceContainer name="columns.top">
<container name="page.messages" htmlTag="div"
htmlClass="page messages">
<block class="Magento\Framework\View\Element
\Messages" name="messages" as="messages"
template="Magento_Theme::messages.phtml"/>
</container>
</referenceContainer>
<!-- ... -->
</body>
</page>
The template le that renders the messages is view/frontend/templates/
messages.phtml in the Magento_Theme module. By looking at the Magento\
Framework\View\Element\Messages class, you will see that the _toHtml method
branches into if-else statements, depending on whether template is set or not. In
case the template is not set, _toHtml internally calls the _renderMessagesByType
method, which renders messages in the HTML format that are grouped by type.
The view/adminhtml/layout/default.xml admin layout le in the
Magento_AdminNotification module denes it as follows:
<page xmlns:xsi="http://www.w3.org/2001/XMLSchema-instance"
xsi:noNamespaceSchemaLocation="urn:magento:
framework:View/Layout/etc/page_configuration.xsd">
<body>
<referenceContainer name="notifications">
<block class="Magento\AdminNotification\Block
\System\Messages" name="system_messages"
as="system_messages" before="-" template=
"Magento_AdminNotification::system/messages.phtml"/>
</referenceContainer>
</body>
</page>
Chapter 7
[ 127 ]
The template le that renders the messages is view/adminhtml/templates/
system/messages.phtml in the Magento_AdminNotification module. When you
look at the Magento\AdminNotification\Block\System\Messages class, you will
see that its _toHtml is calling the _toHtml parent method, where the parent belongs
to the \Magento\Framework\View\Element\Template class. This means that the
output is relying on the view/adminhtml/templates/system/messages.phtml le
in the Magento_AdminNotification module.
Session and cookies
Sessions in Magento conform to Magento\Framework\Session\
SessionManagerInterface. In the app/etc/di.xml le, there is a denition
preference for the SessionManagerInterface class which points to the Magento\
Framework\Session\Generic class type. The Session\Generic class is just an
empty class that extends the Magento\Framework\Session\SessionManager class,
which in turn implements the SessionManagerInterface class.
There is one important object that gets instantiated in the SessionManager instance
that conforms to \Magento\Framework\Session\Config\ConfigInterface. On
looking at app/etc/di.xml le, we can see a preference for ConfigInterface
pointing to a Magento\Framework\Session\Config class type.
To fully understand the session behavior in Magento, we should
study the inner workings of both the SessionManager and
Session\Config classes.
Magento uses cookies to keep track of a session. These cookies have a default lifetime
of 3,600 seconds. When a session is established, a cookie with the name of PHPSESSID
is created in the browser. The value of the cookie equals the session name. By
default, sessions are stored in les in the var/session directory of Magento's
root installation.
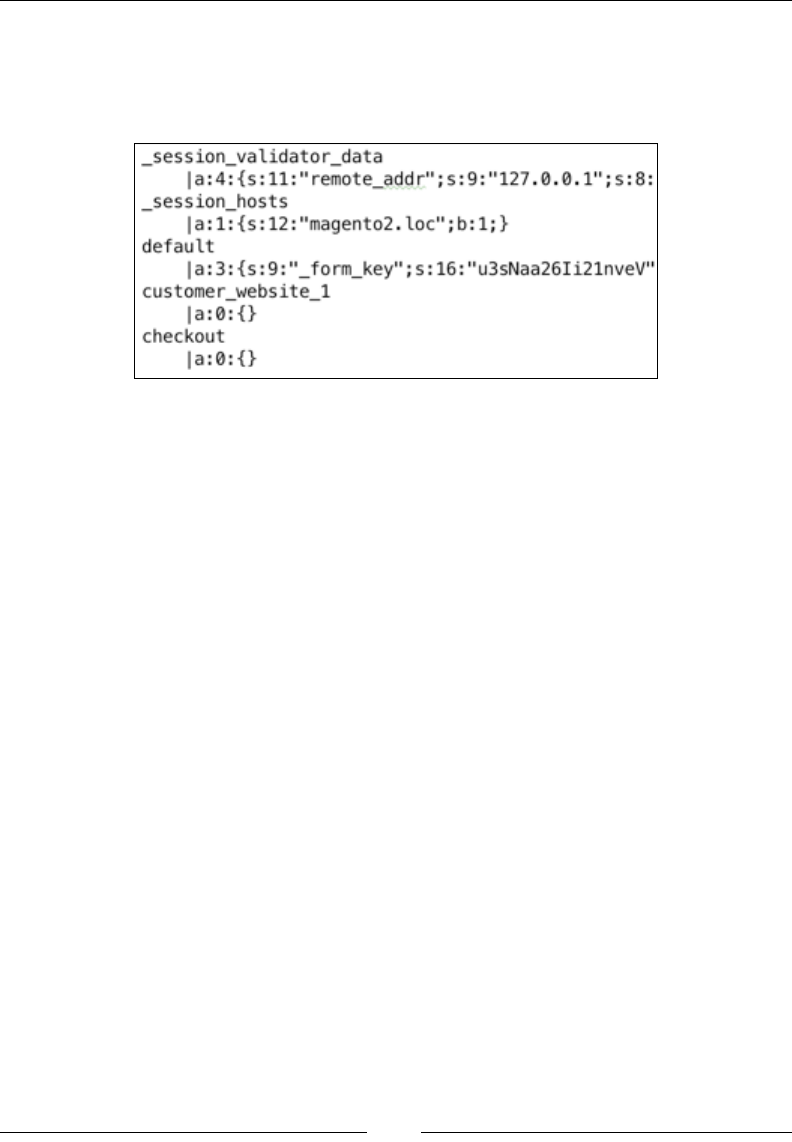
Backend Development
[ 128 ]
If you have a look at these session les, you will see that session information
is being stored in serialized strings that are divided into groupings such as _
session_validator_data, _session_hosts, default, customer_website_1,
and checkout, as shown in the following screenshot:
This is not the nite list of grouping. Modules that implement their own session
handling bits can add their own groups.
We can store and retrieve information in a session by simply using expressions like
the following ones:
$this->sessionManager->setFoggylineOfficeVar1('Office1');
$this->sessionManager->getFoggylineOfficeVar1();
The preceding expressions will create and get an entry from the session under the
default group.
We can get the entire content of the default session group simply by using the
$this->sessionManager->getData() expression, which will return an array of
data that is similar to the following one:
array(3) {
["_form_key"] => string(16) "u3sNaa26Ii21nveV"
["visitor_data"] => array(14) {
["last_visit_at"] => string(19) "2015-08-19 07:40:03"
["session_id"] => string(26) "8p82je0dkqq1o00lanlr6bj6m2"
["visitor_id"] => string(2) "35"
["server_addr"] => int(2130706433)
["remote_addr"] => int(2130706433)
["http_secure"] => bool(false)
["http_host"] => string(12) "magento2.loc"
["http_user_agent"] => string(121) "Mozilla/5.0 …"
["http_accept_language"] => string(41) "en-US,en;"
["http_accept_charset"] => string(0) ""

Chapter 7
[ 129 ]
["request_uri"] => string(38)
"/index.php/foggyline_office/test/crud/"
["http_referer"] => string(0) ""
["first_visit_at"] => string(19) "2015-08-19 07:40:03"
["is_new_visitor"] => bool(false)
}
["foggyline_office_var_1"] => string(7) "Office1"
}
As you can see, the foggyline_office_var_1 value is right there among other
session values.
There are several useful methods of ConfigInterface that we can use to fetch
session conguration information; a few of these methods are as follows:
• getCookieSecure
• getCookieDomain
• getCookieHttpOnly
• getCookieLifetime
• getName
• getSavePath
• getUseCookies
• getOptions
Here's a result example of the getOptions method call on the Session\Config
instance:
array(9) {
["session.save_handler"] => string(5) "files"
["session.save_path"] => string(39)
"/Users/branko/www/magento2/var/session/"
["session.cookie_lifetime"] => int(3600)
["session.cookie_path"] => string(1) "/"
["session.cookie_domain"] => string(12) "magento2.loc"
["session.cookie_httponly"] => bool(true)
["session.cookie_secure"] => string(0) ""
["session.name"] => string(9) "PHPSESSID"
["session.use_cookies"] => bool(true)
}
Cookies often go hand in hand with sessions. Besides being used to link to a certain
session, cookies are often used to store some information on the client side, thus
tracking or identifying the return users and customers.

Backend Development
[ 130 ]
Besides the pure PHP approach with the setcookie function, we can manage
cookies in Magento through an instance of Magento\Framework\Stdlib\
CookieManagerInterface. When you look at app/etc/di.xml le, you will see
that the preference for CookieManagerInterface points to a class of the Magento\
Framework\Stdlib\Cookie\PhpCookieManager type.
The following restrictions are worth noting when it comes to Magento cookies:
• We can set maximum of 50 cookies in the system. Otherwise, Magento will
throw an Unable to send the cookie. Maximum number of cookies
would be exceeded exception.
• We can store a cookie with a maximum size of 4096 bytes. Otherwise,
Magento will throw an Unable to send the cookie. Size of \'%name\'
is %size bytes exception.
By imposing these restrictions, Magento ensures that we are compatible with
most browsers.
The CookieManagerInterface class, among other things, species the
setSensitiveCookie method requirement. This method sets a value in a private
cookie with the given $name $value pairing. Sensitive cookies have HttpOnly set to
true and thus cannot be accessed by JavaScript.
As we will soon demonstrate in the following examples, to set a public or private
cookie, we can help ourselves by using instances of the following:
• \Magento\Framework\Stdlib\Cookie\CookieMetadataFactory
• \Magento\Framework\Stdlib\CookieManagerInterface
• \Magento\Framework\Session\Config\ConfigInterface
We can set public cookies in the following way:
$cookieValue = 'Just some value';
$cookieMetadata = $this->cookieMetadataFactory
->createPublicCookieMetadata()
->setDuration(3600)
->setPath($this->sessionConfig->getCookiePath())
->setDomain($this->sessionConfig->getCookieDomain())
->setSecure($this->sessionConfig->getCookieSecure())
->setHttpOnly($this->sessionConfig->getCookieHttpOnly());
$this->cookieManager
->setPublicCookie('cookie_name_1', $cookieValue,
$cookieMetadata);
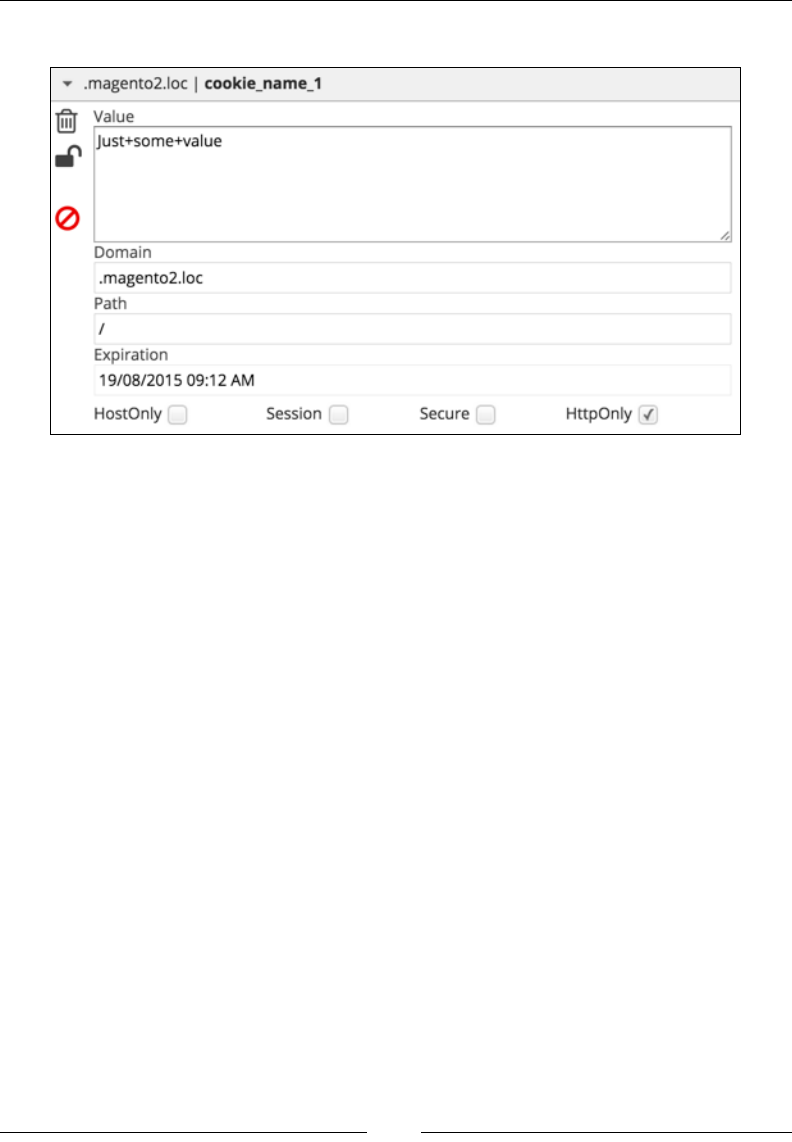
Chapter 7
[ 131 ]
The preceding code will result in a cookie, as shown in the following screenshot:
We can set private cookies in the following way:
$cookieValue = 'Just some value';
$cookieMetadata = $this->cookieMetadataFactory
->createSensitiveCookieMetadata()
->setPath($this->sessionConfig->getCookiePath())
->setDomain($this->sessionConfig->getCookieDomain());
$this->cookieManager
->setSensitiveCookie('cookie_name_2', $cookieValue,
$cookieMetadata);
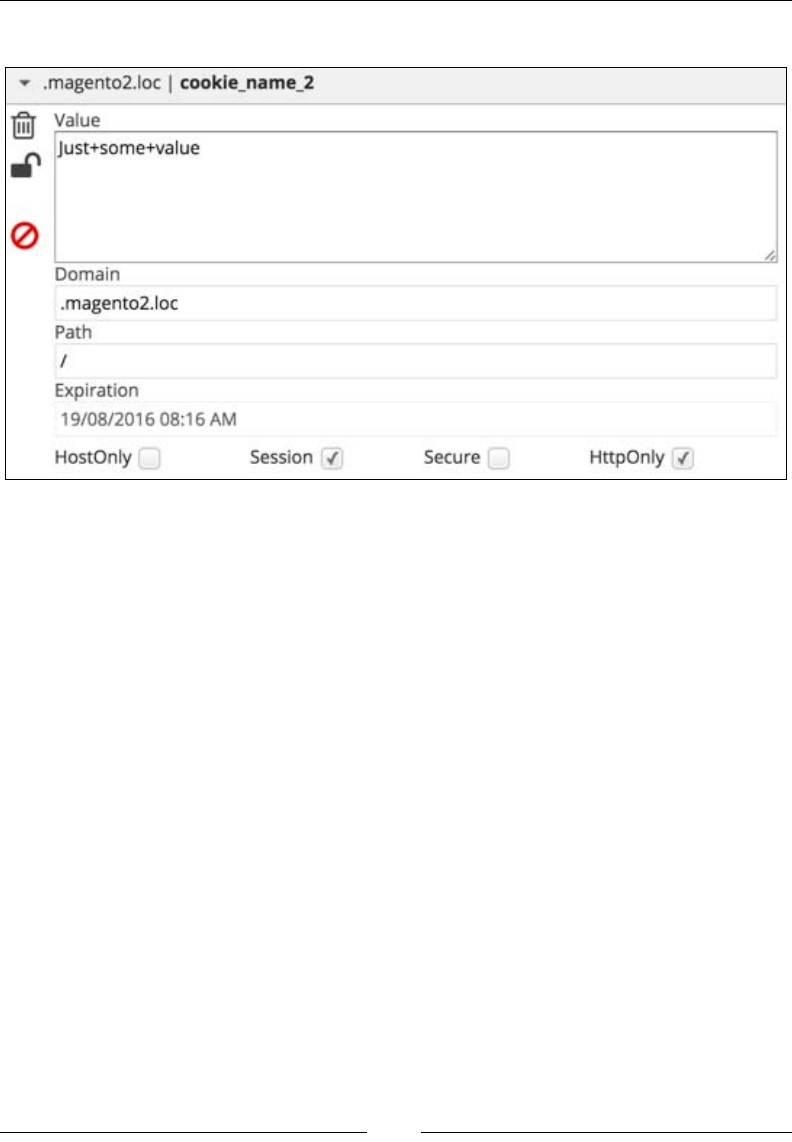
Backend Development
[ 132 ]
The preceding code will result in a cookie, as shown in the following screenshot:
Interestingly, both the public and private cookies in the preceding example show
that HttpOnly is checked off because by default, a Magento admin has Stores |
Settings | Conguration | General | Web | Default Cookie Settings | Use HTTP
Only set to Yes. Since we are using the setHttpOnly method in the public cookie
example, we simply picked up the config value via $this->sessionConfig->
getCookieHttpOnly() and passed it on. If we comment out that line, we will see
that the public cookie does not really set HttpOnly by default.
Logging
Magento supports the messages logging mechanism via its \Psr\Log\
LoggerInterface class. The LoggerInterface class has a preference dened
within app/etc/di.xml le for the Magento\Framework\Logger\Monolog class
type. The actual crux of implementation is actually in the Monolog parent class
named Monolog\Logger, which comes from the Monolog vendor.
The LoggerInterface class uses the following eight methods to write logs to the
eight RFC 5424 levels:
• debug
• info
• notice

Chapter 7
[ 133 ]
• warning
• error
• critical
• alert
• emergency
To use a logger, we need to pass the LoggerInterface class to a constructor of
a class from within we want to use it and then simply make one of the following
method calls:
$this->logger->log(\Monolog\Logger::DEBUG, 'debug msg');
$this->logger->log(\Monolog\Logger::INFO, 'info msg');
$this->logger->log(\Monolog\Logger::NOTICE, 'notice msg');
$this->logger->log(\Monolog\Logger::WARNING, 'warning msg');
$this->logger->log(\Monolog\Logger::ERROR, 'error msg');
$this->logger->log(\Monolog\Logger::CRITICAL, 'critical msg');
$this->logger->log(\Monolog\Logger::ALERT, 'alert msg');
$this->logger->log(\Monolog\Logger::EMERGENCY, 'emergency msg');
Alternatively, the preferred shorter version through individual log level type
methods is as follows:
$this->logger->debug('debug msg');
$this->logger->info('info msg');
$this->logger->notice('notice msg');
$this->logger->warning('warning msg');
$this->logger->error('error msg');
$this->logger->critical('critical msg');
$this->logger->alert('alert msg');
$this->logger->emergency('emergency msg');
Both approaches result in the same two log les being created in Magento, which are
as follows:
• var/log/debug.log
• var/log/system.log
The debug.log le contains only the debug level type of the log, while the rest are
saved under system.log.
Backend Development
[ 134 ]
Entries within these logs will then look like this:
[2015-11-21 09:42:18] main.DEBUG: debug msg {"is_exception":false}
[]
[2015-11-21 09:42:18] main.INFO: info msg [] []
[2015-11-21 09:42:18] main.NOTICE: notice msg [] []
[2015-11-21 09:42:18] main.WARNING: warning msg [] []
[2015-11-21 09:42:18] main.ERROR: error msg [] []
[2015-11-21 09:42:18] main.CRITICAL: critical msg [] []
[2015-11-21 09:42:18] main.ALERT: alert msg [] []
[2015-11-21 09:42:18] main.EMERGENCY: emergency msg [] []
Each of these logger methods can accept an entire array of arbitrary data called
context, as follows:
$this->logger->info('User logged in.', ['user'=>'Branko',
'age'=>32]);
The preceding expression will produce the following entry in system.log:
[2015-11-21 09:42:18] main.INFO: User logged in.
{"user":"Branko","age":32} []
We can manually delete any of the .log les from the var/log
directory, and Magento will automatically create it again when needed.
Magento also has another logging mechanism in place, where it logs the following
actions in the log_* tables in a database:
• log_customer
• log_quote
• log_summary
• log_summary_type
• log_url
• log_url_info
• log_visitorz
• log_visitor_info
• log_visitor_online
It is worth noting that this database logging is not related in any way to Psr logger
that was described previously. While Psr logger serves developers within the code to
group and log certain messages according to the Psr standard, the database logging
logs the live data that is a result of user/customer interaction in the browser.
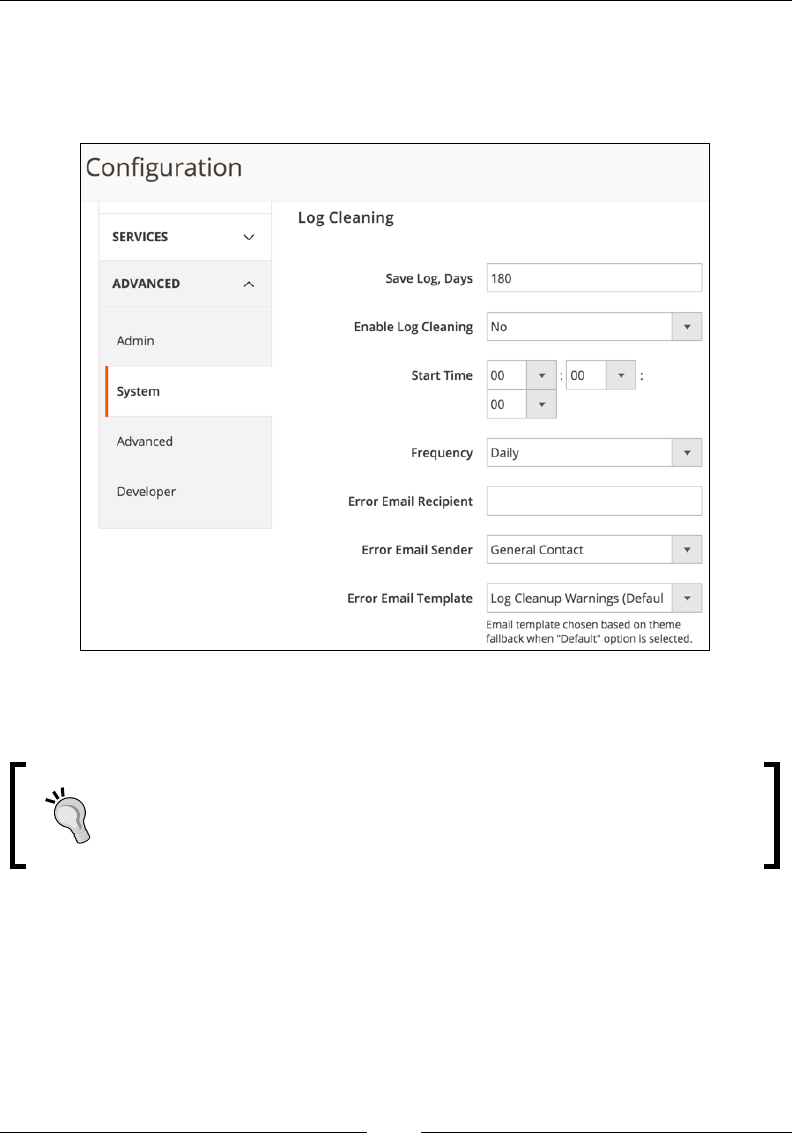
Chapter 7
[ 135 ]
By default, Magento keeps database logs for around 180 days. This is a congurable
option that can be controlled in the Magento admin area under the Stores | Settings
| Conguration | Advanced | System | Log Cleaning tab with other log related
options, as shown in the following screenshot:
Conguration options that are shown in the preceding screenshot only bare meaning
operating system cron is triggering Magento cron.
We can execute two commands on terminal: php bin/magento
log:status to get the current state information about log tables and
php bin/magento log:clean to force the clearing of tables.
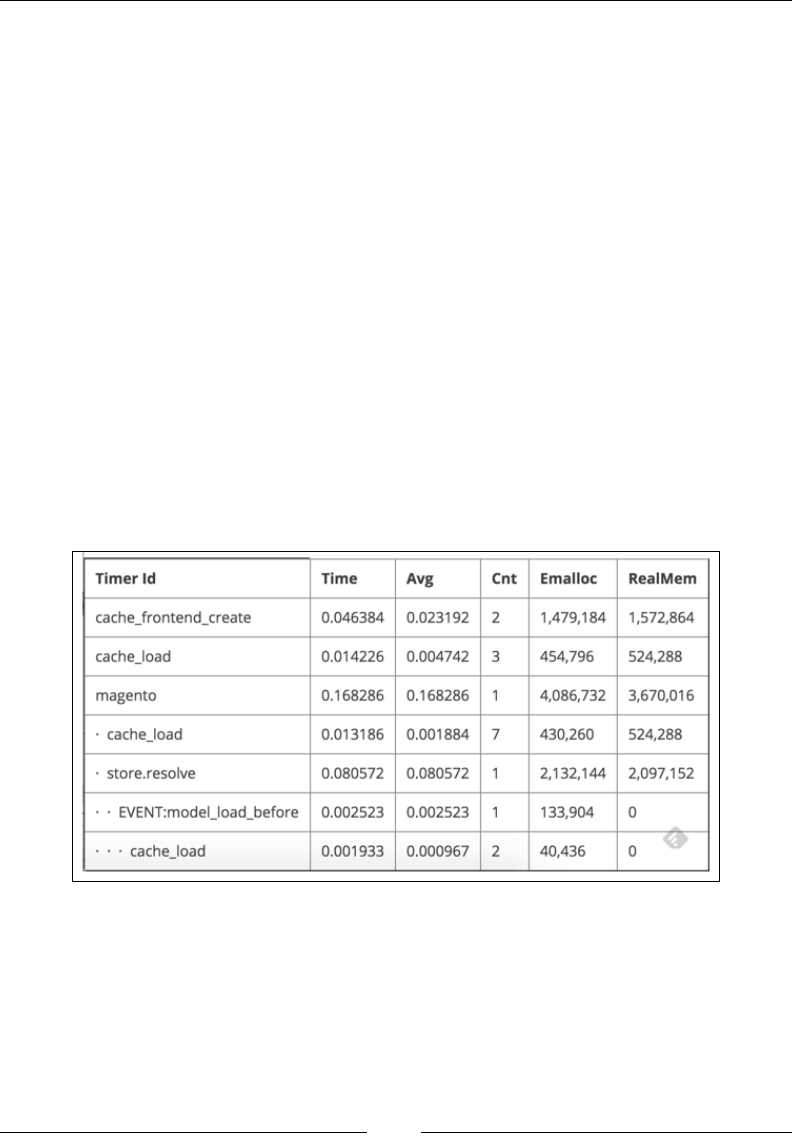
Backend Development
[ 136 ]
The proler
Magento has an in-built proler that can be used to identify performance problems
on the server side. In a nutshell, the proler can tell us the execution time of certain
chunks of code. There is nothing that great with its behavior. We can only get the
execution time of code blocks or individual expressions that have been wrapped
by the proler's start and stop methods. On its own, Magento calls for the proler
extensively across its code. However, we can't see it in effect as the proler output is
disabled by default.
Magento supports three proler outputs, namely html, csvfile, and firebug.
To enable the proler, we can edit .htaccess and add one of the following
expressions:
• SetEnv MAGE_PROFILER "html"
• SetEnv MAGE_PROFILER "csvfile"
• SetEnv MAGE_PROFILER "firebug"
The HTML type of proler will show its output into the footer area of a page that we
open in the browser, as shown in the following screenshot:
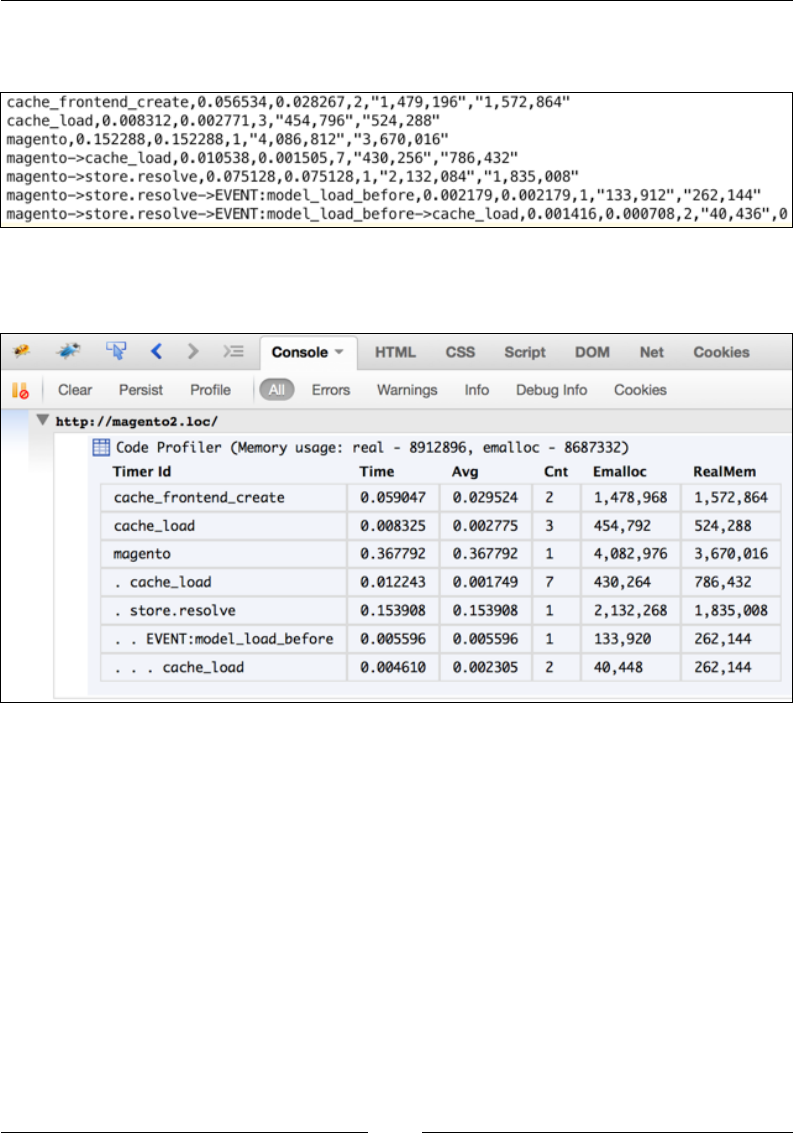
Chapter 7
[ 137 ]
The csv le type of proler will output into var/log/profiler.csv, as shown in
the following screenshot:
The rebug type of proler will output into var/log/profiler.csv, as shown in
the following screenshot:
The proler outputs the following pieces of information:
• Time profiler shows the time spent from Profiler::start to
Profiler::stop.
• Avg profiler shows the average time spent from Profiler::start to
Profiler::stop for cases where Cnt is greater than one.
• Cnt profiler shows the integer value of how many times we have started the
profiler with the same timer name. For example, if we have called \Magento\
Framework\Profiler::start('foggyline:office'); twice somewhere in
the code, then Cnt will show the value of 2.
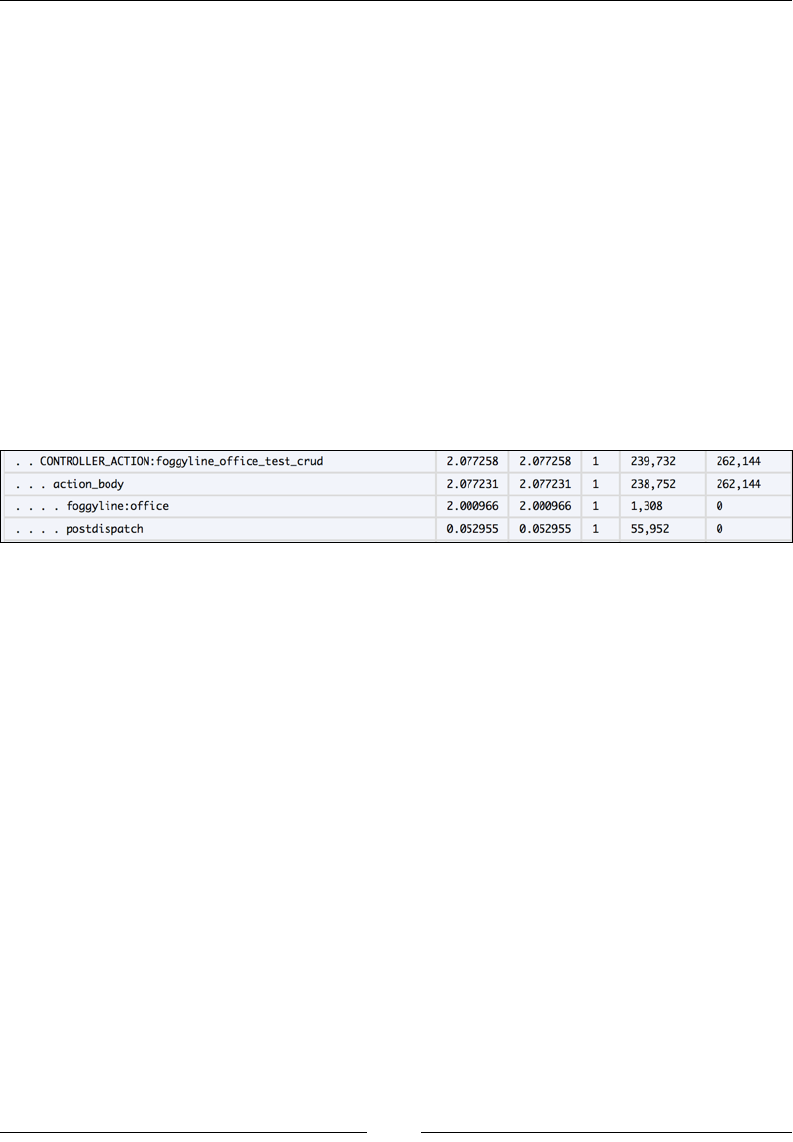
Backend Development
[ 138 ]
• Emalloc profiler stands for the amount of memory allocated to PHP. It is a
mix of the core PHP memory_get_usage function without the true parameter
passed to it and the timer values.
• RealMem profiler also stands for the amount of memory allocated to PHP
whose final value is also obtained via the memory_get_usage function minus
the timer values, but this time with the true parameter passed to it.
We can easily add our own Profiler::start calls anywhere in the code. Every
Profiler::start should be followed by some code expressions and then nalized
with a Profiler::stop call, as follows:
\Magento\Framework\Profiler::start('foggyline:office');
sleep(2); /* code block or single expression here */
\Magento\Framework\Profiler::stop('foggyline:office');
Depending on where we call the proler in the code, the resulting output should be
similar to the one shown in the following screenshot:
Events and observers
Magento implements the observer pattern through \Magento\Framework\
Event\ManagerInterface. In app/etc/di.xml, there is a preference for
ManagerInterface that points to the Magento\Framework\Event\Manager\Proxy
class type. The Proxy class further extends the \Magento\Framework\Event\
Manager class that implements the actual event dispatch method.
Events are dispatched by calling a dispatch method on the instance of the Event\
Manager class and passing the name and some data, which is optional, to it. Here's
an example of a Magento core event:
$this->eventManager->dispatch(
'customer_customer_authenticated',
['model' => $this->getFullCustomerObject($customer),
'password' => $password]
);

Chapter 7
[ 139 ]
The $this->eventManager is an instance of the previously mentioned Event\
Manager class. In this case, the event name equals to customer_customer_
authenticated, while the data passed to the event is the array with two elements.
The preceding event is red when the authenticate method is called on \Magento\
Customer\Model\AccountManagement, that is, when a customer logs in.
Dispatching an event only makes sense if we expect someone to observe it and
execute their code when the event is dispatched. Depending on the area from
which we want to observe events, we can dene observers in one of the
following XML les:
• app/code/{vendorName}/{moduleName}/etc/events.xml
• app/code/{vendorName}/{moduleName}/etc/frontend/events.xml
• app/code/{vendorName}/{moduleName}/etc/adminhtml/events.xml
Let's dene an observer that will log an e-mail address of an authenticated user
into a var/log/system.log le. We can use the Foggyline_Office module and
add some code to it. As we are interested in the storefront, it makes sense to put the
observer in the etc/frontend/events.xml module.
Let's dene the app/code/Foggyline/Office/etc/frontend/events.xml le with
content, as follows:
<config xmlns:xsi="http://www.w3.org/2001/XMLSchema-instance"
xsi:noNamespaceSchemaLocation="urn:magento:framework:
Event/etc/events.xsd">
<event name="customer_customer_authenticated">
<observer name="foggyline_office_customer_authenticated"
instance="Foggyline\Office\Observer\LogCustomerEmail" />
</event>
</config>
Here, we are specifying a foggyline_office_customer_authenticated
observer for the customer_customer_authenticated event. The observer is
dened in the LogCustomerEmail class that is placed in the Observer module
directory. The Observer class has to implement the Magento\Framework\Event\
ObserverInterface class. The Observer interface denes a single execute method.
The execute method hosts the observer code and is executed when the customer_
customer_authenticated event is dispatched.

Backend Development
[ 140 ]
Let's go ahead and dene the Foggyline\Office\Observer\LogCustomerEmail
class in the app/code/Foggyline/Office/Observer/LogCustomerEmail.php le,
as follows:
namespace Foggyline\Office\Observer;
use Magento\Framework\Event\ObserverInterface;
class LogCustomerEmail implements ObserverInterface
{
protected $logger;
public function __construct(
\Psr\Log\LoggerInterface $logger
)
{
$this->logger = $logger;
}
/**
* @param \Magento\Framework\Event\Observer $observer
* @return self
*/
public function execute(\Magento\Framework\Event\Observer
$observer)
{
//$password = $observer->getEvent()->getPassword();
$customer = $observer->getEvent()->getModel();
$this->logger->info('Foggyline\Office: ' . $customer->
getEmail());
return $this;
}
}
The execute method takes a single parameter called $observer of the \Magento\
Framework\Event\Observer type. The event that we are observing is passing two
pieces of data within the array, namely the model and password. We can access
this by using the $observer->getEvent()->get{arrayKeyName} expression.
The $customer object is an instance of the Magento\Customer\Model\Data\
CustomerSecure class, which contains properties such as email, firstname,
lastname, and so on. Thus, we can extract the e-mail address from it and pass it to
logger's info method.

Chapter 7
[ 141 ]
Now that we know how to observe existing events, let's see how we can dispatch
our own events. We can dispatch events from almost anywhere in the code, with or
without data, as shown in the following example:
$this->eventManager->dispatch('foggyline_office_foo');
// or
$this->eventManager->dispatch(
'foggyline_office_bar',
['var1'=>'val1', 'var2'=>'val2']
);
It is worth noting that there are two types of events; we can group them in the
following way according to the way their name is assigned:
• Static: $this->eventManager->dispatch('event_name', ...)
• Dynamic: $this->eventManager->dispatch({expression}.'_event_
name', ...)
The static events have a xed string for a name, while the dynamic ones have a name
that is determined during the runtime. Here's a nice example of the core Magento
functionality from the afterLoad method that is dened under lib/internal/
Magento/Framework/Data/AbstractSearchResult.php, which showcases how to
use both types of events:
protected function afterLoad()
{
$this->eventManager->dispatch
('abstract_search_result_load_after', ['collection' =>
$this]);
if ($this->eventPrefix && $this->eventObject) {
$this->eventManager->dispatch($this->eventPrefix .
'_load_after', [$this->eventObject => $this]);
}
}
We can see a static event (abstract_search_result_load_after) and a dynamic
event ($this->eventPrefix . '_load_after'). The $this->eventPrefix is an
expression that gets evaluated during the runtime. We should be careful when using
dynamic events as they are triggered under multiple situations. Some interesting
dynamic events are the one dened on classes like the following ones:
• Magento\Framework\Model\AbstractModel
°$this->_eventPrefix . '_load_before'
°$this->_eventPrefix . '_load_after'
°$this->_eventPrefix . '_save_commit_after'

Backend Development
[ 142 ]
°$this->_eventPrefix . '_save_before'
°$this->_eventPrefix . '_save_after'
°$this->_eventPrefix . '_delete_before'
°$this->_eventPrefix . '_delete_after'
°$this->_eventPrefix . '_delete_commit_after'
°$this->_eventPrefix . '_clear'
• \Magento\Framework\Model\ResourceModel\Db\Collection\
AbstractCollection
°$this->_eventPrefix . '_load_before'
°$this->_eventPrefix . '_load_after'
• \Magento\Framework\App\Action\Action
°'controller_action_predispatch_' . $request->
getRouteName()
°'controller_action_predispatch_' . $request->
getFullActionName()
°'controller_action_postdispatch_' . $request->
getFullActionName()
°'controller_action_postdispatch_' . $request->
getRouteName()
• Magento\Framework\View\Result\Layout
• 'layout_render_before_' . $this->request-> getFullActionName()
These events are red on the model, collection, controller, and layout classes,
which are probably among the most used backend elements that often require
observing and interacting. Even though we can say that the full event name is known
during the runtime along with the dynamic event, this can be assumed even before
the runtime.
For example, assuming that we want to observe 'controller_action_
predispatch_' . $request->getFullActionName() for the Foggyline_Office
module's Crud controller action, the actual full event name will be 'controller_
action_predispatch_foggyline_office_test_crud', given that $request-
>getFullActionName() will resolve to foggyline_office_test_crud during
the runtime.

Chapter 7
[ 143 ]
Cache(s)
Magento has eleven out-of-the-box cache types, according to the following list.
These are used across many levels within the system:
• Configuration: Various XML configurations that were collected across
modules and merged
• Layouts: Layout building instructions
• Blocks HTML output: Page blocks HTML
• Collections data: Collection data files
• Reflection data: API interfaces reflection data
• Database DDL operations: Results of DDL queries, such as describing tables
or indexes
• EAV types and attributes: Entity types declaration cache
• Page cache: Full page caching
• Translations: Translation files
• Integrations configuration: Integration configuration file
• Integrations API configuration: Integrations API configuration file
• Web services configuration: REST and SOAP configurations, generated
WSDL file
There is also Additional Cache Management that manages the cache for the
following les:
• Previously generated product image files
• Themes JavaScript and CSS files combined to one file
• Preprocessed view files and static files
Each of these caches can be cleared separately.
We can easily dene our own cache type. We can do so by rst creating an app/
code/Foggyline/Office/etc/cache.xml le with content, as follows:
<config xmlns:xsi="http://www.w3.org/2001/XMLSchema-instance"
xsi:noNamespaceSchemaLocation="urn:magento:framework:Cache/etc/
cache.xsd">
<type name="foggyline_office"
instance="Foggyline\Office\Model\Cache">
<label>Foggyline Office Example</label>
<description>Example cache from Foggyline Office
module.</description>
</type>
</config>

Backend Development
[ 144 ]
When dening a new cache type, we need to specify its name and instance
attributes. The name attribute of the type element should be set to foggyline_
office and should be unique across Magento. This value should match the TYPE_
IDENTIFIER constant value on the Foggyline\Office\Model\Cache class, which
will be created soon. The instance attribute holds the class name that we will use
for caching.
Then, we will dene the Foggyline\Office\Model\Cache class in the app/code/
Foggyline/Office/Model/Cache.php le with the following content:
namespace Foggyline\Office\Model;
class Cache extends \Magento\Framework\Cache\Frontend\Decorator\
TagScope
{
const TYPE_IDENTIFIER = 'foggyline_office';
const CACHE_TAG = 'OFFICE';
public function __construct(
\Magento\Framework\App\Cache\Type\FrontendPool
$cacheFrontendPool
)
{
parent::__construct(
$cacheFrontendPool->get(self::TYPE_IDENTIFIER),
self::CACHE_TAG
);
}
}
The Cache class extends from TagScope and species its own values for TYPE_
IDENTIFIER and CACHE_TAG, passing them along to the parent constructor in the
__construct method. With these two les (cache.xml and Cache), we have
basically dened a new cache type.
Once we have specied the cache.xml le and the referenced cache class, we should
be able to see our cache type in the Magento admin under the System | Tools |
Cache Management menu, as shown in the following screenshot:
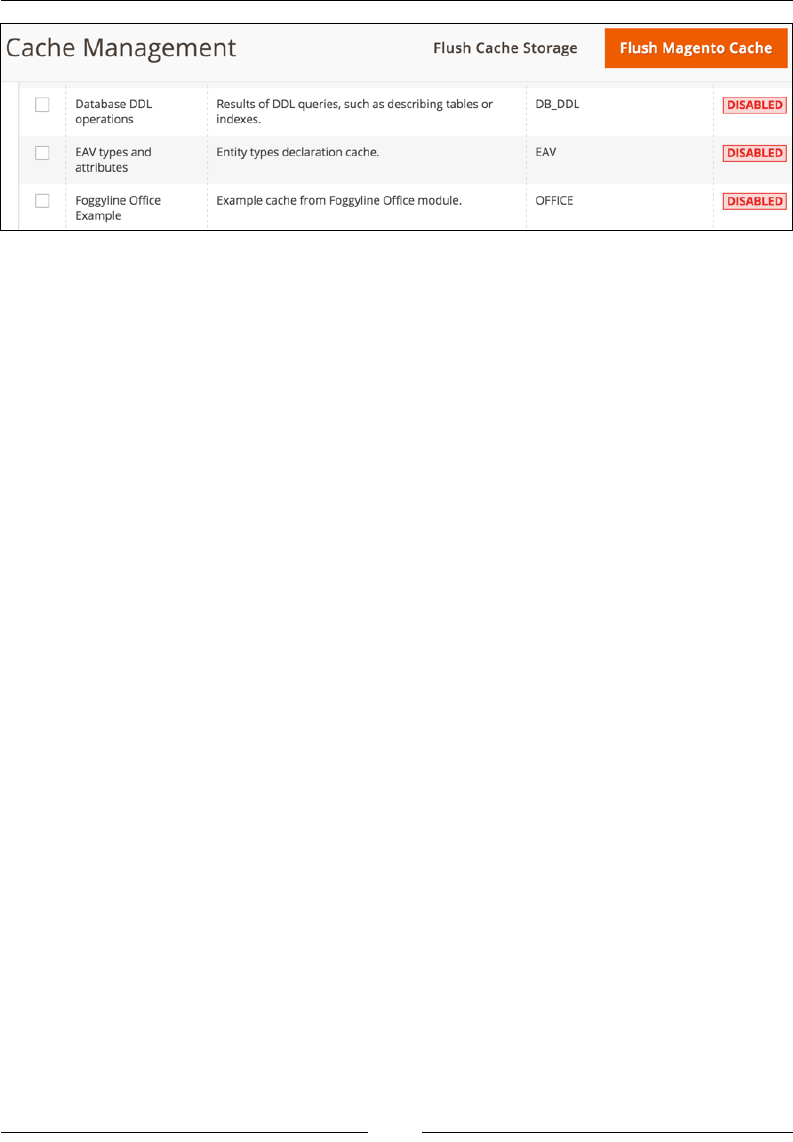
Chapter 7
[ 145 ]
On its own, simply dening a new cache does not mean that it will get lled and
used by Magento.
If you would like to use the cache anywhere within your code, you can do so by rst
passing the instance of the cache class to the constructor, as follows:
protected $cache;
public function __construct(
\Foggyline\Office\Model\Cache $cache
)
{
$this->cache = $cache;
}
Then, you can execute a chunk of code, as follows:
$cacheId = 'some-specific-id';
$objInfo = null;
$_objInfo = $this->cache->load($cacheId);
if ($_objInfo) {
$objInfo = unserialize($_objInfo);
} else {
$objInfo = [
'var1'=> 'val1',
'var2' => 'val2',
'var3' => 'val3'
];
$this->cache->save(serialize($objInfo), $cacheId);
}
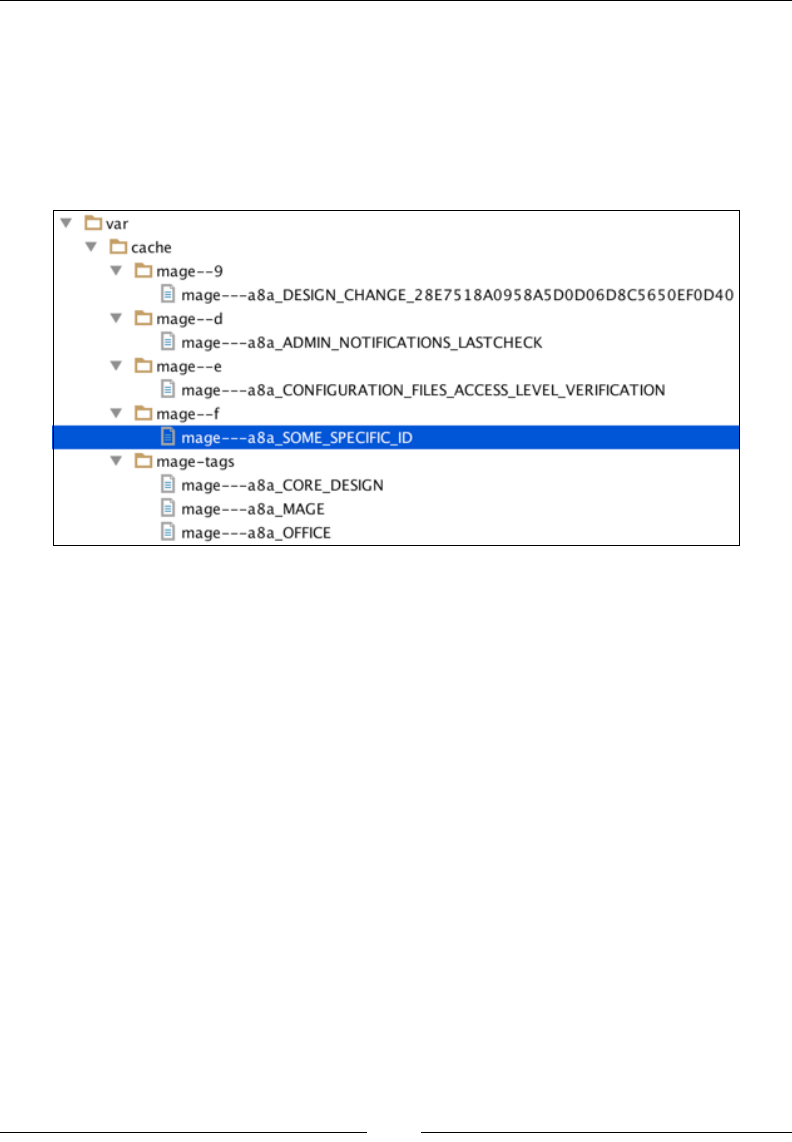
Backend Development
[ 146 ]
The preceding code shows how we rst try to load the value from the existing cache
entry, and if there is none, we save it. If the cache type is set to disabled under the
Cache Management menu, then the preceding code will never save and pull the
data from the cache, as it is not in effect.
If you take a look at the var/cache folder of Magento at this point, you will see
something similar to what's shown in the following screenshot:
Magento created two cache entries for us, namely var/cache/mage-tags/mage---
a8a_OFFICE and var/cache/mage--f/mage---a8a_SOME_SPECIFIC_ID. The mage-
--a8a_OFFICE le has only a single line of entry in this specic case, and the entry
is the a8a_SOME_SPECIFIC_ID string, which obviously points to the other le. The
mage---a8a_SOME_SPECIFIC_ID le contains the actual serialized $objInfo array.
The a8a_ prex and other prexes in the cache le names are not really relevant
to us; this is something that Magento adds on its own. What is relevant to us is the
passing of proper individual cache tags to the chunks or variables that we want to
cache, like in the preceding example, and the TYPE_IDENTIFIER and CACHE_TAG tags
that we set for the Cache class.
Widgets
Magento provides support for widgets. Though the word "widget" might imply
frontend development skills and activities, we will look at them as a part of the
backend development ow because creating useful and robust widgets requires a
signicant amount of backend knowledge.

Chapter 7
[ 147 ]
Magento provides several out-of-the-box widgets; some of them are as follows:
• CMS page link
• CMS static block
• Catalog category link
• Catalog new products list
• Catalog product link
• Catalog products list
• Orders and returns
• Recently compared products
• Recently viewed products
To create a fully custom widget, we start by dening app/code/Foggyline/Office/
etc/widget.xml with content, as follows:
<widgets xmlns:xsi="http://www.w3.org/2001/XMLSchema-instance"
xsi:noNamespaceSchemaLocation="urn:magento:module:
Magento_Widget:etc/widget.xsd">
<widget id="foggyline_office"
class="Foggyline\Office\Block\Widget\Example"
placeholder_image="Magento_Cms::images/
widget_block.png">
<label translate="true">Foggyline Office</label>
<description translate="true">Example Widget</description>
<parameters>
<parameter name="var1" xsi:type="select"
visible="true" source_model="Magento\Config\Model
\Config\Source\Yesno">
<label translate="true">Yes/No var1</label>
</parameter>
<parameter name="var2" xsi:type="text" required="true"
visible="true">
<label translate="true">Number var2</label>
<depends>
<parameter name="var1" value="1"/>
</depends>
<value>5</value>
</parameter>
</parameters>
</widget>
</widgets>
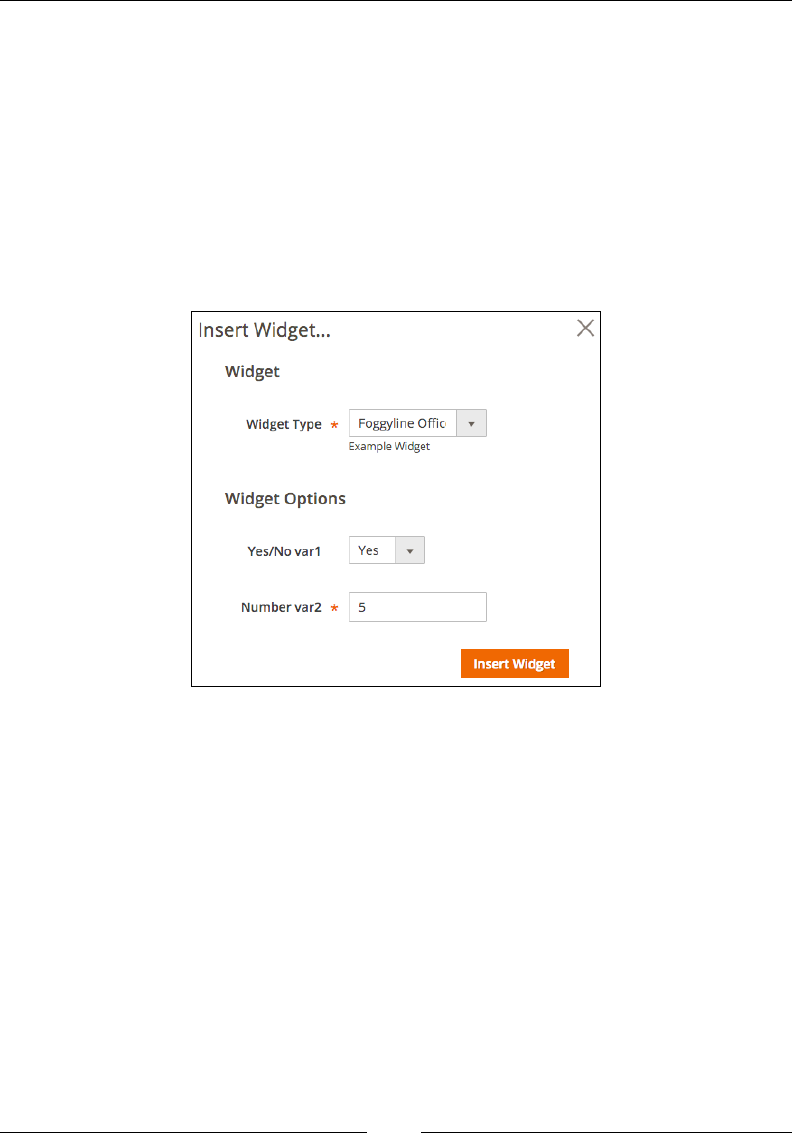
Backend Development
[ 148 ]
The id widget has been set to foggyline_office, while the class powering widget
has been set to Foggyline\Office\Block\Widget\Example. the widget class is
basically a block class that extends from \Magento\Framework\View\Element\
AbstractBlock and implements \Magento\Widget\Block\BlockInterface. The
label and description element set values appear under the Magento admin when
we select the widget for use.
The parameters of a widget are its congurable options that translate into HTML
form elements, depending on the type and source_model options that we have
selected. In the following example, we will demonstrate the usage of the select and
text elements to retrieve input from a user, as shown in the following screenshot:
Let's proceed by creating the actual Widget\Example class in the app/code/
Foggyline/Office/Block/Widget/Example.php le with content, as follows:
namespace Foggyline\Office\Block\Widget;
class Example extends \Magento\Framework\View\Element\Text
implements \Magento\Widget\Block\BlockInterface
{
protected function _beforeToHtml()
{
$this->setText(sprintf(
'example widget: var1=%s, var2=%s',
$this->getData('var1'),
$this->getData('var2')
));

Chapter 7
[ 149 ]
return parent::_beforeToHtml();
}
}
What is happening here is that we are using Element\Text as a block type and not
Element\Template because we want to simplify the example, as Element\Template
will require the phtml template to be dened as well. By using Element\Text, we
can simply dene _beforeToHtml and call the setText method to set the text string
of the block's output. We will build the output string by picking up the var1 and
var2 variables, which were passed as parameters to the block.
Now, if we open the Magento admin area, go to Content | Elements | Pages, and
select Home Page to edit, we should be able to click on the Insert Frontend App
button and add our widget to the page. Alternatively, if we are not editing the page
content in the WYSIWYG mode, we can also add the widget manually to the page by
using the following expression:
{{widget type="Foggyline\\Office\\Block\\Widget\\Example" var1="1"
var2="5"}}
Finally, we should see the example widget: var1=1, var2=5 string in the browser
while visiting the home page of the storefront.
We can use frontend apps to create highly congurable and embeddable widgets
that users can easily assign to a CMS page or block.
Custom variables
Variables are a handy little feature of a core Magento_Variable module. Magento
allows you to create custom variables and then use them in e-mail templates, the
WYSIWYG editor, or even code expressions.
The following steps outline how we can create a new variable manually:
1. In the Magento admin area, navigate to System | Other Settings | Custom
Variables.
2. Click on the Add New Variable button.
3. While keeping in mind the Store View switcher, ll in the required Variable
Code and Variable Name options, and preferably one of the optional
options, either Variable HTML Value or Variable Plain Value.
4. Click on the Save button.

Backend Development
[ 150 ]
Now that we have created the custom variable, we can use it in an e-mail template or
the WYSIWYG editor by calling it using the following expression:
{{customVar code=foggyline_hello}}
The preceding expression will call for the value of the custom variable with code
foggyline_hello.
Variables can be used within various code expressions, though it is not
recommended to rely on the existence of an individual variable, as an admin user
can delete it at any point. The following example demonstrates how we can use an
existing variable in the code:
$storeId =0;
$variable = $this->_variableFactory->create()->setStoreId(
$storeId
)->loadByCode(
'foggyline_hello'
);
$value = $variable->getValue(
\Magento\Variable\Model\Variable::TYPE_HTML
);
The $this->_variableFactory is an instance of \Magento\Variable\Model\
VariableFactory.
If used in the right way, variables can be useful. Storing information such as
phone numbers or specialized labels that are used in CMS pages, blogs, and
e-mail templates is a nice example of using custom variables.
i18n
i18n is the abbreviation for internationalization. Magento adds i18n support out
of the box, thus adapting to various languages and regions without application
changes. Within app/functions.php, there is a __() translation function, which is
dened as follows:
function __()
{
$argc = func_get_args();
$text = array_shift($argc);
if (!empty($argc) && is_array($argc[0])) {

Chapter 7
[ 151 ]
$argc = $argc[0];
}
return new \Magento\Framework\Phrase($text, $argc);
}
This translation function accepts a variable number of arguments and passes
them to a constructor of the \Magento\Framework\Phrase class and returns its
instance. The Phrase class has the __toString method, which then returns the
translated string.
Here are a few examples of how we can use the __() function:
• __('Translate me')
• __('Var1 %1, Var2 %2, Var %3', time(), date('Y'), 32)
• __('Copyright %1 <a href="%2">Magento</a>', date('Y'), 'http://
magento.com')
Strings passed through the translation function are expected to be found under
the local CSV les, such as app/code/{vendorName}/{moduleName}/i18n/
{localeCode}.csv. Let's imagine for a moment that we have two different store
views dened in the Magento admin area under Stores | Settings | All Stores. One
store has Store | Settings | Conguration | General | Locale Options | Locale
set to English (United Kingdom) and the other one to German (Germany). The
local code for English (United Kingdom) is en_GB, and for German (Germany),
it is de_DE.
For the de_DE locale, we will add translation entries in the app/code/Foggyline/
Office/i18n/de_DE.csv le, as follows:
"Translate me","de_DE Translate me"
"Var1 %1, Var2 %2, Var %3","de_DE Var1 %1, Var2 %2, Var %3"
"Copyright %1 <a href=""%2"">Magento</a>","de_DE Copyright %1 <a
href=""%2"">Magento</a>"
For the en_GB locale, we will add translation entries in the app/code/Foggyline/
Office/i18n/en_GB.csv le, as follows:
"Translate me","en_GB Translate me"
"Var1 %1, Var2 %2, Var %3", "en_GB Var1 %1, Var2 %2, Var %3"
"Copyright %1 <a href=""%2"">Magento</a>","en_GB Copyright %1 <a
href=""%2"">Magento</a>"

Backend Development
[ 152 ]
Looking at the two CSV les, a pattern emerges. We can see that the CSV les
function in the following way:
• Individual translation strings are provided according to every line of CSV
• Each line further comprises two individual strings that are separated
by a comma
• Both individual strings are surrounded by quotes
• If a string contains quotes, it is escaped by a double quote so that it does not
break translation
• The %1, %2, %3...%n pattern is used to mark variable placeholders that we
provided during application runtime through the code
Magento supports several commands related to its bin/magento console tool:
i18n
i18n:collect-phrases Discovers phrases in the codebase
i18n:pack Saves language package
i18n:uninstall Uninstalls language packages
If we execute a console command as follows, Magento will recursively look for
translatable expressions within PHP, PHTML, or XML les that have phrases to
translate:
php bin/magento i18n:collect-phrases -o
"/Users/branko/www/magento2/app/code/Foggyline/Office/i18n/en_GB.csv"
/Users/branko/www/magento2/app/code/Foggyline/Office
The output of the preceding command will basically overwrite the app/code/
Foggyline/Office/i18n/en_GB.csv le, which has all the Foggyline/Office
module translatable phrases. This is a nice way of aggregating all the translatable
phrases into appropriate locale les, such as en_GB.csv in this case.
The translation CSV les can also be placed under the individual theme. For
example, let's imagine a situation where we add content to app/design/frontend/
Magento/blank/i18n/en_GB.csv, as follows:
"Translate me","Theme_en_GB Translate me"
"Var1 %1, Var2 %2, Var %3", "Theme_en_GB Var1 %1, Var2 %2, Var %3"
"Copyright %1 <a href=""%2"">Magento</a>","Theme_en_GB Copyright
%1 <a href=""%2"">Magento</a>"
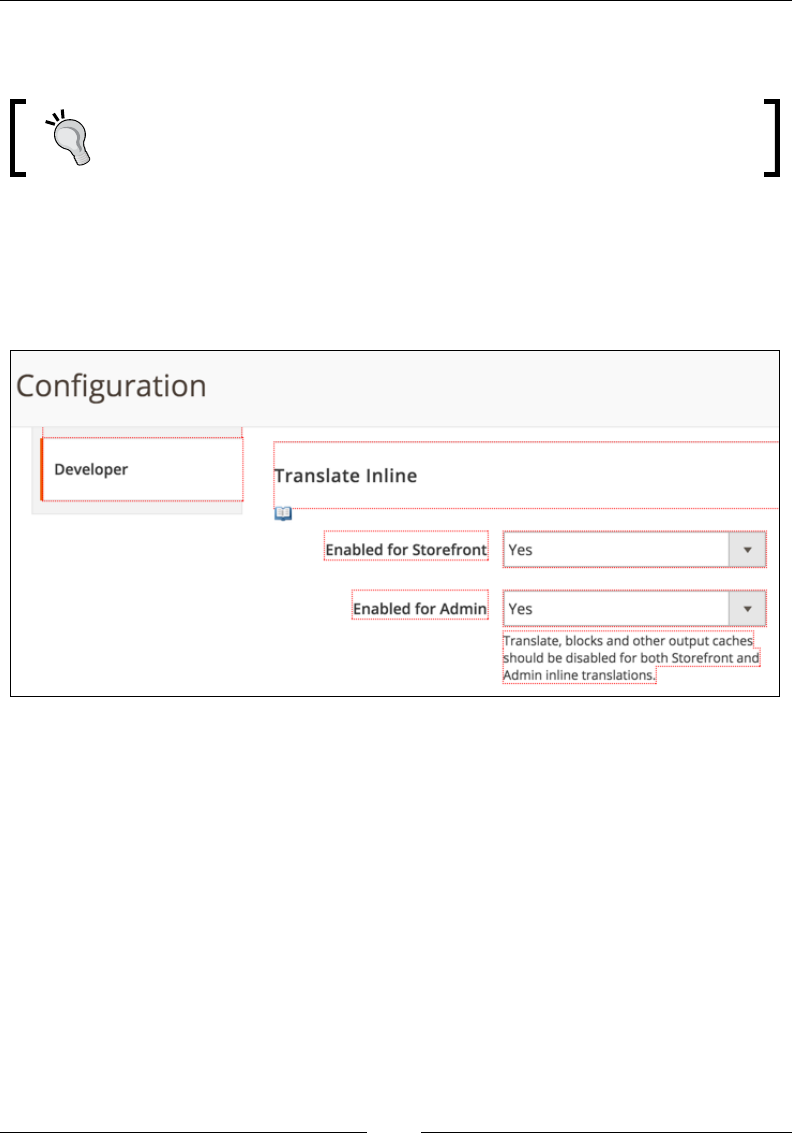
Chapter 7
[ 153 ]
Now, a Translate me string output of the storefront for the en_GB locale would
resolve to Theme_en_GB Translate me and not to the en_GB Translate me string.
Theme CSV translations take higher precedence than module CSV
translations, thus enabling developers to override individual module
translations.
Along with CSV translation les, Magento also supports a feature called inline
translation. We can activate the inline translation in the Magento admin area
by navigating to Store | Settings | Conguration | Advanced | Developer |
Translate Inline. This feature can be turned on separately for admin and storefront,
as shown in the following screenshot:
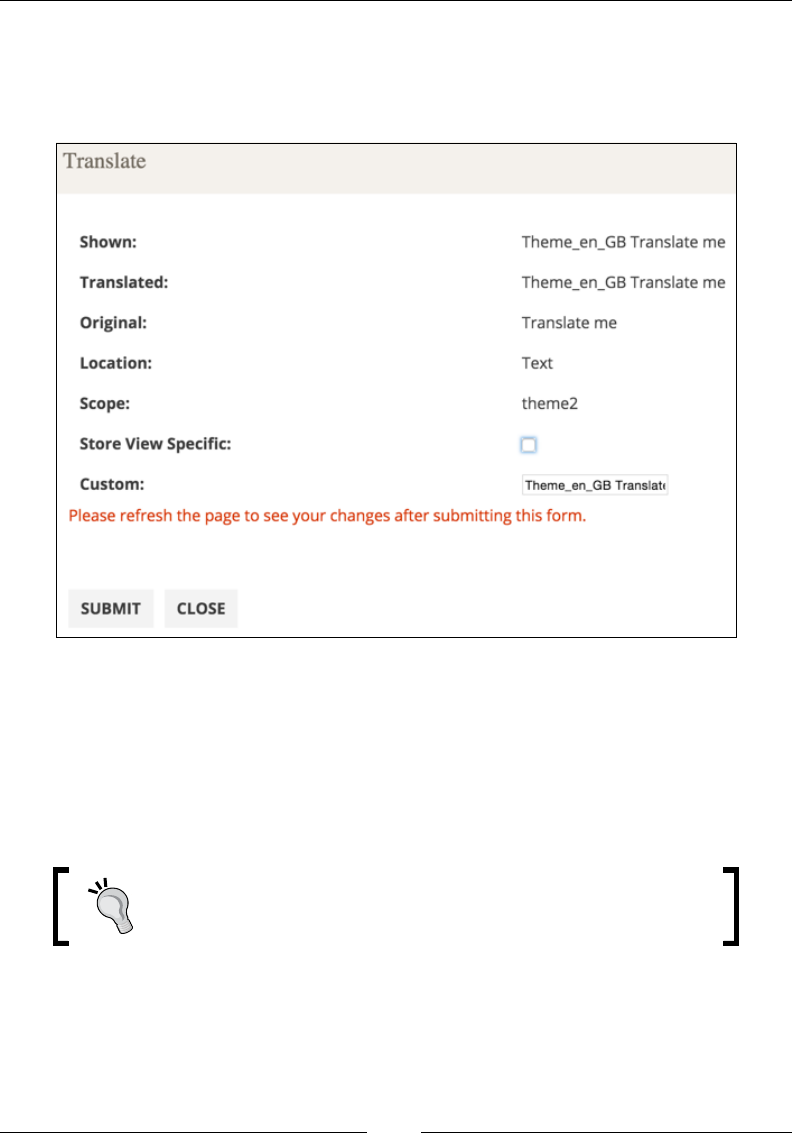
Backend Development
[ 154 ]
As shown in the preceding screenshot, when a feature is activated, red dotted
borders appear around the HTML elements. Hovering over an individual element
shows a little book icon near the individual element at the bottom left corner.
Clicking on the book icon opens a popup, as shown in the following screenshot:
It is important to note that these red dotted borders and the book icon will only
appear for strings that we passed through the __() translate function.
Here, we can see various pieces of information about the string, such as the Shown,
Translated, and Original string. There is also an input eld called Custom,
where we can add a new translation. Inline translation strings are stored in the
translation table in the database.
Inline translation takes higher precedence than theme CSV
translation les.

Chapter 7
[ 155 ]
Indexer(s)
Indexing is the process of transforming data by reducing it to attened data with less
database tables. This process is run for products, categories, and so on in order to
improve the performance of a web store. Since data constantly changes, this is not a
one-time process. Rather, it is a periodic one. The Magento_Indexer module is a base
of the Magento Indexing functionality.
The Magento console tool supports the following indexer commands.
indexer
indexer:info Shows allowed Indexers
indexer:reindex Reindexes Data
indexer:set-mode Sets index mode type
indexer:show-mode Shows Index Mode
indexer:status Shows status of Indexer
On running php bin/magento indexer:info, you will get a list of all the Magento
indexers; the default ones are as follows:
catalog_category_product Category Products
catalog_product_category Product Categories
catalog_product_price Product Price
catalog_product_attribute Product EAV
foggyline_office_employee Employee Flat Data
cataloginventory_stock Stock
catalogrule_rule Catalog Rule Product
catalogrule_product Catalog Product Rule
catalogsearch_fulltext Catalog Search
You will see all the indexers listed in the Magento admin in the System | Tools |
Index Management menu.
From within the admin area, we can only change the indexer mode. There are two
modes of indexers:
• Update on Save: Index tables are updated right after the dictionary
data is changed
• Update by Schedule: Index tables are updated by cron jobs according to the
configured schedule

Backend Development
[ 156 ]
Since indexers cannot be run manually from admin, we have to rely either on their
manual execution or the cron execution.
Manual execution is done via the following console command:
php bin/magento indexer:reindex
The preceding command will run all the indexers at once. We can ne-tune it further
to execute individual indexes by running a console command that is similar to the
following line of code:
php bin/magento indexer:reindex catalogsearch_fulltext
Cron-executed indexers are dened via the Magento_Indexer module, as follows:
• indexer_reindex_all_invalid: This will execute every minute of every
hour every day. It runs the reindexAllInvalid method on an instance of
the Magento\Indexer\Model\Processor class.
• indexer_update_all_views: This will execute every minute of every hour
every day. It runs the updateMview method on an instance of the Magento\
Indexer\Model\Processor class.
• indexer_clean_all_changelogs: This will execute the 0th minute of every
hour every day. It runs the clearChangelog method on an instance of the
Magento\Indexer\Model\Processor class.
These cron jobs use an operating system cron job setup in such a way that the
Magento cron job is triggered every minute.
The following three statuses is what an indexer can have:
• valid: The data is synchronized and no re-indexing is required
• invalid: The original data was changed and the index should be updated
• working: The index process is running
While we won't go into the details of actually creating a custom indexer within
this chapter, it is worth noting that Magento denes its indexers in the vendor/
magento/module-*/etc/indexer.xml le. This might come in handy for cases
where we want a deeper understanding of the inner workings of an individual
indexer. For example, the catalog_product_flat indexer is implemented via the
Magento\Catalog\Model\Indexer\Product\Flat class, as dened within the
vendor/magento/module-catalog/etc/indexer.xml le. By studying the Flat
class implementation in depth, you can learn how data is taken from EAV tables and
attened into a simplied structure.

Chapter 7
[ 157 ]
Summary
In this chapter, we covered some of the most relevant aspects of Magento, which
was beyond models and classes, regarding backend development. We had a look
at crontab.xml, which helps us schedule jobs (commands) so that they can be
run periodically. Then, we tackled notication messages, which enable us to push
styled messages to users via a browser. The Session and cookies section gave us an
understanding of how Magento tracks user information from a browser to a session.
Logging and proling showed us a simple yet effective mechanism to keep track
of performance and possible issues across code. The Events and observers section
introduced us to a powerful pattern that Magento implements across the code, where
we can trigger custom code execution when a certain event is red. The section on
caching guided us through the available cache types, and we studied how to create
and use our own cache type. Through the section on frontend apps (widgets), we
learned how to create our own miniature apps that can be called into CMS pages
and blocks. Custom variables gave us an insight into a simple yet interesting feature,
where we can dene a variable via the admin interface and then use it within CMS
page, block, or e-mail template. The section on i18n showed us how to use the
Magento translation feature to translate any string on three different levels,
namely the module CSV le, the theme CSV le, and inline translation. Finally,
we had a look at indexers and their mode and status; we learned how to control
their execution.
The next chapter will tackle frontend development. We will learn how create our
own theme and use blocks and layouts to affect the output.

[ 159 ]
Frontend Development
Frontend development is a term most commonly tied to producing HTML, CSS,
and JavaScript for a website or web application. Interchangeably, it addresses
accessibility, usability, and performance toward reaching a satisfying user
experience. Various levels of customization we want to apply to our web store
require different development skill levels. We can make relatively simple changes
to our store using just CSS. These would be the changes where we accept the
structure of the store and focus only on visuals like changing colors and images.
This might be a good starting point for less experienced developers and those new
to the Magento platform. A more involved approach would be to make changes
to the output generated by Magento modules. This usually means tiny bits of PHP
knowledge, mostly copy-paste-modify of existing code fragments. A skill level above
this one would imply knowledge of making structural changes to our store. This
usually means mastering Magento's moderately sophisticated layout engine, where
we make changes through XML denitions. The nal and highest skill level for
Magento frontend development implies the modication of existing or new custom
functionality development.
Throughout this chapter, we will take a deep dive through the following sections:
• Rendering flow
• View elements
• Block architecture and life cycle
• Templates
• XML layouts
• Themes
• JavaScript
• CSS

Frontend Development
[ 160 ]
Rendering ow
The Magento application entry point is its index.php le. All of the HTTP requests
go through it.
Let's analyze the (trimmed) version of the index.php le as follows:
//PART-1-1
require __DIR__ . '/app/bootstrap.php';
//PART-1-2
$bootstrap = \Magento\Framework\App\Bootstrap::create(BP,
$_SERVER);
//PART-1-3
$app = $bootstrap->
createApplication('Magento\Framework\App\Http');
//PART-1-4
$bootstrap->run($app);
PART-1-1 of the preceding code simply includes /app/bootstrap.php into the
code. What happens inside the bootstrap is the inclusion of app/autoload.php and
app/functions.php. The functions le contains a single __() function, used for
translation purposes, returning an instance of the \Magento\Framework\Phrase
object. Without going into the details of the auto-load le, it is sufce to say it
handles the auto-loading of all our class les across Magento.
PART-1-2 is simply a static create method call to obtain the instance of the \
Magento\Framework\App\Bootstrap object, storing it into the $bootstrap variable.
PART-1-3 is calling the createApplication method on the $bootstrap object. What
is happening within createApplication is nothing more than using object manager
to create and return the object instance of the class we are passing to it. Since we are
passing the \Magento\Framework\App\Http class name to the createApplication
method, our $app variable becomes the instance of that class. What this means,
effectively, is that our web store app is an instance of Magento\Framework\App\
Http.
PART-1-4 is calling the run method on the $bootstrap object, passing it the instance
of the Magento\Framework\App\Http class. Although it looks like a simple line of
code, this is where things get complicated, as we will soon see.

Chapter 8
[ 161 ]
Let's analyze the (trimmed) version of the \Magento\Framework\App\Bootstrap ->
run method as follows:
public function run(\Magento\Framework\AppInterface $application)
{
//PART-2-1
$this->initErrorHandler();
$this->initObjectManager();
$this->assertMaintenance();
$this->assertInstalled();
//PART-2-2
$response = $application->launch();
//PART-2-3
$response->sendResponse();
}
In the preceding code, PART-2-1 handles the sort of housekeeping bits. It initializes
the custom error handler, initializes the object manager, checks if our application is
in maintenance mode, and checks that it is installed.
PART-2-2 looks like a simple line of code. Here, we are calling the launch method
on $application, which is the Magento\Framework\App\Http instance. Without
going into the inner workings of the launch method for the moment, let's just say it
returns the instance of the Magento\Framework\App\Response\Http\Interceptor
class dened under var/generation/Magento/Framework/App/Response/Http/
Interceptor.php. Note that this is an automatically generated wrapper class,
extending the \Magento\Framework\App\Response\Http class. Effectively, ignoring
Interceptor, we can say that $response is an instance the \Magento\Framework\
App\Response\Http class.
Finally, PART-2-3 calls the sendResponse method on $response. Though
$response is an instance of the \Magento\Framework\App\Response\Http class,
the actual sendResponse method is found further down the parent tree on the \
Magento\Framework\HTTP\PhpEnvironment\Response class. The sendResponse
method calls another parent class method called send. The send method can be
found under the Zend\Http\PhpEnvironment\Response class. It triggers the
sendHeaders and sendContent methods. This is where the actual output gets sent to
the browser, as the sendHeaders method is using PHP's header function and echo
construct to push the output.

Frontend Development
[ 162 ]
To reiterate on the preceding, the ow of execution as we understand it comes down
to the following:
• index.php
• \Magento\Framework\App\Bootstrap -> run
• \Magento\Framework\App\Http -> launch
• \Magento\Framework\App\Response\Http -> sendResponse
Though we have just made it to the end of the bootstrap's run method, it would be
unfair to say we covered the rendering ow, as we barely touched it.
We need to take a step back and take a detailed look at PART-2-2, the inner workings
of the launch method. Let's take a look at the (trimmed) version of the \Magento\
Framework\App\Http -> launch method as follows:
public function launch()
{
//PART-3-1
$frontController = $this->_objectManager->get
('Magento\Framework\App\FrontControllerInterface');
//PART-3-2
$result = $frontController->dispatch($this->_request);
if ($result instanceof \Magento\Framework\Controller
\ResultInterface) {
//PART-3-3
$result->renderResult($this->_response);
} elseif ($result instanceof \Magento\Framework\App
\Response\HttpInterface) {
$this->_response = $result;
} else {
throw new \InvalidArgumentException('Invalid return
type');
}
//PART-3-4
return $this->_response;
}

Chapter 8
[ 163 ]
PART-3-1 creates the instance of the object whose class conforms to \Magento\
Framework\App\FrontControllerInterface. If we look under app/etc/di.xml,
we can see there is a preference for FrontControllerInterface in favor of the \
Magento\Framework\App\FrontController class. However, if we were to debug
the code and check for the actual instance class, it would show Magento\Framework\
App\FrontController\Interceptor. This is Magento adding an interceptor
wrapper that then extends \Magento\Framework\App\FrontController, which we
expected from the di.xml preference entry.
Now that we know the real class behind the $frontController instance, we
know where to look for the dispatch method. The dispatch method is another
important step in understanding the rendering ow process. We will look into its
inner workings in a bit more detail later on. For now, let's focus back on the $result
variable of PART-3-2. If we were to debug the variable, the direct class behind it
would show as Magento\Framework\View\Result\Page\Interceptor, dened
under the dynamically created var/generation/Magento/Framework/View/
Result/Page/Interceptor.php le. Interceptor is the wrapper for the \Magento\
Framework\View\Result\Page class. Thus, it is safe to say that our $result variable
is an instance of the Page class.
The Page class extends \Magento\Framework\View\Result\Layout, which further
extends \Magento\Framework\Controller\AbstractResult and implements \
Magento\Framework\Controller\ResultInterface. Quite a chain we have here,
but it is important to understand it.
Notice PART-3-3. Since our $result is an instance of \Magento\Framework\
Controller\ResultInterface, we fall into the rst if condition that calls the
renderResult method. The renderResult method itself is declared within the \
Magento\Framework\View\Result\Layout class. Without going into the details of
renderResult, sufce to say that it adds HTTP headers, and content to the $this->_
response object passed to it. That same response object is what the launch method
returns, as we described before in PART-2-2.
Though PART-3-3 does not depict any return value, the expression $result-
>renderResult($this->_response) does not do any output on its own. It modies
$this->_response that we nally return from the launch method as shown in
PART-3-4.
To reiterate on the preceding, the ow of execution as we understand it comes down
to the following:
• index.php
• \Magento\Framework\App\Bootstrap -> run
• \Magento\Framework\App\Http -> launch

Frontend Development
[ 164 ]
• \Magento\Framework\App\FrontController -> dispatch
• \Magento\Framework\View\Result\Page -> renderResult
• \Magento\Framework\App\Response\Http -> sendResponse
As we mentioned while explaining PART-3-2, the dispatch method is another
important step in the rendering ow process. Let's take a look at the (trimmed)
version of the \Magento\Framework\App\FrontController -> dispatch method
as follows:
public function dispatch(\Magento\Framework\App\RequestInterface
$request)
{
//PART-4-1
while (!$request->isDispatched() && $routingCycleCounter++ <
100) {
//PART-4-2
foreach ($this->_routerList as $router) {
try {
//PART-4-3
$actionInstance = $router->match($request);
if ($actionInstance) {
$request->setDispatched(true);
//PART-4-4
$result = $actionInstance->dispatch($request);
break;
}
} catch (\Magento\Framework\Exception
\NotFoundException $e) {}
}
}
//PART-4-4
return $result;
}
PART-4-1 and PART-4-2 in the preceding code shows (almost) the entire dispatch
method body contained within a loop. The loop does 100 iterations, further looping
through all available router types, thus giving each router 100 times to nd a
route match.
The router list loop includes routers of the following class types:
• Magento\Framework\App\Router\Base
• Magento\UrlRewrite\Controller\Router
• Magento\Cms\Controller\Router
• Magento\Framework\App\Router\DefaultRouter

Chapter 8
[ 165 ]
All of the listed routers implement \Magento\Framework\App\RouterInterface,
making them all have the implementation of the match method.
A module can further dene new routers if they choose so. As an example, imagine if
we are developing a Blog module. We would want our module catching all requests
on a URL that starts with a /blog/ part. This can be done by specifying the custom
router, which would then show up on the preceding list.
PART-4-3 shows the $actionInstance variable storing the result of the router
match method call. As per RouterInterface requirements, the match method is
required to return an instance whose class implements \Magento\Framework\App\
ActionInterface. Let's imagine we are now hitting the URL /foggyline_office/
test/crud/ from the module we wrote in Chapter 4, Models and Collections. In this
case, our $router class would be \Magento\Framework\App\Router\Base and
our $actionInstance would be of the class \Foggyline\Office\Controller\
Test\Crud\Interceptor. Magento automatically adds Interceptor, through
the dynamically generated var/generation/Foggyline/Office/Controller/
Test/Crud/Interceptor.php le. This Interceptor class further extends our
module \Foggyline\Office\Controller\Test\Crud class le. The Crud class
extends \Foggyline\Office\Controller\Test, which further extends \Magento\
Framework\App\Action\Action, which implements \Magento\Framework\
App\ActionInterface. After a lengthy parent-child tree, we nally got to
ActionInterface, which is what our match method is required to return.
PART-4-4 shows the dispatch method being called on $actionInstance. This
method is implemented within \Magento\Framework\App\Action\Action,
and is expected to return an object that implements \Magento\Framework\App\
ResponseInterface. Internal to dispatch, the execute method is called, thus
running the code within our Crud controller action execute method.
Assuming our Crud controller action execute method does not return nothing, the
$result object becomes an instance of Magento\Framework\App\Response\Http\
Interceptor, which is wrapped around \Magento\Framework\App\Response\
Http.
Let's imagine our Crud class has been dened as follows:
/**
* @var \Magento\Framework\View\Result\PageFactory
*/
protected $resultPageFactory;
public function __construct(
\Magento\Framework\App\Action\Context $context,

Frontend Development
[ 166 ]
\Magento\Framework\View\Result\PageFactory $resultPageFactory
)
{
$this->resultPageFactory = $resultPageFactory;
return parent::__construct($context);
}
public function execute()
{
$resultPage = $this->resultPageFactory->create();
//...
return $resultPage;
}
Debugging the $result variable now shows it's an instance of \Magento\
Framework\View\Result\Page\Interceptor. This Interceptor gets dynamically
generated by Magento under var/generation/Magento/Framework/View/Result/
Page/Interceptor.php and is merely a wrapper for \Magento\Framework\
View\Result\Page. This Page class further extends the \Magento\Framework\
View\Result\Layout class, and implements \Magento\Framework\App\
ResponseInterface.
Finally, PART-4-4 shows the $result object of type \Magento\Framework\View\
Result\Page being returned from the FrontController dispatch method.
To reiterate on the preceding, the ow of execution as we understand it comes down
to the following:
• index.php
• \Magento\Framework\App\Bootstrap -> run
• \Magento\Framework\App\Http -> launch
• \Magento\Framework\App\FrontController -> dispatch
• \Magento\Framework\App\Router\Base -> match
• \Magento\Framework\App\Action\Action -> dispatch
• \Magento\Framework\View\Result\Page -> renderResult
• \Magento\Framework\App\Response\Http -> sendResponse
In a nutshell, what we as frontend developers should know is that returning the
Page type object from our controller action will automatically call the renderResult
method on that object. Page and Layout is where all the theme translations, layout,
and template loading are triggering.

Chapter 8
[ 167 ]
View elements
Magento's primary view elements are its UI Components, containers, and blocks.
The following is a brief overview of each of them.
Ui components
Under the vendor/magento/framework/View/Element/ folder, we can nd
UiComponentInterface and UiComponentFactory. The full set of Ui components is
located under the vendor/magento/framework/View/Element/ directory. Magento
implements UiComponent through a separate module called Magento_Ui. Thus,
the components themselves are located under the vendor/magento/module-ui/
Component/ directory.
Components implement UiComponentInterface, which is dened under the
vendor/magento/framework/View/Element/UiComponentInterface.php
le as follows:
namespace Magento\Framework\View\Element;
use Magento\Framework\View\Element\UiComponent\ContextInterface;
interface UiComponentInterface extends BlockInterface
{
public function getName();
public function getComponentName();
public function getConfiguration();
public function render();
public function addComponent($name, UiComponentInterface
$component);
public function getComponent($name);
public function getChildComponents();
public function getTemplate();
public function getContext();
public function renderChildComponent($name);
public function setData($key, $value = null);
public function getData($key = '', $index = null);
public function prepare();
public function prepareDataSource(array & $dataSource);
public function getDataSourceData();
}

Frontend Development
[ 168 ]
Notice how BlockInterface extends BlockInterface, whereas BlockInterface
denes only one method requirement as follows:
namespace Magento\Framework\View\Element;
interface BlockInterface
{
public function toHtml();
}
Since Block is an element of the interface, UiComponent can be looked at as an
advanced block. Let's take a quick look at the _renderUiComponent method of the \
Magento\Framework\View\Layout class, (partially) dened as follows:
protected function _renderUiComponent($name)
{
$uiComponent = $this->getUiComponent($name);
return $uiComponent ? $uiComponent->toHtml() : '';
}
This shows that UiComponent is rendered in the same way as block, by calling
the toHtml method on the component. The vendor/magento/module-ui/view/
base/ui_component/etc/definition.xml le contains an extensive list of several
UiComponents as follows:
• dataSource: Magento\Ui\Component\DataSource
• listing: Magento\Ui\Component\Listing
• paging: Magento\Ui\Component\Paging
• filters: Magento\Ui\Component\Filters
• container: Magento\Ui\Component\Container
• form: Magento\Ui\Component\Form
• price: Magento\Ui\Component\Form\Element\DataType\Price
• image: Magento\Ui\Component\Form\Element\DataType\Media
• nav: Magento\Ui\Component\Layout\Tabs\Nav
… and many more

Chapter 8
[ 169 ]
These components are mostly used to construct a listing and lters in the admin
area. If we do a string search for uiComponent across the entire Magento, we would
mostly nd entries like the one in vendor/magento/module-cms/view/adminhtml/
layout/cms_block_index.xml with content as follows:
<page xmlns:xsi="http://www.w3.org/2001/XMLSchema-instance"
xsi:noNamespaceSchemaLocation="urn:magento:framework:View/Layout
/etc/page_configuration.xsd">
<body>
<referenceContainer name="content">
<uiComponent name="cms_block_listing"/>
</referenceContainer>
</body>
</page>
The value cms_block_listing of uiComponent's name attribute refers to the
name of the vendor/magento/module-cms /view/adminhtml/ui_component/
cms_block_listing.xml le. Within the cms_block_listing.xml le, we have a
listing component dened across more than a few hundreds lines of XML. Listing
component then dataSource, container, bookmark, filterSearch, filters, and
so on. We will not go into the details of these declarations, as our focus here is on
more general frontend bits.
Containers
Containers have no block classes related to them. Container renders all of its children
automatically. They allow the conguration of some attributes. Simply attach any
element to a container and it will render it automatically. With a container, we can
dene wrapping tags, CSS classes, and more.
We cannot create instances of containers because they are an abstract concept,
whereas we can create instances of blocks.
Containers are rendered via the _renderContainer method of the Magento\
Framework\View\Layout class, dened as follows:
protected function _renderContainer($name)
{
$html = '';
$children = $this->getChildNames($name);
foreach ($children as $child) {
$html .= $this->renderElement($child);
}

Frontend Development
[ 170 ]
if ($html == '' || !$this->structure->getAttribute($name,
Element::CONTAINER_OPT_HTML_TAG)) {
return $html;
}
$htmlId = $this->structure->getAttribute($name,
Element::CONTAINER_OPT_HTML_ID);
if ($htmlId) {
$htmlId = ' id="' . $htmlId . '"';
}
$htmlClass = $this->structure->getAttribute($name,
Element::CONTAINER_OPT_HTML_CLASS);
if ($htmlClass) {
$htmlClass = ' class="' . $htmlClass . '"';
}
$htmlTag = $this->structure->getAttribute($name,
Element::CONTAINER_OPT_HTML_TAG);
$html = sprintf('<%1$s%2$s%3$s>%4$s</%1$s>', $htmlTag,
$htmlId, $htmlClass, $html);
return $html;
}
Containers support the following extra attributes: htmlTag, htmlClass, htmlId,
and label. To make a little demonstration of a container in action, let us make sure
we have a module from Chapter 4, Models and Collections in place, and then create
the view/frontend/layout/foggyline_office_test_crud.xml le within the
module root folder app/code/Foggyline/Office/ with content as follows:
<page xmlns:xsi="http://www.w3.org/2001/XMLSchema-instance"
layout="1column"
xsi:noNamespaceSchemaLocation="urn:magento:framework:View
/Layout/etc/page_configuration.xsd">
<head>
<title>Office CRUD #layout</title>
</head>
<body>
<container name="foobar" htmlTag="div" htmlClass="foo-
bar">
<block class="Magento\Framework\View\Element\Text"
name="foo">
<action method="setText">
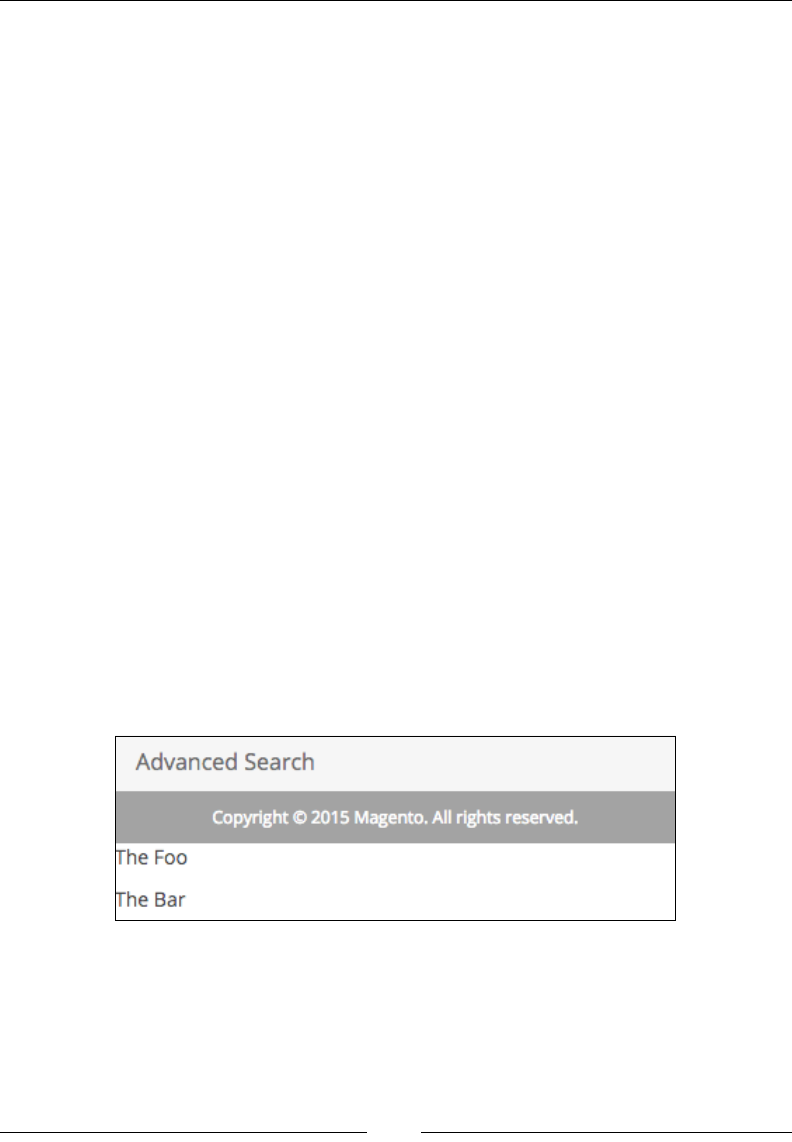
Chapter 8
[ 171 ]
<argument name="text" xsi:type="string">
<![CDATA[<p>The Foo</p>]]></argument>
</action>
</block>
<block class="Magento\Framework\View\Element\Text"
name="bar">
<action method="setText">
<argument name="text" xsi:type="string">
<![CDATA[<p>The Bar</p>]]></argument>
</action>
</block>
</container>
</body>
</page>
The preceding XML denes a single container named foobar, and within the
container there are two block elements named foo and bar. It should kick in when
we open http://{our-shop-url}/index.php/foggyline_office/test/crud/ in
the browser.
Notice how the container itself is not nested within any other element, rather directly
into the body. We could have easily nested into some other container as shown:
<body>
<referenceContainer name="content">
<container name="foobar" htmlTag="div" htmlClass="foo-
bar">
Either way, we should see the strings The Foo and The Bar shown in the browser,
with a full-page layout loaded, as shown in the following screenshot:

Frontend Development
[ 172 ]
Blocks
Although containers determine the layout of the page, they do not contain actual
content directly. Pieces that contain the content and are nested within containers are
called blocks. Each block can contain any number of child content blocks or child
containers. Thus, mostly every web page in Magento is formed as a mix of blocks
and containers. Layout denes a sequence of blocks on the page, not their location.
The look and feel of the blocks is determined by CSS and how the page is rendered.
When we speak of blocks, we almost always implicitly refer to templates as well.
Templates are the thing that actually draw elements within a page; blocks are the
thing that contain the data. In other words, templates are PHTML or HTML les
pulling data through variables or methods sent on a linked PHP block class.
Magento denes the Magento\Framework\View\Result\Page type under app/etc/
di.xml as follows:
<type name="Magento\Framework\View\Result\Page">
<arguments>
<argument name="layoutReaderPool"
xsi:type="object">pageConfigRenderPool</argument>
<argument name="generatorPool"
xsi:type="object">pageLayoutGeneratorPool</argument>
<argument name="template"
xsi:type="string">Magento_Theme::root.phtml</argument>
</arguments>
</type>
Notice the template argument is set to Magento_Theme::root.phtml. When Page
gets initialized, it picks up the vendor/magento/module-theme/view/base/
templates/root.phtml le. root.phtml is dened as follows:
<!doctype html>
<html <?php echo $htmlAttributes ?>>
<head <?php echo $headAttributes ?>>
<?php echo $requireJs ?>
<?php echo $headContent ?>
<?php echo $headAdditional ?>
</head>
<body data-container="body" data-mage-init='{"loaderAjax": {},
"loader": { "icon": "<?php echo $loaderIcon; ?>"}}' <?php
echo $bodyAttributes ?>>
<?php echo $layoutContent ?>
</body>
</html>

Chapter 8
[ 173 ]
Variables within root.phtml are assigned during the Magento\Framework\View\
Result\Page render method call as (partially) as shown:
protected function render(ResponseInterface $response)
{
$this->pageConfig->publicBuild();
if ($this->getPageLayout()) {
$config = $this->getConfig();
$this->addDefaultBodyClasses();
$addBlock = $this->getLayout()->getBlock
('head.additional');
$requireJs = $this->getLayout()->getBlock('require.js');
$this->assign([
'requireJs' => $requireJs ? $requireJs->toHtml() :
null,
'headContent' => $this->pageConfigRenderer->
renderHeadContent(),
'headAdditional' => $addBlock ? $addBlock->toHtml() :
null,
'htmlAttributes' => $this->pageConfigRenderer->
renderElementAttributes($config::ELEMENT_TYPE_HTML),
'headAttributes' => $this->pageConfigRenderer->
renderElementAttributes($config::ELEMENT_TYPE_HEAD),
'bodyAttributes' => $this->pageConfigRenderer->
renderElementAttributes($config::ELEMENT_TYPE_BODY),
'loaderIcon' => $this->getViewFileUrl('images/loader-
2.gif'),
]);
$output = $this->getLayout()->getOutput();
$this->assign('layoutContent', $output);
$output = $this->renderPage();
$this->translateInline->processResponseBody($output);
$response->appendBody($output);
} else {
parent::render($response);
}
return $this;
}
The expression $this->assign is what assigns variables like layoutContent to the
root.phtml template. layoutContent is generated based on base layouts, together
with all layout updates for the current page.
Frontend Development
[ 174 ]
Whereas base layouts include the following XMLs within vendor/magento/module-
theme/view/:
• base/page_layout/empty.xml
• frontend/page_layout/1column.xml
• frontend/page_layout/2columns-left.xml
• frontend/page_layout/2columns-right.xml
• frontend/page_layout/3columns.xml
The expression $this->getLayout()->getOutput() is what gets all blocks marked
for output. It basically nds elements in a layout, renders them, and returns the
string with its output. Along the way, the event core_layout_render_element gets
red, giving us one possible way of affecting the output result. At this point, most of
the elements on the page are rendered. This is important because blocks play a big
role here. The rendering system will take empty.xml into account, as it too consists
of a list of containers, and every container has some blocks attached to it by other
layout updates.
In a nutshell, each container has blocks assigned to it. Each block usually
(but not always) renders a template. The template itself may or may not
call other blocks, and so on. Blocks are rendered when they are called
from the template.
Block architecture and life cycle
Blocks are another one of the primary view elements in Magento. At the root of the
parent tree structure, blocks extend from the Magento\Framework\View\Element\
AbstractBlock class and implement Magento\Framework\View\Element\
BlockInterface.
BlockInterface sets only one requirement, the implementation of the toHtml
method. This method should return blocks HTML output.
Looking inside AbstractBlock, we can see it has a number of methods declared.
Among the most important ones are the following methods:
• _prepareLayout: Prepares a global layout. We can redefine this method in
child classes for changing the layout.
• addChild: Creates a new block, sets it as a child of the current block, and
returns the newly created block.

Chapter 8
[ 175 ]
• _toHtml: Returns an empty string. We need to override this method in
descendants to produce HTML.
• _beforeToHtml: Returns $this. Executes before rendering HTML, but after
trying to load a cache.
• _afterToHtml: Processing block HTML after rendering. Returns a HTML
string.
• toHtml: Produces and returns a block's HTML output. This method should
not be overridden. We can override the _toHtml method in descendants
if needed.
The AbstractBlock execution ow can be described as follows:
• _prepareLayout
• toHtml
• _beforeToHtml
• _toHtml
• _afterToHtml
It starts with _prepareLayout and ows through a set of methods until it
reaches _afterToHtml. This is, in essence, what we need to know about block
execution ow.
The most important block types are:
• Magento\Framework\View\Element\Text
• Magento\Framework\View\Element\Text\ListText
• Magento\Framework\View\Element\Messages
• Magento\Framework\View\Element\Template
All of these blocks are basically an implementation of an abstract block. Since
the _toHtml method in AbstractBlock returns only an empty string, all of these
descendants are implementing their own version of the _toHtml method.
To demonstrate the usage of these blocks, we can use our previously created app/
code/Foggyline/Office/view/frontend/layout/foggyline_office_test_
crud.xml le.

Frontend Development
[ 176 ]
The Text block has a setText method we can use to set its content. The way we
instantiate the Text block and set its text value through the layout le is shown as
follows:
<block class="Magento\Framework\View\Element\Text"
name="example_1">
<action method="setText">
<argument name="text"
xsi:type="string"><![CDATA[<p>Text_1</p>]]></argument>
</action>
</block>
The ListText block extends from Text. However, it does not really support the use
of setText to set its content. This is obvious just by looking at its code, where the
$this->setText('') expression is immediately called within its _toHtml method
implementation. Instead, what happens is that the _toHtml method loops through
any child blocks it might have and calls the layout's renderElement method on it.
Basically, we might compare the ListText block to container, as it has nearly the
same purpose. However, unlike container, block is a class so we can manipulate it
from PHP. The following is an example of using ListText, containing a few child
Text blocks:
<block class="Magento\Framework\View\Element\Text\ListText"
name="example_2">
<block class="Magento\Framework\View\Element\Text"
name="example_2a">
<action method="setText">
<argument name="text" xsi:type="string">
<![CDATA[<p>Text_2A</p>]]></argument>
</action>
</block>
<block class="Magento\Framework\View\Element\Text"
name="example_2b">
<action method="setText">
<argument name="text" xsi:type="string">
<![CDATA[<p>Text_2B</p>]]></argument>
</action>
</block>
</block>

Chapter 8
[ 177 ]
The Messages block supports four methods that we can use to add content to output:
addSuccess, addNotice, addWarning, and addError. The following is an example
instantiating the Messages block through the layout update le:
<block class="Magento\Framework\View\Element\Messages"
name="example_3">
<action method="addSuccess">
<argument name="text" xsi:type="string">
<![CDATA[<p>Text_3A: Success</p>]]></argument>
</action>
<action method="addNotice">
<argument name="text" xsi:type="string">
<![CDATA[<p>Text_3B: Notice</p>]]></argument>
</action>
<action method="addWarning">
<argument name="text" xsi:type="string">
<![CDATA[<p>Text_3C: Warning</p>]]></argument>
</action>
<action method="addError">
<argument name="text" xsi:type="string">
<![CDATA[<p>Text_3D: Error</p>]]></argument>
</action>
</block>
The preceding example should be taken with caution, since calling these setter
methods in layout is not the proper way to do it. The default Magento_Theme module
already denes the Messages block that uses vendor/magento/module-theme/
view/frontend/templates/messages.phtml for message rendering. Thus,
for most of the part there is no need to dene our own messages block.
Finally, let's look at the example of the Template block as follows:
<block class="Magento\Framework\View\Element\Template"
name="example_4" template="Foggyline_Office::office
/no4/template.phtml"/>
The preceding XML will instantiate the Template type of block and render the
content of the view/frontend/templates/office/no4/template.phtml le
within the app/code/Foggyline/Office/ directory.
On the PHP level, instantiating a new block can be accomplished using the layout
object, or directly through the object manager. The layout approach is the preferred
way. With regard to the previous examples in XML, let's see their alternatives in
PHP (assuming $resultPage is an instance of \Magento\Framework\View\Result\
PageFactory).

Frontend Development
[ 178 ]
The following is an example of instantiating the Text type of block and adding it as a
child of the content container:
$block = $resultPage->getLayout()->createBlock(
'Magento\Framework\View\Element\Text',
'example_1'
)->setText(
'<p>Text_1</p>'
);
$resultPage->getLayout()->setChild(
'content',
$block->getNameInLayout(),
'example_1_alias'
);
The ListText version is done in PHP as follows:
$blockLT = $resultPage->getLayout()->createBlock(
'Magento\Framework\View\Element\Text\ListText',
'example_2'
);
$resultPage->getLayout()->setChild(
'content',
$blockLT->getNameInLayout(),
'example_2_alias'
);
$block2A = $resultPage->getLayout()->createBlock(
'Magento\Framework\View\Element\Text',
'example_2a'
)->setText(
'<p>Text_2A</p>'
);
$resultPage->getLayout()->setChild(
'example_2',
$block2A->getNameInLayout(),
'example_2a_alias'
);
$block2B = $resultPage->getLayout()->createBlock(
'Magento\Framework\View\Element\Text',
'example_2b'

Chapter 8
[ 179 ]
)->setText(
'<p>Text_2B</p>'
);
$resultPage->getLayout()->setChild(
'example_2',
$block2B->getNameInLayout(),
'example_2b_alias'
);
Notice how we rst made an instance of the ListText block and assigned it as a
child of an element named content. Then we created two individual Text blocks and
assigned them as a child of an element named example_2, which is our ListText.
Next, let's dene the Messages block as follows:
$messagesBlock = $resultPage->getLayout()->createBlock(
'Magento\Framework\View\Element\Messages',
'example_3'
);
$messagesBlock->addSuccess('Text_3A: Success');
$messagesBlock->addNotice('Text_3B: Notice');
$messagesBlock->addWarning('Text_3C: Warning');
$messagesBlock->addError('Text_3D: Error');
$resultPage->getLayout()->setChild(
'content',
$messagesBlock->getNameInLayout(),
'example_3_alias'
);
Finally, let's look at the Template block type, which we initiate as follows:
$templateBlock = $resultPage->getLayout()->createBlock(
'Magento\Framework\View\Element\Template',
'example_3'
)->setTemplate(
'Foggyline_Office::office/no4/template.phtml'
);
$resultPage->getLayout()->setChild(
'content',
$templateBlock->getNameInLayout(),
'example_4_alias'
);

Frontend Development
[ 180 ]
Whenever possible, we should set our blocks using XML layouts.
Now that we know how to utilize the most common types of Magento blocks, let's
see how we can create our own block type.
Dening our own block class is as simple as creating a custom class le that extends
Template. This block class should be placed under our module Block directory.
Using our Foggyline_Office module, let's create a le, Block/Hello.php, with
content as follows:
namespace Foggyline\Office\Block;
class Hello extends \Magento\Framework\View\Element\Template
{
public function helloPublic()
{
return 'Hello #1';
}
protected function helloProtected()
{
return 'Hello #2';
}
private function helloPrivate()
{
return 'Hello #3';
}
}
The preceding code simply creates a new custom block class. We can then call this
block class through our layout le as follows:
<block class="Foggyline\Office\Block\Hello"
name="office.hello" template="office/hello.phtml"/>
Finally, within our module app/code/Foggyline/Office/ directory, we create
a template le, view/frontend/templates/office/hello.phtml, with content
as follows:
<?php /* @var $block Foggyline\Office\Block\Hello */ ?>
<h1>Hello</h1>
<p><?php echo $block->helloPublic() ?></p>
<p><?php //echo $block->helloProtected() ?></p>
<p><?php //echo $block->helloPrivate() ?></p>

Chapter 8
[ 181 ]
To further understand what is happening here within the template le, let's take a
deeper look at templates themselves.
Templates
Templates are snippets of HTML mixed with PHP. The PHP part includes elements
such as variables, expressions, and class method calls. Magento uses the PHTML
le extension for template les. Templates are located under an individual module's
view/{_area_}/templates/ directory.
In our previous example, we referred to our module template le with an expression
like Foggyline_Office::office/hello.phtml. Since templates can belong to
different modules, we should prepend the template with the module name as a best
practice. This will help us locate template les and avoid le conicts.
A simple naming formula goes like this: we type the name of the module, double
single colon, and then the name. Thus making a template path like office/hello.
phtml equaling to Foggyline_Office::office/hello.phtml.
Within the PHTML template le we often have various PHP expressions like
$block->helloPublic(). Notice the block class Foggyline\Office\Block\
Hello in the preceding XML. An instance of this block class becomes available to
us in hello.phtml through the $block variable. Thus, an expression like $block-
>helloPublic() is effectively calling the helloPublic method from an instance of
the Hello class. The Hello class is not one of the Magento core classes, but it does
extend \Magento\Framework\View\Element\Template.
Our hello.phtml template also has two more expressions: $block-
>helloProtected() and $block->helloPrivate(). However, these are not
executed as template les can only see public methods from their $block instances.
The $this variable is also available within the PHTML template as an instance of the
Magento\Framework\View\TemplateEngine\Php class.
In the preceding template code example, we could have easily replaced $block-
>helloPublic() with the $this->helloPublic() expression. The reason why this
would work lies in the template engine Php class, (partially) dened as follows:
public function __call($method, $args)
{
return call_user_func_array([$this->_currentBlock, $method],
$args);
}
public function __isset($name)
{

Frontend Development
[ 182 ]
return isset($this->_currentBlock->{$name});
}
public function __get($name)
{
return $this->_currentBlock->{$name};
}
Given that templates are included in the context of the engine rather than in the
context of the block, __call redirects methods calls to the current block. Similarly,
__isset redirects isset calls to the current block and __get allows read access to
properties of the current block.
Though we can use both $block and $this for the same purpose within the
template le, we should really opt for using $block.
Another important aspect of templates is their fallback mechanism. Fallback is the
process of dening a full template path given only its relative path. For example,
office/hello.phtml falls back to the app/code/Foggyline/Office/view/
frontend/templates/office/hello.phtml le.
Path resolution starts from the _toHtml method dened on the Magento\
Framework\View\Element\Template class. The _toHtml method then calls
getTemplateFile within the same class, which in turn calls getTemplateFileName
on resolver, which is an instance of \Magento\Framework\View\Element\
Template\File\Resolver. Looking further, resolver's getTemplateFileName
further calls getTemplateFileName on _viewFileSystem, which is an instance of \
Magento\Framework\View\FileSystem. The method getFile is further called on
an instance of \Magento\Framework\View\Design\FileResolution\Fallback\
TemplateFile. getFile further triggers the resolve method on the Magento\
Framework\View\Design\FileResolution\Fallback\Resolver\Simple instance,
which further calls the getRule method on the Magento\Framework\View\Design\
Fallback\RulePool instance. The RulePoll class is the nal class in the chain here.
getRule nally calls the createTemplateFileRule method, which creates the rule
that detects where the le is located.
While running the getRule method, Magento checks against the following types of
fallback rules:
• file
• locale
• template
• static
• email

Chapter 8
[ 183 ]
It is worth spending some time to study the inner workings of the RulePool class, as
it showcases detailed fallbacks for the listed rules.
Layouts
Up to this point, we briey touched on layout XMLs. Layout XML is a tool to build
the pages of the Magento application in a modular and exible manner. It enables us
to describe the page layout and content placement. Looking at XML root nodes, we
differentiate two types of layouts:
• layout: XML wrapped in <layout>
• page: XML wrapped in <page>
Page layouts represent a full page in HTML, whereas layout layouts represent
a part of a page. The layout type is a subset of the page layout type. Both types
of layout XML les are validated by the XSD schema found under the vendor/
magento/framework/View/Layout/etc/ directory:
• layout – layout_generic.xsd
• page – page_configuration.xsd
Based on the application components that provide <layout> and <page> elements ,
we can further section them as base and theme layouts.
The base layouts are provided by the modules, usually at the following locations:
• <module_dir>/view/frontend/layout: page configuration and generic
layout files
• <module_dir>/view/frontend/page_layout: page layout files
The theme layouts are provided by the themes, usually at the following locations:
• <theme_dir>/<Namespace>_<Module>/layout: page configuration and
generic layout files
• <theme_dir>/<Namespace>_<Module>/page_layout: page layout files
Magento will load and merge all module and theme XML les on the appropriate
page. Once les are merged and XML instructions are processed, the result is
rendered and sent to the browser for display. Having two different layout XML les,
where both reference the same block, means that the second one with the same name
in the sequence will replace the rst one.

Frontend Development
[ 184 ]
When the XML les are loaded, Magento applies an inheritance theme at the same
time. We can apply a theme and it will look for the parent until a theme without a
parent is reached.
In addition to the merging of les from each module, layout les from within
module directories can also be extended or overridden by themes. Overriding
layout XML is not a good practice, but it might be necessary sometimes.
To override the base layout les provided by the module within the <module_dir>/
view/frontend/layout/directory.
We need to create an XML le with the same name in the app/design/frontend/<v
endor>/<theme>/<Namespace_Module>/layout/override/base/directory.
To override the theme layout les provided by the parent theme within the <parent_
theme_dir>/<Namespace>_<Module>/layout/directory.
We need to create an XML le with the same name in the app/design/
frontend/<vendor>/<theme >/<Namespace_Module>/layout/override/
theme/<Parent_Vendor>/<parent_theme>/directory.
Layouts can be both overridden and extended.
The recommended way to customize layout is to extend it through a custom theme.
We can do so by simply adding a custom XML layout le with the same name in the
app/design/frontend/{vendorName}/{theme}/{vendorName}_{moduleName}/
layout/ directory.
Layouts, as we saw in previous examples, support a large number of directives: page
page, head, block, and so on. The practical use of these directives and how they mix
together is a challenge on its own. Giving full details on each and every directive is
beyond the scope of this book. However, what we can do is to show how to gure
out the use of an individual directive, which we might need at a given time. For that
purpose, it is highly recommended to use an IDE environment like NetBeans PHP or
PhpStorm that provide autocomplete on XMLs that include XSD.
The following is an example of dening an external schema to PhpStorm, where
we are simply saying that the urn:magento:framework:View/Layout/etc/
page_configuration.xsd alias belongs to the vendor/magento/framework/View/
Layout/etc/page_configuration.xsd le:
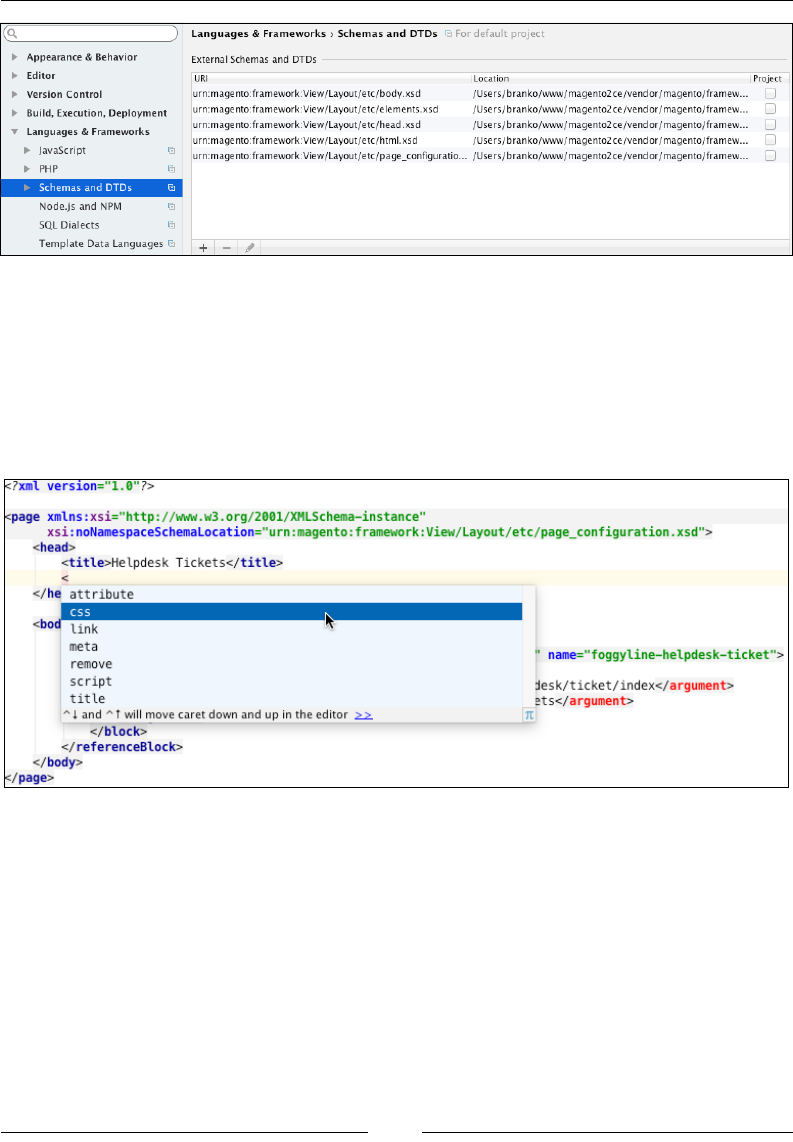
Chapter 8
[ 185 ]
This way, PhpStorm will know how to provide autocomplete while we type around
XML les.
As an example, let's take a look at how we could use the css directive to add an
external CSS le to our page. With an IDE that supports autocomplete as soon as we
type the css directive within the page | head element, autocomplete might throw
out something like the following:
A list of available attributes is shown, such as src, sizes, ie_condtion, src_type,
and so on. IDEs like PhpStorm will allow us to right-click an element or its attribute
and go to the denition. Looking into the denition for the src attribute gets us into
the vendor/magento/framework/View/Layout/etc/head.xsd le that denes the
css element as follows:
<xs:complexType name="linkType">
<xs:attribute name="src" type="xs:string" use="required"/>
<xs:attribute name="defer" type="xs:string"/>
<xs:attribute name="ie_condition" type="xs:string"/>
<xs:attribute name="charset" type="xs:string"/>
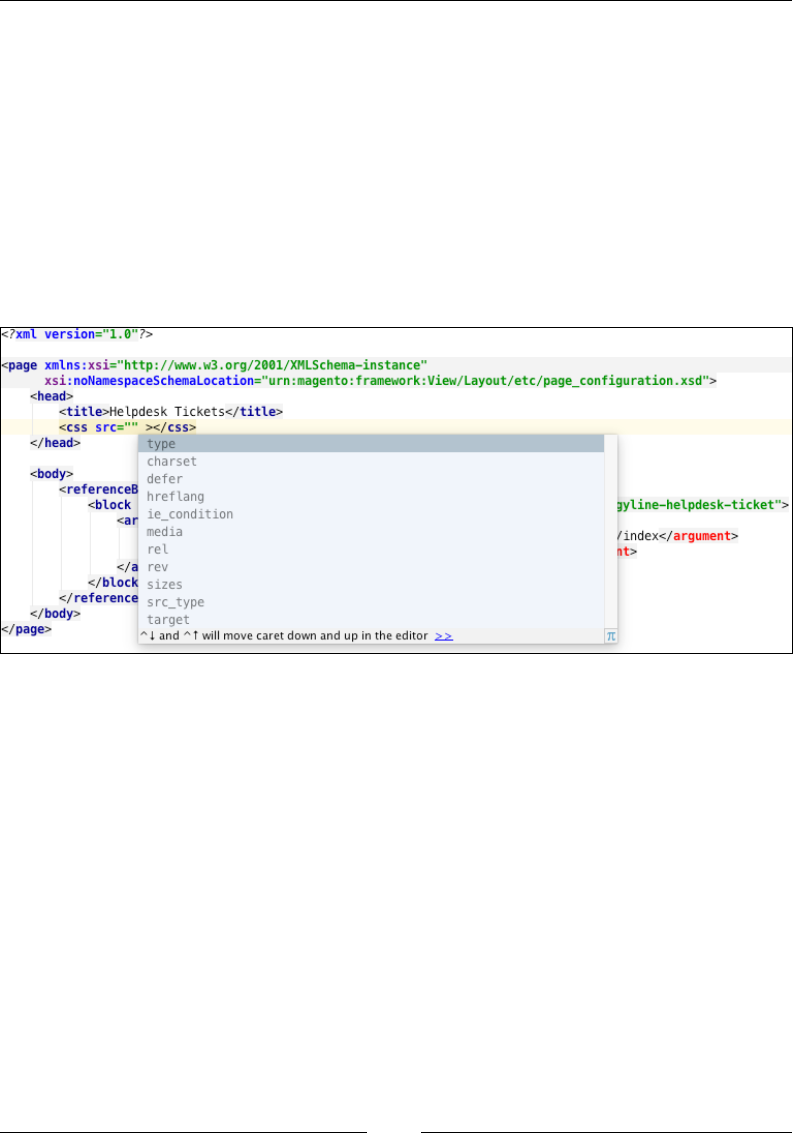
Frontend Development
[ 186 ]
<xs:attribute name="hreflang" type="xs:string"/>
<xs:attribute name="media" type="xs:string"/>
<xs:attribute name="rel" type="xs:string"/>
<xs:attribute name="rev" type="xs:string"/>
<xs:attribute name="sizes" type="xs:string"/>
<xs:attribute name="target" type="xs:string"/>
<xs:attribute name="type" type="xs:string"/>
<xs:attribute name="src_type" type="xs:string"/>
</xs:complexType>
All of these are attributes we can set on the css element, and as such get their
autocomplete as shown:
Although it is not required to use a robust IDE with Magento, it certainly helps to
have one that understands XML and XSD les to the level of providing autocomplete
and validation.
Themes
By default, Magento comes with two themes, named Blank and Luma. If we log in to
the Magento admin area, we can see a list of available themes under the Content |
Design | Themes menu, as shown in the following screenshot:
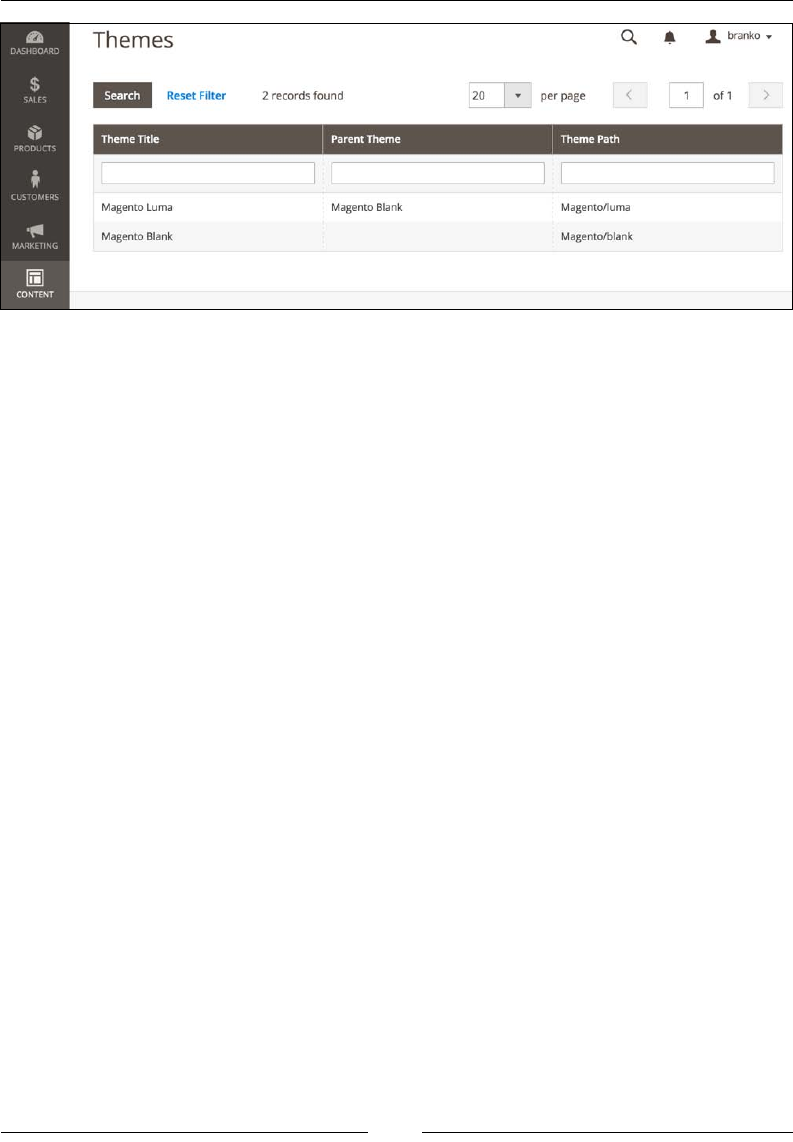
Chapter 8
[ 187 ]
Magento themes support a parent-child relationship, something we noted
previously, that is visible on the preceding image within the Parent Theme column.
Creating a new theme
The following steps outline the process of creating our own theme:
1. Under {Magento root directory}/app/design/frontend, create a new
directory bearing our vendor name, Foggyline.
2. Within the vendor directory, create a new directory bearing the theme
name, jupiter.
3. Within the jupiter directory, create the registration.php le with content
as follows:
<?php
\Magento\Framework\Component\ComponentRegistrar::register(
\Magento\Framework\Component\ComponentRegistrar::THEME,
'frontend/Foggyline/jupiter',
__DIR__
);
4. Copy vendor/magento/theme-frontend-blank/theme.xml into our theme,
app/design/frontend/Foggyline/jupiter/theme.xml, changing the
content as follows:
<theme xmlns:xsi="http://www.w3.org/2001/XMLSchema-
instance" xsi:noNamespaceSchemaLocation="urn:magento:
framework:Config/etc/theme.xsd">
<title>Foggyline Jupiter</title>
<parent>Magento/blank</parent>
<media>
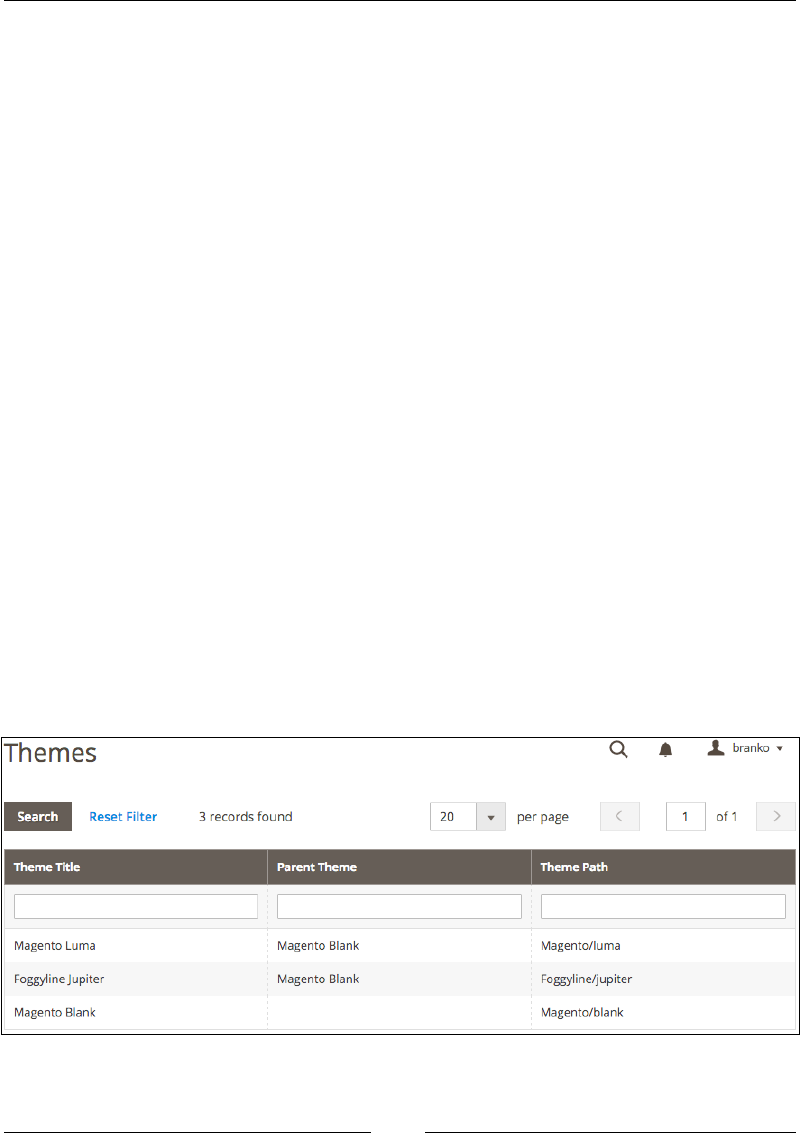
Frontend Development
[ 188 ]
<preview_image>media/preview.jpg</preview_image>
</media>
</theme>
5. Create the app/design/frontend/Foggyline/jupiter/media/preview.
jpg image le to serve as the theme preview image (the one used in the
admin area).
6. Optionally, create separate directories for static les such as styles, fonts,
JavaScript, and images. These are stored within the web subdirectory of our
theme app/design/frontend/Foggyline/jupiter/ folder like follows:
°web/css/
°web/css/source/
°web/css/source/components/
°web/images/
°web/js/
Within the theme web directory, we store general theme static files. If our
theme contains module-specific static files, these are stored under the
corresponding vendor module subdirectories, like app/design/frontend/
Foggyline/jupiter/{vendorName_moduleName}/web/.
7. Optionally, we can create the theme logo.svg image under our theme
web/images/ folder.
Once we are done with the preceding steps, looking back into the admin area under
the Content | Design | Themes menu, we should now see our theme listed as
shown in the following screenshot:

Chapter 8
[ 189 ]
Whereas clicking on the row in the table next to our theme name would open a
screen like the following:
Notice how the previous two screens do not show any options to apply the theme.
They are only listing out available themes and some basic information next to each
theme. Our custom theme shows an interesting relationship, where a parent and a
child theme can belong to different vendors.
Applying the theme requires the following extra steps:
1. Make sure our theme appears in the theme list, under the Content | Design
| Themes menu.
2. Go to Stores | Settings | Conguration | General | Design.
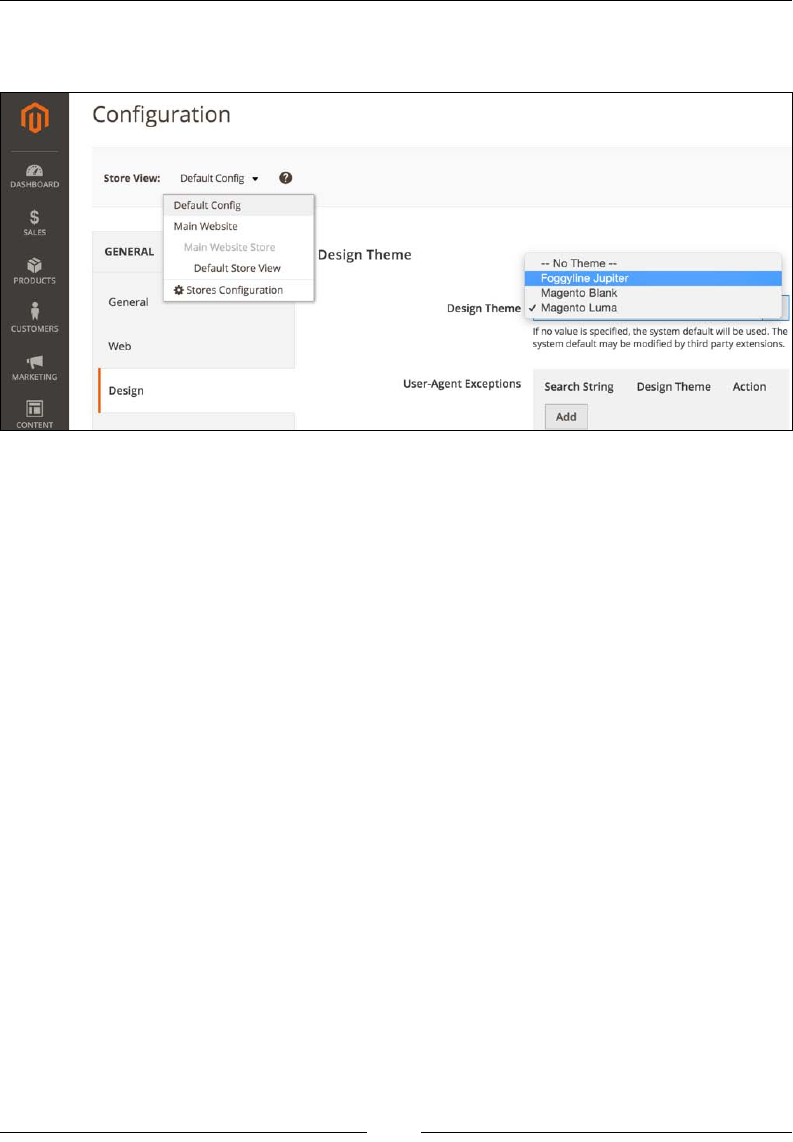
Frontend Development
[ 190 ]
3. In the Store View drop-down eld, we select the store view where we want
to apply the theme, as shown in the upper-left corner of the following image:
4. On the Design Theme tab, we select our newly created theme in the Design
Theme drop-down, as shown on the right-hand side of the preceding image.
Click Save Cong.
5. Under System | Tools | Cache Management, select and refresh the invalid
cache types and click on the Flush Catalog Images Cache, Flush JavaScript/
CSS Cache, and Flush Static Files Cache buttons.
6. Finally, to see our changes applied, reload the storefront pages in
the browser.
There is a lot more to be said about themes that can t in a book of its own. However,
we will move on to the other important bits.
JavaScript
Magento makes use of quite a large number of JavaScript libraries, such as:
• Knockout: http://knockoutjs.com
• Ext JS: https://www.sencha.com/products/extjs/
• jQuery: https://jquery.com/
• jQuery UI: https://jqueryui.com/
• modernizr: http://www.modernizr.com/
• Prototype: http://www.prototypejs.org/
• RequireJS: http://requirejs.org/

Chapter 8
[ 191 ]
• script.aculo.us: http://script.aculo.us/
• moment.js: http://momentjs.com/
• Underscore.js: http://underscorejs.org/
• gruntjs: http://gruntjs.com/
• AngularJS: https://angularjs.org/
• jasmine: http://jasmine.github.io/
… and a few others
Though a frontend developer is not required to know the ins and outs of every
library, it is recommended to at least have a basic insight into most of them.
It is worth running find {MAGENTO-DIR}/ -name \*.js > js-list.
txt on the console to get a full list of each and every JavaScript le in
Magento. Spending a few minutes glossing over the list might serve as a
nice future memo when working with JavaScript bits in Magento.
The RequireJS and jQuery libraries are probably the most interesting ones, as they
often step into the spotlight during frontend development. RequireJS plays a big
role in Magento, as it loads other JavaScript les. Using a modular script loader like
RequireJS improves the speed of code. Speed improvement comes from removing
JavaScript from the header and asynchronously or lazy loading JavaScript resources
in the background.
JavaScript resources can be specied as follows:
• Library level for all libraries in the Magento code base (lib/web).
• Module level for all libraries in a module (app/code/{vendorName}/
{moduleName}/view/{area}/web).
• Theme for all libraries in a theme (app/design/{area}/{vendorName}/
{theme}/{vendorName}_{moduleName}/web).
• All libraries in a theme (app/design/{area}/{vendorName}/{theme}/web).
Though possible, it is not recommended using this level to specify JavaScript
resources.
It is recommended to specify JavaScript resources in the templates rather than in the
layout updates. This way, we ensure processing of the resources through RequireJS.
To work with the RequireJS library, specify the mapping of JavaScript resources; that
is, assign the aliases to resources. Use requires-config.js to create the mapping.

Frontend Development
[ 192 ]
To make our congurations more precise and specic for different modules/
themes, we can identify mapping in the requires-config.js le at several
levels depending on our needs. Congurations are collected and executed in
the following order:
• Library configurations
• Configurations at the module level
• Configurations at the theme module level for the ancestor themes
• Configurations at the theme module level for a current theme
• Configurations at the theme level for the ancestor themes
• Configurations at the theme level for the current theme
When we speak of JavaScript in Magento, we can hear various terms like component
and widget. We can easily divide those terms by describing the type of JavaScript in
Magento as per the following list:
• JavaScript component (JS component): This can be any single JavaScript file
decorated as an AMD (short for Asynchronous Module Definition) module
• Ui component: A JavaScript component located in the Magento_Ui module
• jQuery UI widget: A JavaScript component/widget provided by the jQuery
UI library used in Magento
• jQuery widget: A custom widget created using jQuery UI Widget Factory
and decorated as an AMD module
There are two ways we can initialize a JavaScript component in template les:
• Using the data-mage-init attribute
• Using the <script> tag
The data-mage-init attribute is parsed on a DOM ready event. Since it is initialized
on a certain element, the script is called only for that particular element, and is
not automatically initialized for other elements of the same type on the page.
An example of data-mage-init usage would be something like the following:
<div data-mage-init='{ "<componentName>": {...} }'></div>

Chapter 8
[ 193 ]
The <script> tag initialization is done without relation to any specic element, or
in relation to a specic element but no direct access to the element. The script tag has
to have an attribute, type="text/x-magento-init". An example of <script> tag
initialization would be something like the following:
<script type="text/x-magento-init">
// specific element but no direct access to the element
"<element_selector>": {
"<jsComponent1>": ...,
"<jsComponent2>": ...
},
// without relation to any specific element
"*": {
"<jsComponent3">: ...
}
</script>
Depending on the situation and desired level of expressiveness, we can either opt for
usage of data-mage-init or attribute or <script> tag.
Creating a custom JS component
Let's go through a practical example of creating a JS component within our
Foggyline_Office module in a form of the jQuery widget as follows:
First, we add our entry to app/code/Foggyline/Office/view/frontend/
requirejs-config.js, as shown:
var config = {
map: {
'*': {
foggylineHello:
'Foggyline_Office/js/foggyline-hello'
}
}
};
Then we add the actual JavaScript app/code/Foggyline/Office/view/frontend/
web/js/foggyline-hello.js with content as follows:
define([
"jquery",
"jquery/ui"
], function($){
"use strict";
Frontend Development
[ 194 ]
$.widget('mage.foggylineHello', {
options: {
},
_create: function () {
alert(this.options);
//my code here
}
});
return $.mage.foggylineHello;
});
Finally, we call our JavaScript component within some PHTML template, let's say
app/code/Foggyline/Office/view/frontend/templates/office/hello.phtml,
as show:
<div data-mage-init='{"foggylineHello":{"myVar1": "myValue1",
"myVar2": "myValue2"}}'>Foggyline</div>
Once we refresh the frontend, we should see the result of alert(this.options) in
the browser showing myVar1 and myVar2.
The data-mage-init part basically triggers as soon as the page loads. It is not
triggered via some click or similar event on top of the div element; it is triggered
on page load.
If we don't see the desired result in the browser, we might need to fully clear the
cache in the admin area.
CSS
Magento uses a PHP port of the ofcial LESS processor to parse the .less les into
.css les. LESS is a CSS preprocessor that extends the CSS language by adding
various features to it, like variables, mixins, and functions. All of this makes CSS
more maintainable, extendable, and easier to theme. Frontend developers are thus
expected to write LESS les that Magento then converts to appropriate CSS variants.
It is worth running find {MAGENTO-DIR}/ -name \*.less
> less-list.txt on the console to get a full list of each and
every LESS le in Magento. Spending a few minutes glossing
over the list might serve as a nice future memo when working
with style sheet bits in Magento.

Chapter 8
[ 195 ]
We can customize the storefront look and feel through one of the
following approaches:
• Override the default LESS files – only if our theme inherits from the default
or any other theme, in which case we can override the actual LESS files
• Create our own LESS files using the built-in LESS preprocessor
• Create our own CSS files, optionally having compiled them using a
third-party CSS preprocessor
Within the individual frontend theme directory, we can nd style sheets at the
following locations:
• {vendorName}_{moduleName}/web/css/source/
• {vendorName}_{moduleName}/web/css/source/module/
• web/css/
• web/css/source/
CSS les can be included in a page through templates and layout les. A
recommended way is to include them through layout les. If we want our style
sheets to be available through all pages on the frontend, we can add using the
default_head_blocks.xml le. If we look at the blank theme, it uses vendor/
magento/theme-frontend-blank/Magento_Theme/layout/default_head_
blocks.xml dened as follows:
<page xmlns:xsi="http://www.w3.org/2001/XMLSchema-instance"
xsi:noNamespaceSchemaLocation="urn:magento:framework:View/Layout
/etc/page_configuration.xsd">
<head>
<css src="css/styles-m.css"/>
<css src="css/styles-l.css" media="screen and (min-width:
768px)"/>
<css src="css/print.css" media="print"/>
</head>
</page>
All it takes is for us to copy this le in the same location under our custom theme;
assuming it's the jupiter theme from the preceding examples, that would be app/
design/frontend/Foggyline/jupiter/Magento_Theme/layout/default_head_
blocks.xml. Then we simply modify the le to include our CSS.
When run, Magento will try to nd the included CSS les. If a CSS le is not found, it
then searches for the same lenames with a .less extension. This is part of the built-
in preprocessing mechanism.

Frontend Development
[ 196 ]
Summary
In this chapter, we started off by looking into the three aspects of the rendering ow
process: the view, result object, and pages. Then we took a detailed look at three
primary view elements: ui-components, containers, and blocks. We further
studied blocks in depth, looking into their architecture and life cycle. We moved on
to templates, looking into their locations, rendering, and fallback. Then came XML
layouts, as the glue between blocks and templates. All of this gave us a foundation
for further looking into theme structure, JavaScript components, and CSS. Along the
way, we did a little bit of hands-on with a custom theme and JavaScript components
creation. CSS and JavaScript is merely a fragment of what the Magento frontend is all
about. Technology-wise, having a solid understanding of XML and even some PHP
is more of a requirement than an exception for frontend-related development.
The following chapter will introduce us to Magento's web API where we will learn
how to authenticate, make API calls, and even build our own APIs.

[ 197 ]
The Web API
Throughout previous chapters, we learned how to use some of the backend
components so that storeowners can manage and manipulate the data such as
customers, products, categories, orders, and so on. Sometimes this is not enough, like
when we are pulling data in or out from third-party systems. In cases like these, the
Magento Web API framework makes it easy to call Magento services through REST
or SOAP.
In this chapter, we will cover the following topics:
• User types
• Authentication methods
• REST versus SOAP
• Hands-on with token-based authentication
• Hands-on with OAuth-based authentication
• OAuth-based Web API calls
• Hands-on with session-based authentication
• Creating custom Web APIs
• Search Criteria Interface for list filtering
Before we can start making Web API calls, we must authenticate our identity
and have the necessary permissions (authorization) to access the API resource.
Authentication allows Magento to identify the caller's user type. Based on the user's
(administrator, integration, customer, or guest) access rights, the API calls' resource
accessibility is determined.

The Web API
[ 198 ]
User types
The list of resources that we can access depends on our user type and is dened
within our module webapi.xml conguration le.
There are three types of users known to API, listed as follows:
• Administrator or integration: Resources for which administrators or
integrators are authorized. For example, if administrators are authorized for
the Magento_Cms::page resource, they can make a POST /V1/cmsPage
call.
• Customer: Resources for which customers are authorized. These are the
resources with anonymous or self permission.
• Guest user: Resources for which guests are authorized. These are the
resources with anonymous permission.
Two les play a crucial role toward dening an API: our module acl.xml and
webapi.xml les.
acl.xml is where we dene our module access control list (ACL). It denes an
available set of permissions to access the resources. The acl.xml les across all
Magento modules are consolidated to build an ACL tree that is used to select
allowed admin role resources or third-party integration's access (System |
Extensions | Integrations | Add New Integration | Available APIs).
webapi.xml is where we dene Web API resources and their permissions. When
we create webapi.xml, the permissions dened in acl.xml are referenced to create
access rights for each API resource.
Let's take a look at the following (truncated) webapi.xml from the core Magento_Cms
module:
<routes xmlns:xsi="http://www.w3.org/2001/XMLSchema-instance"
xsi:noNamespaceSchemaLocation=
"urn:magento:module:Magento_Webapi:etc/webapi.xsd">
...
<route url="/V1/cmsPage" method="POST">
<service class="Magento\Cms\Api\PageRepositoryInterface"
method="save" />
<resources>
<resource ref="Magento_Cms::page" />
</resources>
</route>
...
<route url="/V1/cmsBlock/search" method="GET">
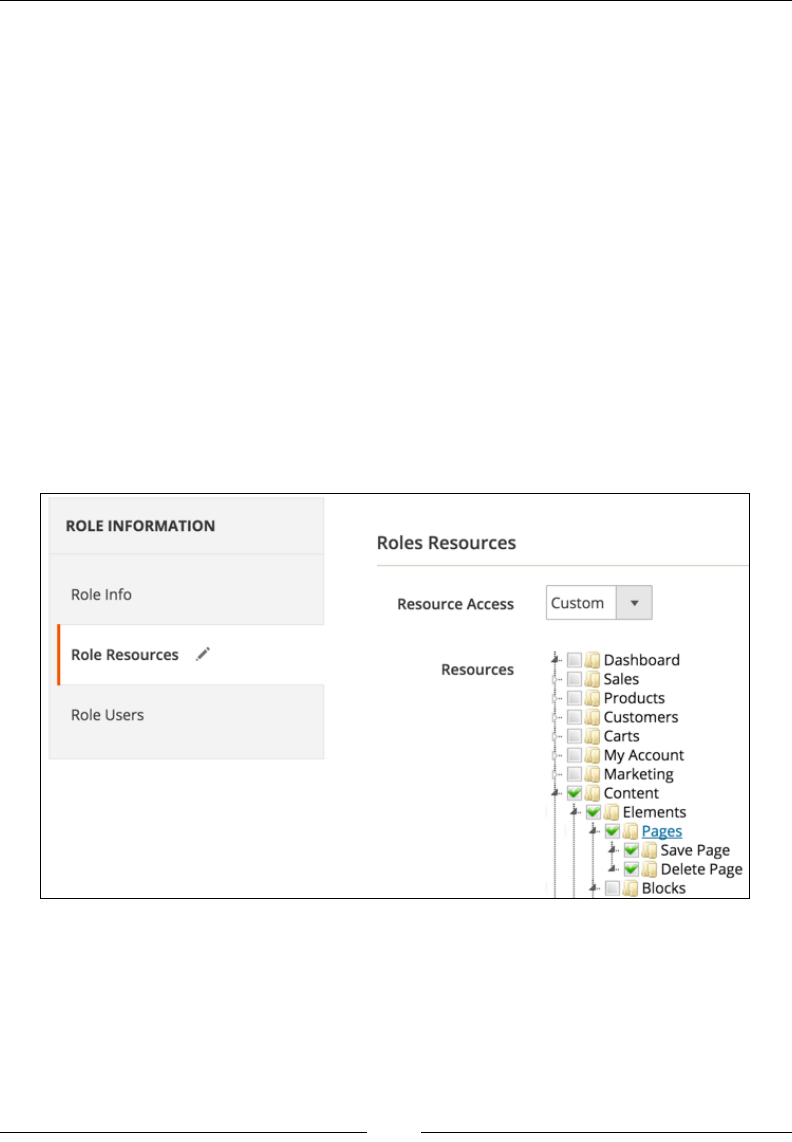
Chapter 9
[ 199 ]
<service class="Magento\Cms\Api\BlockRepositoryInterface"
method="getList" />
<resources>
<resource ref="Magento_Cms::block" />
</resources>
</route>
...
</routes>
In the preceding webapi.xml le for the CMS page API, only a user with Magento_
Cms::page authorization can access POST /V1/cmsPage or GET /V1/cmsBlock/
search. We will get back to a more detailed explanation of route later on in our
examples; for the moment, our focus is on resource. We can assign multiple child
resource elements under resources. In cases like these, it would be sufcient for a
user to have any one of those ACLs assigned to be able to make an API call.
The actual authorization is then granted to either an administrator or integration,
dened in the Magento admin, with full group or a specic resource selected in the
ACL tree as shown in the following screenshot:
Given that webapi.xml and acl.xml go hand in hand, let's take a look at the
(truncated) acl.xml le from the core Magento_Cms module:
<resources>
<resource id="Magento_Backend::admin">
<resource id="Magento_Backend::content">
<resource id="Magento_Backend::content_elements">

The Web API
[ 200 ]
<resource id="Magento_Cms::page" ...>
...
</resource>
</resource>
</resource>
</resource>
</resources>
Notice how the position of the Magento_Cms::page resource is nested under
Magento_Backend::content_elements, which in turn is nested under Magento_
Backend::content, which is further nested under Magento_Backend::admin. This
tells Magento where to render the ACL under Magento admin when showing the
Roles Resources tree as shown in the previous screenshot. This does not mean that
the user authorized against the Magento_Cms::page resource won't be able to access
the API if all those parent Magento_Backend resources are granted to him as well.
Authorizing against a resource is sort of a at thing. There is no tree check when
authorizing. Thus, each resource is required to have a unique id attribute value on a
resource element when dened under acl.xml.
The resources just dened are what we listed before as resources for which
administrators or integrators are authorized.
The customer, on the other hand, is assigned a resource named anonymous or self.
If we were to do a full <resource ref="anonymous" /> string search across all
Magento core modules, several occurrences would show up.
Let's take a look at the (truncated) core module vendor/magento/module-catalog/
etc/webapi.xml le:
<route url="/V1/products" method="GET">
<service class=
"Magento\Catalog\Api\ProductRepositoryInterface"
method="getList"/>
<resources>
<resource ref="anonymous" />
</resources>
</route>
The preceding XML denes an API endpoint path with a value of /V1/products,
available via the HTTP GET method. It further denes a resource called anonymous,
which means either the currently logged-in customer or guest user can call this
API endpoint.

Chapter 9
[ 201 ]
anonymous is a special permission that doesn't need to be dened in acl.xml. As
such, it will not show up in the permissions tree under Magento admin. This simply
means that the current resource in webapi.xml can be accessed without the need
for authentication.
Finally, we take a look at the self resource, whose example we can nd under the
(truncated) vendor/magento/module-customer/etc/webapi.xml le as follows:
<route url="/V1/customers/me" method="PUT">
<service class=
"Magento\Customer\Api\CustomerRepositoryInterface"
method="save"/>
<resources>
<resource ref="self"/>
</resources>
<data>
<parameter name="customer.id"
force="true">%customer_id%</parameter>
</data>
</route>
self is a special kind of access that enables a user to access resources they own,
assuming we already have an authenticated session with the system. For example,
GET /V1/customers/me fetches the logged-in customer's details. This is something
that is typically useful for JavaScript-based components/widgets.
Authentication methods
Mobile applications, third-party applications, and JavaScript components/widgets
(storefront or admin) are the three main types of clients as seen by Magento. Though
a client is basically everything communicating with our APIs, each type of client has
a preferred authentication method.
Magento supports three types of authentication methods, listed as follows:
• Token-based authentication
• OAuth-based authentication
• Session-based authentication

The Web API
[ 202 ]
Token-based authentication is most suitable for mobile applications, where a token
acts like an electronic key providing access to the Web API's. The general concept
behind a token-based authentication system is relatively simple. The user provides
a username and password during initial authentication in order to obtain a time-
limited token from the system. If a token is successfully obtained, all subsequent API
calls are then made with that token.
OAuth-based authentication is suitable for third-party applications that integrate
with Magento. Once an application is authorized through the OAuth 1.0a handshake
process, it gains access to Magento Web APIs. There are three key terminologies we
must understand here: user (resource owner), client (consumer), and server (service
provider). The user or resource owner is the one who is being asked to allow access
to its protected resource. Imagine a customer as a user (resource owner) allowing
access to its orders to some third-party applications. In such a case, this third-party
application would be the client (consumer), whereas Magento and its Web API
would be the server (service provider).
Session-based authentication is probably the simplest one to grasp. As a customer,
you log in to the Magento storefront with your customer credentials. As an admin,
you log in to the Magento admin with your admin credentials. The Magento Web
API framework uses your logged-in session information to verify your identity and
authorize access to the requested resource.
REST versus SOAP
Magento supports both SOAP (short for Simple Object Access Protocol) and REST
(short for Representational State Transfer) types of communication with the Web
API. Authentication methods themselves are not really bound to any of them. We
can use the same authentication method and Web API method calls with both
SOAP and REST.
Some of the REST specics we might outline as follows:
• We run REST Web API calls through cURL commands or a REST client.
• Requests support HTTP verbs: GET, POST, PUT, or DELETE.
• A HTTP header requires an authorization parameter, specifying the
authentication token with the Bearer HTTP authorization scheme,
Authorization: Bearer <TOKEN>. <TOKEN> is the authentication token
returned by the Magento token service.
• We can use the HTTP header Accept: application/<FORMAT>,
where <FORMAT> is either JSON or XML.

Chapter 9
[ 203 ]
Some of the SOAP specics we might outline as follows:
• We run SOAP Web API calls through cURL commands or a SOAP client.
• A Web Service Definition Language (WSDL) file is generated only for
services that we request. There is no one big merged WSDL file for all
services.
• The Magento Web API uses WSDL 1.2, compliant with WS-I 2.0 Basic Profile.
• Each Magento service interface that is part of a service contract is represented
as a separate service in the WSDL.
• Consuming several services implies specifying them in the WSDL endpoint
URL in a comma-separated manner, for example http://<magento.
host>/soap/<optional_store_code>?wsdl&services=<service_
name_1>,<service_name_2>.
• We can get a list of all available services by hitting a URL like
http://<SHOP-URL>/soap/default?wsdl_list in the browser.
The following REST and SOAP examples will make extensive use of cURL, which
is essentially a program that allows you to make HTTP requests from the command
line or different language implementations (like PHP). We can further describe cURL
as the console browser, or our view source tool for the web. Anything we can do
with various fancy REST and SOAP libraries, we can do with cURL as well; it is just
considered to be a more low-level approach.
Doing SOAP requests with cURL or anything else that does not have WSDL/XML
parsing implemented internally is cumbersome. Thus, using PHP SoapClient or
something more robust is a must. SoapClient is an integrated, actively maintained
part of PHP, and is thus generally available.
With negative points being pointed, we will still present all of our API calls with
console cURL, PHP cURL, and PHP SoapClient examples. Given that libraries
abstract so much functionality, it is absolutely essential that a developer has a solid
understanding of cURL, even for making SOAP calls.
Hands-on with token-based
authentication
The crux of token-based authentication is as follows:
• Client requests access with a username and password
• Application validates credentials
• Application provides a signed token to the client

The Web API
[ 204 ]
The following code example demonstrates the console cURL REST-like request for
the customer user:
curl -X POST "http://magento2.ce/rest/V1/integration/customer/token"\
-H "Content-Type:application/json"\
-d '{"username":"john@change.me", "password":"abc123"}'
The following code example demonstrates the PHP cURL REST-like request for the
customer user:
$data = array('username' => 'john@change.me', 'password' =>
'abc123');
$data_string = json_encode($data);
$ch = curl_init('http://magento2.ce/rest/V1/integration
/customer/token');
curl_setopt($ch, CURLOPT_CUSTOMREQUEST, 'POST');
curl_setopt($ch, CURLOPT_POSTFIELDS, $data_string);
curl_setopt($ch, CURLOPT_RETURNTRANSFER, true);
curl_setopt($ch, CURLOPT_HTTPHEADER, array(
'Content-Type: application/json',
'Content-Length: ' . strlen($data_string))
);
$result = curl_exec($ch);
The following code example demonstrates the console cURL SOAP-like request for
the customer user:
curl -X POST -H 'Content-Type: application/soap+xml;
charset=utf-8; action=
"integrationCustomerTokenServiceV1CreateCustomerAccessToken"'
-d @request.xml http://magento2.ce/index.php/soap/default?services=
integrationCustomerTokenServiceV1
Notice the -d @request.xml part. Here, we are saying to the curl command to
take the content of the request.xml le and pass it on as POST body data where
the content of the request.xml le for the preceding curl command is dened
as follows:
<?xml version="1.0" encoding="UTF-8"?>
<env:Envelope xmlns:env="http://www.w3.org/2003/05/soap-envelope"
xmlns:ns1="http://magento2.ce/index.php/soap/default?
services=integrationCustomerTokenServiceV1">
<env:Body>

Chapter 9
[ 205 ]
<ns1:integrationCustomerTokenServiceV1CreateCustomer
AccessTokenRequest>
<username>john@change.me</username>
<password>abc123</password>
</ns1:integrationCustomerTokenServiceV1CreateCustomer
AccessTokenRequest>
</env:Body>
</env:Envelope>
The following code example demonstrates the PHP cURL SOAP-like request for the
customer user:
$data_string = file_get_contents('request.xml');
$ch =
curl_init('http://magento2.ce/index.php/soap/default?services=
integrationCustomerTokenServiceV1');
curl_setopt($ch, CURLOPT_CUSTOMREQUEST, 'POST');
curl_setopt($ch, CURLOPT_POSTFIELDS, $data_string);
curl_setopt($ch, CURLOPT_RETURNTRANSFER, true);
curl_setopt($ch, CURLOPT_HTTPHEADER, array(
'Content-Type: application/soap+xml; charset=utf-8;
action="integrationCustomerTokenServiceV1
CreateCustomerAccessToken"',
'Content-Length: ' . strlen($data_string))
);
$result = curl_exec($ch);
The following code example demonstrates the usage of PHP SoapClient to make a
Web API call:
$request = new SoapClient(
'http://magento2.ce/index.php/soap/default?wsdl&services=
integrationCustomerTokenServiceV1',
array('soap_version' => SOAP_1_2, 'trace' => 1)
);
$token = $request->integrationCustomerTokenServiceV1Create
CustomerAccessToken(array('username' => 'john@change.me',
'password' => 'abc123'));
The API call for admin user authentication is nearly identical, and depends on
which one of three approaches we take. The difference is merely in using https://
magento2.ce/rest/V1/integration/admin/token as the endpoint URL in the case
of REST, and using http://magento2.ce/index.php/soap/default?services=in
tegrationCustomerTokenServiceV1. Additionally, for a SOAP call, we are
calling integrationAdminTokenServiceV1CreateAdminAccessToken on the
$request object.
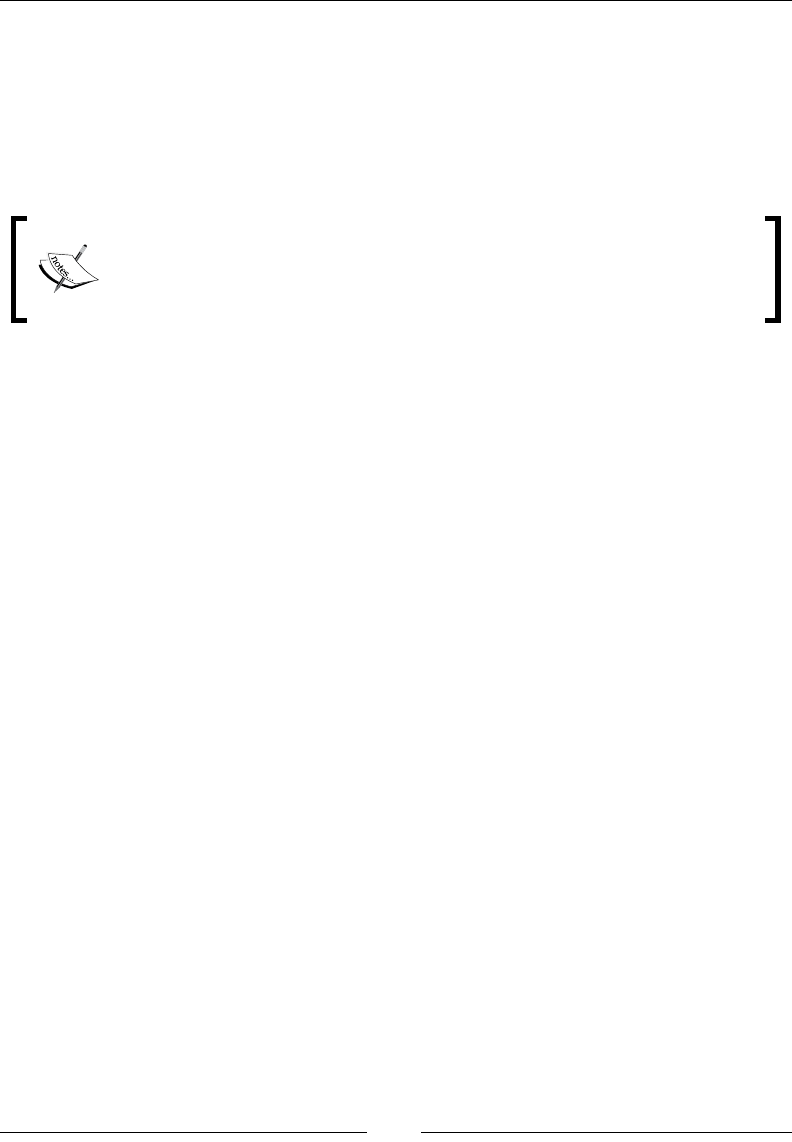
The Web API
[ 206 ]
In the case of successful authentication, for both the customer and admin API call,
the response would be a random-looking 32-characters-long string that we call
token. This token is further saved to the oauth_token table in the database, under
the token column.
This might be a bit confusing with regard to what the oauth_token table has to do
with token authentication.
If we think about it, token-based authentication can be looked at as a
simplied version of OAuth, where the user would authenticate using a
username and password and then give the obtained time-expiring token
to some third-party application to use it.
In the case of failed authentication, the server returns HTTP 401 Unauthorized,
with a body containing a JSON message:
{"message":"Invalid login or password."}
Notice how we are able to call the API method, though we are not already
authenticated? This means we must be calling an API dened by the anonymous
type of resource. A quick look at the API endpoint gives us a hint as to the location
of its denition. Looking under the vendor/magento/module-integration/etc/
webapi.xml le, we can see the following (truncated) XML:
<route url="/V1/integration/admin/token" method="POST">
<service
class="Magento\Integration\Api\AdminTokenServiceInterface"
method="createAdminAccessToken"/>
<resources>
<resource ref="anonymous"/>
</resources>
</route>
<route url="/V1/integration/customer/token" method="POST">
<service
class="Magento\Integration\Api\
CustomerTokenServiceInterface"
method="createCustomerAccessToken"/>
<resources>
<resource ref="anonymous"/>
</resources>
</route>
We can clearly see how even token-based authentication itself is dened as
API, using the anonymous resource so that everyone can access it. In a nutshell,
token-based authentication is a feature of the Magento\Integration module.
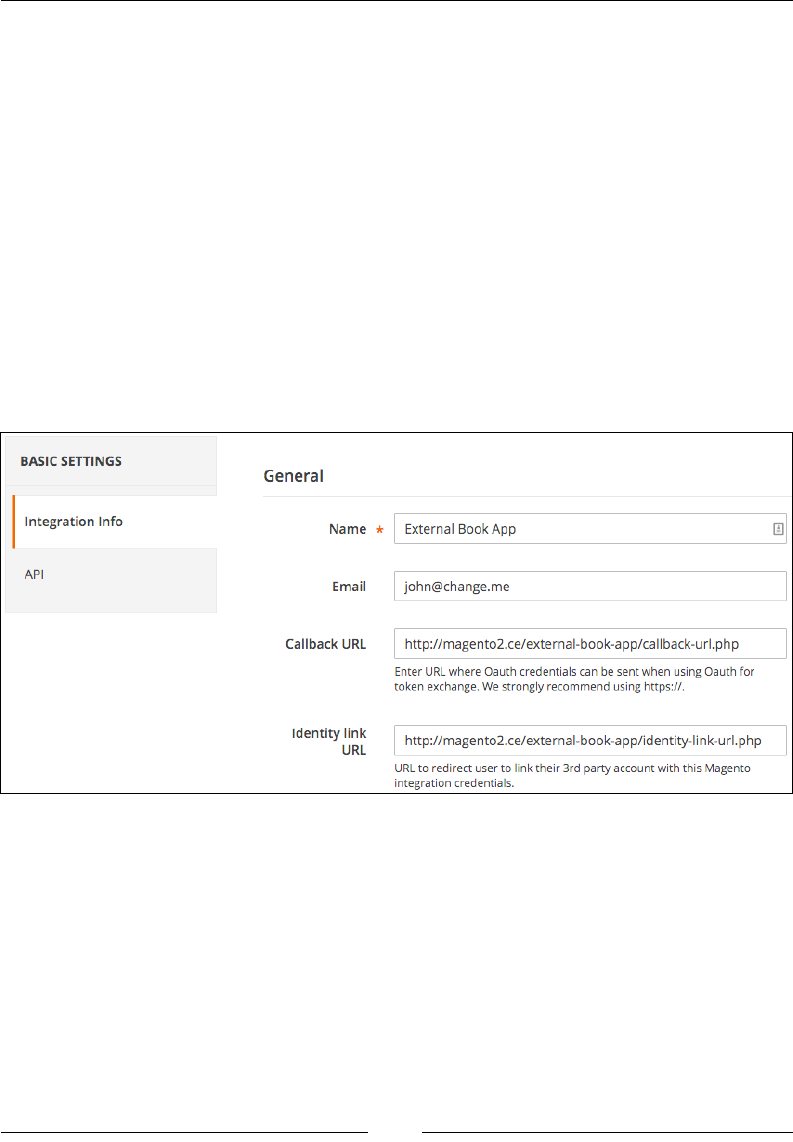
Chapter 9
[ 207 ]
Now that we have our authentication token, we can start making other API calls.
Remember, token simply means we have been authenticated against a given
username and password. It does not mean we get full access to all Web API methods.
This further depends on whether our customer or user has the proper access role.
Hands-on with OAuth-based
authentication
OAuth-based authentication is the most complex, yet most exible one supported by
Magento. Before we get to use it, the merchant must register our external application
as integration with the Magento instance. Placing ourselves in the role of merchant,
we do so in the Magento admin area under System | Extensions | Integrations.
Clicking on the Add New Integration button opens the screen as shown in the
following screenshot:
The value External Book App is the freely given name of our external application.
If we were connecting it with Twitter, we could have easily put its name here. Next
to Name, we have the Email, Callback URL, and Identity Link URL elds. The
value of e-mail is not really that important. The callback URL and identity link URL
dene the external application endpoint that receives OAuth credentials. The values
of these links point to external app that stands as the OAuth client. We will come back
to it in a moment.
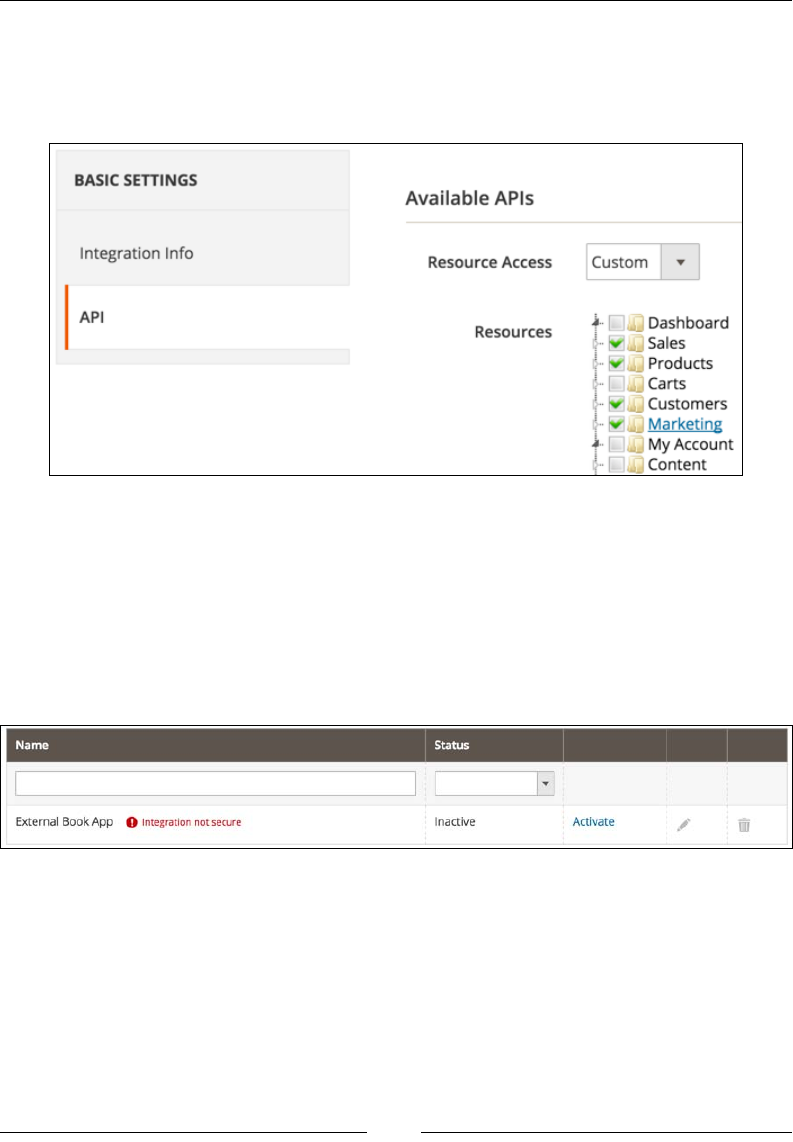
The Web API
[ 208 ]
In the API tab under the Available APIs pane, we set Resource Access to the
value of All or Custom. If set to Custom, we can further ne-tune the resources in
the Resources option we want to allow access to this integration as shown in the
following screenshot:
We should always give the minimum required resources to the external application
we are using. This way, we minimize possible security risks. The preceding
screenshot shows us dening only Sales, Products, Customer, and Marketing
resources to the integration. This means that the API user would not be able to use
content resources, such as save or delete pages.
If we click the Save button now, we should be redirected back to the System |
Extensions | Integrations screen as shown in the following screenshot:
There are three things to focus our attention here. First, we are seeing an Integration
not secure message. This is because when we dened our callback URL and
identity link URL, we used HTTP and not HTTPS protocol. When doing real-world
connections, for security reasons, we need to be sure to use HTTPS. Further, we
notice how the Status column still says Inactive.

Chapter 9
[ 209 ]
The Activate link, to the right of the Status column, is the preceding step before
the two-legged OAuth handshake starts. Only an administrator with access to
integration listing in the backend can initiate this.
At this point, we need to pull the entire PHP code behind the External
Book App OAuth client from here, https://github.com/ajzele/B05032-
BookAppOauthClient, and place it into the root of our Magento installation under
the pub/external-book-app/ folder as shown in the following screenshot:
The function of these les is to simulate our own mini-OAuth client. We will not go
into much detail about the content of these les, It is more important to look at it as
an external OAuth client app. The callback-url.php and identity-link-url.
php les will execute when Magento triggers the callback and identity link URL's as
congured under the output image on the previous page.
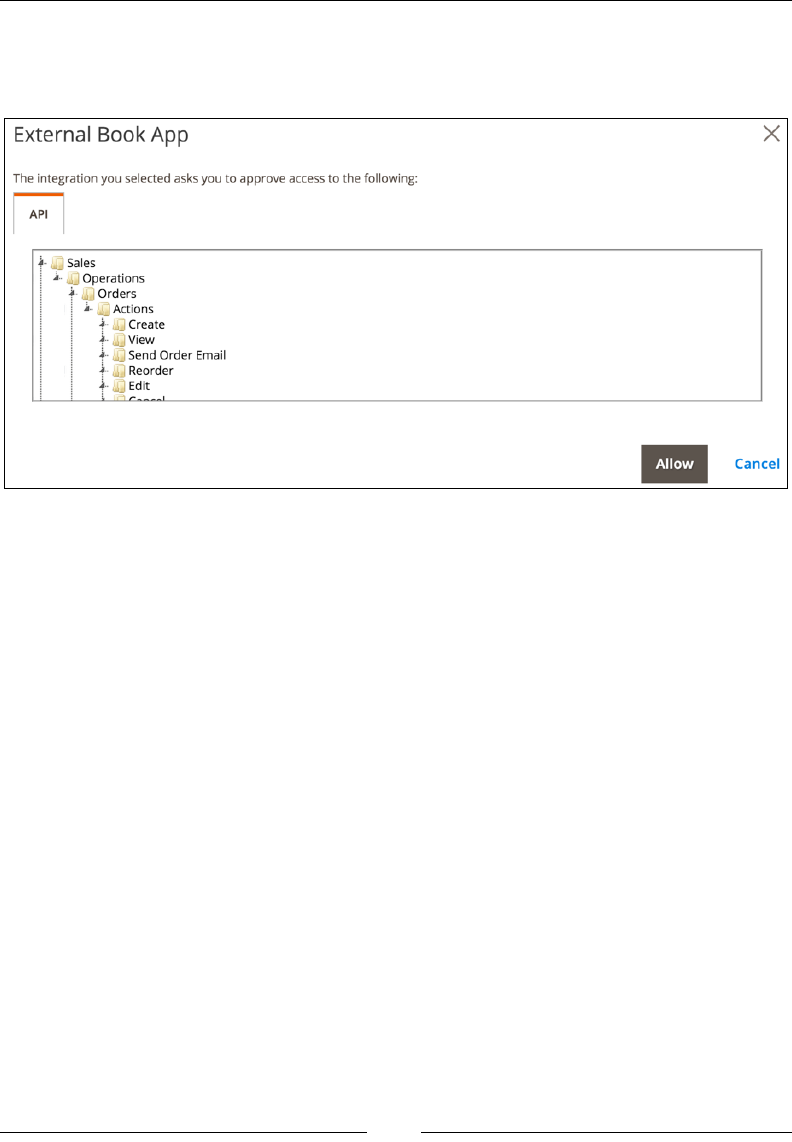
The Web API
[ 210 ]
Once the OAuth client les are in place, we go back to our integrations listing. Here,
we click on the Activate link. This opens a modal box, asking us to approve access to
the API resources as shown in the following screenshot:
Notice how API resources listed here match those few we set under the API tab
when creating integration. There are only two actions we can do here really: either
click Cancel or Allow to start the two-legged OAuth handshake. Clicking the Allow
button does two things in parallel.
First, it instantly posts the credentials to the endpoint (callback URL) specied when
creating the External Book App integration. The HTTP POST from Magento to the
callback URL contains parameters with values similar to the following:
Array
(
[oauth_consumer_key] => cn5anfyvkg7sgm2lrv8cxvq0dxcrj7xm
[oauth_consumer_secret] => wvmgy0dmlkos2vok04k3h94r40jvi5ye
[store_base_url] => http://magento2-merchant.loc/index.php/
[oauth_verifier] => hlnsftola6c7b6wjbtb6wwfx4tow2x6x
)
Basically, a HTTP POST request is hitting the callback-url.php le whose content
(partial) is as follows:
session_id('BookAppOAuth');
session_start();
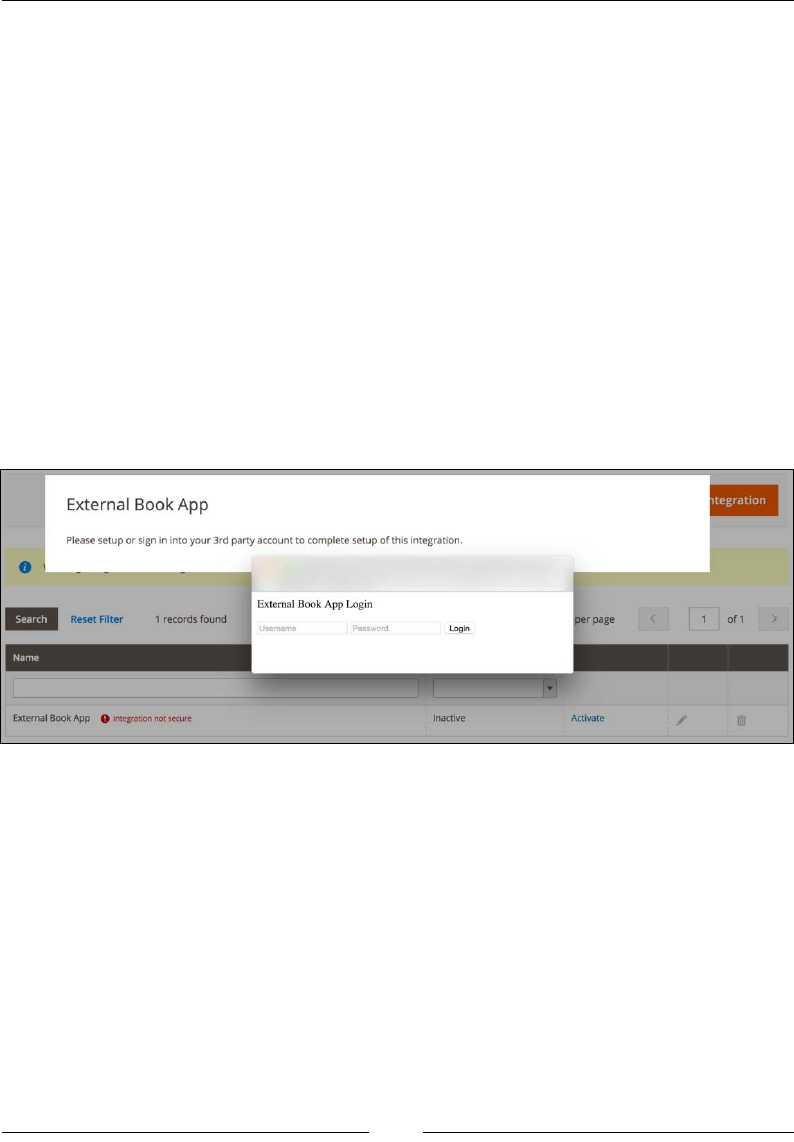
Chapter 9
[ 211 ]
$_SESSION['oauth_consumer_key'] = $_POST['oauth_consumer_key'];
$_SESSION['oauth_consumer_secret'] = $_POST['oauth_consumer_secret'];
$_SESSION['store_base_url'] = $_POST['store_base_url'];
$_SESSION['oauth_verifier'] = $_POST['oauth_verifier'];
session_write_close();
header('HTTP/1.0 200 OK');
echo 'Response';
We can see that parameters passed by Magento are stored into an external app
session named BookAppOAuth. Later on, within the check-login.php le, these
parameters will be used to instantiate the BookAppOauthClient, which will further
be used to get a request token, which is a pre-authorized token.
Parallel to Callback URL HTTP POST, we have a popup window opening as shown
in the following screenshot:
The login form we see in the popup is just some dummy content we placed under
the identity-link-url.php le. Magento passes two values to this le via HTTP
GET. These are consumer_id and success_call_back. The consumer_id value is
the ID of our integration we created in the admin area. It is up to the OAuth client
app to decide if it wants to do anything with this value or not. The success_call_
back URL points to our Magento admin integration/loginSuccessCallback
path. If we take a look at the code of the identity-link-url.php le, we can see
the form is set to do the POST action on the URL like check-login.php?consumer_
id={$consumerId}&callback_url={$callbackUrl}.
If we now click the Login button, the form will POST data to the check-login.php
le passing it consumer_id and callback_url within the URL as GET parameters.

The Web API
[ 212 ]
The content of check-login.php is dened (partially) as follows:
require '../../vendor/autoload.php';
$consumer = $_REQUEST['consumer_id'];
$callback = $_REQUEST['callback_url'];
session_id('BookAppOAuth');
session_start();
$consumerKey = $_SESSION['oauth_consumer_key'];
$consumerSecret = $_SESSION['oauth_consumer_secret'];
$magentoBaseUrl = rtrim($_SESSION['store_base_url'], '/');
$oauthVerifier = $_SESSION['oauth_verifier'];
define('MAGENTO_BASE_URL', $magentoBaseUrl);
$credentials = new
\OAuth\Common\Consumer\Credentials($consumerKey,
$consumerSecret, $magentoBaseUrl);
$oAuthClient = new BookAppOauthClient($credentials);
$requestToken = $oAuthClient->requestRequestToken();
$accessToken = $oAuthClient->requestAccessToken(
$requestToken->getRequestToken(),
$oauthVerifier,
$requestToken->getRequestTokenSecret()
);
header('Location: '. $callback);
To keep thing simple, we have no real user login check here. We might have added
one above the OAuth-related calls, and then authenticate the user against some
username and password before allowing it to use OAuth. However, for simplicity
reasons we omitted this part from our sample OAuth client app.
Within the check-login.php le, we can see that based on the previously stored
session parameters we perform the following:
• Instantiate the \OAuth\Common\Consumer\Credentials object passing it the
oauth_consumer_key, oauth_consumer_secret, store_base_url stored in
the session
• Instantiate the BookAppOauthClient object passing its constructor the entire
credentials object
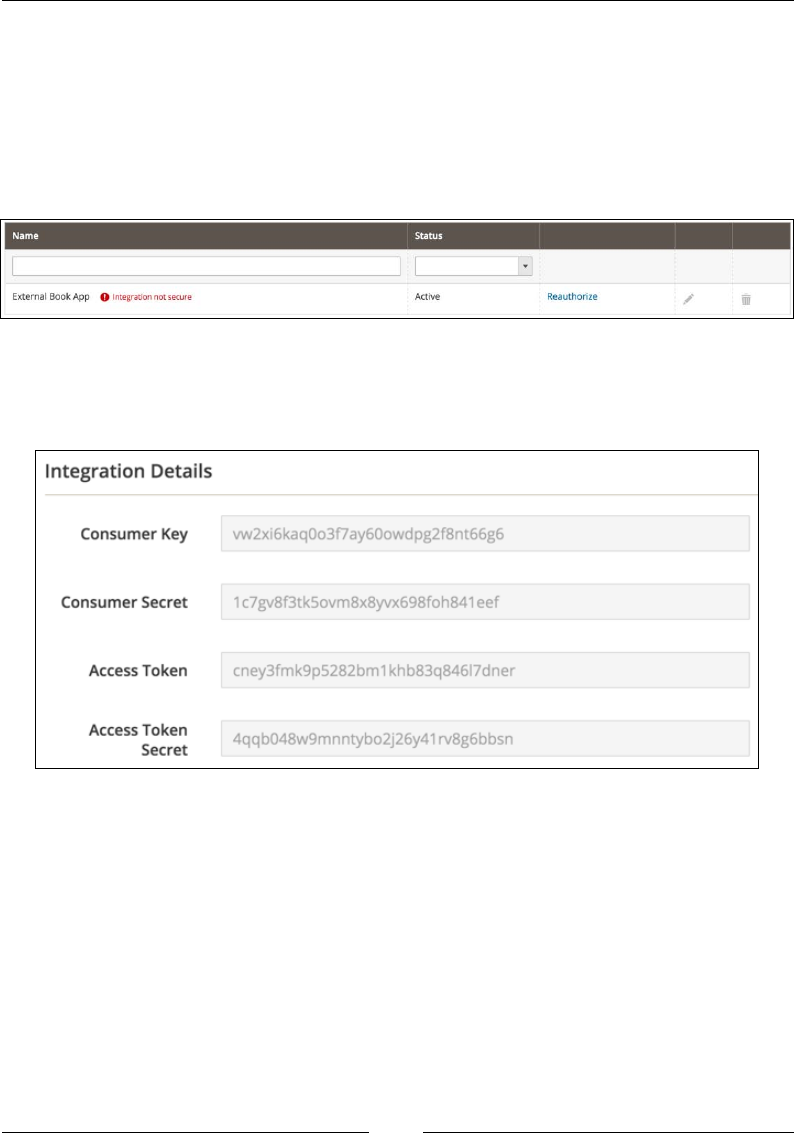
Chapter 9
[ 213 ]
• Use the OauthClient object to get the request token
• Use the request token to get a long-lived access token
If everything executes successfully, the popup window closes and we get redirected
back to the integrations listing. The difference now is that looking at the grid, we
have an Active status and next to it we have a Reauthorize link, as shown in the
following screenshot:
What we are really after at this point are Access Token and Access Token Secret.
We can see those if we edit the External Book App integration. These values should
now be present on the Integration Details tab as shown in the following screenshot:
Access Token is the key to all of our further API calls, and with it we successfully
nish our authentication bit of OAuth-based authentication.
OAuth-based Web API calls
Once we have obtained OAuth access token, from the preceding steps, we can
start making Web API calls to other methods. Even though the Web API coverage
is the same for both REST and SOAP, there is a signicant difference when making
method calls.

The Web API
[ 214 ]
For the purpose of giving a more robust example, we will be targeting the customer
group save method, (partially) dened in the vendor/magento/module-customer/
etc/webapi.xml le as follows:
<route url="/V1/customerGroups" method="POST">
<service class="Magento\Customer\Api\GroupRepositoryInterface"
method="save"/>
<resources>
<resource ref="Magento_Customer::group"/>
</resources>
</route>
To use the access token to make Web API calls, like POST /V1/customerGroups,
we need to include these request parameters in the authorization request header
in the call:
• oauth_consumer_key, available from the Magento admin area, under the
integration edit screen.
• oauth_nonce, random value, uniquely generated by the application for
each request.
• oauth_signature_method, name of the signature method used to sign the
request. Valid values are: HMAC-SHA1, RSA-SHA1, and PLAINTEXT.
• Even though the Outh protocol supports PLAINTEXT, Magento does not.
We will be using HMAC-SHA1.
• oauth_timestamp, integer value, Unix-like timestamp.
• oauth_token, available from the Magento admin area, under the integration
edit screen.
• oauth_version, Magento supports Oauth 1.0a, thus we use 1.0.
• oauth_signature, generated signature value, omitted from the signature
generation process.
To generate an OAuth 1.0a HMAC-SHA1 signature for a HTTP request takes focused
effort, if done manually.
We need to determine the HTTP method and URL of the request, which equals to
POST http://magento2-merchant.loc/rest/V1/customerGroups. It is important
to use the correct protocol here, so make sure that the https:// or http:// portion
of the URL matches the actual request sent to the API.
We then gather all of the parameters included in the request. There are two such
locations for these additional parameters: the URL (as part of the query string) and
the request body.

Chapter 9
[ 215 ]
In the HTTP request, the parameters are URL encoded, but we need to collect the
raw values. In addition to the request parameters, every oauth_* parameter needs to
be included in the signature, except the oauth_signature itself.
The parameters are normalized into a single string as follows:
• Parameters are sorted by name, using lexicographical byte value ordering. If
two or more parameters share the same name, they are sorted by their value.
• Parameters are concatenated in their sorted order into a single string. For
each parameter, the name is separated from the corresponding value by an =
character (ASCII code 61), even if the value is empty. Each name-value pair is
separated by an & character (ASCII code 38).
Further, we dene the signing key as a value of {Consumer Key}+{&}+{Access
Token Secret}.
Once we apply the string normalization rules to parameters and determine the
signing key, we call hash_hmac('sha1', $data, {Signing Key}, true) to get
the nal oauth_signature value.
This should get us the oauth_signature as a random 28-characters-long string,
similar to this one – Pi/mGfA0SOlIxO9W30sEch6bjGE=.
Understanding how to generate the signature string is important, but getting it right
every time is tedious and time consuming. We can help ourselves by instantiating
the objects of the built-in \OAuth\Common\Consumer\Credentials and \OAuth\
OAuth1\Signature\Signature classes, like (partially) shown as follows:
$credentials = new
\OAuth\Common\Consumer\Credentials($consumerKey,
$consumerSecret, $magentoBaseUrl);
$signature = new \OAuth\OAuth1\Signature\Signature($credentials);
$signature->setTokenSecret($accessTokenSecret);
$signature->setHashingAlgorithm('HMAC-SHA1');
echo $signature->getSignature($uri, array(
'oauth_consumer_key' => $consumerKey,
'oauth_nonce' => 'per-request-unique-token',
'oauth_signature_method' => 'HMAC-SHA1',
'oauth_timestamp' => '1437319569',
'oauth_token' => $accessToken,
'oauth_version' => '1.0',
), 'POST');

The Web API
[ 216 ]
Now that we have the oauth_signature value, we are ready to do our console curl
REST example. It comes down to running the following on a console:
curl -X POST http://magento2.ce/rest/V1/customerGroups
-H 'Content-Type: application/json'
-H 'Authorization: OAuth
oauth_consumer_key="vw2xi6kaq0o3f7ay60owdpg2f8nt66g6",
oauth_nonce="per-request-token-by-app-1",
oauth_signature_method="HMAC-SHA1",
oauth_timestamp="1437319569",
oauth_token="cney3fmk9p5282bm1khb83q846l7dner",
oauth_version="1.0",
oauth_signature="Pi/mGfA0SOlIxO9W30sEch6bjGE="'
-d '{"group": {"code": "The Book Writer", "tax_class_id": "3"}}'
Note that the preceding command is merely visually broken into new lines. It should
all be single line on a console. Once executed, the API call will create a new customer
group called The Book Writer. A logical question one might ask looking at the curl
command is how come we did not normalize the POST data passed as JSON via the
–d ag switch. This is because parameters in the HTTP POST request body are only
taken into consideration for signature generation if content-type is application/x-
www-form-urlencoded.
The console cURL SOAP requests do not require usage of the OAuth signature. We
can execute a SOAP request passing Authorization: Bearer { Access Token
value } into the request header, like shown in the following example:
curl -X POST
http://magento2.ce/index.php/soap/default?services=
customerGroupRepositoryV1 -H 'Content-Type: application/soap+xml;
charset=utf-8; action="customerGroupRepositoryV1Save"' -H
'Authorization: Bearer cney3fmk9p5282bm1khb83q846l7dner' -d
@request.xml
Where request.xml contains content as follows:
<?xml version="1.0" encoding="UTF-8"?>
<env:Envelope xmlns:env="http://www.w3.org/2003/05/soap-envelope"
xmlns:ns1="http://magento2.ce/index.php/soap/default?
services=customerGroupRepositoryV1">
<env:Body>
<ns1:customerGroupRepositoryV1SaveRequest>
<group>
<code>The Book Writer</code>
<taxClassId>3</taxClassId>

Chapter 9
[ 217 ]
</group>
</ns1:customerGroupRepositoryV1SaveRequest>
</env:Body>
</env:Envelope>
The following code example demonstrates the PHP cURL SOAP-like request for the
customer group save method call:
$request = new SoapClient(
'http://magento2.ce/index.php/soap/?wsdl&services=
customerGroupRepositoryV1',
array(
'soap_version' => SOAP_1_2,
'stream_context' => stream_context_create(array(
'http' => array(
'header' => 'Authorization: Bearer
cney3fmk9p5282bm1khb83q846l7dner')
)
)
)
);
$response = $request->customerGroupRepositoryV1Save(array(
'group' => array(
'code' => 'The Book Writer',
'taxClassId' => 3
)
));
Notice how the method name customerGroupRepositoryV1Save actually comprises
service name customerGroupRepositoryV1, plus the Save name of the actual
method within the service.
We can get a list of all services dened by opening a URL like http://magento2.ce/
soap/default?wsdl_list in the browser (depending on our Magento installation).
Hands-on with session-based
authentication
Session-based authentication is the third and most simple type of authentication in
Magento. We do not have any complexities of token-passing here. As the customer,
we log in to the Magento storefront with our customer credentials. As an admin,
we log in to the Magento admin with our admin credentials. Magento uses a cookie
named PHPSESSID to track the session where our login state is stored. The Web
API framework uses our logged-in session information to verify our identity and
authorize access to the requested resource.

The Web API
[ 218 ]
Customers can access resources that are congured with anonymous or self-
permission in the webapi.xml conguration le, like GET /rest/V1/customers/me.
If we try to open the http://magento2.ce/rest/V1/customers/me URL while in
the browser, but not logged in as the customer, we would get a response as follows:
<response>
<message>Consumer is not authorized to access
%resources</message>
<parameters>
<resources>self</resources>
</parameters>
</response>
If we log in as the customer and then try to open that same URL, we would get a
response as follows:
<response>
<id>2</id>
<group_id>1</group_id>
<created_at>2015-11-22 14:15:33</created_at>
<created_in>Default Store View</created_in>
<email>john@change.me</email>
<firstname>John</firstname>
<lastname>Doe</lastname>
<store_id>1</store_id>
<website_id>1</website_id>
<addresses/>
<disable_auto_group_change>0</disable_auto_group_change>
</response>
Admin users can access resources that are assigned to their Magento admin prole.
Creating custom Web APIs
Magento comes with a solid number of API methods that we can call. However,
sometimes this is not enough, as our business needs dictate additional logic, and
we need to be able to add our own methods to the Web API.
The best part of creating our own API's is that we do not have to be concerned about
making them REST or SOAP. Magento abstracts this so that our API methods are
automatically available for REST and for SOAP calls.

Chapter 9
[ 219 ]
Adding new API's conceptually evolves around two things: dening business logic
through various classes, and exposing it via the webapi.xml le. However, as we
will soon see, there is a lot of boilerplate to it.
Let's create a miniature module called Foggyline_Slider, on which we will
demonstrate create (POST), update (PUT), delete (DELETE), and list (GET)
method calls.
Create a module registration le, app/code/Foggyline/Slider/registration.
php, with content (partial) as follows:
\Magento\Framework\Component\ComponentRegistrar::register(
\Magento\Framework\Component\ComponentRegistrar::MODULE,
'Foggyline_Slider',
__DIR__
);
Create a module conguration le, app/code/Foggyline/Slider/etc/module.xml,
with content as follows:
<config xmlns:xsi="http://www.w3.org/2001/XMLSchema-instance"
xsi:noNamespaceSchemaLocation="urn:magento:framework:Module
/etc/module.xsd">
<module name="Foggyline_Slider" setup_version="1.0.0"/>
</config>
Create an install script where our future models will persist module data. We do so
by creating the app/code/Foggyline/Slider/Setup/InstallSchema.php le with
content (partial) as follows:
namespace Foggyline\Slider\Setup;
use Magento\Framework\Setup\InstallSchemaInterface;
use Magento\Framework\Setup\ModuleContextInterface;
use Magento\Framework\Setup\SchemaSetupInterface;
class InstallSchema implements InstallSchemaInterface
{
public function install(SchemaSetupInterface $setup,
ModuleContextInterface $context)
{
$installer = $setup;
$installer->startSetup();
/**
* Create table 'foggyline_slider_slide'

The Web API
[ 220 ]
*/
$table = $installer->getConnection()
->newTable($installer-
>getTable('foggyline_slider_slide'))
->addColumn(
'slide_id',
\Magento\Framework\DB\Ddl\Table::TYPE_INTEGER,
null,
['identity' => true, 'unsigned' => true,
'nullable' => false, 'primary' => true],
'Slide Id'
)
->addColumn(
'title',
\Magento\Framework\DB\Ddl\Table::TYPE_TEXT,
200,
[],
'Title'
)
->setComment('Foggyline Slider Slide');
$installer->getConnection()->createTable($table);
...
$installer->endSetup();
}
}
Now we specify the ACL for our resources. Our resources are going to be CRUD
actions we do on our module entities. We will structure our module in a way that
slide and image are separate entities, where one slide can have multiple image
entities linked to it. Thus, we would like to be able to control access to save and
delete actions separately for each entity. We do so by dening the app/code/
Foggyline/Slider/etc/acl.xml le as follows:
<config xmlns:xsi="http://www.w3.org/2001/XMLSchema-instance"
xsi:noNamespaceSchemaLocation="urn:magento:framework:Acl/etc/
acl.xsd">
<acl>
<resources>
<resource id="Magento_Backend::admin">
<resource id="Magento_Backend::content">
<resource id=
"Magento_Backend::content_elements">
<resource id="Foggyline_Slider::slider"
title="Slider" sortOrder="10">

Chapter 9
[ 221 ]
<resource id="Foggyline_Slider::slide"
title="Slider Slide" sortOrder="10">
<resource id=
"Foggyline_Slider::slide_save"
title="Save Slide"
sortOrder="10" />
<resource id="Foggyline_Slider::
slide_delete" title="Delete
Slide" sortOrder="20" />
</resource>
<resource id="Foggyline_Slider::image"
title="Slider Image" sortOrder="10">
<resource id=
"Foggyline_Slider::image_save"
title="Save Image"
sortOrder="10" />
<resource id=
"Foggyline_Slider::image_delete"
title="Delete Image"
sortOrder="20" />
</resource>
</resource>
</resource>
</resource>
</resource>
</resources>
</acl>
</config>
Now that the ACL has been set, we dene our Web API resources within the app/
code/Foggyline/Slider/etc/webapi.xml le (partial) as follows:
<routes xmlns:xsi="http://www.w3.org/2001/XMLSchema-instance"
xsi:noNamespaceSchemaLocation=
"urn:magento:module:Magento_Webapi:etc/webapi.xsd">
<route url="/V1/foggylineSliderSlide/:slideId" method="GET">
<service class="Foggyline\Slider\Api\
SlideRepositoryInterface" method="getById" />
<resources>
<resource ref="Foggyline_Slider::slide" />
</resources>
</route>
<route url="/V1/foggylineSliderSlide/search" method="GET">
<service class="Foggyline\Slider\Api\
SlideRepositoryInterface" method="getList" />
<resources>
<resource ref="anonymous" />

The Web API
[ 222 ]
</resources>
</route>
<route url="/V1/foggylineSliderSlide" method="POST">
<service class="Foggyline\Slider\Api\
SlideRepositoryInterface" method="save" />
<resources>
<resource ref="Foggyline_Slider::slide_save" />
</resources>
</route>
<route url="/V1/foggylineSliderSlide/:id" method="PUT">
<service class="Foggyline\Slider\Api\
SlideRepositoryInterface" method="save" />
<resources>
<resource ref="Foggyline_Slider::slide_save" />
</resources>
</route>
<route url="/V1/foggylineSliderSlide/:slideId"
method="DELETE">
<service class="Foggyline\Slider\Api\
SlideRepositoryInterface" method="deleteById" />
<resources>
<resource ref="Foggyline_Slider::slide_delete" />
</resources>
</route>
<route url="/V1/foggylineSliderImage/:imageId" method="GET">
<service class="Foggyline\Slider\Api\
ImageRepositoryInterface" method="getById" />
<resources>
<resource ref="Foggyline_Slider::image" />
</resources>
</route>
<route url="/V1/foggylineSliderImage/search" method="GET">
<service class="Foggyline\Slider\Api\
ImageRepositoryInterface" method="getList" />
<resources>
<resource ref="Foggyline_Slider::image" />
</resources>
</route>
<route url="/V1/foggylineSliderImage" method="POST">
<service class="Foggyline\Slider\Api\
ImageRepositoryInterface" method="save" />
<resources>
<resource ref="Foggyline_Slider::image_save" />
</resources>
</route>

Chapter 9
[ 223 ]
<route url="/V1/foggylineSliderImage/:id" method="PUT">
<service class="Foggyline\Slider\Api\
ImageRepositoryInterface" method="save" />
<resources>
<resource ref="Foggyline_Slider::image_save" />
</resources>
</route>
<route url="/V1/foggylineSliderImage/:imageId"
method="DELETE">
<service class="Foggyline\Slider\Api\
ImageRepositoryInterface" method="deleteById" />
<resources>
<resource ref="Foggyline_Slider::image_delete" />
</resources>
</route>
</routes>
Notice how each of those service class attributes point to the interface, not the class.
This is the way we should build our exposable services, always having an interface
denition behind them. As we will soon see, using di.xml, this does not mean
Magento will try to create objects from these interfaces directly.
We now create the app/code/Foggyline/Slider/etc/di.xml le with content
(partial) as follows:
<config xmlns:xsi="http://www.w3.org/2001/XMLSchema-instance"
xsi:noNamespaceSchemaLocation=
"urn:magento:framework:ObjectManager/etc/config.xsd">
<preference for="Foggyline\Slider\Api\Data\SlideInterface"
type="Foggyline\Slider\Model\Slide"/>
<preference for="Foggyline\Slider\Api\
SlideRepositoryInterface" type=
"Foggyline\Slider\Model\SlideRepository"/>
...
</config>
What is happening here is that we are telling Magento something like, "hey,
whenever you need to pass around an instance that conforms to the Foggyline\
Slider\Api\Data\SlideInterface interface, preferably use the Foggyline\
Slider\Model\Slide class for it."
At this point, we still do not have any of those interfaces or model classes actually
created. When creating APIs, we should rst start by dening interfaces, and then
our models should extend from those interfaces.

The Web API
[ 224 ]
Interface Foggyline\Slider\Api\Data\SlideInterface is dened within the app/
code/Foggyline/Slider/Api/Data/SlideInterface.php le (partial) as follows:
namespace Foggyline\Slider\Api\Data;
/**
* @api
*/
interface SlideInterface
{
const PROPERTY_ID = 'slide_id';
const PROPERTY_SLIDE_ID = 'slide_id';
const PROPERTY_TITLE = 'title';
/**
* Get Slide entity 'slide_id' property value
* @return int|null
*/
public function getId();
/**
* Set Slide entity 'slide_id' property value
* @param int $id
* @return $this
*/
public function setId($id);
/**
* Get Slide entity 'slide_id' property value
* @return int|null
*/
public function getSlideId();
/**
* Set Slide entity 'slide_id' property value
* @param int $slideId
* @return $this
*/
public function setSlideId($slideId);
/**
* Get Slide entity 'title' property value
* @return string|null
*/

Chapter 9
[ 225 ]
public function getTitle();
/**
* Set Slide entity 'title' property value
* @param string $title
* @return $this
*/
public function setTitle($title);
}
We are going for ultimate simplication here. Our Slide entity only really has ID
and title values. The id and slide_id point to the same eld in the database and the
implementation of their getters and setters should yield the same results.
Although API/Data/*.php interfaces become blueprint requirements for our data
models, we also have Api/*RepositoryInterface.php les. The idea here is to
extract create, update, delete, search, and similar data-handling logic away from the
data model class into its own class. This way, our model classes become more pure
data and business logic classes while the rest of persistence and search-related logic
moves into these repository classes.
Our Slide Repository Interface is dened within the app/code/Foggyline/Slider/
Api/SlideRepositoryInterface.php le as follows:
namespace Foggyline\Slider\Api;
/**
* @api
*/
interface SlideRepositoryInterface
{
/**
* Retrieve slide entity.
* @param int $slideId
* @return \Foggyline\Slider\Api\Data\SlideInterface
* @throws \Magento\Framework\Exception\NoSuchEntityException
If slide with the specified ID does not exist.
* @throws \Magento\Framework\Exception\LocalizedException
*/
public function getById($slideId);
/**
* Save slide.
* @param \Foggyline\Slider\Api\Data\SlideInterface $slide
* @return \Foggyline\Slider\Api\Data\SlideInterface

The Web API
[ 226 ]
* @throws \Magento\Framework\Exception\LocalizedException
*/
public function save(\Foggyline\Slider\Api\Data\SlideInterface
$slide);
/**
* Retrieve slides matching the specified criteria.
* @param \Magento\Framework\Api\SearchCriteriaInterface
$searchCriteria
* @return \Magento\Framework\Api\SearchResultsInterface
* @throws \Magento\Framework\Exception\LocalizedException
*/
public function
getList(\Magento\Framework\Api\SearchCriteriaInterface
$searchCriteria);
/**
* Delete slide by ID.
* @param int $slideId
* @return bool true on success
* @throws \Magento\Framework\Exception\NoSuchEntityException
* @throws \Magento\Framework\Exception\LocalizedException
*/
public function deleteById($slideId);
}
With interfaces in place, we can move on to model class. In order to persist and
fetch data in a database, our Slide entity really needs three les under the Model
directory. These are called data model, resource class, and collection class.
The data model class is dened under the app/code/Foggyline/Slider/Model/
Slide.php le (partial) as follows:
namespace Foggyline\Slider\Model;
class Slide extends \Magento\Framework\Model\AbstractModel
implements \Foggyline\Slider\Api\Data\SlideInterface
{ /**
* Initialize Foggyline Slide Model
*
* @return void
*/
protected function _construct()
{

Chapter 9
[ 227 ]
/* _init($resourceModel) */
$this->_init
('Foggyline\Slider\Model\ResourceModel\Slide');
}
/**
* Get Slide entity 'slide_id' property value
*
* @api
* @return int|null
*/
public function getId()
{
return $this->getData(self::PROPERTY_ID);
}
/**
* Set Slide entity 'slide_id' property value
*
* @api
* @param int $id
* @return $this
*/
public function setId($id)
{
$this->setData(self::PROPERTY_ID, $id);
return $this;
}
/**
* Get Slide entity 'slide_id' property value
*
* @api
* @return int|null
*/
public function getSlideId()
{
return $this->getData(self::PROPERTY_SLIDE_ID);
}
/**
* Set Slide entity 'slide_id' property value
*
* @api

The Web API
[ 228 ]
* @param int $slideId
* @return $this
*/
public function setSlideId($slideId)
{
$this->setData(self::PROPERTY_SLIDE_ID, $slideId);
return $this;
}
/**
* Get Slide entity 'title' property value
*
* @api
* @return string|null
*/
public function getTitle()
{
return $this->getData(self::PROPERTY_TITLE);
}
/**
* Set Slide entity 'title' property value
*
* @api
* @param string $title
* @return $this
*/
public function setTitle($title)
{
$this->setData(self::PROPERTY_TITLE, $title);
}
}
Following the model data class is the model resource class, dened in the app/code/
Foggyline/Slider/Model/ResourceModel/Slide.php le (partial) as follows:
namespace Foggyline\Slider\Model\ResourceModel;
/**
* Foggyline Slide resource
*/
class Slide extends
\Magento\Framework\Model\ResourceModel\Db\AbstractDb
{
/**

Chapter 9
[ 229 ]
* Define main table
*
* @return void
*/
protected function _construct()
{
/* _init($mainTable, $idFieldName) */
$this->_init('foggyline_slider_slide', 'slide_id');
}
}
Finally, the third bit is the model collection class, dened in the app/code/
Foggyline/Slider/Model/ResourceModel/Slide/Collection.php le as follows:
namespace Foggyline\Slider\Model\ResourceModel\Slide;
/**
* Foggyline slides collection
*/
class Collection extends
\Magento\Framework\Model\ResourceModel\Db\Collection\
AbstractCollection
{
/**
* Define resource model and model
*
* @return void
*/
protected function _construct()
{
/* _init($model, $resourceModel) */
$this->_init('Foggyline\Slider\Model\Slide',
'Foggyline\Slider\Model\ResourceModel\Slide');
}
}
If we were to manually instantiate the model data class now, we would be able to
persist the data in the database. To complete the di.xml requirements, we still lack
one more nal ingredient – the Model/SlideRepository class le.

The Web API
[ 230 ]
Let us go and create the app/code/Foggyline/Slider/Model/SlideRepository.
php le with content (partial) as follows:
namespace Foggyline\Slider\Model;
use Magento\Framework\Api\DataObjectHelper;
use Magento\Framework\Api\SearchCriteriaInterface;
use Magento\Framework\Exception\CouldNotDeleteException;
use Magento\Framework\Exception\CouldNotSaveException;
use Magento\Framework\Exception\NoSuchEntityException;
use Magento\Framework\Reflection\DataObjectProcessor;
class SlideRepository implements \Foggyline\Slider\Api\
SlideRepositoryInterface
{
/**
* @var \Foggyline\Slider\Model\ResourceModel\Slide
*/
protected $resource;
/**
* @var \Foggyline\Slider\Model\SlideFactory
*/
protected $slideFactory;
/**
* @var \Foggyline\Slider\Model\ResourceModel\Slide\
CollectionFactory
*/
protected $slideCollectionFactory;
/**
* @var \Magento\Framework\Api\SearchResultsInterface
*/
protected $searchResultsFactory;
/**
* @var \Magento\Framework\Api\DataObjectHelper
*/
protected $dataObjectHelper;
/**
* @var \Magento\Framework\Reflection\DataObjectProcessor
*/

Chapter 9
[ 231 ]
protected $dataObjectProcessor;
/**
* @var \Foggyline\Slider\Api\Data\SlideInterfaceFactory
*/
protected $dataSlideFactory;
/**
* @param ResourceModel\Slide $resource
* @param SlideFactory $slideFactory
* @param ResourceModel\Slide\CollectionFactory
$slideCollectionFactory
* @param \Magento\Framework\Api\SearchResultsInterface
$searchResultsFactory
* @param DataObjectHelper $dataObjectHelper
* @param DataObjectProcessor $dataObjectProcessor
* @param \Foggyline\Slider\Api\Data\SlideInterfaceFactory
$dataSlideFactory
*/
public function __construct(
\Foggyline\Slider\Model\ResourceModel\Slide $resource,
\Foggyline\Slider\Model\SlideFactory $slideFactory,
\Foggyline\Slider\Model\ResourceModel\Slide\
CollectionFactory $slideCollectionFactory,
\Magento\Framework\Api\SearchResultsInterface
$searchResultsFactory,
\Magento\Framework\Api\DataObjectHelper $dataObjectHelper,
\Magento\Framework\Reflection\DataObjectProcessor
$dataObjectProcessor,
\Foggyline\Slider\Api\Data\SlideInterfaceFactory
$dataSlideFactory
)
{
$this->resource = $resource;
$this->slideFactory = $slideFactory;
$this->slideCollectionFactory = $slideCollectionFactory;
$this->searchResultsFactory = $searchResultsFactory;
$this->dataObjectHelper = $dataObjectHelper;
$this->dataObjectProcessor = $dataObjectProcessor;
$this->dataSlideFactory = $dataSlideFactory;
}
...
}

The Web API
[ 232 ]
It might appear that there is a lot going on here, but really we are just passing on
some class and interface names to the constructor in order to instantiate the objects
we will use across individual service methods dened in the webapi.xml le.
The rst service method on our list is getById, dened within SlideRepository.
php as follows:
/**
* Retrieve slide entity.
*
* @api
* @param int $slideId
* @return \Foggyline\Slider\Api\Data\SlideInterface
* @throws \Magento\Framework\Exception\NoSuchEntityException If
slide with the specified ID does not exist.
* @throws \Magento\Framework\Exception\LocalizedException
*/
public function getById($slideId)
{
$slide = $this->slideFactory->create();
$this->resource->load($slide, $slideId);
if (!$slide->getId()) {
throw new NoSuchEntityException(__('Slide with id %1 does
not exist.', $slideId));
}
return $slide;
}
Then we have the save method, dened within SlideRepository.php as follows:
/**
* Save slide.
*
* @param \Foggyline\Slider\Api\Data\SlideInterface $slide
* @return \Foggyline\Slider\Api\Data\SlideInterface
* @throws \Magento\Framework\Exception\LocalizedException
*/
public function save(\Foggyline\Slider\Api\Data\SlideInterface
$slide)
{
try {
$this->resource->save($slide);
} catch (\Exception $exception) {
throw new CouldNotSaveException(__($exception-
>getMessage()));
}
return $slide;
}

Chapter 9
[ 233 ]
The save method addresses both POST and PUT requests dened in webapi.xml,
thus effectively handling the creation of new slides or an update of existing ones.
Going further, we have the getList method, dened within SlideRepository.php
as follows:
/**
* Retrieve slides matching the specified criteria.
*
* @param \Magento\Framework\Api\SearchCriteriaInterface
$searchCriteria
* @return \Magento\Framework\Api\SearchResultsInterface
* @throws \Magento\Framework\Exception\LocalizedException
*/
public function
getList(\Magento\Framework\Api\SearchCriteriaInterface
$searchCriteria)
{
$this->searchResultsFactory->setSearchCriteria
($searchCriteria);
$collection = $this->slideCollectionFactory->create();
foreach ($searchCriteria->getFilterGroups() as $filterGroup) {
foreach ($filterGroup->getFilters() as $filter) {
$condition = $filter->getConditionType() ?: 'eq';
$collection->addFieldToFilter($filter->getField(),
[$condition => $filter->getValue()]);
}
}
$this->searchResultsFactory->setTotalCount($collection->
getSize());
$sortOrders = $searchCriteria->getSortOrders();
if ($sortOrders) {
foreach ($sortOrders as $sortOrder) {
$collection->addOrder(
$sortOrder->getField(),
(strtoupper($sortOrder->getDirection()) === 'ASC')
? 'ASC' : 'DESC'
);
}
}
$collection->setCurPage($searchCriteria->getCurrentPage());
$collection->setPageSize($searchCriteria->getPageSize());
$slides = [];

The Web API
[ 234 ]
/** @var \Foggyline\Slider\Model\Slide $slideModel */
foreach ($collection as $slideModel) {
$slideData = $this->dataSlideFactory->create();
$this->dataObjectHelper->populateWithArray(
$slideData,
$slideModel->getData(),
'\Foggyline\Slider\Api\Data\SlideInterface'
);
$slides[] = $this->dataObjectProcessor->
buildOutputDataArray(
$slideData,
'\Foggyline\Slider\Api\Data\SlideInterface'
);
}
$this->searchResultsFactory->setItems($slides);
return $this->searchResultsFactory;
}
Finally, we have the deleteById method, dened within SlideRepository.php
as follows:
/**
* Delete Slide
*
* @param \Foggyline\Slider\Api\Data\SlideInterface $slide
* @return bool
* @throws CouldNotDeleteException
*/
public function delete(\Foggyline\Slider\Api\Data\SlideInterface
$slide)
{
try {
$this->resource->delete($slide);
} catch (\Exception $exception) {
throw new CouldNotDeleteException(__($exception->
getMessage()));
}
return true;
}
/**
* Delete slide by ID.
*
* @param int $slideId
* @return bool true on success

Chapter 9
[ 235 ]
* @throws \Magento\Framework\Exception\NoSuchEntityException
* @throws \Magento\Framework\Exception\LocalizedException
*/
public function deleteById($slideId)
{
return $this->delete($this->getById($slideId));
}
Keep in mind that we only covered the Slide entity in the preceding partial code
examples, which is enough to progress further with API call examples.
API call examples
Since all of our dened API's are resource protected, we rst need to
authenticate as the admin user, assuming the admin user has access to all our
custom resources that encompass the ones we dened. For simplicity sake, we will
use the token-based authentication method, examples of which are given previously
in this chapter. Once authenticated, we should have a 32 random characters long
token like pk8h93nq9cevaw55bohkjbp0o7kpl4d3, for example.
Once the token key has been obtained, we will test the following API calls using
console cURL, PHP cURL, PHP SoapClient, and console SOAP style cURL examples:
• GET /V1/foggylineSliderSlide/:slideId, calls the getById service
method, requires the Foggyline_Slider::slide resource
• GET /V1/foggylineSliderSlide/search, calls the getList service
method, requires the Foggyline_Slider::slide resource
• POST /V1/foggylineSliderSlide, calls the save service method, requires
the Foggyline_Slider::slide_save resource
• PUT /V1/foggylineSliderSlide/:id, calls the save service method,
requires the Foggyline_Slider::slide_save resource
• DELETE /V1/foggylineSliderSlide/:slideId, calls the deleteById
service method, requires the Foggyline_Slider::slide_delete resource
The getById service method call examples
The console cURL style for executing GET /V1/foggylineSliderSlide/:slideId is
done as follows:
curl -X GET -H 'Content-type: application/json' \
-H 'Authorization: Bearer pk8h93nq9cevaw55bohkjbp0o7kpl4d3' \
http://magento2.ce/rest/V1/foggylineSliderSlide/1

The Web API
[ 236 ]
The PHP cURL style for executing GET /V1/foggylineSliderSlide/:slideId is
done as follows:
$ch = curl_init('http://magento2.ce/rest/V1/foggylineSliderSlide/1');
curl_setopt($ch, CURLOPT_CUSTOMREQUEST, 'GET');
curl_setopt($ch, CURLOPT_RETURNTRANSFER, true);
curl_setopt($ch, CURLOPT_HTTPHEADER, array(
'Content-Type: application/json',
'Authorization: Bearer pk8h93nq9cevaw55bohkjbp0o7kpl4d3'
));
$result = curl_exec($ch);
The response for console and PHP cURL style should be a JSON string similar to the
following one:
{"slide_id":1,"title":"Awesome stuff #1"}
The PHP SoapClient style for executing GET /V1/foggylineSliderSlide/:slideId
is done as follows:
$request = new SoapClient(
'http://magento2.ce/index.php/soap/?
wsdl&services=foggylineSliderSlideRepositoryV1',
array(
'soap_version' => SOAP_1_2,
'stream_context' => stream_context_create(array(
'http' => array(
'header' => 'Authorization: Bearer
pk8h93nq9cevaw55bohkjbp0o7kpl4d3')
)
)
)
);
$response = $request->
foggylineSliderSlideRepositoryV1GetById(array('slideId'=>1));
The response for PHP SoapClient style should be the stdClass PHP object
as follows:
object(stdClass)#2 (1) {
["result"]=>
object(stdClass)#3 (2) {
["slideId"]=>
int(1)
["title"]=>
string(16) "Awesome stuff #1"
}
}

Chapter 9
[ 237 ]
The console SOAP style cURL for executing GET /V1/
foggylineSliderSlide/:slideId is done as follows:
curl -X POST \
-H 'Content-Type: application/soap+xml; charset=utf-8;
action="foggylineSliderSlideRepositoryV1GetById"' \
-H 'Authorization: Bearer pk8h93nq9cevaw55bohkjbp0o7kpl4d3' \
-d @request.xml \
http://magento2.ce/index.php/soap/default?services=foggyline
SliderSlideRepositoryV1
Where request.xml has content as follows:
<?xml version="1.0" encoding="UTF-8"?>
<env:Envelope xmlns:env="http://www.w3.org/2003/05/soap-envelope"
xmlns:ns1="http://magento2.ce/index.php/soap/default?
services=foggylineSliderSlideRepositoryV1">
<env:Body>
<ns1:foggylineSliderSlideRepositoryV1GetByIdRequest>
<slideId>1</slideId>
</ns1:foggylineSliderSlideRepositoryV1GetByIdRequest>
</env:Body>
</env:Envelope>
Notice how we did not really do GET, rather a POST type of request. Also, the URL
to which we are pointing our POST is not really the same as with previous requests.
This is because Magento SOAP requests are always POST (or PUT) type, as the data is
submitted in XML format. XML format in return species the service, and the request
header action species the method to be called on the service.
The response for console SOAP style cURL should be an XML as follows:
<?xml version="1.0" encoding="UTF-8"?>
<env:Envelope xmlns:env="http://www.w3.org/2003/05/soap-envelope"
xmlns:ns1="http://magento2.ce/index.php/soap/default?
services=foggylineSliderSlideRepositoryV1">
<env:Body>
<ns1:foggylineSliderSlideRepositoryV1GetByIdResponse>
<result>
<slideId>1</slideId>
<title>Awesome stuff #1</title>
</result>
</ns1:foggylineSliderSlideRepositoryV1GetByIdResponse>
</env:Body>
</env:Envelope>

The Web API
[ 238 ]
The getList service method call examples
The console cURL style for executing GET /V1/foggylineSliderSlide/search is
done as follows:
curl -X GET -H 'Content-type: application/json' \
-H 'Authorization: Bearer pk8h93nq9cevaw55bohkjbp0o7kpl4d3' \
"http://magento2.ce/rest/V1/foggylineSliderSlide/search?search_
criteria%5Bfilter_groups%5D%5B0%5D%5Bfilters%5D%5B0%5D%5Bfield%5D=title&
search_criteria%5Bfilter_groups%5D%5B0%5D%5Bfilters%5D%5B0%5D%5Bvalue%5D
=%25some%25&search_criteria%5Bfilter_groups%5D%5B0%5D%5Bfilters%5D%5B0%
5D%5Bcondition_type%5D=like&search_criteria%5Bcurrent_page%5D=1&search_
criteria%5Bpage_size%5D=10&search_criteria%5Bsort_orders%5D%5B0%5D%5Bfiel
d%5D=slide_id&search_criteria%5Bsort_orders%5D%5B0%5D%5Bdirection%5D=ASC"
The PHP cURL style for executing GET /V1/foggylineSliderSlide/search is
done as follows:
$searchCriteriaJSON = '{
"search_criteria": {
"filter_groups": [
{
"filters": [
{
"field": "title",
"value": "%some%",
"condition_type": "like"
}
]
}
],
"current_page": 1,
"page_size": 10,
"sort_orders": [
{
"field": "slide_id",
"direction": "ASC"
}
]
}
}';
$searchCriteriaQueryString =
http_build_query(json_decode($searchCriteriaJSON));

Chapter 9
[ 239 ]
$ch =
curl_init('http://magento2.ce/rest/V1/foggylineSliderSlide/
search?' . $searchCriteriaQueryString);
curl_setopt($ch, CURLOPT_CUSTOMREQUEST, 'GET');
curl_setopt($ch, CURLOPT_RETURNTRANSFER, true);
curl_setopt($ch, CURLOPT_HTTPHEADER, array(
'Content-Type: application/json',
'Authorization: Bearer pk8h93nq9cevaw55bohkjbp0o7kpl4d3'
));
$result = curl_exec($ch);
The response for console and PHP cURL style should be a JSON string similar to the
following one:
{"items":[{"slide_id":2,"title":"Just some other
slider"},{"slide_id":1,"title":"Awesome stuff #1"}],
"search_criteria":{"filter_groups":[{"filters":
[{"field":"title","value":"%some%","condition_type":"like"}]}],
"sort_orders":[{"field":"slide_id","direction":"-
1"}],"page_size":10,"current_page":1},"total_count":2}
The PHP SoapClient style for executing GET /V1/foggylineSliderSlide/search is
done as follows:
$searchCriteria = [
'searchCriteria' =>
[
'filterGroups' =>
[
[
'filters' =>
[
[
'field' => 'title',
'value' => '%some%',
'condition_type' => 'like',
],
],
],
],
'currentPage' => 1,
'pageSize' => 10,
'sort_orders' =>
[
[

The Web API
[ 240 ]
'field' => 'slide_id',
'direction' =>'ASC',
],
],
],
];
$request = new SoapClient(
'http://magento2.ce/index.php/soap/?wsdl&services=
foggylineSliderSlideRepositoryV1',
array(
'soap_version' => SOAP_1_2,
'trace'=>1,
'stream_context' => stream_context_create(array(
'http' => array(
'header' => 'Authorization: Bearer
pk8h93nq9cevaw55bohkjbp0o7kpl4d3')
)
)
)
);
$response = $request->
foggylineSliderSlideRepositoryV1GetList($searchCriteria);
The response for PHP SoapClient style should be the stdClass PHP object
as follows:
object(stdClass)#2 (1) {
["result"]=>
object(stdClass)#3 (3) {
["items"]=>
object(stdClass)#4 (0) {
}
["searchCriteria"]=>
object(stdClass)#5 (3) {
["filterGroups"]=>
object(stdClass)#6 (1) {
["item"]=>
object(stdClass)#7 (1) {
["filters"]=>
object(stdClass)#8 (1) {
["item"]=>
object(stdClass)#9 (2) {
["field"]=>

Chapter 9
[ 241 ]
string(5) "title"
["value"]=>
string(6) "%some%"
}
}
}
}
["pageSize"]=>
int(10)
["currentPage"]=>
int(1)
}
["totalCount"]=>
int(0)
}
}
The console SOAP style cURL for executing GET /V1/foggylineSliderSlide/
search is done as follows:
curl -X POST \
-H 'Content-Type: application/soap+xml; charset=utf-8;
action="foggylineSliderSlideRepositoryV1GetList"' \
-H 'Authorization: Bearer pk8h93nq9cevaw55bohkjbp0o7kpl4d3' \
-d @request.xml \
http://magento2.ce/index.php/soap/default?services=foggyline
SliderSlideRepositoryV1
Where request.xml has content as follows:
<?xml version="1.0" encoding="UTF-8"?>
<env:Envelope xmlns:env="http://www.w3.org/2003/05/soap-envelope"
xmlns:ns1="http://magento2.ce/index.php/soap/default?
services=foggylineSliderSlideRepositoryV1">
<env:Body>
<ns1:foggylineSliderSlideRepositoryV1GetListRequest>
<searchCriteria>
<filterGroups>
<item>
<filters>
<item>
<field>title</field>
<value>%some%</value>
</item>
</filters>

The Web API
[ 242 ]
</item>
</filterGroups>
<pageSize>10</pageSize>
<currentPage>1</currentPage>
</searchCriteria>
</ns1:foggylineSliderSlideRepositoryV1GetListRequest>
</env:Body>
</env:Envelope>
Notice we did not really do GET, rather POST. Also, the URL to which we are pointing
our POST is not really the same as with previous requests. This is because Magento
SOAP requests are always POST type, as the data is submitted in XML format. XML
format in return species the service, and the request header action species the
method to be called on the service.
The response for console SOAP style cURL should be an XML as follows:
<?xml version="1.0" encoding="UTF-8"?>
<env:Envelope xmlns:env="http://www.w3.org/2003/05/soap-envelope"
xmlns:ns1="http://magento2.ce/index.php/soap/default?
services=foggylineSliderSlideRepositoryV1">
<env:Body>
<ns1:foggylineSliderSlideRepositoryV1GetListResponse>
<result>
<items/>
<searchCriteria>
<filterGroups>
<item>
<filters>
<item>
<field>title</field>
<value>%some%</value>
</item>
</filters>
</item>
</filterGroups>
<pageSize>10</pageSize>
<currentPage>1</currentPage>
</searchCriteria>
<totalCount>0</totalCount>
</result>
</ns1:foggylineSliderSlideRepositoryV1GetListResponse>
</env:Body>
</env:Envelope>

Chapter 9
[ 243 ]
The save (as new) service method call examples
The console cURL style for executing POST /V1/foggylineSliderSlide is done
as follows:
curl -X POST -H 'Content-type: application/json' \
-H 'Authorization: Bearer pk8h93nq9cevaw55bohkjbp0o7kpl4d3' \
-d '{"slide": {"title": "API test"}}' \
http://magento2.ce/rest/V1/foggylineSliderSlide/
The PHP cURL style for executing POST /V1/foggylineSliderSlide is done
as follows:
$slide = json_encode(['slide'=>['title'=> 'API test']]);
$ch =
curl_init('http://magento2.ce/rest/V1/foggylineSliderSlide');
curl_setopt($ch, CURLOPT_CUSTOMREQUEST, 'POST');
curl_setopt($ch, CURLOPT_POSTFIELDS, $slide);
curl_setopt($ch, CURLOPT_RETURNTRANSFER, true);
curl_setopt($ch, CURLOPT_HTTPHEADER, array(
'Content-Type: application/json',
'Content-Length: ' . strlen($slide),
'Authorization: Bearer pk8h93nq9cevaw55bohkjbp0o7kpl4d3'
));
$result = curl_exec($ch);
The response for console and PHP cURL style should be a JSON string similar to the
following one:
{"slide_id":4,"title":"API test"}
The PHP SoapClient style for executing POST /V1/foggylineSliderSlide is done
as follows:
$slide = ['slide'=>['title'=> 'API test']];
$request = new SoapClient(
'http://magento2.ce/index.php/soap/?wsdl&services=
foggylineSliderSlideRepositoryV1',
array(
'soap_version' => SOAP_1_2,
'trace'=>1,
'stream_context' => stream_context_create(array(
'http' => array(

The Web API
[ 244 ]
'header' => 'Authorization: Bearer
pk8h93nq9cevaw55bohkjbp0o7kpl4d3')
)
)
)
);
$response = $request->
foggylineSliderSlideRepositoryV1Save($slide);
The response for PHP SoapClient style should be the stdClass PHP object
as follows:
object(stdClass)#2 (1) {
["result"]=>
object(stdClass)#3 (2) {
["slideId"]=>
int(6)
["title"]=>
string(8) "API test"
}
}
The console SOAP style cURL for executing POST /V1/foggylineSliderSlide is
done as follows:
curl -X POST \
-H 'Content-Type: application/soap+xml; charset=utf-8;
action="foggylineSliderSlideRepositoryV1Save"' \
-H 'Authorization: Bearer pk8h93nq9cevaw55bohkjbp0o7kpl4d3' \
-d @request.xml \
http://magento2.ce/index.php/soap/default?services=foggyline
SliderSlideRepositoryV1
Where request.xml has content as follows:
<?xml version="1.0" encoding="UTF-8"?>
<env:Envelope xmlns:env="http://www.w3.org/2003/05/soap-envelope"
xmlns:ns1="http://magento2.ce/index.php/soap/default?
services=foggylineSliderSlideRepositoryV1">
<env:Body>
<ns1:foggylineSliderSlideRepositoryV1SaveRequest>
<slide>
<title>API test</title>
</slide>

Chapter 9
[ 245 ]
</ns1:foggylineSliderSlideRepositoryV1SaveRequest>
</env:Body>
</env:Envelope>
The response for console SOAP style cURL should be an XML as follows:
<?xml version="1.0" encoding="UTF-8"?>
<env:Envelope xmlns:env="http://www.w3.org/2003/05/soap-envelope"
xmlns:ns1="http://magento2.ce/index.php/soap/default?
services=foggylineSliderSlideRepositoryV1">
<env:Body>
<ns1:foggylineSliderSlideRepositoryV1SaveResponse>
<result>
<slideId>8</slideId>
<title>API test</title>
</result>
</ns1:foggylineSliderSlideRepositoryV1SaveResponse>
</env:Body>
</env:Envelope>
The save (as update) service method call examples
The console cURL style for executing PUT /V1/foggylineSliderSlide/:id is done
as follows:
curl -X PUT -H 'Content-type: application/json' \
-H 'Authorization: Bearer pk8h93nq9cevaw55bohkjbp0o7kpl4d3' \
-d '{"slide": {"slide_id": 2, "title": "API update test"}}' \
http://magento2.ce/rest/V1/foggylineSliderSlide/2
The PHP cURL style for executing PUT /V1/foggylineSliderSlide/:id is done
as follows:
$slideId = 2;
$slide = json_encode(['slide'=>['slide_id'=> $slideId, 'title'=>
'API update test']]);
$ch =
curl_init('http://magento2.ce/rest/V1/foggylineSliderSlide/' .
$slideId);
curl_setopt($ch, CURLOPT_CUSTOMREQUEST, 'PUT');
curl_setopt($ch, CURLOPT_POSTFIELDS, $slide);
curl_setopt($ch, CURLOPT_RETURNTRANSFER, true);
curl_setopt($ch, CURLOPT_HTTPHEADER, array(
'Content-Type: application/json',
'Content-Length: ' . strlen($slide),

The Web API
[ 246 ]
'Authorization: Bearer pk8h93nq9cevaw55bohkjbp0o7kpl4d3'
));
$result = curl_exec($ch);
The response for console and PHP cURL style should be a JSON string similar to the
following one:
{"id":2,"slide_id":2,"title":"API update test"}
The PHP SoapClient style for executing PUT /V1/foggylineSliderSlide/:id is
done as follows:
$slideId = 2;
$slide = ['slide'=>['slideId'=> $slideId, 'title'=> 'API update
test']];
$request = new SoapClient(
'http://magento2.ce/index.php/soap/?wsdl&services=
foggylineSliderSlideRepositoryV1',
array(
'soap_version' => SOAP_1_2,
'trace'=>1,
'stream_context' => stream_context_create(array(
'http' => array(
'header' => 'Authorization: Bearer
pk8h93nq9cevaw55bohkjbp0o7kpl4d3')
)
)
)
);
$response = $request->
foggylineSliderSlideRepositoryV1Save($slide);
The response for PHP SoapClient style should be the stdClass PHP object
as follows:
object(stdClass)#2 (1) {
["result"]=>
object(stdClass)#3 (2) {
["slideId"]=>
int(2)
["title"]=>
string(15) "API update test"
}
}

Chapter 9
[ 247 ]
The console SOAP style cURL for executing PUT /V1/foggylineSliderSlide/:id
is done as follows:
curl -X PUT \
-H 'Content-Type: application/soap+xml; charset=utf-8;
action="foggylineSliderSlideRepositoryV1Save"' \
-H 'Authorization: Bearer pk8h93nq9cevaw55bohkjbp0o7kpl4d3' \
-d @request.xml \
http://magento2.ce/index.php/soap/default?services=
foggylineSliderSlideRepositoryV1
Where request.xml has content as follows:
<?xml version="1.0" encoding="UTF-8"?>
<env:Envelope xmlns:env="http://www.w3.org/2003/05/soap-envelope"
xmlns:ns1="http://magento2.ce/index.php/soap/default?
services=foggylineSliderSlideRepositoryV1">
<env:Body>
<ns1:foggylineSliderSlideRepositoryV1SaveRequest>
<slide>
<slideId>2</slideId>
<title>API update test</title>
</slide>
</ns1:foggylineSliderSlideRepositoryV1SaveRequest>
</env:Body>
</env:Envelope>
The response for console SOAP style cURL should be an XML as follows:
<?xml version="1.0" encoding="UTF-8"?>
<env:Envelope xmlns:env="http://www.w3.org/2003/05/soap-envelope"
xmlns:ns1="http://magento2.ce/index.php/soap/default?
services=foggylineSliderSlideRepositoryV1">
<env:Body>
<ns1:foggylineSliderSlideRepositoryV1SaveResponse>
<result>
<slideId>2</slideId>
<title>API update test</title>
</result>
</ns1:foggylineSliderSlideRepositoryV1SaveResponse>
</env:Body>
</env:Envelope>

The Web API
[ 248 ]
The deleteById service method call examples
The console cURL style for executing DELETE /V1/
foggylineSliderSlide/:slideId is done as follows:
curl -X DELETE -H 'Content-type: application/json' \
-H 'Authorization: Bearer pk8h93nq9cevaw55bohkjbp0o7kpl4d3' \
http://magento2.ce/rest/V1/foggylineSliderSlide/3
The PHP cURL style for executing DELETE /V1/foggylineSliderSlide/:slideId
is done as follows:
$slideId = 4;
$ch =
curl_init('http://magento2.ce/rest/V1/foggylineSliderSlide/' .
$slideId);
curl_setopt($ch, CURLOPT_CUSTOMREQUEST, 'DELETE');
curl_setopt($ch, CURLOPT_RETURNTRANSFER, true);
curl_setopt($ch, CURLOPT_HTTPHEADER, array(
'Content-Type: application/json',
'Authorization: Bearer pk8h93nq9cevaw55bohkjbp0o7kpl4d3'
));
$result = curl_exec($ch);
The response for console and PHP cURL style should be a JSON string similar to the
following one:
true
The PHP SoapClient style for executing DELETE /V1/
foggylineSliderSlide/:slideId is done as follows:
$slideId = 2;
$request = new SoapClient(
'http://magento2.ce/index.php/soap/?wsdl&services=
foggylineSliderSlideRepositoryV1',
array(
'soap_version' => SOAP_1_2,
'trace'=>1,
'stream_context' => stream_context_create(array(
'http' => array(
'header' => 'Authorization: Bearer
pk8h93nq9cevaw55bohkjbp0o7kpl4d3')
)

Chapter 9
[ 249 ]
)
)
);
$response = $request->
foggylineSliderSlideRepositoryV1DeleteById(array('slideId'=>
$slideId));
The response for PHP SoapClient style should be the stdClass PHP object
as follows:
object(stdClass)#2 (1) {
["result"]=>
bool(true)
}
The console SOAP style cURL for executing DELETE /V1/
foggylineSliderSlide/:slideId is done as follows:
curl -X POST \
-H 'Content-Type: application/soap+xml; charset=utf-8;
action="foggylineSliderSlideRepositoryV1DeleteById"' \
-H 'Authorization: Bearer pk8h93nq9cevaw55bohkjbp0o7kpl4d3' \
-d @request.xml \
http://magento2.ce/index.php/soap/default?services=
foggylineSliderSlideRepositoryV1
Where request.xml has content as follows:
<?xml version="1.0" encoding="UTF-8"?>
<env:Envelope xmlns:env="http://www.w3.org/2003/05/soap-envelope"
xmlns:ns1="http://magento2.ce/index.php/soap/default?
services=foggylineSliderSlideRepositoryV1">
<env:Body>
<ns1:foggylineSliderSlideRepositoryV1DeleteByIdRequest>
<slideId>5</slideId>
</ns1:foggylineSliderSlideRepositoryV1DeleteByIdRequest>
</env:Body>
</env:Envelope>
The response for console SOAP style cURL should be an XML as follows:
<?xml version="1.0" encoding="UTF-8"?>
<env:Envelope xmlns:env="http://www.w3.org/2003/05/soap-envelope"
xmlns:ns1="http://magento2.ce/index.php/soap/default?
services=foggylineSliderSlideRepositoryV1">
<env:Body>

The Web API
[ 250 ]
<ns1:foggylineSliderSlideRepositoryV1DeleteByIdResponse>
<result>true</result>
</ns1:foggylineSliderSlideRepositoryV1DeleteByIdResponse>
</env:Body>
</env:Envelope>
The preceding API call examples cover all of our custom-dened APIs for the
Slide entity.
Looking back at the $searchCriteria variable, we used the GET type of HTTP
method, passing the entire variable as a query string. If we think about it, we
could have specied POST during the Web API resource denition and packed the
content of the $searchCriteria variable into the request body. Although the GET
method approach might look a bit dirtier, imagine if we assigned the anonymous
or self role to the resource: we would be able to simply open a lengthy URL in the
browser and have the search results. Think of a possible widget use, where a widget
would simply do an AJAX request to the URL and fetch the results for guests or
the customer.
The full module source code can be found here: https://github.com/ajzele/
B05032-Foggyline_Slider. Aside from the Slide entity, the full module code
includes the Image entity as well. Since each slide can contain multiple images,
we can further test the Image API calls analogous to the preceding calls.
Search Criteria Interface for list ltering
Knowing how to do a proper list ltering to fetch the entities that match a certain
lookup is essential for the effective use of getList services across core Magento and
possibly custom-coded API's. An example is fetching the list of customers registered
within the last 24 hours for the latest added product.
Let's take a look back at our app/code/Foggyline/Slider/etc/webapi.xml le,
the bit where we dened the service method="getList". The service class is dened
as Foggyline\Slider\Api\SlideRepositoryInterface, which is dened as a
preference for the Foggyline\Slider\Model\SlideRepository class. Finally,
within the SlideRepository class, we have the actual getList. Method getList is
dened as follows:
getList(\Magento\Framework\Api\SearchCriteriaInterface
$searchCriteria);
We can see that the getList method takes only one parameter, object instance,
that complies with SearchCriteriaInterface called $searchCriteria.

Chapter 9
[ 251 ]
What this means is we already have the (incomplete) JSON object of the following
type to pass to the getList method:
{
"search_criteria": {
}
}
In order to further understand the inner workings of search_criteria, we need to
understand SearchCriteriaInterface, which is (partially) dened as follows:
interface SearchCriteriaInterface
{
/* @param \Magento\Framework\Api\Search\FilterGroup[]
$filterGroups */
public function setFilterGroups(array $filterGroups = null);
/* @param \Magento\Framework\Api\SortOrder[] $sortOrders */
public function setSortOrders(array $sortOrders = null);
/* @param int $pageSize */
public function setPageSize($pageSize);
/* @param int $currentPage */
public function setCurrentPage($currentPage);
}
Every interface getter and setter method expects the values to be found in passed
API parameters. What this means is that the getPageSize() and setPageSize()
methods would expect search_criteria to have an integer type page_size
property on it. Similarly, the getFilterGroups() and setFilterGroups() methods
would expect search_criteria to have an array of \Magento\Framework\Api\
Search\FilterGroup passed to it. These insights bring us to an (incomplete) JSON
object of the following type to pass to the getList method:
{
"search_criteria": {
"filter_groups": [
],
"current_page": 1,
"page_size": 10,
"sort_orders": [
]
}
}

The Web API
[ 252 ]
Now we have got to the point where we need to determine what goes into filter_
groups and sort_orders, since these are not simple types but compound values.
Looking further into \Magento\Framework\Api\Search\FilterGroup, we see the
denition of the getFilters() and setFilters() methods that work with an array
of \Magento\Framework\Api\Filter objects. What this means is that filter_
groups has a property lter that is an array of individual lter objects dened as
\Magento\Framework\Api\Filter. With this in mind, we are now down to the
following form of the search_criteria JSON object:
{
"search_criteria": {
"filter_groups": [
{
"filters": [
]
}
],
"current_page": 1,
"page_size": 10,
"sort_orders": [
]
}
}
Looking further into individual \Magento\Framework\Api\Filter, through its
getters and setters it denes we can conclude properties like field, value, and
condition_type. This brings us one step further to nalizing our search_criteria
JSON object, which is now structured as follows:
{
"search_criteria": {
"filter_groups": [
{
"filters": [
{
"field": "title",
"value": "%some%",
"condition_type": "like"
}
]
}
],
"current_page": 1,
"page_size": 10,

Chapter 9
[ 253 ]
"sort_orders": [
]
}
}
Let us take a look at sort_orders as the last outstanding bit. sort_orders is of type
\Magento\Framework\Api\SortOrder, which has getters and setters for the eld
and direction properties. Knowing this, we are able to fully construct our search_
criteria JSON object (or array) that we would be passing to the getList() service
method call, as follows:
{
"search_criteria": {
"filter_groups": [
{
"filters": [
{
"field": "title",
"value": "%some%",
"condition_type": "like"
}
]
}
],
"current_page": 1,
"page_size": 10,
"sort_orders": [
{
"field": "slide_id",
"direction": -1
}
]
}
}
What happens when we dene multiple entries under filter_groups, filters,
or sort_orders? The logical expectation would be that these break into AND and
OR operators in SQL when they hit the database. Surprisingly, this is not always the
case, at least not with our preceding example. Since the actual implementation of the
getList method is left for us to handle, we can decide how we want to handle the
lter groups and lters.
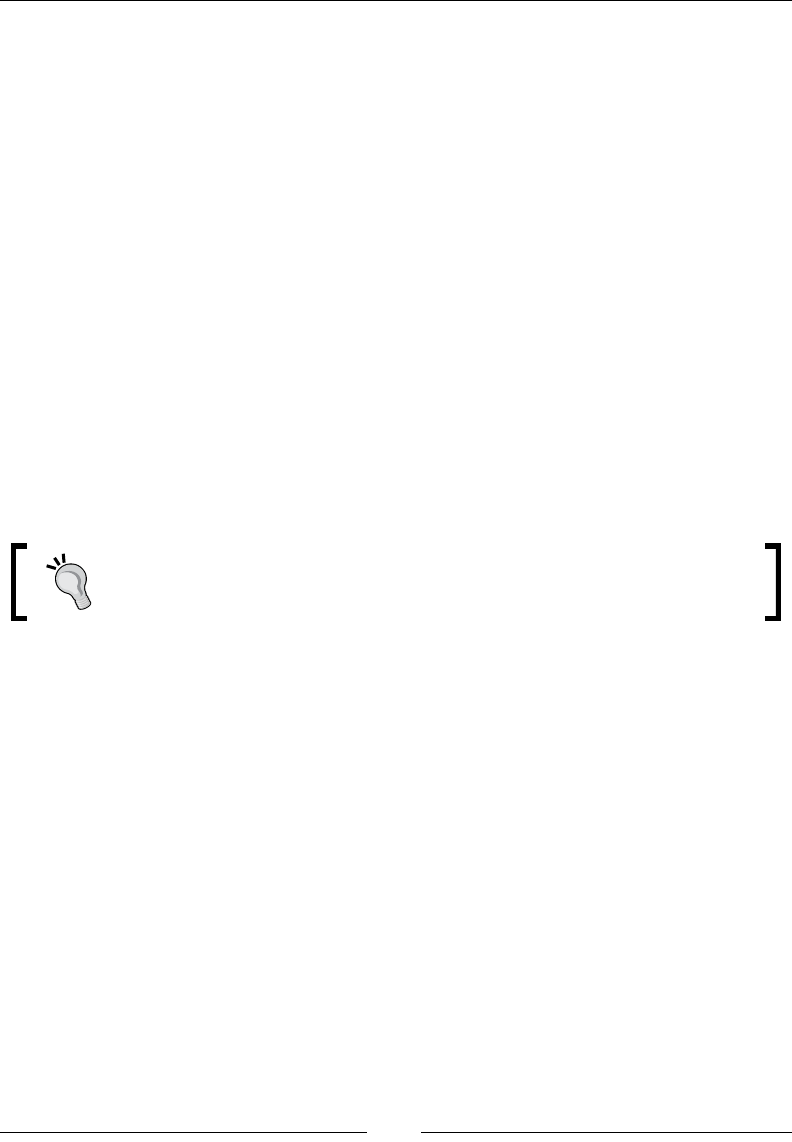
The Web API
[ 254 ]
Looking back at our getList method, as (partially) shown next, we are not doing
anything to imply an OR operator, so everything ends up with an AND condition on
the database:
foreach ($searchCriteria->getFilterGroups() as $filterGroup) {
foreach ($filterGroup->getFilters() as $filter) {
$condition = $filter->getConditionType() ?: 'eq';
$collection->addFieldToFilter($filter->getField(),
[$condition => $filter->getValue()]);
}
}
The preceding code simply loops through all lter groups, pulling in all lters within
the group and calling the same addFieldToFilter method for everything. Similar
behavior is implemented across core Magento modules. Although the ltering itself
follows the \Magento\Framework\Api\SearchCriteriaInterface interface, there
is no unied Magento-wide approach to force AND and OR operators in ltering.
However, Magento core API's like GET products do implement both AND and OR
conditions. In cases like these, lter groups result in OR and lters within the group
result in AND conditions.
Following best practices, we should make sure our modules that
implement search criteria do so respecting the filter_groups/
filters and OR/AND relationship.
Summary
In this chapter, we covered a lot of ground relating to Magento API's. There is much
more left to be said, but the steps outlined here should be enough to get us started
even with more advanced API usage. We started the chapter with learning about
types of users and the authentication methods supported. Strong emphasis was
placed on making several types of API calls, like console cURL, PHP cURL, PHP
SoapClient, and console cURL SOAP. This was to encourage developers
to understand the inner workings of API calls more deeply than just using
high-level libraries.
Throughout the next chapter, we will look into some of the major sections
of Magento.
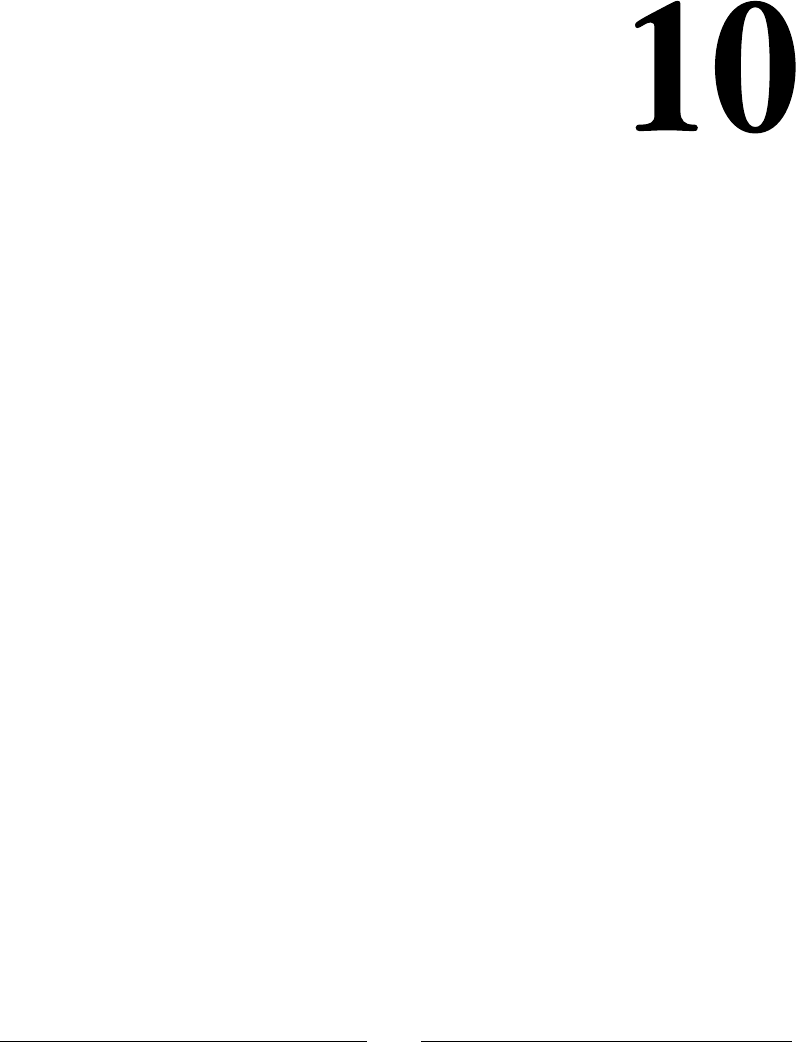
[ 255 ]
The Major Functional Areas
The Magento platform comprises various modules that deliver various bits of
functionality. Developers are often more in touch with one group of functionality
than others. Examples of some of the most commonly used functionalities include
those related to CMS blocks and pages, categories, products, customers, imports,
custom product types, custom payment, and shipping modules. This is not to say
that other functionalities are less important. In this chapter, we will take a quick
look at the functionalities in the Magento admin area, PHP code, and API calls.
The chapter is divided into the following sections:
• CMS management
• Catalog management
• Customer management
• Products and customer import
• Custom product types
• Custom offline shipping methods
• Custom offline payment methods
The intention is not to go into the details of each functional area. Rather, the aim is to
show the admin interface and the corresponding programmatic and API approach
towards basic management.
CMS management
Content is what helps differentiate one store from another. Quality content can boost
a store's visibility on search engines, provide informative insight to the customers
who buy products, and provide credibility and trust. Magento provides a solid
content management system, which can be used to create rich content for a store.
We can use it to manage blocks and pages too.
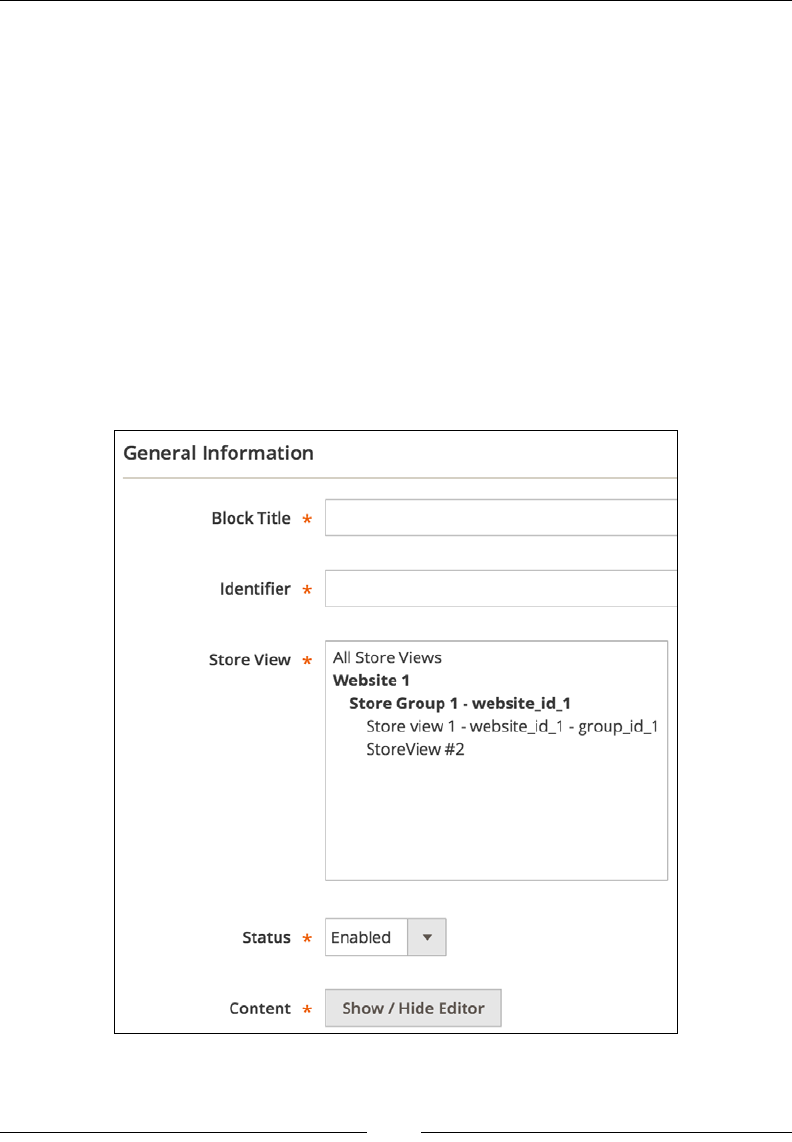
The Major Functional Areas
[ 256 ]
Managing blocks manually
A CMS block is a small modular unit of content that can be positioned almost
anywhere on a page. They can even be called into another blocks. Blocks support
HTML and JavaScript as its content. Therefore, they are able to display static
information such as text, images, and embedded video as well as dynamic
information.
Blocks can be created via an admin interface, APIs, or code.
The following steps outline the block creation process from within an
admin interface:
1. Log in to the Magento admin area.
2. In the Content | Elements | Blocks menu, click on Add New Block. This
opens a screen that is similar to the one shown in the following screenshot:

Chapter 10
[ 257 ]
3. Fill in some values for the required elds (Block Title, Identier, Store
View, Status, and Content) and click on the Save Block button.
Once the block is saved, you will see the You saved the block. success message in
the browser. CMS blocks are stored in the cms_block and cms_block_store tables
in a database.
The Identier value is probably the most interesting aspect here. We can use
it in a CMS page, another CMS block, or some code to fetch the block that we
have just created.
Assuming that we have created a block with the Identier value of foggyline_
hello, we can call it in the CMS page or another block by using the following
expression:
{{widget type="Magento\\Cms\\Block\\Widget\\Block"
template="widget/static_block/default.phtml"
block_id="foggyline_hello"}}
We can also pass the actual integer ID value of a block to the preceding expression,
as follows:
{{widget type="Magento\\Cms\\Block\\Widget\\Block"
template="widget/static_block/default.phtml" block_id="2"}}
However, this approach requires us to know the actual integer ID of a block.
The preceding expressions show that blocks are included in a page or another block
via a widget, which is also known as a frontend app. A widget of the Magento\Cms\
Block\Widget\Block class type is using the widget/static_block/default.
phtml template le to render the actual CMS block.
Managing blocks via code
Besides the manual creation of blocks via the admin interface, we can create CMS
blocks by using code, as shown in the following code snippet:
$model = $this->_objectManager->create('Magento\Cms\Model\Block');
$model->setTitle('Test block');
$model->setIdentifier('test_block');
$model->setContent('Test block!');
$model->setIsActive(true);
$model->save();

The Major Functional Areas
[ 258 ]
Here, we used the instance manager to create a new model instance of the Magento\
Cms\Model\Block class. Then, we set some properties through dened methods and
nally called the save method.
We can load and update the existing blocks using a code snippet that is similar to the
following code:
$model = $this->_objectManager->create('Magento\Cms\Model\Block');
//$model->load(3);
$model->load('test_block');
$model->setTitle('Updated Test block');
$model->setStores([0]);
$model->save();
The block's load method accepts either an integer value of a block ID or a string
value of a block identier.
Finally, we can manage the creation and updating of blocks through the available
APIs method. The following code snippet shows how a CMS block is created via a
console cURL REST API call:
curl -X POST "http://magento2.ce/index.php/rest/V1/cmsBlock" \
-H "Content-Type:application/json" \
-H "Authorization: Bearer lcpnsrk4t6al83lymhfs86jabbi9mmt8" \
-d '{"block": {"identifier": "test_api_block", "title": "Test
API Block", "content": "API Block Content"}}'
The bearer string is just a login token that we obtain by rst running the
authentication API call, as described in the previous chapter. Once we have the
authentication token, we can make a V1/cmsBlock POST request, passing a JSON
object as data.

Chapter 10
[ 259 ]
Managing blocks via API
We can get the newly created CMS block through an API by executing a snippet of
code that looks like this:
curl -X GET "http://magento2.ce/index.php/rest/V1/cmsBlock/4" \
-H "Content-Type:application/json" \
-H "Authorization: Bearer lcpnsrk4t6al83lymhfs86jabbi9mmt8"
We can update the existing CMS block by using an API and executing a snippet of
code that is similar to this:
curl -X PUT "http://magento2.ce/index.php/rest/V1/cmsBlock/4" \
-H "Content-Type:application/json" \
-H "Authorization: Bearer lcpnsrk4t6al83lymhfs86jabbi9mmt8" \
-d '{"block": {"title": "Updated Test API Block"}}'
Here, we used the HTTP PUT method and passed the integer 4 as a part of the V1/
cmsBlock/4 URL. The number 4 represents the ID value of the block in the database.
Managing pages manually
CMS pages are robust content units unlike CMS blocks, which are simply embedded
into certain pages. The CMS page can have its own URL. Examples of CMS pages are
pages such as 404 Not Found, Home page, Enable Cookies, and Privacy and Cookie
Policy. The idea, when it comes to dealing with CMS pages, is that we can control
the content area of a page without affecting site-wide elements such as the header,
footer, or sidebars. Magento does not really come with many out-of-the-box CMS
pages other than the ones that were listed previously.
Like blocks, pages can also be created via the admin interface, APIs, or code.
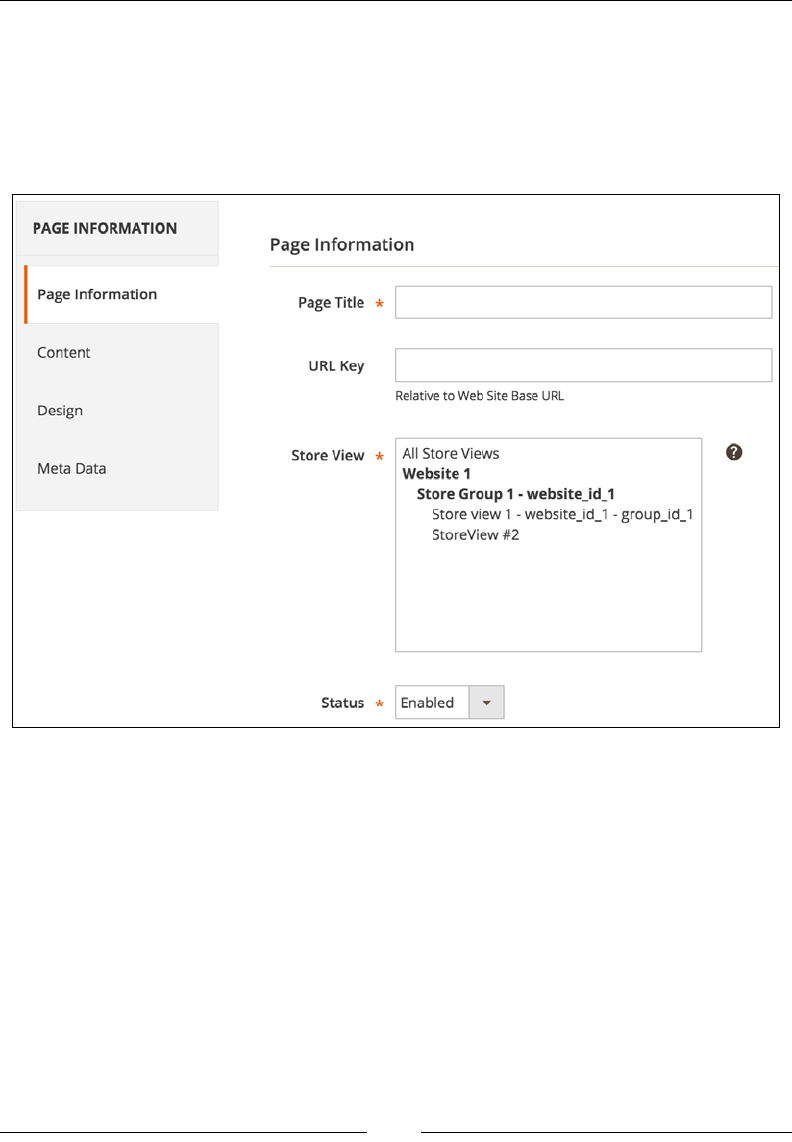
The Major Functional Areas
[ 260 ]
The following steps outline the page creation process from within the admin
interface:
1. Log in to Magento admin area.
2. In the Content | Elements | Pages menu, click on Add New Page. This
opens a screen that is similar the one shown in the following screenshot:
3. Fill in some values for the required elds (Page Title, Store View, Status,
and Content) and click on the Save Block button.
Once the page is saved, you will see the You saved this page. success message
in the browser. CMS pages are stored in the cms_page and cms_page_store tables
in the database.
Assuming that we have created a page with Page Title value Info, we can access
this page in a browser via a URL such as http://magento2.ce/info. Though we
could have to specify the URL Key value in the New Page edit screen, Magento
automatically assigns URL Key that matches Page Title.

Chapter 10
[ 261 ]
Managing pages via code
Besides the manual creation through the admin interface, we can create CMS pages
via code, as shown in the following code snippet:
$model = $this->_objectManager->create('Magento\Cms\Model\Page');
$model->setTitle('Test page');
$model->setIdentifier('test-page');
$model->setPageLayout('1column');
$model->setContent('Test page!');
$model->setIsActive(true);
$model->setStores([0]);
$model->save();
Here, we used the instance manager to create a new model instance of the Magento\
Cms\Model\Page class. Then, we set some properties through the dened methods
and nally called the save method. The URL Key that we set through the admin
interface is actually an identier that we set via the setIdentifier method call.
Managing pages via API
We can load and update the existing pages by using a code snippet that is similar to
the following one:
$model = $this->_objectManager->create('Magento\Cms\Model\Page');
//$model->load(6);
$model->load('test-page');
$model->setContent('Updated Test page!');
$model->save();
The page model load method accepts either an integer ID value of a page identier
(URL Key).
Finally, we can manage the creation and updating of pages through the available
APIs method. The following code snippet shows how a CMS page is created via a
console cURL REST API call:
curl -X POST "http://magento2.ce/index.php/rest/V1/cmsPage" \
-H "Content-Type:application/json" \
-H "Authorization: Bearer lcpnsrk4t6al83lymhfs86jabbi9mmt8" \
-d '{"page": {"identifier": "test-api-page", "title": "Test API
Page", "content": "API Block Content"}}'

The Major Functional Areas
[ 262 ]
Once we have the authentication token, we can make a V1/cmsPage POST request,
passing on the JSON object as data.
We can get the newly created CMS page through an API by executing a snippet of
code that is similar to the following one:
curl -X GET "http://magento2.ce/index.php/rest/V1/cmsPage/7" \
-H "Content-Type:application/json" \
-H "Authorization: Bearer lcpnsrk4t6al83lymhfs86jabbi9mmt8"
We can update the existing CMS page through an API by executing a snippet of code
that is similar to the following one:
curl -X PUT "http://magento2.ce/index.php/rest/V1/cmsPage/7" \
-H "Content-Type:application/json" \
-H "Authorization: Bearer lcpnsrk4t6al83lymhfs86jabbi9mmt8" \
-d '{"page": {"content": "Updated Test API Page",
"identifier":"updated-page"}}'
Here, we used the HTTP PUT method, passing the integer 7 as a part of the V1/
cmsPage/7 URL. The number 7 represents the ID value of the page in the database.
Catalog management
The Magento_Catalog module is one of the backbones of the entire Magento
platform. It provides robust support for the inventory management of various
product types. This module is what manages products, categories and their
attributes, the display on the frontend, and many more things.
Managing categories manually
We can access the catalog functionality within the Magento admin area by
navigating to Products | Inventory | Catalog or Products | Inventory | Category.
If we start with a blank Magento installation, we will probably start with categories
as one of the rst entities to be created. We can manually create categories by
performing the following steps:
1. Log in to the Magento admin area.
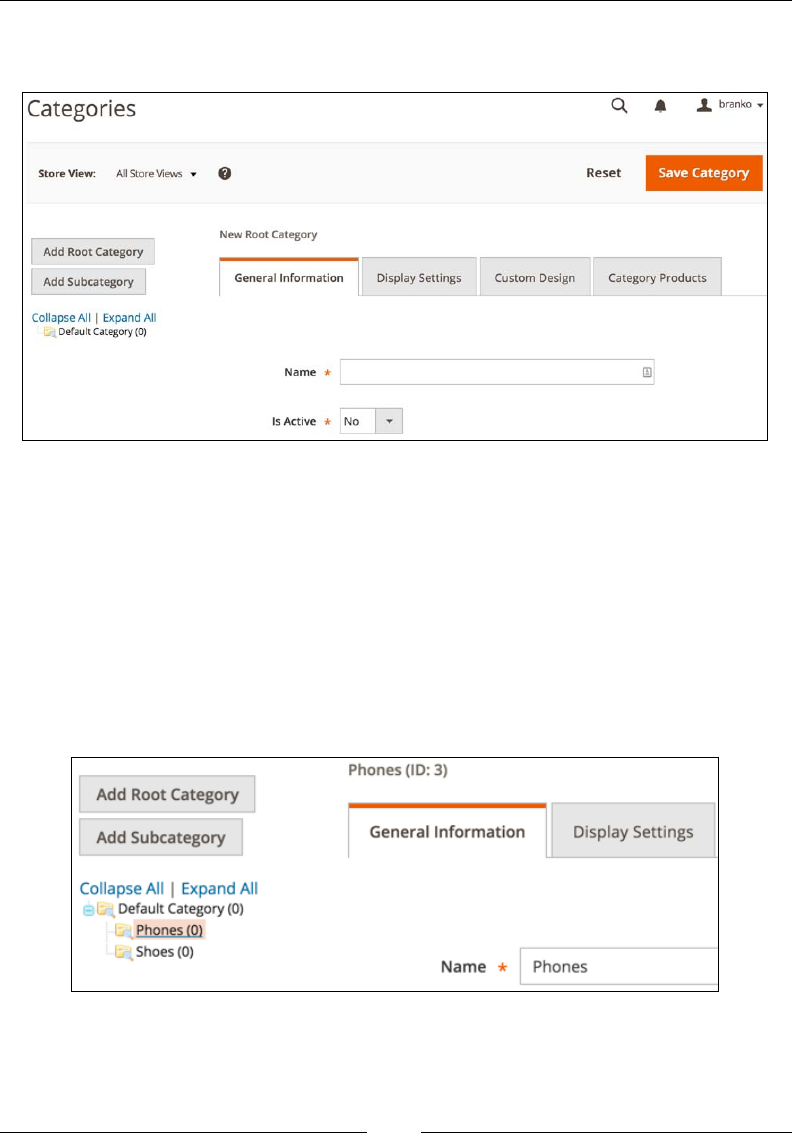
Chapter 10
[ 263 ]
2. Go to the Products | Inventory | Category menu. This opens a screen that is
similar to the one shown in the following screenshot:
3. On the left-hand side of the screen, click on Default Category. Then, when
the page reloads, click on the Add Subcategory button.
4. Though it may seem that nothing has happened, as the screen content
does not change, we should now ll in the required options in the General
Information tab, setting Name to some string value and Is Active to Yes.
5. Finally, click on the Save Category button.
The new category should now be created. To the left screen area, if you click on the
name of the newly created category, you will see its ID value above the General
Information tab, as shown in the following screenshot:
The Major Functional Areas
[ 264 ]
Knowing the category ID enables you to directly test it on a storefront
simply by opening a URL such as http://magento2.ce/index.
php/catalog/category/view/id/3 in the browser, where the
number 3 is the ID of the category. You will see a loaded category page
that probably shows the We can't nd products matching the selection.
message, which is good, as we haven't assigned products to a category.
Though we will not go into its details, it is worth noting that we have simply
scratched the surface here, as categories enable us to provide many additional
options using the Display Settings, Custom Design tabs.
Given that categories are EAV entities, their data is stored across several tables in the
database, as follows:
• catalog_category_entity
• catalog_category_entity_datetime
• catalog_category_entity_decimal
• catalog_category_entity_int
• catalog_category_entity_text
• catalog_category_entity_varchar
There are a few additional tables that link categories to products:
• catalog_category_product
• catalog_category_product_index
• catalog_category_product_index_tmp
• catalog_url_rewrite_product_category
Managing categories via code
Besides the manual creation through the admin interface, we can create categories
via code, as shown in the following code snippet:
$parentId = \Magento\Catalog\Model\Category::TREE_ROOT_ID;
$parentCategory = $this->_objectManager
->create('Magento\Catalog\Model\Category')
->load($parentId);

Chapter 10
[ 265 ]
$category = $this->_objectManager
->create('Magento\Catalog\Model\Category');
$category->setPath($parentCategory->getPath());
$category->setParentId($parentId);
$category->setName('Test');
$category->setIsActive(true);
$category->save();
What is specic here is that when creating a new category, we rst created a
$parentCategory instance, which represents the root category object. We used the
Category model TREE_ROOT_ID constant as the ID value of a parent category ID.
Then, we created an instance of the category, set its path, parent_id, name, and
is_active value.
Managing categories via API
We can further manage category creation through the available APIs method. The
following code snippet shows category creation via the console cURL REST API call:
curl -X POST "http://magento2.ce/index.php/rest/V1/categories" \
-H "Content-Type:application/json" \
-H "Authorization: Bearer lcpnsrk4t6al83lymhfs86jabbi9mmt8" \
-d '{"category": {"parent_id": "1", "name": "Test API
Category", "is_active": true}}'
The bearer string is just a login token that we obtain by rst running the
authentication API call, as described in the previous chapter. Once we have the
authentication token, we can make a /V1/categories POST request, passing a JSON
object as data.
We can get the newly created category as a JSON object through an API by executing
a snippet of code that looks like the following one:
curl -X GET "http://magento2.ce/index.php/rest/V1/categories/9" \
-H "Content-Type:application/json" \
-H "Authorization: Bearer lcpnsrk4t6al83lymhfs86jabbi9mmt8"
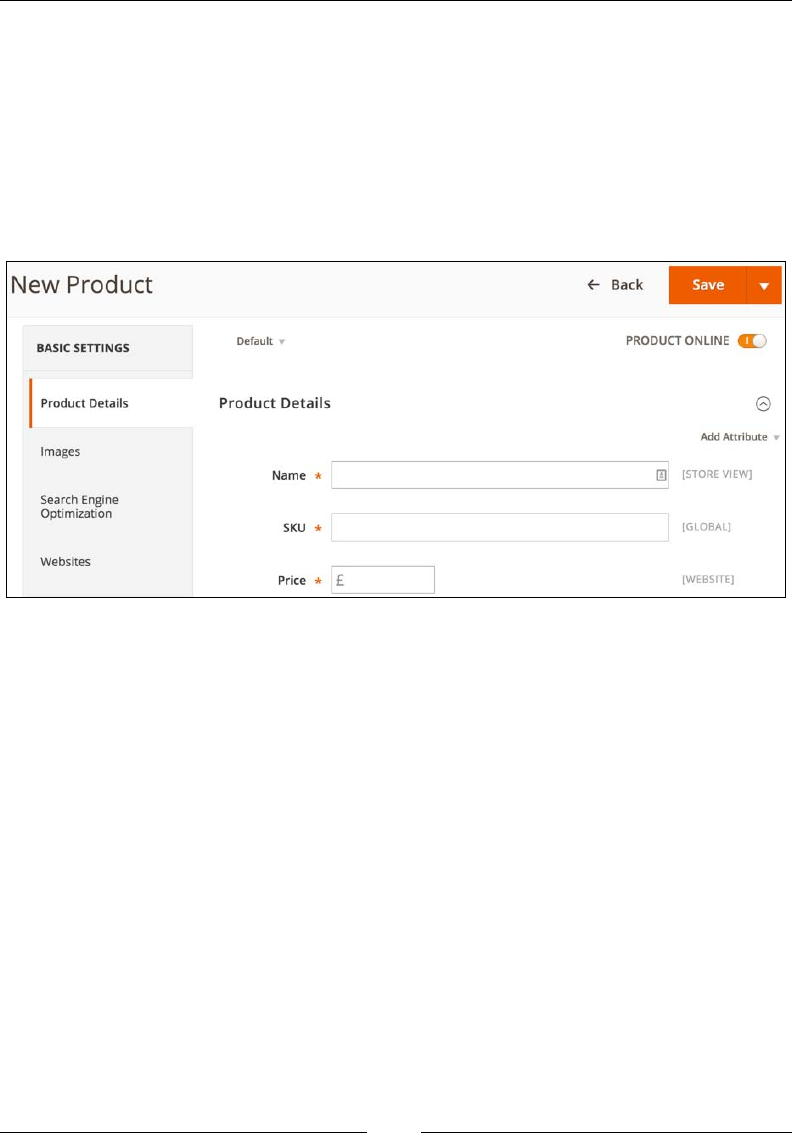
The Major Functional Areas
[ 266 ]
Managing products manually
Now, let's take a look at how to create a new product. We can manually create
products by performing the following steps:
1. Log in to the Magento admin area.
2. In the Products | Inventory | Catalog menu, click on the Add
Product button. This opens a screen similar to the one shown in the
following screenshot:
3. Now, ll in the required options on the Product Details tab.
4. Finally, click on the Save button.
If it is successfully saved, the page reloads and shows the You saved the product.
message.
Like categories, we have barely scratched the surface of products here. Looking at
the other available tabs, there are a large number of additional options that can be
assigned to a product. Simply assigning the required options should be enough for
us to see the product on the store's frontend on a URL such as http://magento2.
ce/index.php/catalog/product/view/id/4, where the number 4 is the ID value
of a product.

Chapter 10
[ 267 ]
Products are also EAV entities, whose data is stored across several tables in a
database, as follows:
• catalog_product_entity
• catalog_product_entity_datetime
• catalog_product_entity_decimal
• catalog_product_entity_gallery
• catalog_product_entity_group_price
• catalog_product_entity_int
• catalog_product_entity_media_gallery
• catalog_product_entity_media_gallery_value
• catalog_product_entity_text
• catalog_product_entity_tier_price
• catalog_product_entity_varchar
There are also a large number of other table referencing products, such as catalog_
product_bundle_selection, but these are mostly used to link bits of functionalities.
Managing products via code
Besides the manual creation through the admin interface, we can create products via
code, as shown in the following code snippet:
$catalogConfig = $this->_objectManager
->create('Magento\Catalog\Model\Config');
$attributeSetId = $catalogConfig->getAttributeSetId(4, 'Default');
$product = $this->_objectManager
->create('Magento\Catalog\Model\Product');
$product
->setTypeId(\Magento\Catalog\Model\Product\Type::TYPE_SIMPLE)
->setAttributeSetId($attributeSetId)
->setWebsiteIds([$this->storeManager->getWebsite()->getId()])
->setStatus(\Magento\Catalog\Model\Product\Attribute
\Source\Status::STATUS_ENABLED)

The Major Functional Areas
[ 268 ]
->setStockData(['is_in_stock' => 1, 'manage_stock' => 0])
->setStoreId(\Magento\Store\Model\Store::DEFAULT_STORE_ID)
->setVisibility(\Magento\Catalog\Model\Product
\Visibility::VISIBILITY_BOTH);
$product
->setName('Test API')
->setSku('tets-api')
->setPrice(19.99);
$product->save();
Managing products via API
The following example uses the REST API to create a new simple product:
curl -X POST "http://magento2.ce/index.php/rest/V1/products" \
-H "Content-Type:application/json" \
-H "Authorization: Bearer lcpnsrk4t6al83lymhfs86jabbi9mmt8" \
-d '{"product":{"sku":"test_api_1","name":"Test API
#1","attribute_set_id":4,"price":19.99,"status":1,
"visibility":4,"type_id":"simple","weight":1}}'
The Bearer token should have been previously obtained by using an authentication
request. The response should be a JSON object that contains all the exposed
product data.
We can get the existing product as information through an API that executes a
snippet of code, as follows:
curl -X GET "http://magento2.ce/index.php/rest/V1/products
/product_dynamic_125" \
-H "Content-Type:application/json"
The product_dynamic_125 part in the preceding URL stands for this specic
product SKU value. The response is a JSON object that contains all the exposed
product data.
The entire list of the available catalog APIs can be seen in the vendor/magento/
module-catalog/etc/webapi.xml le.
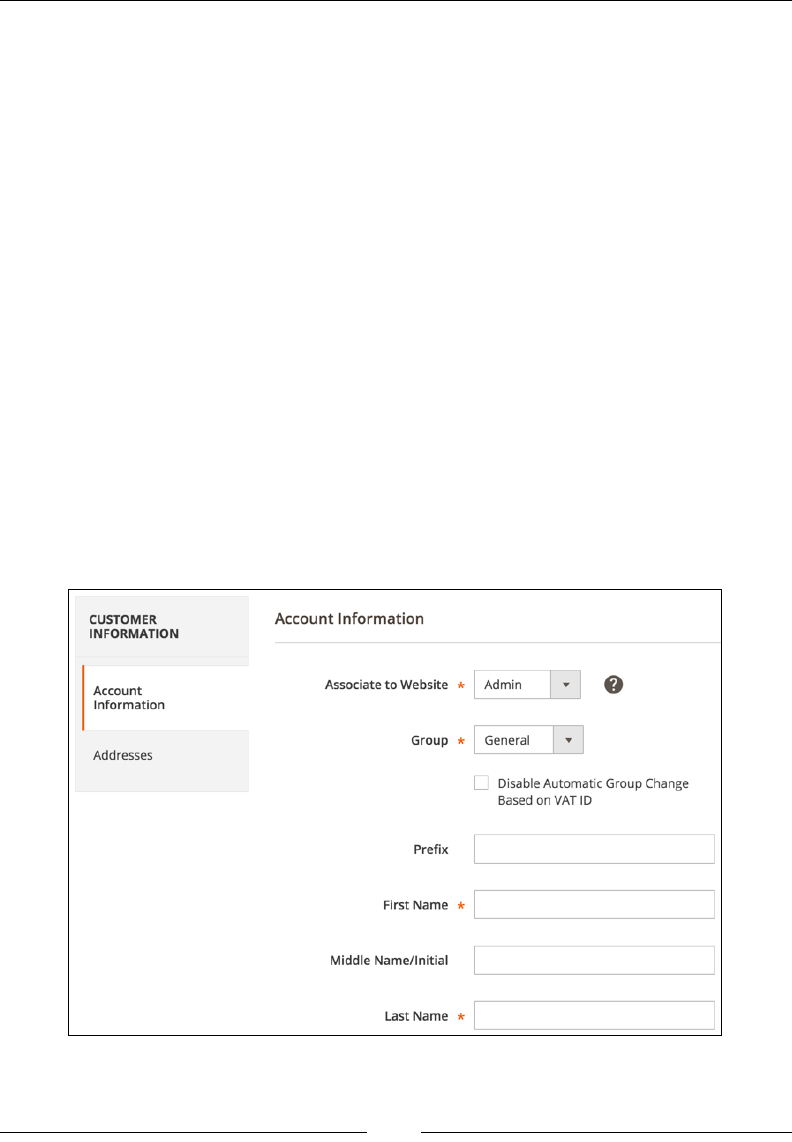
Chapter 10
[ 269 ]
Customer management
Managing customers is another important aspect of the Magento platform.
Most of the time, customer creation is something that is left for a new customer to do.
A new customer who visits a store initiates the registration process and nishes up
with a customer account being created. Once registered, customers can then further
edit their account details on the storefront under the My Account page, which is
usually available on a link such as http://magento2.ce/index.php/customer/
account/index/.
As a part of this section, we are interested in the possibility of managing customer
accounts by using the admin area, code, and API.
Managing customers manually
The following steps outline the customer account creation process from within the
admin interface:
1. Log in to Magento admin area.
2. In the Customers | All Customers menu, click on the Add New Customer
button. This opens a screen that looks similar to the one shown in the
following screenshot:
The Major Functional Areas
[ 270 ]
3. Fill in some values for the required elds (Associate to Website, Group, First
Name, Last Name, and Email) and click on the Save Customer button.
Once the customer is saved, you will see the You saved the customer. success
message in the browser.
The Associate to Website value is probably the most important value for cases
like this one, where customer accounts are being indirectly created by a user who's
not a customer.
Since Magento supports the setting up of multiple websites, customer
accounts can be set to either the Global or Per Website value,
depending on the Stores | Settings | Conguration | Customers |
Customer Conguration | Account Sharing Option | Share Customer
Accounts option. Thus, if the Share Customer Accounts option
has been set to Per Website, it is of the utmost important to point
the Associate to Website value to the proper website. Otherwise, a
customer account will be created but the customer won't be able to log
in to it on the storefront.
The Magento_Customer module uses the EAV structure to store customer data. Thus,
there is no single table that stores customer information. Rather, multiple tables exist,
depending on the customer property and its data type.
The following list comprises tables that store customer entity:
• customer_entity
• customer_entity_datetime
• customer_entity_decimal
• customer_entity_int
• customer_entity_text
• customer_entity_varchar
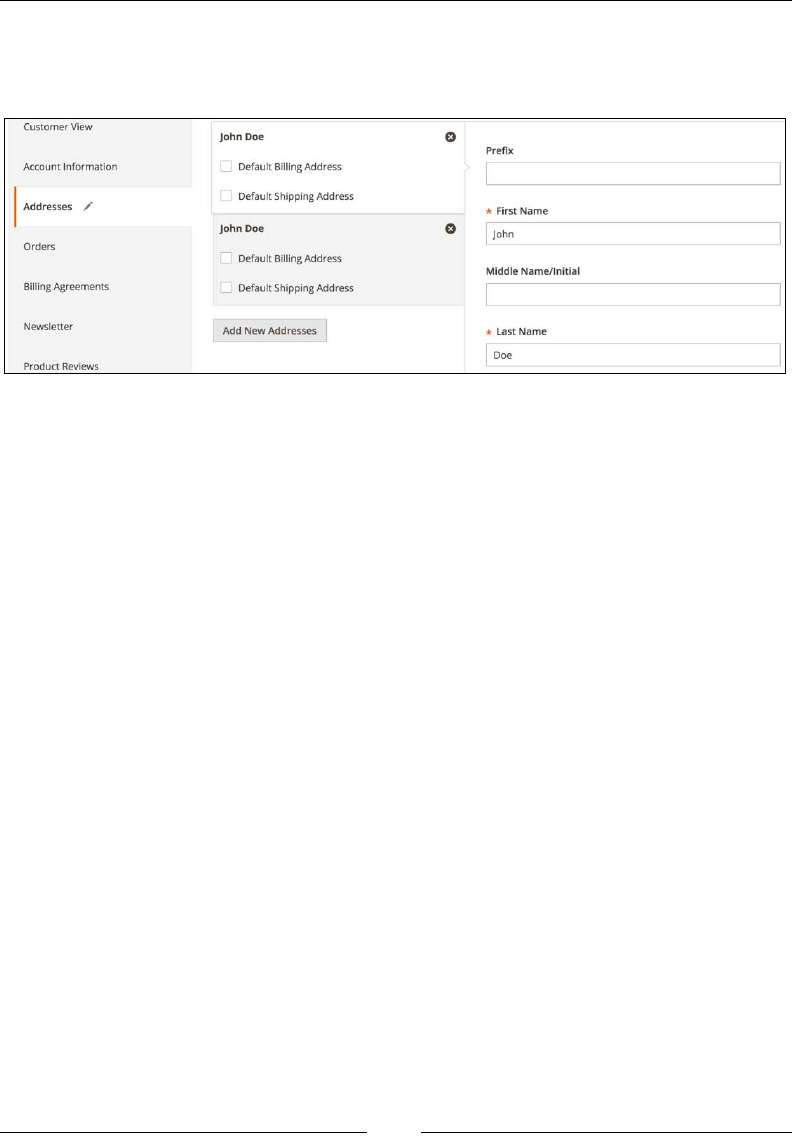
Chapter 10
[ 271 ]
Customer accounts will not really be complete without a customer address.
The address can be added via the Addresses tab under the customer edit
screen in the admin area, as shown in the following screenshot:
Note that Magento enables us to set one of the addresses as Default Shipping
Address and Default Billing Address.
Like the customer entity, the customer address entity also uses the EAV structure to
store its data.
The following list comprises tables that store the customer address entity:
• customer_address_entity
• customer_address_entity_datetime
• customer_address_entity_decimal
• customer_address_entity_int
• customer_address_entity_text
• customer_address_entity_varchar

The Major Functional Areas
[ 272 ]
Managing customers via code
Besides the manual creation via the admin interface, we can create customers via
code, as shown in the following code snippet:
$model = $this->_objectManager->
create('Magento\Customer\Model\Customer');
$model->setWebsiteId(1);
$model->setGroupId(1);
$model->setFirstname('John');
$model->setLastname('Doe');
$model->setEmail('john.doe@mail.com');
$model->save();
Here, we are using the instance manager to create a new model instance of the
Magento\Customer\Model\Customer class. We can then set some properties
through the dened methods and nally call the save method.
We can load and update an existing customer by using a code snippet that is similar
to the following one:
$model = $this->_objectManager->
create('Magento\Customer\Model\Customer');
$model->setWebsiteId(1);
//$model->loadByEmail('john.doe@mail.com');
$model->load(1);
$model->setFirstname('Updated John');
$model->save();
We can use either the load or loadByEmail method call. The load method accepts
the integer ID value of the existing customer entity, while loadByEmail accepts a
string e-mail address. It is worth noting that setWebsiteId has to be called prior
to any of the load methods. Otherwise, we will get an error message that says
A customer website ID must be specied when using the website scope.
Managing customers via an API
Finally, we can manage the creation and updating of customer information using the
available API method. The following code snippet shows how to create a customer
via a console cURL REST API call:
curl -X POST "http://magento2.ce/index.php/rest/V1/customers" \
-H "Content-Type:application/json" \

Chapter 10
[ 273 ]
-H "Authorization: Bearer r9ok12c3wsusrxqomyxiwo0v7etujw9h" \
-d '{"customer": {"website_id": 1, "group_id": 1, "firstname":
"John", "lastname": "Doe", "email": "john.doe@mail.com"},
"password":"abc123"}'
Once we have the authentication token, we can make a V1/customers POST request,
passing a JSON object as data.
We can get the newly created customer via an API by executing a snippet of code
that is similar to the following one:
curl -X GET "http://magento2.ce/index.php/rest/V1/customers/24" \
-H "Content-Type:application/json" \
-H "Authorization: Bearer lcpnsrk4t6al83lymhfs86jabbi9mmt8"
We can update an existing customer through an API by executing a snippet of code
that is similar to the following one:
curl -X PUT "http://magento2.ce/index.php/rest/V1/customers/24" \
-H "Content-Type:application/json" \
-H "Authorization: Bearer r9ok12c3wsusrxqomyxiwo0v7etujw9h" \
-d '{"customer": {"id":24, "website_id": 1, "firstname": "John
Updated", "lastname": "Doe", "email": "john2@mail.com"},
"password_hash":"cda57c7995e5f03fe07ad52d99686ba130e0d3e
fe0d84dd5ee9fe7f6ea632650:cEf8i1f1ZXT1L2NwawTRNEqDWGyru6h3:1"}'
Here, we used the HTTP PUT method, passing the integer 24 as a part of the V1/
customers/24 and as part of the body URL. The number 24 represents the ID
value of a customer in the database. Also, note the password_hash value; without it,
the update will fail.
Managing customer address via code
Similar to customers, we can create a customer address using code, as shown in the
following code snippet:
$model = $this->_objectManager->
create('Magento\Customer\Model\Address');
//$model->setCustomer($customer);
$model->setCustomerId(24);
$model->setFirstname('John');
$model->setLastname('Doe');

The Major Functional Areas
[ 274 ]
$model->setCompany('Foggyline');
$model->setStreet('Test street');
$model->setCity('London');
$model->setCountryId('GB');
$model->setPostcode('GU22 7PY');
$model->setTelephone('112233445566');
$model->setIsDefaultBilling(true);
$model->setIsDefaultShipping(true);
$model->save();
Here, we used the instance manager to create a new model instance of the Magento\
Customer\Model\Address class. We then set some properties through the dened
methods and nally called the save method.
We can load and update the existing customer address by using a code snippet that
is similar to the following one:
$model = $this->_objectManager->
create('Magento\Customer\Model\Address');
$model->load(22);
$model->setCity('Update London');
$model->save();
Here, we used the load method to load an existing address by its ID value. Then, we
called the setCity method passing it the updated string. After the save method is
executed, the address should reect the change.
Managing customers address via an API
Surprisingly, a customer address cannot be created or updated directly via an API
call, as there is no POST or PUT REST API dened. However, we can still get the
existing customer address information by using an API, as follows:
curl -X GET "http://magento2.ce/index.php/rest/V1/customers
/addresses/22" \
-H "Content-Type:application/json" \
-H "Authorization: Bearer lcpnsrk4t6al83lymhfs86jabbi9mmt8"
The entire list of available customer APIs can be seen in the vendor/magento/
module-customer/etc/webapi.xml le.
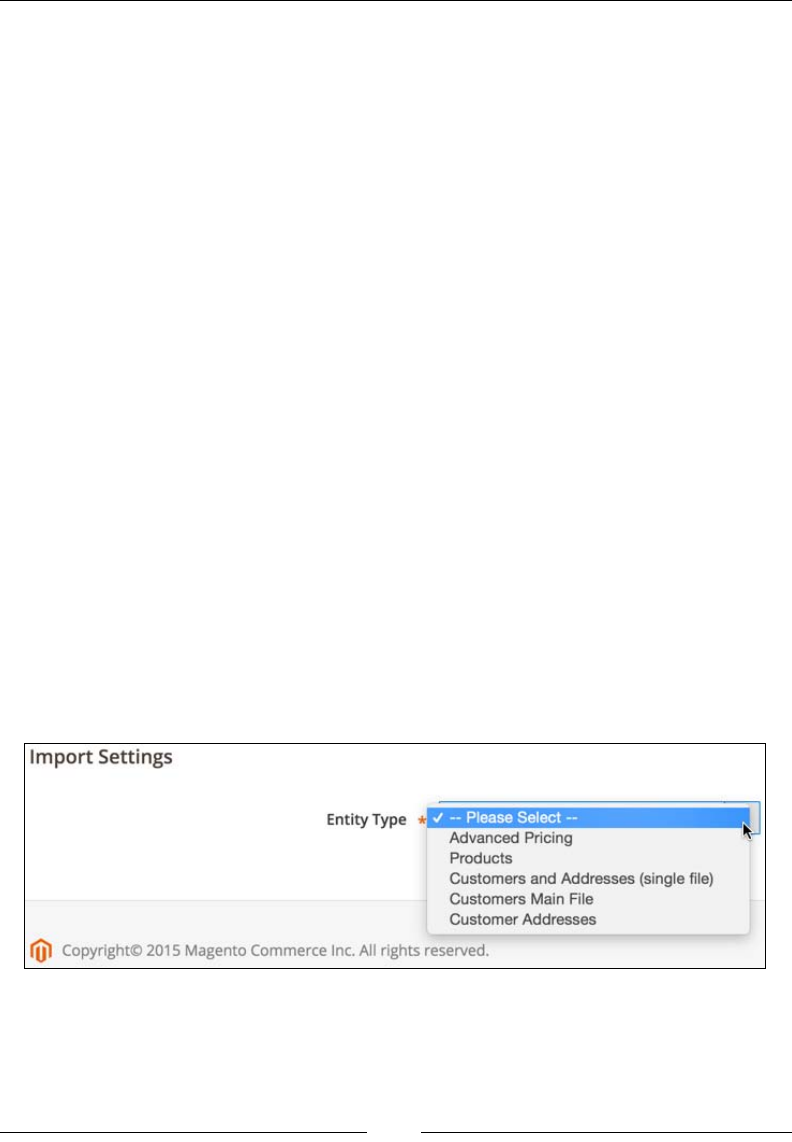
Chapter 10
[ 275 ]
Products and customers import
Magento provides an out-of-the-box mass import and export functionality via the
following modules:
• AdvancedPricingImportExport
• BundleImportExport
• CatalogImportExport
• ConfigurableImportExport
• CustomerImportExport
• GroupedImportExport
• ImportExport
• TaxImportExport
The heart of the import functionality actually lies in the ImportExport module,
while other modules provide individual import and export entities through the
vendor/magento/module-{partialModuleName}-import-export/etc/import.
xml and vendor/magento/module-{partialModuleName}-import-export/etc/
export.xml les.
These functionalities can be accessed from the Magento admin area from the
System | Data Transfer menu. They enable us to export and import several entity
types, such as Advanced Pricing, Products, Customers Main File, and Customer
Addresses.
The following screenshot shows the Entity Type options for the Import Settings
screen:
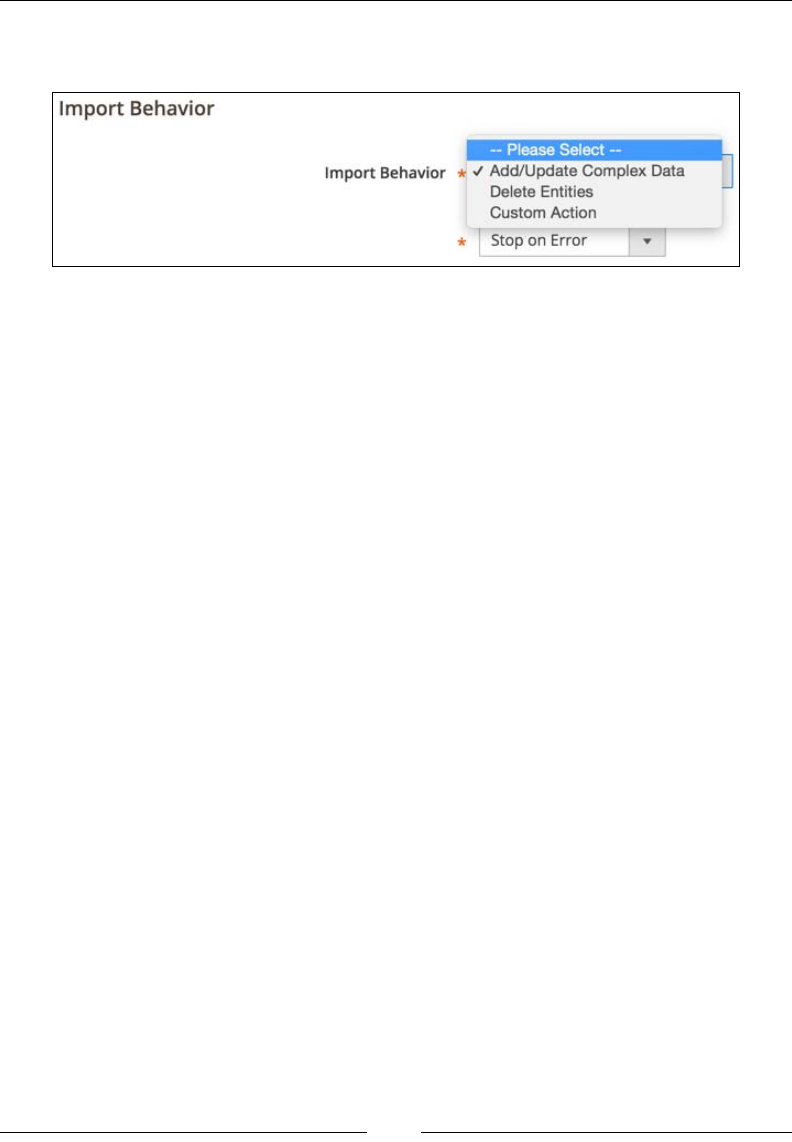
The Major Functional Areas
[ 276 ]
Next to Import Settings, when we select Entity Type for import, the Import
Behavior section appears, as shown in the following screenshot:
Most entity types have similar options for Import Behavior. Most of the time, we
will be interested in the Add/Update behavior.
Since importing is a bit more complicated process than exporting, we will focus
on importing and the CSV le format. More specically, our focus is on Products,
Customers Main File, and Customer Addresses imports.
When working with a clean Magento installation, the following columns are
required during the product import in order to make the product visible on the
storefront afterwards:
• sku (for example, "test-sku"): This can have almost any value as long as it is
unique across Magento.
• attribute_set_code (for example, "Default"): This can have any of the
values found in a database when the SELECT DISTINCT attribute_set_
name FROM eav_attribute_set; query is executed.
• product_type (for example, "simple"): This can have the values of simple,
configurable, grouped, virtual, bundle, or downloadable. Additionally,
if we create or install a third-party module that adds a new product type, we
can use that one as well.
• categories (for example, "Root/Shoes"): Create a full category path using
the "Root category name/Child category name/Child child category name"
syntax. If there are multiple categories, then a pipe ("|") is used to separate
them. An example of this is "Root category name/Child category name/
Child child category name| Root category name/Child_2 category name".
• product_websites (for example, "base"): This can have the values found in
a database when the SELECT DISTINCT code FROM store_website; query
is executed.

Chapter 10
[ 277 ]
• name (for example, "Test"): This can have almost any value.
• product_online (for example, "1"): This can be either 1 for visible or 0 for
not visible
• visibility (for example, "Catalog, Search"): This can have the values of
"Not Visible Individually", "Catalog", "Search", or "Catalog, Search".
• price (for example, "9.99"): This can be an integer or a decimal value.
• qty (for example, "100"): This can be an integer or a decimal value.
Though the products will get imported just with the preceding list that comprises a
set of columns, we usually would like to assign additional information to them, such
as descriptions and images. We can do so with the help of the following columns:
• description (for example, "The description"): This can have any string
value. HTML and JavaScript are supported.
• short_description (for example, "The short description"): This can have
any string value. HTML and JavaScript are supported.
• base_image (for example, butterfly.jpg): This is the final import image
name.
• small_image (for example, galaxy.jpg)
• thumbnail_image (for example, serenity.jpg)
Regarding the importing of images, we only need to provide the nal image name as
long as the Images File Directory path is set during the import. We can use a relative
path for the Magento installation, such as var/export, var/import, var/export/
some/dir.
Once the import is nished, it is suggested to run the php bin/magento
indexer:reindex command via the console. Otherwise, the products won't be
visible on the storefront until the indexer is run.
Once the reindexing is done, we can try opening the storefront URL, which looks like
http://magento2.ce/index.php/catalog/product/view/id/1. The number 1 in
this case is a newly imported product ID.
When working with a clean Magento installation, the following columns are
required during a customer's main le import in order for our customer to be able to
successfully log in to the storefront afterwards:
• email (for example, john.doe@fake.mail): an e-mail address as a
string value

The Major Functional Areas
[ 278 ]
• _website (for example, base): This can have any of the values found in the
database when the SELECT DISTINCT code FROM store_website; query
is executed
• firstname (for example, John): a string value
• lastname (for example, Doe): a string value
• group_id (for example, 1): This can have any of the values found in the
database when the SELECT customer_group_id code FROM customer_
group WHERE customer_group_id != 0; query is executed
Though a customer will be able to log in to the storefront with just the previously
listed set of columns, we usually would like to assign other relevant pieces of
information. We can do so with the help of the following columns:
• gender (for example, Male): This can be either Male or Female
• taxvat (for example, HR33311122299): any valid VAT number, though an
import will accept even the invalid ones
• dob (for example, 1983-01-16): date of birth
• prefix (for example, Mr): any string value
• middlename (for example, the dev guy): any string value
• suffix (for example, engineer): any string value
• password (for example, 123abc): any string value that has a minimum length
of 6 characters, as defined via \Magento\CustomerImportExport\Model\
Import\Customer::MIN_PASSWORD_LENGTH
We need to pay special attention to the password column. This is a clear text
password. Therefore, we need to be careful not to distribute a CSV le in a nonsecure
manner. Ideally, we can provide the password_hash column instead of password.
However, entries under the password_hash column will need to be hashed via the
same algorithm as the one that was called within the hashPassword method of the
Magento\Customer\Model\Customer class. This further calls the getHash method
on an instance of the Magento\Framework\Encryption\Encryptor class, which
nally resolves to the md5 or sha256 algorithm.

Chapter 10
[ 279 ]
When working with a clean Magento installation, the following columns are
required during the customer address import in order for our customers to be able to
successfully use the addresses on the storefront afterwards:
• _website (for example, base): This can have any of the values found in the
database when the SELECT DISTINCT code FROM store_website; query
is executed
• _email (for example, john@change.me): an e-mail address as a string value
• _entity_id
• firstname (for example, John): any string value
• lastname (for example, Doe): any string value
• street (for example, Ashton Lane): any string value
• city (for example, Austin): any string value
• telephone (for example, 00 385 91 111 000): any string value
• country_id (for example, GB): the country code in the ISO-2 format
• postcode (for example, TX 78753): any string value
Though a customer will be able to use the addresses on the storefront with just
a listed set of columns, we usually would like to assign other relevant pieces of
information. We can do so with the help of the following columns:
• region (for example, California): This can be blank, a free form string, or a
specific string that matches any of the values found in the database when
the SELECT DISTINCT default_name FROM directory_country_region;
query is executed. On running SELECT DISTINCT country_id FROM
directory_country_region;, 13 different country codes that have entries
within the directory_country_region table are shown—AT, BR, CA, CH, DE,
EE, ES, FI, FR, LT, LV, RO, US. This means that countries with that code need to
have a proper region name assigned.
• company (for example, Foggyline): This can be any string value.
• fax (for example, 00 385 91 111 000): This can be any string value.
• middlename (for example, the developer): This can be any string value.
• prefix (for example, Mr): This can be any string value.
• suffix (for example, engineer): This can be any string value.

The Major Functional Areas
[ 280 ]
• vat_id (for example, HR33311122299): This can be any valid VAT number,
though import will accept even the non-valid ones.
• _address_default_billing_ (for example, "1"): This can be either "1" as yes
or "0" as no, to flag the address as being the default billing address.
• _address_default_shipping_ (for example, "1"): This can be either "1" as
yes or "0" as no, to flag the address as being default shipping address.
While CSV imports are a great and relatively fast way to mass import products,
customers, and their addresses, there are some limitations to it. CSV is simply at
data. We cannot apply any logic to it. Depending on how clean and valid the data
is, the CSV import might do just ne. Otherwise, we might want to opt for APIs.
We need to keep in mind that a CSV import is much faster than the API creation of
products and customers because CSV imports work directly by bulk inserting on the
database, while APIs instantiate full models, respect the event observers, and so on.
The custom product types
Magento provides the following six out-of-the-box product types:
• Simple products
• Configurable products
• Grouped products
• Virtual products
• Bundle products
• Downloadable products
Each product has its specics. For example, the virtual and downloadable products
do not have the weight attribute. Therefore, they are excluded from the standard
shipping calculations. With custom coding around built-in product types, by using
observers and plugins we can achieve almost any functionality. However, this is
not enough sometimes or there is no solution to the requirement. In cases such as
these, we might need to create our own product type that will match the project
requirements in a more streamlined way.
Let's create a miniature module called Foggyline_DailyDeal that will add a new
product type to Magento.

Chapter 10
[ 281 ]
Start by creating a module registration le named app/code/Foggyline/
DailyDeal/registration.php that has the following partial content:
\Magento\Framework\Component\ComponentRegistrar::register(
\Magento\Framework\Component\ComponentRegistrar::MODULE,
'Foggyline_DailyDeal',
__DIR__
);
Then, create an app/code/Foggyline/DailyDeal/etc/module.xml with the
following content:
<config xmlns:xsi="http://www.w3.org/2001/XMLSchema-instance"
xsi:noNamespaceSchemaLocation="urn:magento:framework:Module
/etc/module.xsd">
<module name="Foggyline_DailyDeal" setup_version="1.0.0">
<sequence>
<module name="Magento_Catalog"/>
</sequence>
</module>
</config>
Now, create an app/code/Foggyline/DailyDeal/etc/product_types.xml le that
has the following content:
<config xmlns:xsi="http://www.w3.org/2001/XMLSchema-instance"
xsi:noNamespaceSchemaLocation="urn:magento:module:
Magento_Catalog:etc/product_types.xsd">
<type name="foggylinedailydeal"
label="Daily Deal"
modelInstance="Foggyline\DailyDeal\Model\Product\Type
\DailyDeal"
composite="false"
isQty="true"
canUseQtyDecimals="false">
<priceModel instance="Foggyline\DailyDeal\Model
\Product\Price"/>
<indexerModel instance="Foggyline\DailyDeal\Model
\ResourceModel\Indexer\Price"/>
<stockIndexerModel instance="Foggyline\DailyDeal\Model
\ResourceModel\Indexer\Stock"/>
<!-- customAttributes parsed by
Magento\Catalog\Model\ProductTypes\Config -->
<customAttributes>

The Major Functional Areas
[ 282 ]
<attribute name="is_real_product" value="true"/>
<attribute name="refundable" value="false"/>
<attribute name="taxable" value="true"/>
</customAttributes>
</type>
</config>
The customAttributes element is parsed by vendor/magento/module-catalog/
Model/ProductTypes/Config.php.
Create an app/code/Foggyline/DailyDeal/Model/Product/Type/DailyDeal.php
le with partial content, as follows:
namespace Foggyline\DailyDeal\Model\Product\Type;
class DailyDeal extends
\Magento\Catalog\Model\Product\Type\AbstractType
{
const TYPE_DAILY_DEAL = 'foggylinedailydeal';
public function deleteTypeSpecificData
(\Magento\Catalog\Model\Product $product)
{
// TODO: Implement deleteTypeSpecificData() method.
}
}
Now, create an app/code/Foggyline/DailyDeal/Model/Product/Price.php le
with partial content, as follows:
namespace Foggyline\DailyDeal\Model\Product;
class Price extends \Magento\Catalog\Model\Product\Type\Price
{
}
After this is done, create an app/code/Foggyline/DailyDeal/Model/
ResourceModel/Indexer/Price.php le with partial content, as follows:
namespace Foggyline\DailyDeal\Model\ResourceModel\Indexer;
class Price extends \Magento\Catalog\Model\ResourceModel\Product
\Indexer\Price\DefaultPrice
{
}

Chapter 10
[ 283 ]
Then, create an app/code/Foggyline/DailyDeal/Model/ResourceModel/
Indexer/Stock.php le with partial content, as follows:
namespace Foggyline\DailyDeal\Model\ResourceModel\Indexer;
class Stock extends \Magento\CatalogInventory\Model\ResourceModel
\Indexer\Stock\DefaultStock
{
}
Finally, create an app/code/Foggyline/DailyDeal/Setup/InstallData.php le
with partial content, as follows:
namespace Foggyline\DailyDeal\Setup;
class InstallData implements
\Magento\Framework\Setup\InstallDataInterface
{
private $eavSetupFactory;
public function __construct(\Magento\Eav\Setup\EavSetupFactory
$eavSetupFactory)
{
$this->eavSetupFactory = $eavSetupFactory;
}
public function install(
\Magento\Framework\Setup\ModuleDataSetupInterface $setup,
\Magento\Framework\Setup\ModuleContextInterface $context
)
{
// the "foggylinedailydeal" type specifics
}
}
Extend the install method from within the InstallData class by adding the
following foggylinedailydeal type specics to it:
$eavSetup = $this->eavSetupFactory->create(['setup' => $setup]);
$type = \Foggyline\DailyDeal\Model\Product\Type\
DailyDeal::TYPE_DAILY_DEAL;
$fieldList = [
'price',

The Major Functional Areas
[ 284 ]
'special_price',
'special_from_date',
'special_to_date',
'minimal_price',
'cost',
'tier_price',
'weight',
];
// make these attributes applicable to foggylinedailydeal products
foreach ($fieldList as $field) {
$applyTo = explode(
',',
$eavSetup->getAttribute
(\Magento\Catalog\Model\Product::ENTITY, $field,
'apply_to')
);
if (!in_array($type, $applyTo)) {
$applyTo[] = $type;
$eavSetup->updateAttribute(
\Magento\Catalog\Model\Product::ENTITY,
$field,
'apply_to',
implode(',', $applyTo)
);
}
}
Now, run php bin/magento setup:upgrade from the console.
If you now open the Products | Inventory | Catalog menu in the admin area and
click on the dropdown icon next to the Add Product button, you will see the Daily
Deal product type on the list, as shown in the following screenshot:
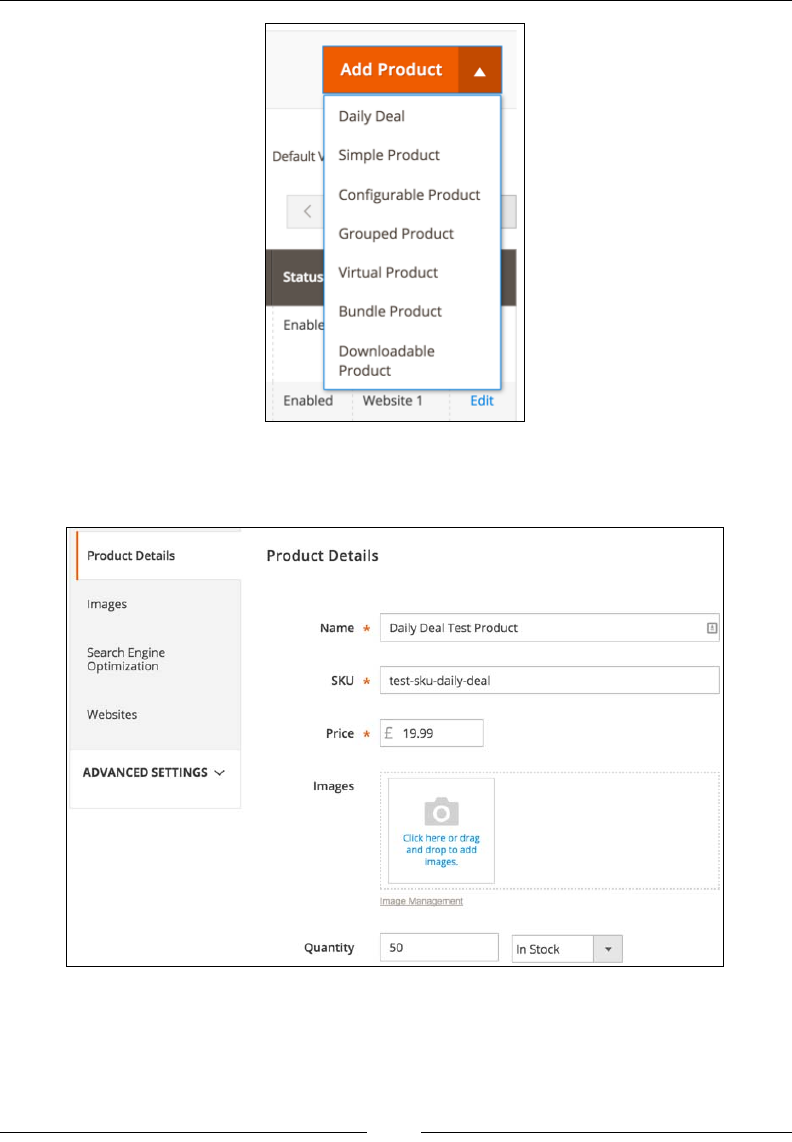
Chapter 10
[ 285 ]
Clicking on the Daily Deal product type in the dropdown list should open the
product edit page, as shown in the following screenshot:
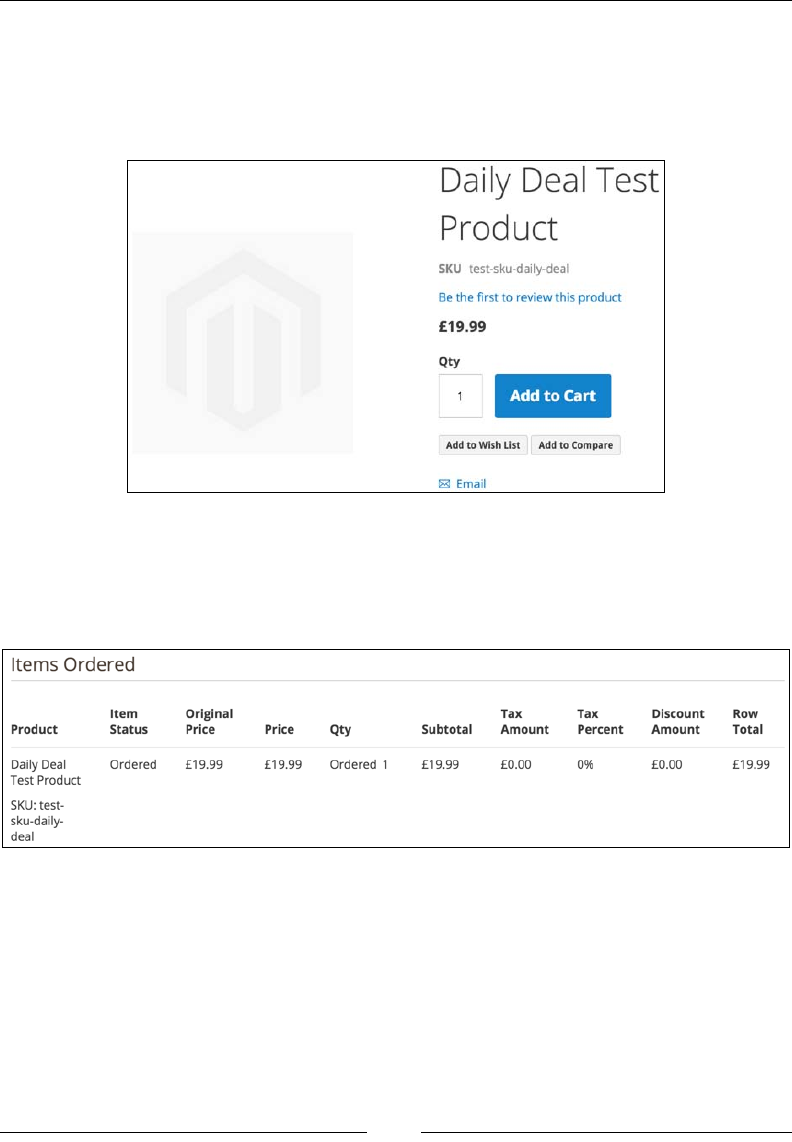
The Major Functional Areas
[ 286 ]
There is no noticeable difference between the custom product type edit screen and
one of the built-in product types.
Assuming that we have named the product Daily Deal Test Product and saved
it, we should be able to see it on the storefront, as shown in the following screenshot:
If we add the product to the cart and perform a checkout, an order should be created
just as with any other product type. Within the admin area, on the order view page,
under Items Ordered, we should be able to see the product on the list, as shown in
the following screenshot:
Again, there is no noticeable difference between the custom product type and the
built-in product type that is rendering under the Items Ordered section.
Finally, we should run the php bin/magento indexer:reindex command on the
console. Even though we haven't really implemented any code within the indexers,
this is just to ensure that none of the existing indexers broke.
The entire module code can be downloaded from https://github.com/ajzele/
B05032-Foggyline_DailyDeal.

Chapter 10
[ 287 ]
Custom ofine shipping methods
Magento provides several out-of-the-box ofine shipping methods, such as
Flatrate, Freeshipping, Pickup, and Tablerate. We can see those in the
vendor/magento/module-offline-shipping/Model/Carrier directory.
However, project requirements quite often are such that we need a custom coded
shipping method where a special business logic is applied. Thus, the shipping price
calculation can be controlled by us. In such cases, knowing how to code our own
ofine shipping method might come in handy.
Let's go ahead and create a small module called Foggyline_Shipbox that provides
Magento an extra ofine shipping method.
Start by creating a module registration le named app/code/Foggyline/Shipbox/
registration.php with partial content, as follows:
\Magento\Framework\Component\ComponentRegistrar::register(
\Magento\Framework\Component\ComponentRegistrar::MODULE,
'Foggyline_Shipbox',
__DIR__
);
Then, create an app/code/Foggyline/Shipbox/etc/module.xml le with the
following content:
<config xmlns:xsi="http://www.w3.org/2001/XMLSchema-instance"
xsi:noNamespaceSchemaLocation="urn:magento:framework:Module
/etc/module.xsd">
<module name="Foggyline_Shipbox" setup_version="1.0.0">
<sequence>
<module name="Magento_OfflineShipping"/>
</sequence>
</module>
</config>
Now, create an app/code/Foggyline/Shipbox/etc/config.xml le with content,
as follows:
<config xmlns:xsi="http://www.w3.org/2001/XMLSchema-instance"
xsi:noNamespaceSchemaLocation="urn:magento:module:Magento_Store
:etc/config.xsd">
<default>
<carriers>
<shipbox>

The Major Functional Areas
[ 288 ]
<active>0</active>
<sallowspecific>0</sallowspecific>
<model>
Foggyline\Shipbox\Model\Carrier\Shipbox</model>
<name>Shipbox</name>
<price>4.99</price>
<title>Foggyline Shipbox</title>
<specificerrmsg>This shipping method is not
available. To use this shipping method, please
contact us.</specificerrmsg>
</shipbox>
</carriers>
</default>
</config>
After this is done, create an app/code/Foggyline/Shipbox/etc/adminhtml/
system.xml le with content, as follows:
<config xmlns:xsi="http://www.w3.org/2001/XMLSchema-instance"
xsi:noNamespaceSchemaLocation="urn:magento:module:
Magento_Config:etc/system_file.xsd">
<system>
<section id="carriers">
<group id="shipbox" translate="label" type="text"
sortOrder="99" showInDefault="1" showInWebsite="1"
showInStore="1">
<label>Foggyline Shipbox</label>
<field id="active" translate="label" type="select"
sortOrder="1" showInDefault="1"
showInWebsite="1" showInStore="0">
<label>Enabled</label>
<source_model>
Magento\Config\Model\Config\Source\Yesno
</source_model>
</field>
<field id="name" translate="label" type="text"
sortOrder="3" showInDefault="1" showInWebsite="1"
showInStore="1">
<label>Method Name</label>
</field>
<field id="price" translate="label" type="text"
sortOrder="5" showInDefault="1"
showInWebsite="1" showInStore="0">
<label>Price</label>

Chapter 10
[ 289 ]
<validate>validate-number validate-zero-or-
greater</validate>
</field>
<field id="title" translate="label" type="text"
sortOrder="2" showInDefault="1"
showInWebsite="1" showInStore="1">
<label>Title</label>
</field>
<field id="sallowspecific" translate="label"
type="select" sortOrder="90" showInDefault="1"
showInWebsite="1" showInStore="0">
<label>Ship to Applicable Countries</label>
<frontend_class>shipping-applicable-country
</frontend_class>
<source_model>
Magento\Shipping\Model\Config\Source
\Allspecificcountries </source_model>
</field>
<field id="specificcountry" translate="label"
type="multiselect" sortOrder="91"
showInDefault="1" showInWebsite="1"
showInStore="0">
<label>Ship to Specific Countries</label>
<source_model> Magento\Directory\Model
\Config\Source\Country </source_model>
<can_be_empty>1</can_be_empty>
</field>
</group>
</section>
</system>
</config>
Now, create an app/code/Foggyline/Shipbox/Model/Carrier/Shipbox.php le
with partial content, as follows:
namespace Foggyline\Shipbox\Model\Carrier;
use Magento\Quote\Model\Quote\Address\RateRequest;
class Shipbox extends
\Magento\Shipping\Model\Carrier\AbstractCarrier
implements \Magento\Shipping\Model\Carrier\CarrierInterface
{

The Major Functional Areas
[ 290 ]
protected $_code = 'shipbox';
protected $_isFixed = true;
protected $_rateResultFactory;
protected $_rateMethodFactory;
public function __construct(
\Magento\Framework\App\Config\ScopeConfigInterface
$scopeConfig,
\Magento\Quote\Model\Quote\Address\RateResult\ErrorFactory
$rateErrorFactory,
\Psr\Log\LoggerInterface $logger,
\Magento\Shipping\Model\Rate\ResultFactory
$rateResultFactory,
\Magento\Quote\Model\Quote\Address\RateResult
\MethodFactory $rateMethodFactory,
array $data = []
)
{
$this->_rateResultFactory = $rateResultFactory;
$this->_rateMethodFactory = $rateMethodFactory;
parent::__construct($scopeConfig, $rateErrorFactory,
$logger, $data);
}
public function collectRates(RateRequest $request)
{
//implement business logic
}
public function getAllowedMethods()
{
return ['shipbox' => $this->getConfigData('name')];
}
}
Extend the collectRates method in the Carrier\Shipbox class, as follows:
public function collectRates(RateRequest $request)
{
if (!$this->getConfigFlag('active')) {
return false;

Chapter 10
[ 291 ]
}
//Do some filtering of items in cart
if ($request->getAllItems()) {
foreach ($request->getAllItems() as $item) {
//$item->getQty();
//$item->getFreeShipping()
//$item->isShipSeparately()
//$item->getHasChildren()
//$item->getProduct()->isVirtual()
//...
}
}
//After filtering, start forming final price
//Final price does not have to be fixed like below
$shippingPrice = $this->getConfigData('price');
$result = $this->_rateResultFactory->create();
$method = $this->_rateMethodFactory->create();
$method->setCarrier('shipbox');
$method->setCarrierTitle($this->getConfigData('title'));
$method->setMethod('shipbox');
$method->setMethodTitle($this->getConfigData('name'));
$method->setPrice($shippingPrice);
$method->setCost($shippingPrice);
$result->append($method);
return $result;
}
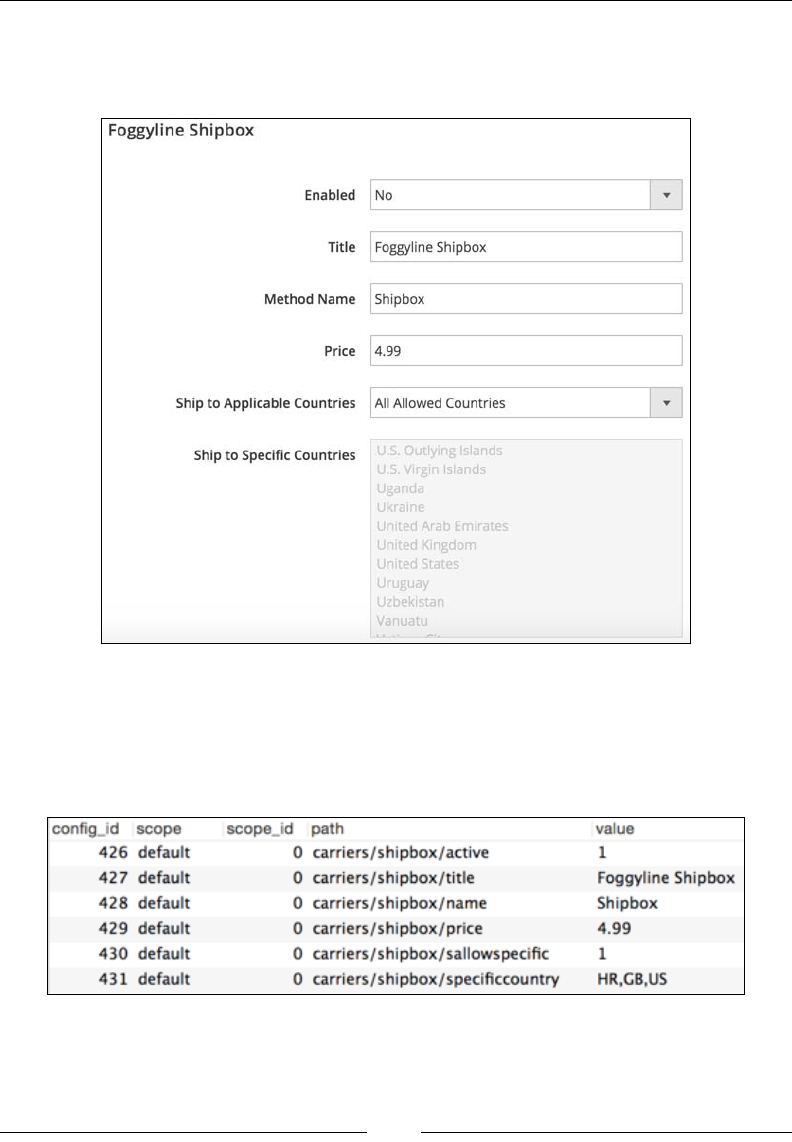
The Major Functional Areas
[ 292 ]
In the Magento admin area, if you now look under Stores | Settings |
Conguration | Sales | Shipping Methods, you will see Foggyline Shipbox
on the list, as shown in the following screenshot:
Set the Enabled option to Yes and click the Save Cong button.
If you now run the SELECT * FROM core_config_data WHERE path LIKE
"%shipbox%"; query on the MySQL server, you will see results that are similar
to the ones shown in the following screenshot:
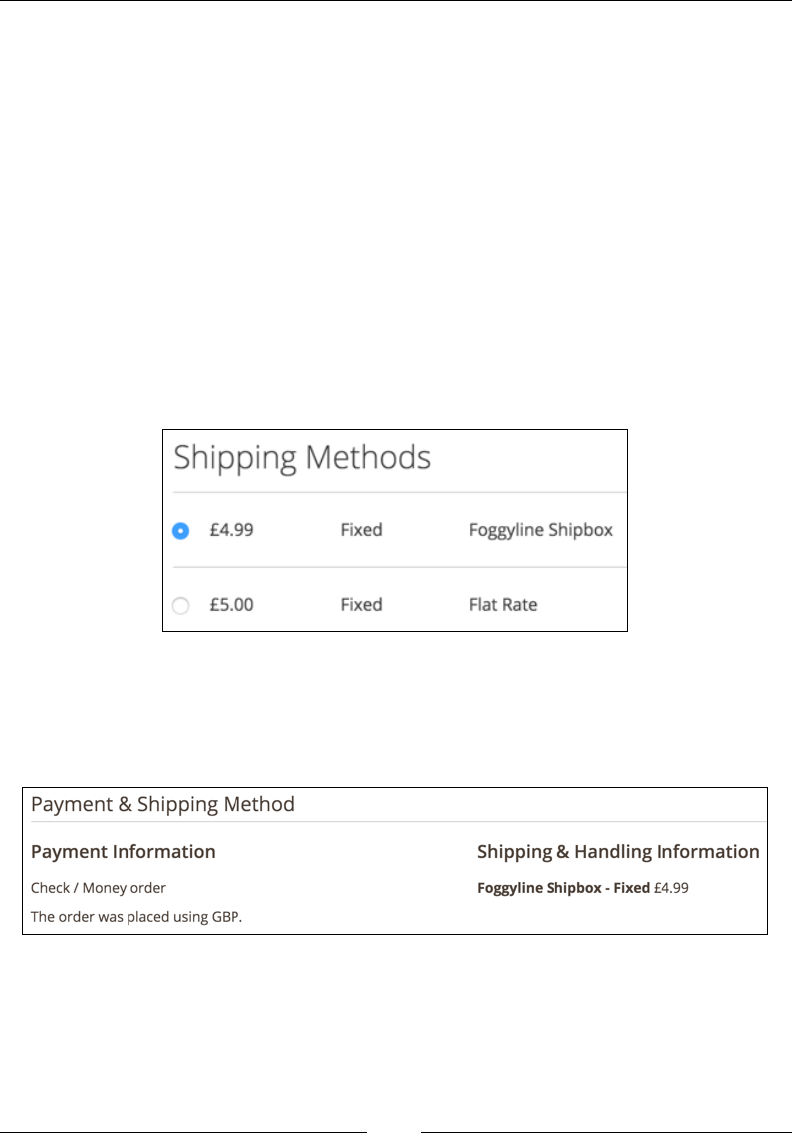
Chapter 10
[ 293 ]
Note how there is no direct code within the code snippets in the preceding
screenshot that is related to the Ship to Applicable Countries and Ship to Specic
Countries options, because the handling of these options is built into the parent
AbstractCarrier class. Thus, simply by adding the sallowspecific option in
config.xml and system.xml, we enabled a feature where the shipping method can
be shown or hidden from certain countries.
The crux of the implementation comes down to the collectRates method. This is
where we implement our own business logic that should calculate the shipping price
based on the items in the cart. We can use the $request->getAllItems()in the
collectRates method to fetch the collection of all the cart items, traverse through
them, form a nal shipping price based on various conditions, and so on.
Now, let's go ahead and jump to the storefront in order to test the checkout.
We should be able to see our method on the checkout, as shown in the
following screenshot:
If we complete one order, we should further see the shipping method details on the
order itself. Within the admin area, under Sales | Operations | Orders, if we View
our order in the Payment & Shipping Method section, we should see the shipping
method, as shown in the following screenshot:
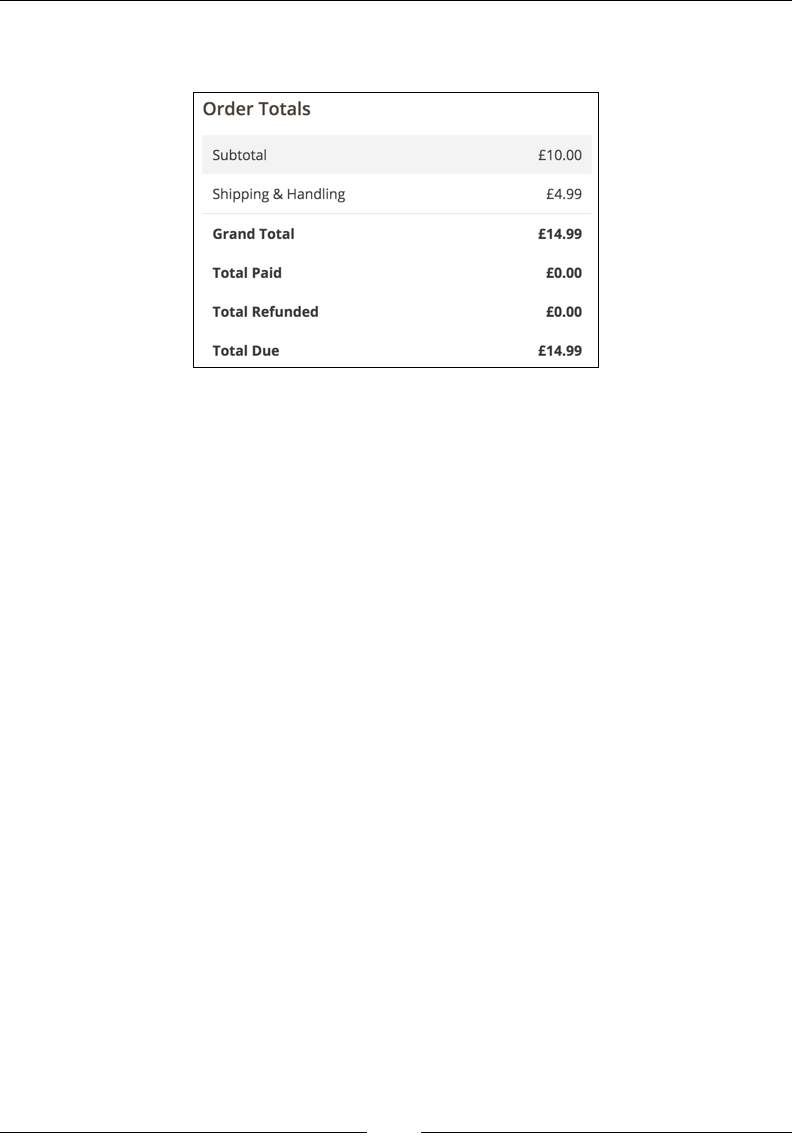
The Major Functional Areas
[ 294 ]
Similarly, in the Order Totals section, we should see the shipping amount in
Shipping & Handling, as shown in the following screenshot:
With this, we conclude our custom ofine shipping method module. The full module
can be found at https://github.com/ajzele/B05032-Foggyline_Shipbox.
Custom ofine payment methods
Magento provides several out-of-the-box ofine payment methods, such as
Banktransfer, Cashondelivery, Checkmo, and Purchaseorder. You can see
them in the vendor/magento/module-offline-payments/Model directory.
When it comes to payment methods, it is more common to use an online payment
provider (gateway), such as PayPal or Braintree. Sometimes, project requirements
may be such that we may need a custom coded payment method. You will need to
think of programmatic product import and order creation script that might specialize
in some specically labeled payment method. Thus, the payment process will be
controlled by us.
In such cases, knowing how to code our own ofine payment method might come
in handy. It is worth noting that while we can make an ofine payment that will
grab a user's credit card information, it is not really advisable to do so unless our
infrastructure is PCI-compliant.
Let's go ahead and create a small module called Foggyline_Paybox that provides
Magento an extra ofine payment method.

Chapter 10
[ 295 ]
Start by creating a module registration le named app/code/Foggyline/Paybox/
registration.php with partial content, as follows:
\Magento\Framework\Component\ComponentRegistrar::register(
\Magento\Framework\Component\ComponentRegistrar::MODULE,
'Foggyline_Paybox',
__DIR__
);
Then, create an app/code/Foggyline/Paybox/etc/module.xml le with the
following content:
<config xmlns:xsi="http://www.w3.org/2001/XMLSchema-instance"
xsi:noNamespaceSchemaLocation="urn:magento:framework:Module
/etc/module.xsd">
<module name="Foggyline_Paybox" setup_version="1.0.0">
<sequence>
<module name="Magento_OfflinePayments"/>
</sequence>
</module>
</config>
After this is done, create an app/code/Foggyline/Paybox/etc/config.xml le
with the following content:
<config xmlns:xsi="http://www.w3.org/2001/XMLSchema-instance"
xsi:noNamespaceSchemaLocation="urn:magento:module:
Magento_Store:etc/config.xsd">
<default>
<payment>
<paybox>
<active>0</active>
<model>Foggyline\Paybox\Model\Paybox</model>
<order_status>pending</order_status>
<title>Foggyline Paybox</title>
<allowspecific>0</allowspecific>
<group>offline</group>
</paybox>
</payment>
</default>
</config>

The Major Functional Areas
[ 296 ]
Then, create the app/code/Foggyline/Paybox/etc/payment.xml le with the
following content:
<payment xmlns:xsi="http://www.w3.org/2001/XMLSchema-instance"
xsi:noNamespaceSchemaLocation="urn:magento:module:
Magento_Payment:etc/payment.xsd">
<methods>
<method name="paybox">
<allow_multiple_address>1</allow_multiple_address>
</method>
</methods>
</payment>
Now, create an app/code/Foggyline/Paybox/etc/adminhtml/system.xml le
with the following content:
<config xmlns:xsi="http://www.w3.org/2001/XMLSchema-instance"
xsi:noNamespaceSchemaLocation="urn:magento:module:
Magento_Config:etc/system_file.xsd">
<system>
<section id="payment">
<group id="paybox" translate="label" type="text"
sortOrder="30" showInDefault="1" showInWebsite="1"
showInStore="1">
<label>Paybox</label>
<field id="active" translate="label" type="select"
sortOrder="1" showInDefault="1"
showInWebsite="1" showInStore="0">
<label>Enabled</label>
<source_model>
Magento\Config\Model\Config\Source\Yesno
</source_model>
</field>
<field id="order_status" translate="label"
type="select" sortOrder="20" showInDefault="1"
showInWebsite="1" showInStore="0">
<label>New Order Status</label>
<source_model> Magento\Sales\Model\Config
\Source\Order\Status\NewStatus
</source_model>
</field>
<field id="sort_order" translate="label"
type="text" sortOrder="100" showInDefault="1"
showInWebsite="1" showInStore="0">
<label>Sort Order</label>

Chapter 10
[ 297 ]
<frontend_class>
validate-number</frontend_class>
</field>
<field id="title" translate="label" type="text"
sortOrder="10" showInDefault="1"
showInWebsite="1" showInStore="1">
<label>Title</label>
</field>
<field id="allowspecific" translate="label"
type="allowspecific" sortOrder="50"
showInDefault="1" showInWebsite="1"
showInStore="0">
<label>Payment from Applicable Countries
</label>
<source_model> Magento\Payment\Model\
Config\Source\Allspecificcountries
</source_model>
</field>
<field id="specificcountry" translate="label"
type="multiselect" sortOrder="51"
showInDefault="1" showInWebsite="1"
showInStore="0">
<label>Payment from Specific Countries</label>
<source_model> Magento\Directory\Model
\Config\Source\Country </source_model>
<can_be_empty>1</can_be_empty>
</field>
<field id="payable_to" translate="label"
sortOrder="61" showInDefault="1"
showInWebsite="1" showInStore="1">
<label>Make Check Payable to</label>
</field>
<field id="mailing_address" translate="label"
type="textarea" sortOrder="62" showInDefault="1"
showInWebsite="1" showInStore="1">
<label>Send Check to</label>
</field>
<field id="min_order_total" translate="label"
type="text" sortOrder="98" showInDefault="1"
showInWebsite="1" showInStore="0">
<label>Minimum Order Total</label>
</field>
<field id="max_order_total" translate="label"
type="text" sortOrder="99" showInDefault="1"
showInWebsite="1" showInStore="0">

The Major Functional Areas
[ 298 ]
<label>Maximum Order Total</label>
</field>
<field id="model"></field>
</group>
</section>
</system>
</config>
Create an app/code/Foggyline/Paybox/etc/frontend/di.xml le with the
following content:
<config xmlns:xsi="http://www.w3.org/2001/XMLSchema-instance"
xsi:noNamespaceSchemaLocation="urn:magento:framework:
ObjectManager/etc/config.xsd">
<type name="Magento\Checkout\Model\CompositeConfigProvider">
<arguments>
<argument name="configProviders" xsi:type="array">
<item name=
"offline_payment_paybox_config_provider"
xsi:type="object">
Foggyline\Paybox\Model\PayboxConfigProvider
</item>
</argument>
</arguments>
</type>
</config>
After this is done, create an app/code/Foggyline/Paybox/Model/Paybox.php le
with the following content:
namespace Foggyline\Paybox\Model;
class Paybox extends \Magento\Payment\Model\Method\AbstractMethod
{
const PAYMENT_METHOD_PAYBOX_CODE = 'paybox';
protected $_code = self::PAYMENT_METHOD_PAYBOX_CODE;
protected $_isOffline = true;
public function getPayableTo()
{
return $this->getConfigData('payable_to');
}

Chapter 10
[ 299 ]
public function getMailingAddress()
{
return $this->getConfigData('mailing_address');
}
}
Now, create an app/code/Foggyline/Paybox/Model/PayboxConfigProvider.php
le with the following content:
namespace Foggyline\Paybox\Model;
class PayboxConfigProvider implements
\Magento\Checkout\Model\ConfigProviderInterface
{
protected $methodCode =
\Foggyline\Paybox\Model\Paybox::PAYMENT_METHOD_PAYBOX_CODE;
protected $method;
protected $escaper;
public function __construct(
\Magento\Payment\Helper\Data $paymentHelper
)
{
$this->method = $paymentHelper->getMethodInstance($this->
methodCode);
}
public function getConfig()
{
return $this->method->isAvailable() ? [
'payment' => [
'paybox' => [
'mailingAddress' => $this->
getMailingAddress(),
'payableTo' => $this->getPayableTo(),
],
],
] : [];
}
protected function getMailingAddress()
{

The Major Functional Areas
[ 300 ]
$this->method->getMailingAddress();
}
protected function getPayableTo()
{
return $this->method->getPayableTo();
}
}
Copy the entire vendor/magento/module-offline-payments/view/frontend/
layout/checkout_index_index.xml Magento core le into the app/code/
Foggyline/Paybox/view/frontend/layout/checkout_index_index.xml module.
Then, edit the module's checkout_index_index.xml le by replacing the entire
<item name="offline-payments" xsi:type="array"> element and its children
with the following code:
<item name="foggline-offline-payments" xsi:type="array">
<item name="component" xsi:type="string">
Foggyline_Paybox/js/view/payment/foggline-offline-payments
</item>
<item name="methods" xsi:type="array">
<item name="paybox" xsi:type="array">
<item name="isBillingAddressRequired"
xsi:type="boolean">true</item>
</item>
</item>
</item>
Then, create an app/code/Foggyline/Paybox/view/frontend/web/js/view/
payment/offline-payments.js le with the following content:
/*browser:true*/
/*global define*/
define(
[
'uiComponent',
'Magento_Checkout/js/model/payment/renderer-list'
],
function (
Component,
rendererList
) {

Chapter 10
[ 301 ]
'use strict';
rendererList.push(
{
type: 'paybox',
component:
'Foggyline_Paybox/js/view/payment/method-
renderer/paybox'
}
);
return Component.extend({});
}
);
After this is done, create an app/code/Foggyline/Paybox/view/frontend/web/
js/view/payment/method-renderer/paybox.js le with the following content:
/*browser:true*/
/*global define*/
define(
[
'Magento_Checkout/js/view/payment/default'
],
function (Component) {
'use strict';
return Component.extend({
defaults: {
template: 'Foggyline_Paybox/payment/paybox'
},
getMailingAddress: function () {
return window.checkoutConfig.payment.
paybox.mailingAddress;
},
getPayableTo: function () {
return window.checkoutConfig.payment.
paybox.payableTo;
}
});
}
);

The Major Functional Areas
[ 302 ]
Now, create an app/code/Foggyline/Paybox/view/frontend/web/template/
payment/paybox.html le with the following content:
<div class="payment-method" data-bind="css: {'_active': (getCode()
== isChecked())}">
<div class="payment-method-title field choice">
<input type="radio"
name="payment[method]"
class="radio"
data-bind="attr: {'id': getCode()}, value:
getCode(), checked: isChecked, click:
selectPaymentMethod, visible:
isRadioButtonVisible()"/>
<label data-bind="attr: {'for': getCode()}"
class="label"><span data-bind="text:
getTitle()"></span></label>
</div>
<div class="payment-method-content">
<div class="payment-method-billing-address">
<!-- ko foreach:
$parent.getRegion(getBillingAddressFormName()) -->
<!-- ko template: getTemplate() --><!-- /ko -->
<!--/ko-->
</div>
<!-- ko if: getMailingAddress() || getPayableTo() -->
<dl class="items check payable">
<!-- ko if: getPayableTo() -->
<dt class="title"><!-- ko i18n: 'Make Check payable
toooooo:' --><!-- /ko --></dt>
<dd class="content"><!-- ko i18n: getPayableTo() -->
<!-- /ko --></dd>
<!-- /ko -->
<!-- ko if: getMailingAddress() -->
<dt class="title"><!-- ko i18n: 'Send Check toxyz:' --
><!-- /ko --></dt>
<dd class="content">
<address class="paybox mailing address" data-bind
="html: $t(getMailingAddress())"></address>
</dd>
<!-- /ko -->
</dl>
<!-- /ko -->
<div class="checkout-agreements-block">

Chapter 10
[ 303 ]
<!-- ko foreach: $parent.getRegion('before-place-
order') -->
<!-- ko template: getTemplate() --><!-- /ko -->
<!--/ko-->
</div>
<div class="actions-toolbar">
<div class="primary">
<button class="action primary checkout"
type="submit"
data-bind="
click: placeOrder,
attr: {title: $t('Place Order')},
css: {disabled:
!isPlaceOrderActionAllowed()},
enable: (getCode() == isChecked())
"
disabled>
<span data-bind="i18n: 'Place Order'"></span>
</button>
</div>
</div>
</div>
</div>
With this, we conclude our custom ofine payment method module. The entire
module can be found at https://github.com/ajzele/B05032-Foggyline_Paybox.
Summary
In this chapter, we touched upon some of the most common bits of functionality that
developers come in contact with. We learned where to look in the admin area and
how to programmatically manage the entities behind these functionalities. Thus,
we were effectively able to manually and programmatically create and fetch CMS
pages, blocks, categories, and products. We also learned how to create product and
customer import scripts. Finally, we studied how to create our own custom product
type, simple payment, and shipment module.
The following chapter will guide us through Magento's in-built tests and how we can
use them to effectively QA an application to keep it healthy.
[ 305 ]
Testing
Software testing can be dened as a critical step in the development life cycle. This
step is often silently overlooked by a number of developers because a certain amount
of time need to be invested into writing a decent test suite for a code base. Rather
than being a single one-time activity, writing tests is a process that follows our
code as it grows and changes. Test results should, at any given time, validate and
verify that our software works as expected, thus meeting the business and technical
requirements. Writing tests should follow writing the actual application code early
on in the life cycle. This helps prevent defects from being introduced in the code.
On a high level, we can divide tests into the following categories:
• Static: Application code is not executed during testing. Possible errors are
found by inspecting the application code files and not on their execution.
• Dynamic: Application code is executed during testing. Possible errors are
found while checking for functional behavior of an application.
In this chapter, we will take a look at the testing options that Magento offers.
Along the way, we will build a basic module with some testing features in it.
Types of tests
Magento provides several types of tests out of the box. We can see a list of these tests
on running the following command on the console in the Magento root folder:
php bin/magento dev:tests:run –help

Testing
[ 306 ]
The result of the command is an output that looks like this:
Usage:
dev:tests:run [type]
Arguments:
type Type of test to run. Available types: all, unit, integration,
integration-all, static, static-all, integrity, legacy, default
(default: "default")
This output originates from the Console/Command/DevTestsRunCommand.php le in
the core Magento_Developer module. Looking at the output, we might say that there
are actually nine types of tests, which are as follows:
• all
• unit
• integration
• integration-all
• static
• static-all
• integrity
• legacy
• default
However, these are not unique types of tests; these are combinations, as we will
soon see.
Let's take a closer look at the code in the DevTestsRunCommand class and its
setupTestInfo method.
The setupTestInfo method denes the internal commands property, as follows:
$this->commands = [
'unit' => ['../tests/unit', ''],
'unit-performance' => ['../tests/performance/
framework/tests/unit', ''],
'unit-static' => ['../tests/static/
framework/tests/unit', ''],
'unit-integration' => ['../tests/integration/
framework/tests/unit', ''],
'integration' => ['../tests/integration', ''],
'integration-integrity' => ['../tests/integration', '
testsuite/Magento/
Test/Integrity'],

Chapter 11
[ 307 ]
'static-default' => ['../tests/static', ''],
'static-legacy' => ['../tests/static', '
testsuite/Magento/Test/Legacy'],
'static-integration-js' => ['../tests/static', '
testsuite/Magento/Test/
Js/Exemplar'],
];
Furthermore, we can see the types property in the setupTestInfo method dened
in the following way:
$this->types = [
'all' => array_keys($this->commands),
'unit' => ['unit', 'unit-performance', 'unit-
static', 'unit-integration'],
'integration' => ['integration'],
'integration-all' => ['integration', 'integration-integrity'],
'static' => ['static-default'],
'static-all' => ['static-default', 'static-legacy',
'static-integration-js'],
'integrity' => ['static-default', 'static-legacy',
'integration-integrity'],
'legacy' => ['static-legacy'],
'default' => [
'unit',
'unit-performance',
'unit-static',
'unit-integration',
'integration',
'static-default',
],
];
The types property logically groups one or more tests into a single name that
is found under the commands property. We can see how like unit single type
encompasses the unit, unit-performance, unit-static, and unit-integration
tests in it. The commands property points to the disk location of the actual test
library. Relative to the Magento root installation folder, tests can be found in
the dev/tests/ directory.

Testing
[ 308 ]
Unit testing
Unit tests are designed to test individual class methods in isolation, asserting all
possible combinations and taking care of the smallest testable part of an application.
Magento uses the PHPUnit testing framework for its unit tests. Being highly focused,
unit tests make it easy to identify the root cause of issues if a certain test fails.
We can specically trigger the unit tests from the root of the Magento installation by
using the following command:
php bin/magento dev:tests:run unit
Once triggered, Magento will run the execute command in the vendor/magento/
module-developer/Console/Command/DevTestsRunCommand.php le. Since the
unit type is mapped to several commands, what will happen internally is that
Magento will change the directories from one directory to another, as follows:
• dev/tests/unit
• dev/tests/performance/framework/tests/unit
• dev/tests/static/framework/tests/unit
• dev/tests/integration/framework/tests/unit
We can say that all of these directories are considered unit test directories.
Within each of those directories, Magento internally runs the passthru($command,
$returnVal) method, where the $command parameter gets resolved to a string
similar to the following one:
php /www/magento2/./vendor/phpunit/phpunit/phpunit
The PHPUnit will then look for the phpunit.xml conguration le accordingly in
each of these directories. If phpunit.xml does not exist, we need to copy the contents
of phpunit.xml.dist into phpunit.xml.
Let's take a closer look at the dev/tests/unit/phpunit.xml le for testsuite,
filter, whitelist, and other conguration elements.
The following default testsuite directory list is found in the dev/tests/unit/
phpunit.xml file, which lists the directories in which you need to look for tests
les prexed with Test.php:
../../../app/code/*/*/Test/Unit
../../../dev/tools/*/*/Test/Unit
../../../dev/tools/*/*/*/Test/Unit
../../../lib/internal/*/*/Test/Unit
../../../lib/internal/*/*/*/Test/Unit
Chapter 11
[ 309 ]
../../../setup/src/*/*/Test/Unit
../../../update/app/code/*/*/Test/Unit
../../../vendor/*/module-*/Test/Unit
../../../vendor/*/framework/Test/Unit
../../../vendor/*/framework/*/Test/Unit
The list is relative to the dev/tests/unit/ directory. For example, if we take
a look at the rst line in the preceding code and then look at the Magento_
Catalog module, it is clear that the Test les are found under the app/
code/<vendorName>/<moduleName>/Test/ directory and its subdirectories.
Everything sufxed with Test.php in these folders will get executed as a part
of a unit test.
If we were building our own module, we could easily make a copy of
dev/tests/unit/phpunit.xml.dist, properly edit testsuite and
filter > whitelist to quickly execute only our module's unit tests,
thus saving some time on avoiding frequent execution of entire Magento
unit tests.
Integration testing
Integration tests test the interaction between individual components, layers, and an
environment. They can be found in the dev/tests/integration directory. Like unit
tests, Magento also uses PHPUnit for integration tests. Thus, the difference between
a unit and an integration test is not that much of a technical nature; rather, it's of a
logical nature.
To specically trigger integration tests only, we can execute the following command
on the console:
php bin/magento dev:tests:run integration
When executed, Magento internally changes the directory to dev/tests/
integration and executes a command that is similar to the following one:
php /Users/branko/www/magento2/./vendor/phpunit/phpunit/phpunit
The integration directory has its own phpunit.xml.dist le. Looking at its
testsuite denition, we can see that it is pointing to all the Test.php sufxed
les that are found in the dev/tests/integration/testsuite directory.

Testing
[ 310 ]
Static testing
Static tests do not really run the code; they analyze it. They are used to verify that
the code conforms to certain coding standards, such as PSR-1. We can nd them
under the dev/tests/static directory.
To specically trigger static tests only, we can execute the following command on
the console:
php bin/magento dev:tests:run static
When executed, Magento internally changes the directory to dev/tests/static and
executes a command that is similar to the following one:
php /Users/branko/www/magento2/./vendor/phpunit/phpunit/phpunit
The static directory has its own phpunit.xml.dist le. Looking at its testsuite
denition, you will see the following four test suites dened:
• JavaScript static code analysis
• PHP coding standard verification
• Code integrity tests
• XSS unsafe output test
JSHint, a JavaScript code quality tool, is used for JavaScript static code analysis. For
PHP code standard verication, the elements of PHP_CodeSniffer libraries are used.
PHP_CodeSniffer tokenizes PHP, JavaScript, and CSS les and detects violations of
a dened set of coding standards.
Integrity testing
Integrity tests check how an application is linked. They check for things such as
merged conguration validation. Basically, they tell us if your application should be
able to run.
We can specically trigger the integrity tests from the root of the Magento
installation by using the following command:
php bin/magento dev:tests:run integrity

Chapter 11
[ 311 ]
When this is executed, Magento rst internally changes the directory to dev/tests/
static and then executes two commands that are similar to the following ones:
php /Users/branko/www/magento2/./vendor/phpunit/phpunit/phpunit
php /Users/branko/www/magento2/./vendor/phpunit/phpunit/phpunit
testsuite/Magento/Test/Legacy
Then, Magento internally changes the directory to dev/tests/integration and
executes a command that is similar to the following one:
php /Users/branko/www/magento2/./vendor/phpunit/phpunit/phpunit
testsuite/Magento/Test/Integrity
Integration tests also utilize the PHPUnit to write the actual tests.
Legacy testing
Legacy tests comprise fragments of libraries that help developers port their modules
to a new version of Magento.
We can trigger legacy tests specically from the root of the Magento installation by
using the following command:
php bin/magento dev:tests:run legacy
When this is executed, Magento rst internally changes the directory to /dev/tests/
static and then executes a command, which is similar to the following one:
php /Users/branko/www/magento2/./vendor/phpunit/phpunit/phpunit
testsuite/Magento/Test/Legacy
Once this is triggered, the code runs a check for obsolete access lists, connections,
menus, responses, system conguration, and a few other things.

Testing
[ 312 ]
Performance testing
Performance tests can be found under the setup/performance-toolkit/ directory.
These tests require Apache JMeter to be installed and are available on the console via
the jmeter command. Apache JMeter can be downloaded and installed by following
the instructions at http://jmeter.apache.org.
The crux of the performance test is dened in the benchmark.jmx le, which can be
opened in the JMeter GUI tool, as shown in the following screenshot:
As shown in the preceding screenshot, the default benchmark.jmx tests are sectioned
into three thread groups that are named setUp Thread Group, Customer Checkout,
and tearDown Thread Group. We might want to additionally click on each group
and congure it with some extra parameters, thus possibly changing Number of
Threads (users), as shown in the following screenshot. We can then simply save the
changes as modications to the benchmark.jmx le or a le with new name:
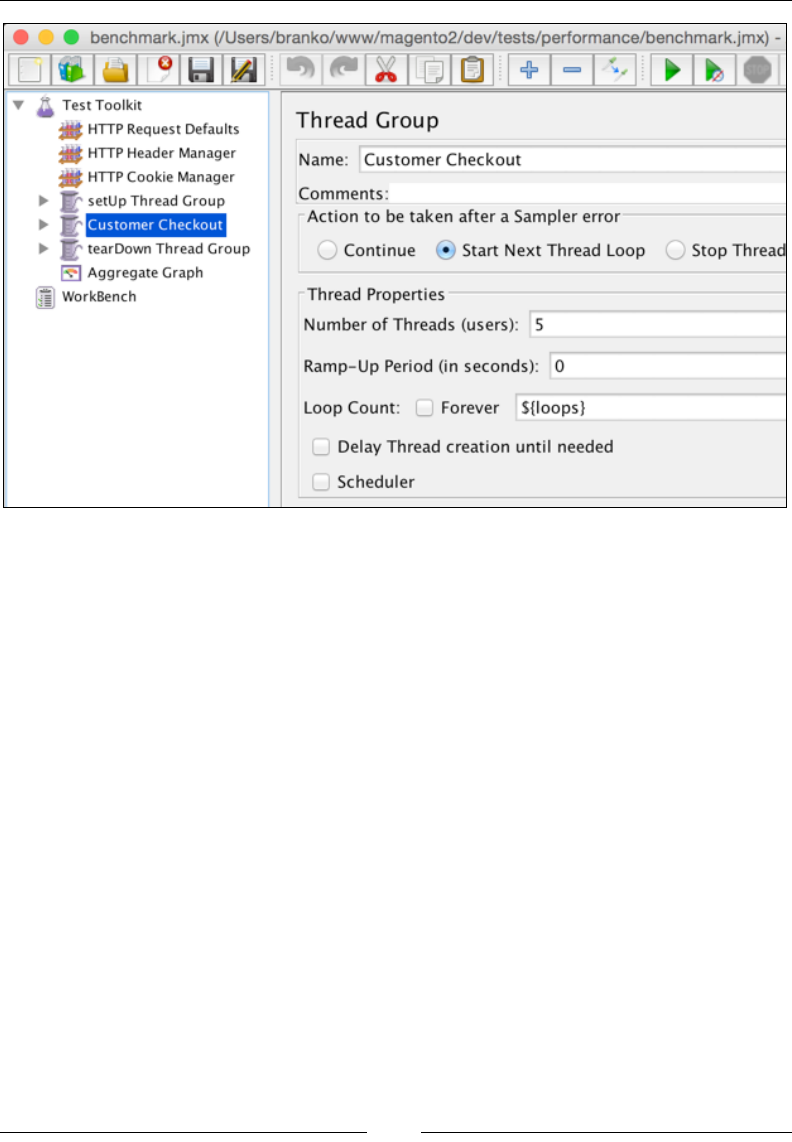
Chapter 11
[ 313 ]
We can manually trigger a performance test from the console without using a GUI
interface by running the following command:
jmeter -n \
-t /Users/branko/www/magento2/setup/performance-toolkit/benchmark.jmx \
-l /Users/branko/Desktop/jmeter-tmp/results.jtl \
-Jhost="magento2.ce" \
-Jbase_path="/" \
-Jreport_save_path="/Users/branko/report" \
-Jloops=2 \
-Jurl_suffix=".html" \
-Jcustomer_email="john.doe@email.loc" \
-Jcustomer_password="abc123" \
-Jadmin_path="/admin_nwb0bx" \
-Jadmin-user="john" \
-Jadmin-password="abc123" \

Testing
[ 314 ]
-Jresponse_time_file_name="/Users/branko/report/AggregateGraph.csv" \
-Jsimple_product_url_key="simple-product-1" \
-Jsimple_product_name="Simple Product 1" \
-Jconfigurable_product_url_key="configurable-product-1" \
-Jconfigurable_product_name="Configurable Product 1" \
-Jcategory_url_key="category-1" \
-Jcategory_name="Category 1" \
-Jsleep_between_steps=50
The console parameters that are listed here and which start with -J also match
the names of the Used Dened Variables test toolkit, as shown in the preceding
screenshot. We need to be careful and set them according to the Magento installation.
The -n parameter instructs jmeter to run in the run nongui mode. The -t parameter
is where we set the path of the test (.jmx) le to run. The -l parameter sets the le
where we need to log samples to.
Functional testing
Functional tests mimic the user interaction with our application. They literally mean
testing in the form of browser interaction, which involves clicking on the page, adding
products to the cart, and so on. For this purpose, Magento uses Magento Testing
Framework (MTF). It's a PHP wrapper around Selenium, which is a portable software
testing framework for web applications. MTF is not available out of the box via the
console. It can be downloaded at https://github.com/magento/mtf.
The following requirements need to be met before installing MTF:
• Git must be installed.
• The Firefox browser must be installed.
• The PHP openssl extension must be installed and enabled.
• Java version 1.6 or later is required and it's JAR executable must be in the
system PATH.
• The Selenium standalone server, which is available at http://www.
seleniumhq.org/, needs to be downloaded. The download should provide a
JAR file that we will later need to refer to.
• Magento must be installed and configured to not use the secret URL key. We
can set the secret URL key option by navigating to Stores | Configuration
| Advanced | Admin | Security | Add Secret Key to URLs [Yes/No] and
setting it to No.
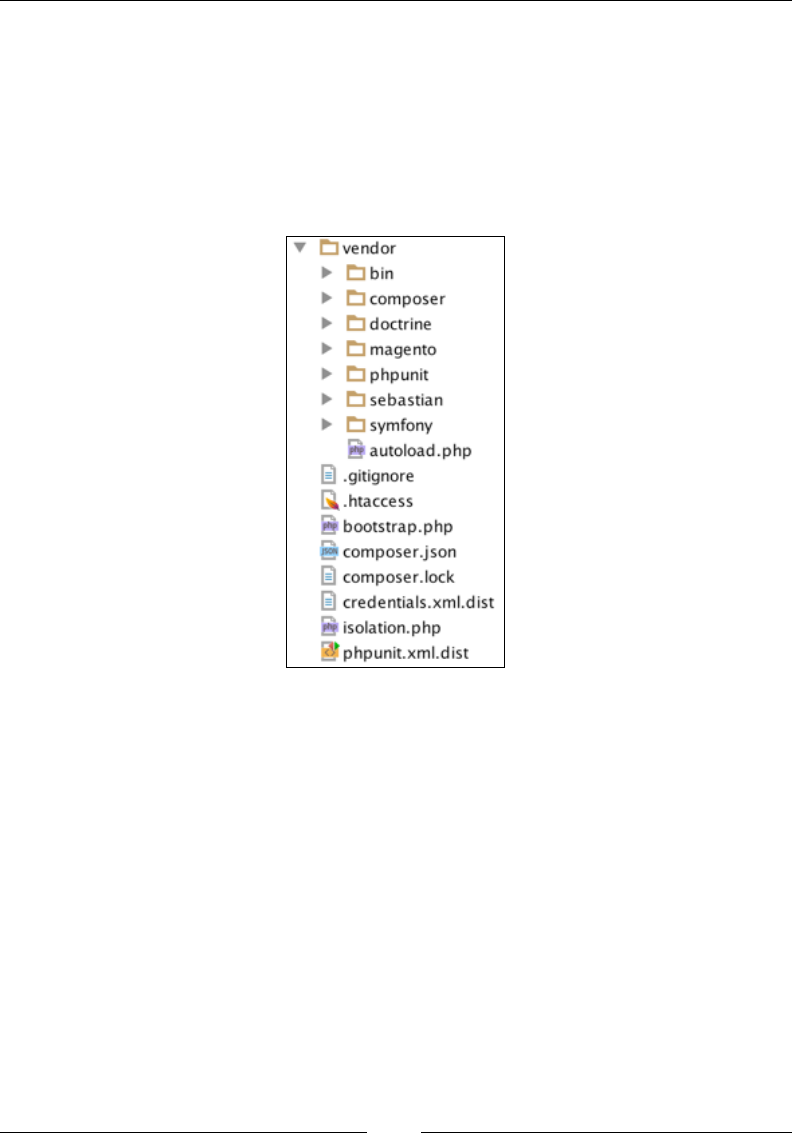
Chapter 11
[ 315 ]
Once the minimal requirements are met, we can install MTF, as follows:
1. Run the composer install command from the dev/tests/functional/
directory. This creates a new directory named vendor; MTF is pulled from
the Git repository at https://github.com/magento/mtf. We should see
a new directory named vendor that is created with the checked off MTF.
The vendor directory contains the content that is shown in the following
screenshot:
2. Run the generate.php le from the dev/tests/functional/utils/
directory. This should give us a console output that is similar to the
following one:
|| Item || Count || Time ||
|| Page Classes || 152 || 0 ||
|| Fixture Classes || 46 || 0 ||
|| Repository Classes || 67 || 0 ||
|| Block || 475 || 0 ||
|| Fixture || 100 || 0 ||
|| Handler || 3 || 0 ||
|| Page || 165 || 0 ||
|| Repository || 67 || 0 ||
Testing
[ 316 ]
The generator tool creates factories for fixtures, handlers, repositories,
page objects, and block objects. When MTF is initialized, the factories are
pregenerated to facilitate the creation and running of tests.
Before we can actually run the tests, there are a few more things that we need to
congure, as follows:
1. Edit the dev/tests/functional/phpunit.xml le. Under the php
element, for name="app_frontend_url", set the value of the actual URL
for the Magento storefront under test. For name="app_backend_url", set
the value of the actual URL for the Magento admin URL under test. For
name="credentials_file_path", set the value of ./credentials.xml.
If phpunit.xml does not exist, we need to create it and copy the contents
of dev/tests/functional/phpunit.xml.dist into it and then edit
it afterwards.
2. Edit the dev/tests/functional/etc/config.xml le. Under the
application element, nd and edit the information about backendLogin,
backendPassword, and appBackendUrl so that it matches that of our store.
If config.xml does not exist, we need to create it and copy the contents
of dev/tests/functional/etc/config.xml.dist into it and then
edit it afterwards.
3. Edit the dev/tests/functional/credentials.xml le. Chances are that we
will not need this on a blank Magento installation, as we can see by default
the entries for the fedex, ups, dhl US, and dhl EU carriers, which haven't
been set on the freshly installed Magento.
If credentials.xml does not exist, we need to create it and copy the
contents of dev/tests/functional/credentials.xml.dist into it
and then edit it afterwards.
4. Run the java -jar {selenium_directory}/selenium-server.jar
command via the console. This is to ensure that the Selenium server
is running.
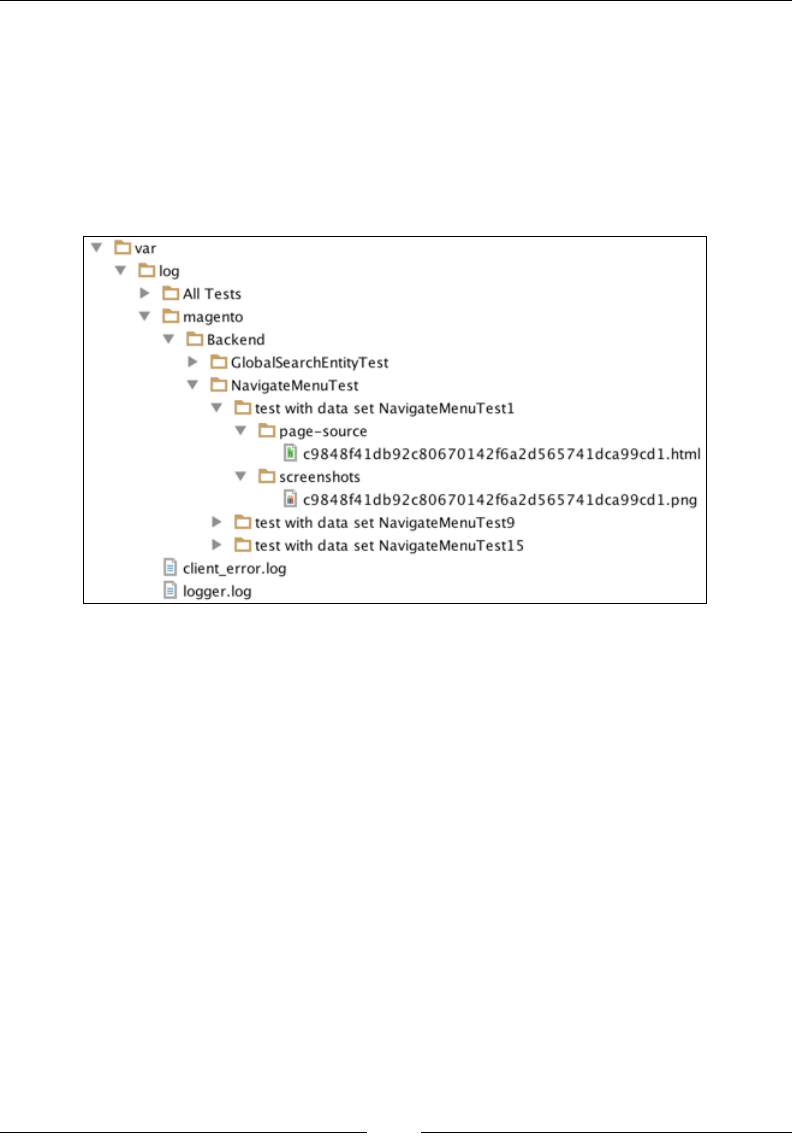
Chapter 11
[ 317 ]
5. Open a new console or a console tab and execute the phpunit command
in the dev/tests/functional/ directory. This command should open the
Firefox browser and start running test cases in it, simulating a user clicking
on the browser window and lling in the form inputs.
While a test is running, Magento will log all the failed tests under the dev/tests/
functional/var/log directory in a structure that is similar to the one shown in the
following screenshot:
The log path can be congured in the dev/tests/functional/phpunit.xml le
under the php element with name="basedir".
If we want to target a specic test within the entire test suite, we can simply trigger a
command like the following one in the dev/tests/functional/ directory:
phpunit tests/app/Magento/Customer/Test/TestCase
/RegisterCustomerFrontendEntityTest.php
The preceding command will run a single test called
RegisterCustomerFrontendEntityTest.php. We can also use a shorter form
expression for the same thing, as follows:
phpunit --filter RegisterCustomerFrontendEntityTest
Once this is executed, the browser should open and simulate the customer
registration process on the storefront.

Testing
[ 318 ]
Writing a simple unit test
Now that we took a quick look at all the type of tests that Magento offers, let's take
a step back and look at unit tests again. In practice, unit tests are probably the ones
that we will be writing most of the time. With this in mind, let's grab the Foggyline_
Unitly module from https://github.com/ajzele/B05032-Foggyline_Unitly
and start writing unit tests for it.
If you do not already have the Foggyline_Unitly module in the code base that was
a part of the previous chapters, then you need to place its content under app/code/
Foggyline/Unitly and execute the following commands on the console from the
root of the Magento directory:
php bin/magento module:enable Foggyline_Unitly
php bin/magento setup:upgrade
The tests that we will write reside in the module's Test/Unit directory. This makes
the entire path of the test directory look like app/code/Foggyline/Unitly/Test/
Unit/. Magento knows that it needs to look inside this folder simply because of the
test suite directory denitions found in the dev/tests/unit/phpunit.xml le, as
shown in the following piece of code:
<directory suffix="Test.php">
../../../app/code/*/*/Test/Unit
</directory>
The structure of les and the folder within the individual module Test/Unit
directory also follows the structure of that module's les and folders. The following
screenshot shows a structure of the Test/Unit directory for the Magento_Catalog
module:
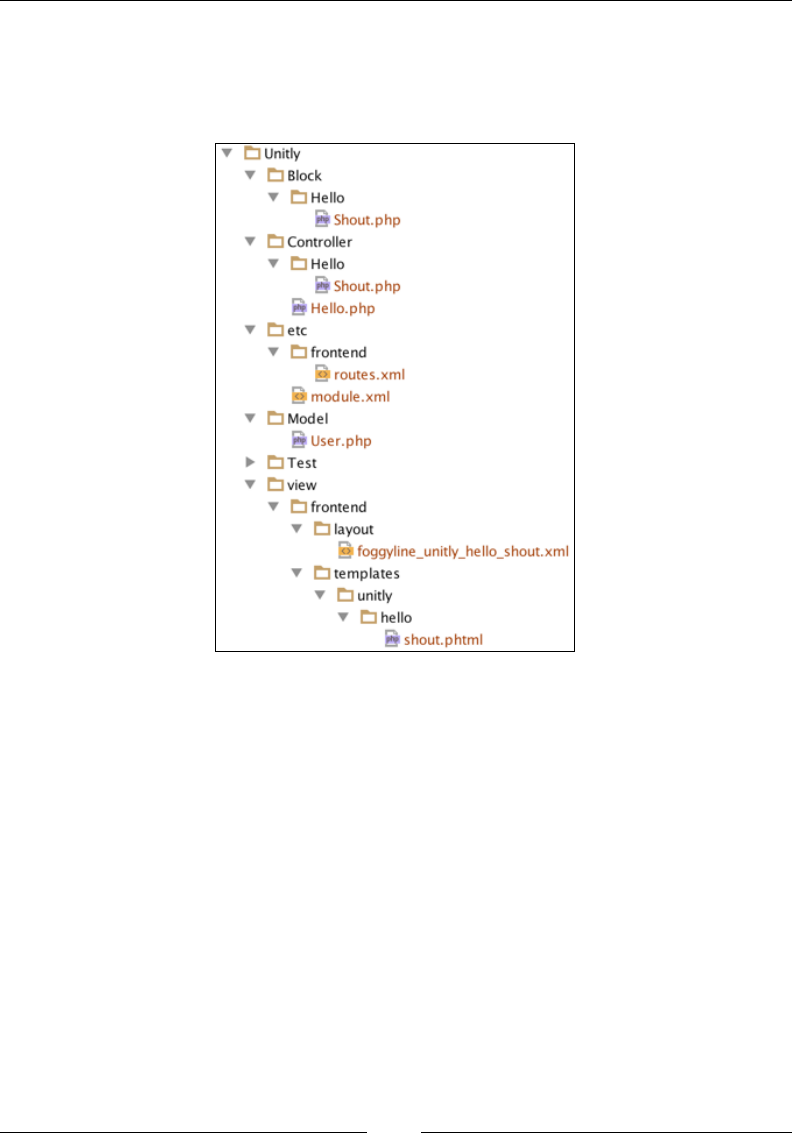
Chapter 11
[ 319 ]
This shows that almost any PHP class can be unit tested irrespective of the fact
that it is a controller, block, helper, module, observer, or something else. To keep
things simple, we will focus on the controller and block unit tests in relation to the
Foggyline_Unitly module, which is structured as follows:
Let's start by rst writing a test for the Foggyline\Unitly\Controller\Hello\
Shout controller class. The Shout class, ignoring the __construct, has only one
method called execute.
We will write a test for it under the same directory structure, relative to the module's
Test\Unit directory, placing the test under the app/code/Foggyline/Unitly/
Test/Unit/Controller/Hello/ShoutTest.php le with (partial), as follows:
namespace Foggyline\Unitly\Test\Unit\Controller\Hello;
class ShoutTest extends \PHPUnit_Framework_TestCase
{
protected $resultPageFactory;
protected $controller;
public function setUp()
{

Testing
[ 320 ]
/* setUp() code here */
}
public function testExecute()
{
/* testExecute() code here */
}
}
Every unit test in the Magento module directory extends from the \PHPUnit_
Framework_TestCase class. The setUp method is called before the test is executed;
we can think of it as PHP's __construct. Here, we would usually set up the xtures,
open a network connection, or perform similar actions.
The testExecute method name is actually formed from test + the method name
from the class that we are testing. Since the Shout class has an execute method, the
test method formed becomes test + execute. By capitalizing the rst letter of the class
method name, the nal name is testExecute.
Now, let's go ahead and replace /* setUp() code here */ with content. as follows:
$request = $this->getMock(
'Magento\Framework\App\Request\Http',
[],
[],
'',
false
);
$context = $this->getMock(
'\Magento\Framework\App\Action\Context',
['getRequest'],
[],
'',
false
);
$context->expects($this->once())
->method('getRequest')
->willReturn($request);
$this->resultPageFactory = $this-> getMockBuilder
('Magento\Framework\View\Result\PageFactory')
->disableOriginalConstructor()
->setMethods(['create'])
Chapter 11
[ 321 ]
->getMock();
$this->controller = new \Foggyline\Unitly\Controller\Hello\Shout(
$context,
$this->resultPageFactory
);
The whole concept of tests is based on mocking the objects that we need to work
with. We use the getMock method that returns a mock object for a specied class.
Besides the class name, the getMock method accepts quite a bit of other arguments.
The second $methods parameter marks the names of the methods that are replaced
with a test double. Providing null for the $methods parameter means that no
methods will be replaced. The third parameter for the getMock method stands for
$arguments, which are parameters that are passed to the original class constructor.
We can see from the preceding code that the $request mock object does not provide
any $methods or $arguments parameters to its getMock method. On the other hand,
the $context object passes on the array with a single getRequest element in it. Once
the $context object is initialized, it then calls the expects method, which registers
a new expectation in the mock object and returns InvocationMocker on which we
call method and willReturn. In this case, the instance on the previously initiated
$request object is passed to willReturn. We used getMockBuilder to create a
Result\PageFactory mock object and instantiated the Shout controller action class,
passing the context and result page mocks to it.
All the code in this setUp method served a purpose in getting out the controller
instance, which will be used in the testExecute method.
The final, private, and static methods cannot be mocked. They are
ignored by PHPUnit's test functionality because they retain their original
behavior.
Let's go ahead and replace the /* testExecute() code here */ with content,
as follows:
$title = $this->
getMockBuilder('Magento\Framework\View\Page\Title')
->disableOriginalConstructor()
->getMock();
$title->expects($this->once())
->method('set')
->with('Unitly');

Testing
[ 322 ]
$config = $this->
getMockBuilder('Magento\Framework\View\Page\Config')
->disableOriginalConstructor()
->getMock();
$config->expects($this->once())
->method('getTitle')
->willReturn($title);
$page = $this->
getMockBuilder('Magento\Framework\View\Result\Page')
->disableOriginalConstructor()
->getMock();
$page->expects($this->once())
->method('getConfig')
->willReturn($config);
$this->resultPageFactory->expects($this->once())
->method('create')
->willReturn($page);
$result = $this->controller->execute();
$this->assertInstanceOf('Magento\Framework\View\Result\Page',
$result);
In the preceding code, we checked into the page title, page, and result page object.
To get to the page title from within the controller code, we would normally use an
expression such as $resultPage->getConfig()->getTitle(). This expression
involves three objects. The $resultPage object calls the getConfig() method, which
returns the instance of the Page\Config object. This object calls for the getTitle
method, which returns the instance of the Page\Title object. Thus, we are mocking
and testing all the three objects.
Now that we took a look at the controller test case, let's see how we can make one for
the block class. Create an app/code/Foggyline/Unitly/Test/Unit/Block/Hello/
ShoutTest.php le with partial content, as follows:
namespace Foggyline\Unitly\Test\Unit\Block\Hello;
class ShoutTest extends \PHPUnit_Framework_TestCase
{
/**
* @var \Foggyline\Unitly\Block\Hello\Shout
*/

Chapter 11
[ 323 ]
protected $block;
protected function setUp()
{
$objectManager = new \Magento\Framework\TestFramework\Unit
\Helper\ObjectManager($this);
$this->block = $objectManager->
getObject('Foggyline\Unitly\Block\Hello\Shout');
}
public function testGreeting()
{
$name = 'Foggyline';
$this->assertEquals(
'Hello '.$this->block->escapeHtml($name),
$this->block->greeting($name)
);
}
}
Here, we have also dened the setUp method and testGreeting. The
testGreeting method is used as a test for the greeting method on the Shout
block class.
Conceptually, there is no difference between unit testing a controller, block, or model
class. Therefore, we will omit the model unit test in this example. What's important
for you to realize is that the test is what we make of it. Technically speaking, we
can test a single method for various cases or just the most obvious one. However,
to serve the purpose of the tests in a better way, we should test it for any possible
number of result combinations.
Let's go ahead and create a dev/tests/unit/foggyline-unitly-phpunit.xml le
with content, as follows:
<phpunit xmlns:xsi="http://www.w3.org/2001/XMLSchema-instance"
xsi:noNamespaceSchemaLocation="http://schema.phpunit.de
/4.1/phpunit.xsd"
colors="true"
bootstrap="./framework/bootstrap.php"
>
<testsuite name="Foggyline_Unitly - Unit Tests">
<directory suffix="Test.php">
../../../app/code/Foggyline/Unitly/Test/Unit
</directory>
</testsuite>
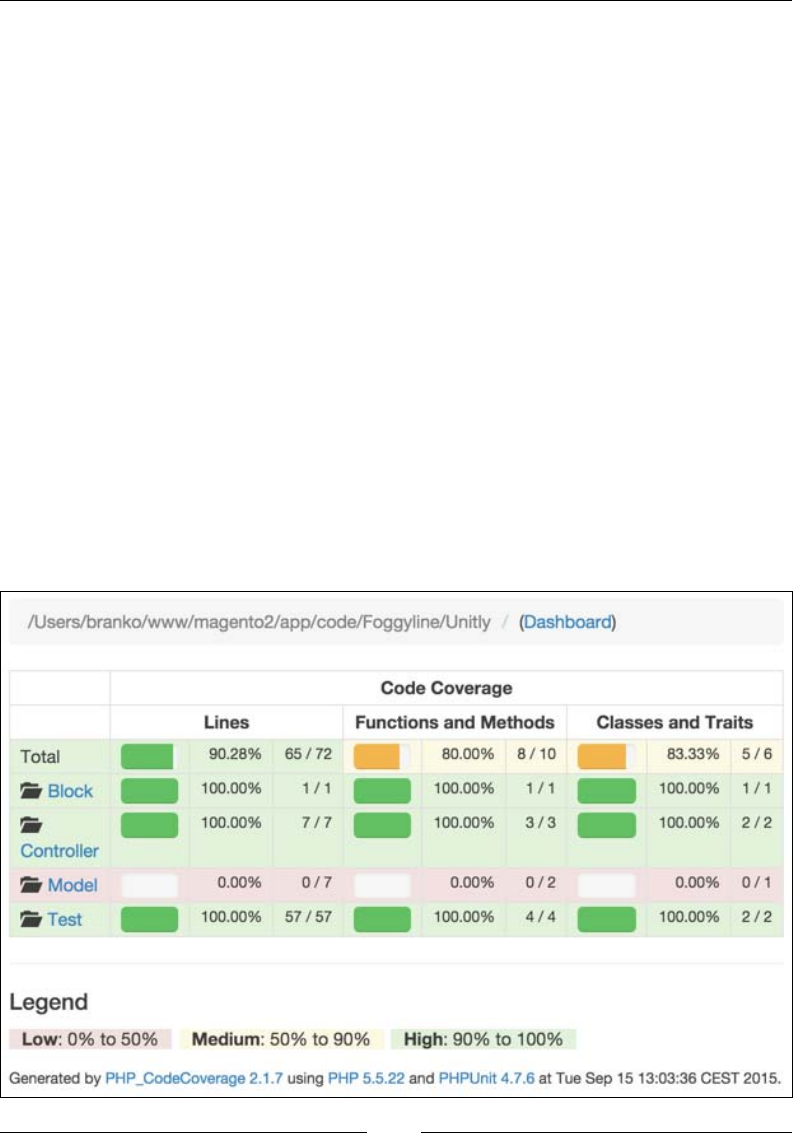
Testing
[ 324 ]
<php>
<ini name="date.timezone" value="Europe/Zagreb"/>
<ini name="xdebug.max_nesting_level" value="200"/>
</php>
<filter>
<whitelist addUncoveredFilesFromWhiteList="true">
<directory suffix=".php">
../../../app/code/Foggyline/Unitly/*
</directory>
</whitelist>
</filter>
<logging>
<log type="coverage-html"
target="coverage_dir/Foggyline_Unitly/test-
reports/coverage" charset="UTF-8" yui="true"
highlight="true"/>
</logging>
</phpunit>
Finally, we can execute only our own module unit tests by running a command such
as phpunit -c foggyline-unitly-phpunit.xml.
Once tests are executed, we should be able to see the entire code coverage report
in the dev/tests/unit/coverage_dir/Foggyline_Unitly/test-reports/
coverage/index.html le, as shown in the following screenshot:

Chapter 11
[ 325 ]
The preceding screenshot demonstrates how detailed the code coverage is,
which shows even the percentages and lines of code covered with test.
Summary
In this chapter, we took a look at the testing facility embedded in Magento through
the libraries in the root dev/tests/ directory and the Magento_Developer
module. We learned how to run all of its test types and studied a simple example
of writing our own unit tests. The examples that are given here do not do justice
to PHPUnit, given its robustness. More information on PHPUnit can be found at
https://phpunit.de/.
We will now move on to the nal chapter of this book, where we will reiterate
the things that we learned so far and develop a functional miniature module that
involves some basic testing.
[ 327 ]
Building a Module
from Scratch
Based on the knowledge acquired from previous chapters, we will now build a
miniature Helpdesk module. Though miniature, the module will showcase the
usage of several important Magento platform features as we go through the
following sections:
• Registering a module (registration.php and module.xml)
• Creating a configuration file (config.xml)
• Creating e-mail templates (email_templates.xml)
• Creating a system configuration file (system.xml)
• Creating access control lists (acl.xml)
• Creating an installation script (InstallSchema.php)
• Managing entity persistence (model, resource, collection)
• Building a frontend interface
• Building a backend interface
• Creating unit tests
Module requirements
Module requirements are dened as follows:
• Name used, Foggyline/Helpdesk
• Data to be stored in table is called foggyline_helpdesk_ticket

Building a Module from Scratch
[ 328 ]
• Tickets entity will contain ticket_id, customer_id, title, severity,
created_at, and status properties
• The customer_id property is to be foreign key on the customer_entity
table
• There will be three available ticket severity values: low, medium, and high
• If not specified, the default severity value for new tickets is low
• There will be two available ticket statuses: opened and closed
• If not specified, the default status value for new tickets is opened
• Two e-mails templates: store_owner_to_customer_email_template and
customer_to_store_owner_email_template are to be defined for pushing
e-mail updates upon ticket creation and status change
• Customers will be able to submit a ticket through their My Account section
• Customers will be able to see all of their previously submitted tickets under
their My Account section
• Customers will not be able to edit any existing tickets
• Once a customer submits a new ticket, transactional e-mail (let's call it
Foggyline – Helpdesk – Customer | Store Owner) is sent to the store owner
• Configurable option is required for possibly overriding Foggyline –
Helpdesk – Customer | Store Owner e-mail
• Admin users will be able to access a list of all tickets under Customers |
Helpdesk Tickets
• Admin users will be able to change ticket status from Opened to Closed and
other way round
• Once an admin user changes the ticket status, transactional e-mail (let's call it
Foggyline – Helpdesk – Store Owner | Customer) is sent to the customer
• Configurable option is required for possibly overriding Foggyline –
Helpdesk – Store Owner | Customer e-mail
With the requirements outlined, we are ready to begin our module development.

Chapter 12
[ 329 ]
Registering a module
We rst start by dening the app/code/Foggyline/Helpdesk/registration.php
le with the following content:
<?php
\Magento\Framework\Component\ComponentRegistrar::register(
\Magento\Framework\Component\ComponentRegistrar::MODULE,
'Foggyline_Helpdesk',
__DIR__
);
We then dene the app/code/Foggyline/Helpdesk/etc/module.xml le with the
following content:
<?xml version="1.0"?>
<config xmlns:xsi="http://www.w3.org/2001/XMLSchema-instance"
xsi:noNamespaceSchemaLocation="urn:magento:framework:Module
/etc/module.xsd">
<module name="Foggyline_Helpdesk" setup_version="1.0.0">
<sequence>
<module name="Magento_Store"/>
<module name="Magento_Customer"/>
</sequence>
</module>
</config>
Looking at the preceding le, if we strip away the boilerplate that repeats itself
across all modules, we are left with three important things here:
• The module name attribute, defined as Foggyline_Helpdesk. We need to
be sure to follow a certain pattern when naming our modules, like Vendor
+ _ + Module name. The module name attribute can contain only letters and
numbers [A-Z, a-z, 0-9, _].
• The schema setup_version attribute that defines our module version. Its
value can contain only numbers [0-9]. Our example sets the value of 1.0.0
for the setup_version attribute.
• The sequence module name attribute, which defines module dependencies.
Our module basically says it requires Magento_Store and Magento_
Customer modules to be enabled.
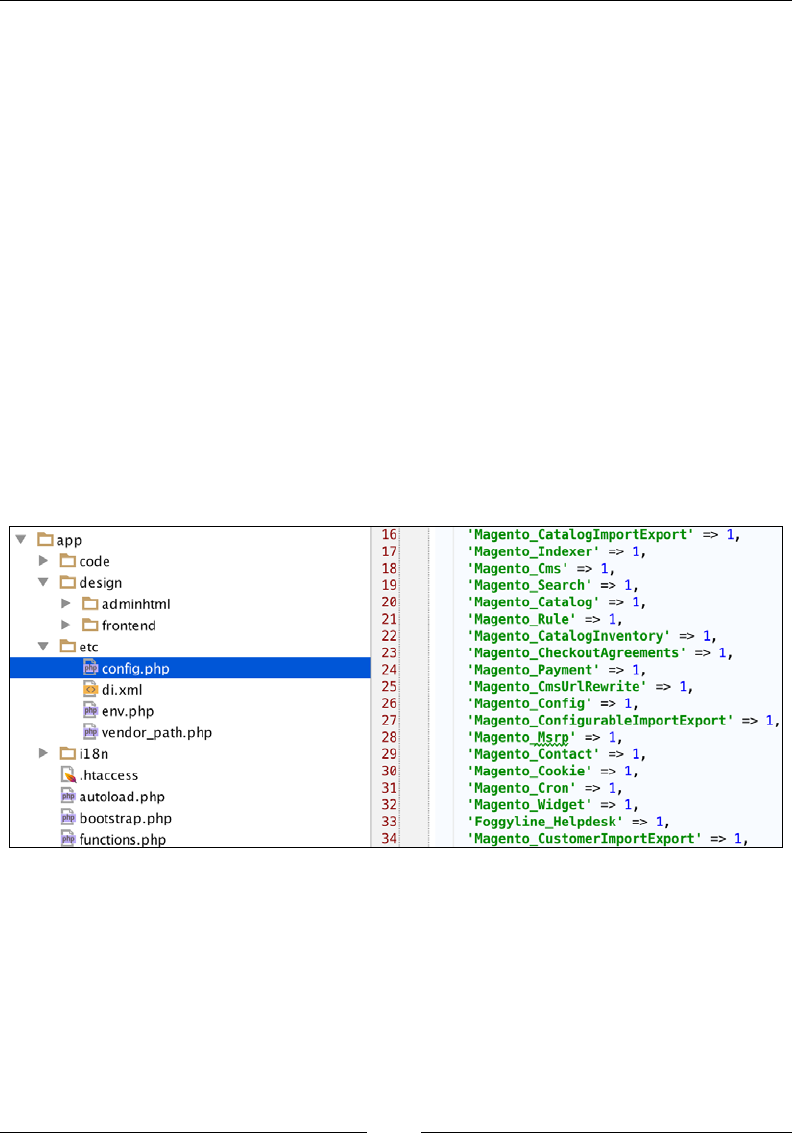
Building a Module from Scratch
[ 330 ]
Once this le is in place, we need to go to the command line, change the directory to
that of Magento installation, and simply execute the following command:
php bin/magento module:enable Foggyline_Helpdesk
However, if we now open either the admin of the frontend area in our browser,
we might get an error page, which generates the following error under the var/
reports/ folder:
Please upgrade your database: Run "bin/magento setup:upgrade" from
the Magento root directory.
Luckily, the error is pretty self-descriptive so we simply move back to the
console, change the directory to the Magento root folder, and execute the
following command:
php bin/magento setup:upgrade
Executed commands will activate our module.
We can conrm that by looking under the app/etc/config.php le, as shown in the
following screenshot (on line 33):
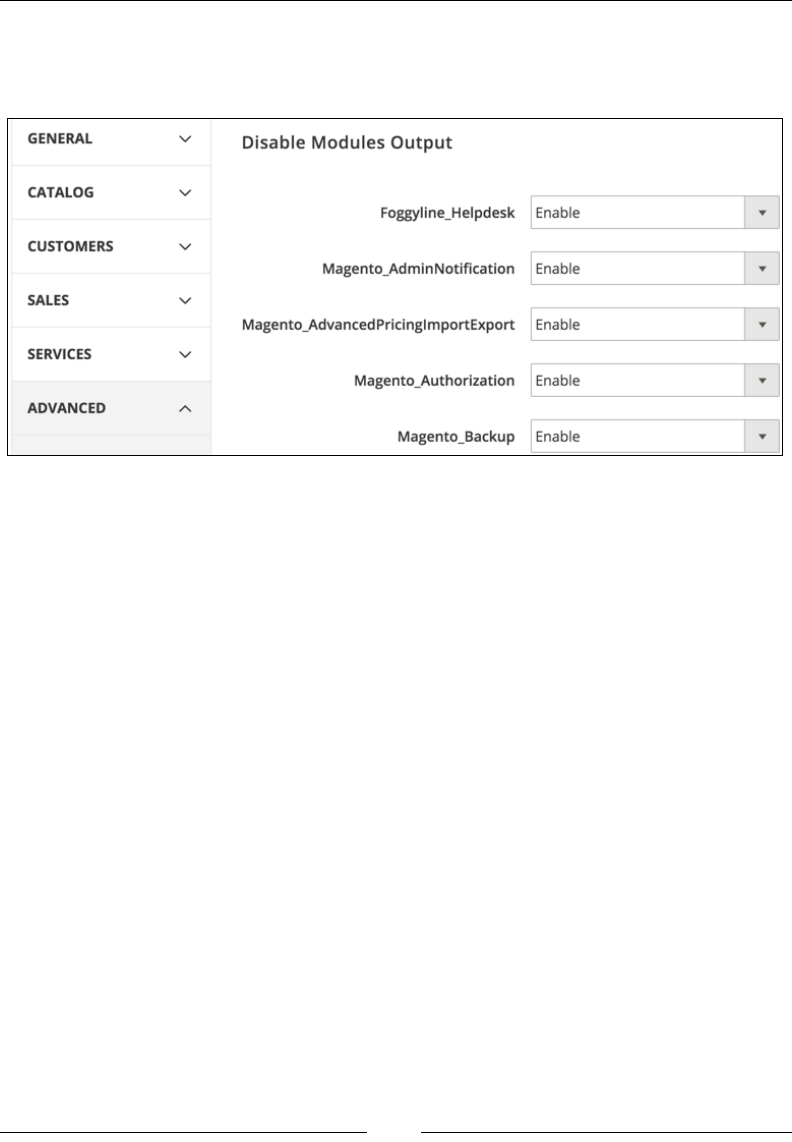
Chapter 12
[ 331 ]
Further if we log in to the admin area, and go to Stores | Conguration | Advanced
| Advanced, we should see our module listed there, as shown in the following
screenshot:
Creating a conguration le (cong.xml)
Now we will create an app/code/Foggyline/Helpdesk/etc/config.xml le with
the content, as follows:
<?xml version="1.0"?>
<config xmlns:xsi="http://www.w3.org/2001/XMLSchema-instance"
xsi:noNamespaceSchemaLocation="urn:magento:module:Magento_Store:
etc/config.xsd">
<default>
<foggyline_helpdesk>
<email_template>
<customer>
foggyline_helpdesk_email_template_customer
</customer>
<store_owner>
foggyline_helpdesk_email_template_store_owner
</store_owner>
</email_template>
</foggyline_helpdesk>
</default>
</config>

Building a Module from Scratch
[ 332 ]
This might look confusing at rst as to where the default | foggyline_helpdesk
| email_template structure comes from. The structure itself denotes the position of
our conguration values that we will map to the administrative interface visible in
our browser under the Stores | Conguration section. Given that all things visual
regarding the Stores | Conguration section originate from system.xml les, this
structure we have now in config.xml will then map to another system.xml le we
will dene soon.
Right now, just remember the structure and the values contained within the
customer and store_owner attributes. These values will further map to another
email_templates.xml le, which we will soon create.
There is one more important thing regarding the config.xml le. We need to be very
careful of the xsi:noNamespaceSchemaLocation attribute value. This value needs to
be set to urn:magento:module:Magento_Store:etc/config.xsd. It's an alias that
actually points to the vendor/magento/module-store/etc/config.xsd le.
Creating e-mail templates
(email_templates.xml)
Our module requirements specify that two e-mail templates need to be dened.
Hints to this have already been given in the app/code/Foggyline/Helpdesk/
etc/config.xml le previously dened. The actual denition of e-mail templates
available to our modules is done through the app/code/Foggyline/Helpdesk/etc/
email_templates.xml file, with the content as follows:
<?xml version="1.0"?>
<config xmlns:xsi="http://www.w3.org/2001/XMLSchema-instance"
xsi:noNamespaceSchemaLocation="urn:magento:module:
Magento_Email:etc/email_templates.xsd">
<template id="foggyline_helpdesk_email_template_customer"
label="Foggyline Helpdesk - Customer Email"
file="store_owner_to_customer.html" type="html"
module="Foggyline_Helpdesk" area="frontend"/>
<template id="foggyline_helpdesk_email_template_store_owner"
label="Foggyline Helpdesk - Store Owner Email"
file="customer_to_store_owner.html" type="html"
module="Foggyline_Helpdesk" area="frontend"/>
</config>

Chapter 12
[ 333 ]
Looking into email_templates.xsd, we can conclude that the values for id, label,
file, type, and module are all required. id should be dened unique to our module,
giving some sensible and reasonable code name to our e-mail templates, as this code
name is going to be used further in other XML les or in code.
What we dened as ID values here, can be found under app/code/Foggyline/
Helpdesk/etc/config.xml, as the value of default | foggyline_helpdesk
| email_template | customer and default | foggyline_helpdesk | email_
template | store_owner elements.
If it is not yet fully clear what the connection between the two is; we will get to it
when we start building our system.xml le soon.
The value of the label attribute is something that is visible later on, within the
Magento admin area under Marketing | Communications | Email Templates,
so be sure to put something user friendly and easily recognizable here.
Further, the values of the file attribute point to the location of the following les:
• app/code/Foggyline/Helpdesk/view/frontend/email/customer_to_
store_owner.html
• app/code/Foggyline/Helpdesk/view/frontend/email/store_owner_to_
customer.html
The content of the les will be set such that later on, in the code, we will need to pass
it on certain variables in order to ll in the variable placeholders.
The customer_to_store_owner.html e-mail template, with content as follows, will
be triggered later on in the code when a customer creates a new ticket:
<!--@subject New Ticket Created @-->
<h1>Ticket #{{var ticket.ticket_id}} created</h1>
<ul>
<li>Id: {{var ticket.ticket_id}}</li>
<li>Title: {{var ticket.title}}</li>
<li>Created_at: {{var ticket.created_at}}</li>
<li>Severity: {{var ticket.severity}}</li>
</ul>
Later on, we will see how to pass the ticket object as a variable into the template, in
order to enable calls like {{var ticket.title}} within the HTML template.
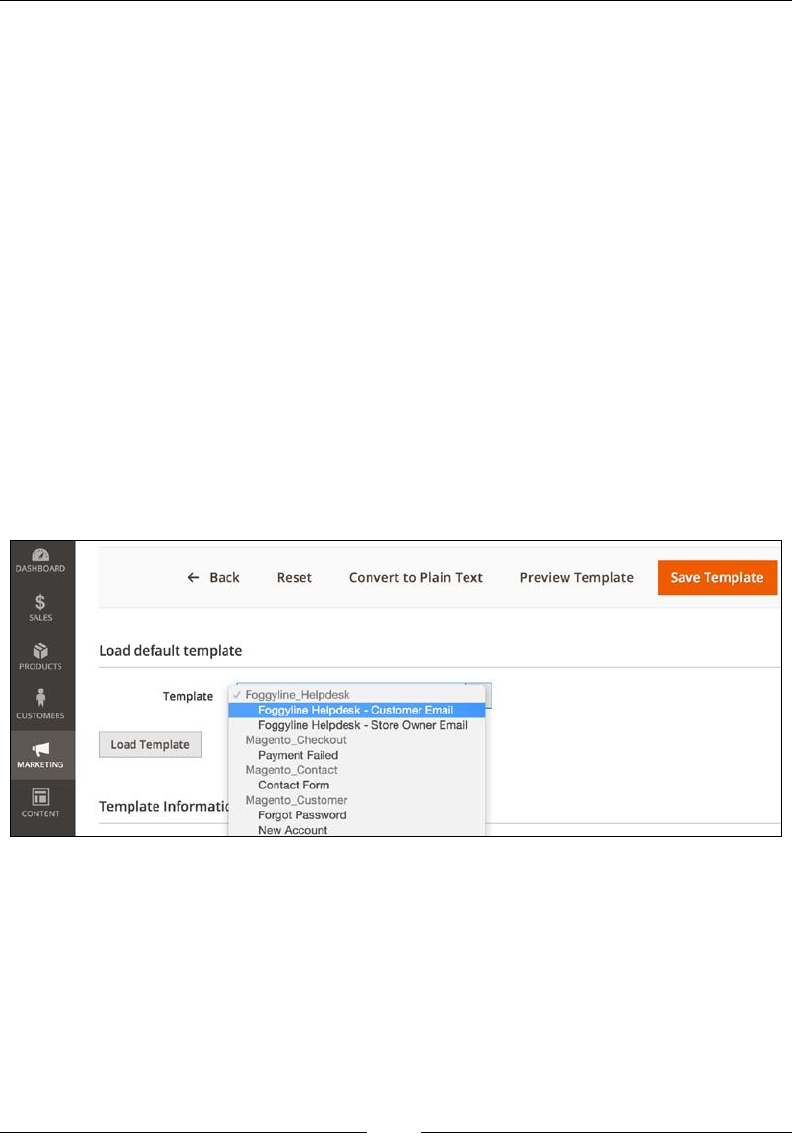
Building a Module from Scratch
[ 334 ]
The store_owner_to_customer.html e-mail template, with content as follows, will
be triggered later on in the code when the store owner changes the status of a ticket:
<!--@subject Ticket Updated @-->
<h1>Ticket #{{var ticket.ticket_id}} updated</h1>
<p>Hi {{var customer_name}}.</p>
<p>Status of your ticket #{{var ticket.ticket_id}} has been updated</
p>
<ul>
<li>Title: {{var ticket.title}}</li>
<li>Created_at: {{var ticket.created_at}}</li>
<li>Severity: {{var ticket.severity}}</li>
</ul>
If we now log in to the Magento admin area, go under Marketing |
Communications | Email Templates, click on the Add New Template button, and
we should be able to see our two e-mail templates under the Template drop-down,
as shown in the following screenshot:
If we look back at our config.xml and email_templates.xml, there is still no
clear connection as to what default | foggyline_helpdesk | email_template |
customer and default | foggyline_helpdesk | email_template | store_owner
under config.xml actually do. That is because we still lack two more ingredients
that will link them together: the app/code/Foggyline/Helpdesk/etc/adminhtml/
system.xml and app/code/Foggyline/Helpdesk/etc/acl.xml files.

Chapter 12
[ 335 ]
Creating a system conguration le
(system.xml)
The system.xml le is essentially the Stores | Conguration interface builder.
Entries we dene in our module's system.xml le will render certain parts of the
Stores | Conguration interface under the Magento admin area.
Unlike the previous two XML les, this conguration le is located under an
additional subfolder, so its full path goes like app/code/Foggyline/Helpdesk/etc/
adminhtml/system.xml, with content as follows:
<?xml version="1.0"?>
<config xmlns:xsi="http://www.w3.org/2001/XMLSchema-instance"
xsi:noNamespaceSchemaLocation="urn:magento:module:
Magento_Config:etc/system_file.xsd">
<system>
<tab id="foggyline" translate="label" sortOrder="200">
<label>Foggyline</label>
</tab>
<section id="foggyline_helpdesk" translate="label"
type="text" sortOrder="110" showInDefault="1"
showInWebsite="1" showInStore="1">
<label>Helpdesk</label>
<tab>foggyline</tab>
<resource>Foggyline_Helpdesk::helpdesk</resource>
<group id="email_template" translate="label"
type="text" sortOrder="1" showInDefault="1"
showInWebsite="1" showInStore="1">
<label>Email Template Options</label>
<field id="customer" translate="label"
type="select" sortOrder="1" showInDefault="1"
showInWebsite="1" showInStore="1">
<label>
Store Owner to Customer Email Template
</label>
<source_model>
Magento\Config\Model\Config\Source\
Email\Template
</source_model>
</field>
<field id="store_owner" translate="label"
type="select" sortOrder="1" showInDefault="1"
showInWebsite="1" showInStore="1">
Building a Module from Scratch
[ 336 ]
<label>
Customer to Store Owner Email Template
</label>
<source_model>
Magento\Config\Model\Config\Source\
Email\Template
</source_model>
</field>
</group>
</section>
</system>
</config>
Even though we have a lot going on in this le, it can all be summed up in a few
important bits.
Determining where we want to show our module conguration
options is a matter of choice. Either we dene and use our own tab or
we use an existing tab from one of the core modules. It really comes
down to where we decide to put our conguration options.
system.xml denes one tab, as noted by the tab element assigned id attribute value
of foggyline. We can have multiple tabs dened under a single system.xml le.
The tab element attribute id needs to be unique under all tabs, not just those dened
within our module. Within the tab element, we have a label element with the value
of Foggyline. This value is what shows up under the Magento admin Stores |
Conguration area.
The nal results should be as shown in the following image:
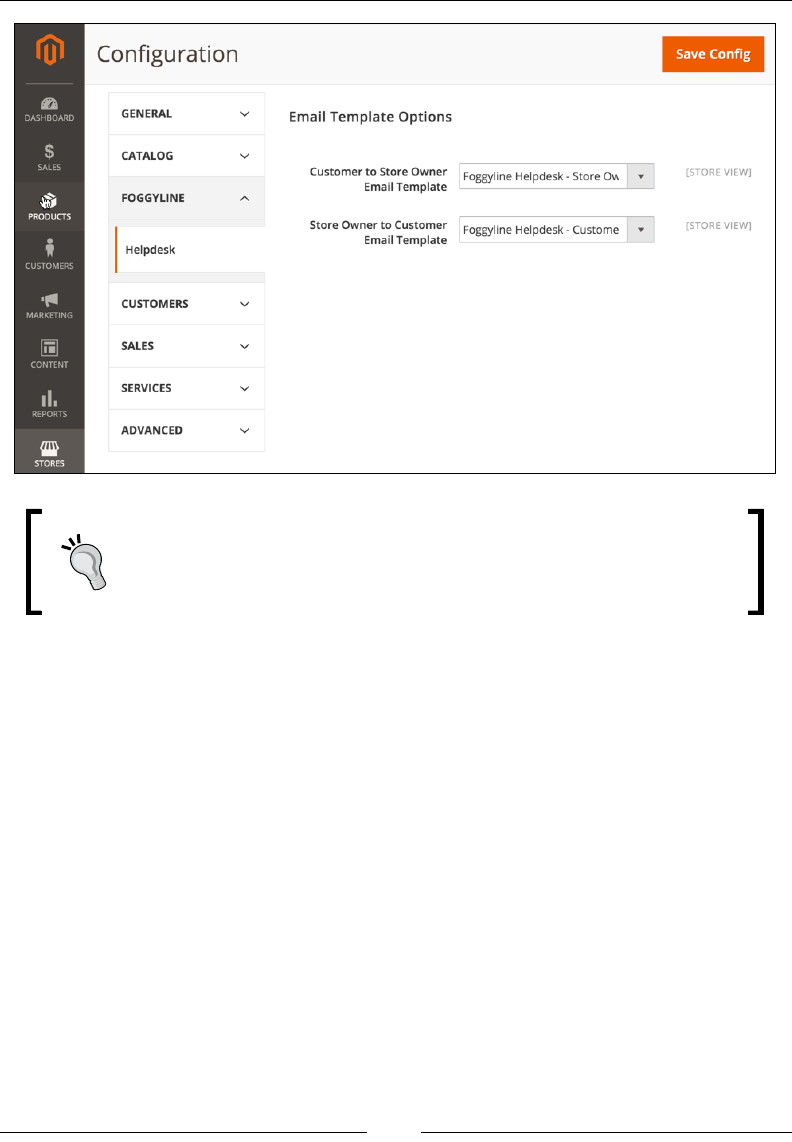
Chapter 12
[ 337 ]
Magento has six pre-existing tabs dened (General, Service,
Advanced, Catalog, Customer, Sales) across its core modules. We can
easily get a list of all dened tabs in Magento just by doing a search
for the tab string, ltering only on les named system.xml.
Next to the tab element, we have the config | system | section element. This is
the element within which we further dene what are to become HTML input elds
for accepting conguration options, as visible on the previous image.
We can have multiple sections dened within a single system.xml le. The actual
section element attributes require us to specify the id attribute value, which in our
example is set to foggyline_helpdesk. Other important section element attributes
are showInWebsite and showInStore. These can have either 0 or 1 as a value.
Depending on our module business logic, we might nd a good reason for
choosing one value over the other.
Building a Module from Scratch
[ 338 ]
Looking further, the elements contained within our section element are:
• label: This specifies the label we will see under the Magento admin Store |
Configuration area.
• tab: This specifies the ID value of a tab under which we want this section to
appear, which in our case equals to foggyline.
• resource: This specifies the ACL resource ID value.
• group: This specifies the group of fields. Similar to the section element,
it also has id, sortOrder, showInWebsite, and showInStore attributes.
Further, the group element has child field elements, which translate to HTML
input fields under the Magento admin Store | Configuration area.
We dened two elds, customer and store_owner. Similar to section and group,
field elements also have id, sortOrder, showInWebsite, and showInStore
attributes.
Notice how field further contains child elements that dene its options. Given that
our field element type attribute was set to select with both elds, we needed
to dene the source_model element within each field. Both elds have the same
source_model value which points to the Magento core class, Magento\Config\
Model\Config\Source\Email\Template. Looking into that class, we can see it
implements \Magento\Framework\Option\ArrayInterface and denes the
toOptionArray method. During rendering the admin Stores | Conguration area,
Magento will call this method to ll in the values for the select HTML element.
Understanding what we can do with system.xml comes down to
understanding what is dened under vendor/magento/module-
config/etc/system_file.xsd and studying existing Magento
core module system.xml les to get some examples.
As noted previously, our system.xml has a resource element that points to the app/
code/Foggyline/Helpdesk/etc/acl.xml le, which we will now look into.
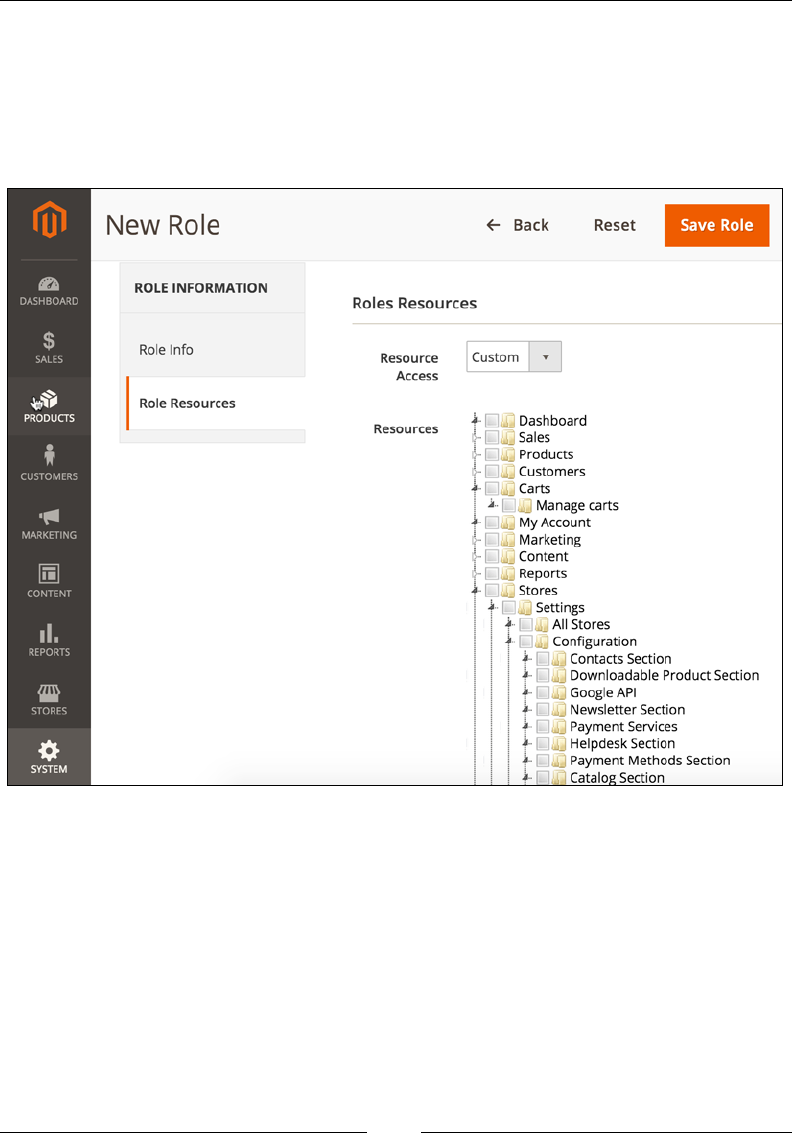
Chapter 12
[ 339 ]
Creating access control lists (acl.xml)
The app/code/Foggyline/Helpdesk/etc/acl.xml le is where we dene our
module access control list resources. Access control list resources are visible under
the Magento admin System | Permissions | User Roles area, when we click on the
Add New Role button, as shown in the following screenshot:

Building a Module from Scratch
[ 340 ]
Looking at the preceding screenshot, we can see our Helpdesk Section under Stores
| Settings | Conguration. How did we put it there? We have dened it in our
app/code/Foggyline/Helpdesk/etc/acl.xml le with content as follows:
<?xml version="1.0"?>
<config xmlns:xsi="http://www.w3.org/2001/XMLSchema-instance"
xsi:noNamespaceSchemaLocation="urn:magento:framework:Acl/
etc/acl.xsd">
<acl>
<resources>
<resource id="Magento_Backend::admin">
<resource id="Magento_Customer::customer">
<resource id="Foggyline_Helpdesk::
ticket_manage" title="Manage Helpdesk
Tickets" />
</resource>
<resource id="Magento_Backend::stores">
<resource id="Magento_Backend::
stores_settings">
<resource id="Magento_Config::config">
<resource id=
"Foggyline_Helpdesk::helpdesk"
title="Helpdesk Section" />
</resource>
</resource>
</resource>
</resource>
</resources>
</acl>
</config>
Looking at the provided code, the immediate conclusion is that resources can
be nested into each other. It is unclear how we should know where to nest our
custom-dened resource with an ID value of Foggyline_Helpdesk::helpdesk.
The simple answer is we followed the Magento structure. By looking into a few
of the Magento core modules system.xml les and their acl.xml les, a pattern
emerged where modules nest their resource under Magento_Backend::admin |
Magento_Backend::stores | Magento_Backend::stores_settings | Magento_
Config::config. These are all existing resources dened in core Magento, so we
are merely referencing them, not dening them. The only resource we are dening
in our acl.xml le is our own, which we are then referencing from our system.xml
le. We can dene other resources within acl.xml and not all would be nested into
the same structure as Foggyline_Helpdesk::helpdesk.
Chapter 12
[ 341 ]
The value of the title attribute we assign to a resource element is shown in the
admin area, as in the previous screenshot.
Be sure to use a descriptive label so that our module
resource is easily recognizable.
Creating an installation script
(InstallSchema.php)
InstallSchema, or install script, is a way for us to set up tables in the database that
will be used to persist our models later on.
If we look back at the module requirements, the following elds need to be created
in the foggyline_helpdesk_ticket table:
• ticket_id
• customer_id
• title
• severity
• created_at
• status
Our InstallSchema is dened under the app/code/Foggyline/Helpdesk/Setup/
InstallSchema.php le with (partial) content as follows:
<?php
namespace Foggyline\Helpdesk\Setup;
use Magento\Framework\Setup\InstallSchemaInterface;
use Magento\Framework\Setup\ModuleContextInterface;
use Magento\Framework\Setup\SchemaSetupInterface;
/**
* @codeCoverageIgnore
*/

Building a Module from Scratch
[ 342 ]
class InstallSchema implements InstallSchemaInterface
{
public function install(SchemaSetupInterface $setup,
ModuleContextInterface $context)
{
$installer = $setup;
$installer->startSetup();
$table = $installer->getConnection()
->newTable($installer->
getTable('foggyline_helpdesk_ticket'))
/* ->addColumn ... */
/* ->addIndex ... */
/* ->addForeignKey ... */
->setComment('Foggyline Helpdesk Ticket');
$installer->getConnection()->createTable($table);
$installer->endSetup();
}
}
The InstallSchema class conforms to InstallSchemaInterface by implementing a
single install method. Within this method, we start the installer, create new tables,
create new elds, add indexes and foreign keys to the table, and nally end the
installer, as shown in the following (partial) code:
->addColumn(
'ticket_id',
\Magento\Framework\DB\Ddl\Table::TYPE_INTEGER,
null,
['identity' => true, 'unsigned' => true, 'nullable' => false,
'primary' => true],
'Ticket Id'
)
->addColumn(
'customer_id',
\Magento\Framework\DB\Ddl\Table::TYPE_INTEGER,
null,
['unsigned' => true],
'Customer Id'
)

Chapter 12
[ 343 ]
->addColumn(
'title',
\Magento\Framework\DB\Ddl\Table::TYPE_TEXT,
null,
['nullable' => false],
'Title'
)
->addColumn(
'severity',
\Magento\Framework\DB\Ddl\Table::TYPE_SMALLINT,
null,
['nullable' => false],
'Severity'
)
->addColumn(
'created_at',
\Magento\Framework\DB\Ddl\Table::TYPE_TIMESTAMP,
null,
['nullable' => false],
'Created At'
)
->addColumn(
'status',
\Magento\Framework\DB\Ddl\Table::TYPE_SMALLINT,
null,
['nullable' => false],
'Status'
)
->addIndex(
$installer->getIdxName('foggyline_helpdesk_ticket',
['customer_id']),
['customer_id']
)
->addForeignKey(
$installer->getFkName('foggyline_helpdesk_ticket',
'customer_id', 'customer_entity', 'entity_id'),
'customer_id',
$installer->getTable('customer_entity'),
'entity_id',
\Magento\Framework\DB\Ddl\Table::ACTION_SET_NULL
)
Building a Module from Scratch
[ 344 ]
The provided code shows each of the elds from the module requirement being
added to the database using the addColumn method call and passing it certain
parameters such as the field type and nullable state. It is worth getting familiar
with the addColumn, addIndex, and addForeignKey methods as these are most
commonly used when specifying new tables for our modules.
We could further deepen our understanding of the installation
script by studying how other core modules handle the
InstallSchema.php le. Following a good database design
practice, we should always create indexes and foreign keys on our
table when referencing data from other tables.
Managing entity persistence
(model, resource, collection)
With InstallSchema in place, we now have conditions for entity persistence. Our
next step is to dene model, resource, and collection classes for the Ticket entity.
The Ticket entity model class is dened under the app/code/Foggyline/
Helpdesk/Model/Ticket.php le with content as follows:
<?php
namespace Foggyline\Helpdesk\Model;
class Ticket extends \Magento\Framework\Model\AbstractModel
{
const STATUS_OPENED = 1;
const STATUS_CLOSED = 2;
const SEVERITY_LOW = 1;
const SEVERITY_MEDIUM = 2;
const SEVERITY_HIGH = 3;
protected static $statusesOptions = [
self::STATUS_OPENED => 'Opened',
self::STATUS_CLOSED => 'Closed',
];

Chapter 12
[ 345 ]
protected static $severitiesOptions = [
self::SEVERITY_LOW => 'Low',
self::SEVERITY_MEDIUM => 'Medium',
self::SEVERITY_HIGH => 'High',
];
/**
* Initialize resource model
* @return void
*/
protected function _construct()
{
$this->_init('Foggyline\Helpdesk\Model\
ResourceModel\Ticket');
}
public static function getSeveritiesOptionArray()
{
return self::$severitiesOptions;
}
public function getStatusAsLabel()
{
return self::$statusesOptions[$this->getStatus()];
}
public function getSeverityAsLabel()
{
return self::$severitiesOptions[$this->getSeverity()];
}
}
Reading the preceding code, we see it extends the \Magento\Framework\Model\
AbstractModel class, which further extends the \Magento\Framework\Object class.
This brings a lot of extra methods into our Ticket model class, such as load, delete,
save, toArray, toJson, toString, toXml, and so on.
The only actual requirement for us is to dene the _construct method that,
through the _init function call, species the resource class the model will be using
when persisting data. We have set this value to Foggyline\Helpdesk\Model\
ResourceModel\Ticket, which will be the next class we will dene, the so-called
resource class.

Building a Module from Scratch
[ 346 ]
We have further dened several constants, STATUS_* and SEVERITY_*, as a sign of
good programming practice and not to hardcode values that we will use across the
code, which we can centralize into a class constant. These constants, in a way, map to
our module requirements.
Additionally, we have three additional methods (getSeveritiesOptionArray,
getStatusAsLabel, and getSeverityAsLabel) that we will use later on in our block
class and template le.
The Ticket entity resource class is dened under app/code/Foggyline/Helpdesk/
Model/ResourceModel/Ticket.php with content as follows:
<?php
namespace Foggyline\Helpdesk\Model\ResourceModel;
class Ticket extends
\Magento\Framework\Model\ResourceModel\Db\AbstractDb
{
/**
* Initialize resource model
* Get table name from config
*
* @return void
*/
protected function _construct()
{
$this->_init('foggyline_helpdesk_ticket', 'ticket_id');
}
}
We can see the code extends the \Magento\Framework\Model\ResourceModel\
Db\AbstractDb class, which further extends the \Magento\Framework\Model\
ResourceModel\AbstractResource class. This brings a lot of extra methods into our
Ticket resource class, such as load, delete, save, commit, rollback, and so on.
The only actual requirement for us is to dene the _construct method, through which
we call the _init function that accepts two parameters. The rst parameter of the _
init function species the table name foggyline_helpdesk_ticket and the second
parameter species identifying the ticket_id column within that table where we
will be persisting data.

Chapter 12
[ 347 ]
Finally, we dene the Ticket entity collection class under app/code/Foggyline/
Helpdesk/Model/ResourceModel/Ticket/Collection.php with content as
follows:
<?php
namespace Foggyline\Helpdesk\Model\ResourceModel\Ticket;
class Collection extends \Magento\Framework\Model\
ResourceModel\Db\Collection\AbstractCollection
{
/**
* Constructor
* Configures collection
*
* @return void
*/
protected function _construct()
{
$this->_init('Foggyline\Helpdesk\Model\Ticket',
'Foggyline\Helpdesk\Model\ResourceModel\Ticket');
}
}
The collection class code extends the \Magento\Framework\Model\ResourceModel\
Db\Collection\AbstractCollection class, which further extends the \Magento\
Framework\Data\Collection\AbstractDb class, which further extends \
Magento\Framework\Data\Collection. The nal parent collection class then
implements the following interfaces: \IteratorAggregate, \Countable,
Magento\Framework\Option\ArrayInterface, and Magento\Framework\Data\
CollectionDataSourceInterface. Through this deep inheritance, a large number
of methods become available to our collection class, such as count, getAllIds,
getColumnValues, getFirstItem, getLastItem, and so on.
With regard to our newly dened collection class, the only actual requirement
for us is to dene the _construct method. Within the _construct method, we
call the _init function to which we pass two parameters. The rst parameter
species the Ticket model class Foggyline\Helpdesk\Model\Ticket and the
second parameter species the Ticket resource class Foggyline\Helpdesk\Model\
ResourceModel\Ticket.
The three classes we just dened (model, resource, collection) act as an overall
single entity persistence mechanism. With the currently dened code, we are able
to save, delete, update, lookup with ltering, and list our Ticket entities, which we
demonstrate in the upcoming sections.

Building a Module from Scratch
[ 348 ]
Building a frontend interface
Now that we have dened the necessary minimum for data persistence functionality,
we can move forward to building a frontend interface. The module requirement says
that customers should be able to submit a ticket through their My Account section.
We will therefore add a link called Helpdesk Tickets under the customer's My
Account section.
The following are needed for a fully functional frontend:
• A route that will map to our controller
• A controller that will catch requests from a mapped route
• A controller action that will load the layout
• Layout XMLs that will update the view making it look as if we are on the My
Account section while providing content of our own
• A block class to power our template file
• A template file that we will render into the content area of a page
• A controller action that will save the New Ticket form once it is posted
Creating routes, controllers, and layout
handles
We start by dening a route within the app/code/Foggyline/Helpdesk/etc/
frontend/routes.xml le with content as follows:
<?xml version="1.0"?>
<config xmlns:xsi="http://www.w3.org/2001/XMLSchema-instance"
xsi:noNamespaceSchemaLocation="urn:magento:framework:App/
etc/routes.xsd">
<router id="standard">
<route id="foggyline_helpdesk"
frontName="foggyline_helpdesk">
<module name="Foggyline_Helpdesk"/>
</route>
</router>
</config>
Note that the route element id and frontName attributes have the same value, but
they do not serve the same purpose, as we will see soon.

Chapter 12
[ 349 ]
Now we dene our controller app/code/Foggyline/Helpdesk/Controller/
Ticket.php le with content as follows:
<?php
namespace Foggyline\Helpdesk\Controller;
abstract class Ticket extends \Magento\Framework\App\Action\Action
{
protected $customerSession;
public function __construct(
\Magento\Framework\App\Action\Context $context,
\Magento\Customer\Model\Session $customerSession
)
{
$this->customerSession = $customerSession;
parent::__construct($context);
}
public function dispatch(\Magento\Framework\App
\RequestInterface $request)
{
if (!$this->customerSession->authenticate()) {
$this->_actionFlag->set('', 'no-dispatch', true);
if (!$this->customerSession->getBeforeUrl()) {
$this->customerSession->setBeforeUrl($this->
_redirect->getRefererUrl());
}
}
return parent::dispatch($request);
}
}
Our controller loads the customer session object through its constructor. The
customer session object is then used within the dispatch method to check if the
customer is authenticated or not. If the customer is not authenticated, all frontend
actions in the Internet browser that lead to this controller will result in the customer
being redirected to the login screen.

Building a Module from Scratch
[ 350 ]
Once the controller is in place, we can then dene the actions that extend from
it. Each action is a class le on its own, extending from the parent class. We will
now dene our index action, the one that will render the view under My Account
| Helpdesk Tickets, within the app/code/Foggyline/Helpdesk/Controller/
Ticket/Index.php le with content as follows:
<?php
namespace Foggyline\Helpdesk\Controller\Ticket;
class Index extends \Foggyline\Helpdesk\Controller\Ticket
{
public function execute()
{
$resultPage = $this->resultFactory->create(\Magento
\Framework\Controller\ResultFactory::TYPE_PAGE);
return $resultPage;
}
}
Controller action code lives within the execute method of its class. We simply
extend from the \Foggyline\Helpdesk\Controller\Ticket controller class and
dene the necessary logic within the execute method. Simply calling loadLayout
and renderLayout is enough to render the page on the frontend.
The frontend XML layout handles reside under the app/code/Foggyline/
Helpdesk/view/frontend/layout folder. Having the route ID, controller, and
controller action is enough for us to determine the handle name, which goes by
formula {route id}_{controller name}_{controller action name}.xml. Thus, we dene an
index action layout within the app/code/Foggyline/Helpdesk/view/frontend/
layout/foggyline_helpdesk_ticket_index.xml le with content as follows:
<?xml version="1.0"?>
<page xmlns:xsi="http://www.w3.org/2001/XMLSchema-instance"
xsi:noNamespaceSchemaLocation="urn:magento:framework:View/Layout
/etc/page_configuration.xsd">
<update handle="customer_account"/>
<body>
<referenceContainer name="content">
<block class="Foggyline\Helpdesk\Block\Ticket\Index"
name="foggyline.helpdesk.ticket.index" template=
"Foggyline_Helpdesk::ticket/index.phtml"
cacheable="false"/>
</referenceContainer>
</body>
</page>

Chapter 12
[ 351 ]
Notice how we immediately call the update directive, passing it the customer_
account handle attribute value. This is like saying, "Include everything from the
customer_account handle into our handle here." We are further referencing the
content block, within which we dene our own custom block type Foggyline\
Helpdesk\Block\Ticket\Index. Though a block class can specify its own template,
we are using a template attribute with a module-specic path, Foggyline_
Helpdesk::ticket/index.phtml, to assign a template to a block.
Simply including the customer_acount handle is not enough; we need something
extra to dene our link under the My Account section. We dene this extra
something under the app/code/Foggyline/Helpdesk/view/frontend/layout/
customer_account.xml le with content as follows:
<?xml version="1.0"?>
<page xmlns:xsi="http://www.w3.org/2001/XMLSchema-instance"
xsi:noNamespaceSchemaLocation="urn:magento:framework:View/
Layout/etc/page_configuration.xsd">
<head>
<title>Helpdesk Tickets</title>
</head>
<body>
<referenceBlock name="customer_account_navigation">
<block class="Magento\Framework\View\Element\Html
\Link\Current" name="foggyline-helpdesk-ticket">
<arguments>
<argument name="path" xsi:type="string">
foggyline_helpdesk/ticket/index
</argument>
<argument name="label" xsi:type="string">
Helpdesk Tickets
</argument>
</arguments>
</block>
</referenceBlock>
</body>
</page>
What is happening here is that we are referencing an existing block called
customer_account_navigation and dening a new block within it of class
Magento\Framework\View\Element\Html\Link\Current. This block accepts two
parameters: the path that is set to our controller action and the label that is set to
Helpdesk Tickets.

Building a Module from Scratch
[ 352 ]
Creating blocks and templates
The Foggyline\Helpdesk\Block\Ticket\Index block class we pointed to
from foggyline_helpdesk_ticket_index.xml is dened under the app/code/
Foggyline/Helpdesk/Block/Ticket/Index.php le with content as follows:
<?php
namespace Foggyline\Helpdesk\Block\Ticket;
class Index extends \Magento\Framework\View\Element\Template
{
/**
* @var \Magento\Framework\Stdlib\DateTime
*/
protected $dateTime;
/**
* @var \Magento\Customer\Model\Session
*/
protected $customerSession;
/**
* @var \Foggyline\Helpdesk\Model\TicketFactory
*/
protected $ticketFactory;
/**
* @param \Magento\Framework\View\Element\Template\Context
$context
* @param array $data
*/
public function __construct(
\Magento\Framework\View\Element\Template\Context $context,
\Magento\Framework\Stdlib\DateTime $dateTime,
\Magento\Customer\Model\Session $customerSession,
\Foggyline\Helpdesk\Model\TicketFactory $ticketFactory,
array $data = []
)
{
$this->dateTime = $dateTime;
$this->customerSession = $customerSession;
$this->ticketFactory = $ticketFactory;

Chapter 12
[ 353 ]
parent::__construct($context, $data);
}
/**
* @return \Foggyline\Helpdesk\Model\ResourceModel
\Ticket\Collection
*/
public function getTickets()
{
return $this->ticketFactory
->create()
->getCollection()
->addFieldToFilter('customer_id', $this->
customerSession->getCustomerId());
}
public function getSeverities()
{
return \Foggyline\Helpdesk\Model\
Ticket::getSeveritiesOptionArray();
}
}
The reason why we dened the Foggyline\Helpdesk\Block\Ticket block class
instead of using just \Magento\Framework\View\Element\Template is because
we wanted to dene some helper methods we could then use in our index.phtml
template. These methods are getTickets (which we will use for listing all customer
tickets) and getSeverities (which we will use for creating a dropdown of possible
severities to choose from when creating a new ticket).
The template is further dened under the app/code/Foggyline/Helpdesk/view/
frontend/templates/ticket/index.phtml le with content as follows:
<?php $tickets = $block->getTickets() ?>
<form
id="form-validate"
action="<?php echo $block->
getUrl('foggyline_helpdesk/ticket/save') ?>"
method="post">
<?php echo $block->getBlockHtml('formkey') ?>
<div class="field title required">

Building a Module from Scratch
[ 354 ]
<label class="label" for="title"><span>
<?php echo __('Title') ?></span></label>
<div class="control">
<input
id="title"
type="text"
name="title"
data-validate="{required:true}"
value=""
placeholder="<?php echo __('Something
descriptive') ?>"/>
</div>
</div>
<div class="field severity">
<label class="label" for="severity"><span><?php echo
__('Severity') ?></span></label>
<div class="control">
<select name="severity">
<?php foreach ($block->getSeverities() as $value
=> $name): ?>
<option value="<?php echo $value ?>"><?php
echo $this->escapeHtml($name) ?></option>
<?php endforeach; ?>
</select>
</div>
</div>
<button type="submit" class="action save primary">
<span><?php echo __('Submit Ticket') ?></span>
</button>
</form>
<script>
require([
'jquery',
'mage/mage'
], function ($) {
var dataForm = $('#form-validate');
dataForm.mage('validation', {});
});

Chapter 12
[ 355 ]
</script>
<?php if ($tickets->count()): ?>
<table class="data-grid">
<?php foreach ($tickets as $ticket): ?>
<tr>
<td><?php echo $ticket->getId() ?></td>
<td><?php echo $block->escapeHtml($ticket->
getTitle()) ?></td>
<td><?php echo $ticket->getCreatedAt() ?></td>
<td><?php echo $ticket->getSeverityAsLabel() ?>
</td>
<td><?php echo $ticket->getStatusAsLabel() ?></td>
</tr>
<?php endforeach; ?>
</table>
<?php endif; ?>
Though this is a big chunk of code, it is easily readable as it is divided into a few very
different role-playing chunks.
The $block variable is actually the same as if we wrote $this, which is a reference
to the instance of the Foggyline\Helpdesk\Block\Ticket class where we dened
the actual getTickets method. Thus, the $tickets variable is rst dened as a
collection of tickets that belong to the currently logged-in customer.
We then specied a form with a POST method type and an action URL that
points to our Save controller action. Within the form, we have a $block-
>getBlockHtml('formkey') call, which basically returns a hidden input
eld named form_key whose value is a random string. Form keys in Magento
are a means of preventing against Cross-Site Request Forgery (CSRF), so we need
to be sure to use them on any form we dene. As part of the form, we have also
dened a title input eld, severity select eld, and submit button. Notice the CSS
classes tossed around, which guarantee that our form's look will match those of other
Magento forms.
Right after the closing form tag, we have a RequireJS type of JavaScript inclusion
for validation. Given that our form ID value is set to form-validate, the JavaScript
dataForm variable binds to it and triggers a validation check when we press the
Submit button.
We then have a count check and a foreach loop that renders all possibly existing
customer tickets.

Building a Module from Scratch
[ 356 ]
The nal result of the template code can be seen in the following image:
Handling form submissions
There is one more piece we are missing in order to complete our frontend
functionality – a controller action that will save the New Ticket form once it
is posted. We dene this action within the app/code/Foggyline/Helpdesk/
Controller/Ticket/Save.php le with content as follows:
<?php
namespace Foggyline\Helpdesk\Controller\Ticket;
class Save extends \Foggyline\Helpdesk\Controller\Ticket
{
protected $transportBuilder;
protected $inlineTranslation;
protected $scopeConfig;
protected $storeManager;
protected $formKeyValidator;

Chapter 12
[ 357 ]
protected $dateTime;
protected $ticketFactory;
public function __construct(
\Magento\Framework\App\Action\Context $context,
\Magento\Customer\Model\Session $customerSession,
\Magento\Framework\Mail\Template\TransportBuilder
$transportBuilder,
\Magento\Framework\Translate\Inline\StateInterface
$inlineTranslation,
\Magento\Framework\App\Config\ScopeConfigInterface
$scopeConfig,
\Magento\Store\Model\StoreManagerInterface $storeManager,
\Magento\Framework\Data\Form\FormKey\Validator
$formKeyValidator,
\Magento\Framework\Stdlib\DateTime $dateTime,
\Foggyline\Helpdesk\Model\TicketFactory $ticketFactory
)
{
$this->transportBuilder = $transportBuilder;
$this->inlineTranslation = $inlineTranslation;
$this->scopeConfig = $scopeConfig;
$this->storeManager = $storeManager;
$this->formKeyValidator = $formKeyValidator;
$this->dateTime = $dateTime;
$this->ticketFactory = $ticketFactory;
$this->messageManager = $context->getMessageManager();
parent::__construct($context, $customerSession);
}
public function execute()
{
$resultRedirect = $this->resultRedirectFactory->create();
if (!$this->formKeyValidator->validate($this->
getRequest())) {
return $resultRedirect->setRefererUrl();
}
$title = $this->getRequest()->getParam('title');
$severity = $this->getRequest()->getParam('severity');

Building a Module from Scratch
[ 358 ]
try {
/* Save ticket */
$ticket = $this->ticketFactory->create();
$ticket->setCustomerId($this->customerSession->
getCustomerId());
$ticket->setTitle($title);
$ticket->setSeverity($severity);
$ticket->setCreatedAt($this->dateTime->
formatDate(true));
$ticket->setStatus(\Foggyline\Helpdesk\Model\
Ticket::STATUS_OPENED);
$ticket->save();
$customer = $this->customerSession->getCustomerData();
/* Send email to store owner */
$storeScope =
\Magento\Store\Model\ScopeInterface::SCOPE_STORE;
$transport = $this->transportBuilder
->setTemplateIdentifier($this->scopeConfig->
getValue('foggyline_helpdesk/email_template/
store_owner', $storeScope))
->setTemplateOptions(
[
'area' => \Magento\Framework\App\
Area::AREA_FRONTEND,
'store' => $this->storeManager->
getStore()->getId(),
]
)
->setTemplateVars(['ticket' => $ticket])
->setFrom([
'name' => $customer->getFirstname() . ' ' .
$customer->getLastname(),
'email' => $customer->getEmail()
])
->addTo($this->scopeConfig->getValue(
'trans_email/ident_general/email', $storeScope))
->getTransport();

Chapter 12
[ 359 ]
$transport->sendMessage();
$this->inlineTranslation->resume();
$this->messageManager->addSuccess(__('Ticket
successfully created.'));
} catch (Exception $e) {
$this->messageManager->addError(__('Error occurred
during ticket creation.'));
}
return $resultRedirect->setRefererUrl();
}
}
First, we look at __construct to see what parameters are passed to it. Given that the
code we run in the execute method needs to check if the form key is valid, create a
ticket in the database, pass on the ticket and some customer info to the e-mail that is
being sent to the store owner; then, we get an idea of what kind of objects are being
passed around.
The execute method starts by checking the validity of the form key. If the form key
is invalid, we return with a redirection to the referring URL.
Passing the form key check, we grab the title and severity variables as passed by
the form. We then instantiate the ticket entity by the ticket factory create method
and simply set the ticket entity values one by one. Note that the Ticket entity
model Foggyline\Helpdesk\Model\Ticket does not really have methods like
setSeverity on its own. This is the inherited property of its \Magento\Framework\
Object parent class.
Once the ticket entity is saved, we initiate the transport builder object, passing
along all of the required parameters for successful e-mail sending. Notice how
setTemplateIdentifier uses our system.xml conguration option foggyline_
helpdesk/email_template/store_owner. This, if not specically set under the
admin Store | Conguration | Foggyline | Helpdesk area, has a default value
dened under config.xml that points to the e-mail template ID in the email_
templates.xml le.
setTemplateVars expects the array or instance of \Magento\Framework\Object to
be passed to it. We pass the entire $ticket object to it, just nesting it under the ticket
key, thus making the properties of a Ticket entity, like a title, become available in
the e-mail HTML template as {{var ticket.title}}.

Building a Module from Scratch
[ 360 ]
When a customer now submits the New Ticket form from My Account | Helpdesk
Tickets, the HTTP POST request will hit the save controller action class. If the
preceding code is successfully executed, the ticket is saved to the database and
redirection back to My Account | Helpdesk Tickets will occur showing a Ticket
successfully created message in the browser.
Building a backend interface
Until now, we have been dealing with setting up general module conguration,
e-mail templates, frontend route, frontend layout, block, and template. What remains
to complete the module requirements is the admin interface, where the store owner
can see submitted tickets and change statuses from open to closed.
The following are needed for a fully functional admin interface as per
the requirements:
• ACL resource used to allow or disallow access to the ticket listing
• Menu item linking to tickets listing the controller action
• Route that maps to our admin controller
• Layout XMLs that map to the ticket listing the controller action
• Controller action for listing tickets
• Full XML layout grid definition within layout XMLs defining grid, custom
column renderers, and custom dropdown filter values
• Controller action for closing tickets and sending e-mails to customers
Linking the access control list and menu
We start by adding a new ACL resource entry to the previously dened app/code/
Foggyline/Helpdesk/etc/acl.xml le, as a child of the Magento_Backend::admin
resource as follows:
<resource id="Magento_Customer::customer">
<resource id="Foggyline_Helpdesk::ticket_manage" title="Manage
Helpdesk Tickets"/>
</resource>
On its own, the dened resource entry does not do anything. This resource will later
be used within the menu and controller.

Chapter 12
[ 361 ]
The menu item linking to the tickets listing the controller action is dened under the
app/code/Foggyline/Helpdesk/etc/adminhtml/menu.xml le as follows:
<?xml version="1.0"?>
<config xmlns:xsi="http://www.w3.org/2001/XMLSchema-instance"
xsi:noNamespaceSchemaLocation="urn:magento:module:
Magento_Backend:etc/menu.xsd">
<menu>
<add id="Foggyline_Helpdesk::ticket_manage"
title="Helpdesk Tickets" module="Foggyline_Helpdesk"
parent="Magento_Customer::customer"
action="foggyline_helpdesk/ticket/index"
resource="Foggyline_Helpdesk::ticket_manage"/>
</menu>
</config>
We are using the menu | add element to add a new menu item under the Magento
admin area. The position of an item within the admin area is dened by the attribute
parent, which in our case means under the existing Customer menu. If the parent is
omitted, our item would appear as a new item on a menu. The title attribute value
is the label we will see in the menu. The id attribute has to uniquely differentiate our
menu item from others. The resource attribute references the ACL resource dened
in the app/code/Foggyline/Helpdesk/etc/acl.xml le. If a role of a logged-in
user does not allow him to use the Foggyline_Helpdesk::ticket_manage resource,
the user would not be able to see the menu item.
Creating routes, controllers, and layout
handles
Now we add a route that maps to our admin controller, by dening the app/code/
Foggyline/Helpdesk/etc/adminhtml/routes.xml le as follows:
<?xml version="1.0"?>
<config xmlns:xsi="http://www.w3.org/2001/XMLSchema-instance"
xsi:noNamespaceSchemaLocation="urn:magento:framework:App/etc
/routes.xsd">
<router id="admin">
<route id="foggyline_helpdesk"
frontName="foggyline_helpdesk">
<module name="Foggyline_Helpdesk"/>
</route>
</router>
</config>

Building a Module from Scratch
[ 362 ]
The admin route denition is almost identical to the frontend router denition,
where the difference primarily lies in the router ID value, which equals to the
admin here.
With the router denition in place, we can now dene our three layout XMLs, under
the app/code/Foggyline/Helpdesk/view/adminhtml/layout directory, which
map to the ticket listing the controller action:
• foggyline_helpdesk_ticket_grid.xml
• foggyline_helpdesk_ticket_grid_block.xml
• foggyline_helpdesk_ticket_index.xml
The reason we dene three layout les for a single action controller and not one is
because of the way we use the listing in control in the Magento admin area.
The content of the foggyline_helpdesk_ticket_index.xml le is dened as
follows:
<?xml version="1.0" encoding="UTF-8"?>
<page xmlns:xsi="http://www.w3.org/2001/XMLSchema-instance"
xsi:noNamespaceSchemaLocation="urn:magento:framework:View/Layout
/etc/page_configuration.xsd">
<update handle="formkey"/>
<update handle="foggyline_helpdesk_ticket_grid_block"/>
<body>
<referenceContainer name="content">
<block class="Foggyline\Helpdesk\Block
\Adminhtml\Ticket"
name="admin.block.helpdesk.ticket.grid.container">
</block>
</referenceContainer>
</body>
</page>
Two update handles are specied, one pulling in formkey and the other pulling in
foggyline_helpdesk_ticket_grid_block. We then reference the content container
and dene a new block of the Foggyline\Helpdesk\Block\Adminhtml\Ticket
class with it.

Chapter 12
[ 363 ]
Utilizing the grid widget
We could have used Magento\Backend\Block\Widget\Grid\Container as a block
class name. However, given that we needed some extra logic, like removing the Add
New button, we opted for a custom class that then extends \Magento\Backend\
Block\Widget\Grid\Container and adds the required logic.
The Foggyline\Helpdesk\Block\Adminhtml\Ticket class is dened under the
app/code/Foggyline/Helpdesk/Block/Adminhtml/Ticket.php le as follows:
<?php
namespace Foggyline\Helpdesk\Block\Adminhtml;
class Ticket extends \Magento\Backend\Block\Widget\Grid\Container
{
protected function _construct()
{
$this->_controller = 'adminhtml';
$this->_blockGroup = 'Foggyline_Helpdesk';
$this->_headerText = __('Tickets');
parent::_construct();
$this->removeButton('add');
}
}
Not much is happening in the Ticket block class here. Most importantly, we extend
from \Magento\Backend\Block\Widget\Grid\Container and dene _controller
and _blockGroup, as these serve as a sort of glue for telling our grid where to nd
other possible block classes. Since we won't have an Add New ticket feature in
admin, we are calling the removeButton method to remove the default Add New
button from the grid container.
Back to our second XML layout le, the foggyline_helpdesk_ticket_grid.xml
le, which we dene as follows:
<?xml version="1.0"?>
<layout xmlns:xsi="http://www.w3.org/2001/XMLSchema-instance"
xsi:noNamespaceSchemaLocation="urn:magento:framework:View/Layout
/etc/layout_generic.xsd">

Building a Module from Scratch
[ 364 ]
<update handle="formkey"/>
<update handle="foggyline_helpdesk_ticket_grid_block"/>
<container name="root">
<block class="Magento\Backend\Block\Widget\Grid\Container"
name="admin.block.helpdesk.ticket.grid.container"
template="Magento_Backend::widget/grid/container
/empty.phtml"/>
</container>
</layout>
Notice how the content of foggyline_helpdesk_ticket_grid.xml is nearly
identical to that of foggyline_helpdesk_ticket_index.xml. The only difference
between the two is the value of the block class and the template attribute. The block
class is dened as Magento\Backend\Block\Widget\Grid\Container, where we
previously dened it as Foggyline\Helpdesk\Block\Adminhtml\Ticket.
If we look at the content of the \Magento\Backend\Block\Widget\Grid\Container
class, we can see the following property dened:
protected $_template =
'Magento_Backend::widget/grid/container.phtml';
If we look at the content of the vendor/magento/module-backend/view/
adminhtml/templates/widget/grid/container.phtml and vendor/magento/
module-backend/view/adminhtml/templates/widget/grid/container/empty.
phtml les, the difference can be easily spotted. container/empty.phtml only
returns grid HTML, whereas container.phtml returns buttons and grid HTML.
Given that foggyline_helpdesk_ticket_grid.xml will be a handle for the AJAX
loading grid listing during sorting and ltering, we need it to return only grid HTML
upon reload.
We now move on to the third and largest of XML's layout les, the app/code/
Foggyline/Helpdesk/view/adminhtml/layout/foggyline_helpdesk_ticket_
grid_block.xml le. Given the size of it, we will split it into two code chunks as we
explain them one by one.
The rst part, or initial content of the foggyline_helpdesk_ticket_grid_block.
xml le, is dened as follows:
<?xml version="1.0" encoding="UTF-8"?>
<page xmlns:xsi="http://www.w3.org/2001/XMLSchema-instance"
xsi:noNamespaceSchemaLocation="urn:magento:framework:View/Layout
/etc/page_configuration.xsd">

Chapter 12
[ 365 ]
<body>
<referenceBlock name=
"admin.block.helpdesk.ticket.grid.container">
<block class="Magento\Backend\Block\Widget\Grid"
name="admin.block.helpdesk.ticket.grid" as="grid">
<arguments>
<argument name="id" xsi:type="string">
ticketGrid</argument>
<argument name="dataSource" xsi:type="object">
Foggyline\Helpdesk\Model\ResourceModel
\Ticket\Collection
</argument>
<argument name="default_sort"
xsi:type="string">ticket_id</argument>
<argument name="default_dir"
xsi:type="string">desc</argument>
<argument name="save_parameters_in_session"
xsi:type="boolean">true</argument>
<argument name="use_ajax"
xsi:type="boolean">true</argument>
</arguments>
<block class="Magento\Backend\Block
\Widget\Grid\ColumnSet" name=
"admin.block.helpdesk.ticket.grid.columnSet"
as="grid.columnSet">
<!-- Column definitions here -->
</block>
</block>
</referenceBlock>
</body>
</page>
Notice <!-- Column definitions here -->; we will come back to that soon.
For now, let's analyze what is happening here. Right after a body element, we
have a reference to admin.block.helpdesk.ticket.grid.container, which is a
content block child dened under the foggyline_helpdesk_ticket_grid.xml and
foggyline_helpdesk_ticket_index.xml les. Within this reference, we are dening
another block of class Magento\Backend\Block\Widget\Grid, passing it a name of
our choosing and an alias. Further, this block has an arguments list and another block
of class Magento\Backend\Block\Widget\Grid\ColumnSet as child elements.

Building a Module from Scratch
[ 366 ]
Through the arguments list we specify the:
• id: Set to the value of ticketGrid, we can set any value we want here,
ideally sticking to formula {entity name}.
• dataSource: Set to the value of Foggyline\Helpdesk\Model\
ResourceModel\Ticket\Collection, which is the name of our Ticket
entity resource class.
• default_sort: Set to the value of ticket_id, which is the property of the
Ticket entity by which we want to sort.
• default_dir: Set to the value of desc, to denote a descending order of
sorting. This value functions together with default_sort as a single unit.
• save_parameters_in_session: Set to true, this is easiest to explain using
the following example: if we do some sorting and filtering on the Ticket
grid and then move on to another part of the admin area, then come back to
Ticket grid, if this value is set to yes, the grid we see will have those filters
and sorting set.
• use_ajax: Set to true, when grid filtering and sorting is triggered, an AJAX
loader kicks in and reloads only the grid area and not the whole page.
Right after the grid blocks argument list, we have the grid column set. This brings us
to the second part of foggyline_helpdesk_ticket_grid_block.xml content. We
simply replace the <!-- Columns here --> comment with the following:
<block class="Magento\Backend\Block\Widget\Grid\Column"
as="ticket_id">
<arguments>
<argument name="header" xsi:type="string"
translate="true">ID</argument>
<argument name="type" xsi:type="string">number</argument>
<argument name="id" xsi:type="string">ticket_id</argument>
<argument name="index"
xsi:type="string">ticket_id</argument>
</arguments>
</block>
<block class="Magento\Backend\Block\Widget\Grid\Column"
as="title">
<arguments>
<argument name="header" xsi:type="string"
translate="true">Title</argument>
<argument name="type" xsi:type="string">string</argument>

Chapter 12
[ 367 ]
<argument name="id" xsi:type="string">title</argument>
<argument name="index" xsi:type="string">title</argument>
</arguments>
</block>
<block class="Magento\Backend\Block\Widget\Grid\Column"
| as="severity">
<arguments>
<argument name="header" xsi:type="string"
translate="true">Severity</argument>
<argument name="index"
xsi:type="string">severity</argument>
<argument name="type" xsi:type="string">options</argument>
<argument name="options" xsi:type="options"
model="Foggyline\Helpdesk\Model\Ticket\Grid\Severity"/>
<argument name="renderer" xsi:type="string">
Foggyline\Helpdesk\Block\Adminhtml\Ticket\Grid\Renderer
\Severity
</argument>
<argument name="header_css_class" xsi:type="string">
col-form_id</argument>
<argument name="column_css_class" xsi:type="string">
col-form_id</argument>
</arguments>
</block>
<block class="Magento\Backend\Block\Widget\Grid\Column"
as="status">
<arguments>
<argument name="header" xsi:type="string"
translate="true">Status</argument>
<argument name="index" xsi:type="string">status</argument>
<argument name="type" xsi:type="string">options</argument>
<argument name="options" xsi:type="options"
model="Foggyline\Helpdesk\Model\Ticket
\Grid\Status"/>
<argument name="renderer" xsi:type="string">
Foggyline\Helpdesk\Block\Adminhtml\Ticket\Grid
\Renderer\Status
</argument>
<argument name="header_css_class" xsi:type="string">
col-form_id</argument>
<argument name="column_css_class" xsi:type="string">
col-form_id</argument>
</arguments>

Building a Module from Scratch
[ 368 ]
</block>
<block class="Magento\Backend\Block\Widget\Grid\Column"
as="action">
<arguments>
<argument name="id" xsi:type="string">action</argument>
<argument name="header" xsi:type="string"
translate="true">Action</argument>
<argument name="type" xsi:type="string">action</argument>
<argument name="getter" xsi:type="string">getId</argument>
<argument name="filter"
xsi:type="boolean">false</argument>
<argument name="sortable"
xsi:type="boolean">false</argument>
<argument name="actions" xsi:type="array">
<item name="view_action" xsi:type="array">
<item name="caption" xsi:type="string"
translate="true">Close</item>
<item name="url" xsi:type="array">
<item name="base"
xsi:type="string">*/*/close</item>
</item>
<item name="field" xsi:type="string">id</item>
</item>
</argument>
<argument name="header_css_class" xsi:type="string">
col-actions</argument>
<argument name="column_css_class" xsi:type="string">
col-actions</argument>
</arguments>
</block>
Similar to grid, column denitions also have arguments that dene its look
and behavior:
• header: Mandatory, the value we want to see as a label on top of the column.
• type: Mandatory, can be anything from: date, datetime, text, longtext,
options, store, number, currency, skip-list, wrapline, and country.
• id: Mandatory, a unique value that identifies our column, preferably
matching the name of the entity property.
• index: Mandatory, the database column name.

Chapter 12
[ 369 ]
• options: Optional, if we are using a type like options, then for the options
argument we need to specify the class like Foggyline\Helpdesk\Model\
Ticket\Grid\Severity that implements \Magento\Framework\Option\
ArrayInterface, meaning it provides the toOptionArray method that then
fills the values of options during grid rendering.
• renderer: Optional, as our Ticket entities store severity and status as
integer values in the database, columns would render those integer values
into columns, which is not really useful. We want to turn those integer values
into labels. In order to do so, we need to rewrite the rendering bit of a single
table cell, which we do with the help of the renderer argument. The value
we pass to it, Foggyline\Helpdesk\Block\Adminhtml\Ticket\Grid\
Renderer\Severity, needs to be a class that extends \Magento\Backend\
Block\Widget\Grid\Column\Renderer\AbstractRenderer and does its
own implementation of the render method.
• header_css_class: Optional, if we prefer to specify a custom header class.
• column_css_class: Optional, if we prefer to specify a custom column class.
Creating a grid column renderer
The Foggyline\Helpdesk\Block\Adminhtml\Ticket\Grid\Renderer\Severity
class, dened in the app/code/Foggyline/Helpdesk/Block/Adminhtml/Ticket/
Grid/Renderer/Severity.php le, is as follows:
<?php
namespace Foggyline\Helpdesk\Block\Adminhtml\Ticket\Grid\Renderer;
class Severity extends \Magento\Backend\Block\Widget\Grid
\Column\Renderer\AbstractRenderer
{
protected $ticketFactory;
public function __construct(
\Magento\Backend\Block\Context $context,
\Foggyline\Helpdesk\Model\TicketFactory $ticketFactory,
array $data = []
)
{
parent::__construct($context, $data);
$this->ticketFactory = $ticketFactory;

Building a Module from Scratch
[ 370 ]
}
public function render(\Magento\Framework\DataObject $row)
{
$ticket = $this->ticketFactory->create()->load($row->
getId());
if ($ticket && $ticket->getId()) {
return $ticket->getSeverityAsLabel();
}
return '';
}
}
Here, we are passing the instance of the ticket factory to the constructor and then
using that instance within the render method to load a ticket based on the ID value
fetched from the current row. Given that $row->getId() returns the ID of the ticket,
this is a nice way to reload the entire ticket entity and then fetch the full label from
the ticket model by using $ticket->getSeverityAsLabel(). Whatever string we
return from this method is what will be shown under the grid row.
Another renderer class that is referenced within the foggyline_helpdesk_ticket_
grid_block.xml le is Foggyline\Helpdesk\Block\Adminhtml\Ticket\Grid\
Renderer\Status, and we dene its content under the app/code/Foggyline/
Helpdesk/Block/Adminhtml/Ticket/Grid/Renderer/Status.php le as follows:
<?php
namespace Foggyline\Helpdesk\Block\Adminhtml\Ticket\Grid\Renderer;
class Status extends \Magento\Backend\Block\Widget\Grid\Column
\Renderer\AbstractRenderer
{
protected $ticketFactory;
public function __construct(
\Magento\Backend\Block\Context $context,
\Foggyline\Helpdesk\Model\TicketFactory $ticketFactory,
array $data = []
)
{

Chapter 12
[ 371 ]
parent::__construct($context, $data);
$this->ticketFactory = $ticketFactory;
}
public function render(\Magento\Framework\DataObject $row)
{
$ticket = $this->ticketFactory->create()->load($row->
getId());
if ($ticket && $ticket->getId()) {
return $ticket->getStatusAsLabel();
}
return '';
}
}
Given that it too is used for a renderer, the content of the Status class is nearly
identical to the content of the Severity class. We pass on the ticket factory object
via the constructor, so we have it internally for usage within the render method.
Then we load the Ticket entity using the ticket factory and ID value fetched from a
$row object. As a result, the column will contain the label value of a status and not its
integer value.
Creating grid column options
Besides referencing renderer classes, our foggyline_helpdesk_ticket_grid_
block.xml le also references the options class for the Severity eld.
We dene the Foggyline\Helpdesk\Model\Ticket\Grid\Severity options class
under the app/code/Foggyline/Helpdesk/Model/Ticket/Grid/Severity.php le
as follows:
<?php
namespace Foggyline\Helpdesk\Model\Ticket\Grid;
class Severity implements \Magento\Framework\Option\ArrayInterface
{
public function toOptionArray()
{
return \Foggyline\Helpdesk\Model
\Ticket::getSeveritiesOptionArray();
}
}

Building a Module from Scratch
[ 372 ]
The options value from XML layouts refers to a class that has to implement the
toOptionArray method, which returns an array of arrays, such as the following
example:
return [
['value'=>'theValue1', 'theLabel1'],
['value'=>'theValue2', 'theLabel2'],
];
Our Severity class simply calls the static method we have dened on the Ticket
class, the getSeveritiesOptionArray, and passes along those values.
Creating controller actions
Up to this point, we have dened the menu item, ACL resource, XML layouts, block,
options class, and renderer classes. What remains to connect it all are controllers.
We will need three controller actions (Index, Grid, and Close), all extending from
the same admin Ticket controller.
We dene the admin Ticket controller under the app/code/Foggyline/Helpdesk/
Controller/Adminhtml/Ticket.php le as follows:
<?php
namespace Foggyline\Helpdesk\Controller\Adminhtml;
class Ticket extends \Magento\Backend\App\Action
{
protected $resultPageFactory;
protected $resultForwardFactory;
protected $resultRedirectFactory;
public function __construct(
\Magento\Backend\App\Action\Context $context,
\Magento\Framework\View\Result\PageFactory
$resultPageFactory,
\Magento\Backend\Model\View\Result\ForwardFactory
$resultForwardFactory
)
{
$this->resultPageFactory = $resultPageFactory;
$this->resultForwardFactory = $resultForwardFactory;
$this->resultRedirectFactory = $context->
getResultRedirectFactory();

Chapter 12
[ 373 ]
parent::__construct($context);
}
protected function _isAllowed()
{
return $this->_authorization->
isAllowed('Foggyline_Helpdesk::ticket_manage');
}
protected function _initAction()
{
$this->_view->loadLayout();
$this->_setActiveMenu(
'Foggyline_Helpdesk::ticket_manage'
)->_addBreadcrumb(
__('Helpdesk'),
__('Tickets')
);
return $this;
}
}
There are a few things to note here. $this->resultPageFactory, $this-
>resultForwardFactory and $this->resultRedirectFactory are objects to be
used on the child (Index, Grid, and Close), so we do not have to initiate them in
each child class separately.
The _isAllowed() method is extremely important every time we have a custom-
dened controller or controller action that we want to check against our custom ACL
resource. Here, we are the isAllowed method call on the \Magento\Framework\
AuthorizationInterface type of object ($this->_authorization). The parameter
passed to the isAllowed method call should be the ID value of our custom
ACL resource.
We then have the _initAction method, which is used for setting up logic shared
across child classes, usually things like loading the entire layout, setting up the active
menu ag, and adding breadcrumbs.
Moving forward, we dene the Index controller action within the app/code/
Foggyline/Helpdesk/Controller/Adminhtml/Ticket/Index.php le as follows:
<?php
namespace Foggyline\Helpdesk\Controller\Adminhtml\Ticket;

Building a Module from Scratch
[ 374 ]
class Index extends
\Foggyline\Helpdesk\Controller\Adminhtml\Ticket
{
public function execute()
{
if ($this->getRequest()->getQuery('ajax')) {
$resultForward = $this->resultForwardFactory->
create();
$resultForward->forward('grid');
return $resultForward;
}
$resultPage = $this->resultPageFactory->create();
$resultPage->
setActiveMenu('Foggyline_Helpdesk::ticket_manage');
$resultPage->getConfig()->getTitle()->
prepend(__('Tickets'));
$resultPage->addBreadcrumb(__('Tickets'), __('Tickets'));
$resultPage->addBreadcrumb(__('Manage Tickets'),
__('Manage Tickets'));
return $resultPage;
}
}
Controller actions execute within their own class, within the execute method.
Our execute method rst checks if the coming request is the AJAX parameter
within it. If there is an AJAX parameter, the request is forwarded to the Grid
action of the same controller.
If there is no AJAX controller, we simply create the instance of the \Magento\
Framework\View\Result\PageFactory object, and set title, active menu item,
and breadcrumbs in it.
A logical question at this point would be how does all of this work and where can we
see it. If we log in to the Magento admin area, under the Customers menu we should
be able to see the Helpdesk Tickets menu item. This item, dened previously within
app/code/Foggyline/Helpdesk/etc/adminhtml/menu.xml, says the menu action
attribute equals to foggyline_helpdesk/ticket/index, which basically translates
to the Index action of our Ticket controller.
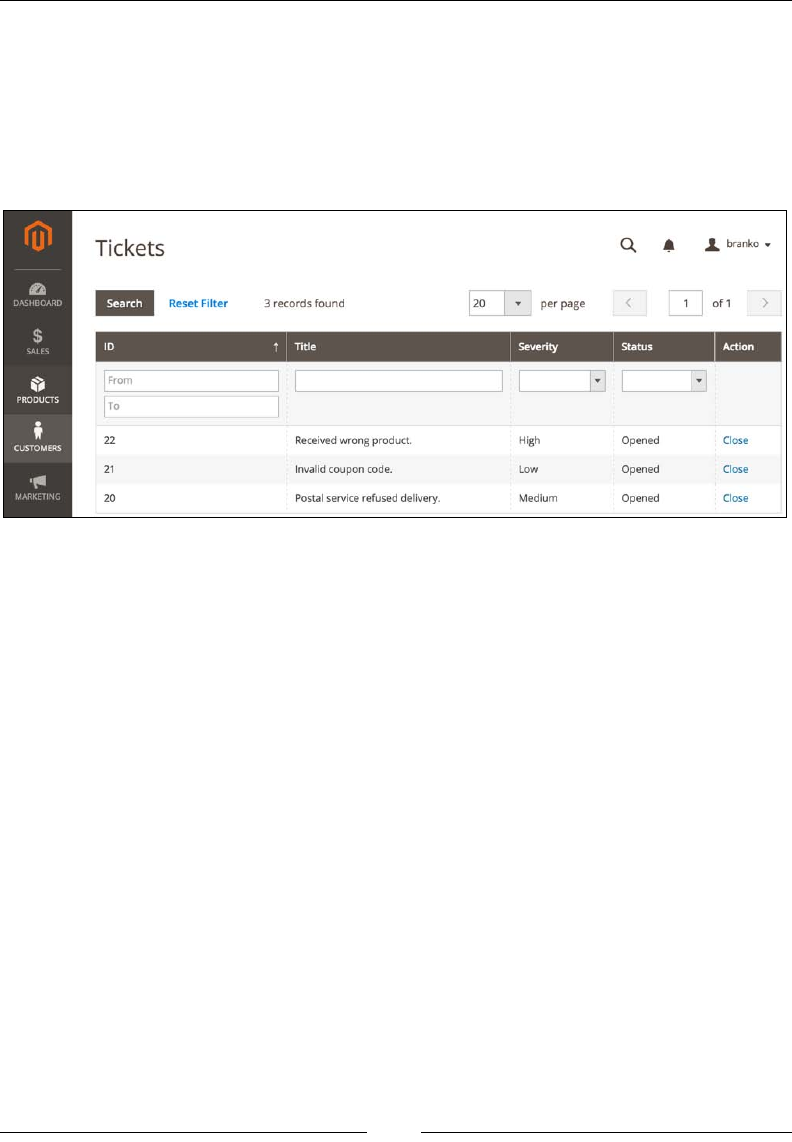
Chapter 12
[ 375 ]
Once we click on the Helpdesk Tickets link, Magento will hit the Index action
within its Ticket controller and try to nd the XML le that has the matching route
{id}+{controller name }+{controller action name }+{xml le extension }, which in our case
translates to {foggyline_helpdesk}+{ticket}+{index}+{.xml}.
At this point, we should be able to see the screen, as shown in the following
screenshot:
However, if we now try to use sorting or ltering, we would get a broken layout.
This is because based on arguments dened under the foggyline_helpdesk_
ticket_grid_block.xml le, we are missing the controller Grid action. When we
use sorting or ltering, the AJAX request hits the Index controller and asks to be
forwarded to the Grid action, which we haven't dened yet.
We now dene the Grid action within the app/code/Foggyline/Helpdesk/
Controller/Adminhtml/Ticket/Grid.php le as follows:
<?php
namespace Foggyline\Helpdesk\Controller\Adminhtml\Ticket;
class Grid extends \Foggyline\Helpdesk\Controller\Adminhtml\Ticket
{
public function execute()
{
$this->_view->loadLayout(false);
$this->_view->renderLayout();
}
}

Building a Module from Scratch
[ 376 ]
There is only one execute method with the Grid controller action class, which is
expected. The code within the execute method simply calls the loadLayout(false)
method to prevent the entire layout loading, making it load only the bits dened
under the foggyline_helpdesk_ticket_grid.xml le. This effectively returns the
grid HTML to the AJAX, which refreshes the grid on the page.
Finally, we need to handle the Close action link we see on the grid. This link was
dened as part of the column denition within the foggyline_helpdesk_ticket_
grid_block.xml le and points to */*/close, which translates to "router as relative
from current URL / controller as relative from current URL / close action", which
further equals to our Ticket controller Close action.
We dene the Close controller action under the app/code/Foggyline/Helpdesk/
Controller/Adminhtml/Ticket/Close.php le as follows:
<?php
namespace Foggyline\Helpdesk\Controller\Adminhtml\Ticket;
class Close extends
\Foggyline\Helpdesk\Controller\Adminhtml\Ticket
{
protected $ticketFactory;
protected $customerRepository;
protected $transportBuilder;
protected $inlineTranslation;
protected $scopeConfig;
protected $storeManager;
public function __construct(
\Magento\Backend\App\Action\Context $context,
\Magento\Framework\View\Result\PageFactory
$resultPageFactory,
\Magento\Backend\Model\View\Result\ForwardFactory
$resultForwardFactory,
\Foggyline\Helpdesk\Model\TicketFactory $ticketFactory,
\Magento\Customer\Api\CustomerRepositoryInterface
$customerRepository,
\Magento\Framework\Mail\Template\TransportBuilder
$transportBuilder,
\Magento\Framework\Translate\Inline\StateInterface
$inlineTranslation,
\Magento\Framework\App\Config\ScopeConfigInterface
$scopeConfig,

Chapter 12
[ 377 ]
\Magento\Store\Model\StoreManagerInterface $storeManager
)
{
$this->ticketFactory = $ticketFactory;
$this->customerRepository = $customerRepository;
$this->transportBuilder = $transportBuilder;
$this->inlineTranslation = $inlineTranslation;
$this->scopeConfig = $scopeConfig;
$this->storeManager = $storeManager;
parent::__construct($context, $resultPageFactory,
$resultForwardFactory);
}
public function execute()
{
$ticketId = $this->getRequest()->getParam('id');
$ticket = $this->ticketFactory->create()->load($ticketId);
if ($ticket && $ticket->getId()) {
try {
$ticket->setStatus(\Foggyline
\Helpdesk\Model\Ticket::STATUS_CLOSED);
$ticket->save();
$this->messageManager->addSuccess(__('Ticket
successfully closed.'));
/* Send email to customer */
$customer = $this->customerRepository->
getById($ticket->getCustomerId());
$storeScope = \Magento\Store\Model\
ScopeInterface::SCOPE_STORE;
$transport = $this->transportBuilder
->setTemplateIdentifier($this->scopeConfig->
getValue('foggyline_helpdesk/email_template
/customer', $storeScope))
->setTemplateOptions(
[
'area' => \Magento\Framework\App\
Area::AREA_ADMINHTML,
'store' => $this->storeManager-
>getStore()->getId(),
]
)

Building a Module from Scratch
[ 378 ]
->setTemplateVars([
'ticket' => $ticket,
'customer_name' => $customer->
getFirstname()
])
->setFrom([
'name' => $this->scopeConfig->
getValue('trans_email/ident_general
/name', $storeScope),
'email' => $this->scopeConfig->
getValue('trans_email/ident_general
/email', $storeScope)
])
->addTo($customer->getEmail())
->getTransport();
$transport->sendMessage();
$this->inlineTranslation->resume();
$this->messageManager->addSuccess(__('Customer
notified via email.'));
} catch (Exception $e) {
$this->messageManager->addError(__('Error with
closing ticket action.'));
}
}
$resultRedirect = $this->resultRedirectFactory->create();
$resultRedirect->setPath('*/*/index');
return $resultRedirect;
}
}
The Close action controller has two separate roles to fulll. One is to change the
ticket status; the other is to send an e-mail to the customer using the proper e-mail
template. The class constructor is being passed a lot of parameters that all instantiate
the objects we will be juggling around.
Within the execute action, we rst check for the existence of the id parameter and
then try to load a Ticket entity through the ticket factory, based on the provided ID
value. If the ticket exists, we set its status label to \Foggyline\Helpdesk\Model\
Ticket::STATUS_CLOSED and save it.

Chapter 12
[ 379 ]
Following the ticket save is the e-mail-sending code, which is very similar to the
one that we already saw in the customer New Ticket save action. The difference
is that the e-mail goes out from the admin user to the customer this time. We are
setting the template ID to the conguration value at path foggyline_helpdesk/
email_template/customer. The setTemplateVars method is passed to the member
array this time, both ticket and customer_name, as they are both used in the e-mail
template. The setFrom method is passed the general store username and e-mail, and
the sendMessage method is called on the transport object.
Finally, using the resultRedirectFactory object, the user is redirected back to the
tickets grid.
With this, we nalize our module functional requirement.
Though we are done with the functional requirement of a module, what remains
for us as developers is to write tests. There are several types of tests, such as unit,
functional, integration, and so on. To keep things simple, within this chapter we will
cover only unit tests across a single model class.
Creating unit tests
This chapter assumes that we have PHPUnit congured and available on the
command line. If this is not the case, PHPUnit can be installed using instructions
from the https://phpunit.de/ website.
To build and run tests using the PHPUnit testing framework, we need to dene
test locations and other conguration options via an XML le. Magento denes this
XML conguration le under dev/tests/unit/phpunit.xml.dist. Let's make a
copy of that le under dev/tests/unit/phpunit-foggyline-helpdesk.xml, with
adjustments as follows:
<?xml version="1.0" encoding="UTF-8"?>
<phpunit xmlns:xsi="http://www.w3.org/2001/XMLSchema-instance"
xsi:noNamespaceSchemaLocation="http://schema.phpunit.de/4.1
/phpunit.xsd"
colors="true"
bootstrap="./framework/bootstrap.php"
>
<testsuite name="Foggyline_Helpdesk - Unit Tests">
<directory suffix="Test.php">
../../../app/code/Foggyline/Helpdesk/Test/Unit
</directory>
Building a Module from Scratch
[ 380 ]
</testsuite>
<php>
<ini name="date.timezone" value="Europe/Zagreb"/>
<ini name="xdebug.max_nesting_level" value="200"/>
</php>
<filter>
<whitelist addUncoveredFilesFromWhiteList="true">
<directory suffix=".php">
../../../app/code/Foggyline/Helpdesk/*</directory>
<exclude>
<directory>
../../../app/code/Foggyline/Form/Helpdesk
</directory>
</exclude>
</whitelist>
</filter>
<logging>
<log type="coverage-html"
target="coverage_dir/Foggyline_Helpdesk/test-
reports/coverage" charset="UTF-8"
yui="true" highlight="true"/>
</logging>
</phpunit>
We are making a special XML conguration le for our
module alone because we want to quickly run a few of the
tests contained within our module alone and not the entire
Magento app/code folder.
Given that the actual art of writing unit tests is beyond the scope of this book and
writing the full unit test with 100 percent code coverage for this simple module
would require at least a dozen more pages, we will only write a single test, one that
covers the Ticket entity model class.
We dene our Ticket entity model class test under the app/code/Foggyline/
Helpdesk/Test/Unit/Model/TicketTest.php le as follows:
<?php
namespace Foggyline\Helpdesk\Test\Unit\Model;
class TicketTest extends \PHPUnit_Framework_TestCase
{
protected $objectManager;
protected $ticket;

Chapter 12
[ 381 ]
public function setUp()
{
$this->objectManager = new
\Magento\Framework\TestFramework\Unit\Helper
\ObjectManager($this);
$this->ticket = $this->objectManager->
getObject('Foggyline\Helpdesk\Model\Ticket');
}
public function testGetSeveritiesOptionArray()
{
$this-> assertNotEmpty(\Foggyline
\Helpdesk\Model\Ticket::getSeveritiesOptionArray());
}
public function testGetStatusesOptionArray()
{
$this->assertNotEmpty(\Foggyline
\Helpdesk\Model\Ticket::getStatusesOptionArray());
}
public function testGetStatusAsLabel()
{
$this->ticket->setStatus(\Foggyline\Helpdesk
\Model\Ticket::STATUS_CLOSED);
$this->assertEquals(
\Foggyline\Helpdesk\Model\Ticket::$statusesOptions
[\Foggyline\Helpdesk\Model\Ticket::STATUS_CLOSED],
$this->ticket->getStatusAsLabel()
);
}
public function testGetSeverityAsLabel()
{
$this->ticket->setSeverity(\Foggyline
\Helpdesk\Model\Ticket::SEVERITY_MEDIUM);
$this->assertEquals(
\Foggyline\Helpdesk\Model\Ticket::$severitiesOptions
[\Foggyline\Helpdesk\Model\Ticket::SEVERITY_MEDIUM],
$this->ticket->getSeverityAsLabel()
);
}
}

Building a Module from Scratch
[ 382 ]
The location of test les should map those of the les being tested. The naming of
the test le should also follow the naming of the le being tested with the sufx
Test attached to it. This means that if our Ticket model is located under the
modules Model/Ticket.php le, then our test should be located under Test/Unit/
TicketTest.php.
Our Foggyline\Helpdesk\Test\Unit\Model\TicketTest extends the \PHPUnit_
Framework_TestCase class. There is a setUp method we need to dene, which
acts like a constructor, where we set up the variables and everything that requires
initializing.
Using Magento ObjectManager, we instantiate the Ticket model, which is then
used within the test methods. The actual test methods follow a simple naming
pattern, where the name of the method from the Ticket model matches the
{test}+{method name} from the TicketTest class.
We dened four test methods: testGetSeveritiesOptionArray,
testGetStatusesOptionArray, testGetStatusAsLabel, and
testGetSeverityAsLabel. Within the test methods, we are using only
assertEquals and assertNotEmpty methods from the PHPUnit testing framework
library to do basic checks.
We can now open a console, change the directory to our Magento installation
directory, and execute the following command:
phpunit -c dev/tests/unit/phpunit-foggyline-helpdesk.xml
After the command executes, the console should show an output as shown:
PHPUnit 4.7.6 by Sebastian Bergmann and contributors.
....
Time: 528 ms, Memory: 11.50Mb
OK (4 tests, 4 assertions)
Generating code coverage report in HTML format ... done
Looking back at our dev/tests/unit/phpunit-foggyline-helpdesk.xml le,
under the target attribute of the phpunit > logging > log element, we can see
that the test report is dumped into the coverage_dir/Foggyline_Helpdesk/test-
reports/coverage folder relative to the XML le.
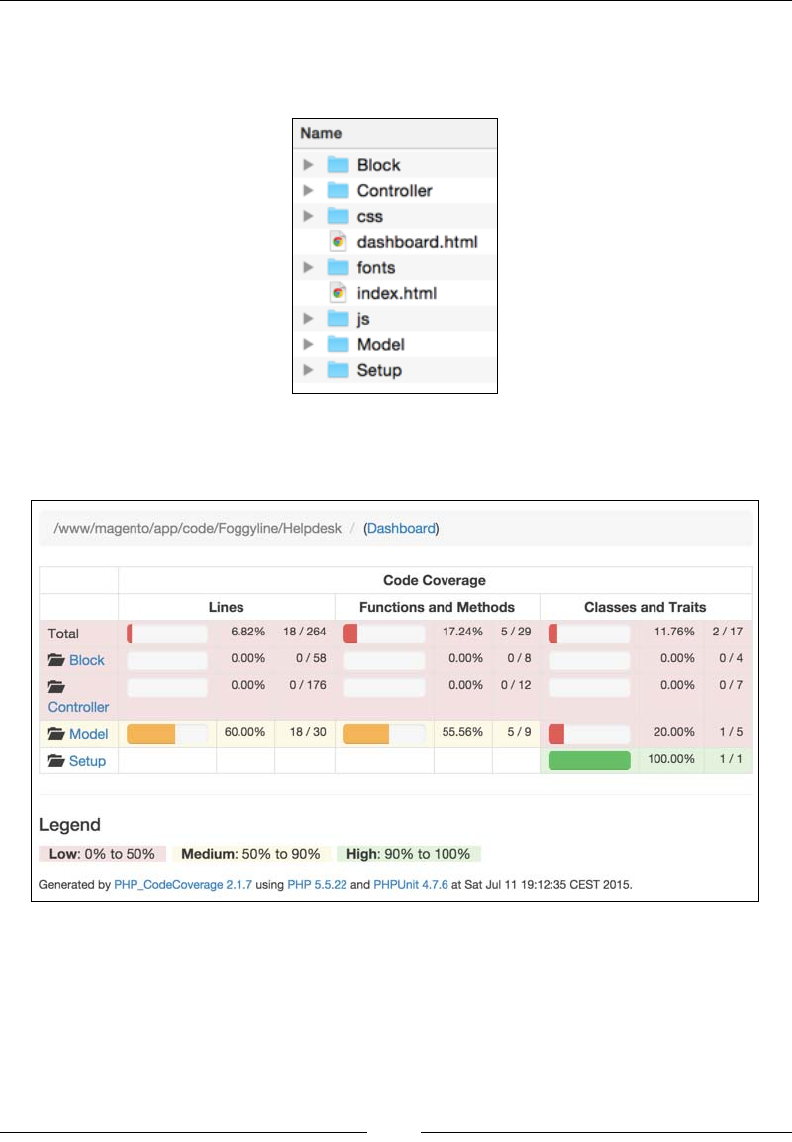
Chapter 12
[ 383 ]
If we open the dev/tests/unit/coverage_dir/Foggyline_Helpdesk/test-
reports/coverage/ folder, we should see a whole lot of les generated there,
as shown in the following screenshot:
Opening the index.html le in the browser should give us a page as shown in the
following screenshot:
We can see the code coverage report showing 60% on lines and methods for our
Model folder and 0% for the rest. This is because we only wrote the test for the
Ticket entity model class, whereas the rest remain untested.

Building a Module from Scratch
[ 384 ]
Summary
This chapter gave a full step-by-step guide to writing a simple yet functional
Magento module. Seemingly simple in terms of functionality, we can see that the
module code is signicantly scattered across multiple PHP, XML, and PHMTL les.
With this simple module, we covered quite a lot of various Magento platform
parts, from routes, ACLs, controllers, blocks, XML layouts, grids, controller actions,
models, resources, collections, install scripts, interactions with session, e-mail
templates, e-mail transport, and layout objects.
At the end, we wrote a few simple unit tests for our models. Although the practice is
to write unit tests for all of our PHP code, we opted for a shorter version or else we
would need more pages to cover everything.
The full module code is available here: https://github.com/ajzele/B05032-
Foggyline_Helpdesk.
With this being the last chapter, let us look at a short overview of the things we
learned throughout the whole book. Our journey started by grasping the Magento
platform architecture, where we gained signicant insight into the technology stack
behind it. We then progressed to environment management. Although it might seem
like a wrong order of things, we opted for this next step in order to quickly get us
set for development. We then looked into programming concepts and conventions,
which served as a precursor to actual hands-on development bits. Details of entity
persistence were shown through model, resource, collection classes, and indexers.
We further covered the importance and practical details of dependency injection and
interception. Backend and frontend-related development was covered in their own
two chapters, outlining the most common bits and pieces for making customizations
to our Magento platform. We then dug into details of the web API, showing how
to make authenticated API calls and even dene our own APIs. Along the way, we
covered a few major functional areas as well, such as customers, reports, import
export, cart, and so on. The testing and QA took up a signicant chunk as we briey
covered all forms of available tests. Finally, we used what we learned to build a fully
functional module.
Although we have covered a signicant path on our journey, this is merely a rst
step. Given its massive code base, diverse technology stacks, and feature list,
Magento is not an easy platform to master. Hopefully, this book will give enough
incentive to take further steps into proling ourselves as true Magento experts.

[ 385 ]
Index
A
access control lists (acl.xml)
creating 339, 340
after listener
using 118
Amazon Elastic Compute Cloud
(Amazon EC2) 22
Amazon Web Services (AWS) 20, 22
AngularJS
URL 191
Apache JMeter
URL 312
API call examples
deleteById service method
call examples 248-250
getById service method
call examples 235-237
getList service method
call examples 238-242
references 250
save (as new) service method
call examples 243-245
save (as update) service method
call examples 245-247
around listener
using 118
authentication methods
dening 201
OAuth-based authentication 202
session-based authentication 202
token-based authentication 202
AWS management console
URL 21
B
backend development 121
backend interface
access control list and menu,
linking 360, 361
building 360
controller actions, creating 372-379
controllers, creating 361, 362
grid column options, creating 371, 372
grid column renderer, creating 369-371
grid widget, utilizing 363-369
routes, creating 361, 362
Bearer HTTP authorization scheme 202
before listener
using 117
blocks 172-174
C
cache(s)
dening 143-146
catalog management
about 262
categories, managing manually 262-264
categories, managing via API 265
categories, managing via code 264, 265
products, managing manually 266, 267
products, managing via API 268
products, managing via code 267
class preferences
conguring 109
CMS management
blocks, managing manually 256, 257
blocks, managing via API 259

[ 386 ]
blocks, managing via code 257, 258
dening 255
pages, managing manually 259, 260
pages, managing via API 261, 262
pages, managing via code 261
code demarcation 58
code generation 55, 56
coding standards 58
collection lters 98, 99
collections
managing 91-98
components, open source technologies
Apache or Nginx 2
Coding standards 2
Composer 2
CSS 2
HTML 2
jQuery 2
MTF 2
MySQL 2
PHP 2
RequireJS 2
third-party libraries 2
Composer
dening 47-52
references 50
URL 48
conguration le (cong.xml)
creating 331
cookies 127-132
Cron jobs
dening 122-124
CRUD (create, read, update, and delete) 4
CSV les
dening 152
customer management
about 269
customer address, managing via API 274
customer address, managing
via code 273, 274
customers, managing
manually 269-271
customers, managing via API 272
customers, managing via code 272
custom ofine payment methods
dening 294-303
URL 303
custom ofine shipping methods
dening 287-294
URL 294
custom product types
dening 280-286
URL 286
custom variables
dening 149, 150
custom Web APIs
API call examples 235
creating 218-234
D
data interfaces 53
data scripts
dening 69, 70
dependency injection 101-108
development environment
setting up 12
Vagrant 12
Vagrant project 13-16
VirtualBox 12
DNS
setting up 43-45
E
EC2 instance
setting up 35-42
Elastic IP
setting up 43-45
e-mail templates (email_templates.xml)
creating 333, 334
Entity-Attribute-Value (EAV) 4
entity CRUD actions
dening 85-87
references 86
entity persistence
managing 344-347
events
dening 138-142
dynamic 141

[ 387 ]
static 141
existing entities
deleting 91
reading 90
updating 91
Ext JS
URL 190
F
factories 56
ow
rendering 160-166
frontend development 159
frontend interface
blocks, creating 352-355
building 348
controllers, creating 348-351
form submissions, handling 356-359
layout handle, creating 348-351
routes, creating 348-351
templates, creating 352-355
functional testing
dening 314-317
G
gruntjs
URL 191
I
i18n (internationalization)
dening 150-154
IAM groups
creating 25-28
IAM users
creating 23-25
Identity and Access Management (IAM) 22
indexing 155, 156
inline translation 153
installation script (InstallSchema.php)
creating 341-344
install data script (InstallData.php)
creating 79-83
install schema script (InstallSchema.php)
creating 71-78
integrated development environments
(IDEs) 56
integration testing
dening 309
integrity testing
dening 310
interception 113
J
jasmine
URL 191
JavaScript
about 190-192
custom JS component, creating 193, 194
JavaScript coding standard
URL 58
JavaScript component (JS component) 192
JavaScript DocBlock standard
about 59
URL 59
jQuery
URL 190
jQuery UI
URL 190
jQuery UI widget 192
K
Kernel-based Virtual Machine (KVM) 12
Knockout
URL 190
L
layouts 183-186
legacy testing
dening 311
LESS coding standard 59
logging 132-135
M
Magento
about 1
architectural layers 3, 4
domain layer 3

[ 388 ]
module lesystem structure 8, 9
persistence layer 4
presentation layer 3
service layer 3
top-level lesystem structure 4-7
Magento Testing Framework (MTF)
about 2, 314
requirements 314
URL 3
miniature module
creating 62, 63
EAV model, creating 66-68
simple model, creating 64-66
modernizr
URL 190
module
registering 329-331
module requirements
dening 327, 328
moment.js
URL 191
N
NetBeans PHP 184
new entities
creating 88, 89
notication messages
dening 124-127
O
OAuth 1.0a handshake process 202
OAuth-based authentication
dening 207-213
OAuth-based Web API calls
dening 213-217
OAuth client
URL 209
object manager 102, 103
Object Relational Mapping (ORM) 61
observers
dening 138-142
P
performance testing
dening 312-314
PHP
URL 58
PHP coding standard 58
PHP OOP 2
PhpStorm 184
PHPUnit
URL 379
PHPUnit testing framework 308
plugin
about 113
creating 114-116
plugin sort order 119
production environment
access, setting up for S3 usage 22
Amazon Web Services (AWS) 20, 22
bash script, for automated EC2 setup 30-34
S3, setting up for database and media les
backup 28-30
setting up 20
products and customers Import
dening 275-279
proler
about 136-138
dening 137, 138
enabling 136
Prototype
URL 190
R
relational database management system
(RDBMS) 2
Representational State Transfer. See REST
RequireJS
URL 190
REST
versus SOAP 202, 203

[ 389 ]
S
schema ow
dening 69, 70
Search Criteria Interface
used, for list ltering 250-254
service contract 3, 52-54
session 127-132
session-based authentication
dening 217, 218
Slide Repository Interface 225
SOAP
versus REST 202, 203
SoapClient 203
software testing 305
standards
URL 59
static testing
dening 310
Symfony 2
system conguration le (system.xml)
creating 335-338
T
templates 181, 182
tests
dynamic 305
static 305
test types
dening 305-307
themes, view elements
about 186
new theme, creating 187-190
token-based authentication
dening 203-206
U
Ui component 192
Underscore.js
URL 191
unit testing
creating 379-383
dening 308, 309
writing 318-325
upgrade data script (UpgradeData.php)
creating 83-85
upgrade schema script
(UpgradeSchema.php)
creating 78, 79
user types
about 198-201
administrator or integration 198
customer 198
guest user 198
V
Vagrant
about 12
URL 12
Vagrant project
about 13-16
Apache, provisioning 17
Magento installation, provisioning 18, 19
MySQL, provisioning 17
PHP, provisioning 16
var directory 57
view elements
about 167
block architecture 174-180
blocks 172-174
containers 169, 170
CSS 194, 195
JavaScript 190-192
layouts 183-186
life cycle 174-180
templates 181, 182
themes 186
Ui components 167, 168
VirtualBox
about 12
URL 12
virtual types
about 110
using 110
VMware 12


Thank you for buying
Magento 2 Developer's Guide
About Packt Publishing
Packt, pronounced 'packed', published its rst book, Mastering phpMyAdmin for Effective
MySQL Management, in April 2004, and subsequently continued to specialize in publishing
highly focused books on specic technologies and solutions.
Our books and publications share the experiences of your fellow IT professionals in adapting
and customizing today's systems, applications, and frameworks. Our solution-based books
give you the knowledge and power to customize the software and technologies you're using
to get the job done. Packt books are more specic and less general than the IT books you have
seen in the past. Our unique business model allows us to bring you more focused information,
giving you more of what you need to know, and less of what you don't.
Packt is a modern yet unique publishing company that focuses on producing quality,
cutting-edge books for communities of developers, administrators, and newbies alike.
For more information, please visit our website at www.packtpub.com.
About Packt Open Source
In 2010, Packt launched two new brands, Packt Open Source and Packt Enterprise, in order
to continue its focus on specialization. This book is part of the Packt Open Source brand,
home to books published on software built around open source licenses, and offering
information to anybody from advanced developers to budding web designers. The Open
Source brand also runs Packt's Open Source Royalty Scheme, by which Packt gives a royalty
to each open source project about whose software a book is sold.
Writing for Packt
We welcome all inquiries from people who are interested in authoring. Book proposals should
be sent to author@packtpub.com. If your book idea is still at an early stage and you would
like to discuss it rst before writing a formal book proposal, then please contact us; one of our
commissioning editors will get in touch with you.
We're not just looking for published authors; if you have strong technical skills but no writing
experience, our experienced editors can help you develop a writing career, or simply get some
additional reward for your expertise.
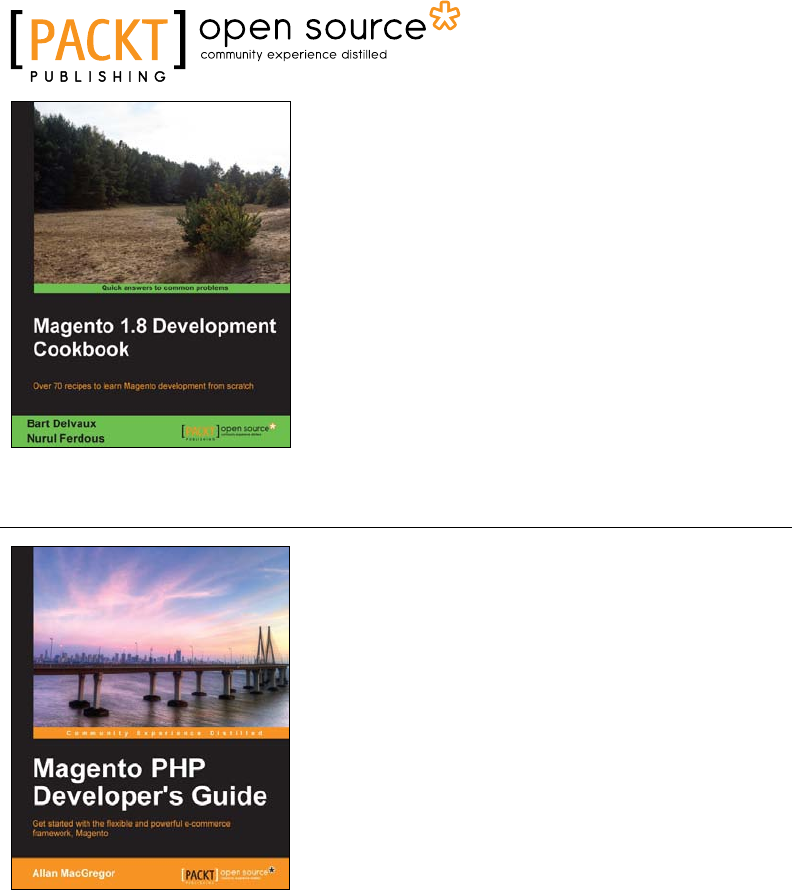
Magento 1.8 Development
Cookbook
ISBN: 978-1-78216-332-9 Paperback: 274 pages
Over 70 recipes to learn Magento development
from scratch
1. Customize the look and feel of your Magento
shop.
2. Work on theming, catalog conguration,
module, and database development.
3. Create modules to modify or extend Magento's
standard behavior.
Magento PHP Developer's Guide
ISBN: 978-1-78216-306-0 Paperback: 256 pages
Get started with the exible and powerful
e-commerce framework, Magento
1. Build your rst Magento extension, step by
step.
2. Extend core Magento functionality,
such as the API.
3. Learn how to test your Magento code.
Please check www.PacktPub.com for information on our titles
Mastering Magento
ISBN: 978-1-84951-694-5 Paperback: 300 pages
Maximize the power of Magento: for developers,
designers, and store owners
1. Learn how to customize your Magento store for
maximum performance.
2. Exploit little known techniques for extending
and tuning your Magento installation.
3. Step-by-step guides for making your store run
faster, better, and more productively.
Magento Beginner's Guide
Second Edition
ISBN: 978-1-78216-270-4 Paperback: 320 pages
Learn how to create a fully featured, attractive online
store with the most powerful open source solution for
e-commerce
1. Install, congure, and manage your own
e-commerce store.
2. Extend and customize your store to reect your
brand and personality.
3. Handle tax, shipping, and custom orders.
Please check www.PacktPub.com for information on our titles
