NGNIv1 Platform User Guide (rev 0.1)
User Manual: Pdf
Open the PDF directly: View PDF ![]() .
.
Page Count: 10

NGNI@IMPERIAL COLLEGE
1
NGNIV1 PLATFORM USER GUIDE (REV 0.1)
Table of Contents
Preferred computer specs ...................................................................................................................... 2
Software pack installation....................................................................................................................... 2
Hardware setup ...................................................................................................................................... 3
There are two methods to provide power to the system. They are mutually exclusive. Must
confirm the jumper position before connecting power. .................................................................... 3
Record to computer ................................................................................................................................ 4
Template generation............................................................................................................................... 4
Record to SD Card from computer.......................................................................................................... 5
Auto start record from SD Card .............................................................................................................. 5
Processing SD card data .......................................................................................................................... 6
Convert data to .mat files ................................................................................................................... 6
View mat files ...................................................................................................................................... 6
Generate PNG files using python ........................................................................................................ 7
FAQ .......................................................................................................................................................... 7
FX3 loses its firmware ......................................................................................................................... 7
Realtime display doesn’t show any track............................................................................................ 7
How to undo template generation changes ....................................................................................... 8
SD card recording keep overflow (red light constantly on) ................................................................ 8
SD card recording doesn’t start (green light does not go off) ............................................................ 8
Make sure the SD card is properly formatted otherwise see How to undo template generation
changes ............................................................................................................................................... 8
SD card recording files are created but has 0kB size .......................................................................... 8
Change a SD card or formatted SD card following advice in How to undo template generation
changes ............................................................................................................................................... 8
Data corrupted by SD card recording spike noise ............................................................................... 8
How to delete a template ................................................................................................................... 8
How to merge templates .................................................................................................................... 9
Revision History .................................................................................................................................... 10

NGNI@IMPERIAL COLLEGE
2
NGNIV1 PLATFORM USER GUIDE (REV 0.1)
Preferred computer specs
• Discrete graphic card with minimum 2GB memory
• USB 3.0
• 16 GB memory
• Windows 7 or 10
Software pack installation
The software pack can be downloaded from:
https://www.dropbox.com/sh/cz8c18mtk7bx8u0/AACD1vQcnJqh9t8M0a8MMBPDa?dl=0
The folder structure iss
Software
|--- FX3
|--- FX3_Driver (Drivers)
|--- Tools
|---- CyControl.exe (Tools for programming FX3)
|--- USBridge_v2.img (FX3 firmware)
|--- GUI
|--- Template_Matching_GUI (Generating templates)
|--- USBridge_Install (Headstage control)
|--- directx_Jun2010_redist.exe (DirectX9 SDK required for realtime display)
|--- Data_Processing
|---- Python (Script for generating png files)
|---- MAT_CONVERSION
|---- bin
|---- iprobe.exe (Convert SD card record files to .mat)
|---- plot_iprobe.m (Plot spike events and raw data in .mat file )
To setup a new computer:
1. Plugin FX3 board and update its driver from FX3_Driver. Set search folder to FX3_Driver and
windows should find the correct version on its own.
2. Install directx_Jun2010_redist.exe. The exe will unpack into a location then you need to run
the setup in the unpacked folder.
3. Copy USBridge to a local folder (NOT network folder or dropbox folder), then run the
installation
4. Add Template_Matching_GUI and MAT_CONVERSION/bin folder to matlab path
5. (Optional) Install Anacoda 3 for python scripts generating PNG files. You can also use
another python environment.
NGNI@IMPERIAL COLLEGE
3
NGNIV1 PLATFORM USER GUIDE (REV 0.1)
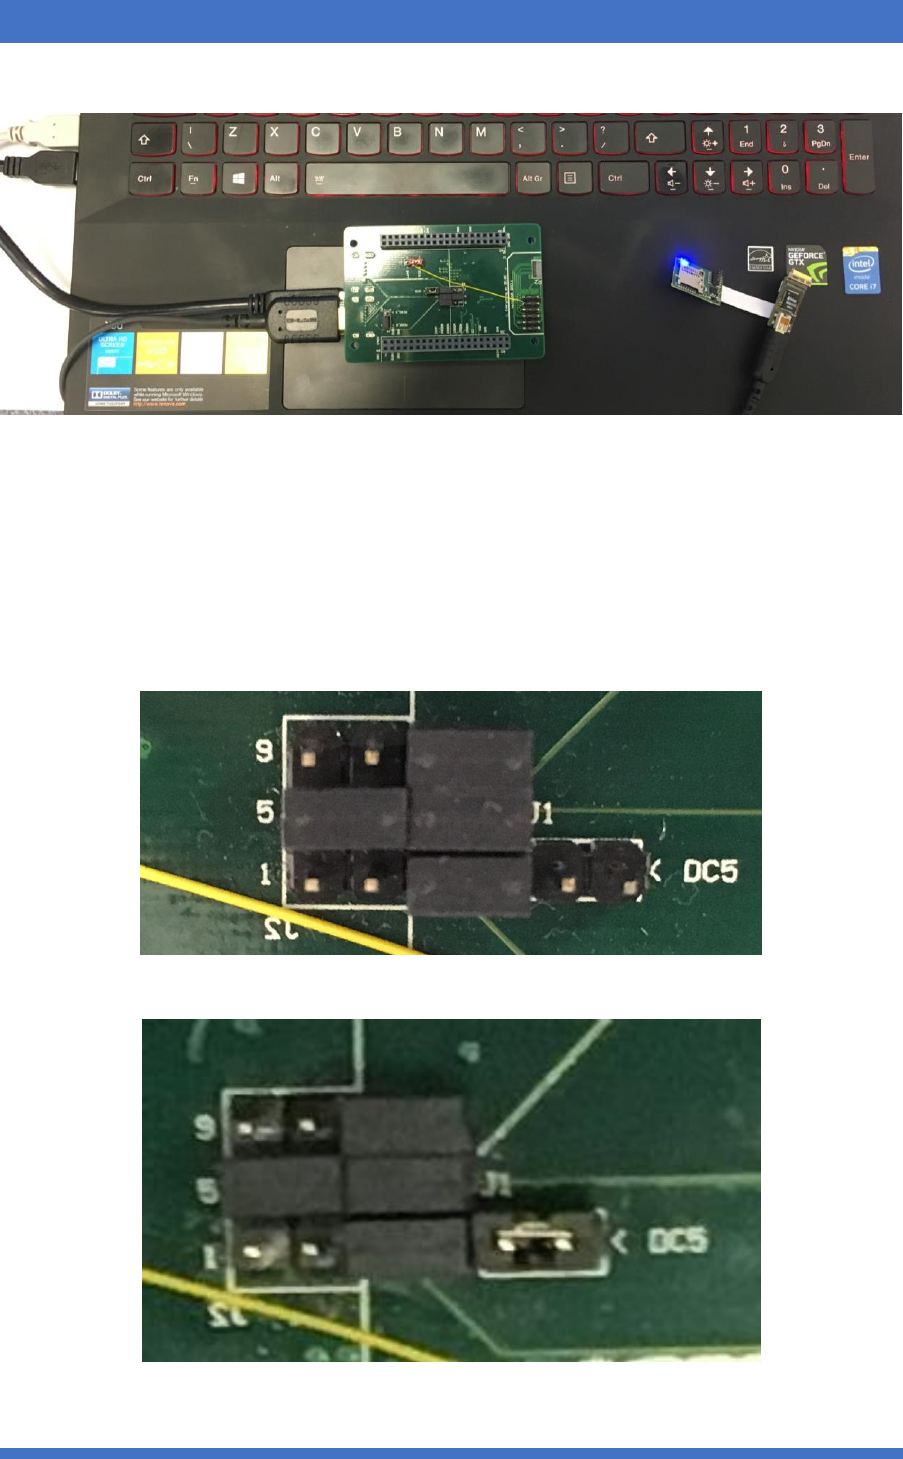
Hardware setup
Laptop USB 3.0 FX3 HDMI Head stage FPC MCU extension
^
|
Battery
There are two methods to provide power to the system. They are mutually exclusive.
Must confirm the jumper position before connecting power.
• Power from battery (mitigates the problem of SD card recording noise): Remove jumper J1
• Power from USB: Short jumper J1
NGNI@IMPERIAL COLLEGE
4
NGNIV1 PLATFORM USER GUIDE (REV 0.1)
Record to computer
This allows signal to be viewed in real-time w/o real-time spike events annotation.
1. Connect the system to computer (can be powered from either power method)
2. (Optional) Inserted a formatted SD Card if you want to record to SD card later. LED should go
from blue to green.
3. Open USBridge_WPF from start menu
4. Click through all the debug message boxes.
5. From Windows Add Waveform add all the windows from device.
6. From setting Amplifier, change relevant settings to adjust bandwidth and maximise the
usage of the ADC dynamic range without clipping signal. When done, click Upload
Configuration to send settings to the headstage. You may need to change the scale settings
in the waveform window to observe the whole signal.
7. From Project Set Project Folder, select a location for storing data (preferably not a
network location).
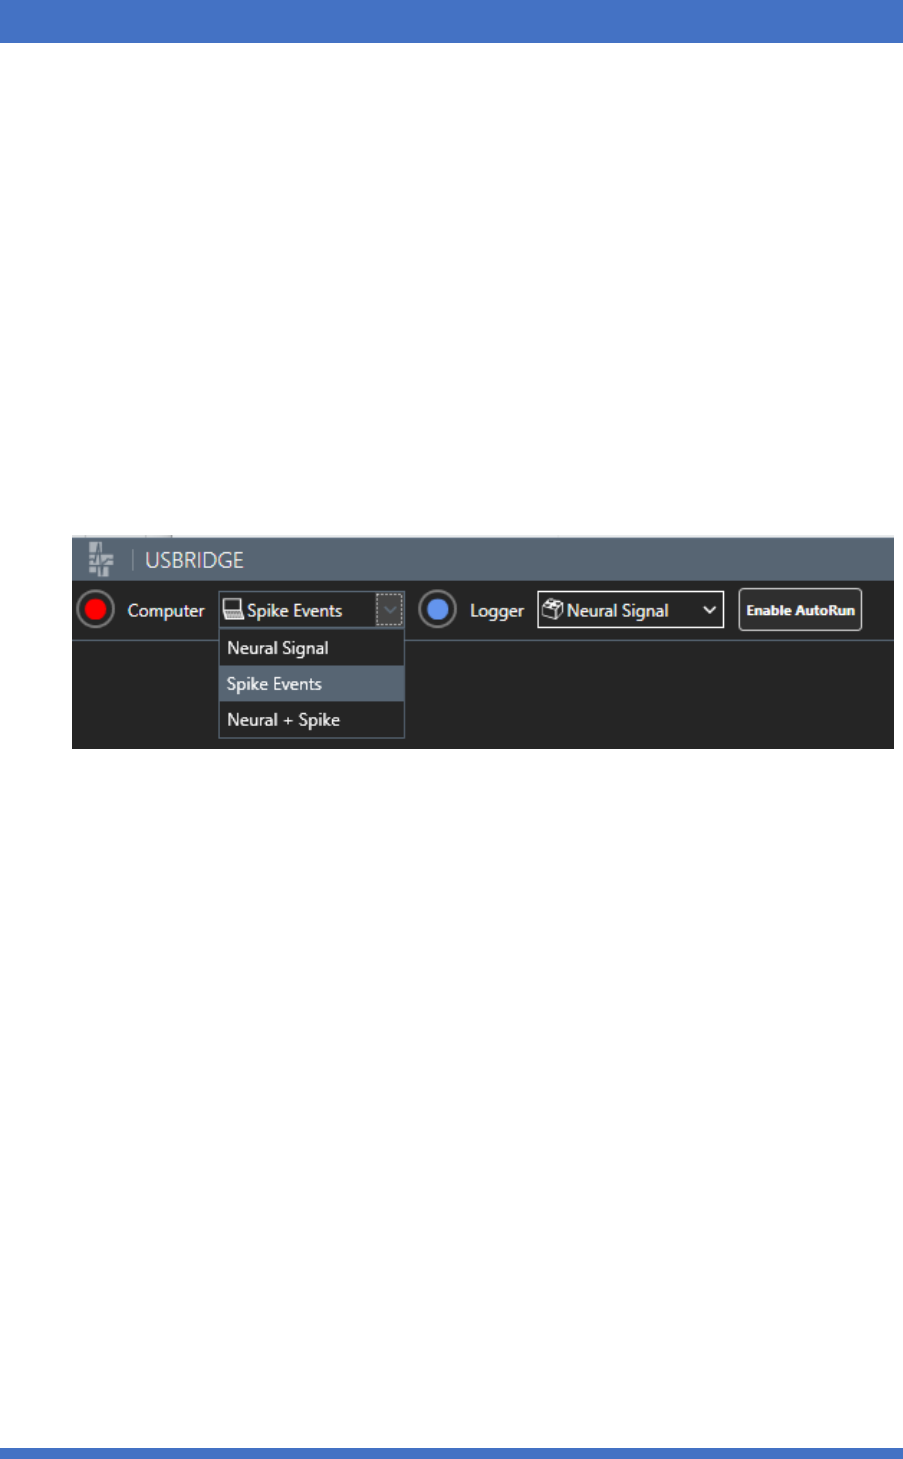
8. Use the dropdown menu to select required modes.
9. Click the red round button to start recording to the project folder. Click the same button
(white square when recording) to stop recording.
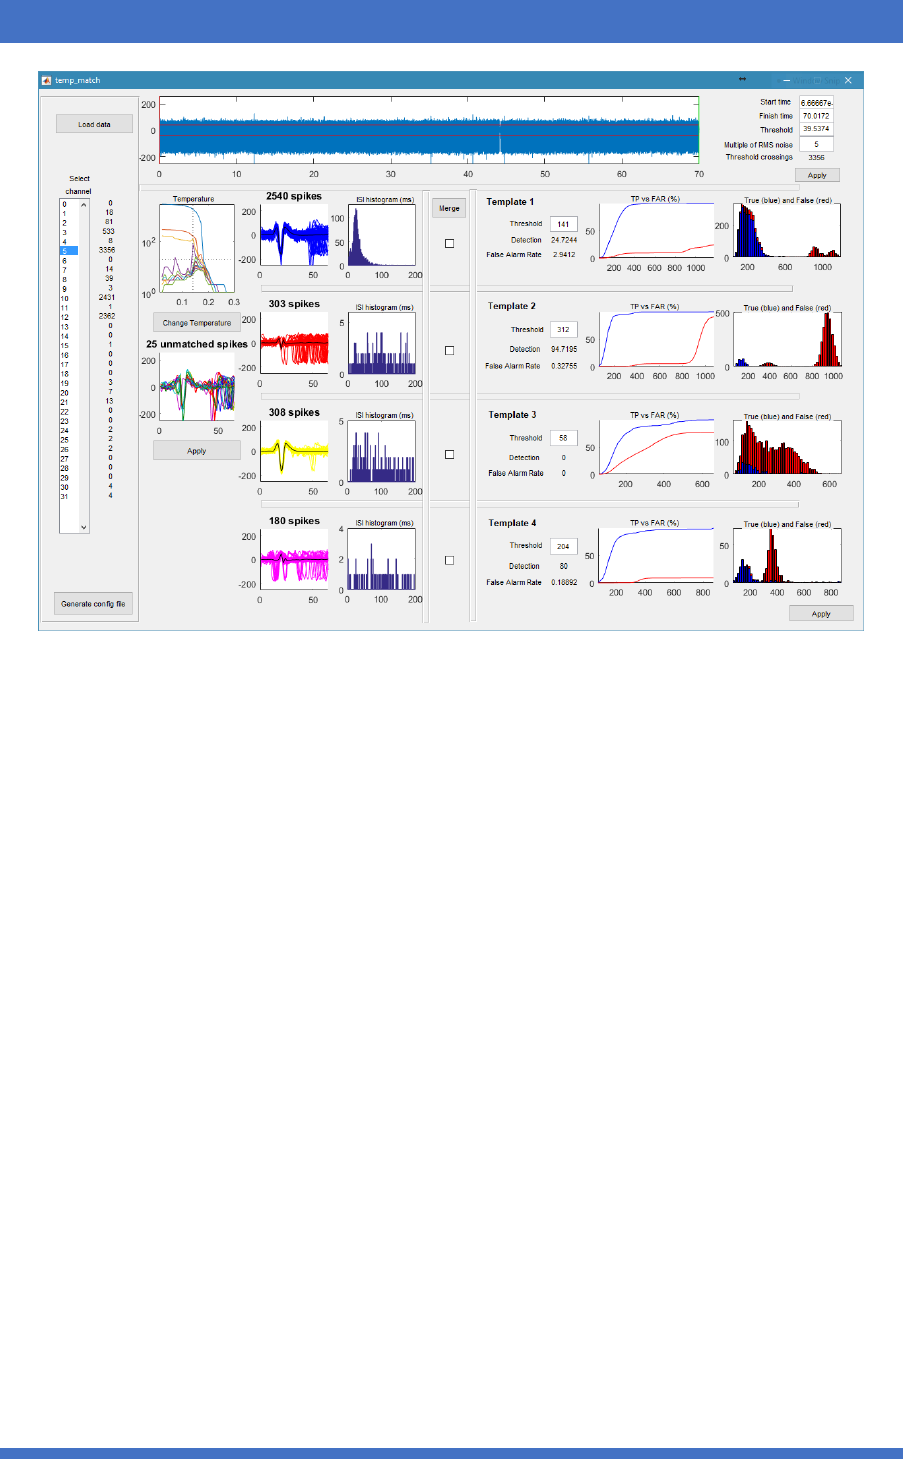
Template generation
This step is required when spike events need to be annotated on-node in realtime.
1. Type “temp_match” in matlab to load the template matching GUI
2. Click Load Data and select the .sig file just recorded
3. You can process a selection or all the 32 channel recorded used the GUI. Once done, the GUI
will show clustered results with template generated. You can tweak each channel and
template individually (see more in FAQ). Once done, click Generate config file.
NGNI@IMPERIAL COLLEGE
5
NGNIV1 PLATFORM USER GUIDE (REV 0.1)
4. The configuration file is generated in the folder <timestamp>_op with the name config.bin.
It can be loaded from the USBridge SettingTemplates Load Template
Record to SD Card from computer
This is typically used to generate “auto_cfg.bin” on the SD card and verify that SD card is operational
before start chronic recording. It is however not recommended when powering from USB due to the
SD card spike writing noise.
1. Insert a formatted SD Card into MCU extension. The light should go from blue to green.
2. (Optional) if you need to auto start SD recording later, toggle the “Enable AutoRun”.
3. Click the blue button and select the corresponding modes when SD. Click the same button
again to stop recording.
Auto start record from SD Card
This is used for chronic recording where a switching of power supply usually happens. Hence the
system requires to config and start recording upon restoring power or SD card insertion. This also
allows quick switching SD card or changing battery without a need of computer.
1. You should either perform Record to computer or have configuration files ready copied over
to SD card. These files are:
SD Root
|--- auto_run.bin (Required for auto start. Flag for auto start recording modes.
1 -- signal, 2 – spikes, 3 – mix stream)
|--- asic_cfg.bin (Required for all 3 modes Contains LSB, filter and gain settings for
analogue frontend)
|--- fpga_cfg.bin (Required for mode 2 and 3. Contains templates, detection
threshold and matching threshold)
NGNI@IMPERIAL COLLEGE
6
NGNIV1 PLATFORM USER GUIDE (REV 0.1)
2. Switch power supply to battery and insert the SD card. The light should go from blue to
green then off. It may become red if there is a problem. The system will retry for 10 times
before completely stop.
Processing SD card data
This only applies to the data recorded on SD card. Data directly saved onto computer are processed
differently. You will need the scripts from Data_Processing folder in the software pack.
Convert data to .mat files
1. Copy all the data in the date stamped folder from SD card to local drive. For instance
“D:\cycle_001\2017-08-22”.
2. In windows command line, change directory to Data_Processing\MAT_CONVERSION\bin
3. Run “iprobe.exe <path to the files>”. For instance “iprobe.exe D:\cycle_001\2017-08-22”
4. The converted data is in the “mat” folder as the original data
View mat files
You can use the files in matlab but would recommend to do short snippets other than whole 24
hour. 24 hour data is better displayed subsampled or chopped or using the python scripts in
Generate PNG files using python.
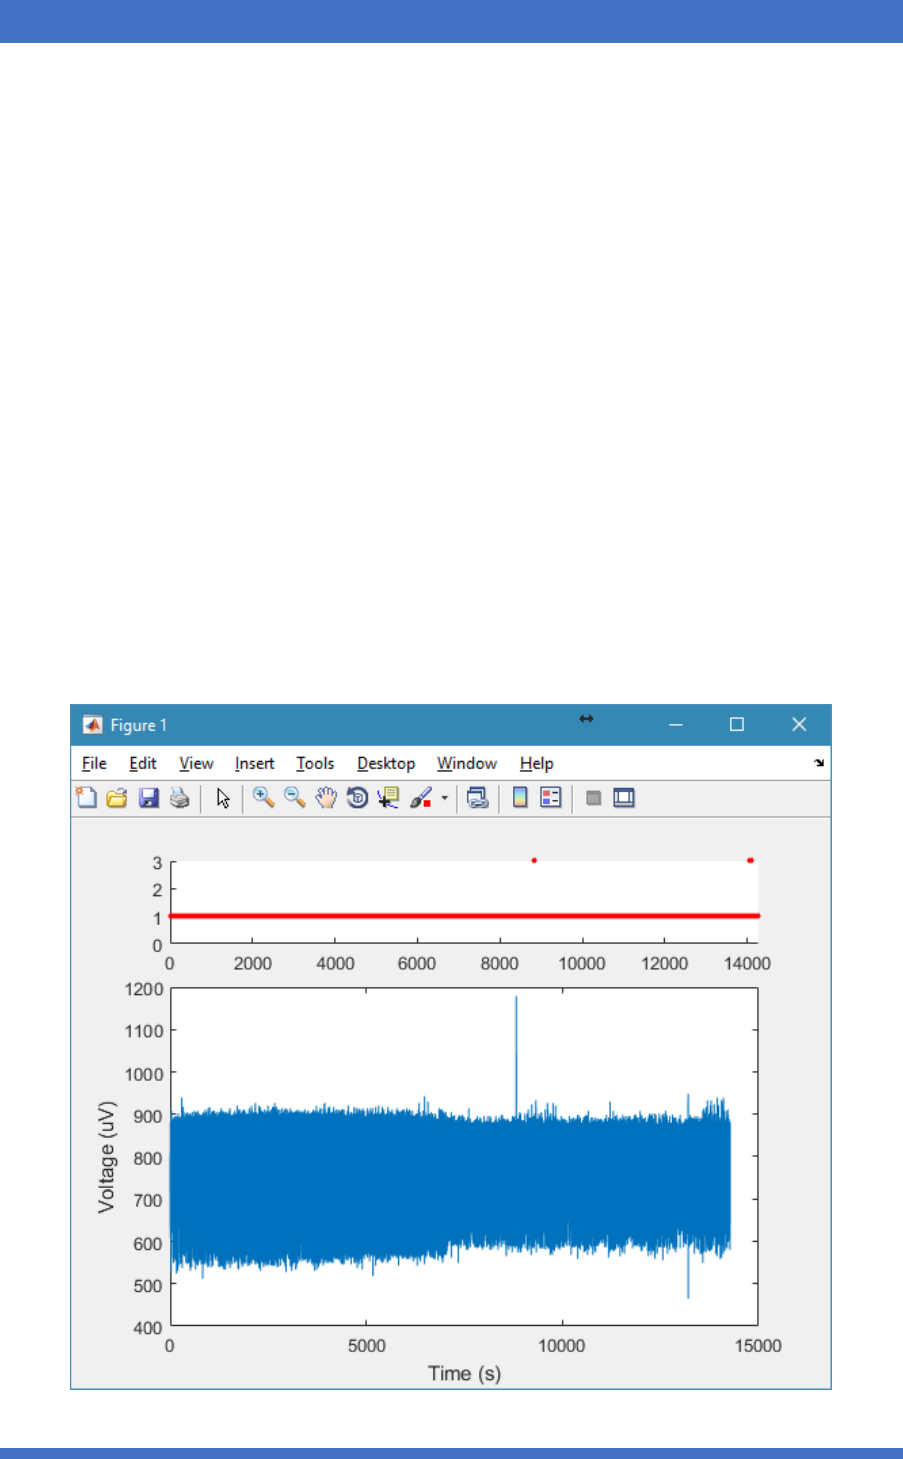
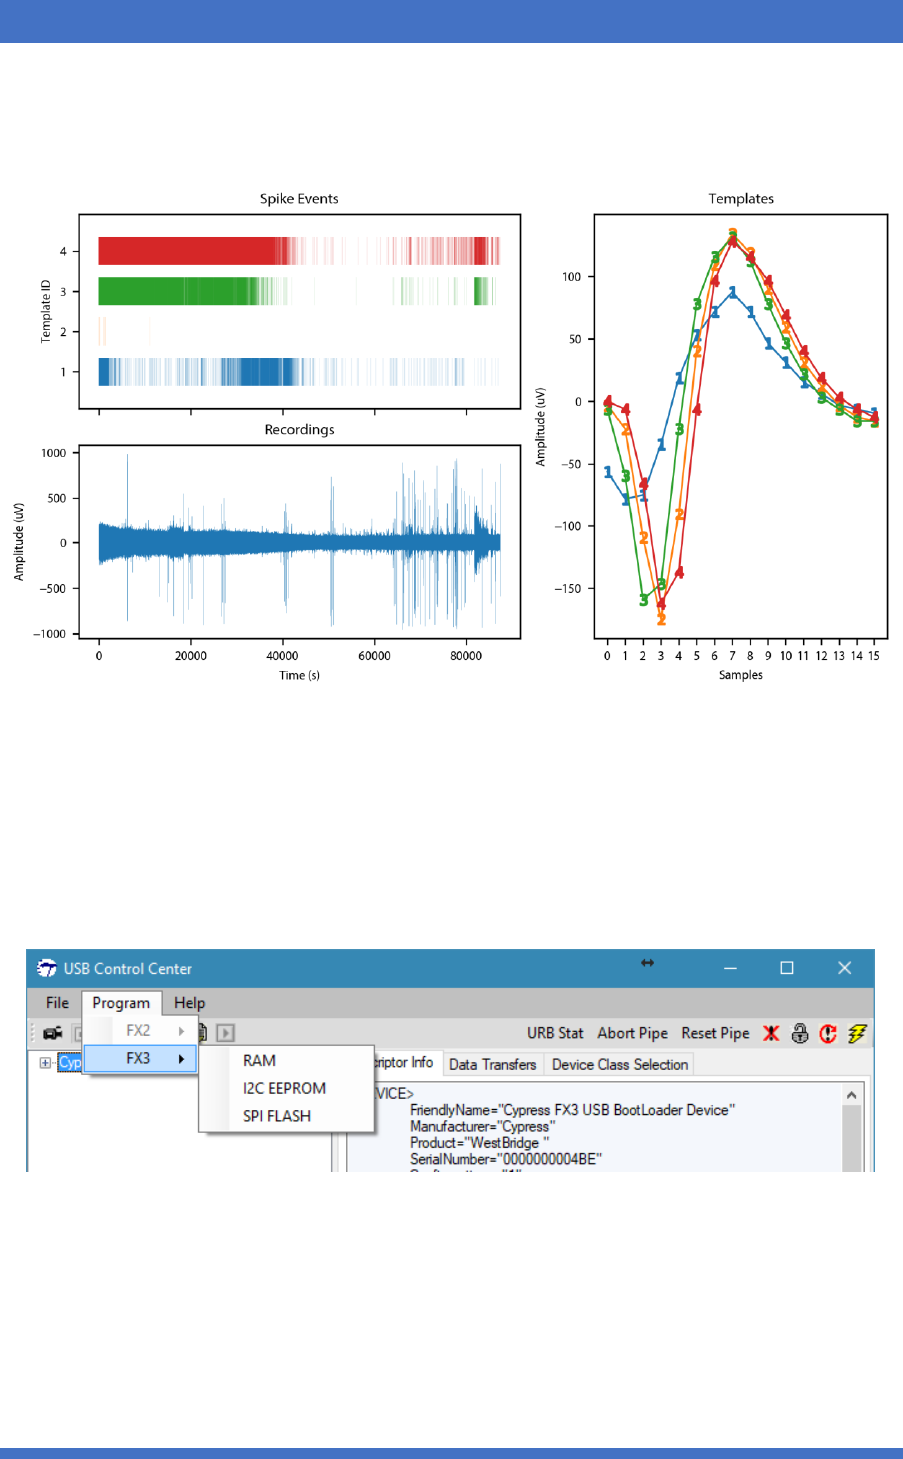
1. In matlab, use plot_iprobe(‘<file path>’,<channel number>). E.g.
plot_iprobe('cycle_003/2016-10-03/mat',1). You should see a fiure like below.
NGNI@IMPERIAL COLLEGE
7
NGNIV1 PLATFORM USER GUIDE (REV 0.1)
Generate PNG files using python
1. Edit DataPath and timeStamp in NGNI_JNE_SpikePlot.py and run it.
2. A PNG image like the one below will be generated in the work directory.
FAQ
FX3 loses its firmware
In rare cases, the EEPROM in FX3 gets corrupted and requires reprogramming.
1. Short PMODE J4 on the the blue FX3 board.
2. Open CyControl.exe. Select Cypress FX3 USB BootLoader Device
3. Then select Program FX3 I2C EEPROM
4. Then in the browse image window select “USBridge_v2.img” and wait for the programming
to finish.
5. Remove jumper on PMODE J4 and power cycled the board. It should now populated as
“Cypress FX3 USB BulkloopExample Device”
Realtime display doesn’t show any track
Press reset button next to the USB connector on FX3 and power cycled the system incl. headstage.

NGNI@IMPERIAL COLLEGE
8
NGNIV1 PLATFORM USER GUIDE (REV 0.1)
How to undo template generation changes
There is no method to undo changes in this version. You must reprocess the data again using the
GUI. The generated working folder <timestamp>_op must be deleted first before reclustering.
SD card recording keep overflow (red light constantly on)
Make sure the SD card is U3 grade. Then use SD Formatter from
https://www.sdcard.org/downloads/formatter_4/index.html to format the SD card with Format Size
Adjustment on in the option. If Full Erase (Quick) is supported by the host system, it should also be
set to on. Note that some microSD card adapter might not populated the microSD card as a SD card
but as a Mass storage device which can cause problem doing Full Erase.
SD card recording doesn’t start (green light does not go off)
Make sure the SD card is properly formatted otherwise see How to undo template
generation changes
There is no method to undo changes in this version. You must reprocess the data again using the
GUI. The generated working folder <timestamp>_op must be deleted first before reclustering.
1. SD card recording keep overflow (red light constantly on) for formatting advice.
2. Make sure auto_run.bin and asic_cfg.bin are in the root of SD card for recording raw signal;
auto_run.bin and asic_cfg.bin and fpga_cfg.bin are in the root folder for recording spike
events or mixed stream of raw signal and spike events.
3. Make sure auto_run.bin can be opend in a text editor and there is only a number which is
either 1 or 2 or 3.
4. If problem not resolved, send Song (s.luan@ic.ac.uk) an email with all three binary files.
SD card recording files are created but has 0kB size
1. Make sure FX3 is not connected to the headstage when you want to auto start recording
from SD card.
2. Try to reset FX3 and power cycled the whole system
Change a SD card or formatted SD card following advice in How to undo template
generation changes
There is no method to undo changes in this version. You must reprocess the data again using the
GUI. The generated working folder <timestamp>_op must be deleted first before reclustering.
3. SD card recording keep overflow (red light constantly on)
4. If problem not resolved, send Song (s.luan@ic.ac.uk) an email with all three binary files.
Data corrupted by SD card recording spike noise
Try not to record to SD card when power is supplied from USB.
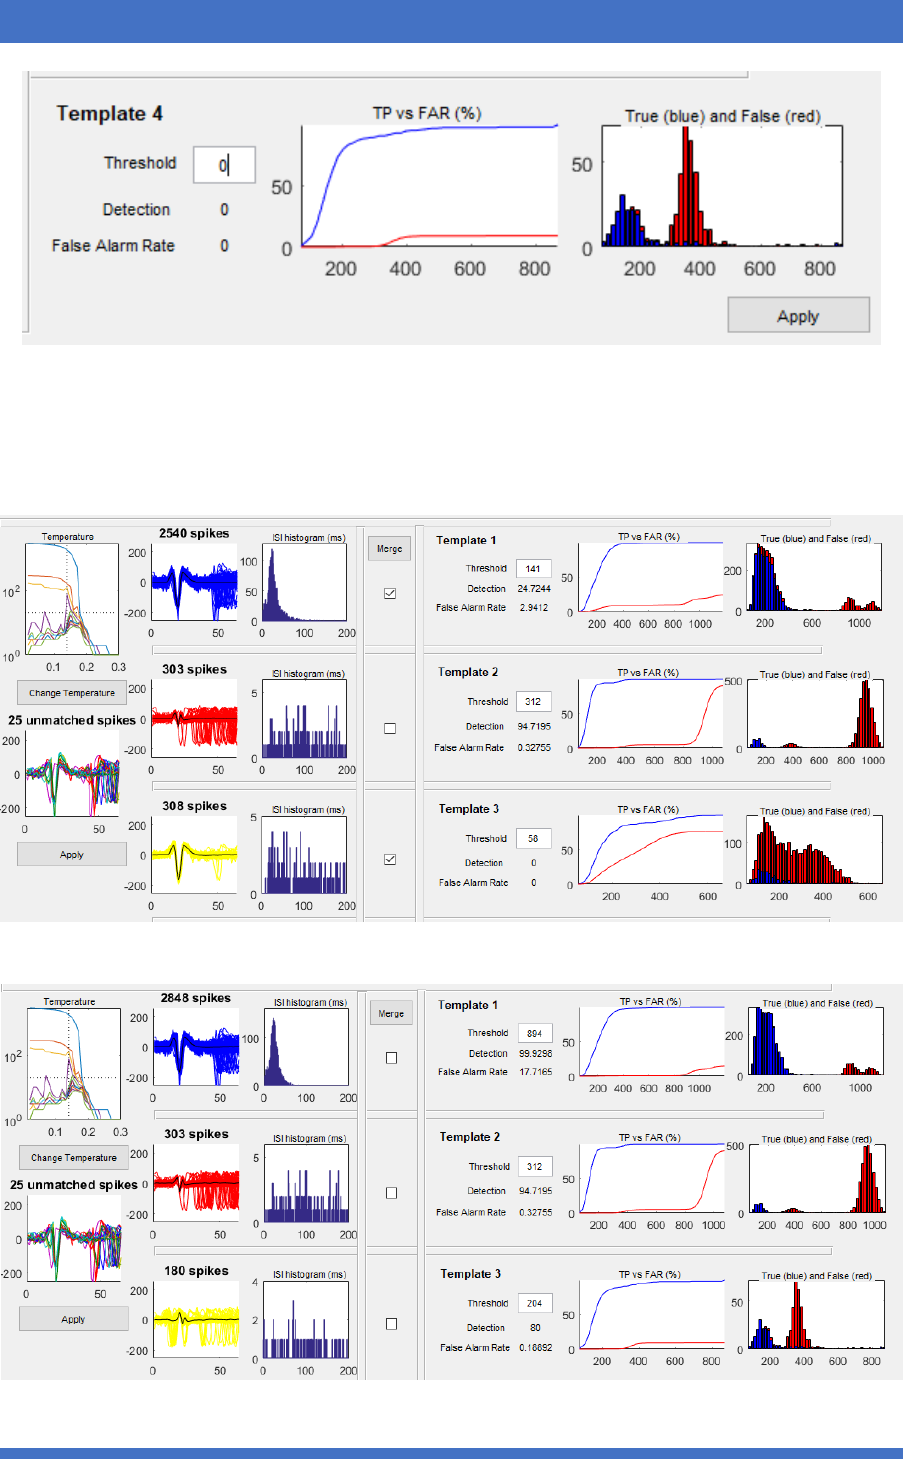
How to delete a template
Since the template is auto generated by wave_clus, changing temperature cannot guarantee the
deletion of the selected template. The best way is to set matching threshold to 0 in the
corresponding template and click Apply in the corner of that section.
NGNI@IMPERIAL COLLEGE
9
NGNIV1 PLATFORM USER GUIDE (REV 0.1)
How to merge templates
Tick the templates that you want to merge and then click merge. Note that the merge cannot be
undone. It is based on the average of two generated templates and a relaxed matching threshold.
For example, a merge of template 1 and 3 are shown as before merging:
After merging: Note the change in matching threshold.

NGNI@IMPERIAL COLLEGE
10
NGNIV1 PLATFORM USER GUIDE (REV 0.1)
Revision History
R0.1 2017/08/22 Created by Song Luan
