WMPCProgrammingManual Programming Manual
User Manual: Pdf
Open the PDF directly: View PDF ![]() .
.
Page Count: 125 [warning: Documents this large are best viewed by clicking the View PDF Link!]
- Table of Contents
- Chapter One: Welcome To Programming In MedState Notation
- Chapter Two: Introduction to the Basic Concepts of Programming
- Chapter Three: An Introduction to #R, SX, ADD, and SHOW Commands
- Chapter Four: Controlling the Beginning and End of a Program
- Chapter Five: Creating a Program for an FR Schedule
- Chapter Six: Establishing Default Values for Variables and Using a Variable Time Input
- Chapter Seven: Decisions, Decisions, Decisions
- Chapter Eight: Introduction to Arrays, Part One
- Chapter Nine: Array Commands As Outputs
- Chapter Ten: You Have Collected The Data, Now What?
- Chapter Eleven: So How Does This Work
- Appendix A: MedState Notation Commands
- Index
MED-PC® for Windows
Programmer’s Manual
Copyright © 1999, 2003 MED Associates Inc & Thomas A. Tatham
All rights reserved. No part of this manual may be reproduced in any form without prior,
written permission of the publisher. Published by MED Associates Inc., P.O. Box 319,
St. Albans, Vermont, 05478. (802) 527-2343 FAX (802) 527-5095
Trademarks: MED-PC, WMPC, MedState Notation; MED Associates, Inc.
Registered Trademarks: MED-PC; MED Associates, Inc
Turbo Pascal; Borland International, Inc.
TABLE OF CONTENTS
Chapter One:...................................................................................................................1
Welcome To Programming In MedState Notation .............................................1
Chapter Two:...................................................................................................................2
Introduction to the Basic Concepts of Programming .........................................2
Chapter Three: ................................................................................................................9
An Introduction to #R, SX, ADD, and SHOW Commands.................................9
Chapter Four: ................................................................................................................13
Controlling the Beginning and End of a Program ............................................13
Chapter Five:.................................................................................................................18
Creating a Program for an FR Schedule .........................................................18
(An Introduction to Z-pulses and Adding a Counter to Inputs).........................18
Chapter Six:...................................................................................................................23
Establishing Default Values for Variables and Using a Variable Time Input....23
(An Introduction to the SET and #T Commands).............................................23
Chapter Seven:..............................................................................................................28
Decisions, Decisions, Decisions......................................................................28
(Introducing the "IF" Statement) ......................................................................28
Chapter Eight:................................................................................................................37
Introduction to Arrays, Part One......................................................................37
Chapter Nine: ................................................................................................................43
Array Commands As Outputs..........................................................................43
(An introduction to the LIST, RANDI, AND RANDD commands).....................43
Chapter Ten:..................................................................................................................47
You Have Collected The Data, Now What? ....................................................47
(An introduction to Print and Disk Commands)................................................47
Chapter Eleven:.............................................................................................................53
So How Does This Work .................................................................................53
(The MED-PC: Theory Of Operation)..............................................................53
Appendix A: ...................................................................................................................62
MedState Notation Commands .......................................................................62
INDEX..........................................................................................................................121
1
Chapter One:
Welcome To Programming In MedState Notation
Introduction
This newly revised manual has been designed to aid all users of the state notation
language, MEDSTATE NOTATION (MSN), used with MED-PC® for Windows
(WMPC™).
For the novel user, you will find that each of the following chapters introduces a couple
of commands in MedState Notation and then allows you to write a program using those
new commands. Each chapter builds on one another, so it is recommended that you
read the manual from cover to cover, taking the time to try each tutorial. There should
be no concerns about having to set aside large blocks of time to read the manual; the
manual has been written in such a way that no one chapter should take very long to
read. To get the most from each chapter you should type the program in the tutorial to
test your new knowledge. Also, make sure to save the files with the names suggested
(or at least keep track of the substituted names). The reason is you will see that many
of the tutorials build on one another. Not only will this make it easier for you to switch
from one tutorial to the next, it will also get you in the habit of going back to old code for
ideas and/or shortcuts in programming.
For the intermediate user, you may find the chapters of some use, but if already familiar
with most of the commands, you may just want to flip to the tutorials at the end of each
chapter to brush up on MedState Notation.
For the experienced user, who is switching from MED-PC for DOS to WMPC, you may
want to look at the first tutorial to see the differences in translating and compiling in
WMPC and any refreshers you may need for codes can be answered in Appendix A.
Software Backup
In this age of hard drives and CD ROMS, many people overlook the need to back up
their software. We at MED-Associates, however, advise everyone to make a backup of
the distribution diskettes that have been supplied. Put the originals in a safe place and
use the copies for installation. The procedure for making disk copies is found in the
Windows 95/98 manual.
Before Getting Started
In order to get the most out of the tutorials at the end of each chapter, we recommend
that you install WMPC on your hard drive and configure your hardware before starting to
read this manual. If you have not already done so, consult the WMPC manual for step-
by-step directions.

2
Chapter Two:
Introduction to the Basic Concepts of Programming
State Sets:
MEDSTATE NOTATION procedures are organized into blocks of code called state sets.
There may be as many as 32 state sets within a single procedure, with each state set
functioning autonomously with apparent simultaneity, as though each is an independent
program. Within MedState, it is represented by the "S.S. #" where # is a number
between one (1) and thirty-two (32) 1. There may be no decimal point in the number
and constants and variables in place of the number are not permissible. The periods
following each "S" and the comma following the number are required.
States:
The basic unit of a state set is the State. At any given moment, a procedure can be
thought of as being in a given state. When a procedure begins to execute, it is always
in the first (i.e. top most) State. States are indicated by "S#", where # = an integer
between one (1) and thirty-two (32) with the same restrictions on numbering as
indicated for state set numbering.
Statements - General Description:
Statements are within States and are made up of commands. Comparing the basic
elements of a program (e.g., state set, state, and statements) to the components of a
book, the state sets are the chapters, the states are the paragraphs within those
chapters, the statements are the sentences, and the commands are the words.
The Components of a Statement:
A statement is composed of three components: an Input Section, an Output Section,
and a Transition. The input section consists of the commands to the left of the colon
":", the output section is between the colon and the arrow "--->", and the transition is to
the right of the arrow.
A statement may be thought of as an IF - THEN - GOTO statement. For example, the
following statement means, IF "Input" occurs THEN "Output" and GOTO "Next:"
Input: Output ---> Next
Actual code may look like this:
#R1: ADD A; ON 5 ---> S3
1 State sets do not need to be numbered consecutively, nor do they need to be in
ascending order, since state sets are processed in the order in which they appear in a
procedure but each state set MUST have a unique number.
3
Typing Conventions
Case Is Irrelevant:
Upper and Lower case letters may be freely intermixed and used in any manner that
best clarifies source code for a procedure.
Spacing And Blank Lines:
Spacing and blank lines are ignored. Again, this feature may be used to make source
code statements as clear and as easy to read as possible.
Rules For Comments:
Comments are notes placed into the code that do not get translated into PASCAL.
Comments may be placed on their own lines or following the end of any line containing
MEDSTATE NOTATION code. Comments always begin with a backslash '\'. Please
note that this is the same character as the DOS path separator, not the arithmetic
division symbol, (/). Comments may not occur in the middle of a statement.
Legal examples:
\This is a comment before State Set 1 (S.S.1)
S.S.1,
\This is a comment before state 1
S1,
Input: Output ---> Next
Illegal examples:
Input \This is the house light : Output ---> Next
4
Integers:
Integers are whole or counting numbers, such as 0, 5, 112 and 3000, which do not
contain decimal points. A few commands logically require the use of integers, but MED-
PC automatically converts numbers to integer format, where necessary, by rounding
them to the nearest whole number. For example, "ON 1.9" or "ON 2.1" are illogical, but
will not cause difficulties because MED-PC will automatically convert both to "ON 2".
The only place where proper use of integers is required is in declaring constants and in
numbering state sets and states.
Constants:
Constants are a convenient means for substituting words for frequently used integers.
Constants must be declared prior to the first state set and may be up to 55 characters in
length. They must be preceded by a caret "^" and the first character must be a letter
followed by any mix of letters and numbers. Spaces are ignored. An example declaring
"^Feeder" follows:
^Feeder = 1
S.S.1,
S1,
Input: ON ^Feeder ---> S2
S2,
2": OFF ^Feeder ---> S1
Constants must be declared as having an integer value, and time may not be assigned
to a constant. For example, "^Feeder = 1.1" and "^FeederDur = 2”" are illegal. As
constants are represented as integer (whole) numbers, it is illegal to attempt to assign
the value of a variable to constant during program execution. There is no limit to the
number of constants that may be in a single procedure, but values may be assigned to
a constant are restricted to a range from -32768 to 32767.
The use of constants cannot be emphasized enough. Constants tremendously improve
the readability of a procedure, and can substantially reduce debugging time. They also
greatly ease the difficulty associated with understanding a procedure written by
someone else or simply written years earlier. A very good practice is to define and use
constants to refer to all inputs and outputs.
5
Tutorial 1: Writing your first program
Now you have the basic terminology and concepts down to write a simple program.
This will replace the vague notions of "input," Output," and "Next" from the previous
sections and replace them with concrete example of code. In this exercise you will
learn how to arrange State Sets, States and Statements as well as learn the proper use
of Statements, Constants, Inputs, and Outputs. For the example, we will assume that
your operant chamber is equipped with a house light, although any output device can be
used.
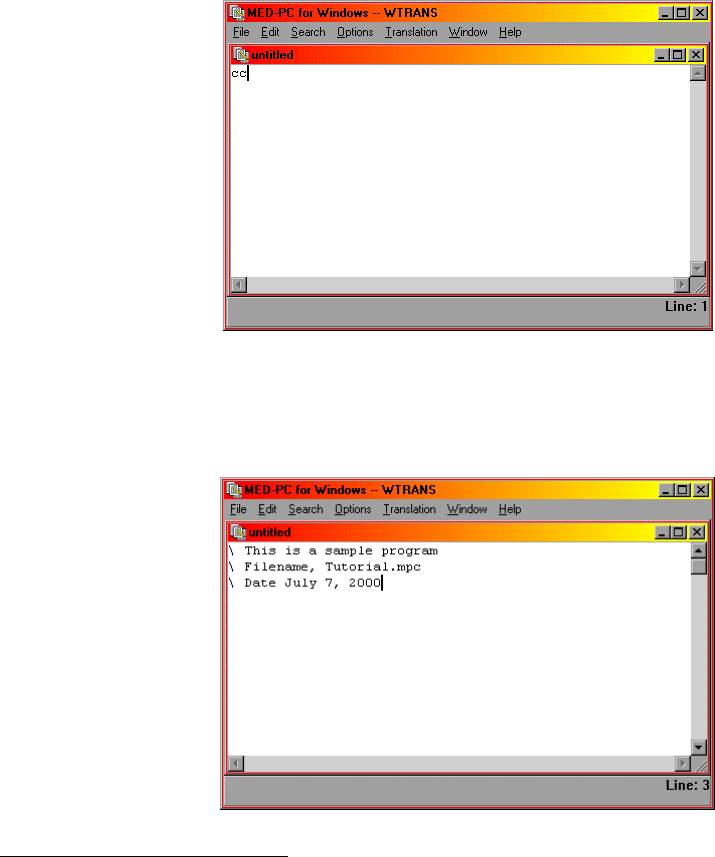
The first step is to open TRANS for Windows®. Scrolling the mouse to the menu bar,
first click "File" and then click "New." 2
Second, we will type in our comments. Remember, it does not matter what is said in
the comment section, it is only there for your convenience.
2 Please note that any ASCII text editor may be used to type the initial code. If a text
editor other than the one supplied with TRANS for Windows is used, however, you must
save the text as unformatted ASCII or DOS text and it must be saved with the extension
*.MPC (where * is your filename.).
6
Next, we will define our constants. This is a simple program with only one input, time,
and one output, the house light. Therefore, we will define one constant for the house
light and we will call it "House".
As previously mentioned, time will be our input. In MedState Notion, we do not write
out minutes or seconds. Instead, seconds are represented by a double quotation mark
(") and minutes are represented by single quotation marks, ('). In this example, our first
input will be one second (1") and the second input will be five seconds (5"):
7
Save this file as Tutor01.mpc in your C:\WMPC\MPC file. Once you are satisfied the
program is saved, scroll the mouse across the menu bar, click "Translation" and follow
that up by clicking "Translate and Compile 3." Highlight the filename "Tutor01.mpc" with
your mouse and click MAKE. There should now me a letter M a tab space or two away
from the file name, now click "OK." Your program should now automatically translate
(Parse) and compile. When it is done, close TRANS for Windows® and open MED-PC®
for Windows.
Scrolling your mouse to the menu bar, click first on "File" and then on "Open Session."
Open Tutor01.mpc.
3 Note: If you chose to use another text editor, save your file and close your text editor.
Open your file in TRANS for Windows.
8
After one second, your house light should come on for five seconds, turn itself off for
one second, and repeat this cycle until the session is closed.
To close the session, scroll and click once again to "File" on the menu bar and click on
"Close Sessions." A pop up window should now appear.
Check the button next to Box 1 and Check the Button "Stop Kill." Note that the light
turning on and off continues as you are in this window because the close command
does not get sent until you click "OK."
Congratulations, you just wrote, ran, and closed your first program in MEDSTATE using
MED-PC for Windows!
9
Chapter Three:
An Introduction to #R, SX, ADD, and SHOW Commands
In the previous chapter, we used time as our only input. Although time is used quite
often as inputs, what may be of more interest to us as researchers is the input from our
test animal on a response lever, lickometer, nose poke, etc. Also, remember back to
what was being displayed on the MED-PC window, as you ran your first program, not
much. This chapter will explain how to write code for the recording of mechanical inputs
as well as how to display the information on the screen.
#R:
#R is, in the simplest terms, the code for the response of a test animal on a MED
Associates input device (e.g. a lever). In order for #R to have any meaning in a
program, you must specify what device the response is on as well as the number of
times the response must happen. So the syntax is:
[Number of times]#R[Device that is collecting input]: OUTPUT ---> NEXT
So real code may look like:
5#R^LeftLever: ---> S4
Which means, "After five presses of the left lever, make the transition to State 4."
Or:
#R^RightLever: ON ^Pellet ---> S2
Which means "After one press of the Right Lever (MedState Notation has a default of
one for #R), turn on the pellet dispenser and make the transition to S2.
Null Transition (SX):
In the aforementioned example, a transition was made to S2 after the pellet dispenser
was turned on, but sometimes we do not want to make a transition to another state, it
would be better to "go nowhere." Well MedState Notation can do this with a command
we call SX, which is known as the null transition. The significance of this command will
be shown shortly, but in code it would come after the transition:
INPUT: OUTPUT ---> SX
10
ADD:
As the name suggests, ADD is a mathematical command that will increment a variable
by one. It is an output command, so it will always follow the colon in our code. Its
syntax is:
INPUT: ADD X ---> NEXT
Where X = the variable to which the value 1 will be added.
Real code may look like this:
S1,
1": ADD C ---> S2
In this example, after one second, the value one will be added to the variable C and
then the transition will be made to S2.
SHOW:
In the program you wrote at the end of Chapter 2, you knew it was running by watching
the light come on and off. As explained thus far, you would not know your program was
running when using an ADD command because there is no feedback associated with it.
This is why we have the SHOW command. When MED-PC programs are running, lines
2-13 of the screen may be used to display data for each active box. MED-PC programs
may display information in this space in each of sixty positions (numbered 1 - 60). The
syntax is:
INPUT: OUTPUT; SHOW P,Label,X ---> NEXT
Where P = Position 1-60 (must be defined), Label is a user-defined name for that
position 1-60 that cannot be more than six characters long and must begin with a letter
(the other five characters may be alpha-numeric), and X is the variable value listed in
position 1-60.
Real code may look like this:
#R2: ADD A; SHOW 1,CENKEY,A ---> SX
Where after one response on input 2, we will add one to the variable A and finally the
value of variable A will be displayed on the screen in position 1 (and to the left of the
value will be the label CENKEY) before making the null transition.
11
Tutorial 2: Expanding your first program
In this exercise, we are going to expand on the program you wrote in the first tutorial.
Whether you want to open Tutor01.mpc and make these changes and save as
Tutor02.mpc or just start fresh is up to you. The goal of this program will be to have a
count appear on the screen every time the left lever is pushed.
Once again, open your text editor (TRANS for Windows) and type in the following:
\This is a sample program
\Filename, Tutor02.mpc
\Date July 7, 2000
^House = 1
^LeftLever = 1
S.S.1,
S1,
.01": ON ^House ---> S2
Note that the house light is an output whereas the left lever is an input. That is why
both constants can be defined as 1. If there was anything in this program thus far that
you did not understand, refer back to Chapter Two.
Next we will want to add the code for the responses, the count, and the display. In
order to do this, we must add a new State within State Set 1.
\This is a sample program
\Filename, Tutor02.mpc
\Date July 7, 2000
^House = 1
^LeftLever = 1
S.S.1,
S1,
.01": ON ^House ---> S2
S2,
#R^LeftLever: ADD C; SHOW 1,COUNT,C ---> SX
And just like that, your program is now ready to be saved as Tutor02.mpc in the
C:\WMPC\MPC directory.
Once you are satisfied the program is saved, follow the same procedure as before to
translate and compile this program and then open it in MED-PC. If you do not
remember how to do this, refer back to chapter two's tutorial.
If the program is running, the house light should turn immediately after loading the
program. Now reach into the box and click the left lever. Notice how the count
increments on the screen.
12
If it is not going up geometrically (…11, 12, 13, 14, 15…), but instead sporadically (11,
16, 18, 19, 22), do not be alarmed. The screen update is a low priority function. If the
responses are rapid, the computer is keeping an accurate count of the data, but the
screen is only updated when the system gets a chance.
Congratulations, you successfully wrote another program. You may end your session in
the same manner as Tutor01.mpc.
13
Chapter Four:
Controlling the Beginning and End of a Program
Thus far, all programs that we have wrote have begun to run the second they were
loaded. For our purposes, this was fine; there was no reason for them wait before
running. This is usually not the case, however. Your experiment may require you to
load more than one box and have them run simultaneously or perhaps you want to have
the program all ready to go before loading your test subject in the chamber. In either
case, starting the program upon loading is not what we would want to do. This chapter
will deal with how to avoid that problem, as well as how to have your program stop
without having to issue the stop session command.
#START:
As already stated, execution begins as soon as the procedure was loaded in our earlier
programs. The #START command will give us the ability to load a procedure but hold
procedure initiation until a signal is given by the experimenter. This is especially useful
when loading several boxes because this enables the experimenter to place multiple
subjects in experimental chambers and then start their sessions simultaneously.
#START is an input command so the syntax is:
#START: OUTPUT ---> NEXT
Or real code may look like:
#START: ON ^HOUSE ---> S2
This means, "Wait until a start command has been issued and when it has, turn on the
house light and make the transition to State 2."
We will get into what it means to issue a start command in the tutorial.
STOPABORT and STOPKILL:
These two commands cause the program that is running to immediately stop executing.
Any outputs currently turned on get shut off immediately (i.e., whether the program is in
the middle of a procedure or not, everything stops). In addition, the box's status lines on
the monitor are cleared. The difference between STOPABORT and STOPKILL is that
data collected up to the STOPABORT command can still be salvaged by saving and/or
printing it (i.e., it is still in memory) whereas STOPKILL wipes the data from the
memory. These commands are special transitions, so their syntax is:
14
INPUT: OUTPUT ---> STOPABORT
Or
INPUT: OUTPUT ---> STOPKILL
Real code may look like this:
2': ---> STOPABORT
Or
2': ---> STOPKILL
So this is saying after 2 minutes make the transition to stop, but leave the data in
memory (or stop and wipe the memory clean).
STOPABORTFLUSH:
Like STOPABORT, STOPABORTFLUSH is a special transition that turns off all outputs
and stops procedure execution. Instead of keeping the data in memory, however,
STOPABORTFLUSH will save the data to the hard drive and then wipe the memory
clean. The syntax will be similar to STOPABORT:
INPUT: OUTPUT ---> STOPABORTFLUSH
Or real code may look like this:
60': ---> STOPABORTFLUSH
Where after 60 minutes, the program will stop, the box status will clear, the data will be
saved to disk and the memory will be wiped clean.
Multiple Commands:
So far we have been following the format, one INPUT, OUTPUT, AND NEXT per line.
Since there are cases where this is not practical (e.g., If you want to ADD to a variable
and simultaneously SHOW the variable on the screen), MedState Notation allows for
the stringing together of multiple commands. In order to do this, semicolons are used to
separate the parameters of a command from the following command. The syntax would
be:
INPUT: OUTPUT#1; OUTPUT#2 ---> NEXT
Or real code may look like this:
#R^LeftLever: ADD C; SHOW 1,COUNT,C ---> SX
15
Tutorial 3: Expanding your last program to control itself
In this exercise, we are going to expand on the program you wrote in the second
tutorial. The goal of this program will be to demonstrate how to issue a start command
and have your program stop on its own. You will also learn what you can do once the
program stops.
Once again, open your text editor (TRANS for Windows) and type in the following:
\This is a sample program
\Filename, Tutor03.mpc
\Date July 7, 2000
^House = 1
^LeftLever = 1
S.S.1,
S1,
Next we want to add the code for the responses, the count, and the display. In order to
do this, we must add a new State within State Set 1.
\This is a sample program
\Filename, Tutor03.mpc
\Date July 7, 2000
^House = 1
^LeftLever = 1
S.S.1,
S1,
<This we will fill in>
S2,
#R^LeftLever: ADD C; SHOW 1,COUNT,C ---> SX
Now we need to add our start command, so under State Set 1, State 1 type:
#START: ON ^House ---> S2
We need to add a new State Set to have our program stop on its own, so type the
following at the bottom of the new program:
S.S.2,
S1,
#START: ---> S2
S2,
1’: ---> STOPABORT

16
So your final product should look like this:
\This is a sample program
\Filename, Tutor03.mpc
\Date July 7, 2000
^House = 1
^LeftLever = 1
S.S.1,
S1,
#START: ON ^House ---> S2
S2,
#R^LeftLever: ADD C; SHOW 1,COUNT,C ---> SX
S.S.2,
S1,
#START: ---> S2
S2,
1’: ---> STOPABORT
And just like that, your program is now ready to be saved as Tutor03.mpc in your
C:\WMPC\MPC directory.
Once again, follow the same procedure as before to translate and compile this program
and then open it in MED-PC. Notice how, unlike before, the house light is not on. But
look at the bottom window -- it shows that the program "Tutor3" was loaded at xx:xx
(your computer clocks current time). This shows that the box was indeed loaded, and is
now awaiting your start command.
So let us issue the start command. Scroll your mouse to the menu bar and click first on
configure and then on signals. A window will pop up giving you more options.
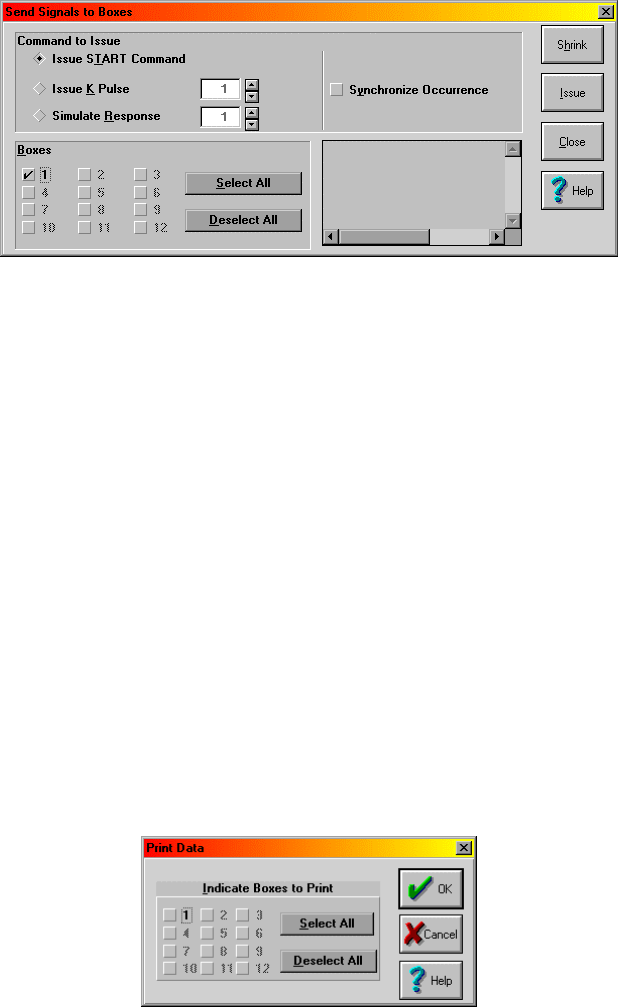
17
The "Issue start command" button is already highlighted, so all you should need to do is
click on the button next to "BOX 1." Once both are selected (represented by black
dots), press the ISSUE button. Your program is now running.
Like you did in the previous tutorial, press the left lever a couple times to get a few
counts on the screen. After one minute, the house light should go off, the counter will
no longer go up with subsequent lever pushes, and the information next to box 1 should
be gone and the word, "Closed" should appear. This demonstrates that your program
was successfully STOPABORTed.
Keep in mind, your data is still in memory, and MED-PC knows this. To test this, try to
close MED-PC. You will get an error window with the following message: "MED PC
HAS UNFINISHED BUSINESS"
Choose "cancel."
Going back to file, select print and check BOX 1 and then click OK.
You should now have a print out of your data from that "experiment." It is up to you if
you want to save this data or close without saving.
Congratulations, you have now written three programs.

18
Chapter Five:
Creating a Program for an FR Schedule
(An Introduction to Z-pulses and Adding a Counter to Inputs)
Until the last chapter, all of our programs have only had one State Set, and in the last
chapter there was no need for our two state sets to communicate with one another.
MedState Notation utilizes Z-pulses to communicate between state sets.
Z-pulses (#Z)
It is often convenient to break procedures into multiple state sets. Indeed, procedures
composed of multiple state sets are more readable and easier to modify than single
state set procedures and Z-pulses provide a convenient means for communicating
among state sets. Let us say that the left key's red stimulus is flashed on off whenever
the FR-5 contingency has not been satisfied but is turned off during feeder operation.
You may be able to write a program that had all of this in one State Set, but it would be
confusing and have the potential to be prone to programming errors. It would be easier
to program the flasher as a separate state set and then turn it off and on as needed
(i.e., when the test animal has or has not met the conditions you define).
Like State Sets and States, Z-pulses must be numbered but the highest Z-pulse may
not be greater than 32. 4 Unlike any of the other commands which fit nicely in our
INPUT: OUTPUT ---> NEXT format as either an INPUT, an OUTPUT or a NEXT, Z-
pulses are unique in that each Z-pulse acts as either an input or an output. Although
this concept may seem confusing at first, if you think about the role that the Z-pulse
plays it makes sense; it communicates between two state sets. The syntax of the Z-
pulse is:
S.S.1,
S1,
INPUT: Z N ---> NEXT
S.S.2,
S1,
#ZN: OUTPUT ---> NEXT
Where N = an integer between one and thirty-two and is the same in both examples.
Also note that when used as an output, the syntax is ZN but when used as an input, the
syntax is #ZN.
4 Also like State Sets and States, the numbering of Z-pulses is arbitrary in the sense
that they do not have to be sequential – they are processed in the order they are read.
It is recommended, however, that you keep the numbers sequential to minimize the
potential confusion.
19
In real code, it may look more like this:
S.S.1,
S1,
#START: ON ^HouseLight; Z1 ---> S2
S.S.2,
S1,
#Z1 ---> S2
Rules For Comments Revisited:
In the second chapter the idea of comments was introduced and we have used them in
every program we have written, at the beginning of each program, before we wrote any
real code. Comments can also be placed at the END of a line code (Once again,
comments may not occur in the middle of a statement). This tactic will be used from
here on out in tutorials to explain why things are written the way they are or placed
where they are (please note that it will be up to you whether or not you type in these
comments in the tutorials – they are there for your benefit only). The syntax is
demonstrated below:
S1,
Input: Output ---> Next \Comment
20
Tutorial 4: Writing an FR-5 Program
In this exercise, we are going to use parts of the program you wrote for the last tutorial.
The goal of this tutorial will be to write a program that works on a Fixed Ratio Schedule.
Once again, open your text editor (TRANS for Windows) and type in the following:
\This is an FR-5
\Filename, Tutor04.mpc
\Date July 7, 2000
\This section is for inputs
^LeftLever = 1
\This section is for outputs
^House = 1
^Reward = 2 \In this code, this is a pellet dispenser.
S.S.1, \Main control logic for "FR"
S1,
#START: ON ^House ---> S2
Next we will want to add the code for the responses (remember, this is an FR-5) as well
as a means of keeping count of the responses in another State Set. In order to do this,
we must add a new State with in State Set 1.
S2,
5#R^LeftLever: ON ^Reward; Z1 ---> SX
The Z-pulse (Z1) is what will let us record our rewards in another state set, which we will
program later. Now we will program our response count and set it up to display on the
screen:
S.S.2, \This is the state set that contains the response
\count and display
S1,
#Start: SHOW 1,RESP,A ---> S2
\This will now put label "RESP"
\and its value "A" on screen
\until start command issued.
S2,
#R^LeftLever: ADD A; SHOW 1,RESP,A ---> SX
Now it is time to insert the code for that reward counter and timer. In order to do this,
we will have to use the Z-pulse generated in State Set 1. Note how the Z-pulse has a #
sign in front of it. This demonstrates that it is an input, as opposed to an output (as it
was in State Set 1):
S.S.3, \Reward Counter and Timer
S1,
#Z1: ADD B; SHOW 2,REWARD,B ---> S2
S2,
.05": OFF ^Reward ---> S1
21
The final bit of code we must write is for the session timer. As you can tell, it is identical
to the session timer used in the previous tutorial.
S.S.4, \Session Timer
S1,
#START: ---> S2
S2,
1': ---> STOPABORT
Since that was the last state set, the final product looks like this:
\This is an FR-5
\Filename, Tutor04.mpc
\Date July 7, 2000
\This section is for inputs
^LeftLever = 1
\This section is for outputs
^House = 1
^Reward = 2 \In this code, this is a pellet dispenser.
S.S.1, \Main control logic for "FR"
S1,
#START: ON ^House ---> S2
S2,
5#R^LeftLever: ON ^Reward; Z1 ---> SX
S.S.2, \This is the state set that contains the response
\count and display
S1,
#START: SHOW 1,RESP,A ---> S2
S2,
#R^LeftLever: ADD A; SHOW 1,RESP,A ---> SX
S.S.3, \Reward Timer, count, and display
S1,
#Z1: ADD B; SHOW 2,REWARD,B ---> S2
S2,
.05": OFF ^Reward ---> S1
S.S.4, \Session Timer
S1,
#START: ---> S2
S2,
1': ---> STOPABORT
And just like that, your program is now ready to be saved as Tutor04.mpc in your
C:\WMPC\MPC directory.
22
Once again, follow the same procedure as before to translate and compile this program
and then open it in MED-PC. The bottom window should show that the program
"Tutor4" was loaded at xx:xx (your computer clocks current time). Now issue the start
command as you have done in the past. When you have issued the start command, hit
the left lever repeatedly to get responses and reward counts on the screen. When one
minute has passed and the program has shut down, the data is hanging in limbo waiting
for your next move. Do with the data what you please (i.e., save, print, or erase). This
is a good opportunity for you to test your knowledge.
You are on your way to becoming an expert user!

23
Chapter Six:
Establishing Default Values for Variables and Using a Variable Time Input
(An Introduction to the SET and #T Commands)
SET:
SET is used to perform any of four basic mathematical operations involving two or more
operands 5. The four operators permitted are multiplication (*), division (/), addition (+),
and subtractions (-). Although always outputs, two forms of this command are possible
as indicated by syntax A and syntax B.
Syntax A:
INPUT: SET P1 = P2 Operator P3 ---> NEXT
Syntax B:
INPUT: SET P1 = P2 ---> NEXT
Where: P1 = variable or array element, P2 and P3 = number, variable, or array element,
and Operator = a mathematical operation (e.g., *, /, +, or -).
It is important to point out that the stringing of elements with in the program is
permissible (i.e., P2 or P3 may be followed by " or ' to assign a time value to a variable)
with each operation separated by a comma. Variables may also be set to seconds or
minutes. Assigning a new value to a constant, however, is not permissible.
Real code may look like this:
1': SET A = 5 * A, B = C(K) ---> SX
#R3: SET A = (5 * A) + B + C ---> SX
#START: SET A = A * 1"
One last side note on the set command, in the past, complicated math expressions had
to be broken into pieces. MedState Notation has now been extended so that complex
expressions (e.g., 1 + [(2 * 10) / 4] - 3) may now be written directly
(e.g., SET A = 1 + ((2 * 10) / 4) - 3).
Variable Time Inputs (#T):
Time may be explicitly defined in terms of minutes (10' = ten minutes) or seconds with a
whole or decimal number (3.5" = three and one half seconds). Variable time inputs
using the #T command are also possible. Regardless if the time values are explicit or
variable, time always serves as an input in MedState Notation. When it is desirable to
change the value of a time variable, #T is preceded by a variable containing a specified
amount of time. The syntax will be:
5 Any mathematical function provided by Turbo Pascal can also be inserted within a
MedState Notation statement using In-Line Pascal.
24
X#T: OUTPUT ---> NEXT
Where X is a predefined variable; in this example it is set to a value of 1:
S.S.1,
S1,
#START: ON 1; SET X = 1" ---> S2
S2,
X#T: OFF 1 ---> S1
Please note, as with explicit time values, only one time command per state may be
present, so the following example of code is illegal:
S1,
X#T: ---> SX
1": ---> SX
25
Tutorial 5: Creating an FI Schedule
Start by opening Tutor04.mpc and make the following changes (changes noted in bold
and appropriate comments are made off to side):
\This is an FI
\Filename, Tutor05.mpc
\Date July 7, 2000
\This section is for inputs
^LeftLever = 1
\This section is for outputs
^House = 1
^Reward = 2 \In this code, this is a pellet dispenser.
S.S.1, \Main control logic for "FI"
S2, \Changed S1 to S2
#START: ON ^House; <WILL BE ADDING CODE HERE> ---> S3
S4, \Changed S2 to S4
#R^LeftLever: ON ^Reward; Z1 ---> SX \DELETE 5 BEFORE #R
S.S.2,
S1,
#START: SHOW 2,RESP,A ---> S2 \WAS SHOW 1
S2,
#R^LeftLever: ADD A; SHOW 2,RESP,A --->SX
S.S.3,
S1,
#Z1: ADD B; SHOW 3,REWARD,B ---> S2 \WAS SHOW 2
S2,
.05": OFF ^Reward ---> S1
S.S.4,
S1,
#START: ---> S2
S2,
1': ---> STOPABORT
Next we will add our "SET" code. The variable we are going to set is "X" which, in this
program, will be our fixed interval. We are going to default it to 10, but later in this
tutorial we will see how to change this interval without changing the code. All of the
"SET" code will be inserted into State Set 1:
26
S1,
.01": SET X = 10 ---> S2
S2,
#START: ON ^House; SET X = X*1" ---> S3
\ Converts time into WMPC clock ticks
\ (Interrupts -- see User's Manual for additional
\ information on runtime system).
1": SHOW 1,FI =,X ---> SX
Next add the time command #T with Variable X as State 3 of State Set 1:
S3,
X#T: ---> S4
The final product should look like this:
\This is an FI
\Filename, Tutor05.mpc
\Date July 7, 2000
\This section is for inputs
^LeftLever = 1
\This section is for outputs
^House = 1
^Reward = 2 \In this code, this is a pellet dispenser.
S.S.1, \Main control logic for "FI"
S1,
.01": SET X = 10 ---> S2
S2,
#START: ON ^House; SET X = X*1" ---> S3
1": SHOW 1,FI =,X ---> SX
S3,
X#T: ---> S4
S4,
#R^LeftLever: ON ^Reward; Z1 ---> S3
S.S.2, \This is the state set that contains the reward count
\and display
S1,
#START: SHOW 2,RESP,A ---> S2
S2,
#R^LeftLever: ADD A; SHOW 2,RESP,A ---> SX
S.S.3, \Reward Timer
S1,
#Z1: ADD B; SHOW 3,REWARD,B ---> S2
S2,
.05": OFF ^Reward ---> S1
27
S.S.4, \Session Timer
S1,
#START: ---> S2
S2,
1': ---> STOPABORT
Save this file as Tutor05.mps and follow the same procedure as before to translate and
compile this program and then open it in MED-PC, load the file, issue the start
command as you have done in the past, and hit the left lever repeatedly to get
responses and reward counts on the screen. As you can see, you are clearly on an FI-
10 schedule. When one minute has passed and the program has shut down, the data is
hanging in limbo waiting for your next move. Do with the data what you please, but DO
NOT exit WMPC. Instead, reload the box – we are going to change this to an FI-15.
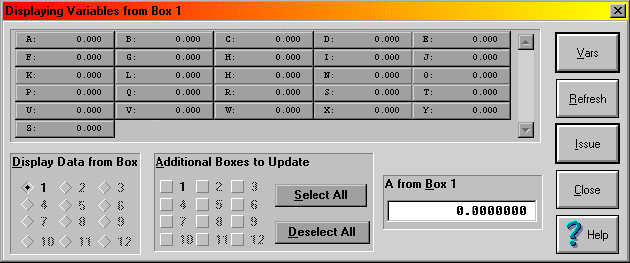
A "Change Variables" screen may be brought up by scrolling the mouse first to the
"Configure" option of the menu bar, clicking once, and then clicking on "Changing
Variables."
Changing the value of any selected variable field changes the variable data for the
displayed box. You can change all boxes if you click "Select All" or only some boxes by
clicking the appropriate number(s) in the "Additional Boxes to Update" section of the
window. For our purposes, we only want to change one variable (the interval) on one
box (Box 1). If you look back at the code you wrote for this program, the variable "X" is
the interval value. So click in the text box next to the letter "X." In the lower, right hand
corner of the "Change Variable" window, there is a text box whose title is now "X from
Box 1," and whose default value is 10. To change this program to an FI-15, replace 10
with 15 and click "Issue." You now have an FI-15. You can tell this by looking at the
runtime screen. Note how the FI value displayed is now 15. You can run the program if
you would like, or you can close it now.
From the Window's Desktop, reopen WMPC and reload "Tutor05." Now look at the run
time screen. Note how it reads FI = 10. This is because the "Change Variables" screen
does not change the code, only the value of the variable for the procedure currently
being run. Once you close WMPC, the change goes away. You can change it back
upon reopening the WMPC or even change it multiple times in one session, depending
on how the code is written. In the current example, changes made after the #START
command is issued would result in an error unless the value changed is in "MED clock
ticks."

28
Chapter Seven:
Decisions, Decisions, Decisions
(Introducing the "IF" Statement)
Until this point, the programs that have been written have been very straightforward.
They have all followed a pattern of, "do one thing until completed, then another, then
another until I either get tired of watching (e.g., the house light blinking on and off) or
time is up (e.g., tutorial 5)." By utilizing the "IF" command we are able to have programs
come to a proverbial fork in the road and the path they take is contingent on whether or
not a criterion you have established has been met. There are many variations to the IF
command and this chapter will deal with three of them. As a result, there will be three
versions of the tutorial at the end of the chapter so that you can see how they would all
work in the code.
An overview of "IF":
IF is an output command that compares the values of two numeric parameters, a
numeric parameter and a variable, or two variables. The basic syntax of "IF" regardless
of function, is 6:
INPUT: IF P1 Operator P2 [@Label1, @Label2]
@Label1: Output ---> NEXT 1
@Label2: Output ---> NEXT 2
Where: "P1 and P2" are constants, numbers, variables, etc.; " Operator" is one of six
comparisons operators that are permitted: Equals (=), Less Than (<), Less Than or
Equal To (<=), Greater Than (>), Greater Than or Equal To (>=), or Not Equal To (<>);
and @Label is a condition that must be met (e.g., true or false). Note, the @ must be
present before the "Label" but the label itself is purely subjective.
IF as a session timer:
We have been using a crude version of a session time for a few tutorials now. The set
up has been after one minute, stop everything no matter what. Since we were not
running very complex programs, you have probably not noted a problem with this. If
there were a lot of things going on in the program, it would be possible for the screen
data not to agree with the saved data (the saved data would be higher and correct, but
the screen may not have time to update) or the program may stop in the middle of an
event (like issuing a reward). Neither of these are ideal situations.
6 Please note, there are three syntaxes that can be used to write an IF statement. This
chapter will only show how to use the most complete syntax that can be used in any
situation. As time goes on, and you become more comfortable with programming in
MedState Notation, you may choose to look in Appendix A: MEDSTATE NOTATION
COMMANDS for examples of how to use the other, abbreviated, syntaxes.
29
Assume that your experiment is running for sixty minutes, real code may look like this:
S.S.5,
S1,
1": ADD N; IF N/60 >= M [@TrueEnd, @FalseContinue]
@End: Z5 ---> S2
@Cont: ---> SX
S2,
3": ---> STOPABORT
What this is doing is adding the variable N every second and then converting the new
value N to minutes. Since your session timer (represented by variable M) is set for 1
hour, or sixty minutes, this IF statement is set to stop the program at an hour or any
fraction above it. If the session has been running for less than an hour, the system
waits (coded for by @Cont: --->SX). When an hour has passed, the program transitions
to S2 where it waits three second before shutting down (therefore the screen can be
updated, the reward can be given, etc.). A Z-pulse has been added that can be used
where a function is terminated immediately (e.g., a response contingent statement or
counter).
Nested IF commands:
IF statements are not limited to only one set of options, they can also be nested. The
syntax is nearly the same as a non-nested if, with the exception being that the nested
commands must be organized sequentially:
1": IF A >= X [@FirstTrue, @FirstFalse]
@FirstTrue: IF B >= X [@SecondTrue, @SecondFalse]
@SecondTrue: IF C >= X [@ThirdTrue, @ThirdFalse]
@ThirdTrue: ---> S2
@ThirdFalse: ---> S3
@SecondFalse: ---> S3
@FirstFalse: ---> S3
In the above example, all three variables (A, B, and C) must be greater than or equal to
X for the statement to transition to S2. Any False outcome results in a transition to S3.
Compound IF commands:
IF statements also may be constructed so that several logical conditions are evaluated
in a single expression. This may be accomplished by placing each set of logical criteria
in parentheses and connecting each set with AND, OR, NOT, AND NOT, or OR NOT.
Parentheses must be used to denote the order in which expressions are evaluated if
multiple expressions are strung together (note that this is like the way that parentheses
control execution of algebraic expressions in SET statements). The syntax would look
like this:
30
INPUT: IF (A = 1) AND (B = 2) [@True, @False]
@True: ---> S2
@False: ---> SX
Real Code may look like this:
S.S.5,
S1,
1": IF (R = 100) OR (M = 60) [@True, @False]
@True: ---> S2
@False: ---> SX
S2,
3": ---> STOPABORT
31
Tutorial 6A: Using A Single "IF" Command as a Session Timer
At this point you know how to write/change your program, translate/compile it, load it,
change the variables, and run it. For the second two uses of the "IF" command, only
the final product is going to be given to you with the changes from Tutor06A.mpc shown
in bold, although a short explanation to why changes were made will be given for
Tutor6b.mpc. Write and test both of them and if you have any problems, refer to earlier
tutorials.
The first step is to open Tutor04.mpc and make the following changes noted in bold:
\This is an FR schedule
\Filename, Tutor06A.mpc
\Date July 7, 2000
\This section is for inputs
^LeftLever = 1
\This section is for outputs
^House = 1
^Reward = 2 \In this code, this is a pellet dispenser.
\DEFINED VARIABLES
\ A = NUMBER OF RESPONSES
\ B = NUMBER OF REWARDS
\ M = MINUTES
\ X = FIXED RATIO
\ N = SESSION TIMER
S.S.1, \main control logic for "FR"
S1,
1": SET M = 1; SET X = 5 ---> S2
S2,
#START: ON ^House ---> S3
S3,
X#R^LeftLever: ON ^Reward; Z1 ---> SX
S.S.2,
S1,
#START: SHOW 2,RESP,A ---> S2
S2,
#R^LeftLever: ADD A; SHOW 2,RESP,A ---> SX
S.S.3,
S1,
#Z1: ADD B; SHOW 3,REWARD,B ---> S2
S2,
.05": OFF ^Reward ---> S1
32
A few things are worth pointing out. You have changed the position of the displays for
the responses and the reward counters by shifting them over one. This should tip you
off that we are going to add another counter before these "preexisting" ones before we
are done. The other thing we have done is added a set of statements in the beginning
of the program that "define" our constants. Since they are statements preceded by a
backslash, they are not part of the heart of the program. They are only there for our
convenience. It is a wise thing to put the definitions in because we now have more
variables that we can change the value of (and even more will be able to be changed in
the next two tutorials). As it stands now, once this program is translated and compiled,
you will be able to change M (duration of the program) and X (the fixed ratio number).
Now we need to add our session timer, which will be our state set 4. The code is:
S.S.4, \Session timer
S1,
#START: SHOW 1,Sess_n,N ---> S2
S2,
1": ADD N; SHOW 1,Sess_n,N/60;
IF N/60 >= M [@True, @False]
@True: ---> S3 \Therefore, when the session timer
\>= M, time to stop
@False: ---> SX \But here if session timer < M, go
\nowhere
S3,
3": ---> STOPABORT
Your program is ready to be saved (as Tutor06A.mpc), translated, and compiled. When
you open WMPC to test it, run it first, as is. After seeing that it times out after a minute,
but acts as a fr-5 when it is running, reload the box with Tutor06A and change variables
X to 10 and M to 1.5 before issuing the start command. Notice now how it is running as
a FR-10 for a minute and a half.
33
Tutor06B.mpc
We are doing a couple of interesting things in this program. As the chapter would lead
you to believe, the primary purpose of this program is to see how a nested "IF"
statement works. State 2 of state set 4 contains our nested "IF" statement. In order to
make it work, we had to revisit a couple familiar topics. First, we needed to SET a
variable back in State Set 1 to allow us to have something to nest. Looking at the
comments, it is seen that our variable Q is going to be the maximum number of rewards
the animal will be allowed. The second topic revisited is Z-pulses. We had a z-pulse in
this program already to signal the reward timer. The new z-pulse serves the purpose of
terminating certain program functions after our session timer times out or the animal has
enough rewards. Without the z-pulse, the animal could get another reward and the
response counter could still be counting after the procedure is "terminated." This is
because of the three-second-time delay in S3 (needed to allow the screen to update
before stopping).
\This is an FR-5
\Filename, Tutor06B.mpc
\Date July 7, 2000
\This section is for inputs
^LeftLever = 1
\This section is for outputs
^House = 1
^Reward = 2 \In this code, this is a pellet dispenser.
\DEFINED CONSTANTS
\ A = NUMBER OF RESPONSES
\ B = NUMBER OF REWARDS
\ M = MINUTES
\ X = FIXED RATIO
\ N = SESSION TIMER
\ Q = MAXIMUM REWARD
S.S.1, \main control logic for "FR"
S1,
1": SET M = 1; SET X = 5; SET Q = 5 ---> S2
S2,
#START: ON ^House ---> S3
S3,
X#R^LeftLever: ON ^Reward; Z1 ---> SX
#Z2: ---> S1
S.S.2,
S1,
#START: SHOW 2,RESP,A ---> S2
S2,
#R^LeftLever: ADD A; SHOW 2,RESP,A ---> SX
#Z2: ---> S1
34
S.S.3,
S1,
#Z1: ADD B; SHOW 3,REWARD,B ---> S2
S2,
.05": OFF ^Reward ---> S1
S.S.4,
S1,
#START: SHOW 1,Sess_n,N ---> S2
S2,
1": ADD N; SHOW 1,Sess_n, N/60;
IF N/60 < M [@True, @False]
\AS LONG AS SESSION TIME < M WE WILL CONTINUE
@True: IF Q < B [@2True, @2False]
\IF ANIMAL HAS ENOUGH REWARDS WE WILL STOP
@2True: Z2 --->S3
@2False: ---> SX
\Z PULSE ADDED WHEN ELAPSED TIME = M WILL GO UP TO
\S.S.1 AND WAIT
@False: Z2 ---> S3
S3,
3": ---> STOPABORT
35
Tutor06C.mpc
The primary purpose of this program is to see how a compound "IF" statement works.
State 2 of state set 4 contains our compound "IF" statement and, in this example, it
simplifies the information in Tutor06B.mpc's into four lines (from six).
\NOTE: CHANGES IN BOLD ARE CHANGES FROM Tutor06B.MPC
\This is an FR-5
\Filename, Tutor06C.mpc
\Date July 7, 2000
\This section is for inputs
^LeftLever = 1
\This section is for outputs
^House = 1
^Reward = 2 \In this code, this is a pellet dispenser.
\DEFINED VARIABLES
\ A = NUMBER OF RESPONSES
\ B = NUMBER OF REWARDS
\ M = MINUTES
\ X = FIXED RATIO
\ N = SESSION TIMER
\ Q = MAXIMUM REWARD
S.S.1, \main control logic for "FR"
S1,
1": SET M = 1; SET X = 5; SET Q = 5 ---> S2
S2,
#START: ON ^House ---> S3
S3,
X#R^LeftLever: ON ^Reward; Z1 ---> SX
#Z2: ---> S1
S.S.2,
S1,
#START: SHOW 2,RESP,A ---> S2
S2,
#R^LeftLever: ADD A; SHOW 2,RESP,A ---> SX
#Z2: ---> S1
S.S.3,
S1,
#Z1: ADD B; SHOW 3,REWARD,B ---> S2
S2,
.05": OFF ^Reward ---> S1
36
S.S.4,
S1,
#START: SHOW 1,Sess_n,N ---> S2
S2,
1": ADD N; SHOW 1,Sess_n, N/60;
IF (N/60 >= M) OR (B >= Q) [@True, @False]
@True: Z2---> S3
@False: ---> SX
S3,
3": ---> STOPABORT

37
Chapter Eight:
Introduction to Arrays, Part One
The variables used so far have all been simple, non-array variables. Any variable (A to
Z) can also be designated as an array with from 2 to 10,001 elements. Although there
are certain restrictions when using arrays, over all this is a very powerful means of
collecting data and controlling your program. This chapter will deal with a way that you
can use arrays to collect data.
The General Concept Behind Arrays:
Once a variable has been assigned, or defined, as an array the elements within that
array are identified with subscripts of that variable where the first element is always
numbered 0 (zero), and each successive element is consecutively numbered. The
individual elements of an array are always accessed through subscripts. In other
words, the first piece of data in array "A" would be placed in element 0 and would be
referenced by A(0), while the third piece of data would be placed in element 2 and
referenced by A(2). If properly defined, this could continue up to the 10,001 piece of
data that would be placed in element 10,000 and referenced by A(10000). This,
however, would have to be the last piece of data for not only the array, but for the box.
It would also have to be the only variable defined because the limit is 10,001 elements
per box (i.e., one array of 10,001 or two arrays of 5,000 each, one array of 5,000 plus 5
arrays of 1,000 each, etc.) 7.
DIM Command:
The size of the array must be stated before the first state set. As with all MSN
variables, the values of array elements are always equal to 0 until explicitly changed. In
a case where you would want your program to fill in your array with data through the
course of an experiment (i.e., the array is to be created empty), the DIM (dimensional)
command is very useful. Its syntax is:
DIM = X
S.S.1,
(NOTE: this command doesn't fit into the INPUT: OUTPUT ---> NEXT format, it must
always be placed somewhere before S.S.1)
7 An attempt to further explain this concept using this example would probably result in
more confusion then actual help. All that needs to be kept in mind when programming
is that the maximum number of variables and variable subscripts is 10,001. For
example, you could define 21 variables and set up 4 arrays with 2495 elements to
satisfy the 10,001 cap or another program with 16 variables, 1 array of 8000, another
array of 1500, and 1 array of 485. Also keep in mind, this is only a cap, not a
requirement; there is nothing wrong with setting up a program with 3 variables and an
array with 50 elements.
38
Where x = the number of elements you want defined. Remember, arrays start with
element zero, so if you wanted an array with 25 elements to fill with data, you write it as:
DIM = 24
Using An Array To Record IRT's:
An especially useful application of an array is the recording of Inter-Response Time
(IRT) data. If your array is dimensioned smaller than the number of IRTs, you will get
an error message from WMPC when an attempt is made to use an array element that
does not exist.
Sealing An Array:
If defining your array too small results in an error, then it only makes sense that you
would want to typically "pad" your array with more elements than you expect to use.
But what if, for example, you assign the array to have 500 elements (DIM = 499), but
your animal only responds 25 times? The result would be 25 points of data followed by
475 empty elements represented by zeros. Although better than an error message, this
is hardly ideal. The secret is to seal your array so that only data recorded is displayed
and all superfluous elements are excluded from the data file. This is done with the
MedState Notation -987.987 command. In order to use this command, it must be done
in conjunction with the "SET" command (e.g., SET X = -987.987). The real code would
look like this:
S2,
#R^LeftLever: SET C(I) = T, T=0; ADD I;
IF B >= Q [@True, @False]
@True: ---> S1
@False: SET C(I) = -987.987 ---> SX
In this example (which will be seen again in the tutorial), every response adds to array
C, and then the array is tested. If our statement is true transition takes place to the first
statement the collection of IRT's without terminating the procedure (Note: the program
will end when the session timer tells it to do so). If the statement is false, however, the
seal of our array is moved over one spot. The advantage, of course, being that the
array is always "sealed" in case of a true statement or a premature stop but the seal can
always be moved.
39
Tutorial 7A: Using the DIM command
Once again we are going to modify the FR-5 program from Tutor04.mpc. So go ahead
and open that file and make the following changes marked in bold, saving it as
Tutor07A.mpc and translate/compile it as you have done in the past.
\This is an FR-5
\Filename, Tutor07A.mpc
\Date July 7, 2000
\This section is for inputs
^LeftLever = 1
\This section is for outputs
^House = 1
^Reward = 2 \In this code, this is a pellet dispenser.
\DEFINED VARIABLES
\ A = NUMBER OF RESPONSES
\ B = NUMBER OF REWARDS
\ C = DATA ARRAY
DIM C = 49
S.S.1, \main control logic for "FR"
S1,
#START: ON ^House ---> S2
S2,
5#R^LeftLever: ON ^Reward; Z1 ---> SX
S.S.2, \response counter
S1,
#START: SHOW 1,RESP,A ---> S2
S2,
#R^LeftLever: ADD A; SHOW 1,RESP,A ---> SX
S.S.3, \reward counter
S1,
#Z1: ADD B; SHOW 2,REWARD,B ---> S2
S2,
.05": OFF ^Reward ---> S1
S.S.4, \Time increment in .1 sec intervals.
S1,
#START: ---> S2
S2,
0.1": SET T = T + 0.1 ---> SX
40
S.S.5, \Recording IRT'S
S1,
#START: ---> S2
S2,
#R^LeftLever: SET C(I) = T, T = 0; ADD I ---> SX
S.S.6,
S1,
#START: ---> S2
S2,
1' ---> STOPABORT
After opening MED-PC, load and start the program as you normally would. When
testing it, take care in not pressing the lever more than 50 times (remember, DIM = 49).
When your box times out after one minute, go to file and select print. At the bottom of
your print out, you should get something that looks like this:
C:
0: 6.400 0.800 0.400 0.500 0.300
5: 3.200 0.500 0.300 0.300 0.900
10: 0.300 0.400 0.600 0.300 0.200
15: 0.200 0.500 0.200 0.400 0.800
20: 1.000 1.200 2.300 0.600 1.000
25: 6.400 0.800 0.400 0.500 0.300
30: 3.200 0.500 0.300 0.300 0.900
35: 0.300 0.400 0.600 0.300 0.200
40: 0.200 0.500 0.200 0.000 0.000
45: 0.000 0.000 0.000 0.000 0.000
This is your data array. The numbers preceding the colon show what the subscript of
the first number per row is. Each number that follows is the next subscript Therefore,
looking at the 0: row, the value 6.400 = A(0), 0.800 = A(1), 0.400 = A(2), etc.
41
Tutorial 7B: Sealing the Array
In this tutorial, we are just going to make some changes to the previous tutorial. The
changes to be made are noted in bold.
\This is an FR-5
\Filename, Tutor07B.mpc
\Date July 7, 2000
\This section is for inputs
^LeftLever = 1
\This section is for outputs
^House = 1
^Reward = 2 \In this code, this is a pellet dispenser.
\DEFINED VARIABLES
\ A = NUMBER OF RESPONSES
\ B = NUMBER OF REWARDS
\ C = DATA ARRAY
\ M = MAX TIME IN MINUTES
\ N = SESSION TIMER
\ Q = MAX REWARD
DIM C = 999
S.S.1, \main control logic for "FR"
S1,
#START: ON ^House; SET Q = 5; SET M = 1 ---> S2
S2,
5#R^LeftLever: ON ^Reward; Z1 ---> SX
#Z2: ---> S1
S.S.2, \response counter
S1,
#START: SHOW 2,RESP,A --- > S2
S2,
#R^LeftLever: ADD A; SHOW 2,RESP,A ---> SX
#Z2: ---> S1
S.S.3, \reward counter
S1,
#Z1: ADD B; SHOW 3,REWARD,B ---> S2
S2,
.05": OFF ^Reward ---> S1
S.S.4, \Time increment in .1 sec intervals.
S1,
#START: ---> S2
S2,
0.1": SET T = T + 0.1 ---> SX
42
S.S.5, \Recording IRT'S
S1,
#START: ---> S2
S2,
#R^LeftLever: SET C(I) = T, T = 0; ADD I;
SET C(I) = -987.987 ---> SX
#Z2: ---> S1
S.S.6,
S1,
#START: SHOW 1,Sess_n,N ---> S2
S2,
1": ADD N; SHOW 1,Sess_n,N/60;
IF N/60 < M [@True, @False]
@True: IF Q < B [@2True, @2False]
@2True: Z2---> S3
@2False: ---> SX
@False: Z2 ---> S3
S3,
3": ---> STOPABORT
Go ahead and save this program as Tutor7B.mpc, translate/compile it, and go to MED-
PC and load/run it. This program will now stop in one of two ways, either because the
animal has enough rewards (defined by Q) or the program has run its course (set as
one minute). Although we have set our array for a much larger number than we would
ever need (1000 elements) it does not matter, the array will seal itself no matter how it
stops. When the program gets done running, make a print out. Unlike our last program
that had zeros in the array where there were no responses, this printout only shows the
data collected. An example of the data from an IRT = 42 is shown below:
C:
0: 3.700 0.300 0.200 0.300 0.500
5: 0.800 0.200 0.100 0.700 0.100
10: 0.200 0.200 0.100 0.100 0.100
15: 0.100 0.100 0.100 0.100 0.100
20: 8.900 0.500 0.600 0.600 0.500
25: 0.500 0.800 0.500 0.500 0.800
30: 3.700 1.300 1.100 4.500 0.800
35: 0.000 18.100 0.500 0.500 1.400
40: 0.700 0.900
As you can tell, this was an example of the programming timing out as opposed to
getting the maximum numbers of rewards. Notice how, unlike the print out from the
Tutor07A.mpc, this printout does not have all of the excessive zeros due to the insertion
of the -987.987 command.
43
Chapter Nine:
Array Commands As Outputs
(An introduction to the LIST, RANDI, AND RANDD commands)
The previous chapter dealt with a way to transform a variable into an array just by
assigning it a dimensional value. This was a nice way to collect and sort data. Arrays
can be used for more than just data collection; they can also be used as control
variables in a program. This chapter will deal with how to set up and use arrays in
outputs.
LIST (as a definer of arrays):
Unlike DIM, which only allows you to set up the shell of an array that must be filled in (or
sealed), LIST allows you to set up an array with assigned values. LIST is best used in
conjunction with an output function (this will be demonstrated a bit later). When used to
define, the syntax of LIST is:
LIST X = V1, V2, V3,…
Where X is any available variable and V1, V2, and V3 are all values assigned to the
new array X.
LIST (as an output):
The second use of the LIST command is found in the output section of statements. This
must be used in conjunction with LIST as a definer. The basic idea behind these two
commands is that LIST first defines the array at the beginning of a program. Later in
the program when you want to draw from this array, the LIST as an output will draw
each number, one at a time and sequentially until the program is done or the numbers
have all been used. If the latter occurs, LIST simply starts again at the beginning of the
list. The following would successively display the numbers 1, 2, and 3 on the screen,
and demonstrates the two uses of LIST:
LIST G = 1,2,3
S.S.1,
S1,
1": LIST F = G(H); SHOW 1,FVAL,F ---> SX
RANDI:
RANDI is similar to LIST (as an output) and is used in to automatically select data from
an array set up with LIST (as a definer). The difference between LIST and RANDI is
that while LIST pulls its values from the array sequentially, RANDI pulls them randomly
with replacement. The following example shows how the program above could use the
RANDI command:
44
LIST G = 1,2,3
S.S.1,
S1,
1": RANDI F = G; SHOW 1,FVAL,F ---> SX
Note that a subscript variable is not specified for the array variable, as was the case
with the LIST command. The subscript is selected randomly as a function of RANDI.
Also, unlike the LIST program that would present the data 1, 2, 3, 1, 2, 3,…, this
program might cause the numbers 2, 2, 1, 3, 2, 1, 3 to be successively displayed on the
screen (so the average, if allowed to run over time would be 1 = 2 = 3).
RANDD:
RANDD is closely related to RANDI with the difference lying in that RANDD randomly
selects from an array, but without replacement. Substituting RANDD in the examples of
code used above might cause the numbers 1, 3, 2, 2, 1, 3, 2, 3, 1 to be successively
displayed on the screen (the point being that any one number cannot be reused until the
other two numbers have been selected.
45
Tutorial 8: Using the List (As a definer) And RANDD To Set Up a VI
Schedule
We are going to add/change a few lines of code from the Tutor07B.mpc. As done in the
past, the changes are shown below in bold. Make the changes, save as Tutor08.mpc,
translate/compile, and then go to MED-PC for Windows and test the program.
\This is a VR-10
\Filename, Tutor08.mpc
\Date July 7, 2000
\This section is for inputs
^LeftLever = 1
\This section is for outputs
^House = 1
^Reward = 2 \In this code, this is a pellet dispenser.
\DEFINED VARIABLES
\ A = NUMBER OF RESPONSES
\ B = NUMBER OF REWARDS
\ C = DATA ARRAY
\ D = OUTPUT ARRAY
\ M = MAX TIME IN MINUTES
\ N = SESSION TIMER
\ Q = MAXIMUM REWARD
DIM C = 999
LIST D = 1, 5, 10, 15, 19
S.S.1, \main control logic for "VR"
S1,
#START: ON ^House; SET Q = 10; SET M = 1 ---> S2
S2,
1": RANDD X = D; SHOW 2,VI =,X ---> S3
S3,
X#R^LeftLever: ON ^Reward; Z1 ---> S2
#Z2: ---> S1
S.S.2, \response counter
S1,
#START: SHOW 3,RESP,A ---> S2
S2,
#R^LeftLever: ADD A; SHOW 3,RESP,A ---> SX
#Z2: ---> S1
46
S.S.3, \reward counter
S1,
#Z1: ADD B; SHOW 4,REWARD,B ---> S2
S2,
.05": OFF ^Reward ---> S1
S.S.4, \Time increment in .1 sec intervals.
S1,
#START: ---> S2
S2,
0.1": SET T = T +0.1 ---> SX
S.S.5, \Recording IRT'S
S1,
#START: ---> S2
S2,
#R^LeftLever: SET C(I) = T, T = 0; ADD I;
SET C(I) = -987.987 ---> SX
#Z2: ---> S1
S.S.6,
S1,
#START: SHOW 1,Sess_n,N ---> S2
S2,
1": ADD N; SHOW 1,Sess_n,N/60;
IF N/60 < M [@True, @False]
@True: IF Q < B [@2True, @2False]
@2True: Z2 ---> S3
@2False: ---> SX
@False: Z2 ---> S3
S3,
3": ---> STOPABORT
Notice as you run this program how the value of VI is shown on the runtime screen. As
long as you generate at least five responses you will see that VI will equal 1, 5, 10, 15,
19 (not in that order) before repeating any of those number. This is because of the
RANDD command. If you would like to test it for yourself, change RANDD to RANDI to
make the selection random with replacement or to LIST to get the numbers to come out
sequentially.
Congratulations, you have now mastered all the building blocks necessary to write any
program you could imagine. The next chapter will cover some obscure commands that
you may or may not find useful in your programming. If you are interested in getting
more in depth in any of the commands presented here, flip to Appendix A for a list of all
commands and their syntax. Good luck in your MED-PC programming endeavors.
47
Chapter Ten:
You Have Collected The Data, Now What?
(An introduction to Print and Disk Commands)
Up to this point, we have seen how to assign variables, create and fill arrays, and print
this data. Having never used all of our variables, we have had zeros next to those
unassigned. Over the course of an experiment, however, this can result in cluttered
data files and an exorbitant amount of numbers to slug through to get to the data
needed. With WMPC you can establish which data are to be printed and/or saved. As
you will soon see, there are times when the printing (PRINT) and data saving (DISK)
commands overlap. When this occurs, only the syntax of the PRINT command will be
shown, but it will be explained that DISK can be used in place of PRINT.
As you go through this chapter, all of these commands, unless explicitly stated, are
written as stand alone statements and must precede the first state set (Like the DIM
command from Chapter Eight).
Setting the Orientation of Printouts (PRINTORIENTATION)
This command is used to override system defaults with respect to whether a given
printout occurs in landscape (sideways) or portrait (standard) orientation.
The syntax is:
PRINTORIENTATION = direction
Where direction is "landscape" or "portrait."
Setting the # of Columns on Printouts (PRINTCOLUMNS) [on Data files
(DISKCOLUMNS)]:
PRINTCOLUMNS controls the number of columns in which the contents of arrays are
printed. The use of this command will override any defaults set within the WMPC menu
system (which is five columns). This command functions in combination with
PRINTORIENTATION, PRINTPOINTS, and PRINTFORMAT. If the total line space
available is exceeded, the column function may be automatically truncated. The syntax
is:
PRINTCOLUMNS = X
Where "X" is the number of columns.
The DISKCOLUMNS command will do the same thing but to the data file. Its syntax is
identical.
48
Controlling Font Size on Printouts (PRINTPOINTS):
PRINTPOINTS controls the size of the font used to print data from the box in which this
command is issued. The use of this command will override any defaults set within the
WMPC menu system. The syntax is:
PRINTPOINTS = X
Where X is the number of points (12 is the default).
Controlling the Printouts/Data Files (PRINTFORMAT)/ (DISKFORMAT):
By default, WMPC automatically sets aside 12 spaces for each number to be printed. It
breaks down the 12 spaces into 8 reserved for the integer part of the number (to the left
of the decimal), 1 for the decimal and 3 spaces for numbers right of the decimal. An
example of a number printed in 12.3 format (the meaning of 12.3 will be detailed below)
is, "12345678.123".
In many instances, it is useful to print data in other formats, particularly when trying to
increase the amount of data printed per page. Placing a PRINTFORMAT statement
before the first state set of the procedure you can control the printed format of numbers.
The syntax of PRINTFORMAT is:
PRINTFORMAT = P1.P2
Where P1is the number indicates the total number of spaces to be occupied by the
number including the decimal point and P2 is the number indicating the number of
spaces to be set aside for the decimal portion of the number.
PRINTFORMAT Examples:
PRINTFORMAT = 5.1 \Print in five space, with 3 to left of decimal
\1 to right as in 123.1
PRINTFORMAT = 7.2 \e.g., 1234.12
PRINTFORMAT = 6.0 \e.g., 123456
The use of a PRINTFORMAT statement has no effect upon the internal representation
of numbers. If multiple PRINTFORMAT statements are used in the same .MPC
procedure, then only the last one is implemented.
If the digits to the left of the decimal point exceeds the total number of spaces set aside
by the PRINTFORMAT statement, then the general formatting rules are temporarily set
aside and the number is printed in as many spaces as are needed to represent the
integer portion of the number. This may result in the printed line "spilling" onto the next
line on the page. If the decimal portion of a number exceeds the space allocated, the
number printed is rounded to the nearest value.
49
Remember, to save the data in the same format, just replace the word PRINT with DISK
and follow all of the same rules.
Controlling the Selection of Variables or Arrays on Printouts/Data Files
(PRINTVARS) (DISKVARS):
It is often desirable to print only a subset of the variables and arrays in a procedure.
This is particularly true when many of the variables are used internally by the procedure
and do not contain data. Additionally, when collecting hundreds or thousands of data
points per session, it would be convenient to be able to print a few key indices to the
printer after every session, and yet be able to save the detailed counters to disk file for
later analysis.
The above objectives may be accomplished by using the PRINTVARS command. This
command may be used to declare a list of variables that will be printed whenever a
PRINT command is issued. The PRINTVARS command affects printing irrespective of
whether the command to print was issued from within a state table or by a keyboard
command. The PRINTVARS command in no way affects the variables that will be
written to disk (but a parallel command, DISKVARS, is provided).
As seen in previous tutorials, by default all variables and arrays (A-Z) are printed. To
print selected variables, place a PRINTVARS directive before the first state set of the
procedure. PRINTVARS must come before the first state set and its syntax is:
PRINTVARS = P1, P2...P26
Where P1...P26 are the variables or arrays A through Z that you want printed. Real
Code may look like this:
PRINTVARS = A, B, C, D, F, G, Z
Condensed vs. Full Headers (PRINTOPTIONS):
PRINTOPTIONS provides control over the appearance of the headers that appear at
the beginning of printouts as well as when to print your data. The headers include
information, such as the time the experiment was loaded and the name of the program
used to control the experiment. There are two options for the appearance of headers:
FULLHEADERS vs. CONDENSEDHEADERS. For when to print your data, the options
are FORMFEEDS or NOFORMFEEDS. If FORMFEEDS is selected, the printout will
occur when data is queued to be printed (i.e., when a box is done running). If
NOFORMFEEDS is selected, WMPC will print only when a page of data is in the queue.
If PRINTOPTIONS is not explicitly specified, the default printout is to print a condensed
header and no form feed. When specified, commas separate multiple options, and any
option not specified will stay at its default value. The syntax is:
50
PRINTOPTIONS = P1, P2
Where P1 = FULLHEADERS or CONDENSEDHEADERS and P2 = FORMFEED OR
NOFORMFEED.
Printing Data (PRINT):
PRINT is the only command in this section that is not placed before State Set 1. It is an
output command that may be used to generate printouts from within the code. Just like
with printing from the menu bar, unless you specify differently (using the
aforementioned commands), PRINT will print everything.
All printing is done through the Windows Print Manager. In the event that the printer is
offline or out of paper or there is some other problem, Windows will present a dialog box
indicating the nature of the problem. It is generally best to correct the problem and the
select "RETRY". Data will not generally be lost under such circumstances.
Since it is an output command, the syntax of PRINT is:
INPUT: PRINT ---> NEXT
And real code may look like this:
S2,
30': PRINT ---> STOPABORTFLUSH
51
Tutorial 9: Bringing it all together
For this tutorial, open up tutor08.mpc and make the following changes noted in bold and
save it as tutor09.mpc:
\ This is a VR-10
\ Filename, Tutor09.mpc
\ Date July 7, 2000
\This section is for inputs
^LeftLever = 1
\This section is for outputs
^House = 1
^Reward = 2 \In this code, this is a pellet dispenser.
\DEFINED VARIABLES
\ A = NUMBER OF RESPONSES
\ B = NUMBER OF REWARDS
\ C = DATA ARRAY
\ D = OUTPUT ARRAY
\ M = MAX TIME IN MINUTES
\ N = SESSION TIMER
\ Q = MAXIMUM REWARD
DIM C = 999
LIST D = 1, 5, 10, 15, 19
PRINTORIENTATION = LANDSCAPE
PRINT COLUMNS = 4
PRINT OPTIONS = FULLHEADERS, FORMFEEDS
PRINT VARS = A, B, C
S.S.1, \main control logic for "VR"
S1,
#START: ON ^House; SET Q = 10; SET M= 1 ---> S2
S2,
1": RANDD X = D; SHOW 2,VI =,X ---> S3
S3,
X#R^LeftLever: ON ^Reward; Z1 ---> S2
#Z2: ---> S1
S.S.2, \response counter
S1,
#START: SHOW 3,RESP,A ---> S2
S2,
#R^LeftLever: ADD A; SHOW 3,RESP,A ---> SX
#Z2: ---> S1
52
S.S.3, \reward counter
S1,
#Z1: ADD B; SHOW 4,REWARD,B ---> S2
S2,
.05":OFF ^Reward ---> S1
S.S.4, \Time increment in .1 sec intervals.
S1,
#START: ---> S2
S2,
0.1": SET T = T + 0.1 ---> SX
S.S.5, \Recording IRT'S
S1,
#START: ---> S2
S2,
#R^LeftLever: SET C(I) = T, T = 0; ADD I;
SET C(I) = -987.987 ---> SX
#Z2: ---> S1
S.S.6,
S1,
#START: SHOW 1,Sess_n,N ---> S2
S2,
1": ADD N; SHOW 1,Sess_n, N/60;
IF N/60 < M [@True, @False]
@True: IF Q < = B [@2True, @2False]
@2True: Z2 ---> S3
@2False: ---> SX
@False: Z2 ---> S3
S3,
5": PRINT ---> STOPABORTFLUSH
Translate and compile the program as usual, open it in WMPC, and run. After one
minute you should get a print out of the data you specified in a landscape format. The
data file, on the other hand, will contain all variables and arrays in the default format.
This is the first program we have written with a STOPABORTFLUSH command in it.
We did this so a data file would be made and you could compare your printout with the
data file. The data file was saved under MED-PC's automatic naming system (unless
you changed that yourself). Consult your MED-PC User's Manual for an explanation of
how and where MED-PC saves files, if necessary.
Congratulations, you now have all the building blocks necessary to program in
MedState Notation!
53
Chapter Eleven:
So How Does This Work
(The MED-PC: Theory Of Operation)
This chapter is written for the experienced MED-PC user or for one who has read the
rest of this manual and is interested in some of the background information. A thorough
understanding of this chapter content, although not required to begin using the system,
is invaluable when trying to determine why a particular program does not perform as
anticipated.
Time-Based Interrupts:
Many of the features of the current version of MED-PC are possible because it is an
interrupt-based system. Most of the time, MED-PC is occupied by performing non-
critical, non-experimental operations such as responding to user keystrokes, displaying
the output of SHOW commands, writing to disk and the printer, etc. Periodically, these
activities are "interrupted" and attention is shifted to active boxes. These interrupts
occur immediately; regardless of what actions the computer is performing. Even in the
middle of writing to disk, the occurrence of an interrupt immediately shifts attention to
the experimental boxes. The frequency with which interrupts occur (and boxes are
serviced) is equal to the system resolution value declared during system installation with
"Hardware Configuration." For example, on a system installed with 10 ms resolution,
the boxes are serviced every 10 ms. In the discussions that follow, it will be assumed
that a system with 10 ms resolution is applicable. These timed-based interrupts are
generated by crystal-controlled interrupt hardware on the interface card that plugs into
the chassis of the PC.
Noting And Reacting To Inputs:
As soon as an interrupt occurs, any ongoing activity is suspended and processing of all
active boxes commences. Before any individual boxes are processed, the status of all
inputs is read and recorded. Thus, if an #R1 has occurred in Box 1 and an #R1 has
occurred in Box 3, these events will be noted and made available to the respective
boxes when the boxes are serviced (soon to commence). Any keyboard #R's presented
from the keyboard since the initiation of the last processing sweep will be merged with
any that were read from the input cards. For example, if a keyboard #R1 was recently
generated for Box 3 and a hardware #R2 for Box 3 was also recorded, both #R1 and
#R2 will be presented to Box 3 during the present sweep. Only one instance of a given
response for a single Box may occur during a single sweep. Thus, if #R1 was issued
from both the keyboard and was present on the interface for the same Box since the
last interrupt, only one instance of the #R1 will be presented to the Box. A statement of
the form "2#R1--->S2" would require a response on another sweep in order for a
transition to S2 to occur. Similarly, if the subject responded twice on the same input
between the occurrences of two interrupts, only one response would be counted.
54
Before becoming alarmed that a response may be missed, remember that:
• For years 50ms was the finest resolution provided by any programming system.
• Responses are latched in the hardware buffer until read (contact does not have
to be coincident with the interrupt).
• Most users install their systems with a resolution of 10 milliseconds...far faster
than subjects can respond.
• The minimum response time is not dependent on resolution, but rather the
response frequency of the hardware. MED Associates SmartCtrl Cards use a
response frequency of 100 Hz whereas Standard and SuperPort modules range
from 7 Hz to 400 Hz.
• As a fine point, two responses occurring less than 10 ms apart will actually be
resolved if one occurs before a given interrupt (processing sweep) and the other
occurs after the interrupt.
Further discussion of theoretical vs. practical timing resolutions is provided at the end of
this section.
Order Of Processing Of Boxes:
After preliminary events have occurred (i.e., recording of inputs) individual boxes are
serviced in sequential order, beginning with the first active (loaded) Box. Please note
that inactive (unloaded) boxes receive no processing and lower-numbered boxes are
processed before higher-numbered boxes. In other words, if you have four boxes, but
only load boxes 1, 4, and 3. Box 1 will be processed first, Box 2 will be ignored, Box 3
will then be processed and finally processing will occur on Box 4.
Order Of Processing Of Events Within A Box:
Once processing of a Box's state sets begins, the "first" state set of the procedure is
serviced. Next, the remaining state sets are processed in the order in which they
appear in the .MPC procedure file or "state table," not by the assigned numerical label.
Processing then proceeds to the next active Box. For example in the following code,
S.S.2 will be processed prior to S.S.1:
S.S.2,
S1,
#R1: ADD A ---> SX
S.S.1,
S1,
#R2: ADD B ---> SX
55
Processing of States:
The State within each state set that gets processed depends on the "current" State of
any given state set. When loaded, the first State listed will always be the "current" State
of any procedure until the input requirements of that State are met and a transition
occurs. Again, this is independent of the numbering of the States. In the state set that
follows, S10 will be the current state when the procedure is loaded and will remain
"current" until #R1 occurs:
S.S.3,
S10,
#R1 ---> S5
S5,
1": ADD A ---> S10
Processing of Statements within a State:
As indicated above, processing of an .MPC procedure file starts with the first state set
listed as being the current State. Processing of statements within a State also proceeds
from the top down with the caveat that those statements associated with external inputs
(i.e. #R, #K, ", ', #T, and #START) are processed before those statements associated
with internal inputs (i.e., Z-pulses). Within each current state, processing continues until
a statement is encountered in which the stated input condition has been met or until the
last statement has been reached.
In the following example, S1 of S.S.5 begins by ignoring the Z-pulse in line 3. Assuming
an #R1 has occurred prior to the initiation of the current sweep, the internal variable that
tracks the total number of responses on R1 in S.S.5, S1 is incremented. The current
state remains S1 since two #R1s are required to cause a transition to S2. Additionally,
processing of the state proceeds downward to line 5 because the input requirement was
not satisfied and no transition (either to SX, the same state or to a different state) has
occurred. If an #R2 occurs, the #R2 input count will be incremented, but, since three
#R2s are required, processing continues within S1. Line 8 is then processed, and if Z1
is issued (i.e., if 1 second has elapsed), a second "sweep" of the procedure begins in
which only #Z-pulse inputs are processed. Now, processing of S.S.5, S1 issues a
transition to S3 (not shown). If S.S.5, S1 is re-entered all counters are reset to zero.
Example:
S.S.5, / Line 1
S1, / 2
#Z1 ---> S3 / 3
2#R1 ---> S2 / 4
3#R2 ---> S4 / 5
S.S.6, / 6
S1, / 7
1": Z1 ---> SX / 8
56
A Review of the General Principles:
When reading this section, there is something very important to keep in mind. Although
it may take up to a few minutes for us to read this review, all of this is occurring in the
FIRST MILLISECOND of each 10 ms interrupt.
1. External inputs are processed first.
A. External inputs refer to:
i. #R (Used to input a response via interface modules)
ii. #K (Used to input a "signal" from another box)
iii. " (Used with a numerical value to time in seconds, e.g., 5")
iv. ' (Used with a numerical value to time in minutes, e.g., 2')
v. #T (Used with a variable to define a timed input)
vi. #START (A user issued command)
2. Z-pulses are ignored during the processing of "external" inputs.
3. Processing is done in a top-down fashion.
A. The first states set listed is processed first, followed by the subsequent state sets
in the order LISTED; state set numbers (1 to 32) do not determine processing
order.
B. Within a state set, the "current" State is processed.
i. The current State at the beginning of program execution is that which is
physically first in the state set.
ii. The current State is changed as the result of transitions that occurs when a
statement's input requirements are satisfied. A state change resulting from
an external input becomes the "current" state for the processing of Z pulses.
C. Statements within a state set are processed in a top-down fashion, with the
proviso, that Z-pulses are ignored during the processing of external inputs.
4. Processing of a State stops as soon as a statement's input requirements are
satisfied.
A. As inputs (K's, R's, Start) are encountered, the counters associated with them
are incremented as appropriate. As soon as the input side of a statement is
satisfied, any subsequent counted inputs do not have their counters incremented.
i. This is true irrespective of whether the satisfied statement is performing a
transition to SX, the same state or a different state.
ii. Although there are no counters associated with time-based inputs, the effect
of a time-based transition is analogous to that of the "counted" inputs in that
satisfaction of a time-based input also halts further processing of the present
state.
57
5. All Z-pulses issued in the output section of statements during the processing of
external inputs are noted and held for use as input during the Z-pulse processing
phase.
A. Only one instance of a given Z-pulse is recorded during processing of external
inputs, but more than one different Z-pulse may be counted. If, for example, a
time-based statement issues two #Z1's in its output section, the effect of doing so
does not differ from issuing a single #Z1. Similarly, issuing #Z1 from multiple
States is equivalent to issuing a single #Z1.
6. After the completion of processing of external inputs, one or more passes is made
through the state table, provided that at least one #Z-pulse was issued during the
external-processing phase.
7. The current state of a given state set during Z-pulse processing is that state it was
left in at the conclusion of external-input processing. Thus, if the current state of a
state set changes from State 1 to State 2 during external-processing, #Z-pulses will
be processed in State 2 during Z-pulse processing.
8. During Z-pulse processing, only Z-pulses serve as input, all other inputs are ignored.
9. Processing priority rules for stacked Z-pulses are analogous to those for external
inputs.
10. Any new Z-pulses issued during Z-pulse processing are held until the bottom of the
state table is reached, at which time a new Z-pulse processing pass will be initiated.
A. During any given Z-pulse processing pass, only Z-pulses generated during the
immediately preceding pass will be presented during the present pass.
B. Up to 9 consecutive Z-pulse processing passes may occur. If a tenth pass is
required to resolve the actions of the state table, processing of the state table will
be terminated and the on screen error indicator will be activated, with a
corresponding entry made in the Journal. This is done to avoid the occurrence of
"endless loops" which could indefinitely delay processing of events in other
boxes. The box will, however, be processed at the beginning of the next
processing sweep.
C. Within a state set, a new state entered during a given Z processing pass
becomes the current state when (and if) a subsequent Z processing pass occurs.
Thus, if transition from S1 to S2 occurs as the result of a Z-pulse, and another
processing pass is occasioned by the generation of Z-pulses during the earlier
pass; S2 will be the current state in which further Z-pulses may be detected. The
final states that result from transitions during Z-pulse processing will remain; of
course, the "current" state when external inputs are processed upon occurrence
of the next interrupt.
58
EXAMPLES:
The following code results in a SHOW display, as soon as K1 is issued, of AVAL with a
value of "1" in position 1 and CVAL incrementing in position 3. BVAL is never displayed
and subsequent occurrences of K1 are not reflected in AVAL since S.S.1 remains in S3
after processing is complete.
EXAMPLE A:
This illustrates that processing of Z-pulses continues, and progressions through more
than one State may occur during Z-pulse processing.
S.S.1,
S1,
#Z1: Z2 ---> S2
#K1: ADD A; SHOW 1,AVAL,A ---> SX
S2,
#Z2 ---> S3 \ #Z2 detected in same clock tick in
\ which it is issued.
0.1": ADD B; SHOW 2,BVAL,B ---> SX
\ Never executed
\ #Z2 always occurs immediately
S3,
0.1": ADD C; SHOW 3,CVAL,C ---> SX
S.S.2,
S1,
#K1: Z1 ---> SX
EXAMPLE B:
The following code changes the second statement in State Set 1 so that transition
occurs to S1 (replacing SX). The result, however, is exactly the same as in Example A.
S.S.1,
S1,
#Z1: Z2 ---> S2
#K1: ADD A; SHOW 1,AVAL,A ---> S1
S2,
#Z2 ---> S3
0.1": ADD B; SHOW 2,BVAL,B ---> SX
S3,
0.1": ADD C; SHOW 3,CVAL,C ---> SX
S.S.2,
S1,
#K1: Z1 ---> SX
59
EXAMPLE C:
In this code, issuing K1 places S.S.1, S1 into S4. Hence, when the Z1 is issued in
S.S.2, S.S.1 S1 is no longer active – S4 becomes the active state. As a result, B and C
are not displayed when K1 is issued.
S.S.1,
S1,
#Z1: Z2 ---> S2
#K1: ADD A; SHOW 1,AVAL,A ---> S4
S2,
#Z2 ---> S3
0.1": ADD B; SHOW 2,BVAL,B ---> SX
S3,
0.1": ADD C; SHOW 3,CVAL,C ---> SX
S4,
1": ---> SX
S.S.2,
S1,
#K1: Z1---> SX
EXAMPLE D:
In the following code, #K1 causes a transition to S5 in S.S.1. In S.S.2, it generates #Z1.
During the Z-pulse-processing phase, S.S.1 is in S5 so the Z1 required for transition is
received and "INS5: 1" is displayed on the screen, upon issuance of the first #K1 from
the keyboard. A second #K1 will display a 2, a third, 3, etc.
S.S.1,
S1,
#Z1: Z2 ---> S2
#K1: ADD A; SHOW 1,AVAL,A ---> S5
S2,
#Z2 ---> S3
0.1": ADD B; SHOW 2,BVAL,B ---> SX
S3,
0.1": ADD C; SHOW 3,CVAL,C ---> SX
S5,
#Z1: ADD D; SHOW 4,INS5,D ---> SX
S.S.2,
S1,
#K1: Z1 ---> SX
60
Additional Commentary on Time Based Inputs:
Time-based inputs (", ', #T) are subject to the same rules and considerations with
respect to order of processing and the consequences of stacking as is true of the other
external inputs (#K, #R, #START) but a few points may not be readily apparent.
1. Timers continue to time even when stacked with other external inputs but cannot
cause a transition (to SX, to the same state, or to another state) unless they are
processed prior to other inputs for which an input actually occurred. Once a timer
has elapsed, it will continue to be eligible to cause a transition, provided that the
current state has not changed, until it is the first statement capable of causing a
transition.
2. It is never a good idea to stack timers with durations equal to the system resolution
above other external inputs, for the other inputs will never receive processing
because the timer will always cause a transition.
3. Timers with durations equal to the system resolution may be stacked beneath other
inputs. Note, intervals specified for less than the resolution interval (the interrupt
sweep interval) will be processed as though they were equal to the resolution
interval.
4. In the following situation, imagine a system resolution of 10 milliseconds and that an
#R1 occurs and the 10" time duration times out on the same interrupt sweep.
(Within the 10 millisecond window between interrupts). In this unlikely occurrence, A
will be added and transition to S2 will occur during the subsequent interrupt, or
10.01" after entry into the state, provided that another #R1 does not occur within 10
milliseconds of the first response which is probably physically impossible. Stated
differently, transition to S2 will not occur until a clock tick occurs in which no #R1 has
occurred and the elapsed time is >= 10" since entry into S1.
S.S.1,
S1,
#R1: ADD A ---> SX
10" ---> S2
Accuracy of the MED-PC System:
The MED Associates Inc. millisecond timer, which generates the interrupt signal,
features a precise microsecond crystal with an accuracy of 0.001%. Keep in mind that
all PC's are sequential processors and therefore can only do one thing at a time,
although by virtue of their speed they appear to do multiple tasks simultaneously. The
actual processing speed of any system depends upon the number and complexity of the
procedures run, but the resolution of timed events is determined by the interrupt interval
(resolution) set during the running of MPC2INST. Some users may wish to think of this
as one clock tick. Theoretically, it is possible to err in timing by one clock tick -- as is
61
the case with all timing systems. In practical applications however this becomes a
concern only when several conditions are met (i.e., the processing time for all boxes is
both inconsistent and at times approaches the resolution value, and time durations have
been set equal to the resolution value). The MED-PC system provides a speed warning
system that monitors the average processing or sweep time. This does not inhibit the
performance of the system in any way, but alerts the user to possible procedure
shortcomings before they become a problem. Remember, this is an interrupt-based
system. Interrupts are extremely precise and all external inputs (both responses and
timed events) are serviced prior to further processing.
At the risk of making MED-PC appear less accurate than it really is, the following
illustration demonstrates a "worst case" situation for MED-PC. Consider a computer
that just barely keeps up with the 10 millisecond resolution set during installation and 12
boxes are running the same procedure. This procedure is designed to turn an output
alternately turned on and off every 10 ms. The results are that Box 1 performs exactly
as expected, but the timing in Box 12 is somewhat less precise. This is because Box 1
is always serviced immediately after initiation of a sweep. In contrast, the processing of
Box 12 is dependent on the amount of time it takes to process the preceding 11 boxes
on each sweep. The potential problems that this could pose are illustrated by a
scenario in which a sweep is initiated, and boxes 1 through 11 require 9 ms to process.
Box 12's output would be toggled on 9 ms after initiation of the sweep and the next
sweep would occur 1 ms later. If on the second sweep, boxes 1 through 11 required
very little time to process, such that Box 12 is serviced 1 ms after initiation of the sweep,
its output would be turned off 2 ms after being turned on (rather than the 10 ms
separation specified by the procedure). NOTE: This is not a cumulative source of errors
and would never be any greater than the resolution value. An extremely important point
to bear in mind is that this discussion reflects a very unlikely situation in which the
system oscillates from moment-to-moment between the boxes requiring substantial time
to process and the boxes requiring minimal processing time. The actual behavior of a
MED-PC system can be expected to be closer to one in which any given box is
processed at intervals approximating the nominal resolution value because the
demands of the boxes average out, with some boxes active on one sweep and others
active on the next. This is especially true when the boxes have timers with minimum
durations of at least twice the resolution value. The error, in practice, will also usually
be much smaller than +/- the resolution value provided that the average sweep duration
(displayed on screen by the "A:" indicator on the status line) is appreciably less than the
resolution value.
62
Appendix A:
MedState Notation Commands
The chapters of this manual are designed to get one comfortable with the programming
of MedState Notation and the introduction the most frequently used commands. This
Appendix, however, lists all MedState Notation commands and is presented in detail,
with syntax, comments, examples and discussion. They have been grouped as follows,
Input Section Commands, Output Section Commands, Mathematic Commands
including decision functions, Array Functions, Data Handling Commands, and
Miscellaneous Commands. Each command is indexed for convenience.
Input Commands
Reacting to responses (#R)
Fixed Time Inputs (" and ')
Variable Time Inputs (#T)
ORing Inputs (!)
K Signals (#K)
Z Pulses
Output Commands
Controlling Outputs
Turning outputs on (ON)
Turning outputs off (OFF)
Locking outputs on or off (LOCKON and LOCKOFF)
Coordinating Events Across State Sets
Z Pulse Generation
Coordinating Events Across Boxes
Inter-box Communication Via K Commands
Performing Computations and Counting
Incrementing Variables (ADD)
Decrementing Variables (SUB)
Incrementing or Decrementing to a Limit Value (LIMIT)
Mathematical Assignment (SET)
Recording Frequency Distributions (BIN)
Decision Functions
Logical Comparisons (IF)
Probability Gates (WITHPI)
63
Array Functions
Sequentially Selecting Items from an Array (LIST)
Random Selection, With Replacement (RANDI)
Random Selection Without Replacement (RANDD)
Setting All Array Elements to Zero (ZEROARRAY)
Copying Elements of One Array to Another (COPYARRAY)
Displaying, Printing and Saving data
Displaying Data Onscreen (SHOW)
Printing Data (PRINT)
Stopping the Procedure
STOPKILL
STOPABORT
STOPABORTFLUSH
Miscellaneous output commands
DATE and TIME
Commands that Come before the First State Set:
Declaring Arrays
DIM -- Dimensioning Arrays
Declaring an Array with the LIST Command
Declaring Constants
Constants
Controlling the Appearance of Printouts
Printout Appearance Options
Controlling the Appearance of Disk Files
Disk File Appearance Options
Year 2000 Compatibility
The Y2KCOMPATIBILITY directive

64
Input Section Commands
#START
#START: is used to hold a state set in a given state until the "#START:" command is
issued via the keyboard by the operator. #START: may appear in any state set and
may appear more than once. This command is useful for allowing the operator to load
procedures and place subjects in chambers before actually initiating the experimental
session as well as allowing the setting of variable values, either from the keyboard or
via macros.
Syntax: P1#START:
Where: P1 = number, constant, variable, array element, or special identifier.
Comments: P1, since it is unclear when specifying a count would be useful, it is
generally not stated and defaults to 1
Examples and Discussion:
#START: ---> S2 \ go to state 2 following #START
#START: ON 1 ---> S2 \ turn on 1 and go to state 2 following #START
5#START: ---> S2 \ wait for 5 #START commands before proceeding
\ to state 2
Remember, WMPC procedures actually begin to execute as soon as they are loaded.
#START: does not initiate the procedure, it is merely a mechanism for holding a state
set in a given state until the operator provides keyboard input. Also, #START: and
program start dates and times in WMPC printouts and data files are unrelated.
#R
#R is satisfied by "responses" resulting either from keyboard simulation (see Chapter 2
of the WMPC User’s Manual), or from satisfying the electrical requirement of an input on
the MED ASSOCIATES interface 8. It has two parameters, P2 that specifies a logical
input number, and P1 that specifies the number of responses that must occur to
progress to the output section of the statement.
Syntax: P1#RP2
Where: P1 & P2 = number, constant, variable, mathematical expression, array
element, or special identifier.
8 A variety of modular and stand-alone interface cards are available. The most
common input is a 28 VDC ground signal or a TTL 5VDC sinking logic signal.
65
Comments: P1 defaults to 1 if not stated
P2 must be a legal input in the range 1...80 defined in the MPC2INST.DTA
file
Examples and Discussion:
5#R3: ON 1 ---> SX
In the preceding example, Output 1 will be turned on after five responses have occurred
on Input 3. If P1 is omitted, as in "#R3: ON 1 ---> SX", P1 defaults to 1 and the first
response will turn on Output 1. P1 is reset upon entry to a state. #R is unrelated to the
variable "R".
A common misconception of beginning MSN programmers is that an external input may
be detected in only one state set at a time. In actuality, a single #R, #K, or #START:
may be detected and processed in multiple state sets, without penalty of efficiency or
processing speed. In the following example, an occurrence of #R1 would place three
Show’s on the screen:
S.S.1,
S1,
#R1: ADD A; SHOW 1,FIRST,A ---> SX
S.S.2,
S1,
#R1: ADD B; SHOW 2,SCND,B ---> SX
S.S.3,
S1,
#R1: ADD C; SHOW 3,THIRD,C ---> SX
#Z (Z pulses as inputs)
Z-pulses are used to communicate between state sets and are generated in the output
section of a MSN statement (See the output commands section of this appendix).
When placed in the input section of a MSN statement they perform in a manner
analogous to responses (#R). #Z is unrelated to the variable "Z."
Syntax: P1#ZP2
Where: P1 & P2 = number, constant, variable, mathematical expression, array
element, or special identifier.
Comments: P1 defaults to 1 if not stated
P2 must be in the range 1...32
P1 is reset upon entry to the state.
66
Example:
S.S.1,
S1,
#Z1: ON 1 ---> S2
#K
This command like the Z-pulse may be found in either the input or the output section of
a statement. It may be used to communicate with procedures via the keyboard as
shown in Chapter 2 of the WMPC User’s Manual, and may also be used to allow boxes
to communicate with one another. (See the description of K-pulses in the section of this
chapter covering output commands). When placed in the input section of a MSN
statement they perform in a manner analogous to responses (#R). Indeed, the syntax
rules for #K are identical to those for #R. One common use for #K is in yoked
experiment using the special identifier "Box" as the P2 parameter. #K is unrelated to
the variable "K."
Syntax: P1#KP2
Where: P1 & P2 = number, constant, variable, mathematical expression, array
element, or special identifier.
Comments: P1 defaults to 1 if not stated
P2 must be in the range 1...100
67
Examples and Discussion:
Example A: Yoked Shock
(NOTE: BOX is explained on page 80)
S.S.1,
S1,
#K(BOX – 1): ON ^SHOCK ---> S2
S2,
2": OFF ^SHOCK ---> S1
Example B: Free or Shaping pellet
(NOTE: “!” (Logical OR) is explained on page 71)
S.S.2,
S1,
#START: ---> S2
S2,
#K100 ! A#R1: ON 1 ---> S3 \ REINFORCE AFTER EVERY "A" RESPONSES
\ OR A FREE REINFORCER IF OPERATOR
\ ISSUES #K100
S3,
.1": OFF 1; ADD C;
IF C >= B [@END, @CONTINUE]
@END ---> STOPABORT \ SESSION ENDS AFTER B RFS
@CONT ---> SX
Example C:
S.S.1,
S1,
#R: ON ^PELLET ---> S2
#K1: ---> STOPABORT
S2,
.05": OFF ^PELLET ---> S1
68
Explicit Time Inputs:
" (Seconds) and ' (Minutes)
Time, specified in terms of seconds or minutes, may be used as an input condition.
Syntax: P1" or P2'
Where: P1 & P2 = number or constant
Comments " = Seconds
' = Minutes
Legal Examples:
a) 1": ON 1 ---> SX
b) .5": ON 1 ---> SX
c) 5.2': ON 1 ---> SX
d) .5': ON 1 ---> SX
e) ^Dur = 2
S.S.1,
S1,
^Dur": ---> S2
Illegal Example:
f) A": ON 1 ---> SX
As can be seen in the examples above, time may be specified as decimal quantities,
unless P1 is a constant. When a fractional minute is specified, (example c above), the
decimal portion corresponds to fractional minutes, not seconds. When specifying time
values it is most precise to use values that are multiples of the temporal resolution
declared during the installation procedure (typically 10 milliseconds). Time values
falling between two multiples will be treated as the higher of the multiples. For example,
WMPC handles 0.245" as 0.25". Time values are reset upon entry to a state.
A fundamental rule is that only one time expression may occur within a single state.
The following is illegal and will produce a WTRANS error message:
S.S.1,
S1,
1":ON1--->S2
2':OFF 2--->S2
69
Variable Time Inputs:
#T
Time values may also serve as inputs without an explicit declaration. This may be
accomplished by using #T proceeded by a variable containing a specified amount of
time.
Syntax: P1#T
Where: P1 = a variable, array element, or mathematical expression.
LEGAL EXAMPLES:
Example A:
S.S.1,
S1,
1": ON 1; SET X = 1" ---> S2
S2,
X#T: OFF 1 ---> S1
Example B:
LIST X = 1", 2", 3"
S.S.1,
S1,
1": ON 1 ---> S2
S2,
X(0)#T: OFF 1 ---> S1
In Example A, X is set equal to one second and then used in State 2 as the parameter
to #T. The effect of the procedure segment is to repeatedly turn output 1 on for 1" and
off for 1". Example B manipulates output 1 in a similar fashion, but demonstrates the
use of an array element as the parameter. A common misconception is that array
variables may be set to time values only through a list declaration. The following
examples, in which B(0)=5" and B(1)=10" are equivalent:
LIST B = 5", 10"
#START: SET B(0) = 5", B(1) = 10" ---> S2
As with explicit time values, only one time command per state may be present.
S.S.1, \ ILLEGAL EXAMPLE
S1,
X#T ---> SX
1" ---> SX
S.S.1, \ ILLEGAL EXAMPLE
S1,
X#T ---> SX
Y#T ---> SX
70
Time Inputs Less Than the Resolution Value
The minimum amount of time that an MSN procedure can time is equal to the resolution
parameter declared during installation. A system set up with 10 ms resolution can not
time events less than .01". On a system with 10 ms resolution, the following code would
increment A every 10 ms. If the resolution was 25 ms, then A would increment every 25
ms. Using time inputs less than the resolution value causes no particular stress to
WMPC run-time programs -- just be advised that they become equal to the resolution
value.
S.S.1,
S1,
0.001": ADD A ---> SX \ Increments A every 10ms not every 1ms
A possibly less obvious situation arises when programs are run without an interface and
the PC's internal clock (as opposed to the MED crystal timer) is used for timing; since
the PC's timer cannot time in units less than 66 ms, this value becomes the effective
resolution. If timing seems to be slow or inaccurate while debugging a procedure
without an interface, test the program with an interface.
Internal Representation of Time
Time values in seconds (") or minutes (') are represented internally as the numeric value
multiplied by the result of (1000 / the systems resolution value in seconds or minutes).
For example, on a system with 10 ms resolution, the variable A in the following
expression would be internally set to 100 by MED-PC:
#R1: Set A = 1" ---> SX
Examining A with the VARS command or in a WMPC printout would show that A=100.
A useful trick for displaying time values with SHOW commands is to divide the value by
1" (or 1', depending on the units of the time value) prior to display. For example:
LIST B = 1", 2", 3"
S.S.1,
S1,
#START: RANDI A = B; SHOW 1,TIME,A/1" ---> SX
71
Using Logical OR "!" with Input Commands
It is often desirable to permit several conditions to cause transfer to the same output
section. For example, to allow presses on either a left lever or a right lever to produce
reinforcement, one could write the following code:
S.S.1,
S1,
#R1: ON 1 ---> S2
#R2: ON 1 ---> S2
S2,
0.1": OFF 1 ---> S1
A more desirable way to code this, however, is to use a logical OR, indicated by placing
an exclamation point "!" between two or more input commands. For example, the
following code indicates that either #R1 or #R2 is acceptable:
S.S.1,
S1,
#R1 ! #R2: ON 1 ---> S2
S2,
0.1": OFF 1 ---> S1
72
OUTPUT SECTION COMMANDS
OVERVIEW
Output section commands fall between the colon and arrow of a statement. Multiple
output commands may be separated by semicolons, ";" while multiple parameters for
the same command are separated by commas, ",". An example of separating output
commands is:
S1,
#R1: ON 1, 5; ADD X ---> SX
The output section commands are divided into those responsible for turning outputs on
and off (ON, LOCKON, OFF, LOCKOFF) including the PC's speaker (ALERTON,
ALERTOFF), the mathematics commands (ADD, SUB, SET, BIN, LIMIT), the decision
functions (IF, WITHPI), array functions (LIST, RANDD, RANDI, COPYARRAY,
ZEROARRAY, data handling (SHOW, CLEAR), and miscellaneous commands
(STOPABORT, STOPKILL, STOPABORTFLUSH).
Turning outputs on and off:
ON
ON is used to turn outputs on. Turning on an already active output has no effect.
Syntax: ON P1
Where: P1 = number, constant, variable, array element, or mathematical
expression.
Comments: Comma separation permissible
Examples:
Activate a stimulus light (output 1) and grain feeder (output 2) for 4 seconds:
^Feeder = 2
S.S.1,
S1,
#R1: ON 1, ^Feeder ---> S2
S2,
4": OFF 1, ^Feeder ---> S1
73
OFF
OFF turns off the specified output. It is the opposite of ON.
Syntax: OFF P1
Where: P1 = number, constant, variable, array element, or mathematical
expression.
Comments: Comma separation permissible
Example:
S1,
#R1: OFF 1, 2, ^Feeder, A(K), X ---> S2
LOCKON and LOCKOFF
LOCKON and LOCKOFF commands supplement ON and OFF, and like ON and OFF,
may be issued from the menu system (See WMPC User's Manual) or from the output
section of an MSN statement, but with somewhat different effects. They are more
powerful versions of ON and OFF in the sense that an output turned on by ON may be
shutoff by either OFF or LOCKOFF, but an output turned on by LOCKON may only be
shut off by LOCKOFF. Essentially, until a LOCKOFF is issued, OFF will not deactivate
an output activated by LOCKON. In contrast, LOCKOFF will shut off an output,
irrespective of whether it was activated by ON or LOCKON.
If an output has been turned on by ON and a LOCKON for the same output is issued,
the output is upgraded from ON status to LOCKON status. Outputs activated by
LOCKON remain on even after a box is unloaded by STOPKILL or STOPABORT and
are not even turned off when the system is shutdown and the CPU is turned off. The
only way to shut off an output activated by LOCKON is by executing a LOCKOFF.
LOCKON and LOCKOFF are especially useful in conjunction with an output that must
be left on even when boxes wired to it are not running. An example of this requirement
arises chamber ventilation fans are controlled by WMPC; subjects still need fresh air
even when their box is not running. Another application of LOCKON might be a light
attached to the door of a running room. The output that drives the light could be shared
by all boxes and LOCKON'd by each box as it loads. By using LOCKON, the light is not
shutoff every time a box terminates (because of automatic shutoff outputs activated by
ON). When all sessions have finished, the technician could execute a keyboard macro
to LOCKOFF the relevant output to extinguish the light. For further discussion of output
sharing, refer to the next section, "Overlapping Inputs and Outputs."
Syntax: LOCKON P1 or LOCKOFF P1
Where: P1 = number, constant, variable, array element, or mathematical
expression.
Comments: Comma separation permissible
74
Overlapping Inputs and Outputs
It is an acceptable practice to have a given bit on an input or output card assigned to
more than one logical box. For example, all boxes might have output one mapped to
output card 780, bit #1. This kind of output sharing is used in one of the beta testing
labs, where every box turns on output 1 upon loading. This output is mapped to port
780, bit 1 in all boxes and is connected to a relay that turns on all of the chamber
ventilation fans.
It is also okay for a box to attempt to turn on an output it doesn't have. For example,
some operant chambers may have lever extension solenoids but some of the others do
not. The chambers with solenoids are wired to six outputs, whereas the remaining
boxes each have four outputs. Never the less, a single procedure is used to run both
types of chambers. Irrespective of which type of chambers is actually being run,
outputs five and six are turned on to extend or retract the levers (if present).
Input sharing is also permissible and might be used as a panic button to cause all boxes
to shut off simultaneously via a push-button wired to a single shared input. Entering a
keyboard response (#R) that is not matched by a hardware input has no effect.
WARNING! Assigning a procedure to a box that does not have a hardware input
corresponding to an input that the procedure attempts to read would result in a stream
of continuous responses being produced.
Z-pulses
A construct known as a Z-pulse may be used to communicate among state sets. Z-
pulses are generated in the output section of statements, but may also function as
inputs to other statements (refer back to the Input command section for more details on
this use of Z-pulses). Z-pulses may have values falling between 1 and 32. They can be
an invaluable means for coordinating the action of multiple state sets.
Syntax: Z P1
Where: P1 = number, constant, variable, array element, or mathematical
expression with value in the range 1...32.
Warning: It is the programmer's responsibility to ensure that P1 is in range 1...32. If
this range is not observed, particularly if violated with a constant, variable
array element, or mathematical expression, no warning message will be
generated and unpredictable problems will result when programs are
running.
75
Example and Discussion:
Example A:
The following example demonstrates the use of Z-pulses to coordinate an FR 10 on
input 1, an FI 30" on input 2 and reinforcement. When either schedule is satisfied, a Z1
is generated in the relevant output section. For example, when the FR 10 is completed,
a Z1 is generated. The Z1 then serves as an input to state 2 or 3 of state set 2
(depending on whether or not 30" have elapsed), driving state set 2 to state 4.
Simultaneously, the Z1 also serves as an input in state 2 of state set 3, causing an
output channel to turn on and transition to state 3. After 2", a Z2 is generated, which
then serves as an input to state 3 of state set one and state 4 of state set 2, driving
them both back to state 2.
S.S.1, \ FR 10 on Input 1
S1,
#START: ---> S2
S2,
#Z1 ---> S3
10#R1: Z1 ---> S3
S3,
#Z2 ---> S2
S.S.2, \ FI 30" on Input 2
S1,
#START: ---> S2
S2,
#Z1 ---> S4
30" ---> S3
S3,
#Z1 ---> S4
#R2: Z1---> S4
S4,
#Z2 ---> S2
S.S.3, \ Reinforcer State Set
S1,
#Start: ---> S2
S2,
#Z1: ON 2 ---> S3
S3,
2": OFF 2; Z2 ---> S2
76
Z-pulses can be tremendously useful, but they must be used wisely. When a Z-pulse is
generated, it does not get processed immediately. Instead, a record of all Z-pulses
generated during a pass through the state sets of a procedure are recorded and then a
second pass is immediately made through the state sets. If more Z-pulses are
generated, then yet another pass through the state sets occurs. Each pass, of course,
requires processing time. A situation to avoid is having one Z-pulse lead to the
immediate generation of another Z-pulse, then another, etc. Below is an example of
poor programming utilizing Z-pulses, which could produce a loop that the runtime
system will treat as an error after 10 iterations.
Example B:
S.S.1,
S1,
#START ! #Z3: Z1 ---> S2
S2,
#Z1: ON 1; Z2 ---> S3
S3,
#Z2: OFF 1; Z3 ---> S1
While it is unlikely that one will ever write a series of statements as aberrant as the set
above, it is still important to avoid generating chains of Z-pulses wherever possible.
The following example is inefficient, for a #Z1 is used as input in state one of state set
two to immediately generate a Z2, which is then used in state set three to produce a
reinforcer. Although the following code will not cause a system "lock up," it could result
in some system performance falling on a slower computer.
Example C:
S.S.1, \ FR 1
S1,
#Start: ---> S2
S2,
#R1: Z1 ---> S3
S3,
#Z3 ---> S2
S.S.2, \ Record Data
S1,
#Z1: ADD A; SHOW 1,Rfs,A; Z2 ---> SX
S.S.3, \ Deliver Reinforcer
S1,
#Z2: ON 1 ---> S2
S2,
2": OFF 1; Z3 ---> S1
77
Z-pulse Depth Checking
It has been possible under previous releases to cause a runtime program to lock-up
from a never-ending sequence of Z-pulses. If a very long (yet finite) sequence is
generated, program performance may suffer greatly. Indeed, most excessively long #Z-
pulse sequences are probably errors, rather than planned actions. Generally speaking
do not use Z-pulses to repeat other input statements (#R, #K, or #START). It is more
efficient to repeat the input statement in multiple state sets. In those instances where a
substance such as a latency counter is activated with #START for the first trial and a Z-
pulse in subsequent trials, the input may be OR'd or simply disregard the previous rule.
Example A:
S.S.1,
S1,
#Z1 ! 1": #Z1 ---> SX \Will cause a WMPC runtime error
Example B:
A limit of nine consecutive Z-pulses is now considered acceptable. For example: the
following is acceptable:
S.S.1,
S1,
1": Z1 ---> SX
S.S.2,
S1,
#Z1: Z2 ---> SX
S.S.3,
S1,
#Z2: Z3 ---> SX
.
.
.
S.S.9,
S1,
#Z8 ---> SX
Adding a tenth Z-pulse would cause an error condition in the present version of WMPC.
When the tenth Z-pulse in a chain is generated, the "ERROR" indicator on the runtime
screen appears and flashes. Additionally, an entry is made in the journal, and the chain
of Z-pulse is terminated; Z-pulse chains longer than nine are no longer tolerated. Once
Z-pulse chains longer than two or three are used in a procedure, it is very possible that
Z-pulses are being substituted for clear procedure logic (comparable to using lots of
GOTOs in a BASIC program).
78
K-pulses
The K-pulse bears considerable similarity to the Z-pulse in that both may be issued in
the output sections of statements and received on the input side. Whereas the Z-pulse
is used to communicate between state sets within the same box, the K-pulse is used to
communicate between boxes.
An example of a situation in which K-pulses may be useful is yoking procedures in
which the behavior of one subject determines the stimuli to which another subject is
exposed. In the following code example, the "CONTROL" box is running a procedure
that implements a "classic" auto shaping procedure in which a keylight is illuminated
following an inter-trial-interval (ITI) of random duration with a mean of 20". Pecking the
illuminated key produces immediate 4" access to grain. In the absence of a keypeck,
the keylight is extinguished after 8" and grain is delivered. The bird in the yoked box
receives the same pattern of stimuli and reinforcers, but that bird has no control over the
events. The following pair of procedures, one for the control box and the other for the
yoked box, illustrates the use of K-pulses.
(NOTE: “WITHPI” is explained on page 93)
\AUTOSHAPING PROCEDURE FOR THE "CONTROL" BOX
^FEEDER=1
^HOUSELIGHT=2
^KEYLIGHT=3
S.S.1,
S1,
#START: ON ^HOUSELIGHT ---> S2
S2, \ 20" MEAN ITI. TELL YOKED BOX WHEN ITI OVER BY SENDING K1
1": WITHPI = 500 [ON ^KEYLIGHT; K1] ---> S3
S3, \ TELL YOKED BOX THAT FEEDER IS ON BY SENDING K2
#R1 ! 8": OFF ^KEYLIGHT; ON ^FEEDER; K2 ---> S4
S4,
4": OFF ^FEEDER ---> S2
==============================================
\AUTOSHAPING PROCEDURE FOR THE "YOKED" BOX
^FEEDER=1
^HOUSELIGHT=2
^KEYLIGHT=3
S.S.1,
S1,
#START: ON ^HOUSELIGHT ---> S2
S2, \ K1 SENT BY CONTROL BOX WHEN KEYLIGHT TURNED ON
#K1: ON ^KEYLIGHT ---> S3
79
S3, \ K2 SENT BY CONTROL BOX WHEN RF STARTS
#K2: OFF ^KEYLIGHT; ON ^FEEDER ---> S4
S4,
4": OFF ^FEEDER ---> S2
K-Pulse Theory Of Operation And Technical Details
When a K-pulse is issued, it is not immediately available as an input to statements, and
does not become available to other statements and boxes until the beginning of the next
interrupt (the next time boxes are serviced). For illustrative purposes assume that the
system resolution is set to 10 ms and the control procedure is running in box 1 and the
yoked box is running in Box 2. When the control box issues K1, the K1 is entered into a
queue (a waiting list). Although Box 2 will be serviced immediately after Box 1 (within a
millisecond), the K1 will not be presented to Box 2. Instead, when the next interrupt
occurs, about 10 ms later, the K1 is removed from the queue and made available to
both Boxes 1 and 2 and Box 2 will then react to the K1. Stated succinctly, K-pulses are
placed in a queue until the next processing sweep (interrupt) occurs.
If more than one box issues the same K-pulse within the same processing sweep, only
one K-pulse will be issued. For example, if Box 1 is counting the number of K1 pulses
that occur and Boxes 2 and 3 simultaneously issue K1, Box 1 will detect only 1 K-pulse.
Similarly, if the same K-pulse is issued several times within the same output statement,
the net effect will be the same as if the K-pulse was issued only once. For example,
1":K1; K1 ---> SX is equivalent to 1": K1 ---> SX.
When a Box issues a K-pulse, it is available to all active boxes on the next processing
sweep. Also, a Box may react to one of its own K-pulses. The following procedure
could both issue and count the occurrence of K1.
S.S.1,
S1,
1": K1 ---> SX
S.S.2,
S1,
#K1: ADD A; SHOW 1,K1CNT,A ---> SX
K-pulses should not be used in place of Z-pulses; although superficially similar, these
commands have different purposes. K-pulses are used for communication between
boxes, whereas Z-pulses are designed for communication between state sets within
boxes. K-pulses have the same priority level as normal MSN commands. Unlike Z-
pulses, K commands are treated as normal inputs in the sense that when K's are
"stacked" with other commands, the topmost statement will be processed in the event of
a tie. For example, in the following code, in the event of a simultaneous #K1 and #R1,
transition would be to S2:
#K1 ---> S2
#R1 ---> S3
80
Processing Efficiency of the K-pulse
As noted above, do not treat K-pulses as interchangeable with Z-pulses. One reason
for this concern is that issuing a K-pulse from within an MSN procedure generates a
considerable amount of overhead because each box must be processed to determine
whether the occurrence of the K-pulse necessitates any transitions between states.
When a K is issued from the keyboard, it is not presented simultaneously to all boxes.
Instead, the operator specifies a list of one or more boxes to receive the K.
Furthermore, WMPC automatically spaces the delivery of keyboard K's across boxes to
help distribute the processing load. This is in contrast to the situation when K's are
issued from an MSN procedure, in which case the K is issued simultaneously to all
boxes; hence, issue K-pulses from within MSN procedures sparingly. This is not to
discourage their use, but rather to point out that they should not be used with abandon.
The Special Variable "BOX"
It is often desirable to have an MSN procedure react to K-pulses conditionally upon
which box issued the K-pulse. Consider the yoked auto-shaping paradigm presented
above. In that example, the control box issues K1 and K2 to indicate to the yoked box
the occurrence of critical events. As long as only one box is running the control
procedure and only one is running the yoked procedure at any given time, everything
will work fine. Consider, though what would happen if Boxes 1 and 3 were
simultaneously running the control procedure while Boxes 2 and 4 were running the
yoked procedure. Whenever a stimulus change would occur in Box 1 or 3, stimulus
changes would occur in both Boxes 2 and 4; the two yoked boxes would each be yoked
to two control boxes. One way around this problem would be to write separate a control
procedure for box 1 that issues K1 and K2 and a different control procedure for Box 3
that issues K3 and K4. This solution would work, but would require writing and
maintaining multiple copies of essentially the same procedure.
A more elegant solution to this problem is to adjust the number of the K-pulse on the
basis of which box is issuing or receiving the K-pulse. In the following example, the
yoked auto shaping code has been modified so that Box 1 will issue K1 and K2,
whereas Box 3 will issue K3 and K4 to communicate with Box 4. This is accomplished
by incorporating a special variable named "BOX" into commands that receive and issue
K-pulses. BOX is always equal to the box number of the box in which the MSN program
is running. In the control procedure in the following code example, the K-pulse in state
2 would be K1 when the procedure is running in Box 1 because BOX would equal 1.
Similarly, when running in Box 3, the same statement would issue K3. In the yoked
procedure, K (BOX - 1) would respond to K1 (issued by Box 1) when running in Box 2
because BOX would equal 2. When running in Box 4, the yoked procedure would
respond to K3 (Box 3's first K-pulse). By alternating between Control and Yoked boxes
any number could run the same procedure.
81
\ Modified auto shaping code demonstrating use of the "box" variable
\ Auto shaping procedure for the "control" box
^FEEDER=1
^HOUSELIGHT=2
^KEYLIGHT=3
S.S.1,
S1,
#START: ON ^HOUSELIGHT ---> S2
S2, \ 20" mean tell yoked box when it is over by sending a k-pulse
\ equal to this box's box number
1": WITHPI = 500 [ON ^KEYLIGHT; K BOX] ---> S3
S3, \ Tell yoked box that feeder is on by sending K2
#R1 ! 8": OFF ^KEYLIGHT; ON ^FEEDER; K(BOX + 1) ---> S4
\ End a K with a number 1 more than this box's box number
S4,
4": OFF ^FEEDER ---> S2
==============================================
\ Auto shaping procedure for the "yoked" box
^FEEDER=1
^HOUSELIGHT=2
^KEYLIGHT=3
S.S.1,
S1,
#START: ON ^HOUSELIGHT ---> S2
S2, \ K1 sent by control box when KEYLIGHT turned on
#K(BOX - 1): ON ^KEYLIGHT ---> S3
\ Look for the first K of the preceding box
S3, \ K2 Sent by control box when RF starts
#K BOX: OFF ^KEYLIGHT; ON ^FEEDER ---> S4
\Look for the second k of preceding box
S4,
4": OFF ^FEEDER ---> S2
82
Turning the PC's Speaker on and off:
ALERTON
ALERTON produces a 500 Hz tone via the PC's speaker. The tone is alternately on
and off for 500 ms. If multiple boxes issue ALERTON, a single alternating tone is
produced; one cannot identify the number of boxes that have issued the ALERTON.
ALERTOFF
ALERTOFF cancels the tone. A single ALERTOFF cancels the tone until the next
ALERTON. Thus, several boxes could issue an ALERTON, but a single ALERTOFF
would entirely eliminate the tone.
A common use for ALERTON will be to signal the end of a session as follows:
S.S.1,
S1,
10#R1: ON 1 ---> S2
S2,
2": OFF 1 ---> S1
S.S.2,
S1,
30': ALERTON ---> S2
S2,
#K1: ALERTOFF ---> SX
ALERTON may only be turned on from within an MSN procedure, but ALERTOFF may
either be issued from within a procedure or by using a functionally equivalent command
from the runtime menu system. It is also possible to produce beeps whenever all boxes
are shut off by enabling the "Tone Alert When Done" toggle within the runtime menu
system. The beeps produced by this menu selection are functionally equivalent to
those produced by ALERTON, and may be canceled either from the menu or by
ALERTOFF. See Chapter 2 of the WMPC User’s Manual for detailed procedures on the
use of these commands from the runtime menu system.
Even if inline Pascal code is used to produce tones, it is still possible to simultaneously
use the ALERTON/ALERTOFF features. Note that ALERTON is easier to use than
inline Pascal-produced beeps because it is unnecessary to handle timing or other
details of producing beeps. Additionally, the beeping will persist even when all boxes
are unloaded.
The duration of beeps produced by ALERTON may show considerable variation and
may temporarily be suspended during some especially time-intensive menu tasks. This
is especially likely to happen while writing files to disk. As soon as disk writing is
finished, the beeping will resume.
83
Mathematics Output Commands:
ADD
ADD is generally used to increment a variable or array element by 1. It performs the
same function as SET A = A + 1.
Syntax: ADD P1
Where: P1 = variable or array element
Comments: Stringing Variables with Comma separation permissible
Examples:
S1,
1": ADD C ---> SX \ Every second add 1 to the value
\ of C
#R2: ADD X, Y, Z, A(I) ---> SX \ Every response from input 2 add 1
\ to the value of variables X, Y, Z
\ and array element A(I)
SUB
SUB is used to decrement a variable or array element by 1. It performs the same
function as SET A = A - 1.
Syntax: SUB P1
Where: P1 = variable or array element
Comments: Stringing Variables with Comma separation permissible
Examples:
S1,
1": SUB C ---> SX \ every second subtract 1 from the
\ value of C
#R2: SUB X, Y, Z, A(I) ---> SX \ Every response from input 2
\ subtract 1 from the value of
\ variables X, Y, Z and array element
\ A(I)
84
SET
SET is used to perform any of four basic mathematical operations involving two or more
operands. Any mathematical function provided by Turbo Pascal can also be inserted
within a MSN statement using In-Line Pascal (See Appendix B). Two forms of this
command are possible as indicated by syntax A and syntax B.
Four "Operators" are permitted:
/ (Division)
* (Multiplication)
+ (Addition)
- (Subtraction)
Syntax A: SET P1 = P2 Operator P3
Syntax B: SET P1 = P2
Where: P1 = variable or array element
P2 and P3 = number, variable, or array element
Operator = /, *, +, or -
Comments: Stringing is permissible
P2 and/or P3 may be followed by " or ' to assign a time value to a variable
or array element.
Assigning a new value to a constant is not permissible. It will not produce a TRANS20
error but will produce a TPC error during compilation, typically of the form "Undefined
Label".
In the original MED-PC, complicated math expressions had to be broken into pieces.
For example "SET A = 1+2*10/4-3" may have been written, "SET A = 2 * 10, A = A / 4,
A = A - 2". Since Version 2.0 of MED-PC (DOS), complex expressions can be written
directly; this example is now written as "SET A = 1 + ((2 * 10) / 4) - 3".
Examples:
1': SET A = 5 * A, C = B(K) ---> SX
#R3: SET A= (5 * A) + B + C ---> SX \ Note: multiple operations
85
BIN
BIN is an output command that can be used to generate frequency distribution as data
is collected. The frequency distribution is output into a range of array elements
specified in the call to BIN. The width of each "Bin" in the frequency distribution is user
controllable. The first "bin" always contains the total frequency, or total number of all
categorized events, and the second bin always contains the total number of events with
values greater than that represented by the last "bin." Like any array, the BIN data
array must be dimensioned prior to State Set 1.
Syntax: BIN P1, P2, P3, P4, P5, P6
Where: P1 = Array which will hold the frequency distribution.
P2 = A variable or array element containing the number to be added to
the frequency distribution.
P3 = The units of P2. If one is recording time, then P3 is how frequently
P2 is incremented.
P4 = The width of each bin or cell of the distribution.
P5 = Array element, variable, constant, or number denoting the first
counter or array element containing the BIN distribution. It is also
the element into which the total frequency will be recorded.
P6 = Array element, variable, constant, or number denoting the last
counter or array element into which the BIN distribution is recorded.
Example:
^START = 0
^END = 10
DIM C = 10
S.S.1,
S1,
#R1: BIN C, A, .1, 5, ^START, ^END; SET A = 0 ---> S1
.1": ADD A ---> SX
In this example, the frequency distribution is recorded into array C from element C(0)
through element C(10). C(^START) marks the first element of the distribution and will
also contain the total frequency recorded, i.e., C(^START + 1) + C(^START + 2) +...+
C(^END). A is a variable containing the current value to be categorized. Values greater
than the category assigned to C(^END) are placed in C(^START + 1), the second
element in the BIN array. The .1 indicates that the data are being recorded with 0.1"
resolution and the 5 indicates that each BIN is to be five seconds wide. Given the
values above and a subject that responds 50 times with IRT's between 0.1 seconds and
some indeterminate maximum, the following data array might result:
86
ELEMENT BIN RANGE IN SECONDS RESPONSES
C(0) Total Responses 50
C(1) Greater than 45 3
C(2) 0 - 5 3
C(3) 5.1 - 10 5
C(4) 10.1 - 15 7
C(5) 15.1 - 20 8
C(6) 20.1 - 25 9
C(7) 25.1 - 30 6
C(8) 30.1 - 35 4
C(9) 35.1 - 40 3
C(10) 40.1 - 45 2
The aforementioned example serves to "BIN" inter-response times. Sometimes it is
desirable to "BIN" a response count by the elapsed time. The following example
illustrates this with an FI20 schedule. Note: this does not require the BIN command.
\ Sample program showing how to create incremental "Bins."
\ C = Array storing the number of responses in 5 minute bins
\ D = Experiment Duration with default value 60 minutes
\ I = Index into the array
DIM C = 200 \ Arbitrary value. In this example only 13 elements
\ (0 - 12) are used, one for total response count plus
\ 12 five minute bins.
S.S.1, \ Increment Response count in C(0) plus bin C(I)
S1,
.01": SET D = 60, I = 1 ---> S2
S2,
#START: SHOW 1,BIN,I, 2,BinCnt,C(I), 3,TotCnt,C(0) ---> S3
1": SHOW 1,BIN,I, 2,Sess_n,D ---> SX
S3, \ Response Count and Display
#R1: ADD C(0), C(I); SHOW 2,BinCnt,C(I), 3,TotCnt,C(0) ---> SX
S.S.2, \ Increment to the Next Counter Every 5 Minutes. Use a
\ variable and #T for a more flexible program. See S.S.3.
S1,
#START: SET C(I + 1) = -987.987 ---> S2
S2,
5': ADD I; SET C(I) = 0, C(I + 1) = -987.987;
SHOW 1,BIN,I, 2, BinCnt, C(I) ---> SX
S.S.3, \ End the Session After D amount of Time
S1,
#START: SET D = D * 1' ---> S2
S2,
D#T: ---> STOPABORTFLUSH
87
LIMIT - Increment or Decrement to a Bound
This function may be used to increment or decrement a variable. Importantly, a limit is
specified beyond which the variable will not be incremented or decrement. This function
should be used when it is specifically desired to limit the value of a variable; it should
not be used as an alternative to ADD, SUB or SET in cases where those functions will
suffice. The processing overhead or performance penalty associated with LIMIT is
somewhat higher than that associated with the alternative functions. This is not to say
that LIMIT should not be used when necessary, but rather that it should not be used
indiscriminately.
Syntax: LIMIT P1, P2, P3
Where: P1 = Variable or array element to be incremented or decremented. It may
not be a constant or a fixed number.
P2 = A variable, array element, constant or number specifying the
numerical value by which P1 will be incremented or decremented
each time LIMIT is executed.
P3 = The maximum or minimum value of P1. Once reached this value will
be held no matter how many times LIMIT is executed.
S.S.1, \ This code fragment adds 2 to X every second.
S1, \ X will achieve and hold a value of 10.
1": LIMIT X, 2, 10 ---> SX
S.S.1, \ This code fragment adds 3 to X every second.
S1, \ X will achieve and hold a value of 9.
1": LIMIT X, 3, 10 ---> SX
S.S.1, \ This code fragment subtracts 1 from X every second.
S1, \ X will achieve and hold a value of -5.
1": LIMIT X, -1, -5 ---> SX
88
Decision Functions:
IF
IF permits the values of two numeric parameters, a numeric parameter and a variable,
or two variables to be compared. Several syntaxes are permissible.
Six comparisons "Operators" are permitted:
= (Equals)
< (Less Than)
<= (Less Than or Equal To)
> (Greater Than)
>= (Greater Than or Equal To)
<> (Not Equal To)
Syntax A:
IF P1 Operator P2 [@Label1, @Label2]
@Label1: Output Section ---> Transition
@Label2: Output Section ---> Transition
Syntax B:
IF P1 Operator P2 [@Label1]
@Label1: Output Section ---> Transition
Syntax C:
IF P1 Operator P2 [Output Section] ---> Transition
Where: P1 & P2 = Constant, number, variable, array element, or special identifier
as described below.
Label1 & Label2 = Any text label containing only letters.
Output Section = Any legal output command(s).
Transition = Any legal Transition such as SX, STOPABORT, STOPKILL,
or S1...S32 (given that S1...S32 is a valid state within the
same state set)
Comments: Unlimited nesting is permissible. The three syntax variations may be
freely intermixed when nesting. Labels are arbitrary, and need not match,
but must begin with @.
89
Examples and Discussion:
Example A:
Because labels are arbitrary, spelling does not need to be consistent. If the comparison
evaluates as TRUE, then the following statement (on the next line) is executed. If the
comparison is FALSE, then the statement two lines down is executed.
S.S.1,
S1,
#R1: ADD A; OFF1; ON2 ---> S2
S2,
2": OFF2; IF A = 100 [@True, @False]
@True: ---> STOPABORT
@False: ON1 ---> S1
S.S.1,
S1,
#R1: ADD A; OFF1; ON2 ---> S2
S2,
2": OFF2; IF A = 100 [@True, @False]
@True: ---> STOPABORT
@F: ON1 ---> S1
\ @FALSE and @F are not required to match.
The legal examples above illustrate a situation in which a #R1 increments a
reinforcement counter, turns off a stimulus light, turns on a feeder and goes to S2. After
2", the feeder output is turned off and variable A (the reinforcement counter) is tested. If
the value of A is now 100 then the statement associated with the label @True is
executed and the procedure terminates. If the value is less than 100, the statement
following the label @False is executed (the stimulus is turned ON and transition takes
place back to S1).
Example B:
When a label is in the input section of a statement, a colon (:) must follow it, even when
there is no output section to the statement.
Illegal Examples:
S.S.1,
S1,
#R1: ADD A; OFF1; ON2 ---> S2
S2,
2": OFF2; IF A = 100 [@True, @False]
@True ---> STOPABORT \ Missing ":" after label
@False: ON1 ---> S1
90
Example C:
Careful attention to proper syntax is important, for certain errors are not detected by
WTRANS and will result in compiler errors. An error which WTRANS does not detect
but which will cause programs to malfunction is to have a transition arrow after the first
label. For example:
1": IF A [@TRUE, @FALSE] ---> S2
Example D:
Although not permitted by earlier versions of MPC, IF statements may be nested more
than one deep. In the following example variables A, B and C are all tested with respect
to Variable X. If all three are greater than or equal to X then transition is to State 2. If
any variable fails the test then transition is to State 3.
S.S.1,
S1,
1": IF A >= X [@FirstTrue, @FirstFalse]
@FirstTrue: IF B >= X {@SecondTrue, @SecondFalse]
@SecondTrue: IF C >= X [@ThirdTrue,@ThirdFalse]
@ThirdTrue: ---> S2
@ThirdFalse: ---> S3
@SecondFalse: ---> S3
@FirstFalse: ---> S3
The labels used with the IF command are arbitrary. For example, in the above example
if A >= X is false then execution immediately drops down to the statement on the same
tab, regardless of whether @FirstFalse is properly spelled. It is, however, mandatory to
use a label. Also, a colon must follow the label, even if there is no output section, as in
"@FirstFalse: ---> S3."
Example E:
A variation on the IF command is to specify only the true alternative. If the conditions
tested by the IF are not met, then transition to SX automatically occurs without being
stated. This is illustrated with Example B.
S.S.1,
S1,
10": ADD A; IF A = 10 [@GO]
@GO: ON 1 ---> S2
S2,
.1": SET A = 0; OFF 1 ---> S1
In Example E, no transition will take place in state 1 until A is equal to 10. When A = 10
is true, transition to state 2 will occur.
91
Example F:
A final variation on the syntax permits labels for true and false conditions to be omitted.
When this syntax is used, output commands are enclosed in square brackets following
the logical comparison. If the logical comparison is TRUE then the commands enclosed
in the brackets are executed and the transition indicated to the right of the arrows is
executed. If the logical comparison is FALSE then transition to SX automatically
occurs. This is illustrated by the following:
S.S.1,
S1,
10": ADD A; IF A = 10 [ON 1] ---> S2
S2,
.1": SET A = 0; OFF 1 ---> S1
Example F functions equivalently to Example E. This format requires a pair of square
brackets, even if they enclose nothing. For example:
S.S.1,
S1,
10": ADD A; IF A = 10 [ ] ---> S2
Compound IF Statements
IF statements may be constructed such that several logical conditions must be met in
order for the expression to evaluate as TRUE. This may be accomplished by placing
each set of logical criteria in parentheses and connecting each set with AND, OR, NOT,
AND NOT, or OR NOT. Parentheses serve to denote the order in which expressions
are evaluated, in much the same way that parentheses control execution of algebraic
expressions in SET statements. Logical expressions are always evaluated first within
the deepest level of parentheses.
Examples:
In the following expression, output 1 is turned on only if A equals 1 and B equals 2.
#R1: IF (A = 1) AND (B = 2)[ON 1] ---> S2
\Note that each term "A = 1" and "B = 2"
\are enclosed in parentheses ().
In the following expression, output 1 will be turned on if either X + 3 equals 10, or if A
equals 1 and B equals 2. Of course, if all three conditions are met, output 1 will also be
turned on.
#R1: IF (X + 3 = 10) OR ((A = 1) AND (B = 2)) [ON 1] ---> S2
92
This example also demonstrates the use of mathematical expressions within IF
statements. Whenever writing IF statements in which parenthetical expressions are
used, be sure that the number of left and right parentheses are equal. Parentheses
must be used whenever more than one logical condition is being tested.
The following are examples of illegal tests, followed by correct examples:
1)
A = 1 OR B = 2 \ Illegal -- no parentheses
(A = 1) OR (B = 2) \ Legal
2)
A = 1) OR (B = 2 \ Illegal - unequal number of parentheses
(A = 1) OR (B = 2) \ Legal
3)
A = 10 OR 5 \ Illegal - each comparison must have 2 terms
(A = 10) OR (A = 5) \ Legal
Special Identifiers
P1 and/or P2 may be a special identifier as listed below. One special identifier reflects
the specified state set's current state, and is represented by "S.S.#". Never alter the
value of this variable. Other special identifiers may be used in expressions in the same
way that any variable or array element may be used. For example, they may participate
in logical tests with IF statements, be part of assignments with SET, and may serve as
prefixes or suffixes to #K, #R, #Z, etc. WMPC does not prevent one from changing the
value of these identifiers with a SET command, but do so only with caution. These
variables are also available for use in inline PASCAL expressions. A complete list of
the variables that may be queried follows the "Examples and Discussions" section:
Examples and Discussion:
Example A:
1": IF S.S.3 = 5 [ON 1] ---> S2
The IF command makes a logical comparison on the basis of whether State Set 3 is
currently in State 5. If the comparison is true output 1 is turned ON and a transition is
made to State 2. A complete list of special identifiers will be found at the end of this
section, following the WITHPI command.
93
WITHPI
WITHPI is a probability gate that samples with replacement. WITHPI functions much
like an IF statement, but truth or falsity of decisions depend upon probabilistic decisions.
As with IF, it may be used with three different syntaxes. Probabilities are always
specified as chances out of ten thousand.
Syntax A:
WITHPI = P1 [@Label1, @Label2]
@Label1: Output Section ---> Transition
@Label2: Output Section ---> Transition
Syntax B:
WITHPI = P1 [@Label1]
@Label1: Output Section ---> Transition
Syntax C:
WITHPI = P1 [Output Section] ---> Transition
Where: P1 = Constant, number, variable, or array element.
Label1 & Label2 = Any text label containing only letters.
Output Section = Any legal output command(s).
Transition = Any legal Transition such as SX, STOPABORT, STOPKILL,
or S1...S32 (given that S1...S32 is a valid state within the
same state set).
Comments: Nesting is permissible using the first Syntax.
Stringing is not permitted.
Labels are arbitrary but must begin with @.
When a label is in the input section of a statement, it must be followed by
":" even when there is no output section to the statement.
Examples and Discussion:
Example A:
Because labels are arbitrary, spelling does not need to be consistent. If the probability
gate evaluates as TRUE, then the following statement (on the next line) is executed. If
the probability gate is FALSE, then the statement two lines down is executed.
94
S.S.1,
S1,
#R1: WITHPI = 5000 [@Reinforcement, @No Reinforcement]
@RF: ON1 ---> S2
@NORF: ---> SX
S2,
2": OFF1 ---> S1
In Example A, every response in state 1 has a pseudo-randomly determined probability
of 5000/10000 (50%) of causing transition to the true alternative (@RF) in which case
reinforcement is delivered and transition to State 2 will occur.
Changing the parameter from 5000 to 1000 would specify that response 1 would have a
10% (1000/10000) probability of resulting in transition to State 2.
Example B:
An error which WTRANS does not detect but which will cause programs to malfunction
is to have a transition arrow after labels. For example:
1": WITHPI = 1000 [@TRUE, @FALSE] ---> S2

95
LISTING OF SPECIAL IDENTIFIERS
BOXNUMBER and BOX
These identifiers are synonymous and reflect the box number of the box in which the
MSN procedure is executing. BOX may be especially useful in conjunction with inter-
box communication (see section on inter-box K-pulses). Under no circumstances
should these values be altered with a SET command.
SUBJECTNUMBER, EXPNUMBER and GROUPNUMBER
These reflect the subject, experiment and group numbers of the subject in the box in
which the experiment is executing. These values may be safely altered with a SET
command but be aware that the box's status line on the runtime screen will not be
automatically updated to reflect changed values.
STARTMONTH, STARTDATE, STARTYEAR, STARTHOURS, STARTMINUTES and
STARTSECONDS
These reflect the date and time at the moment when the current box was loaded with
the "Open Session" menu selection. They are equal to the values displayed on the
runtime screen on the box's status line. STARTYEAR is a 2-digit number reflecting the
last 2 digits of the year. For example, in 1991, STARTYEAR will equal 91 9. Note, the
use of the term start in this context bears no relationship to the issuance of a #START
command from the keyboard. Procedures actually "start" the instant they are loaded.
These values may be safely altered with a SET command but be aware that the box's
status line on the runtime screen will not be automatically updated to reflect changed
values.
ENDMONTH, ENDDATE, ENDYEAR, ENDHOURS, ENDMINUTES and
ENDSECONDS
These variables are set equal to the date and time when the box’s execution is
terminated with KILL, ABORT or ABORTFLUSH. During procedure execution these
variables are normally equal to 0. These values may be altered during procedure
execution with a SET statement, but when procedure execution terminates, they will be
automatically changed to the date and time of termination.
9 You must use a four-digit date if the Y2KCOMPLIANT command is used in your code.
For a discussion on this command, see the "Commands that come before the first state
set" section of this Appendix.
96
CURRENTMONTH, CURRENTDATE, CURRENTYEAR, CURRENTHOURS,
CURRENTMINUTES, and CURRENTSECONDS
These variables reflect the date and time at approximately the time they are accessed in
an expression. It is important to recognize that CURRENTSECONDS is not a precise
reflection of the present time. Under some circumstance, this variable (and all other
CURRENT variables) may be a few seconds behind the actual value of the DOS clock
because their values are updated only as WMPC has spare time remaining after
servicing boxes. These values are in no way related to the internal timing of
experimental events; experimental events are timed independently of the DOS clock.
For precise access to time, utilize BTIME. These values may be altered but it is
pointless to do so because WMPC will automatically correct them within a few seconds
of their alteration.
SECSTODAY
This variable is a single variable that contains the cumulative number of seconds past
midnight. SECSTODAY is subject to the same accuracy limitations as
CURRENTSECS. SECSTODAY is useful for recording the approximate (accurate to
within a few seconds) time of day when an event occurs. It is no more or less accurate
than CURRENTHOURS, CURRENTMINUTES and CURRENTSECONDS, but does
allow one to condense the information contained in those three variables into a single
number. This allows one to record the time of occurrence of events in a minimum
number of array locations. Subsequent data analysis software could be used to
reconstruct hour, minute and second information.
DATETODAY
DATETODAY is a single number that condenses CURRENTYEAR, CURRENTMONTH
and CURRENTDATE into a single number in the format YYMMDD. For example, June
2, 1990 would be expressed as 900602.
BTIME
This number is based upon MED-PC's internal timer interrupt system. BTIME is used
internally to time experimental events. BTIME is set to 0 when WMPC is loaded and
continues to increment throughout the session every time an interrupt occurs. BTIME
increments 1000/RESOLUTION times per second, where RESOLUTION is the timing
resolution declared during installation. On a 50 ms system, BTIME increments 20 times
per second. On a 20 ms system, BTIME increments 50 times per second.
BTIME may be useful for recording elapsed times, but there is no particular advantage
to this technique over recording elapsed time by incrementing a WMPC variable on a
periodic basis with conventional MSN timing statements.
BTIME must never be altered.
97
Array Functions:
Data that has been entered into arrays via a LIST declaration may be accessed via the
commands LIST, RAND and RANDI. LIST successively draws values from an array,
RANDI randomly selects with replacement from an array, while RANDD selects without
replacement from an array.
LIST
List is first placed before State Set 1 to dimension an array and assign a value to each
element in an array. It can then be used in the output section of a statement to select
each value in sequence. When the last element in the list has been used, selection
restarts at the beginning of the list.
Syntax A: Defining the array
LIST P1 = P2, P3,...,Pn
Where: P1 = Array
P2, P3,...,Pn = Number
Comments: Array elements take up a larger amount of memory than one would think.
Therefore, there is a limit on the number of characters (2550) per
statement
Up to 10 Lines are permissible.
Each line, up to 255 characters, long must end on a comma <CR>.
Syntax B: Selecting elements from the array.
LIST P1 = P2 (P3)
Where: P1 = variable or array element
P2 = array from which an item is to be drawn
P3 = variable or array element used as subscript to array P2
Comments: Stringing is permissible
The value of P3 is automatically incremented by the LIST command. Assignments to
P3 through other commands will affect the selection of subsequent items via the LIST
command (i.e. it is possible to skip or retrace elements in the array via manipulation of
the P3 subscript.) This must be done with caution, however, as an illegal subscript
value will be ignored by WMPC, reverting your array back to subscript zero.
Array P2 may be declared with LIST or DIM statement.
98
Examples and Discussion:
Running the following procedure would result in the following pattern of outputs: 1, 2, 3,
1, 2, 3, 1, 2, 3,...
Example A:
LIST A=1, 2, 3
S.S.1,
S1,
1": LIST B = A(K); ON B ---> S2
S2,
1": OFF B ---> S1
In the first LIST statement above, an array named A is declared. The lowest element of
an array is always referenced as Element 0. Element 0 contains the value 1, Element 1
contains the value 2 and Element 2 contains the value 3.
One second after this procedure is loaded, the statement "LIST B = A(K)" sets B equal
to the value of element K of array A. Since all variables are automatically set to 0 at the
beginning of program execution, the value of B is set equal to A(0) and ON B causes
output 1 to be turned ON. One second later, output 1 is turned OFF in State 2.
Following assignment of the value of A(K) to B, 1 is automatically added to the value of
K so that the next time the list statement is executed, the array index (K) for array A is
equal to 1 giving B a value of 2 to turn ON output 2.
The LIST command continues to select successive array elements until the end of the
list is reached. When the last element has been accessed, the array index (K) is reset
back to 0.
Example B:
LIST A: 5, 10, 15, 20, 25, 30, \note that each line
30, 35, 40, 45, 50, 55, \must end in a comma
60, 65, 70, 75, 80, 85 \except for the last one.
99
RANDD
RANDD is similar to LIST except that it selects values from a previously defined array
without replacement. A major difference, however, is that no subscript is specified with
this command. Again, all elements in the array are drawn before any element is
repeated. RANDD can only operate on arrays declared in a LIST statement.
Syntax:
RANDD P1 = P2
Where: P1 = variable or array element
P2 = array from which an item is to be drawn
Comments: Stringing of parameters is permissible.
Array P2 must be declared with a LIST statement.
The maximum number of elements that may be in an array manipulated
by RANDD is 501 (elements 0...500).
The order of the contents of P2 is not affected by RANDD Selection
actually takes place from an internal copy created and managed
automatically by WMPC.
Example:
Items are randomly selected from the LIST, however once selected an item is removed
from the list until all items have been selected. This is selection without replacement.
The following state set might turn outputs on in the following order: 1, 2, 3, 2, 3, 1, 2, 1,
3, 3, 1, 2,...
LIST A=1, 2, 3
S.S.1,
S1,
1": RANDD B = A; ON B ---> S2
S2,
1": OFF B ---> S1
100
RANDI
RANDI is similar to RANDD in that it selects values from a list. Again, no array
subscript is specified. RANDI randomly draws with replacement from an array,
however, so elements can be repeated and may not occur an equal number of times
(unless run over a long period of time). RANDI can only operate on arrays declared in a
LIST statement.
Syntax:
RANDI P1 = P2
Where: P1 = variable or array element
P2 = array from which an item is to be drawn
Comments: Stringing of parameters is permissible.
Array P2 must be declared with a LIST statement.
The maximum number of elements that may be in an array manipulated
by RANDI is 501 (elements 0...500)
The order of the contents of P2 is not affected by RANDI Selection
actually takes place from an internal copy created and managed
automatically by WMPC.
Example:
The actual order of selection is totally random. A single item may be selected more
than once even though some items have not been selected. This is selection with
replacement. The following order of outputs might occur: 3, 1, 1, 2, 1, 3, 2, 2, 1, 3,...
LIST A=1, 2, 3
S.S.1,
S1,
1": RANDI B = A; ON B ---> S2
S2,
1": OFF B ---> S1
101
COPYARRAY
COPYARRAY is an output command that may be used to transfer the contents of one
array to another. This command simplifies and speeds the transfer of data between
arrays and can be used to move an entire array to a "buffer array" for saving while
continuing to collect data. Copying the contents of one array to another is particularly
useful for continuous running applications.
COPYARRAY takes three arguments: the source array from which data are to be
copied, the target array to which data will be copied, and the number of elements of the
source to copy to the target. Copying always starts with the first element of the source
array (element 0) and data are always placed into the target array starting at element 0
of the target. The number of elements of the source array that are copied should never
exceed the size of the target array. If an attempt is made to copy too many elements to
the target array, a WMPC runtime error message will be generated.
Syntax:
COPYARRAY P1, P2, P3
Where: P1 = The source array from which data will be copied.
P2 = The array into which data will be copied.
P3 = The number of elements of P1 to copy to P2.
P1 & P2 must be the name of an array.
P3 may be a variable, constant, number, array element, or
mathematical expression.
Example:
In the following example, the current cumulative response totals on inputs 1-3 are
transferred from array A to array B every 5' and then printed. This technique ensures
that all data are printed from the same moment (see description of PRINT command).
DIM A = 2
DIM B = 2
PRINTVARS = B
S.S.1,
S1,
#R1: ADD A(0) ---> SX
#R2: ADD A(1) ---> SX
#R3: ADD A(2) ---> SX
S.S.2,
S1,
5': COPYARRAY A, B, 3; PRINT ---> SX \FROM A to B COPY 3 Elements
\(0,1,2) AND THEN PRINT
102
ZEROARRAY
This command sets all of the elements of an array to 0. The command takes the name
of the array to zero as its only argument.
Syntax:
ZEROARRAY P1
Where: P1 = Must be the name of an array declared by LIST or DIM.
Example:
S.S.2,
S1,
5': COPYARRAY A, B, 3; ZEROARRAY A; PRINT ---> SX
The above uses the same S.S.2 from the COPYARRAY example; however, this time
the counter in array A are also zeroed every 5'.
GETVAL
GETVAL is an output command that may be used to get the value of a variable or array
element in another box. This command is useful in situations in which it is necessary
for one box to monitor the status of another box. This situation may arise when
conducting experiments on yoked subject pairs. (See use of K-pulses and the special
variable named "BOX").
Syntax:
GETVAL P1 = P2, P3
Where: P1 = The variable or array element in the present box to be set.
P2 = The box number from which a datum is requested.
P3 = The variable or array element whose value is being read.
Example:
S.S.1,
S1,
1": GETVAL A = 2, B ---> SX \ Set A equal to the value of
\ variable B in Box 2
Sometimes it is desirable to get a variable value from a prior day's run for the same box.
See Appendix B for an advanced programming technique to call User.pas for this
propose.
103
Data Handling Commands:
SHOW
SHOW may be used to display data on the screen while a procedure is running. Each
SHOW command takes three arguments. The first is the screen position (1-60), the
second is the 6-character label, and the third is a number, variable or constant to be
displayed on the screen. Each of up to 12 procedures may independently display the
values of up to 60 variables along with descriptive labels on the screen. See the WMPC
User's Manual for full details on how these are displayed on the screen.
Syntax:
SHOW P1, P2, P3
Where: P1 = whole number in range 1..60 expressed as an array element,
variable, constant, or number.
P2 = a one to six character description that may not resemble a MedState
Notation command (e.g., TIME, DATE, etc).
P3 = number, variable, constant, array element, or mathematical
expression.
Comments: There may be up to sixty SHOW's per Box.
The SHOW command is a secondary function and may be delayed while
boxes are processed, data saved, or sent to print manager.
Stringing is permissible.
Example A:
The following example displays the label "XValue" in the tenth position on the SHOW
screen (last position in the second line of the SHOW area). Every second the value of
X will increment by one and will be reflected on the screen.
S.S.1,
S1,
1": ADD X; SHOW 10,XValue,X ---> SX
Example B:
This example illustrates stringing of parameters in SHOW, the use of a constant value
(5.01), the constant "^ThisValue" and a mathematical expression.
104
^ThisValue = 5
LIST A = 2, 5
S.S.1,
S1,
1": SHOW 1,Value1,5.01, 2,Value2,^ThisValue, 3,Math,A(0)+A(1) ---> SX
When loaded to box 1 this example creates the following display:
1) VALUE1 5.01 VALUE2 5 MATH 7
Numeric Format of SHOW Output
Numbers are normally displayed in a "7.2" format, meaning that there is room for 4
digits to the left and 2 to the right of the decimal point. This allows for numbers up to
9999.99 to be displayed with 2-digits of decimal precision. If, however, the number
exceeds 9999.99, then decimal positions and the decimal point will be successively
dropped so that a number as large as 9999999 may be displayed (with no decimal
digits).
Updating the SHOW Display
SHOW commands are not displayed in real-time. When a box issues a SHOW
command, the data values are retained, but the data will not actually be displayed until
the runtime system has time to update the screen. The values eventually shown on the
screen will reflect the values of their respective variables at the moment that their
respective SHOW commands were issued. In practice, the SHOW screen is usually
updated within a small fraction of a second after any changes are made by active
boxes; most users would probably not even notice that updates are not in "real-time"
except in the case of displaying running response totals for rapidly-responding subjects,
in which case the response total shown on the screen will discontinuously count up. For
example, a pigeon responding in a box controlled by the following code would most
likely produce SHOW output that appears on the screen as a discontinuously
incrementing counter (perhaps incrementing as 3,7,8,12, etc.):
Example A:
^FEEDER=5
S.S.1,
S1,
20#R1: ADD Y; SHOW 2,RFS,Y; ON ^FEEDER ---> S2
S2,
2": OFF ^FEEDER ---> S1
S.S.2,
S1,
#R1: ADD X; SHOW 1,RESPS,X ---> SX
105
Example B:
In the above sample, the displays are not present until the animal begins responding
(SHOW1) or responds 20 times (SHOW2). Show Labels may be displayed even while
variable values are zero to confirm that a program is running with the following changes
to the above code.
S.S.1,
S1,
#START: SHOW 1,RESPS,X, 2,RFS,Y ---> S2
S2,
20#R1: ADD Y; SHOW 2,RFS,Y; ON ^FEEDER ---> S3
S3,
2": OFF ^FEEDER ---> S1
CLEAR - Remove SHOW Counters
CLEAR works in conjunction with SHOW. As its name suggests, CLEAR blanks out
SHOW command output. For example, one might SHOW successive IRTs or other
events in a trial (up to sixty) and then issue CLEAR 1,60 to erase the output of those
SHOWs in preparation for the next trial. CLEAR may be used to remove any sub-range
of counters and may take variables, numbers, calculations, or constants as arguments.
Syntax:
CLEAR P1, P2
Where: P1 = number, variable, array element, or constant.
P2 = number, variable, array element, or constant.
Comment: 1 <= P1 <= 60 i.e., P1 between 1 and 60 (inclusive)
P1 <= P2 <= 60 i.e., P2 greater than or equal to P1 and less than or equal
to 60.
It is not necessary to include a CLEAR command to initialize or clear the output left
behind by one box when the box is reloaded. Each box's SHOW area is automatically
cleared when a box is loaded.
The following examples are all legal:
#Z10: CLEAR 40, 50 ---> SX
60#R1: CLEAR A, B ---> SX
#R2: CLEAR ^FIRST, ^LAST ---> SX
106
PRINT
The PRINT command may be used in conjunction with PRINTVARS, PRINTFORMAT,
and PRINTOPTION to generate an annotated style printout on any Epson-compatible
printer attached to LPT1: from within an MSN procedure, while boxes are active,
irrespective of whether the printout option selected during installation is annotated or
one of the stripped formats.
Syntax:
PRINT
Comment: PRINT takes no arguments.
Example:
The following code illustrates a FI-10 interval schedule with two second reinforcement.
Each response is added to variable A. At the end of 60 minutes a complete annotated
printout will occur of all variables even though only the A variable may have a value
other than 0. No data is saved to disk.
S.S.1,
S1,
10" ---> S2
S2,
#R1: ON 1 ---> S3
S3,
2": OFF 1; ADD B ---> S1
S.S.2,
S1,
#R1: ADD A ---> SX
S.S.3,
S1,
60': PRINT ---> S2
S2,
1" ---> STOPKILL
107
Handling of Printer Problems
Different procedures in the same runtime program may use different formats.
Different MPC procedures may use different combinations of printer options without
interfering with the options specified by other procedures, even when different
procedures with different combinations of options are being run in multiple boxes. For
example, if Box 1 uses portrait and Box 2 uses landscape, each box's data will print
properly.
Printouts reflect data values at the moment of actual printing, not values at the time of
printing requests
When a request is made to print a box's data, either from the menu system or from
within a state notation procedure, the request is not immediately fulfilled. A finite
amount of time is required for the runtime system to generate the printout. Until the
printout is generated, the data values within a printout may "float" during the period
between the printing request being issued and the time at which the data are actually
printed. For example, consider the following code:
DIM A = 2000
DIM Z = 2000
S.S.1,
S1,
1": ADD A(0), Z(2000) ---> SX
In this example, the values of A(0) and Z(2000) are incremented every second and will
always be equal. If a request to print is made after the box has finished running, the
values of data printed for A(0) and Z(2000) will be identical. However, if the data for this
procedure are printed while the box is still active, the values of both variables will
continue to increment while the runtime system is constructing the printout. Different
values are likely to be printed for the two variables, with the value of Z(2000) being
larger than that of A(0) because variables and arrays are printed in alphabetical order.
The basis for the discrepancy is that it takes time to generate a printout and A(0) will be
placed on the printout before Z(2000).
There are, however, several different ways to ensure that data on a printout are "frozen"
at the time of a printing request:
1) Issue a print command after a procedure has finished its work and it's data values
will no longer change. The preceding code example could be changed to:
DIM A = 2000
DIM Z = 2000
S.S.1,
S1,
1": ADD A(0), Z(2000) ---> SX
108
S.S.2,
S1,
60': PRINT ---> STOPABORT \ VALUES WILL STOP CHANGING WHEN
\ THIS LINE EXECUTES
2) Transfer the to-be-printed data to special arrays or variables that won't be updated
during the time between a printing request and the generation of the printout. The code
example could become:
DIM A = 2000
DIM B = 1
DIM Z = 2000
PRINTVARS B
S.S.1,
S1,
#K1: SET B(0) = A(0), B(1) = Z(2000); PRINT ---> SX
\ "FREEZE" THE DATA AND PRINT THE VALUES
\ BY ISSUING K1 FROM THE KEYBOARD
1": ADD A(0), Z(2000) ---> SX
3) Transfer an entire array with COPYARRAY.
DIM A = 2
DIM B = 2
PRINTVARS = B
S.S.1,
S1,
#R1: ADD A(0) ---> SX
#R2: ADD A(1) ---> SX
#R3: ADD A(2) ---> SX
S.S.2,
S1,
5': COPYARRAY A, B, 3; PRINT ---> SX
\FROM A to B COPY 3 Elements (0,1,2) AND THEN PRINT
4) Print data after a box has stopped executing but before it's data are written to disk
and before the box is reloaded. Simply put, if a box isn't running, its data values can't
change.
In many instances it may not even matter whether data values float, particularly when
the printout is being generated to get a quick look at the data, as opposed to generating
archival printouts. Additionally, if small amounts of data are printed, the time interval
between printing the first and last values will typically be quite small and often not
detectable.
109
In addition to the asynchrony between printing the first and last data elements within a
box that may arise when printing while a box is running, the amount of time it takes for a
printout to appear on the printer varies according to a variety of factors. Typically, a
printout is generated within seconds after a request. This may change, though, if a
large number of printing requests have preceded the present request or if a great deal
of disk-writing activity is underway. Specifically, printout generation does not occur
while disks files are being written.
Queuing of Printouts and Availability of Data for Printing
When a request to print data is received by MED-PC, the request is placed in a queue
or waiting line until WMPC has time to process the request. Assuming that WMPC is
not occupied performing other tasks, the printout is generated in memory before actually
being sent to the printer. During printout formation, the on screen memory indicators
will rapidly run down until only about 5K remain. As the printout actually gets sent to the
printer, memory locations are constantly released. As memory again becomes
available, more printout is formed in memory.
A request to print data will be fulfilled whenever any of the following conditions are met:
1) The print request is issued while the box is still running.
2) The box is not running, but the box was terminated by an ABORT (as opposed to
KILL) and the box has not been reloaded and the data has not yet been written to disk.
The moment data is written to disk or abandoned; print requests will no longer be
honored. However, if a print request has been issued, one may immediately write data
to disk and/or reload the box without adversely affecting the printout -- the request will
be honored. Note, though, that in systems running under tight memory constraints, the
release of memory normally associated with writing data to disk will be delayed until the
data is finished being printed.
3) The box is not running, but a request to print the box's data is still in the print queue.
This feature may be of little practical value.
Example:
60': PRINT ---> STOPKILL
\ DATA WILL PRINT, EVEN THOUGH TRANSITION IS TO
\ STOPKILL BECAUSE PRINT REQUEST ISSUED BEFORE THE
\ STOPKILL.
Miscellaneous
The End Date and End Time indicators on printouts will be set to 0 when a print request
is issued from within a procedure or when a print is issued from the keyboard and the
box is still running.
110
STOPABORT and STOPKILL
These commands are actually the names of two special transitions. They are placed
following a transition arrow and cause the procedure to immediately stop executing.
Any outputs currently turned on get shut off immediately unless turned on by LOCKON.
In addition, the box's status lines on the monitor are cleared. The difference between
STOPABORT and STOPKILL is that STOPABORT retains the values of all variables
and array elements in memory for subsequent dumping into a file (Flush) and print can
be executed before the dump. The data from procedures terminated by STOPKILL are
not recoverable - the data are not placed in the dump queue. STOPABORT and
STOPKILL automatically perform the same functions as their manual equivalents on the
"close sessions" window. Please see the WMPC User's Manual on how to save your
data manually.
Syntax:
---> STOPABORT
---> STOPKILL
Example:
S.S.1,
S1,
10#R1: ADD A; ON 1 ---> S2
S2,
2": OFF 1; IF A = 50 [] ---> STOPABORT
STOPABORTFLUSH
Stop Procedure Execution and Write Data to Disk
STOPABORTFLUSH is identical to STOPABORT in that it is a transition that turns off
all outputs and stops procedure execution. Additionally, this command causes the data
to be written to disk automatically. File structure is determined by the internal file format
declared during installation and any "DISK" commands prior to State Set One. File
naming defaults to the scheme declared during installation unless a custom file name is
assigned from the "Open Session" window.
Executing STOPABORTFLUSH will cause all data waiting to be written to disk to be
transferred to disk even if the data are awaiting transfer as the result of other boxes
executing STOPABORT.
Syntax:
--->STOPABORTFLUSH
111
Example:
S.S.1,
S1,
#R1: ADD A ---> SX
#R2: ADD B ---> SX
S.S.2,
S1,
60' ---> STOPABORTFLUSH
DATE and TIME
These commands return information about the DOS date and time. Having access to
this may be useful in IF statements for setting experimental parameters on the basis of
time or date information.
Syntax:
DATE P1, P2, P3
TIME P1, P2, P3
Where: P1, P2, P3 = variable or array element
Information returned by DATE into the parameters:
P1: Month
P2: Day
P3: Year (last two digits)
Information returned by TIME into the parameters:
P1: Hours (12 or 24 hour based on DOS setting)
P2: Minutes
P3: Seconds
Example:
In the following example, the calendar information is returned by DATE. If the first
parameter (A) returns 10 then F is set equal to 5, establishing an FR 5. If the month is
equal to anything other than 5, then the FR is set equal to 10.
S.S.1,
S1,
#START: DATE A, B, C; IF A = 10 [@OctFR, @NotOctFR]
@OctFR: SET F = 5 ---> S2 \ FR 5
@NotOctFR: SET F = 10 ---> S2 \ FR10
S2,
F#R1: ON 2 ---> S3
S3,
2": OFF 2 ---> S1
112
Commands that Come Before the First State Set
Declaring Arrays
DIM is used to define (dimension) the size of arrays. Like variables, array names are
letters of the alphabet; however declaring a letter of the alphabet to be an array
precludes its use as a simple variable (i.e., "A" can not be both an array and a variable).
By default, all letters are defined as variables.
Syntax:
DIM P1 = P2
Where: P1 = A letter of the alphabet to be declared as an array.
P2 = The maximum subscript of the array. Because arrays are always
zero-based (zero is the lowest subscript), the number of elements is
P2 + 1. The elements range from 0...P2.
Examples and Discussion:
DIM B = 10 \Declare "B" as an array with elements 0...10
S.S.1,
S1,
1: Add B(5) ---> SX
Declaring an Array with the LIST Command
Another way to declare an array is with the LIST command. See the output section of
this appendix for additional information on the other uses of the LIST command.
Declaring Constants
The clarity of MSN programs may be enhanced through the use of constants.
Constants are user-defined meaningful names that may be used in place of whole
numbers in MSN programs. Constants are particularly useful for providing logical
names for output numbers and Z pulses. Constant names must always begin with a
carat '^' and must not be more than eight characters in length.
Syntax:
^CONSTANT = P1
Where: CONSTANT = the name you are assigning
P1 = the Input or Output number being assigned to a constant.
113
The following code illustrates several uses of constants.
\Outputs
^Feeder = 1
^Light = 2
\Inputs
^LeftKey = 1
\Z PULSES
^RFBEGIN = 1
^RFEND = 2
\OFFSETS INTO C ARRAY
^RFS=0 \COUNTER 0 WILL COUNT RFS
DIM C = 5
S.S.1,
S1,
.01": ON ^Light ---> S2
S2,
10#R^LeftKey: ON ^Feeder; Z^RFBEGIN; ADD C(^RFS) ---> S3
S3,
2": OFF ^FEEDER; Z^RFEND ---> S2
Comments:
1) It is acceptable to assign time values to constants
(e.g., prior to the first state set: ^FIVAL=30”)
2) Do not attempt to change the value of a constant within a state set
(e.g., 1”: SET ^FIVAL = 60” ---> SX)
PRINTVARS
It is often desirable to print only a subset of the variables and arrays in a procedure.
This is particularly true when many of the variables are used internally by the procedure
and do not contain data. Additionally, when collecting hundreds or thousands of data
points per session, it would be convenient to be able to print a few key indices to the
printer after every session, and yet be able to save the detailed counters to disk file for
later analysis.
The above objectives may be accomplished by using the PRINTVARS command. This
command may be used to declare a list of variables that will be printed whenever a
PRINT command is issued. The PRINTVARS command affects printing irrespective of
whether the command to print was issued from within a state table or by a keyboard
command. The PRINTVARS command in no way affects the variables that will be
written to disk (but a parallel command, DISKVARS, is provided).
114
In the absence of a PRINTVARS directive, all variables and arrays (A-Z) are printed. To
print selected variables, place a PRINTVARS directive before the first state set of the
procedure. The exact placement of PRINTVARS does not matter, provided that it is
before the first state set.
Syntax:
PRINTVARS = P1, P2,..., P26
Where: P1...P26 are variables or arrays A through Z
Comment: PRINTVARS must be placed before the first state set.
In the following example, the PRINTVARS directive specifies that printouts should
contain only variables/arrays A, J & K.
DIM J = 5
PRINTVARS = A, J, K
\ Printouts will contain vars. A & K and array J.
\ this statement has no effect on what is written to disk.
S.S.1,
S1,
60': PRINT ---> STOPABORT
\ Print variables specified by printvars
\ from within state table after 1 hour
PRINTFORMAT
WMPC automatically prints numbers such that 12 spaces are set aside for each
number, with 8 digits reserved for the integer part of the number (to the left of the
decimal), 1 space is used for the decimal and 3 spaces are provided for the decimal
portion of the number. An example of a number printed in 12.3 format (the meaning of
12.3 will be detailed below) is, "12345678.123".
In many instances, it is useful to print data in other formats, particularly when trying to
increase the amount of data printed per page. Placing a PRINTFORMAT statement
before the first state set of the procedure will control the printed format of numbers.
PRINTFORMAT takes one argument consisting of a decimal number in which the
integer (to the left of the decimal) indicates the total number of spaces to be occupied
by the number and the decimal portion indicates the number of spaces to be set aside
for the decimal portion of to-be-printed numbers.
Syntax:
PRINTFORMAT = P1.P2
Where: P1 = number indicates the total number of spaces to be occupied by the
number including the decimal point.
P2 = number indicates the number of spaces to be set aside for the
decimal portion of the number.
115
PRINTFORMAT examples:
PRINTFORMAT = 5.1 \ Print in five space, with 3 to left of decimal
\ 1 to right as in 123.1
PRINTFORMAT = 7.2 \ 1234.12
PRINTFORMAT = 6.0 \ 123456
The use of a PRINTFORMAT statement has no effect upon the internal representation
of numbers. If multiple PRINTFORMAT statements are used in the same .MPC
procedure, then only the last one is implemented.
If the digits to the left of the decimal point exceeds the total number of spaces set aside
by the printformat statement, then the general formatting rules are temporarily set aside
and the number is printed in as many spaces as are needed to represent the integer
portion of the number. This may result in the printed line "spilling" onto the next line on
the page. If the decimal portion of a number exceeds the space allocated, the number
printed is rounded to the nearest value.
PRINTOPTIONS
PRINTOPTIONS provides control over three aspects of the appearance of printouts.
The options provided are FULLHEADERS vs. CONDENSEDHEADERS,
NOFORMFEEDS vs. FORMFEEDS, and 80 vs. 132 characters per line. If
PRINTOPTIONS is not specified in a procedure, the default printout uses a condensed
header, no form feed, and 132 characters per line. When specified commas separate
multiple options, and any option not specified will stay at its default value. Several
samples are provided below.
Syntax:
PRINTOPTIONS = P1, P2
Where: P1=FULLHEADERS or CONDENSEDHEADERS
P2 = FORMFEEDS or NOFORMFEEDS
Comments: commas separate multiple options
CONDENSEDHEADERS and NOFORMFEEDS are the default settings
and need not be specified.
The order of options is irrelevant.
116
Examples and Discussion:
PRINTVARS = A
PRINTFORMAT = 9.2
PRINTOPTIONS = FULLHEADERS
LIST A = 1234.67, 1234.67, 1234.67, 1234.67, 1234.67, 1234.67, 1234.67,
1234.67, 1234.67, 1234.67, 1234.67, 1234.672, 1234.677
S.S.1,
S1,
1": PRINT ---> STOPKILL
The code above will produce a printout similar to the following:
Start Date: 03/10/91
End Date: 03/10/91
Subject: 0
Experiment: 0
Group: 0
Box: 1
Start Time: 14:11:32
End Time: 14:11:33
Source Code: PRINTSAM
A:
0: 1234.67 1234.67 1234.67 1234.67 1234.67 1234.67 1234.67
7: 1234.67 1234.67 1234.68
A second option is whether a formfeed is issued after each box is printed so that data
for each box begins at the top of the page. NOFORMFEEDS is the default setting, but
FORMFEEDS causes the printouts to begin at the top of pages. Note that individual
formfeeds may also be issued from within the runtime menu system.
Controlling Number of Columns of Data on Printouts
By judicious use of PRINTOPTIONS and PRINTFORMAT, it is possible to achieve
considerable control over the number of columns of data printed on each printout. The
number of columns printed is determined by the following formula:
Number of Data Columns = Trunc | (PrinterColumns - 5) |
| (WidthOfEachNumber + 1) |
Trunc refers to truncate which only takes the integer (whole number left of the decimal)
part of the result. Several examples are provided on the next page.
117
Examples and Discussion:
Example A:
PRINTORIENTATION = LANDSCAPE
PRINTFORMAT = 6.0
This would result in the data printing in 18 columns abreast with values up to 999,999
because:
Number of Cols. = TRUNC ((132 - 5) / (6 + 1))
= TRUNC (127 / 7)
= TRUNC 18.1428
= 18
Example B:
PRINTFORMAT = 6.1
PRINTOPTIONS = FORMFEED
This would result in the data printing in 10 columns abreast with values up to 99,999.9
and an automatic form feed after each print command because:
Number of Cols. = TRUNC ((80 - 5) / (6 + 1))
= TRUNC (75 / 7)
= TRUNC 10.714
= 10
DISKVARS, DISKFORMAT, and DISKOPTIONS
DISKVARS, DISKFORMAT, and DISKOPTIONS are analogous to the PRINT
commands previously discussed, but are completely separate and independent. The
disk commands determine which variables are saved and the format.
Syntax:
DISKVARS = P1, P2,..., P26
Where: P1...P26 are variables or arrays A through Z
Comment: DISKVARS must be placed before the first state set.
118
Syntax:
DISKFORMAT = P1.P2
Where: P1 = number indicates the total number of spaces to be occupied by the
number including the decimal point.
P2 = number indicates the number of spaces to be set aside for the
decimal portion of the number.
Syntax:
DISKOPTIONS = P1, P2, P3
Where: P1 = 80 or 132
P2 = FULLHEADERS or CONDENSEDHEADERS
P3 = FORMFEEDS or NOFORMFEEDS
Comments: Multiple options are separated by commas
CONDENSEDHEADERS and NOFORMFEEDS are the default settings
and need not be specified.
The order of options is irrelevant.
Example and Discussion:
Writing a data file with FLUSH takes place in the background, which is to say that
FLUSH does not cause any interference with the speed and efficiency with which
experimental events are processed; the data is written when the processor has free
time. It is important to note that the amount of time that it takes to write a disk file is
indeterminate; it is not advisable to make changes to the data structure(s) being written
to disk until one may be reasonably certain that the data has actually been transferred
to disk.
For a discussion of an analogous issue with the PRINT command, refer to the section of
the manual covering that command. A way to cope with the indeterminacy is to collect
data into one array and then periodically copy the contents of that array to a second
array (See COPYARRAY) and then write the second array to disk.
119
\ Declare A and B with elements 0...99
DIM A = 99
DIM B = 99
\ Declare that only B will be written to disk
DISKVARS = B
S.S.1,
S1,
#START: ---> S2
S2, \ Whenever a response on input 1 occurs, do the following:
\ 1) Record the elapsed time since the last response into A(I).
\ 2) Clear X so that elapsed timer is reset.
\ 3) Update I so that the next response is recorded into the
\ next element of A.
\ 4) If 100 inter-response times have been recorded, its time
\ to transfer data to disk by doing the following:
\ A) Transfer the data to B so that the data is not
\ altered by subsequent responses prior to MED-PC
\ having an opportunity to transfer the data to disk.
\ B) Set all elements of A to 0 so that new data may be
\ logged into A. Also set I to 0 so that recording
\ resumes at the beginning of A.
\ C) Issue the FLUSH command to request writing the
\ elements of B to disk as time permits.
\ 5) Transition is to S2 so that the .1" IRT timer is reset
\ whenever a response occurs.
#R1: SET A(I) = X, X = 0; ADD I;
IF I = 100 [@Write, @NotYet]
@Write: COPYARRAY A, B, 100; ZERROARRAY A;
SET I = 0; FLUSH ---> S2
@NotYet: ---> S2
\The following line is the IRT timer.
0.1": Set X = X + .1 ---> SX
\ For some applications ADD X may be substituted
\ in the Output Section for SET X = X + 0.1
120
Y2KCOMPLIANT
Y2K issues: A new MSN directive, "Y2KCOMPLIANT," has been created. The
command gets placed before the first state set and takes no arguments. The
consequence of including this directive is that all years are 4 digits on printouts (disk
and paper) and in all data files.
Syntax:
Y2KCOMPLIANT
Example:
Y2KCOMPLIANT
DISKOPTIONS = FULLHEADERS
PRINTOPTIONS = FULLHEADERS
S.S.1,
S1,
1" ---> SX
121
INDEX
' (Minutes).....................................................................................................................68
" (Seconds) ..................................................................................................................68
#K..................................................................................................................................66
#R..................................................................................................................................64
#START.........................................................................................................................64
#T ..................................................................................................................................69
#Z ..................................................................................................................................65
ADD...............................................................................................................................83
ALERTOFF ...................................................................................................................82
ALERTON .....................................................................................................................82
BIN ................................................................................................................................85
BOX...............................................................................................................................95
BOXNUMBER...............................................................................................................95
BTIME ...........................................................................................................................96
CLEAR ........................................................................................................................105
Commands that Come Before the First State Set...................................................112
Compound IF Statements ...........................................................................................91
Controlling Number of Columns of Data on Printouts ...........................................116
COPYARRAY..............................................................................................................101
CURRENTDATE ...........................................................................................................96
CURRENTHOURS ........................................................................................................96
CURRENTMINUTES.....................................................................................................96
CURRENTMONTH........................................................................................................96
CURRENTSECONDS ...................................................................................................96
CURRENTYEAR ...........................................................................................................96
DATE...........................................................................................................................111
DATETODAY ................................................................................................................96
Declaring an Array with the LIST Command...........................................................112
Declaring Arrays........................................................................................................112
Declaring Constants..................................................................................................112
DISKFORMAT.............................................................................................................117
DISKOPTIONS............................................................................................................117
DISKVARS..................................................................................................................117
ENDDATE .....................................................................................................................95
ENDHOURS..................................................................................................................95
ENDMINUTES...............................................................................................................95
ENDMONTH..................................................................................................................95
ENDSECONDS .............................................................................................................95
ENDYEAR.....................................................................................................................95
EXPNUMBER................................................................................................................95
GETVAL......................................................................................................................102
GROUPNUMBER..........................................................................................................95
Handling of Printer Problems...................................................................................107
IF ..................................................................................................................................88
Internal Representation of Time.................................................................................70
K-Pulse Theory Of Operation And Technical Details ...............................................79
2
K-pulses .......................................................................................................................78
LIMIT .............................................................................................................................87
LIST...............................................................................................................................97
LOCKOFF .....................................................................................................................73
LOCKON.......................................................................................................................73
Miscellaneous............................................................................................................109
Numeric Format of SHOW Output............................................................................104
OFF ...............................................................................................................................73
ON.................................................................................................................................72
Overlapping Inputs and Outputs................................................................................74
PRINT..........................................................................................................................106
PRINTFORMAT ..........................................................................................................114
PRINTOPTIONS..........................................................................................................115
PRINTVARS................................................................................................................113
Processing Efficiency of the K-pulse.........................................................................80
Queuing of Printouts and Availability of Data for Printing ....................................109
RANDD..........................................................................................................................99
RANDI .........................................................................................................................100
SECSTODAY ................................................................................................................96
SET................................................................................................................................84
SHOW .........................................................................................................................103
Special Identifiers........................................................................................................92
STARTDATE.................................................................................................................95
STARTHOURS..............................................................................................................95
STARTMINUTES ..........................................................................................................95
STARTMONTH .............................................................................................................95
STARTSECONDS.........................................................................................................95
STARTYEAR.................................................................................................................95
STOPABORT..............................................................................................................110
STOPABORTFLUSH ..................................................................................................110
STOPKILL...................................................................................................................110
SUB...............................................................................................................................83
SUBJECTNUMBER......................................................................................................95
The Special Variable "BOX"........................................................................................80
TIME............................................................................................................................111
Time Inputs Less Than the Resolution Value ...........................................................70
Updating the SHOW Display.....................................................................................104
Using Logical OR "!" with Input Commands.............................................................71
WITHPI..........................................................................................................................93
Y2KCOMPLIANT ........................................................................................................120
ZEROARRAY..............................................................................................................102
Z-pulse Depth Checking..............................................................................................77
Z-pulses........................................................................................................................74
