Pelco Security Camera Ip3701H Users Manual Pelco_Web Browser For IP Cameras_guide
IP3701H to the manual 46151b69-2f93-4dda-a2aa-2f4065bfb25a
2015-02-02
: Pelco Pelco-Pelco-Security-Camera-Ip3701H-Users-Manual-441442 pelco-pelco-security-camera-ip3701h-users-manual-441442 pelco pdf
Open the PDF directly: View PDF ![]() .
.
Page Count: 20

QUICK START
C3433M-A (8/07)
Web Browser for
Pelco IP Cameras
IP110 Camclosure® Series
IP3701H Series

2C3433M-A (8/07)
Contents
Welcome . . . . . . . . . . . . . . . . . . . . . . . . . . . . . . . . . . . . . . . . . . . . . . . . . . . . . . . . . . . . . . . . . . . . . . . 4
Getting Started . . . . . . . . . . . . . . . . . . . . . . . . . . . . . . . . . . . . . . . . . . . . . . . . . . . . . . . . . . . . . . 4
IP Address Settings. . . . . . . . . . . . . . . . . . . . . . . . . . . . . . . . . . . . . . . . . . . . . . . . . . . . . . . . . . . 5
Using a Web Browser . . . . . . . . . . . . . . . . . . . . . . . . . . . . . . . . . . . . . . . . . . . . . . . . . . . . . . . . . . . . . 6
Accessing the Camera . . . . . . . . . . . . . . . . . . . . . . . . . . . . . . . . . . . . . . . . . . . . . . . . . . . . . . . . 6
IP Camera Main Menu . . . . . . . . . . . . . . . . . . . . . . . . . . . . . . . . . . . . . . . . . . . . . . . . . . . . . . . . . . . . . 7
Home Screen. . . . . . . . . . . . . . . . . . . . . . . . . . . . . . . . . . . . . . . . . . . . . . . . . . . . . . . . . . . . . . . . 7
Image Rate Setting . . . . . . . . . . . . . . . . . . . . . . . . . . . . . . . . . . . . . . . . . . . . . . . . . . . . . . 8
Screen Modes. . . . . . . . . . . . . . . . . . . . . . . . . . . . . . . . . . . . . . . . . . . . . . . . . . . . . . . . . . . . . . . 8
How to Capture a Still Image . . . . . . . . . . . . . . . . . . . . . . . . . . . . . . . . . . . . . . . . . . . . . . 8
Settings Screen. . . . . . . . . . . . . . . . . . . . . . . . . . . . . . . . . . . . . . . . . . . . . . . . . . . . . . . . . . . . . . 9
General Tab . . . . . . . . . . . . . . . . . . . . . . . . . . . . . . . . . . . . . . . . . . . . . . . . . . . . . . . . . . . . 9
Network Tab . . . . . . . . . . . . . . . . . . . . . . . . . . . . . . . . . . . . . . . . . . . . . . . . . . . . . . . . . . 10
Users Tab. . . . . . . . . . . . . . . . . . . . . . . . . . . . . . . . . . . . . . . . . . . . . . . . . . . . . . . . . . . . . 11
Roles Tab . . . . . . . . . . . . . . . . . . . . . . . . . . . . . . . . . . . . . . . . . . . . . . . . . . . . . . . . . . . . . 13
Edit Profile Screen . . . . . . . . . . . . . . . . . . . . . . . . . . . . . . . . . . . . . . . . . . . . . . . . . . . . . . . . . . 15
Help screen . . . . . . . . . . . . . . . . . . . . . . . . . . . . . . . . . . . . . . . . . . . . . . . . . . . . . . . . . . . . . . . . 15
Sign Out screen. . . . . . . . . . . . . . . . . . . . . . . . . . . . . . . . . . . . . . . . . . . . . . . . . . . . . . . . . . . . . 15
Troubleshooting . . . . . . . . . . . . . . . . . . . . . . . . . . . . . . . . . . . . . . . . . . . . . . . . . . . . . . . . . . . . . . . . . 16
Specifications. . . . . . . . . . . . . . . . . . . . . . . . . . . . . . . . . . . . . . . . . . . . . . . . . . . . . . . . . . . . . . . . . . . 18
C3433M-A (8/07) 3
VIDEO QUALITY CAUTION
Pelco systems are capable of providing high quality video for both live viewing and playback. However, the
systems can be used in lower quality modes, which can degrade picture quality, to allow for a slower rate
of data transfer and to reduce the amount of video data stored. The picture quality can be degraded by
either lowering the resolution, reducing the picture rate, or both. A picture degraded by having a reduced
resolution may result in an image that is less clear or even indiscernible. A picture degraded by reducing
the picture rate has fewer frames per second, which can result in images that appear to jump or move
more quickly than normal during playback. Lower frame rates may result in a key event not being recorded
by the system.
Judgment as to the suitability of the products for user’s purposes is solely the user’s responsibility. Users
shall determine the suitability of the products for their own intended application, picture rate and picture
quality. In the event user intends to use the video for evidentiary purposes in a judicial proceeding or
otherwise, user should consult with its attorney regarding any particular requirements for such use.

4C3433M-A (8/07)
Welcome
This manual explains how to interface with the IP camera using a standard Web browser (for example
Microsoft® Internet Explorer®).
The IP camera can also be used with an Endura™ system as an Endura Enabled™ device or a third-party
system with Pelco’s API interface. If you are using one of these systems refer to the following:
NOTES:
• Only use a cable modem router or a switch with a DHCP server when installing the Pelco IP camera
on a network. Refer to the installation manual shipped with the Pelco IP camera for installation
instructions.
• Do not use a HUB in the network setup of the camera.
• To secure access to the Pelco IP camera, place the camera behind a firewall when it is connected to
a network.
• For optimum image quality and bandwidth efficiency, use the IP camera as an Endura Enabled device
or with an approved Pelco API interface.
• If the camera is part of an Endura system, the graphical user interface will automatically discover
the device and display it as a camera within the system manager. Refer to the documentation for the
Endura System Manager.
• For a list of compatible API interfaces go to www.pelco.com/ipcam.
• Network and processor bandwidth limitations may cause the video stream to pause or appear
pixilated when an increased number of Web-interface users connect to the camera. Decrease the
images per second (IPS) of the Web-interface video streams to compensate for network/processor
limitations.
GETTING STARTED
You will need to install your IP camera before using this manual (refer to the installation manual supplied
with the IP camera). Once installed, apply power to the system. The camera will start a configuration
sequence.
The following is the configuration process for the IP camera:
• The green LED flashes five times per second for approximately two minutes, or until the server
recognizes the camera.
• If the camera is not connected to a DHCP server, the green LED will flash for approximately four
minutes before the camera switches to Automated Private IP Addressing mode.
C3433M-A (8/07) 5
IP ADDRESS SETTINGS
The network automatically assigns an IP address to the camera. The following scenarios describe how a
DHCP or static network assigns IP settings:
•DHCP network: If the camera is connected to a DHCP network, the server will automatically assign
an IP address to the camera. DHCP is the default setting for the camera.
•Static IP network: The camera will automatically cycle through the IP address range
169.254.200.0 through 169.254.200.255, on netmask 255.255.0.0. The first available address
located will be assigned to the IP camera.
If the network cannot find an open address in the default range, manually set the IP address.
To manually set the IP address refer to “How to Change the Network Settings” on page 10.
NOTES:
• Contact your network administrator to avoid any network conflicts before setting/changing the IP
address of the camera.
• If you do not know the IP address of the IP camera, install the Pelco Device Utility software available
on the CD shipped with the product. The utility will locate the assigned name, IP address, and MAC®
address for the device.
• The Device Utility software is also available at www.pelco.com/software/downloads/.
6C3433M-A (8/07)
Using a Web Browser
The following are the minimum system requirements to use a Web browser with the IP camera:
• PC (Pentium® 4 microprocessor, 1.6 GHz) with Windows 98, Windows 2000, Windows XP (or higher)
or Mac OS X 10.3.9 (or higher)
• RAM: 512 Mbyte
• Ethernet Card: 100 Mbit
• Internet Explorer 5.5 (or higher) or Firefox® 1.5 (or higher)
• Screen resolution of 1024 x 768 pixels or higher, 16- or 32-bit pixel color resolution
•JRE
™ 1.4.2 or higher: You must have JRE installed on your machine to view images. Download Java™
version J2SE JRE available on the CD (shipped with the product) or at www.java.com/en/download.
ACCESSING THE CAMERA
To access the IP camera do the following:
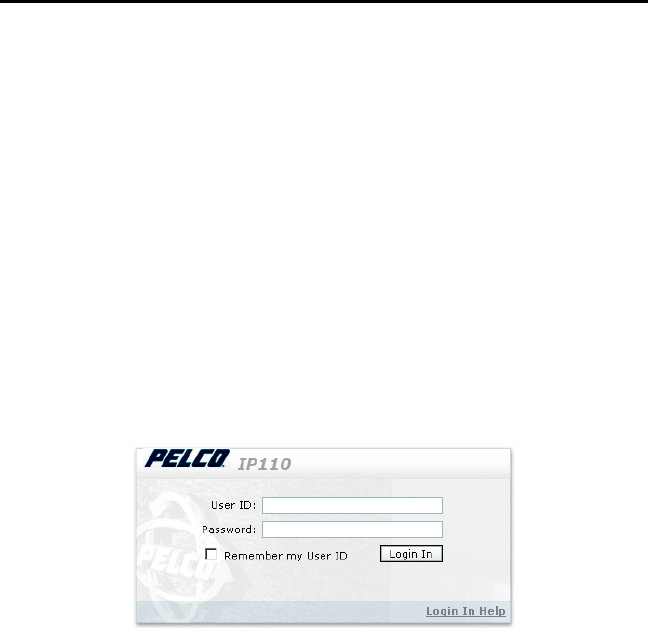
1. Open the Web browser.
2. Enter the IP address of the IP camera in the browser’s address bar. The Login screen opens.
3. Enter admin (all lowercase) in the User ID and Password fields (admin is the default setting for
these fields).
Figure 1. Login Screen
4. Click Login In.
NOTE: For security purposes, be sure to change the password after you log on for the first time. Refer to
“How to Modify a User Profile” on page 12.
C3433M-A (8/07) 7
IP Camera Main Menu
HOME SCREEN
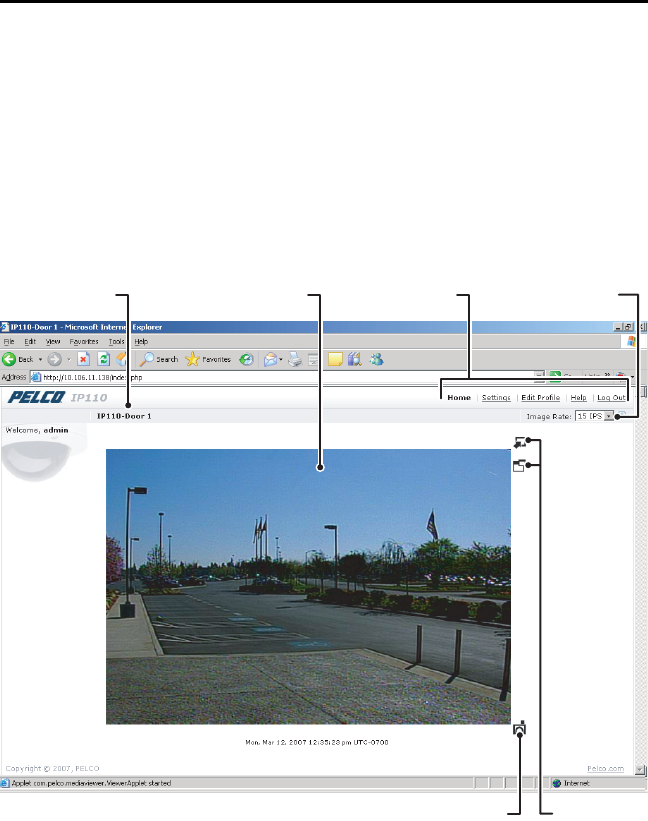
The following features are available from the Home screen:
•Live stream view: Live video displays in the center of the screen.
•Image rate setting: The image rate can be set to 15, 10, 5, 2, or 1 ips; the default setting is 15 ips.
•Change screen view: Live video can be displayed in normal screen mode, full screen mode, or
scalable screen mode.
•Capture a screen view: Captures and saves a screen image as a JPEG file.
•Access to menu screens (based on user permissions).
Figure 2. Home Screen
IMAGES PER SECOND
SCREEN VIEWSCAPTURE SCREEN
MENU SCREENS
LIVE STREAM VIEWDEVICE NAME

8C3433M-A (8/07)
IMAGE RATE SETTING
The image rate for the IP camera can be set to 15, 10, 5, 2, or 1 ips. The default setting is 15 ips. To change
the image rate do the following:
1. Click the down arrow to open the Image Rate drop-down box.
2. Select an image rate from the drop-down box.
3. The selected image rate is now listed in the Image Rate box.
NOTES:
• The maximum frame rate of 15 may not be obtainable due to network bandwidth, network latency,
or processor limitations. The ips setting will slow to accommodate the network speed and avoid
frame corruption.
• Network and processor bandwidth limitations may cause the video stream to pause or appear
pixilated when an increased number of web-interface users connect to the camera. Decrease the ips
of the web-interface video streams to compensate for network/processor limitations.
SCREEN MODES
Live stream video can be viewed in normal screen mode, full screen mode, or scalable screen mode.
Full Screen Mode
To open the browser in full screen mode click the full screen mode icon . The image is scaled to the
full resolution of the browser. Although the main menu is hidden, the camera icon is available to capture
screen images. To return to normal screen mode, click the normal screen mode icon .
Scalable Stream Mode
To scale the live stream video into an independent scalable window, click the scalable stream mode icon
. The main menu is not available when using this mode. This screen mode allows viewing while other
applications are running.
The camera icon is available in this mode to capture screen images, but all other functions are not
accessible.
HOW TO CAPTURE A STILL IMAGE
1. Click the camera icon . The File Download dialog box opens and a message appears, “Do you
want to open or save this file?”
2. Select one of the following:
• Click Open, the captured screen image is displayed in the browser.
• Click Save to save the image as a JPEG on your computer.
• Click Print to print the image.
• Click “Send Image as E-mail” to send the image as an e-mail attachment.
NOTE: To capture a still image your computer must have Internet Explorer version 7.0 or Firefox version
1.5 (or later). This function is not available if you are using the IP camera with Internet Explorer version 5.5
or 6.0.

C3433M-A (8/07) 9
SETTINGS SCREEN
Use the Settings screen to set the name and language of the IP camera; configure network settings; and
add, change, or delete users and roles (permissions).
GENERAL TAB
Use the General tab to change the device name to a user-friendly name. The Gerneral tab also displays the
firmware version loaded on the IP camera.
Figure 3. General Tab
Change the Device Name
The default name for the IP camera is Pelco Device. To change the device name do the following:
1. Double-click in the Device Name text box to highlight the text.
2. Type a user-friendly name into the Device Name text box (maximum 36 characters). A friendly name
makes it easier to recognize the device on the network. For example, Front Door, Lobby, or Parking Lot.
3. Click Save to save the device name, or click Cancel to revert to the previous device name.
FIRMWARE VERSION
DEVICE NAME
10 C3433M-A (8/07)
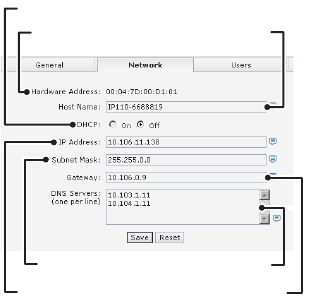
NETWORK TAB
Use the Network tab to change network settings including the host name, turn on/off the DHCP (Dynamic
Host Configuration Protocol) setting, or set a static IP address.
Figure 4. Network Tab
How to Change the Network Settings
1. Click Settings in the main menu. The IP camera settings menu opens.
2. Click the Network tab.
3. Go to DHCP and select Off to turn off the Dynamic Host Configuration Protocol.
4. Change the following network settings as required:
•IP Address: The address of the device connected to the network.
•Subnet Mask: Determines the network segment packet the IP protocol uses.
•Gateway: Converts packets from one protocol to another.
•DNS Server Address: The address of the dedicated server that provides the name for the IP
network. The server assigns names for Web sites and network resources into numeric IP
addresses.
5. Click Save to save the new network settings.
NOTE: Contact your network administrator to avoid any network conflicts before changing network
settings.
DNS SERVERS
SUBNET MASK
IP ADDRESS
HOST NAME
HARDWARE ADDRESS
DHCP
GATEWAY
C3433M-A (8/07) 11
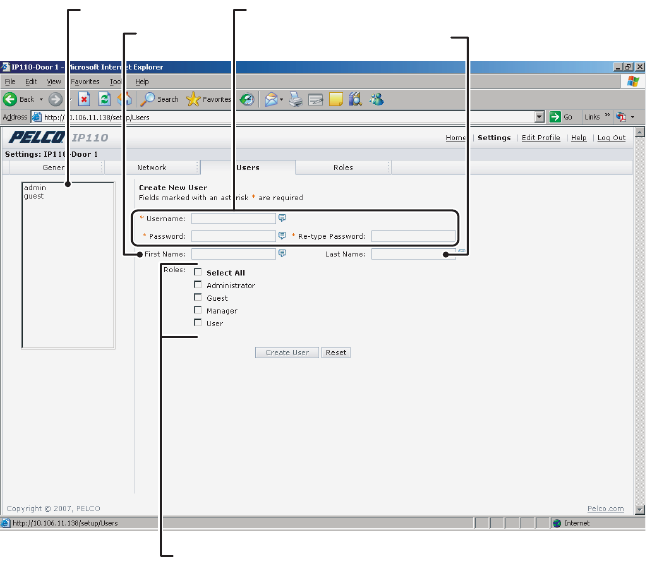
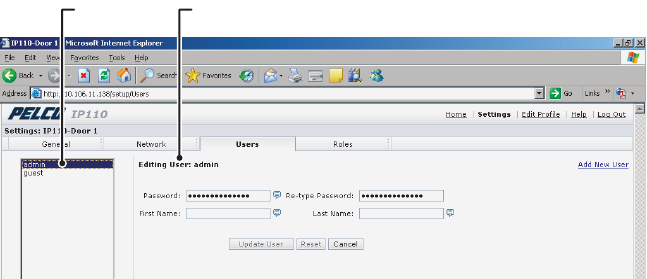
USERS TAB
The Users tab allows the administrator to create, modify, or delete user accounts (which can contain one
or more roles). The Users tab includes default accounts for the following:
•Administrator: This is the only defined user that cannot be deleted. But the administrator
password can be changed. For security purposes you should change the password after you log on
for the first time.
•User: This defined user can be modified or deleted.
•Guest: This defined user can be modified or deleted.
Figure 5. Users Tab
ROLES
LAST NAME
MANDATORY FIELDS
FIRST NAME
USER ACCOUNTS
12 C3433M-A (8/07)
How to Add a New User
1. Click Settings in the main menu. The IP camera settings menu opens.
2. Click the Users tab. The “Create a New User” form opens.
3. Complete the form; User name, Password and Role are required. Do not use spaces when entering
the user name in the User Name text box.
4. Click the Create User button to save the new user profile.
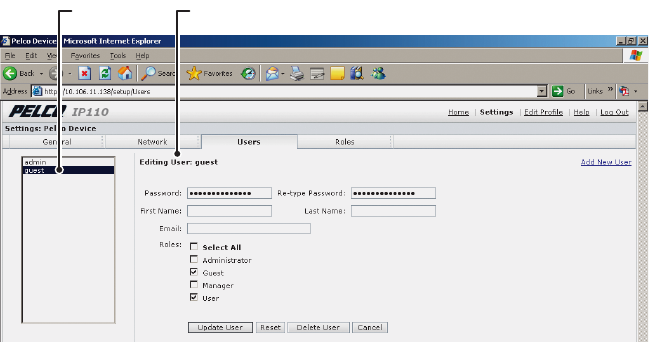
How to Modify a User Profile
1. Click Settings in the main menu, the IP camera settings menu opens.
2. Click the Users tab. All defined user profiles are listed on the left side of the screen.
3. Click a defined profile. The “Create a New User” form changes to the Editing User form.
4. Edit the form and then click the Update User button to save the new settings.
Figure 6. Edit User Form
How to Delete a User Profile
1. Click Settings in the main menu. The IP camera settings menu opens.
2. Select a User. The Edit User form opens.
3. Click the Delete User button. The Delete User dialog box opens, and a message appears, “Are you
sure you want to delete the user?”
4. Select one of the following:
• Click OK to delete the user.
• Click Cancel to close the dialog box.
EDITING USER FORMSELECT USER
C3433M-A (8/07) 13
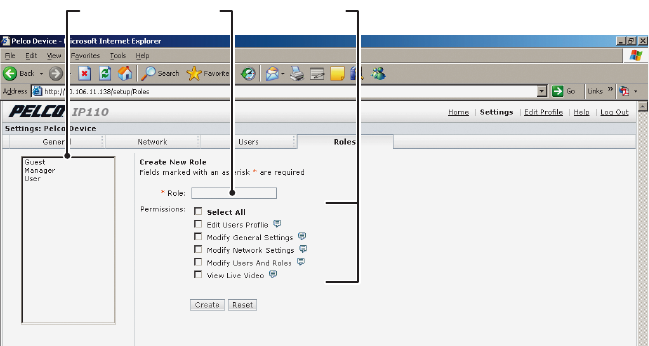
ROLES TAB
Use the Roles tab to create, change, or delete roles (permissions). Multiple permissions can be assigned to
a role. The following permissions can be assigned to a role:
•Edit Users Profile: Gives users permission to edit their own profile. Users cannot edit any other
profiles.
•Modify Camera Settings: Gives users access to the General tab in the Settings menu. Users have
permission to change the name and language of the device.
•Modify Network Settings: Gives users access to the Network tab in the Settings menu. Users
have permission to change network settings.
•Modify Users & Roles: Gives users access to the Users and Roles tabs in the Settings menu. The
users have permission to add, modify, or delete users and roles.
•View Live Video: Gives users permission to view streaming video.
.
Figure 7. Role Tab
How to Create a New Role
1. Click Settings in the main menu, the IP camera settings menu opens.
2. Click the Roles tab. The Create a New Role form opens.
3. Enter text in the Role text box.
4. Select the permissions for the role.
5. Click the Create button to save the new role.
PERMISSIONSROLEROLE LIST
14 C3433M-A (8/07)
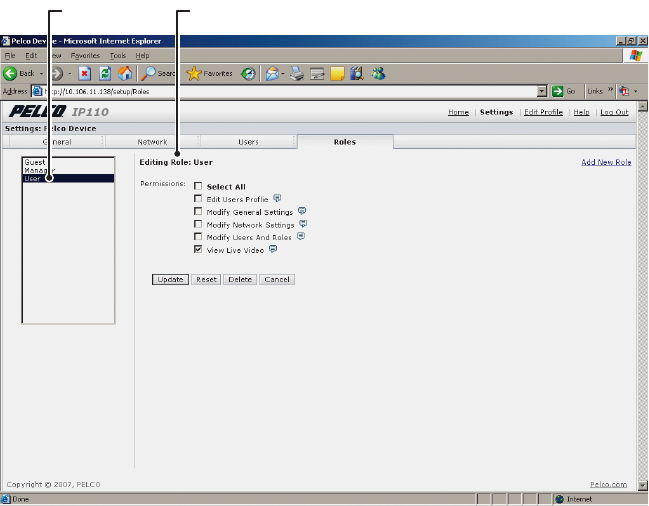
How to Modify an Existing Role
1. Click Settings in the main menu. The IP camera settings menu opens.
2. Click the Roles tab. All defined roles are listed on the left side of the screen.
3. Click a defined Role. The “Create a New Role” form changes to the Editing Role form.
4. Edit the form as required, and then click the Update button to save the new settings.
Figure 8. Edit Role Form
How to Delete a Role
1. Click Settings in the main menu. The IP camera settings menu opens.
2. Click the Roles tab. All defined roles are listed on the left side of the screen.
3. Click a defined Role. The “Create a New Role” form changes to the Editing Role form.
4. Click the Delete button. The Delete Role dialog box opens and a message appears, “Are you sure
you want to delete the role?”
5. Select one of the following:
• Click OK to delete the role.
• Click Cancel to close the dialog box.
EDITING ROLE FORMSELECT A ROLE
C3433M-A (8/07) 15
EDIT PROFILE SCREEN
The Edit Profile screen gives users permission to modify their individual account. They can change/edit the
information in the following text boxes:
•First Name
•Last Name
• Password
Figure 9. Edit Profile Screen
HELP SCREEN
For help with the system select the Online help menu.
SIGN OUT SCREEN
Use the Sign Out screen to log off and return to the Login screen. Log off from the system to avoid
unauthorized access to the unit by someone who does not have a user name and password.
FIRST NAME EDIT USER FORM

16 C3433M-A (8/07)
Troubleshooting
Problem Possible Cause Suggested Remedy
No video PoE power issue • Verify CAT 5 cable connection.
• Verify PoE injector power.
• Disconnect the Cat5 cable from the PoE and then
reconnect the cable. Power is indicated by the LED.
The LED will flash (green) five times per second for
approximately two minutes if the camera has
power.
Power issue (24 VAC) • Verify the 24 VAC power supply connection.
• Power is indicated by the LED. The LED will flash
(green) five times per second for approximately two
minutes if the camera has power.
Network connectivity issues • Verify network cable connections.
• Disconnect the network cable and then reconnect
the cable to the camera. Verify the LED is flashing
green.
• Replace the network cable with a new cable. If the
new cable does not work, contact Pelco’s Product
Support at 1-559-292-1981 or 1-800-289-9100.
Defective camera • Use a service connector to verify camera operation.
Connect one end of the service connector to the
service connector of the camera. Then connect the
other end of the service connector to a monitor.
• Replace the camera with a new camera. If the new
camera does not work, contact Pelco’s Product
Support at 1-559-292-1981 or
1-800-289-9100.
Java not installed Install JRE from the IP camera resource CD shipped
with this product. It is also available at
www.pelco.com/software/downloads
Image flickering Flickerless setting • Verify DIP switch settings.
• Verify power supply specifications.
• Replace the camera module with a new camera. If
the new camera does not work, contact Pelco’s
Product Support at 1-559-292-1981 or
1-800-289-9100.
Image quality Image not focused Adjust the field of view and the focus.
15 ips quality bad In some networks with high latency, the maximum
frame rate may not be attainable.
30 ips not available The IP camera only supports MJPEG up to 15 ips for
NTSC camera modules, where applicable. For PAL
camera modules, the maximum rate is 12 ips.

C3433M-A (8/07) 17
No dual streams Web browser Not available with Web browser. Only supported by
the Endura system or Pelco’s API Interface solution.
Cannot record a
MJPEG stream
Web browser Not available with Web browser. Only supported by
the Endura system or Pelco’s API Interface solution.
MPEG4 not
available
Web browser Not available with Web browser. Only supported by
the Endura system or Pelco’s API Interface solution.
Camera not
discovered
No camera power Verify the camera is powered correctly with PoE or
with 24 VAC. Confirm power consumption with web
interface of PoE-capable switch or through blinking
(green) LED during camera configuration.
Network conflict Verify the camera is physically connected to the same
network as the PC running the Device Utility.
Network not
working
Faulty cable connection Verify all cable connections and ensure all plugs are
properly plugged in.
Incorrect serial device
configuration
A hub will not work with the available network
bandwidth shared across all ports. Use a Fast Ethernet
switch, Gigabit Ethernet switch, or a Cable-modem
router with an n-Port switch.
Network connectivity issues Contact your network administrator.

18 C3433M-A (8/07)
Specifications
VIDEO
Signal System NTSC or PAL
Compression MPEG-4, MJPEG in Web viewing mode
Video Streams 3, simultaneous
Video Resolutions NTSC PAL
4CIF 704 x 480 704 x 576
2CIF 704 x 240 704 x 288
CIF 352 x 240 352 x 288
QCIF 176 x 120 176 x 144
Bit Rate Configurable 20 kbps through 2 Mpbs per stream, implements EnduraViewTM
Web User Interface Requires Java Runtime Environment (JRE)
Video Access from
Web Browser Camera live view up to 10 video sources
Users 10 simultaneous users, unlimited number of users using multicast
Minimum Web Browser
Requirements PC (Pentium 4 microprocessor, 1.6 GHz) with Windows 98/2000/XP
(or higher) or Mac OS X 10.3.9 (or higher)
RAM 512 Mbyte
Ethernet Card 100 Mbit
Web Browser Microsoft Internet Explorer 5.5 (or higher) or Firefox 1.5 (or higher)
Screen Resolution 1024 x 768 pixels or higher, 16- or 32-bit pixel color resolution
(Design and product specifications subject to change without notice.)

PRODUCT WARRANTY AND RETURN INFORMATION
WARRANTY
Pelco will repair or replace, without charge, any merchandise proved defective in material or workmanship for a period of one year after the date of
shipment.
Exceptions to this warranty are as noted below:
• Five years on fiber optic products and TW3000 Series unshielded twisted pair transmission products.
• Three years on Spectra® IV products.
• Three years on Genex® Series products (multiplexers, server, and keyboard).
• Three years on Camclosure® and fixed camera models, except the CC3701H-2, CC3701H-2X, CC3751H-2, CC3651H-2X, MC3651H-2, and
MC3651H-2X camera models, which have a five-year warranty.
• Three years on PMCL200/300/400 Series LCD monitors.
• Two years on standard motorized or fixed focal length lenses.
• Two years on Legacy®, CM6700/CM6800/CM9700 Series matrix, and DF5/DF8 Series fixed dome products.
• Two years on Spectra III™, Esprit®, ExSite®, and PS20 scanners, including when used in continuous motion applications.
• Two years on Esprit and WW5700 Series window wiper (excluding wiper blades).
• Two years (except lamp and color wheel) on Digital Light Processing (DLP®) displays. The lamp and color wheel will be covered for a period of
90 days. The air filter is not covered under warranty.
• Eighteen months on DX Series digital video recorders, NVR300 Series network video recorders, and Endura™ Series distributed network-based video
products.
• One year (except video heads) on video cassette recorders (VCRs). Video heads will be covered for a period of six months.
• Six months on all pan and tilts, scanners or preset lenses used in continuous motion applications (that is, preset scan, tour and auto scan modes).
Pelco will warrant all replacement parts and repairs for 90 days from the date of Pelco shipment. All goods requiring warranty repair shall be sent freight
prepaid to Pelco, Clovis, California. Repairs made necessary by reason of misuse, alteration, normal wear, or accident are not covered under this
warranty.
Pelco assumes no risk and shall be subject to no liability for damages or loss resulting from the specific use or application made of the Products. Pelco’s
liability for any claim, whether based on breach of contract, negligence, infringement of any rights of any party or product liability, relating to the Products
shall not exceed the price paid by the Dealer to Pelco for such Products. In no event will Pelco be liable for any special, incidental or consequential
damages (including loss of use, loss of profit and claims of third parties) however caused, whether by the negligence of Pelco or otherwise.
The above warranty provides the Dealer with specific legal rights. The Dealer may also have additional rights, which are subject to variation from state
to state.
If a warranty repair is required, the Dealer must contact Pelco at (800) 289-9100 or (559) 292-1981 to obtain a Repair Authorization number (RA), and
provide the following information:
1. Model and serial number
2. Date of shipment, P.O. number, Sales Order number, or Pelco invoice number
3. Details of the defect or problem
If there is a dispute regarding the warranty of a product which does not fall under the warranty conditions stated above, please include a written
explanation with the product when returned.
Method of return shipment shall be the same or equal to the method by which the item was received by Pelco.
RETURNS
In order to expedite parts returned to the factory for repair or credit, please call the factory at (800) 289-9100 or (559) 292-1981 to obtain an authorization
number (CA number if returned for credit, and RA number if returned for repair).
All merchandise returned for credit may be subject to a 20% restocking and refurbishing charge.
Goods returned for repair or credit should be clearly identified with the assigned CA or RA number and freight should be prepaid. Ship to the appropriate
address below.
If you are located within the continental U.S., Alaska, Hawaii or Puerto Rico, send goods to:
Service Department
Pelco
3500 Pelco Way
Clovis, CA 93612-5699
If you are located outside the continental U.S., Alaska, Hawaii or Puerto Rico and are instructed to return goods to the USA, you may do one of the
following:
If the goods are to be sent by a COURIER SERVICE, send the goods to:
Pelco
3500 Pelco Way
Clovis, CA 93612-5699 USA
If the goods are to be sent by a FREIGHT FORWARDER, send the goods to:
Pelco c/o Expeditors
473 Eccles Avenue
South San Francisco, CA 94080 USA
Phone: 650-737-1700
Fax: 650-737-0933
REVISION HISTORY
Manual # Date Comments
C3433M 3/07 Original version.
C3433M-A 8/07 Revised manual to include all Pelco IP cameras. Removed information on Device Utility software; new
manual created for Device Utility software (C3437M).
Pelco, the Pelco logo, Camclosure, Esprit, Genex, Legacy, Exsite and Spectra are registered trademarks of Pelco. ©Copyright 2007, Pelco.
Endura, Endura Enabled, and EnduraView are trademarks of Pelco. All rights reserved.
Microsoft, Windows, and Internet Explorer are registered trademarks of Microsoft Corporation.
Firefox is a registered trademark of the Mozilla Foundation.
JRE is a registered trademark of Sun Microsystems, Inc.
Mac is a registered trademark of Apple Inc.
Pentium is a registered trademark of Intel Corporation.
DLP is a registered trademark of Texas Instruments Incorporated.

Australia
|
Canada
|
Finland
|
France
|
Germany
|
Italy
|
Macau
|
The Netherlands
|
Russia
|
Singapore
South Africa
|
Spain
|
Sweden
|
United Arab Emirates
|
United Kingdom
|
United States
Worldwide Headquarters
3500 Pelco Way
Clovis, California 93612 USA
USA & Canada
Tel: 800/289-9100
Fax: 800/289-9150
International
Tel: 1-559/292-1981
Fax: 1-559/348-1120
www.pelco.com
ISO9001
