Philips 32HFL5008D/12 User Manual Installation 32hfl5008d 12 Img Vie
46HFL5008D/12 Installation Manual 46hfl5008d_12_img_ces Profesionalni LED TV 46HFL5008D/12 | Philips46HFL5008D/12
46HFL5008D/12 Installation Manual 46hfl5008d_12_img_fas Profesionalni LED TV 46HFL5008D/12 | Philips46HFL5008D/12
46HFL5008D/12 Installation Manual 46hfl5008d_12_img_cfr Profesionalni LED TV 46HFL5008D/12 | Philips46HFL5008D/12
46HFL5008D/12 Installation Manual 46hfl5008d_12_img_ind Profesionalni LED TV 46HFL5008D/12 | Philips46HFL5008D/12
46HFL5008D/12 Installation Manual 46hfl5008d_12_img_hin Profesionalni LED TV 46HFL5008D/12 | Philips46HFL5008D/12
User Manual: Philips 32HFL5008D/12 Installation Manual Professional LED TV 32HFL5008D/12 | Philips32HFL5008D/12
Open the PDF directly: View PDF ![]() .
.
Page Count: 40

Philips Hospitality TV
Installation manual for
26HFL5008D/10
32HFL5008D/10
40HFL5008D/10
46HFL5008D/10
55HFL5008D/10
Status: Approved
Version 1.0
Date: June 2013
Author: Marian Pufulete

1
Contents
1. Requirements before starting the installation .......................................................................................................... 2
2. Find out the state of the TV ...................................................................................................................................... 3
3. Re-install TV .............................................................................................................................................................. 4
4. Installation wizard ..................................................................................................................................................... 6
5. Channel options ...................................................................................................................................................... 15
a. Reordering channels ........................................................................................................................................... 15
b. Rename channels ................................................................................................................................................ 18
c. Hide channels ...................................................................................................................................................... 18
6. Professional Setup .................................................................................................................................................. 19
7. Welcome Logo ......................................................................................................................................................... 33
8. Clone /Upgrade ....................................................................................................................................................... 34
9. Feature settings ....................................................................................................................................................... 35
10. CSM (Consumer Setup menu) ................................................................................................................................. 39

2
1. Requirements before starting the installation
Before starting the installation, make sure that you have everything you need at hand.
Master remote control 22AV8573 or Guest remote control 22AV1109A
And
USB stick
You will need the master remote control or the guest remote control to access the menus.
To access the setup menu press the ‘RC5 SETUP’ key, and then press the ‘Home/Menu’ button.
For the guest remote control, press the following keys sequential: 3, 1, 9, 7, 5, 3, ‘MUTE’.
Note: The sequence: 3,1,9,7,5,3, ‘MUTE’ will not show the Setup Menu if High Security Menu is enabled. (See. Page
19).
For cloning settings from one TV to another TV, you will need to have a USB stick. This stick needs to be formatted as
FAT32 and should be empty.
For the best guest experience check if the software version on the TV is the latest one. This can be done using the
Master Remote control by pressing Recall Button and checking on page ‘2.1 - Current Main Software’. This also can
be done with the Guest Remote by pressing 1,2,3,6,5,4.
Go to: http://www.support.philips.com/support
Enter the model number and check to confirm you have the latest version available.
Confirm the software version present on TV is identical with the one from website. If not please download the latest
version from website, unzip and save on to a USB key The USB key must be format FAT32 and preferably empty to
avoid and accidental upload of wrong setting and software. Follow the instruction how to upgrade the software.
If the software version from your TV is identical with the one available on website it is not necessary to upgrade.
If an upgrade is necessary you can upgrade and clone files at the same time automatically. (Upgrade -> Reboot ->
Clone) --- See Instant Initial Cloning (page 32)
Initial instant cloning option can only be used if you reinstall TV or TV is out the box.
3
2. Find out the state of the TV
It is important to know if a TV is in ‘virgin mode’ (out of the box) or installed before.
If you can see this screen below, you know that the TV is in ‘virgin mode’ and you can install the set. See chapter 4 of
this manual.
If you power on the set and then press the ‘Home’ button on the guest remote, you will see this screen appear, if the
TV already has been installed or if the wizard was already skipped.
Professional Settings mode on
Professional Settings mode off
You can start the installation wizard again by reinstalling the TV as explained in chapter 3 of this manual.
Disable the Professional Settings Mode
Access the setup menu by pressing the ‘RC5 SETUP’ key, and then press the ‘Home/Menu’ button. (For the guest
remote control, press the following keys in sequence: 3,1,9,7,5,3, ‘MUTE’).
Go to Professional Settings Professional Mode and select the OFF option and confirm with “OK”. Go back with
the arrow keys and select Store settings. Confirm with “OK”. After restart the TV will have the Professional Settings
mode set to OFF.
4
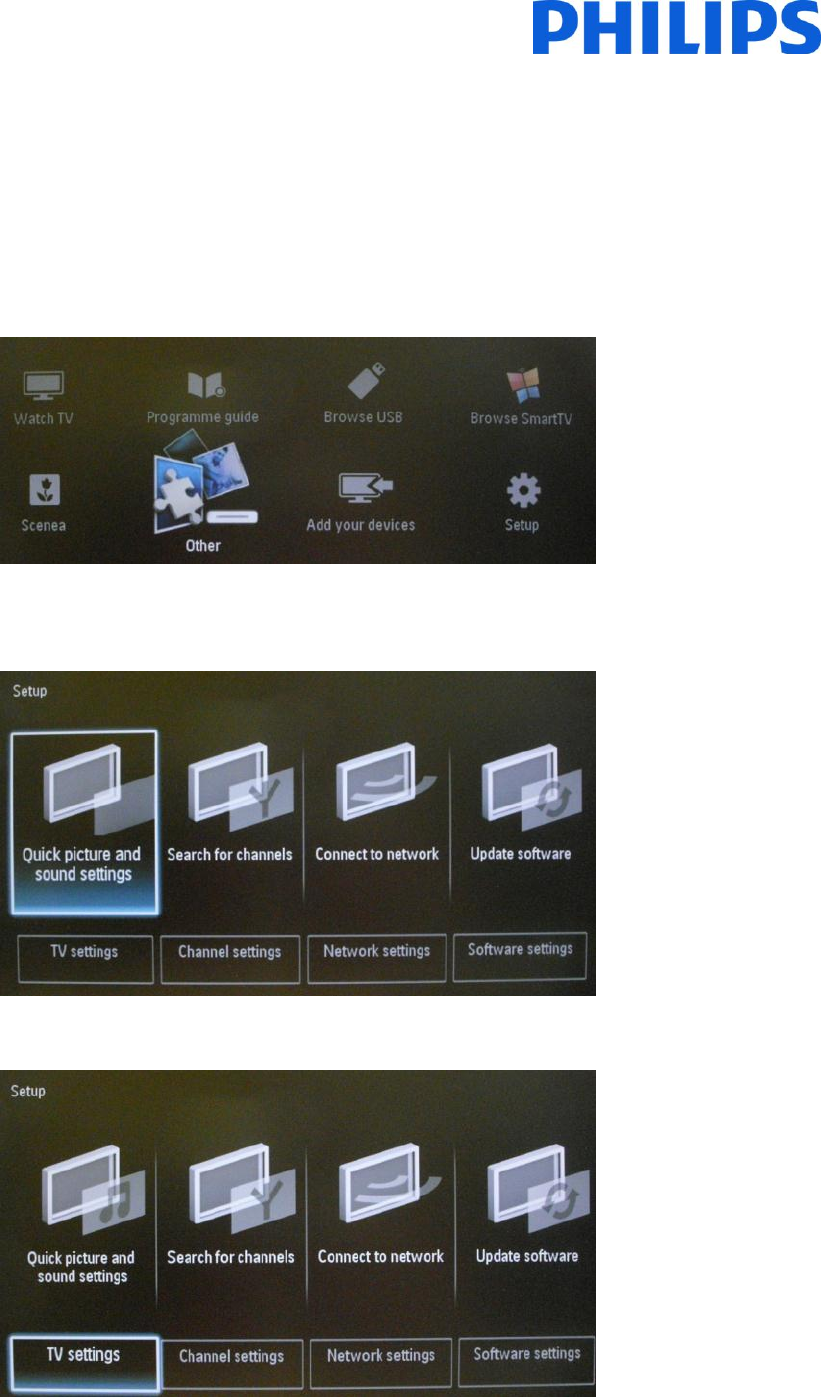
3. Re-install TV
If you want to start an installation from scratch you can always re-install the TV. This can be done by using the
option: Re-install TV set.
If Professional Settings are active you can access the setup menu press the ‘RC5 SETUP’ key, and then press the
‘Home/Menu’ button (For the guest remote control, press the following keys in sequence: 3,1,9,7,5,3, ‘MUTE’) , then
go to TV Setup, confirm with “OK”. This menu will appear:
If the Professional Settings Menu is disabled, you can access the Setup menu with the guest remote control. Select
“Setup” and press “OK”.
Select the option TV settings for this menu:
5
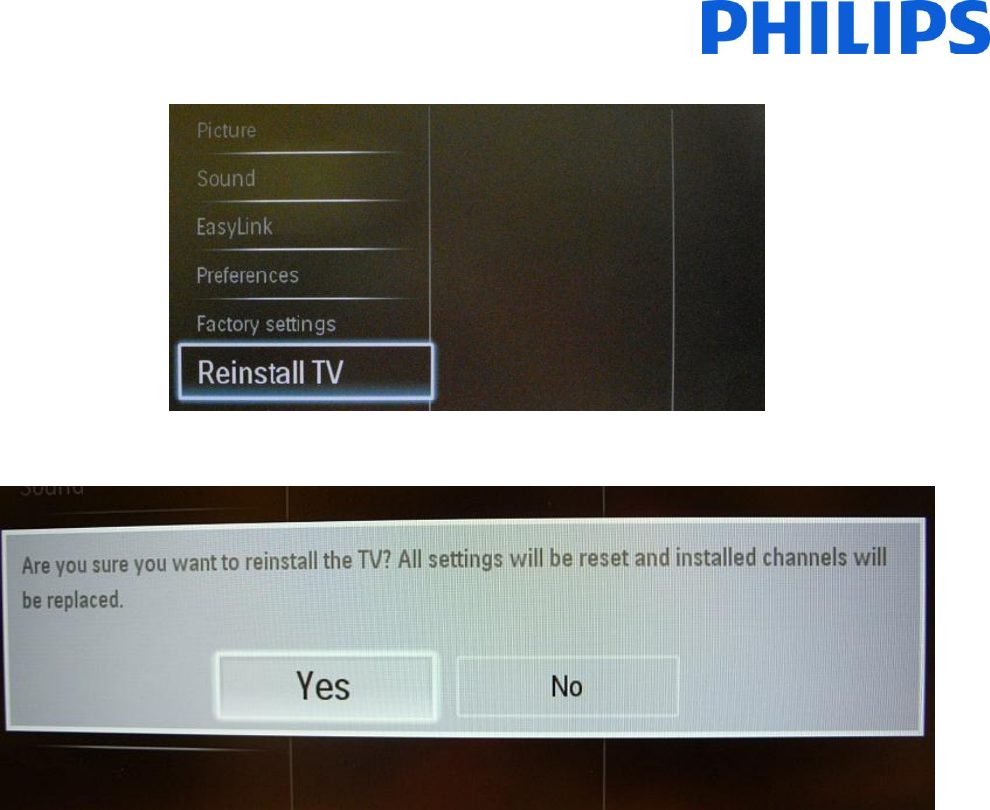
Press “OK” to access the sub-menu, navigate to “Reinstall TV”.
Press “OK” to reinstall the TV set.
If all is correct select “YES” and press “OK”.
After this operation the TV will power off and on and display the installation wizard.
Note: All settings are at default values and no channel plan is available.
After reinstalling, the PROFESSIONAL SETTINGS menu will keep the PROFESSIONAL SETTINGS Mode and Room ID, all other parameters will be
reseted to default values.
6
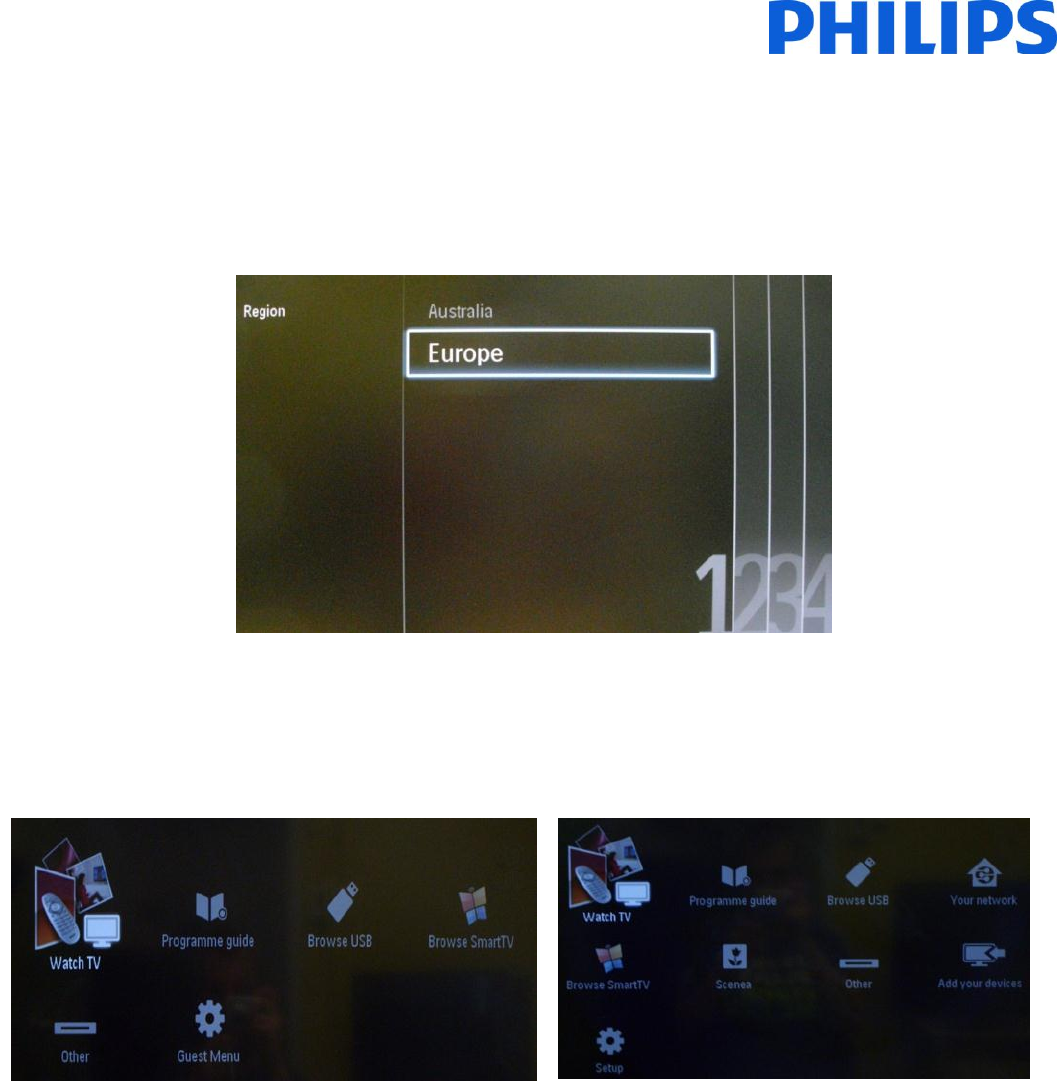
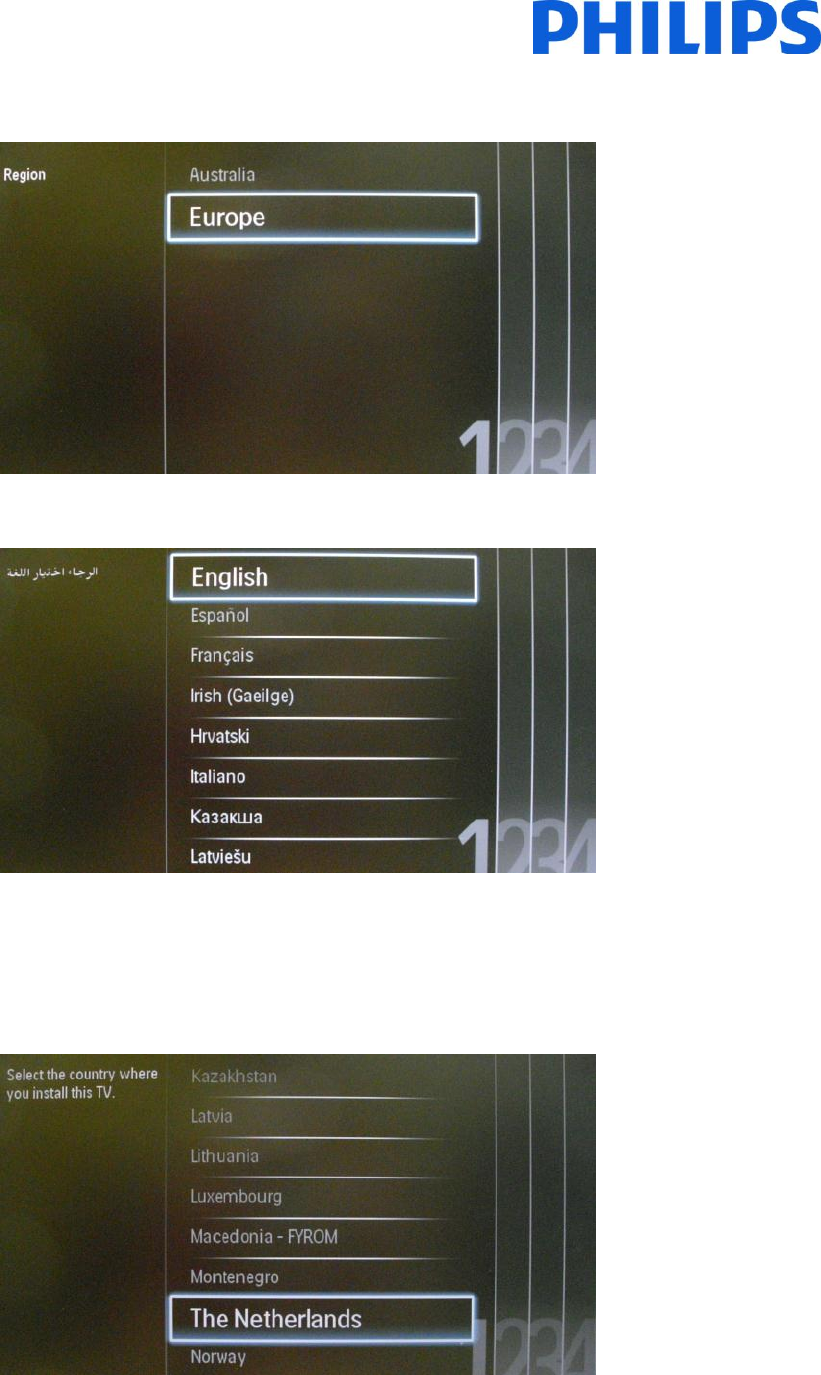
4. Installation wizard
When you turn on the TV for the first time, or you have reinstalled the TV, you should see the following screen.
Here you will need to select your preferred language.
After this, you will need to select the country. Depending on the country selection, some pre-defined settings will be
activated, because of local broadcast requirements. Example: digital/analog channels could be disabled; reordering
and deleting channels can in some cases not be possible.
Note: If you are experiencing some issues after selecting your country, please select ‘Others’ in the menu.
7
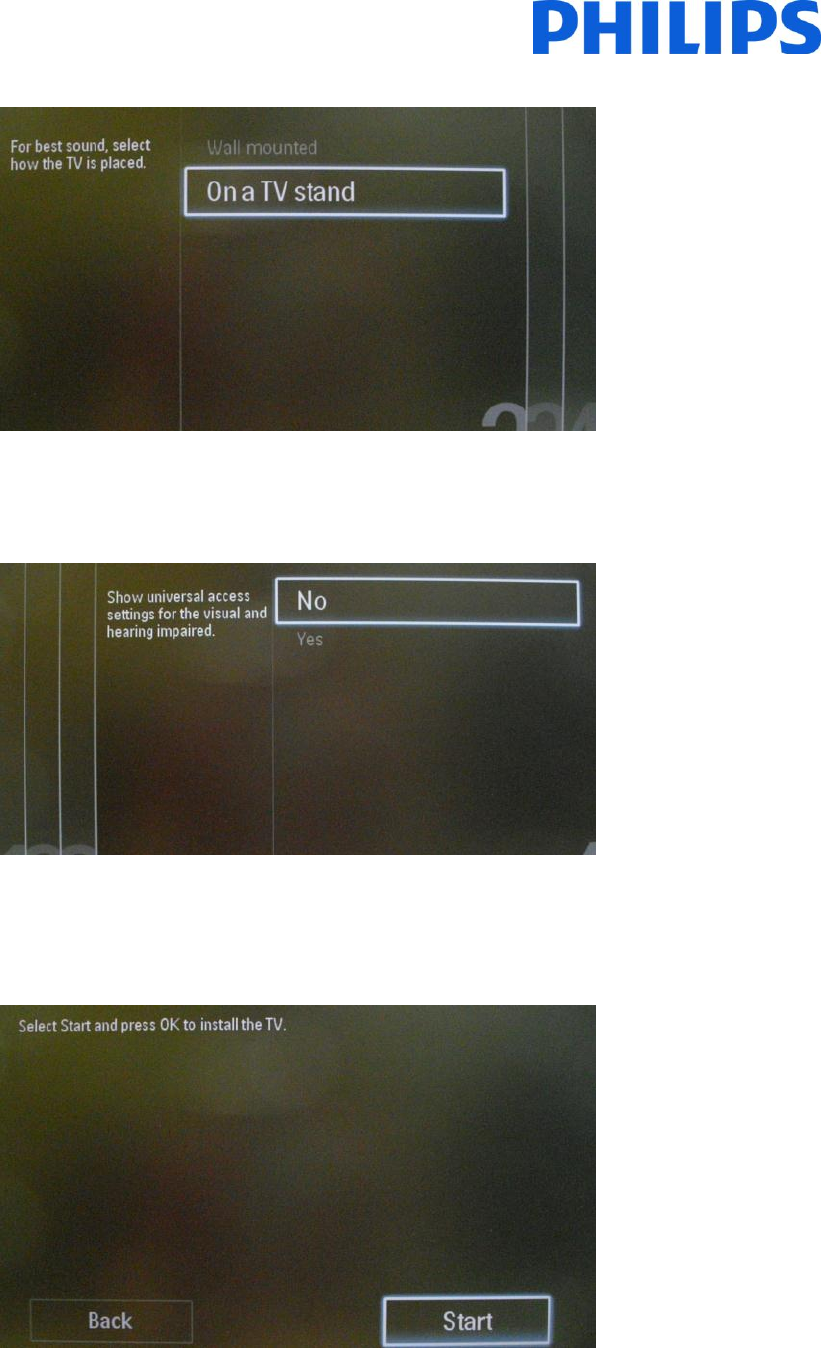
The next step is to select ‘Wall mounted’ or ‘On a TV stand’. This option changes some settings for the audio and
image of the TV.
Now you can select the visual and hearing impaired options. If you select ‘On’, your TV will automatically turn on
settings to help visual and hearing impaired people. THE MOST COMMON OPTION IS TO TURN THIS FUNCTION OFF.
On the following page we can start the channel installation wizard. You can also press “Back” to correct any previous
setting. We recommend you only select your preferred options as this will result in longer installation times.
8
For the channel installations, select ‘Install TV channels’ and press ‘OK’
Then you can select ‘Continue’ and press ‘OK’ again.
Here you can select the type of channels you would like to install and what preference you will use.
It is advisable to check the settings before starting the search.
9
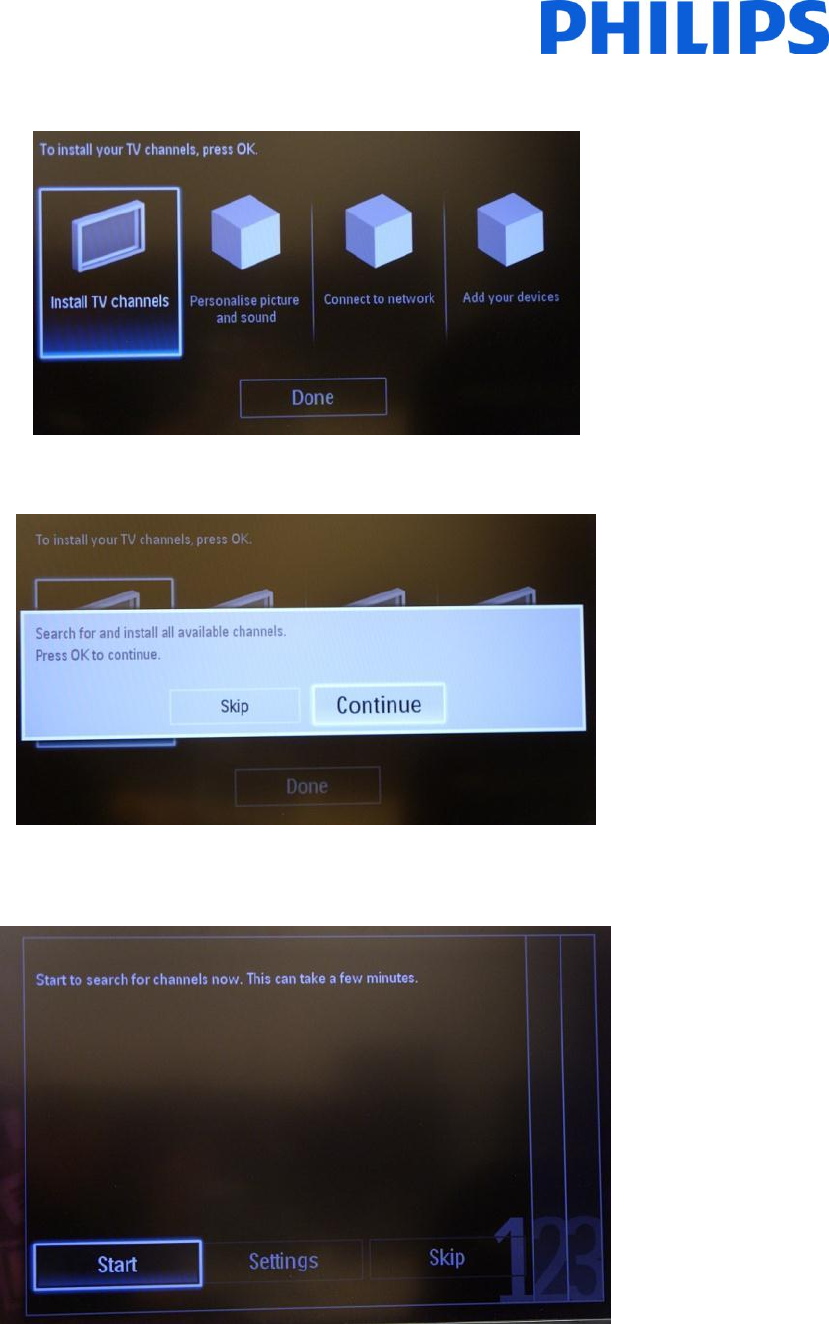
Note: If all options are disabled you have to go down to the Digital channels option and set the digital channels to ON.
Installation medium: Allows you to define what type of channels will be installed. Depending on country settings
some channel types might be disabled.
A screen is displayed to make changes to set the channel list/map configuration:
[Symbol rate mode]: Automatic TV will use the preset Symbol rate (6.900/6.875)
Manual Option to set Symbol rate 1 and Symbol rate 2
[Symbol rate 1]: 0.000 (to set)
[Symbol rate 2]: 0.000 (to set)
10
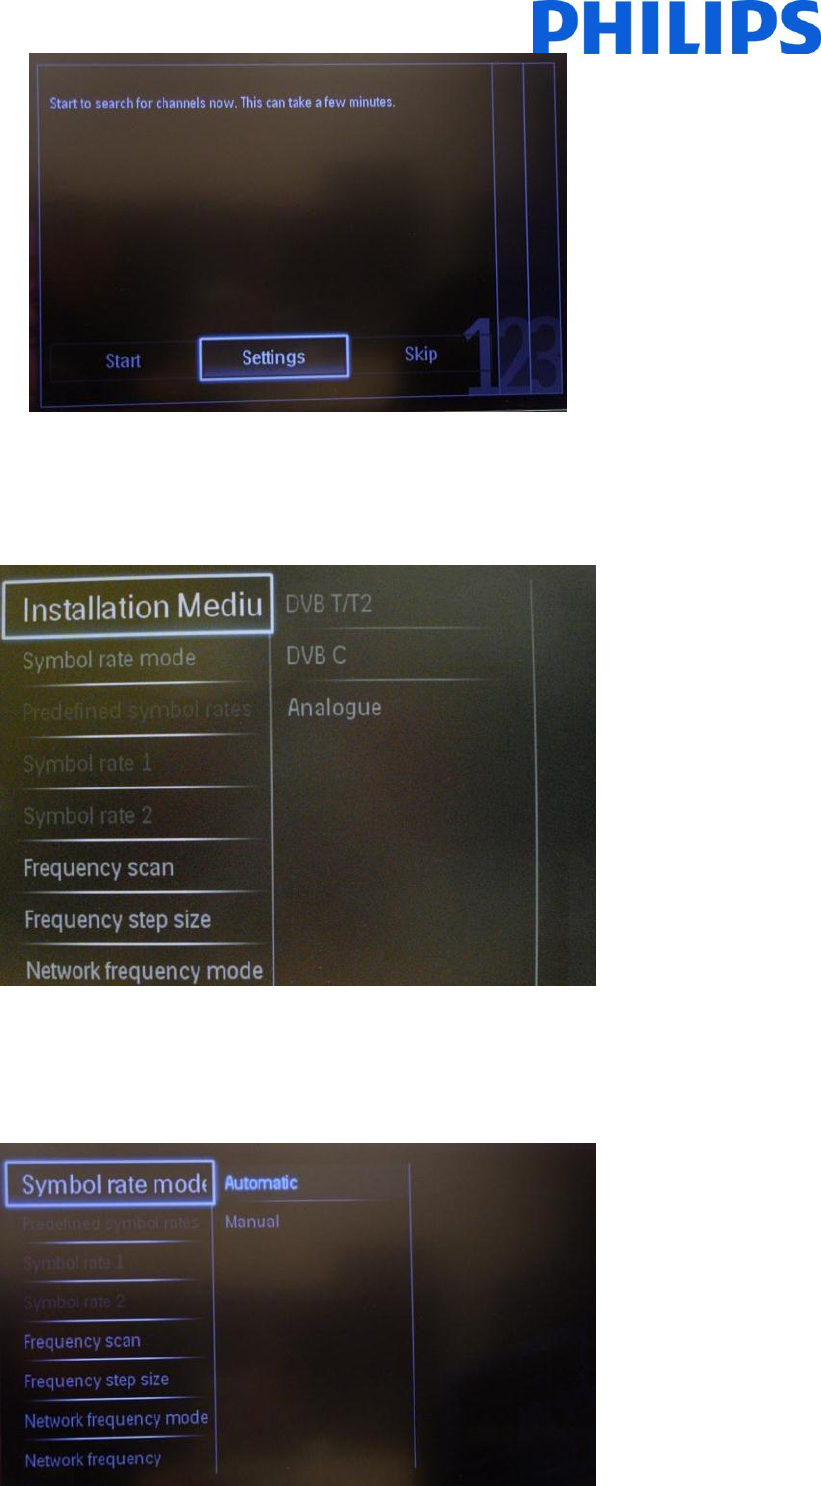
The “Frequency scan” contains two options:
- “Quick”: this is a fast method to search channels but it might skip some channels (depending on the
network).
- “Full”: the scan will search on all frequencies and will store all channels available. This is the safe method if
you don’t know the network parameters, but it takes more time.
Frequency step size has two options:
1. “1 MHz” – With Full scan, the step size to search for channels is 1 MHz The scan will take more time but
will find also channels broadcasted not according to the channel grid.
2. “8 MHz (default)” – With Full scan, the step size to search for channels is 8 MHz. The scan will be shorter
in time but some channels which are not in the expected channel grid (local head-end) will not be found.
When details of the local network are known they can be filled out in this menu. If the details are not known leave
everything as the default values.
LCN sorting: With the LCN function (Logical Channel Number), the channel list is ordered automatically. This function
can be disabled and the TV will not change channel order according to the LCN table.
Note: Only applicable if this is supported on the local network.
11
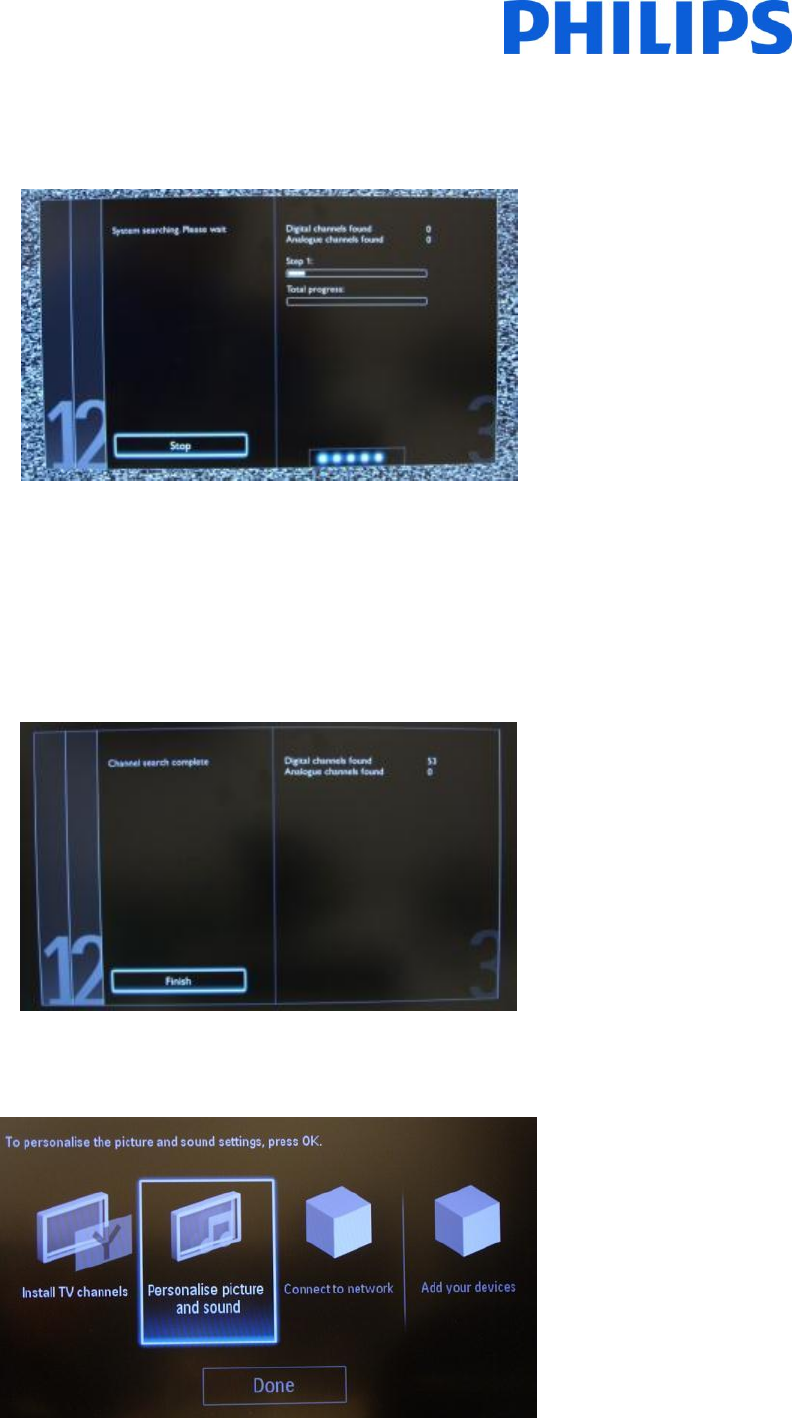
The “Reset” option will reset the search settings to default. After you have checked or changed settings, you can
select “Done” and select “Start” to start the channel search.
During the channel search you can see the progress bar and how many channels are found at that time.
When the search is done, you should see “Channel search complete” and a summary of the channels found. In this
case:
Digital channels found: 53
Analogue channels found: 0
Press the “OK” button on the remote control to finish the search.
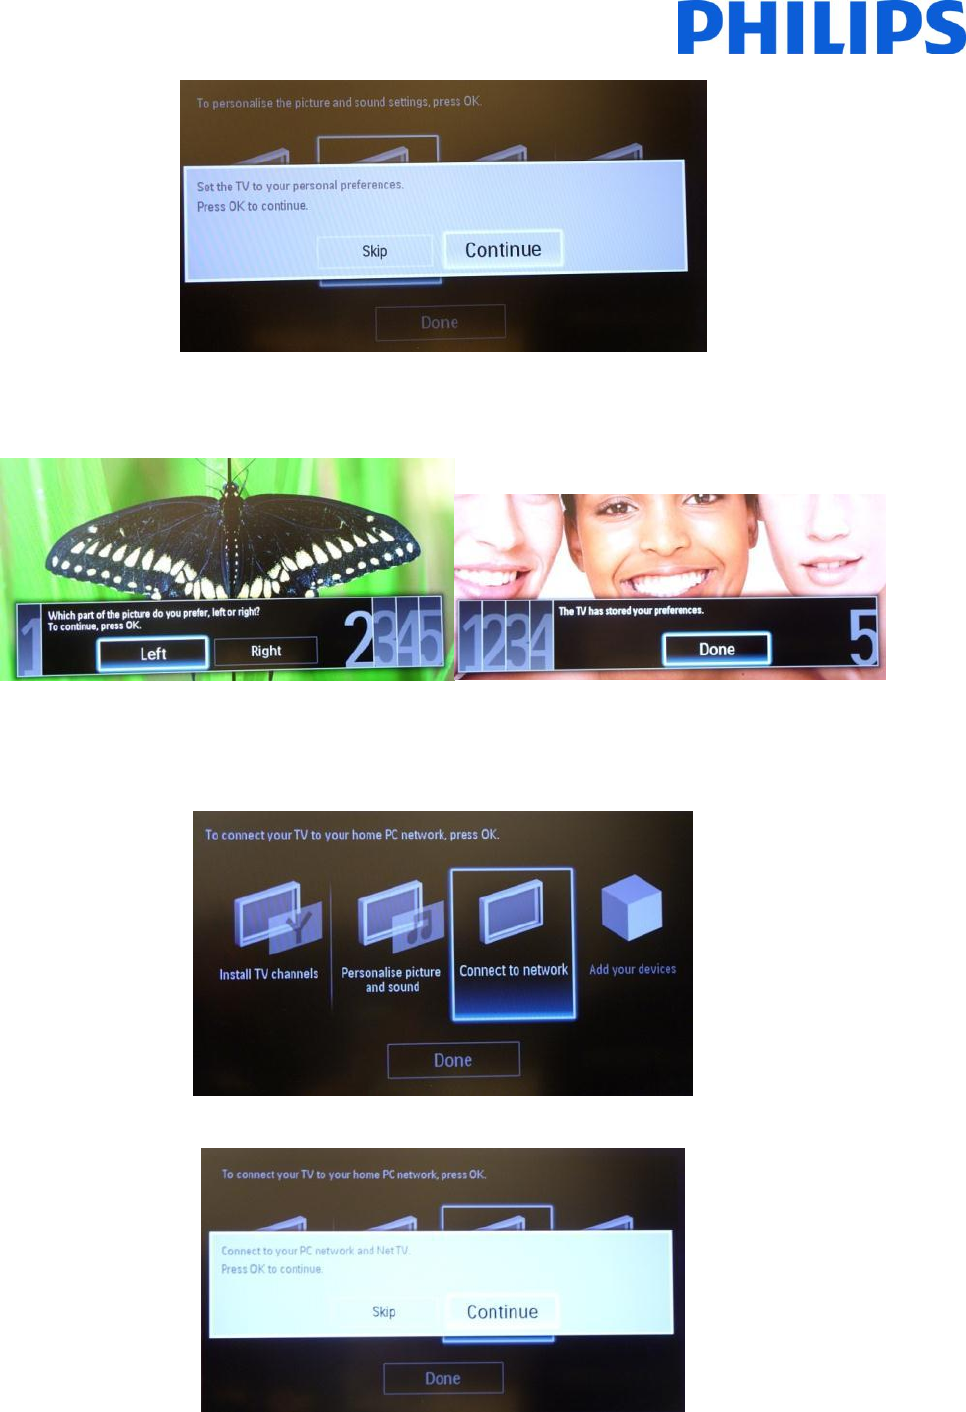
If you would like to change the picture and sound settings, you can go to “Optimize TV picture and sound” and press
the “OK” button on the remote control.
A wizard will start to guide you through the process of setting the sound and picture on the TV set.
12
Select “Continue” to start the wizard and press “OK” on the remote control.
The wizard will ask you some questions about which image you prefer, select the option you desire and press “OK”
on the remote control.
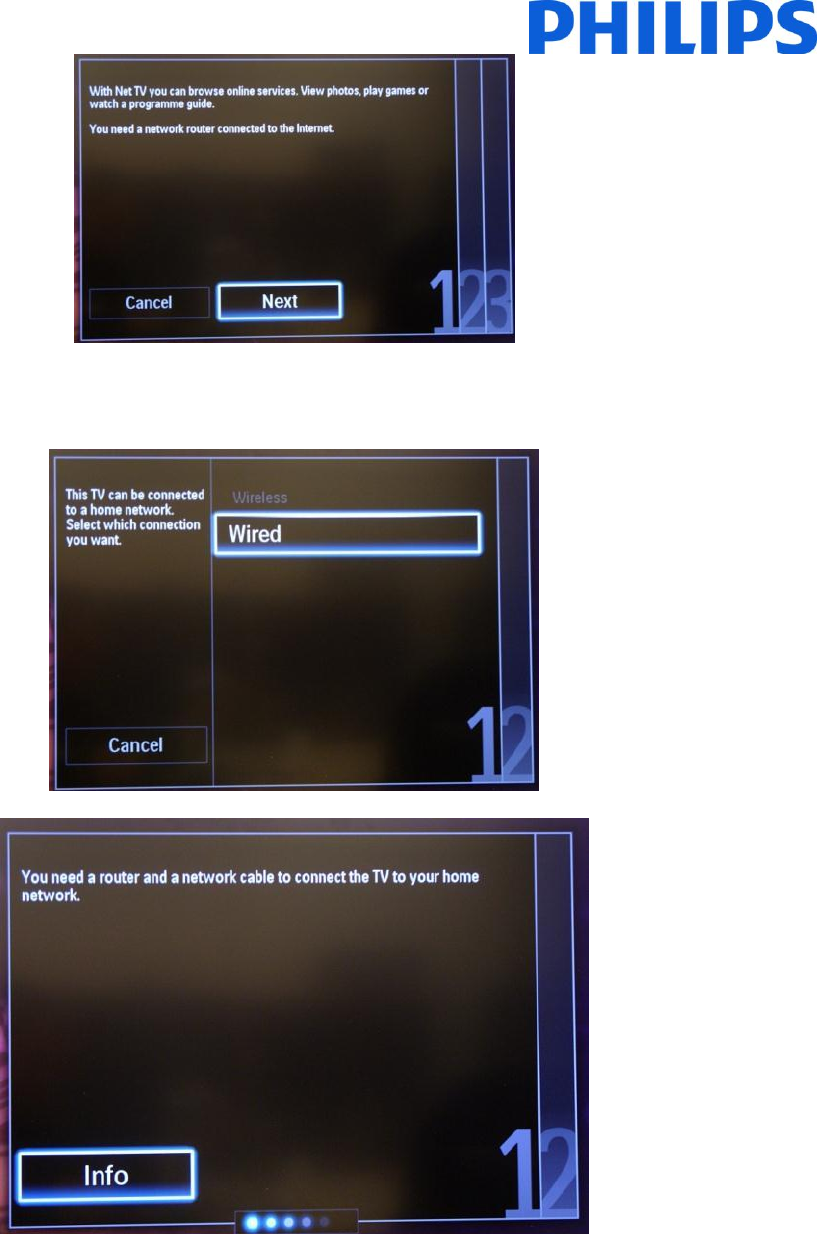
Once this wizard is done, you will return to the installation menu again. The network wizard will guide you through
network setup.
This wizard will popup:
Please select “Next” and press OK to continue
13
The connection will be made to a wireless network or via a wired network, depending on preferences. The TV will
automatically acquire an IP address if this is available via DHCP.
After the connection is made, the result is shown on the TV.
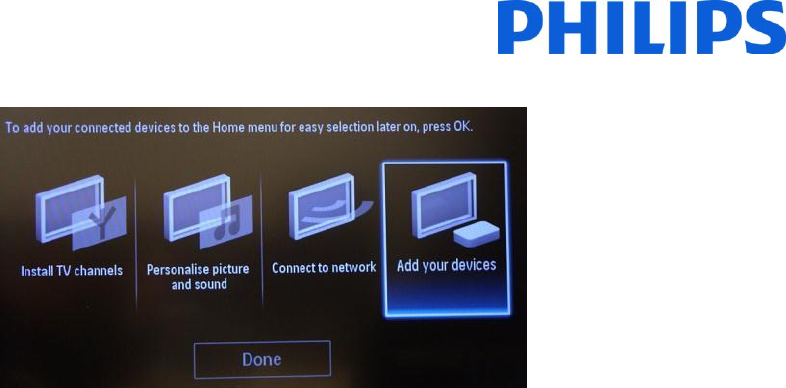
The last option in this menu is “Add your devices”. This can be done if you would like to add a DVD player or STB.
14
When you are done with this, select “Done” and press ‘OK’ on the remote control.
After pressing “Done” you have completed the installation of the TV and you should see this screen. Press “OK” on
the remote control to exit this wizard.
Note: This wizard will not be available anymore when you start the TV the next time.
The only way to re-use this wizard is to reinstall the TV set.
15
5. Channel options
a. Reordering channels
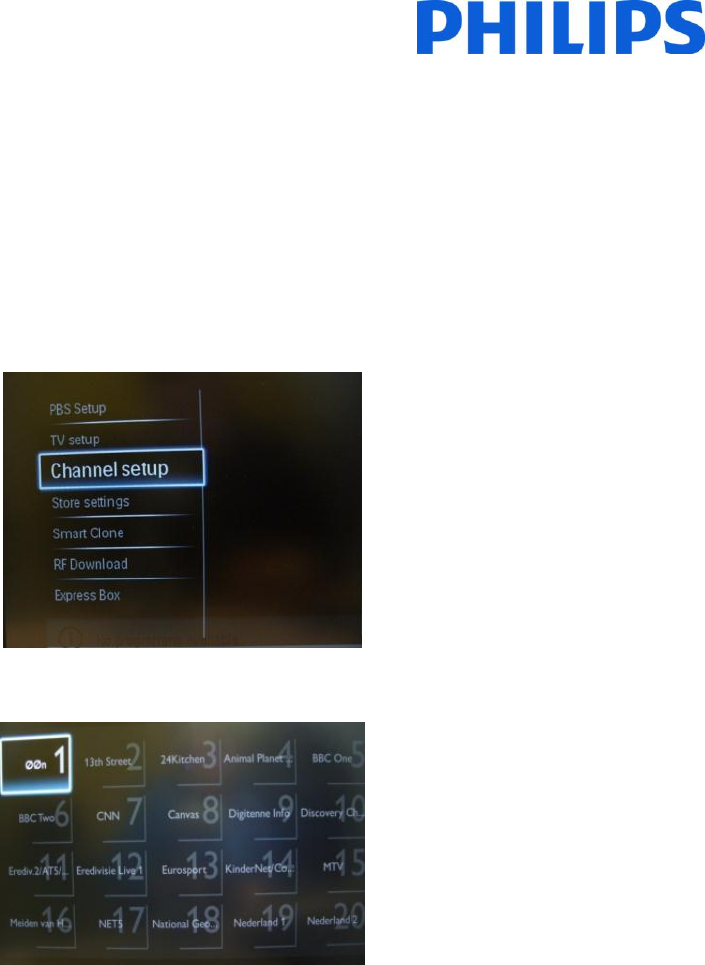
For reordering TV channels, the channel plan from the Professional Settings menu must be used. In the consumer
menu you cannot rearrange channels. The Channel Setup can be accessed by using the Yellow remote (RC 22AV8573
Master Remote control) and pressing the MENU Button or with the TV remote press 3,1,9,7,5,3, MUTE).
The Professional Settings menu will appear like in picture. Go to the option Channel setup and press “OK” to access
the submenu.
The channel grid will contain all installed channels.
With the channel grid displayed, press the “OPTION” button on the remote control to display settings for channels.
Select “Reorder” and Press the “OK” button on the remote control to reorder channels.
16
17
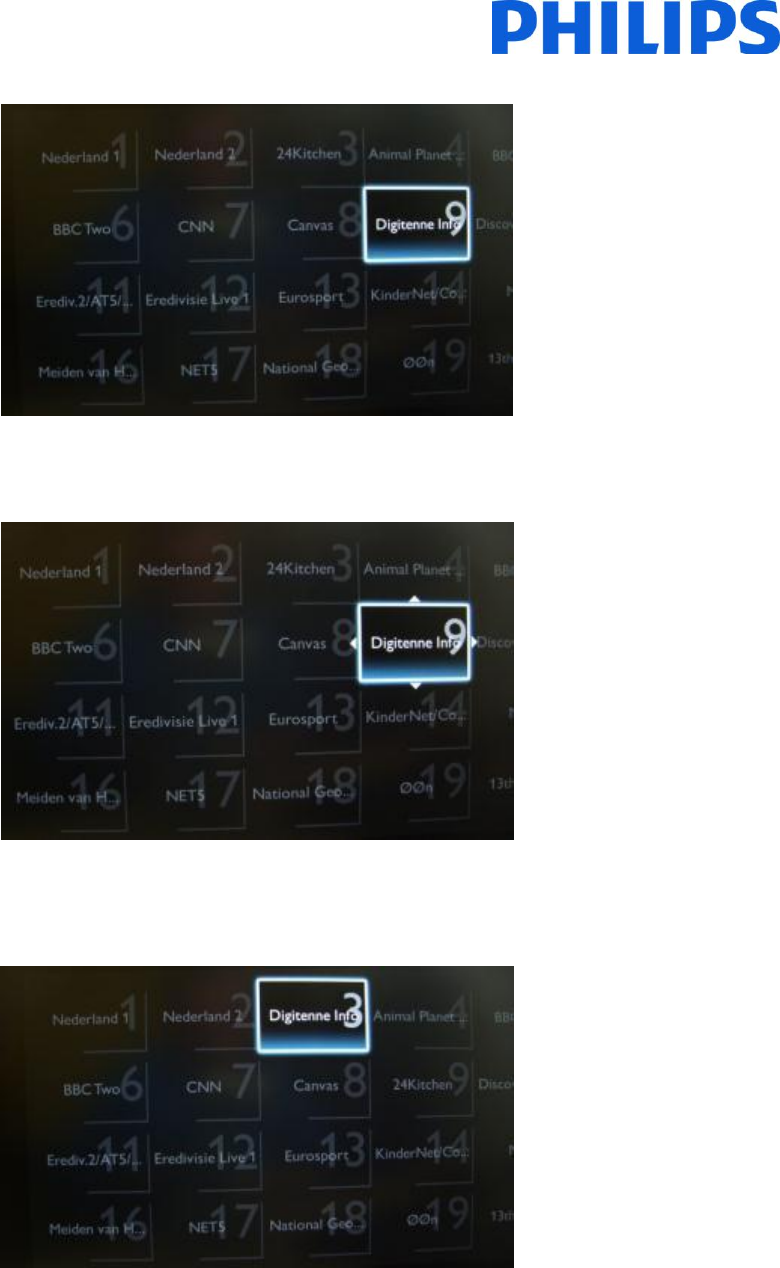
Navigate to the channel that you want to move and press “OK” on the remote control to select that channel.
The arrows around the channel indicate that the channel is selected and can be moved. Use the arrow keys to move
the channel to the new position.
When you reached the new position press “OK” on the remote control to confirm the new position of the channels.
Once you are finished with the reordering, press “Options” on the remote control again.
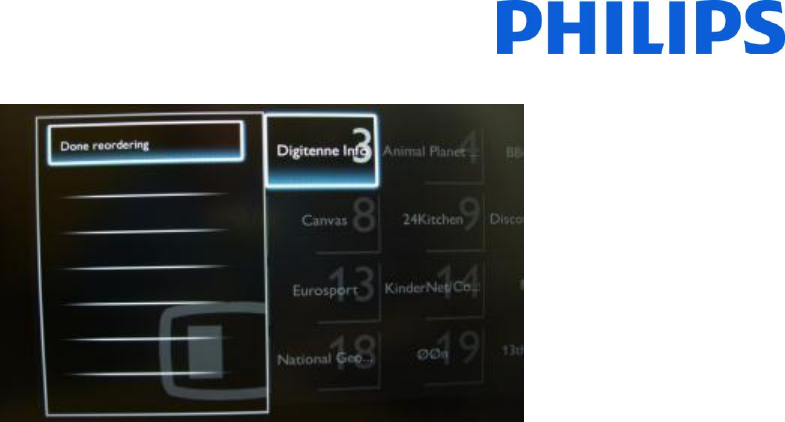
18
Press “OK” on the remote control to confirm that you are done with the re-ordering.
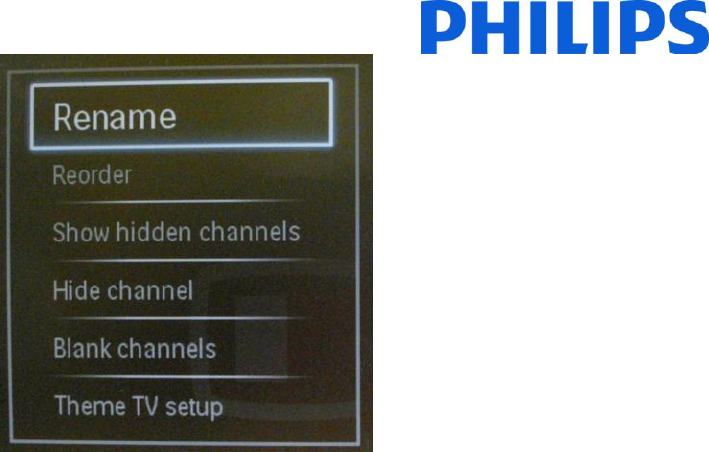
b. Rename channels
Select the channel, press the “Options” button on the remote control and select “Rename” to change the name of a
channel. If you then press the “OK” button a virtual QWERTY keyboard will pop up.
c. Hide channels
Important: You cannot delete channels from the channel grid, but you can use the option to hide the channels.
Select the Channel, press the “Options” button and select “Hide channels”. You will see an “H” in the channel square.
Note: Select “Show hidden channels” if you want to see all channels, hidden or not hidden. Using this option will not remove the hidden
attribute.
19
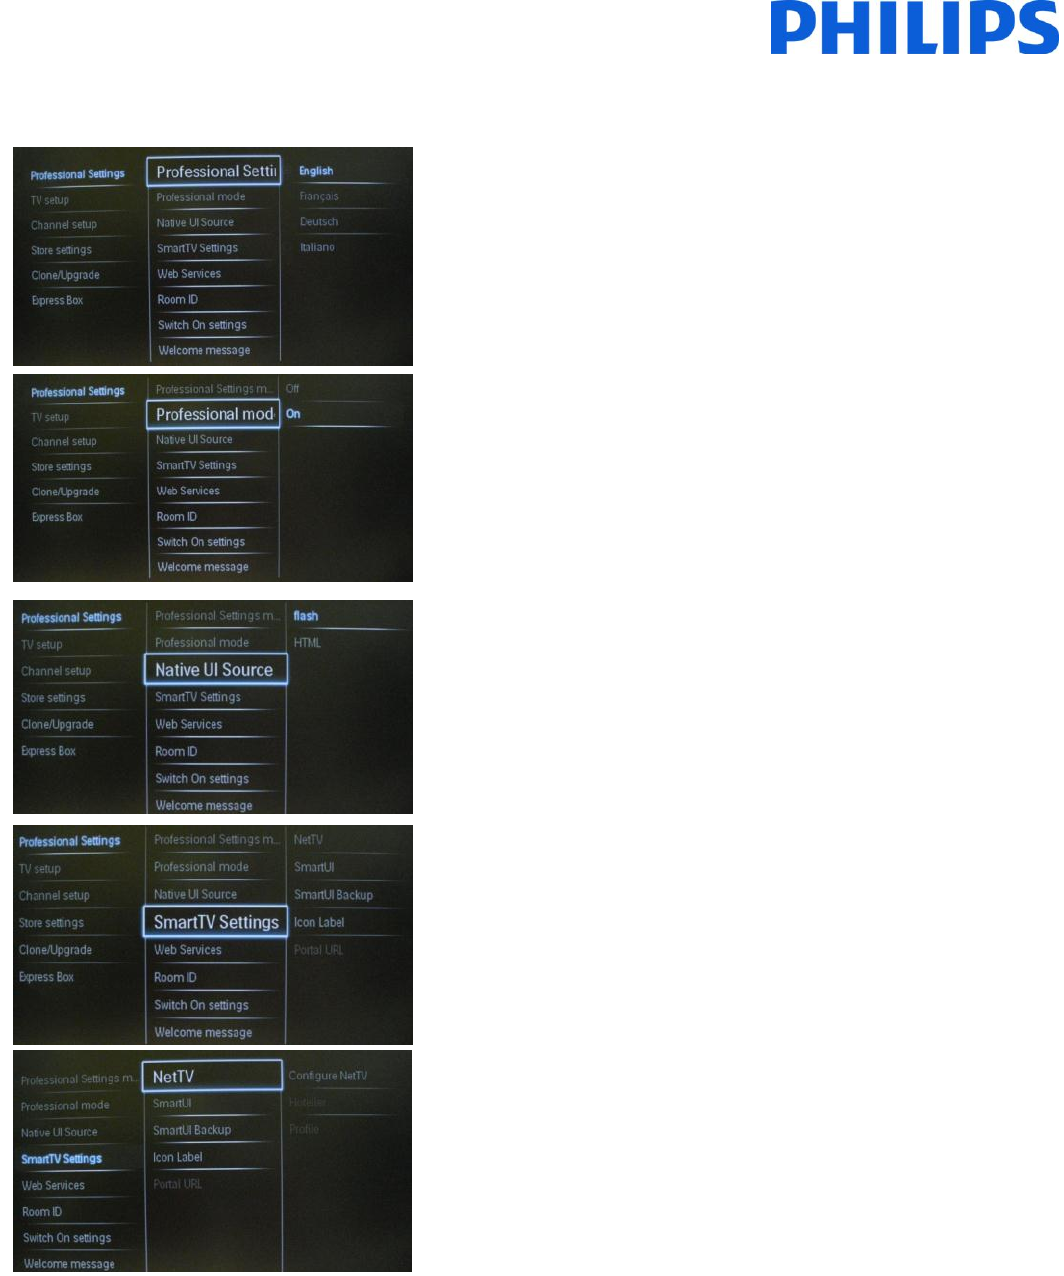
6. Professional Setup
[Professional Settings]
Select the Setup menu language to be in English, French, German or
Italian.
[Professional Mode]
[Off]: The TV operates as a basic (consumer) TV.
[On]: All settings in the Professional Settings mode Setup menu are
active.
Only by switching on this mode the TV will act as a Hospitality TV.
[Native UI Source]
Change the source of the user interface to browser or native (HTML
or Flash).
[SmartTV Settings]
[NetTV]
[Configure Net TV] allows you to disable/enable the Net TV portal
provided by the Philips Net TV server.
If you select [Configuration], [Hotelier] and [Profile], options become
visible -- [Hotelier] and [Profile] are text entry fields that allow you
to configure the Net TV portal for the hotel.
20
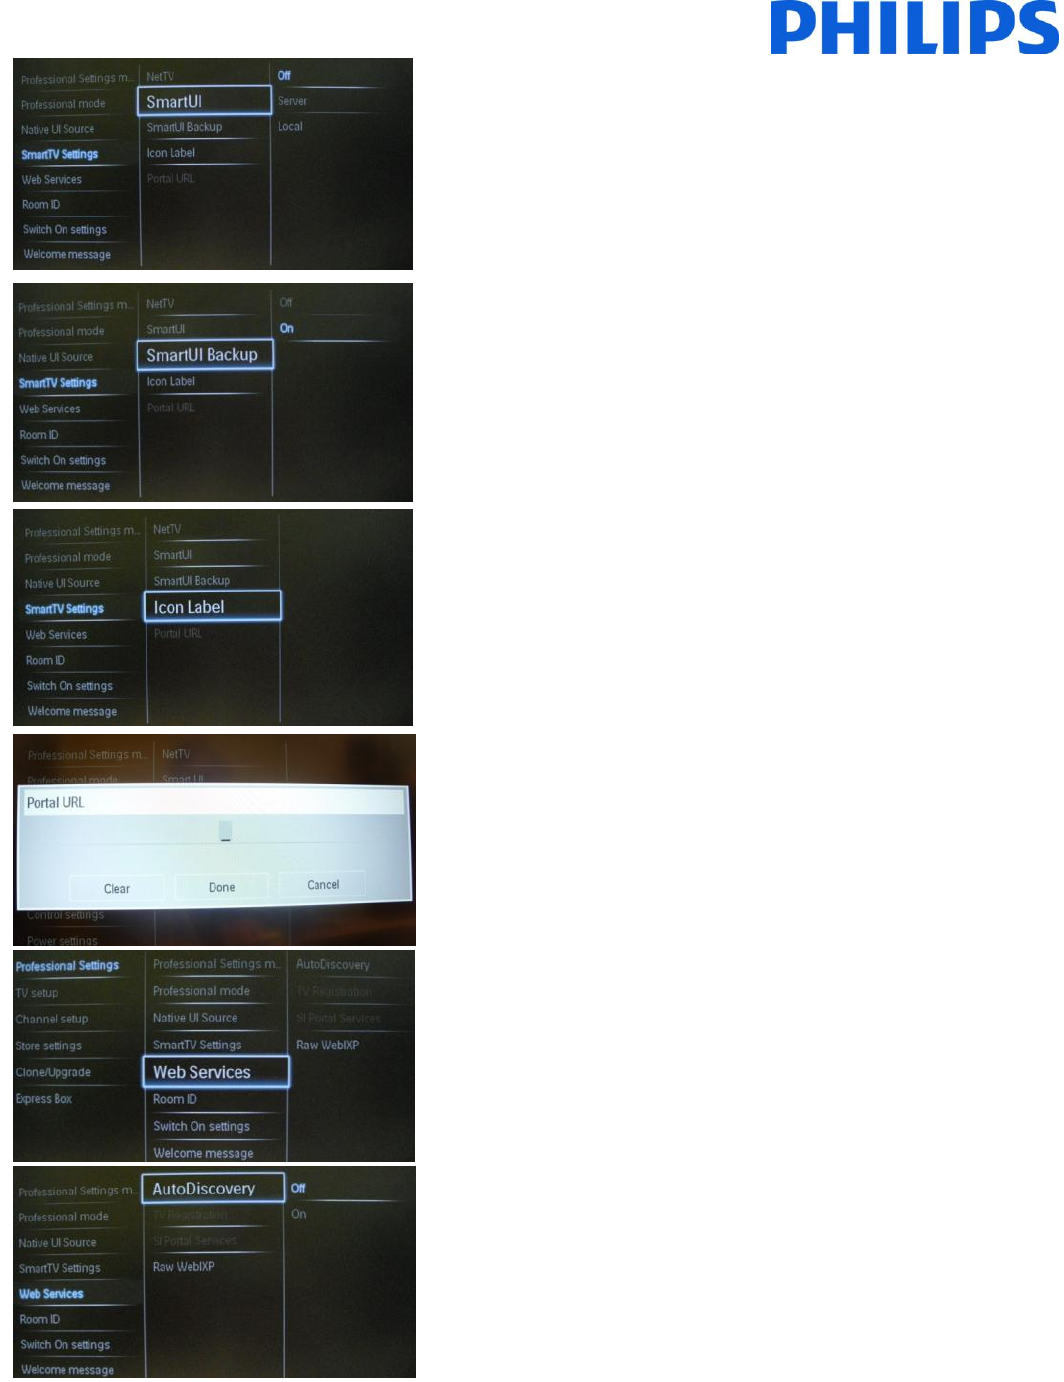
[Smart UI]
Smart UI allows hotels to display an HTML portal when users select
[Browse Portal] from the Home menu. Select [Off] to disable this
feature and hide [Browse Portal] from the Home menu. Selecting
[Server] links to a URL and [Local] displays locally-stored HTML
pages. The HTML files and supporting content stored in the TV
should not exceed a total of 4MB.
[Smart UI Backup]
If [SmartUI] is on, enabling the backup automatically launches
locally-stored HTML content if the link to an external server or URL
does not work.
[Icon Label]
Change the label of the [Browse Portal] icon.
[Portal URL]
Enter the URL to access from [Browse Portal]. The address is for the
SmartUI external server.
[Web Services]
[AutoDiscovery]
Enable auto discovery by selecting [On].
Disable it by selecting [Off].
21
[TV Registration]:
This service is used to provide some basic information about the TV
to a server side application.
Disable TV registration by selecting [Off]
[SI Services]:
If SI Services is enabled by selecting [On], users view the server
defined in [Smart TV Settings] when they select [Browse Portal] in
the home menu.
If SI Services is disabled, the locally-stored HTML files (defined in
[Smart TV Settings]) will launch when [Browse Portal] is selected.
[Raw WebIXP]
It is possible to send and receive strings between the client
application and the server side code by making use of the RawWIXP
feature.
Enable:ON/OFF
IP Adress
Port:
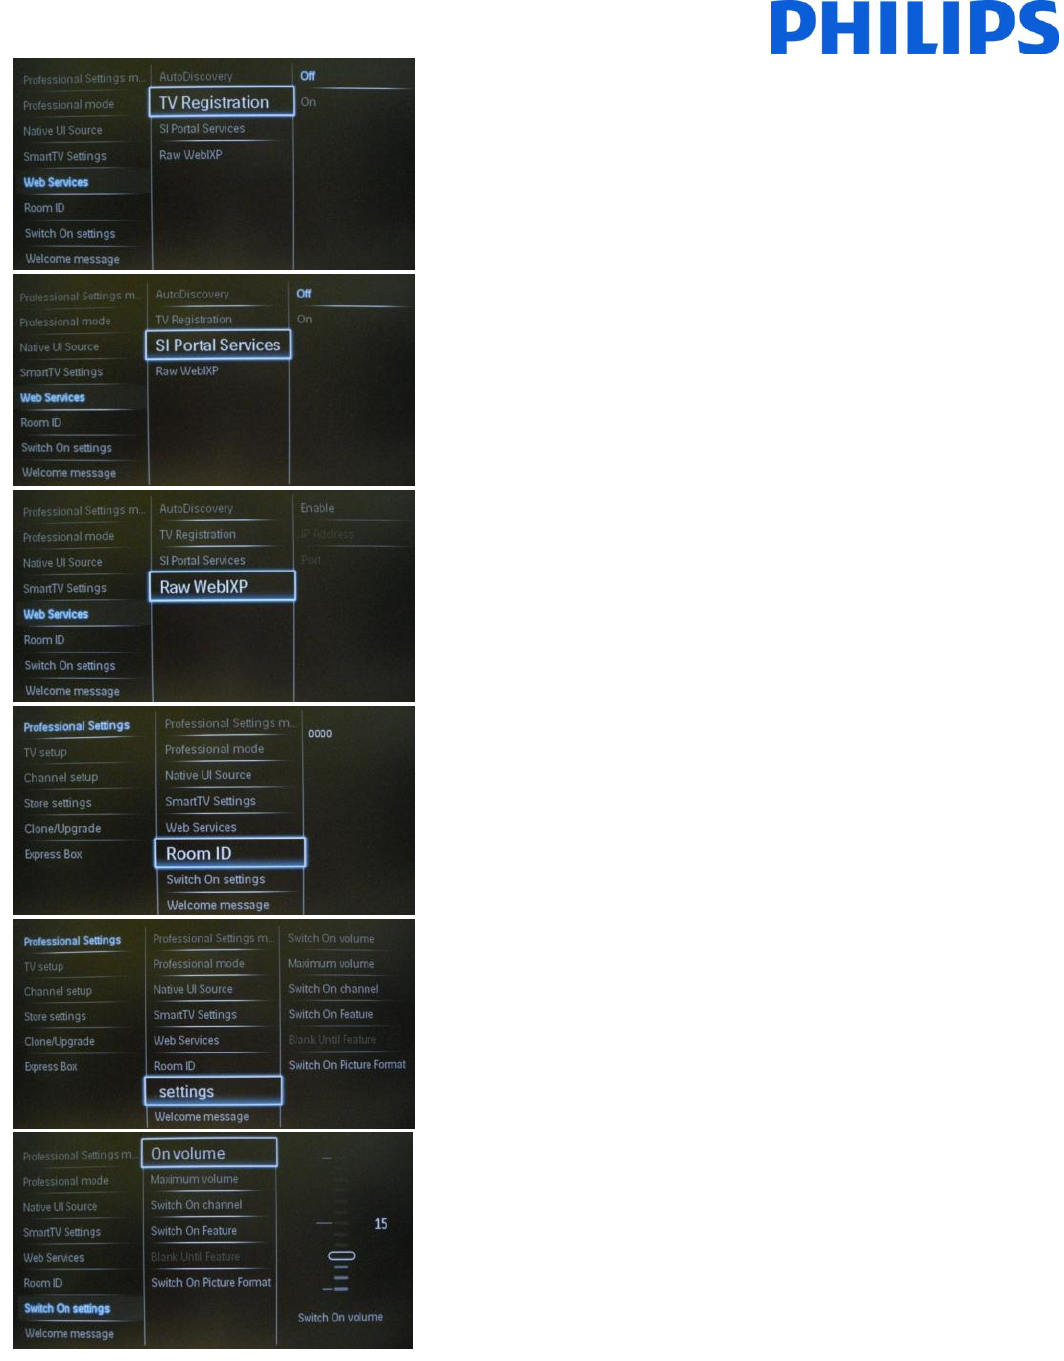
[Room ID]
Entry field to store 4 digits to set the Room Identifier.
Room ID can be used to distinguish between different
floors/rooms/setups when using SmartInstall.
[Switch on settings]
[Switch on volume]
When the guest switches the TV on, it will play at the specified
volume level.
Selectable value from 00 until 60.
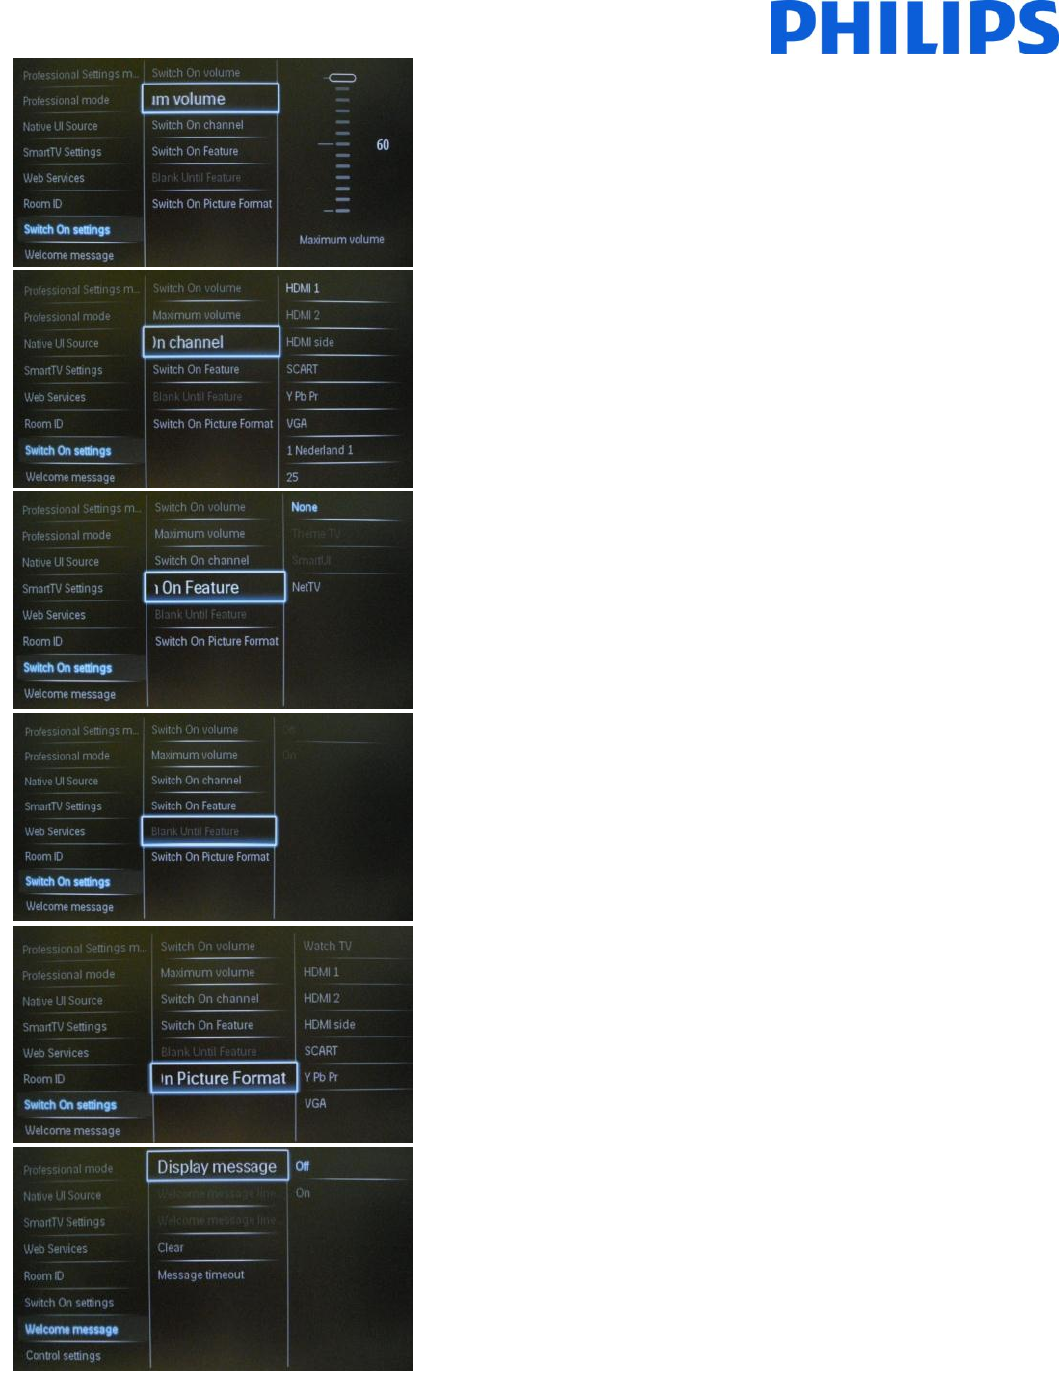
22
[Maximum volume]
This option specifies the maximum allowable volume level of the TV.
Selectable value from 00 until 60.
[Switch on channel]
When the TV is switched on, it will start up on the specified
source/channel.
Available EXT1, EXT2, VGA, HDMI, HDMI side, AV side or one of the
installed TV channels.
[Switch on feature]
Starts up in Theme TV, Smart UI or Net TV modes.
[Blank Until Feature]
The TV will remain black until the Feature is fully loaded.
Note: Enabling this option will increase the startup time.
[Switch on Picture Format]
Switches to a pre-defined picture format.
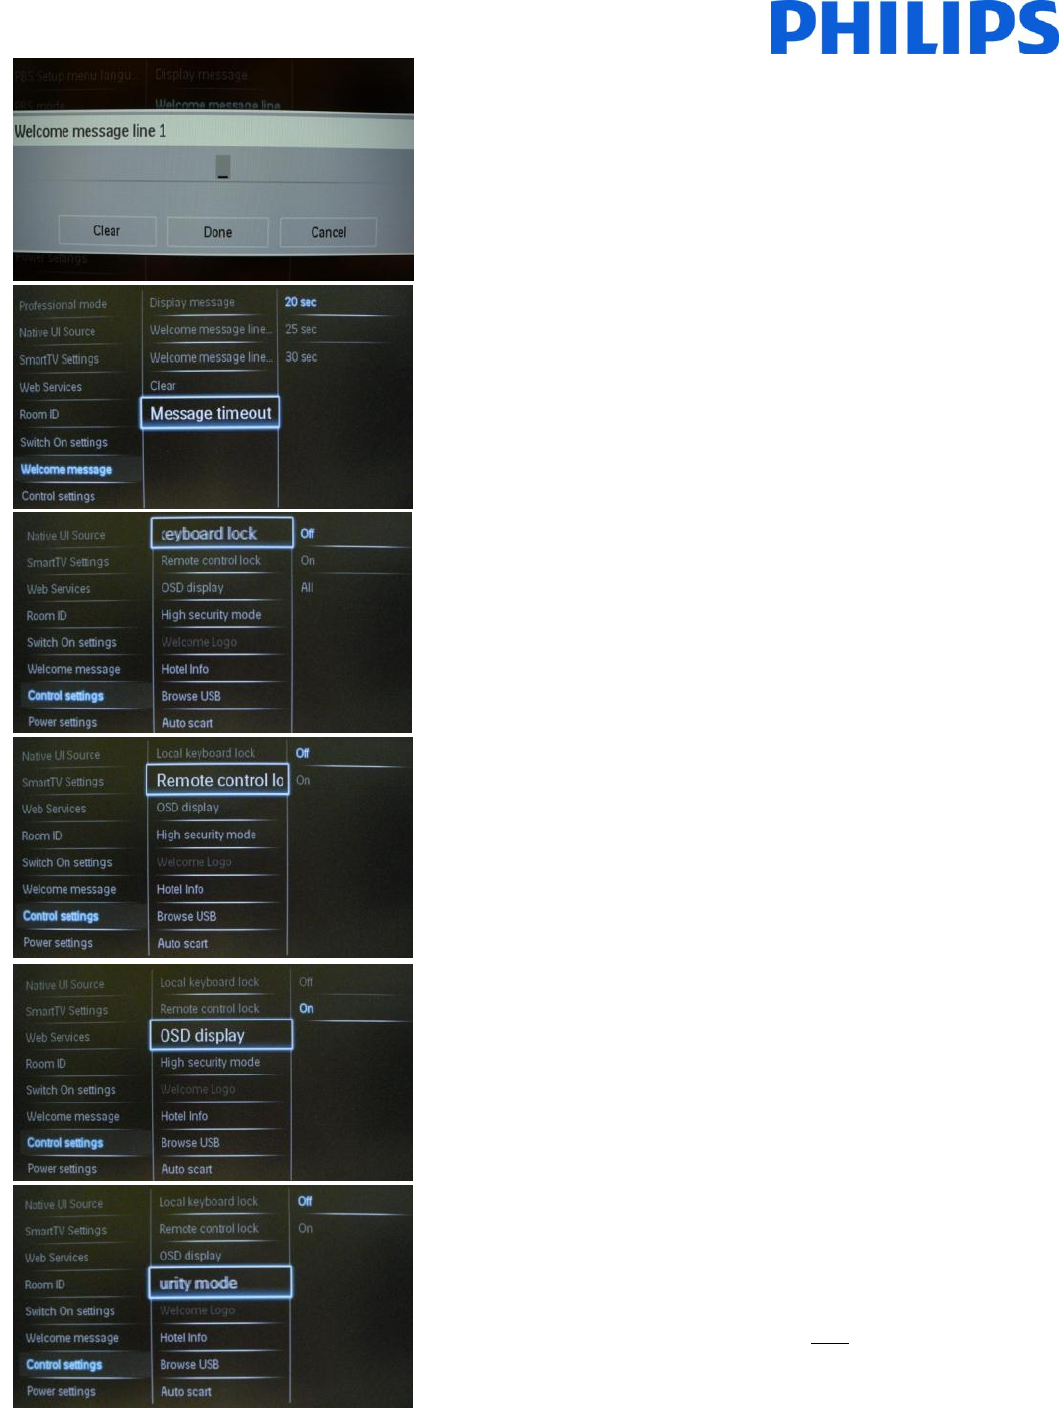
[Display message]
[On] To enable the welcome message.
[Off] No welcome message
23
[Welcome message line 1 &2]
Line 1: First line of the welcome message.
Line 2: Second line of the welcome message.
Clear: Will delete the message entered on the welcome message.
A virtual keyboard will pop up when pressing the “OK” button on the
remote control while editing line 1 or 2, Maximum 20 characters per
line.
[Message timeout]
Sets the period of time to display the welcome message on the
screen when TV is turned on from standby.
Note: Selectable values: 20, 25, 30 seconds.
[Local keyboard lock]
[Off]: The local keyboard (control buttons on TV) buttons are
enabled.
[On]: The local keyboard (control buttons on TV) buttons are
disabled, power button still enabled.
[All]: All local keyboard (control buttons on TV) buttons are disabled.
[Remote control lock]
[OFF]: All buttons on the guest remote control will function
normally.
[On]: All buttons on the guest remote control are disabled.
Master remote control 22AV8573 (yellow) or RC2573 (green)
commands are not affected by this setting.
[OSD Display]
Set this function to show or hide on screen information.
[Off]: On screen information is suppressed.
[On]: Normal onscreen information is displayed.
[Off]: Professional Settings menu can be accessed by both Guest
remote control and Master remote control 22AV8573 (yellow) or
RC2573 (green).
Guest remote control access to the set up menu only possible with
code 3,1,9,7,5,3, mute.
[On]: Professional Settings menu can only be accessed by the
Master remote control 22AV8573 (yellow) or RC2573 (green).

24
[Welcome logo]
Enables / disables the showing of the stored welcome Logo at start-
up when the TV starts up in Green Mode (see Power Settings):
[Off]: When set to Off, the TV will hide the Welcome Logo at start-
up.
[On]: When set to On, the TV will show the Welcome Logo at start-
up.
Note: If no welcome logo is loaded the feature is greyed out.
[Display information]
[On]: Enables hotel information to be available in guest menu.
[Off]: Disables hotel information to be available in guest menu.
Check upload hotel info. (on page 31)
[Browse USB]
Enables / disables the USB Browse icon to be presented in the Guest
Menu.
[Off]: When set to Off, the TV will hide the USB icon in the Home
menu.
[On]: When set to On, the TV will show the USB icon in the Home
menu.
[Auto scart]
Enables auto scart switching (or break-in) in Professional mode.
[AV]: Enables auto scart switching or break-in.
[Power On Scart]: Enables auto TV start On/Off when detecting
scart break-in.
(never use this feature without a connected STB)
[Off]: Disables auto scart switching or break-in.
[Easylink Break-in]
Enables or disables the HDMI-CEC standby feature in Professional
mode:
[Off]: Not able to switch on the TV by external HDMI-CEC devices.
[On]: Able to switch on the TV by external HDMI-CEC devices
[Easylink control]
Enables or disables the HDMI-CEC one touch play feature in
Professional mode:
[Off]: Disables TV functionality to control external HDMI-CEC
devices.
[On]: Enables TV functionality to control external HDMI-CEC
devices.

25
[Easylink Application menu]
Allows the menu to control external HDMI-CEC.
[Off]: Disables TV functionality to control external HDMI-CEC
devices.
[On]: Enables TV functionality to control external HDMI-CEC
devices.
[Auto USB]
Enables or disables USB break-in feature in Professional mode:
[Off]: When a USB device is plugged in, the [Multimedia] menu will
not appear automatically, but users can access the [Multimedia]
menu from the Guest menu.
[On]: When a USB device is plugged in, the [Multimedia] menu
appears automatically.
[SXP Baudrate]
Sets the Baud rate for the Serial Express
communication channel to be 38200 or 19200
Baud (bits per second).
[Enable CI-slot]
Enables or disables the use of the integrated CI/CI+ slot:
[Off]: No pass through of the TV input signal via the CI-Slot Card is
possible; the use of CI Card slot is not possible.
[On]: Pass through of the TV input signal via the CI-Slot Card is
possible; the use of CI-Card slot is possible.
!! Check with your local operator if your CI-Card is compatible with this TV.
[Enable teletext]
Enables or disables the use of Teletext by pressing the Teletext
button:
[Off]: Disables Teletext.
[On]: Enables Teletext.
[Enable MHEG]
Enables or disables the use of MHEG by pressing the MHEG button:
[Off]: Disables MHEG.
[On]: Enables MHEG.
26
[Enable EPG]
Enables or disables the use of the EPG by pressing the EPG button:
[Off]: No EPG services available
[Now & Next]: EPG (Now/Next) services available
[8 Day EPG]: EPG (8 Day) services available
Note: EPG availability depends on local conditions.
[Subtitle On StartUp]
Enables or disables the use of subtitles at start-up:
[Off]: No subtitles services available
[On]: Subtitles services available
[On during mute]: Subtitles services when TV audio is muted
[Enable subtitle]
Enables or disables the use of subtitles in a DVB broadcast channel:
[Off]: No subtitles services available
[On]: Subtitles services available
[Enable Channel Map]
Select Channel Map to be viewed:
[Native]: Show standard default channel map
[BDS]: To be used only if a system is connected
[Source setup]
Lists all supported connectors on the TV. A disabled connector will
not be visible from the Source menu.
[Jointspace]
This feature is not supported for hotel mode. Always set it to off.
27
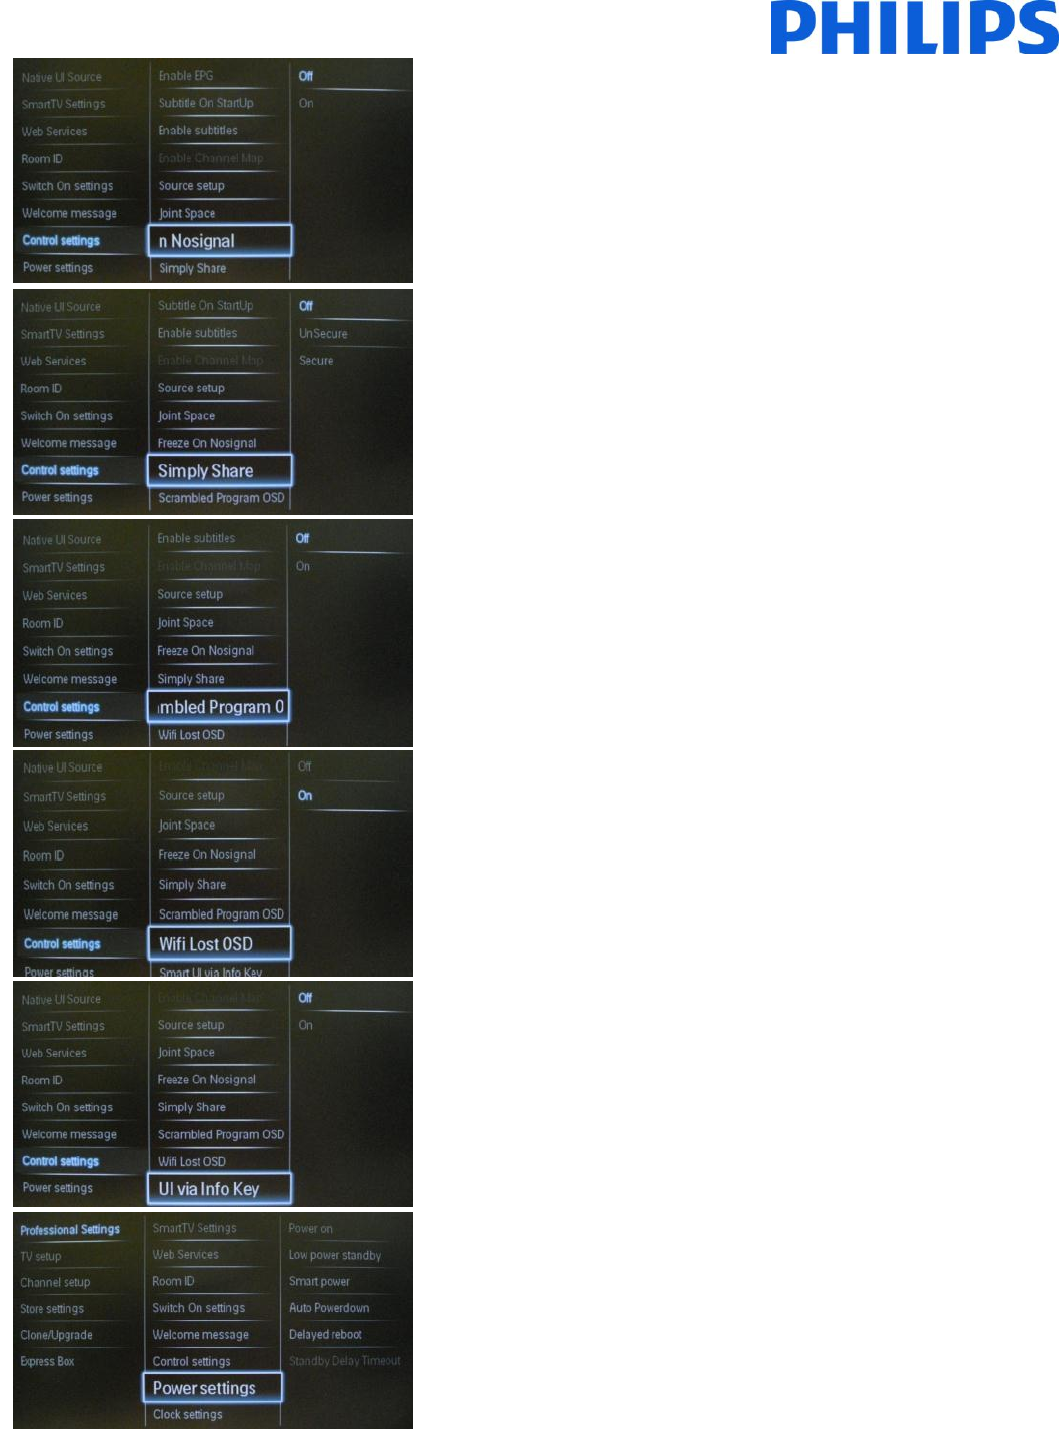
[Freeze on no signal]
When this feature is enabled, the TV will display the last received
frame in case of signal loss on DVB signals.
[Simply Share]
Enable or disable the Simply Share feature.
[Scrambled Program OSD]
Show OSD on scrambled TV channel.
[Wifi Lost OSD]
Enable or disabled the message when the wireless network is not
available.
[Smart UI Info Key]
Enables or disables the access on SmartInfo using the Info button on
the remote control.
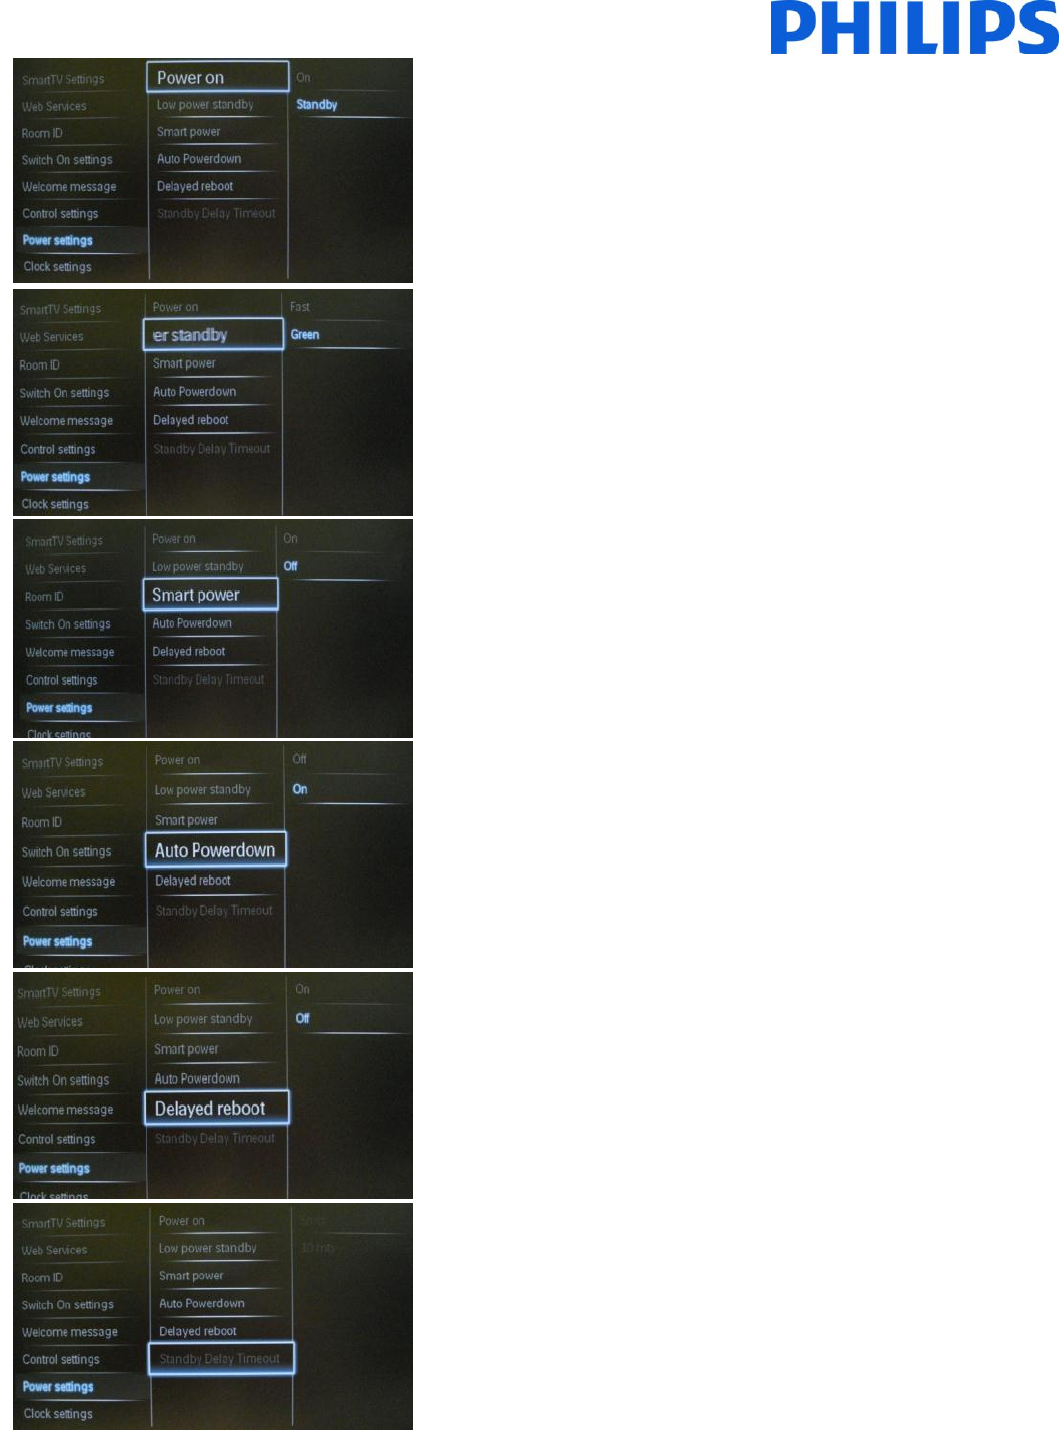
[Power settings]
The possible power settings are explained below.
28
The power on function allows the TV to enter a specific mode ([On],
[Standby], or [Last status]) of operation when the mains power is
activated (cold start):
[On]: The TV will always turn on (show startup channel) after the
mains power is connected.
[Standby]: When set, the TV will always turn to standby (status as
defined in Low power standby option) after the mains power is
connected.
[Low power standby]
The Low power standby option defines the TV to enter a specific
standby mode after pressing the On/Off button on the remote
control.
[Fast]: The TV will quickly turn on (This mode will consume more
power in stand-by compared to Green mode).
[Green]: The TV will turn on less fast. (This mode will consume less
power in stand-by compared to Fast mode).
[Smart power]
The power consumption for the Smart power mode is defined by the
Smart Picture setting in the TV Setup part.
[Off]: The TV will start with the Standard Smart Picture setting, but
the setting can be changed in the guest setup mode.
[On]: The TV will start with the default Smart Picture setting and
Smart Picture setup and is not selectable in the guest setup.
[Auto Powerdown]
Enables or disables the use of the automatic switch off functionality.
The TV will switch off if no RC action is noticed after 240 minutes:
[Off]: The TV will not switch off after 240 minutes
[On]: The TV will switch of after 240 minutes
[Delayed reboot]
Enables or disables the use of delayed standby:
[On]: TV is able to switch on immediately after switching to standby.
[Off]: Switch ON time of the TV will be longer after switching to
stand-by.
[Standby Delay Timeout]
This option will set the amount of time for Delayed reboot.
5 mts – TV will power down complete after 5 minutes.
10 mts - TV will power down complete after 10 minutes.
29
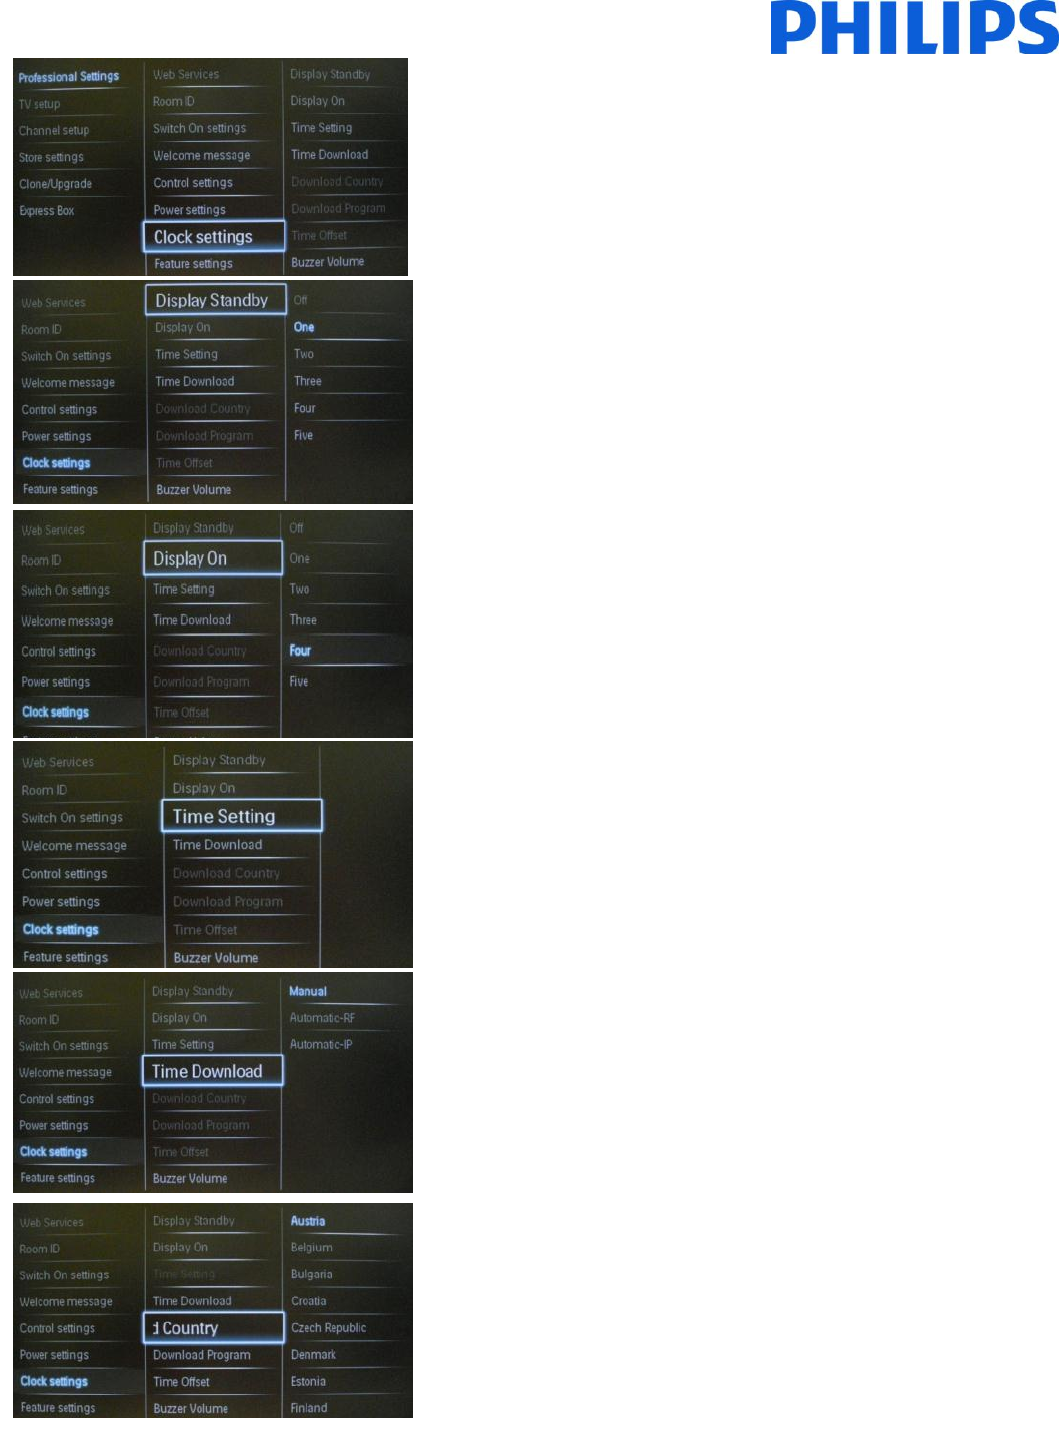
[Clock settings]
All the clock settings are explained below.
[Display Standby]
Defines the brightness level for the Clock LCD backlight if the TV is in
Standby mode:
[Set]: Off, 1, 2, 3, 4, 5
[Display ON]
Defines the brightness level for the Clock LCD backlight if the TV is in
On mode:
[Set]: Off, 1, 2, 3, 4, 5
[Time Setting]
Manually set the Time.
[Time Download]
Select the source for the clock time:
[Automatic-RF]: Clock time is retrieved from the “Download
Program” channel.
[Automatic-IP]: Function available only for IP channels
[Manual]: The clock time is set using the Time Setting option.
Note: If the power is disconnected the TV will lose the time set.
[Download Country]
Set the selected country as the source for clock time.
30
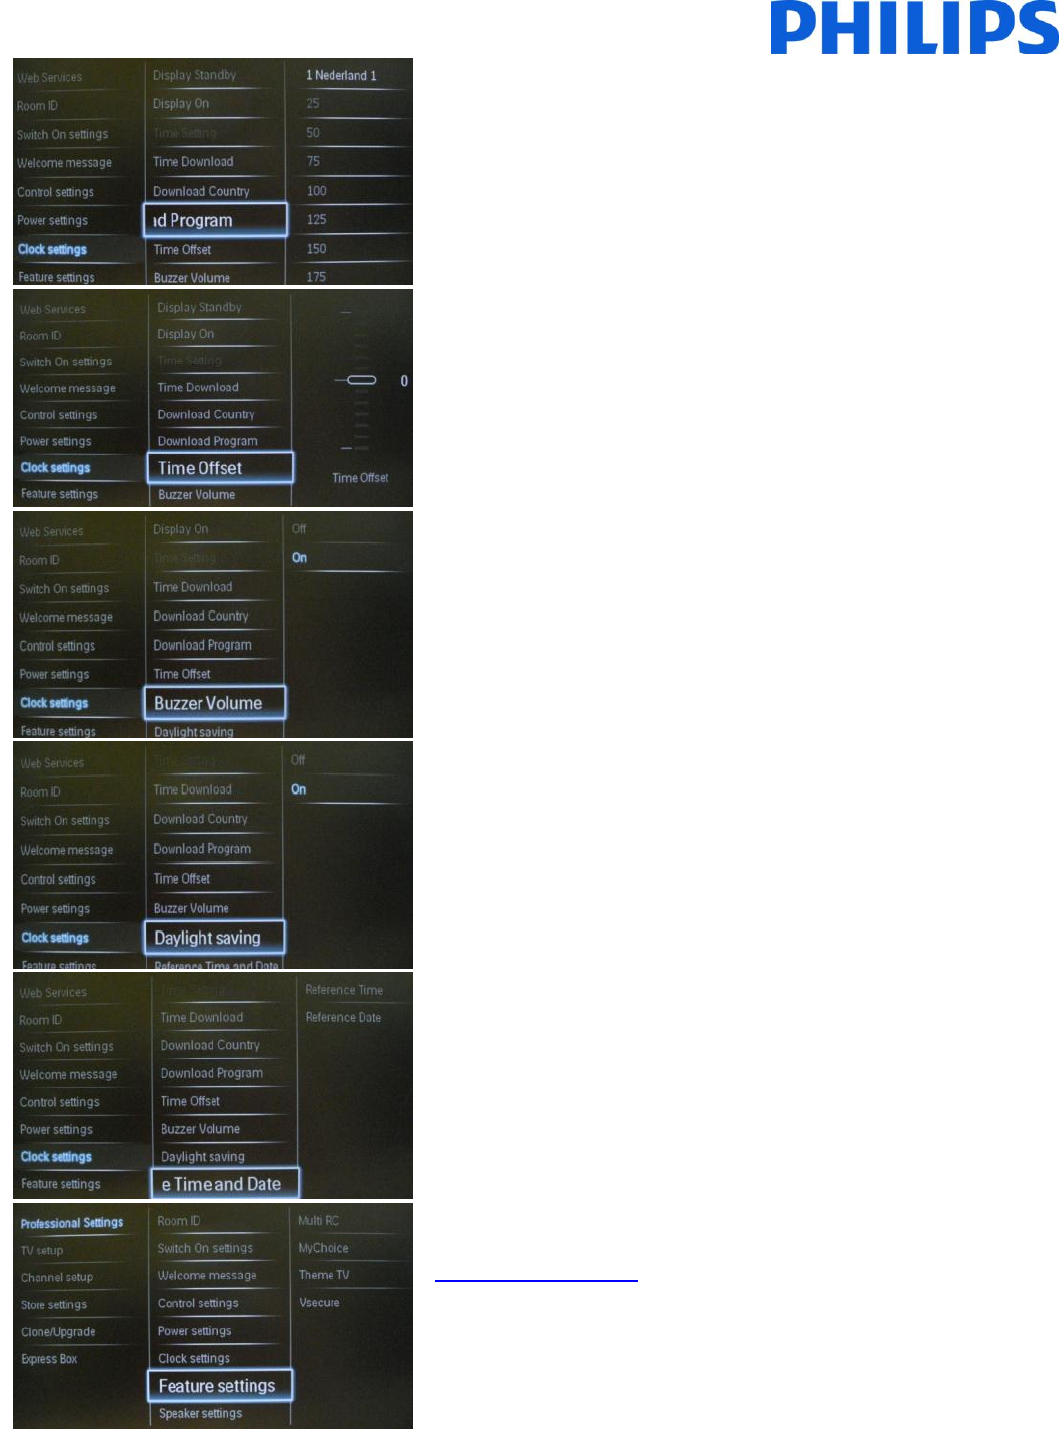
[Download Program]
Set selected Download Program as the source for the clock time.
Note: Correct clock information is needed to provide correct EPG data and to have
MyChoice working.
[Time Offset]
In case the clock download information is not correct for your region
you can set an offset here to correct this.
Selectable value between -12 and +12.
[Buzzer Volume]
Alarm (buzzer):
[Set]: Off, On
[Daylight saving]
Set the Daylight saving options:
[Set]: Off, On
[Reference Time and Date]
Define whether the time and date are referenced from the TV.
[Feature settings]
Check Feature settings (page 34)
31
[Speaker settings]
[TV Speaker Enable]
[Off]: The main speakers are muted. The RC can control the volume
and mute the headphone/bathroom speaker
[On]: The main speakers are active and the behavior of the
headphone/bathroom speaker is defined by the Independent Main
Speaker Mute.
[EasyLink & EasyLink autostart]: only to be used when external
audio amplifier supporting HDMI-CEC is connected.
[Independent Main Speakers]
[Off]: The volume +/- on the Guest remote control will affect both
the TV Main speaker and the headphone volume.
[On]: The volume +/- on the Guest remote control will affect both
the TV Main speaker and the headphone volume.
After pressing “MUTE”, the volume +/- on the Guest remote control
will not reactivate the TV Main speaker volume, but will only control
the headphone volume.
[Default Main Speakers Volume]
This option defines the volume level that will be set to the main
speakers when the TV is unmuted and the Independent Main
Speaker Mute is set to ‘On’.
[Headphone]
The default volume for headphones can be set.
The value define will be applied when the headphones are
connected.
[Factory default]
Restore the factory default of the Professional Settings Menu.
Channel installation is not affected.
32
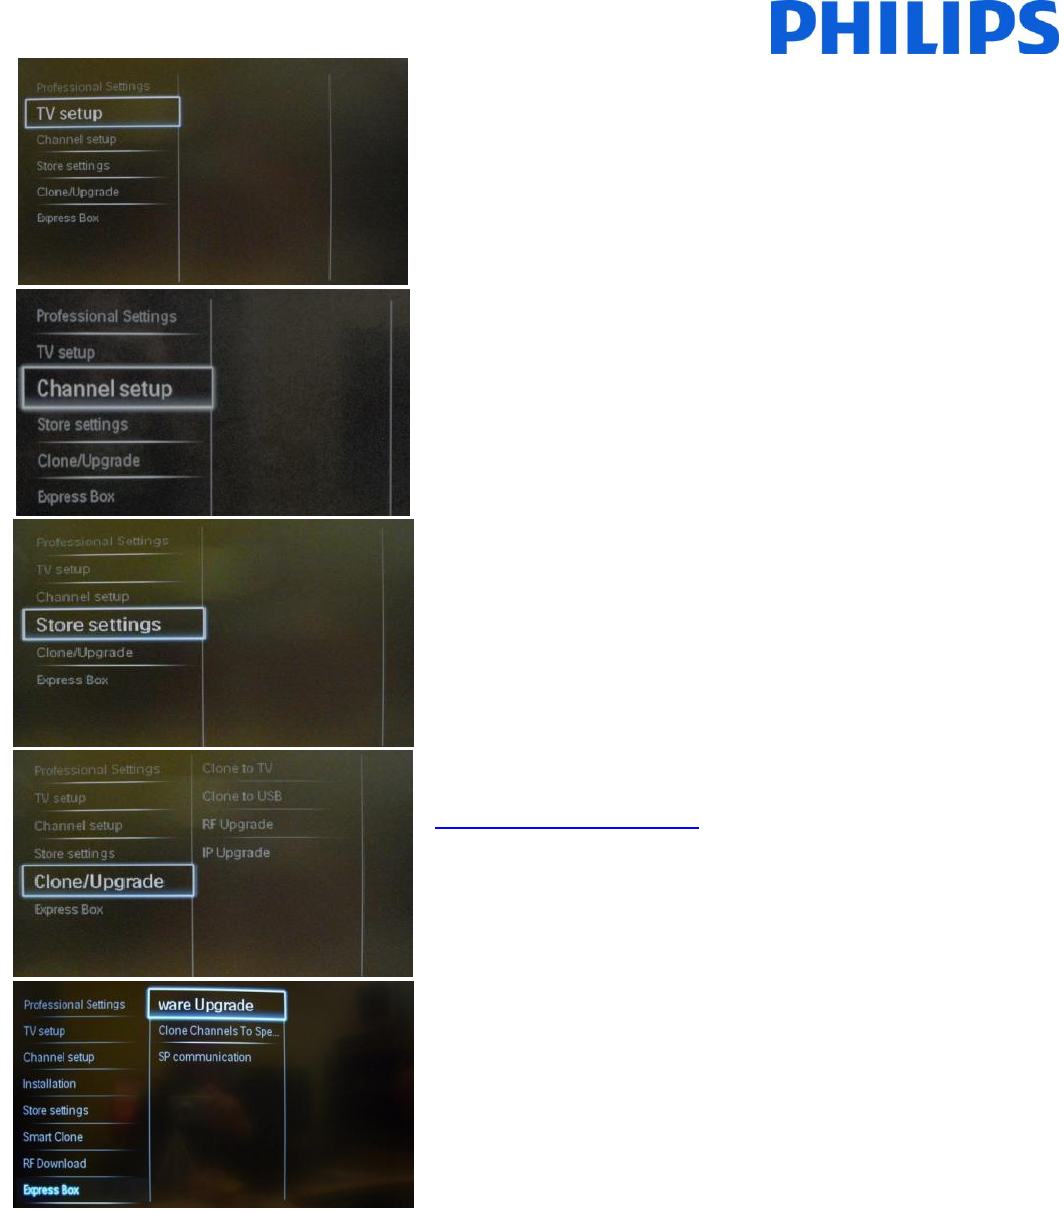
[TV Setup]
A shortcut to enter the consumer installation menu.
Consumer installation menu should be accessed to change e.g.
picture and sound settings and update channels.
Using this shortcut will trigger a popup screen which warns losing
settings in the Professional Settings menu if you continue. Select
discard if you want to stay in the Professional Settings menu or
continue.
[Channel setup]
A shortcut to enter the channel grid.
Info: check Channel Options
In this grid you can reorder, rename and hide channels.
Using this shortcut will trigger a popup screen which warns about
losing settings in the Professional Settings menu if you continue.
Select discard if you want to stay in the Professional Settings menu.
[Store settings]
To save the changes in the Professional Settings menu
Menu, the changes must be stored.
1. Select [Store settings] and press “OK” to store.
Note: TV will automatically reboot to apply changes.
2. Select [Cancel] to discard any changes
[Clone/Upgrade]
Check Clone/Upgrade section (page 32)
[Express Box]
Only applicable for system connected installation.
After storing Professional Settings, the TV will restart to apply the new parameters. Now you can clone all settings to
other TV sets by using the option TV to USB and USB to TV. Check how to clone settings (On page 32).
33
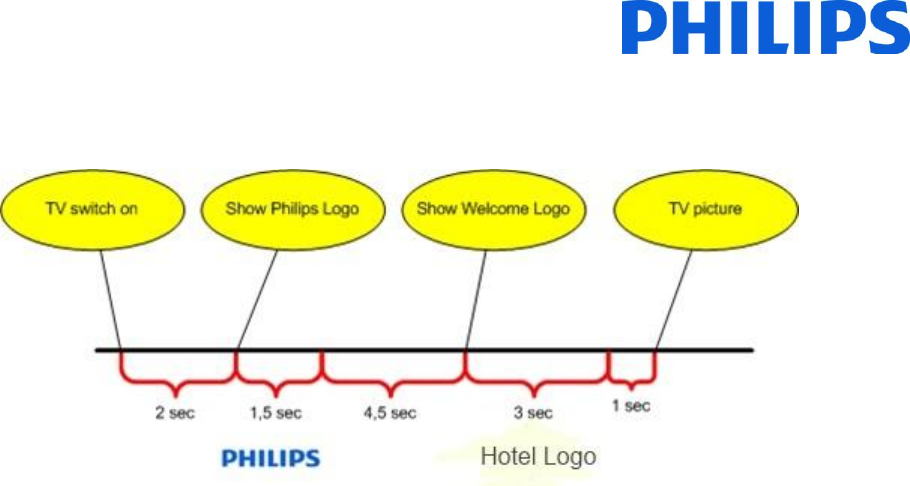
7. Welcome Logo
There are 2 Philips logos displayed at startup. The second logo can be replaced by a picture uploaded via USB.
File format: 1280 x 720.jpg file. The Welcome Logo is displayed only when Standby mode is set to “Green”.
Note: below timing values are approximate indications and can differ from the real situation!
Welcome Logo
1. Create graphics file: 1280 x 720 jpg file with the logo.
2. File name: WelcomeLogo.jpg (File name is case-sensitive)
3. Install TV channels and access the Professional Settings menu
a. Go to Professional Settings -> Professional Mode -> Set to ON
b. Go to Professional Settings ->Power settings ->Low power standby -> Set to Green.
c. Go Store settings (Back in the root of Professional settings) -> Press OK and confirm that you want to store
the settings.
4. Power on the TV, insert a USB key in the side USB port (USB key must be formatted FAT32).
5. Enter the Professional Settings menu
a. Go to Smart Clone -> TV to USB -> Press OK to copy settings to USB key. After the ‘Done’ message pops up
remove the USB key.
6. Insert the USB key on your computer. Save the WelcomeLogo.jpg into the TV cloning data folder
(Q554B\WelcomeLogo)
7. Insert a USB key in the side USB port and enter the Professional Settings menu
8. Go to: Smart Clone -> USB to TV -> Press OK to copy settings from USB to TV.
9. The TV will load all settings and reboot to activate the new settings. After rebooting the TV please enter the
Professional menu and Go to Professional Settings -> Control Settings -> Welcome Logo -> Set to ON. (The option
should be active and you can select the OFF or ON).
10. Store all settings and check if the welcome logo is properly displayed. After this you can clone the settings from
TV to USB for future use in other TV sets.
Hotel Information
Any JPEG can be used for the Hotel information and triggered from consumer menu screen.
How to upload single page Hotel Info
1. Create a JPEG graphics file with maximum resolution 1920 x 1080.
2. File name: HotelInfo.jpeg (File name is case-sensitive).
3. Copy the file to the folder “Wallpaper” inside the TV cloning data folder (Q554B/Wallpaper/)
4. Insert the USB device into the TV
5. Enter the Professional menu
6. Go to Smart Clone
7. Select USB -> TV
8. The TV will load all settings and reboot to activate the new settings.

34
8. Clone /Upgrade
Clone/Upgrade
The cloning option is used to copy data from/to a TV by a USB stick. It contains all configuration and channel list
data,
Place a USB Memory stick in the USB side connector of the TV.
*The USB device should be formatted as FAT or FAT32.
[Clone to TV]
1. Select [Clone/Upgrade] and press OK.
2. Select [Clone to TV] and press OK.
3. The clone data will be loaded from the USB device into the TV. To activate the loaded settings, wait until
the OSD message is displayed to remove the power cord.
4. Remove and re-insert the power cord.
[Clone to USB]
1. Select [Clone/Upgrade] and press OK.
2. Select [Clone to USB] and press OK.
3. Clone data will be loaded from the TV into the USB device.
4. Wait until the OSD message returns to its earlier state before removing the USB device.
[RF Upgrade]
Instead of using a USB memory device to do cloning and firmware update, this upgrading is also possible using the RF
infrastructure. This is supported by SmartInstall (Philips Hospitality RF Download mechanism) and allows a
simultaneous upgrade of all installed televisions.
[Start Download]: To manually start a RF download action:
1. Select [RF Download] and press OK.
2. Select [Start Download] and press OK.
The download action will start and search if valid content is found on the RF network.
[IP Upgrade]
Instant initial clone:
A TV out of the box will trigger the software upgrade and instant initial cloning. Before connecting the power cord
and power on the TV, insert the USB key with latest software version and cloning data. After power on, the TV will
search on the USB key for software and cloning files. When the software upgrade is complete, the TV will reboot and
start the instant initial cloning. After power down you can remove the USB key and power on the TV to check the
result of the cloning and also check the correct functionality of the TV (e.g: Welcome message, welcome logo,
starting channel, startup volume).
35
9. Feature settings
[Multi RC]
This function allows that up to four televisions can be installed in a room whereas every TV will listen to its own RC.
Once the TV is set, also every RC can be set to remember its connected TV:
[Off] Multi RC is turned off; all TVs will listen to a ‘blue’ RC.
The TV will listen to a ‘blue’ RC. Press and hold both the menu and blue button on the RC for about five
seconds to change the color of the remote.
[Green] The TV will listen to a ‘green’ RC. Press and hold both the menu and green button on the RC for
about five seconds to change the color of the remote.
[Yellow] The TV will listen to a ‘yellow’ RC. Press and hold both the menu and yellow button on the RC for
about five seconds to change the color of the remote.
[Red] The TV will listen to a ‘red’ RC. Press and hold both the menu and red button on the RC for about five
seconds to change the color of the remote.
[Digit 0] The TV will listen to a ‘0’ RC. Press and hold both the menu and digit “0” button on the RC for about
five seconds to assign the remote to the number.
[Digit 1] The TV will listen to a ‘0’ RC. Press and hold both the menu and digit “1” button on the RC for about
five seconds to assign the remote to the number.
[Digit 2] The TV will listen to a ‘0’ RC. Press and hold both the menu and digit “2” button on the RC for about
five seconds to assign the remote to the number.
The same process can be applied for all 10 digits on the remote control.
Press and hold the OK button for about five seconds to check on the current color of the Multi Remote setting for
the TV and the user remote.
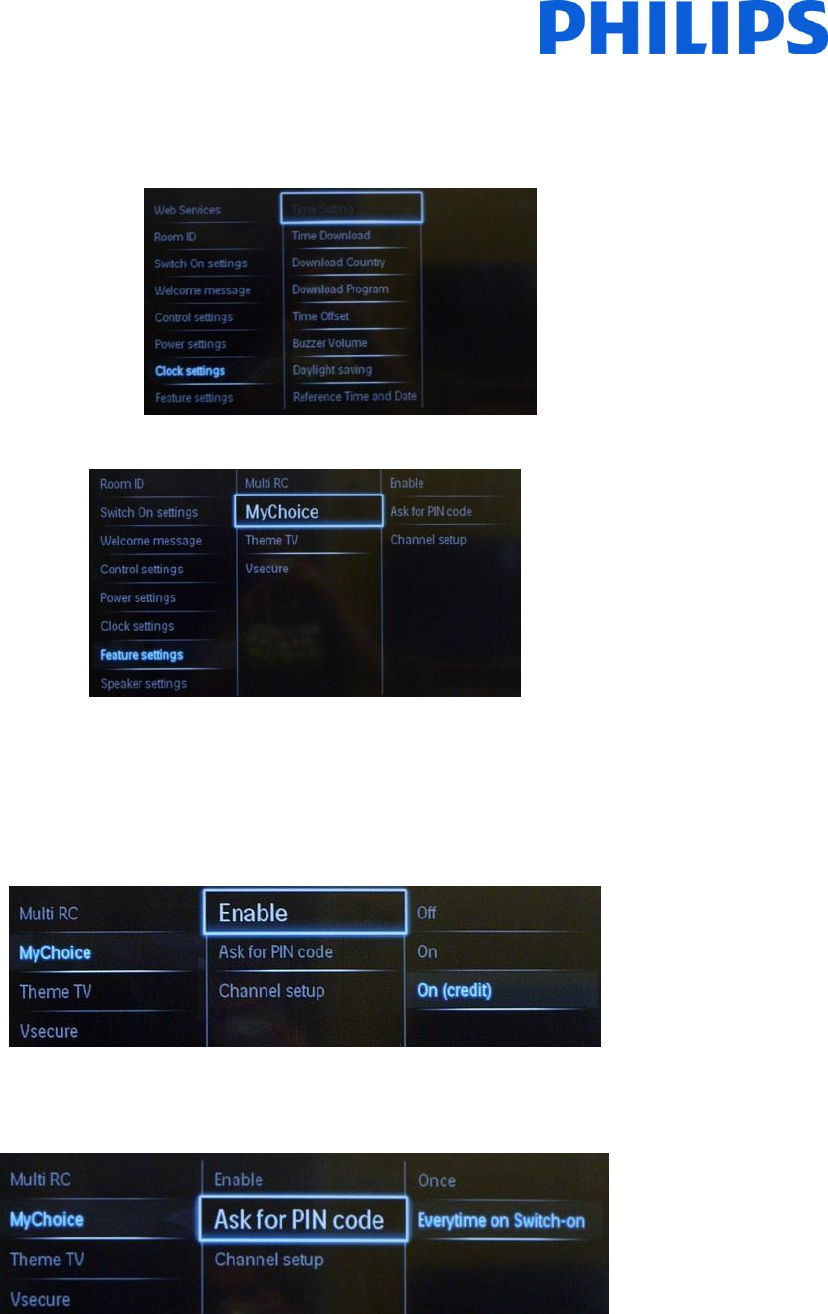
[MyChoice]
In this manual we will cover only the configuration of MyChoice on TV, all details about the account and credit are
covered in a different manual. Please contact your TP Vision country sales manager to setup an account and buy the
credits.
During the installation of the TV sets please collect the following information:
Room number
TV model
Serial number
101
32HFL5008D/10
FZ1A
Room number, TV model and serial number are required on the MyChoice website when the rooms are configured.
Make sure that all values are correct because the MyChoice website is generating pin codes based on this
information. You can gather all these details during the installation and afterwards enter them in the administration
part of the MyChoice website.
How to configure the MyChoice is described below:
1. The most important step for MyChoice is the clock. If the clock is not defined or TV doesn’t have the correct
time, MyChoice will display the following message: MyChoice is not available, please contact the reception.
36
Enter in the Professional menu go to: Clock settings and configure the following:
Time Download: Automatic-RF is the default option for DVB-C/DVB-T channels.
Download Country: Define the country in which the TV is installed.
Download Program: Define the TV channel from which the TV set will download the correct date and time.
Make sure that clock is available for that TV channel.
After making the correct settings in the clock settings, go back and access the menu Feature settings.
Inside you will find the MyChoice sub menu with few extra categories:
[Enable]:
[Off]: Single channel map as configured during channel installation.
[On]: MyChoice channel packages will be available with the help of scratch card.
[On (credit)]: My Choice channel packages will be available with a pin code generated by MyChoice website
or with the help of scratch card. If you are using the pin codes generated by the website this is the correct
option to be used.
[Ask for PIN Code]:
[Once]: The pin code is required one time.
[Every time on switch ON]: The code is required every time.
37
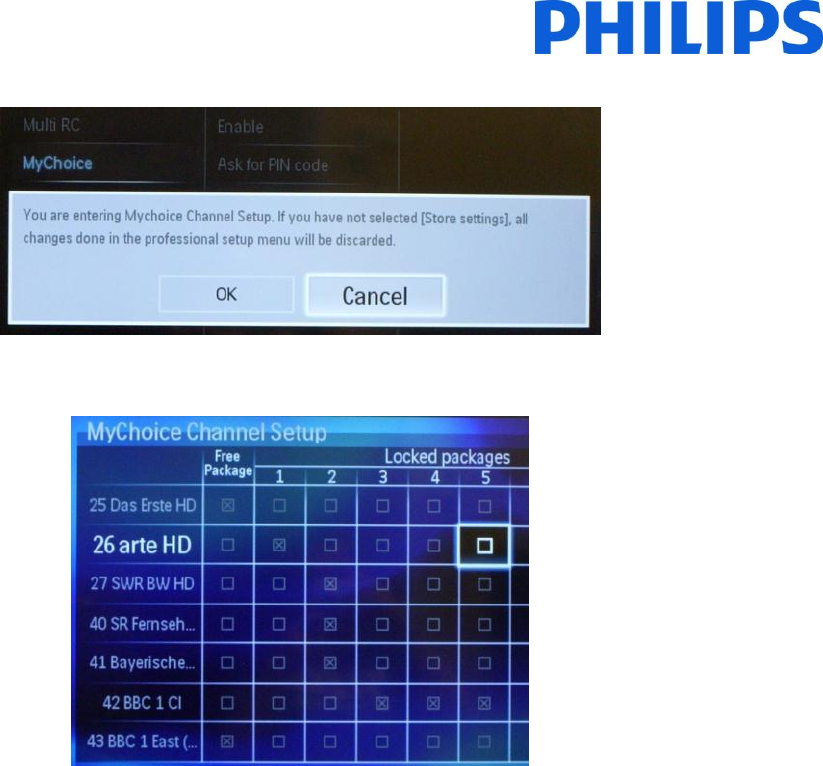
[Channel setup]: MyChoice channel setup.
Before entering the MyChoice Channel setup please confirm that you want to discard the unsaved changes.
The MyChoice setup will look like in the picture from below.
From the channel list you can assign the channels to different locked packages. In this case the channel 26 Arte HD is
assigned to locked package 1 which means that the channel will be visible only after a MyChoice pin code for
package 1 was entered.
To add a channel to a locked package just select the box from the right side of the channel and press OK, the box will
become ticked and that channel will be assigned to that locked package.
You also can put the same channel in different locked packages like channel 42 BBC1 CI in this example. You can
configure any number of locked packages between one and five, every package will have a different pin code for
access.
Be aware that you cannot have a TV channel in Free Package and also in one of the Locked packages.

38
[ThemeTV]
With ThemeTV it is possible to activate a customizable user interface to select up to 15 different themes that
contains Channel references. ThemeTV can be presented on the display by means of pressing the ThemeTV button
on the RC, or automatically after starting up the TV:
[On]: Show ThemeTV on the display after pressing the ThemeTV button on the RC.
[Off]: ThemeTV disabled.
[Startup]: Show ThemeTV on startup and able to show the ThemeTV by pressing the ThemeTV button on the RC.
[VSecure]
VSecure is the hospitality content scrambling method used by the Philips Hospitality TVs. If you are interested to use
it please contact the local Philips Hospitality TV sales representative.
39
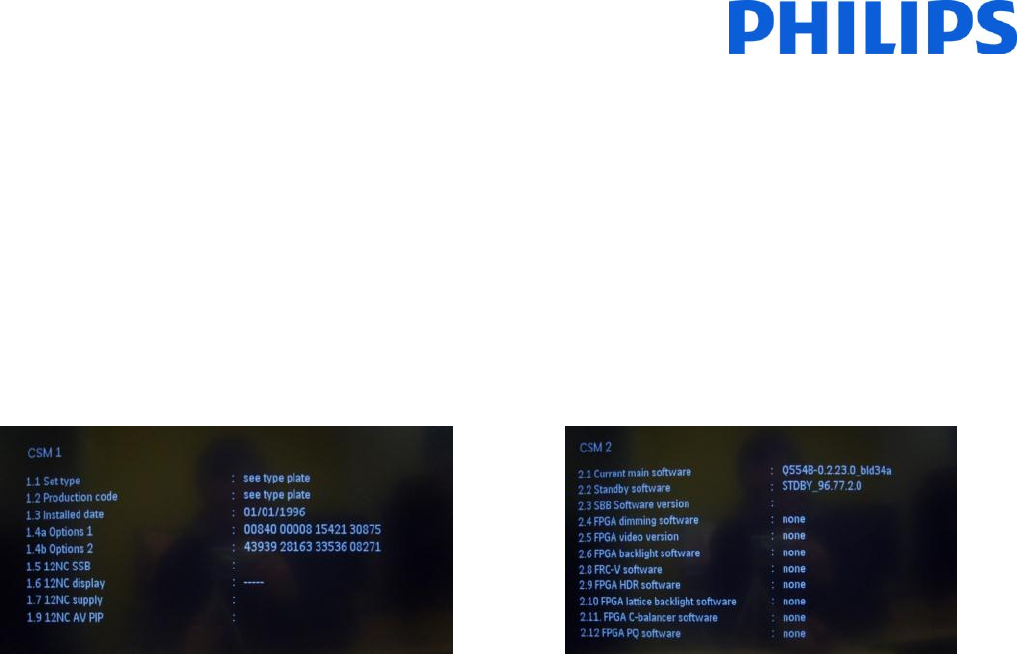
10. CSM (Consumer Setup menu)
The CSM contains data about the TV software, serial number and other details. The menu can be accessed using a
standard remote control or using the master remote control.
1. Using the standard remote control: press the following key sequence “1,2,3,6,5,4”
2. Using master remote control (22AV8753D): Press the RECALL button, available only if Professional
Settings mode is ON.
Notes: Activation of the CSM is only possible if there is no (user) menu on the screen.
How to save the CSM content on USB stick:
1. Insert the USB stick
2. Enter the CSM
3. The CSM content will be saved on USB stick as a text file
4. File name example: “CSM_32HFL5008D10_FZ1A1146015773.txt”
a. Where 32HFL5008D10 is the TV model number
b. Where FZ1A1046015773 is the TV serial number
