Pro Nets Technology WU71RL Wireless USB Dongle User Manual 1 of 4
Pro-Nets Technology Corporation Wireless USB Dongle 1 of 4
Contents
- 1. User manual 1 of 4
- 2. User manal 2 of 4
- 3. User manual 3 of 4
- 4. User manual 4 of 4
User manual 1 of 4

IEEE 802.11n
Wireless USB Adapter
User’s Manual
July 2008

1
FCC Warning
This equipment has been tested and found to comply with the limits for a Class B digital
device,
pursuant to part 15 of the FCC Rules. These limits are designed to provide reasonable
protection against harmful interference in a residential installation. This equipment generates,
uses, and can radiate radio frequency energy and, if not installed and used in accordance with
the instructions, may cause harmful interference to radio communication. However, there is no
guarantee that interference will not occur in a particular installation. If this equipment does
cause harmful interference to radio or television reception, which can be determined by turning
the equipment off and on, the user is encouraged to try to correct the interference by one or
more of the following measures:
TGReorient or relocate the receiving antenna.
TGIncrease the separation between the equipment and receiver.
TGConnect the equipment into an outlet on a circuit different from that to which
TGConsult the dealer or an experienced radio/TV technician for help. the receiver is
connected.
FCC Caution: Any changes or modifications not expressly approved by the party responsible
for compliance could void the user’s authority to operate this equipment.
This device complies with Part 15 of the FCC Rules. Operation is subject to the following two
conditions: (1) This device may not cause harmful interference, and (2) this device must
accept any interference received, including interference that may cause undesired operation.
NOTE: All Telecom and safety Tests only include this content hardware device only.
You are cautioned that changes or modifications not expressly approved by the party responsible for compliance could void your
authority to operate the equipment.
FCC RF Radiation Exposure Statement: This equipment complies with FCC RF radiation exposure limits set forth for an
uncontrolled environment. This Transmitter must not be co-located or operating in conjunction with any other antenna or transmitter.

3
Contents
1. Introduction.............................................................................................4
1.1 Features.................................................................................................. 4
1.2 LED Indicator ......................................................................................... 4
1.3 Package Contents ................................................................................. 4
1.4 Minimum System Requirements .......................................................... 5
2. Installation Procedure ............................................................................5
2.1 For Windows XP and 2000.................................................................... 5
2.2 For Vista ............................................................................................... 11
3. Wireless Network Configuration Utility ..............................................15
3.1 For Windows XP & 2000 .......................................................................... 15
3.1.1 Start........................................................................................... 21
3.1.2 Profile........................................................................................ 27
3.1.3 Network..................................................................................... 32
3.1.4 Advanced.................................................................................. 33
3.1.5 Statistics................................................................................... 36
3.1.6 WMM ......................................................................................... 37
3.1.7 WPS........................................................................................... 43
3.1.8 About ........................................................................................ 46
3.1.9 Link Status ............................................................................... 47
3.1.10 Enable AP Mode Feature in Windows 2000 OS .................... 48
3.2 For Windows Vista................................................................................... 53
3.2.1 Profile........................................................................................ 53
3.2.2 Link Status ............................................................................... 61
3.2.3 Site Survey ............................................................................... 62
3.2.4 Statistics................................................................................... 68
3.2.5 WPS Configuration .................................................................. 70
3.2.6 QoS ........................................................................................... 72
3.2.7 About ........................................................................................ 80
3.2.8 How to Manage Windows Profile ........................................... 81
4. Troubleshooting ...................................................................................85

2
IMPORTANT NOTE:
In the event that these conditions cannot be met (for example certain laptop configurations or
co-location with another transmitter), then the FCC authorization is no longer considered valid
and the FCC ID cannot be used on the final product. In these circumstances, the OEM
integrator will be responsible for re-evaluating the end product (including the transmitter) and
obtaining a separate FCC authorization.
Revision History
Revision History
V2.0 Second release
All brand and product names mentioned in this manual are trademarks and/or registered
trademarks of their respective holders.

4
1. Introduction
This is a wireless 11n USB Adapter that provides unsurpassed wireless performance for your
Desktop PC or Notebook. It complies with IEEE 802.11n draft 2.0 wireless standard and is
backward compatible with IEEE 802.11b/g. This USB adapter provides better wireless
reception and up to 150/300Mbps (depend on model) data transfer rates in 11n mode. With
this adapter, you can easily upgrade your Desktop PC or Notebook wireless connectivity.
Once connected, to access the network with high-speed Internet connection while sharing
photos, files, music, video, printers, and storage. Get a better Internet experience with a
faster wireless connection so you can enjoy smooth digital phone calls, gaming, downloading,
and video streaming.
The Wireless USB adapter provides peer-to-peer communication among any compatible
wireless client users and no Access Point required. It also supports WEP, WPA, WPA2,
WPS, 802.1x high-level WLAN security features that guarantee the best security for users..
1.1 Features
ΘʳComplies with draft IEEE 802.11n standard
ΘʳUp to 150/300Mbps (depend on model) data transfer rates in IEEE 802.11n mode
ΘʳBackward compatible with IEEE 802.11b/g
ΘʳLegacy and High Throughput Modes
ΘʳSupports 64/128-bit WEP Data Encryption
ΘʳSupports WPA, WPA2 (802.11i), WPS, 802.1x advanced security
ΘʳSupports Quality of Service (QoS) - WMM, WMM-PS
ΘʳSupports both Infrastructure and Ad-Hoc Networking Modes
ΘʳSupports Multiple BSSID
ΘʳSimple user setup and diagnostics utilities
1.2 LED Indicator
LED Light Status Description
ACT Blinking
Data is being transmitted or received
1.3 Package Contents
ΘʳOne Wireless USB Adapter
ΘʳOne USB A-type Extension Cable
ΘʳOne Installation CD (Drivers, Utility, User’s Manual)
5
1.4 Minimum System Requirements
Computer with:
Θʳ300MHz processor and minimum 64MB RAM
ΘʳWindows 2000, XP or Vista
ΘʳA CD-ROM Drive
ΘʳAn available USB 2.0 port
2. Installation Procedure
Note: If you have installed the Wireless Adapter driver & utility before, please
uninstall the old version first.
2.1 For Windows XP and 2000
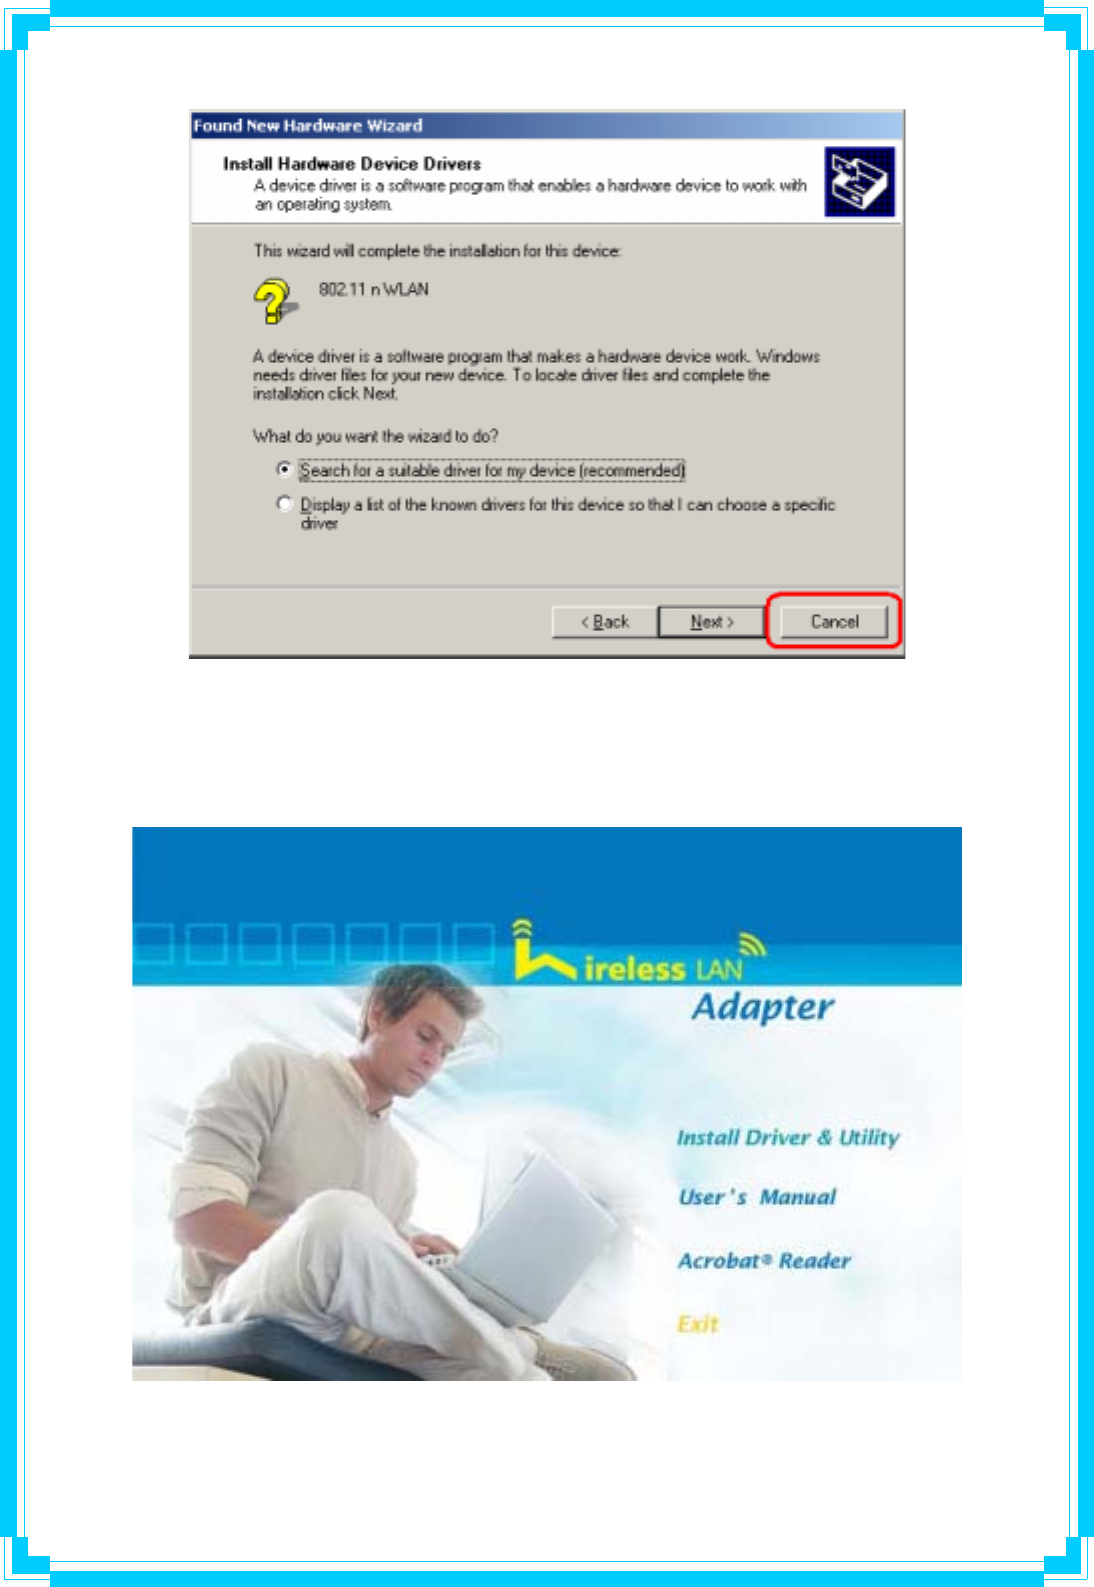
STEP1: The Found New Hardware Wizard below will appear after the USB adapter is
installed. Please click Cancel to continue.
(For Windows XP)
6
(For Windows 2000)
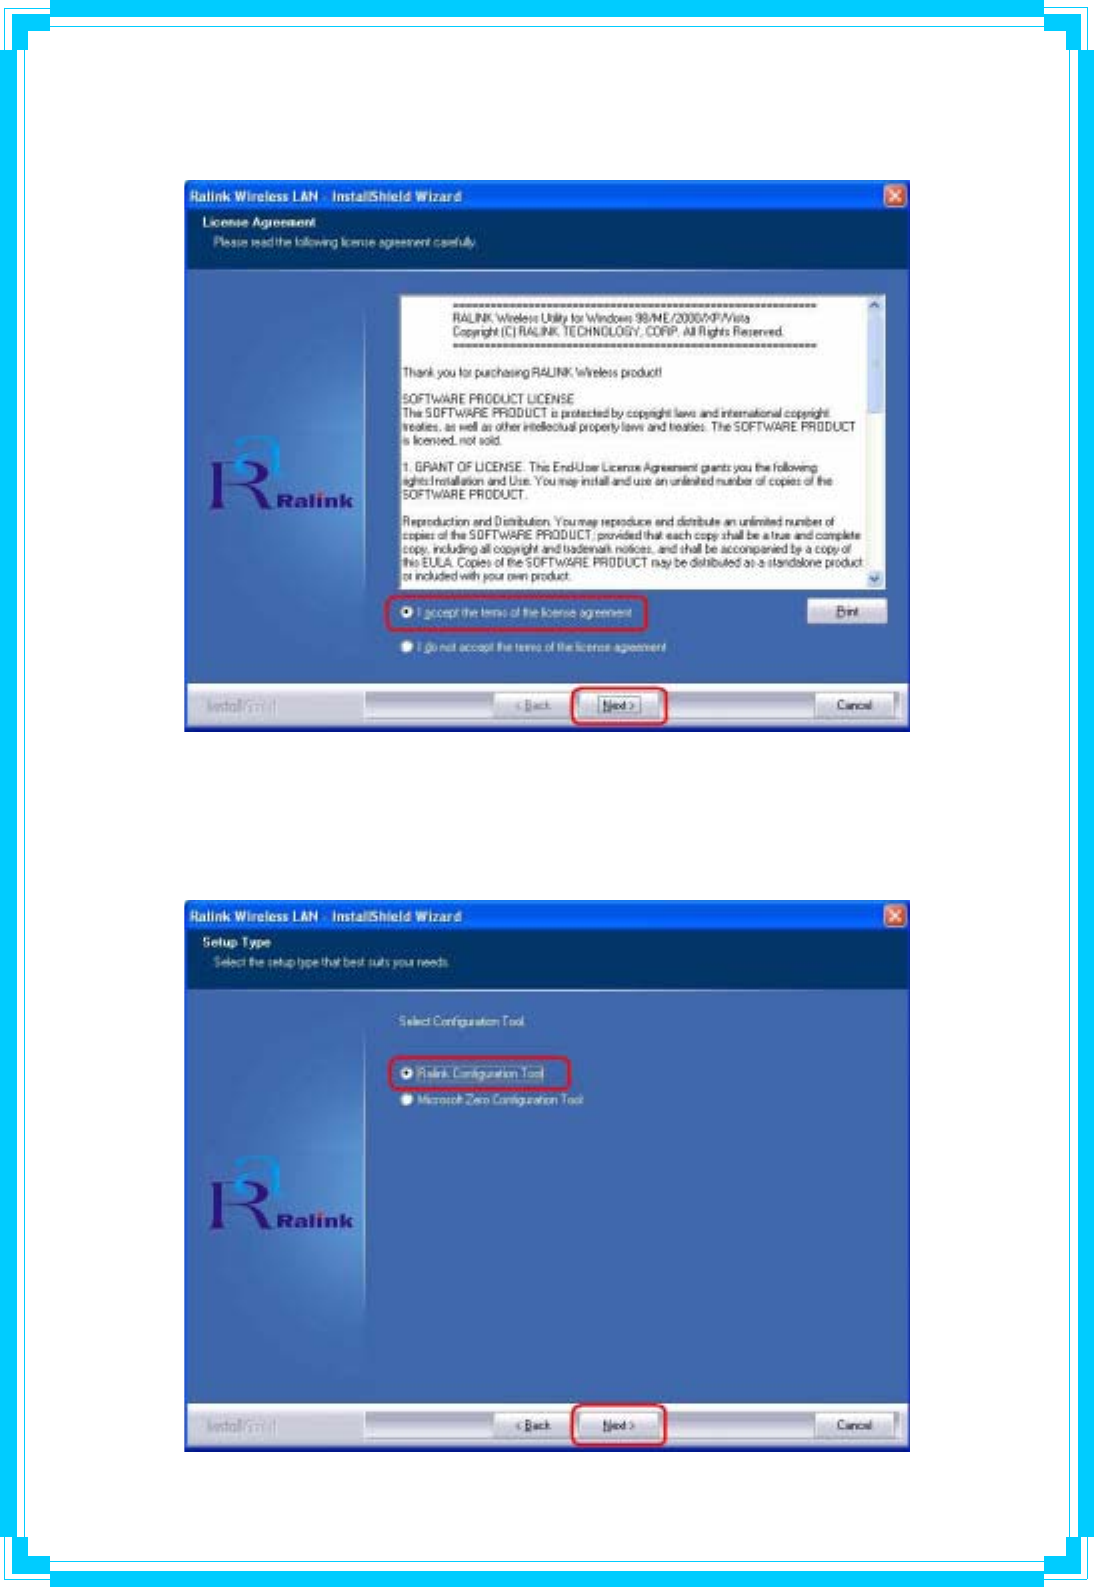
STEP2: Insert Installation CD into CD-ROM drive, windows below will appear. Click Install
Driver & Utility to begin device driver installation.
7
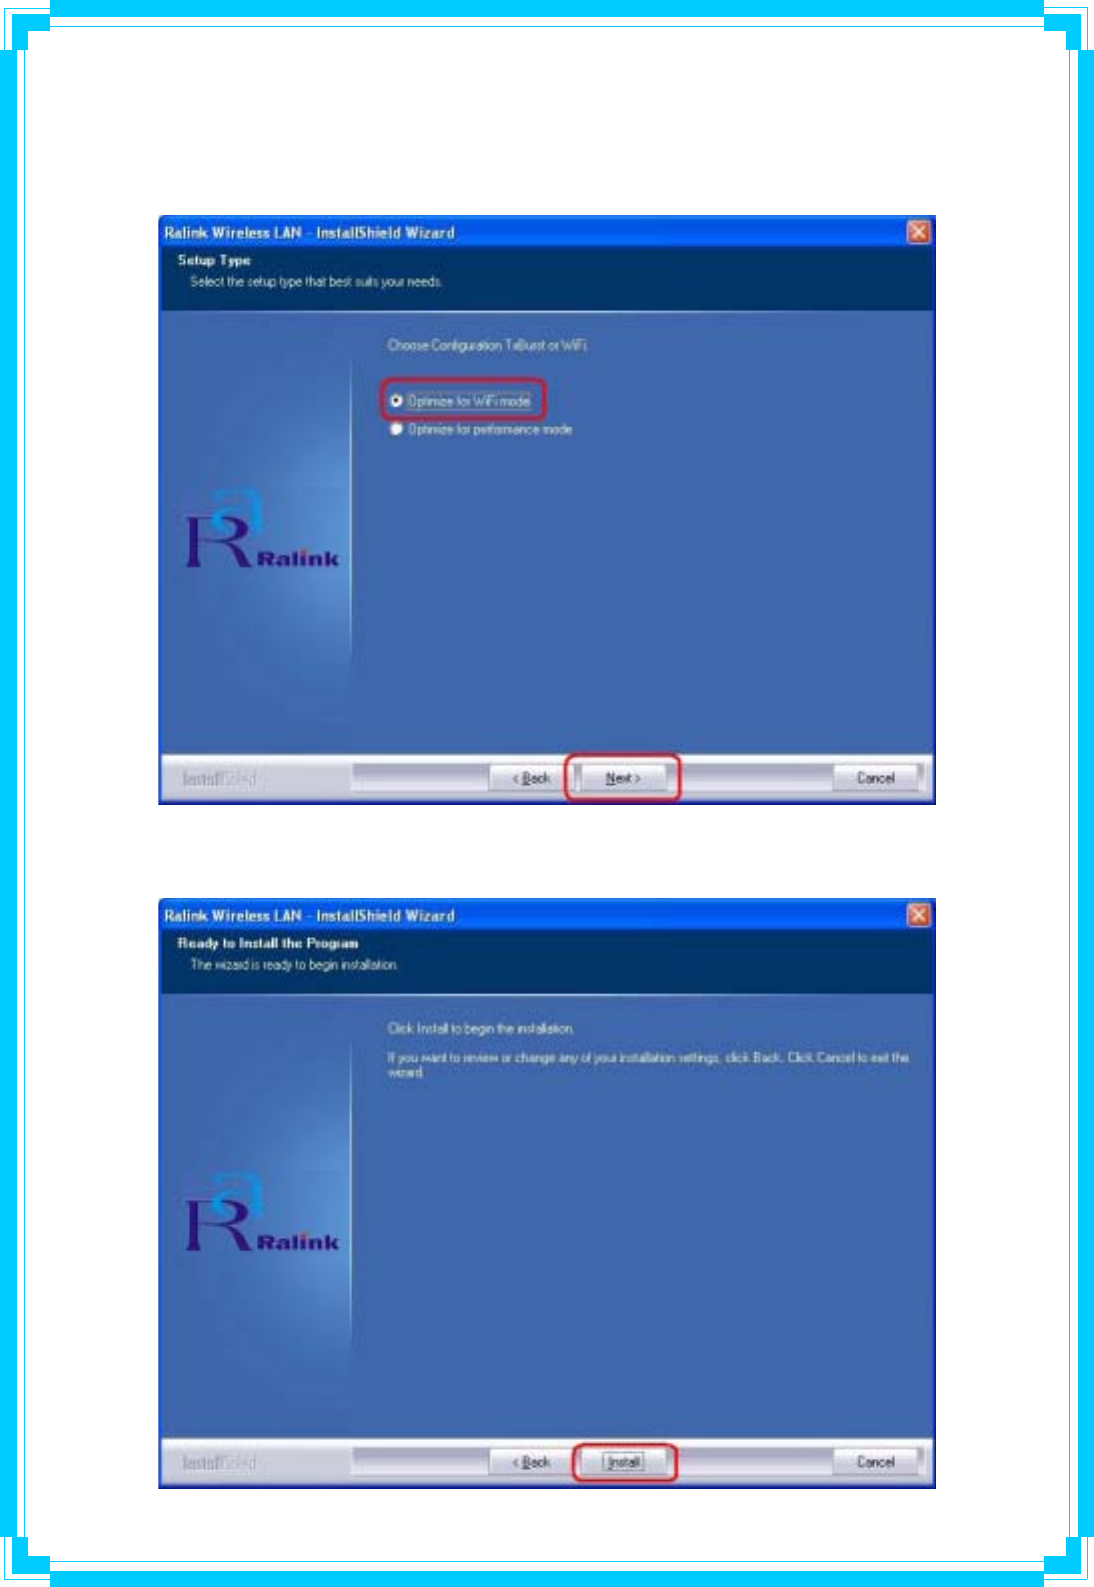
STEP3: Please read the following license agreement. Use the scroll bar to view the rest of this
agreement. Select I accept the terms of the license agreement and click Next to continue.
STEP4: In Windows XP, there is a Windows Zero Configuration Tool for you to setup
wireless adapter. You can choose to configure the adapter through the Microsoft Zero
Configuration Tool or the Ralink Configuration Tool. It is recommended to choose the
Ralink Configuration Tool for the adapter. Click Next to continue.
8
STEP5: If you need the adapter to operate with better performance, place choose Optimize
for performance mode to enable the Tx Burst mode. Or you can choose Optimize for WiFi
mode to run in standard wireless network.
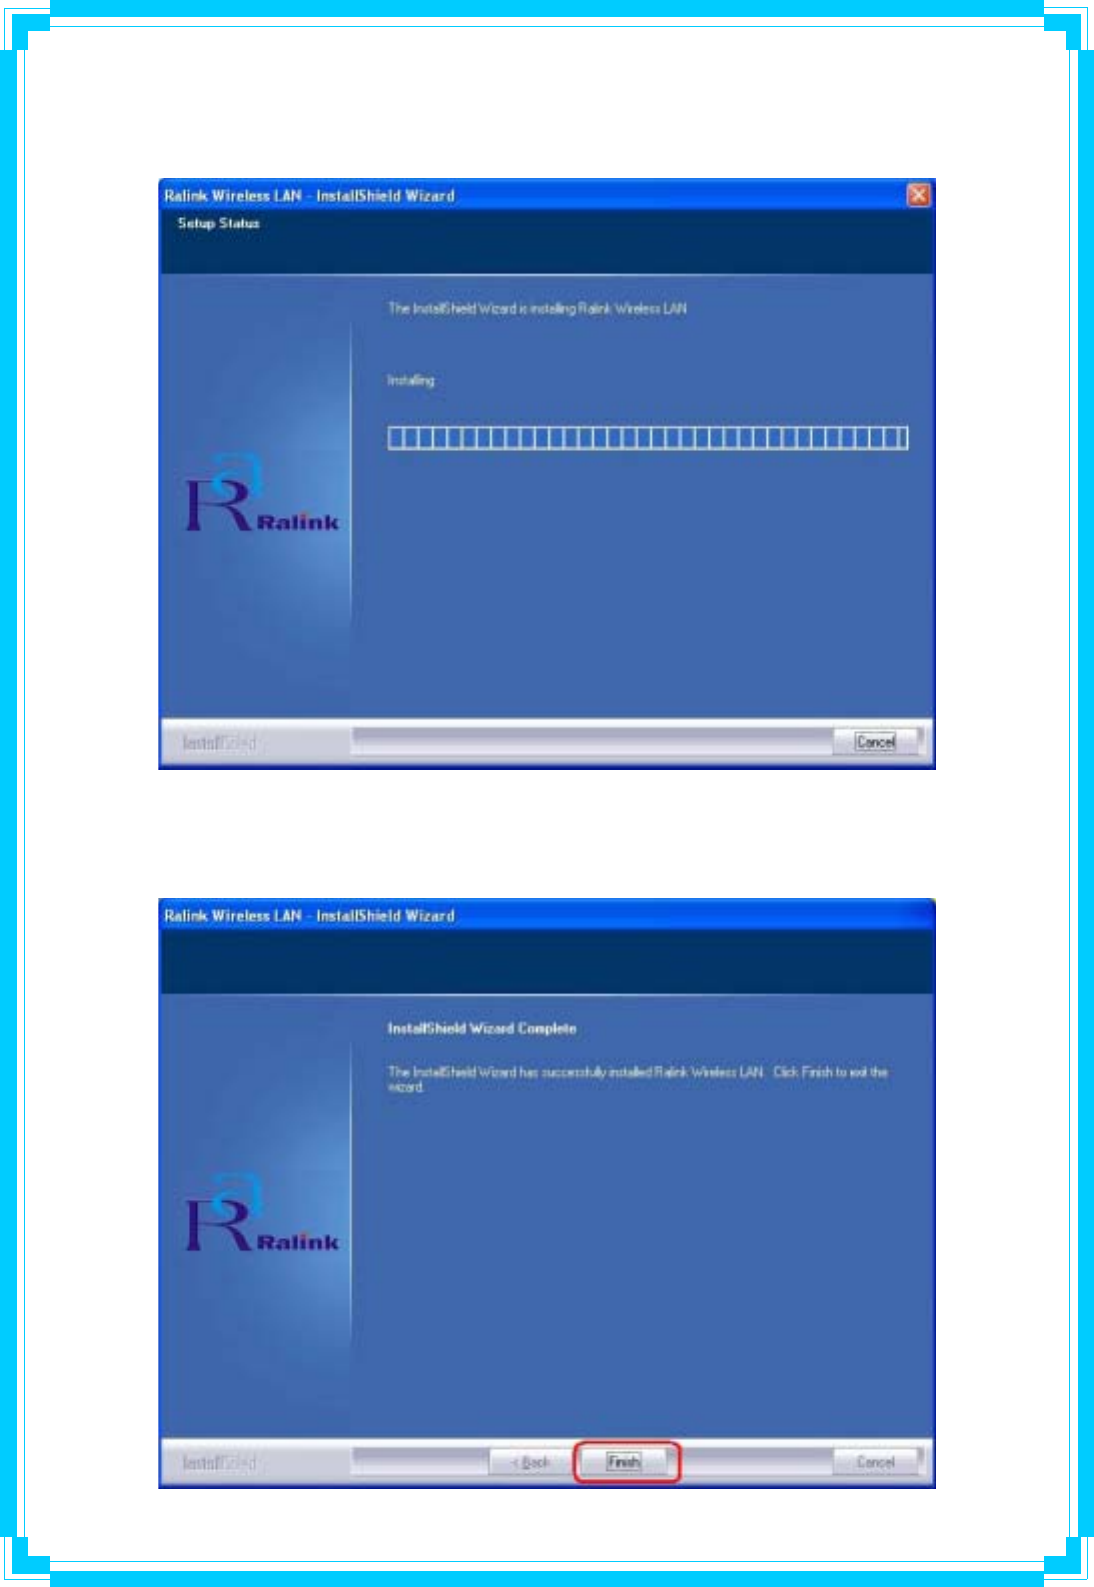
STEP6: Click Install to begin the installation.
9
STEP7: Please wait for a while during the adapter is configuring your new software
installation.
STEP8: After the setup wizard has successfully installed wireless LAN, click Finish to exit the
wizard.
10
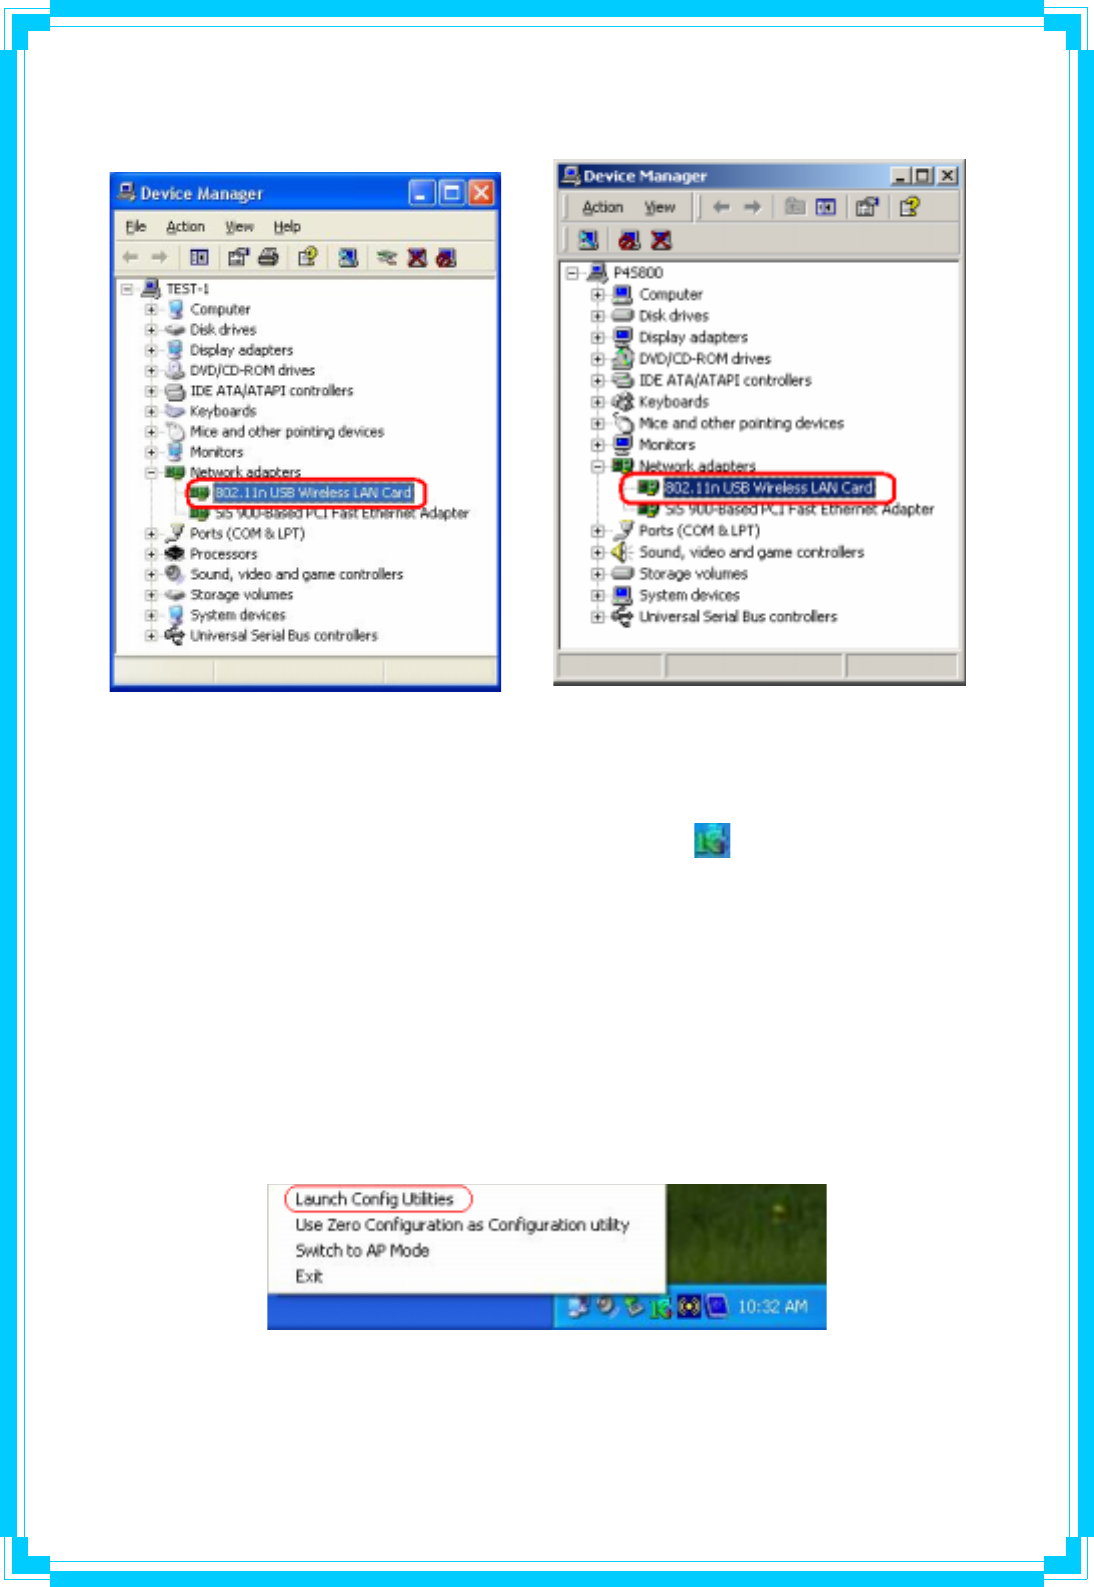
To check if the adapter is properly installed, you can right-click My Computer Æ choose
Properties Æ click Device Manager.
(For Widows XP) (For Widows 2000)
The Configuration Utility appears as an icon on the system tray of Windows while the adapter
is running. You can open the utility by double-click on the icon.
Right-click the icon, there are some items for you to operate the configuration utility,
zLaunch Config Utilities Æ Select this option to open the Configuration Utility tool.
zUse Zero Configuration as Configuration utilityÆ Select this option to use Windows
XP built-in wireless configuration utility (Windows Zero Configuration) to configure to
card.
zSwitch to AP Mode Æ Select this option to change to AP mode.
zExit Æ Select Exit to close the Configuration Utility tool.
11
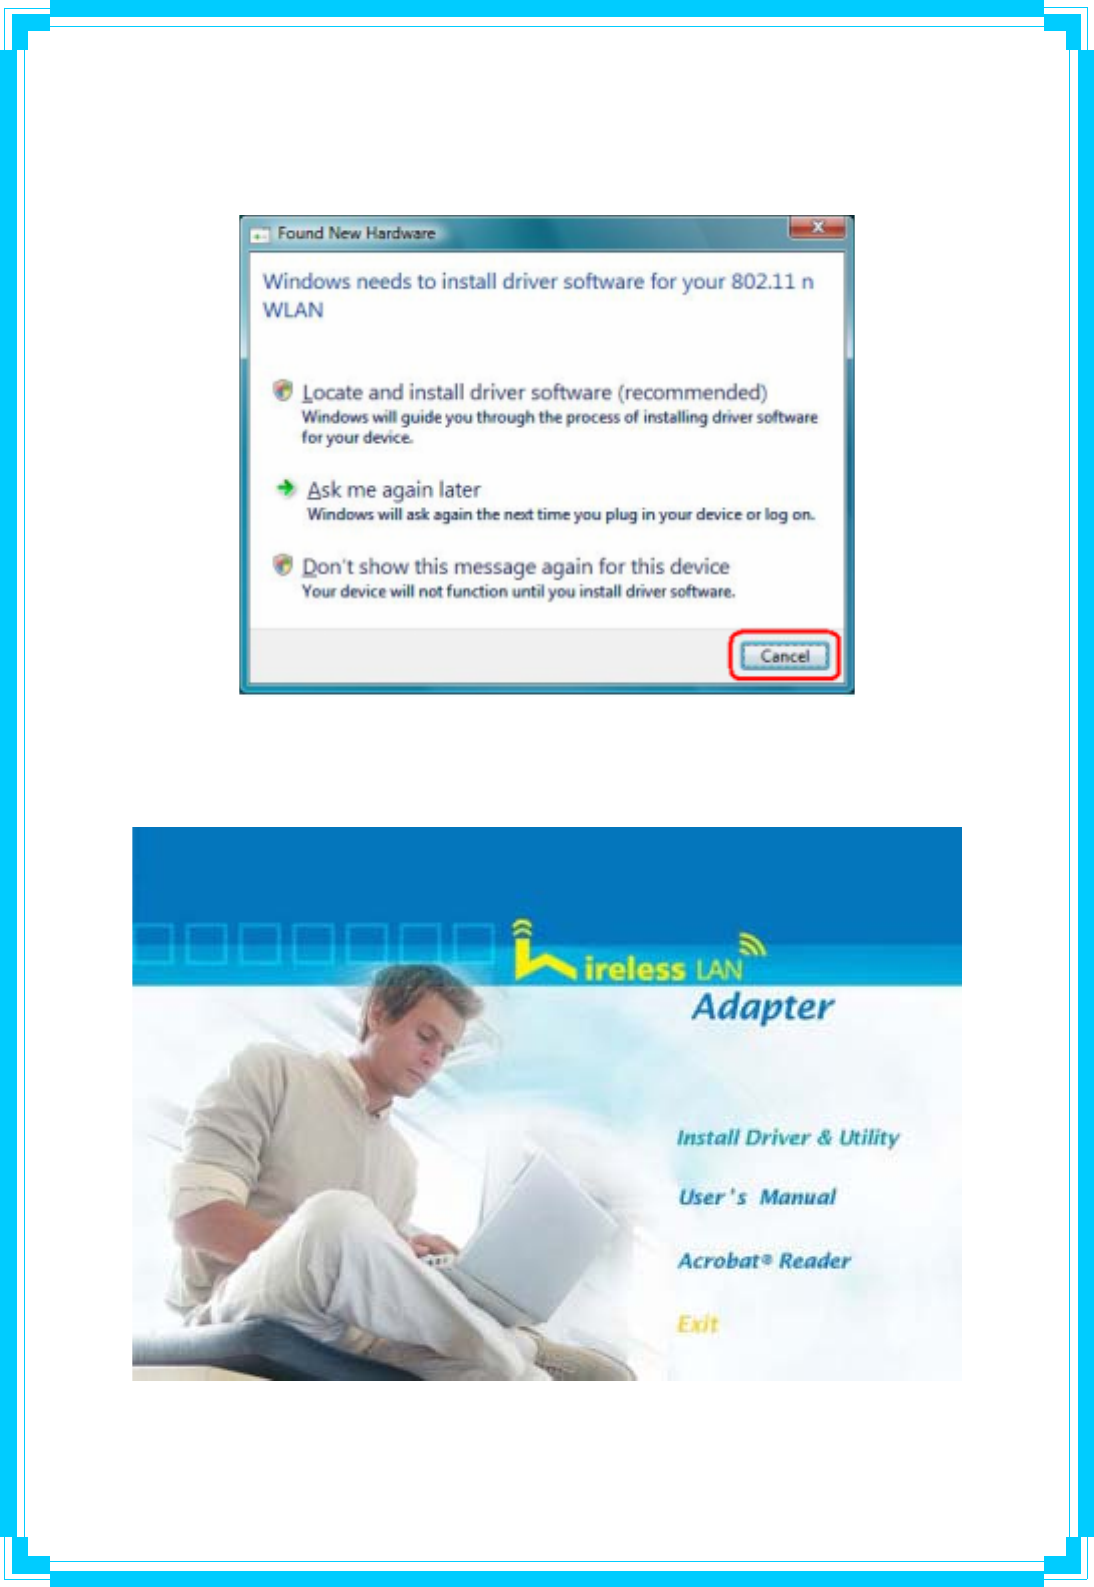
2.2 For Vista
STEP1: The Found New Hardware Wizard below will appear after the USB adapter is
installed. Please click Cancel to continue.
STEP2: Insert Installation CD into CD-ROM drive, windows below will appear. Click Install
Driver & Utility to begin device driver installation.
12
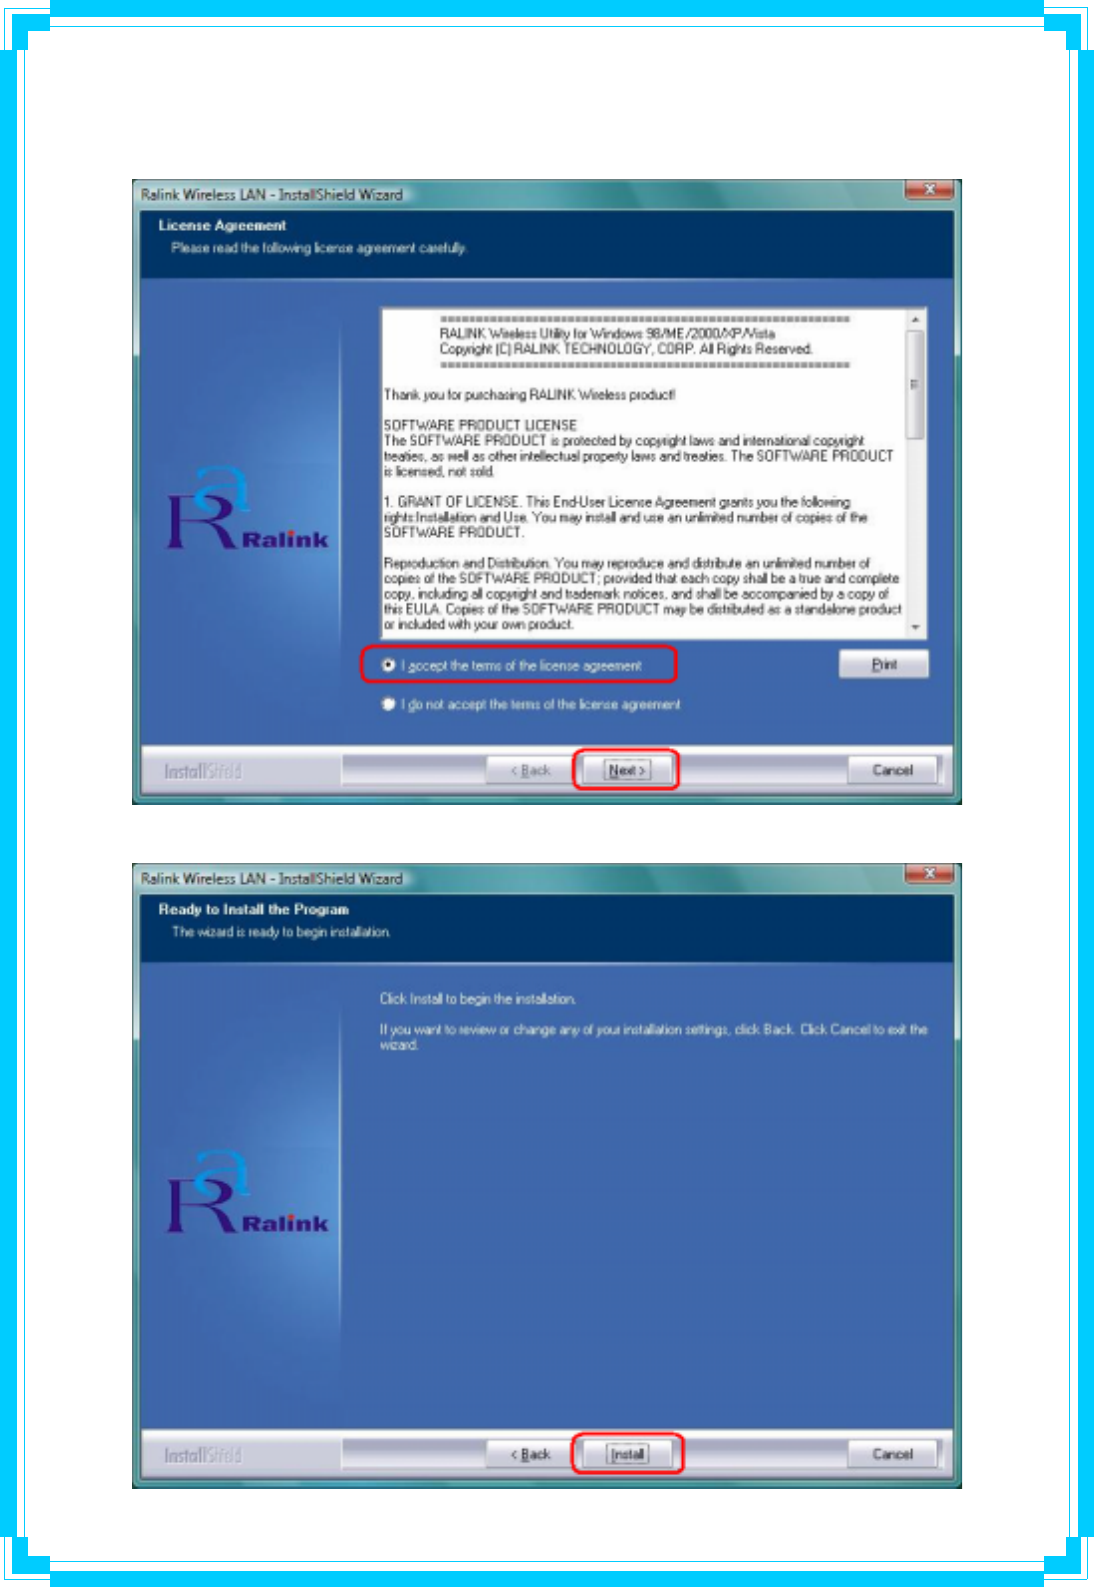
STEP3: Please read the following license agreement. Use the scroll bar to view the rest of this
agreement. Select I accept the terms of the license agreement and click Next to continue.
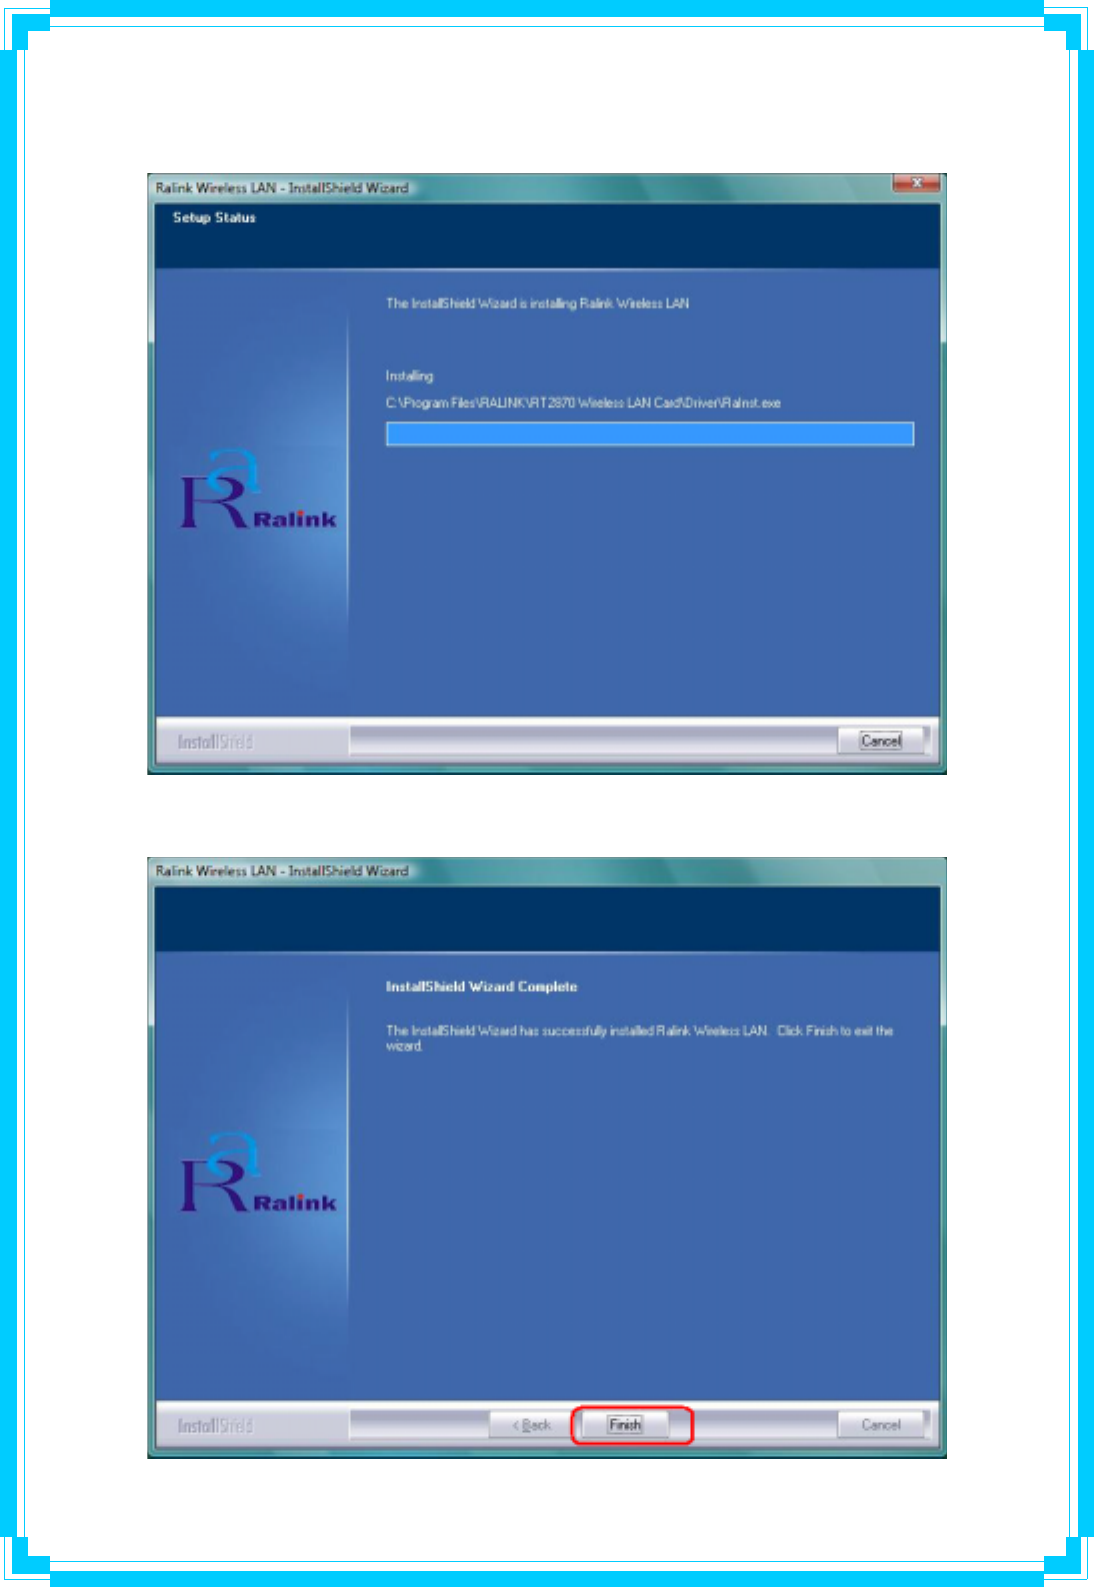
STEP4: Click Install to begin the installation.
13
STEP5: Please wait for a while during the adapter is configuring your new software
installation.
STEP8: After the setup wizard has successfully installed wireless LAN, click Finish to exit the
wizard.
14
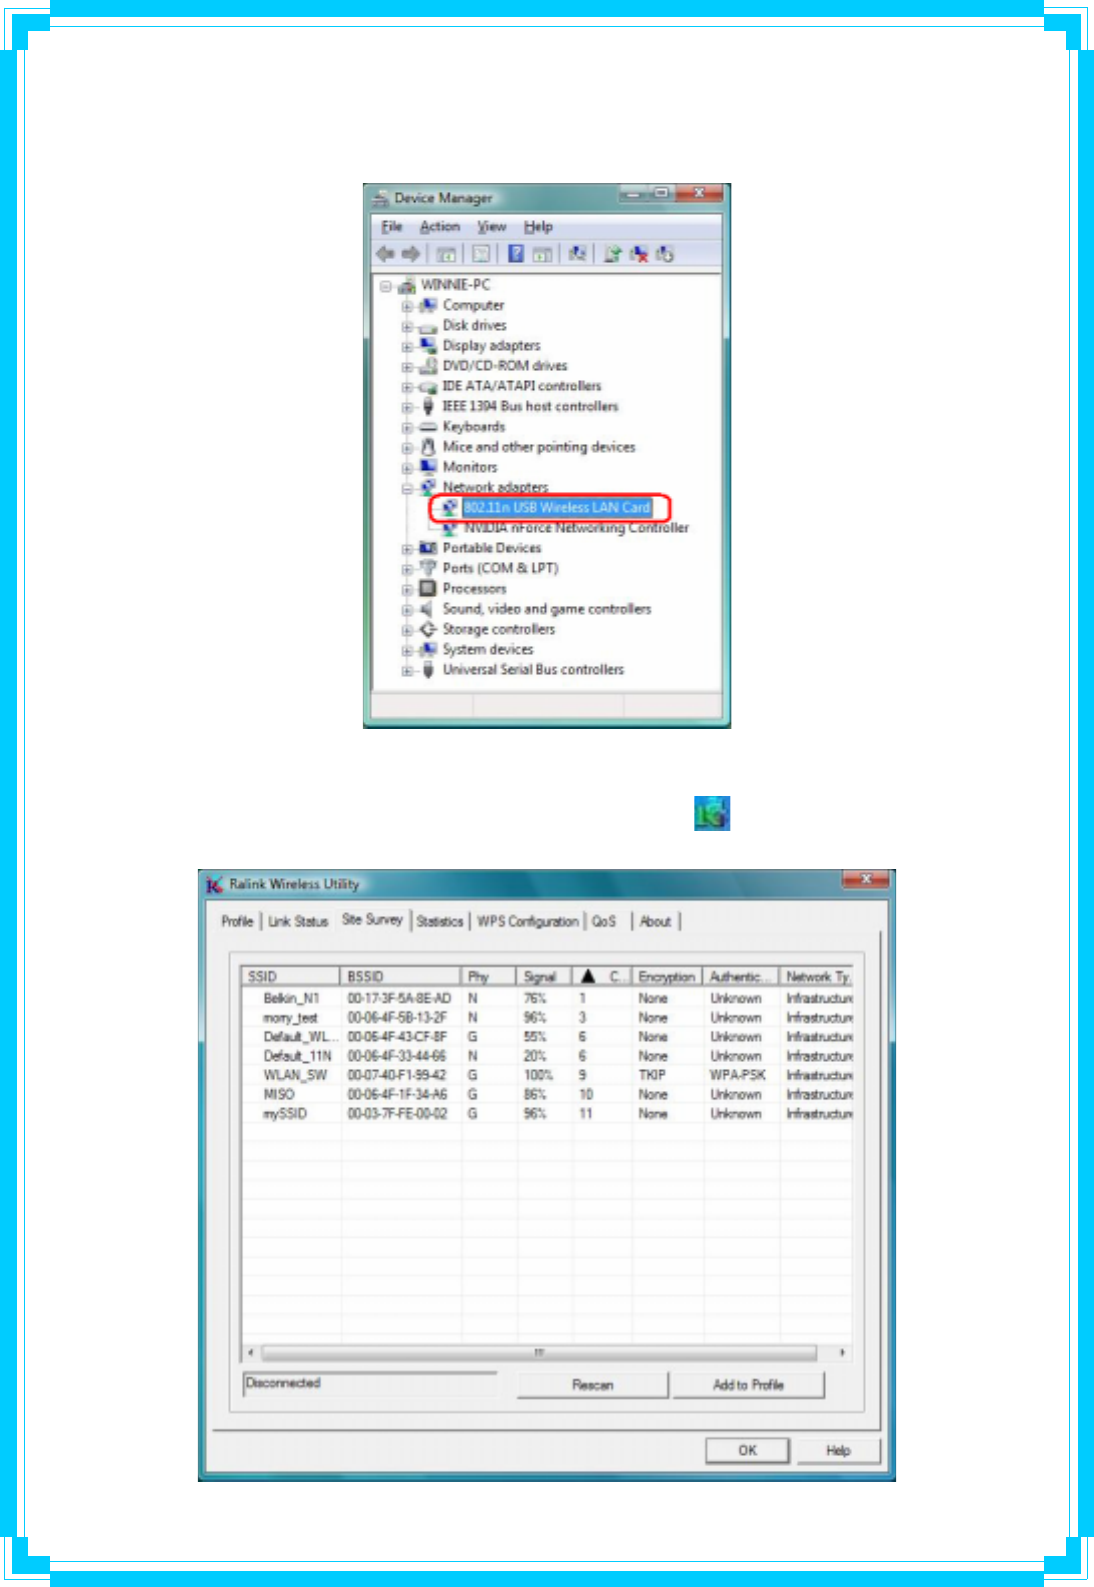
To check if the adapter is properly installed, you can right-click My Computer Æ choose
Properties Æ click Device Manager.
The Configuration Utility appears as an icon on the system tray of Windows while the adapter
is running. You can open the utility by double-click on the icon.
15
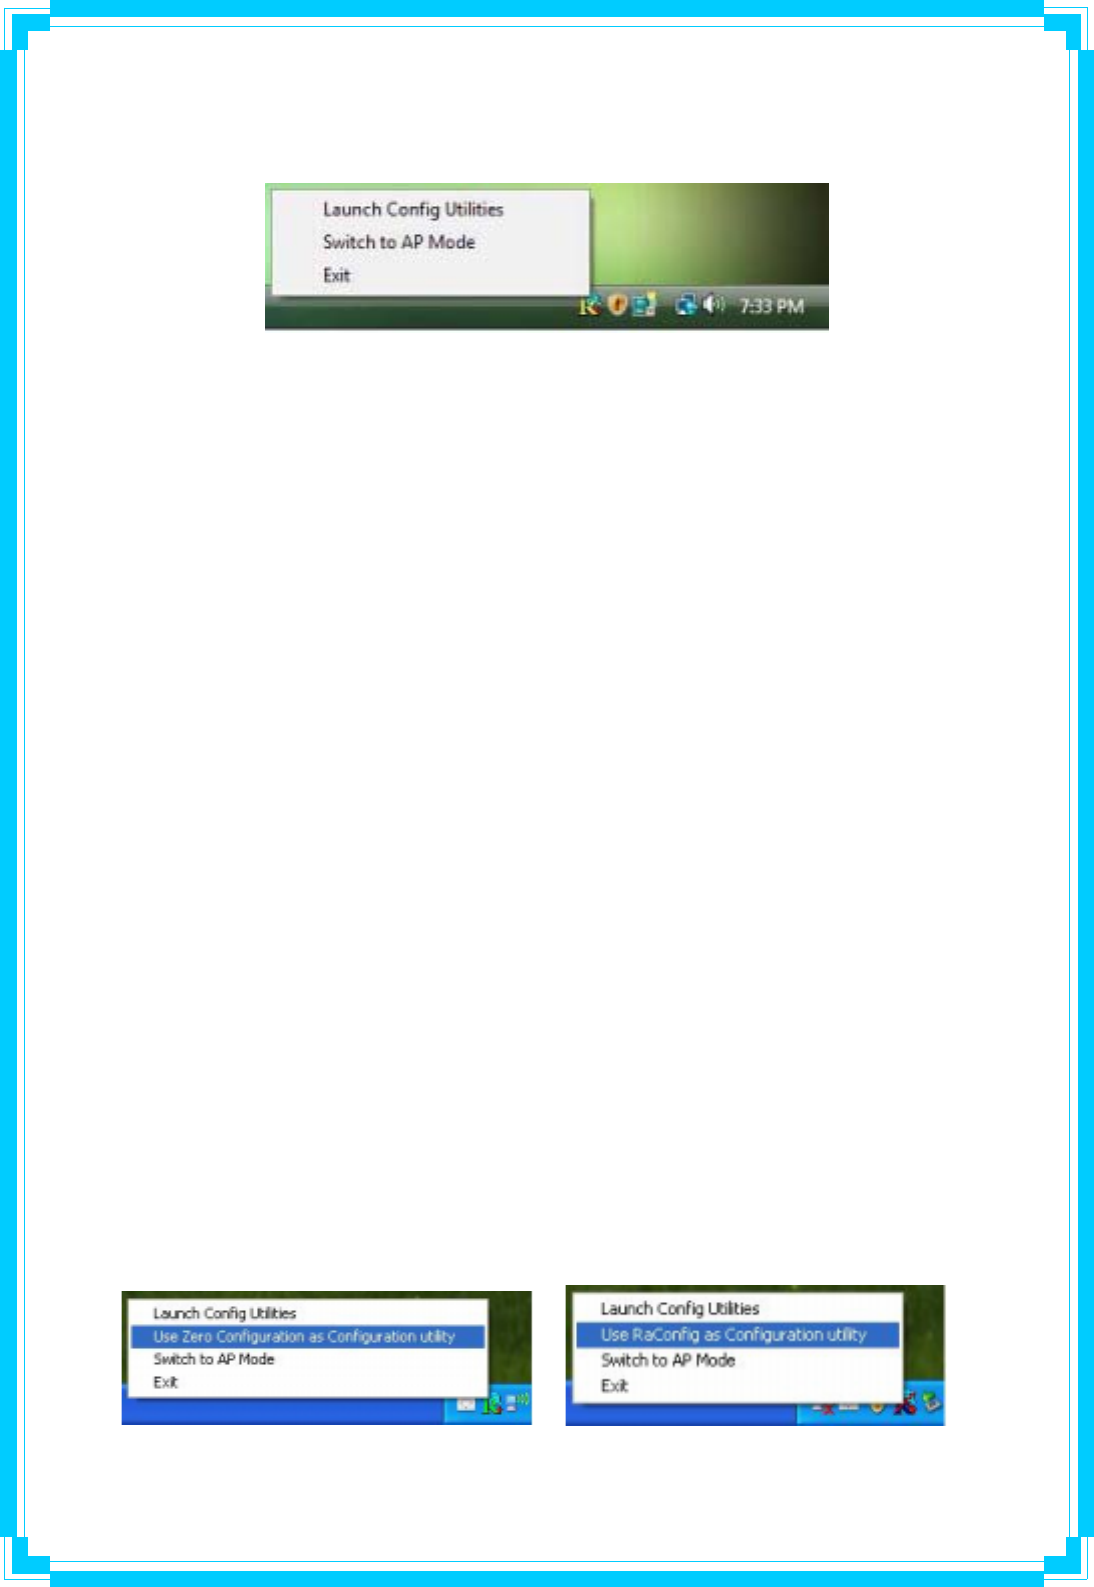
Ralink wireless utility needs to cooperate with Microsoft AutoConfig service in order to perform
scanning and connecting actions, so the AutoConfig service should be enable beforehand.
Control Menu Î Once Ralink wireless utility is minimized, the user can click the Ralink icon
on the taskbar to bring up the control menu.
zLaunch Config Utilities Æ Restore Ralink wireless utility window.
zSwitch to AP Mode Æ Select this option to change to AP mode.
zExit Æ Select Exit to close the Configuration Utility tool.
3. Wireless Network Configuration Utility
3.1 For Windows XP & 2000
The Configuration Utility is a powerful application that helps you to configure the Wireless LAN
adapter and monitor the link status and statistics during the communication process.
When the adapter is installed, the configuration utility will be displayed automatically. This
adapter will auto connect to wireless device which has better signal strength and no wireless
security setting.
In Windows XP, it provides wireless configuration utility named “Windows Zero configuration”
which provides basic configuration function for Ralink Wireless NIC, Ralink’s Utility (RaUI)
provides WPA supplicant functionality. To make it easier for user to select the correct utility,
RaUI will let user make the selection when it first runs after windows XP boots.
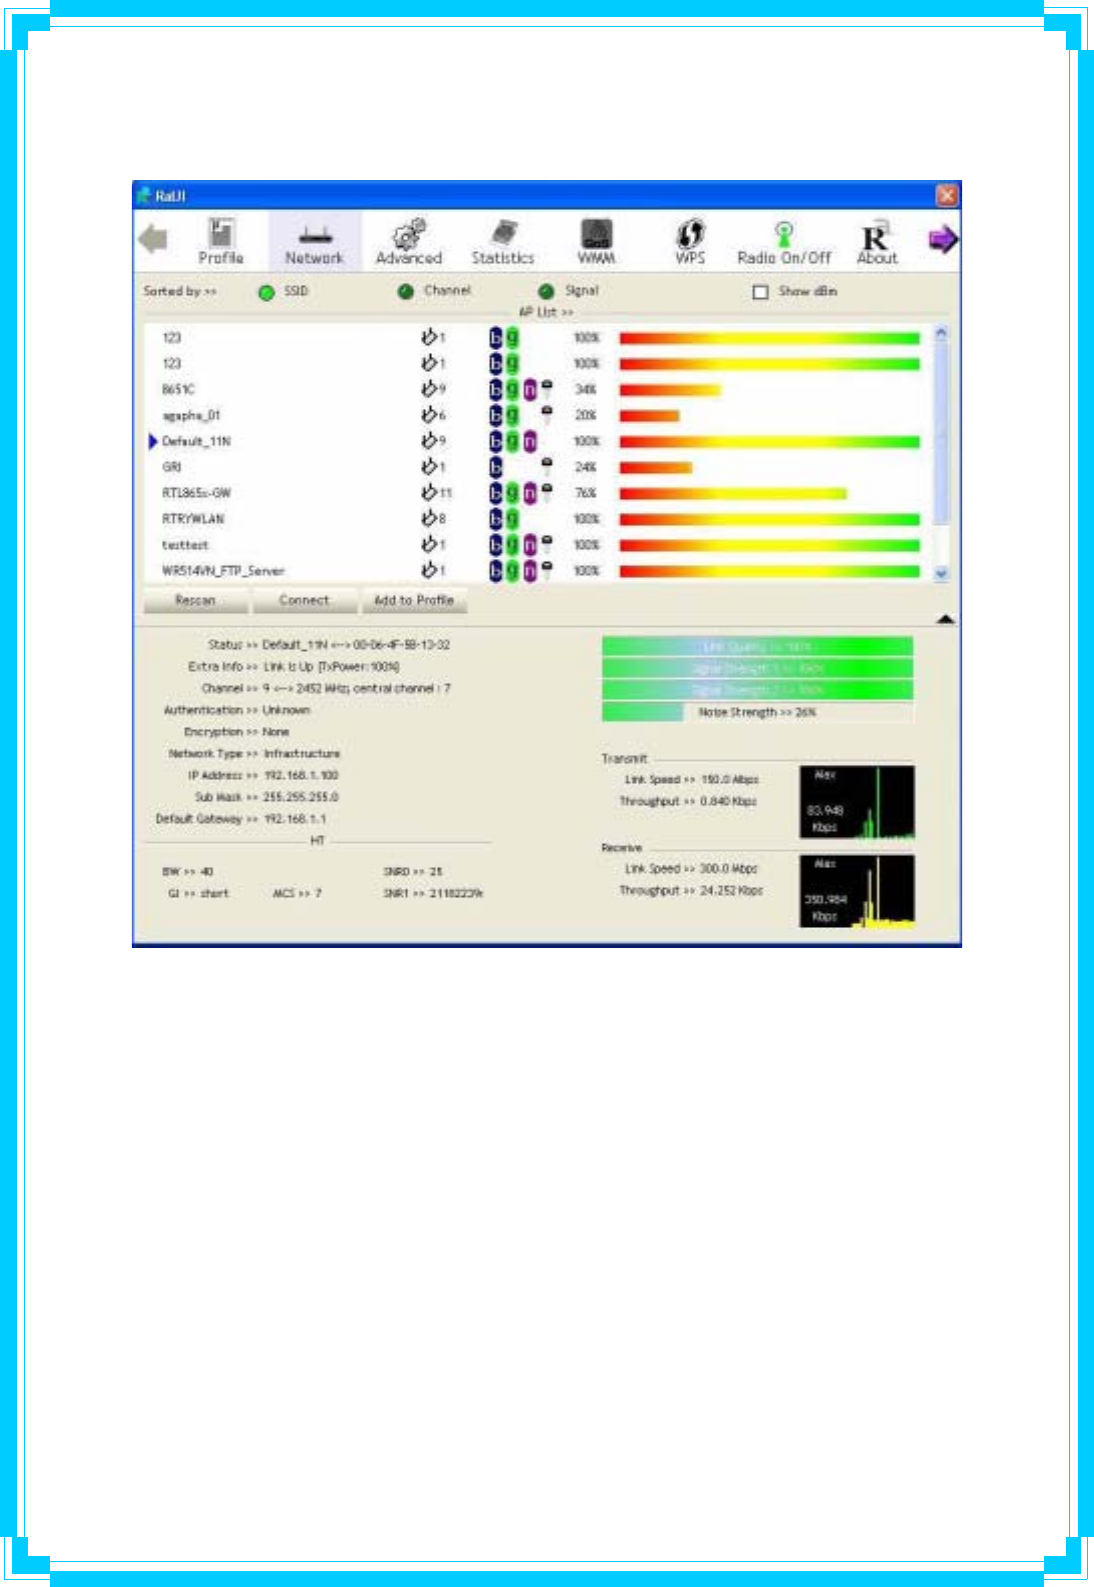
RaUI can co-exist with WZC (Windows Zero Configuration). When coexisting with WZC,
RaUI only provides monitoring function, such as link status, network status, statistic counters,
advance feature status, WMM status and WPS status. It won’t interfere with WZC’s
configuration or profile functions. Please see below picture: To select WZC or RaUI
16
If “Use Zero Configurations as Configuration utility” is selected, please continue on the
section. Below picture shows that the RaUI status when WZC is active as main control utility.
When activating WZC, there are couple different on RaUI status compare to the without WZC
running:
(1) Profile button will be gray, profile function is removed since the NIC is controlled by WZC.
(2) The connect and add profile function will be gray. The reason is same as the first
difference.
17
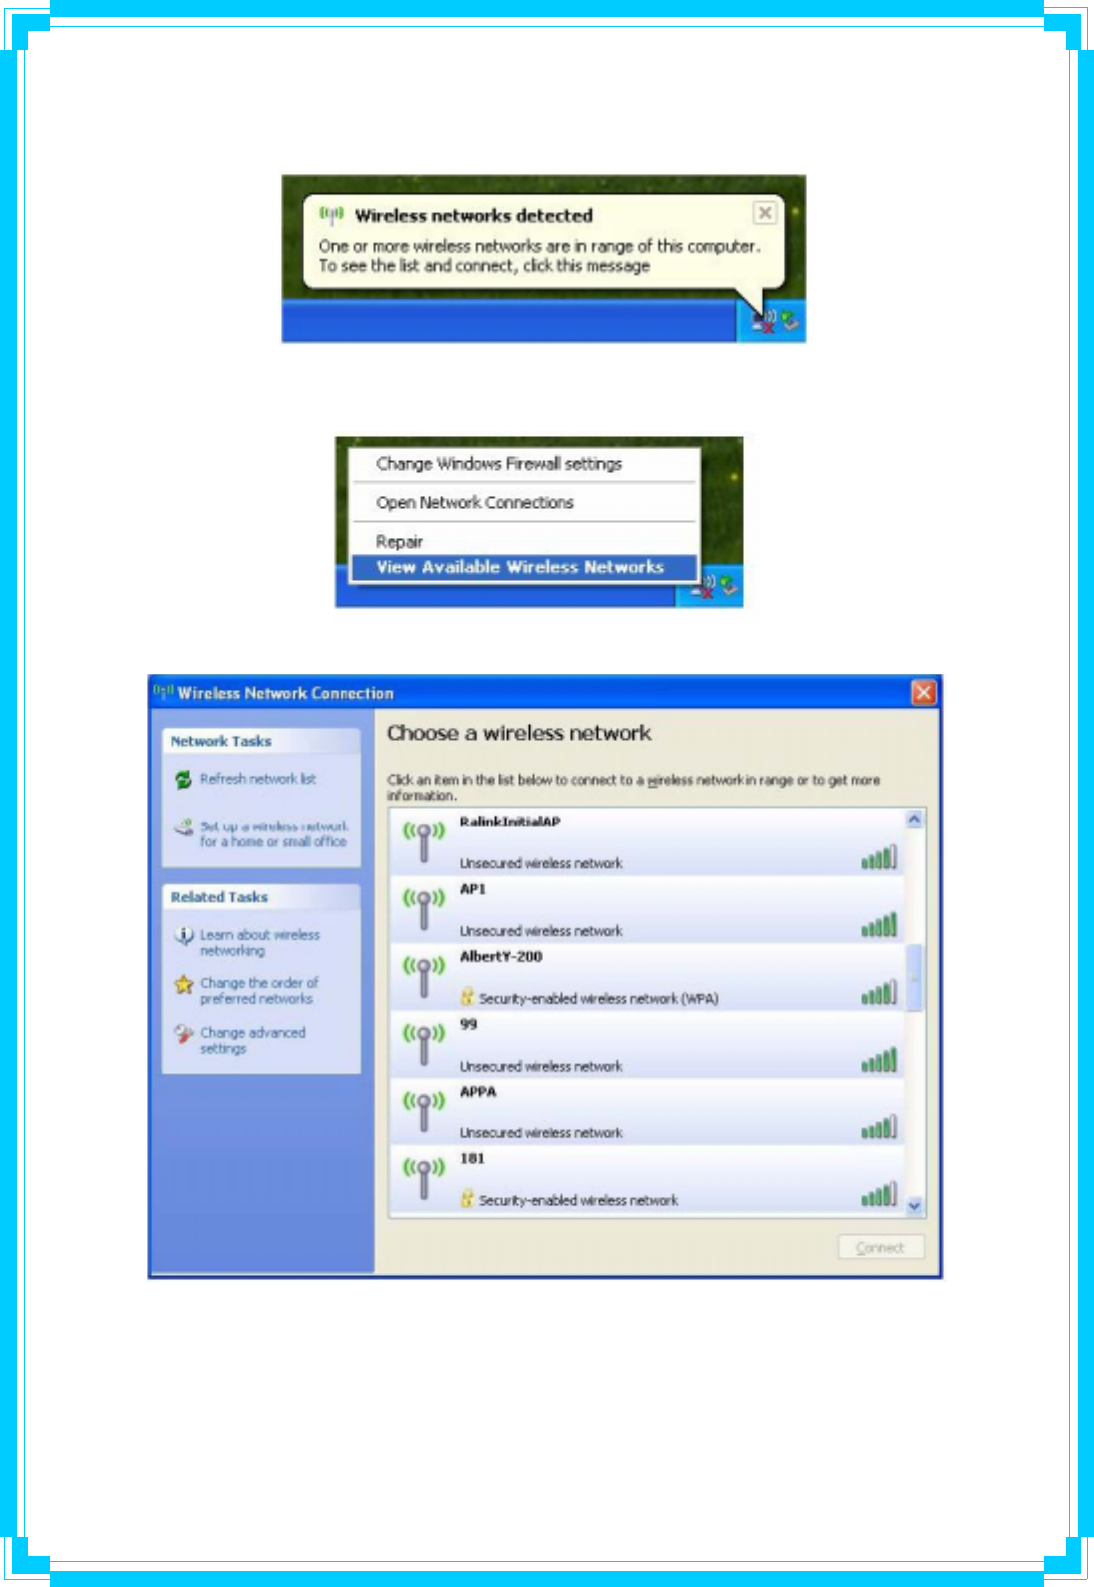
[Use WZC to configure wireless adapter]
STEP1: If connection is lost or not connected, the status prompt as below will pop up.
STEP2: Right-click the network connection icon in the task bar.
STEP3: Select “View Available Wireless Networks” will pop up the dialog shown as below.
18
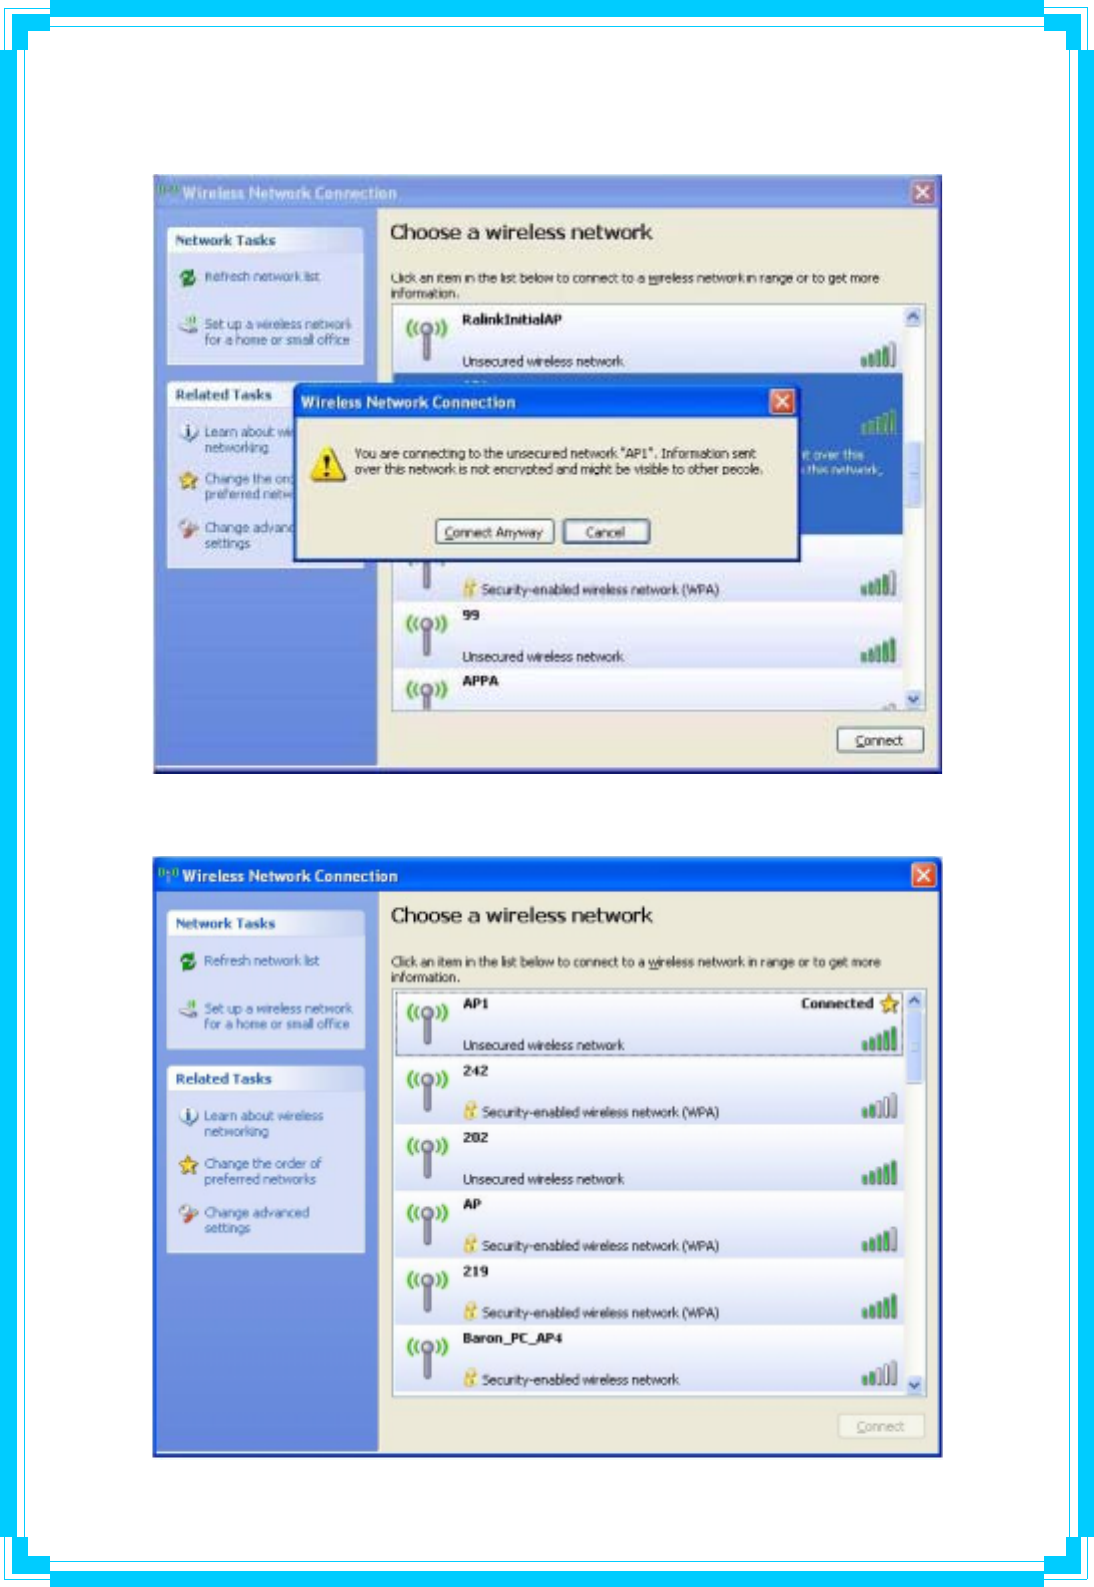
STEP4: Select intended AP and click “Connect” shown as below, then click “Connect
Anyway”.
STEP5: AP1 is successfully connected.
19
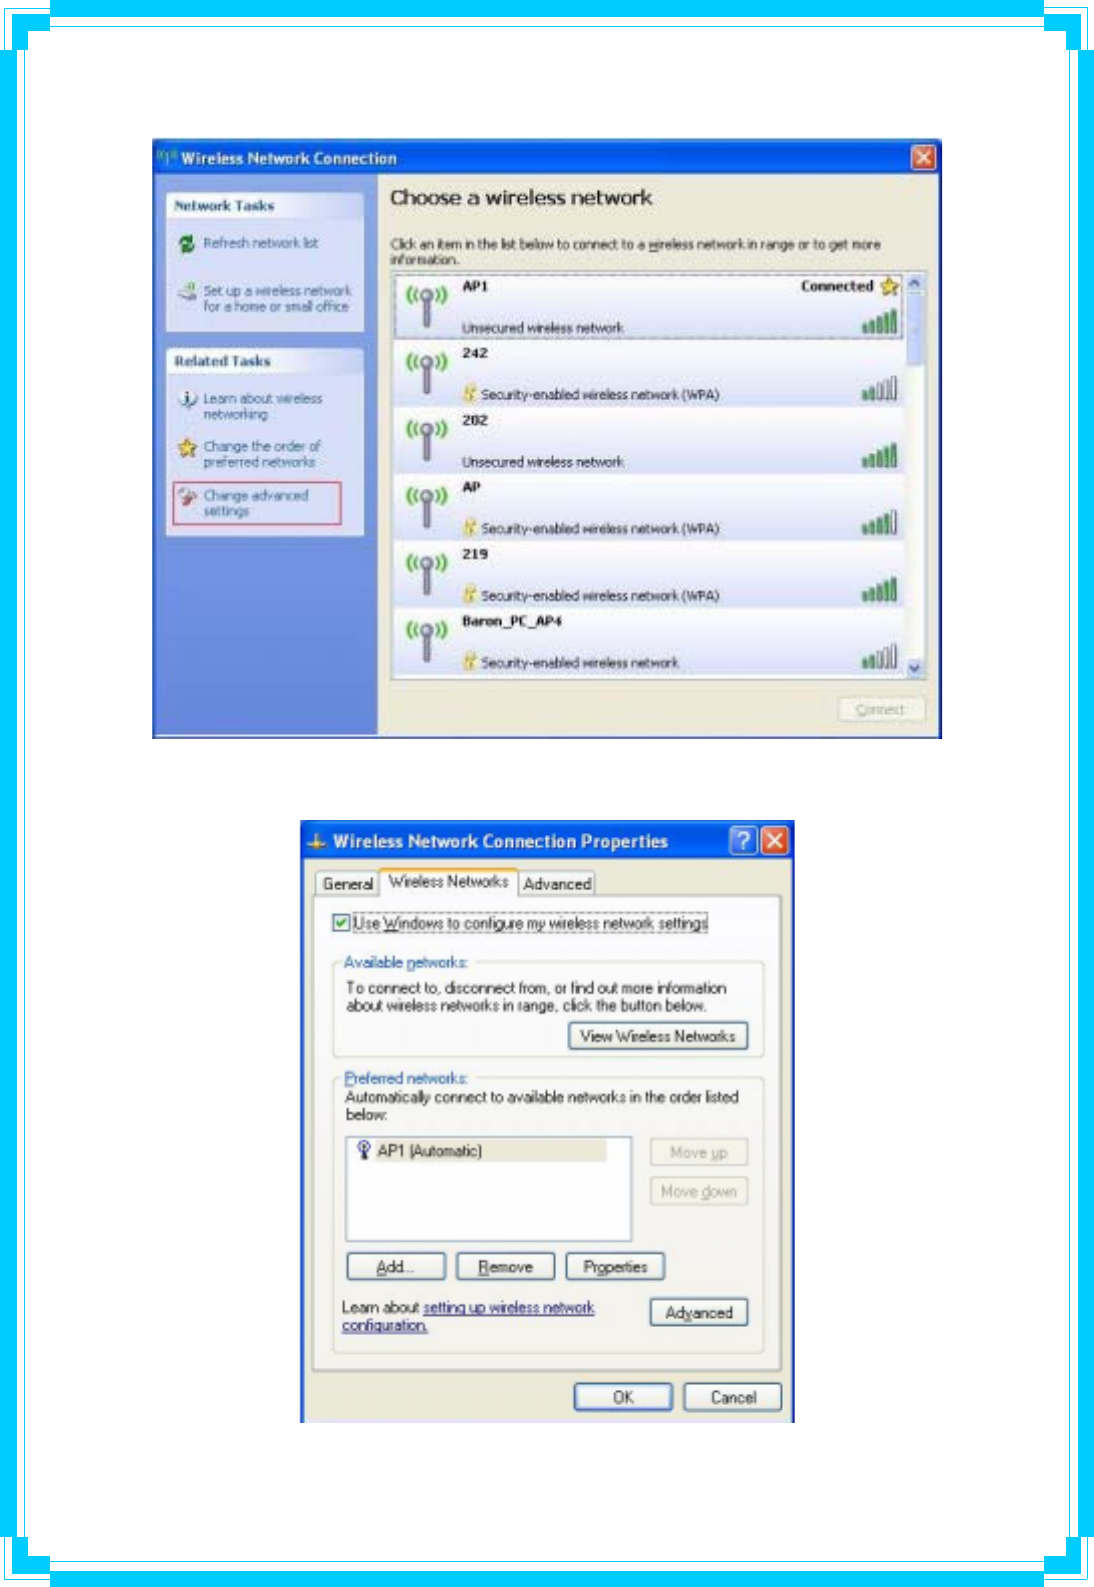
STEP6: If you want to modify information about AP, click “Change advanced settings”
STEP7: Choose “Wireless Networks” tab.
20
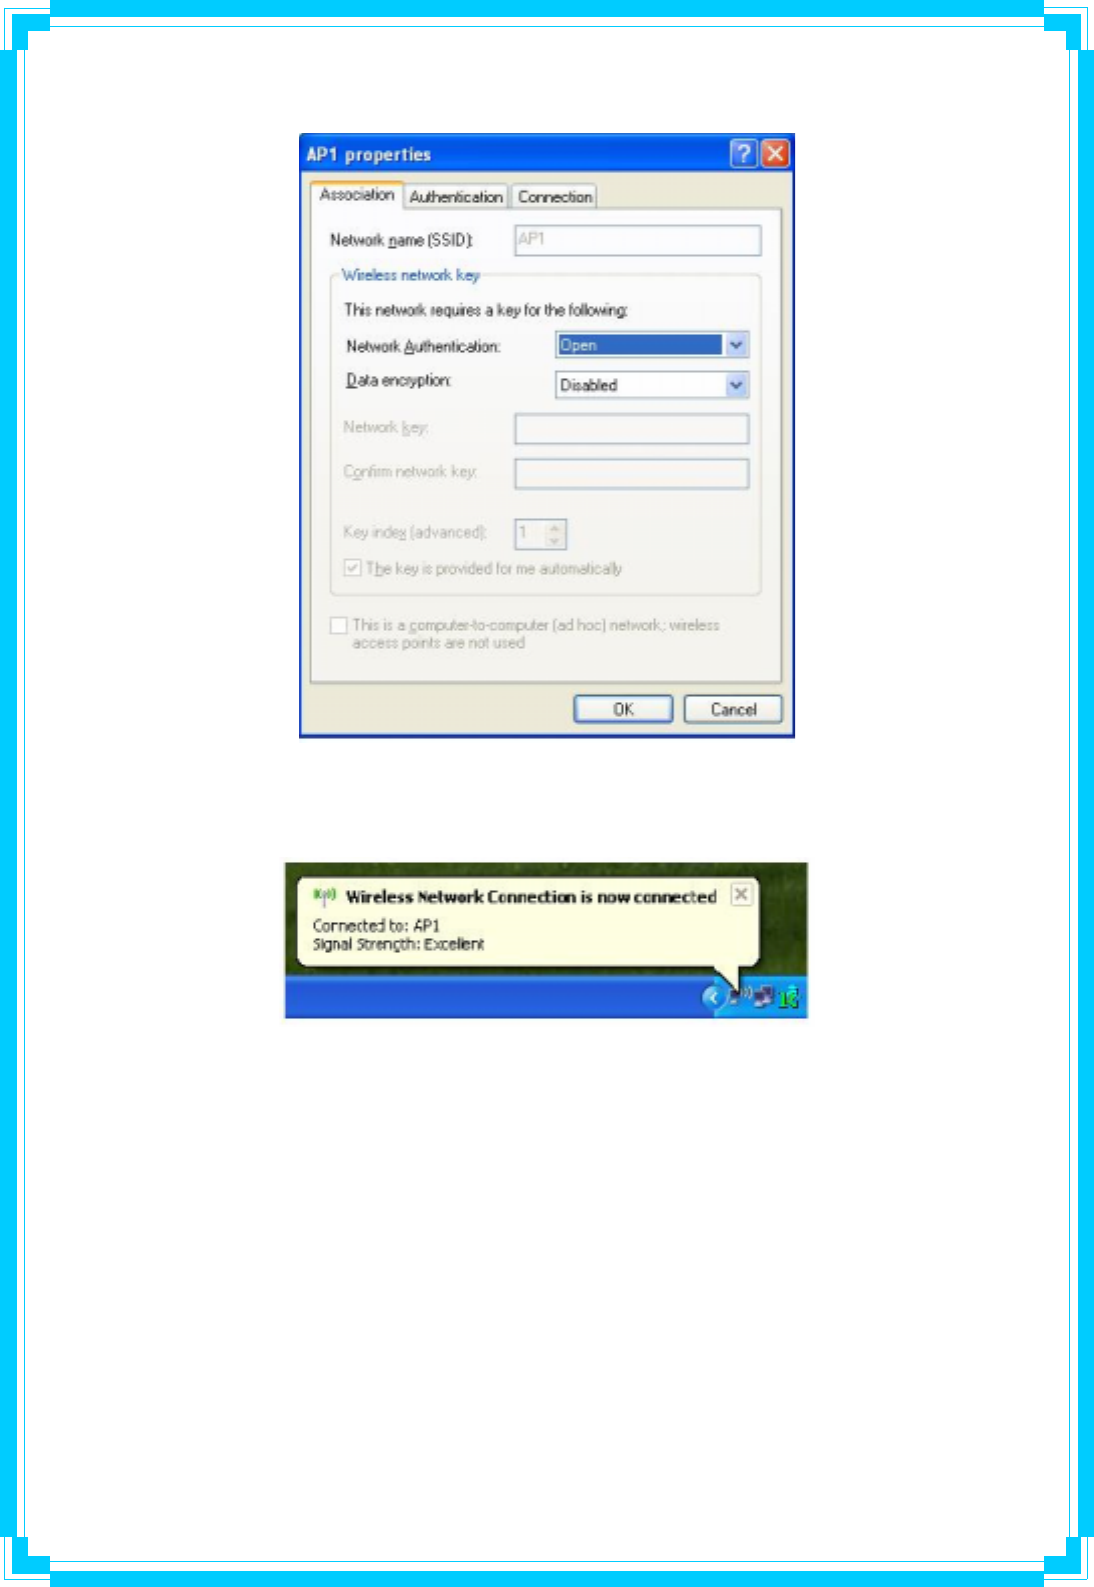
STEP8: Click “Properties” and then click “OK” button.
STEP9: After filling appropriate value, click “OK” button. And the status will prompt up as
below.
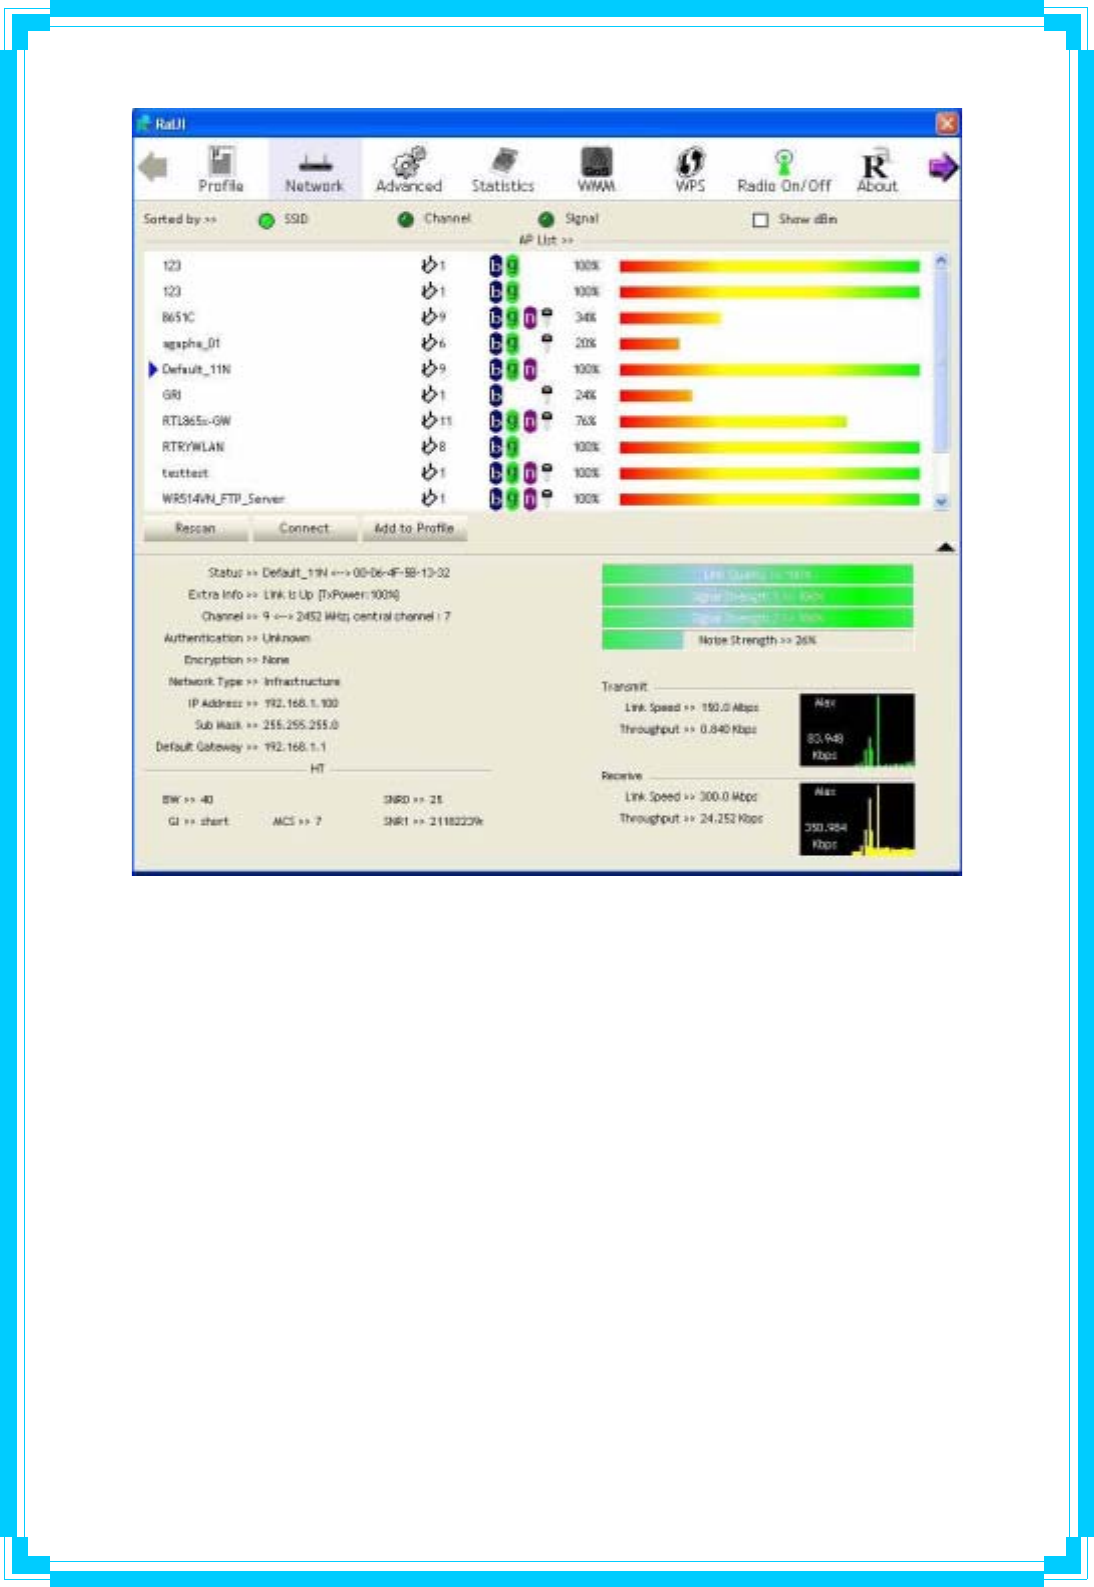
STEP10: Click the Ralink’s icon will bring up RaUI main window. User can find the surrounding
APs in the list. The current connected AP will also shown with the green icon indicated as
below screen. User may user the available tab to configure more advanced features provided
by Ralink’s wireless NIC.
21
3.1.1 Start
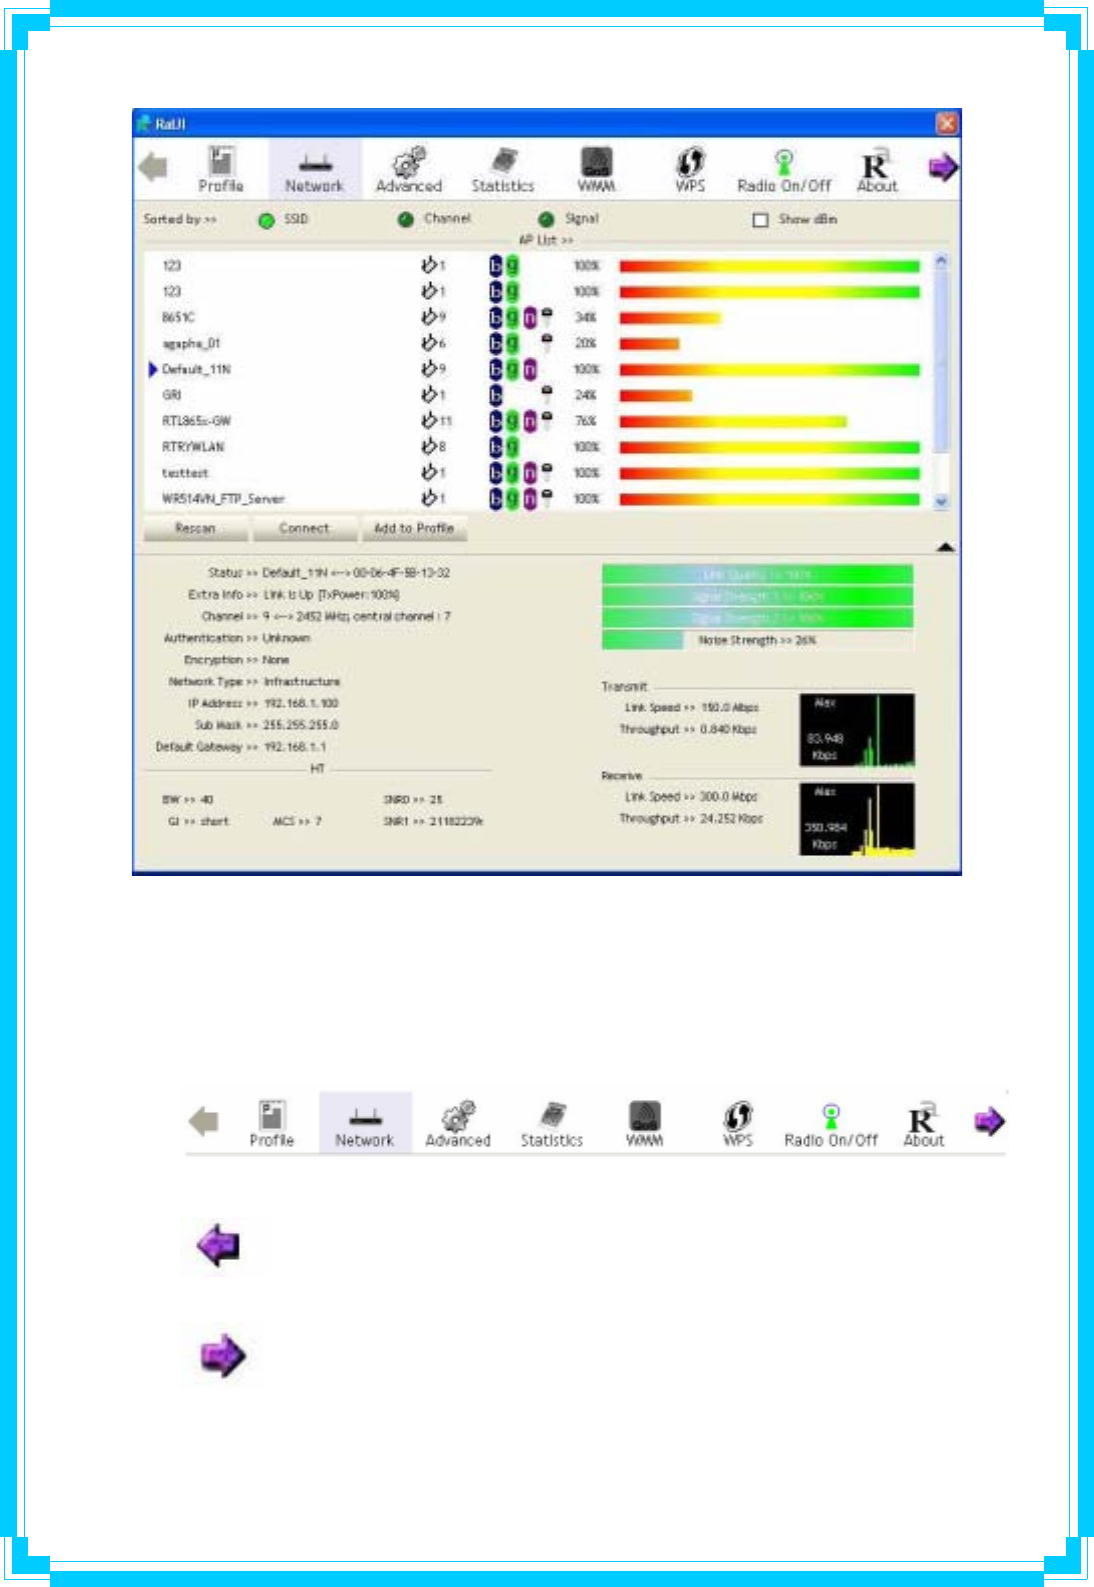
When starting RaUI, system will connect to the AP with best signal strength without setting
profile or matching profile setting. It will issue a scan command to wireless NIC. After two
seconds, the AP list will updated with the result of BSS list scan. The AP list include most used
fields, such as SSID, network type, channel used, wireless mode, security status and signal
percentage. The arrow icon indicates the connected BSS or IBSS network.
22
There are three sections in RaUI. These sections are briefly described as below.
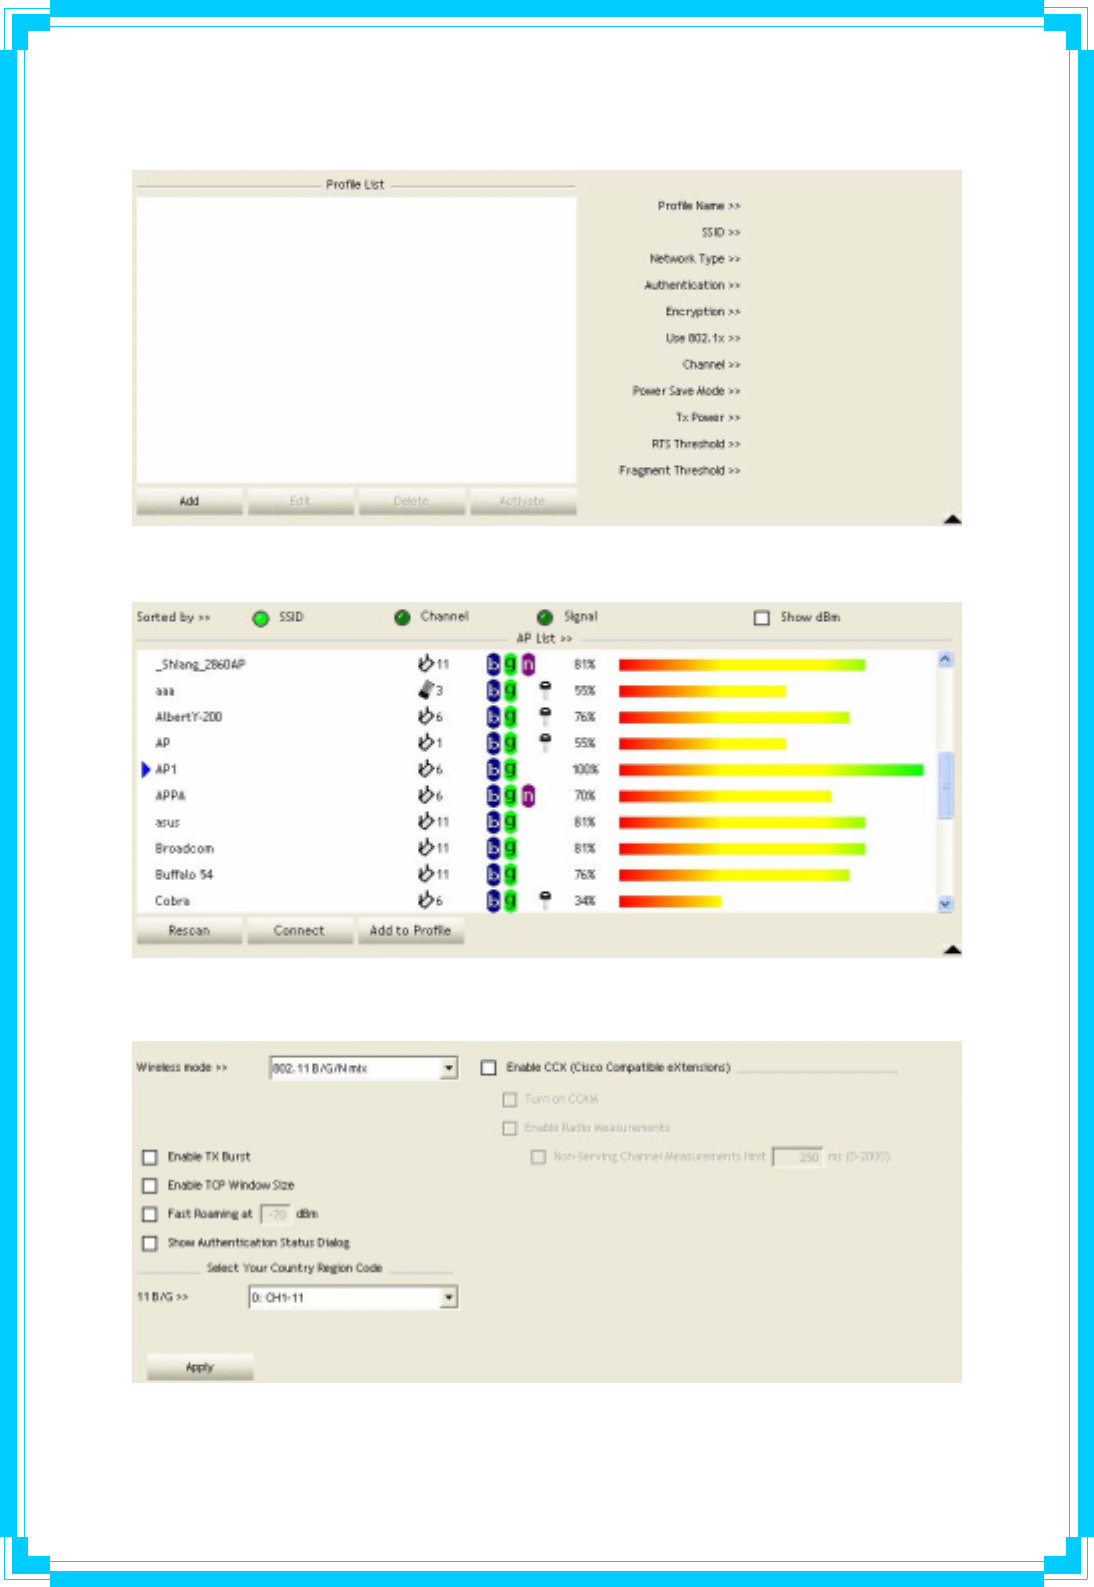
Button Section: include Profile page, Network page, Advanced page, Statistics
page, WMM page, WPS page, About button, Radio On/Off button and Help button.
ÎButton Section
Î Move to the Left
Î Move to the Right
23
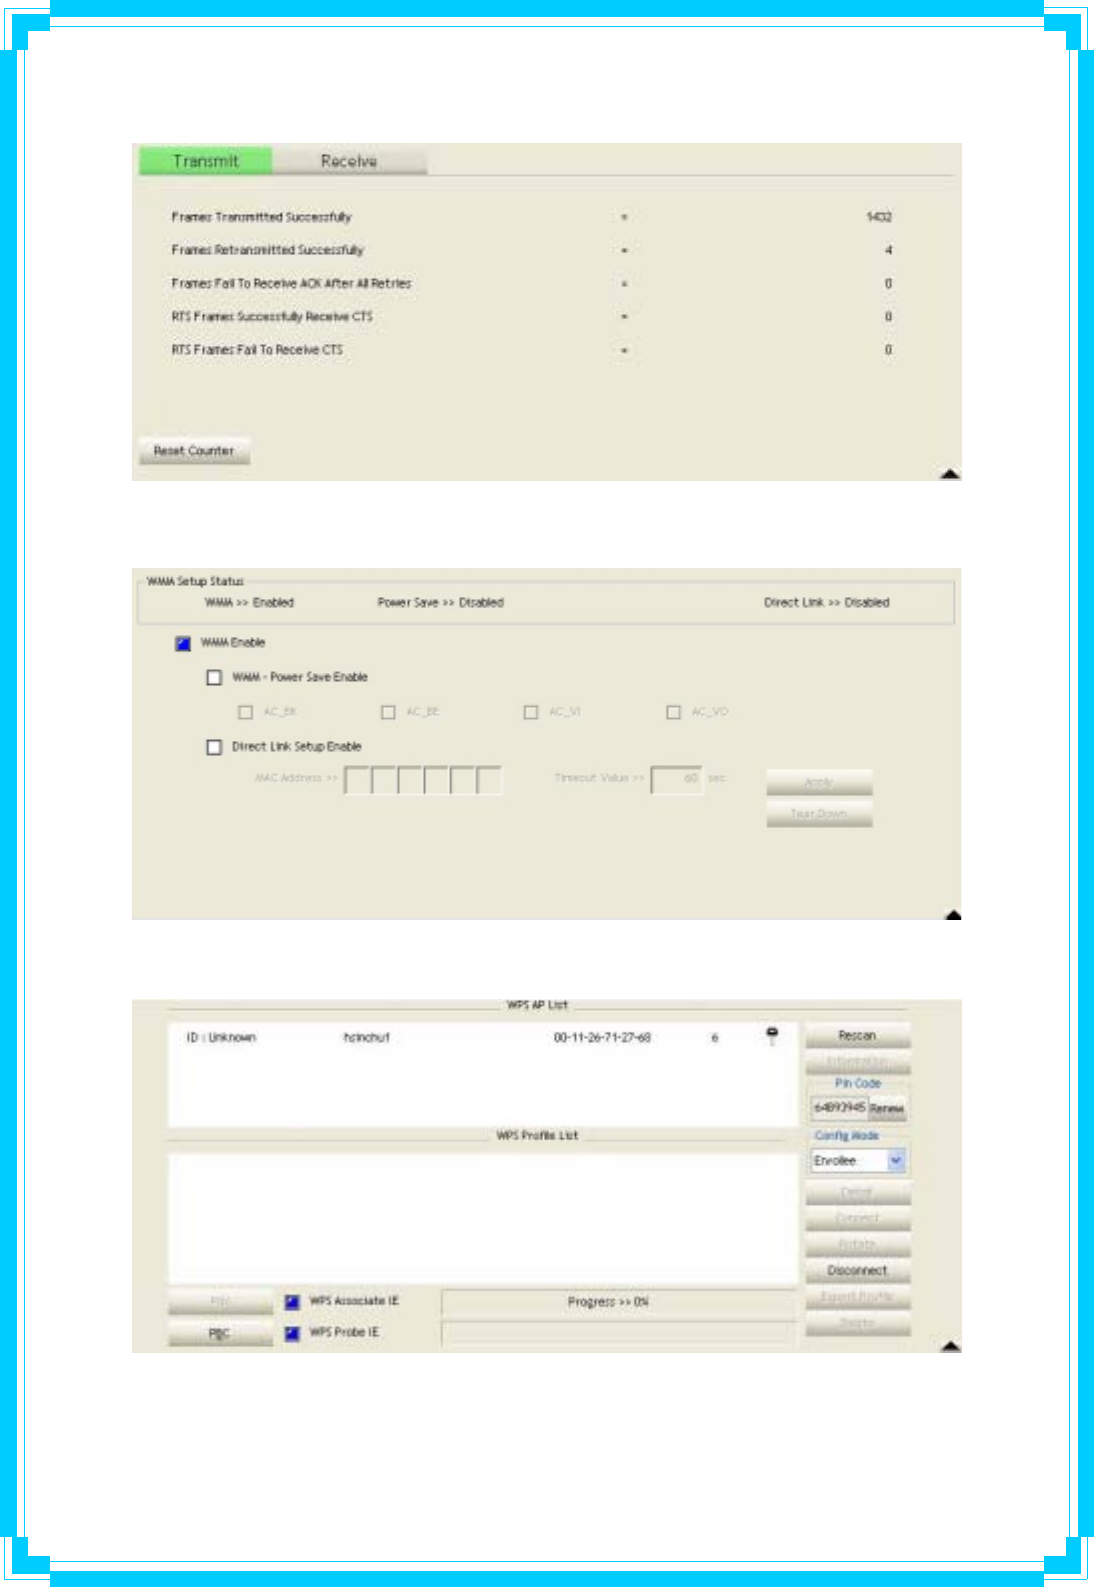
Function Section: Corresponding button
Î Profile Page
Î Network Page
Î Advanced Page
24
Î Statistics Page
Î WMM Page
Î WPS Page
25
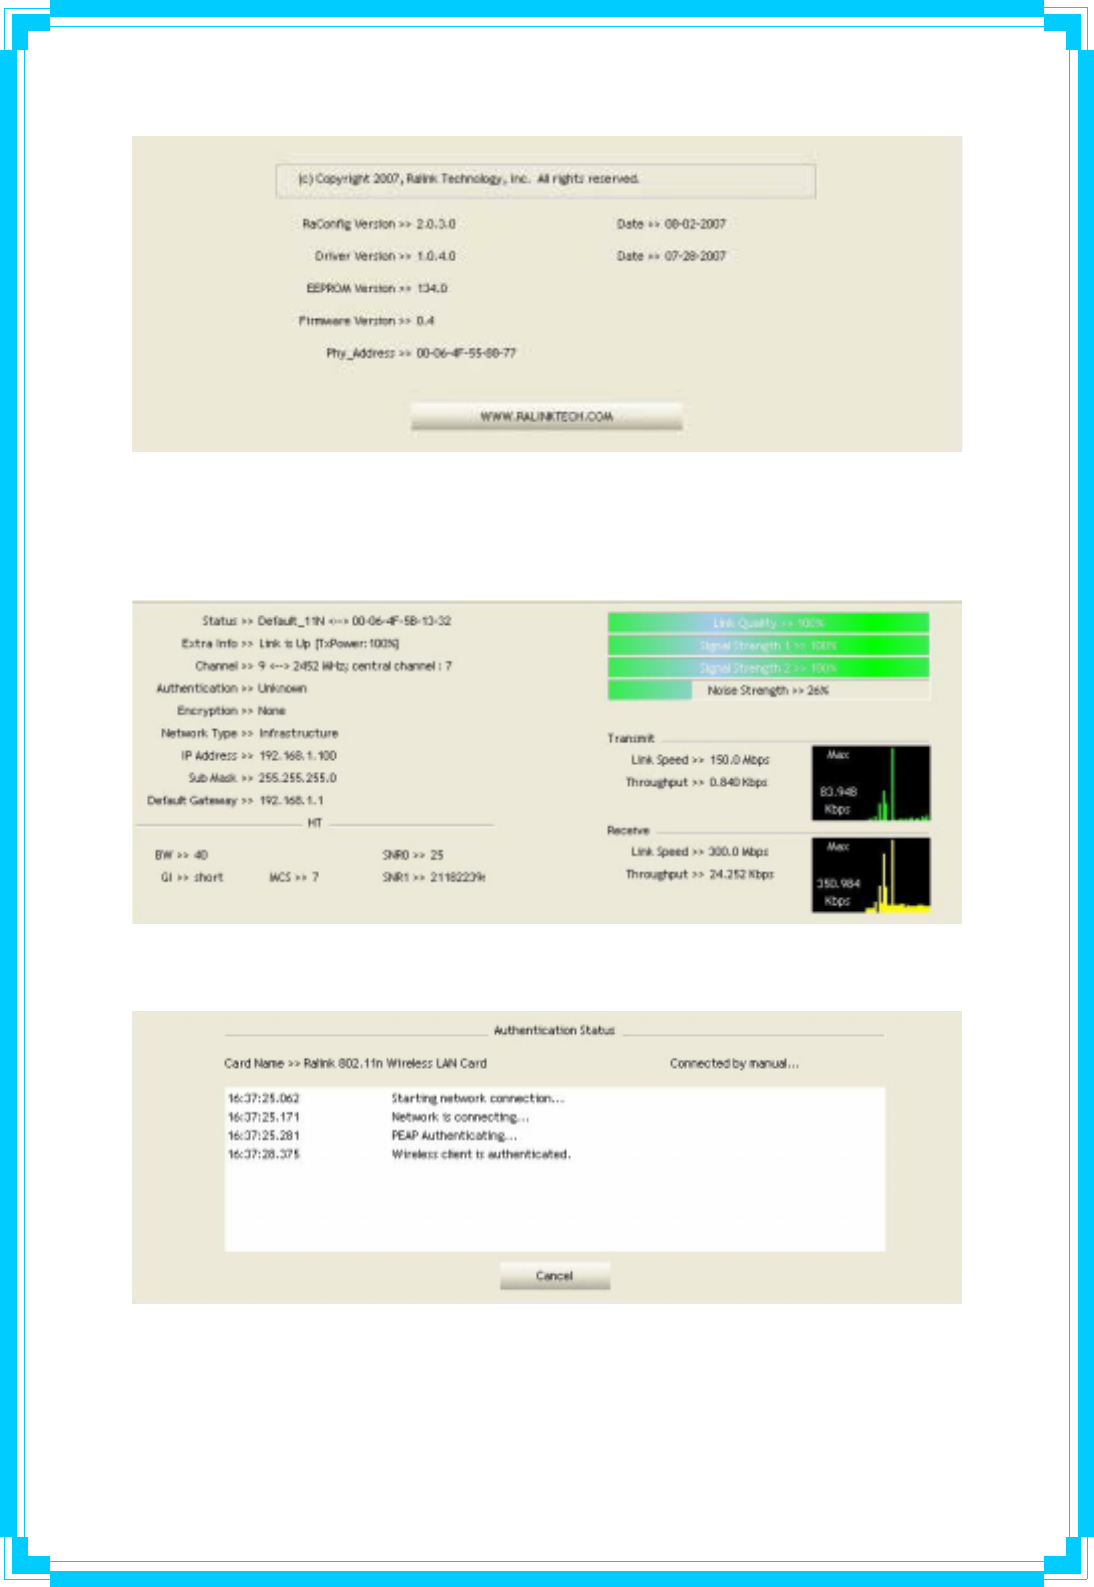
Î About Page
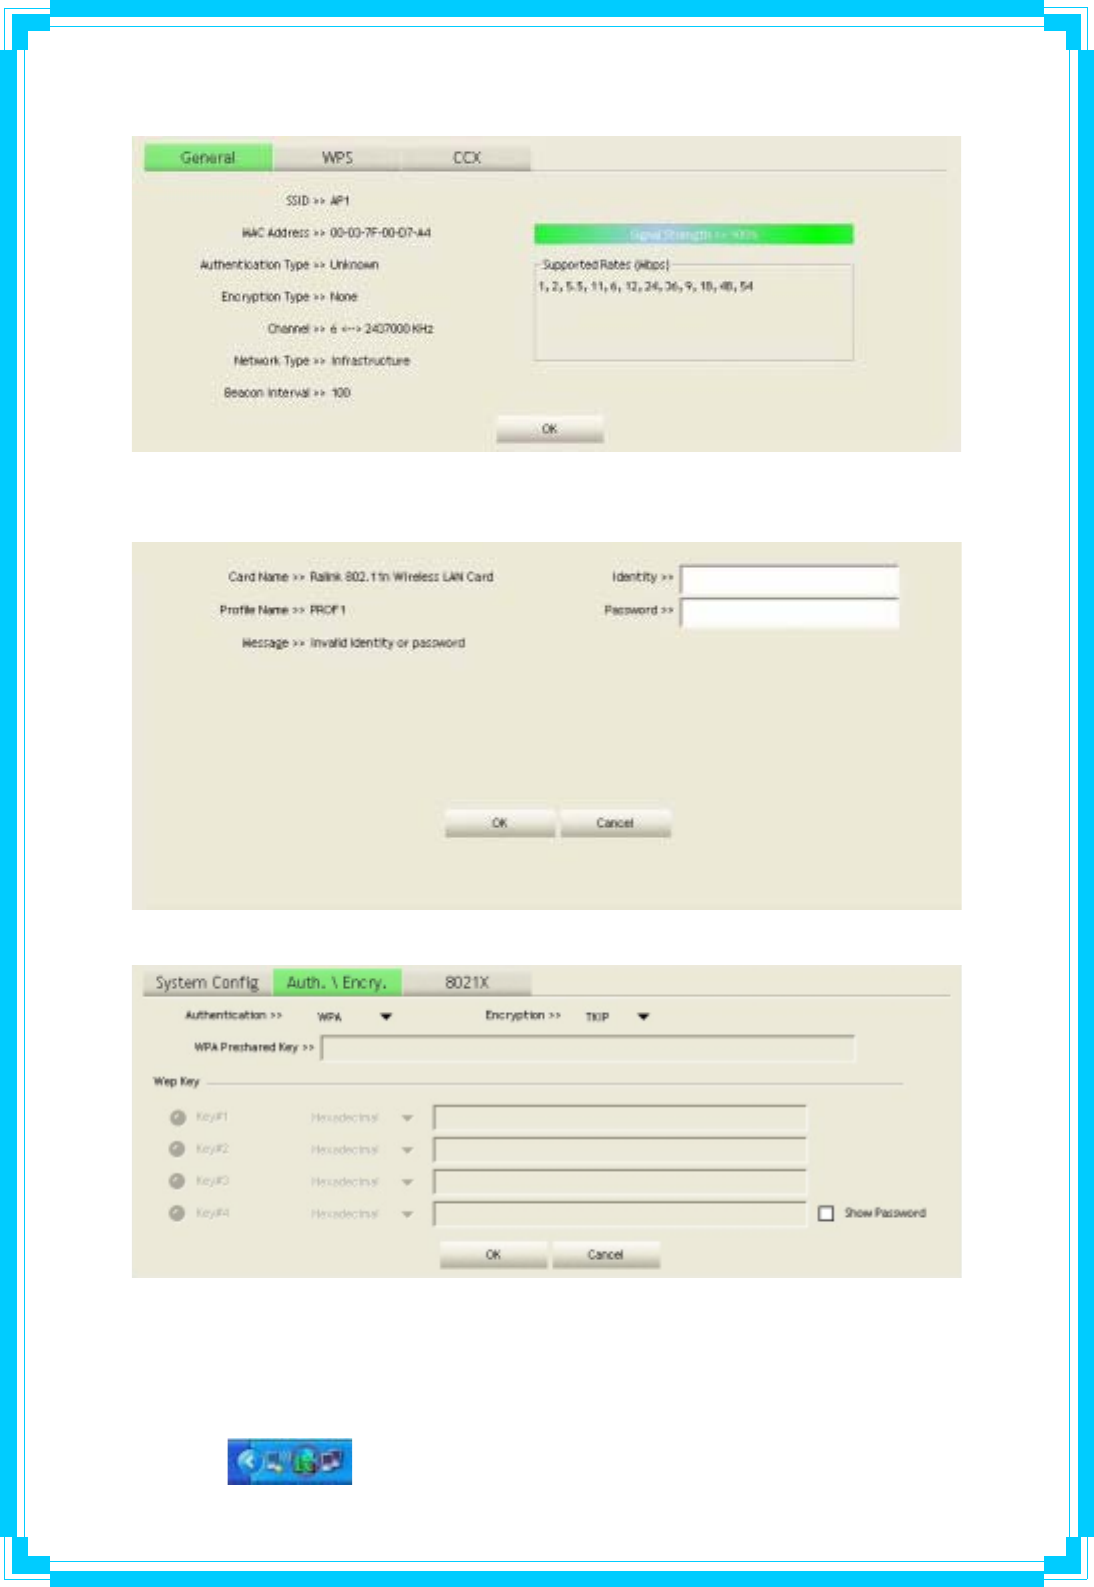
Status Section: Include Link Status, Authentication Status, AP’s information,
Configuration and retrying the connection when authentication is failed.
Î Link Status
Î Authentication Status
26
Î AP’s Information
Î Retry the Connection
Î Configuration
At the mean time of starting RaUI, there is also a small Ralink icon appears within
windows taskbar as below. You may double click it to bring up the main menu if you
selected to close RaUI menu earlier. You may also use mouse;s right button to close
RaUI utility.
ÎÎ Ralink icon in system tray.
27
Besides, the small icon will change color to reflect current wireless network
connection status. The status indicates as follow:
Î -- indicate Connected and Signal Strength is Good.
Î -- indicate Connected and Signal Strength is Normal
Î -- indicate Wireless NIC is not connected yet
Î -- indicate Wireless NIC is not detected
Î -- indicate Connected and Signal Strength is Weak
3.1.2 Profile
Profile can book keeping your favorite wireless setting among your home, office, and other
public hot-spot. You may save multiple profiles, and activate the correct one at your
preference.
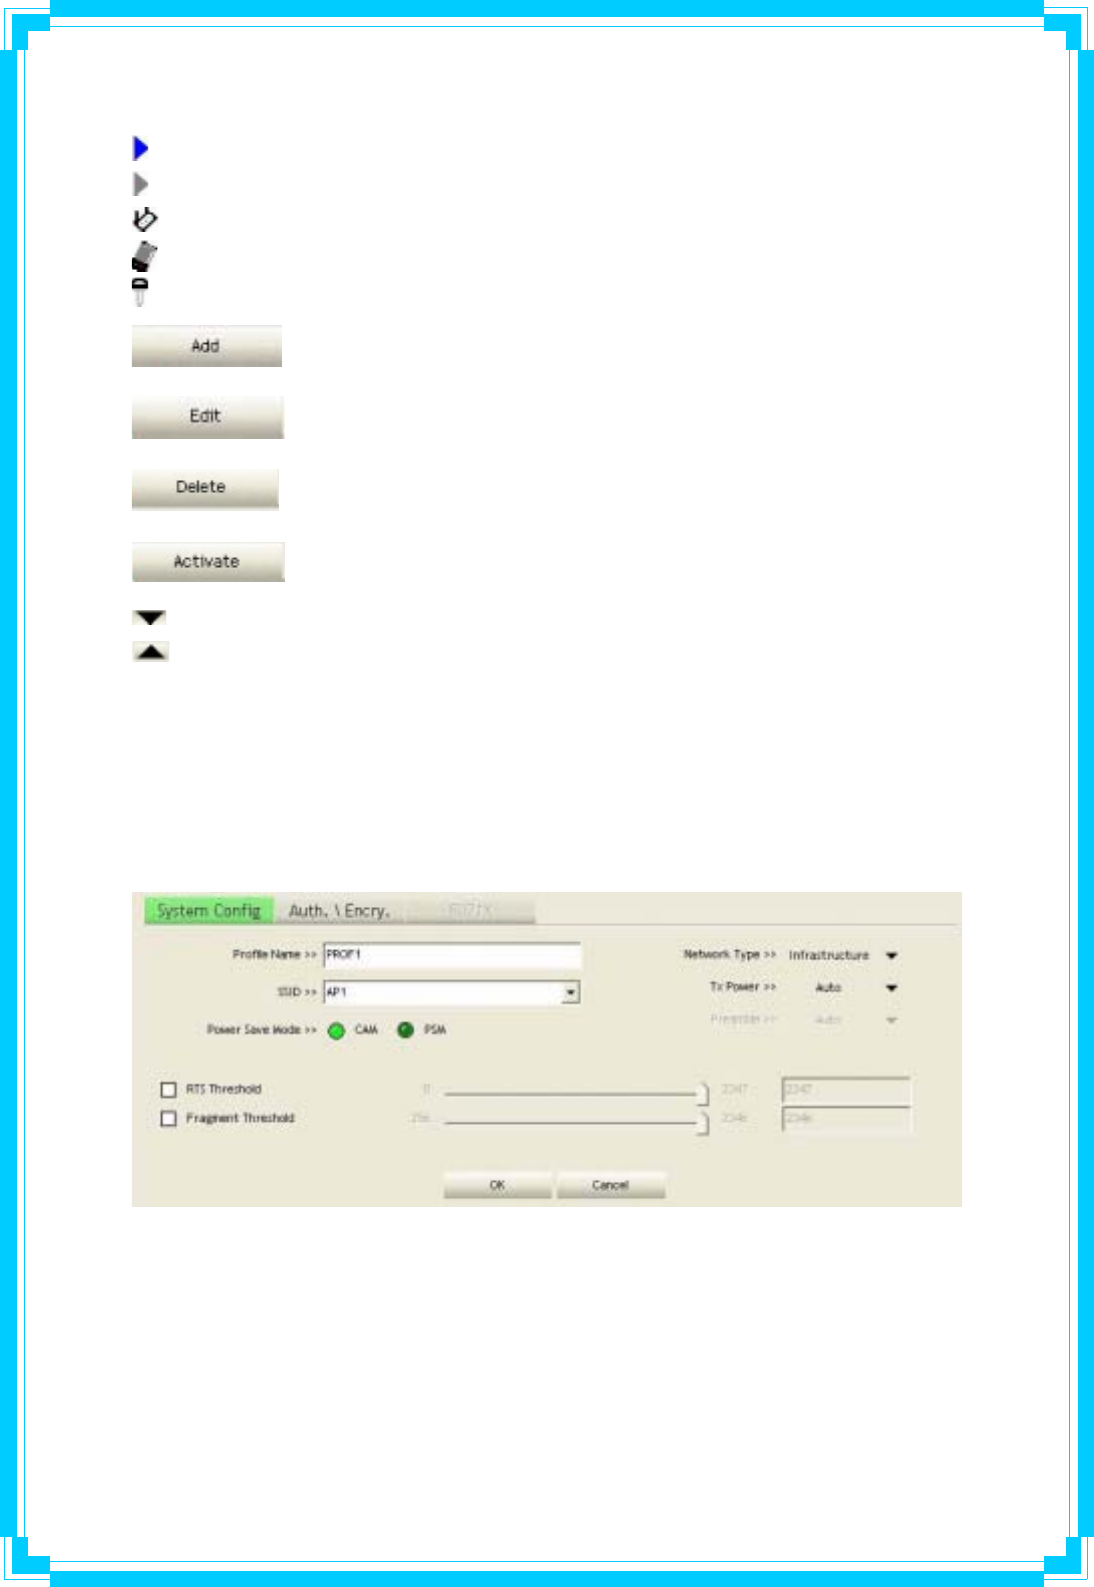
[Definition of each field]
Profile Name: Name of profile, preset to PROFϿ)Ͽindicate 1,2,3,…)
SSID: AP or Ad-Hoc name
Network Type: Network’s type, including infrastructure and Ad-Hoc.
Authentication: Authentication mode
Encryption: Encryption Type
Use 802.1x: Whether or not use 802.1x feature
Channel: channel in use for Ad-Hoc mode
Power Save Mode: Choose from CAM (Constantly Awake Mode) or Power Saving Mode.
Tx Power: Transmit power, the amount of power used by a radio transceiver to send the
signal out.
RTS Threshold: User can adjust the RTS threshold number by sliding the bar or key in the
value directly.
Fragment Threshold: User can adjust the Fragment threshold number by sliding the bar or
key in the value directly.
28
[Icons and buttons]
Î indicate connection is successful on currently activated profile
Î indicate connection is failed on currently activate profile
Î indicate network type is infrastructure mode
Î indicate network type is Ad-Hoc
Î indicate security-enabled wireless network
Î Add a new profile
Î Edit an existing profile
Î Delete an existing profile
Î Activate selected profile
Î Show the information of Status Section
Î Hide the information of Status Section
3.1.2.1 Add/Edit Profile
There are 3 methods to open Profile Editor form:
Î You can open it from “Add to Profile” button in Site Survey function
Î You can open it form “Add” button in Profile function
Î You can open it from “Edit” button in Profile function
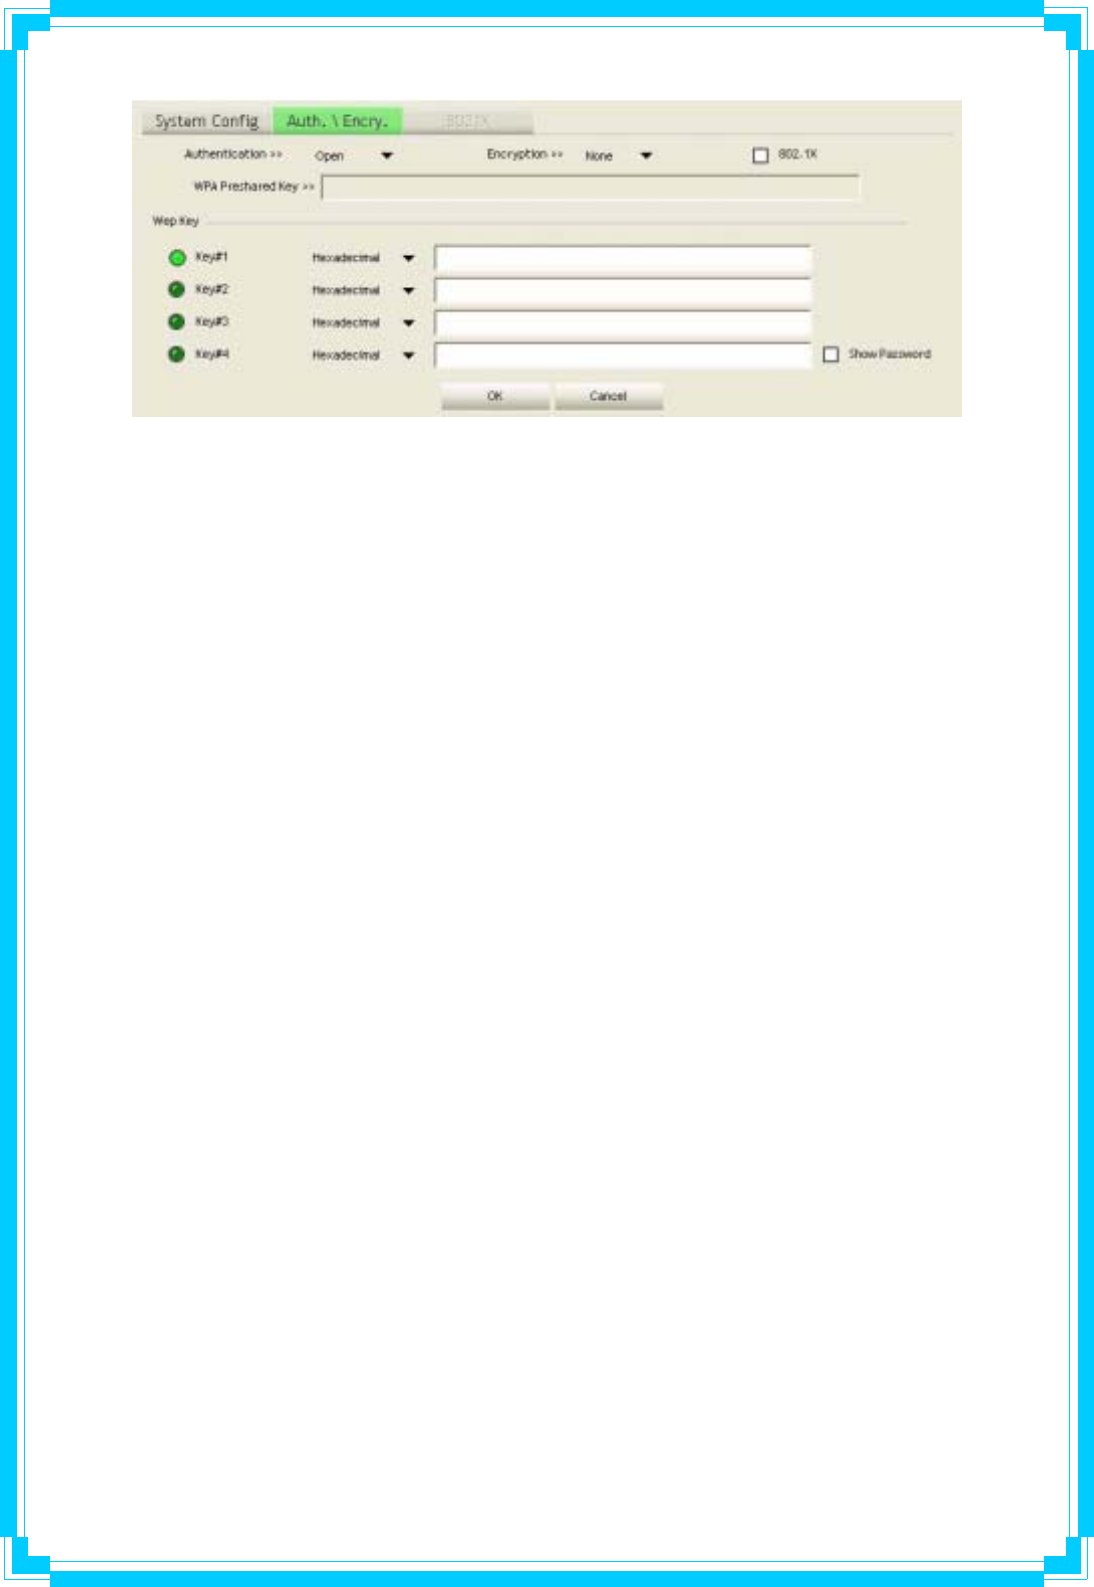
29
Profile Name: User can chose name for this profile, or use default name defined by system.
SSID: User can key in the intended SSID name or use pull down menu to select from available
APs.
Power Save Mode: Choose from CAM [Constantly Awake Mode] or Power Saving Mode.
Network Type: There are two types, infrastructure and 802.11 Ad-Hoc mode. Under Ad-Hoc
mode, user can also choose the preamble type, the available preamble type includes auto and
long. In addition to that the channel field will be available for setup in Ad-Hoc mode.
RTS Threshold: User can adjust the RTS threshold number by sliding the bar or key in the
value directly. The default value is 2347.
Fragment Threshold: User can adjust the Fragment threshold number by sliding the bar or
key in the value directly. The default value is 2346.
Channel: Only available for setting under Ad-Hoc mode. User can choose the channel
frequency to start their Ad-Hoc network.
Authentication Type: There are 7 type of authentication modes supported by RaUI. They are
Open, Shared, LEAP, WPA, WPA-PSK, WPA2, WPA2-PSK.
Encryption Type: For open and shared authentication mode, the selection of encryption type
are None and WEP. For WPA, WPA2, WPA-PSK and WPA2-PSK authentication mode, the
encryption type supports both TKIP and AES.
802.1x Setting: It is an authentication for WPA and WPA2 certificate to server.
WPA Pre-Shared Key: This is the shared secret between AP and STA. For WPA-PSK and
WPA2-PSK authentication mode, this field must be filled with character longer than 8 and less
than 32 lengths.
WEP Key: Only valid when using WEP encryption algorithm. The key must matched AP’s key.
There are several formats to enter the keys:
Î Hexadecimal – 40bits: 10 Hex characters
Î Hexadecimal – 128bits: 26 Hex characters.
Î ASCII – 40bits: 5 ASCII characters
Î ASCII – 128bits: 13 ASCII characters