Radio Shack 1502117 RadioShack Remote Control User Manual RS 8in1 IR RF UG
RadioShack Corporation RadioShack Remote Control RS 8in1 IR RF UG
UserManual.wiki
>
Radio Shack
>
1502117 User Manual
>
Users Manual
Contents
1.
Users Manual
2.
Revised page from Users Manual
Users Manual
Navigation menu
Upload a User Manual
Namespaces
Wiki Guide
HTML
PDF
Info
Views
User Manual
Discussion / Help
Navigation
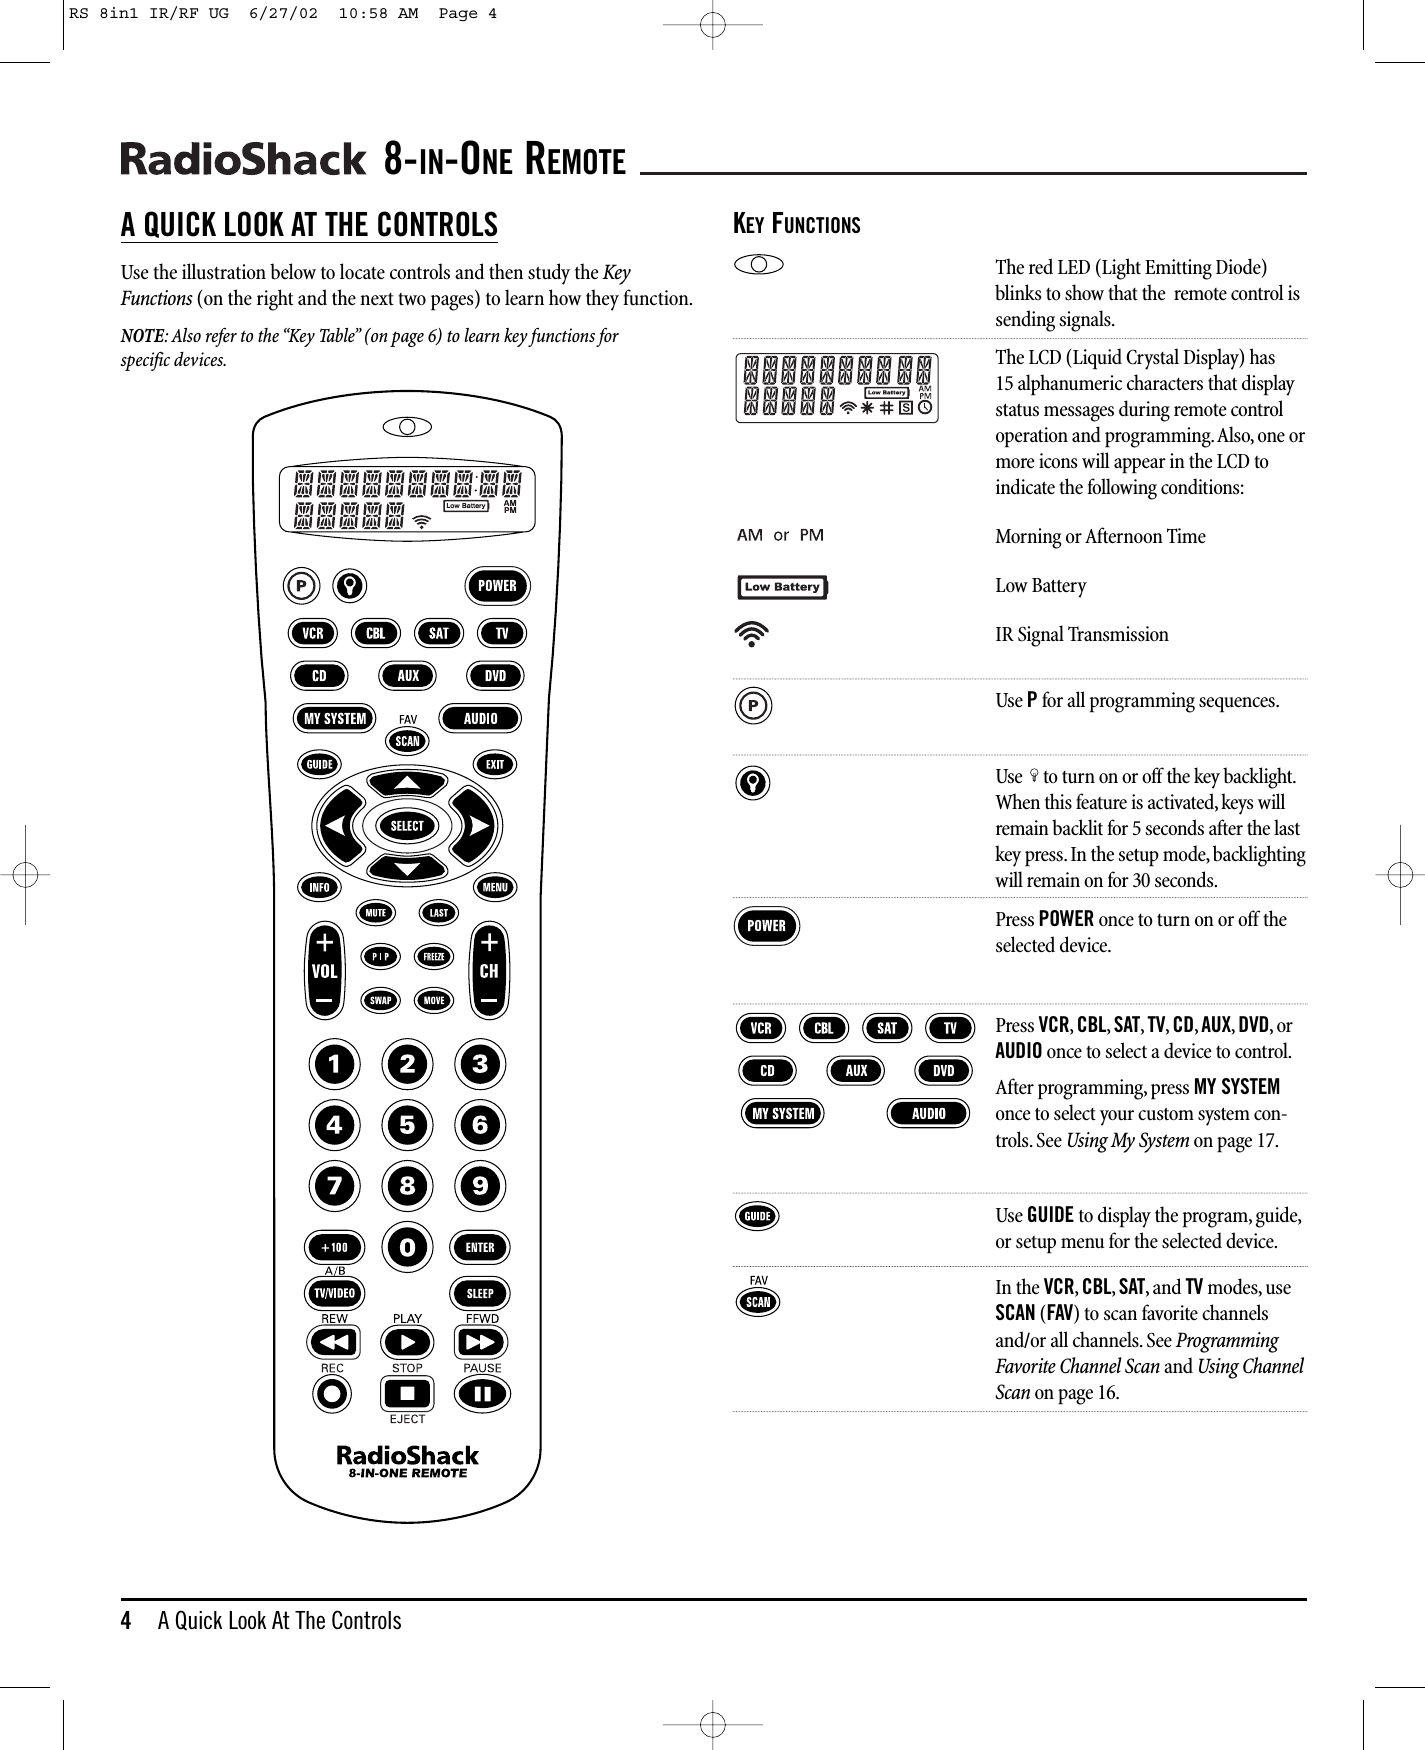
![INSTALLING BATTERIESYour remote requires four AAA batteries (not supplied) for power. For thebest performance and longest life, we recommend using RadioShack alkaline batteries.CAUTIONS:• Use only fresh batteries of the required size and recommended type.• Do not mix old and new batteries, different types of batteries (e.g.,standard, alkaline, or rechargeable), or rechargeable batteries ofdifferent capacities.• Dispose of old batteries promptly and properly. Do not burn or bury them.• If you do not plan to use the remote for an extended period, removethe batteries. They can leak chemicals that can destroy electronic parts.TOINSTALL BATTERIES:1. Press the tab on the battery compartment cover (located on the backof the remote) and lift off the cover.2. Place the AAA batteries in the compartment as indicated by the polarity symbols (+ and –) marked inside.3. Align the cover key with the compartment opening and replace the cover.4. If batteries are inserted correctly, the entire LCD will turn on.After5 seconds of inactivity, the remote control will turn itself off to con-serve battery life.5. Perform the steps in Setting The Clock (on the right) to set the correct time.NOTE: When a battery icon appears in the display (see page 4,“Key Functions”),the batteries are low. Simply replace them as soon as possible and the remote will berestored to full functionality, complete with your favorite settings.SETTING THE CLOCK1. On the remote, press and hold Puntil the display changesfrom the default device and time to [CODE SET].NOTE: Default values for device, its code, and time are shownabove.Your remote control settings may be different.NOTE: If you wish to exit the programming mode at any time, pressEXIT once. An [EXIT] message appears as the remote control returnsto normal operation.NOTE:Ifan [INVALID] message appears, you have inadvertentlypressed an incorrect key. Simply note your error and continue programming.2. Press ▲four times until [CLOCK SET] appears.NOTE:Ifyou go past [CLOCK SET],press ▼one or more times toreturn to it.3. Press SELECT once to begin programming.The default setting(12:00 a.m.) or the current time (if previously set) appears.4. Press ▲one or more times until the desired hour for morn-ing or evening (a.m. or p.m.) appears.5. Press ▼one or more times until the desired minute appears.6. Once the time is correctly set,press SELECT once to acceptthe values.The display will confirm your entry with [SUCCESS] and then [EXIT SETUP].The remote will return to normal operation.USER’SGUIDEInstalling Batteries/Setting The Clock 3(x 4)❶❸❷RS 8in1 IR/RF UG 6/27/02 10:58 AM Page 3](https://usermanual.wiki/Radio-Shack/1502117.Users-Manual/User-Guide-264579-Page-3.png)
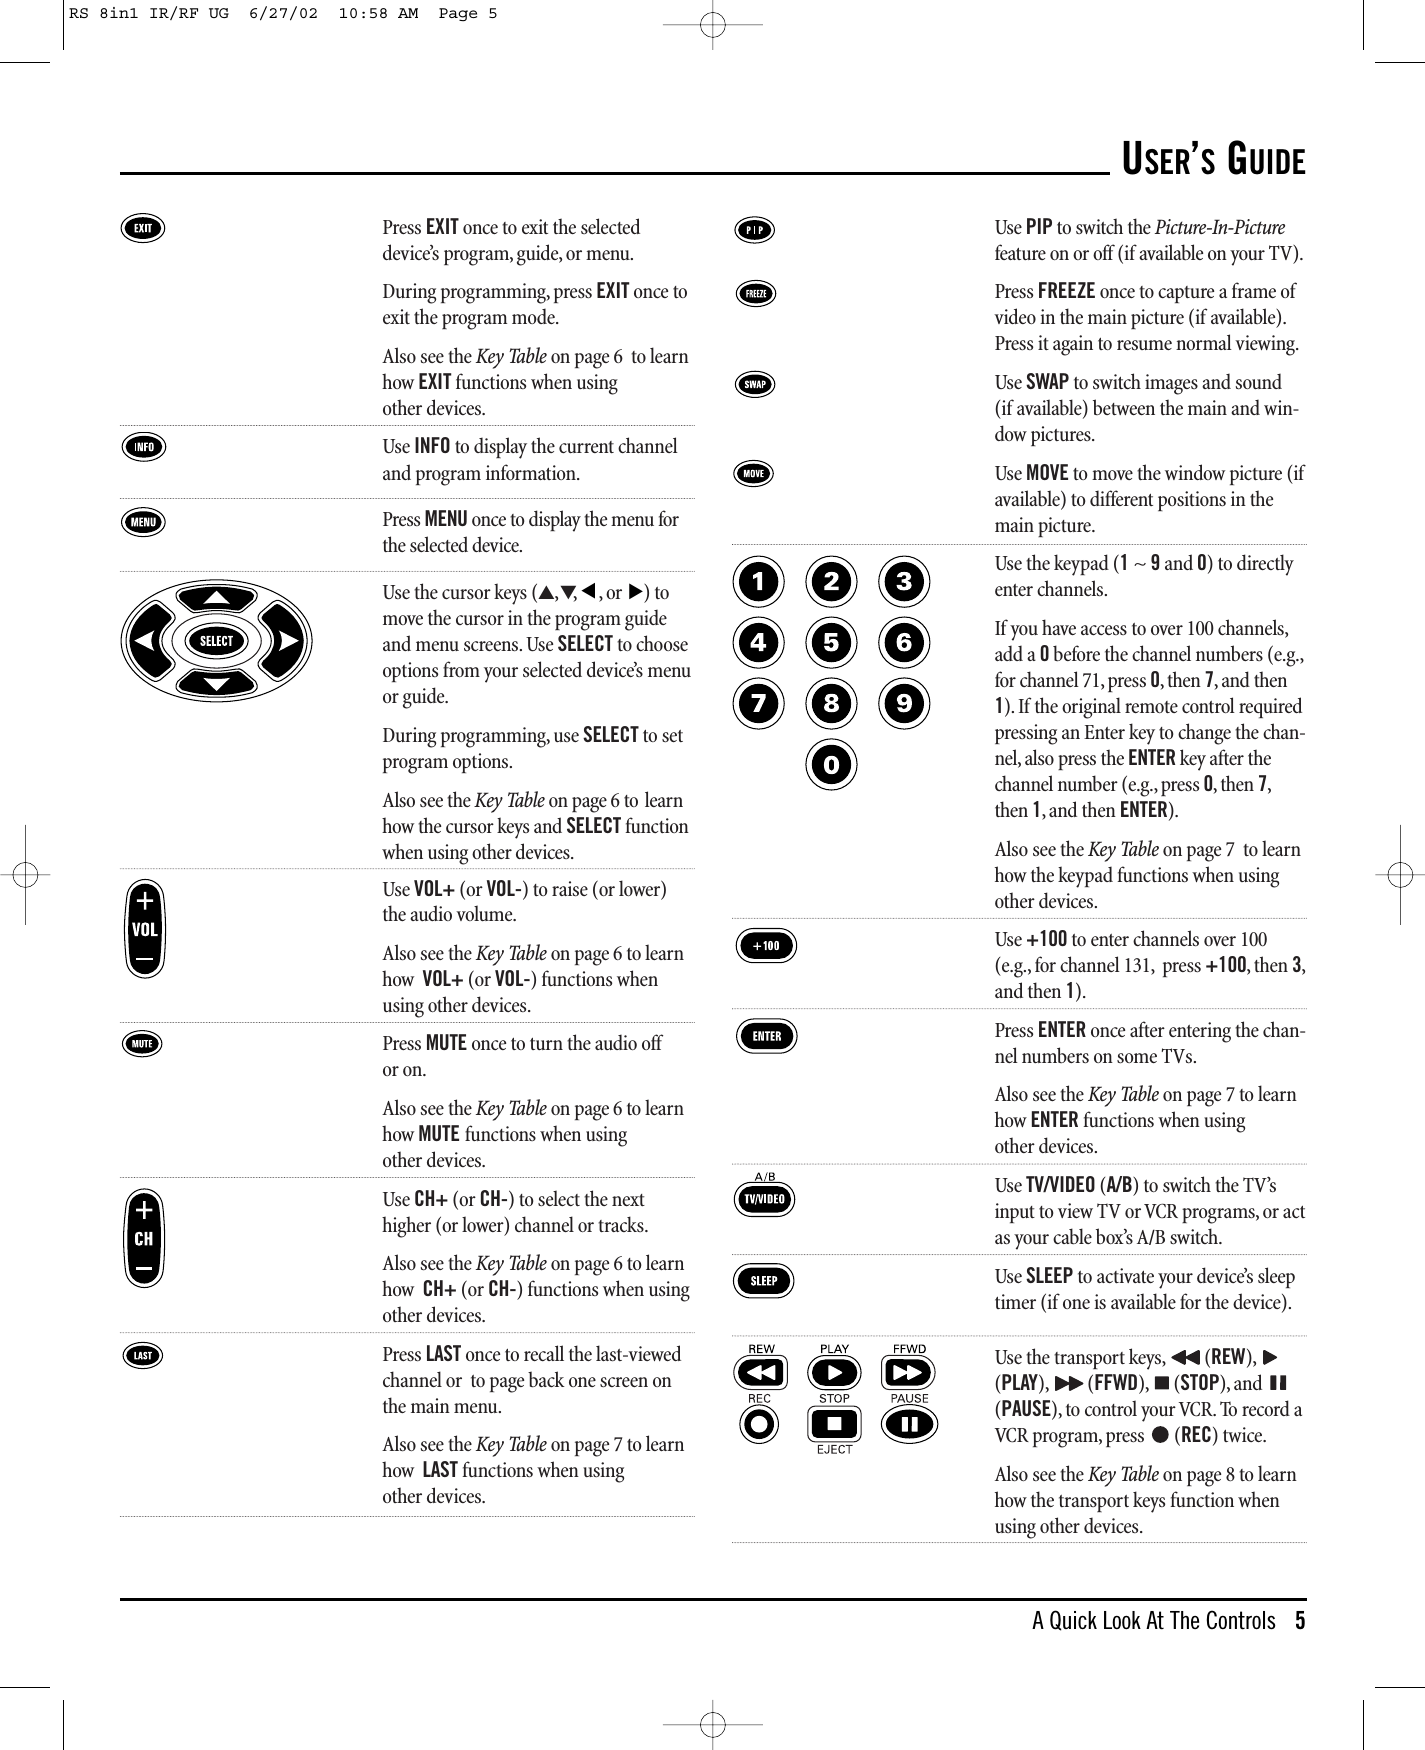
![PROGRAMMING A DEVICEThe remote is preprogrammed at the factory to operate an RCA TV,VCR,and satellite receiver, a Motorola (General Instruments) cable converter,and Pioneer CD and DVD players,and audio devices. To control devicesother than the default brands,perform the following steps and repeat themas needed for each device to be programmed; otherwise skip this section:NOTE: To control a TV/VCR Combo, see “Programming A TV/VCR Combo” on page 10.1. Find the codes for the devices you want to program inManufacturer’s Codes (starting on page 48) and write themdown or highlight them.2. Turn on a device (e.g.,VCR or DVD player) and,if necessary,load media (e.g., cassette or disc).NOTE: Please read steps 3 through 9 completely before proceeding.Highlight or write down the codes and device you wish to programbefore starting step 2.3. On the remote, press and hold Puntil the display changesfrom the default device and time to [CODE SET].NOTE: Default values for device, its code, and time are shownabove.Your remote control settings may be different.NOTE: If you wish to exit the programming mode at any time, pressEXIT once. An [EXIT] message appears as the remote control returnsto normal operation.NOTE:Ifan [INVALID] message appears, you have inadvertentlypressed an incorrect key. Simply note your error and continue programming.4. Press SELECT once to begin programming.The last-selecteddevice and its current code (e.g., TV and 0051) appear.5. Press a desired device key once (e.g., VCR). The desireddevice and its current code (e.g., VCR and 0035) appear.NOTE: Use the AUX key to program home automation devices, videoaccessories, audio services, and other audio/video devices. See“Reassigning Device Keys” on page 19.6. Use the keypad to enter the first four-digit code for yourdevice and press SELECT once.For example,to enter the first GE VCR code (on page 52),press 0twice, 6once, 0once, and then SELECT once.If the code is entered correctly, [SUCCESS] appears.7. Press EXIT to exit the programming mode.An [EXIT SETUP]message appears as the remote returns to normal operation.8. To verify the code works, aim the remote at the desireddevice, press its device key once and then press POWERonce.The device should turn off.If it does not respond,repeat steps 3 through 7, trying each code for your branduntil you find one that works.If you cannot find a code thatworks,try Searching For Your Code on page 10.NOTE: If the device does not have a POWER key, press (Play).9. Repeat steps 1 through 8 for each device you want to control.For future reference, write down each working device codein the boxes below:VCR Code:CBL Code:SAT Code:TV Code:CD Code:DVD Code:AUDIO Code:Audio DeviceType:________________________________AUX Code:Aux. DeviceType:________________________________USER’SGUIDEProgramming A Device 9RS 8in1 IR/RF UG 6/27/02 10:58 AM Page 9](https://usermanual.wiki/Radio-Shack/1502117.Users-Manual/User-Guide-264579-Page-9.png)
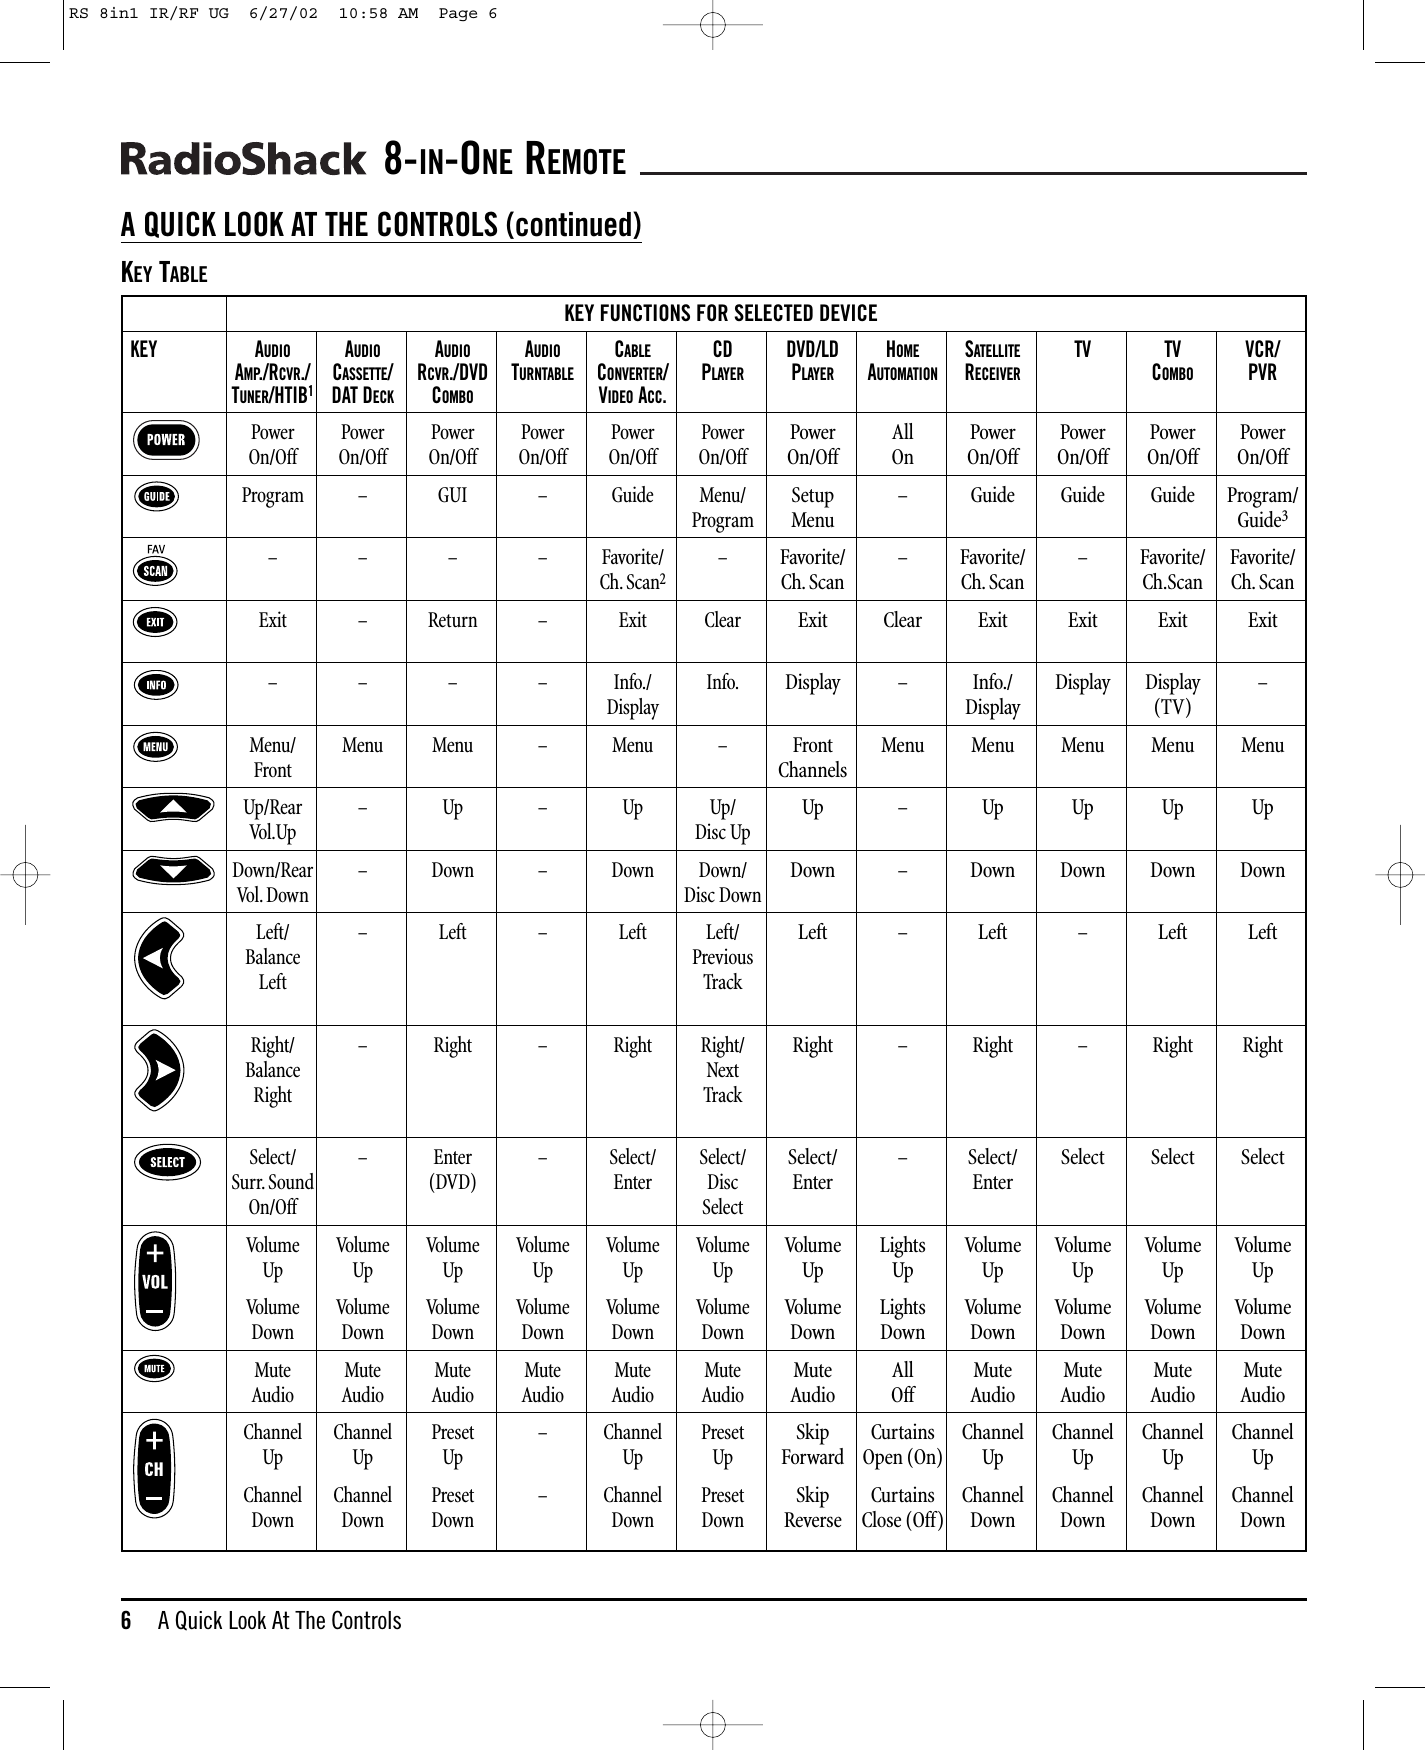
![PROGRAMMING A TV/VCR COMBO1. Find the codes for the devices you want to program in SetupCodes for TV/VCR Combos on page 51 and write them downor highlight them.2. Turn on the TV/VCR Combo and insert a videocassette.3. On the remote, press and hold Puntil the display changesfrom the default device and time to [CODE SET].NOTE: Default values for device, its code, and time are shownabove.Your remote control settings may be different.NOTE: If you wish to exit the programming mode at any time, pressEXIT once. An [EXIT] message appears as the remote control returnsto normal operation.NOTE:Ifan [INVALID] message appears, you have inadvertentlypressed an incorrect key. Simply note your error and continue programming.4. Press SELECT once to begin programming.The last-selecteddevice and its current code (e.g., TV and 0051) appear.5. Press VCR once. [VCR] and its current code appear.6. Use the keypad to enter the first four-digit code for yourdevice and press SELECT once.For example,to enter the first Sony TV/VCR Combo on page 51,press 0four times and then SELECT once.If the code is entered correctly, [SUCCESS] appears.7. Press EXIT to exit the programming mode.An [EXIT SETUP]message appears as the remote returns to normal operation.8. To verify the code works, aim the remote at the TV/VCRCombo,press VCR once and then press POWER once.NOTE: If the device does not have a POWER key, press (Play) .The unit should turn off or start playing if you pressed (Play).If it does not respond,repeat steps 3 through 9,trying each code for your brand until you find one that works.If you cannot find a code that works,try Searching For YourCode in the next section.9. For future reference,write down the working TV/VCRcombo code in the below boxes:TV/VCR Code:TV Code (if used):SEARCHING FOR YOUR CODEIf your device does not respond to the remote after trying all codes listed foryour brand, or if your brand is not listed at all, try manually searching foryour code.For example,to manually search for a code for your TV:1. Turn on the TV.2. On the remote, press and hold Puntil the display changesfrom the default device and time to [CODE SET] .NOTE: Default values for device, its code, and time are shownabove.Your remote control settings may be different.NOTE: If you wish to exit the programming mode at any time, pressEXIT once. An [EXIT] message appears as the remote control returnsto normal operation.NOTE:Ifan [INVALID] message appears, you have inadvertentlypressed an incorrect key. Simply note your error and continue programming.3. Press ▼once. [MAN SEARCH] appears.NOTE:Ifyou go past [MAN SEARCH],press ▲one or more times toreturn to it.4. Press SELECT once to begin programming.The last-selecteddevice and its code (e.g., VCR and 0035) appear.5. Press TV once. The desired device and the first code in themanual search list (e.g., TV and 0047) appear.6. Aim the remote at the TV and press SELECT once. The redLED blinks and the (IR) icon flashes,indicating IR codesare being transmitted.8-IN-ONE REMOTE10 Programming A TV/VCR Combo/Searching For Your CodeRS 8in1 IR/RF UG 6/27/02 10:59 AM Page 10](https://usermanual.wiki/Radio-Shack/1502117.Users-Manual/User-Guide-264579-Page-10.png)
![NOTE: In the manual search mode, the remote will send IR codesfrom its library to the selected device, starting with the most popularcode first.7. If the TV turned off,skip to the next step. If it did not turnoff,aim the remote at the TV and press ▲once to advancethe manual search to the next code (e.g.,TV and 0054).Again the red LED blinks and the (IR) icon flashes.Repeat this step as often as needed until you find a code thatturns off the device.8. Once you have found a working code,press SELECT once tosave it. The display confirms your entry with [SUCCESS] andthen [EXIT SETUP].The remote returns to normal operation.NOTE: For future reference, write down the working device code inthe appropriate boxes on page 9.9. To perform a manual code search for another device,repeatsteps 1 through 8, but this time (in step 5) substitute theappropriate device key for the device you are searching for.USING LEARNINGThe remote includes a Learning feature so you can add functions that areunique to your home entertainment devices (e.g.,VCR Tracking Up orDown). However, there are some considerations:• Your original remote controls must be in working order for the learning feature to work properly.• Learned keys are mode specific,so each one can store a unique function for each mode.• Learned keys can be used in macros (see Using Macros on page 13).• You can also use any key for learning, except device keys, P,,andPOWER. However, using them as learned keys will overwrite their original functions.• For optimum learning, avoid high levels of ambient light such as natural sunlight or energy-efficient fluorescent lights.NOTE: Please have your original remote controls handy before programming learning. Be sure to press each key within 5 seconds of the previous entry. If not,the remote will exit the programming mode.PROGRAMMING A LEARNING KEY1. On the remote, press and hold Puntil the display changesfrom the default device and time to [CODE SET].NOTE: Default values for device, its code, and time are shownabove.Your remote control settings may be different.NOTE: If you wish to exit the programming mode at any time, pressEXIT once. An [EXIT] message appears as the remote control returnsto normal operation.NOTE:Ifan [INVALID] message appears, you have inadvertentlypressed an incorrect key. Simply note your error and continue programming.2. Press ▼twice until [IR LEARN] appears.NOTE:Ifyou go past [IR LEARN],press ▲one or more times toreturn to it.3. Press SELECT once to begin programming.The last-selecteddevice appears.4. Press a device key once (e.g.,TV) to assign a desired modefor learning.5. Select a key for learning and press it once.As the remoteenters the learning mode, [LEARNING] appears and the redLED turns on for 5 seconds.6. Place your original remote control (e.g., TV remote control)head-to-head (about 2" apart) from the remote.continued on next page...2"USER’SGUIDESearching For Your Code/Using Learning 11(x 2)RS 8in1 IR/RF UG 6/27/02 10:59 AM Page 11](https://usermanual.wiki/Radio-Shack/1502117.Users-Manual/User-Guide-264579-Page-11.png)
![USING LEARNINGPROGRAMMING A LEARNING KEY (CONTINUED)7. On the original remote control,press and hold the key (i.e.,feature) to be learned until [SUCCESS] appears on theremote.The display will return to the device mode youselected for learning (e.g., TV).If the key was not learned, you will see an [ERROR]message instead.Repeat steps 5 through 7 as needed to achieve [SUCCESS].8. To learn functions onto other keys,repeat steps 4 through 7for each key.9. Press EXIT to exit the programming mode.An [EXIT SETUP]message appears as the remote returns to normal operation.10. To test a learned feature,aim the remote at the desireddevice and press its device key once (e.g.,TV, where thelearning mode was assigned). Then press the key where thelearned feature is stored.The feature should activate.If not,try the programming the key again,starting with step 1 (onpage 11).DELETING A FUNCTION FROM A LEARNING KEY1. On the remote, press and hold Puntil the display changesfrom the default device and time to [CODE SET].NOTE: Default values for device, its code, and time are shownabove.Your remote control settings may be different.NOTE: If you wish to exit the programming mode at any time, pressEXIT once. An [EXIT] message appears as the remote control returnsto normal operation.NOTE:Ifan [INVALID] message appears, you have inadvertentlypressed an incorrect key. Simply note your error and continue programming.2. Press ▼three times until [IR DELETE] appears.NOTE:Ifyou go past [IR DELETE],press ▲one or more times toreturn to it.3. Press SELECT once to begin programming.The last-selecteddevice (e.g.,TV) appears.4. Press a device key once (e.g.,TV) for the mode that contains thelearned function.5. Press the key once where the learned function (to be delet-ed) is stored. The display changes to [DELETED] and thenreturns to last-selected mode (e.g., TV).6. If desired, repeat steps 4 and 5 to delete other learned functions.7. Press EXIT to exit the programming mode.An [EXIT SETUP]message appears as the remote returns to normal operation.CHANGING VOLUME LOCKIn its default (unlocked) state, the remote allows each device to control itsown volume only in its own mode (e.g., TV volume in the TV mode, VCRvolume in VCR mode, etc.). However, using our Volume Lo ck feature, youcan lock the volume controls for each device to all modes (e.g., AUDIOvolume in all modes).Moreover, using the Volume Unlock feature (see the next page), you can further customize the settings so that a device’s volume controls areunlocked in one mode, but remain locked in all other modes (e.g., TVvolume in the TV mode and AUDIO volume in other modes).PROGRAMMING VOLUME LOCK1. On the remote, press and hold Puntil the display changesfrom the default device and time to [CODE SET].NOTE: Default values for device, its code, and time are shownabove.Your remote control settings may be different.NOTE: If you wish to exit the programming mode at any time, pressEXIT once. An [EXIT] message appears as the remote control returnsto normal operation.NOTE:Ifan [INVALID] message appears, you have inadvertentlypressed an incorrect key. Simply note your error and continue programming.8-IN-ONE REMOTE12 Using Learning(x 3)RS 8in1 IR/RF UG 6/27/02 10:59 AM Page 12](https://usermanual.wiki/Radio-Shack/1502117.Users-Manual/User-Guide-264579-Page-12.png)
![2. Press ▼four times until [VOL LOCK] appears.NOTE:Ifyou go past [VOL LOCK],press ▲one or more times toreturn to it.3. Press SELECT once to begin programming. [TO MODE]appears.4. Press a mode key (e.g., AUDIO) to lock a device’s volume con-trols to all modes.[SUCCESS] and then [EXIT SETUP] appearas the remote control automatically exits the programmingmode and returns to normal operation.5. If desired, repeat steps 1 through 4 as needed to lock volumecontrols for other devices to all modes.Programming Volume Unlock 1. On the remote, press and hold Puntil the display changesfrom the default device and time to [CODE SET].2. Press ▼five times until [VOL UNLOCK] appears.NOTE:Ifyou go past [VOL UNLOCK],press ▲one or more times toreturn to it.3. Press SELECT once to begin programming. [ALL MODE]appears.To unlock one mode,skip to step 4.Otherwise press SELECTonce to unlock all modes. [UNLOCKED] and then [EXITSETUP] appear as the remote automatically exits the programming mode and returns to normal operation.4. (Optional) Press ▲(or ▼) once.[ONE MODE] appears.a. Press SELECT once. [SEL MODE] appears.b. Press a mode key once (e.g., TV) to unlock it. [UNLOCKED]and then [SEL MODE] appear.c. If desired,repeat step 4b as needed to unlock volume controls for other devices. Otherwise, press EXIT to exit theprogramming mode.An [EXIT SETUP] message appears asthe remote returns to normal operation.USING MACROSWith Macro programming, your remote can be setup to perform repeti-tive, time-consuming operations for easy, convenient access through thepress of a single key. Macros are ideal for home theater operations, settinga favorite channel,guide steps, or other multiple functions you would liketo control with one key press. Moreover, each macro can hold up to 15 keypresses total.NOTE: Programming a new macro over an existing one will erase the original macro.PROGRAMMING A FAVORITE CHANNELWith so many channels available through your cable or satellite systemprovider, you can program a macro that directly selects a favorite channelwith one key press. For example,let’s assume your favorite cable programsare on channel 71. Perform the following steps to program a macro fordirect access of this channel:NOTE: This example assumes the TV connects directly to the cable and not througha cable converter.1. On the remote, press and hold Puntil the display changesfrom the default device and time to [CODE SET].NOTE: Default values for device, its code, and time are shownabove.Your remote control settings may be different.NOTE: If you wish to exit the programming mode at any time, pressEXIT once. An [EXIT] message appears as the remote control returnsto normal operation.NOTE:Ifan [INVALID] message appears, you have inadvertentlypressed an incorrect key. Simply note your error and continue programming.2. Press ▼six times until [KEY MACRO] appears.NOTE:Ifyou go past [KEY MACRO],press ▲one or more times toreturn to it.continued on next page...USER’SGUIDEChanging Volume Lock/Using Macros 13(x 5)(x 6)(x 4)orRS 8in1 IR/RF UG 6/27/02 10:59 AM Page 13](https://usermanual.wiki/Radio-Shack/1502117.Users-Manual/User-Guide-264579-Page-13.png)
![USING MACROSPROGRAMMING A FAVORITE CHANNEL (CONTINUED) 3. Press SELECT once to begin programming. [SEL MACKEY]appears.4. Select a key you want to use as a macro and press it once.[ENTER SEQ] appears.5. Enter a macro sequence of up to 15 keys.For our example,press the following keys once in this order: TV - 7- 1.NOTE: If you have access to over 100 channels, add a 0 before thechannel numbers (e.g., 0 -7 - 1). If the original remote controlrequired pressing an Enter key to change the channel, also pressENTER after the channel number (e.g., 0 - 7 - 1 - ENTER).NOTE:An [ERROR] message, followed by [MAX = 15] alerts youthat the macro sequence must be 15 keys or less.After pressing the first key (in the macro sequence), [SEL TOEND] appears as a reminder to use SELECT to end thesequence (see next step).6. To end the macro sequence,press and hold SELECT until[SUCCESS] appears, followed by [EXIT SETUP].The remote will automatically exit the programming mode and return tonormal operation.Now when you press the key with this assigned macro,you will instantly seecable channel 71 on your TV set.PROGRAMMING A MASTER POWER KEY WITH INSTANTCHANNEL SELECTIONA macro key can be programmed to turn on and off your devices as well.For example, let’s set up a sequence that will turn on the TV and tune it tochannel 3, and then turn on the cable converter and tune it to a premiumchannel (e.g., 11).NOTE: This example assumes all equipment is turned off and that the TV is con-nected through the cable converter with TV tuning set to channel 3.1. Perform steps 1 through 4 of the previous section,Programming A Favorite Channel, that starts on the previouspage.However, this time in step 4,substitute another key foruse as a macro key.2. Enter a macro sequence of up to 15 keys.For our example,press the following keys once in this order: CBL - POWER -TV - POWER - 0- 3- CBL- 1- 1NOTE: If you have access to over 100 channels, add an 0before eachset of channel numbers (e.g., 0- 0- 3and 0- 1- 1). If the originalremote control required pressing an Enter key to change the channel,also press ENTER after each channel number (e.g., 0- 0- 3 - ENTERand 0- 1- 1 - ENTER).NOTE:An [ERROR] message, followed by [MAX = 15] alerts youthat the macro sequence must be 15 keys or less.3. After pressing the first key (in the macro sequence), [SEL TOEND] appears as a reminder to use SELECT to end thesequence (see next step).4. To end the macro sequence,press and hold SELECT until yousee [SUCCESS] appear in the display, followed by [EXITSETUP].The remote will automatically exit the programmingmode and return to normal operation.Now when you press the key with this assigned macro,the cable converterand TV will turn on, the TV will tune to channel 03,and then the cableconverter will tune to channel 11.CLEARING A MACRO1. Perform steps 1 through 4 of the earlier section,Programming A Favorite Channel., that starts on the previ-ous page.However,this time in step 2,select a macro keyyou want to be cleared.2. Press and hold SELECT to clear the macro key. [SEL TO END]appears as a reminder to use SELECT to end the sequence(see next step).3. Press SELECT until [SUCCESS] appears, followed by [EXITSETUP].The remote will automatically exit the programmingmode and return to normal operation.8-IN-ONE REMOTE14 Using MacrosRS 8in1 IR/RF UG 6/27/02 10:59 AM Page 14](https://usermanual.wiki/Radio-Shack/1502117.Users-Manual/User-Guide-264579-Page-14.png)
![USING KEYMOVERThe remote includes a Keymover feature that allows you to map (or copy) keys from one mode (i.e., source mode) to another mode (i.e.,destination mode).NOTE: The following keys cannot be used as a source or destination: VCR,CBL,SAT,TV,CD,AUX,DVD,MY SYSTEM,AUDIO,and P.PROGRAMMING KEYMOVERFor example, if your VCR does not have volume control, try mapping thevolume and mute keys from TV mode to VCR mode as follows:1. On the remote, press and hold Puntil the display changesfrom the default device and time to [CODE SET].NOTE: Default values for device, its code, and time are shownabove.Your remote control settings may be different.NOTE: If you wish to exit the programming mode at any time, pressEXIT once. An [EXIT] message appears as the remote control returnsto normal operation.NOTE:Ifan [INVALID] message appears, you have inadvertentlypressed an incorrect key. Simply note your error and continue programming.2. Press ▲five times until [KEYMOVER] appears.NOTE:Ifyou go past [KEYMOVER],press ▼one or more times toreturn to it.3. Press SELECT once to begin programming. [FROM MODE]appears.4. Select a source mode (e.g., TV) and press it once.[FROM KEY]appears.5. Select a source key (e.g., VOL+) and press it once.[TO MODE]appears.6. Select a destination mode (e.g., VCR) and press it once.[TO KEY] appears.7. Select a destination key (e.g., VOL+) and press it once.[SUCCESS] appears, followed by [EXIT SETUP].The remote will automatically exit the programming mode and return tonormal operation.8. Repeat steps 1 through 7 twice more, substituting VOL–andMUTE as source and destination keys in steps 5 and 7.Upon completion of the above procedure, you can now use your remoteto control the TV’s volume and mute in the VCR mode, as well as in the TV mode.RESTORING A SINGLE KEYMOVED KEY1. Perform steps 1 through 7 of the previous section,Programming Keymover.However, this time in step 6,makethe destination mode the same as the source mode (e.g., TV).[CLR KMVR] appears.2. Press SELECT once to clear the keymoved key. [DELETED]appears, followed by [EXIT SETUP].The remote will automatically exit the programming mode and return tonormal operation.RESTORING ALL KEYMOVED KEYS INA SINGLE MODE1. Perform steps 1 through 4 of the earlier section,Programming Keymover.However,this time in steps 3 and 4,make the source mode and source key the same mode (e.g.,TV). [CLR KMVR] appears.2. Press SELECT once to clear all keymoved keys from thismode. [DELETED] appears, followed by [EXIT SETUP].Theremote will automatically exit the programming mode andreturn to normal operation.USER’SGUIDEUsing Keymover 15(x 5)RS 8in1 IR/RF UG 6/27/02 10:59 AM Page 15](https://usermanual.wiki/Radio-Shack/1502117.Users-Manual/User-Guide-264579-Page-15.png)
![PROGRAMMING FAVORITE CHANNEL SCANIn the TV,VCR,DVD,SAT,or CBL mode, the remote can store a list of up to10 favorite channels, in any order, that will be immediately scanned whenyou press FAV once (see the following section, Using Channel Scan).NOTE: Only channels of one mode can be stored and any previously-stored channelswill be cleared.1. On the remote, press and hold Puntil the display changesfrom the default device and time to [CODE SET].NOTE: Default values for device, its code, and time are shownabove.Your remote control settings may be different.NOTE: If you wish to exit the programming mode at any time, pressEXIT once. An [EXIT] message appears as the remote control returnsto normal operation.NOTE:Ifan [INVALID] message appears, you have inadvertentlypressed an incorrect key. Simply note your error and continue programming.2. Press ▲three times until [FAV CHAN] appears.NOTE:Ifyou go past [FAV CHAN],press ▼one or more times toreturn to it.3. Press SELECT once to begin programming.The last-selecteddevice (e.g.,[VCR]) appears.4. Select a mode (e.g., TV) for favorite channel scanning andpress it once. Then press SELECT once. [FAV] appears.5. Use the keypad to enter a favorite channel number (e.g.,031). The display shows your entry.NOTE: If the original remote control required pressing an Enter keyto change the channel, also press ENTER after the channel number(e.g., 0- 3- 1- ENTER). However, the display will not show ENTER.NOTE: If you made a mistake during entry, press any number keyone or more times until you see the display clear out. Then try enter-ing the correct numbers again.Press SELECT once.The display clears out, ready for yournext entry.6. If desired, repeat step 5 for each favorite channel to bestored, up to a total of 10 channels.NOTE: Once the tenth channel is entered, the remote will automatically exit the programming mode.7. (Optional) To exit programming, press and hold SELECTuntil [SUCCESS] appears, followed by [EXIT SETUP].Theremote will automatically exit the programming mode andreturn to normal operation.USING CHANNEL SCANIn the VCR,CBL,SAT,TV,and DVD modes, use the SCAN (FAV) key to start a3-second scan of all favorite channels (if programmed – see ProgrammingFavorite Channel Scan in the previous section) and/or all channels for theselected mode.1. If Favorite Channel Scan has been set up,skip to step 2.Otherwise, on the remote,press VCR,CBL,SAT,TV,or DVD once.2. Press SCAN (FAV) once.•IfFavorite Channel Scan has been set up,scanning offavorite channels will start and, upon completion, contin-ue to scan all channels upward for the same device.•IfFavorite Channel Scan has not been set up,scanningwill start with the current channel, then proceed to thenext channel up, and continue until all channels of theselected device are scanned.The red LED and IR trans-mission icon ( ) blink each time a channel is scanned.3. To stop scanning channels at any time, press any key once.8-IN-ONE REMOTE16 Programming Favorite Channel Scan/ Using Channel Scan(x 3)RS 8in1 IR/RF UG 6/27/02 10:59 AM Page 16](https://usermanual.wiki/Radio-Shack/1502117.Users-Manual/User-Guide-264579-Page-16.png)
![USING MY SYSTEMThe remote includes a custom My System mode for your devices.After theMY SYSTEM key is programmed, it will allow you to access five groups ofremote control keys without having to change device modes.However,thereare some considerations.•Keymoved,Learned,and Macro functions are affected by the My Systemmode. If keys are moved (using Keymover) or learned onto (usingLearning) and they are placed on keys not within the Control Groups,the keys will be ignored when pressed.•A Macro on the POWER key (if applicable) will carry over to the MySystem mode.CONTROL ORGANIZATIONABOUT CONTROL GROUPSFor My System programming, the remote’s keys are grouped by type ofcontrol into the following five control groups:(1) Playback Controls:REW,PLAY,FFWD,REC,STOP,and PAUSE(2) Audio Controls: VOL+,VOL-,and MUTE(3) Channel Controls: CH+,CH-,Keypad (0~9), ENTER,LAST,SLEEP,INFO,and TV/VIDEO(4) Menu Controls:MENU,GUIDE,Cursor Controls (▲,▼,,),SELECT,and EXIT(5) PIP Controls: PIP,FREEZE,SWAP,MOVE,and +100ABOUT DEVICE GROUPSMoreover, the remote’s devices are grouped into the following five device groups:(1) Playback Group: VCR,CBL,SAT,CD,AUDIO,and DVD(2) Audio Group: VCR,CBL,SAT,TV,CD,AUDIO,DVD and AUX(3) Channel Group: VCR,CBL,SAT,TV,CD,AUDIO,DVD and AUX(4) Menu Group: VCR,CBL,SAT,TV,and DVD(5) PIP Group: VCR,CBL,SAT,and TVThe default Device Group settings from the factory is:(1) Playback Group: VCR(2) Audio Group: TV(3) Channel Group: CBL(4) Menu Group: CBL(5) PIP Group: TVPROGRAMMING MYSYSTEMFor example, let’s assume you have a TV, a cable converter, and a VCR inyour home theater system.You can program the My System mode so thatselected controls are assigned to these devices as follows:1. On the remote, press and hold Puntil the display changesfrom the default device and time to [CODE SET].NOTE: Default values for device, its code, and time are shownabove.Your remote control settings may be different.NOTE: If you wish to exit the programming mode at any time, pressEXIT once. An [EXIT] message appears as the remote control returnsto normal operation.NOTE:Ifan [INVALID] message appears, you have inadvertentlypressed an incorrect key. Simply note your error and continue programming.2. Press ▲two times until [MY SYSTEM] appears.NOTE:Ifyou go past [MY SYSTEM],press ▼one or more times toreturn to it.3. Press SELECT once to begin programming. [PLAYBACK]appears.NOTE: The program will automatically step through each ControlGroup (from Playback to PIP) as you perform steps 3 through 7.However, you can use the ▲or ▼keys to navigate to a specific groupto make further changes.a. Press SELECT once to enter Playback Control Groupassignment.The last-selected device (e.g., [TV]) appears.b. Select a device for Playback Control Group assignment.For this example,press VCR once.This will assign theentire group of Playback Controls (i.e., REW,PLAY,FFWD,REC,STOP,and PAUSE) to the VCR.Your device choice(e.g., [VCR]) appears.c. Press SELECT once to accept the assignment in step 3b.The next Control Group assignment, [AUDIO]) appears.continued on next page...▲▲USER’SGUIDEUsing My System 17(x 2)RS 8in1 IR/RF UG 6/27/02 10:59 AM Page 17](https://usermanual.wiki/Radio-Shack/1502117.Users-Manual/User-Guide-264579-Page-17.png)
![USING MY SYSTEMPROGRAMMING MYSYSTEM (CONTINUED)4. Press SELECT once to enter Audio Control Group assignment.The last-selected device (e.g.,[VCR]) appears.a. Select a device for Audio Control Group assignment. Forthis example, press TV once.This will assign the entiregroup of Audio Controls (i.e., VOL+,VOL,and MUTE) to theTV. Your device choice (e.g., [TV]) appears.b. Press SELECT once to accept the assignment in step 4a.The next Control Group assignment, [CHANNEL]) appears.5. Press SELECT once to enter Channel Control Group assign-ment.The last-selected device (e.g., [TV]) appears.a. Select a device for Channel Control Group assignment. Forthis example, press CBL once.This will assign the entiregroup of Channel Controls (i.e., CH+,CH-,Keypad (0~ 9),ENTER,LAST,SLEEP,INFO,and TV/VIDEO) to the cable converter.Your device choice (e.g.,[CBL]) appears.b. Press SELECT once to accept the assignment in step 5b.The next Control Group assignment, [MENU]) appears.6. Press SELECT once to enter Menu Control Group assignment.The last-selected device (e.g.,[CBL]) appears.a. Select a device for Menu Control Group assignment. Forthis example, press CBL once.This will assign the entiregroup of Menu Controls (i.e., MENU,GUIDE,CursorControls (▲,▼,,),SELECT,and EXIT) to the cableconverter.Your device choice (e.g.,[CBL]) appears.b. Press SELECT once to accept the assignment in step 6a.The next Control Group assignment, [PIP]) appears.7. Press SELECT once to enter the PIP Control Group assign-ment.The last-selected device (e.g., [CBL]) appears.a. Select a device for PIP Control Group assignment.For thisexample, press TV once.This will assign the entire groupof PIP Controls (i.e., PIP,FREEZE,SWAP,MOVE,and+100) to the TV. Your device choice (e.g., [TV]) appears.b. Press SELECT once to accept the assignment in step 7a.The first Control Group assignment, [PLAYBACK]) appears.8. At this point, all Control Groups have been assigned. Tochange an assignment, use ▲or ▼to navigate to a specificgroup and make changes by repeating the appropriate step(3, 4, 5, 6, or 7).Otherwise, to exit programming, press and hold SELECTuntil [SUCCESS] appears, followed by [EXIT SETUP].Theremote will automatically exit the programming mode andreturn to normal operation.OPERATING MYSYSTEMAfter programming the My System mode (see the previous section),simplyactivate it by pressing MY SYSTEM once. Instantly, groups of remote keys will be assigned to their programmed devices.In the above example,pressing MY SYSTEM once would assign the following keys to the VCR, TV,and cable converter:VCR: REW,PLAY,FFWD,REC,STOP,and PAUSETV: VOL+,VOL,MUTE,PIP,FREEZE,SWAP,MOVE,and +100Cable Converter: CH+,CH-,Keypad (0~ 9), ENTER,LAST,SLEEP,INFO,TV/VIDEO,MENU,GUIDE,Cursor Controls (▲,▼,,),SELECT,and EXIT▲▲▲▲8-IN-ONE REMOTE18 Using My SystemorRS 8in1 IR/RF UG 6/27/02 10:59 AM Page 18](https://usermanual.wiki/Radio-Shack/1502117.Users-Manual/User-Guide-264579-Page-18.png)
![REASSIGNING DEVICE KEYSThe remote can be set up to control a second TV,VCR, DVD player, orother device not listed on the device keys. For example, to control a TV, acable converter, and two VCRs,you can reassign the unused AUX key tooperate the second VCR as follows:1. Find the codes for the device you want to program inManufacturer’s Codes (starting on page 48) and write themdown or highlight them.For this example,locate the VCRcodes on page 51.2. Turn on a device (e.g.,VCR) and, if necessary, load media(e.g., videocassette).NOTE: Please read steps 3 through 9 completely before proceeding.Highlight or write down the codes and device you wish to programbefore starting step 2.3. On the remote,press AUX once.Then press and hold Puntilthe display changes from the current AUX device and code(e.g., RCVR and 1023) to [CODE SET].NOTE: Default values for device, its code, and time are shownabove.Your remote control settings may be different.NOTE: If you wish to exit the programming mode at any time, pressEXIT once. An [EXIT] message appears as the remote control returnsto normal operation.NOTE:Ifan [INVALID] message appears, you have inadvertentlypressed an incorrect key. Simply note your error and continue programming.4. Press SELECT once to begin programming.The last-selecteddevice and its current code (e.g., RCVR and 1023) appear.5. Use ▲or ▼to navigate to the device type you want to assignto the AUX key. For this example,locate VCR and its defaultcode (e.g., VCR and 0060).6. Use the keypad to enter the first four-digit code for yourdevice and press SELECT once.For example,to enter the first Sony VCR code (0035 onpage 52) press 0twice, then 3,then 5,and then SELECT once.If the code is entered correctly, [SUCCESS] appears.7. Press EXIT to exit the programming mode.An [EXIT SETUP]message appears as the remote returns to normal operation.8. To verify the code works, aim the remote at the desireddevice (e.g.,VCR), press the reassigned device key (e.g., AUX)once and then press POWER once. The device should turnoff.If it does not respond, repeat steps 3 through 8,tryingeach code for your brand until you find one that works.Ifyou cannot find a code that works, try Searching For YourCode on page 10.NOTE: If the device does not have a POWER key, press (Play).9. To reassign other device keys, repeat steps 1 through 8,butthis time in step 3 substitute another device key you want toreassign. Then in step 4, locate and select the device you own.For example,let’s say you own a LD player instead of DVDplayer. In step 3, press DVD once (instead of AUX).In step 4,use ▲or ▼to navigate to LDP instead of VCR.Then completethe remaining instructions.10. For future reference, write down each reassigned device keyand its working code in the boxes below:VCR = Device: _____________________ Code =CBL = Device: _____________________ Code =SAT = Device:______________________ Code =TV = Device: ______________________ Code =CD = Device: ______________________ Code =AUX = Device: _____________________ Code =DVD = Device______________________ Code =AUDIO = Device:____________________ Code =USER’SGUIDEReassigning Device Keys 19orRS 8in1 IR/RF UG 6/27/02 10:59 AM Page 19](https://usermanual.wiki/Radio-Shack/1502117.Users-Manual/User-Guide-264579-Page-19.png)
![RESTORING FACTORY DEFAULT SETTINGSThe remote includes an Operation Reset program that you can use torestore the unit to factory default settings.IMPORTANT: Executing this program will erase all custom settings, includingHome Theater assignments, Macros, Learned Keys, Keymoved Keys, and alldevice assignments.1. On the remote, press and hold Puntil you see the displaychange from the default device and time to [CODE SET].NOTE: Default values for device, its code, and time are shownabove.Your remote control settings may be different.NOTE: If you wish to exit the programming mode at any time, pressEXIT once. An [EXIT] message appears as the remote control returnsto normal operation.NOTE:Ifan [INVALID] message appears, you have inadvertentlypressed an incorrect key. Simply note your error and continue programming.2. Press ▲once. [OPS RESET] appears.NOTE:Ifyou go past [OPS RESET],press ▼ one or more times toreturn to it.3. Press SELECT once to begin programming. [CLR SETUP]appears.4. Press SELECT once to start the process.[RESET RAM] appearsas the active memory is cleared,followed by [RESET E2] asthe preprogrammed memory is restored.An [EXIT SETUP] message appears as the remote automatically exits the programming mode and returns tonormal operation.USING THE IR/RF COMMAND CENTERThe remote package includes an IR/RF Command Center which receivesradio-frequency (RF) signals from the remote control, anywhere in yourhome,up to 100 feet away. Once it is set up, the IR/RF Command Centerwill convert the RF signals into Infrared (IR) signals to control your homeentertainment devices.NOTE: The remote transmits both an IR and an RF signal simultaneously. It is youroption whether you want to install the IR/RF Command Center for extended remotecontrol range. If you choose to do so, during testing do not aim the remote at yourhome entertainment devices to verify that RF transmission is working.NOTE: The RF signal transmitted by the remote, only works with the IR/RFCommand Center.SETTING UPTHE IR/RF COMMAND CENTER1. Find a location approximately 8 feet in front of your homeentertainment devices.It should provide (line-of-sight)access to your equipment and a power outlet to plug in theIR/RF Command Center.2. Plug in the IR/RF Command Center’s power cord into anactive outlet and raise the telescoping antenna.Tel es cop ing AntennaIR Lens3. Position the IR/RF Command Center so the black IR Lens isaimed at your home entertainment devices.4. To test the IR/RF Command Center, take the remote intoanother room in your home,up to100 feet away. Select adevice key (e.g.,TV) and press it once.Then press POWERonce.The device (e.g.,TV) should turn on.If it does not turn on,review the steps 1 through 3 and makeany adjustments.Try step 4 again.If you continue to have aproblem,perhaps there is an IR line-of sight problem.Tryadding the enclosed IR Signal Extension Cord (see nextpage).Also review the tips in Optimizing IR/RF CommandCenter Reception.8-IN-ONE REMOTE20 Restoring Factory Default Settings/Using The IR/RF Command CenterRS 8in1 IR/RF UG 6/27/02 10:59 AM Page 20](https://usermanual.wiki/Radio-Shack/1502117.Users-Manual/User-Guide-264579-Page-20.png)
![TROUBLESHOOTINGPROBLEM: LCD (Liquid Crystal Display) begins to fade,does not appear,or the LOW BATTERY ()icon appears.SOLUTION: Replace the batteries with four (4) new AAA alkaline batteries (see page 3).PROBLEM: Red LED and IR ( ) icon blinks when you press a key, butdevice does not respond.SOLUTION: Be sure to select the correct device key for the device you want to control.Also,aim the remote at the device not farther than 15 feet away. Or try installing the IR/RF Command Center for greater range (see page 20).PROBLEM: The remote does not control devices or commands are notworking properly.SOLUTION: Try all listed codes for the device. Make sure the device operates with an infrared remote control.PROBLEM: TV/VCR combo does not respond properly.SOLUTION: Use the VCR codes for your brand.Some combo units may require both a TV code and a VCR code for full operation.PROBLEM: The remote does not turn on a Sony or Sharp TV/VCR combo.SOLUTION: These models require TV codes to turn on power. For Sony,use TV code 0000 and VCR code 0032. For Sharp,use TV code 0093 and VCR code 0048.PROBLEM: Changing channels does not work properly.SOLUTION: If the original remote control required Enter to be pressed to change channels, press ENTER on the remote after entering the channel number.PROBLEM: During learning, the remote’s display shows an [ERROR]message after pressing and holding a key to be learned.SOLUTION: A bad capture has occurred.Avoid high-ambient light sources,such as direct daylight and fluorescent bulbs.Also,try readjusting positions of remote controls before performing theprocedure again.Make sure the key(s) on the original remote control is (are) operating correctly.PROBLEM: CH+,CH-,and LAST do not work for your RCA TV.SOLUTION: Due to RCA design from 1983 to 1987, only the original remote control will operate these functions.PROBLEM: No volume on a second TV.SOLUTION: Follow instructions in Changing Volume Lock on page 12.PROBLEM: Cannot find a working code using the instructions inSearching For Your Code.SOLUTION: See our website www.radioshack.com for help or take the remote to your local RadioShack store.PROBLEM: The remote turns on audio devices and controls volume, butdoes not change preset channels.SOLUTION: Some products may need both a Tuner (or Receiver) code and an Audio Amplifier code for remote control of all featureson your audio device.PROBLEM: Your satellite (DSS) receiver does not respond to the codeslisted on page 50.SOLUTION: Make sure the satellite (DSS) receiver can be operated with aninfrared (IR) remote control and is not set up to receive only radio frequency (RF) signals.NOTE: If you have any other problems, call customer service at 1-800-763-9232.ERROR MESSAGESA wrong key sequence or incorrect data hasbeen entered. Try entry again.Requested manufacturer’s code has not been found in the remote’s database.Tryanother code.Macro sequence being entered has reached themaximum limit of 15 keystrokes.Try entryagain with fewer keystrokes.A complete cycle of code search in the remote’s database has been completed. Try another code search or see our website www.radioshack.com for help.Or take the remote to your local RadioShack store.An error has occurred during a learning orprogramming sequence.Try entry again.Indicates a check result of E2 status is either bad or is not present.See our website www.radioshack.com for help or take the remote to your local RadioShack store.Indicates data captured during learning has filled the remote’s memory. Try deleting older learned keys to free up memory space (see page 14).Indicates data captured during learning has caused a error in the remote’s memory. Trylearning again.8-IN-ONE REMOTE22 Troubleshooting/Error MessagesRS 8in1 IR/RF UG 6/27/02 11:00 AM Page 22](https://usermanual.wiki/Radio-Shack/1502117.Users-Manual/User-Guide-264579-Page-22.png)
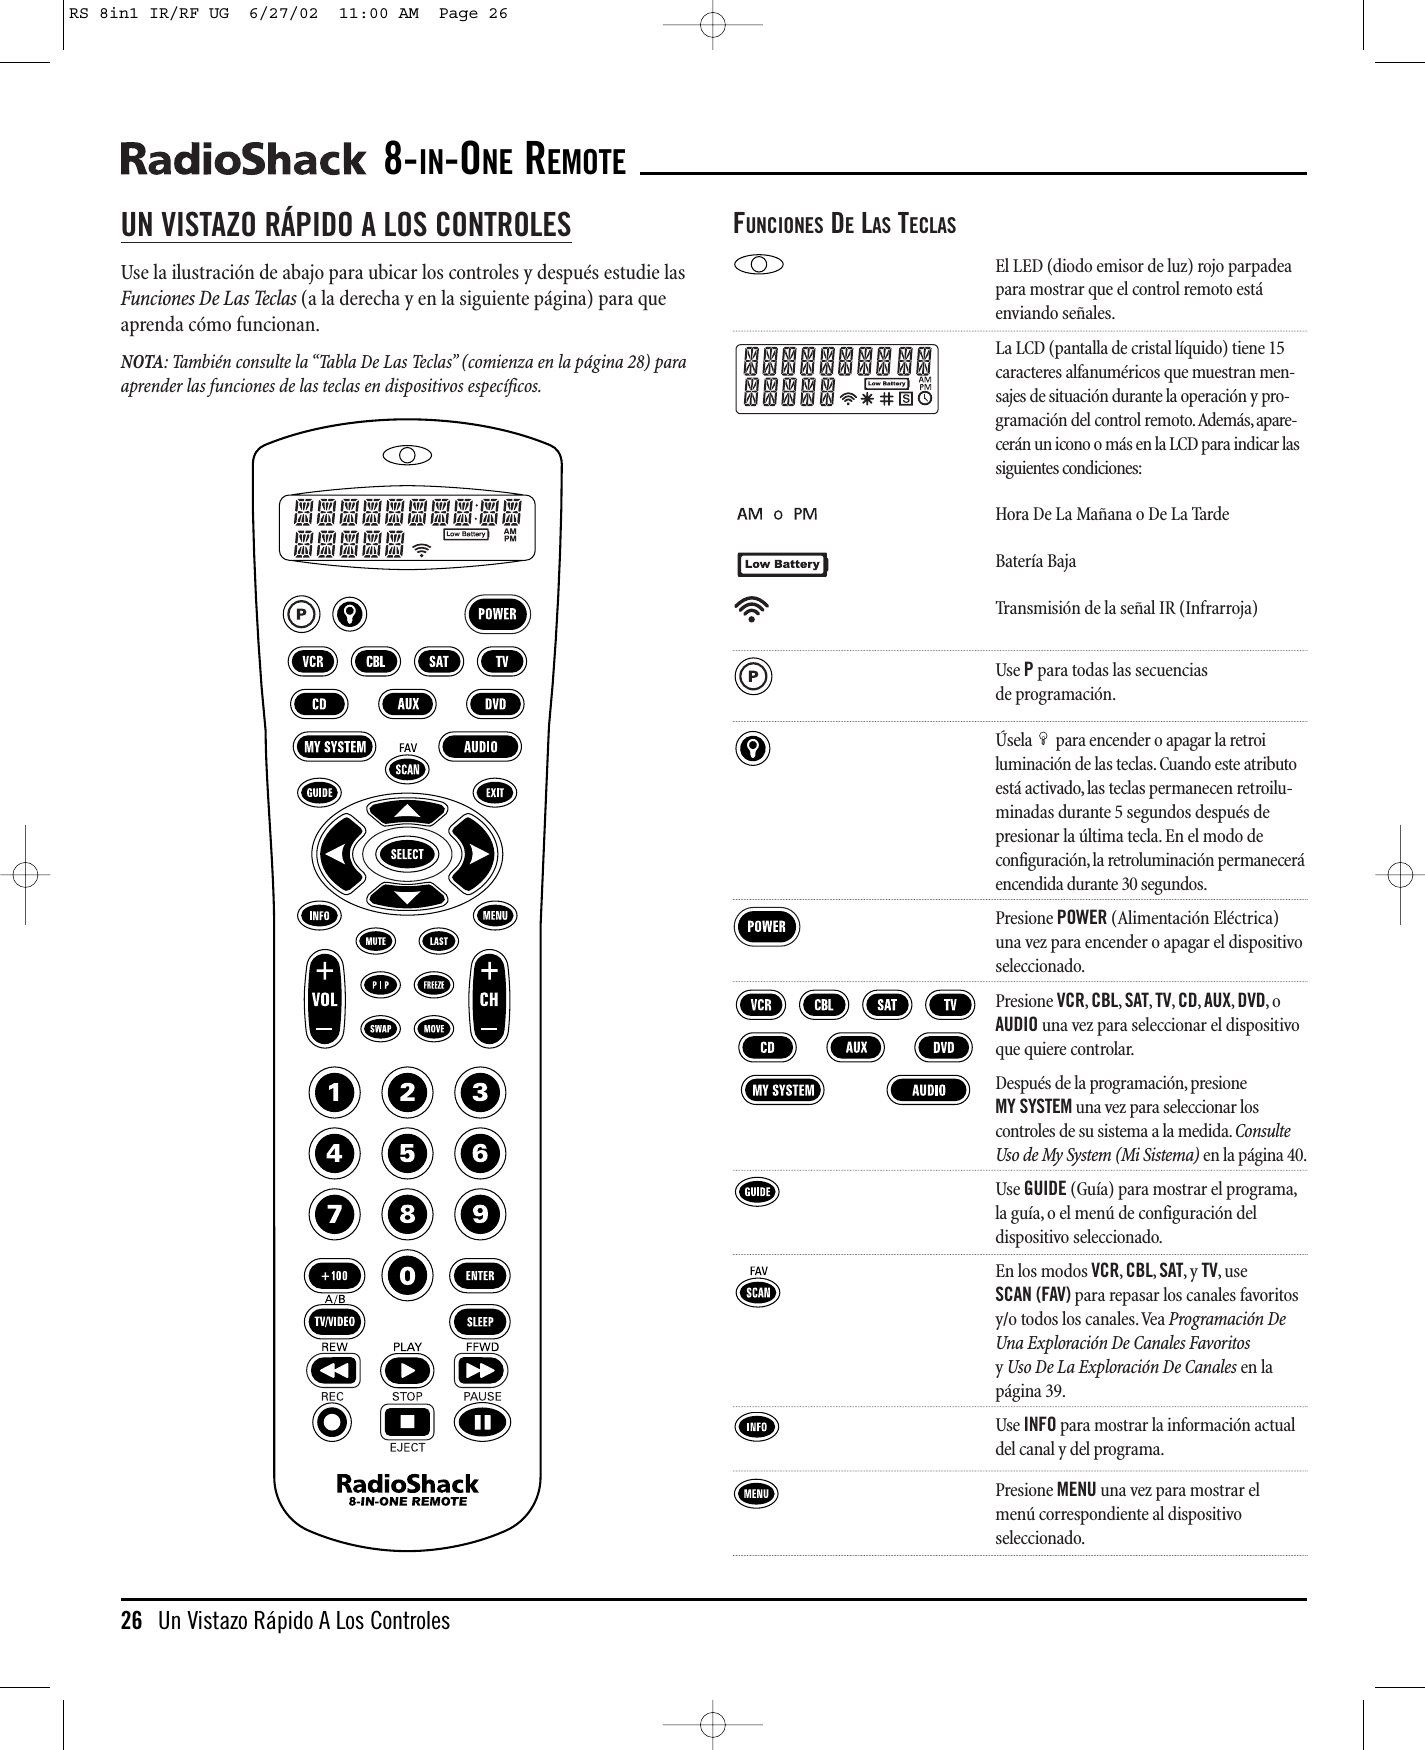
![INSTALACIÓN DE LAS BATERÍASSu control remoto necesita cuatro baterías AAA (no vienen incluidas)para funcionar. Para obtener el mejor funcionamiento y mayor duración,le recomendamos que use las baterías alcalinas RadioShack.PRECAUCIONES:• Utilice únicamente baterías frescas del tamaño requerido y del tiporecomendado.• No mezcle baterías viejas y nuevas, diferentes tipos de baterías(v.g., estándar, alcalinas, o recargables),ni baterías recargables dediferentes capacidades.• Deseche las baterías viejas rápida y adecuadamente. No las queme nilas entierre.• Si no va a usar el control remoto durante un largo tiempo, quítele lasbaterías. Éstas pueden derramar substancias químicas que puedendestruir los componentes electrónicos.PARA INSTALAR LAS BATERÍAS:1. Presione la lengüeta en la tapa del compartimento de baterías (ubica-do en el respaldo del control remoto) y levante la tapa.2. Coloque las baterías AAA en el compartimento como se indica por lossímbolos de polaridad (+ y –) marcados en el interior.3. Alinee la saliente de la tapa con la abertura del compartimento y vuelvaa colocar la tapa.4. Si las baterías se insertan como es debido, toda la pantalla LCD seencenderá. Después de 5 segundos de inactividad, el control remoto seapagará por sí mismo para conservar la vida de las baterías.5. Lleve a cabo los pasos de la sección Fijación de la hora (en la páginasiguiente) para poner la hora correcta.NOTA: Cuando aparece un icono de batería en la pantalla (vea la página 27,“Funciones De Las Teclas”), significa que las baterías están bajas. Cámbielas tanpronto le sea posible y el control remoto se restaurará a su funcionamiento comple-to, con todo y sus fijaciones favoritas.FIJACIÓN DE LA HORA1. En el control remoto, presione y mantenga oprimida la teclaPhasta que la pantalla cambie del dispositivo y de la hora defábrica a la [CODE SET] (Fijación De Códigos).NOTA: Arriba se muestran los valores de fábrica de un dispositivo,su código, y la hora. Los valores fijados en su control remoto puedenser diferentes.NOTA: Si en algún momento dado desea salirse del modo de progra-mación, presione EXIT (Salida) una vez.Aparece un mensaje [EXIT]al tiempo que el control remoto vuelve a la operación normal.NOTA:Si aparece el mensaje [INVALID] (No Válido), significa queaccidentalmente presionó una tecla incorrecta. Simplemente tomenota del error y continúe programando.2. Presione ▲cuatro veces hasta que aparezca [CLOCK SET](Fijación De La Hora).NOTA: Si se pasa de [CLOCK SET], presione t una vez o más hastavolver a ella.3. Presione SELECT (Seleccionar) una vez para comenzar a programar.Aparece el valor fijado en la fábrica (12:00 a.m.)o la hora actual (si ésta se fijó antes).4. Presione ▲una vez o más hasta que aparezca la hora quedesea del día o de la tarde (a.m.o p.m.).5. Presione ▼una vez o más hasta que aparezca el minuto que desea.6. Una vez que haya fijado la hora correcta, presione SELECTuna vez para aceptar los valores indicados.La pantalla confirmará los datos asentados con [SUCCESS] (Éxito) ydespués con [EXIT SETUP] (Salir De Configuración).El control remoto volverá a la operación normal.GUÍADEL USUARIOInstalación De Las Baterías/Fijación De La Hora 25❶❸❷(x 4)RS 8in1 IR/RF UG 6/27/02 11:00 AM Page 25](https://usermanual.wiki/Radio-Shack/1502117.Users-Manual/User-Guide-264579-Page-25.png)
![PROGRAMACIÓN DE UN DISPOSITIVOEl control remoto está pre-programado en la fábrica para operar un tele-visor, una videograbadora y un receptor de satélite RCA, un convertidorde cable Motorola (General Instruments),y reproductores de CD, DVD ydispositivos de audio Pioneer. Para controlar dispositivos diferentes a lasmarcas fijadas en la fábrica,lleve a cabo los siguientes pasos y repítalossegún se necesite para cada dispositivo que vaya a programar; de otraforma puede saltarse esta sección:NOTA: Para controlar un aparato combinado televisor/ videograbadora (TV/VCR),vea “Programación De Un Aparato Combinado Televisor/ Videograbadora(TV/VCR)” en la página 32.1. Encuentre los códigos de los dispositivos que desea programar en los Códigos Del Fabricante (comenzando en la página 48) y anótelos o reálcelos con un marcador.2. Encienda un dispositivo (v.g., la videograbadora o el repro-ductor de DVDs) y, si fuese necesario,póngale el medio queusa (v.g., casete o disco).NOTA: Por favor lea los pasos 3 a 9 en su totalidad antes de proceder.Realce o anote los códigos y el dispositivo que quiere programar antesde iniciar el paso 2.3. En el control remoto,presione y mantenga presionada Phasta que la pantalla cambie de dispositivo y hora de fábricaa [CODE SET] (Fijar Código).NOTA: Arriba se muestran los valores de fábrica de un dispositivo,su código, y la hora. Los valores fijados en su control remoto puedenser diferentes.NOTA: Si en algún momento dado desea salirse del modo de programación, presione EXIT (Salida) una vez.Aparece un mensaje[EXIT] al tiempo que el control remoto vuelve a la operación normal.NOTA:Si aparece el mensaje [INVALID] (No Válido), significa queaccidentalmente presionó una tecla incorrecta. Simplemente tomenota del error y continúe programando.4. Presione SELECT una vez para comenzar la programación.Aparece el último dispositivo seleccionado y su código actual (v.g., TV y 0051).5. Presione una vez la clave del dispositivo que desea programar(v.g., VCR).Aparece el dispositivo deseado y su código actual(v.g., VCR y 0035).NOTA: Use la tecla AUX para programar dispositivos de automati-zación del hogar, accesorios de vídeo, servicios de audio, y otros dispositivos de audio/vídeo. Vea “Reasignación De Las Teclas DeDispositivos” en la página 42.6. Use el teclado para introducir el primer código de cuatrodígitos para el dispositivo y presione SELECT una vez.Por ejemplo,para introducir el primer código de la video-grabadora (VCR) de la GE (en la página 52), presione el 0dos veces, el 6una vez,el 0una vez,y después SELECT unavez. Si se introduce el código correctamente, aparece [SUCCESS] (Éxito).7. Presione EXIT (Salida) para salir del modo de programación.Aparecerá un mensaje de [EXIT SETUP] (Salir DeConfiguración) al tiempo que el control remoto vuelve a laoperación normal.8. Para verificar que el código funciona,apunte el controlremoto al dispositivo deseado, presione la tecla de ese dis-positivo una vez y después presione la tecla POWER una vez.El dispositivo debe apagarse.Si no responde,repita los pasos 3 a 7,probando con cadacódigo para la marca del dispositivo hasta que encuentreuno que funcione.Si no puede hallar un código que funcione, haga la prueba con Búsqueda De Su Código en la página 33.NOTA: Si el dispositivo no tiene una tecla POWER,presione (Play).continúa en la siguiente página...GUÍADEL USUARIOProgramación De Un Dispositivo 31RS 8in1 IR/RF UG 6/27/02 11:00 AM Page 31](https://usermanual.wiki/Radio-Shack/1502117.Users-Manual/User-Guide-264579-Page-31.png)
![PROGRAMACIÓN DE UN DISPOSITIVO (cont.)9. Repita los pasos 1 a 8 para cada dispositivo que desee controlar. Para referencia futura,anote cada uno de los códigos de los dispositivos que funcionan en los cuadradosde abajo:Código VCR:Código CBL:Código SAT:Código TV:Código CD:Código DVD:Código AUDIO:Tipo de dispositivode audio:________________________________Código AUX:Tipo de dispositivoauxiliar:_________________________________PROGRAMACIÓN DE UN APARATO COMBINADOTELEVISOR/ VIDEOGRABADORA (TV/VCR)1. Encuentre los códigos de los dispositivos que desea progra-mar en los Códigos Para Programar CombinacionesTelevisor/ Videograbadora en la página 51 y anótelos o reálcelos con un marcador.2. Encienda el aparato combinado TV/VCR e insértele unvideocasete.3. En el control remoto,presione y mantenga presionada Phasta que la pantalla cambie de dispositivo y hora de fábricaa [CODE SET] (Fijar Código).NOTA: Arriba se muestran los valores de fábrica de un dispositivo,su código, y la hora. Los valores fijados en su control remoto puedenser diferentes.NOTA: Si en algún momento dado desea salirse del modo de programación, presione EXIT (Salida) una vez.Aparece un mensaje[EXIT] al tiempo que el control remoto vuelve a la operación normal.NOTA:Si aparece el mensaje [INVALID] (No Válido), significa queaccidentalmente presionó una tecla incorrecta. Simplemente tomenota del error y continúe programando.4. Presione SELECT una vez para comenzar la programación.Aparece el último dispositivo seleccionado y su código actual (v.g., TV y 0051).5. Presione VCR una vez.Aparece [VCR] y su código actual.6. Use el teclado para introducir el primer código de cuatrodígitos para el dispositivo y presione SELECT una vez.Por ejemplo,para introducir el primer código de los aparatoscombinados TV/VCRSony en la página 51, presione el 0cuatro veces y después SELECT una vez.Si el código se introdujo en forma correcta,aparece el mensaje[SUCCESS] (Éxito).7. Presione EXIT (Salida) para salir del modo de programación.Aparecerá un mensaje de [EXIT SETUP] (Salir DeConfiguración) al tiempo que el control remoto vuelve a laoperación normal.8. Para verificar que el código funciona,apunte el controlremoto al aparato combinado TV/VCR, presione la tecla VCRuna vez y después presione la tecla POWER una vez.NOTA: Si el dispositivo no tiene una tecla POWER,presione (Play).La unidad debe apagarse o comenzar a tocar si presionó (Play).Si no responde,repita los pasos 3 a 9,probando cadacódigo para la marca de su aparato hasta que halle un quefuncione.Si no puede hallar un código que funcione, haga laprueba con Búsqueda De Su Código en la siguiente página.9. Para referencia futura, anote el código que funciona delaparato combinado TV/VCR en los cuadrados de abajo:Código TV/VCR:Código TV (si se usa):8-IN-ONE REMOTE32 Programación De Un Dispositivo/Programación De Un Aparato Combinado Televisor/VideograbadoraRS 8in1 IR/RF UG 6/27/02 11:00 AM Page 32](https://usermanual.wiki/Radio-Shack/1502117.Users-Manual/User-Guide-264579-Page-32.png)
![BÚSQUEDA DE SU CÓDIGOSi su dispositivo no le responde al control remoto después de haber probadotodos los códigos listados para su marca,o si su marca no está listada en loabsoluto, haga la prueba de buscar manualmente a su código. Por ejemplo,para buscar manualmente un código para su TV:1. Encienda el televisor.2. En el control remoto,presione y mantenga presionada Phasta que la pantalla cambie de dispositivo y hora de fábricaa [CODE SET] (Fijar Código).NOTA: Arriba se muestran los valores de fábrica de un dispositivo,su código, y la hora. Los valores fijados en su control remoto puedenser diferentes.NOTA: Si en algún momento dado desea salirse del modo de programación, presione EXIT (Salida) una vez.Aparece un mensaje[EXIT] al tiempo que el control remoto vuelve a la operación normal.NOTA:Si aparece el mensaje [INVALID] (No Válido), significa queaccidentalmente presionó una tecla incorrecta. Simplemente tomenota del error y continúe programando.3. Presione la tecla ▼una vez.Aparece [MAN SEARCH](Búsqueda Manual).NOTA: Si se pasa de [MAN SEARCH],presione ▲una vez o máshasta volver a ella.4. Presione SELECT (Seleccionar) una vez para comenzar a pro-gramar.Aparecen el último dispositivo seleccionado y sucódigo (v.g., VCR y 0035).5. Presione TV una vez.Aparecen el dispositivo deseado y elprimer código en la lista de búsqueda manual (v.g., TV y0047).6. Apunte el control remoto al televisor y presione SELECT unavez. El LED rojo parpadea y el icono (IR) destella, indi-cando que se están transmitiendo códigos IR (infrarrojos).NOTA: En el modo de búsqueda manual, el control remoto enviarácódigos IR de su base de datos hacia el dispositivo seleccionado,comenzando primero con el código más popular.7. Si el televisor se apaga,sáltese al siguiente paso.Si no seapagó,apunte el control remoto al televisor y presione ▲una vez para avanzar la búsqueda manual al siguiente código (v.g., TV y 0054). Nuevamente el LED rojo parpadea yel icono (IR) destella.Repita este paso tanta veces como sea necesario hasta quehalle un código que apague el dispositivo.8. Una vez que encuentre un código que funcione, presioneSELECT una vez para guardarlo.La pantalla confirma elnúmero introducido con [SUCCESS] y después con[EXIT SETUP].El control remoto vuelve a la operación normal.NOTA: Para referencia futura, anote el código que funciona para eldispositivo en los cuadrados apropiados en la página 32.9. Para realizar una búsqueda manual del código de otro dispositivo,repita los pasos 1 a 8,pero esta vez (en el paso 5)substituya la tecla de dispositivo apropiada por el dispositivoque está buscando.USO DE LA FUNCIÓN APRENDIZAJEEl control remoto incluye una función de Aprendizaje para que usted puedaañadir funciones que son únicas a los dispositivos de su entretenimiento enel hogar (v.g., rastreo arriba o abajo de su VCR). Sin embargo, hay algunasconsideraciones:• Sus controles remotos originales tienen que estar trabajando bienpara que la función de aprendizaje funcione adecuadamente.• Las teclas aprendidas son específicas al modo, de manera que cadauna puede guardar una función única para cada modo.• Las teclas aprendidas se pueden usar en macros (vea Uso De Los Macrosen la página 36).• También puede usar cualquier tecla para el aprendizaje, excepto lasteclas de dispositivos, P,,y POWER.Sin embargo,el usarlas comoteclas aprendidas borra sus funciones originales.• Para un aprendizaje óptimo, evite niveles altos de luz ambiental comola luz del sol o las luces fluorescentes eficientes de energía.NOTA: Tenga a la mano sus controles remotos originales antes de programar elaprendizaje. Cerciórese de presionar cada tecla antes de que pasen 5 segundosdespués de la introducción previa. Si no, el control remoto se saldrá de su modo deprogramación.continúa en la siguiente página...GUÍADEL USUARIOBúsqueda De Su Código/Uso De La Función Aprendizaje 33RS 8in1 IR/RF UG 6/27/02 11:00 AM Page 33](https://usermanual.wiki/Radio-Shack/1502117.Users-Manual/User-Guide-264579-Page-33.png)
![USO DE LA FUNCIÓN APRENDIZAJE (continuación)PROGRAMACIÓNDEUNA TECLA DEAPRENDIZAJE1. En el control remoto,presione y mantenga presionada Phasta que la pantalla cambie de dispositivo y hora de fábricaa [CODE SET] (Fijar Código).NOTA: Arriba se muestran los valores de fábrica de un dispositivo,su código, y la hora. Los valores fijados en su control remoto puedenser diferentes.NOTA: Si en algún momento dado desea salirse del modo de programación, presione EXIT (Salida) una vez.Aparece un mensaje[EXIT] al tiempo que el control remoto vuelve a la operación normal.NOTA:Si aparece el mensaje [INVALID] (No Válido), significa queaccidentalmente presionó una tecla incorrecta. Simplemente tomenota del error y continúe programando.2. Presione la tecla ▼dos veces hasta que aparezca [IR LEARN].NOTA: Si se pasa de [IR LEARN],presione ▲una vez o más hastavolver a ella.3. Presione SELECT una vez para comenzar la programación.Aparece el último dispositivo seleccionado.4. Presione la tecla de un dispositivo una vez (v.g., TV) paraasignar el modo deseado para el aprendizaje.5. Escoja una tecla para aprendizaje y presiónela una vez.Cuando el control remoto entra en el modo de aprendizaje,aparece [LEARNING] y el LED rojo se enciende durante5segundos.6. Coloque el control remoto original (v.g., el control remoto deltelevisor) junto (a unos 5 cm de distancia) al control remoto.7. En el control remoto original, presione y mantenga oprimidala tecla (es decir, la función) que se va a aprender hasta queaparezca [SUCCESS] en el control remoto.La pantalla volveráal modo del dispositivo que usted escogió para aprender(v.g., TV).Si no se aprendió la tecla,entonces verá un mensaje de[ERROR].Repita los pasos del 5 al 7 según se necesite para alcanzar el[SUCCESS] (Éxito).8. Para aprender funciones sobre otras teclas,repita los pasos 4 a7 para cada tecla.9. Presione EXIT (Salida) para salir del modo de programación.Aparecerá un mensaje de [EXIT SETUP] (Salir DeConfiguración) al tiempo que el control remoto vuelve a laoperación normal.10. Para probar la función aprendida, apunte el remoto al dispos-itivo deseado y presione la tecla del dispositivo una vez (v.g.,TV, donde fue asignado el modo de aprendizaje). Despuéspresione la tecla donde se guardó la función aprendida. Lafunción debe activarse.Si no sucede, vuelva a tratar de programar la tecla,comenzando con el paso 1.SUPRESIÓNDEUNA FUNCIÓNDEUNA TECLA DEAPRENDIZAJE1. En el control remoto,presione y mantenga presionada Phasta que la pantalla cambie de dispositivo y hora de fábricaa [CODE SET] (Fijar Código).NOTA: Arriba se muestran los valores de fábrica de un dispositivo,su código, y la hora. Los valores fijados en su control remoto puedenser diferentes.NOTA: Si en algún momento dado desea salirse del modo de progra-mación, presione EXIT (Salida) una vez.Aparece un mensaje [EXIT]al tiempo que el control remoto vuelve a la operación normal.NOTA:Si aparece el mensaje [INVALID] (No Válido), significa queaccidentalmente presionó una tecla incorrecta. Simplemente tomenota del error y continúe programando.5 cm8-IN-ONE REMOTE34 Uso De La Función Aprendizaje(x 2)RS 8in1 IR/RF UG 6/27/02 11:00 AM Page 34](https://usermanual.wiki/Radio-Shack/1502117.Users-Manual/User-Guide-264579-Page-34.png)
![2. Presione ▼tres veces hasta que aparezca [IR DELETE].NOTA: Si se pasa de [IR DELETE],presione ▲una vez o más hastavolver a ella.3. Presione SELECT una vez para comenzar la programación.Aparece el último dispositivo seleccionado (v.g., TV).4. Presione la tecla de un dispositivo una vez (v.g.,TV) correspon-diente al modo que contiene la función aprendida.5. Presione la tecla una vez en donde está guardada la funciónaprendida (que se va a borrar). La pantalla cambia a [DELETED] y después vuelve al último modo seleccionado(v.g., TV).6. Si lo desea,puede repetir los pasos 4 y 5 para borrar otrasfunciones aprendidas.7. Presione EXIT (Salida) para salir del modo de programación.Aparecerá un mensaje de [EXIT SETUP] (Salir DeConfiguración) al tiempo que el control remoto vuelve a laoperación normal.CAMBIO DEL BLOQUEO DEL VOLUMENEn su estado original (desbloqueado), el remoto permite que cada dispos-itivo controle su propio volumen únicamente en su propio modo (v.g., elvolumen del televisor en el modo TV, el volumen de la videograbadora enel modo VCR, etc.).Sin embargo, al usar nuestra función De Bloqueo DeVolu me n , usted puede bloquear los controles del volumen de cada disposi-tivo en todos los modos (v.g., el volumen de AUDIO en todos los modos).Más aún, al usar la función De Desbloqueo Del Volumen (vea la página quesigue), usted puede ajustar más a su gusto las fijaciones de tal maneraque los controles del volumen de un dispositivo estén desbloqueados enun modo,pero permanezcan bloqueados en todos los otros modos (v.g., elvolumen del televisor en el modo TV y el volumen AUDIO en todos losotros modos).PROGRAMACIÓNDEL BLOQUEO DEL VOLUMEN1. En el control remoto,presione y mantenga presionada Phasta que la pantalla cambie de dispositivo y hora de fábricaa [CODE SET] (Fijar Código).NOTA: Arriba se muestran los valores de fábrica de un dispositivo,su código, y la hora. Los valores fijados en su control remoto puedenser diferentes.NOTA: Si en algún momento dado desea salirse del modo de programación, presione EXIT (Salida) una vez.Aparece un mensaje[EXIT] al tiempo que el control remoto vuelve a la operación normal.NOTA:Si aparece el mensaje [INVALID] (No Válido), significa queaccidentalmente presionó una tecla incorrecta. Simplemente tomenota del error y continúe programando.2. Presione ▼cuatro veces hasta que aparezca [VOL LOCK].NOTA: Si se pasa de [VOL LOCK],presione ▲una vez o más hastavolver a ella.3. Presione SELECT (Seleccionar) una vez para comenzar a pro-gramar.Aparece [TO MODE] (Al Modo).4. Presione una tecla de modo (v.g., AUDIO) para bloquear loscontroles de volumen de un dispositivo a todos los modos.Aparecen [SUCCESS] y después [EXIT SETUP] al tiempo queel control remoto sale automáticamente del modo de progra-mación y vuelve a la operación normal.5. Si lo desea,repita los pasos 1 al 4 según sea necesario parabloquear los controles de volumen de otros dispositivos atodos los modos.PROGRAMACIÓNDEL DESBLOQUEO DEL VOLUMEN1. En el control remoto,presione y mantenga presionada Phasta que la pantalla cambie de dispositivo y hora de fábricaa [CODE SET] (Fijar Código).2. Presione ▼cinco veces hasta que aparezca [VOL UNLOCK] .NOTA: Si se pasa de [VOL UNLOCK],presione ▲una vez o máshasta volver a ella.continúa en la siguiente página...GUÍADEL USUARIOUso De La Función Aprendizaje/Cambio Del Bloqueo Del Volumen 35(x 3)(x 5)(x 4)RS 8in1 IR/RF UG 6/27/02 11:00 AM Page 35](https://usermanual.wiki/Radio-Shack/1502117.Users-Manual/User-Guide-264579-Page-35.png)
![CAMBIO DEL BLOQUEO DEL VOLUMENPROGRAMACIÓNDEL DESBLOQUEO DEL VOLUMEN (CONTINUACIÓN) 3. Presione SELECT una vez para comenzar la programación.Aparece [ALL MODE].Para desbloquear un modo,sáltese al paso 4. De otra forma,presione SELECT una vez para desbloquear todos los modos.Aparecen [UNLOCKED] y después [EXIT SETUP] al tiempo queel remoto se sale automáticamente del modo de progra-mación y vuelve a la operación normal.4. (Opcional) Presione ▲(o ▼) una vez.Aparece [ONE MODE].a. Presione SELECT una vez.Aparece [SEL MODE].b. Presione una tecla de modo una vez (v.g., TV) para desblo-quearla.Aparecen [UNLOCKED] y después [SEL MODE].c. Si lo desea, repita el paso 4b según se necesite para desblo-quear los controles de volumen de otros dispositivos.Deotra forma, presione EXIT para salirse del modo de progra-mación.Aparecerá un mensaje de [EXIT SETUP] al tiempoque el control remoto vuelve a la operación normal.USO DE LOS MACROSCon la programación de Macros, su control remoto se puede configurarpara que realice operaciones repetitivas que desperdician tiempo,ybrindarle acceso fácil, conveniente con sólo presionar una sola tecla.Los macros son ideales para las operaciones de cine en el hogar, fijaciónde un canal favorito, pasos de guía, u otras funciones múltiples que austed le gustaría controlar con una sola tecla.Más aún, cada macro puedeguardar hasta 15 presiones de tecla en total.NOTA: La programación de un nuevo macro por encima de uno existente borraráal macro original.PROGRAMACIÓNDEUNCANAL FAVORITOCon tantos canales disponibles a través del proveedor de su sistema decable o de satélite, usted puede programar un macro que seleccione directamente un canal favorito con sólo presionar una tecla.Por ejemplo,supongamos que sus programas favoritos de cable están en el canal 71.Lleve a cabo los siguientes pasos para programar un macro con accesodirecto a este canal:NOTA: Este ejemplo supone que el televisor está conectado directamente al cable yno a través de un convertidor de cable.1. En el control remoto,presione y mantenga presionada Phasta que la pantalla cambie de dispositivo y hora de fábricaa [CODE SET] (Fijar Código).NOTA: Arriba se muestran los valores de fábrica de un dispositivo,su código, y la hora. Los valores fijados en su control remoto puedenser diferentes.NOTA: Si en algún momento dado desea salirse del modo de programación, presione EXIT (Salida) una vez.Aparece un mensaje[EXIT] al tiempo que el control remoto vuelve a la operación normal.NOTA:Si aparece el mensaje [INVALID] (No Válido), significa queaccidentalmente presionó una tecla incorrecta. Simplemente tomenota del error y continúe programando.2. Presione ▼seis veces hasta que aparezca [KEY MACRO].NOTA: Si se pasa de [KEY MACRO],presione ▲una vez o más hastavolver a ella.3. Presione SELECT una vez para comenzar a programar.Aparece [SEL MACKEY].4. Escoja la tecla que quiere usar como un macro y presiónelauna vez.Aparece [ENTER SEQ] (Introduzca La Secuencia).5. Introduzca una secuencia de macro de hasta 15 teclas. Ennuestro ejemplo, presione las siguientes teclas una vez eneste orden: TV - 7- 1.NOTA: Si tiene acceso a más de 100 canales, agregue un 0 antes de losnúmeros de canal (v.g., 0 -7 - 1).Si el control remoto original requeríaque se presionase la tecla Enter para cambiar de canal, también debe pre-sionar ENTER después del número de canal (v.g., 0 - 7 - 1 - ENTER).NOTA:Un mensaje de [ERROR],seguido de [MAX = 15] le recuerdaque la secuencia del macro tiene que ser de 15 teclas o menos.8-IN-ONE REMOTE36 Cambio Del Bloqueo Del Volumen/Uso De Los Macroso(x 6)RS 8in1 IR/RF UG 6/27/02 11:00 AM Page 36](https://usermanual.wiki/Radio-Shack/1502117.Users-Manual/User-Guide-264579-Page-36.png)
![Después de presionar la primera tecla (en la secuencia delmacro),aparece [SEL TO END] como recordatorio de usarSELECT para finalizar la secuencia (vea el siguiente paso).6. Para terminar la secuencia del macro,presione y mantengaoprimida SELECT hasta que aparezca [SUCCESS],seguida de[EXIT SETUP].El control remoto se saldrá automáticamente delmodo de programación y volverá a la operación normal.Ahora cuando usted presione la tecla con este macro asignado, verá instan-táneamente el canal 71 del cable en su televisor.PROGRAMACIÓNDEUNA TECLA MAESTRA DEENCENDIDO CONSELECCIÓNINSTANTÁNEA DECANALSe puede programar un macro para encender y apagar sus dispositivos tam-bién.Por ejemplo, vamos a configurar una secuencia que encenderá su tele-visor y sintonizará el canal 3, y después encenderá el convertidor de cable ysintonizará un canal premium (v.g., el 11).NOTA: Este ejemplo supone que todos los equipos están apagados y que el televisorestá conectado a través de un convertidor de cable con la sintonía de la TV fijada alcanal 3.1. Lleve a cabo los pasos 1 a 4 de la sección pasada,Programación De Un Canal Favorito,que comienza en lapágina anterior. Sin embargo,en esta ocasión en el paso 4,substituya otra tecla para usarla como una tecla de macro.2. Introduzca una secuencia de macro de hasta 15 teclas. Paranuestro ejemplo, presione las siguientes teclas una vez eneste orden: CBL - POWER - TV - POWER - 0- 3- CBL - 1- 1NOTA: Si tiene acceso a más de 100 canales, agregue un 0 antes decada grupo de números de canal (v.g., 0- 0- 3y 0- 1- 1). Si el con-trol remoto original requería que se presionara una tecla Enter paracambiar el canal, también presione la tecla ENTER después delnúmero del canal (v.g., presione 0- 0- 3 - ENTER y 0- 1- 1 -ENTER).NOTA:Un mensaje de [ERROR],seguido de [MAX = 15] le recuerdaque la secuencia del macro tiene que ser de 15 teclas o menos.3. Después de presionar la primera tecla (en la secuencia delmacro),aparece [SEL TO END] como un recordatorio de usarSELECT para terminar la secuencia (vea el siguiente paso).4. Para terminar la secuencia del macro,presione y mantengaoprimida SELECT hasta que vea [SUCCESS] en la pantalla,seguida de [EXIT SETUP].El control remoto se saldráautomáticamente del modo de programación y volverá a laoperación normal.Ahora cuando presione la tecla con este macro asignado, se encenderá elconvertidor de cable y el televisor, el televisor se sintonizará en el canal 03,y después el convertidor de cable se sintonizará en el canal 11.REMOCIÓNDEUNMACRO1. Lleve a cabo los pasos 1 a 4 de la sección pasada,Programación De Un Canal Favorito,que comienza en lapágina anterior. Sin embargo,esta vez en el paso 2,selec-cione una tecla de macro que usted quiera borrar.2. Presione y mantenga oprimida SELECT para borrar la tecla delmacro.Aparecerá [SEL TO END] como un recordatorio de usarSELECT para terminar la secuencia (vea el siguiente paso).3. Presione SELECT hasta que aparezca [SUCCESS],seguido de[EXIT SETUP].El control remoto se saldrá automáticamentedel modo de programación y volverá a la operación normal.USO DE LA FUNCIÓN KEYMOVEREl control remoto incluye una función Keymover (mueve teclas) que le permite detallar (o copiar) teclas de un modo (es decir, el modo origen) aotro modo (es decir, el modo destino).NOTA: Las siguientes teclas no se pueden usar como un origen o como un destino:VCR,CBL,SAT,TV,CD,AUX,DVD,MY SYSTEM,AUDIO,and P.PROGRAMACIÓNDELAFUNCIÓNKEYMOVERPor ejemplo, si su videograbadora (VCR) no tiene control de volumen,haga la prueba de copiar las teclas de volumen y de enmudecer desde elmodo TV hasta el modo VCR como sigue:1. En el control remoto,presione y mantenga presionada Phasta que la pantalla cambie de dispositivo y hora de fábricaa [CODE SET] (Fijar Código).continúa en la siguiente página...GUÍADEL USUARIOUso De Los Macros/Uso De La Función Keymover 37RS 8in1 IR/RF UG 6/27/02 11:00 AM Page 37](https://usermanual.wiki/Radio-Shack/1502117.Users-Manual/User-Guide-264579-Page-37.png)
![USO DE LA FUNCIÓN KEYMOVERPROGRAMACIÓNDELAFUNCIÓNKEYMOVER1. (continuación)NOTA: Arriba se muestran los valores de fábrica de un dispositivo,su código, y la hora. Los valores fijados en su control remoto puedenser diferentes.NOTA: Si en algún momento dado desea salirse del modo de programación, presione EXIT (Salida) una vez.Aparece un mensaje[EXIT] al tiempo que el control remoto vuelve a la operación normal.NOTA:Si aparece el mensaje [INVALID] (No Válido), significa queaccidentalmente presionó una tecla incorrecta. Simplemente tomenota del error y continúe programando.2. Presione ▲cinco veces hasta que aparezca [KEYMOVER].NOTA: Si se pasa de [KEYMOVER],presione ▼una vez o más hastavolver a ella.3. Presione SELECT (Seleccionar) una vez para comenzar a programar.Aparece [FROM MODE] (Desde El Modo).4. Seleccione un modo de origen (v.g., TV) y presiónelo una vez.Aparece [FROM KEY] (Desde La Tecla).5. Seleccione una tecla origen (v.g., VOL+) y presiónela una vez.Aparece [TO MODE] (Al Modo).6. Seleccione un modo destino (v.g., VCR) y presiónelo una vez.Aparece [TO KEY] (A La Tecla).7. Seleccione una tecla destino (v.g., VOL+) y presionela unavez. Aparece [SUCCESS],seguido de [EXIT SETUP].El controlremoto se saldrá automáticamente del modo de progra-mación y volverá a la operación normal.8. Repita los pasos 1 al 7 dos veces más, sustituyendo VOL- yMUTE como teclas de origen y de destino en los pasos 5 y 7.Al completar el procedimiento de arriba, podrá usar su control remotopara controlar el volumen de su televisor y el enmudecimiento en el modoVCR, igual que en el modo TV.RESTAURACIÓNDEUNA SOLA TECLA MOVIDA1. Lleve a cabo los pasos 1 a 7 de la sección anterior,Programación De La Función Keymover.Sin embargo,estavez en el paso 6, haga que el modo destino sea el mismo queel modo origen (v.g., TV).Aparece [CLR KMVR].2. Presione SELECT una vez para borrar la tecla movida.Aparece [DELETED] (Borrada), seguido de [EXIT SETUP].Elcontrol remoto se saldrá automáticamente del modo de programación y volverá a la operación normal.RESTAURACIÓNDETODAS LAS TECLAS MOVIDAS ENUNSOLO MODO1. Realice los pasos 1 a 4 de la sección anterior, ProgramaciónDe La Función Keymover, en la página anterior. Sin embargo,esta vez en los pasos 3 y 4,haga que el modo origen y la tecla origen tengan el mismo modo (v.g., TV).Aparecerá [CLR KMVR].2. Presione SELECT una vez para borrar todas las teclas movidasde este modo.Aparece [DELETED],seguido de [EXIT SETUP].El control remoto se saldrá automáticamente del modo deprogramación y volverá a la operación normal.8-IN-ONE REMOTE38 Uso De La Función Keymover(x 5)RS 8in1 IR/RF UG 6/27/02 11:00 AM Page 38](https://usermanual.wiki/Radio-Shack/1502117.Users-Manual/User-Guide-264579-Page-38.png)
![PROGRAMACIÓN DE UNA EXPLORACIÓN DE CANALES FAVORITOSEn el modo TV,VCR,DVD,SAT,o CBL, el control remoto puede guardar unalista de hasta 10 canales favoritos,en cualquier orden, que serán exploradosinmediatamente cuando usted presione SCAN (FAV) una vez (vea la sigu-iente sección,Uso De La Exploración De Canales).NOTA: Sólo se pueden guardar canales en un modo y cualesquiera canales previa-mente guardados se borrarán.1. En el control remoto,presione y mantenga presionada Phasta que la pantalla cambie de dispositivo y hora de fábricaa [CODE SET] (Fijar Código).NOTA: Arriba se muestran los valores de fábrica de un dispositivo,su código, y la hora. Los valores fijados en su control remoto puedenser diferentes.NOTA: Si en algún momento dado desea salirse del modo de programación, presione EXIT (Salida) una vez.Aparece un mensaje[EXIT] al tiempo que el control remoto vuelve a la operación normal.NOTA:Si aparece el mensaje [INVALID] (No Válido), significa queaccidentalmente presionó una tecla incorrecta. Simplemente tomenota del error y continúe programando.2. Presione ▲tres veces hasta que aparezca [FAV CHAN](Canales Favoritos).NOTA: Si se pasa de [FAV CHAN],presione ▼una vez o más hastavolver a ella.3. Presione SELECT una vez para comenzar la programación.Aparece el último dispositivo seleccionado (v.g., [VCR]).4. Seleccione un modo (v.g., TV) para explorar sus canalesfavoritos y presiónelo una vez. Después presione SELECT unavez. Aparece [FAV].5. Use el teclado para introducir el número de un canal favorito(v.g., 031). La pantalla muestra lo que usted tecleó.NOTA: Si el control remoto original requería que se presionara unatecla Enter para cambiar el canal, también presione la tecla ENTERdespués del número del canal (v.g., 0- 3- 1- ENTER). Sin embargo,la pantalla no mostrará ENTER.NOTA: Si se equivoca al asentar los datos, presione cualquier teclanumérica una vez o más hasta que vea que la pantalla se borra.Entonces, trate de volver a introducir los números correctos.Presione SELECT una vez.La pantalla se borra, lista para lapróxima introducción de datos.6. Si lo desea,repita el paso 5 (en la página anterior) para cada canal favorito que va a guardar, hasta por un total de10 canales.NOTA: Una vez que haya introducido el décimo canal, el controlremoto se saldrá automáticamente del modo de programación.7. (Opcional) Para salir de la programación, presione y man-tenga oprimida SELECT hasta que aparezca [SUCCESS],seguida de [EXIT SETUP]. El control remoto se saldráautomáticamente del modo de programación y volverá a laoperación normal.USO DE LA EXPLORACIÓN DE CANALESEn los modos VCR,CBL,SAT,TV,y DVD, use la tecla SCAN (FAV) para iniciaruna exploración de 3 segundos de todos los canales favoritos (si estánprogramados – vea Programación De Una Exploración De Canales Favoritosen la sección anterior) y/o todos los canales para el modo seleccionado.1. Si se configuró Una Exploración De Canales Favoritos, sálteseal paso 2. De otra forma, en el control remoto,presione VCR,CBL,SAT,TV,o DVD una vez.2. Presione SCAN (FAV) una vez.• Si se configuró Una Exploración De Canales Favoritos,ésta dará comienzo y, al terminar, continuará la explo-ración de todos los canales del mismo dispositivo enforma ascendente.• Si no se ha configurado Una Exploración De CanalesFavoritos, la exploración comenzará con el canal actual,después procederá al siguiente canal ascendente,y continuará hasta que todos los canales del dispositivoseleccionado hayan sido explorados. El LED rojo y el icono de transmisión IR ( ) parpadean cada vez que seexplora un canal.3. Para detener la exploración de canales en cualquier momento,presione cualquier tecla una vez.GUÍADEL USUARIOProgramación De Una Exploración De Canales Favoritos/Uso De La Exploración De Canales 39(x 3)RS 8in1 IR/RF UG 6/27/02 11:01 AM Page 39](https://usermanual.wiki/Radio-Shack/1502117.Users-Manual/User-Guide-264579-Page-39.png)
![USO DE MY SYSTEM (MI SISTEMA)El control remoto incluye un modo al gusto llamado My System (Mi Sistema)para sus dispositivos.Después de que la tecla MY SYSTEM se haya programado,le permitirá acceder cinco grupos de teclas de control remoto sin tener quecambiar de modo de dispositivo. Sin embargo,hay algunas consideraciones.•Las Funciones Tecla Movida,Aprendida,y De Macro son afectadas por el modo My System. Si las teclas se movieron (usando el Keymover) ose les enseñó algo (usando Aprendizaje) y están ubicadas en teclas queno estén dentro de los Grupos Control, las teclas serán ignoradascuando se las presione.•Un Macro en la tecla POWER (si es aplicable) se pasará al modo My System.ORGANIZACIÓNDELOS CONTROLESACERCA DELOS GRUPOS CONTROLPara la programación de My System, las teclas del remoto están agrupadaspor tipo de control dentro de los siguientes cinco grupos de control:(1) Controles De Reproducción:REW,PLAY,FFWD,REC,STOP,y PAUSE(2) Controles De Audio: VOL+,VOL-,y MUTE(3) Controles De Canal: CH+,CH-,Teclado (0~9), ENTER,LAST,SLEEP,INFO,yTV/VIDEO(4) Controles De Menú:MENU,GUIDE,Controles Del Cursor (▲,▼,,),SELECT,y EXIT(5) Controles PIP: PIP,FREEZE,SWAP,MOVE,y +100ACERCA DELOS GRUPOS DEDISPOSITIVOSMás aún, los dispositivos del remoto están agrupados dentro de los siguientes cinco grupos de dispositivos:(1) Grupo Reproductor: VCR,CBL,SAT,CD,AUDIO,y DVD(2) Grupo De Audio: VCR,CBL,SAT,TV,CD,AUDIO,DVD y AUX(3) Grupo De Canales: VCR,CBL,SAT,TV,CD,AUDIO,DVD y AUX(4) Grupo De Menúes: VCR,CBL,SAT,TV,y DVD(5) Grupo PIP: VCR,CBL,SAT,y TVLos parámetros originales Del Grupo De Dispositivos son:(1) Grupo Reproductor: VCR(2) Grupo De Audio: TV(3) Grupo De Canales: CBL(4) Grupo De Menúes: CBL(5) Grupo PIP: TVPROGRAMACIÓNDEMYSYSTEMPor ejemplo, supongamos que usted tiene un televisor, un convertidor decable,y una videograbadora en su sistema de cine en el hogar. Usted puedeprogramar el modo My System de tal manera que los controles selecciona-dos se asignen a estos dispositivos como sigue:1. En el control remoto,presione y mantenga presionada Phasta que la pantalla cambie de dispositivo y hora de fábricaa [CODE SET] (Fijar Código).NOTA: Arriba se muestran los valores de fábrica de un dispositivo,su código, y la hora. Los valores fijados en su control remoto puedenser diferentes.NOTA: Si en algún momento dado desea salirse del modo de programación, presione EXIT (Salida) una vez.Aparece un mensaje[EXIT] al tiempo que el control remoto vuelve a la operación normal.NOTA:Si aparece el mensaje [INVALID] (No Válido), significa queaccidentalmente presionó una tecla incorrecta. Simplemente tomenota del error y continúe programando.2. Presione ▲dos veces hasta que aparezca [MY SYSTEM].NOTA: Si se pasa de [MY SYSTEM],presione ▼una vez o más hastavolver a ella.3. Presione SELECT una vez para comenzar la programación.Aparece [PLAYBACK] (Reproducción).NOTA: El programa automáticamente pasará a través de cadaGrupo de Control (desde Playback hasta PIP) mientras usted realizalos pasos del 3 al 7. Sin embargo, usted puede usar las teclas ▲o ▼para navegar a un grupo específico con el fin de hacer más cambios.a. Presione SELECT una vez para ingresar a la asignación delGrupo De Control De Reproducción.Aparece el último dispositivo seleccionado (v.g., [TV]).b. Seleccione un dispositivo para asignarle el Grupo DeControl De Reproducción.Para este ejemplo, presione VCRuna vez.Esto asignará todo el Grupo De Controles DeReproducción (es decir, PLAY,FFWD,REC,STOP,y PAUSE)a la videograbadora (VCR).Aparece su selección de dispositivo (v.g., [VCR]).▲▲8-IN-ONE REMOTE40 Uso De My System (Mi Sistema)(x 2)RS 8in1 IR/RF UG 6/27/02 11:01 AM Page 40](https://usermanual.wiki/Radio-Shack/1502117.Users-Manual/User-Guide-264579-Page-40.png)
![c. Presione SELECT una vez para aceptar la asignación delpaso 3b.Aparece la siguiente asignación de Grupo DeControl,[AUDIO]).4. Presione SELECT una vez para ingresar a la asignación DelGrupo De Control De Audio.Aparece el último dispositivoseleccionado (v.g., [VCR]).a. Seleccione un dispositivo para asignarle el Grupo DeControl De Audio. Para este ejemplo, presione TV una vez.Esto asignará todo el grupo de Controles De Audio (esdecir, VOL+,VOL-,y MUTE) al televisor.Aparece su selec-ción de dispositivo (v.g., [TV]).b. Presione SELECT una vez para aceptar la asignación delpaso 4a.Aparece la siguiente asignación de Grupo DeControl,[CHANNEL]).5. Presione SELECT una vez para ingresar a la asignación delGrupo De Control De Canales.Aparece el último dispositivoseleccionado (v.g., [TV]).a. Seleccione un dispositivo para asignarle el Grupo DeControl De Canales. Para este ejemplo,presione CBL unavez. Esto asignará todo el grupo de Controles De Canales(es decir, CH+,CH-,Teclado (0~ 9), ENTER,LAST,SLEEP,INFO,y TV/VIDEO) al convertidor de cable.Aparece suselección de dispositivo (v.g., [CBL]).b. Presione SELECT una vez para aceptar la asignación delpaso 5b.Aparece la siguiente asignación de Grupo DeControl,[MENU]).6. Presione SELECT una vez para ingresar a la asignación delGrupo De Control De Menúes.Aparece el último dispositivoseleccionado (v.g., [CBL]).a. Seleccione un dispositivo para asignarle el Grupo DeControl De Menúes.Para este ejemplo,presione CBL unavez. Esto asignará todo el grupo de Controles De Menúes(es decir, MENU,GUIDE,Los Controles Del Cursor(▲,▼,,),SELECT,y EXIT) al convertidor de cable.Aparece su selección de dispositivo (v.g., [CBL]).b. Presione SELECT una vez para aceptar la asignación delpaso 6a.Aparece la siguiente asignación de Grupo DeControl,[PIP]).7. Presione SELECT una vez para ingresar la asignación delGrupo De Control PIP.Aparece el último dispositivo selec-cionado (v.g., [CBL]).a. Seleccione un dispositivo para asignarle el Grupo DeControl PIP. Para este ejemplo, presione TV una vez.Estoasignará todo el grupo de Controles PIP (es decir, PIP,FREEZE,SWAP,MOVE,y +100) a TV.Aparece su selecciónde dispositivo (v.g., [TV]).b. Presione SELECT una vez para aceptar la asignación en elpaso 7a.Aparece la primera asignación de Grupo DeControl,([PLAYBACK]).8. En este punto, todos los Grupos De Control han sido asigna-dos.Para cambiar la asignación,use ▲o ▼para navegar aun grupo específico y realice los cambios repitiendo el pasoadecuado (3, 4, 5, 6, o 7).De otra forma, para salir de la programación, presione ymantenga oprimida SELECT hasta que aparezca [SUCCESS],seguida de [EXIT SETUP]. El control remoto se saldráautomáticamente del modo de programación y volverá a laoperación normal.continúa en la siguiente página...▲▲GUÍADEL USUARIOUso De My System (Mi Sistema) 41oRS 8in1 IR/RF UG 6/27/02 11:01 AM Page 41](https://usermanual.wiki/Radio-Shack/1502117.Users-Manual/User-Guide-264579-Page-41.png)
![USO DE MY SYSTEM (continuación)OPERACIÓNDEMYSYSTEMDespués de programar el modo My System (vea la sección previa), simple-mente actívelo presionando MY SYSTEM una vez.Instantáneamente, los gru-pos de teclas del control remoto se asignarán a sus dispositivos programa-dos.En el ejemplo de arriba, al presionar MY SYSTEM una vez se asignaríanlas siguientes teclas a la VCR,TV, y convertidor de cable:VCR: REW,PLAY,FFWD,REC,STOP,y PAUSETV: VOL+,VOL,MUTE,PIP,FREEZE,SWAP,MOVE,y +100Convertidor De Cable: CH+,CH-,Teclado (0~ 9), ENTER,LAST,SLEEP,INFO,TV/VIDEO,MENU,GUIDE,Controles Del Cursor(▲,▼,,),SELECT,y EXITREASIGNACIÓN DE LAS TECLAS DE DISPOSITIVOSEl remoto se puede configurar para que controle un segundo televisor,videograbadora o reproductor de DVDs, u otro dispositivo que no esté lis-tado en las teclas de dispositivo.Por ejemplo,para controlar un televisor, un convertidor de cable y dosvideograbadoras, usted puede reasignar la tecla AUX no utilizada para queopere la segunda videograbadora como sigue:1. Encuentre los códigos para el dispositivo que usted quiereprogramar en los Códigos Del Fabricante (comenzando en lapágina 48) y anótelos o reálcelos con un marcador. Para esteejemplo,ubique los códigos VCR en la página 51.2. Encienda el dispositivo (v.g., la VCR) y, si fuese necesario,insértele el medio que utiliza (v.g., videocasete).NOTA: Por favor lea los pasos 3 a 9 en su totalidad antes de proced-er. Realce o anote los códigos y el dispositivo que quiere programarantes de iniciar el paso 2.3. En el remoto, presione AUX una vez.Después presione y man-tenga oprimida P hasta que la pantalla cambie del dispositivoy código AUX actual (v.g., RCVR y 1023) a [CODE SET].NOTA: Arriba se muestran los valores de fábrica de un dispositivo,su código, y la hora. Los valores fijados en su control remoto puedenser diferentes.NOTA: Si en algún momento dado desea salirse del modo de programación, presione EXIT (Salida) una vez.Aparece un mensaje[EXIT] al tiempo que el control remoto vuelve a la operación normal.NOTA:Si aparece el mensaje [INVALID] (No Válido), significa queaccidentalmente presionó una tecla incorrecta. Simplemente tomenota del error y continúe programando.4. Presione SELECT una vez para comenzar la programación.Aparece el último dispositivo seleccionado y su código actual (v.g., RCVR y 1023).5. Use ▲o ▼para navegar hasta el tipo de dispositivo queusted quiere asignar a la tecla AUX.En este ejemplo,encuentre VCR y su código de fábrica (v.g., VCR y 0060).6. Use el teclado para introducir el primer código de cuatrodígitos para el dispositivo y presione SELECT una vez.Por ejemplo,para introducir el primer código VCR de Sony(0035 en la página 52), presione el 0dos veces, luego el 3,luego el 5,y después SELECT una vez.Si el código se introdujo en forma correcta,aparece el mensaje[SUCCESS] (Éxito).7. Presione EXIT (Salida) para salir del modo de programación.Aparecerá un mensaje de [EXIT SETUP] (Salir DeConfiguración) al tiempo que el control remoto vuelve a laoperación normal.8. Para verificar que el código funciona, apunte el controlremoto al dispositivo deseado (v.g.,VCR), presione la teclareasignada del dispositivo (v.g., AUX) una vez y después pre-sione la tecla POWER una vez.El dispositivo debe apagarse.Si no responde,repita los pasos 3 a 8,probando con cadacódigo para la marca del dispositivo hasta que encuentreuna que funcione. Si no puede hallar un código que fun-cione,haga la prueba con Búsqueda De Su Código en lapágina 33.NOTA: Si el dispositivo no tiene una tecla POWER,presione (Play).9. Para reasignar otras teclas de dispositivos,repita los pasos 1a 8, pero esta vez en el paso 3 substituya otra tecla de dispos-itivo que quiera reasignar. Después, en el paso 4, ubique yseleccione el dispositivo que usted tiene.Por ejemplo, digamos que usted tiene un reproductor de discos láser (LD) en lugar de un reproductor de DVDs. En elpaso 3, presione DVD una vez (en lugar de AUX).En el paso 4,use ▲o ▼para navegar a LDP en lugar de VCR. Luego,termine el resto de las instrucciones.▲▲8-IN-ONE REMOTE42 Uso De My System (Mi Sistema)/Reasignación De Las Teclas De DispositivosoRS 8in1 IR/RF UG 6/27/02 11:01 AM Page 42](https://usermanual.wiki/Radio-Shack/1502117.Users-Manual/User-Guide-264579-Page-42.png)
![10. Para referencia futura, anote cada una de las teclas reasig-nadas de dispositivo y su código de funcionamiento en loscuadrados de abajo:VCR = Dispositivo:________________ Código =CBL = Dispositivo: ________________ Código =SAT = Dispositivo: ________________ Código =TV = Dispositivo: _________________ Código =CD = Dispositivo:_________________ Código =AUX = Dispositivo: ________________ Código =DVD = Dispositivo: _______________ Código =AUDIO = Dispositivo: ______________ Código =RESTAURACIÓN DE LOS VALORES FIJADOS EN LA FÁBRICAEl remoto incluye un programa de Reposición De Las Operaciones queusted puede usar para restaurar los valores fijados en la fábrica.IMPORTANTE: Al ejecutar este programa se borran todos los parámetrosmodificados a la medida, incluyendo las asignaciones de Cine En El Hogar,Macros, Teclas Con Aprendizaje, Teclas Reasignadas (Keymoved), y todas lasasignaciones de dispositivos.1. En el control remoto,presione y mantenga presionada Phasta que la pantalla cambie de dispositivo y hora de fábricaa [CODE SET] (Fijar Código).NOTA: Arriba se muestran los valores de fábrica de un dispositivo,su código, y la hora. Los valores fijados en su control remoto puedenser diferentes.NOTA: Si en algún momento dado desea salirse del modo de progra-mación, presione EXIT (Salida) una vez.Aparece un mensaje [EXIT]al tiempo que el control remoto vuelve a la operación normal.NOTA:Si aparece el mensaje [INVALID] (No Válido), significa queaccidentalmente presionó una tecla incorrecta. Simplemente tomenota del error y continúe programando.2. Presione ▲una vez.Aparece [OPS RESET].NOTA: Si se pasa de [OPS RESET],presione ▼una vez o más hastavolver a ella.3. Presione SELECT una vez para comenzar a programar.Aparece [CLR SETUP].4. Presione SELECT una vez para comenzar el proceso.Aparece[RESET RAM] al borrarse la memoria activa, seguido de[RESET E2] al restaurarse la memoria pre-programada.Aparece un mensaje de [EXIT SETUP] al tiempo que el remoto se sale automáticamente del modo de programacióny vuelve a la operación normal.GUÍADEL USUARIOReasignación De Las Teclas De Dispositivos/Restauración De Los Valores Fijados En La Fábrica 43RS 8in1 IR/RF UG 6/27/02 11:01 AM Page 43](https://usermanual.wiki/Radio-Shack/1502117.Users-Manual/User-Guide-264579-Page-43.png)
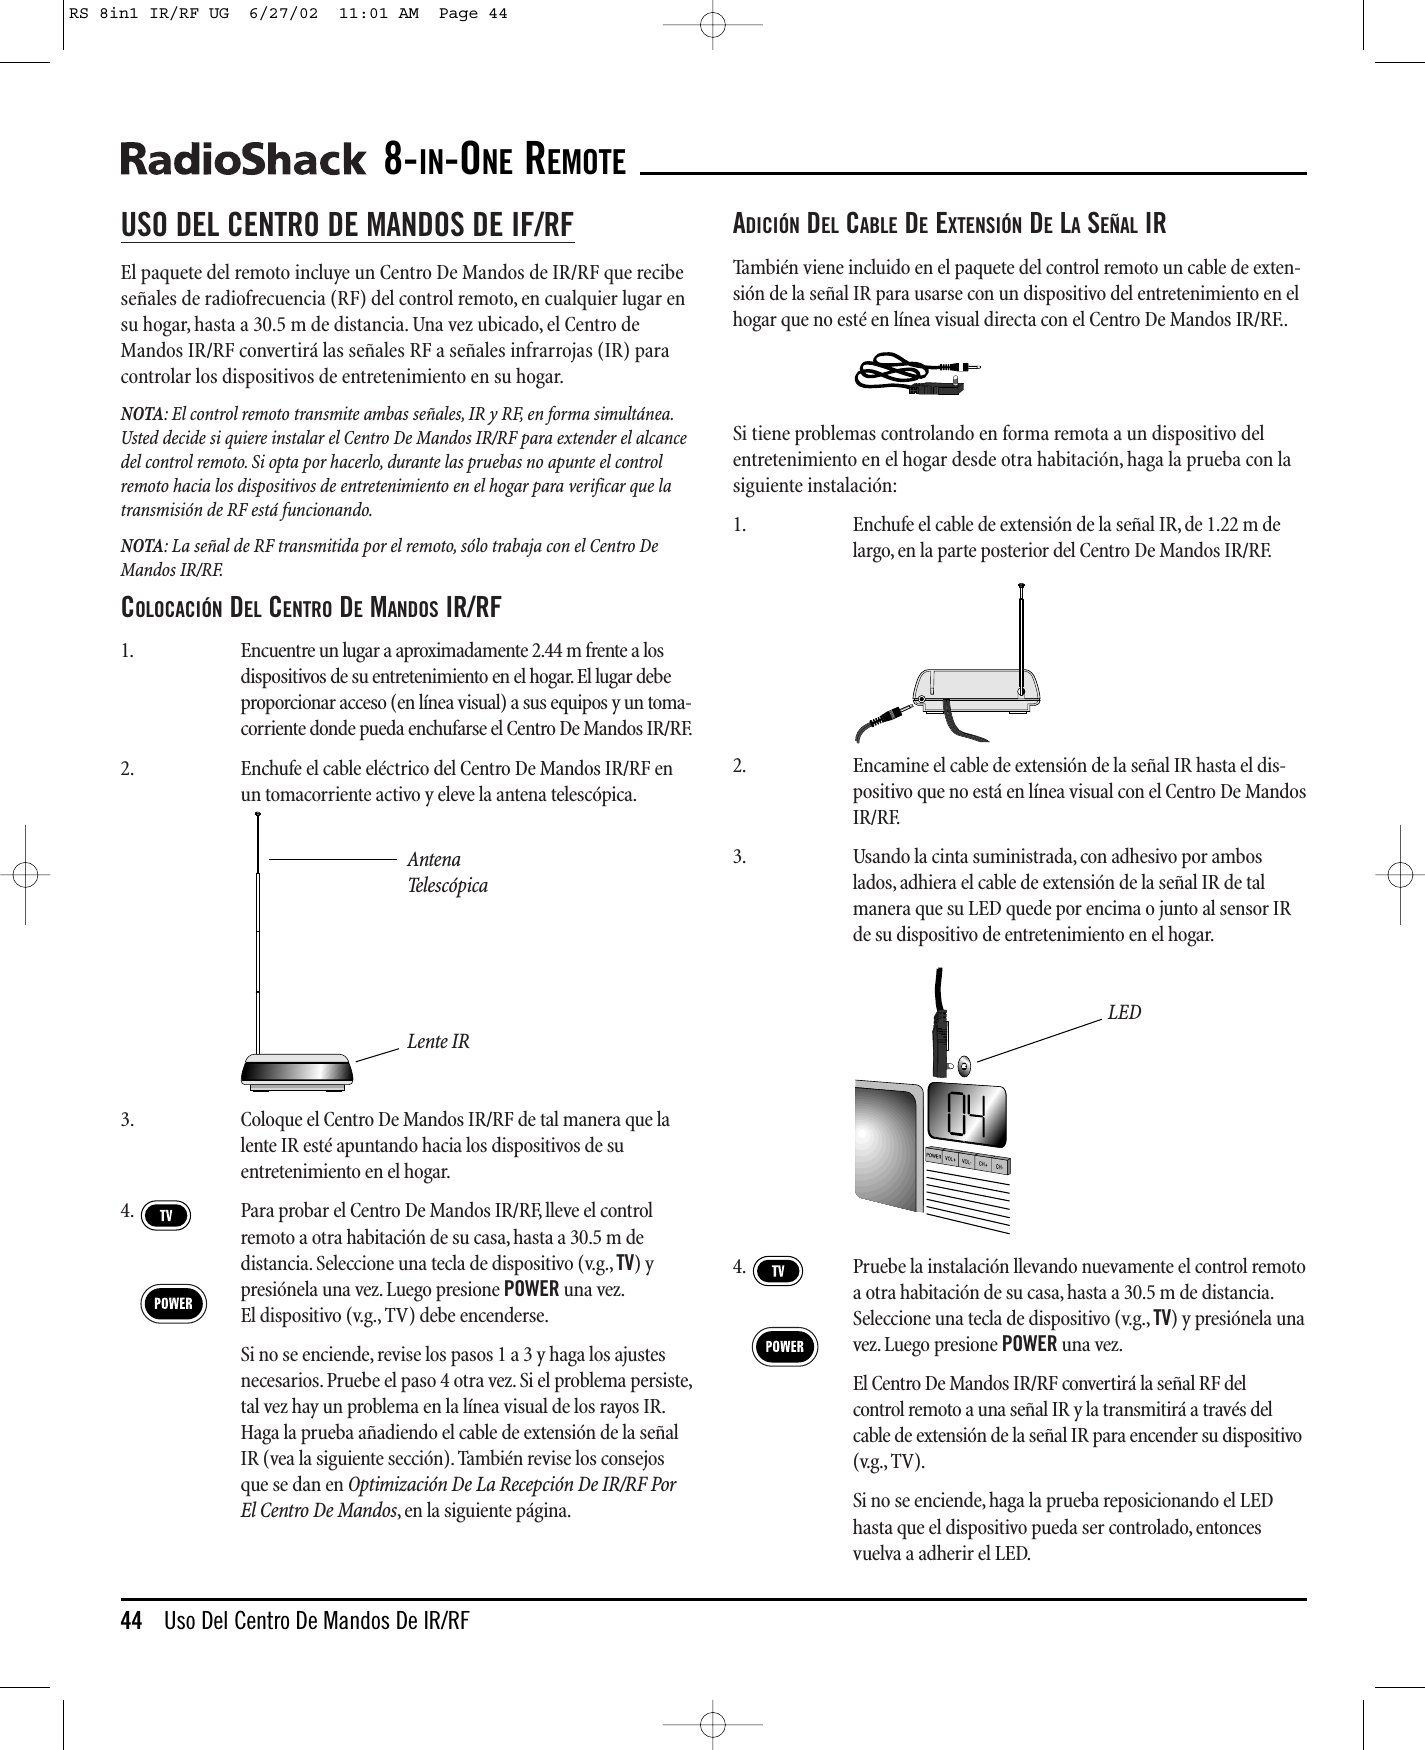
![OPTIMIZACIÓNDELARECEPCIÓNDEIF/RF POR ELCENTRO DEMANDOSPara optimizar la operación de su Centro de Mandos IR/RF, haga la prueba con lo siguiente:• Apunte el control remoto hacia la habitación donde está ubicado elCentro de Mandos IR/RF.• No coloque el Centro de Mandos IR/RF cerca de objetos metálicos,como los conductos térmicos. El metal puede absorber las señales RF.• Cerciórese de que las baterías en el control remoto estén completa-mente cargadas.Cámbielas y haga la prueba si no está seguro (veaInstalación De Las Baterías en la página 25). Las baterías bajas afec-tarán el alcance.• Cerciórese de que el control remoto no esté siendo afectado por otrastransmisiones de RF (v.g., los abrepuertas de cochera, teléfonosinalámbricos, etc.).NOTA: Las pruebas de los límites del alcance del remoto y del Centro De MandosIR/RF se realizaron en pruebas de distancia al aire libre. La distancia de la señalreal se basará en la construcción del edificio en donde se esté usando la unidad, asícomo en otros factores, como la interferencia exterior.ESPECIFICACIONESAlimentación Del Control Remoto . . . . . . . . . . . . . . . . . . . . . . . 4 Baterías AAAAlimentación De La Consola IR/RF . . . . . . . . . . . . . . . . . . . . . . . . . . . 120 Vc.a.Alcance Del Control Remoto A La Consola IR/RF . . . . . . . . . . . . . . . . 30.48 mAlcance De La Consola De Mandos IR/RF Al Dispositivo. . . . . . 7.62 m ± 30˚Dimensiones Del Control Remoto (H x A x P). . . . . . . . . . . . . . . . . . . . . . . . . . . . . . . . . . . . . . . 234 x 64 x 34 mmDimensiones De La Consola De Mandos IR/RF(H x A x P) . . . . . . . . . . . . . . . . . . . . . . . . . . . . . . . . . 39.7 x 128.6 x 101.6 mmPeso Del Control Remoto (Sin Las Baterías). . . . . . . . . . . . . . . . . . . . . . . . 204 gPeso De La Consola De Mandos IR/RF . . . . . . . . . . . . . . . . . . . . . . . . . . . . 300 gNOTA: Las especificaciones son típicas. Las unidades individuales podrían variar.Las especificaciones quedan sujetas a cambios y mejoras sin previo aviso.LOCALIZACIÓN DE FALLASPROBLEMA: La LCD (pantalla de cristal líquido) comienza a desvanecerse,no enciende,o aparece el icono de Batería Baja ( ).SOLUCIÓN: Cambie las baterías por cuatro (4) nuevas baterías alcalinas tamaño AAA (vea la página 25).PROBLEMA: El LED rojo y el icono de infrarrojos IR ( ) parpadean cuandousted presiona una tecla,pero el dispositivo no responde.SOLUCIÓN: Cerciórese de seleccionar la tecla de dispositivo correcta para eldispositivo que desea controlar.Además,apunte el remoto hacia el dispositivo a menos de 4.58 m de distancia.O haga la prueba instalando el Centro De Mandos IR/RF para un alcancemás grande (vea la página 44).PROBLEMA: El remoto no controla dispositivos o los mandos no estánfuncionando bien.SOLUCIÓN: Pruebe todos los códigos listados para el dispositivo.Cerciórese de que el dispositivo funcione con un control remoto de rayos infrarrojos.PROBLEMA: La combinación TV/VCR no responde adecuadamente.SOLUCIÓN: Use los códigos VCR para su marca.Algunas unidades de combinación pueden requerir un código TV y un código VCRpara una operación completa.PROBLEMA: El remoto no enciende a una unidad de combinaciónTV/VCR marca Sony o Sharp.SOLUCIÓN: Estos modelos requieren códigos de TV para encenderse.Para la Sony, use el código 0000 para TV y el código 0032 para VCR. Para la marca Sharp, use el código 0093 para TV y el código 0048 para VCR.PROBLEMA: El cambio de canales no funciona bien.SOLUCIÓN: Si el control remoto original requería que se presionara la tecla Enter para cam biar de canales,presione ENTER en el remoto después de introducir el número de canal.PROBLEMA: Durante el aprendizaje, la pantalla del remoto muestra unmensaje de [ERROR] después de presionar y manteneroprimida una tecla que se va a aprender.SOLUCIÓN: Ocurrió una captura equivocada.Evite las fuentes de luz ambiental intensa,como lo son la luz directa del sol y las bombillas (focos) fluorescentes.Además, vuelva a ajustar las posiciones de los controles remotos antes de volver a realizar el procedimiento. Cerciórese de que la(s) tecla(s) en el controlremoto original esté(n) funcionando correctamente.PROBLEMA: Las teclas CH+,CH-,y LAST no funcionan con su televisormarca RCA.SOLUCIÓN: Debido al diseño RCA de 1983 a 1987, sólo el control remoto original puede realizar estas funciones.continúa en la siguiente página...GUÍADEL USUARIOUso Del Centro De Mandos De IR/RF/Especificaciones/Localización De Fallas 45RS 8in1 IR/RF UG 6/27/02 11:01 AM Page 45](https://usermanual.wiki/Radio-Shack/1502117.Users-Manual/User-Guide-264579-Page-45.png)
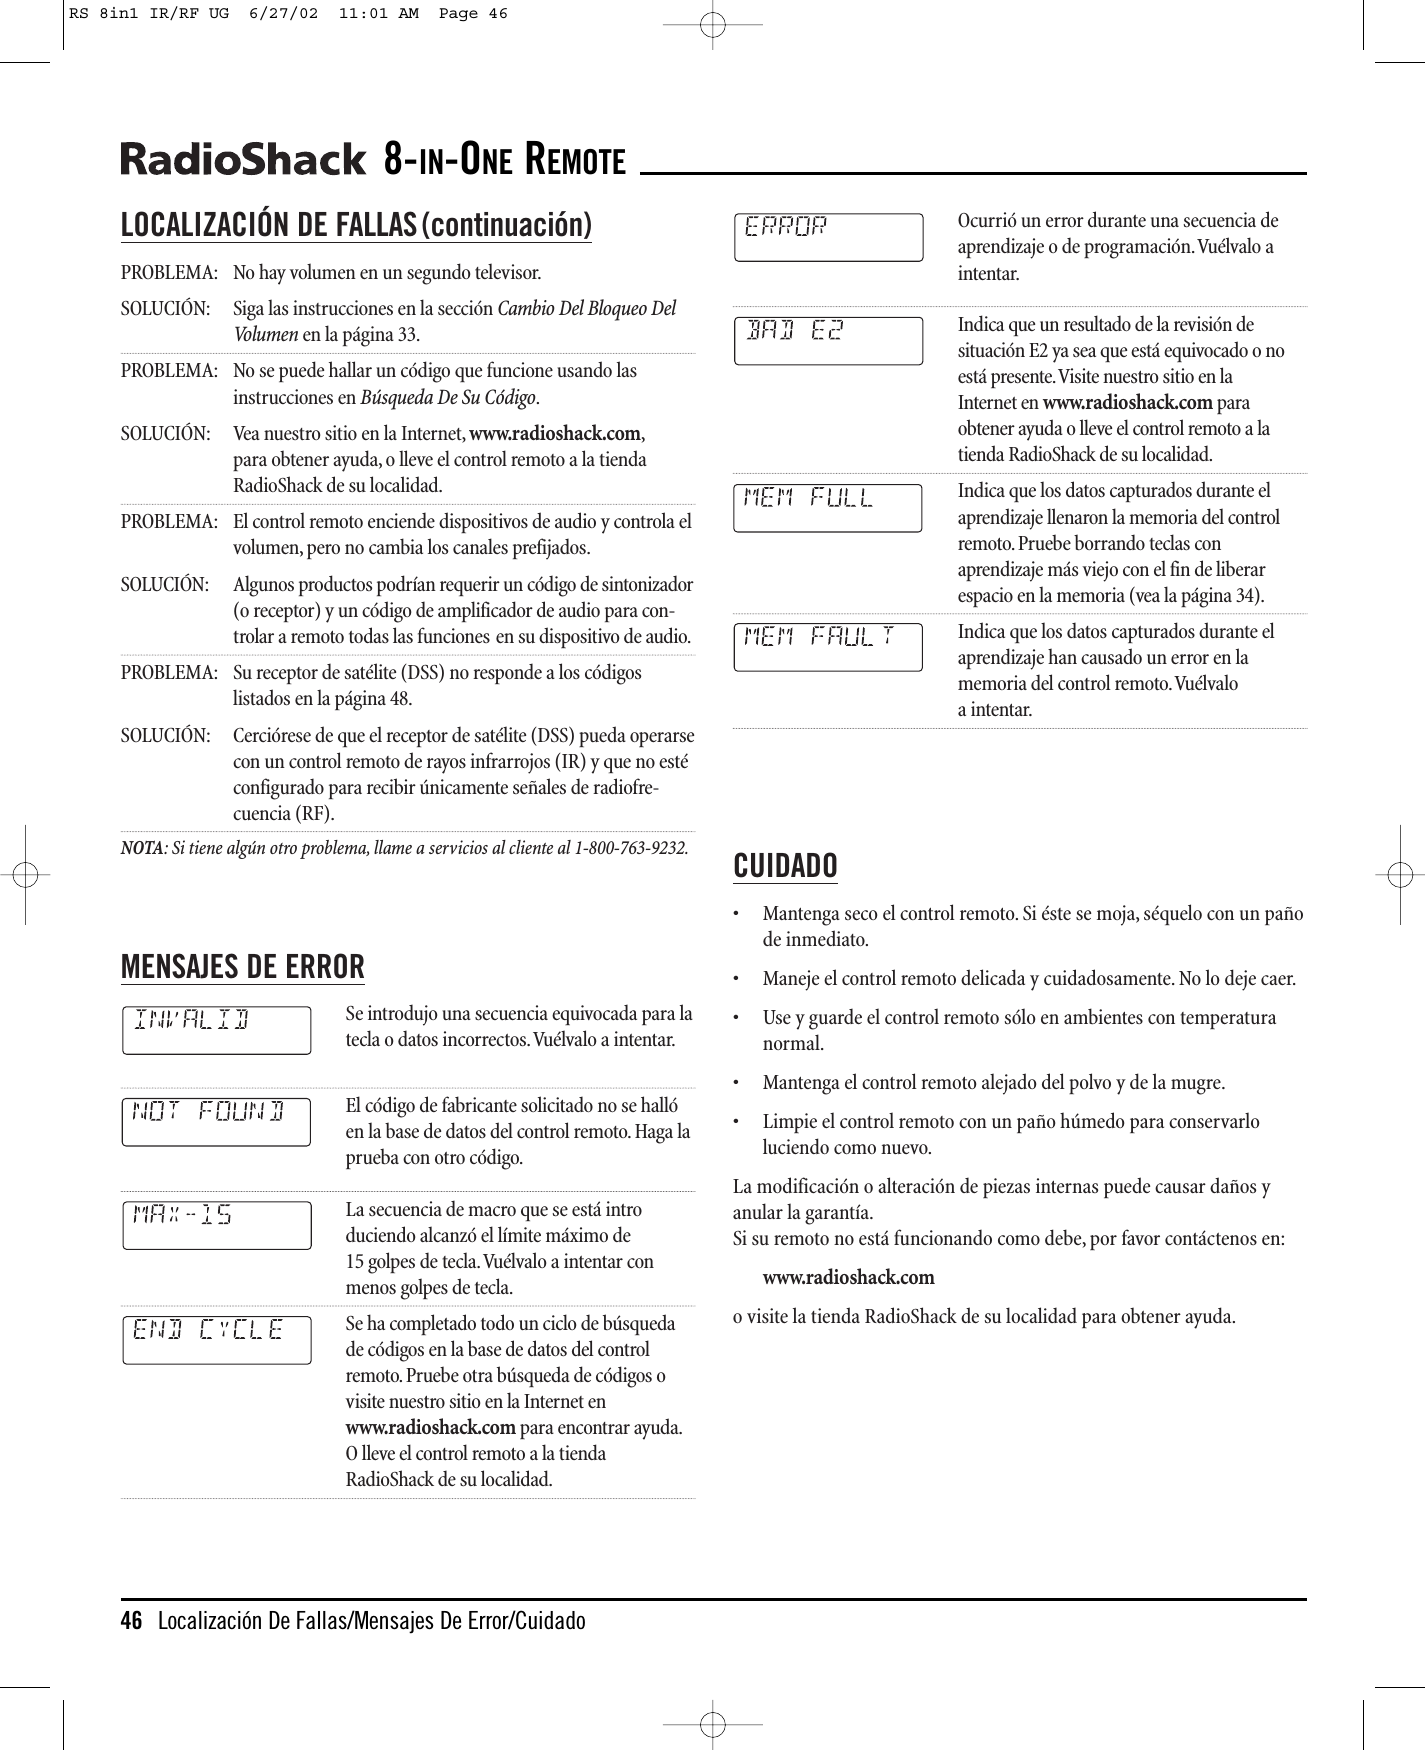
![MANUFACTURER’S CODES(CÓDIGOS DEL FABRICANTE)SETUPCODESFORAUDIOAMPLIFIERS(CÓDIGOSDECONFIGURACIÓNPARAAMPLIFICADORESDEAUDIO)[AMP]Aiwa 0406Carver 0269Curtis Mathes 0300Denon 0160Harman/Kardon 0892JVC 0331Left Coast 0892Linn 0269Magnavox 0269Marantz 0892, 0269Optimus 0395, 0300, 0823Panasonic 0308Philips 0892, 0269Pioneer 0013, 0300, 0823Polk Audio 0892, 0269RCA 0300, 0823Realistic 0395Technics 0308Victor 0331Wards 0013Yamaha 0354SETUPCODESFORAUDIOCASSETTEDECKS(CÓDIGOSDECONFIGURACIÓNPARAREPRODUCTORESDEAUDIOCASETES)[TAPE]Akai 0188, 0189Carver 0261Fisher 0261Garrard 0300, 0439Optimus 0027, 0220, 0300, 0318, 0439Pioneer 0027, 0220RCA 0027, 0220, 0261Rotel 0174Sanyo 0261Sony 0243, 0170Wards 0027SETUPCODESFORAUDIORECEIVERS(CÓDIGOSDECONFIGURACIÓNPARARECEPTORESDEAUDIO)[RCVR]ADC 0531Admiral 0182Aiwa 1089, 1405, 0121Akai 0115Audiotronic 1189Capetronic 0531, 0690Carver 1089, 1189, 0042, 0360Casio 0195Clarinette 0195Curtis Mathes 0080Denon 1104, 1160Fisher 0042, 0219, 0360Glory Horse 1263Garrard 0440, 0744Hanwah 0741Jensen 0754Kansai 0440Kenwood 1313, 1027, 1570, 1569, 0042, 0186Koss 0744LXI 0181, 0744Lloyd’s 0195Magnavox 1089, 1189, 0195, 0364, 0531Marantz 1089, 1189Memorex 0335Modulaire 0195Musicmagic 1089NTDE Geniesom 0744Optimus 1023, 0042, 0080, 0177, 0181, 0186, 0219,0754, 0440, 0531, 0622, 0670, 0690, 0738,0744, 0797, 0801, 0849, 1074Orient Power 0744Panasonic 1518Penney 0195Philips 1089, 1189, 1269Pioneer 1023, 0080, 0531Proscan 1254RCA 1023, 1254, 0080, 0360, 0531, 1074,1122, 1123, 1609Radio Shack 0744, 1263Realistic 0001, 0025, 0163, 0178, 0181, 0182, 0195,0534Sansui 1089Sanyo 0219, 0801Schneider 0364Scott 0163, 0418Sharp 0186Sony 1058, 1258, 1158, 0415Soundesign 0670Stereophonics 1023Sunfire 1313Symphonic 0182Teac 0163Technics 1308, 1309, 1518Techwood 0364Thorens 1189Wards 0080Yamaha 0176, 0186, 1176, 1276Yorx 0195Zenith 0622, 0744SETUPCODESFORAUDIOSERVICES(CÓDIGOS DECONFIGURACIÓNPARA SERVICIOSDEAUDIO)[MISC]Aiwa 0159Sony 0159SETUPCODESFORAUDIOTURNTABLES(CÓDIGOS DECONFIGURACIÓNPARATORNAMESAS DEAUDIO)[PHONO]Aiwa 0188Carver 0188Magnavox 0188Marantz 0188Philips 0188SETUPCODESFORCABLECONVERTERS(CÓDIGOS DECONFIGURACIÓNPARACONVERTIDORES DECABLE)[CBL]ABC 0003, 0008, 0014Americast 0899Archer 0797Bell & Howell 0014Bell South 0899Director 0476Emerson 0797Gemini 0797General Instrument 0476, 0810GoldStar 0144Goodmind 0797Jerrold 0476, 0003, 0276, 0014, 0810Memorex 0000Motorola 0476, 1106, 0276, 0810Pace 0237Panasonic 0000, 01078-IN-ONE REMOTE48 Manufacturer’s Codes (Códigos Del Fabricante)RS 8in1 IR/RF UG 6/27/02 11:01 AM Page 48](https://usermanual.wiki/Radio-Shack/1502117.Users-Manual/User-Guide-264579-Page-48.png)
![SETUPCODESFORCABLECONVERTERS,CONTINUED(CÓDIGOS DECONFIGURACIÓNPARACONVERTIDORES DECABLE), CONTINUACIÓN)[CBL]Paragon 0000Philips 0305, 0317Pioneer 0877, 0144, 0533, 1877Pulsar 0000Quasar 0000Radio Shack 0303, 0797, 0883Runco 0000Samsung 0144Scientific Atlanta 0877, 0008, 0477,1877Sony 1006Starcom 0003Stargate 0797Supercable 0276Torx 0003Toshiba 0000Viewmaster 0883Zenith 0000, 0525, 0899SETUPCODESFORCD PLAYERS(CÓDIGOS DECONFIGURACIÓNPARAREPRODUCTORES DECDS)[CD]Adcom 0155Aiwa 0157Audio Alchemy 0194BSR 0194Burmester 0420California Audio Labs 0029Carrera 0194Carver 0157, 0179, 0437DKK 0000DMX Electronics 0157Denon 0873Emerson 0155, 0164, 0305Fisher 0179, 0342Garrard 0280, 0420Genexxa 0032, 0164, 0305Harman/Kardon 0157, 0173, 0426Hitachi 0032, 0155JVC 0072Kenwood 0681, 0826, 0626, 0028, 0037, 0190Krell 0157LXI 0305Linn 0157MCS 0029MTC 0420Magnavox 0157, 0305Marantz 0626, 0029, 0157, 0180Miro 0000Mission 0157NSM 0157Nikko 0164Onkyo 0868Optimus 1063, 0000, 0032, 0037, 0145, 0175, 0179,0194, 0196, 0280, 0305, 0342, 0420, 0426,0437, 0468, 0536, 0671, 0775, 0850, 1075Panasonic 0029Parasound 0194, 0420Philips 0626, 0157Pioneer 1063, 1062, 0032, 0305, 0468Polk Audio 0157Proton 0157QED 0157Quasar 0029RCA 1062, 0032, 0053, 0155, 0179, 0305, 0468Radio Shack 1083Realistic 0155, 0164, 0175, 0179, 0180, 0420Rotel 0157, 0420SAE 0157Sansui 0157, 0305Sanyo 0179Scott 0155, 0164, 0305Sears 0305Sharp 0861, 0037, 0180Sherwood 1067, 0180, 0196, 0426Sonic Frontiers 0157Sony 0490, 0000Soundesign 0145Staron 0398Tascam 0420Teac 0180, 0420Technics 0029Vector Research 0194Victor 0072Wards 0157, 0053, 0559Yamaha 0888, 0036SETUPCODESFORDAT DECKS(CÓDIGOSDECONFIGURACIÓNPARAREPRODUCTORESDAT)[DAT]Carver 0158Harman/Kardon 0158Magnavox 0158Marantz 0158Philips 0158SETUPCODESFORDVD PLAYERS(CÓDIGOSDECONFIGURACIÓNPARAREPRODUCTORESDVD)[DVD]Alco 0790Apex 0672, 0755Apex Digital 0717Blue Parade 0571Denon 0490Emerson 0591Enterprise 0591Fisher 0670GE 0522, 0717, 0815Go Video 0715, 0783Gradiente 0651Greenhill 0717Hitachi 0573, 0664Hiteker 0672InterAct 0697JVC 0558, 0623Kenwood 0534, 0682, 0737KLH 0717Konka 0711, 0719, 0720, 0721Magnavox 0503, 0675Marantz 0539Microsoft 0522Mitsubishi 0521Onkyo 0503Oritron 0651Panasonic 0490, 0632, 0677Pelican Accessories 0731Philips 0503, 0539Pioneer 0525, 0571, 0632Proscan 0522RCA 0522, 0571, 0717, 0790, 0822, 1022Saitek 0731Samsung 0573Sanyo 0670Sharp 0630Sony 0533, 0772Technics 0490Theta Digital 0571Thrustmaster 0498Toshiba 0503Urban Concepts 0503Yamaha 0490, 0545Zenith 0503, 0591continued on next page...(continúa en la siguiente página...)USER’SGUIDE (GUÍADEL USUARIO)Manufacturer’s Codes (Códigos Del Fabricante) 49RS 8in1 IR/RF UG 6/27/02 11:01 AM Page 49](https://usermanual.wiki/Radio-Shack/1502117.Users-Manual/User-Guide-264579-Page-49.png)
![MANUFACTURER’S CODES,Continued(CÓDIGOS DEL FABRICANTE,Continuación) SETUPCODESFORHOMEAUTOMATION(CÓDIGOS DECONFIGURACIÓNPARA LAAUTOMATIZACIÓNDEL HOGAR)[HOME]GE 0240One For All 0167Radio Shack 0240Security System 0167Universal X10 0167X10 0167SETUP CODES FOR HOME-THEATER-IN-A-BOXDEVICES(CÓDIGOSDECONFIGURACIÓNPARADISPOSITIVOSHOME-THEATER-IN-A-BOX)[RCVR]Kenwood 1313Marantz 1089, 1189Philips 1269Pioneer 1023RCA 1609Sony 1258SETUPCODESFORLD PLAYERS(CÓDIGOS DECONFIGURACIÓNPARAREPRODUCTORES LD)[LDP]Aiwa 0203Denon 0059Funai 0203Mitsubishi 0059NAD 0059Optimus 0059Pioneer 0059Realistic 0203SETUPCODESFORSATELLITERECEIVERS(CÓDIGOS DECONFIGURACIÓNPARA RECEPTORESDESATÉLITE)[SAT]AlphaStar 0772Chaparral 0216Echostar 1005, 0775Expressvu 0775GE 0566GOI 0775General Instrument 0869HTS 0775Hitachi 0819Hughes Network Systems 1142, 0749, 1749JVC 0775Magnavox 0724, 0722Memorex 0724Mitsubishi 0749Motorola 0869Next Level 0869Panasonic 0247, 0701Paysat 0724Philips 1142, 0749, 0724, 1076, 0722Proscan 0392RCA 0392, 0566, 0855, 0143Radio Shack 0869Realistic 0052Samsung 1109Sony 0639Star Choice 0869Toshiba 0749, 0790Uniden 0724, 0722, 0052Zenith 0856SETUPCODESFORTVS(CÓDIGOSDECONFIGURACIÓNPARATELEVISORES)[TV]A-Mark 0003AOC 0030, 0019, 0003Abex 0032Admiral 0093, 0463Aiko 0092Aiwa 0701Akai 0030Alaron 0179America Action 0180Ampro 0751Anam 0180Archer 0003Audiovox 0451, 0180, 0003, 0092, 0623Baysonic 0180Belcor 0019Bell & Howell 0154, 0016Bradford 0180Brockwood 0019Broksonic 0236, 0463, 0003CXC 0180Candle 0030, 0056Carnivale 0030Carver 0054Celebrity 0000Cineral 0451, 0092Citizen 0060, 0030, 0056, 0039, 0092Concerto 0056Contec 0180Craig 0180Crosley 0054Crown 0180, 0039Curtis Mathes 0047, 0054, 0154, 0051, 0451, 0093, 0060,0030, 0145, 0056, 0016, 0039, 0166, 0466,0747, 1147, 1347Daewoo 0451, 0019, 0039, 0092, 0623, 0624Daytron 0019Denon 0145Dumont 0017, 0019Dwin 0720, 0774Electroband 0000Electrohome 0409Emerson 0154, 0236, 0463, 0180, 0178, 0019, 0179,0039, 0623, 0624Envision 0030Fisher 0154Fujitsu 0179, 0683Funai 0180, 0179, 0171Futuretech 0180GE 0047, 0051, 0451, 0093, 0178, 0021, 0747,1147, 1347Gibralter 0017, 0030, 0019GoldStar 0030, 0178, 0019, 0056, 0032, 0409Gradiente 0053, 0056Grunpy 0180, 0179Hallmark 0178Harley Davidson 0179Harman/Kardon 0054Harvard 0180Havermy 0093Hitachi 0145, 0056, 0016, 0032, 0409Infinity 0054Inteq 0017JBL 0054JCB 0000JVC 0053KEC 0180KTV 0180, 0030, 0039Kenwood 0030, 0019Konka 0628, 0632, 0638, 0703, 0707LG 0056LXI 0047, 0054, 0154, 0156, 0178, 0747Logik 0016Luxman 00568-IN-ONE REMOTE50 Manufacturer’s Codes (Códigos Del Fabricante)RS 8in1 IR/RF UG 6/27/02 11:01 AM Page 50](https://usermanual.wiki/Radio-Shack/1502117.Users-Manual/User-Guide-264579-Page-50.png)
![SETUPCODESFORTVS, CONTINUED(CÓDIGOSDECONFIGURACIÓNPARATELEVISORES, CONTINUACIÓN)[TV]MGA 0150, 0030, 0178, 0019MTC 0060, 0030, 0019, 0056Magnavox 0054, 0030, 0179, 1254Majestic 0016Marantz 0054, 0030Matsushita 0250Megatron 0178, 0145, 0003Memorex 0154, 0250, 0463, 0150, 0178, 0179,0056, 0016Midland 0047, 0017, 0051, 0039, 0032, 0747Minutz 0021Mitsubishi 0093, 0150, 0178, 0019Motorola 0093Multitech 0180NAD 0156, 0178, 0166NEC 0030, 0019, 0056NTC 0092Nikko 0030, 0178, 0092Onwa 0180Optimus 0154, 0250, 0166Optonica 0093, 0165Orion 0236, 0463, 0179Panasonic 0250, 0051Penney 0047, 0156, 0051, 0060, 0030, 0178, 0021,0019, 0056, 0039, 0003, 0032, 0747, 1347Philco 0054, 0463, 0030, 0145, 0019Philips 0054Pilot 0030, 0019, 0039Pioneer 0166, 0679Portland 0019, 0039, 0092Princeton 0717Prism 0051Proscan 0047, 0747Proton 0178, 0003, 0466Pulsar 0017, 0019Quasar 0250, 0051, 0165RCA 0047, 0051, 0093, 0019, 0090, 0679, 0747,1047, 1147, 1247, 1347, 1447Radio Shack 0047, 0154, 0165, 0180, 0030,0178, 0019,0056, 0039, 0032, 0409, 0747Realistic 0154, 0165, 0180, 0030, 0178, 0019, 0056,0039, 0032Runco 0017, 0030, 0603SSS 0180, 0019Sampo 0030, 0039, 0032Samsung 0060, 0030, 0178, 0019, 0056, 0032Samsux 0039Sansei 0451Sansui 0463Sanyo 0154Scimitsu 0019Scotch 0178Scott 0236, 0180, 0178, 0019, 0179Sears 0047, 0054, 0154, 0156, 0178, 0179, 0056,0171, 0747Semivox 0180Semp 0156Sharp 0093, 0165, 0039, 0688, 0689Shogun 0019Signature 0016Sony 0000Soundesign 0180, 0178, 0179Spectricon 0003Squareview 0171Starlite 0180Supreme 0000Sylvania 0054, 0030Symphonic 0180, 0171TMK 0178, 0056TNCi 0017Tandy 0093Tatung 0003Technics 0250, 0051Technol Ace 0179Techwood 0051, 0056, 0003Teknika 0054, 0180, 0150, 0060, 0019, 0179, 0056,0016, 0039, 0092Telefunken 0056Toshiba 0154, 0156, 0060, 1256Totevision 0039Vector Research 0030Victor 0053Vidikron 0054Vidtech 0178, 0019Wards 0054, 0165, 0030, 0178, 0021, 0019, 0179,0056, 0016Waycon 0156White Westinghouse 0463, 0623, 0624Yamaha 0030, 0019Zenith 0017, 0463, 0016, 0092, 0624Zonda 0003SETUPCODESFORTV/VCR COMBOS(CÓDIGOSPARAPROGRAMARCOMBINACIONESTELEVISOR/VIDEOGRABADORA)[VCR]Broksonic 0002, 1479Citizen 1278Colt 0072Curthis Mathes 1035Daewoo 1278Emerson 0002, 1278, 1479Funai 0000GE 0807, 1035, 1060, 0240Goldstar 1237Harley Davidson 0000Hitachi 0000Lloyd’s 0000MGA 0240Magnasonic 0593, 1278Magnavox 1781, 0000Magnin 0240Memorex 1162, 1237, 1262, 1037Mitsubishi 0807Optimus 0593, 1162, 1262Orion 0002, 1479Panasonic 1035, 1162, 1262, 1362Penney 1035, 1237, 0240Proscan 1060Quasar 1035, 1162RCA 0807, 1035, 1060, 0240Radio Shack 1037Sansui 0000, 1479Sanyo 0240Sears 1237, 0000Sharp 0807Sony 1232, 0000Sylavania 1781Symphonic 0000, 0593Thomas 0000White Westinghouse 1278Zenith 0000, 1479SETUPCODESFORVCRS(CÓDIGOSPARAPROGRAMARVIDEOGRABADORAS)[VCR]Admiral 0048, 0209Adventura 0000Aiko 0278Aiwa 0037, 0000, 0307Akai 0041America Action 0278American High 0035Asha 0240Audiovox 0037Beaumark 0240Bell & Howell 0104Broksonic 0184, 0121, 0209, 0002, 0479continued on next page...(continúa en la siguiente página...)USER’SGUIDE (GUÍADEL USUARIO)Manufacturer’s Codes (Códigos Del Fabricante) 51RS 8in1 IR/RF UG 6/27/02 11:01 AM Page 51](https://usermanual.wiki/Radio-Shack/1502117.Users-Manual/User-Guide-264579-Page-51.png)
![MANUFACTURER’S CODES(CÓDIGOS DEL FABRICANTE)SETUPCODESFORVCRS, CONTINUED(CÓDIGOSPARAPROGRAMARVIDEOGRABADORAS, CONTINUACIÓN)[VCR]CCE 0072, 0278Calix 0037Canon 0035Carver 0081Cineral 0278Citizen 0037, 0278Colt 0072Craig 0037, 0047, 0240, 0072Curtis Mathes 0060, 0035, 0162, 0041, 0760Cybernex 0240Daewoo 0045, 0278Denon 0042Dynatech 0000Electrohome 0037Electrophonic 0037Emerex 0032Emerson 0037, 0184, 0000, 0121, 0043, 0209, 0002,0278, 0479Fisher 0047, 0104, 0066Fuji 0035, 0033Funai 0000GE 0060, 0035, 0048, 0240, 0202, 0760Garrard 0000Go Video 0432GoldStar 0037, 0038, 0480Gradiente 0000HI-Q 0047Harley Davidson 0000Harman/Kardon 0081, 0038Harwood 0072Headquarter 0046Hitachi 0000, 0042, 0041Hughes Network Systems 0042JVC 0067, 0041Jensen 0041KEC 0037, 0278KLH 0072Kenwood 0067, 0041, 0038Kodak 0035, 0037LXI 0037Lloyd’s 0000Logik 0072MEI 0035MGA 0240, 0043MGN Technology 0240MTC 0240, 0000Magnasonic 0278, 0593Magnavox 0035, 0039, 0081, 0000, 0149, 0563Magnin 0240Marantz 0035, 0081Marta 0037Matsushita 0035, 0162, 0454Memorex 0035, 0162, 0037, 0048, 0039, 0047, 0240,0000, 0104, 0209, 0046, 0268, 0299, 0307,0454, 0479, 1037, 1162, 1262Minolta 0042Mitsubishi 0048, 0067, 0043Motorola 0035, 0048Multitech 0000, 0072NAD 0058NEC 0104, 0067, 0041, 0038Nikko 0037Noblex 0240Olympus 0035Optimus 1062, 0162, 0037, 0048, 0104, 0058, 0454,0432, 0568, 0593, 0619,1048, 1162, 1262Optonica 0062Orion 0184, 0209, 0002, 0479Panasonic 1062, 0035, 0162, 0225,0454, 0616, 1162,1262, 1362Penney 0035, 0037, 0240, 0042, 0038Pentax 0042Philco 0035, 0209, 0479Philips 0035, 0081, 0062, 0618, 1081, 1181Pilot 0037Pioneer 0067, 0058Polk Audio 0081Profitronic 0240Proscan 0060, 0202, 0760Protec 0072Pulsar 0039Quarter 0046Quartz 0046Quasar 0035, 0162, 0454, 1162RCA 0060, 0035, 0048, 0240, 0042, 0149, 0058,0202, 0619, 0760Radio Shack 0000, 1037Radix 0037Randex 0037Realistic 0035, 0037, 0048, 0047, 0000, 0104, 0062,0046, 0066ReplayTV 0614, 0616Runco 0039STS 0042Samsung 0240, 0045Sanky 0048, 0039Sansui 0000, 0067, 0209, 0041, 0479Sanyo 0047, 0240, 0104, 0046, 0268Scott 0184, 0045, 0121, 0043Sears 0035, 0037, 0047, 0000, 0042, 0104, 0046,0066Semp 0045Sharp 0048, 0062Shintom 0072Shogun 0240Singer 0072Sony 0035, 0032, 0000, 0033, 0636, 1032Sylvania 0035, 0081, 0000, 0043Symphonic 0000, 0593TMK 0240Tatung 0041Teac 0000, 0041Technics 0035, 0162Teknika 0035, 0037, 0000Thomas 0000Tivo 0618, 0636Toshiba 0045, 0043, 0066Totevision 0037, 0240Unitech 0240Vector 0045Vector Research 0038Video Concepts 0045Videomagic 0037Videosonic 0240Villain 0000Wards 0060, 0035, 0048, 0047, 0081, 0240, 0000,0042, 0072, 0149, 0062, 0760White Westinghouse 0209, 0072, 0278XR-1000 0035, 0000, 0072Yamaha 0038Zenith 0039, 0000, 0209, 0033, 0479SETUPCODESFORVIDEOACCESSORIES(CÓDIGOS DECONFIGURACIÓNPARAACCESORIOS DEVÍDEO)[VIDEO]Archer 0160Bantor 0160GC Electronics 0160Jebsee 0160Panasonic 1120Princeton 0113, 0295Radio Shack 0160Samsung 1190Sensory Science 11268-IN-ONE REMOTE52 Manufacturer’s Codes (Códigos Del Fabricante)RS 8in1 IR/RF UG 6/27/02 11:01 AM Page 52](https://usermanual.wiki/Radio-Shack/1502117.Users-Manual/User-Guide-264579-Page-52.png)