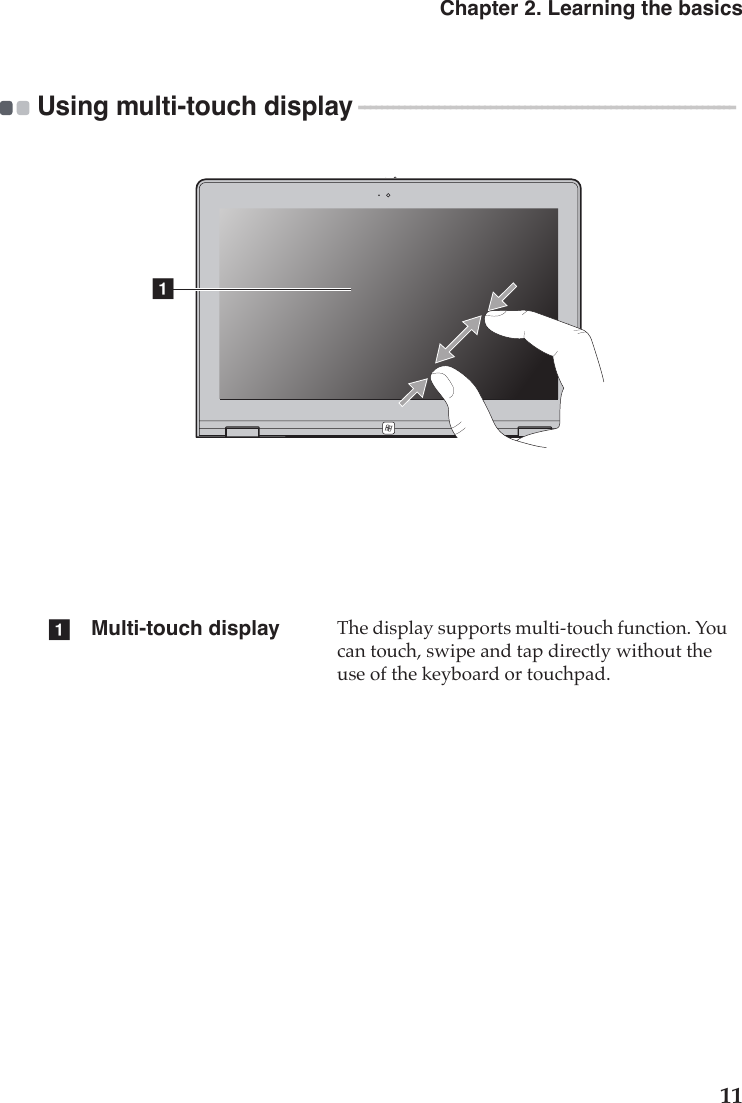
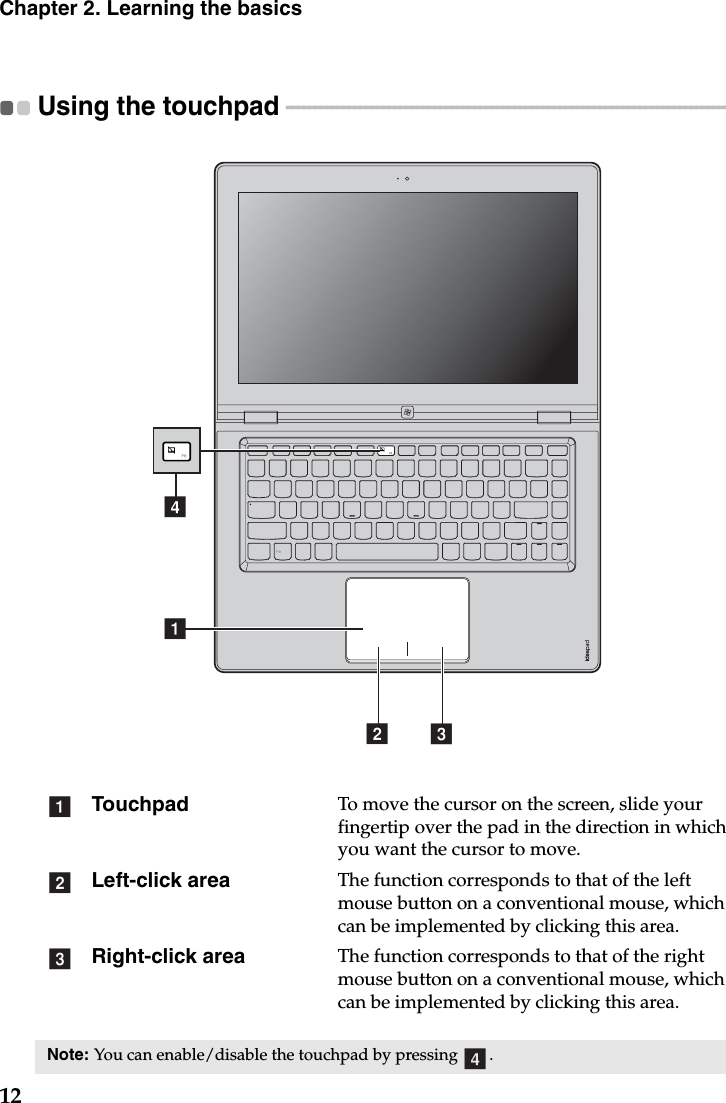
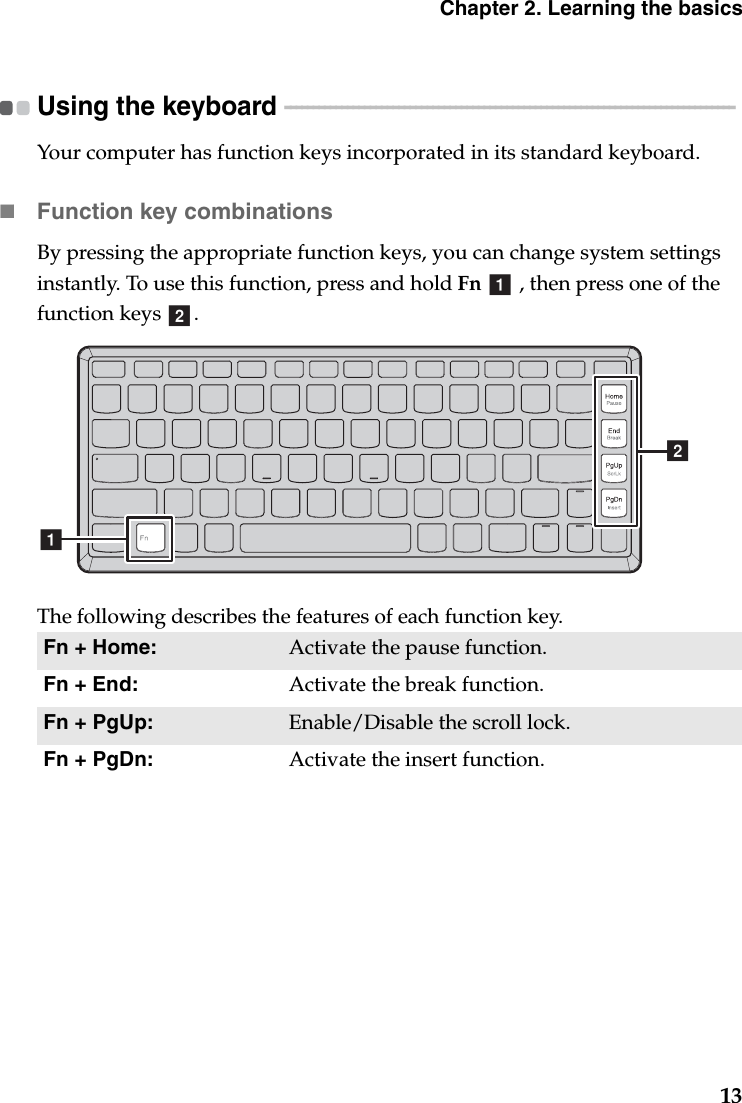
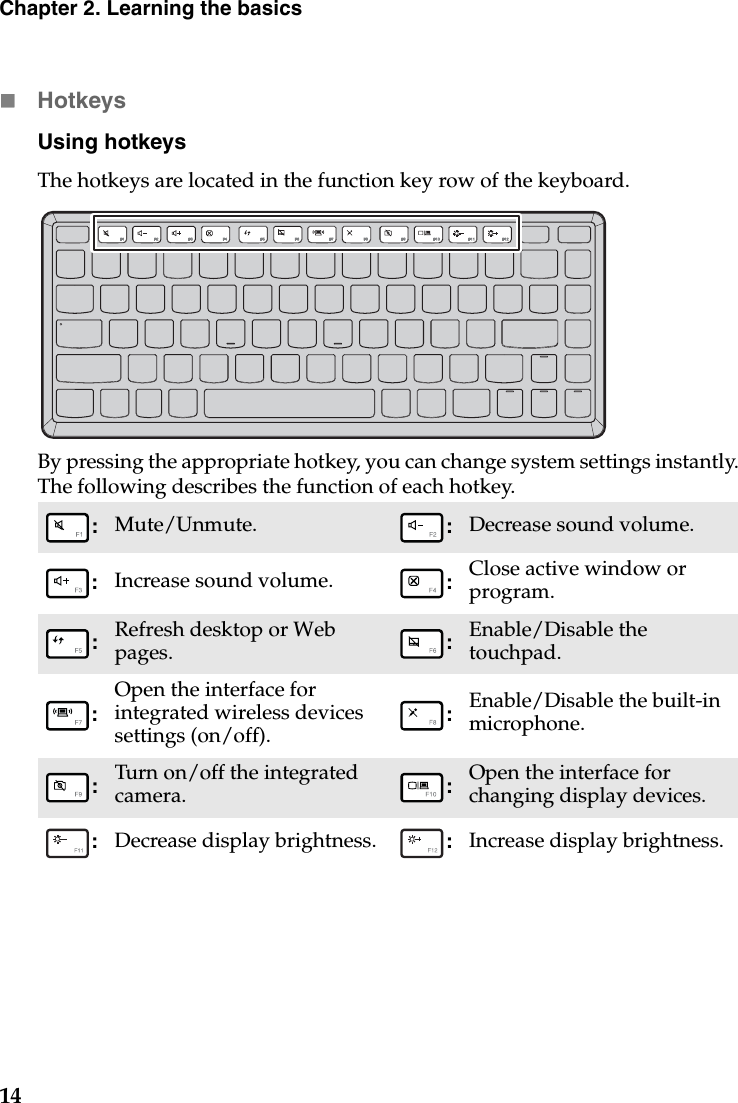
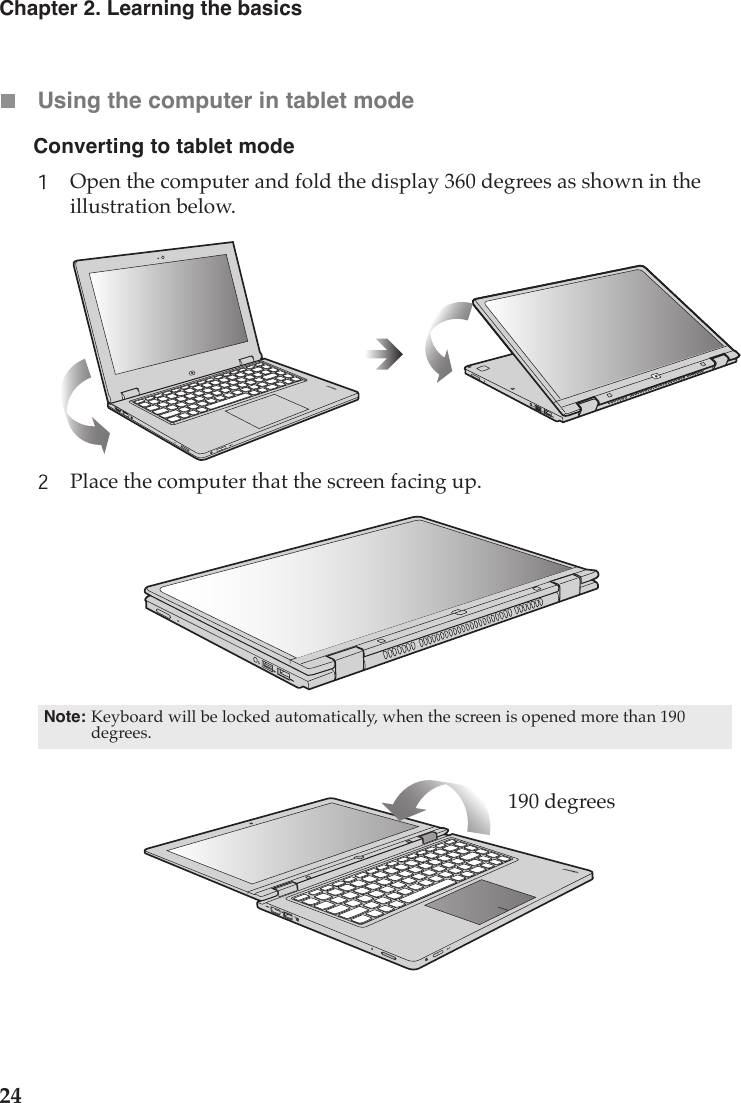
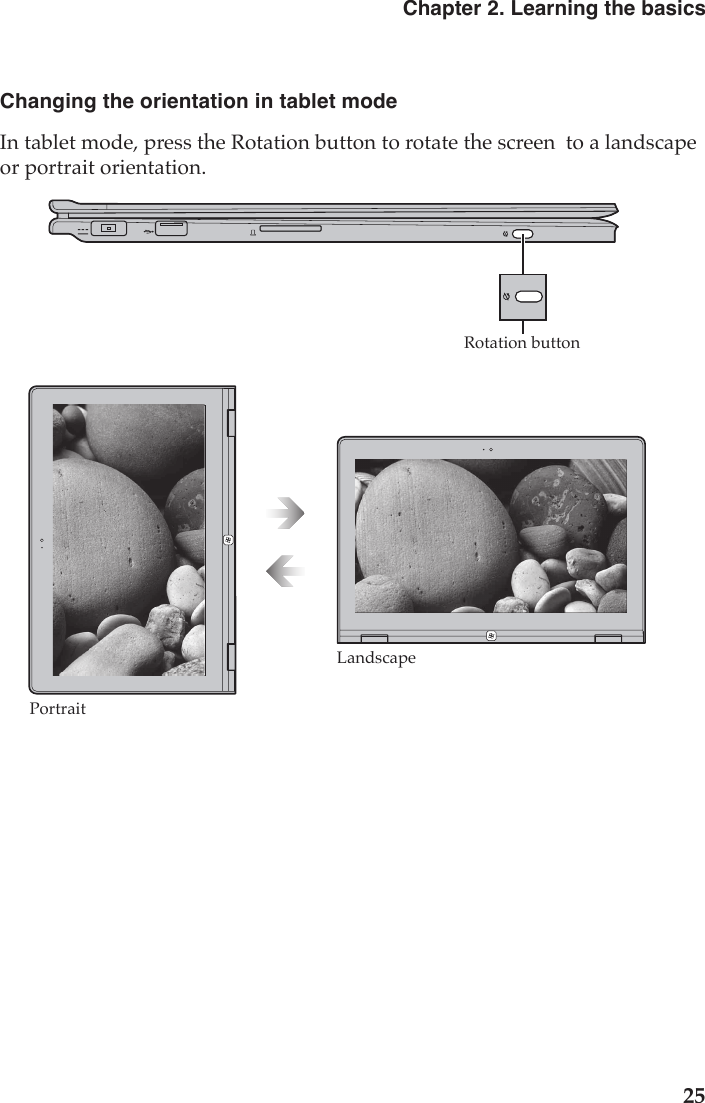
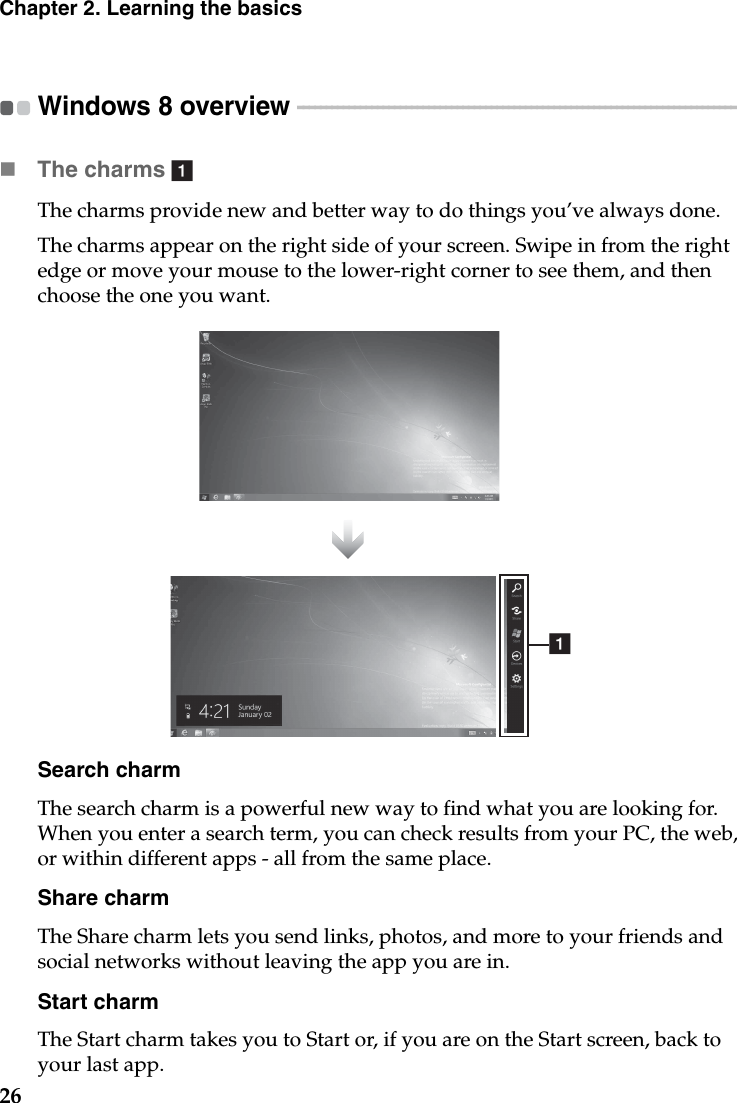
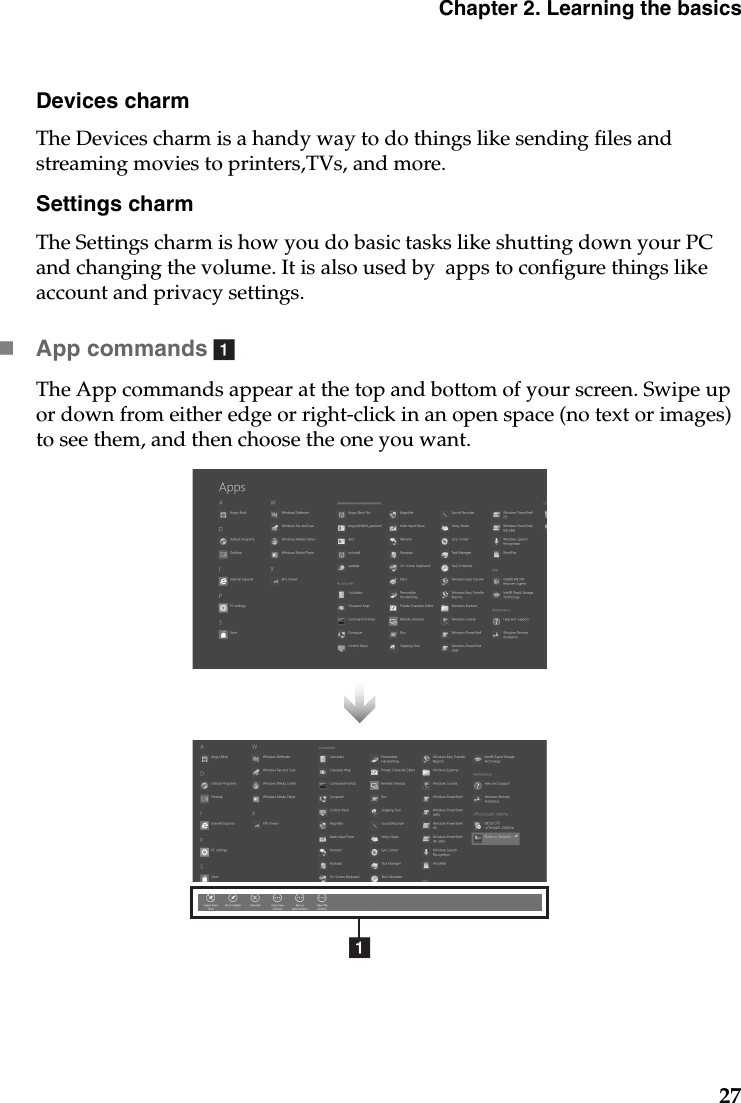
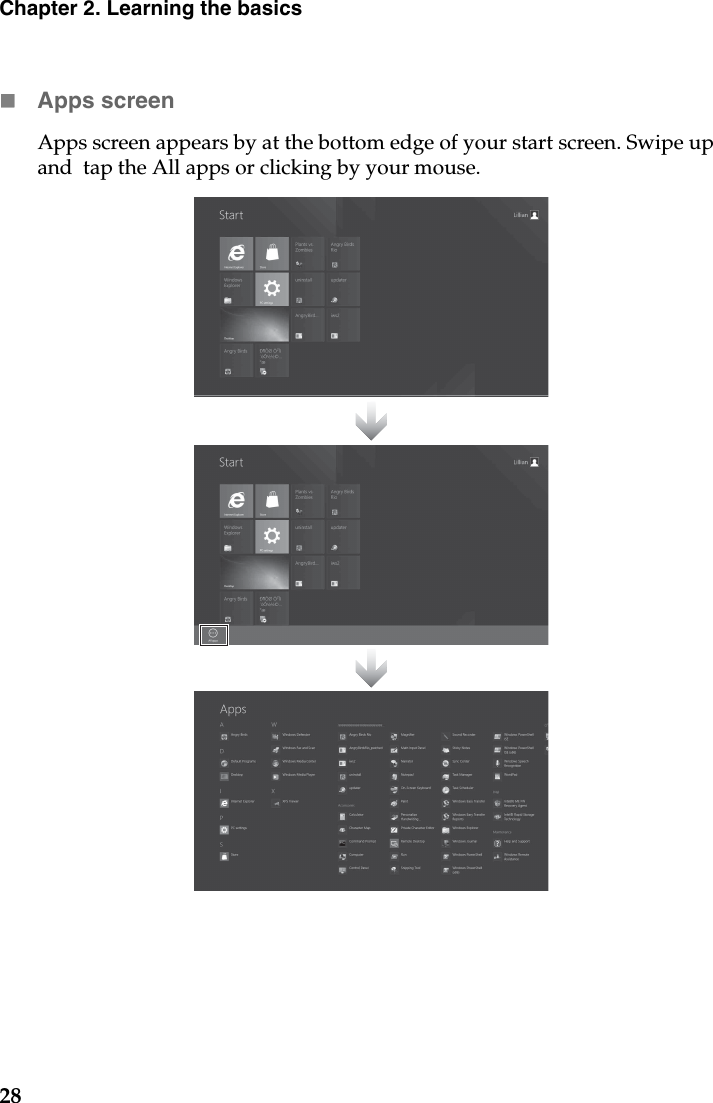
Realtek Semiconductor RTL8723AS 802.11 b/g/n RTL8723AS combo module User Manual 1 of 2

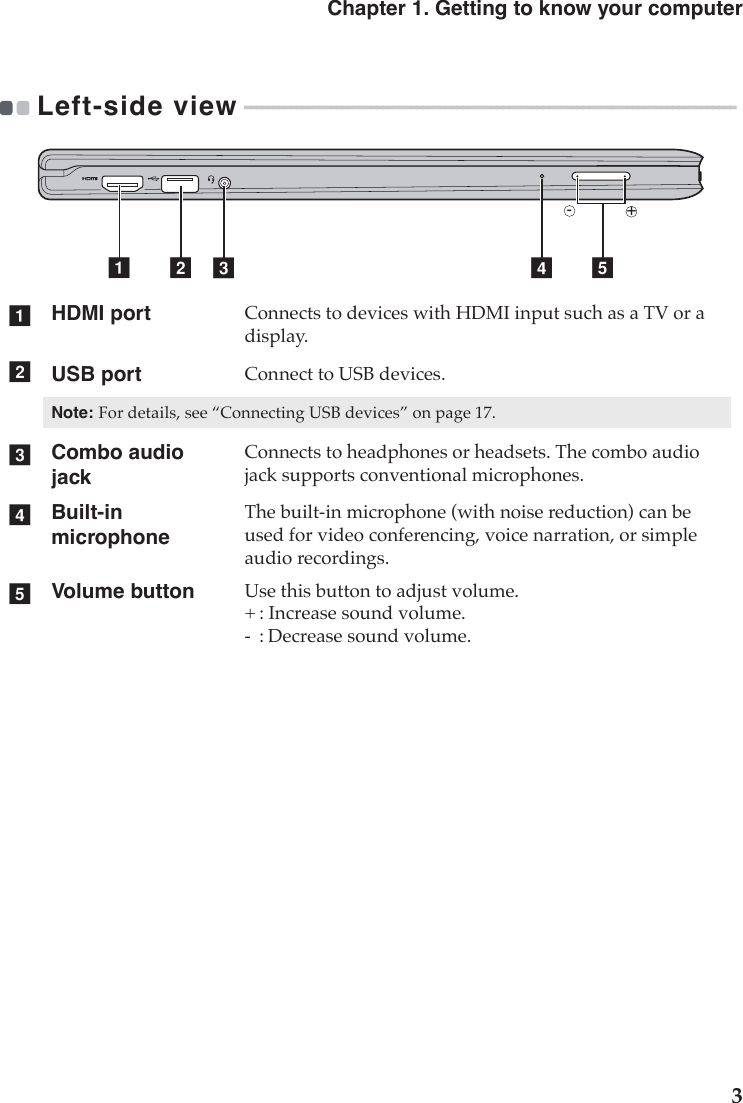
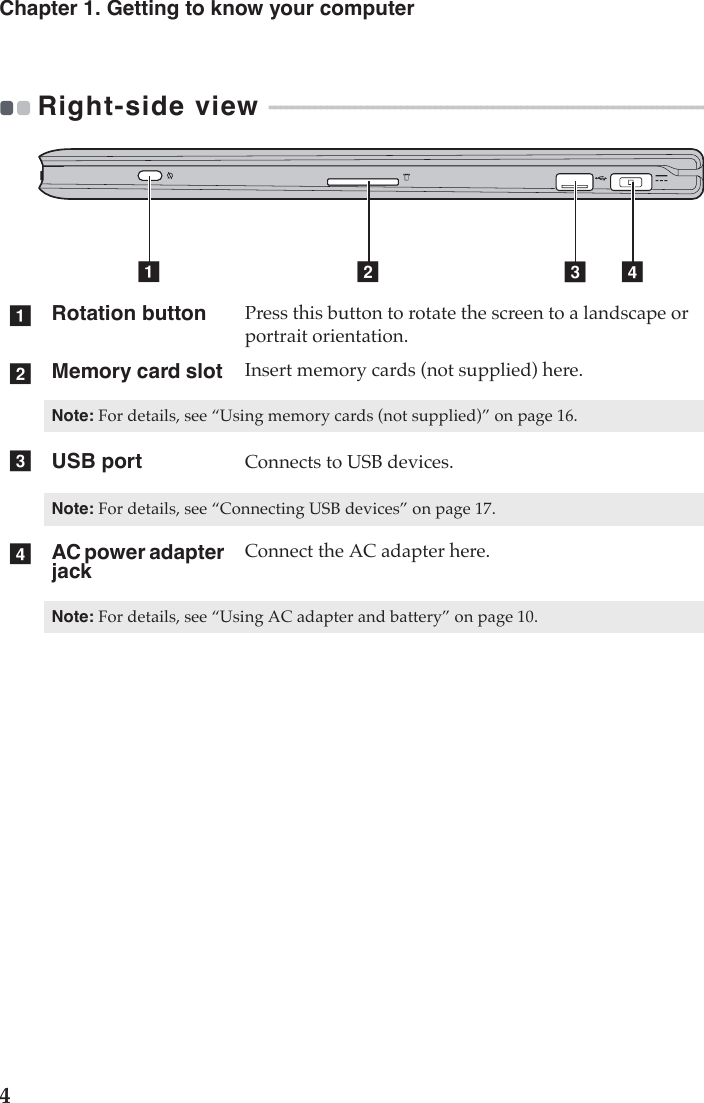
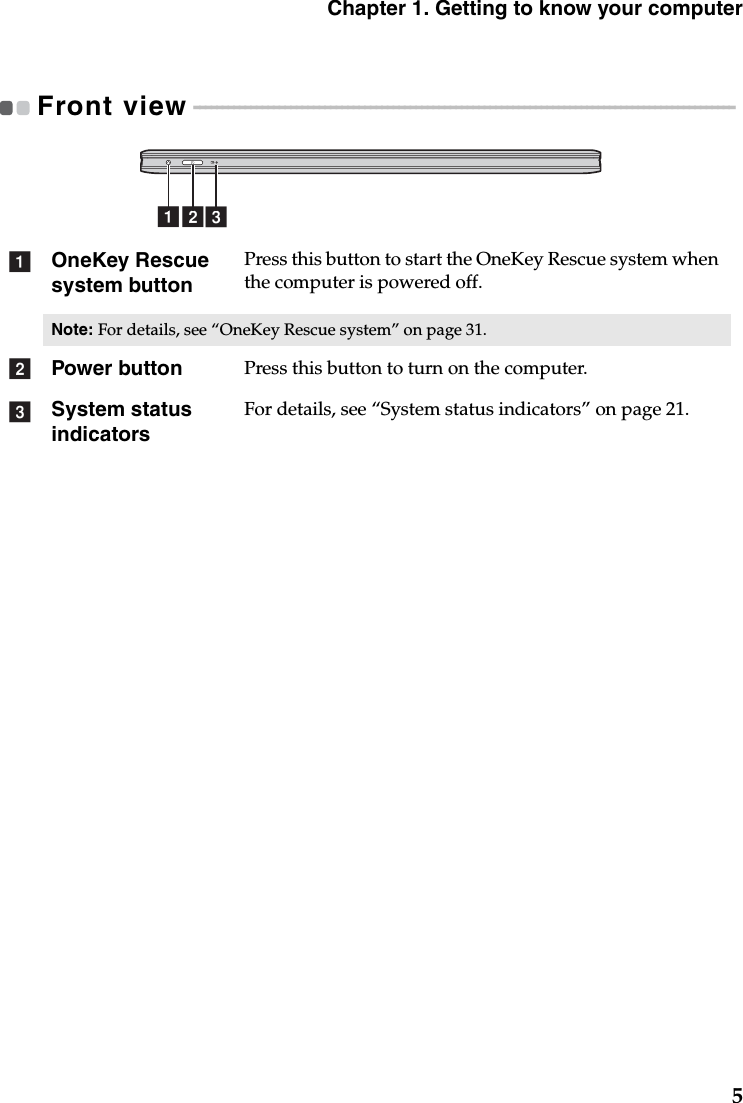
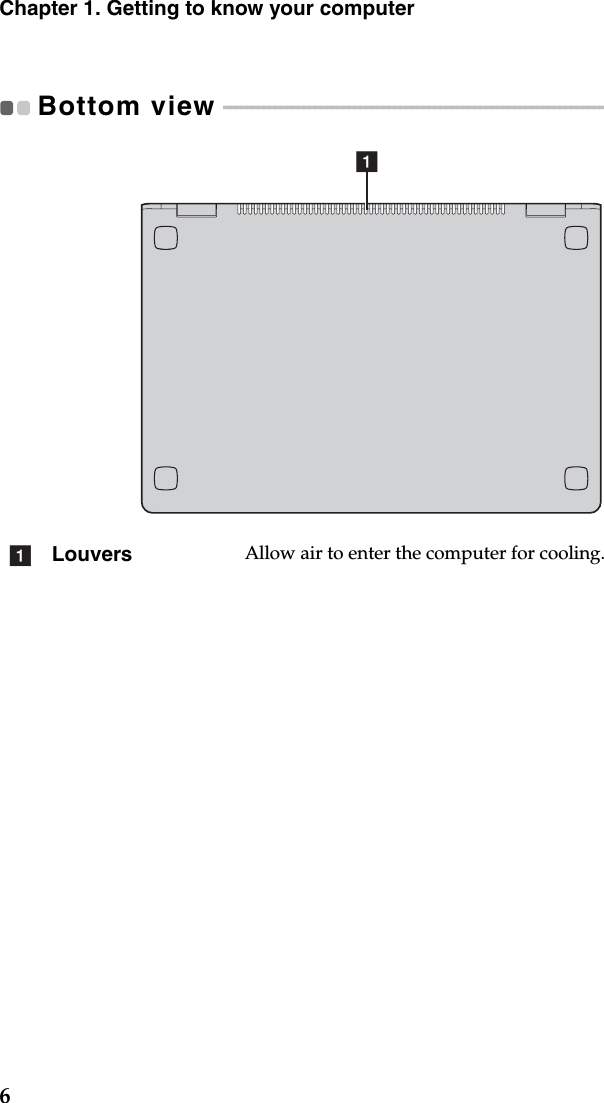
Realtek Semiconductor Corp. 802.11 b/g/n RTL8723AS combo module Users Manual 1 of 2

Users Manual - 1 of 2

Lenovo IdeaPad Yoga 13Read the safety notices and important tips in the included manuals before using your computer.©Lenovo China 2012New World. New Thinking.TMwww.lenovo.comV1.0_en-USUser Guide V1.0
First Edition (June 2012)© Copyright Lenovo 2012. Before using the product, be sure to read  Lenovo Safety and General Information Guide first.The features described in this guide are common to most models. Some features may not be available on your computer and/or your computer may include features that are not described in this user guide.Some instructions in this guide may assume that you are using Windows® 8. If you are using other Windows operating system, some operations may be slightly different. If you are using other operating systems, some operations may not apply to you.LIMITED AND RESTRICTED RIGHTS NOTICE: If data or software is delivered pursuant a General Services Administration “GSA” contract, use, reproduction, or disclosure is subject to restrictions set forth in Contract No. GS-35F-05925.Note•••The illustrations in this manual may differ from the actual product. Please refer to the actual product.•To refer to it, go to http://consumersupport.lenovo.com/ and click User guides and manuals. Regulatory Notice•
iChapter 1. Getting to know your computer ..........................................1Top view.......................................................................................................................1Left-side view ..............................................................................................................3Right-side view............................................................................................................4Front view ....................................................................................................................5Bottom view .................................................................................................................6Chapter 2. Learning the basics..............................................................7First use.........................................................................................................................7Using AC adapter and battery ................................................................................10Using multi-touch display .......................................................................................11Using the touchpad...................................................................................................12Using the keyboard...................................................................................................13Connecting external devices....................................................................................16Special keys and buttons..........................................................................................19System status indicators...........................................................................................21Using the computer in stand, tent or tablet mode................................................23Windows 8 overview................................................................................................26Securing your computer...........................................................................................29Chapter 3. Connecting to the Internet.................................................30Wireless connection ..................................................................................................30Chapter 4. OneKey Rescue system.....................................................31OneKey Rescue system ............................................................................................31Chapter 5. Troubleshooting ................................................................. 34Frequently asked questions .....................................................................................34Troubleshooting ........................................................................................................36Trademarks............................................................................................ 41Contents
1Chapter 1. Getting to know your computerTop view  - - - - - - - - - - - - - - - - - - - - - - - - - - - - - - - - - - - - - - - - - - - - - - - - - - - - - - - - - - - - - - - - - - - - - - - - - - - - - - - - - - - - - - - - - - - - - - - - - - - Note: The illustrations in this manual may differ from the actual product. Please refer to the actual product. Attention:•The parts bounded by dashed lines are internally installed.abedcf
2Chapter 1. Getting to know your computerIntegrated cameraUse the camera for video communication.Multi-touch displayThe LCD display with LED backlight provides brilliant visual output. Multi-touch function is available on this display.MS button Press this button to switch between the current screen and Home screen. SpeakerThe stereo speaker provides rich and powerful sound.Touchpad The touchpad functions as a conventional mouse.Note: For details, see “Using multi-touch display” on page 11.Wireless module antennasThe built-in antennas ensure optimal reception of wireless radio.abcdef
Chapter 1. Getting to know your computer3Left-side view - - - - - - - - - - - - - - - - - - - - - - - - - - - - - - - - - - - - - - - - - - - - - - - - - - - - - - - - - - - - - - - - - - - - - - - - - - - - - - - - - - - - - - HDMI port Connects to devices with HDMI input such as a TV or a display.USB port Connect to USB devices.Note:For details, see “Connecting USB devices” on page 17.Combo audio jackConnects to headphones or headsets. The combo audio jack supports conventional microphones.Built-in microphoneThe built-in microphone (with noise reduction) can be used for video conferencing, voice narration, or simple audio recordings.Volume button Use this button to adjust volume.+ : Increase sound volume.-  : Decrease sound volume.a b edcabcde+-
4Chapter 1. Getting to know your computerRight-side view  - - - - - - - - - - - - - - - - - - - - - - - - - - - - - - - - - - - - - - - - - - - - - - - - - - - - - - - - - - - - - - - - - - - - - - - - - - - - - - - - - - Rotation button Press this button to rotate the screen to a landscape or portrait orientation. Memory card slot  Insert memory cards (not supplied) here.Note: For details, see “Using memory cards (not supplied)” on page 16.USB port Connects to USB devices.Note: For details, see “Connecting USB devices” on page 17.AC power adapter jackConnect the AC adapter here.Note: For details, see “Using AC adapter and battery” on page 10.a bc dabcd
Chapter 1. Getting to know your computer5Front view - - - - - - - - - - - - - - - - - - - - - - - - - - - - - - - - - - - - - - - - - - - - - - - - - - - - - - - - - - - - - - - - - - - - - - - - - - - - - - - - - - - - - - - - - - - - - - - OneKey Rescue system buttonPress this button to start the OneKey Rescue system when the computer is powered off.Note: For details, see “OneKey Rescue system” on page 31.Power button Press this button to turn on the computer.System status indicatorsFor details, see “System status indicators” on page 21.abcabc
6Chapter 1. Getting to know your computerBottom view  - - - - - - - - - - - - - - - - - - - - - - - - - - - - - - - - - - - - - - - - - - - - - - - - - - - - - - - - - - - - - - - - - - - - - - - - - - - - - - - - - - - - - - - - - - Louvers Allow air to enter the computer for cooling.aa
7Chapter 2. Learning the basicsFirst use - - - - - - - - - - - - - - - - - - - - - - - - - - - - - - - - - - - - - - - - - - - - - - - - - - - - - - - - - - - - - - - - - - - - - - - - - - - - - - - - - - - - - - - - - - - - - - - - - - - - - - - Reading the manualsRead the supplied manuals before using your computer.Conncting to the powerThe built-in battery pack is not fully charged at purchase.To charge the battery and begin using your computer,  connect the computer to an electrical outlet. The battery is automatically charged while the computer is running on AC power.Connecting the computer to an electrical outlet1Connect the power cord to the AC adapter.2Connect the AC adapter to the AC power adapter jack of the computer firmly.3Plug the power cord into an electrical outlet.Turning on the computerPress the power button to turn on the computer.Configuring the operating systemYou may need to configure the operating system when it is first used. The configuration process may include the procedures below.• Accepting the end user license agreement• Configuring the Internet connection• Registering the operating system• Creating a user account
8Chapter 2. Learning the basicsPutting your computer into Sleep mode or shutting it down When you finish working with your computer, you can put it into Sleep mode or shut it down.Putting your computer into Sleep modeIf you will be away from your computer for only a short time, put the computer into Sleep mode. When the computer is in Sleep mode, you can quickly wake it to resume use, and bypass the startup process.1Swipe in from the right edge of the screen or point to the lower right corner of the screen Settings, and then tap Settings.2Tap or click Power and then select  Sleep.Note: Wait until the power indicator light starts blinking (indicating that the computer is in Sleep mode) before you move your computer. Moving your computer while the hard disk is spinning can damage the hard disk, causing loss of data.
Chapter 2. Learning the basics9To wake the computer, do one of the following.• Press the power button.• Press any key on the keyboard, if the key board is not locked.• Press the MS button.Shutting down your computer1Swipe in from the right edge of the screen or point to the lower right corner of the screen Settings, and then tap Settings.2Tap or click Power and then select  Shut down.Note: keyboard will be locked automatically, when the screen is opened more than 180 degrees.
10Chapter 2. Learning the basicsUsing AC adapter and battery - - - - - - - - - - - - - - - - - - - - - - - - - - - - - - - - - - - - - - - - - - - - - - - - - - - - - - - - - - Checking battery statusYou can determine the percentage of battery power remaining by checking the battery icon in the notification area.Charging the batteryIf the battery power is low, you need to charge the battery.You need to charge the battery in any of the following situations:• If the battery status indicator starts blinking• If the battery has not been used for a long timeBattery ProtectionIf the battery pack remains idle for a long time, the battery may be over-discharged, and its degradation speed may be increased. The battery pack of IdeaPad Yoga series uses the battery protection technology. When your computer remains idle for a long time, the battery pack enters the hibernation mode to avoid over-discharge. After the battery pack enters the hibernation mode, you cannot turn the computer on without using the power adapter. Please connect the power adapter to the computer to activate the battery pack.Note: As each computer user has different habits and needs, it is difficult to predict how long a battery charge will last. There are two main factors:• The amount of energy stored in the battery when you commence work.• The way you use your computer: for example, how often you access the hard disk drive and how bright you make the computer display.Note:•To increase the life of the battery pack, the computer does not start recharging the battery immediately after it drops from fully charged.•Charge the battery at a temperature between 50 °F and 86 °F (10 °C-30 °C).•Full charge or discharge is not required.Note: The batter pack is in the hibernation mode by default. When you use the computer for the first time, please plug the power adapter into it. Otherwise, the computer cannot be turned on.
Chapter 2. Learning the basics11Using multi-touch display  - - - - - - - - - - - - - - - - - - - - - - - - - - - - - - - - - - - - - - - - - - - - - - - - - - - - - - - - - - - - - - - - - - Multi-touch display The display supports multi-touch function. You can touch, swipe and tap directly without the use of the keyboard or touchpad.aa
12Chapter 2. Learning the basicsUsing the touchpad  - - - - - - - - - - - - - - - - - - - - - - - - - - - - - - - - - - - - - - - - - - - - - - - - - - - - - - - - - - - - - - - - - - - - - - - - - - - - - - -  Touchpad To move the cursor on the screen, slide your fingertip over the pad in the direction in which you want the cursor to move.Left-click area The function corresponds to that of the left mouse button on a conventional mouse, which can be implemented by clicking this area.Right-click area The function corresponds to that of the right mouse button on a conventional mouse, which can be implemented by clicking this area.Note: You can enable/disable the touchpad by pressing  .b cadabcd
Chapter 2. Learning the basics13Using the keyboard  - - - - - - - - - - - - - - - - - - - - - - - - - - - - - - - - - - - - - - - - - - - - - - - - - - - - - - - - - - - - - - - - - - - - - - - - - - - - - - - Your computer has function keys incorporated in its standard keyboard.Function key combinationsBy pressing the appropriate function keys, you can change system settings instantly. To use this function, press and hold Fn   , then press one of the function keys  .The following describes the features of each function key.Fn + Home: Activate the pause function.Fn + End: Activate the break function.Fn + PgUp: Enable/Disable the scroll lock.Fn + PgDn: Activate the insert function.abba
14Chapter 2. Learning the basicsHotkeysUsing hotkeysThe hotkeys are located in the function key row of the keyboard.By pressing the appropriate hotkey, you can change system settings instantly. The following describes the function of each hotkey.:  Mute/Unmute. :  Decrease sound volume.:  Increase sound volume. :  Close active window or program. :  Refresh desktop or Web pages. :  Enable/Disable the touchpad.: Open the interface for integrated wireless devices settings (on/off).:  Enable/Disable the built-in microphone.:  Turn on/off the integrated camera. :  Open the interface for changing display devices.:  Decrease display brightness. :  Increase display brightness.
Chapter 2. Learning the basics15Setting hotkey modeBy default, the hotkey functions are accessible by pressing the appropriate hotkey. However, you can disable the hotkey mode in the BIOS setup utility. To disable the hotkey mode:1Restart the computer. When the Lenovo logo appears, immediately press Fn + F2 to enter the BIOS setup utility.2In the BIOS setup utility, open the Configuration menu, and change the setting of Hot key function from Enabled to Disabled.3Open the Exit menu, and select Exit Saving Changes.Note: When hotkey mode is disabled, press the Fn key and the appropriate hotkey to access the corresponding hotkey function.
16Chapter 2. Learning the basicsConnecting external devices  - - - - - - - - - - - - - - - - - - - - - - - - - - - - - - - - - - - - - - - - - - - - - - - - - - - - - - - - - - - - Your computer has a wide range of built-in features and connection capabilities.Using memory cards (not supplied) Your computer supports the following types of memory cards:• Secure Digital (SD) card• MultiMediaCard (MMC)Inserting a memory card1Push the dummy card until you hear a click. Gently pull the dummy card out of the memory card slot.2Slide the memory card in until it clicks into place.Removing a memory card1Push the memory card until you hear a click.2Gently pull the memory card out of the memory card slot.Note:•Insert ONLY one card in the slot at a time.•This card reader does not support SDIO devices (e.g., SDIO Bluetooth, etc.).Note: The dummy card is used for preventing dust and small particles from entering the inside of your computer when the memory card slot is not in use. Retain the dummy card for future use.Note: Before removing the memory card, disable it via Windows safely remove hardware and eject media utility to avoid data corruption.
Chapter 2. Learning the basics17Connecting USB devicesYou can connect a USB device to your computer by inserting its USB plug (Type A) into the USB port on your computer.The first time you plug a USB device into a particular USB port on your computer, Windows automatically installs a driver for that device. After the driver is installed, you can disconnect and reconnect the device without performing any additional steps.Before disconnecting a USB storage device, make sure your computer has finished transferring data by that device. Click the Safely Remove Hardware icon in the notification area of  Windows to remove the device before disconnecting.Note: Typically, Windows detects a new device after connecting it, and then installs the driver automatically. However, some devices may require you to install the driver before connecting. Check the documentation provided by the device’s manufacturer before connecting the device.Note: If your USB device uses a power cord, connect the device to a power source before connecting it. Otherwise, the device may not be recognized.
18Chapter 2. Learning the basicsConnecting Bluetooth enabled device (on select models)If your computer has an ieocntegrated Bluetooth adapter card, it can connect to and transfer data wirelessly to other Bluetooth enabled devices, such as notebook computers, PDAs and cell phones. You can transfer data between these devices without cables and up to 10 meters range in open space.Enabling Bluetooth communications on your computerPress   to make configuration.Note: The actual maximum range may vary due to interference and transmission barriers. To get the best possible connection speed, place the device as near your computer as possible.Note:•When you do not need to use the Bluetooth function, turn it off to save battery power.•You need to pair the Bluetooth enabled device with your computer before you can transfer data between them. Read the documentation supplied with the Bluetooth enabled device for details on how to pair the device with your computer.
Chapter 2. Learning the basics19Special keys and buttons  - - - - - - - - - - - - - - - - - - - - - - - - - - - - - - - - - - - - - - - - - - - - - - - - - - - - - - - - - - - - - - - - - - - OneKey Rescue system button •When the computer is powered off, press this button to start the OneKey Rescue system.•In the Windows operating system, press this button to start the Lenovo OneKey Recovery system.Rotation button Press this button to rotate the screen  to a landscape or portrait orientation in the tablet mode.Note:For details, see “OneKey Rescue system” on page 31.Note:For details, see “Changing the orientation in tablet mode” on page 25.aaaa
20Chapter 2. Learning the basicsMS button Press this button to switch between the current screen and Home screen (Desktop or Home).Desktop screenHome screenaa
Chapter 2. Learning the basics21System status indicators - - - - - - - - - - - - - - - - - - - - - - - - - - - - - - - - - - - - - - - - - - - - - - - - - - - - - - - - - - - - - - - - - - - - These indicators inform you of the computer status.baPower status indicator Battery status indicator ab
22Chapter 2. Learning the basicsNo. Symbol Indicator IndicatorstatusMeaningPower On (solid white)The computer is powered on.Blinking The computer is in Sleep mode.Off The computer is powered off.Battery On (solid white)The battery has more than 20% charge.Solid amberThe battery has between 5% and 20% charge.Fast blinking amberThe battery has less than 5% charge.Slow blinking amberThe battery is being charged. When battery charge reaches 20%, the blinking color changes to white.Slow blinking whiteThe battery has between 20% and 80% charge and is still charging. When the battery reaches 80% charge the light will stop blinking, but charging will continue until the battery is fully charged.Off The battery is detached.ab
Chapter 2. Learning the basics23Using the computer in stand, tent or tablet mode  - - - - - - - - - - - - - - - - Using the computer in stand modeConverting to stand modeOpen the computer and fold the display about 280 degrees as shown in the illustration below.Using the computer in tent modeConverting to tent modeOpen the computer and fold the display about 315 degrees as shown in the illustration below.确认是否需要描述在何种情况下使用此模式。确认是否需要描述在何种情况下使用此模式。
24Chapter 2. Learning the basicsUsing the computer in tablet modeOpen the computer and fold the display 360 degrees as shown in the illustration below.Place the computer that the screen facing up.Note: Keyboard will be locked automatically, when the screen is opened more than 190 degrees.190 degreesConverting to tablet mode
Chapter 2. Learning the basics25Changing the orientation in tablet modeIn tablet mode, press the Rotation button to rotate the screen  to a landscape or portrait orientation.Rotation buttonPortraitLandscape
26Chapter 2. Learning the basicsWindows 8 overview  - - - - - - - - - - - - - - - - - - - - - - - - - - - - - - - - - - - - - - - - - - - - - - - - - - - - - - - - - - - - - - - - - - - - - - - - - - - - - The charms  The charms provide new and better way to do things you’ve always done.The charms appear on the right side of your screen. Swipe in from the right edge or move your mouse to the lower-right corner to see them, and then choose the one you want.Search charmThe search charm is a powerful new way to find what you are looking for. When you enter a search term, you can check results from your PC, the web, or within different apps - all from the same place.Share charmThe Share charm lets you send links, photos, and more to your friends and social networks without leaving the app you are in.Start charmThe Start charm takes you to Start or, if you are on the Start screen, back to your last app.aa
Chapter 2. Learning the basics27Devices charmThe Devices charm is a handy way to do things like sending files and streaming movies to printers,TVs, and more.Settings charmThe Settings charm is how you do basic tasks like shutting down your PC and changing the volume. It is also used by  apps to configure things like account and privacy settings.App commands  The App commands appear at the top and bottom of your screen. Swipe up or down from either edge or right-click in an open space (no text or images) to see them, and then choose the one you want.aa
28Chapter 2. Learning the basicsApps screenApps screen appears by at the bottom edge of your start screen. Swipe up and  tap the All apps or clicking by your mouse.
Chapter 2. Learning the basics29Securing your computer  - - - - - - - - - - - - - - - - - - - - - - - - - - - - - - - - - - - - - - - - - - - - - - - - - - - - - - - - - - - - - - - - - - - - - This section provides information about how to help protect your computer from theft and unauthorized use.Using passwordsUsing passwords helps prevent your computer from being used by others. Once you set a password and enable it, a prompt appears on the screen each time you power on the computer. Enter your password at the prompt. The computer cannot be used unless you enter the correct password.For details about how to set the password, see the Help to the right of the screen in BIOS setup utility.Note: This password can be from one to seven alphanumeric characters in any combination.Note: To enter BIOS setup utility, press Fn + F2 (when Hot key function is set to Enabled) or F2 (when Hot key function is set to Disabled) when the Lenovo logo appears on the screen while the computer is starting up.
30Chapter 3. Connecting to the InternetAs a global network, the Internet connects computers worldwide, providing services such as e-mailing, information searching, electronic commerce, Web browsing and entertainment.You can connect the computer to the Internet in the following way:Wireless network technology: connect without wiring.Wireless connection  - - - - - - - - - - - - - - - - - - - - - - - - - - - - - - - - - - - - - - - - - - - - - - - - - - - - - - - - - - - - - - - - - - - - - - - - - - - - Wireless connections provide mobile access to the Internet, allowing you to stay online anywhere the wireless signal covers.Divided by the signal scales, wireless connection to the Internet can be built based on the following standards. Using Wi-Fi/WiMAX (on select models)Enabling wireless connectionTo enable wireless communications, do the following:Press   to make configuration.Hardware connectionSoftware configurationConsult your Internet Service Provider (ISP) and search Windows Help and Support Center for details on how to configure your computer.Wi-Fi Wi-Fi networks cover a small physical area, like a home, office, or small group of buildings. An access point is necessary for the connection.WiMAX  WiMAX networks connect several Wireless LAN systems to cover a metropolitan area, providing high-speed broadband access without the need for cables.Note: Your computer may not support all wireless connection methods.Access point *Wi-Fi/WiMAX network* Not supplied
31Chapter 4. OneKey Rescue systemOneKey Rescue system  - - - - - - - - - - - - - - - - - - - - - - - - - - - - - - - - - - - - - - - - - - - - - - - - - - - - - - - - - - - - - - - - - - - - - - Introduction  The Lenovo OneKey Rescue system is an easy-to-use application that can be used to back up the data on your system partition (C drive) for easy restore when required. You can run Lenovo OneKey Recovery under the Windows operating system, and the OneKey Rescue system without starting the Windows operating system.Attention:In order to utilize the features of the OneKey Rescue system, your hard disk already includes a hidden partition by default to store the system image file and OneKey Rescue system program files. This default partition is hidden for security reasons and is the reason the available disk space is less than it claims. The exact available hard disk space depends on the file size of the mirror image file (based on the size of operating system and preinstalled software).Using Lenovo OneKey Recovery (within Windows operating system)In Windows operating system, double click the OneKey Recovery system Icon on the desktop to launch Lenovo OneKey Recovery. Within the program, you can back up the system partition on the hard disk drive, other storage devices, or by creating recovery discs. For more instructions, see the Help file of Lenovo OneKey Recovery.Note:•The backup process and creation of recovery discs may take some time, connect the AC adapter and battery pack to your computer.•After the recovery discs are burned, please number them so that you can use them in the correct order.•Computers without an integrated optical drive support the creation of recovery discs; however an appropriate external optical drive is needed to physically create the recovery discs.
32Chapter 4. OneKey Rescue systemUsing Lenovo OneKey Rescue system (without Windows operating system)In the event that the operating system cannot be loaded, follow the steps below to access OneKey Rescue system.• Shut down your computer.• Press the   key to launch OneKey Rescue system.Within the program, you can choose to restore your system partition to the original factory status, or to a previously generated backup.Creating a recovery disc(s)Your computer does not ship with a recovery disc. You can use Lenovo OneKey Recovery system to create a recovery disc(s), which can be used to start and restore your computer in case of a system failure.To create a recovery disc(s):• Insert a recordable disc into the optical drive on your computer.• In Windows, press the OneKey Rescue system button to launch Lenovo OneKey Recovery system.• On the main screen, click Create Recovery Disc.• Choose the type of recovery disc(s). You can create three types of recovery disc(s): recovery disc(s) with existing backup image, recovery disc(s) from the current system partition, and factory default recovery disc(s). Select the type of recovery disc you want to create and follow the on-screen instructions.• Insert additional recordable disc(s) when prompted.Note: The recovery process is irreversible. Make sure to back up any critical data before using the recovery feature.Note: If your computer does not come with an integrated optical drive or if the integrated optical drive does not support disc creating, connect an appropriate external optical drive to your computer.
Chapter 4. OneKey Rescue system33Note: •The estimated number of discs needed will be displayed before the process of creating the  recovery disc(s) begins. To minimize the number of discs needed, use recordable DVDs as the media. Also make sure your optical drive is compatible with the disc intended for use.•After  recovery disc  creation, number the discs appropriately for use in their correct order. The first disc created will be used to start the computer in the case of a system failure.
34Chapter 5. TroubleshootingFrequently asked questions - - - - - - - - - - - - - - - - - - - - - - - - - - - - - - - - - - - - - - - - - - - - - - - - - - - - - - - - - - - - This section lists frequently asked questions and tells where you can find detailed answers.What safety precautions should I follow when using my computer?See “Chapter 1. Important safety information” of Lenovo Safety and General Information Guide.How can I prevent problems with my computer?See “Chapter 2. Use and care Information” of Lenovo Safety and General Information Guide.What are the main hardware features of my computer?More information can be found in Chapter 1 and 2.Where can I find the detailed specifications for my computer?See http://consumersupport.lenovo.com.Where are the recovery discs?Your computer did not come with a recovery disc. For an explanation of the alternative recovery methods offered by Lenovo, see “Chapter 4. OneKey Rescue system” on page 31.Where are the installation discs for pre-installed software?Your computer does not come with installation discs for the pre-installed  software. Installation programs for the pre-installed software on your computer can be downloaded from Lenovo’s consumer support Web site (http://consumersupport.lenovo.com). If your computer is pre-installed with Windows operating system, you can also find installation programs for some pre-installed software in the Application folder on D partition of the hard disk drive.How can I contact the customer support center?See “Chapter 3. Getting help and service” of Lenovo Safety and General Information Guide.
Chapter 5. Troubleshooting35Where can I find warranty information?For the warranty applicable to your computer, including the warranty period and type of warranty service, see the Lenovo limited warranty flyer that came with your computer.Where can I find the device drivers?A compatible device driver is a requirement to ensure correct operation and performance of each component in your computer. All the device drivers for your computer model can be downloaded from Lenovo’s consumer support Web site. If your computer is pre-installed with Windows operating system, you can also find device drivers for the operating system in the Driver folder on D partition of the hard disk drive. Lenovo’s consumer support Web site contains the most updated device drivers.What can I do if the backup process fails?If you can start the backup feature without a problem, but it fails during the backup process, please try the following steps:1Close other programs, then restart the backup process.2Check if the destination media is damaged, try to select another path and then try again.When do I need to restore the system to the factory status?You can use this feature when your system fails or you need to re-install your operating system. This will restore your computer back to the initial status when you first booted up your computer after receiving it from the store. If there is critical data on your current partition, back it up before you run this recovery feature.
36Chapter 5. TroubleshootingTroubleshooting - - - - - - - - - - - - - - - - - - - - - - - - - - - - - - - - - - - - - - - - - - - - - - - - - - - - - - - - - - - - - - - - - - - - - - - - - - - - - - - - - - - - - - If you do not find your problem here, see Chapter 2. The following section only describes problems that might negate the need to refer to the more comprehensive information in Chapter 2.Display problemsWhen I turn on the computer, nothing appears on the screen.•If the screen is blank, make sure that:- The AC adapter is connected to the computer and the power cord is plugged into a working electrical outlet.- The computer power is on. (Press the power button again for confirmation.)•If these items are properly set, and the screen remains blank, have the computer serviced. When I turn on the computer, only a white cursor appears on a blank screen. •Restore backed-up files to your Windows environment or the entire contents of your hard disk to the original factory contents using OneKey Rescue system. If you still see only the cursor on the screen, have the computer serviced.My screen goes blank while the computer is on.•Your screen saver or power management may be enabled. Do one of the following to exit from the screen saver or to resume from Sleep mode:-Touch the touchpad.- Press any key on the keyboard.-Press the power button.
Chapter 5. Troubleshooting37Password problemsI forgot my password. •If you forget your user password, you must take your computer to a Lenovo authorized servicer or a marketing representative to have the password changed. •If you forget your HDD password, a Lenovo authorized servicer cannot reset your password or recover data from the hard disk. You must take your computer to a Lenovo authorized servicer or a marketing representative to have the hard disk drive replaced. Proof of purchase is required, and a fee will be charged for parts and service. •If you forget your administrator password, a Lenovo authorized servicer cannot reset your password. You must take your computer to a Lenovo authorized servicer or a marketing representative to have the system board replaced. Proof of purchase is required, and a fee will be charged for parts and service. Sleep problemsThe critical low-battery error message appears, and the computer immediately turns off.•The battery power is getting low. Connect the AC adapter to the computer, or replace the battery with a fully charged one.The computer enters hibernation mode immediately after Power-on self-test (POST). •Make sure that: - The battery is charged.- The operating temperature is within the acceptable range. See “Chapter 2. Use and care Information” of Lenovo Safety and General Information Guide.Note: If the battery is charged and the temperature is within range, have the computer serviced.
38Chapter 5. TroubleshootingThe computer does not return from hibernation mode and the computer does not work. •If the computer does not return from hibernation mode, it may have entered hibernation mode automatically because the battery is depleted. Check the power indicator. •If your computer is in hibernation mode, connect the AC adapter to the computer, then press any key or the power button.•If your computer is in hibernation mode or power-off state, connect the AC adapter to the computer, then press the power button to resume operation.Note:If the system still does not return from hibernation mode, your system has stopped responding, and you cannot turn off the computer; reset the computer. Unsaved data may be lost. To reset the computer, press and hold the power button for 4 seconds or more. If the computer is still not reset, remove the AC adapter.Computer screen problemsThe screen is blank.  •Do the following:- If you are using the AC adapter, or using the battery, and the battery status indicator is on, press  to make the screen brighter. - If the power indicator is in blinking, press the power button to resume from the hibernation mode. - If the problem persist, follow the solution in the following problem “The screen is unreadable or distorted.”The screen is unreadable or distorted.•Make sure that: - The display device driver is installed correctly.- The screen resolution and color quality are correctly set. - The monitor type is correct.Incorrect characters appear on the screen.•Did you install the operating system or programs correctly? If they are installed and configured correctly, have the computer serviced.
Chapter 5. Troubleshooting39Sound problemsNo sound can be heard from the speaker even when the volume is turned up.•Make sure that:- The Mute function is off.- The headphone jack is not used.- The speaker is selected as the playback device. Battery problemsYour computer shuts down before the battery status indicator shows empty.-or-Your computer operates after the battery status indi-cator shows empty.•Discharge and recharge the battery.The computer does not operate with a fully charged battery.•The surge protector in the battery might be active. Turn off the computer for one minute to reset the protector; then turn on the computer again.A hard disk drive problemThe hard disk drive does not work.•In the Boot menu in BIOS setup utility, make sure that the hard disk drive is included in the Boot Device Priority correctly.A startup problemThe Microsoft® Windows operating system does not start.•Use the OneKey Rescue system to help solve or identify your problem. For details about OneKey Rescue system, see “Chapter 4. OneKey Rescue system” on page 31.
40Chapter 5. TroubleshootingOther problemsYour computer does not respond.•To turn off your computer, press and hold the power button for 4 seconds or more. If the computer still does not respond, remove the AC adapter. •Your computer might lock when it enters hibernation mode during a communication operation. Disable the hibernation timer when you are working on the network.The computer does not start from a device you want. •See the Boot menu of the BIOS setup utility. Make sure that the Boot Device Priority in the BIOS setup utility is set so that the computer starts from the device you want. •Also make sure that the device from which the computer starts is enabled. In the Boot menu in the BIOS setup utility, make sure that the device is included in the Boot Device Priority list.•Press Fn + F12 (when Hot key function is set to Enabled) or F12 (when Hot key function is set to Disabled) when the Lenovo logo appears on the screen while the computer is starting up to select the device you want the computer starts from.The connected external device does not work. •Do not connect or disconnect any external device cables other than USB while the computer power is on; otherwise, you might damage your computer.•When using a high power consumption external devices such as an external USB optical disk drive, use external device power adapter. Otherwise, the device may not be recognized, or system shut down may result.
41TrademarksThe following terms are trademarks or registered trademarks of Lenovo in the United States, other countries, or both.LenovoIdeaPadOneKeyMicrosoft and Windows are trademarks of Microsoft Corporation in the United States, other countries, or both.Other company, products, or service names may be trademarks or service marks of others.
The illustrations in this manual may differ from the actual product. Please refer to the actual product.•First Edition (March 2011)To refer to it, go to http://consumersupport.lenovo.com/ and click User guides and manuals. Regulatory Notice•© Copyright Lenovo 2011. Before using the product, be sure to read  Lenovo Safety and General Information Guide first.The features described in this guide are common to most models. Some features may not be available on your computer and/or your computer may include features that are not described in this user guide.Some instructions in this guide may assume that you are using Windows® 7. If you are using other Windows operating system, some operations may be slightly different. If you are using other operating systems, some operations may not apply to you.LENOVO products, data, computer software, and services have been developed exclusively at private expense and are sold to governmental entities as commercial items as defined by 48 C.F.R. 2.101 with limited and restricted rights to use, reproduction and disclosure. LIMITED AND RESTRICTED RIGHTS NOTICE: If products, data, computer software, or services are delivered pursuant a General Services Administration “GSA” contract, use, reproduction, or disclosure is subject to restrictions set forth in Contract No. GS-35F-05925.Notes•••
Lenovo IdeaPad S200/S206Read the safety notices and important tips in the included manuals before using your computer.©Lenovo China 2012New World. New Thinking.TMwww.lenovo.comV1.0_en-USUser Guide V1.0

Navigation menu