Remotesolution RH61A Touch Screen Remote Controller User Manual 1
Remote Solution Co., Ltd. Touch Screen Remote Controller 1
UserManual.wiki
>
Remotesolution
>
RH61A User Manual
>
User Manual 1
Contents
1.
User Manual 1
2.
User Manual 2
User Manual 1
Navigation menu
Upload a User Manual
Namespaces
Wiki Guide
HTML
PDF
Info
Views
User Manual
Discussion / Help
Navigation

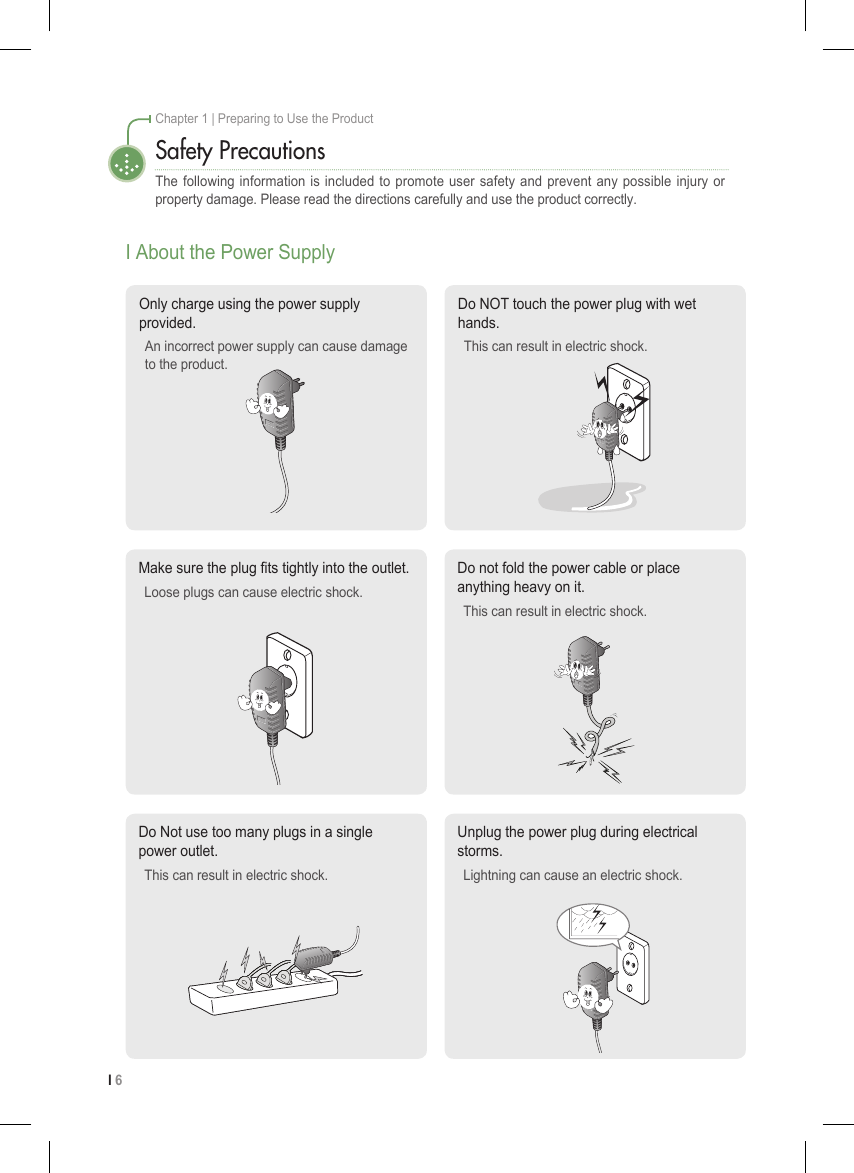
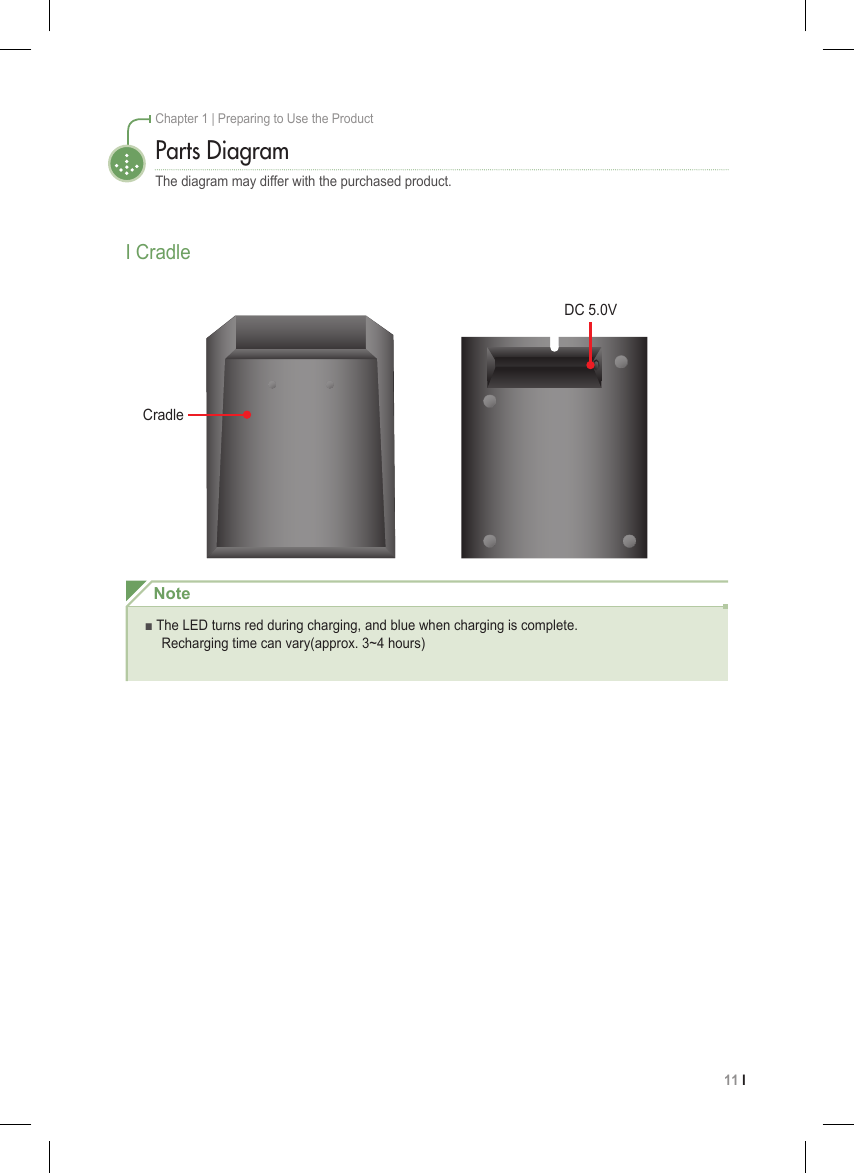
![9 I Chapter 1 | Preparing to Use the ProductParts DiagramThe diagram may differ with the purchased product.I Remote (Front)1ON, OFF POWER Enters POWER [ON/OFF] CODE for the set device2 ARROW Enters [UP/DOWN/LEFT/RIGHT] CODE for the set deviceOK OK Enters OK and/or ENTER CODE for the set device3MENU MENU Enters MENU CODE for the set deviceEXIT EXIT Enters EXIT CODE for the set device4 PAGE MOVE Flips to [NEXT/PREVIOUS] page shown on the device screenHOME Moves to the HOME / UP Screen5CH , CH CHANNEL Enters CHANNEL [UP/DOWN] CODE for the set deviceVOL , VOL VOLUME Enters VOLUME [UP/DOWN] CODE for the set device6MUTE Enters MUTE CODE for the set deviceGUIDEINFOEnters Guide CODE for the set device7 FUNCTION 1, 2, 3, 4 Moves directly to Page [1, 2, 3, 4] on the set device * The FUNCTION key can be set in the manager. 123456LCD Screen 7](https://usermanual.wiki/Remotesolution/RH61A.User-Manual-1/User-Guide-963232-Page-9.png)
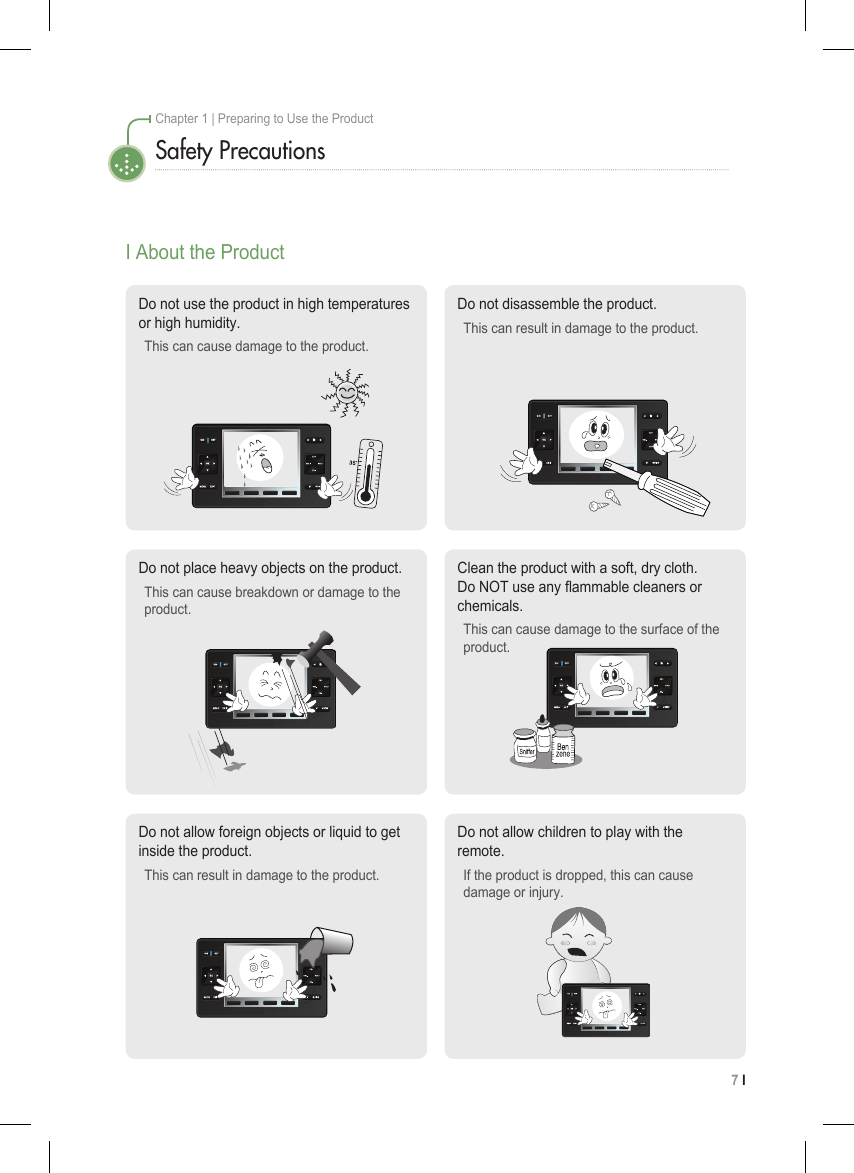
![I 12Chapter 1 | Preparing to Use the ProductRecharging and Turning Power On/OffI Recharging with an AdapterI Turning the Remote Control Power On/OffControl using the power switch at the bottom rear of the remote control.Insert the adapter cable into the cradle and then plug the other end into a power outlet. When recharging, do so with the power switch at the bottom of the rear side of the remote control set to [ON]. (Note, if the power switch is set to [OFF], recharging is not performed.)1) In case of malfunction, power off and then power on product.2) In case of malfunction, after fully charging battery, retry operation.NoteIf this remote control is subjected to excess voltage above 6.0V, the protective circuit within the device becomes activated, thus discontinuing normal remote control operation. To use normally, turn the remote control OFF and ON.](https://usermanual.wiki/Remotesolution/RH61A.User-Manual-1/User-Guide-963232-Page-12.png)
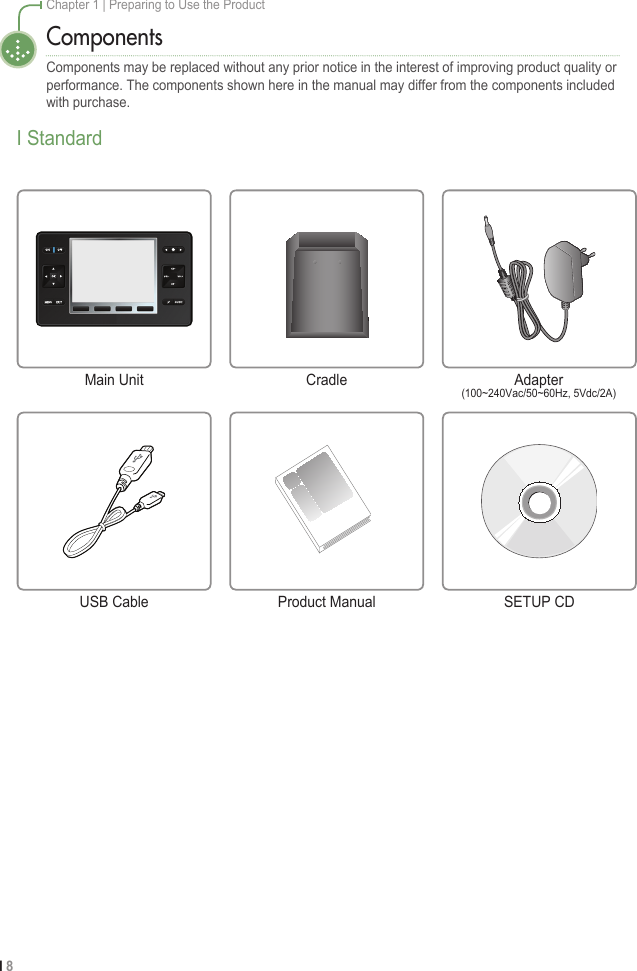
![13 I Chapter 1 | Preparing to Use the ProductI TSR750 PC Mananger InstallationSoftware InstallationInsert the Setup CD in the CD-ROM drive. The installation program will run automatically.1Click the [Next] icon.2To change the PC folder for installation, click the [Change] icon. Clicking the [Next] icon will move directly to the installation screen in 5).3After designating the desired folder for installation, click the [OK] icon.4Click the [Next] icon.5](https://usermanual.wiki/Remotesolution/RH61A.User-Manual-1/User-Guide-963232-Page-13.png)
![I 14Chapter 1 | Preparing to Use the ProductSoftware InstallationClick the [Install] icon.6Wait until the installation process has been completed.7If the PC on which the installation was performed has the Microsoft ActiveSync program installed, click the [Finish] icon and end the installation. If the Microsoft ActiveSync program is not already installed, check the box marked [Install Microsoft ActiveSync 4.2] and click the [Finish] icon to perform Microsoft ActiveSync 4.2 installation. (Please refer to pages 16~17 for detailed installation instructions.)8When the program installation is fully complete, the icon is created on the desktop. Double-click the icon to run TSR750 PC Mananger.9](https://usermanual.wiki/Remotesolution/RH61A.User-Manual-1/User-Guide-963232-Page-14.png)
![15 I Chapter 1 | Preparing to Use the ProductI Microsoft ActiveSync 4.2 InstallationSoftware InstallationInsert the Setup CD in the CD-ROM drive. There are two ways to install Microsoft ActiveSync 4.2. 1. Install together with TSR750 PC Mananger. 2. Run the Setup.exe le located in the Setup CD in [Program Files\RemoteSolution\TSR750\ActiveSync].1Run the Setup.exe le located in the Setup CD in [Program les\RemoteSolution\TSR750\ActiveSync].Click the [Next] icon in the screen that appears.2After selecting [I accept the …], click the [Next] icon.3Fill in the User Name and Organization elds and click the [Next] icon.4After conrming the hard disk and folder of the PC for installation, click the [Next] icon. Press the [Change] icon to change the folder.5](https://usermanual.wiki/Remotesolution/RH61A.User-Manual-1/User-Guide-963232-Page-15.png)
![I 16Chapter 1 | Preparing to Use the ProductSoftware InstallationClick the [Install] icon.6Wait until the installation process has been completed.7Click the [Finish] icon.8When the screen as shown appears, click the [Cancel] icon.9When the installation is fully complete, the icon appears at the lower right of the window. Turn the remote control power ON, and connect it to the PC via the USB cable. When connecting the remote control to the PC for the rst time, the USB driver must be installed. (Please refer to pages 17~18 for detailed installation instructions.)10](https://usermanual.wiki/Remotesolution/RH61A.User-Manual-1/User-Guide-963232-Page-16.png)
![17 I Chapter 1 | Preparing to Use the ProductI USB Driver InstallationSoftware InstallationCertain differences may occur depending on the user’s OS environment.After selecting [Install from a list ...], click the [Next] icon.2After selecting [Include this loction ...], click the [Browse] icon.Select the [program les\RemoteSolution\ TSR750\USB_Driver] folder in the SETUP CD.Click the [OK] icon in the screen that appears.4Click the [Next] icon.53Turn the remote control power ON, and if connecting to a PC for the rst time, the USB driver must be installed. Upon rst connection, popup window appears.1](https://usermanual.wiki/Remotesolution/RH61A.User-Manual-1/User-Guide-963232-Page-17.png)
![I 18Chapter 1 | Preparing to Use the ProductSoftware InstallationClick the [Finish] icon to end the installation.7Wait until the installation process has been completed.6Connecting the ProductI USB ConnectionConnect the USB cable provided into the USB port of the product.Chapter 1 | Preparing to Use the Product](https://usermanual.wiki/Remotesolution/RH61A.User-Manual-1/User-Guide-963232-Page-18.png)
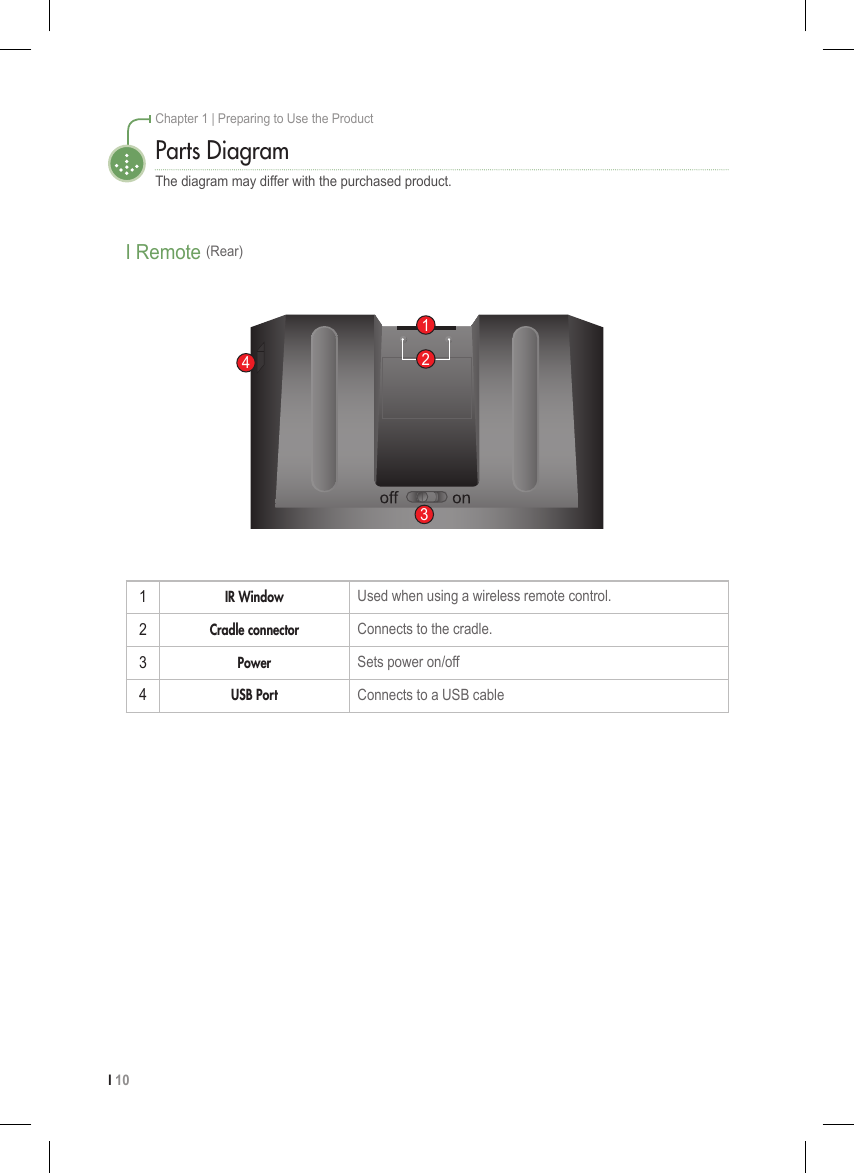
![19 I Chapter 1 | Preparing to Use the ProductI Product SpecificationsProduct SpecificationsDue to ongoing product performance and/or quality improvements, the following information is subject to change without prior notice.Item SpecificationGeneralProduct Size 160 X 95 X 20mmProduct Type Portable UR Remote ControlOperating System WINCE 5.0Usable Memory 128 MByte (including OS)USB Download USB 1.1Battery 3.7V / 1800mAButton 22 External ButtonsImage Color LCD Samsung 3.5" TFT LCD (320X240)Supported Image File TypesBMP, JPG, PNGAudio Channel MONO (Built-In Speaker)Supported Audio File TypesMP3, WAVOperation DistanceIR Operation Distance MIN 10mRF Operation Distance MIN 20mOperation Voltage3.2V~5.4VDetailsProcessor Type 332-FBGA0℃ ~ +35℃-20℃ ~ +70℃Processor Samsung S3C2442 Processor 300MHzCPU Core ARM 920TTouch Panel Touch Panel Controller ADS7846Motion Sensor LIS302DIR InfraredZigBee 2.4Ghz [IEEE 802.15.4 Standard]RUN MAX 250mA @ 3.7VSleep MAX 4mA @ 3.7VTemperature OperationStorage](https://usermanual.wiki/Remotesolution/RH61A.User-Manual-1/User-Guide-963232-Page-19.png)

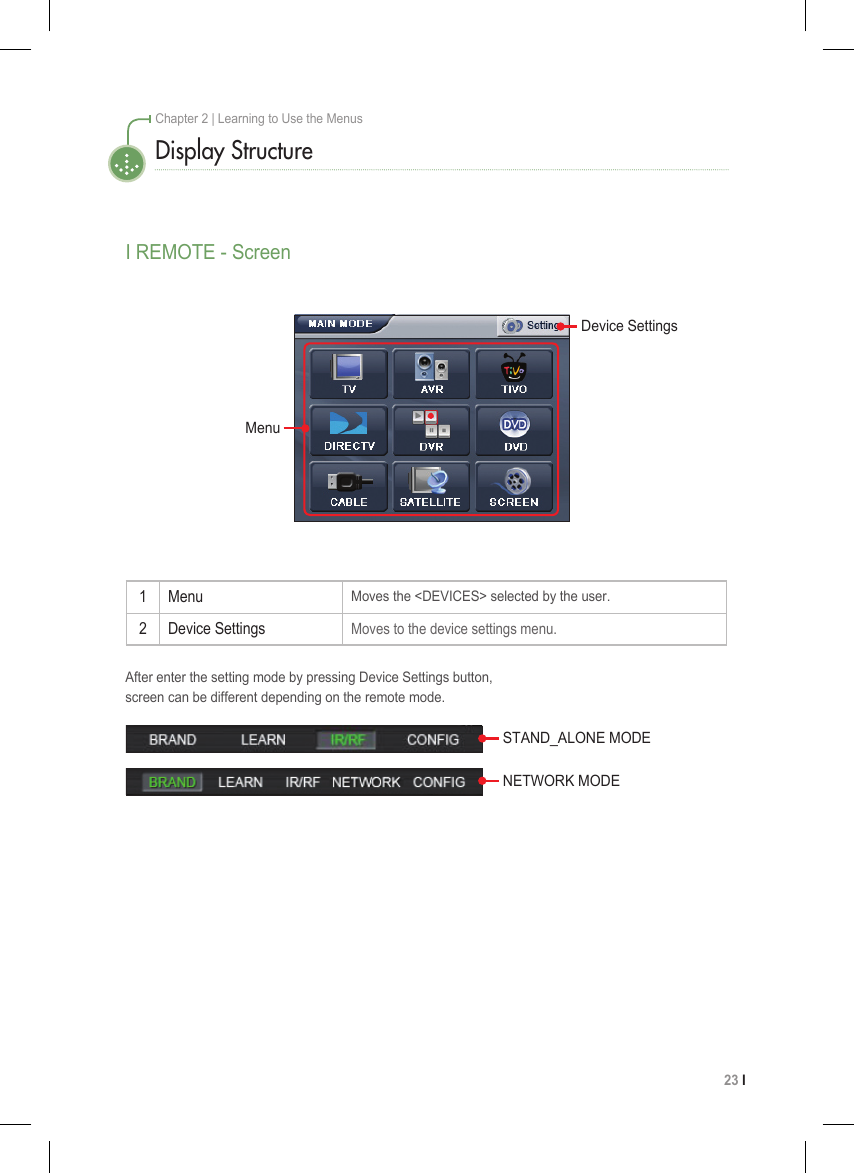
![I 22Chapter 2 | Learning to Use the MenusDisplay StructureI Main ScreenPress the [Menu] icon in the LCD screen of the remote control to open the menu.1 REMOTE Moves to the device group to be controlled.2 PHOTO Moves to the playback menu for image files.3 UTILITY Goes to the user preferences menu.4 SETTING Moves to the system settings menu.](https://usermanual.wiki/Remotesolution/RH61A.User-Manual-1/User-Guide-963232-Page-22.png)
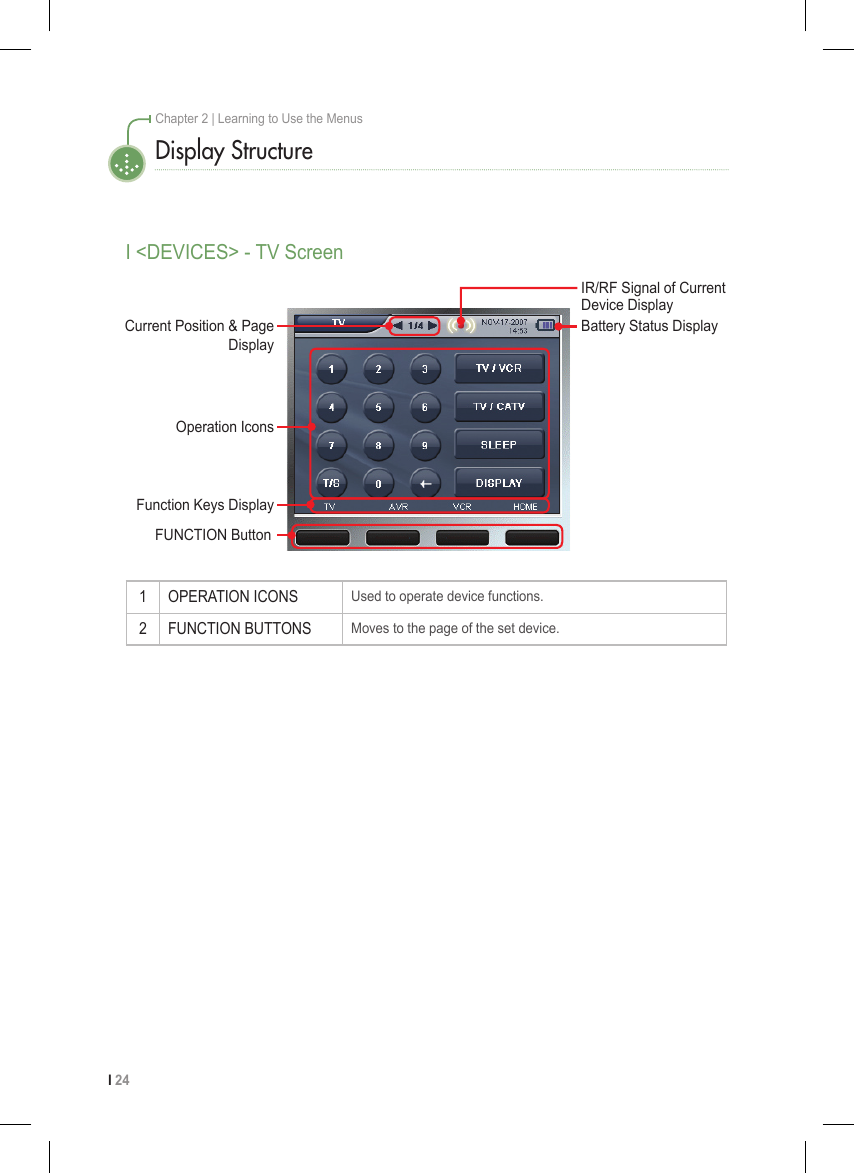
![25 I Chapter 2 | Learning to Use the MenusI <DEVICES> - Using the TV Remote Control<DEVICES> Mode[ <TV>, <AVR>, <TIVO>, <DIRECTV>, <DVR>, <DVD>, <CABLE>, <SATELLITE>, etc.Follow the same instructions to move to the [DEVICES] menu.Press the [REMOTE] icon on the screen to open the menu. The [REMOTE] screen appears.1Press the [TV] icon on the screen. The [DEVICES] screen appears.2Press and use the operation icons on the <TV> screen. Use the product's [ ] buttons to move between pages. (refer to page 9)3Press the [ ] button the end the mode.4](https://usermanual.wiki/Remotesolution/RH61A.User-Manual-1/User-Guide-963232-Page-25.png)
![I 26Chapter 2 | Learning to Use the MenusI BRAND(CODE) SET-UP (TV Remote Control Setting)OPERATING SET-UPPress the [REMOTE] icon on the screen to open the menu. The [REMOTE] screen appears.1Press the [Settings] icon on the screen. The [Settings] screen appears.2Press the [NAME-TV] icon on the screen. The [DEVICES] screen appears.3■ Turn on the desired TV.■ Ex : TV brand name LG (Goldstar).■ Point the remote control at the TV.Press the button of the device to be set. If the selected device is not displayed on the screen, press [ ] button to move between pages. Ex.) TV4](https://usermanual.wiki/Remotesolution/RH61A.User-Manual-1/User-Guide-963232-Page-26.png)
![27 I Chapter 2 | Learning to Use the MenusOPERATING SET-UPIn the screen, press the rst letter "L" of the TV brand. If the TV brand is the same, press the [CODE] button. The models held by a brand increase by one and are outputted per each instance of pressing the [LG(GOLDSTAR)] icon. (Note: Continuous pressing results in the continuous output of the same model.)7Press the [DEVICE-TV] icon on the screen.5Press the button of the device to be set. The device here is that of the database. Ex.) TV6](https://usermanual.wiki/Remotesolution/RH61A.User-Manual-1/User-Guide-963232-Page-27.png)