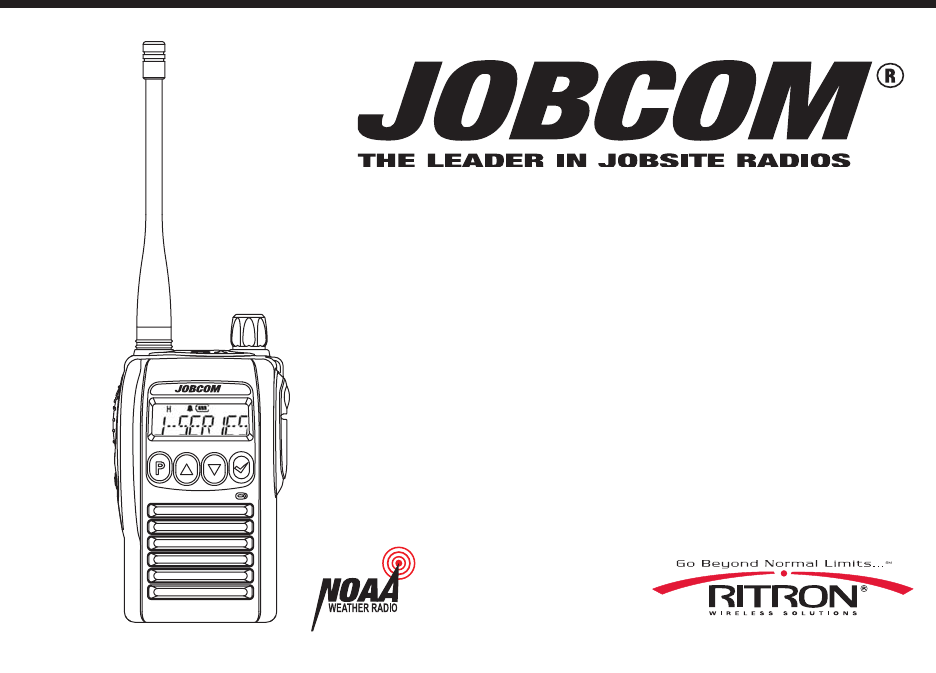
Ritron RIT23-450 UHF-FM PORTABLE TRANSCEIVER User Manual SLX Series UML 8 18 05 rearranged
Ritron Inc UHF-FM PORTABLE TRANSCEIVER SLX Series UML 8 18 05 rearranged
Ritron >
Contents
USERS MANUAL
Have questions? Call
800-USA-1-USA
(800-872-1872) or visit our website at www.ritron.com
P/N 14500065 Rev A 12/05
User Guide
J Series
J Series

Have questions? Call
800-USA-1-USA
(800-872-1872) or visit our website at www.ritron.com
Thank you for buying the Ritron J Series business band radio. For almost 30 years, Ritron has been a leader in
providing cost-effective, on-site communication equipment for businesses. The J-Series radio will provide cost-
effective communication for schools, retail stores, manufacturing, warehousing, construction sites, property
management, hotel and motel management and many more. Ritron radio communication products improve efficiency
and safety in virtually any workplace environment. Ritron is the wireless connection for your on-site communication
needs.
NOTE: Please read all instructions in this manual.
Two-way Radio
INCLUDED ITEMS
2.5 Hour, Dual Slot Charging
Stand with Power Supply
User Manual
1800mAh Li-Ion
Battery Pack
with attached Belt Clip
VHF or UHF Antenna
i

Have questions? Call
800-USA-1-USA
(800-872-1872) or visit our website at www.ritron.com
FCC REGULATIONS, LICENSING ................................ 1
SAFETY STANDARDS ................................................ 1
SERVICE ............................................................... 1
HOW TO OBTAIN AN FCC RADIO LICENSE ................. 1
ABOUT THIS USER GUIDE ........................................ 2
RADIO CONTROLS ................................................... 3
RADIO BUTTONS & CONTROLS .................................. 4
DISPLAY ICONS ....................................................... 5
ATTACHING THE BATTERY ......................................... 6
REMOVING THE BATTERY .......................................... 6
J SERIES AUDIO ACCESSORIES ................................. 7
FAST RATE DUAL SLOT DROP-IN CHARGER ................. 9
ATTACHING THE A NTENNA ......................................... 10
ON/OFF AND VOLUME CONTROL ............................. 10
OPERATING THE RADIO ............................................ 11
KEYPAD LOCK .................................................. 11
EMERGENCY CALL FEATURE (ORANGE BUTTON) ......... 11
NOAA WEATHER RADIO .................................... 12
HOW TO READ-OUT FREQUENCY &
TONE CODE SETTINGS .................................. 13
HOW TO PROGRAM PER-CHANNEL FEATURES ........... 14
TABLE #1 PROGRAMMABLE FREQUENCY CODES........... 15
TABLE #2 INTERFERENCE ELIMINATOR
PROGRAMMABLE CODES.................................. 16
TABLE #3 DIGITAL INTERFERENCE ELIMINATOR
PROGRAMMABLE CODES.................................. 16
HOW TO PROGRAM RADIO-WIDE FEATURES............... 17
HOW TO ASSIGN A FUNCTION TO A PKEY
PROGRAMMABLE FUNCTION BUTTON ................. 18
HOW TO DELETE A CHANNEL ............................... 19
RITRON LIMITED WARRANTY ................................ 20
CONTENTS
ii
© 2005 Ritron, Inc. All rights reserved. Ritron, Patriot, Jobcom, OutPost, GateGuard, Quiet Call and Quick Assist are registered
trademarks of Ritron, Inc. Quick Talk, Liberty and RadioNexus are trademarks of Ritron, Inc.

Have questions? Call
800-USA-1-USA
(800-872-1872) or visit our website at www.ritron.com
FCC REGULATIONS
LICENSING The FCC requires the owners of J Series radios to obtain a sta-
tionlicense before using them.
The station licensee is responsible for ensuring that transmitter power, frequency
and deviation are within the limits specified by the station license. The station
licensee is also responsible for proper operation and maintenance of the radio
equipment. This includes checking the transmitter frequency and deviation peri-
odically, using appropriate methods.
To get a FCC license for VHF or UHF frequencies, submit FCC application Form
600 as indicated in the block at right. Your Ritron dealer can help you with this pro-
cess.
SAFETY STANDARDS The FCC (with its action in General Docket 79-144,
March 13, 1985) has adopted a safety standard for human exposure to radio fre-
quency electromagnetic energy emitted by FCC regulated equipment. Ritron ob-
serves these guidelines and recommends that you do also:
DO NOT hold the radio so that the antenna is very close to or touching ex-
posed parts of the body, especially the face or eyes, while transmitting.
Keep the radio vertical, four inches away while talking into the front panel.
DO NOT press the Push-To-Talk except when you intend to transmit.
DO NOT operate radio equipment near electrical blasting caps or in an
explosive atmosphere.
DO NOT allow children to play with any radio equipment that contains a
transmitting device.
Repair of Ritron products should be performed only by Ritron authorized
personnel.
Service - Federal law prohibits you from making any internal adjustments to the
transmitter, and/ or from changing transmit frequencies unless you are
specifically designated by the licensee.
If your radio equipment fails to operate properly, or you wish to have the radio
programmed, contact your authorized dealer or Ritron.
HOW TO OBTAIN AN FCC RADIO LICENSE
Federal Communications Commission (FCC)
Licensing Information
Because your Ritron radio operates on Private Land
Mobile frequencies, it is subject to the Rules and
Regulations of the FCC, which requires all operators
of these frequencies to obtain a station license
before operating their equipment. Make application
for your FCC license on FCC Forms 600 and 159.
To have forms and instructions faxed to you by
the FCC, call the FCC Fax-On-Demand system
at 202-418-0177 from your fax machine;
request Document 000600 & Form 159.
To have Document 000600 & Form 159 mailed
to you, call the FCC Forms Hotline at
800-418-FORM (800-418-3676).
For help with questions concerning the
license application, contact the FCC at
888-CALL-FCC (888-225-5322).
You must decide which radio frequency(ies) you
can operate on before filling out your
application; refer to Table 1 on page 15 of this
manual.
For help determining your frequencies, call
Ritron at 800-USA-1-USA (800-872-1872).
RITRON, INC.
Repair Department
P. O. Box 1998
Carmel, IN 46082-1998
USA
Phone: 317-846-1201
FAX: 317-846-4978
1
Have questions? Call
800-USA-1-USA
(800-872-1872) or visit our website at www.ritron.com
About This User Guide
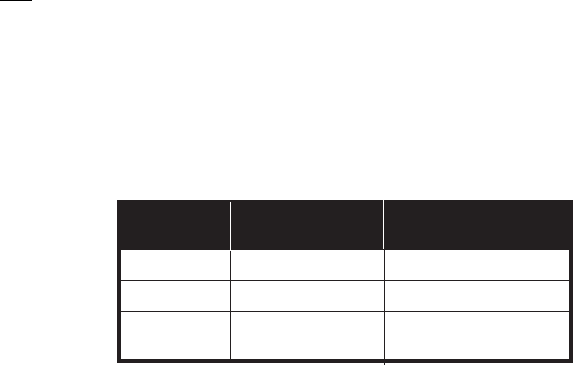
This user guide covers two J Series model radios. Your model number is shown on the inside of the radio.
2
Model JV-110 JU-410
Frequencv Band VHF UHF
Transmit Pwr Out Hi/Lo (Watt) 5/2 * 4/2 *
Channel Capacity up to 10 + WX up to 10
Selectable Frequency Codes 26 77
Interference Eliminator Codes 158 possible 158 possible
NOAA Weather Channel 7 possible N/A
Programble Function Buttons 3 assignable PFBs 3 assignable PFBs
Emergency Call Feature Yes Yes
Voice Scrambler Yes Yes
VOX Capability Yes Yes
* Per FCC regulations certain frequencies (see frequency listing) are pre-set to operate at 2 Watt maximum.
Have questions? Call
800-USA-1-USA
(800-872-1872) or visit our website at www.ritron.com
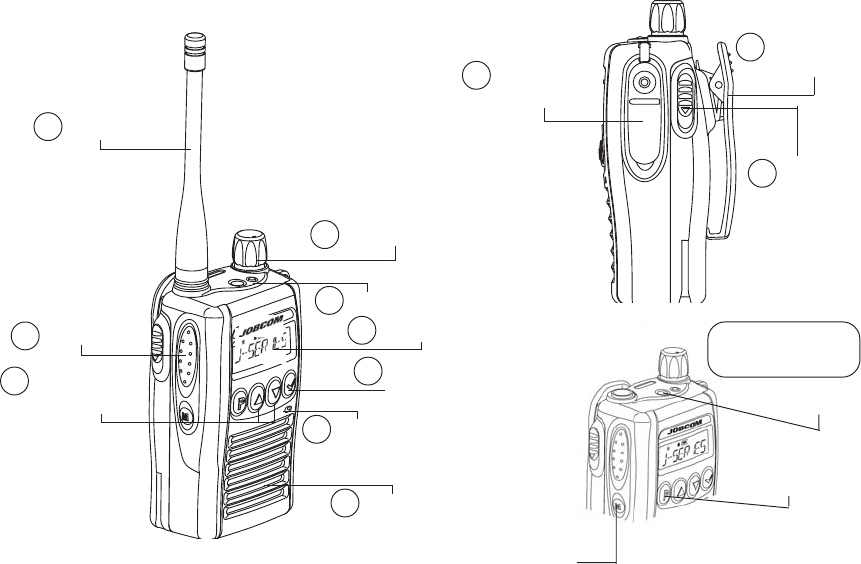
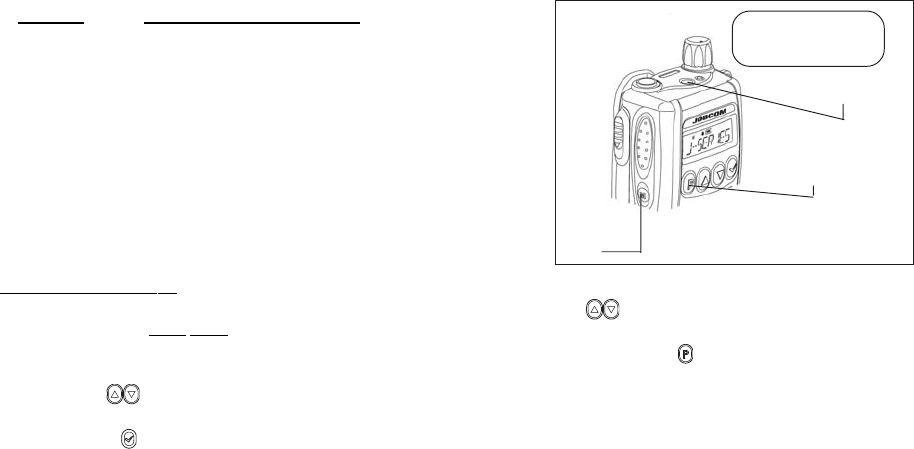
Radio Controls
FIG. - 2:
10. Accessory Connector
Connects headsets, remote speaker/
microphones and other accessories. Replace
attached dust cap when not in use.
11. Spring Action Belt Clip
12. Battery Release Latches
FIG. - 3:
P Keys or Programmable Function Buttons (PFB)
These buttons can be re-programmed for one of several
functions refer to page 18.
FIG. - 1:
1. On-Off / Volume Knob
Turn clockwise to turn the radio ON. Turn fully
counter clockwise to turn OFF. Rotate to adjust
volume.
2. Push to Talk Button (PTT)
Push and hold to transmit; release to listen.
3. Up/ Down Scroll Buttons
4. LED Indicator
Lights RED while transmitting.
Lights Green while receiving a call.
5. LCD Display
6. Keypad Lock/Menu
Keypad Lock function is permanently assigned to
this button in normal operation. Also serves as Menu
Button in programming mode. See additional notes
on page 11.
7. Microphone
8. Speaker
9. Antenna
3
The numbers below refer to the illustrations on the next page.
(press momentarily)
(on radio)
P Key Location Default Function
P1 P (front) Scan
P2 Orange (top) Emergency Call
P3 Side Monitor
Have questions? Call
800-USA-1-USA
(800-872-1872) or visit our website at www.ritron.com
Radio Buttons & Controls
FIG.-1
9 Antenna
1 Volume Knob
8 Speaker
7 Microphone
3 Up / Down
Scroll
5 LCD Display
2 PTT Button
4 TX/RX LED
6 Keypad Lock/
Menu
4
FIG.-2
10 Accessory
Connector
11 Spring Action
Belt Clip
12 Battery
Release Latches
(right & Left sides)
FIG.-3
P1
P3
P2 (Orange)
3 Programmable
Function Buttons
Have questions? Call
800-USA-1-USA
(800-872-1872) or visit our website at www.ritron.com
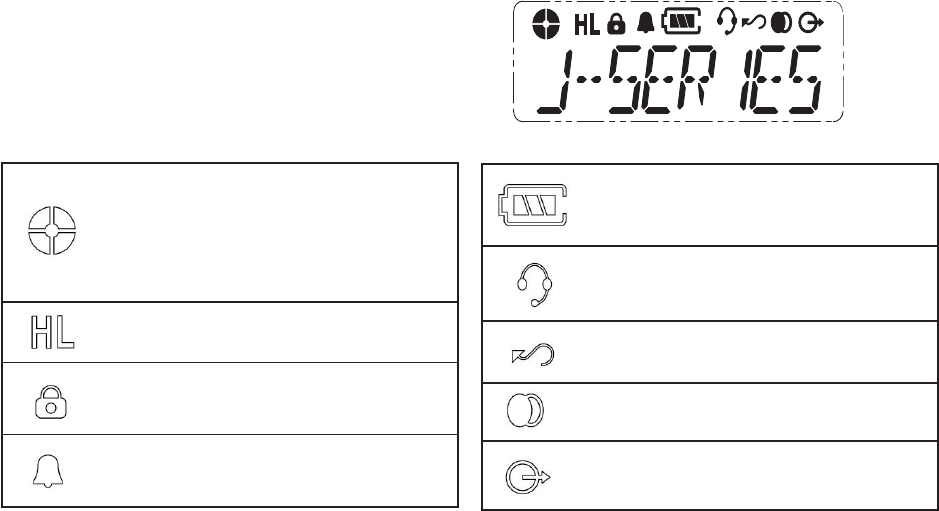
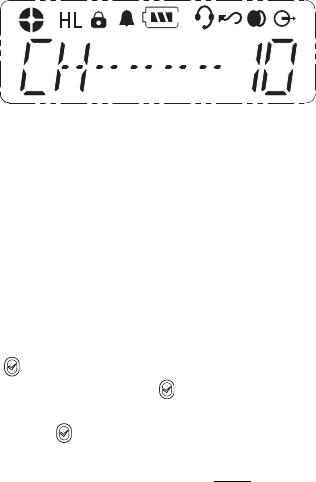
Scan Indicator Appears when Channel
Scan is ON.
Display Icons
To provide additional feedback to the radio user, the
LED display has several status icons. Some status
icons are radio wide. Other icons appear only IF the
feature is set to ON for the current operating channel.
Symbol Name/Function
Signal Strength Indicator shows
received signal strength of an incoming
call.
Full circle = strong signal
¾ circle = moderate signal
½ circle = acceptable signal
¼ circle = very weak signal
H/L - Indicates power (High or Low) setting
of individual channel.
Keypad Lock Appears when keypad lock
is ON.
Bell Appears when keypad tones are
ON.
Battery Level Indicator:
3 Bars = full charge
2 bars = 66%
1 = bar 33%
Hands-Free VOX Indicator Appears
when Hands-Free feature is ON.
Symbol Name/Function
Scrambler Indicator Appears when
Voice Scrambler is ON.
Talk Around Indicator Appears when
radio is operating on the Talk Around
channel.
5
Have questions? Call
800-USA-1-USA
(800-872-1872) or visit our website at www.ritron.com
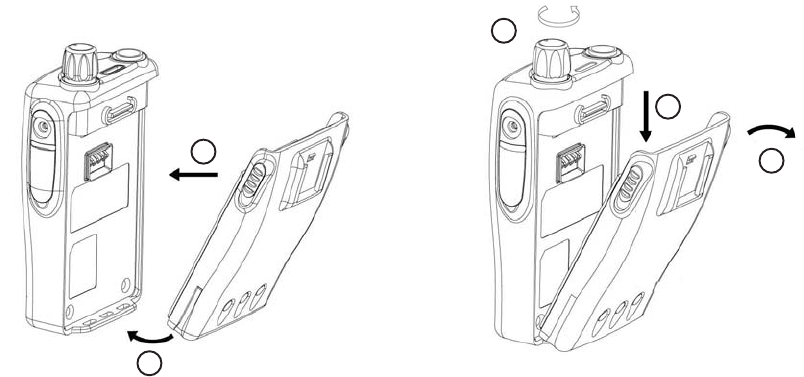
1. Fit the tabs at the bottom of the battery
into the slots at the bottom of the radios body.
2. Press the top part of the battery towards the
radio until both latches firmly attach to the
radio.
Attaching the Battery
1. Turn off the radio.
2. Slide the latches located on both sides of the
battery downwards at the same time.
3. Pull the top part of the battery away from the
radios body, and remove the battery.
Removing the Battery
1
2
2
3
1
6
Have questions? Call
800-USA-1-USA
(800-872-1872) or visit our website at www.ritron.com
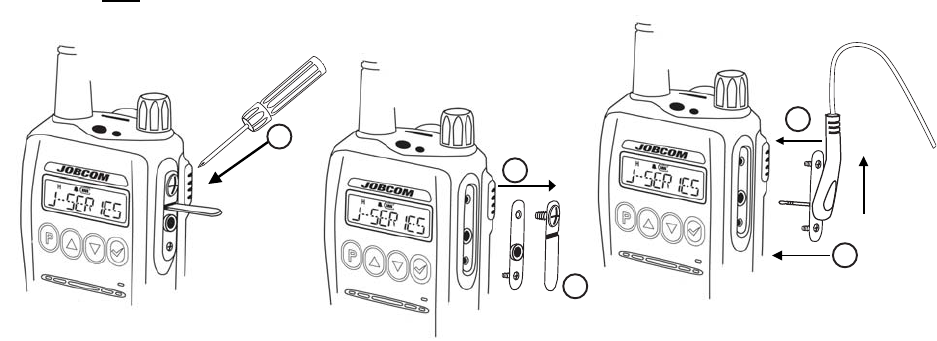
J Series Audio Accessories
Ritron offers a wide range of audio accessories and headsets to help customize your J Series radio for your
application. All J Series audio accessories include a durable, injection molded strain relief. The strain relief
keeps the audio accessory firmly attached to the J Series radio during use and attaches to the radio using 2
Phillips head screws (provided).
1
2
3
5
6
1. To attach audio accessory to the J Series radio- first remove the Phillips head screw holding the rubber
dust cover in place. (see diagram below).
2. Remove the Phillips head screw on the inside bottom of the dust cover area.
3. Remove inner foam gasket.
4. Place these items in a secure place for future possible use.
5. Attach audio accessory to the J Series radio. (see diagram for proper position of strain relief). Cord
leading to the headset or speaker mic of the accessory must be directed toward the top of the radio.
6. Do NOT over-tighten or apply excessive force when securing Phillips heads screws. Snug top and
bottom screws down to the molded strain relief.
7
Have questions? Call
800-USA-1-USA
(800-872-1872) or visit our website at www.ritron.com
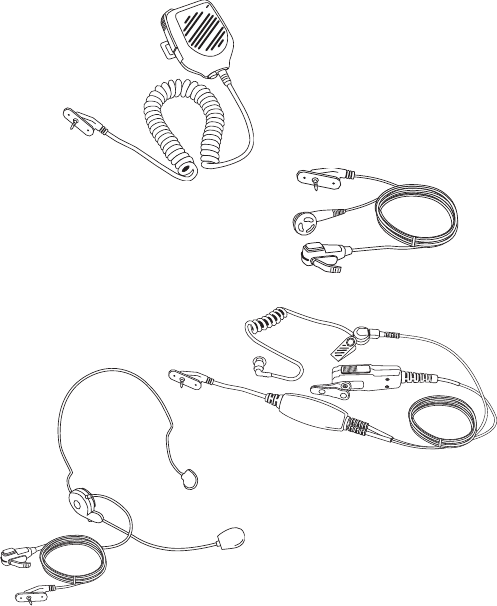
RSM-5X Remote Speaker Microphone w/ rotating
spring action clip
Speaker/mic can be attached to clothing close to
mouth and ears allowing easier communication
without removing radio from belt.
RHD-10X Earbud w/ pendant PTT w/ built-in
microphone and clip.
Enables private listening and great for noisy
environments. Mic with PTT can be attached to clothing
for easy activation.
RHD-11X Security type earpiece w/ pendant PTT
with built-in microphone and clip.
Allows private listening and remote PTT for
applications requiring more discrete communications.
RHD-12X Lightweight behind-the-head headset w/
boom mic and pendant PTT.
Great for noisy environments! Single ear headset with
boom mic and in-line PTT.
8
RSM-5X
RHD-12X
RHD-10X
RHD-11X
Note: All J Series audio accessories are VOX capable.
Have questions? Call
800-USA-1-USA
(800-872-1872) or visit our website at www.ritron.com
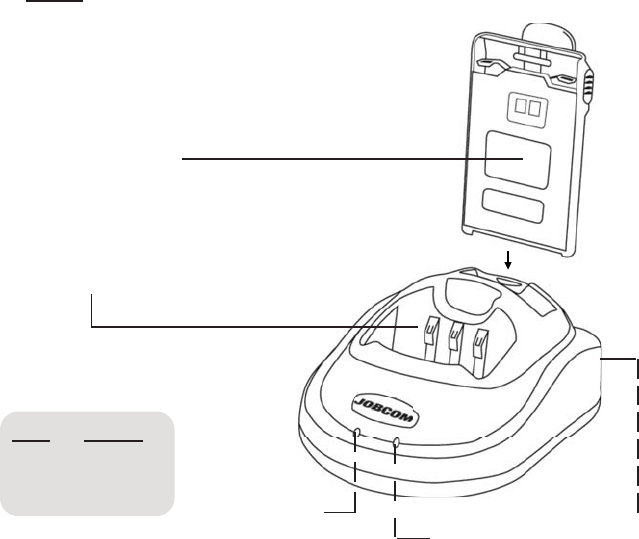
Fast Rate Dual Slot Drop-in Charger (BC-JX)
The enclosed dual slot charger can charge two batteries sequentially. The front slot must be complete
(green) before it will charge the 2nd slot. Note: Charge battery completely before use!
A completely discharged pack will be recharged
in approximately 2.5 hours.
Place radio with attached battery pack
or battery pack only (see slots for
battery only)
Place spare battery pack in slot
with label facing forward
* Use only a Ritron
approved 110 VAC
adapter.
* Do not attempt to
repair.
* Do not attempt to
charge any other
brand of battery!
* Do not expose to
rain, snow, or
moisture.
* Do not use an
extension cord to
run power to the
charger.
LED Status
Red Charging
Green Complete
Amber Waiting
Input For Ritron
110 VAC Adapter
9
Front Slot LED
Indicator Rear Slot LED
Indicator
Have questions? Call
800-USA-1-USA
(800-872-1872) or visit our website at www.ritron.com
1. To turn the radio ON, turn the knob clockwise.
To turn the radio OFF, turn the knob fully counter
clockwise.
2. To adjust volume UP, turn the knob clockwise.
To turn the volume DOWN, turn the knob counter
clockwise.
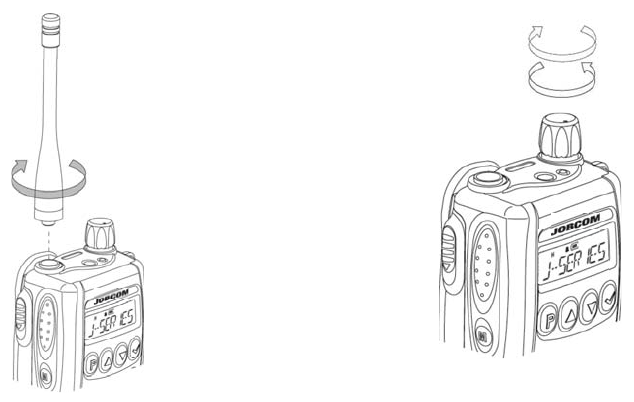
1. Align the threaded end of the antenna with the
radios antenna connector.
2. Turn the antenna clockwise to attach to the radio.
Attaching the Antenna
* Do not use radio or activate transmitter unless antenna is securely fastened to radio.
* Do not use any portable radio that has a damaged antenna.
NOTE:
ON/OFF and Volume Control
10
Have questions? Call
800-USA-1-USA
(800-872-1872) or visit our website at www.ritron.com
Select the desired channel by using the Up/
Down button. When held down, channels change
continuously.
To check channel activity, press the monitor
button.
To talk, press and hold the PTT button and speak
into the microphone on the radio. Release to
listen.
Note: For maximum clarity hold the radio 2-3 inches away
from your mouth and speak in a normal tone of voice.
Operating the Radio
This radio offers up to 10 channels.
11
Emergency Call Feature
(Default P2 Key-orange button)
The Emergency Call feature allows the radio user to
immediately notify all other radios on the same channel.
For example, if the radio user should become injured,
trapped or is in danger, a simple push of the orange
button (factory default) will activate the Emergency Call
feature.
The Emergency Call feature operates as follows:
1. Press and hold for 2 seconds the P Key
programmed to activate the Emergency Call feature
(factory default is the P2 Key orange button on top
of the radio).
2. The radio then sends an alert tone to all other radios
on the same channel. Alert tone also sounds in the
speaker of the radio.
3. Transmitter on sending radio will automatically key
up and transmit for a number of seconds after the
alert tone ends.
4. This allows any audio present at the initiating radio
to be transmitted hands free to all other radios on
the system; e.g. a call for help.
Default Setting: The Emergency Call will repeat 2 times
and can be cancelled at anytime by momentarily
pressing the appropriate P KEY (orange button).
Keypad Lock
The button serves as the keypad lock. To turn ON,
PRESS AND HOLD the button for 3 seconds. Keypad
lock icon will be displayed when ON. To turn OFF, press
and HOLD button for 3 seconds, keypad lock icon will
disappear. Keypad lock feature prevents accidental
activation of the buttons on the front of the radio (the PTT
button, P2 and P3 keys do not lock).

Have questions? Call
800-USA-1-USA
(800-872-1872) or visit our website at www.ritron.com
NOAA Weather Radio (NWR) Feature
12
As an added benefit, your J Series radio is capable of
receiving broadcasts from the National Weather Service.
Use this extremely useful feature during times of
hazardous weather or simply to better schedule activities
that are weather dependent.
The National Weather Service (NWR) broadcasts are
transmitted 24 hours a day, 7 days a week. Your area
has a specific NOAA weather frequency. To find the
frequency for your area go to:
http://www.nws.noaa.gov/nwr/nwrbro.htm
Click on your state. Then click on the county closest to
you. You will see a frequency listed. Match the frequency
for your area with 1 of the 7 listed in the table on this
page.
Refer to page 17 [NOAA WX] How To Program Radio-
Wide Features for details on how to program your
J Series radio to a National Weather Service frequency.
When youve programmed the NOAA WX feature into your
radio, [NOAA WX] will appear as the last channel
programmed in your radio.
You may select from the National Weather Service
frequencies listed below:
NOAA WEATHER BROADCAST FREQUENCY TABLE
Code Frequency
W1 162.400
W2 162.425
W3 162.450
W4 162.475
W5 162.500
W6 162.525
W7 162.550

Have questions? Call
800-USA-1-USA
(800-872-1872) or visit our website at www.ritron.com
13
How To Read-Out Frequency and Tone Code Settings
Step 4. Radio will then display [READY] and return to normal operation.
Step 5. To read-out a different channel repeat steps 1-4 for each channel.
Step 6. Turn radio OFF then ON again to return to normal operation.
Note: If no Tone Code is programmed, the display will read: [ T 4 4 2T X ] 44 = No Tone
* If no 2-Tone Code is programmed, display will read: [ 2T X ]. 2-Tone feature not available in all J Series models.
This step allows you to read-out on a per-channel-basis what the frequency code and interference eliminator
tone code settings are in your radio.
Step 1. With radio ON, select the channel # you want to read-out.
Step 2. Turn radio OFF,
Step 3. HOLD the button and Turn radio ON.
Note: Continue to HOLD button until the following appears on the display:
Frequency Tone 2-Tone*
Ch # Code # Code # Code #
Display will read for 3 seconds = [CH _ _ F _ _ ] then . [T _ _ _ 2T _ ]
Have questions? Call
800-USA-1-USA
(800-872-1872) or visit our website at www.ritron.com
How To Program Per-Channel Features
To match other radios, the owner can select from a table of frequency codes and interference eliminator codes. In
order to talk to other radios, the channel must be programmed to the same frequency and the same tone code.
The following list of features can be programmed on a Per-Channel basis.
14
Options Description of the feature
[FREQ] Codes Select a Frequency code for a channel. Choose from 26 VHF frequencies or 77 UHF frequencies.
[TONE] Codes Select a Tone code for channel. Choose from 158 interference eliminator codes. Tone codes screen-out
other users not in your group. All radios must be the same code to talk.
[CH SCAN] Select ON to mark a channel to be included in the scan list. Select OFF (default) to delete a channel
from the scan list. Marked channels will be scanned when Scan feature is activated. You must
assign Scan function to a programmable function button (PFB) to activate. See Radio-Wide and
PFB Programming.
[SCRAMBLE] Select ON to activate Voice Scrambling for a specific channel. If ON, icon will be displayed and radio
will operate in Scramble mode on this channel. To be heard, all radios must have Scramble ON.
[VOX] Select ON to activate Hands-Free VOX for a specific channel. No accessory required. If ON, radio will
operate Hands-Free on this channel and icon will be displayed. To adjust level of audio required to
trigger radio transmitter refer to page 17 [VOX LEV] How To Program Radio-Wide Features.
Step 1. HOLD Push-To-Talk button and turn radio ON.
Step 2. Radio will sound triple beep, then [CH PROG] will
be displayed for 3 sec. Then [CH 1] or the
programmed name will be displayed.
Step 3. Use to select the desired channel
[CH _ _ ], pick 1-10.
Step 4. Press for Per Channel option (see list above).
Step 5. Use to go to a specific option; e.g. [FREQ],
[TONE], [2-TONE], [CH SCAN], [SCRAMBLE], [VOX].
Step 6. Press to select a desired option e.g. [FREQ].
Display will then show current setting of the
selected option.
Step 7. Use Buttons to scroll option sub-list; e.g.
[FREQ] codes or [TONE] code lists.
Step 8. Press button to SAVE selection. Display will
show selected feature. Example: [FREQ].
Step 9. Use to select a different Per-Channel
Feature for the channel; e.g. [TONE] and Repeat
Steps 7 8 or...
Step10. To select a different channel to program, PRESS the
Orange button on top of the radio. Display will
show the last channel programmed; e.g. [CH 1].
Repeat Steps 3 8 or...
Step11. To return to normal operation turn radio OFF and
then ON.
Important: If a Frequency Code is changed you must also reprogram the Tone Code.
Have questions? Call
800-USA-1-USA
(800-872-1872) or visit our website at www.ritron.com
*2-digit Frequency placeholder code (Refer to
How to Delete a Channel on page 19).
** MURS frequencies - The 5 MURS frequencies
do not require an FCC license. All other
frequencies require an FCC license. Refer to
page 1 for license information.
VHF MURS **
Code MHz Color Band
No. Dot Width
-- NONE *
^01 154.6000 Green Dot 2 5
^02 154.5700 Blue Dot 25
^19 151.8200 MURS 12.5
^20 151.8800 MURS 12.5
^21 151.9400 MURS 12.5
^22 154.6000 MURS/
Green
12.5
^23 154.5700 MURS/
Blue
12.5
VHF Business Band
Code MHz Color Band
No. Dot Width
03 151.6250 Red Dot 25
04 151.9550 Purple Dot 25
05 151.9250 25
06 154.5400 25
07 154.5150 25
08 154.6550 25
09 151.6850 25
10 151.7150 25
11 151.7750 25
12 151.8050 25
13 151.8350 25
14 151.8950 25
15 154.4900 25
16 151.6550 25
17 151.7450 25
18 151.8650 25
24 151.7000 12.5
25 151.7600 12.5
26 152.7000 25
UHF Business Band
Code MHz Color Band
No. Dot Width
^27 467.8750 Gold Star 12.5
^28 467.9000 Red Star 12.5
^29 467.9250 Blue Star 12.5
30 461.0375 12.5
31 461.0625 12.5
32 461.0875 12.5
33 461.1125 12.5
34 461.1375 12.5
35 461.1625 12.5
36 461.1875 12.5
37 461.2125 12.5
38 461.2375 12.5
39 461.2625 12.5
40 461.2875 12.5
41 461.3125 12.5
42 461.3375 12.5
43 461.3625 12.5
44 462.7625 12.5
45 462.7875 12.5
46 462.8125 12.5
47 462.8375 12.5
48 462.8625 12.5
49 462.8875 12.5
50 462.9125 12.5
51 464.4875 12.5
52 464.5125 12.5
UHF Business Band
Code MHz Color Band
No. Dot Width
-- NONE *
^01 467.7625 J 25
^02 467.8125 K 25
03 464.5500 Yellow Dot 25
04 464.5000 Brown Dot 25
^05 467.8500 Silver Star 25
^06 467.8750 Gold Star 25
^07 467.9000 Red Star 25
^08 467.9250 Blue Star 25
09 469.2625 25
10 462.5750 White Dot 25
11 462.6250 Black Dot 25
12 462.6750 Orange Dot 25
13 464.3250 25
14 464.8250 25
15 469.5000 25
16 469.5500 25
17 463.2625 25
18 464.9125 25
19 464.6000 25
20 464.7000 25
21 462.7250 25
22 464.5000 Brown Dot 12.5
23 464.5500 Yellow Dot 12.5
^24 467.7625 J 12.5
^25 467.8125 K 12.5
^26 467.8500 Silver Star 12.5
Per FCC rules and regulations, a
given radio must not be
programmed to contain a mix of
both VHF Business Band and VHF
MURS frequencies.
RADIO PROGRAMMING
TABLE #1: PROGRAMMABLE FREQUENCY CODES
15
^ By FCC rule these frequencies are
limited to 2 Watt maximum power output.
Have questions? Call
800-USA-1-USA
(800-872-1872) or visit our website at www.ritron.com
UHF Business Band
Code MHz Color Band
No. Dot Width
53 464.5375 12.5
54 464.5625 12.5
55 466.0375 12.5
56 466.0625 12.5
57 466.0875 12.5
58 466.1125 12.5
59 466.1375 12.5
60 466.1625 12.5
61 466.1875 12.5
62 466.2125 12.5
63 466.2375 12.5
64 466.2625 12.5
65 466.2875 12.5
66 466.3125 12.5
67 466.3375 12.5
68 466.3625 12.5
^69 467.7875 12.5
^70 467.8375 12.5
^71 467.8625 12.5
^72 467.8875 12.5
^73 467.9125 12.5
74 469.4875 12.5
75 469.5125 12.5
76 469.5375 12.5
77 469.5625 12.5
TABLE #2: INTERFERENCE ELIMINATOR
PROGRAMMABLE QC TONE CODES
TABLE #3: DIGITAL INTERFERENCE ELIMINATOR
PROGRAMMABLE DQC CODES
Code Numbers
356
364
365
371
411
412
413
423
431
432
445
446
452
454
455
023
025
026
031
032
036
043
047
051
053
054
065
071
072
073
074
114
115
116
122
125
131
132
134
143
145
152
155
156
162
165
172
174
205
212
223
225
226
243
244
245
246
251
252
255
261
263
265
266
271
274
306
311
315
325
331
332
343
346
351
462
464
465
466
503
506
516
523
532
546
565
606
612
624
627
631
632
645
654
662
664
703
712
723
731
732
734
743
754
-- NONE
01 67.0 18 123.0 3 5 225.7
02 71.9 19 127.3 3 6 233.6
03 74.4 20 131.8 3 7 241.8
04 77.0 21 136.5 3 8 250.3
05 79.7 22 141.3 3 9 69.4
06 82.5 23 146.2 4 0 159.8
07 85.4 24 151.4 41 165.5
08 88.5 25 156.7 42 171.3
09 91.5 26 162.2 4 3 177.3
10 94.8 27 167.9 44 No Tone
11 97.4 28 173.8 45 183.5
12 100.0 29 179.9 46 189.9
13 103.5 3 0 186.2 47 196.6
14 107.2 3 1 192.8 48 199.5
15 110.9 32 203.5 49 206.5
16 114.8 33 210.7 50 229.1
17 118.8 34 218.1 51 254.1
Code No. Hz Code No. Hz Code No. Hz
RADIO PROGRAMMING
TABLE #1: CONT.
16
^ By FCC rule these frequencies are
limited to 2 Watt maximum power output.
Have questions? Call
800-USA-1-USA
(800-872-1872) or visit our website at www.ritron.com
How To Program Radio-Wide Features
The following list of features can be programmed on a Radio-Wide basis. These settings will uniformly affect
radio operation on all channels.
17
Options Description of the feature
[VOX LEV] Select VOX Level. 0 to 15, Higher number = Lower level of audio required to key radio transmitter.
Ex:15 = whisper trigger. Must also program channel for VOX operation. See page 14.
[SQ LEV] Select Squelch Level. 0 to15, Higher number = decreases receiver sensitivity. With higher number the
radio will hear only the strongest, closest signals.
[EMERGENC] Factory Default = [ON] and feature is by factory default assigned to P2 Key. Can turn feature OFF or ON. If
ON, must also assign this feature to one of the Programmable Function Button. See page 18.
[P1 Key] Factory Default = [SCAN KEY]. Allows access to one specific feature. See page 18 for list.
[P2 Key] Factory Default = [EMERGENC]. Allows access to one specific feature. See page 18 for list.
[P3 Key] Factory Default = [MONITOR]. Allows access to one specific feature. See page 18 for list.
[ALERTS] Factory Default = [ON]. Select ON for keypad tones when button is pressed. Icon will be displayed when
ON. Keypad Tones OFF allows silent operation.
[EAR PTT] Select ON if earphone only is used. When earphone only is connected to radio, microphone on radio will be
active when PTT is pressed.
[WEATHER] Factory Default = [W7]. Select NONE or choose from 7 National Weather Broadcast RX frequencies. If
selected, [NOAA WX] will be displayed after last programmed channel. Choose [NONE] to turn feature OFF.
Go to www.noaa.nws.gov/nws/nwrbro/htm to find frequency of NOAA Weather Broadcast for your area.
To Program Radio-Wide Settings:
Step 1. HOLD the MONITOR button and turn radio ON. Radio
will sound triple beep, then [PROGRAM ] will flash
on the display for 3 sec. [VOX LEV] will appear first
on display.
Step 2. Use buttons to scroll to one of the Radio-
Wide features. e.g. [VOX LEV], [SQ LEV],
[EMERGENC], [P1 KEY], [P2 KEY], [P3 KEY],
[ALERTS], [EAR PTT], OR [WEATHER (VHF only)].
Step 3. Press for the current setting of the selected
Radio-Wide feature.
Step 4. Use buttons to scroll sub-list setting
options such as; [1-15] Level Settings; ON or OFF
Setting; or individual Key function options.
Step 5. Press button to SAVE the sub-list setting
selection. Display will then return to selected
Radio-Wide feature,
Step 6. To program another Radio-Wide setting repeat
Steps 2 - 5 or...
Step 7. To return to normal operation turn radio OFF and
then ON.
VHF models only
Have questions? Call
800-USA-1-USA
(800-872-1872) or visit our website at www.ritron.com
How To Assign A Function To A P KEY (Programmable Function Button)
There are 3 Programmable Function Buttons on the J Series radio (P1, P2 and P3). See FIG 3 below for their
location on the radio. You can assign each of these buttons or P keys to perform 1 specific function when
pressed. The functions you may choose from are listed below:
18
Options Description of the feature
[NONE]P KEY will perform no function when pressed.
[SCAN KEY] When P KEY pressed, radio will scan marked
channels. Icon will display when ON. See CH SCAN
on page 14.
[EMERGENC] When P KEY pressed, radio sends Emergency signal
to other radios on same frequency.
[CALL KEY] Press and hold the P KEY to send a unique Call Tone
to let others know you are about to talk.
[MONITOR] When P KEY pressed, radio will monitor traffic on the
channel without tone.
[TX PWR KEY] When P KEY pressed, will toggle* transmit power of
selected channel frequency, between HI and LOW
power. Icon H or L will be displayed.
To Program P KEYs :
Step 1. HOLD the MONITOR button and turn radio ON. Radio
will sound triple beep, then [PROGRAM] will flash
on the display for 3 sec. [VOX LEV] will appear first
on display.
Step 2. Use buttons to scroll to the PFB you wish to
program: [P1 KEY], [P2 KEY] or [P3 KEY].
Step 3. Press to see current setting of the specific
P KEY you have selected.
Step 4. Use buttons to scroll sub-list setting
options listed above.
Step 5. Press the button to SAVE your sub-listing option.
Display will then show the last P KEY programmed;
e.g. [P_ KEY].
Step 6. To program another [P_ KEY] repeat Steps 2 - 5
or...
Step 7. To return to normal operation turn radio OFF and
then ON.
P1
P3
P2 (Orange)
3 Programmable
Function Buttons
* NOTE: Certain frequencies are limited by the FCC to 2 Watt maximum output. See pages 16 & 16.
Have questions? Call
800-USA-1-USA
(800-872-1872) or visit our website at www.ritron.com
How To Delete A Channel
To delete a channel from your channel list, follow these instructions. Deleting a channel will remove that channel
number from the display. It is not necessary to delete a channel if you merely wish to change the frequency and/
or tone settings. To change frequency or tone settings see How To Program Per-Channel Features on page 14.
19
To Program Channel Delete:
Step 1. HOLD Push-To-Talk button and turn radio ON.
Step 2. Radio will sound triple beep, then [CH PROG] will
flash on display for 3 sec. Then [CH 1] or a
programmed name will appear on the display.
Step 3. Use to select the channel you want to
delete [CH _ _], 1-10.
Step 4. Press for Per-Channel Feature list
Step 5. Display will show [FREQ].
Step 6. Press to select [FREQ]. Display will then
show current frequency code for the channel; e.g.
[F C_ _ ].
Step 7. Use buttons to scroll to [NONE]
Step 8. Press button to SAVE [NONE] selection.
Display will show selected feature; e.g. [FREQ].
Step 9. To select a different channel, PRESS the P2 Key
(orange button) on the top of radio. Display will
show the last channel deleted; e.g. [CH 1].
Repeat Steps 3 8 or
Step 10. To return to normal operation turn radio OFF and
then ON.
Step 11. The channel(s) you deleted will not appear on
the display in normal operation.

Have questions? Call
800-USA-1-USA
(800-872-1872) or visit our website at www.ritron.com
WHAT THIS WARRANTY COVERS: RITRON, INC. ("RITRON") pro-
vides the following warranty against defects in materials and/or work-
manship in RITRON JV-110 AND JU-410 PORTABLE RADIOS under
normal use and service during the applicable warranty period, as
stated below. "Accessories" means antennas, holsters, chargers, ear-
phones, speaker/microphones, and items contained in the program-
ming and programming/service kits. Rechargeable batteries will be re-
placed during the applicable warranty period only if leakage occurs or
the batteries drop below 75% of rated capacity.
WHAT THIS WARRANTY DOES NOT COVER:
Any technical information provided with the covered product or any
other products;
Installation, maintenance or service of the product, unless this is
covered by a separate written agreement with RITRON;
Any products not furnished by RITRON which are attached or used
with the covered product, or defects or damage from the use of the
covered product with equipment that is not covered;
Defects or damage, including broken antennas, resulting from:
- misuse, abuse, improper maintenance, alteration, modification,
neglect, accident or act of God, or,
- the use of covered products other than in normal and customary
manner, or,
- improper testing or installation;
Defects or damages from unauthorized disassembly, repair or
modification, or where unauthorized disassembly, repair or modifica-
tion prevents inspection and testing necessary to validate warranty
claims;
Defects or damages in which the serial number has been removed,
altered or defaced.
IMPORTANT: This warranty sets forth the full extent of RITRON's ex-
press responsibilities regarding the covered products, and is given in
lieu of all other express warranties. What RITRON has agreed to do
above is your sole and exclusive remedy. No person is authorized to
make any other warranty to you on behalf of RITRON. Warranties im-
plied by state law, such as implied warranties of merchantability and
fitness for a particular purpose, are limited to the duration of this lim-
ited warranty as it applies to the covered product. Incidental and con-
sequential damages are not recoverable under this warranty (this in-
cludes loss of use or time, inconvenience, business interruption, com-
mercial loss, lost profits or savings). Some states do not allow the
exclusion or limitation of incidental or consequential damages,
or limitation on how long an implied warranty lasts, so the
above limitations or exclusions may not apply to you. Because
each covered product system is unique, RITRON disclaims liabil-
ity for range, coverage, or operation of the system as a whole
under this warranty.
WHO IS COVERED BY THIS WARRANTY: This warranty is given
only to the purchaser or lessee of covered products when acquired for
use, not resale. This warranty is not assignable or transferable.
HOW TO GET WARRANTY SERVICE: To receive warranty service,
you must deliver or send the defective product, delivery costs and in-
surance prepaid, within the applicable warranty period, to RITRON,
INC., 505 West Carmel Drive, Carmel, Indiana 46032, Attention: War-
ranty Department. Please point out the nature of the defect in as
much detail as you can. You MUST retain your sales or lease re-
ceipt (or other written evidence of the date of purchase) and de-
liver it along with the product. If RITRON chooses to repair or re-
place a defective product, RITRON may replace the product or any
part or component with reconditioned product, parts or components.
Replacements are covered for the balance of the original applicable
warranty period. All replaced covered products, parts or components
become RITRON's property.
RIGHTS TO SOFTWARE RETAINED: Title and all rights or licenses to
patents, copyrights, trademarks and trade secrets in any RITRON
software contained in covered products are and shall remain in
RITRON. RITRON nevertheless grants you a limited non-exclusive,
transferable right to use the RITRON software only in conjunction with
covered products. No other license or right to the RITRON software is
granted or permitted.
YOUR RIGHTS UNDER STATE LAW: This warranty gives you spe-
cific legal rights, and you may also have other rights which vary from
state to state.
WHERE THIS WARRANTY IS VALID: This warranty is valid only
within the United States, the District of Columbia and Puerto Rico.
RITRON, INC. LIMITED WARRANTY
WHAT IS COVERED FOR HOW LONG WHAT RITRON WILL DO
J Series 1 year * During the first year after date
Portable Radio of purchase, RITRON will repair
or replace the defective product,
at RITRON's option, parts and
labor included at no charge.
Ritron Rechargeable 1 year * Ritron willl replace the defective
Batteries battery
Accessories 90 days * *After date of purchase
20
Have questions? Call
800-USA-1-USA
(800-872-1872) or visit our website at www.ritron.com
505 West Carmel Drive Carmel, IN 46032 USA
P. O. Box 1998 Carmel, IN 46082-1998 USA
Ph: 317-846-1201 Fax: 317-846-4978 Email: ritron@ritron.com Website: www.ritron.com
Base Station JMX Series Portables XT Callbox