Contents
- 1. User Manual
- 2. Users Manual
User Manual

Hi! Let’s get you started.
2
15
2 6
3 7
4
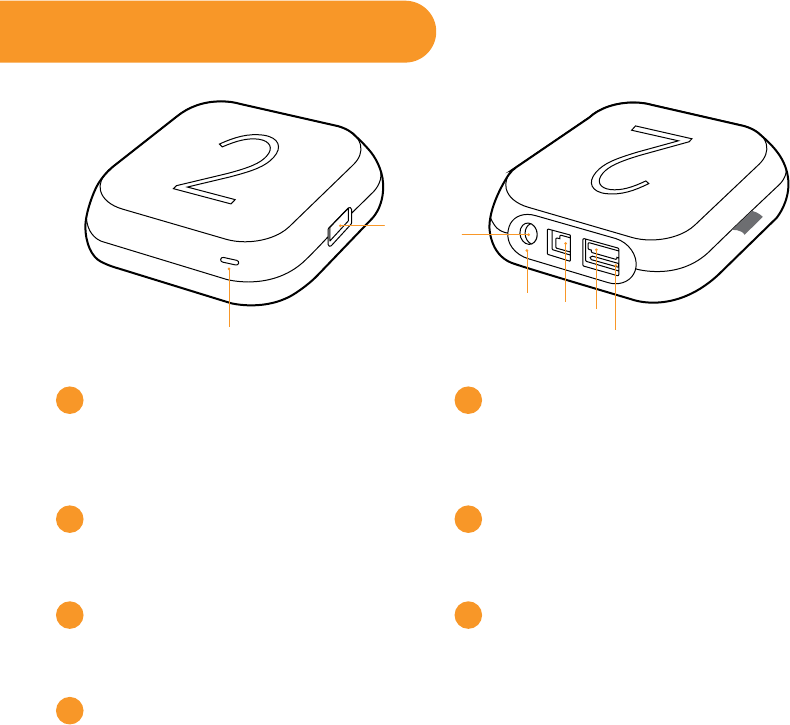
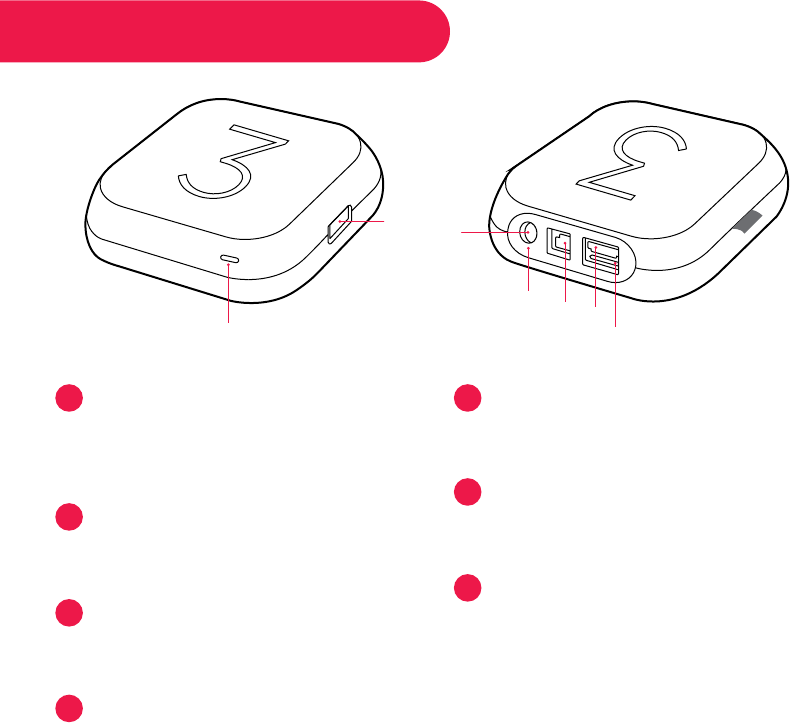
Status light – Flashes slowly when
the Roku player starts up. Glows
when it’s on. Flashes once with
each press of the remote control.
USB port – Connect a compatible
USB device for browsing photos,
music and movies.
Power port – Connect your player
to the power source with the
included power cable.
Reset Button - Reset your Roku
player (you probably won’t ever
have to use this)
Ethernet port – Connect your
Roku player to a wired network
with an Ethernet cable (not
included).
HDMI port – Connect your player
to an HDTV with an HDMI cable
(not included).
Storage expansion slot – Connect
a microSD card (not included)
to expand internal storage for
channels and games.
Front view Back view
Get to know your Roku 2
1
23
456
7
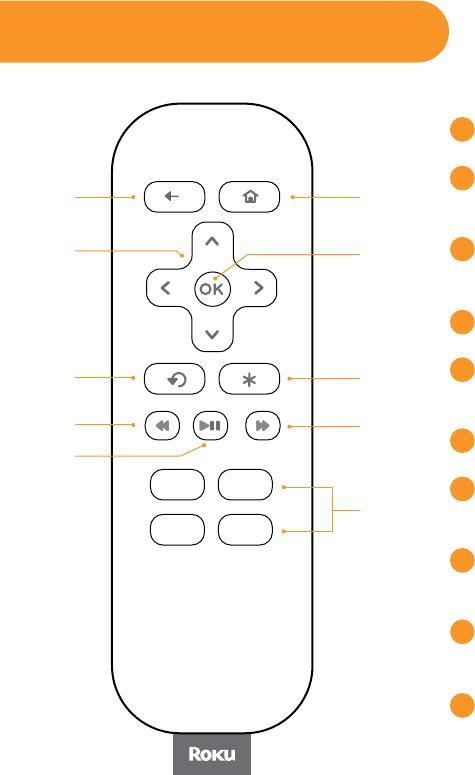
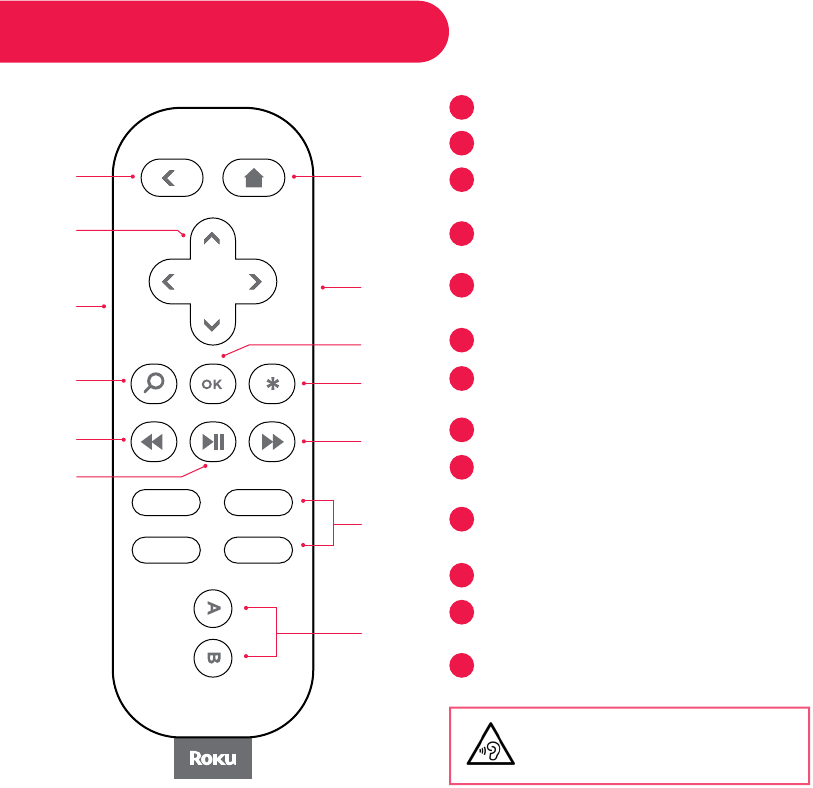
[BACK] Return to previous screen
[HOME] Return to Roku home
screen
[UP] or [DOWN] Move up or down;
[LEFT] or [RIGHT] Move left or right
[OK] Select an option from a menu
[INSTANT REPLAY] Replay last
7 seconds of video
[OPTIONS] View more options
[REV SCAN] Rewind, scroll left one
page at a time
[FWD SCAN] Fast forward, scroll
right one page at a time
[PLAY/PAUSE] Start or pause
playback
[CHANNEL SHORTCUT] Instant
access to favorite channels
B
H
J
A
E
I
G
A
D
G
E
I
C
B
D
F
H
J
C
F
Get to know your Remote
What to do Step 1
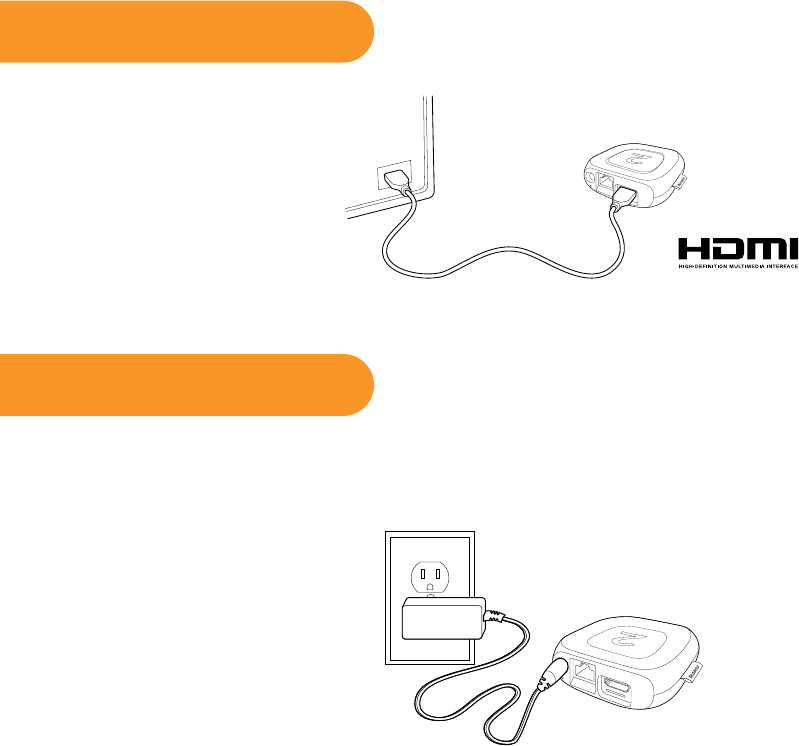
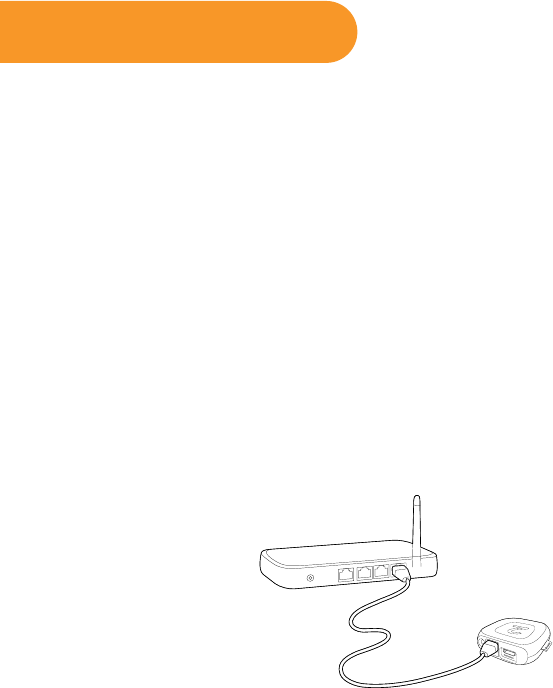
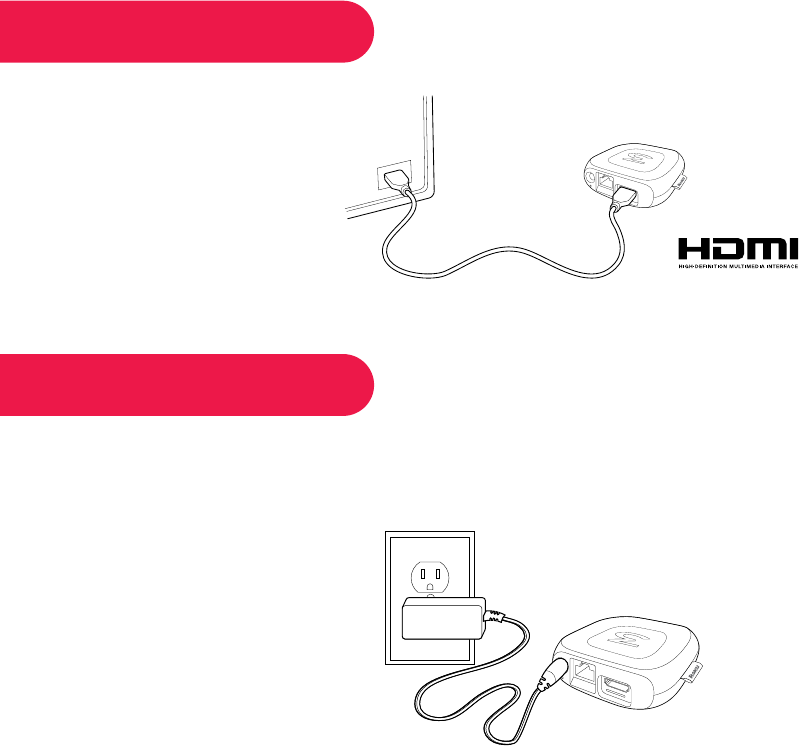
Connect your player
Connect your Roku player
to your HDTV with the
HDMI cable.
™
What to do Step 2
Next, connect your included power adapter to your Roku player, and then plug the
adapter into an outlet.
Finally, power on your TV and
look for a Roku message to fill
the screen.
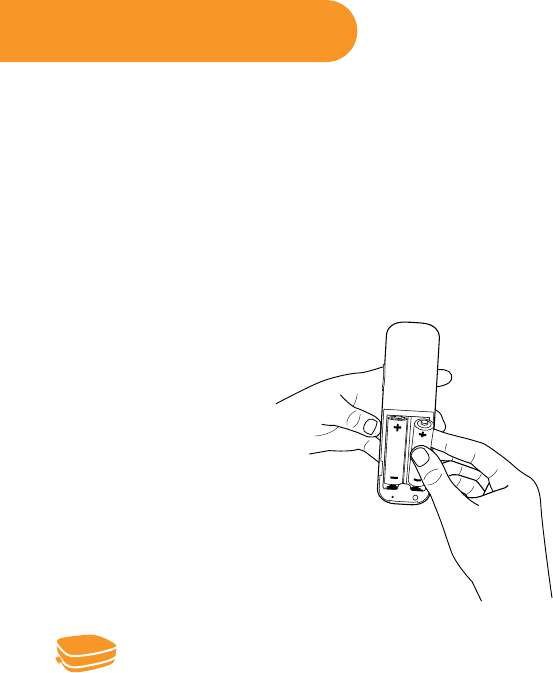
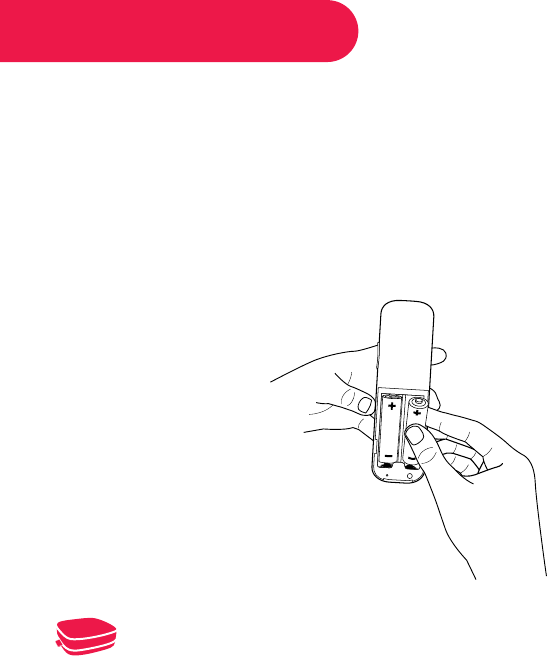
What to do Step 3
Power up your remote
•Power your Roku remote by inserting the included batteries.
•Insert each battery, negative (-) side first, pushing it into the coil and then into
the compartment. DO NOT insert batteries positive (+) side first. Place the
battery door back over the compartment and press it gently down until the
latch snaps securely into place.
Never use damaged batteries. If your remote gets warm/hot during use,
discontinue use and contact Roku Customer Support immediately at
http://support.roku.com.
What to do Step 4
Connect to your network
Step 4 establishes your network connection. You can do it! Just choose either
wireless or wired and read on for instructions:
Wireless: If you use a wireless network, grab that Roku remote and jump right into
Guided Setup. When prompted, select “Wireless” as your network connection and
have your network name and password ready. Then:
•Select your network from the list of available networks.
•Enter your network password, if you use one. Remember that network
passwords are case sensitive.
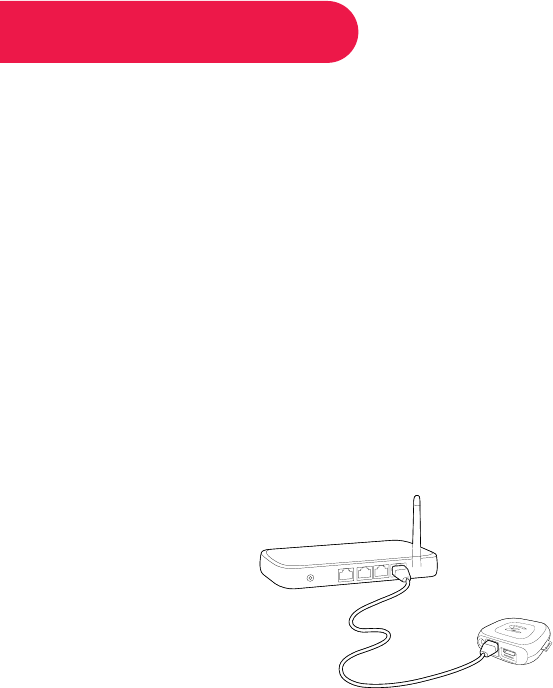
Wired: If you use a wired network, this step is a snap. Simply connect the Ethernet
port on the back of your Roku player to the back of your router with an Ethernet
cable (not included), and then use your Roku remote to select “Wired” from the
on-screen network options.
•Connect one end to the Ethernet port on the back of your Roku player.
•Connect the other end to an open Ethernet port on your router.

What to do Step 5
Complete guided setup
It’s the final stretch. Continue following the on-screen instructions and you’ll:
•Get the latest software.
•Link the Roku player to your Roku account on your computer.
•During Guided Setup, you’ll be prompted to create your Roku account
online at http://roku.com/link
•Your Roku player will generate a unique code that links your player to your
new account.
Setup is done. Congratulations! Continue using your Roku remote to personalize
your channel line-up, stream movies or play games. The fun has just begun, we
promise.
Your Roku account: Roku accounts are free. And while a valid credit
card number is required to create your account, rest assured you will only
be charged if you authorize purchases of channels and games from the
Roku Channel Store.

Choose & Personalize
Your homescreen is yours to personalize.
Select your favorite channels from over
2000 choices* in the Roku Channel store.
Then, arrange the channels in the order
that’s best for you.
Control with Ease
Both our simple remote and our mobile
app let you navigate with ease. Here’s a
hint: Try the star button on any screen or
channel to access an options menu.
Search
Find what you want to watch by searching
across top streaming channels. Then, choose
the best option or value. Follow movies,
actors, TV shows & episodes, to get updates
when your favorites are ready to watch.
Cast Media
Cast and mirror videos, music, photos, and
more from your mobile devices** to your
TV. Use the Roku app, Netflix and YouTube
apps, or built in screen mirroring capabilities.
Get the most out of your Roku player
*Subscription or other payment may be required to access certain content. Channel availability subject to change.
**Applies to select iOS®, Android™ and Windows® devices only.
For more information, please visit http://support.roku.com.

Having trouble completing Guided Setup? Don’t worry. It’s usually an easy fix.
For detailed trouble-shooting, visit http://support.roku.com.
If you cannot see a picture on your TV:
•If you are using HDMI with a home theater receiver, make sure the HDMI cable
from your Roku player is connected to an HDMI-in port on your receiver and
your receiver is connected to your TV via an HDMI input.
•Make sure the video input on your TV or home theater receiver is set to match
the output used with the Roku player. Most TVs have an Input button on the
remote control to change video inputs.
If you cannot connect to your wireless home network during guided setup:
•If you are not getting 3 or more signal-strength bars above your wireless
network, adjust the location of your Roku player and/or wireless router.
•Try to avoid obstructions, like cement walls, between your Roku player and
your wireless router.
•If you have turned o SSID broadcasting on your wireless router, you can
add your network by selecting “My network is not shown” from the “Select
wireless network” screen.
Troubleshooting
Dos and don’ts on where to place your Roku player:
•DO place your player within range of your wireless network.
•DON’T place your player in an enclosed cabinet; it may interfere with the wireless signal.
•DON’T place anything on top of your player; it may cause the player to overheat. Eeeeks.
®
Visit: http://support.roku.com
Get the most out of your Roku player.
Check out our FAQs, instructional videos and user forums.
© 2015 Roku, Inc. All rights reserved. Roku® and Happy Streaming™ are the trademarks of Roku, Inc.
All other logos and trademarks herein not owned by Roku, Inc. are the property of their respective owners.
Need more help?
4100000120-1
®

Hi! Let’s get you started.
3
15
2
6
3
7
4
Status light – Flashes slowly when
the Roku player starts up. Glows
when it’s on. Flashes once with
each press of the remote control.
USB port – Connect a compatible
USB device for browsing photos,
music and movies.
Power port – Connect your player
to the power source with the
included power cable.
Reset Button - Reset your player
(you probably won’t ever have to
use this)
Ethernet port – Connect your
player to a wired network with an
Ethernet cable (not included).
HDMI port – Connect your player
to an HDTV with an HDMI cable
(not included).
Storage expansion slot – Add
a microSD card (not included)
to expand internal storage for
channels and games.
Front view Back view
Get to know your Roku 3
1
23
456
7
Front view Back view
L
[BACK] Return to previous screen
[HOME] Return to Roku home screen
[UP] or [DOWN] Move up or down;
[LEFT] or [RIGHT] Move left or right
[VOLUME +/-] Increase/Decrease the
volume of your headphones
[HEADPHONE JACK] Plug in
headphones here
[OK] Select an option from a menu
[VOICE SEARCH] Use your voice to
search across top channels
[OPTIONS] View more options
[REV SCAN] Rewind, scroll left one
page at a time
[FWD SCAN] Fast forward, scroll right
one page at a time
[PLAY/PAUSE] Start or pause playback
[CHANNEL SHORTCUT] Instant access
to favorite channels
[A & B] Action buttons for gaming
B
H
J
A
E
G
K
I
A
D
G
E
I
C
B
D
F
H
J
L
M
C
K
F
Get to know your Remote
M
To prevent possible hearing
damage, do not listen at high
volume levels for long periods.
What to do Step 1
Connect your player
Connect your Roku player
to your HDTV with the
HDMI cable.
™
What to do Step 2
Next, connect your included power adapter to your Roku player, and then plug the
adapter into an outlet.
Finally, power on your TV and
look for a Roku message to fill
the screen.
What to do Step 3
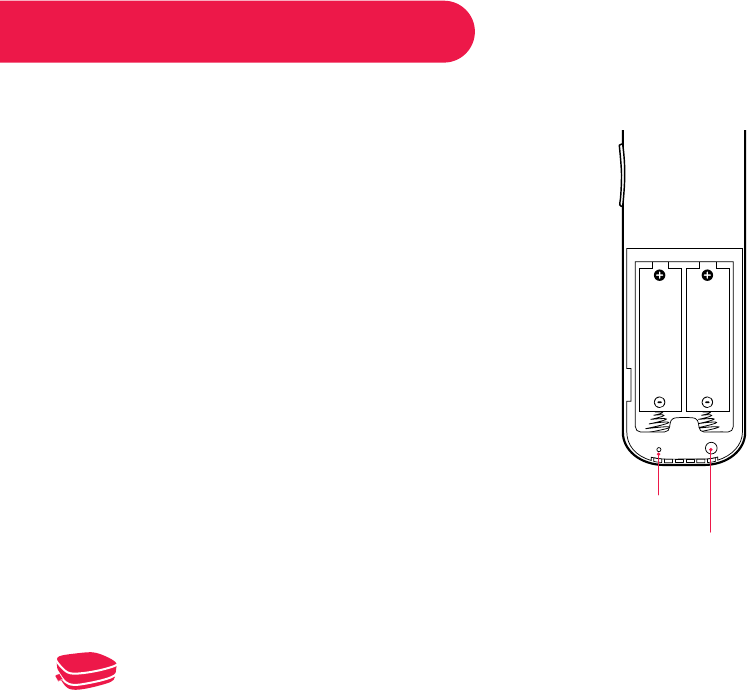
Power up your remote
••Power your Roku remote by inserting the included batteries.
••Insert each battery, negative (-) side first, pushing it into the coil and then into
the compartment. DO NOT insert batteries positive (+) side first. Place the
battery door back over the compartment and press it gently down until the
latch snaps securely into place.
Never use damaged batteries. If your remote gets warm/hot during use,
discontinue use and contact Roku Customer Support immediately at
http://support.roku.com.
Do not operate the Roku remote using any vigorous motions or gestures.
What to do Step 3 (continued)
Pairing your remote control
The Roku remote should automatically pair with your
Roku player at the beginning of Guided Setup. If you
are not able to use the remote to navigate through
Guided Setup, you can manually pair the Roku
remote by following these steps:
••Open the Roku remote battery compartment
and press and hold the pairing button until the
LED begins to flash.
••A pairing dialog should appear on your TV
screen. Once the dialog disappears, try using
your remote to continue setup.
Pairing button
(in battery compartment)
Status LED
For more information on pairing your remote, see http://support.roku.com.
What to do Step 4
Connect to your network
Step 4 establishes your network connection. Just choose either wireless or wired
and read on for instructions:
Wireless: If you use a wireless network, grab that Roku remote and jump right into
Guided Setup. When prompted, select “Wireless” as your network connection and
have your network name and password ready. Then:
••Select your network from the list of available networks.
••Enter your network password, if you use one. Remember that network
passwords are case sensitive.
Wired: If you use a wired network, this step is a snap. Simply connect the Ethernet
port on the back of your Roku player to the back of your router with an Ethernet
cable (not included), and then use your Roku remote to select “Wired” from the
on-screen network options.
••Connect one end to the Ethernet port on the back of your Roku player.
••Connect the other end to an open Ethernet port on your router.

What to do Step 5
Complete guided setup
It’s the final stretch! Continue following the on-screen instructions and you’ll:
••Get the latest software.
••Link the Roku player to your Roku account on your computer.
••During Guided Setup, you’ll be prompted to create your Roku account
online at http://roku.com/link
••Your Roku player will generate a unique code that links your player to your
new account.
Setup is done. Congratulations! Continue using your Roku remote to personalize
your channel line-up, stream movies, TV shows, and music, or play games. The fun
has just begun, we promise.
Your Roku account: Roku accounts are free. And while a valid credit
card number is required to create your account, rest assured you will only
be charged if you authorize purchases of channels and games from the
Roku Channel Store.

Choose & Personalize
Your homescreen is yours to personalize.
Select your favorite channels from over
2000 choices* in the Roku Channel store.
Then, arrange the channels in the order
that’s best for you.
Control with Ease
Both our simple remote and our mobile
app let you navigate with ease. Here’s a
hint: Try the star button on any screen or
channel to access an options menu.
Search
Find what you want to watch by searching
across top streaming channels. Then, choose
the best option or value. Follow movies,
actors, TV shows & episodes, to get updates
when your favorites are ready to watch.
Cast Media
Cast and mirror videos, music, photos, and
more from your mobile devices** to your
TV. Use the Roku app, Netflix and YouTube
apps, or built in screen mirroring capabilities.
Get the most out of your Roku player
*Subscription or other payment may be required to access certain content. Channel availability subject to change.
**Applies to select iOS®, Android™ and Windows® devices only.
For more information on how Roku works with your other connected devices, please visit http://support.roku.com.

Having trouble completing Guided Setup? Don’t worry. It’s usually an easy fix.
For detailed trouble-shooting, visit http://support.roku.com.
If you cannot see a picture on your TV:
••If you are using HDMI with a home theater receiver, make sure the HDMI cable
from your Roku player is connected to an HDMI-in port on your receiver and
your receiver is connected to your TV via an HDMI input.
••Make sure the video input on your TV or home theater receiver is set to match
the output used with the Roku player. Most TVs have an Input button on the
remote control to change video inputs.
If you cannot connect to your wireless home network during guided setup:
••If you are not getting 3 or more signal-strength bars above your wireless
network, adjust the location of your Roku player and/or wireless router.
••Try to avoid obstructions, like cement walls, between your Roku player and
your wireless router.
••If you have turned o SSID broadcasting on your wireless router, you can
add your network by selecting “My network is not shown” from the “Select
wireless network” screen.
Troubleshooting
Dos and don’ts on where to place your Roku player:
••DO place your player within range of your wireless network.
••DON’T place your player in an enclosed cabinet; it may interfere with the wireless signal.
••DON’T place anything on top of your player; it may cause the player to overheat. Eeeeks.

Visit: http://support.roku.com
Get the most out of your Roku player.
Check out our FAQs, instructional videos and user forums.
© 2015 Roku, Inc. All rights reserved. Roku® and Happy Streaming™ are the trademarks of Roku, Inc.
All other logos and trademarks herein not owned by Roku, Inc. are the property of their respective owners.
Need more help?
4100000121-1
®

Roku Player
Important Product Information
®
The License Agreement
The Roku and third-party software license terms can be found at: www.roku.com/license. Use of the Roku player constitutes
acceptance of as well as agreement to those license terms. If you do not agree to the software license terms and conditions and you
are within the allowable time period for returns under the applicable return policy, you may return the Player (defined below) to the
place where you obtained it for a refund, in accordance with the terms of such return policy.
Limited Hardware Warranty
Subject to the additional terms and conditions set forth below, Roku provides this Limited Warranty:
•OnlytothepersonorentitythatoriginallypurchasedthePlayerfromRokuorfromoneofitsauthorizedresellersordistributors;and
•One(1)yearlimitedhardwarewarrantyforPlayerspurchasedanddeliveredtotheenduserwithintheUnitedStates.
Limited Warranty
Roku warrants the Roku Player (“Player”) hardware against defects in materials and workmanship under normal use for a period of
one(1)yearfromthedateofpurchase(“Warranty Period”). If Roku determines that the Player’s hardware is defective, Roku will
either repair the unit or replace the unit with either a new or rebuilt Player, at its option. If the Warranty Period has expired or is
otherwise not applicable (see Scope and Limitation on Warranty below), we will return the Player to you. More information about
this warranty can be found at www.roku.com/support. THE FOREGOING SETS FORTH ROKU’S SOLE OBLIGATION AND YOUR
EXCLUSIVEREMEDYINTHEEVENTOFANYBREACHOFTHISLIMITEDWARRANTY.
Return and Warranty Service Process
Please access and review Roku Support online help resources at support.roku.com before seeking warranty service. Returns or
warranty service requests for your new Player must be within the 30-day return period, or within the original product warranty
period.YoumustrstobtainaReturnMerchandiseAuthorization(RMA)numberfromRokuCustomerSupport.RMAnumbersexpire
thirtydaysfromissuance.Rokumayattempttotroubleshootawarranty-relatedproblempriortoissuingaRMAnumber.Pleasebe
preparedtoprovideadditionalinformationuponrequest.OnceaRMAnumberisobtained,youmustshipyourPlayer,freightprepaid,
together with proof of purchase and all accessories, in either the original packaging or packaging aording an equal degree of
protection,totheRokuauthorizeddistributionfacilityidentiedbyRokuCustomerSupport.Failuretoreturnanyoftheaccessories
could result in a delay and/or result in an invoice to you or credit to Roku for the missing accessories.
Important:WhensubmittingaRMA,pleaseprovidethefollowinginformationwithyourrequest:(a)modelnumber,(b)serialnumber,
(c) problem description, (d) software version (located in the Settings menu), (e) date of purchase, (f) place of purchase (reseller or
onlineplaceofpurchase),and(g)returnshippingaddress(P.O.boxesarenotaccepted).
AdditionalRokutroubleshootingandonlinehelpresourcescanbefoundatsupport.roku.com
Scope of and Limitation on Warranty
The warranty on the Player is limited to the repair or replacement of defective units as described in the Limited Warranty section above. This
warranty does not cover customer training or education, installation, set up adjustments, or signal reception problems. This warranty also does
not cover any issue related to the service provided by your Internet service provider or content providers, including but not limited to service
disruption, changes in service terms, changes in oerings, changes in format, or technical problems. This warranty does not cover damage due
toactsofGod,accident,misuse,abuse,negligence,commercialuseormodicationof,ortoanypartof,yourPlayer.Thiswarrantydoesnot
cover damage caused by other devices, improper operation or maintenance, connection to improper voltage supply or attempted repair by
anyoneotherthanafacilityauthorizedbyRokutoserviceyourPlayer.Thiswarrantydoesnotcoverconsumables(suchasfusesandbatteries).
Legal Notices
Federal Communication Commission Interference Statement
This equipment has been tested and found to comply with the limits for a Class B digital device, pursuant to Part 15 of the FCC
Rules. These limits are designed to provide reasonable protection against harmful interference in a residential installation. This
equipment generates, uses and can radiate radio frequency energy and, if not installed and used in accordance with the instructions,
may cause harmful interference to radio communications. However, there is no guarantee that interference will not occur in a
particular installation. If this equipment does cause harmful interference to radio or television reception, which can be determined
by turning the equipment o and on, the user is encouraged to try to correct the interference by one of the following measures:
•Reorientorrelocatethereceivingantenna.
•Increasetheseparationbetweentheequipmentandreceiver.
•Connecttheequipmentintoanoutletonacircuitdierentfromthattowhichthereceiverisconnected.
•Consultthedealeroranexperiencedradio/TVtechnicianforhelp.
ThisdevicecomplieswithPart15oftheFCCRules.Operationissubjecttothefollowingtwoconditions:(1)Thisdevicemaynotcause
harmful interference, and (2) this device must accept any interference received, including interference that may cause undesired operation.
FCCCaution:Anychangesormodicationsnotexpresslyapprovedbythepartyresponsibleforcompliancecouldvoidtheuser’s
authority to operate this equipment.
IEEE802.11bor802.11goperationofthisproductintheU.S.A.isrmware-limitedtochannels1through11.WirelessRadioUse:
Thisdeviceisrestrictedtoindoorusewhenoperatinginthe5.15to5.25GHzfrequencyband.
IMPORTANT NOTE:
FCC Radiation Exposure Statement:
This equipment complies with FCC radiation exposure limits set forth for an uncontrolled environment. This equipment should be
installed and operated with minimum distance 20cm between the radiator and your body.
This transmitter must not be co-located or operating in conjunction with any other antenna or transmitter.
Note to US model owner:
To comply with US FCC regulation, the country selection function has been completely removed from all US models.
The availability of some specific channels and/or operational frequency bands are country dependent and are firmware programmed
at the factory to match the intended destination. The firmware setting is not accessible by the end user.

Safety Precautions
This product has been designed with the highest concern for safety. However, any electrical device, if used improperly, has the
potential for causing fire, electrical shock or personal injury. To help ensure accident-free operation, follow these guidelines:
•Observeallwarnings,precautionsandinstructions.
•RegularlyinspecttheACpoweradapterfordamage.
•Stopuse,unplugtheACpoweradapterfromtheelectricaloutletanddisconnectanyothercablesimmediatelyifthePlayer
functions in an abnormal manner, produces unusual sounds or smells or becomes too hot to touch.
•Formoreinformationonproductsafetyandtroubleshooting,pleasegotowww.roku.com/support.
Use and Handling
•DonotoperatetheRokuremoteusinganyvigorousmotionsorgestures.
•KeepthePlayerandaccessories,includingcabletiesandfasteners,outofthereachofsmallchildren.
•DonottouchthePlayerorconnectedcablesduringanelectricalstorm.
•Donotallowliquid,smallparticlesorotherforeignobjectstogetintothePlayeroraccessories.
•DonotexposethePlayertosmokeorsteam.
•DonotexposethePlayeroraccessoriestohigh,temperatures,highhumidityordirectsunlight.
•DonotplacethePlayerortheremoteontheoororinaplacewheretheymaycausesomeone
to trip or stumble.
•Topreventpossiblehearingdamage,donotlistenathighvolumelevelsforlongperiods.
IMPORTANT tips about battery handling!
Inserting batteries: When inserting batteries, be sure to insert each battery negative (-) side first, pushing it into the coil and then
intothecompartment.Neverinsertbatteriespositive(+)siderst.
Replacing batteries: Alwaysreplacedeadbatterieswithtwobrand-newbatteriesfromthesamemanufacturer.Neverusedamagedbatteries.
Disposal of batteries: Alwaysdisposeofbatteriesfollowingfederalguidelinesorlocalordinances.Donotdisposeofusedbatteries
in an open fire.
Warning: If your remote gets warm/hot during use, discontinue use and contact Roku Customer Support immediately at roku.com/support.
There is a risk of explosion if battery is replaced by an incorrect type.
Copyright © 2015 Roku, Inc. All rights reserved. Roku and the
Roku logo are registered trademarks of Roku, Inc. HDMI, the HDMI logo and
High-Definition Multimedia Interface are trademarks or registered trademarks
of HDMI Licensing LLC. 4100000130-1
www.roku.com