SKYPINE ELECTRONICS UN1780 ALL IN ONE DVD PLAYER User Manual UN1780
SKYPINE ELECTRONICS (SHEN ZHEN) CO., LTD. ALL IN ONE DVD PLAYER UN1780
Contents
- 1. User Manual 1
- 2. User Manual 2
- 3. User Manual-1
- 4. User Manual-2
User Manual 1

1
UN1780
(CNE-6227B-RS)
Operation Manual
All Rights Reserved.Copyright Stinger Entertainment Systems

2
CONTENTS
1 OPERATIONS ....................................................................................................................... 3
1.1 PANEL BUTTONS ........................................................................................................................ 3
1.2 REMOTE CONTROL ................................................................................................................... 4
2 BASIC OPERATIONS ........................................................................................................... 6
2.1 TITLE AND BOTTOM .................................................................................................................. 6
2.2 CHANGE AUDIO SOURCE .......................................................................................................... 6
2.3 AUDIO MUTE-ON / AUDIO MUTE-OFF ................................................................................. 7
3 USB MODE ............................................................................................................................ 8
4 HD RADIOTM OPERATIONS .............................................................................................. 11
5 SXM OPERATIONS ............................................................................................................ 16
6 SETTINGS OPERATION .................................................................................................... 17
6.1 MAIN SETTINGS ...................................................................................................................... 17
6.2 SET BOTTOM TABS ................................................................................................................. 17
6.3 VIDEO SETUP MENU ............................................................................................................... 17
6.4 AUDIO SETUP MENU ............................................................................................................... 18
6.5 RIGHT/LEFT HAND DRIVE MODE ........................................................................................... 18
7 IPOD/IPHONE OPERATIONS ........................................................................................... 19
8 PANDORA AUDIO .............................................................................................................. 20
9 CARPLAY OPERATIONS ................................................................................................... 20
10 BLUETOOTH OPERATIONS ............................................................................................. 21
10.1 BLUETOOTH PARING ............................................................................................................... 21
10.2 BLUETOOTH SETTING ............................................................................................................. 21
10.3 TELEPHONE OPERATIONS ........................................................................................................ 22
10.4 BLUETOOTH AUDIO PLAYER OPERATIONS .............................................................................. 22
11 CAMERA IN OPERATIONS ............................................................................................... 23
12 HDMI OPERATIONS .......................................................................................................... 23
13 AUX OPERATIONS ............................................................................................................ 24

3
1 Operations
1.1 Panel buttons
Functions of Buttons
1. [PWR] [VOL] Knob
• Press this knob to turn on the unit.
• Long press this knob to turn off the unit.
• Rotate the knob to increase or decrease the volume.
2. [MUTE] Button
• Press this button to mute the volume.
3. [HOME] Button
• Press this button to main menu.
• Press this button to back to the last source.
4. [SIRI] Button
• Press this button to use the carplay siri.
5. [MWP] [ENTER] Knob
• Press this knob to enter a select item.
• Rotate the knob to increase or decrease the list item.
6. [PREVIOUS] Button
• Press this button to choose the previous track/chapter.
• Press this button in radio mode to auto search down.
7. [NEXT] Button
• Press this button to choose the next track/chapter.
• Press this button in radio mode to auto search up.
1
2
3
4
5
6
7
8

4
8. [NAVI] Button
• Press this button to enter navi app.
• Press this button to back to the last page.
1.2 Remote Control
[ / ] Button
• Press this button to play or pause video and audio media.
[MUTE] Button
• Mute or release mute the speaker.
• The symbol on upper right area of the screen indicates that speaker is muted.
[OPEN] Button
• Press this button to eject the disc.
[POWER/SRC] Button
• Press this button to change source.
• Press this button more than 1 second to power on when the unit is power off.
• Press this button more than 1 second to power off when the unit is power on.
[0 - 9] Buttons
• Use in the Key Pad screen to select the radio or satellite radio.
[ / ]
[OPEN]
[Power/SRC]
Signal transmitter
Operating rang: 30°in all directions
[VOLUME]
[SEL]
[NAV/AV]
[BAND]
[MENU]
[PIC]
[ENT]
[TAG]
[RPT]
[ROOT]
[
][ ]
[AUDIO]
[MUTE]
[0-9]
[SRCH]
[ANGLE]
[BACK]
[TITLE]
[ZOOM]
[SUB.T]

5
• Press to enter DVD video chapters/titles in the Key Pad screen if the unit support DVD.
[VOLUME] Button
• Increase or decrease volume.
[NAVI/AV] Button
• Press this button to switch between current source and current position on navigation map.
[SRCH] Button
• Press this button to open chapter or title search window while playing DVD .
[BAND] button
• Switch to next band alternately.
[SET] Button
• Press this button to open the Audio setting menu in any mode.
[BACK] Button
• Press this button to quit main menu if current screen is main menu.
Button
• Press this button for cursor movement in main menu or Setting mode.
• From the main menu, you can select your desired source or change your settings.
[MENU] Button
• Press this button to enter the MAIN MENU or return current resource.
[ENT] Button
• Press to fix the entered data in the Key Pad screen or enter the item the cursor is on.
[TITLE] Button
• Press to go to the title menu on the DVD.
[ROOT] Button
• Press to go to the root menu on the DVD.
[RPT] Button
• Press to perform chapter repeat / title repeat / repeat off while playing DVD mode.
• Press to perform track repeat/repeat off while playing CD.
• Press to perform repeat track /repeat folder/ repeat off while playing MP3/WMA, or video files
on disc.
• Press to perform repeat track /repeat folder/ repeat off while playing MP3/WMA, or video files
in USB memory.
Buttons
• Press to seek the next available higher or lower station in Tuner mode.
• In SAT Radio mode, you will scroll through the categories.
• Press to select the next higher or lower chapter number in DVD video mode.
• Press to select the next higher or lower track in DVD Audio, USB Video, USB Audio mode.
• Press for movement of background source in Navigation mode.
Buttons
• Press to manually select the next higher or lower station in Tuner and Satellite Radio modes.
• Press to perform fast-forward or fast-backward searching. Press again to change the speed to 2x,
4x, 8x or 16x.
• Press for movement of background source in Navigation mode.
[ZOOM] Button
6
• Press to turn on and zoom in while playing DVD. You can zoom in up to 3x. (No all DVD disc
supports this function)
[AUDIO] Button
• Press to switch the AUDIO channel of the disc while playing DVD.
[SUB-T] Button
• Press to switch next available subtitle while playing DVD.
• Press to display Video menu in iPod mode.
[ANGLE] Button
• Press to switch the different ANGLE while playing DVD. (No all DVD disc supports this
function)
• Press to display Audio menu in iPod mode.
2 Basic operations
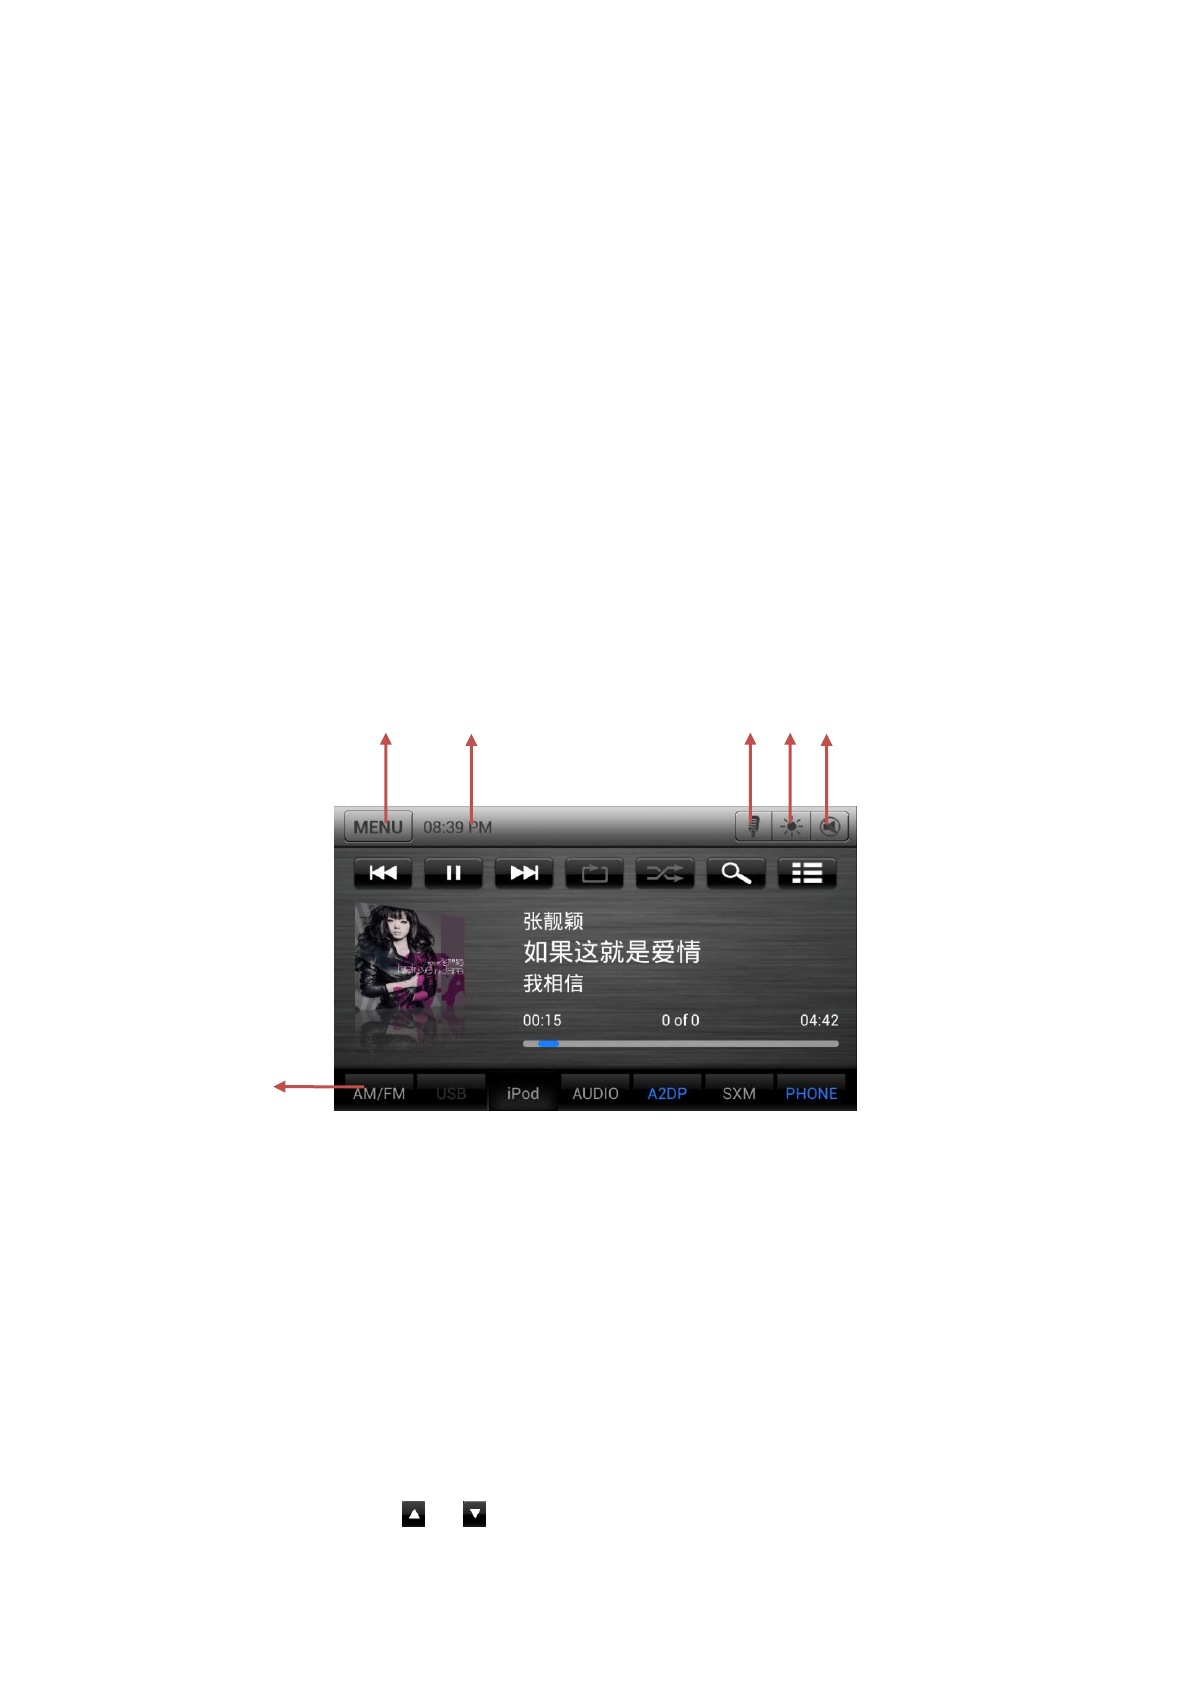
2.1 Title and Bottom
1. Select the tab and enter the page
2. Back to menu or back to the current audio source.
3. Show the current time
4. When BT connected, launch the phone voice
5. Monitor-OFF / Monitor-ON
6. Audio MUTE-OFF/ Audio MUTE-ON
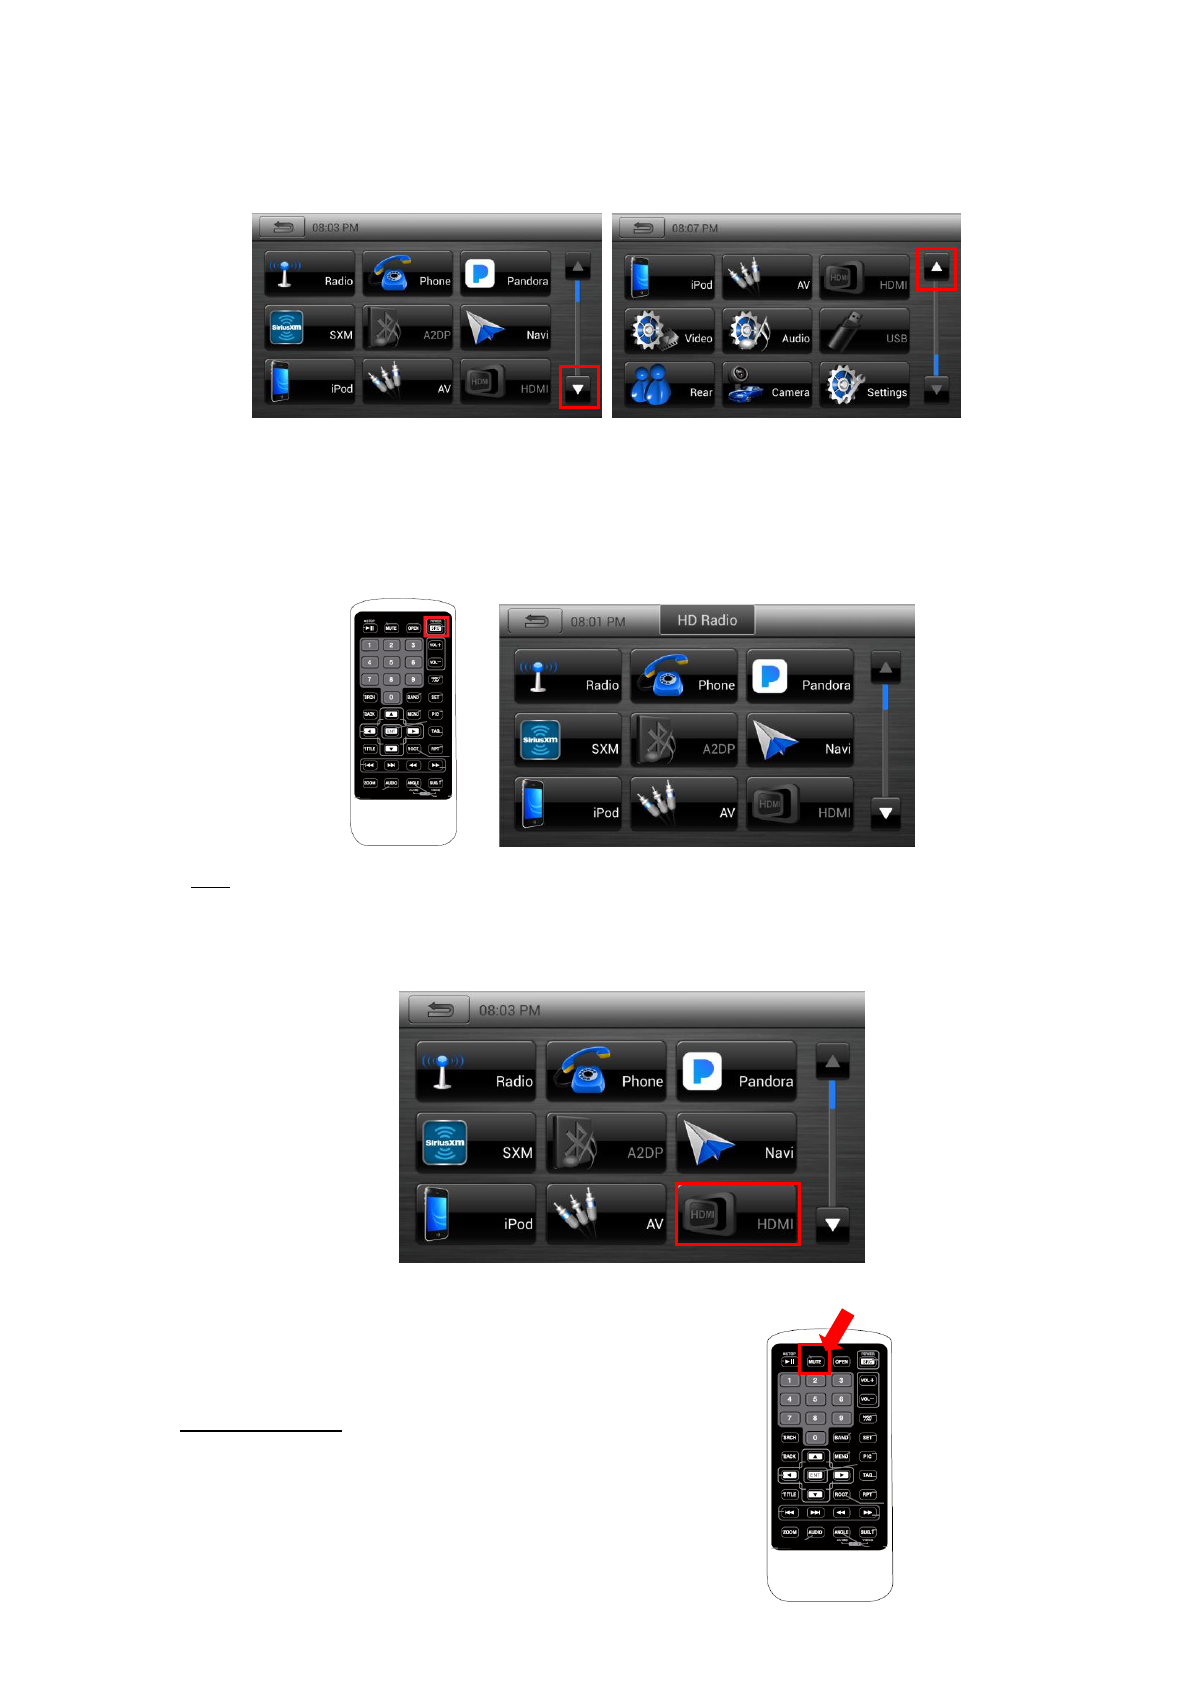
2.2 Change Audio Source
• To change audio source by touch screen:
1. Press “Home” button. Main menu will be displayed.
2. When you touch or icon on the screen or scroll the screen, previous or next page
1
2
3
4
5
6

7
will be displayed.
3. Touch audio source icon that you want. Then the selected audio source will play.
• To change audio source by remote controller or SWC:
1. Press the “SRC” button, it will show next source toast.
2. Each time you continuously press the “SRC” button, active icon moves to the next.
3. If you don’t press the “SRC” button about 2 seconds, the source will be entered.
*Note:
If there is unavailable source, the icon will be disabled and the icon cannot be selected.
For example, if HDMI is not connected, "HDMI" icon will be disabled and HDMI mode cannot be
selected.
2.3 Audio MUTE-ON / Audio MUTE-OFF
Audio MUTE-ON
1. Press “MUTE” button of remote controller.
2. Press “MUTE” button of SWC.
3. Press “MUTE” button of titlebar.
8
Audio MUTE-OFF
1. Press “MUTE” button of remote controller again.
2. Press “MUTE” button of SWC again.
3. Press “MUTE” button of titlebar again
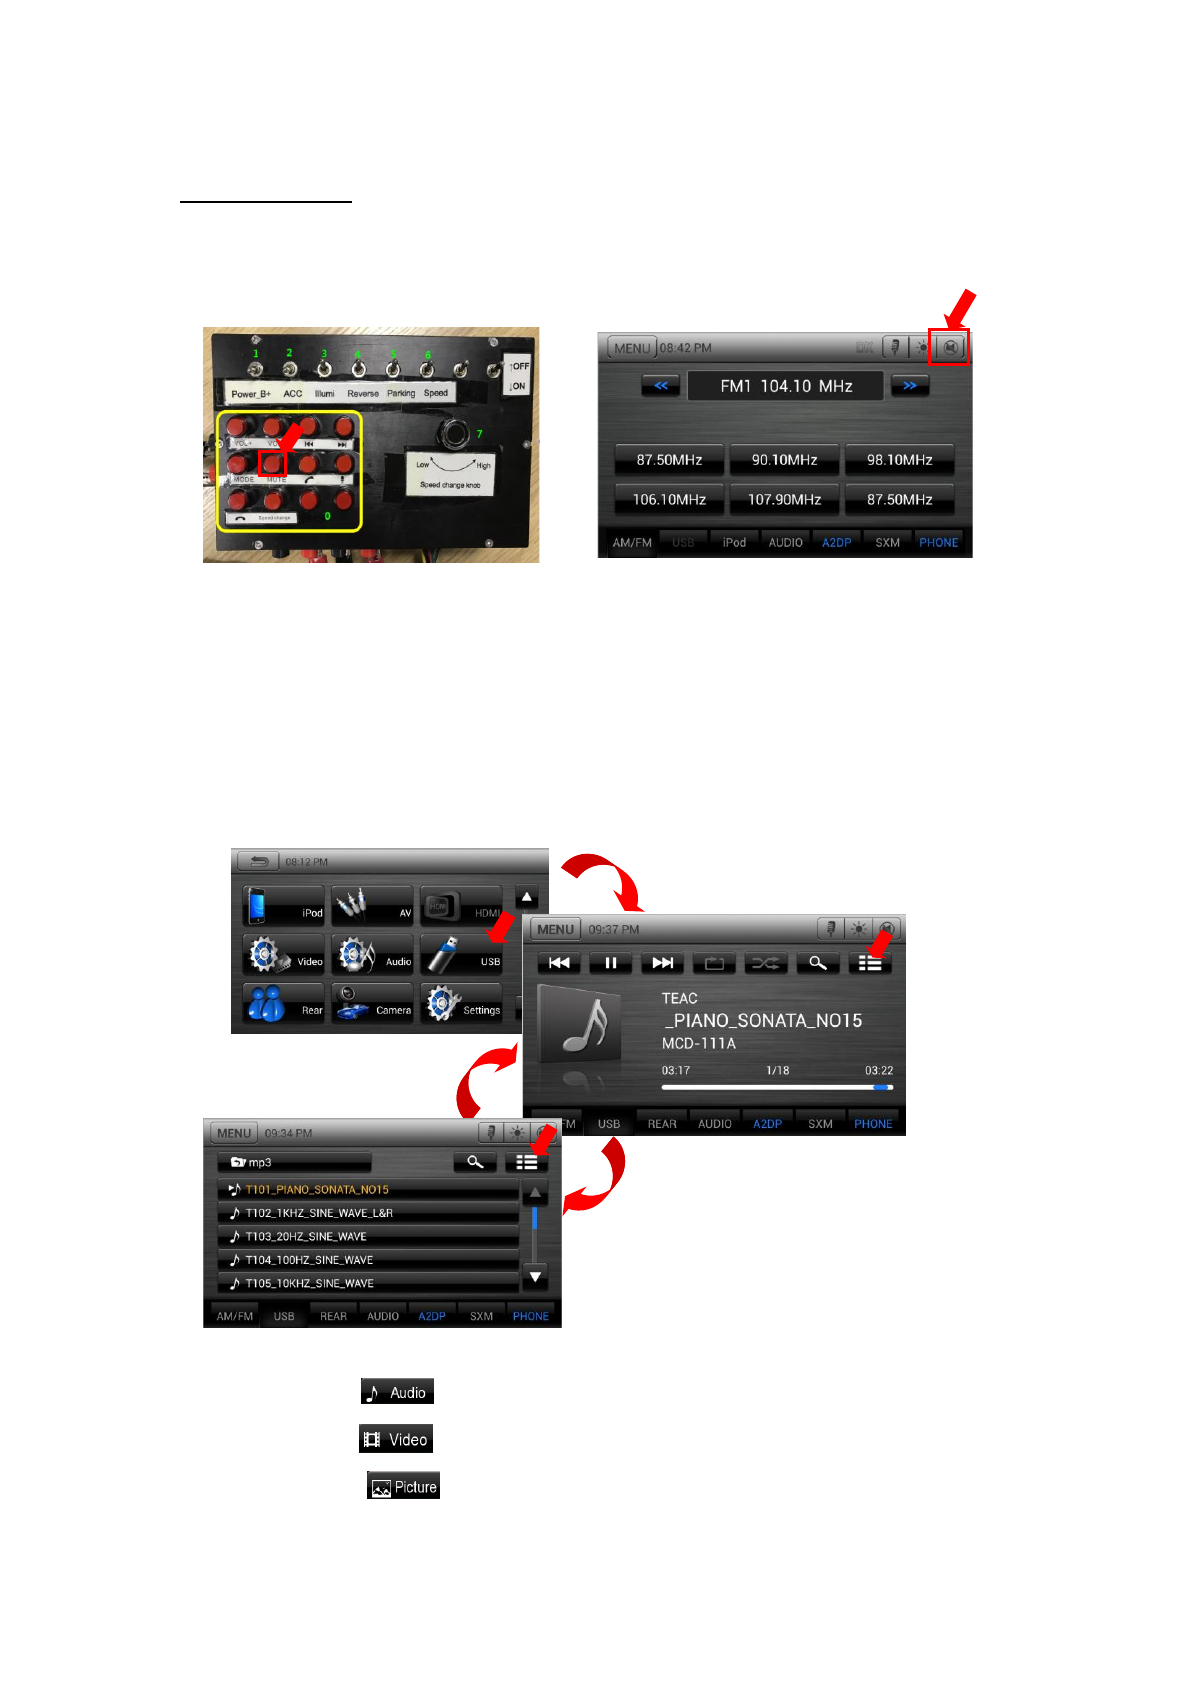
3 USB Mode
1. Connect a U-disk to the USB cable.
2. The system will automatically detect the connected U-disk.
3. Press the Audio [ ] button to display Audio files list.
4. Press the Video [ ] button to display Video files list.
5. Press the Picture [ ] button to display Picture files list.

9
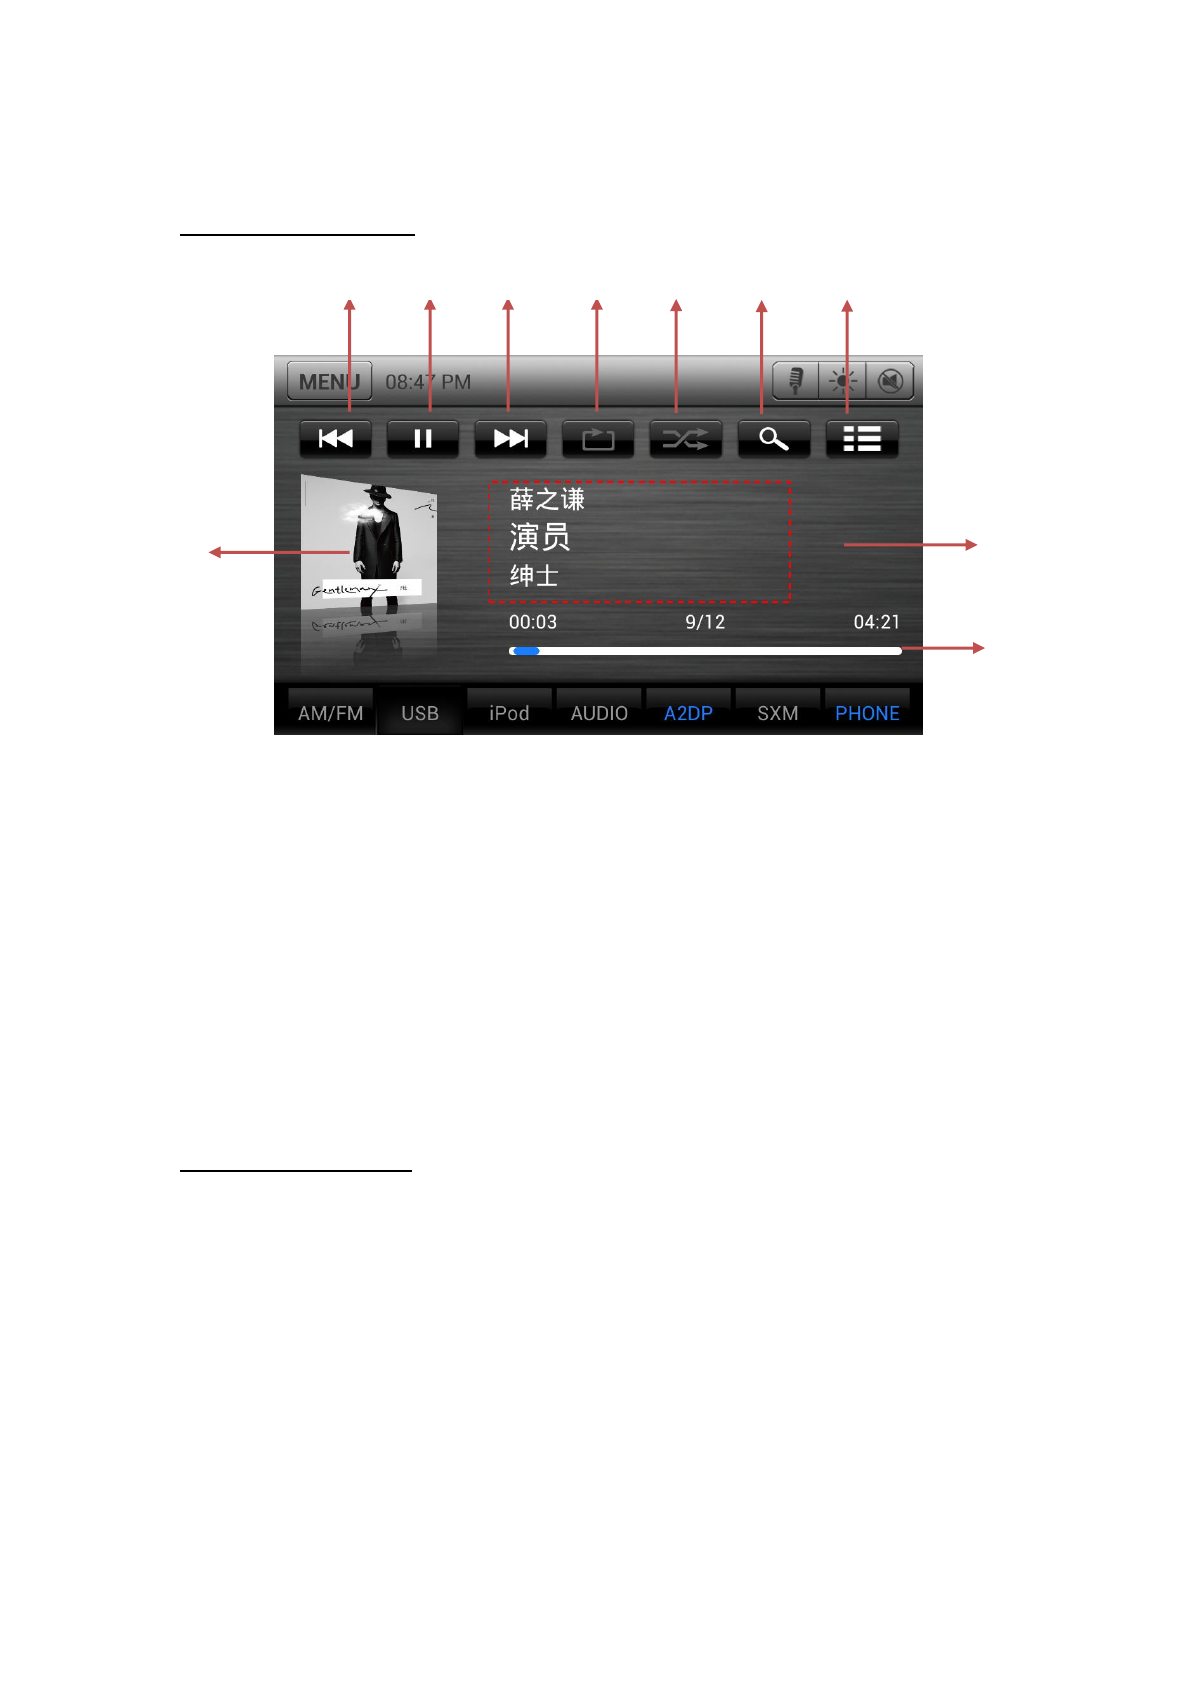
USB Audio Operations
1. Previous Track /Fast Backward button.
2. Play/Pause button.
3. Next Track/Fast Forward button.
4. Repeat button.
5. Shuffle button.
6. Direct Searching button.
7. Track list button.
8. Album Art.
9. Current ID3 info area.
10. Elapsed playing time indicator/Seek bar.
USB Video Operations
1
2
3
4
5
10
8
9
6
7
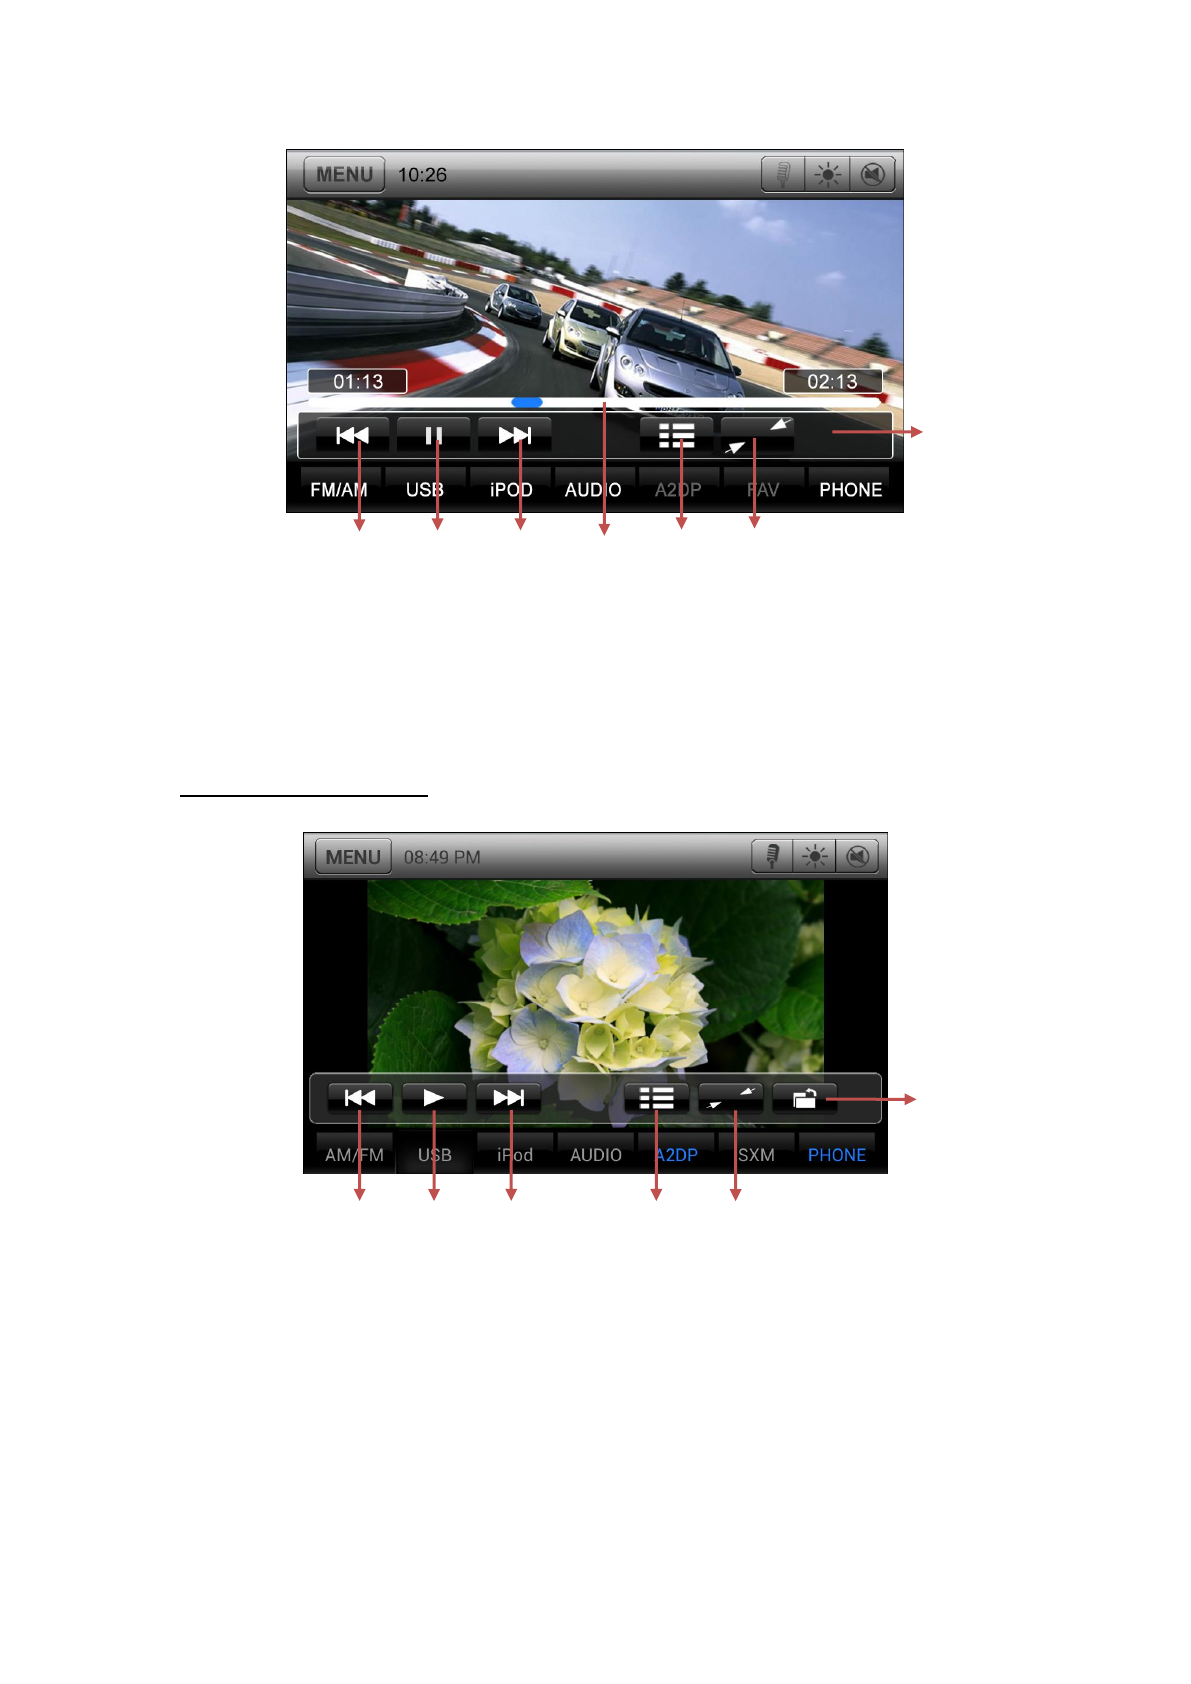
10
1. Previous Video button
2. Play/Pause button
3. Next Video button
4. Elapsed playing time indicator/Seek bar
5. Go to list menu mode
6. Hide Operation bar
7. Operation bar.
USB Picture Operations
1. Previous picture button.
2. Play/Pause picture button.
3. Next picture button.
4. Go to list menu mode
5. Hide Operation bar and Shortcut bar
6. Operation bar.
1
2
3
5
6
4
7
1
2
3
4
5
6
11
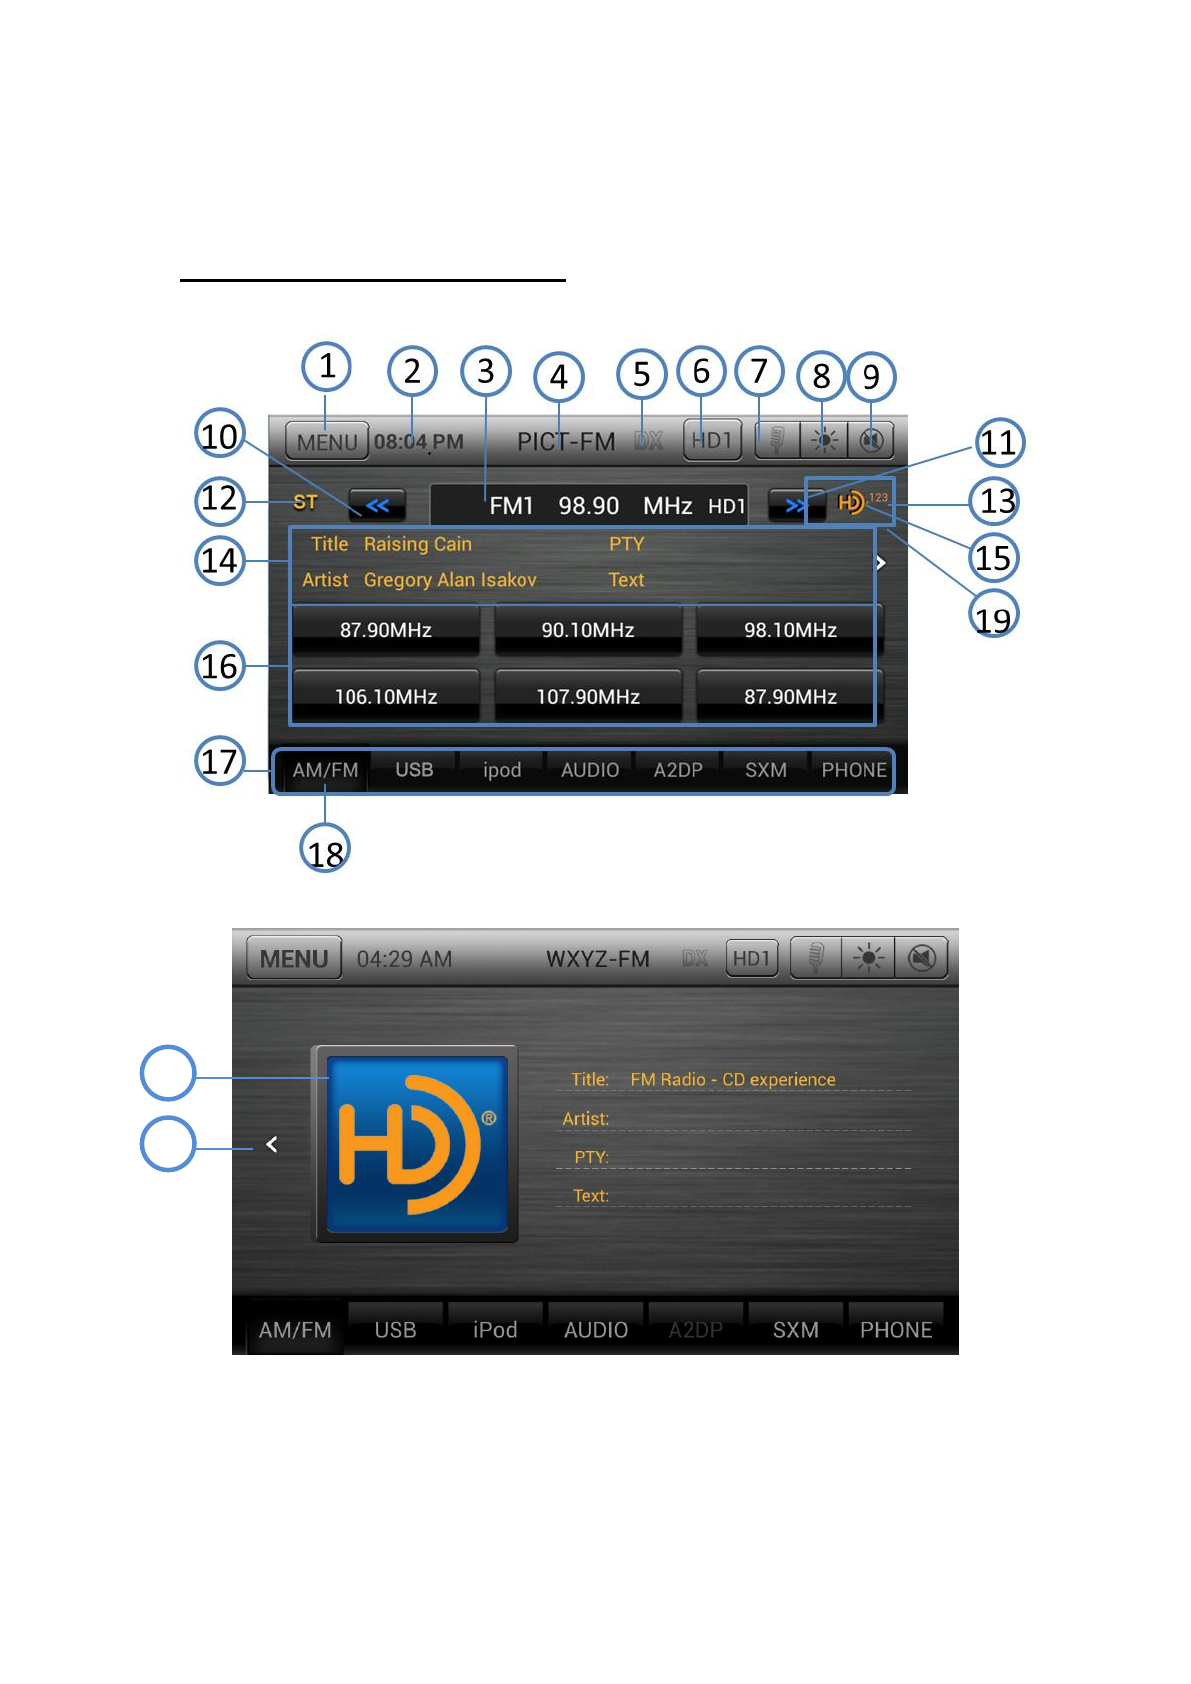
4 HD RadioTM Operations
Listening to the HD Radio broadcasts
1- Return to Main Menu
2- Time display
3- Frequency display, touch to automatically seek next station in the direction of higher
frequencies
21
20

12
4- Station name
5- Loc/DX. It is used to set the station is local or dx.
6- Touch to change the next available sub channel
7- Voice dial, if the unit connect to a smart phone which can support this function this button
can be enable
8- Change the back ground light
9- Mute button
10- Tune backward
11- Tune forward
12- ST flag
13- Subchannel indicator
14- Title, PTY, Artist, Text display area. The strings will roll from left to right to display all
the characters.
15- HD Radio logo when audio is digital
16- Preset station list
17- Mode switch buttons bar
18- AM/FM button
19- Touch this area to switch to Artist experience page
20- Station logo and Album logo
21- Touch this area to switch to Main page
Using the tuner unit:
1. Touch the AM/FM button on the mode switch buttons bar, if the unit does not
work in tuner mode. The tuner mode screen is displayed.
2. Touch the AM/FM button to select the radio band, when the unit already works in
tuner mode. Each time the button is pressed, the radio reception band changes in the
following order: FM1 FM2 FM3 AM1 AM2 FM1 FM2 FM3 AM1 AM2…
3. Hold one preset station more than 3 seconds to save current station to the preset
station list.
HD Radio Stations
HD Radio stations feature the following:
1. High quality audio
2. FM multicasting
3. Data service
User Manual-1

1
UN1780
(CNE-6227B-RS)
Operation Manual
All Rights Reserved.Copyright Stinger Entertainment Systems


2
CONTENTS
1 OPERATIONS ....................................................................................................................... 3
1.1 PANEL BUTTONS ........................................................................................................................ 3
1.2 REMOTE CONTROL ................................................................................................................... 4
2 BASIC OPERATIONS ........................................................................................................... 6
2.1 TITLE AND BOTTOM .................................................................................................................. 6
2.2 CHANGE AUDIO SOURCE .......................................................................................................... 6
2.3 AUDIO MUTE-ON / AUDIO MUTE-OFF ................................................................................. 7
3 USB MODE ............................................................................................................................ 8
4 HD RADIOTM OPERATIONS .............................................................................................. 11
5 SXM OPERATIONS ............................................................................................................ 16
6 SETTINGS OPERATION .................................................................................................... 17
6.1 MAIN SETTINGS ...................................................................................................................... 17
6.2 SET BOTTOM TABS ................................................................................................................. 17
6.3 VIDEO SETUP MENU ............................................................................................................... 17
6.4 AUDIO SETUP MENU ............................................................................................................... 18
6.5 RIGHT/LEFT HAND DRIVE MODE ........................................................................................... 18
7 IPOD/IPHONE OPERATIONS ........................................................................................... 19
8 PANDORA AUDIO .............................................................................................................. 20
9 CARPLAY OPERATIONS ................................................................................................... 20
10 BLUETOOTH OPERATIONS ............................................................................................. 21
10.1 BLUETOOTH PARING ............................................................................................................... 21
10.2 BLUETOOTH SETTING ............................................................................................................. 21
10.3 TELEPHONE OPERATIONS ........................................................................................................ 22
10.4 BLUETOOTH AUDIO PLAYER OPERATIONS .............................................................................. 22
11 CAMERA IN OPERATIONS ............................................................................................... 23
12 HDMI OPERATIONS .......................................................................................................... 23
13 AUX OPERATIONS ............................................................................................................ 24
3
1 Operations
1.1 Panel buttons
Functions of Buttons
1. [PWR] [VOL] Knob
• Press this knob to turn on the unit.
• Long press this knob to turn off the unit.
• Rotate the knob to increase or decrease the volume.
2. [MUTE] Button
• Press this button to mute the volume.
3. [HOME] Button
• Press this button to main menu.
• Press this button to back to the last source.
4. [SIRI] Button
• Press this button to use the carplay siri.
5. [MWP] [ENTER] Knob
• Press this knob to enter a select item.
• Rotate the knob to increase or decrease the list item.
6. [PREVIOUS] Button
• Press this button to choose the previous track/chapter.
• Press this button in radio mode to auto search down.
7. [NEXT] Button
• Press this button to choose the next track/chapter.
• Press this button in radio mode to auto search up.
1
2
3
4
5
6
7
8

4
8. [NAVI] Button
• Press this button to enter navi app.
• Press this button to back to the last page.
1.2 Remote Control
[ / ] Button
• Press this button to play or pause video and audio media.
[MUTE] Button
• Mute or release mute the speaker.
• The symbol on upper right area of the screen indicates that speaker is muted.
[OPEN] Button
• Press this button to eject the disc.
[POWER/SRC] Button
• Press this button to change source.
• Press this button more than 1 second to power on when the unit is power off.
• Press this button more than 1 second to power off when the unit is power on.
[0 - 9] Buttons
• Use in the Key Pad screen to select the radio or satellite radio.
[ / ]
[OPEN]
[Power/SRC]
Signal transmitter
Operating rang: 30°in all directions
[VOLUME]
[SEL]
[NAV/AV]
[BAND]
[MENU]
[PIC]
[ENT]
[TAG]
[RPT]
[ROOT]
[
][ ]
[AUDIO]
[MUTE]
[0-9]
[SRCH]
[ANGLE]
[BACK]
[TITLE]
[ZOOM]
[SUB.T]

5
• Press to enter DVD video chapters/titles in the Key Pad screen if the unit support DVD.
[VOLUME] Button
• Increase or decrease volume.
[NAVI/AV] Button
• Press this button to switch between current source and current position on navigation map.
[SRCH] Button
• Press this button to open chapter or title search window while playing DVD .
[BAND] button
• Switch to next band alternately.
[SET] Button
• Press this button to open the Audio setting menu in any mode.
[BACK] Button
• Press this button to quit main menu if current screen is main menu.
Button
• Press this button for cursor movement in main menu or Setting mode.
• From the main menu, you can select your desired source or change your settings.
[MENU] Button
• Press this button to enter the MAIN MENU or return current resource.
[ENT] Button
• Press to fix the entered data in the Key Pad screen or enter the item the cursor is on.
[TITLE] Button
• Press to go to the title menu on the DVD.
[ROOT] Button
• Press to go to the root menu on the DVD.
[RPT] Button
• Press to perform chapter repeat / title repeat / repeat off while playing DVD mode.
• Press to perform track repeat/repeat off while playing CD.
• Press to perform repeat track /repeat folder/ repeat off while playing MP3/WMA, or video files
on disc.
• Press to perform repeat track /repeat folder/ repeat off while playing MP3/WMA, or video files
in USB memory.
Buttons
• Press to seek the next available higher or lower station in Tuner mode.
• In SAT Radio mode, you will scroll through the categories.
• Press to select the next higher or lower chapter number in DVD video mode.
• Press to select the next higher or lower track in DVD Audio, USB Video, USB Audio mode.
• Press for movement of background source in Navigation mode.
Buttons
• Press to manually select the next higher or lower station in Tuner and Satellite Radio modes.
• Press to perform fast-forward or fast-backward searching. Press again to change the speed to 2x,
4x, 8x or 16x.
• Press for movement of background source in Navigation mode.
[ZOOM] Button

6
• Press to turn on and zoom in while playing DVD. You can zoom in up to 3x. (No all DVD disc
supports this function)
[AUDIO] Button
• Press to switch the AUDIO channel of the disc while playing DVD.
[SUB-T] Button
• Press to switch next available subtitle while playing DVD.
• Press to display Video menu in iPod mode.
[ANGLE] Button
• Press to switch the different ANGLE while playing DVD. (No all DVD disc supports this
function)
• Press to display Audio menu in iPod mode.
2 Basic operations
2.1 Title and Bottom
1. Select the tab and enter the page
2. Back to menu or back to the current audio source.
3. Show the current time
4. When BT connected, launch the phone voice
5. Monitor-OFF / Monitor-ON
6. Audio MUTE-OFF/ Audio MUTE-ON
2.2 Change Audio Source
• To change audio source by touch screen:
1. Press “Home” button. Main menu will be displayed.
2. When you touch or icon on the screen or scroll the screen, previous or next page
1
2
3
4
5
6
7
will be displayed.
3. Touch audio source icon that you want. Then the selected audio source will play.
• To change audio source by remote controller or SWC:
1. Press the “SRC” button, it will show next source toast.
2. Each time you continuously press the “SRC” button, active icon moves to the next.
3. If you don’t press the “SRC” button about 2 seconds, the source will be entered.
*Note:
If there is unavailable source, the icon will be disabled and the icon cannot be selected.
For example, if HDMI is not connected, "HDMI" icon will be disabled and HDMI mode cannot be
selected.
2.3 Audio MUTE-ON / Audio MUTE-OFF
Audio MUTE-ON
1. Press “MUTE” button of remote controller.
2. Press “MUTE” button of SWC.
3. Press “MUTE” button of titlebar.

8
Audio MUTE-OFF
1. Press “MUTE” button of remote controller again.
2. Press “MUTE” button of SWC again.
3. Press “MUTE” button of titlebar again
3 USB Mode
1. Connect a U-disk to the USB cable.
2. The system will automatically detect the connected U-disk.
3. Press the Audio [ ] button to display Audio files list.
4. Press the Video [ ] button to display Video files list.
5. Press the Picture [ ] button to display Picture files list.
9
USB Audio Operations
1. Previous Track /Fast Backward button.
2. Play/Pause button.
3. Next Track/Fast Forward button.
4. Repeat button.
5. Shuffle button.
6. Direct Searching button.
7. Track list button.
8. Album Art.
9. Current ID3 info area.
10. Elapsed playing time indicator/Seek bar.
USB Video Operations
1
2
3
4
5
10
8
9
6
7

10
1. Previous Video button
2. Play/Pause button
3. Next Video button
4. Elapsed playing time indicator/Seek bar
5. Go to list menu mode
6. Hide Operation bar
7. Operation bar.
USB Picture Operations
1. Previous picture button.
2. Play/Pause picture button.
3. Next picture button.
4. Go to list menu mode
5. Hide Operation bar and Shortcut bar
6. Operation bar.
1
2
3
5
6
4
7
1
2
3
4
5
6

11
4 HD RadioTM Operations
Listening to the HD Radio broadcasts
1- Return to Main Menu
2- Time display
3- Frequency display, touch to automatically seek next station in the direction of higher
frequencies
21
20

12
4- Station name
5- Loc/DX. It is used to set the station is local or dx.
6- Touch to change the next available sub channel
7- Voice dial, if the unit connect to a smart phone which can support this function this button
can be enable
8- Change the back ground light
9- Mute button
10- Tune backward
11- Tune forward
12- ST flag
13- Subchannel indicator
14- Title, PTY, Artist, Text display area. The strings will roll from left to right to display all
the characters.
15- HD Radio logo when audio is digital
16- Preset station list
17- Mode switch buttons bar
18- AM/FM button
19- Touch this area to switch to Artist experience page
20- Station logo and Album logo
21- Touch this area to switch to Main page
Using the tuner unit:
1. Touch the AM/FM button on the mode switch buttons bar, if the unit does not
work in tuner mode. The tuner mode screen is displayed.
2. Touch the AM/FM button to select the radio band, when the unit already works in
tuner mode. Each time the button is pressed, the radio reception band changes in the
following order: FM1 FM2 FM3 AM1 AM2 FM1 FM2 FM3 AM1 AM2…
3. Hold one preset station more than 3 seconds to save current station to the preset
station list.
HD Radio Stations
HD Radio stations feature the following:
1. High quality audio
2. FM multicasting
3. Data service