SkyRC Technology 6X80BLUE AC/DC Fast Charger User Manual 6x80 BLUE MJ
SKYRC Technology Co., Ltd. AC/DC Fast Charger 6x80 BLUE MJ
UserManual.wiki
>
SkyRC Technology
>
6X80BLUE User Manual
User Manual
Navigation menu
Upload a User Manual
Namespaces
Wiki Guide
HTML
PDF
Info
Views
User Manual
Discussion / Help
Navigation

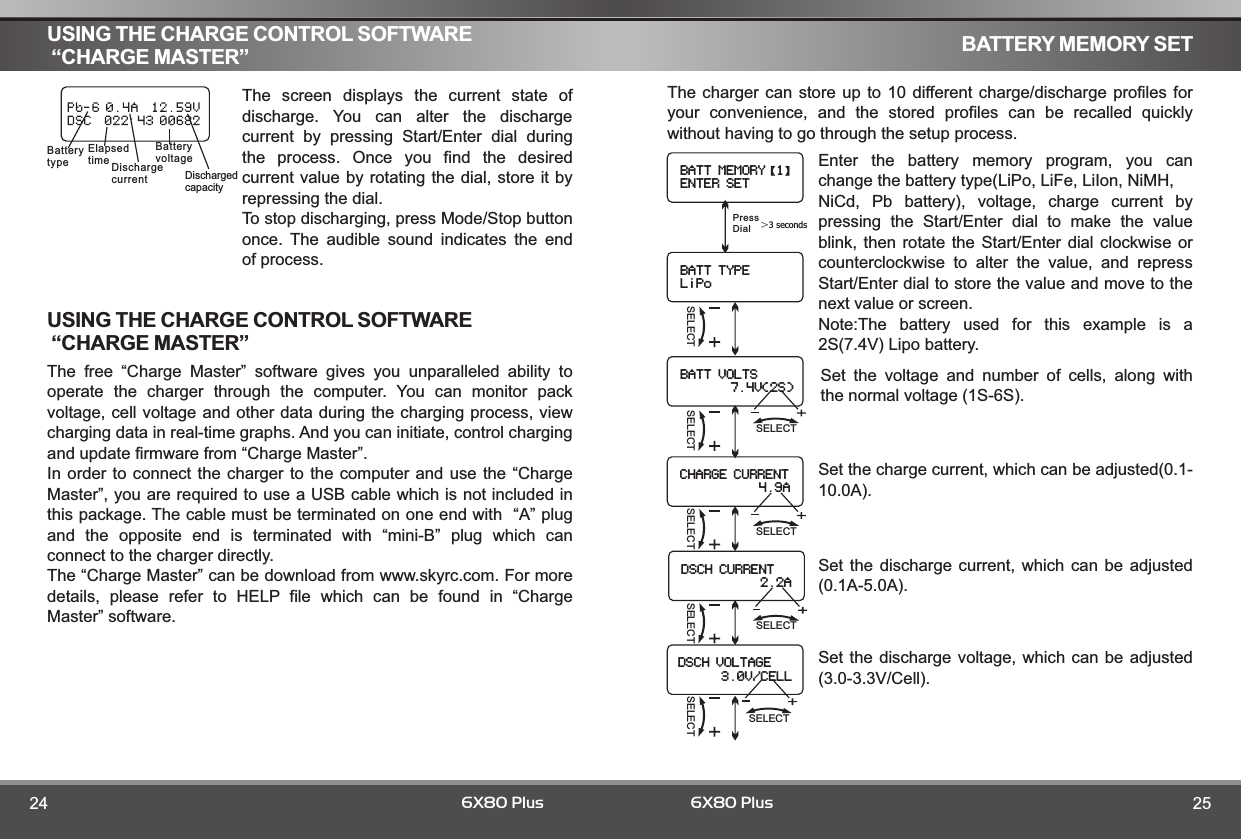
![PROGRAM FLOW CHART PROGRAM FLOW CHART12 136X80 Plus 6X80 PlusPROGRAM SELECT BATT MEMORY ENTERSTART BATT MEMORY [1]ENTER SET ENTERSTART BATT TYPELiPoBATT VOLTS 7.4V ( 2S )CHARGE CURRENT 4.9ADSCH CURRENT 2.2ADSCH VOLTAGE 3.0V/CELLTVC=YOUR RISK 4.20VENTERSTARTENTERSTARTPROGRAM SELECT SYSTEM SET->Rest TimeCHG>DCHG 10MinENTERSTART SAFETY TIMEON 120MinCapacity Cut-OffON 5000mAHKey Beep ONBuzzer ONDECINCInput Power LowCut-Off 11.0VExt. Temp Int. Temp 37C0CSTOPSAVE PROGRAM ENTERSAVE PROGRAM SAVE….BATT MEMORY [1]LiPo 7.4V (2S ) ENTERSTARTBATT MEMORY [1]C:4.9A D:2.2AENTER CHARGERLOAD……LiPo BALANCE4.9A 7.4V(2S)LiPo CHARGE4.9A 7.4V(2S)LiPo FAST CHG4.9A 7.4V(2S)LiPo STORAGE 4.9A 7.4V(2S)LiPo DISCHARGE2.2A 7.4V(2S)BATT MEMORY 2NiMH 2.4V (2S)BATT TYPEMiMHBATT VOLTS 2.4V (2S)ENTERSTART CHARGE CURRENT 3.3ATRICKLE 100mAPEAK DELAY 1MinDSCH CURRENT 2.2ADSCH VOLTAGE 1.1V/CELLDELTA PEAK SENSE 4Mv/CSAVE PROGRAM ENTERBATT MEMORY 3Pb 4V (2S) ENTERSTART BATT TYPEPbBATT VOLTS 4.0V (2S)CHARGE CURRENT 3.3ADSCH CURRENT 1.5ADSCH VOLTAGE 1.7V/CELLSAVE PROGRAM ENTERPROGRAM SELECT Pb BATT ENTERSTART Pb CHARGE2.0A 2.0V (1P)Pb DISCHARGE0.1A 2.0V (1P)PROGRAM SELECT NiCD BATTNiCD CHARGECURRENT 2.0AENTERSTART NiCD DISCHARGE0.1A CUT: 1.0VNiCD CYCLECHG>DCHG 1PROGRAM SELECT NiMH BATT ENTERSTART NiMH CHARGECURRENT 2.0ANiMH DISCHARGE0.1A CUT: 1.0VNiMH CYCLECHG>DCHG 1PROGRAM SELECT LiPo BATTLiPo BALANCE2.0A 7.4V (2S)LiPo CHARGE2.0A 7.4V (2S)LiPo FAST CHG2.0A 7.4V (2S)LiPo STORAGE2.0A 7.4V (2S)LiPo DISCHARGE2.0A 7.4V (2S)ENTERSTARTPROGRAM SELECT Lilo BATTLilo BALANCE2.0A 7.2V (2S)Lilo CHARGE2.0A 7.2V (2S)Lilo FAST CHG2.0A 7.2V (2S)Lilo STORAGE2.0A 7.2V (2S)Lilo DISCHARGE2.0A 7.2V (2S)ENTERSTARTPROGRAM SELECT LiFe BATTLiFe BALANCE2.0A 6.6V (2S)LiFe CHARGE2.0A 6.6V (2S)LiFe FAST CHG2.0A 6.6V (2S)LiFe STORAGE2.0A 6.6V (2S)LiFe DISCHARGE2.0A 6.6V (2S)ENTERSTARTENTERSTARTPROGRAM SELECT Li BATT METER4.20 4.19 4.19 V0.00 0.00 0.00 VMAIN 0.00V H0.000V L0.000VNiCD RE-PEAK 1NiMH RE-PEAK 1NiMH Auto CHARGECURRENT 2.0ANiCD Auto CHARGECURRENT 2.0ATEMPERATURECUT-OFF 50CTEMPERATURECUT-OFF 50CTEMPERATURECUT-OFF 50CSELECTSELECTSELECTSELECTSELECTSELECTSELECTSELECTSELECTSELECTSELECTSELECTSELECTSELECTSELECTSELECTSELECTSELECTSELECTSELECTSELECTVERSION 1.00LOAD FACTORY SET ENTERSELECTSELECTSELECTSELECTSELECTSELECTSELECTSELECTSELECTSELECTSELECTSELECTSELECTSELECTSELECTSELECTSELECTSELECTSELECTSELECTSELECTSELECTSELECTSELECTSELECTSELECTSELECTSELECTSELECTSELECTSELECTSELECTSELECTSELECTSELECTSELECTSELECTSELECTSELECTSELECTSELECTSELECTSELECTSELECTPROGRAM SELECT SERVO TESTERPULSE WIDTH: 700uSSELECTPROGRAM SELECTMOTOR RPM TESTERPULSE WIDTH:1800 RPM: 00000SELECTMODEENTERSTARTENTERSTARTMODE/STOPMODE/STOPSELECTBLUETOOTHActive PairingSELECTBLUETOOTHClearing MemonySELECT](https://usermanual.wiki/SkyRC-Technology/6X80BLUE/User-Guide-1912859-Page-8.png)