Samsung Electronics Co SV10 Notebook Computer User Manual Manual pp 1 to 44
Samsung Electronics Co Ltd Notebook Computer Manual pp 1 to 44
Contents
- 1. Manual pp 1 to 44
- 2. Manual pp 45 to 88
Manual pp 1 to 44

Notices i
Notices
No part of this publication may be reproduced, stored in a retrieval system, or
transmitted, in any form or by any means, mechanical photocopying, recording or
otherwise, without the prior written permission of the manufacturer.
The information within this manual is subject to change without notice.
The manufacturer shall not be held liable for technical or editorial errors or omissions
contained in herein; nor for incidental or consequential damages resulting from the
furnishing, performance or use of this material.
Microsoft Windows is a registered trademark of the Microsoft Corporation.
Product names mentioned herein are for identification purposes only, and may be
trademarks and/or registered trademarks of their respective companies.
Macrovision Statement
If your computer has a DVD drive and an analog TV Out port, the following
paragraph applies:
This product incorporates copyright protection technology that is protected by method
claims of certain U.S. patents and other intellectual property rights owned by
Macrovision Corporation and other rights owners. Use of this copyright protection
technology must be authorized by Macrovision Corporation, and is intended for home
and other limited viewing uses only unless otherwise authorized by Macrovision
Corporation. Reverse engineering or disassembly is prohibited.
Copyright 2001 All rights are reserved

ii Users Manual
Important Safety Information
Safety Instructions
Your system is designed and tested to meet the latest standards for safety of
information technology equipment. However, to ensure safe use of this product, it is
important that the safety instructions marked on the product and in the documentation
are followed.
Always follow these instructions to help guard against personal injury and
damage to your system.
i
Setting Up your System
•Read and follow all instructions marked on the product and in the
documentation before you operate your system. Retain all safety and operating
instructions for future use.
•Do not use this product near water or a heat source such as a radiator.
•Set up the system on a stable work surface.
•The product should be operated only with the type of power source indicated on
the rating label.
•Ensure that the electrical outlet you are using to power your equipment is easily
accessible in case of fire or short circuit.
•If your computer has a voltage selector switch, make sure that the switch is in
the proper position for your area.
•Openings in the computer case are provided for ventilation. Do not block or
cover these openings. Make sure you provide adequate space, at least 6 inches
(15 cm), around the system for ventilation when you set up your work area.
Never insert objects of any kind into the computer ventilation openings.
•Ensure that the fan vents on the bottom of the casing are clear at all times. Do
not place the computer on a soft surface, doing so will block the bottom vents.
•If you use an extension cord with this system, make sure that the total ampere
rating on the products plugged into the extension cord does not exceed the
extension cord ampere rating.

Important Safety Information iii
Care During Use
•Do not walk on the power cord or allow anything to rest on it.
•Do not spill anything on the system. The best way to avoid spills is to not eat or
drink near your system.
•Some products have a replaceable CMOS battery on the system board. There is
a danger of explosion if the CMOS battery is replaced incorrectly. Replace the
battery with the same or equivalent type recommended by the manufacturer.
Dispose of batteries according to the manufacturer’s instructions. If the CMOS
battery requires replacement insure that a qualified technician performs the task
•When the computer is turned off, a small amount of electrical current still flows
through the computer. To avoid electrical shock, always unplug all power
cables, remove the battery and modem cables from the wall outlets before
cleaning the system.
•Unplug the system from the wall outlet and refer servicing to qualified
personnel if:
– The power cord or plug is damaged.
– Liquid has been spilled into the system.
– The system does not operate properly when the operating instructions are
followed.
– The system was dropped or the casing is damaged.
– The system performance changes.
Replacement Parts and Accessories
Use only replacement parts and accessories recommended by manufacturer.
To reduce the risk of fire, use only No. 26 AWG or larger telecommunications
line cord.
Do not use this product in areas classified as hazardous. Such areas include
patient care areas of medical and dental facilities, oxygen rich environments,
or industrial areas.

iv Users Manual
Battery Disposal
Do not put rechargeable batteries or products powered by non-removable
rechargeable batteries in the garbage.
Contact the Samsung Helpline for information on how to dispose of batteries that you
cannot use or recharge any longer.
Follow all local regulations when disposing of old batteries.

Federal Communications Commission (FCC) v
Federal Communications Commission (FCC)
This device complies with Part 15 of the FCC Rules. Operation is subject to the
following two conditions:(1) this device may not cause harmful interference, and (2)
this device must accept any interference received, including interference that may
cause undesired operation.
This equipment has been tested and found to comply with the limits for a Class
B digital device pursuant to Part 15 of the FCC Rules. These limits are
designed to provide reasonable protection against harmful interference in a
residential installation. This equipment generate uses and can radiate radio
frequency energy and if not installed and used in accordance with the
instructions may cause harmful interference will not occur in a particular
installation. If this equipment does cause harmful interference to radio or
television reception, which can be determined by turning the equipment off
and on, the user is encouraged to try to correct the interference by one or more
of the following measures:
•Reorient or relocate the receiving antenna.
•Increase the separation between the equipment and receiver.
•Connect the equipment into an outlet on a circuit different from that to which
the receiver is connected.
•Consult the dealer or an experienced radio/TV technician for help.
If necessary, the user should consult the dealer or an experienced radio/television
technician for additional suggestions. The user may find the following booklet helpful:
"Something About Interference." This is available at FCC local regional offices. Our
company is not responsible for any radio or television interference caused by
unauthorized modifications of this equipment or the substitution or attachment of
connecting cables and equipment other than those specified by our company. The
correction will be the responsibility of the user. Use only shielded data cables with this
system.
FCC statement for Wireless LAN use:
"While installing and operating this transmitter and antenna combination the
radio frequency exposure limit of 1mW/cm2 may be exceeded at distances
close to the antenna installed. Therefore, the user must maintain a minimum
distance of 20cm from the antenna at all times. This device can not be
colocated with another transmitter and transmitting antenna."

vi Users Manual
Federal Communications Commission Part 68 Statement
Note:
This equipment compiles with part of the FCC rules. On the back of this equipment is
a label that contains, among other information, the FCC registration number and ringer
equivalence number(REN) for this equipment. If requested, this information must be
provided to the telephone company.
This equipment uses the following USOC jacks : RJ11C
An FCC compliant telephone cord and modular plug is provided with this equipment.
This equipment is designed to be connected to the telephone network or promises
wiring using a compatible modular jack which is Part 68 compliant. See Installation
Instructions for details.
The REN is used to determine the quantity of devices which may be connected to
telephone line. Excessive RENs on the telephone line may result in the devices not
ringing in response to an incoming call. In most, but not all areas, the sum of RENs
should not exceed five(5.0). To be certain of the number of devices that may be
connected to a line, as determined by total RENs, contact the local telephone company
to determine the maximum REN for the calling area.
If the terminal equipment causes harm to the telephone network, the Telephone
Company will notify you in advance that temporary discontinuance of service may be
required. But if advance notice is not practical, the telephone company will notify the
customer as soon as possible. Also, you will be advised of your right to file a complaint
with the FCC if you believe it is necessary.
The telephone company may make changes in its facilities, equipment, operations, or
procedures that could affect the operation of the equipment. If this happens, the
telephone company will provide advanced notice in order for you to make necessary
modifications to maintain uninterrupted service.
If trouble is experienced with this equipment (SENS Modem) for repair or warranty
information, please contact your local distributor. If the equipment is causing harm to
the telephone network, the telephone company may request that you disconnect the
equipment until the problem is resolved.
The user must use the accessories and cables supplied by the manufacturer to get
optimum performance from the product.
No repairs may be done by the customer.
This equipment cannot be used on public coin phone service provided by the telephone
company. Connection to party line service is subject to state tariffs.

Federal Communications Commission (FCC) vii
The Telephone Consumer Protection Act of 1991 makes it unlawful for any person to
use a computer or other electronic device, including fax machines, to send any message
unless such message clearly contains in a margin at the top or bottom of each
transmitted page or on the first page of the transmission, the date and time it is sent and
an identification of the business or other entity, or other individual sending the message
and the telephone number of the sending machine or such business, other entity, or
individual. (The telephone number provided may not be any number for which charges
exceed local or long-distance transmission charges.)
In order to program this information into your fax machine, refer to your
communications software user manual.
CTR21 Statement
The equipment has been approved in accordance with Council Decision 98/482/EC for
pan-European single terminal connection to the public switched telephone network
(PSTN). However, due to differences between the individual PSTNs provided in
different countries, the approval does not, of itself, give an unconditional assurance of
successful operation on every PSTN network termination point.
In the event of problems, you should contact your equipment supplier in the first
instance.
Canadian Radio Interference Regulations
This apparatus does not exceed the class B limits for radio noise emissions set out in
the radio interference regulations of the Canadian Department of Communications.
Le présent appareil n’émet pas de bruits radioélectriques dépassant les limites
applicable aux appareils de la classe B prescrites par le règlement de brouillage
radioélectrique dicté par le Ministère des Communications du Canada.

viii Users Manual
Laser Safety
All systems equipped with CD or DVD drives comply with the appropriate safety
standards, including IEC 825. The laser devices in these components are classified as
“Class 1 Laser Products” under a US Department of Health and Human Services
(DHHS) Radiation Performance Standard. Should the unit ever need servicing, contact
an authorized service location.
Laser Safety Note:
Use of controls or adjustments or performance of procedures other than those
specified in this manual may result in hazardous radiation exposure. To
prevent exposure to laser beams, do not try to open the enclosure of a CD or
DVD drive.

Power Cord Requirements ix
Power Cord Requirements
The power cord set (wall plug, cable and AC adapter plug) you received with your
computer meets the requirements for use in the country where you purchased your
equipment.
Power cord sets for use in other countries must meet the requirements of the country
where you use the computer. For more information on power cord set requirements,
contact your authorized dealer, reseller, or service provider.
General Requirements
The requirements listed below are applicable to all countries:
•The length of the power cord set must be at least 6.00 feet (1.8m) and a
maximum of 9.75 feet (3.0m).
•All power cord sets must be approved by an acceptable accredited agency
responsible for evaluation in the country where the power cord set will be used.
•The power cord set must have a minimum current capacity of 7 A and a
nominal voltage rating of 125 or 250 volts AC, as required by each country’s
power system.
•The appliance coupler must meet the mechanical configuration of an EN 60
320/IEC 320 Standard Sheet C13 connector, for mating with appliance inlet on
the computer.

x Users Manual
Country-Specific Power Cord Set Requirements
The requirements listed below are applicable to the specific country listed:
Notes:
1.Flexible cord must be Type HO5VV-F, 2-conductor, 1.0 mm² conductor
size. Power cord set fittings (appliance coupler and wall plug) must bear
the certification mark of the agency responsible for evaluation in the
country where it will be used.
2.Flexible cord must be Type SVT or equivalent, No.18 AWG. Wall plug
must be a two-pole grounding type.
3.Appliance coupler, flexible cord, and wall plug must bear a "T" mark and
registration number in accordance with the Japanese Dentori Law.
Flexible cord must be Type VCT or VCTF, 2-conductor, 0.75 mm²
conductor size. Wall plug must be a two-pole grounding type with a
Japanese Industrial Standard C8303 (15 A, 125V) configuration.
Country Accrediting
Agency Applicable Note
Numbers
Australia EANSW 1
Austria OVE 1
Belgium CEBC 1
Canada CSA 2
Denmark DEMKO 1
Finland FIMKO 1
France UTE 1
Germany VDE 1
Italy IMQ 1
Japan JIS 3
The Netherlands KEMA 1
Norway NEMKO 1
Sweden SEMKO 1
Switzerland SEV 1
United Kingdom BSI 1
United States UL 2
Using Your Documentation 1
Using Your Documentation
Congratulations on your purchase of a notebook computer with the Windows® 2000
operating system. Whether you are new to using a notebook computer or are an
experienced user, this user’s manual can help you get the most from your computer.
Manual Documentation Conventions
Information Icons
Three icons and their associated messages appear in this manual. The information
icons are placed before the step/information they apply to:
Warning:
Indicates the possibility of personal injury.
Caution:
Warns you of possible damage to equipment or data.
Note:
Informs you of special circumstances.
Keyboard Conventions
Keys that you need to press to perform certain functions are displayed in the manual
using a small graphic of the button. For example:
<Ctrl>
indicates the control key (Ctrl on the keyboard).
If you need to press two keys at the same time, the key names are shown joined by a
plus sign. For example:
<Alt+PgUp>
means that you should press the Alt key and hold it and then press the PgUp key.

2 Users Manual
CD-ROM Device Naming Convention
In many installation programs you will have to get a program from the CD-ROM
device. The program installation sequence assumes that the CD is drive d:\, however
this is not always the case. The name of the CD-ROM drive is the letter following the
letter assigned to your last HDD. For instance, if you have one HDD with two
partitions, the HDD is drives C: and D: and the CD-ROM drive is then drive E.
Touchpad Conventions
You may be asked to click or double-click on items on the display screen. As a general
note the touchpad actions act much in the same way as a wheel mouse, any differences
are explained fully.
The object that needs to be clicked upon will be displayed in Bold text or shown in a
small figure such as the “Start Button” shown on the right => .
Table 1. Touchpad Click Conventions
Windows Conventions:
Almost all "Windows" programs will display the name/function of a button or
icon if you place the touchpad pointer on the item you want information about.
Software User Documentation
Your computer is shipped from the factory with several software programs installed.
The software may include its own online or printed documentation. Refer to the
documentation or the Help options in the software for more information.
The figures and illustrations in this manual may not be identical to those on
your system.
General Icon Note:
Some of the Icons used in Windows may be placed on the taskbar by selecting
(ex: Place the volume icon in the taskbar) in the properties dialog box.
Action Process
Click Depress the touchpad left button and release
Double-Click Quickly click the left touchpad button two times
Introducing Your Computer 3
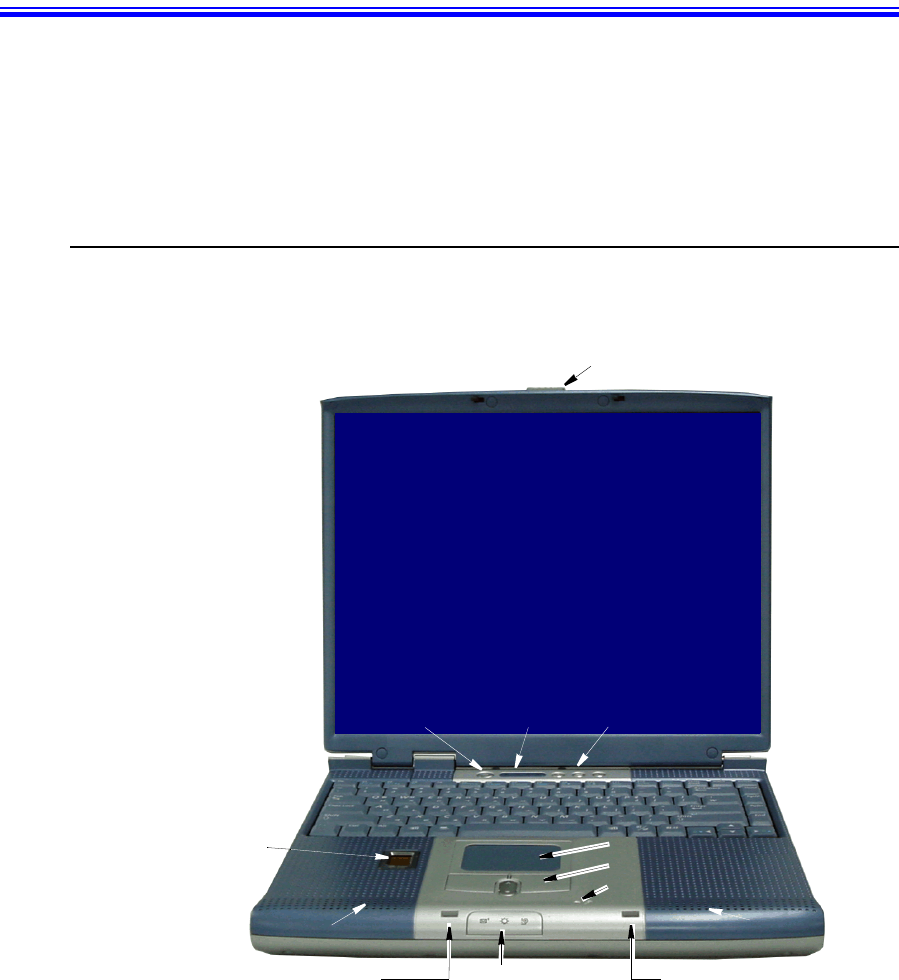
Introducing Your Computer
Your computer is a lightweight portable computer that includes features such as Dolby
Digital & Dolby Theater System support, CD-ROM/floppy drives, Biometric
(fingerprint) security system (factory option) and wireless LAN capability (factory
option), to meet your computing needs at home or on the road. [Figures may be
different depending on options).
Where Everything Is
The next 6 figures will explain the location of all of the buttons, LEDs and equipment
needed to operate your notebook computer.
Front
Touchpad
Speaker
Touchpad Buttons
LCD Latch
Cover Latch Slot Cover Latch Slot
Keyboard
Speaker
Power, Battery Status
& E-mail LEDs
Biometric
Security
pad
Internal Microphone
SENS Keyboard
Buttons
Power Button LEDs
LCD Display
4 Users Manual
Buttons and LEDs
Right Side
Left Side
Drive Access Icon
Scroll Lock Icon
Number Lock Icon
Caps Lock Icon
Power Button
User
Programmable
Button
E-Mail Button
Internet Button
E-Mail Alert
Power
Battery Status
FDD Fan Vent LAN PortCD/DVD - ROM Hard Drive
PC Card Eject Buttons PC Card Slot
Fan Vent Security Lock Port
Microphone Jack
Headphone Jack
Battery
Wheel Volume
Control
Line In Jack
TV-Out Port
SPDIF In Jack
Introducing Your Computer 5
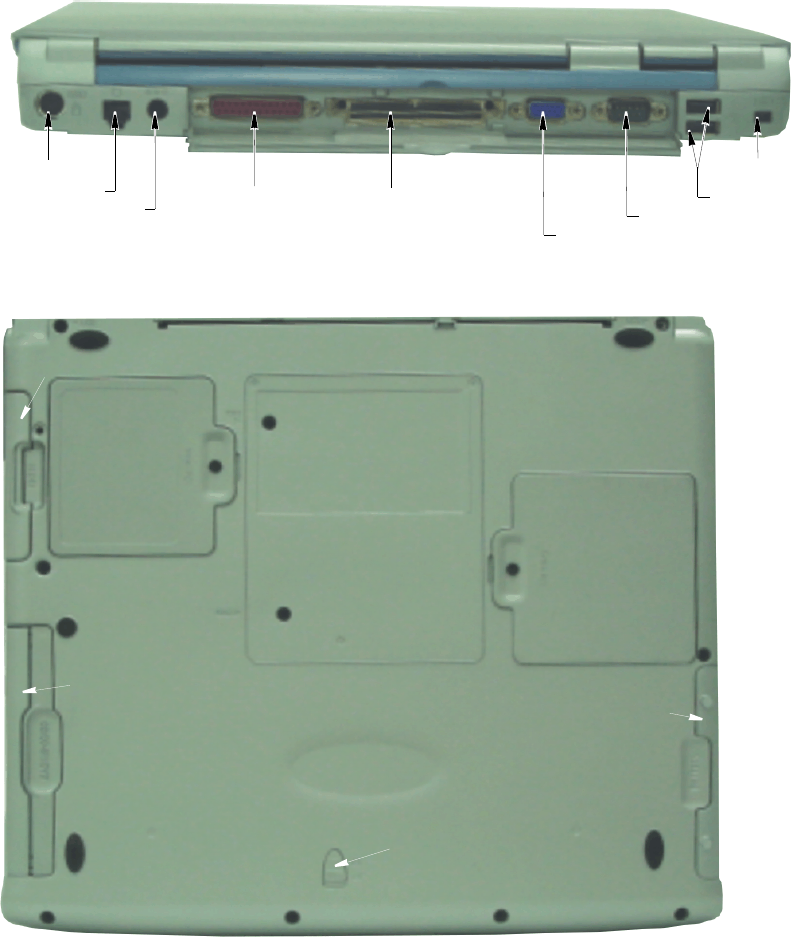
Back Side
Bottom
External Monitor Port
Modem Port Parallel
Printer Port
PS/2 Port
USB Ports
1394 Port
Serial Port
Docking
Connector
DC-In Port
Hard Drive
Battery Compartment
Flex Bay Latch
Mini PCI Memory
Compartment
Compartment
Flex Bay Compartment

6 Users Manual
Using Your Computer for the First Time
This section gives you detailed information on using your computer for the first time.
Installing the Battery
To install the battery pack:
1. With the computer’s power off, close the LCD panel and turn the computer over
so the bottom of the unit faces up.
2. Slide the battery compartment cover straight up and off the computer. See
“Installing the Battery” on page 37.
Insert the battery into the battery compartment, ensuring the correct
orientation so that the battery fits in its slot properly.
3. Slide the battery pack into the compartment. Make sure the battery is fully inserted
into the compartment.
4. Align the tabs on the battery compartment cover with the slots on the battery
compartment.
5. Push the cover straight down until it snaps into place.
Using Your Computer for the First Time 7
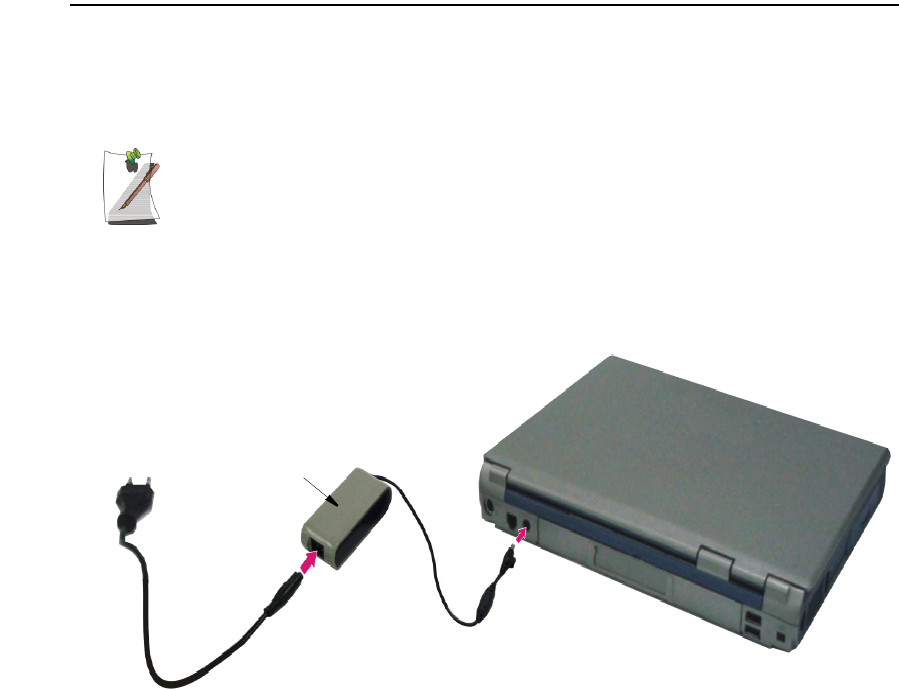
Attaching the AC Adapter
Your computer runs on power from the battery in the computer or from an electrical
outlet. The first time that you use your computer, fully charge the battery by attaching
the power cord to the computer and to an electrical outlet.
All batteries lose their charge if they sit unused for an extended time period.
When not used, battery can discharge fully in 2 to 3 months. The battery may
have discharged in the time it took for the computer to go from the factory to
you.
To attach the power cord:
1. Plug the AC adapter into the power connector on the back side of the computer.
2. Connect the power cord to the AC adapter and then to an electrical outlet.
The battery starts charging as soon as you plug the power cord into an electrical outlet.
The battery charges faster if the computer is turned off during charging.
If the battery is fully depleted and the computer is turned off, the battery charges in
about 3 hours. If the computer is turned on, the battery charges in about 6 hours. When
the battery is charging, the battery charge light is red. When the battery is fully charged,
the light turns green.
See “Using Power Management Options” on page 46 for more information on using
your computer’s battery.
AC Adapter
8 Users Manual
Turning On the Computer
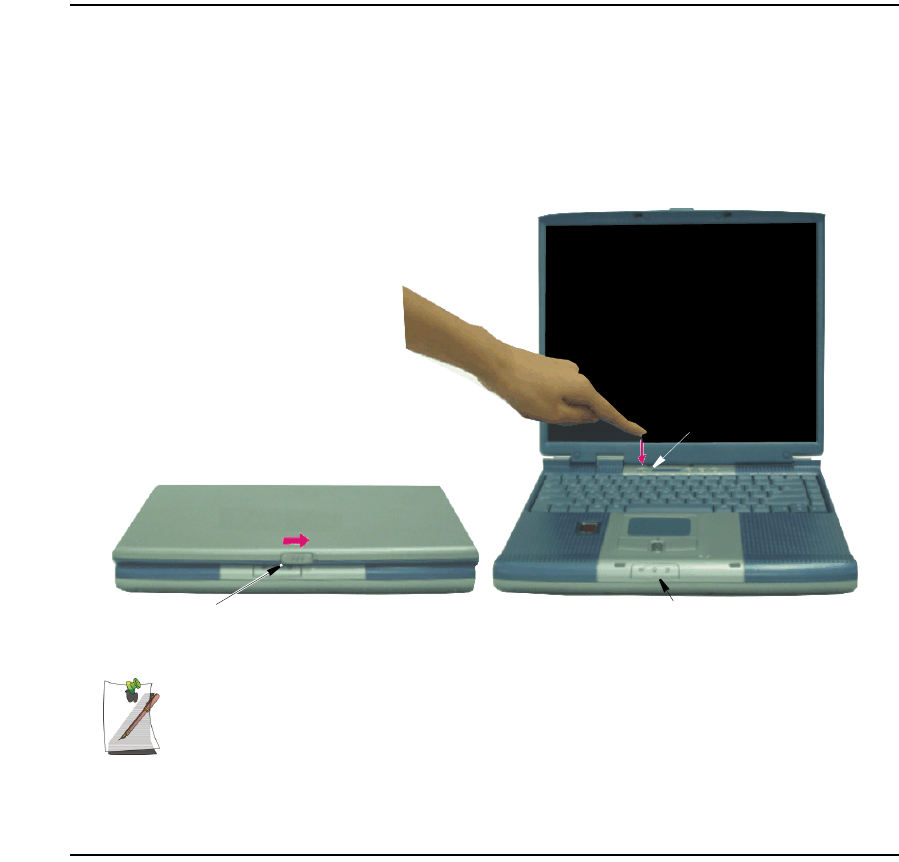
To turn on the computer’s power for the first time:
1. Slide the LCD latch, located on the front of the cover to the right.
2. Lift up the cover.
3. Press and then release the power button.
The power light is on when the computer’s power is on.
Initial Computer Startup:
The first time you start your computer you will see the operating system
registration screens. Simply read each screen and follow the simple directions.
You must complete this process in order to use your computer. A tutorial is
provided if you require it.
Adjusting the LCD Display
You may wish to adjust the LCD (Liquid-Crystal Display) when you begin using your
computer. A TFT (Thin-Film Transistor) LCD does not require adjustment for contrast
because the contrast is set to remain at maximum.
To adjust the LCD:
•Press <Fn+Right Arrow> to increase the display brightness.
•Press <Fn+Left Arrow> to decrease the display brightness.
Power Light
Cover Latch
Power button
Using Your Computer for the First Time 9
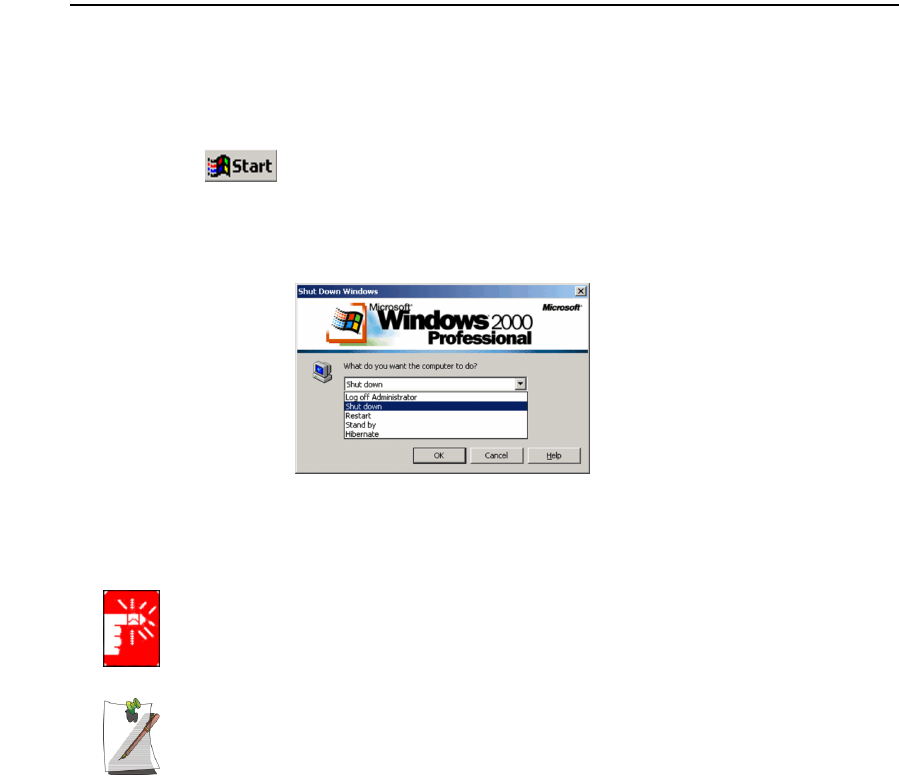
Turning Off Your Computer
Prior to shutting down your computer ensure all of your data and current work are
saved. The system will ask if you wish to save any unsaved work, saving your work
first will speed the shutdown process.
To turn off the computer, complete the following steps:
1. Click on the taskbar.
If you need to restart your computer after software (re)installation or because it is not
responding select the Restart option in step 2 below.
2. Click Shut Down to display the shutdown popup window shown below..
3. Select Shut down.
4. Click OK.
Power Off:
If the system does not power off, then press and hold the power button for over
5 seconds. See “Using Power Management Options” on page 46.
Power Button Functions:
The power button has several functions other than just turning on and off your
computer, see “Using Power Management Options” on page 46.
You can also perform a soft boot by saving your files and pressing
<Ctrl+Alt+Del> to pop-up the “Windows Task Manager” window.
Click Shut Down > Restart.
You can perform a cold boot by pressing the power button for more than 5 seconds to
turn the computer off, waiting more than five seconds, and then pressing the power
button to turn the computer on. The system may perform some extra checks during the
restart.

10 Users Manual
Tips for Using Your Computer
The following information helps you avoid potential problems as you use your
computer:
Do not try to disassemble your computer. Opening the system chassis voids
your warranty. Only an authorised manufacturer service center can replace or
add any parts inside the chassis.
•Follow all the instructions and cautions in your computer user documentation.
•The LCD has a polarized surface and can be damaged easily. To prevent
damage, avoid touching the screen.
•Use only approved AC adapters, auto adapters, memory modules and other
options.
•Because a notebook computer is small and has restricted air flow around
components, it is more likely to overheat than a desktop computer. A fan inside
your computer runs when needed to help eliminate heat. Make sure the fan vent
on the left side of your computer is not blocked when you use the computer.
Occasionally check the vents and remove any accumulated dust on the outside.
•Avoid using or storing the computer in extremely hot or cold areas, such as a
car on a hot day. Keep the computer away from heaters and out of direct
sunlight. Exposure to excessive heat may damage computer components. If you
have left your computer in a hot place, let it cool down slowly to room
temperature (with the LCD panel open) before using it.
•Do not remove the memory-module compartment door, or try to install a
memory module when the computer is on.
(For information on installing memory modules, see “Installing a Memory
Module” on page 58.)
•Set up your computer work area to avoid physical strain. Sit with your back
straight and supported by your chair. Adjust your chair or work table so that
your arms and wrists can remain in a relaxed position, parallel with the floor.
Avoid bending or twisting your wrists as you work. Your hands should “float”
slightly above the keyboard. Refer to a book on office ergonomics for more
information on setting up your work area.
•Take frequent breaks from working at the computer to rest your eyes and
stretch your muscles.
•Remember to save your data files frequently and to make backup copies of your
files.

Using Your Computer for the First Time 11
Travelling with Your Computer
If you are travelling by air, follow these tips:
•Take the computer with you as carry-on luggage. Do not check the computer
with your baggage.
•Allow the computer and disks to go through the X-ray security devices. Do not
hand-carry disks through the walk-through metal detectors, which can cause
loss of data.
•Please collect your computer immediately after X-ray scanning, this is a high
theft area for portable computers.
•Make sure that the battery is charged or the power cord is easily accessible.
You may be required to turn on the computer for airport security personnel.
•Be prepared to turn off the computer during take off and landing.
Handling Spills
Do not spill anything on your computer. The best way to avoid spills is to avoid eating
and drinking around your computer. If you do spill something on your computer, turn
off your computer, unplug it immediately, and do the following:
•If you spill liquid on the keyboard, drain as much of the liquid from the
keyboard as possible. Be careful not to let the liquid drip onto the LCD panel.
Allow the system to dry for several days before trying to use it.
•If you spill liquid on an external keyboard or keypad, unplug it and drain as
much of the liquid as possible. Allow the keyboard to sit at room temperature
for a full day before trying to use it.
Sweet liquids leave a sticky residue that may jam the keyboard despite your
efforts to dry it.
•If you spill liquid on the LCD panel, clean it immediately with a soft cloth and
denatured alcohol or a proprietary LCD screen cleaner. Do not use water,
window cleaner, acetone, aromatic solvent, or dry, rough towels to clean it.
Some liquids damage the polarized LCD screen. If your screen is damaged,
contact your authorized manufacturer’s service center for a replacement.

12 Users Manual
Storing the Computer for Long Periods
If possible, leave the power cord connected to the computer and an electrical outlet
when the computer is not in use. This extends the life of the battery and keeps the
battery fully charged.
If you will not be using the computer for a long period of time (a month or more), you
should charge the battery until it is completely full. After you have done so, remove the
battery from the unit.
Using the Keyboard 13
Using the Keyboard
Your computer has an 87/88-key keyboard. By pressing designated key combinations,
you can have access to all the key functions of a full-sized keyboard.
Although the layout of the keys on your computer’s keyboard is different from
that on a desktop computer’s keyboard, the keyboard feels like a full-sized
keyboard when you use it.
The keys on the keyboard can be grouped into the following categories:
•Full-sized Alphanumeric typewriter keys are arranged like a standard
typewriter keyboard and are used for text entry. The Windows keys on either
side of the spacebar open Windows menus and perform other special functions.
•Function keys, when pressed together with the <Fn> key, enable special
functions.
•Cursor and Screen control keys move the cursor. They may perform other
functions, depending on your software.
To clean the computer keyboard, use slightly damp cotton swabs. Scrub the keys and
the surface around the keys.
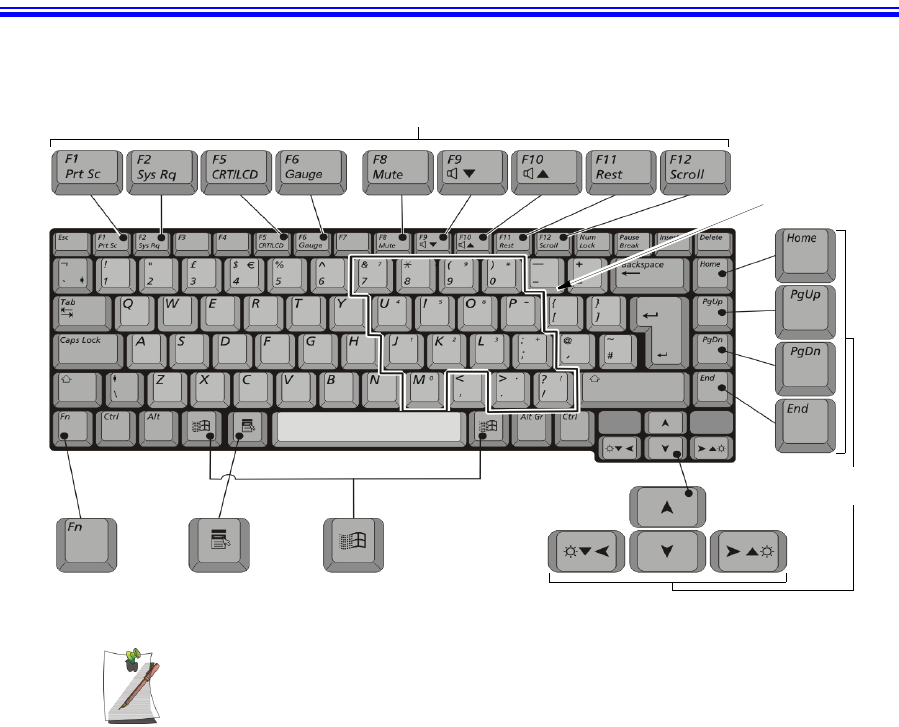
Function & Special Purpose Keys
Embedded
Numeric Keypad
Application Key
Cursor/Screen
Control Keys
Windows KeyFunction Key
14 Users Manual
Do not allow liquid to drip into the keyboard or you may damage the keyboard.
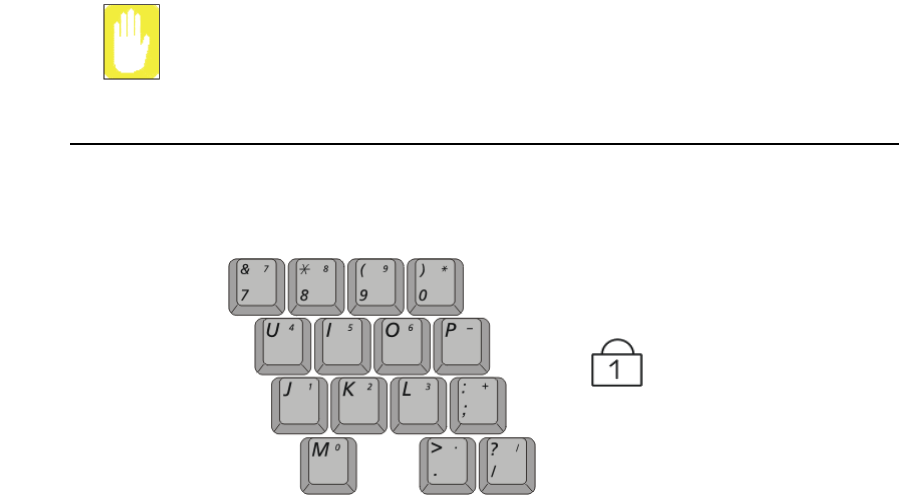
Using the Numeric Keypad
Your keyboard includes a numeric keypad, which is a group of keys that you can set to
type numbers and mathematical symbols, such as the plus sign. A number or symbol
on the right corner of each keypad key shows its numeric function.
Press <Num Lock> to turn on the embedded numeric keypad. The numeric functions
of the keypad are enabled and the Num Lock light turns on.
While the numeric functions are enabled, you can temporarily return a key to its normal
function by pressing <Fn> and the key. For example to type the letter m, press
<Fn+m>.
To turn the numeric keypad off, press <Num Lock> again. The Num Lock light turns
off.
Num Lock LED

Using the Keyboard 15
Using Special Function Keys
The <Fn> key activates special functions when it is pressed in combination with
another key.
Table 2. Description of Special Function Keys
When you press a function key combination, the system sound may be
temporarily muted.
<Fn> Key
Combination Function
<Fn+F1> Print screen: Takes a picture of the open screen, which you can paste into the Paint
program.
<Fn+F2> System request: Reserved for use in software programs.
<Fn+F5> CRT/LCD: Switches the display between the LCD, the external monitor, and
simultaneous display on both the LCD and the external monitor.
<Fn+F6> Gauge: Displays the battery gauge in the upper-right corner of your screen.
The gauge closes in a few seconds, or you can press <Esc> to close the gauge.
(See “Monitoring the Battery Charge” on page 37 for more information on the battery
gauge.)
<Fn+F8> Mute: Turns the audio output on and off.
<Fn+F9> Volume down: Decreases the audio volume.
<Fn+F10> Volume up: Increases the audio volume.
<Fn+F11> Rest: Puts the computer into Suspend mode. To resume normal operation from rest,
press the power button. (See “Using Power Management Options” on page 46 for
more information about the rest mode.)
<Fn+F12> Scroll: In some applications, sets the cursor-control keys to scroll the page up or
down while the cursor position does not change. Pressing <Fn+F12> again turns off
the scrolling function.
<Fn+Right
Arrow>
Brightness up: Increases the LCD brightness.
<Fn+Left Arrow> Brightness down: Decreases the LCD brightness.
16 Users Manual
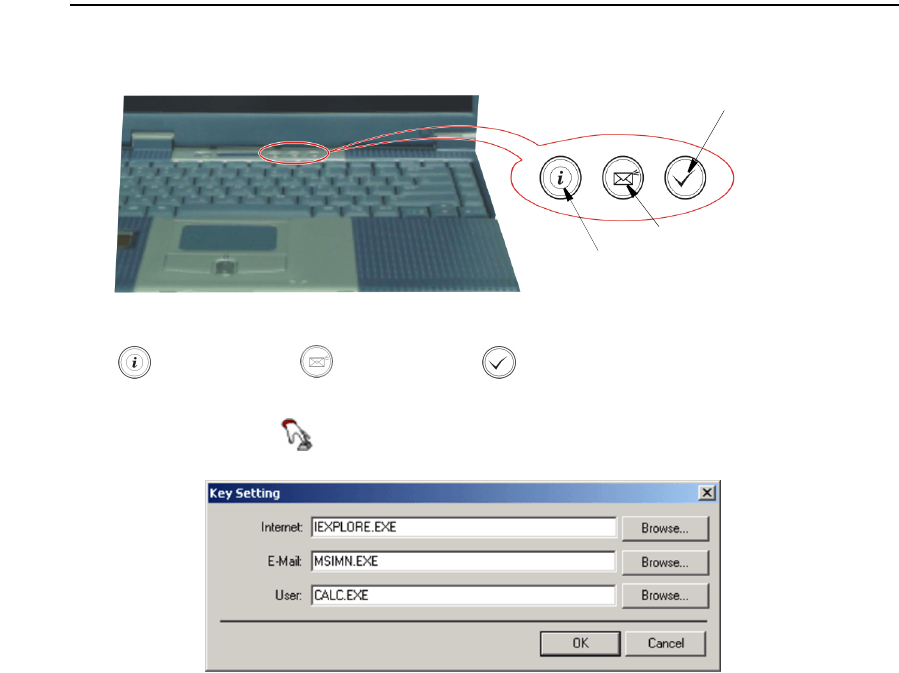
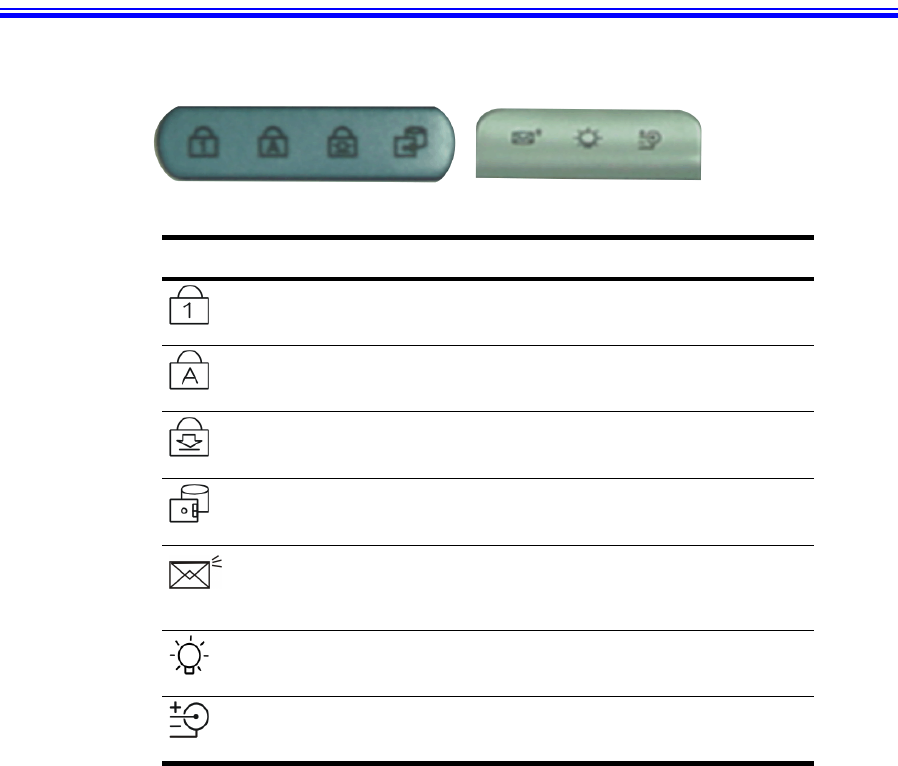
User Defined Buttons (SENS Keyboard)
You may program the three buttons to the left of the power button to start any program
you have installed on your computer.
The default settings for these buttons are:
To reprogram the Sens Keyboard, follow the steps below:
1. Double-Click icon on the Windows taskbar, the Key Setting window is
displayed.
2. Select Button you wish to reprogram from the drop down menus in the Key
Setting window.
3. Use the Browse button to locate the program you wish to assign to the SENS
Keyboard button selected.
4. Click on your program choice to select it.
5. Click Open.
6. Click OK to close window and complete programming the Sens Keyboard.
Internet E-Mail - Outlook Windows Calculator
Internet Explorer
Outlook Express
User defined program
Using the Touchpad 17
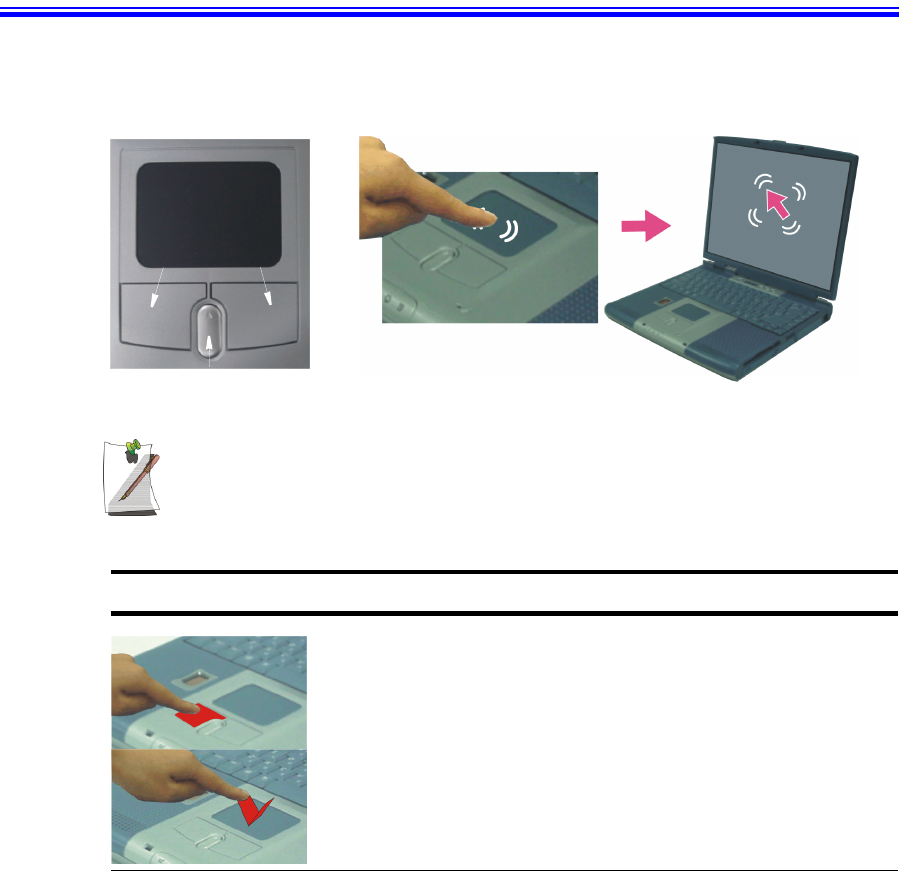
Using the Touchpad
Your computer is equipped with a touchpad, which is an integrated-pointing device
that is used to perform standard mouse functions. The touchpad is an advanced and
reliable pointing device that works with a touch of your finger.
Press on the touchpad gently. The touchpad responds to light pressure.
Table 3. Using the Touchpad
Action Process and Comment
Click/Tap Process
Depress the touchpad left button and release or position the pointer
over the object and Quickly tap the touchpad once with your finger.
This action is called clicking.
Comment
This will cause a process to begin or select an object on the screen.
Touchpad
Mouse buttons
Scroll button
18 Users Manual
PS/2 Mouse:
You may change the setup in Setup > Advanced Menu
Disabled prevents both the touchpad and external PS/2 port from functioning.
Single mouse (default) enables the external PS/2 port or the touchpad, and
external PS/2 port has priority. Dual Mouse allows the use of both the
touchpad and PS/2 port.
Double-Click/Tap Process
Quickly click the left touchpad button two times or position the pointer
over the object and Quickly tap the touchpad twice with your finger.
This action is called Double-clicking.
Comment
This will cause a process to begin or open a file folder.
Click-Hold Process
Depress the left touchpad button and do not release.
Comment
This is used to move/drag objects to new locations. See “Drag (Move)”
on page 19.
Right-Click Process
Position the pointer over the object. Quickly press and release the right
button once.
This action is called Right-clicking.
Comment
This is usually used to obtain information about an object or access a
short cut menu.
Scroll up Process
Place your finger on the top half of the button to scroll up the current
window.
Comment
Moves the current window down.
Scroll down Process
Place your finger on the bottom half of the button to scroll up the current
window.
Comment
Moves the current window up.
Action Process and Comment
Using the Touchpad 19
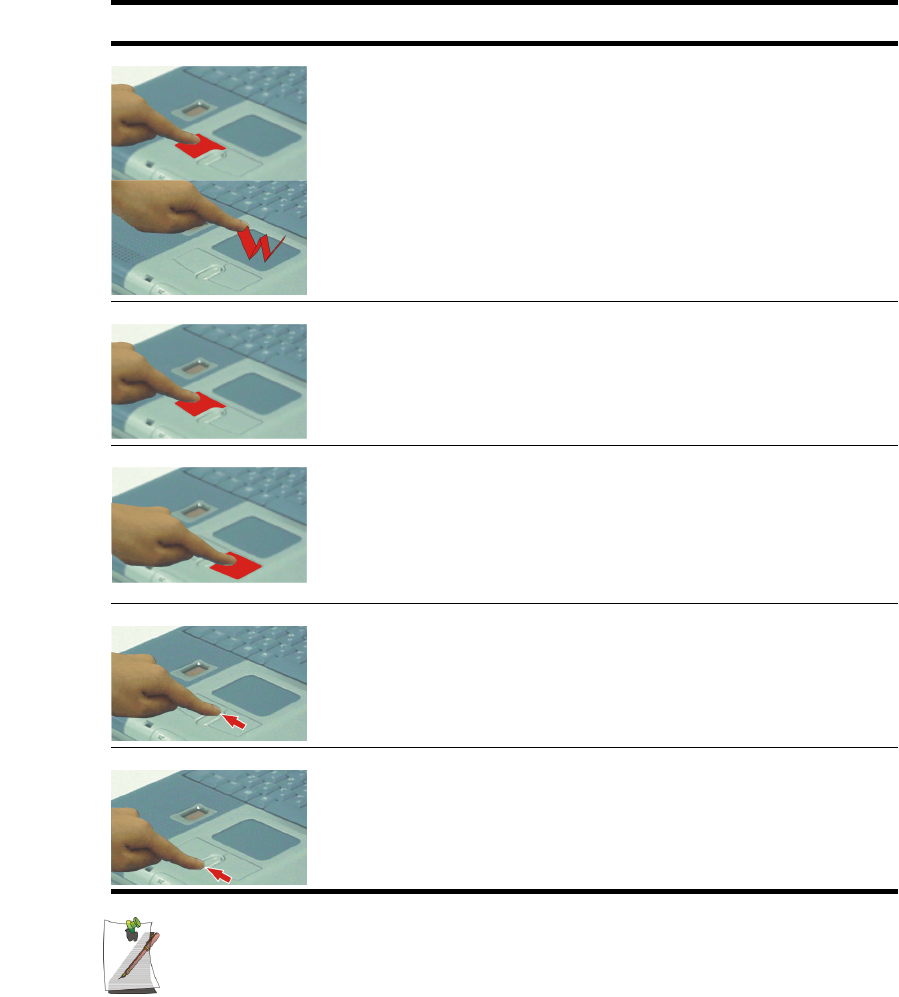
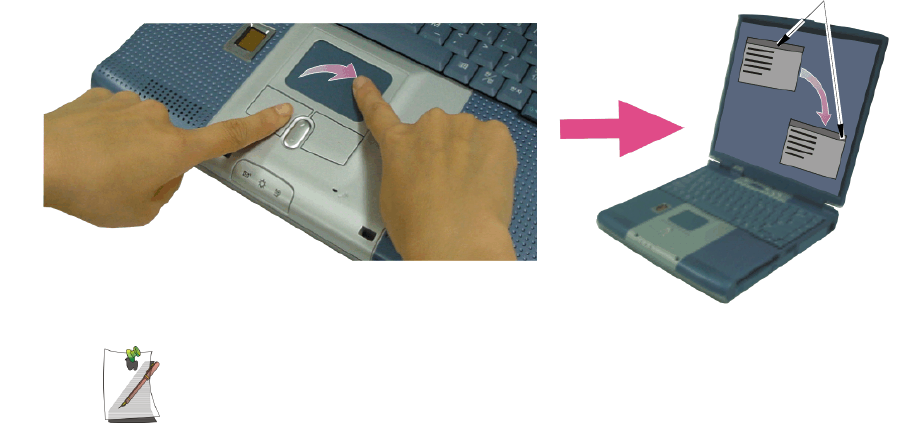
Drag (Move)
To move a window on the desktop, complete the following:
1. Click the window title bar or icon in the bottom of the window which you want
to drag using the touchpad.
2. Press the left touchpad button and hold it.
3. Drag the window using the touchpad.
Area or Multiple item selection:
The drag function may be used to select an area or multiple items in an area
by clicking in one area and then dragging to create a selection window. The
items inside the window will be selected.
Cursor in Windows
Title Bar
11 Click the Window
Title Bar and Hold
1
22 Drag your finger to
move the window
2
20 Users Manual
Reading the System Status Lights
System Status lights show the status of computer functions.
Table 4. System Status Lights
LED Name Function
Num Lock Changes a portion of the keyboard to a numeric keypad.
See “Using the Numeric Keypad” on page 14.
Caps Lock Changes all alpha or letter input into capital letters.
No changes occur to numeric and special keys.
Scroll Lock Scroll lock in certain software.
Drive Access Using the Disk Drives.
Blinking Green - HDD is being accessed
Blinking Amber - FDD or CD-ROM is being accessed
E-mail Alert The Light comes on when e-mail arrives.
To use this function, you must register an E-mail Account in the
Register E-mail Account window. To register an E-mail account
Select: Start > Programs > StartUp > Internet Launcher.
Power Green - System power on.
Blinking - Standby mode.
Battery
Status
Green - No battery pack installed/battery fully charged.
Red - Charging.
Connecting to the Internet 21
Connecting to the Internet
This section explains how to connect you to the internet. For details on how to establish
the connection contact the Internet Service Provider [ISP] or system administrator
[SysAdmin].
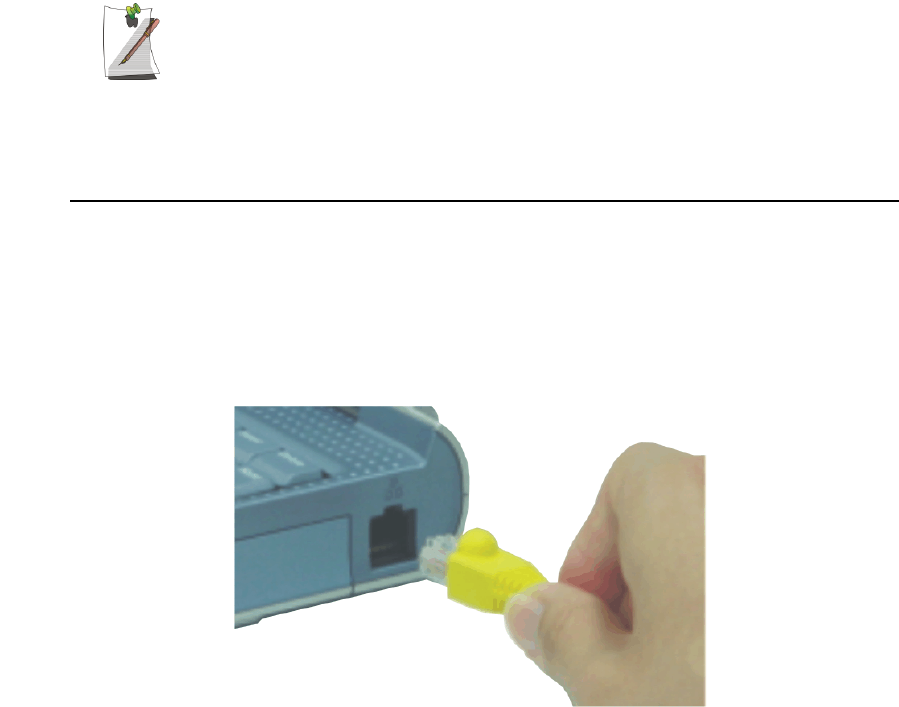
Using the Modem
Install the Modem cable by simply plugging the cable into the slot in the back of the
computer.
1. Contact your Internet Service Provider to obtain information or CD required to
make the connection in your area.
2. After the cable is connected create a “Dialup” connection by clicking Start >
Settings > Network and Dial-Up Connections.
3. Double-Click icon to pop up the connection wizard.
4. Follow the instructions in provided in the Make New Connection wizard.
Modem Cable
(Minimum 26 AWG)

22 Users Manual
Precautions Before Use
Country Selection
Country Selection:
Because your computer is very mobile you must ensure you select the country
you are calling from is selected correctly, otherwise you may experience
connection problems.
To change the country selection proceed as follows:
1. Click Start > Settings > Control Panel.
2. Click Phone and Modem Options.
3. Click on the connection you wish to edit in the Locations: box.
4. Click Edit
5. Select the Country/region you are calling from in the General tab.
6. Click OK to close the "Edit Locations" box.
7. Click OK to close “Phone and Modem Options” box.
Digital Phone Lines:
If you connect the modem to a digital phone line (such as a company
4-wire system), the modem may be damaged.
DOS support
•Windows 2000:Does not support pure DOS mode and the modem does not
support a DOS box in Windows. So you cannot use a
communication application which runs under DOS.
Using the Modem on a PBX system
If you use a Windows Communication Program:
1. Click Start > Settings > Control Panel.
2. Click Phone and Modem Options.
3. Click Properties in the Modems tab section.
4. Check off “Wait for dial tone before dialing” check box in the Modem tab
section.
5. Click OK to close the dialog box.
6. Click OK to close “Modem Properties” dialog box.
Connecting to the Internet 23
If you use a simple terminal program (i.e. hyper terminal):
Type the “ATX3&W” or “ATX3” command as an initialization command.
MODEM Notes:
1. In order to use the 56K feature, be sure to check if the standards supported
by the on-line service provider and the modem are identical.
2. If you use a PBX phone system, you can not connect using the 56K mode.
3. Internationally connected calls will be limited to 33.6K (Max.)
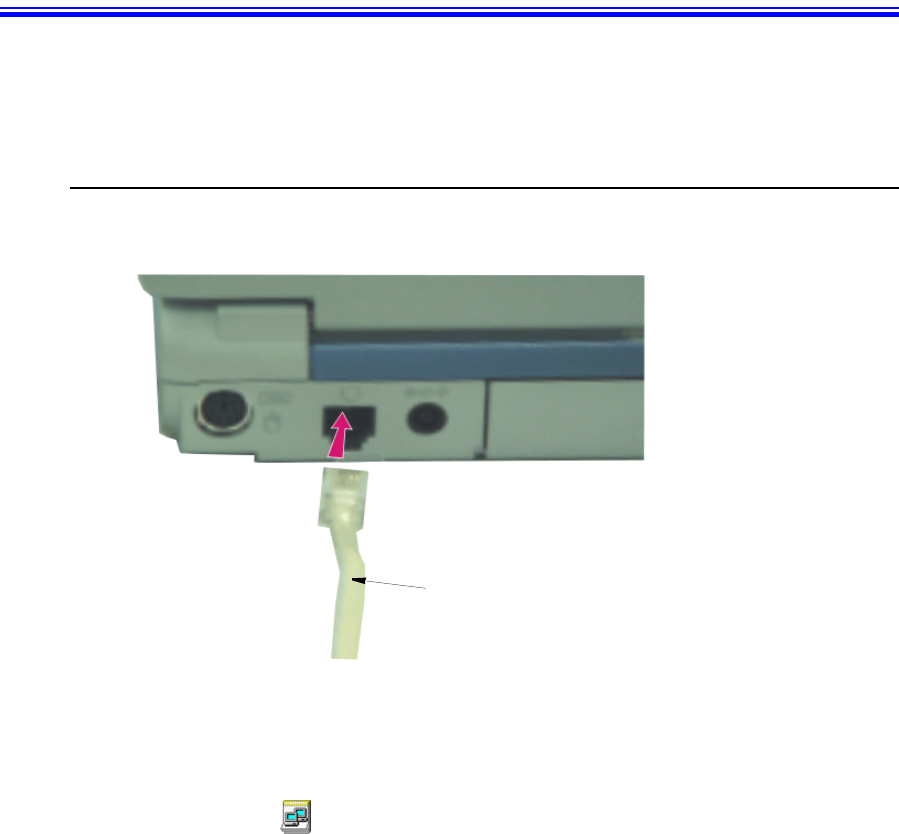
Using the LAN
You may connect to the network using either a LAN cable or by establishing a wireless
connection if factory option is installed..
Cable Connection
Install the LAN cable by simply plugging the cable into the slot in the right side of the
computer.
Your computer’s LAN adapter is ready to use for most situations, however if your
system does not have a DHCP server or you wish to personally configure your LAN
connection, proceed as outlined in “Configuring Network Environment” below.

24 Users Manual
Network Protocols:
You may need to consult your SysAdmin if their network protocols and settings
are required for your LAN environment.
Configuring Network Environment
Configure the Network Adapter as follows:
1. Click Start > Settings > Control Panel.
2. Double-Click Network and Dial-up Connections.
3. Right Click Local Area Connection > Properties.
4. Select Internet Protocol (TCP/IP) and click properties.
5. Select Use the following IP Address: then enter your IP address, Subnet mask
and Default gateway. If you use DHCP server, select Obtain an IP address
automatically.
6. Select Use the following DNS server address: and enter the address in the
Preferred DNS server and Alternate DNS server. If you use DHCP server,select
Obtain DNS server address automatically.
7. Click OK when you finish the TCP/IP setup.
Wireless Connection
If this factory option is installed, see the users manual included with the option to setup
and establish your connection. You should also consult your system administrator for
any questions you may have.
Using the Flex-Bay 25
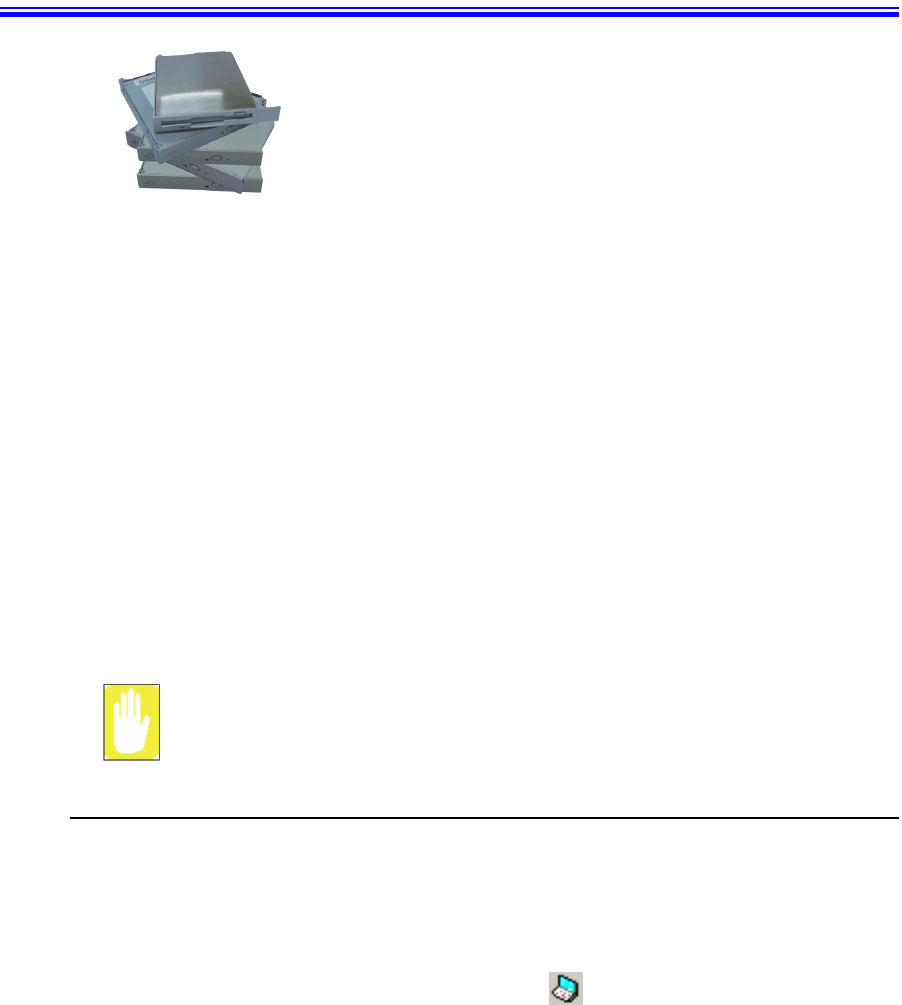
Using the Flex-Bay
If your operating system is Windows, you can use the Bay Manager Utility to
hot-swap the devices. If you do not use Windows, make sure that the
computer’s power is off before you remove or install any devices.
Remove/Install a Flex-Bay Device - Power On
You can use the Softex Bay Manager utility to hot-swap your devices in the flex-bay.
To start the Softex Bay Manager utility:
1. Click Start > Settings > Control Panel > Softex Bay Manager.
- or -
2. Double-Click the Softex BayManager icon in the windows taskbar.
The Flex-Bay provides an impressive array of secondary
storage devices listed below:
CD-ROM drive:
Shipped with some computers is also an available option.
CD-ROM R/W drive:
Shipped with some computers is also an available option.
DVD-ROM drive:
Shipped with some computers is also an available option.
DVD/CD-RW Combo drive:
Shipped with some computers is also an available option.
Optional secondary hard drive:
Available as an option for your computer.
Superdisk LS-120:
Available as an option for your computer
Second Battery:
Available as an option for your computer.
26 Users Manual
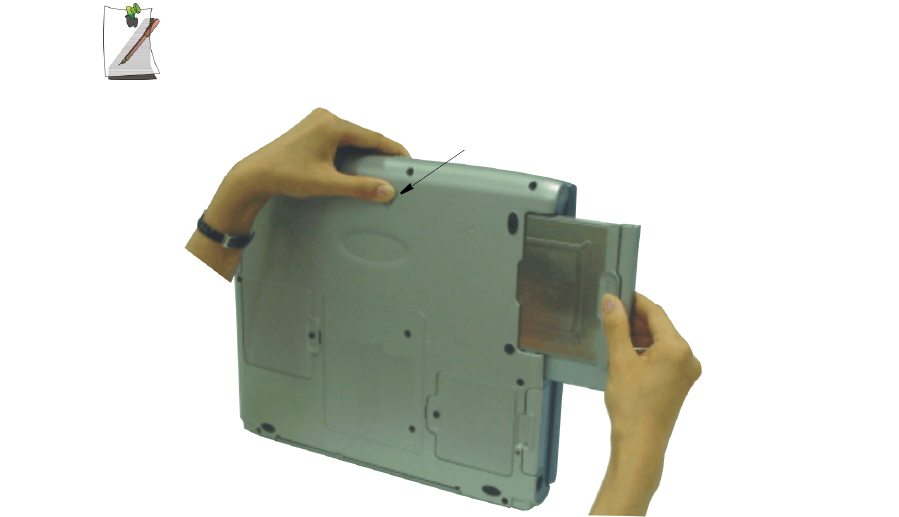
To remove a device:
1. Start the Softex Bay Manager Utility.
You do not have to turn the computer over or tip it on its side to change
devices. Simply tilt the computer up at the front about 10 cm and locate the
Flex-Bay latch. See Figure below for the location of the Flex-Bay latch. The
computer in the figure is tilted on its side for clarity.
2. Click Remove / Swap. A Device Change popup window stating, “Please wait until
the system processes the device change” appears then another popup window
appears and says, “Please remove or swap your bay device(s) now and press OK.”
3. Tilt the computer up & locate the smart bay latch.
4. Slide and hold the device latch toward the front of the computer.
5. Slide the device out.
6. Click OK. The message “Please wait until the system processes the device change”
appears again.
7. Click OK to close the Softex Bay Manager Utility.
Flex-Bay Latch

Using the Flex-Bay 27
To insert a device:
1. Open the Softex Bay Manager Utility.
You do not have to turn the computer over to change devices. Simply tilt the
computer up and locate the Flex-Bay latch. See “Bottom” on page 5 for the
location of the Flex-Bay latch.
2. Click Device Insert. A popup window appears stating “Please insert your device(s)
into the bay now and click OK.”
3. Insert the device.
4. Click OK to allow your computer to detect the device. The message “Please wait
until the system processes the device change” appears.
5. Click OK to close the Softex Bay Manager Utility.
Remove/Install a Flex-Bay Device - Power Off
Remove a Device:
1. Turn the computer’s power off.
2. Close the LCD panel, and turn the computer over so that the bottom of the unit
faces up.
3. Tilt the computer up & locate the smart bay latch.
4. Slide and hold the device latch toward the front of the computer.
5. Slide the device out.
Install a Device:
1. Turn the computer’s power off.
2. Carefully slide the device into the bay.
3. Push the device in until it is flush with the chassis and the Flex-Bay latch snaps
into place. Your computer’s operating system automatically recognizes the device
in the Flex-Bay and configures your computer accordingly when power is restored.
28 Users Manual
Using the Disk Drives
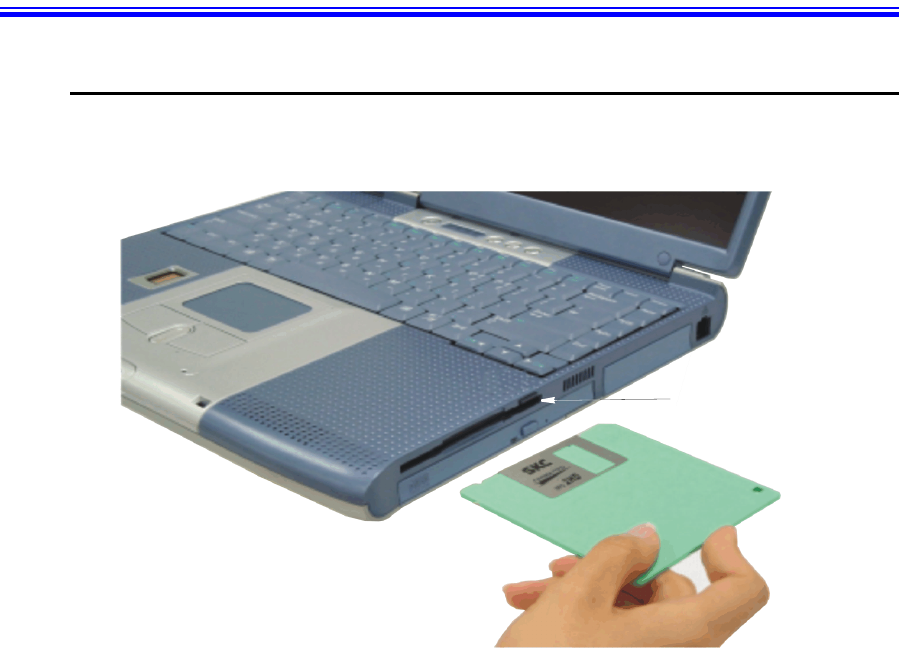
Using the Floppy Disk Drive
Your computer comes with a 1.44 MB, 3.5-inch, floppy drive.
To use a floppy disk in your computer, insert it into the floppy drive.
To remove a floppy disk, press the floppy disk eject button on the front of the floppy
drive.
To protect the data on your floppy disks, follow the manufacturers guidelines.
Floppy Disk Eject Button
Using the Disk Drives 29
Using the CD/DVD-ROM Drive
Compact discs are designed so that you can easily insert one into the computer when
you need it, and then remove it. See “Using the Flex-Bay” on page 25 for information
on installing the DVD-ROM drive into the computer.
DVD Notes:
A DVD player is a factory option and if you ordered this option you will have to
install the provided DVD software to view the DVD Title.
1. Press the button on the CD-ROM or DVD-ROM drive, and the tray slides out.
(Do not lean on the tray; because it will not support much weight.)
CD/DVD Drive Warnings:
Do not place reflective objects other than the CD/DVD disks in the disk slot
because of possible hazardous laser emissions. The laser beam used in this
CD/DVD-ROM drive is harmful to the eyes. Do not attempt to disassemble the
CD/DVD-ROM drive. Refer servicing to your authorized service center.
Do not touch the CD/DVD lens, doing so may damage the device.
CD/DVD Precautions:
The tray may be stuck, in which case straighten out a paper clip, insert
it into the Emergency Eject hole in the front of the CD/DVD-ROM and push it
until the tray ejects.
A LED on the drive tray is on when the computer is reading from a CD. Do not
remove a disc when this LED is on.
To clean a CD/DVD, wipe from the center outwards with clean and dry cloth.
Remove the CD/DVD when the drive activity LED is off.
2. Insert a CD/DVD, label side up (or remove a disc, if you have finished using it).
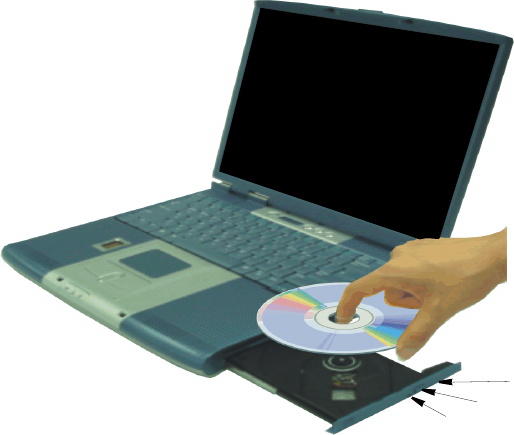
30 Users Manual
3. Push the tray in gently to close the drive tray.
Install and/or start a CD-based program as you would run a program on a floppy disk.
Eject Button
CD-ROM Light
Emergency eject button

Working with PC Cards 31
Working with PC Cards
When you install PC Cards, you can add a multitude of functions to your notebook
computer similar to those found on add-in boards for desktop computers. There are
many PC Cards on the market, the supported PC Cards are listed below:
•Input/output, such as modem, network, video capture, and SCSI cards.
•Storage, such as hard drive and flash memory cards.
Your computer includes the following PC Card support:
•Two PC-Card slots: You can install Type I, II, or III cards in the slots.
TYPE III Cards:
Type III cards are thicker than Types I and II. If you install a Type III card in the
bottom slot, you cannot install a card in the top slot.
•CardBus hardware and software: CardBus enables the computer to use 32-bit
PC Cards. Windows 2000 supports 32-bit and 16-bit PC Cards.
•Zoomed video: Both PC Card slots and the video chip on your computer
support zoomed video. When you install a zoom video PC Card in the upper or
lower slot, data can be transferred directly from the PC Card to video and audio
systems without going through the microprocessor. Video conferencing and
real-time multimedia devices, such as video cameras, are supported by zoomed
video.
Maintaining PC Cards
To maintain your PC Cards, follow these guidelines:
•Keep cards away from excessive heat, direct sunlight, and liquids.
•Do not drop, bend, flex, or crush cards when handling.
•Keep dust, magnets, and static electricity away from PC Cards.
•When a card is not in use, carry it in its protective carrying case.
•Some PC Cards include cables that extend from the back of the cards. Be
careful not to bend or put excessive strain on these cables.
32 Users Manual
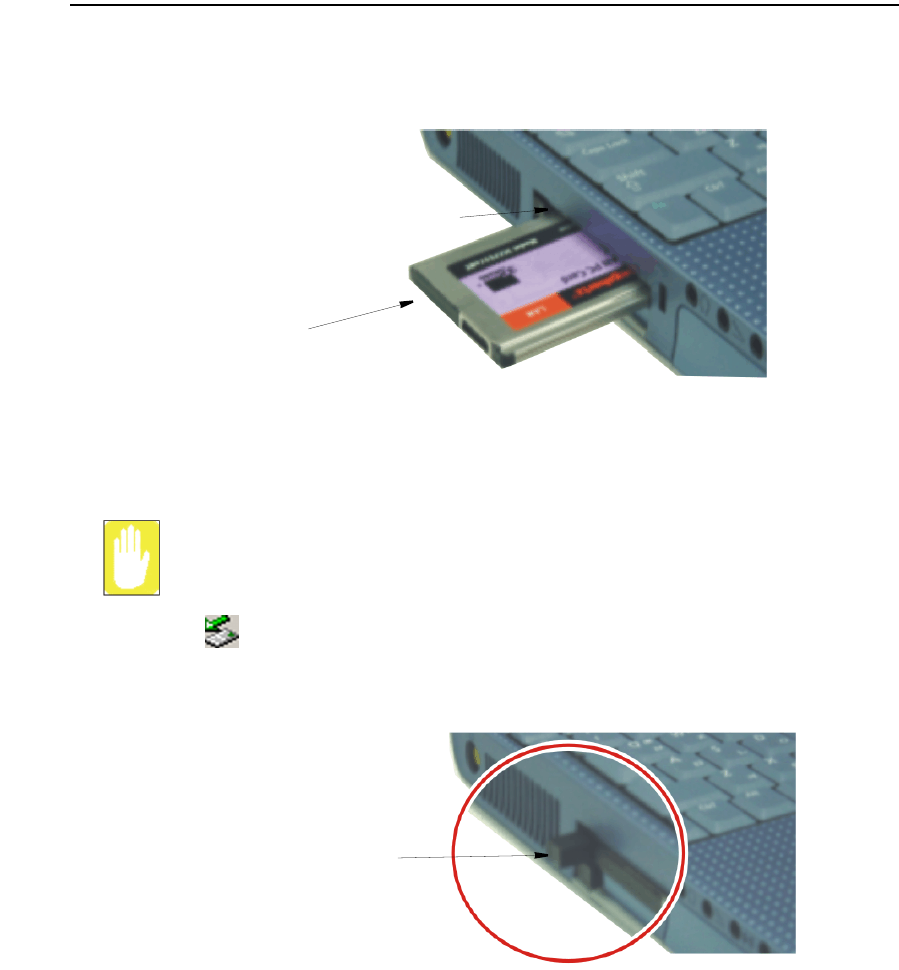
Using PC Cards
To insert a PC Card into a slot:
1. Push the slot door in with the PC Card.
2. Align the card with a slot and insert the card into the slot until it locks in place.
Windows automatically assigns computer resources (such as communication ports and
memory addresses) to a PC Card installed in your computer.
To remove a PC Card from your computer:
Use the following procedures to remove PC Cards, or you may lose data that
is being stored to a card.
1. Click icon on the taskbar.
2. Select the card currently in use, and click the Stop button.
The eject button for the card slot operates in two steps, therefore to remove a PC Card:
3. Push the eject button once to pop it outward then push the eject button again to
eject the card.
4. Pull the card out of the PC Card slot.
PC Card Eject Buttons
PC Card: (Example)
Insert PC Card with product
information facing up
PC Card Eject Buttons

Multi Media Functions/Equipment 33
Multi Media Functions/Equipment
Media Player
You can play video and audio CD files with the Windows Media Player, as well as
watching TV, video and listening to the radio through internet. The on-board audio
hardware and software of your computer enable the computer to play audio/video
compact discs. The instructions to play a video CD-ROM are the same as the
instructions for the audio CD below. If you wish to do so, you can attach external
speakers to the Headphone jack.
Playing a Audio/Multimedia CD
To play an CD follow the instructions below:
1. Insert a compact disc into your CD-ROM drive.
2. Press the button on the CD-ROM drive to open the CD-ROM device.
3. Insert a CD, label side up.
4. Carefully push the tray in to close the drive tray. The Windows Media Player
button appears on the taskbar if not already there, and the music begins to play. If
the disk does not play click Start > Programs > Accessories > Entertainment >
Windows Media Player.
CD LED On:
A LED on the drive tray is on when the computer is reading from a CD. Do not
remove a disc when this LED is on.
Removing the Audio/Multimedia CD
To remove the CD follow the instructions below:
1. Click Start > Programs > Accessories > Entertainment > Windows Media
Player to open the Windows Media Player window, if not already open.
2. Click Stop in the Windows Media Player window or simply close the Windows
media player.
3. Press the button on your CD-ROM drive. The drive tray opens and you can remove
the CD from the CD-ROM drive.
4. For more information on playing compact discs, see the Help menu in the
Windows Media Player window.

34 Users Manual
Dolby Digital & Dolby Theater System
Your computer supports Dolby Digital & Dolby Theater System through a SPDIF
connector, located next to the volume control wheel on the left side of the computer.
You must have a 3.5 mm (mono)- to RCA cable to use this port.
Volume Control
Using the Wheel Volume Control
Simply turn the wheel located on the left side of the computer.
Using the Keyboard
Changing the volume with your keyboard.
Use <Fn+F9> to decrease the volume or <Fn+F10> to increase the volume.
Using the Volume Control Icon
Double-Click icon in the active program tray. The Volume Control window pops
up. Use this window to adjust the volume. You can pop up a simple volume slider by
a single click icon.
Wheel Volume Control