Seal Electronics Asia E-CSM-0003 Wireless Camera User Manual Manual
Seal Electronics Asia Limited Wireless Camera Manual
Manual

Please read all instructions and warnings carefully. Keep
this instruction manual for future reference.
User’s Guide
Deluxe Baby Monitor Set
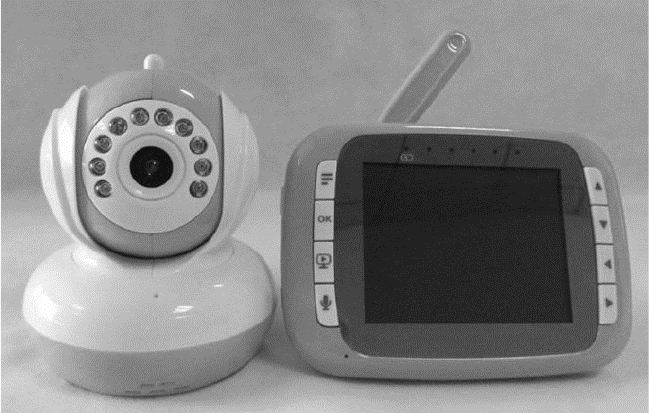
Congratulations on your purchase of the Deluxe Baby Monitor Set. This
product uses the latest 2.4GHz wireless technology to enable you to see and hear
your baby sleeping in another room or monitor your older children in the
playroom. Infrared LED’s on the camera makes the baby visible both day and
night. Both the camera and monitor have rechargeable batteries which makes the
set portable and possible to operate cordless.
We want you to fully enjoy this product for a long time. Please read this user’s
guide completely to learn about the features and controls of the product.

Important Safety Instructions
WARNING
• Some adult assembly or installation required.
• This product contains small parts that may cause choking. Keep small parts
away from children.
• This product is NOT intended to replace proper supervision of children.
• You MUST check your child’s activity regularly, as this product will not alert
parents to silent activities of a child.
• Before using this product, read and follow all instructions contained in this booklet, and read and
follow all instructions and warnings on the product.
• To prevent entanglement with adapter cords, NEVER PLACE THE CORD IN OR NEAR A CRIB OR
PLAYPEN. DO NOT place the product or its AC adapter cords within reach of children.
• ALWAYS KEEP THE CAMERA, MONITOR AND AC ADAPTERS OUT OF REACH OF CHILDREN.
• NEVER use the camera or monitor near water, including near a bathtub, sink, laundry tub, wet
basement, etc.
• This product is intended for indoor use only.
• This product is not intended for use as a medical monitor and its use should not replace adult
supervision.
• Check reception regularly. Test monitor before use and after changing camera location.
• Always unplug AC adapters from wall outlets and power sources during periods of non-use.
• To prevent overheating, keep the product and AC power adapters away from any direct sunlight
and heat sources such as radiators, heat registers, cooking devices (e.g., stoves and ovens) and
other appliances that produce heat (e.g., amplifiers, televisions and stereos).
• Ensure that the product is well ventilated during use. Avoid contact with pillows and furniture
that may block ventilation.
• Use only the AC adapters provided with the product, as other adapters may damage the product.
Plug the adapters only into standard household current.
• Place the AC adapters avoiding pinch points otherwise you can damage the adapters.
• When an AC adapter is plugged into a power source, DO NOT touch the exposed end of the AC
adapter’s cord.
• Do not use extension cords with the AC power adapters to avoid entanglement.
• This product should only be serviced by qualified and authorized Samsung service centers.
• Images and sounds are transmitted by the product over public airwaves and transmissions may
be picked up by other units.
• Caution if you use the system to watch a young child, do not place the camera where the child
can reach.
• When using the system with only battery power and the charge is low, then the picture and or
sound may affected.
• If this occurs then please connect the AC power adapter and/or replace with new batteries.
• If you are using the optional rechargeable battery then plug in the AC power adapter to
recharge.
NOTE
• The wireless signal transfer range may be shortened if there exists an obstacle such as a
concrete wall between.
WARNING
STRANGULATION HAZARD – Keep the unit and adapter cord more than 3 feet from the
crib and out of baby’s reach.
NEVER place the camera or cords within the crib. Secure the cord more than 3 feet away from baby’s
reach.
Contents
Page
Contents ---------------------------------------------------------------------------------------------------------- 1
01 System overview
Overview of the monitor --------------------------------------------------------------------------------------- 2
Overview of the camera --------------------------------------------------------------------------------------- 3
02 Getting started
Setting up -------------------------------------------------------------------------------------------------------- 5
Camera power supply ------------------------------------------------------------------------------------------ 5
Monitor power supply ------------------------------------------------------------------------------------------ 5
Pairing ------------------------------------------------------------------------------------------------------------ 6
Viewing video through TV ------------------------------------------------------------------------------------- 6
03 Using the camera
Pan and tilt ------------------------------------------------------------------------------------------------------ 7
Night vision mode ---------------------------------------------------------------------------------------------- 7
Talk mode -------------------------------------------------------------------------------------------------------- 7
LCD on/off ------------------------------------------------------------------------------------------------------- 7
VOX function ---------------------------------------------------------------------------------------------------- 7
Temperature display ------------------------------------------------------------------------------------------- 7
04 Monitor menu options
Volume ----------------------------------------------------------------------------------------------------------- 8
Brightness -------------------------------------------------------------------------------------------------------- 8
Lullaby ------------------------------------------------------------------------------------------------------------ 8
Zoom ------------------------------------------------------------------------------------------------------------- 8
Alarm ------------------------------------------------------------------------------------------------------------- 8
Camera control -------------------------------------------------------------------------------------------------- 8
05 Additional information
Cleaning ---------------------------------------------------------------------------------------------------------- 10
Troubleshooting ------------------------------------------------------------------------------------------------- 10
Specification ----------------------------------------------------------------------------------------------------- 11
1

01 System overview
Overview of the monitor
NOTE
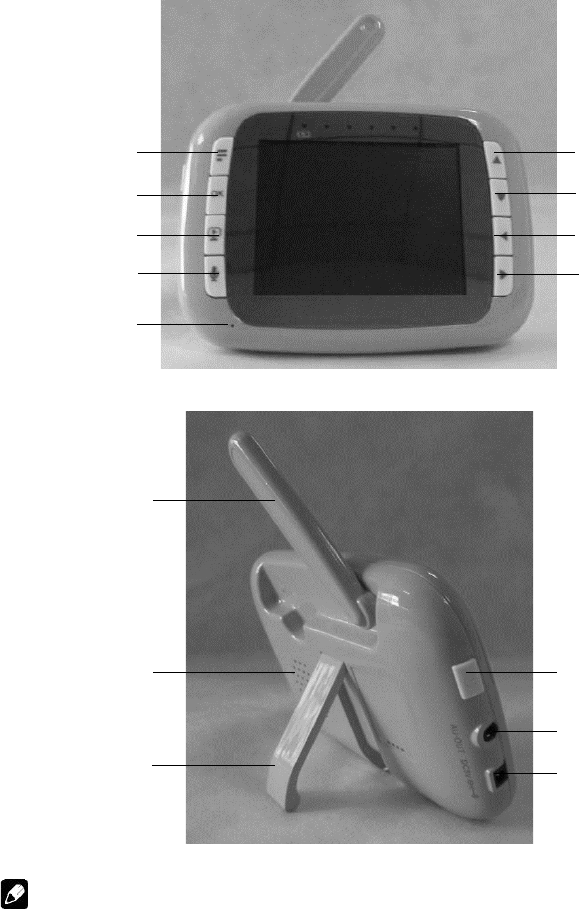
• Do not pull up the stand lever with an excessive force. Otherwise, it may be broken.
MENU KEY
OK KEY
LCD ON/OFF KEY
TALK KEY
UP KEY
DOWN KEY
LEFT KEY
RIGHT KEY
MICROPHONE
SPEAKER
STAND LEVER
POWER ON/OFF KEY
AV OUT JACK
5V DC JACK
ANTENNA
2

Part Function
MENU BUTTON Press to open the Menu options.
OK BUTTON Press to confirm command or selection.
LCD ON/OFF BUTTON Press to turn on/off the LCD display.
TALK BUTTON Press and hold to talk to your baby.
UP BUTTON
Normal Mode: Tilt Up
Menu Mode: Up
DOWN BUTTON
Normal Mode: Tilt Down
Menu Mode: Down
LEFT BUTTON
Normal Mode: Pan Left
Menu Mode: Left
RIGHT BUTTON
Normal Mode: Pan Right
Menu Mode: Right
POWER ON/OFF BUTTON Press and hold to switch on/off the unit.
AV OUT JACK Connect AV cable here.
5V DC JACK Connect AC power adaptor here.
Overview of the camera
NOTE
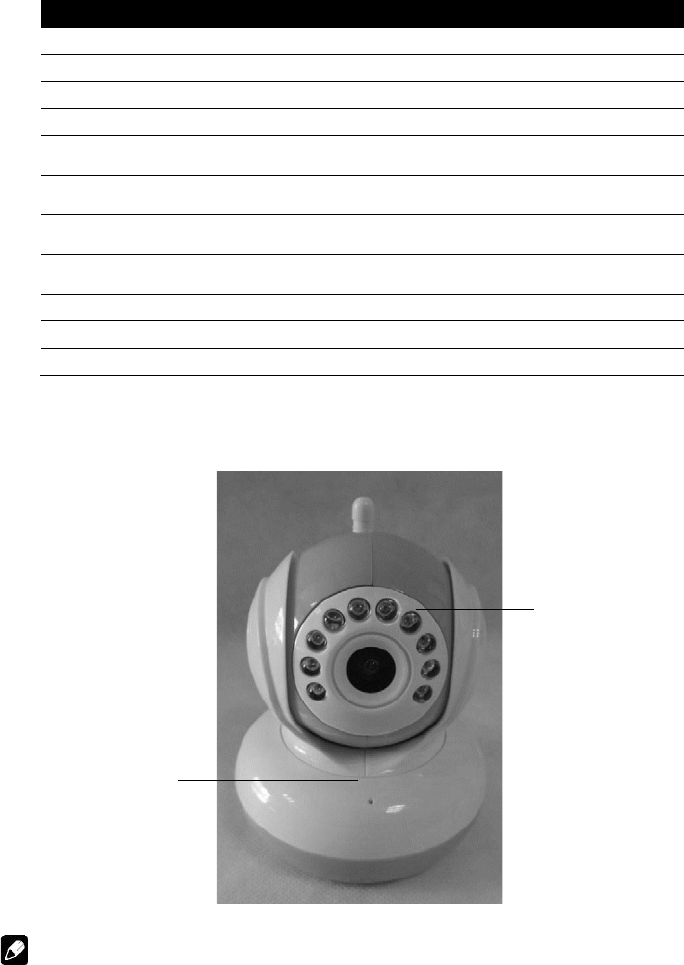
• The IR LEDs will be activated in a low contrast scene and cause an increase of the temperature,
which may affect the temperature sensor.
• The IR LEDs will not emit visible light.
IR LEDs
MICROPHONE
3

Part Function
IR LED Infrared LED’s provide viewing in no/low light conditions.
MICROPHONE
Receives sounds for the area near the camera, and transmits
sound from the camera to the monitor.
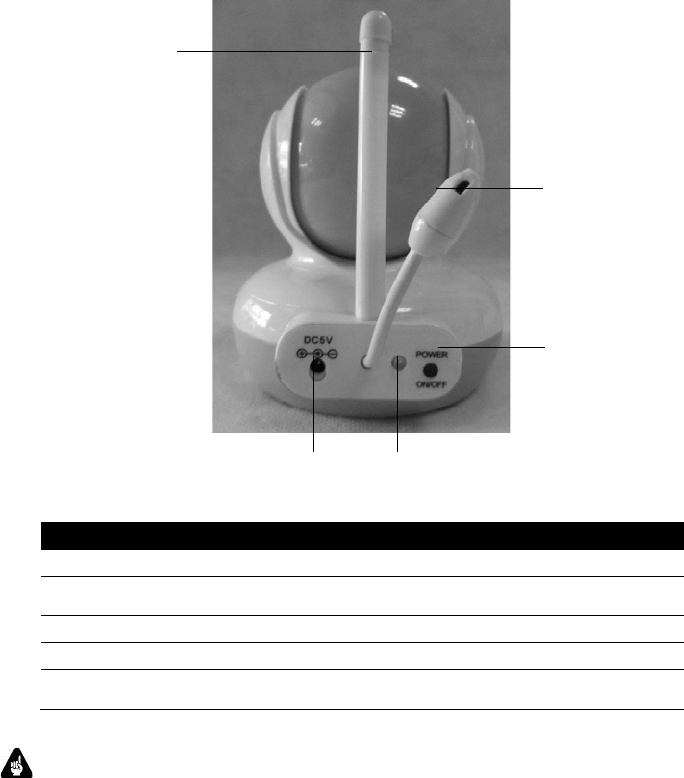
ANTENNA Sends & receives signals to or from the monitor.
5V DC JACK Connect AC power adaptor here.
POWER ON/OFF
BUTTON
Press and hold for 2 seconds to switch on/off the unit.
Press twice to enter PAIRING mode.
IMPORTANT
• To use your camera and monitor together, you must be able to establish a radio link between
them, and the range will be affected by environmental conditions.
• Any large metal object, like a refrigerator, a mirror, a filing cabinet, metallic doors or reinforced
concrete between the baby and monitor.
• Unit may block the radio signal.
• The signal strength may also be reduced by other solid structures, like walls, or by radio or
electrical equipment, such as TVs, computers, cordless or mobile phones, fluorescent lights or
dimmer switches.
• Use of other 2.4GHz products, such as wireless networks (WiFi routers), Bluetooth® systems, or
microwave ovens, may cause interference with this product, so keep the camera away at least
5ft (1m) from these types of products, or turn them off if they appear to be causing interference.
• If the signal is weak, try moving the monitor and/or the camera to different positions in the
rooms.
5V DC JACK POWER LED
ANTENNA
TEMPERATURE
SENSOR
POWER ON/OFF KEY
4

02 Getting started
Setting up
Place the camera in a convenient location (e.g. on a table) and point the camera lens towards the
area you want to monitor. Adjust the camera’s head angle by rotating the camera up, down, left and
right until you are satisfied with the image in the monitor.
IMPORTANT
• Do not place the camera within baby's reach! If there is interference with the picture or sound,
try moving the units to different locations, and ensure they are not close to other electrical
equipment.
Camera power supply
IMPORTANT
• Only use the included AC power adapter for the camera.
1. Connect the small plug of the power adapter (marked for CAMERA) to the camera and the other
end to the electrical outlet.
2. Press and hold for 2 sec the POWER ON/OFF button. The Power LED will light up in green.
3. Press for 2 sec the POWER ON/OFF button to turn the camera off.
IMPORTANT
• Charging the built-in battery pack fully before use is recommended. This allow the unit to
operate on battery in the event of power failure.
NOTE
• The Power LED at the back of the camera will flicker to indicate that the battery is low. The
battery needs to be recharged.
Monitor power supply
IMPORTANT
• Only use the included AC power adapter for the monitor.
1. Connect the small plug of the power adapter (marked for MONITOR) to the monitor and the
other end to the electrical outlet.
2. Press and hold the POWER ON/OFF button.
3. Once the camera and monitors are switched on, the display on the monitor will show the video
captured by the camera.
4. If there is no connection or you are out of range, the video display will go off and the words NO
SIGNAL will be shown on the LCD display, and the unit will beep every 5 seconds. Move the
monitor closer to the camera until the link is re-established.
5. Press and hold the POWER ON/OFF button until the progress bar finishes scrolling to turn OFF
the monitor.
IMPORTANT
• Charging the built-in battery pack fully before use is recommended. This allow the unit to
operate on battery in the event of power failure.
5

NOTE
• The battery icon turns RED to indicate that the battery is low, and it gives a beep every 16
seconds. The battery needs to be recharged.
When charging
1. During power OFF, when adapter is plugged in, an adapter logo will display on screen and then a
flashing battery logo will display for 45 sec. The blue LED at top left corner light up indicates
adapter is plugged in.
2. During power ON, when adapter is plugged in, the battery icon on screen’s top right corner will
show that the battery is charging. The blue LED at the top left corner light up indicates adapter
is plugged in.
Pairing
The camera is pre-registered to your monitor. You do not need to register it again unless the camera
loses its link with the monitor.
To re-register your camera, or register a new camera, follow the procedure below:
1. Press the MENU button of the monitor and the menu bar will pop up.
2. Press the LEFT button or RIGHT button until CAMERA ICON is highlighted, and the
del/add/view/scan menu will pop up.
3. Press the UP button or DOWN button to select ADD, and press the OK button to confirm.
4. CAM 1 / CAM 2 / CAM 3 / CAM 4 will pop up, press the UP button or DOWN button to select the
desired CAM and press the OK button to start searching for a camera unit.
5. PRESS PAIR CAM will display on the LCD. It means the monitor is in PAIRING status.
6. Press the POWER ON/OFF button behind the camera twice. The Power LED will flicker until the
monitor finds the camera. Then video from the camera will display.
NOTE
• If a particular camera was registered previously, registering this current camera again will
overwrite the old registration.
Viewing video through TV
Connect the included AV cable into the AV OUT socket on the side of the monitor and into the AV
input of the TV. Scroll through the AV inputs on the TV menu until the camera picture is visible.
NOTE
• The monitor's power button must be turned ON and CAM pre-selected before connecting the AV
cable. Once the AV cable is connected, the monitor's controls cannot be activated.
6
03 Using the camera
Pan and tilt
The camera can be remotely controlled from the monitor.
1. Press the UP button or DOWN button to tilt upward or downward.
2. Press the LEFT button or RIGHT button to pan left or right.
Night vision mode
The camera has 8 high-intensity infrared LEDs for picking up clear images in the dark. When the built-
in photo sensor detects a low level of ambient light, the LEDs will automatically activate and the
screen on the monitor will display in black and white. The MOON icon will be displayed on the screen.
Talk mode
Press and hold the TALK button on the monitor to talk to your baby through the camera’s
loudspeaker. The TALK icon will be displayed at the top of the LCD screen.
LCD on/off
Press LCD ON/OFF button to turn the LCD display on or off, but will still leave the audio monitor on.
VOX function
If cannot detect any noise in baby room, VOX function will activate automatically and will turn off the
LCD to save monitor battery. If you want to see your baby, you can press the LCD ON/OFF button to
turn on the display. The LCD will turn on automatically when the camera detects voice in the baby
room.
Temperature display
The temperature reading from the temperature sensor at the back of the camera will be displayed at
the top of the LCD screen. The readings will turn RED if the temperature goes above 29ºC / 84ºF or
below 14ºC / 57ºF.
7

04 Monitor menu options
Volume
1. Press the MENU button and the menu bar will pop up.
2. Press the LEFT button or RIGHT button until VOLUME ICON is highlighted.
3. Press the UP button or DOWN button to select the desired volume level from level 1 ~ 8. (The
default volume level setting is level 4.)
Brightness
1. Press the MENU button and the menu bar will pop up.
2. Press the LEFT button or RIGHT button until BRIGHTNESS ICON is highlighted.
3. Press the UP button or DOWN button to select the desired brightness level from level 1 ~ 8.
(The default brightness level setting is level 4.)
Lullaby
1. Press the MENU button and the menu bar will pop up.
2. Press the LEFT button or RIGHT button until LULLABY ICON is highlighted.
3. Press the UP button or DOWN button to select the desired song from the 3 lullabies available, or
the cycle option to play all 3 songs in turn. If an individual song is selected it will only play once
and then stop. (The default setting is lullaby OFF)
4. Press OK on the selected lullabies to select the desired song sound level.
Zoom
1. Press the MENU button and the menu bar will pop up.
2. Press the LEFT button or RIGHT button until ZOOM ICON is highlighted.
3. Press the UP button or DOWN button to select the 1X or 2X Zoom. (The default setting is 1X.)
Alarm
1. Press the MENU button and the menu bar will pop up.
2. Press the LEFT button or RIGHT button until ALARM ICON is highlighted.
3. Press the UP button or DOWN button to select the alarm time (6h, 4h, 2h). (The default setting
is Alarm OFF.)
If an alarm time is selected, the monitor will beep for about 45 seconds after every 6, 4 or 2 hour
period, and the alarm icon will flash red.
Camera control
Add (pair) a camera
1. Press the MENU button and the menu bar will pop up.
2. Press the LEFT button or RIGHT button until CAMERA ICON is highlighted, and the
del/add/view/scan menu will pop up.
3. Press the UP button or DOWN button to select ADD, and press the OK button to confirm.
4. CAM 1 / CAM 2 / CAM 3 / CAM 4 will pop up, press the UP button or DOWN button to select the
desired CAM, and press the OK button to start searching for a camera unit. The green audio
level LED will flash rapidly while searching.
5. Press the POWER ON/OFF button behind the camera twice. The Power LED will flicker until the
monitor finds the camera. Then video from the camera will display.
NOTE
• A camera can only be registered to one monitor at any one time.
8

View a camera
1. Press the MENU button and the menu bar will pop up.
2. Press the LEFT button or RIGHT button until CAMERA ICON is highlighted and the
del/add/view/scan menu pops up.
3. Press the UP button or DOWN button to select VIEW, and press the OK button to confirm.
4. CAM 1 / CAM 2 / CAM 3 / CAM 4 will pop up, press the UP button or DOWN button to select
desired CAM, and press the OK button to view the picture from that camera.
NOTE
• Quick Method to View Cameras instead of entering into the menu bar. Directly press OK
repeatedly to select CAM 1, CAM 2, CAM 3, CAM 4, SCAN.
Delete a camera
1. Press the MENU button and the menu bar will pop up.
2. Press the LEFT button or RIGHT button until CAMERA ICON is highlighted, and the
del/add/view/scan menu will pop up.
3. Press the UP button or DOWN button to select DEL, and press the OK button to confirm.
4. CAM 1/CAM 2/CAM 3/CAM 4 will pop up, press the UP button or DOWN button to select the
desired CAM, and press the OK button to delete that registration.
Scan camera
1. Press the MENU button and the menu bar will pop up.
2. Press the LEFT button or RIGHT button until CAMERA ICON is highlighted, and the
del/add/view/scan menu will pop up.
3. Press the UP button or DOWN button to select SCAN, and press the OK button to confirm.
4. The screen will then display images from different registered cameras in a loop of CAM 1/CAM
2/CAM 3/CAM 4, changing about every 12 seconds.
NOTE
• Quick Method to View Cameras instead of entering into the menu bar. Directly press OK
repeatedly to select CAM 1, CAM 2, CAM 3, CAM 4, SCAN.
9
05 Additional information
Cleaning
Clean the camera/monitor with a slightly damp cloth or with an anti-static cloth. Never use cleaning
agents or abrasive solvents.
• Do not clean any part of the camera/monitor with thinners or other solvents and chemicals - this
may cause permanent damage to the product which is not covered by the warranty.
• Keep your camera/monitor away from hot, humid areas or strong sunlight, and don’t let it get
wet.
• Every effort has been made to ensure high standards of reliability for your camera/monitor.
However, if something does go wrong, please do not try to repair it yourself - contact Customer
Service for assistance.
Troubleshooting
No display
• Try recharging the battery pack.
• Reset the units. Unplug both the units’ electrical power, then plug them back in.
• Is the unit turned on? Press and hold the POWER ON/OFF button on the monitor to turn it ON.
• Is the correct camera selected? Change the camera number, if necessary.
• Is the video display turned on? Press the LCD ON/OFF button to turn it on.
• When operating using batteries, only the display will go blank after 2 minutes to save power.
The unit is still active and will give you audio alerts. You can reactivate the screen by pressing
any button.
If the camera has lost its link with the monitor
• Try recharging the battery pack.
• If the camera is too far away it may be going out of range, so move the camera closer to the
monitor.
• Reset the units by disconnecting them from electrical power. Wait about 15 seconds before
reconnecting. Allow up to one minute for the camera and the monitor to synchronize.
• See “Pairing” section, if there is a need to re-register the units.
Noise interference on your monitor
• Your camera and monitors may be too close. Move them farther apart.
• Make sure there is at least 3 to 6 feet between the 2 units to avoid audio feedback.
• If the camera is too far away it may be out of range, so move the camera closer to the monitor.
• Make sure the camera and monitors are not near other electrical equipment, such as a television,
computer or cordless/mobile telephone.
• Use of other 2.4GHz products, such as wireless networks (WiFi routers), Bluetooth® systems, or
microwave ovens, may cause interference with this product, so keep the camera away at least
5ft (1m) from these types of products, or turn them off if they appear to be causing interference.
• If the signal is weak, try moving the monitor and/or camera to different positions in the rooms.
Picture appears to be grainy when viewing through TV
The purpose of the AV output is for convenience only. When using with large screen TV, the picture
might be grainy as the camera limits video resolution to VGA (640x480 pixels). This is not a product
defect.
• For best performance use with TV PIP (Picture in Picture) function. Check your TV product
manual to see if this feature is available on your TV.
• View video on a smaller screen TV.
10
Specification
General
Transmission frequency : 2400-2480MHz
Transmission power : 17dBm
Operating frequency : 2410MHz
Unobstructed effective range : 250 m
Modulation mode : FHSS
Operating temperature : 0-60°C
Storage temperature : 25°C
Operating humidity : 20-80% RH
Camera
Imaging sensor type : ¼ CMOS
Horizontal resolution : 360 lines
View angle : 60°
Minimum illumination : 1.5 lux
Bandwidth : 4MHz
Night vision range : 3-5 m
Battery working time : 2 hours
VOX : >10 m
Sound control sensitivity : >60 dBA
Consumption current : 220mA±15mA
Power supply : DC 5V
Frame rate : 25 fps
Dimension (W x D x H) : 98 x 89 x 85 mm
Weight : 205 g
Receiver
LCD screen type : 3.5” TFT LCD
Effective pixels : 320 x 240
Receiving sensitivity : -85 dBm
Battery working time : 8 hours
Color configuration : RGB
Consumption current : 200mA±15mA
Power supply : DC 5V
Dimension (W x D x H) : 125.2 x 90.3 x 23.1 mm
Weight : 155 g
11
FCC Statement:
This equipment has been tested and found to comply with the limits for a Class
B Digital Device, pursuant to Part 15 of the FCC Rules. These limits are
designed to this equipment generates, uses, and can radiate radio frequency
energy and, if not installed and used in accordance with the instructions, may
cause harmful interference to radio communications. However, there is no
guarantee that interference will not occur in a particular installation. If this
equipment does cause harmful interference to radio or television reception,
which can be determined by turning the radio or television off and on, the user
is encouraged to try to correct interference by one or more of the following
measures:
• Reorient or relocate the receiving antenna.
• Increase the separation between the equipment and receiver.
• Connect the equipment into an outlet on another circuit.
• Consult the dealer or an experienced radio/TV technician for help.
Caution: Any changes or modifications not expressly approved by the party
responsible for compliance could void the user's authority to operate this
equipment.
This device complies with Part 15 of the FCC Rules. Operation is subject to the
following two conditions: (1) this device may not cause harmful interference
and (2) this device must accept any interference received, including
interference that may cause undesired operation.