SkyHawke Technologies M15-389DSW2 Golf GPS Watch User Manual
SkyHawke Technologies, LLC Golf GPS Watch Users Manual
Contents
- 1. Users Manual
- 2. User manual_revised0318
Users Manual
USER GUIDE
2
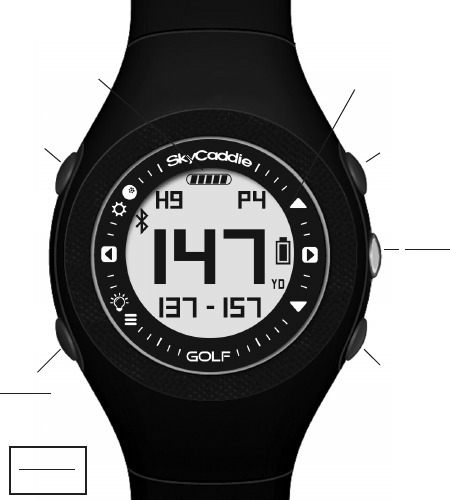
BACK
LIGHT
MENU
UP
DOWN
OK
RESET
PRESS
HOLD
BATTERY LEVEL
GPS SIGNAL

3
ACTIVATING AND REGISTERING YOUR SkyCaddie® SW2
There are two ways to register your SkyCaddie SW2:
• Via Bluetooth® on your smart device
• Via CaddieSync® Express on your computer
Activate Your SkyCaddie SW2 via Bluetooth® and SkyGolf 360 Mobile app.
1. Using your smartphone or tablet, go to the Google PlayTM Store or the
Apple® App StoreSM to download the SkyGolf 360TM Mobile App.
2. Log in with your username and password or create an account here.
3. Now you need to pair your device
PAIRING WITH YOUR SMART DEVICE
Your SkyCaddie SW2 will need to pair with your Bluetooth® Low Energy enabled
smart device in order for Bluetooth features to work.
1. Make sure Bluetooth is enabled on your smart device.
2. Make sure Bluetooth is enabled on your SW2.
a. Press and hold the MENU button until the Menu list appears.
b. Select SETTINGS and press the OK button.
c. Highlight PAIR and press the OK
d. On your smart device, in the SkyGolf 360 mobile app, press the SYNC icon
and follow the onscreen instructions to complete pairing process.
Now you’re ready to
• Register and activate your SkyCaddie SW2 with SkyGolf 360
• Upload scores (see section 4.3)
•
Receive incoming smart notifications (on compatible iOS devices only) see section 6.0
Activate your SkyCaddie SW2 via the enclosed USB cable
IMPORTANT: Before you connect the enclosed USB cable to your computer, please
go to www.MySkyCaddie.com first and follow the onscreen directions to install the
latest version of CaddieSync Express on your computer and to obtain the latest
drivers for your SkyCaddie.
1.
On your computer, go to www.MySkyCaddie.com.
2. On your SkyCaddie SW2, select CODE in the Main Menu to display your
unique 8-character Access Code.
3. To complete activation, the website will ask you to log into your SkyGolf account
or to create a user account, should you not yet have one.
4. Follow the onscreen prompts to complete registration and activation of your
SkyCaddie SW2.
4
1.0 CHARGING YOUR SKYCADDIE® SW2
Please fully charge your SW2 before first use. The length of time required to fully
charge the battery varies and depends on actual usage.
1.1 How To Charge using the provided USB Cable
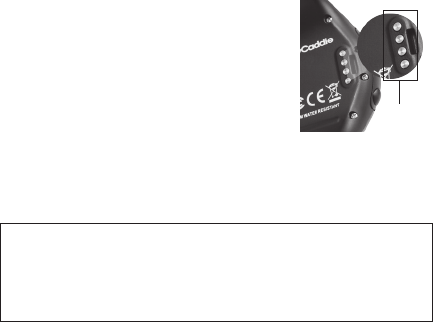
1. Attach SW2 charging clip to USB cable
2. Align the charging clip with the contacts on the
back of the SW2 and connect the charging clip
securely
3. Insert the USB plug into a USB port on your
computer or a SkyCaddie wall charger.
4. If connected correctly, “CHARGE” will display
5. When fully charged, “FULL CHARGE” will
display
The Battery Level indicator displays on the upper right side of the SW2 screen. If this
indicator starts blinking, your battery is low and needs to be fully charged as soon
as possible. When the battery is low, GOLF and ODOMETER modes will not be
available.
2.0 WATCH MODES
Your SkyCaddie SW2 is versatile and includes several modes:
• GOLF*: view distances, track your score, and measure shot distances.
• TIME: view the current time and date.
• DEMO: Demos the GOLF features without being on a course or using GPS.
• ODOMETER*: Track and save info about your walk, run, or ride.
• STOPWATCH: Track elapsed time and individual lap times.
• ALARM: 5 alarms that can alert you at specific times of the day.
NOTE: Always make sure the charging contacts on your SW2 and surrounding area are dry
and clean of any dirt or debris to ensure proper electrical contact and to prevent corrosion. It is
recommended that the battery is recharged after every round of golf or an odometer session, as
these functions require GPS and deplete a battery charge at a much higher rate than non-GPS
Modes. A full charge should provide up to 40 days in Time mode, 25.5 days in Time mode with
Bluetooth® on, and 13+ hours in GPS/Golf mode.
CHARGING
CONTACTS

5
• SAVES: view and manage saved Rounds and Workouts.
• LOCATION*: Display your current GPS location.
• SETTINGS: adjust various settings for your SW2.
• INFO: Display information about your SW2.
• CODE: Display your activation access Code.
3.0 CHANGING MODES
To change modes, you will need to use the main menu:
1. Press and hold the MENU button until the menu appears.
2. Use the UP/DOWN buttons to scroll through menu items.
3. Press the OK button to select the highlighted menu item.
3.1 Changing a Mode setting using the SET Button
You can quickly change the settings within a Mode using the SET button:
1. Select the mode you want to be in (see Section 2.0 above).
2. Press and hold the BACK/SET button until the settings menu shows.
3. Use the UP/DOWN buttons to scroll through menu items.
4. Press the OK button to select the highlighted menu item.
5. Press the BACK/SET button to exit.
3.2 Resetting the SkyCaddie SW2
The SW2 has no OFF option. Therefore, should the SW2 require a reset, press and
hold all 4 corner buttons simultaneously until the SW2 restarts.
* NOTE: For these WATCH functions GPS is required. You must be outdoors with a clear view of
the sky for the Mode to work. We recommend that you start these activities with a fully charged
battery, as they consume battery capacity at a higher rate than non-GPS Modes.
6
4.0 GOLF MODE
In GOLF mode, you can access several golf features:
• View real-time distances to the front, center, and back of the green.
• Track your score as you play your round.
• Measure how far you hit each of your clubs.
• View current time and the elapsed time since beginning your round.
4.1 Starting a new round
Make sure you are outside and near the course you are going to play.
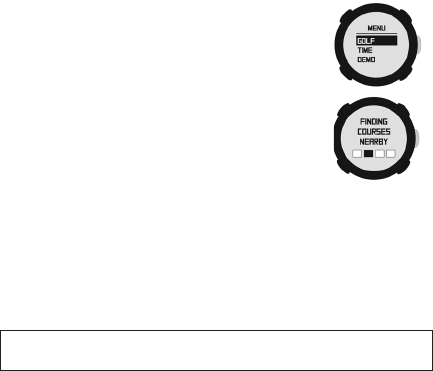
1. Press and hold the MENU button until the menu appears.
2. Highlight GOLF using the UP/DOWN buttons.
3. Press the OK button to confirm.
4. If prompted, highlight NEW GAME and the OK button.
5. The SW2 will turn on the GPS and auto-search for
nearby courses. It may take a few minutes for the SW2
to acquire a GPS signal.
6. When the search is completed, a list of nearby courses
will display.
7. Highlight the correct course using the UP/DOWN
buttons.
8. Press the OK button to open the highlighted course.
4.2 Playing Golf
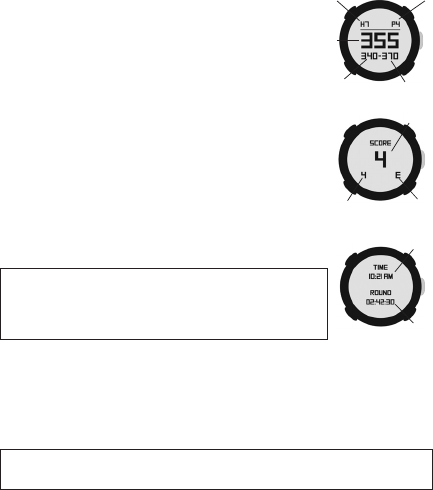
Your SW2 provides three views during GOLF mode. To change between views,
press the OK button:
• The default GREEN VIEW automatically updates the distances to the
Front, Center and Back distances to the green as you progress from Tee
to Green.
• The SCORE VIEW allows you to enter your score. Par will be set as default.
To adjust your score, press the UP/DOWN buttons. Your score is saved
automatically. The SW2 will save up to 20 rounds. After 20 rounds your
oldest round will be deleted to make room.
NOTE: The SW2 will automatically advance to the next hole if auto-Hole advance is selected in
Settings.
7
• The TIME VIEW displays current time and elapsed
time since starting your round.
• After changing to other views, your SW2 will
automatically return to the GREEN VIEW if no button
is pressed for 20 seconds.
4.3 Syncing Scores to SkyGolf360 SkyGolf 360 allows
you to tracks your scores and follow your progress. This
services requires nominally priced membership plan. There are
two ways to sync your scores to SkyGolf 360: Via Bluetooth®
with SkyGolf 360 or via your Caddiesync on your computer.
4.4 Hole Advance
You can change holes on your SW2 in two ways:
• Manually: In GREEN view, press the UP/DOWN
buttons to change holes.
•
Automatically: If AUTO-HOLE ADVANCE is turned on,
you will not need to press any buttons to go to the next
hole, since your SW2 will know to change holes
automatically. You can turn AUTOHOLE on or off in SETTINGS.
4.5 Measure Any Shot Distance
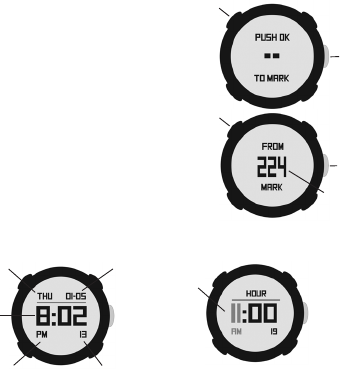
Mark the location where you hit your ball:
1. Press the MARK BALL button to open
the MARK view.
2. Press the OK to mark your location.
3. Press MARK BALL again to return to
the previous golf view.
TIME
PLAYED
CURRENT
TIME
TIME
HOLE
CENTER
PAR
BACK
FRONT
GREEN
HOLE
SCORE
TOTAL
SCORE
RELATIVE
TO PAR
SCORE
HINT: To conserve your battery after completion of play or a break in play,
simply hold the MENU button and select TIME mode to turn GPS off. After
exiting GOLF mode, you can select GOLF mode again and either resume
your round or start a NEW GAME.
NOTE: If you skip a hole or do not start your round at Hole 1, you may have to use the UP/DOWN
buttons to advance to a different hole.
8
At the place where your ball landed:
1. Press the MARK BALL button to open
the MARK view.
2. The MARK view will display the distance
from your last mark.
3. If you want to mark again, press the OK
button again.
4. Press MARK BALL again to return to
the previous golf view.
The MARK BALL feature only works when you are
in GOLF mode.
While on the MARK view, if no button is pressed
for 20 seconds your SW2 will automatically return
to the GREEN view.
5.0 SETTING THE TIME AND DATE
5.1 To set the time and date manually
1. Press and hold the MENU button until the menu appears.
2. Highlight SETTINGS and press the OK button.
3. Highlight TIME and press the OK button.
4. Set MODE to MANUAL using the UP/DOWN buttons.
5. Press the OK button to confirm.
6. Select MM-DD or DD-MM and press OK.
MARK
BALL
OK
YARDS
FROM
MARK
OK
MARK
BALL
DAY
TIME
DATE
SECONDS
AM/PM
SET THE
HOUR

9
7. Select 12H or 24H and press OK.
8. Set the hour, minute, second, year, month, and day. Press the UP/DOWN
buttons to adjust. Press the OK button to confirm each element of the
time and date.
9. Press the BACK button to return to the main menu when finished.
5.2 To Set the time and date automatically using the GPS**
1. Press and hold the MENU button until the menu appears
2. Select SETTINGS and press the OK button
3. Highlight TIME and press the OK button
4. Set MODE to GPS using the UP/DOWN buttons and press OK
5. Select your time zone and press the OK button
6. Turn DST (Daylight Savings Time) ON or OFF and press OK
7. Select MM-DD or DD-MM and press OK.
8. Select 12H or 24H and press OK
9. Press the BACK button to return to the main menu
5.3 Pairing with your Smart device
Your SkyCaddie SW2 will need to pair with your Bluetooth® Low Energy-Enabled
smart device in order for the Bluetooth features on the SW2 to work.
1. Make sure Bluetooth is enabled on your smart device.
2. Make sure Bluetooth is enabled on your SW2.
a. Press and hold the MENU button until the Menu list appears.
b. Select SETTINGS and press the OK button.
c. Highlight PAIR, press the OK button
On our smart device, in the SkyGolf 360 mobile app, press the SYNC icon and follow
the onscreen instructions to complete pairing process.
Now you’re ready to
• Register and activate your SkyCaddie SW2 with SkyGolf 360
• Upload scores see section 4.3
• Receive smart notifications (on compatible iOS devices only) see section 6.0
**NOTE: Time will adjust only when your SW2 is in a GPS-enabled function such as GOLF,
ODOMETER or LOCATION. Please allow time for GPS to locate your position and begin functioning.
If local time is not displayed correctly, make sure the proper time zone has been selected and that
Daylight Savings Time (DST) is set to On or Off, as appropriate.

10
6.0 SMARTPHONE NOTIFICATIONS (only on iOS)
Your SW2 will need to pair with your Bluetooth® Low Energy enabled smart
device in order for Bluetooth features on the SW2 to work.
1. Press and hold the MENU button until the Menu list
appears.
2. Select SETTINGS and press the OK button.
3. Highlight ALERTS, press the OK button and select an
option:
• ON – Displays the smartphone notifications.
• MUTE – Display the smartphone notification but don’t beep.
• OFF – Don’t display the smartphone notification and don’t beep.
4. Press the BACK button to return to the Main Menu.
7.0 SETTING YARDS (STANDARD) OR METERS (METRIC)
1. Press and hold the MENU button until the MENU list appears.
2. Select SETTINGS and press OK.
3. Highlight UNITS and press the OK button.
4. Using the UP/DOWN buttons, choose STANDARD (yards/miles) or METRIC
(meters/kilometers) and press OK.
5. Press the BACK button to return to the Main Menu.
8.0 30-DAY COMPLIMENTARY COURSE MAP TRIAL
Your SW2 comes preloaded with front, center, and back distances for golf courses
worldwide on a 30-day trial basis. Your complimentary 30-day trial period will
begin with your first round of golf. After 30 days, access to course data requires a
registration for either a ‘ no annual fee’ option or a nominally priced membership plan.
SkyGolf Memberships Offer Much More Than Just a Better Golf Game!
SkyGolf membership plans have no hidden fees or variable charges. Through this
minimal annual investment, you have access to SkyCaddie’s highly accurate and
proprietary course map database, software updates, post-round game analysis, and
many more member benefits and rewards. For more information go to www.skygolf.
com/plans/plansoverview.

11
9.0 ACQUIRING SATELLITE SIGNALS
For optimal performance while playing, ensure that the SW2 has a clear view of the
sky at all times. Avoid being around buildings, obstructions, heavy foliage, low areas
with adjacent obstructions, or reflective objects (such as metal/glass structures) while
using the SW2. While designed to be used and worn as a normal watch, orienting the
SW2 towards the sky provides the best reception and accuracy. The internal antenna
is located at the 6 o’clock position of the SW2. Allow the SW2 to have a few minutes
to acquire satellite signals before play.
10.0 ODOMETER MODE
ODOMETER mode provides real-time data about your walk, run, or ride:
• Speed: How fast you are moving.
•
Pace: The ratio of the number of minutes it takes you to
cover a mile or kilometer.
• Calories: How many calories you have burned so far.
• Distance: How far you have gone since you started.
• Duration: How much time has elapsed since you
started.
In addition, your SW2 will log your GPS location every 5 seconds. This real-time log
can be saved to your SW2 at the end of your session. At any time, you can access
previous saves by selecting SAVES from the main menu. Your SW2 can hold up to
20 Saves at one time depending on the length of each session. If your SW2 is full, the
oldest Save will be removed automatically to make room. Saved Odometer sessions
will be uploaded to your SkyGolf 360 account when you sync. From SkyGolf 360, you
may export your Odometer sessions to several popular fitness websites such as Map
My Run, Map My Walk and Training Peaks.
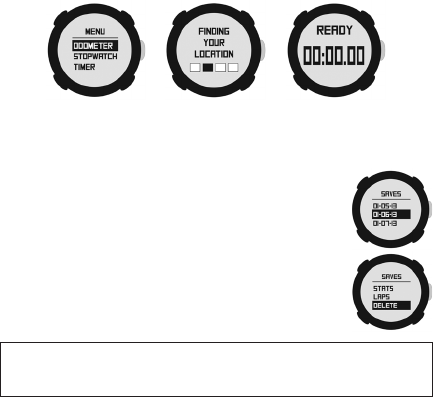
10.1 Starting an odometer session
1. Make sure you are outside, away from tall buildings and trees.
2. Press and hold the MENU button until the menu appears.
3. Highlight ODOMETER using the UP/DOWN buttons.
4. Press the OK button to confirm.
5. Your SW2 will now search for your location. This may take a few minutes
as your SW2 acquires a GPS signal.
12
6. When READY appears, the SW2 is ready to track your session.
• To start or resume the Odometer, press the OK button.
• To pause the Odometer, press the OK button again.
• To mark a lap, press the BACK button.
• To change the display, press the UP/DOWN buttons.
• To reset/save your session, hold down the OK button until SAVED
appears.
10.2 Manage Saved workout data
After you have saved a round or workout session, you can manage it under the
SAVES section of the main menu:
1. Press and hold the MENU button until the menu appears.
2.
Highlight SAVES using the UP/DOWN buttons and press OK.
3. Highlight WORKOUT and press OK.
4. A list of previous Saves will appear by date.
6. Highlight a Save using the UP/DOWN buttons.
7. Press OK to open the highlighted Save.
• To view session information, highlight STATS and press OK.
• To view lap information, highlight LAPS and press OK.
•
To permanently delete a Save, highlight DELETE and hold OK.
• To return to the previous screen, press the BACK button.
When viewing session/lap information, use the UP/DOWN buttons to
scroll through the available information or to change the current lap.
IMPORTANT! To avoid losing your session data, you must SAVE before changing modes. To avoid
excessive battery drain, exit ODOMETER Mode at the completion of each session after saving
your data.
13
11.0 INFO MODE
Select INFO in the main menu to display the Firmware version and map version.
Press UP or DOWN to display the membership Expiration date along with the 12-digit
Electronic Serial number (ESN) of your SW2. Press OK to exit and return to the menu.
12.0 HELPFUL SKYCADDIE TIPS
• Wait until the SW2 has finished syncing before you disconnect it or power off
your computer.
• Turn on GPS-enabled features on your SW2 only when outdoors or on the
golf course, with a clear view of the sky. To receive the best GPS accuracy
performance, give it an initial five to ten minutes to warm-up before play or
activity.
• Higher GPS Signal strength provides higher accuracy.
• To maintain optimal GPS accuracy, make sure the SW2 always has a clear
view of the sky when using a GPS feature.
• Do not put the SW2 in your pocket, or otherwise obscure the watch’s view of
the sky, when using a GPS feature to assure optimal performance.
• Fully charge the battery before each round of Golf or Odometer use.
• Do not expose the SW2 to extreme temperatures or to water.
CUSTOMER SUPPORT
Before contacting our call center, please try the following sources:
• Frequently Asked Questions section at SkyCaddie.com
• Online Support Chat available at SkyCaddie.com
EXTENDED WARRANTY OPTION IN U.S. AND CANADA
When registering your SkyCaddie SW2, you will be given the option of purchasing
an Extended Warranty for your SW2 if you reside in the U.S. or Canada. This will
extend the standard 6-month manufacturer’s limited warranty to a 12-month warranty
against defects in materials and workmanship. Terms and conditions are listed online
at SkyCaddie.com.
14
NOTES:
15
NOTES:

©2016 SkyHawke Technologies, LLC. All rights reserved.
SkyGolf®, SkyCaddie®, SkyGolf 360™, and TrueGround® are trademarks of
SkyHawke Technologies, LLC. The Bluetooth® word mark and logos are registered
trademarks owned by Bluetooth SIG, Inc. and any use of such marks by SkyHawke
Technologies, LLC is under license. Other trademarks and trade names are those
of their respective owners. U.S. patent no. 7,118,498; 6,456,938; 5,740,077,
5,507,485 & patent pending.
For product terms and conditions, please visit
http://www.skygolf.com/skygolf/legal/default.aspx
Federal Communication Commission (FCC) Radiation Exposure Statement
The device has been evaluated to meet
general RF exposure requirement,
The device can be used in portable exposure
condition without restriction
FCC statements:
This device complies with part 15 of the FCC rules. Operation is subject to the
following two conditions: (1) this device may not cause harmful interference, and (2)
this device must accept any interference received, including interference that may
cause undesired operation.
NOTE: The manufacturer is not responsible for any radio or TV interference caused
by unauthorized modifications or changes to this equipment. Such modifications or
changes could void the user’s authority to operate the equipment.
NOTE: This equipment has been tested and found to comply with the limits for a
Class B digital device, pursuant to part 15 of the FCC Rules. These limits are designed
to provide reasonable protection against harmful interference in a residential
installation. This equipment generates uses and can radiate radio frequency energy
and, if not installed and used in accordance with the instructions, may cause harmful
interference to radio communications. However, there is no guarantee that
interference will not occur in a particular installation. If this equipment does cause
harmful interference to radio or television reception, which can be determined by
turning the equipment off and on, the user is encouraged to try to correct the
interference by one or more of the following measures:
‐ Reorient or relocate the receiving antenna.
‐ Increase the separation between the equipment and receiver.
‐Connect the equipment into an outlet on a circuit different from that to which the
receiver is connected.
‐Consult the dealer or an experienced radio/TV technician for help.