Sony Group MEXXB100BT Bluetooth Audio System User Manual MEX XB100BT
Sony Corporation Bluetooth Audio System MEX XB100BT
Contents
- 1. (Short-term Confidential)User Manual- I
- 2. (Short-term Confidential)User Manual- II
(Short-term Confidential)User Manual- II
![20GBE:\DATA\4563800111\4563800111MEXXB100BTUC\01GB-MEXXB100BTUC\040CD.fm masterpage: LeftMEX-XB100BT4-563-800-11(1)POSITION (listening position)F/R POSITION (front/rear position)Simulates a natural sound field by delaying the sound output from speakers to suit your position: [FRONT L] (front left), [FRONT R] (front right), [FRONT] (center front), [ALL] (center of your car), [CUSTOM] (position set by “SongPal”), [OFF] (no position set)ADJ POSITION* (adjust position)Fine-tunes the listening position setting: [+3] – [CENTER] – [-3].SW POSITION* (subwoofer position) [NEAR] (near), [NORMAL] (normal), [FAR] (far)BALANCEAdjusts the sound balance: [RIGHT-15] – [CENTER] – [LEFT-15].FADERAdjusts the relative level: [FRONT-15] – [CENTER] – [REAR-15].DSEE (digital sound enhancement engine)Improves digitally compressed sound by restoring high frequencies lost in the compression process.This setting can be memorized for each source other than the tuner.Selects the DSEE mode: [ON], [OFF].AAV (advanced auto volume)Adjust the playback volume level of all playback sources to the optimum level: [ON], [OFF].REARBAS ENH (rear bass enhancer)Rear Bass Enhancer enhances the bass sound by applying a low pass filter setting to the rear speakers. This function allows the rear speakers to work as a subwoofer if one is not connected. (Available only when [SW DIREC] is set to [OFF].)RBE MODE (rear bass enhancer mode)Selects the rear bass enhancer mode: [1], [2], [3], [OFF].LPF FREQ (low pass filter frequency)Selects the subwoofer cut-off frequency: [50Hz], [60Hz], [80Hz], [100Hz], [120Hz].LPF SLOPE (low pass filter slope)Selects the LPF slope: [1], [2], [3].SW DIREC (subwoofer direct connection)You can use the subwoofer without a power amplifier when it is connected to the rear speaker lead. (Available only when [RBE MODE] is set to [OFF].)Be sure to connect a 4 – 8 ohm subwoofer to either of the rear speaker leads. Do not connect a speaker to the other rear speaker lead.SW MODE (subwoofer mode) Selects the subwoofer mode: [1], [2], [3], [OFF].SW PHASE (subwoofer phase) Selects the subwoofer phase: [NORM], [REV].SW POSITION* (subwoofer position)Selects the subwoofer position: [NEAR], [NORMAL], [FAR].LPF FREQ (low pass filter frequency) Selects the subwoofer cut-off frequency: [50Hz], [60Hz], [80Hz], [100Hz], [120Hz].LPF SLOPE (low pass filter slope) Selects the LPF slope: [1], [2], [3].SUB WOOFER (subwoofer)SW LEVEL (subwoofer level)Adjusts the subwoofer volume level: [+10 dB] – [0 dB] – [-10 dB].([ATT] is displayed at the lowest setting.)SW PHASE (subwoofer phase)Selects the subwoofer phase: [NORM], [REV].SW POSITION* (subwoofer position)Selects the subwoofer position: [NEAR], [NORMAL], [FAR].LPF FREQ (low pass filter frequency)Selects the subwoofer cut-off frequency: [50Hz], [60Hz], [80Hz], [100Hz], [120Hz].LPF SLOPE (low pass filter slope)Selects the LPF slope: [1], [2], [3].HPF (high pass filter)HPF FREQ (high pass filter frequency)Selects the front/rear speaker cut-off frequency: [OFF], [50Hz], [60Hz], [80Hz], [100Hz], [120Hz].HPF SLOPE (high pass filter slope)Selects the HPF slope (effective only when [HPF FREQ] is set to other than [OFF]): [1], [2], [3].AUX VOLUME (AUX volume level)Adjusts the volume level for each connected auxiliary device: [+18 dB] – [0 dB] – [-8 dB].This setting negates the need to adjust the volume level between sources.BTA VOLUME (BLUETOOTH audio volume level)Adjusts the volume level for each connected BLUETOOTH device: [+6 dB] – [0 dB] – [-6 dB].This setting negates the need to adjust the volume level between sources.* Does not appear when [F/R POSITION] is set to [OFF].010COV.book Page 20 Monday, September 22, 2014 2:03 PM](https://usermanual.wiki/Sony-Group/MEXXB100BT.Short-term-Confidential-User-Manual-II/User-Guide-2459218-Page-1.png)
![21GBE:\DATA\4563800111\4563800111MEXXB100BTUC\01GB-MEXXB100BTUC\040CD.fm masterpage: RightMEX-XB100BT4-563-800-11(1)Display Setup (DISPLAY)DEMO (demonstration)Activates the demonstration: [ON], [OFF].DIMMERDims the display: [ON], [OFF], [AT] (auto) ([AT] is available only when the illumination control lead is connected, and turn on the head light).SUB DISPLAYSelects the item to display as sub information: [SOURCE], [CLOCK].(Available only while the source is off and the clock is displayed.)BUTTON COLORSets a preset color or customized color for the buttons.COLORSelects from 15 presets colors, 1 customized color.CUSTOM COLORRegisters a customized color for the buttons.RGB RED, RGB GRN, RGB BLUEAdjustable color range: [0] – [32] ([0] cannot be set for all color ranges).DISP COLOR (display color)Sets a preset color or customized color for the display.COLORSelects from 15 presets colors, 1 customized color.CUSTOM COLORRegisters a customized color for the display.RGB RED, RGB GRN, RGB BLUEAdjustable color range: [0] – [32] ([0] cannot be set for all color ranges).ALL COLORSets a preset color or customized color for the display and buttons.COLORSelects from 15 presets colors, 1 customized color.CUSTOM COLORRegisters a customized color for the display and buttons.RGB RED, RGB GRN, RGB BLUEAdjustable color range: [0] – [32] ([0] cannot be set for all color ranges).SOUND SYNC (sound synchronization)Selects the color with sound synchronization: [ON], [OFF].WHITE MENUYou can display the menu more clearly (white) without concern for color setting: [ON], [OFF].START WHITEWhen SRC is pressed, the display and buttons on the main unit turn white once, then change to the customized color: [ON], [OFF].MOTION DSPL (motion display)Shows moving patterns: [ON], [OFF], [SA] (spectrum analyzer).(Available only when [SOUND SYNC] is set to [OFF].)AUTO SCROLLScrolls long items automatically: [ON], [OFF].(Not available when the AUX or tuner is selected.)BLUETOOTH Setup (BT)PAIRING (page 8)PHONEBOOK (page 15)REDIAL (page 15)RECENT CALL (page 15)VOICE DIAL (page 16)DIAL NUMBER (page 15)RINGTONESelects whether this unit or the connected cellular phone outputs the ringtone: [1] (this unit), [2] (cellular phone).AUTO ANSWERSets this unit to answer an incoming call automatically: [OFF], [1] (about 3 seconds), [2] (about 10 seconds).AUTO PAIRStart BLUETOOTH pairing automatically when iOS device version 5.0 or later is connected via USB: [ON], [OFF].BT SIGNL (BLUETOOTH signal) (page 9)Activates/deactivates the BLUETOOTH function.BT INIT (BLUETOOTH initialize)Initializes all the BLUETOOTH related settings (pairing information, preset number, device information, etc.).When disposing the unit, initialize all the settings. (Available only while the source is off and the clock is displayed.)SongPal Setup (SONGPAL)Establish and terminate “SongPal” function (connection).010COV.book Page 21 Monday, September 22, 2014 2:03 PM](https://usermanual.wiki/Sony-Group/MEXXB100BT.Short-term-Confidential-User-Manual-II/User-Guide-2459218-Page-2.png)
![25GBE:\DATA\4563800111\4563800111MEXXB100BTUC\01GB-MEXXB100BTUC\040CD.fm masterpage: RightMEX-XB100BT4-563-800-11(1)SiriusXM Connect Vehicle Tuner and Subscription sold separately.www.siriusxm.comSirius, XM and all related marks and logos are trademarks of Sirius XM Radio Inc. All rights reserved.The Bluetooth® word mark and logos are registered trademarks owned by Bluetooth SIG, Inc. and any use of such marks by Sony Corporation is under license. Other trademarks and trade names are those of their respective owners.The N-Mark is a trademark or registered trademark of NFC Forum, Inc. in the United States and in other countries. Windows Media is either a registered trademark or trademark of Microsoft Corporation in the United States and/or other countries.This product is protected by certain intellectual property rights of Microsoft Corporation. Use or distribution of such technology outside of this product is prohibited without a license from Microsoft or an authorized Microsoft subsidiary.iPhone, iPod, iPod classic, iPod nano, iPod touch, and Siri are trademarks of Apple Inc., registered in the U.S. and other countries. App Store is a service mark of Apple Inc.MPEG Layer-3 audio coding technology and patents licensed from Fraunhofer IIS and Thomson.Pandora, the Pandora logo, and the Pandora trade dress are trademarks or registered trademarks of Pandora Media, Inc., used with permission.Google, Google Play and Android are trademarks of Google Inc.libFLACCopyright (C) 2000-2009 Josh CoalsonCopyright (C) 2011-2013 Xiph.Org FoundationRedistribution and use in source and binary forms, with or without modification, are permitted provided that the following conditions are met:Redistributions of source code must retain the above copyright notice, this list of conditions and the following disclaimer.Redistributions in binary form must reproduce the above copyright notice, this list of conditions and the following disclaimer in the documentation and/or other materials provided with the distribution.Neither the name of the Xiph.org Foundation nor the names of its contributors may be used to endorse or promote products derived from this software without specific prior written permission.THIS SOFTWARE IS PROVIDED BY THE COPYRIGHT HOLDERS AND CONTRIBUTORS “AS IS” AND ANY EXPRESS OR IMPLIED WARRANTIES, INCLUDING, BUT NOT LIMITED TO, THE IMPLIED WARRANTIES OF MERCHANTABILITY AND FITNESS FOR A PARTICULAR PURPOSE ARE DISCLAIMED. IN NO EVENT SHALL THE FOUNDATION OR CONTRIBUTORS BE LIABLE FOR ANY DIRECT, INDIRECT, INCIDENTAL, SPECIAL, EXEMPLARY, OR CONSEQUENTIAL DAMAGES (INCLUDING, BUT NOT LIMITED TO, PROCUREMENT OF SUBSTITUTE GOODS OR SERVICES; LOSS OF USE, DATA, OR PROFITS; OR BUSINESS INTERRUPTION) HOWEVER CAUSED AND ON ANY THEORY OF LIABILITY, WHETHER IN CONTRACT, STRICT LIABILITY, OR TORT (INCLUDING NEGLIGENCE OR OTHERWISE) ARISING IN ANY WAY OUT OF THE USE OF THIS SOFTWARE, EVEN IF ADVISED OF THE POSSIBILITY OF SUCH DAMAGE.TroubleshootingThe following checklist will help you remedy problems you may encounter with your unit.Before going through the checklist below, check the connection and operating procedures.For details on using the fuse and removing the unit from the dashboard, see “Connection/Installation” (page 31).If the problem is not solved, visit the support site on the back cover.GeneralNo power is being supplied to the unit.If the unit is turned off and the display disappears, the unit cannot be operated with the remote commander.Turn on the unit.No sound or the sound is very low.The position of the fader control [FADER] is not set for a 2-speaker system.The volume of the unit and/or connected device is very low.Increase the volume of the unit and connected device.No beep sound.An optional power amplifier is connected and you are not using the built-in amplifier.Copyrights010COV.book Page 25 Monday, September 22, 2014 2:03 PM](https://usermanual.wiki/Sony-Group/MEXXB100BT.Short-term-Confidential-User-Manual-II/User-Guide-2459218-Page-6.png)
![26GBE:\DATA\4563800111\4563800111MEXXB100BTUC\01GB-MEXXB100BTUC\040CD.fm masterpage: LeftMEX-XB100BT4-563-800-11(1)The contents of the memory have been erased.The reset button has been pressed.Store again into the memory.The power supply lead or battery has been disconnected or not connected properly.Stored stations and correct time are erased.The fuse has blown.Makes a noise when the position of the ignition is switched.The leads are not matched correctly with the car’s accessory power connector.During playback or reception, the demonstration mode starts.If no operation is performed for 5 minutes with [DEMO-ON] set, the demonstration mode starts.Set [DEMO-OFF] (page 21).The display disappears from/does not appear in the display window.The dimmer is set to [DIM-ON] (page 21).The display disappears if you press and hold OFF.Press OFF on the unit until the display appears.The connectors are dirty (page 23).The operation buttons do not function.The disc will not eject.The connection is not correct.Check the connection of the unit.If the situation does not improve, press RESET (page 7).The contents stored in memory are erased.For your safety, do not reset the unit while you are driving.Radio receptionStations cannot be received.The sound is hampered by noises.The connection is not correct.If your car has built-in radio antenna (aerial) in the rear/side glass, connect an REM OUT lead (blue/white striped) or accessory power supply lead (red) to the power supply lead of a car’s antenna (aerial) booster.Check the connection of the car antenna (aerial).If the auto antenna (aerial) will not extend, check the connection of the power antenna (aerial) control lead.Preset tuning is not possible.The broadcast signal is too weak.RDSPTY displays [- - - - - - - -].The current station is not an RDS station.RDS data has not been received.The station does not specify the program type.CD playbackThe disc does not play.Defective or dirty disc.The CD-R/CD-RW is not for audio use (page 22).MP3/WMA/AAC files cannot be played.The disc is incompatible with the MP3/WMA/AAC format and version. For details on playable discs and formats, visit the support site on the back cover.MP3/WMA/AAC files take longer to play than others.The following discs take a longer time to start playback.A disc recorded with a complicated tree structure.A disc recorded in Multi Session.A disc to which data can be added.The sound skips.Defective or dirty disc.USB device playbackYou cannot play items via a USB hub.This unit cannot recognize USB devices via a USB hub.A USB device takes longer to play.The USB device contains files with a complicated tree structure.The sound is intermittent.The sound may be intermittent at a high-bit-rate of more than 320 kbps.Audio file cannot be played.USB device formatted with file systems other than FAT16 or FAT32 are unsupported.** This unit supports FAT16 and FAT32, but some USB device may not support all of these FAT. For details, refer to the operating instruction of each USB device or contact the manufacturer.NFC functionOne touch connection (NFC) is not possible.If the smartphone does not respond to the touching.Check that the NFC function of the smartphone is turned on.Move the N-Mark part of the smartphone closer to the N-Mark part on this unit.If the smartphone is in a case, remove it.NFC receiving sensitivity depends on the device.If One touch connection with the smartphone fails several times, make BLUETOOTH connection manually.010COV.book Page 26 Monday, September 22, 2014 2:03 PM](https://usermanual.wiki/Sony-Group/MEXXB100BT.Short-term-Confidential-User-Manual-II/User-Guide-2459218-Page-7.png)
![27GBE:\DATA\4563800111\4563800111MEXXB100BTUC\01GB-MEXXB100BTUC\040CD.fm masterpage: RightMEX-XB100BT4-563-800-11(1)BLUETOOTH functionThe connecting device cannot detect this unit.Before the pairing is made, set this unit to pairing standby mode.While connected to a BLUETOOTH device, this unit cannot be detected from another device.Disconnect the current connection and search for this unit from another device.When the device pairing is made, set the BLUETOOTH signal output to on (page 9).Connection is not possible.The connection is controlled from one side (this unit or BLUETOOTH device), but not both.Connect to this unit from a BLUETOOTH device or vice versa.The name of the detected device does not appear.Depending on the status of the other device, it may not be possible to obtain the name.No ringtone.Adjust the volume by rotating the control dial while receiving a call.Depending on the connecting device, the ringtone may not be sent properly.Set [RINGTONE] to [1] (page 21).The front speakers are not connected to the unit.Connect the front speakers to the unit. The ringtone is output only from the front speakers.The talker’s voice cannot be heard.The front speakers are not connected to the unit.Connect the front speakers to the unit. The talker’s voice is output only from the front speakers.A call partner says that the volume is too low or high.Adjust the volume accordingly using mic gain adjustment (page 16).Echo or noise occurs in phone call conversations.Lower the volume.Set EC/NC Mode to [EC/NC-1] or [EC/NC-2] (page 16).If the ambient noise other than the phone call sound is loud, try reducing this noise.E.g.: If a window is open and road noise, etc., is loud, shut the window. If an air conditioner is loud, lower the air conditioner.The phone is not connected.When BLUETOOTH audio is played, the phone is not connected even if you press CALL.Connect from the phone.The phone sound quality is poor.Phone sound quality depends on reception conditions of cellular phone. Move your car to a place where you can enhance the cellular phone’s signal if the reception is poor.The volume of the connected audio device is low (high).Volume level will differ depending on the audio device.Adjust the volume of the connected audio device or this unit.The sound skips during playback of a BLUETOOTH audio device.Reduce the distance between the unit and the BLUETOOTH audio device.If the BLUETOOTH audio device is stored in a case which interrupts the signal, remove the audio device from the case during use.Several BLUETOOTH devices or other devices which emit radio waves are in use nearby.Turn off the other devices.Increase the distance from the other devices.The playback sound stops momentarily when the connection between this unit and the cellular phone is being made. This is not a malfunction.The connected BLUETOOTH audio device cannot be controlled.Check that the connected BLUETOOTH audio device supports AVRCP.Some functions do not work.Check if the connecting device supports the functions in question.A call is answered unintentionally.The connecting phone is set to answer a call automatically.Pairing failed due to time out.Depending on the connecting device, the time limit for pairing may be short.Try completing the pairing within the time.BLUETOOTH function cannot operate.Turn off the unit by pressing OFF for more than 2 seconds, then turn the unit on again.No sound is output from the car speakers during handsfree call.If the sound is output from the cellular phone, set the cellular phone to output the sound from the car speakers.010COV.book Page 27 Monday, September 22, 2014 2:03 PM](https://usermanual.wiki/Sony-Group/MEXXB100BT.Short-term-Confidential-User-Manual-II/User-Guide-2459218-Page-8.png)
![28GBE:\DATA\4563800111\4563800111MEXXB100BTUC\01GB-MEXXB100BTUC\040CD.fm masterpage: LeftMEX-XB100BT4-563-800-11(1)Siri Eyes Free is not activated.Perform the handsfree registration for an iPhone that supports Siri Eyes Free.Set the Siri function on the iPhone to on.Cancel the BLUETOOTH connection with the iPhone and the unit, and reconnect.SongPal operationApplication name is mismatched with the actual application in “SongPal”.Launch the application again from the “SongPal” application.While running the “SongPal” application via BLUETOOTH, the display automatically switches to [BT AUDIO].The “SongPal” application or BLUETOOTH function has failed.Run the application again.While running the “SongPal” application, the display automatically switches to [IPD].The source of the unit automatically switches to [IPD] when an iPhone/iPod is connected to the USB port.Make the BLUETOOTH connection and launch the “SongPal” application again.Pandora® operationPandora® connection is not possible.Shut down the Pandora® application on the mobile device, and then launch it again.Error displays/MessagesCD ERROR: The disc cannot be played. The disc will be ejected automatically.Clean or insert the disc correctly, or make sure the disc is not blank or defective.CD NO MUSIC: There is no playable file. The disc will be ejected automatically.Insert a disc or connect a USB device containing playable files (page 24).CD PUSH EJT: The disc could not be ejected properly.Press (eject).HUB NO SUPRT: USB hubs are not supported.IPD STOP: iPod playback has finished.Operate your iPod/iPhone to start playback.NO DEV: A USB device is not connected or recognized.Make sure the USB device or USB cable is securely connected.OUTPUT ERROR: There may be an internal malfunction.Check the connection. If the error massage still remains on in the display, consult your nearest Sony dealer.OVERLOAD: The USB device is overloaded.Disconnect the USB device, then press SRC to select another source. The USB device has a fault, or an unsupported device is connected.READ: Now reading information.Wait until reading is complete and playback starts automatically. This may take some time depending on the disc structure.RESET: The unit cannot be operated due to the problem.Press RESET (page 7).TEMP CAUTION: The thermal protector is activated. Reduce the volume.USB ERROR: The USB device cannot be played.Connect the USB device again.USB NO SUPRT: The USB device is not supported.For details on the compatibility of your USB device, visit the support site on the back cover. or : The beginning or the end of the disc has been reached.: The character cannot be displayed.For BLUETOOTH function:BT BUSY: The BLUETOOTH device is busy.Wait for a while, then try again.ERROR: The selected operation could not be performed.Wait for a while, then try again.MEMORY BUSY: Now storing data.Wait for a while, then try again.NO DEV: The BLUETOOTH device is not connected or recognized.Make sure the BLUETOOTH device is securely connected, or the BLUETOOTH connection is established with the BLUETOOTH device.010COV.book Page 28 Monday, September 22, 2014 2:03 PM](https://usermanual.wiki/Sony-Group/MEXXB100BT.Short-term-Confidential-User-Manual-II/User-Guide-2459218-Page-9.png)
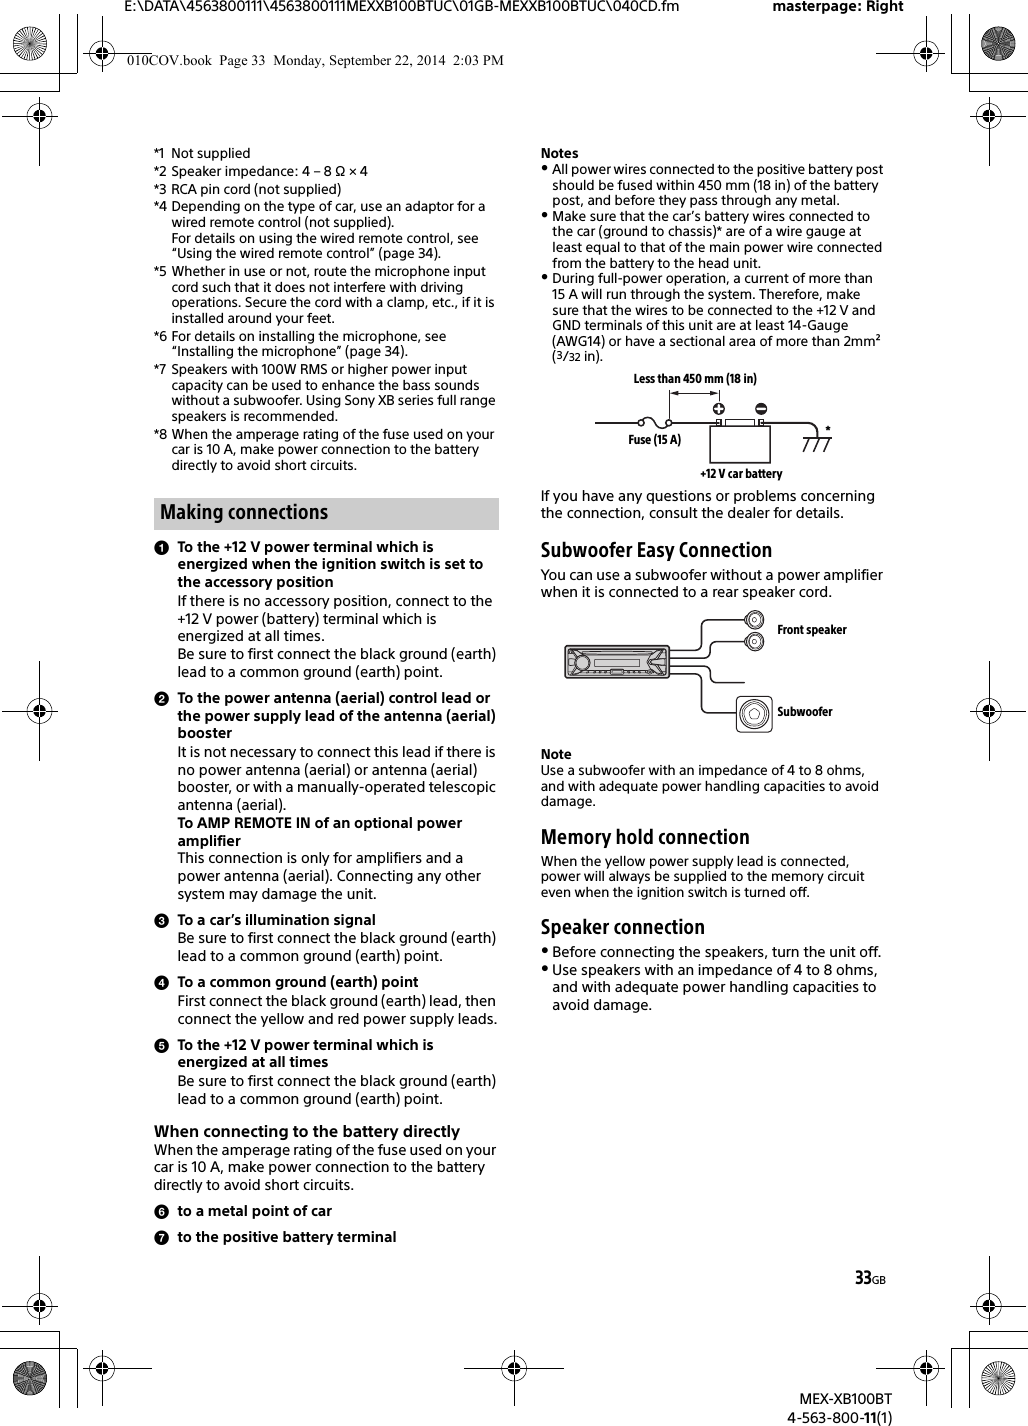
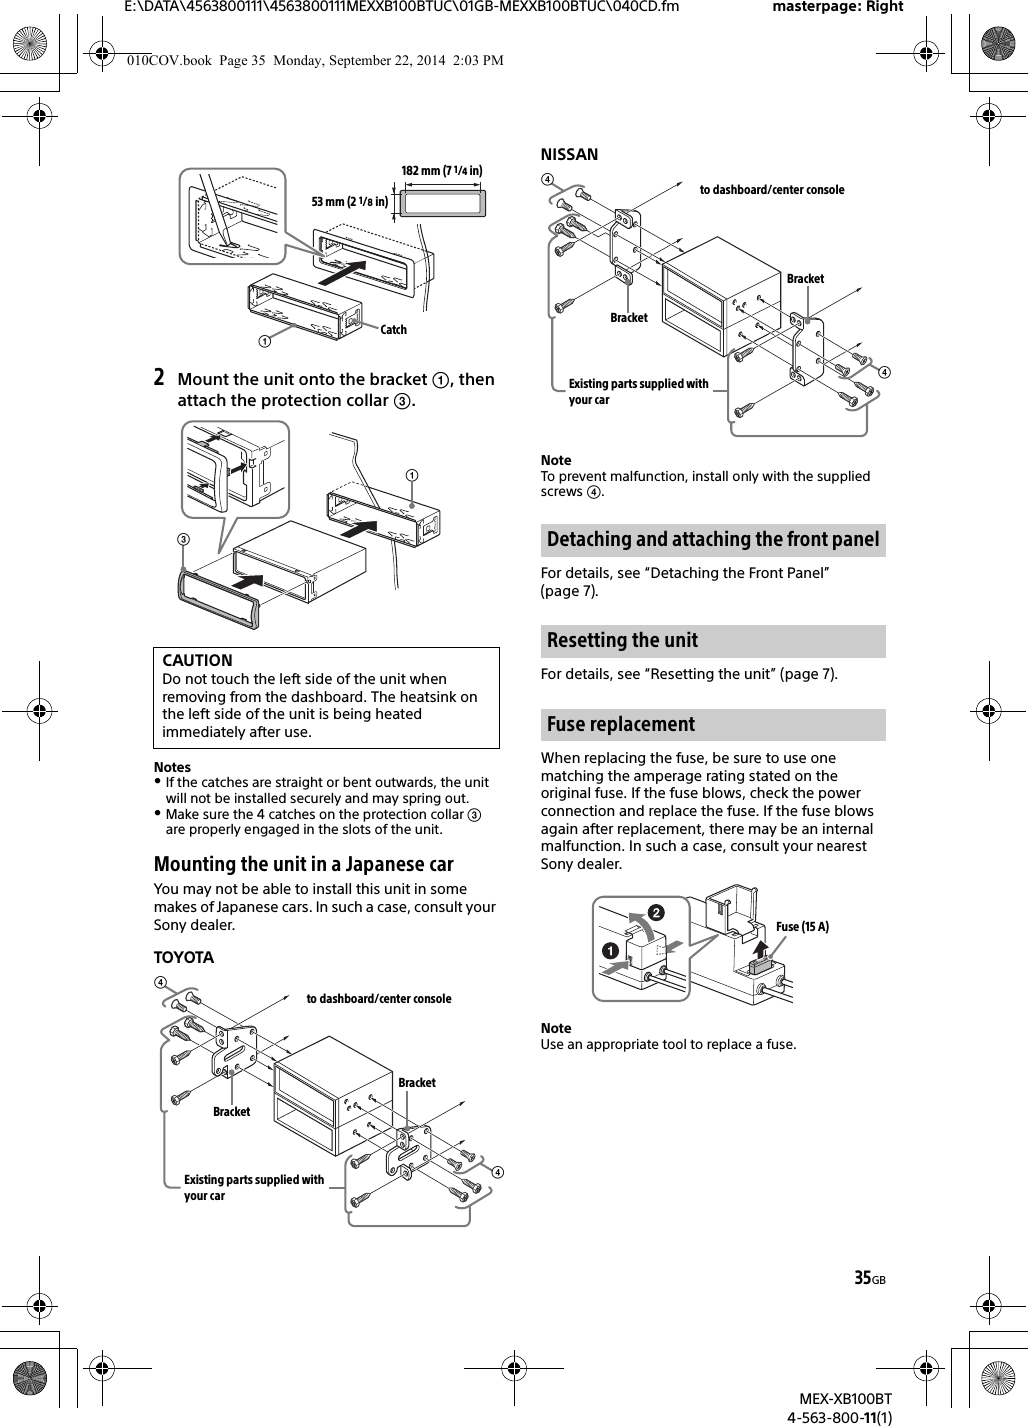
![34GBE:\DATA\4563800111\4563800111MEXXB100BTUC\01GB-MEXXB100BTUC\040CD.fm masterpage: LeftMEX-XB100BT4-563-800-11(1)To capture your voice during handsfree calling, you need to install the microphone .CautionsIt is extremely dangerous if the cord becomes wound around the steering column or gearstick. Be sure to keep it and other parts from interfering with your driving operations.If airbags or any other shock-absorbing equipment is in your car, contact the store where you purchased this unit, or the car dealer, before installation.NoteBefore attaching the double-sided tape , clean the surface of the dashboard with a dry cloth.When using the steering wheel remote controlInstallation of the connection cable RC-RS1 (not supplied) is required.Notes on the connection cable RC-RS1 (not supplied)Refer to the support sites on the back cover for details, then connect each lead properly to the appropriate leads. Making an improper connection may damage the unit.Depending on the type of car, be sure to insulate the unused leads with electrical tape for safety.Do not connect this cable when the steering wheel remote control is not used.Consulting the dealer or an experienced technician for help is recommended.1To enable the steering remote, select [STEERING] [STR EDIT] to make the registration (page 19).When the registration completes, the steering remote control becomes available.When using the wired remote control (e.g., rotary commander) other than the steering remote1In the STEERING setting, set [STR CONTROL] to [EXTERNAL] (page 19).InstallationBefore installing the unit, remove the protection collar and the bracket from the unit.1Pinch both edges of the protection collar , then pull it out.2Insert both release keys until they click, and pull down the bracket , then pull up the unit to separate.Before installing, make sure the catches on both sides of the bracket are bent inwards 2 mm (3/32 in). When mounting in a Japanese car, see “Mounting the unit in a Japanese car” (page 35).1Position the bracket inside the dashboard, then bend the claws outward for a tight fit.Installing the microphoneUsing the wired remote controlClip (not supplied)Removing the protection collar and the bracketMounting the unit in the dashboardFace the hook inwards.010COV.book Page 34 Monday, September 22, 2014 2:03 PM](https://usermanual.wiki/Sony-Group/MEXXB100BT.Short-term-Confidential-User-Manual-II/User-Guide-2459218-Page-15.png)