Sony WCM2-WCL2 Wireless Mouse Transmitter User Manual US 1U p65
Sony Corporation Wireless Mouse Transmitter US 1U p65
Sony >
Users Manual
English
WARNING
To prevent fire or shock hazard, do not
expose the unit to rain or moisture.
For customers in the U.S.A.
Owner’s Record
The model and serial numbers are located on the
bottom of the mouse, Receiver and Receiver stand.
Record these numbers in the space provided below.
Refer to them whenever you call your Sony dealer
regarding this product.
Model No.
Mouse
Receiver
Receiver stand
Serial No.
Mouse
Receiver
Receiver stand
2-179-485 -11(1)
2005 Sony Corporation Printed in China
SMU-WCM2/WCL2
USB Wireless
Mouse
Operating Instructions
Mode d’emploi
Manual de instrucciones
– Microsoft and Windows are registered trademarks of
Microsoft Corporation in the United States and/or
other countries.
– All other names of systems and products are
trademarks or registered trademarks of their
respective owners. ™ and ® marks are omitted in this
manual.
–Copyright laws prohibit reproducing the
software supplied with this mouse or the
manual accompanying it in whole or in part, or
renting the software without the permission of
the copyright holder.
–In no event will SONY be liable for any financial
damages, or loss of profits, including claims made
by third parties, arising out of the use of the
software supplied with this mouse.
–In the event a problem occurs with this product as
a result of defective manufacturing, SONY will
replace it. However, SONY bears no other
responsibility.
–The software provided with this mouse cannot be
used with equipment other than that which is so
designated.
–Please note that, due to continued efforts to
improve quality, the specifications of the software
supplied with this mouse may be changed without
notice.
Operating humidity
20% to 80% (not condensed)
Storage temperature
–10˚C to 60˚C (14˚F to 140˚F)
Storage humidity
10% to 90 % (not condensed)
Dimensions
Mouse
Approx. 59 × 34 × 98 mm (2 3⁄8 × 1 3⁄8 × 3 7⁄8 in)
(w/h/d) (SMU-WCM2)
Approx. 65 × 35 × 113 mm (2 5⁄8 × 1 7⁄16 × 4 1⁄4 in)
(w/h/d) (SMU-WCL2)
Receiver
Approx. 19 × 13 × 74 mm (3⁄4 × 17⁄32 × 3 in) (w/h/d)
Receiver stand
Approx. 50 × 28 mm (2 × 1 1⁄8 in) (w/h)
Approx. 1.5 m (4.9 ft) (cord length)
Mass
Mouse
Approx. 80 g (2.8 oz) (including batteries) (SMU-WCM2)
Approx. 120 g (4.2 oz) (including
batteries
)
(SMU-
WC
L2)
Receiver
Approx. 14 g (0.5 oz)
Receiver stand
Approx. 60 g (2.1 oz) (including cord)
Battery life
Approx. 1.3 months (SMU-WCM2) (for normal usage*
of alkaline batteries)
Approx. 3.3 months (SMU-WCL2) (for normal usage*
of alkaline batteries)
*Normal usage is 10% operation when the POWER
switch is ON 8 hours per day.
The battery life is calculated based on the above.
Supplied accessories
Receiver (1), Receiver stand (1),
Operating instructions (2)
Design and specifications are subject to change without
notice.
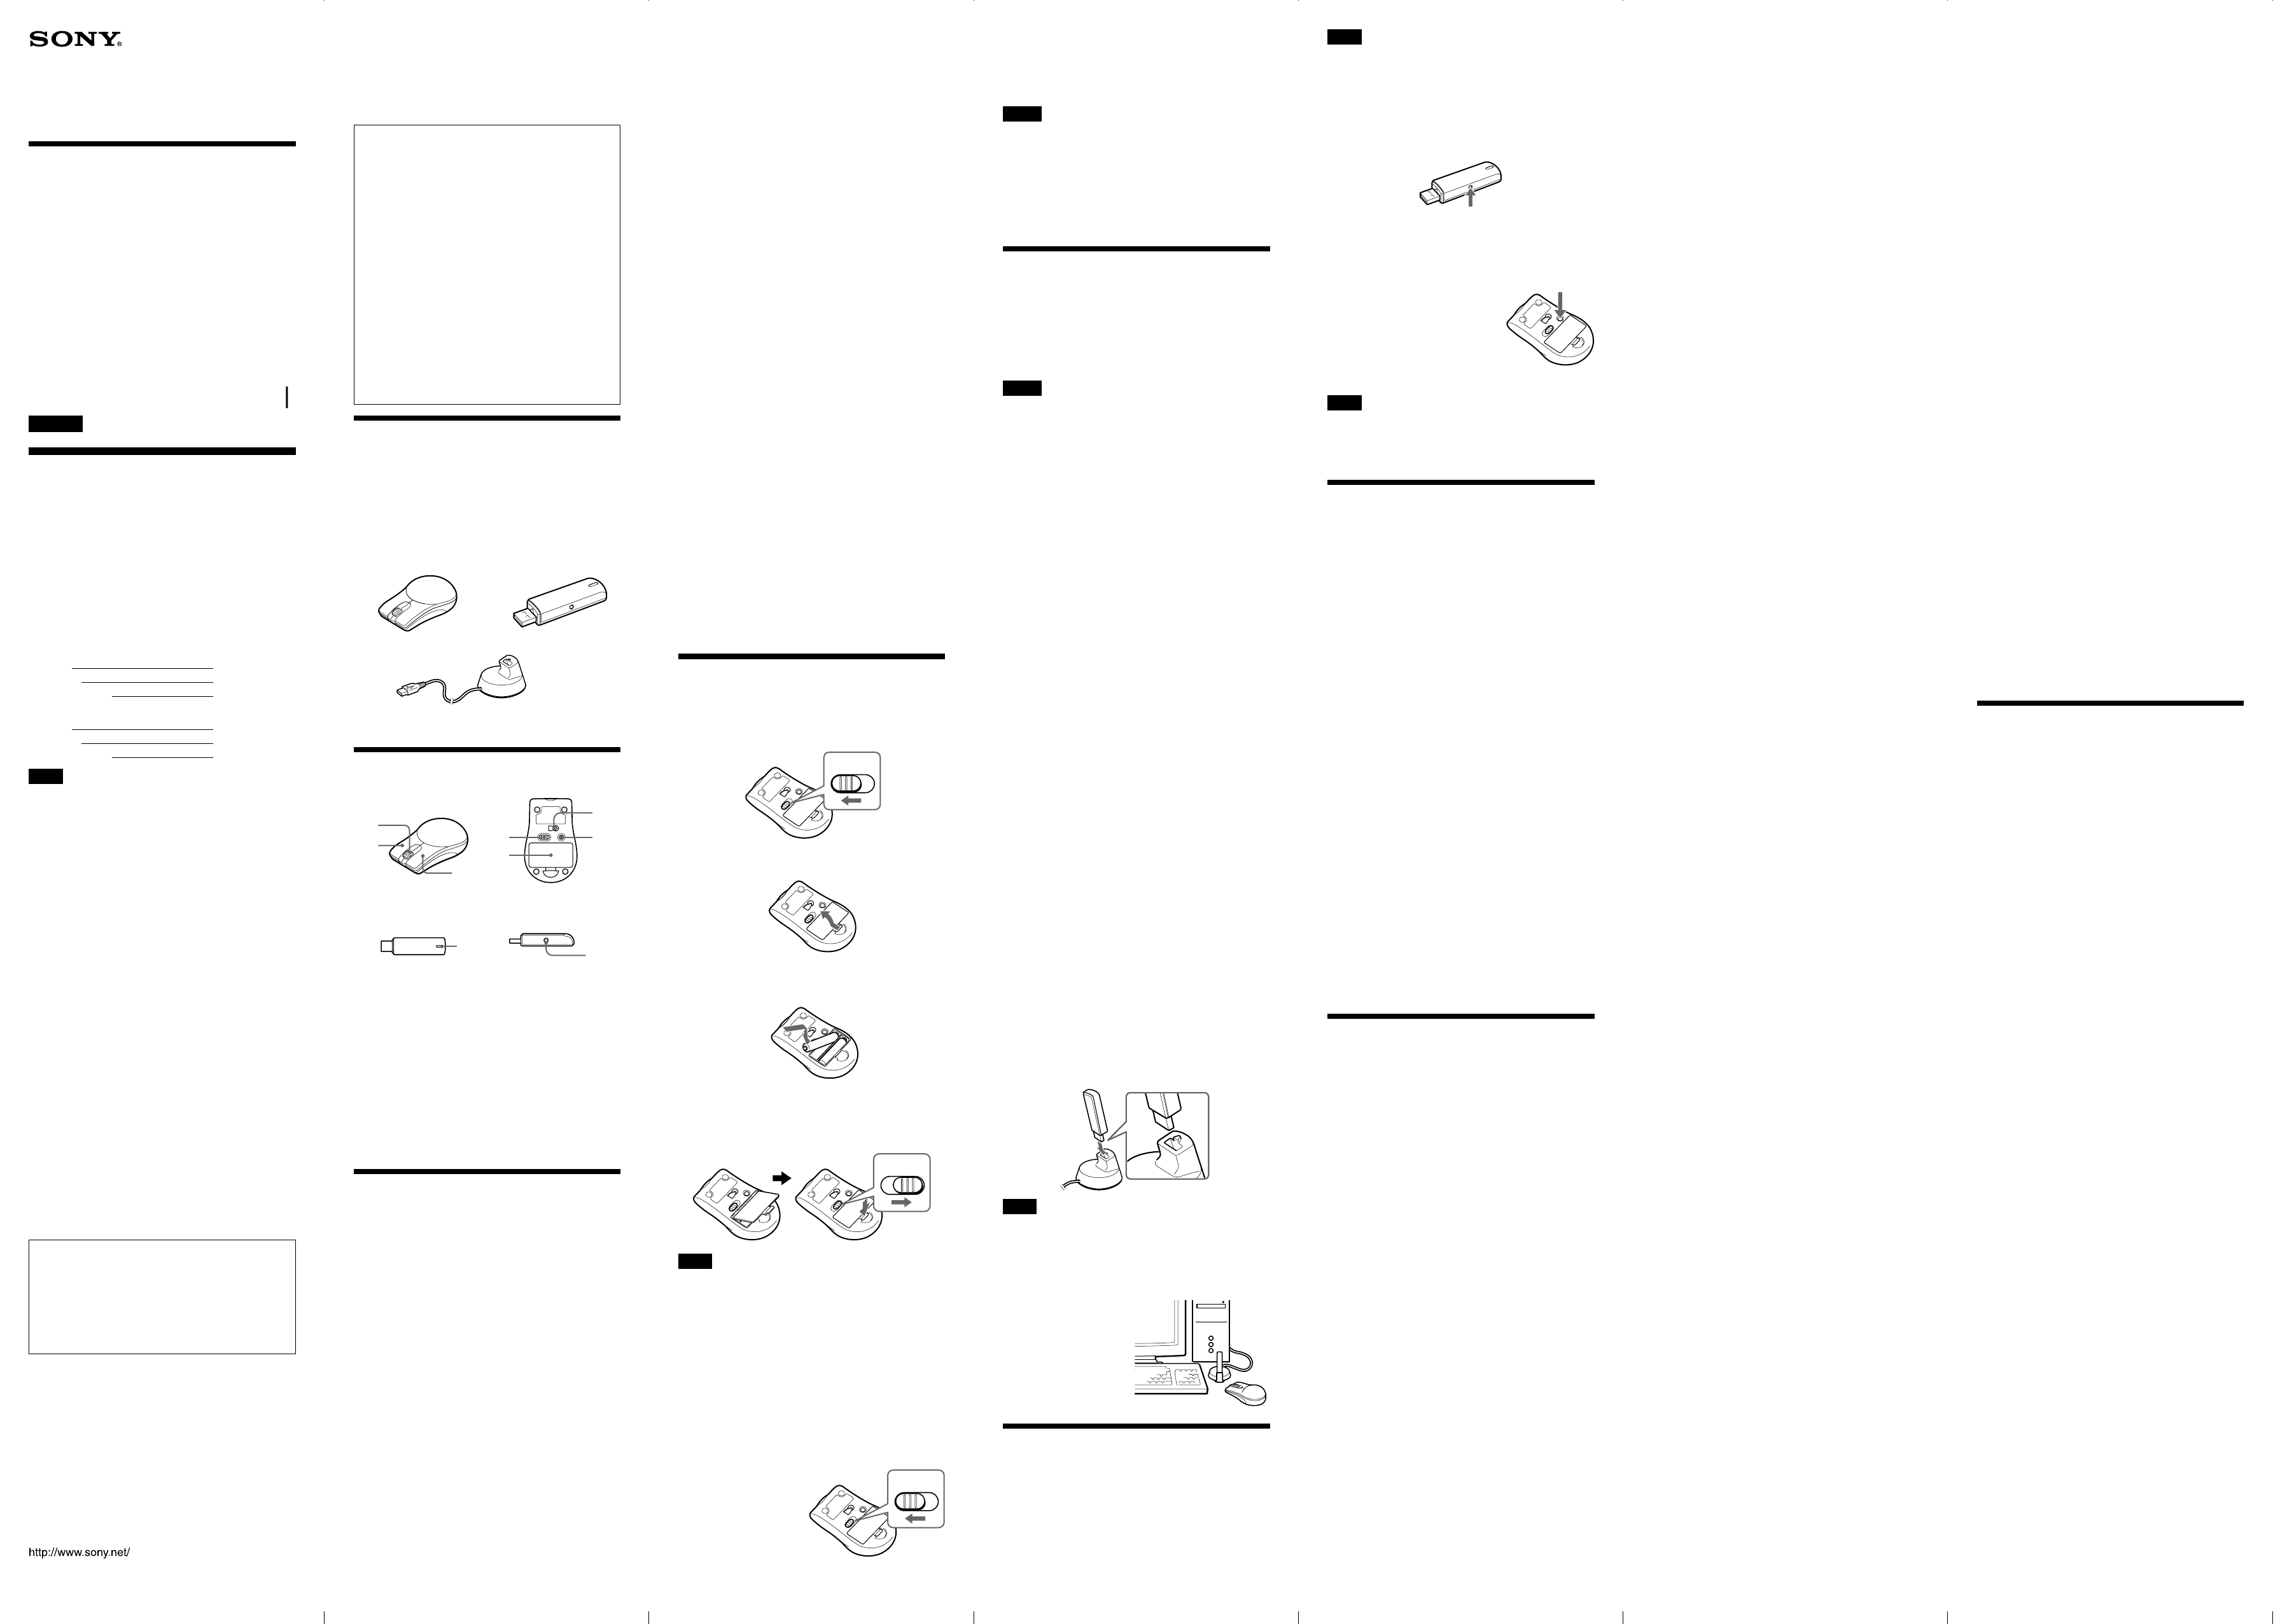
Inserting batteries into
the Mouse
1Slide the POWER switch to OFF.
2Open the compartment lid as shown in
the illustration.
3Insert two batteries, lining up the + and
– marks on the batteries with the + and –
marks in the battery compartment.
4Close the compartment lid as shown in
the illustration.
Slide the POWER switch to ON. The optical
sensor starts to blink.
Note
Do not use the mouse when use of electronic
equipment is prohibited. Remove the batteries to
prevent electric waves from occurring when you
carry the mouse on an airplane.
On the power saving mode
The mouse has a POWER switch and sleep mode to
save power.
–POWER switch
Slide the POWER switch to OFF to save the power.
–Sleep mode
The mouse enters sleep mode when no input is
detected for a while.
On storage of the mouse
Slide the POWER
switch to OFF when not
using the mouse.
Remove the batteries
when you do not intend
to use the mouse for a
long time.
On replacement of the batteries
When the battery power goes down, the LED indicator
on the Receiver blinks red. When this occurs, replace
the batteries with new ones. The LED indicator does
not blink when your computer is turned off.
Notes
The LED indicator usually blinks red when moving the
mouse, however, if the battery is low, it may blink
orange. This is because as the LED blinks red, the
Receiver blinks green simultaneously. This is not a
malfunction.
If the LED indicator will not blink green even you
replace the batteries, set the wireless setting again to
refer to “Setting up the Wireless Mouse.”
Connecting the Mouse
You can use this mouse by connecting it to a USB
port of your computer.
Connect this mouse to a USB port of your computer.
The mouse is recognized by your computer, and is
ready for use.
Notes
•The LED indicator may blink red temporarily when
the Receiver is connected to a USB port or when the
computer starts up. The LED indicator stops blinking
when the mouse is recognized. This is not a
malfunction.
•When you connect this mouse to your computer, or
when you start up your computer, do not move this
mouse until it is identified.
•Do not connect to a computer using a USB hub.
•Some computers may require installing an OS disk.
In this case, follow the directions shown on your
computer.
•Depending on the condition of the computer or OS,
operation of this mouse may become unstable or
impossible. In such a case, refer to
“Troubleshooting.”
•After disconnecting this mouse from the USB port,
wait about five seconds before reconnecting it. (If
you reconnect it immediately, it may not be
recognized.)
•Do not press the Receiver forcibly when it is
connected to your computer to prevent damage to
the Receiver or your computer.
•Remove the Receiver when carrying your notebook
computer to prevent damage.
1Start up your computer.
2Connect this mouse to a USB port of
your computer.
Your computer automatically recognizes the
mouse, allowing you to use it.
z Tips
•You can connect/disconnect this mouse without
turning off the power of your computer.
• Set the pointer speed for the mouse using the mouse
property settings.
Using the Receiver Stand
If the mouse and receiver are not closely situated,
for example if your USB port is located on the back
of the computer, or if your computer is placed under
the desk, place the Receiver on the Receiver stand
for good reception.
1Insert the Receiver into the jack on the
Receiver stand as shown in the
illustration.
Note
This Receiver stand is only for the Receiver supplied
with this mouse. Do not insert other devices into the
jack on this Receiver stand.
2Connect the Receiver stand to a USB port
of your computer.
z Tip
Place the Receiver stand
nearby the computer and
adjust the Receiver stand
position for good
reception to move the
mouse.
Setting Up the Wireless
Mouse
The Receiver needs to recognize the mouse before
using the mouse. Connect the Receiver to your
computer before using the mouse. For details about
connection, refer to “Connecting the Mouse.”
Note
Place the Receiver and the mouse within 10 cm (4 in)
distance. Do not move the mouse from the Receiver
until it is identified.
1Press the SET button on the side of the
Receiver.
The LED indicator starts to blink green slowly.
2Press the SET button on the bottom of
the mouse while the LED indicator is
blinking (about 60 seconds).
The LED indicator will blink fast (about two
seconds) when the Receiver recognizes the
mouse. The set up is
completed. The LED
indicator will blink green
when the pointer is moved
according to the operation of
the mouse. If the pointer
does not move, set up again.
Note
Never press the SET button on the bottom of the mouse
except for the above settings, as the Receiver will not
recognize the mouse. If the button is pushed, set up
again.
On the Placement of the
Wireless Mouse
• When you use the Receiver stand, place it at least 20
cm (7 7⁄8 in) from electromagnetic wave equipment
such as a monitor, fluorescent lamp, etc.
•Depending on the material of desk (steel, etc.), the
mouse may not operate properly even if the mouse is
in the operational area 1 m (3.3 ft) from the Receiver.
In such a case, try the measures as shown below:
–Use a thick mouse pad and make sure the mouse
does not touch the desk.
– Place the Receiver on the Receiver stand and
position it near the mouse.
– Place the Receiver on the Receiver stand and
position it in a high place, such as a shelf.
–Do not wrap the Receiver stand with its cord.
–Change the position of the Receiver stand cable
and place it apart from the desk surface.
–Change the setting direction of the Receiver stand.
•If there are objects made of metal except the desk,
place the mouse and Receiver apart from the object at
least 20 cm (7 7⁄8 in) or more.
•The operational area of the mouse is 1 m (3.3 ft) in
normal use, but it will be shorten in a radio
frequency environment.
•If you use other devices which have the same
frequency of this mouse within the 1 m (3.3 ft)
distance from the Receiver, the pointer may not
operate properly due to radio disturbance. In such a
case, place the Receiver and the mouse close or move
the other device from the Receiver.
• Use the Receiver and the mouse as close together as
possible. Place the Receiver stand behind the mouse
when the Receiver is connected to the Receiver stand
for good reception.
Troubleshooting
If you experience any of the following difficulties
while using this mouse, refer to this troubleshooting
guide to help remedy the problem. If the problem
persists, consult your nearest Sony dealer.
My mouse does not work.
❒The LED indicator on the Receiver blinks red.
cReplace the batteries with new ones.
(The LED indicator may go off temporarily if
the mouse is not used for a long time or the
computer is turned off. In such a case, the LED
indicator will blink after you start to use the
mouse. If the LED indicator blinks red, replace
batteries with new ones immediately.)
❒The Receiver does not recognize the operation of
the mouse.
cPlace the Receiver on the Receiver stand and
use the mouse close to the Receiver. The LED
indicator will blink green when the Receiver
receives the signal from the mouse. If the
Receiver does not receive the signal, set up the
wireless mouse again. Refer to “Setting up the
Wireless Mouse” and “On the placement of the
Wireless Mouse.”
❒The optical sensor is not working properly.
cDue to the nature of this optical mouse, do not
use the mouse on glass, a mirror, or glossy
surfaces as it will not work properly. Use the
mouse with a mouse pad, or lay something
suitable under it.
❒The USB connector is not connected properly.
cAfter closing all the applications, reconnect the
USB connector.
(After disconnecting the mouse from the USB
port, reconnect it after about five seconds.)
❒The mouse is not recognized by your computer
through the USB port to which the mouse is
connected.
cIf your computer has more than one USB port,
try connecting the mouse to another USB port.
(After disconnecting the mouse from the USB
port, reconnect it after about five seconds.)
cTurn off the power of your computer while the
mouse is connected to it, then start it up again
after about 30 seconds.
(If your mouse still does not work, repeat this
procedure several times.)
❒The mouse is connected through a USB hub or a
keyboard.
cConnect the mouse directly to your computer.
❒The POWER switch is OFF.
cSlide the POWER switch to ON.
❒The USB port is disabled by your computer.
cTry the following, using the keyboard or
another functional mouse. Double-click the
[System] icon in the [Control Panel], and click
[Device Manager]. If [!] is displayed for the USB
device icon or the mouse icon, choose [!] and
click [Delete], then restart your computer.
❒The USB port is disabled in the BIOS settings.
cCheck the default BIOS settings in your
computer. The USB port may have been
disabled. Enable the USB port, following the
manual, etc., of your computer.
The [Found New Hardware wizard] appears
when I connect this mouse to my computer.
❒Your computer has more than one USB port.
cThe USB driver may be installed for every port
according to the computer. Click [Cancel] on
the [Found New Hardware wizard] and
reconnect the mouse to the USB port for which
the driver is already installed. Otherwise, install
the driver for all the USB ports to which you
wish to connect the mouse.
The pointer sometimes does not move even
though the mouse works.
❒The Receiver does not recognize the operation of
the mouse.
cPlace the Receiver on the Receiver stand and
use the mouse close to the Receiver. The LED
indicator will blink green when the Receiver
receives the signal from the mouse. If the
Receiver does not receive the signal, set up the
wireless mouse again. Refer to “Setting up the
Wireless Mouse.”
❒Another wireless mouse is used nearby.
cUse this mouse at least 1 m (3.3 ft) or more from
the other wireless mouse.
❒There is an electromagnetic wave disturbance
from other equipment, such as a monitor,
fluorescent lamp, etc.
cMove the Receiver and the mouse away from
other electromagnetic equipment.
❒The mouse is in the auto scroll mode.
cPress the wheel button to exit this mode.
❒The optical sensor is not working properly.
cDue to the nature of this optical mouse, do not
use the mouse on glass, a mirror, or glossy
surfaces as it will not work properly. Use the
mouse with a mouse pad, or lay something
suitable under it.
Nothing happens when I press the buttons of the
mouse.
❒The Receiver does not recognize the operation of
the mouse.
cPlace the Receiver on the Receiver stand and
use the mouse close to the Receiver. The LED
indicator will blink green when the Receiver
receives the signal from the mouse. If the
Receiver does not receive the signal, set up the
wireless mouse again. Refer to “Setting up the
Wireless Mouse.”
❒The USB connector is not connected properly.
cAfter closing all the applications, reconnect the
USB connector.
❒This mouse does not support the OS of your
computer.
cUse an OS that this mouse supports.
The scrolling features do not work
❒The Receiver does not recognize the operation of
the mouse.
cPlace the Receiver on the Receiver stand and
use the mouse close to the Receiver. The LED
indicator will blink green when the Receiver
receives the signal from the mouse. If the
Receiver does not receive the signal, set up the
wireless mouse again. Refer to “Setting up the
Wireless Mouse.”
❒This mouse does not support the OS of your
computer.
cUse an OS that this mouse supports.
❒An application that does not support the
scrolling features is open.
cSome applications do not support the scrolling
features.
Pointer speed cannot be set on a notebook
computer.
❒Priority is given to the pointing device built into
the notebook computer. Therefore, it may not be
possible to set up with a USB-connected mouse.
The mouse property settings are disabled.
❒More than one mouse is connected to USB ports.
cDisconnect every mouse except this one.
❒Utility driver software for another mouse is
installed.
cUninstall the utility driver software and then
restart your computer. The operating system’s
mouse property settings become effective. For
details about uninstalling, refer to the manual,
etc., of your utility driver software.
(A touchpad function may be disabled when
you use a notebook computer.)
Even if the wheel button is rotated, the zoom
function does not operate.
❒The application does not support the zoom
function.
cThe zoom function cannot be used with
applications that do not support the zoom
function.
The LED indicator blinks orange.
❒The battery power is low.
cWhen the LED indicator blinks red and the
Receiver blinks green simultaneously, it looks
like orange. Replace the batteries with new
ones.
Even while my mouse is in use, the display is
dark, or the computer enters the System Standby
mode or the System Hibernation mode.
❒Depending on the USB equipment you use, the
computer may enter the System Standby mode
or the System Hibernation mode even while the
USB equipment is being used.
cTo prevent your notebook computer from
entering these modes, change the power
management settings of the computer. For
details, refer to the manual or online manual of
your notebook computer.
cTouch the touchpad or press any key to exit
these modes.
Precautions
CAUTION
Your health may be affected if you do not follow the
caution below.
Prolonged use of this product may strain your wrist or
arm.
If you feel any pain during use, stop immediately and
take a rest. If the pain persists, even after a prolonged
rest, consult a doctor.
On safety
Should any solid object or liquid fall into the casing,
disconnect the USB mouse and have it checked by
qualified personnel before continuing use.
On placement
Do not place the USB mouse in a location where it is:
•On an unstable surface
• On a rug or carpet
•In very humid areas, or where there is no ventilation
•Subject to excessive dust
•Subject to direct sunlight or extreme heat
•Extremely cold
• In a car with the windows closed.
On operation
If the USB mouse is brought directly from a cold to a
warm location, or is placed in a very damp room,
moisture may condense on the inside of the mouse. If
this occurs, the mouse may not work properly.
In this case, wait about 30 minutes for the moisture to
evaporate. If the mouse does not work properly after
one hour, consult your nearest Sony dealer.
Sony is exempt from responsibility for any malfunction
or other problem caused as a result of using this mouse.
POWER
OFF ON
e
E
eE
POWER
OFF ON
POWER
OFF ON
Note
This equipment has been tested and found to
comply with the limits for a Class B digital device,
pursuant to Part 15 of the FCC Rules. These limits
are designed to provide reasonable protection
against harmful interference in a residential
installation. This equipment generates, uses, and can
radiate radio frequency energy and, if not installed
and used in accordance with the instructions, may
cause harmful interference to radio
communications. However, there is no guarantee
that interference will not occur in a particular
installation. If this equipment does cause harmful
interference to radio or television reception, which
can be determined by turning the equipment off and
on, the user is encouraged to try to correct the
interference by one or more of the following
measures:
–Reorient or relocate the receiving antenna.
–Increase the separation between the equipment and
receiver.
–Connect the equipment into an outlet on a circuit
different from that to which the receiver is
connected.
–Consult the dealer or an experienced radio/TV
technician for help.
You are cautioned that any changes or modifications
not expressly approved in this manual could void
your authority to operate this equipment.
If you have any questions about this product, you
may call; Sony Customer Information Services
Center 1-800-222-7669 or http://www.sony.com/
Declaration of Conformity
Trade Name : SONY
Model No. : SMU-WCRC110
Responsible Party : Sony Electronics Inc.
Address : 16450 W. Bernardo Dr, San Diego, CA
92127 USA
Telephone No. : 858-942-2230
This device complies with Part 15 of the FCC Rules.
Operation is subject to the following two conditions:
(1) This device may not cause harmful interference,
and (2) this device must accept any interference
received, including interference that may cause
undesired operation.
For customers in Canada
Operation is subject to the following two conditions:
(1) This device may not cause harmful interference,
and (2) this device must accept any interference
received, including interference that may cause
undesired operation.
Unpacking Your Mouse
Check that the package contains before using this
product.
If anything is missing, contact the Sony dealer
where you purchased this product or a Sony service
representative serving your local area.
• Mouse SMU-WCM2/
SMU-WCL2
• Receiver stand SMU-WCUS110
• Operating instructions (2)
Identifying the Parts
• Mouse
• Receiver
1Wheel button
2Right button
3Left button
4POWER switch
5Compartment lid
6Optical sensor LED
7SET button
This enables
recognition between
the Receiver and the
mouse.
Specifications
Connector
USB connector
Resolving power
800 counts/inch
Transmitter frequency
27.045 MHz
Number of channels
1 ch 8190ID
Electric field strength
At 3 m (9.8 ft), 500 µV/m MAX
Operational distance
Approx. 1 m (3.3 ft) (depending on the situation)
Power supply
2 size AAA (LR03) alkaline batteries (SMU-WCM2)
2 size AA (LR6) alkaline batteries (SMU-WCL2)
Supported OS
Windows® XP Professional, Windows® XP Home
Edition, Windows® 2000 Professional, Windows®
Millennium Edition, Windows® 98 Second Edition
(Manufacturer installed.)
Operating temperature
5˚C to 35˚C (41˚F to 95˚F)
• Receiver
SMU-WCRC110
Français
AVERTISSEMENT
Pour prévenir tout risque d’incendie ou
d’électrocution, garder cet appareil à l’abri
de la pluie et de l’humidité.
–Microsoft et Windows sont des marques déposées de
Microsoft Corporation aux États-Unis et/ou dans
d’autres pays.
–Tous les autres noms de systèmes et de produits sont
des marques de commerce ou des marques déposées
de leurs propriétaires respectifs. Les symboles ™ et ®
ne sont pas utilisés dans le présent mode d’emploi.
Front
SideTop
Rear
8LED indicator
Blink green when
receive a signal
from the mouse.
Blink red when the
battery power goes
down.
9SET button
This enables
recognition between
the Receiver and the
mouse.
89
1
2
3
4
5
6
7