Sorenson Communications ADWAS-1986 Bluetooth System User Manual Setup Guide Sorenson Pulse
Sorenson Communications, Inc. Bluetooth System Setup Guide Sorenson Pulse
User Manual

Sorenson Pulse
Setup Guide
Version 1.0
April 19, 2018
Part No: 770-00002
Sorenson Confidential — Do Not Distribute Without Permission
Model: ADWAS-1986
Table of Contents
• Take Inventory ............................................................................. 2
• Connect the Equipment ............................................................. 3
• Safety Instructions ...................................................................... 5
• Regulatory Compliance ............................................................. 6
Take Inventory
2
Sorenson Pulse
Sorenson Confidential — Do Not Distribute Without Permission
Take Inventory
Step 1. Check For These Things First
You will need to have the following things ready and available near the location where you
intend to set up your Sorenson Pulse device:
Sorenson ntouch VP2 Videophone or other ntouch Endpoint Device
The Sorenson Pulse flasher is designed for use with the Sorenson ntouch VP2 videophone
or other ntouch endpoint device that supports wireless connections. A wireless connection
between the Pulse and the ntouch endpoint allows the Pulse to flash a visual signal
whenever an incoming call is received by the ntouch endpoint.
Electrical Outlet
You’ll need a standard 120v AC electrical outlet located near your Pulse device. A power
transformer is supplied with your videophone.
Step 2. Unpack the Shipping Box
Look for the following components packed in the shipping box:
Pulse Device
The Pulse device is a white circular plastic unit with a power port on its back side. Two
slider switches are used to set the intensity of the two flasher systems in the device. A radio
“pairing” button is located above the two slider switches.
DC Power Supply
The DC Power Supply (transformer) is a black rectangular device with an integral power
cord that you will attach to the power port on the back side of the Pulse device. Do not
use any other transformer with the Pulse device.
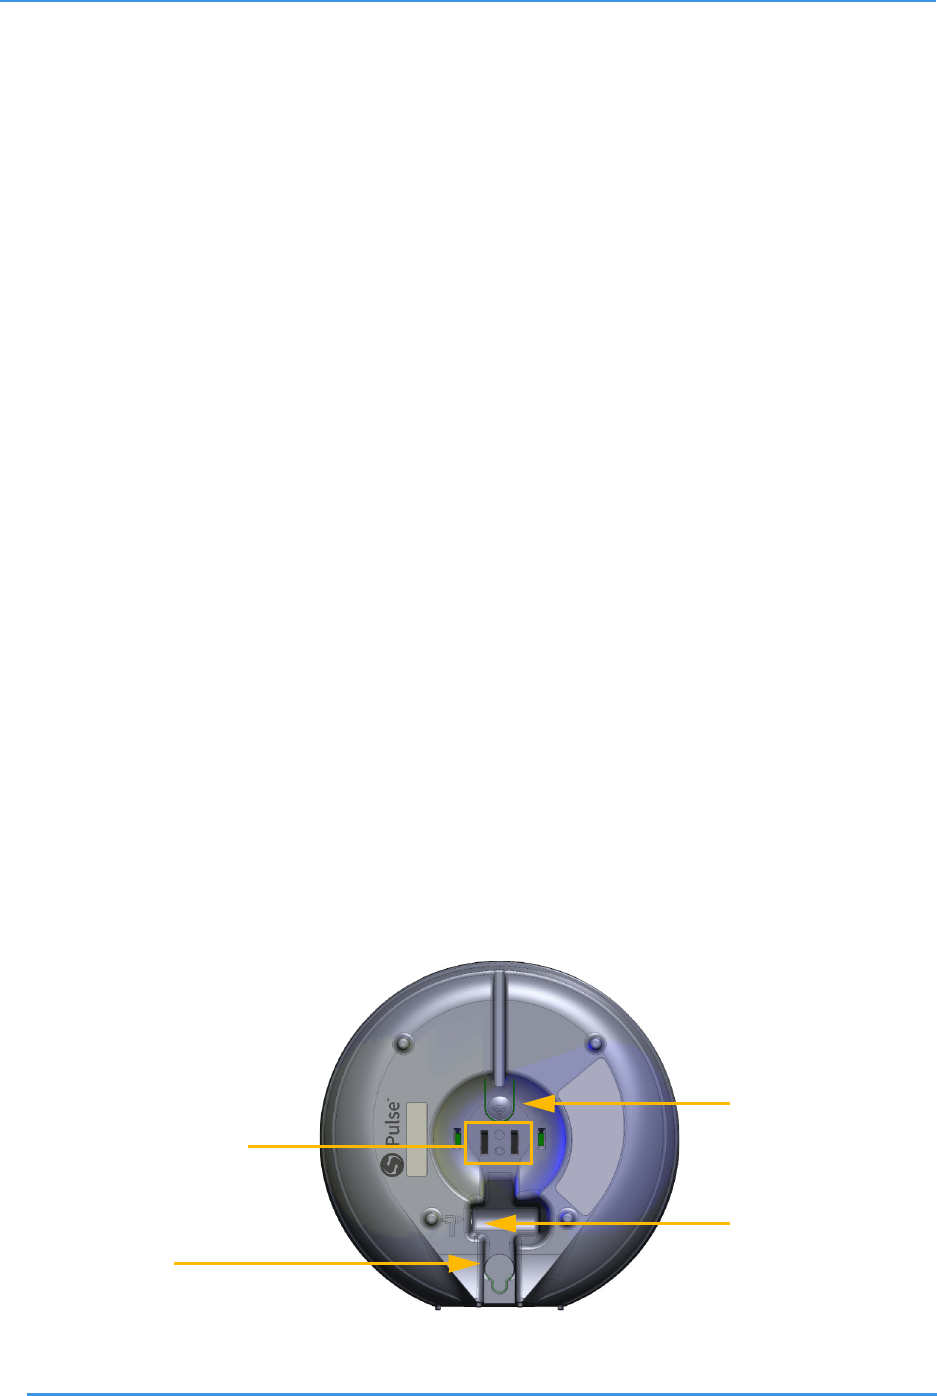
Step 3. Examine the Backside of the Pulse Device
Examine the back side of the Pulse device to identify its power port, flash intensity control
switches, radio pairing button and wall-mount slot:
Backside view
Flash intensity switches
Radio pairing button
Power port
Wall-mount slot
Connect the Equipment
3
Setup Guide
Sorenson Confidential — Do Not Distribute Without Permission
Connect the Equipment
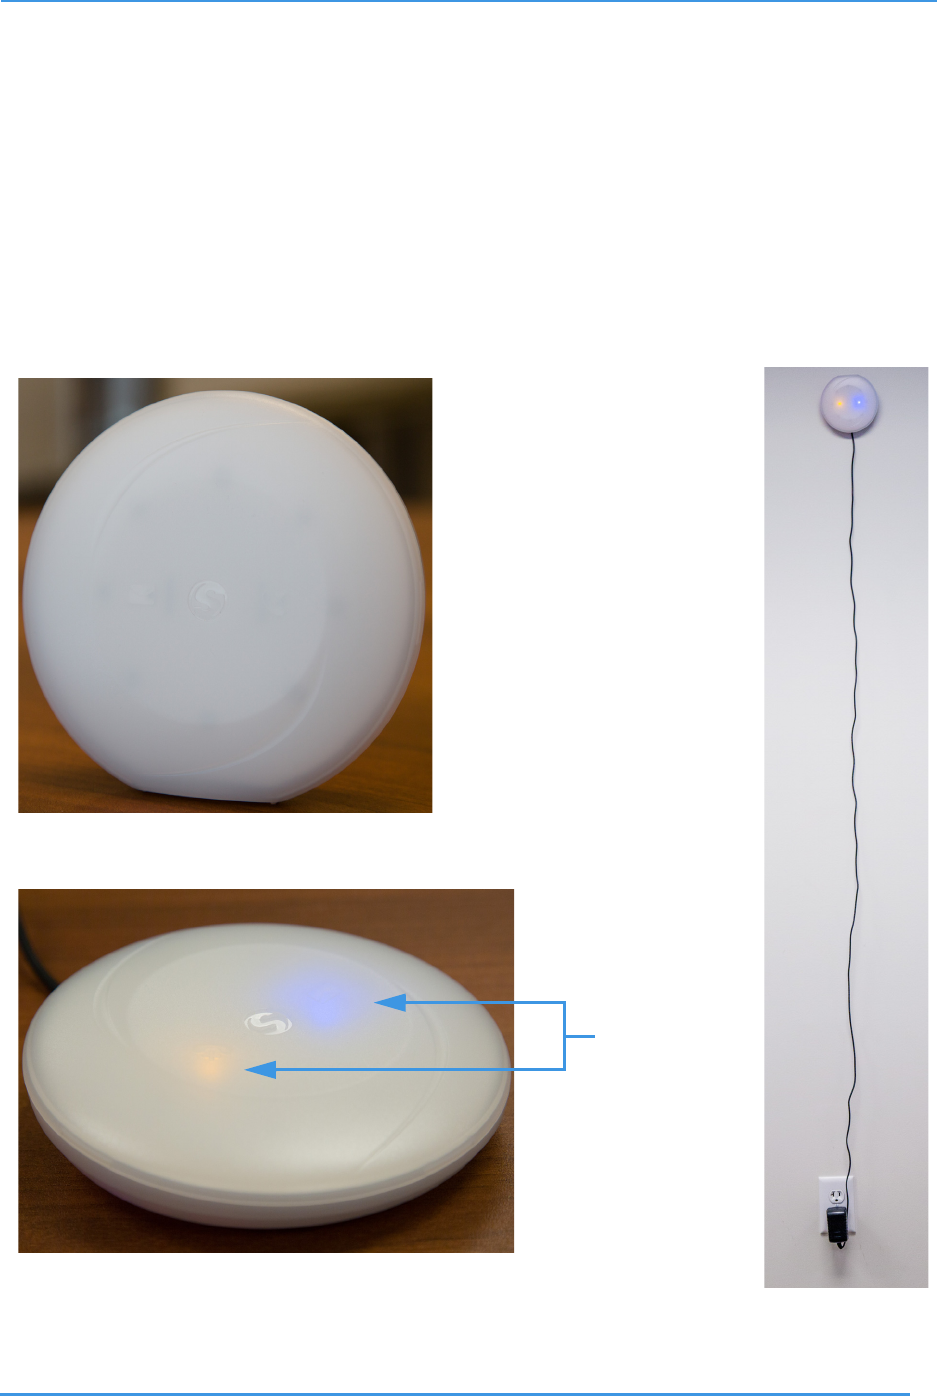
Step 1. Find a good place to put the Pulse device.
Look around for a good place to set up your Pulse device. You’ll need a stable table,
counter, or shelf that’s located near an available AC power outlet. Because the Pulse device
connects wirelessly to the ntouch VP2 videophone (or other ntouch endpoint), you do
not need to place the device near the videophone. Choose a convenient location where
you will see the Pulse device when it flashes to alert you to an incoming videophone call.
You can place the Pulse device in a vertical or horizontal orientation or you can choose to
mount it to a wall using the wall-mount slot located on the back side of the device.
Also notice the SignMail and Missed Calls lights on the front-side of the Pulse device.
Vertical (standing up)
Wall-mount
Horizontal (lying down)
SignMail and
Missed Call
lights on front
side of Pulse
Connect the Equipment
4
Sorenson Pulse
Sorenson Confidential — Do Not Distribute Without Permission
Step 2. Connect the DC Power Supply to the power port on the Pulse device.
Step 3. On the ntouch VP2 or other ntouch endpoint, open its Bluetooth pairing function.
The Pulse device can be paired to only one ntouch endpoint at a time. However, an
ntouch endpoint can be paired to multiple Pulse devices at one time (such as multiple
devices placed throughout your home or office).
Step 4. Briefly press the radio pairing button on the backside of the Pulse device. The
device will enter the pairing mode. Use the pairing function on the ntouch endpoint
to establish a connection between the Pulse device and the endpoint.
When the pairing function is complete on the ntouch endpoint, the setup of the Pulse
device is complete.
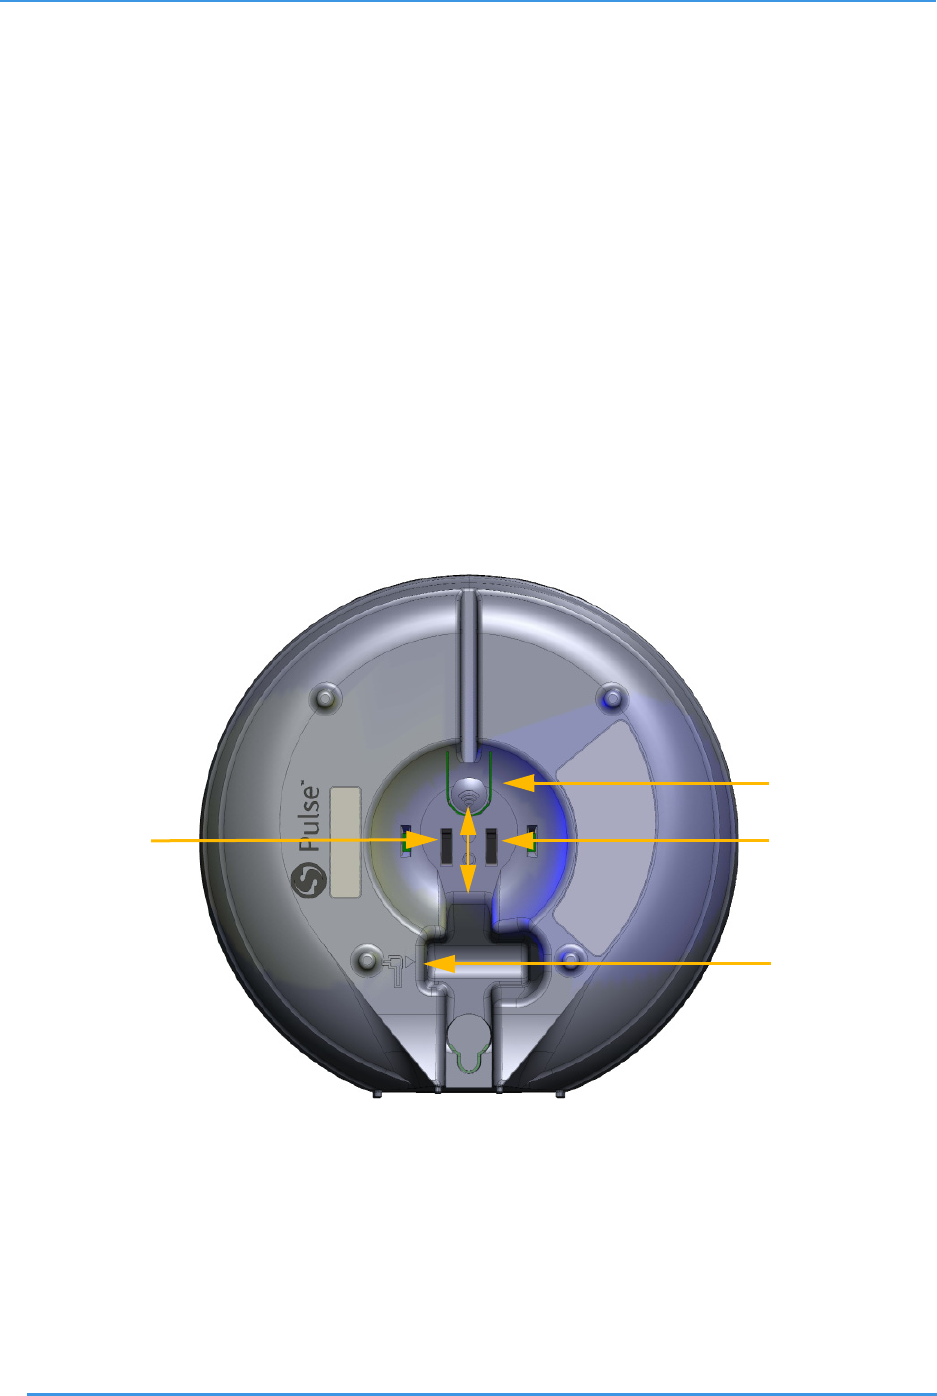
Step 5. Choose a light intensity setting for both the LightRing and the Alert Flasher lights.
Move the two switches on the back of the Pulse device to adjust the lights to the
desired setting. Each switch has four positions: Off, Low, Medium, High
The High setting is located nearest to the Radio pairing button. The Low setting is
located nearest to the power supply port. The selected lights will flash briefly as you
move through the settings to demonstrate the brightness of each setting.
Step 6. Refer to your ntouch VP2 User Guide for details on setting the color and the
flashing pattern of the LightRing. On all other ntouch endpoints, the LightRing
lights will flash “white” in sync with the Alert Flasher lights on the Pulse device.
Step 7. Refer to your ntouch VP2 User Guide (or other ntouch endpoint User Guide) for
details on understanding the meaning of the SignMail and Missed Call lights on the
front side of the Pulse device. These lights will turn on to indicate you have new
SignMail messages or have received missed calls on the ntouch endpoint.
Backside view
Alert Flasher
intensity switch
LightRing
intensity switch
Radio pairing
button
OFF
HIGH
OFF
HIGH
Power port

Safety Instructions
5
Setup Guide
Sorenson Confidential — Do Not Distribute Without Permission
Safety Instructions
Save these instructions for future reference.
To make sure that using your Pulse alert device is a safe and pleasant experience, please
take the time to read, fully understand and follow each of these safety instructions:
• The Pulse device is to be used only with the included power supply. Do not use any
other power supply with the device.
• The Pulse device has no on/off switch. To turn it off, disconnect its power supply.
• Carefully position the power cable connected to the Pulse so that it will not be
accidentally pulled or tripped on by anyone.
• Be very careful not to drop the Pulse device to avoid damaging it or causing harm to
yourself or to others.
• The intensity of the LightRing and Alert lights on the Pulse may appear to be very
bright to you or to others. Remember to point the back side of the Pulse away from
yourself and anyone else while you are adjusting the brightness of the lights.
• Carefully position the Pulse alert device on a wall, table, or another stable place away
from any source of heat or moisture. The device is intended only for indoor use.
• Never use the Pulse near any source of water or while your hands are wet. Clean the
outside of any part of the device only with a dry or very slightly damp cloth.
• To avoid the risk of an electric shock, do not disassemble the Pulse device. Do not
attempt to open or service the device yourself. Contact Sorenson for servicing
instructions if any part of the device is damaged, if any liquid has been spilled on
any part of the device, or if the device does not appear to power on normally.
• If you experience any operating problems with the Pulse, call us for assistance.
WARNING: Carefully follow these safety instructions to avoid personal injury and the chance of fire,
electric shock, or other damage.

Regulatory Compliance
6
Sorenson Pulse
Sorenson Confidential — Do Not Distribute Without Permission
Regulatory Compliance
FCC Compliance Statement
This device complies with part 15 of the FCC Rules. Operation is subject to the following two conditions: (1)
This device may not cause harmful interference, and (2) this device must accept any interference received,
including interference that may cause undesired operation.
Note: This equipment has been tested and found to comply with the limits for a Class B digital device,
pursuant to part 15 of the FCC Rules. These limits are designed to provide reasonable protection against
harmful interference in a residential installation. This equipment generates, uses and can radiate radio
frequency energy and, if not installed and used in accordance with the instructions, may cause harmful
interference to radio communications. However, there is no guarantee that interference will not occur in a
particular installation. If this equipment does cause harmful interference to radio or television reception, which
can be determined by turning the equipment off and on, the user is encouraged to try to correct the
interference by one or more of the following measures:
• Reorient or relocate the receiving antenna.
• Increase the separation between the equipment and receiver.
• Connect the equipment into an outlet on a circuit different from that to which the receiver is connected.
• Consult the dealer or an experienced radio/TV technician for help.
This equipment complies with FCC radiation exposure limits.
Caution: Any changes or modifications not expressly approved by the party responsible for compliance to this
equipment would void the user’s authority to operate this device.
Wireless Radio Use
This device operates on the 2.4GHz frequency band. This equipment complies with FCC radiation exposure
limits set forth for an uncontrolled environment. This transceiver must not be co‐located or operating in
conjunction with any other antenna or transmitter.
Responsible Party (Contact for FCC Matters)
Sorenson Communications, Inc.
Attn: FCC Liaison
4192 South Riverboat Road, Suite 100
Salt Lake City, UT, 84123 USA
Disposal and Recycling Information
All Sorenson product packaging materials may be recycled.
When the Pulse device is no longer needed, its plastic and metal parts may be recycled. Please check with local
resources for information on how to properly dispose of the components of your Sorenson Pulse device.
RoHS
The Sorenson Pulse device is 100% RoHS compliant, and therefore free of the following hazardous materials:
lead (Pb), mercury (Hg), cadmium (Cd), hexavalent chromium (CrVI), polybrominated biphenyls (PBB) and
polybrominated diphenyl ethers (PBDE).