SOUNDMAX ELECTRONICS KD-AV41B MONITOR WITH DVD RECEIVER User Manual KD AV41BT K indb
Soundmax Electronics Limited MONITOR WITH DVD RECEIVER KD AV41BT K indb
UserManual.wiki
>
SOUNDMAX ELECTRONICS
>
KD AV41B User Manual
User manual
Navigation menu
Upload a User Manual
Namespaces
Wiki Guide
HTML
PDF
Info
Views
User Manual
Discussion / Help
Navigation
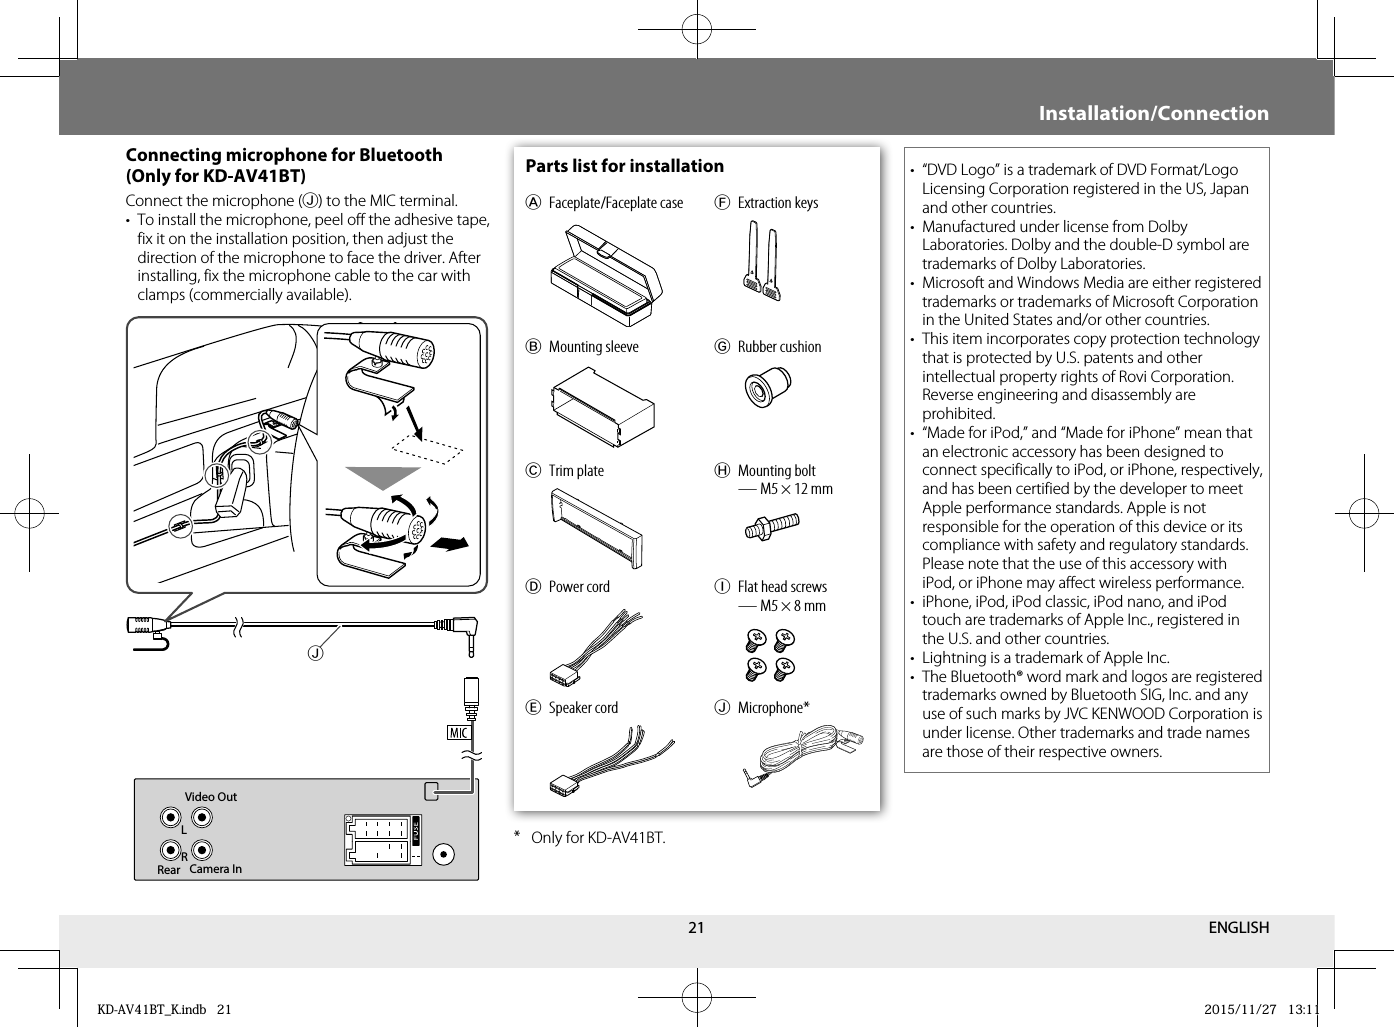
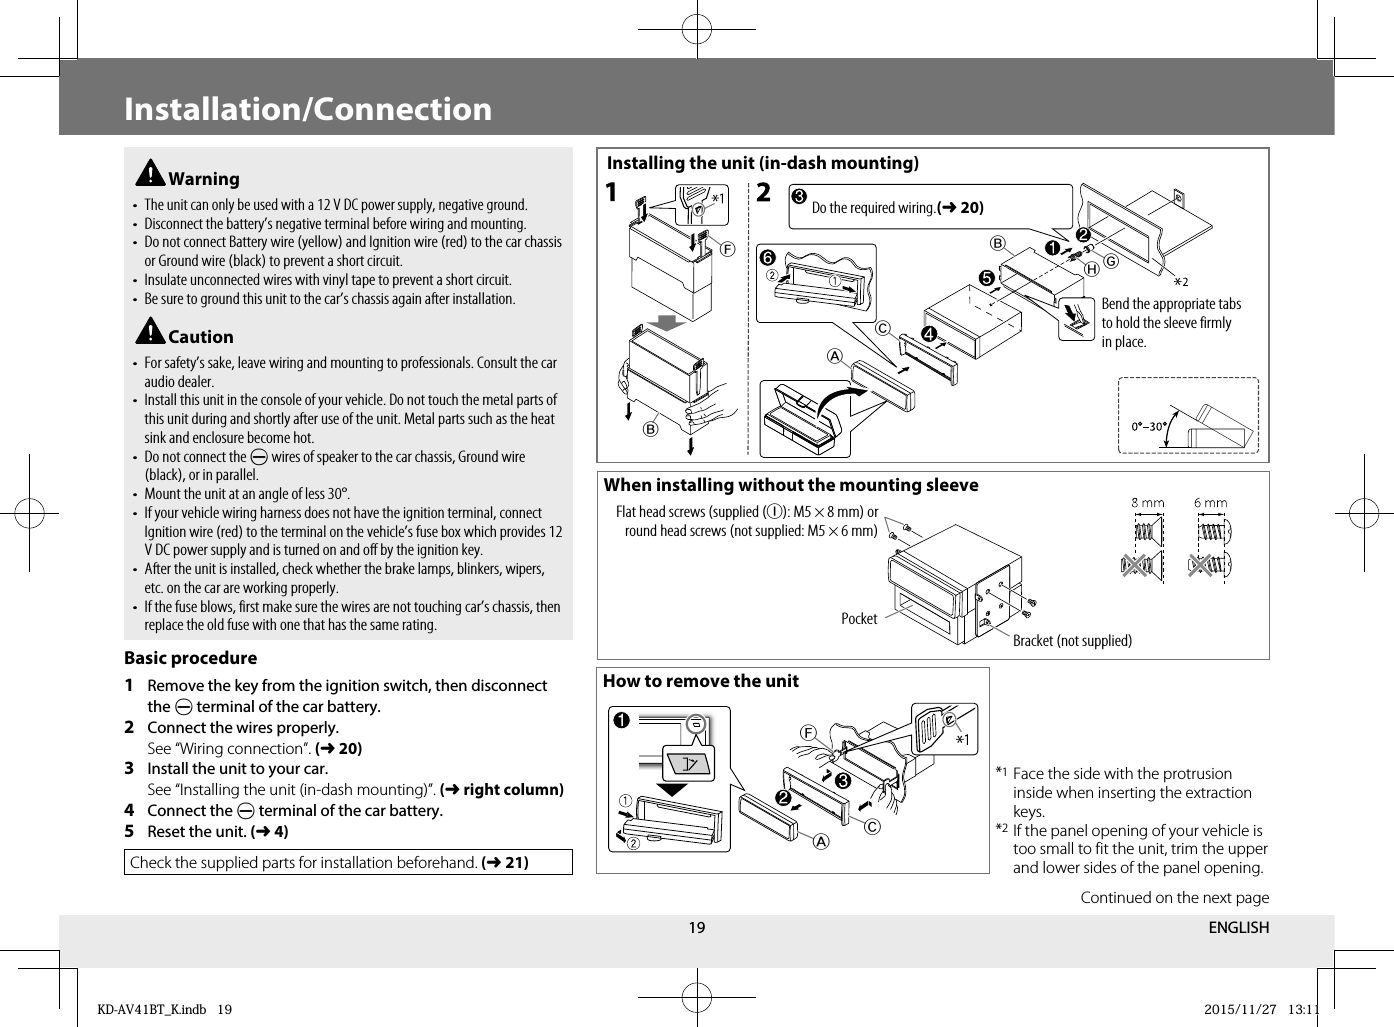
![3ContentsBefore UseHow to read this manual• Illustrations of KD-AV41BT are mainly used for explanation. The buttons on the faceplate are used for explaining the operations unless mentioned otherwise. However, if the remote control has the same or similar button names, they can also be used for the operations. For operations from the remote control, see “Remote control (RM-RK259)”. (➜ 5)• [XX] indicates the selected items or menu. • (➜ XX) indicates that references are available on the stated page number. • English indications are used for the purpose of explanation. You can select the indication language from the [Settings/General] menu. (➜ 14)• Updated information (the latest Instruction Manual, system updates, new functions, etc.) is available from <http://www.jvc.net/cs/car/>.IMPORTANTTo ensure proper use, please read through this manual before using this product. It is especially important that you read and observe WARNINGS and CAUTIONS in this manual. Please keep the manual in a safe and accessible place for future reference. Warning Do not operate any function that takes your attention away from safe driving. Caution Volume setting:• Adjust the volume so that you can hear sounds outside the car to prevent accidents.• Lower the volume before playing digital sources to avoid damaging the speakers by the sudden increase of the output level. General:• Avoid using the USB device or iPod/iPhone if it might hinder safety driving. • Make sure all important data has been backed up. We shall bear no responsibility for any loss of recorded data.• Never put or leave any metallic objects (such as coins or metal tools) inside the unit, to prevent a short circuit.• If a disc error occurs due to condensation on the laser lens, eject the disc and wait for the moisture to evaporate. Remote control (RM-RK259):• Do not leave the remote control in hot places such as on the dashboard.• The Lithium battery is in danger of explosion if replaced incorrectly. Replace it only with the same or equivalent type.• The battery pack or batteries shall not be exposed to excessive heat such as sunshine, fire or the like.• Keep the battery out of reach of children and in original package when not used. Dispose of used batteries promptly. If swallowed, contact a physician immediately.Before Use 3Basics 4Tuner 6iPod/iPhone (Only for KD-AV41BT) 7Disc/USB 8External Components 10Bluetooth (Only for KD-AV41BT) 11Sound/Display/Other Settings 13More Information 15Troubleshooting 17Specifications 18Installation/Connection 19ENGLISHKD-AV41BT_K.indb 3KD-AV41BT_K.indb 3 2015/11/27 13:112015/11/27 13:11](https://usermanual.wiki/SOUNDMAX-ELECTRONICS/KD-AV41B/User-Guide-2887039-Page-3.png)
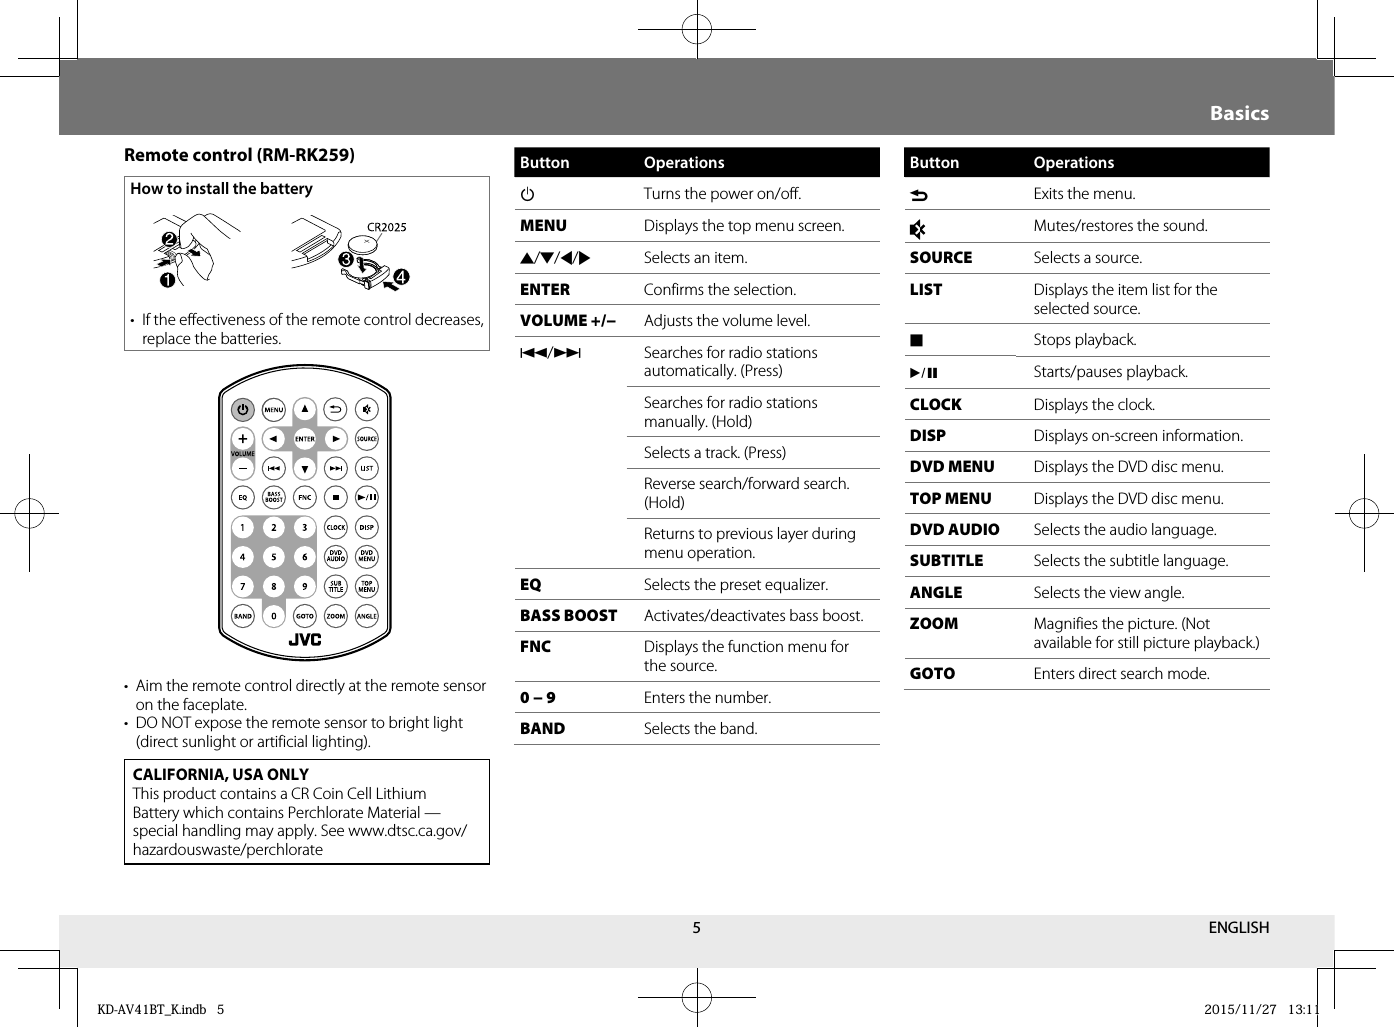
![4Top menu screen operationYou can select the source or enter the setting menu on the top menu screen.Press MENU to display the top menu screen, turn the volume knob to select the item, then press the knob to confirm the selection.• If no operation is done for about 10 seconds, the operation will be canceled.• To exit, press .BasicsFaceplate Attach How to resetYour preset adjustments will also be erased.DetachVolume knob (turn/press)Faceplate-open buttonRemote sensorMonitorTo Do thisTurn on the power Press B/SOURCE.(The buttons on the faceplate light up.)• Press and hold to turn off the power.Adjust the volume Turn the volume knob.Press the volume knob to mute the sound.• Press again to cancel.Select a source • Press B/SOURCE repeatedly.• Press MENU to display the top menu screen, and turn the volume knob to select the source, then press the knob.Display the clock Press and hold CLOCK.Initial setting — Clock adjustmentSynchronizing the clock time with FM RBDS Activate [RDS Clock Sync]. (➜6) Adjusting the clock manually1 Press B /SOURCE to turn on the power.2 Press MENU to display the top menu screen.3 Turn the volume knob to select [Settings], then press the knob to display the setting menu.4 Turn the volume knob to select [ ], then press the knob to display the [Settings/General] menu.5 Turn the volume knob to select [Time], then press the knob.6 Turn the volume knob to select the time format ([12 Hour] or [24Hour]), then press the knob.7 Turn the volume knob to select [Adjust], then press the knob.8 Turn the volume knob to adjust the hour, then press the knob.9 Turn the volume knob to adjust the minute, then press the knob.10 When [12 Hour] is selected in Step 6: turn the volume knob to select AM or PM, then press the knob.11 Press to exit.• If no operation is done for about 10 seconds, the operation will be canceled.• To return to the previous layer, press .KD-AV41BT KD-AV31Top menu screenFor KD-AV41BT: [iPod] or [USB] ([iPod] appears when the iPod/iPhone is connected.)KD-AV41BT_K.indb 4KD-AV41BT_K.indb 4 2015/11/27 13:112015/11/27 13:11](https://usermanual.wiki/SOUNDMAX-ELECTRONICS/KD-AV41B/User-Guide-2887039-Page-4.png)
![6TunerSearch for a station1 Press B /SOURCE repeatedly to select [Tuner].2 Press BAND repeatedly to select the band. • Selectable tuner band varies according to the selected [Radio Area] setting: - [Latin]/[USA]: FM1/FM2/FM3/AM1/AM23 Press / to search for a station automatically. • “Auto Seek” appears. (or) Press and hold / repeatedly to search for a station manually. • “Manual Seek” appears.• The indicator lights up when receiving an FM stereo broadcast with sufficient signal strength.• To store stations, perform [Manual Store] or [Auto Store] (➜right column)Select a stored station1 Press LIST to display the [Tuner List] menu.2 Turn the volume knob to select a preset number, then press the knob.• If no operation is done for about 10 seconds, the operation will be canceled.• To exit, press . Other settings—Tuner functionWhile listening to a station...1 Press FNC to display the [Tuner function] menu.2 Turn the volume knob to select the item to set (see the table below), then press the knob to make a selection.3 Press to exit.• If no operation is done for about 10 seconds, the operation will be canceled.Default: XXManual StoreStores a station manually (up to 6 stations for each band).While listening to a station you want to store, turn the volume knob to select a preset number, then press the knob.• The preset number, band, and “Stored OK!” appear.Auto StoreAutomatically searches and stores the 6 stations with the strongest signals for the selected band.• “Auto Store” appears.Local Seek ON: Tunes in only to the stations with sufficient signal strength. (LOCAL indicator lights up.)OFF: Deactivates the function.Radio AreaLatin: For some South American countries, AM/FM intervals: 10 kHz/50 kHz.USA: For North/Central/South America, AM/FM intervals: 10 kHz/200 kHz.RDS Clock SyncON: Synchronizes the clock time with FM RBDS .OFF: Deactivates the function. Set the clock manually. (➜4)[Tuner List] menu screenThe frequency of the tuned-in stationLOCAL indicatorBASS indicator (➜13)Sound mode indicator (➜13)BandPreset numberStation name (if acquired) indicatorTuner source screenKD-AV41BT_K.indb 6KD-AV41BT_K.indb 6 2015/11/27 13:112015/11/27 13:11](https://usermanual.wiki/SOUNDMAX-ELECTRONICS/KD-AV41B/User-Guide-2887039-Page-6.png)
![7iPod/iPhone (Only for KD-AV41BT)Start playbackYou cannot play video from the iPod/iPhone.USB input terminaliPod/iPhone (Lightning connector models)(commercially available)iPod/iPhone (30-pin connector models)(commercially available)30-pin to USB cable (accessory of iPod/iPhone)*KS-U62 (optional accessory)*“USB Reading” appears, the source changes to [iPod], and playback starts. (Current control mode appears for 2 seconds.) (➜right column)* Do not leave the cable inside the car when not using it.[List] menu screenTo Do thisPlay/pause Press *.Select the control mode Press and hold iPod MODE.• To control music playback from this unit, select [Head Unit Mode].• To control music playback from the iPod/iPhone, select [iPod Mode].Select a song Press / repeatedly.Reverse/Fast-forwardPress and hold /.Select a song from the list1 Press LIST to display the [List] menu.2 Turn the volume knob to select an item, then press the knob. 1. Select [ ] . 2. Select category ([Playlists]/[Artists]/[Albums]/[Genres]/[Songs]/[Composers]/[Audiobooks]/[Podcasts]) 3. Select desired item.• If no operation is done for about 10 seconds, the operation will be canceled.• To return to the previous layer, press .• To exit, press .Other settings—iPod function1 Press FNC to display the [iPod function] menu.2 Turn the volume knob to select the item to set (see the table below), then press the knob to make a selection.3 Press to exit.• If no operation is done for about 10 seconds, the operation will be canceled.Default: XXRepeat*OFF: Normal playback. ( indicator lights up.)One: Functions the same as “Repeat One”. ( indicator lights up.)All: Functions the same as “Repeat All”. ( indicator lights up.)Random*OFF: Normal playback. ( indicator lights up.)Songs: Functions the same as “Shuffle Songs”. ( indicator lights up.)Albums: Functions the same as “Shuffle Albums”. ( indicator lights up.)AudiobookNormal/Slow/Fast: Selects the speed of audiobooks.* You cannot activate repeat mode and random mode at the same time. ([OFF] is automatically selected for the previously activated mode.)Artwork (shown if the file contains the artwork)Playback status (I: play/W: pause)/Playing time/Total playing timeBASS indicator (➜13)Sound mode indicator (➜13)Song no./Total song numberSong informationPlayback modeiPod/iPhone playback screenENGLISHKD-AV41BT_K.indb 7KD-AV41BT_K.indb 7 2015/11/27 13:112015/11/27 13:11](https://usermanual.wiki/SOUNDMAX-ELECTRONICS/KD-AV41B/User-Guide-2887039-Page-7.png)
![8Disc/USBStart playbackDiscLabel side“DISC Reading” appears, the source changes to [Disc], and playback starts.• When the file list (the [List] menu) is displayed, turn the volume knob to select the file, then press the knob to start playback.• To eject a disc, press to open the faceplate, then press M while the power is turned on.USB deviceUSB input terminal USB 2.0 cable*(commercially available)“USB Reading” appears, the source changes to [USB], and playback starts.* Do not leave the cable inside the car when not using it.To Do thisPlay/pause Press *.Select a track/file Press / repeatedly.Reverse/Fast-forwardPress and hold /.Select a file from a list1 Press LIST to display [List] menu.2 When the disc/device contains different types of files: Press LIST repeatedly to select the file type ([ ]).3 Turn the volume knob to select an item, then press the knob. 1. MP3/WMA: Select a folder (if contained). 2. Select a track/file.• If no operation is done for about 10 seconds, the operation will be canceled.• To return to the previous layer, press .Other settings—CD function/Media function1 Press FNC to display the [CD function] (CD) or [Media function] (MP3/WMA) menu.2 Turn the volume knob to select the item to set (see the table below), then press the knob to make a selection.3 Press to exit.• If no operation is done for about 10 seconds, the operation will be canceled.Default: XXRepeatAll: Repeats all tracks/files. ( indicator lights up.)One: Repeats current track/file. ( indicator lights up.)Folder: Repeats all files in the current folder. ( indicator lights up.)RandomOFF: Normal playback.ON: Randomly plays all tracks/files. ( indicator lights up.)• You cannot activate repeat mode and random mode at the same time. ([OFF] is automatically selected for the previously activated mode.) If both the repeat mode and random mode are set to [OFF], the unit repeats all tracks/files ( indicator lights up.)CD/MP3/WMASource ([Disc] or [USB])Playback status (I: play/W: pause)/Playing time/Total playing timeBASS indicator (➜13)Sound mode indicator (➜13)Track/file no. / Total track/file numberFolder no./Total folder number (MP3/WMA)Track/file informationPlayback modeAudio playback screenKD-AV41BT_K.indb 8KD-AV41BT_K.indb 8 2015/11/27 13:112015/11/27 13:11](https://usermanual.wiki/SOUNDMAX-ELECTRONICS/KD-AV41B/User-Guide-2887039-Page-8.png)
![9Video playback screen [List] menu screenTo Do thisPlay/pause Press *.Select a chapter/track/file Press / repeatedly.Reverse/Fast-forward Press and hold /.• Each time you press the button, the search speed changes.Select an item from the disc menu/list1 Press LIST. DVD: Disc menu is displayed. VCD with PBC: PBC menu is displayed. • For VCD without PBC, the playback is started from the 1st track. MPEG1/MPEG2/JPEG: [List] menu is displayed.2 When the disc/device contains different types of files: Press LIST repeatedly to select a playback file type ([ ] : video file/[ ] : picture file).3 Turn the volume knob to select an item, then press the knob. Repeat the procedure until playback starts.• If no operation is done for about 10 seconds, the operation will be canceled.• To return to the previous layer, press .• DVD/VCD: To exit, press .DVD/VCD/MPEG1/MPEG2/JPEGDisc/USBPlayback information• DVD Video: Title no./Chapter no./Playing time• VCD/MPEG1/MPEG2: Playing timeVarious disc operations from the remote control (RM-RK259)Display the playback informationPress DISP.• To erase, press the button again.Display the disc menu (DVD)Press DVD MENU or TOP MENU.Search for a chapter/title/scene directly (DVD)1 Press GOTO. • Each time you press the button, the target item switches between chapter, title, and time.2 Use the number buttons to select a chapter/title/scene.3 Press ENTER.Select the track from PBC menu (VCD)Press LIST to display the PBC menu, then press the number button to select a track.Select audio language Press DVD AUDIO repeatedly.Select subtitle languagePress SUBTITLE repeatedly.Select view angle Press ANGLE repeatedly.Magnify the picture (except for JPEGs)Press ZOOM repeatedly.For DVD/VCD/MPEG1/MPEG2: On-screen information is displayed by pressing DISP on the remote control.Playback file type: Audio : Picture : VideoContinued on the next pageENGLISHKD-AV41BT_K.indb 9KD-AV41BT_K.indb 9 2015/11/27 13:112015/11/27 13:11](https://usermanual.wiki/SOUNDMAX-ELECTRONICS/KD-AV41B/User-Guide-2887039-Page-9.png)
![10Use a portable audio player (AUX)1 Connect a portable audio player (commercially available).2 Press B/SOURCE repeatedly to select [AUX].3 Turn on the portable audio player and start playback.Use a 3-core plug head stereo mini plug for optimum audio output.Use a rear view cameraTo use a rear view camera, the REVERSE GEAR SIGNAL wire connection is required. For details, see “Installation/Connection”. (➜20)When a rear view camera is connected, the rear view screen is displayed when you shift the gear to the reverse (R) position.• Check the safety of your surroundings with your eyes before backing up.Other settings—DVD function/VCD function/Media function1 Press FNC to display the [DVD function] (DVD), [VCD function] (VCD), or [Media function] (MPEG1/MPEG2) menu.2 Turn the volume knob to select the item to set (see the table below), then press the knob to make a selection.3 Press to exit.• If no operation is done for about 10 seconds, the operation will be canceled.Default: XXDVD/VCD/MPEG1/MPEG2RepeatDVD OFF: Normal playback.Ch: Repeats current chapter.Tt: Repeats current title.VCD All: Repeats all tracks/files.One: Repeats current track/file. MPEG1/MPEG2 All: Repeats all tracks/files.One: Repeats current track/file.Folder: Repeats all files in the current folder.DVDDVD AudioSelects the audio language.SubtitleSelects the subtitle language.AngleSelects the view angle.Aspect Ratio16:9 / 4:3: Selects the aspect ratio.VCDChannelStereo / Left / Right: Selects the audio channel.PBCON: Activates the PBC function.OFF: Deactivates the PBC function.• When PBC is activated, repeat mode is automatically deactivated ([Off]).All discs/filesBrightness −00 — +08 (04): Adjusts the brightness.Contrast −00 — +08 (04): Adjusts the contrast.Color −00 — +08 (04): Adjusts the colors.DefaultRestores the default settings.Disc/USB External ComponentsRear view screenFront AUX source screenPortable audio playerAuxiliary input jack3.5 mm stereo mini plug (commercially available)Sound mode indicator (➜13)KD-AV41BT_K.indb 10KD-AV41BT_K.indb 10 2015/11/27 13:112015/11/27 13:11](https://usermanual.wiki/SOUNDMAX-ELECTRONICS/KD-AV41B/User-Guide-2887039-Page-10.png)
![11Bluetooth (Only for KD-AV41BT)Information for using Bluetooth® devicesBluetooth is a short-range wireless radio communication technology for mobile devices such as mobile phones, portable PCs, and other devices. Bluetooth devices can be connected without cables and communicate with each other. Notes• While driving, do not perform complicated operations such as dialing numbers, using the phone book, etc. When you perform these operations, stop your car in a safe place.• Some Bluetooth devices may not connect to this unit depending on the Bluetooth version of the device.• This unit may not work for some Bluetooth devices.• Connecting conditions may vary depending on your environment.• For some Bluetooth devices, the device is disconnected when the unit is turned off.About mobile phones compatible with Phone book Access Profile (PBAP)If your mobile phone supports PBAP, you can display the following items on the touch panel screen when the mobile phone is connected.• Phone book (up to 9999 entries)• Dialed calls, received calls, and missed calls (up to 10 entries in total) Connecting a Bluetooth deviceTo use a Bluetooth device (mobile phone or audio player), pair the device and the unit. Pairing allows Bluetooth devices to communicate with each other.• Use a Bluetooth device compatible with Bluetooth 3.0.• You can pair the device and the unit using SSP (Secure Simple Pairing) which only requires confirmation.• Once a device and the unit are paired, the unit is registered on the device. When you next use the device with the unit, you can connect the device and the unit by selecting from the registered device list on your device.• One device can be connected at a time.Auto pairingWhen iPod/iPhone is connected to the USB input terminal, the unit establishes pairing automatically with the connected iPod/iPhone even if the Bluetooth function is deactivated on iPod/iPhone.Pairing a Bluetooth device manually1 Turn on the Bluetooth function on your Bluetooth device.2 Search for the unit (“JVC unit” ) from your Bluetooth device.3 Confirm the request on the device. Pairing and connection are established. “Connect OK” appears. • “ ” appears when the Bluetooth mobile phone is connected. • “ ” appears when the Bluetooth audio player is connected.Disconnecting the deviceTurn off the ignition switch.Checking the information about the paired deviceSelect [BT Info] on the [Settings/Bluetooth] menu. (➜14)Continued on the next pageENGLISHKD-AV41BT_K.indb 11KD-AV41BT_K.indb 11 2015/11/27 13:112015/11/27 13:11](https://usermanual.wiki/SOUNDMAX-ELECTRONICS/KD-AV41B/User-Guide-2887039-Page-11.png)
![12BluetoothPlayback status (I: play/W: pause)/Playing time/Total playing timeBASS indicator (➜13)Sound mode indicator (➜13)Track informationBluetooth audio playback screenVoice dialing screenBluetooth mobile phone Bluetooth audio playerTo Do thisMake a call 1 Press . The phone screen ([Phonebook]) is displayed.2 Press , turn the volume knob to select a method to make a call ([ ]: from the calls history/[ ]: from the phone book), then press the knob.3 Turn the volume knob to select the target, then press the knob to make a call.• To return to the previous layer, press .• To exit, press .Receive a call Press the volume knob when a call comes in.Use voice dialing 1 Press and hold to display the voice dialing screen. • You can also display the voice dialing screen by selecting [ ] as the method to make a call on the phone screen.2 Press the volume knob to activate voice recognition function. “Please speak after the beep” appears and the beep sounds.3 Say the name of the person you want to call.• To exit, press .Switching between handsfree mode and phone modeWhile talking, press FNC.Each time you press the button, “Transfer!” appears and talking method is switched between handsfree mode and phone mode.Phone screen ([Phonebook])To Do thisStart Bluetooth audio playerPress B/SOURCE repeatedly to select [BT Audio].Play/pause Press *.Select a track Press / repeatedly.Reverse/Fast-forward Press and hold /.Select an item from the track list1 Press LIST to display the track list.2 Turn the volume knob to select an item, then press the knob. Repeat the procedure until playback starts.• If no operation is done for about 10 seconds, the operation will be canceled.• To return to the previous layer, press .• To exit, press .KD-AV41BT_K.indb 12KD-AV41BT_K.indb 12 2015/11/27 13:112015/11/27 13:11](https://usermanual.wiki/SOUNDMAX-ELECTRONICS/KD-AV41B/User-Guide-2887039-Page-12.png)
![13Sound/Display/Other Settings Select a preset equalizer (EQ)Press EQ repeatedly to select a preset sound mode — [Flat] (default)/[Pop]/[User]/[Techno]/[Rock]/[Classic]/[Jazz]/[Optimal]. (Corresponding sound mode indicator lights up.)Store your own sound settings1 Press EQ repeatedly to select [User].2 Press MENU to display the top menu screen.3 Turn the volume knob to select [Settings], then press the knob to display the setting menu.4 Check that [ ] ([Settings/Audio]) is selected, then press the knob.5 Turn the volume knob to select the item to set ([Bass]/[Treble]), then press the knob.6 Turn the volume knob to adjust the value, then press .7 Repeat steps 5 and 6 to adjust the value for other settings.8 Press to exit. The setting is stored to [User] in EQ.• If no operation is done for about 10 seconds, the operation will be canceled.• To return to the previous layer, press . Activate the bass boostPress BASS BOOST. (BASS indicator lights up.)• To cancel, press the button again.Only for KD-AV41BT:You can also activate/deactivate the bass boost on the [Settings/Audio] menu.1 Press MENU to display the top menu screen.2 Turn the volume knob to select [Settings], then press the knob to display the setting menu.3 Check that [ ] ([Settings/Audio]) is selected, then press the knob.4 Turn the volume knob to select [Bass Boost], then press the knob.5 Turn the volume knob to select [ON] (to activate) or [OFF] (to deactivate), then press .6 Press to exit.• If no operation is done for about 10 seconds, the operation will be canceled.• To return to the previous layer, press .Change the display brightness (Dimmer)Press and hold DIMMER repeatedly to select [Dimmer Low] or [Dimmer High].[Settings/Audio] menuOnly for KD-AV31. For KD-AV41BT, operate on the [Settings/Audio] menu, or from the remote control (RM-RK259).Continued on the next pageENGLISHKD-AV41BT_K.indb 13KD-AV41BT_K.indb 13 2015/11/27 13:112015/11/27 13:11](https://usermanual.wiki/SOUNDMAX-ELECTRONICS/KD-AV41B/User-Guide-2887039-Page-13.png)
![14 Change the general settings/check information on the [Settings] menu1 Press MENU to display the top menu screen.2 Turn the volume knob to select [Settings], then press the knob to display the setting menu.3 Turn the volume knob to select the category ( : [Settings/Audio]/: [Settings/General]/: [Settings/Bluetooth]), then press the knob.4 Turn the volume knob to select the item to set (see the table on the right column), then press the knob.5 Turn the volume knob to change the setting, then press the knob.• If no operation is done for about 10 seconds, the operation will be canceled.• To return to the previous layer, press .• To exit, press .Sound/Display/Other Settings[Settings/Audio] menu [Settings/Bluetooth] menu[Settings/General] menuDefault: XXSettings/Audio ( )Bass*1−15 — +15 (00): Adjusts the sound elements of the bass tone.Middle*1−15 — +15 (00): Adjusts the sound elements of the middle tone.Treble*1−15 — +15 (00): Adjusts the sound elements of the treble tone.Fader R12 — F12 (00): Adjusts the front and rear speaker output balance. Balance L12 — R12 (00): Adjusts the left and right speaker output balance. Bass Boost*2ON/OFF: Activates or deactivates the bass boost. Settings/General ( )BeepON/OFF: Activates or deactivates the keypress tone. Time12 Hour/24 Hour: Selects time format.Adjust: Adjusts the clock.LanguageEnglish/Spanish : Selects the text language used for on-screen information.Settings/Bluetooth ( )*2Sync PhonebookON/OFF: Activates or deactivates the synchronization of the phonebook in the connected mobile phone with the unit. BT InfoDisplays the information about the connected Bluetooth device (device name, phone name, Bluetooth version, and mac address).*1 Adjustable only when [User] is selected as the sound mode. *2 Only for KD-AV41BT.KD-AV41BT_K.indb 14KD-AV41BT_K.indb 14 2015/11/27 13:112015/11/27 13:11](https://usermanual.wiki/SOUNDMAX-ELECTRONICS/KD-AV41B/User-Guide-2887039-Page-14.png)
![20PARKINGBRAKEVideo OutCamera InRearLRACCB+REVERSE GEAR SIGNALSTEERINGWHEELREMOTECONTROLDEPOWER ANT/REMOTE OUT Wiring connectionChange the FUSE location to switch ACC and B+ pin location on the ISO connector.* Video is not output for the video output terminal when the source is [Tuner] or [AUX].Fuse (15 A)Antenna terminalAntenna cordRear view camera inputVideo output*To reverse lamp (required when using a rear view camera)To use the steering wheel remote control feature, an exclusive remote adapter (not supplied) matching your car is required.Purple/WhiteLight blue/YellowLight GreenTo the vehicle's parking brake detection switch harness.Only for KD-AV41BT: Connect the microphone for Bluetooth (➜21).To the power control terminal when using an optional power amplifier, or to the antenna control terminal in the vehicle (150 mA max)Audio output (Rear)Car fuse boxBatteryIgnition switchRed (Ignition wire)BlueYellow (Battery wire)Black (Ground wire)To the metallic body or chassis of the carWhite ª / White/Black ·: To front speaker (left)Gray ª / Gray/Black ·: To front speaker (right)Green ª / Green/Black ·: To rear speaker (left)Purple ª / Purple/Black ·: To rear speaker (right)Installation/ConnectionKD-AV41BT_K.indb 20KD-AV41BT_K.indb 20 2015/11/27 13:112015/11/27 13:11](https://usermanual.wiki/SOUNDMAX-ELECTRONICS/KD-AV41B/User-Guide-2887039-Page-20.png)