Suzhou Switek Electronics and Technology AS-9116ULD Double LCD control platform User Manual KVM
Suzhou Switek Electronics & Technology Co., Ltd. Double slide LCD control platform KVM
UserManual.wiki
>
Suzhou Switek Electronics and Technology
>
AS 9116ULD User Manual
Users Manual
Navigation menu
Upload a User Manual
Namespaces
Wiki Guide
HTML
PDF
Info
Views
User Manual
Discussion / Help
Navigation
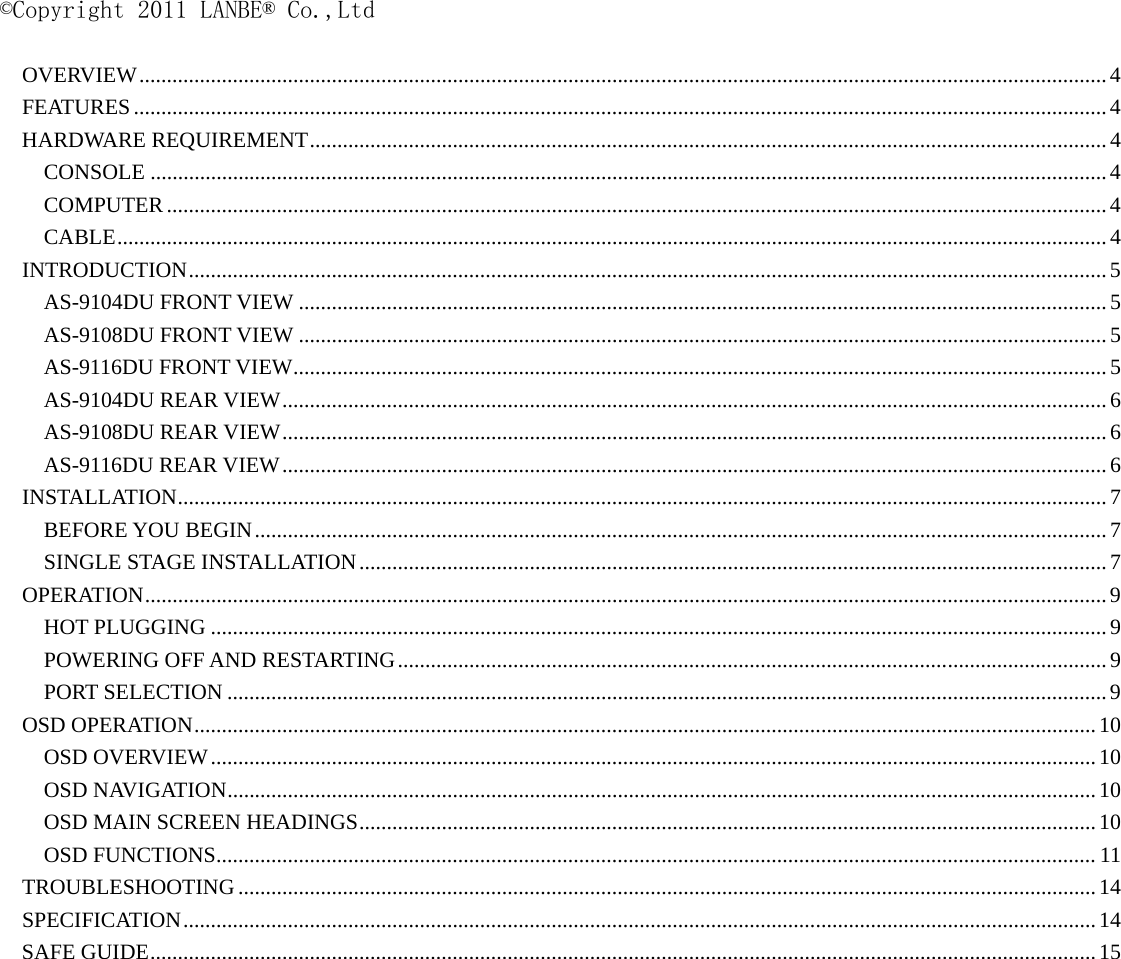
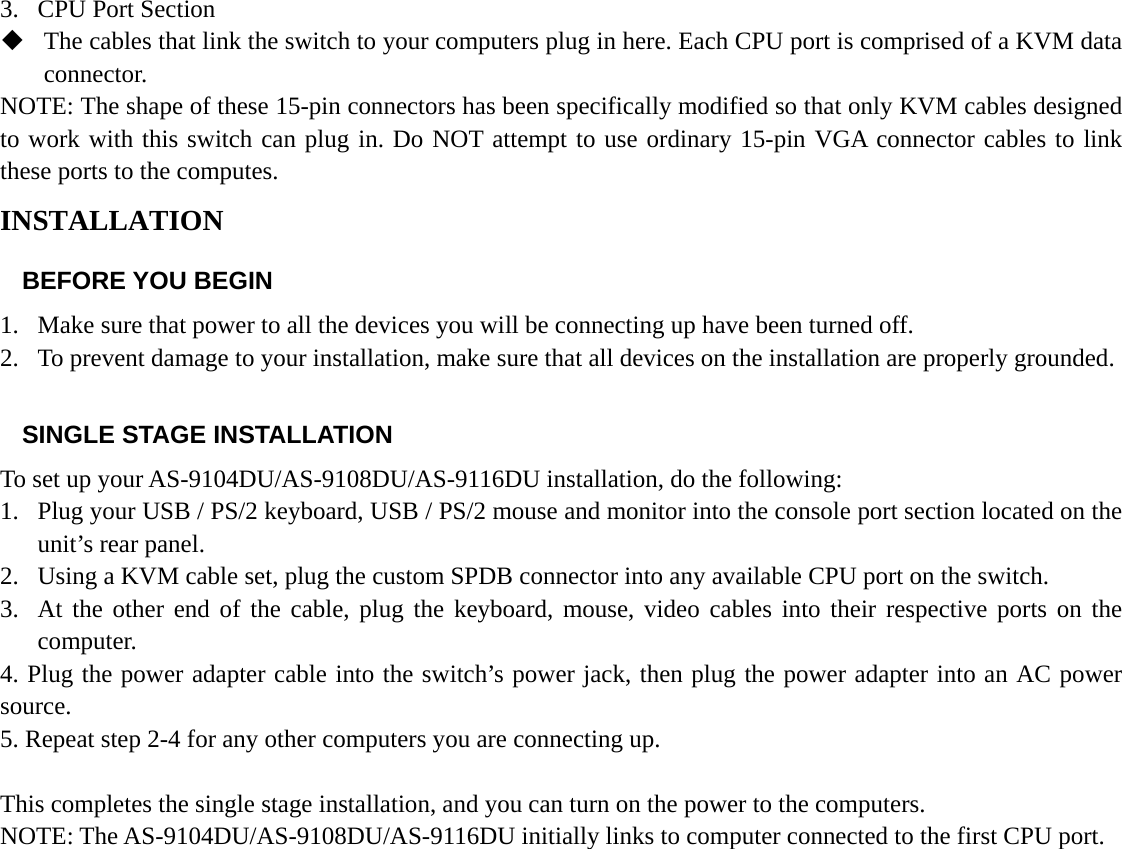
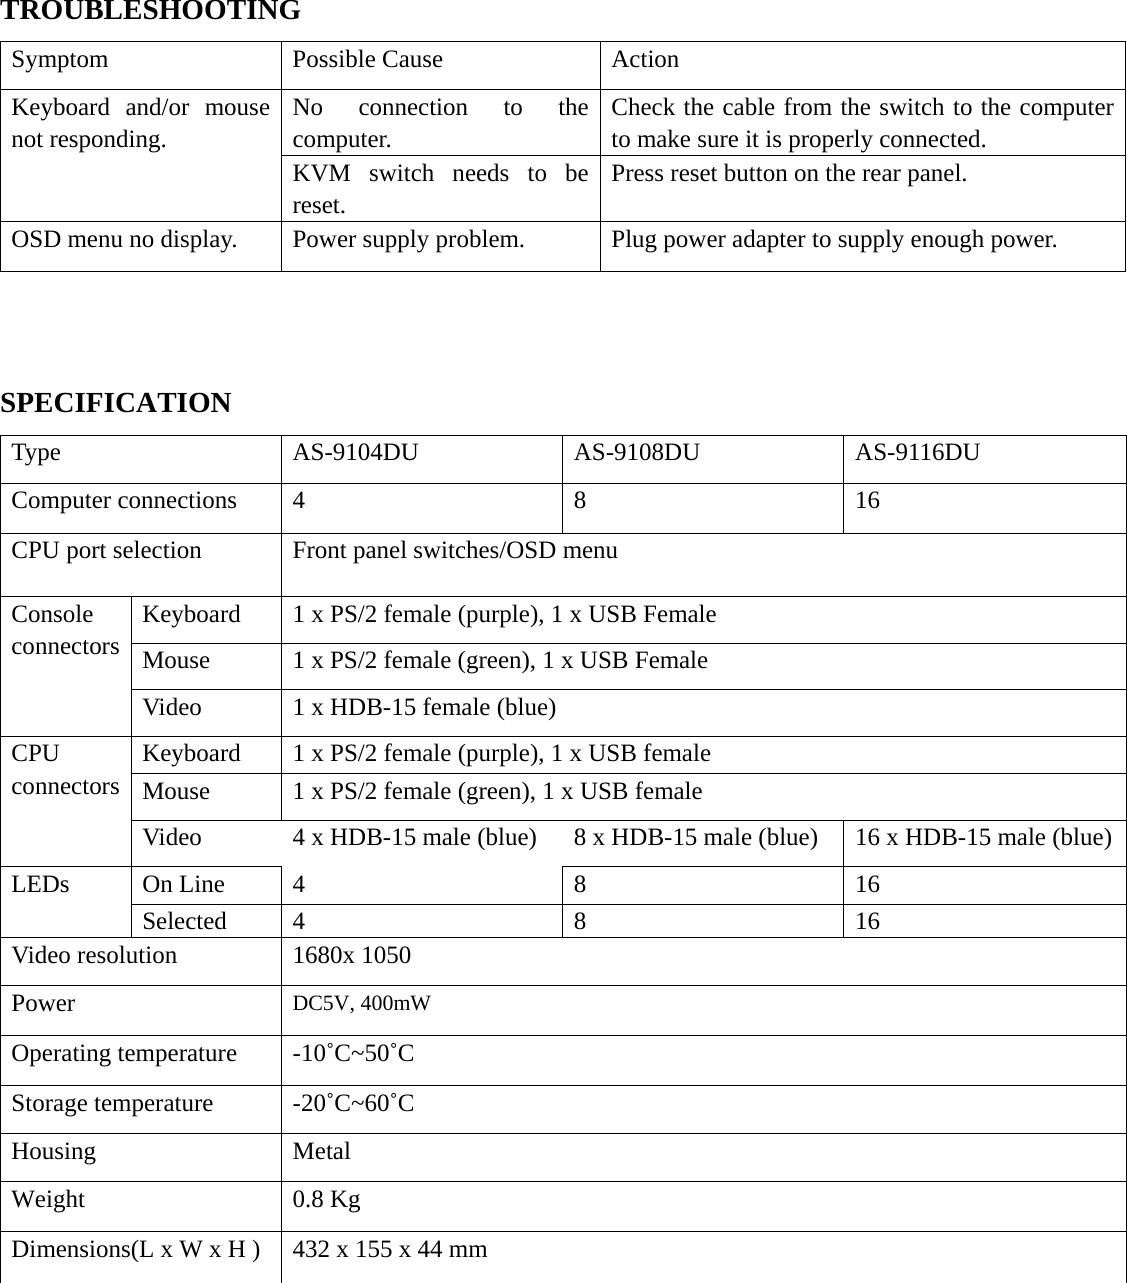
![OSD OPERATION OSD OVERVIEW The On Screen Display (OSD) is used to handle all computer control and switching procedures. All procedures start from the OSD main menu. To pop up the main menu, tap the [Scroll Lock] twice. Note: You can optionally change the hotkey to the Ctrl key, in which case you would tap [ctrl] twice. If OSD menu is set as “console locked”, you must input password each time the main menu appears. If no password has been set, just press [Enter] to show main menu. Note: There are two passwords in OSD. One is user password which is initially empty. And the other is factory password which is “LANBE”. OSD menu interface is shown as below: Note: OSD always starts in List View, with the highlight bar at the same position it was in the last time it was closed. OSD NAVIGATION To dismiss OSD, press [Esc]. To move up and down through the list one line at a time, use the Up and Down Arrow Keys. If there are more list entries than what can appear on the main screen, the screen will scroll. To activate a port, move the highlight bar to it then press [Enter]. After selecting a port, the OSD menu automatically disappear and a blue tip window appears to indicate the port currently selected. OSD MAIN SCREEN HEADINGS Heading Explanation PN This column lists the port numbers for all the CPU ports on the installation. The simplest method to access a particular computer is to move the highlight bar to it, then press [Enter].](https://usermanual.wiki/Suzhou-Switek-Electronics-and-Technology/AS-9116ULD/User-Guide-2702830-Page-10.png)
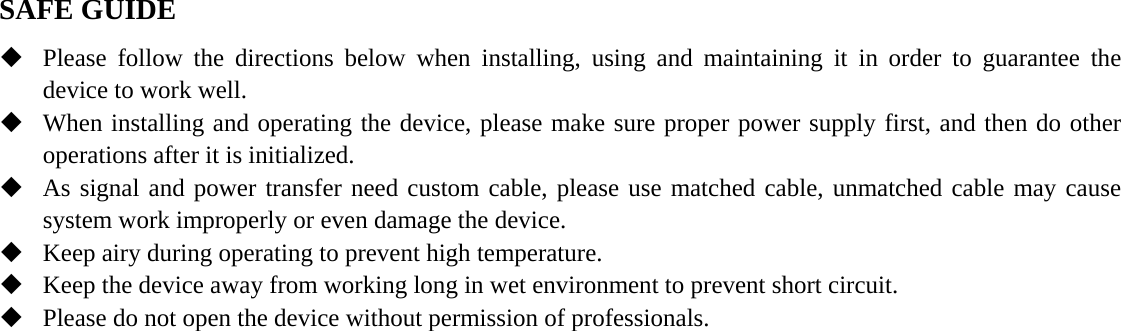
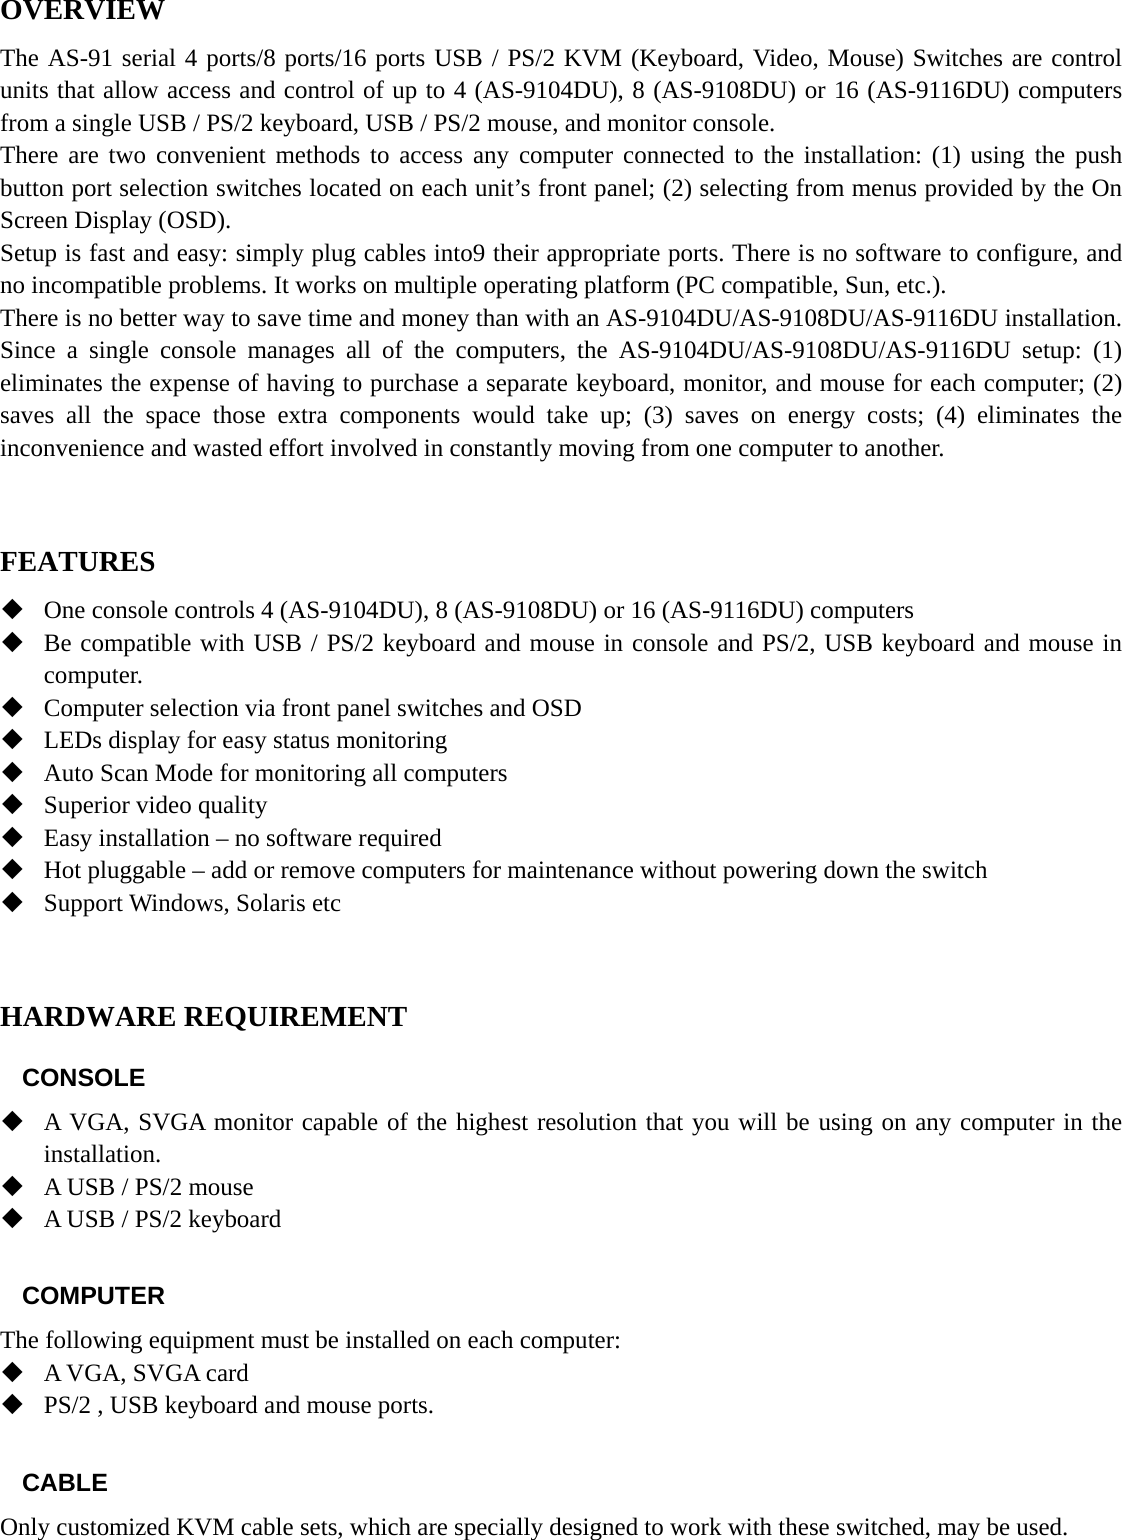
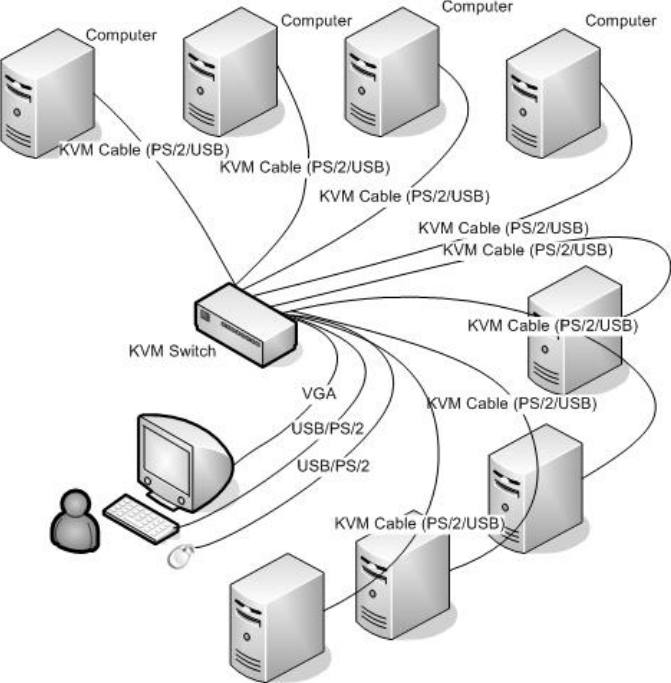
![QV If a port has been selected for Quick View scanning, an arrowhead symbol displays in this column to indicate so. PC The computers that are powered on and are on line have an arrowhead symbol in this column to indicate so. NAME If a port has been given a name, its name appears in this column. OSD FUNCTIONS OSD functions are used to configure and control the OSD. For example, you can: rapidly switch to any port; scan selected ports only; limit the list you wish to view; designate a port as a Quick View Port; create or edit a port name; or make OSD setting adjustments. F1 GOTO: GOTO allows you to switch directly to a port either by keying in the port’s name or its port number. To use NAME method, move highlight bar to “NAME”, press [Enter], input name of a port, then press [Enter] to confirm. To use PN method, move highlight bar to “PN”, press [Enter], input port number, then press [Enter] to switch. If the port number is invalid, it will remind the user to input again. To switch to other BANK, move highlight bar to “BANK”, press [Enter], input bank number, then press [Enter] to switch to the specified bank. If the bank is invalid, it will remind the user to input again. Note: When keying name, if there is a matching name, the matched name will appear on the screen, just press [Enter] to switch to that port. To return to main menu, press [Esc]. F2 SCAN The SCAN function can automatically scan from current selected port, the scan interval can be set by users. When scanning, a small window on the screen indicates the current port number. Press [Space] to stop scanning, and the KVM switches to the port last scanned. F3 LIST The LIST function lets you broaden or narrow the scope of which ports the OSD displays on the main screen. Many of the OSD functions only operate on the computers that have been selected for listing on the main screen with this function. The choices and their meanings are given in the table below: Choice Meaning ALL Lists all of the ports on the installation. QVIEW Lists only the ports that have been selected as Quick View Ports. POWERED ON Lists only the ports that have their attached computers powered on. POWERED ON + QVIEW Lists only the ports that have their attached computers powered on and have been selected as Quick View Ports. QVIEW + NAME Lists only the ports that have been selected as Quick View Ports and have name.](https://usermanual.wiki/Suzhou-Switek-Electronics-and-Technology/AS-9116ULD/User-Guide-2702830-Page-11.png)
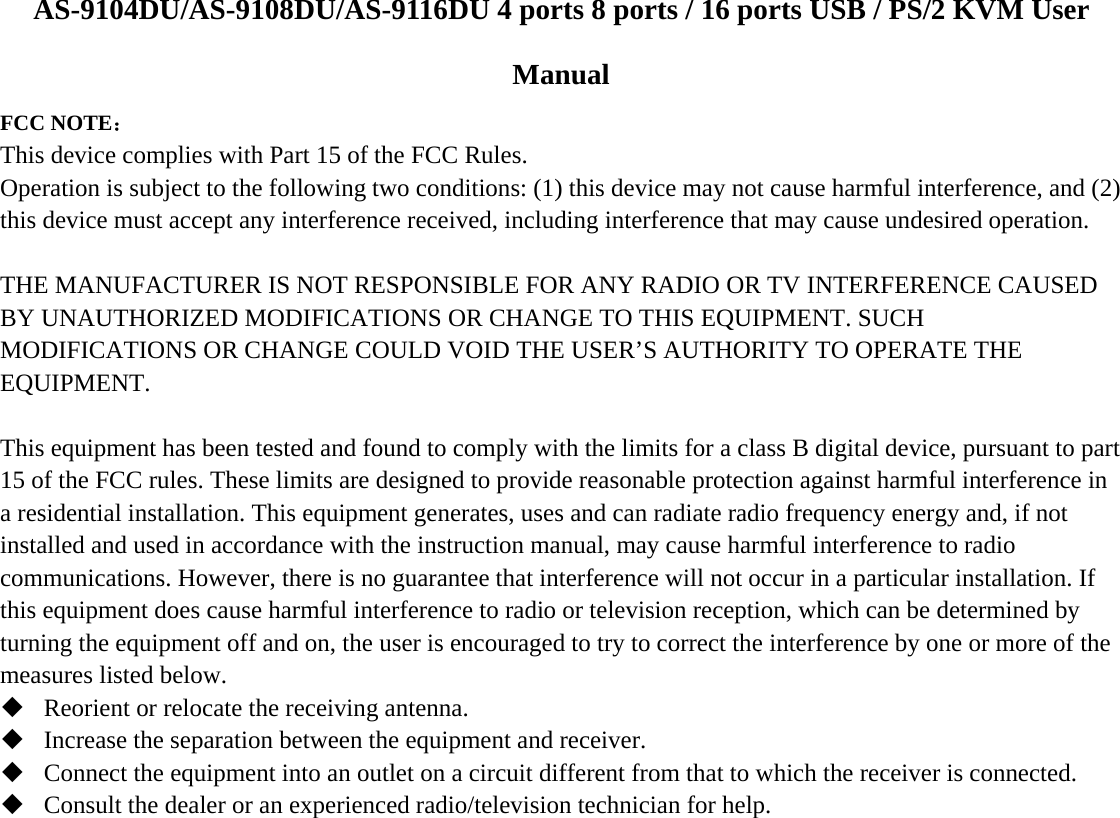
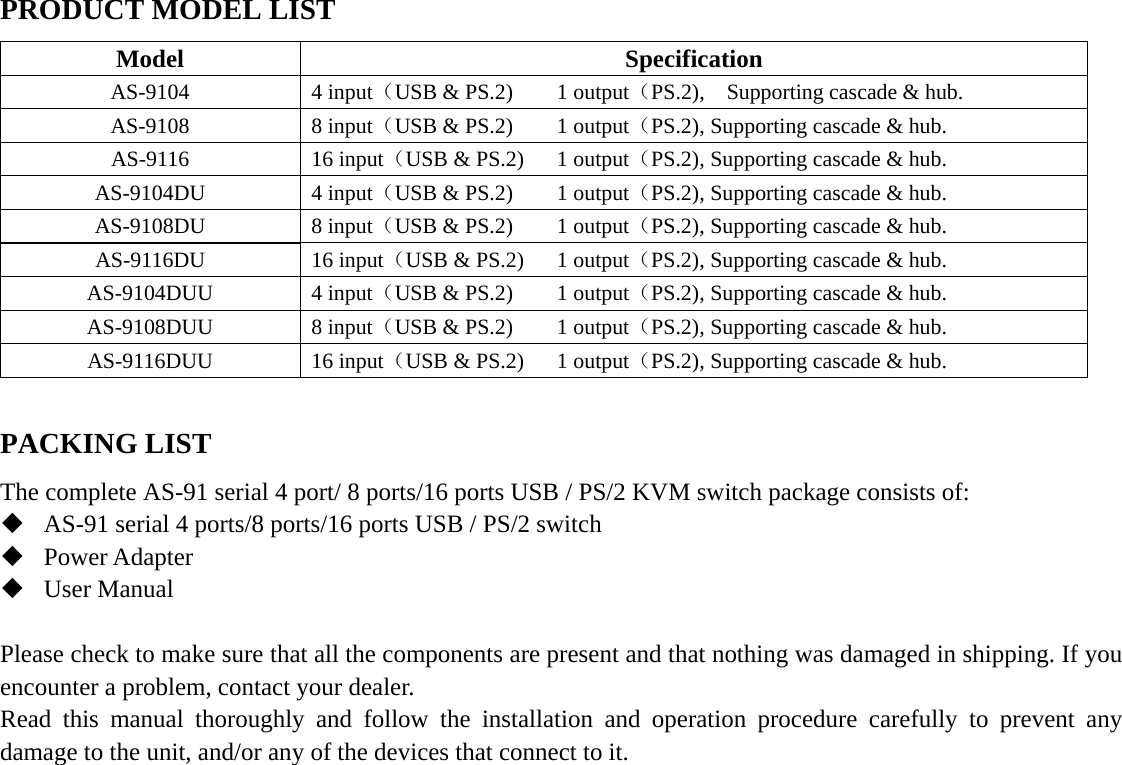
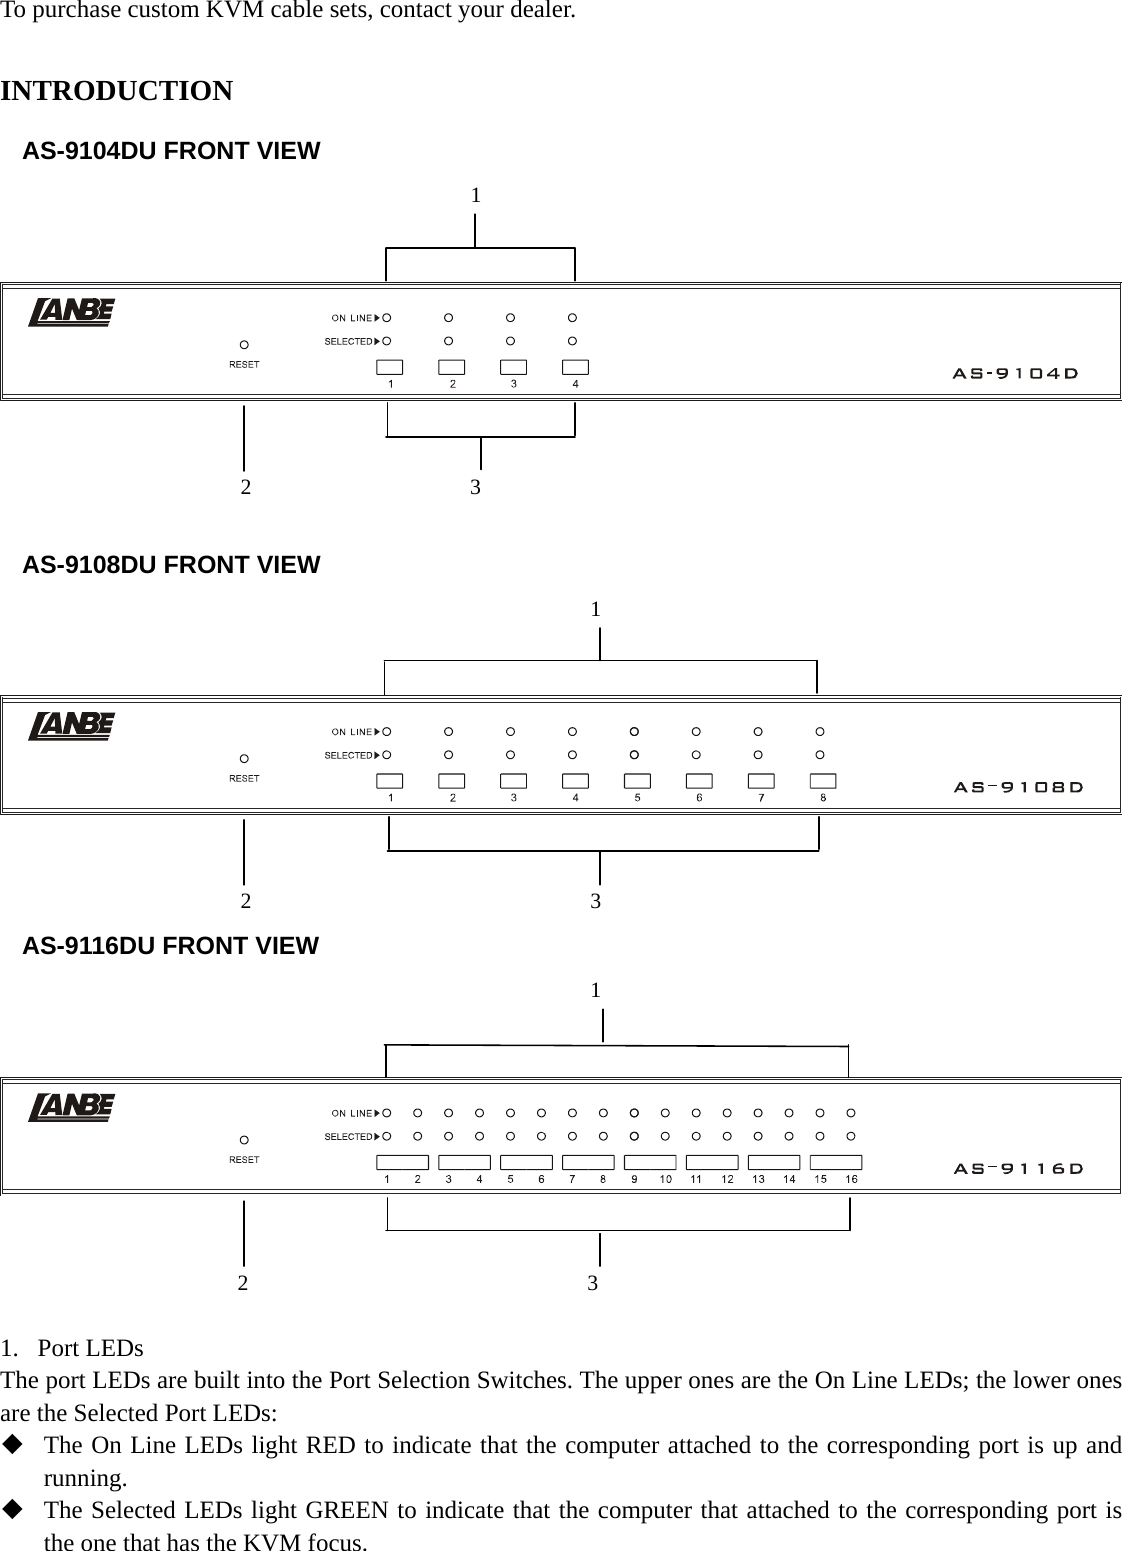
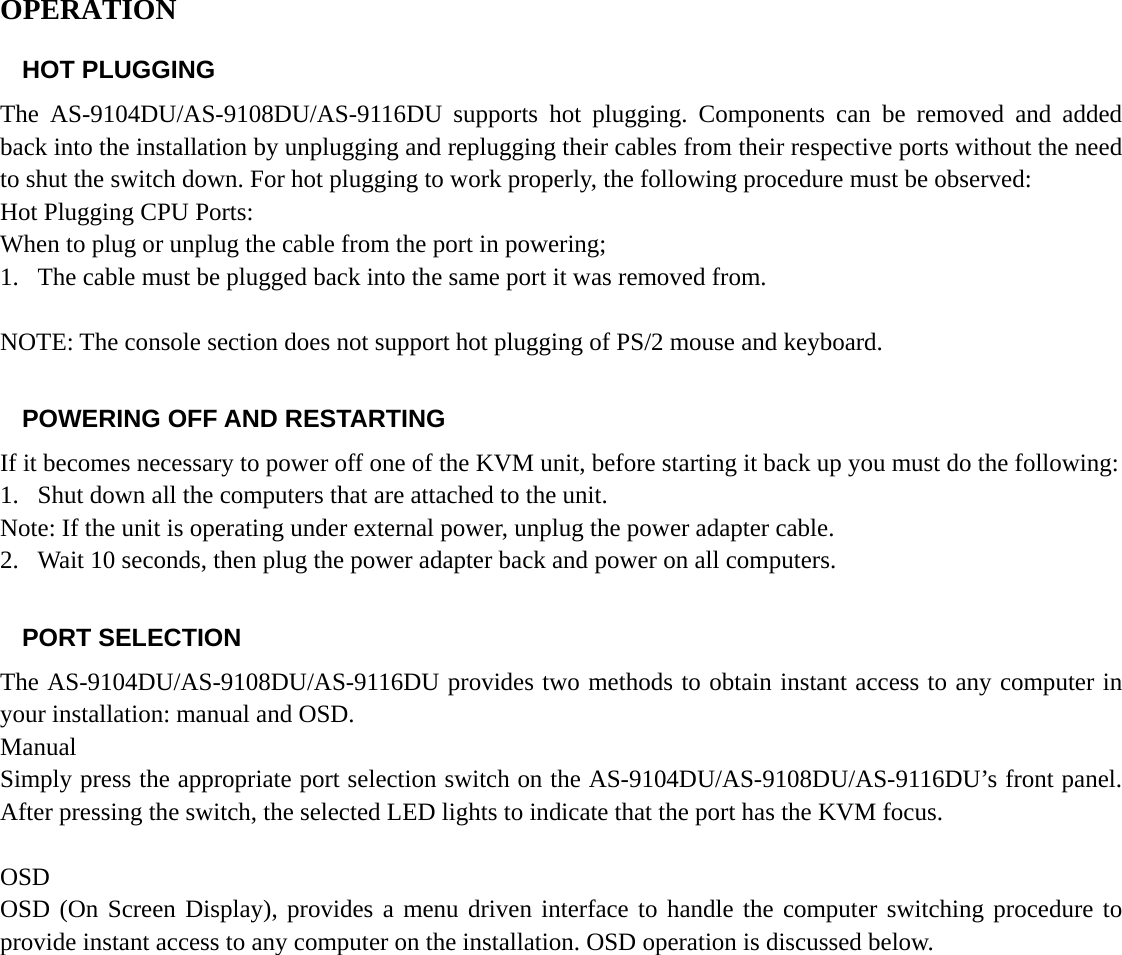
![NAME Lists only the ports that have names. Move the highlight bar to the choice you want, then press [enter]. An icon appears before the choice to indicate that it is the currently selected one. After you make your choice and press [Enter], you return to the OSD main screen with the newly formulated list displayed. F4 QV QV function can select port as Quick View. Move the highlight bar to a port, press [F4], an icon of up triangle appears. Press [F4] again, the icon disappears. F5 EDIT EDIT function creates or edits the name of a port. Press [F5], a pink edit box will appear on the screen. Input name, and then press [Enter], the port is set a name and it will also appear on the screen. F6 SET SET function configures the OSD menu. Move the highlight bar to an option, press [Enter] to enter a setting option. CHANNEL DISPLAY MODE: Mode of small tip window。 Choices and meanings are below: Choice Meaning PN + NAME Tip window displays port number and port name. PN Tip window displays port number. NAME Tip window displays port name. Move the highlight bar to an option and press [Enter] to select it. CHANNEL DISPLAY DURATION: Time the tip window last. Options are following: 3 SECOND The tip window lasts for 3seconds. ALWAYS ON The tip window always on the screen. Move the highlight bar to an option and press [Enter] to select it. CHANNEL DISPLAY POSITION: Position of the tip window. A small blue window appears on the screen. Use arrow key to move it, then press [Enter] to specify the position. SCAN DURATION: Duration for scanning one port。 Options are 3 seconds, 5 seconds, 10 seconds, 15 seconds, 20 seconds, 30 seconds, 40 seconds, 60 seconds. Move the highlight bar to an option and press [Enter] to select it. OSD ACTIVATING HOTKEY: Select OSD activating hotkey。 [Ctrl] [Ctrl] Set hotkey as [Ctrl] [Ctrl]. [Scroll] [Scroll] Set hotkey as [Scroll] [Scroll]. [Shift] [Shift] Set hotkey as [Shift] [Shift].](https://usermanual.wiki/Suzhou-Switek-Electronics-and-Technology/AS-9116ULD/User-Guide-2702830-Page-12.png)
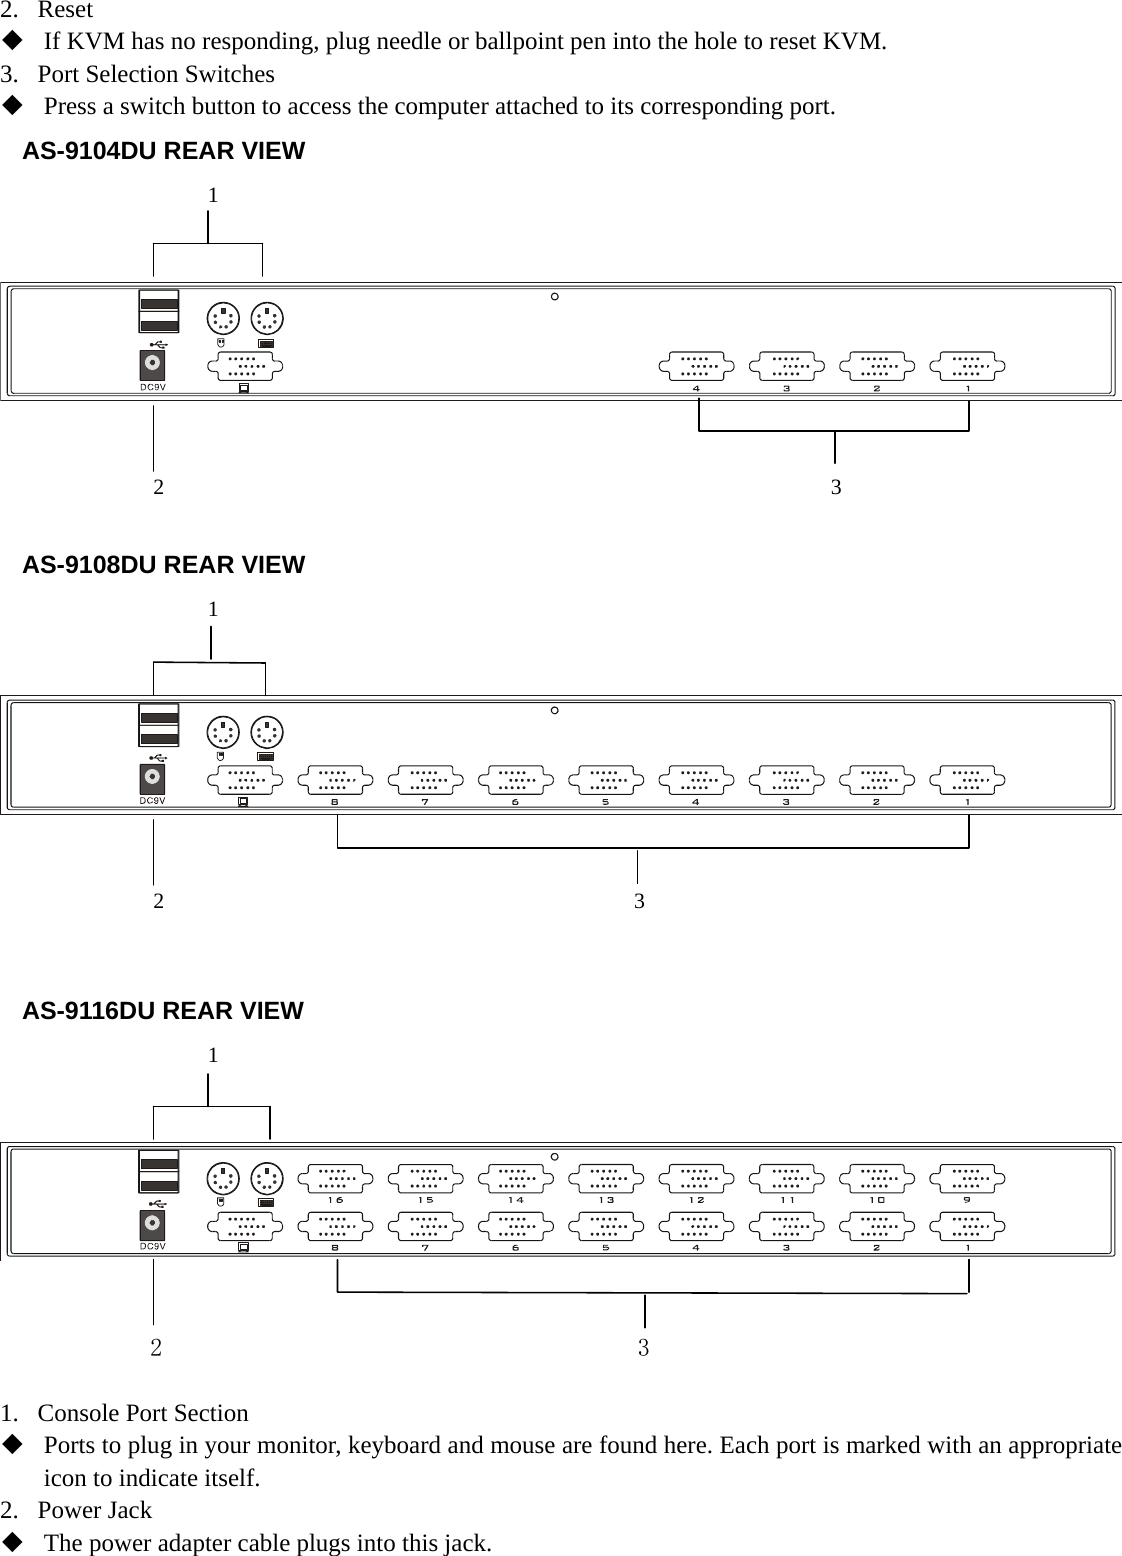
![ [Alt] [Alt] Set hotkey as [Alt] [Alt]. Move the highlight bar to an option and press [Enter] to select it. SET PASSWORD: Set new password. First enter old password, then enter new password and confirm it. The new password is set. If error occurs, the screen will remind users. CLEAR THE NAME LIST: Clear the names of port list. You need to enter password to clear the names of port list. RESTORE DEFAULT VALUE: Restore settings to default value. You need to enter password to Restore settings to default value. Note: The user password will also be cleared, and the factory password will not. LOCK CONSOLE: Lock the console. You cannot switch or scan after you lock the console (including switch by push button on the panel or OSD). You need to enter password to set. Note: After Locking the console, you can also unlock the console by this option. It also needs password verification.](https://usermanual.wiki/Suzhou-Switek-Electronics-and-Technology/AS-9116ULD/User-Guide-2702830-Page-13.png)