TTE Technology LE24FHDP21TA LED TV User Manual 72 D20M05 XNA1A 12 31
TTE Technology, Inc. LED TV 72 D20M05 XNA1A 12 31
Contents
- 1. (LE24FHDP21TA) User Manual
- 2. (LE24FHDP21TA) Manual
(LE24FHDP21TA) Manual

1
LED TV
User’s Guide
For use with models: LE19HDP11 /
LE24FHDD20
/
LE32HDD20
Need Assistance?
Please visit our website at www.tclusa.com
or call 1-877-300-8837.
2
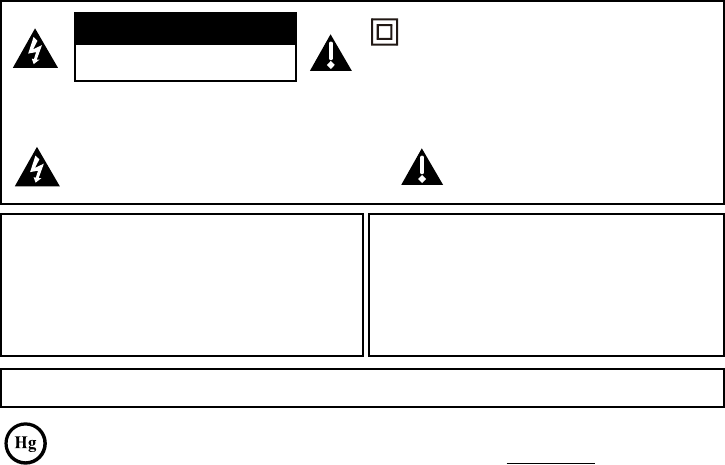
Important Information
This symbol indicates that this product contains mercury. Special disposal of this product for environmental
reasons may be required under the laws applicable to your jurisdiction. For disposal or recycling information,
please contact your local authorities or the Electronic Industries Alliance: www.eiae.org.
Refer to thHLGHQWL¿FDWLRQUDWLQJODEHOORFDWHGRQWKHEDFNSDQHORI\RXUSURGXFWIRULWVSURSHURSHUDWLQJYROWDJH
)&&UHJXODWLRQVVWDWHWKDWXQDXWKRUL]HGFKDQJHVRUPRGL¿FDWLRQVWRWKLVHTXLSPHQWPD\YRLGWKHXVHU¶VDXWKRULW\WR
operate it.
Cable TV Installer: This reminder is provided to call your attention to Article 820-40 of the National Electrical Code
(Section 54 of the Canadian Electrical Code, Part 1) which provides guidelines for proper grounding and, in particular,
VSHFL¿HVWKDWWKHFDEOHJURXQGVKRXOGEHFRQQHFWHGWRWKHJURXQGLQJV\VWHPRIWKHEXLOGLQJDVFORVHWRWKHSRLQWRI
cable entry as practical.
Important: 7KLVWHOHYLVLRQLVDWDEOHPRGHODQGLVGHVLJQHGWRVLWRQD¿UPÀDWVXUIDFH'RQ¶WSODFHWKH79RQVRIW
FDUSHWLQJRUVLPLODUVXUIDFHEHFDXVHWKHYHQWLODWLRQVORWVRQWKHERWWRPRIWKHXQLWZLOOEHEORFNHGUHVXOWLQJLQUHGXFHG
lifetime from overheating. To assure adequate ventilation for this product, maintain a spacing of 4 inches from the top
DQGVLGHRIWKH79UHFHLYHUDQGLQFKHVIURPWKHUHDURIWKH79UHFHLYHUDQGRWKHUVXUIDFHV
$OVRPDNHVXUHWKHVWDQGRUEDVH\RXXVHLVRIDGHTXDWHVL]HDQGVWUHQJWKWRSUHYHQWWKH79IURPEHLQJDFFLGHQWDOO\
WLSSHGRYHUSXVKHGRIIRUSXOOHGRII7KLVFRXOGFDXVHSHUVRQDOLQMXU\DQGRUGDPDJHWRWKH795HIHUWRWKH
Important Safety Instructions on the next page.
7KH3RZHUEXWWRQIROORZHGE\WKHSRZHUV\PERORQWKLV79DQG\RXUUHPRWHFRQWUROSXWVWKH79LQWRDYHU\
low-power standby mode but will not completely turn the power off. In order to completely shut the power off, you will
QHHGWRGLVFRQQHFWWKHSRZHUFRUGIURPWKHRXWOHW7KHPDLQVSOXJDSSOLDQFHFRXSOHULVXVHGDVGLVFRQQHFWGHYLFH
WKHGLVFRQQHFWGHYLFHVKDOOUHPDLQUHDGLO\RSHUDEOH7KHUHIRUH\RXVKRXOGHQVXUHWKDWWKH79LVLQVWDOOHGLQDPDQQHU
that allows you to disconnect the power cord when desired.
Product Information
Keep your sales receipt to obtain warranty parts and service and for proof of purchase. Attach it here and record the
serial and model numbers in case you need them. These numbers are located on the product.
Model No. ______________________ Serial No._____________________________________
Purchase Date __________________ Dealer/Address/Phone___________________________
WARNING 7KHEDWWHULHVVKDOOQRWEHH[SRVHGWRH[FHVVLYHKHDWVXFKDVVXQVKLQH¿UHRUWKHOLNH
&DXWLRQ7RUHGXFHWKHULVNRIHOHFWULFVKRFNGRQRWUHPRYHFRYHURUEDFN1RXVHUVHUYLFHDEOHSDUWVLQVLGH
5HIHUVHUYLFLQJWRTXDOL¿HGVHUYLFHSHUVRQQHO
This symbol indicates “dangerous voltage”
LQVLGHWKHSURGXFWWKDWSUHVHQWVDULVNRI
HOHFWULFVKRFNRUSHUVRQDOLQMXU\
This symbol indicates important
instructions accompanying the product.
This symbol indicates that this product incorporates
double insulation between hazardous main voltage
and user accessible parts. When servicing, use only
identical replacement parts.
WARNING
7RUHGXFHWKHULVNRI¿UHRUHOHFWULFVKRFNGRQRW
expose this product to rain or moisture. This product
should not be exposed to dripping or splashing. No
REMHFWV¿OOHGZLWKOLTXLGVVXFKDVYDVHVVKRXOGEH
placed on the component.
7KH79LVXQVWDEOHLILWLVQRWSURSHUO\DWWDFKHGWR
the base or mounted to the wall. Please follow the
base or wall mounting instructions provided in the
8VHU¶V*XLGHWRHQVXUH\RXUVDIHW\
WARNING
CAUTION
RISK OF ELECTRIC SHOCK.
'212723(1
Product Registration
3OHDVHUHJLVWHU\RXU7&/SXUFKDVHRQOLQHDWZZZWFOXVDFRP,WZLOOPDNHLWHDVLHUWRFRQWDFW\RXVKRXOGLWHYHUEH
necessary. Registration is not required for warranty coverage.
3
Important Safety Instructions
1. Read and follow all instructions.
2. Keep these instructions.
3. Heed all warnings.
'RQRWEORFNDQ\YHQWLODWLRQRSHQLQJV,QVWDOOLQDFFRUGDQFHZLWKWKHPDQXIDFWXUHU¶VLQVWUXFWLRQV
'RQRWLQVWDOOQHDUDQ\KHDWVRXUFHVVXFKDVUDGLDWRUVKHDWUHJLVWHUVVWRYHVRURWKHUDSSDUDWXV
LQFOXGLQJDPSOL¿HUVWKDWSURGXFHKHDW
'RQRWQHJDWHWKHVDIHW\SXUSRVHRIWKHSRODUL]HGRUJURXQGLQJW\SHSOXJ$SRODUL]HGSOXJKDV
two blades with one wider than the other. A grounding type plug has two blades and a third
grounding prong. The wide blade or the third prong is provided for your safety. If the provided plug
GRHVQRW¿W\RXURXWOHWFRQVXOWDQHOHFWULFLDQIRUUHSODFHPHQWRIWKHREVROHWHRXWOHW
3URWHFWWKHSRZHUFRUGIURPEHLQJZDONHGRQRUSLQFKHGSDUWLFXODUO\DWSOXJVUHFHSWDFOHVDQGWKH
point where it exits from the component.
'RQRWXVHWKLVFRPSRQHQWQHDUZDWHU
2QO\XVHWKHDWWDFKPHQWVDFFHVVRULHVVSHFL¿HGE\WKHPDQXIDFWXUHU
10. Clean only with dry cloth.
8VHRQO\ZLWKWKHFDUWVWDQGWULSRGEUDFNHWRUWDEOHVSHFL¿HGE\WKHPDQXIDFWXUHURUVROGZLWK
WKHFRPSRQHQW:KHQWKH79LVSODFHGRQDFDUWXVHFDXWLRQZKHQPRYLQJWKHFDUWWRDYRLGLQMXU\
from tip-over.
12. Unplug this component during lightning storms or when unused for long periods of time.
5HIHUDOOVHUYLFLQJWRTXDOL¿HGVHUYLFHSHUVRQQHO6HUYLFHLVUHTXLUHGZKHQWKHFRPSRQHQWLV
damaged in any way, such as power supply cord or plug damage, liquid spilled on or objects falling
onto the component, rain or moisture exposure, abnormal operation, or if the component has been
dropped.
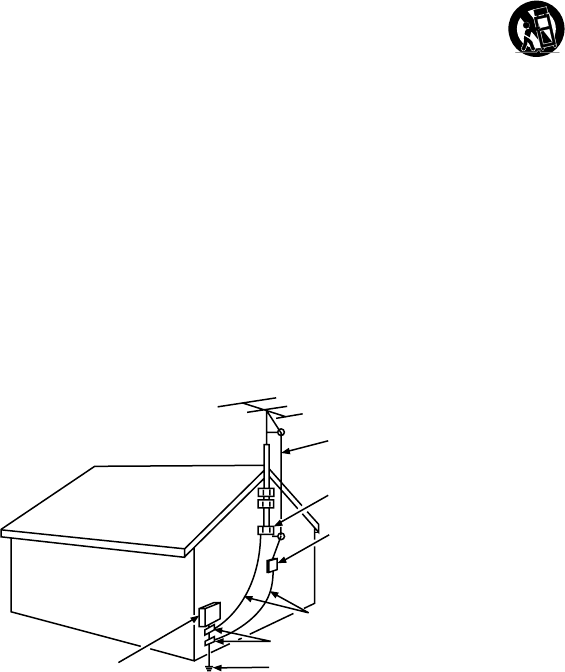
14. If an outside antenna or cable system is connected to the product, be sure the antenna or
cable system is grounded so as to provide some protection against voltage surges and built-up
VWDWLFFKDUJHV6HFWLRQRIWKH1DWLRQDO(OHFWULFDO&RGH$16,1)3$1R6HFWLRQ
54 of Canadian Electrical Code, Part 1) provides information with respect to proper grounding of
the mast and supporting structure, grounding of the lead-in wire to an antenna-discharge unit, size
of grounding conductors, location of antenna-discharge unit, connection to grounding electrodes,
and requirements for the grounding electrode. See following example:
ANTENNA LEAD IN WIRE
GROUND CLAMP
GROUNDING CONDUCTORS
(NEC SECTION 810-21)
GROUND CLAMPS
POWER SERVICE GROUNDING
ELECTRODE SYSTEM
(NEC ART 250, PARTH)
ELECTRIC SERVICE
EQUIPMENT
ANTENNA DISCHARGE
UNIT(NEC SECTION 810-20)
4
Important Information ..............................2
Important Safety Instructions...................3
Chapter 1 - Connections and Setup
Before Initial Setup .................................5
Protect Against Power Surges.............5
Safety Information ..............................5
Avoid Audio Interference ....................5
$YRLG'LUHFW/LJKW ................................5
&KHFN6XSSOLHG3DUWV..........................5
$WWDFKLQJ<RXU79WRWKH7DEOH6WDQG......... 6
0RXQWLQJ<RXU79WRWKH:DOO ..................7
([SODQDWLRQRI-DFNVDQG%XWWRQVRQ79
....8
Rear Panel ...........................................8
6LGH,QSXW-DFNV...................................9
793DQHO%XWWRQV .................................9
Obtain the Signal.....................................10
What You Need ....................................10
What You Need to Know ......................10
Choose Your Connections.......................11
&RPSRVLWH9LGHR&RQQHFWLRQ ..............12
&RPSRQHQW9LGHR&RQQHFWLRQ .............12
+'0,&RQQHFWLRQ.................................13
+'0,'9,&RQQHFWLRQ..........................13
PC Connection.....................................14
3OXJLQWKH79 ..........................................14
Put Batteries in the Remote.....................14
7XUQRQWKH79.........................................14
Using the Remote Control to Complete the
Initial Setup..............................................14
Complete the Initial Setup .......................15
Set the Menu Language.......................15
6HWWKH79/RFDWLRQ0RGH ...................15
Set the Time Zone................................15
Auto Channel Scan..............................16
6NLS6FDQ.............................................16
Chapter 2 - Understanding the Basics
7XUQLQJWKH792QDQG2II ......................17
6HOHFWLQJWKH9LGHR,QSXW6RXUFH ............17
Selecting a Channel ................................17
$GMXVWLQJ0XWLQJWKH9ROXPH...................17
Screen Formats.......................................18
Channel Banner.......................................18
Chapter 3 - Using the Remote Control
Remote Control Buttons ..........................19
Chapter 4 - Using the TV Menu
Using the Menu System ..........................20
Picture Menu ...........................................20
Picture Settings....................................20
Expert Settings.....................................20
Advanced Settings...............................21
PC Settings..........................................21
Reset Picture Settings .........................21
Sound Menu ............................................22
Setup Menu .............................................23
Signal Type ..........................................23
Channel Scan ......................................23
&KDQQHO6NLS........................................24
Channel Edit ........................................24
,QSXW6NLS.............................................25
Input Labels .........................................25
Closed Caption ....................................26
Time Setup...........................................27
Reset All...............................................28
3DUHQWDO&RQWUROVDQG9&KLS..................28
&UHDWH&KDQJH9&KLS3DVVZRUG........28
5HVHW9&KLS3DVVZRUG.......................28
&KDQQHO%ORFN......................................29
%XWWRQ%ORFN.........................................29
9&KLS5DWLQJ(QDEOH...........................29
9&KLS5DWLQJ6FUHHQ ..........................30
869&KLS795DWLQJV .........................30
%ORFNLQJ6SHFL¿F&RQWHQW7KHPHV ......30
869&KLS0RYLH5DWLQJ/LPLW..............31
%ORFNLQJ&DQDGD9&KLS5DWLQJV.........31
2SHQ9&KLS ........................................32
%ORFNLQJ8QUDWHG([HPSW3URJUDPV....32
5HVHW'RZQORDGDEOH'DWD ...................32
,QSXW%ORFN ...........................................32
Language Menu.......................................32
USB Menu ...............................................33
USB Connection......................................33
Chapter 5 - Other Information
)UHTXHQWO\$VNHG4XHVWLRQV)$4V .......34
Troubleshooting.......................................35
Care and Cleaning...................................37
9&KLS5DWLQJ([SODQDWLRQV.....................38
869&KLS5DWLQJ6\VWHP....................38
&DQDGLDQ(QJOLVK9&KLS5DWLQJ6\VWHP ... 38
&DQDGLDQ)UHQFK9&KLS5DWLQJ6\VWHP.... 39
7HOHYLVLRQ6SHFL¿FDWLRQV..........................39
Limited Warranty .....................................40
Table of Contents

5
Before Initial Setup
Protect Against Power Surges
Connect all components before you plug any power cords into the wall outlet or power strip.
1(9(5SOXJ\RXU79LQWRDQRXWOHWWKDWLVFRQWUROOHGE\DZDOOVZLWFK
7XUQRIIWKH79EHIRUH\RXFRQQHFWRUGLVFRQQHFWDQ\FDEOHV
0DNHVXUHDOODQWHQQDVDQGFDEOHVDUHSURSHUO\JURXQGHG5HIHUWRWKH,PSRUWDQW6DIHW\
Instructions.
Safety Information
3URWHFWFRPSRQHQWVIURPRYHUKHDWLQJ
'RQ¶WEORFNYHQWLODWLRQKROHVRQDQ\RIWKHFRPSRQHQWV$UUDQJHWKHFRPSRQHQWVVRWKDWDLUFDQ
circulate freely.
'RQ¶WVWDFNFRPSRQHQWV
,I\RXSODFHWKHFRPSRQHQWLQDVWDQGPDNHVXUH\RXDOORZDGHTXDWHYHQWLODWLRQ
,I\RXFRQQHFWDQDXGLRUHFHLYHURUDPSOL¿HUSODFHLWRQWKHWRSVKHOIVRWKHKHDWHGDLUIURPLWZRQ¶W
harm other components.
Avoid Audio Interference
3RVLWLRQFDEOHVSURSHUO\LQVHUWHDFKFDEOH¿UPO\LQWRWKHGHVLJQDWHGMDFN
,I\RXSODFHFRPSRQHQWVDERYHWKH79URXWHDOOFDEOHVGRZQRQHVLGHRIWKHEDFNRIWKH79LQVWHDG
of straight down the middle.
,I\RXUDQWHQQDXVHVRKPWZLQOHDGFDEOHVGRQRWFRLOWKHFDEOHV
.HHSWZLQOHDGFDEOHVDZD\IURPDXGLRYLGHRFDEOHV
Avoid Direct Light
'RQ¶WSODFHWKH79ZKHUHVXQOLJKWRUURRPOLJKWLQJLVGLUHFWHGWRZDUGWKHVFUHHQ8VHVRIWRULQGLUHFW
lighting.
Check Supplied Parts
&KHFNWKDWWKHIROORZLQJSDUWVZHUHSDFNHGZLWK\RXUSURGXFW
1 Remote Control and 2 AAA Batteries
8VHU¶V*XLGH
4XLFN6WDUW*XLGH
Parts List for Table Stand (see pages 6 and 7)
Chapter 1 - Connections and Setup
*UDSKLFVFRQWDLQHGZLWKLQWKLVSXEOLFDWLRQDUHSUHVHQWDWLRQRQO\
Replacing your remote
If you need to replace your remote, visit www.tclusa.com. A shipping and handling fee, and the appropriate sales tax, will be charged
upon ordering. Have your Visa or MasterCard ready.
6
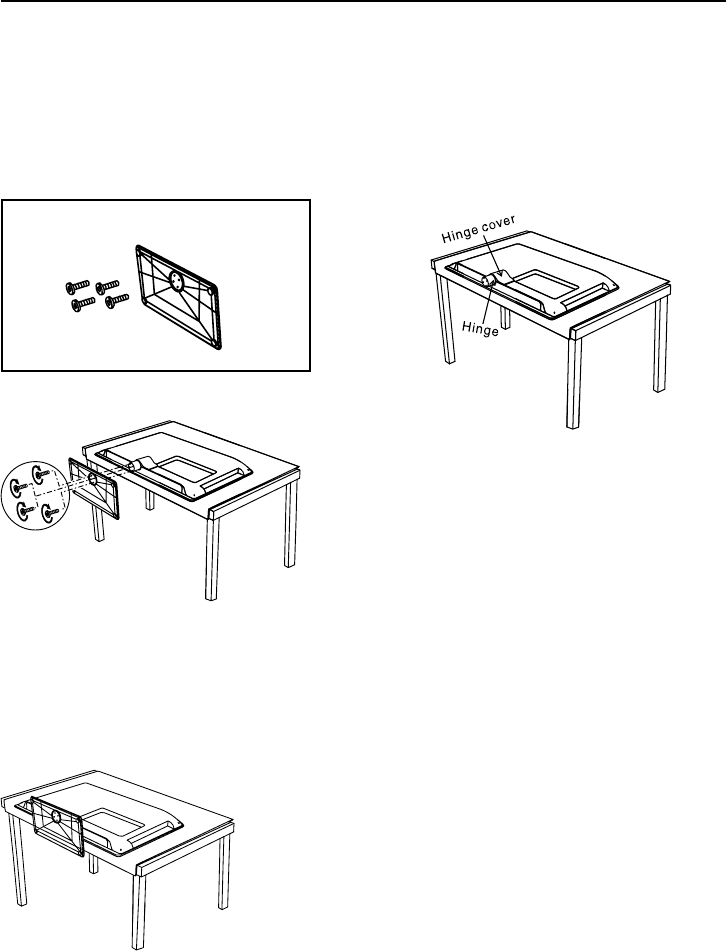
Attaching Your TV to the Table Stand
<RXU79FRPHVZLWKRXWWKHWDEOHVWDQGDWWDFKHGVRWKDW\RXFDQFKRRVHWRPRXQW\RXU79HLWKHUWR
LWVWDEOHVWDQGRUWRDZDOOZDOOPRXQWVROGVHSDUDWHO\,I\RXZDQWWRPRXQW\RXU79WRWKHZDOOGRQ¶W
DWWDFKWKHWDEOHVWDQGUHPRYHWKHKLQJHFRYHUDQGKLQJH)ROORZWKH0RXQWLQJ<RXU79WRWKH:DOO
instructions on page 7.
Step 1
5HPRYHWKH79EDJDQGSODFHLWRQD
ODUJHÀDWVXUIDFHVXFKDVDWDEOHRU
FRXQWHUWRS5HPRYHWKH79IURPWKH
FDUWRQDQGSODFHLWIDFHGRZQRQWKH79
EDJ%HVXUHWKDWWKH79LVIDFHGRZQWR
avoid scratching the screen.
Parts list
4 Screws
Table Stand
Step 2
Attach the table stand to the bottom
RIWKH79FDELQHW7RGRWKLVXVH
a screwdriver to tighten four M3
screws.
Table Stand Assembly for Models /(+'3
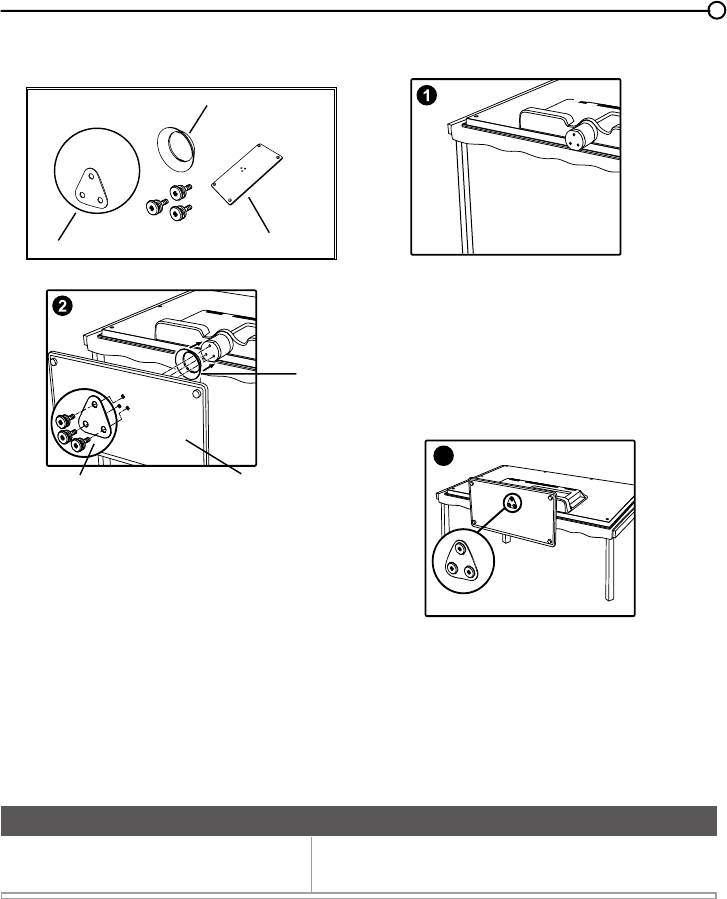
7
Step 1
5HPRYHWKH79EDJDQGSODFHLWRQD
ODUJHÀDWVXUIDFHVXFKDVDWDEOHRU
FRXQWHUWRS5HPRYHWKH79IURPWKH
FDUWRQDQGSODFHLWIDFHGRZQRQWKH79
EDJ%HVXUHWKDWWKH79LVIDFHGRZQWR
avoid scratching the screen.
Parts list
Part A
Part B
Part C
3 Screws
,I\RXDUHPRXQWLQJ\RXU79WRWKHZDOOGRQ¶WDWWDFKWKHWDEOHVWDQGUHPRYHWKHKLQJHFRYHUDQG
hinge.
0RXQWLQJ<RXU79WRWKH:DOO
7KH9(6$QXPEHULVWKHKRUL]RQWDODQGYHUWLFDOPHDVXUHPHQWRIWKHPRXQWLQJKROHV)RUH[DPSOH
100x100 refers to the fact that the mounting measurements are 100mm horizontally and 100mm
vertically.
Notes: Follow the directions included with the wall mount to mount the TV to the wall.
Caution: <RXUZDOOPRXQWPXVWEHDEOHWREHDUDPLQLPXPRI¿YHWLPHVWKH79¶VQHWZHLJKWWRDYRLGFDXVLQJGDPDJH
7RPRXQW\RXU79WRWKHZDOOSXUFKDVHD9(6$ZDOOPRXQW
0RGHOV/(+'3/()+''
/(+'' Purchase a VESA 100 x 100, M4 screw
3
Table Stand Assembly for Models /()+''/(+''
Part A
Part B
Part C
Step 2
Attach the table stand to the bottom
RIWKH79FDELQHW7RGRWKLVXVHD
screwdriver to tighten three screws
as shown above.
8
ANTENNA/CABLE IN
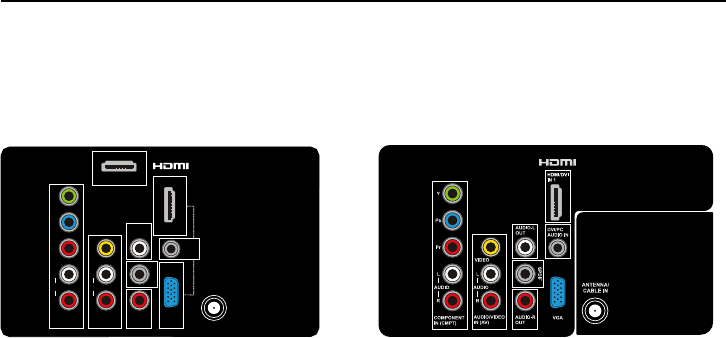
Lets you connect a coaxial cable to receive the signal from your antenna, cable, or cable box.
AUDIO (R/L) OUT 8VHDQ5&$DXGLRFDEOHWRFRQQHFW\RXU79WRDFRPSDWLEOHDXGLRUHFHLYHUQRW
availble in USB mode)
AUDIO/VIDEO (AV) IN
/HWV\RXFRQQHFWDFRPSRQHQWWKDWKDVFRPSRVLWHYLGHRMDFNVVXFKDVD9&5RU'9'SOD\HU
L AUDIO 3URYLGHVOHIWDXGLRFRQQHFWLRQZKHQXVLQJWKH9,'(2,1MDFN7KHOHIWDXGLR
FRQQHFWRUVDUHXVXDOO\ZKLWH)RUPRQRDXGLRVRXUFHVEHVXUHWRXVHWKH/$8',2,1
R AUDIO 3URYLGHVULJKWDXGLRFRQQHFWLRQZKHQXVLQJWKH9,'(2,1MDFN7KHULJKWDXGLR
connector is usually red.
COMPONENT IN /HWV\RXFRQQHFWDFRPSRQHQWWKDWKDVFRPSRQHQWYLGHRMDFNVVXFKDVD'9'
player.
&037<3E3U&RPSRQHQW9LGHR Provides good picture quality because the video is separated
into three signals. Use three video-grade or component video cables for the connection.
CMPT L AUDIO3URYLGHVOHIWDXGLRFRQQHFWLRQZKHQXVLQJWKH&0379,'(2LQSXWV7KHOHIWDXGLR
FRQQHFWRULVXVXDOO\ZKLWH)RUPRQRDXGLRVRXUFHVEHVXUHWRXVHWKHOHIW$8',2LQSXW
CMPT R AUDIO3URYLGHVULJKW$8',2FRQQHFWLRQZKHQXVLQJWKH&0379,'(2LQSXWV7KHULJKW
audioconnector is usually red.
SPDIF - DIGITAL AUDIO OUT (coaxial) 8VHDGLJLWDOFRD[LDOFDEOHWRFRQQHFW\RXU79WRDFRPSDWLEOH
audio receiver.
HDMI IN 3 /HWV\RXFRQQHFWDFRPSRQHQWVXFKDVDGLJLWDOFDEOHER[ZLWKDQ+'0,RXWSXWIRUWKH
best picture quality. (Note: HDMI 3 is not available for model LE19HDP11)
HDMI/DVI IN 1 +LJK'H¿QLWLRQ0XOWLPHGLD,QWHUIDFH'LJLWDO9LVXDO,QWHUIDFH3URYLGHVDQ
uncompressed digital connection that carries both video and audio data by way of an integrated
PLQLSOXJFDEOH6LQFH+'0,WHFKQRORJ\LVEDVHGRQ'LJLWDO9LVXDO,QWHUIDFH'9,WKHMDFNRQWKHEDFN
RI\RXU79LV alsoFRPSDWLEOHZLWK'9,FRPSRQHQWV
(PC IN) VGA &RQQHFW\RXUFRPSXWHURURWKHUFRPSRQHQWZLWKD9*$RXWSXWWRWKLVMDFNXVLQJD
SLQ'VXEFDEOH
DVI/PC AUDIO IN (used for DVI/PC only) 3URYLGHVDXGLRFRQQHFWLRQZKHQXVLQJ+'0,'9,,1387
MDFNIRU'9,RUZKHQXVLQJ3&,1
Note: If using a DVI component, remember to connect the audio cable because the DVI cable carries
only the picture signal, not the sound.
Rear Panel
Explanation of Jacks and Buttons on TV
7KLVVHFWLRQGHVFULEHVWKHMDFNVRQWKHEDFNSDQHORI\RXU797KHUHDUHVHYHUDOZD\VWRFRQQHFW
components.
for Models /()+''/(+'' for Model /(+'3
Y
Pb
Pr
VIDEO
ANTENNA/CABLE IN
HDMI/DVI IN 1
COMPONENT
IN (CMPT)
L
AUDIO
R
HDMI IN 3
AUDIO-L
OUT
AUDIO-R
OUT
AUDIO/VIDEO
IN (AV)
L
AUDIO
R
SPDIF
DVI/PC
AUDIO
IN
VGA
PC IN

9
6LGH,QSXW-DFNV
(HEADPHONE) Allow you to connect headphones to
OLVWHQWRWKHVRXQGFRPLQJIURPWKH79
USB
Allows you to connect a compatible mass storage device
XVLQJD86%MDFN
HDMI IN 2
Lets you connect a component, such as a digital cable box,
ZLWKDQ+'0,RXWSXWIRUWKHEHVWSLFWXUHTXDOLW\
79 Panel Buttons
If you cannot locate your remote, you can use the 79 panel
buttonsRQ\RXU79WRRSHUDWHPDQ\79IHDWXUHV
INPUT
Press the INPUT button to select the signal source.
MENU
Press the MENUEXWWRQWREULQJXSWKH79¶V0DLQPHQX
VOL+/-
Press VOL +/- to increase or decrease the volume or to
move right ( ) or left ( ) through the menu items.
VOL+/(OK) When in the menu system, press to display sub-
menus and select highlighted items.
CH+/-
Press CH+/- to select channels stored in the channel list or to
move up ( ) or down ( ) through the menu items.
POWER ( )
3UHVVWKH32:(5EXWWRQWRWXUQWKH79RQDQGRII
2QO\IRUPRGHOV/()+''DQG/(+''DQGSOVQRWH
WKDWWKHVHEXWWRQVORFDWHGRQWKHUHDUSDQOHRIWKH79
2QO\IRUPRGHOV/(+'3DQGSOVQRWHWKDWWKHVHNH\V
ORFDWHGRQWKHIURQWSDQHORIWKH79
USB
HDMI IN2
10
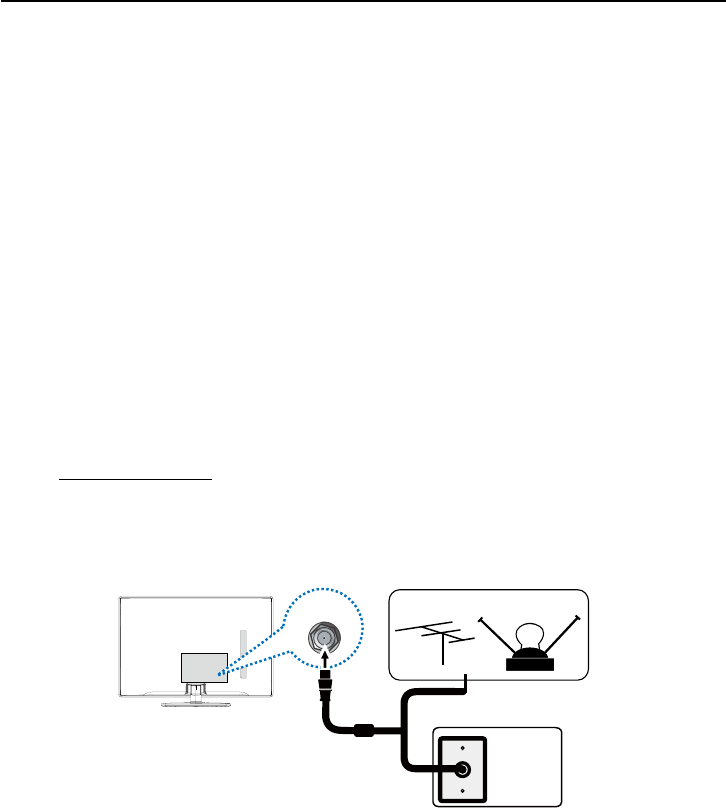
Outdoor or indoor Antenna
Cable Box,
( Wall Outlet)
RF Coaxial
Wire
(75 ohm)
Or
Or
ANTENNA/
CABLE IN
Connect the RF coaxial cable on your home outlet to the ANTENNA/
CABLE INMDFNRIWKLVXQLW
Once all connections are complete, turn on the unit and begin the initial setup process, scanning for
channels in your area.
Obtain the Signal
7KH¿UVWVWHSLQFRQQHFWLQJ\RXU79LVREWDLQLQJWKHVLJQDO7KHEDFNSDQHORI\RXU79DOORZV\RXWR
UHFHLYHDQDORJDQGRUGLJLWDOFKDQQHOVE\XVLQJWKH$17(11$&$%/(,1387
%HIRUH\RXFRQQHFW\RXU79\RXKDYHWRGHWHUPLQHZKHWKHU\RXZLOOEHXVLQJDQDQWHQQDRUDFDEOH
service to obtain the signal.
What You Need
Antenna (Rabbit Ears) Or Outdoor Antenna with Coaxial Cable
Plug the antenna or coaxial cable from the wall outlet into the ANTENNA/CABLE INRQWKHEDFNRIthe
79<RXDUHUHDG\WRUHFHLYHRIIDLUORFDOGLJLWDODQGDQDORJFKDQQHOV
Cable Service
Plug the coaxial cable from the wall outlet into the ANTENNA/CABLE INRQWKHEDFNRIWKH79You
are ready to receive your cable channels.
Set-Top Box
If you have a set-top box, you may need to call your cable company or satellite service provider. They
may recommend special cables to allow you to view digital channels.
What You Need to Know
9LVLWwww.antennaweb.org for help in deciding what type of antenna to use in order to receive the
local digital channels available to you. Enter your location, and the program will list local analog
and digital stations available using your antenna.
:KHQ\RXZDWFK79WKHChannel Banner displays the type of channel currently viewed.
11
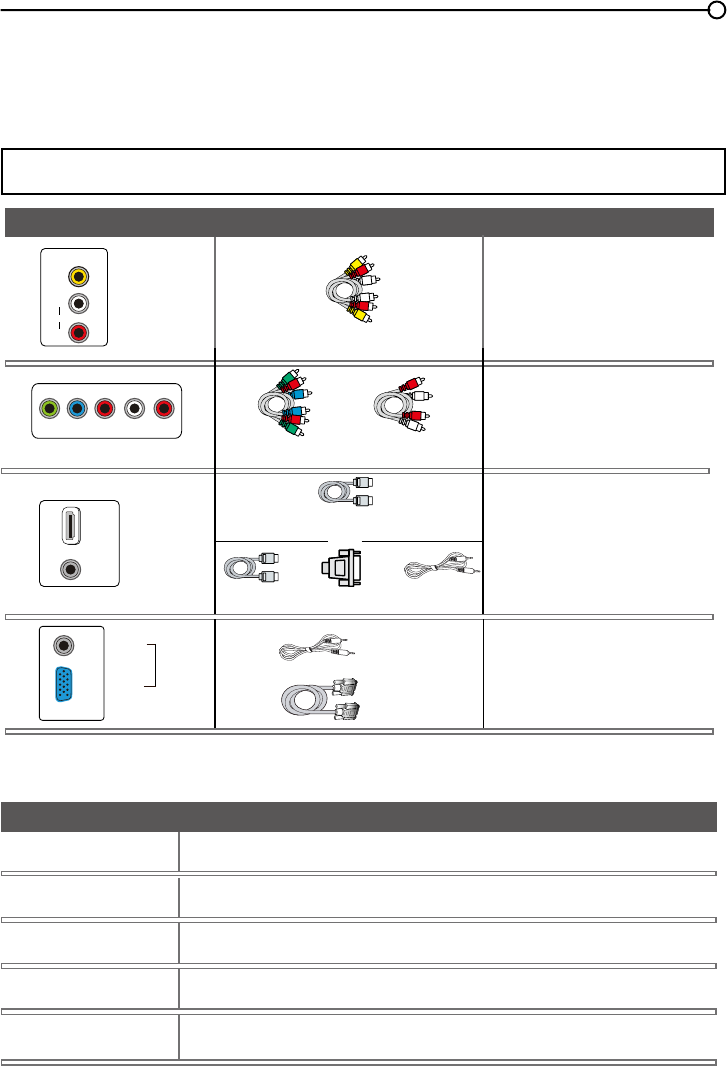
Choose Your Connections
7KHUHDUHVHYHUDOZD\VWRFRQQHFWFRPSRQHQWVVXFKDV'9'SOD\HUVDQGVHWWRSER[HVWR\RXU
793OHDVHXVHWKHIROORZLQJFKDUWWRGHWHUPLQHZKLFKFRQQHFWLRQVDUHEHVWIRU\RX3URFHHGWRWKH
appropriate pages to connect your components.
Note: No cables are supplied with this unit. Please purchase the necessary cables. A high-speed
+'0,FDEOHLVUHFRPPHQGHGIRUEHWWHUFRPSDWLELOLW\
$XGLR9LGHR
page 12
page 12
page 13
page 14
&RPSRQHQW9LGHR Audio
Jacks Used Cable Needed Go to...
+'0,TM
+'0,'9,$GDSWHU+
OR
Audio
Audio
Audio
Audio
+'0,'9,
Y Pb Pr Audio L and R
Audio L and R
9LGHR
9*$
9*$
PC IN
+'0,TM
+'0,WKH+'0,ORJRDQG+LJK'H¿QLWLRQ0XOWLPHGLD,QWHUIDFHDUHWUDGHPDUNVRUUHJLVWHUHG
WUDGHPDUNVRI+'0,/LFHQVLQJ//&
Input Signal Compatability
$QWHQQD&DEOH480i, 480p, 720p, 1080i (NTSC, ATSC, and QAM formats)
&RPSRVLWH9LGHR480i
&RPSRQHQW9LGHR 480i, 480p, 720p/60Hz, 1080i/60Hz, 1080p/60Hz
+'0, 480i, 480p, 720p/60Hz, 1080i/60Hz, 1080p/60Hz
PC VGA SVGA XGA
VIDEO
L
AUDIO
R
AUDIO/VIDEO
IN (AV)
YPb Pr L AUDIOR
COMPONENT IN (CMPT)
HDMI/DVI IN 1
DVI/PC
AUDIO
IN
DVI/PC
AUDIO
IN
VGA
12
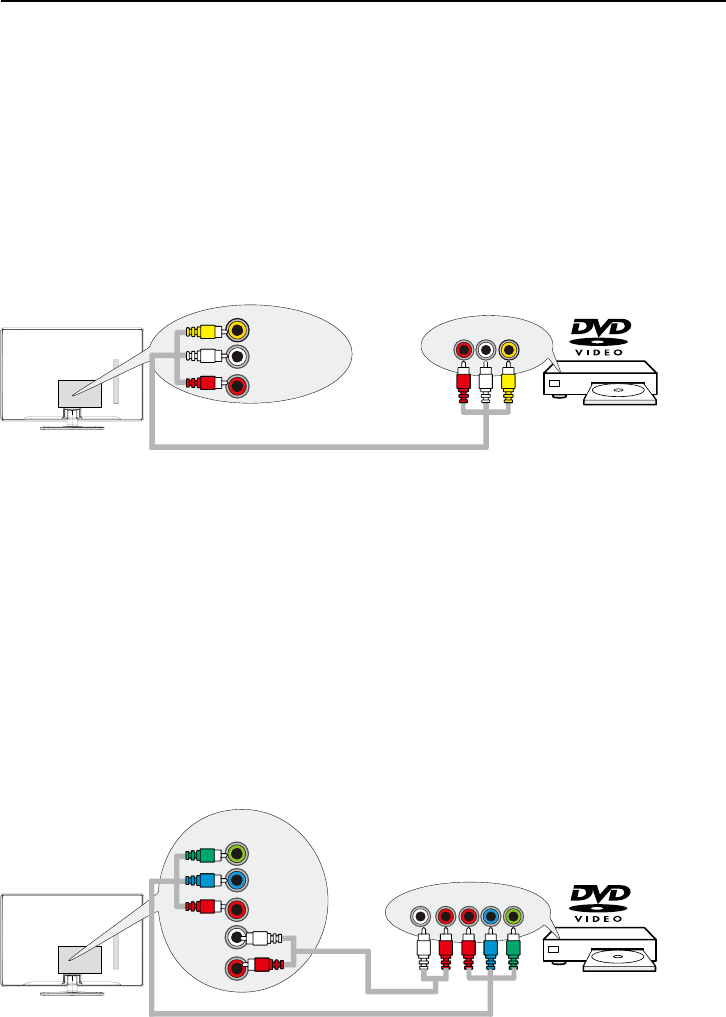
Connecting a CompRQHQWZLWK&RPSRVLWH9LGHR*RRG
7RFRQQHFWDFRPSRQHQWZLWKDYLGHRRXWSXWMDFNVXFKDVD'9'SOD\HUIROORZWKHVHVWHSV
([DPSOH'9'3OD\HU
&RQQHFW\RXUFDEOHDQGRURIIDLUDQWHQQDDVGHVFULEHGRQSDJH
2. Connect the yellow video cable to the (AV) VIDEOMDFNRQWKHEDFNRIWKH79DQGWRWKHYLGHR
RXWSXWMDFNRQWKH'9'SOD\HU
3. Connect the red and white audio cables to the (AVULJKWDQGOHIWDXGLRMDFNVRQWKHEDFNRIWKH79
DQGWRWKHDXGLRRXWSXWMDFNVRQWKH'9'SOD\HU
7XUQRQ\RXU79WKHQWXUQRQWKH'9'SOD\HU
5. Press the INPUT button on the remote control to open the Input list. Once open, press the INPUT
button repeatedly to select AV.
7KLVLVDQH[DPSOHRIDFRQQHFWLRQXVLQJWKHFRPSRVLWHYLGHRMDFN
&RQQHFWLQJD&RPSRQHQWZLWK&RPSRQHQW9LGHR%HWWHU
Component video connection offers better picture quality for video devices connected to the unit. To
FRQQHFWDFRPSRQHQWWKDWKDV<3E3UMDFNVVXFKDVD'9'SOD\HUIROORZWKHVHVWHSV
([DPSOH'9'3OD\HU
&RQQHFW\RXUFDEOHDQGRURIIDLUDQWHQQDDVGHVFULEHGRQSDJH
2.
Connect three video cables or special Y Pb Pr cables to the COMPONENT IN (CMPT) Y Pb Pr
MDFNVRQWKHEDFNRIWKH79DQGWRWKH<3E3URXWSXWVRQWKH'9'SOD\HU
3. Connect your red and white audio cables to the COMPONENT IN (CMPT) R and L AUDIO
MDFNVRQWKHEDFNRIWKH79DQGWRWKHDXGLRRXWSXWMDFNVRQWKH'9'SOD\HU
7XUQRQ\RXU79WKHQWXUQRQWKH'9'SOD\HU
5. Press the INPUT button on the remote control to open the Input list. Once open, press the INPUT
button repeatedly to select CMPT.
7KLVLVDQH[DPSOHRIDFRQQHFWLRQXVLQJWKHFRPSRQHQWYLGHRMDFNV
VIDEO
L
AUDIO
R
AUDIO/VIDEO
IN (AV)
VIDEOLR
AUDIO
AUDIO/VIDEO OUT
LRPrPbY
COMPONENT
IN (CMPT)
L
AUDIO
R
Y
Pb
Pr COMPONENT OUT
13
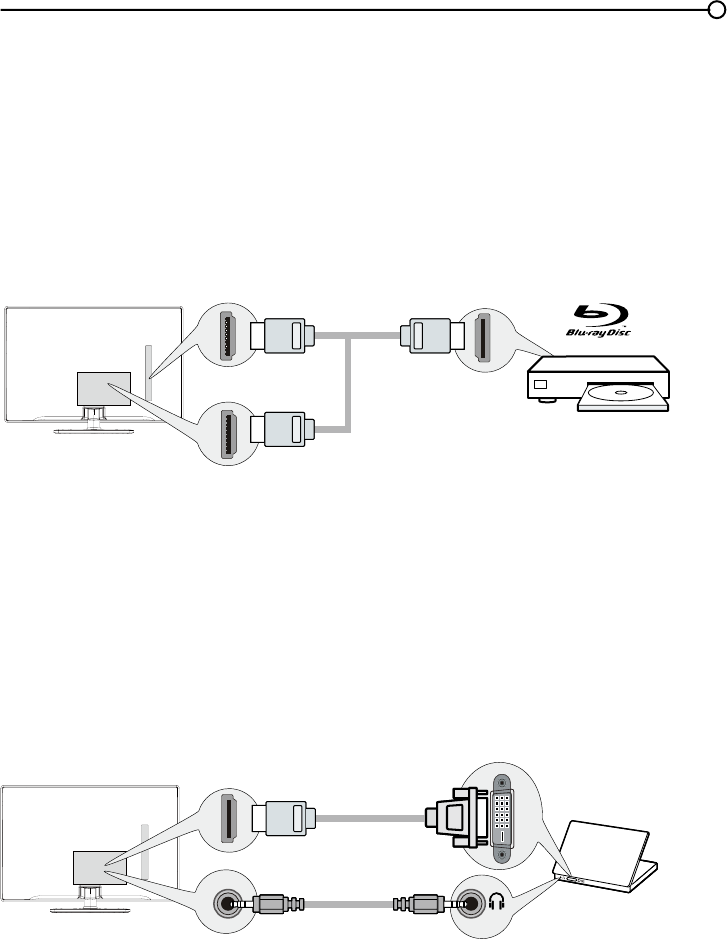
+'0,'9,&RQQHFWLRQ
6LQFH+'0,WHFKQRORJ\LVEDVHGRQ'LJLWDO9LVXDO,QWHUIDFH'9,WKHMDFNRQWKHEDFNRI\RXU79LV
also compatiEOHZLWKFRPSRQHQWVWKDWKDYHD'9,RXWSXWMDFN
Example: Personal Computer (PC)
&RQQHFWDQ+'0,FDEOHWRWKHHDMI/DVI IN 1MDFNRQWKHEDFNRIWKH79
$WWDFKDQ+'0,'9,DGDSWHURQWKHRWKHUHQGRIWKH+'0,FDEOHWKHQFRQQHFWLWWRWKH'9,RXWSXW
MDFNRQWKH3&
6LQFH\RX¶UHXVLQJDQ+'0,'9,DGDSWHU\RXQHHGWRFRQQHFWDVHSDUDWHDXGLRFDEOHWRWKHDVI
AUDIO INMDFNRQWKHEDFNRIWKH79DQGWKHDXGLRRXSXWMDFNRQWKH3&
7XUQRQ\RXU79WKHQWXUQRQWKH3&
5. Press the INPUT button on the remote control to open the Input list. Once open, press the INPUT
button repeatedly to select HDMI 1.
&RQQHFWLQJD&RPSRQHQWZLWK+'0,%HVW
+LJK'H¿QLWLRQ0XOWLPHGLD,QWHUIDFH+'0,WHFKQRORJ\LVDQXQFRPSUHVVHGGLJLWDOFRQQHFWLRQWKDW
carries both video and audio data by way of an integrated mini-plug cable.
([DPSOH&RPSRQHQWZLWK+'0,MDFN
&RQQHFWDQ+'0,FDEOHWRWKHHDMI IN 2MDFNRQWKHVLGHRIWKH79RUWKHHDMI/DVI IN 1
MDFNRUHDMI IN 3 MDFNRQWKHEDFNRIWKH79DQGWRWKH+'0,RXWSXWMDFNRQWKH
component.
7XUQRQ\RXU79WKHQWXUQRQWKHFRPSRQHQW
3. Press the INPUT button on the remote control to open the Input list. Once open, press the INPUT
button repeatedly to select HDMI 2 (or HDMI 1 or HDMI 3).
Note: HDMI 3 is not available for model LE19HDP11
Don't forget:
If necessary, connect antenna or cable to get a picture. Go to page 10 for instructions.
HDMI OUT
HDMI IN 2
HDMI CABLE
OR
HDMI/DVI IN 1
or HDMI IN 3
To HDMI/DVI IN 1 only
HDMI-DVI
conversion cable
Audio cable
DVI/PC AUDIO IN
DVI
14
Plug in the TV
3OXJWKHHQGRIWKHSRZHUFRUGLQWRWKHEDFNRIWKH793OXJWKHRWKHUHQGLQWRDQRXWOHWLQVHUWLQJWKH
SOXJFRPSOHWHO\'RQRWSOXJWKH79LQWRDQRXWOHWFRQWUROOHGE\DOLJKWVZLWFK
Put Batteries in the Remote
5HPRYHWKHEDWWHU\FRPSDUWPHQWFRYHUIURPWKHEDFNRIWKHUHPRWHFRQWUROE\SXVKLQJWKHWDEDQG
lifting off the cover.
,QVHUW$$$EDWWHULHVPDNLQJVXUHWKHSRODULWLHVDQGDUHDOLJQHGFRUUHFWO\
5HSODFHWKHFRYHU
Turn on the TV
7XUQRQ\RXU79E\SUHVVLQJWKH EXWWRQRQWKH79RUWKH button on the remote control.
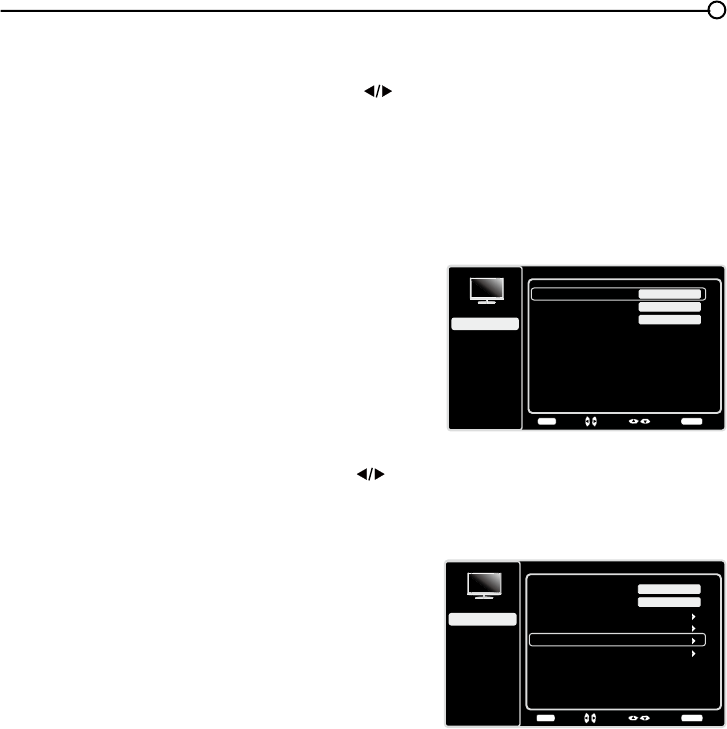
Using the Remote Control to Complete the Initial Setup
<RXZLOOQHHGWRXVHWKHUHPRWHFRQWUROWRFRPSOHWHWKHVHWXSRI\RXU797KHUHPRWHFRQWURODOORZV
\RXWRQDYLJDWHWKURXJKDQGVHOHFWLWHPVWKDWDSSHDULQWKHRQVFUHHQPHQXV7KHSURFHVVZRUNVWKH
same on all menu screens: highlight your choice and select it.
To highlight an item in the menu list, press the up or down arrow ( ) to move up or down. Use the
left or right arrows ( ) to view other selections for the highlighted menu choice or to display a sub-
menu.
Note: Highlighted items stand out from other menu items on the list (appear darker, brighter, or a
different color).
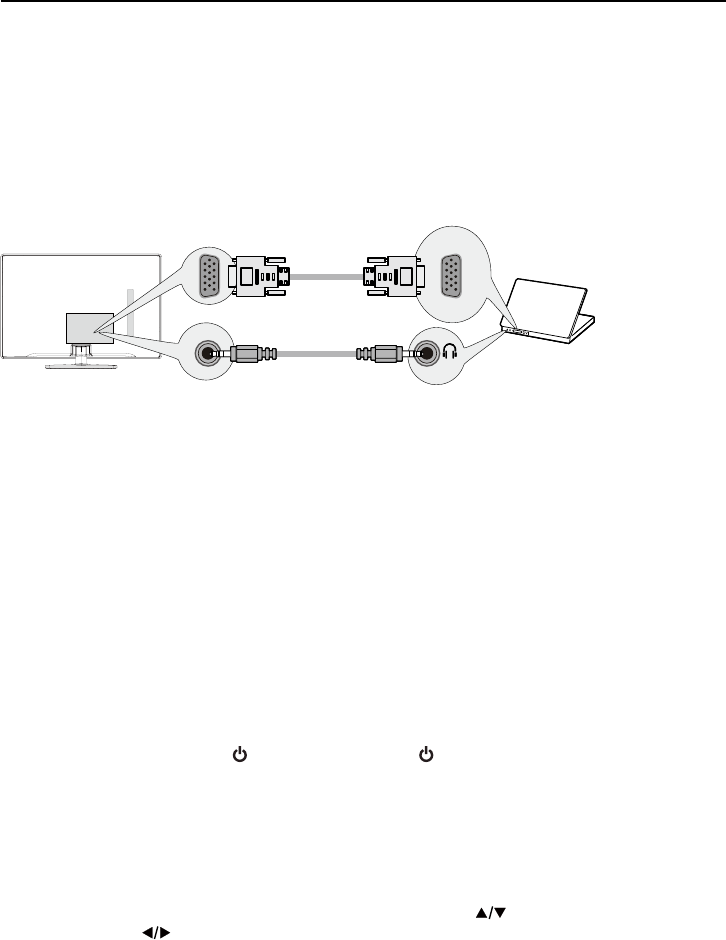
PC Connection
7RFRQQHFWDSHUVRQDOFRPSXWHUDQGXVH\RXU79DVDPRQLWRUIROORZWKHVHVWHSV
&RQQHFWRQHHQGRIDSLQPRQLWRUFDEOH9*$FDEOHWRWKHPC IN VGAMDFNRQWKH79DQGWKH
RWKHUHQGWRWKH3&¶VYLGHRRXWSXWMDFN
2. Connect an audio cable to the PC AUDIO INMDFNRQWKHEDFNRIWKH79DQGWKHRWKHUHQGWRWKH
DXGLRRXWSXWMDFNRQWKH3&
7XUQRQ\RXU79WKHQWXUQRQWKH3&
4. Press the INPUT button on the remote control to open the Input list. Once open, press the INPUT
button repeatedly to select PC.
To PC VIDEO
IN (VGA)
VGA cable
Audio cable
DVI/PC AUDIO IN
VGA
15
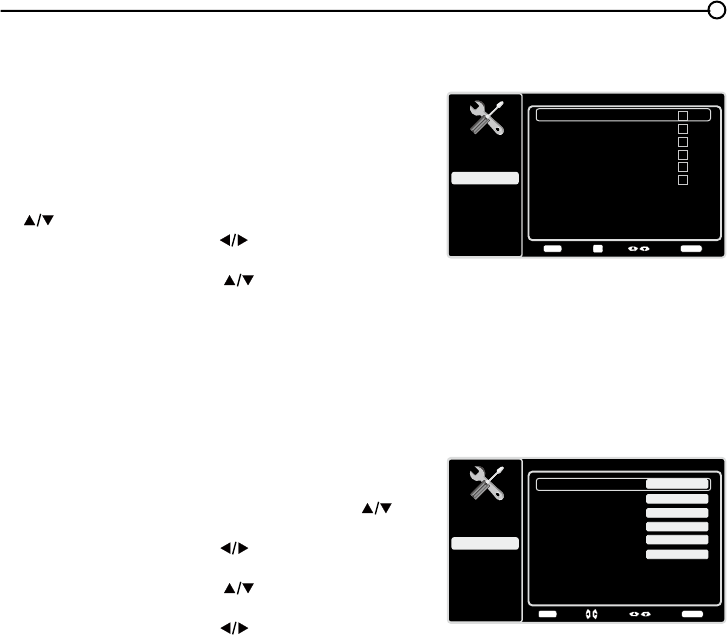
Complete the Initial Setup
7KHPHQXV\VWHPLQ\RXU79DOORZVDOORIWKH79¶VIHDWXUHVWRZRUNSURSHUO\7KH¿UVWWLPH\RXWXUQ
RQ\RXU79WKH,QLWLDO6HWXS:L]DUGRSHQVZKLFKJXLGHV\RXWKURXJKWKHVHWXSSURFHVVLQFOXGLQJ
/DQJXDJH79/RFDWLRQ7LPH=RQH7XQHUDQG&KDQQHO6FDQ
Set the Menu Language
7KH¿UVWVWHSRIWKHVHWXSUHTXLUHV\RXWRVHOHFW\RXU
preferred language for the menu system. If English is
your preferred language, press the OK button on the
remote control. To select another language use the
down arrow button ( ) until that language is selected
then press OK or the right arrow button ( ) to proceed
to the next screen.
6HWWKH79/RFDWLRQ0RGH
$IWHUFKRRVLQJWKHODQJXDJHDPHQXVFUHHQDVNV\RXWR
VHWWKH79/RFDWLRQ
&KRRVLQJ³Home´IRUWKH79/RFDWLRQDVVLJQV
the optimal picture settings for most home
environments.
&KRRVLQJ³Retail,” which is not Energy Star
FRPSOLDQWVHWVWKHXQLWXSZLWKSUHGH¿QHG
settings for retail displays. In this setting, the power
consumption may exceed the requirements of the
(QHUJ\6WDUTXDOL¿FDWLRQ
Use the up or down arrow ( ) to select the desired
location setting (Home/RetailWKHQSUHVVWKHOK button
or right arrow ( ) to continue to the next screen.
Set the Time Zone
Use the up or down arrows ( ) to select the current
local time zone. Press the OK button or right arrow ( )
to continue to the next screen.
Initial Setup
Please select your language:
Language
Español
Français
English
Select OK Next
Initial Setup TV Location
TV Location
This mode is Energy Star compliant. Retail
Home
Back OK NextSelect
Initial Setup Time Zone
Please select your time zone:
Alaska
Pacific
Hawaii
Mountain
Central
Eastern
Atlantic
Newfoudland
Back OK Next
Select Exit
CLEAR
EASTERN
16
Auto Channel Scan
1. On the Tuner screen, select either Antenna or Cable.
Press the OK button or right arrow ( ) to continue to
the next screen.
Note: If you are using a satellite or cable set-top box,
you do not have to complete the Channel Search.
2. The Channel Scan screen is now displayed. The
default choice is to scan. Press the OK button or the
right arrow ( ) to begin the channel scan for available
FKDQQHOVWREHVWRUHGLQWKH79¶VPHPRU\
Note: If you do not want to scan for channels at this
time, press CLEAR to stop the scanning process.
3. The screen will change to show the progress of the
scanning process.
:KHQWKHVFDQQLQJLV¿QLVKHGWKHComplete screen
appears to inform you that the unit has completed the
Initial Setup.
5. Press CLEAR to exit the Wizard and begin watching
79
6NLS6FDQ
,I\RXHOHFWWRVNLSWKH$XWR6FDQQLQJSURFHVVE\FKRRVLQJ
Skip Scan or by pressing the CLEAR button, you will need
to follow this process the next time you decide to complete
this procedure.
1. Select the TV as input (using the INPUTNH\
*RWKURXJKWKHPHQXRSWLRQVWRVHOHFWWKHSignal Type,
which will display the option of scanning the channels
again.
3. If you are using a satellite or cable set-top box, you do
not have to complete the Channel Search.
Note: See the Setup Menu to:
6FDQFKDQQHOVDXWRPDWLFDOO\DJDLQSDJH
$GGGHVLUHGFKDQQHOVQRWPHPRUL]HGE\WKH&KDQQHO
Scan (page 24).
5HVHWWKHWLPH]RQHSDJH
See the Language Menu to:
&KDQJHWRDQRWKHUODQJXDJHSDJH
Initial Setup Tuner
Please select your tuner mode:
Cable
Antenna
Back OK NextSelect Exit
CLEAR
Initial Setup Channel Scan
Please connect antenna or cable.
Start Channel Scan now?
If you skip this step, the Channel
Scan can be performed by going to
the Setup menu later.
Skip Scan
Scan
Back OK NextSelect Exit
CLEAR
0%
Initial Setup Complete
Back
Congratulations!
The Initial Setup is complete.
Please press [OK] to exit the Initial
Setup Menu.
Exit
CLEAR
17
Selecting a Channel
1. Select the desired channel by using the CH+/- RUWKHQXPHULFNH\SDG
The CH+/- can select only memorized channels.
6HOHFWQRQPHPRUL]HGFKDQQHOVXVLQJWKHQXPHULFNH\SDG
7RXVHWKHQXPHULFNH\SDG
Analog TV Channels – When selecting an analog channel, such as channel 12, press the 1,
then the 2, then press OK.
DTV ±:KHQVHOHFWLQJGLJLWDOFKDQQHOVVXFKDVEHVXUHWRSUHVVWKHGRWLQWKH
appropriate place. So, for 12.3, you would press 1, then 2, then dot, then 3. Press OK to select.
3. Press GO BACK to return to the previously viewed channel.
What is a Sub-channel?
A sub-channel is a channel such as 12.3. By using high-compression technology, digital broadcasting
enables multiple signals to be sent simultaneously. Therefore, you can select more than one program
per main channel, since digital broadcasting technology can distinguish between multiple channels on
DVLQJOHQHWZRUN
Turning the TV On and Off
3OXJWKHSRZHUFRUGIURPWKH79LQWRDQ$&SRZHURXWOHW
2. Press WRWXUQRQWKH79
3. Press WRWXUQRIIWKH79:KHQ\RXWXUQWKH79RIILWDXWRPDWLFDOO\JRHVLQWR6WDQGE\0RGH
Note: When your TV is in Standby Mode, it is still receiving some power. To completely
disconnect the power, unplug the power cord.
Selecting the Video Input Source
7XUQRQWKH79WKHQSUHVV INPUT on the remote control.
The INPUT list appears.
2. To select an input source, press the INPUT button
repeatedly or use the up and down arrows ( ) to
highlight the video source and press OK to select.
Note: HDMI 3 is not available for model LE19HDP11
Adjusting/Muting the Volume
1.
Use the VOL +/- to adjust the volume. The volume bar will be displayed at the bottom part of your
79VFUHHQZKHQ\RXDUHDGMXVWLQJWKHYROXPH7KHYROXPHEDUGLVDSSHDUVDIHZVHFRQGVDIWHU
you have completed the adjustment.
2. Press MUTEWRWXUQWKHVRXQGRQDQGRII7KH087(PDUNLVGLVSOD\HGRQWKH79VFUHHQIRUD
few seconds.
3. When you press MUTE again, the volume reverts to its previous level. Or you can press the
VOL + to cancel the mute function.
Chapter 2 - Understanding the Basics
Input
AV
CMPT No Label
PC No Label
HDMI1 No Label
HDMI2 No Label
TV
No Label
HDMI3 No Label
18
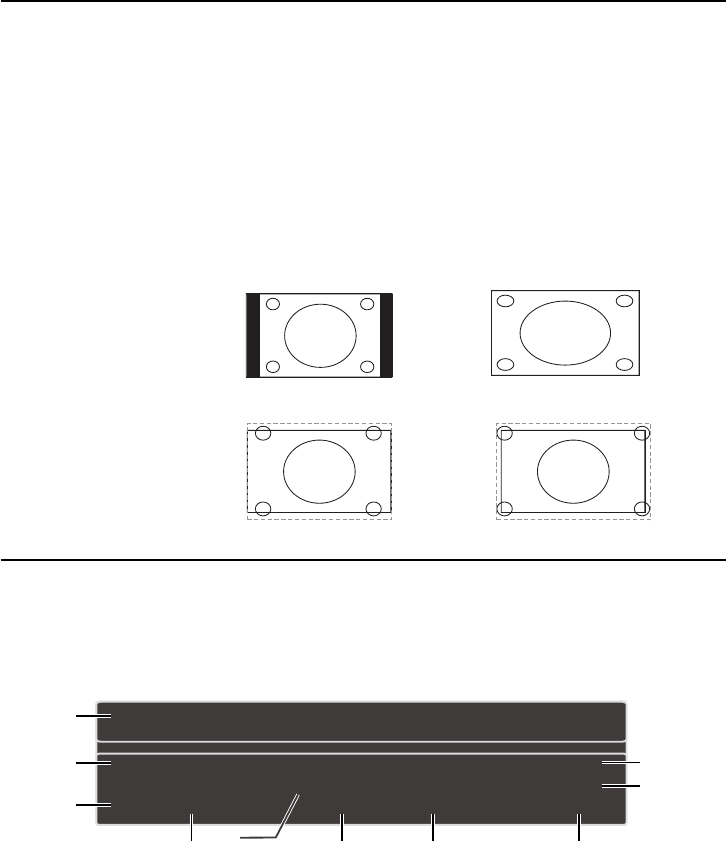
Screen Formats
6FUHHQIRUPDWUHIHUVWRWKHZD\WKHSLFWXUHLVGLVSOD\HGRQ\RXU793UHVVWKHZOOM -/+ button on
your remote to see if a different format is available for the video you are viewing. The format changes
as you press the ZOOM -/+ button, and the format type is displayed at the bottom left of the screen.
$QDORJYLGHRLVVHQWLQDIRUPDWZKLFK\RXU79GLVSOD\VLQDIRUPDW0RVWGLJLWDOYLGHRLVVHQW
LQDIRUPDWZKLFK¿OOV\RXUVFUHHQEXWLWVRPHWLPHVLVVHQWLQZKLFKGRHVQRW¿OO\RXUVFUHHQ
,WGHSHQGVRQKRZWKHVWDWLRQRUFRPSRQHQWFRQQHFWHGWR\RXU79LVIRUPDWWLQJWKHYLGHR,IWKHUHDUH
bars on the screen, press the ZOOM -/+ button to try a different format that may eliminate the bars.
6RPHEDUVFDQ¶WEHUHPRYHGEHFDXVHRIWKHZD\WKHIRUPDWLVVHQWE\WKHEURDGFDVWHU3UHVVZOOM -/+
repeatedly to cycle through the available display formats.
Examples of the different formats appear below. Each format is available for analog video, but it might
not be available for digital video.
Channel Banner
There are several indicators that may appear when you press the INFO button on the remote control.
This display is called the Channel Banner. The following list describes the items on the Channel
Banner screen.
1. Program Guide – The term “No program
details” is displayed when no program
guide is available.
2. Program Title
3. Rating Information – This displays the
rating of the current program.
4. Closed Captioning – This tells whether
or not Closed Captioning is available for
the current program.
5. Audio Language
6. Effective Scanning Lines ±'LVSOD\V
6FDQQLQJPRGHSDQGGLJLWDO79
IRUPDW+'
7. Current Time
8. Signal Type
9. Channel Name, if available
10. Channel Number
Normal
Cinerama
Full
Zoom
Note: For HD Video, press
ZOOM -/+ to choose
from Full, Expand, Normal
and Zoom. For HDMI and
CMPT inputs, there is also
a No Overscan format.
(No program details.)
(No program title.)
Not Rated 720p HD 12:35 PM
English Stereo
Cable
RFHF
2.1
1
2
3
56 7 8
9
10
cc
4
19
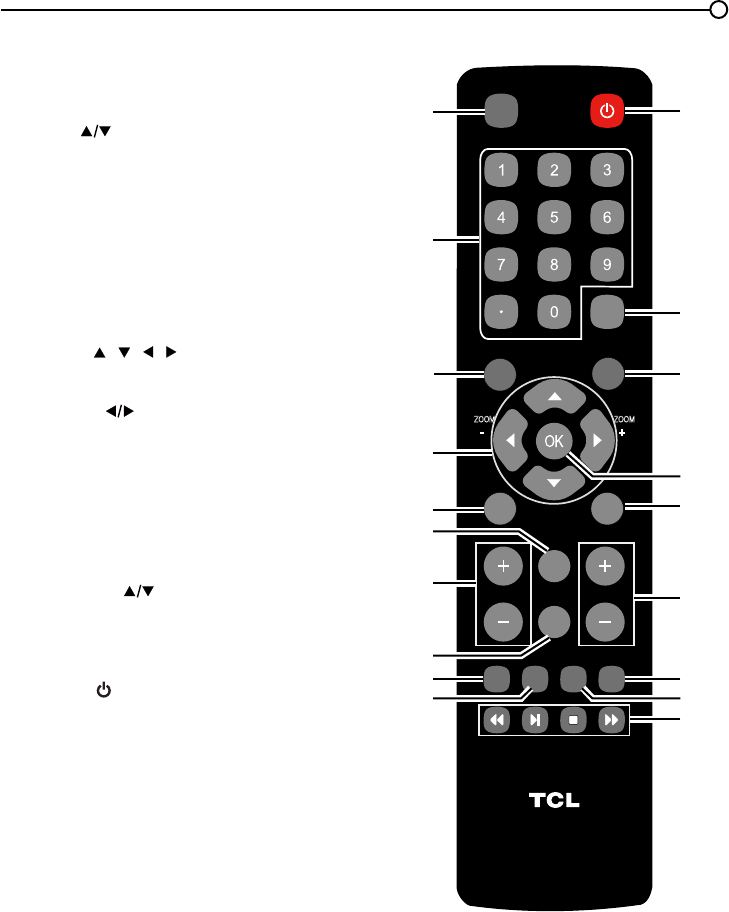
Chapter 3 - Using the Remote Control
Remote Control Buttons
1. INPUT – Press the INPUT button to open the
InputOLVWWKHQSUHVVWKHINPUT button repeatedly
to select the video input, or press the up and down
arrows ( )
to highlight options, and press OK to
select the desired option.
2. Alphanumeric Buttons – Using these
buttons, enter channel numbers. To enter a
channel, press the number buttons and press OK
(or let the entry timeout).
To enter a digital channel with a sub-channel,
HQWHUWKHPDLQFKDQQHOWKHQSUHVVWKHGRWWKH
sub-channel, and then the OK button.
3. MENU – Press the MENU button to display the
Main Menu.
4. Arrows ( / / / ) – Use the four arrows to
KLJKOLJKWGLIIHUHQWLWHPVLQWKH79PHQXDQGWR
adjust the menu controls.
ZOOM -/+ () – Press to select the desired
screen format.
5. PIC – Press to select your desired picture mode.
6. INFO – If no menus are currently active, press the
INFO button to display the Channel Banner.
7. VOL+/- –,QFUHDVHVRUGHFUHDVHVWKH79YROXPH
8. MUTE – Press to turn the volume on and off.
9. FAV – Press the FAV button to browse the
channels in your favorite list. Use the up and
down arrows ( ) to highlight options, then press
OK to select. Or, press the FAV button repeatedly
to cycle through your favorite channels.
10. MEDIA –
Press the MEDIA button to enter the
USB menu directly.
11. POWER ( ) – Press the POWER button to turn
WKH79RQDQGRII
12. GUIDE – Press the GUIDE button to display the
program guide. Program guide details are only
available on digital channels.
13. CLEAR – Press the CLEAR button to remove any
menu or display from the screen and return to
normal viewing.
14.OK –:KHQWKH79LVLQWKH0HQXV\VWHPSUHVV
the OK EXWWRQWRFRQ¿UP\RXUVHOHFWLRQ
15.GO BACK – Pressing the GO BACK button
returns you to the previously viewed channel.
16.CH + or CH - – Press the CH+/- buttons to select
channels and external input mode.
17.TV –3UHVVWRDFFHVVWRWKH79PRGH
18.MTS – Press to select your desired sound mode.
19.These buttons can be used for playing music and
photos in the USB menu.
VOL CH
RC3000N01
INPUT
GUIDE
MENU
CLEAR
GO BACK
INFO
MUTE
FAV
MEDIA
MTS
TV
PIC
ZOOM
+
ZOOM
-
8
9
1
2
3
4
5
7
6
10
11
1
2
1
5
1
6
1
8
1
3
1
7
1
9
1
4
20
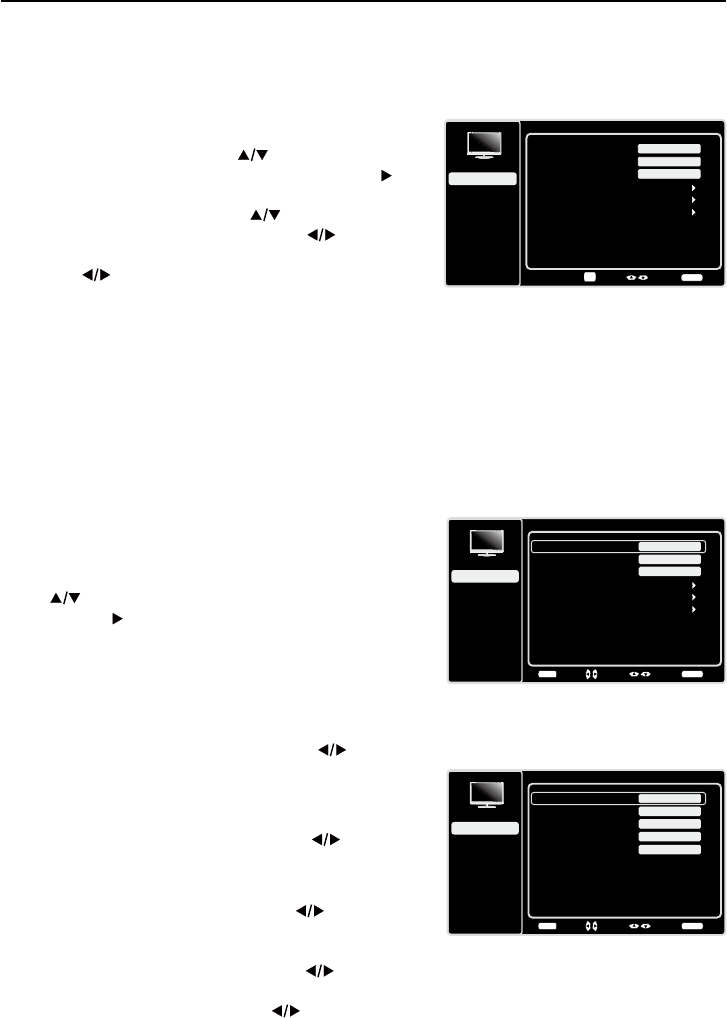
Using the Menu System
7KLVVHFWLRQH[SORUHVWKHPHQXVRI\RXU79(DFKPHQX
is outlined and detailed to help you get the most from your
797RDFFHVVWKHPHQXV\VWHPIROORZWKHVHVWHSV
1. Press the MENU button to open the main menu.
2. Use the up and down arrows ( ) to highlight an
option and press the OK button or the right arrow ( ) to
enter its sub-menu.
3. Press the up and down arrows ( ) to highlight an
LWHPWKHQSUHVVWKHOHIWRUULJKWDUURZV )
to adjust the selected items, or press the left or right
arrows ( ) to enter the next screen.
4. Press the OKEXWWRQWRFRQ¿UP\RXUVHOHFWLRQV
5. Press the MENU button to return to the previous
screen, or press the CLEAR button to close the menu.
Note:
Use the text at the bottom of the screen to assist you.
Descriptions of each menu are discussed in the order they
appear.
Picture Menu
The Picture Menu contains menus and controls to
FRQ¿JXUHWKHZD\WKHSLFWXUHDSSHDUV7KHPicture Menu
RSWLRQVDSSO\WRWKHYLGHRIRUWKHPDLQ79DQG9,'(2
INPUT selections.
To access the Picture Menu, press the MENU button on
the remote to open the Main menu. Press the up or down
arrow ( ) to select PictureWKHQSUHVVWKHOK button or
the right arrow ( ) to display options.
Picture Settings:
Picture Preset - 'LVSOD\VDOLVWWKDWOHWV\RXVHOHFW
one of the preset picture settings: Natural, Vibrant,
Cinematic, Sports, ECO or Personal. Choose the
setting that is best for your viewing environment.
Brightness - Use the left or right arrows ( ) to
adjust the brightness of the picture. This function is able
to be adjusted only when Light Sensor and Dynamic
Backlight in the Advanced Settings are both turned off.
Sharpness - Use the left or right arrows ( ) to adjust
the crispness of the edges in the picture.
Expert Settings
Contrast - Use the left or right arrows ( ) to adjust
WKHGLIIHUHQFHEHWZHHQWKHOLJKWDQGGDUNDUHDVRIWKH
picture.
Black Level -Use the left or right arrow ( ) to adjust
WKHEODFNOHYHO
Color - Use the left or right arrows ( ) to adjust the
richness of the color.
Picture
Setup
Parental Control
Language
Sound
Picture
Picture Preset
Brightness
Vibrant
USB
Exit
Advanced Settings
Reset Picture Settings
100
Sharpness 3
Back
MENU
Adjust Select Exit
CLEAR
Expert Settings
Expert Settings
Setup
Parental Control
Language
Sound
Picture
Contrast
Black Level
Color
Tint
USB
Exit
Color Temperature
45
58
0
Back
MENU
Adjust Select Exit
CLEAR
35
0
Chapter 4 - Using the TV Menu
Picture
Setup
Parental Control
Language
Sound
Picture
Picture Preset
Brightness
Vibrant
USB
Exit
Advanced Settings
100
Sharpness 3
Reset Picture Settings
Enter Select Back
CLEAR
Expert Settings
OK
21
Tint - This option adjusts the balance between the red
and green levels.
Color Temperature - Use the left or right arrow ( ) to
adjust the color temperature from cool to warm.
Advanced Settings
Light Sensor – When activated, this feature monitors
the ambient light conditions in the room and adjusts the
79¶VEDFNOLJKWIRURSWLPXPYLHZLQJ,WDOVRVHUYHVDVDQ
HQHUJ\VDYLQJIHDWXUHE\ORZHULQJWKHEDFNOLJKWSRZHU
OHYHOZKHQDSSURSULDWHW\SLFDOO\LQGDUNHUFRQGLWLRQV
Dynamic Backlight – This option automatically adjusts
WKHEULJKWQHVVRIWKHEDFNOLJKWDFFRUGLQJWRWKHFRQWHQW
of the incoming signal. Dynamic Backlight optimizes
the picture quality and decreases power consumption.
Noise Reduction – This setting reduces picture “static”
or any type of interference. This feature is especially
XVHIXOIRUSURYLGLQJDFOHDUHUSLFWXUHLQZHDNDQDORJ
signal conditions. Press the left or right arrow ( ) to
choose between these options:
Low for a softer, smoother picture that retains picture
sharpness and detail.
Middle for a slightly softer picture than the Low
setting.
High for an even softer, smoother picture than
the other settings (the picture detail is somewhat
decreased).
PC Settings -This option allows you to adjust the PC
settings when in PC mode.
Reset Picture Settings -This function allows you to
reset all the picture settings to the factory default settings.
Advanced Settings
Setup
Parental Control
Language
Sound
Picture
Light Sensor
Dynamic Backlight
Noise Reduction
Off
USB
Exit
Off
Middle
Back
MENU
Adjust Select Exit
CLEAR
Picture
Setup
Parental Control
Language
Sound
Picture
Picture Preset
Brightness
Vibrant
USB
Exit
Advanced Settings
PC
100
Reset Picture Settings
Back
MENU
Enter Select Exit
CLEAR
Expert Settings
Only in PC mode
22
Sound Menu
The Sound Menu lets you adjust audio output. To access
the Sound Menu, press MENU on the remote, and then
use the up and down arrows ( ) to highlight Sound from
the Main Menu. Press the OK button RUULJKWDUURZNH\ )
to select. The following options will be displayed:
Equalizer – 7KH¿YHEDQGHTXDOL]HUDOORZV\RXWRDGMXVW
WKHDXGLRIUHTXHQF\VHWWLQJV<RXFDQVHOHFWRQHRIWKH¿YH
preset options or create a custom preset.
Equalizer±$OORZV\RXWRFKRRVHDVSHFL¿F
sound preset. Press the left and right arrows ( )
to cycle through the options: Standard, Movie, Voice,
Music and Personal.
Frequency Range – 'LVSOD\VWKHGLIIHUHQWJUDSKLF
equalizer names set for each sound preset option.
&KRRVHDEDQGDQGPDNHDGMXVWPHQWV:KHQPDNLQJ
adjustments, the Equalizer option automatically
changes to Personal. Press the left or right arrow
() to select the desired frequency (100Hz, 300Hz,
1KHz, 3KHz, 10KHz) you wish to adjust. Use the up
and down arrows ( ) to adjust the level. When you
KDYH¿QLVKHGDGMXVWLQJWKHOHYHOVSUHVVWKHMENU
button to exit.
Sound
Setup
Parental Control
Language
Sound
Picture
Equalizer
Balance
Surround
Analog TV Sound
USB
Exit
0
On
Stereo
Back
MENU
Enter Select Exit
CLEAR
Speaker On
SPDIF Type Dolby Digital
Auto Volume Control Off
Balance – Use the left or right arrows ( ) to adjust the
DPRXQWRIDXGLRVHQWWRWKHOHIWDQGULJKWVSHDNHUV
Surround – Option On/Off. When turned on, this option
enables a mode which simulates a surround sound effect.
Speaker – Option On/Off. When you select the Off option,
WKHVRXQGVSHDNHURQWKH79ZLOOEHWXUQHGRII
SPDIF Type – Press the left or right arrow ( ) to select
SPDIF Type. This option controls the type of audio stream
VHQWWRWKH'LJLWDO$XGLR2XWSXWMDFN$YDLODEOHRSWLRQVDUH
Dolby Digital, PCM, or Off.
only available for analog channels
Auto Volume Control – Option On/Off. This option reduces the annoying blasts in volume that often
RFFXUGXULQJFRPPHUFLDOEUHDNVDQGDOVRDPSOL¿HVVRIWHUVRXQGVLQSURJUDPPDWHULDOHOLPLQDWLQJWKH
need for constant volume adjustment.
Analog TV Sound – This option controls the manner in which the sound comes through your
VSHDNHUV2SWLRQVDYDLODEOHYDU\DFFRUGLQJWRWKHLQSXWVHOHFWHG
0RQRDYDLODEOHIRUUHJXODU79YLHZLQJRQO\± This option plays the sound in mono only. Use
WKLVVHWWLQJZKHQUHFHLYLQJEURDGFDVWVZLWKZHDNVWHUHRVLJQDOV
Stereo –7KLVRSWLRQVSOLWVWKHLQFRPLQJVWHUHRDXGLRVLJQDOLQWROHIWDQGULJKWFKDQQHOV0RVW79
programs and recorded materials have stereo audio. The word “Stereo” appears in the Channel
Banner when you tune to a program that is broadcast in stereo.
Second Audio Program (SAP) – 7KLVRSWLRQSOD\VWKHSURJUDP¶VDXGLRLQDVHFRQGODQJXDJH
if available. The letters “SAP” appear in the Channel Banner when you tune to a program that
is broadcast with SAP information. SAP audio is broadcast in mono only. SAP is also used to
EURDGFDVWDSURJUDP¶VDXGLRZLWKGHVFULSWLRQVRIWKHYLGHRIRUWKHYLVXDOO\LPSDLUHG
Sound
Setup
Parental Control
Language
Sound
Picture
Equalizer
Balance
Surround
Analog TV Sound
USB
Exit
0
On
Stereo
Speaker On
SPDIF Type Dolby Digital
Auto Volume Control Off
Back
MENU
Adjust Select Exit
CLEAR
23
Default Audio Language – Choose the language you
prefer for dialog on digital channels. If the preferred
ODQJXDJHLVQRWEURDGFDVWHGZLWKWKHSURJUDPWKHQWKH79
plays the default audio for the program (usually English in
the US). There are 3 available default languages (English,
French, Spanish).
Current Audio Language – Press the left or right arrow
() to choose from the list of languages available for the
SURJUDP\RX¶UHZDWFKLQJ7KHODQJXDJHFKRVHQEHFRPHV
your preferred language for all digital channels until you turn
WKH79RII,IWKHODQJXDJHFKRVHQLVQRWEHLQJEURDGFDVWHG
ZLWKDSURJUDPWKH79SOD\VWKHGHIDXOWODQJXDJHIRUWKH
program (usually English in the US).
only available for digital channels
Sound
Setup
Parental Control
Language
Sound
Picture
Equalizer
Balance
Surround
Default Audio Language
USB
Exit
0
On
English
Current Audio Language
Unknown 5.1CH
Speaker On
SPDIF Type Dolby Digital
Auto Volume Control Off
Back
MENU
Adjust Select Exit
CLEAR
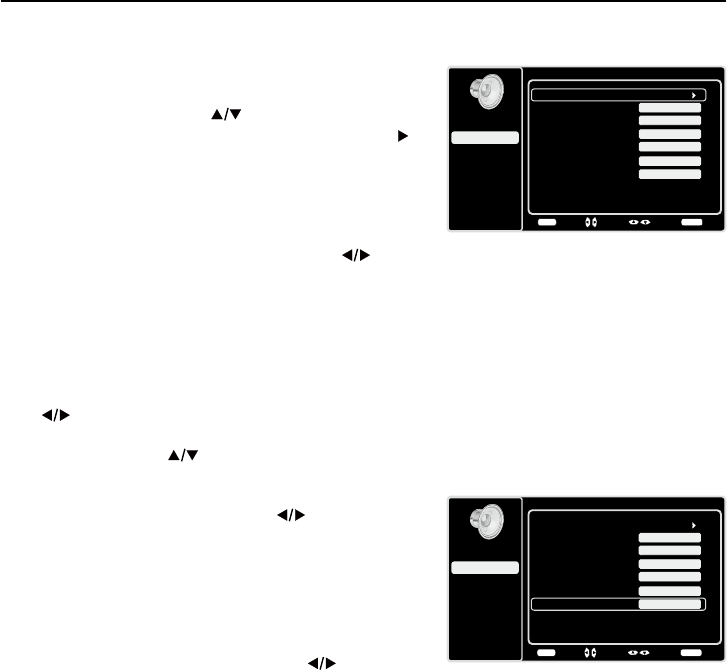
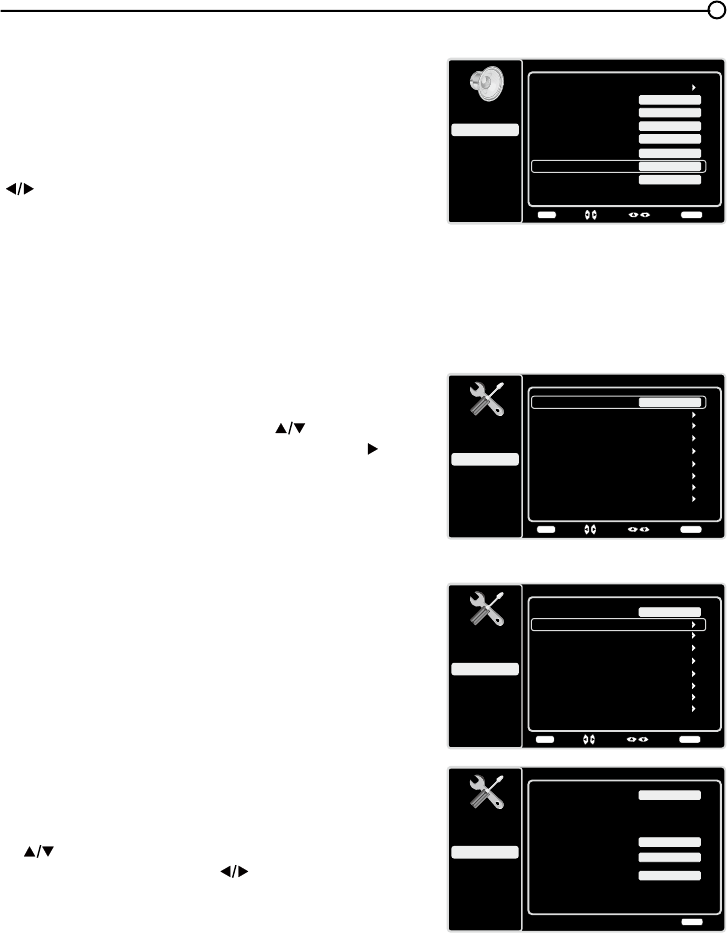
Setup Menu
The Setup0HQXDOORZV\RXWRFRQ¿JXUHWKH79ZLWK\RXU
preferences. Press MENU on the remote to open the Main
Menu. Press the up and down arrows ( ) to select
SetupWKHQSUHVVWKHOK button or the right arrow ( ) to
display the following options:
Signal Type
Choose the type of signal (Cable/Antenna) you have
connected to the ANTENNA/CABLE IN.
Channel Scan
:KHQ\RXSHUIRUPD&KDQQHO6FDQ\RXU79VHDUFKHVIRU
channels with signals and stores the channel information
LQWKH&KDQQHO/LVW7KHQDV\RXZDWFK79DQGSUHVVCH+
or CH-\RXU79JRHVWRWKHQH[WRUSUHYLRXVFKDQQHOLQ
WKH&KDQQHO/LVWDQGVNLSVWKHFKDQQHOVWKDWGRQRWKDYH
signals.
,IWKH79VLJQDOVRXUFHFKDQJHV±IRUH[DPSOHLI\RX
FKDQJHIURPDQRXWGRRUDQWHQQDWRFDEOH79±\RXZLOO
need to rescan for channels.
To automatically scan for channels:
1. After choosing a signal type, press the up or down arrow
() to highlight Channel Scan.
2. Press the left or right arrow ( ) to start the scan. You
can see the search progress and how many channels
are found in the on-screen menu. (Note: If you wish to
stop the search, press the CLEAR button.)
3. After the scan is complete, press the MENU button to
return to the previous menu, or press the CLEAR button
to close the menu.
Setup
Setup
Parental Control
Language
Sound
Picture
Signal Type
Channel Scan
USB
Exit
Cable
Channel Skip
Channel Edit
Input Skip
Input Labels
Closed Caption
Time Setup
Reset All
Back
MENU
Adjust Select Exit
CLEAR
Setup
Setup
Parental Control
Language
Sound
Picture
Signal Type
Channel Scan
USB
Exit
Cable
Channel Skip
Channel Edit
Input Skip
Input Labels
Closed Caption
Time Setup
Reset All
Back
MENU
Enter Select Exit
CLEAR
Channel Scan
Setup
Parental Control
Language
Sound
Picture
Signal Type
Status: Scanning...
USB
Exit
Cable
Progress 10%
Analog Channels Found
0
0
Digital Channels Found
Exit
CLEAR
24
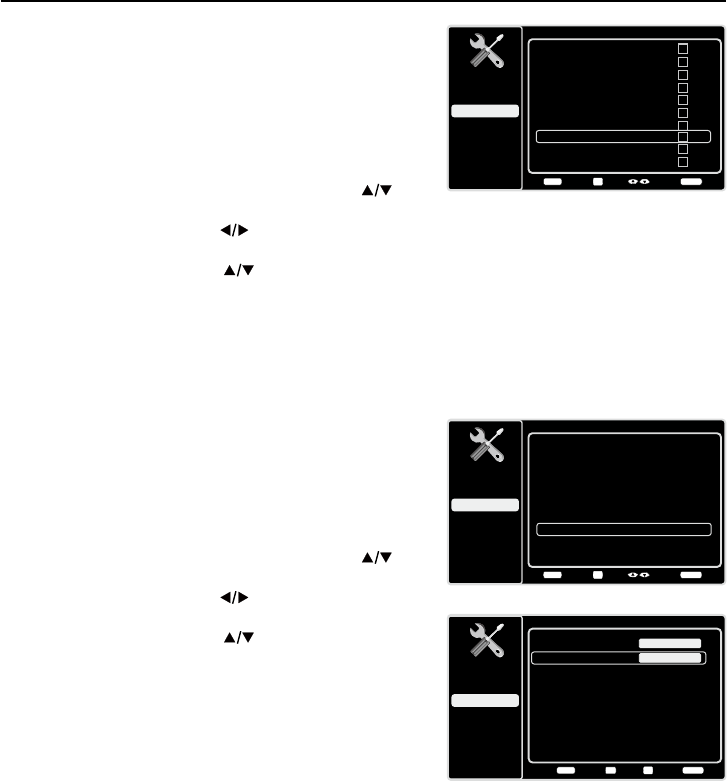
&KDQQHO6NLS
You can hide channels in the Channel List. Then, when you
press the CH+ or CH-EXWWRQWKH79ZLOOVNLSWKHKLGGHQ
channels. You can still tune to these hidden channels
by pressing the number of the channel on the numeric
NH\SDG
7RKLGHVSHFL¿FFKDQQHOV
1. In the Setup Menu, press the up or down arrow ( ) to
highlight Channel Skip.
2. Press the left or right arrow ( ) to open the Channel
List screen.
3. Press the up or down arrow ( ) to highlight the
FKDQQHO\RXZLVKWRVNLSWKHQSUHVVWKHOK button to
FKHFNWKHKLJKOLJKWHGFKDQQHO<RXFDQDGGWKH
FKDQQHOEDFNLQWRWKH&KDQQHO/LVWE\KLJKOLJKWLQJLWDQG
XQFKHFNLQJLW
4. Repeat the process to hide additional channels.
5. Press the MENU button to return to the previous menu,
or press the CLEAR button to close the menu.
Channel Edit
The Channel Edit function allows you to add or change
a channel label, only for analog channels. You cannot
change the name on digital channels.
To edit an analog channel name:
1. In the Setup Menu, press the up or down arrow ( ) to
highlight Channel Edit.
2. Press the left or right arrow ( ) to open the Channel
List screen.
3. Press the up or down arrow ( ) to highlight the
channel you wish to label or edit.
4. Press the OK button to enter the Channel Edit screen.
5. The Channel name will be highlighted. Use the numeric
NH\SDGWRHQWHUWKHQDPHIRUWKHFKDQQHO
6. Press the OK EXWWRQWRFRQ¿UPDQGVDYHWKHQHZODEHO
7. Press the MENU button to return to the previous menu,
or press the CLEAR button to close the menu.
Channel Skip
Setup
Parental Control
Language
Sound
Picture
12
USB
Exit
Analog
13 Analog
14 Analog
15 Analog
16 Analog
17 Analog
18 Analog
19 Analog
20 Analog
21 Analog
Back
MENU
Set Select Exit
CLEAR
OK
Channel Edit
Setup
Parental Control
Language
Sound
Picture
12
USB
Exit
Analog
13 Analog
14 Analog
15 Analog
16 Analog
17 Analog
18 Analog
19 Analog
20 Analog
21 Analog
Back
MENU
Set Select Exit
CLEAR
OK
Channel Edit
Setup
Parental Control
Language
Sound
Picture
Channel number:
USB
Exit
19
Channel name:
Back
MENU
Set Exit
CLEAR
Save
OK
0-9
25
,QSXW6NLS
You can hide video inputs in the Channel List. This option
allows you to remove the inputs from the Channel List so
you do not encounter them when channeling up or down.
2QFH\RXKDYHKLGGHQLQSXWVWKH79ZLOOVNLSWKHVHLQSXWV
when you press the CH+ or CH- button.
To hide video inputs:
1. In the Setup Menu screen, press the up or down arrow
() to highlight Input Skip.
2. Press the left or right arrow ( ) to open the Input Lists
screen.
3. Press the up or down arrow ( ) to highlight the video
input you want to hide.
4. Press the OKEXWWRQWRFKHFNWKHKLJKOLJKWHGLQSXW<RX
FDQDGGDQLQSXWE\KLJKOLJKWLQJLWDQGXQFKHFNLQJLW
5. Repeat the process to hide additional video inputs.
6. Press the MENU button to return to the previous menu,
or press the CLEAR button to close the menu.
Input Labels
<RXFDQDGGDODEHOWRDYLGHRLQSXWVRXUFHWRPDNHLW
easier to identify.
1. In the Setup Menu, press the up or down arrow ( ) to
highlight Input Labels.
2. Press the left or right arrow ( ) to open the Input
Labels screen.
3. Press the up or down arrow ( ) to highlight the input
source you wish to label.
4. Press the left or right arrow ( ) to select the label for
this source.
5. Press the MENU button to return to the previous menu,
or press the CLEAR button to close the menu.
Input Skip
Setup
Parental Control
Language
Sound
Picture
USB
Exit
AV
CMPT
HDMI1
HDMI2
Back
MENU
Set Select Exit
CLEAR
OK
No Label
No Label
No Label
PC No Label
No Label
HDMI3 No Label
Input Labels
Setup
Parental Control
Language
Sound
Picture
USB
Exit
AV
CMPT No Label
No Label
HDMI1 No Label
PC No Label
HDMI2 No Label
HDMI3 No Label
Back
MENU
Adjust Select Exit
CLEAR
Note: HDMI 3 is not available for model LE19HDP11
Note: HDMI 3 is not available for model LE19HDP11

26
Closed Caption
Many programs are encoded with closed captioning information, which allows you to display the audio
SRUWLRQRIDSURJUDPDVWH[WRQWKH79VFUHHQ
Note: Closed caption settings are not available for HDMI, CMPT or PC INPUTS. These settings must
EHVHWLQWKHFRQQHFWHGFRPSRQHQW¶VPHQX&ORVHGFDSWLRQLQJLVQRWDYDLODEOHRQDOOFKDQQHOVDWDOO
WLPHV2QO\VSHFL¿FSURJUDPVDUHHQFRGHGZLWKFORVHGFDSWLRQLQJLQIRUPDWLRQ:KHQDSURJUDPLV
closed captioned, CC is displayed in the Channel Banner. See page 18 for more information about
the Channel Banner.
The Closed Caption options are:
CC Setting – This option allows you to choose the way
closed captioning information appears on the screen.
Off - No captioning information displayed.
On Always – Choose this option if you want captioning
information to be shown whenever available.
On When Muted – This option allows the closed
captioning to display (when available) whenever the
79¶VVRXQGLVPXWHG7KHFDSWLRQLQJLQIRUPDWLRQLVQRW
displayed when the sound is not muted.
Analog CC Type – This option lets you select the
captioning mode used for displaying caption information,
when available. If you are unsure of the differences among
the modes, you may prefer to leave the closed captioned
mode set to CC1, which displays complete text of the
program in the primary language in your area.
Digital CC Type If available, this allows you to select a
closed caption service mode (1-6) for digital channels.
Digital CC Preset If available, this allows you to select
between Off and On options. On mode allows you to set
the options below.
Digital CC Style – This option lets you customize the
following display options, if available:
Caption Style – Select either As Broadcast or
Custom options. If you choose Custom options, the
setting changes according to the options you choose.
Digital CC Size – Set the size of the digital closed
caption text: Small, Middle or Large.
Digital CC Font - Select a character design for
the digital closed caption text. A font is a complete
DVVRUWPHQWRIOHWWHUVQXPEHUVSXQFWXDWLRQPDUNVHWF
in a given design. You can choose from a variety of
fonts.(Style1-7).
Digital CC Color – Choose the color of the digital
FORVHGFDSWLRQWH[W:KLWH*UHHQ%OXH5HG&\DQ
<HOORZ0DJHQWDRU%ODFN
Digital CC Opacity – Set the appearance of the digital
closed caption text: Solid, Translucent, Transparent or
Flashing.
Closed Caption
Setup
Parental Control
Language
Sound
Picture
CC Setting
Analog CC Type
USB
Exit
On Always
Digital CC Type
Digital CC Preset
Digital CC Style
Off
On
Back
MENU
Adjust Select Exit
CLEAR
Digital CC Style
Setup
Parental Control
Language
Sound
Picture
Caption Style
Digital CC Size
USB
Exit
Custom
Digital CC Font
Digital CC Opacity
Style1
Solid
Large
Digital CC Background Color
Black
Digital CC Background Opacity
Solid
Window Color Black
Window Opacity Transparent
Digital CC Color White
Back
MENU
Adjust Select Exit
CLEAR
Note: These captioning style options
only have an effect on true digital closed
captions. Not all captioning on digital
channels is digital captioning--it depends
on what the broadcaster is sending. If the
closed captioning for a program is not
digital, the Digital CC style settings will not
have an effect.
27
Digital CC Background Color – Set the appearance of the area behind the digital closed caption
WH[W:KLWH*UHHQ%OXH5HG&\DQ<HOORZ0DJHQWDRU%ODFN
Digital CC Background Opacity – Set the appearance of the area behind the digital closed
caption text: Solid, Translucent, Transparent, or Flashing.
Window Color – &KRRVHWKHFRORURIWKHZLQGRZ:KLWH*UHHQ%OXH5HG&\DQ<HOORZ0DJHQWD
RU%ODFN
Window Opacity – Set the appearance of the window: Solid, Transparent, or Translucent.
Time Setup
Time Zone
You can select the current local time. Options are: Eastern,
$WODQWLF1HZIRXQGODQG+DZDLL$ODVND3DFL¿F
Mountain and Central.
To choose a time zone:
1. In the Time Setup Menu, press the up or down arrow
() to highlight Time Zone.
2. Press the left or right arrow ( ) to proceed to the next
screen.
3. Press the left or right arrow ( ) to select the time zone
for your area.
4. Press the MENUEXWWRQWRJREDFNWRWKHSUHYLRXV
screen, or press the CLEAR button to close the menu.
Time
To set the time:
1. In the Time Setup Menu, press the up or down arrow
() to highlight Time.
2. Press the left or right arrow ( ) to proceed to the next
screen.
3. Options on this screen include:
a. Auto Synchronization – Press the left or right arrow
() to choose On to acquire the time automatically
from digital channels.
b. Date±8VHWKHQXPHULFNH\SDGWRVHWWKHGDWH
c. Time – If you want to set the time manually, use
WKHQXPHULFNH\SDGWRVHWWKHKRXUDQGPLQXWHV
Press OK to select AM or PM.
d. Power On Timer – Select On or Off.
e. Power On Time – Allows you to set the time you
ZDQWWKH79WRWXUQLWVHOIRQ
f. Power Off Timer – Select On or Off.
g. Power Off Time – Allows you to set the time you
ZDQWWKH79WRWXUQLWVHOIRII
Sleep Timer – Press the left or right arrow ( ) to set
WKH79WRWXUQRIIDIWHUDJLYHQDPRXQWRIWLPH
Time Setup
Setup
Parental Control
Language
Sound
Picture
Time Zone
Time
USB
Exit
Off
Sleep Timer
Back
MENU
Enter Select Exit
CLEAR
Time
Setup
Parental Control
Language
Sound
Picture
Auto Synchronization
Date
USB
Exit
Off
Time
2009/10/22
02:16PM
Power On Timer
Power On Time
On
Power Off Timer
12:00AM
Back
MENU
AM/PM Select Exit
CLEAR
OK
Power Off Time 12:00AM
On
28
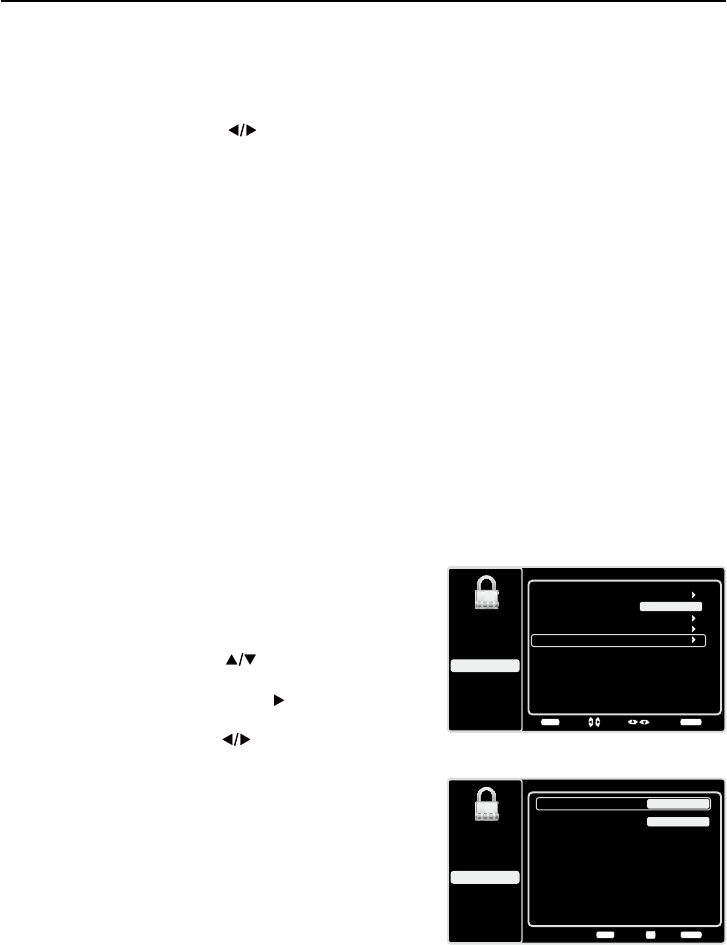
Parental Controls and V-Chip
7KHFKRLFHVLQWKH869&KLSDQG&DQDGD9&KLSPHQXVLQYROYHVRIWZDUHLQVLGH\RXU79UHIHUUHG
WRDV9&KLSZKLFKDOORZV\RXWREORFN79SURJUDPVDQGPRYLHV79SURJUDPVFDQEHEORFNHGE\
DJHEDVHGUDWLQJVVXFKDV790$6HHSDJH,IDYDLODEOH79SURJUDPVFDQDOVREHEORFNHGE\
FRQWHQWVXFKDVDGXOWODQJXDJH/6HHSDJH0RYLHVFDQRQO\EHEORFNHGE\DJHEDVHGUDWLQJV
6HHSDJH2QFH\RXEORFNSURJUDPV\RXFDQXQEORFNWKHPE\HQWHULQJDSDVVZRUG%\GHIDXOW
WKHVRIWZDUHLQVLGH\RXU79LVWXUQHGRIIRUXQORFNHG)RULQVWUXFWLRQVWRORFN9&KLSVHHSDJH
V-Chip - US and Canada
9&KLSUHDGVWKHSURJUDP¶VDJHEDVHGUDWLQJ790$79HWFDQGFRQWHQWWKHPHV9LROHQFH
9$GXOW/DQJXDJH/HWF,I\RXKDYHEORFNHGWKHUDWLQJDQGRUFRQWHQWWKHPHVWKDWWKHSURJUDP
FRQWDLQV\RXUHFHLYHDPHVVDJHWKDWWKHFKDQQHOLVFXUUHQWO\EORFNHG&KDQJHWKHFKDQQHORUSUHVV
OK to enter your password and temporarily deactivate the parental controls.
Broadcasters are not required to provide content themes, so programs received with no content
WKHPHVDUHEORFNHGRQO\LI\RXEORFNWKHLUDJHEDVHGUDWLQJ<RXFDQDOVREORFNSURJUDPVWKDWKDYH
been given an Exempt rating, and programs that are considered unrated. See page 38 for the US and
Canada ratings explanations.
Reset All
This option resets all settings (except parental control settings) to the factory defaults. When you select
WKLVRSWLRQDFRQ¿UPDWLRQER[RSHQV1RWH,IVRPHFKDQQHOVDUHEORFNHG\RXPXVWHQWHUWKH9FKLS
password, then you can follow the operation below).
1. Press the left or right arrows ( ) to select OK or Cancel.
2. Press the OKEXWWRQWRFRQ¿UP
&UHDWH&KDQJH9&KLS3DVVZRUG
7KH¿UVWWLPH\RXHQWHUWKH3DUHQWDO&RQWUROPHQX\RX
must set a password in order to adjust other parental control
VHWWLQJV7RHQWHUD9&KLS3DVVZRUGIROORZWKHVHVWHSV
1. Press the MENU button to display the Main Menu.
2. Press the up or down arrow ( ) to highlight Parental
Control.
3. Press the OK button or right arrow ( ) to enter the next
screen,
Create
Password is highlighted.
4. Press the left or right arrow ( ) to enter the
Create
Password screen.
8VHWKHQXPHULFNH\SDGWRHQWHUWKHIRXUGLJLWQXPEHU
for your password.
5HHQWHUWKHVDPHFRGHWRFRQ¿UPWKHSDVVZRUG7KH
next time you wish to access the Parental Control
PHQX\RXPXVWHQWHUWKHFRUUHFWSDVVZRUG¿UVW
Note: After you set a password, and return to the 3DUHQWDO
Control menu, “&UHDWH3DVVZRUG” changes to “Change
3DVVZRUG”, you can change your password throught this menu.
5HVHW9&KLS3DVVZRUG
$IWHU\RXKDYHLQLWLDOO\VHW\RXUSHUVRQDO9&KLSSDVVZRUG
you can change it later. If you have forgotten your personal
password, follow these steps:
Setup
Parental Control
Language
Sound
Picture
USB
Exit
Create Password
Back
MENU
Set Exit
CLEAR
0-9
New Password ----
Confirm Password ----
Parental Control
Channel Block
Button Block
Setup
Parental Control
Language
Sound
Picture
USB
Exit
V-Chip
Input Block
Create Password
Off
Back
MENU
Enter Select Exit
CLEAR
29
&KDQQHO%ORFN
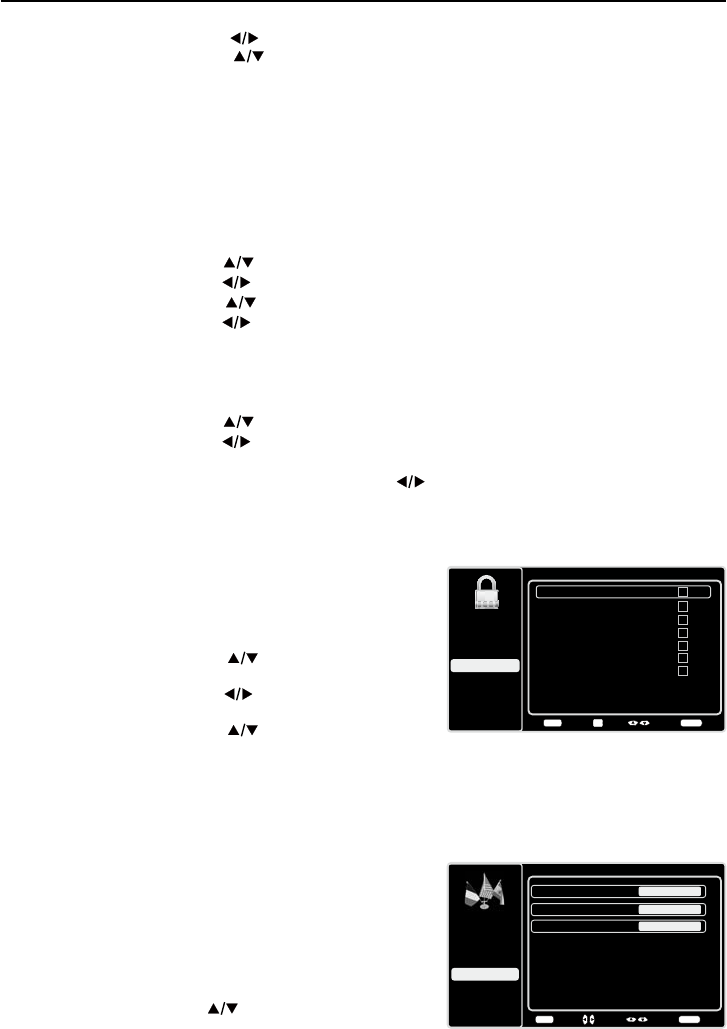
7REORFNDVSHFL¿FFKDQQHOIROORZWKHVHVWHSV
1. Press the up or down arrow ( ) to highlight Channel
Block in the Parental Control submenu.
2. Press the left or right arrow ( ) to display the Channel
List screen.
3. Press the up or down arrow ( ) to select the channel
\RXZLVKWREORFN
4. Press the OKEXWWRQWRSODFHDFKHFNPDUNLQWKHER[
WREORFNWKDWFKDQQHO:KHQ\RXWXQHWRWKDWFKDQQHO
you will need to enter a password to view the channel
programming.
%XWWRQ%ORFN
7KLVRSWLRQDOORZV\RXWREORFNGLVDEOHRUXQEORFNHQDEOH
WKH79SDQHOEXWWRQV7KHUHPRWHFRQWUROVWLOOWXQHVWR
DQ\FKDQQHO,I\RXDUHXVLQJWKLVWRNHHSFKLOGUHQIURP
changing channels, be sure to remove access to any
UHPRWHWKDWLVFDSDEOHRIRSHUDWLQJWKH79ZKLOH\RXKDYH
the 79SDQHOEXWWRQEORFNHG
7REORFNWKH79SDQHOEXWWRQVIROORZWKHVHVWHSV
1. Press the up or down arrow ( ) to highlight Button
Block in the Parental Control submenu.
2. Choose the On option.
3. To enable these buttons again, return to this menu and
choose the Off option.
Channel Block
1Analog
2Analog
3Analog
4Analog
5Analog
6Analog
7Analog
8Analog
9Analog
10 Analog
Setup
Parental Control
Language
Sound
Picture
USB
Exit
Back
MENU
Set Select Exit
CLEAR
OK
Parental Control
Channel Block
Button Block
Setup
Parental Control
Language
Sound
Picture
USB
Exit
V-Chip
Input Block
Change Password
Off
Back
MENU
Adjust Select Exit
CLEAR
1. Press the MENU button to display the Main Menu.
2. Press the up or down arrow ( ) to highlight Picture
menu.
3. Press the OK button or right arrow ( ) to enter the next
screen.
4. Press the up or down arrow ( ) to highlight Expert
Settings.
5. Press the left or right arrow ( ) to continue to the next
screen.
6. Contrast is highlighted. Enter 2458, using the numeric
NH\SDG
7. Return to the Parental Control menu to select Create
Password and set a new password.
Expert Settings
Setup
Parental Control
Language
Sound
Picture
Contrast
Black Level
Color
Tint
USB
Exit
Color Temperature
45
58
0
Back
MENU
Adjust Select Exit
CLEAR
35
0
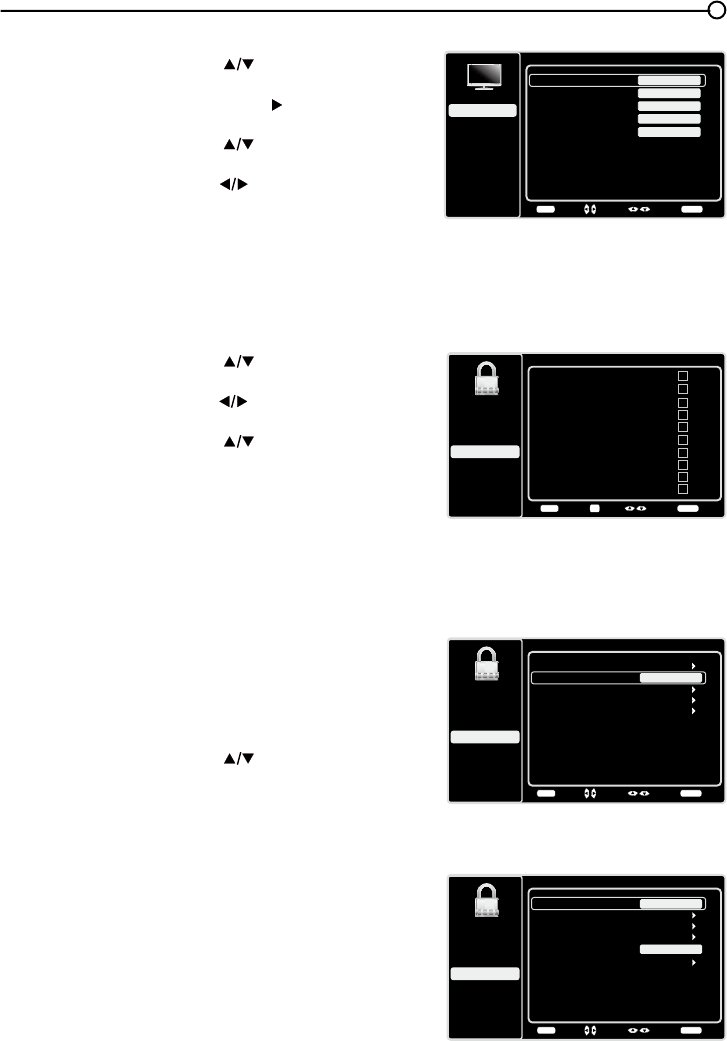
9&KLS5DWLQJ(QDEOH
You must remember to set Rating Enable to On mode to
KDYHWKHIROORZLQJ9&KLSUDWLQJOLPLWVWRWDNHHIIHFW
V-Chip
Rating Enable
US V-Chip
Setup
Parental Control
Language
Sound
Picture
USB
Exit
Canada V-Chip
Open V-Chip
Unrated/Exempt Ratings
On
Back
MENU
Adjust Select Exit
CLEAR
Reset Downloadable Data
View

30
869&KLS795DWLQJV
<RXFDQDXWRPDWLFDOO\EORFNDOOSURJUDPUDWLQJVDERYHD
VSHFL¿HGDJHEDVHGUDWLQJOHYHO
1. Choose Parental Control from the Main Menu. If
SDUHQWDOFRQWUROVKDYHSUHYLRXVO\EHHQORFNHG\RX
must enter your password.
2. Press the up or down arrow ( ) to select V-Chip.
3. Press the left or right arrow ( ) to enter the next
screen.
4. Press the up or down arrow ( ) to select US V-Chip.
5. Press the left or right arrow ( ) to enter the next
screen.
6. U.S. TV Ratings is highlighted. Press the left or right
arrow ( ) .
7. Use the up or down arrow ( ) to select the desired
rating.
8. Press the OK button repeatedly to toggle between
9LHZDQG%ORFN
9. Use the MENU button repeatedly to return to the Main
Menu.
%ORFNLQJ6SHFL¿F&RQWHQW7KHPHV
From the US V-Chip0HQX\RXFDQVHWVXEUDWLQJVWREORFNVSHFL¿FSURJUDPVEDVHGRQWKHLUFRQWHQW
7REORFNSURJUDPFRQWHQW
1. Press the up or down arrow ( ) to select V-Chip in the Parental Control submenu.
2. Press the left or right arrow ( ) to enter the next screen.
3. Press the up or down arrow( ) to select US V-Chip.
4. Press the left or right arrow ( ) to enter the next screen.
5. U.S. TV Ratings is highlighted. Press the left or right arrow ( ) .
6. Use the up, down, left and right arrows ( ) to select the desired rating.
7. Press the OKEXWWRQUHSHDWHGO\WRWRJJOHEHWZHHQ9LHZDQG%ORFN
7RYLHZFRQWHQWWKHPHVDIWHU\RX¶YHORFNHGWKHPIROORZWKHVDPHVWHSVDVDERYHWRXQORFN
U. S. TV Ratings
TV-Y
TV-G
TV-PG
TV-14
TV-MA
Setup
Parental Control
Language
Sound
Picture
USB
Exit
A D L S V FV
Allowed Rating Blocked Rating
Back
MENU
Set Select Exit
CLEAR
OK
TV-Y7
9&KLS5DWLQJ6FUHHQ
7KHIROORZLQJJUDSKLFGHWDLOVZKHUHLWHPVDUHORFDWHGZLWKLQWKH795DWLQJVRSWLRQZLWKWKH869&KLS
menu.
U. S. TV Ratings
TV-Y
TV-G
TV-PG
TV-14
TV-MA
Setup
Parental Control
Language
Sound
Picture
USB
Exit
ADLSVFV
Allowed Rating Blocked Rating
Back
MENU
Set Select Exit
CLEAR
OK
TV-Y7
Rating Status Field
Lets you select whether the status
of the age-based rating to the left
is view or block.
Rating Field
Lets you select
from a list of age-
based ratings you
can block or view.
Content Themes
Lists the content
themes you can
blockor view.
Content Status Fields
Lets you select which content
themes to view for the selected
rating, and whether the status of
the content theme is currently
unlocked or locked.

31
869&KLS0RYLH5DWLQJ/LPLW
6HWPRYLHUDWLQJOLPLWVE\EORFNLQJPRYLHVUDWHGDERYHD
VSHFL¿HGOHYHO7RDFFHVVWKH0RYLH5DWLQJ/LPLW0HQX
follow these steps:
1. Press the up or down arrow ( ) to select V-Chip in
the Parental Control submenu.
2. Press the left or right arrow ( ) to enter the next
screen.
3. Press the up or down arrow ( ) to select US V-Chip.
4. Press the left or right arrow ( ) to enter the next
screen.
5. Press the up or down arrow( ) to select U.S. Movie
Ratings.
6. Press the left or right arrow ( ).
7. Press the up or down arrow ( ) to select the desired
rating.
8. Press the OK button repeatedly to toggle between
9LHZDQG%ORFN
%ORFNLQJ&DQDGD9&KLS5DWLQJV
,I\RXUHFHLYH&DQDGLDQSURJUDPV\RXFDQEORFN&DQDGLDQ
(QJOLVKDQG)UHQFK9&KLSE\UDWLQJVRQO\:KHQ\RXEORFN
DSDUWLFXODUUDWLQJ\RXDXWRPDWLFDOO\EORFNWKHKLJKHUUDWHG
SURJUDPVDVZHOO7REORFN&DQDGLDQ(QJOLVKDQG)UHQFK
program ratings, follow these steps:
1. Press the up or down arrow ( ) to select V-Chip in
the Parental Control submenu.
2. Press the left or right arrow ( ) to enter the next
screen.
3. Press the up or down arrow ( ) to select Canada
V-Chip.
4. Press the left or right arrow ( ) to proceed to the
next screen.
5. Press the up or down arrow ( ) to select Canadian
English Ratings or Canadian French Ratings.
Rating
G
PG
PG-13
R
NC-17
X
Category
General audience
Unsuitable for children under 13
Restricted; under 17 requires accompanying
parent or adult guardian
No one under 17 admitted
Mature audience only
Parental guidance suggested
Canadian English Ratings
C
C8+
G
PG
14+
Setup
Parental Control
Language
Sound
Picture
USB
Exit
Allowed Rating Blocked Rating
18+
Back
MENU
Set Select Exit
CLEAR
OK
Hierarchy of Age-Based Ratings
790$ Mature Audience Only
79 Parents Strongly Cautioned
793* 3DUHQWV*XLGDQFH6XJJHVWHG
79* *HQHUDO$XGLHQFH
79< 'LUHFWHGWR&KLOGUHQ<HDUVDQG
Older
79< All Children '6H[XDOO\([SOLFLW'LDORJXH
LAdult Language
SSexual Situations
99LROHQFH
)9 )DQWDV\9LROHQFH
Content Themes
32
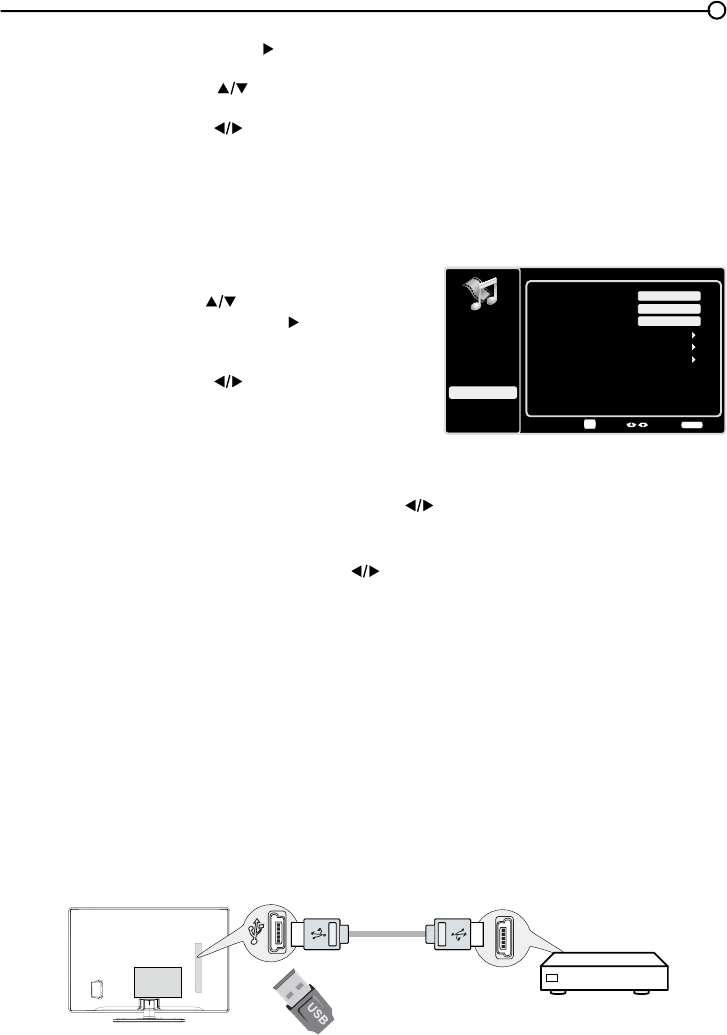
Language Menu
To select the preferred language for all menus, follow the
steps below. You can choose between English, Espanol, or
Francais.
1. Press MENU on the remote control (the Main Menu
appears).
2. Use the up or down arrow ( ) to select Language.
Language
Setup
Parental Control
Language
Sound
Picture
English On
USB
Exit
Español
Desactivado
Français
Désactivé
Back
MENU
Adjust Select Exit
CLEAR
%ORFNLQJ8QUDWHG([HPSW3URJUDPV
7KH8QUDWHG([HPSW5DWLQJVRSWLRQOHWV\RXGHFLGHLISURJUDPVWKDWWKH9&KLSUHFRJQL]HVDVXQUDWHG
RUH[HPSWFDQEHYLHZHG8QUDWHG79SURJUDPVPD\LQFOXGHQHZVVSRUWVSROLWLFDOUHOLJLRXVORFDO
and weather programs, emergency bulletins, public announcements, and programs without ratings.
The Exempt option applies to both US and Canadian unrated programs and Canadian programs rated E.
1. Press the up or down arrow ( ) to select V-Chip in the Parental Control submenu.
2. Press the left or right arrow ( ) to proceed to the next screen.
3. Press the up or down arrow ( ) to highlight Unrated/Exempt Ratings.
4. Press the left or right arrow ( ) to toggle between View and Block.
View All unrated programs are available.
Block All unrated programs are not available.
5HVHW'RZQORDGDEOH'DWD
1. Press the up or down arrow ( ) to select V-Chip in the Parental Control submenu.
2. Press the left or right arrow ( ) to proceed to the next screen.
6HOHFWWKLVRSWLRQWRUHVHWWKHGRZQORDGDEOH9&KLSGDWD:KHQ\RXVHOHFWWKLVRSWLRQD
FRQ¿UPDWLRQER[RSHQV3UHVVWKHOHIWRUULJKWDUURZ ) to select.
4. Press the OK button to reset the downloadable rating data, if present.
,QSXW%ORFN
1. Press MENU on the remote control (the Main Menu
appears).
2. Select Parental Control. If parental controls have
SUHYLRXVO\EHHQORFNHG\RXPXVWHQWHU\RXUSDVVZRUG
3. Press the up or down arrow ( ) to highlight Input
Block.
4. Press the left or right arrow ( ) to display the Input
Source List screen.
5. Press the up or down arrow ( ) to place a
FKHFNPDUNLQWKHER[WREORFNWKHLQSXW:KHQ
you tune to that input, you will need to enter a password
to view the channel.
6. Press the OKEXWWRQWRFRQ¿UP\RXUVHOHFWLRQ$
ORFNHGXQORFNHGLFRQDSSHDUVQH[WWRWKHVHOHFWHGLQSXW
Setup
Parental Control
Language
Sound
Picture
USB
Exit
Input Block
AV
CMPT
HDMI1
HDMI2
Back
MENU
Set Select Exit
CLEAR
OK
No Label
No Label
No Label
PC No Label
No Label
HDMI3 No Label
TV
6. Press the left or right arrow ( ) to proceed.
7. Press the up or down arrow ( ) to select the desired rating.
8. Press the OK EXWWRQWRWRJJOHEHWZHHQ9LHZDQG%ORFN
2SHQ9&KLS- allows you to select the downloadable rating level. In the event that a new rating
system is provided by the broadcaster, the new rating options would appear within this menu.
Note: HDMI 3 is not available for model LE19HDP11
33
USB Menu
7KH86%IHDWXUHRQ\RXU79DOORZV\RXWRSOD\DXGLR¿OHVIRUPDWVXSSRUWHG03RUGLVSOD\SLFWXUHVIRUPDW
VXSSRUWHG-3(*7RXWLOL]HWKLVIHDWXUHIROORZWKHVHVWHSV
1. Press MENU on the remote control (the Main Menu appears).
2. Use the up or down arrow ( ) to select USB.
3. Press the OK button or the right arrow ( ) to proceed to the
USB Screen. Or, you can press the MEDIA button on the
remote control to display the USB screen directly.
4. Press the left or right arrow ( WRVHOHFWWKH¿OHRUIROGHURQ
\RXU86%GHYLFHFRQQHFWHGWR\RXU79
5. Press the OKEXWWRQWRFRQ¿UPRUSOD\EDFN2U\RXFDQSUHVV
the MENU button to use the menu option.
Media Type
Photo-
,I\RXKDYHSKRWRVRQ\RXU86%GHYLFHFRQQHFWHGWR\RXU79WKLVPHQXDOORZV\RXWRYLHZWKH
photos individually by pressing the left or right arrow ( ) to highlight the picture, then press OK for
SOD\EDFN)RUVOLGHVKRZRSWLRQVSUHVVMENUDJDLQWRJRWRWKH3OD\EDFN2SWLRQVPHQX
Music-,I\RXKDYHPSDXGLR¿OHVRQ\RXU86%GHYLFHFRQQHFWHGWR\RXU79WKLVPHQXDOORZV
\RXWRSOD\¿OHVLQGLYLGXDOO\E\SUHVVLQJWKH to highlight the song
, then press OKIRUSOD\EDFN
For slideshow options, press MENUDJDLQWRJRWRWKH3OD\EDFN2SWLRQVPHQX
Thumbnail Size - <RXFDQVHOHFWWRGLVSOD\WKH¿OHVRUIROGHUVRQ\RXU86%GHYLFHLQSmall,
Middle or Large size.
USB Connection
<RXFDQFRQQHFWDGHYLFHZLWK86%WR\RXU79RUXVHD86%ÀDVKGULYH
7KLVFRQQHFWLRQDOORZV\RXWRLQVHUWD86%ÀDVKGULYHGLUHFWO\RUFRQQHFWDFRPSDWLEOHPDVVVWRUDJH
device with USB, such as a digital camera, a multi-format card reader, or an MP3 player. If you have
a USB drive, plug it into the drive directly. If you have a device with a USB port, connect one end of
WKH86%FDEOHWRWKH86%SRUWDQGWKHRWKHUHQGWRWKH86%MDFNRQWKHVLGHRIWKH797RDFFHVVDQG
adjust the options of the USB device, refer to USB Menu.
Side of this unit
Or
3. Press the OK button or right arrow ( ) to display the
Language Screen.
4. Press the up or down arrow ( ) to select the preferred
language for the menu.
5. Press the left or right arrow ( ) to select On or Off.
6. Press the MENU or CLEARNH\WRH[LWWKHPHQX
Picture
Setup
Parental Control
Language
Sound
Picture
Picture Preset
Brightness
Vibrant
USB
Exit
Advanced Settings
100
Sharpness 3
Reset Picture Settings
Enter Select Back
CLEAR
Expert Settings
OK

34
Frequently Asked Questions (FAQs)
:KDW¶VWKHTXLFNHVWZD\WRYLHZ+LJK'H¿QLWLRQ+'YLGHR"
&RQQHFWDQRIIDLUDQWHQQDWRWKH$17(11$&$%/(,QSXWWRYLHZIUHHORFDOGLJLWDOFKDQQHOV<RXPD\
need to purchase an antenna. (See page 10 for more information).
9LVLWwww.antennaweb.org for assistance in deciding what type of antenna to use to receive the local
digital channels available to you. By entering your location, this mapping program tells you which local
analog and digital stations are available using a certain antenna.
$UHWKHUHRWKHUZD\VWRYLHZ+LJK'H¿QLWLRQ+'YLGHR"
Besides using an off-air antenna as mentioned above, you can also use a set-top box to receive
digital video. Contact your cable company or satellite provider to purchase digital programming
and have them connect the box to ensure you are viewing channels the best way.
How do I tell an analog channel from a digital channel?
Press the INFO button to display the Channel Banner/RRNDWWKHERWWRPULJKWFRUQHURIWKHVFUHHQ
7KHGRWLVGLVSOD\HGIRUDGLJLWDOFKDQQHO,IWKHUHLVQRGRWLWLVDQDQDORJFKDQQHO
Why are there bars on my screen and can I get rid of them?
0RVWGLJLWDOYLGHRLVVHQWLQDIRUPDWZKLFK¿OOV\RXUVFUHHQEXWLVVRPHWLPHVVHQWLQZKLFK
GRHVQRW¿OO\RXUVFUHHQ,WGHSHQGVRQKRZWKHVWDWLRQRUGHYLFHFRQQHFWHGWR\RXU79LVIRUPDWWLQJ
the video. If there are bars on the screen, press the ZOOM -/+ button to try a different format that
PD\HOLPLQDWHWKHEDUV6RPHEDUVFDQ¶WEHUHPRYHGEHFDXVHRIWKHZD\WKHIRUPDWLVVHQWE\WKH
broadcaster. The format changes as you press the ZOOM -/+ button and the format type is displayed
at the bottom left of the screen. For more information on screen formats, go to page 18.
:K\GRHVFKDQQHOVHDUFK¿QGDORWRIFKDQQHOVEXWZKHQ,WU\WRWXQHWR
them, there’s nothing there?
6RPHFKDQQHOVHQDEOHGE\WKHFDEOHFRPSDQ\GRQ¶WFDUU\SURJUDPPLQJVXFKDVYLGHRRQGHPDQG
:KHQFKDQQHOVDUHXQDYDLODEOH\RXU79VFUHHQLVEODQNRUDSSHDUVOLNHVQRZ<RXSUREDEO\ZDQWWR
UHPRYHWKHVHFKDQQHOVIURP\RXU&KDQQHO/LVW5HPRYHWKHVHLQWKH&KDQQHO6NLS0HQX*RWRSDJH
24 for more information.
:K\GRHVWKH¿UVWFKDQQHOVHDUFKWDNHDORQJWLPH"
,I\RXKDYHERWKDQDORJDQGGLJLWDOFKDQQHOVWKH79LVORRNLQJIRUDOODYDLODEOHFKDQQHOVLQWKH&KDQQHO
/LVW,I\RXGRKDYHGLJLWDOFKDQQHOVWKH79LVDOVRVHDUFKLQJIRUVFUDPEOHGFKDQQHOVQRQVFUDPEOHG
channels, and each sub-channel of that digital channel.
Chapter 5 - Other Information

35
Troubleshooting
0RVWSUREOHPV\RXHQFRXQWHUZLWK\RXU79FDQEHFRUUHFWHGE\FRQVXOWLQJWKHIROORZLQJ
troubleshooting list.
793UREOems
The TV won’t turn on.
0DNHVXUHWKH79LVSOXJJHGLQ
&KHFNWKHZDOOUHFHSWDFOHRUH[WHQVLRQFRUGWRPDNHVXUHLWLV³OLYH´E\SOXJJLQJLQDQRWKHUGHYLFH
7KHUHDUSDQHOFRQWUROVPD\EHORFNHGGLVDEOHG8VHWKHUHPRWHFRQWUROWRXQORFNWKHUHDUSDQHO
controls.
6HOHFWWKH%XWWRQ%ORFNIHDture on the Parental Control menu and press OKWRXQFKHFNWKHER[
There is no picture and no sound but the TV is on.
<RXPD\EHWXQHGWRDQLQSXWZLWKQRFRPSRQHQWFRQQHFWHGWRLW,I\RX¶UHWU\LQJWRYLHZD
connected component, press INPUT until the picture from that component appears.
7KH6LJQDO7\SHRSWLRQPD\EHVHWLQFRUUHFWO\*RWRSDJHIRUGHWDLOHGLQVWUXFWLRQV
7KHFKDQQHOPD\EHEODQN7U\FKDQJLQJFKDQQHOV
,I\RX¶UHZDWFKLQJ\RXU9&5DQGLW¶VFRQQHFWHGZLWKFRD[LDOFDEOHWRWKH$17(11$&$%/(MDFN
WXQHWKH79WRFKDQQHORUZKLFKHYHUFKDQQHOLVVHOHFWHGRQWKHVZLWFKRQWKHEDFNRI\RXU
9&5$OVRPDNHVXUHWKH799&5EXWWRQRQWKH9&5LVLQWKHFRUUHFWPRGHSUHVVWKH799&5
button oQ\RXU9&5
7KHVRXQGLV¿QHEXWWKHSLFWXUHLVSRRUTXDOLW\
,I\RX¶UHJHWWLQJDEODFNDQGZKLWHSLFWXUHIURPDFRPSRQHQW\RX¶YHFRQQHFWHGWR\RXU79
\RXPLJKWKDYH\RXUYLGHRFDEOHVFRQQHFWHGWRWKHZURQJMDFNV$\HOORZYLGHRFDEOHFRQQHFWV
WRWKH\HOORZ9,'(2,1387MDFNRQWKHVLGHRUEDFNRI\RXU79WKUHHYLGHRFDEOHVRUEXQGOHG
component video cables (red, blue, and green) connect to the corresponding COMPONENT INPUT
MDFNVRQWKHEDFNRI\RXU79
&KHFNWKHDQWHQQDFRQQHFWLRQV0DNHVXUHDOORIWKHFDEOHVDUH¿UPO\FRQQHFWHGWRWKHMDFNV
7U\DGMXVWLQJWKHVKDUSQHVVIXQFWLRQWRLPSURYHZHDNVLJQDOV*RWRSDJHIRUPRUHLQVWUXFWLRQV
ThereLVQRVRXQGEXWWKHSLFWXUHLV¿QH.
7KHVRXQGPLJKWEHPXWHG7U\SUHVVLQJWKHYROXPHXSEXWWRQWRUHVWRUHVRXQG
,IXVLQJ'9,RU<3%35UHPHPEHUWRDOVRFRQQHFWWKHGHYLFH¶VOHIWDQGULJKWDXGLRRXWSXWMDFNVWR
WKH79¶V/DQG5$8',2,1387MDFNV
7KHVRXQGVHWWLQJVPD\QRWEHVHWFRUUHFWO\*RWRSDJHIRUPRUHLQIRUPDWLRQ
,I\RXUDXGLRVRXUFHKDVRQO\RQHMDFNRULVDPRQRDXGLRVRXUFHPDNHVXUH\RXKDYHSOXJJHG
WKHFRQQHFWLRQLQWRWKH/$8',2,1387MDFNRQWKH79
The screen is blank.
&KHFN\RXUFRQQHFWLRQV,I\RXXVHG\HOORZUHGDQGZKLWHFDEOHVWRFRQQHFWPDNHVXUHWKH\¶UH
FRQQHFWHGWRWKHUHGZKLWHDQG\HOORZ$8',29,'(2,1387MDFNVRQWKHVLGHRUEDFNRIWKH79
,I\RX¶UHWU\LQJWRZDWFKVRPHWKLQJWKDW¶VSOD\LQJRQDFRPSRQHQWFRQQHFWHGWRWKH79OLNHD'9'
press INPUT until you get to the correct video input channel.
0DNHVXUHWKHFRPSRQHQWFRQQHFWHGWRWKH79LVWXUQHGRQ
7U\DQRWKHUFKDQQHO

36
The buttons on the TV panel don’t work.
7KH79SDQHOFRQWUROVPD\EHORFNHGGLVDEOHG8VHWKHUHPRWHFRQWUROWRXQORFNWKH79SDQHO
FRQWUROVE\VHOHFWLQJWKH%XWWRQ%ORFNIHDWXUHLQWKH3DUHQWDO&RQWURO0HQXDQGSUHVVW
he left or right
arrow ( )
WRXQFKHFNWKHER[
8QSOXJWKH79IRUPLQXWHVDQGWKHQSOXJLWEDFNLQ7XUQWKH79RQDQGWU\DJDLQ
The TV turns off unexpectedly.
7KHHOHFWURQLFSURWHFWLRQFLUFXLWPD\KDYHEHHQDFWLYDWHGEHFDXVHRIDSRZHUVXUJH:DLW
VHFRQGVDQGWKHQWXUQWKH79RQDJDLQ,IWKLVKDSSHQVIUHTXHQWO\WKHYROWDJHLQ\RXUKRXVH
may be abnormally high or low.
8QSOXJ:DLWPLQXWHV3OXJLQDJDLQ
You can’t select a certain channel.
7KHFKDQQHOPD\EHEORFNHGRUQRWDSSURYHGLQWKHParental Control Menu.
,IXVLQJD9&5FKHFNWRPDNHVXUHWKHTV/VCREXWWRQRQWKH9&5LVLQWKHFRUUHFWPRGHSUHVV
the TV/VCREXWWRQRQ\RXU9&5
3UHVVWKHTV button and then try to change channels.
The stereo reception is noisy.
,WPD\EHDZHDNVWDWLRQ8VHWKH6RXQG0HQXDQG$QDORJ796RXQGWRFKRRVHPRQR
A black box appears on the screen.
&ORVHGFDSWLRQLQJPLJKWEHRQ&KHFN&ORVHG&DSWLRQLQWKH6HWXSPHQX*RWRSDJHIRUPRUH
instructions.
You are having problems with the HDMI Connection.
0DNHVXUHWKH+'0,RU'9,FRPSRQHQWLVWXUQHGRQDQGWKHFDEOHVDUH¿UPO\FRQQHFWHG,I
problems still occur, turn off your component and reconnect it. Reset the power by unplugging the
SRZHUFRUGDQGSOXJJLQJLWEDFNLQ
,I\RXDUHWXQHGWRWKHHDMI 1, HDMI 2 or HDMI 3,1387DQG\RX¶UHUHFHLYLQJ8QXVDEOH
Signal message onscreen, press the INFO button on the remote. If Acquiring Channel appears in
the Channel BannerWKH+'0,RU'9,GHYLFHLVQ¶WUHVSRQGLQJ&RQWDFWWKHPDQXIDFWXUHURIWKH
+'0,RU'9,GHYLFHIRUIXUWKHUDVVLVWDQFH
,I\RXWXQHWRWKHHDMI 1, HDMI 2 or HDMI 3 INPUT and you see snow, the video goes in
DQGRXWRUWKHYLGHRWDNHVDORQJWLPHWRDSSHDU\RXU+'0,RU'9,FRPSRQHQWLVKDYLQJ
WURXEOHVHQGLQJYLGHRLQIRUPDWLRQWRWKH795HFRQQHFW\RXUGHYLFH5HVHWWKHSRZHUE\
XQSOXJJLQJWKHSRZHUFRUGDQGSOXJJLQJLWEDFNLQ,ISUREOHPVSHUVLVWWU\FRQQHFWLQJWKH<
3E3UMDFNVLIWKH\DUHDYDLODEOHRUFRQWDFWWKHPDQXIDFWXUHURIWKH+'0,RU'9,FRPSRQHQW
for further assistance.
,I\RXKDYHEODFNEDUVRQHDFKVLGHRI\RXUSLFWXUHWKHFRPSRQHQW\RXFRQQHFWHGPLJKWKDYHD
VZLWFKRUDPHQXRSWLRQDOORZLQJ\RXWRFKDQJHWKHSLFWXUHTXDOLW\RXWSXWWKDWZLOO¿[WKLV&KRRVH
either 720p or 1080i.

37
The remote control doesn’t work.
6RPHWKLQJPLJKWEHEHWZHHQWKHUHPRWHDQGWKHUHPRWHOLJKWVHQVRURQWKHIURQWRIWKH790DNH
sure there is a clear path.
7KHUHPRWHPD\QRWEHDLPHGGLUHFWO\DWWKH79
7KHEDWWHULHVLQWKHUHPRWHPD\EHZHDNGHDGRULQVWDOOHGLQFRUUHFWO\3XWQHZEDWWHULHVLQWKH
remote.
The Universal Remote control doesn’t work.
7KLV79XWLOL]HVQHZUHPRWHFRQWUROVLJQDOVDQGPD\QRWEHFRPSDWLEOHZLWK\RXUH[LVWLQJXQLYHUVDO
remote (e.g. satellite box remotes, cable box remotes, and generic universal remotes, etc.). Over time,
QHZHUXQLYHUVDOUHPRWHVZLOOEHFRPHDYDLODEOHWKDWVKRXOGSLFNXSWKHQHZ79FRGHV
You are experiencing problems with V-Chip/Parental Controls.
,IWKHUDWLQJOLPLWVGRQ¶WZRUN\RXPXVWORFNWKHVHWWLQJV*RWRWKH0DLQ0HQXSUHVV0(18RQ\RXU
UHPRWHVHOHFW3DUHQWDO&RQWURO6HOHFW9&KLSDQGWKHQSUHVVWKHOHIWRUULJKWDUURZ ) to proceed
to the next screen. Rating Enable is highlighted. Press the left or right arrow ( ) to select On to have
WKHUDWLQJOLPLWVWDNHHIIHFW
The V-Chip won’t let me watch a program even though it’s not rated as
violent.
0D\EHWKHPRYLHZDVJLYHQDQ151RW5DWHGVWDWXV$IWHU\RXEORFNPRYLHUDWLQJV\RXPXVWVHW15
WR9LHZ6HSDUDWHO\LQRUGHUWRYLHZPRYLHVZLWKDQ15UDWLQJ
What else can I do?
,I\RX¶YHEHHQWKURXJKWKH7URXEOHVKRRWLQJVHFWLRQDQGQRWKLQJKDV¿[HG\RXUSUREOHPWU\UHERRWLQJ
\RXU791RWHWKDWDIWHUDUHERRW\RXPD\QHHGWRUXQ\RXU79WKURXJKWKHVHWXSSURFHVVDJDLQ7R
GRDUHERRWXQSOXJWKHSRZHUFRUGIURPWKHZDOORXWOHWRUSRZHUVWULS.HHS\RXU79XQSOXJJHGIRU
DERXWPLQXWHV7KHQSOXJLQWKH79DQGWXUQLWRQ6HHLIWKHSUREOHPLV¿[HG,IWKHSUREOHPUHPDLQV
WKHQSOHDVHYLVLWZZZWFOXVDFRPIRUXSGDWHG)$4VRUFRQWDFW7&/&XVWRPHU6XSSRUWDWWKHVXSSRUW
QXPEHUSURYLGHGLQ\RXU:DUUDQW\XQGHU³+RZ7R*HW6HUYLFH´
Care and Cleaning
&DXWLRQ7XUQ2))\RXU79EHIRUHFOHDQLQJ
<RXFDQFOHDQWKH79DVUHTXLUHGXVLQJDVRIWOLQWIUHHFORWK%HVXUHWRRFFDVLRQDOO\GXVWWKH
ventilation slots in the cabinet to help assure adequate ventilation.
IMPORTANT: Never use strong cleaning agents, such as ammonia-based cleaners, or abrasive
SRZGHU7KHVH W\SHV RI FOHDQHUV ZLOO GDPDJH WKH 79 7KH79¶V VFUHHQ PD\ EH FOHDQHG ZLWK D VRIW
OLQWIUHHFORWKDVZHOO7DNH FDUHQRWWRVFUDWFKRUPDU WKHVFUHHQ,IQHFHVVDU\\RXPD\XVHDFORWK
dampened with warm water. While cleaning, do not spray liquid directly on the screen, or allow liquid to
UXQGRZQWKHVFUHHQDQGLQVLGHWKH79$OVRQHYHUSODFHGULQNVRUYDVHVZLWKZDWHURQWRSRIWKH79
7KLVFRXOGLQFUHDVHWKHULVNRI¿UHVKRFNKD]DUGRUGDPDJHWRWKH79

38
V-Chip Rating Explanations
US V-Chip Rating System
TV-MA0DWXUH$XGLHQFH2QO\6SHFL¿FDOO\GHVLJQHGWREHYLHZHGE\DGXOWVDQGPD\EHXQVXLWDEOHIRU
children under 17. It contains one or more of the following content themes: crude indecent language (L),
H[SOLFLWVH[XDODFWLYLW\6RUJUDSKLFYLROHQFH9
TV-143DUHQWV6WURQJO\&DXWLRQHG&RQWDLQVVRPHPDWHULDOWKDWPDQ\SDUHQWVZRXOG¿QGXQVXLWDEOH
for children under 14. Parents are strongly urged to exercise greater care in monitoring this program
and are cautioned against letting children under the age of 14 watch unattended. This program
FRQWDLQVRQHRUPRUHRIWKHIROORZLQJFRQWHQWWKHPHVLQWHQVHO\VXJJHVWLYHGLDORJXH'VWURQJFRDUVH
ODQJXDJH/LQWHQVHVH[XDOVLWXDWLRQV6RULQWHQVHYLROHQFH9
TV-PG 3DUHQWDO*XLGDQFH6XJJHVWHG&RQWDLQVPDWHULDOWKDWSDUHQWVPD\¿QGXQVXLWDEOHIRU\RXQJHU
children. Many parents may want to watch it with their younger children. The program contains one or
PRUHRIWKHIROORZLQJFRQWHQWWKHPHVVRPHVXJJHVWLYHGLDORJXH'LQIUHTXHQWFRDUVHODQJXDJH/
VRPHVH[XDOVLWXDWLRQV6RUPRGHUDWHYLROHQFH9
TV-G3DUHQWDO$XGLHQFH0RVWSDUHQWVZRXOG¿QGWKLVSURJUDPVXLWDEOHIRUDOODJHV,WFRQWDLQVOLWWOHRU
QRVH[XDOGLDORJXH'RUVLWXDWLRQV6QRVWURQJODQJXDJH/DQGOLWWOHRUQRYLROHQFH9
TV-Y7'LUHFWHGWR&KLOGUHQ\HDUVDQGROGHU'HVLJQHGIRUFKLOGUHQDJHVDQGDERYH,WPD\EH
PRUHDSSURSULDWHIRUFKLOGUHQZKRKDYHDFTXLUHGWKHGHYHORSPHQWDOVNLOOVQHHGHGWRGLVWLQJXLVK
EHWZHHQPDNHEHOLHYHDQGUHDOLW\7KHPHVDQGHOHPHQWVLQWKLVSURJUDPPD\LQFOXGHPLOGIDQWDV\
YLROHQFH)9RUFRPHGLFYLROHQFHRUPD\IULJKWHQFKLOGUHQXQGHUWKHDJHRI
TV-Y (All Children) Themes and elements in this program are designed for a young audience, including
children ages 2-6. It is not expected to frighten younger children.
Canadian English V-Chip Rating System
18+ (Adult) Programming intended for adults 18 and older. It may contain elements of violence,
ODQJXDJHDQGVH[XDOFRQWHQWZKLFKFRXOGPDNHLWXQVXLWDEOHIRUYLHZHUVXQGHU9LROHQFH
*XLGHOLQHV0D\FRQWDLQYLROHQFHLQWHJUDOWRWKHGHYHORSPHQWRIWKHSORWFKDUDFWHURUWKHPHLQWHQGHG
IRUDGXOWDXGLHQFHV2WKHU&RQWHQW*XLGHOLQHV0D\FRQWDLQJUDSKLFODQJXDJHDQGH[SOLFLWSRUWUD\DOVRI
QXGLW\DQGRUVH[
14+ (Viewer 14 and over) Programming contains themes or content which may not be suitable for
viewers under the age of 14. Parents are strongly cautioned to exercise discretion in permitting viewing
E\SUHWHHQVDQGHDUO\WHHQV9LROHQFH*XLGHOLQHV0D\FRQWDLQLQWHQVHVFHQHVRIYLROHQFH&RXOGGHDO
ZLWKPDWXUHWKHPHVDQGVRFLHWDOLVVXHVLQDUHDOLVWLFIDVKLRQ2WKHU&RQWHQW*XLGHOLQHV0D\FRQWDLQ
VFHQHVRIQXGLW\DQGRUVH[XDODFWLYLW\7KHUHFRXOGEHIUHTXHQWXVHRISURIDQLW\
PG (Parental Guidance) Programming intended for a general audience but which may not be
suitable for younger children (under the age of 8). Parents may consider some content inappropriate
IRUXQVXSHUYLVHGYLHZLQJE\FKLOGUHQDJHG9LROHQFH*XLGHOLQHV'HSLFWLRQVRIFRQÀLFWDQGRU
DJJUHVVLRQZLOOEHOLPLWHGDQGPRGHUDWHPD\LQFOXGHSK\VLFDOIDQWDV\RUVXSHUQDWXUDOYLROHQFH2WKHU
&RQWHQW*XLGHOLQHV0D\FRQWDLQLQIUHTXHQWPLOGSURIDQLW\RUPLOGO\VXJJHVWLYHODQJXDJH&RXOGDOVR
contain brief scenes of nudity.
G (General Audience) Programming considered acceptable for all ages groups. While not designed
VSHFL¿FDOO\IRUFKLOGUHQLWLVXQGHUVWRRG\RXQJHUYLHZHUVPD\EHSDUWRIWKHDXGLHQFH9LROHQFH
*XLGHOLQHV:LOOFRQWDLQYHU\OLWWOHYLROHQFHHLWKHUSK\VLFDORUYHUEDORUHPRWLRQDO:LOOEHVHQVLWLYHWR
themes which could frighten a younger child, will not depict realistic scenes of violence which minimize
RUJORVVRYHUWKHHIIHFWVRIYLROHQWDFWV2WKHU&RQWHQW*XLGHOLQHV7KHUHPD\EHVRPHLQRIIHQVLYH
slang, no profanity and no nudity.

39
C8+ (Children 8 and older) Programming generally considered acceptable for children 8 years and
RYHUWRZDWFKRQWKHLURZQ9LROHQFH*XLGHOLQHV9LROHQFHZLOOQRWEHSRUWUD\HGDVWKHSUHIHUUHG
DFFHSWDEOHRURQO\ZD\WRUHVROYHFRQÀLFWRUHQFRXUDJHFKLOGUHQWRLPLWDWHGDQJHURXVDFWVZKLFKWKH\
may see on television. Any realistic depictions of violence will be infrequent, discreet, of low intensity
DQGZLOOVKRZWKHFRQVHTXHQFHVRIWKHDFWV2WKHU&RQWHQW*XLGHOLQHV7KHUHZLOOEHQRSURIDQLW\
nudity or sexual content.
C (Children)3URJUDPPLQJLQWHQGHGIRUFKLOGUHQXQGHUDJH9LROHQFH*XLGHOLQHV&DUHIXODWWHQWLRQ
LVSDLGWRWKHPHVZKLFKFRXOGWKUHDWHQFKLOGUHQ¶VVHQVHRIVHFXULW\DQGZHOOEHLQJ7KHUHZLOOEH
QRUHDOLVWLFVFHQHVRIYLROHQFH'HSLFWLRQVRIDJJUHVVLYHEHKDYLRUZLOOEHLQIUHTXHQWDQGOLPLWHGWR
SRUWUD\DOVWKDWDUHFOHDUO\LPDJLQDU\FRPHGLFRUXQUHDOLVWLFLQQDWXUH2WKHU&RQWHQW*XLGHOLQHV7KHUH
will be no offensive language, nudity or sexual content.
Canadian French V-Chip Rating System
18 ans+ (Adult) Programming is for adults only. This program contains sustained violence
or extremely violent scenes.
16 ans+ (Viewer 16 and over) Programming is not suitable for those under age 16. This
program contains frequent scenes of violence or intensely violent scenes.
13 ans+ (Viewer 13 and over) Programming may not be suitable for children under the
age of 13. This program either contains several violent scenes or one or more scenes that
DUHYLROHQWHQRXJKWRDIIHFWWKHP9LHZLQJLQWKHFRPSDQ\RIDQDGXOWLVWKHUHIRUHVWURQJO\
recommended for children under the age of 13.
8 ans+ (Viewer 8 and over) Not recommended for young children. This program is suitable
for most audiences, but it contains mild or occasional violence that could upset young
FKLOGUHQ9LHZLQJLQWKHFRPSDQ\RIDQDGXOWLVWKHUHIRUHUHFRPPHQGHGIRU\RXQJFKLOGUHQ
(under the age of 8) who do not distinguish between reality and imagination.
G (General Audience) This program is suitable for audiences of all ages. It contains
no violence, or any violence that it does contain is either minimal or is presented in a
humorous manner, as a caricature, or in an unrealistic way.
7HOHYLVLRQ6SHFL¿FDWLRQV
Broadcasting system US System NTSC-M
$76&VWDQGDUG96%4$0
5HFHLYLQJ&KDQQHOV 9+)
UHF14-69
&$79 $:
37-59 (AA)-(WW)
60-85 (AAA)-(ZZZ)
86-94 (86)-(94)95-99 (A-5)-(A-1)
100-135 (100)-(135)
01 (4A)
Tuner type Frequency synthesized
6FUHHQUHIUHVKUDWH +]IRUPRGHOV/(+''DQG/(+'3
+]IRUPRGHOV/()+''
40
TTE Technology, Inc. (“TTE”) Limited Warranty
$OO/&'/('0RGHOV
(;&(37727+((;7(17352+,%,7('%<$33/,&$%/(/$:7+,6:$55$17<
'2(6127&29(5$1'$6'(6&5,%('%(/2:77((;35(66/<',6&/$,06$//
$&78$/$1',03/,(':$55$17,(6:,7+5(63(&772$1<352'8&786(')25
,167,787,21$/2527+(5&200(5&,$/385326(6,1&/8',1*%87127
/,0,7('725(17$/385326(6
What your warranty covers:'HIHFWVLQ PDWHULDOVRUZRUNPDQVKLSWRWKH RULJLQDORZQHURIWKLV
7&/SURGXFWZKHQSXUFKDVHG IURPDQ$XWKRUL]HG'HDOHURI7&/EUDQGSURGXFWVDQGSDFNDJHGZLWK
this warranty statement.
New LCD/LED Televisions
For how long after your purchase:
7ZR\HDUVIURPGDWHRISXUFKDVHIRUSDUWV
7ZR\HDUVIURPGDWHRISXUFKDVHIRUODERU
What we will do:
$W77(¶VGLVFUHWLRQSD\DQ$XWKRUL]HG7&/6HUYLFH&HQWHUIRUERWKODERUFKDUJHVDQGSDUWVWR
UHSDLU\RXUWHOHYLVLRQRUUHSODFH\RXUWHOHYLVLRQZLWKDQHZRUUHIXUELVKHGUHPDQXIDFWXUHG
unit. See “How to get service”.
How to get service:
&DOO1-877-300-88373OHDVHKDYH\RXUXQLW¶VGDWHRISXUFKDVHSODFHRISXUFKDVHDQGPRGHO
VHULDOQXPEHUUHDG\7KHPRGHOVHULDOQXPEHULQIRUPDWLRQFDQEHIRXQGRQWKHEDFNRI\RXUXQLW
$UHSUHVHQWDWLYHZLOOWURXEOHVKRRW\RXUSUREOHPRYHUWKHSKRQH,ILWLVGHWHUPLQHGWKDW\RXUXQLW
requires service, the service location will be at the sole discretion of TTE based upon the TTE
Limited Warranty statement.
$WWKHVROHGLVFUHWLRQRI77(WHOHYLVLRQVFUHHQVL]HV´DQGVPDOOHUZLOOHLWKHUEHUHSDLUHGDWDQ
$XWKRUL]HG7&/6HUYLFH&HQWHURUGLUHFWO\H[FKDQJHGIRUDQHZRUUHIXUELVKHGUHPDQXIDFWXUHG
unit. At the sole discretion of TTE, television screen sizes 33” through 55” will either be repaired
at an Authorized TCL Service Center or repaired in-home.
If repaired at an Authorized TCL Service Center, TTE is not responsible for transportation costs
to the Authorized TCL Service Center. However, TTE will pay for return shipping. TTE will
SURYLGHLQVWUXFWLRQVIRUSDFNDJLQJDQGVKLSSLQJWKHXQLW3URRIRISXUFKDVHLQWKHIRUPRIDELOORI
VDOHRUUHFHLSWHGLQYRLFHIURPDQ$XWKRUL]HG'HDOHUZKLFKLVHYLGHQFHWKDWWKHSURGXFWLVZLWKLQ
the warranty period must be presented to obtain warranty service.
What your warranty does not cover:
&XVWRPHULQVWUXFWLRQ<RXU2ZQHU¶V0DQXDOGHVFULEHVKRZWRLQVWDOODGMXVWDQGRSHUDWH\RXU
XQLW$Q\DGGLWLRQDOLQIRUPDWLRQVKRXOGEHREWDLQHGIURP\RXU$XWKRUL]HG'HDOHU
,QVWDOODWLRQDQGUHODWHGDGMXVWPHQWV
'DPDJHUHVXOWLQJIURPQRQDSSURYHGLQVWDOODWLRQPHWKRGV
6LJQDOUHFHSWLRQSUREOHPVQRWFDXVHGE\\RXUXQLW
'DPDJHIURPPLVXVHRUQHJOHFW
%DWWHULHV
$WHOHYLVLRQWKDWKDVEHHQPRGL¿HGRULQFRUSRUDWHGLQWRRWKHUSURGXFWVRULVXVHGIRULQVWLWXWLRQDO
or other commercial purposes (including but not limited to rental purposes).
$XQLWSXUFKDVHGRUVHUYLFHGRXWVLGHWKH86$
$XQLWVROGDVLVRUZLWKDOOIDXOWV
$FWVRIQDWXUHVXFKDVEXWQRWOLPLWHGWROLJKWQLQJGDPDJH
6SHFLDOLQFLGHQWDORUFRQVHTXHQWLDOGDPDJHV
41
Product Registration:
3OHDVHUHJLVWHU\RXU7&/SXUFKDVHRQOLQHDWZZZWFOXVDFRP,WZLOOPDNHLWHDVLHUWRFRQWDFW\RX
should it ever be necessary. Registration is not required for warranty coverage.
Limitation of Warranty:
7+(:$55$17<67$7('$%29(,67+(21/<:$55$17<$33/,&$%/(727+,6
PRODUCT. NO VERBAL OR WRITTEN INFORMATION GIVEN BY TTE TECHNOLOGY,
INC., ITS AGENTS OR EMPLOYEES SHALL CREATE A GUARANTY OR IN ANY WAY
INCREASE OR MODIFY THE SCOPE OF THIS WARRANTY.
5(3$,5255(3/$&(0(17$63529,'('81'(57+,6:$55$17<,67+((;&/86,9(
REMEDY OF THE CONSUMER. TTE TECHNOLOGY, INC. SHALL NOT BE LIABLE FOR
SPECIAL, INCIDENTAL OR CONSEQUENTIAL DAMAGES RESULTING FROM
THE USE OF THIS PRODUCT OR ARISING OUT OF ANY BREACH OF ANY EXPRESS OR
IMPLIED WARRANTY ON THIS PRODUCT. THIS DISCLAIMER OF WARRANTIES AND LIMITED
WARRANTY ARE GOVERNED BY THE LAWS OF THE STATE OF INDIANA.
EXCEPT TO THE EXTENT PROHIBITED BY APPLICABLE LAW, ANY IMPLIED WARRANTY
OF MERCHANTABILITY OR FITNESS FOR A PARTICULAR PURPOSE ON THIS PRODUCT IS
LIMITED TO THE APPLICABLE WARRANTY AND WARRANTY PERIOD SET FORTH ABOVE.
How State Law relates to this warranty:
6RPHVWDWHVGRQRWDOORZWKHH[FOXVLRQQRUOLPLWDWLRQRILQFLGHQWDORUFRQVHTXHQWLDOGDPDJHVRU
limitations on how long an implied warranty lasts, so the above limitations or exclusions may
not apply to you.
7KLVZDUUDQW\JLYHV\RXVSHFL¿FOHJDOULJKWVDQG\RXDOVRPD\KDYHRWKHUULJKWVWKDWYDU\IURPVWDWH
to state.
If you purchased your unit outside the United States or seek warranty coverage outside the
United States: This warranty does not apply. Contact your dealer for warranty information.
Service calls which do not involve defective materials or workmanship are not covered by this
warranty. Costs of such service calls are the sole responsibility of the purchaser.

42

43

44
FCC Information
This equipment has been tested and found to comply with the limits for a Class B digital device,
pursuant to Part 15 of the FCC Rules. These limits are designed to provide reasonable protection
against harmful interference in a residential installation. This equipment generates, uses, and can
radiate radio frequency energy and, if not installed and used in accordance with the instructions, may
cause harmful interference to radio communications. However, there is no guarantee that interference
will not occur in a particular installation. If this equipment does cause harmful interference to radio
or television reception, which can be determined by turning the equipment off and on, the user is
encouraged to try to correct the interference by one or more of the following measures:
5HRULHQWRUUHORFDWHWKHUHFHLYLQJDQWHQQD
,QFUHDVHWKHVHSDUDWLRQEHWZHHQWKHHTXLSPHQWDQGUHFHLYHU
&RQQHFWWKHHTXLSPHQWLQWRDQRXWOHWRQDFLUFXLWGLIIHUHQWIURPWKDWWRZKLFKWKHUHFHLYHULV
connected.
&RQVXOWWKHGHDOHURUDQH[SHULHQFHGUDGLR79WHFKQLFLDQIRUKHOS
This Class B digital apparatus complies with Canadian ICES-003.
Please do not send any products to the Indianapolis address listed in this manual or on the carton.
This will only add delays in service for your product.
TTE Technology, Inc.
*UDSKLWH'ULYH&RURQD&$
©2011 TTE Technology, Inc.
7&/DQGDVVRFLDWHGPDUNVDUHWUDGHPDUNVRI7&/6$XVHG
under license to TTE Corporation.
Printed in China
3DUW1R'0;1$$
ENERGY STAR is a set of power-saving guidelines issued by the U.S. Environmental Protection
Agency (EPA).
Manufactured under license from Dolby Laboratories.
“Dolby” and the double-D symbol are registered trademarks of Dolby Laboratories.