Technicolor Connected Home USA DCI401GEU2 wirelessly controlled converter box User Manual Manual Part 1
Technicolor Connected Home USA LLC wirelessly controlled converter box Manual Part 1
Contents
- 1. Manual Part 1
- 2. Manual Part 2
- 3. Manual Reg Part
Manual Part 1
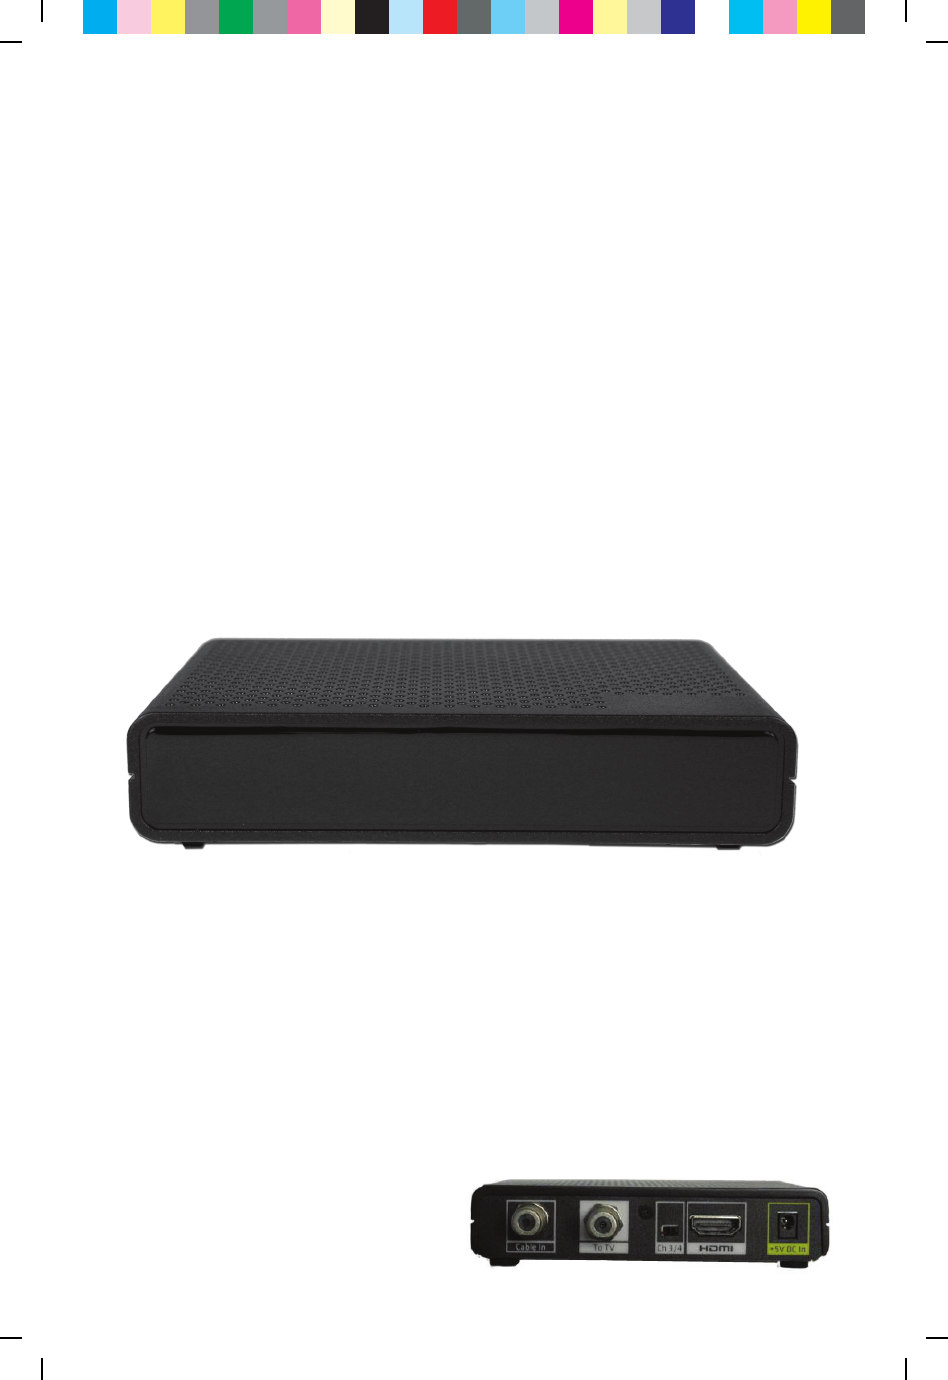
HD-DTA
Easy Setup Guide
Installation • Operation • Troubleshooting
C25M 75Y 50K CY GB50 75M 25Y K25C MY GB75 50C GB25 M50Y 25K CM P75C 50M Y75K

2
Table of Contents
What’s included in this Install Kit? 4
Start Here! 6
Connecting to a TV with HDMI Cable (No VCR) 8
Connecting to a TV+VCR with Coax cable 9
Connecting to a TV with Coax cable (No VCR) 10
Power Up 12
Connecting to the Network and activating your HD-DTA 14
Verify your Services 15
Programming the new remote 16
HD-DTA Operation Guide 20
Using your HD-DTA and VCR 21
Remote Operation Guide 23
RF Remote Pairing Process 26
Troubleshooting Guide 28
DTA Operation Guide (Two remotes) 30
C25M 75Y 50K CY GB50 75M 25Y K25C MY GB75 50C GB25 M50Y 25K CM P75C 50M Y75K

3
What you need to know
To bring you better service now and in the future your cable operator is
upgrading to an
All-Digital network – All-Digital for every channel, on every TV set.
To continue to receive all the channels you are used to, you will need
to make sure that every TV in your home is equipped with
one of our HD-DTA or Digital Cable Boxes.
What you need to do
C25M 75Y 50K CY GB50 75M 25Y K25C MY GB75 50C GB25 M50Y 25K CM P75C 50M Y75K
4
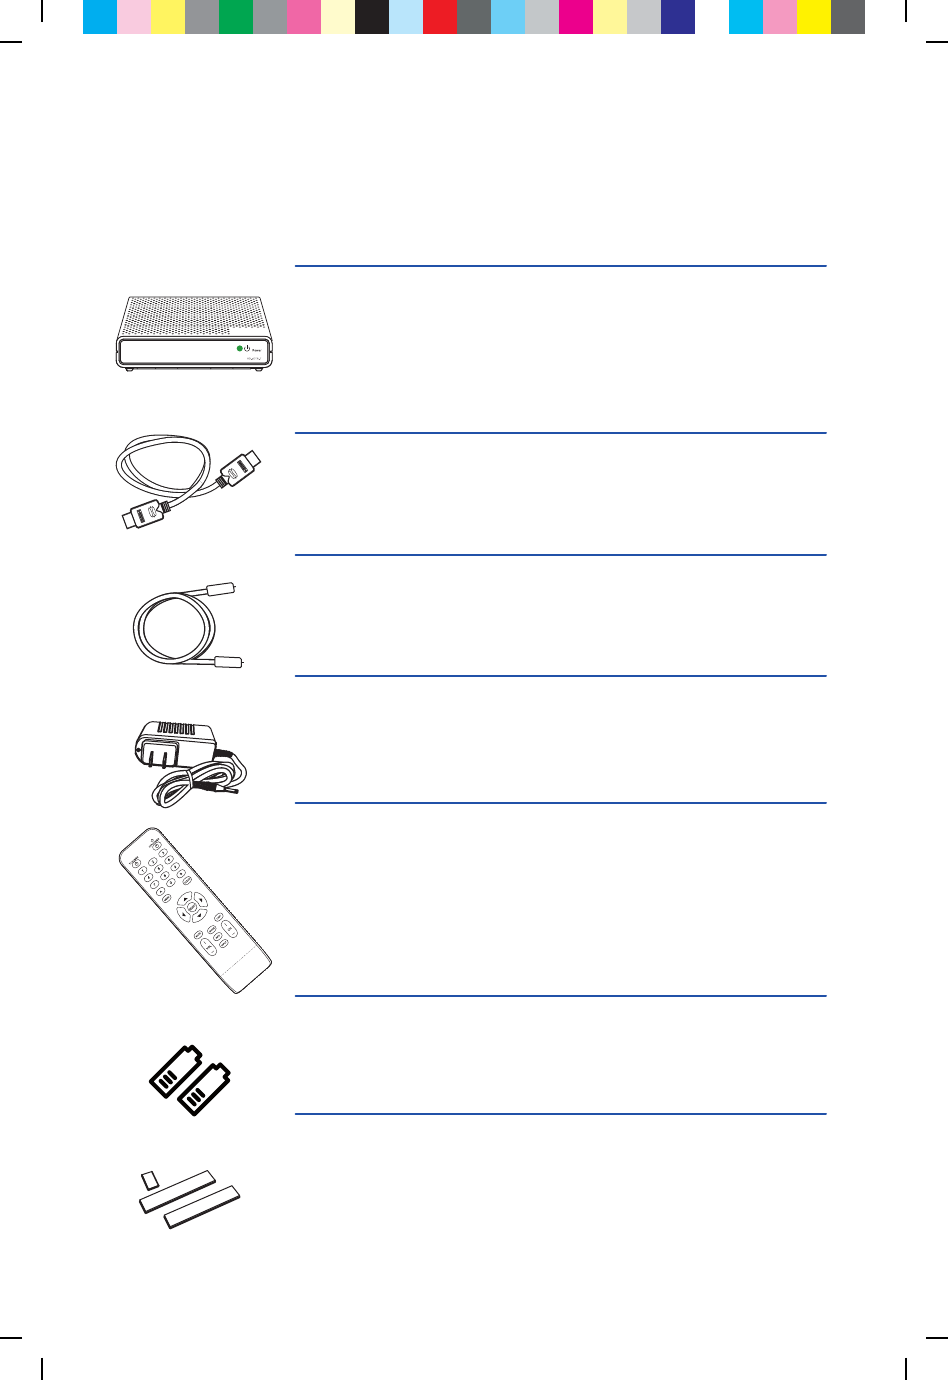
What’s included in this Install Kit?
HD-DTA
Each TV will need to be connected to a HD-DTA or a Digital Cable
Box, but not both.
HDMI Cable
5 Foot Coax Cable
Power Cord
Remote Control
In order to operate the HD-DTA you must use the remote control
included with this kit. Programming instructions for the remote control
are included in this guide.
2 AAA Batteries
Adhesive Fasteners
Use these if you want to stick the HD-DTA to your TV.
Note: Please be careful. Technicolor is not responsible for any damage
done to any surface you stick these to.
C25M 75Y 50K CY GB50 75M 25Y K25C MY GB75 50C GB25 M50Y 25K CM P75C 50M Y75K
5
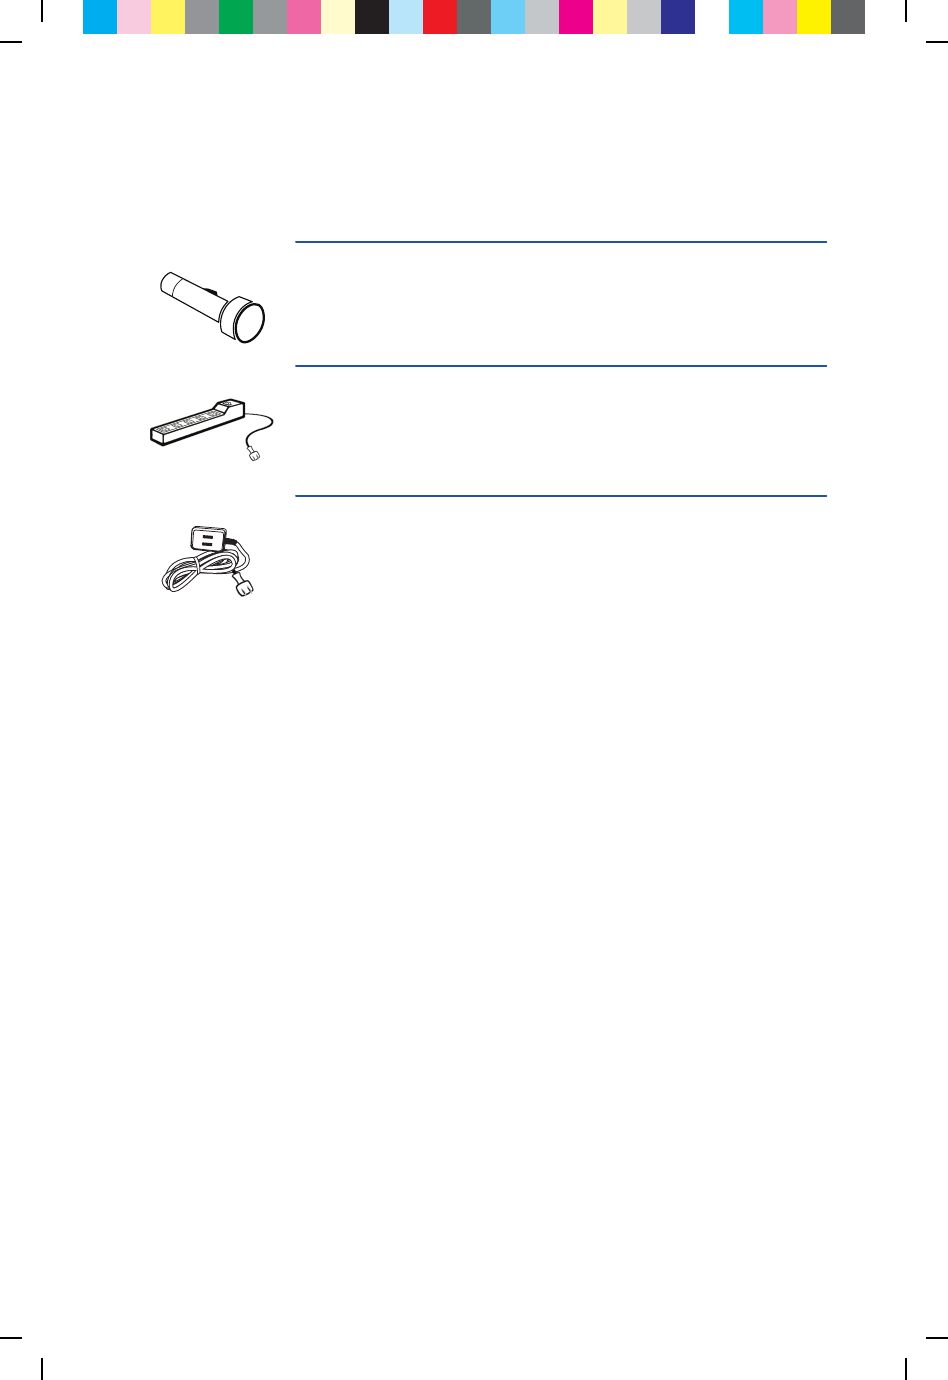
Items that you may also need:
Flashlight
Power Strip
You’ll need a power strip if you already have 2 items plugged into the
electrical outlet that you plan to use.
Extension Cord
You’ll need an extension cord if you already have 2 items plugged into
the electrical outlet closest to your TV.
C25M 75Y 50K CY GB50 75M 25Y K25C MY GB75 50C GB25 M50Y 25K CM P75C 50M Y75K

6
Please refer to the Welcome Letter that was delivered
with this kit to identify:
Start Here!
• ThephonenumberassociatedwithyourCableOperatoraccount
• Thechannelwhereyoucanviewavideodemonstrationofthese
instructions
C25M 75Y 50K CY GB50 75M 25Y K25C MY GB75 50C GB25 M50Y 25K CM P75C 50M Y75K
7
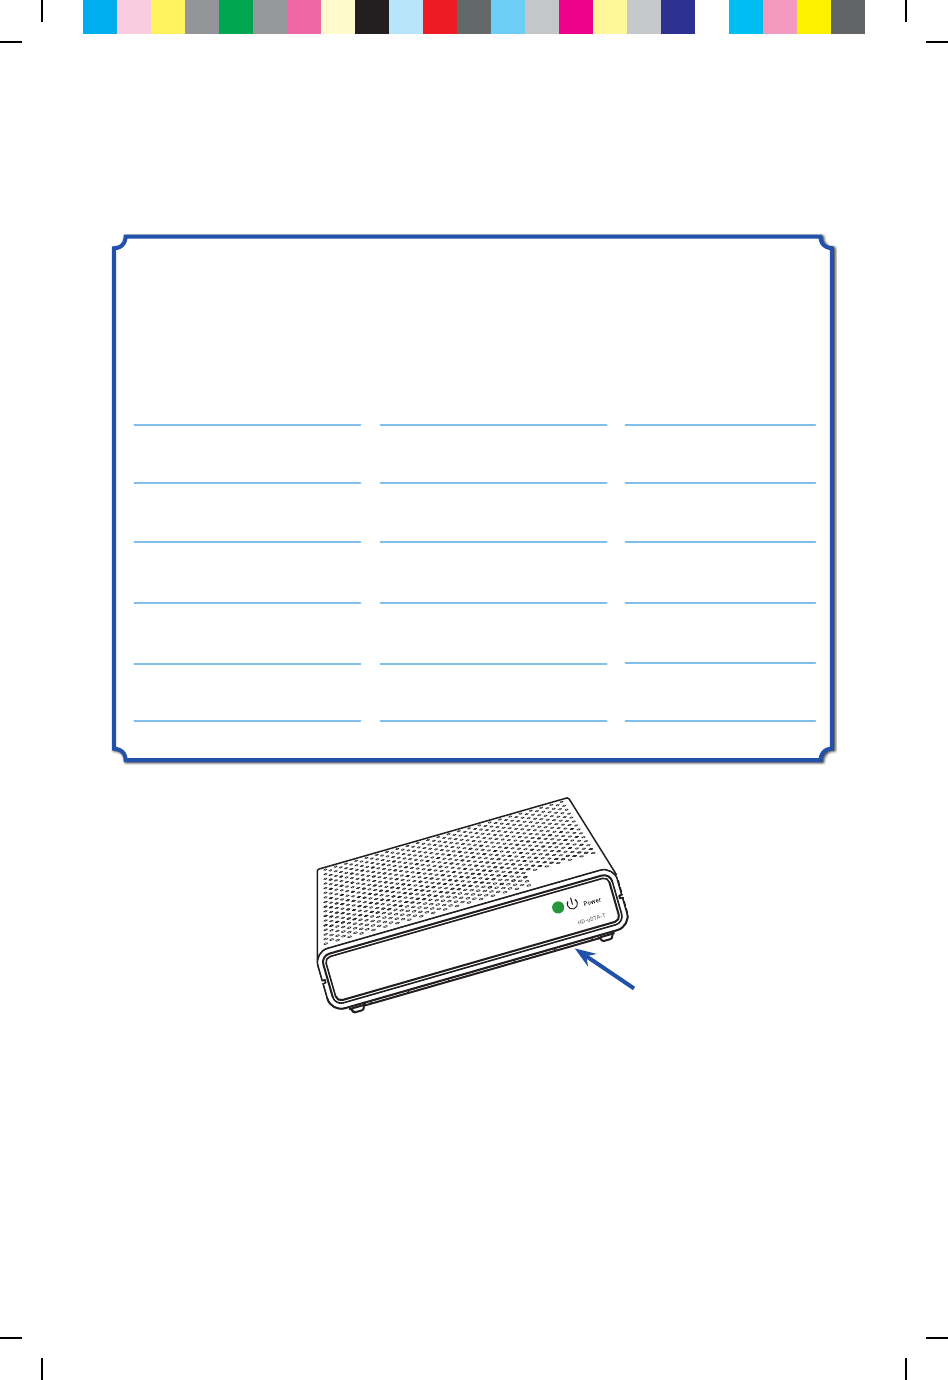
The last four digits of the serial number of
each HD-DTA that you will be activating:
Serial Number Location in your home Output Channel
Note: The serial number can be found on the bottom of the
HD-DTA itself and is also printed on the outside of the
HD-DTA package.
C25M 75Y 50K CY GB50 75M 25Y K25C MY GB75 50C GB25 M50Y 25K CM P75C 50M Y75K
8
A
Turn o your TV.
B
Locate the cable that currently runs from
the cable wall outlet to the back of your
TV. Leave one end of the cable connected
to the wall, but disconnect
the other end from the back of your TV.
C
Reconnect this end of the cable to the
“Cable In” input on the back of the
HD-DTA.
Cable Outlet
Wall
B
TV
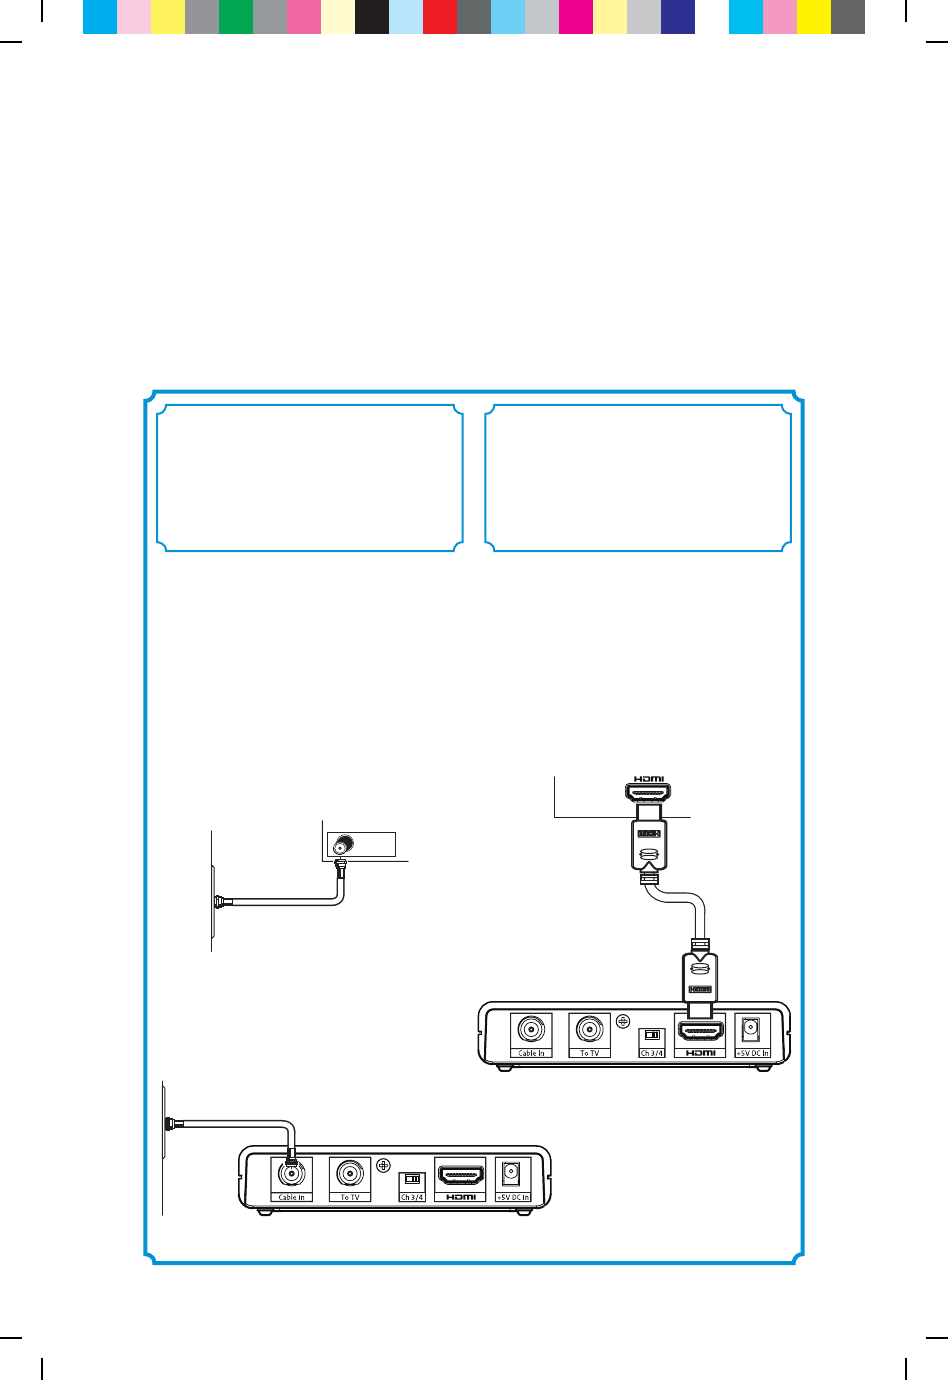
If you have a VCR, follow the directions on page 9.
If you do not have a VCR, follow the directions on this page.
Connecting to a TV
with HDMI Cable
(No VCR)
A
Find the HDMI cable included in this kit.
Connect one end of the cable to the “HDMI”
input on the back of the HD-DTA.
B
Connect the other end to the “HDMI” input
on the back of your TV.
Connect the HD-DTA
to the Cable Outlet
Connect the HD-DTA
to the TV
12
Wall
Cable Outlet C
A
B
TV
C25M 75Y 50K CY GB50 75M 25Y K25C MY GB75 50C GB25 M50Y 25K CM P75C 50M Y75K
9
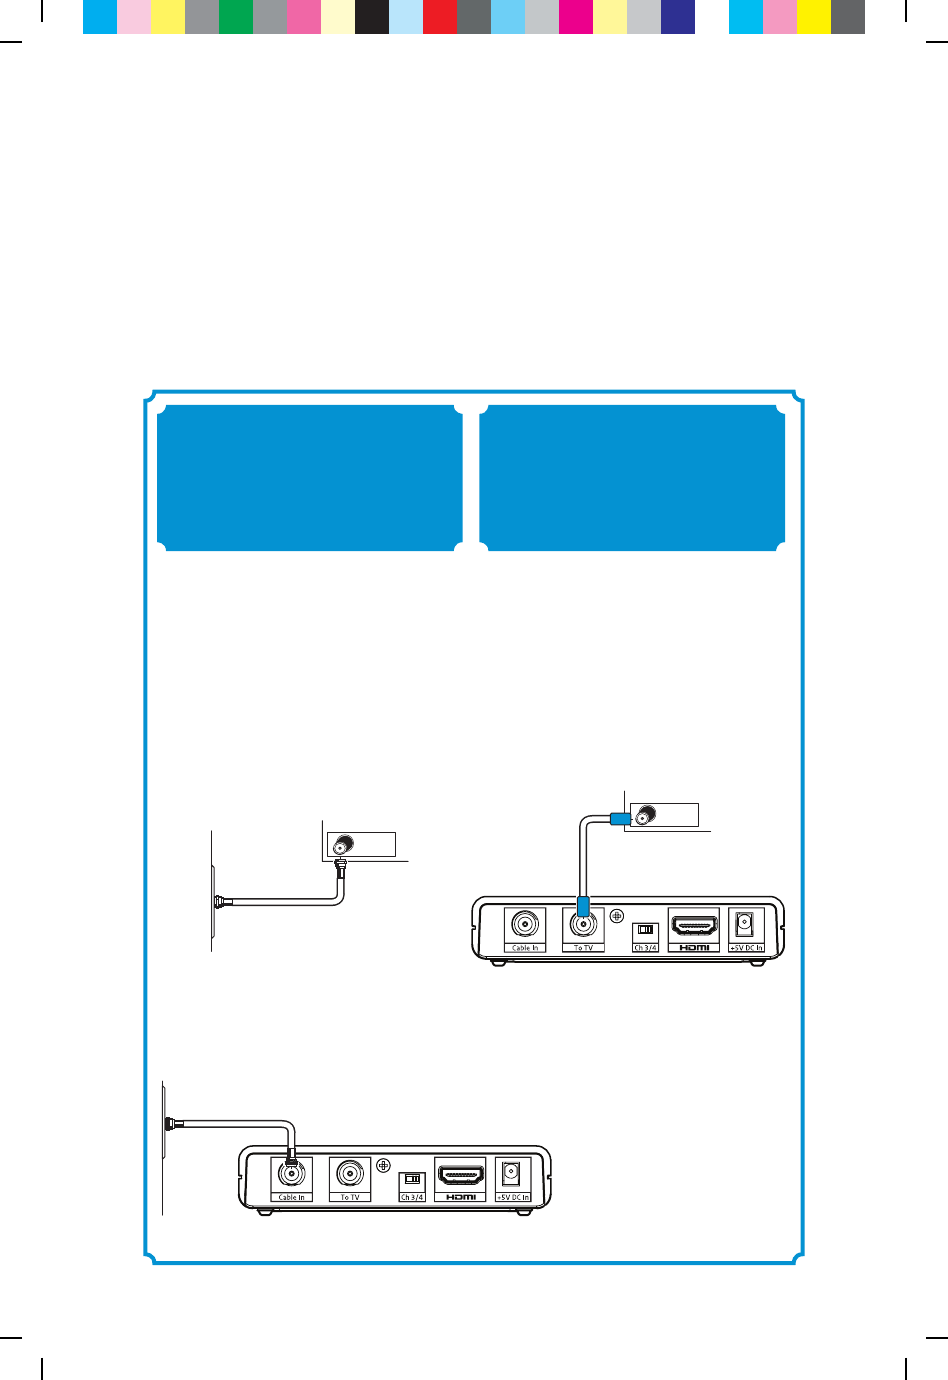
If you do not have a VCR, follow the directions on page 8.
If you have a VCR, follow the directions on this page.
Connecting to a TV+VCR
with Coax cable
A
Find the 5-foot coax cable included in this
kit. Connect one end of the cable to the
“To TV” input on the back of the HD-DTA.
B
Connect the other end to the “Cable In/RF
In” input on the back of your VCR.
A
Turn o your TV.
B
Locate the cable that currently runs from
the cable wall outlet to the back of your
VCR (or other recording device). Leave one
end of the cable connected to the wall, but
disconnect the other end from the back of
your VCR.
C
Reconnect this end of the cable to the
“Cable In” input on the back of the
HD-DTA.
Cable Outlet
Wall
B
VCR
Connect the HD-DTA
to the Cable Outlet
Connect the HD-DTA
to the VCR
1 2
Wall
Cable Outlet C
A
B
VCR Input
C25M 75Y 50K CY GB50 75M 25Y K25C MY GB75 50C GB25 M50Y 25K CM P75C 50M Y75K
10
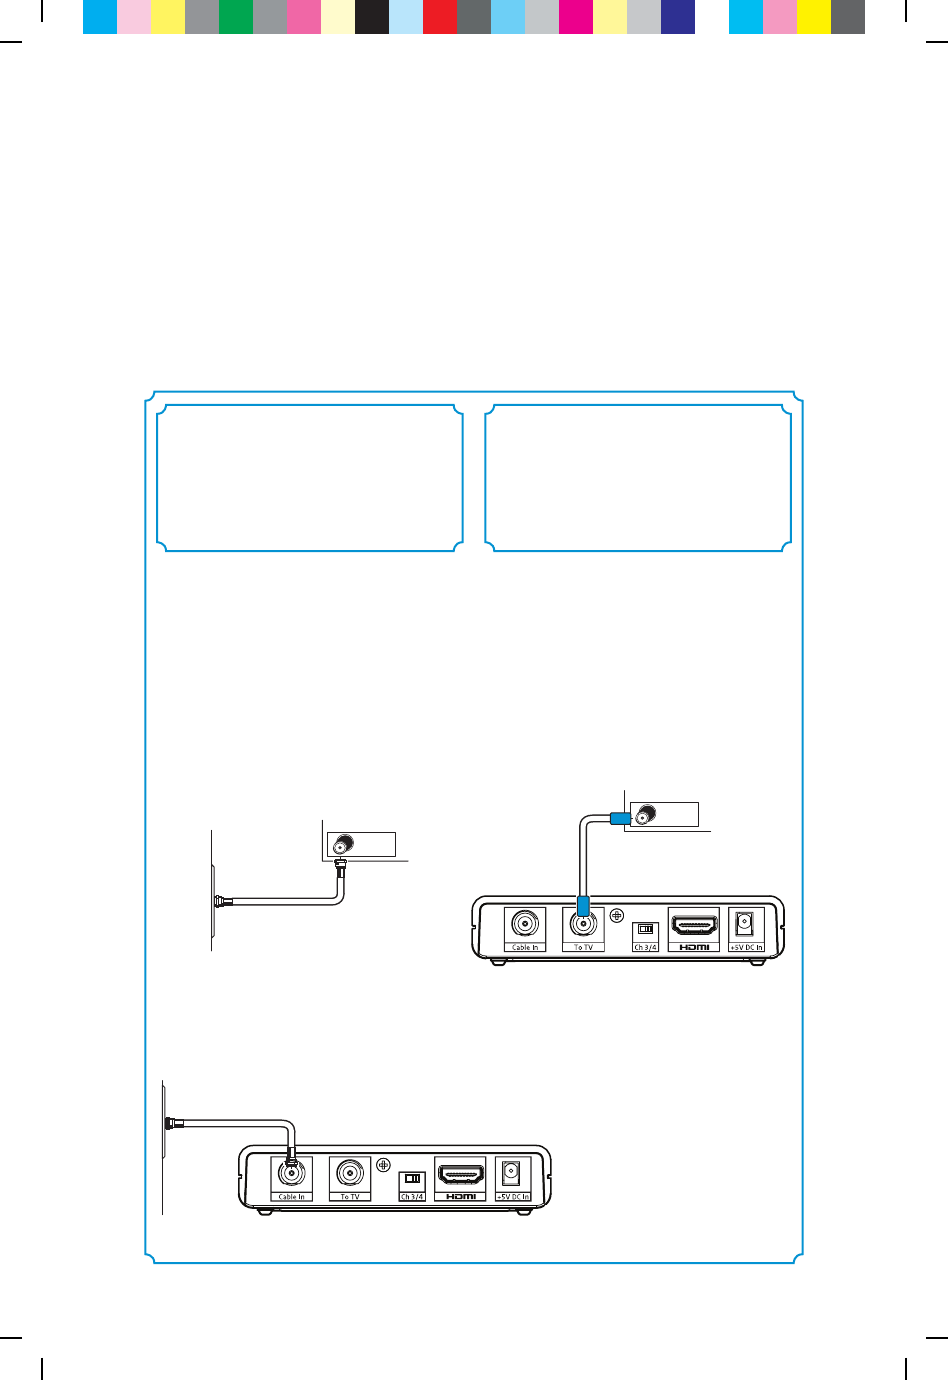
If you have a VCR, follow the directions on this page 9.
Connecting to a TV with Coax cable
(No VCR)
A
Find the 5-foot coax cable included in this
kit. Connect one end of the cable to the
“To TV” input on the back of the HD-DTA.
B
Connect the other end to the “Cable In/RF
In” input on the back of your TV.
A
Turn o your TV.
B
Locate the cable that currently runs from
the cable wall outlet to the back of your
VCR (or other recording device). Leave one
end of the cable connected to the wall, but
disconnect the other end from the back of
your VCR.
C
Reconnect this end of the cable to the
“Cable In” input on the back of the
HD-DTA.
Cable Outlet
Wall
B
VCR
Wall
Cable Outlet C
A
B
Cable IN / RF IN
Connect the HD-DTA
to the Cable Outlet
Connect the HD-DTA
to the TV
12
C25M 75Y 50K CY GB50 75M 25Y K25C MY GB75 50C GB25 M50Y 25K CM P75C 50M Y75K

11
C25M 75Y 50K CY GB50 75M 25Y K25C MY GB75 50C GB25 M50Y 25K CM P75C 50M Y75K
12
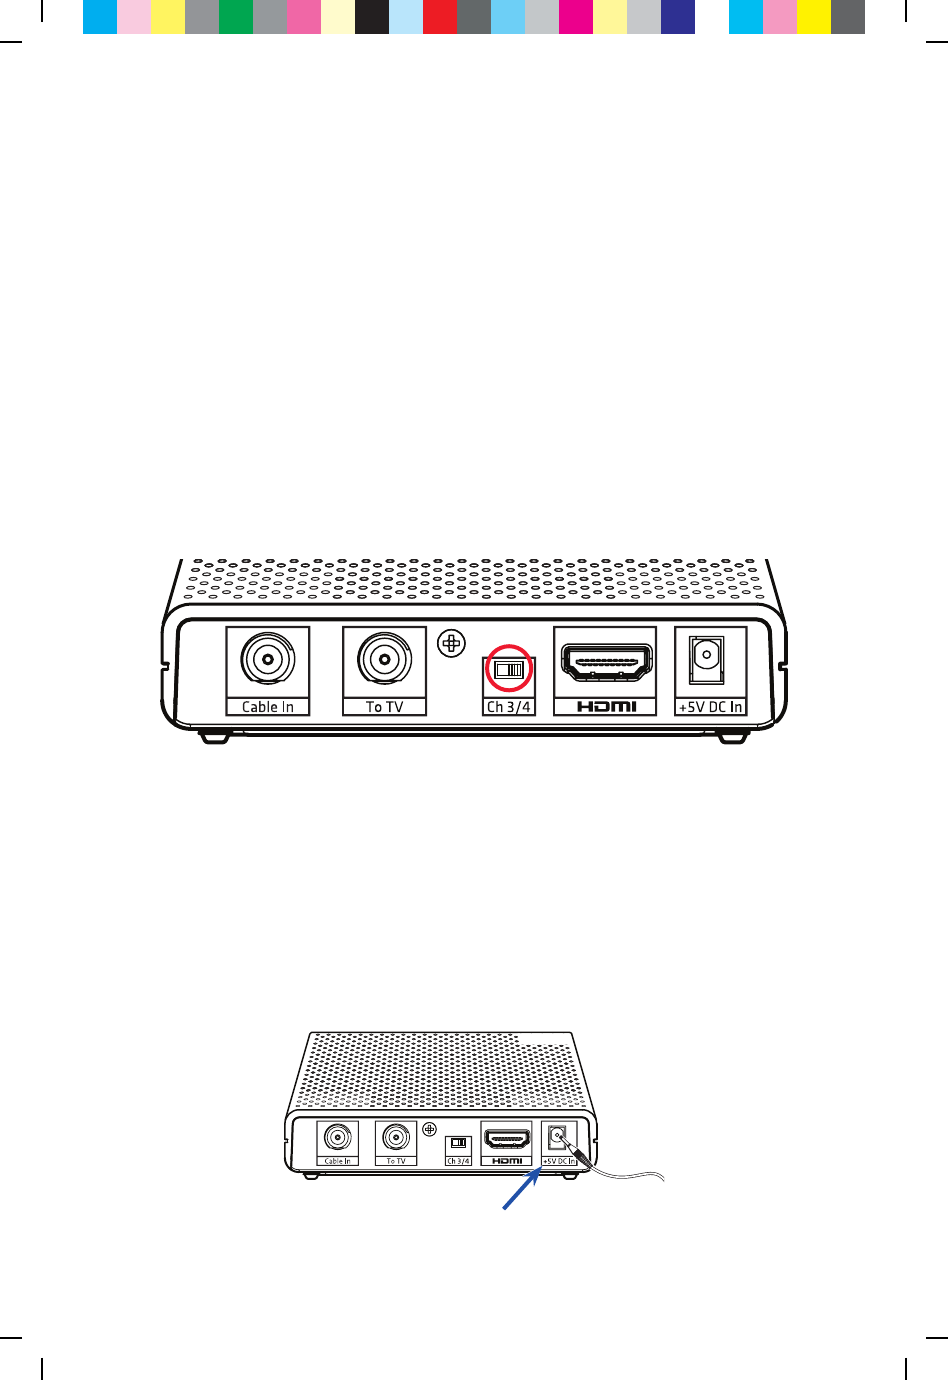
A
If you are connecting the HD-DTA to a television with HDMI,
set your TV to choose “HDMI” as the input source.
Or
Pick which output channel your TV will use and make sure your television
is set to that selected channel
by setting the switch on the back of the HD-DTA
to the proper output channel (Ch 3 or Ch 4).
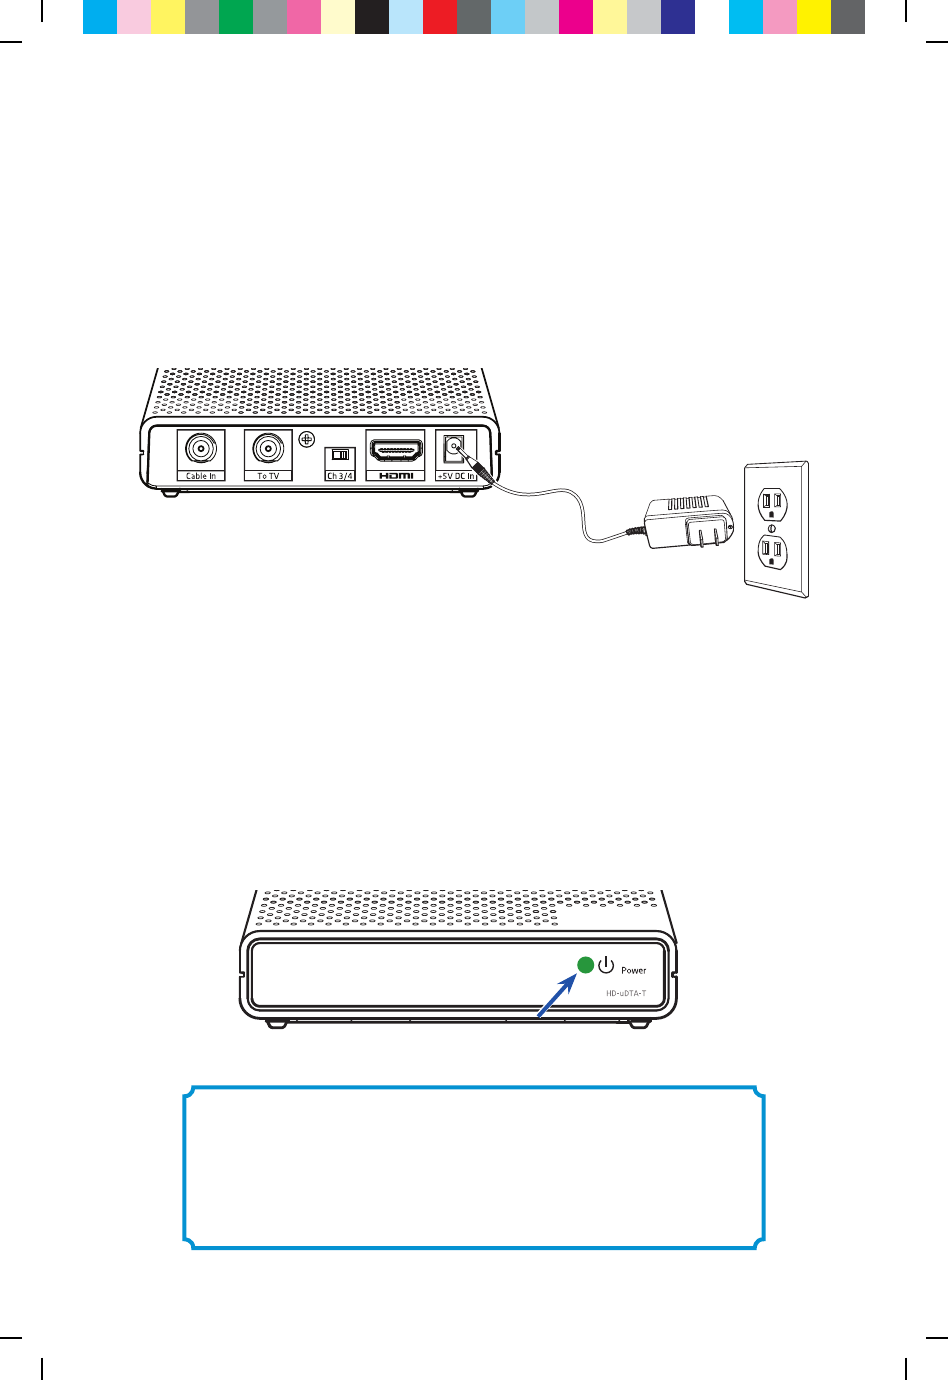
Power Up
A
B
B
Find the power cord included in the kit. Plug the end of the
power cord into the power input “+5V DC In” on the back of the HD-DTA.
C25M 75Y 50K CY GB50 75M 25Y K25C MY GB75 50C GB25 M50Y 25K CM P75C 50M Y75K
13
C
Plug the other end into a working electrical outlet or power strip.
Make sure that the outlet is not controlled by a
switch that gets turned on and o.
D
Check the front of the HD-DTA to see if the green light is on and blinking.
If it is not on, check to make sure the power plug was plugged
into the power input “+5V DC In” and that the other end
is plugged into a working electrical outlet.
Note: After activation, this light will remain on and constantly lit.
B
C
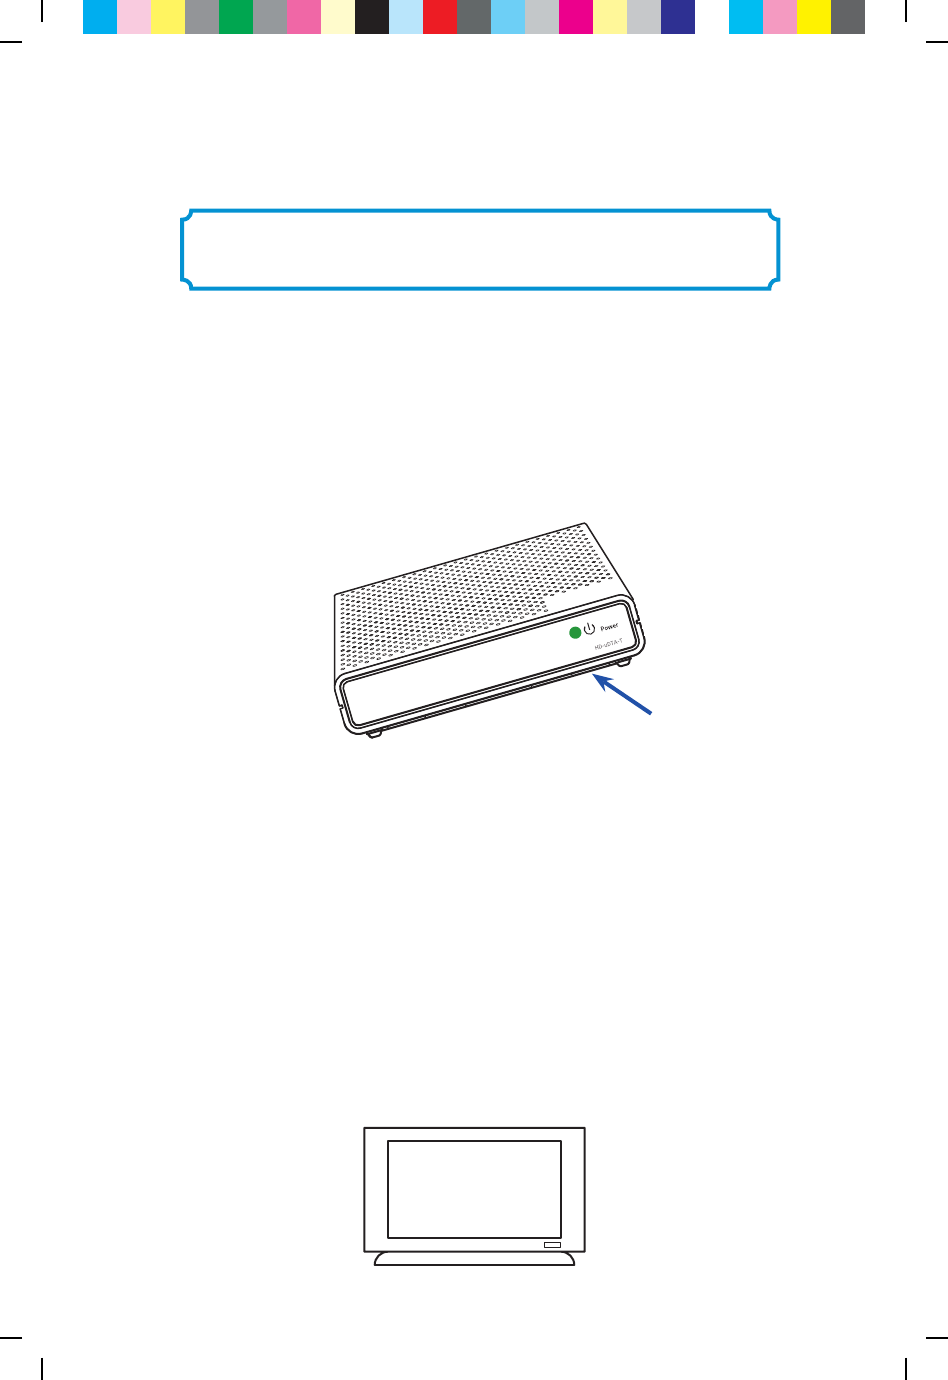
Please wait 20 minutes before calling to activate.
This will allow the HD-DTA to connect to the
network and get the latest updates.
D
C25M 75Y 50K CY GB50 75M 25Y K25C MY GB75 50C GB25 M50Y 25K CM P75C 50M Y75K
14
A
If you received more than one HD-DTA, this would be a good time to
get the others installed so you can activate them all with one call.
Channel 3/4
Connecting to the Network and
activating your HD-DTA
Remember, you must wait 20 minutes before calling to
activate. This will allow the HD-DTA to connect to the
network and get the latest updates.
B
Call your cable operator’s automated activation line
and follow the instructions.
C
Turn on your TV and tune it to the proper output channel (Ch 3 or Ch 4).
Note: The serial number can be found on the bottom of the
HD-DTA itself and is also printed on the outside of the
HD-DTA package.
Note: To complete your activation, you will need your account information
and the serial number of each HD-DTA you are activating.
C25M 75Y 50K CY GB50 75M 25Y K25C MY GB75 50C GB25 M50Y 25K CM P75C 50M Y75K
15
After completing the activation step, wait a few minutes
for programming to appear.
A
Confirm that the HD-DTA is connected to the power and that
the light on the front is solid (not blinking).
B
Make sure that the TV is on.
C
Using the remote control to operate your HD-DTA, scroll through
your channels and make sure they are all working.
Verify your Services
A
B
C
Note: If the light is blinking or your channels are not showing up, turn to the
troubleshooting section of this guide.
C25M 75Y 50K CY GB50 75M 25Y K25C MY GB75 50C GB25 M50Y 25K CM P75C 50M Y75K
16
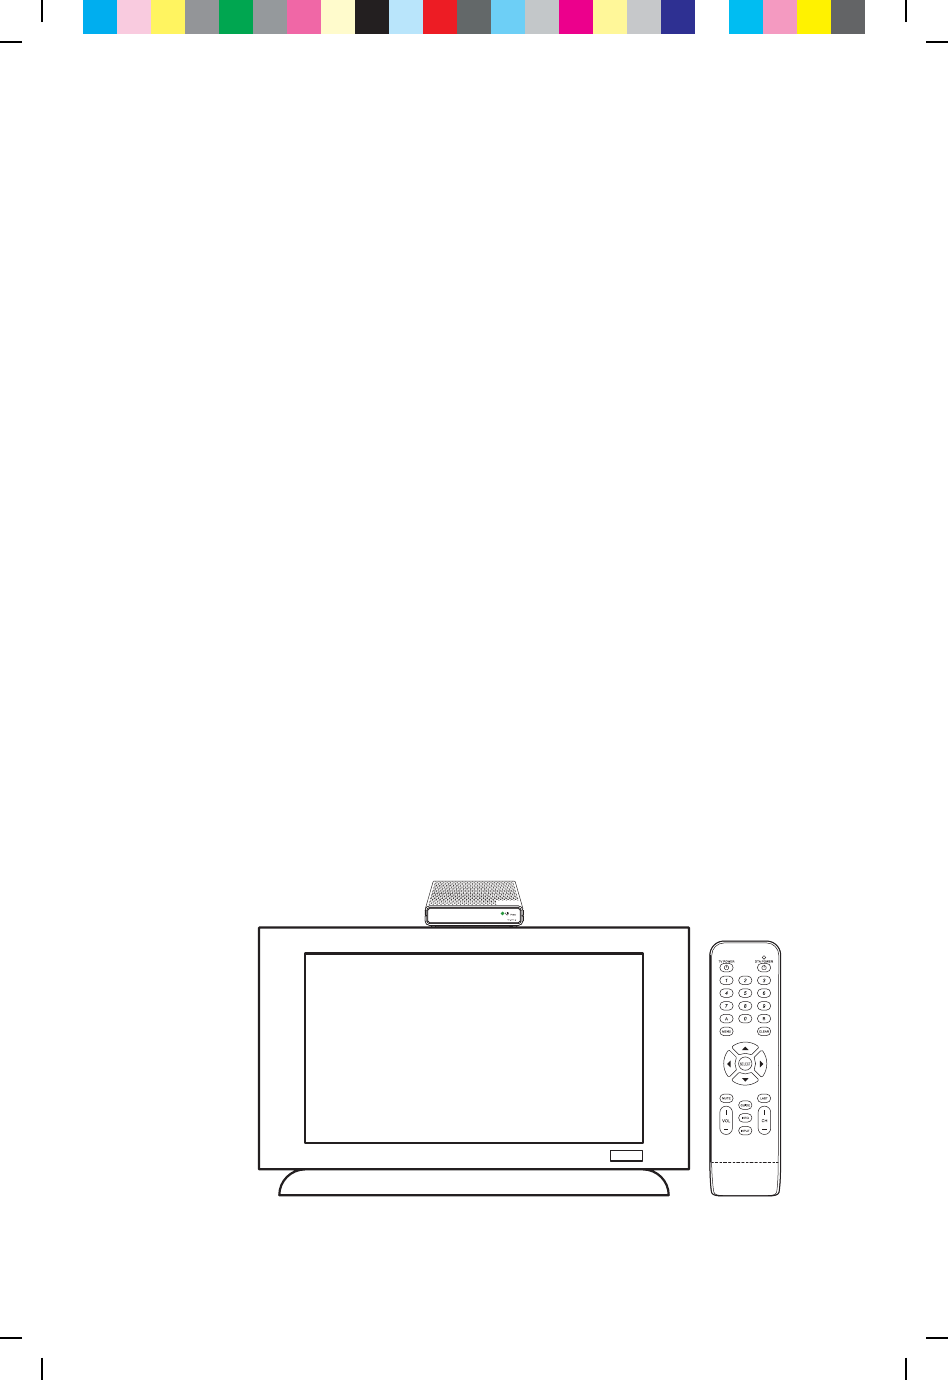
Programming the new remote
This is the easiest method for programming your remote control to
operate the volume and power on your TV.
In this next section, you will use the remote to
automatically find the right code for your TV.
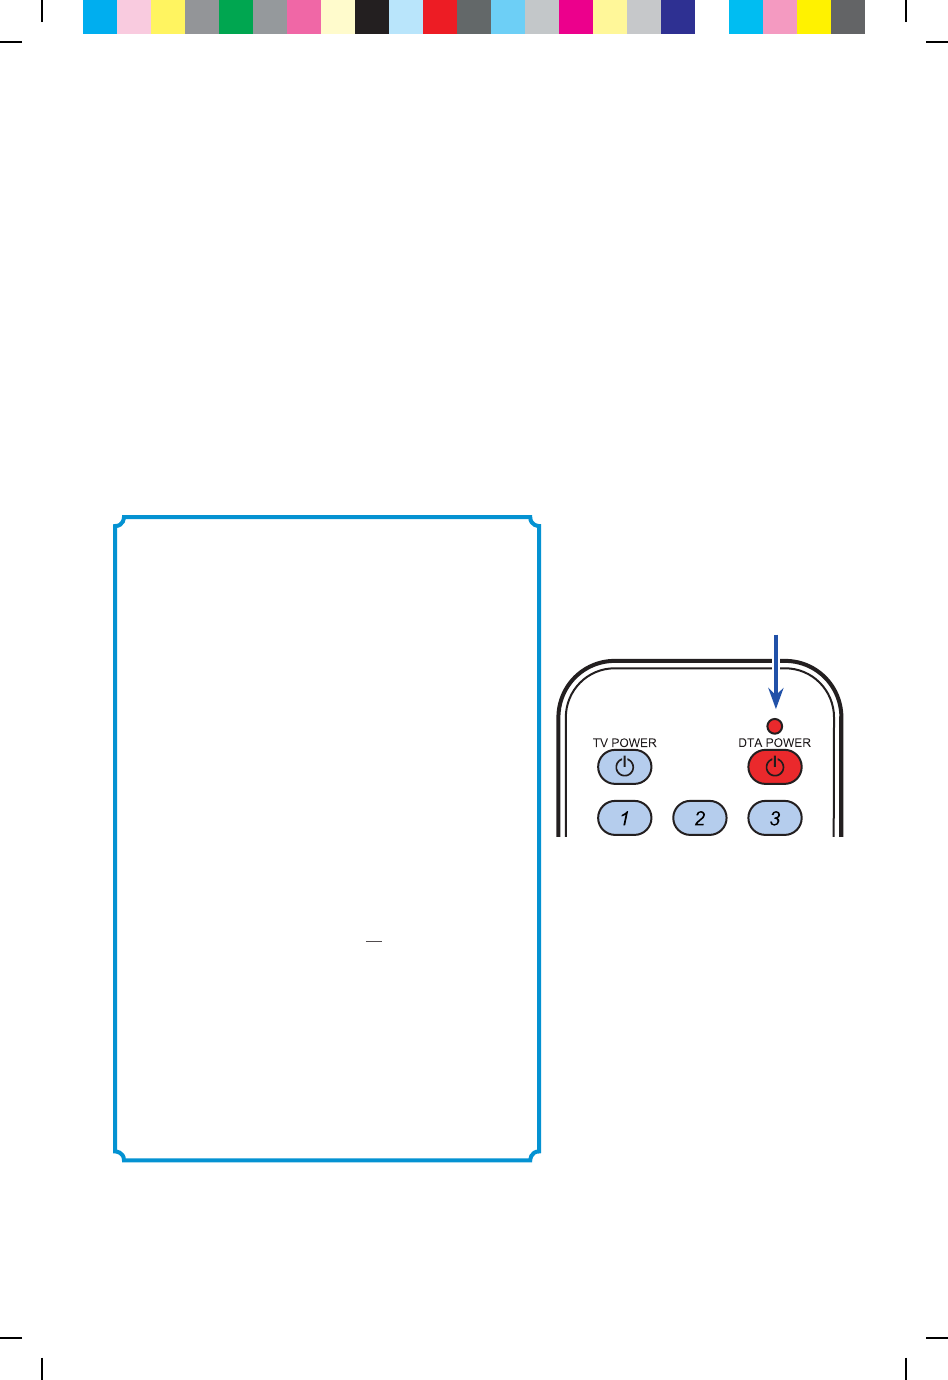
Keys to successfully
programming your remote:
• Carefullyreadallinstructionsonpages17
and18beforestarting.
• Payattentiontotheredlightonthe
remote.Youwillneedtowatchfor“blinks”
inordertotellifyouhavecompleteda
stepcorrectly.
• Bepatient.Itmaytakeafewtriestoget
thisright.
• Step3iscritical.Remembertopressand
holdtheTVPOWERortheMUTE
buttonwhilesearchingfortherightcode
foryourparticularbrandofTV.Assoon
astheTVturnsoorbecomesmuted,
youwillhavetoreleasethebuttonwithin
2secondsforthecodetolockintothe
remote.
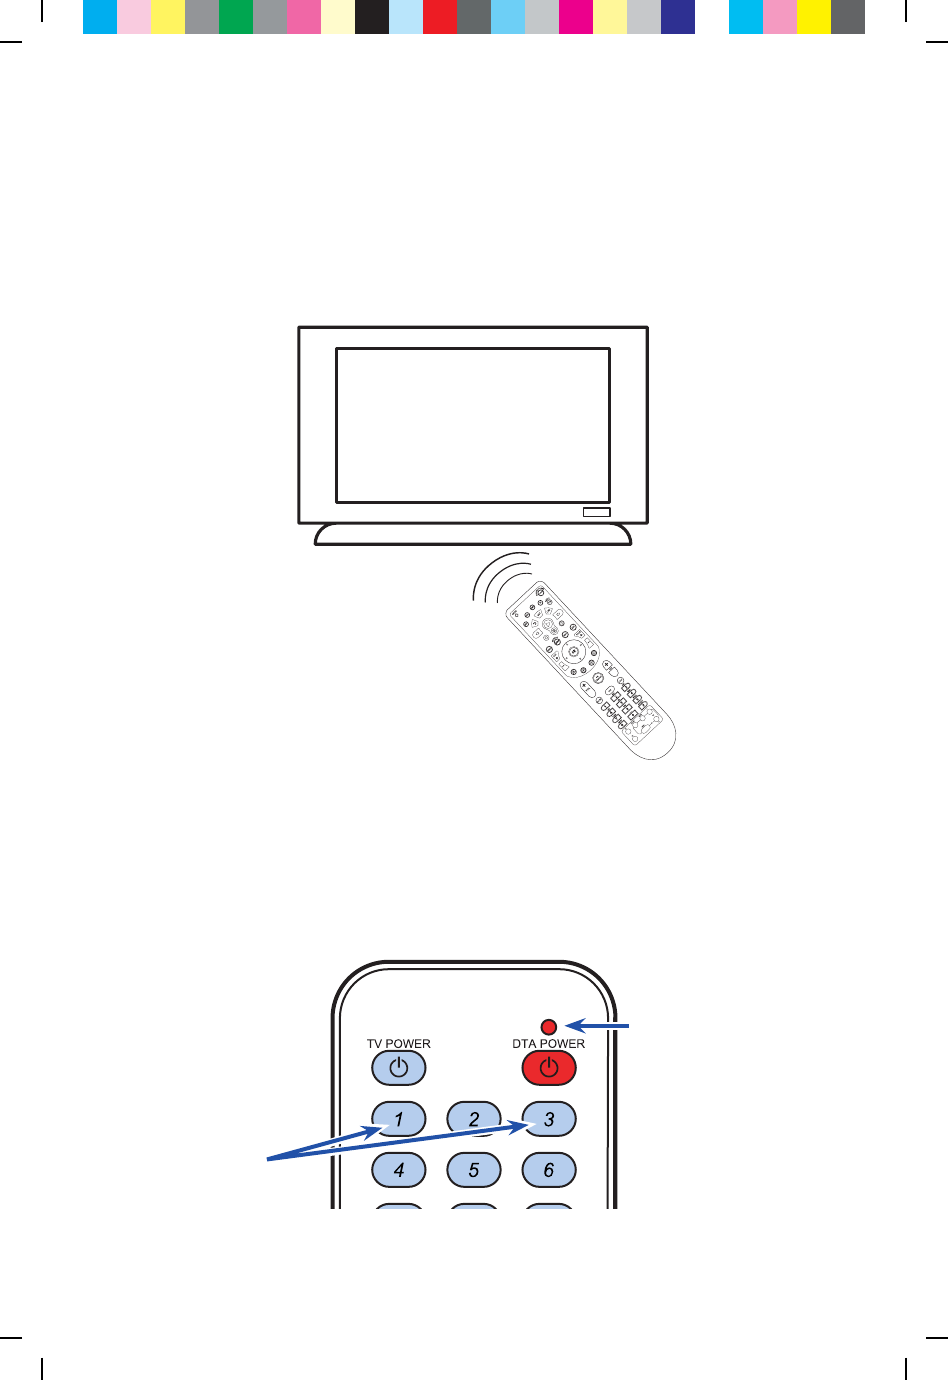
Red light location
C25M 75Y 50K CY GB50 75M 25Y K25C MY GB75 50C GB25 M50Y 25K CM P75C 50M Y75K
17
Press and hold
both buttons at the
same time
Step 1
Step 2
Turn on your TV using the buttons on the TV or the TV remote.
Install the batteries (included in your kit) in your new remote control.
Press and hold both Digit 1 and Digit 3 buttons together until the red light turns on.
Release both buttons.
Keep your eyes on
the remote so you can
watch the red light.
Note: Your TV must always be set to the proper channel (Ch 3 or Ch 4)
or HDMI Input to match the output channel on the back of your HD-DTA.
C25M 75Y 50K CY GB50 75M 25Y K25C MY GB75 50C GB25 M50Y 25K CM P75C 50M Y75K
18
Keys to success:
• Carefullyreadallpartsof
step3beforeattempting.
• Bepatientandholddown
theTVPOWERorMUTE
buttonduringthesearchfor
therightcode.
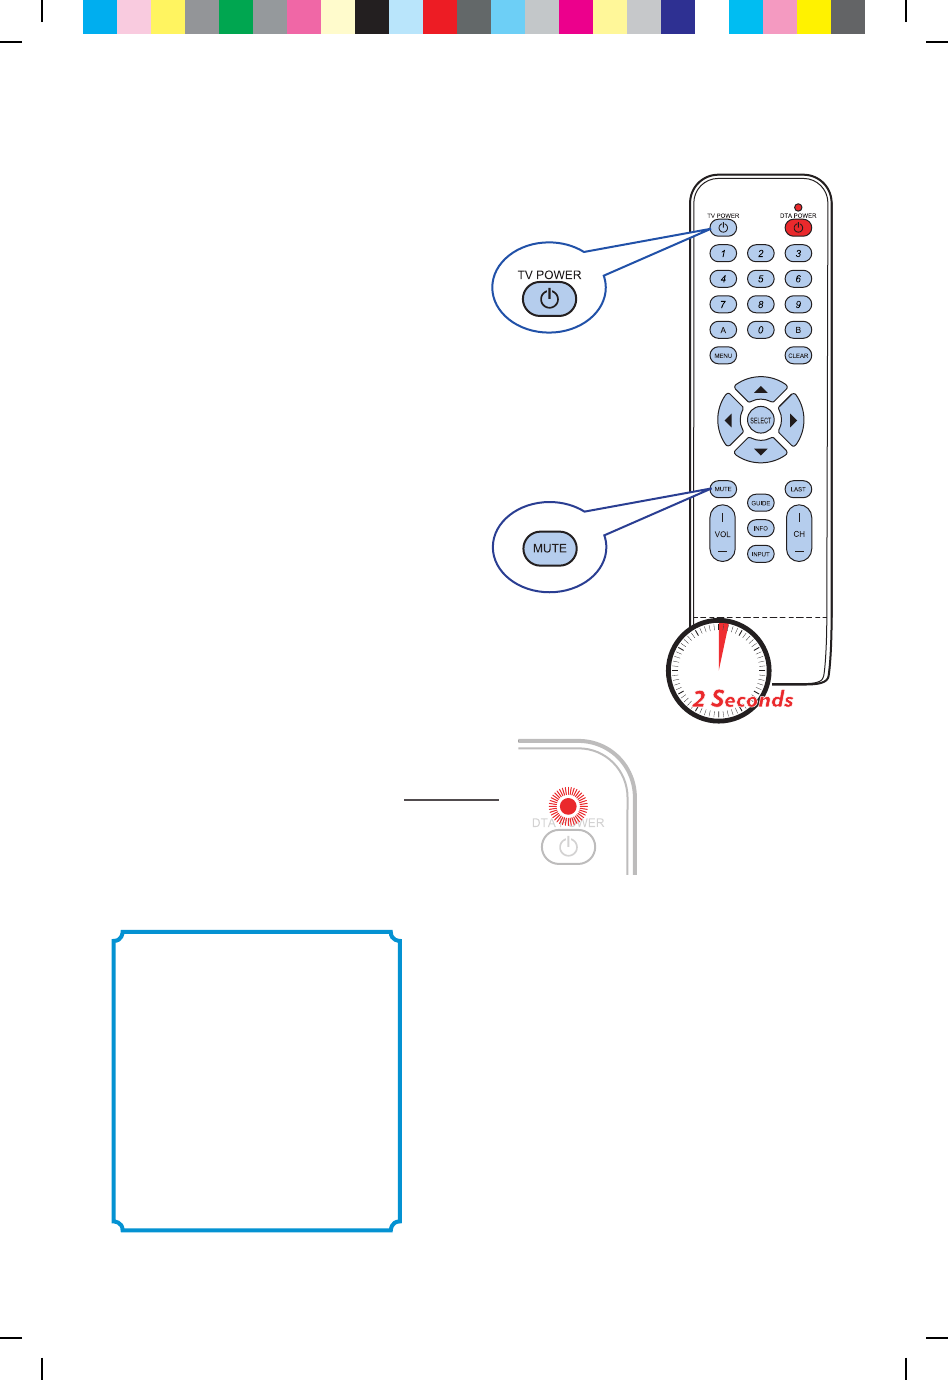
Step 3
Step 4
Point the new remote at the TV.
If you pressed TV POWER in Step 3, press TV
POWER on your remote to turn on your TV.
If you pressed MUTE in Step 3, press MUTE on
the remote to restore the sound to your TV.
If your TV responds, then you have successfully
programmed your remote.
When the TV follows the command you chose
(turns o if you held the TV POWER button
or the sound goes o if you held the MUTE
button), release the button within 2 seconds
to lock in the code.
The red light on the remote will blink twice.
Press and hold either the
TV POWER or the MUTE button.
The remote will start searching for the
right code while you are holding one
of these buttons.
C25M 75Y 50K CY GB50 75M 25Y K25C MY GB75 50C GB25 M50Y 25K CM P75C 50M Y75K

19
Find the small instruction booklet that came with the remote.
Use those instructions to look up and enter the 4 digit code
for your TV make and model.
If you are not successful the first time,
try again.
If you still don’t succeed, try this alternate method:
C25M 75Y 50K CY GB50 75M 25Y K25C MY GB75 50C GB25 M50Y 25K CM P75C 50M Y75K
20
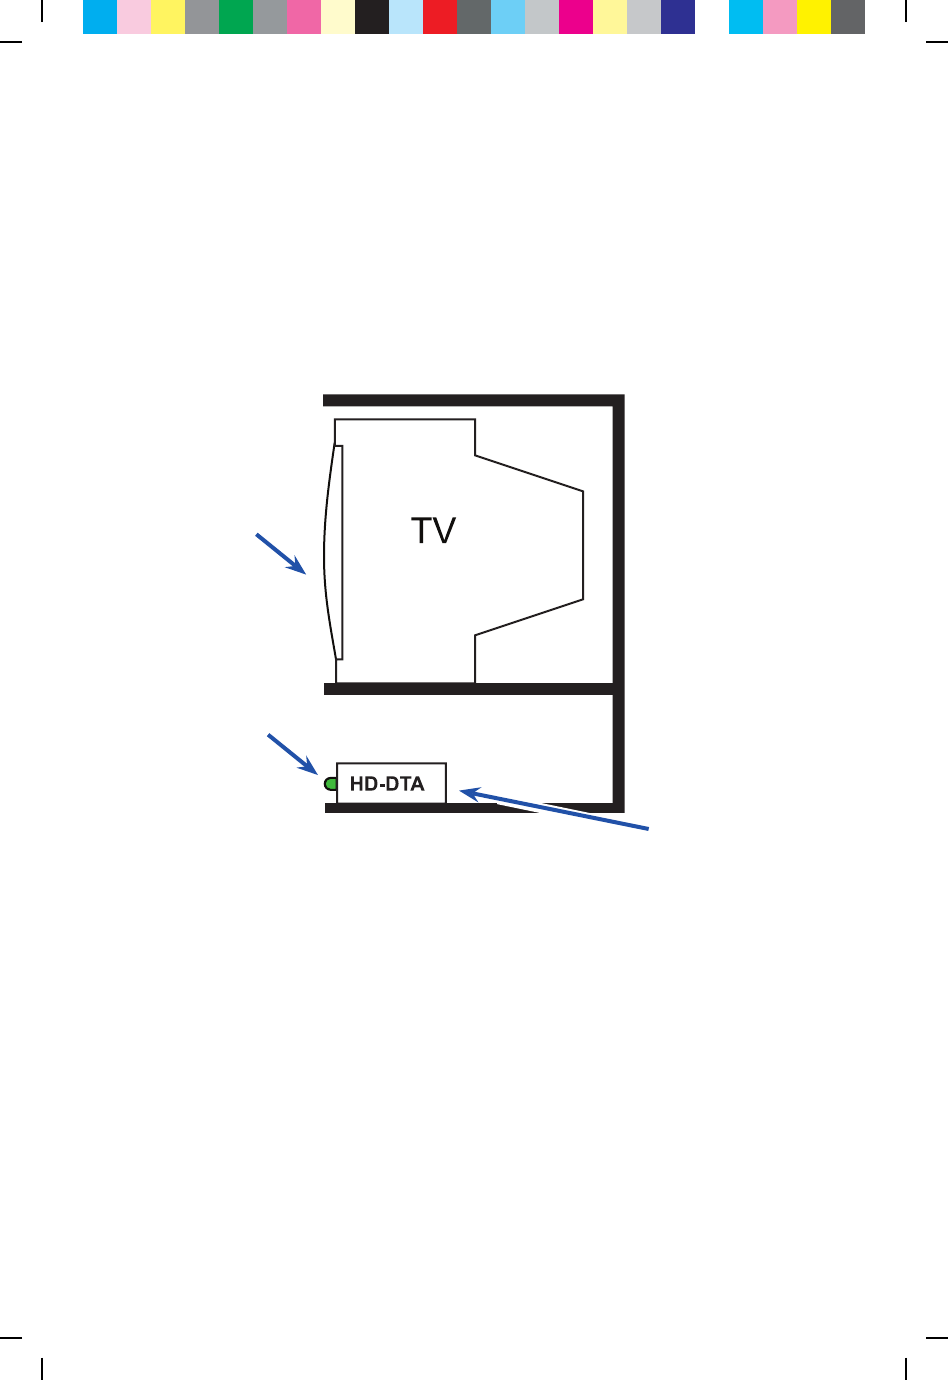
HD-DTA Operation Guide
Quick Troubleshooting Checklist
• TVsetontheproperoutputchannel(Ch 3 or Ch 4)orHDMIInput
• HD-DTAlightison
Be sure that the
HD-DTA is on.
You should see a
solid green light.
Be sure that the
HD-DTA is set to the proper
output channel (Ch 3 or Ch 4).
Be sure that the TV
is on the proper
channel
(Ch 3 or Ch 4).
Always use the remote that came with the HD-DTA to
change channels and for volume control.
C25M 75Y 50K CY GB50 75M 25Y K25C MY GB75 50C GB25 M50Y 25K CM P75C 50M Y75K
21
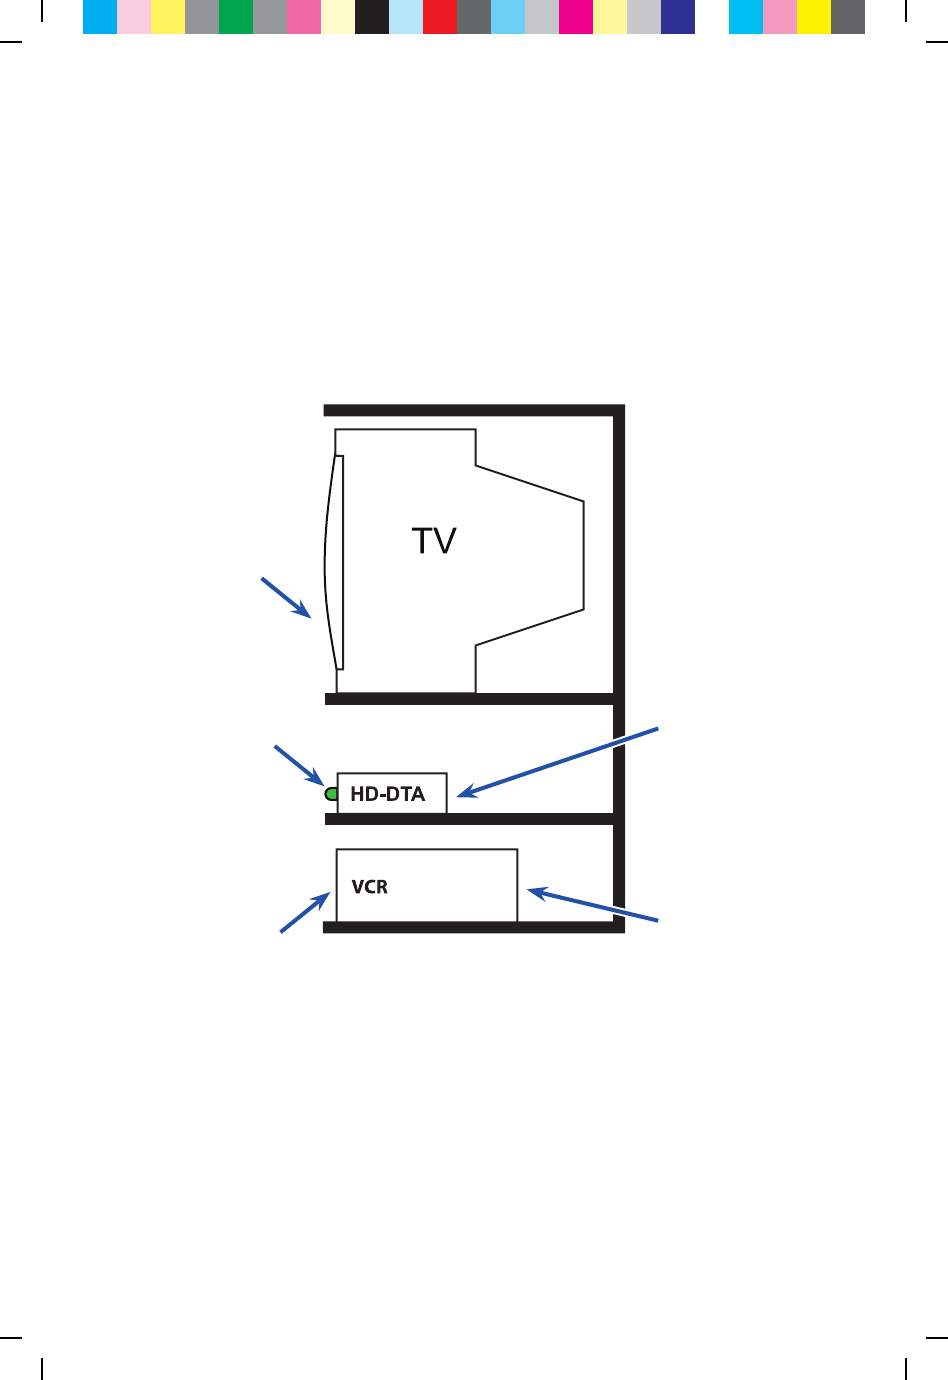
Using your HD-DTA and VCR
Quick Troubleshooting Checklist
• TVsetontheproperoutputchannel(Ch 3 or Ch 4)orHDMI
• VCRsetontheproperoutputchannel(Ch 3 or Ch 4)
• TuneVCRtothesamechannel
• HD-DTAlightison
• TuneHD-DTAtochannelthatyouwanttorecord
Use your HD-DTA
remote to tune the
HD-DTA to the
channel that you
want to record.
Be sure that the TV
is on the proper channel
(Ch 3 or Ch 4) or
HDMI.
Be sure that the
HD-DTA is set to the
proper output channel
(Ch 3 or Ch 4).
Be sure that the VCR
is set on the
proper output channel
(Ch 3 or Ch 4).
Be sure that
the VCR tuner
is set to the
proper channel
(Ch 3 or Ch 4).
Recording with your VCR:
TV on 3 and VCR on 3 if you selected 3 for your HD-DTA output channel
or
TV on 4 and VCR on 4 if you selected 4 for your HD-DTA output channel
Use your HD-DTA remote to tune the HD-DTA to the channel to be recorded.
If you are scheduling a recording you must leave your
HD-DTA tuned to the channel that you want to record.
C25M 75Y 50K CY GB50 75M 25Y K25C MY GB75 50C GB25 M50Y 25K CM P75C 50M Y75K
22
C25M 75Y 50K CY GB50 75M 25Y K25C MY GB75 50C GB25 M50Y 25K CM P75C 50M Y75K
23
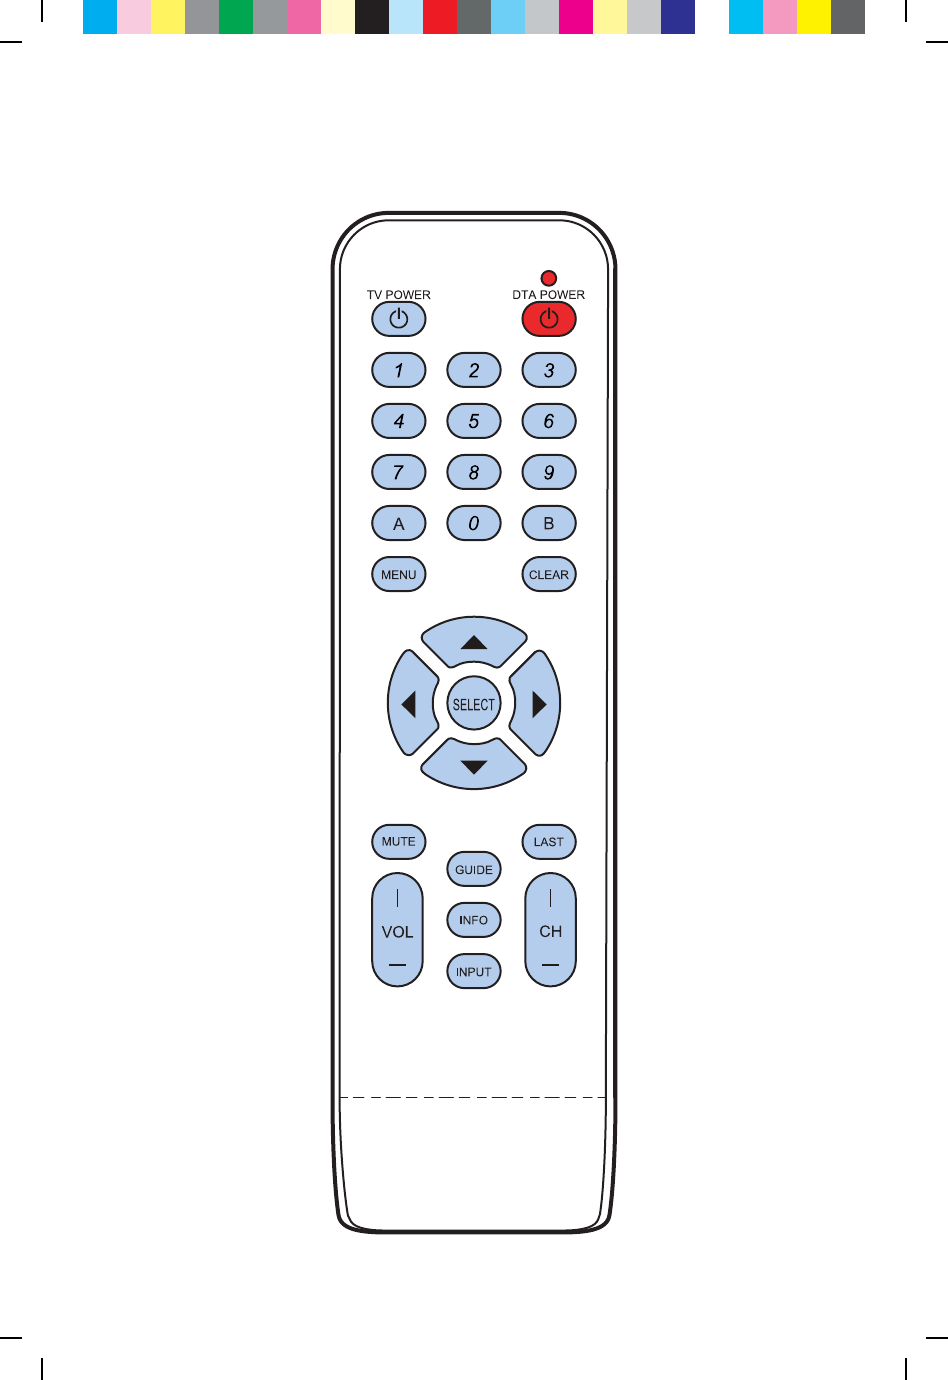
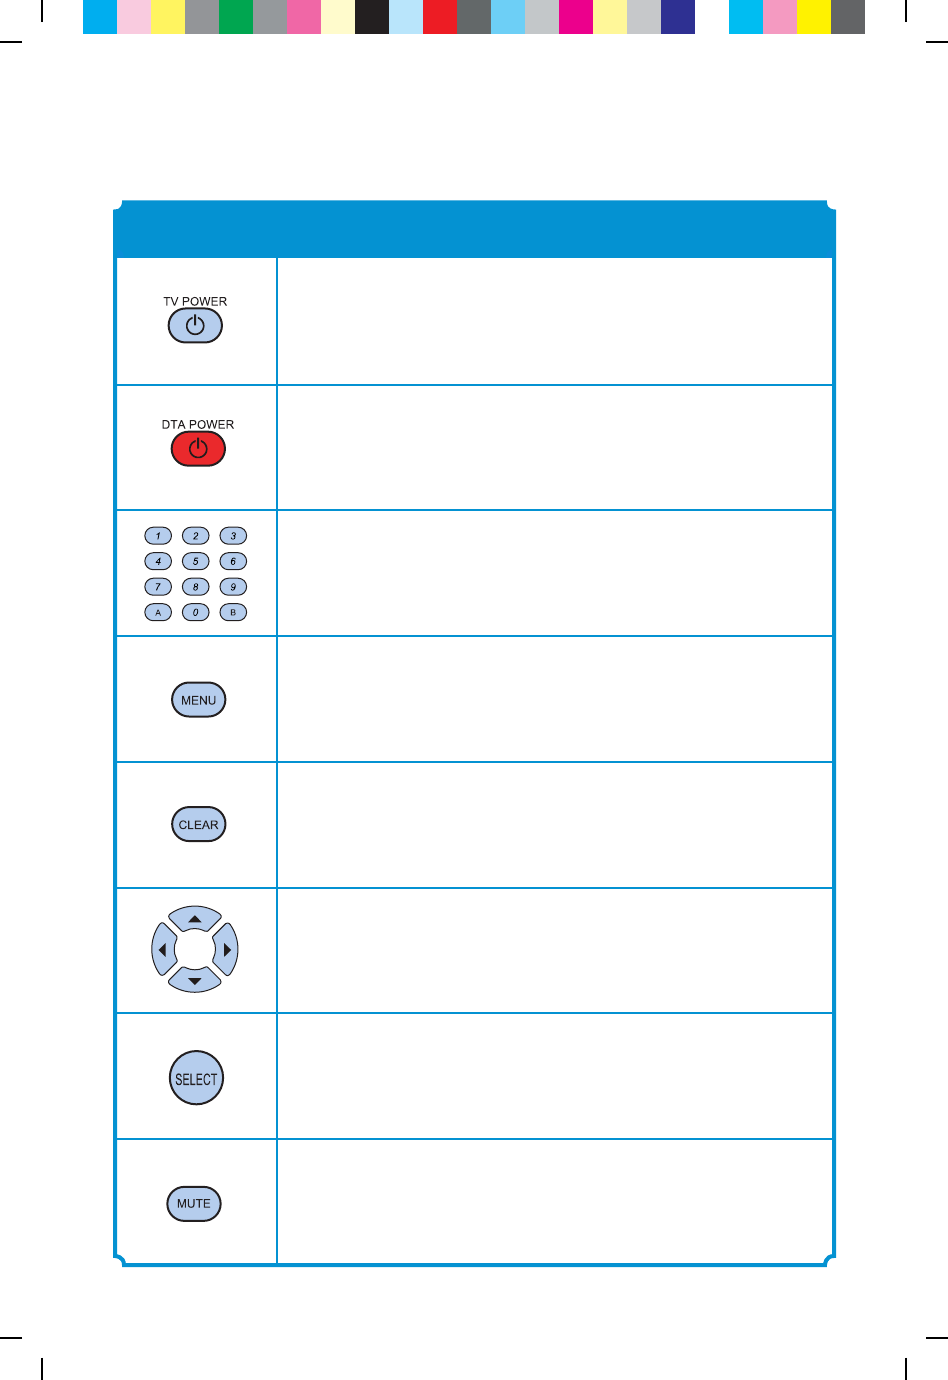
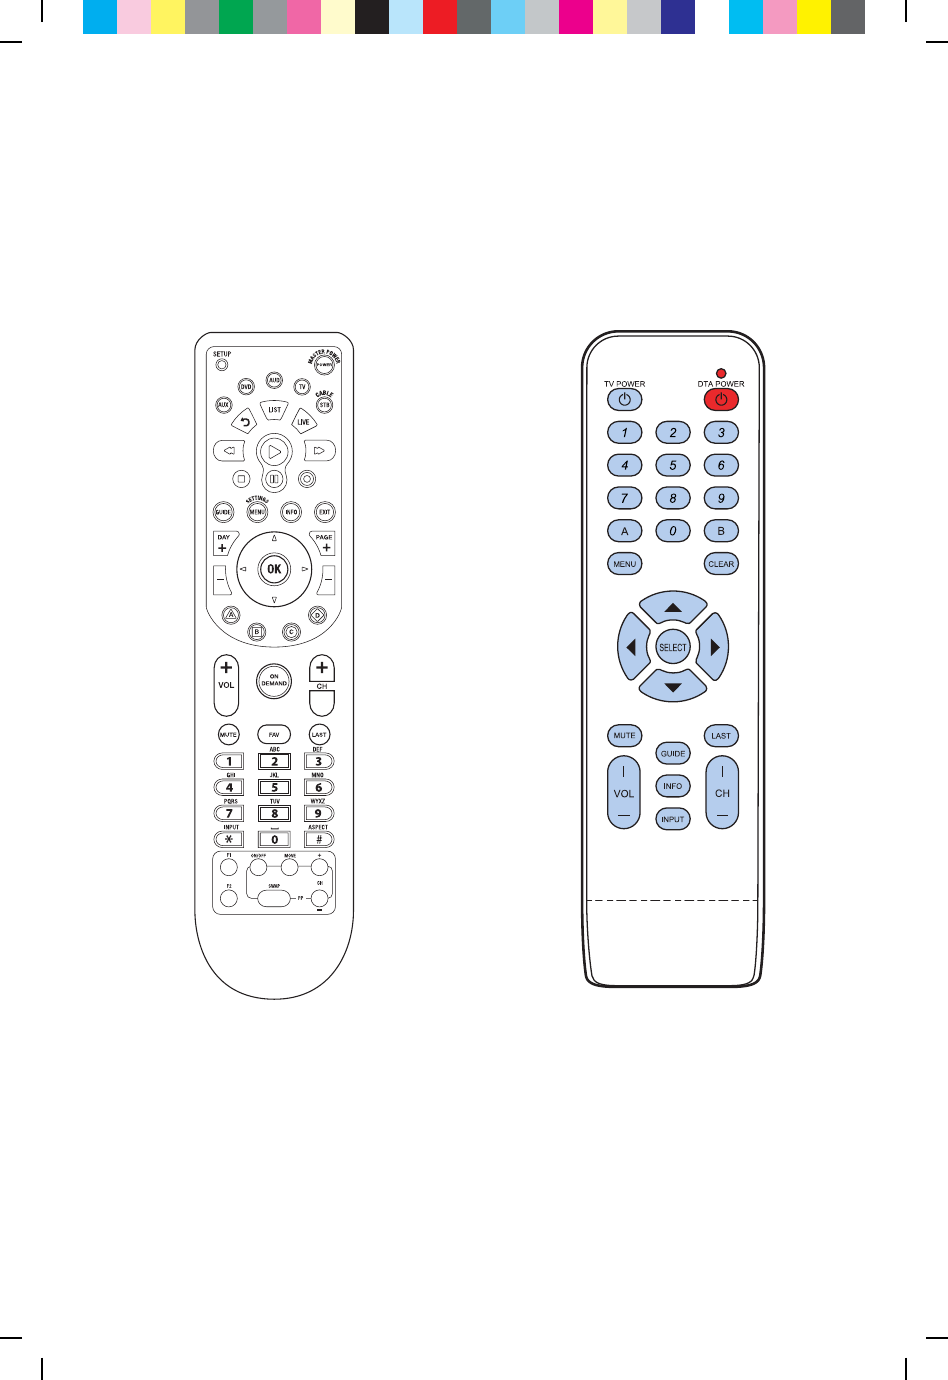
When the remote has been programmed to the TV,
TV POWER will turn the TV on and o.
Use DTA POWER to turn the HD-DTA on and o.
Use the key pad (0-9) to directly select the channels.
Use MENU to display the Menu screen.
Use CLEAR to erase the last digit you had entered.
Use Navigation Keys to move the cursor UP, DOWN, LEFT,
DOWN.
Use SELECT to select the item the cursor is pointing to.
Press MUTE once to turn the sound on or o.
FUNCTIONKEY
Remote Operation Guide
C25M 75Y 50K CY GB50 75M 25Y K25C MY GB75 50C GB25 M50Y 25K CM P75C 50M Y75K
24
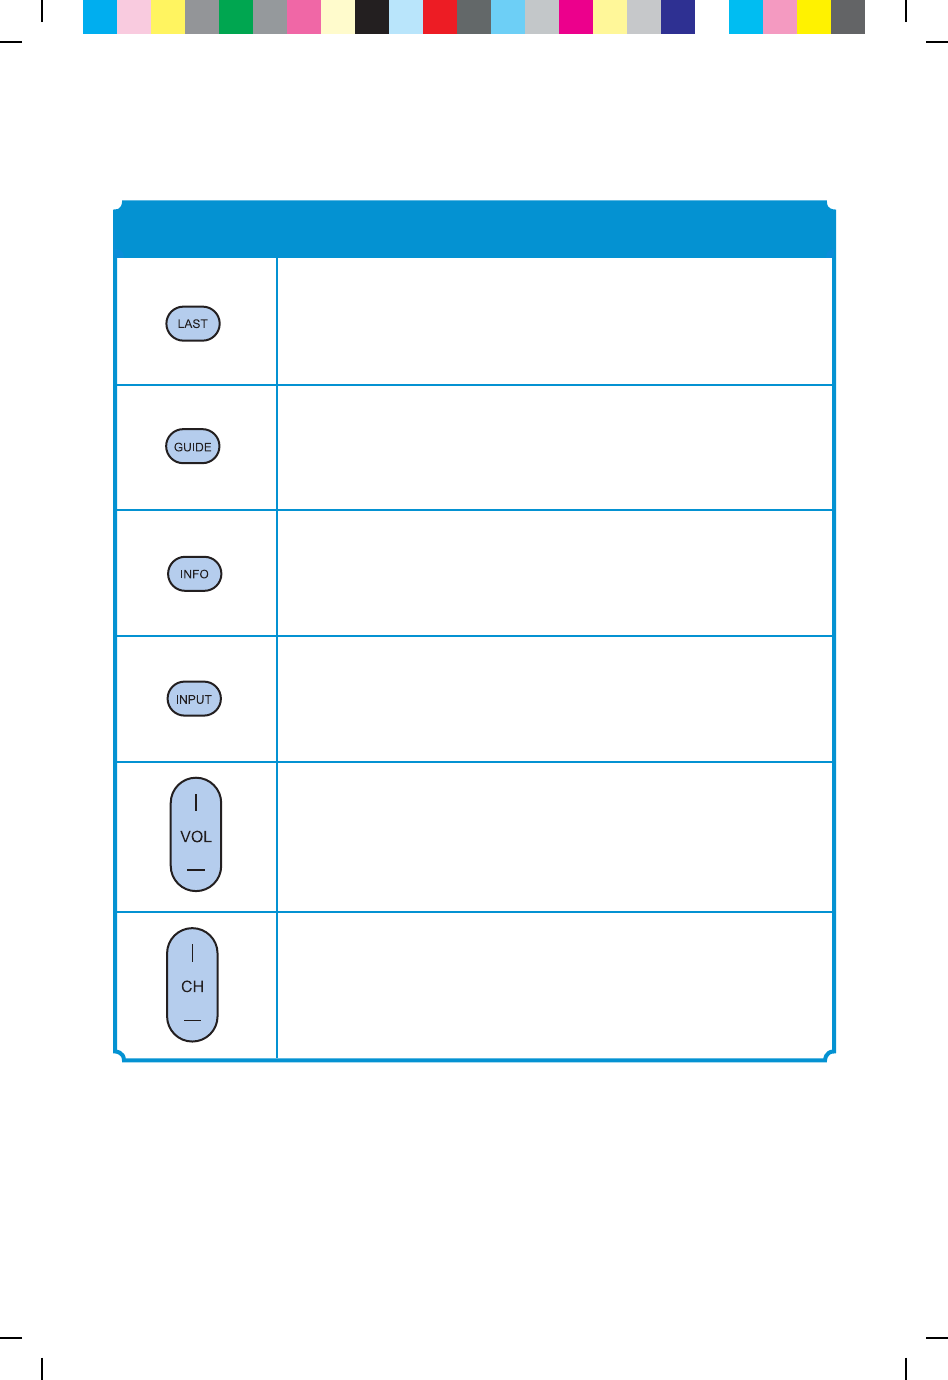
Use LAST to recall the last channel.
Use GUIDE to display the Electronic Program Guide.
Use INFO to display information relating to current
contents.
Use INPUT to toggle among TV Input signals.
Use VOL+ (or VOL-) to raise (or lower) the volume.
Use CH+ (or CH-) to select the next higher (or lower)
channel.
FUNCTIONKEY
Remote Operation Guide
C25M 75Y 50K CY GB50 75M 25Y K25C MY GB75 50C GB25 M50Y 25K CM P75C 50M Y75K
25
C25M 75Y 50K CY GB50 75M 25Y K25C MY GB75 50C GB25 M50Y 25K CM P75C 50M Y75K
26
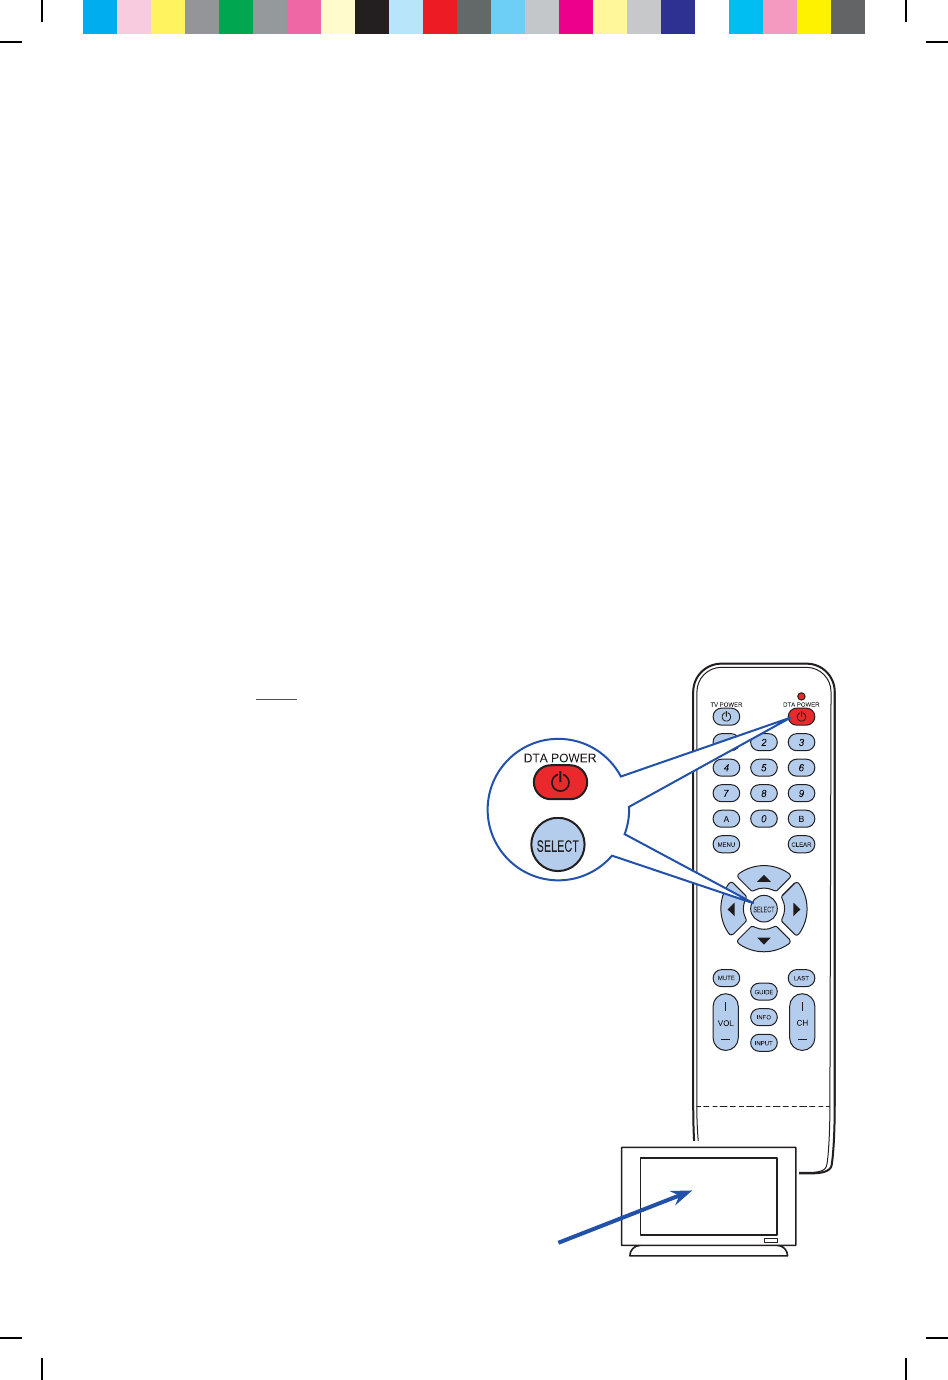
Follow these steps to “pair” a remote with a HD-DTA:
RF Remote Pairing Process
When multiple Technicolor remotes work in a shared space, interference can result.
To avoid this problem, the remote must be paired with the HD-DTA.
Make certain no other Technicolor remote is in the area.
Turn on your HD-DTA.
Turn on your TV using the buttons on the TV or the TV remote
(not a HD-DTA remote in this instance).
Press and hold both DTA POWER and SELECT keys
at the same time.
123
Code to appears on the screen.
Step 1
Step 2
Wait, then a 3 digit validation code will display on the TV.
C25M 75Y 50K CY GB50 75M 25Y K25C MY GB75 50C GB25 M50Y 25K CM P75C 50M Y75K

27
Step 3
Release both remote keys.
Enter the 3 digit code using the HD-DTA remote.
When remote is successfully paired with the HD-DTA, the
remote’s red light will blink twice.
C25M 75Y 50K CY GB50 75M 25Y K25C MY GB75 50C GB25 M50Y 25K CM P75C 50M Y75K

28
Troubleshooting Guide
If the remote control does not work:
• Checkthatthebatteriesstillhavechargeandareinsertedcorrectly.
• Makesureyourremotecan“see”thefrontoftheHD-DTA.
If there is no picture on the TV and the light on the HD-DTA is
blinking:
• Checkyourcoaxialcablesandmakesurethattheyareattached
correctly.
• UnplugtheHD-DTA,plugitbackin,thenwait5minutesforittoreset.
If there is no picture on the TV and the light on the HD-DTA is solid
(not blinking):
• CheckthattheTVistunedtotheproperchannel(Ch 3 or Ch 4).
• IfyouarealsoconnectedtoaVCR,tryturningtheVCRo.
• CheckthattheHD-DTAisconnecteddirectlytothecableprovider
outletinyourwall.
• Makesurethatallcablesarermlyconnected.
• ChecktheinputsettingonyourTV,makesurethatitisseton
ANTorCABLE.
C25M 75Y 50K CY GB50 75M 25Y K25C MY GB75 50C GB25 M50Y 25K CM P75C 50M Y75K

29
If the audio is in a language that you did not expect to hear:
• Youmayhavechangedtoanalternatelanguagesetting–Pressthe“LANG”button
onyourremotecontroloneortwotimes.
If the remote is turning the TV o and on and changing the channels
but not changing the volume:
• YourTVvolumemayhavebeenturnedallthewaydownormutedwiththeoldTV
remote.Refertopage26.
If your HD-DTA is not coming on:
• MakesurethatthepowercordissecurelyconnectedtothebackoftheHD-DTA.
• MakesurethattheHD-DTApowercordispluggedintoaworkingpoweroutlet.
If you cannot get the HD-DTA remote programmed to your TV:
• YoumaynotbehittingtheCH+enoughtimes.
• Besuretopushthe“set”buttonwithin5secondsonceyourTVturnso.
• YoumaybehittingtheCH+oncetheTVhasalreadyturnedo.Startoverandpress
thebuttonslowly.
• Trythealternateprogrammingmethodonpage19.
VCR is not recording the right channel:
• TheVCRwillonlyrecordthechannelthattheHD-DTAistunedto.SetyourTV
andVCRtotheproperchannel(Ch 3 or Ch 4),thenusetheHD-DTAremoteto
tunetheHD-DTAtothechanneltoberecorded.
C25M 75Y 50K CY GB50 75M 25Y K25C MY GB75 50C GB25 M50Y 25K CM P75C 50M Y75K

30
DTA Operation Guide
(Two remotes)
If you were unable to program your remote, you will need to use two
remotes to operate your TV:
the HD-DTA remote and the one that came with your TV.
Setting the remote volume
1. UsetheremotecontrolthatcamewithyourTV
toadjustthevolumetoacomfortablelevel.This
shouldbethelasttimeyou’llusethisremotefor
volumecontrol.
2. GoingforwarduseonlyyourHD-DTAremoteto
adjustvolumeupordown.
Caution:
Don’t use your TV remote to change channels.
Your TV must always be set to the proper
channel (Ch 3 or Ch 4) or you will
see a snowy or blank screen.
C25M 75Y 50K CY GB50 75M 25Y K25C MY GB75 50C GB25 M50Y 25K CM P75C 50M Y75K
31
Using two remotes
Use the remote that came
with your TV to turn
the TV on and o.
Use your HD-DTA remote
to change channels
and adjust volume.
C25M 75Y 50K CY GB50 75M 25Y K25C MY GB75 50C GB25 M50Y 25K CM P75C 50M Y75K

36899020
C25M 75Y 50K CY GB50 75M 25Y K25C MY GB75 50C GB25 M50Y 25K CM P75C 50M Y75K