Tekcom TP-329 14 CH FRS TRANSCEIVER User Manual
Tekcom Industries Limited 14 CH FRS TRANSCEIVER Users Manual
Tekcom >
Users Manual
OWNER’S MANUAL
TP-329
INTRODUCTION
Thank you for selecting the Oregon Scientific™ TP329 as your product of
choice. This product is a portable, easy-to-use two-way radio transceiver.
You can use it to contact your family and friends at shopping malls, amusement
parks, or even sports events!
The transceiver has 14 channels and 38 CTCSS (Continuous Tone Coded
Squelch System) codes. If someone else is using the same channel as yours,
and you do not want to hear that person, you can select another channel or
use the CTCSS feature. You can talk with a person who has the same
transceiver if both are tuned to the same channel and/or CTCSS code.
KEY FEATURES
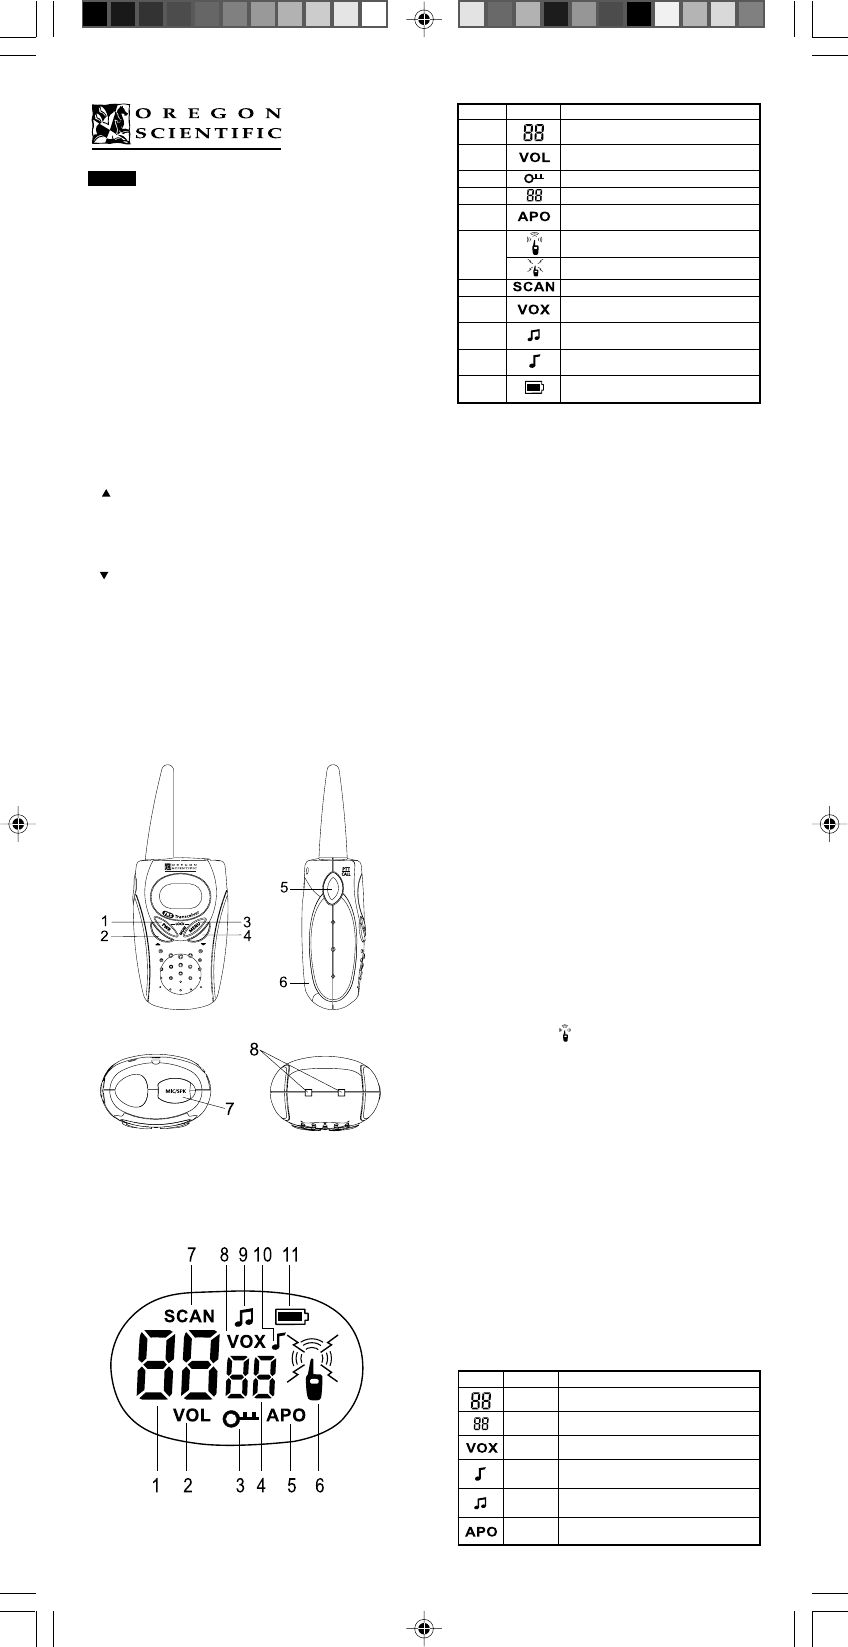
1. PWR button
Press and hold the PWR button for two seconds to enable/disable the
transceiver.
2. button
The Up button is used to adjust volume and settings up one notch.
3. MENU button
a) Press MENU to enter the Menu Functions mode.
b) Press and hold MENU for 2 seconds to disable Auto-Squelch of the
current channel.
4. button
The Down button is used to adjust volume and settings down one notch.
5. Push-To-Talk button
To talk, press and hold the PTT (Push-To-Talk) button, then speak into
the MIC to transmit.
6. Battery Compartment
Your transceiver uses three (3) AAA Alkaline batteries for power.
7. External Microphone/Speaker Jack
Connect optional microphones, speakers, or earphones into this jack.
8. Charging Contacts
If Ni-MH rechargeable batteries are installed, rest the unit on the
optional 2-bay Cradle Charger to recharge.
LCD DISPLAY SYMBOLS
English
Number Symbol Explanation
1. Shows the selected channel number.
2. Displays when the volume of radio is being
adjusted higher or lower.
3. Display when the Key Lock is activated.
4. Shows the selected CTCSS code number.
5. Indicates the Automatic Power Off mode is
activated.
6. Displays when your radio is transmitting or the
CALL function is set.
Displays when your radio is receiving a signal.
7. Indicates when the scan mode is activated.
8. Displays when the voice detection mode is
activated.
9. Displays when the key tone function is
activated.
10. Indicates that the Roger Beep mode is
activated.
11. Indicates current battery level. The symbol
flashes when battery is low.
SAFETY AND CARE INSTRUCTIONS
Safety precautions
Please observe the following safety precautions when setting up and using
this product.
· LCD panel – The LCD panel is made of glass, and may break if the unit
is dropped or impacted.
· Heat sources – Keep the product away from heat sources such as radia
tors, stoves, heaters, and other heat-generating products.
· Water and moisture – Do not use the product in or near water or in high
moisture areas such as a bathroom.
Caring for this product
To ensure you receive the maximum benefit from using this product, please
observe the following guidelines.
· Cleaning – Use a damp cloth. Do not use liquid cleaning agents, ben
zene, thinner, or aerosols.
· Repair – Do not attempt to repair the product or modify the circuitry by
yourself. Dangerously high voltages are contained inside the unit. Con
tact the retailer or a qualified repairman if the product requires servic
ing. Only use replacement parts that are recommended by the manufac
turer.
· Do not scratch hard objects against the LCD display as this may cause
damage.
Caution
· To avoid risk of fire or injury, do not attempt to charge non-recharge
able batteries.
· Replace only batteries with the same or equivalent type recommended
by the manufacturer.
· Please dispose of old, defective batteries in an environmentally friendly
manner in accordance with the relevant legislation.
· No naked flames, such as lighted candles, should be placed near the
apparatus.
BASIC FUNCTIONS
Operating the Transceiver
1. To start using your radio, insert three AAA batteries or Ni-MH recharge
able batteries (previously charged) into the battery compartment, not
ing the polarities
2. Press Power On/Off button to turn on the radio. Adjust the volume to a
desired level.
3. Select a channel and /or CTCSS code.
4. Press and hold down the PTT (Push-To-Talk) button and speak into the
MIC to transmit. The icon will then appear. When you have finished
your transmission, release the PTT button.
5. The transceiver will automatically play received transmissions if the
PTT button is not held.
NOTE: You can only communicate with another radio that is using the same
channel and/or the same CTCSS code as your radio.
Call Function
You can send a ringer sound to all radios tuned to the same channel and/or
the CTCSS code as your radio. To send a call, quickly press PTT key twice.
Using the Key Lock
You can lock the buttons on the transceiver to avoid accidentally enabling
the device. Press and hold the POWER and MENU buttons to enable or
disable the Key Lock.
Auto-Squelch Function
Your FRS transceiver has an Auto-Squelch function, which means you will
not hear anything on a channel unless someone is transmitting nearby on the
same channel. You can turn off the Auto-Squelch to hear weaker, distant
transmissions by pressing and holding MENU for 2 seconds. The enable the
function again, press and hold MENU for 2 seconds.
MENU OPTIONS
To access the Menu Options, press the MENU button. The transceiver will
then toggle between the following configurable settings.
Symbol Setting Description
Channel Selects channel for transmission
CTCSS Selects a CTCSS code for the current channel
VOX Enable/disable voice-activated transmission
Roger Beep Enable/disable beep heard after the finish of
a received transmission
Key Tone Enable/disable beep when a key on the trans
ceiver is pressed
Automatic Enable/disable automatic shut-off after device
Power-Off is idle for 2 hours
CTCSS Privacy Codes
Channel Frequency (in Hz) Channel Frequency (in Hz)
01 67.0 20 131.8
02 71.9 21 136.5
03 74.4 22 141.3
04 77.0 23 146.2
05 79.7 24 151.4
06 82.5 25 156.7
07 85.4 26 162.2
08 88.5 27 167.9
09 91.5 28 173.8
10 94.8 29 179.9
11 97.4 30 186.2
12 100.0 31 192.8
13 103.5 32 203.5
14 107.2 33 210.7
15 110.9 34 218.1
16 114.8 35 225.7
17 118.8 36 233.6
18 123.0 37 241.8
19 127.3 38 250.3
THE FCC WANTS YOU TO KNOW
This equipment has been tested and found to comply with the limits for a
Class B digital device, pursuant to Part 15 of the FCC Rules. These limits are
designed to provide reasonable protection against harmful interference in
a residential installation. This equipment generates, uses, and can radiate
radio frequency energy and, if not installed and used in accordance with the
instructions, may cause harmful interference to radio communications.
However, there is no guarantee that interference will not occur in a particular
installation. If this equipment does cause harmful interference to radio or
television reception, which can be determined by turning the equipment off
and on, the user is encouraged to try to correct the interference by one or
more of the following measures:
. Reorient or relocate the receiving antenna.
. Increase the separation between the equipment and receiver.
. Connect the equipment into an outlet on a circuit different from that
to which the receiver is connected.
. Consult your local RadioShack store or an experienced radio/TV
technician for help.
The device complies with Part 15 of the FCC Rules. Operation is subject to
the following two conditions:
(1) This device may not cause harmful interference, and (2) this device
must accept any interference received, including interference that may
cause undesired operation.
SAFETY INFORMATION
Your wireless handheld portable transceiver contains a low power
transmitter. When the Push-To-Talk (PTT) button is pressed, it sends out
radio frequency signals. The device is authorized to operate at a duty factor
not to exceed fifty percent. In August 1996, the Federal Communications
Commission adopted RF exposure guidelines with safety levels for handheld
wireless devices.
CAUTION
To maintain compliance with the FCC’s RF exposure guidelines, hold the
transmitter and antenna at least two inches from your face and speak in a
normal voice, with the antenna pointed up and away from your face. If you
wear the handset on your body while using the headset accessory, use only
the supplied belt clip for this product. When transmitting, take it out of the
belt to ensure the antenna is at least one inch (2.5cm) from your body.
Use only the supplied antenna. Unauthorized antennas, modifications, or
attachments could damage the transmitter and may violate FCC regulations.
SPECIFICATIONS
RX Frequency ................................................ 462.5625 - 467.7125 MHz
Channels. ............................................................................................... 14
Modulation type ................................................................................. FM
Antenna impedance .................................................................... .50 Ohm
Microphone .................................................................... condenser Type
Power supply ............................................................... 3 × AAA Alkaline
Sensitivity at 12dB Sinad ............................................................... .0.5µV
Adjacent Channel Rejection ........................................................... 45dB
Audio Squelch .................................................................................. Auto
Audio output power .................................................... 100mW @ 8 Ohm
Audio Distortion ................................................................................. 7%
RF Output Power ...................................................... 500 mW @4.5VDC
Harmonic Emissions ................................................................. > = 46dB
Dimensions (HWD) ........................................................... 87×54×36mm
Weight(without batteries) ................................................................... 74g
ADDITIONAL RESOURCES
Visit our website (www.oregonscientific.com) to learn more about your
transceiver and other Oregon Scientific™ products such as digital cam-
eras, hand-held organizers, alarm clocks, and weather stations. The website
also includes contact information for our customer service department, in
case you need to reach us.
2004 Oregon Scientific. All rights reserved.
NOTE: When you are finished configuring the current setting, press MENU
again to confirm and move to the next setting. To confirm the changes but
quit the Menu Options, press PTT.
Selecting a Channel
Select between the 14 channels of the transceiver to use to communicate
with others. To transmit, the transmitter and the receiver must be on the same
channel.
Scanning
When you are selecting a channel, you can also activate the channel scan
function by pressing and holding or . will be shown on the
display. If a valid signal is present, the transceiver will pause on the current
active channel. Press a button to set this as your channel. Otherwise, the
scan mode will then immediately search for the next channel if no button is
pressed after 5 seconds. During scan, pressing PTT or MENU key will stop
the scan mode and exit the menu. Or, pressing MENU key will stop scan-
ning and go to the next setting.
Selecting a CTCSS code
The CTCSS is like having a sub-channel within a channel, giving you greater
communication flexibility. It lets you talk and listen to other transmitters set
to BOTH the same channel and CTCSS code. There are 38 CTCSS codes
to choose from (see Appendix).
Scanning the CTCSS
You can also activate the CTCSS scan function by pressing and holding
or . will be shown on the display. If a valid signal is present, the
transceiver will pause on the current active CTCSS channel. Press a button
to set this as your CTCSS channel. Otherwise, the scan mode will then
immediately search for the next CTCSS channel if no button is pressed after
5 seconds. During scan, pressing PTT or MENU key will stop the scan
mode and exit the menu. Or, pressing MENU key will stop scanning and go
to the next setting.
Setting VOX
This setting automatically detects and transmits your voice through the se-
lected channel, without needing to push and hold PTT. Select between 3
levels of VOX by pressing or key. The icon is displayed when
this function is enabled.
LCD Symbol Description
0 VOX disabled
1 Low sensitivity – only audibly loud voices are
transmitted (useful for noisy environment)
2 Normal sensitivity – ideal setting for voice-
activated transmission
3 High sensitivity – all detected sounds (includ
ing noise) are transmitted
Roger Beep Mode
If the Roger Beep mode is enabled, the receiving party will hear a beep tone
when you finish transmitting a message. This avoids situations where mes-
sages are interrupted because the other party is not aware that the transmis-
sion is not finished. Press or to activate or deactivate the Roger Beep
function. Icon will be shown if activated.
Key Tone
The Key Tone function, if enabled, causes the unit to beep whenever a
button is pressed. Press or to activate or deactivate the Key Tone
function. Icon ‘ ’ will be shown if activated.
APO Function (Automatic Power Off)
This function enables your transceiver to automatically shut itself off if left
idle for 2 hours. Press or key to activate or deactivate the APO func-
tion. Icon will be shown if activated.
NOTE: To re-enable the transceiver after automatic shut-off, simply press
PWR button.
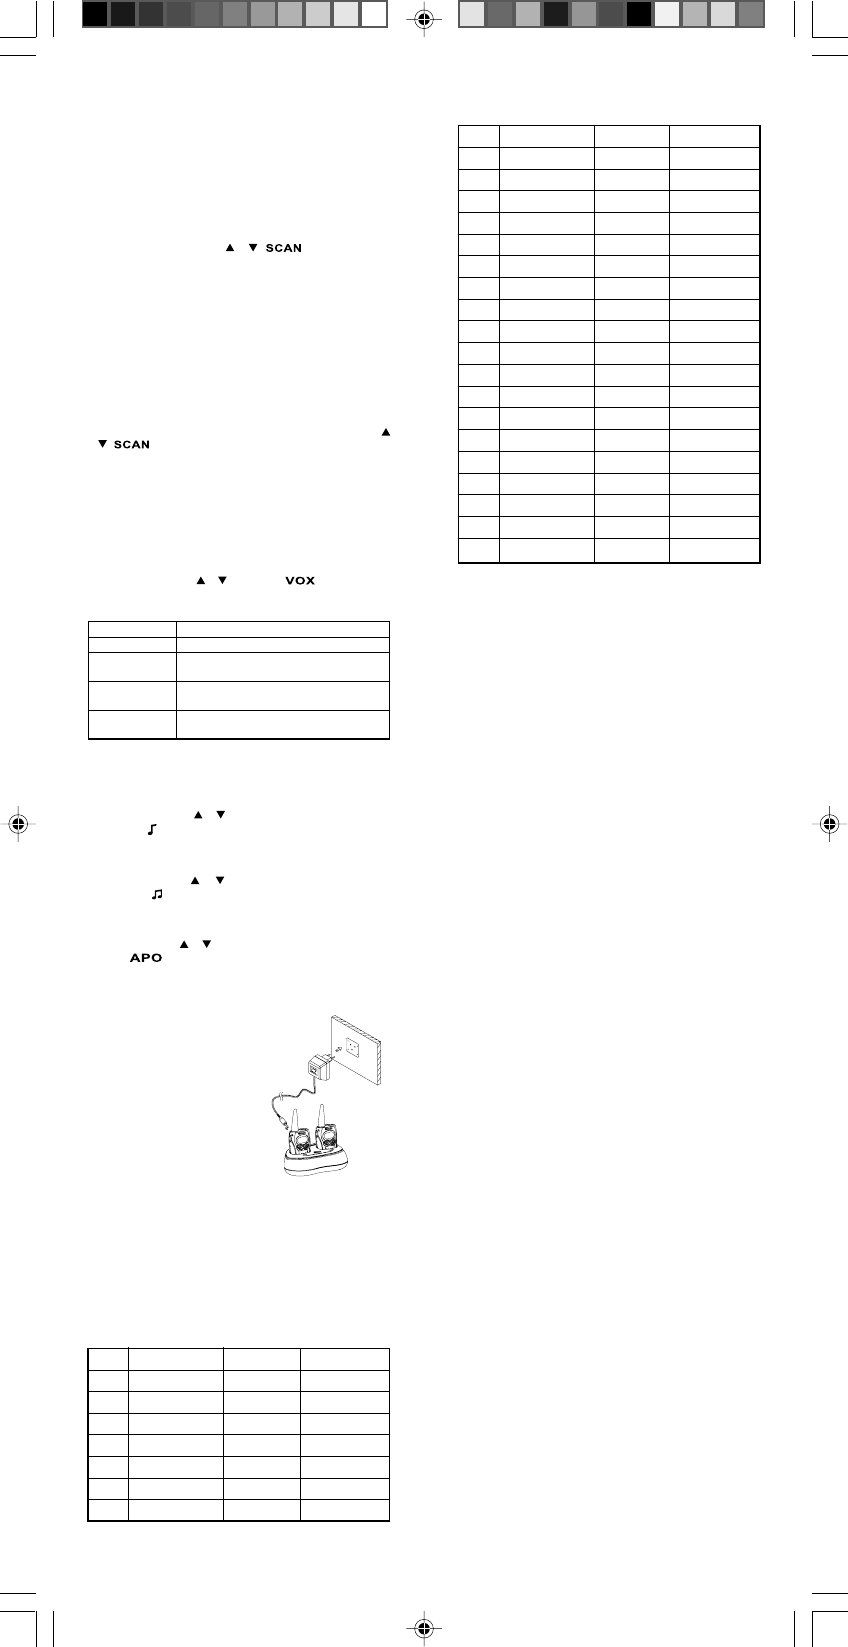
CHARGING CONTACTS
(OPTIONAL)
You can directly charge Ni-MH re-
chargeable batteries without taking bat-
teries out from the battery compartment
by using an optional 2-bay cradle charger
(sold separately). You can recharge up
to two radios at the same time. The LED
on the cradle charger will light red when
the transceivers are charging. Complete
charging takes about 14 to 1 6 hours.
Located inside the transceiver’s battery
compartment is a charging switch, which
enables the recharging of batteries. When
placed on the cradle. The switch must be
set to ‘ON’ when rechargeable batteries are used and recharged using the
cradle. If alkaline batteries are used, the switch should be set to ‘OFF’.
WARNING: Do not put transceivers into the charger when using alkaline
batteries.
CAUTION: The cradle charger does not automatically switch off after the
batteries have been fully recharged. As such, there is a danger of over-
charging, which may shorten the batteries’ lifespan heavily.
APPENDIX
Channel Frequencies
Channel Frequency (in MHz) Channel Frequency (in MHz)
01 462.5625 08 467.5625
02 462.5875 09 467.5875
03 462.6125 10 467.6125
04 462.6375 11 467.6375
05 462.6625 12 467.6625
06 462.6875 13 467.6875
07 462.7125 14 467.7125