Texas Instruments GEMINIWP GEMINI Word Pad User Manual webpad15 ug
Texas Instruments Inc. GEMINI Word Pad webpad15 ug
Contents
- 1. Users Guide
- 2. Revised User Manual
- 3. user manual version 13
Users Guide
© 1999 National Semiconductor® Corporation www.national.com
WebPAD™ 1.5 System User’s Guide
Confidential
Nov 1999
Revision 1.0
WebPAD™ 1.5 System
The Ultimate Internet Personal Access Device
GXLV Processor
System consists of three pieces:
—Tablet
— Base Station
—Cradle
9.5x11.75 inch tablet with interactive 10
inch DSTN screen (800x600 color)
Weighs 3.25 pounds
Preloaded, preconfigured software. Just
power up and use.
Familiar Internet browser user interface
Allows user to select and access
“Favorite” web sites
Wireless operation
— Transmits over a 2.4 GHz radio
frequency signal
— 300 feet range from base station
Battery operated
— 3 hours of active use
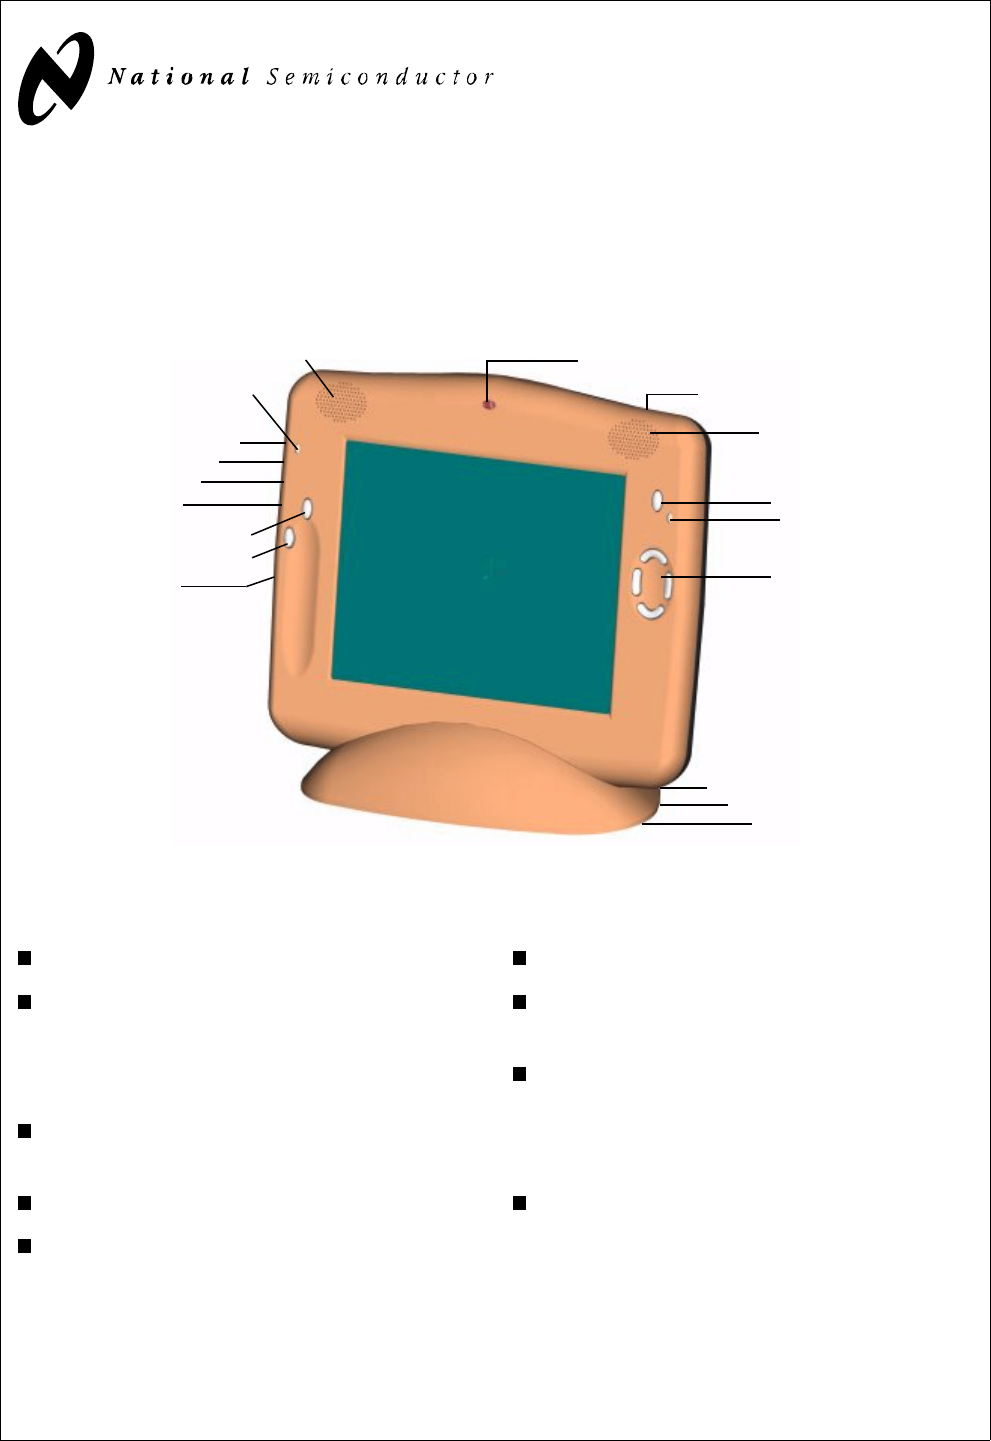
Speaker
Internal Microphone
LED
User Defined Button 1
User Defined Button 2
Power Button
LED
Scroll Pad
Cradle
DC Power
Headphone
Microphone
USB Port
Speaker
External DC
Reset Button
Stylus
USB Port
National Semiconductor is a registered trademark and WebPAD is a trademark of National Semiconductor Corporation. All other products mentioned herein are trademarks of their
respective owners and are hereby recognized as such.

www.national.com 2 (Confidential) Revision 1.0
Table of Contents
1.0 UserInterface.....................................................4
1.1 GRAPHICALUSERINTERFACE .............................................4
1.1.1 QNXMenuButton ..................................................5
1.1.2 RFLinkTaskBox ...................................................5
1.1.3 VirtualKeyboardTaskBox ............................................5
1.2 LEDS ...................................................................5
1.3 BUTTONS ...............................................................5
1.4 RESETBUTTON ..........................................................5
1.5 APPLICATIONS ...........................................................6
1.5.1 TouchScreenCalibration .............................................7
1.5.2 Terminal ..........................................................7
1.5.3 VirtualKeyboard....................................................7
1.5.4 LinkStatus ........................................................7
1.5.5 MediaPlayer .......................................................7
1.5.6 RealPlayer® ..................................................................... 7
1.5.7 Email ............................................................7
1.5.8 News ............................................................7
1.5.9 Browser ..........................................................7
1.5.10 LowBatteryWarning ................................................7
1.5.11 DECTMonitor(DECT-basedsystemsonly) ...............................8
1.5.12 InternetDialer(DECT-basedsystemsonly) ...............................8
2.0 SystemConfiguration ..............................................8
2.1 BROWSERCONFIGURATION ...............................................8
2.1.1 Browser>Cache ....................................................8
2.1.2 Browser>Fonts .....................................................8
2.1.3 Browser>Colors ....................................................9
2.1.4 Browser>Network...................................................9
2.2 BUTTONSCONFIGURATIONOPTIONS ......................................10
2.3 RADIOCONFIGURATIONOPTIONS .........................................11
2.4 SOFTWAREIMAGEVERSION ..............................................11
3.0 FavoriteSitesWindow.............................................12
4.0 Setup and Troubleshooting . . . . . . . . . . . . . . . . . . . . . . . . . . . . . . . . . . . . . . . . . 12
4.1 SETTINGUPAWEBPAD1.5SYSTEM .......................................12
4.1.1 Dect-basedBaseStation ............................................12
4.1.1.1 SetupGuidelines ..................................................12
4.1.1.2 WebPAD/BaseStationRegistration....................................13
4.1.1.3 UsingTheSystem .................................................13
4.1.1.4 AddingaNewDial-upAccount .......................................13
4.1.1.5 LoginScripts .....................................................13
4.1.2 802.11-basedAccessPointBaseStation ...............................14
4.1.2.1 SetupGuidelines ..................................................14
4.1.2.2 UsingTheSystem .................................................14
4.1.2.3 AddingaNewDial-UpAccount .......................................14
4.2 TROUBLESHOOTING .....................................................14
4.2.1 Tabletwillnotpoweron .............................................14
4.2.2 RFlinkisdown....................................................14
4.2.3 Receivedanerrorwhentryingtobringupawebsite ......................15
4.3 USINGTWOORMORETABLETSFROMTHESAMEBASESTATION ..............15
4.4 REALAUDIO/REALVIDEOCONFIGURATION ..................................15

www.national.com 4 (Confidential) Revision 1.0
WebPAD™ 1.5 System User’s Guide
1.0 User Interface
The WebPAD™ system’s tablet user interface is simple
and easy to use. It consists of an interactive touch screen,
scroll pad, and several user-configurable buttons. Speak-
ers and a microphone are built in. Additionally, two ports
have been added to the side of the tablet to allow for con-
nectivity to USB devices (i.e., external keyboard, head-
phones, external microphone, etc.).
The main way to interact with the tablet is through the
touch screen. Links and menus are accessed by touching
the screen directly over their titles. Additionally, the touch
screen is sensitive enough to allow for handwriting recog-
nition software to be used as a means of inputting charac-
ters. The touch screen on the tablet works with any type of
pointer, from a stylus (included) to the simple touch of a
finger.
All of the buttons on the tablet, including the scroll pad,
are user-configurable, except the power button. The user
can change the definition of the buttons by entering the
system configuration mode (see Section 2.0 “System
Configuration”). Some of the buttons suggest clearly
defined operations, like the scroll pad, but the definitions
are changeable.
To input text, whether for an email, search criteria, or to
enter a URL, a virtual keyboard is available. The keypad
works the same as a normal keyboard and is accessed
from the QNX menu button or the Virtual Keyboard task
box at the bottom of the screen. The user touches the
screen just above the desired key and the letter appears
next to the cursor.
1.1 GRAPHICAL USER INTERFACE
When the tablet finishes booting, the graphical user inter-
face (GUI) is started, as shown in Figure 1. The GUI con-
tains a window area and a task bar. The background of
the window area contains an application launcher. Touch-
ing either the icon or button beneath the icon invokes the
desired application. When applications are invoked, their
windows reside in this area.
The task bar contains a menu button and boxes for each
of the tasks currently running. The menu button is labeled
“QNX” and offers the user another method of launching
applications. To use the menu, touch the QNX button and
then the desired application.
Two tasks are initially started up when the tablet is booted:
RF Link task and Virtual Keyboard task. Touching any of
the task boxes on the task bar brings that task’s window to
the foreground (See Section 1.1.2 “RF Link Task Box” and
Section 1.1.3 “Virtual Keyboard Task Box”).
FIGURE 1. Application Launcher Screen
QNX® Menu Button
Invoke
Email Reader Invoke
News Reader
Invoke Web Browser
RF Link Task Box Virtual Keyboard Task Box Task Bar
Window Area

Revision 1.0 (Confidential) 5 www.national.com
WebPAD™ 1.5 System User’s Guide
1.1.1 QNX Menu Button
Touch the QNX pop-up menu button to view the menu of
available applications. To invoke an application, simply
touch the name of the application.
1.1.2 RF Link Task Box
The RF Link task displays the status of the radio link and
battery. Selecting the box on the task bar will invoke the
Link Status application (see Section 1.5.4 “Link Status”),
showing the user the strength of the radio signal from the
base station, the amount of charge left on the battery, and
the operational status of the link to the base station (“RF
Link Up”) or not (“RF Link Down”). Refer to Section 1.5.4
“Link Status” for more details on this task.
1.1.3 Virtual Keyboard Task Box
Touching the Virtual Keyboard task box invokes a soft-
ware keyboard which allows the user to interact with the
system. The soft keyboard is the main method of entering
URLs, responding to emails, etc.
1.2 LEDS
The tablet contains two LEDs (one amber and one green).
The amber LED is on the left side of the tablet, just above
the two user-defined buttons. It is a charge indicator. If the
LED is on, the battery is fully charged. If the LED is blink-
ing, the battery is being charged. If the LED is off, the sys-
tem is running off the batteries.
The green LED is on the right side of the tablet, just below
the power button. It is a status indicator. If the LED is on,
the tablet has been powered up. If the LED is blinking, the
batteries inside the tablet are low on power. If the LED is
off, the tablet has been powered off.
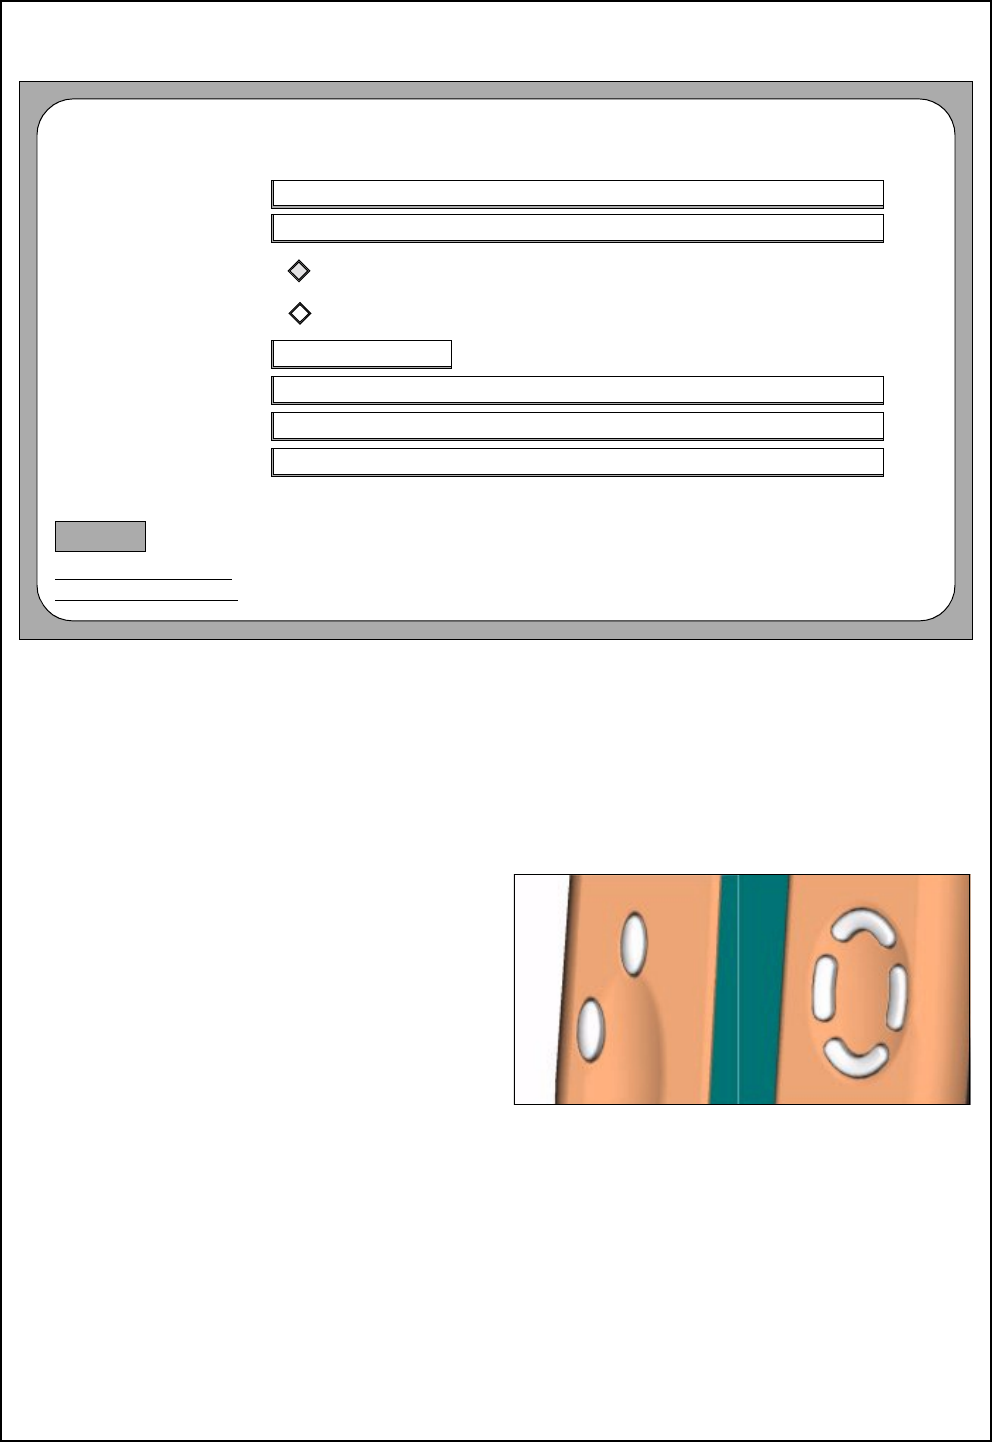
1.3 BUTTONS
The tablet has seven buttons:
• One power button
• Two user definable buttons
• Four buttons that form the scroll pad
The power button is in the upper right hand corner of the
tablet. To turn the system on, simply press the power but-
ton. The system will remain powered on until the button is
pressed again.
The two user-defined buttons are on the left side of the
tablet. These two buttons can be configured by the user to
perform a variety of operations. The initial settings of
these buttons may vary, so the user should verify the initial
settings of the buttons before they are used (see Section
2.2 “Buttons Configuration Options”). Pushing both user-
defined buttons at the same time invokes the touch screen
calibration application. See Section 1.5.1 "Touch Screen
Calibration" for details on this application. If the applica-
tion configured for a particular button is running when the
button is pressed, the application is aborted. This includes
pressing both buttons to abort the touch screen calibration
application.
Scroll pad buttons are also user-defined. At their default
settings, the buttons are used to scroll around in web
pages. Pressing one of these buttons will scroll the screen
in that direction. The user can reconfigure these buttons
but it is not recommended. These buttons have a built in
repeat function, therefore, if they are reconfigured, the
function may be initiated multiple times with each press of
the button. Refer to Section 2.2 “Buttons Configuration
Options” for details on configuring the user-defined and
scroll pad buttons.
1.4 RESET BUTTON
The tablet also contains a recessed reset button, located
on the left edge. This button is used to perform a hard
reset to the system. This will put the system into a known
reset state. This should only be used if all other attempts
to remedy any problems have been exhausted.
www.national.com 6 (Confidential) Revision 1.0
WebPAD™ 1.5 System User’s Guide
1.5 APPLICATIONS
Applications range from a web browser and email reader
to MediaPlayer and touch screen calibrator. Each applica-
tion has its own function.
Table 1 summarizes the available applications and their
access mechanisms. The subsections that follow provide
descriptions of each of the applications.
TABLE 1. Applications Summary
Application Path/Command Access Mechanisms
Touch Screen
Calibration /usr/webpad/bin/calib Terminal window
User-defined button, if configured
Pressing both user-defined buttons, simultaneously
Terminal /usr/photon/bin/pterm QNX menu: Terminal
User-defined button, if configured
Virtual Key-
board /usr/webpad/bin/keypad QNX menu: Virtual Keyboard
Terminal window
User-defined button, if configured
Link Status /usr/webpad/bin/alert QNX menu: Link Status
Terminal window
User-defined button, if configured
MediaPlayer /usr/photon/bin/mplayer QNX menu: MediaPlayer
Terminal window
User-defined button, if configured
RealPlayer® /usr/photon/bin/rvplayer Terminal window
User-defined button, if configured
Web browser if user establishes a RealAudio® and
ReadVideo® link
Email /usr/webpad/bin/cmail Application launcher
QNX menu: Email
Terminal window
User-defined button, if configured
News /usr/webpad/cvoyager -u www.dejanews.com Application launcher
User-defined button, if configured
Browser /usr/webpad/bin/cvoyager Application launcher
QNX menu: Browser
Terminal window
User-defined button, if configured
Brightness &
Contrast /usr/webpad/bin/bright_contrast QNX menu: Brightness & Contrast
Terminal window
User-defined button, if configured
DECT Monitor
(DECT sys-
tems only)
/usr/photon/bin/Monitor QNX menu: DECT Monitor
Terminal window
User-defined-button, if configured
Internet Dialer
(DECT sys-
tesms only)
/usr/photon/bin/dialer QNX menu: Internet Dialer
Terminal window
User-defined button, if configured

Revision 1.0 (Confidential) 7 www.national.com
WebPAD™ 1.5 System User’s Guide
1.5.1 Touch Screen Calibration
To calibrate the screen, touch the center of each target in
the order that it appears on the screen, as follows:
1) Upper left corner
2) Lower left corner
3) Lower right corner
4) Upper right corner
5) Center of screen
6) Touch box in center of screen
If target 6 does not occur within 10 seconds of target 5’s
completion, the calibration routine will assume an error
has occurred and start over. Once all 6 targets have been
touched, the touch screen is calibrated. To verify calibra-
tion, drag the stylus across the screen from top to bottom
and then left to right. If the cursor does not track the stylus
properly, repeat the calibration process.
1.5.2 Terminal
A terminal window allows access to the operating system
and applications from the command line. To type com-
mands, touch the Virtual Keyboard task box or use an
USB keyboard which has been plugged in.
1.5.3 Virtual Keyboard
The Virtual Keyboard application is a Virtual Keyboard
that allows the user to enter characters without having an
external keyboard attached.
1.5.4 Link Status
The Link Status application displays the strength of the
radio signal from the base station and the strength of the
tablet’s batteries. Additionally, this application allows the
user to set the length of idle time desired before the
screen dims. To set the idle time, touch the box next to
“Dim Screen” so a check mark appears in it. Select a
length of time and touch the “Apply” button to execute and
save the selection.
1.5.5 MediaPlayer
The MediaPlayer application plays WAV and MP3 files.
1.5.6 RealPlayer®
The RealPlayer application allows the WebPAD system to
play RealAudio®and RealVideo®clips from the web.
1.5.7 Email
The email tool allows the user to compose, send, retrieve
and store emails in a variety of folder configurations. The
icons across the top of the email tool are labeled with their
functionality. The frame along the left side of the tool
shows the various mail folders that have been configured
on the system. The upper frame on the right side lists all
of the emails contained in a particular mail folder. The
lower frame on the right displays the text of the selected
email.
Before using the email tool, it must be properly config-
ured. To enter configuration mode, touch the “Config” icon
in the upper left corner of the email tool. The “Incoming
Server” and “Outgoing Server” sections must be filled out
completely. Contact the administrator of the mail system if
configuration assistance in needed. Also, the user should
fill out the “General” and “Composition” sections as com-
pletely as they like. When all the sections have been filled
out, touch the “Save” icon at the top of the tool. The tool
should now be operational. If problems occur, contact the
administrator.
1.5.8 News
Selecting the “news” icon on the application launcher
brings up a browser window and loads www.dejan-
ews.com. Although the “news” icon is not configurable, the
default page can be altered by configuring a user-defined
button and changing the www.dejanews.com part of the
URL. Once the user-defined button has been configured,
thenewpagecanonlybeaccessedviathatbutton.The
“news” icon will always launch the original URL.
1.5.9 Browser
The WebPAD system uses the QNX Voyager™ web
browser which has been customized for the WebPAD sys-
tem.
The icons along the top of the browser window provide
basic browser functionality: back, forward, reload, and
stop loading. To the right of the icons is the URL text box
that allows the user to enter a new internet address or
view previously selected sites. The icon in the upper right
corner is used to close the browser.
The icons on the left side of the browser window provide
functionality beyond basic browsing. These functions
include: bringing up a favorite web site window, adding a
web site to the list of favorites, jumping to the user’s favor-
ite search engine and cycling through the various font
types and sizes.
The icon in the upper left corner of the browser window
has multiple functions. When the icon appears as a sailing
ship, the WebPAD system is in the process of loading the
requested web site. When the icon appears as a toolbox,
the WebPAD system has finished loading the desired
page. Touching the icon puts the WebPAD system in Con-
figuration mode and stops the loading of any page cur-
rently being loaded (see Section 2.0 “System
Configuration”).
When a “mailto:” link is selected within the browser, a
“Send Mail” window will open. The user then fills out the
subject and contents of the email and touches the “Send”
button to deliver the mail to the server specified in the
“EMail Server” (see Section 2.1.4 “Browser>Network”).
Selecting the “Cancel” button in the “Send Mail” window
aborts the mail delivery operation.
1.5.10 Low Battery Warning
This application warns the user when the battery is about
to run out of power. Upon seeing this warning, the user
should power of the tablet.
www.national.com 8 (Confidential) Revision 1.0
WebPAD™ 1.5 System User’s Guide
1.5.11 DECT Monitor (DECT-based systems only)
The DECT Monitor allows the user to interact with the
DECT-based base station. This is the application used to
scan for DECT-based base stations in the proximity of the
tablet, register the tablet and base station with each other,
and modify the PIN numbers used in the registration pro-
cess. This application only appears on systems shipped
with the DECT-based base stations.
1.5.12 Internet Dialer (DECT-based systems only)
The Internet Dialer is used to setup and establish connec-
tions to a Internet Service Provider (ISP). The application
is capable of storing information for multiple ISPs. See
Section 4.1.1.4 “Adding a New Dial-up Account” for details
on how to configure a new ISP.
2.0 System Configuration
The tablet has several configuration options where modifi-
cations can be made. To enter the system configuration
mode, touch the sailing ship/toolbox icon in the upper left
corner of the web browser. The options that appear on the
screen are:
• WebPAD Configuration
-Browser
- Buttons
-Radio
-Version
Selecting any of the configuration option links takes the
user to a screen where modifications can be made.
2.1 BROWSER CONFIGURATION
The Browser Configuration page contains links to configu-
ration screens for customizing the browser. The options
are:
• Browser Configuration
-Cache
- Fonts
-Colors
-Network
Selecting one of these links takes the user to a screen
where component configurations can be modified.
2.1.1 Browser>Cache
This screen allows the user to modify the settings for the
browser cache. Configuration settings for the cache are
asshowninFigure2.
Max Connections - Specifies the maximum number of
simultaneously open TCP/IP connections to the Internet.
Number of Pages to Cache - Specifies the number of
pages to cache locally. Increasing the number will speed
up the time it takes to open previously visited pages. How-
ever, caching more pages uses more memory and may
effect overall performance
Image Cache Size KB - Specifies the size of the image
cache, in kilobytes. Increasing the size of the cache allows
more images to be stored locally, thereby increasing the
rate at which previously visited pages will be re-displayed;
however, the user must be careful not to assign too much
memory.
FIGURE 2. Browser>Cache Configuration Screen
2.1.2 Browser>Fonts
Figure 3 shows the screen that allows the user to alter the
font style and text size. Three options of text feature modi-
fication are available: Font style, font size and underlining
of links. After making changes, touch “Update” to imple-
ment the changes.
Underline Links - Specifies whether the links incorpo-
rated in a web page are underlined. If the box is colored,
links will be underlined; if not colored, the links will not be
underlined.
User Text Size [0-4] - Specifies the default font size. The
font size can be changed by touching the font size icon but
will revert to the configuration value upon each restart.
Body Font,Heading Font, and Fixed Font -Specifies
the font styles (“times”, for Times Roman, “helv”, for Hel-
vetica or “cour” for Courier) available.
Browser Configuration
Cache
Max connections:
Number of pages to cache:
Image cache size KB:
Browser Configuration
WebPAD Configuration
5
4
2000
Update

Revision 1.0 (Confidential) 9 www.national.com
WebPAD™ 1.5 System User’s Guide
FIGURE 3. Browser>Fonts Configuration Screen
2.1.3 Browser>Colors
The Browser>Colors screen, as illustrated in Figure 4,
allows the user to modify the color attributes of the text,
links, and background. Each setting is a hexadecimal
value which defines the intensity of each of the color
components of the pixel. The first two digits specify the
intensity of the red, the middle two digits specify the
intensity of the green and the last two digits specify the
intensity of the blue. These colors can be overridden by a
web page, but upon leaving the web page, the colors
revert to the defaults. Touch the keyboard icon to edit the
settings. After making any changes to the configuration,
touch “Update” to implement the changes.
Active Color - Specifies the color of a link when it has
been selected.
Visited Color - Specifies the color of a link on a page
after the link has already been visited.
Link Color - Specifies the color of a link before the link
has been visited.
HL Color - Specifies the color used to highlight text.
Body Text Color - Specifies the color of the text used in
thebodyofthewebpage.Anytextwhichisnotalinkis
effected by this setting.
Background Color - Specifies the default color of the
background of a web page.
FIGURE 4. Browser>Colors Configuration Screen
2.1.4 Browser>Network
Figure 5 shows the Browser>Network configuration
screen which allows the user to alter proxy and web des-
tination settings. Touch the keyboard icon to edit the set-
tings. After making changes to the settings, touch
“Update” to implement the changes. The tablet can only
run with a SOCKS proxy or HTTP proxy, but not both.
Therefore, if the user selects one of the proxy servers,
the other is automatically deselected.
Home Page - Specifies home page for the browser. This
is the page displayed when the browser is first started.
Search Page - Specifies the URL for the web page to go
to when the Search icon is touched.
SOCKS Proxy Server - Determines whether the
browserwilluseaSOCKSproxyserver.Iftheboxiscol-
ored, the browser will use the SOCKS proxy server con-
figured on the base station. If the box is not colored, the
browser will not use a SOCKS proxy server.
HTTP Proxy Server - Determines whether the browser
will use a HTTP proxy server. If the box is colored, the
browser will use the proxy server configured on the base
station. If the box is not colored, the browser will not use
aproxyserver.
Proxy Address - Specifies the IP address of the proxy
server. This value is ignored if a proxy server is not being
used. If using an access point base station, this value
needs to be cleared.
Proxy Port - Specifies the port number to which all
browser requests are sent. The port must match the type
of proxy server being used. If the SOCKS proxy server is
selected, set the proxy port to 1080. If the HTTP proxy
server is selected, set the proxy port to 80.
Email Server - Specifies where emails are sent when a
“mailto:” link is selected.
Browser Configuration
Fonts
Underline Links:
User text Size [0-4] =
Body Font =
Browser Configuration
WebPAD Configuration
2
times
Update
helv
cour
Heading Font =
Fixed Font =
Browser Configuration
Colors
Active Color (RGB) =
Visited Color (RGB) =
Link Color (RGB) =
Browser Configuration
WebPAD Configuration
0000FF
Update
FF00FF
000000
HL Color (RGB) =
Body Text Color (RGB) =
FF0000
008080
FFFFFF
Body Text Color (RGB) =
www.national.com 10 (Confidential) Revision 1.0
WebPAD™ 1.5 System User’s Guide
Email Address - Specifies the “From” address in emails
generated after a “mailto:” link has been selected.
FIGURE 5. Browser>Network Configuration Screen
2.2 BUTTONS CONFIGURATION OPTIONS
This link allows the user to configure the operation of the
tablet's buttons. Figure 6 identifies the buttons. Figure 7
shows the button configuration screen and examples of
how buttons can be configured. Next to each button identi-
fier is a field defining the button's operation.
To change the function of a button, replace the current
operation with a new operation. The operations take the
form of:
<action>[<type>]
<action> - defines the type of operation the button pro-
vides.Thevaluesare:CMD,KEY,MAC.Whenabutton
with the action of CMD is pressed, a command is exe-
cuted. The KEY action is used to define the button as a
particular key from the keyboard. The MAC action invokes
amacro.
<type> - is dependent on the action defined. For “CMD”
actions, the type is the executable command string. For
“KEY” actions, the type is either “UP”, “DN”, “LF”, or “RT”
and refer to the Up, Down, Left and Right arrow keys on
the keyboard. For “MAC” actions, the type is NXT. NXT
cycles between all active windows.
When all of the buttons have been configured, press the
"Update" button to implement and save the changes.
FIGURE 6. Button Identifier Diagram
Browser Configuration
Network
Home Page:
Search Page:
SOCKS Proxy
HTTP Proxy Server
Proxy Address
Proxy Port:
www.national.com/webpad
www.yahoo.com
191.168.0.1
1080
191.168.0.1
Email Server:
xxxx@xxx.com
Email Address:
Server
Browser Configuration
WebPAD Configuration
Update
BUT1
BUT2
BUT4
BUT3
BUT6
BUT5
Revision 1.0 (Confidential) 11 www.national.com
WebPAD™ 1.5 System User’s Guide
FIGURE 7. Button Configuration Screen
2.3 RADIO CONFIGURATION OPTIONS
The Radio Configuration options screen, shown in Figure
8, allows the user to define the system ID and the RF link
channel. The system ID is the 802.11 SS ID shared
between the base station and tablet. A base station asso-
ciates only with a tablet that shares the same SS ID. If the
SS ID of the base station and tablet do not match, the
base station will ignore data coming from the tablet. The
“DS channel” is the radio channel used by the base sta-
tion.
2.4 SOFTWARE IMAGE VERSION
The software image version indicates the current version
of the software. in addition, the page contains release
notes on changes made to the previous version. Links at
the bottom of the page will go to either the initial WebPAD
system configuration page or to the browser configuration
page.
FIGURE 8. Radio Configuration Screen
Hardware Button Configuration
BUTx = action[type]
BUTx is a button identifier for BUT1 thru BUT6
WebPAD Configuration
Update
‘action’ is a key, macro or a command definition – ‘KEY’, ‘MAC’ or ‘CMD’
‘type’ for commands should be the actual command string to execute
‘type’ for key definitions should be: ‘UP’; ‘DN’, ‘LF’, ‘RT’
‘type’ for macro key definitions should be ‘NXT’
BUT1 =
BUT2 =
BUT3 =
BUT4 =
BUT5 =
BUT6 =
KEY[UP]
KEY[DN]
KEY[LT]
KEY[RT]
MAC[NXT]
CMD[/usr/webpad/bin/keypad]
The System ID is the 802.11 SS ID shared between a base and client pair. A base will only allow a client
toassociateiftheysharethesameSSID.YoumaysettheSSIDoftheclienthere.Itisastringofupto
32 alphanumeric characters.
Radio Configuration
WebPAD Configuration
Update
System ID: webpad
The radio channel used by the base. A number between 0-11.
DS Channel: 6
www.national.com 12 (Confidential) Revision 1.0
WebPAD™ 1.5 System User’s Guide
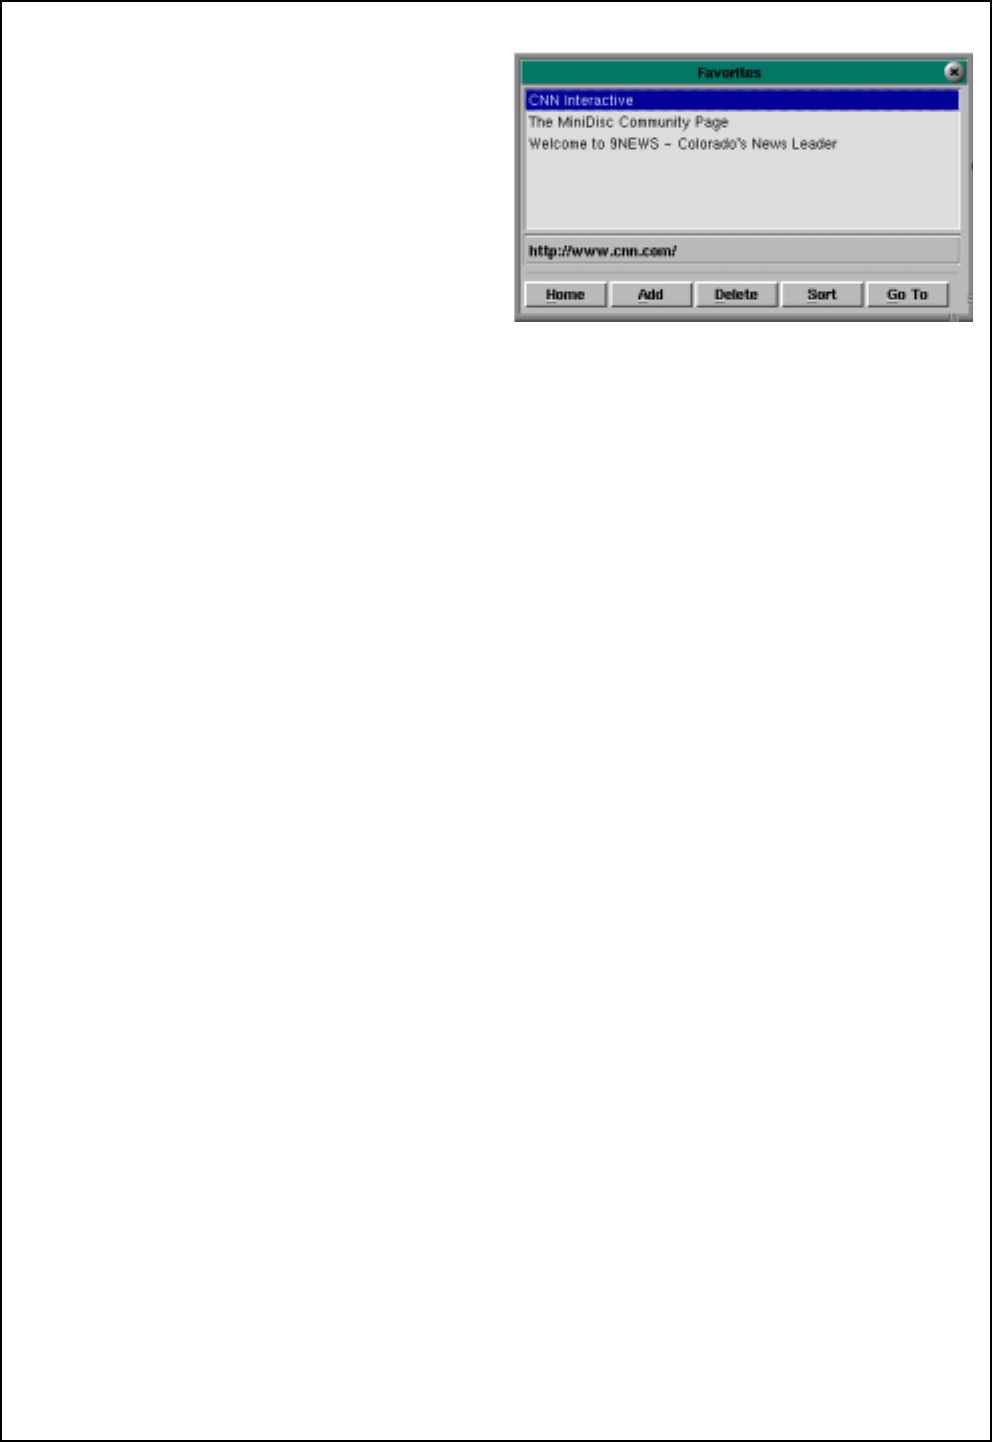
3.0 Favorite Sites Window
Selecting the Favorites icon brings up the Favorite Sites
window. From here, the user navigates to favorite web
pages. The WebPAD system can store up to 512 site loca-
tions.
The Favorite Sites window is split into three sections. The
top section contains a list of the web sites that have been
saved. Below that is a section that displays the URL
address for the selected site in the favorites list. Along the
bottom of the window is a series of buttons used to navi-
gate amongst and manage the list of sites. The functions
provided by these buttons are:
• Bringing up the designated home page
• Addingapagetothelist
• Deleting a page from the list
• Sorting the list
• Navigating to a selected link
Figure 9 shows the Favorite Sites Window.
Thebrowsercanbesenttothedesignatedhomepageat
any time by selecting the Home button in the Favorite
Sites window. This action does not effect the pages you
have already visited in this session, so the Back button
still sends the browser to the previously visited page.
Sites are added to the list using one of two methods. The
first method uses the icon supplied in the border of the
browser. Touching this icon immediately sends the site
currently shown in the browser window to the list. The
second method is to open the desired site to be saved,
bring up the Favorite Sites window and touch the “Add”
button.
To delete a page from the list of favorites, highlight the
site, then touch the “Delete” button. If a site was acci-
dently deleted, the only way to replace it on the list is by
going to the site and selecting the icon in the border of the
browser, or selecting the “Add” button in the Favorite Sites
window while the site is open.
Sites are listed in the order they are added. As the list
grows, use the Sort button to alphabetize the entries. New
sites appear at the bottom of the list.
To navigate to a stored web site, select the appropriate
link in the list and touch the “Go” To button. This page will
be placed on the stack immediately after the page cur-
rently being viewed. Pages before the current page will be
lost.
FIGURE 9. Favorite Sites Window
4.0 Setup and Troubleshooting
This section explains how to setup and troubleshoot a
WebPAD system. The system consists of the tablet, base
station, and cradle.
4.1 SETTING UP A WEBPAD 1.5 SYSTEM
The WebPAD 1.5 System that you receive may come with
one of two types of base stations: A DECT-based or an
802.11-based Access Point. Please refer only to the sec-
tion for the type of base station accompanying your partic-
ular WebPAD 1.5 system.
4.1.1 Dect-based Base Station
4.1.1.1 Setup Guidelines
The following is the sequence used for setting up a Web-
PAD system.
1. Connect the power cord and phone cable(s) to the
base station. The phone line and power jack connec-
tors are located at the rear side of the base station.
The line to the wall goes in the top dual RJ-11
connector, and the line to the phone set (optional)
goes directly below it. The single RJ-11 connector is
not used at this time. The power cord plugs into the
power jack at the bottom of the unit.
2. Power on the base station, then the tablet. If this is
the first time the tablet has been used with this base
station, they must be registered with each other (See
Section 4.1.1.2 “WebPAD/Base Station Registra-
tion”). Otherwise, the tablet establishes a link to the
previously registered base station. The system is now
ready for use. Upon starting, the browser loads its
home page. When the base station receives the
request for the web page, it establishes its connection
to the internet.

Revision 1.0 (Confidential) 13 www.national.com
WebPAD™ 1.5 System User’s Guide
4.1.1.2 WebPAD/Base Station Registration
Before a base station and tablet can communicate with
each other, they must be registered together. The regis-
tration process is a simple one.
1. Power up the base station and the tablet.
2. Invoke the DECT Monitor utility using the QNX menu
button in the lower left corner of the screen.
3. In the Dect Monitor window, select the Utilities menu,
followed by the “Scan Base Station” entry. The tablet
scans for base stations to be used. A window
appears listing all of the base stations found.
4. Select the box next to the base station to be used.
5. Press the Registration button located on the front of
the base station. Note: Step 8 (below) must be
completed within one minute of pressing the Regis-
tration button (step 5). If step 8 is not been completed
with one minute of step 5, repeat steps 4 through 8.
6. In the “Scan Base Station” window, touch the Select
button. Another window will appear, listing the capa-
bilities of the base station.
7. Once all the capabilities of the base station have
been listed, enter the PIN code in the PIN Code text
box (See the WebPAD 1.5 System User Guide for
more information about the PIN).
8. Press the Register button. Note: This step must be
completed within one minute of step 5 (above). If step
8 is not completed within one minute of step 5, repeat
steps 4 through 8.
This initiates the registration process. When completed,
the tablet and base station will have established a com-
munication link between them. For a more detailed expla-
nation of the registration process, please consult the
WebPAD 1.5 System User Guide.
4.1.1.3 Using The System
The browser included in the WebPAD 1.5 system provides
the same basic functionality as all standard browsers.
1. Select “Web” from the application launcher or
“Browser” from the QNX menu to invoke the web
browser.
2. To enter a web page address (URL), touch the
address of the current page which appears in the
upper border of the browser. This highlights the entire
address.
3. Touch the keyboard icon in the lower left-hand corner
of the screen.
4. Type in the desired address. (Note: the keyboard
contains a “www.” and a “.com” button to simplify the
typing process).
5. Press “Enter.” The desired web site will appear.
The browser is also capable of moving between previ-
ously loaded pages, reloading pages and stopping the
loading of a page (via the icon in the top border of the
browser). To follow links between pages, simply touch the
link and the browser will load and displays that page.
4.1.1.4 Adding a New Dial-up Account
To add a new dial-up account to a system containing a
DECT base station, use the Internet Dial-up Connector
utility, as follows:.
1. Invoke the Internet Dial-up Connector utility via the
QNX menu button in the lower left corner.
2. Touchthe“New”buttontocreateannewISPaccount
for the WebPAD 1.5 system.
3. In the “ISP Setup” window, add:
- ISP Description: Name of the ISP
- Server Address: IP Address of the DNS server
- Phone No.: Phone number of the ISP
- Login Script: Select login script or create new one
- Idle Time-out: Length of idle time before ISP log off
- User Name: Logon Identification, provided by ISP
- Password: Password provided by ISP (optional.) If
not entered here, the user will be prompted for it
when establishing the connection to the ISP.
4. Verify the modem setup. If you are unsure, leave
them at their default settings.To check and/or change
the settings, touch the “Modem Settings...” button
and make changes. Touch “Apply” to enter the
desired changes.
5. When all information is entered, touch the “Apply”
button.
The Internet Dial-up Connector utility is now ready to con-
nect to the new ISP.
4.1.1.5 Login Scripts
Login scripts search for particular text strings in a certain
order. When the dialer finds the string it is looking for, it
replies with the designated text string. These scripts are
created and edited in the Internet Dial-up Connector util-
ity, in the ISP Setup window (see 4.1.1.4 "Adding a New
Dial-up Account"), on a WebPAD 1.5 system that contains
a DECT base station. In the ISP setup window, select
either an existing script or enter a new script name, then
touch the “Edit Script...” button to open the Script Editor
window.
Each step shown in the window is processed, in
sequence, starting at the top. Each line is composed of
three parts: What to wait for, what to reply with, and what
status is to be posted. On the right side of the window are
buttons to insert steps or modify/remove the currently
selected line. Three boxes at the bottom of the window are
used to edit the settings of the currently selected line.
To modify a line, select it. The contents of the line is then
shown in the boxes at the bottom. Modify any or all of the
selected line. After completing the modifications, touch
the“Modify”buttontosavethechanges.

www.national.com 14 (Confidential) Revision 1.0
WebPAD™ 1.5 System User’s Guide
4.1.2 802.11-based Access Point Base Station
4.1.2.1 Setup Guidelines
ThefollowingisthesequenceusedforsettingupaWeb-
PAD system.
1. Plug the radio card into the PCMCIA slot on the base
station.
2. Connect the modem, power cord and phone cables to
the base station.
3. After applying power to the base station, power up
the tablet. Once the tablet finishes booting, the
system is ready for use.
4.1.2.2 Using The System
The browser included in the WebPAD 1.5 system provides
the same basic functionality as all standard browsers.
1. Select “Web” from the application launcher or
“Browser” from the QNX menu to invoke the web
browser.
2. To enter a web page address (URL), touch the
address of the current page which appears in the
upper border of the browser. This highlights the entire
address.
3. Touch the keyboard icon in the lower left-hand corner
of the screen.
4. Type the desired address. (Note: the keyboard
contains a “www.” and a “.com” button to simplify the
typing process).
5. Press “Enter.” The desired web site will appear.
The browser is also capable of moving between previ-
ously loaded pages, reloading pages and stopping the
loading of a page (via the icon in the top border of the
browser). To follow links between pages, simply touch the
link and the browser will load and displays that page.
4.1.2.3 Adding a New Dial-Up Account
Add a new dial-up account to the Access Point via the
web browser on the tablet, as follows.
1. Enter the home page URL of the access point in the
tablet’s browser (http://manage.ap).
2. Touch the “Setup” link in the border on the left side of
the page. This provides the user with a summary of
the settings for the access point.
3. Before going any further, the access point requires
the user to enter a password. Enter the password. If
the password shows as a series of asterisks, the
password is remembered by the system and need not
be re-entered.
4. In the border on the left side of the page is a “Basic
Setup” section. Touch on the Internet Access link in
this section.
5. Enter “ISP Phone Number,” “ISP Login Name” and
“ISP Password.”
6. Touch the “Enter” button directly beneath where the
information has been entered.
7. Touch the “Save” button to save all changes.
This last step reboots the access point. When the access
point completes the reboot process, the new dial-up
account will be established.
4.2 TROUBLESHOOTING
4.2.1 Tablet will not power on
If the tablet will not power on when the power button is
pressed, the batteries may not have enough power to
operate the device. Plug the AC adapter into the tablet to
charge the batteries. The tablet can be used during the
charging process, but the user should allow the batteries
to charge some before using.
If the tablet still does not boot, there may be a serious
problem with the device. Return for servicing.
4.2.2 RF link is down
IftheRFLinktaskboxreads“RFLinkDown”,theradioin
the tablet is not able to communicate with the radio in the
base station. This problem can have several causes:
1. First, make sure the base station has completely
booted. If it has not, wait for it to complete booting
and check to see if the task box reads “RF Link Up”.
2. If the base station has completely booted but the task
box still reads “RF Link Down”, the radio in the tablet
may not be receiving a strong enough signal from the
base station. The distance between the tablet and the
base station may be too great or interference may be
a factor. Try moving the tablet closer to the base
station. If the task box now reads “RF Link Up”,
operate the tablet closer to the base station.
Refer to the following only if using a DECT-based base
station:
3. If the base station is DECT-based, run through the
registration process. If the tablet and base station are
not registered with each other, the system will not
function properly. If registered, but still not working,
please contact the service representative for assis-
tance.
Refer to the following only if using an Access Point base
station:
3. If the radio in the tablet is still not communicating with
the radio in the base station, check the system IDs of
the radios in both the base station and the tablet.
These IDs should match. If they do not match,
change them to match.
4. To check the system ID on the tablet, refer to Section
2.3 “Radio Configuration Options”.
5. To check the system ID on the access point base
station:
a. Disconnect the modem. Connect a null modem
cable to the back of the base station.

Revision 1.0 (Confidential) 15 www.national.com
WebPAD™ 1.5 System User’s Guide
b. Connect the other end of the null modem cable to
a PC and bring up a terminal emulation program
on the PC.
c. Set the serial port on the PC to 9600 baud, 8 data
bits,noparity,and1stopbit.
d. If “Password:” is not displayed, press the “Enter”
key until it appears. Enter the password. The
default password is default.
e. At the prompt, type in “config”. In the information
displayed on the screen, look for the entry
Network Name. This value should match the
system ID on the tablet.
If none of the above recommendations solves the prob-
lem, call the service representative for further assistance.
4.2.3 Received an error when trying to bring up a
web site
If the link between the tablet and base station is up, prob-
lems may still occur when trying to access a web site.
Certain problems can be resolved by the user. Others will
require assistance from another source, such as from the
Internet Service Provider (ISP).
1. Check the network settings on the tablet. Make sure
the proper proxy port address is set up for the proxy
server selected (see Section 2.1.4
“Browser>Network”)
2. Verify that the ISP’s phone number, user name and
password have been correctly entered (see Section
4.1.1.4 “Adding a New Dial-up Account” for DECT-
based base station and Section 4.1.2.3 “Adding a
New Dial-Up Account” for the access point base
station).
3. Verify the base station has established a connection
to the ISP. With an access point base station, bring
up the access point’s configuration screen by going to
the web page http://manage.ap. If an animated GIF is
active between the representation of the access point
and the world icon, the connection is up and active. If
not, touch the “Connect” button to initiate the connec-
tion sequence. If you have problems connecting, go
to the “Status” web page. Select the “Modem” link,
then select “View PPP Log”. This log lists all the
activity taking place over the modem. This log will
help when discussing the connection problem with
the ISP.
If a problem still exists, contact your service representa-
tive for assistance.
4.3 USING TWO OR MORE TABLETS FROM THE
SAME BASE STATION
The ability to support more than one tablet on a base sta-
tion depends on the type of base station supplied with the
device. The 802.11-based access point base station is
already set up to handle this topology, without any extra
configuration.
The DECT-based base station, however, does not support
multiple tablets. These base stations only support a one-
to-one topology.
4.4 REALAUDIO/REALVIDEO CONFIGURATION
The WebPAD system contains a RealPlayer application.
To configure the RealPlayer on the tablet, follow these
steps:
1. On the tablet, bring up a terminal window. Touch the
Virtual Keyboard task box to bring up the keyboard.
2. At the “#” prompt, enter the command:
rvplayer &
3. Once the player window appears, select the “View”
menu.
4. Select the “Preferences” submenu. A new window
labeled “Preferences” will be displayed. This window
has several tabs; select the “Connection” tab. Verify
that the bandwidth is correct for the base station’s
Internet connection.
5. Select the “Proxy” tab. This form notifies the player of
the proxy server. If “Use Proxy” is selected (the box
next to it is colored), then deselect it by touching it.
6. Touch “OK” to save the changes.
Once the RealPlayer on the tablet has been set up, log
onto the network to test it. If the player is not working, call
the service representative for assistance.
5.0 Upgrading Tablet Software
As new functionality is developed and modifications are
made, the software residing in the tablet will need to be
upgraded. The tablet’s browser is the main source used to
access and implement upgrades. To implement an
upgrade, point the browser at the server containing the
latest software. Once the image has been selected, the
browser will download the image to the tablet. Once the
download is completed, the image is unpacked and
placed into the current directory structure. The tablet then
automatically reboots into the new upgraded system. If,
after the upgrade, the system is not working properly, refer
to Section 4.0 “Setup and Troubleshooting” or contact the
service representative for further assistance.
The tablet image can either be upgraded locally or
remotely. The local upgrade can only be done if the Web-
PAD system being used has a laptop base station or
another PC has been set up to act like a laptop base sta-
tion. Without a separate PC, WebPAD systems shipped
with the access point base station will not be able to per-
form a local upgrade. All WebPAD systems are capable of
performing the remote upgrade.
5.1 REMOTE UPGRADES
A remote upgrade is performed off of a web server, not a
laptop base station. This web server could be one oper-
ated by the user or the National Semiconductor™ Web-
PAD software update site. To perform a remote upgrade:

www.national.com 16 (Confidential) Revision 1.0
WebPAD™ 1.5 System User’s Guide
1. Bring up the browser on the WebPAD tablet, and go
to the site which contains a link to the software
update file.
2. Locate the link to the latest version of the software
and touch it to start the download process.
3. When a question appears in the dialog box, asking if
the update should be performed, touch the “Yes”
button to install the upgrade.
If the user has modified any of the settings from the
default values, these settings will have to be reset to
the desired function upon completion of the upgrade.

LIFE SUPPORT POLICY
NATIONAL’S PRODUCTS ARE NOT AUTHORIZED FOR USE AS CRITICAL COMPONENTS IN LIFE SUPPORT
DEVICES OR SYSTEMS WITHOUT THE EXPRESS WRITTEN APPROVAL OF THE PRESIDENT AND GENERAL
COUNSEL OF NATIONAL SEMICONDUCTOR CORPORATION. As used herein:
1. Life support devices or systems are devices or
systems which, (a) are intended for surgical implant
into the body, or (b) support or sustain life, and whose
failure to perform when properly used in accordance
with instructions for use provided in the labeling, can
be reasonably expected to result in a significant injury
to the user.
2. A critical component is any component of a life
support device or system whose failure to perform can
be reasonably expected to cause the failure of the life
support device or system, or to affect its safety or
effectiveness.
National Semiconductor
Corporation
Americas
Tel: 1-800-272-9959
Fax: 1-800-737-7018
Email: support@nsc.com
National Semiconductor
Europe Fax: +49 (0) 1 80-530 85 86
Email: europe.support@nsc.com
Deutsch Tel: +49 (0) 1 80-530 85 85
English Tel: +49 (0) 1 80-532 78 32
Francais Tel: +49 (0) 1 80-532 93 58
Italiano Tel: +49 (0) 1 80-534 16 80
National Semiconductor
Asia Pacific Customer
Response Group
Tel: 65-2544466
Fax: 65-2504466
Email: sea.support@nsc.com
National Semiconductor
Japan Ltd.
Tel: 81-3-5639-7560
Fax: 81-3-5639-7507
www.national.com
National does not assume any responsibility for use of any circuitry described, no circuit patent licenses are implied and National reserves the right at any time without notice to change said circuitry and specifications.
Trademark Acknowledgements
National Semiconductor and TRI-STATE are registered trademarks of National Semiconductor Corporation.
QNX is a registered trademark and Voyager is a trademark of QNX Software Systems, Ltd.
All other products mentioned herein are trademarks of their respective owners and are hereby recognized as such:
RealAudio, RealPlayer, and RealVideo are registered trademarks of RealNetworks, Inc.
Disclaimer
National Semiconductor Corporation reserves the right to make changes to this document. National Semiconductor Cor-
poration assumes no responsibility for any errors or omissions contained herein.